fields rv
TRANSCRIPT

SIEBEL® eBUSINESS APPLICATIONS
SIEBEL FIELD SERVICEGUIDE
SIEBEL 2000VERSION 6.1
SEPTEMBER 2000
10PA1-FS00-06100

Siebel Systems, Inc., 2207 Bridgepointe Parkway, San Mateo, CA 94404 Copyright © 2000 Siebel Systems, Inc.All rights reserved. Published 1998–2000Printed in the United States of America
No part of this publication may be stored in a retrieval system, transmitted, or reproduced in any way, including but not limited to photocopy, photographic, magnetic or other record, without the prior agreement and written permission of Siebel Systems, Inc.
The full text search capabilities of Siebel eBusiness Applications include technology used under license from Fulcrum Technologies, Inc. and are the copyright of Fulcrum Technologies, Inc. and/or its licensors.
Siebel, the Siebel logo, TrickleSync, TSQ, Universal Agent, and other Siebel product names referenced herein are trademarks of Siebel Systems, Inc., and may be registered in certain jurisdictions.
Windows® is a registered trademark of Microsoft Corporation.
All other product names, marks, logos, and symbols may be trademarks or registered trademarks of their respective owners.
U.S. GOVERNMENT RESTRICTED RIGHTS. Programs, Ancillary Programs and Documentation, delivered subject to the Department of Defense Federal Acquisition Regulation Supplement, are “commercial computer software” as set forth in DFARS 227.7202, Commercial Computer Software and Commercial Computer Software Documentation, and as such, any use, duplication and disclosure of the Programs, Ancillary Programs and Documentation shall be subject to the restrictions contained in the applicable Siebel license agreement. All other use, duplication and disclosure of the Programs, Ancillary Programs and Documentation by the U.S. Government shall be subject to the applicable Siebel license agreement and the restrictions contained in subsection (c) of FAR 52.227-19, Commercial Computer Software - Restricted Rights (June 1987), or FAR 52.227-14, Rights in Data—General, including Alternate III (June 1987), as applicable. Contractor/licensor is Siebel Systems, Inc., 2207 Bridgepointe Parkway, San Mateo, CA 94404.
Proprietary InformationSiebel Systems, Inc. considers information included in this documentation andin Siebel Online Help to be Confidential Information. Your access to and use ofthis Confidential Information are subject to the terms and conditions of: (1) theapplicable Siebel Systems software license agreement, which has been executedand with which you agree to comply; and (2) the proprietary and restrictedrights notices included in this documentation.

Contents
IntroductionWho Should Use This Guide . . . . . . . . . . . . . . . . . . . . . . . . . . . . . Intro-2
How This Guide Is Organized . . . . . . . . . . . . . . . . . . . . . . . . . . . . Intro-3
What’s New in This Release . . . . . . . . . . . . . . . . . . . . . . . . . . . . . Intro-3
Additional Documentation . . . . . . . . . . . . . . . . . . . . . . . . . . . . . . Intro-5
Contacting Siebel Technical Support . . . . . . . . . . . . . . . . . . . . . . . . Intro-6
Siebel Welcomes Your Comments . . . . . . . . . . . . . . . . . . . . . . . . . . Intro-8
Chapter 1. Field Service OverviewAbout Field Service . . . . . . . . . . . . . . . . . . . . . . . . . . . . . . . . . . . . . . 1-2
Managing the Full Cycle of Field Service . . . . . . . . . . . . . . . . . . . . . . . . . 1-3
Dispatch Board . . . . . . . . . . . . . . . . . . . . . . . . . . . . . . . . . . . . . . . . . . . 1-6
Mobile Computing Support . . . . . . . . . . . . . . . . . . . . . . . . . . . . . . . . . . . 1-6
Service Parts Information . . . . . . . . . . . . . . . . . . . . . . . . . . . . . . . . . . . . 1-6
Field Engineer Information . . . . . . . . . . . . . . . . . . . . . . . . . . . . . . . . . . . 1-7
Field Engineer Activities . . . . . . . . . . . . . . . . . . . . . . . . . . . . . . . . . . . . . 1-7
Service Inventory . . . . . . . . . . . . . . . . . . . . . . . . . . . . . . . . . . . . . . . . . . 1-7Preventive Maintenance and Asset Measurements . . . . . . . . . . . . . . . . . . . 1-8
Shipping and Receiving . . . . . . . . . . . . . . . . . . . . . . . . . . . . . . . . . . . . . 1-8Field Service Analysis . . . . . . . . . . . . . . . . . . . . . . . . . . . . . . . . . . . . . . . 1-9
Field Service Application Design . . . . . . . . . . . . . . . . . . . . . . . . . . . . . . . 1-9
Screens and Views in Field Service . . . . . . . . . . . . . . . . . . . . . . . . . . 1-11
Logging On as the Siebel Administrator . . . . . . . . . . . . . . . . . . . . . . . 1-27
Administrative Tasks . . . . . . . . . . . . . . . . . . . . . . . . . . . . . . . . . . . . 1-28
Version 6.1 Siebel Field Service Guide i i i

Contents
Chapter 2. Service SupportAbout This Chapter . . . . . . . . . . . . . . . . . . . . . . . . . . . . . . . . . . . . . . 2-3
Business Scenario . . . . . . . . . . . . . . . . . . . . . . . . . . . . . . . . . . . . . . . 2-4
Concepts and Terms . . . . . . . . . . . . . . . . . . . . . . . . . . . . . . . . . . . . . . 2-6
Application Overview . . . . . . . . . . . . . . . . . . . . . . . . . . . . . . . . . . . . . 2-7
Assigning Activities and Dispatching Field Service Engineers . . . . . . . . . . 2-7Activity Templates and Plans . . . . . . . . . . . . . . . . . . . . . . . . . . . . . . . . . . 2-8Using Service Requests . . . . . . . . . . . . . . . . . . . . . . . . . . . . . . . . . . . . . . 2-9
Screens and Views for Service Support . . . . . . . . . . . . . . . . . . . . . . . . 2-21
Setting Up Service Support . . . . . . . . . . . . . . . . . . . . . . . . . . . . . . . . . . .2-21Carrying Out Service Support . . . . . . . . . . . . . . . . . . . . . . . . . . . . . . . . . 2-22
Accounts Screen . . . . . . . . . . . . . . . . . . . . . . . . . . . . . . . . . . . . . . . 2-25
Accounts Across Organizations . . . . . . . . . . . . . . . . . . . . . . . . . . . . . . . 2-25
Accounts Views . . . . . . . . . . . . . . . . . . . . . . . . . . . . . . . . . . . . . . . . . . 2-26
Contacts View . . . . . . . . . . . . . . . . . . . . . . . . . . . . . . . . . . . . . . . . . . . 2-27
Service Agreements and Entitlements Views . . . . . . . . . . . . . . . . . . . . . 2-28
Service Profile View . . . . . . . . . . . . . . . . . . . . . . . . . . . . . . . . . . . . . . . 2-30
Service Requests Screen . . . . . . . . . . . . . . . . . . . . . . . . . . . . . . . . . . 2-32
Service Requests Views . . . . . . . . . . . . . . . . . . . . . . . . . . . . . . . . . . . . . 2-33Activity Plans View . . . . . . . . . . . . . . . . . . . . . . . . . . . . . . . . . . . . . . . . 2-36
Activities View . . . . . . . . . . . . . . . . . . . . . . . . . . . . . . . . . . . . . . . . . . . 2-36
Field Service Details View . . . . . . . . . . . . . . . . . . . . . . . . . . . . . . . . . . . 2-38
Invoices View . . . . . . . . . . . . . . . . . . . . . . . . . . . . . . . . . . . . . . . . . . . . 2-40
Metrics View . . . . . . . . . . . . . . . . . . . . . . . . . . . . . . . . . . . . . . . . . . . . .2-41
Product Defects View . . . . . . . . . . . . . . . . . . . . . . . . . . . . . . . . . . . . . . 2-42
Orders View . . . . . . . . . . . . . . . . . . . . . . . . . . . . . . . . . . . . . . . . . . . . . 2-44
Service Calendar View . . . . . . . . . . . . . . . . . . . . . . . . . . . . . . . . . . . . . 2-45
Solution Search View . . . . . . . . . . . . . . . . . . . . . . . . . . . . . . . . . . . . . . 2-46
Dispatch Board Screen . . . . . . . . . . . . . . . . . . . . . . . . . . . . . . . . . . . 2-47
Dispatch Board View . . . . . . . . . . . . . . . . . . . . . . . . . . . . . . . . . . . . . . 2-48
Employee Query View . . . . . . . . . . . . . . . . . . . . . . . . . . . . . . . . . . . . . 2-56
i v Siebel Field Service Guide Version 6.1
Contents
Service Request Charts . . . . . . . . . . . . . . . . . . . . . . . . . . . . . . . . . . . 2-57
Service Request Reports . . . . . . . . . . . . . . . . . . . . . . . . . . . . . . . . . . 2-59
Setup and Configuration . . . . . . . . . . . . . . . . . . . . . . . . . . . . . . . . . . 2-60
Setting Up Service Accounts and Service Requests . . . . . . . . . . . . . . . . . .2-60
Setting Up Territories and Schedules . . . . . . . . . . . . . . . . . . . . . . . . . . . .2-62
Setting Up Dispatchers . . . . . . . . . . . . . . . . . . . . . . . . . . . . . . . . . . . . . .2-63
Dispatch Board Schedules . . . . . . . . . . . . . . . . . . . . . . . . . . . . . . . . . . . .2-63
Using Dispatch Board Queries . . . . . . . . . . . . . . . . . . . . . . . . . . . . . . . . .2-64
Chapter 3. Field Service ActivitiesAbout This Chapter . . . . . . . . . . . . . . . . . . . . . . . . . . . . . . . . . . . . . . 3-3
Business Scenario . . . . . . . . . . . . . . . . . . . . . . . . . . . . . . . . . . . . . . . 3-6
Application Overview . . . . . . . . . . . . . . . . . . . . . . . . . . . . . . . . . . . . . 3-7
Setting Up Field Service Activities . . . . . . . . . . . . . . . . . . . . . . . . . . . . . . 3-7
Monitoring Field Service Activities . . . . . . . . . . . . . . . . . . . . . . . . . . . . .3-10
Recording Field Service Activities . . . . . . . . . . . . . . . . . . . . . . . . . . . . . .3-12
Screens and Views for Field Service Activities . . . . . . . . . . . . . . . . . . . 3-14
Carrying Out Field Service Activities . . . . . . . . . . . . . . . . . . . . . . . . . . . .3-14
Activities Screen . . . . . . . . . . . . . . . . . . . . . . . . . . . . . . . . . . . . . . . 3-16
All Activities View . . . . . . . . . . . . . . . . . . . . . . . . . . . . . . . . . . . . . . . . .3-17
Expense Tracker View . . . . . . . . . . . . . . . . . . . . . . . . . . . . . . . . . . . . . . .3-20
Field Part Movements View . . . . . . . . . . . . . . . . . . . . . . . . . . . . . . . . . . .3-22
Field Service Details View . . . . . . . . . . . . . . . . . . . . . . . . . . . . . . . . . . . .3-24
Instructions View . . . . . . . . . . . . . . . . . . . . . . . . . . . . . . . . . . . . . . . . . .3-26
Invoices View . . . . . . . . . . . . . . . . . . . . . . . . . . . . . . . . . . . . . . . . . . . .3-27
Measurements View . . . . . . . . . . . . . . . . . . . . . . . . . . . . . . . . . . . . . . . .3-27
Recommended Parts and Tools View . . . . . . . . . . . . . . . . . . . . . . . . . . . .3-28
Skills View . . . . . . . . . . . . . . . . . . . . . . . . . . . . . . . . . . . . . . . . . . . . . . .3-29Steps View . . . . . . . . . . . . . . . . . . . . . . . . . . . . . . . . . . . . . . . . . . . . . . 3-30
Time Tracker View . . . . . . . . . . . . . . . . . . . . . . . . . . . . . . . . . . . . . . . . .3-31
Version 6.1 Siebel Field Service Guide v

Contents
Products Screen . . . . . . . . . . . . . . . . . . . . . . . . . . . . . . . . . . . . . . . . 3-32
Product Field Service Details View . . . . . . . . . . . . . . . . . . . . . . . . . . . . 3-32
Part Browser Screen . . . . . . . . . . . . . . . . . . . . . . . . . . . . . . . . . . . . . 3-36
Solutions Views . . . . . . . . . . . . . . . . . . . . . . . . . . . . . . . . . . . . . . . . 3-38
All Solutions View . . . . . . . . . . . . . . . . . . . . . . . . . . . . . . . . . . . . . . . . 3-39
Resolution Documents View . . . . . . . . . . . . . . . . . . . . . . . . . . . . . . . . . 3-40
Related Documents View . . . . . . . . . . . . . . . . . . . . . . . . . . . . . . . . . . . .3-41
Solution Search View . . . . . . . . . . . . . . . . . . . . . . . . . . . . . . . . . . . . . . .3-41
Activities Charts . . . . . . . . . . . . . . . . . . . . . . . . . . . . . . . . . . . . . . . 3-42
Activity Reports . . . . . . . . . . . . . . . . . . . . . . . . . . . . . . . . . . . . . . . . 3-43
Setup and Configuration . . . . . . . . . . . . . . . . . . . . . . . . . . . . . . . . . . 3-43
Chapter 4. Service AgreementsAbout This Chapter . . . . . . . . . . . . . . . . . . . . . . . . . . . . . . . . . . . . . . 4-3
Business Scenario . . . . . . . . . . . . . . . . . . . . . . . . . . . . . . . . . . . . . . . 4-4
Concepts and Terms . . . . . . . . . . . . . . . . . . . . . . . . . . . . . . . . . . . . . . 4-5
Application Overview . . . . . . . . . . . . . . . . . . . . . . . . . . . . . . . . . . . . . 4-6
Verifying Service Agreements . . . . . . . . . . . . . . . . . . . . . . . . . . . . . . . . . 4-6
Using Service Agreements . . . . . . . . . . . . . . . . . . . . . . . . . . . . . . . . . . . . 4-7
Screens and Views for Agreements . . . . . . . . . . . . . . . . . . . . . . . . . . . 4-9
Agreements Screen . . . . . . . . . . . . . . . . . . . . . . . . . . . . . . . . . . . . . . 4-12
All Agreements View . . . . . . . . . . . . . . . . . . . . . . . . . . . . . . . . . . . . . . 4-12
Activities View . . . . . . . . . . . . . . . . . . . . . . . . . . . . . . . . . . . . . . . . . . . 4-15
Activity Plans View . . . . . . . . . . . . . . . . . . . . . . . . . . . . . . . . . . . . . . . 4-16
Administrative Contacts View . . . . . . . . . . . . . . . . . . . . . . . . . . . . . . . . 4-17
Attachments View . . . . . . . . . . . . . . . . . . . . . . . . . . . . . . . . . . . . . . . . 4-19
Documents View . . . . . . . . . . . . . . . . . . . . . . . . . . . . . . . . . . . . . . . . . 4-19
Entitlements View . . . . . . . . . . . . . . . . . . . . . . . . . . . . . . . . . . . . . . . . 4-20
Financial Details View . . . . . . . . . . . . . . . . . . . . . . . . . . . . . . . . . . . . . 4-22
v i Siebel Field Service Guide Version 6.1

Contents
Invoices View . . . . . . . . . . . . . . . . . . . . . . . . . . . . . . . . . . . . . . . . . . . .4-25
Line Items View . . . . . . . . . . . . . . . . . . . . . . . . . . . . . . . . . . . . . . . . . . .4-26
Terms and Totals View . . . . . . . . . . . . . . . . . . . . . . . . . . . . . . . . . . . . . .4-28
Preventive Maintenance View . . . . . . . . . . . . . . . . . . . . . . . . . . . . . . . . .4-29
Entitlements Screen . . . . . . . . . . . . . . . . . . . . . . . . . . . . . . . . . . . . . 4-30
Accounts View . . . . . . . . . . . . . . . . . . . . . . . . . . . . . . . . . . . . . . . . . . . .4-30
Contacts View . . . . . . . . . . . . . . . . . . . . . . . . . . . . . . . . . . . . . . . . . . . .4-31Metrics View. . . . . . . . . . . . . . . . . . . . . . . . . . . . . . . . . . . . . . . . . . . . . 4-33
Preventive Maintenance View . . . . . . . . . . . . . . . . . . . . . . . . . . . . . . . . .4-34
Products View . . . . . . . . . . . . . . . . . . . . . . . . . . . . . . . . . . . . . . . . . . . .4-35
Service Details View . . . . . . . . . . . . . . . . . . . . . . . . . . . . . . . . . . . . . . . .4-36
Agreements Charts . . . . . . . . . . . . . . . . . . . . . . . . . . . . . . . . . . . . . . 4-37
Agreements Reports . . . . . . . . . . . . . . . . . . . . . . . . . . . . . . . . . . . . . 4-37
Setup and Configuration . . . . . . . . . . . . . . . . . . . . . . . . . . . . . . . . . . 4-38
Setting Up Entitlements . . . . . . . . . . . . . . . . . . . . . . . . . . . . . . . . . . . . .4-38Setting Up Service Agreements . . . . . . . . . . . . . . . . . . . . . . . . . . . . . . . . 4-42Verifying Entitlements . . . . . . . . . . . . . . . . . . . . . . . . . . . . . . . . . . . . . . 4-45
Specifying Entitlement Rules . . . . . . . . . . . . . . . . . . . . . . . . . . . . . . . . . .4-45
Chapter 5. AssetsAbout This Chapter . . . . . . . . . . . . . . . . . . . . . . . . . . . . . . . . . . . . . . 5-3
Concepts and Terms . . . . . . . . . . . . . . . . . . . . . . . . . . . . . . . . . . . . . . 5-5
Application Overview . . . . . . . . . . . . . . . . . . . . . . . . . . . . . . . . . . . . . 5-6
Obtaining Information About Assets . . . . . . . . . . . . . . . . . . . . . . . . . . . . 5-6
Calculating the Value and Cost of an Asset . . . . . . . . . . . . . . . . . . . . . . . 5-7
Setting Up Asset Measurements . . . . . . . . . . . . . . . . . . . . . . . . . . . . . . . 5-8
Obtaining Readings from Assets . . . . . . . . . . . . . . . . . . . . . . . . . . . . . . . 5-9
Screens and Views for Assets . . . . . . . . . . . . . . . . . . . . . . . . . . . . . . 5-10
Pricing Administration Screen . . . . . . . . . . . . . . . . . . . . . . . . . . . . . . 5-12
Asset Mapping View . . . . . . . . . . . . . . . . . . . . . . . . . . . . . . . . . . . . . . . .5-12
Version 6.1 Siebel Field Service Guide v i i
Contents
Marketing Administration Screen . . . . . . . . . . . . . . . . . . . . . . . . . . . . 5-14
Product Measurements View . . . . . . . . . . . . . . . . . . . . . . . . . . . . . . . . . 5-14
Assets Screen . . . . . . . . . . . . . . . . . . . . . . . . . . . . . . . . . . . . . . . . . 5-16
All Assets View . . . . . . . . . . . . . . . . . . . . . . . . . . . . . . . . . . . . . . . . . . 5-16
Product Defects View . . . . . . . . . . . . . . . . . . . . . . . . . . . . . . . . . . . . . . 5-19Relationships View . . . . . . . . . . . . . . . . . . . . . . . . . . . . . . . . . . . . . . . . 5-21
Sub-Components and Transaction Views . . . . . . . . . . . . . . . . . . . . . . . . 5-22
Repair History View . . . . . . . . . . . . . . . . . . . . . . . . . . . . . . . . . . . . . . . 5-26
Valuation View . . . . . . . . . . . . . . . . . . . . . . . . . . . . . . . . . . . . . . . . . . . 5-26
Activities View . . . . . . . . . . . . . . . . . . . . . . . . . . . . . . . . . . . . . . . . . . . 5-30
Measurements and Readings Views . . . . . . . . . . . . . . . . . . . . . . . . . . . . 5-30Preventive Maintenance Views . . . . . . . . . . . . . . . . . . . . . . . . . . . . . . . . 5-34
Asset Chart . . . . . . . . . . . . . . . . . . . . . . . . . . . . . . . . . . . . . . . . . . . 5-36
Setup and Configuration . . . . . . . . . . . . . . . . . . . . . . . . . . . . . . . . . . 5-36
Setting Up Assets . . . . . . . . . . . . . . . . . . . . . . . . . . . . . . . . . . . . . . . . . 5-36
Asset Creation . . . . . . . . . . . . . . . . . . . . . . . . . . . . . . . . . . . . . . . . . . . 5-39Asset Registration . . . . . . . . . . . . . . . . . . . . . . . . . . . . . . . . . . . . . . . . . 5-40
Asset Transactions . . . . . . . . . . . . . . . . . . . . . . . . . . . . . . . . . . . . . . . . 5-40
Chapter 6. WarrantiesAbout This Chapter . . . . . . . . . . . . . . . . . . . . . . . . . . . . . . . . . . . . . . 6-2
Business Scenario . . . . . . . . . . . . . . . . . . . . . . . . . . . . . . . . . . . . . . . 6-3
Concepts and Terms . . . . . . . . . . . . . . . . . . . . . . . . . . . . . . . . . . . . . . 6-3
Application Overview . . . . . . . . . . . . . . . . . . . . . . . . . . . . . . . . . . . . . 6-4
Obtaining Information About Warranties . . . . . . . . . . . . . . . . . . . . . . . . . 6-4
Screens and Views for Warranties . . . . . . . . . . . . . . . . . . . . . . . . . . . . 6-8
Service Administration Screen . . . . . . . . . . . . . . . . . . . . . . . . . . . . . . . 6-9
Warranties View . . . . . . . . . . . . . . . . . . . . . . . . . . . . . . . . . . . . . . . . . . . 6-9
Warranty Products View . . . . . . . . . . . . . . . . . . . . . . . . . . . . . . . . . . . . .6-11
Service Providers View . . . . . . . . . . . . . . . . . . . . . . . . . . . . . . . . . . . . . 6-12
v i i i Siebel Field Service Guide Version 6.1
Contents
Assets Screen . . . . . . . . . . . . . . . . . . . . . . . . . . . . . . . . . . . . . . . . . . 6-13
Warranties View . . . . . . . . . . . . . . . . . . . . . . . . . . . . . . . . . . . . . . . . . . .6-13
Orders Screen . . . . . . . . . . . . . . . . . . . . . . . . . . . . . . . . . . . . . . . . . 6-14
Line Item Warranties View . . . . . . . . . . . . . . . . . . . . . . . . . . . . . . . . . . .6-14
Products Screen . . . . . . . . . . . . . . . . . . . . . . . . . . . . . . . . . . . . . . . . 6-16
Warranties View . . . . . . . . . . . . . . . . . . . . . . . . . . . . . . . . . . . . . . . . . . .6-16
Repairs Screen . . . . . . . . . . . . . . . . . . . . . . . . . . . . . . . . . . . . . . . . . 6-16
Repairs View . . . . . . . . . . . . . . . . . . . . . . . . . . . . . . . . . . . . . . . . . . . . .6-16
Service Requests Screen . . . . . . . . . . . . . . . . . . . . . . . . . . . . . . . . . . 6-17
Field Service Details View . . . . . . . . . . . . . . . . . . . . . . . . . . . . . . . . . . . .6-17
Setting Up Warranties . . . . . . . . . . . . . . . . . . . . . . . . . . . . . . . . . . . . 6-17
Chapter 7. Service InventoryAbout This Chapter . . . . . . . . . . . . . . . . . . . . . . . . . . . . . . . . . . . . . . 7-3
Using Mobile Service Inventory . . . . . . . . . . . . . . . . . . . . . . . . . . . . . . . . 7-5
Replenishing Inventory . . . . . . . . . . . . . . . . . . . . . . . . . . . . . . . . . . . . . . 7-5
Concepts and Terms . . . . . . . . . . . . . . . . . . . . . . . . . . . . . . . . . . . . . . 7-6
Application Overview . . . . . . . . . . . . . . . . . . . . . . . . . . . . . . . . . . . . . 7-7
Using Service Inventory . . . . . . . . . . . . . . . . . . . . . . . . . . . . . . . . . . . . . 7-7
Screens and Views for Service Inventory . . . . . . . . . . . . . . . . . . . . . . . 7-11
Service Administration Screen . . . . . . . . . . . . . . . . . . . . . . . . . . . . . . 7-14
Parts Movement Administration View . . . . . . . . . . . . . . . . . . . . . . . . . . .7-14
Inventory Types View . . . . . . . . . . . . . . . . . . . . . . . . . . . . . . . . . . . . . . .7-16
Inventory Transaction Types View . . . . . . . . . . . . . . . . . . . . . . . . . . . . . .7-19
Inventory Bucket Categories View . . . . . . . . . . . . . . . . . . . . . . . . . . . . . .7-21
Marketing Administration Screen . . . . . . . . . . . . . . . . . . . . . . . . . . . . 7-23
Product Field Service Details View . . . . . . . . . . . . . . . . . . . . . . . . . . . . .7-23
Version 6.1 Siebel Field Service Guide ix
Contents
Service Inventory Screen . . . . . . . . . . . . . . . . . . . . . . . . . . . . . . . . . 7-27
Inventory Locations Views . . . . . . . . . . . . . . . . . . . . . . . . . . . . . . . . . . 7-27
Product Buckets View . . . . . . . . . . . . . . . . . . . . . . . . . . . . . . . . . . . . . . .7-31
New Replenishment Orders View . . . . . . . . . . . . . . . . . . . . . . . . . . . . . 7-34
Pending Replenishment Orders View . . . . . . . . . . . . . . . . . . . . . . . . . . . 7-37
Authorized Vendors View . . . . . . . . . . . . . . . . . . . . . . . . . . . . . . . . . . . 7-38
Relationships View . . . . . . . . . . . . . . . . . . . . . . . . . . . . . . . . . . . . . . . . 7-39
Roles View . . . . . . . . . . . . . . . . . . . . . . . . . . . . . . . . . . . . . . . . . . . . . . 7-40
Cycle Counting Administration View . . . . . . . . . . . . . . . . . . . . . . . . . . . 7-40
Part Browser Screen . . . . . . . . . . . . . . . . . . . . . . . . . . . . . . . . . . . . . 7-41
Part Browser View . . . . . . . . . . . . . . . . . . . . . . . . . . . . . . . . . . . . . . . . .7-41
Inventory Transactions Screen . . . . . . . . . . . . . . . . . . . . . . . . . . . . . . 7-43
All Inventory Transactions View . . . . . . . . . . . . . . . . . . . . . . . . . . . . . . 7-43
Assets View . . . . . . . . . . . . . . . . . . . . . . . . . . . . . . . . . . . . . . . . . . . . . 7-47
Activities Screen . . . . . . . . . . . . . . . . . . . . . . . . . . . . . . . . . . . . . . . 7-48
Field Part Movements View . . . . . . . . . . . . . . . . . . . . . . . . . . . . . . . . . . 7-48
Service Inventory Reports . . . . . . . . . . . . . . . . . . . . . . . . . . . . . . . . . 7-51
Setup and Configuration . . . . . . . . . . . . . . . . . . . . . . . . . . . . . . . . . . 7-51
Setting Up a Service Inventory . . . . . . . . . . . . . . . . . . . . . . . . . . . . . . . 7-52Setting Up Service Inventory . . . . . . . . . . . . . . . . . . . . . . . . . . . . . . . . . 7-54
Inventory Structure . . . . . . . . . . . . . . . . . . . . . . . . . . . . . . . . . . . . . . . . .7-61Inventory Types. . . . . . . . . . . . . . . . . . . . . . . . . . . . . . . . . . . . . . . . . . . 7-62
Product Buckets . . . . . . . . . . . . . . . . . . . . . . . . . . . . . . . . . . . . . . . . . . 7-62
Product Serialization . . . . . . . . . . . . . . . . . . . . . . . . . . . . . . . . . . . . . . 7-63
Inventory Relationships . . . . . . . . . . . . . . . . . . . . . . . . . . . . . . . . . . . . 7-63
Tracking an Inventory Location . . . . . . . . . . . . . . . . . . . . . . . . . . . . . . . 7-65
Inventory Transactions . . . . . . . . . . . . . . . . . . . . . . . . . . . . . . . . . . . . . 7-66Synchronizing Remote and Local Databases . . . . . . . . . . . . . . . . . . . . . . 7-75
x Siebel Field Service Guide Version 6.1
Contents
Chapter 8. OrdersAbout This Chapter . . . . . . . . . . . . . . . . . . . . . . . . . . . . . . . . . . . . . . 8-3
Concepts and Terms . . . . . . . . . . . . . . . . . . . . . . . . . . . . . . . . . . . . . . . . 8-4
Application Overview . . . . . . . . . . . . . . . . . . . . . . . . . . . . . . . . . . . . . 8-5
RMAs . . . . . . . . . . . . . . . . . . . . . . . . . . . . . . . . . . . . . . . . . . . . . . . . . . 8-5Repair Orders . . . . . . . . . . . . . . . . . . . . . . . . . . . . . . . . . . . . . . . . . . . . . 8-9Internal Orders . . . . . . . . . . . . . . . . . . . . . . . . . . . . . . . . . . . . . . . . . . . 8-10
Purchase Orders . . . . . . . . . . . . . . . . . . . . . . . . . . . . . . . . . . . . . . . . . . . 8-11
Fulfillment . . . . . . . . . . . . . . . . . . . . . . . . . . . . . . . . . . . . . . . . . . . . . . . 8-11
Creating and Tracking Orders . . . . . . . . . . . . . . . . . . . . . . . . . . . . . . . . .8-13
Fulfilling Orders . . . . . . . . . . . . . . . . . . . . . . . . . . . . . . . . . . . . . . . . . . .8-18
Screens and Views for Orders . . . . . . . . . . . . . . . . . . . . . . . . . . . . . . 8-20
Application Administration Screen . . . . . . . . . . . . . . . . . . . . . . . . . . . 8-22
Order Action Types View . . . . . . . . . . . . . . . . . . . . . . . . . . . . . . . . . . . .8-22
Order Types View . . . . . . . . . . . . . . . . . . . . . . . . . . . . . . . . . . . . . . . . . .8-23
Orders Screen . . . . . . . . . . . . . . . . . . . . . . . . . . . . . . . . . . . . . . . . . 8-24
All RMAs/Service Orders View . . . . . . . . . . . . . . . . . . . . . . . . . . . . . . . .8-24
Line Items View . . . . . . . . . . . . . . . . . . . . . . . . . . . . . . . . . . . . . . . . . . .8-27
Line Item Actions View . . . . . . . . . . . . . . . . . . . . . . . . . . . . . . . . . . . . . .8-31
Line Item Part Locator View . . . . . . . . . . . . . . . . . . . . . . . . . . . . . . . . . .8-33
Line Item Warranties View . . . . . . . . . . . . . . . . . . . . . . . . . . . . . . . . . . .8-35
Terms View . . . . . . . . . . . . . . . . . . . . . . . . . . . . . . . . . . . . . . . . . . . . . .8-36
Repairs View . . . . . . . . . . . . . . . . . . . . . . . . . . . . . . . . . . . . . . . . . . . . .8-37
Orders Charts . . . . . . . . . . . . . . . . . . . . . . . . . . . . . . . . . . . . . . . . . 8-38
Orders Reports . . . . . . . . . . . . . . . . . . . . . . . . . . . . . . . . . . . . . . . . . 8-39
Version 6.1 Siebel Field Service Guide x i

Contents
Setup and Configuration . . . . . . . . . . . . . . . . . . . . . . . . . . . . . . . . . . 8-40
Setting Up Orders . . . . . . . . . . . . . . . . . . . . . . . . . . . . . . . . . . . . . . . . . 8-40
Setting Up the Fulfillment and Part Locator Engines . . . . . . . . . . . . . . . . 8-40
Options for Using Orders . . . . . . . . . . . . . . . . . . . . . . . . . . . . . . . . . . . . 8-43Generating Pick Ticket Button . . . . . . . . . . . . . . . . . . . . . . . . . . . . . . . . 8-45Fulfillment Engine . . . . . . . . . . . . . . . . . . . . . . . . . . . . . . . . . . . . . . . . . 8-46
Part Locator . . . . . . . . . . . . . . . . . . . . . . . . . . . . . . . . . . . . . . . . . . . . . 8-48System Preferences for the Fulfillment and Part Locator Engines . . . . . . . 8-49Engine Parameters for the Fulfillment and Part Locator Engines . . . . . . . . 8-53Running the Fulfillment and Part Locator Engines . . . . . . . . . . . . . . . . . . 8-54
Chapter 9. Logistics ManagementAbout This Chapter . . . . . . . . . . . . . . . . . . . . . . . . . . . . . . . . . . . . . . 9-3
Concepts and Terms . . . . . . . . . . . . . . . . . . . . . . . . . . . . . . . . . . . . . . 9-3
Application Overview . . . . . . . . . . . . . . . . . . . . . . . . . . . . . . . . . . . . . 9-4
Replenishment . . . . . . . . . . . . . . . . . . . . . . . . . . . . . . . . . . . . . . . . . . . . 9-4
Cycle Counting . . . . . . . . . . . . . . . . . . . . . . . . . . . . . . . . . . . . . . . . . . . . 9-5Replenishing Inventory . . . . . . . . . . . . . . . . . . . . . . . . . . . . . . . . . . . . . . 9-7
Running the Cycle Counting Engine . . . . . . . . . . . . . . . . . . . . . . . . . . . . . 9-8
Using a Barcode Interface . . . . . . . . . . . . . . . . . . . . . . . . . . . . . . . . . 9-10
The Barcode Toolbar . . . . . . . . . . . . . . . . . . . . . . . . . . . . . . . . . . . . . . . .9-11Printing Barcodes in Reports . . . . . . . . . . . . . . . . . . . . . . . . . . . . . . . . . 9-15
Using a Barcode Reader . . . . . . . . . . . . . . . . . . . . . . . . . . . . . . . . . . . . 9-16
Screens and Views for Logistics Management . . . . . . . . . . . . . . . . . . . 9-18
Service Administration Screen . . . . . . . . . . . . . . . . . . . . . . . . . . . . . . 9-20
Barcode Mapping View . . . . . . . . . . . . . . . . . . . . . . . . . . . . . . . . . . . . . 9-20
Marketing Administration Screen . . . . . . . . . . . . . . . . . . . . . . . . . . . . 9-22
Product Field Service Details View . . . . . . . . . . . . . . . . . . . . . . . . . . . . 9-22
Cycle Counting Screen . . . . . . . . . . . . . . . . . . . . . . . . . . . . . . . . . . . 9-23
All Cycle Counts View . . . . . . . . . . . . . . . . . . . . . . . . . . . . . . . . . . . . . 9-23
Part List View . . . . . . . . . . . . . . . . . . . . . . . . . . . . . . . . . . . . . . . . . . . . 9-25
Variance View . . . . . . . . . . . . . . . . . . . . . . . . . . . . . . . . . . . . . . . . . . . 9-27
xi i Siebel Field Service Guide Version 6.1

Contents
Cycle Counting Report . . . . . . . . . . . . . . . . . . . . . . . . . . . . . . . . . . . 9-30
Service Inventory Screen . . . . . . . . . . . . . . . . . . . . . . . . . . . . . . . . . . 9-31
Cycle Counting Administration View . . . . . . . . . . . . . . . . . . . . . . . . . . . .9-31
New Replenishment Orders View . . . . . . . . . . . . . . . . . . . . . . . . . . . . . .9-33
Pending Replenishment Orders View . . . . . . . . . . . . . . . . . . . . . . . . . . . .9-35
Setup and Configuration for Barcode Reading . . . . . . . . . . . . . . . . . . . 9-36
Setting Up a Barcode Interface . . . . . . . . . . . . . . . . . . . . . . . . . . . . . . . .9-36
Destinations for Barcode Data . . . . . . . . . . . . . . . . . . . . . . . . . . . . . . . . .9-37
Processing Barcode Data . . . . . . . . . . . . . . . . . . . . . . . . . . . . . . . . . . . . .9-37
Searching for Barcode Data . . . . . . . . . . . . . . . . . . . . . . . . . . . . . . . . . . .9-38
Setup and Configuration for Cycle Counting . . . . . . . . . . . . . . . . . . . . 9-39
Setting Up Cycle Counting . . . . . . . . . . . . . . . . . . . . . . . . . . . . . . . . . . .9-39
Configuration Parameters . . . . . . . . . . . . . . . . . . . . . . . . . . . . . . . . . . . .9-41
Configuration Information for the Cycle Counting Engine . . . . . . . . . . . . .9-42System Preferences for the Cycle Counting Engine. . . . . . . . . . . . . . . . . . 9-44Engine Parameters for the Cycle Counting Engine . . . . . . . . . . . . . . . . . . 9-45Running the Cycle Counting Engine . . . . . . . . . . . . . . . . . . . . . . . . . . . . 9-46Tracing for the Cycle Counting Engine . . . . . . . . . . . . . . . . . . . . . . . . . . 9-47
Setup and Configuration for the Replenishment Engine . . . . . . . . . . . . 9-49
Setting Up Replenishment . . . . . . . . . . . . . . . . . . . . . . . . . . . . . . . . . . . .9-49Configuration Information for the Replenishment Engine. . . . . . . . . . . . . 9-51System Preferences for the Replenishment Engine . . . . . . . . . . . . . . . . . . 9-52
Parameters for the Replenishment Engine . . . . . . . . . . . . . . . . . . . . . . . .9-53Running the Replenishment Engine . . . . . . . . . . . . . . . . . . . . . . . . . . . . 9-54
Chapter 10. Shipping and ReceivingAbout This Chapter . . . . . . . . . . . . . . . . . . . . . . . . . . . . . . . . . . . . . 10-3
Concepts and Terms . . . . . . . . . . . . . . . . . . . . . . . . . . . . . . . . . . . . . 10-3
Application Overview . . . . . . . . . . . . . . . . . . . . . . . . . . . . . . . . . . . . 10-4
Processing and Tracking Shipments . . . . . . . . . . . . . . . . . . . . . . . . . . . . .10-7Processing and Tracking Receipts . . . . . . . . . . . . . . . . . . . . . . . . . . . . . . 10-9
Version 6.1 Siebel Field Service Guide x i i i

Contents
Screens and Views for Shipping and Receiving . . . . . . . . . . . . . . . . . .10-11
Shipping Screen . . . . . . . . . . . . . . . . . . . . . . . . . . . . . . . . . . . . . . . 10-12
All Pick Tickets View . . . . . . . . . . . . . . . . . . . . . . . . . . . . . . . . . . . . . . 10-12
Pick Ticket View . . . . . . . . . . . . . . . . . . . . . . . . . . . . . . . . . . . . . . . . . 10-14
Repair Pick Ticket View . . . . . . . . . . . . . . . . . . . . . . . . . . . . . . . . . . . . 10-17
Waybill View . . . . . . . . . . . . . . . . . . . . . . . . . . . . . . . . . . . . . . . . . . . . 10-18Consolidation View . . . . . . . . . . . . . . . . . . . . . . . . . . . . . . . . . . . . . . . 10-20
Shipping Report . . . . . . . . . . . . . . . . . . . . . . . . . . . . . . . . . . . . . . . 10-22
Receiving Screen . . . . . . . . . . . . . . . . . . . . . . . . . . . . . . . . . . . . . . 10-22
All Pending Orders View . . . . . . . . . . . . . . . . . . . . . . . . . . . . . . . . . . . .10-22
Line Item Receipts View . . . . . . . . . . . . . . . . . . . . . . . . . . . . . . . . . . . . 10-24
All Unknown Receipts View . . . . . . . . . . . . . . . . . . . . . . . . . . . . . . . . . 10-26
Receive Internal Orders View . . . . . . . . . . . . . . . . . . . . . . . . . . . . . . . . 10-28
Receive Purchase Order View . . . . . . . . . . . . . . . . . . . . . . . . . . . . . . . . 10-31
Receive Repair Order View . . . . . . . . . . . . . . . . . . . . . . . . . . . . . . . . . .10-33
Receive RMA View . . . . . . . . . . . . . . . . . . . . . . . . . . . . . . . . . . . . . . . . 10-33
Receive Unknown View . . . . . . . . . . . . . . . . . . . . . . . . . . . . . . . . . . . . 10-33
Waybill View . . . . . . . . . . . . . . . . . . . . . . . . . . . . . . . . . . . . . . . . . . . . 10-33
Setup and Configuration . . . . . . . . . . . . . . . . . . . . . . . . . . . . . . . . . 10-34
Process Shipment Button . . . . . . . . . . . . . . . . . . . . . . . . . . . . . . . . . . . 10-34
Generate Transactions Button . . . . . . . . . . . . . . . . . . . . . . . . . . . . . . . . 10-34Common Checks and Validations for Shipping and Receiving. . . . . . . . . 10-35
Inventory Transactions for Repairs in an Internal Repair Center . . . . . . . . 10-35
Inventory Transactions for Repairs Sent to a Third-Party Vendor . . . . . . . 10-36
Inventory Transactions for Repairs Received from a Third-Party Vendor . . . . . . . . . . . . . . . . . . . . . . . . . . . . . . . . . . . . . . . . 10-37
Third-Party Vendor Swaps an Asset During Repair . . . . . . . . . . . . . . . . . 10-38
xiv Siebel Field Service Guide Version 6.1

Contents
Chapter 11. RepairsAbout This Chapter . . . . . . . . . . . . . . . . . . . . . . . . . . . . . . . . . . . . . 11-2
Business Scenario . . . . . . . . . . . . . . . . . . . . . . . . . . . . . . . . . . . . . . 11-3
Concepts and Terms . . . . . . . . . . . . . . . . . . . . . . . . . . . . . . . . . . . . . 11-4
Application Overview . . . . . . . . . . . . . . . . . . . . . . . . . . . . . . . . . . . . 11-4
Workflow for Repairs. . . . . . . . . . . . . . . . . . . . . . . . . . . . . . . . . . . . . . . 11-5
Receiving Items for Repair . . . . . . . . . . . . . . . . . . . . . . . . . . . . . . . . . . . 11-6
Repair Records and Defective Tags . . . . . . . . . . . . . . . . . . . . . . . . . . . . . . 11-6Repair Activities . . . . . . . . . . . . . . . . . . . . . . . . . . . . . . . . . . . . . . . . . . 11-7
Repair Orders . . . . . . . . . . . . . . . . . . . . . . . . . . . . . . . . . . . . . . . . . . . . . 11-7
Asset Repair Histories . . . . . . . . . . . . . . . . . . . . . . . . . . . . . . . . . . . . . . . 11-7
Processing Defective Items for Repair . . . . . . . . . . . . . . . . . . . . . . . . . . . 11-8
Screens and Views for Repairs . . . . . . . . . . . . . . . . . . . . . . . . . . . . . 11-14
Repairs Screen . . . . . . . . . . . . . . . . . . . . . . . . . . . . . . . . . . . . . . . . 11-15
Repairs Views . . . . . . . . . . . . . . . . . . . . . . . . . . . . . . . . . . . . . . . . . . . 11-15
Activities Plan View . . . . . . . . . . . . . . . . . . . . . . . . . . . . . . . . . . . . . . . 11-18
Activities View . . . . . . . . . . . . . . . . . . . . . . . . . . . . . . . . . . . . . . . . . . . 11-20
Assets Screen . . . . . . . . . . . . . . . . . . . . . . . . . . . . . . . . . . . . . . . . . 11-22
Repair History View . . . . . . . . . . . . . . . . . . . . . . . . . . . . . . . . . . . . . . . 11-22
Repair Reports . . . . . . . . . . . . . . . . . . . . . . . . . . . . . . . . . . . . . . . . 11-23
Setup and Configuration . . . . . . . . . . . . . . . . . . . . . . . . . . . . . . . . . 11-24
Setting Up Repair Activities . . . . . . . . . . . . . . . . . . . . . . . . . . . . . . . . . . 11-24
Serialized Products and Inventory Location . . . . . . . . . . . . . . . . . . . . . . 11-25
Inventory Transactions for the Repair Process . . . . . . . . . . . . . . . . . . . . 11-25
Version 6.1 Siebel Field Service Guide xv
Contents
Chapter 12. Preventive MaintenanceAbout This Chapter . . . . . . . . . . . . . . . . . . . . . . . . . . . . . . . . . . . . . 12-3
Business Scenarios . . . . . . . . . . . . . . . . . . . . . . . . . . . . . . . . . . . . . . 12-3
Concepts and Terms . . . . . . . . . . . . . . . . . . . . . . . . . . . . . . . . . . . . . 12-4
Application Overview . . . . . . . . . . . . . . . . . . . . . . . . . . . . . . . . . . . . 12-4
Generating Preventive Maintenance Actions . . . . . . . . . . . . . . . . . . . . . . 12-6
Screens and Views for Preventive Maintenance . . . . . . . . . . . . . . . . . . 12-7
Service Administration Screen . . . . . . . . . . . . . . . . . . . . . . . . . . . . . . 12-8
Service Request Templates View . . . . . . . . . . . . . . . . . . . . . . . . . . . . . . 12-8
SR Template Activities View . . . . . . . . . . . . . . . . . . . . . . . . . . . . . . . . . 12-11
Preventive Maintenance Screen . . . . . . . . . . . . . . . . . . . . . . . . . . . . 12-12
Plans View . . . . . . . . . . . . . . . . . . . . . . . . . . . . . . . . . . . . . . . . . . . . . .12-13
Triggers View . . . . . . . . . . . . . . . . . . . . . . . . . . . . . . . . . . . . . . . . . . . .12-14
Products View . . . . . . . . . . . . . . . . . . . . . . . . . . . . . . . . . . . . . . . . . . .12-18
Actions View . . . . . . . . . . . . . . . . . . . . . . . . . . . . . . . . . . . . . . . . . . . .12-19
History View . . . . . . . . . . . . . . . . . . . . . . . . . . . . . . . . . . . . . . . . . . . .12-20
Assets Screen . . . . . . . . . . . . . . . . . . . . . . . . . . . . . . . . . . . . . . . . 12-22
History View . . . . . . . . . . . . . . . . . . . . . . . . . . . . . . . . . . . . . . . . . . . .12-22
Plans View . . . . . . . . . . . . . . . . . . . . . . . . . . . . . . . . . . . . . . . . . . . . . .12-24
Agreements Screen . . . . . . . . . . . . . . . . . . . . . . . . . . . . . . . . . . . . . 12-25
Setup and Configuration . . . . . . . . . . . . . . . . . . . . . . . . . . . . . . . . . 12-25
Setting Up the Preventive Maintenance Engine . . . . . . . . . . . . . . . . . . . .12-25
Enabling Preventive Maintenance Plans . . . . . . . . . . . . . . . . . . . . . . . . .12-28
Validating PM Plans for an Asset . . . . . . . . . . . . . . . . . . . . . . . . . . . . . .12-28
Trigger Logic . . . . . . . . . . . . . . . . . . . . . . . . . . . . . . . . . . . . . . . . . . . .12-29
Invoking the Preventive Maintenance Engine . . . . . . . . . . . . . . . . . . . . .12-32
System Preferences for the Preventive Maintenance Engine . . . . . . . . . . .12-33
Engine Parameters for the Preventive Maintenance Engine . . . . . . . . . . .12-33Tables Involved . . . . . . . . . . . . . . . . . . . . . . . . . . . . . . . . . . . . . . . . . . 12-36
xvi Siebel Field Service Guide Version 6.1

Contents
Chapter 13. InvoicesAbout This Chapter . . . . . . . . . . . . . . . . . . . . . . . . . . . . . . . . . . . . . 13-3
Business Scenario . . . . . . . . . . . . . . . . . . . . . . . . . . . . . . . . . . . . . . 13-3
Concepts and Terms . . . . . . . . . . . . . . . . . . . . . . . . . . . . . . . . . . . . . 13-4
Application Overview . . . . . . . . . . . . . . . . . . . . . . . . . . . . . . . . . . . . 13-4
Producing a Customer Invoice . . . . . . . . . . . . . . . . . . . . . . . . . . . . . . . . 13-6
Screens and Views for Invoices . . . . . . . . . . . . . . . . . . . . . . . . . . . . . 13-9
Pricing Administration Screen . . . . . . . . . . . . . . . . . . . . . . . . . . . . . 13-10
Asset Mapping View . . . . . . . . . . . . . . . . . . . . . . . . . . . . . . . . . . . . . . . 13-10
Billings Screen . . . . . . . . . . . . . . . . . . . . . . . . . . . . . . . . . . . . . . . . 13-10
All Invoices View . . . . . . . . . . . . . . . . . . . . . . . . . . . . . . . . . . . . . . . . . 13-11Line Items View . . . . . . . . . . . . . . . . . . . . . . . . . . . . . . . . . . . . . . . . . 13-14
Line Item Detail View . . . . . . . . . . . . . . . . . . . . . . . . . . . . . . . . . . . . . .13-16Payments View . . . . . . . . . . . . . . . . . . . . . . . . . . . . . . . . . . . . . . . . . . 13-18
Activities Screen . . . . . . . . . . . . . . . . . . . . . . . . . . . . . . . . . . . . . . 13-20
Expense Tracker View . . . . . . . . . . . . . . . . . . . . . . . . . . . . . . . . . . . . . .13-20
Field Parts Movements View . . . . . . . . . . . . . . . . . . . . . . . . . . . . . . . . . 13-21
Field Service Details View . . . . . . . . . . . . . . . . . . . . . . . . . . . . . . . . . . . 13-21
Invoices View . . . . . . . . . . . . . . . . . . . . . . . . . . . . . . . . . . . . . . . . . . . 13-21
Time Tracker View . . . . . . . . . . . . . . . . . . . . . . . . . . . . . . . . . . . . . . . .13-22
Service Requests Screen . . . . . . . . . . . . . . . . . . . . . . . . . . . . . . . . . 13-24
Invoice Report . . . . . . . . . . . . . . . . . . . . . . . . . . . . . . . . . . . . . . . . 13-27
Setup and Configuration . . . . . . . . . . . . . . . . . . . . . . . . . . . . . . . . . 13-27
Setting Up Auto Invoicing . . . . . . . . . . . . . . . . . . . . . . . . . . . . . . . . . .13-27Requirements of the Auto Invoicing Engine. . . . . . . . . . . . . . . . . . . . . . 13-28Cost and Price Lists . . . . . . . . . . . . . . . . . . . . . . . . . . . . . . . . . . . . . . . 13-29Organization of an Invoice. . . . . . . . . . . . . . . . . . . . . . . . . . . . . . . . . . 13-30
Version 6.1 Siebel Field Service Guide xv i i

Contents
Chapter 14. Field Service AnalysisAbout This Chapter . . . . . . . . . . . . . . . . . . . . . . . . . . . . . . . . . . . . . 14-2
Field Service Analysis Screen . . . . . . . . . . . . . . . . . . . . . . . . . . . . . . 14-2
Data for Field Service Analysis . . . . . . . . . . . . . . . . . . . . . . . . . . . . . . . 14-2Activity Analysis View. . . . . . . . . . . . . . . . . . . . . . . . . . . . . . . . . . . . . . 14-3Activity Trend Analysis View . . . . . . . . . . . . . . . . . . . . . . . . . . . . . . . . . 14-5
Average Time Spent Analysis View . . . . . . . . . . . . . . . . . . . . . . . . . . . . 14-7
Average Time Spent Trend Analysis View . . . . . . . . . . . . . . . . . . . . . . . . 14-9
Index
xvi i i Siebel Field Service Guide Version 6.1

Introduction
Who Should Use This Guide . . . . . . . . . . . . . . . . . . . . . . . . . . . . . Intro-2
How This Guide Is Organized . . . . . . . . . . . . . . . . . . . . . . . . . . . . Intro-3
What’s New in This Release . . . . . . . . . . . . . . . . . . . . . . . . . . . . . Intro-3
Additional Documentation . . . . . . . . . . . . . . . . . . . . . . . . . . . . . . Intro-5
Contacting Siebel Technical Support . . . . . . . . . . . . . . . . . . . . . . . . Intro-6
Siebel Welcomes Your Comments . . . . . . . . . . . . . . . . . . . . . . . . . . Intro-8
Version 6.1 Siebel Field Service Guide Intro -1

Introduction
Who Should Use This Guide
Who Should Use This Guide Intro
This guide describes each feature of Siebel Field Service 6.0 in terms of a likely business scenario, the user interface for implementing the scenario, and the specific tasks that a user can carry out. In addition, the guide provides the information required for configuring and administering this application.
NOTE: This guide is not intended for end users. It is designed primarily for configurators and the personnel described in the following list.
The audience for this guide consists of:
Configurators Persons responsible for planning, implementing, and configuring Siebel applications.
Installers Persons responsible for setting up Siebel Field Service for initial use.
Marketing Administrators
Persons responsible for setting up and maintaining a marketing department; duties include designing and managing campaigns, product marketing information, and product distribution lists.
Siebel Application Administrators
Persons responsible for planning, setting up, and maintaining Siebel applications.
Service Center Administrator
Persons responsible for setting up and maintaining a service center.
Siebel System Administrators
Persons responsible for the whole system, including installing, maintaining, and upgrading Siebel products.
Database Administrators
Persons who administer the database system, including data loading; system monitoring, backup, and recovery; space allocation and sizing; and user account management.
Siebel Application Developers
Persons who plan, implement, and configure Siebel applications, possibly adding new functionality.
Int ro -2 Siebel Field Service Guide Version 6.1

Introduction
How This Guide Is Organized
How This Guide Is Organized Intro
This guide is organized according to the functions of screens that apply to Siebel Field Service. For example, screens that apply to service support are grouped into one chapter.
What’s New in This Release Intro
Siebel Field Service, version 6.1, has the following new feature:
NOTE: Your Siebel implementation may not have all the features described in this guide, depending on which software modules you have purchased.
Feature Description
Dispatch Board A color-coded chart which displays the schedules of selected employees. Dispatchers use this screen to assign and schedule field service activities. See Chapter 2, “Service Support.”
Version 6.1 Siebel Field Service Guide Intro -3

Introduction
What’s New in This Release
Siebel Field Service, version 6.0, has these following new features:
NOTE: Your Siebel implementation may not have all the features described in this guide, depending on which software modules you have purchased.
Feature Description
Agreements New Agreements and Entitlements screens and views.
Assets Measurements
For collecting data directly from assets for use in preventive maintenance, agreements, and diagnostics.
Barcode Support Automated input of data from barcode scanners to predetermined fields. Also, automated searching of the Field Service database for records related to data obtained from barcodes.
Invoices Automatic preparation of invoices, in the field, for services. Itemizes all activities, materials, labor, and expenses related to a service request or an activity.
Logistics For cycle counting, automatic adjustments for discrepancies between physical counts and inventory quantities.
Field Service Analysis
Analysis of field service activities using data mart technology.
Organizations The ability to partition the Field Service database among logical units of a large company, limiting visibility of the data.
Preventive Maintenance
Automatic generation of service requests for the preventive maintenance (PM) of assets. PM activities may be based on service requests and activity templates. PM activities are triggered by data collected from assets, a fixed length of time, or the number of service requests in a period of time.
Warranty New Product Warranty views to handle multi-level coverage.
Receiving New Receiving view: All Pending Orders.
Remote Transactions
Ability to record inventory transactions in the field and automatically commit part movements during synchronization.
Int ro -4 Siebel Field Service Guide Version 6.1

Introduction
Additional Documentation
Additional Documentation Intro
The following documentation also provides information on the topics addressed in this guide.
This guide does not provide information about general software concepts, such as records and queries, or about using Windows. Neither does it provide instructions for basic navigation in Siebel applications. For this information, refer to Siebel Basics.
Administrators and developers, such as marketing administrators, service center administrators, and application developers, should also read the Siebel Applications Administration Guide for information on how to set up and maintain Siebel applications.
You will find information about Siebel Technical and Professional Services in the Guide to Siebel Global Services.
For copies of these documents, please use Siebel Books Online, accessible via the Worldwide Services tab on the Siebel Systems Web site (www.siebel.com). Through Siebel Books Online, you can order additional Siebel documentation and copies of the Bookshelf for Siebel eBusiness Applications CD-ROM.
Another source of information is the Siebel Online Help.
Siebel Applications Administration Guide
Siebel Assignment Manager Administration Guide
Siebel .COM Applications Guide
Siebel Configurator Guide
Siebel Release Notes
Siebel Pricing, Costing, and Rate List Administration Guide
Siebel Search Guide
Siebel Server Administration Guide
Siebel Workflow Manager Guide
Using Siebel Applications
Version 6.1 Siebel Field Service Guide Intro -5

Introduction
Contacting Siebel Technical Support
Contacting Siebel Technical Support Intro
Do you know how to access Siebel Technical Support? It is crucial that you understand the requirements for getting support before you encounter technical issues that require Siebel Technical Support’s assistance. This will facilitate smooth resolution of your issues. If you have questions, please don’t hesitate to contact us.
To maximize your knowledge of Siebel products and your return on investment:
You must attend Siebel training to become a designated contact.
Your Siebel-trained designated contacts provide technical support to your users. Siebel Technical Support provides support directly to your designated contacts only.
To provide efficient, timely support and access to an extensive knowledge base:
Siebel Technical Support is primarily Web-based, accessed through Siebel SupportWeb (http://supportweb.siebel.com). Please submit new service requests to us through SupportWeb, where you can also search the knowledge base for solutions.
Designated contacts receive read/write access to Siebel SupportWeb. All other project team members at your company receive read-only accounts so that they can access the support knowledge base.
To register for Siebel training, please access http://www.siebel.com/education/ and choose Implementation Team Training.
Please submit your technical issues and updates to Siebel SupportWeb (http://supportweb.siebel.com). If you do not have a SupportWeb account, or if you have a question, please contact us at [email protected] or call your local Siebel Support Center below:
■ North America: +800 214 0400 or +1 650 295 5724
■ Brazil (Sao Paulo): +55 11 5110 0800
■ UK (London): +44 (0) 800 072 6787 or +44 (0) 1784 494949
■ Germany (Munich): +49 89 957 18 400
■ France (Paris): +00 +800 - 21 40 40 04
Int ro -6 Siebel Field Service Guide Version 6.1
Introduction
Contacting Siebel Technical Support
■ Japan (Tokyo): 0120 606 750 (Japan domestic only), +81 3 5469 3811 (outside of Japan)
■ Singapore: +65 320 8533
Outside of local support center hours, Gold and Rollout Support Option customers can call +1 800 214 0400 or +1 650 295 5724.
We appreciate your business and look forward to working with you.
Version 6.1 Siebel Field Service Guide Intro -7

Introduction
Siebel Welcomes Your Comments
Siebel Welcomes Your Comments Intro
To help us with future versions, we want to know about any corrections or clarifications that you would find useful. Please include in your message:
■ The title and version of this guide
■ Your name, company name, job title or functional area, phone number, and email address
Contact us through regular mail or email at:
Siebel Systems, Inc.Technical Publications Department2207 Bridgepointe ParkwaySan Mateo, CA 94404-5009
We appreciate your feedback.
Int ro -8 Siebel Field Service Guide Version 6.1
Field Service Overview 1
About Field Service . . . . . . . . . . . . . . . . . . . . . . . . . . . . . . . . . . . . . . 1-2
Managing the Full Cycle of Field Service . . . . . . . . . . . . . . . . . . . . . 1-3
Dispatch Board . . . . . . . . . . . . . . . . . . . . . . . . . . . . . . . . . . . . . . . 1-6
Mobile Computing Support . . . . . . . . . . . . . . . . . . . . . . . . . . . . . . . 1-6
Service Parts Information . . . . . . . . . . . . . . . . . . . . . . . . . . . . . . . . 1-6
Field Engineer Information . . . . . . . . . . . . . . . . . . . . . . . . . . . . . . . 1-7
Field Engineer Activities . . . . . . . . . . . . . . . . . . . . . . . . . . . . . . . . . 1-7
Service Inventory . . . . . . . . . . . . . . . . . . . . . . . . . . . . . . . . . . . . . . 1-7
Preventive Maintenance and Asset Measurements . . . . . . . . . . . . . . . . . . 1-8
Shipping and Receiving . . . . . . . . . . . . . . . . . . . . . . . . . . . . . . . . . 1-8
Field Service Analysis . . . . . . . . . . . . . . . . . . . . . . . . . . . . . . . . . . . . . . . 1-9
Field Service Application Design . . . . . . . . . . . . . . . . . . . . . . . . . . . 1-9
Screens and Views in Field Service . . . . . . . . . . . . . . . . . . . . . . . . . . 1-11
Logging On as the Siebel Administrator . . . . . . . . . . . . . . . . . . . . . . . 1-27
Administrative Tasks . . . . . . . . . . . . . . . . . . . . . . . . . . . . . . . . . . . . 1-28
Version 6.1 Siebel Field Service Guide 1-1

Field Service Overview
About Field Service
About Field Service 1
Siebel Field Service provides service center agents, warehouse staff, and field service engineers the tools to respond efficiently and effectively to service requests. Siebel Field Service handles a full complement of field service tasks, including the following:
■ Receives service center calls.
■ Verifies service agreements and entitlements.
■ Enters a service request.
■ Searches for solutions.
■ Creates activities for a service request.
■ Assigns and dispatches field service engineers.
■ Provides part inventories for parts depots and trunk stock.
■ Provides detailed customer configuration.
■ Tracks parts consumption and logistics.
■ Manages inventory replenishment.
■ Integrates return materials authorizations and service orders.
■ Provides field service engineers with complete service details, including the required skills, tools, and parts for all service activities.
■ Manages repair of defective parts.
■ Sets up and manages preventive maintenance plans.
■ Tracks and analyzes service costs.
■ Prepares invoices for service, and tracks payments.
■ Defines characteristics of assets and records readings from equipment (assets) in the field for preventive maintenance, billing, and service.
■ Utilizes a barcode reader to read serial numbers and to label certain field service and inventory documents.
1-2 Siebel Field Service Guide Version 6.1

Field Service Overview
About Field Service
The field service process typically consists of a customer reporting a problem to a service center and field engineers being dispatched with spare parts. A field service business that can rely on a single software application to manage this process can fully observe and control the process.
Separate functional groups such as the service center, dispatch, field engineers, and parts business need to share information. Siebel Field Service integrates call center, dispatch, field activities, and service parts information in a comprehensive, enterprise-wide customer management system.
Managing the Full Cycle of Field Service 1
Field service businesses use Siebel Field Service to manage the entire flow of field service operations. Inbound service center calls are managed by first checking the service level agreements of the caller. Then a Service Request is entered. Service Request Activities are created throughout the life cycle of the Service Request. Based on the diagnosis of the problem and the service level agreement, a Return Material Authorization or a Service Order is created and linked to the Service Request to allow prompt resolution. The order is filled and the replacement parts shipped to the customer or the field engineer. Activities are dispatched to a field engineer with the right skill set, tools, time, and location.
When a call has been resolved, the engineer can report details of the resolution from the field, the customer relationship database is updated to reflect possible cross-selling opportunities, and the service parts inventory is updated and replenished on a just-in-time basis. An invoice can be issued to the customer as proof of work. Pending return material authorizations from customers are tracked from receiving the items; and defective parts are managed through the repair cycle.
Siebel Field Service consists of basic functions required by most service businesses, plus optional functions that can be added to fit most field service requirements:
■ Base Field Service applications:
■ Call Management
■ Account/Contact Management
■ Field Activities Management
■ Warranty Management
Version 6.1 Siebel Field Service Guide 1-3

Field Service Overview
About Field Service
■ Asset Management
■ On-Site Services Management
■ Knowledge Management
■ Optional Field Service applications:
■ Orders Management
■ Service Inventory
■ Shipping and Receiving
■ Repair
■ Barcode Integration
■ Preventive Maintenance
■ Field Service Analysis
■ Logistics Management
■ Contract Management
■ Dispatch and Scheduling Management (Calendar option)
1-4 Siebel Field Service Guide Version 6.1

Field Service Overview
About Field Service
The flow chart in Figure 1-1 shows the functional relationships among the components of Siebel Field Service.
Figure 1-1. A Functional Overview of Field Service Components
Order Processing
Logistics
Service Inventory
Adjustment
Over-the-counter
Cyclecounting
Inventorybuckets
Inventorylocations
Inventorytransactions
Inventorytransfers
Allocate
Receiving
Fulfillment/Part Locator
Replenish-ment
Pickingand
shipping
Internalorder RMA
Serviceorder
Fieldtransfers
Repairs
Defectivetag
Billing
PartsTime andmaterials
Expenses
Invoice
Repairorder
Field Service Operation and Dispatch
PartBrowser
AssignmentManager
Serviceorder
Servicerequest
Assign
Schedule
Dispatch
Preventive Maintenance
Servicerequesttemplate
Servicerequest
Trigger
Contracts
Serviceagreement
Entitlement
Installed Base
Customer
Warranties
Configuration
Assets
Field Service Engineer Activities
Field engineer
Activity pan
Trunkinventory
Fieldserviceactivity
Skills Shift
Activitytemplate
ToolsCalenderTerritory
Version 6.1 Siebel Field Service Guide 1-5

Field Service Overview
About Field Service
1-6 Siebel Field Service Guide Version 6.1
Dispatch Board 1
The Dispatch Board is a flexible and intuitive graphic user interface that allows call center personnel and dispatchers to select, schedule, and assign field service engineers to service activities. It also allows the selection of field service engineers based on territories, skills, and experience.
The Dispatch Board screen shows all unplanned activities and a list of the selected field service engineers and their schedules. Dragging unplanned activities onto the schedules of field service engineers automatically assigns and schedules these activities.
Mobile Computing Support 1
Field service engineers in the field access Siebel Field Service on their laptop computers, and later synchronize to send local changes to the Field Service server and to retrieve new information from this server. Siebel applications support synchronization over LANs, WANs, dial-up connections, wireless networks, and the Internet.
Siebel Field Service introduces uncommitted transactions for inventory transfers in the field. This allows for tracking of part movements without immediate access to records in the corporate computer. Upon synchronization with a Field Service server, these transactions may be committed and recorded in the server database.
Service Parts Information 1
Siebel Field Service provides full information about parts availability, including important parts attributes such as installation instructions, operational constraints, and warranty and manufacturing data. Siebel Field Service enables the field engineer to graphically navigate through the base configuration of any complex product, and to review the customer’s on-site configuration. Siebel Field Service supports parts comparison and replacement information, so that field service operations can quickly identify alternative parts.
Barcode support allows for the use of scanner guns to read barcode numbers and labels, facilitating warehouse operations.

Field Service Overview
About Field Service
Field Engineer Information 1
Siebel Field Service tracks a wide variety of information for field service engineers. such as skill sets, product expertise, location, and business, as well as critical contact data such as cellular phone and paging information. Each field engineer can define notification preferences so that the attempts to reach him or her always use the best possible means. Integrated calendaring and scheduling allows each field engineer to maintain a personal calendar.
Field Engineer Activities 1
When a service event is reported, Siebel Field Service defines the steps required to correct the problem, necessary tools, required parts and skills, and the appropriate sequence in which the steps must be performed. Vital information, such as safety data, schematics, and technical notes on the products, may be linked to the service activities and parts data. It also allows the capture of billing information related to an activity at a customer site, including parts, expenses, and labor charges.
Service Inventory 1
The Siebel Field Service Inventory manages service parts inventory. Inventory is tracked in real time across all locations and businesses, including trunk inventories, and is accessible from anywhere in the company. Given the challenge of a highly distributed set of inventory locations, Siebel Service Inventory provides a powerful Part Locator screen to find parts during the RMA/order process or during a dispatch operation. The Part Locator engine offers real-time access to inventory, allowing everyone in the service business to make accurate and informed decisions on parts shipments.
The Field Service Part Browser allows an FSE to investigate the availability of a product in all inventory locations within a field service business. All of this information appears conveniently on one screen, for easy lookup.
Version 6.1 Siebel Field Service Guide 1-7

Field Service Overview
About Field Service
Preventive Maintenance and Asset Measurements 1
Siebel Field Service enables customers to generate preventive maintenance (PM) management services automatically. PM is often a critical revenue and cost-containment factor for a service business. PM provides the ability to create automatically pre-defined PM service requests and related activities based on usage or frequency.
Service businesses often provide preventive maintenance services as part of their offerings. Those services are sometimes included in warranty agreements, or can be sold to the customer and made part of the service contract. Certain equipment (for example, photocopiers or printers) requires regular maintenance to be kept in good condition.
Monitoring systems can automatically request maintenance when certain conditions are met; for example, a meter reading passes a threshold or a fixed time period has elapsed. These events trigger the creation of a service request.
To facilitate preventive maintenance, Siebel Field Service provides for the collection and processing of asset measurements. Readings taken either manually or automatically from equipment in the field are recorded in Field Service. These readings can be from gauges, counters, or meters attached to products. This data may be used to initiate service requests for repairs or preventive maintenance. Usage readings can be used for billing on a fee-per-use basis.
Shipping and Receiving 1
Shipping and Receiving are integrated with Siebel Service Inventory, and track customer orders to shipment. Internal orders to transfer stock among inventory locations are also managed within Siebel Shipping and Receiving. RMAs and Orders are received within Siebel Shipping and Receiving, closing the loop with each customer.
1-8 Siebel Field Service Guide Version 6.1

Field Service Overview
About Field Service
Field Service Analysis 1
Siebel Field Service Activity Analysis provides managers a tool to analyze a large volume of field service-related activity records.
Activity records are transferred from the Siebel on-line transaction database to a data repository in the Siebel Marketing DataMart. The results of the analysis are displayed on charts.
Field Service Application Design 1
Siebel Field Service operates as a single Windows NT service, in charge of running components such as EIM, Assignment Manager, Cycle Counting Engine, Replenishment Engine, Fulfillment Engine, and so on. Siebel Server operates components as processes or threads based on the system preferences specified for each component. Thus, there can be multiple components running at the same time and each component can run a specified number of tasks at a given time.
The Logistics Manager and Preventive Maintenance provide these automated functions for Siebel Field Service:
■ Order Fulfillment engine. Analyzes orders, locates parts for each line item, returns the located parts (products or substitute products) to the user, allocates parts, and generates pick tickets.
■ Part Locator engine. Analyzes orders, locates parts for each line item, returns the located parts (products or substitute products) to the user. Now the user can manually allocate these parts and generate the pick tickets.
■ Replenishment engine. Selects source and target inventories when restocking is needed and generates the orders required to obtain materials from an external provider, an internal inventory site, or an internal manufacturing facility.
■ Cycle Counting engine. Generates cycle counting orders (parts lists).
■ Preventive Maintenance engine. Generates service requests for the maintenance of assets, based on pre-defined triggers.
These components are designed as task-based, multi-threaded servers.
Version 6.1 Siebel Field Service Guide 1-9

Field Service Overview
About Field Service
CachingTo improve performance of Siebel Field Service, the engines, along with the database connection that they use, can be cached. This mechanism caches the multiple engine objects and stores them in a queue. For each request, a new thread is started and each thread uses the object from the queue. When it is done with the object, it returns the object back to the queue. Initially, when the queue is created, the queue size is kept equal to the minimum number of tasks parameter by creating that many engine objects. As requests arrive, an object is removed from the queue if there is a free object in the queue; otherwise, a new object is created and added to the queue. While freeing the object, the caching mechanism looks for the maximum number of tasks. If the number of free elements is less than or equal to the maximum number of tasks, then the object is deleted; otherwise, it returns the object to the queue.
For changes to the caching parameters to take effect, the server component must be stopped and restarted again.
1-10 Siebel Field Service Guide Version 6.1

Field Service Overview
Screens and Views in Field Service
Screens and Views in Field Service 1
The Field Service user interface provides task-specific screens and views, some for end users and some for administrators. An example of an end-user screen is shown in Figure 1-2.
Many Siebel eBusiness Applications modules can be purchased and used with Field Service. Optional modules specific to Field Service can be purchased to provide enhanced functionality for business processes.
Figure 1-2. Example of an End-User Screen
Version 6.1 Siebel Field Service Guide 1-11

Field Service Overview
Screens and Views in Field Service
For information on the optional modules that can be used with Field Service, contact your Siebel sales representative.
NOTE: This guide documents Field Service with all optional modules installed. The sample database includes data for all optional modules. If your installation does not include these modules, your software interface will differ from that described in some sections of this guide.
The exact configuration of Field Service screens and views depends on your company’s configuration of the application. The product is designed primarily to support field service businesses. For introductory information on the user interface, see Siebel Basics and Online Help.
1-12 Siebel Field Service Guide Version 6.1

Field Service Overview
Screens and Views in Field Service
Figure 1-3 shows an example of a Field Service screen and points out its main elements. This illustration shows a list-form view, but the view format (the combination of applet types) varies from view to view.
NOTE: Most administrative tasks are performed from administration views that must be accessed from the Screens menu. These views cannot be accessed from shortcuts on the tab bar.
Figure 1-3. Field Service Screen Layout
Menu barView bar Barcode toolbar Tab bar List applet Form applet
Version 6.1 Siebel Field Service Guide 1-13

Field Service Overview
Screens and Views in Field Service
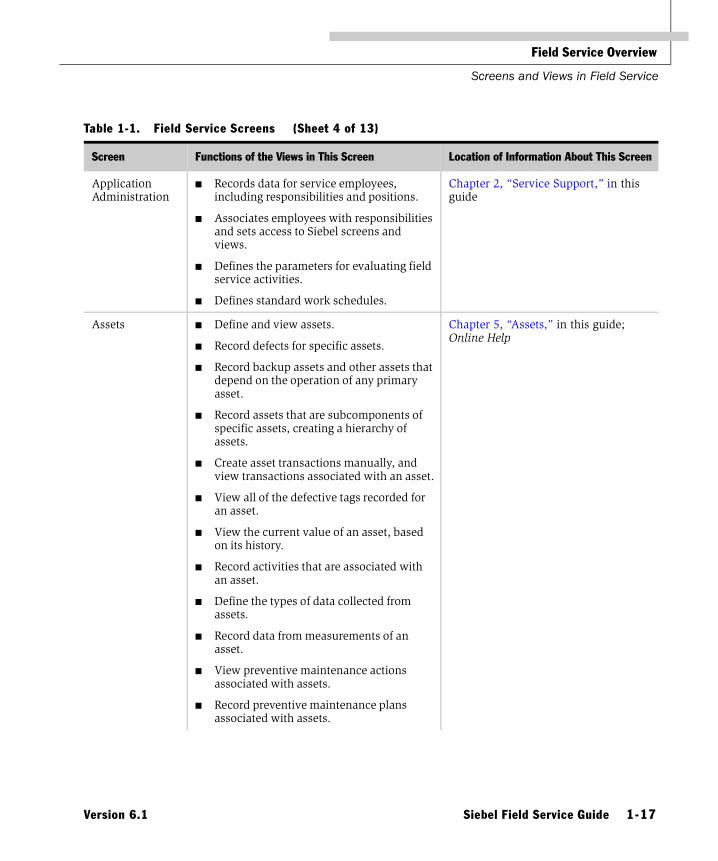
Table 1-1 lists the most frequently used Field Service screens and the functions of the views in those screens. The screens listed here are those appearing on the tab bar. Only the Siebel administrator sees all of the screens listed here.
Table 1-1. Field Service Screens (Sheet 1 of 13)
Screen Functions of the Views in This Screen Location of Information About This Screen
Accounts ■ Verify an account for the business placing a service call.
■ Verify the person placing a service call.
■ Verify the coverage and entitlements for service.
■ Record the assets, products, and contacts associated with an account.
Chapter 2, “Service Support,” in this guide; Online Help
■ Define and identify service contracts.
■ Record the billing details for service activities associated with entitlements.
Chapter 4, “Service Agreements,” in this guide; Online Help
1-14 Siebel Field Service Guide Version 6.1

Field Service Overview
Screens and Views in Field Service
Activities ■ Add activities or modify existing activities; for example, change the status of an activity.
■ Record expenses related to an activity.
■ Record the transfer of parts in the field among the client, a service order, and the FSE’s trunk inventory.
■ Record instructions for carrying out an activity.
■ Display invoices created for an activity and generate, manually or automatically, invoices for any activities that are marked as billable.
■ Display key characteristics of an asset that may be recorded and tracked.
■ Show the materials that an FSE must have to complete an activity.
■ View the skills needed to complete successfully an activity.
■ View the recommended procedure.
■ Record the hours spent on each field service activity procedures for carrying out an activity.
Chapter 3, “Field Service Activities,” in this guide; Chapter 13, “Invoices,” in this guide; Online Help
■ Record the transfers of products and assets in the field. Set the Billable flag to include the price of this part in an invoice.
■ Record information about the service request, account, and contact associated with an activity.
■ Automatically create invoices based on the information provided for an activity.
Chapter 13, “Invoices,” in this guide; Online Help
■ Record movement of parts in the field, between two trunks or between a trunk and a customer site.
Chapter 7, “Service Inventory,” in this guide; Online Help
Table 1-1. Field Service Screens (Sheet 2 of 13)
Screen Functions of the Views in This Screen Location of Information About This Screen
Version 6.1 Siebel Field Service Guide 1-15

Field Service Overview
Screens and Views in Field Service
Agreements ■ Define and identify service contracts.
■ Associate activities with agreements.
■ Associate activity plans with agreements and view the activities that belong to these plans.
■ Associate legal, billing, and shipping contacts with an agreement.
■ Associate files with agreements.
■ Automatically generate documents required to implement a service agreement; for example, subcontractor agreements and work orders.
■ Create entitlements and associate them with specific agreements.
■ Create and view the invoices that are associated with agreements.
■ Record and view a description of each product covered by a selected service agreement.
■ Learn how payment is made on a service agreement.
■ Initiate preventive maintenance actions for specific agreements and view the related PM plans for each entitlement.
Chapter 4, “Service Agreements,” in this guide; Online Help
■ Run the Preventive Maintenance engine interactively for selected agreements.
Chapter 12, “Preventive Maintenance,” in this guide; Online Help
Table 1-1. Field Service Screens (Sheet 3 of 13)
Screen Functions of the Views in This Screen Location of Information About This Screen
1-16 Siebel Field Service Guide Version 6.1
Field Service Overview
Screens and Views in Field Service
Application Administration
■ Records data for service employees, including responsibilities and positions.
■ Associates employees with responsibilities and sets access to Siebel screens and views.
■ Defines the parameters for evaluating field service activities.
■ Defines standard work schedules.
Chapter 2, “Service Support,” in this guide
Assets ■ Define and view assets.
■ Record defects for specific assets.
■ Record backup assets and other assets that depend on the operation of any primary asset.
■ Record assets that are subcomponents of specific assets, creating a hierarchy of assets.
■ Create asset transactions manually, and view transactions associated with an asset.
■ View all of the defective tags recorded for an asset.
■ View the current value of an asset, based on its history.
■ Record activities that are associated with an asset.
■ Define the types of data collected from assets.
■ Record data from measurements of an asset.
■ View preventive maintenance actions associated with assets.
■ Record preventive maintenance plans associated with assets.
Chapter 5, “Assets,” in this guide; Online Help
Table 1-1. Field Service Screens (Sheet 4 of 13)
Screen Functions of the Views in This Screen Location of Information About This Screen
Version 6.1 Siebel Field Service Guide 1-17

Field Service Overview
Screens and Views in Field Service
Assets (continued)
■ View all of the defective tags recorded for an asset.
Chapter 11, “Repairs,” in this guide; Online Help
■ Run the Preventive Maintenance engine interactively for selected assets.
■ Associate assets with preventive maintenance plans.
Chapter 12, “Preventive Maintenance,” in this guide; Online Help
View the warranties associated with selected assets.
Chapter 6, “Warranties,” in this guide; Online Help
Assignment Administration
Associates employees with assignment rules.
Sets up the rules and policies for automatic assignment of field service staff.
Chapter 2, “Service Support,” in this guide
Call Center Administration
Record solutions to service requests and associated service requests and product defects.
Chapter 3, “Field Service Activities,” in this guide
Contacts ■ Define and identify service contracts.
■ View explicit and implicit entitlements associated with a contact.
Chapter 4, “Service Agreements,” in this guide; Online Help
Cycle Counting ■ Define cycle counts for inventory locations.
■ View the product buckets to count and record the count results.
■ View the differences between the inventory in the Field Service database and the actual counts of products. Generate inventory transactions to adjust the difference.
Chapter 9, “Logistics Management,” in this guide; Online Help
Dispatch Board ■ Select field service engineers to carry out activities and schedule these activities.
■ Select field service engineers that are best qualified to carry out an activity.
Chapter 2, “Service Support,” in this guide; Online Help
Table 1-1. Field Service Screens (Sheet 5 of 13)
Screen Functions of the Views in This Screen Location of Information About This Screen
1-18 Siebel Field Service Guide Version 6.1

Field Service Overview
Screens and Views in Field Service
Entitlements ■ Associate accounts with specific entitlements.
■ Associate contacts at an account with a specific entitlement.
■ Record performance data for an entitlement.
■ Associate preventive maintenance plans with entitlements.
■ Associate assets and products with entitlements.
■ Record the billing details for service activities associated with entitlements.
Chapter 4, “Service Agreements,” in this guide; Online Help
Field Service Analysis
■ Show all activities broken down in five ways: by activity category, activity type, product line, territory, or field engineer.
■ Show workload as a function of calendar period.
■ Show the average time devoted to each activity.
■ Show any changes in time required for each activity.
Chapter 14, “Field Service Analysis,” in this guide; Online Help.
Inventory Transactions
List all inventory transactions created automatically (in other screens and views). Transactions can be created manually in this view.
Show the asset and serial numbers if the product associated with a selected transaction is serialized.
Chapter 7, “Service Inventory,” in this guide; Online Help
Marketing Administration
Define the fields on the Product Field Service Details view, including the vendor that supplies a product and the allocation rules that apply to the product.
Chapter 3, “Field Service Activities,” in this guide
Define measurements that may be obtained from specific assets.
Chapter 5, “Assets,” in this guide
Table 1-1. Field Service Screens (Sheet 6 of 13)
Screen Functions of the Views in This Screen Location of Information About This Screen
Version 6.1 Siebel Field Service Guide 1-19

Field Service Overview
Screens and Views in Field Service
Marketing Administration(continued)
Obtain the information used in locating and allocating products for use in field service activities.
Chapter 7, “Service Inventory,” in this guide
Record the information used in locating and allocating products, including inventory types (Warehouse, Truck, and so on) and the cycle counting class A/X, B,/Y or C/Z for a product.
Chapter 9, “Logistics Management,” in this guide; Online Help
Orders ■ Associate warranties with assets in an order; track warranty claims; and record details of expected credit recovery.
Chapter 6, “Warranties,” in this guide; Online Help
■ Record all orders related to service and inventory replenishment: internal, purchase, RMAs, and service orders.
■ Define all products required to fulfill an order.
■ Define activities associated with an order line item. These activities must be completed to fulfill the order.
■ Find in inventory the product to fulfill an order.
■ View the warranties associated with a product.
■ View a summary of an order, shipping instructions and billing instructions.
■ View repairs (defective tags) associated with a line item in an RMA or service order.
Chapter 7, “Service Inventory,” in this guide; Online Help
Part Browser Investigate the availability of a product in all inventory locations within a field service business.
Chapter 3, “Field Service Activities,” in this guide; Online Help
Chapter 7, “Service Inventory,” in this guide; Online Help
Table 1-1. Field Service Screens (Sheet 7 of 13)
Screen Functions of the Views in This Screen Location of Information About This Screen
1-20 Siebel Field Service Guide Version 6.1

Field Service Overview
Screens and Views in Field Service
Preventive Maintenance
■ Associate preventive maintenance plans with assets.
■ Set the time or event that activates a PM plan.
■ Associate service request templates and service activities with specific PM plans.
■ Associate specific products with a PM plan and associate specific valid assets with the products.
■ View preventive maintenance actions for selected assets.
Chapter 12, “Preventive Maintenance,” in this guide; Online Help
Pricing Administration
Record the factors that are used to calculate the Asset Values and the Replacement Costs on the asset Valuation screen.
Chapter 5, “Assets,” in this guide
■ Define the costs for a service business.
■ Describe the products in a selected cost list.
■ Describe the indirect costs of services.
■ Record the factors used to adjust the cost of assets, depending on the Condition, Value Basis, Cost List, and Cost Method for each asset.
Chapter 13, “Invoices,” in this guide; Online Help
Products Obtain information about replacing a defective part and about possible substitute parts.
Chapter 3, “Field Service Activities,” in this guide; Online Help
View warranties and their terms for all products and service providers.
Chapter 6, “Warranties,” in this guide; Online Help
Table 1-1. Field Service Screens (Sheet 8 of 13)
Screen Functions of the Views in This Screen Location of Information About This Screen
Version 6.1 Siebel Field Service Guide 1-21

Field Service Overview
Screens and Views in Field Service
Receiving ■ View all orders not yet received.
■ View all line items, pending and processed, for orders.
■ View received items that arrive with incomplete documentation.
■ Record received items that are transfers between inventory locations within a service business.
■ Record items that are received on purchase orders.
■ Record products repaired and received from a third-party vendor.
■ Record items that are received on all types of RMAs.
■ Record items that are received without an associated order.
■ Record the waybills that accompany received shipments.
Chapter 10, “Shipping and Receiving,” in this guide; Online Help
Repairs ■ Record the information that is necessary to identify a repair. Assign a defective tag.
■ Associate an activities plan and its activities with a defective tag record.
■ Associate individual activities with a defective tag record.
Chapter 11, “Repairs,” in this guide; Online Help
View warranty information for an asset. Chapter 6, “Warranties,” in this guide; Online Help
Table 1-1. Field Service Screens (Sheet 9 of 13)
Screen Functions of the Views in This Screen Location of Information About This Screen
1-22 Siebel Field Service Guide Version 6.1

Field Service Overview
Screens and Views in Field Service
Service Administration
■ Create warranties and their terms for all products and service providers under the care of a service business.
■ Specify the products covered by a warranty.
■ Record the service providers for a warranty.
Chapter 6, “Warranties,” in this guide
■ Record transactions that occurred in the field, but are not yet recorded in the server database.
■ Define the types of inventory locations that are available in the Type field of the Inventory Locations applets.
■ Define the transaction types that are available in the Type field of the Inventory Location applets.
■ Define the inventory bucket categories that are available in the Buckets applet.
Chapter 7, “Service Inventory,” in this guide; Online Help
■ Set the destinations for barcode data in specific views, applets, and fields.
Chapter 9, “Logistics Management,” in this guide; Online Help
■ Create templates for preventive maintenance service requests.
■ Associate activity templates with preventive maintenance service request templates.
Chapter 12, “Preventive Maintenance,” in this guide; Online Help
■ Create warranties and their terms for all products and service providers under the care of a service business.
■ Specify the products covered by a warranty.
■ Record the service providers for a warranty.
Chapter 6, “Warranties,” in this guide; Online Help
Table 1-1. Field Service Screens (Sheet 10 of 13)
Screen Functions of the Views in This Screen Location of Information About This Screen
Version 6.1 Siebel Field Service Guide 1-23

Field Service Overview
Screens and Views in Field Service
Service Inventory
Set up inventory locations.
Associate inventory locations with products and buckets (availability and status of products).
Produce orders, using the Replenishment engine, to replenish products in inventory.
List pending orders to replenish an inventory location.
Record vendors who may supply products for a selected inventory location.
Set up the physical hierarchy of inventory locations or relationships used in inventory replenishment or order fulfillment.
Set the roles of personnel associated with selected inventory locations.
Show the parameters of cycle counting at a selected inventory location.
Chapter 7, “Service Inventory,” in this guide; Online Help
Enter specifications that the Cycle Counting engine uses to automatically generate cycle count parts lists.
Automatically produce orders to replenish the product in inventory.
View pending orders to replenish a location.
Chapter 9, “Logistics Management,” in this guide; Online Help
Table 1-1. Field Service Screens (Sheet 11 of 13)
Screen Functions of the Views in This Screen Location of Information About This Screen
1-24 Siebel Field Service Guide Version 6.1

Field Service Overview
Screens and Views in Field Service
Service Requests ■ Create and track service requests.
■ Choose a template to define the activities that can resolve a service request.
■ Add activities to a service request and assign field service engineers to each activity.
■ Check for warranties covering an asset, the symptom reported for the asset, and its resolution.
■ View the invoices against this service request and automatically generate invoices for billable orders and activities.
■ Obtain benchmarks of performance for a service request.
■ Describe the defects in the components requiring service.
■ View orders related to service requests.
■ View the valid hours of coverage for a service request, based on a selected entitlement.
■ Obtain answers to frequently asked questions (FAQs), and information from related service requests, and search for information.
Chapter 2, “Service Support,” in this guide; Online Help
■ Record and display solutions to repetitive service activities, plus search functions: Related SRs, Encyclopedia, and Search.
Chapter 3, “Field Service Activities,” in this guide; Online Help
■ Identify the warranties that are associated with a service request on a selected date.
Chapter 6, “Warranties,” in this guide; Online Help
■ Automatically create invoices based on the information provided for a service request.
Chapter 13, “Invoices,” in this guide; Online Help
Table 1-1. Field Service Screens (Sheet 12 of 13)
Screen Functions of the Views in This Screen Location of Information About This Screen
Version 6.1 Siebel Field Service Guide 1-25

Field Service Overview
Screens and Views in Field Service
Shipping Record pick tickets to process orders for shipment.
Record the shipment of allocated line items on a pick ticket and generate inventory transactions.
For repairs, associate a defective material tag with a shipment to track it throughout the repair cycle.
For repair orders only, record the shipment of allocated line items on a pick ticket and generate inventory transactions.
Associate waybills with pick tickets.
Combine line items for existing pick tickets into a single pick ticket.
Chapter 10, “Shipping and Receiving,” in this guide; Online Help
Siebel Assistant Administration
■ Sets up activity templates with associated details, steps, skills, parts and tools, and instructions.
Chapter 2, “Service Support,” in this guide
■ Set up activity templates.
■ Describe additional conditions for activity templates.
■ Describe additional conditions for service activities.
■ Record the recommended steps in a service activity.
■ Record the skills required to complete a service activity.
■ List the parts and tools required to complete a service activity.
■ Record instructions for a service activity.
Chapter 3, “Field Service Activities,” in this guide
Solutions Record solutions to repetitive service activities.
Chapter 3, “Field Service Activities,” in this guide; Online Help
Table 1-1. Field Service Screens (Sheet 13 of 13)
Screen Functions of the Views in This Screen Location of Information About This Screen
1-26 Siebel Field Service Guide Version 6.1

Field Service Overview
Logging On as the Siebel Administrator
Logging On as the Siebel Administrator 1
Figure 1-4 shows the list of screens available to administrators from the Screens menu. As an example, it also shows the list of views that can be accessed from the Service Administration submenus.
The Siebel database server installation script creates a Siebel administrator account that can be used to perform the tasks described in this guide. For information on this, see the Siebel Server Installation Guide and the Siebel Server Administration Guide.
Figure 1-4. Screens Menu and Service Administration Submenus
Version 6.1 Siebel Field Service Guide 1-27

Field Service Overview
Administrative Tasks
To log on to your Field Service database as the Siebel administrator, start the application, and log on using the user name and password assigned by your database administrator. Generally, the Siebel administrator connects to the server database.
Administrative Tasks 1
This section describes the types of administrative tasks required for Field Service. Instructions for performing these tasks are provided in this guide and in other guides in the Siebel eBusiness Applications documentation set.
For instructions on administrative tasks related to Field Service, see the guides for those products.
NOTE: This guide assumes that you have successfully installed Field Service. If you have not yet installed the application, see the Siebel Server Installation Guide or the Siebel Upgrade Guide. If you plan to use Siebel Remote, you must complete additional implementation tasks described in the Siebel Remote and Replication Manager Administration Guide.
The following administrative tasks are required:
■ Implementation and application administration. You must define and structure a number of elements that are used throughout the application. These include currencies, exchange rates, organizations, divisions and positions in your organization, users and their responsibilities, service territories, and so on. These tasks are described in the Siebel Applications Administration Guide.
■ Product management and administration. Field Service provides two tables for product information: an internal product table and an external product table for competitive products. In addition to populating these tables, you must define a product categorization hierarchy, specify product features, and specify settings for products that will be tracked in inventory. You can also define price lists and associate them with products. These tasks are described in the Siebel Marketing Administration Guide and the Siebel Pricing, Costing, and Rate List Administration Guide.
1-28 Siebel Field Service Guide Version 6.1

Field Service Overview
Administrative Tasks
■ Marketing administration. All the various elements of marketing information must be defined and set up for your implementation. These include accounts, contacts, vendors, and so on. These tasks are described in Using Siebel Applications.
■ Assignment administration. Siebel Assignment Manager allows you to automatically assign the appropriate people to specific tasks. Instructions for using Siebel Assignment Manager can be found in the Siebel Assignment Manager Administration Guide.
■ Templates. Service and preventive maintenance plans use activity and service request templates to define efficient service calls. These tasks are described in the Siebel Assistant Administration Guide.
■ Agreements and Entitlements. Service and preventive maintenance plans are based on contracts and entitlements that customers purchase. Setting up service agreements and entitlements is described in the Using Siebel Applications and Chapter 4, “Service Agreements,” in this guide.
■ Inventory. Field Service includes the process of setting up a logical inventory structure and a maintaining a physical inventory. These tasks are described in Chapter 7, “Service Inventory” and Chapter 9, “Logistics Management” in this guide.
Version 6.1 Siebel Field Service Guide 1-29

Field Service Overview
Administrative Tasks
1-30 Siebel Field Service Guide Version 6.1

Service Support 2
About This Chapter . . . . . . . . . . . . . . . . . . . . . . . . . . . . . . . . . . . . . . 2-3
Business Scenario . . . . . . . . . . . . . . . . . . . . . . . . . . . . . . . . . . . . . . . 2-4
Concepts and Terms . . . . . . . . . . . . . . . . . . . . . . . . . . . . . . . . . . . . . . 2-6
Application Overview . . . . . . . . . . . . . . . . . . . . . . . . . . . . . . . . . . . . . 2-7
Assigning Activities and Dispatching Field Service Engineers . . . . . . . 2-7
Activity Templates and Plans . . . . . . . . . . . . . . . . . . . . . . . . . . . . . . . . . 2-8
Using Service Requests . . . . . . . . . . . . . . . . . . . . . . . . . . . . . . . . . . . . . . 2-9
Screens and Views for Service Support . . . . . . . . . . . . . . . . . . . . . . . . 2-21
Setting Up Service Support . . . . . . . . . . . . . . . . . . . . . . . . . . . . . . 2-21
Carrying Out Service Support . . . . . . . . . . . . . . . . . . . . . . . . . . . . . . . . .2-22
Accounts Screen . . . . . . . . . . . . . . . . . . . . . . . . . . . . . . . . . . . . . . . . 2-25
Accounts Across Organizations . . . . . . . . . . . . . . . . . . . . . . . . . . . 2-25
Accounts Views . . . . . . . . . . . . . . . . . . . . . . . . . . . . . . . . . . . . . . 2-26
Contacts View . . . . . . . . . . . . . . . . . . . . . . . . . . . . . . . . . . . . . . . 2-27
Service Agreements and Entitlements Views . . . . . . . . . . . . . . . . . . 2-28
Service Profile View . . . . . . . . . . . . . . . . . . . . . . . . . . . . . . . . . . . 2-30
Service Requests Screen . . . . . . . . . . . . . . . . . . . . . . . . . . . . . . . . . . 2-32
Service Requests Views . . . . . . . . . . . . . . . . . . . . . . . . . . . . . . . . 2-33
Activity Plans View . . . . . . . . . . . . . . . . . . . . . . . . . . . . . . . . . . . . . . . .2-36
Activities View . . . . . . . . . . . . . . . . . . . . . . . . . . . . . . . . . . . . . . 2-36
Field Service Details View . . . . . . . . . . . . . . . . . . . . . . . . . . . . . . 2-38
Invoices View . . . . . . . . . . . . . . . . . . . . . . . . . . . . . . . . . . . . . . . 2-40
Metrics View . . . . . . . . . . . . . . . . . . . . . . . . . . . . . . . . . . . . . . . . 2-41
Product Defects View . . . . . . . . . . . . . . . . . . . . . . . . . . . . . . . . . . 2-42
Version 6.1 Siebel Field Service Guide 2-1

Service Support
Orders View . . . . . . . . . . . . . . . . . . . . . . . . . . . . . . . . . . . . . . . . 2-44
Service Calendar View . . . . . . . . . . . . . . . . . . . . . . . . . . . . . . . . . 2-45
Solution Search View . . . . . . . . . . . . . . . . . . . . . . . . . . . . . . . . . . 2-46
Dispatch Board Screen . . . . . . . . . . . . . . . . . . . . . . . . . . . . . . . . . . . 2-47
Dispatch Board View . . . . . . . . . . . . . . . . . . . . . . . . . . . . . . . . . . 2-48
Employee Query View . . . . . . . . . . . . . . . . . . . . . . . . . . . . . . . . . 2-56
Service Request Charts . . . . . . . . . . . . . . . . . . . . . . . . . . . . . . . . . . . 2-57
Service Request Reports . . . . . . . . . . . . . . . . . . . . . . . . . . . . . . . . . . 2-59
Setup and Configuration . . . . . . . . . . . . . . . . . . . . . . . . . . . . . . . . . . 2-60
Setting Up Service Accounts and Service Requests . . . . . . . . . . . . . 2-60
Setting Up Territories and Schedules . . . . . . . . . . . . . . . . . . . . . . . 2-62
Setting Up Dispatchers . . . . . . . . . . . . . . . . . . . . . . . . . . . . . . . . . 2-63
Dispatch Board Schedules . . . . . . . . . . . . . . . . . . . . . . . . . . . . . . 2-63
Using Dispatch Board Queries . . . . . . . . . . . . . . . . . . . . . . . . . . . . 2-64
2-2 Siebel Field Service Guide Version 6.1

Service Support
About This Chapter
About This Chapter 2
This chapter describes how Siebel Field Service processes incoming service requests, then dispatches and manages the activities of field service engineers. The new Dispatch Board feature provides for assigning field service engineers and scheduling field service activities in one easy step, using an intuitive graphic user interface.
Field Service is designed so that field service engineers can work from activities. Activities are displayed on the engineers’ calendars, and contain the information they need to assess the requirements of a service call, carry out the service in the most efficient way, and report on its execution.
Detailed information is provided for field service activities, including steps to carry out these activities, recommended parts and tools, required skills, instructions, field part movements to transfer inventory to the field engineer and customer, a log of expenses, and a record of time. These are the common types of activities:
■ Service activities (research, call, correspondence, and so on).
■ Field engineer activities that can be dispatched to field engineers. FSE activities fall into these major categories:
■ Break/Fix
■ Installation
■ Preventive maintenance
■ Repair activities in the repair depot, for repair and return calls.
You can create field activities manually either as stand-alone activities or activities attached to a service request.
You can also use an activity plan template to automatically generate a set of activities and attach these activities to a service request. The activities provide all relevant information to carry out these tasks.
Version 6.1 Siebel Field Service Guide 2-3

Service Support
Business Scenario
Business Scenario 2
A service center receives a customer request for service. In response, service center personnel use Siebel Field Service to carry our these components:
■ Verify the contact and the account with the customer’s company.
■ Verify the service agreement and entitlements for the account.
■ Create a service request.
■ Generate required field service activities.
■ Assign the activities to a field service engineer with the appropriate location, skills, and tools. Field Service provides the Dispatch Board and the Assignment Manager to assure the efficient selection and scheduling of the best-qualified field service engineers.
■ Determine the need for replacement parts in the field.
■ Locate the required parts in inventory, or place an order for the parts.
■ Check orders linked to field service activities.
■ Check the status of field engineer activities on customer callback.
2-4 Siebel Field Service Guide Version 6.1

Service Support
Business Scenario
The business scenario for setting up a service call is illustrated in Figure 2-1.
Figure 2-1. Service Scenario of Call Center and Field Engineering Operations
Receive Service Call
Generate ServiceRequest
Assign Activityand Schedule
Perform Activity
EntitlementGenerate Field
Engineer Activities
Version 6.1 Siebel Field Service Guide 2-5

Service Support
Concepts and Terms
Concepts and Terms 2
Account A customer/company that has any business relationship with a field service company, or that has products which may require service.
Activity plan A collection of activities which, when carried out in the correct sequence, meet a specific objective; for example, repairing an asset. An activity plan consists of an activity template plus the start date and time for the activities.
Activity template A pre-determined collection of activities used to populate an activity plan. These activities solve a service objective.
Commit time The data and time required to meet the response time requirements of an entitlement.
Entitlement A document that defines the level of support for specific accounts, contacts, and products, including the response time and the service level that customers can expect.
Entitlement metric The values that characterize a level of service; for example, response time.
Field service activity A record in Siebel Field Service that maintains information about activities performed by field service engineers or repair technicians. This is an extension of Siebel Activity, with Field Service customizations that specifically meet the requirements of engineers reporting complex, standardized service activities, including work done in response to a service request, assignment and scheduling of field activities, and tracking of tools and parts.
Field service engineer (FSE)
An employee trained to respond to a customer’s request for on-site service and repairs.
Organization A attribute that limits the visibility of data to part of the company.
Service agreement Service agreements specify the terms and conditions of service provided to customers. A service agreement may have several entitlements.
Service request A record of a customer’s request for information about or assistance with products or services. A service request tracks all customer input and field service responses.
2-6 Siebel Field Service Guide Version 6.1

Service Support
Application Overview
Application Overview 2
This section includes detailed procedures for using the screens and features provided for service support. For details on individual screens, see “Screens and Views for Service Support” on page 2-21.
Assigning Activities and Dispatching Field Service Engineers 2
Field Service provides two tools for assigning activities to the best-qualified FSEs and for scheduling these activities:
■ The Dispatch Board allows you to select field service staff on the basis of territory and skills, then assign and schedule specific activities for these engineers on a convenient service calendar.
■ The Assignment Manager provides a ranked list of personnel who are best qualified to carry out specific service activities. By selecting the suitable assignment method (batch or best fit, for example), you can simplify the task and fully automate the process (see the Siebel Assignment Manager Administration Guide).
After the activity has been assigned, you can notify the field engineer using the Workflow Manager to send, for example, a page or an email. See the Siebel Workflow Manager Guide for more details on using the Workflow Manager.) The engineer can then synchronize a mobile PC to obtain details about the activity.
NOTE: When a field service activity involves shipping a part to the repair center, a service request can link repair activities with field engineer activities. For more information about repair activities, see Chapter 11, “Repairs.”
Version 6.1 Siebel Field Service Guide 2-7

Service Support
Application Overview
Activity Templates and Plans 2
Activity templates are a collection of pre-defined activities, defined by experts, that are used to create a set of activities that are exact copies of the template activities. The activity templates are attached to service requests and repair records. In the Activity Plans applets on the Service Requests, Accounts, and Repairs screens, only the activity templates for that type of activity are visible in the picklist for the Templates field. Once a template is selected, all the activities and the child records of that activity (using deep copy) are instantiated.
Fields Copied from Activity TemplatesThe following fields are copied from activity templates to activities:
■ Activity type
■ Priority
■ Assigned to (default name)
■ Duration
■ Required. This check box is in Activities ➞ Field Service Details.
Details are copied from the template to the following views on the Activities screen:
■ Steps view
■ Instructions view
■ Recommended Parts and Tools view
■ Skills view
For more information about views on the Activities screen, see “Activities Screen” on page 3-16.
2-8 Siebel Field Service Guide Version 6.1

Service Support
Application Overview
Using Service Requests 2
Use these procedures to carry out service requests. For procedures to set up service requests, see “Setting Up Territories and Schedules” on page 2-62, “Setting Up Dispatchers” on page 2-63, and “Dispatch Board Schedules” on page 2-63.
To verify an account
1 Choose Accounts ➞ All Accounts (see “Accounts Views” on page 2-26).
2 In the Accounts applet, query the account by name (Account field).
3 The account information appears in the list and form applets.
To verify the contact placing a service call
1 Choose Accounts ➞ All Accounts (see “Accounts Views” on page 2-26).
2 In the Accounts applet, query the account by name (Account field).
3 Click the account name to go to the Contacts view (see “Contacts View” on page 2-27).
The list of authorized contacts appears in the Contacts applet.
To check the service agreements and entitlements for an account
1 Choose Accounts ➞ Agreements (see “Service Agreements and Entitlements Views” on page 2-28).
2 In the Agreements view, query the account by name (Account field).
The list of agreements appears in the Agreements applet.
3 Click the name of this agreement.
The Entitlements view appears, with a list of entitlements for the selected agreement. Note the start and end dates for the entitlements.
Version 6.1 Siebel Field Service Guide 2-9

Service Support
Application Overview
To create a service request
1 Choose Service Requests ➞ All Service Requests (see “Service Requests Views” on page 2-33).
2 Create a new record.
3 Complete the fields in either Service Requests applet.
To check the entitlements for a service request
1 Choose Service Requests ➞ All Service Requests (see “Service Requests Views” on page 2-33).
2 Select an existing service request.
3 Click the Verify button.
The Pick Entitlement dialog box appears. Only entitlements that match the criteria appear. Therefore, if no entitlements appear, the selected service request is not entitled to receive service.
4 Select an existing entitlement from the entitlements related to the service request, and then click Pick.
To add activity plans to a service request
1 Choose Service Requests ➞ Activity Plans (see “Activity Plans View” on page 2-36).
2 Query the service request.
3 In the Activity Plans applet, create a new record.
4 Choose a template from the Template column.
For more information on how to set up and configure activity plans, see Table 2-1 on page 2-21.
2-10 Siebel Field Service Guide Version 6.1
Service Support
Application Overview
To add activities to a service request
1 Choose Service Requests ➞ Activities (see “Activities View” on page 2-36).
2 In the Service Requests applet, query the service request.
3 In the Activities applet, create a new record.
4 Fill in the Description column.
5 Complete the other fields, as needed.
To update activities for a service request
1 Choose Service Request ➞ All Service Requests (see “Service Requests Views” on page 2-33).
2 Select a service request.
3 Choose Service Requests ➞ Activities (see“Activities View” on page 2-36).
4 In the Activities applet, select a record.
5 Enter or update the activity information.
To create activities on the Dispatch Board
1 Choose Dispatch Board ➞ Dispatch Board (see “Dispatch Board View” on page 2-48).
2 Complete one of the following:
■ In the Unplanned Activities applet, reduce the tree to the top-level folder (”Pending Field Engineer Activities”), then right-click and choose Add Child from the menu; or
■ In the Field Engineer Activity applet, right-click anywhere, then choose New Record from the menu.
3 In the Field Engineer Activity applet, complete the Description field and all required fields.
Version 6.1 Siebel Field Service Guide 2-11

Service Support
Application Overview
To assign field service engineers to service activities manually
1 Choose Service Requests ➞ Activities (see “Activities View” on page 2-36).
2 In the Service Requests applet, query the service request.
3 Select the activity in the Activities applet.
4 Click the Assigned To column and choose the name of an employee from the dialog box.
To assign field service engineers automatically using the Assignment Manager
1 Choose Service Requests ➞ Activities (see “Activities View” on page 2-36).
2 In the Service Requests applet, query the service request.
3 Select an activity in the Activities applet.
4 Click the Assign button in the Activities applet.
A dialog box appears with names of field service employees ranked in order of preference.
5 From the dialog box, choose the employee who will be the owner of this activity.
The suggested assignments are based on a variety of criteria including workload and skills, set up using the Assignment Manager. For instructions on configuring the Assignment Manager, see the Siebel Assignment Manager Administration Guide.
NOTE: The Lock Assignment flag for the activity must be unchecked (see “Rules for Assigning Activities” on page 2-38).
To add field service engineers to the Dispatch Board
1 Choose Dispatch Board ➞ Dispatch Board (see “Dispatch Board View” on page 2-48).
2 In the Planned Activities applet, select one individual FSE from the picklist for the Employee field. Leave this field blank for no individual engineer.
2-12 Siebel Field Service Guide Version 6.1

Service Support
Application Overview
3 Click Refresh.
The name of the engineer appears in the Planned Activities calendar.
4 In the Planned Activities applet, select all engineers in a territory from the picklist for the Territory field. Leave this field blank to omit engineers from any specific territory.
5 Click Refresh.
The names of the engineers appear in the Planned Activities calendar.
NOTE: Light gray boxes to the right of an engineer’s name indicate available hours in the schedule of that FSE. Dark gray boxes indicate hours that are not available for activities. Horizontal bars indicate activities already assigned and scheduled.
To select a subset of field service engineers based on a skill
1 Choose Dispatch Board ➞ Employee Query (see “Employee Query View” on page 2-56).
2 In the Employee Query Skill list applet, choose a class of skill.
3 In the Employee Query Skill Item applet, choose a specific skill.
NOTE: You can choose only one skill at a time. The Dispatch Board uses only your last choice.
4 Choose the Dispatch Board view (see “Dispatch Board View” on page 2-48).
5 In the Planned Activities applet, click Apply Skills.
Only those engineers with the selected skill appear in the applet.
6 To remove the constraint of the applied skill from this list of FSEs, click Refresh.
Version 6.1 Siebel Field Service Guide 2-13

Service Support
Application Overview
To assign field service engineers and schedule activities using the Dispatch Board
1 Choose Dispatch Board ➞ Dispatch Board (see “Dispatch Board View” on page 2-48).
2 Drag an unscheduled activity from the Unplanned Activities applet to the schedule for an FSE.
The activity appears as a horizontal bar. Holding the cursor over this bar displays a popup window containing a description of the activity.
NOTE: To assign an activity, it must have a type, description, and duration displayed in the Field Engineer Activity applet.
3 Drag activities to other days, hours, or schedules of FSEs, as needed.
4 To remove an activity, drag it back to the Unplanned Activities applet.
To assign an activity with an inappropriate date, using the Dispatch Board
■ If dragging an activity to the Planned Activities applet results in this message:
This activity can not be planned later than Due date
try one of these solutions:
■ Use the left scroll bar at the bottom of the Planned Activities applet to go to earlier dates in the schedule.
■ In the Field Engineer Activity applet, change the date in the No Later Than Date field. This changes the date in the No Later Than field.
To make sure that unassigned activities appear in the Dispatch Board
1 Choose Activities ➞ All Activities (see “All Activities View” on page 3-17).
2 Select or query an activity.
3 Delete the contents of the Assigned To field.
4 Delete either the Planned Start or Planned Completion date.
Make sure that the Lock Assignment flag for the activity is unchecked (see “Rules for Assigning Activities” on page 2-38).
2-14 Siebel Field Service Guide Version 6.1
Service Support
Application Overview
To search for related service requests
1 Choose Service Requests ➞ All Service Requests (see “Service Requests Views” on page 2-33).
2 Select a service request for which you need information.
3 Choose the Solution Search view (see “Solution Search View” on page 2-46).
4 In the Service Request applet, click Related SRs.
Key search criteria values appear in the Product, Area, and Sub-Area fields. Enter more search criteria in the other fields to narrow your search.
5 Choose Execute Query from the Query menu.
The Solutions list applet shows a list of all the solutions that matched the search criteria. The Solutions form applet shows details of each solution.
To search the Encyclopedia for information about a service issue
1 Choose Service Requests ➞ All Service Requests (see “Service Requests Views” on page 2-33).
2 Select a service request for which you need information.
3 Choose the Solution Search view (see “Solution Search View” on page 2-46).
4 In the Service Request applet, click Encyclopedia.
This executes a search on the value in the Area field of the Service Request applet.
The All Decision Issues view appears, showing useful information for resolving the service request, such as a script for discussing the issue with the customer, related issues, and literature.
Version 6.1 Siebel Field Service Guide 2-15

Service Support
Application Overview
To perform full-text searching
1 Choose Service Requests ➞ All Service Requests (see “Service Requests Views” on page 2-33).
2 Select a service request for which you need information.
3 Choose the Solution Search view (see “Solution Search View” on page 2-46).
4 In the Service Request applet click Search.
The Siebel Search Contents dialog box appears.
5 In the Query field, type the search string you want to find.
6 To narrow the search, click Subset and then select the subset you want to search.
7 If you want to search all records, click All.
8 Click Search.
A list of items that contain the search string appears in the Results box. The records are ranked according to how many times the search string appears. They appear in the order in which they are most likely to be useful to you.
9 To preview any of the items in the list, double-click it.
If the item is a document, it appears at the bottom of the Search Contents dialog box. Each occurrence of the search string is highlighted. Use the First, Next, Prev, and Last buttons to go to the search strings. If the item is a database record, your Siebel application locates and displays this information.
10 If you want to review the document in its original application, click Launch.
Reviewing the document in its original application allows you to see the original formatting. However, search strings are not highlighted.
11 To add a solution to a service request, select it in the Results list, and click Add.
The selected solution appears in the Solution applet.
NOTE: You can start Siebel’s text search from anywhere in Siebel Field Service by choosing Search from the Edit menu or by pressing CTRL-G.
For more information, see the Siebel Search Guide.
2-16 Siebel Field Service Guide Version 6.1

Service Support
Application Overview
To update the status of field engineer activities
1 Choose Service Requests ➞ Activities (see “Activities View” on page 2-36).
2 In the Service Requests applet, query the service request.
3 Select an activity in the Activities applet.
4 In the Activities applet, click in the Status column.
5 From the picklist, choose a new status.
To check the status of materials ordered for an activity
1 Choose Service Requests ➞ Activities (see “Activities View” on page 2-36).
2 In the Service Requests applet, query the service request.
3 Select an activity in the Activities applet.
4 Click the activity type.
You see Activities ➞ Attachments.
5 Choose Activities ➞ Recommended Parts & Tools (see “Recommended Parts and Tools View” on page 3-28).
The Status field shows the status of parts ordered for this activity.
To log a defect for an item in a service request
1 Choose Service Requests ➞ All Service Requests (see “Service Requests Views” on page 2-33).
2 Select a service request.
3 Choose Service Requests ➞ Product Defects.
4 In the Product Defects applet, add a new record.
5 In the Add Product Defects dialog box, choose a defect or click New to define a new defect.
An existing product defect is associated with a product.
Version 6.1 Siebel Field Service Guide 2-17

Service Support
Application Overview
6 To change the product associated with this defect, click the Product field.
7 In the Products dialog box, select a product or click New to add products from the Add Product dialog box.
To check the steps involved in an activity
1 Choose Service Requests ➞ Activities (see “Activities View” on page 2-36).
2 In the Service Requests applet, query the service request.
3 Select an activity in the Activities applet.
4 Click the activity type.
You see Activities ➞ Attachments.
5 Choose Activities ➞ Steps (see “Steps View” on page 3-30).
This shows a list of steps required for this activity.
To check skills needed to perform an activity
1 Choose Service Requests ➞ Activities (see “Activities View” on page 2-36).
2 In the Service Requests applet, query the service request.
3 Select an activity in the Activities applet.
4 Click the activity type.
You see Activities ➞ Attachments.
5 Choose Activities ➞ Skills (see “Skills View” on page 3-29).
This shows a list of skills required for this activity and a list of the parts with their required level of technical skill.
To check field part movements
1 Choose Service Requests ➞ Activities (see “Activities View” on page 2-36).
2 In the Service Requests applet, query the service request.
3 Select an activity in the Field Engineer Activities applet.
2-18 Siebel Field Service Guide Version 6.1

Service Support
Application Overview
4 Click the activity type.
You see Activities ➞ Attachments.
5 Choose Activities ➞ Field Part Movements (see “Field Part Movements View” on page 3-22).
The Field Part Movements applet shows the parts involved in this activity.
To record the symptom and resolution codes for a service request
1 Choose Service Requests ➞ Field Service Details (see “Field Service Details View” on page 2-38).
2 In the Service Requests applet, select a service request.
3 In the Field Service Details applet, click the Symptom Codes field and choose a symptom from the Symptom Codes dialog box. Or click New in this dialog box to define a new symptom code.
4 In the Field Service Details applet, click the Resolution Code field and select a resolution code from the dialog box.
To review orders linked to service requests
1 Choose Service Requests ➞ All Service Requests (see “Service Requests Views” on page 2-33).
2 Select a service request.
3 Choose Service Requests ➞ Orders.
4 The RMAs/Service Orders applet shows the orders associated with this service request.
To generate an invoice for a service request
1 Choose Service Requests ➞ All Service Requests (see “Service Requests Views” on page 2-33).
2 Select a service request.
3 Choose Service Requests ➞ Invoices (see “Invoices View” on page 2-40).
Version 6.1 Siebel Field Service Guide 2-19

Service Support
Application Overview
4 Click Auto Invoice to automatically generate an invoice.
5 Click the invoice number.
You see Billings ➞ Line Items.
6 From the Reports menu, choose Customer Invoice.
7 In the Siebel Report Viewer window, click the Print button.
To view the performance measurements (metrics) for a service request
1 Choose Service Requests ➞ All Service Requests (see “Service Requests Views” on page 2-33).
2 Select a service request.
3 Choose Service Requests ➞ Metrics.
To close a service request
When a service request is resolved, change its status to Closed. You can change the status on any Service Request applet. Service requests that are closed are frozen so that changes cannot be made to the service request. The status of a service request must be changed to Re-opened before changes can be made.
NOTE: The behavior of the status and sub-status fields is controlled by the use of the Siebel state model. See the Siebel Workflow Manager Guide for a detailed explanation of the state model.
1 Choose Service Requests ➞ All Service Requests (see “Service Requests Views” on page 2-33).
2 In the Service Request form applet, set Status to Closed.
The Sub-Status field automatically changes to Resolved and sets the closed date and time to the current date and time.
NOTE: After you close a service request, the record is available on a read-only basis.
2-20 Siebel Field Service Guide Version 6.1

Service Support
Screens and Views for Service Support
Screens and Views for Service Support 2
Table 2-1 and Table 2-2 on page 2-22 summarize the screen and views provided for setting up and implementing service support.
Setting Up Service Support 2
Service support and call center activities are set up and configured on screens and views listed in Table 2-1. For details and procedures, see the Siebel Applications Administration Guide, “Setting Up Territories and Schedules” on page 2-62, “Setting Up Dispatchers” on page 2-63, and “Dispatch Board Schedules” on page 2-63.
Table 2-1. Screens and Views for Setting Up Service Support
Screens Views Role/Procedures (Click to see full procedure.)
Application Administration Employees ➞ Employees Records data for service employees, including responsibilities and positions. See: “To assign a schedule to an employee” on page 2-63
Responsibilities Associates employees with responsibilities and sets access to Siebel screens and views. See: “To add a user with the responsibility of a dispatcher” on page 2-63
Service Metrics Defines the parameters for evaluating field service activities.
Schedules ➞ All Schedules Defines standard work schedules. See: “To set up schedules” on page 2-62
Assignment Administration Assignment Employees Associates employees with assignment rules. See: “To assign employees to territories” on page 2-62
Assignment Rules Sets up the rules and policies for automatic assignment of field service staff. See: “To assign employees to territories” on page 2-62
Siebel Assistant Administration Activity Templates Sets up activity templates with associated details, steps, skills, parts and tools, and instructions.
Version 6.1 Siebel Field Service Guide 2-21

Service Support
Screens and Views for Service Support
Carrying Out Service Support 2
Service support activities are carried out using the screens listed in Table 2-2. click the name of a screen or view to see more information.
Table 2-2. Screens and Views for Using Service Support (Sheet 1 of 3)
Screen Views Role/Procedures (Click to see full procedure.)
Accounts Accounts Verify an account for the business placing a service call. See:
“To verify an account” on page 2-9“To verify the contact placing a service call” on page 2-9
Contacts Verify the person placing a service call. See: “To verify the contact placing a service call” on page 2-9
Service Agreements and Entitlements
Verify the coverage and entitlements for service. See: “To check the service agreements and entitlements for an account” on page 2-9
Service Profile Record the assets, products, and contacts associated with an account.
2-22 Siebel Field Service Guide Version 6.1
Service Support
Screens and Views for Service Support
Service Requests
Service Requests
Create and track service requests. See:
“To create a service request” on page 2-10“To update activities for a service request” on page 2-11“To close a service request” on page 2-20“To search for related service requests” on page 2-15“To search the Encyclopedia for information about a service issue” on page 2-15“To perform full-text searching” on page 2-16
Activity Plans Choose a template to define the activities that can resolve a service request. See: “To add activity plans to a service request” on page 2-10
Activities Add activities to a service request and assign field service engineers to each activity. See:
“To add activities to a service request” on page 2-11“To update activities for a service request” on page 2-11“To assign field service engineers to service activities manually” on page 2-12“To assign field service engineers automatically using the Assignment Manager” on page 2-12“To make sure that unassigned activities appear in the Dispatch Board” on page 2-14“To update the status of field engineer activities” on page 2-17“To check the status of materials ordered for an activity” on page 2-17“To check the steps involved in an activity” on page 2-18“To check skills needed to perform an activity” on page 2-18“To check field part movements” on page 2-18
Field Service Details
Check for warranties covering an asset, the symptom reported for the asset, and its resolution.
Invoices View the invoices against this service request and automatically generate invoices for billable orders and activities.
Metrics Obtain benchmarks of performance for a service request. See: “To view the performance measurements (metrics) for a service request” on page 2-20
Product Defects Describe the defects in the components requiring service.
Orders View orders related to service requests.
Service Calendar
View the valid hours of coverage for a service request, based on a selected entitlement.
Solution Search Obtain answers to frequently asked questions (FAQs), information from related service requests, and search for information.
Table 2-2. Screens and Views for Using Service Support (Sheet 2 of 3)
Screen Views Role/Procedures (Click to see full procedure.)
Version 6.1 Siebel Field Service Guide 2-23

Service Support
Screens and Views for Service Support
Dispatch Board
Dispatch Board Select field service engineers to carry out activities and schedule these activities. See:
“To create activities on the Dispatch Board” on page 2-11“To assign an activity with an inappropriate date, using the Dispatch Board” on page 2-14“To add field service engineers to the Dispatch Board” on page 2-12“To assign field service engineers and schedule activities using the Dispatch Board” on page 2-14“To select a subset of field service engineers based on a skill” on page 2-13
Employee Query
Select field service engineers that are best qualified to carry out an activity. See:
“To select a subset of field service engineers based on a skill” on page 2-13
Table 2-2. Screens and Views for Using Service Support (Sheet 3 of 3)
Screen Views Role/Procedures (Click to see full procedure.)
2-24 Siebel Field Service Guide Version 6.1

Service Support
Accounts Screen
Accounts Screen 2
Using the Accounts screen, a customer service representative checks that the customer has a service agreement and the terms of that service. The customer service representative can automatically check entitlement coverage by clicking the Verify button on the Service Request screen (see “Service Requests Views” on page 2-33).
Accounts Across Organizations 2
Organizations are a new feature in Siebel Field Service. A business is a category that limits the visibility of data within a company. The All Accounts across Organizations view shows the accounts for all businesses within a company.
NOTE: The person owning a record can see this record in the My Accounts view if it is in a different business. However, if this person is logged in to Siebel Field Service, this record does not appear in the All Accounts view.
Version 6.1 Siebel Field Service Guide 2-25
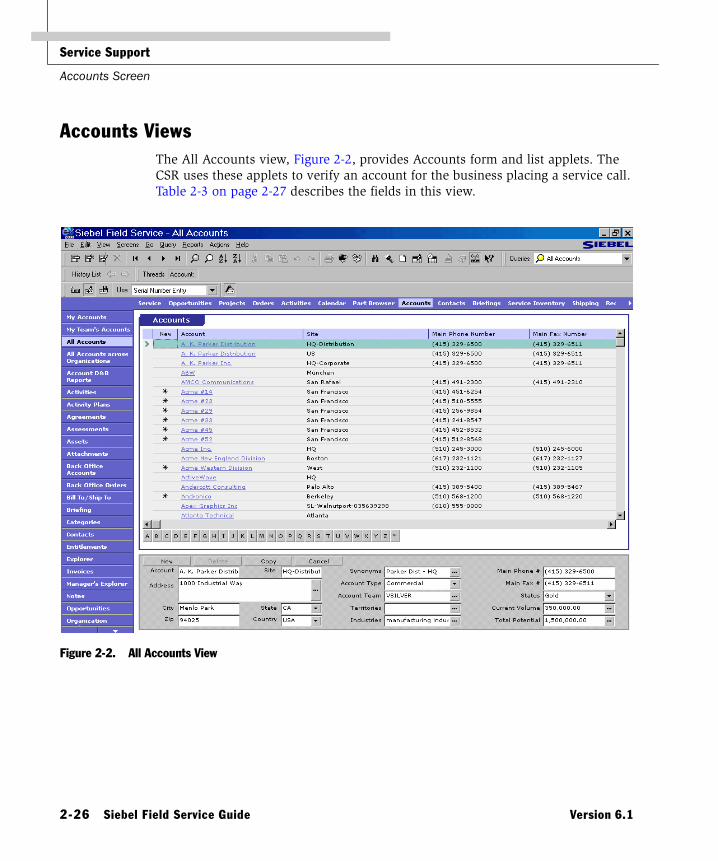
Service Support
Accounts Screen
Accounts Views 2
The All Accounts view, Figure 2-2, provides Accounts form and list applets. The CSR uses these applets to verify an account for the business placing a service call. Table 2-3 on page 2-27 describes the fields in this view.
Figure 2-2. All Accounts View
2-26 Siebel Field Service Guide Version 6.1

Service Support
Accounts Screen
For information on using the Accounts applets, see “Accounts” in Using Siebel Applications.
Contacts View 2
The customer service representative uses this view, Figure 2-3, to verify the person placing a service call.
For information on using the Contacts view, see “Contacts” in Using Siebel Applications.
Table 2-3. Organization Field in the Accounts List Applet
Field Description
Organization The name of the business to which this account belongs, chosen from a dialog box.
Figure 2-3. The Contacts Applet in the Contacts View
Version 6.1 Siebel Field Service Guide 2-27

Service Support
Accounts Screen
Service Agreements and Entitlements Views 2
The CSR uses the Service Agreements and Entitlements views, Figure 2-4 and Figure 2-5 on page 2-29, to verify coverage for the service. With an account selected in the Accounts screen, the CSR selects the Entitlements view to verify that the entitlements are valid.
Figure 2-4. Service Agreements View
2-28 Siebel Field Service Guide Version 6.1

Service Support
Accounts Screen
For information on using the Agreements and Entitlements views, see “Entitlement Verification” in Using Siebel Applications and “Agreements, Entitlements, and Entitlement Verification” in the Siebel Applications Administration Guide. Also see “All Agreements View” on page 4-12 and “Entitlements View” on page 4-20.
Figure 2-5. Entitlements View
Version 6.1 Siebel Field Service Guide 2-29
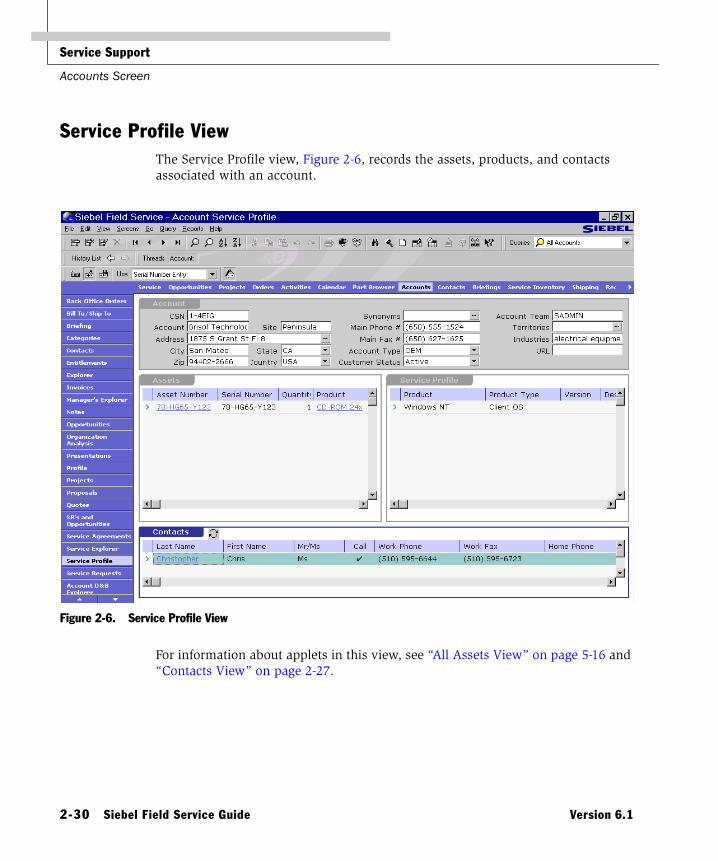
Service Support
Accounts Screen
Service Profile View 2
The Service Profile view, Figure 2-6, records the assets, products, and contacts associated with an account.
For information about applets in this view, see “All Assets View” on page 5-16 and “Contacts View” on page 2-27.
Figure 2-6. Service Profile View
2-30 Siebel Field Service Guide Version 6.1
Service Support
Accounts Screen
Table 2-4 describes the fields in the Products applet. These fields are read-only, except for Product and Comments.
Table 2-4. Selected Fields in the Products Applet
Field Description
Product The name of a product, chosen from a dialog box.
Product Type The category of product, filled in automatically.
Version The version of the product, filled in automatically.
Description A description of the product, filled in automatically.
Vendor The vendor for this product, filled in automatically.
Vendor Site The address of the vendor, filled in automatically.
Competitor A check box indicating that this account is a competitor; filled in automatically.
Comments A type-in field for comments.
Version 6.1 Siebel Field Service Guide 2-31

Service Support
Service Requests Screen
Service Requests Screen 2
The CSR, in response to a service call, uses the Service Requests screen to create a service request. The service request tracks all activities connected with the call and records the service business’s entire response to the service call (all activities, orders, parts movements, assignments). All records are attached to the service request.
Organizations are a new feature in Siebel Field Service. A business is a category that limits the visibility of data within a company. The All Service Requests Across Organizations view shows the service requests for all businesses within a company. There is an exception. The person owning a record can see this record in the My Service Requests view even if it is in a different business. However, this record does not appear in the All Service Requests view.
To set up businesses, see the discussion in the Siebel Applications Administration Guide.
2-32 Siebel Field Service Guide Version 6.1
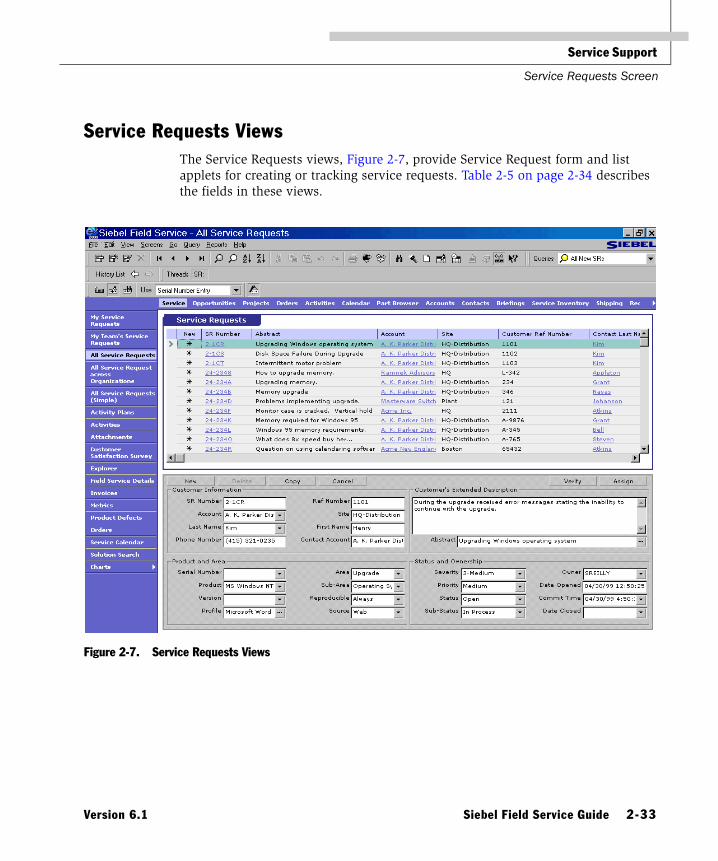
Service Support
Service Requests Screen
Service Requests Views 2
The Service Requests views, Figure 2-7, provide Service Request form and list applets for creating or tracking service requests. Table 2-5 on page 2-34 describes the fields in these views.
Figure 2-7. Service Requests Views
Version 6.1 Siebel Field Service Guide 2-33

Service Support
Service Requests Screen
Table 2-5. Fields in Service Requests Applets (Sheet 1 of 2)
Field/Button Description
Verify This button produces a dialog box with the names of the entitlements to which this customer has subscribed. Only entitlements that match the criteria are displayed. If no entitlements appear, the selected service request is not entitled to receive service.
Assign This button is used to choose an owner for a selected service request. Clicking Assign produces a dialog box with a list of field service employees, ranked based on administrative criteria. Choose the employee who will be the best fit.
SR Number A unique number assigned to this service request. Clicking on this number takes you to the Activities view.
Abstract A brief description of the service request.
Account The name of the account, chosen from a dialog box.
Customer Ref Number A type-in field for a reference supplied by the customer.
Contact Last Name The last name of the account’s contact person, chosen from a dialog box. Choosing this name fills in the other contact fields, including the Contact Account field.
Serial Number The serial number of an asset that is associated with this service request, chosen from a dialog box.
Version The version of the asset. This field is filled in when the serial number is chosen, or it is chosen from a dialog box.
Profile The external products involved in the service request, displayed in a dialog box.
Asset Number A unique number assigned to an asset.
Product The name of the product associated with the asset number field, chosen from a dialog box.
Billable Flag A check box indicating that the activities associated with this service request are billable.
Price List The price list used to bill these service activities, chosen from a dialog box.
Rate List The rate list used to bill hourly services, chosen from a dialog box.
2-34 Siebel Field Service Guide Version 6.1
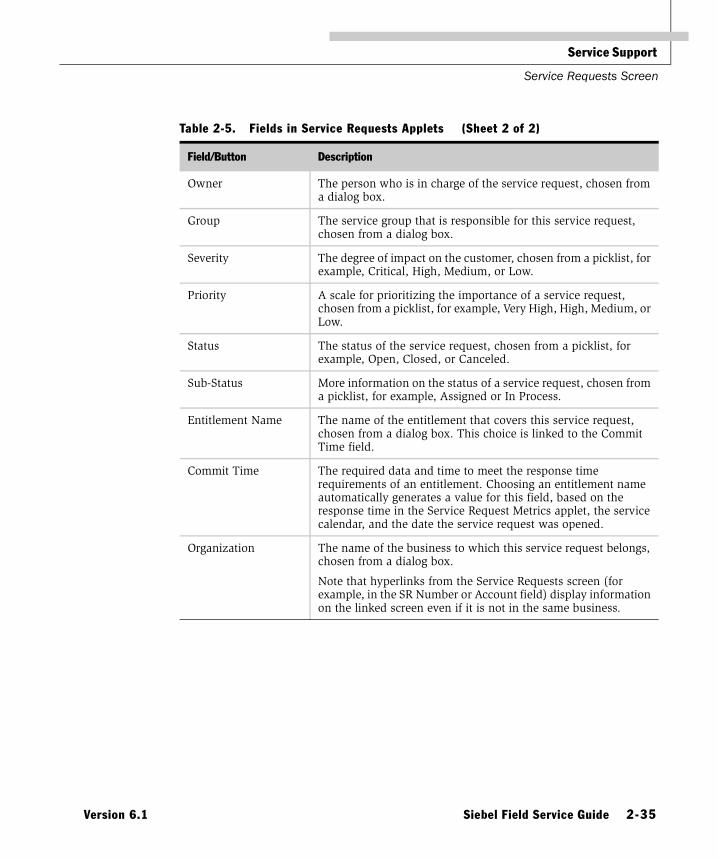
Service Support
Service Requests Screen
Owner The person who is in charge of the service request, chosen from a dialog box.
Group The service group that is responsible for this service request, chosen from a dialog box.
Severity The degree of impact on the customer, chosen from a picklist, for example, Critical, High, Medium, or Low.
Priority A scale for prioritizing the importance of a service request, chosen from a picklist, for example, Very High, High, Medium, or Low.
Status The status of the service request, chosen from a picklist, for example, Open, Closed, or Canceled.
Sub-Status More information on the status of a service request, chosen from a picklist, for example, Assigned or In Process.
Entitlement Name The name of the entitlement that covers this service request, chosen from a dialog box. This choice is linked to the Commit Time field.
Commit Time The required data and time to meet the response time requirements of an entitlement. Choosing an entitlement name automatically generates a value for this field, based on the response time in the Service Request Metrics applet, the service calendar, and the date the service request was opened.
Organization The name of the business to which this service request belongs, chosen from a dialog box.
Note that hyperlinks from the Service Requests screen (for example, in the SR Number or Account field) display information on the linked screen even if it is not in the same business.
Table 2-5. Fields in Service Requests Applets (Sheet 2 of 2)
Field/Button Description
Version 6.1 Siebel Field Service Guide 2-35
Service Support
Service Requests Screen
Activity Plans View 2
Using the Activity Plans applet, Figure 2-8, a field service manager can choose a template to define the activities to resolve a service request. Table 2-6 describes the fields in this view.
Activities View 2
Using the Activities applet, Figure 2-9, a field service manager can add activities to a service request and assign field service engineers to each activity. Table 2-7 on page 2-37 describes the fields in this view.
See the Dispatch Board (“Dispatch Board Screen” on page 2-47) for the preferred way to assign and schedule activities at the same time.
Figure 2-8. Activity Plans Applet in the Activity Plans View
Table 2-6. Fields in the Activity Plans Applet
Field Description
Start Date/Time The date and time to begin the activities that resolve a service request. The default is the date and time that the record is created.
Template A set of activities for recurring tasks, chosen from a picklist.
Suppress Calendar This check box prevents inclusion of this activity on the service calendar.
Figure 2-9. Activities Applet in the Activities View
2-36 Siebel Field Service Guide Version 6.1

Service Support
Service Requests Screen
NOTE: FSE activities are usually attached to a service request, but they can be stand-alone; for example, for preventive maintenance. For complex stand-alone activities, it may be convenient to formalize these activities by creating a service request.
Table 2-7. Selected Fields in the Activities Applet
Field/Button Description
Refresh The Refresh button refreshes all records in the Activities applet, showing new records or changes to existing records.
Internal A check box indicating that this activity is internal to the service business and should not be visible to a customer over the Internet.
Activity Type The name of an activity, chosen from a picklist; for example, Demonstration or Installation.
Priority A picklist of priorities, for example, High, Medium, or Low.
Status A picklist for the current state of a service process; for example, Not Started or In Progress.
Activity Type A capsule description of the activity, chosen from a picklist.
Assigned To The name of the field service engineer or other person responsible for this activity.
Description Required description of an activity.
Due The date on which the activity is scheduled.
Alarm A check box turning on a reminder for this activity. For those activity records which are entered into the Calendar, the alert is displayed on the user’s desktop screen at the date and time specified.
Duration The estimated length of the activity, chosen from a picklist.
Call Duration The total time spent on a service call. A type-in field.
Completed The date and time the activity is completed.
Last Name The name of the customer contact for this service request, chosen from a dialog box.
Created by The person creating this activity, chosen from a dialog box.
Resolution Code A descriptive code for the resolution of this activity.
Billable Flag A check box indicating that this activity is billable to the customer.
Cost A type-in field for the cost of this activity.
Version 6.1 Siebel Field Service Guide 2-37

Service Support
Service Requests Screen
Rules for Assigning ActivitiesActivities can be assigned using the Assignment Manager, or assigned and scheduled at the same time using the Dispatch Board. The Assign button in the Service Request applet (and in the Unplanned Activities Detail applet, Dispatch Board ➞ Dispatch Board view) runs the Assignment Manager.
When an activity is created with the category set to Field Engineer Activity, Repair Activity, or Preventive Maintenance, the Lock Assignment flag, by default, is not checked—meaning that the Assignment Manager automatically assigns this activity. Other activity types are excluded from assignment.
Use Siebel Tools to change this to assignment for all activity types (set ASGN_USR_EXCLD_FLG to N; the default is Y).
Use the Lock Assignment flag in the Activities view (see “All Activities View” on page 3-17) and the Field Service Details view (see “Field Service Details View” on page 3-24) to change this assignment for individual activities. If this flag is checked, the Assignment Manager excludes this activity.
Field Service Details View 2
The Field Service Details view, Figure 2-10, provides a check for warranties covering an asset, the symptom reported for the asset, and its resolution. Table 2-8 describes the fields in this view.
Figure 2-10. Field Service Details Applet in the Field Service Details View
2-38 Siebel Field Service Guide Version 6.1

Service Support
Service Requests Screen
Table 2-8. Selected Fields in the Field Service Details Applet
Field/Button Description
Check Warranty This button determines the warranties in effect for an asset on the date in the Warranty As of field. Check marks appear next to the types of warranty: Product, Components, and Manufacturer. To check on warranties active on another date, change the date in the Warranty As of field and click again on this button.
For information about warranties, see Chapter 6, “Warranties.”
Product A check box indicating that this type of warranty is in effect on the specified date.1
1. For information about this type of warranty, see “Concepts and Terms” on page 6-3.
Component A check box indicating that this type of warranty is in effect on the specified date.1
Manufacturer A check box indicating that this type of warranty is in effect on the specified date.1
Warranty As of The date that Check Warranty uses to validate warranties.
Asset Num The number of the asset:
■ If there is a serial number, then the asset number is set equal to the serial number.
■ If this is a non-serialized asset, there is an asset number but the serial number is null.
Symptom Code A description of the symptom that triggered this service request, chosen from a dialog box. see the following section, “Symptoms for a Service Request” on page 2-40.
Resolution Code The resolution of this service request, chosen from a dialog box.
Entitlement The level of service for this product and account, chosen from a dialog box.
Version 6.1 Siebel Field Service Guide 2-39

Service Support
Service Requests Screen
Symptoms for a Service RequestSymptoms are tied together with Service Requests and Activities. For any problem description there might exist one or more failure symptoms.
For example, a service request with a problem description “System Slow” might be due to problems with hardware or outdated software.
The customer can report some symptoms (on a service request), while the FSE can find other symptoms and report them on site (as part of an activity), and the repair technician may report other symptoms in a repair station (as part of a repair activity). All the symptoms reported at different times and places appear in the Symptom Codes dialog box available from the Symptom Code field (see, for example, Activities ➞ Field Service Details). This is possible because they are stored in an intersection table that also stores the activity and the service request Id.
Invoices View 2
The Invoices view, Figure 2-11, shows the invoices against this service request. Click Auto Invoice to generate an invoice using orders and activities that have a billable flag set.
For more information about invoicing and the Invoice engine, see Chapter 13, “Invoices.”
Figure 2-11. Invoices Applet for Service Requests in the Invoices View
2-40 Siebel Field Service Guide Version 6.1

Service Support
Service Requests Screen
Metrics View 2
The Metrics view, Figure 2-12, provides benchmarks of performance for a service request. All fields are read-only. Table 2-9 describes the fields in this view.
Figure 2-12. Metrics Applet for Service Requests in the Metrics View
Table 2-9. Selected Fields in the Metrics Applet
Field Description
Type The name of the measurement of performance; for example, Response Time.
Value The measurement of performance; for example, 4 hours.
Units The units of the measurement.
Version 6.1 Siebel Field Service Guide 2-41

Service Support
Service Requests Screen
2-42 Siebel Field Service Guide Version 6.1
Product Defects View 2
The Product Defects view, Figure 2-13, describes the defect in the component requiring service. To add a new record to the Product Defects applet, choose a pre-defined product defect from a dialog box or define a new product defect. Table 2-10 describes the fields in this view.
Figure 2-13. Product Defects Applet in the Product Defect View
Table 2-10. Selected Fields in the Product Defects View Applet (Sheet 1 of 2)
Field Description
Defect Number A unique number assigned to this defect.
Product The name of the product, chosen or entered from a dialog box.
Abstract A type-in field for a description of the defect.
Severity The degree of the defect, chosen from a picklist; for example, Crash/Data Loss or Minor Error.
Priority The importance of the defect, chosen from a picklist; for example, Very High, High, Medium, or Low.
Status The state of the service for this defect, chosen from a picklist; for example, Pending or Closed.
Sub-Status Additional state of the service for a defect, chosen from a picklist; for example, Assigned or Not a Defect.
Area Categories for the service request activities, chosen from a picklist; for example, Installation or Upgrade.
Sub-Area The additional categories for the service request activities, chosen from a picklist.

Service Support
Service Requests Screen
Owner The name of a person in the service business who is responsible for carrying out this service, chosen from a dialog box.
Group The name of a group in the service business that is responsible for carrying out this service, chosen from a dialog box.
Date Reported The date the defect record was created.
Date Closed The date the defect was corrected.
Type A category of defect, chosen from a picklist, for example, Documentation or Hardware Defect.
Cause The cause of the defect, chosen from a picklist; for example, Abnormal Usage or Design Error.
Reported By The name of the person in the service business who reported the defect.
Date Opened The date the service request was filed.
Table 2-10. Selected Fields in the Product Defects View Applet (Sheet 2 of 2)
Field Description
Version 6.1 Siebel Field Service Guide 2-43
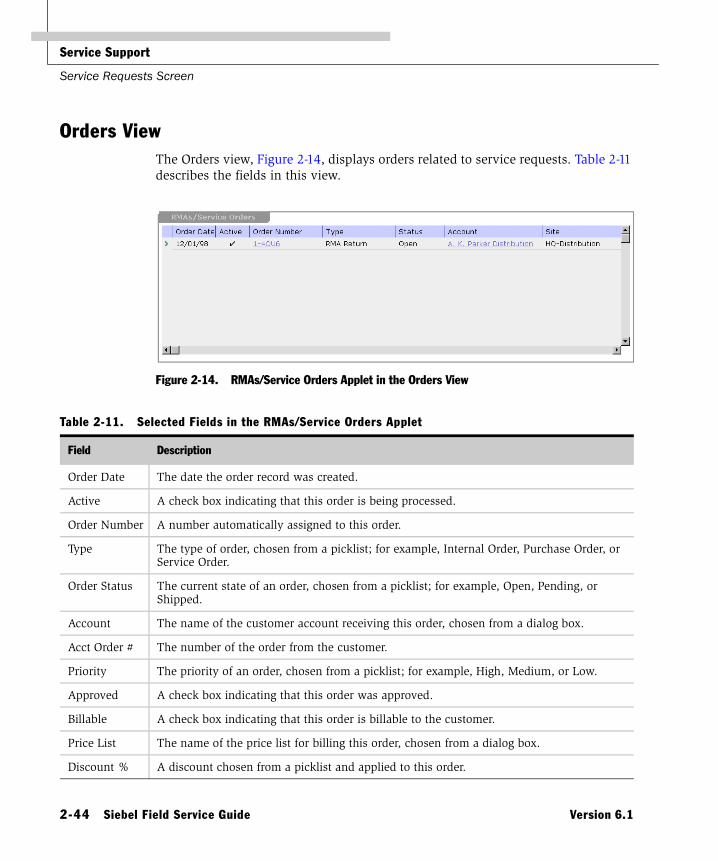
Service Support
Service Requests Screen
Orders View 2
The Orders view, Figure 2-14, displays orders related to service requests. Table 2-11 describes the fields in this view.
Figure 2-14. RMAs/Service Orders Applet in the Orders View
Table 2-11. Selected Fields in the RMAs/Service Orders Applet
Field Description
Order Date The date the order record was created.
Active A check box indicating that this order is being processed.
Order Number A number automatically assigned to this order.
Type The type of order, chosen from a picklist; for example, Internal Order, Purchase Order, or Service Order.
Order Status The current state of an order, chosen from a picklist; for example, Open, Pending, or Shipped.
Account The name of the customer account receiving this order, chosen from a dialog box.
Acct Order # The number of the order from the customer.
Priority The priority of an order, chosen from a picklist; for example, High, Medium, or Low.
Approved A check box indicating that this order was approved.
Billable A check box indicating that this order is billable to the customer.
Price List The name of the price list for billing this order, chosen from a dialog box.
Discount % A discount chosen from a picklist and applied to this order.
2-44 Siebel Field Service Guide Version 6.1
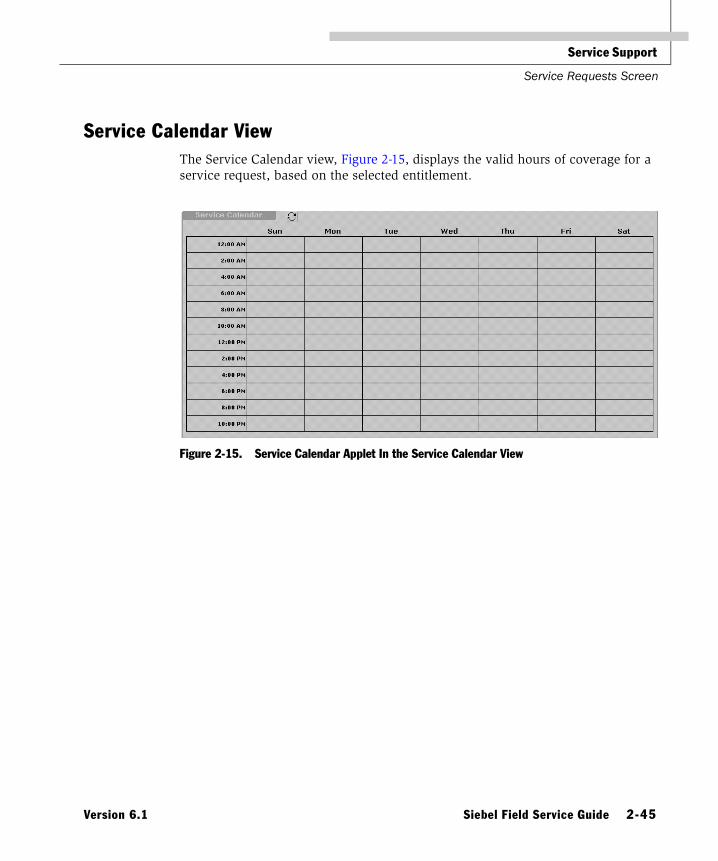
Service Support
Service Requests Screen
Service Calendar View 2
The Service Calendar view, Figure 2-15, displays the valid hours of coverage for a service request, based on the selected entitlement.
Figure 2-15. Service Calendar Applet In the Service Calendar View
Version 6.1 Siebel Field Service Guide 2-45

Service Support
Service Requests Screen
Solution Search View 2
The Solution Search view, Figure 2-16, provides answers to frequently asked questions (FAQs), information from related service requests, and a search engine to find information. For a discussion, see “Solution Search View” on page 3-41.
NOTE: Buttons for finding information are in the Service Requests applet: Related SRs, Encyclopedia, and Search. See “Solution Search View” on page 3-41.
Figure 2-16. Solution Search Applet in the Solution Search View
2-46 Siebel Field Service Guide Version 6.1

Service Support
Dispatch Board Screen
Dispatch Board Screen 2
The Field Service Dispatch Board view, Figure 2-17, provides a color-coded Gantt chart which displays the schedules of multiple employees. Dispatchers use this screen to assign and schedule field service activities.
Field service engineers are selected on the basis of geographic location (territory) and skills. Drag-and-drop capabilities fit the activities to the schedules of selected engineers.
Figure 2-17. Field Service Dispatch Board View
Version 6.1 Siebel Field Service Guide 2-47

Service Support
Dispatch Board Screen
Use the Dispatch Board to carry out these tasks:
■ Select field service engineers who might perform an activity.
■ Select subsets of the engineering staff based on a particular skill, ability, or previous experience with a product.
■ Assign unscheduled activities to specific field service engineers and time slots.
■ View the existing commitments of field service engineers and schedule new activities as appropriate.
All activities without a planned start or planned completion date automatically appear in the Dispatch Board. These may be generated automatically by an activity plan, manually in any Activities view on the Activities screen, or manually in the Dispatch Board ➞ Dispatch Board, Unplanned Activities applet.
Dispatch Board View 2
The Dispatch Board view, Figure 2-17 on page 2-47, provides a flexible and intuitive interface for both selection of field service engineers to carry out activities and scheduling of these activities.
The white areas in the Planned Activities view indicate the available times, in hours, for employees. The gray areas indicate hours that are not planned for activities; however, they accept activities.
Unplanned Activities AppletThe Unplanned Activities tree applet can display all activities that meet these criteria:
To appear in the Unplanned Activities applet, an activity must meet both of these criteria:
■ Not assigned or No Planned Start date or No Planned Completion date
■ Status other than Done or Cancelled
NOTE: Also, the Lock Assignment flag for the activity must be unchecked (see “Rules for Assigning Activities” on page 2-38).
2-48 Siebel Field Service Guide Version 6.1

Service Support
Dispatch Board Screen
The tree structure for this applet contains the following hierarchy of information:
■ Pending Field Engineer Activities. These are unassigned activities.
■ A description of each activity
❏ Recommended Skills
❏ Recommended Tools
❏ Recommended Parts
❏ Steps
❏ Parts Movements
❏ Attachments
Clicking on the bottom-level items in this tree (for example, Steps) changes the Field Engineer Activity applet (see“Field Engineer Activity Applet” on page 2-49).
Note on Using the Unplanned Activities Applet■ If an activity does not appear in this applet, follow the procedure “To make sure
that unassigned activities appear in the Dispatch Board” on page 2-14 to display that activity in this applet.
Field Engineer Activity AppletThe Field Engineer Activity applet appears with these selections in the Unplanned Activities applet:
■ Pending Field Engineer Activities (folder)
■ Individual activities in the tree applet
The fields in the Field Engineer Activity applet describe the activity selected in the Unplanned Activities applet.
Version 6.1 Siebel Field Service Guide 2-49

Service Support
Dispatch Board Screen
Selecting lower levels in the Unplanned Activities applet changes the Field Engineer Activity applet to one of the applets shown in Table 2-12.
The following fields in the Unplanned Activities Detail applet, Table 2-13, describe the selected activity in the Unplanned Activities applet.
Table 2-12. Applets that Appear in Place of the Field Engineer Activity Applet
Item in the Unplanned Activities Applet Corresponding Applet For Information, See:
Recommended Skills Service Activity Skills “Skills View” on page 3-29
Recommended Tools Recommended Tools “Recommended Parts and Tools View” on page 3-28
Recommended Parts Recommended Parts “Recommended Parts and Tools View” on page 3-28
Steps Steps “Steps View” on page 3-30
Field Parts Field Part Movements “Field Part Movements View” on page 3-22
Attachments Attachments
Table 2-13. Selected Fields in the Field Engineer Activity Applet (Sheet 1 of 2)
Button/Field Description
Assign This button runs the Assignment Manager. A dialog box appears with a ranked list of potential field service engineers for assignment to the selected activity. Choosing an engineer places this name in the Assigned To field for this activity.
Refresh This button adds new activities to the Unplanned Activities and Field Engineer Activity applet. Another user may have created these activities since the Dispatch Board was opened.
Activity Type The category of an activity, chosen from a picklist. click the type to go to Activities ➞ Attachments for this activity.
Priority The priority for carrying out this activity, chosen from a picklist.
No Sooner Than The earliest starting date for this activity, chosen from a calendar.
No Later Than The latest date for starting this activity, calculated from the No Later Than Date and No later Than Time fields. Read-only.
2-50 Siebel Field Service Guide Version 6.1

Service Support
Dispatch Board Screen
Planned Activities AppletThe Planned Activities applet contains the schedules of selected field service engineers. Use these simple procedures to schedule field service activities:
■ To schedule unplanned activities for these engineers, drag the activity from the Unplanned activities applet to the appropriate line and date on the Planned Activities applet.
■ To reschedule an activity, drag that activity to another line (field engineer) and date.
■ To remove an activity from the schedule, drag it back to the Unplanned Activities applet.
Description A type-in field for the description of this activity, which also appears in the Unplanned Activities applet.
Assigned To The name of the owner of this activity. If it contains the name of a field service engineer, this name does not affect the assignment of this activity.
Planned Start Planned time to begin an activity, chosen from a calendar.
Planned Completion Planned time to end an activity, chosen from a calendar.
Duration (Minutes) The total estimated time required by an activity, in minutes, chosen from a picklist. This field is required for assigning this activity using the Dispatch Board.
Activity Status The status of this activity, chosen from a picklist. Activities categorized as Done or Cancelled do not appear in the Dispatch Board.
Site The location of the account, completed automatically with the Account field.
Account The name of the account associated with this activity, chosen from a dialog box.
No Later than Date A type-in field for the latest starting date for this activity. Same as Due in the Activities applet (see Table 3-4 on page 3-21).
No Later than Time A type-in field for the latest starting time for this activity. Same as Start Time in the Activities applet (see Table 3-4 on page 3-21).
Table 2-13. Selected Fields in the Field Engineer Activity Applet (Sheet 2 of 2)
Button/Field Description
Version 6.1 Siebel Field Service Guide 2-51
Service Support
Dispatch Board Screen
The calendar, which scrolls left to right to show additional days, provides for scheduling up to 168 hours per week.
Selecting Field Service Engineers for the Planned Activities AppletUse the following options for selecting the field service engineers that appear in the Planned activities applet:
■ Choose an employee from the Employee picklist at the top of the applet. Then click Refresh. This name is added to any names that already appear in the applet.
NOTE: Choosing a second employee from this list replaces the previous choice. The selection for employee field may be blank (none). Choosing blank removes a previous choice.
■ Choose the engineers that belong to a territory or group from the Territory picklist at the top of the applet. Then click Refresh. This selection replaces a previous selection from the Territory picklist, but it does not remove the name of an individual employee chosen from the Employee picklist.
NOTE: Choosing a second territory from this list replaces the previous choice. The selections for the Territory field may be blank (none). Choosing blank removes a previous choice.
■ Click Apply Skills. This selects a subset of the names that already appear in the Planned Activities applet. The selection is based on the skill selected in the Employee Query view.
NOTE: If the Employee and Territory fields in the Planned Activities applet are both blank, the Apply Skills button lists all employees that possess the selected skill.
2-52 Siebel Field Service Guide Version 6.1

Service Support
Dispatch Board Screen
Notes on Using the Planned Activities Applet■ When attempting to schedule an activity produces this message:
This Activity cannot be planned later than Due date
follow the procedure “To assign an activity with an inappropriate date, using the Dispatch Board” on page 2-14.
■ An unlimited number of activities can overlap (be assigned to the same hours for an FSE), but only three appear in the chart. Adding more than one activity to a time slot reduces the height of the bar representing that activity and removes the description of the activity. To see the description of an activity bar and the properties of this activity, hold the cursor over the bar for a few seconds.
■ Activities may be assigned to available or unavailable hours in an FSE’s schedule.
■ Any activity in the Planned Activities applet can be re-assigned or rescheduled, including previously assigned activities.
■ The Planned Activities applet initially shows the current day at the left end. Scroll to the right to see earlier days in the schedule. The default chart shows two days earlier and five days ahead (total of seven days).
■ Double-click an activity to see more information about it. You see Activities ➞ Field Service Details.
■ To remove a single employee from the Dispatch Board, in the Employee field of the Planned Activities applet, choose the blank position at the top of the picklist. Then click refresh. Note that this field allows the addition of only one employee at a time, or the removal of only the same employee.
■ Clicking on the name of an employee shows the employee’s skills. You see Employees ➞ Employee Skills. This link only works if the employee has assigned activities.
Version 6.1 Siebel Field Service Guide 2-53

Service Support
Dispatch Board Screen
■ Dragging an activity from the Planned Activities applet back to the Unplanned Activities applet erases the Assigned To, Planned Start, and Planned Complete fields, effectively unassigning the activity.
■ The assignment of an activity and its duration may be changed from the Dispatch Board Field Engineer Activity applet or from Activities ➞ All Activities.
NOTE: If an employee does not appear in a Territory, that employee can be added on Assignment Administration ➞ Assignment Employees. Administrators should have access to this screen. See “To assign field service engineers automatically using the Assignment Manager” on page 2-12 and the Siebel Assignment Manager Administration Guide.
Changing the Behavior of the Planned Activity AppletField Service provides control over many aspects of the Planned Activity applet, from Options on the View menu. Go to the Dispatch Board tab, Figure 2-18, in the Options dialog box. Table 2-14 on page 2-55 describes the fields in this tab.
Figure 2-18. Dispatch Board Option Dialog Box
2-54 Siebel Field Service Guide Version 6.1

Service Support
Dispatch Board Screen
Table 2-14. Options for the Dispatch Board View, Planned Activities Applet
Group/Field Description
Territory The default value that appears in the Territory field.
Refresh The Auto Refresh check box turns on automatic updating of the employee list in the applet, at the interval set in the Refresh Interval field. Setting this option on may slow the performance of the Dispatch Board. Alternatively, click the Refresh button to update the list.
Start date The date that appears at the center of the applet, either today’s date or a date chosen from the calendar.
Color scheme The colors of the bars representing schedules activities. A different color can be assigned to each of these categories and subcategories:
■ Activity priority: ASAP, High, Medium, and Low.
■ Activity status: Not Started, In Progress, On Hold, Done, Cancelled, Acknowledged, and Declined.
■ Activity Type: Various types, chosen from a picklist.
Click the color sample to choose a color from the Choose Color dialog box. Both Web colors and standard VGA colors are provided.
Time This sets the time scale for scheduling activities:
■ Time Interval: the smallest unit of time, in minutes. The default is 30 minutes.
■ Start day at: The start time for a work day. The default is 9 A.M.
■ End day at: The end time for a work day. The default is 5 P.M.
Number of days to fetch The number of work days to appear in the applet:
Before start date: The number of days to the left of the start date. The default is 2 days.
After start date: The number of days to the right of the start date. The default is 5 days.
Note that larger settings may slow the performance of the Dispatch Board, as more records must be retrieved.
Version 6.1 Siebel Field Service Guide 2-55

Service Support
Dispatch Board Screen
Employee Query View 2
The Employee Query view, Figure 2-19, provides criteria for selecting field service engineers that can best carry out an activity. The criteria may include industry experience, language ability, and product knowledge.
To select a skill and apply it to the list of engineers in the Dispatch Board view, follow the procedure “To select a subset of field service engineers based on a skill” on page 2-13.
NOTE: You can choose only one skill at a time. The Dispatch Board uses only your last choice.
Figure 2-19. Employee Query View
2-56 Siebel Field Service Guide Version 6.1

Service Support
Service Request Charts
Service Request Charts 2
The Service Requests screen provides charts for analysis, listed in Table 2-15.
Table 2-15. Service Requests Analysis (Sheet 1 of 2)
Chart Analysis
Aging Analysis by Priority The duration of a service request as a function of priority.
Aging Analysis by Product The duration of a service request as a function of product.
Aging Analysis by Product Area The duration of a service request as a function of field service product area.
Aging Analysis by Severity The duration of a service request as a function of severity.
Aging Analysis by Status The duration of a service request as a function of status (Open, Assigned, Pending, and so on).
Priority Analysis by Owner The priority of service requests assigned to each FSE.
Status Analysis by Owner The status of service requests assigned to each FSE.
Closed Service Requests by Owner The history of closed service requests assigned to each FSE.
Closed Service Requests by Product The history of closed service requests for each product.
Customer Analysis The number of service requests for each customer account.
New Service Requests The number of new service requests per calendar period.
New Service Requests by Owner The number of new service requests assigned to FSE per calendar period or per product.
New Service Requests by Product The number of new service requests for each product per calendar period.
Product Analysis The number of new service requests for each product.
Product Version Analysis The number of new service requests for each version of a product.
Severity and Priority Analysis Two graphs:
■ The number of service requests as a function of severity.
■ The number of service requests as a function of priority.
Version 6.1 Siebel Field Service Guide 2-57

Service Support
Service Request Charts
Status and Area Analysis Two graphs:
■ The number of service requests as a function of status.
■ The number of service requests as a function of field service product area.
Symptom and Resolution Analysis Two graphs:
■ The number of service requests as a function of symptom.
■ The number of service requests as a function of resolution.
Trend Analysis by Product The number of service requests for each product as a function of calendar period.
Trend Analysis by Product Area The number of service requests for each field service product as a function of calendar period.
Trend Analysis by Severity The number of service requests for each severity level as a function of calendar period.
Trend Analysis by Source The number of service requests logged in by a given route (email, phone, etc.) as a function of calendar period.
Trend Analysis by Status The number of service requests with a given status as a function of calendar period.
Table 2-15. Service Requests Analysis (Sheet 2 of 2)
Chart Analysis
2-58 Siebel Field Service Guide Version 6.1

Service Support
Service Request Reports
Service Request Reports 2
The Reports menu provides reports for Service Requests, listed in Table 2-16.
NOTE: Use a query to limit reports to service requests of interest.
Table 2-16. Service Request Reports
Report Description
Service Request Activity (All) Prints a page for each service request, with information about the service request and each of the associated activities.
Service Request Activity (Public) Prints a page for each service request, with information about the service request and each of the associated activities.
Service Request Detail Provides all information about each service request.
Service Request Summary Provides a summary of each service request.
Version 6.1 Siebel Field Service Guide 2-59

Service Support
Setup and Configuration
Setup and Configuration 2
The information in this section is intended for system planners, configurators, and administrators.
Setting Up Service Accounts and Service Requests 2
Follow these procedures to set up service accounts and service requests.
To create customer accounts
1 Choose Accounts ➞ All Accounts.
2 Create a new record.
3 In the Account field, type in the account name.
4 Add other information, as needed.
To create service agreements
1 Choose Agreements ➞ All Agreements.
2 Create a new record.
3 In the Name field, type in the name of the agreement.
This replaces the agreement number in this field.
4 Add other information, as needed.
To create contacts for customer accounts
1 Choose Accounts ➞ All Accounts.
2 Select an account.
3 Choose Accounts ➞ Contacts.
4 Create a new record.
5 Type in a first name and last name.
6 Add other information, as needed.
2-60 Siebel Field Service Guide Version 6.1
Service Support
Setup and Configuration
To create activity plans
1 Choose Service Requests ➞ All Service Requests (see “Service Requests Views” on page 2-33).
2 Select a service request.
3 Choose Service Requests ➞ Activity Plans.
4 In the Activity Plans applet, create a new record.
5 Choose a template from the picklist for this field.
To create additional activities for a service request
Service activities are automatically associated with service requests by adding activity plans. Additional activities may be added to any service request.
1 Choose Service Requests ➞ All Service Requests (see “Service Requests Views” on page 2-33).
2 Select a service request.
3 Choose Service Requests ➞ Activities.
4 In the Activities applet, add a new record.
5 Type in a description of the activity.
6 Complete other fields as needed.
To set up attachments for service requests
Decompressed attachments (Service Requests ➞ Attachments) are written to these two directories:
■ <install root>server/files. In the server-connected mode, this directory is used to decompress read-only files.
■ <install>/temp. Writable attachments are decompressed in this directory.
These directories must have write access.
Version 6.1 Siebel Field Service Guide 2-61

Service Support
Setup and Configuration
Setting Up Territories and Schedules 2
The Territory field in the Dispatch Board (Dispatch Board ➞ Dispatch Board) presents a list of territories for field service activities. Field service engineers are assigned to these territories on the Assignment Administration screen.
Follow these procedures to assign territories and schedules for employees.
To assign employees to territories
1 Choose Assignment Administration ➞ Assignment Rules.
2 Select or create a new rule.
These rules appear in the Territory picklist on the Dispatch Board (Planned Activities applet).
3 With the new rule selected, go to the Assignment Employees view.
4 Add employees by adding new records to the Assignment Rule Employee applet.
5 Return to the Assignment Rules view.
6 Click the Release button in the Assignment Rules list applet.
When this Territory is chosen on the Dispatch Board, these employees appear in the Planned Activities applet.
To set up schedules
1 Choose Application Administration ➞ Schedules ➞ All Schedules.
2 To create a new schedule, create a new record.
3 With the new schedule selected, go to the Schedule Hours view.
4 Define the hours of the schedule.
5 Choose the All Exceptions view.
6 Pick the holidays that apply to this schedule. If a new set of holidays is needed, these can be defined in the All Exceptions view, with the hours defined in the Exception Hours view.
2-62 Siebel Field Service Guide Version 6.1

Service Support
Setup and Configuration
To assign a schedule to an employee
1 Choose Application Administration ➞ Employees ➞ Employees.
2 In the Employees list applet, select the employee.
3 In the Schedule Name field, choose the appropriate schedule from the picklist.
The employee's schedule will appear on the Dispatch Board.
Setting Up Dispatchers 2
Field Service provides a responsibility for dispatchers, which shows only the views needed to complete their job. For more information on responsibilities and visibility see the Siebel Applications Administration Guide.
To add a user with the responsibility of a dispatcher
1 Choose Application Administration ➞ Responsibilities.
2 Select the Dispatcher record in the Responsibilities applet.
3 In the Employees applet, add the name of the employee who will take the Dispatcher’s role.
Dispatch Board Schedules 2
Available hours on the Dispatch Board are shown in white boxes. Available hours and the white shading are controlled by the Schedule Name field in employee records Application Administration ➞ Employees, Employees list applet (see “To assign a schedule to an employee” on page 2-63). The picklist for the Schedule Name field is set in Application Administration ➞ Schedules (see “To set up schedules” on page 2-62).
For more information on schedules, see the Siebel Applications Administration Guide.
Version 6.1 Siebel Field Service Guide 2-63

Service Support
Setup and Configuration
Using Dispatch Board Queries 2
The Dispatch Board is provided with several pre-defined queries useful for limiting the amount of data that appears in the Unplanned Activities applet (see Table 2-17).
If there is a large quantity of legacy data, older activities that were not scheduled using the Dispatch Board may also appear. It is advisable to limit the queries to show only records created after the Dispatch Board is installed, to make that extraneous data does not appear in the Unplanned Activities applet.
Table 2-17. Pre-Defined Queries for the Dispatch Board
Name of Query Definition of Query
* Today's Activities (the default query)
Due Date < Today() + 1 (i.e., anything due before tomorrow)
Note that the query definition also returns any activities that were due before today. This is by design.
*Overdue Activities Due Date < Today() OR (Due Date = Today() AND Start Time > Now())
All Field Service Activities Category = "Customer Satisfaction" OR "Diagnostic" OR "Field Engineer Activity" OR "Other" OR "Preventive Maintenance" OR "Repair Activity"
All Field Engineer Activities Category = "Field Engineer Activity"
All Preventive Maintenance Activities
Category = "Preventive Maintenance"
All Other Field Service Activities Category = "Customer Satisfaction" OR "Diagnostic" OR "Other"
All Repair Activities Category = "Repair Activity"
High Priority Activities Priority = "1-ASAP"
2-64 Siebel Field Service Guide Version 6.1

Field Service Activities 3
About This Chapter . . . . . . . . . . . . . . . . . . . . . . . . . . . . . . . . . . . . . . 3-3
Business Scenario . . . . . . . . . . . . . . . . . . . . . . . . . . . . . . . . . . . . . . . 3-6
Application Overview . . . . . . . . . . . . . . . . . . . . . . . . . . . . . . . . . . . . . 3-7
Setting Up Field Service Activities . . . . . . . . . . . . . . . . . . . . . . . . . . 3-7
Monitoring Field Service Activities . . . . . . . . . . . . . . . . . . . . . . . . 3-10
Recording Field Service Activities . . . . . . . . . . . . . . . . . . . . . . . . . 3-12
Screens and Views for Field Service Activities . . . . . . . . . . . . . . . . . . . 3-14
Carrying Out Field Service Activities . . . . . . . . . . . . . . . . . . . . . . . 3-14
Activities Screen . . . . . . . . . . . . . . . . . . . . . . . . . . . . . . . . . . . . . . . 3-16
All Activities View . . . . . . . . . . . . . . . . . . . . . . . . . . . . . . . . . . . . 3-17
Expense Tracker View . . . . . . . . . . . . . . . . . . . . . . . . . . . . . . . . . 3-20
Field Part Movements View . . . . . . . . . . . . . . . . . . . . . . . . . . . . . . 3-22
Field Service Details View . . . . . . . . . . . . . . . . . . . . . . . . . . . . . . 3-24
Instructions View . . . . . . . . . . . . . . . . . . . . . . . . . . . . . . . . . . . . 3-26
Invoices View . . . . . . . . . . . . . . . . . . . . . . . . . . . . . . . . . . . . . . . 3-27
Measurements View . . . . . . . . . . . . . . . . . . . . . . . . . . . . . . . . . . . 3-27
Recommended Parts and Tools View . . . . . . . . . . . . . . . . . . . . . . . 3-28
Skills View . . . . . . . . . . . . . . . . . . . . . . . . . . . . . . . . . . . . . . . . . 3-29
Steps View . . . . . . . . . . . . . . . . . . . . . . . . . . . . . . . . . . . . . . . . . . . . . . .3-30
Time Tracker View . . . . . . . . . . . . . . . . . . . . . . . . . . . . . . . . . . . . 3-31
Products Screen . . . . . . . . . . . . . . . . . . . . . . . . . . . . . . . . . . . . . . . . 3-32
Product Field Service Details View . . . . . . . . . . . . . . . . . . . . . . . . 3-32
Part Browser Screen . . . . . . . . . . . . . . . . . . . . . . . . . . . . . . . . . . . . . 3-36
Version 6.1 Siebel Field Service Guide 3-1

Field Service Activities
Solutions Views . . . . . . . . . . . . . . . . . . . . . . . . . . . . . . . . . . . . . . . . 3-38
All Solutions View . . . . . . . . . . . . . . . . . . . . . . . . . . . . . . . . . . . . 3-39
Resolution Documents View . . . . . . . . . . . . . . . . . . . . . . . . . . . . . 3-40
Related Documents View . . . . . . . . . . . . . . . . . . . . . . . . . . . . . . . 3-41
Solution Search View . . . . . . . . . . . . . . . . . . . . . . . . . . . . . . . . . . 3-41
Activities Charts . . . . . . . . . . . . . . . . . . . . . . . . . . . . . . . . . . . . . . . 3-42
Activity Reports . . . . . . . . . . . . . . . . . . . . . . . . . . . . . . . . . . . . . . . . 3-43
Setup and Configuration . . . . . . . . . . . . . . . . . . . . . . . . . . . . . . . . . . 3-43
3-2 Siebel Field Service Guide Version 6.1

Field Service Activities
About This Chapter
About This Chapter 3
This chapter shows how an FSE uses Siebel Field Service to carry out activities to resolve service requests (Figure 3-1).
The activity module maintains information about field service activities performed by field service engineers or repair technicians. Use this module to track the following tasks:
■ Work to be done in response to a service request
■ Assigning and scheduling field engineer activities
■ Tracking tools and parts
■ Activities involved in running field service
Figure 3-1. Activities Associated with a Service Request
ServiceRequest
Research Callback
DiagnosticUpgrade Replacement
Test ECO Repair
PreventiveMaintenance
Call ResolutionActivities
Field EngineerActivities
Repair CenterActivities
Version 6.1 Siebel Field Service Guide 3-3
Field Service Activities
About This Chapter
Activities can also be generated in the absence of a Service Request—for instance, for preventive maintenance and repair.
A Service Request can be used to link repair activities with field engineer activities, when a field engineer activity involves shipping a part to the repair center.
Field Engineer Activity is an extension of the Siebel Activity object, with Field Service customizations that specifically meet the requirements of engineers reporting complex, standardized service activities.
The field engineer, the customer service representative, the dispatcher, and the field service manager all use Field Engineer Activity information to fulfill their roles in the service organization. This chapter provides an overview of field engineer activities managed by Siebel Field Service, and describes the Field Engineer Activity tasks associated with these roles.
NOTE: Field service activities can be stand-alone (for example, preventive maintenance activities) or, more commonly, attached to service requests. For complex preventive maintenance activities, it may be convenient to formalize the activity by creating a service request.
Service activities used by the call center and field service managers are described in Chapter 2, “Service Support.”
3-4 Siebel Field Service Guide Version 6.1

Field Service Activities
About This Chapter
The following are the most common types of activities:
■ Call management activities (research, call, correspondence, and so on)
■ Field engineer activities that can be dispatched to field engineers
■ Repair activities in the repair depot, for repair and return calls
Field and repair activities typically use the detailed information for field service that includes steps, recommended parts/tools, skills and instructions, field part movements, expenses, and time.
The major advantages of breaking down a service request into one or more activities are:
■ The ownership of the problem remains at the call management level when required.
■ The person looking at objects assigned to him or her does not need to wade through the entire resolution to locate the precise action he or she needs to perform.
■ Reporting is simplified.
■ The problem becomes easy to break up into activities that can be assigned to multiple persons.
The application is designed so that field service engineers can work primarily with activities (category Field Engineer Activities). Activities are displayed on the engineers’ calendars, and contain the information they need to have to assess the requirements for the activity, to accept or decline it, and to report on its execution.
Version 6.1 Siebel Field Service Guide 3-5

Field Service Activities
Business Scenario
Business Scenario 3
A field service engineer is assigned to a service request, with specific activities to carry out. The call center assigned these activities when it selected and dispatched the FSE. On a small job, this may include all the activities planned to complete this service call. For a larger job, one FSE may be assigned only part of the required activities.
Siebel Field Service supplies the FSE with these items:
■ A list of the activities to perform at the customer site
■ An estimate of the time required
■ Tools to be used
■ Recommended parts
■ A list of steps
On completing the activity, the FSE reports the actual steps performed, parts consumed, time taken, and expenses incurred, so that management can track the status of the request.
On a mobile computer, the FSE records the movement of assets between the customer site and the trunk inventory, or between different trunk inventories. Later, upon synchronization with the Field Service server, these mobile transactions are committed to the inventory database.
3-6 Siebel Field Service Guide Version 6.1
Field Service Activities
Application Overview
Application Overview 3
This section includes detailed procedures for using the screens and features provided for field service activities. For details on individual screens, see “Screens and Views for Field Service Activities” on page 3-14.
Setting Up Field Service Activities 3
To set up activity templates
1 Choose Siebel Assistant Administration ➞ Activity Templates.
2 Create a new record.
3 For the Type field, choose from the picklist.
4 In the Name field, type in a name for the template.
5 In the Description field, type in a description.
To associate activities with a template
1 Choose Siebel Assistant Administration ➞ Activity Templates.
2 Select a template.
3 Click the Name field.
You see Siebel Assistant Administration ➞ Activity Template Details.
4 In the Service Activities applet, create a new record for each activity in the template.
5 For the Activity Type field, choose from the picklist.
To define activity plans for service requests
1 Choose Service Requests ➞ All Service Requests (see “Service Requests Views” on page 2-33).
2 Select a service request.
Version 6.1 Siebel Field Service Guide 3-7
Field Service Activities
Application Overview
3 Choose Service Requests ➞ Activity Plans.
4 In the Activity Plans applet, create a new record.
5 Choose a template from the picklist for the Template field.
NOTE: An activity plan includes an activity template plus a start date.
To create additional activities
Service activities are automatically associated with service requests by adding activity plans. Additional activities may be added to any service request.
1 Choose Service Requests ➞ All Service Requests (see “Service Requests Views” on page 2-33).
2 Select a service request.
3 Choose Service Requests ➞ Activities.
4 In the Activities applet, add a new record.
5 Type in a description of the activity.
6 Complete other fields as needed.
To describe additional conditions for field service activities
1 Choose Activities ➞ My Activities.
2 Select an activity.
3 Choose Activities ➞ Field Service Details (see “Field Service Details View” on page 3-24).
4 Complete the fields in the Field Service Details applet.
To record the recommended steps in a service activity
1 Choose Activities ➞ Steps (see “Steps View” on page 3-30).
2 In the Field Engineering Activity list applet, select the activity.
3-8 Siebel Field Service Guide Version 6.1

Field Service Activities
Application Overview
3 In the Steps applet, create a new record for each step.
4 Click the Step field and choose a step from the dialog box.
5 When several steps are entered, correct the sequence of steps by typing the correct numbers into the Steps field.
To record the skills required to complete a service activity
1 Choose Activities ➞ Skills (see “Skills View” on page 3-29).
2 In the Field Engineering Activity list applet, select the activity.
3 In the Service Activity Skills applet, create a new record for each skill.
4 In the Item field, choose a skill category from the picklist.
5 In the Service Activity Skills Item applet, create a new record for each specific product associated with a skill category.
6 Choose a product from the Pick Product dialog box.
To record instructions for a service activity
1 Choose Activities ➞ Instructions (see “Instructions View” on page 3-26).
2 In the Field Engineering Activity list applet, select the activity.
3 In the Instructions applet, create a new record for each instruction.
4 Complete both the Type and Instruction fields.
To record solutions to service requests and associated product defects
1 Choose Service Requests ➞ Solutions.
2 In the Solution applet, create a new record.
3 In the Add Solutions dialog box, choose an existing solution and click Add, or click New and type the solution into the fields of the Solution applet.
Version 6.1 Siebel Field Service Guide 3-9

Field Service Activities
Application Overview
Monitoring Field Service Activities 3
Follow these procedures to monitor field service activities.
To review an FSE’s activities
1 Choose Activities ➞ My Activities.
2 Select or query the activity to review.
NOTE: FSEs can also check the schedule for activities in the Calendar view.
To update the status of activities
1 Choose Activities ➞ My Activities (see “All Activities View” on page 3-17).
2 In the Activities applet, enter a value in the Status column.
To check part movements in the field
1 Choose Activities ➞ Field Part Movements (see “Field Part Movements View” on page 3-22).
2 In the Field Engineer Activity applet, select the activity.
A record of part movements appears in the Field Part Movements applet.
To check the availability and order status of materials for an activity
1 Choose Activities ➞ Recommended Parts and Tools (see “Recommended Parts and Tools View” on page 3-28).
2 In the Field Engineer Activity form applet, query the activity record.
The associated parts appear in the Recommended Parts and Tools list applet. The Order Status field shows the progress of receiving an ordered part.
3-10 Siebel Field Service Guide Version 6.1

Field Service Activities
Application Overview
To list the parts and tools required to complete a service activity
1 Choose Activities ➞ Recommended Parts and Tools (see “Recommended Parts and Tools View” on page 3-28).
2 In the Field Engineering Activity list applet, select the activity.
3 In the Recommended Parts and Tools applet, create a new record for each part or tool.
4 In the Part/Tool field, choose the item from the Pick Product dialog box.
Notice that the parts and tools in this dialog box have a check in the Tools column.
To check on-hand inventory using the Part Browser
1 Choose Part Browser ➞ Part Browser.
2 In the Product Inventory Location applet, select the record for the part and inventory location.
3 Check the Quantity applet for the part’s availability, status, and quantity at that inventory location. Click in the Availability column (containing the name of a bucket) to see the definition of this bucket.
To check inventory levels from the Service Inventory screen
■ Choose Service Inventory ➞ Product Buckets.
The Part Locator (see “Part Locator” on page 8-48) is intended for case-by-case fulfillment of Service Orders. The Part Locator follows the fulfillment logic specified in Figure 8-4 on page 8-9, and uses the same configuration parameters.
Version 6.1 Siebel Field Service Guide 3-11

Field Service Activities
Application Overview
To identify substitute products
1 Choose Products ➞ Product Field Service Details (see “Product Field Service Details View” on page 3-32).
2 In the Product applet, query the product.
The Substitute Products applet shows substitute products.
3 Click a product name to see related products and product comparisons.
You see Products ➞ Details.
Recording Field Service Activities 3
To enter a new activity
1 Choose Activities ➞ All Activities (see “All Activities View” on page 3-17).
2 Create a new record.
To enter a new activity for a service request
1 Choose Service Requests ➞ All Service Requests (see “Service Requests Views” on page 2-33).
2 Select a service request.
3 Choose Service Requests ➞ Activities.
4 In the Activities applet, add a new record.
5 Type in a description of the activity.
6 Complete other fields as needed.
To associate orders with activities
1 Choose Orders ➞ RMAs/Service Orders ➞ Line Items.
2 In the Line Items list applet, select a line item.
3 In the Related Activity field, choose an activity from the Pick Related Activity dialog box.
3-12 Siebel Field Service Guide Version 6.1

Field Service Activities
Application Overview
To delete an activity
1 Choose Activities ➞ My Activities.
2 Select an activity.
3 From the Edit menu, choose Delete Record.
To record expenses for service activities
1 Choose Activities ➞ Expense Tracker.
2 In the Field Engineer Activity list applet, select an activity.
3 In the Expense Tracker applet, create a record for each expense.
4 Check the Billable field if this activity is billable.
To record the hours spent on each service activity
1 Choose Activities ➞ Time Tracker.
2 In the Field Engineer Activity list applet, select an activity.
3 In the Expense Tracker applet, create a record for each expense.
4 Check the Billable field if these hours are billable.
To record movement of service parts in the field
1 Choose Activities ➞ Field Part Movements.
2 In the Field Engineer Activity list applet, select an activity.
3 In the Field Part Movements applet, create a record for a part that moves between trunks or customer sites in the field.
4 Click Commit to create a transaction that will be recorded in the Field Service server upon synchronization.
Version 6.1 Siebel Field Service Guide 3-13

Field Service Activities
Screens and Views for Field Service Activities
To generate an invoice for field service activities
1 Activities ➞ My Activities (see “All Activities View” on page 3-17).
2 Choose the activity you are working on.
3 Select a price list, a rate list, and the Billable check box.
4 Choose the Invoices view (see “Invoices View” on page 3-27).
5 Click Auto Invoice.
Screens and Views for Field Service Activities 3
Table 3-1 list the screens and views for carrying out field service activities.
Carrying Out Field Service Activities 3
Field service activities are carried out using the screens listed in Table 3-1. Click the name of a screen or view to see more information. For procedures using these screens, see “Monitoring Field Service Activities” on page 3-10.
Table 3-1. Screens and Views for Service Activities (Sheet 1 of 2)
Screen Views Role/Procedures (Click to See Full Procedure)
Activities Activities Add activities or modify existing activities; for example, change the status of an activity. See: “To review an FSE’s activities” on page 3-10, and “To update the status of activities” on page 3-10.
Expense Tracker Record expenses related to an activity.
Field Part Movements Record the transfer of parts in the field between the client, a service order, or the FSE’s trunk inventory. See: “To check part movements in the field” on page 3-10.
Instructions Record instructions for carrying out an activity.
3-14 Siebel Field Service Guide Version 6.1

Field Service Activities
Screens and Views for Field Service Activities
Activities (continued) Invoices Display invoices created for an activity and generate, manually or automatically, invoices for any activities that are marked as billable.
Measurements Display key characteristics of an asset that may be recorded and tracked.
Recommended Parts and Tools Show the materials that an FSE must have to complete an activity. See: “To check the availability and order status of materials for an activity” on page 3-10.
Skills View the skills needed to complete successfully an activity.
Steps View the recommended procedures for carrying out an activity.
Time Tracker Record the hours spent on each field service activity.
Products Product Field Service Details Obtain information about replacing a defective part and about possible substitute parts. This view is a read-only version of Marketing Administration ➞ Products ➞ Product Field Service Details. See: “To identify substitute products” on page 3-12
Part Browser Part Browser Investigate the availability of a product in all inventory locations within a field service business.
Solutions All Solutions Record solutions to repetitive service activities.
Resolution Documents Record document files containing information related to a selected solution.
Call Center Administration Related Documents Record document files containing information related to a selected solution.
Service Requests Solution Search Record and display solutions to repetitive service activities, plus search functions: Related SRs, Encyclopedia, and Search.
Table 3-1. Screens and Views for Service Activities (Sheet 2 of 2)
Screen Views Role/Procedures (Click to See Full Procedure)
Version 6.1 Siebel Field Service Guide 3-15

Field Service Activities
Activities Screen
Activities Screen 3
The Calendar screen provides another way to look at field service activities. Changing information for an activity on the Calendar views automatically changes the same information on the Activities applets that also display that activity. Similarly, changing information about an activity in any Activities view changes the same information in the Calendar views. See Using Siebel Applications for information on the Siebel calendar.
3-16 Siebel Field Service Guide Version 6.1

Field Service Activities
Activities Screen
All Activities View 3
The All Activities view, Figure 3-2, presents all activities, both active and closed, assigned to an FSE. The FSE can use the Activities form or list applet to add activities or modify existing activities; for example, to change the status of an activity. Table 3-2 on page 3-18 describes the fields in this view.
Figure 3-2. Activities Applets In the All Activities View
Version 6.1 Siebel Field Service Guide 3-17
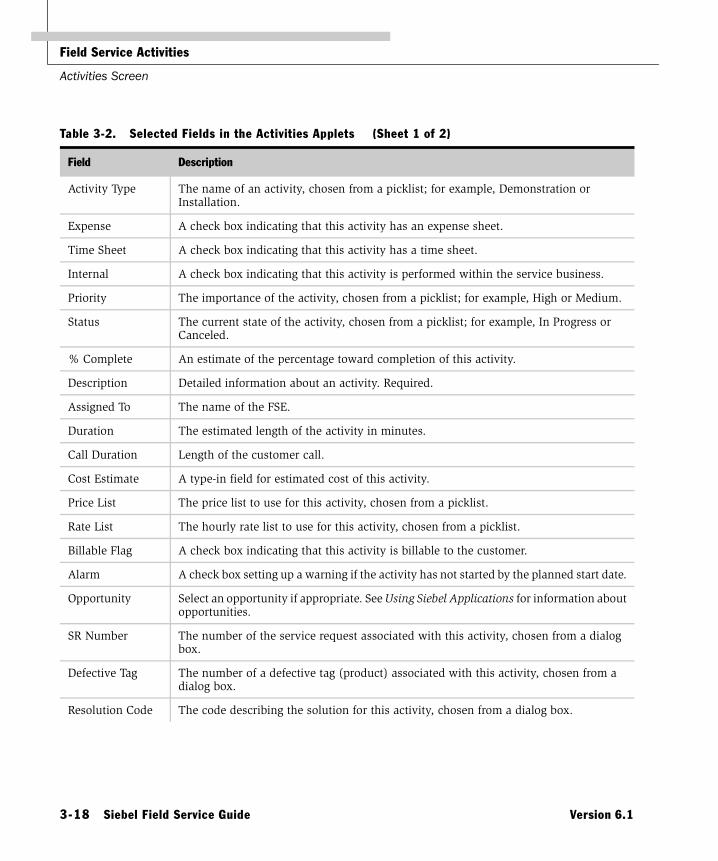
Field Service Activities
Activities Screen
Table 3-2. Selected Fields in the Activities Applets (Sheet 1 of 2)
Field Description
Activity Type The name of an activity, chosen from a picklist; for example, Demonstration or Installation.
Expense A check box indicating that this activity has an expense sheet.
Time Sheet A check box indicating that this activity has a time sheet.
Internal A check box indicating that this activity is performed within the service business.
Priority The importance of the activity, chosen from a picklist; for example, High or Medium.
Status The current state of the activity, chosen from a picklist; for example, In Progress or Canceled.
% Complete An estimate of the percentage toward completion of this activity.
Description Detailed information about an activity. Required.
Assigned To The name of the FSE.
Duration The estimated length of the activity in minutes.
Call Duration Length of the customer call.
Cost Estimate A type-in field for estimated cost of this activity.
Price List The price list to use for this activity, chosen from a picklist.
Rate List The hourly rate list to use for this activity, chosen from a picklist.
Billable Flag A check box indicating that this activity is billable to the customer.
Alarm A check box setting up a warning if the activity has not started by the planned start date.
Opportunity Select an opportunity if appropriate. See Using Siebel Applications for information about opportunities.
SR Number The number of the service request associated with this activity, chosen from a dialog box.
Defective Tag The number of a defective tag (product) associated with this activity, chosen from a dialog box.
Resolution Code The code describing the solution for this activity, chosen from a dialog box.
3-18 Siebel Field Service Guide Version 6.1

Field Service Activities
Activities Screen
Defect Number The number of the defect for a product associated with this activity, chosen from a dialog box.
Project The name of a project associated with this activity, chosen from a dialog box. This name is created in the Field Service Projects option.
Account The name of the customer account associated with this activity, chosen from a dialog box.
Suppress Calendar A check box indicating that this activity should not appear the calendar.
Repeat A check box indicating that this activity is repeated.
Frequency The frequency for repeating this activity, chosen from a picklist; for example, Monthly.
Until The end date for repeating this activity.
ER Number Id number of an expense report.
TS Number Id number of a time sheet.
Category The type of activity, chosen from a picklist; for example:
■ Field Engineer Activity
■ Preventive Maintenance
■ Repair Activity
■ Other
Lock Assignment A check box that instructs the Assignment Manager not to assign this activity. The default state of this flag depends on the choice of category:
■ Field Engineer Activity: unchecked (automatically assigned)
■ Preventive Maintenance: unchecked (automatically assigned)
■ Repair Activity: unchecked (automatically assigned)
■ Other: checked (not assigned)
For more information on the function of this flag, see “Rules for Assigning Activities” on page 2-38.
Table 3-2. Selected Fields in the Activities Applets (Sheet 2 of 2)
Field Description
Version 6.1 Siebel Field Service Guide 3-19

Field Service Activities
Activities Screen
Expense Tracker View 3
The Expense Tracker view, Figure 3-3, records expenses related to an activity. This view introduces the Field Engineer Activity applets (both list and form), which are a modification of the Activities applets (see Figure 3-2 on page 3-17). Table 3-3 describes the fields in this view.
Figure 3-3. Expense Tracker Applet in the Expense Tracker View
Table 3-3. Selected Fields in the Expense Tracker Applet
Field Description
Expense Type The name of an expense, chosen from a picklist; for example, Gas or Telephone.
Amount A type-in field for the amount of an expense.
Billable A check box indicating that this expense is billable to the customer.
Rate Type The category for an expense, chosen from a picklist.
3-20 Siebel Field Service Guide Version 6.1

Field Service Activities
Activities Screen
The fields shown in Table 3-4 appear in the Field Engineer applets in addition to (or replacing) the fields in the Activities applets (see Table 3-2 on page 3-18).
Figure 3-4. Field Engineer Form Applet in the Expense Tracker View
Table 3-4. Selected Fields in the Field Engineer Activity Applets (Sheet 1 of 2)
Field Description
Activity Status The current state of the activity, chosen from a picklist; for example, In Progress or Canceled. Same as Status in the Activities applets.
SR Status The status of service request that includes this activity. Filled in automatically with SR Number.
Symptom Code A description of the symptom associated with this activity, chosen from a dialog box.
Required A check box indicating that this activity is mandatory.
Repeating, or Recurring
A check box indicating that this activity should be repeated. Same as Repeat in the Activities applets.
Asset Number The number of the asset associated with this activity, chosen from a dialog box.
Serial Number The serial number of the asset associated with this activity, filled in automatically with the asset number.
No Sooner Than An earliest starting date for this activity.
Duration (Minutes) The total estimated time spent for an activity.
Due The latest completion date for this activity.
Version 6.1 Siebel Field Service Guide 3-21

Field Service Activities
Activities Screen
Field Part Movements View 3
The Field Part Movements view, Figure 3-5, describes the transfer of parts in the field between the client, a service order, or the FSE’s trunk inventory. Table 3-5 on page 3-23 describes the fields in this view.
NOTE: Transactions between inventories and between inventories and customers are recorded on the Inventory Transactions screen (see “All Inventory Transactions View” on page 7-43).
Start Time The start time for an activity to appear on the calendar.
Planned Start Time Planned time to begin an activity.
Planned End Time Planned time to end an activity.
Actual Start Time Actual start time for an activity.
Actual End Time Actual end time for an activity.
Table 3-4. Selected Fields in the Field Engineer Activity Applets (Sheet 2 of 2)
Field Description
Figure 3-5. Field Part Movements Applet in the Field Part Movements View
3-22 Siebel Field Service Guide Version 6.1

Field Service Activities
Activities Screen
Table 3-5. Selected Fields in the Field Part Movements Applet
Field/Button Description
Commit This button completes the selected field part movements by creating a transaction that will be recorded in the Field Service server upon synchronization.
Commit All This button completes all field part movements listed in this applet.
Movement Date The date that the product was transferred.
Product Name The name of the transferred product, chosen from a dialog box.
Status The condition of the product, chosen from a picklist; for example, Good or Defective.
Used Quantity The number of items in the product. Read-only.
Asset Number The number of this asset, chosen from a dialog box.
Serial Number The serial number of this asset, filled in automatically.
Commit A check box indicating that this record was completed by clicking the Commit button.
Write-In Asset This is an asset number for an asset that is not yet in the Field Service database on the FSE’s laptop, but is on the Field Service server. An inventory transaction for the asset is not generated until the user synchronizes.
Write-In Serial Number This is a serial number for an asset that is not yet in the Field Service database on the FSE’s laptop, but is on the Field Service server. An inventory transaction for the asset is not generated until the user synchronizes.
Source The origin of this part movement, chosen from a picklist; for example, Service Order, Trunk, or Customer.
Destination The destination of this part movement, chosen from a picklist; for example, Service Order, Trunk, or Customer.
Trunk Inventory The name of the trunk inventory, if a trunk is associated with this transfer, chosen from a dialog box.
Order Item Id The number of the service order, if it is associated with this transfer, chosen from a dialog box.
Billable A check box indicating that the product transferred is billable to the customer.
Version 6.1 Siebel Field Service Guide 3-23
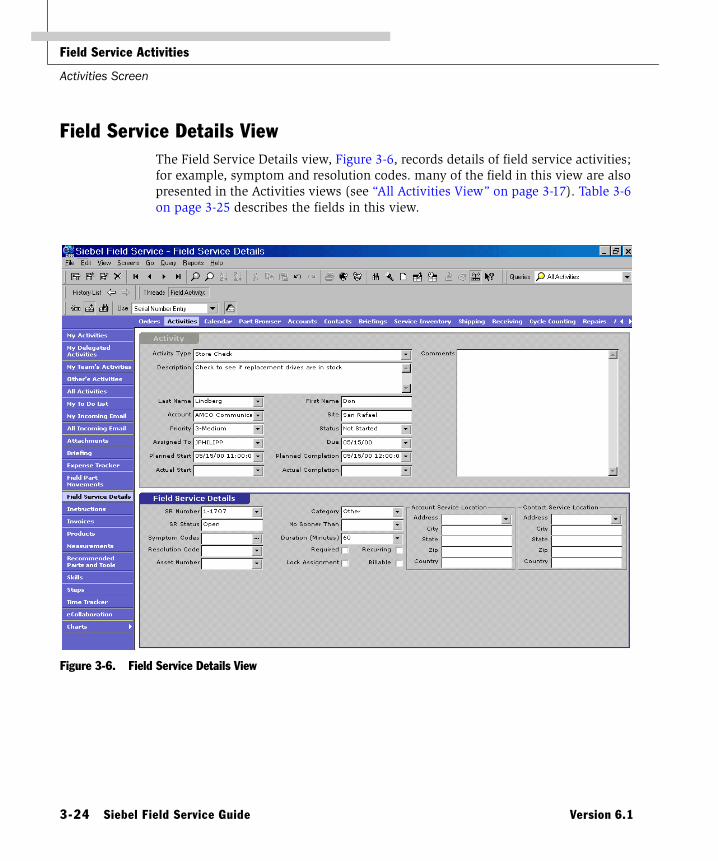
Field Service Activities
Activities Screen
Field Service Details View 3
The Field Service Details view, Figure 3-6, records details of field service activities; for example, symptom and resolution codes. many of the field in this view are also presented in the Activities views (see “All Activities View” on page 3-17). Table 3-6 on page 3-25 describes the fields in this view.
Figure 3-6. Field Service Details View
3-24 Siebel Field Service Guide Version 6.1

Field Service Activities
Activities Screen
Table 3-6. Selected Fields in the Field Service Details View
Field Description
SR Number The number of the service request associated with this activity, chosen from a dialog box.
SR Status The status of this activity, chosen from a dialog box.
Symptom Codes A description of the symptom associated with this activity, chosen from a dialog box.
Resolution Codes The code describing the solution for this activity, chosen from a dialog box.
Asset Number The number of an asset associated with this activity, chosen from a dialog box.
Category The type of activity, chosen from a picklist; for example:
■ Field Engineer Activity
■ Preventive Maintenance
■ Repair Activity
■ Other
No Sooner Than An earliest starting date for this activity.
Duration (Minutes) The total estimated time spent for an activity.
Required A check box indicating that this activity is mandatory.
Lock Assignment A check box that instructs the Assignment Manager not to assign this activity. The default state of this flag depends on the choice of category:
■ Field Engineer Activity: unchecked (assigned)
■ Preventive Maintenance: unchecked (assigned)
■ Repair Activity: unchecked (assigned)
■ Other: checked (not assigned)
For more information on the function of this flag, see “Rules for Assigning Activities” on page 2-38.
Recurring A check box indicating that this activity should be repeated. Read-only.
Billable A check box indicating that this activity is billable.
Version 6.1 Siebel Field Service Guide 3-25

Field Service Activities
Activities Screen
Instructions View 3
The Instructions view, Figure 3-7 records instructions for carrying out an activity. These instructions may be specific to a customer’s site. Table 3-7 describes the fields in this view.
Figure 3-7. Instruction Applet in the Instructions View
Table 3-7. Fields in the Instructions Applet
Field Description
Type A category of instructions, chosen from a picklist; for example, Note, Directions, Safety, or Special.
Instruction A type-in field for an instruction.
3-26 Siebel Field Service Guide Version 6.1

Field Service Activities
Activities Screen
Invoices View 3
The Invoices view, Figure 3-8, displays invoices created for this activity and it allows manual or automatic generation of invoices for any activities that are marked as billable. For details see “All Invoices View” on page 13-11.
Measurements View 3
The Measurements view, Figure 3-9, displays key characteristics of an asset that may be recorded and tracked. For more information, see “Measurements and Readings Views” on page 5-30
Figure 3-8. Invoices Applet in the Invoices View
Figure 3-9. Measurements View
Version 6.1 Siebel Field Service Guide 3-27

Field Service Activities
Activities Screen
Recommended Parts and Tools View 3
The Recommended Parts and Tools view, Figure 3-10, shows the materials that an FSE must have to complete an activity. Table 3-8 describes the fields in this view.
Figure 3-10. Recommended Parts and Tools Applet in the Recommended Parts and Tool View
Table 3-8. Fields in the Recommended Parts and Tools Applet
Field Description
Part/Tool The name of a part or tool, chosen from a dialog box.
Quantity The number of parts or tools, filled in automatically if defined in the activity plan.
Tool A check box indicating that this is a tool rather than a part.
Order Id The number of a service order, if this part or tool is on order, chosen from a dialog box.
Order Status The status of an order for a part or tool. Filled in automatically with the order Id.
3-28 Siebel Field Service Guide Version 6.1

Field Service Activities
Activities Screen
Skills View 3
The Skills view, Figure 3-11, describes the skills needed to complete successfully an activity. The view contains the Service Activity Skills and the Service Activity Skill Item applet. Table 3-9 and Table 3-10 on page 3-29 describe the fields in this view.
NOTE: Various types of skills are required for an FSE to work on an activity; for example, product or language skills. Add skill types using the Assignment Administration screen. The Assignment Manager uses these attributes in assigning an activity to the right employee.
Figure 3-11. Service Activity Skills Applets in the Skills View
Table 3-9. Selected Field in the Service Activity Skills Applet
Field Description
Item A skill category, chosen from a picklist; for example, Industry, Language Code, Product, Product Line, Product Line Wildcard, Product Wildcard, or Revenue.
Table 3-10. Fields in the Service Activity Skill Item Applet
Field Description
Product, Language... A specific product line, language, and so on, depending on the choice for Item in the Service Activity Skills applet.
Expertise, Currency... The level of skill required, chosen from a picklist; for example, Intermediate or Expert. This field changes with the choice for Item in the Service Activity Skills applet.
Version 6.1 Siebel Field Service Guide 3-29

Field Service Activities
Activities Screen
Steps View 3
The Steps applet, Figure 3-12, describes the recommended procedures for carrying out an activity. Table 3-11 describes the fields in this view.
Figure 3-12. Steps Applet in the Steps View
Table 3-11. Fields in the Steps Applet
Field Description
Step The name of a step, chosen from a dialog box.
Description A type-in field for a description of the step.
Sequence A type-in field for the number of each step in a procedure.
Performed A check box indicating that this step was completed.
Performed By The name of the person completing the step, chosen from a dialog box.
3-30 Siebel Field Service Guide Version 6.1

Field Service Activities
Activities Screen
Time Tracker View 3
The Time Tracker view, Figure 3-13, records the hours spent on each field service activity. Table 3-12 describes the fields in this view.
Figure 3-13. Time Tracker Applet in the Time Tracker View
Table 3-12. Fields in the Time Tracker Applet
Field Description
Time Type The category of hourly activity, from a picklist; for example, Install or Travel.
Date The date of the service activity.
Rate Type The type of rate to use in billing these hours, chosen from a picklist; for example, Contract, Premium, or Standard. These types of rates correspond to values in the rate list that is associated with this service request.
Start Time The time that the activity began.
Stop Time The time that the activity ended.
Hours The total time spent on this activity, Stop time minus Start time.
Billable A check box indicating that these hours are billable to the customer.
Version 6.1 Siebel Field Service Guide 3-31

Field Service Activities
Products Screen
Products Screen 3
The Products screen has one view, Figure 3-14 on page 3-32, that applies specifically to field service activities: Product Field Service Details.
Product Field Service Details View 3
The Product Field Service Details view, Figure 3-14, provides information about replacing a a defective part and about possible substitute parts. All fields are read-only. The values are defined in Marketing Administration ➞ Products ➞ Products (see “Marketing Administration Screen” on page 7-23). Table 3-13 on page 3-33 through Table 3-16 on page 3-35 describe the fields in this view.
Figure 3-14. Product Field Service Details View
3-32 Siebel Field Service Guide Version 6.1

Field Service Activities
Products Screen
Table 3-13. Fields in the Product Form Applet
Field Description
Product The name of the product selected in the All Products view.
Product Line The name of the family or group to which this product belongs.
Description A description of the product.
Part Number The manufacturer’s part number for this product.
Unit of Measure The number of units that make up this product.
Table 3-14. Fields in the Field Service Details Form Applet (Sheet 1 of 2)
Field Description
Version The version number of the product.
Version status The status of the product version, chosen from a picklist; for example, Prototype or Product.
Serialized A check box indicating that this product is serialized. See the following note.
Tool A check box defining that this is a tool. This setting is inherited by the recommended Parts and Tools applet (see “Recommended Parts and Tools View” on page 3-28).
Return if Defective A check box indicating that defective instances of this product should be returned to the field service business.
Field Replaceable Unit A check box directing that the FSE can replace this product in the field.
Primary Vendor The name of the product vendor.
Vendor Catalog # The catalog number for this product.
Auto Allocate A check box directing automatic allocation of a replacement part from inventory.
Auto Substitute A check box directing automatic allocation of a substitute part for this part.
Version 6.1 Siebel Field Service Guide 3-33

Field Service Activities
Products Screen
NOTE: If the Serialized check box is checked, a product movement (transaction) requires an asset number or its corresponding serial number. For other purposes, assets with serial numbers do not have to have this box checked.
Serialized products are treated in a different way than non-serialized ones. Whenever a serialized product is shipped or received, the Field Service expects the right number of assets. For example, if four serialized hard drives are shipped or received, Field Service expects that four separate assets are entered.
Allocate Below Safety A check box indicating that allocation may be made below the safe inventory level of this product.
Shipping Method The method for shipping a replacement part from the vendor, chosen from a picklist; for example, Air or Ground.
Carrier The carrier for shipping a replacement part from the vendor, chosen from a picklist; for example, UPS.
MTBF Mean time between failures; a measure of dependability of the product.
MTTR Mean time to repair; a measure of the time required to repair the product.
Table 3-14. Fields in the Field Service Details Form Applet (Sheet 2 of 2)
Field Description
3-34 Siebel Field Service Guide Version 6.1

Field Service Activities
Products Screen
NOTE: The Substitute Products list applet can define substitute parts. Suppose a product P is selected and a record is added with product S. This means product S can be used as a substitute for product P. The relationship is unidirectional; it does not mean that product P can be used as a substitute for product S. The order fulfillment process and the Part Locator use this relationship to identify substitutes for a product.
Table 3-15. Fields in the Inventory Options List Applet
Field Description
Inventory Type The inventory container, chosen from a picklist; for example, Trunk, Bin, or Warehouse.
Auto Allocate Yes, No, or Default, indicating automatic allocation of a replacement part from inventory. See “System Preferences for the Fulfillment and Part Locator Engines” on page 8-49.
Allocate Below Safety Yes, No, or Default, indicating that allocation may be made below the safe inventory level of this product. See “System Preferences for the Fulfillment and Part Locator Engines” on page 8-49.
Auto Substitute Yes, No, or Default, directing automatic allocation of a substitute part for this part. See “System Preferences for the Fulfillment and Part Locator Engines” on page 8-49.
Class ABC The cycle counting priority for this product is based on cost.
Class XYZ The cycle counting priority for this product is based on turnover.
Table 3-16. Field in the Substitute Products List Applet
Field Description
Product Name The names of products that can replace a selected product. Click the name to see the details view for this product.
Version 6.1 Siebel Field Service Guide 3-35
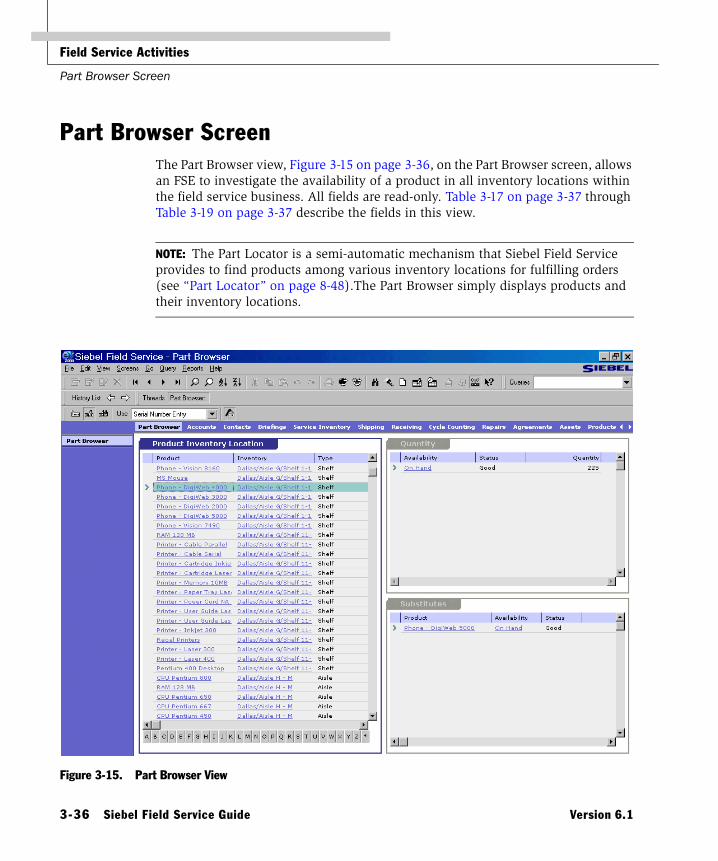
Field Service Activities
Part Browser Screen
Part Browser Screen 3
The Part Browser view, Figure 3-15 on page 3-36, on the Part Browser screen, allows an FSE to investigate the availability of a product in all inventory locations within the field service business. All fields are read-only. Table 3-17 on page 3-37 through Table 3-19 on page 3-37 describe the fields in this view.
NOTE: The Part Locator is a semi-automatic mechanism that Siebel Field Service provides to find products among various inventory locations for fulfilling orders (see “Part Locator” on page 8-48).The Part Browser simply displays products and their inventory locations.
Figure 3-15. Part Browser View
3-36 Siebel Field Service Guide Version 6.1
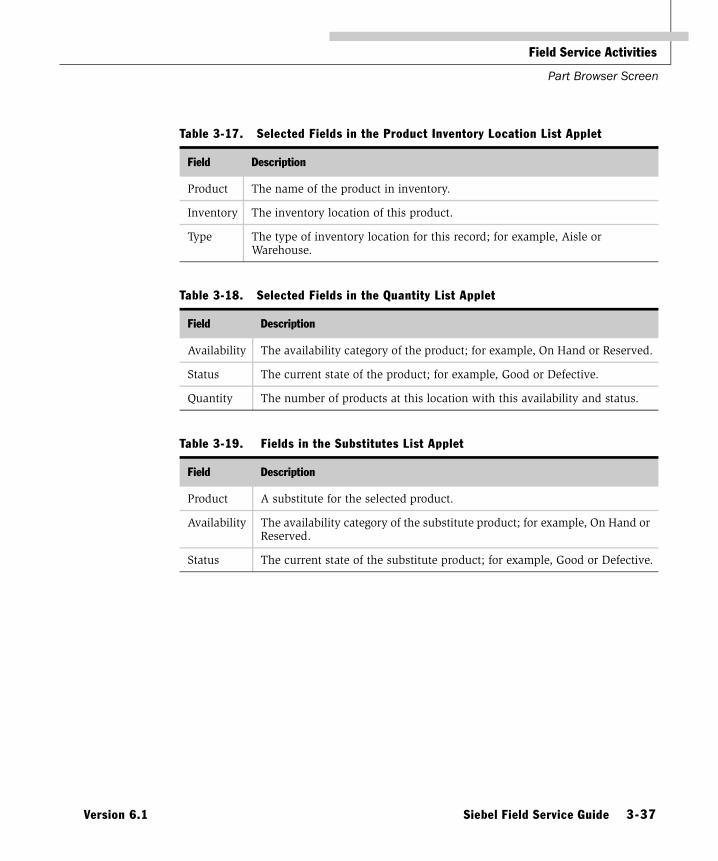
Field Service Activities
Part Browser Screen
Table 3-17. Selected Fields in the Product Inventory Location List Applet
Field Description
Product The name of the product in inventory.
Inventory The inventory location of this product.
Type The type of inventory location for this record; for example, Aisle or Warehouse.
Table 3-18. Selected Fields in the Quantity List Applet
Field Description
Availability The availability category of the product; for example, On Hand or Reserved.
Status The current state of the product; for example, Good or Defective.
Quantity The number of products at this location with this availability and status.
Table 3-19. Fields in the Substitutes List Applet
Field Description
Product A substitute for the selected product.
Availability The availability category of the substitute product; for example, On Hand or Reserved.
Status The current state of the substitute product; for example, Good or Defective.
Version 6.1 Siebel Field Service Guide 3-37

Field Service Activities
Solutions Views
Solutions Views 3
The FSE has as a resource solutions to previous service requests and documents related to finding solutions. These are found on four different screens:
■ Solutions ➞ All Solutions
■ Solutions ➞ Resolution Documents
■ Call Center Administration ➞ Related Documents
■ Service Requests ➞ Solution Search
3-38 Siebel Field Service Guide Version 6.1

Field Service Activities
Solutions Views
All Solutions View 3
The All Solutions view (Solutions ➞ All Solutions), Figure 3-16, presents Solutions list and form applets. These applets record solutions to repetitive service activities.
Figure 3-16. All Solutions View
Version 6.1 Siebel Field Service Guide 3-39
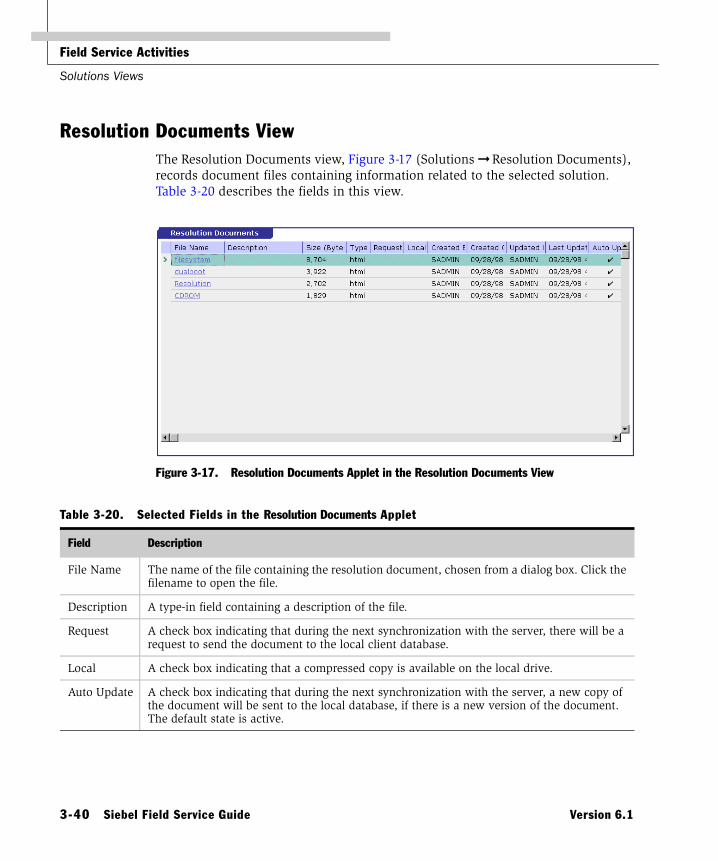
Field Service Activities
Solutions Views
Resolution Documents View 3
The Resolution Documents view, Figure 3-17 (Solutions ➞ Resolution Documents), records document files containing information related to the selected solution. Table 3-20 describes the fields in this view.
Figure 3-17. Resolution Documents Applet in the Resolution Documents View
Table 3-20. Selected Fields in the Resolution Documents Applet
Field Description
File Name The name of the file containing the resolution document, chosen from a dialog box. Click the filename to open the file.
Description A type-in field containing a description of the file.
Request A check box indicating that during the next synchronization with the server, there will be a request to send the document to the local client database.
Local A check box indicating that a compressed copy is available on the local drive.
Auto Update A check box indicating that during the next synchronization with the server, a new copy of the document will be sent to the local database, if there is a new version of the document. The default state is active.
3-40 Siebel Field Service Guide Version 6.1
Field Service Activities
Solutions Views
Related Documents View 3
The Related Documents view on the call Center Administration screen is the same as the Solutions ➞ Resolution Documents view.
Solution Search View 3
The Solution Search view on the Service Requests screen is the same as the Solution applets in the Solutions ➞ All Solutions view (see “All Solutions View” on page 3-39). The Service Requests applet in the same view adds three buttons (see Table 3-21) with the following search capabilities.
Table 3-21. Search Buttons in the Solution Search View
Field/Button Description
Related SRs This button sets up a query of all service requests to determine if there are other service requests that are similar. The query must be pre-populated with the current Product, Status, and Sub-Status for the selected service request. After clicking Related SRs, select values for other fields to add more search criteria. From the Query menu, choose Execute Query to carry out the search.
Encyclopedia This button performs a query of the Siebel Encyclopedia (products, decision issues, competitors, and online sales literature) to determine if there are other entries that are similar to those associated with the current service request. The query must be pre-populated with the current Area for the selected service request. This button goes to Decision Issues ➞ All Decision Issues to display the information related to the selected service request.
Search This button performs a query of all data sources, using Siebel’s full-text search engine, to determine if there are other records that are similar. For the syntax of full text searches, see the online help for the Service Request screen.
Version 6.1 Siebel Field Service Guide 3-41

Field Service Activities
Activities Charts
Activities Charts 3
The Activities screen provides the charts for analysis, listed in Table 3-22.
Table 3-22. Activities Analyses
Chart Analysis
Account and Type Analysis Two graphs:
■ The number of activities for each account.
■ The number of activities for each type of account.
Contact Analysis The number of activities for each contact.
New Activities Analysis The number of new activities as a function of calendar period.
Status Analysis by Owner The number of activities for each owner.
Status and Priority Analysis Two graphs:
■ The number of activities for each status category.
■ The number of activities for each priority category.
Symptom and Resolution Analysis Two graphs:
■ The number of activities of each symptom type.
■ The number of activities for each resolution code.
Trend Analysis by Activity Type The number of activities of each type as a function of calendar period.
Trend Analysis by Product The number of activities for each product as a function of calendar period.
3-42 Siebel Field Service Guide Version 6.1

Field Service Activities
Activity Reports
Activity Reports 3
The Reports menu provides the reports for activities, listed in Table 3-23.
Setup and Configuration 3
Activities for FSEs are set up and configured on the screens and views listed in Table 3-24. For details and procedures, see the Siebel Applications Administration Guide.
Table 3-23. Activities Reports
Report Description
Activity List A summary of all activities.
Field Engineer Activity Summary A summary of all activities for FSEs.
Field Engineer Activity Detail A full report of each field service activity, printed one per page.
Table 3-24. Screens and Views for Setting Up Activities (Sheet 1 of 2)
Screen View Role
Siebel Assistant Administration Activity Templates Set up activity templates.
Activity Template Details Associate activities with an activity template.
Service Activity Details Describe additional conditions for service activities.
Service Activity Steps Record the recommended steps in a service activity.
Service Activity Skills Record the skills required to complete a service activity.
Service Activity Parts and Tools List the parts and tools required to complete a service activity.
Service Activity Instructions Record instructions for a service activity.
Version 6.1 Siebel Field Service Guide 3-43

Field Service Activities
Setup and Configuration
Call Center Administration Solutions Record solutions to service requests and associated service requests and product defects.
Marketing Administration Products ➞ Product Field Service Details Define the fields on the Product Field Service Details view, including the vendor that supplies a product and the allocation rules that apply to the product. See:“Marketing Administration Screen” on page 7-23.
Table 3-24. Screens and Views for Setting Up Activities (Sheet 2 of 2)
Screen View Role
3-44 Siebel Field Service Guide Version 6.1

Service Agreements 4
About This Chapter . . . . . . . . . . . . . . . . . . . . . . . . . . . . . . . . . . . . . . 4-3
Business Scenario . . . . . . . . . . . . . . . . . . . . . . . . . . . . . . . . . . . . . . . 4-4
Concepts and Terms . . . . . . . . . . . . . . . . . . . . . . . . . . . . . . . . . . . . . . 4-5
Application Overview . . . . . . . . . . . . . . . . . . . . . . . . . . . . . . . . . . . . . 4-6
Verifying Service Agreements . . . . . . . . . . . . . . . . . . . . . . . . . . . . . 4-6
Using Service Agreements . . . . . . . . . . . . . . . . . . . . . . . . . . . . . . . . 4-7
Screens and Views for Agreements . . . . . . . . . . . . . . . . . . . . . . . . . . . . 4-9
Agreements Screen . . . . . . . . . . . . . . . . . . . . . . . . . . . . . . . . . . . . . . 4-12
All Agreements View . . . . . . . . . . . . . . . . . . . . . . . . . . . . . . . . . . 4-12
Activities View . . . . . . . . . . . . . . . . . . . . . . . . . . . . . . . . . . . . . . 4-15
Activity Plans View . . . . . . . . . . . . . . . . . . . . . . . . . . . . . . . . . . . 4-16
Administrative Contacts View . . . . . . . . . . . . . . . . . . . . . . . . . . . . 4-17
Attachments View . . . . . . . . . . . . . . . . . . . . . . . . . . . . . . . . . . . . 4-19
Documents View . . . . . . . . . . . . . . . . . . . . . . . . . . . . . . . . . . . . . 4-19
Entitlements View . . . . . . . . . . . . . . . . . . . . . . . . . . . . . . . . . . . . 4-20
Financial Details View . . . . . . . . . . . . . . . . . . . . . . . . . . . . . . . . . 4-22
Invoices View . . . . . . . . . . . . . . . . . . . . . . . . . . . . . . . . . . . . . . . 4-25
Line Items View . . . . . . . . . . . . . . . . . . . . . . . . . . . . . . . . . . . . . 4-26
Terms and Totals View . . . . . . . . . . . . . . . . . . . . . . . . . . . . . . . . . 4-28
Preventive Maintenance View . . . . . . . . . . . . . . . . . . . . . . . . . . . . 4-29
Version 6.1 Siebel Field Service Guide 4-1

Service Agreements
Entitlements Screen . . . . . . . . . . . . . . . . . . . . . . . . . . . . . . . . . . . . . 4-30
Accounts View . . . . . . . . . . . . . . . . . . . . . . . . . . . . . . . . . . . . . . 4-30
Contacts View . . . . . . . . . . . . . . . . . . . . . . . . . . . . . . . . . . . . . . . 4-31
Metrics View . . . . . . . . . . . . . . . . . . . . . . . . . . . . . . . . . . . . . . . . . . . . 4-33
Preventive Maintenance View . . . . . . . . . . . . . . . . . . . . . . . . . . . . 4-34
Products View . . . . . . . . . . . . . . . . . . . . . . . . . . . . . . . . . . . . . . . 4-35
Service Details View . . . . . . . . . . . . . . . . . . . . . . . . . . . . . . . . . . 4-36
Agreements Charts . . . . . . . . . . . . . . . . . . . . . . . . . . . . . . . . . . . . . . 4-37
Agreements Reports . . . . . . . . . . . . . . . . . . . . . . . . . . . . . . . . . . . . . 4-37
Setup and Configuration . . . . . . . . . . . . . . . . . . . . . . . . . . . . . . . . . . 4-38
Setting Up Entitlements . . . . . . . . . . . . . . . . . . . . . . . . . . . . . . . . 4-38
Setting Up Service Agreements . . . . . . . . . . . . . . . . . . . . . . . . . . . . . . . 4-42
Verifying Entitlements . . . . . . . . . . . . . . . . . . . . . . . . . . . . . . . . . . . . . . 4-45
Specifying Entitlement Rules . . . . . . . . . . . . . . . . . . . . . . . . . . . . 4-45
4-2 Siebel Field Service Guide Version 6.1

Service Agreements
About This Chapter
About This Chapter 4
This chapter describes how to create and manage agreements with specific levels of service (entitlements).
Siebel Field Service supports contract management processes including quote-to-agreement, proposal generation, activity templates, line item pricing, financial tracking, invoicing, entitlements, preventive maintenance, service calendars, metrics, selective coverage, and immediate entitlement verification. On the Agreements screen, All Agreements view, many different types of agreements can be created manually. These agreements can be created automatically from a quote on the Quotes screen, Agreements view. A master agreement can have multiple child agreements.
An agreement proposal can be quickly created on the Agreements screen, Documents view, based on a pre-defined template created on the Marketing Administration screen, Documents ➞ Document Templates view. An Agreement can also have many line items, where each line item describes a product or service provided to the customer. Each line item can also have multiple entitlements. The line items define the financial relationship between the parties, and the entitlements define the service relationship. Entitlements can cover specific costs, contacts, and accounts, and can include specific metrics, service hours, responsiveness, and preventive maintenance plans.
After the agreement is fully defined, users can check the Valid flag to activate the agreement. Preventive maintenance actions for covered assets of a given entitlement are only initiated if the agreement’s Valid flag is checked. When the Valid flag is checked and the entitlement is active based on its start and end dates, the agreement’s entitlements are available for selection when valid contacts or accounts require service. If a user clicks the Verify button on the Service Requests screen, a dialog box displays the valid entitlements for the specified account, contact, product, and asset.
When an entitlement is selected, the service request inherits its entitlements metrics, service calendar, and committed response time.
Version 6.1 Siebel Field Service Guide 4-3

Service Agreements
Business Scenario
Administrators can specify key financial information and track total amounts invoiced versus expected agreement revenue. Invoice frequency and preferences are defined along with other information, like expected margin, revenue recognition process, and payment terms. Invoices can be manually created based on the agreement and tracked through a back-office billing process.
Business Scenario 4
A large service company wants to upgrade its software for managing agreements. The company has 1,000 customers with service agreements; most are complex multi-vendor deals with service of large equipment. The company needs the following capabilities for its new enterprise solution:
■ Create a proposal for an agreement, using a standard template. See “Siebel Proposals” in the Siebel Applications Administration Guide.
■ Create an agreement automatically from a quote for a service. See the Quotes screen in Siebel Field Service and the description of the Quote Assistant in the Siebel eConfigurator Guide and the Quote Assistant Tutorial in the online help.
■ Each agreement should include all terms, conditions, pricing, billing, approved contacts, and services using a standard template.
■ Ability to provide accurate and timely invoicing and billing. Payments to date, amount outstanding, and days outstanding should be available and visible.
■ Track agreement profitability, part usage, service performance, and the installed base.
■ Ability to track assets in the field and create preventive maintenance service calls.
4-4 Siebel Field Service Guide Version 6.1
Service Agreements
Concepts and Terms
Concepts and Terms 4
Agreement A document that defines the obligations to perform, provide, offer, or produce specific activities, responsibilities, products, or services over a determined period of time for a specific amount of money. Agreements can be sales, service, or both. An agreement is created after both parties sign a proposal that often includes detailed descriptions of pricing, terms, limitations, coverage, and conditions, in addition to legal rights, processes, and guidelines.
Contract This is another name for agreement. It often replaces agreement in formal discussions or communications. The term contract is the accepted term within the legal and business communities.
Service Agreement A type of contract that defines a service relationship. The agreement specifies pricing, service level, support requirements, maintenance, warranty, and all terms and conditions of the service. Other types of contract include sales, purchasing, and development.
Service Level Agreement (SLA)
A type of service agreement that defines the coverage (or entitlement) for customers and their assets. Service levels can be measured and are usually expressed as a percentage. Service levels include the percentage of parts received on time out of those requested, percentage of asset uptime, percentage of problems fixed within the required time frame, and so on. SLAs can also be a part of a larger service agreement.
Entitlement The service or extent of coverage a specific customer receives, based on the service agreement. Entitlements are created within an SLA or service agreement. Each entitlement provides a quantifiable level of service for an account or a contact.
Agreement Revenue The amounts payable by a customer, according to the terms of an agreement. Customer payments may be periodic, up-front, disbursed over time, or charged at the time of service.
Service Products Specific types of services offered by the company and set up for sale with a common name, list price per unit, and so on.
Agreement Value The total amount of revenue expected over the life of service agreement (entire term).
Costs The total costs incurred to meet the agreement. Costs include labor, materials, overhead, travel, supplies, tools, purchases, inventory carrying costs, transportation, billing, depreciation, and other capital expenses needed to fulfill the terms.
Preventive Maintenance (PM)
Service activities performed on a product to prevent excessive wear or failure. For more information, see Chapter 12, “Preventive Maintenance.”
Version 6.1 Siebel Field Service Guide 4-5

Service Agreements
Application Overview
Application Overview 4
This section includes detailed procedures for using the screens and features provided for service agreements. For details on individual screens, see “Screens and Views for Agreements” on page 4-9.
Verifying Service Agreements 4
Follow these procedures to check the status of service agreements.
To verify service agreements and entitlements for an account
1 Choose Accounts ➞ Agreements (see “All Agreements View” on page 4-12).
2 In the Agreements view, query the account by name (Account field).
The list of agreements appears in the Agreements applet.
3 Click the name of this agreement.
You see Agreements ➞ Entitlements, with a list of entitlements for the selected agreement. Note the start and end dates for the entitlements.
Verifying service agreements for a contact
1 Choose Contacts ➞ All Contacts.
2 Select a contact.
3 Choose Contacts ➞ Agreements.
The Agreements applet lists the agreements for this contact.
Verifying products covered by agreements
1 Choose Agreements ➞ All Agreements.
2 Select an agreement.
3 Click in the Name column.
You see Agreements ➞ Entitlements.
4-6 Siebel Field Service Guide Version 6.1

Service Agreements
Application Overview
4 In the Entitlements applet, click the name of an entitlement.
You see Entitlement ➞ Metrics.
5 Choose Entitlements ➞ Products.
This view shows a list of products covered by each entitlement.
Using Service Agreements 4
Follow these procedures to implement service agreements.
To generate documents for implementing a service agreement
1 Choose Agreements ➞ Documents (see “Documents View” on page 4-19).
2 In the Agreements applet, select an agreement.
3 Create a new record in the Documents applet.
4 Type in a name.
5 Choose a template from the picklist.
6 Complete the other fields, as needed.
To manually create invoices for service agreements
1 Choose Agreements ➞ Invoices (see “Invoices View” on page 4-25).
2 In the Agreements applet, select a service agreement.
3 Add a new record to the Invoices applet.
4 Complete the fields, as needed.
5 Click the invoice number to go to the Invoices screen.
6 Choose the Invoice Line Items view (see “Line Items View” on page 4-26) and add line items as needed.
7 With the invoice still selected, go to Reports ➞ Customer Invoice (see “Agreements Reports” on page 4-37).
8 Generate and print the invoice.
Version 6.1 Siebel Field Service Guide 4-7

Service Agreements
Application Overview
Attaching documents to agreements
1 Choose Agreements ➞ Attachments.
2 In the Agreements list applet, select an agreement.
3 In the Attachments applet, create a new record for each document.
4 In the Select File dialog box, choose the name of the file to attach.
To verify entitlements for an agreement
1 Choose Agreements ➞ All Agreements.
2 Select an agreement.
3 Choose Agreements ➞ Entitlements.
The Entitlements applet lists the entitlements for this agreement.
4 Check the start and end dates to see if the entitlement is active.
To verify entitlements for a service request
1 Choose Service Requests ➞ All Service Requests.
2 Select a service request.
3 In the Service Requests form applet, click Verify.
The Pick Entitlement dialog box appears, with a list of the active entitlements for this service request.
4 Click Close.
NOTE: To select an entitlement for this service request, highlight that entitlement and click Pick in the same dialog box.
4-8 Siebel Field Service Guide Version 6.1

Service Agreements
Screens and Views for Agreements
Screens and Views for Agreements 4
Click the name of a screen or view in Table 4-1 to see more information.
Table 4-1. Screens and Views for Agreements (Sheet 1 of 3)
Screen View Role/Procedures (Click to see full procedure.)
Agreements All Agreements Define and identify service contracts. See:
“To add activities to an agreement” on page 4-42
“To associate contacts with an agreement” on page 4-43
Activities Associate activities with agreements.
Activity Plans Associate activity plans with agreements and view the activities that belong to these plans. See:
“To associate activity plans (and associated activities) with an agreement” on page 4-42
Administrative Contacts Associate legal, billing, and shipping contacts with an agreement. See:
“To create administrative contacts” on page 4-43
Attachments Associate files with agreements.
Documents Automatically generate documents required to implement a service agreement; for example, subcontractor agreements and work orders. See:
“To generate documents for implementing a service agreement” on page 4-7
Entitlements Create entitlements and associate them with specific agreements. See:
“To define entitlements for a service agreement” on page 4-44
“To associate accounts with entitlements” on page 4-38
“To associate contacts with entitlements” on page 4-39
“To associate products and assets with entitlements” on page 4-40
“To associate a preventive maintenance plan with entitlements” on page 4-40
“To add performance measurements (metrics) for an entitlement” on page 4-41
Version 6.1 Siebel Field Service Guide 4-9

Service Agreements
Screens and Views for Agreements
Agreements (continued)
Financial Details Summarize the contractual terms of an entitlement and the cost basis for a field service business.
Invoices Create and view the invoices that are associated with this agreement. See:
“To manually create invoices for service agreements” on page 4-7
Line Items Record and view a description of each product covered by a selected service agreement.
Terms and Totals Learn how payment is made on a service agreement.
Preventive Maintenance Initiate preventive maintenance actions for specific agreements and view the related PM plans for each entitlement. See:
“To associate a preventive maintenance plan with entitlements” on page 4-40
Entitlements Accounts Associate accounts with specific entitlements.
Contacts Associate contacts at an account with a specific entitlement. See:
“To associate contacts with entitlements” on page 4-39
Metrics Record performance data for an entitlement. See:
“To add performance measurements (metrics) for an entitlement” on page 4-41
Preventive Maintenance Associate preventive maintenance plans with entitlements. See:
“To associate a preventive maintenance plan with entitlements” on page 4-40
Products Associate assets and products with entitlements. See:
“To associate products and assets with entitlements” on page 4-40
Service Details Record the billing details for service activities associated with entitlements.
Accounts Agreements Define and identify service contracts. Indicate that this is a parent agreement that includes other agreements (Primary Agreement check box).
Entitlements Record the billing details for service activities associated with entitlements.
Service Agreements Same as Accounts ➞ Agreements, but only for service agreements.
Table 4-1. Screens and Views for Agreements (Sheet 2 of 3)
Screen View Role/Procedures (Click to see full procedure.)
4-10 Siebel Field Service Guide Version 6.1

Service Agreements
Screens and Views for Agreements
Contacts Agreements Same as Accounts ➞ Agreements.
Entitlements View entitlements associated with a contact:
Explicit Entitlements: All entitlements that have a contact listed on Entitlements ➞ Contacts.
Implicit Entitlements: All entitlements that have a check in the All Contacts check box on Entitlements ➞ Accounts.
Table 4-1. Screens and Views for Agreements (Sheet 3 of 3)
Screen View Role/Procedures (Click to see full procedure.)
Version 6.1 Siebel Field Service Guide 4-11

Service Agreements
Agreements Screen
Agreements Screen 4
All Agreements View 4
The All Agreements view, Figure 4-1, contains the Agreements form and list applets for defining and identifying service contracts. Table 4-2 on page 4-13 describes the fields in this view.
Figure 4-1. All Agreements View
4-12 Siebel Field Service Guide Version 6.1

Service Agreements
Agreements Screen
Table 4-2. Selected Fields in the Agreements Applets (Sheet 1 of 2)
Field Description
Name A type-in field for the name of an agreement. The default for a new record is the Agreement number. Replace this with a descriptive or systematic name. Click this field to go to Agreements ➞ Entitlements.
Agreement #
Agmt #
A unique number that is assigned to each agreement record.
Type A required value describing the class of agreement, chosen from a picklist; for example:
■ Master Service Agreement
■ Work Order
■ Letter of Understanding
■ Letter of Intent
■ Subcontractor Work Order
■ Order
■ Price Protection
■ Service Level agreement
■ Support Renewal
Status A required value defining the current state of an agreement, chosen from a picklist:
■ Canceled
■ Current
■ Expired
■ In Process
■ Inactive
■ Signed
■ Under Negotiation
Revision A type-in field for the revision number of an agreement.
Version 6.1 Siebel Field Service Guide 4-13
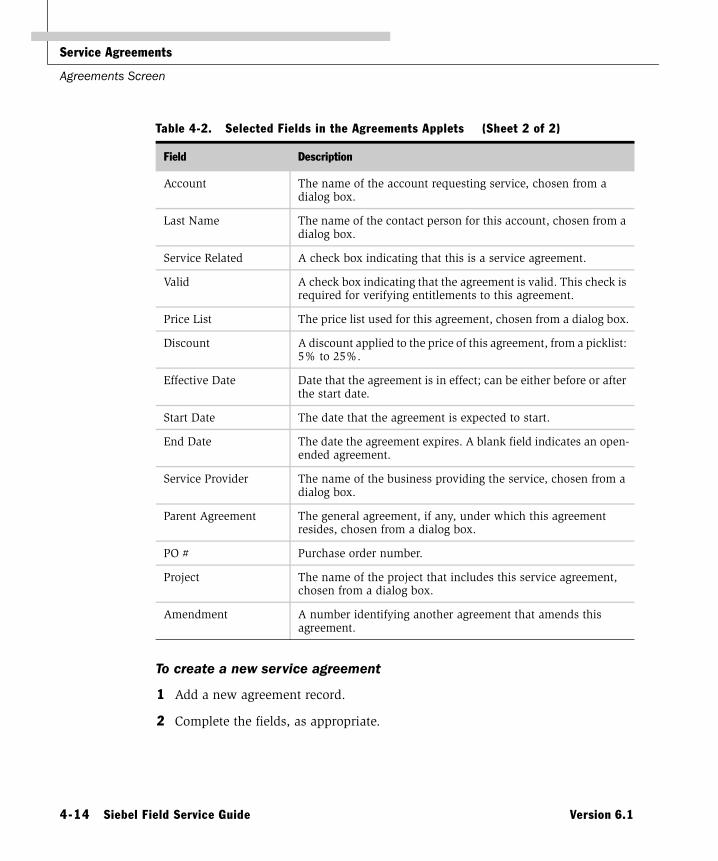
Service Agreements
Agreements Screen
To create a new service agreement
1 Add a new agreement record.
2 Complete the fields, as appropriate.
Account The name of the account requesting service, chosen from a dialog box.
Last Name The name of the contact person for this account, chosen from a dialog box.
Service Related A check box indicating that this is a service agreement.
Valid A check box indicating that the agreement is valid. This check is required for verifying entitlements to this agreement.
Price List The price list used for this agreement, chosen from a dialog box.
Discount A discount applied to the price of this agreement, from a picklist: 5% to 25%.
Effective Date Date that the agreement is in effect; can be either before or after the start date.
Start Date The date that the agreement is expected to start.
End Date The date the agreement expires. A blank field indicates an open-ended agreement.
Service Provider The name of the business providing the service, chosen from a dialog box.
Parent Agreement The general agreement, if any, under which this agreement resides, chosen from a dialog box.
PO # Purchase order number.
Project The name of the project that includes this service agreement, chosen from a dialog box.
Amendment A number identifying another agreement that amends this agreement.
Table 4-2. Selected Fields in the Agreements Applets (Sheet 2 of 2)
Field Description
4-14 Siebel Field Service Guide Version 6.1
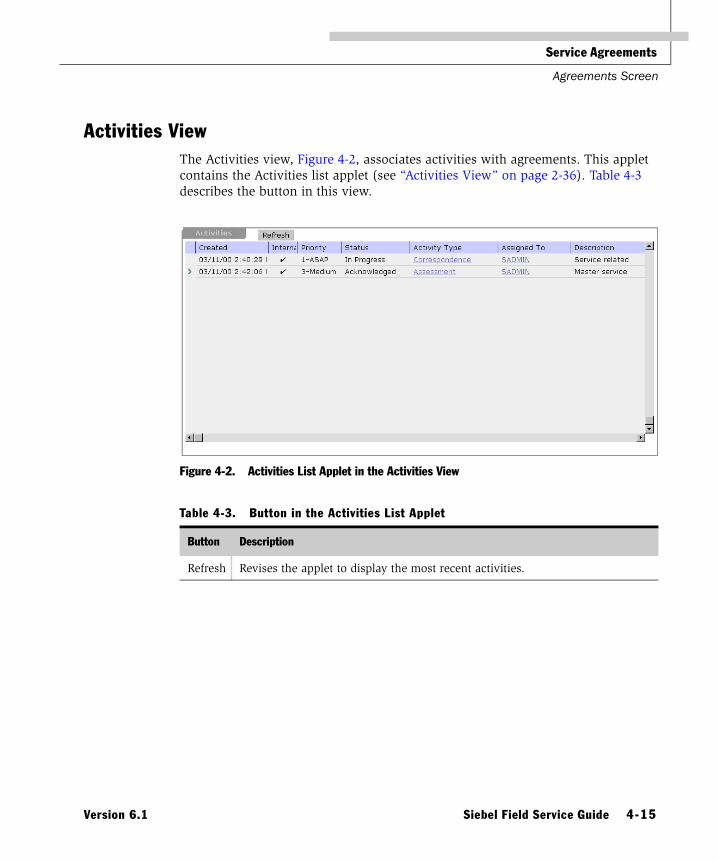
Service Agreements
Agreements Screen
Activities View 4
The Activities view, Figure 4-2, associates activities with agreements. This applet contains the Activities list applet (see “Activities View” on page 2-36). Table 4-3 describes the button in this view.
Figure 4-2. Activities List Applet in the Activities View
Table 4-3. Button in the Activities List Applet
Button Description
Refresh Revises the applet to display the most recent activities.
Version 6.1 Siebel Field Service Guide 4-15

Service Agreements
Agreements Screen
Activity Plans View 4
The Activity Plans view, Figure 4-3, associates activity plans with agreements. This view contains the Agreement applet (see “All Agreements View” on page 4-12), the Activity Plans list applet (see “Activity Plans View” on page 2-36), and the Activities list applet (see “Activities View” on page 2-36). The Activities list applet in this view is read-only; it displays the activities in the selected plan.
Figure 4-3. Activity Plans and Activities List Applets in the Activity Plans View
4-16 Siebel Field Service Guide Version 6.1

Service Agreements
Agreements Screen
Administrative Contacts View 4
The Administrative Contacts view, Figure 4-4, associates legal, billing, and shipping contacts with an agreement. This view contains the Agreements form applet (see “All Agreements View” on page 4-12) and the Administrative Contacts applet. Table 4-4 describes the fields in this view.
Figure 4-4. Administrative Contacts Form Applet in the Administrative Contacts View
Table 4-4. Fields in the Administrative Contacts Form Applet (Sheet 1 of 2)
Field Description
Agreement The name of the agreement selected in the Agreements applet.
Amendment A number identifying an amendment to this agreement.
Revision A type-in field for the version number of this agreement.
Parent Agmt The general agreement, if any, under which this agreement resides, chosen from a dialog box.
Account The name of the account contracting for service, chosen from a dialog box.
Version 6.1 Siebel Field Service Guide 4-17
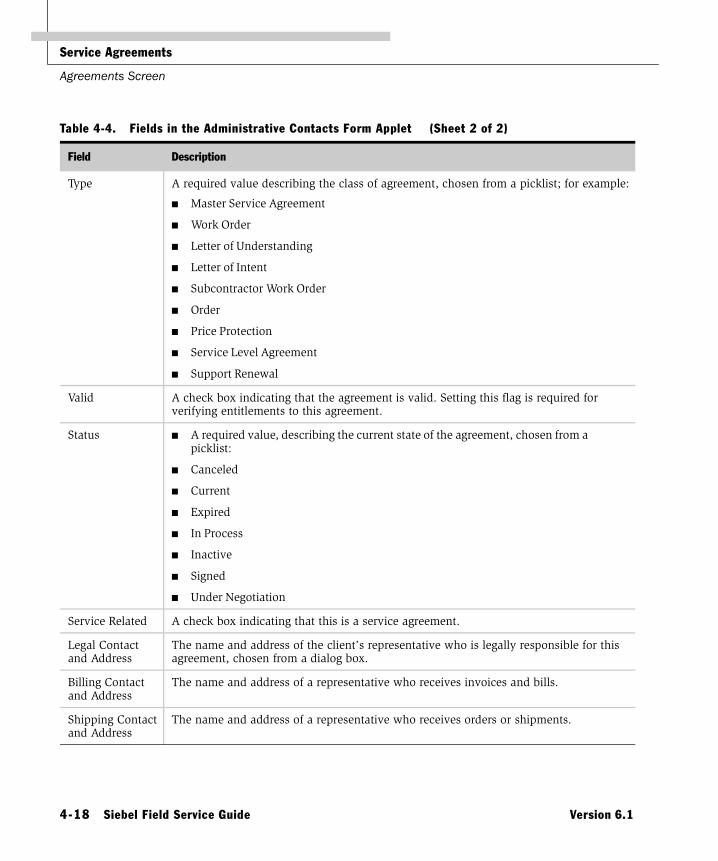
Service Agreements
Agreements Screen
Type A required value describing the class of agreement, chosen from a picklist; for example:
■ Master Service Agreement
■ Work Order
■ Letter of Understanding
■ Letter of Intent
■ Subcontractor Work Order
■ Order
■ Price Protection
■ Service Level Agreement
■ Support Renewal
Valid A check box indicating that the agreement is valid. Setting this flag is required for verifying entitlements to this agreement.
Status ■ A required value, describing the current state of the agreement, chosen from a picklist:
■ Canceled
■ Current
■ Expired
■ In Process
■ Inactive
■ Signed
■ Under Negotiation
Service Related A check box indicating that this is a service agreement.
Legal Contactand Address
The name and address of the client’s representative who is legally responsible for this agreement, chosen from a dialog box.
Billing Contactand Address
The name and address of a representative who receives invoices and bills.
Shipping Contactand Address
The name and address of a representative who receives orders or shipments.
Table 4-4. Fields in the Administrative Contacts Form Applet (Sheet 2 of 2)
Field Description
4-18 Siebel Field Service Guide Version 6.1

Service Agreements
Agreements Screen
Attachments View 4
Use the Attachments view to associate files with selected agreements. The Attachments view contains the Agreement applet (see “All Agreements View” on page 4-12) and the Attachments list applet.
Documents View 4
The Documents view, Figure 4-5, automatically generates documents required to implement a service agreement; for example, subcontractor agreements and work orders. This view contains the Agreements applet (see “All Agreements View” on page 4-12) and the Documents list applet. Table 4-5 on page 4-20 describes the fields in this view.
See also “Siebel Proposals” in the Siebel Applications Administration Guide and Using Siebel Applications.
Figure 4-5. Documents List Applet in the Documents View
Version 6.1 Siebel Field Service Guide 4-19

Service Agreements
Agreements Screen
Entitlements View 4
The Entitlements view creates entitlements and associates them with specific agreements. This view contains the Agreements form applet (see “All Agreements View” on page 4-12) and the Entitlements list applet, shown in Figure 4-6. Table 4-6 describes the fields in this view.
Table 4-5. Selected Fields in the Documents List Applet
Field Description
Name A type-in field for the name of a document.
Template A template for this document, chosen from a picklist:
■ Standard Subcontractor Agreement
■ Standard Work Order
Draft Document Name The name of the draft document.
Local A check box indicating that this document is stored locally.
Figure 4-6. Entitlements List Applet in the Entitlements View
4-20 Siebel Field Service Guide Version 6.1
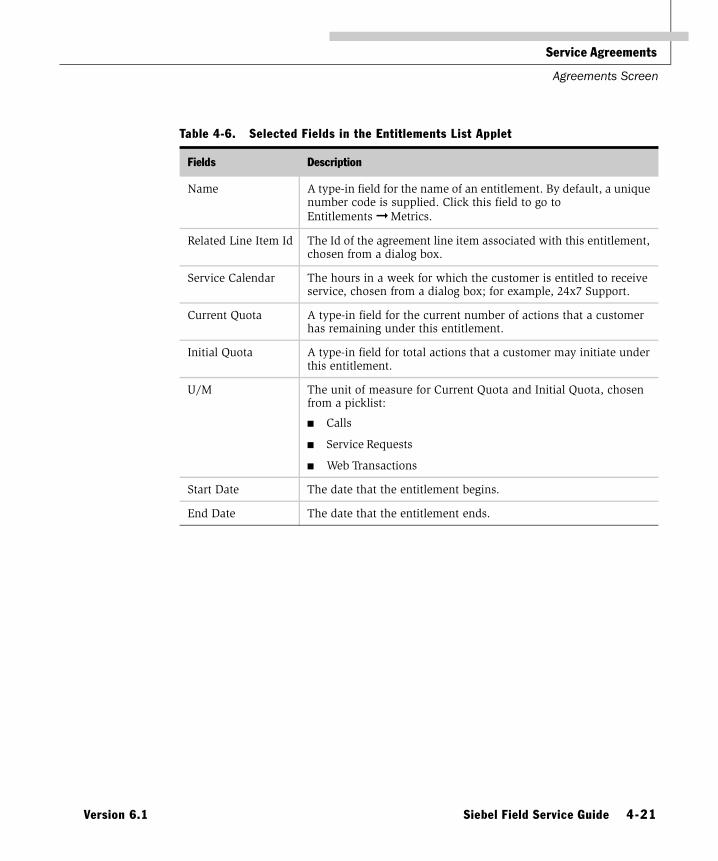
Service Agreements
Agreements Screen
Table 4-6. Selected Fields in the Entitlements List Applet
Fields Description
Name A type-in field for the name of an entitlement. By default, a unique number code is supplied. Click this field to go to Entitlements ➞ Metrics.
Related Line Item Id The Id of the agreement line item associated with this entitlement, chosen from a dialog box.
Service Calendar The hours in a week for which the customer is entitled to receive service, chosen from a dialog box; for example, 24x7 Support.
Current Quota A type-in field for the current number of actions that a customer has remaining under this entitlement.
Initial Quota A type-in field for total actions that a customer may initiate under this entitlement.
U/M The unit of measure for Current Quota and Initial Quota, chosen from a picklist:
■ Calls
■ Service Requests
■ Web Transactions
Start Date The date that the entitlement begins.
End Date The date that the entitlement ends.
Version 6.1 Siebel Field Service Guide 4-21

Service Agreements
Agreements Screen
Financial Details View 4
The Financial Details view summarizes the contractual terms of an entitlement and the cost basis for a field service business. This view contains the Agreements applets (see “All Agreements View” on page 4-12) and the Financial Summary form applet, shown in Figure 4-7. Table 4-7 on page 4-22 describes the fields in this view.
Figure 4-7. Financial Summary Form Applet In the Financial Details View
Table 4-7. Selected Fields in the Financial Summary Form Applet (Sheet 1 of 3)
Field/Check Box Description
Order # An order number associated with an agreement, chosen from a dialog box.
Quote # The number of the quote for an agreement, chosen from a dialog box.
Term Months The period of a service agreement, in months.
Months Left The calculated months remaining in a service agreement.
Auto Renewal A check box indicating that the renewal of an agreement can be automatic.
Renewal Term A type-in field for the length of an automatic renewal, in months.
Lead-Time (Days) A type-in field for the number of days before the end date that the customer should be informed.
Ext. List Price The extended list price for the line items in this agreement.
Net Discount The discount applied to this agreement, in an amount of currency.
4-22 Siebel Field Service Guide Version 6.1

Service Agreements
Agreements Screen
Ext. Price The extended price of this agreement, after the discount. Calculated as the sum of the extended price of each line item.
Freight The freight charges, if any.
Total Total price of this agreement, calculated automatically.
Total Est. Rev Total estimated revenue from this agreement.
Total Est. Cost Total estimated cost for this agreement.
Est. Margin The estimated profit margin for this agreement.
Est. Margin % The percentage of the estimated profit margin for this agreement.
Recognition The type of recognition process followed for revenues from the agreement, chosen from a picklist:
■ Annually
■ As Received
■ Daily
■ Monthly
■ Quarterly
■ Upon Approval
■ Weekly
Invoice Type The type of invoice prepared for this agreement:
■ Consolidated
■ Contract
■ Installment
■ Project
■ Sales
■ Service
■ Standard
■ Time & Materials
Table 4-7. Selected Fields in the Financial Summary Form Applet (Sheet 2 of 3)
Field/Check Box Description
Version 6.1 Siebel Field Service Guide 4-23

Service Agreements
Agreements Screen
Invoice Schedule The frequency of invoices for this agreement:
■ Annually
■ Bi-Annually
■ Monthly
■ Quarterly
Invoice Day The day of the month for preparing invoices:
■ 10th of Month
■ 15th of Month
■ 1st of Month
■ 30th of Month
■ Last day of Month
Amount A type-in field for the amount of each invoice.
Invoiced to Date A type-in field for the total of invoices up to the current date.
Payment Method The preferred method of payment by the customer:
■ Check
■ Credit Card
First Payment The date that the first payment is expected.
Last Payment The date that the last payment is expected.
Table 4-7. Selected Fields in the Financial Summary Form Applet (Sheet 3 of 3)
Field/Check Box Description
4-24 Siebel Field Service Guide Version 6.1
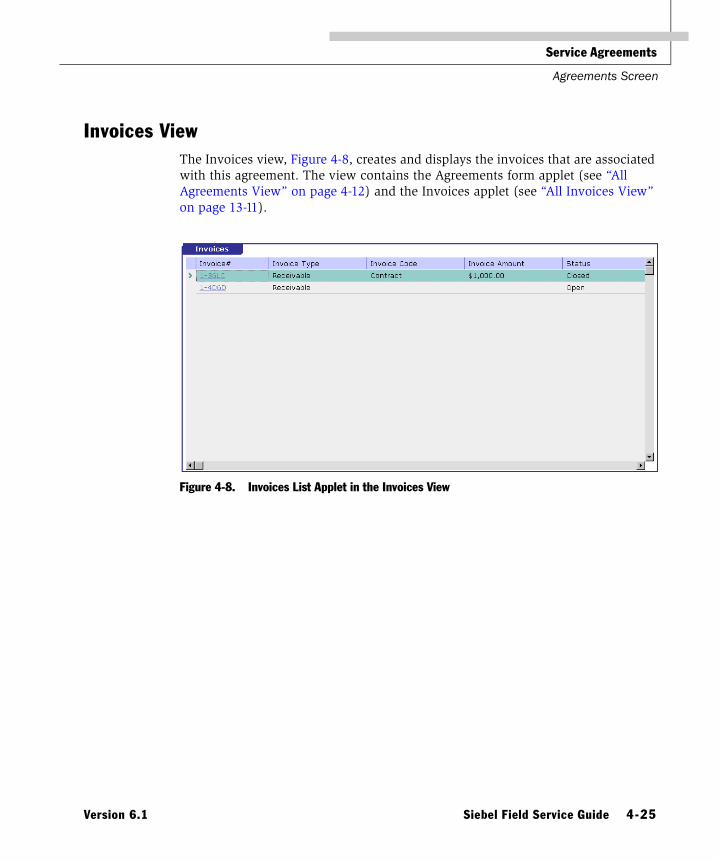
Service Agreements
Agreements Screen
Invoices View 4
The Invoices view, Figure 4-8, creates and displays the invoices that are associated with this agreement. The view contains the Agreements form applet (see “All Agreements View” on page 4-12) and the Invoices applet (see “All Invoices View” on page 13-11).
Figure 4-8. Invoices List Applet in the Invoices View
Version 6.1 Siebel Field Service Guide 4-25

Service Agreements
Agreements Screen
Line Items View 4
The Line Items view, Figure 4-9, records and displays a description of each product covered by the selected service agreement. The view contains the Agreements form applet (see “All Agreements View” on page 4-12) and the Line Items applet. Table 4-8 describes the fields in this view.
Figure 4-9. Line Items List Applet in the Line Items View
Table 4-8. Selected Fields in the Line Items List Applet (Sheet 1 of 2)
Field/Button Description
Reprice This button calculates the latest price for the selected line item.
Reprice All This button calculates the price for all line items associated with this agreement.
Renumber This button numbers the line items sequentially, starting at 1.
Line A number assigned to each line item, starting with 1.
Qty Req The quantity of this part covered by the service agreement. The default is 1. Type in another quantity.
Product The name of a product, chosen from a dialog box.
Part Number The part number of the line item, automatically filled in with the product name.
Current Discount The current discount percentage for the quantity ordered. For instance, if the user ordered 70, and the discount for 50–99 items is 10%, this field shows 10%.
4-26 Siebel Field Service Guide Version 6.1

Service Agreements
Agreements Screen
Net Discount The volume discount for the next highest level. For instance, if the user ordered 170, and the discount for 100–200 items is 15%, this field shows 15%.
Upsell This is a read-only message that encourages the user to purchase a higher volume. For instance, if the user ordered 70, and the discount for 100–200 items is 15%, this might show the message, “If you buy 30 more, your discount will rise to 15%.”
Net Price A read-only value calculated from List Price–Discount.
Service A check box indicating that this line item is a service product.
Covered Product If the line item is priced as a service product, this field indicates the products covered by the service.
Req Delivery The date that delivery of this item is scheduled, if appropriate.
Qty The same as Qty Req; filled in automatically.
U/M The unit of measure for the part, automatically filled in with the product name.
List Price A read-only field for the list price of this item, derived from the price list.
Disc % The percentage of discount to apply to the list price, chosen from a picklist.
Discount Amount The absolute amount of the discount for this line item.
Discount Price The discounted list price.
Next Discount % This is a calculated value, equal to (List Price–Net Price)/List Price.
Non-Discount Extended Price A read-only value calculated from Qty * List Price. If List Price is blank, then Qty * Net Price.
Extended Price A read-only value calculated from it is calculated from Qty * Net Price.
Table 4-8. Selected Fields in the Line Items List Applet (Sheet 2 of 2)
Field/Button Description
Version 6.1 Siebel Field Service Guide 4-27

Service Agreements
Agreements Screen
Terms and Totals View 4
The Terms and Totals, Figure 4-10, describes how payment is made on a service agreement. This view contains the Agreements applets (see “All Agreements View” on page 4-12), the Terms applet, and the Totals applet (see Online Help for the Quotes screen).
Figure 4-10. Terms and Totals Form Applets in the Terms and Totals View
4-28 Siebel Field Service Guide Version 6.1

Service Agreements
Agreements Screen
Preventive Maintenance View 4
The Preventive Maintenance view, Figure 4-11, initiates preventive maintenance actions for specific agreements and displays the related PM plans for each entitlement. This view contains the Agreements applet (see “All Agreements View” on page 4-12), Entitlements applet (see the “Entitlements View” on page 4-20), and PM Plans applet. Table 4-9 describes the fields in this view.
Figure 4-11. PM Plans List Applet in the Preventive Maintenance View
Table 4-9. Selected Fields in the PM Actions List Applet
Field Description
Name The name of a preventive maintenance, chosen from a dialog box. The available names are only those of the PM plans that are valid.
Click this name to see the PM actions associated with this plan (Preventive Maintenance ➞ History, PM Actions applet; see “History View” on page 12-20).
Active Filled in automatically with the name of the PM plan. Read-only.
Description Filled in automatically with the name of the PM plan. Read-only.
Version 6.1 Siebel Field Service Guide 4-29

Service Agreements
Entitlements Screen
Entitlements Screen 4
The Entitlements screen associates accounts, contacts, entitlement metrics, products, and preventive maintenance plans with specific entitlements. Create entitlements for service agreements on the Agreements ➞ Entitlements view (see “Entitlements View” on page 4-20).
NOTE: For all of the views on the Entitlements screen, select the agreement and the entitlement in the Agreements screen (see “Entitlements View” on page 4-20). Then go to the Entitlements screen.
Accounts View 4
The Accounts view, Figure 4-12, associates accounts with specific entitlements. This view contains the Entitlements applet (see “Entitlements View” on page 4-20) and the Accounts applet. Table 4-10 on page 4-31 describes the fields in this view.
Figure 4-12. Accounts List Applet in the Accounts View
4-30 Siebel Field Service Guide Version 6.1

Service Agreements
Entitlements Screen
Contacts View 4
The Contacts view shown in Figure 4-13 associates contacts at an account with a specific entitlement. This view contains the Entitlements applet (see “Accounts View” on page 4-30) and the Contacts applet. Table 4-11 on page 4-32 describes the fields in this view.
Table 4-10. Fields in the Accounts List Applet
Fields Description
Account The name of an account, chosen from a dialog box.
Site The location of the account, filled in automatically with the account name.
All Contacts A check box indicating that all contacts associated with this account are covered by this entitlement.
All Products A check box indicating that all products are covered by this entitlement.
Figure 4-13. Contacts List Applet in the Contacts View
Version 6.1 Siebel Field Service Guide 4-31

Service Agreements
Entitlements Screen
Table 4-11. Selected Fields in the Contacts List Applet
Field Description
Last Name The name of a contact, chosen from a dialog box, which shows all contacts for all accounts.
Phone A check box indicating that a contact can receive phone support.
Email A check box indicating that a contact can receive service by email.
Internet A check box indicating that a contact can receive service over the Internet.
Internet Logon The user name for logging in to Siebel eService. Read-only. For more information, see the Siebel .COM Applications Guide.
Internet Password The password for logging in to Siebel eService. For more information, see the Siebel .COM Applications Guide.
Email Name A type-in field for the contact’s email name.
All Products A check box indicating that the selected entitlement applies to all products.
4-32 Siebel Field Service Guide Version 6.1

Service Agreements
Entitlements Screen
Metrics View 4
The Metrics view, Figure 4-14, records performance data for an entitlement. This view contains the Entitlements applet (see “Accounts View” on page 4-30) and the Metrics applet. Table 4-12 describes the fields in this view.
NOTE: A Response Time metric is required for calculating Commit Time in the Service Request view (see “Service Requests Views” on page 2-33).
Figure 4-14. Metrics List Applet for Entitlements in the Metrics View
Table 4-12. Selected Fields for the Metrics List Applet
Fields Description
Type The type of performance measurement for the selected entitlement, chosen from a dialog box.
The type Response Time is used to calculate Commit Time for a service request. If Response Time is not defined for an entitlement, Commit Time is not calculated.
Value A type-in field for the value of the measurement.
If the unit is Days, this value must be an integer.
Units The unit of measurement, from a picklist.
Version 6.1 Siebel Field Service Guide 4-33

Service Agreements
Entitlements Screen
Preventive Maintenance View 4
The Preventive Maintenance view, Figure 4-15, associates preventive maintenance plans with entitlements. This view contains the Entitlements applet (see “Accounts View” on page 4-30) and the PM Plans applet. Table 4-13 describes the fields in this view.
Figure 4-15. PM Plans List Applet in the Preventive Maintenance View
Table 4-13. Fields in the PM Plans List Applet
Field Description
Name The name of a preventive maintenance plan, chosen from a dialog box. The available names are only those PM plans that are valid.
Active Filled in automatically with the name of the PM plan. Read-only.
Description Filled in automatically with the name of the PM plan. Read-only.
4-34 Siebel Field Service Guide Version 6.1

Service Agreements
Entitlements Screen
Products View 4
The Products view, Figure 4-16, associates assets and products with entitlements. This view contains the Entitlements applet (see “Accounts View” on page 4-30) and the Products applet. Table 4-14 on page 4-35 describes the fields in this view.
Figure 4-16. Products List Applet in the Products View
Table 4-14. Fields in the Products List Applet (Sheet 1 of 2)
Field Description
Asset Number The number assigned to an asset, chosen from a dialog box. Selecting this number automatically fills in all other fields, except for Install Quantity.
Serial Number The serial number of the asset, filled in automatically.
Product The name of a product, chosen from a dialog box. Selecting this name automatically fills in the Part Number, if available.
Part Number The part number of the asset.
Account Name The name of the account owning the asset.
Install Quantity A type-in field for the number of products of this type. This number applies only to assets of non-serialized products.
Version 6.1 Siebel Field Service Guide 4-35

Service Agreements
Entitlements Screen
Service Details View 4
The Service Details view, Figure 4-17, records the billing details for service activities associated with entitlements. Table 4-15 describes the fields in this view.
Install Date The date the asset was installed.
Warranty Start Date Not applicable.
Warranty End Date Not applicable.
Table 4-14. Fields in the Products List Applet (Sheet 2 of 2)
Field Description
Figure 4-17. Service Detail List Applet in the Service Details View
Table 4-15. Fields in the Service Detail Applet
Field Description
Activity Type The type of activity for which billing data is specified, chosen from a picklist.
Travel Time Billable A check box indicating that travel for this activity should be billed.
Labor Billable A check box indicating that labor for this activity should be billed.
Parts Billable A check box indicating that parts used for this activity should be billed.
4-36 Siebel Field Service Guide Version 6.1

Service Agreements
Agreements Charts
Agreements Charts 4
The Agreements screen provides charts for analysis, listed in Table 4-16.
Agreements Reports 4
The Reports menu provides reports for Agreements, listed in Table 4-17.
Table 4-16. Agreements Analysis
Chart Analysis
Trend Analysis by Effective Date The number of agreements beginning as a function of calendar period.
Trend Analysis by Expiration Date The number of agreements ending as a function of calendar period.
Table 4-17. Agreements Reports
Report Description
Agreement Summary Provides a summary of each agreement, printing three agreements per page.
Current Agreement Detail Provides all information about each agreement and associated line items.
Version 6.1 Siebel Field Service Guide 4-37

Service Agreements
Setup and Configuration
Setup and Configuration 4
This section includes procedures for setting up activities for Field Service.
Setting Up Entitlements 4
Follow these procedures to set up entitlements.
To set system preferences for entitlements
1 Choose Application Administration ➞ System Preferences
2 Select or query the system preferences for entitlements.
Use the query string Entitlement*.
3 Select a preference and set the value field to TRUE or FALSE.
See “Specifying Entitlement Rules” on page 4-45 for a discussion of these preferences.
To associate accounts with entitlements
1 Choose Agreements ➞ Entitlements (see “Entitlements View” on page 4-20).
2 In the Agreements applet, choose an agreement.
3 In the Entitlements applet, choose an entitlement for this agreement.
4 Click the name of the entitlement.
You see Entitlements ➞ Metrics.
5 Choose Entitlements ➞ Accounts (see “Accounts View” on page 4-30).
6 Add a new record to the Accounts applet; then choose an account from the dialog box.
7 Check the All Contacts and All Products boxes, as needed.
4-38 Siebel Field Service Guide Version 6.1
Service Agreements
Setup and Configuration
To associate contacts with entitlements
1 Choose Agreements ➞ Entitlements (see “Entitlements View” on page 4-20).
2 In the Agreements applet, choose an agreement.
3 In the Entitlements applet, choose an entitlement for this agreement.
4 Click the name of the entitlement.
You see Entitlements ➞ Metrics.
5 Choose Entitlements ➞ Contacts (see “Contacts View” on page 4-31).
6 Add a new record to the Contacts applet: then choose the name of a contact for this account from the dialog box.
7 Complete the other fields, as needed.
To associate all contacts for an account with an agreement
1 Choose Agreements ➞ All Agreements.
2 Select an agreement.
3 In the Name column, click the name of the agreement.
You see Agreements ➞ Entitlements.
4 Click an entitlement in the Entitlements list applet.
You see Entitlements ➞ Metrics.
5 Choose Entitlements ➞ Accounts.
6 Select an account.
7 Click the All Contacts check box to specify that all contacts associated with this account and entitlement are covered under the agreement.
8 Add a PM plan to the entitlement.
Version 6.1 Siebel Field Service Guide 4-39
Service Agreements
Setup and Configuration
To associate products and assets with entitlements
1 Choose Agreements ➞ Entitlements (see “Entitlements View” on page 4-20).
2 In the Agreements applet, choose an agreement.
3 In the Entitlements applet, choose an entitlement for this agreement.
4 Click the name of the entitlement.
You see Entitlements ➞ Metrics.
5 Choose Entitlements ➞ Products (see “Products View” on page 4-35).
6 Add a new record to the Products applet
7 Choose either the name of a product or an asset number from the lists.
8 Complete the other fields, as needed.
To associate a preventive maintenance plan with entitlements
1 Choose Agreements ➞ Entitlements (see “Entitlements View” on page 4-20).
2 In the Agreements applet, choose an agreement.
3 In the Entitlements applet, choose an entitlement for this agreement.
4 Click the name of the entitlement.
You see Entitlements ➞ Metrics.
5 Choose Entitlements ➞ Preventive Maintenance (see “Preventive Maintenance View” on page 4-34).
6 Add a new record to the PM Plans applet, then choose the name of a plan from the dialog box.
4-40 Siebel Field Service Guide Version 6.1

Service Agreements
Setup and Configuration
Associating a service calendar with an entitlement
1 Choose Agreements ➞ All Agreements.
2 Select an agreement.
3 In the Name column, click the name of the agreement.
You see Agreements ➞ Entitlements.
4 In the Entitlements applet, add a new record.
5 Click the Service Calendar field and choose a service calendar from the Pick Service Calendar dialog box.
To add performance measurements (metrics) for an entitlement
1 Choose Agreements ➞ Entitlements (see “Entitlements View” on page 4-20).
2 In the Agreements applet, choose an agreement.
3 In the Entitlements applet, choose an entitlement for this agreement.
4 Click the name of the entitlement.
You see Entitlements ➞ Metrics (see “Metrics View” on page 4-33).
5 Add a new record to the Metrics applet.
6 Choose a type of metric from the dialog box.
7 Type in the value of the measurement.
8 Complete the other fields, as needed.
Version 6.1 Siebel Field Service Guide 4-41

Service Agreements
Setup and Configuration
Setting Up Service Agreements 4
Follow these procedures to set up agreements.
To create new service agreements
1 Choose Agreements ➞ All Agreements (see “All Agreements View” on page 4-12).
2 Add a new record.
3 Type the agreement name in the Name column.
This replaces the agreement number.
4 In the Account column, replace the default account name with an account from the dialog box.
5 Complete the other fields as needed.
A new account record has Service Related checked, Status set to Current, and Type set to Service Level Agreement. Change these as needed.
To add activities to an agreement
1 Choose Agreements ➞ All Agreements (see “All Agreements View” on page 4-12).
2 In the Agreements applet, select an agreement.
3 Create a new record in the Activities applet.
4 Fill in the description of the activity.
5 Complete the other fields, as needed.
To associate activity plans (and associated activities) with an agreement
1 Choose Agreements ➞ Activity Plans (see “Activity Plans View” on page 4-16).
2 In the Agreements applet, select an agreement.
3 Create a new record in the Activity Plans applet.
4 Choose a template for the activity plan.
5 Complete the other fields, as needed.
4-42 Siebel Field Service Guide Version 6.1
Service Agreements
Setup and Configuration
To create administrative contacts
1 Choose Agreements ➞ Administrative Contacts (see “Administrative Contacts View” on page 4-17).
2 In the Agreements applet, select an agreement.
3 Create a new record in the Administrative Contacts applet.
4 Choose an account.
This choice automatically fills in the contact information.
5 To change the legal, billing, or shipping contact, click the respective field and choose a name from the list of contacts for that account.
6 Complete the other fields, as needed.
To associate contacts with an agreement
1 Choose Agreements ➞ All Agreements (see “All Agreements View” on page 4-12).
2 Select an agreement.
3 Click the account name.
You see Accounts ➞ Contacts (see “Contacts View” on page 2-27).
4 Create a new record to add a contact to this account.
To define financial details of agreements
1 Choose Agreements ➞ All Agreements (see “All Agreements View” on page 4-12).
2 Select an agreement.
3 Choose Agreements ➞ Financial Details (see “Financial Details View” on page 4-22).
4 Complete the fields in the Agreement and Financial Summary applets.
Version 6.1 Siebel Field Service Guide 4-43

Service Agreements
Setup and Configuration
To define entitlements for a service agreement
1 Choose Agreements ➞ Entitlements (see “Entitlements View” on page 4-20).
2 In the Agreements applet, select a service agreement.
3 Add a new record to the Entitlements applet.
4 Complete the fields, as required.
To define billing terms and shipping information for agreements
1 Choose Agreements ➞ All Agreements (see “All Agreements View” on page 4-12).
2 Select an agreement.
3 Choose Agreements ➞ Terms and Totals (see “Terms and Totals View” on page 4-28).
4 Complete the fields in the Terms applet.
5 Choose Agreements ➞ Administrative Contacts (see “Administrative Contacts View” on page 4-17).
6 Complete the fields for billing and shipping.
To include products in a service agreement
1 Choose Agreements ➞ List Items (see “Line Items View” on page 4-26).
2 In the Agreements applet, select an agreement.
3 Add a new record to the Line Items applet.
4 Choose a product for this line item.
5 Complete the other fields, as needed.
4-44 Siebel Field Service Guide Version 6.1

Service Agreements
Setup and Configuration
Verifying Entitlements 4
Entitlements determine whether a customer receives services, and how much they should pay. A CSR creates a service request and fills in the account, contact, and product. When the CSR clicks the Verify button (see “Service Requests Views” on page 2-33), Siebel Field Service matches the information in the selected record against the entitlement settings and returns the entitlements that apply. The following section describes settings that determine how closely the input data is checked.
Specifying Entitlement Rules 4
Application Administration ➞ System Preferences has three settings for agreements and entitlements, which are set to TRUE or FALSE (see Table 4-18). These setting change the entitlements and agreements that appear in the respective applets.
Table 4-18. Settings for Agreements/Entitlements in the System Preferences Applet (Sheet 1 of 2)
System Preference Name Description
Entitlement: Verify Consumer This setting checks that the contact requesting service is authorized to do so. If TRUE, the entitlements displayed must meet one of these criteria:
■ The contact for the entitlement matches the service request contact.
■ The entitlement account is set to All Contacts (see Table 4-10 on page 4-31), and the entitlement account matches the service request account or the account for the contact for the service request.
If no contact is selected, Siebel Field Service tries to verify the entitlement using the other settings.
Version 6.1 Siebel Field Service Guide 4-45
Service Agreements
Setup and Configuration
Entitlement: Verify Dates This setting checks that the service request falls within the time span of the entitlement. If TRUE, the entitlements displayed are only those that provide coverage on the date the service request was opened: a date between the start and end dates for the entitlement.
If the entitlement has no start or end date (see “Entitlements View” on page 4-20), it is not displayed.
Entitlement: Verify Product This setting checks that the asset or product is entitled to service. If TRUE, the agreements displayed must meet one of these criteria:
■ The entitlement asset matches an asset in the service request.
■ The entitlement product matches a product in the service request (no asset or serial number specified).
■ The entitlement is set to All Products (see Table 4-10 on page 4-31) and the product or asset for the entitlement matches the product or asset for the service request.
If no product is selected, Siebel Field Service tries to verify the entitlement using the other settings.
Table 4-18. Settings for Agreements/Entitlements in the System Preferences Applet (Sheet 2 of 2)
System Preference Name Description
4-46 Siebel Field Service Guide Version 6.1
Assets 5
About This Chapter . . . . . . . . . . . . . . . . . . . . . . . . . . . . . . . . . . . . . . 5-3
Concepts and Terms . . . . . . . . . . . . . . . . . . . . . . . . . . . . . . . . . . . . . . 5-5
Application Overview . . . . . . . . . . . . . . . . . . . . . . . . . . . . . . . . . . . . . 5-6
Obtaining Information About Assets . . . . . . . . . . . . . . . . . . . . . . . . 5-6
Calculating the Value and Cost of an Asset . . . . . . . . . . . . . . . . . . . . 5-7
Setting Up Asset Measurements . . . . . . . . . . . . . . . . . . . . . . . . . . . . 5-8
Obtaining Readings from Assets . . . . . . . . . . . . . . . . . . . . . . . . . . . 5-9
Screens and Views for Assets . . . . . . . . . . . . . . . . . . . . . . . . . . . . . . 5-10
Pricing Administration Screen . . . . . . . . . . . . . . . . . . . . . . . . . . . . . . 5-12
Asset Mapping View . . . . . . . . . . . . . . . . . . . . . . . . . . . . . . . . . . 5-12
Marketing Administration Screen . . . . . . . . . . . . . . . . . . . . . . . . . . . . 5-14
Product Measurements View . . . . . . . . . . . . . . . . . . . . . . . . . . . . . 5-14
Assets Screen . . . . . . . . . . . . . . . . . . . . . . . . . . . . . . . . . . . . . . . . . . 5-16
All Assets View . . . . . . . . . . . . . . . . . . . . . . . . . . . . . . . . . . . . . . 5-16
Product Defects View . . . . . . . . . . . . . . . . . . . . . . . . . . . . . . . . . . 5-19
Relationships View . . . . . . . . . . . . . . . . . . . . . . . . . . . . . . . . . . . . . . . . .5-21
Sub-Components and Transaction Views . . . . . . . . . . . . . . . . . . . . 5-22
Repair History View . . . . . . . . . . . . . . . . . . . . . . . . . . . . . . . . . . . 5-26
Valuation View . . . . . . . . . . . . . . . . . . . . . . . . . . . . . . . . . . . . . . 5-26
Activities View . . . . . . . . . . . . . . . . . . . . . . . . . . . . . . . . . . . . . . 5-30
Measurements and Readings Views . . . . . . . . . . . . . . . . . . . . . . . . 5-30
Preventive Maintenance Views . . . . . . . . . . . . . . . . . . . . . . . . . . . . . . . .5-34
Asset Chart . . . . . . . . . . . . . . . . . . . . . . . . . . . . . . . . . . . . . . . . . . . 5-36
Version 6.1 Siebel Field Service Guide 5-1

Assets
Setup and Configuration . . . . . . . . . . . . . . . . . . . . . . . . . . . . . . . . . . 5-36
Setting Up Assets . . . . . . . . . . . . . . . . . . . . . . . . . . . . . . . . . . . . 5-36
Asset Creation . . . . . . . . . . . . . . . . . . . . . . . . . . . . . . . . . . . . . . 5-39
Asset Registration . . . . . . . . . . . . . . . . . . . . . . . . . . . . . . . . . . . . . . . . . 5-40
Asset Transactions . . . . . . . . . . . . . . . . . . . . . . . . . . . . . . . . . . . . 5-40
5-2 Siebel Field Service Guide Version 6.1

Assets
About This Chapter
About This Chapter 5
This chapter describes the capabilities in Siebel Field Service for tracking and managing assets. It also provides a central location for automating the collection of data from assets in the field, providing information for preventive maintenance, repairs, billing, and marketing.
A field service business needs to track its assets, which can be installed at customers’ locations or can be stored within its own warehouses and inventory locations. These assets can be serialized or non-serialized.
In Siebel Field Service, assets have these properties:
■ Assets can contain a hierarchy of other assets as sub-components.
■ Assets can be related to or dependent upon other assets. For example, a UPS power supply can be related to a group of servers. So if the UPS power supply must be replaced, its dependent assets, the servers that are attached to it, must be considered.
■ Actions, such install, deinstall, upgrade, or down grade, can be performed on the asset by a field service engineer. A history of these transactions is maintained for the asset.
■ When an asset is returned for repairs, a repair record can be associated with the asset, and a repair history is maintained for that asset.
■ Assets can have activity records that describe events associated with an asset.
■ Assets can be associated with many of the Siebel business objects. For example, service requests can be related to a specific asset; a user can view all service requests associated with an asset.
■ Assets can be related to warranties; a user can view all warranties associated with an asset. A CSR can determine whether or not to charge a customer for field service and repairs, based on the warranty.
■ Assets can be related to preventive maintenance plans. Preventive maintenance actions can be created to service that asset.
■ Assets can be related to product defects; a user can view all product defects associated with an asset.
Version 6.1 Siebel Field Service Guide 5-3

Assets
About This Chapter
■ Siebel can function as the central store of information about assets, including documents that are attached to asset records.
■ Assets can have attributes. These attributes may have counters and gauges associated with them. Asset measurement can be set up for these attributes and readings recorded. For example, an office equipment distributor rents photocopy machines and invoices the customer based on usage. A photocopy machine can have three counters which count the number of standard-size, legal-size, and color prints produced. Each counter starts at zero, and for each use, increments by 1. Monthly, Siebel Field Service records the reading of each counter. These readings are the basis for billing.
■ Assets have financial value. Siebel Field Service can calculate the current value of an asset based on its condition.
5-4 Siebel Field Service Guide Version 6.1

Assets
Concepts and Terms
Concepts and Terms 5
Assets Products, parts, or assemblies that need to maintain their own identity—for the reason of maintaining the install base of the customer, or for tracking individual parts in the inventory. An asset can be defined for any product and may have a unique asset or serial number (a serialized asset).
Asset mapping Provides a mapping from an asset’s physical condition and age to a factor that is used to calculate its current value or replacement cost.
Cost list Consists of a cost name and a default cost method (standard, average, next, last). Cost List Items contains products associated with a cost list, along with the cost values for each product. Cost values are required for costing products, based on different cost methods. A cost list can be associated with a price list.
Fee-per-use The process of generating revenue based on the actual use of an asset.
Measurements Key characteristics of assets that are diagnostic of the state of an asset. These characteristics may be pressure, total revolutions, number of copies, and so on.
Non-serialized assets An asset can still be created for this type of product, but serial number tracking is not strictly enforced and is not explicitly identified in any inventory locations.
Readings The values taken from meters, counters, and gauges associated with assets installed in the field. Readings are records of a measurement that may involve several samples taken over a short period of time or periodic monitoring of a measurement over a longer period of time.
Version 6.1 Siebel Field Service Guide 5-5

Assets
Application Overview
Application Overview 5
This section includes detailed procedures for using the screens and features provided for assets. For details on individual screens, see “Screens and Views for Assets” on page 5-10.
Obtaining Information About Assets 5
Follow these procedures to obtain information about assets.
To review all defectives for a selected asset
1 Choose Assets ➞ All Assets.
2 Select an asset.
3 Choose Assets ➞ Product Defects.
The Product Defects applet list all of the defects for this asset.
4 Click the defect number to see more information about a defect.
You see Quality ➞ Activities.
NOTE: Defect Numbers are part of Siebel Quality Management and should not be confused with Defective Tags which are part of Siebel Repair (see Chapter 11, “Repairs”).
To review all activities associated with an asset
1 Choose Assets ➞ All Assets.
2 Select an asset.
3 Choose Assets ➞ Activities.
The Activities applet describes the activities associated with the asset.
5-6 Siebel Field Service Guide Version 6.1

Assets
Application Overview
To review preventive maintenance actions associated with specific assets
1 Choose Assets ➞ All Assets.
2 Select an asset.
3 Choose Assets ➞ Preventive Maintenance ➞ History.
The PM Actions applet describes the preventive maintenance activities associated with the asset.
Calculating the Value and Cost of an Asset 5
Follow these procedures to calculate the costs and value of assets.
To calculate the adjusted cost of an asset
The adjusted cost of an asset is calculated from the original cost, plus the value of enhancements, minus the value of depreciation, write-downs, and so on.
1 Choose Assets ➞ Valuation.
2 In the Asset Costing applet, add the original cost, if it is not already there.
3 Choose Adjusted from the picklist for Value Basis.
4 Choose the asset’s condition.
5 In the Asset Valuation applet, enter a new record for each action that affected the value of an asset.
6 Click Recost.
Field Service calculates the adjusted cost as original cost plus or minus the sum of values in the Amount column of the Asset Valuation applet. It also includes a factor for the asset’s condition.
Version 6.1 Siebel Field Service Guide 5-7

Assets
Application Overview
To calculate the value and replacement cost of an asset
This method of determining the cost of an asset uses the value basis for the asset. These variables are defined in the Asset Mapping view (see “Asset Mapping View” on page 5-12).
1 Choose Assets ➞ Valuation.
2 In the Asset Valuation applet, choose a Cost List from the picklist.
3 In the Asset Valuation applet, choose a Value Basis other than Adjusted from the picklist.
4 Click Recost.
Field Service calculates the Asset Value and Replacement Cost using one of these methods:
■ If Value Basis = Original Cost
■ Asset Value = Factor x Original Cost
■ Replacement Cost = Factor * Cost List value
Setting Up Asset Measurements 5
Follow these procedures to set up measurements of assets.
To associate measurements with an asset
1 Choose Assets ➞ All Assets.
2 Select an asset.
3 Choose Assets ➞ Measurements.
4 In the Asset Measurement list or form applet, create a new record for each measurement that applies to this asset.
NOTE: To set up the measurements that are associated with assets, see “To set up measurements for assets” on page 5-39.
5-8 Siebel Field Service Guide Version 6.1

Assets
Application Overview
Obtaining Readings from Assets 5
Follow these procedures to take readings of measurements from assets.
To record a reading for an asset
1 Choose Assets ➞ All Assets.
2 Select an asset.
3 Choose Assets ➞ Readings.
4 In the Assets Measurements applet, select a measurement.
5 In the Readings applet, create a new record for each reading associated with this asset and measurement.
To record a reading for an asset associated with a selected activity
1 Choose Assets ➞ All Assets.
2 Select an asset.
3 Choose Assets ➞ Activities.
4 Select an activity associated with this asset, or create a new activity record in the Activities applet.
5 Click the activity type.
You see Activities ➞ Attachments.
6 Choose Activities ➞ Measurements.
7 In the Assets Measurements applet, select a measurement.
8 In the Readings applet, create a new record for each reading associated with this asset and measurement.
Version 6.1 Siebel Field Service Guide 5-9

Assets
Screens and Views for Assets
To analyze the results of readings for a selected asset
1 Choose Assets ➞ All Assets.
2 Select an asset.
3 Choose Assets ➞ Charts ➞ Measurement Analysis.
4 In the Measurements applet, select a measurement.
The Readings applet shows the readings from a selected measurement as a function of the date of the readings.
Screens and Views for Assets 5
Click the name of a screen or view in Table 5-1 to see more information.
Table 5-1. Screens and Views for Assets (Sheet 1 of 2)
Screen ViewsRole/Procedures (Click to See Full Procedure)
Pricing Administration Costing ➞ Asset Mapping Record the factors that are used to calculate the Asset Values and the Replacement Costs on the Asset Valuation screen (see “Valuation View” on page 5-26). See: “To map the cost of assets for specific product lines” on page 5-38.
Marketing Administration Product Measurements Define measurements that may be obtained from specific assets.
5-10 Siebel Field Service Guide Version 6.1
Assets
Screens and Views for Assets
Assets All Assets Define and view assets. See: “To create an asset” on page 5-36 and “To associate a backup or dependent asset with a primary asset” on page 5-37.
Product Defects Record defects for specific assets.
Relationships Record backup assets and other assets that depend on the operation of any primary asset.
Sub-Components Record assets that are subcomponents of specific assets, creating a hierarchy of assets. See: “To create subcomponents” on page 5-37.
Transactions Create asset transactions manually, and view transactions associated with an asset. See: “To create subcomponents” on page 5-37 and “To associate manually a transaction with an asset” on page 5-37.
Repair History View all of the defective tags recorded for an asset.
Valuation View the current value of an asset, based on its history. See: “To calculate the adjusted cost of an asset” on page 5-7 and “To calculate the value and replacement cost of an asset” on page 5-8.
Activities Record activities that are associated with assets.
Measurements Define the types of data collected from assets.
Reading Record data from measurements of an asset.
Preventive Maintenance ➞ History View preventive maintenance actions associated with assets.
Record preventive maintenance plans
Table 5-1. Screens and Views for Assets (Sheet 2 of 2)
Screen ViewsRole/Procedures (Click to See Full Procedure)
Version 6.1 Siebel Field Service Guide 5-11
Preventive Maintenance ➞ PM Plansassociated with assets.
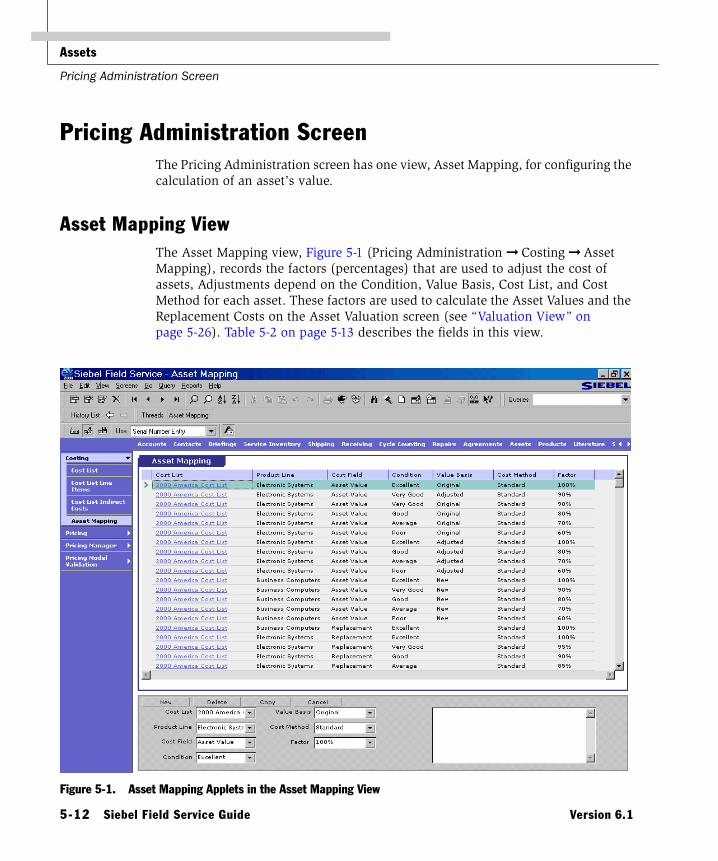
Assets
Pricing Administration Screen
Pricing Administration Screen 5
The Pricing Administration screen has one view, Asset Mapping, for configuring the calculation of an asset’s value.
Asset Mapping View 5
The Asset Mapping view, Figure 5-1 (Pricing Administration ➞ Costing ➞ Asset Mapping), records the factors (percentages) that are used to adjust the cost of assets, Adjustments depend on the Condition, Value Basis, Cost List, and Cost Method for each asset. These factors are used to calculate the Asset Values and the Replacement Costs on the Asset Valuation screen (see “Valuation View” on page 5-26). Table 5-2 on page 5-13 describes the fields in this view.
Figure 5-1. Asset Mapping Applets in the Asset Mapping View
5-12 Siebel Field Service Guide Version 6.1

Assets
Pricing Administration Screen
Table 5-2. Fields in the Asset Mapping Applets
Field Description
Cost List The product line to map, chosen from a picklist.
Product Line The product to map, chosen from a picklist.
Cost Field The field in the Asset Costing applet to which a record applies, chosen from a picklist:
■ Asset Value
■ Replacement
Condition The condition of the asset, chosen from a picklist:
■ Excellent
■ Very Good
■ Good
■ Average
■ Poor
Value Basis A variable used to calculate the value of an asset, chosen from a picklist:
■ Original
■ Adjusted
■ New Used
■ Refurbished
■ Scrap
Cost Method The method for determining the value of an asset, specified in the cost list, chosen from a picklist:
■ Standard
■ Average
■ Next
■ Last
Factor A type-in field containing the factor used to calculate the Asset Value and Replacement Cost on the Asset Valuation screen (see “Valuation View” on page 5-26).
Version 6.1 Siebel Field Service Guide 5-13

Assets
Marketing Administration Screen
Marketing Administration Screen 5
The Marketing Administration screen has a Product Measurements view (Marketing Administration ➞ Products ➞ Products Measurements) for defining measurements of specific products.
Product Measurements View 5
The Product Measurements view, Figure 5-2, defines measurements that may be obtained from specific assets. Table 5-3 on page 5-15 describes the fields in this view.
Figure 5-2. Product Measurements View
5-14 Siebel Field Service Guide Version 6.1

Assets
Marketing Administration Screen
Table 5-3. Fields in the Product Measurements Applets
Field Description
Type The type of measurement, in terms of the reading device. Chosen from a picklist; for example, Cycle Counter, Usage Meter, or Odometer.
Name A type-in field for the name of the measurement.
Method The means of collecting the readings of this measurement, chosen from a picklist; for example, Manual, Remote, Dial-up, or Internet.
Location A type-in field describing the physical location on the product of the measurement device.
U/M The unit of measurement, chosen from a picklist; for example, deg C, kw, or ppm.
Conversion A type-in field for a conversion factor applied to readings.
Frequency A type-in field for the interval between readings, chosen from a picklist; for example, Hourly or Yearly.
Maximum The largest possible value for the measurement device.
Minimum The smallest possible value for the measurement device.
Upper Limit The upper control limit for readings. This is less than or equal to the Maximum.
Lower Limit The lower control limit for readings. This is greater than or equal to the Minimum.
Exp Mean A type-in field for the expected average of readings.
Exp Std Dev A type-in field for the expected standard deviation of readings.
Usage Basis The number of days that define the period of expected usage.
Version 6.1 Siebel Field Service Guide 5-15

Assets
Assets Screen
Assets Screen 5
The Assets screen records all information about assets, including service and repair history, sub-components, associated activities, and preventive maintenance.
All Assets View 5
The All Assets view, Figure 5-3, has a list and a form applet for defining and viewing assets. Table 5-4 on page 5-17 describes the fields in this view.
Figure 5-3. Asset Applets in the All Assets View
5-16 Siebel Field Service Guide Version 6.1
Assets
Assets Screen
Table 5-4. Selected Fields in the Asset Applets (Sheet 1 of 2)
Field Description
Asset Number A unique number assigned to each asset of a product. An asset number can be reused for an asset of another product. Initially, Siebel Field Service generates an asset number. The user can replace this number with a serial number.
Serial Number A type-in field for the serial number of an asset. Assets must have serial numbers for products defined as serialized. Serial numbers are optional for non-serialized products.
A serial number entered in this field also appears in the Asset Number field, replacing the assigned asset number.
Quantity The number of assets. For serialized products, this number can only be 1. For non-serialized products, this number can be larger than 1; for example, a car can have four tires, tracked as one asset.
Product The name of the product, chosen from a dialog box.
Part Number The part number assigned to a product, filled in with the selection of a product.
Serialized A check box indicating that an asset is serialized. This check box is completed automatically if the product is serialized. See the Products screen and the “Product Field Service Details View” on page 3-32.
Version The version of the asset, chosen from a picklist.
Account The name of the party currently in possession of an asset, chosen from a dialog box.
Site The location of the account, filled in with the selection of an account.
Install Date The date that this asset was first installed at the account site.
Registered Date Date the asset was registered by the customer (for example, by a warranty registration card or a Web site).
Ship Date The date that this asset was first shipped to the account.
Original Cost The initial cost of the asset at the time it was shipped.
Warranty Start Date1 The first day of the warranty period.
Version 6.1 Siebel Field Service Guide 5-17
Assets
Assets Screen
Warranty End Date1 The last date of a warranty period.
Warranty Type1 The coverage of a warranty, chosen from a picklist:
■ Full
■ Hardware Only
■ Software Only
Status The state of an asset, chosen from a picklist:
■ Evaluation
■ Pilot
■ Production
Asset Tag The Id number on a label attached to a product, used for accounting purposes.
Contact The name of the person at the customer site who is responsible for this asset.
Employee The name of the FSE responsible for this asset, chosen from a picklist.
Personal Address The address of the FSE responsible for this asset, chosen from a picklist.
Inventory Location The location of an asset, if it is in the inventory of the service business.
1. Provided for continuity with Siebel Field Service version 5.5, but not used in this version.
Table 5-4. Selected Fields in the Asset Applets (Sheet 2 of 2)
Field Description
5-18 Siebel Field Service Guide Version 6.1

Assets
Assets Screen
Product Defects View 5
The Product Defects view, Figure 5-4, has a list applet for recording defects for specific assets. Table 5-5 describes the fields in this view.
Figure 5-4. Product Defects List Applet in the Product Defects View
Table 5-5. Selected Fields from the Product Defects List Applet (Sheet 1 of 2)
Field Description
Defect Number The unique number assigned to a reported product defect. Click this number to see details of the defect and activities resulting from this defect.
Note that Defect Numbers are part of Siebel Quality Management and should not be confused with Defective Tags, which are part of Siebel Repair.
Product The name of the product, chosen from a dialog box.
Abstract A short description of the defect.
Severity The quality of a defect, chosen from a picklist; for example, Crash/Data Loss, Feature Inaccessible, Wrong Behavior, or Minor Error.
Version 6.1 Siebel Field Service Guide 5-19

Assets
Assets Screen
Priority A priority assigned to the correction of a defect, chosen from a picklist; for example, Very High or Low.
Status The state of a defect, chosen from a picklist; for example, Open, Closed, or Canceled.
Sub-Status A further definition of the state of a defect, chosen from a picklist; for example, Unassigned, Assigned, or Resolved.
Area The class of defect, chosen from a picklist.
Sub-Area The subclass of defect, chosen from a picklist.
Owner The name of the person responsible for correcting this defect, chosen from a dialog box.
Group The name of the group responsible for correcting this defect, chosen from a dialog box.
Type The type of defect, chosen from a picklist.
Cause The cause of the defect, chosen from a picklist; for example, Abnormal Usage or User Related.
Reported By The name of the person reporting the defect, chosen from a dialog box. The default is the login name of the person creating the record.
Table 5-5. Selected Fields from the Product Defects List Applet (Sheet 2 of 2)
Field Description
5-20 Siebel Field Service Guide Version 6.1

Assets
Assets Screen
Relationships View 5
The Relationships view has a list applet, Figure 5-5, for recording backup assets and other assets that depend on the operation of a primary asset. Table 5-6 on page 5-22 describes the fields in this view.
Backup or dependent assets are dependent on other assets for their normal operation. An example of a dependent asset is a hospital power system; hospital medical equipment is dependent on the power system. By checking this view, the engineer can tell what other assets may be affected by a defective asset. The FSE can then take steps to make sure that no unintended disruptions occur. In this example, the engineer would make sure that the medical equipment was switched to the backup power supply before down taking the primary power supply.
Figure 5-5. Relationships List Applet in the Relationships View
Version 6.1 Siebel Field Service Guide 5-21

Assets
Assets Screen
Sub-Components and Transaction Views 5
The Sub Components list applet in the Sub-Components view, Figure 5-6 on page 5-23, displays assets that are subcomponents of specific assets. There can be a hierarchy of assets, by defining each level in the hierarchy as a sub-component. Subcomponents are themselves individual assets that must exist before entering them into subcomponent relationships.
Use the Transactions view, (see the Transcations and Sub-Component applets in Figure 5-7 on page 5-24), along with the Sub-Components view to create sub-components. Transactions of the type Install create subcomponents. Removing a subcomponent requires another transaction of the type DeInstall.
Table 5-6. Selected Fields in the Relationships List Applet
Field Description
Related Asset Number The asset number of the related part.
Related Asset Serial Number The serial number of the related part.
Related Asset Product Name The product name of the related part.
Relationship The relationship of the related part to the primary asset, chosen from a picklist:
■ Backup
■ Dependent
5-22 Siebel Field Service Guide Version 6.1

Assets
Assets Screen
Installation and de-installation of sub-components are two transactions provided with Siebel Field Service. They can be entered manually in the Transactions applet, or field part movements can create these transactions automatically (see “Parts Movement Administration View” on page 7-14).
NOTE: The asset transactions (Install, De-Install, Upgrade, and Downgrade) do not update directly quantities for inventory buckets.
Figure 5-6. Sub-Components List Applet In the Sub-Components View
Version 6.1 Siebel Field Service Guide 5-23

Assets
Assets Screen
Table 5-7 describes the fields in the Transactions view. For the definition of the fields in the Sub-Components applet in the Subcomponents view or the Transcations view, see Table 5-4 on page 5-17 for the Assets applets.
Figure 5-7. Transactions and Sub-Components List Applets In the Transcations View
Table 5-7. Fields in the Transactions Applet
Field Description
Transaction Date Date that this transaction record was created.
Transaction Type The type of transaction, chosen from a picklist:
■ DeInstall
■ Downgrade
■ Install
■ Upgrade
Asset Number A unique number assigned to each asset.
Serial Number The serial number of an asset.
Quantity The number of assets. This applies only to un assets. For serialized products, this value is 1.
Product The name of the product, chosen from a dialog box.
5-24 Siebel Field Service Guide Version 6.1

Assets
Assets Screen
Table 5-8. Fields in the Sub-Components Applet
Field Description
Transaction Date Date that this transaction record was created.
Transaction Type The type of transaction, chosen from a picklist:
■ DeInstall
■ Downgrade
■ Install
■ Upgrade
Asset Number A unique number assigned to each asset.
Serial Number The serial number of an asset.
Quantity The number of assets. This applies only to an assets. For serialized products, this value is 1.
Product The name of the product, chosen from a dialog box.
Version 6.1 Siebel Field Service Guide 5-25
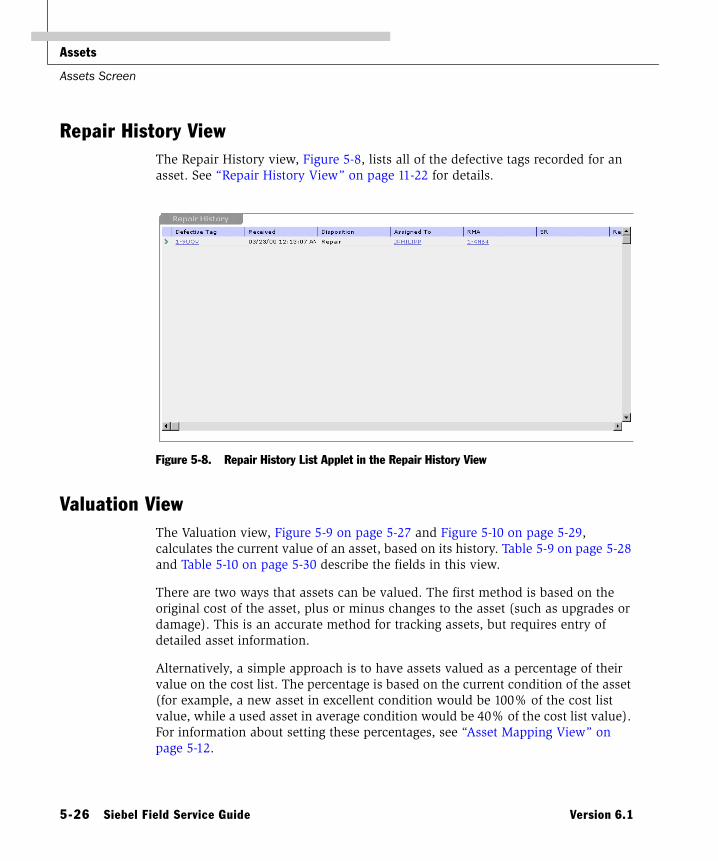
Assets
Assets Screen
Repair History View 5
The Repair History view, Figure 5-8, lists all of the defective tags recorded for an asset. See “Repair History View” on page 11-22 for details.
Valuation View 5
The Valuation view, Figure 5-9 on page 5-27 and Figure 5-10 on page 5-29, calculates the current value of an asset, based on its history. Table 5-9 on page 5-28 and Table 5-10 on page 5-30 describe the fields in this view.
There are two ways that assets can be valued. The first method is based on the original cost of the asset, plus or minus changes to the asset (such as upgrades or damage). This is an accurate method for tracking assets, but requires entry of detailed asset information.
Alternatively, a simple approach is to have assets valued as a percentage of their value on the cost list. The percentage is based on the current condition of the asset (for example, a new asset in excellent condition would be 100% of the cost list value, while a used asset in average condition would be 40% of the cost list value). For information about setting these percentages, see “Asset Mapping View” on page 5-12.
Figure 5-8. Repair History List Applet in the Repair History View
5-26 Siebel Field Service Guide Version 6.1

Assets
Assets Screen
Both cost and value are important, as they allow businesses to report accurately the value of their inventory and make repair versus replace decisions based on asset valuation.
Recost ButtonThe Recost button in the Asset Costing applet (Assets ➞ Valuation) is used to assess an asset’s cost. To calculate the current cost and the replacement value of the asset, a cost list, condition, and value basis must be selected, On activating the Recost button, the values are calculated by taking the cost of the asset from the cost list factoring in the cost method, and applying the factor from Asset Mapping. Asset Mapping must provide mapping for Asset Value and Replacement Cost; if the mapping is unavailable, the factor defaults to 100%.
An asset is valuated based on the actions (Damaged, Refurbished, Up-grade, De-install, Depreciation, and so on) applied to it. These actions have a cost associated with them, and this cost increases or decreases the cost of the asset.
NOTE: Asset actions can have negative cost values to reflect devaluation in the asset cost if applied.
Figure 5-9. Asset Costing Form Applet in the Valuation View
Version 6.1 Siebel Field Service Guide 5-27

Assets
Assets Screen
Table 5-9. Fields in the Asset Costing Form Applet (Sheet 1 of 2)
Field/Button Description
Recost This button calculates the Adj. Cost or the Asset Value and Replacement Cost, depending on the setting for Value Basis.
Original Cost A type-in field for the initial cost of the asset at the time of shipping. Depending on the system configuration, this value can come from a back office system, a cost list, or a purchase order for external products. Check with your system administrator for more information.
Adjustment The difference between the Original Cost and the Adj. Cost; it is the sum of the Amounts column in the Asset Valuation applet.
Adj. Cost The revised cost for an asset, calculated as the sum of the Original Cost and Adjustment.
Original Order The number of the first order for the asset.
Asset Age The time period, in days, between the date that the asset was recorded in Siebel Field Service and the current date.
Days Installed The time period, in days, between the date that the asset was installed and the current date.
Accounting The accounting method used for this asset, chosen from a picklist:
■ Expensed
■ Capitalized
Condition The condition of the asset, chosen from a picklist; for example, Excellent or Average.
Cost List The cost list used to determine the cost of this asset, chosen from a picklist.
5-28 Siebel Field Service Guide Version 6.1
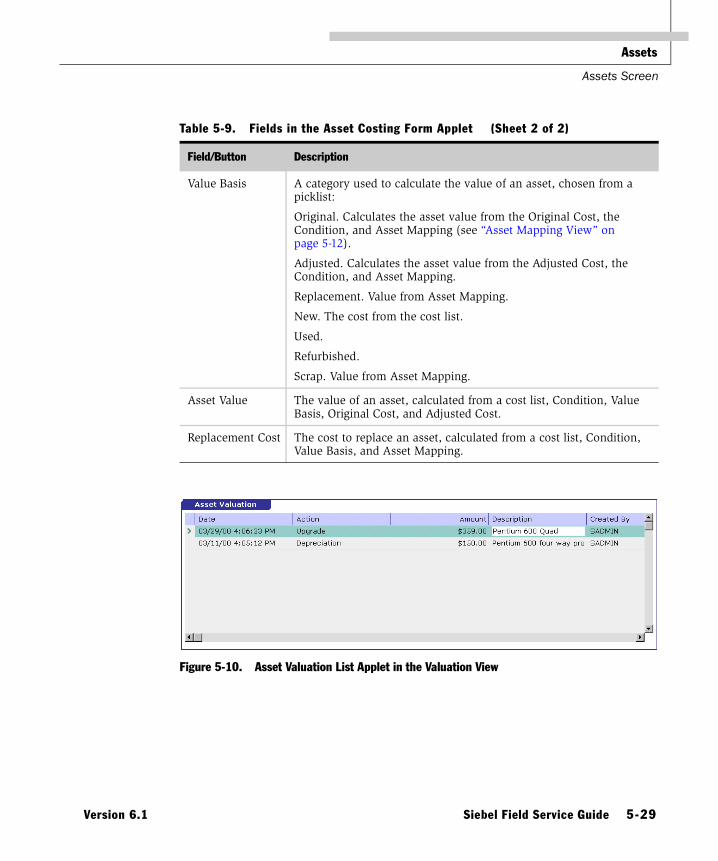
Assets
Assets Screen
Value Basis A category used to calculate the value of an asset, chosen from a picklist:
Original. Calculates the asset value from the Original Cost, the Condition, and Asset Mapping (see “Asset Mapping View” on page 5-12).
Adjusted. Calculates the asset value from the Adjusted Cost, the Condition, and Asset Mapping.
Replacement. Value from Asset Mapping.
New. The cost from the cost list.
Used.
Refurbished.
Scrap. Value from Asset Mapping.
Asset Value The value of an asset, calculated from a cost list, Condition, Value Basis, Original Cost, and Adjusted Cost.
Replacement Cost The cost to replace an asset, calculated from a cost list, Condition, Value Basis, and Asset Mapping.
Figure 5-10. Asset Valuation List Applet in the Valuation View
Table 5-9. Fields in the Asset Costing Form Applet (Sheet 2 of 2)
Field/Button Description
Version 6.1 Siebel Field Service Guide 5-29

Assets
Assets Screen
Activities View 5
The Activities view records activities that are associated with an asset. For information about the Activities applet, see “All Activities View” on page 3-17. Table 5-11 on page 5-31 and Table 5-12 on page 5-33 describe the fields in this view.
Measurements and Readings Views 5
The Measurements and Readings views address these business needs:
■ Capture asset usage and compare the actual versus expected usage.
■ Capture data in support of preventive maintenance.
■ Automate meter reading, fee-per-use, and other service models based on usage.
■ Capture important performance and quality data.
Table 5-10. Selected Fields in the Asset Valuation List Applet
Field Description
Action The action leading to a change in the value of an asset, chosen from a picklist:
■ Upgrade
■ Damage
■ Refurbish
■ Write-Down
■ De-Install
■ Depreciation
■ Restoration
■ Renovation
Amount The change in value of an asset as the result of the corresponding action.
Description A required description of the action that changed the value of this asset.
5-30 Siebel Field Service Guide Version 6.1

Assets
Assets Screen
The Measurements view, Figure 5-11, defines the types of data collected from assets. The Readings view, Figure 5-12 on page 5-33, records data from measurements of an asset.
Figure 5-11. Asset Measurements Applet in the Measurements View
Table 5-11. Fields in the Asset Measurements Applet (Sheet 1 of 2)
Field Description
Type The characteristic used to measure for an asset, chosen from a dialog box. The choices depend on the measurements defined for the product, on the Marketing Administration screen (see “Product Measurements View” on page 5-14).
Name The name of a measurement. Read-only; inherited from the Product Measurements view.
Method The method for obtaining a measurement, chosen from a picklist:
■ Manual
■ Remote
■ Dial-up
■ Internet
Version 6.1 Siebel Field Service Guide 5-31

Assets
Assets Screen
Location A type-in field for the location of a gauge or meter attached to an asset; used to locate this measuring device.
U/M Unit of measure, from a picklist.
Conversion A conversion factor (multiplier) for the readings. This field is not used in the out-of-box Field Service application. It could define the relationship between samples and readings.
Frequency The interval between readings, chosen from a picklist; for example, Hourly or Yearly.
Maximum The largest possible value for the measurement device.
Minimum The smallest possible value for the measurement device.
Upper Limit The upper control limit for readings. This is less than or equal to the Maximum.
Lower Limit The lower control limit for readings. This is greater than or equal to the Minimum.
Expected Mean A type-in field for the expected average of readings.
Expected Std Dev A type-in field for the expected standard deviation of readings.
Expected Usage A type-in field for the expected usage for an asset; for example, miles or copies per usage basis.
Usage Basis (Use) The time period, in days, over which the Expected Usage is to occur.
Calculated As of1 The date on which statistical values for a measurement are calculated.
Calculated Mean1 A type-in field for the average of readings.
Calculated Std1 A type-in field for the standard deviation of readings.
Calculated Avg1 A type-in field for the average of readings for usage-based measurements.
1. These fields are provided for users to enter calculated values from asset readings.
Table 5-11. Fields in the Asset Measurements Applet (Sheet 2 of 2)
Field Description
5-32 Siebel Field Service Guide Version 6.1

Assets
Assets Screen
NOTE: The toggle in the Readings applet presents form and list views.
Figure 5-12. Asset Readings Applet in the Readings View
Table 5-12. Fields in the Asset Readings Applet
Field Description
Created The date the record was created.
Created By The name of the person who created the record.
Reading # A unique Id assigned to this record.
Time Taken The time of the reading.
Reading The value of a reading.
U/M The unit of measurement for this reading, from a picklist. Read-only.
Complete A check box indicating that the reading is final. Once checked, this record is read-only.
Sample 1, 2, 3 Type-in fields for one to three sample readings.
Version 6.1 Siebel Field Service Guide 5-33

Assets
Assets Screen
Preventive Maintenance Views 5
The Preventive Maintenance view contains two sub-views:
■ History. Displays preventive maintenance actions associated with assets (Figure 5-13).
■ PM Plans. Records preventive maintenance plans associated with assets (Figure 5-14 on page 5-35).
Figure 5-13. History View
5-34 Siebel Field Service Guide Version 6.1

Assets
Assets Screen
The Auto PM buttons in the History view allow users to run interactively the Preventive Maintenance engine for selected assets. When run this way, the Preventive Maintenance engine considers all PM Plans associated with each asset.
For more information about the PM plans, PM actions, and the Preventive Maintenance engine, see Chapter 12, “Preventive Maintenance.”
Figure 5-14. PM Plans Applet in the PM Plans View
Version 6.1 Siebel Field Service Guide 5-35

Assets
Asset Chart
Asset Chart 5
The Asset screen has a Measurement Analysis chart that shows the readings from a selected measurement as a function of the date of the readings. The upper and lower limits of readings are also shown on the graphs.
Setup and Configuration 5
This section includes procedures for setting up assets.
Setting Up Assets 5
Follow these procedures to set up assets.
To create an asset
1 Choose Assets ➞ All Assets.
2 In either the form or list Assets applet, create a new record.
3 Choose a product from the dialog box.
4 Fill in the other fields, as required.
To associate defects with an asset
1 Choose Assets ➞ All Assets.
1 Select an asset.
2 Choose Assets ➞ Product Defects.
3 In the Product Defects applet, create a new record.
4 In the Add Product Defects dialog box, either select an existing defect and click Add, or click New to define a new defect.
5-36 Siebel Field Service Guide Version 6.1

Assets
Setup and Configuration
To associate a backup or dependent asset with a primary asset
1 Choose Assets ➞ All Assets.
2 Select an asset.
3 Choose Assets ➞ Relationships.
4 In the Relationships view, create a new record and add a related asset number and a relationship.
5 Fill in the other fields, as required.
To create subcomponents
1 Choose Assets ➞ Transactions.
2 In the Assets applet, query an asset that will have one or more sub-components.
3 Create a new transaction record.
4 For the Transaction Type, choose Install.
5 For Asset Number, choose an asset from the dialog box.
6 Choose Assets ➞ Sub-Components.
The new sub-component appears in the Sub-Components list applet.
NOTE: The Sub-Components list applet in the Transactions view updates only after returning to this view.
To associate manually a transaction with an asset
1 Choose Assets ➞ Transactions.
2 In the Assets applet, query an asset.
3 In the Transactions applet, create a new record.
4 Choose a transaction type.
5 Choose an asset number.
Version 6.1 Siebel Field Service Guide 5-37

Assets
Setup and Configuration
To map the cost of assets for specific product lines
Asset mapping records the factors that are used to adjust the cost of assets. Adjustments depend on the Condition, Value Basis, Cost List, and Cost Method for each asset. These factors are used to calculate the Asset Values and the Replacement Costs on the Asset Valuation screen (see “Valuation View” on page 5-26).
1 Choose Pricing Administration ➞ Costing ➞ Asset Mapping.
2 In the Asset Mapping list or form applet, add a new record.
NOTE: Asset mapping applies to product lines and all assets that belong to the same product line and cost list.
3 Specify the Cost List and Product Line, both chosen from a picklist.
4 Specify the Cost Method for this product line.
It should match the cost method used in the Cost List Line Items view.
5 For the Cost Field, specify Asset value or Replacement.
Asset value and Replacement specify two different methods of calculating the cost. See “Valuation View” on page 5-26 for details.
6 Choose from the picklists the Condition and Value Basis for this record.
7 Add a value for the Factor field (percentage).
NOTE: You can assign the same factor to all cases of Condition and Value Basis by leaving these values blank in a record and adding a value for Factor. This factor applies to all of the unspecified cases of Condition, Value Basis, or both. If another record specifies either Condition or Value Basis, that record overrides the default record.
If there are no records for Asset Costing and a cost list is specified, the “Valuation View” on page 5-26 uses the asset cost from the Cost List and Cost List Line Items views.
5-38 Siebel Field Service Guide Version 6.1
Assets
Setup and Configuration
To associate preventive maintenance plans with assets
1 Choose Assets ➞ All Assets.
2 Select an asset.
3 Choose Assets ➞ Preventive Maintenance ➞ Plans.
4 In the Plans applet, create a new record for each PM plan associated with this asset.
To set up measurements for assets
Measurements are defined for products and apply to assets of that product.
1 Choose Marketing Administration ➞ Products ➞ All Products.
2 Select a product.
3 Choose Marketing Administration ➞ Products ➞ Product Measurements.
4 In the Product Measurement list or form applet, create a new record for each measurement that applies to this product.
Asset Creation 5
An asset can be created for any product by assigning an asset Id and quantity = n. The definition of assets allows users to define a complete asset hierarchy. For example, a PC is an parent asset (A1) that has child assets: a motherboard (product M, qty 1, serial number ###), RAM (product RAM, Qty 16, no serial number), and so on. For all inventory transactions involving serialized products, an asset is considered equivalent to one part (quantity = 1).
Version 6.1 Siebel Field Service Guide 5-39

Assets
Setup and Configuration
Asset Registration 5
An asset can be registered to either a contact or an account. All registered assets for an account can be viewed from the Accounts screen.
Asset Transactions 5
The install base is maintained using asset transactions. Consider a scenario where a PC (asset #A) has a defective HDD (asset #H) that needs to be replaced with another HDD (asset #N). The change is effected by two asset transactions. One de-installs the defective asset (H) from the parent asset (A). The second installs the new HDD (N) on the parent asset (A). There may be more types of asset transactions allowing the users to track the complete history of an asset.
5-40 Siebel Field Service Guide Version 6.1

Warranties 6
About This Chapter . . . . . . . . . . . . . . . . . . . . . . . . . . . . . . . . . . . . . . 6-2
Business Scenario . . . . . . . . . . . . . . . . . . . . . . . . . . . . . . . . . . . . . . . 6-3
Concepts and Terms . . . . . . . . . . . . . . . . . . . . . . . . . . . . . . . . . . . . . . 6-3
Application Overview . . . . . . . . . . . . . . . . . . . . . . . . . . . . . . . . . . . . . 6-4
Obtaining Information About Warranties . . . . . . . . . . . . . . . . . . . . . 6-4
Screens and Views for Warranties . . . . . . . . . . . . . . . . . . . . . . . . . . . . 6-8
Service Administration Screen . . . . . . . . . . . . . . . . . . . . . . . . . . . . . . . 6-9
Warranties View . . . . . . . . . . . . . . . . . . . . . . . . . . . . . . . . . . . . . . 6-9
Warranty Products View . . . . . . . . . . . . . . . . . . . . . . . . . . . . . . . . 6-11
Service Providers View . . . . . . . . . . . . . . . . . . . . . . . . . . . . . . . . . 6-12
Assets Screen . . . . . . . . . . . . . . . . . . . . . . . . . . . . . . . . . . . . . . . . . . 6-13
Warranties View . . . . . . . . . . . . . . . . . . . . . . . . . . . . . . . . . . . . . 6-13
Orders Screen . . . . . . . . . . . . . . . . . . . . . . . . . . . . . . . . . . . . . . . . . 6-14
Line Item Warranties View . . . . . . . . . . . . . . . . . . . . . . . . . . . . . . 6-14
Products Screen . . . . . . . . . . . . . . . . . . . . . . . . . . . . . . . . . . . . . . . . 6-16
Warranties View . . . . . . . . . . . . . . . . . . . . . . . . . . . . . . . . . . . . . 6-16
Repairs Screen . . . . . . . . . . . . . . . . . . . . . . . . . . . . . . . . . . . . . . . . . 6-16
Repairs View . . . . . . . . . . . . . . . . . . . . . . . . . . . . . . . . . . . . . . . . 6-16
Service Requests Screen . . . . . . . . . . . . . . . . . . . . . . . . . . . . . . . . . . 6-17
Field Service Details View . . . . . . . . . . . . . . . . . . . . . . . . . . . . . . 6-17
Setting Up Warranties . . . . . . . . . . . . . . . . . . . . . . . . . . . . . . . . . . . . 6-17
Version 6.1 Siebel Field Service Guide 6-1

Warranties
About This Chapter
About This Chapter 6
This chapter describes how to use Siebel Field Service to track the layers of warranties for products through all phases of field service.
Siebel Field Service offers multi-level warranty tracking, immediate recognition, and closed-loop handling. Warranties are categorized into three types: product, manufacturer, and component warranties. Each warranty includes a duration and specifies the covered products, costs, and service providers. These warranties are separate from entitlements that are sold to a customer.
When an asset is created for a product that is covered by a warranty, the user can activate the warranty by clicking the Get Warranties button on the Assets screen, Warranties view. The number of days remaining on the warranty is automatically tracked.
When creating a service request or Defective Tag for repairing an asset, the user can click the Check Warranty button to immediately find out the valid warranty coverage based on a specified day. The user sees immediately the valid coverage type and can see the details with a right mouse click, and selection of Go to Warranty.
When an asset returned from the field is still under warranty, an order can be created for the warranty provider, and each line item is tracked through closure, based on the warranty recovery process.
6-2 Siebel Field Service Guide Version 6.1

Warranties
Business Scenario
Business Scenario 6
A customer called in to report a product failure. The CSR checked the warranty, which was close to expiration. The CSR offered a new extended warranty to the customer and the customer accepted. The CSR added this new service to the customer’s existing service contract. The customer asked how many other assets in the system would be coming off warranty, and when. The CSR was able to quickly furnish this information by using the Warranties view (see “Warranties View” on page 6-16) on the assets screen, helping the customer to plan for future decisions.
Another customer asked the CSR about the status of a part replacement. The CSR found the customer’s Service Request and verified that the parts were shipped out to the manufacturer for repair under warranty and at no charge to the customer.
Concepts and Terms 6
Manufacturer’s warranty Protects the product user from any additional financial liability if the product fails and requires replacing during the warranty period.
Component warranty The original warranty from the component or sub-assembly manufacturer, who was responsible for the production of the part.
Product warranty Protects the customer from any financial burden if the product fails, for a limited period of time after purchase. Typically, the seller, service provider, or re-seller of the product offers this warranty. It is like a guarantee or quality certification for 30 to 180 days. This type of warranty can overlap with the manufacturer’s warranty, without the buyer’s knowledge.
Version 6.1 Siebel Field Service Guide 6-3

Warranties
Application Overview
Application Overview 6
This section provides detailed procedures for using the screens and features provided for warranties. For details on individual screens, see “Screens and Views for Warranties” on page 6-8.
Obtaining Information About Warranties 6
To check the Ship Date, Install Date, and Register Date for assets covered by a warranty
1 Choose Assets ➞ All Assets.
2 Select an asset.
3 Choose Assets ➞ Warranties.
4 In the Warranties applet, click Get Warranties.
The Warranties applet displays all warranties associated with a product, the start and end date of the warranties, and the number of days left.
The Assets applet shows the ship date, install date, and the register date.
To check the warranties for a product
1 Choose Products ➞ All Products.
2 Select a product.
3 Choose Products ➞ Warranties.
The Warranties applet shows the warranties associated with this product.
To check the products covered by a warranty
1 Choose Service Administration ➞ Warranty Products (see “Warranty Products View” on page 6-11).
2 Query a warranty.
The Products applet shows the products covered by this warranty.
6-4 Siebel Field Service Guide Version 6.1

Warranties
Application Overview
To check warranties for an asset
1 Choose Assets ➞ All Assets.
2 Select an asset.
3 Choose Assets ➞ Warranties.
4 In the Warranties applet, click Get Warranties.
The Warranties applet displays all warranties associated with a product.
To check warranties for service requests
1 Choose Service Requests ➞ Field Service Details (see “Field Service Details View” on page 6-17).
2 Select a service request.
3 Set a date on which the warranty status is to be assessed, in the field Warranty As of. The default date for this field is the date the service request was created.
4 Click Check Warranty.
This shows which, if any, warranties are in effect on the selected date. To find out the status of warranties on another date, change the date for Warranty As of and click again on Check Warranty.
5 For information about the warranties, right-click anywhere in the Field Service Details applet and choose Go to Warranty from the menu.
You see Assets ➞ Warranties, which shows the warranties for this asset (see “Warranties View” on page 6-13).
To check warranties for an order
1 Choose Orders ➞ All RMAs/Service Orders.
2 Select an order.
3 Choose RMAs/Service Order ➞ Line Items.
4 In the Line Items applet, select the line item.
5 Choose RMAs/Service ➞ Line Item Warranties.
Version 6.1 Siebel Field Service Guide 6-5

Warranties
Application Overview
6 The Warranties applet displays the warranties for this order.
To identify the service providers for a warranty
1 Choose Service Administration ➞ Warranties ➞ Service Providers (see “Service Providers View” on page 6-12).
2 Query a warranty.
The Service Provider applet shows the service providers for this warranty.
To track warranty recovery
1 Choose Orders ➞ All RMAs/Service Orders.
2 Select an order with the type RMA.
3 Choose RMAs/Service Order ➞ Line Items.
4 In the Line Items applet, select the line item returned for warranty recovery.
5 Choose RMAs/Service ➞ Line Item Warranties (see “Line Item Warranties View”).
6 In the Warranties applet, select or add the record for the appropriate warranty.
7 Record the warranty claim information (see Table 6-6 on page 6-15).
To check the warranty status for defective parts
1 Choose Repairs ➞ Repairs (see “Repairs Views” on page 11-15).
2 Select a Defective Tag record.
3 Set a date for which the warranty status is to be assessed, in the field Warranty As of.
4 Click Check Warranty.
This shows which warranties are in effect on the selected date. To find out the status of warranties on another date, change the date for Warranty As of and click again on Check Warranty.
6-6 Siebel Field Service Guide Version 6.1

Warranties
Application Overview
5 For information about the warranties, right-click anywhere in the Repairs form applet and choose Go to Warranty from the menu.
You see Assets ➞ Warranties, which shows the warranties for this asset (see “Warranties View” on page 6-13).
Version 6.1 Siebel Field Service Guide 6-7

Warranties
Screens and Views for Warranties
Screens and Views for Warranties 6
Click the name of a screen or view in Table 6-1 to see more information.
Table 6-1. Screens and Views for Warranties
Screen Views Role/Procedures (Click to see full procedure.)
Service Administration Warranties ➞ Warranties Create warranties and their terms for all products and service providers under the care of a service business.
Warranties ➞ Warranty Products Specify the products covered by a warranty. See: “To check the products covered by a warranty” on page 6-4.
Warranties ➞ Service Providers Record the service providers for a warranty. See: “To identify the service providers for a warranty” on page 6-6.
Assets Warranties View the warranties associated with selected assets. See: “To check warranties for service requests” on page 6-5.
Orders Line Item Warranties Associate warranties with assets in an order; track warranty claims; and record details of expected credit recovery. See: “To track warranty recovery” on page 6-6.
Products Warranties View warranties and their terms for all products and service providers.
Repairs Repairs View warranty information for an asset. See: “Repairs View” on page 6-16.
Service Requests Field Service Details Identify the warranties that are associated with a service request on a selected date. See: “To check warranties for service requests” on page 6-5.
6-8 Siebel Field Service Guide Version 6.1

Warranties
Service Administration Screen
Service Administration Screen 6
Warranties View 6
The Warranties view, Figure 6-1 (Service Administration ➞ Warranties ➞ Warranties), creates warranties and their terms for all products and service providers under the care of a service business. Table 6-2 on page 6-10 describes the fields in this view.
Figure 6-1. Warranties View
Version 6.1 Siebel Field Service Guide 6-9

Warranties
Service Administration Screen
Table 6-2. Selected Fields in the Warranties/Warranty Applets
Field Description
Name A type-in field for the name of a warranty; for example, 1-Year Limited Warranty.
Type One of the three types of warranties that Field Service recognizes, chosen from a picklist: Component, Manufacturer, or Product.
Sub-Type The class of warranty coverage, chosen from a picklist; for example, Full Coverage, Hardware Only, Repair, or Replace.
Description A type-in field describing the warranty.
Duration (Days) The length of the warranty, in days.
Start Date Type The basis for warranty coverage, chosen from a picklist; for example, Install Date, Registered Date, or Ship Date.
Expenses A check box indicating that this warranty covers expenses of the FSE.
Labor A check box indicating that this warranty covers labor charges.
Parts A check box indicating that this warranty covers replacement parts.
Transportation A check box indicating that this warranty covers travel by the FSE.
Claim Process The method of presenting a claim against this warranty, chosen from a picklist; for example, E-Mail, Fax, or Phone.
Recovery Type The method of payment for items not covered by this warranty, chosen from a picklist; for example, Cash or No Charge.
Provider The name of the account associated with this warranty, chosen from a dialog box.
6-10 Siebel Field Service Guide Version 6.1

Warranties
Service Administration Screen
Warranty Products View 6
The Warranty Products view, Figure 6-2, specifies the products covered by a warranty. Table 6-3 describes the fields in this view.
Figure 6-2. Products List Applet in the Warranty Products View
Table 6-3. Selected Field in the Products List Applet
Field Description
Product The name of a product, chosen from a dialog box. The remaining fields are filled in automatically.
Version 6.1 Siebel Field Service Guide 6-11

Warranties
Service Administration Screen
Service Providers View 6
The Service Providers view, Figure 6-3, records the service providers for a warranty. Table 6-4 describes the fields in this view.
Figure 6-3. Service Providers Applet in the Service Providers View
Table 6-4. Selected Field in the Service Providers Applet
Field Description
Account The name of an account, chosen from a dialog box.
6-12 Siebel Field Service Guide Version 6.1

Warranties
Assets Screen
Assets Screen 6
The Assets screen has one view that displays information about warranties.
Warranties View 6
The Warranties view, Figure 6-4, displays the warranties associated with selected assets. Table 6-5 describes the fields in this view.
Figure 6-4. Warranties List Applet in the Warranties View
Table 6-5. Selected Fields in the Warranties List Applet
Field/Button Description
Get Warranties This button automatically lists all warranties associated with a product. The fields that describe the warranty are also filled in automatically.
Start Date The first day that the warranty is in effect.
End Date The last day of the warranty.
Days Left The number of days remaining on this warranty. This number is zero if the start date is after today’s date.
Version 6.1 Siebel Field Service Guide 6-13

Warranties
Orders Screen
Orders Screen 6
Line Item Warranties View 6
The Line Item Warranties view, Figure 6-5 (Orders ➞ RMAs/Service Orders ➞ Line Item Warranties), associates warranties with assets in an order, and is used to track warranty claims. The view allows users to record details of expected credit recovery. Table 6-6 on page 6-15 describes the fields in this view.
NOTE: The Line Item form applet (see “Line Item Warranties View” on page 8-35) in this view contains a check box, Wrnty Rcvry, indicating that a warranty credit is being requested for this line item.
Figure 6-5. Warranties List Applet In the Line Item Warranties View
6-14 Siebel Field Service Guide Version 6.1

Warranties
Orders Screen
Table 6-6. Selected Fields in the Warranties List Applet
Field Description
Expected A type-in field for the details of predicted credit recovery.
Received A type-in field for the details of the recovered credit.
Recovered Amount The amount recovered by the service business for this item, from the warranty provider.
Estimated Value The balance owed to the service business for this item, from the warranty provider.
Expected Recovery Date The predicted date to receive the balance owed by the service provider.
Recovered Date The actual date the balance was received from the service provider.
Status The current state of the warranty recovery process, chosen from a picklist; for example, Closed, Delinquent, In-Process, On-Hold, or Open.
Version 6.1 Siebel Field Service Guide 6-15

Warranties
Products Screen
Products Screen 6
The Products screen has one view for warranties.
Warranties View 6
The Warranties view shows the warranties that apply to products. The Product Warranties applet in this view contains the same fields as the Warranties applets on the Service Administration screen (see Table 6-2 on page 6-10), but it is read-only.
Repairs Screen 6
The Repairs screen has one view for warranties.
Repairs View 6
A Check Warranty button in the Repairs form applet (see Table 11-2 on page 11-16) provides warranty information for an asset. Clicking this button checks the appropriate warranty boxes (Product, Component, and Manufacturer), as of a date that the user provides (in the field Warranty As of).
6-16 Siebel Field Service Guide Version 6.1

Warranties
Service Requests Screen
Service Requests Screen 6
The Service Requests screen has one view, with a Check Warranties button.
Field Service Details View 6
The Field Service Details view (see “Field Service Details View” on page 2-38) has a Check Warranty button that identifies the warranties that are associated with a service request on a selected date.
Setting Up Warranties 6
Follow these procedures to set up warranties.
To create new warranties
1 Choose Service Administration ➞ Warranties ➞ Warranties.
2 Create a new record.
To specify the products covered by a warranty
1 Choose Service Administration ➞ Warranties ➞ Warranties.
2 Select a warranty.
3 Choose Service Administration ➞ Warranties ➞ Products.
4 In the Products applet, create a new record for each product.
To associate assets with warranties
1 Choose Assets ➞ All Assets.
2 Select an asset.
3 Choose Assets ➞ Warranties.
4 In the Warranties applet, create a record for each warranty associated with the selected asset.
Version 6.1 Siebel Field Service Guide 6-17

Warranties
Setting Up Warranties
To associate warranties with warranty service providers
1 Choose Service Administration ➞ Warranties ➞ Warranties.
2 Select a warranty.
3 Choose Service Administration ➞ Warranties ➞ Warranty Providers.
4 In the Service Providers applet, create a new record.
To associate warranties with assets that are line items in an order
1 Choose Orders ➞ All RMAs/Service Orders.
2 Select an order.
3 Choose Orders ➞ RMAs/Service Order ➞ Line Items.
4 Select a line item.
5 Choose Orders ➞ RMAs/Service Order ➞ Line Item Warranties.
6 In the Warranties applet, create a new record for each warranty associated with the selected line item.
6-18 Siebel Field Service Guide Version 6.1

Service Inventory 7
About This Chapter . . . . . . . . . . . . . . . . . . . . . . . . . . . . . . . . . . . . . . 7-3
Using Mobile Service Inventory . . . . . . . . . . . . . . . . . . . . . . . . . . . . 7-5
Replenishing Inventory . . . . . . . . . . . . . . . . . . . . . . . . . . . . . . . . . . 7-5
Concepts and Terms . . . . . . . . . . . . . . . . . . . . . . . . . . . . . . . . . . . . . . 7-6
Application Overview . . . . . . . . . . . . . . . . . . . . . . . . . . . . . . . . . . . . . 7-7
Using Service Inventory . . . . . . . . . . . . . . . . . . . . . . . . . . . . . . . . . 7-7
Screens and Views for Service Inventory . . . . . . . . . . . . . . . . . . . . . . . 7-11
Service Administration Screen . . . . . . . . . . . . . . . . . . . . . . . . . . . . . . 7-14
Parts Movement Administration View . . . . . . . . . . . . . . . . . . . . . . 7-14
Inventory Types View . . . . . . . . . . . . . . . . . . . . . . . . . . . . . . . . . . 7-16
Inventory Transaction Types View . . . . . . . . . . . . . . . . . . . . . . . . . 7-19
Inventory Bucket Categories View . . . . . . . . . . . . . . . . . . . . . . . . . 7-21
Marketing Administration Screen . . . . . . . . . . . . . . . . . . . . . . . . . . . . 7-23
Product Field Service Details View . . . . . . . . . . . . . . . . . . . . . . . . 7-23
Service Inventory Screen . . . . . . . . . . . . . . . . . . . . . . . . . . . . . . . . . . 7-27
Inventory Locations Views . . . . . . . . . . . . . . . . . . . . . . . . . . . . . . 7-27
Product Buckets View . . . . . . . . . . . . . . . . . . . . . . . . . . . . . . . . . 7-31
New Replenishment Orders View . . . . . . . . . . . . . . . . . . . . . . . . . . 7-34
Pending Replenishment Orders View . . . . . . . . . . . . . . . . . . . . . . . 7-37
Authorized Vendors View . . . . . . . . . . . . . . . . . . . . . . . . . . . . . . . 7-38
Relationships View . . . . . . . . . . . . . . . . . . . . . . . . . . . . . . . . . . . 7-39
Roles View . . . . . . . . . . . . . . . . . . . . . . . . . . . . . . . . . . . . . . . . . 7-40
Cycle Counting Administration View . . . . . . . . . . . . . . . . . . . . . . . 7-40
Version 6.1 Siebel Field Service Guide 7-1

Service Inventory
Part Browser Screen . . . . . . . . . . . . . . . . . . . . . . . . . . . . . . . . . . . . . 7-41
Part Browser View . . . . . . . . . . . . . . . . . . . . . . . . . . . . . . . . . . . . 7-41
Inventory Transactions Screen . . . . . . . . . . . . . . . . . . . . . . . . . . . . . . 7-43
All Inventory Transactions View . . . . . . . . . . . . . . . . . . . . . . . . . . 7-43
Assets View . . . . . . . . . . . . . . . . . . . . . . . . . . . . . . . . . . . . . . . . 7-47
Activities Screen . . . . . . . . . . . . . . . . . . . . . . . . . . . . . . . . . . . . . . . 7-48
Field Part Movements View . . . . . . . . . . . . . . . . . . . . . . . . . . . . . 7-48
Service Inventory Reports . . . . . . . . . . . . . . . . . . . . . . . . . . . . . . . . . 7-51
Setup and Configuration . . . . . . . . . . . . . . . . . . . . . . . . . . . . . . . . . . 7-51
Setting Up a Service Inventory . . . . . . . . . . . . . . . . . . . . . . . . . . . 7-52
Setting Up Service Inventory . . . . . . . . . . . . . . . . . . . . . . . . . . . . . . . . . 7-54
Inventory Structure . . . . . . . . . . . . . . . . . . . . . . . . . . . . . . . . . . . 7-61
Inventory Types . . . . . . . . . . . . . . . . . . . . . . . . . . . . . . . . . . . . . . . . . . 7-62
Product Buckets . . . . . . . . . . . . . . . . . . . . . . . . . . . . . . . . . . . . . 7-62
Product Serialization . . . . . . . . . . . . . . . . . . . . . . . . . . . . . . . . . . 7-63
Inventory Relationships . . . . . . . . . . . . . . . . . . . . . . . . . . . . . . . . 7-63
Tracking an Inventory Location . . . . . . . . . . . . . . . . . . . . . . . . . . . 7-65
Inventory Transactions . . . . . . . . . . . . . . . . . . . . . . . . . . . . . . . . . 7-66
Synchronizing Remote and Local Databases . . . . . . . . . . . . . . . . . . . . . . 7-75
7-2 Siebel Field Service Guide Version 6.1

Service Inventory
About This Chapter
About This Chapter 7
This chapter describes how a field service business sets up and maintains a service inventory.
Service Inventory is a service-oriented, transaction-based inventory system. Service organizations use it to track parts, status, quantities, and inventories throughout the service organization itself, in the customer organization, and in the repair and logistics organizations of third-party providers.
Version 6.1 Siebel Field Service Guide 7-3

Service Inventory
About This Chapter
Service organizations use the Service Inventory module to manage parts throughout their life cycles, and to monitor parts consumption during order fulfillment and field engineer activities (Figure 7-1). Service Inventory also enables mobile field engineers to manage their trunk inventories using an unconnected client.
Figure 7-1. Flow of Goods in Service Inventory
FieldEngineer 2
Recycle
Defective Good
FieldEngineer 1
CustomerSite
on-siterepair
In-transit
replace
In-transit
IncomingGoods
Part enters systemfrom manufacturer
test
repair
return Outsourcefor testing,
repair,etc.
outsource
scrap
replace
Picking/ Shipping
In-Transit
CustomerReceive
Test andSort
Repair
Restock toGood
OrderPlacement
Receiving(good)
Service PartsLife Cycle
7-4 Siebel Field Service Guide Version 6.1

Service Inventory
About This Chapter
Service Inventory tracks all information about service parts, including definition, compatibility, history, status, stock levels, and location. Materials managers use this application to access and manage service parts information throughout the service cycle, including allocations of orders, replenishment of local offices and trunk inventories, and fulfillment of orders from customers or field engineers. The materials manager can also automate all of these tasks using the logistics manager engines, which are discussed in this chapter.
This chapter discusses service inventory configuration, and the tasks commonly performed by materials managers and warehouse clerks. The Replenishment Engine, which automates replenishment processes, and the Cycle Counting Engine, which materials managers can configure to automatically produce cycle counting orders for an inventory, are also discussed.
Using Mobile Service Inventory 7
Managing a trunk service inventory requires recording activities and part movements on the FSE’s laptop computer. The database on the mobile computer is often out of sync with the database on the Field Service server. To solve this problem, Siebel Field Service provides uncommitted transactions for field operations that are then validated upon synchronization with the server.
At the time of synchronizing the laptops in the field with the Field Service server, an administrator can use the Parts Movement Administration view (see “Setup and Configuration” on page 7-51) to review transactions and commit them.
Replenishing Inventory 7
Replenishment is the process of generating an order to restock depleted inventory in an inventory location. The Replenishment engine generates internal orders to other inventory locations or purchase orders to outside vendors. For a full discussion of replenishment and the Field Service Replenishment engine, see Chapter 9, “Logistics Management.”
Version 6.1 Siebel Field Service Guide 7-5

Service Inventory
Concepts and Terms
Concepts and Terms 7
Aisle Sublevel of a warehouse.
Allocate The process of reserving a product in inventory for fulfilment of an order.
Bin Sublevel of an aisle.
Buckets Categories of inventory that specify availability and status. A bucket is specified by a pair of values; for example:
■ On Order (availability), Good (status)
■ On Hand (availability), Good (status)
■ Reserved (availability), Good (status)
■ In Transit (availability), Defective (status)
Product buckets can exist at any physical level of inventory (location).
Fulfillment The process of selecting and allocating inventory to satisfy an order. The Fulfillment engine locates inventory items or substitute items, allocates these items, and generates pick tickets.
Inventorylocation
The physical location of inventory; for example, a field engineer’s trunk, a warehouse, or a sublevel, such as a shelf or an aisle in a warehouse.
Replenishment Restocking inventory. The Replenishment engine selects source and target inventories when restocking is needed and generates the orders required to obtain materials from an external provider, an internal inventory site, or an internal manufacturing facility.
Shelf Sublevel of a warehouse.
Sublevel A position in the hierarchy of a service inventory; for example, a shelf is a sublevel of an aisle.
Trunk A field engineer’s mobile inventory; must be associated with a field engineer so that parts movements involving the field engineer’s trunk inventory can be tracked properly.
Virtual location A logical grouping of inventory locations; for example, West Coast Inventories.
Warehouse The level at which inventory relationships are defined and pick tickets are generated. This is the default inventory location.
7-6 Siebel Field Service Guide Version 6.1

Service Inventory
Application Overview
Application Overview 7
This section provides detailed procedures for using the screens and features provided with Service Inventory. For details on individual screens, see “Screens and Views for Service Inventory” on page 7-11. For guidelines and technical details of configuration, see “Setup and Configuration” on page 7-51.
Using Service Inventory 7
Follow these procedures to check inventory and create inventory transactions.
Tracking InventoryFollow these procedures to check inventory.
To check Inventory Status
1 Choose Service Inventory ➞ Product Buckets.
2 In the Inventory Locations applet, select a location.
3 In the Products applet, select a product.
The Buckets applet shows the inventory status for this product.
To use the Part Browser
1 Choose Part Browser ➞ Part Browser.
2 In the Product Inventory Location applet, query a product and inventory location.
The Quantity applet shows the inventory status for this product.
To generate the report “Product List by Location”
1 Choose Service Inventory ➞ All Inventory Locations.
2 In the Inventory Locations list applet, select a location.
3 From the Reports menu, choose Product List by Location.
Version 6.1 Siebel Field Service Guide 7-7

Service Inventory
Application Overview
To view a summary of inventory at every location
1 Choose Service Inventory ➞ All Inventory Locations.
2 Choose Service Inventory ➞ Product Buckets.
3 In the Inventory Locations list applet, select a location.
The data for each location appears in the Products, Buckets, and Assets applets.
To view cycle counting parameters for a selected location
1 Choose Service Inventory ➞ All Inventory Locations.
2 In the Inventory Locations list applet, select a location.
Cycle counting parameters appear in the Inventory Locations list applet.
To view all inventory transactions
■ Choose Inventory Transactions ➞ All Inventory Transactions.
Creating Inventory TransactionsFollow these procedures to process inventory transactions.
To create inventory transactions manually
1 Choose Inventory Transactions ➞ All Inventory Transactions.
2 Create a new record.
3 Select a transaction type in the Tracking group.
4 Fill in all fields in the Details group.
To verify automatic inventory transactions
1 Choose Inventory Transactions ➞ All Inventory Transactions.
2 Query the inventory transactions using the relevant fields.
7-8 Siebel Field Service Guide Version 6.1
Service Inventory
Application Overview
To receive a product as a stock transfer or over-the-counter transaction
1 Choose Inventory Transactions ➞ Inventory Transactions (see “All Inventory Transactions View” on page 7-43).
2 Add a new transaction record.
3 For Type, select Stock Transfer or Over-the-Counter.
4 Select the Product (Name), Quantity, Source Inventory (Name), Source Availability, Source Status, Destination Inventory (Name), Destination Availability, and Destination Status.
5 If the product is serialized, go to the Assets view (see “Assets View” on page 7-47).
The Serialized flag is set in “Product Field Service Details View” on page 7-23.
6 Add the serial number in the Assets list applet.
7 In the Inventory Transaction form applet, check Commit to update.
To move an item from one trunk to another: source mobile client
1 Choose Inventory Transactions ➞ All Inventory Transactions (see “All Inventory Transactions View” on page 7-43).
2 Create a new record.
3 Set Type to Exchange Between FSEs.
4 Complete all fields in the Details group of the Inventory Transactions form applet.
5 Click the Commit check box.
Version 6.1 Siebel Field Service Guide 7-9

Service Inventory
Application Overview
To move an item from one trunk to another: destination mobile client
1 Choose Activities ➞ My Activities (see “All Activities View” on page 3-17).
2 Select an activity.
3 Choose Activities ➞ Field Part Movements (see “Field Part Movements View” on page 7-48).
4 In the Field Part Movements applet, create a new record.
5 Choose a product name and status.
6 Check Write-in Asset.
7 Type in a write-in serial number.
8 For the Source field, select Trunk.
9 For the destination, choose Customer.
10 Repeat steps 4 through 9 for all assets that are moving from one trunk to another.
11 When all assets are entered, click the Commit button.
To commit transactions reported by mobile clients
1 Choose Service Administration ➞ Parts Movements Administration (see “Parts Movement Administration View” on page 7-14).
2 Select the transaction in the Parts Movement Administration applet.
3 In the Asset Number column, choose an asset from the Pick Asset dialog box. This asset should correspond to the Write-In Asset entered by the mobile field service engineer.
4 Click the Commit button.
This generates an inventory transaction which decrements the source inventory location and increments the destination location.
7-10 Siebel Field Service Guide Version 6.1

Service Inventory
Screens and Views for Service Inventory
Screens and Views for Service Inventory 7
Click the name of a screen or view in Table 7-1 to see more information.
Table 7-1. Screens and Views for Service Inventory (Sheet 1 of 3)
Screen ViewsRole/Procedures (Click to see full procedure.)
Service Administration
Parts Movement Administration Record transactions that occurred in the field, but are not yet recorded in the server database. See: “To commit transactions reported by mobile clients” on page 7-10.
Service Inventory ➞ Inventory Types Define the types of inventory locations that are available in the Type field of the Inventory Locations applets.
Service Inventory ➞ Inventory Transaction Types Define the transaction types that are available in the Type field of the Inventory Locations applets.
Service Inventory ➞ Inventory Bucket Categories Define the inventory bucket categories that are available in the Buckets applet.
Marketing Administrations
Product Field Service Details Obtain the information used in locating and allocating products for use in field service activities.
Service Inventory Inventory Locations Set up inventory locations. See: “To configure cycle counting parameters for products at an inventory location” on page 7-60
Product Buckets Associate inventory locations with products and buckets (availability and status of products). See: “To configure cycle counting parameters for products at an inventory location” on page 7-60.
Version 6.1 Siebel Field Service Guide 7-11

Service Inventory
Screens and Views for Service Inventory
Service Inventory(continued)
New Replenishment Orders Produce orders to replenish products in inventory, by an internal transfer between inventory locations, or by purchase from an outside vendor. For a full discussion of replenishment, see Chapter 9, “Logistics Management.”
Pending Replenishment Orders List pending orders to replenish an inventory location. For a full discussion of replenishment, see Chapter 9, “Logistics Management.”
Authorized Vendors Record vendors who may supply products for a selected inventory location.
Relationships Set up the physical hierarchy of inventory locations or relationships used in inventory replenishment or order fulfillment.
Roles Set the roles of personnel associated with selected inventory locations.
Cycle Counting Administration Show the parameters of cycle counting at a selected inventory location.
Part Browser Part Browser Show a summary of inventory at every inventory location in a service business.
Table 7-1. Screens and Views for Service Inventory (Sheet 2 of 3)
Screen ViewsRole/Procedures (Click to see full procedure.)
7-12 Siebel Field Service Guide Version 6.1

Service Inventory
Screens and Views for Service Inventory
Inventory Transactions
All Inventory Transactions List all inventory transactions created automatically (in other screens and views). Transactions can be created manually in this view. See: “To receive a product as a stock transfer or over-the-counter transaction” on page 7-9, “To view all inventory transactions” on page 7-8, and “To move an item from one trunk to another: source mobile client” on page 7-9.
Assets Show the asset and serial numbers if the product associated with a selected transaction is serialized. See: “To receive a product as a stock transfer or over-the-counter transaction” on page 7-9.
Activities Field Part Movements Record movement of parts in the field, between two trunks or between a trunk and a customer site. See: “To move an item from one trunk to another: destination mobile client” on page 7-10.
Table 7-1. Screens and Views for Service Inventory (Sheet 3 of 3)
Screen ViewsRole/Procedures (Click to see full procedure.)
Version 6.1 Siebel Field Service Guide 7-13
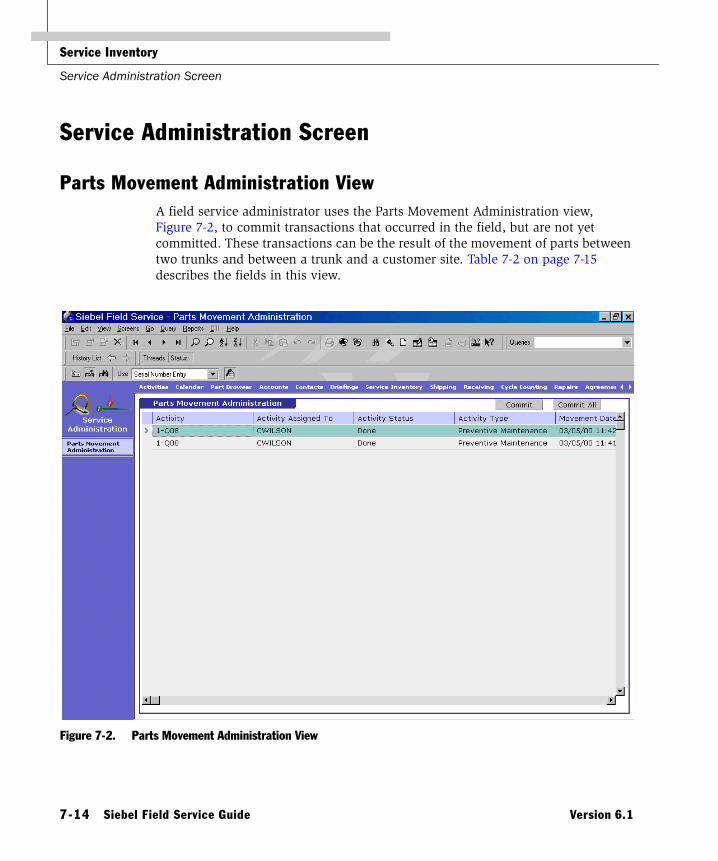
Service Inventory
Service Administration Screen
Service Administration Screen 7
Parts Movement Administration View 7
A field service administrator uses the Parts Movement Administration view, Figure 7-2, to commit transactions that occurred in the field, but are not yet committed. These transactions can be the result of the movement of parts between two trunks and between a trunk and a customer site. Table 7-2 on page 7-15 describes the fields in this view.
Figure 7-2. Parts Movement Administration View
7-14 Siebel Field Service Guide Version 6.1

Service Inventory
Service Administration Screen
Table 7-2. Selected Fields in the Parts Movement Administration List Applet
Field/Button Description
Commit This button creates the transaction for the part movement in the selected record.
Commit All This button creates the transaction for the part movement in all the records.
Activity The Id of the activity associated with the field part movement.
Activity Assigned To The FSE who is assigned to the activity associated with this part movement.
Activity Status The status of the activity; for example, Done.
Activity Type The type of activity; for example, Meeting or Preventive Maintenance.
Movement Date The date the part movement took place.
Product Name The name of the product used in this activity.
Status The functional condition of the product used for this activity; for example, Good or Defective.
Used Quantity The quantity of the product used for this activity.
Commit Flag A check box indicating that this transaction was committed.
Asset Number The asset number of the product.
Serial Number The serial number of the asset, filled in automatically with the asset number.
Write-In Asset This check box indicates that the asset was a write-in for the FSE. An inventory transaction for the specified asset is generated upon synchronization. See Table 7-26 on page 7-50.
Write-In Serial Number This field is automatically filled with the serial number of the write-in asset.
Source The origin of the product in this transfer; for example, Service Order, Trunk, Customer.
Trunk Inventory The inventory location (Type: Trunk) associated with the field part movement.
Version 6.1 Siebel Field Service Guide 7-15

Service Inventory
Service Administration Screen
Inventory Types View 7
The Inventory Types view, Figure 7-3 on page 7-17 (Service Administration ➞ Service Inventory ➞ Inventory Types), defines the types of inventory locations that are available in the Type field of the Inventory Locations applets (see “Inventory Locations Views” on page 7-27). Table 7-3 on page 7-18 describes the fields in this view.
NOTE: Do not delete Inventory Types, Inventory Bucket Categories, or Inventory Transaction Types as their Row Ids provide values for tables elsewhere in Service Inventory. To change or replace an Inventory Type, Inventory Transaction Type, or Inventory Bucket Category, modify the List of Values and then update (do not delete and reenter) the Type entry.
Do not delete the Inventory table row with the name “External” and the type “Virtual,” shipped as seed data with Field Service. Inventory transactions use this row, and cannot take place without it. Changing the name is acceptable.
7-16 Siebel Field Service Guide Version 6.1

Service Inventory
Service Administration Screen
Figure 7-3. Inventory Types View
Version 6.1 Siebel Field Service Guide 7-17
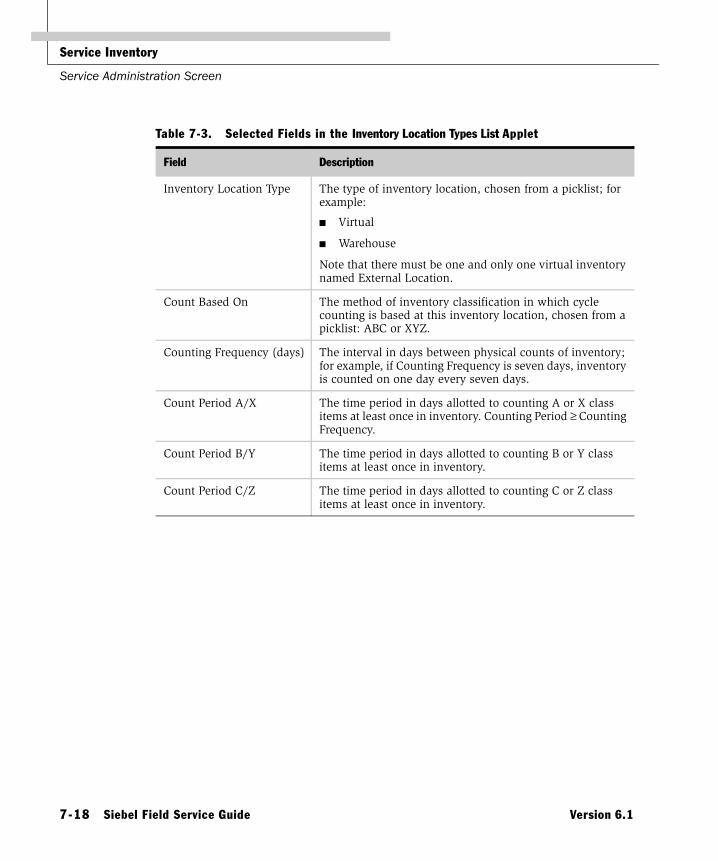
Service Inventory
Service Administration Screen
Table 7-3. Selected Fields in the Inventory Location Types List Applet
Field Description
Inventory Location Type The type of inventory location, chosen from a picklist; for example:
■ Virtual
■ Warehouse
Note that there must be one and only one virtual inventory named External Location.
Count Based On The method of inventory classification in which cycle counting is based at this inventory location, chosen from a picklist: ABC or XYZ.
Counting Frequency (days) The interval in days between physical counts of inventory; for example, if Counting Frequency is seven days, inventory is counted on one day every seven days.
Count Period A/X The time period in days allotted to counting A or X class items at least once in inventory. Counting Period ≥ Counting Frequency.
Count Period B/Y The time period in days allotted to counting B or Y class items at least once in inventory.
Count Period C/Z The time period in days allotted to counting C or Z class items at least once in inventory.
7-18 Siebel Field Service Guide Version 6.1

Service Inventory
Service Administration Screen
Inventory Transaction Types View 7
The Inventory Transaction Types view, Figure 7-4 (Service Administration ➞ Service Inventory ➞ Transaction Types), defines the transaction types that are available in the Type field of the Inventory Location applets (see “Inventory Locations Views” on page 7-27). Table 7-4 on page 7-20 describes the fields in this view.
Figure 7-4. Inventory Transaction Types View
Version 6.1 Siebel Field Service Guide 7-19

Service Inventory
Service Administration Screen
Table 7-4. Fields in the Inventory Transaction Type List Applet
Field Description
Name The name of an inventory transaction, chosen from a picklist; for example:
■ Adjustment
■ Allocate
■ De-Allocate
■ Exchange between FSE
■ Receive Internal
■ Receive Other
■ Ship Internal
■ Ship Other
■ Over-the-Counter
■ Stock Transfer
■ Receive from TP
■ Ship to TP
7-20 Siebel Field Service Guide Version 6.1

Service Inventory
Service Administration Screen
Inventory Bucket Categories View 7
The Inventory Bucket Categories view, Figure 7-5 (Service Administration ➞ Service Inventory ➞ Bucket Categories), defines the inventory bucket categories that are available in the Buckets applet (see “Product Buckets View” on page 7-31). A bucket category consists of a pairing of two values: Availability and Status. Table 7-5 on page 7-22 describes the fields in this view.
Figure 7-5. Inventory Bucket Categories View
Version 6.1 Siebel Field Service Guide 7-21

Service Inventory
Service Administration Screen
NOTE: It is not necessary to create products and buckets manually. When an inventory transaction occurs, products and buckets are automatically created if they do not exist. However, products created automatically in this way will not be assigned specific levels or cycle counting classifications in the inventory structure, so you might still need to come back to the Product applet and update newly created rows.
Table 7-5. Fields in the Inventory Bucket Categories List Applets
Field Description
Availability The availability category, chosen from a picklist; for example:
■ Customer Owned
■ In Transit
■ On Hand
■ On Order
■ Reserved
Status The status category, chosen from a picklist; for example:
■ Good
■ Defective
7-22 Siebel Field Service Guide Version 6.1

Service Inventory
Marketing Administration Screen
Marketing Administration Screen 7
Product Field Service Details View 7
The Product Field Service Details view, Figure 7-6 (Marketing Administration ➞ Products ➞ Product Field Service Details), provides the information used in locating and allocating products for use in field service activities. Table 7-6 on page 7-24 through Table 7-9 on page 7-26 describe the fields in this view.
Figure 7-6. Product Field Services Details View
Version 6.1 Siebel Field Service Guide 7-23

Service Inventory
Marketing Administration Screen
Table 7-6. Fields in the Product Form Applet
Field Description
Product A type-in field for the name of a product.
Product Line The name of the line to which this product belongs, chosen from a dialog box.
Part Number A type-in field for the manufacturer’s part number for this product.
Unit of Measure The number of units that make up this product, chosen from a picklist.
Description A description of the product.
Table 7-7. Fields in the Field Service Details Form Applet (Sheet 1 of 2)
Field Description
Version A type-in field for the version number of the product.
Version status The status of the product version, chosen from a picklist; for example, Prototype or Product.
Serialized A check box indicating that assets of this product must have a recorded serial number.
Tool A check box defining that this is a tool.
Return if Defective A check box indicating that defective instances of this product should be returned to the field service business. This flag is not used in any logic.
Field Replaceable Unit A check box directing that the FSE can replace this product in the field. This flag is not used in any logic.
Primary Vendor The name of the product vendor.
Vendor Catalog # A type-in field for the catalog number for this product.
Auto Allocate A check box allowing automatic allocation of a part from inventory. See “Substitution and Allocation Flags” on page 8-51. This setting applies to the selected product.
Auto Substitute A check box allowing automatic allocation of a substitute part for this part. See “Substitution and Allocation Flags” on page 8-51. This setting applies to the selected product.
7-24 Siebel Field Service Guide Version 6.1

Service Inventory
Marketing Administration Screen
NOTE: If a product is going to have a serialized asset, then the Serialized check box must be selected. Serialized products are treated in a different way than non-serialized ones. Whenever a serialized product is shipped or received, Field Service expects the right number of assets with serial numbers; for example, if four serialized hard drives are shipped or received, Field Service expects that four separate serial numbers are entered.
Allocate Below Safety A check box indicating that allocation may be made below the safe inventory level of this product. See “Substitution and Allocation Flags” on page 8-51. This setting applies to the selected product.
Shipping Method The method for shipping a replacement part from the vendor, chosen from a picklist; for example, Air or Ground.
Carrier The carrier for shipping a replacement part from the vendor, chosen from a picklist; for example, UPS.
MTBF Mean time between failures; a measure of dependability of the product.
MTTR Mean time to repair; a measure of the time required to repair the product.
Table 7-7. Fields in the Field Service Details Form Applet (Sheet 2 of 2)
Field Description
Version 6.1 Siebel Field Service Guide 7-25

Service Inventory
Marketing Administration Screen
Table 7-8. Fields in the Inventory Options List Applet
Field Description
Inventory Type The inventory container, chosen from a picklist; for example, Trunk, Bin, or Warehouse. These settings apply to the selected inventory type.
Auto Allocate Yes, No, or Default, indicating automatic allocation of a part from inventory. These settings apply to the selected inventory type.
Allocate Below Safety Yes, No, or Default, indicating that allocation may be made below the safe inventory level of this product. These settings apply to the selected inventory type.
Auto Substitute Yes, No, or Default, allowing automatic allocation of a substitute part for this part (see “System Preferences for the Fulfillment and Part Locator Engines” on page 8-49).
Class ABC The cycle counting priority for this product is based on cost.
Class XYZ The cycle counting priority for this product is based on turnover.
Table 7-9. Field in the Substitute Products List Applet
Field Description
Product Name The names of products that can replace a selected product. Click the name to see the details view for this product.
7-26 Siebel Field Service Guide Version 6.1

Service Inventory
Service Inventory Screen
Service Inventory Screen 7
Inventory Locations Views 7
The Inventory Locations applets set up the inventory locations in a service business. These applets occur in My Inventory Locations, All Inventory Locations, and All Inventory Locations across Organizations views, Figure 7-7 on page 7-28. Table 7-10 on page 7-29 describes the fields in this view.
Inventory Locations Across OrganizationsAn organization is a category that limits the visibility of data within a business. The All Inventory Locations Across Organizations view shows the inventory locations for all organizations within a company. Inventory transactions can take place only between locations within the same organization.
The person owning a record can see this record in the My Inventory Locations view if it is in a different organization. However, if this same person is logged in to Siebel Field Service, this record does not appear in the All Inventory Locations view.
Caution: Improper configuration of organizations and inventory locations can lead to unintended effects. It may not be possible to carry out inventory transactions between certain locations.
Version 6.1 Siebel Field Service Guide 7-27
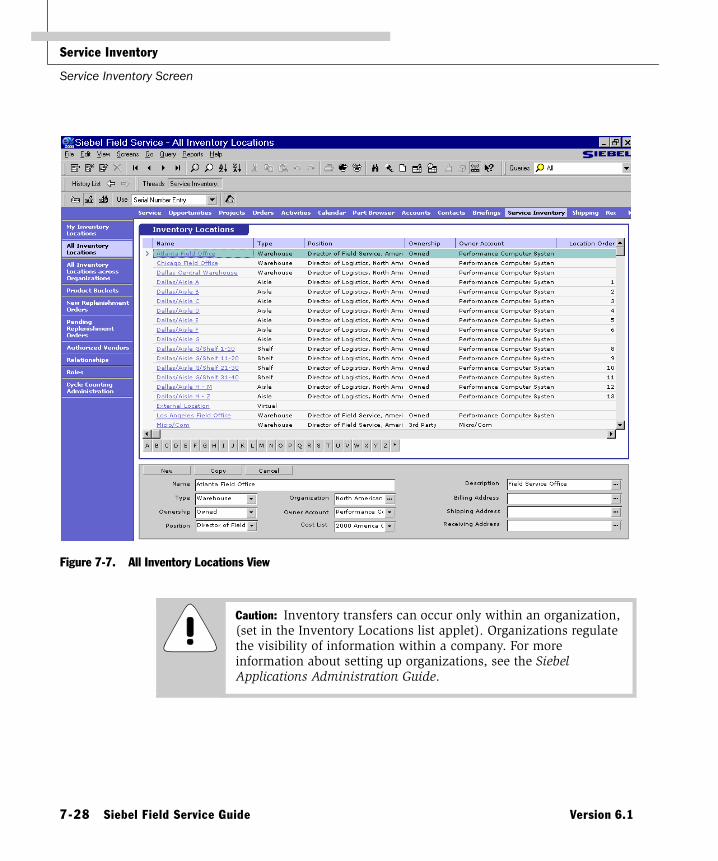
Service Inventory
Service Inventory Screen
Figure 7-7. All Inventory Locations View
Caution: Inventory transfers can occur only within an organization, (set in the Inventory Locations list applet). Organizations regulate the visibility of information within a company. For more information about setting up organizations, see the Siebel Applications Administration Guide.
7-28 Siebel Field Service Guide Version 6.1

Service Inventory
Service Inventory Screen
Table 7-10. Fields in the Inventory Locations Applets (Sheet 1 of 2)
Field Description
Name A type-in field for the name of an inventory location. Click this name to go to the Product Buckets view.
Type The category of inventory location, chosen from a picklist; for example, Aisle, Shelf, Trunk, Virtual, Warehouse, or Bin.
Position The name of the position of the employee who is responsible for the inventory location, chosen from a dialog box.
Ownership A category of ownership for the inventory location, chosen from a picklist; for example, 3rd Party, Customer, or Owned.
Owner Account The name of the account that owns the inventory location, chosen from a dialog box.
Location Order A numeric description of the order of locations within a larger inventory location. This order is used for picking and cycle counting; it has no effect on the Fulfillment or Cycle Counting engines.
Description A type-in field containing the description of a location.
Cost List The cost list used to value inventory.
Billing Address The billing address of the owner account, entered in a dialog box.
Shipping Address The shipping address of the owner account, entered in a dialog box.
Receiving Address The receiving address of the owner account, entered in a dialog box.
Count Based On The method of inventory classification used for cycle counting, chosen from a picklist: ABC or XYZ.
Counting Frequency (days) The interval in days between physical counts of inventory at this location; for example, if Counting Frequency is 7 days, inventory is counted on one day every seven days.
Version 6.1 Siebel Field Service Guide 7-29

Service Inventory
Service Inventory Screen
Setting Up an External LocationFor every service business, you must set up one inventory location named External Location, with the type Virtual. This is used as the default location in the absence of a source or destination location. It also allows inventory transactions between locations in different organizations (see “Inventory Transactions Across Organizations” on page 5-12). Follow these rules in setting up an External Location:
■ The name of the inventory location must be External Location. There can be only one inventory location named External Location.
■ The Type for an External Location must be Virtual.
■ Using the Organization field, associate all organizations in the company that will use the inventory with the External Location.
Counting Period A/X (days) The time period in days allotted to count A or X class items at least once at this location. Counting Period ≥ Counting Frequency.
Counting Period B/Y (days) The time period in days allotted to counting B or Y class items at least once at this location. Counting Period ≥ Counting Frequency.
Counting Period C/Z (days) The time period in days allotted to count C or Z class items at least once at this location. Counting Period ≥ Counting Frequency.
Organization The name of a category within a company that limits the visibility of information to that category, chosen from a dialog box. Using this field, one inventory location may be associated with many organizations. For more information about setting up organizations, see the Siebel Applications Administration Guide.
Table 7-10. Fields in the Inventory Locations Applets (Sheet 2 of 2)
Field Description
7-30 Siebel Field Service Guide Version 6.1

Service Inventory
Service Inventory Screen
Product Buckets View 7
The Product Buckets view, Figure 7-8, associates inventory locations with products and buckets (availability and status of products). Table 7-11 on page 7-32 through Table 7-13 on page 7-33 describe the fields in this view.
Figure 7-8. Product Buckets View
Version 6.1 Siebel Field Service Guide 7-31
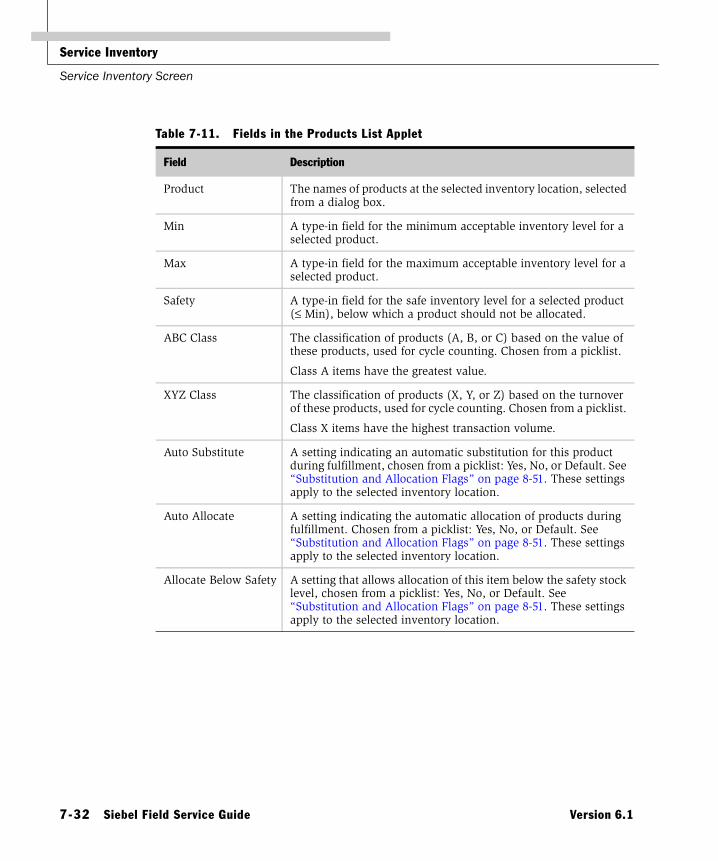
Service Inventory
Service Inventory Screen
Table 7-11. Fields in the Products List Applet
Field Description
Product The names of products at the selected inventory location, selected from a dialog box.
Min A type-in field for the minimum acceptable inventory level for a selected product.
Max A type-in field for the maximum acceptable inventory level for a selected product.
Safety A type-in field for the safe inventory level for a selected product (≤ Min), below which a product should not be allocated.
ABC Class The classification of products (A, B, or C) based on the value of these products, used for cycle counting. Chosen from a picklist.
Class A items have the greatest value.
XYZ Class The classification of products (X, Y, or Z) based on the turnover of these products, used for cycle counting. Chosen from a picklist.
Class X items have the highest transaction volume.
Auto Substitute A setting indicating an automatic substitution for this product during fulfillment, chosen from a picklist: Yes, No, or Default. See “Substitution and Allocation Flags” on page 8-51. These settings apply to the selected inventory location.
Auto Allocate A setting indicating the automatic allocation of products during fulfillment. Chosen from a picklist: Yes, No, or Default. See “Substitution and Allocation Flags” on page 8-51. These settings apply to the selected inventory location.
Allocate Below Safety A setting that allows allocation of this item below the safety stock level, chosen from a picklist: Yes, No, or Default. See “Substitution and Allocation Flags” on page 8-51. These settings apply to the selected inventory location.
7-32 Siebel Field Service Guide Version 6.1
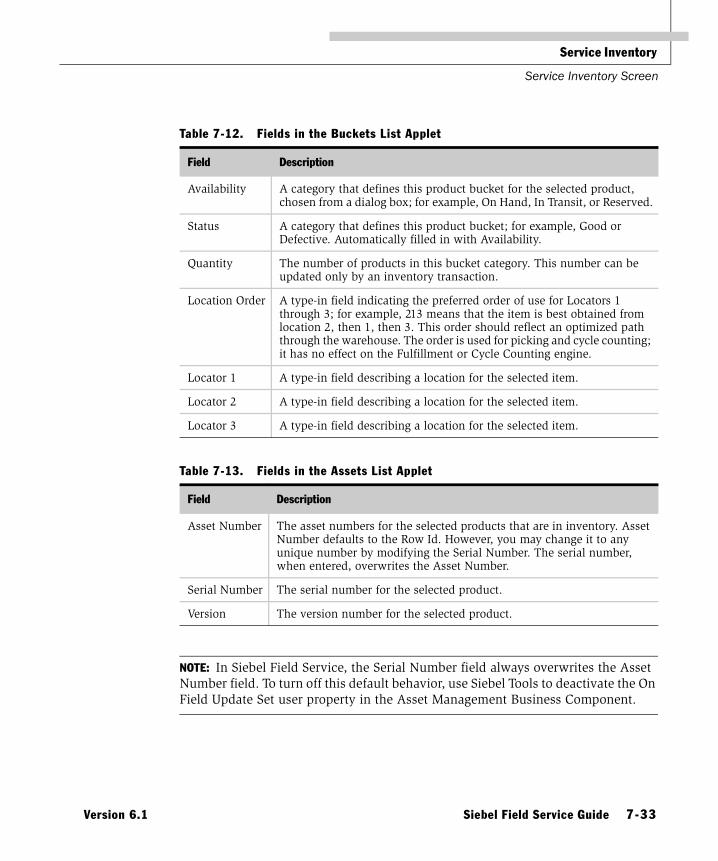
Service Inventory
Service Inventory Screen
NOTE: In Siebel Field Service, the Serial Number field always overwrites the Asset Number field. To turn off this default behavior, use Siebel Tools to deactivate the On Field Update Set user property in the Asset Management Business Component.
Table 7-12. Fields in the Buckets List Applet
Field Description
Availability A category that defines this product bucket for the selected product, chosen from a dialog box; for example, On Hand, In Transit, or Reserved.
Status A category that defines this product bucket; for example, Good or Defective. Automatically filled in with Availability.
Quantity The number of products in this bucket category. This number can be updated only by an inventory transaction.
Location Order A type-in field indicating the preferred order of use for Locators 1 through 3; for example, 213 means that the item is best obtained from location 2, then 1, then 3. This order should reflect an optimized path through the warehouse. The order is used for picking and cycle counting; it has no effect on the Fulfillment or Cycle Counting engine.
Locator 1 A type-in field describing a location for the selected item.
Locator 2 A type-in field describing a location for the selected item.
Locator 3 A type-in field describing a location for the selected item.
Table 7-13. Fields in the Assets List Applet
Field Description
Asset Number The asset numbers for the selected products that are in inventory. Asset Number defaults to the Row Id. However, you may change it to any unique number by modifying the Serial Number. The serial number, when entered, overwrites the Asset Number.
Serial Number The serial number for the selected product.
Version The version number for the selected product.
Version 6.1 Siebel Field Service Guide 7-33

Service Inventory
Service Inventory Screen
New Replenishment Orders View 7
The New Replenishment Orders view, Figure 7-9 on page 7-35, automatically produces orders to replenish the product in inventory, by an internal transfer between inventory locations, or by purchase from an outside vendor. For replenishment, a product bucket must be defined for a product. For replenishment from a vendor, the authorized vendor must be defined.
Table 7-14 on page 7-36 through Table 7-16 on page 7-36 describe the fields in this view.
For a full discussion of replenishment, see Chapter 9, “Logistics Management.”
7-34 Siebel Field Service Guide Version 6.1

Service Inventory
Service Inventory Screen
The replenishment process describes either a source inventory location to replenish the selected location or a target location to be replenished from the selected location. Specific relationships between locations are defined in Service Inventories ➞ Relationships (see “Relationships View” on page 7-39).
Figure 7-9. New Replenishment Orders View
Version 6.1 Siebel Field Service Guide 7-35

Service Inventory
Service Inventory Screen
Table 7-14. Fields in the Source Inventory Locations List Applet
Field/Button Description
Generate Internal Orders This button automatically creates an internal order, in the Pending Replenishment Orders view, for transfer of the selected product from the source to the destination inventory location. All products below the minimum levels are replenished.
Source Location The inventory locations that replenish the selected inventory location (defined in the Inventory Location applet), as described in the Relationships view. Only inventory locations of the relationship type Replenishes appear in this applet.
Table 7-15. Fields in the Target Inventory Locations List Applet
Field/Button Description
Generate Purchase Orders This button automatically creates an internal order, in the Pending Replenishment Orders view, for transfer of the selected product from the source to the destination inventory location. All products below the minimum levels are replenished.
Target Location The target inventory locations that are replenished by the selected inventory location (defined in the Inventory Location applet), as described in the Relationships view. Only inventory locations of the relationship type Replenishes appear in this applet.
Table 7-16. Fields in the Vendors for This Location List Applet
Field/Button Description
Generate Purchase Orders This button automatically creates a purchase order to replenish the selected product at the selected inventory location. All products below the minimum levels, which have an authorized vendor, are replenished.
Vendor The authorized vendors that are defined for the selected inventory location in the Authorized Vendors view.
Site The location of the vendor.
Type The type of vendor; for example, Primary Vendor or Vendor.
7-36 Siebel Field Service Guide Version 6.1

Service Inventory
Service Inventory Screen
Pending Replenishment Orders View 7
This Pending Replenishment Orders view, Figure 7-10, lists pending orders to replenish a location, either by replenishments between inventory locations or purchases from a vendor. The records in this view, generated by the Replenishment engine, are read-only. Table 7-17 describes the fields in this view.
For a full discussion of replenishment, see Chapter 9, “Logistics Management.”
Figure 7-10. Pending Replenishment Orders List Applet in the Pending Replenishment Orders View
Table 7-17. Fields in the Pending Replenishment Orders List Applet (Sheet 1 of 2)
Field Description
Order The order number.
Type The type of order; for example, Internal Order or Purchase Order.
Status The current state of this order; for example, Open, In Transit, or Shipped.
From Vendor The name of the vendor filling this order, if it is a purchase order.
Version 6.1 Siebel Field Service Guide 7-37

Service Inventory
Service Inventory Screen
Authorized Vendors View 7
The Authorized Vendors view, Figure 7-11, records vendors who may supply products for a selected inventory location. Table 7-18 describes the fields in this view.
From Inventory Location The service inventory location from which this product is being transferred, if this is an internal order.
Created On The date and time that this order was created.
Table 7-17. Fields in the Pending Replenishment Orders List Applet (Sheet 2 of 2)
Field Description
Figure 7-11. Authorized Vendors List Applet in the Authorized Vendors View
Table 7-18. Fields in the Authorized Vendors List Applet
Field Description
Account The name of a vendor account, chosen from a dialog box.
Site The location of this vendor, filled in automatically with the name.
Type The type of vendor, chosen from a picklist; for example, Primary Vendor.
7-38 Siebel Field Service Guide Version 6.1

Service Inventory
Service Inventory Screen
Relationships View 7
The Relationships view, Figure 7-12, records the relationships of a selected inventory location with other inventory locations. A relationship may be physical (for example, a shelf belonging to an aisle) or logistical (for replenishment of inventory or fulfillment of orders). Table 7-19 on page 7-39 describes the fields in this view.
NOTE: If your business uses more than one inventory location, relationships among inventory locations are useful for automating inventory replenishment (see “Setup and Configuration for the Replenishment Engine” on page 9-49) and order fulfillment (see “Fulfillment Engine” on page 8-46).
Figure 7-12. Relationships List Applet in the Relationships View
Table 7-19. Fields in the Relationships List Applet
Field Description
Name The name of an inventory location, chosen from a dialog box.
Type The class of location filled in with the location name; for example, Warehouse or Trunk.
With Relationship
The relationship of this inventory location to the location selected in the Inventory Locations applet, chosen from a picklist. The choices are Fulfills, Replenishes, and Sublevel.
Order Priority The priority of an order to be fulfilled from the inventory location, if the relationship type is Fulfills, chosen from a picklist (for example, Low, Medium, or High).
Version 6.1 Siebel Field Service Guide 7-39

Service Inventory
Service Inventory Screen
Roles View 7
The Roles view, Figure 7-13, sets the roles of personnel associated with a selected inventory location. Table 7-20 on page 7-40 describes the fields in this view.
Cycle Counting Administration View 7
The Cycle Counting Administration view shows the parameters of cycle counting at the selected inventory location. The two applets, Cycle Count Periods and Cycle Counts, are discussed in “Cycle Counting Administration View” on page 9-31.
Figure 7-13. Roles Applet in the Roles View
Table 7-20. Fields in the Roles Applet
Field Description
Role Name The name of a role associated with the selected inventory location, chosen from a dialog box; for example, Manager or Receiving Clerk.
Position Name The position of the person filling the role, chosen from a dialog box; for example, Warehouse Clerk. Associated with this title is the name of an employee.
7-40 Siebel Field Service Guide Version 6.1

Service Inventory
Part Browser Screen
Part Browser Screen 7
Part Browser View 7
The Part Browser view, Figure 7-14, presents a read-only summary of inventory at every inventory location in a service business. Any product may be at more than one location. Table 7-21 on page 7-42 through Table 7-23 on page 7-42 describe the fields in this view.
Figure 7-14. Part Browser View
Version 6.1 Siebel Field Service Guide 7-41
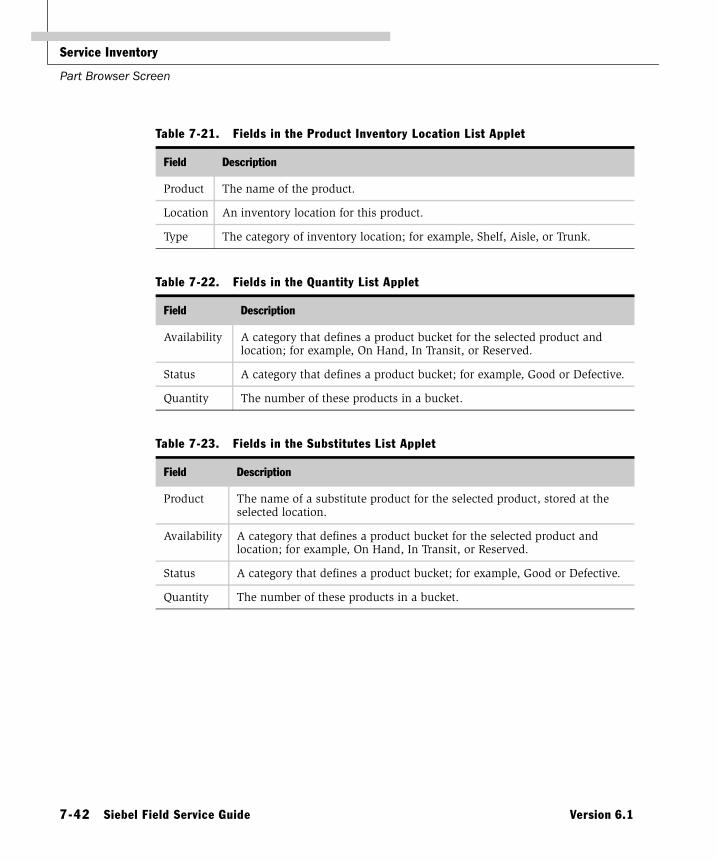
Service Inventory
Part Browser Screen
Table 7-21. Fields in the Product Inventory Location List Applet
Field Description
Product The name of the product.
Location An inventory location for this product.
Type The category of inventory location; for example, Shelf, Aisle, or Trunk.
Table 7-22. Fields in the Quantity List Applet
Field Description
Availability A category that defines a product bucket for the selected product and location; for example, On Hand, In Transit, or Reserved.
Status A category that defines a product bucket; for example, Good or Defective.
Quantity The number of these products in a bucket.
Table 7-23. Fields in the Substitutes List Applet
Field Description
Product The name of a substitute product for the selected product, stored at the selected location.
Availability A category that defines a product bucket for the selected product and location; for example, On Hand, In Transit, or Reserved.
Status A category that defines a product bucket; for example, Good or Defective.
Quantity The number of these products in a bucket.
7-42 Siebel Field Service Guide Version 6.1
Service Inventory
Inventory Transactions Screen
Inventory Transactions Screen 7
All Inventory Transactions View 7
The All Inventory Transactions view, Figure 7-15, lists all inventory transactions created automatically (in other screens and views) to allocate, ship, receive, transfer, or adjust the quantity and buckets for a product. The same transactions can be created manually in this view. Table 7-24 on page 7-45 describes the fields in this view.
Inventory Transactions Across OrganizationsInventory transactions can take place between organizations by using two transactions and the virtual location named External Location:
■ The first transaction is from the source location (Inv1) in one organization to the External Location. This transaction is committed by a user who can see Inv1 and the External Location.
■ The second transaction is from the External Location to the destination location (Inv2) in a different organization. This transaction is committed by a user who can see Inv2 and the External Location.
Version 6.1 Siebel Field Service Guide 7-43

Service Inventory
Inventory Transactions Screen
For more information, see “Setting Up an External Location” on page 7-30.
Figure 7-15. Inventory Transactions View
7-44 Siebel Field Service Guide Version 6.1

Service Inventory
Inventory Transactions Screen
Table 7-24. Selected Fields in the Inventory Transactions Applets (Sheet 1 of 2)
Field Description
Transaction date The date the transaction record was created.
Transaction Id A unique number assigned automatically to this transaction.
Type The category of transaction, reflecting the activity that created this transaction, chosen from a picklist; for example:
■ Adjustment
■ Allocate
■ De-Allocate
■ Exchange between FSE
■ Receive Internal
■ Receive Other
■ Ship Internal
■ Ship Other
■ Over-the-Counter
■ Stock Transfer
■ Receive from TP (third party)
■ Ship to TP
Product The name of a product, chosen from a dialog box.
Quantity A type-in field for the number of products involved in the transaction.
Serialized Product A check box indicating that the product has a serial number. This is filled in automatically with the product name.
Cycle Count Part Id A type-in field for the cycle count number. This field is populated when performing adjustments in the Variance view for cycle counting (see “Variance View” on page 9-27).
Order Part Movement Id The order movement number.
Activity Part Id The activity number.
Repair Id The defective tag number. This field is populated by generating inventory transactions when creating repair records (see “Repairs Views” on page 11-15).
Version 6.1 Siebel Field Service Guide 7-45

Service Inventory
Inventory Transactions Screen
Service Inventory The name of the inventory location originating the part movement, chosen from a dialog box.
Source Availability A category that defines a product bucket for the selected product and location, chosen from a picklist; for example, On Hand, In Transit, or Reserved.
Source Status A category that defines a product bucket, chosen from a picklist; for example, Good or Defective.
Destination Inventory The name of the inventory location receiving the part, chosen from a dialog box. This applies only to internal transfers.
Destination Availability A category that defines a product bucket for the selected product and location, chosen from a picklist; for example, On Hand, In Transit, or Reserved.
Destination Status A category that defines a product bucket, chosen from a picklist; for example, Good or Defective.
Commit Flag A check box indicating that the transaction was sent to the database on the Field Service server.
Product The name of a product, chosen from a dialog box.
Quantity The number of items in the transaction.
Table 7-24. Selected Fields in the Inventory Transactions Applets (Sheet 2 of 2)
Field Description
7-46 Siebel Field Service Guide Version 6.1
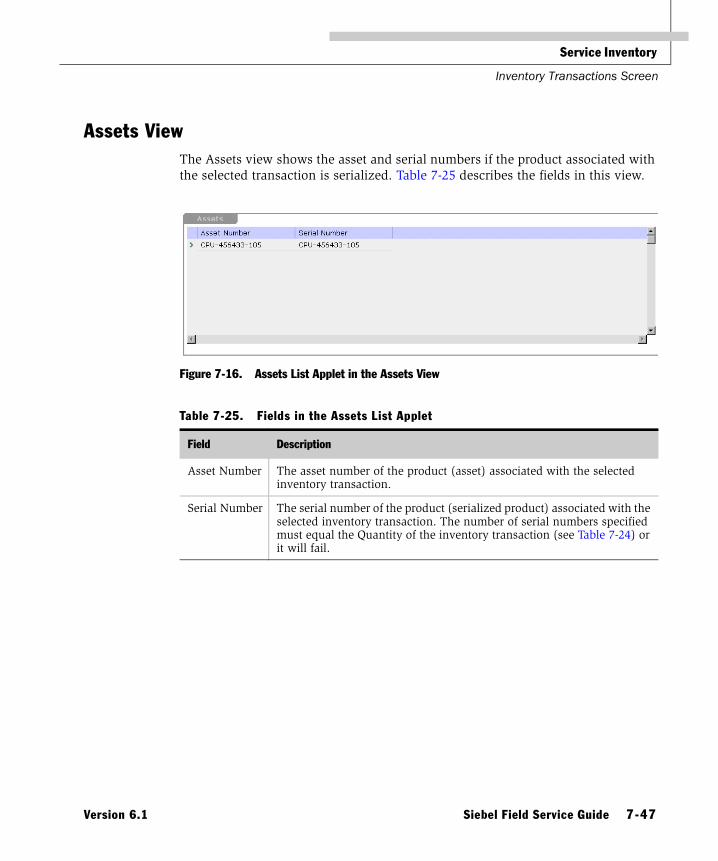
Service Inventory
Inventory Transactions Screen
Assets View 7
The Assets view shows the asset and serial numbers if the product associated with the selected transaction is serialized. Table 7-25 describes the fields in this view.
Figure 7-16. Assets List Applet in the Assets View
Table 7-25. Fields in the Assets List Applet
Field Description
Asset Number The asset number of the product (asset) associated with the selected inventory transaction.
Serial Number The serial number of the product (serialized product) associated with the selected inventory transaction. The number of serial numbers specified must equal the Quantity of the inventory transaction (see Table 7-24) or it will fail.
Version 6.1 Siebel Field Service Guide 7-47

Service Inventory
Activities Screen
Activities Screen 7
The Activities screen has a Field Part Movements view for recording movement of parts in the field, between two trunks or between a trunk and a customer site. The part movements created in this view remain uncommitted until the user clicks the Commit button.
Field Part Movements View 7
The Field Part Movements view, Figure 7-17 on page 7-49, associates parts movements carried out by an FSE in the field with selected FSE activities. This view can record both committed and uncommitted part movements. For uncommitted part movements, the field service engineer cannot see the part or asset on the mobile computer; Write-In Asset and Write-In Serial Number fields allow recording of this asset and its serial number. Table 7-26 on page 7-50 describes the fields in this view.
7-48 Siebel Field Service Guide Version 6.1

Service Inventory
Activities Screen
The Commit button checks that the appropriate information is provided, then tries to create an inventory transaction. Once committed, a record becomes read-only. See “Generating Transactions” on page 7-69.
NOTE: Before creating a record in this applet, Field Service verifies that the owner of the activity also owns a trunk inventory.
Figure 7-17. Field Part Movements View
Version 6.1 Siebel Field Service Guide 7-49
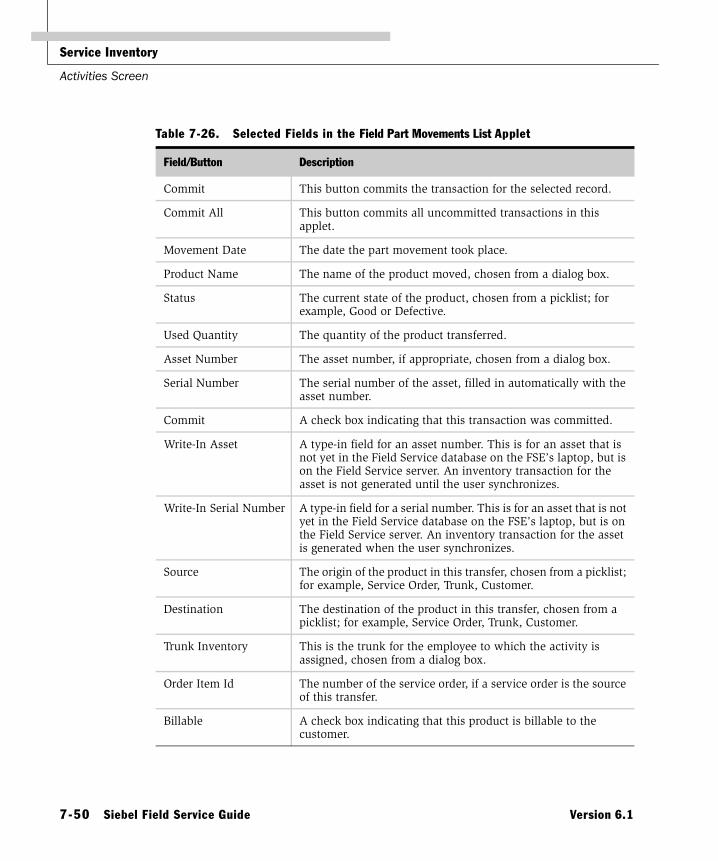
Service Inventory
Activities Screen
Table 7-26. Selected Fields in the Field Part Movements List Applet
Field/Button Description
Commit This button commits the transaction for the selected record.
Commit All This button commits all uncommitted transactions in this applet.
Movement Date The date the part movement took place.
Product Name The name of the product moved, chosen from a dialog box.
Status The current state of the product, chosen from a picklist; for example, Good or Defective.
Used Quantity The quantity of the product transferred.
Asset Number The asset number, if appropriate, chosen from a dialog box.
Serial Number The serial number of the asset, filled in automatically with the asset number.
Commit A check box indicating that this transaction was committed.
Write-In Asset A type-in field for an asset number. This is for an asset that is not yet in the Field Service database on the FSE’s laptop, but is on the Field Service server. An inventory transaction for the asset is not generated until the user synchronizes.
Write-In Serial Number A type-in field for a serial number. This is for an asset that is not yet in the Field Service database on the FSE’s laptop, but is on the Field Service server. An inventory transaction for the asset is generated when the user synchronizes.
Source The origin of the product in this transfer, chosen from a picklist; for example, Service Order, Trunk, Customer.
Destination The destination of the product in this transfer, chosen from a picklist; for example, Service Order, Trunk, Customer.
Trunk Inventory This is the trunk for the employee to which the activity is assigned, chosen from a dialog box.
Order Item Id The number of the service order, if a service order is the source of this transfer.
Billable A check box indicating that this product is billable to the customer.
7-50 Siebel Field Service Guide Version 6.1

Service Inventory
Service Inventory Reports
Service Inventory Reports 7
The Service Inventory screen provides the reports listed in Table 7-27.
Setup and Configuration 7
This section includes procedures for setting up a service inventory, cycle counting, and remote field service clients.
Table 7-27. Service Inventory Reports
Report Description
Products Below Minimum Level by Location A list of products of good quality and below the minimum stock level at a selected location.
Product List by Location A list of stock levels for products of good quality at a selected inventory location.
Inventory Cost Detail A list of all products at a selected location with itemized and total cost.
Version 6.1 Siebel Field Service Guide 7-51

Service Inventory
Setup and Configuration
Setting Up a Service Inventory 7
A primary objective of Service Inventory is to record the organization of inventory. Figure 7-18 shows an example of an inventory structure.
Figure 7-18. Sample of a Service Inventory Structure
Product Buckets
US Inventory (virtual)
Field Offices (virtual)California Field Service
Engineers (virtual)
Aisle A Aisle BAisle A
On Hand
Returns
Product Buckets
Shelf 1 Shelf 2
Bin A Bin B
DiskDrives
CD-ROMDrives
Dallas(warehouse)
Boston RepairCenter (warehouse)
Chris Smith'sTrunk
Fred Robert'sTrunk Boston
San Francisco(warehouse)
Los Angeles
Aisle B
Aisle C
7-52 Siebel Field Service Guide Version 6.1
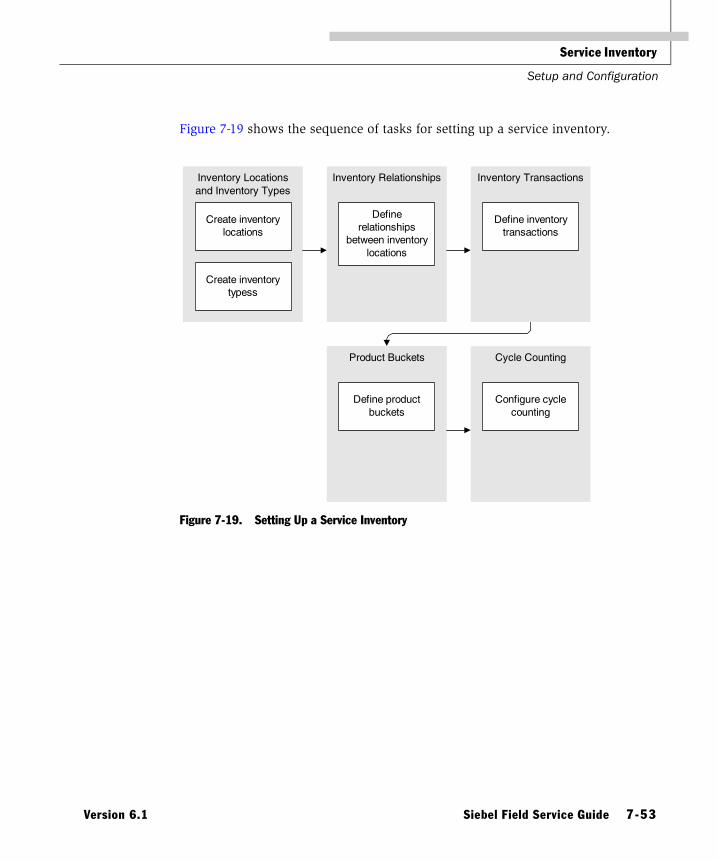
Service Inventory
Setup and Configuration
Figure 7-19 shows the sequence of tasks for setting up a service inventory.
Figure 7-19. Setting Up a Service Inventory
Product Buckets
Inventory Locationsand Inventory Types
Create inventorylocations
Create inventorytypess
Inventory Relationships
Definerelationships
between inventorylocations
Define productbuckets
Cycle Counting
Configure cyclecounting
Inventory Transactions
Define inventorytransactions
Version 6.1 Siebel Field Service Guide 7-53
Service Inventory
Setup and Configuration
Setting Up Service Inventory 7
These are procedures for setting up the structure and operation of an inventory system using Siebel Field Service. The procedures may require administrative access.
Defining Products for Field ServiceFollow these procedures to define products.
To create product lines
1 Choose Marketing Administration ➞ Products ➞ Products.
2 Create a new record for each new product.
3 Complete relevant information in the other product views.
To create serialized and non-serialized products
1 Choose Marketing Administration ➞ Products ➞ Products.
2 Select a product.
3 Choose Marketing Administration ➞ Products ➞ Product Field Service Details.
4 In the Field Service Details applet, check Serialized if the product has a serial or asset number.
To specify assets for a product
1 Choose Assets ➞ All Assets.
2 Create a new record for an asset.
3 If the asset has a serial number, type it into the Serial Number field.
4 In the Product field, choose a product from the Pick Product dialog box.
7-54 Siebel Field Service Guide Version 6.1

Service Inventory
Setup and Configuration
To specify allocation of products
1 Choose Marketing Administration ➞ Products ➞ Products.
2 Select a product.
3 Choose Marketing Administration ➞ Products ➞ Product Field Service Details.
4 Check the desired allocation modes: Allocate Below Safety, Auto Allocate, and Auto Substitute.
5 In the Inventory applet, review existing inventory options or create new records for additional inventory locations from which this product may be allocated.
Setting Up an InventoryFollow these procedures to set up an inventory.
To define inventory types
1 Choose Service Administration ➞ Service Inventory ➞ Inventory Types.
2 Create a new record.
3 For the Inventory Location Type, choose from the picklist.
4 Set the parameters for cycle counting, as required (see “Inventory Types View” on page 7-16).
To create inventory locations
1 Choose Service Inventory ➞ All Inventory Locations (see “Inventory Locations Views” on page 7-27).
2 In the Inventory Location applet, add a new record.
The Name field uniquely identifies an Inventory Location.
Version 6.1 Siebel Field Service Guide 7-55

Service Inventory
Setup and Configuration
To add a product to inventory
1 Service Inventory ➞ Product Buckets (see“Product Buckets View” on page 7-31).
2 In the Inventory Locations applet, select the inventory location to which you want to add a product.
3 In the Products list applet, add a new record for the new product, specifying Min, Max, and Safety Levels, ABC and XYZ classes for cycle counting, and substitution and allocation specifications.
To define physical locations
1 Choose Service Inventory ➞ All Inventory Locations.
2 Create a new record.
3 Type in the name of the physical inventory location.
4 In the Type field, choose any type from the picklist except Virtual.
5 Complete the remaining fields as needed.
To set up an order for using inventory locations
1 Choose Service Inventory ➞ All Inventory Locations.
2 In the Location Order field enter single numbers, starting from 1, indicating the preferred order for using inventory locations.
7-56 Siebel Field Service Guide Version 6.1

Service Inventory
Setup and Configuration
To set up an order for using product buckets
1 Choose Service Inventory ➞ Product Buckets.
2 In the Buckets applet, type a set of numbers into the Location Order field that indicate the preferred sequence for using products in specific physical locations; for example, 12 or 231.
3 In the Locator 1, Locator 2, and Locator 3 fields, type a description of these physical locations.
NOTE: The Location Order fields in the Inventory Locations and Product Buckets views are informational only. They have no effect on the Fulfillment or Cycle Counting engines.
Location order for inventory locations takes precedence over that for product buckets.
To create an external (virtual) location
1 Choose Service Inventory ➞ All Inventory Locations.
2 Create a new record.
3 Type in the name of the virtual inventory location; for example, External.
4 In the Type field, choose Virtual from the picklist.
5 Complete the remaining fields as needed.
To associate each location with a position
1 Choose Service Inventory ➞ All Inventory Locations.
2 Select an inventory location.
3 In the Position field, choose the position from the dialog box.
Version 6.1 Siebel Field Service Guide 7-57
Service Inventory
Setup and Configuration
To define the roles associated with a location
1 Choose Service Inventory ➞ All Inventory Locations.
2 Select an inventory location from the Inventory Locations list applet.
3 In the Roles applet, create a new record.
4 Choose a value for Role Name from the picklist.
5 To associate the role with a position, choose a value for the Position field from the dialog box.
To associate vendors with inventory locations
1 Choose Service Inventory ➞ Authorized Vendors.
2 In the Inventory Location list applet, select a location.
3 In the Authorized Vendors applet, add a new record for each vendor.
To associate a location with organizations
1 Choose Service Inventory ➞ All Inventory Locations.
2 In the Inventory Locations list applet, go to the Organization column.
3 Click New in the Organizations dialog box.
4 In the Add Organizations dialog box, select an organization and click Add.
5 In the Organizations dialog box, click Close.
To specify the default organization for an inventory location
1 Choose Service Inventory ➞ All Inventory Locations.
2 In the Inventory Locations list applet, go to the Organization column.
3 In the Organizations dialog box, click in the Primary column to place a check next to the default organization.
7-58 Siebel Field Service Guide Version 6.1

Service Inventory
Setup and Configuration
To define bucket categories
1 Choose Service Administration ➞ Service Inventory ➞ Inventory Bucket Categories.
2 Create a new record.
3 Choose availability and status from the picklists for these fields.
To create a bucket for a part
1 Choose Service Inventory ➞ Product Buckets (see “Product Buckets View” on page 7-31).
2 In the Inventory Location applet, select the Inventory Location where the product is stored.
3 In the Products applet, select or add the product.
4 In the Buckets applet, select or create a bucket for the product.
To associate bucket categories with each bucket
1 Choose Service Inventory ➞ Product Buckets (see “Product Buckets View” on page 7-31).
2 In the Inventory Location applet, select an Inventory Location.
3 In the Products applet, select a product.
4 In the Buckets applet, create a new record for the product.
5 Choose the availability and status from the picklists for these fields.
To define the relationships between inventory locations (physical and replenishment relationships)
1 Choose Service Inventory ➞ Relationships (see “Relationships View” on page 7-39).
2 In the Inventory Location applet, select an inventory location.
3 In the Relationships applet, add a new record.
Version 6.1 Siebel Field Service Guide 7-59

Service Inventory
Setup and Configuration
4 Click the down arrow in the Name column to open the Pick Inventory Location dialog box, and select an inventory location.
5 Specify the relationship between the first inventory location and the second inventory location (Replenishes, Fulfills, Sublevel),
To update recommended inventory levels
1 Choose Service Inventory ➞ Product Buckets (see “Product Buckets View” on page 7-31).
2 In the Inventory Location applet, select an Inventory Location.
3 In the Products applet, select a product.
4 Type in new values for the Min, Max, and Safety fields (see Table 7-11 on page 7-32).
Setting Up Inventory TransactionsFollow these procedures to define inventory transactions.
To define types of inventory transactions
1 Service Administration ➞ Service Inventory ➞ Inventory Transaction Types.
2 Create a new record for each transaction type.
3 Choose the name of a transaction from the picklist.
Setting Up Cycle CountingFollow these procedures to set up cycle counting.
To configure cycle counting parameters for products at an inventory location
1 Choose Service Inventory ➞ All Inventory Locations (see “Inventory Locations Views” on page 7-27).
2 Query or select an Inventory Location.
3 Specify the XYZ or ABC classification (in the Count Based On field), the Counting Frequency, and the Counting Period for the inventory categories (A/X, B/Y, C/Z).
7-60 Siebel Field Service Guide Version 6.1

Service Inventory
Setup and Configuration
4 Choose Service Inventory ➞ Product Buckets (see“Product Buckets View” on page 7-31).
5 Select the product in the Products list applet and specify its ABC and XYZ classification.
NOTE: For other procedures for cycle counting, see “Setup and Configuration for Cycle Counting” on page 9-39 and “Running the Cycle Counting Engine” on page 9-8.
Inventory Structure 7
Use inventory locations to consolidate and manage all records having to do with service inventory (see “Inventory Locations Views” on page 7-27). An inventory can be a field engineer’s trunk, a warehouse, or a sublevel, such as a shelf or an aisle in a warehouse. You can add product buckets at any level in your inventory structure.
Building an inventory requires decisions about:
■ Which of your service business’s inventory locations are tracked using Service Inventory, and which are tracked by other means, such as an external back office inventory system.
■ How many hierarchical levels are appropriate for each inventory location in your business.
Version 6.1 Siebel Field Service Guide 7-61

Service Inventory
Setup and Configuration
Inventory Types 7
Different types of inventory locations can be defined in Siebel Field Service (see “Inventory Types” on page 7-62). Each one of them may serve different functions.
The warehouse is the default inventory location. This is the level where the inventory fulfillment and replenishment relationships are defined. Also, pick tickets are generated at this level.
Virtual inventory locations are logical groupings of inventory locations; for example, one virtual inventory location named External is important for proper functioning of inventory transactions. This is a part of the seed data with ROW_ID value VIRTUAL_INVLOC. This can be treated as a void or out of the system virtual inventory location. It is used when receiving items from outside the system; in this case the destination is one of the inventory types in the system, but the source is not. A virtual inventory location is used as a source.
Product Buckets 7
Product buckets are categories for tracking products. Each product has two variables: availability and status. Here are some examples of buckets for one product:
Service Inventory ➞ Product Buckets (see “Product Buckets View” on page 7-31) records buckets for each product in inventory. New products and buckets can be added in this view, but it is not necessary to create product and bucket records manually. When an inventory transaction occurs, products and buckets are automatically created if they do not exist. However, products created this way are not assigned levels (Min, Max, and Safety) or cycle counting classifications (ABC Class and XYZ Class), so records in the Product applet may need updating.
Availability Status
On Order Good
On Hand Good
Reserved Good
In Transit Defective
7-62 Siebel Field Service Guide Version 6.1

Service Inventory
Setup and Configuration
Product Serialization 7
Use the Product Field Service Details view in the Marketing Administration screen (see “Product Field Service Details View” on page 7-23) to serialize products.
If you serialize a product (by checking the Serialized check box), then a serial number is required for all movements and transactions for assets of this product:
■ Inventory transactions
■ Field part movements for field engineer activities
■ Cycle counts
■ Shipments
■ Receipts
Serialized products are treated in a different way than non-serialized ones. Whenever a serialized product is shipped or received, Field Service expects the right number of assets with serial numbers; for example, if four serialized hard drives are shipped or received, Field Service expects that four separate serial numbers are entered.
Inventory Relationships 7
An inventory location is normally related to other locations by relationships. An inventory structure typically consists of a complex network of relationships. Relationships define physical spaces, replenishment sources, fulfillment sources, and cycle counting lists. See “Relationships View” on page 7-39.
A big warehouse can be implemented two ways in Siebel Field Service. The simple way is to create one inventory location, maintain the products at this location (product buckets), and then attach the physical location to the bin level. Locators at the bucket level can store values like A1S3B7, meaning Aisle1, Shelf3, and Bin7.
Version 6.1 Siebel Field Service Guide 7-63

Service Inventory
Setup and Configuration
The other way to implement a warehouse is to define each aisle, shelf, and bin as one inventory location. Only bin-level inventory will have product; typically only one or two in each bin. The inventory name can reflect the combination of location and product. These different inventories can be linked to each other using the relationship type Sub-level, indicating that Aisle1 is a sub-level inventory of Warehouse.
While considering fulfillment or generating the cycle counting lists, or while running the replenishment at the warehouse level, all the inventories below the warehouse level (connected using sub-level) are automatically considered.
To boost the performance of Field Service (for example, to avoid traversing a tree every time to find all sub-inventories for this warehouse), there is a denormalized table in Siebel Field Service. This table stores every child of a parent inventory, direct child, or grandchild (any level deep). If an inventory hierarchy is defined as follows:
■ Inventory A is parent of Inventories B, C, and D
■ Inventory B is parent of inventories E and F
Table 7-28 summarizes the entries in the denormalized table.
This table is maintained by specialized code in the Relationships view (see “Relationships View” on page 7-39).
Table 7-28. S_INVLOC_ROLLUP
Parent Invloc Invloc
A B
A C
A D
A E
A F
B E
B F
7-64 Siebel Field Service Guide Version 6.1

Service Inventory
Setup and Configuration
Inventory locations may also be related through replenishment. For example, the Texas manufacturing inventory may replenish the New Jersey inventory and Oakland Warehouse may replenish the trunk inventories of all the FSEs associated with this warehouse.
The Replenishment engine uses this relationship to identify the source and destination of inventory.
NOTE: Fulfillment and replenishment relationships between inventory locations should be set at the warehouse level, and not at lower levels, such as aisles, bins, or shelves. When using relationships, the Fulfillment, Replenishment, and Part Locator engines automatically search for parts at lower levels by using the sublevel relationship.
Tracking an Inventory Location 7
There are two methods to track a part’s physical location in an inventory location:
■ If the inventory location is defined down to the shelf or bin level, attach the product bucket to a bin or shelf, whose fixed location identifies the part.
■ Type a description, in the Locator fields in the Product Bucket view, of where the part is in an inventory location. This view provides three Locator fields to allow for multiple possible locations—for instance, a part called Defective 1 GB HD might be found first in the northeast corner of the San Francisco field office, second on shelf A in the supplies room, and third on shelf B in the supplies room.
Location OrderService Inventory tracks location order, which matches a product bucket to the physical layout of the warehouse. This matching optimizes the pick ticket and the cycle counting processes by ordering line items according to the physical layout of the warehouse, minimizing walking distance for the warehouse clerk.
Version 6.1 Siebel Field Service Guide 7-65
Service Inventory
Setup and Configuration
To optimize the pick ticket process (and the cycle counting process, see “Cycle Counting” on page 9-5), you can define the location order at two levels:
■ Inventory locations, if a pick ticket is generated across multiple inventory locations (locations of type aisles, shelves, or bins) (see “Inventory Locations Views” on page 7-27).
■ Product buckets (used mostly where an inventory structure is not very detailed) (see “Product Buckets View” on page 7-31).
Location order is represented by numeric values. Pick Ticket Line Items and Cycle Count Part Lists can be ordered based on this value. To take advantage of this feature, make sure that the location numbers in the Inventory Locations or Buckets applet are in the order of the optimized path in the warehouse.
NOTE: The Location Order fields in the Inventory Locations and Product Buckets views are informational only. They have no effect on the Fulfillment or Cycle Counting engines. Location order for inventory locations takes precedence over that for product buckets.
Inventory Transactions 7
Field Service uses inventory transactions to update inventory levels in response to parts movements. As inventory transactions are entered, they update the quantities in product buckets. Every inventory change is tracked through an inventory transaction; it is not possible simply to change the quantity in a location. An inventory transaction occurs between two locations or whenever there is change in a bucket.
These are the types of inventory transactions:
Adjustment Adjusts inventory levels; for example, if after a cycle count there is a variance between original inventory and counted inventory. Manually generated in the Inventory Transactions screen.
Allocate Adds inventory into a Reserved bucket. Automatically generated when the Allocate action is called on an order line item.
De-Allocate Clears inventory from a Reserved bucket. Automatically generated when the De-Allocate action is called on an order line item.
7-66 Siebel Field Service Guide Version 6.1

Service Inventory
Setup and Configuration
In Siebel Field Service, the service parts inventory is maintained through inventory transactions. The service inventory is organized as buckets that classify all the products in a given inventory location that share the common inventory properties: availability and status. An example of a bucket is 50 CD-ROMs on hand and in good condition at an Oakland warehouse.
Exchange Between FSEs
Moves inventory from one trunk inventory to another; intended to move inventory from one Field Service Engineer to another. Manually generated in the Inventory Transactions screen.
Over-the-Counter Moves inventory from one bucket to another; intended to move inventory between Field Service Engineers and warehouses. Manually generated in the Inventory Transactions screen.
Receive Internal Moves inventory from an In-Transit Inventory bucket to a defined physical bucket, such as a shelf in a warehouse. Automatically generated in the Receiving screen.
Receive Other Enters inventory into an inventory bucket on receipt. Automatically generated in the Receiving screen.
Ship Internal Moves inventory from a physical bucket to an In-Transit bucket for internal orders. Automatically generated in the Shipping screen.
Ship Other Moves inventory from a physical bucket to an In-Transit bucket for non-internal orders. Automatically generated in the Shipping screen.
Stock Transfer Moves inventory from one bucket to another, whether the buckets are in the same warehouse or not. Manually generated in the Inventory Transaction screen.
Version 6.1 Siebel Field Service Guide 7-67

Service Inventory
Setup and Configuration
The quantity in a bucket is never updated directly. Any change is made through an inventory transaction. Each inventory transaction has a product, a quantity, a source (the location the product moves from), and a destination (the location where it moves to). In addition, it has other attributes, such as who created the transaction, when it was created, and other information, like related documents (order, activity, or cycle counting). These transactions are created as a result of various business activities:
■ Perform a part movement by doing an install or de-install of a part and move it into or out of the trunk of the service engineer.
■ Allocate or de-allocate a part against an order line item on order entry manually, or through an engine (Fulfillment).
■ Ship a pick ticket and click the Process Shipment button on Shipping ➞ Pick Ticket.
■ Receive an order and click the Generate Transaction button on Receiving ➞ Receive Internal Order, Receive Purchase Order, or Receive Repair Order.
In addition, the transactions can be created directly on the Inventory Transactions screen.
Three Phases of an Inventory Transaction1 Creation, where a row is inserted in S_INV_TXN and, if applicable, rows are
inserted in S_INVT_XN_ASSET.
2 Commit, where the transaction is validated, the buckets are created if not already present, and two rows are inserted in the S_INV_LEDGER table: one to increment the quantity at the destination bucket and the other to decrement it at the source bucket.
3 Apply the quantity changes to the buckets from the ledger entries.
Phases Two and Three take place within the boundary of a single database transaction to ensure the consistency of data.
7-68 Siebel Field Service Guide Version 6.1

Service Inventory
Setup and Configuration
The commit phase of a transaction begins when the record is saved with the commit flag set. At the time of commit, the following validations are performed:
■ If the Product is serialized, then:
S_INV_TXN.QTY = Sum of total number of rows in S_INV_TXN_ASSET
(If the product is serialized, then the total quantity for a particular transaction in the transaction table should be equal to the total number of rows in the transaction asset table.)
■ For each row in the S_INV_TXN_ASSET table:
S_ASSET.PROD_INV_ID (Bucket Id) should belong to the Source Inventory Location (identified by S_INV_TXN.PHYS_SRC_INVLOC_ID), except if the Source Inventory Location is “Customer”.
If the transaction passes these validations, then it enters the execution stage:
■ Insert two rows in the ledger table. The effect of inserting these two rows is propagated and the quantities in the bucket table are updated.
■ For each row in the S_INV_TXN_ASSET table:
Update S_ASSET.PROD_INV_ID (Bucket Id) = DESTINATION.BKT.ID,
S_ASSET.INVLOC_ID = ROW_ID of the Destination Inventory Location.
Generating TransactionsThe following sections describe the rules for generating inventory and asset transactions.
Rules for Inventory TransactionsIf a product is serialized:
■ The asset for the part movement cannot be empty.
■ The quantity of the part movement should be 1.
■ The asset needs to be from the source bucket.
When these conditions are met, the inventory transaction is generated.
Version 6.1 Siebel Field Service Guide 7-69

Service Inventory
Setup and Configuration
If the product is not serialized and the asset is empty, a committed inventory transaction is generated without an inventory transaction asset. If the asset is not empty, the quantity of the part movement is 1 and the asset must be from the source bucket. When these conditions are met, a committed inventory transaction and an inventory transaction asset are generated.
Rules for Asset TransactionsAfter committed inventory transactions are generated and the asset numbers for both the asset and the part movement are not empty, asset transactions are generated. Otherwise, there is no need to generate an asset transaction.
Types of Inventory TransactionsTable 7-29 summarizes the different types of inventory transactions in Siebel Field Service.
Table 7-29. Inventory Transactions in Siebel Field Service (Sheet 1 of 2)
Source Destination
Inventory Transaction
Inventory Txn Type Inventory Bucket Assets1 Inventory Bucket Assets1
Part Movement on Activity
Ship Other Trunk of FE On Hand Yes Customer On Hand Yes
Receive Other
Customer On Hand Yes Trunk of FE On Hand Yes
Allocate action insertion on Order Entry
Allocate Customer On Order No Ord Part Movement Source Invloc ID
Reserved No
De-allocate action insertion on Order Entry
De-allocate Ord Part Movement Source Invloc ID
Reserved No Customer On Order No
7-70 Siebel Field Service Guide Version 6.1

Service Inventory
Setup and Configuration
Ship Other Ship Other Ord Part Movement Source Inv
On Hand Yes Customer On Hand Yes
De-allocate Ord Part Movement Source Inv
Reserved Yes Customer On Order Yes
Ship Internal
Ship Internal Ord Part Movement Source Inv
On Hand Yes Order Hdr. Destination Invloc ID
In Transit Yes
De-allocate Ord Part Movement Source Invloc ID
Reserved Yes Customer On Order Yes
Receive RMA/PO
Receive Other
Customer On Hand Yes Ord Part Movement Dest Inv
Ord Part Movement Avail/Status
Yes
Receive Internal
Receive Internal
Order Hdr Destination Inv
In Transit Yes Ord Part Movement Dest Inv
On Hand Yes
Ship RO Ship To TP Ord Part Movement Source Inv
On Hand Yes Order Hdr. Destination Invloc ID
On Hand Yes
De-allocate Ord Part Movement Source Invloc ID
Reserved Yes Customer On Order Yes
Receive RO Receive From TP
Order Hdr Destination Inv
On Hand Yes Ord Part Movement Dest Inv
On Hand Yes
1. The assets rows are included in the transaction validation if the product is serialized.
Table 7-29. Inventory Transactions in Siebel Field Service (Sheet 2 of 2)
Source Destination
Inventory Transaction
Inventory Txn Type Inventory Bucket Assets1 Inventory Bucket Assets1
Version 6.1 Siebel Field Service Guide 7-71

Service Inventory
Setup and Configuration
Transactions for Part Movements in the FieldWhen a field service engineer reports part movements in the field, specific types of transactions (Table 7-30 on page 7-72) are generated automatically.
For example, a record in the Part Movement list applet with a source of Customer and a destination of Trunk means that the FSE has taken a part out of the customer’s install base and has put it in his or her trunk. Field Service reflects this transfer by creating an inventory transaction (to receive the part into his or her trunk) and an asset transaction (to change the install base).
Table 7-30. Transactions for Field Part Movements
Inventory Transaction
Source DestinationAsset is PRESENT on Activity Header? Source Destination Asset Transaction
Customer Trunk No Virtual FSE Trunk No
Customer Trunk Yes Virtual FSE Trunk Yes
Customer Customer Yes No Yes
Customer Customer No No No
Order Customer Yes No Yes
Order Customer No No No
Trunk Customer Yes FSE Trunk Virtual Yes
Trunk Customer No FSE Trunk Virtual No
7-72 Siebel Field Service Guide Version 6.1

Service Inventory
Setup and Configuration
Mobile Inventory Transaction EngineSiebel Field Service provides for recording part movements in the field (mobile inventory), without synchronization with the Field Service server. This allows FSEs to record transfers of assets without having the asset number or serial number on the FSE’s local laptop. Normally, this would cause a transaction to fail. With Field Service, the part movement is recorded, but not applied to the inventory. On synchronization, parts movement transactions are sent to a Field Service server and recorded in the database. If these transactions are marked as uncommitted, the system administrator can commit them (see “To commit transactions reported by mobile clients” on page 7-10).
The server component FSInvTxn is a part of the server component group FieldSvc. The engine is invoked through Service Administration ➞ Parts Movement Administration. This view is used to commit field part movements to the database.
InputAll uncommitted field part movements, or selected field part movements.
OutputFor each uncommitted field part movement:
■ Create committed inventory transactions (Receive Other/Ship Other).
■ Create inventory transaction asset.
■ Create new ledger records (for the source and destination).
■ Update the quantity of the source and destination buckets.
■ Update Asset (update INVLOC_ID and PROD_INV_ID).
■ Create asset transaction.
■ Commit the field part movement.
Version 6.1 Siebel Field Service Guide 7-73

Service Inventory
Setup and Configuration
CriteriaIf the asset doesn’t belong to the source bucket, leave it uncommitted and don’t do anything or otherwise create the right output.
Parameters for the Mobile Inventory Engine
1 Mode: All or Temp Table
2 ClientID (when Mode = Temp Table)
Tables Involved
Table 7-31. Business Object for the Mobile Inventory Engine
Business Comp/Object Table Class::Base Class Description
Action S_ACTPART_MVMT CSSBCActivityPartMvmt : CSSBCBase
Changed:
CSSBCActivityPartMvmt::AddAssetTxn();CSSBCActivityPartMvmt::AddInvTxn();CSSBCActivityPartMvmt::SqlWrteRecord();
■ S_ACTPART_MVMT ■ S_EVT_ACT ■ S_EMPLOYEE
■ S_INVLOC ■ S_INVLOC_TYPE ■ S_INV_TXN
■ S_INVTXN_ASSET ■ S_PROD_INVLOC ■ S_PROD_INV
■ S_LST_OF_VAL ■ S_INV_TEMP
7-74 Siebel Field Service Guide Version 6.1

Service Inventory
Setup and Configuration
Synchronizing Remote and Local Databases 7
Siebel Remote enables mobile or remote clients (typically laptop computers) to connect to a Siebel Server and exchange updated data and files, a process known as synchronization.
Setting Up Siebel RemoteFollow these procedures to set up communication with a remote client.
To set up a server connection to a remote client
1 Choose Siebel Remote Administration ➞ Remote Clients.
2 In the Mobile Clients applet, add a new record.
3 For Routing Group, select Mobile Client - Standard from the Pick Routing Group dialog box.
4 Choose Server Administration ➞ Enterprise Configuration ➞ Enterprise Component Groups.
5 Select Siebel Remote.
6 Click the Enable button to activate Siebel Remote.
7 Choose Server Administration ➞ Enterprise Configuration ➞ Batch Component Administration.
8 Click the Synchronize button.
9 For Siebel Field Service running under a Solaris operating system, run the start_server and stop_server shells.
10 For Windows NT, choose Settings ➞ Control Panel ➞ Services.
a Select Siebel Server.
b Click Stop, then click Start.
Version 6.1 Siebel Field Service Guide 7-75
Service Inventory
Setup and Configuration
To set up a a remote client
1 Choose Server Administration ➞ Servers ➞ Server Tasks.
2 Add a new record.
3 Select Generate New Database.
4 Click Start.
5 Wait until the Status field reports “Completed Successfully.”
6 Add a new record.
7 Select Database Extract.
8 Click Parameters.
9 In the Client Name record, enter the client name in the Value field.
10 Click Start.
11 Wait till the Status field reports “1 client(s) extracted.”
To log on to the local database for the first time
NOTE: The Transaction Processor must be running prior to database initialization. See the Siebel Remote and Replication Manager Administration Guide.
1 Connect the mobile client to the server, or run the server locally.
2 Start Siebel Field Service.
3 Log on, selecting Local for the database.
4 Enter a new user name and password.
5 Choose Server Administration ➞ Servers ➞ Server Tasks.
6 Select Transaction Merger.
7 Click Start.
7-76 Siebel Field Service Guide Version 6.1

Service Inventory
Setup and Configuration
8 Optional: Click Parameters and type a new, smaller value for Sleep Time. The Default is 60 seconds.
NOTE: The sleep time should be the same for the Transaction Processor, Transaction Merger, and Transaction Router or gaps will occur which impact synchronization performance.
9 Select Transaction Router.
10 Click Start.
To synchronize a Field Service server with a remote client
1 Connect the remote client to the server.
2 Log on to your remote client.
3 Click the Synchronize database icon on the toolbar, or choose Synchronize from the File menu.
The Status bar reports “Synch” when synchronization is complete.
Version 6.1 Siebel Field Service Guide 7-77

Service Inventory
Setup and Configuration
7-78 Siebel Field Service Guide Version 6.1

Orders 8
About This Chapter . . . . . . . . . . . . . . . . . . . . . . . . . . . . . . . . . . . . . . 8-3
Concepts and Terms . . . . . . . . . . . . . . . . . . . . . . . . . . . . . . . . . . . . . . . . 8-4
Application Overview . . . . . . . . . . . . . . . . . . . . . . . . . . . . . . . . . . . . . 8-5
RMAs . . . . . . . . . . . . . . . . . . . . . . . . . . . . . . . . . . . . . . . . . . . . . . 8-5
Repair Orders . . . . . . . . . . . . . . . . . . . . . . . . . . . . . . . . . . . . . . . . . . . . . 8-9
Internal Orders . . . . . . . . . . . . . . . . . . . . . . . . . . . . . . . . . . . . . . . . . . . .8-10
Purchase Orders . . . . . . . . . . . . . . . . . . . . . . . . . . . . . . . . . . . . . 8-11
Fulfillment . . . . . . . . . . . . . . . . . . . . . . . . . . . . . . . . . . . . . . . . . 8-11
Creating and Tracking Orders . . . . . . . . . . . . . . . . . . . . . . . . . . . . 8-13
Fulfilling Orders . . . . . . . . . . . . . . . . . . . . . . . . . . . . . . . . . . . . . 8-18
Screens and Views for Orders . . . . . . . . . . . . . . . . . . . . . . . . . . . . . . 8-20
Application Administration Screen . . . . . . . . . . . . . . . . . . . . . . . . . . . 8-22
Order Action Types View . . . . . . . . . . . . . . . . . . . . . . . . . . . . . . . 8-22
Order Types View . . . . . . . . . . . . . . . . . . . . . . . . . . . . . . . . . . . . 8-23
Orders Screen . . . . . . . . . . . . . . . . . . . . . . . . . . . . . . . . . . . . . . . . . 8-24
All RMAs/Service Orders View . . . . . . . . . . . . . . . . . . . . . . . . . . . 8-24
Line Items View . . . . . . . . . . . . . . . . . . . . . . . . . . . . . . . . . . . . . 8-27
Line Item Actions View . . . . . . . . . . . . . . . . . . . . . . . . . . . . . . . . 8-31
Line Item Part Locator View . . . . . . . . . . . . . . . . . . . . . . . . . . . . . 8-33
Line Item Warranties View . . . . . . . . . . . . . . . . . . . . . . . . . . . . . . 8-35
Terms View . . . . . . . . . . . . . . . . . . . . . . . . . . . . . . . . . . . . . . . . . 8-36
Repairs View . . . . . . . . . . . . . . . . . . . . . . . . . . . . . . . . . . . . . . . . 8-37
Orders Charts . . . . . . . . . . . . . . . . . . . . . . . . . . . . . . . . . . . . . . . . . 8-38
Orders Reports . . . . . . . . . . . . . . . . . . . . . . . . . . . . . . . . . . . . . . . . . 8-39
Version 6.1 Siebel Field Service Guide 8-1
Orders
Setup and Configuration . . . . . . . . . . . . . . . . . . . . . . . . . . . . . . . . . . 8-40
Setting Up Orders . . . . . . . . . . . . . . . . . . . . . . . . . . . . . . . . . . . . 8-40
Setting Up the Fulfillment and Part Locator Engines . . . . . . . . . . . . 8-40
Options for Using Orders . . . . . . . . . . . . . . . . . . . . . . . . . . . . . . . 8-43
Generating Pick Ticket Button . . . . . . . . . . . . . . . . . . . . . . . . . . . . . . . . 8-45
Fulfillment Engine . . . . . . . . . . . . . . . . . . . . . . . . . . . . . . . . . . . . . . . . 8-46
Part Locator . . . . . . . . . . . . . . . . . . . . . . . . . . . . . . . . . . . . . . . . 8-48
System Preferences for the Fulfillment and Part Locator Engines . . . . . . . 8-49
Engine Parameters for the Fulfillment and Part Locator Engines . . . . . . . 8-53
Running the Fulfillment and Part Locator Engines . . . . . . . . . . . . . . . . . 8-54
8-2 Siebel Field Service Guide Version 6.1

Orders
About This Chapter
About This Chapter 8
Customer support representatives, field engineers, and materials managers all use orders records to carry out their roles in the service business. This chapter describes the tasks associated with these roles.
Table 8-1 describes the types of orders used in Field Service.
Table 8-1. Orders Used in Field Service
Type of Order Typical Use
Sales Order Selling new finished goods to customers, normally from manufacturing inventory
Service Order Handling outbound service orders, normally from the service inventory
Purchase Order Buying inventory from external vendors
Internal Order Replenishing stock, or moving inventory among inventory locations
RMA Return Receiving inbound returns from customers
RMA Repair Return Handling customer returns that require receiving, repairing, and shipping back to customers
RMA Advance Exchange Handling customer returns that require receiving and immediate shipping of exchange parts
Repair Order Ordering, shipping, and receiving parts to be repaired by a third party
Version 6.1 Siebel Field Service Guide 8-3

Orders
About This Chapter
Concepts and Terms 8
Fulfillment The process of identifying ordered items in inventory, allocating (reserving) them to selected orders, and generating pick tickets for use in shipping these items. The Fulfillment engine generates an inventory transaction for a specified product, quantity, source, and status, based on the priority of the order and the relationships defined for the account selected or order terms specified.
Internal order Document for replenishing stock or moving inventory among inventory locations.
Logistics manager An option of Siebel Field Service that includes the Fulfillment and Part Locator engines, the Replenishment engine (see “Setup and Configuration for the Replenishment Engine” on page 9-49), and the Cycle Counting engine (see “Cycle Counting” on page 9-5).
Purchase order Document for buying inventory from external vendors.
Repair order Document for ordering repairs, shipping parts to be repaired to a third party, and receiving the repaired parts.
RMA Return materials authorization, with a unique RMA Id.
RMA advance exchange Document for handling customer returns that require immediate shipment of a replacement part, instead of waiting for the damaged part to be received.
RMA repair return Document for handling customer returns that require receiving, repairing, and shipping a part back to a customer.
RMA return Document for receiving inbound returns from customers.
Sales order Document for the sale of new finished goods to customers, normally from manufacturing inventory.
Service order Document that authorizes the request from a customer for service on existing products, including replacement or repair of parts.
8-4 Siebel Field Service Guide Version 6.1

Orders
Application Overview
Application Overview 8
This section describes the orders used in field service activities and how Siebel Field Service processes these orders. It also provides detailed procedures for using the screens and features provided with Siebel Field Service. For details on individual screens, see “Screens and Views for Orders” on page 8-20. For procedures on setting up orders, see “Setup and Configuration” on page 8-40.
RMAs 8
An RMA authorizes a customer to return products. RMAs can be advance exchanges, which authorize allocation, pick-up, and shipping an exchange product to the customer before receipt of the customer’s defective product. RMAs also include repair and return orders, which order a product repaired and shipped back to the customer.
Version 6.1 Siebel Field Service Guide 8-5

Orders
Application Overview
Figure 8-1 illustrates a business flow for an RMA and RMA advance exchange.
Figure 8-1. Business Flow for an RMA and RMA Advance Exchange
8-6 Siebel Field Service Guide Version 6.1

Orders
Application Overview
Figure 8-2 illustrates a business flow for an RMA return.
Figure 8-2. Business Flow for an RMA Return
Service Request
Support CenterCustomer
Call
ShipDefective
Item
Outsource?
Receive
Repair
Yes
No
Warehouse Clerk
Receive RMANumber from CSR
Third-Party RepairInternal Repair
Return Good toInventory
Repair
Repair?
Yes
No
RMA
Version 6.1 Siebel Field Service Guide 8-7

Orders
Application Overview
Figure 8-3 illustrates a typical business flow for a service order.
Figure 8-3. Business Flow for Service Orders
ServiceRequest
Support CenterLogisticsManager
PickPackShip
Warehouse Clerk
Generate PickTicket
Check PartsAvailability
Outsource?
Allocate
Yes
No
Service Order
ReceiveOrder
Third-PartySupplier
PickPackShip
Customer
Call
Receive GoodParts
8-8 Siebel Field Service Guide Version 6.1

Orders
Application Overview
Repair Orders 8
A repair order is an order used to obtain the repair of defective parts from a third-party vendor, to ship a defective part to the third-party repair center, and to receive the refurbished or repaired part. Figure 8-4 illustrates a business flow for a repair return.
Figure 8-4. Business Flow for a Repair Return
Return Part
Internal Repair External Repair
Receiving Part
GenerateDefective Tag
Generate RepairActivities through
Repair Plan
Complete RepairActivities
Complete Repair
Record Time andExpenses
Ship RO toExternal Repair
Provider
ReceiveRepaired Itemfrom Vendor
Transfer toGood Inventory
Ship toCustomer
Generate RepairOrder or Attachto Existing RO
RMA OTCStock
Transfer
Version 6.1 Siebel Field Service Guide 8-9

Orders
Application Overview
Internal Orders 8
An internal order is an order to transfer products between two internal inventory locations—usually the result of a replenishment process. Figure 8-5 illustrates the business flow for an internal order.
Figure 8-5. Business Flow for an Internal Order
Check PartLevel
Logistics Manager Warehouse Clerk Warehouse Clerk orField Service
Engineer
PickPackShip
ReceiveGenerate Pick
Ticket
Allocate Parts
GenerateInternal Order
(Replenishment)
8-10 Siebel Field Service Guide Version 6.1

Orders
Application Overview
Purchase Orders 8
A purchase order is an order to buy products from an outside vendor or from manufacturing.
Fulfillment 8
Siebel Field Service provides two methods for filling an order automatically:
■ The Fulfillment engine automatically locates in inventory the ordered items (or substitutes for these items), allocates these items, and generates a pick ticket.
■ The Parts Locator is a semi-automatic version of the Fulfillment engine. It gives the user control over fulfillment of individual line items in an order. The user can select the line items and choose to carry out these automatic procedures for the selected items:
■ Find products or substitutes in inventory.
■ Allocate these items.
■ Generate pick tickets.
Version 6.1 Siebel Field Service Guide 8-11

Orders
Application Overview
Figure 8-6 illustrates the flow of a typical service order in Siebel Field Service.
Figure 8-6. Order Processing
Take orderfrom customer
Manualfulfillment?
FulfillmentEngine
PartLocator
Generatepick ticket
Pickticket
Pick ticketprocessing:line items
Is the ordercomplete?
Deallocatethe quantitynot found
Pick ticketprocessing:
waybill
Shippinginformation
Ship orderto customer
Customer Service RepresentativeOrder Handler/
Warehouse StaffAutomatic processes
YesNo
No
Yes
8-12 Siebel Field Service Guide Version 6.1
Orders
Application Overview
Creating and Tracking Orders 8
Follow these procedures to create and track orders.
To create a service order
1 Choose Orders ➞ All RMAs/Service Orders (see “All RMAs/Service Orders View” on page 8-24).
2 Add a new record, specifying the type as Service Order.
3 Choose the Line Items view (see “Line Items View” on page 8-27).
4 Add a record for each product required for this service order.
5 To associate action types (allocate, backorder, ship, and substitute) with a line item, select that line item.
6 Choose the Line Item Actions view (see “Line Item Actions View” on page 8-31).
7 In the Line Item Actions applet, add a record for each action (allocate, backorder, ship, and substitute) associated with a product.
NOTE: If the Logistics Manager is installed, these steps can be automated (see “Fulfillment” on page 8-11).
8 Specify the product and asset to ship, if required.
9 Specify the source inventory location plus other information, as needed.
To create an RMA
1 Choose Orders ➞ All RMAs/Service Orders (see “All RMAs/Service Orders View” on page 8-24).
2 Add a new record, specifying the type as RMA Advance Exchange, RMA Repair Return, or RMA Return.
3 Choose Orders ➞ RMAs/Service Order ➞ Line Items (see “Line Items View” on page 8-27).
Version 6.1 Siebel Field Service Guide 8-13

Orders
Application Overview
4 Add a record for each product required for this service order.
5 Supply the product name and other information as needed.
NOTE: If the Logistics Manager is installed, these steps can be automated (see “Fulfillment” on page 8-11).
To create a purchase order
1 Choose Orders ➞ All RMAs/Service Orders (see “All RMAs/Service Orders View” on page 8-24).
2 Add a new record.
3 Select Purchase Order for the type.
4 Click the order number to go to RMAs/Service Order ➞ Line Items (see “Line Items View” on page 8-27).
5 In the Line Items applet, add records for each product ordered.
To create an internal order
1 Choose Orders ➞ All RMAs/Service Orders (see “All RMAs/Service Orders View” on page 8-24).
2 Add a new record of the type Internal Order.
3 Choose Orders ➞ RMAs/Service Order ➞ Terms (see “Terms View” on page 8-36).
4 Specify both shipping and receiving locations in the From and To Inventory fields.
5 Click the Line number to go to Orders ➞RMAs/Service Order ➞ Line Item Actions (see “Line Item Actions View” on page 8-31).
6 In the Line Item Actions applet, assign action types (Allocate, Substitute, Ship, Receive, De-Allocate, or Backorder) to the line item.
NOTE: If the Logistics Manager is installed, these steps can be automated (see “Fulfillment” on page 8-11).
8-14 Siebel Field Service Guide Version 6.1
Orders
Application Overview
To create a repair order
1 Choose Orders ➞ All RMAs/Service Orders (see “All RMAs/Service Orders View” on page 8-24).
2 Add a new record, specifying Repair Order as the Type.
3 Click the Order Number to go to RMAs/Service Order ➞ Line Item (see “Line Items View” on page 8-27).
4 In the Line Items list applet, add the items to be repaired.
5 Choose Orders ➞RMAs/Service Order ➞ Terms (see “Terms View” on page 8-36).
6 Specify the source inventory in the From field.
7 Specify the external provider in the To Inventory field (the destination).
8 Choose Orders ➞ RMAs/Service Order ➞ Line Item Actions (see “Line Item Actions View” on page 8-31).
9 In the Line Item Actions list applet, add a new record, specifying Allocate as the Action Type.
10 Click Generate Pick Tickets to create the pick ticket for the shipment.
To record all products required to fulfill an order
1 Choose Orders ➞ All RMAs/Service Orders (see “All RMAs/Service Orders View” on page 8-24).
2 Select an order.
3 Choose Orders ➞ RMAs/Service Order ➞ Line Item (see “Line Items View” on page 8-27).
4 In the Line Items applet, select a record.
5 Choose Orders ➞ RMAs/Service Order ➞ Line Item (see “Line Items View” on page 8-27).
6 In the Line Items applet, add a record for each item in the order.
Version 6.1 Siebel Field Service Guide 8-15

Orders
Application Overview
To define activities required to fulfill an order
1 Choose Orders ➞ All RMAs/Service Orders (see “All RMAs/Service Orders View” on page 8-24).
2 Select an order.
3 Choose Orders ➞ RMAs/Service Order ➞ Line Items (see “Line Items View” on page 8-27).
4 In the Line Items applet, select a record.
5 Choose Orders ➞ RMAs/Service Order ➞ Line Item Actions (see “Line Item Actions View” on page 8-31).
6 In the Line Item Actions applet, create a new record for each action.
Action types may be Ship, Allocate, and so on.
To check the status of an order
1 Choose Orders ➞ All RMAs/Service Orders (see “All RMAs/Service Orders View” on page 8-24).
2 Select the order from the list applet.
3 Check the Status column.
To allocate parts for an order manually
1 Choose Orders ➞ RMAs/Service Orders ➞ Line Item Actions (see “Line Item Actions View” on page 8-31).
2 Select an order.
3 Click the order number to go to RMAs/Service Order ➞ Line Items (see “Line Items View” on page 8-27).
4 Select the line item to allocate for the order, or create new line items.
5 Choose RMAs/Service Order ➞ Line Item Actions (see “Line Item Actions View” on page 8-31).
8-16 Siebel Field Service Guide Version 6.1

Orders
Application Overview
6 Add an action record and choose Allocation as the action type.
NOTE: If the Logistics Manager and its Fulfillment engine are installed, specifying Allocate actions is unnecessary. Instead, use the Fulfillment engine.
7 Specify Source Inv Loc, Availability, and Status.
8 Generate a shipment number by clicking Generate Pick Tickets.
To allocate items for pending RMAs and service orders
1 Choose Orders ➞ All RMAs/Service Orders (see “All RMAs/Service Orders View” on page 8-24).
2 Select an order.
3 Click the Order Number to go to RMAs/Service Order ➞ Line Items (see “Line Items View” on page 8-27).
4 In the Line Items applet, select the Product to allocate, and click its Line number to go to RMAs/Service Order ➞ Line Item Actions (see “Line Item Actions View” on page 8-31).
5 In the Line Item Actions applet, add a new record for the Product.
6 Specify Allocate as the Action Type.
7 Specify the source inventory location (Source Inv Loc field).
To generate a pick ticket for a repair order
1 Choose Orders ➞ All RMAs/Service Orders (see “All RMAs/Service Orders View” on page 8-24).
2 Select a repair order.
3 Choose Orders ➞ RMAs/Service Order ➞ Repairs (see “Repairs View” on page 8-37).
4 In the RMA/Service Order applet, click Generate Pick Ticket.
NOTE: All subviews of Orders ➞ RMAs/Service Order contain the Generate Pick Ticket button.
Version 6.1 Siebel Field Service Guide 8-17

Orders
Application Overview
To view shipping and billing instructions and payment terms for an order
1 Choose Orders ➞ All RMAs/Service Orders (see “All RMAs/Service Orders View” on page 8-24).
2 Select an order.
3 Choose Orders ➞ RMAs/Service Order ➞ Terms (see “Terms View” on page 8-36).
Fulfilling Orders 8
Follow these procedures to fulfill service orders.
Fulfilling a Service Order Using the Part Locator
To locate then allocate order line items
1 Choose Orders ➞ RMAs/Service Orders ➞ Line Item Part Locator (see “Line Item Part Locator View” on page 8-33).
2 Query the order to fulfill.
3 Select a line item in the Line Items applet and click Locate.
The Part Locator searches for the product or specified substitutes through available inventory locations, and then loads the list of available and substitute parts in the Available Products/Available Substitutes applet.
NOTE: To view or allocate available substitutes, click the Toggle button in the Available Products/Available Substitutes applet.
4 In the Available Products/Available Substitutes applet, select the Inventory Locations from which you want to allocate the product.
5 Select the quantity of a selected line item. If no quantity is specified, the available quantity is allocated.
8-18 Siebel Field Service Guide Version 6.1

Orders
Application Overview
6 Click the appropriate button:
■ Allocate All. Allocates available parts automatically, starting with the first listed inventory location.
■ Allocate. Allocates the selected line item.
The allocated parts appear in the Line Item Allocation applet.
7 Complete the fulfillment by clicking Generate Pick Tickets in the RMA/Service Order applet.
Field Service generates a Pick Ticket for each inventory location from which parts are allocated.
Fulfilling a Service Order Using the Fulfillment Engine
To fulfill orders
1 Choose one of the following views:
■ Orders ➞ All RMAs/Service Orders (see “All RMAs/Service Orders View” on page 8-24).
■ Orders ➞ All RMAs/Service Orders across Organizations.
2 Select one or more orders.
3 Click Fulfill to fulfill selected orders, or click Fulfill All to fulfill all orders.
To fulfill order line items
1 Choose Orders ➞ RMAs/Service Order ➞ Line Items (see “Line Items View” on page 8-27).
2 Select line items for a service order.
3 Click Fulfill to fulfill selected line items, or click Fulfill All to fulfill all line items.
Version 6.1 Siebel Field Service Guide 8-19

Orders
Screens and Views for Orders
Screens and Views for Orders 8
Click the name of a screen or view in Table 8-2 to see more information.
Table 8-2. Screens and Views for Orders (Sheet 1 of 2)
Screen ViewsRole/Procedures (Click to see full procedure.)
Application Administration
Order Action Types Define the actions that may be associated with order types.
Order Types Define the types of orders.
Record all orders related to service and inventory replenishment: internal, purchase, RMAs, and service orders. See:
“To create a service order” on page 8-13
“To create an RMA” on page 8-13
“To create a purchase order” on page 8-14
“To create an internal order” on page 8-14
“To create a repair order” on page 8-15
“To check the status of an order” on page 8-16
“To allocate parts for an order manually” on page 8-16
“To allocate items for pending RMAs and service orders” on page 8-17
“To fulfill orders” on page 8-19
8-20 Siebel Field Service Guide Version 6.1

Orders
Screens and Views for Orders
Version 6.1 Siebel Field Service Guide 8-21
Orders RMAs/Service Order ➞ Line Items Define all products required to fulfill an order. See:
“To create a service order” on page 8-13
“To create an RMA” on page 8-13
“To create a purchase order” on page 8-14
“To create a repair order” on page 8-15
“To allocate parts for an order manually” on page 8-16
“To allocate items for pending RMAs and service orders” on page 8-17
“To fulfill order line items” on page 8-19
RMAs/Service Order ➞ Line Item Actions Define activities associated with an order line item. These activities must be completed to fulfill the order. See:
“To create a service order” on page 8-13
“To create an internal order” on page 8-14
“To create a repair order” on page 8-15
“To allocate parts for an order manually” on page 8-16
“To allocate items for pending RMAs and service orders” on page 8-17
RMAs/Service Order ➞ Line Item Part Locator Find in inventory the product to allocate to a line item in an order. See:
“To locate then allocate order line items” on page 8-18
RMAs/Service Order ➞ Line Item Warranties View the warranties associated with a product.
RMAs/Service Order ➞ Terms View a summary of an order, shipping instructions and billing instructions. See:
“To create an internal order” on page 8-14
“To create a repair order” on page 8-15
RMAs/Service Order ➞ Repairs View repairs (defective tags) associated with a line item in an RMA or service order.
Table 8-2. Screens and Views for Orders (Sheet 2 of 2)
Screen ViewsRole/Procedures (Click to see full procedure.)

Orders
Application Administration Screen
Application Administration Screen 8
The Orders views on the Application Administration screen has two subviews for configuring orders.
The processing of orders is defined by actions. These actions indicate that the product has been reserved for a line item (allocate action), it has been substituted by another product, it has been shipped, or it has been received.
Order Action Types View 8
The Order Action Types view (Application Administration ➞ Orders, Figure 8-7) defines the actions that may be associated with an order type. Table 8-3 on page 8-23 describes the field in this view.
Figure 8-7. Order Action Types List Applet in the Order Action Types View
8-22 Siebel Field Service Guide Version 6.1
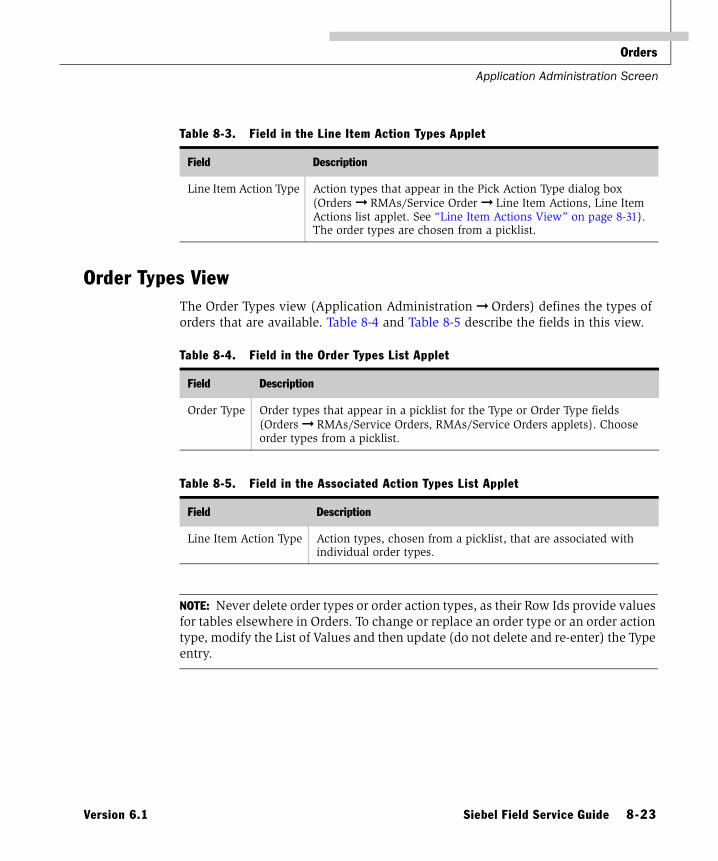
Orders
Application Administration Screen
Order Types View 8
The Order Types view (Application Administration ➞ Orders) defines the types of orders that are available. Table 8-4 and Table 8-5 describe the fields in this view.
NOTE: Never delete order types or order action types, as their Row Ids provide values for tables elsewhere in Orders. To change or replace an order type or an order action type, modify the List of Values and then update (do not delete and re-enter) the Type entry.
Table 8-3. Field in the Line Item Action Types Applet
Field Description
Line Item Action Type Action types that appear in the Pick Action Type dialog box (Orders ➞ RMAs/Service Order ➞ Line Item Actions, Line Item Actions list applet. See “Line Item Actions View” on page 8-31). The order types are chosen from a picklist.
Table 8-4. Field in the Order Types List Applet
Field Description
Order Type Order types that appear in a picklist for the Type or Order Type fields (Orders ➞ RMAs/Service Orders, RMAs/Service Orders applets). Choose order types from a picklist.
Table 8-5. Field in the Associated Action Types List Applet
Field Description
Line Item Action Type Action types, chosen from a picklist, that are associated with individual order types.
Version 6.1 Siebel Field Service Guide 8-23

Orders
Orders Screen
Orders Screen 8
All RMAs/Service Orders View 8
The All RMAs/Service Orders view, Figure 8-8 on page 8-24, records all orders related to service and inventory replenishment: internal, purchase, RMAs, and service orders. Table 8-6 on page 8-25 describes the fields in this view.
This view shows only the service orders that belong to the organizations to which the user also belongs. See “Inventory Locations Across Organizations” on page 7-27 and “Inventory Transactions Across Organizations” on page 7-43.
Figure 8-8. All RMAs/Service Orders View
8-24 Siebel Field Service Guide Version 6.1
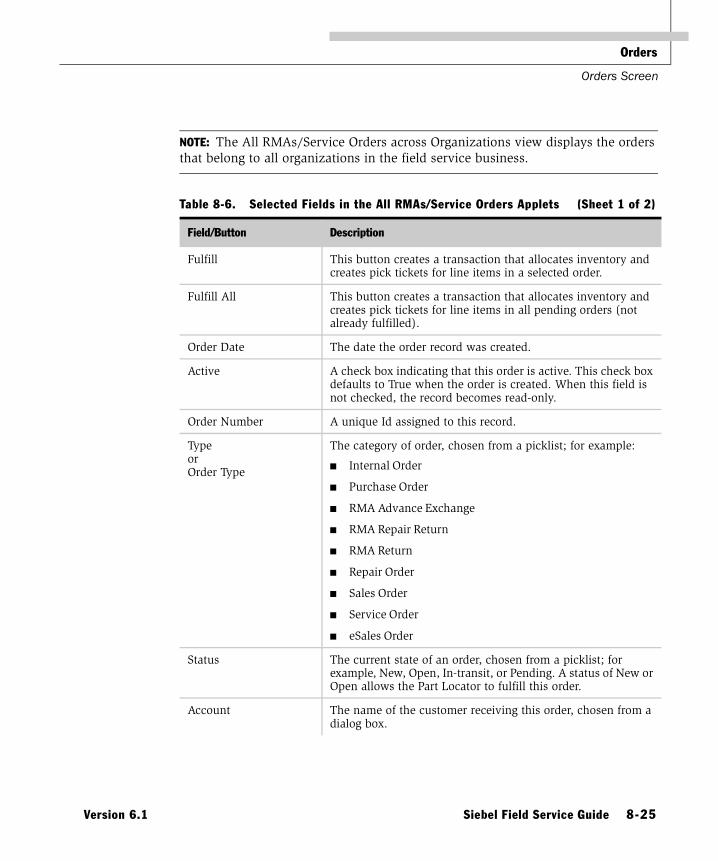
Orders
Orders Screen
NOTE: The All RMAs/Service Orders across Organizations view displays the orders that belong to all organizations in the field service business.
Table 8-6. Selected Fields in the All RMAs/Service Orders Applets (Sheet 1 of 2)
Field/Button Description
Fulfill This button creates a transaction that allocates inventory and creates pick tickets for line items in a selected order.
Fulfill All This button creates a transaction that allocates inventory and creates pick tickets for line items in all pending orders (not already fulfilled).
Order Date The date the order record was created.
Active A check box indicating that this order is active. This check box defaults to True when the order is created. When this field is not checked, the record becomes read-only.
Order Number A unique Id assigned to this record.
TypeorOrder Type
The category of order, chosen from a picklist; for example:
■ Internal Order
■ Purchase Order
■ RMA Advance Exchange
■ RMA Repair Return
■ RMA Return
■ Repair Order
■ Sales Order
■ Service Order
■ eSales Order
Status The current state of an order, chosen from a picklist; for example, New, Open, In-transit, or Pending. A status of New or Open allows the Part Locator to fulfill this order.
Account The name of the customer receiving this order, chosen from a dialog box.
Version 6.1 Siebel Field Service Guide 8-25

Orders
Orders Screen
NOTE: With an RMA advance exchange, the customer is not required to send the defective part before receiving a replacement. It would be advisable to create a Workflow Manager policy which tracks unreturned parts and reminds the customer, by email, to return those parts.
Acct Order # A type-in field for the number of an order from the customer.
Priority The level of importance for this order, chosen from a picklist; for example, Low or High.
Approved A check box indicating that this order is approved for fulfillment.
Approved By The name of the person approving this order, chosen from a dialog box.
Billable A check box indicating that this order is billable to the customer.
Currency The type of currency used to bill this order, chosen from a dialog box.
Price List The price list used to bill this order, chosen from a dialog box.
Discount % The discount applied to the total price of this order, chosen from a picklist.
Service Request Number If the order results from a service request, the number of the service request, chosen from a dialog box.
Quote Number If the order results from a previous quote, the number of the quote, chosen from a dialog box.
Requested Ship Date The date that the customer requested for fulfilling this order.
Table 8-6. Selected Fields in the All RMAs/Service Orders Applets (Sheet 2 of 2)
Field/Button Description
8-26 Siebel Field Service Guide Version 6.1

Orders
Orders Screen
Line Items View 8
The Line Items view (RMAs/Service Order ➞ Line Items, Figure 8-9) records all products required to fulfill an order. Table 8-7 describes the button in this view.
NOTE: Subviews of the RMAs/Service Orders view have a Generate Pick Tickets button.
Table 8-7. Button in the RMS/Service Order Form Applet
Button Description
Generate Pick Tickets
This button generates a pick ticket for line items that have been allocated. For the details of how this button works, see “Generating Pick Ticket Button” on page 8-45.
Figure 8-9. Line Items List Applet in the Line Items View
Version 6.1 Siebel Field Service Guide 8-27

Orders
Orders Screen
Table 8-8. Selected Fields in the Line Items List Applet (Sheet 1 of 3)
Field/Button Description
Fulfill This button creates a transaction that carries forward the order for line items in the selected order.
Note that the Fulfill buttons are present only if Siebel Field Service has the optional Logistics Manager.
Fulfill All This button creates transactions that carry forward the orders for line items in all pending orders (not already fulfilled).
Reprice This button recalculates the price of the selected line item only, based on the pricing data in the Pricing Administration ➞ Pricing ➞ Price List Line Items.
Note that pricing data is cached to increase speed. If the administrator changes the pricing structure in this view, the user must restart the application to update the price for the line item.
Reprice All This button recalculates the prices of all line items.
Renumber This button numbers line items sequentially, starting from 1. This is useful if a line item was deleted.
Line A number assigned to this record or typed in by the user.
Asset Number The asset number for the product in this line item, chosen from a dialog box.
Serial Number The serial number of this line item. Read-only.
Product The name of a product, chosen from a dialog box.
Product Status The current state of the product, chosen from a picklist; for example, Good or Defective.
Qty Requested A type-in field for the number of items requested in the order.
Qty Shipped A type-in field for the number of items available to ship.
Loaner A check box indicating that this line item is on loan to the customer.
Billable Flag A check box indicating that this item is billable to the customer.
8-28 Siebel Field Service Guide Version 6.1

Orders
Orders Screen
Service A check box indicating that the order line item is a service product, with special pricing.
Covered Product The name of the product covered by the service line item, chosen from a dialog box. If the line item represents a service defined in the Product Administration view, it is possible to specify a covered product (for example, that product that the service covers). The service and the covered product may have a different price. The service price can be based on the price of the product covered.
Write-In Prod A type-in field for the name of a product not in the Field Service database.
Due Date Date this product was promised to the customer.
Status The current state of fulfillment for this item, chosen from a picklist; for example, Open or In-transit.
List Price A read-only field for the list price of this item, derived from the price list.
Disc % The percentage of discount to apply to the list price, chosen from a picklist.
Disc Amount A type-in field for the amount of the discount to apply to a list price.
Note that Disc %, Disc Amount, and Disc Price are mutually exclusive. When you set one of these, the other two are set to blank. The Net Price is then set.
Disc Price A type-in field for the discounted list price.
Tax Exempt A check box indicating that this item is tax exempt.
Net Disc% This is a calculated value, equal to (List Price — Net Price)/List Price.
Net Price A read-only value calculated from List Price — Discount.
Non-Discount Extended Price A read-only value calculated from Qty * List Price. If List Price is blank, then this is calculated from Qty * Net Price.
Extended Price A read-only value calculated from Qty * Net Price.
Table 8-8. Selected Fields in the Line Items List Applet (Sheet 2 of 3)
Field/Button Description
Version 6.1 Siebel Field Service Guide 8-29

Orders
Orders Screen
NOTE: When fulfilling orders, the Fulfillment engine cannot create backorder actions if the line item cannot be entirely fulfilled. Instead, the remaining quantity that should be fulfilled is computed each time the Fulfillment engine is run against the order.
Current Discount The current discount percentage for the quantity ordered. For instance, if the user ordered 70, and the discount for 50–99 items is 10%, this field shows 10%.
Next Discount The volume discount for the next highest level. For instance, if the user ordered 170, and the discount for 100–200 items is 15%, this field shows 15%.
Upsell This is a read-only message that encourages the user to purchase a higher volume. For instance, if the user ordered 70, and the discount for 100–200 items is 15%, this might show the message, “If you buy 30 more, your discount will rise to 15%.”
Source Inv Loc The inventory location containing this line item, chosen from a dialog box.
Destination Inv Loc For internal transfers, the inventory location to receive this line item, chosen from a dialog box.
Related Activity An activity related to this order, chosen from the Pick Related Activity dialog box.
Table 8-8. Selected Fields in the Line Items List Applet (Sheet 3 of 3)
Field/Button Description
8-30 Siebel Field Service Guide Version 6.1
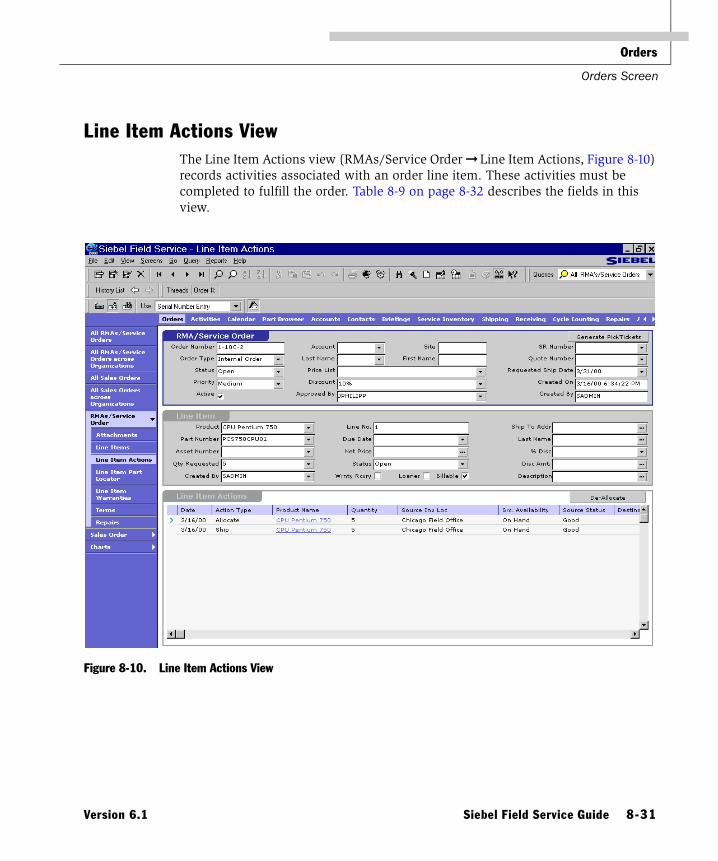
Orders
Orders Screen
Line Item Actions View 8
The Line Item Actions view (RMAs/Service Order ➞ Line Item Actions, Figure 8-10) records activities associated with an order line item. These activities must be completed to fulfill the order. Table 8-9 on page 8-32 describes the fields in this view.
Figure 8-10. Line Item Actions View
Version 6.1 Siebel Field Service Guide 8-31
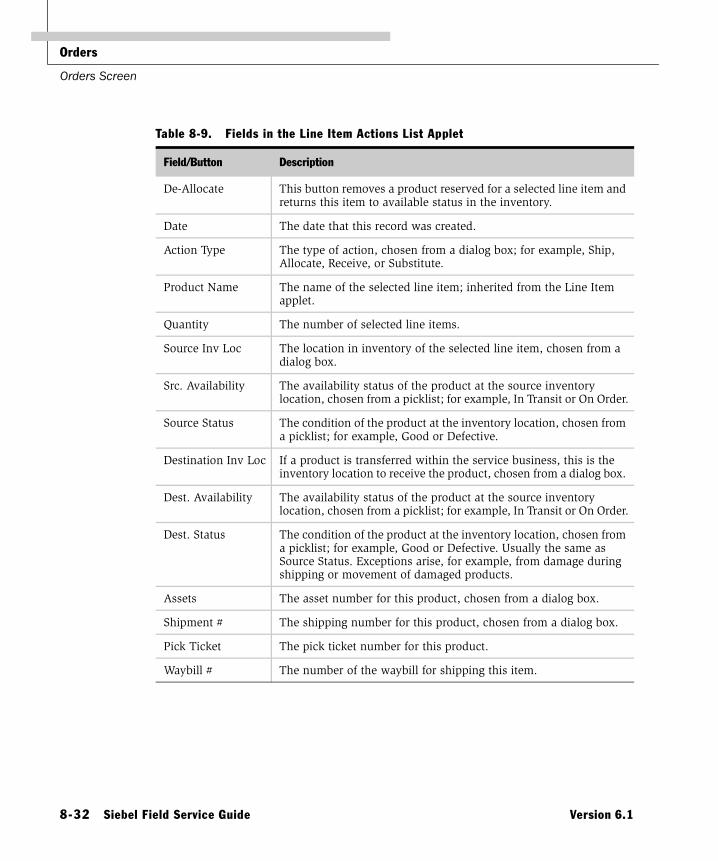
Orders
Orders Screen
Table 8-9. Fields in the Line Item Actions List Applet
Field/Button Description
De-Allocate This button removes a product reserved for a selected line item and returns this item to available status in the inventory.
Date The date that this record was created.
Action Type The type of action, chosen from a dialog box; for example, Ship, Allocate, Receive, or Substitute.
Product Name The name of the selected line item; inherited from the Line Item applet.
Quantity The number of selected line items.
Source Inv Loc The location in inventory of the selected line item, chosen from a dialog box.
Src. Availability The availability status of the product at the source inventory location, chosen from a picklist; for example, In Transit or On Order.
Source Status The condition of the product at the inventory location, chosen from a picklist; for example, Good or Defective.
Destination Inv Loc If a product is transferred within the service business, this is the inventory location to receive the product, chosen from a dialog box.
Dest. Availability The availability status of the product at the source inventory location, chosen from a picklist; for example, In Transit or On Order.
Dest. Status The condition of the product at the inventory location, chosen from a picklist; for example, Good or Defective. Usually the same as Source Status. Exceptions arise, for example, from damage during shipping or movement of damaged products.
Assets The asset number for this product, chosen from a dialog box.
Shipment # The shipping number for this product, chosen from a dialog box.
Pick Ticket The pick ticket number for this product.
Waybill # The number of the waybill for shipping this item.
8-32 Siebel Field Service Guide Version 6.1

Orders
Orders Screen
Line Item Part Locator View 8
The Line Item Part Locator view (RMAs/Service Order ➞ Line Item Part Locator, Figure 8-11) finds the product to allocate to a line item in an order. The Allocate buttons reserve the product for an order. Table 8-10 through Table 8-12 on page 8-34 describe the fields in this view.
NOTE: The toggle in the Available Products list applet switches to the Available Substitutes list applet.
Figure 8-11. Line Items, Available Products/Available Substitutes, and Line Item Allocation List Applets in the Line Item Part Locator View
Table 8-10. Buttons in the Line Items List Applet
Button Description
Locate This button finds available products or substitutes in an inventory location for a selected line item. These appear in the Available Products/Available Substitutes applet.
Locate All This button finds available products or substitute in an inventory location for all line items. These appear in the Available Products/Available Substitutes applet.
Version 6.1 Siebel Field Service Guide 8-33

Orders
Orders Screen
NOTE: Substitutions are unidirectional. Product A may substitute for product B, but B cannot substitute for A unless that substitution is explicitly defined.
Table 8-11. Selected Fields in the Available Products/Available Substitutes List Applet
Field/Button Description
Allocate Reserves the selected line item.
Allocate All Reserves all line items.
Qty The number of each line item to allocate when the Allocate or Allocate All button is activated. If no quantity is specified, the available quantity is allocated.
Product The name of the product, chosen from a dialog box.
Inventory Location The location of the product in the service inventory.
Quantity Available The number of this item in inventory with the status of available.
Table 8-12. Fields in the Line Item Allocation Applet
Field/Button Description
Product The name of the product, chosen from a dialog box.
Inventory Location The location of the product in the service inventory.
Quantity Allocated The number of this item in inventory that have been reserved for this line item.
Shipment # The shipping number for this product, chosen from a dialog box.
8-34 Siebel Field Service Guide Version 6.1

Orders
Orders Screen
Line Item Warranties View 8
The Line Item Warranties view (RMAs/Service Order ➞ Line Item Warranties, Figure 8-12) shows the warranties associated with a product. For more information about warranties, see Chapter 6, “Warranties.” Table 8-13 describes the fields in this view.
Figure 8-12. Line Item Warranties List Applet in the Line Item Warranties View
Table 8-13. Selected Fields in the Warranties List Applet (Sheet 1 of 2)
Field Description
Name The name of a warranty; for example, 1-Year Limited Warranty.
Type One of the three type of warranties that Field Service recognizes, chosen from a picklist: Component, Manufacturer, or Product.
Sub-Type The class of warranty coverage, chosen from a picklist; for example, Full Coverage, Hardware Only, Repair, or Replace.
Recovery Type The method of payment for items not covered by the warranty, chosen from a picklist; for example, Cash or No Charge.
Claim Process The method of presenting a claim, chosen from a picklist; for example, E-Mail, Fax, or Phone.
Expected Text describing this claim and what is expected.
Received Text describing the claim and what was received.
Recovered Amount The amount of payment received.
Version 6.1 Siebel Field Service Guide 8-35

Orders
Orders Screen
Terms View 8
The Terms view (RMAs/Service Order ➞ Terms) contains a summary of an order, shipping instructions, and billing instructions. For more information, see the online help for the Quotes screen.
NOTE: When creating repair and internal order records, the From [inventory] and To Inventory fields in the Terms view (Terms form applet) must be completed. Failure to set these fields properly will generate an error when shipping or receiving the order.
Estimated Value The estimated value of this claim.
Expected Recovery Date The date predicted for receiving the recovered amount.
Recovered Date The actual date for receiving the recovered amount.
Status The current state of this warranty recovery.
Wrnty Rcvry A check box indicating that a warranty credit is being requested for this line item.
Loaner A check box indicating that this line item is on loan to the customer.
Billable Flag A check box indicating that this item is billable to the customer.
Table 8-13. Selected Fields in the Warranties List Applet (Sheet 2 of 2)
Field Description
8-36 Siebel Field Service Guide Version 6.1
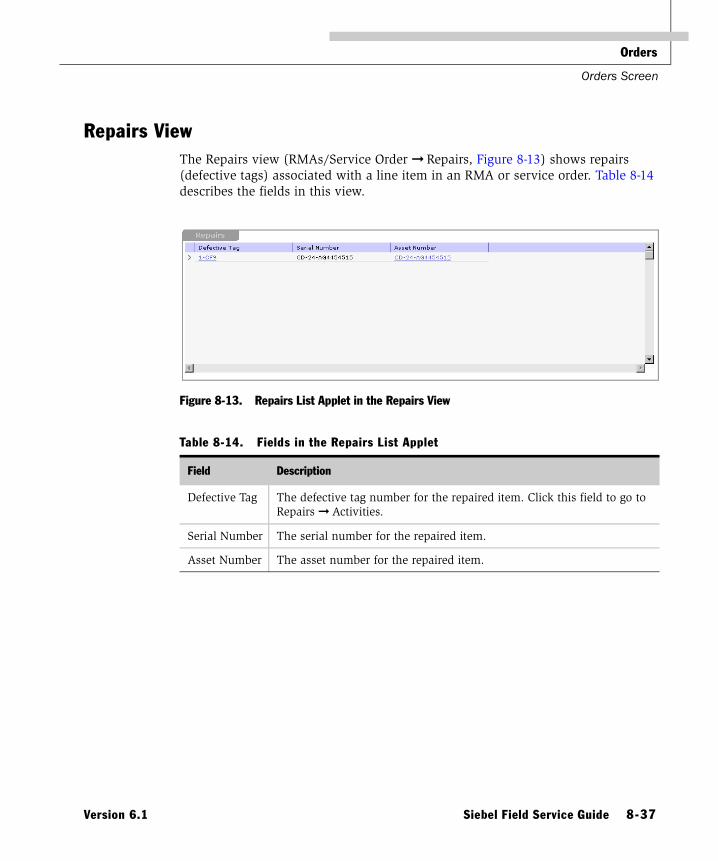
Orders
Orders Screen
Repairs View 8
The Repairs view (RMAs/Service Order ➞ Repairs, Figure 8-13) shows repairs (defective tags) associated with a line item in an RMA or service order. Table 8-14 describes the fields in this view.
Figure 8-13. Repairs List Applet in the Repairs View
Table 8-14. Fields in the Repairs List Applet
Field Description
Defective Tag The defective tag number for the repaired item. Click this field to go to Repairs ➞ Activities.
Serial Number The serial number for the repaired item.
Asset Number The asset number for the repaired item.
Version 6.1 Siebel Field Service Guide 8-37

Orders
Orders Charts
Orders Charts 8
The Orders screen provides the charts listed in Table 8-15.
Table 8-15. Orders Analysis
Chart Analysis
Account and Type Analysis (RMAs/Service)
Two charts:
■ The number of RMAs/Service orders for each account.
■ The number of RMAs/Service orders of each type.
Account and Type Analysis (Sales) Two charts:
■ The number of sales orders for each account.
■ The number of sales orders of each type.
Aging Analysis by Priority (RMAs/Service)
The number of RMAs/Service orders of a specific age.
Aging Analysis by Priority (Sales) The number of sales orders of a specific age.
New Orders Analysis (RMAs/Service)
New RMAs/Service orders as a function of calendar period.
New Orders Analysis (Sales) New sales orders as a function of calendar period.
Status and Priority Analysis (RMAs/Service)
Two charts:
■ The number of RMAs/Service orders of a specific priority.
■ The number of RMAs/Service orders of a specific status.
Status and Priority Analysis (Sales) Two charts:
■ The number of sales orders of a specific priority.
■ The number of sales orders of a specific status.
Trend Analysis by Type (RMAs/Service) The number of orders of each type as a function of calendar period.
8-38 Siebel Field Service Guide Version 6.1
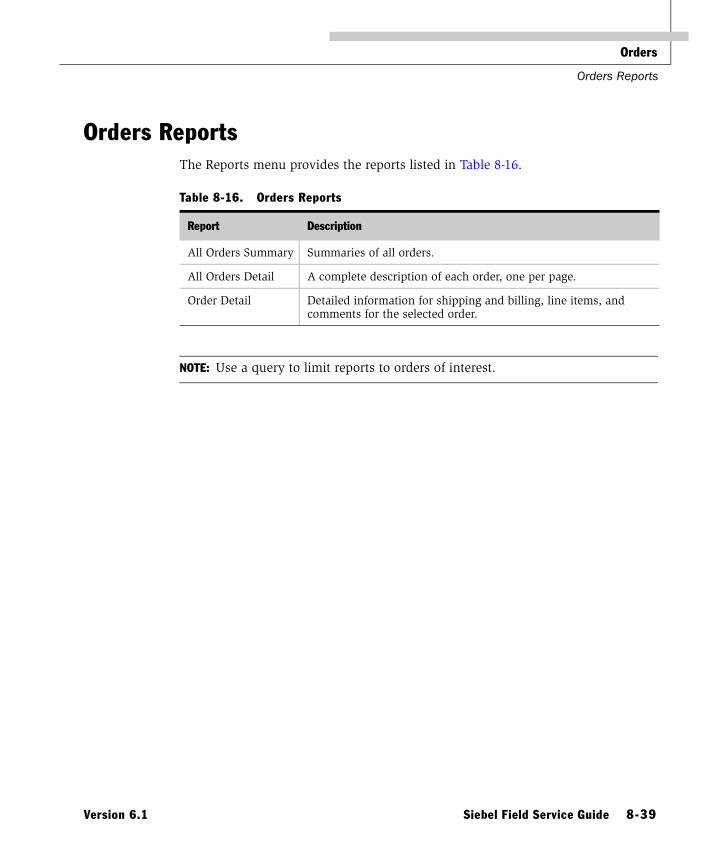
Orders
Orders Reports
Orders Reports 8
The Reports menu provides the reports listed in Table 8-16.
NOTE: Use a query to limit reports to orders of interest.
Table 8-16. Orders Reports
Report Description
All Orders Summary Summaries of all orders.
All Orders Detail A complete description of each order, one per page.
Order Detail Detailed information for shipping and billing, line items, and comments for the selected order.
Version 6.1 Siebel Field Service Guide 8-39

Orders
Setup and Configuration
Setup and Configuration 8
This section includes procedures for setting up orders for Field Service.
Setting Up Orders 8
Follow these procedures to define order types.
To define types of orders
1 Choose Application Administration ➞ Orders ➞ Order Types.
2 In the Order Types list applet, create a new record.
3 In the Order Type field, choose a value from the picklist.
To define actions supported for an order type
1 Choose Application Administration ➞ Orders ➞ Order Types.
2 In the Order Types list applet, select the order type to configure; for example, select a Purchase Order.
3 In the Associated Action Types applet, add a new record for each action type that you want to associate with the order type; for example, Allocate.
Setting Up the Fulfillment and Part Locator Engines 8
Follow these procedures to set up the Fulfillment and Part Locator engines.
To set the parameters for the Fulfillment and Part Locator engines
1 Choose Server Component Requests ➞ My Component Requests.
2 In the Component Request form applet, select FSFulfill or FSLocate for the Component/Job.
3 In the Component Request Parameters list applet, find the parameter (see Table 8-18 on page 8-53) in the Name column.
4 Type the new value in the Value column.
8-40 Siebel Field Service Guide Version 6.1
Orders
Setup and Configuration
To set asynchronous or synchronous operation of the Fulfillment and Part Locator engines
1 From the View menu, choose Options.
2 In the Options dialog box, choose the Field Service tab.
3 For the Mode of Operation, check or uncheck Asynchronous generation of Replenishment orders.
To set the Fulfillment engine to wait for the fulfillment results
1 Choose Options from the View menu.
2 In the Options dialog box, select the Field Service tab.
3 Uncheck Asynchronous fulfillment of Orders.
To set system preferences for the Fulfillment and Part Locator engines
1 Choose Application Administration ➞ System Preferences.
2 Locate the name of the system preference (System Preference Name column) (see Table 8-17 on page 8-50).
3 Type in a new value for System Preference Value.
4 To register changes to system preferences, restart the Field Service server.
To set a default inventory location for fulfillment
1 Choose Application Administration ➞ System Preferences.
2 In the System Preference Name column, select DefaultFulfillInvloc.
3 In the System Preference Value column, enter the Row Id of the inventory location (see Table 8-17 on page 8-50).
4 Restart the Field Service server.
Version 6.1 Siebel Field Service Guide 8-41

Orders
Setup and Configuration
To set inventory location types for fulfillment
1 Choose Application Administration ➞ System Preferences.
2 In the System Preference Name column, select InventoryTypeForPT.
3 In the System Preference Value column, enter the Inventory Location Types that you wish to make valid for order fulfillment.
To add an inventory location type, you must enter its name as it appears in the application, enclosed in single quotes.
4 Restart the Field Service server.
To set substitution allocation rules for fulfillment
1 Choose Application Administration ➞ System Preferences.
2 In the System Preference Name column, select AllocationRule.
3 In the System Preference Value column, enter 1, 2, or 3 to specify an allocation rule:
■ Rule 1: Always allocate a substitute before searching the next inventory location.
■ Rule 2: Allocate a substitute only if substitution allows shipment from a single inventory location.
■ Rule 3: Never allocate a substitute if the exact product can be found in another inventory location.
4 Restart the Field Service server.
To set the Fulfillment engine to fulfill another order status
1 Choose Application Administration ➞ System Preferences.
2 In the System Preference Name column, select OrderStatusToBeFulfilled.
3 Add or delete order statuses.
To add an order status, you must enter its name as it appears in the application, enclosed in single quotes. Default vales for items in fulfillment are Open, New, and Pending.
4 Restart the Field Service server.
8-42 Siebel Field Service Guide Version 6.1

Orders
Setup and Configuration
To set the Fulfillment engine to fulfill another order status for line items
1 Choose Application Administration ➞ System Preferences.
2 In the System Preference Name column, select OrderItemStatusToBeFulfilled.
3 Enter or delete order item statuses.
To add an order item status, you must enter its name as it appears in the application, enclosed in single quotes.
4 Restart the Field Service server.
Options for Using Orders 8
Service businesses deploy Field Service Orders in a variety of ways, according to their business processes and needs. Three typical options for using Orders are described in this section.
Option I■ RMAs and service orders are created within Siebel Field Service.
■ Customer service representatives have read-only access to inventory levels in order to provide feedback to the customer.
■ The materials manager processes orders using Orders (Allocation, Pick Ticket generation).
■ Warehouse clerks use Orders to process the movement (pick/pack/ship and receipts).
■ Service inventory is tracked using Field Service Inventory.
■ Orders are transferred to a back office system for financial purposes (invoicing, billing, credit).
■ Inventory levels are rolled-up and transferred to a back office system for financial processes.
Version 6.1 Siebel Field Service Guide 8-43

Orders
Setup and Configuration
Option II■ RMAs and service orders are created within Siebel Field Service.
■ Orders are transferred to a back office system for fulfillment and receipt.
■ Service Inventory is tracked using the back office application.
■ Integration with the back office application can be bidirectional:
■ Batch feed from the back office application to the Siebel application on order status and fulfillment information.
■ Real-time access to the Siebel application’s order status and fulfillment information on request.
Option III■ RMAs and Service Orders are created within Siebel Field Service.
■ Customer support representatives and materials managers have read-only access to Field Service inventory levels in order to provide feedback to customers, but parts cannot be committed to an order using Field Service Orders.
■ Orders are transferred to a back office system for fulfillment and receipt.
■ Service Inventory is tracked within the back office application but Field Service has read-access so that inventory levels are visible to Siebel users.
■ Integration with the back office application can be bidirectional:
■ Batch feed from the back office application to the Siebel application on order status and fulfillment information.
■ Real-time access to the Siebel application’s order status and fulfillment information on request.
8-44 Siebel Field Service Guide Version 6.1

Orders
Setup and Configuration
Generating Pick Ticket Button 8
The Generate Pick Ticket button on the Orders screen (see “Application Overview” on page 8-5) produces a pick ticket record. This is the logic behind the button:
■ For each line item action of type Allocate, where the item is not on a pick ticket (the Shipment number field is blank), the Generate Pick Ticket function tries to create a valid pick ticket (a new row in table S_SHIPMENT). In doing so it looks at the source inventory where the allocation is done. If this inventory is not of type Warehouse, then it tries to find a parent inventory for the source inventory with the type Warehouse. If one is found, then it generates a pick ticket at this location. For other line item actions that have same source, the same pick ticket is used. Only when source warehouses are different will a new pick ticket be generated.
■ Associates the line item action to that pick ticket by updating the Shipment number field.
Special Considerations for Internal OrdersAn internal order is between two inventory locations that are recorded as inventory locations. It is necessary to input the source (From:) and the destination (To:) inventory locations in Orders ➞ Terms. This enables Siebel Field Service to track the in-transit inventory at the destination. For a description of how in-transit inventory is tracked, please refer to “Inventory Transactions” on page 7-66.
Version 6.1 Siebel Field Service Guide 8-45
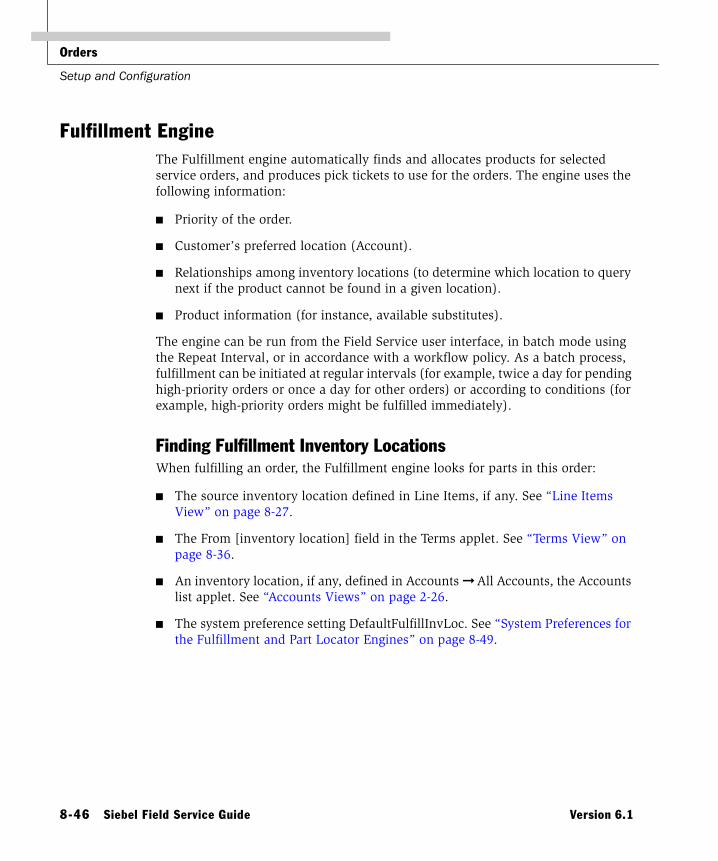
Orders
Setup and Configuration
Fulfillment Engine 8
The Fulfillment engine automatically finds and allocates products for selected service orders, and produces pick tickets to use for the orders. The engine uses the following information:
■ Priority of the order.
■ Customer’s preferred location (Account).
■ Relationships among inventory locations (to determine which location to query next if the product cannot be found in a given location).
■ Product information (for instance, available substitutes).
The engine can be run from the Field Service user interface, in batch mode using the Repeat Interval, or in accordance with a workflow policy. As a batch process, fulfillment can be initiated at regular intervals (for example, twice a day for pending high-priority orders or once a day for other orders) or according to conditions (for example, high-priority orders might be fulfilled immediately).
Finding Fulfillment Inventory LocationsWhen fulfilling an order, the Fulfillment engine looks for parts in this order:
■ The source inventory location defined in Line Items, if any. See “Line Items View” on page 8-27.
■ The From [inventory location] field in the Terms applet. See “Terms View” on page 8-36.
■ An inventory location, if any, defined in Accounts ➞ All Accounts, the Accounts list applet. See “Accounts Views” on page 2-26.
■ The system preference setting DefaultFulfillInvLoc. See “System Preferences for the Fulfillment and Part Locator Engines” on page 8-49.
8-46 Siebel Field Service Guide Version 6.1

Orders
Setup and Configuration
Figure 8-14 describes what the Fulfillment engine does after a user selects the orders to fulfill and starts the engine.
Figure 8-14. The Logic of the Fulfillment Engine
Any remainingline items?
Set source = default source forthe line item or for the
customer site
Allocate the lesser of thequantity available for this product
and theorder quantity pending
(ordered <minus sign> allocated)
Generate one pick ticketper inventory location
(warehouse level)
Quantityallocated =
quantitypending?
Review possible substitutesfor the current product and
allocate as appropriate(if option selected)
Set source =next source for this
order priority
End of fulfillment process
Order to fulfill
Yes
Quantityallocated =
quantitypending?
Yes
Is therea next
source?
Yes
No
No
Yes
No
No
Version 6.1 Siebel Field Service Guide 8-47

Orders
Setup and Configuration
Part Locator 8
The Part Locator provides for semi-automatic searching and fulfillment of line items in an order. The Part Locator controls are on Orders ➞ RMAs/Service Order ➞ Line Item Part Locator. The Part Locator engine analyzes orders, locates parts for each line item, and returns the located parts (products or substitute products) to the user. Now the user can manually allocate these parts and generate the pick tickets.
In a typical use of the Part Locator, a customer service representative (CSR) receives a service request that requires shipping a product. The CSR creates a Service Order, selects a line item in the order, and starts the Part Locator from a line item of the Service Order. Using information from the configuration parameters, the Part Locator browses among various inventory locations and proposes sources from which to fulfill the order.
The Part Locator follows the fulfillment logic specified in Figure 8-14 on page 8-47, and adheres to configuration parameters for the Fulfillment engine.
The Part Locator, unlike the Fulfillment Engine, cannot run asynchronously—meaning that the Locate command initiates a product search during which the Field Service application is unavailable for other operations.
The Fulfillment engine uses information entered elsewhere in Field Service to decide how to fulfill a service order. For instance, it considers account information to select the nearest warehouse in which suitable products are available. Where substitution of products is necessary, the engine uses allowable substitutes specified for the product. If a nearby warehouse is out of stock, it reads the replenishment relationships between inventory locations to determine from which other warehouse to fulfill the order.
8-48 Siebel Field Service Guide Version 6.1

Orders
Setup and Configuration
System Preferences for the Fulfillment and Part Locator Engines 8
For all the Field Service engines, there are system preferences which determine the behavior of each engine (see “System Preferences for the Fulfillment and Part Locator Engines” on page 8-49). The Fulfillment and Part Locator engines use the same system preferences, shown in Table 8-17 on page 8-50. These system preferences are stored in the table S_SYS_PREF. The BusComp is System Preferences. These are the columns of main interest:
■ SYS_PREF_CD. Name of the system preference.
■ VAL. Value of the system preference.
Changing the values of these preferences changes the default behavior of each engine. Use System Preferences to set these values:
■ Default fulfillment inventory locations
■ Default inventory location types
■ Substitution allocation rules
■ Order statuses valid for fulfillment
■ Item statuses valid for fulfillment
■ Synchronous or asynchronous fulfillment
NOTE: To register changes to system preferences, restart the Field Service server.
Version 6.1 Siebel Field Service Guide 8-49

Orders
Setup and Configuration
NOTE: To register changes to system preferences, restart the Field Service application.
Table 8-17. System Preferences for the Fulfillment and Part Locator Engines
Parameter Default Value Comments
DefaultFulfillInvloc Blank Specifies the default inventory location to use as a source inventory location for the Fulfillment engine and Part Locator. This will be used as the Source Inventory Location if the user doesn't specify the Source Inventory Location at run time.
The value must be the Row Id of the service inventory location. To find this Id, use the following procedure:
■ In any Service Inventory view, select an inventory location.
■ From the Help menu, select About Record.
■ In the dialog box, click Details.
The Row # field contains the Id.
InventoryTypeForPT Warehouse Specifies the Inventory location type. The values should be from the Inventory location type LOV and individual values should be LIVs.
AllocationRule 1 Specifies the rules for substitution. The possible values are 1,2,3 where: 1 = Always allocate a substitute before going to next inventory location.2 = Allocate a substitute only if it allows shipment from a single inventory location.3 = Never allocate a substitute if the exact product can be found in another inventory location.
OrderTypeToBeFulfilled Service Order, Internal Order
Specifies the valid values for Order Type. The values should be from the Order Type LOV and individual values should be LIVs.
OrderStatusToBeFulfilled Open, New, Pending
Specifies the valid values for Order Status. The values should be from the Order Status LOV and individual values should be LIVs.
OrderItemStatusToBeFulfilled Open, New, Pending
Specifies the valid values for Order Item Status. The values should be from the Order Item Status LOV and individual values should be LIVs.
8-50 Siebel Field Service Guide Version 6.1

Orders
Setup and Configuration
Substitution and Allocation FlagsThe Fulfillment engine uses the following inventory-specific attributes in its logic:
■ Auto-allocate. If this flag is set, the Fulfillment engine can allocate this product.
■ Auto-substitute. If this flag is set for a product, the Fulfillment engine can allocate substitute parts in lieu of this product.
■ Allocate Below Safety. If this flag is set, the Fulfillment engine allocates from available quantity even if this allocation takes the available stock to below safety level. If the value is No, then any allocation that can take the level to below safety is not carried out.
Allocation and substitution options are set in at three levels in Field Service:
■ Products. See the Field Service Details applet, Marketing Administration ➞ Product Field Service Details (“Product Field Service Details View” on page 7-23).
■ Inventory types. See the Inventory Options applet, Marketing Administration ➞ Product Field Service Details (“Product Field Service Details View” on page 7-23).
■ Inventory locations. See the Products applet, Service Inventory ➞ Product Buckets (“Product Buckets View” on page 7-31).
The settings at the Product level take precedence over the Inventory Type settings, which take precedence over Inventory Location settings.
At the product level, these attributes are binary values, either Yes or No. But at the inventory type level or inventory level, they may be Yes, No, or Default. A Yes or No value means override the value defined at the previous level and use this value. A Default value means use the value defined at the previous level. The attributes are checked in this order:
1 Get the value for the attribute at the inventory level. If not defined, then
2 Get the value of the attribute at inventory type level. If not defined, then
3 Get the value of the attribute at product level.
Version 6.1 Siebel Field Service Guide 8-51
Orders
Setup and Configuration
Conditions for Auto-SubstitutionIf the fulfillment engine is running and the following conditions are met, the Fulfillment engine attempts to allocate a substitute from the parent inventory, then from the inventory's sub-level, then from the fulfillment center (based on order priority), assuming there are no exact products at any of these locations.
All of these conditions must be met for auto-substitution to take place during fulfillment:
■ A product bucket for the inventory location, the inventory option for the INV_LOC_TYPE, and the product are all FS_PROD_ALLOC_RULES = Yes.
■ A substitute product for the specified line item exists.
■ AllocationRule = 1.
NOTE: FS_PROD_ALLOC_RULES can be specified in the List of Values view (Application Administration ➞ List of Values). However, changes to the Language Independent Code may adversely affect the Fulfillment and Part Locator engines.
8-52 Siebel Field Service Guide Version 6.1

Orders
Setup and Configuration
Engine Parameters for the Fulfillment and Part Locator Engines 8
Table 8-18 contains the parameters for the Fulfillment and Part Locator engines that are set for the components FSFulfill and FSLocate on Server Component Requests ➞ My Component Requests.
Table 8-18. Parameters for the Fulfillment and Part Locator Engines
Parameter Value Comments
InputMode ORDERSEARCHSPEC In this mode, we can specify the where clause meaning specify some criteria and fulfill the orders which meet that criteria.
ORDERID In this mode, specify the Single Order Id to be fulfilled and the engine will fulfill the specified Order.
LINEITEMID In this mode, just specify the Single Order line item Id to be fulfilled and the engine will fulfill the specified Order line item.
TEMPTABLE In this mode, put all the required values into a temporary table with a particular Client Request Id and pass that Id to server to retrieve the parameters from Temp Table.
ClientReqId A row Id for retrieving line items input from the temporary table
Required when InputMode = TEMPTABLE.
RowId Row Id of a single order to fulfill or Row Id of a single line item to fulfill
Required when InputMode = ORDERID or InputMode = LINEITEMID.
OrderSearchSpec A SQL Where clause Required when InputMode = ORDERSEARCHSPEC.
Version 6.1 Siebel Field Service Guide 8-53

Orders
Setup and Configuration
Running the Fulfillment and Part Locator Engines 8
Use these routes to run the engines:
■ Dispatch the engine using the workflow manager in batch mode.
■ Invoke the engine through the server manager on the application server.
■ Invoke the engine for order line items by clicking the Fulfill or Fulfill All button on Orders ➞ RMAs/Service Orders ➞ Line Items, after selecting one or more Order line items.
■ Invoke the engine for orders by clicking the Fulfill or Fulfill All button on Orders ➞ All RMAs/Service Orders, after selecting the one or more orders.
Input to the Fulfillment EngineAs input, the Fulfillment engine requires one or multiple orders to be fulfilled.
Output from the Fulfillment EngineThe Fulfillment engine produces this output:
■ Allocated parts for each order.
■ Pick tickets to be used by picker to pick, pack, and ship each order.
■ Inventory transactions for part allocation.
Tables Involved
■ S_INV_LGR_ENTRY ■ S_PROD_INV ■ S_ORDER_TYPE
■ S_INV_TEMP ■ S_PROD_REL ■ S_ORDTYP_MVTTYP
■ S_INV_TXN_TYPE ■ S_INVLOC_ROLLUP ■ S_ORG_EXT
■ S_INV_TXN ■ S_INVLOC_REL ■ S_PRD_INVLOCTYP
■ S_PROD_INT ■ S_INVLOC_TYPE ■ S_ORDPART_MVMT
■ S_PROD_INV_CAT ■ S_ORDER_ITEM ■ S_PARTMVMT_TYPE
■ S_PROD_INVLOC ■ S_ORDER ■ S_LST_OF_VAL
8-54 Siebel Field Service Guide Version 6.1

Logistics Management 9
About This Chapter . . . . . . . . . . . . . . . . . . . . . . . . . . . . . . . . . . . . . . 9-3
Concepts and Terms . . . . . . . . . . . . . . . . . . . . . . . . . . . . . . . . . . . . . . 9-3
Application Overview . . . . . . . . . . . . . . . . . . . . . . . . . . . . . . . . . . . . . 9-4
Replenishment . . . . . . . . . . . . . . . . . . . . . . . . . . . . . . . . . . . . . . . . 9-4
Cycle Counting . . . . . . . . . . . . . . . . . . . . . . . . . . . . . . . . . . . . . . . 9-5
Replenishing Inventory . . . . . . . . . . . . . . . . . . . . . . . . . . . . . . . . . . . . . . 9-7
Running the Cycle Counting Engine . . . . . . . . . . . . . . . . . . . . . . . . . 9-8
Using a Barcode Interface . . . . . . . . . . . . . . . . . . . . . . . . . . . . . . . . . 9-10
The Barcode Toolbar . . . . . . . . . . . . . . . . . . . . . . . . . . . . . . . . . . 9-11
Printing Barcodes in Reports . . . . . . . . . . . . . . . . . . . . . . . . . . . . . . . . . .9-15
Using a Barcode Reader . . . . . . . . . . . . . . . . . . . . . . . . . . . . . . . . 9-16
Screens and Views for Logistics Management . . . . . . . . . . . . . . . . . . . 9-18
Service Administration Screen . . . . . . . . . . . . . . . . . . . . . . . . . . . . . . 9-20
Barcode Mapping View . . . . . . . . . . . . . . . . . . . . . . . . . . . . . . . . . 9-20
Marketing Administration Screen . . . . . . . . . . . . . . . . . . . . . . . . . . . . 9-22
Product Field Service Details View . . . . . . . . . . . . . . . . . . . . . . . . 9-22
Cycle Counting Screen . . . . . . . . . . . . . . . . . . . . . . . . . . . . . . . . . . . 9-23
All Cycle Counts View . . . . . . . . . . . . . . . . . . . . . . . . . . . . . . . . . 9-23
Part List View . . . . . . . . . . . . . . . . . . . . . . . . . . . . . . . . . . . . . . . 9-25
Variance View . . . . . . . . . . . . . . . . . . . . . . . . . . . . . . . . . . . . . . . 9-27
Cycle Counting Report . . . . . . . . . . . . . . . . . . . . . . . . . . . . . . . . . . . 9-30
Version 6.1 Siebel Field Service Guide 9-1

Logistics Management
Service Inventory Screen . . . . . . . . . . . . . . . . . . . . . . . . . . . . . . . . . 9-31
Cycle Counting Administration View . . . . . . . . . . . . . . . . . . . . . . . 9-31
New Replenishment Orders View . . . . . . . . . . . . . . . . . . . . . . . . . 9-33
Pending Replenishment Orders View . . . . . . . . . . . . . . . . . . . . . . . 9-35
Setup and Configuration for Barcode Reading . . . . . . . . . . . . . . . . . . . 9-36
Setting Up a Barcode Interface . . . . . . . . . . . . . . . . . . . . . . . . . . . 9-36
Destinations for Barcode Data . . . . . . . . . . . . . . . . . . . . . . . . . . . 9-37
Processing Barcode Data . . . . . . . . . . . . . . . . . . . . . . . . . . . . . . . 9-37
Searching for Barcode Data . . . . . . . . . . . . . . . . . . . . . . . . . . . . . 9-38
Setup and Configuration for Cycle Counting . . . . . . . . . . . . . . . . . . . . 9-39
Setting Up Cycle Counting . . . . . . . . . . . . . . . . . . . . . . . . . . . . . . 9-39
Configuration Parameters . . . . . . . . . . . . . . . . . . . . . . . . . . . . . . . 9-41
Configuration Information for the Cycle Counting Engine . . . . . . . . 9-42
System Preferences for the Cycle Counting Engine . . . . . . . . . . . . . . . . . 9-44
Engine Parameters for the Cycle Counting Engine . . . . . . . . . . . . . . . . . . 9-45
Running the Cycle Counting Engine . . . . . . . . . . . . . . . . . . . . . . . . . . . . 9-46
Tracing for the Cycle Counting Engine . . . . . . . . . . . . . . . . . . . . . . . . . . 9-47
Setup and Configuration for the Replenishment Engine . . . . . . . . . . . . 9-49
Setting Up Replenishment . . . . . . . . . . . . . . . . . . . . . . . . . . . . . . 9-49
Configuration Information for the Replenishment Engine . . . . . . . . . . . . .9-51
System Preferences for the Replenishment Engine . . . . . . . . . . . . . . . . . 9-52
Parameters for the Replenishment Engine . . . . . . . . . . . . . . . . . . . 9-53
Running the Replenishment Engine . . . . . . . . . . . . . . . . . . . . . . . . . . . . 9-54
9-2 Siebel Field Service Guide Version 6.1

Logistics Management
About This Chapter
About This Chapter 9
This chapter presents the logistics features of Siebel Field Service, including entering data using barcodes, cycle counting of inventory, and replenishment of inventory.
Concepts and Terms 9
Allocation The process of reserving an item in inventory to fulfill an order. An allocation changes the bucket to which an item belongs, records that a part is allocated, and tracks how many parts from a specific bucket are allocated.
Barcode A series of vertical bars printed or stamped on parts, containers, labels, or other media that represent information read by an electronic barcode reader attached to a computer system. Most commercial barcode readers can read the various barcode systems: Code 39, Code 128, ISBN, and so on.
Barcode label A label that carries a barcode.
Barcode reader An electronic device (scanner) that reads barcodes. There are two types of readers:
■ Readers that plug into a computer keyboard and emulate typing on the keyboard. These can be programmed to add special characters before or after the code, for example a carriage return symbol after each entry.
■ Readers that are terminals, with memory, a keyboard, and an LCD panel. These readers can run applets and connect to a server through RF transmissions or a docking port.
Cycle counting The process of counting part of an inventory every day, in a regular cycle, so that each item is counted several times a year.
Logistics The process of planning, implementing, and controlling the efficient, effective flow and storage of goods, services, and related information from point of origin to point of consumption for the purpose of conforming to customer requirements.
Logistics Manager An option of Siebel Field Service that includes the Fulfillment and Part Locator engines (see “Fulfillment” on page 8-11), the Replenishment engine (see “Replenishing Inventory” on page 9-7), and the Cycle Counting engine (see “Cycle Counting” on page 9-5).
Replenishment The process of generating an order to restock depleted inventory. Replenishment transfers products between specified inventory locations. Products at the source locations must have an on-hand inventory level. Products at the destination location must be at levels below the specified minimum.
Version 6.1 Siebel Field Service Guide 9-3

Logistics Management
Application Overview
Application Overview 9
This section includes detailed procedures for using the screens and features for reading barcode data, running cycle counts, and replenishing inventory. For details on individual screens, see “Screens and Views for Logistics Management” on page 9-18. For guidelines and technical details of configuration, see “Setup and Configuration for Cycle Counting” on page 9-39 and “Setup and Configuration for the Replenishment Engine” on page 9-49.
Replenishment 9
Replenishment is the process of generating an order to restock depleted inventory in an inventory location. The Replenishment engine generates internal orders to other inventory locations or purchase orders to outside vendors using the following information about a product in inventory:
■ Minimum and maximum safety levels
■ Replenishment relationships with other inventories
There are three sources for replenishment:
■ Another service inventory location. In this case, the Replenishment engine generates an internal order. For example, the main service warehouse replenishes a subsidiary warehouse.
■ External provider. The product is purchased from an external vendor. In this case, the Replenishment engine generates a purchase order.
■ Manufacturing inventory. The product is provided by an internal manufacturing division. Such replenishments are usually handled as if from an external provider; a purchase order is generated.
NOTE: Replenishment is different from fulfillment (see “Fulfillment” on page 8-11). The replenishment process creates orders; the fulfillment process allocates items and generates pick tickets.
Figure 9-1 on page 9-6 illustrates the decision path used by the Replenishment engine in carrying out a replenishment.
9-4 Siebel Field Service Guide Version 6.1

Logistics Management
Application Overview
Cycle Counting 9
Cycle counting is a method of taking inventory by grouping products into classes and counting the products in each class at designated intervals over a period of time. Only part of the products are counted at one time, but over the designated time period all products are counted. Products of class A, for instance, might be counted once every three months, products of class B once every six months, and assets of class C once a year. You configure cycle counting for an inventory location type or an inventory location.
Cycle counting is normally based on one of two methods of product classification: ABC and XYZ. The ABC classification ranks products according to their financial value. Cycle counting then counts the items with a larger number of dollars flowing through inventory more often than those with a smaller financial value.
The XYZ classification ranks products according to their turnover. Higher-turnover products are counted more often, resulting in a higher accuracy of inventory counting.
The Cycle Counting engine produces a parts list that provides instructions for the next physical count of inventory. Siebel Field Service records the count data, compares it to the inventory records in its database, and, if there is a variance, allows for an adjustment of the database inventory.
Version 6.1 Siebel Field Service Guide 9-5

Logistics Management
Application Overview
Figure 9-1 shows the decision path used by the Cycle Counting engine to generate parts lists.
Figure 9-1. Cycle Counting Engine Logic
Identify cycle-countingproduct classification(ABC or XYZ) for theinventory location or
location type specified.
Any(remaining) product
category to be handled?(order: A to C,
X to Z)?
Calculate number ofproducts to count today(P=number of productsin category divided by
number of days incounting period).
Randomly select aproduct category that
has not been counted inthis counting period.
Add selected product toparts list (or cycle
counting order); flagproduct counted.
Print parts list.
Any(remaining) uncounted
product incategory?
Have P products beenselected yet?
Yes
No
No
No
Yes
Yes
9-6 Siebel Field Service Guide Version 6.1

Logistics Management
Application Overview
Replenishing Inventory 9
Follow these procedures to replenish inventory.
To replenish inventory by an internal order
1 Choose Service Inventory ➞ New Replenishment Orders (see “New Replenishment Orders View” on page 9-33).
2 Select an inventory location in the Inventory Locations list applet.
3 Select the source inventory in the Source Inventory Locations list applet or the target inventory in the Target Inventory Locations list applet.
4 Click Generate Internal Orders.
Every product that is under the minimum level is replenished, based on the flag settings.
To replenish inventory by purchasing a product
1 Choose Service Inventory ➞ New Replenishment Orders (see “New Replenishment Orders View” on page 9-33).
2 Select an inventory location in the Inventory Locations list applet.
3 Select a vendor in the Vendors for this Location list applet.
4 Click Generate Purchase Orders.
To check on pending replenishment orders
1 Choose Service Inventory ➞ Pending Replenishment Orders (see “Pending Replenishment Orders View” on page 9-35).
2 From the Inventory Location list applet, select an inventory location that is being replenished.
The replenishment orders and order numbers for this location appear in the Pending Replenishment Orders applet.
Version 6.1 Siebel Field Service Guide 9-7

Logistics Management
Application Overview
Running the Cycle Counting Engine 9
Follow these procedures to carry out cycle counts of inventory.
To run the Cycle Counting engine interactively
1 Choose Service Inventory ➞ Cycle Counting Administration (see “Cycle Counting Administration View” on page 9-31).
2 In the Inventory Locations applet, select an inventory location for cycle counting.
3 Click Generate Period to produce counting periods for the selected inventory location.
The counting periods for inventory locations currently selected in the Inventory Locations applet appear in the read-only Cycle Count Periods applet (see Table 9-16 on page 9-32).
4 Select a count period in the Cycle Count Periods applet to display the count period’s scheduled cycle counts in the Cycle Counts applet.
5 In the Cycle Counts list applet, click a cycle count to view its status in the Cycle Counting Screen.
To record the results of a cycle count
1 Choose Cycle Counts ➞ All Cycle Counts (see “All Cycle Counts View” on page 9-23).
2 Select the Cycle Count record in the Cycle Counts applet.
3 Choose Cycle Counts ➞ Part List (see “Part List View” on page 9-25).
4 If the products you are counting are not serialized, enter quantities counted in the Count column.
5 If the items you are counting are serialized, select the Product in the Part List applet, and enter the Asset Number in the Counted Serial Numbers applet. Note that you must add a new record for every serialized asset.
6 Click the Counting Complete button.
This populates the Counted Serial Numbers applet in the Parts List view and the Missing Assets applet in Cycle Counts ➞ Variance.
9-8 Siebel Field Service Guide Version 6.1

Logistics Management
Application Overview
To review a cycle count
1 Choose Cycle Counts ➞ All Cycle Counts (see “All Cycle Counts View” on page 9-23).
2 Select a cycle count record.
3 Choose the Variance view (see “Variance View” on page 9-27).
4 Review the results (Original, Count, and Variance) of the product count and counted serial numbers, if applicable.
To adjust inventory
1 Choose Cycle Counts ➞ All Cycle Counts (see “All Cycle Counts View” on page 9-23).
2 Select a cycle counting record.
3 Choose Cycle Counts ➞ Variance (see “Variance View” on page 9-27).
4 Click the Adjust button.
To complete a cycle count
1 Choose Cycle Counts ➞ All Cycle Counts (see “All Cycle Counts View” on page 9-23).
2 Select the cycle count record.
3 Choose Cycle Counts ➞ Part List (see “Part List View” on page 9-25).
4 Click the Counting Complete button.
To check the status of cycle counts
1 Choose Service Inventory ➞ Cycle Counting Administration.
2 In the Inventory Locations list applet, select an inventory location.
3 In the Cycle Counts applet, review the status of cycle counts.
Version 6.1 Siebel Field Service Guide 9-9
Logistics Management
Using a Barcode Interface
Using a Barcode Interface 9
Siebel Field Service accepts the following types of data from barcode readers:
■ Part numbers
■ Serial numbers
■ Defective tags
■ Order numbers
■ Service request numbers
■ Pick ticket numbers
With the data from the barcode reader, the user can perform three types of operations: New, Update, and Search:
■ New. Enter the number from the barcode in a new line (record) in the applet. In this mode, the user goes to the view that is to receive a number, then clicks on a specific applet. Siebel Field Service creates a new record and fills the appropriate field in this record.
■ Update. Update the number in a selected line (record) in the applet. The new number replaces the existing number. In this mode, the user goes to the view that is to receive a number, clicks on a specific applet, and selects a record in the applet. Siebel Field Service fills the appropriate field in the selected record.
■ Search. In the Search mode, the incoming barcode finds its own destination, opens the appropriate view, selects an applet, and fills in the appropriate fields.
With the New option and selected applets in certain views (for example, the Serial Numbers applet in the Pick Ticket view), the user can either enter individual barcodes of any acceptable type or read multiple barcodes in succession, all of the same type (either serial numbers or defective tags). Individual barcodes are entered with either the New or Update option.
9-10 Siebel Field Service Guide Version 6.1

Logistics Management
Using a Barcode Interface
The Barcode Toolbar 9
Siebel Field Service provides a Barcode toolbar to specify the type of data that you enter from a barcode reader.
To display the Barcode toolbar, select Barcode Bar from the View menu.
The toolbar contains four buttons and a Use list (see Figure 9-2, Table 9-1 on page 9-12, and Table 9-2 on page 9-13) that configure Siebel Field Service to use incoming data from a barcode reader.
Figure 9-2. Barcode Toolbar
New
Update
Search ActivateUse List
Version 6.1 Siebel Field Service Guide 9-11
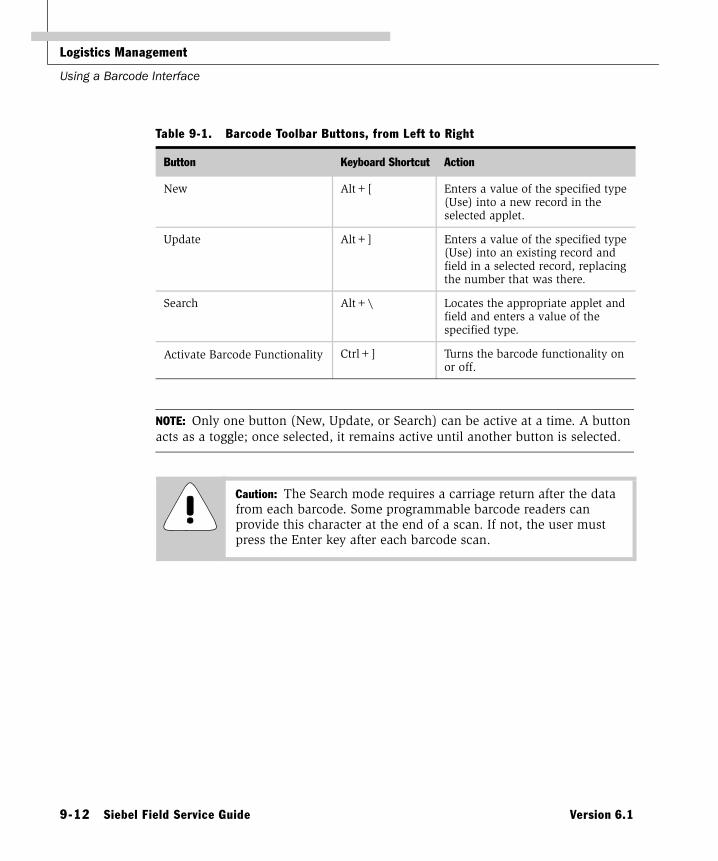
Logistics Management
Using a Barcode Interface
NOTE: Only one button (New, Update, or Search) can be active at a time. A button acts as a toggle; once selected, it remains active until another button is selected.
Table 9-1. Barcode Toolbar Buttons, from Left to Right
Button Keyboard Shortcut Action
New Alt+[ Enters a value of the specified type (Use) into a new record in the selected applet.
Update Alt+] Enters a value of the specified type (Use) into an existing record and field in a selected record, replacing the number that was there.
Search Alt+\ Locates the appropriate applet and field and enters a value of the specified type.
Activate Barcode Functionality Ctrl+] Turns the barcode functionality on or off.
Caution: The Search mode requires a carriage return after the data from each barcode. Some programmable barcode readers can provide this character at the end of a scan. If not, the user must press the Enter key after each barcode scan.
9-12 Siebel Field Service Guide Version 6.1

Logistics Management
Using a Barcode Interface
The Use list (Table 9-2) contains Process Modes (see “Barcode Mapping View” on page 9-20) that define the type of information coming from the next barcode. The contents of the Use list change with the choice of the New, Update, or Search button.
Table 9-2. Use List in the Barcode Toolbar
List Item (Process Mode)
New/Update Search Description
Defective Tag Entry Repair Specifies that the next entry from the barcode reader is a defective tag.
Part Number Entry Product Specifies that the next entry from the barcode reader is a part number.
Serial Number Entry Asset Specifies that the next entry from the barcode reader is a serial number.
Order Specifies that the next entry from the barcode reader is an order number.
Pick Ticket Specifies that the next entry from the barcode reader is a pick ticket number.
Service Request Specifies that the next entry from the barcode reader is a service request number.
Version 6.1 Siebel Field Service Guide 9-13

Logistics Management
Using a Barcode Interface
Keyboard Shortcuts for the Barcode ToolbarEach of the four buttons on the Barcode toolbar has a keyboard shortcut (see Table 9-1 on page 9-12). There are two other shortcut keys for barcode operation (Table 9-3).
Table 9-3. Additional Keyboard Shortcuts for the Barcode Toolbar
Keyboard Shortcut Action
Ctrl-[ Acts on the Use list to allow scrolling through the list with the up and down arrow keys.
Ctrl-] Turns on barcode functionality.
Ctrl-\ Carries out a series of steps to copy the data from the barcode into the correct field in an applet:
■ Determines the current view, applet, and active button on the Barcode toolbar: New, Update, or Search.
■ Examines the records in the Barcode Mapping applet to determine if there is a record for this combination of view, applet, and selection from the Barcode toolbar.
■ Determines in the corresponding record the field to receive the data.
■ Sets the focus on the field from the Barcode mapping record.
This command is normally programmed into the barcode reader and is delivered as a prefix to the barcode data; it is not entered from the keyboard. To program the command into the barcode reader as a prefix to the barcode data, refer to the user manual or the product reference guide provided with the barcode reader.
9-14 Siebel Field Service Guide Version 6.1

Logistics Management
Using a Barcode Interface
Printing Barcodes in Reports 9
The following reports (Reports menu) include barcodes, when available:
■ Pick Ticket Details (Shipping Screen). The Pick Ticket number is barcoded.
■ Repair Detail (Repair screen). The Defective Tag number is barcoded.
■ Order Detail (Orders screen). The Order number is barcoded.
■ Service Request Detail (Service Requests screen). The Service Request number is barcoded.
Reports menus display two versions for each report: barcoded and not barcoded.
Barcodes are printed using Code 39. The user can choose one of the variations of Code 39, shown in Table 9-4. For the procedure, see “Setting Up a Barcode Interface” on page 9-36.
Table 9-4. Fonts for Printing Code 39 Barcodes
Filename Font Name Description
39 HI.TTF BC 39 HI High precision with normal height
39 HITALL.TTF BC 39 HI TALL High precision with tall height
38 HIHR.TTF BC 39 HI HR BC 39 HI with character below the barcode
39 HITLHR.TTF BC 39 HI TALL HR BC 39 HI TALL with character below the barcode
Version 6.1 Siebel Field Service Guide 9-15

Logistics Management
Using a Barcode Interface
Using a Barcode Reader 9
To display the Barcode toolbar
■ Select Barcode Bar from the View menu.
To create a new record for barcode data
1 Click the New button on the Barcode toolbar.
2 From the Use list (Table 9-2 on page 9-13), select the type of information contained in the barcode; for example, a serial number.
3 Click the applet that is to receive the number from a barcode.
4 Scan the barcode.
To update an existing record with barcode data
1 Click the Update button on the Barcode toolbar.
2 From the Use list (Table 9-2 on page 9-13), select the type of information contained in the barcode; for example, a part number.
3 Click the applet and select the record that is to receive the number from a barcode.
4 Scan the barcode.
To add data from barcodes to the next records in an applet
1 Click the New button on the Barcode toolbar.
2 From the Use list (Table 9-2 on page 9-13), select the type of information contained in the barcode; for example, a serial number.
3 Click the applet that is to receive the number from a barcode.
4 Scan the barcode.
5 Scan the next barcode.
9-16 Siebel Field Service Guide Version 6.1

Logistics Management
Using a Barcode Interface
To search for a part, serial, or defective tag number from barcode data
1 Click the Search button on the Barcode toolbar.
2 From the Use list (Table 9-2 on page 9-13), select the type of information expected from the barcode; for example, a serial number.
3 Scan the barcode.
4 Press Enter on the keyboard.
If the data already exists in the Field Service database, the record matching the barcode input is displayed.
Version 6.1 Siebel Field Service Guide 9-17

Logistics Management
Screens and Views for Logistics Management
Screens and Views for Logistics Management 9
Click the name of a screen or view in Table 9-5 to see more information.
Table 9-5. Screens and Views for Service Inventory (Sheet 1 of 2)
Screen Views Role/Procedures (Click to see full procedure.)
Service Administration Barcode Mapping Set the destinations for barcode data in specific views, applets, and fields. See: “To map barcode data to views, applets, and fields” on page 9-36.
Marketing Administration Product Field Service Detail Record the information used in locating and allocating products, including inventory types (Warehouse, Truck, and so on) and the cycle counting class (A/X, B,/Y or C/Z) for a product.
Cycle Counting All Cycle Counts To carry out cycle counts for inventory locations. See:
“To record the results of a cycle count” on page 9-8
“To review a cycle count” on page 9-9
“To adjust inventory” on page 9-9
“To complete a cycle count” on page 9-9
“To manually specify parts for a cycle count” on page 9-41
Part List View the product buckets to count and record the count results. See:
“To record the results of a cycle count” on page 9-8
“To complete a cycle count” on page 9-9
“To manually specify parts for a cycle count” on page 9-41
9-18 Siebel Field Service Guide Version 6.1

Logistics Management
Screens and Views for Logistics Management
Cycle Counting (continued)
Variance View the differences between the inventory in the Field Service database and the actual counts of products. Generate inventory transactions to adjust the difference. See:
“To review a cycle count” on page 9-9
“To adjust inventory” on page 9-9
Service Inventory All Inventory Locations Define cycle counting parameters for inventory locations.
Product Buckets Define cycle counting parameters for products.
New Replenishment Orders Automatically produce orders to replenish the product in inventory. See:
“To replenish inventory by an internal order” on page 9-7
“To replenish inventory by purchasing a product” on page 9-7
Pending Replenishment Orders View pending orders to replenish a location. See:
“To check on pending replenishment orders” on page 9-7
Cycle Counting Administration Enter specifications that the Cycle Counting engine uses to automatically generate cycle count parts lists. See:
“To run the Cycle Counting engine interactively” on page 9-8
Table 9-5. Screens and Views for Service Inventory (Sheet 2 of 2)
Screen Views Role/Procedures (Click to see full procedure.)
Version 6.1 Siebel Field Service Guide 9-19

Logistics Management
Service Administration Screen
Service Administration Screen 9
Barcode Mapping View 9
The Barcode Mapping view, Figure 9-3, on the Service Administration screen sets the destinations for barcode data. Based on these mappings, barcode data is copied to specific views, applets, and fields. The data may create a new record or update an existing record. Table 9-6 on page 9-21 describes the fields in this view.
Figure 9-3. Barcode Mapping View
9-20 Siebel Field Service Guide Version 6.1

Logistics Management
Service Administration Screen
When mapping barcode data to fields, enter a new line for each field that is to receive data from a barcode.
NOTE: The Barcode Mapping view does not check the validity of applet and field names for a specified view.
Table 9-6. Fields in the Barcode Mapping List Applet
Field Description
View Name The view to receive the data, chosen from a dialog box.
Applet Name The applet to receive the data, chosen from a dialog box.
Field Name A type-in field to receive data.
Process Mode This matches the selections in the Use list in the Barcode toolbar:
■ Defective Tag Entry (New/Update only)
■ Part Number Entry (New/Update only)
■ Serial Number Entry (New/Update only)
■ Repair (Search only)
■ Order (Search only)
■ Product (Search only)
■ Pick Ticket (Search only)
■ Asset (Search only)
Service Request (Search only)
New Record When checked, data from a barcode reader creates a new record. When unchecked, the data updates a field in a selected record. New Record off is equivalent to Update in the Barcode toolbar. New Record on is equivalent to New in the barcode toolbar.
Note that this field applies only to the data entry modes (New/Update). It has no effect on the Search mode.
Version 6.1 Siebel Field Service Guide 9-21

Logistics Management
Marketing Administration Screen
Marketing Administration Screen 9
Product Field Service Details View 9
The Inventory Options applet in the Product Field Service Details view (Marketing Administration ➞ Products ➞ Inventory Options) provides the information used in locating and allocating products. The screen records inventory types (Warehouse, Truck, and so on) and the cycle counting class (A/X, B/Y, or C/Z) for a product.
For details, see “Marketing Administration Screen” on page 7-23.
9-22 Siebel Field Service Guide Version 6.1

Logistics Management
Cycle Counting Screen
Cycle Counting Screen 9
All Cycle Counts View 9
The All Cycle Counts view, Figure 9-4, defines cycle counts for inventory locations in a service business. Table 9-7 on page 9-24 describes the fields in this view.
Figure 9-4. All Cycle Counts View
Version 6.1 Siebel Field Service Guide 9-23

Logistics Management
Cycle Counting Screen
Table 9-7. Selected Fields in the Cycle Counts Applets
Field Description
Status The current state of a cycle count, chosen from a picklist; for example, Assigned, Closed, or Open.
Inventory Location The name of an inventory location for this cycle count, chosen from a dialog box.
Assignee The position of the employee assigned to carry out this cycle count, chosen from a dialog box.
Due Date The date on which the cycle count should be completed.
Start Date The date the cycle count actually starts.
End Date The date the cycle count was completed.
9-24 Siebel Field Service Guide Version 6.1

Logistics Management
Cycle Counting Screen
Part List View 9
The Part List view, Figure 9-5, displays the product buckets to count and records the count results. The records in the Part List are created by clicking the Generate Period or the Generate Periods (All Locations) button in the Cycle Counting Administration view (see “Cycle Counting Administration View” on page 9-31). Records can also be entered manually. Table 9-8 on page 9-26 describes the fields in this view.
Figure 9-5. Part List View
Version 6.1 Siebel Field Service Guide 9-25

Logistics Management
Cycle Counting Screen
Table 9-8. Fields in the Part List Applet
Field/Button Description
Counting Complete This button determines if there are any assets that are missing. The result appears in the Missing Assets applet in the Variance view.
Product Bucket The product bucket to count, chosen from a dialog box.
Serialized A check box indicating that the products are serialized. If this is checked, the Count field does not accept input. All input from a cycle count must go into the Counted Serial Numbers applet, also in this view.
Inventory Location The inventory location containing this product bucket. Filled in automatically with Product Bucket.
Availability A category that defines the availability of the product, chosen from a dialog box; for example, On Hand, In Transit, or Reserved. Filled in automatically with Product Bucket.
Status A category that defines the functional condition of the product; for example, Good or Defective. Filled in automatically with Product Bucket.
Count A type-in field for the number of products counted. If the product is serialized, this number is entered automatically, and is equal to the number of records in the Counted Serial Numbers applet.
Location 1 The first physical location within the Inventory Location for the product bucket. Filled in automatically with Product Bucket.
Location 2 The second physical location within the Inventory Location for the product bucket.
Location 3 The third physical location within the Inventory Location for the product bucket.
Table 9-9. Fields in the Counted Serial Numbers Applet
Field Description
Asset Number The asset number for an asset in the selected product bucket, chosen from a dialog box.
Serial Number The serial number for an asset in the selected product bucket. Filled in automatically.
9-26 Siebel Field Service Guide Version 6.1

Logistics Management
Cycle Counting Screen
Variance View 9
The Variance view, Figure 9-6, shows the differences between the inventory in the Field Service database and the actual product count. The Adjust button generates inventory transactions to adjust the difference between the quantity recorded in the database and the physical count. Table 9-10 on page 9-28 through Table 9-13 on page 9-29 describe the fields in this view.
Figure 9-6. Variance View
Version 6.1 Siebel Field Service Guide 9-27

Logistics Management
Cycle Counting Screen
Table 9-10. Fields in the Variance List Applet
Field/Button Description
Adjust This button generates inventory transactions to correct the quantity for the selected product bucket to equal the number obtained from the physical count.
Product Bucket The name of a product bucket for this cycle count.
Serialized A check box indicating that the products are serialized.
Inventory Location The inventory location containing this product bucket.
Availability A category that defines the availability of the product, chosen from a dialog box; for example, On Hand, In Transit, or Reserved. Filled in automatically with Product Bucket.
Status A category that defines the functional condition of the product; for example, Good or Defective. Filled in automatically with Product Bucket.
Original The quantity of products from the database.
Count The quantity of products from the physical count.
Variance The difference between Original and Count.
Location 1 The first physical location within the Inventory Location for the product bucket.
Location 2 The second physical location within the Inventory Location for the product bucket.
Location 3 The third physical location within the Inventory Location for the product bucket.
9-28 Siebel Field Service Guide Version 6.1

Logistics Management
Cycle Counting Screen
.
Table 9-11. Fields in the Counted Serial Numbers Applet
Field Description
Asset Number An asset number as recorded in the Counted Serial Number applet in the Part List view.
Serial Number A serial number corresponding to an asset number.
Match A check box indicating that there is no discrepancy for counted serial numbers (checked).
Table 9-12. Fields in the Missing Assets List Applet
Field Description
Asset Number The asset number for an asset that is in the database but not yet counted.
Serial Number A serial number corresponding to an asset number.
Table 9-13. Selected Fields in the Inventory Transaction List Applet (Sheet 1 of 2)
Field Description
Transaction A unique number assigned to a transaction. These transactions were created by clicking the Adjust button in the Variance applet. There is one transaction for each serialized asset and one transaction for all the non-serialized products in a bucket.
Type The type of transaction. This type must be Adjustment.
Transaction Date The date the transaction was created.
Product The name of the product counted.
Quantity The quantity entered into the database. This number is one for each serialized product.
Serialized Product A check box indicating that this transactions was for a serialized asset.
Part Cycle Count Id The Id for the cycle count.
Version 6.1 Siebel Field Service Guide 9-29

Logistics Management
Cycle Counting Report
Cycle Counting Report 9
The Reports menu provides the Cycle Count Detail report (Table 9-14).
Source Inventory If the original quantity is less than the physical count, this field is populated with the external location.
If the original quantity is greater than the physical count, this field is populated with the inventory location of the cycle count.
Source Availability A category that defines the availability of the product, chosen from a dialog box; for example, On Hand, In Transit, or Reserved. Filled in automatically with Product Bucket.
Source Status A category that defines the functional condition of the product; for example, Good or Defective. Filled in automatically with Product Bucket.
Destination Inventory If the original quantity is less than the physical count, this field is populated with the inventory location of the cycle count.
If the original quantity is greater than the physical count, this field is populated with the external location.
Destination Availability The same as Source Availability.
Destination Status The same as Source Status.
Commit Flag A check box indicating that the selected transaction was committed.
Table 9-13. Selected Fields in the Inventory Transaction List Applet (Sheet 2 of 2)
Field Description
Table 9-14. Cycle Count Detail Report
Report Description
Cycle Count Detail Presents all information about selected cycle counts.
9-30 Siebel Field Service Guide Version 6.1

Logistics Management
Service Inventory Screen
Service Inventory Screen 9
Cycle Counting Administration View 9
The Cycle Counting Administration view, Figure 9-7, accepts specifications that the Cycle Counting engine uses to automatically generate cycle count parts lists. Table 9-15 on page 9-32 through Table 9-17 on page 9-32 describe the fields in this view.
Figure 9-7. Cycle Counting Administration View
Version 6.1 Siebel Field Service Guide 9-31

Logistics Management
Service Inventory Screen
Table 9-15. Buttons in the Inventory Locations Applet
Button Description
Generate Period Produces a set of periods for the next cycle counts, cycle counting headers, and the records in the Part Lists view (see “Part List View” on page 9-25) for the selected inventory location.
Generate Period (All Locations) Produces sets of periods for the next cycle counts, cycle counting headers, and the records in the Part Lists view (see “Part List View” on page 9-25) for all inventory location records.
Table 9-16. Fields in the Cycle Count Periods List Applet
Field Description
ABC Class The classification (ABC) of products for which the cycle count period is generated.
XYZ Class The classification (XYZ) of products for which the cycle count period is generated.
Started The date the cycle count period starts.
Ended The date the cycle count period ends.
Status The current state of a cycle count period; for example, Assigned, Closed, or Open.
Table 9-17. Selected Fields in the Cycle Counts List Applet
Field Description
Status The current state of a cycle count; for example, Assigned, Closed, or Open.
Inventory Location The name of an inventory location for this cycle count.
Assignee The position of the person assigned to carry out this cycle count.
Due Date The date the cycle count should be completed.
Start Date The date the cycle count actually starts.
End Date The date the cycle count was completed.
9-32 Siebel Field Service Guide Version 6.1

Logistics Management
Service Inventory Screen
New Replenishment Orders View 9
The New Replenishment Orders view, Figure 9-8 on page 9-33, replenishes inventory by an internal transfer between inventory locations or by purchase from an outside vendor. For replenishment, a product bucket must be defined for a product. For replenishment from a vendor, the authorized vendor must be defined. Table 9-18 on page 9-34 through Table 9-20 on page 9-34 describe the fields in this view.
The replenishment process describes either a source inventory location to replenish the selected location or a target location to be replenished from the selected location. Specific relationships between locations are defined in the Relationships view (see “Relationships View” on page 7-39).
Figure 9-8. New Replenishment Orders View
Version 6.1 Siebel Field Service Guide 9-33

Logistics Management
Service Inventory Screen
Table 9-18. Fields in the Source Inventory Locations List Applet
Field/Button Description
Generate Internal Orders This button automatically creates an internal order, in the Pending Replenishment Orders view, for transfer of the selected product from the source to the destination inventory location. All products below the minimum levels are replenished.
Source Location The inventory locations that replenish the selected inventory location (defined in the Inventory Location applet), as described in the Relationships view. Only inventory locations of the relationship type Replenishes appear in this applet.
Table 9-19. Fields in the Target Inventory Locations List Applet
Field/Button Description
Generate Purchase Orders This button automatically creates an internal order, in the Pending Replenishment Orders view, for transfer of the selected product from the source to the destination inventory location. All products below the minimum levels are replenished.
Target Location The target inventory locations that are replenished by the selected inventory location (defined in the Inventory Location applet), as described in the Relationships view. Only inventory locations of the relationship type Replenishes appear in this applet.
Table 9-20. Fields in the Vendors for This Location List Applet
Field/Button Description
Generate Purchase Orders This button automatically creates a purchase order to replenish the selected product at the selected inventory location. All products below the minimum levels, which have an authorized vendor, are replenished.
Vendor The authorized vendors that are defined for the selected inventory location in the Authorized Vendors view.
Site The location of the vendor.
Type The type of vendor; for example, Primary Vendor or Vendor.
9-34 Siebel Field Service Guide Version 6.1

Logistics Management
Service Inventory Screen
Pending Replenishment Orders View 9
This Pending Replenishment Orders view, Figure 9-9, lists pending orders to replenish a location, either by replenishments between inventory locations or purchases from a vendor. The records in this view, generated by the Replenishment engine, are read-only. Table 9-21 describes the fields in this view.
Figure 9-9. Pending Replenishment Orders List Applet in the Pending Replenishment Orders View
Table 9-21. Fields in the Pending Replenishment Orders List Applet
Field Description
Order The order number.
Type The type of order; for example, Internal Order or Purchase Order.
Status The current state of this order; for example, Open, In Transit, or Shipped.
From Vendor The name of the vendor filling this order, if it is a purchase order.
From Inventory Location The service inventory location from which this product is being transferred, if this is an internal order.
Created On The date and time that this order was created.
Version 6.1 Siebel Field Service Guide 9-35

Logistics Management
Setup and Configuration for Barcode Reading
Setup and Configuration for Barcode Reading 9
This section describes the configuration of barcode reading and the mechanism of operation.
Setting Up a Barcode Interface 9
Follow these procedures to set up barcode reading.
To map barcode data to views, applets, and fields
1 Choose Service Administration ➞ Barcode Mapping (see “Barcode Mapping View” on page 9-20).
2 Create a new record for every field that is to receive barcode data.
3 Choose the view name from a dialog box.
4 Choose the name of an applet that belongs to the selected view.
5 Type in the name of a field that belongs to the selected applet.
6 Choose a process mode (type of data entry for this field).
7 Check New Record if the barcode data creates a new record in this applet.
To change the barcode font for a report
1 Locate in the file system the Actuate (rod) file for a specific report.
2 Double-click this filename to start Actuate.
3 Locate the text control that contains the barcode font and double-click it.
4 In the Component Editor window, go to the font directory, then the FaceName directory.
5 Enter the name of the font to use. Do not enter the filename for the font.
6 Click Apply, close the window, and then save.
9-36 Siebel Field Service Guide Version 6.1

Logistics Management
Setup and Configuration for Barcode Reading
Destinations for Barcode Data 9
In the New or Update mode for barcode input, the data goes to a specified field or fields in the active applet. The user is responsible for selecting the appropriate view and applet. If barcode input is using the Update mode, the user must also select the record to update. Barcode mappings specify the views, applets, and fields where the specified data type (for example, serial number or part number) is added.
In the Search mode, Siebel Field Service selects the view, applet, and field for the barcode data. There may be several applets and fields for one type of data. Barcode mappings specify the views, applets, and fields where the specified data type is added.
Processing Barcode Data 9
When processing data from a barcode reader, Field Service follows these steps:
1 Checks for these settings in the Barcode toolbar:
■ New or Update
■ Data type selected in the Use table
2 Checks in the Barcode Mapping table to determine if the barcode data is to update an existing record or create a new record in the selected applet.
3 Copies the data to the specified view, applet, and field.
Version 6.1 Siebel Field Service Guide 9-37

Logistics Management
Setup and Configuration for Barcode Reading
For example, if the settings in the Barcode toolbar are New and Serial Number Entry, the barcode data goes to the applets listed in Table 9-22, creates new records, and fills in the Serial Number fields.
NOTE: Other fields are filled in as appropriate; for example, the current date and time or a status.
Searching for Barcode Data 9
In the Search mode, Field Service follows this procedure to find data that matches input from a barcode:
1 Checks for these settings in the Barcode toolbar:
■ Search Mode
■ Data type selected in the Use table
2 Checks in the Barcode Mapping table where the selected data type is defined.
3 The user presses Enter on the keyboard.
4 Searches the database for the data in the view, applet, and field specified in the barcode mappings.
If the data is already in the database, this matching record appears.
Table 9-22. Examples of Barcode Mapping for Serial Number Entry and New
View Applet Field Process Mode New
Asset Mngt - Assets View Asset Mngt - Asset list applet Serial Number Serial Number Entry Y
FS Receiving Internal view FS Order Line Item action Assets Rcv form applet
Serial Number Serial Number Entry Y
FS Receiving PO view FS Order Line Item action Assets Rcv form applet
Serial Number Serial Number Entry Y
FS Receiving RMA view FS Order Line Item action Assets Rcv form applet
Serial Number Serial Number Entry Y
9-38 Siebel Field Service Guide Version 6.1

Logistics Management
Setup and Configuration for Cycle Counting
Setup and Configuration for Cycle Counting 9
The following sections describe the procedures and parameters for configuring cycle counting.
Setting Up Cycle Counting 9
Follow these procedures to set up cycle counting.
To specify synchronous or asynchronous operation of the Cycle Counting engine
1 Choose Options on the View menu.
2 Choose the Field Service tab.
3 For Mode of Operation, check or uncheck Asynchronous generation of cycle counts.
To set parameters for the Cycle Counting engine
1 Choose Server Component Requests ➞ My Component Requests.
2 In the Component Request form applet, select FSCyccnt for the Component/Job.
3 In the Component Request Parameters list applet, find the parameter (see Table 9-25 on page 9-45) in the Name column.
4 Type the new value in the Value column.
To change system preferences for the Cycle Counting engine
1 Choose Application Administration ➞ System Preferences.
2 Locate the System Preference Name (see Table 9-27 on page 9-52).
3 Type in a new value for System Preference Value.
4 To register changes to system preferences, restart the Field Service server.
Version 6.1 Siebel Field Service Guide 9-39
Logistics Management
Setup and Configuration for Cycle Counting
To create cycle counts for specific inventory locations
1 Choose Service Inventory ➞ All Inventory Locations.
2 Select an inventory location.
3 Complete the fields Count Based On, Counting Frequency, and Counting Period.
To define the start date and end date for cycle counts at inventory locations
1 Choose Service Inventory ➞ Cycle Counting Administration.
2 In the Inventory Locations list applet, select an inventory location.
3 In the Inventory Locations applet, set the fields Start Date and End Date for the selected location.
To define cycle counts for inventory types (for example, warehouse or bin)
1 Choose Service Administration ➞ Service Inventory ➞ Inventory Types.
2 Select an inventory type or add a new record for an inventory type.
3 Complete the fields Count Based On, Count Frequency, and Count Period.
To define “Count based on” (ABC or XYZ) for product buckets
1 Choose Service Inventory ➞ Product Buckets.
2 In the Inventory Location list applet, select a location.
3 In the Products applet, select a product.
4 For the selected product, complete the fields ABC Class and XYZ Class.
To configure tracing for the Cycle Counting engine
1 Choose Server Administration ➞ Servers ➞ Server Parameters.
2 Set the Trace Flag parameter (see “Tracing for the Cycle Counting Engine” on page 9-47).
9-40 Siebel Field Service Guide Version 6.1

Logistics Management
Setup and Configuration for Cycle Counting
To manually specify parts for a cycle count
1 Choose Cycle Counts ➞ All Cycle Counts (see “All Cycle Counts View” on page 9-23).
2 In the Cycle Counts applet, add a new record.
3 Select the inventory location where the count will take place.
4 Enter the Due Date.
5 Choose the Part List view.
6 In the Parts List applet, add a new record.
7 Click the down arrow in the Product Bucket column to open the Pick Bucket dialog box, which is populated with products associated with the Inventory Location.
8 Select a product for the count from the Pick Bucket dialog box.
9 In the Cycle Count applet, assign the cycle count using the Assignee column.
Configuration Parameters 9
The Cycle Counting engine generates Cycle Counting headers and cycle counting orders (part lists) by using the configuration information from the Cycle Counting Administration screen (see “Cycle Counting Administration View” on page 9-31).
Cycle counting uses these configuration parameters:
■ ABC Class. The classification of products, based on the financial value of the item; A ≥ B ≥ C.
■ XYZ Class. The classification of products, based on the turnover of the item; X ≥ Y ≥ Z.
■ Frequency. The interval in days between physical counts of inventory at a location; for example, if Counting Frequency is 7 days, inventory is counted on one day every seven days.
Version 6.1 Siebel Field Service Guide 9-41

Logistics Management
Setup and Configuration for Cycle Counting
■ Period. The time period in days allotted to counting all A/X, B/Y, or C/Z class items at this location. For example, if the Counting Period for class A/X products is 90 days, the Cycle Counting engine makes sure the products in this class are included in the Part List at least once every 90 days. Counting Period ≥ Counting Frequency.
■ Start Date and End Date. The time span in calendar days during which all classes in an inventory location are counted. End Date − Start Date ≥ Period.
Here is an example of a cycle counting scenario:
An inventory location is configured to be counted on a financial value basis (ABC). There are approximately 100 A-class products in inventory. Every five days (Frequency = 5 days) someone spends as much time as needed to count one-quarter (5/20) of the A-class items, with the goal of counting all of the A-class items within 20 days (Counting Period A/X = 20 days).
Configuration Information for the Cycle Counting Engine 9
Configuration of cycle counting takes place at several levels, on different screens (see Table 9-23).
Table 9-23. Configuration of Cycle Counting (Sheet 1 of 2)
Configuration Parameter Applies to Path/View
Cycle counting based on ABC or XYZ Inventory location Service Inventory ➞ All/My Inventory Locations. See “Inventory Locations Views” on page 7-27.
Inventory type; for example, Warehouse, Aisle, Shelf, or Bin
Service Administration ➞ Service Inventory ➞ Inventory Types. See “Inventory Types View” on page 7-16.
Frequency Inventory location Service Inventory ➞ All Inventory Locations. See “Inventory Locations Views” on page 7-27.
Inventory type; for example, Warehouse, Aisle, Shelf, or Bin
Service Administration ➞ Service Inventory ➞ Inventory Types. See “Inventory Types View” on page 7-16.
9-42 Siebel Field Service Guide Version 6.1

Logistics Management
Setup and Configuration for Cycle Counting
NOTE: If a configuration parameter can be set at different levels of an inventory location, the parameter for the more specific level takes precedence. For example, the class of cycle counting (ABC or XYZ) for an inventory location takes precedence over that for an inventory type. The cycle count class, A/X, B/Y, or C/Z, for an inventory type takes precedence over that for a product.
Count period for A/X, B/Y, and C/Z Inventory location Service Inventory ➞ All/My Inventory Locations. See “Inventory Locations Views” on page 7-27.
Inventory type; for example, Warehouse, Aisle, Shelf, or Bin
Service Administration ➞ Service Inventory ➞ Inventory Types. See “Inventory Types View” on page 7-16.
Product classification: A/X, B/Y, or C/Z Product Service Inventory ➞ Product Buckets. See “Inventory Bucket Categories View” on page 7-21.
Cycle count class: A/X, B/Y, or C/Z Inventory type; for example Warehouse, Aisle, or Trunk
Marketing Administration ➞ Products ➞ Product Field Service Details. See “Product Field Service Details View” on page 9-22.
Start Date and End Date Inventory location Cycle Counting ➞ All Cycle Counts. See “Cycle Counting Administration View” on page 9-31.
Table 9-23. Configuration of Cycle Counting (Sheet 2 of 2)
Configuration Parameter Applies to Path/View
Version 6.1 Siebel Field Service Guide 9-43
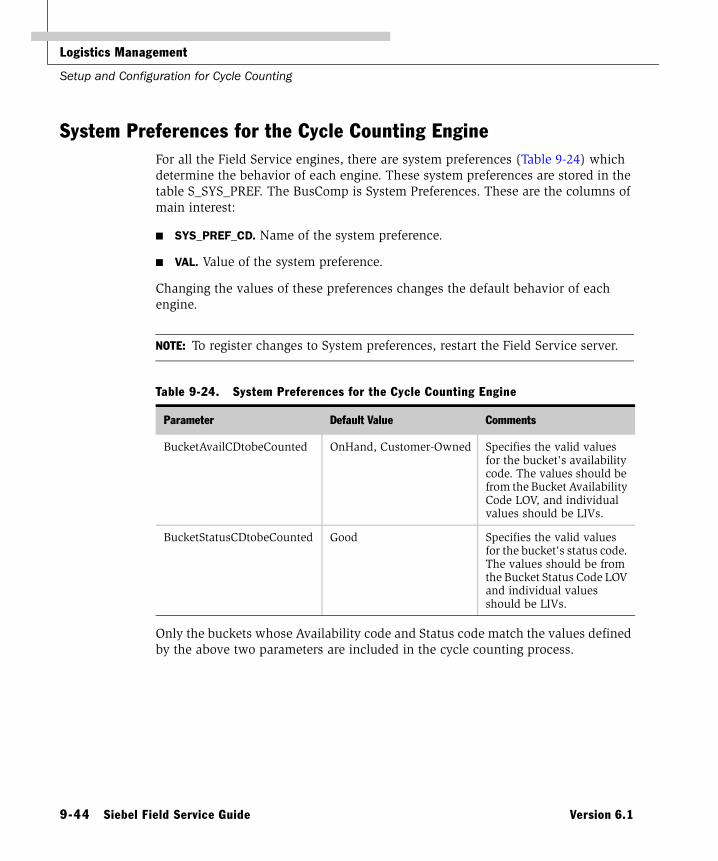
Logistics Management
Setup and Configuration for Cycle Counting
System Preferences for the Cycle Counting Engine 9
For all the Field Service engines, there are system preferences (Table 9-24) which determine the behavior of each engine. These system preferences are stored in the table S_SYS_PREF. The BusComp is System Preferences. These are the columns of main interest:
■ SYS_PREF_CD. Name of the system preference.
■ VAL. Value of the system preference.
Changing the values of these preferences changes the default behavior of each engine.
NOTE: To register changes to System preferences, restart the Field Service server.
Only the buckets whose Availability code and Status code match the values defined by the above two parameters are included in the cycle counting process.
Table 9-24. System Preferences for the Cycle Counting Engine
Parameter Default Value Comments
BucketAvailCDtobeCounted OnHand, Customer-Owned Specifies the valid values for the bucket's availability code. The values should be from the Bucket Availability Code LOV, and individual values should be LIVs.
BucketStatusCDtobeCounted Good Specifies the valid values for the bucket's status code. The values should be from the Bucket Status Code LOV and individual values should be LIVs.
9-44 Siebel Field Service Guide Version 6.1

Logistics Management
Setup and Configuration for Cycle Counting
Engine Parameters for the Cycle Counting Engine 9
All the engines can be invoked from the Workflow Manager or from the client. These engines require certain parameters to be passed. These parameters are set for the component FSCyccnt on Server Component Requests ➞ My Component Requests. Table 9-25 on page 9-45 contains the parameters for the Cycle Counting engine and what they mean.
Table 9-25. Parameters for the Cycle Counting Engine
Parameter Value Comments
Mode SQL In this mode, specify the where clause to set up criteria and count the parts which meet that criteria.
Id In this mode, specify the Id of the inventory location or the inventory type and only the parts related to that loc/type will be counted.
TempTbl In this mode, put all the required parameters into a temporary table with a temporary Client Request Id and pass that Id to the server to retrieve the parameters from Temp Table.
ClientId A row Id for retrieving params from the temp table
Required when Mode = TempTbl.
RowID Row Id of an Inventory location or Inventory type
Required when Mode = Id.
StartDT Start Date Required. The proposed start date of cycle counting.
EndDT End Date Required. The proposed end date of cycle counting.
Where SQL Where Clause Required when Mode = SQL.
Loc/Type Inventory Location or Inventory Type
Required when Mode = Id or TempTbl.
Version 6.1 Siebel Field Service Guide 9-45

Logistics Management
Setup and Configuration for Cycle Counting
Running the Cycle Counting Engine 9
Ways to Invoke the Cycle Counting EngineUse these routes to run the Cycle Counting engine:
■ Dispatch the engine using the workflow manager to generate the cycle counting headers and their part lists.
■ Invoke the engine by clicking the Generate Period or the Generate Periods (All Locations) button in the Service Inventory ➞ Cycle Counting Administration view to generate a set of periods for the next cycle counts, cycle counting headers, and their part lists for one or more specific inventory locations.
■ Invoke the engine through the server manager on the application server.
Input to the Cycle Counting EngineThe Cycle Counting engine requires this input:
■ One or more inventory locations
■ Start date
■ End date
Output from the Cycle Counting EngineThe Cycle Counting engine produces this output:
■ Cycle counting periods
■ Cycle counting headers
■ Part lists for each cycle counting header
Tables Involved
■ S_CYCCNT_PERIOD ■ S_INVLOC_CYCCNT ■ S_PROD_INV_CNT
■ S_INVLOC ■ S_PROD_INVLOC ■ S_PROD_INV
■ S_PROD_INV_CAT ■ S_INVLOC_TYPE ■ S_INVLOC_ROLLUP
■ S_INV_TEMP
9-46 Siebel Field Service Guide Version 6.1

Logistics Management
Setup and Configuration for Cycle Counting
Tracing for the Cycle Counting Engine 9
For the Cycle Counting engine, a log file is created only if there is an error. This is the default state. This is determined by the Trace Flags parameter in Server Administration ➞ Servers ➞ Server Parameters, which is set, by default, to 0. To activate the log under normal conditions, there are three options:
■ Set the Trace Flags parameter to 1; the log collects information about the parameters that are passed to the Cycle Counting engine; for example:
00001011 2000-03-07 12:46:03 2000-03-07 12:46:05 +HHMM 00000002 000 001f 0001 09 FSCyccnt 3164 389 271 C:\sieb60\ssvr\log\FSCyccnt_3164.log 6.0 BASE DBCS [2824] ENU
TraceTrace32000-03-07 12:46:03Start Date = 2000-03-07 00:00:00, End Date = 2001-03-07 00:00:00
TraceTrace32000-03-07 12:46:03Mode = TempTbl, Where = , Loc/Type = Loc, ClientID = 1-3W4H, RowID =
■ Set the Trace Flags parameter to 2; the log collects information on which inventory locations were processed and the corresponding cycle count periods; for example:
00001011 2000-03-07 12:49:28 2000-03-07 12:49:28 +HHMM 00000009 000 001f 0001 09 FSCyccnt 3166 389 169 C:\sieb60\ssvr\log\FSCyccnt_3166.log 6.0 BASE DBCS [2824] ENU
TraceTrace32000-03-07 12:49:28Processing InvLoc: 1-2MDF ...
TraceTrace32000-03-07 12:49:28Config Info -- Classification: ABC, Frequency: 10, Period: 180, 270, 360
TraceTrace32000-03-07 12:49:28Cycle Counting Periods -- Class A, Start Date: 2000-03-07 00:00:00, End Date: 2000-09-02 00:00:00
TraceTrace32000-03-07 12:49:28Cycle Counting Periods -- Class A, Start Date: 2000-09-03 00:00:00, End Date: 2001-03-01 00:00:00
TraceTrace32000-03-07 12:49:28Cycle Counting Periods -- Class A, Start Date: 2001-03-02 00:00:00, End Date: 2001-08-28 00:00:00
Version 6.1 Siebel Field Service Guide 9-47

Logistics Management
Setup and Configuration for Cycle Counting
TraceTrace32000-03-07 12:49:28Cycle Counting Periods -- Class B, Start Date: 2000-03-07 00:00:00, End Date: 2000-12-01 00:00:00
TraceTrace32000-03-07 12:49:28Cycle Counting Periods -- Class B, Start Date: 2000-12-02 00:00:00, End Date: 2001-08-28 00:00:00
TraceTrace32000-03-07 12:49:28Cycle Counting Periods -- Class C, Start Date: 2000-03-07 00:00:00, End Date: 2001-03-01 00:00:00
TraceTrace32000-03-07 12:49:28Cycle Counting Periods -- Class C, Start Date: 2001-03-02 00:00:00, End Date: 2002-02-24 00:00:00
■ Set the Trace Flags parameter to 3; the log collects information that is available for the previous two settings.
NOTE: The server does not have to be shut down and restarted after changing this parameter.
9-48 Siebel Field Service Guide Version 6.1

Logistics Management
Setup and Configuration for the Replenishment Engine
Setup and Configuration for the Replenishment Engine 9
Replenishment is the process of generating orders to restock an inventory location. Various location types that need restocking are warehouses, trunk inventories, and so on. Sources for replenishment can be internal (service inventory) or external (external vendor). Examples of internal are warehouses and trunk. Orders generated for internal are of the type Internal Order. Orders generated for external are of type Purchase Order.
Setting Up Replenishment 9
Follow these procedures to set up replenishment.
To set system preferences for the Replenishment engine
1 Choose Application Administration ➞ System Preferences.
2 Locate the name of the system preference (System Preference Name column) (see Table 9-27 on page 9-52).
3 Type in a new value for System Preference Value.
4 To register changes to system preferences, restart the Field Service server.
To set the parameters for the Replenishment engine
1 Choose Server Component Requests ➞ My Component Requests.
2 In the Component Request form applet, select FSCRepl for the Component/Job.
3 In the Component Request Parameters list applet, find the parameter (see Table 9-28 on page 9-53) in the Name column.
4 Type the new value in the Value column.
Version 6.1 Siebel Field Service Guide 9-49

Logistics Management
Setup and Configuration for the Replenishment Engine
To set synchronous or asynchronous operation of the Replenishment engine
1 From the View menu, choose Options.
2 In the Options dialog box, choose the Field Service tab.
3 For the Mode of Operation, check or uncheck Asynchronous generation of Replenishment orders.
To set the maximum and minimum quantity of products to keep in stock
1 Choose Service Inventory ➞ Product Buckets.
2 In the Inventory Location list applet, select a location.
3 In the Products applet, select a product.
4 For the selected product, complete the Max, Min, and Safety fields.
To set up replenishment relationships among inventory locations
1 Choose Service Inventory ➞ Relationships.
2 In the Inventory Location list applet, select a location.
3 In the Relationships applet, create a new record.
4 Select an inventory location in the Name field.
5 In the With Relationship field, choose the relationship of the named location to the location selected in Step 2.
To set up the vendor for a product
1 Choose Products ➞ All Products.
2 In the Products list applet, select a product.
3 In the Vendor field, choose a vendor from the dialog box.
To set up vendors for an inventory location
1 Choose Service Inventory ➞ Authorized Vendors.
2 In the Inventory Location list applet, select a location.
3 In the Authorized Vendors applet, create a new record for each vendor.
9-50 Siebel Field Service Guide Version 6.1
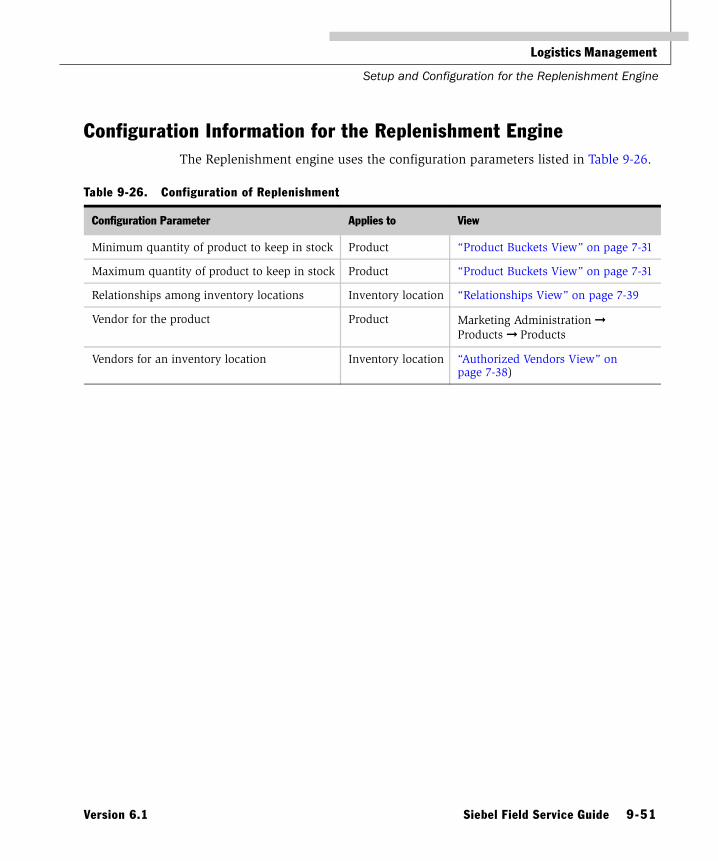
Logistics Management
Setup and Configuration for the Replenishment Engine
Configuration Information for the Replenishment Engine 9
The Replenishment engine uses the configuration parameters listed in Table 9-26.
Table 9-26. Configuration of Replenishment
Configuration Parameter Applies to View
Minimum quantity of product to keep in stock Product “Product Buckets View” on page 7-31
Maximum quantity of product to keep in stock Product “Product Buckets View” on page 7-31
Relationships among inventory locations Inventory location “Relationships View” on page 7-39
Vendor for the product Product Marketing Administration ➞ Products ➞ Products
Vendors for an inventory location Inventory location “Authorized Vendors View” on page 7-38)
Version 6.1 Siebel Field Service Guide 9-51

Logistics Management
Setup and Configuration for the Replenishment Engine
System Preferences for the Replenishment Engine 9
For all the Field Service engines, there are system preferences, listed in Table 9-27, which determine the behavior of each engine. These system preferences are stored in the table S_SYS_PREF. The BusComp is System Preferences. These are the columns of main interest:
■ SYS_PREF_CD. Name of the system preference.
■ VAL. Value of the system preference.
Table 9-27. System Preferences for the Replenishment Engine
Parameter Default Value Comments
ValidOrderStatusForOnOrderQty Open, New, Pending Specifies the valid values for the existing order status. The values should be from the Order Status LOV and individual values should be LIVs.
ValidOrderItemStatusForOnOrderQty Open, New, Pending Specifies the valid values for the existing order item status. The values should be from the Order Item Status LOV and individual values should be LIVs.
ValidOrderTypeForOnOrderQty Internal Order, Purchase Order Specifies the valid values for the existing order type. The values should be from the Order Type LOV and individual values should be LIVs.
ReplenishOrderPriority Medium Specifies the default order priority. The values should be from the Order Priority LOV and individual values should be LIVs.
InvLocTypeForReplenishRelation Warehouse Specifies the default replenishment level. Orders to replenish any level of an inventory location have this value as their Destination.
9-52 Siebel Field Service Guide Version 6.1

Logistics Management
Setup and Configuration for the Replenishment Engine
The first three parameters decide what kind of Orders, Order Items, and Orders Types to look for when searching for an existing order, to avoid creating duplicate orders. The fourth parameter sets the Order Priority for newly created orders.
NOTE: To register changes to System preferences, restart the Field Service server.
Parameters for the Replenishment Engine 9
All the engines can be invoked from the Workflow Manager or from the client. These engines require certain parameters to be passed. These parameters are set for the component FSRepl on Server Component Requests ➞ My Component Requests. Table 9-28 contains the parameters for the Replenishment engine, and what they mean.
Table 9-28. Parameters for the Replenishment Engine
Parameter Value Comments
InvokeMode Id In this mode, specify the inventory location to be replenished and the engine will replenish the specified location.
SQL In this mode, specify the where clause, meaning specify some criteria and replenish the inventory locations which meet that criteria.
TEMP In this mode, put all the required parameters into a temporary table with a particular Client Request Id and pass that Id to the server to retrieve the parameters from Temp Table.
ClientId A row Id for retrieving parameters from the temp table
Required when InvokeMode = TEMP.
SourceType I (Inventory Location) V (Vendor)
Required when InvokeMode = TEMP. Defaults to I when InvokeMode = Id or SQL.
DestId Destination Inventory Id Required when InvokeMode = Id.
WhereClause SQL Where Clause Required when InvokeMode = SQL.
Version 6.1 Siebel Field Service Guide 9-53

Logistics Management
Setup and Configuration for the Replenishment Engine
Running the Replenishment Engine 9
Ways to Invoke the Replenishment Engine■ Dispatch the engine using the workflow manager to generate internal and
purchase orders, based on the stock levels.
■ Invoke the engine by clicking the Generate Internal Orders button or the Generate Purchase Orders button on the Service Inventory ➞ New Replenishment Orders view.
■ Invoke the engine through the server manager on the application server.
Input to the Replenishment EngineAs input, the Replenishment engine requires one or more inventory locations.
Output from the Replenishment EngineAs output, the Replenishment engine produces internal orders and purchase orders.
Tables Involved■ S_INVLOC (inventory management table)
■ S_PROD_INVLOC (manage products at the inventory location; also stores minimum, maximum, and safety levels for products)
■ S_PROD_INV (stores bucket information: quantity, status, and availability)
■ S_INVLOC_ROLLUP (stores relationship sublevel in de-normalized form, for example, stores children and grandchildren for a particular inventory)
■ S_INVLOC_ORG (link table between S_INVLOC and Account table to store vendors for an inventory)
■ S_INVLOC_REL (stores relationships such as Fulfills, Replenishes, and Sublevel for an inventory location)
■ S_PROD_INT (stores product definition, used for vendor information)
■ S_INV_TEMP
9-54 Siebel Field Service Guide Version 6.1

Shipping and Receiving 10
About This Chapter . . . . . . . . . . . . . . . . . . . . . . . . . . . . . . . . . . . . . 10-3
Concepts and Terms . . . . . . . . . . . . . . . . . . . . . . . . . . . . . . . . . . . . . 10-3
Application Overview . . . . . . . . . . . . . . . . . . . . . . . . . . . . . . . . . . . . 10-4
Processing and Tracking Shipments . . . . . . . . . . . . . . . . . . . . . . . . 10-7
Processing and Tracking Receipts . . . . . . . . . . . . . . . . . . . . . . . . . . . . . .10-9
Screens and Views for Shipping and Receiving . . . . . . . . . . . . . . . . . 10-11
Shipping Screen . . . . . . . . . . . . . . . . . . . . . . . . . . . . . . . . . . . . . . . 10-12
All Pick Tickets View . . . . . . . . . . . . . . . . . . . . . . . . . . . . . . . . . 10-12
Pick Ticket View . . . . . . . . . . . . . . . . . . . . . . . . . . . . . . . . . . . . 10-14
Repair Pick Ticket View . . . . . . . . . . . . . . . . . . . . . . . . . . . . . . . 10-17
Waybill View . . . . . . . . . . . . . . . . . . . . . . . . . . . . . . . . . . . . . . . 10-18
Consolidation View . . . . . . . . . . . . . . . . . . . . . . . . . . . . . . . . . . . . . . . 10-20
Shipping Report . . . . . . . . . . . . . . . . . . . . . . . . . . . . . . . . . . . . . . . 10-22
Receiving Screen . . . . . . . . . . . . . . . . . . . . . . . . . . . . . . . . . . . . . . 10-22
All Pending Orders View . . . . . . . . . . . . . . . . . . . . . . . . . . . . . . . 10-22
Line Item Receipts View . . . . . . . . . . . . . . . . . . . . . . . . . . . . . . . 10-24
All Unknown Receipts View . . . . . . . . . . . . . . . . . . . . . . . . . . . . 10-26
Receive Internal Orders View . . . . . . . . . . . . . . . . . . . . . . . . . . . 10-28
Receive Purchase Order View . . . . . . . . . . . . . . . . . . . . . . . . . . . 10-31
Receive Repair Order View . . . . . . . . . . . . . . . . . . . . . . . . . . . . . 10-33
Receive RMA View . . . . . . . . . . . . . . . . . . . . . . . . . . . . . . . . . . . 10-33
Receive Unknown View . . . . . . . . . . . . . . . . . . . . . . . . . . . . . . . 10-33
Waybill View . . . . . . . . . . . . . . . . . . . . . . . . . . . . . . . . . . . . . . . 10-33
Version 6.1 Siebel Field Service Guide 10-1
Shipping and Receiving
Setup and Configuration . . . . . . . . . . . . . . . . . . . . . . . . . . . . . . . . . 10-34
Process Shipment Button . . . . . . . . . . . . . . . . . . . . . . . . . . . . . . 10-34
Generate Transactions Button . . . . . . . . . . . . . . . . . . . . . . . . . . . 10-34
Common Checks and Validations for Shipping and Receiving . . . . . . . . . 10-35
Inventory Transactions for Repairs in an Internal Repair Center . . . 10-35
Inventory Transactions for Repairs Sent to a Third-Party Vendor . . . 10-36
Inventory Transactions for Repairs Received from a Third-Party Vendor . . . . . . . . . . . . . . . . . . . . . . . . . . . . . . . . . . 10-37
Third-Party Vendor Swaps an Asset During Repair . . . . . . . . . . . . 10-38
10-2 Siebel Field Service Guide Version 6.1
Shipping and Receiving
About This Chapter
About This Chapter 10
This chapter describes fulfillment of orders, shipping, and receiving.
Siebel Field Service records and reviews information relating to physical shipment of material. Such a shipment may be to a customer, or to another inventory location belonging to the organization. Internal shipments may be triggered by the replenishment process.
Concepts and Terms 10
Fulfillment The process of filling an order by locating which inventory has the line items in the order, reserving (allocating) these items, and creating a pick ticket.
Pick ticket A document that provides detailed information about the service parts required to fill orders. A warehouse clerk uses this list to pick and ship the items that complete an order.
Waybill A document prepared by the carrier of a shipment of goods that contains details of the shipment, route, and charges. This document travels with the items during shipment, as record of the shipment.
Version 6.1 Siebel Field Service Guide 10-3

Shipping and Receiving
Application Overview
Application Overview 10
This section includes detailed procedures for using the screens and features for shipping and receiving. For details on individual screens, see “Screens and Views for Shipping and Receiving” on page 10-11. For guidelines and technical details of configuration, see “Setup and Configuration” on page 10-34.
Shipping activities focus on two documents, the pick ticket and the waybill. The pick ticket provides detailed information about the items required to fill orders. The waybill, which records a variety of data related to the shipment, normally travels with the shipment and mediates between shipping and receiving.
Shipping begins where fulfillment ends; with the generation of a pick ticket. Figure 10-1 on page 10-5 illustrates the shipping process.
10-4 Siebel Field Service Guide Version 6.1

Shipping and Receiving
Application Overview
Siebel Field Service automatically performs the necessary inventory transactions and creates the necessary line item actions on shipped orders.
Figure 10-1. Shipping Flow
Pick Parts
Update PickTicket
(Parts Shipped)
Choose Carrierand
Update Waybill
ProcessShipment
Get Pick Ticket
Version 6.1 Siebel Field Service Guide 10-5

Shipping and Receiving
Application Overview
Receiving applies to all types of orders:
■ Replenishment of internal orders or internal transfers received by a field office, a repair center, or a field service engineer.
■ RMAs (returns from a customer).
■ Purchase Orders and Repair Orders (receipt from an external vendor).
■ For convenience, another receipt type, Unknown, has been included that encompasses any other received packages.
When an item is received, a receipt is generated as proof of the item arriving. Figure 10-2 illustrates the receiving process.
Siebel Field Service performs the necessary inventory transactions and creates the necessary line item actions on received orders.
Figure 10-2. Receiving Flow
GenerateUnknown Receipt
Create Receipt(Internal,
Purchase/RepairOrder, or RMA)
GenerateTransactions
Identify Order?No
Yes
10-6 Siebel Field Service Guide Version 6.1

Shipping and Receiving
Application Overview
Processing and Tracking Shipments 10
Follow these procedures to process the shipping of orders.
To ship an order
1 Choose Shipping ➞ All Pick Tickets (see “All Pick Tickets View” on page 10-12).
2 In the Pick Tickets list applet, select a pick ticket.
3 Choose the Pick Ticket view (see “Pick Ticket View” on page 10-14).
4 In the Allocated Lines list applet, select a line item or click the Ship All button to generate a shipped quantity equal to the allocated quantity for every allocated line.
5 In the Shipped Line form applet, add a new record. The Quantity must not exceed the allocated quantity in the Allocated Lines applet.
6 For serialized products, create a record in the Serial Numbers Applet, click the down arrow in the Serial Number column to open the Pick Asset applet, and select the product.
7 In the Pick Ticket applet, click the Process Shipment button to create inventory transactions for the line items selected in the Allocated Lines list applet and the quantities specified in the Shipped Line form applet.
To find a pick ticket for a line item
1 Choose Orders ➞ All RMAs/Service Orders.
2 Select an order.
3 Choose Orders ➞ RMAs/Service Order ➞ Line Item Actions.
4 In the Line Item actions applet, locate the Pick Ticket field.
5 Copy the pick ticket number.
6 Choose Shipping ➞ Pick Ticket.
7 Query the pick ticket number.
Version 6.1 Siebel Field Service Guide 10-7

Shipping and Receiving
Application Overview
To update pick tickets
1 Choose Shipping ➞ All Pick Tickets or Pick Ticket.
2 In either view, update shipping information, status, and so on.
3 In the Pick Ticket view, update the quantity shipped for selected line items and serial numbers of line items.
To consolidate pick tickets
1 Choose Shipping ➞ All Pick Tickets view (see “All Pick Tickets View” on page 10-12).
2 Select the pick ticket that you want to consolidate.
3 Choose the Consolidation view (see “Consolidation View” on page 10-20).
4 Select the Qualified Lines applet, and select the lines you want to consolidate.
5 Click the Consolidate button to move the line items from the Qualified Lines to the Consolidated Lines.
To fill in waybills for pick tickets
1 Choose Shipping ➞ All Pick Tickets (see “All Pick Tickets View” on page 10-12).
2 In the Pick Tickets list applet, select a pick ticket.
3 Choose Shipping ➞ Waybill.
4 Complete all fields required for shipping the items described in the selected pick ticket.
10-8 Siebel Field Service Guide Version 6.1

Shipping and Receiving
Application Overview
Processing and Tracking Receipts 10
Follow these procedures to process the receiving of orders.
To receive an order
1 Choose Receiving ➞ All Pending Orders (see “All Pending Orders View” on page 10-22).
2 Select the order in the Pending Internal Orders or the Pending POs/ROs/RMAs applet.
3 Click the Type field.
You see the Receive Internal Orders view, the Receive Purchase Order view, the Receive Repair Order view, or the Receive RMA view.
4 Select a record in the Line Items applet for the received items.
5 Create a new record and enter receipt details in the Received Line Item and Serial Numbers applets.
6 Click Generate Transactions.
To receive a repaired item from a third-party vendor
1 Choose Receiving ➞ Repair Order (see “Receive Repair Order View” on page 10-33).
2 In the Receive Repair Order form applet, query and select the repair order.
3 In the Line Items list applet, choose the first line item received.
4 In the Received Line Item applet, click New to define the conditions of receipt for the selected line item.
5 In the Defective Tags list applet, enter a new record.
6 Repeat Step 3 through Step 5 for each line item received.
7 Click Generate Transactions to record the movement of inventory from the repair vendor to your inventory location.
Version 6.1 Siebel Field Service Guide 10-9

Shipping and Receiving
Application Overview
Review all line items for orders
1 Choose Receiving ➞ All Pending Orders.
2 Select the order in the Pending Internal Orders or the Pending POs/ROs/RMAs applet.
3 Click the Order or Order Number field.field.
You see Orders ➞ All RMAs/Service Orders ➞ RMAs/Service Order ➞ Line Items.
4 Review the items on the Line Items applet.
Review all line items received with incomplete documentation
1 Choose Receiving ➞ Receive Unknown (see “All Unknown Receipts View” on page 10-26).
2 Query the receipt by reference number, waybill number, and so on.
3 Review the line items in the Line Items applet.
10-10 Siebel Field Service Guide Version 6.1

Shipping and Receiving
Screens and Views for Shipping and Receiving
Screens and Views for Shipping and Receiving 10
Click the name of a screen or view in Table 10-1 to see more information.
Table 10-1. Screens and Views for Shipping and Receiving
Screen View Role/Procedures (Click to see full procedure.)
Shipping All Pick Tickets Display all pick tickets generated automatically during order fulfillment or allocation. See: “To ship an order” on page 10-7 or “To consolidate pick tickets” on page 10-8.
Pick Ticket Record the shipment of allocated line items on a pick ticket and generate inventory transactions. See: “To ship an order” on page 10-7.
Repair Pick Ticket For repair orders only, record the shipment of allocated line items on a pick ticket and generate inventory transactions.
Waybill Fill out waybills associated with pick tickets.
Consolidation Combine line items for existing pick tickets into a single pick ticket. See: “To consolidate pick tickets” on page 10-8
Receiving All Pending Orders View all orders not yet received. See: “To receive an order” on page 10-9.
Line Item Receipts View all line items, pending and processed, for orders.
All Unknown Receipts View received items that arrive with incomplete documentation.
Receive Internal Orders Record received items that are transfers between inventory locations within a service business. See: “To receive an order” on page 10-9.
Receive Purchase Orders Record items that are received on purchase orders.
Repair Order Record products repaired and received from a third-party vendor. See: “To receive a repaired item from a third-party vendor” on page 10-9.
Receive RMA Record items that are received on all types of RMAs.
Receive Unknown Record items that are received without an associated order.
Waybill Record the waybills that accompany received shipments.
Version 6.1 Siebel Field Service Guide 10-11

Shipping and Receiving
Shipping Screen
Shipping Screen 10
All Pick Tickets View 10
The All Pick Ticket view, Figure 10-3, displays pick tickets generated automatically by the Fulfillment and Part Locator engines, or by using the Generate Pick Ticket button on the Orders screen (see “Line Items View” on page 8-27). Table 10-2 on page 10-13 describes the fields in this view.
Figure 10-3. All Pick Tickets View
10-12 Siebel Field Service Guide Version 6.1
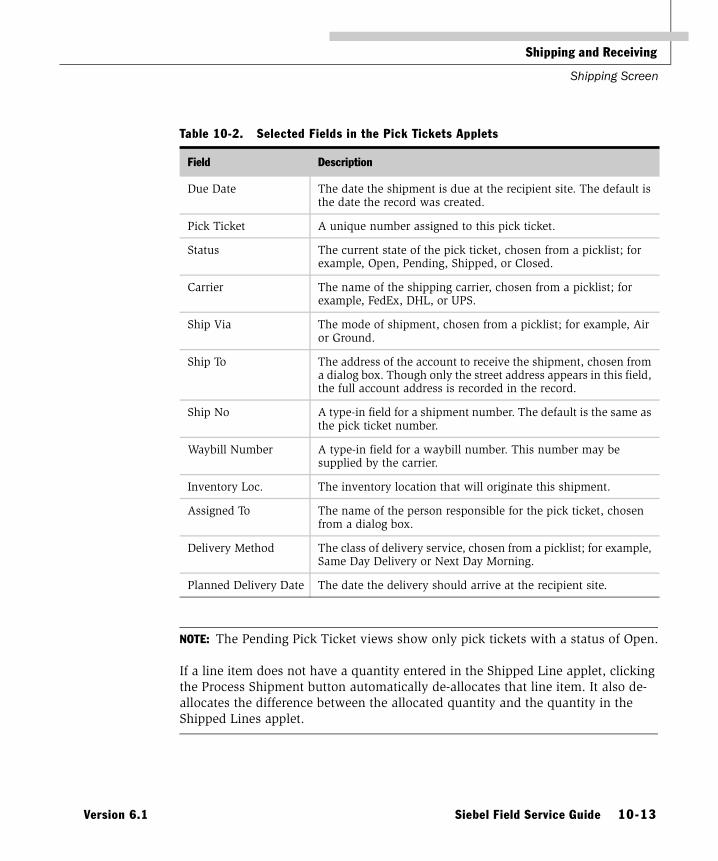
Shipping and Receiving
Shipping Screen
NOTE: The Pending Pick Ticket views show only pick tickets with a status of Open.
If a line item does not have a quantity entered in the Shipped Line applet, clicking the Process Shipment button automatically de-allocates that line item. It also de-allocates the difference between the allocated quantity and the quantity in the Shipped Lines applet.
Table 10-2. Selected Fields in the Pick Tickets Applets
Field Description
Due Date The date the shipment is due at the recipient site. The default is the date the record was created.
Pick Ticket A unique number assigned to this pick ticket.
Status The current state of the pick ticket, chosen from a picklist; for example, Open, Pending, Shipped, or Closed.
Carrier The name of the shipping carrier, chosen from a picklist; for example, FedEx, DHL, or UPS.
Ship Via The mode of shipment, chosen from a picklist; for example, Air or Ground.
Ship To The address of the account to receive the shipment, chosen from a dialog box. Though only the street address appears in this field, the full account address is recorded in the record.
Ship No A type-in field for a shipment number. The default is the same as the pick ticket number.
Waybill Number A type-in field for a waybill number. This number may be supplied by the carrier.
Inventory Loc. The inventory location that will originate this shipment.
Assigned To The name of the person responsible for the pick ticket, chosen from a dialog box.
Delivery Method The class of delivery service, chosen from a picklist; for example, Same Day Delivery or Next Day Morning.
Planned Delivery Date The date the delivery should arrive at the recipient site.
Version 6.1 Siebel Field Service Guide 10-13
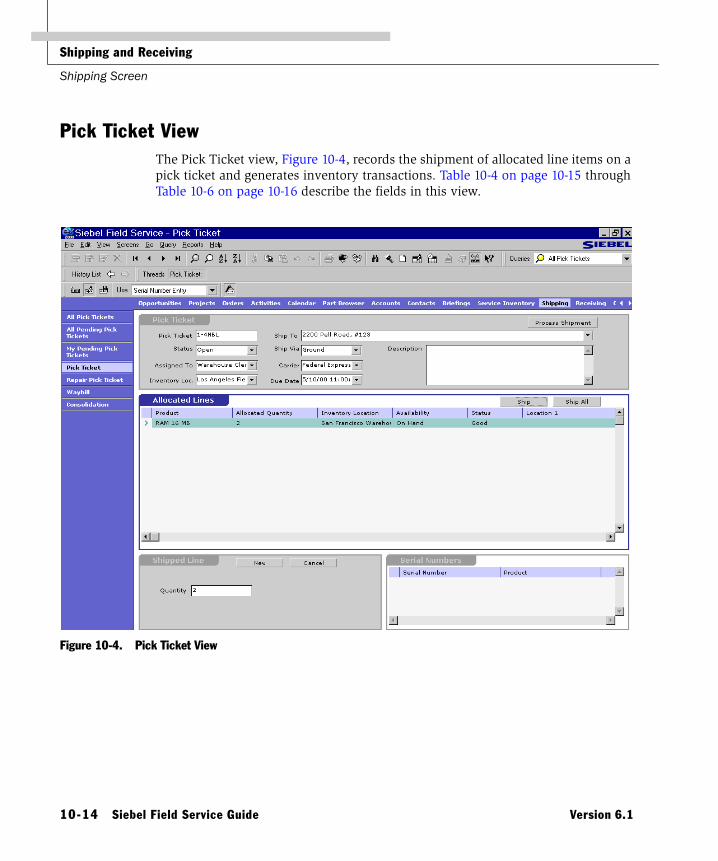
Shipping and Receiving
Shipping Screen
Pick Ticket View 10
The Pick Ticket view, Figure 10-4, records the shipment of allocated line items on a pick ticket and generates inventory transactions. Table 10-4 on page 10-15 through Table 10-6 on page 10-16 describe the fields in this view.
Figure 10-4. Pick Ticket View
10-14 Siebel Field Service Guide Version 6.1

Shipping and Receiving
Shipping Screen
Table 10-3. Button in the Pick Ticket Applet
Button Description
Process Shipment This button generates an inventory transaction that is recorded as a Ship transaction. Once this button is activated, the Pick Ticket Status is set automatically to Closed (see Table 10-2 on page 10-13). For more information, see “Process Shipment Button” on page 10-34.
Table 10-4. Fields in the Allocated Lines Form Applet
Field Description
Ship This button creates a record in the Shipped Line applet, with the same quantity as the allocated quantity, but does not generate an inventory transaction. This number appears automatically in the Quantity field of the Shipped Lines applet.
Ship All This button creates records in the Shipped Line applet for all allocated lines in the Allocated Lines applet. This number appears automatically in the Quantity field of the Shipped Lines applet.
Note that neither the Ship nor Ship All buttons specify the assets to ship for serialized products.
Product The name of a product on the order associated with the selected pick ticket.
Allocated Quantity The number of products allocated for this pick ticket.
Inventory Location The inventory location that will provide the allocated products.
Availability The availability state of the product at the source inventory location; for example, On Hand, In Transit, or On Order.
Status The functional status of the allocated products; for example, Good or Defective.
Location 1 The first physical location in a service inventory to obtain the product.
Location 2 The second physical location in a service inventory to obtain the product.
Location 3 The third physical location in a service inventory to obtain the product.
Shipped Quantity The number of products shipped. This number reflects the value entered in the Shipped Lines applet after clicking the Process Shipment button.
Version 6.1 Siebel Field Service Guide 10-15

Shipping and Receiving
Shipping Screen
NOTE: If the Shipped Line applet has a quantity less than the quantity in the Allocated Lines applet, any excess is de-allocated.
NOTE: The Serial Number applet accepts multiple serial numbers.
Table 10-5. Fields in the Shipped Line Form Applet
Field/Button Description
New This button activates the Quantity field so that it can receive the number of items shipped.
Quantity A type-in field for the number of allocated items to ship from the selected line item. Activating the Ship button fills in this field automatically with the total number of allocated products in the selected line item. The Ship All button does this for all line items.
Table 10-6. Fields in the Serial Number List Applet
Field Description
Serial Number The serial number of a shipped product for the selected line item, chosen from a dialog box. This applet is active only if the Shipped Line applet displays a number of shipped items. The Serial Number applet accepts only as many records as the number of shipped items.
Product The name of the shipped product, filled in automatically.
10-16 Siebel Field Service Guide Version 6.1

Shipping and Receiving
Shipping Screen
Repair Pick Ticket View 10
The Repair Pick Ticket view, Figure 10-5, processes the shipment of allocated line items for a repair order. The Pick Ticket, Allocated Lines, and Shipped Lines applets are identical to those in the Pick Ticket view (see “Pick Ticket View” on page 10-14). Instead of associating serial numbers with shipped products, this view uses the Defective Tags applet to associate defective tags. Table 10-7 describes the fields in this view.
In this view, the Pick Ticket form applet contains a Process Shipment button. For a description of the Process Shipment button see Table 10-3 on page 10-15 and “Process Shipment Button” on page 10-34.
NOTE: The Defective Tags list applet accepts multiple defective tag numbers.
Figure 10-5. Shipped Lines and Defective Tags Applets in the Repair Pick Ticket View
Table 10-7. Fields in the Defective Tags List Applet
Field Description
Defective Tag The defective tag number of a shipped product for the selected line item, chosen from a dialog box. This applet is active only if the Shipped Line applet displays a number of shipped items. The Defective Tag applet accepts only as many records as the number of shipped items.
Serial Number The serial number of the shipped product, filled in automatically.
Version 6.1 Siebel Field Service Guide 10-17

Shipping and Receiving
Shipping Screen
Waybill View 10
The Waybill view, Figure 10-6, associates waybills with pick tickets.
In this view, the Pick Ticket form applet contains a Process Shipment button. For a description of the Process Shipment button see Table 10-3 on page 10-15 and “Process Shipment Button” on page 10-34. Table 10-8 on page 10-19 describes the fields in this view.
Figure 10-6. Waybill Information Form Applet in the Waybill View
10-18 Siebel Field Service Guide Version 6.1

Shipping and Receiving
Shipping Screen
Table 10-8. Selected Fields in the Waybill Information Form Applet
Field Description
Shipment No A type-in field for a number that identifies a shipment. The default value is the Pick Ticket number.
Status The current state of the pick ticket, chosen from a picklist; for example, Open, Pending, Shipped, or Closed.
Ship To The shipping address chosen from the Pick Address dialog box. This selection populates the read-only field in the Pick Ticket applet on the same screen.
Ship Via The mode of shipment, chosen from a picklist; for example, Air or Ground.
Carrier The name of the shipping carrier, chosen from a picklist; for example, FedEx, DHL, or UPS.
Incoterms The payment terms for the shipment, chosen from a picklist; for example, FOB or No Charge.
Freight Info A type-in field.
Weight A type-in field for the weight. The units of measure appear in a field to the right, chosen from a picklist.
Number of Containers A type-in field.
Freight Cost A type-in field.
Insured Value A type-in field.
Insurance Cost A type-in field.
Ship To The address of the recipient, chosen from a dialog box of accounts. This information is inherited from the Orders screen.
Shipped By The person responsible for shipping, chosen from a dialog box of employees.
Ship Date The date of the shipment.
Waybill Number A type-in field.
POD A check box indicating payment on delivery for this shipment.
Received By The person who received the shipment, chosen from a dialog box.
Condition The state of the shipment upon receipt, chosen from a picklist; for example, New, Good, or Defective.
Version 6.1 Siebel Field Service Guide 10-19

Shipping and Receiving
Shipping Screen
Consolidation View 10
The Consolidation view, Figure 10-7, combines line items for existing pick tickets into a single pick ticket. The purpose is to reduce shipping costs. The line items must have the same Ship To address, be shipped from the same inventory location, and have the same order type. Table 10-9 and Table 10-10 on page 10-21 describe the fields in this view.
In this view, the Pick Ticket form applet contains a Process Shipment button. For a description of the Process Shipment button see Table 10-3 on page 10-15 and “Process Shipment Button” on page 10-34.
Figure 10-7. Qualified Lines and Consolidated Lines Applets
10-20 Siebel Field Service Guide Version 6.1

Shipping and Receiving
Shipping Screen
Table 10-9. Fields in the Qualified Lines List Applet
Field/Button Description
Consolidate This button combines the line items in the Qualified Lines applet and shows the result in the Consolidated Lines applet. The qualified lines from one pick ticket are copied to the other, deleting all line items from the first pick ticket. The consolidated lines are then processed as though they were part of the original order.
Pick Ticket The number of the selected pick ticket.
Status The current state of the pick ticket, chosen from a picklist; for example, Open, Pending, Shipped, or Closed.
Product The name of the product to consolidate.
Allocated Quantity The number of this product allocated to this shipment.
Ship To Address The address of the account receiving the shipment.
Table 10-10. Fields in the Consolidated Lines List Applet
Field Description
Product The name of the product in the consolidated shipment.
Allocated Quantity The number of this product allocated to this shipment.
Version 6.1 Siebel Field Service Guide 10-21

Shipping and Receiving
Shipping Report
Shipping Report 10
Shipping provides the Pick Ticket Details report. This report contains a page describing each pick ticket and its associated products.
Receiving Screen 10
All Pending Orders View 10
The All Pending Orders view, Figure 10-8, shows all orders not yet received. All fields are read-only. Table 10-11 and Table 10-12 on page 10-23 describe the fields in this view.
Figure 10-8. All Pending Orders View
10-22 Siebel Field Service Guide Version 6.1

Shipping and Receiving
Receiving Screen
Table 10-11. Fields in the Pending Internal Orders List Applet
Field Description
Type The type of order; for example, Internal Order.
Pick Ticket The number of the pick ticket for this order.
Order The order number.
Shipment The shipment number.
Status The status of the order: Shipped.
Due Date The date the receipt is expected.
From The name of the sending inventory location.
To The name of the receiving inventory location.
Table 10-12. Fields in the Pending POs/ROs/RMAs List Applet
Field Description
Type The type of order; for example, Purchase Order or RMA Return.
Order Number The order number.
Status The status of the receipt; for example, Open, Partially Received, Pending, or Shipped.
Priority The priority of the shipment; for example, High or Low.
Account The name of the account sending the order.
Site The location of the account.
Last Name The last name of the account contact sending the order.
First Name The first name of the account contact sending the order.
Version 6.1 Siebel Field Service Guide 10-23

Shipping and Receiving
Receiving Screen
Line Item Receipts View 10
The Line Items Receipts view, Figure 10-9, shows all line items, pending and processed, for orders. Table 10-13 on page 10-25 describes the fields in this view.
Figure 10-9. Receipts List Applet in the Line Item Receipts View
10-24 Siebel Field Service Guide Version 6.1

Shipping and Receiving
Receiving Screen
Table 10-13. Fields in the Receipts List Applet
Field Description
Product The name of the product in an order.
Quantity The number of the products.
Type The category of order; for example, Internal Order or RMA Advanced Exchange.
Order Number The order number for the product.
Shipment Number The shipment number for the product.
Pick Ticket The pick ticket number for the product. For internal orders only.
Waybill The waybill number for the product.
Status The current state of the receipt for this product; for example, Open, Pending, or Closed.
From The name of an inventory location (warehouse) where the shipment originated.
To The name of an inventory location that received the product.
Carrier The name of the shipping carrier, chosen from a picklist; for example, FedEx, DHL, or UPS.
Version 6.1 Siebel Field Service Guide 10-25

Shipping and Receiving
Receiving Screen
All Unknown Receipts View 10
The All Unknown Receipts view, Figure 10-10, lists received items that arrive with incomplete documentation. Table 10-14 on page 10-27 describes the fields in this view. All fields are read-only.
Figure 10-10. All Unknown Receipts View
10-26 Siebel Field Service Guide Version 6.1

Shipping and Receiving
Receiving Screen
Table 10-14. Selected Fields in the Unknown Receipts List Applet
Field Description
Shipment Number A number that identifies a shipment.
Status The current state of the receipt for this product; for example, Open, Pending, or Closed.
Order Type The category of order; for example, Internal Order or RMA Repair Return.
Match Order # A reference number for a received item that does not match an existing order. When an order is identified, this item must be recorded as received. Until that occurs, no inventory transaction is generated.
Reference # A unique number assigned to unknown receipts.
Carrier The name of the shipping carrier, chosen from a picklist; for example, FedEx, DHL, or UPS.
Waybill The waybill number for this receipt.
Version 6.1 Siebel Field Service Guide 10-27

Shipping and Receiving
Receiving Screen
Receive Internal Orders View 10
The Receive Internal Orders view, Figure 10-11, records received items that are transfers between inventory locations within a service business. Table 10-15 on page 10-29 though Table 10-18 on page 10-30 describe the fields in this view.
NOTE: The Receive Internal Order form and the Line Items list applets are read-only. The data is supplied by“Shipping Screen” on page 10-12.
Figure 10-11. Receive Internal Order View
10-28 Siebel Field Service Guide Version 6.1

Shipping and Receiving
Receiving Screen
Table 10-15. Selected Fields in the Receive Internal Order Form Applet
Field/Button Description
Generate Transactions This button generates transactions that add the received items to buckets. For other actions that this button carries out, see “Generate Transactions Button” on page 10-34.
Note: For replenishment orders, this action generates transactions of the type Receive Internal, and records the source inventory, the products, the assets (for serialized products), the destination inventory and buckets, quantity, and other transaction information.
Shipment # The shipment number for this receipt.
Status The current state of this shipment; for example, Shipped or Closed. The status of an order is changed to Shipped by the Process button (see “Process Shipment Button” on page 10-34).
From Inventory The inventory location from which the shipment originated. The Fulfillment engine supplies this location. It may also be provided if the pick ticket is generated manually.
To Inventory The inventory location that will receive the products. The Fulfillment engine does not supply this location, but it may be provided if the shipment is generated manually on the Orders screen.
Ship To The address of the recipient.
Ship Via The mode of shipment; for example, Air or Ground.
Carrier The name of the shipping carrier; for example, FedEx, DHL, or UPS.
Due Date The date the shipment was expected.
Table 10-16. Fields in the Line Items List Applet
Field Description
Product The name of a product in the received shipment.
Quantity The number of items described for this line item in the internal order.
Status The current state of this shipment; Shipped or Closed.
Version 6.1 Siebel Field Service Guide 10-29

Shipping and Receiving
Receiving Screen
The Received Line Item applet assigns each incoming product to a bucket.
Table 10-17. Fields in the Received Line Item Applet
Field Description
Quantity The number of products received for the selected line item. This number cannot exceed the quantity in the Line Items applet.
Availability The availability status of the product at the destination inventory location; for example, On Hand, In Transit, or On Order.
Status The current status of the allocated products; for example, Good or Defective.
Location The inventory location for the received product, chosen from a dialog box.
Table 10-18. Fields in the Serial Numbers Applet
Field Description
Serial Number The serial number of a received product, chosen from a dialog box.
Product The name of the received product, filled in automatically from the selected line item.
10-30 Siebel Field Service Guide Version 6.1

Shipping and Receiving
Receiving Screen
Receive Purchase Order View 10
The Receive Purchase Order view, Figure 10-12, records items that are received on purchase orders. Table 10-19 on page 10-32 through Table 10-21 on page 10-32 describe the fields in this view.
NOTE: The Receive PO form and the Line Items list applets are read-only.
Figure 10-12. Receive Purchase Order View
Version 6.1 Siebel Field Service Guide 10-31

Shipping and Receiving
Receiving Screen
The Received Line Item applet assigns each incoming product to a bucket.
Table 10-19. Selected Fields in the Receive PO Form Applet
Field Description
Generate Transactions This button generates transactions that add the received items to buckets. For other actions that this button carries out, see “Generate Transactions Button” on page 10-34.
PO Number The number of the purchase order for the received items.
Status The status of the receipt; for example, Open, Partially Received, or Shipped.
Active A check box indicating that processing of this PO is still in progress. If the Active flag is set to false on the Orders screen, it is not possible to complete the receipt or otherwise modify an order.
Account The name of the account that supplies this order.
Table 10-20. Fields in the Line Items List Applet
Field Description
Line The number of the line item in the purchase order.
Product The name of the product received.
Status The status of the receipt; for example, Open, Partially Received, or Shipped.
Quantity The number of products.
Table 10-21. Fields in the Received Line Items Applet (Sheet 1 of 2)
Field Description
Quantity The number of products received for the selected line item. This number cannot exceed the quantity in the Line Items applet.
Availability The availability status of the product at the destination inventory location; for example, On Hand, In Transit, or On Order.
10-32 Siebel Field Service Guide Version 6.1

Shipping and Receiving
Receiving Screen
Receive Repair Order View 10
The Receive Repair Order view records products repaired and received from a third-party vendor. The fields in this view are the same as for purchase orders (see “Receive Purchase Order View” on page 10-31), with the exception of the Defective Tags applet. This applet records the defective tags for the received line items.
Receive RMA View 10
The Receive RMA view records items that are received on all types of RMAs. The fields in this view are the same as for purchase orders (see “Receive Purchase Order View” on page 10-31).
Receive Unknown View 10
The Receive Unknown view records items that are received without an associated order.
Waybill View 10
The Waybill view records the waybills that accompany received shipments. This view is the same as the Waybill view for Shipping (see “Waybill View” on page 10-18) with the addition of a New button for adding a new waybill record.
Status The functional state of the allocated products; for example, Good or Defective.
Location The inventory location for the received product, chosen from a dialog box.
Shipment The shipment number, chosen from a dialog box.
Product The name of the received product, chosen from a dialog box. This name normally should match the name of the product in the Line Item applet. However, if a product was substituted or if the wrong product was shipped, it is possible to select another product.
Table 10-21. Fields in the Received Line Items Applet (Sheet 2 of 2)
Field Description
Version 6.1 Siebel Field Service Guide 10-33
Shipping and Receiving
Setup and Configuration
Setup and Configuration 10
This section describes the operation of shipping and receiving.
Process Shipment Button 10
The Process Shipment button is located on the Pick Ticket, Waybill, and Consolidation views of the Shipping screen. This button generates the following processes within Siebel Field Service:
■ Loop through all the Allocated actions for the pick ticket.
■ For each Shipped action against the allocated action, generate an inventory transaction of type Ship and another of type De-allocate. Refer the Inventory Transactions table (Table 7-29 on page 7-70).
■ If the shipped quantity is less than the allocated quantity, then insert a De-allocate action for this line item for any extra items and generate an inventory transaction of type De-allocate.
■ Generate inventory transactions based on the order type of the pick ticket.
Generate Transactions Button 10
The Generate Transactions button is located in the Receive Internal Order, Receive Purchase Order, and Receive RMA views of the Receiving screen. This button generates the following processes within Siebel Field Service:
■ Based on the Order Type of Internal/Other, generate proper inventory transactions affecting buckets. Refer to the Inventory Transactions table (Table 7-29 on page 7-70).
■ If the product received was serialized, ensures that the total assets received match the product quantity.
■ Verify that the asset physically exists at the source inventory location.
10-34 Siebel Field Service Guide Version 6.1

Shipping and Receiving
Setup and Configuration
Common Checks and Validations for Shipping and Receiving 10
Siebel Field Service provides these automatic validations for shipping and receiving transactions:
■ Quantity to be shipped should be less than or equal to the quantity allocated.
■ Quantity to be received should be less than or equal to the quantity shipped.
■ Total number of assets should be equal to the total quantity of a serialized product.
■ Once the inventory transaction is generated, no update is allowed for the shipped or received line item. However, it is possible to receive partial shipments after selecting the Generate Transactions button. For internal orders, shipped items are known, so there is no need for partial receiving. Any other type of order allows for partial receiving. New receive actions may be added as long as the quantity of items received does not exceed the quantity in the order.
■ While generating inventory transactions, validates the source location of the asset.
Inventory Transactions for Repairs in an Internal Repair Center 10
Repair activities, generated from an Activity Plan, move the part from bucket to bucket. Each time a part is moved from bucket to bucket, an inventory transaction is generated. Validations are performed for each transfer; for example, an asset must belong to a source bucket to be moved to a destination bucket.
These steps summarize the transaction process:
1 Generate inventory transaction as a Stock Transfer.
2 Commit Inventory Transactions.
3 Update the bucket Id (Prod_INV_ID) on the Defective Tag (S_PART_RPR).
Version 6.1 Siebel Field Service Guide 10-35

Shipping and Receiving
Setup and Configuration
The rules for these inventory transactions are in Table 10-22.
Inventory Transactions for Repairs Sent to a Third-Party Vendor 10
On the Shipping screen, in the Repair Pick Ticket view, the Process Shipment button generates transactions, of the type Ship to TP, to move a product from the defective bucket to the third-party vendor, and sets the variables Defective and On Hand. This transaction updates the variables INVLOC_ID, INV_STATUS_CD, and INV_AVAIL_CD.
These steps summarize the transaction process:
1 Generate inventory transaction as Ship to TP and De-Allocate.
2 Commit inventory transactions.
3 Update the bucket Id (Prod_INV_ID), inventory location (INVLOC_ID), status (INV_STSTUS_CD), and availability (INV_AVAIL_CD) on the Defective Tag (S_PART_RPR), using the BusComp FS Repair Without Update logic.
Table 10-22. Rules for Inventory Transactions: Internal Repair
Bucket (InvLoc + Status + Avail)
Old Value New Value Transactions Required?
NULL NULL No
NULL INV1 No
INV1 INV1 No
INV1 INV2 Yes
Normal inventory transaction as Stock Transfer, with all validations.
INV1 NULL No
10-36 Siebel Field Service Guide Version 6.1

Shipping and Receiving
Setup and Configuration
The rules for these inventory transactions are in Table 10-23.
Third-Party Vendor Ships Directly to the CustomerWhen a third-party vendor ships a repaired item directly to the customer, the repair center must receive a confirmation from the vendor. On receipt of this confirmation, the user must manually update the inventory location in the Tracking form applet to CUSTOMER_VIRTUAL. Changing the location from third-party to Virtual Customer, automatically creates an inventory transaction.
Inventory Transactions for Repairs Received from a Third-Party Vendor 10
On the Receiving screen, in the Receive Repair Order view, the Generate Transaction button generates transactions, of the type Receive from TP, to move a product from a third-party vendor to the desired inventory location. This transaction updates the variables INVLOC_ID, INV_STATUS_CD, and INV_AVAIL_CD.
These steps summarize the transaction process:
1 Generate inventory transaction as Receive from TP.
2 Commit the inventory transaction.
3 Update the bucket Id (Prod_INV_ID), inventory location (INVLOC_ID), status (INV_STSTUS_CD), and availability (INV_AVAIL_CD) on the Defective Tag (S_PART_RPR), using the BusComp FS Repair Without Update logic.
Table 10-23. Rules for Inventory Transactions: Send to Third-Party Vendor
InventoryTransactionType
Source Destination
Inventory Bucket Assets1 Inventory Bucket Assets1
Ship to TP Ord Part Movement Source Inv
On Hand
Good/Defective
Yes Order Hdr. Destination Invloc Id (on Orders ➞ Terms)
On Hand
Defective
Yes
De-Allocate Ord Part Movement Source Invloc Id
Reserved No Customer On Order No
1. The assets rows are included in the transaction validation if the product is serialized.
Version 6.1 Siebel Field Service Guide 10-37

Shipping and Receiving
Setup and Configuration
The rules for these inventory transactions are in Table 10-24.
Third-Party Vendor Swaps an Asset During Repair 10
If the third-party repair vendor returns a different part, the inventory transactions will fail unless the new asset exists in the third-party inventory location. The user can accomplish this in one of two ways:
■ Use the same Asset Id, and change the serial number associated with this record.
■ Create a new asset. Receive it from the third-party vendor using a Receive Other transaction. Then delete the previous asset, using another transaction.
Table 10-24. Rules for Inventory Transactions: Receive from Third-Party Vendor
InventoryTransactionType
Source Destination
Inventory Bucket Assets1 Inventory Bucket Assets1
Ship from TP Ord Hdr Destination Inv (on Orders, Terms view)
On Hand
Defective
Yes Order Part Movement Dest Inv (on Receive ➞ Receive Action)
On Hand
Good/Defective
Yes
1. The assets rows are included in the transaction validation if the product is serialized.
10-38 Siebel Field Service Guide Version 6.1

Repairs 11
About This Chapter . . . . . . . . . . . . . . . . . . . . . . . . . . . . . . . . . . . . . 11-2
Business Scenario . . . . . . . . . . . . . . . . . . . . . . . . . . . . . . . . . . . . . . 11-3
Concepts and Terms . . . . . . . . . . . . . . . . . . . . . . . . . . . . . . . . . . . . . 11-4
Application Overview . . . . . . . . . . . . . . . . . . . . . . . . . . . . . . . . . . . . 11-4
Workflow for Repairs . . . . . . . . . . . . . . . . . . . . . . . . . . . . . . . . . . . . . . . 11-5
Receiving Items for Repair . . . . . . . . . . . . . . . . . . . . . . . . . . . . . . 11-6
Repair Records and Defective Tags . . . . . . . . . . . . . . . . . . . . . . . . . 11-6
Repair Activities . . . . . . . . . . . . . . . . . . . . . . . . . . . . . . . . . . . . . . . . . . . 11-7
Repair Orders . . . . . . . . . . . . . . . . . . . . . . . . . . . . . . . . . . . . . . . 11-7
Asset Repair Histories . . . . . . . . . . . . . . . . . . . . . . . . . . . . . . . . . 11-7
Processing Defective Items for Repair . . . . . . . . . . . . . . . . . . . . . . 11-8
Screens and Views for Repairs . . . . . . . . . . . . . . . . . . . . . . . . . . . . . 11-14
Repairs Screen . . . . . . . . . . . . . . . . . . . . . . . . . . . . . . . . . . . . . . . . 11-15
Repairs Views . . . . . . . . . . . . . . . . . . . . . . . . . . . . . . . . . . . . . . 11-15
Activities Plan View . . . . . . . . . . . . . . . . . . . . . . . . . . . . . . . . . . 11-18
Activities View . . . . . . . . . . . . . . . . . . . . . . . . . . . . . . . . . . . . . 11-20
Assets Screen . . . . . . . . . . . . . . . . . . . . . . . . . . . . . . . . . . . . . . . . . 11-22
Repair History View . . . . . . . . . . . . . . . . . . . . . . . . . . . . . . . . . . 11-22
Repair Reports . . . . . . . . . . . . . . . . . . . . . . . . . . . . . . . . . . . . . . . . 11-23
Setup and Configuration . . . . . . . . . . . . . . . . . . . . . . . . . . . . . . . . . 11-24
Setting Up Repair Activities . . . . . . . . . . . . . . . . . . . . . . . . . . . . 11-24
Serialized Products and Inventory Location . . . . . . . . . . . . . . . . . 11-25
Inventory Transactions for the Repair Process . . . . . . . . . . . . . . . . 11-25
Version 6.1 Siebel Field Service Guide 11-1

Repairs
About This Chapter
About This Chapter 11
This chapter describes how to use Siebel Field Service to process and track equipment repairs.
The Repair module tracks defective products returned to a service center for repair. The repair cycle begins with a customer calling a service center with a defective product that requires repair. The customer service representative assigns an RMA (Return Material Authorization) to the product, and authorizes the customer to ship the product to the service center, where it will be repaired or shipped to a third-party repair provider. When the product arrives in the repair center’s receiving department, a defective material tag is generally attached to track the product through the repair process. Siebel Repair generates repair activity plans and assigns and schedules repair activities, tracks symptoms and resolutions, and stores the repair history.
The repair process starts with a defective product in need of repair, which, in many cases, can be repaired and returned to the customer. In other cases the product is repaired and turned back into good stock. Service businesses can choose between internal repair and repair by an external vendor.
The product is received from the customer, usually via an RMA order. The RMA type (Repair Return or Advance Exchange) signifies that the product is to be repaired. The product is then either shipped to a third-party vendor or moved to your organization’s repair location. The product could also be received directly from the field service engineer as an over-the-counter transaction, or be transferred internally if defective parts have been grouped into a field office and then sent to your repair facility. In the latter case, an internal order can be used to track the parts being transferred from one inventory location to another, or a stock transfer (inventory transaction) can be issued directly.
If an external repair is chosen, a repair order number is assigned, which can be used to track the item to and from the external vendor.
The defective tag number is specific to the Repair module. It is a unique number tied to the product or asset being repaired. It is assigned to both internal and external repairs and is used to record repair process detail for a specific product asset. It is a numbered card or marker (often a bar-coded label) physically attached to the product. The defective tag enables the organization to track all defective parts throughout the repair process, whether they are serialized or not.
11-2 Siebel Field Service Guide Version 6.1
Repairs
Business Scenario
When an external repair vendor performs the repair, the item’s repair is tracked to completion using the ship and receive dates to and from the external vendor. The repaired product has its status changed from Defective to Good in the Repair module, which also generates the inventory transactions that record the product’s travels.
The Repair module also enables you to create activity plans for any process needed to repair the product.
The Repair History view enables you to detect failure trends for a product based on defective tag repair data. The decision to scrap (a value in the Disposition field) may be justified if the repair cost is too high, and if a more reliable substitute product can be found.
Business Scenario 11
A repair center receives a defective hard drive and a defective monitor from a field engineer who removed both items from a customer site. The repair center agent records an over-the-counter transfer from the field engineer, and attaches a defective tag to each product.
The repair center will repair the defective monitor. A repair center manager creates an activity plan for this repair (see Chapter 3, “Field Service Activities,” for more information on creating activities). The defective tag number tracks the item through several repair inventory locations until the repair center ships the repaired monitor back to the customer. The defective tag can later be used to bring up the repair history of the monitor.
An external repair provider will repair the defective hard drive. A repair center agent prepares a Repair Order (RO) and ships the hard drive to an external repair supplier. The repair center receives the repaired hard drive back from the external supplier, then ships the hard drive back to the customer. Alternatively, the external repair supplier ships the repaired hard drive directly to the field engineer or the client.
Version 6.1 Siebel Field Service Guide 11-3

Repairs
Concepts and Terms
Concepts and Terms 11
Application Overview 11
This section includes detailed procedures for using the screens and features for processing repairs. For details on individual screens, see “Screens and Views for Repairs” on page 11-14. For guidelines and technical details of configuration, see “Setup and Configuration” on page 11-24.
Asset Any equipment item or component that has a unique identity. Items with serial numbers are automatically assets. Components that define a customer install base may also be defined as assets. Parts that are assets can be components of an asset hierarchy (assembly, sub-assembly, and so on).
Defective tag A unique Id for the product or asset being repaired; usually a numbered card or bar-coded label physically attached to the item. Used to track all repair transactions, comments, and repair processes. Also called a Defective Material Tag (DMT).
Repair history A repair history tracks the past repair to an asset.
Repair order A repair order describes repairs to be performed externally by a third-party repair provider. These orders facilitate shipping items to an external vendor and receiving the repaired items from the vendor.
Repair record A repair record describes the item requiring repair, its repair status, locations, third-party repair provider (if any), and so on. Repair records apply to both internal and external repairs.
11-4 Siebel Field Service Guide Version 6.1

Repairs
Application Overview
Workflow for Repairs 11
The workflow for repairs is illustrated in Figure 11-1.
Figure 11-1. Repair Workflow
Internal Repair
Receive and Tag
Create aDefective Tag
Internal orexternal repair?
Receive RMA
Over-the -counter
Stock transfer
Verify serviceagreement
External Repair
Ship toexternalprovider
Return to Customer
Ship tocustomer
Return to Goodor Defective
Inventory
Inventorytransaction
Return or keepin inventory?
Receive fromexternalprovider
Generaterepair activity
Generaterepair order
Allocate andgenerate
pick tickets
Yes
No
Version 6.1 Siebel Field Service Guide 11-5

Repairs
Application Overview
Receiving Items for Repair 11
There are three routes for placing defective parts in the repair process:
■ Repair items from customers generally arrive by a freight carrier and have an attached RMA. If no RMA is attached, it is necessary to create one.
■ The field service engineer or an internal department (which, for example, may have accidentally damaged a component) can deliver a defective part over the counter to a repair center agent.
■ The repair center may receive transfers from other internal locations.
Repair Records and Defective Tags 11
Create defective tags by creating repair records. These records show repair activities, attachments, location, and other information as the defective item moves through the repair process.
A defective tag number is assigned to the repair record, uniquely identifying the product to repair. A repair center agent physically attaches a defective tag to the product. The defective tag, either a card or a marker (often a bar-coded label), lets the service business track defective parts through the repair process, whether or not they have serial numbers.
If the product is serialized, add the asset number to the repair record. This automatically provides the product name and inventory location, status, and availability.
Some businesses prefer to speed up the receiving process by creating batches of defective tags in advance. To do this, they create multiple blank repair records. When a defective part arrives, the repair center uses one of these blank records and its defective tag. An agent then completes the record for this part.
11-6 Siebel Field Service Guide Version 6.1

Repairs
Application Overview
Repair Activities 11
If your business is going to repair an item, use one of these views in Siebel Field Service:
■ Repair Activity Plan view to execute activity plans that automatically generate activity records
■ Repair Activities view to manually create or update activity records.
Repair activities, activity plans, and activity templates function much as they do for field engineer activities. See Chapter 3, “Field Service Activities,” for more about activities.
As an item moves among inventory locations, record its movements by updating the Location, Status, or Availability field in the Inventory group on any of the Repairs views. These updates automatically generate inventory transactions.
Repair Orders 11
If a third-party repair provider is going to perform the repairs, create a repair order. These orders record the transactions involved in shipping items to an external repair vendor and receiving the repaired items back from this vendor. For more information, see Chapter 8, “Orders.”
Asset Repair Histories 11
A repair history holds data for a defective product that is also an asset. A repair history can associate several defective tags (DMTs) with an asset. The Asset Repair History detects failure trends. Based on the occurrence of defective tags, an asset can be identified as a financial liability.
Version 6.1 Siebel Field Service Guide 11-7

Repairs
Application Overview
Processing Defective Items for Repair 11
To receive defective parts with an RMA
1 Choose Receiving ➞ All Pending Orders (see “All Pending Orders View” on page 10-22).
2 Select the order in the Pending POs/ROs/RMAs applet.
3 Click the Type field.
You see Receiving ➞ Receive RMA.
4 Select a record in the Line Items applet.
5 Create a new record in the Received Line Item applet and enter receipt details.
6 Create a new record in the Serial Numbers applet for each received line item.
7 Click Generate Transactions.
To receive defective parts over the counter
1 Choose Repair ➞ All Repairs.
2 Query the record for the repair item (using the defective tag) or create a new record.
3 Copy the defective tag.
4 Choose Inventory Transactions ➞ All Inventory Transactions.
5 Create a new record.
6 In the Type field, choose Over-the-Counter from the picklist.
7 In the Repair ID field, enter the defective tag.
11-8 Siebel Field Service Guide Version 6.1

Repairs
Application Overview
To receive defective parts by stock transfer
1 Choose Receiving ➞ All Pending Orders (see “All Pending Orders View” on page 10-22).
2 Select the order in the Pending Internal Orders applet.
3 Click the Order Type Field.
You see Receiving ➞ Receive Internal Order (see “Receive Internal Orders View” on page 10-28).
4 Select a record in the Line Items applet.
5 Create a new record in the Received Line Item applet and enter receipt details.
6 Create a new record in the Serial Numbers applet for each received line item.
7 Click Generate Transactions.
To create repair records
1 Choose Repairs ➞ Repairs (see “Repairs Views” on page 11-15).
2 In a Repairs applet, add a record.
Field Service fills in a new defective tag number, a status of New, and the date received (current date and time). All other fields are optional.
3 When attaching the repair record to a serialized item, select the asset number. This automatically fills in the Asset and Product fields.
4 Associate the repair record with its service request or RMA by selecting from the SR Number and RMA fields, respectively.
To generate an activity plan and activities for a repair
1 Choose Repairs ➞ Repairs (see “Repairs Views” on page 11-15).
2 In the Repairs list applet, select a Repair record.
3 Choose the Activity Plan view (see “Activities Plan View” on page 11-18).
4 In the Activity Plans list applet, add a new record.
Version 6.1 Siebel Field Service Guide 11-9

Repairs
Application Overview
5 Choose a template.
This populates the Activities Plans and Activities list applets.
6 In the Activities form applet, use the Assigned to column to assign each activity.
To view and update repair activities
1 Choose Repairs ➞ Repairs (see “Repairs Views” on page 11-15).
2 In the Repair list applet, query the Defective Tag or Asset number to locate the repair.
3 Choose the Activities view (see “Activities View” on page 11-20).
4 In the Activities applet, create or update activity records.
To track the movement of a defective part
■ Choose Repairs ➞ Repairs (see “Repairs Views” on page 11-15).
■ Update the Location, Status, and Availability fields to show the current location and bucket category of a part.
To link a repair order to a repair record and defective tag
1 Choose Repairs ➞ Repairs (see “Repairs Views” on page 11-15).
2 In the Repairs list applet, choose a repair order item in the RO Item field.
3 In the Pick Repair Item list, select the line item.
To link an RMA repair return to a defective tag
1 Choose Repairs ➞ Repairs (see “Repairs Views” on page 11-15).
2 In the Repairs list applet, click the down arrow on the RMA field and select an RMA from the dialog box.
11-10 Siebel Field Service Guide Version 6.1

Repairs
Application Overview
To assign repair activities to a defective tag
1 Choose Repairs ➞ Repairs (see “Repairs Views” on page 11-15).
2 Select a repair record.
3 To use an existing activity plan template, go to the Activity Plan view (see “Activities Plan View” on page 11-18).
a In the Activity Plans applet, add an activity plan record.
b Choose a template from the picklist.
4 To add new activities to an activities plan, go to the Activities view (see “Activities View” on page 11-20).
a In the Activities applet, add an activity record.
b Fill in the Priority, Status, and Activity Type fields from the picklists.
c Check Internal if the repair activity is in-house.
To associate repair activities with a service request
1 Choose Repairs ➞ Repairs (see “Repairs Views” on page 11-15).
2 Select a repair record.
3 In the SR column, select a service request from the dialog box.
To create a repair order and generate a pick ticket
1 Choose Orders ➞ All RMAs/Service Orders (see “All RMAs/Service Orders View” on page 8-24).
2 Add a new record, specifying Repair Order as the Type.
3 Click the Order Number to go to RMAs/Service Order ➞ Line Item (see “Line Items View” on page 8-27).
4 In the Line Items list applet, add the items to be repaired.
5 Choose Orders ➞ RMAs/Service Order ➞ Terms (see “Terms View” on page 8-36).
Version 6.1 Siebel Field Service Guide 11-11
Repairs
Application Overview
6 Specify the source inventory in the From field.
7 Specify the external provider in the To Inventory field (the destination).
8 Choose Orders ➞ RMAs/Service Order ➞ Line Item Actions (see “Line Item Actions View” on page 8-31).
9 In the Line Item Actions list applet, add a new record, specifying Allocate as the Action Type.
10 Click Generate Pick Tickets to create the pick ticket for the shipment.
To ship a defective part to an external repair provider
1 Choose Repair ➞ All Repairs.
2 Query the record for the repair item (using the defective tag) or create a new record.
3 Copy the defective tag.
4 Choose Inventory Transactions ➞ All Inventory Transactions.
5 Create a new record.
6 In the Type field, choose Ship to TP from the picklist.
7 In the Repair ID field, enter the defective tag.
8 Choose Shipping ➞ All Pick Tickets (see “All Pick Tickets View” on page 10-12).
To receive a repaired item from a third-party vendor
1 Choose Repairs ➞ Repairs (see “Repairs Views” on page 11-15).
2 In a Repairs view, change theses fields: Location, Availability, and Status.
To return a repaired or exchanged part to a customer
1 Choose Orders ➞ All RMAs/Service Orders (see “All RMAs/Service Orders View” on page 8-24).
2 Add a new record, specifying the type as RMA Advance Exchange or RMA Return.
11-12 Siebel Field Service Guide Version 6.1

Repairs
Application Overview
3 Choose Orders ➞ RMAs/Service Order ➞ Line Items (see “Line Items View” on page 8-27).
4 Add a record for each product required for this return order.
5 Supply the product name and other information as needed.
6 Click Generate Pick Ticket.
To record time and expenses for repair activities
1 Choose Repairs ➞ Repairs (see “Repairs Views” on page 11-15).
2 In a Repairs view, create a repair record.
3 Choose Repairs ➞ Activities (see “Activities View” on page 11-20).
4 Create an activity record.
5 Click the Activity Type field.
You see Activities ➞ Attachments.
6 Choose Activities ➞ Time Tracker (see “Time Tracker View” on page 3-31) and enter new records for labor.
7 Choose Activities ➞ Expense Tracker (see “Expense Tracker View” on page 3-20) and enter new records for expenses.
To track an item’s repair history
1 Choose Repairs ➞ All Repairs.
2 Select the defective tag record.
3 In the Repairs list applet, click the Asset column.
You see Assets ➞ All Assets.
4 Choose Assets ➞ Repair History.
5 In the Repair History applet, review the defective tags for this item.
Version 6.1 Siebel Field Service Guide 11-13
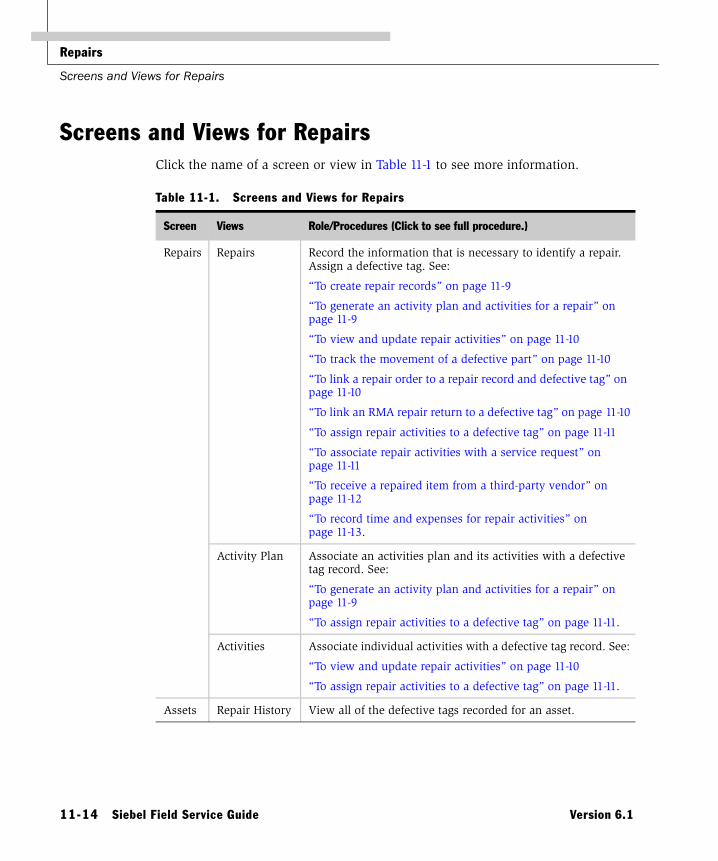
Repairs
Screens and Views for Repairs
Screens and Views for Repairs 11
Click the name of a screen or view in Table 11-1 to see more information.
Table 11-1. Screens and Views for Repairs
Screen Views Role/Procedures (Click to see full procedure.)
Repairs Repairs Record the information that is necessary to identify a repair. Assign a defective tag. See:
“To create repair records” on page 11-9
“To generate an activity plan and activities for a repair” on page 11-9
“To view and update repair activities” on page 11-10
“To track the movement of a defective part” on page 11-10
“To link a repair order to a repair record and defective tag” on page 11-10
“To link an RMA repair return to a defective tag” on page 11-10
“To assign repair activities to a defective tag” on page 11-11
“To associate repair activities with a service request” on page 11-11
“To receive a repaired item from a third-party vendor” on page 11-12
“To record time and expenses for repair activities” on page 11-13.
Activity Plan Associate an activities plan and its activities with a defective tag record. See:
“To generate an activity plan and activities for a repair” on page 11-9
“To assign repair activities to a defective tag” on page 11-11.
Activities Associate individual activities with a defective tag record. See:
“To view and update repair activities” on page 11-10
“To assign repair activities to a defective tag” on page 11-11.
Assets Repair History View all of the defective tags recorded for an asset.
11-14 Siebel Field Service Guide Version 6.1

Repairs
Repairs Screen
Repairs Screen 11
Repairs Views 11
The All Repairs view, Figure 11-2, records the information that is necessary to identify a repair, such as location, status, asset number, assigned technician, repair station, and relevant dates. Table 11-2 on page 11-16 describes the fields in this view. A Check Warranty button provides information about asset warranties.
Figure 11-2. All Repairs View
Version 6.1 Siebel Field Service Guide 11-15

Repairs
Repairs Screen
Table 11-2. Fields in the Repairs Applets (Sheet 1 of 2)
Field/Button Description
Check Warranty This button provides warranty information about the asset associated with a defective tag. Clicking this button locates any warranty that is valid on a selected date (Warranty As of field), and checks the appropriate warranty boxes (Product, Component, and Manufacturer).
Defective Tag A number assigned to each repair record.
Status A picklist with these values:
■ New. A newly received, defective item.
■ Assigned. Assigned to a Repair Center.
■ Open. Repair unresolved.
■ In Progress. Repair in progress.
■ Hold. Repair on hold.
■ Closed. Repair completed or RMA resolved.
■ Re-Open. Repair activities again active.
Asset An asset chosen from a dialog box.
Product Product description selected from a dialog box. Automatically supplied for an asset.
Return to The destination for the repaired item, chosen from a dialog box of accounts.
SR Number The serial number of an asset, chosen from a dialog box.
RMA The RMA number for this item, chosen from a dialog box.
Assigned to The name of the employee assigned to this repair, chosen from a dialog box.
Repair Center The Repair Center that received this item, chosen from a dialog box.
Repair Station The station at the repair center that has the item, chosen from a dialog box.
Vendor Third-party repair provider, chosen from a dialog box.
Site The location of the repair provider (vendor). A type-in field.
RO Item The repair order item associated with the repair.
11-16 Siebel Field Service Guide Version 6.1
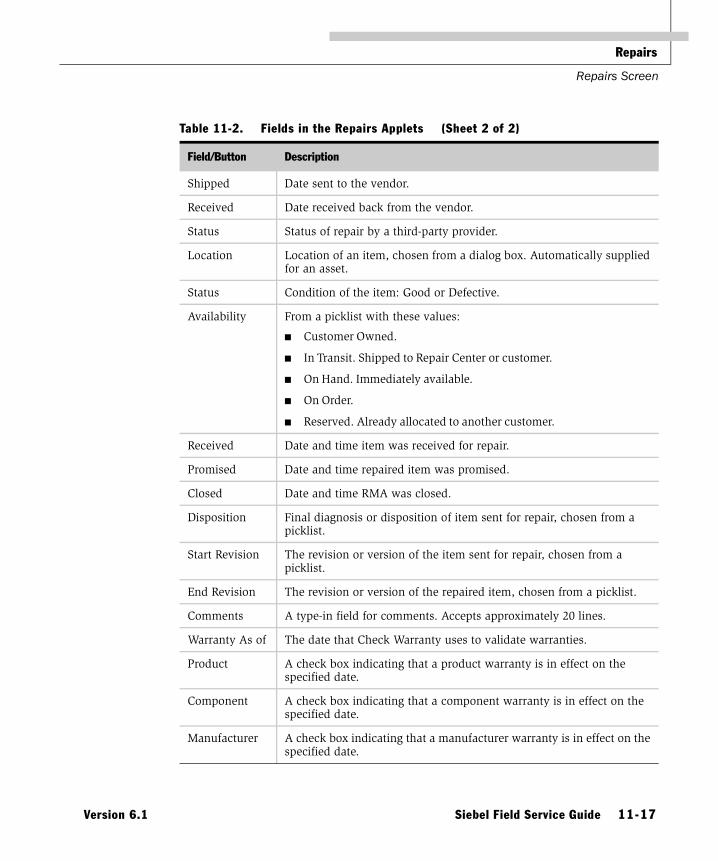
Repairs
Repairs Screen
Shipped Date sent to the vendor.
Received Date received back from the vendor.
Status Status of repair by a third-party provider.
Location Location of an item, chosen from a dialog box. Automatically supplied for an asset.
Status Condition of the item: Good or Defective.
Availability From a picklist with these values:
■ Customer Owned.
■ In Transit. Shipped to Repair Center or customer.
■ On Hand. Immediately available.
■ On Order.
■ Reserved. Already allocated to another customer.
Received Date and time item was received for repair.
Promised Date and time repaired item was promised.
Closed Date and time RMA was closed.
Disposition Final diagnosis or disposition of item sent for repair, chosen from a picklist.
Start Revision The revision or version of the item sent for repair, chosen from a picklist.
End Revision The revision or version of the repaired item, chosen from a picklist.
Comments A type-in field for comments. Accepts approximately 20 lines.
Warranty As of The date that Check Warranty uses to validate warranties.
Product A check box indicating that a product warranty is in effect on the specified date.
Component A check box indicating that a component warranty is in effect on the specified date.
Manufacturer A check box indicating that a manufacturer warranty is in effect on the specified date.
Table 11-2. Fields in the Repairs Applets (Sheet 2 of 2)
Field/Button Description
Version 6.1 Siebel Field Service Guide 11-17

Repairs
Repairs Screen
Activities Plan View 11
The Activities Plan view, Figure 11-3, associates an activities plan and its activities with a defective tag record. Table 11-3 and Table 11-4 on page 11-19 describe the fields in this view. The Activities applet is read-only.
Figure 11-3. Activity Plan View
11-18 Siebel Field Service Guide Version 6.1
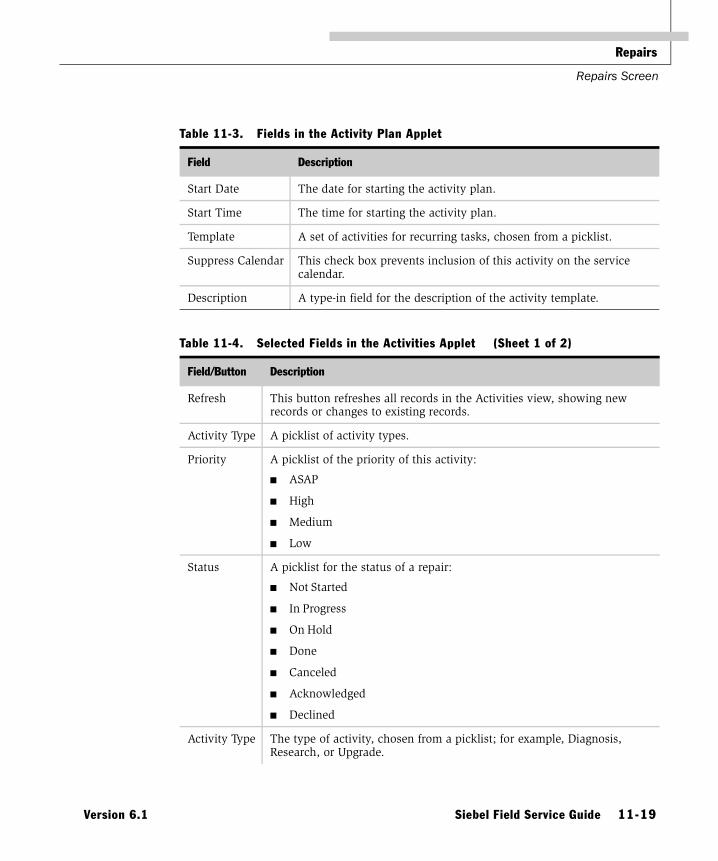
Repairs
Repairs Screen
Table 11-3. Fields in the Activity Plan Applet
Field Description
Start Date The date for starting the activity plan.
Start Time The time for starting the activity plan.
Template A set of activities for recurring tasks, chosen from a picklist.
Suppress Calendar This check box prevents inclusion of this activity on the service calendar.
Description A type-in field for the description of the activity template.
Table 11-4. Selected Fields in the Activities Applet (Sheet 1 of 2)
Field/Button Description
Refresh This button refreshes all records in the Activities view, showing new records or changes to existing records.
Activity Type A picklist of activity types.
Priority A picklist of the priority of this activity:
■ ASAP
■ High
■ Medium
■ Low
Status A picklist for the status of a repair:
■ Not Started
■ In Progress
■ On Hold
■ Done
■ Canceled
■ Acknowledged
■ Declined
Activity Type The type of activity, chosen from a picklist; for example, Diagnosis, Research, or Upgrade.
Version 6.1 Siebel Field Service Guide 11-19

Repairs
Repairs Screen
Activities View 11
The Activities view associates individual activities with a defective tag record. This view contains the Repairs form applet (see “Repairs Views” on page 11-15) and the Activities list applet (see “Activities Plan View” on page 11-18). Table 11-5 describes the fields in this view.
Assigned To The login name of the field service engineer or other person responsible for this activity.
Description Description an of an activity. Required.
Start Date The date for starting the activity.
Start Time The time for starting the activity.
Table 11-4. Selected Fields in the Activities Applet (Sheet 2 of 2)
Field/Button Description
Table 11-5. Selected Fields in the Activities Applet (Sheet 1 of 2)
Field/Button Description
Refresh This button refreshes all records in the Activities view, showing new records or changes to existing records.
Created The date this record was created, automatically completed.
Internal A check box indicating that this activity is internal to the service business. Customers cannot see this activity record.
Activity Type A picklist of activity types.
Priority A picklist of the priority of this activity:
■ ASAP
■ High
■ Medium
■ Low
11-20 Siebel Field Service Guide Version 6.1

Repairs
Repairs Screen
Status A picklist for the status of a repair:
■ Not Started
■ In Progress
■ On Hold
■ Done
■ Canceled
■ Acknowledged
■ Declined
Activity Type The type of activity, chosen from a picklist; for example, Diagnosis, Research, or Upgrade.
Assigned To The login name of the field service engineer or other person responsible for this activity.
Description Description an of an activity. Required.
Due The date on which the activity is scheduled for completion.
Alarm A check box turning on a reminder for this activity on the Calendar screen.
Duration A type-in field for the estimated length of the activity, chosen from a picklist.
Call Duration The total time spent on a service call.
Planned Start Planned time to begin an activity.
Planned Completion Planned time to end an activity.
Completed The date and time the activity is completed.
Last Name The name of the customer contact for this activity, chosen from a dialog box.
Created by The person creating this activity, chosen from a dialog box.
Resolution Code A descriptive code for the resolution of this activity.
Billable Flag A check box indicating that this activity is billable to the customer.
Table 11-5. Selected Fields in the Activities Applet (Sheet 2 of 2)
Field/Button Description
Version 6.1 Siebel Field Service Guide 11-21
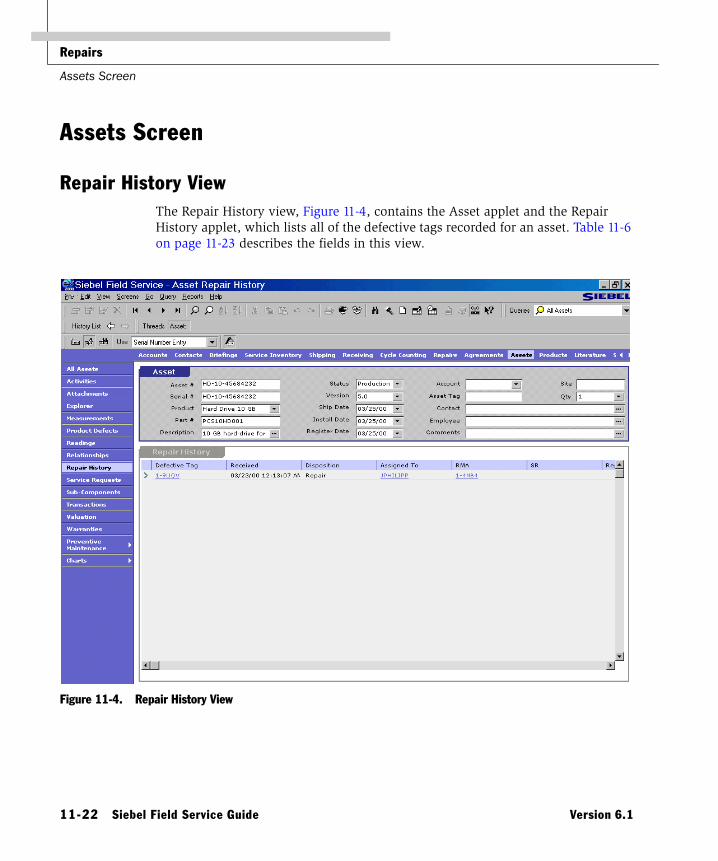
Repairs
Assets Screen
Assets Screen 11
Repair History View 11
The Repair History view, Figure 11-4, contains the Asset applet and the Repair History applet, which lists all of the defective tags recorded for an asset. Table 11-6 on page 11-23 describes the fields in this view.
Figure 11-4. Repair History View
11-22 Siebel Field Service Guide Version 6.1

Repairs
Repair Reports
Repair Reports 11
The Repairs screen provides two reports, listed in Table 11-7.
Table 11-6. Fields in the Repair History List Applet
Field Description
Defective Tag A number assigned to each repair record.
Received Date received for repair.
Disposition Final diagnosis or disposition of an item sent for repair.
Assigned to The name of the employee assigned to this repair.
RMA The RMA number for this repair.
SR The Service Request number for this repair.
Repair Order Item The Repair Order number for this repair.
Repair Vendor The third-party repair vendor for this repair.
Table 11-7. Repair Reports
Report Description
Repair Summary A summary of each repair.
Repair Detail One page for each repair and its associated activities.
Version 6.1 Siebel Field Service Guide 11-23

Repairs
Setup and Configuration
Setup and Configuration 11
The following sections describe the configuration and transactions for repairs.
Setting Up Repair Activities 11
Follow these procedures to set up repair activities.
To create activity templates for repairs
1 Choose Siebel Assistant Administration ➞ Activity Templates.
2 Create a new record.
3 For the Type field, choose from the picklist.
4 In the Name field, type in a name for the template.
5 In the Description field, type in a description.
To associate activities with a template
1 Choose Siebel Assistant Administration ➞ Activity Templates.
2 Select a template.
3 Click the Name field.
You see Siebel Assistant Administration ➞ Activity Template Details.
4 In the Service Activities applet, create a new record for each activity in the template.
5 For the Activity Type field, choose from the picklist.
To define activity plans for service requests
1 Choose Repairs ➞ All Repairs (see “Repairs Views” on page 11-15).
2 Select a repair.
3 Choose Repairs ➞ Activity Plans.
11-24 Siebel Field Service Guide Version 6.1
Repairs
Setup and Configuration
4 In the Activity Plans applet, create a new record.
5 Choose a template from the picklist for the Template field.
NOTE: An activity plan includes an activity template plus a start date.
Serialized Products and Inventory Location 11
If a product is serialized, choose an asset number in the Repairs form applet. This pre-defaults the inventory location at the time an asset is chosen for repair.
NOTE: To generate a defective tag for a serialized product, the asset must be located in one of the service company’s inventory locations. The company must receive the asset through an RMA or field part movement.
Inventory Transactions for the Repair Process 11
Returning to Good InventoryTo return a product to good inventory:
■ For internal repairs, set the Inventory Location, Availability, and Status (usually Good) in the repair record.
■ For repair orders, set the Inventory Location, Availability, and Status in the repair record.
An inventory transaction changes the bucket quantity.
Version 6.1 Siebel Field Service Guide 11-25

Repairs
Setup and Configuration
Inventory Transactions for Shipping to a CustomerIf the defective part was received with an RMA Repair/Return, then the repair center returns the part using the regular shipping process (Allocate, Pick Ticket, and Ship).
When the part is repaired, either internally or by a third-party vendor, it goes to a bucket; for example, On hand/Good. When this is shipped, the inventory transaction moves the product, but the information on the Repairs screen still points to the same bucket, indicating the last location for the repaired item in inventory.
Inventory Transactions for Transfers, Shipping, Receiving, and SwappingFor information about the following inventory transactions, generated for repaired items, see:
■ “Inventory Transactions for Repairs in an Internal Repair Center” on page 10-35
■ “Inventory Transactions for Repairs Sent to a Third-Party Vendor” on page 10-36
■ “Inventory Transactions for Repairs Received from a Third-Party Vendor” on page 10-37
11-26 Siebel Field Service Guide Version 6.1

Preventive Maintenance 12
About This Chapter . . . . . . . . . . . . . . . . . . . . . . . . . . . . . . . . . . . . . 12-3
Business Scenarios . . . . . . . . . . . . . . . . . . . . . . . . . . . . . . . . . . . . . . 12-3
Concepts and Terms . . . . . . . . . . . . . . . . . . . . . . . . . . . . . . . . . . . . . 12-4
Application Overview . . . . . . . . . . . . . . . . . . . . . . . . . . . . . . . . . . . . 12-4
Generating Preventive Maintenance Actions . . . . . . . . . . . . . . . . . . . . . . .12-6
Screens and Views for Preventive Maintenance . . . . . . . . . . . . . . . . . . 12-7
Service Administration Screen . . . . . . . . . . . . . . . . . . . . . . . . . . . . . . 12-8
Service Request Templates View . . . . . . . . . . . . . . . . . . . . . . . . . . 12-8
SR Template Activities View . . . . . . . . . . . . . . . . . . . . . . . . . . . . 12-11
Preventive Maintenance Screen . . . . . . . . . . . . . . . . . . . . . . . . . . . . 12-12
Plans View . . . . . . . . . . . . . . . . . . . . . . . . . . . . . . . . . . . . . . . . 12-13
Triggers View . . . . . . . . . . . . . . . . . . . . . . . . . . . . . . . . . . . . . . 12-14
Products View . . . . . . . . . . . . . . . . . . . . . . . . . . . . . . . . . . . . . . 12-18
Actions View . . . . . . . . . . . . . . . . . . . . . . . . . . . . . . . . . . . . . . . 12-19
History View . . . . . . . . . . . . . . . . . . . . . . . . . . . . . . . . . . . . . . . 12-20
Assets Screen . . . . . . . . . . . . . . . . . . . . . . . . . . . . . . . . . . . . . . . . . 12-22
History View . . . . . . . . . . . . . . . . . . . . . . . . . . . . . . . . . . . . . . . 12-22
Plans View . . . . . . . . . . . . . . . . . . . . . . . . . . . . . . . . . . . . . . . . 12-24
Agreements Screen . . . . . . . . . . . . . . . . . . . . . . . . . . . . . . . . . . . . . 12-25
Version 6.1 Siebel Field Service Guide 12-1

Preventive Maintenance
Setup and Configuration . . . . . . . . . . . . . . . . . . . . . . . . . . . . . . . . . 12-25
Setting Up the Preventive Maintenance Engine . . . . . . . . . . . . . . . 12-25
Enabling Preventive Maintenance Plans . . . . . . . . . . . . . . . . . . . . 12-28
Validating PM Plans for an Asset . . . . . . . . . . . . . . . . . . . . . . . . 12-28
Trigger Logic . . . . . . . . . . . . . . . . . . . . . . . . . . . . . . . . . . . . . . . 12-29
Invoking the Preventive Maintenance Engine . . . . . . . . . . . . . . . . 12-32
System Preferences for the Preventive Maintenance Engine . . . . . . 12-33
Engine Parameters for the Preventive Maintenance Engine . . . . . . . 12-33
Tables Involved . . . . . . . . . . . . . . . . . . . . . . . . . . . . . . . . . . . . . . . . . .12-36
12-2 Siebel Field Service Guide Version 6.1

Preventive Maintenance
About This Chapter
About This Chapter 12
This chapter describes the Preventive Maintenance engine in Field Service and the automatic generation of service orders for maintenance.
Business Scenarios 12
■ A service company wants to generate automatically preventive maintenance activities for one of its top customers, based on the customer’s assets and the usage of each asset. The service company installed a measuring device on each asset to send nightly updates specifying the asset serial number, the counter Id, and the count. Every night the PM engine creates PM service requests for any asset that exceeds the usage threshold.
■ A service company sells multiple preventive maintenance services to customers. The provider needs to create a product that includes multiple PM plans for various types of assets. Once the product is sold, the company needs a software application that tracks the contracts by customer. Here are the requirements:
■ The software must link the customer with the specific PM services for each asset in the customer’s installed base.
■ The PM service requests must be initiated in advance, so the third-party service providers have adequate notice.
■ The company wants to select either one agreement or all agreements and to automatically generate all the service requests needed to meet the PM contract obligations for the specified periods, with the push of one button.
■ This process must run automatically in the background.
■ The software must generate PM activities for certain assets semi-automatically, or manually for emergency situations.
Version 6.1 Siebel Field Service Guide 12-3

Preventive Maintenance
Concepts and Terms
Concepts and Terms 12
Application Overview 12
This section includes detailed procedures for using the screens and features for preventive maintenance. For details on individual screens, see “Screens and Views for Preventive Maintenance” on page 12-7. For guidelines and technical details of configuration, see “Setup and Configuration” on page 12-25.
Field Service can automatically generate preventive maintenance (PM) actions, triggered by elapsed time, asset usage, measurement thresholds, or events (see Figure 12-1 on page 12-5). When a PM action is required, the Field Service Preventive Maintenance creates service requests and detailed field service activities.
Preventive maintenance (PM)
Service performed proactively, based on a defined set of conditions.
PM plan A definition of recurring activities that are always triggered (scheduled) and performed as a unit. A plan includes the products covered and the triggers considered; it also displays the history of actions taken.
PM triggers The specific events for a selected PM plan that initiates PM actions if certain conditions are met. Triggers are based on time, use, thresholds, or events.
PM actions A set of field service actions necessary to carry out a preventive maintenance service call.
12-4 Siebel Field Service Guide Version 6.1

Preventive Maintenance
Application Overview
Version 6.1 Siebel Field Service Guide 12-5
Time-based triggers call for maintenance actions at regular time intervals. Usage-based triggers are for equipment that can keep track of usage with a counter (for example, number of copies for photocopiers). Threshold-based triggers initiate a service action when a measurement falls above or below a set level (similar to an alarm or engine warning light). Event-based triggers use pre-defined events to determine if a PM action is required.
Figure 12-1. Logic of the Preventive Maintenance Engine
Run PM engine foran asset or an
agreement.
Select the PM Planfor the asset or the
entitlement's assets.
For each trigger,determine if conditions
require an action.
Create servicerequests and/or
activities, as definedby the PM actions.
End
Yes
Yes
No
No
Run PM engine for anasset or an agreement.

Preventive Maintenance
Application Overview
Generating Preventive Maintenance Actions 12
Use the following procedures to generate preventive maintenance actions.
To generate service requests for assets based on a PM plan
1 Choose Assets ➞ History (see “History View” on page 12-22).
2 In the Assets list applet, select an asset.
3 Click the Auto PM button to run the Preventive Maintenance engine for the selected assets.
4 Click Auto PM All to run the PM engine for all assets that appear in the Assets list applet.
NOTE: Use a query to limit the assets appearing in the Assets list applet.
To generate service requests for agreements based on a PM plan
1 Choose Agreements ➞ Preventive Maintenance.
2 In the Agreements list applet, select an agreement.
3 Click the Auto PM button to run the Preventive Maintenance engine for the selected assets.
4 Click Auto PM All to run the PM engine for all assets that appear in the Assets list applet.
NOTE: Use a query to limit the agreements appearing in the Agreements list applet.
To review generated PM actions
1 Choose Preventive ➞ Maintenance Plans.
2 Select a plan.
3 Choose Preventive Maintenance ➞ History.
4 Review the PM actions for this plan.
12-6 Siebel Field Service Guide Version 6.1

Preventive Maintenance
Screens and Views for Preventive Maintenance
Screens and Views for Preventive Maintenance 12
Click the name of a screen or view in Table 12-1 to see more information.
Table 12-1. Screens and Views for Preventive Maintenance
Screen ViewsRole/Procedures (Click to see full procedure.)
Service Administration Service Request Templates ➞ SR Templates
Create templates for preventive maintenance service requests.
Service Request Templates ➞ SR Template Activities
Associate activity templates with preventive maintenance service request templates.
Preventive Maintenance Plans Associate preventive maintenance plans with assets. See: “To define PM Plans” on page 12-26
Triggers Set the time or event that activates a PM plan.
Actions Associate service request templates and service activities with specific PM plans.
Products Associate specific products with a PM plan and associate specific valid assets with the products.
History View preventive maintenance actions for selected assets.
Assets History Run the Preventive Maintenance engine interactively for selected assets. See: “To generate service requests for assets based on a PM plan” on page 12-6.
Plans Associate assets with preventive maintenance plans.
Agreements Preventive Maintenance
Run the Preventive Maintenance engine interactively for selected agreements.
Version 6.1 Siebel Field Service Guide 12-7

Preventive Maintenance
Service Administration Screen
Service Administration Screen 12
The following two views, shown in Figure 12-2 on page 12-9 and Figure 12-3 on page 12-11, configure activity templates for preventive maintenance. These templates become part of PM plans (see “Preventive Maintenance Screen” on page 12-12).
Service Request Templates View 12
The Service Request Templates (Service Requests Templates ➞ SR Templates, Figure 12-2) view creates templates for preventive maintenance service requests. Table 12-2 on page 12-10 describes the fields in this view.
12-8 Siebel Field Service Guide Version 6.1

Preventive Maintenance
Service Administration Screen
NOTE: These service request templates apply only to preventive maintenance activities.
Figure 12-2. Service Request Templates View
Version 6.1 Siebel Field Service Guide 12-9
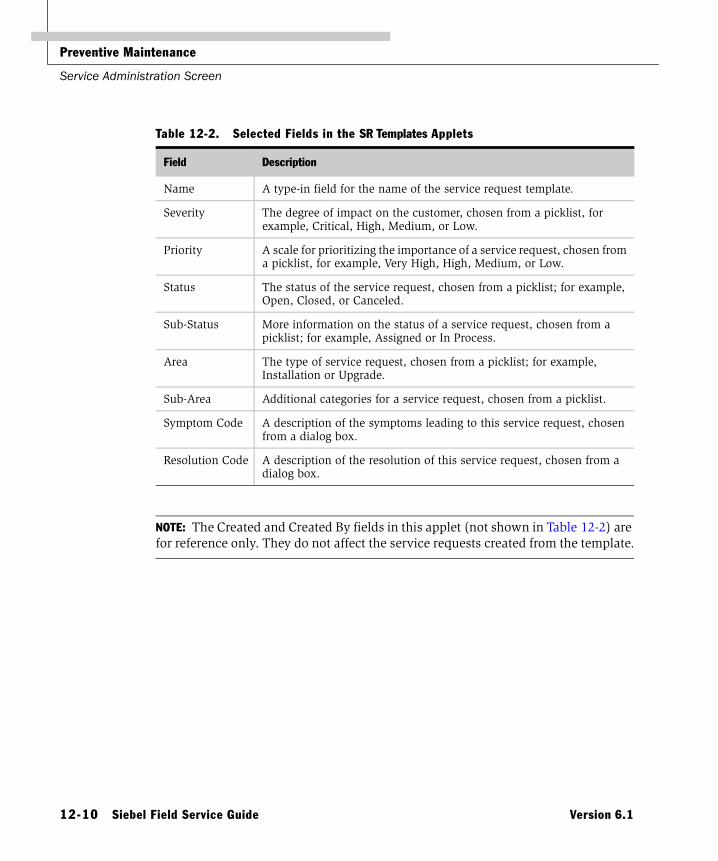
Preventive Maintenance
Service Administration Screen
NOTE: The Created and Created By fields in this applet (not shown in Table 12-2) are for reference only. They do not affect the service requests created from the template.
Table 12-2. Selected Fields in the SR Templates Applets
Field Description
Name A type-in field for the name of the service request template.
Severity The degree of impact on the customer, chosen from a picklist, for example, Critical, High, Medium, or Low.
Priority A scale for prioritizing the importance of a service request, chosen from a picklist, for example, Very High, High, Medium, or Low.
Status The status of the service request, chosen from a picklist; for example, Open, Closed, or Canceled.
Sub-Status More information on the status of a service request, chosen from a picklist; for example, Assigned or In Process.
Area The type of service request, chosen from a picklist; for example, Installation or Upgrade.
Sub-Area Additional categories for a service request, chosen from a picklist.
Symptom Code A description of the symptoms leading to this service request, chosen from a dialog box.
Resolution Code A description of the resolution of this service request, chosen from a dialog box.
12-10 Siebel Field Service Guide Version 6.1
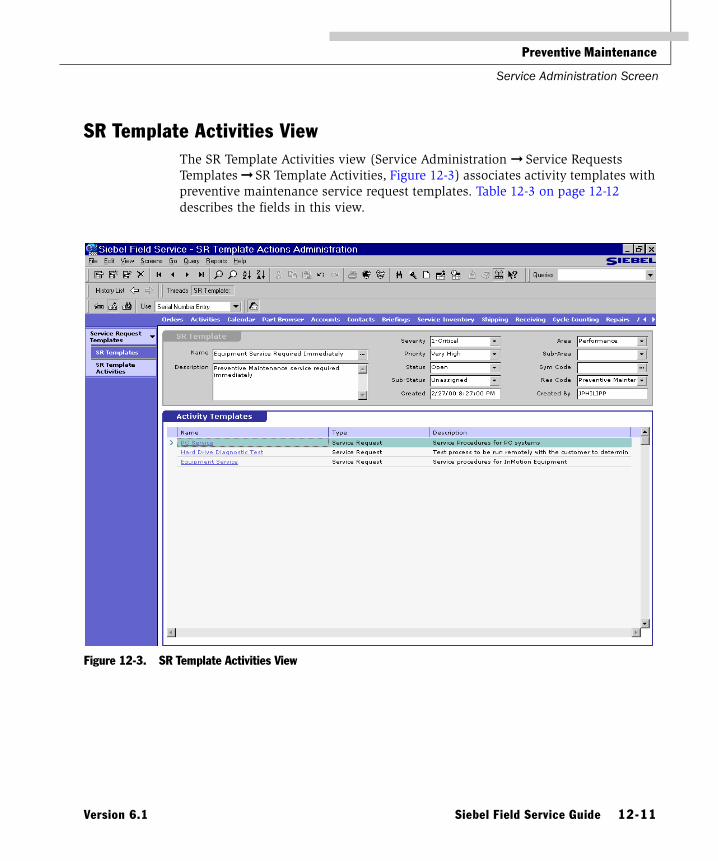
Preventive Maintenance
Service Administration Screen
SR Template Activities View 12
The SR Template Activities view (Service Administration ➞ Service Requests Templates ➞ SR Template Activities, Figure 12-3) associates activity templates with preventive maintenance service request templates. Table 12-3 on page 12-12 describes the fields in this view.
Figure 12-3. SR Template Activities View
Version 6.1 Siebel Field Service Guide 12-11
Preventive Maintenance
Preventive Maintenance Screen
Activity templates are set up in Siebel Assistant Administration ➞ Activity Templates. For details and procedures, see the Siebel Applications Administration Guide.
Preventive Maintenance Screen 12
The Preventive Maintenance screen configures preventive maintenance plans for specific assets.
Table 12-3. Fields in the Activities Templates List Applet
Field Description
Name The name of the activity templates, chosen from a dialog box.
Type Service Request, filled in automatically with the name.
Description Filled in automatically with the name.
12-12 Siebel Field Service Guide Version 6.1
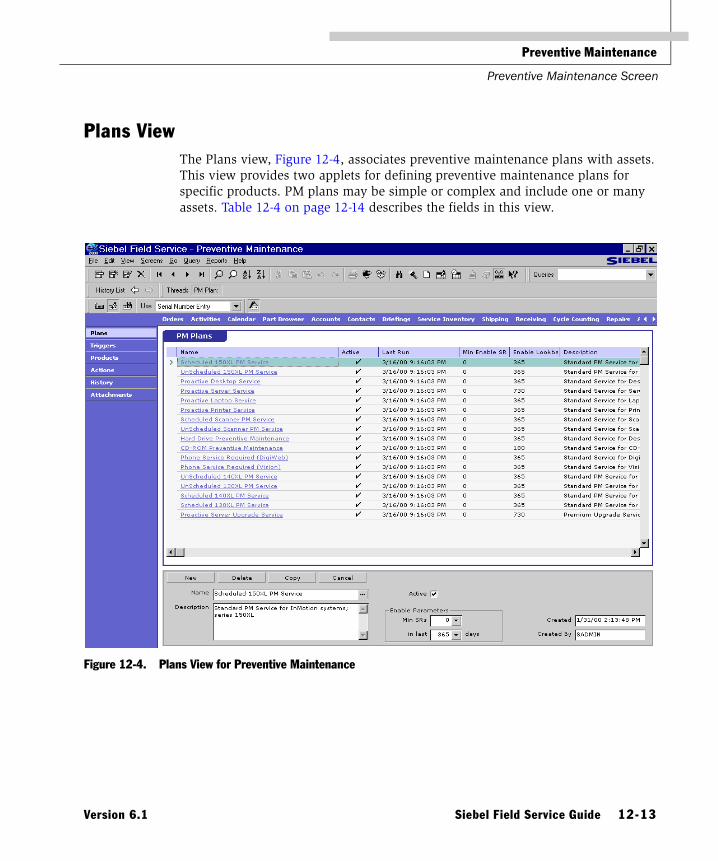
Preventive Maintenance
Preventive Maintenance Screen
Plans View 12
The Plans view, Figure 12-4, associates preventive maintenance plans with assets. This view provides two applets for defining preventive maintenance plans for specific products. PM plans may be simple or complex and include one or many assets. Table 12-4 on page 12-14 describes the fields in this view.
Figure 12-4. Plans View for Preventive Maintenance
Version 6.1 Siebel Field Service Guide 12-13

Preventive Maintenance
Preventive Maintenance Screen
Triggers View 12
The Triggers view, Figure 12-5, provides four applets for setting the time or event that activates each PM plan. Table 12-5 on page 12-15 through Table 12-8 on page 12-17 describe the fields in this view.
Table 12-4. Selected Fields in the Plans Applets
Field Description
Name The name of a PM plan, chosen from a dialog box.
Active A check box indicating that the Preventive Maintenance engine can use this PM plan.
Note that this check box is useful for keeping the Preventive Maintenance engine from considering plans that are still under development (when the Active box is not checked).
Last Run The date that this PM plan was last considered. Filled in automatically.
Min Enable SRs, Min SRs The required minimum number of service requests within a defined time period.
Enable Lookback, in last _ days The time period in which a minimum number of service requests is required.
Figure 12-5. Triggers Applets in the Triggers View
12-14 Siebel Field Service Guide Version 6.1

Preventive Maintenance
Preventive Maintenance Screen
Time Interval Triggers AppletA time interval trigger activates a PM plan after a fixed time interval. Each time interval record has a start and stop age (in days), so that the frequency of PM service requests can change, depending on the age of the asset. For example, in the first year, PM service can take place every 6 months (180 days). After the first year, service calls can occur more often; for example, every 3 months (90 days).
NOTE: The age of the asset is determined by the Install Date (see “All Assets View” on page 5-16). If the Install Date is missing, the asset is considered to be 0 days old.
Table 12-5. Fields in the Time Interval Triggers List Applet
Field Description
Interval A required, type-in field for the length of the interval between triggers, in days or fractions of days. For example, 1 hour is 0.04167 days.
Valid Start The age of an asset, in days, at which this trigger becomes effective. Required.
Valid End The age of an asset at which this trigger is no longer effective. Leaving this value blank sets the end to infinity. Optional.
Version 6.1 Siebel Field Service Guide 12-15
Preventive Maintenance
Preventive Maintenance Screen
Usage Triggers AppletUsage triggers activate a PM plan when the reading from an asset changes by a specified amount. Each usage trigger record has start and stop values, so that the activation of a PM plan can change with the age of the asset. For example, the service request may be generated every 3,000 counts for the first 15,000 counts, then every 10,000 counts after 15,000.
NOTE: For Time Interval and Usage triggers (which use Valid Start and Valid End settings), if the interval falls beyond the Valid End, the trigger does not fire.
Threshold Triggers AppletThe threshold trigger activates a PM Plan when a reading from an asset exceeds a set value. Threshold triggers can fire in response to a change in a binary value; for example, a threshold of 0.5 would trigger a PM plan when an on/off alarm changes state.
Table 12-6. Fields in the Usage Triggers Applet
Field Description
Measurement Type A type of reading, chosen from a picklist.
Interval The change in a reading that triggers a PM plan. Interval uses the units set in Measurement Type.
Valid Start This value defines the time when the trigger becomes valid. The value is in the same units as the interval.
Note that for a time interval trigger, Valid Start and Valid End relate to the age of the asset in days. For a usage trigger, they refer to the reading as defined by the Measurement Type.
Valid End This value defines the time when the trigger is no longer valid. The value is in the same units as the interval. Leaving this value blank sets the end to infinity.
Table 12-7. Field in the Threshold Triggers List Applet
Field Description
Measurement Type A type of measurement, chosen from a picklist.
12-16 Siebel Field Service Guide Version 6.1

Preventive Maintenance
Preventive Maintenance Screen
Measurements and ReadingsThe Measurements view on the Assets screen associates measurements with specific assets. For example, a relevant measurement for a copy machine would be the number of copies, read from a counter; for a car it would be the distance traveled, read from an odometer; and for a pump it might be oil level, oil, pressure, and temperature read from gauges.
The Readings view on the Assets screen allows a technician to record the readings for specific measurements and specific assets. These readings may act as triggers for usage and threshold triggers. See “Measurements and Readings Views” on page 5-30.
Event Trigger AppletAn event trigger activates a PM Plan when the number of service requests for an asset exceeds a threshold number in a specified time period. This trigger is useful for activating a higher level PM plan, when a certain number of routine PM plans have taken place. For example, this trigger could activate a complete overhaul.
Table 12-8. Field in the Event Trigger Applet
Field/Button Description
Enable Click this button to allow the fields in this applet to accept input.
Create PM ... A type-in field for the threshold number of service requests.
Occurred in ... A type-in field for the time interval in days during which the threshold number of service requests must occur.
Version 6.1 Siebel Field Service Guide 12-17

Preventive Maintenance
Preventive Maintenance Screen
Products View 12
In the Products view, Figure 12-6, the Products applet associates specific products with a PM plan. The Assets applet associates specific valid assets with the products. Table 12-9 and Table 12-10 on page 12-19 describe the fields in this view.
Figure 12-6. Products and Assets List Applets In the Products View
Table 12-9. Selected Fields in the Products List Applet
Field Description
Product The name of a product in the selected product line, chosen from a dialog box.
Part Number The part number of the product, filled in automatically with the name of the product.
All Assets A check box indicating that all assets of this product are covered by this PM plan, whether or not they appear in the asset list.
U/M The unit of measure for the product, filled in automatically with the name of the product.
12-18 Siebel Field Service Guide Version 6.1

Preventive Maintenance
Preventive Maintenance Screen
NOTE: To cover only the specified asset, make sure that All Assets is not checked in the Products applet.
Actions View 12
The Actions view, Figure 12-7, associates service request templates and service activities with specific PM plans. The templates are not created in this view. To create these templates, see “Service Administration Screen” on page 12-8. Table 12-11 describes the fields in this view.
Table 12-10. Selected Fields in the Assets List Applet
Field Description
Asset Number An asset number for each instance of the selected product, chosen from a dialog box.
Serial Number The serial number of the asset, filled in automatically.
Installed The date the asset was installed, filled in automatically.
Version The version of the asset, filled in automatically.
Figure 12-7. SR Templates and Activity Templates Applets in the Actions View
Version 6.1 Siebel Field Service Guide 12-19

Preventive Maintenance
Preventive Maintenance Screen
History View 12
The PM Actions applet, Figure 12-8, in the History view displays preventive maintenance actions for selected assets. Table 12-13 describes the fields in this view.
Table 12-11. Selected Field in the SR Templates List Applet
Field Description
Name The name of a service request template, chosen from a dialog box. Click this field to go to Service Administration ➞ Service Request Templates ➞ SR Templates.
Table 12-12. Selected Fields in the Activity Templates List Applet
Field Description
Name The name of an activity template, chosen from a dialog box. Click this field to go to Siebel Assistant Administration ➞ Activity Templates ➞ Service Activity Details.
Type The type of activity template, filled in automatically.
Figure 12-8. PM Actions Applet in the History View
12-20 Siebel Field Service Guide Version 6.1
Preventive Maintenance
Preventive Maintenance Screen
Table 12-13. Fields in the PM Actions Applet
Field Description
Scheduled The date that the activity is to be carried out.
Completed The date the activity was completed.
Trigger Type The type of trigger that activated the PM action.
Asset Num The number of the asset that received preventive maintenance.
Asset Name The name of the asset that received preventive maintenance.
Created The date the PM action was triggered.
Version 6.1 Siebel Field Service Guide 12-21

Preventive Maintenance
Assets Screen
Assets Screen 12
The Preventive Maintenance views on the Assets screen associate PM plans with specific assets and run these plans interactively.
History View 12
The Assets applet in the Repair History view allows users to run the Preventive Maintenance engine interactively for selected assets. When run this way, the Preventive Maintenance engine considers all preventive maintenance plans associated with each asset. The resulting PM actions are listed in the PM Actions applet. Table 12-14 and Table 12-15 on page 12-23 describe the fields in this view.
NOTE: Use a query to limit the assets appearing in the Assets list applet.
Table 12-14. Buttons in the Assets List Applet
Button Description
Auto PM This button runs the Preventive Maintenance engine for the selected assets.
Auto PM All This button runs the Preventive Maintenance engine for all assets in the list.
End Date The last date that the Preventive Maintenance engine considers for generating PM actions. The date must be equal to or greater than the current date.
12-22 Siebel Field Service Guide Version 6.1

Preventive Maintenance
Assets Screen
The PM Actions applet, Figure 12-9, in the History view shows all PM actions in the history of a selected asset. The PM actions are sorted by scheduled date, with the most recent at the top of the list.
Figure 12-9. PM Actions Applet in the History View
Table 12-15. Selected Fields in the PM Actions Applet
Field/Button Description
Plan Item Name The name of the PM plan that generated this PM action. Read-only.
Scheduled The date that the activities should be performed. Read-only.
Completed A type-in field for the date that the activities in the PM service were completed.
Trigger Type The type of trigger that activated the PM plan. Read-only.
Created Date the PM action was activated. Read-only.
Version 6.1 Siebel Field Service Guide 12-23
Preventive Maintenance
Assets Screen
Plans View 12
The Plans view directly associates assets with preventive maintenance plans. For more information, see “Plans View” on page 12-13 (Preventive Maintenance screen).
NOTE: The All Assets check box in the Products applet (Preventive Maintenance ➞ Products, see Table 12-9 on page 12-18) associates all assets of a product line with a PM plan. If the asset is already associated through the All Assets flag in the Products applet, adding the PM plan as a record in the PM Plans applet (Preventive Maintenance ➞ Plans, see “Plans View” on page 12-13) has no further effect other than displaying the relationship directly.
If the asset is not already associated with a PM plan (the All Assets check box is not checked for the product), users can cover the asset by adding the PM plan as a record on the PM Plans applet on the Assets screen (Assets ➞ Preventive Maintenance ➞ Plans).
12-24 Siebel Field Service Guide Version 6.1

Preventive Maintenance
Agreements Screen
Agreements Screen 12
The Agreements screen has one view for preventive maintenance, which shows PM plans that are associated with specific agreements and their entitlements (see “Preventive Maintenance View” on page 4-29). The Auto PM buttons initiate the Preventive Maintenance engine interactively (see Table 12-14 on page 12-22).
Setup and Configuration 12
The following sections describe the setup and operation of the Preventive Maintenance engine.
Setting Up the Preventive Maintenance Engine 12
Follow these procedures to set up the Preventive Maintenance engine.
To set synchronous or asynchronous operation of the Preventive Maintenance engine
1 Choose Options on the View menu.
2 Choose the Field Service tab.
3 For Mode of Operation, check or uncheck Asynchronous processing of Preventive Maintenance.
To set parameters for the Cycle Counting engine
1 Choose Server Component Requests ➞ My Component Requests.
2 In the Component Request form applet, select FSPrevMnt for the Component/Job.
3 In the Component Request Parameters list applet, find the parameter (see Table 12 on page 12-33) in the Name column.
4 Type the new value in the Value column.
Version 6.1 Siebel Field Service Guide 12-25

Preventive Maintenance
Setup and Configuration
To change system preferences for the Cycle Counting engine
1 Choose Application Administration ➞ System Preferences.
2 Locate the System Preference Name (see Table 12 on page 12-33).
3 Type in a new value for System Preference Value.
4 To register changes to system preferences, restart the Field Service server.
To define PM Plans
1 Choose Preventive Maintenance ➞ Plans (see “Plans View” on page 12-24).
2 In the PM Plans applet, create a new record.
3 Choose the name for a plan from the dialog box.
4 Complete the other fields in the record, as needed.
To define PM triggers for a selected PM plan
1 Choose Preventive Maintenance ➞ Plans.
2 Select a PM plan.
3 Choose Preventive Maintenance ➞ Triggers.
4 Create new records in any of the trigger applets (Time Interval, Usage, Threshold, and Event).
NOTE: PM Plans can have any number of triggers of any type (Time Interval, Usage, Threshold, and Event).
To associate PM plans with agreements
1 Choose Agreements ➞ All Agreements.
2 Select an agreement.
3 Choose Agreements ➞ Preventive Maintenance.
4 Create a record in the PM Plans applet for each associated plan.
12-26 Siebel Field Service Guide Version 6.1

Preventive Maintenance
Setup and Configuration
To associate assets with PM plans
1 Choose Assets ➞ All Assets.
2 Select an asset.
3 Choose Assets ➞ Preventive Maintenance ➞ Plans.
4 Create a record in the PM Plans applet for each associated plan.
To associate stand-alone activity templates with a PM plan
1 Choose Preventive Maintenance ➞ Plans.
2 Select a PM plan.
3 Choose Preventive Maintenance ➞ Actions.
4 Create a new record in the Activity Templates applet for each associated template.
To create service request templates for preventive maintenance
1 Choose Service Administration ➞ Service Request Templates ➞ SR Templates.
2 Create a new record for each SR template.
3 Select a template.
4 Choose Service Administration ➞ Service Request Templates ➞ SR Template Activities.
5 Create a record for each activity template associated with the selected SR template.
To associate service request templates with activity templates
1 Choose Preventive Maintenance ➞ Plans.
2 Select a PM plan.
3 Choose Preventive Maintenance ➞ Actions.
4 Create a new record in the SR Templates applet for each associated template.
Version 6.1 Siebel Field Service Guide 12-27

Preventive Maintenance
Setup and Configuration
Enabling Preventive Maintenance Plans 12
The preventive maintenance engine cannot consider a plan until it has been marked as Active. The current state of the Active flag can be viewed from any applet that displays the plan. When the Active flag is unchecked, the plan is not loaded into the Preventive Maintenance engine, and therefore no preventive maintenance actions can be scheduled for that plan. This is often desirable while completing the definition of a plan, or to temporarily disable specific plans. When the plan definition is complete, or the plan is to be reinstated, the preventive maintenance administrator makes sure that the active checkbox is checked.
An administrator can also define a minimum number of service requests that must exist for an asset, within some time period, before the plan is considered enabled for that asset. For example, the plan could be enabled if there are two service requests in the last 90 days. When the Preventive Maintenance engine runs, asset with only one non-PM service request in the last 90 days would not enable that plan The plan would not be considered for that asset and no PM actions could be created for that combination of asset and plan.
Validating PM Plans for an Asset 12
Each preventive maintenance plan stores product ids and asset Ids. The product Ids are obtained by executing two queries against the database and unioning the result sets:
■ The first query obtains the product Ids (ROW_IDs) of all products that have a primary product line which has been associated with the plan and where that relationship has been specified as applying to All Products (stored in ALL_ASSETS_FLG).
NOTE: Currently, product lines are attached to plans through a dialog box on the PM Plan buscomp and the ALL_ASSETS_FLG is always set.
■ The second query obtains all products that have been associated with the plan through a plan/product line association that has NOT been flagged as All Products.
12-28 Siebel Field Service Guide Version 6.1

Preventive Maintenance
Setup and Configuration
To determine if a plan is applicable to an asset, the Preventive Maintenance engine applies the following logic:
1 The product Id of the asset is checked against the collection of product Ids held in the plan. If a match is found, the plan applies to the asset, otherwise processing continues.
2 The Id of the asset is checked against the collection of asset Ids held in the plan. If a match is found, the plan applies to the asset, otherwise the plan does not apply.
Trigger Logic 12
There are five types of triggers for preventive maintenance plans: Time Interval, Date (see “Date Triggers” on page 12-30), Usage, Threshold, and Event. Time Interval and Date triggers are the only trigger type that can fire for a date in the future. All the other triggers either fire for the current date (when the engine runs) or not.
Triggers never fire in the past. If the Preventive Maintenance engine runs and a trigger should have fired in the past, it will fire for the current date unless some other constraint or condition prevents that.
No trigger can fire more than once a day, and no trigger can fire while there is outstanding (future) PM action for the plan/asset pair. When the trigger logic evaluates whether a trigger should fire, it prevents the creation of a new PM action whenever there is an existing action for the current date or any date in the future. This behavior is by design, to prevent triggers from firing multiple times for the same trigger condition. However, it means that plans with a Time or Date trigger combined with another trigger should not be run with end dates too far in the future. For example, a plan with Time and Usage triggers is run with an end date one year in the future. All the PM actions for the next year are created based on the Time trigger, and during that time the Usage trigger will never fire, whatever the actual usage. This can be avoided by only scheduling PM actions a few weeks or one month in advance. Then, in the worst case, the engine runs and schedules a PM action based on the Time trigger even though the asset meets the usage criteria tomorrow. The actual difference in the time between when the PM action should have been scheduled and when it was scheduled is, at most, the difference between the end date passed to the engine and the current date (when the engine runs).
Version 6.1 Siebel Field Service Guide 12-29
Preventive Maintenance
Setup and Configuration
Time Interval TriggersTime interval triggers can fire at a fixed interval of time, measured in days. Although the interval could be less than 1 day, currently higher-level logic prevents triggers from firing more than once a day. Time triggers may also have valid start and end dates enabling trigger patterns such as every 90 days for the first year (365 days) and every 180 days thereafter. These valid start and end dates are specified in days and measured from the asset’s install date.
Date TriggersDate triggers fire on a specific date. Like Time triggers, they may have a valid start and end that are measured from the asset’s install date.
NOTE: In the out-of-the-box configuration, Date triggers are not exposed on the user interface.
Usage TriggersUsage triggers fire based on an asset measurement. The trigger fires if the readings for the specified measurement have a delta greater than the specified interval. The delta is determined by the difference between the most recent reading and the reading at the time of the last PM action. To be considered, the readings must be marked as complete (see “Measurements and Readings Views” on page 5-30). If the most recent reading is less than the reading at the time of the last PM action, then the measurement is assumed to have wrapped around and the delta is calculated as follows:
delta = (max – last) + (new – min) + 1
Usage triggers may also specify a valid start and end, defining what reading values the trigger is valid for.
The measurement is specified only by its type (see Table 5-11 on page 5-31). If an asset is given more than one measurement of the type specified by a Usage trigger, then if any of the measurements exceed the usage specified by its type, the trigger will fire. To avoid this, it is recommended that more specific types be defined as applicable in the measurement type LOV (ASSET_MEAS_TYPE).
12-30 Siebel Field Service Guide Version 6.1
Preventive Maintenance
Setup and Configuration
Threshold TriggersThreshold triggers examine the readings since the most recent PM action. If any completed reading exceeds the lower or upper limit, the trigger fires.
Like Usage triggers, Threshold triggers specify a measurement type to which they apply. The same potential issues and solutions apply to Threshold triggers.
Event TriggersEvent triggers have logic similar to the enablement parameters of a PM plan (see “Enabling Preventive Maintenance Plans” on page 12-28). However, in this case, if the service request count is attained, then the trigger fires. Currently, the only event supported is the number of service requests in a specified period.
Defining Plan ActionsThe final step in configuring preventive maintenance is to define what happens when a plan is triggered for a specific asset. A combination of service requests and activities can be configured.
The generation of service requests is defined by creating SR (service request) templates (Service Administration ➞ SR Templates) and then attaching them to a plan. Similarly, the activities generated are defined by activity templates (Siebel Assistant Administration ➞ Activity Templates) that are attached to a plan. In both cases the templates defined are stand-alone entities that can be reused by attaching them to many plans.
Instantiating the Plan (What Happens When a Trigger Fires)For each SR template associated with a plan, a service request is created with fields defined by the template. The asset is associated with the service request that was created for this asset. For each activity template that is attached to the SR template, an activity plan is created, and in turn, each subordinate object in the template is created under its new parent object.
In a similar fashion, each activity template attached directly to the PM plan generates an activity plan and activities, and so on. However, they are not associated with any service request. In this case, the activities are called stand-alone activities.
Version 6.1 Siebel Field Service Guide 12-31

Preventive Maintenance
Setup and Configuration
Invoking the Preventive Maintenance Engine 12
There are two basic methods of invoking the Preventive Maintenance engine: through server requests and through the client application.
Using Server RequestsServer administrators can set up requests (one-time or repeating) for tasks that are serviced by the Preventive Maintenance engine. The component-specific parameters specified by the request determine what the engine does for that request. For a detailed explanation see “Engine Parameters for the Preventive Maintenance Engine” on page 12-33.
In general, tasks must define these variables:
■ A set of objects for the engine to operate on.
■ An end date that is the latest date to schedule preventive maintenance during the run.
The set of objects must include either assets and plans, or agreements, as defined by the Sub-mode parameter in the request. In the case of assets and plans, if only assets or only plans are specified, then all of the other object types are assumed. For example, if only Assets are specified (Sub-mode=Assets), then the Preventive Maintenance engine checks the specified assets against all Plans. When agreements are specified, each agreement implicitly defines a set of assets and plans (entitlements have both associated assets/products and PM plans) that the engine is to process for that agreement.
Usually these requests use one of the SQL parameters to complete a SQL statement that locates the objects that the engine processes for the run. Server requests may also use the ID parameters in place of the SQL parameters, but they should never use the Temp-Table Mode, as this is reserved for use by interactive engine requests sent directly from a client application.
Using Client RequestsClient requests can be passed directly from the client application from Agreements ➞ Preventive Maintenance or from Assets ➞ Preventive Maintenance ➞ History. Requests generated from the Assets screen always process the specified assets for all PM plans.
12-32 Siebel Field Service Guide Version 6.1

Preventive Maintenance
Setup and Configuration
System Preferences for the Preventive Maintenance Engine 12
The PM engine uses the two system preferences described in Table 12-16.
Engine Parameters for the Preventive Maintenance Engine 12
All the engines can be invoked from the Workflow Manager or from the client. These engines require certain parameters to be passed, Table 12-17 contains the parameters for the PM engine, and what they mean.
Table 12-16. System Preferences for the Preventive Maintenance Engine
Parameter Default Value Comments
FSPrevMnt Org ID The value of this system preference is used as the ROW_ID of the default organization. This default organization is stamped on generated service requests when the asset for which the service request is being generated doesn’t have a specified account. If the owner account is specified for the asset, then the account’s BU_ID is used.
FSPrevMnt Act Owner ID The value of this system preference is used when creating activities from a template in which the activity owner (Assigned To) has not been defined. The value specified should be the ROW_ID of the desired employee.
Table 12-17. Preventive Maintenance Engine Parameters (Sheet 1 of 2)
Parameter Name Values Explanation
Mode {SQL, Id, TempTbl} This required parameter specifies how the engine locates the entities to process. Only SQL or Id is intended to be specified in user requests. TempTbl is used by the client applications for submitting requests.
SubMode {Assets, Plans, Assets&Plans, Agreements} This required parameter specifies what entities are specified. A SubMode of Assets implies ALL PM Plans, and a SubMode of Plans implies ALL Assets.
Version 6.1 Siebel Field Service Guide 12-33

Preventive Maintenance
Setup and Configuration
EndDT YYYY-MM-DD format This required parameter specifies the date furthest into the future for which the engine will generate PM Actions. Note that currently, only time-based triggers can fire for a future date.
AssetId Row Id of an asset This parameter specifies a specific asset. It is required when the Mode is Id and the SubMode is either Assets or Assets&Plans.
PlanId Row Id of a PM Plan This parameter specifies a specific PM Plan. It is required when the Mode is Id and the SubMode is either Plans or Assets&Plans.
AgreementId Row Id of an agreement This parameter specifies a specific Agreement. It is required when the Mode is Id and the SubMode is Agreements.
AssetSQL Where clause for GET_SQL_ASSETS template This parameter specifies a search specification for assets. It is required when the Mode is SQL and the SubMode is either Assets or Assets&Plans. See Step 1 on page 12-35 in the Notes section following this chart.
PlanSQL Where clause for GET_SQL_PM_PLANS template This parameter specifies a search specification for assets. It is required when the Mode is SQL and the SubMode is either Plans or Assets&Plans. See Step 2 on page 12-35.
AgreementSQL Where clause for GET_SQL_AGREEMENT_IDS template
This parameter specifies a search specification for assets. It is required when the Mode is SQL and the SubMode is Agreements. See Step 3 on page 12-35.
Table 12-17. Preventive Maintenance Engine Parameters (Sheet 2 of 2)
Parameter Name Values Explanation
12-34 Siebel Field Service Guide Version 6.1

Preventive Maintenance
Setup and Configuration
Notes1 The SQL template for retrieving assets is as follows:
GET_SQL_ASSETS =
SELECT asset.ROW_ID
FROM&Table_Owner.S_ASSETasset
WHERE$SEARCH_SPEC$
The value supplied as the AssetSQL parameter is substituted for ‘$SEARCH_SPEC$’, and thus, any specification that legally completes this template is allowed for the parameter.
2 The SQL template for retrieving PM Plans is as follows:
GET_SQL_PM_PLANS =
SELECT pln.ROW_ID
FROM&Table_Owner.S_PM_PLNITMpln
WHEREpln.ACTIVE_FLG = 'Y'
AND $SEARCH_SPEC$
The value supplied as the PlanSQL parameter is substituted for ‘$SEARCH_SPEC$’, and thus, any specification that legally completes this template is allowed for the parameter.
3 The SQL template for retrieving PM Plans is as follows:
GET_SQL_AGREEMENT_IDS =
SELECT agrmnt.ROW_ID
FROM&Table_Owner.S_DOC_AGREEagrmt
WHEREagrmnt.VALID_FLG = ‘Y’
AND $SEARCH_SPEC$
The value supplied as the PlanSQL parameter is substituted for ‘$SEARCH_SPEC$’, and thus, any specification that legally completes this template is allowed for the parameter.
Version 6.1 Siebel Field Service Guide 12-35
Preventive Maintenance
Setup and Configuration
Tables Involved 12
Tables shown in italic type are updated (created, modified, or deleted) in some way by the Preventive Maintenance engine. The Preventive Maintenance engine only reads the other tables.
■ S_ACT_PRDINT (Activity Parts and Tools connection to internal products)
■ S_ACT_SKILL (Activity Skills)
■ S_ACT_SKILL_IT (Activity Skill Items)
■ S_ACT_STEP (Activity Steps)
■ S_ASSET (Assets)
■ S_ASSET_MEAS (Asset Measurement Characteristics)
■ S_ASSET_RDNG (Asset Measurement Readings)
■ S_CONTACT (Contacts)
■ S_DOC_AGREE (Agreements)
■ S_EMPLOYEE (Employees)
■ S_ENTLMNT (Agreement Entitlements)
■ S_ENTLMNT_ITEM (Entitlement Assets and Products)
■ S_ENTLMNT_ORG (Entitlement Accounts)
■ S_ENTLMNT_PMITM (Connection between Entitlements and PM Plans)
■ S_EVT_ACT (Activities)
■ S_INV_TEMP (Temporary table for passing set of Ids to work on from client to server)
■ S_NOTE_ACT (Activity Instructions)
■ S_ORG_EXT (Accounts)
■ S_PM_ACTION (Preventive Maintenance Actions)
■ S_PM_APPL_ASSET (Connection between PM Plans and Assets/Products)
12-36 Siebel Field Service Guide Version 6.1

Preventive Maintenance
Setup and Configuration
■ S_PM_PLNITM (Preventive Maintenance Plans)
■ S_PM_PLNITM_TRG (PM Plan Triggers)
■ S_PMITM_SRTMPL (Connection between PM Plans and Service Request Templates)
■ S_PMITM_TMPL_PI (Connection between PM Plans and Activity Templates)
■ S_PROD_INT (Products)
■ S_SR_PLANITEM (Connection between Service Request Templates and Activity Templates)
■ S_SRV_REQ (Service Requests)
■ S_SYMPTOM (Service Request Symptoms)
■ S_TMPL_PLANITEM (Activity Templates)
Version 6.1 Siebel Field Service Guide 12-37

Preventive Maintenance
Setup and Configuration
12-38 Siebel Field Service Guide Version 6.1

Invoices 13
About This Chapter . . . . . . . . . . . . . . . . . . . . . . . . . . . . . . . . . . . . . 13-3
Business Scenario . . . . . . . . . . . . . . . . . . . . . . . . . . . . . . . . . . . . . . 13-3
Concepts and Terms . . . . . . . . . . . . . . . . . . . . . . . . . . . . . . . . . . . . . 13-4
Application Overview . . . . . . . . . . . . . . . . . . . . . . . . . . . . . . . . . . . . 13-4
Producing a Customer Invoice . . . . . . . . . . . . . . . . . . . . . . . . . . . . . . . . .13-6
Screens and Views for Invoices . . . . . . . . . . . . . . . . . . . . . . . . . . . . . 13-9
Pricing Administration Screen . . . . . . . . . . . . . . . . . . . . . . . . . . . . . 13-10
Asset Mapping View . . . . . . . . . . . . . . . . . . . . . . . . . . . . . . . . . 13-10
Billings Screen . . . . . . . . . . . . . . . . . . . . . . . . . . . . . . . . . . . . . . . . 13-10
All Invoices View . . . . . . . . . . . . . . . . . . . . . . . . . . . . . . . . . . . . 13-11
Line Items View . . . . . . . . . . . . . . . . . . . . . . . . . . . . . . . . . . . . . . . . . .13-14
Line Item Detail View . . . . . . . . . . . . . . . . . . . . . . . . . . . . . . . . . 13-16
Payments View . . . . . . . . . . . . . . . . . . . . . . . . . . . . . . . . . . . . . . . . . .13-18
Activities Screen . . . . . . . . . . . . . . . . . . . . . . . . . . . . . . . . . . . . . . 13-20
Expense Tracker View . . . . . . . . . . . . . . . . . . . . . . . . . . . . . . . . 13-20
Field Parts Movements View . . . . . . . . . . . . . . . . . . . . . . . . . . . . 13-21
Field Service Details View . . . . . . . . . . . . . . . . . . . . . . . . . . . . . 13-21
Invoices View . . . . . . . . . . . . . . . . . . . . . . . . . . . . . . . . . . . . . . 13-21
Time Tracker View . . . . . . . . . . . . . . . . . . . . . . . . . . . . . . . . . . . 13-22
Service Requests Screen . . . . . . . . . . . . . . . . . . . . . . . . . . . . . . . . . 13-24
Invoice Report . . . . . . . . . . . . . . . . . . . . . . . . . . . . . . . . . . . . . . . . 13-27
Version 6.1 Siebel Field Service Guide 13-1

Invoices
Setup and Configuration . . . . . . . . . . . . . . . . . . . . . . . . . . . . . . . . . 13-27
Setting Up Auto Invoicing . . . . . . . . . . . . . . . . . . . . . . . . . . . . . 13-27
Requirements of the Auto Invoicing Engine . . . . . . . . . . . . . . . . . . . . . .13-28
Cost and Price Lists . . . . . . . . . . . . . . . . . . . . . . . . . . . . . . . . . . . . . . .13-29
Organization of an Invoice . . . . . . . . . . . . . . . . . . . . . . . . . . . . . . . . . .13-30
13-2 Siebel Field Service Guide Version 6.1

Invoices
About This Chapter
About This Chapter 13
This chapter describes how Siebel Field Service can generate detailed invoices at a customer site as a proof of service.
Business Scenario 13
Star, Inc., provides service on computer systems to small to mid-size companies. It maintains a call center and a field service force. It recently started printing invoices on site for the customer, to show what transpired during the service call. This proves helpful for satisfying customer expectations and reducing customer call-backs.
Recently, one of the field engineers was on site to swap a disk drive. The customer chose to pay directly for the service. The FSE documented the activity and, upon completion, created an invoice based on time and materials. The customer was able to see the appropriate information, sign and date the invoice, and pay by check. The FSE recorded the payment in Siebel Field Service, running on a laptop computer, then synchronized this computer with the corporate server, allowing Star’s back-office billing system to process the invoice.
For another customer, an FSE is always on site because of the system’s complexity. The FSE often performs multiple service requests on the same day for the same customer. The FSE keeps track of work by issuing a separate invoice for each service request. At the end of the day, the FSE and customer review the work performed.
The FSE has a laptop with a pen-based touch-screen and a wireless connection to the corporate server. The customer approves the invoice. The invoice is uploaded to the back-office computer, and funds are electronically transferred.
World Ocean service engineers are expected to quickly respond to on-site service calls, record costs and time as the service is performed, create a customer invoice immediately after the work is done, get the customer’s approval, and accept customer payment by check, cash, or credit card.
Version 6.1 Siebel Field Service Guide 13-3

Invoices
Concepts and Terms
Concepts and Terms 13
Application Overview 13
Field Service can automatically produce invoices for activities or service requests. Each invoice lists the total amount charged to the customer and the payments the customer has made against the invoice. These invoices can then be exported to an accounting system to track accounts receivable and for revenue booking. The invoice can also be marked as delinquent, then tracked by the workflow manager to send automatic reminders to customers. See Figure 13-1 on page 13-5.
The key feature for Invoicing is Auto-Invoice on the Service Request and Activities screen. The Auto-Invoice button carries out these steps:
■ Finds all billable orders associated with a Service Request and uses the price list of that order to get prices for the billable order line items.
■ Finds all associated billable activities and the price and rate lists, takes the expenses and hours, and calculates the total charge for an activity.
■ Creates a new invoice, takes both the activities and orders, totals the charges, and lists them as line items on the invoice.
Cost list Consists of a cost name, a default cost method (standard, average, next, last). Cost List Items contains products associated with a cost list, along with the cost values for each product. Cost values are required for costing products, based on different cost methods. A cost list can be associated with a price list.
Indirect expenses
Expenses incurred while executing a service. This includes costs for generating a service request, shipment costs, pick tickets, email response cost, and so on.
Invoice A document describing the work performed and the amount billed to and payable by the customer.
13-4 Siebel Field Service Guide Version 6.1

Invoices
Application Overview
Once a new invoice is created, the Customer Invoice report produces a printable invoice.
Figure 13-1. Workflow for Auto-Invoicing
Orders
ServiceRequest
Invoice
Service
Line Items
Activities
Time Tracker
ExpenseTracker
Field PartsMovements
Time andMaterials
Version 6.1 Siebel Field Service Guide 13-5

Invoices
Application Overview
Producing a Customer Invoice 13
Follow these procedures to produce customer invoices.
To set up a new invoice
1 Choose Billings ➞ All Invoices (see “All Invoices View” on page 13-11).
2 In the Invoices form applet, create a new invoice record.
Field Service fills in an invoice number, sets Type to Receivable, and sets the Status to Open.
3 Choose an account from the dialog box.
4 Enter an initial amount for the invoice. This can be $0.00.
To create an invoice manually
1 Follow the steps in “To set up a new invoice.”
2 In the Line Items view, add line items to the invoice.
3 Fill in the amount field.
4 Do not associate manually entered line items with activities or orders.
To record billable activities for a service request
1 Choose Service Request ➞ My Service Requests (see “Service Requests Views” on page 2-33).
2 Choose the service request you are working on.
3 Select a price list, a rate list, and the Billable check box.
4 Click the SR Number to go to the Activities view (see “Activities View” on page 2-36).
5 In the Activities list applet, add a record for an activity.
6 Click the Billable flag field to activate it.
13-6 Siebel Field Service Guide Version 6.1

Invoices
Application Overview
To record billable orders for a service request
1 Choose Service Request ➞ My Service Requests (see “Service Requests Views” on page 2-33).
2 Choose the service request you are working on.
3 Choose the Orders view (see “Orders View” on page 2-44).
4 In the Orders list applet, add a record for an order.
5 Click the Billable flag field to activate it.
To record billable expenses for service activities
1 Choose Activities ➞ Expense Tracker.
2 In the Field Engineer Activity list applet, select an activity.
3 In the Expense Tracker applet, create a record for each expense.
4 Check the Billable field if this activity is billable.
To record billable time with an activity
1 Choose Activities ➞ Time Tracker.
2 In the Field Engineer Activity list applet, select an activity.
3 In the Expense Tracker applet, create a record for each expense.
4 Check the Billable field if these hours are billable.
To record billable parts, resulting from field part movements, with an activity
1 Choose Activities ➞ Field Part Movements.
2 In the Field Engineer Activity list applet, select an activity.
3 In the Field Part Movements applet, create a record for a part that moves between trunks or customer sites in the field.
4 Click Commit to create a transaction that will be recorded in the Field Service server upon synchronization.
Version 6.1 Siebel Field Service Guide 13-7

Invoices
Application Overview
To create an invoice automatically for a service request
1 Choose Service Request ➞ My Service Requests (see “Service Requests Views” on page 2-33).
2 Choose the service request you are working on.
3 Choose the Invoices view (see “Invoices View” on page 2-40).
4 Click Auto Invoice.
To create an invoice automatically for an activity
1 Choose Activities ➞ My Activities (see “All Activities View” on page 3-17).
2 Choose the activity you are working on.
3 Select a price list, a rate list, and the Billable check box.
4 Choose the Invoices view (see “Invoices View” on page 3-27).
5 Click Auto Invoice.
To print an invoice
1 Choose Billings ➞ All Invoices.
2 Select the invoice to print.
3 Choose Customer Invoice from the Reports menu.
4 In the Siebel Report Viewer window, click the Print button.
To record payments against an invoice
1 Choose Billings ➞ All Invoices.
2 Select an invoice.
3 Choose Billings ➞ Payments.
4 Create a record for each payment to that invoice.
13-8 Siebel Field Service Guide Version 6.1

Invoices
Screens and Views for Invoices
Screens and Views for Invoices 13
Click the name of a screen or view in Table 13-1 to see more information.
Table 13-1. Screens and Views for Invoices
Screen Views Role/Procedures (Click to see full procedure.)
Pricing Administration Costing ➞ Asset Mapping Record the factors used to adjust the cost of assets, depending on the condition, value basis, cost list, and cost method for each asset.
Billings All Invoices View or modifying existing invoices and set up new invoices. See: “To set up a new invoice” on page 13-6.
Line Items View or add billable items to an invoice. See: “To create an invoice manually” on page 13-6.
Line Item Detail View or add information about the items in an invoice. Used only by the Auto Invoice function.
Payments Record the payments against an invoice.
Activities Expense Tracker Record the expenses associated with an activity.
Field Parts Movements Record the transfers of products and assets in the field. Set the Billable flag to include the price of this part in an invoice.
Field Service Details Record information about the service request, account, and contact associated with an activity. If the Billable flag is set, the Invoice engine includes the price of this activity in an invoice.
Invoices Automatically create invoices based on the information provided for an activity. See: “To create an invoice automatically for an activity” on page 13-8.
Time Tracker Record the labor charges associated with an activity.
Service Requests Invoices Automatically create invoices based on the information provided for a service request. See: “To create an invoice automatically for a service request” on page 13-8.
Version 6.1 Siebel Field Service Guide 13-9

Invoices
Pricing Administration Screen
Pricing Administration Screen 13
The Pricing Administration screen defines basic costs, including cost lists and personnel costs.
Asset Mapping View 13
The Asset Mapping view (Pricing Administration ➞ Costing ➞ Asset Mapping) records the factors that are used to adjust the cost of assets, depending on the Condition, Value Basis, Cost List, and Cost Method for each asset. For more information, see the “Asset Mapping View” on page 5-12.
Billings Screen 13
The Billings screen has seven views that apply to invoices. The Attachments, Contacts, and Notes views are general Siebel Field Service features that are not described here.
13-10 Siebel Field Service Guide Version 6.1

Invoices
Billings Screen
All Invoices View 13
The All Invoices view, Figure 13-2, contains the Invoices list and form applets for viewing or modifying existing invoices and for setting up new invoices. Table 13-2 on page 13-12 describes the fields in this view.
Figure 13-2. Invoices Applets in the All Invoices View
Version 6.1 Siebel Field Service Guide 13-11

Invoices
Billings Screen
Table 13-2. Selected Fields in the Invoices Applets (Sheet 1 of 2)
Field/Button Description
Refresh Total This button in the Invoices applet appears only on the Line Items and Line Items Details views. Clicking this button uses the data on the Payments screen to update the Total Due field.
Invoice # The number assigned to this invoice. Click this number to see the Line Items view.
Invoice Date The date this invoice was sent to the customer.
Code, Invoice Code
The category of invoice, chosen from a picklist, for example:
■ Consolidated
■ Contract
■ Project
■ Sales
■ Service
■ Standard
■ Time & Material
Status The current status of an invoice, chosen from a picklist, for example:
■ Canceled
■ Closed
■ Consolidated
■ In-Process
■ New
■ On-Hold
■ Open, the default for a new invoice
Invoice Type The type of invoice, chosen from a picklist, for example:
■ Payable
■ Receivable, the default for Invoice Type
Days Open The number of days that the invoice has been active. If the invoice status is other than closed, it is calculated from the System Date minus the Invoice Date. If the status is closed, it is calculated from Closed Date minus Invoice Date.
Invoice Amount A type-in field containing the gross value of the invoice.
13-12 Siebel Field Service Guide Version 6.1

Invoices
Billings Screen
NOTE: A manual invoice does not use information from the Line Item Details list applet.
Total Payments Payment received on an invoice. Data is from the Payments applet (see “Payments View” on page 13-18).
Total Due The balance on an invoice, calculated from Invoice Amount and Total Payments.
Closed Date The date that the invoice was closed.
Due Date Date that the invoice payment is due, based on the payment terms.
Delinquent A check box that is set automatically if the current date is past the due date.
Account The name of an account related to the invoice, chosen from a dialog box. Click to go to the Account view.
Choosing an account automatically completes the address and phone number fields for the account. It also completes the Bill To fields.
Service Request The number of the service request associated with this invoice. In the list applet only.
Agreement The number of the service agreement associated with this invoice.
Activity The number of the activity associated with this invoice.
Payment Term The conditions for payment; for example, Net 30.
Period A month, quarter, or year, as described in Application Administration ➞ Period, chosen from a dialog box.
Last Update A date that automatically changes when any field is changed.
Create Date Automatically set to the system date when the record is added.
Last Updated By Automatically changed to the login name of the last person to change this record.
Revision Number A type-in field to identify versions of an invoice. The default is 0.
Payable To Account The name of an account to receive the payment, chosen from a dialog box. The default is normally set to the service engineer’s company. Choosing Payable To Account automatically completes the other Payable To fields.
Table 13-2. Selected Fields in the Invoices Applets (Sheet 2 of 2)
Field/Button Description
Version 6.1 Siebel Field Service Guide 13-13

Invoices
Billings Screen
Line Items View 13
The Line Items view, Figure 13-3, shows the billable items in an invoice. Additional items can be included. This view contains the Invoices form applet (see Figure 13-2 on page 13-11) and Invoice Line Items list applet. Table 13-3 on page 13-15 describes the fields in this view.
NOTE: This view has a Refresh Total button on the Invoices form applet (see Table 13-2 on page 13-12).
Figure 13-3. Line Items List Applet in the Line Items View
13-14 Siebel Field Service Guide Version 6.1

Invoices
Billings Screen
Table 13-3. Selected Fields in the Invoice Line Items Applet
Field/Button Description
Renumber This button numbers line items sequentially, starting at 1.
Line The number assigned to a line item. This number can be replaced by typing in another. Click to go to the Invoice Line Item view.
Description A category of invoice, chosen from a picklist; for example:
■ Assessment
■ Discount
■ Expense
■ Labor
■ Material
■ Return
■ Tax
■ Transportation
■ Upgrade
Amount The amount billed to the customer for a line item.
Reference A type-in field for related reference numbers. Copy Ids into this field so that they appear in one column in reports.
Activity The Id of the activity associated with this invoice.
Order The Id of the order associated with this invoice.
Version 6.1 Siebel Field Service Guide 13-15

Invoices
Billings Screen
Line Item Detail View 13
The Line Item Detail view, Figure 13-4, provides information about the items in an invoice. It is used only by the Auto Invoice function. This view contains the Invoices form applet (see Figure 13-2 on page 13-11), the Invoice Line Items list applet (see Figure 13-3 on page 13-14), and the Invoice Line Item Details list applet. Table 13-4 on page 13-17 describes the fields in this view.
NOTE: This view has a Refresh Total button on the Invoices form applet (see Table 13-2 on page 13-12).
Figure 13-4. Line Items and Line Item Details List Applets in the Line Item Detail View
13-16 Siebel Field Service Guide Version 6.1
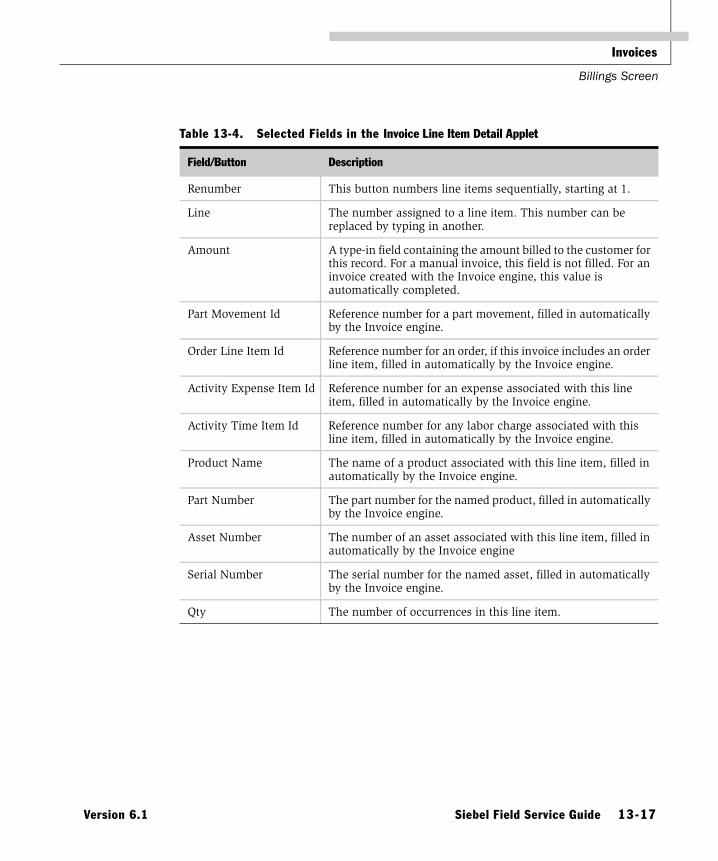
Invoices
Billings Screen
Table 13-4. Selected Fields in the Invoice Line Item Detail Applet
Field/Button Description
Renumber This button numbers line items sequentially, starting at 1.
Line The number assigned to a line item. This number can be replaced by typing in another.
Amount A type-in field containing the amount billed to the customer for this record. For a manual invoice, this field is not filled. For an invoice created with the Invoice engine, this value is automatically completed.
Part Movement Id Reference number for a part movement, filled in automatically by the Invoice engine.
Order Line Item Id Reference number for an order, if this invoice includes an order line item, filled in automatically by the Invoice engine.
Activity Expense Item Id Reference number for an expense associated with this line item, filled in automatically by the Invoice engine.
Activity Time Item Id Reference number for any labor charge associated with this line item, filled in automatically by the Invoice engine.
Product Name The name of a product associated with this line item, filled in automatically by the Invoice engine.
Part Number The part number for the named product, filled in automatically by the Invoice engine.
Asset Number The number of an asset associated with this line item, filled in automatically by the Invoice engine
Serial Number The serial number for the named asset, filled in automatically by the Invoice engine.
Qty The number of occurrences in this line item.
Version 6.1 Siebel Field Service Guide 13-17

Invoices
Billings Screen
Payments View 13
The Payments view, Figure 13-5, records the payments against an invoice. This view contains the Invoices form applet (see Figure 13-2 on page 13-11) and the Payments list applet. Table 13-5 describes the fields in this view.
Figure 13-5. Payments List Applet in the Payments View
Table 13-5. Selected Fields in the Payments List Applet (Sheet 1 of 2)
Field Description
Payment # The Id of the payment to apply to this invoice, chosen from a dialog box. The All Payments dialog box also accepts new payment records.
Payment Date Date a payment was received.
Amount Total amount of a payment.
Ref # A reference number assigned to a payment record.
13-18 Siebel Field Service Guide Version 6.1

Invoices
Billings Screen
Action Type The type of payment transaction, chosen from a picklist; for example:
■ Adjustment
■ Payment
■ Pending
■ Write-Off
Method The method of payment, chosen from a picklist; for example:
■ Billing #
■ Cash
■ Check
■ Credit Card
■ EFT (Electronic Funds Transfer)
Last Name The last name of the contact for this payment, chosen from a dialog box.
Card Number The number of the credit card used for payment.
Card Holder The owner of the credit card.
Expiration Date The expiration date of the credit card.
Table 13-5. Selected Fields in the Payments List Applet (Sheet 2 of 2)
Field Description
Version 6.1 Siebel Field Service Guide 13-19

Invoices
Activities Screen
Activities Screen 13
The Activities screen has five views that are related to invoices.
Expense Tracker View 13
The Expense Tracker view records the expenses associated with an activity. The Expense Tracker view contains the Activities applet (see “All Activities View” on page 3-17) and the Expense Tracker list applet (Figure 13-6). Setting the Billable flag for an expense record makes this information available to the Auto Invoicing engine (see “Requirements of the Auto Invoicing Engine” on page 13-28). Table 13-6 on page 13-20 describes the fields in this view.
Figure 13-6. Expense Tracker List Applet in the Expense Tracker View
Table 13-6. Selected Fields in the Expense Tracker Applet
Field Description
Expense Type The type of expense; for example, a hotel bill, chosen from a picklist.
Amount The amount of the expense.
Billable A check box indicating that this expense is billable. When this flag is set, the Invoice engine uses this record to create an invoice. The service business can define expenses that are never billable.
Rate Type The type of expense, chosen from a picklist; for example:
■ Expense. This is the default.
■ Material.
Qty The number of expensed items, when appropriate; for example, tolls.
13-20 Siebel Field Service Guide Version 6.1

Invoices
Activities Screen
Field Parts Movements View 13
The Field Part Movements view and applet record the transfers of products and assets in the field between a customer installation and a trunk inventory and between trunk inventories. If the Billable flag is set in a Field Parts Movement record, the Invoice engine includes the price of this part, based on the activity’s selected price list, in an invoice. For more information, see “Field Part Movements View” on page 3-22.
Field Service Details View 13
The Field Service Details view and applet provide information about the service request, account, and contact associated with an activity. If the Billable flag is set in a Field Service Details record, the Invoice engine includes the price of this activity in an invoice.
Invoices View 13
The Invoices view creates and displays all invoices associated with an activity. For more information, see “All Invoices View” on page 13-11. For more information about the Auto Invoice button, see “Requirements of the Auto Invoicing Engine” on page 13-28.
If an invoice is created from Activities ➞ Invoices (Invoices applet), the engine looks for any billable expenses, time, or parts related to the an activity, applies the associated price and rate lists, then creates a new invoice.
Click Auto Invoice to generate invoices for selected activities. Only records that have billable flags set in these views are included in the invoice calculation:
■ Activities ➞ Expense Tracker. Records in the Expense Tracker list applet (see “Expense Tracker View” on page 3-20).
■ Activities ➞ Time Tracker. Records in the Time Tracker list applet (see “Time Tracker View” on page 3-31).
■ Activities ➞ Field Part Movements. Records in the Field Part Movements list applet (see “Field Part Movements View” on page 3-22).
Version 6.1 Siebel Field Service Guide 13-21

Invoices
Activities Screen
Time Tracker View 13
The Time Tracker view lists the labor charges associated with an activity. This view contains the Activities applet (see “All Activities View” on page 3-17) and the Time Tracker list applet (Figure 13-7). Setting the Billable flag for a time record makes this information available to the Auto Invoicing engine (see “Requirements of the Auto Invoicing Engine” on page 13-28). Table 13-7 on page 13-23 describes the fields in this view.
Figure 13-7. Time Tracker List Applet in the Time Tracker View
13-22 Siebel Field Service Guide Version 6.1

Invoices
Activities Screen
Table 13-7. Fields in the Time Tracker Applet
Field Description
Time Type The type of task to which time was devoted, chosen from a picklist; for example:
■ Access to System
■ Admin
■ Install
■ Interrupt
■ Other
■ Travel
■ Work
Rate Type The type of rate, defined in the Rate list, used to bill this time, chosen from a picklist; for example:
■ Contract
■ Premium
■ Standard
For more information about rate lists, see the Siebel Pricing, Costing, and Rate List Administration Guide.
Start Time The start time for this part of the activity.
Stop Time The end time for this part of the activity, chosen from a calendar/clock applet.
Hours The time expended, calculated from Start Time minus Stop Time.
Billable A check box indicating that this labor is billable. When this flag is set, the Invoice engine uses this record to create an invoice. The service business can define expenses that are not billable; for example, a coffee break.
Version 6.1 Siebel Field Service Guide 13-23

Invoices
Service Requests Screen
Service Requests Screen 13
The Siebel Invoice engine automatically creates invoices based on the information provided for a service request or activity. The user activates this engine by clicking the Auto Invoice button on the Invoices view of either the Service Requests (Figure 13-8) or Activities screen (Figure 13-9 on page 13-26 and “Invoices View” on page 13-21). Table 13-8 on page 13-25 describes the button in this view.
Figure 13-8. Invoices View on the Service Requests Screen
13-24 Siebel Field Service Guide Version 6.1

Invoices
Service Requests Screen
From the Service Requests ➞ Invoices (Invoices applet), the Invoice engine searches for any billable orders or activities related to a service request, applies the designated price and rate lists, then creates a new invoice.
Click Auto Invoice to generate invoices for selected service requests. Only records that have billable flags set in these views are included in the invoice calculation:
■ Service Requests ➞ Orders. Order records in the RMAs/Service Orders list applet (see “Orders View” on page 2-44).
Table 13-8. Button in the Invoices Applet
Field Description
Auto Invoice This button automatically creates invoices based on the information provided for a service request.
Version 6.1 Siebel Field Service Guide 13-25

Invoices
Service Requests Screen
■ Service Requests ➞ Activities. Activity records in the Activities list applet (see “Activities View” on page 2-36).
NOTE: Billable flags for orders or activities must be set individually; they are not set automatically on the Service Requests screen. This gives users the flexibility to change some activities as needed.
Figure 13-9. Invoices View on the Activities Screen
13-26 Siebel Field Service Guide Version 6.1

Invoices
Invoice Report
Invoice Report 13
The Customer Invoice report, from the Reports menu, prints an invoice for the selected invoice record.
Setup and Configuration 13
Invoicing is easily configurable to extend to other objects; for example, Orders and Agreements.
Setting Up Auto Invoicing 13
For the Auto-invoice feature, some setup is required to make sure that information flows correctly:
■ There must be a price list for all of the items used in service operations.
■ There must be a rate list with all the rates for personnel types (also known as a billing product) used for a particular job (for example, a Field Engineer).
■ Each person who charges time must have a position associated with a billing product.
Activities and orders must have price and rate lists defined. Auto-invoicing uses these lists to determine the total amount billed to a customer.
Version 6.1 Siebel Field Service Guide 13-27

Invoices
Setup and Configuration
Requirements of the Auto Invoicing Engine 13
The Invoice engine requires the following information to generate an invoice automatically:
■ Billable flags. Only records that have billable flags set are included in the invoice.
■ Price List. The price list must be specified.
■ Product Prices. In Pricing Administration ➞ Price List Line Items, billable products must belong to the selected price list.
■ Rate List. The rate list for field service activities must be specified in Activities ➞ All Activities.
■ Activity Prices. In Pricing Administration ➞ Rate List Line Items, the person, known as the resource, carrying out billable service activities, must be related to the selected rate list.
■ Positions. In Application Administration ➞ Positions, the Billing Product field for the person (known as the Resource on the rate list) providing service must be specified.
■ Rate Types. In Activities ➞ Expense Tracker and Activities ➞ Time Tracker, the rate types must be identified for billable expenses and labor.
13-28 Siebel Field Service Guide Version 6.1

Invoices
Setup and Configuration
Cost and Price Lists 13
Siebel Field Service contains a costing infrastructure that allows users to track the cost of major business processes as they are performed, and then export these costs to financial systems for posting to the general ledger and for analysis. Previously, service organizations performing service could only guess at the costs of fulfilling service contracts. Now, with the improved costing infrastructure, they can associate costs of service calls at the time the service call is performed.
The costing infrastructure is based on the creation of cost lists. Cost lists specify the costs of products and personnel. Most companies have this information in their financial systems. Incorporating this information into Field Service has the following advantages:
■ Costs are associated with service requests and activities at the time they are performed.
■ Cost lists can have time limits, so that they provide an accurate record of costs at the time they occurred.
Price lists link cost lists to service requests and service activities. For example, one cost list, North American Costs, describes the costs of products and labor in North America. When an FSE chooses a price list for a service request, the associated cost list is automatically linked to the service request. There is now a record of the costs incurred for that service request.
To learn more about cost lists, price lists, and rate lists, see the Siebel Pricing, Costing, and Rate List Administration Guide.
Version 6.1 Siebel Field Service Guide 13-29

Invoices
Setup and Configuration
Organization of an Invoice 13
The invoice header shows the total invoice amount.
If the invoice was generated for an Activity, then the Line Item view contains the Activity ID and the Line Item Detail view (see “Line Item Detail View” on page 13-16) contains a separate record for every part, time, and expense related to the activity.
If the invoice was generated for a service request, the Line Item Detail view (see “Line Item Detail View” on page 13-16) contains the following information:
■ A record for each order or activity related to the service request
■ Separate records for part, time, or expenses corresponding to each activity
■ Order item detail related to each order
13-30 Siebel Field Service Guide Version 6.1

Field Service Analysis 14
About This Chapter . . . . . . . . . . . . . . . . . . . . . . . . . . . . . . . . . . . . . 14-2
Field Service Analysis Screen . . . . . . . . . . . . . . . . . . . . . . . . . . . . . . 14-2
Data for Field Service Analysis . . . . . . . . . . . . . . . . . . . . . . . . . . . 14-2
Activity Analysis View . . . . . . . . . . . . . . . . . . . . . . . . . . . . . . . . . . . . . .14-3
Activity Trend Analysis View . . . . . . . . . . . . . . . . . . . . . . . . . . . . . . . . . .14-5
Average Time Spent Analysis View . . . . . . . . . . . . . . . . . . . . . . . . 14-7
Average Time Spent Trend Analysis View . . . . . . . . . . . . . . . . . . . . 14-9
Version 6.1 Siebel Field Service Guide 14-1

Field Service Analysis
About This Chapter
About This Chapter 14
This chapter describes how Siebel Field Service tracks field service activities, service workloads, and service efficiency.
Field Service Analysis Screen 14
The Field Service Analysis screen has four views that chart field service activities. Within each view, you can select the type of graphic representation of the data (for example, Line, 2D Bar, or 3D Bar). The Activity Metrics applet on each view displays the data for each graph in a chart applet.
Data for Field Service Analysis 14
Activity records that are field service-related are the basis for predefined charts in Field Service Analysis. These records are identified by one of the following values in their Category field (see Table 3-2 on page 3-18): Field Engineering Activity, Repair, Preventive Maintenance, or Other. Selecting any of these values identifies the activity record as a Field Service-related activity record. Leaving the Category field null means that it is not a Field Service-related activity.
The Field Service-related activity records are transferred to the Siebel Data Mart. An ETL plan controls this transfer. During the transfer, following data mart standard conventions, a null Category field is replaced with the text string Unspecified. Field Service Analysis views filter out any activity records with the Category field equal to Unspecified.
14-2 Siebel Field Service Guide Version 6.1
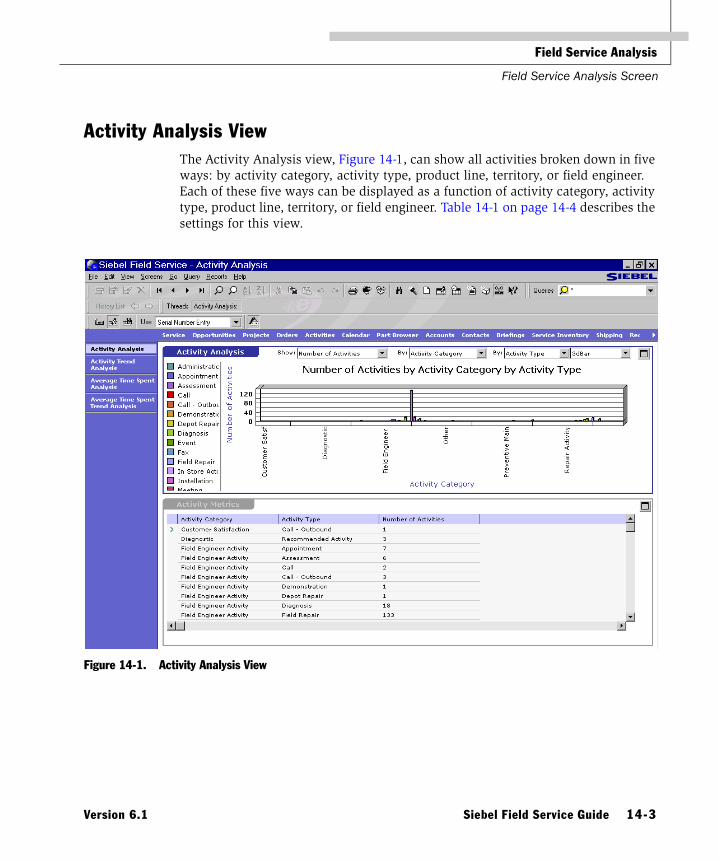
Field Service Analysis
Field Service Analysis Screen
Activity Analysis View 14
The Activity Analysis view, Figure 14-1, can show all activities broken down in five ways: by activity category, activity type, product line, territory, or field engineer. Each of these five ways can be displayed as a function of activity category, activity type, product line, territory, or field engineer. Table 14-1 on page 14-4 describes the settings for this view.
Figure 14-1. Activity Analysis View
Version 6.1 Siebel Field Service Guide 14-3

Field Service Analysis
Field Service Analysis Screen
NOTE: It is possible to select the same value for both By display variables. However, doing so may not yield meaningful results.
Table 14-1. Settings for the Activity Analysis View
Display Variable Description
Show Y axis: Number of Activities
By X axis:
■ Activity Category
■ Activity Type
■ Field Engineer
■ Product Line
■ Territory
By Stacking options:
■ None
■ Activity Category
■ Activity Type
■ Field Engineer
■ Product Line
■ Territory
14-4 Siebel Field Service Guide Version 6.1
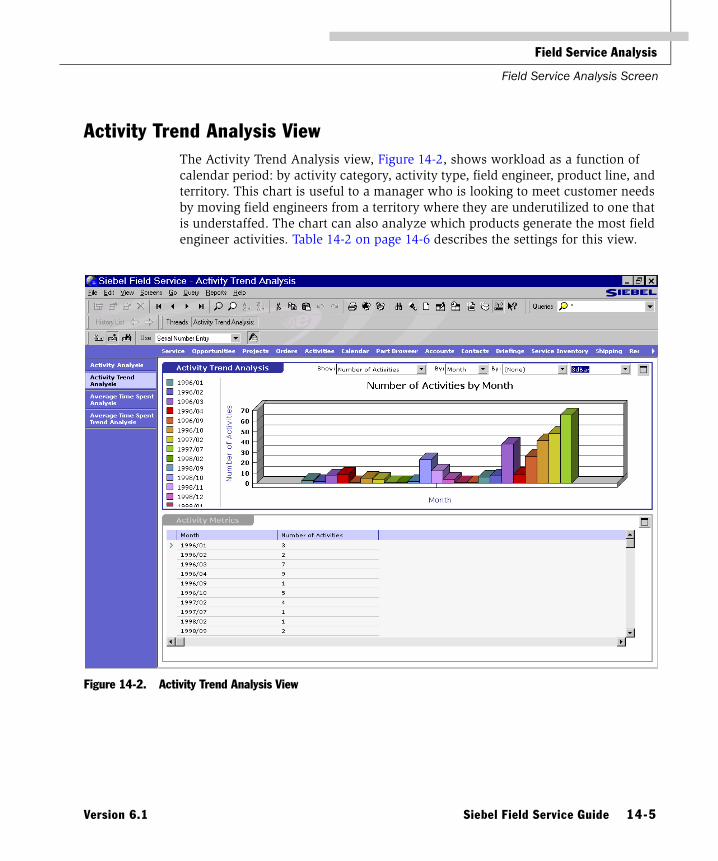
Field Service Analysis
Field Service Analysis Screen
Activity Trend Analysis View 14
The Activity Trend Analysis view, Figure 14-2, shows workload as a function of calendar period: by activity category, activity type, field engineer, product line, and territory. This chart is useful to a manager who is looking to meet customer needs by moving field engineers from a territory where they are underutilized to one that is understaffed. The chart can also analyze which products generate the most field engineer activities. Table 14-2 on page 14-6 describes the settings for this view.
Figure 14-2. Activity Trend Analysis View
Version 6.1 Siebel Field Service Guide 14-5

Field Service Analysis
Field Service Analysis Screen
NOTE: It is possible to select the same value for both By display variables. However, doing so may not yield meaningful results.
Table 14-2. Settings for Activity Trend Analysis View
Display Variable Description
Show Y axis: Number of Activities
By X axis:
■ Month
■ Week
■ Year
■ Quarter
By Stacking options:
■ None
■ Activity Category
■ Activity Type
■ Field Engineer
■ Product Line
■ Territory
14-6 Siebel Field Service Guide Version 6.1

Field Service Analysis
Field Service Analysis Screen
Average Time Spent Analysis View 14
The Average Time Spent Analysis view, Figure 14-3, shows the average time devoted to each activity for a territory, product, product line, territory, field engineer, activity category, or activity type. A manager can use this view, for example, to determine which type of activity requires the greatest amount of time. Table 14-3 on page 14-8 describes the settings for this view.
Figure 14-3. Average Time Spent Analysis View
Version 6.1 Siebel Field Service Guide 14-7

Field Service Analysis
Field Service Analysis Screen
NOTE: It is possible to select the same value for both By display variables. However, doing so may not yield meaningful results.
Table 14-3. Settings for Average Time Spent Analysis View
Display Variable Description
Show Y axis:
■ Average Minutes per Activity
■ Average Hours per Activity
■ Average Days per Activity
By X axis:
■ Field Engineer
■ Activity Category
■ Activity Type
■ Product Line
■ Territory
By Stacking options:
■ None
■ Field Engineer
■ Activity Category
■ Activity Type
■ Product Line
■ Territory
14-8 Siebel Field Service Guide Version 6.1
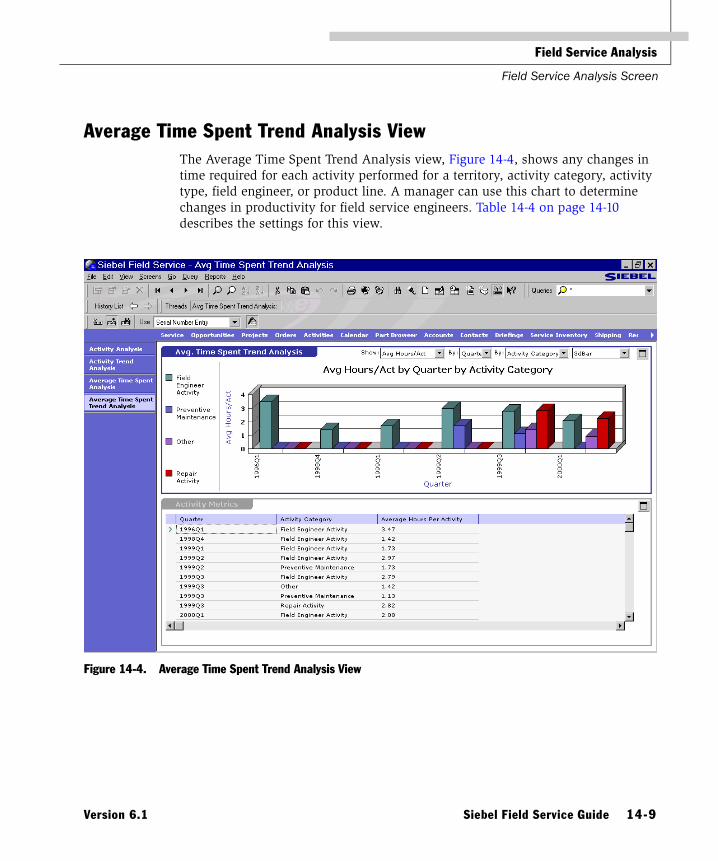
Field Service Analysis
Field Service Analysis Screen
Average Time Spent Trend Analysis View 14
The Average Time Spent Trend Analysis view, Figure 14-4, shows any changes in time required for each activity performed for a territory, activity category, activity type, field engineer, or product line. A manager can use this chart to determine changes in productivity for field service engineers. Table 14-4 on page 14-10 describes the settings for this view.
Figure 14-4. Average Time Spent Trend Analysis View
Version 6.1 Siebel Field Service Guide 14-9

Field Service Analysis
Field Service Analysis Screen
NOTE: It is possible to select the same value for both By display variables. However, doing so may not yield meaningful results.
Table 14-4. Settings for Average Time Spent Trend Analysis View
Display Variable Description
Show Y axis:
■ Average Minutes per Activity
■ Average Hours per Activity
■ Average Days per Activity
By X axis:
■ Month
■ Week
■ Year
■ Quarter
By Stacking options:
■ None
■ Activity Category
■ Activity Type
■ Field Engineer
■ Product Line
■ Territory
14-10 Siebel Field Service Guide Version 6.1

Index
AABC Class field 7-32, 9-32accounts
across organizations 2-25associating assets, products, and
contacts 2-30definition 2-6verifying 2-26
Accounts viewAccounts screen 2-26Entitlements screen 4-30
Actions viewPreventive Maintenance screen 12-19
Activate Barcode Functionality button, Barcode toolbar 9-12
Active check box 2-44, 8-25, 10-32, 12-14activities
administration 3-43analysis 14-3associating agreements 4-15associating field part movements 7-48billing details 4-36charts 3-42checking skills needed 2-18checking status of materials for 3-10checking status of materials ordered 2-17checking steps 2-18configuring instructions 3-43configuring parts and tools 3-43configuring solutions 3-44configuring steps 3-43definition 2-6evaluating 1-17, 2-21field service engineers 2-3generating automatic invoices 13-8invoicing 13-21
locating and allocating products 7-23locking an assignment 3-19on Calendar screen 3-16overview 2-3parts and tools 3-28plans 2-36procedures 3-30re-assigning 2-53recording expenses 13-20recording hours 13-22repeating 3-19reports 3-43scheduling 2-53service 2-3skills 3-29solutions 3-39stand-alone 2-37tracking expenses 3-20types 2-3updating 11-10
Activities viewAgreements screen 4-15Assets screen 5-30Repairs screen 11-20Service Requests screen 2-36
Activity Analysis viewField Service Analysis screen 14-3
Activity Expense Item Id 13-17Activity Part Id 7-45Activity Plan view
Repairs screen 11-18activity plans
adding 2-10definition 2-6generating for repairs 11-9
Version 6.1 Siebel Field Service Guide 1

Index
Activity Plans viewAgreements screen 4-16Service Requests screen 2-36
Activity Template Details viewSiebel Assistant Administration screen 3-
43activity templates 2-8
associating with service request templates 12-11
configuring 2-21definition 2-6fields copied from 2-8overview 2-8
Activity Templates viewSiebel Assistant Administration screen 3-
43Activity Time Item Id 13-17Activity Trend Analysis view
Field Service Analysis screen 14-5Adjust button 9-27, 9-28Adjustment transaction 7-66Administrative Contacts view
Agreements screen 4-17administrative tasks 1-28administrator, logging on as the Siebel
administrator 1-27AgreementId 12-34agreements
associating activities 4-15associating activity plans 4-16associating attachments 4-19associating contacts 4-43associating covered items 1-16, 4-10, 4-26associating entitlements 4-20associating legal, billing, and shipping
contacts 4-17charts 4-37creating invoices 4-10, 4-25defining 4-12definition 4-5generating documents 4-19initiating preventive maintenance
actions 4-29
making payments 4-28overview 4-3reports 4-37system preferences 4-45type 4-13
Agreements viewAccounts screen 4-10Contacts screen 4-11
AgreementSQL 12-34aisle 7-6Alarm check box 2-37, 3-18, 11-21All Activities view
Activities screen 3-17All Agreements view
Agreements screen 4-12All Assets check box 12-18, 12-24All Assets view
Assets screen 5-16All Contacts check box 4-11, 4-31All Cycle Counts view
Cycle Counting screen 9-23All Inventory Transactions view
Inventory Transactions screen 7-43All Invoices view
Billings screen 13-11All Pending Orders view
Receiving screen 10-22All Products check box 4-31, 4-32All RMAs/Service Orders across
Organizations view 8-25All RMAs/Service Orders view
Orders screen 8-24All Solutions view
Solutions screen 3-39Allocate All button 8-34Allocate Below Safety
check box 3-34, 7-25field 3-35, 7-32
Allocate button 8-34Allocate transaction 7-66allocating
definition 7-6, 9-3setting up 7-23
2 Siebel Field Service Guide Version 6.1

Index
amendments 4-17Approved check box 2-44, 8-26Asset Mapping view
Pricing Administration screen 5-12asset number, definition 2-39, 5-17asset transactions
rules for generating 7-70asset value 5-29AssetId 12-34assets
administration 5-39asset value 5-29associated preventive maintenance
plans 5-34associating activities 5-30associating defective tags 5-26associating related assets 5-37calculating adjusted cost 5-7calculating value 5-26calculating value and replacement cost 5-
8charts 5-36condition 5-28configuring costs and values 5-12creating 5-36creating subcomponents 5-37defining 5-16defining measurement data 5-31defining product measurements 5-14defining subcomponents 5-22definition 5-5, 11-4manually associating transactions 5-37mapping costs to product lines 5-38overview 5-3recording backup assets 5-21reporting readings 5-31transactions 5-23, 5-40value basis 5-29
Assets screen 5-16Assets view
Inventory Transactions screen 7-47AssetSQL 12-34Assign button 2-34, 2-50
assignment administration 1-29Assignment Manager 1-29, 2-12, 2-38Attachments applet 2-50Attachments view
Agreements screen 4-19Authorized Vendors view
Service Inventory screen 7-38Auto Allocate
check box 3-33, 7-24field 3-35, 7-32
Auto Invoice button 2-40Auto PM All button 12-22Auto PM button 5-35, 12-22, 12-25Auto Refresh check box 2-55Auto Renewal check box 4-22Auto Substitute
check box 3-33, 7-24field 3-35, 7-32setting 7-26
Auto Update check box 3-40auto-invoicing, setting up 13-27Average Time Spent Analysis view
Field Service Analysis screen 14-7Average Time Spent Trend Analysis view
Field Service Analysis screen 14-9
BBarcode Bar
View menu 9-16Barcode Mapping view
Service Administration screen 9-20Barcode toolbar
process modes 9-13barcodes
Activate Barcode Functionality 9-12definition 9-3destinations for data 9-37in reports 9-15keyboard shortcuts 9-12, 9-14label 9-3New button 9-12reader 9-3Search mode 9-12
Version 6.1 Siebel Field Service Guide 3

Index
setting destinations for data 9-20toolbar 9-11Update button 9-12
Billable check box 2-44, 3-20, 3-23, 3-31, 7-50, 8-26, 13-20, 13-23
Billable Flag check box 2-34, 2-37, 3-18, 8-28, 8-36, 11-21
Billable flags, setting 13-26bin 7-6Bucket Categories view
Service Administration screen 7-21BucketAvailCDtobeCounted 9-44buckets
after shipping repaired parts 11-26associating with inventory locations 7-31Availability field 7-33creating 7-59definition 7-6overview 7-62Quantity field 7-33setting up categories 7-21Status field 7-33updating quantities 7-68
BucketStatusCDtobeCounted 9-44
Ccaching 1-10Calendar screen
for activities 3-16charts
activities 3-42agreements 4-37assets 5-36orders 8-38
Check Warranty button 2-39, 6-16, 6-17, 11-15, 11-16
Class ABC/XYZ fields 3-35, 7-26Client Request Id 8-53ClientId parameter 9-45, 9-53ClientReqId parameter 8-53Commit All button 3-23, 7-15, 7-50Commit button 3-23, 7-15, 7-49, 7-50Commit check box 3-23, 7-50
Commit Flag check box 7-15, 7-46, 9-30commit mechanism 7-69commit time 2-6, 2-35Competitor check box 2-31Complete check box 5-33Component check box 2-39, 11-17component warranty 6-3condition of asset 5-28configuration parameters
Cycle Counting engine 9-41Fulfillment engine 8-53Part Locator engine 8-53precedence rule 9-43Replenishment engine 9-51
Consolidate button 10-21Consolidation view
Shipping screen 10-20contacts
creating administrative 4-43system preference for authorizing 4-45
Contacts viewAccounts screen 2-27Entitlements screen 4-31
contracts, definition 4-5contracts. see also agreements 4-3costs
adjusting for assets 1-21, 13-9, 13-10definition 4-5
Count Based On field 7-18, 7-29Count Period fields 7-18Counting Complete button 9-26Counting Frequency field 7-18, 7-29Counting Period fields 7-30Customer Ref Number 2-34Cycle Count Part Id 7-45cycle counting 9-3
administration 9-41associating ABC/XYZ parameter 7-60completing 9-9configuration parameters 9-41configuring ABC/XYZ 9-40, 9-42configuring count period 9-43
4 Siebel Field Service Guide Version 6.1

Index
configuring cycle count class, A/X, B/Y, or C/Z 9-43
configuring frequency 9-42configuring product classification, A/X,
B/Y, or C/Z 9-43configuring start date and end date 9-40,
9-43creating records 9-23manually specifying parts 9-41optimizing 7-66overview 9-5parameters at an inventory location 7-40product buckets to count and results 9-25recording results 9-8report 9-30reviewing 9-9showing variances 9-27specifying counting frequency 7-60specifying counting period 7-60specifying synchronous/asynchronous 9-
39Cycle Counting Administration view 9-31
Service Inventory screen 7-40Cycle Counting engine
configuring 9-31input and output 9-46invoking 9-46parameters 9-45running 9-8setting parameters 9-39, 12-25tracing 9-47
DDe-Allocate button 8-32De-Allocate transaction 7-66de-allocating 10-13defect number 5-19defective parts,
replacing 3-32defective tags
definition 11-4overview 11-6
Delinquent check box 13-13
DestId parameter 9-53Dispatch Board
options 2-54overview 2-47
Dispatch Board view 2-48Planned Activities Applet 2-51Unplanned Activities applet 2-48Unplanned Activity Detail Applet 2-49
Documents viewAgreements screen 4-19
EEmail check box 4-32Employee Query view 2-56Encyclopedia button 3-41EndDT parameter 9-45, 12-34engines
overview 1-9entitlement coverage 2-25entitlements
associating accounts 4-30, 4-38associating agreements 4-20associating contacts 4-31, 4-39associating PM plans 4-40associating products and assets 4-35, 4-40billing details 4-36contractual terms 4-22cost basis 4-22definition 2-6, 4-5overview 4-3performance data 4-33recording performance metrics 4-41system preference for verifying dates 4-
45, 4-46system preference for verifying products
and assets 4-46system preferences 4-45
Entitlements viewAccounts screen 2-28, 4-10Agreements screen 4-20Contacts screen 4-11
Exchange Between FSEs transaction 7-67Expense check box 3-18
Version 6.1 Siebel Field Service Guide 5

Index
Expense Tracker view 13-20Activities screen 3-20
Expenses check box 6-10External Location 7-16, 7-30, 7-43
FFailure symptoms 2-40fee-per-use 5-5Field Engineer Activity applet 2-49Field engineers, activities 2-3field inventory transactions 1-6field part movements
checking 2-18, 3-10commit transactions 7-14transactions 7-72
Field Part Movements applet 2-50Field Part Movements view
Activities screen 3-22, 7-48, 13-21Field Replaceable Unit check box 3-33, 7-24Field Service
base applications 1-3engines 1-9optional applications 1-4service tasks 1-3
Field Service applicationmulti-threading 1-10
Field Service Details view 3-24Activities screen 13-21Service Requests screen 2-38, 6-17
field service engineersassigned activities 3-17assigning to activities 2-36, 2-52assignment rules 2-21automatically assigning to activities 2-12definition 2-6selecting 2-52, 2-56updating activity status 2-17
Financial Details viewAgreements screen 4-22
Fulfill All button 8-25, 8-28
Fulfill button 8-25, 8-28fulfillment 7-6
configuration criteria 8-53configuring single order Id 8-53configuring single order line item Id 8-53configuring temporary table for Client
Request Ids 8-53definition 8-4overview 8-11setting substitution rules 8-42setting the default inventory location
types 8-42tables involved 8-54
Fulfillment engineconfiguration 8-48input and output 8-54overview 8-46parameters 8-53running 8-54setting parameters 8-40setting to fulfill another order status 8-42setting to fulfill another order status for
line items 8-43system preferences 8-49
GGantt chart 2-47Generate Internal Orders button 7-36, 9-34Generate Period (All Locations) button 9-32Generate Period button 9-32Generate Pick Ticket button
logic 8-45Generate Pick Tickets button 8-27Generate Purchase Orders button 7-36, 9-34Generate Transactions button 10-29, 10-32Get Warranties button 6-13
HHistory view
Assets screen 5-34, 12-22
6 Siebel Field Service Guide Version 6.1

Index
IInputMode parameter 8-53Instructions view
Activities screen 3-26Instructions, configuring 3-43Internal check box 2-37, 3-18, 11-20internal orders
creating 8-14definition 8-4overview 8-10replenishing inventory 9-7special considerations 8-45
Internet check box 4-32inventory
checking with the Part Browser 3-11example of structure 7-52locations 7-6locations across organizations 7-27mobile 7-5overview of relationships 7-63recording locations 7-27reports 7-51setting up 7-53structure 7-61sublevel 7-6summary of all locations 7-41transactions 7-66types 7-62virtual location 7-6
inventory levels, checking 3-11inventory locations
associating other locations 7-39associating roles of personnel 7-40associating vendors 7-38organizations 7-28parameters for cycle counting 7-40physical layout 7-65setting default types for fulfillment 8-42setting up relationships 7-39structure 7-61tracking 7-65
Inventory Locations views 7-27Service Inventory screen 7-27
inventory transactionsacross organizations 7-43asset and serial number associated with
an asset 7-47creating manually 7-43phases 7-68rules for generating 7-69setting up types 7-19shipping from repair vendor to
customer 10-37showing all for a product 7-43types 7-70
Inventory Types viewService Administration screen 7-16
InvLocTypeForPT 8-50InvLocTypeForReplenishRelation 9-52Invoice engine
administration 13-28overview 13-24
invoicesadding billable line items 13-14generating 13-11generating automatically for activities 13-
8generating automatically for service
requests 13-8information used by Auto-invoice 13-16recording payments 13-18report 13-27setting up 13-6
Invoices viewActivities screen 3-27, 13-21Agreements screen 4-25Service Requests screen 2-40
invoicingfor activities 13-21for service requests 13-25
InvokeMode parameter 9-53
Version 6.1 Siebel Field Service Guide 7
Index
Kkeyboard shortcuts
barcodes 9-12
LLabor Billable check box 4-36Labor check box 6-10Line Item Actions view
Orders screen 8-31Line Item Detail view
Billings screen 13-16Line Item Part Locator view
Orders screen 8-33Line Item Warranties view
Orders screen 6-14, 8-35Line Items Receipts view
Receiving screen 10-24Line Items view
Agreements screen 4-26Billings screen 13-14Orders screen 8-27
list-form view 1-13Loaner check box 8-28, 8-36Loc/Type parameter 9-45Local check box 3-40, 4-20Locate All button 8-33Locate button 8-33locating products
setting up 7-23locations
associating with buckets 7-31associating with products 7-31defining the order of use 7-65order of use 7-33setting up inventory transaction types 7-
19setting up types 7-16
Lock Assignment check box 3-19logging on as the Siebel administrator 1-27logistics manager 8-4, 9-3logistics, definition 9-3
MManufacturer check box 2-39, 11-17marketing administration 1-29Match check box 9-29Match Order # 10-27Measurements view
Assets screen 5-30measurements, definition 5-5Metrics view
Entitlements screen 4-33Service Requests screen 2-41
Mobile field service 7-48Mode parameter 9-45, 12-33modules, optional 1-11
NNew button, Barcode toolbar 9-12New Replenishment Orders view
Service Inventory screen 7-34, 9-33non-serialized products 5-5
Ooptional modules 1-11Order Action Types view
Orders screen 8-22, 8-23Order Item Id 7-50Order Line Item Id 13-17Order Part Movement Id 7-45Order Types view
Orders screen 8-23order types, configuring 8-40OrderItemStatusToBeFulfilled 8-50orders
administration 8-22allocating items for 8-17allocating parts manually 8-16associating actions 8-31associating actions with types 8-40associating line items 8-27automatically producing for
replenishment 7-34charts 8-38
8 Siebel Field Service Guide Version 6.1

Index
checking status 8-16defining types 8-40filling automatically 8-11finding, for replenishment 9-7internal 8-4, 8-10listing pending replenishment 7-37, 9-35options for using 8-43purchase 8-4, 8-11repair 8-4, 8-9reports 8-39sales 8-4service 8-4shipping 10-7showing all line items 10-24showing all pending 10-22
Orders viewService Requests screen 2-44
OrderSearchSpec parameter 8-53OrderStatusToBeFulfilled 8-50OrderTypeToBeFulfilled 8-50Organization field 7-30organizations 2-35
definition 2-6inventory locations 7-27, 7-28inventory transactions 7-43visibility of accounts 2-25
over-the-counter transaction 7-67
Pparameters
Cycle Counting engine 9-42Fulfillment engine 8-53Part Locator engine 8-53Preventive Maintenance engine 12-33
Part Browser viewPart Browser screen 3-36, 7-41
Part Cycle Count Id 9-29Part List view
Cycle Counting screen 9-25Part Locator 3-36
overview 8-48
Part Locator engineparameters 8-53running 8-54system preferences 8-49
Part Movement Id 13-17part movements
tracking 11-10parts and tools 3-28
configuring 3-43Parts Billable check box 4-36Parts check box 6-10Parts Movement Administration view
Service Administration screen 7-14Payment # 13-18Payments view
Billings screen 13-18Pending Pick Ticket views
Shipping screen 10-13Pending Replenishment Orders view
Service Inventory screen 7-37, 9-35Performed check box 3-30Phone check box 4-32Pick Ticket number 10-25Pick Ticket views
Shipping screen 10-12pick tickets
associating waybills 10-18combining 10-8, 10-20definition 10-3optimization process 7-66
PlanId 12-34Planned Activities applet 2-51Planned Activity applet
display options 2-54Plans view
Assets screen 12-24Preventive Maintenance screen 12-13
PlanSQL 12-34PM actions
definition 12-4history 12-23
Version 6.1 Siebel Field Service Guide 9

Index
PM planscreating 12-26definition 12-4triggers 12-14
PM Plans viewAssets screen 5-34
PM triggersdefinition 12-4
preventive maintenanceactions 12-20associating assets with PM plans 12-24associating PM plans and assets 12-13,
12-22associating products and assets with PM
Plans 12-18associating service request templates and
activities with PM plans 12-19creating service request templates 12-8definition 12-4end date 12-22overview 1-8service request templates 12-9
Preventive Maintenance engineparameters 12-33running interactively 12-6
Preventive Maintenance viewAgreements screen 4-29Entitlements screen 4-34
Pricing Administration screen 13-10Process Mode field 9-21Process Modes, Barcode toolbar 9-13Process Shipment button 10-13, 10-15product administration 1-28Product Buckets view
Service Inventory screen 7-31Product check box 2-39, 11-17
Product Defects viewAssets screen 5-19Service Requests screen 2-42
product defects, describing 2-42Product Field Service Details view
configuring 1-19, 3-44Marketing Administration screen 7-23, 9-
22Products screen 3-32
Product Field Service Details viewsMarketing Administration screen 3-44
product linesmapping costs for assets 5-38
Product Measurements viewMarketing Administration screen 5-14
product warranty 6-3products
associated warranties 6-16, 8-35associating with inventory locations 7-31defining measurements 5-14investigating availability 1-7, 3-36returning to good inventory 11-25serialized 11-25serializing 7-63setting up locating and allocation 7-23warranty coverage 6-8, 6-11
Products appletAccounts screen 2-31
Products viewEntitlements screen 4-35Preventive Maintenance screen 12-18
purchase orderscreating 8-14definition 8-4overview 8-11recording received items 10-31
10 Siebel Field Service Guide Version 6.1

Index
QQuote # 4-22
RReading view
Assets screen 5-30readings, definition 5-5Receive Internal Orders view
Receiving screen 10-28Receive Internal transaction 7-67Receive Other transaction 7-67Receive Purchase Orders view
Receiving screen 10-31Receive Repair Order view
Receiving screen 10-33Receive RMA view
Receiving screen 10-33Receive Unknown view
Receiving screen 10-33receiving
associating waybills 10-33overview 10-6recording internal transfers 10-28recording unknown receipts 10-26RMAs 10-33serialized products 7-25
Recommended Parts and Tools viewActivities screen 3-28
Recommended Parts applet 2-50Recommended Tools applet 2-50Recost button 5-28Recurring check box 3-21Refresh button 2-37, 11-19, 11-20Refresh Total button 13-12, 13-14Related Documents view
Call Center Administration screen 3-41Related Line Item Id 4-21Related SRs button 3-41Relationships view 5-21
Service Inventory screen 7-39relationships, denormalized table 7-64Renumber button 4-26, 8-28, 13-15, 13-17
Repair History viewAssets screen 5-26, 11-22
Repair Id 7-45Repair Order view
Receiving screen 10-9, 10-10repair orders
creating 8-15, 11-11definition 8-4overview 8-9shipping allocated line items 10-17
Repair Pick Ticket viewShipping screen 10-17
repair records 11-4, 11-6repairs
activities 11-7assigning activities to a defective tag 11-11associating activities with a service
request 11-11configuration 11-24creating repair records 11-9history 11-7linking orders to defective tags 11-10linking orders to repair records 11-10orders 11-7overview 11-5receiving defective parts 11-6receiving repaired items 10-9recording time and expenses 11-13report 11-23updating activities 11-10
Repairs viewsOrders screen 8-37Repairs screen 6-16, 11-15
Repeat check box 3-19Repeating check box 3-21replenishment 7-6, 9-3
administration 9-49automatically generating orders 7-34finding order numbers 9-7pending orders 7-37, 9-35
Replenishment engineinput and output 9-54inventory relationships 7-65
Version 6.1 Siebel Field Service Guide 11

Index
invoking 9-54overview 9-7parameters 9-51, 9-53system preferences 9-52tables involved 9-54
ReplenishOrderPriority 9-52reports
activities 3-43agreements 4-37barcodes included 9-15cycle counting 9-30invoice 13-27orders 8-39repairs 11-23service inventory 7-51shipping 10-22
Reprice All button 4-26, 8-28Reprice button 4-26, 8-28Request check box 3-40Required check box 3-21Resolution Documents view
Solutions screen 3-40response time metric 4-33Return if Defective check box 3-33, 7-24RMA advance exchange 8-4, 8-26RMA repair return 8-4
linking to defective tags 11-10RMAs
creating 8-13definition 8-4receiving 10-33
Roles viewService Inventory screen 7-40
RowId 8-53RowID parameter 9-45
SSafety field 7-32sales orders 8-4schedules
setting up 2-21screen
elements of 1-13
Search buttonBarcode toolbar 9-12Solutions screen 3-41
Search mode, Barcode 9-12Serial numbers overwriting asset
numbers 7-33Serialized check box 3-33, 3-34, 5-17, 7-24,
7-25, 7-63, 9-26, 9-28Serialized Product check box 7-45serialized products 11-25service activities 2-3Service Activity Details view
Siebel Assistant Administration screen 3-43
Service Activity Instructions viewSiebel Assistant Administration screen 3-
43Service Activity Parts and Tools view
Siebel Assistant Administration screen 3-43
Service Activity Skills applet 2-50Service Activity Skills view 3-43service agreements
adding activities 4-42associating activities 4-42creating 4-14creating an invoice 4-7defining entitlements 4-44generating documents 4-7including products 4-44
Service Agreements view 2-28Accounts screen 4-10
Service Calendar viewService Inventory screen 2-45
Service check box 4-27, 8-29service coverage, verifying 2-28Service Details view
Entitlements screen 4-36service employees, administration of 2-21service inventory
overview 1-7service level agreement
definition 4-5
12 Siebel Field Service Guide Version 6.1
Index
service orders 8-4creating 8-13fulfilling using the Part Locator 8-18
service productsdefinition 4-5
Service Profile viewAccounts screen 2-30
service providersfor warranties 6-12
Service Providers viewService Administration screen 6-12
Service Related check box 4-18Service Related Service check box 4-14Service Request Templates view
Service Administration screen 12-8service requests
adding activities 2-36associating SR templates with activity
templates 12-11closing 2-20creating and tracking 2-33creating templates 12-8definition 2-6generating automatic invoices 13-8hours of coverage 2-45invoices 2-40invoicing 13-25recording billable activities 13-6recording billable orders 13-7related orders 2-44solutions 2-46templates 12-19
Service Requests views 2-33service support
overview 2-7, 8-5shelf 7-6Ship All button 10-15Ship button 10-15Ship Internal transaction 7-67Shipment Number 10-25
shippingorders 10-7processing allocated line items 10-14report 10-22serialized products 7-25
Siebel administratorlogging on as 1-27
Siebel Field Serviceoverview 1-2
Siebel technical support Intro-6–Intro-7skills
adding types 3-29checking 2-18configuring 3-43employee 2-53
Skills viewActivities screen 3-29
Solution Search view 2-46Service Requests screen 3-41
solutionsconfiguring 3-44related documents 3-39, 3-40
Solutions viewCall Center Administration screen 3-44
SourceType parameter 9-53SR Template Activities view
Service Administration screen 12-11SR templates 12-19StartDT parameter 9-45Steps applet 2-50Steps view
Activities screen 3-30Steps, configuring 3-43Stock Transfer transaction 7-67subcomponents
creating 5-22, 5-37Sub-Components view
Assets screen 5-22SubMode 12-33substitute parts, specifying 3-32substitute products
specifying 3-12Suppress Calendar check box 3-19, 11-19
Version 6.1 Siebel Field Service Guide 13

Index
Symptom Code field 3-21Symptom codes 2-40system preferences
agreements and entitlements 4-45changing 9-39, 12-26Fulfillment engine 8-49Part Locator engine 8-49Replenishment engine 9-52
SystemDefaultFulfillInvloc 8-50
TTax Exempt check box 8-29technical support Intro-6–Intro-7templates
activities, setting up 3-43service request 12-19
Terms and Totals viewAgreements screen 4-28
Terms viewOrders screen 8-36
Time Sheet check box 3-18Time Tracker view 13-22
Activities screen 3-31Tool check box 3-28, 3-33, 7-24Trace Flags parameter 9-47tracing for Cycle Counting engine 9-47Transaction Types view
Service Administration screen 7-19transactions
committing field transactions 7-14field part movements 7-72inventory 7-66list of automatic 7-43over-the-counter 7-67receiving a stock transfer 7-9receiving over-the-counter 7-9uncommitted 1-6
Transactions viewAssets screen 5-11, 5-22
Transportation check box 6-10Travel Time Billable check box 4-36
triggersevent 12-17threshold 12-16time interval 12-15usage 12-16
Triggers viewPreventive Maintenance screen 12-14
trunk 7-6trunk inventory, managing 7-5
Uunplanned activities
criteria for 2-48including in applet 2-49
Update button, Barcode toolbar 9-12
VValid check box 4-14, 4-18Valid flag check box 4-3ValidOrderItemStatusForOnOrderQty 9-52ValidOrderStatusForOnOrderQty 9-52ValidOrderTypeForOnOrderQty 9-52Valuation view
Assets screen 5-26value basis of asset 5-29Variance view
Cycle Counting screen 9-27Verify button 2-10, 2-25, 2-34, 4-3views 1-13
administration 1-13virtual location 7-6, 7-30, 7-62
Wwarehouse 7-6warranties
associated assets 6-13associated products 6-16associating assets and tracking
claims 6-14checking coverage of assets 2-38checking covered products 6-4checking for a service request 6-5
14 Siebel Field Service Guide Version 6.1

Index
checking for assets 6-6creating 6-9identifying service providers 6-6overview 6-2tracking returns 6-6
Warranties viewAssets screen 6-13Products screen 6-16Service Administration screen 6-9
Warranty Products viewService Administration screen 6-11
Waybill number 10-25Waybill view
Receiving screen 10-33Shipping screen 10-18
waybills, definition 10-3Where parameter 9-45WhereClause parameter 9-53workload analysis 14-5Write-In Asset check box 7-15Write-In Asset field 3-23, 7-50Write-in product 8-29Write-In Serial Number 3-23, 7-50Wrnty Rcvry check box 6-14, 8-36
XXYZ Class field 7-32, 9-32
Version 6.1 Siebel Field Service Guide 15
Index
16 Siebel Field Service Guide Version 6.1