file to download
TRANSCRIPT

Deciding Between a Wired and Wireless Internet Connection
The first step in setting up a home network is deciding if you are going to use a
wired connection to your computer or a wireless connection to your computer. These
connections each have their advantages and disadvantages. The deciding factors are
mainly related to price of equipment, speed, and ease of use. Below are detailed
comparisons between each of the types.
Wired Advantages
Wired internet connections have been used for years, so more people are familiar
with setting up these types of connections. If you are facing a problem with wired
connections that you can’t fix, most likely, there is someone near by who can help you.
Also, because wired connections have been around for so long, bugs are almost
nonexistent. It is also because of their old age that wired connections are relatively cheap
to set-up. Since new technology is in wireless connections, the cost of that equipment
will be more than the cost of wired, although the price difference is only between $10 and
$30.
Most of the cheaper wired connections will also have a faster Local Area
Connection (LAN). There are some wireless connections that are faster than wired
connections, but cost roughly $150 more than wired connections. Of course, this is only
over the LAN and has no effect over the World Area Network (WAN). The only time
you would want this is when you will be doing many large file transfers in your
household because the LAN speed doesn’t affect the internet connection.
1

Another advantage of wired connections is security. Most wired connections are
very secure so you don’t have to worry about other people picking up private data being
transmitted from your home. Most people don’t worry about the security of their home
network so this advantage is usually over looked.
Wired Disadvantages
A disadvantage to using a wired network is the physical wires. Most people see
dangling wires as tacky or cluttered. Also, if your computers are going to be in separate
rooms of your house running wires can be difficult. Letting the wires dangle through the
hallways is dangerous because people can trip over them. The only other option is to run
them under your house or through the ceiling. If you live in an apartment this option may
not be available and you should consult your manager first.
Wireless Advantages
Wireless home networks don’t require you to run wires from each of the rooms in
your house. This is a major advantage to most people who don’t want to or can’t drill
holes in their homes (Vacca, 2001). If you rent your home, this is most likely the option
for you. Most landlords will only allow you to drill a hole in your home if it is done
professionally. Wireless networks solve this problem at a slight cost. Since the
difference in price is so small, most people would rather chip in the extra money rather
than decide how to run their wires from each computer.
Another advantage is that wireless networks are the new technology that is
growing rapidly. Many people are switching over and using laptops instead of a desktop
2

computer. Using a wireless connection, you would be able to access the internet from
anywhere in the house. With a wired connection you would have to bring the laptop over
to a designated area where a wire is. If friends come over to your house, they would have
to bring an extra network cable to plug in if they wanted to connect to the internet. Using
a wireless connection, they would be able to connect from anywhere inside the house.
Wireless Disadvantages
Security is a big issue with wireless connections. People can sit outside your
house and intercept any data transmissions being made. Or they could even tap into your
wireless connections and do illegal activity from your internet connection (Albanese,
2004). Precautions have been made to protect you from them easily doing this such as
requiring network keys to access the network. Most people don’t bother creating these
keys and leave themselves vulnerable for anyone to tamper with their connection.
The price of equipment is a slight disadvantage. However, the price differences
are insignificant compared to the work required to run the wires for a wired connection.
LAN speeds are usually much slower on wireless connections as well. However, since
WAN speeds are the same, the only time this is an issue is when you will be doing many
file transfers from one of your computers to another inside your home.
Wired Connection Wireless Connection
Advantages
Cheap
More Support
Better Security
Easier Setup
Better Compatibility
Newer Technology
3
Table I. Advantages of wired and wireless connections
Determining the Right Equipment for a Home Network
The next step in setting up a home network is determining the right equipment.
There are multiple pieces of equipment which are necessary to set up your home network.
The barebones equipment needed are a router, a Network Interface Card (NIC), and a
modem. Each piece of equipment has variations to it, and the router you choose could
require extra equipment. Below are detailed guides to determine the right router, NIC,
and modem for your network.
Choosing the Router
After deciding which direction you are going, wired or wireless, determining
which router to use is fairly easy. Wired users have to decide whether they want to buy a
router with an internal switch or buy a separate switch for their network. Sometimes the
price of a router with an internal switch costs more than buying a switch and a router
separately; it depends on what the store prices are at the time. Prices on routers have
been decreasing, so there has been less of a demand for separate switches. Most people
choose the router with an internal switch because it’s easier to set up and the price is
typically the same. I recommend using one of these routers because setting up an extra
switch takes up space and it’s just another element that can break.
Wireless network users basically have a straight path to follow. A wireless router
is needed; however, there are different types of wireless routers. The type of router
needed will depend on the range you need and the speed of the LAN. Wireless “A” has a
range of about 25-75 feet and a fast LAN transfer rate (54Mbps). However, it’s
4

incompatible with other bands. This means that you would need to buy a Wireless “A”
NIC for each computer to be able to access the network. This is used primarily in
locations with a crowded wireless network. Since Wireless “A” operates its own band, it
won’t be interfered with. The other wireless networks could be interrupted by
microwaves, cordless phones, etc (Linksys: Education). This typically isn’t a problem,
but if you are around these devices constantly, Wireless “A” network may be for you.
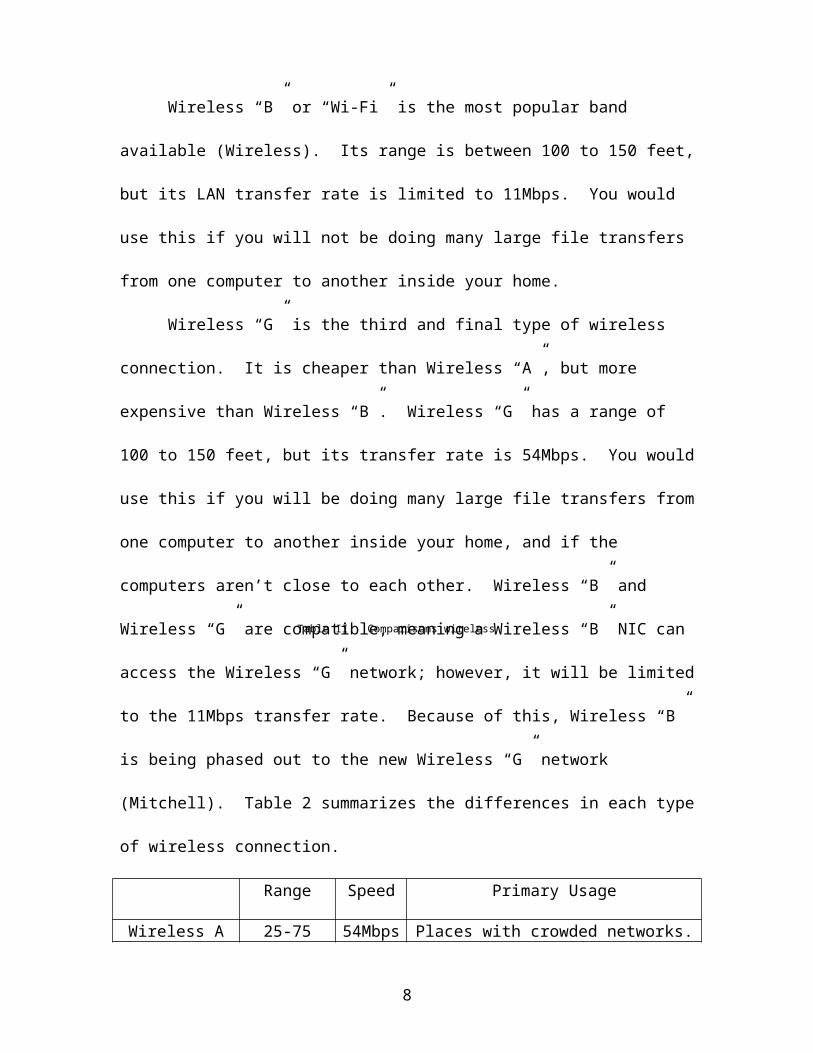
Wireless “B” or “Wi-Fi” is the most popular band available (Wireless). Its range
is between 100 to 150 feet, but its LAN transfer rate is limited to 11Mbps. You would
use this if you will not be doing many large file transfers from one computer to another
inside your home.
Wireless “G” is the third and final type of wireless connection. It is cheaper than
Wireless “A”, but more expensive than Wireless “B”. Wireless “G” has a range of 100 to
150 feet, but its transfer rate is 54Mbps. You would use this if you will be doing many
large file transfers from one computer to another inside your home, and if the computers
aren’t close to each other. Wireless “B” and Wireless “G” are compatible, meaning a
Wireless “B” NIC can access the Wireless “G” network; however, it will be limited to the
11Mbps transfer rate. Because of this, Wireless “B” is being phased out to the new
Wireless “G” network (Mitchell). Table 2 summarizes the differences in each type of
wireless connection.
Range Speed Primary Usage
Wireless A 25-75 ft. 54Mbps Places with crowded networks.
Wireless B 100-150 ft. 11Mbps Homes not needing large file transfers
Wireless G 100-150 ft. 54Mbps Homes frequently doing large file transfers
5
Table II. Comparisons wireless connection types

Choosing the Network Interface Card
The NIC is the next piece of equipment you will want. The NIC is completely
dependant on the type of connection you choose to use (wired or wireless) and the router
you decide on. Wired connections are very straight forward. Most computers are
equipped with an on-board NIC. The only exception is if one of your computers is older
and doesn’t have an on-board NIC included. To determine if you already have a NIC,
look on the back of your computer for a slot that resembles the figure to the side. Be
careful not to mistake it for the phone line slot, they look very similar. Refer to Figure 1
for a comparison. If you don’t have a NIC
preinstalled, you will need to buy one. These cost
roughly $20, but make sure you buy one for a wired
connection.
Wireless networks are a different story. These NICs rely on the type of router you
decided to buy. Typically, computers do not come standard with a wireless NIC. The
only exception is if the computer is a laptop. Most of those computers have adapted to
using wireless NICs. If the computer is a laptop, consult your user manual to determine
what type of wireless connection it has; most likely it will be Wireless “B”.
If you decided on a Wireless “A” router, then you will need to buy a wireless NIC
that supports Wireless “A”. Wireless “A” is incompatible with Wireless “B” and
Wireless “G” so it needs its own special NIC. Wireless “A” is the most expensive
connection, so it is not recommended you go this path.
If you decided on a Wireless “B” router, then a Wireless “B” or Wireless “G”
NIC is needed. Most likely you will want a Wireless “B” NIC because it is cheaper than
6
Fig. 1. Ethernet and telephone comparison. (Pabst)

Wireless “G” and you will get the same benefits. Wireless “G” routers will need a
Wireless “G” NIC to receive all of the benefits, but it will still function with a Wireless
“B” NIC. The only difference is that you will get a slower transfer rate over your LAN.
Choosing the Modem
Choosing the right modem to use is very simple. There are two types of modems
you could get. One is for Digital Subscribers Line (DSL), and the other is for cable
internet. If you aren’t aware of which type of internet you are using, contact your
Internet Service Provider (ISP). You will want to buy a modem that is compatible with
your ISP. On most ISP web pages, the compatible modems are listed there. There is no
major difference between the brands, so just find a modem on the list and buy it. They
typically cost around $100, but can vary from store to store. If you can’t find a list of
compatible modems on your ISPs web page, contact them to make sure you get a
compatible one.
The other option is renting a modem from your ISP. The rates on these are usually
between $4 and $10 a month. You can try and predict how long you’ll have your
broadband internet. If you plan on having it for a year or two, it would be cheaper to buy
your own modem in the long run. You can also just pay a small fee each month and rent
one with a full warranty. I would recommend buying your own modem because
broadband internet will be around for a long time. Spending the $100 will be beneficial
in the long run because after 10 months it will have paid itself off.
7
Installing the Home Network
After all the equipment has been bought, they need to be installed. At this point
you should have a Modem, Router, and a NIC for each computer at the very least. If you
chose to use an external switch, you may have that as well. Wired connections will also
need various lengths of network cable, long enough to reach from the router to each of
the computers.
Installing the NIC
If your computer came with a NIC, then this step can be omitted. For all others, a
step-by-step walkthrough is included. The steps are listed below.
Warning: Some companies will void warranty if you install this item yourself.
Check with your retailer to make sure your warranty will not be voided.
8
Fig. 2. PCI slots of motherboard

1. Shut down your computer and unplug the power from the wall.
2. Remove outer casing from your computer. There are typically screws in the back
that need to be removed, but in the later models, the side panel can usually slide
off. If you don’t know how to remove your casing, consult your user’s manual.
You should see something that resembles Figure 2.
3. Locate an empty PCI slot on your computer. The PCI slot is about four inches
long, and it is typically colored white. There should be multiple slots on your
computer. These are labeled “1” in Figure 2.
4. Remove the metal plate cover associated with that PCI slot. This cover is held on
by a screw at the rear of your computer. These are labeled “2” in Figure 2.
5. Align the NIC so that its face plate is where
the metal plate was from step 3. The PCI slot
should align with the connectors on the
bottom of the card. Notice there is a large side
of the connector and a small side. Make sure
it matches up with the PCI slot as shown in
Figure 3
6. Firmly, but carefully push the PCI slot into place. There may be a slight snap
after it is firmly in place, but it should not sound like it broke. The face plate on
the back of the computer should be correctly in place.
7. Replace the screw you took out in step 3. This should hold the NIC firmly in
place.
9
Fig. 3. PCI card insertion. (Welcome To Emuzed)

8. Replace outer casing of your computer. Inserting all the screws again.
9. Start the computer. Windows should prompt you that new hardware is detected.
Windows can identify 90% of the NICs available. If it is unable to identify the
NIC, drivers must be installed. Refer to your user’s manual on how to manually
install the NIC’s drivers.
Installing the Modem
The modem translates data from your cable line, into data that your computer can
read. The modem is very simple to install. The steps for installing the modem are listed
below.
1. Connect the coaxial cable coming from your wall outlet to the modem’s
cable line. This cable screws onto the modem, unlike the network cable. If
you are using DSL, plug the phone line into the location marked phone.
These are marked “1” in Figure 4.
2. Connect a network cable to the Ethernet port. This is marked “2” in
Figure 4. This port looks like a telephone line but is wider. The other end
of this cable will be connected to the router. Refer to Installing the Router
for more information
10
Fig 4. Cable and DSL modem connections (DSL Install Guide)
Cable DSL

3. Connect the power adapter to the modem and to the wall. This is marked
“3” in Figure 4. This should cause lights to begin blinking. At this point
your modem is looking for your ISP.
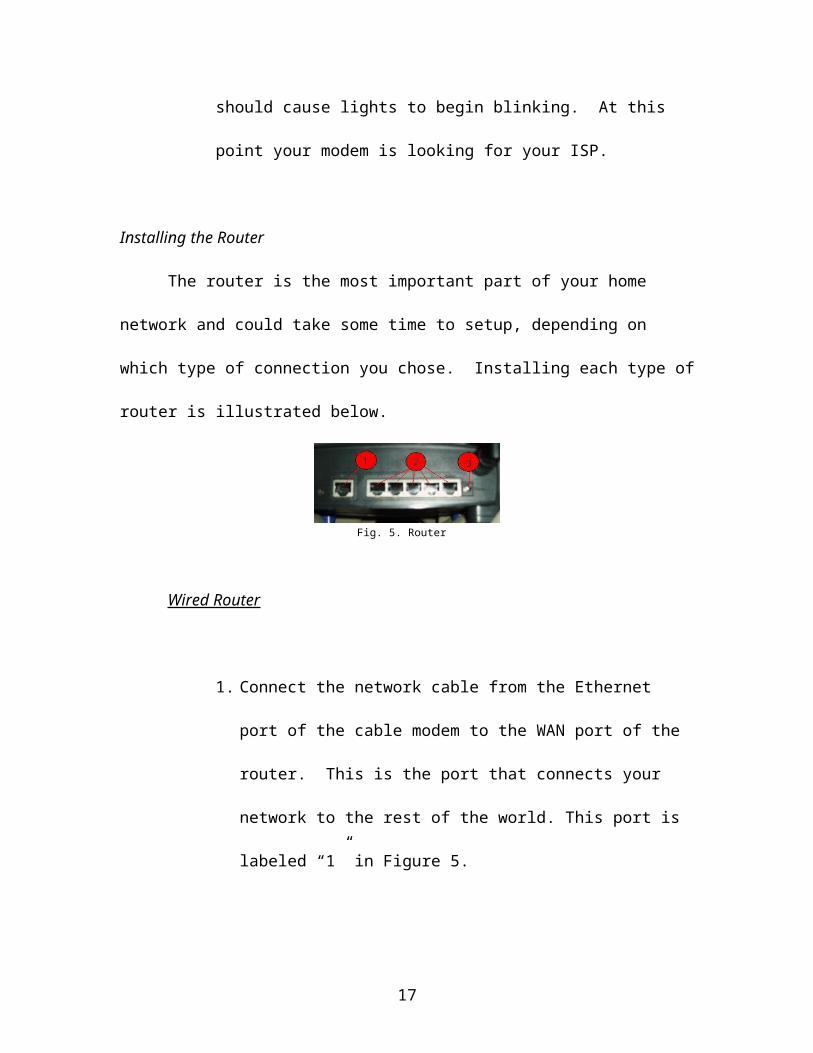
Installing the Router
The router is the most important part of your home network and could take some
time to setup, depending on which type of connection you chose. Installing each type of
router is illustrated below.
Wired Router
1. Connect the network cable from the Ethernet port of the cable modem
to the WAN port of the router. This is the port that connects your
network to the rest of the world. This port is labeled “1” in Figure 5.
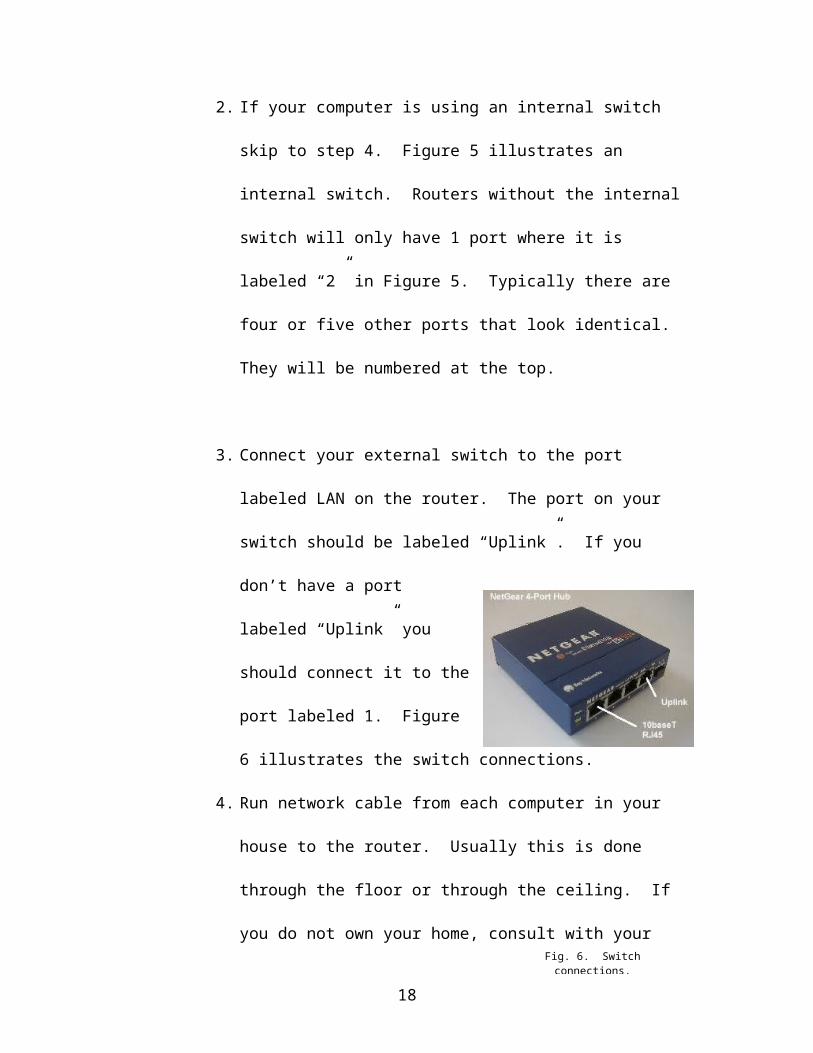
2. If your computer is using an internal switch skip to step 4. Figure 5
illustrates an internal switch. Routers without the internal switch will
only have 1 port where it is labeled “2” in Figure 5. Typically there
are four or five other ports that look identical. They will be numbered
at the top.
11
Fig. 5. Router connections

3. Connect your external switch to the port labeled LAN on the router.
The port on your switch should be labeled “Uplink”. If you don’t have
a port labeled “Uplink” you should connect it to the port labeled 1.
Figure 6 illustrates the switch connections.
4. Run network cable from each
computer in your house to the
router. Usually this is done through
the floor or through the ceiling. If
you do not own your home, consult
with your manager or landlord before drilling any holes in your house.
5. Connect each of the network cables to the NIC on your computer.
6. If you used an external switch, connect each of the network cables
coming from the computers to the remaining ports on the switch.
Otherwise, connect the cables coming from the computers to the
remaining ports on the router.
7. Connect the power adapter to the router and to the wall. This is labeled
“3” in Figure 5. The router should begin to sync up and lights will be
flashing.
8. Reset the computers.
12
Fig. 6. Switch connections. (Hubs and Switches)

Wireless Router
1. Connect the network cable from the Ethernet port of the cable modem
to the WAN port of the router. This is the port that connects your
network to the rest of the world. This port is labeled “1” in Figure 5.
2. Connect the power adapter to the router and to the wall. This is
labeled “3” in Figure 5. The router should begin to sync up and lights
will be flashing.
3. Reset the computers.
Configuring the Home Network
The home network is almost complete. The only thing left to do is to configure
the router and Windows. Configuring is important because otherwise there would be no
communication between the modem and the router. Configuring Windows is important
for a wireless connection because it is setup to have a wired connection as default.
Configuring the Router
Each type of router needs to be configured for your connection. Most routers
have the same basic layout. The procedure for configuring your router may be different,
but will most likely be very similar. If you have trouble locating a certain section, your
user manual may be able to help you locate it. These steps only need to be done once;
you do not have to repeat these steps on each computer.
13

1. Click Start >> Run and type “http://192.168.1.1” in the text box and
press OK. This is a default address for your router. Most routers use
this address, but some may be different. You should be prompted with
something like Figure 7.
2. You should be prompted with a username and password. Typically the
default username is admin and the
password is admin. If these don’t
work, consult your user manual to
determine the default username and
password. You will want to change
these immediately.
3. On the setup tab, there should be an option to “Obtain an IP
automatically.” Make sure this is selected like Figure 8.
4. Make sure the DHCP server is enabled as in Figure 9. This will allow
each of your computers connected to the router to have an internet
connection.
5. Click on “Save Settings” to save changes.
14
Fig. 7. Login prompt
Fig. 8. Router’s IP setup
Fig. 9. DHCP enable

6. Click on the Administration tab. This is where you will change your
router password. Type in a password that you will remember in both
the boxes as shown in Figure 10. Click “Save Settings” when done to
save your changes.
If you are using a wired connection, the configuration is complete. Reboot
your computer and check for an internet connection. If you are using a
wireless connection, follow the steps further.
7. Click on the Wireless tab. Make sure that wireless and wireless SSID
are enabled. Figure 11 illustrates what it should look like.
8. Enter a name for the SSID. This will be the name of your wireless
connection. The name doesn’t matter, but “Home” will be used as an
example SSID shown in Figure 11.
15
Fig. 10. Router’s password setup
Fig. 11. Router’s wireless setup

9. Click “Save Settings” to save the changes you have made.
10. Close the window, your router configuration is complete.
Configuring Windows for a Wireless Connection
Windows needs to be configured to view your wireless connection. Once this is
configured, it will automatically log you on each time you start windows. The steps are
listed below. These steps must be done on each computer using the wireless connection.
1. Right click on the network icon in the
bottom right of your screen. It looks
like two computer screens, one behind
the other.
2. Click on “View Available Wireless Networks” as shown in Figure 12.
3. Select your wireless network from the list of available networks. This name
should be the same one you used when
you configured the SSID on your router.
4. Check “Allow me to connect to the
selected network even though it is not
secure” and then click Connect. This is
done because no key was setup to connect
to your wireless connection. To setup a
key, refer to the user manual of your router.
5. Reboot the computer. You should now have a connection to the internet.
16
Fig. 12. Windows wireless setup icon.
Fig. 13. Windows wireless setup
Conclusion
Setting up a home network can be done in a few easy steps. The hardest part in
setting up a home network is determining which connection you want and what
equipment to get. The first step is to determine which type of network you want, wired
or wireless. Next, you need to decide which equipment you will need. Wireless users
have to make a decision between price and performance on each type of wireless
connection. Wired users only need to decide if they are going to get an external switch.
The recommendation I make is to go with a Wireless “G” connection if you
choose to go wireless. The prices on these connections are decreasing drastically and
have the best benefits. If you choose to go the wired route, I recommend buying a router
with an internal switch. This is easier to setup and there are less dangling wires.
Once those decisions have been made, some simple installation and configuration
of the router is needed. Configuration of Windows is only needed if a wireless
connection is used.
Your home network should have internet connection once the configuration is
done. Typically, Internet Service Providers charge an extra $10 a month for each
additional computer. By using a home network, this fee is eliminated and you have saved
yourself lots of money in the long run.
17
References
Albanese, J., & W. Sonnenreich. (2004). Network security illustrated. New York:
McGraw-Hill.
Emuzed, (n.d.). Welcome to emuzed. retrieved Jun 03, 2004, from Emuzed Web site:
http://www.emuzed.com/images/pci.jpg.
Lava.net, (n.d.). DSL install guide. retrieved Jun 03, 2004, from Lava.net Web site:
http://www.lava.net/support/config/dsl/images/modem.jpg.
Linksys, (n.d.). Linksys: education. retrieved Jun 03, 2004, from Linksys Web site:
http://www.linksys.com/edu/wirelessstandards.asp.
Mitchell, B. (n.d.). Before you buy a home broadband router. retrieved Jun 03, 2004,
from CompNetworking Web site: http://compnetworking.about.com/.
Network Lab, (n.d.). Hubs and switches. retrieved Jun 03, 2004, from Network Lab Web
site: http://www.networklab.co.uk/cmodem/hubswitch.html.
Pabst, T. (n.d.). retrieved Jun 03, 2004, from Tom's Hardware Web site:
http://www.tomshardware.com/.
Playstation, (n.d.). Wireless. retrieved Jun 03, 2004, from Playstation Web site:
http://au.playstation.com/.
Vacca, J. (2001). Wireless broadband networks handbook. Berkeley, CA: Osborne.
18