fileaid - online 1
TRANSCRIPT

FileAid_-_Online_1Print: cwfaux8h via IBM BookManager BookServerIBM BookManager Print Preview
DOCNUM = CWFAUX8HDATETIME = 03/30/01 17:09:37BLDVERS = 1.3 BUILD NT 2.1TITLE = File-AID/MVS User's GuideAUTHOR = COPYR = PATH = /man/compuware/books
TITLE Title Page
File-AID/MVS User's Guide
CWFAUX8H
March 30, 2001
CONTENTS Table of Contents
[Summarize]
TITLE Title Page
CONTENTS Table of Contents
FRONT Front
Intro Introduction
Intro.1 What's In This Guide?
Intro.2 Related PublicationsIntro.2.1 File-AID/MVS Frequently Asked Questions
Intro.3 Technical SupportIntro.3.1 Documentation FeedbackIntro.3.2 Product Problems
Chap_1 Getting Started with File-AID
Chap_1.1 Logging on to TSO with File-AID
Chap_1.2 Accessing File-AID Chap_1.2.1 Steps:
Chap_1.3 Creating Your Training Files Chap_1.3.1 Steps:
Chap_1.4 Setting Your File-AID Default Parameters Chap_1.4.1 Steps:
Chap_1.5 Reviewing and Changing Your Default Values Chap_1.5.1 Steps:
Chap_2 Browsing a Data File Chap_2.1 Character Mode Chap_2.2 Formatted Mode Chap_2.3 Vertical Formatted Mode
Page 1

FileAid_-_Online_1 Chap_2.4 Unformatted Mode
Chap_2.5 Accessing the Browse Function (Option 1) Chap_2.5.1 Steps:
Chap_2.6 Selecting Records to Browse Chap_2.6.1 Steps:Chap_2.6.2 Selecting the Browse Input Dataset Chap_2.6.2.1 Steps: Chap_2.6.2.2 More About the Catalog Utility Dataset ListChap_2.6.3 Specifying Temporary Selection Criteria Chap_2.6.3.1 Steps: Chap_2.6.3.2 More About Temporary Selection CriteriaChap_2.6.4 Specifying the Selection Criteria Options Chap_2.6.4.1 Steps: Chap_2.6.4.2 More About Selection Criteria OptionsChap_2.6.5 Formatted Selection Criteria Screen Chap_2.6.5.1 General Information About Formatted Selection Criteria Chap_2.6.5.2 Profile tailoring commandsChap_2.6.6 Viewing Layout in Column Location Order Chap_2.6.6.1 Steps: Chap_2.6.6.2 Formatted Selection Criteria - Field OffsetsChap_2.6.7 Suppressing the Display of Field Redefinitions Chap_2.6.7.1 Steps: Chap_2.6.7.2 Formatted Selection Criteria - Without RedefinesChap_2.6.8 Defining Formatted Field Selection Criteria Chap_2.6.8.1 Steps: Chap_2.6.8.2 More About Selection CriteriaChap_2.6.9 Defining a Compound AND Condition Chap_2.6.9.1 Steps:Chap_2.6.10 Defining Unformatted Field Selection Criteria Chap_2.6.10.1 Steps:
Chap_2.7 Processing Your Selection Chap_2.7.1 Steps:Chap_2.7.2 Formatted Display of First Selected Record Chap_2.7.2.1 Status Display FeatureChap_2.7.3 Displaying the Next Record in the Dataset Chap_2.7.3.1 Steps: Chap_2.7.3.2 More About Navigating To Browse Your Formatted RecordsChap_2.7.4 Displaying the Previous Record in the Dataset Chap_2.7.4.1 Steps:
Chap_2.8 Displaying the User Profile Options Chap_2.8.1 Steps: Chap_2.8.2 More About Profile SettingsChap_2.8.3 Removing the Profile Settings Information Chap_2.8.3.1 Steps:
Chap_2.9 Specifying the Type of Field Information to Display Chap_2.9.1 Steps: Chap_2.9.2 Result of SHOW PICTURE Chap_2.9.2.1 More About the SHOW CommandChap_2.9.3 Displaying the Offset for Each Field Chap_2.9.3.1 Steps: Chap_2.9.3.2 Result of SHOW OFFSET Chap_2.9.3.2.1 More About the SHOW OFFSET CommandChap_2.9.4 Displaying Current Field Length and Format Chap_2.9.4.1 Steps: Chap_2.9.4.2 Result of SHOW FORMATChap_2.9.5 Displaying Field Numbers Chap_2.9.5.1 Steps: Chap_2.9.5.2 Result of SHOW NUMBER
Page 2
FileAid_-_Online_1
Chap_2.10 Displaying Only Specific Fields by Number (DISPLAY) Chap_2.10.1 Steps:Chap_2.10.2 Result of DISPLAY ONLY command Chap_2.10.2.1 More About the DISPLAY CommandChap_2.10.3 Excluding Fields from the Display Chap_2.10.3.1 Steps: Chap_2.10.3.2 Result of DISPLAY OFFChap_2.10.4 Adding Fields to the Display Chap_2.10.4.1 Steps: Chap_2.10.4.2 Result of DISPLAY 34 ONChap_2.10.5 Redisplaying all the Fields of a Record Chap_2.10.5.1 Steps: Chap_2.10.5.2 Result of DISPLAY ALL
Chap_2.11 Searching for Data Using the FIND Primary CommandChap_2.11.1 Displaying the FIND Command Screen Chap_2.11.1.1 Steps: Chap_2.11.1.2 FIND Command Prompt ScreenChap_2.11.2 Specifying a FIND Using The Command Prompt Screen Chap_2.11.2.1 Steps: Chap_2.11.2.2 Result of FIND command Chap_2.11.2.2.1 More About the FIND Command
Chap_2.12 Invoking Character Mode (CHAR) from Formatted Mode Chap_2.12.1 Steps:Chap_2.12.2 Controlling the Records Not Selected Line
Chap_2.13 Displaying Data in Hexadecimal Format Chap_2.13.1 Steps:Chap_2.13.2 Result of HEX ONChap_2.13.3 Redisplaying Character Format from Hexadecimal Format Chap_2.13.3.1 Steps:
Chap_2.14 Displaying the Column Number Information Line Chap_2.14.1 Steps: Chap_2.14.2 More About COLS Command
Chap_2.15 Searching for Data In a Specific Column Chap_2.15.1 Steps:
Chap_2.16 Invoking Vertical Formatted Mode (VFMT) from Character Mode Chap_2.16.1 Steps:Chap_2.16.2 Vertical Formatted (VFMT) Display Chap_2.16.2.1 More About Vertical Formatted Mode
Chap_2.17 Removing the Mode Prompt Message Line Chap_2.17.1 Steps: Chap_2.17.2 More About the MESSAGE Command
Chap_2.18 Specifying the Type of Information to Display Chap_2.18.1 Steps: Chap_2.18.2 More About the SHOW CommandChap_2.18.3 Displaying the Offset for Each Column Chap_2.18.3.1 Steps:Chap_2.18.4 Displaying the Length and Format of Each Field Chap_2.18.4.1 Steps:
Chap_2.19 Selecting Fields to Display by Field Number Chap_2.19.1 Steps:
Chap_2.20 Changing the Display Format of a FieldChap_2.20.1 Displaying Hexadecimal Notation for a Specified Field
Page 3

FileAid_-_Online_1 Chap_2.20.1.1 Steps: Chap_2.20.1.2 Result of DISPLAY 21 HEX Chap_2.20.1.2.1 More About the DISPLAY CommandChap_2.20.2 Returning Fields to Their Standard Display Format Chap_2.20.2.1 Steps:Chap_2.20.3 Redisplaying All Fields Chap_2.20.3.1 Steps: Chap_2.20.3.2 Result of DISPLAY ALL
Chap_2.21 Exiting the Browse Function Chap_2.21.1 Steps:
Chap_2.22 Viewing the Last Referenced File List Chap_2.22.1 Steps:Chap_2.22.2 Requesting Related File List Chap_2.22.2.1 Steps: Chap_2.22.2.2 More About the Last Referenced File ListChap_2.22.3 Locking Dataset in File List Chap_2.22.3.1 Steps:Chap_2.22.4 Returning To Primary Menu Chap_2.22.4.1 Steps:
Chap_3 Allocating a VSAM Cluster
Chap_3.1 Accessing the VSAM Utility (Option 3.5) Chap_3.1.1 Steps:
Chap_3.2 Choosing a VSAM Utility Option
Chap_3.3 Using an Existing Dataset's Allocation Attributes
Chap_3.4 Allocating a Cluster Chap_3.4.1 Steps:
Chap_3.5 Verifying Allocation Parameters Chap_3.5.1 Steps: Chap_3.5.2 More About VSAM Allocation
Chap_3.6 Specifying Extended Allocation Parameters Chap_3.6.1 Step: Chap_3.6.2 More About Allocate New VSAM Cluster
Chap_3.7 Generating the Batch JCL Information Chap_3.7.1 Steps:
Chap_3.8 Executing the JCL Chap_3.8.1 Steps:
Chap_3.9 Saving the JCL
Chap_3.10 Exit the VSAM Utility Chap_3.10.1 Steps:
Chap_4 Full-Screen Editing Chap_4.1 Character Mode Chap_4.2 Formatted Mode Chap_4.3 Vertical Formatted Mode Chap_4.4 Unformatted Mode
Chap_4.5 Accessing the Edit Function (Option 2) Chap_4.5.1 Steps:
Chap_4.6 Specifying the Dataset to EditPage 4

FileAid_-_Online_1 Chap_4.6.1 Steps:
Chap_4.7 Copying Data Into a File With the COPY Command Chap_4.7.1 Steps: Chap_4.7.2 More About the COPY CommandChap_4.7.3 Specifying the "Copy From" Dataset Chap_4.7.3.1 Steps: Chap_4.7.3.2 Result of COPYChap_4.7.4 Removing Informational Flags from the Display Chap_4.7.4.1 Steps: Chap_4.7.4.2 RESET resultChap_4.7.5 Protecting Keys Chap_4.7.5.1 Steps: Chap_4.7.5.2 P99 result
Chap_4.8 Invoking Formatted Mode Chap_4.8.1 Steps:
Chap_4.9 Controlling the Display of Redefines Fields Chap_4.9.1 Steps: Chap_4.9.2 More About the REDEFINES Command
Chap_4.10 Holding and Hiding Fields Chap_4.10.1 Steps: Chap_4.10.2 Steps: Chap_4.10.3 Steps: Chap_4.10.4 More About the HIDE and HOLD Commands
Chap_4.11 Specifying a Field Number to Conduct a Search For Invalid Data Chap_4.11.1 Steps:Chap_4.11.2 Result of FIND INVALID /19 Chap_4.11.2.1 More About the FIND Command
Chap_4.12 Resetting Hold and Hide Chap_4.12.1 Steps:
Chap_4.13 Printing the Currently Displayed Record Chap_4.13.1 Steps: Chap_4.13.2 More About the FPRINT CommandChap_4.13.3 Directing The FPRINT Report to a Dataset or SYSOUT Chap_4.13.3.1 Steps: Chap_4.13.3.2 More About the Print ParametersChap_4.13.4 Specifying Additional Print Parameters for New Dataset Chap_4.13.4.1 Steps:
Chap_4.14 Changing Data Using the CHANGE Command Chap_4.14.1 Steps:Chap_4.14.2 Specifying the CHANGE Parameters Chap_4.14.2.1 Steps: Chap_4.14.2.2 CHANGE Result Chap_4.14.2.2.1 More About the CHANGE Command
Chap_4.15 Navigating within a Formatted Record Chap_4.15.1 Steps:Chap_4.15.2 Scroll UP Result Chap_4.15.2.1 More About Scroll Commands
Chap_4.16 Creating a New Record by Copying the Currently Displayed Record Chap_4.16.1 Steps:Chap_4.16.2 Record REPEATED Result Chap_4.16.2.1 More About the REPEAT CommandChap_4.16.3 Displaying the New Record Chap_4.16.3.1 Steps:
Page 5
FileAid_-_Online_1 Chap_4.16.3.2 FWD Result - Record 5 is a Repeat of Record 4
Chap_4.17 Entering New Data Values in a Repeated Record Chap_4.17.1 Steps:Chap_4.17.2 Protecting New Record Key Fields Chap_4.17.2.1 Steps: Chap_4.17.2.2 PROTECT Result Chap_4.17.2.2.1 More About the PROTECT Command
Chap_4.18 Navigating to a Record by Its Key Value Chap_4.18.1 Steps:Chap_4.18.2 KEY Result - Key Specification Screen Chap_4.18.2.1 More About the KEY CommandChap_4.18.3 Scrolling to Another Record by Specifying a Key Value Chap_4.18.3.1 Steps: Chap_4.18.3.2 Successful KEY Specification - Key 34010 Found
Chap_4.19 Using Character ModeChap_4.19.1 Switching To Character Mode Chap_4.19.1.1 Steps: Chap_4.19.1.2 More About Switching to Character ModeChap_4.19.2 Removing Informational Lines and Markers (RESET Command) Chap_4.19.2.1 Steps: Chap_4.19.2.2 More About the RESET CommandChap_4.19.3 Assigning Labels Chap_4.19.3.1 Steps:Chap_4.19.4 Using the CHANGE Command With Labels Chap_4.19.4.1 Steps: Chap_4.19.4.2 CHANGE ResultChap_4.19.5 Reversing Changes (UNDO) Chap_4.19.5.1 Steps: Chap_4.19.5.2 UNDO Result Chap_4.19.5.2.1 More About the UNDO CommandChap_4.19.6 Removing the Line Label Values Chap_4.19.6.1 Steps:
Chap_4.20 Editing With Line CommandsChap_4.20.1 C (Copy) Line Command Chap_4.20.1.1 Steps: Chap_4.20.1.2 C (Copy) Line command Result Chap_4.20.1.2.1 More About the C (Copy) Line Command
Chap_4.21 Sorting the Records of the Dataset Chap_4.21.1 Steps: Chap_4.21.2 More About the SORT CommandChap_4.21.3 Deleting Duplicate Records - D (Delete) Line Command Chap_4.21.3.1 Steps:
Chap_4.22 Invoking Vertical Formatted Mode Chap_4.22.1 Steps:Chap_4.22.2 Displaying a Subset of Fields Chap_4.22.2.1 Steps:Chap_4.22.3 Using the CHANGE ANY Command Chap_4.22.3.1 Steps: Chap_4.22.3.2 CHANGE ANY Result
Chap_4.23 Printing Records in Vertical Formatted Mode Chap_4.23.1 Steps:
Chap_4.24 Terminate Edit FunctionChap_4.24.1 Controlling Automatic Save Processing Chap_4.24.1.1 Steps:Chap_4.24.2 Specify Audit Trail Dataset and JOB Statements
Page 6

FileAid_-_Online_1 Chap_4.24.2.1 Steps: Chap_4.24.2.2 More About the Disposition of Audit Trail Screen
Chap_5 Comparing Files
Chap_5.1 Accessing the Compare Function (Option 10) Chap_5.1.1 Steps:
Chap_5.2 Specifying the "Old" Dataset Chap_5.2.1 Steps:
Chap_5.3 Specifying the "New" Dataset Chap_5.3.1 Steps:
Chap_5.4 Specifying Execution Options Chap_5.4.1 Steps:
Chap_5.5 Selecting Your Compare - Criteria Options Chap_5.5.1 Compare Type Chap_5.5.2 Controlling Processing Limits Chap_5.5.3 Steps:
Chap_5.6 Specifying Print Options for a Formatted Compare Chap_5.6.1 Specifying Print Format Chap_5.6.2 Specifying a Reporting Limit Chap_5.6.3 Specifying the Level of Information to Report Chap_5.6.4 Steps: Chap_5.6.5 Formatted Report Option Chap_5.6.6 Compared Fields Option Chap_5.6.7 Field Statistics Report Chap_5.6.8 Steps:
Chap_5.7 Specifying Formatted Field Criteria Chap_5.7.1 Sync/Key Specification Chap_5.7.2 Tolerance Value Specification Chap_5.7.3 Select Print Only Chap_5.7.4 Select Field for Compare Chap_5.7.5 Reset Status Chap_5.7.6 Step:
Chap_5.8 Viewing Formatted Compare Criteria Chap_5.8.1 Steps: Chap_5.8.2 Step:
Chap_5.9 Executing Compare Chap_5.9.1 Steps:
Chap_5.10 Analyzing the Compare Report Chap_5.10.1 Step:
Chap_5.11 Viewing the Compare Summary Report Chap_5.11.1 Step:
Chap_5.12 Printing the Report Chap_5.12.1 Steps: Chap_5.12.2 Step: Chap_5.12.3 Step:
Chap_5.13 Load Library Compare Chap_5.13.1 Steps:
Chap_5.14 Specifying the "New" Load Library Chap_5.14.1 Steps:
Page 7

FileAid_-_Online_1
Chap_5.15 Specifying Execution Options Chap_5.15.1 Steps:
Chap_5.16 Selecting Your Compare - Load Library Criteria Chap_5.16.1 Use "S" to select member compare criteria Chap_5.16.2 Use "S" to select CSECT compare criteria Chap_5.16.3 Controlling Processing Limits Chap_5.16.4 Steps:
Chap_5.17 Specifying Load Library Print Options Chap_5.17.1 Specify Detail Report Print Options Chap_5.17.2 Even if you suppress printing the CHANGED, INSERTED, DELETED, and MATCHED members, Compare always generates a Summary Report. Chap_5.17.3 Specify Member Name Report Print Options Chap_5.17.4 Steps:
Chap_5.18 Viewing Formatted Compare Criteria Chap_5.18.1 Steps: Chap_5.18.2 Step:
Chap_5.19 Executing Compare Chap_5.19.1 Steps:
Chap_5.20 Analyzing the Compare Report Chap_5.20.1 Step:
Chap_5.21 Viewing the Compare Summary Report Chap_5.21.1 Step:
Chap_5.22 Printing the Report Chap_5.22.1 Steps: Chap_5.22.2 Step: Chap_5.22.3 Step:
Chap_6 Scanning and Updating Datasets
Chap_6.1 Accessing the Search/Update Utility (Option 3.6) Chap_6.1.1 Step:
Chap_6.2 Defining Your Search/Update Request
Chap_6.3 Generating a PDS Find/Change Member List of Selected Members Chap_6.3.1 Steps: Chap_6.3.2 More About the Search/Update Entry ScreenChap_6.3.3 Using PDS Member Selection Features Chap_6.3.3.1 Step: Chap_6.3.3.2 More About PDS Processing Options (PPO)Chap_6.3.4 Specifying Quick Selection Criteria Chap_6.3.4.1 Steps: Chap_6.3.4.2 More About Unformatted Selection CriteriaChap_6.3.5 Viewing the Initial PDS Find/Change Member List Chap_6.3.5.1 Steps:Chap_6.3.6 Issuing Commands on the PDS Find/Change Screen Chap_6.3.6.1 More About the PDS Find/Change Member List Chap_6.3.6.2 Editing or Browsing Selected Members Chap_6.3.6.2.1 Steps: Chap_6.3.6.2.2 More About Member Browsing or EditingChap_6.3.7 Specifying a CHANGE to All Selected Members Chap_6.3.7.1 Steps: Chap_6.3.7.2 Using the CHANGE Command Prompt Screen Chap_6.3.7.2.1 Steps: Chap_6.3.7.2.2 More About the CHANGE Command Prompt Screen
Page 8

FileAid_-_Online_1 Chap_6.3.7.3 Viewing the Change Results Preview Chap_6.3.7.3.1 Step: Chap_6.3.7.4 Confirming Your Update Chap_6.3.7.4.1 Step: Chap_6.3.7.4.2 More About Confirm Update Chap_6.3.7.5 Returning to the Search/Update Entry Screen Chap_6.3.7.5.1 Step:
Chap_6.4 Scanning Datasets for Specific Records (Option B) Chap_6.4.1 Steps:Chap_6.4.2 Requesting PDS Member Selection Processing Chap_6.4.2.1 Steps: Chap_6.4.2.2 Using the Manual Member S/X Selection List Chap_6.4.2.2.1 Steps: Chap_6.4.2.2.2 More About the Manual Member Selection List Chap_6.4.2.3 Specify Selection Criteria Chap_6.4.2.3.1 Step: Chap_6.4.2.3.2 More About Selection Criteria Chap_6.4.2.4 Browsing Scan Results Chap_6.4.2.4.1 Step:
Chap_6.5 Specifying Global Changes - (Option U) Chap_6.5.1 Steps:Chap_6.5.2 Specifying Change Criteria Chap_6.5.2.1 Steps: Chap_6.5.2.2 Entering the Change Chap_6.5.2.2.1 Steps: Chap_6.5.2.2.2 More About Change CriteriaChap_6.5.3 Preview Changes Chap_6.5.3.1 Steps:Chap_6.5.4 Apply Changes (Confirm Update) Chap_6.5.4.1 Steps: Chap_6.5.4.2 More About the Confirm Update ScreenChap_6.5.5 Processing Your Update In Batch Chap_6.5.5.1 Steps:Chap_6.5.6 Reviewing Change Criteria Chap_6.5.6.1 Step:Chap_6.5.7 Submit Batch JCL Chap_6.5.7.1 Steps:
Chap_7 Copying Selected PDS Members
Chap_7.1 Accessing the Copy Utility (Option 3.3) Chap_7.1.1 Step:
Chap_7.2 Defining Your Copy Request
Chap_7.3 Specifying a Copy of Selected Members Chap_7.3.1 Steps: Chap_7.3.2 More About the Copy Utility Screen
Chap_7.4 Using PDS Member Processing and Selection FeaturesChap_7.4.1 "FROM" PDS Member ProcessingChap_7.4.2 "TO" PDS Member Processing Chap_7.4.2.1 Specifying PPO Options Chap_7.4.2.1.1 Steps: Chap_7.4.2.1.2 More About the Copy PPO Screen
Chap_7.5 Specifying Temporary Selection Criteria Chap_7.5.1 Steps: Chap_7.5.2 More About the Selection Criteria Menu Screen
Chap_7.6 Specifying the Unformatted Data TestPage 9

FileAid_-_Online_1 Chap_7.6.1 Steps: Chap_7.6.2 More About Unformatted Selection Criteria
Chap_7.7 Ending Selection Criteria Specification Chap_7.7.1 Step:
Chap_7.8 Generate Batch JCL Chap_7.8.1 Steps:
Chap_7.9 Editing Your Generated Copy JCL Chap_7.9.1 Step:
Chap_8 Finding Files On Disk
Chap_8.1 Scanning the System Catalog (3.4 Catalog Utility)Chap_8.1.1 Accessing the Catalog Utility (Option 3.4) Chap_8.1.1.1 Step:Chap_8.1.2 Selecting the Catalog Utility Chap_8.1.2.1 Step:Chap_8.1.3 Specifying Catalog Search Options Chap_8.1.3.1 Steps: Chap_8.1.3.2 More About the Catalog Utility Entry ScreenChap_8.1.4 Working With Your Dataset List (Primary and Line Commands) Chap_8.1.4.1 Step:Chap_8.1.5 Reviewing the Tutorial - Summary of Primary and Line Commands Chap_8.1.5.1 Steps: Chap_8.1.5.2 More About the TutorialChap_8.1.6 Selecting a Dataset for Processing Chap_8.1.6.1 Steps:Chap_8.1.7 Ending Dataset Processing Chap_8.1.7.1 Step:
Chap_8.2 Scanning DASD Volumes to Find Files (3.7 VTOC Utility)Chap_8.2.1 Accessing the VTOC Utility (Option 3.7) Chap_8.2.1.1 Step:Chap_8.2.2 Specifying VTOC Search Options Chap_8.2.2.1 Specifying the OPTION Chap_8.2.2.2 Performing VTOC Processing in Batch Chap_8.2.2.3 Specifying the Volume Selection Information Chap_8.2.2.4 Specifying the Optional Search Name Chap_8.2.2.5 Specifying the Catalog to Use Chap_8.2.2.6 Using the Display Confirm Delete optionChap_8.2.3 Performing the Name Search Chap_8.2.3.1 Steps:Chap_8.2.4 Selecting a Dataset for Processing Chap_8.2.4.1 Ending Dataset Processing Chap_8.2.4.1.1 Step:
Chap_9 Viewing Load Module Information
Chap_9.1 Accessing the Library Utility (Option 3.1) Chap_9.1.1 Step:
Chap_9.2 Defining Your Library Request
Chap_9.3 Generating a Member List Chap_9.3.1 Steps:
Chap_9.4 Using the Load Library Processing Options Chap_9.4.1 Steps:
Chap_9.5 Processing the Member List Using Primary Commands Chap_9.5.1 Steps:
Page 10
FileAid_-_Online_1
Chap_9.6 Processing the Member List Using Line Commands Chap_9.6.1 Steps:
Chap_9.7 Viewing the Load Module's CSECTS in Address Order Chap_9.7.1 Step:
Chap_10 Viewing Layouts
Chap_10.1 Accessing the View Utility (Option 8) Chap_10.1.1 Step:
Chap_10.2 Specifying the Record Layout to be Interpreted Chap_10.2.1 Steps: Chap_10.2.2 More About the View Record Layout - Dataset Specification ScreenChap_10.2.3 Viewing the Interpreted Layout Chap_10.2.3.1 Step: Chap_10.2.3.2 More About the View Display
Chap_11 Reformatting Records
Chap_11.1 Accessing the Reformat Function (Option 9) Chap_11.1.1 Steps:
Chap_11.2 Creating a New Reformat Definition Chap_11.2.1 Steps: Chap_11.2.2 More About the Reformat Definition Screen
Chap_11.3 Identifying the Source and Target Record Layouts Chap_11.3.1 Steps: Chap_11.3.2 More About the Reformat Record Layouts Screen
Chap_11.4 Using the Reformat Definition Editor Chap_11.4.1 Scrolling Chap_11.4.2 The Existing (Source) Record Layout (Upper Window) Chap_11.4.3 The New (Target) Record Layout (Lower Window) Chap_11.4.4 Commands EX, SAVE, CANCEL, END Chap_11.4.5 Scrolling Both Windows Chap_11.4.6 Steps: Chap_11.4.7 Result of Scrolling DOWN Both Windows.
Chap_11.5 Entering Constants Chap_11.5.1 Steps: Chap_11.5.2 Resetting Existing Values to a Constant Chap_11.5.3 Steps:
Chap_11.6 Initializing New Fields Chap_11.6.1 Steps:
Chap_11.7 Hiding Sensitive Data On Output Chap_11.7.1 Steps:
Chap_11.8 Establishing Selection Criteria Chap_11.8.1 Steps: Chap_11.8.2 More About Selection Criteria
Chap_11.9 Executing the Reformat Online at Your Terminal Chap_11.9.1 Viewing Results Immediately Chap_11.9.2 Controlling Copying of Unselected Records Chap_11.9.3 Limiting the Total Records Copied Chap_11.9.4 Specifying the Input and Output Datasets Chap_11.9.5 Steps:
Page 11

FileAid_-_Online_1Chap_11.10 Browsing the Reformatted File Chap_11.10.1 Steps:
Chap_12 Printing File Contents
Chap_12.1 Accessing the Print Selection Menu (Option 5) Chap_12.1.1 Step:
Chap_12.2 Selecting the Type of File To Be Printed Chap_12.2.1 Steps: Chap_12.2.2 More About the Print Selection Menu
Chap_12.3 Requesting a Print of a Data File Chap_12.3.1 Record Layout Usage Chap_12.3.2 Selection Criteria Chap_12.3.3 Steps:
Chap_12.4 Submitting the Print Job Chap_12.4.1 Steps:
Chap_12.5 Viewing the Report Output Chap_12.5.1 More About the Print Function
Chap_12.6 Exiting the Print Function Chap_12.6.1 Step:
Chap_13 Extracting a Selected Subset of Records to Create a Test File
Chap_13.1 Accessing the Selection Criteria Function (Option 6) Chap_13.1.1 Steps:
Chap_13.2 Specifying the Selection Criteria Datasets Chap_13.2.1 Steps:
Chap_13.3 Defining Formatted Field Selections Chap_13.3.1 Steps:
Chap_13.4 Viewing a Layout in Column Location Order Chap_13.4.1 Steps:
Chap_13.5 Defining Formatted Field Selection Criteria Chap_13.5.1 Steps: Chap_13.5.2 More About Formatted Selection Criteria
Chap_13.6 Saving Your Permanent Selection Criteria Member Chap_13.6.1 Steps: Chap_13.6.2 More About Selection Criteria Menu
Chap_13.7 Exiting the Selection Criteria Utility Chap_13.7.1 Steps:
Chap_13.8 Accessing the Copy Utility (3.3) Chap_13.8.1 Steps:
Chap_13.9 Specifying the "FROM" and "TO" Datasets and Selection Criteria Member Chap_13.9.1 Steps:
Chap_13.10 Exiting the Copy Utility Chap_13.10.1 Steps:
Chap_14 Automating Layout Usage with XREF
Chap_14.1 Accessing the XREF Function (Option 7)Page 12

FileAid_-_Online_1 Chap_14.1.1 Steps:
Chap_14.2 Creating a New XREF Member Chap_14.2.1 Steps:
Chap_14.3 Defining the XREF
Chap_14.4 Defining Layout Selection Rules Using Formatted Criteria Chap_14.4.1 Steps: Chap_14.4.2 More About the Define XREF Screen
Chap_14.5 Using the PPO Member Filters Chap_14.5.1 Step: Chap_14.5.2 More About PDS Processing Options For Layout Member List
Chap_14.6 Selecting a Layout Member from a Member List Chap_14.6.1 Steps:
Chap_14.7 Defining the Formatted XREF Criteria Chap_14.7.1 Showing Field Offsets with the SHOW OFFSET Command Chap_14.7.2 Steps:
Chap_14.8 Defining the Formatted Layout Selection Condition Chap_14.8.1 Steps: Chap_14.8.2 More About the Formatted XREF Definition Screen
Chap_14.9 Defining Unformatted XREF Criteria Chap_14.9.1 Steps:
Chap_14.10 Defining the Unformatted Layout Selection Condition Chap_14.10.1 Steps: Chap_14.10.2 More About Unformatted XREF Definition
Chap_14.11 Defining Formatted XREF Criteria Using Beginning Data-NameChap_14.11.1 Accessing the List of Available Layouts Screen Chap_14.11.1.1 Steps:
Chap_14.12 Selecting a Layout Structure from an Available Layouts List Chap_14.12.1 Steps:
Chap_14.13 Defining the Formatted Layout Selection - Compound Condition Chap_14.13.1 Steps:
Chap_14.14 Setting a Default Base Layout Chap_14.14.1 Steps: Chap_14.14.2 More About Default Layouts
Chap_14.15 Saving the New XREF Member Chap_14.15.1 Steps:
Chap_14.16 Exiting XREF and Returning to Main Menu Chap_14.16.1 Steps: Chap_14.16.2 More About XREF Members
Chap_14.17 Using the XREF Member - Record Layout Usage
Chap_14.18 Browsing Formatted Data Records with an XREF Chap_14.18.1 Steps:
Chap_14.19 Requesting the XREF Usage Chap_14.19.1 Steps:
Chap_14.20 Scrolling with the FWD CommandPage 13

FileAid_-_Online_1 Chap_14.20.1 Step: Chap_14.20.2 More about Scrolling Methods and XREF Usage
Chap_14.21 Printing Your Data Records with XREF Chap_14.21.1 Steps:
Chap_14.22 Routing Your FPRINT Chap_14.22.1 Steps:
Chap_15 Using File-AID/Batch
Chap_15.1 Specifying Your Batch Processing Request Chap_15.1.1 Example Control Statement Chap_15.1.2 Dataset Identifier Chap_15.1.3 Function Name Chap_15.1.4 Selection, Action, and Control Parameters
Chap_15.2 Executing the File-AID Batch Utility Interactively (Option 3.8) Chap_15.2.1 Step:
Chap_15.3 Defining Datasets to Process
Chap_15.4 Performing the Totaling Function Chap_15.4.1 Steps: Chap_15.4.2 More About the Interactive Utility Screen
Chap_15.5 Entering Control Statements Chap_15.5.1 Steps: Chap_15.5.2 More About Control Statement EntryChap_15.5.3 Exiting Interactive Execution Chap_15.5.3.1 Steps:
Chap_15.6 Submitting File-AID/Batch JCL
Chap_15.7 Examples of Customer Uses of File-AID/BatchChap_15.7.1 Applying Mass Changes to a JCL LibraryChap_15.7.2 Copying From One Input File to Create Multiple Output FilesChap_15.7.3 Scanning and Printing Data in a Load Library
Chap_16 Segmented Record File Layout Automation
Chap_16.1 How to Identify Segments in a Segmented Record File Chap_16.1.1 Specifying XREF Layout Status Chap_16.1.2 Understanding the XREF Logic Processing Technique Chap_16.1.3 Using the NEXT Command to See the Next Segment Chap_16.1.4 Using the PREV Command to See the Previous Segment Chap_16.1.5 Using the TOP Command to Return to the BASE Segment Chap_16.1.6 Editing Commands for Segmented Records Chap_16.1.7 Manual Layout Selection
Chap_16.2 Review the Sample Segmented Record XREF
Chap_16.3 Viewing an Existing XREF Member Chap_16.3.1 Steps:
Chap_16.4 Using the VIEW Command Chap_16.4.1 Steps:
Chap_16.5 Browsing the XREF View Criteria Chap_16.5.1 Steps: Chap_16.5.2 More About Segment Definitions
Chap_16.6 Using the XREF to Browse a Segmented Record FilePage 14
FileAid_-_Online_1 Chap_16.6.1 Steps:
Chap_16.7 Viewing the Next Segment Using the NEXT Command Chap_16.7.1 Steps:Chap_16.7.2 Understanding NEXT Command Processing
Chap_16.8 Jumping to Another Record with the LR (Locate Record) Command Chap_16.8.1 Steps: Chap_16.8.2 Result of LR 13
Chap_16.9 Keeping a Command On the Command Line with & (Ampersand) Chap_16.9.1 Steps: Chap_16.9.2 Continue Reviewing Segments in Record 13 Chap_16.9.2.1 Step: Chap_16.9.3 Continue Reviewing Segments Chap_16.9.3.1 Step: Chap_16.9.4 Continue Reviewing Segments Chap_16.9.4.1 Step: Chap_16.9.5 Continue Reviewing Segments Chap_16.9.5.1 Step: Chap_16.9.6 Viewing the Last Segment
Chap_16.10 Exiting File-AID with the RETURN Command Chap_16.10.1 Steps:
App_A Convert File-AID for IMS XREF Members to
App_A.1 Convert One File-AID for IMS XREF to One
App_A.2 Convert Multiple File-AID for IMS XREFs to One
App_A.3 Convert Multiple File-AID for IMS XREFs to
INDEX Index
FRONT FrontFile-AID/MVS User' s Guide Release 8.8
Please direct questions about File-AID/MVS
or comments on this document to:
File-AID/MVS Technical Support Compuware Corporation
31440 Northwestern Highway
Farmington Hills, MI 48334-2564
1-800-538-7822
Outside the USA and Canada, please contact
your local Compuware office or agent.
This document and the product referenced in it are subject to the following legends:
Page 15

FileAid_-_Online_1Copyright 1995-2001 Compuware Corporation. All rights reserved. Unpublished rights reserved under the Copyright Laws of the United States. U.S. GOVERNMENT RIGHTS-Use, duplication, or disclosure by the U.S. Government is subject to restrictions as set forth in Compuware Corporation license agreement and as provided in DFARS 227.7202-1(a) and 227.7202-3(a) (1995), DFARS 252.227-7013(c)(1)(ii) (OCT 1988), FAR 12.212(a) (1995), FAR 52.227-19, or FAR 52.227-14 (ALT III), as applicable. Compuware Corporation. This product contains confidential information and trade secrets of Compuware Corporation. Use, disclosure, or reproduction is prohibited without the prior express written permission of Compuware Corporation. Access is limited to authorized users. Use of this product is subject to the terms and conditions of the user's License Agreement with Compuware Corporation. File-AID is a registered trademark of Compuware Corporation. IBM and DB2 are registered trademarks of International Business Machines Corporation. Adobe (R) Acrobat (R) Reader copyright (C) 1987-2001 Adobe Systems Incorporated. All rights reserved. Adobe and Acrobat are trademarks of Adobe Systems Incorporated. All other company or product names are trademarks or registered trademarks of their respective owners. Doc. CWFAUX8H March 30, 2001
INTRO IntroductionThis document provides information and examples for all users of Compuware's Release 8.8.0 File-AID/MVS data management system. Use this document to learn about File- AID's facilities. By using the Compuware supplied test data, you can follow the examples shown in this document to practice using File-AID at your own pace and at your own terminal. The chapters are arranged to explain the most frequently used capabilities of File-AID first. However, the table of contents at the beginning of this book or the index at the back may provide faster access to the example information you need. If Release 8 is not your first experience with File-AID, you should read one of the conversion considerations appendixes in the back of this manual. There is an appendix for former Release 6 users and one for former Release 7 users. These sections explain the differences in Release 8 of File-AID and document utility programs you can run to make Release 8 more productive for you. Subtopics: Intro.1 What's In This Guide? Intro.2 Related Publications Intro.3 Technical Support
INTRO.1 What's In This Guide?The following list briefly describes the contents of each chapter. o Chapter 1, "Getting Started with File-AID": Access File-AID, set defaults and establish test data files.
o Chapter 2, "Browsing a Data File": Browse any data file using selection criteria and source layouts as templates over the data.
o Chapter 3, "Allocating a VSAM Cluster": Allocate a new, smaller version of a test VSAM cluster using attributes of the production file.
o Chapter 4, "Full-Screen Editing": Full-screen editing using source layouts.
o Chapter 5, "Comparing Files": Compare any two files using record layouts to report differences field by field.
Page 16

FileAid_-_Online_1
o Chapter 6, "Scanning and Updating Datasets": Use FIND and CHANGE across all PDS members, and scan or update any dataset with the Search/Update utility.
o Chapter 7, "Copying Selected PDS Members": Copy selected PDS members based on member names, ISPF statistics and/or data content.
o Chapter 8, "Finding Files On Disk": Find files with Catalog or VTOC searches.
o Chapter 9, "Viewing Load Module Information": View load module information and other PDS management facilities using the Library utility.
o Chapter 10, "Viewing Layouts": View interpreted COBOL and PL/I source layouts.
o Chapter 11, "Reformatting Records": Reformat records using the old and new source layouts as templates for data conversion.
o Chapter 12, "Printing File Contents": Print data files using optional source layouts with the Print utility.
o Chapter 13, "Extracting a Selected Subset of Records to Create a Test File": Use selection criteria to copy a subset of production data for test purposes.
o Chapter 14, "Automating Layout Usage with XREF": Use the cross reference (XREF) facility for defining source layout usage for different record types based on data values.
o Chapter 15, "Using File-AID/Batch": File-AID/Batch examples, interactive online facilities, and background JCL requirements.
o Chapter 16, "Segmented Record File Layout Automation": Segmented record processing with advanced XREF usage.
o Appendix A, "Convert File-AID for IMS XREF Members to File-AID/MVS Release 8 Format": Instructions for using the File-AID Release 8.0.2-enhanced batch CONVERT function to convert your File-AID for IMS XREFs to the File-AID Release 8 format.
INTRO.2 Related Publications o File-AID MVS Online Reference Manual (SPF and XE): Detailed reference document for users of File-AID. This manual describes the online product features, screens, options, fields, and commands.
o File-AID Batch Reference Manual: Detailed reference document for users of File- AID/Batch. This manual provides information necessary to fully use the batch features of File-AID.
o File-AID Installation Guide: Step-by-step description of the process necessary to install File-AID. It is intended for the systems group responsible for File-AID at your installation. The installation guide provides the information you need to tailor the online and batch products. It describes the security, I/O, and audit exits. In addition, it describes the SMF recording function and the Release 8 conversion utility.
Page 17

FileAid_-_Online_1 o File-AID Reference Summary: Summary of File-AID options and commands. This reference is intended for any user of File-AID.
o File-AID SMF Record Mapping Reference JES V4: Instructions and reference information for installing and using the File-AID SMF Record Mapping facility.
o File-AID Training Guide: Overview of File-AID to first-time users. This guide is made available during the File-AID training session conducted by Compuware.
o IBM Documentation: File-AID documentation does not document ISPF functions. It is assumed that the File-AID user is familiar with the ISPF environment. For more information on ISPF functions, refer to the current version and release of the following documents:
ISPF Getting Started
ISPF User's Guide
ISPF Dialog Developer's Guide and Reference
ISPF Services Guide
MVS/ESA JCL Reference.
o Innovative Data Processing, Inc. Documentation: File-AID reference manuals assume that Innovation Access Method (IAM) users are familiar with the IAM environment. Refer to the Innovation Access Method User Manual for more information.
FrontLine Support Web Site You can access online technical support for Compuware products via our FrontLine support Web site. You can read or download documentation, frequently asked questions, and product fixes, or directly e-mail Compuware with questions or comments. To access FrontLine, you must first register and obtain a password at http://frontline.compuware.com. Online Documentation Documentation for this product is provided on CD-ROM in several electronic formats. PDF files can be viewed with the free Adobe Acrobat Reader, available at http://www.adobe.com. HTML files can be viewed with any standard web browser. BookManager softcopy files can be viewed with any version of IBM BookManager READ or the IBM Library Reader. To learn more about BookManager or download the free Library Reader, go to http://booksrv2.raleigh.ibm.com. World Wide Web Compuware's site on the World Wide Web provides information about Compuware and its products. The address is http://www.compuware.com. Subtopics: Intro.2.1 File-AID/MVS Frequently Asked Questions
INTRO.2.1 File-AID/MVS Frequently Asked QuestionsCheck out File-AID/MVS's Frequently Asked Questions now located on Compuware's FrontLine support web site. They provide answers to a wide range of questions including topics related to product functions, installation, compatibility, and transition from prior releases. To access Frontline, you must first register and obtain a password at http://frontline.compuware.com.
INTRO.3 Technical SupportSubtopics:
Page 18

FileAid_-_Online_1 Intro.3.1 Documentation Feedback Intro.3.2 Product Problems
INTRO.3.1 Documentation FeedbackCompuware uses your feedback to make the best products and documentation in the industry. If you cannot locate the information you require, or if the information is not clear, please let us know.
INTRO.3.2 Product ProblemsIf problems arise, please consult your manual or the File-AID/MVS technical representative at your site. If problems persist, contact Compuware for technical support:
File-AID Technical Support Compuware Corporation
31440 Northwestern Highway
Farmington Hills, MI 48334-2564
1-800-538-7822
Outside the USA and Canada, please contact your local Compuware office or agent.
1
CHAP_1 Getting Started with File-AIDThis document is designed to give you some hands on practice with File-AID. You need to know how to access the installed version of File-AID at your site in order to use these examples online. In the screen examples, underlined values indicate entries you should make. The Steps section is an ordered list that describes the procedure to follow to accomplish the specific task, including the data values and commands you are to enter and the keys you need to press. All values are distinguished in each step in boldface type. Subtopics: Chap_1.1 Logging on to TSO with File-AID Chap_1.2 Accessing File-AID Chap_1.3 Creating Your Training Files Chap_1.4 Setting Your File-AID Default Parameters Chap_1.5 Reviewing and Changing Your Default Values
CHAP_1.1 Logging on to TSO with File-AIDFile-AID/MVS is designed to be accessed from an ISPF menu such as the ISPF/PDF PRIMARY OPTION MENU shown in Figure 1-1. The option code is usually F. A special logon PROC or allocation CLIST may be required at your site in order to define the File-AID libraries to your TSO session. Your site may choose its own logon method and ISPF menu for access to File-AID.
Figure 1-1. ISPF/PDF PRIMARY OPTION MENU - Select F for File-AID
----------------------- ISPF/PDF PRIMARY OPTION MENU ------------------------ OPTION ===> F USERID - XXXXXXX
Page 19

FileAid_-_Online_1 0 ISPF PARMS - Specify terminal and user parameters TIME - 15:06 1 BROWSE - Display source data or output listings TERMINAL - 3278 2 EDIT - Create or change source data PF KEYS - 24 3 UTILITIES - Perform utility functions 4 FOREGROUND - Invoke language processors in foreground 5 BATCH - Submit job for language processing 6 COMMAND - Enter TSO Command, CLIST, or REXX exec 7 DIALOG TEST - Perform dialog testing 8 LM UTILITIES- Perform library administrator utility functions 9 IBM PRODUCTS- Additional IBM program development products 10 SCLM - Software Configuration and Library Manager C CHANGES - Display summary of changes for this release F File-AID - File-AID data management system P PRODUCTS - COMPUWARE Products S SDSF - System Display and Search Facility U USER - User Dialogs T TUTORIAL - Display information about ISPF/PDF X EXIT - Terminate ISPF using log and list defaults
Enter END command to terminate ISPF.
CHAP_1.2 Accessing File-AIDSubtopics: Chap_1.2.1 Steps:
CHAP_1.2.1 Steps: 1. Log on to TSO using the appropriate logon PROC or allocation CLIST for File-AID.
2. Use the appropriate option code (for example, ISPF option F) or execution CLIST (for example, TSO FASTART) to display the File-AID Primary Option Menu.
After you select option F from the ISPF/PDF PRIMARY OPTION MENU (or the option code on another ISPF menu as defined at your site), or you execute the correct CLIST, the File-AID Primary Option Menu is displayed as shown in Figure 1-2.
Use the following space to note the method of access at your installation:
_________________________________________________________________________
_________________________________________________________________________
_________________________________________________________________________
Figure 1-2. File-AID Primary Option Menu
File-AID 8.8.0 ------------- Primary Option Menu --------------------------- - OPTION ===>
Page 20

FileAid_-_Online_1 0 PARAMETERS - Specify ISPF and File-AID parameters USERID - USERID9 1 BROWSE - Display file contents PF KEYS - 24 2 EDIT - Create or change file contents TERMINAL - 3278 3 UTILITIES - File-AID/SPF extended utilities TIME - 14:21 5 PRINT - Print file contents JULIAN - 00.165 6 SELECTION - Create or change selection criteria DATE - 01/03/16 7 XREF - Create or change record layout cross reference 8 VIEW - View interpreted record layout 9 REFORMAT - Convert file from one format to another 10 COMPARE - Compare file contents C CHANGES - Display summary of File-AID changes T TUTORIAL - Display information about File-AID X EXIT - Terminate File-AID and return to ISPF
Use END to terminate File-AID
Online Technical Support available at: frontline.compuware.com
Copyright (c) 1982 - 2001, by Compuware Corporation. All rights reserved. Unpublished rights reserved under the Copyright Laws of the United States. Type LEGAL on the command line for Copyright/Trade Secret Notice.
CHAP_1.3 Creating Your Training FilesDuring the installation of File-AID, a master set of sample files is created to assist with product verification and user training. A CLIST, FACOPY, is provided with File-AID from which you can create your own set of sample files that are prefixed with your TSO user ID as the high-level qualifier. Throughout the File-AID User's Guide, screen examples and data displays reflect these sample files.
Figure 1-3. Create test files - TSO FACOPY command
File-AID 8.8.0 ------------- Primary Option Menu ---- OPTION ===> TSO %FACOPY
0 PARAMETERS - Specify ISPF and File-AID parameters 1 BROWSE - Display file contents
Subtopics:
Chap_1.3.1 Steps:
CHAP_1.3.1 Steps: 1. On the COMMAND line of any screen (see Figure 1-3 above), execute the FACOPY CLIST by issuing the command TSO %FACOPY.
Notes:
a. Your site may have a different procedure for executing the FACOPY CLIST. If you receive an error message, contact the person who installed File-AID at your site.
b. Whenever three asterisks (***) are displayed, press <Enter> to continue.
2. Before creating your new training files, File-AID displays the following message:
Page 21

FileAid_-_Online_1
FACOPY PREPARING TO CREATE userid.FASAMP TRAINING FILES ANSWER "Y" TO PERMIT DELETE OF OLD AND CREATION OF NEW userid.FASAMP FI LES
3. Type a Y and press <Enter> to begin creating your training files.
4. The FACOPY process takes a couple of minutes to complete and should display status messages as it progresses. Remember, whenever three asterisks (***) are displayed, press <Enter> to continue.
5. When FACOPY is finished executing, File-AID displays an informational message, similar to the following message:
FACOPY PROCESSING HAS COMPLETED! FACOPY - YOUR TRAINING FILES (userid.FASAMP..) ARE NOW READY
CHAP_1.4 Setting Your File-AID Default ParametersThe first time you access File-AID Compuware recommends that you review your operating defaults. After you establish the defaults, File-AID saves them from session to session. Figure 1-4. Selecting Option 0 to set default Parameters
File-AID 8.8.0 ------------- Primary Option Menu ----- OPTION ===> 0 0 PARAMETERS - Specify ISPF and File-AID parameters 1 BROWSE - Display file contents 2 EDIT - Create or change file contents 3 UTILITIES - File-AID/SPF extended utilities
Subtopics:
Chap_1.4.1 Steps:
CHAP_1.4.1 Steps: 1. Select File-AID option 0.
2. Press <Enter>. File-AID displays the Parameter Selection Menu screen ( Figure 1-5) .
Figure 1-5. File-AID Parameter Selection Menu
File-AID ---------------- Parameter Selection Menu ---------------------------- OPTION ===>
0 ISPF - ISPF parameters and File-AID PF keys
1 SYSTEM - File-AID system parameters Page 22

FileAid_-_Online_1
2 SELECTION - Selection criteria default parameters
3 PRINT - Print default parameters
4 PROCESSING - Processing option default parameters
5 AUDIT - Audit file allocation parameters
6 HFS - Hierarchical File System Options
CHAP_1.5 Reviewing and Changing Your Default ValuesTake a moment to review each of the choices on the Parameter Selection Menu ( Figure 1- 5 on page 1-4) . Use this opportunity to make any desired changes. The changes you make are saved from session to session. Figure 1-6. Selecting Option 1 SYSTEM - File-AID System Parameters
File-AID ---------------- Parameter Selection Menu ---- OPTION ===> 1
0 ISPF - ISPF parameters and File-AID PF keys
1 SYSTEM - File-AID system parameters
2 SELECTION - Selection criteria default parameters
Subtopics:
Chap_1.5.1 Steps:
CHAP_1.5.1 Steps: 1. Select each option and look at the defaults that have been pre-set for you.
2. Press PF1 (HELP) to view tutorial information on each default parameter. Make any changes you like.
3. Use the END command or press PF3 (set as the default for the END command) to save any changes you have made. File-AID redisplays the Parameter Selection Menu.
4. Use the KEYS command, or select option 0, to review or change your File-AID PF key settings. The KEYS command is valid on every File-AID screen.
2
CHAP_2 Browsing a Data FileFile-AID enables you to browse a file created through any standard MVS access method (including IAM files). You can display the entire dataset or a selected subset of records. You can supply record layouts and view your data in four display modes: o Character
Page 23
FileAid_-_Online_1 o Formatted
o Vertical formatted.
o Unformatted (not available for DBCS terminals).
This chapter discusses several of the primary commands that you can use in the Browse function. Refer to the File-AID/MVS Online Reference Manual (SPF and XE) for a complete list of the primary and line commands that are supported in the Browse and Edit functions. Subtopics: Chap_2.1 Character Mode Chap_2.2 Formatted Mode Chap_2.3 Vertical Formatted Mode Chap_2.4 Unformatted Mode Chap_2.5 Accessing the Browse Function (Option 1) Chap_2.6 Selecting Records to Browse Chap_2.7 Processing Your Selection Chap_2.8 Displaying the User Profile Options Chap_2.9 Specifying the Type of Field Information to Display Chap_2.10 Displaying Only Specific Fields by Number (DISPLAY) Chap_2.11 Searching for Data Using the FIND Primary Command Chap_2.12 Invoking Character Mode (CHAR) from Formatted Mode Chap_2.13 Displaying Data in Hexadecimal Format Chap_2.14 Displaying the Column Number Information Line Chap_2.15 Searching for Data In a Specific Column Chap_2.16 Invoking Vertical Formatted Mode (VFMT) from Character Mode Chap_2.17 Removing the Mode Prompt Message Line Chap_2.18 Specifying the Type of Information to Display Chap_2.19 Selecting Fields to Display by Field Number Chap_2.20 Changing the Display Format of a Field Chap_2.21 Exiting the Browse Function Chap_2.22 Viewing the Last Referenced File List
CHAP_2.1 Character ModeThe character browse mode provides a full-screen view of the data. From character mode, you can use the FMT primary command to redisplay the data in formatted mode, the VFMT primary command to redisplay the data in Vertical Formatted mode, or UNFMT primary command to redisplay the data in Unformatted mode.
CHAP_2.2 Formatted ModeThe formatted browse mode lets you view data using a record layout. This mode presents data one record at a time and formats each record field-by-field. Record layouts can be either COBOL (FD: 01 level) or PL/I (Declare). Cross references (XREFs) are used to define automatic selection of record layouts for datasets with multiple record types. From Formatted mode, you can use the CHAR primary command to redisplay the data in Character mode, the VFMT primary command to redisplay the data in Vertical Formatted mode, or UNFMT primary command to redisplay the data in Unformatted mode.
CHAP_2.3 Vertical Formatted ModeThe vertical formatted browse mode also provides a full-screen view of the data. This mode, however, uses the record layout fields as column headers. From Vertical Formatted mode, you can use the CHAR primary command to redisplay the data in Character mode, the FMT primary command to redisplay the data in
Page 24

FileAid_-_Online_1Formatted mode, or the UNFMT primary command to redisplay the data in Unformatted mode.
CHAP_2.4 Unformatted ModeThe unformatted browse mode provides a full-screen display of your data one record at a time without record layout formatting. File-AID displays 70 characters of data per line until all data for the record is shown or the screen is filled. Unformatted mode is accessed by selecting Browse or Edit mode U (Unformatted) or entering the UNFMT primary command from Character, Formatted, or Vertical Formatted mode of Browse or Edit. From Unformatted mode, use the CHAR primary command to redisplay the data in Character mode, the FMT primary command to redisplay the data in Formatted mode, or VFMT primary command to redisplay the data in Vertical Formatted mode. Note: Unformatted mode is not available for DBCS terminals.
CHAP_2.5 Accessing the Browse Function (Option 1)The Browse function is shown as option 1 on the File-AID Primary Option Menu. Subtopics: Chap_2.5.1 Steps:
CHAP_2.5.1 Steps: 1. Enter a 1 in the OPTION field on the File-AID Primary Option Menu (not shown here).
2. Press <Enter>. File-AID displays the Browse - Dataset Specification screen as illustrated in Figure 2-1.
CHAP_2.6 Selecting Records to Browse
Figure 2-1. Browse - Dataset Specification Screen . Using a Pattern Dataset Name.
File-AID -------------- Browse - Dataset Specification ----------------------
COMMAND ===>
Browse Mode ===> F (F=Fmt; C=Char; V=Vfmt; U=Unfmt)
Specify Browse Information: Dataset name or HFS path ===> FASAMP.* Member name ===> (Blank or pattern for member list) Volume serial ===> (If dataset is not cataloged)
Specify Record Layout and XREF Information: Record layout usage ===> S (S = Single; X = XREF; N = None) Record layout dataset ===> FASAMP.LAYOUTS Member name ===> EMPLOYEE (Blank or pattern for member list) XREF dataset name ===> Member name ===> (Blank or pattern for member list)
Page 25

FileAid_-_Online_1 Specify Selection Criteria Information: (E = Existing; T = Temporary; Selection criteria usage ===> T M = Modify; Q = Quick; N = None) Selection dataset name ===> Member name ===> (Blank or pattern for member list)
Use the Browse - Dataset Specification screen to define your browse request, which consists of: o Browse Mode
o Browse Dataset
o Record Layout and XREF Information
o Selection Criteria Usage Information.
In this exercise, you create temporary selection criteria to view a subset of records. You supply a record layout to view the data in formatted and vertical formatted display modes. Subtopics: Chap_2.6.1 Steps: Chap_2.6.2 Selecting the Browse Input Dataset Chap_2.6.3 Specifying Temporary Selection Criteria Chap_2.6.4 Specifying the Selection Criteria Options Chap_2.6.5 Formatted Selection Criteria Screen Chap_2.6.6 Viewing Layout in Column Location Order Chap_2.6.7 Suppressing the Display of Field Redefinitions Chap_2.6.8 Defining Formatted Field Selection Criteria Chap_2.6.9 Defining a Compound AND Condition Chap_2.6.10 Defining Unformatted Field Selection Criteria
CHAP_2.6.1 Steps: 1. Type an F in the Browse Mode field to request the Formatted mode for viewing your data records.
2. Type the dataset name and pattern character FASAMP.* in the Dataset name or HFS path field.
The asterisk is a pattern character. It represents any single-level qualifier, or partial- level qualifier when it is preceded by 1 to 7 characters. When you use a pattern character in a dataset name, File-AID displays a list of dataset names that match the pattern you specified. You can then use the S line command to select a dataset from this list. Other valid pattern characters include question mark (?) and percent (%) (single character), as well as plus (+) and slash (/). Refer to the File-AID/MVS Online Reference Manual (SPF and XE) for more information on pattern dataset names.
3. Type an S in the Record layout usage field to indicate that you are using a single layout member to describe your data records.
4. Type the dataset name FASAMP.LAYOUTS in the Record layout dataset field.
The record layout dataset is a dataset containing the source code for one or more record layouts. You can use a layout that is embedded in a source program. An XREF member is used to extract an embedded layout from a source member. A record layout dataset can be a sequential, partitioned, PANVALET, or LIBRARIAN dataset. File-AID Release 6 map libraries are fully supported. The record layout must be a valid COBOL or PL/I declaration. Otherwise, the displayed data may be invalid.
Page 26

FileAid_-_Online_1
5. Type the member name EMPLOYEE in the layout Member name field.
If you do not specify a member, File-AID displays a list of members. You can then select a member from this list.
6. Type a T in the Selection criteria usage field to indicate that you want to create a new temporary selection criteria specification.
Selection criteria enables you to select specific records in a data file for processing. Usage option T (Temporary) dynamically invokes the Selection Criteria function and presents the Selection Criteria Menu (see Figure 2-3 on page 2-5) .
When you specify either T or Q in the Selection criteria usage field on the Browse - Dataset Specification screen, File-AID permits you to save your temporary selection criteria by issuing the SAVE command. File-AID displays a screen to give you the opportunity to save your criteria permanently in a selection criteria dataset. Your sample training file, userid.FASAMP.SELCRIT, may be used to save selection criteria you create.
7. Press <Enter>. File-AID displays the Dataset List illustrated in Figure 2-2 on page 2-4.
CHAP_2.6.2 Selecting the Browse Input DatasetSince you entered an asterisk pattern character as part of the dataset name in the Dataset name field on the Browse - Dataset Specification screen, File-AID displays a list of datasets that match the pattern you specified. Select the dataset you want to use from this list. Subtopics: Chap_2.6.2.1 Steps: Chap_2.6.2.2 More About the Catalog Utility Dataset List
CHAP_2.6.2.1 Steps: 1. Enter the S (select) line command next to the dataset userid.FASAMP.EMPMAST.
In the figure below, userid is shown as USERID9. Your TSO ID should appear on your list.
2. Press <Enter>. File-AID displays the Selection Criteria Menu screen illustrated in Figure 2-3 on page 2-5.
Figure 2-2. Catalog Utility Dataset List Screen . Selecting From a List of Datasets Matching Your Pattern.
File-AID ------------- Catalog Utility Dataset List ---- Select BROWSE Input COMMAND ===> SCROLL ===> PAGE ----- D A T A S E T N A M E -------------- --Type-- -Volume- -Status- USERID9.FASAMP.COMPARE CLUSTER PRD928 USERID9.FASAMP.EMPLOYEE CLUSTER PRD928 USERID9.FASAMP.EMPLOYE2 NON-VSAM PRD925 S USERID9.FASAMP.EMPMAST NON-VSAM PRD925 USERID9.FASAMP.INVFILE NON-VSAM PRD925 USERID9.FASAMP.INVFILE2 NON-VSAM PRD925
Page 27

FileAid_-_Online_1 USERID9.FASAMP.JCL NON-VSAM PRD925 USERID9.FASAMP.LAYOUTS NON-VSAM PRD925 USERID9.FASAMP.LOADLIB1 NON-VSAM PRD925 USERID9.FASAMP.LOADLIB2 NON-VSAM PRD925 USERID9.FASAMP.ORDRFILE NON-VSAM PRD925 USERID9.FASAMP.RFMTDEF NON-VSAM PRD925 USERID9.FASAMP.SEGFILE NON-VSAM PRD925 USERID9.FASAMP.SELCRIT NON-VSAM PRD925 USERID9.FASAMP.XREF NON-VSAM PRD925 ******************************* BOTTOM OF DATA ********************************
CHAP_2.6.2.2 More About the Catalog Utility Dataset List o S is the only valid line command and may be specified for only one dataset.
o The Dataset List of matching names is displayed whenever you use a pattern character to specify a dataset name on any File-AID screen.
CHAP_2.6.3 Specifying Temporary Selection Criteria
Figure 2-3. File-AID Selection Criteria Menu Screen
File-AID - Selection Criteria Menu - TEMPORARY --------------------------------
OPTION ===> 1 - Status - 1 OPTIONS - Enter selection criteria options default 2 FORMATTED - Edit formatted selection criteria 0 sets 3 UNFORMATTED - Edit unformatted selection criteria 0 sets
Member list description ===> SC FOR EMPMAST________________
Long ===> LIMIT TO 12 RECORDS MEETING THE FOLLOWING: SINGLE AND LOCAL__
Description ===> TAX LE 7 OR LIVING IN AREA CODES 404, 408 OR 415______________
Use VIEW command to display selection criteria summary Use SAVE command to write selection criteria request Use END to continue processing Use CANCEL to return to main panel
Use the Selection Criteria Menu screen to access facilities for defining selection conditions based on formatted or unformatted field selection criteria and/or options for reading records. Option 1 (Enter selection criteria options) displays the Selection Criteria Options screen. Here you can tell File-AID where you want to begin selecting records, establish a random read pattern, and set limits on the number of
Page 28

FileAid_-_Online_1records processed. Subtopics: Chap_2.6.3.1 Steps: Chap_2.6.3.2 More About Temporary Selection Criteria
CHAP_2.6.3.1 Steps: 1. Enter a 1 in the OPTION field.
2. Enter the description SC FOR EMPMAST in the Member list description field.
Since this is temporary selection criteria the description is optional. However, if you decide to SAVE this criteria permanently, File-AID displays this description on the Member List screen.
3. Enter the description LIMIT TO 12 RECORDS MEETING THE FOLLOWING: SINGLE AND LOCAL TAX LE 7 OR LIVING IN AREA CODES 404, 408, OR 415 in the Long Description field.
Once again, since this is temporary criteria, descriptions are not needed unless you SAVE your temporary criteria,
4. Press <Enter>. File-AID displays the Selection Criteria Options screen as shown in Figure 2-4 on page 6.
CHAP_2.6.3.2 More About Temporary Selection Criteria o From the criteria menu you can access selection options or either of the two types of field selection criteria: formatted and unformatted.
o Formatted selection criteria allow you to select records based on data within a field as specified by a record layout.
o Unformatted selection criteria allow you to select records based on freeform data specifications without using a record layout.
o Processing of your temporary selection criteria occurs when you END from the menu.
o If you specify usage option Q (Quick) on the Browse - Dataset Specification screen, File-AID creates temporary criteria but bypasses the Selection criteria menu screen and takes you directly to the unformatted selection criteria screen. When you END from the unformatted screen, your selection criteria is applied immediately. With usage Q, default options are used and all records are read and selected based on the defaults you establish in your 0.2 Selection Parameters for number of records to search and select.
CHAP_2.6.4 Specifying the Selection Criteria Options
Figure 2-4. Selection Criteria Options Screen
File-AID -------------- Selection Criteria Options --------------------------
COMMAND ===> FMT Specify Selection Criteria Options:
Page 29

FileAid_-_Online_1 Start at the following record key (both blank for start of dataset) Starting record key ===> - OR - OR at the following RBA or RRN Starting RBA or RRN ===>
Initial records to skip ===> 0 then skip this many records
Subsequent Selection Interval: then repeat the following Records to select ===> 1 - select this many records Records to skip ===> 0 - then skip this many records until Number of records to search ===> ALL you have read this many records Number of records to select ===> 12 or selected this many records
SEQ/VSAM processing direction ===> F (F = Forward; B = Backward)
Use ENTER to return to selection criteria menu
The Selection Criteria Options screen allows you to control the selection of records based on a starting record key, RBA or RRN, and record counts. File-AID reads and selects records in a file based on the values you specify on this screen. File-AID then compares the selected records to any formatted and unformatted selection criteria to determine if any of the selected records match the selection criteria. In this example, you limit the number of selected matching records to 12. Subtopics: Chap_2.6.4.1 Steps: Chap_2.6.4.2 More About Selection Criteria Options
CHAP_2.6.4.1 Steps: 1. Type a value of 12 in the Number of records to select field.
The value you specify in this field sets the limit for the total number of records that File-AID selects from the dataset. Valid values are ALL (the default), 0 (means all), and 1 through 999999.
2. Type FMT in the COMMAND field.
The FMT primary command invokes the Formatted Selection Criteria screen.
3. Press <Enter>. File-AID displays the EMPLOYEE record layout as illustrated in Figure 2-5 on page 2-8.
CHAP_2.6.4.2 More About Selection Criteria Options o If no command is issued, both END or ENTER produce the same result: you are returned to the selection criteria menu.
o The "Starting record key" field enables you to specify a random starting point for File-AID to begin selecting records. You can specify this field for VSAM KSDS, keyed BDAM, and ISAM files. All records before the starting record key are not selected, regardless of matching formatted or unformatted field selection criteria.
o The "Starting RBA or RRN" field enables you to specify a random Page 30

FileAid_-_Online_1 starting point for record selection in a VSAM or BDAM dataset. All records before the specified starting RBA or RRN are not selected, regardless of matching formatted or unformatted field selection criteria.
o The "Initial records to skip" field tells File-AID how many records to skip before processing the dataset. Valid values are 0 through 999999. A value of 0 (zero) tells File-AID to process all records in the dataset.
o The Subsequent Selection Interval: "Records to select" field tells File-AID how many records to retrieve from the dataset per interval. Valid values are 1 through 999999. The default value is 1. File-AID applies all field selection criteria after it retrieves each record.
The Subsequent Selection Interval: "Records to skip" field tells File-AID how many records to skip after it reaches the value you specified in the "Records to select" field. A value greater than 0 (zero) establishes the selection interval. Valid values are 0 through 999999. A value of 0 (zero) tells File-AID to ignore the "Interval Records to select" value.
o The "Number of records to search" field tells File-AID the maximum number of records to read from the dataset. This parameter can prevent excessive I/O processing when searching large files. Valid values are ALL and 0 through 999999. The default for the field is ALL. Both ALL and 0 (zero) indicate to search the entire file.
o The "Number of records to select" field tells File-AID the maximum number of records to select if the records match the selection criteria. Valid values are ALL and 0 through 999999. The default for the field is ALL. Both ALL and 0 (zero) indicate no limit on the number of records selected. You may establish your own default value for these fields by using option 0.2 (Selection Criteria Parameters).
o The "SEQ/VSAM processing direction" field indicates the direction in which File-AID is to read the file (sequential or VSAM). Valid values are F (forward) and B (backward). If you specify a value of B when processing a file other than a sequential or VSAM file, File-AID ignores the value and starts processing at the beginning of the file.
CHAP_2.6.5 Formatted Selection Criteria Screen
Figure 2-5. Formatted Selection Criteria Screen
File-AID --- Formatted Selection Criteria ----------------- COLUMNS 00001 00098 COMMAND ===> SCROLL ===> PAGE SC010- Valid commands are: INSERT, DELETE, REPEAT, VIEW, SAVE, CANCEL, PROFILE ---- FIELD LEVEL/NAME ------- -FORMAT- RO ----+----1----+----2----+----3----+- ******************************* TOP OF DATA ******************************** 5 EMP-NUMBER 5/AN 5 EMP-LAST-NAME 15/AN 5 EMP-FIRST-NAME 10/AN 5 EMP-MID-INIT 1/AN 5 FILLER 2/AN 5 EMP-TITLE 30/AN 5 EMP-PERSONAL-INFO SYNC 23/GRP 10 EMP-NATL-ID-NUMBER 9/NUM 10 FILLER 1/AN 10 EMP-DATE-OF-BIRTH 6/AN
Page 31

FileAid_-_Online_1 10 EMP-DOB-REDEF REDEFINES EMP-DATE-OF-BIRTH 10 EMP-DOB-REDEF SYNC 6/GRP 15 EMP-DOB-MM 2/NUM 15 EMP-DOB-DD 2/NUM 15 EMP-DOB-YY 2/NUM 10 EMP-HIRE-DATE 6/AN 10 EMP-MARITAL-STATUS 1/AN 5 EMP-WITHOLD-INFO SYNC 15/GRP Use VIEW command to browse selection criteria summary
Subtopics:
Chap_2.6.5.1 General Information About Formatted Selection Criteria Chap_2.6.5.2 Profile tailoring commands
CHAP_2.6.5.1 General Information About Formatted Selection CriteriaOn initial entry to the formatted screen, a message is displayed on line 3 and lists some of the valid commands you can use. In addition to the commands listed, valid commands include:
CAPS Use CAPS OFF to establish exact case testing for character fields. Default CAPS ON provides tests for any case and translates entered lowercase characters to uppercase.
DISPLAY Control fields displayed and format of fields.
END Return to the Selection Criteria Menu screen.
SHOW Control information displayed in center column (OFFSET, FORMAT, PICTURE).
OFFSET Control format of offset shown (COLUMNS, RELATIVE, HEX).
OPTIONS Jump to Selection Criteria Options screen.
UNFMT Jump to Unformatted Selection Criteria screen.
ZERO Control zero suppress for numeric fields.
CHAP_2.6.5.2 Profile tailoring commandsSee Table 2-1 on page 2-21 for a complete list of the user profile options and the corresponding profile commands.
CHAP_2.6.6 Viewing Layout in Column Location OrderIssue the SHOW OFFSET command to see the offset of each layout field. (To define unformatted field criteria later in this example, you need to know the offset of the EMP-CON-HOME-PHONE field.)
Page 32

FileAid_-_Online_1 Figure 2-6. Formatted Selection Criteria Screen (SHOW OFFSET Command)
File-AID --- Formatted Selection Criteria -------------- COMMAND ===> SHOW OFFSET SC010- Valid commands are: INSERT, DELETE, REPEAT, VIEW, ---- FIELD LEVEL/NAME ------- -FORMAT- RO ----+----1---- ******************************* TOP OF DATA ************ 5 EMP-NUMBER 5/AN
Subtopics:
Chap_2.6.6.1 Steps: Chap_2.6.6.2 Formatted Selection Criteria - Field Offsets
CHAP_2.6.6.1 Steps: 1. Type SHOW OFFSET in the COMMAND field.
2. Press <Enter>. File-AID redisplays the Formatted Selection Criteria screen as shown in Figure 2-7 displaying the column position of the first byte of each field.
CHAP_2.6.6.2 Formatted Selection Criteria - Field Offsets
Figure 2-7. Formatted Selection Criteria - Field Offset Information
File-AID --- Formatted Selection Criteria ----------------- COLUMNS 00001 00098 COMMAND ===> SCROLL ===> PAGE CRITERIA NUMBER: 1 OF 1 EMPLOYEE-MASTER-FILE LAYOUT LENGTH: 198 ---- FIELD LEVEL/NAME ------- COLUMNS- RO ----+----1----+----2----+----3----+- ******************************* TOP OF DATA ******************************** 5 EMP-NUMBER 1 5 EMP-LAST-NAME 6 5 EMP-FIRST-NAME 21 5 EMP-MID-INIT 31 5 FILLER 32 5 EMP-TITLE 34 5 EMP-PERSONAL-INFO SYNC 64 10 EMP-NATL-ID-NUMBER 64 10 FILLER 73 10 EMP-DATE-OF-BIRTH 74 10 EMP-DOB-REDEF REDEFINES EMP-DATE-OF-BIRTH 10 EMP-DOB-REDEF SYNC 74 15 EMP-DOB-MM 74 15 EMP-DOB-DD 76 15 EMP-DOB-YY 78 10 EMP-HIRE-DATE 80 10 EMP-MARITAL-STATUS 86 5 EMP-WITHOLD-INFO SYNC 87 Use VIEW command to browse selection criteria summary
CHAP_2.6.7 Suppressing the Display of Field RedefinitionsIssue the REDEFINES OFF command to suppress the display of field redefinitions. REDEFINES can be abbreviated REDEF.
Page 33

FileAid_-_Online_1Note: The REDEFINES profile setting command issued during selection criteria definition is temporary and does not affect the browse/edit formatted display profile setting. Most other profile setting commands will affect the browse/edit profile. Upon initial entry to the formatted selection criteria screen, File-AID temporarily sets REDEFINES ON.
Figure 2-8. Suppress Redefinitions (REDEF OFF Command)
File-AID --- Formatted Selection Criteria -------------- COMMAND ===> REDEF OFF CRITERIA NUMBER: 1 OF 1 EMPLOYEE-MASTER-FILE ---- FIELD LEVEL/NAME ------- COLUMNS- RO ----+----1---- ******************************* TOP OF DATA ************ 5 EMP-NUMBER 1
Subtopics:
Chap_2.6.7.1 Steps: Chap_2.6.7.2 Formatted Selection Criteria - Without Redefines
CHAP_2.6.7.1 Steps: 1. Type REDEF OFF in the COMMAND field.
2. Press <Enter>. File-AID redisplays the Formatted Selection Criteria screen as shown in Figure 2-9 and suppresses the EMP-DOB redefinitions of EMP-DATE-OF-BIRTH.
CHAP_2.6.7.2 Formatted Selection Criteria - Without Redefines
Figure 2-9. Formatted Selection Criteria Entry Screen - Without Redefines
File-AID --- Formatted Selection Criteria ----------------- COLUMNS 00001 00098 COMMAND ===> SCROLL ===> PAGE CRITERIA NUMBER: 1 OF 1 EMPLOYEE-MASTER-FILE LAYOUT LENGTH: 198 ---- FIELD LEVEL/NAME ------- COLUMNS- RO ----+----1----+----2----+----3----+- ******************************* TOP OF DATA ******************************** 5 EMP-NUMBER 1 5 EMP-LAST-NAME 6 5 EMP-FIRST-NAME 21 5 EMP-MID-INIT 31 5 FILLER 32 5 EMP-TITLE 34 5 EMP-PERSONAL-INFO SYNC 64 10 EMP-NATL-ID-NUMBER 64 10 FILLER 73 10 EMP-DATE-OF-BIRTH 74 10 EMP-HIRE-DATE 80 10 EMP-MARITAL-STATUS 86 5 EMP-WITHOLD-INFO SYNC 87 10 EMP-LIFE-INS-WITHOLD-AMT 87 10 EMP-NATL-TAX-WITHOLD-PCT 93 10 EMP-REGION-TAX-WITHOLD-PCT 96 10 EMP-LOCAL-TAX-WITHOLD-PCT
Page 34

FileAid_-_Online_1 Use VIEW command to browse selection criteria summary
CHAP_2.6.8 Defining Formatted Field Selection CriteriaYou can selectively choose records for processing by defining one or more conditions that a record must meet in order to be selected. With formatted selection criteria, you can select records based on the value of a specified field within the record layout. To search for a specific field value, you must define a test condition for that field. The test condition consists of the field name, a relational operator (RO), and the value for which you want to test. The relational operator is entered under the RO column on the screen and can be specified in a letter or symbolic format (for example, "equal to" can be specified as EQ or =). The field value is entered to the right of the relational operator. Numeric field data is always entered as a decimal value (digits 0-9) with a decimal point if needed. Subtopics: Chap_2.6.8.1 Steps: Chap_2.6.8.2 More About Selection Criteria
CHAP_2.6.8.1 Steps: 1. Type EQ in the RO column next to the field name EMP-MARITAL-STATUS.
2. Type an S in the data area (to the right of the EQ you just typed) to define the test "MARITAL-STATUS EQUAL TO S".
3. Type DOWN in the COMMAND field and press <Enter> (or use PF8) to view more layout fields. File-AID scrolls the Formatted Selection Criteria screen down one full page as shown in Figure 2-11 on page 2-13.
Figure 2-10. Specifying a Formatted Selection Criteria Test Condition
File-AID --- Formatted Selection Criteria ----------------- COLUMNS 00001 00098 COMMAND ===> DOWN SCROLL ===> PAGE CRITERIA NUMBER: 1 OF 1 EMPLOYEE-MASTER-FILE LAYOUT LENGTH: 198 ---- FIELD LEVEL/NAME ------- COLUMNS- RO ----+----1----+----2----+----3----+- ******************************* TOP OF DATA ******************************** 5 EMP-NUMBER 1 5 EMP-LAST-NAME 6 5 EMP-FIRST-NAME 21 5 EMP-MID-INIT 31 5 FILLER 32 5 EMP-TITLE 34 5 EMP-PERSONAL-INFO SYNC 64 10 EMP-NATL-ID-NUMBER 64 10 FILLER 73 10 EMP-DATE-OF-BIRTH 74 10 EMP-HIRE-DATE 80 10 EMP-MARITAL-STATUS 86 EQ S 5 EMP-WITHOLD-INFO SYNC 87 10 EMP-LIFE-INS-WITHOLD-AMT 87 10 EMP-NATL-TAX-WITHOLD-PCT 93 10 EMP-REGION-TAX-WITHOLD-PCT 96 10 EMP-LOCAL-TAX-WITHOLD-PCT Use VIEW command to browse selection criteria summary
Page 35

FileAid_-_Online_1
CHAP_2.6.8.2 More About Selection Criteria o Other relational operators (RO) supported include:
NE Not equal
LE Less than or equal
LT Less than
GT Greater than
GE Greater than or equal
EQ Equal
CO Contains
NC Not contains
BT Between (specify value1:value2 - endpoints inclusive)
NB Not between (specify value1:value2 - endpoints exclusive)
VA Valid
NV Not Valid
o To specify a search argument that contains case-sensitive data, you must enter the CAPS OFF primary command.
o Multiple values can be tested in non-numeric fields using the CO and EQ operators by separating the values with commas. For example: EQ ABC,DEF,GHI
o You can use the REPEAT or INSERT command to add a new selection criteria set. Sets are ORed together and only one of the test sets must be true. If a record fails to match CRITERIA NUMBER 1 in an ORed condition, File-AID tests the record to see if CRITERIA NUMBER 2 matches. As soon as a record matches any set, File-AID selects it. If a record fails to match any formatted set, it is checked against each unformatted set. If the record fails all tests, it is not selected.
CHAP_2.6.9 Defining a Compound AND ConditionWhen you specify test conditions for more than one field in a criteria set, File-AID links the tests together (the tests are ANDed) and requires that all the conditions be true before it selects a record. You can use the REPEAT or INSERT command to add a new selection criteria set. Sets are ORed.
Figure 2-11. Formatted Selection Criteria - Compound AND Condition
File-AID --- Formatted Selection Criteria ----------------- COLUMNS 00099 00198 COMMAND ===> UNFMT SCROLL ===> PAGE
Page 36

FileAid_-_Online_1 CRITERIA NUMBER: 1 OF 1 EMPLOYEE-MASTER-FILE LAYOUT LENGTH: 198 ---- FIELD LEVEL/NAME ------- COLUMNS- RO ----+----1----+----2----+----3----+- 10 EMP-LOCAL-TAX-WITHOLD-PC 99 LE 7 5 EMP-HOME-ADDRESS SYNC 102 10 EMP-STREET-ADDRESS 102 10 FILLER 127 10 EMP-CITY 128 10 EMP-STATE-PROV-CNTY SYNC 143 15 EMP-STATE 143 15 FILLER 145 10 EMP-POSTAL-CODE 147 5 EMP-EMERGENCY-CONTACT SYNC 152 10 EMP-CONTACT-NAME 152 10 FILLER 177 10 EMP-CON-WORK-PHONE 179 10 EMP-CON-HOME-PHONE 189 ***************************** BOTTOM OF DATA *******************************
Use VIEW command to browse selection criteria summary
Subtopics:
Chap_2.6.9.1 Steps:
CHAP_2.6.9.1 Steps: 1. Type LE in the RO column next to the field name EMP-LOCAL-TAX-WITHOLD-PCT.
2. Type a 7 in data area to define the test.
You have now created a compound criteria set matching records with MARITAL- STATUS EQUAL TO S and EMP-LOCAL-TAX-WITHOLD-PCT LESS THAN OR EQUAL TO 7.
3. Notice the column offset (189) of the EMP-CON-HOME-PHONE field. In Figure 2-12 on page 2-14 you define a test to select records based on the value of the area code (first three characters of the PHONE field) using unformatted selection criteria.
4. Type UNFMT in the COMMAND field.
Instead of entering the UNFMT command, you could enter the END primary command to return to the Selection Criteria Menu and then select option 3 (Unformatted). Or, you could have entered the 3 command. 3 is an alias for UNFMT.
5. Press <Enter> to display the Unformatted Selection Criteria screen as shown in Figure 2-12 on page 2-14.
CHAP_2.6.10 Defining Unformatted Field Selection CriteriaWithout using a record layout, you can define a test condition based on the known position of a field or you can scan for a data value contained within the record. Japanese Data: DBCS and single byte Katakana data is accepted as selection criteria data values for data types C (Character) and T (Text). With unformatted selection criteria, File- AID removes leading or trailing shift characters from DBCS data unless the value is enclosed in double quotes. When KANA is specified
Page 37
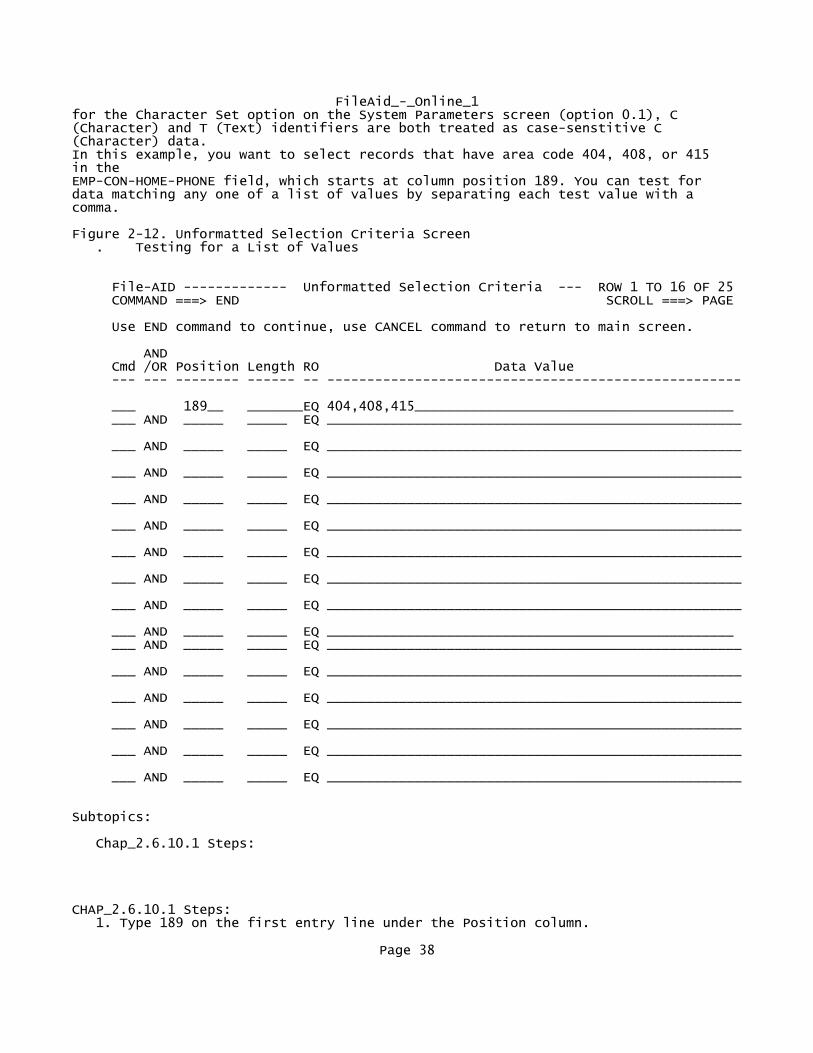
FileAid_-_Online_1for the Character Set option on the System Parameters screen (option 0.1), C (Character) and T (Text) identifiers are both treated as case-senstitive C (Character) data. In this example, you want to select records that have area code 404, 408, or 415 in the EMP-CON-HOME-PHONE field, which starts at column position 189. You can test for data matching any one of a list of values by separating each test value with a comma.
Figure 2-12. Unformatted Selection Criteria Screen . Testing for a List of Values
File-AID ------------- Unformatted Selection Criteria --- ROW 1 TO 16 OF 25 COMMAND ===> END SCROLL ===> PAGE
Use END command to continue, use CANCEL command to return to main screen.
AND Cmd /OR Position Length RO Data Value --- --- -------- ------ -- ----------------------------------------------------
___ 189__ _______EQ 404,408,415________________________________________ ___ AND _____ _____ EQ ____________________________________________________
___ AND _____ _____ EQ ____________________________________________________
___ AND _____ _____ EQ ____________________________________________________
___ AND _____ _____ EQ ____________________________________________________
___ AND _____ _____ EQ ____________________________________________________
___ AND _____ _____ EQ ____________________________________________________
___ AND _____ _____ EQ ____________________________________________________
___ AND _____ _____ EQ ____________________________________________________
___ AND _____ _____ EQ ___________________________________________________ ___ AND _____ _____ EQ ____________________________________________________
___ AND _____ _____ EQ ____________________________________________________
___ AND _____ _____ EQ ____________________________________________________
___ AND _____ _____ EQ ____________________________________________________
___ AND _____ _____ EQ ____________________________________________________
___ AND _____ _____ EQ ____________________________________________________
Subtopics:
Chap_2.6.10.1 Steps:
CHAP_2.6.10.1 Steps: 1. Type 189 on the first entry line under the Position column.
Page 38
FileAid_-_Online_1 The Position tells File-AID where in the record to begin the search.
2. Verify that the value of the relational operator is "equal to" (either EQ or =).
The relational operator default value is EQ. Use option 0.2 Selection Defaults if you want to change the default.
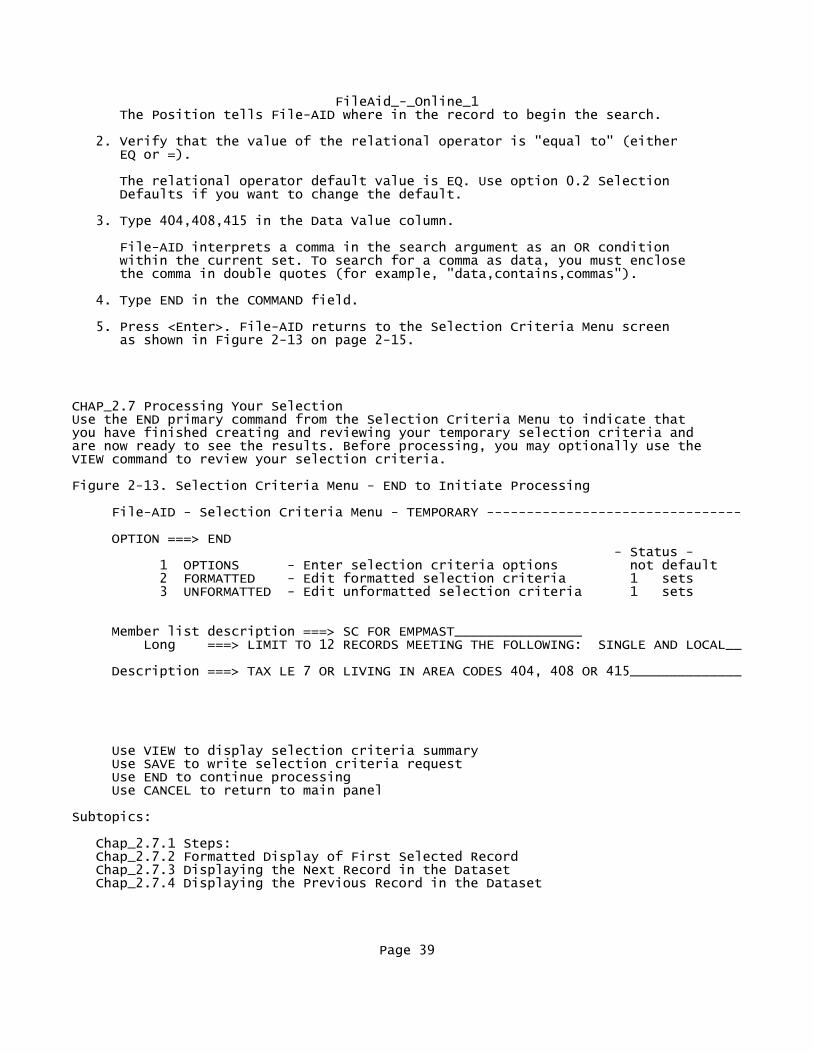
3. Type 404,408,415 in the Data Value column.
File-AID interprets a comma in the search argument as an OR condition within the current set. To search for a comma as data, you must enclose the comma in double quotes (for example, "data,contains,commas").
4. Type END in the COMMAND field.
5. Press <Enter>. File-AID returns to the Selection Criteria Menu screen as shown in Figure 2-13 on page 2-15.
CHAP_2.7 Processing Your SelectionUse the END primary command from the Selection Criteria Menu to indicate that you have finished creating and reviewing your temporary selection criteria and are now ready to see the results. Before processing, you may optionally use the VIEW command to review your selection criteria.
Figure 2-13. Selection Criteria Menu - END to Initiate Processing
File-AID - Selection Criteria Menu - TEMPORARY --------------------------------
OPTION ===> END - Status - 1 OPTIONS - Enter selection criteria options not default 2 FORMATTED - Edit formatted selection criteria 1 sets 3 UNFORMATTED - Edit unformatted selection criteria 1 sets
Member list description ===> SC FOR EMPMAST________________ Long ===> LIMIT TO 12 RECORDS MEETING THE FOLLOWING: SINGLE AND LOCAL__
Description ===> TAX LE 7 OR LIVING IN AREA CODES 404, 408 OR 415______________
Use VIEW to display selection criteria summary Use SAVE to write selection criteria request Use END to continue processing Use CANCEL to return to main panel
Subtopics:
Chap_2.7.1 Steps: Chap_2.7.2 Formatted Display of First Selected Record Chap_2.7.3 Displaying the Next Record in the Dataset Chap_2.7.4 Displaying the Previous Record in the Dataset
Page 39
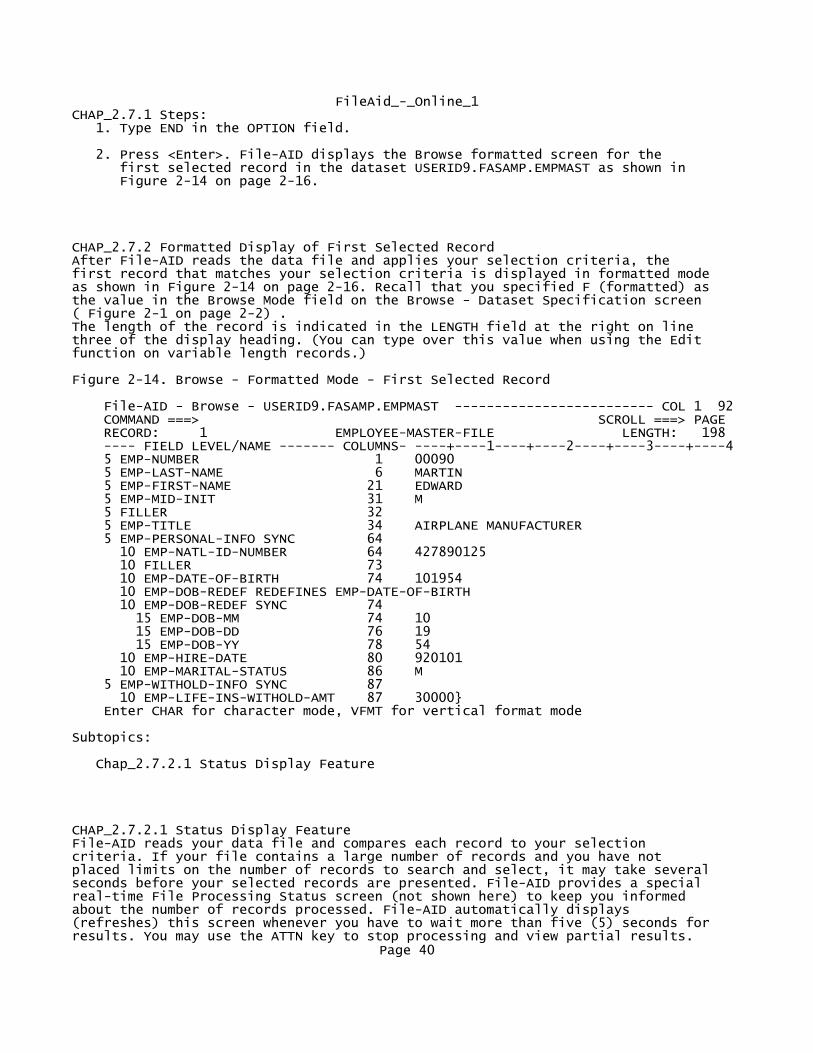
FileAid_-_Online_1CHAP_2.7.1 Steps: 1. Type END in the OPTION field.
2. Press <Enter>. File-AID displays the Browse formatted screen for the first selected record in the dataset USERID9.FASAMP.EMPMAST as shown in Figure 2-14 on page 2-16.
CHAP_2.7.2 Formatted Display of First Selected RecordAfter File-AID reads the data file and applies your selection criteria, the first record that matches your selection criteria is displayed in formatted mode as shown in Figure 2-14 on page 2-16. Recall that you specified F (formatted) as the value in the Browse Mode field on the Browse - Dataset Specification screen ( Figure 2-1 on page 2-2) . The length of the record is indicated in the LENGTH field at the right on line three of the display heading. (You can type over this value when using the Edit function on variable length records.)
Figure 2-14. Browse - Formatted Mode - First Selected Record
File-AID - Browse - USERID9.FASAMP.EMPMAST ------------------------- COL 1 92 COMMAND ===> SCROLL ===> PAGE RECORD: 1 EMPLOYEE-MASTER-FILE LENGTH: 198 ---- FIELD LEVEL/NAME ------- COLUMNS- ----+----1----+----2----+----3----+----4 5 EMP-NUMBER 1 00090 5 EMP-LAST-NAME 6 MARTIN 5 EMP-FIRST-NAME 21 EDWARD 5 EMP-MID-INIT 31 M 5 FILLER 32 5 EMP-TITLE 34 AIRPLANE MANUFACTURER 5 EMP-PERSONAL-INFO SYNC 64 10 EMP-NATL-ID-NUMBER 64 427890125 10 FILLER 73 10 EMP-DATE-OF-BIRTH 74 101954 10 EMP-DOB-REDEF REDEFINES EMP-DATE-OF-BIRTH 10 EMP-DOB-REDEF SYNC 74 15 EMP-DOB-MM 74 10 15 EMP-DOB-DD 76 19 15 EMP-DOB-YY 78 54 10 EMP-HIRE-DATE 80 920101 10 EMP-MARITAL-STATUS 86 M 5 EMP-WITHOLD-INFO SYNC 87 10 EMP-LIFE-INS-WITHOLD-AMT 87 30000} Enter CHAR for character mode, VFMT for vertical format mode
Subtopics:
Chap_2.7.2.1 Status Display Feature
CHAP_2.7.2.1 Status Display FeatureFile-AID reads your data file and compares each record to your selection criteria. If your file contains a large number of records and you have not placed limits on the number of records to search and select, it may take several seconds before your selected records are presented. File-AID provides a special real-time File Processing Status screen (not shown here) to keep you informed about the number of records processed. File-AID automatically displays (refreshes) this screen whenever you have to wait more than five (5) seconds for results. You may use the ATTN key to stop processing and view partial results.
Page 40
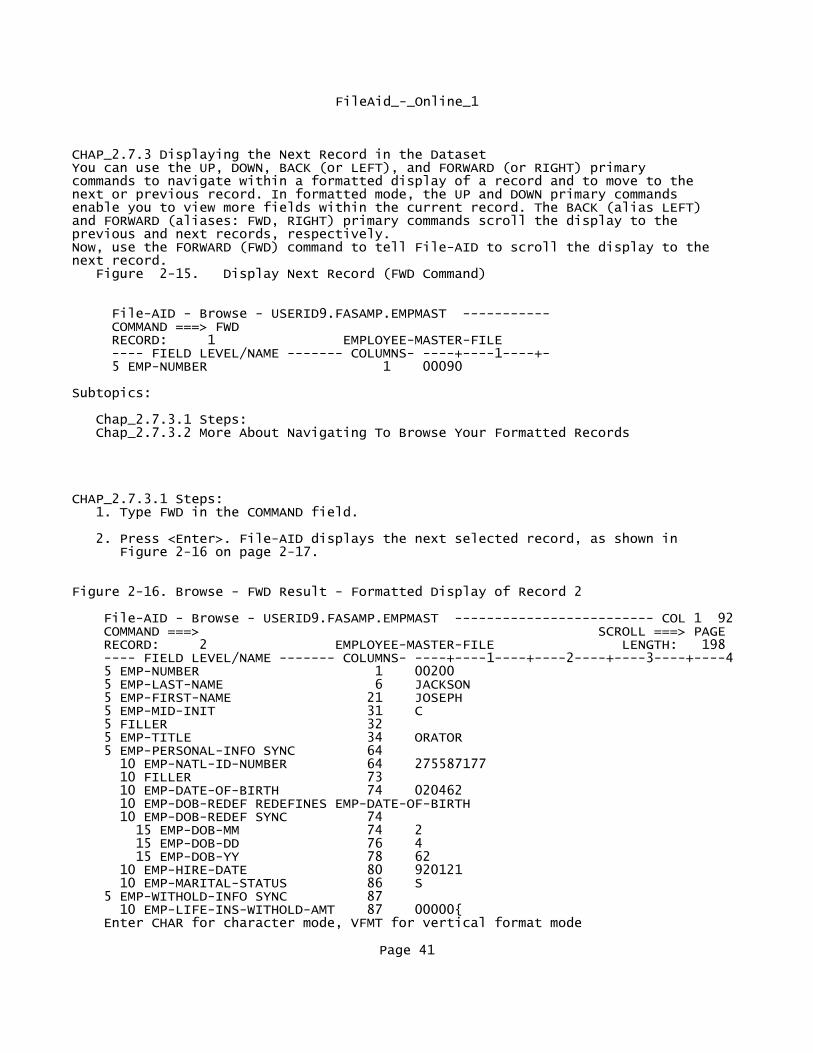
FileAid_-_Online_1
CHAP_2.7.3 Displaying the Next Record in the DatasetYou can use the UP, DOWN, BACK (or LEFT), and FORWARD (or RIGHT) primary commands to navigate within a formatted display of a record and to move to the next or previous record. In formatted mode, the UP and DOWN primary commands enable you to view more fields within the current record. The BACK (alias LEFT) and FORWARD (aliases: FWD, RIGHT) primary commands scroll the display to the previous and next records, respectively. Now, use the FORWARD (FWD) command to tell File-AID to scroll the display to the next record. Figure 2-15. Display Next Record (FWD Command)
File-AID - Browse - USERID9.FASAMP.EMPMAST ----------- COMMAND ===> FWD RECORD: 1 EMPLOYEE-MASTER-FILE ---- FIELD LEVEL/NAME ------- COLUMNS- ----+----1----+- 5 EMP-NUMBER 1 00090
Subtopics:
Chap_2.7.3.1 Steps: Chap_2.7.3.2 More About Navigating To Browse Your Formatted Records
CHAP_2.7.3.1 Steps: 1. Type FWD in the COMMAND field.
2. Press <Enter>. File-AID displays the next selected record, as shown in Figure 2-16 on page 2-17.
Figure 2-16. Browse - FWD Result - Formatted Display of Record 2
File-AID - Browse - USERID9.FASAMP.EMPMAST ------------------------- COL 1 92 COMMAND ===> SCROLL ===> PAGE RECORD: 2 EMPLOYEE-MASTER-FILE LENGTH: 198 ---- FIELD LEVEL/NAME ------- COLUMNS- ----+----1----+----2----+----3----+----4 5 EMP-NUMBER 1 00200 5 EMP-LAST-NAME 6 JACKSON 5 EMP-FIRST-NAME 21 JOSEPH 5 EMP-MID-INIT 31 C 5 FILLER 32 5 EMP-TITLE 34 ORATOR 5 EMP-PERSONAL-INFO SYNC 64 10 EMP-NATL-ID-NUMBER 64 275587177 10 FILLER 73 10 EMP-DATE-OF-BIRTH 74 020462 10 EMP-DOB-REDEF REDEFINES EMP-DATE-OF-BIRTH 10 EMP-DOB-REDEF SYNC 74 15 EMP-DOB-MM 74 2 15 EMP-DOB-DD 76 4 15 EMP-DOB-YY 78 62 10 EMP-HIRE-DATE 80 920121 10 EMP-MARITAL-STATUS 86 S 5 EMP-WITHOLD-INFO SYNC 87 10 EMP-LIFE-INS-WITHOLD-AMT 87 00000{ Enter CHAR for character mode, VFMT for vertical format mode
Page 41

FileAid_-_Online_1
CHAP_2.7.3.2 More About Navigating To Browse Your Formatted Records o Each of the navigation commands has a corresponding PF key set as the default in your user profile. The default settings are:
PF7 UP
PF8 DOWN
PF10 LEFT (BACK)
PF11 RIGHT (FORWARD)
o You can specify a number of records to scroll forward. For example, if record number 10 is the currently displayed record and you enter RIGHT 8, File-AID displays the 18th record in the dataset.
o You can specify a number of records to scroll backward. For example, if record number 10 is the currently displayed record and you enter BACK 8, File-AID displays the 2nd selected record in the dataset.
o Note that the number of the record is indicated in the RECORD field located in line three of the display heading.
o Another navigation command is LR n (locate record number n). For example, LR 4 displays selected record number 4.
CHAP_2.7.4 Displaying the Previous Record in the DatasetThe BACK command tells File-AID to scroll the display to the previous record. Figure 2-17. Display Previous Record (BACK Command)
File-AID - Browse - USERID9.FASAMP.EMPMAST ----------- COMMAND ===> BACK RECORD: 2 EMPLOYEE-MASTER-FILE ---- FIELD LEVEL/NAME ------- COLUMNS- ----+----1----+- 5 EMP-NUMBER 1 00200
Subtopics:
Chap_2.7.4.1 Steps:
CHAP_2.7.4.1 Steps: 1. Type BACK in the COMMAND field.
2. Press <Enter>. File-AID displays the previous selected record, as shown in Figure 2-18.
Figure 2-18. Browse - BACK Result - Formatted Display of Record 1
Page 42

FileAid_-_Online_1 File-AID - Browse - USERID9.FASAMP.EMPMAST ------------------------- COL 1 92
COMMAND ===> SCROLL ===> PAGE RECORD: 1 EMPLOYEE-MASTER-FILE LENGTH: 198 ---- FIELD LEVEL/NAME ------- COLUMNS- ----+----1----+----2----+----3----+----4
5 EMP-NUMBER 1 00090 5 EMP-LAST-NAME 6 MARTIN 5 EMP-FIRST-NAME 21 EDWARD 5 EMP-MID-INIT 31 M 5 FILLER 32 5 EMP-TITLE 34 AIRPLANE MANUFACTURER 5 EMP-PERSONAL-INFO SYNC 64 10 EMP-NATL-ID-NUMBER 64 427890125 10 FILLER 73 10 EMP-DATE-OF-BIRTH 74 101954 10 EMP-DOB-REDEF REDEFINES EMP-DATE-OF-BIRTH 10 EMP-DOB-REDEF SYNC 74 15 EMP-DOB-MM 74 10 15 EMP-DOB-DD 76 19 15 EMP-DOB-YY 78 54 10 EMP-HIRE-DATE 80 920101 10 EMP-MARITAL-STATUS 86 M 5 EMP-WITHOLD-INFO SYNC 87 10 EMP-LIFE-INS-WITHOLD-AMT 87 30000} Enter CHAR for character mode, VFMT for vertical format mode
CHAP_2.8 Displaying the User Profile OptionsUse the PROFILE primary command to display the current profile settings. The profile options that are displayed vary by display mode and record layout language. Table 2-1 on page 2-21 lists all of the profile options, the type of information each option controls, the mode under which it is displayed and language dependencies (COBOL or PL/I). Figure 2-19. Browse - Formatted Mode (PROFILE Command)
File-AID - Browse - USERID9.FASAMP.EMPMAST ----------- COMMAND ===> PROFILE RECORD: 1 EMPLOYEE-MASTER-FILE ---- FIELD LEVEL/NAME ------- COLUMNS- ----+----1----+- 5 EMP-NUMBER 1 00090
Subtopics:
Chap_2.8.1 Steps: Chap_2.8.2 More About Profile Settings Chap_2.8.3 Removing the Profile Settings Information
CHAP_2.8.1 Steps: 1. Type PROFILE in the COMMAND field.
2. Press <Enter>. File-AID displays three profile lines at the top of the data area as shown in Table on page 2-20.
Figure 2-20. Browse - Formatted Mode - After PROFILE Command
Page 43

FileAid_-_Online_1 File-AID - Browse - USERID9.FASAMP.EMPMAST -------------------------- COL 1 98
COMMAND ===> SCROLL ===> PAGE RECORD: 1 EMPLOYEE-MASTER-FILE LENGTH: 198 ---- FIELD LEVEL/NAME ------- -FORMAT- ----+----1----+----2----+----3----+----4
=PROF> ..CAPS OFF....FILLER ON....GROUP ON....OCCURS ON....OFFSET COLUMNS......
=PROF> ..PICT OFF....PROT OFF....REDEF OFF....SHOW LEVEL....SYNC ON............
=PROF> ..ZERO OFF....MESSAGE ON................................................
5 EMP-NUMBER 1 00090 5 EMP-LAST-NAME 6 MARTIN 5 EMP-FIRST-NAME 21 EDWARD 5 EMP-MID-INIT 31 M 5 FILLER 32 5 EMP-TITLE 34 AIRPLANE MANUFACTURER 5 EMP-PERSONAL-INFO SYNC 64 10 EMP-NATL-ID-NUMBER 64 427890125 10 FILLER 73 10 EMP-DATE-OF-BIRTH 74 101954 10 EMP-DOB-REDEF REDEFINES EMP-DATE-OF-BIRTH 10 EMP-DOB-REDEF SYNC 74 15 EMP-DOB-MM 74 10 15 EMP-DOB-DD 76 19 15 EMP-DOB-YY 78 54 10 EMP-HIRE-DATE 80 920101 Enter CHAR for character mode, VFMT for vertical format mode
CHAP_2.8.2 More About Profile Settings o Each option has a corresponding primary command to let you change the setting (for example, GROUP ON or GROUP OFF). A summary of profile options is shown in Table 2-1.
Table 2-1. User Profile Options
_________________________________________________________ |Option |Mode |Language |Controls display of ... | |__________|__________|__________|________________________| |ALIGN |FMT |PL/I |ALIGNED/UNALIGNED term | |__________|__________|__________|________________________| |ARRAY |FMT |PL/I |ARRAY information | |__________|__________|__________|________________________| |AUTOSAVE |All modes |any |ON or OFF issue SAVE on | | | | |END | |__________|__________|__________|________________________| |BOUNDS |CHAR,VFMT |any |current bounds settings | |__________|__________|__________|________________________| |CAPS |All modes |any |ON or OFF uppercase | | | | |entered text | |__________|__________|__________|________________________| |COMPLEX |FMT |PL/I |COMPLEX term | |__________|__________|__________|________________________| |FILLER |FMT, VFMT |COBOL, |FILLER fields |
Page 44

FileAid_-_Online_1 | | |PL/I | | |__________|__________|__________|________________________| |GROUP |FMT |COBOL, |occurrences of | | | |PL/I |group-level items | |__________|__________|__________|________________________| |HEX |CHAR, |any |hexadecimal display of | | |UNFMT, | |data | | |VFMT | | | |__________|__________|__________|________________________| |MESSAGE |all modes |any |mode command prompt line| |__________|__________|__________|________________________| |OCCURS |FMT |COBOL |array declaration lines | |__________|__________|__________|________________________| |OFFSET |FMT, VFMT |COBOL, |format for display of | | | |PL/I |field offset information| |__________|__________|__________|________________________| |PAD |CHAR |any |PAD character for shift | |__________|__________|__________|________________________| |PICTURE |FMT |COBOL, |PICTURE or DISPLAY line | | | |PL/I |for numeric data fields | |__________|__________|__________|________________________| |PROTECT |FMT |COBOL, |ON or OFF key data | | | |PL/I |protection | |__________|__________|__________|________________________| |REDEFINES |FMT, VFMT |COBOL |data item redefinitions | |__________|__________|__________|________________________| |REFLNG |FMT |PL/I |field length reference | | | | |lines for BIT and CHAR | |__________|__________|__________|________________________| |SETUNDO |All modes |any |ON or OFF toggle UNDO | | | | |support | |__________|__________|__________|________________________| |SHOW |FMT, VFMT |COBOL, |LEVEL, NUMBER, FORMAT, | | | |PL/I |OFFSET, or PICTURE | | | | |information | |__________|__________|__________|________________________| |STATS |CHAR,VFMT |any |ISPF statistics update | |__________|__________|__________|________________________| |SYNC |FMT |COBOL |SYNC term for layout | | | | |fields | |__________|__________|__________|________________________| |ZERO |FMT, VFMT |COBOL, |leading zeros in numeric| | | |PL/I |data fields. | |__________|__________|__________|________________________|
CHAP_2.8.3 Removing the Profile Settings InformationUse the RESET command to hide the profile information lines (indicated with =PROF>). Figure 2-21. Browse - Formatted Mode (RESET Command)
File-AID - Browse - USERID9.FASAMP.EMPMAST ----------- COMMAND ===> RESET RECORD: 1 EMPLOYEE-MASTER-FILE ---- FIELD LEVEL/NAME ------- COLUMNS- ----+----1----+- =PROF> ..CAPS OFF....FILLER ON....GROUP ON....OCCURS ON
Subtopics:
Chap_2.8.3.1 Steps:Page 45

FileAid_-_Online_1
CHAP_2.8.3.1 Steps: 1. Type RESET in the COMMAND field.
2. Press <Enter>. File-AID redisplays the screen without the profile information lines. shown in Figure 2-22.
Figure 2-22. Browse - RESET Result - =PROF> Lines Gone
File-AID - Browse - USERID9.FASAMP.EMPMAST ------------------------- COL 1 92
COMMAND ===> SCROLL ===> PAGE RECORD: 1 EMPLOYEE-MASTER-FILE LENGTH: 198 ---- FIELD LEVEL/NAME ------- COLUMNS- ----+----1----+----2----+----3----+----4
5 EMP-NUMBER 1 00090 5 EMP-LAST-NAME 6 MARTIN 5 EMP-FIRST-NAME 21 EDWARD 5 EMP-MID-INIT 31 M 5 FILLER 32 5 EMP-TITLE 34 AIRPLANE MANUFACTURER 5 EMP-PERSONAL-INFO SYNC 64 10 EMP-NATL-ID-NUMBER 64 427890125 10 FILLER 73 10 EMP-DATE-OF-BIRTH 74 101954 10 EMP-DOB-REDEF REDEFINES EMP-DATE-OF-BIRTH 10 EMP-DOB-REDEF SYNC 74 15 EMP-DOB-MM 74 10 15 EMP-DOB-DD 76 19 15 EMP-DOB-YY 78 54 10 EMP-HIRE-DATE 80 920101 10 EMP-MARITAL-STATUS 86 M 5 EMP-WITHOLD-INFO SYNC 87 10 EMP-LIFE-INS-WITHOLD-AMT 87 30000} Enter CHAR for character mode, VFMT for vertical format mode
CHAP_2.9 Specifying the Type of Field Information to DisplayThe SHOW primary command (abbrev. S) sets the display of various types of field information for a record. You now use SHOW PICTURE to change the center column to display data element PICTURE information for each field. Figure 2-23. Browse - Formatted Mode (SHOW PICTURE Command)
File-AID - Browse - USERID9.FASAMP.EMPMAST ----------- COMMAND ===> SHOW PICTURE RECORD: 1 EMPLOYEE-MASTER-FILE ---- FIELD LEVEL/NAME ------- COLUMNS- ----+----1----+- 5 EMP-NUMBER 1 00090
Subtopics:
Chap_2.9.1 Steps: Chap_2.9.2 Result of SHOW PICTURE Chap_2.9.3 Displaying the Offset for Each Field Chap_2.9.4 Displaying Current Field Length and Format Chap_2.9.5 Displaying Field Numbers
Page 46

FileAid_-_Online_1
CHAP_2.9.1 Steps: 1. Type SHOW PICTURE in the COMMAND field.
2. Press <Enter>. File-AID redisplays the screen, changing the heading of the Field Description area to PICTURE and displaying the data declaration of each elementary item. The changed display is shown in Figure 2-24.
CHAP_2.9.2 Result of SHOW PICTURE
Figure 2-24. Browse - Formatted Mode - After SHOW PICTURE Command
File-AID - Browse - USERID9.FASAMP.EMPMAST ------------------------- COL 1 92 COMMAND ===> SCROLL ===> PAGE RECORD: 1 EMPLOYEE-MASTER-FILE LENGTH: 198 ---- FIELD LEVEL/NAME ------- PICTURE- ----+----1----+----2----+----3----+----4 5 EMP-NUMBER X(5) 00090 5 EMP-LAST-NAME X(15) MARTIN 5 EMP-FIRST-NAME X(10) EDWARD 5 EMP-MID-INIT X M 5 FILLER XX 5 EMP-TITLE X(30) AIRPLANE MANUFACTURER 5 EMP-PERSONAL-INFO SYNC GROUP 10 EMP-NATL-ID-NUMBER 9(9) 427890125 10 FILLER X 10 EMP-DATE-OF-BIRTH X(6) 101954 10 EMP-DOB-REDEF REDEFINES EMP-DATE-OF-BIRTH 10 EMP-DOB-REDEF SYNC GROUP 15 EMP-DOB-MM 99 10 15 EMP-DOB-DD 99 19 15 EMP-DOB-YY 99 54 10 EMP-HIRE-DATE X(6) 920101 10 EMP-MARITAL-STATUS X M 5 EMP-WITHOLD-INFO SYNC GROUP 10 EMP-LIFE-INS-WITHOLD-AMT DISPLAY 30000} Enter CHAR for character mode, VFMT for vertical format mode
Subtopics:
Chap_2.9.2.1 More About the SHOW Command
CHAP_2.9.2.1 More About the SHOW Command o Valid syntax for the SHOW command includes:
SHOW PICTURE Change center column heading to PICTURE and information for each field to show the data declaration (see Figure 2-24) . Abbrev: S P.
SHOW FORMAT Change center column heading to FORMAT Page 47
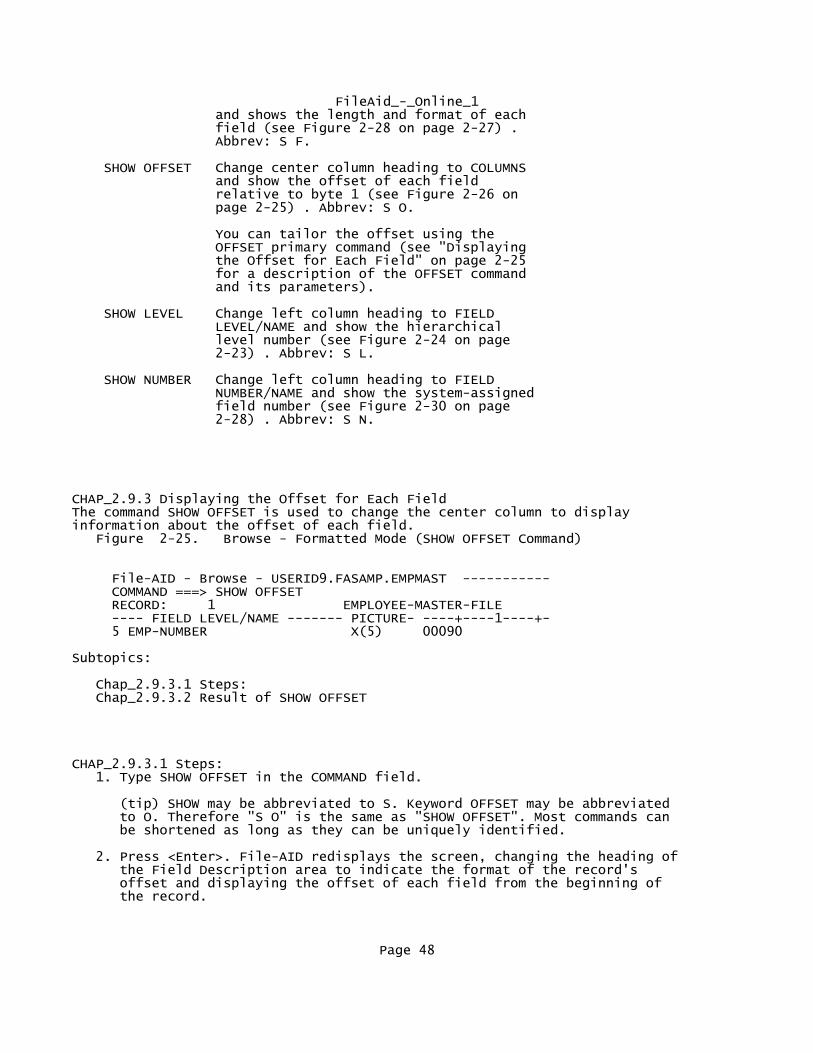
FileAid_-_Online_1 and shows the length and format of each field (see Figure 2-28 on page 2-27) . Abbrev: S F.
SHOW OFFSET Change center column heading to COLUMNS and show the offset of each field relative to byte 1 (see Figure 2-26 on page 2-25) . Abbrev: S O.
You can tailor the offset using the OFFSET primary command (see "Displaying the Offset for Each Field" on page 2-25 for a description of the OFFSET command and its parameters).
SHOW LEVEL Change left column heading to FIELD LEVEL/NAME and show the hierarchical level number (see Figure 2-24 on page 2-23) . Abbrev: S L.
SHOW NUMBER Change left column heading to FIELD NUMBER/NAME and show the system-assigned field number (see Figure 2-30 on page 2-28) . Abbrev: S N.
CHAP_2.9.3 Displaying the Offset for Each FieldThe command SHOW OFFSET is used to change the center column to display information about the offset of each field. Figure 2-25. Browse - Formatted Mode (SHOW OFFSET Command)
File-AID - Browse - USERID9.FASAMP.EMPMAST ----------- COMMAND ===> SHOW OFFSET RECORD: 1 EMPLOYEE-MASTER-FILE ---- FIELD LEVEL/NAME ------- PICTURE- ----+----1----+- 5 EMP-NUMBER X(5) 00090
Subtopics:
Chap_2.9.3.1 Steps: Chap_2.9.3.2 Result of SHOW OFFSET
CHAP_2.9.3.1 Steps: 1. Type SHOW OFFSET in the COMMAND field.
(tip) SHOW may be abbreviated to S. Keyword OFFSET may be abbreviated to O. Therefore "S O" is the same as "SHOW OFFSET". Most commands can be shortened as long as they can be uniquely identified.
2. Press <Enter>. File-AID redisplays the screen, changing the heading of the Field Description area to indicate the format of the record's offset and displaying the offset of each field from the beginning of the record.
Page 48

FileAid_-_Online_1
CHAP_2.9.3.2 Result of SHOW OFFSET
Figure 2-26. Browse - Formatted Mode - After SHOW OFFSET Command
File-AID - Browse - USERID9.FASAMP.EMPMAST ------------------------- COL 1 92
COMMAND ===> SCROLL ===> PAGE RECORD: 1 EMPLOYEE-MASTER-FILE LENGTH: 198 ---- FIELD LEVEL/NAME ------- COLUMNS- ----+----1----+----2----+----3----+----4
5 EMP-NUMBER 1 00090 5 EMP-LAST-NAME 6 MARTIN 5 EMP-FIRST-NAME 21 EDWARD 5 EMP-MID-INIT 31 M 5 FILLER 32 5 EMP-TITLE 34 AIRPLANE MANUFACTURER 5 EMP-PERSONAL-INFO SYNC 64 10 EMP-NATL-ID-NUMBER 64 427890125 10 FILLER 73 10 EMP-DATE-OF-BIRTH 74 101954 10 EMP-DOB-REDEF REDEFINES EMP-DATE-OF-BIRTH 10 EMP-DOB-REDEF SYNC 74 15 EMP-DOB-MM 74 10 15 EMP-DOB-DD 76 19 15 EMP-DOB-YY 78 54 10 EMP-HIRE-DATE 80 920101 10 EMP-MARITAL-STATUS 86 M 5 EMP-WITHOLD-INFO SYNC 87 10 EMP-LIFE-INS-WITHOLD-AMT 87 30000} Enter CHAR for character mode, VFMT for vertical format mode
Subtopics:
Chap_2.9.3.2.1 More About the SHOW OFFSET Command
CHAP_2.9.3.2.1 More About the SHOW OFFSET Command o Offset information can be displayed in three ways by using the OFFSET primary profile command.
Valid syntax for the OFFSET (OFST) command includes:
OFFSET Change the center column to RELATIVE RELATIVE and show a decimal offset of each field relative to byte 0. Abbrev: O R.
OFFSET HEX Change the center column to REL(HEX) and show the offset of each field in a hexadecimal format relative to byte 0.
Abbrev: O H.
OFFSET COLUMNS Change the center column to COLUMNS and show the offset of each field relative to byte 1 (see Figure 2-26 on page 2-25) . Abbrev: O C.
Page 49

FileAid_-_Online_1
CHAP_2.9.4 Displaying Current Field Length and FormatYou now use SHOW FORMAT to change the center column to display data element length and usage information for each field. Figure 2-27. Browse - Formatted Mode (SHOW FORMAT Command)
File-AID - Browse - USERID9.FASAMP.EMPMAST ----------- COMMAND ===> SHOW FORMAT RECORD: 1 EMPLOYEE-MASTER-FILE ---- FIELD LEVEL/NAME ------- COLUMNS- ----+----1----+- 5 EMP-NUMBER 1 00090
Subtopics:
Chap_2.9.4.1 Steps: Chap_2.9.4.2 Result of SHOW FORMAT
CHAP_2.9.4.1 Steps: 1. Type SHOW FORMAT in the COMMAND field.
2. Press <Enter>. File-AID redisplays the screen, changing the heading of the Field Description area to FORMAT and displaying the field length and format of each field.
CHAP_2.9.4.2 Result of SHOW FORMAT
Figure 2-28. Browse - Formatted Mode - After SHOW FORMAT Command
File-AID - Browse - USERID9.FASAMP.EMPMAST ------------------------- COL 1 101
COMMAND ===> SCROLL ===> PAGE RECORD: 1 EMPLOYEE-MASTER-FILE LENGTH: 198 ---- FIELD LEVEL/NAME ------- -FORMAT- ----+----1----+----2----+----3----+----4
5 EMP-NUMBER 5/AN 00090 5 EMP-LAST-NAME 15/AN MARTIN 5 EMP-FIRST-NAME 10/AN EDWARD 5 EMP-MID-INIT 1/AN M 5 FILLER 2/AN 5 EMP-TITLE 30/AN AIRPLANE MANUFACTURER 5 EMP-PERSONAL-INFO SYNC 23/GRP 10 EMP-NATL-ID-NUMBER 9/NUM 427890125 10 FILLER 1/AN 10 EMP-DATE-OF-BIRTH 6/AN 101954 10 EMP-HIRE-DATE 6/AN 920101 10 EMP-MARITAL-STATUS 1/AN M 5 EMP-PERSONAL-INFO SYNC 15/GRP 10 EMP-LIFE-INS-WITHOLD-AMT 6/SNUM -3000.00 10 EMP-NATL-TAX-WITHOLD-PCT 3/PS -74.00 10 EMP-REGION-TAX-WITHOLD-PCT 3/PS 25.00 10 EMP-LOCAL-TAX-WITHOLD-PCT 3/PS 5.00
Page 50

FileAid_-_Online_1 Enter CHAR for character mode, VFMT for vertical format mode
CHAP_2.9.5 Displaying Field NumbersFile-AID assigns a sequential field number to each layout field. These field numbers can be used in several commands to control the display and to refer to specific fields more easily. Figure 2-29. Browse - Formatted Mode (SHOW NUMBER Command)
File-AID - Browse - USERID9.FASAMP.EMPMAST ----------- COMMAND ===> SHOW NUMBER RECORD: 1 EMPLOYEE-MASTER-FILE ---- FIELD LEVEL/NAME ------- -FORMAT- ----+----1----+- 5 EMP-NUMBER 1 00090
Subtopics:
Chap_2.9.5.1 Steps: Chap_2.9.5.2 Result of SHOW NUMBER
CHAP_2.9.5.1 Steps: 1. Type SHOW NUMBER in the COMMAND field.
2. Press <Enter>. File-AID redisplays the screen, changing the heading of the Field Name area to FIELD NUMBER/NAME and displaying the File-AID-assigned number for each field. The changed display is shown in Figure 2-30.
CHAP_2.9.5.2 Result of SHOW NUMBER
Figure 2-30. Browse - Formatted Mode - After SHOW NUMBER Command
File-AID - Browse - USERID9.FASAMP.EMPMAST ------------------------- COL 1 101
COMMAND ===> SCROLL ===> PAGE RECORD: 1 EMPLOYEE-MASTER-FILE LENGTH: 198 ---- FIELD NUMBER/NAME ------ -FORMAT- ----+----1----+----2----+----3----+----4
1 EMP-NUMBER 5/AN 00090 2 EMP-LAST-NAME 15/AN MARTIN 3 EMP-FIRST-NAME 10/AN EDWARD 4 EMP-MID-INIT 1/AN M 5 FILLER 2/AN 6 EMP-TITLE 30/AN AIRPLANE MANUFACTURER 7 EMP-PERSONAL-INFO SYNC 23/GRP 8 EMP-NATL-ID-NUMBER 9/NUM 427890125 9 FILLER 1/AN 10 EMP-DATE-OF-BIRTH 6/AN 101954 15 EMP-HIRE-DATE 6/AN 920101 16 EMP-MARITAL-STATUS 1/AN M 17 EMP-PERSONAL-INFO SYNC 15/GRP 18 EMP-LIFE-INS-WITHOLD-AMT 6/SNUM -3000.00 19 EMP-NATL-TAX-WITHOLD-PCT 3/PS -74.00 20 EMP-REGION-TAX-WITHOLD-PCT
Page 51

FileAid_-_Online_1 3/PS 25.00 21 EMP-LOCAL-TAX-WITHOLD-PCT 3/PS 5.00 Enter CHAR for character mode, VFMT for vertical format mode
CHAP_2.10 Displaying Only Specific Fields by Number (DISPLAY)The DISPLAY command references the File-AID-assigned field numbers. You can use the DISPLAY primary command to display several types of information including: o All or selected fields of a record
o The display format (HEX for example) for individual layout fields One or all redefinitions of the same data. In this example, you request a display of only a few fields of this layout. Figure 2-31. Browse - Formatted Mode (DISPLAY ONLY Command)
File-AID - Browse - USERID9.FASAMP.EMPMAST ----------- COMMAND ===> DISPLAY 1-6 16 21 ONLY RECORD: 1 EMPLOYEE-MASTER-FILE ---- FIELD NUMBER/NAME ------ -FORMAT- ----+----1----+- 1 EMP-NUMBER 5/AN 00090
Subtopics:
Chap_2.10.1 Steps: Chap_2.10.2 Result of DISPLAY ONLY command Chap_2.10.3 Excluding Fields from the Display Chap_2.10.4 Adding Fields to the Display Chap_2.10.5 Redisplaying all the Fields of a Record
CHAP_2.10.1 Steps: 1. Type DISPLAY 1-6 16 21 ONLY in the COMMAND field.
You can separate the field numbers by blanks or commas. You may specify individual fields and/or field ranges (two fields connected by a hyphen: a-b).
2. Press <Enter>. Only the data items in fields 1 thru 6, 16, and 21 are displayed as illustrated in Figure 2-32.
CHAP_2.10.2 Result of DISPLAY ONLY command
Figure 2-32. Browse - Formatted Mode - After DISPLAY ONLY Command
File-AID - Browse - USERID9.FASAMP.EMPMAST ------------------------- COL 1 101
COMMAND ===> SCROLL ===> PAGE RECORD: 1 EMPLOYEE-MASTER-FILE LENGTH: 198 ---- FIELD NUMBER/NAME ------ -FORMAT- ----+----1----+----2----+----3----+----4
******************************** TOP OF DATA **********************************
1 EMP-NUMBER 5/AN 00090 2 EMP-LAST-NAME 15/AN MARTIN
Page 52
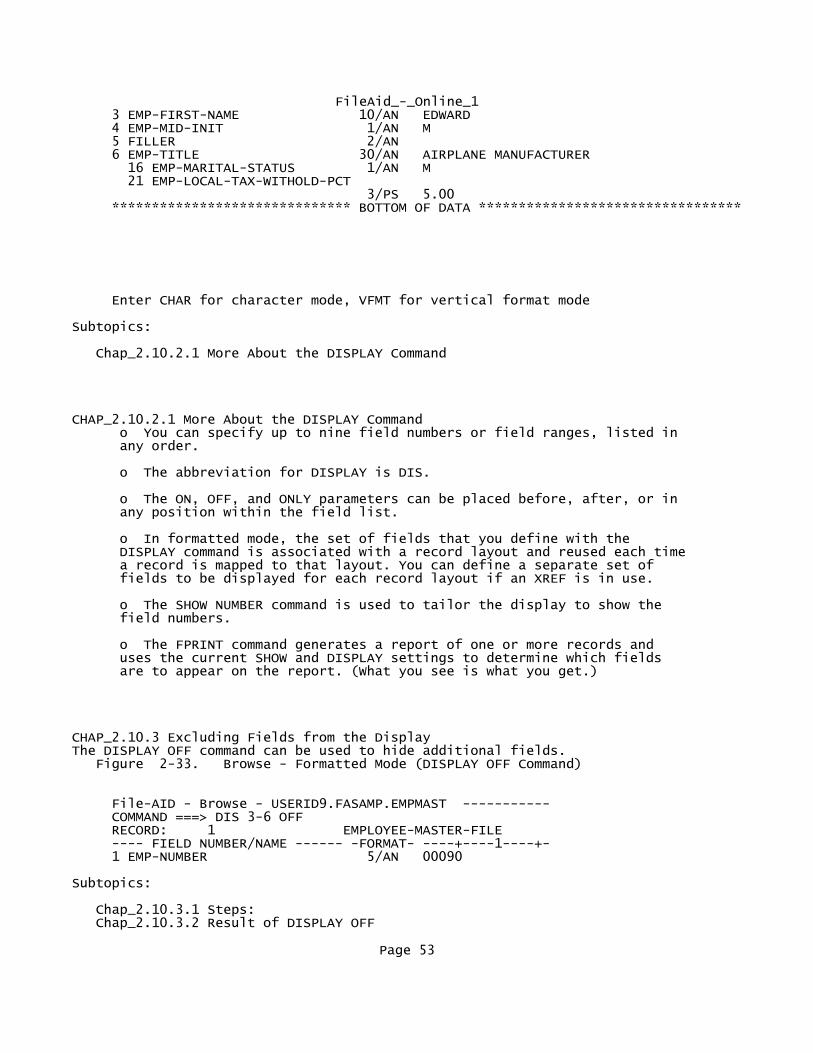
FileAid_-_Online_1 3 EMP-FIRST-NAME 10/AN EDWARD 4 EMP-MID-INIT 1/AN M 5 FILLER 2/AN 6 EMP-TITLE 30/AN AIRPLANE MANUFACTURER 16 EMP-MARITAL-STATUS 1/AN M 21 EMP-LOCAL-TAX-WITHOLD-PCT 3/PS 5.00 ****************************** BOTTOM OF DATA *********************************
Enter CHAR for character mode, VFMT for vertical format mode
Subtopics:
Chap_2.10.2.1 More About the DISPLAY Command
CHAP_2.10.2.1 More About the DISPLAY Command o You can specify up to nine field numbers or field ranges, listed in any order.
o The abbreviation for DISPLAY is DIS.
o The ON, OFF, and ONLY parameters can be placed before, after, or in any position within the field list.
o In formatted mode, the set of fields that you define with the DISPLAY command is associated with a record layout and reused each time a record is mapped to that layout. You can define a separate set of fields to be displayed for each record layout if an XREF is in use.
o The SHOW NUMBER command is used to tailor the display to show the field numbers.
o The FPRINT command generates a report of one or more records and uses the current SHOW and DISPLAY settings to determine which fields are to appear on the report. (What you see is what you get.)
CHAP_2.10.3 Excluding Fields from the DisplayThe DISPLAY OFF command can be used to hide additional fields. Figure 2-33. Browse - Formatted Mode (DISPLAY OFF Command)
File-AID - Browse - USERID9.FASAMP.EMPMAST ----------- COMMAND ===> DIS 3-6 OFF RECORD: 1 EMPLOYEE-MASTER-FILE ---- FIELD NUMBER/NAME ------ -FORMAT- ----+----1----+- 1 EMP-NUMBER 5/AN 00090
Subtopics:
Chap_2.10.3.1 Steps: Chap_2.10.3.2 Result of DISPLAY OFF
Page 53
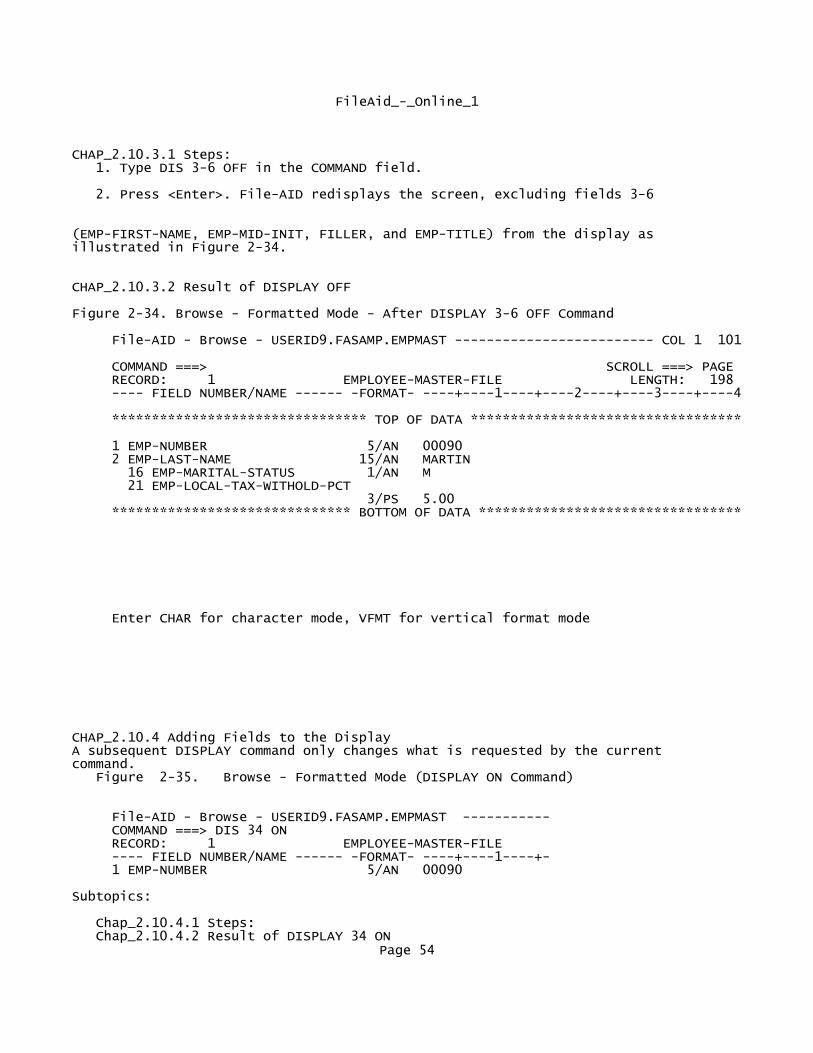
FileAid_-_Online_1
CHAP_2.10.3.1 Steps: 1. Type DIS 3-6 OFF in the COMMAND field.
2. Press <Enter>. File-AID redisplays the screen, excluding fields 3-6
(EMP-FIRST-NAME, EMP-MID-INIT, FILLER, and EMP-TITLE) from the display as illustrated in Figure 2-34.
CHAP_2.10.3.2 Result of DISPLAY OFF
Figure 2-34. Browse - Formatted Mode - After DISPLAY 3-6 OFF Command
File-AID - Browse - USERID9.FASAMP.EMPMAST ------------------------- COL 1 101
COMMAND ===> SCROLL ===> PAGE RECORD: 1 EMPLOYEE-MASTER-FILE LENGTH: 198 ---- FIELD NUMBER/NAME ------ -FORMAT- ----+----1----+----2----+----3----+----4
******************************** TOP OF DATA **********************************
1 EMP-NUMBER 5/AN 00090 2 EMP-LAST-NAME 15/AN MARTIN 16 EMP-MARITAL-STATUS 1/AN M 21 EMP-LOCAL-TAX-WITHOLD-PCT 3/PS 5.00 ****************************** BOTTOM OF DATA *********************************
Enter CHAR for character mode, VFMT for vertical format mode
CHAP_2.10.4 Adding Fields to the DisplayA subsequent DISPLAY command only changes what is requested by the current command. Figure 2-35. Browse - Formatted Mode (DISPLAY ON Command)
File-AID - Browse - USERID9.FASAMP.EMPMAST ----------- COMMAND ===> DIS 34 ON RECORD: 1 EMPLOYEE-MASTER-FILE ---- FIELD NUMBER/NAME ------ -FORMAT- ----+----1----+- 1 EMP-NUMBER 5/AN 00090
Subtopics:
Chap_2.10.4.1 Steps: Chap_2.10.4.2 Result of DISPLAY 34 ON
Page 54
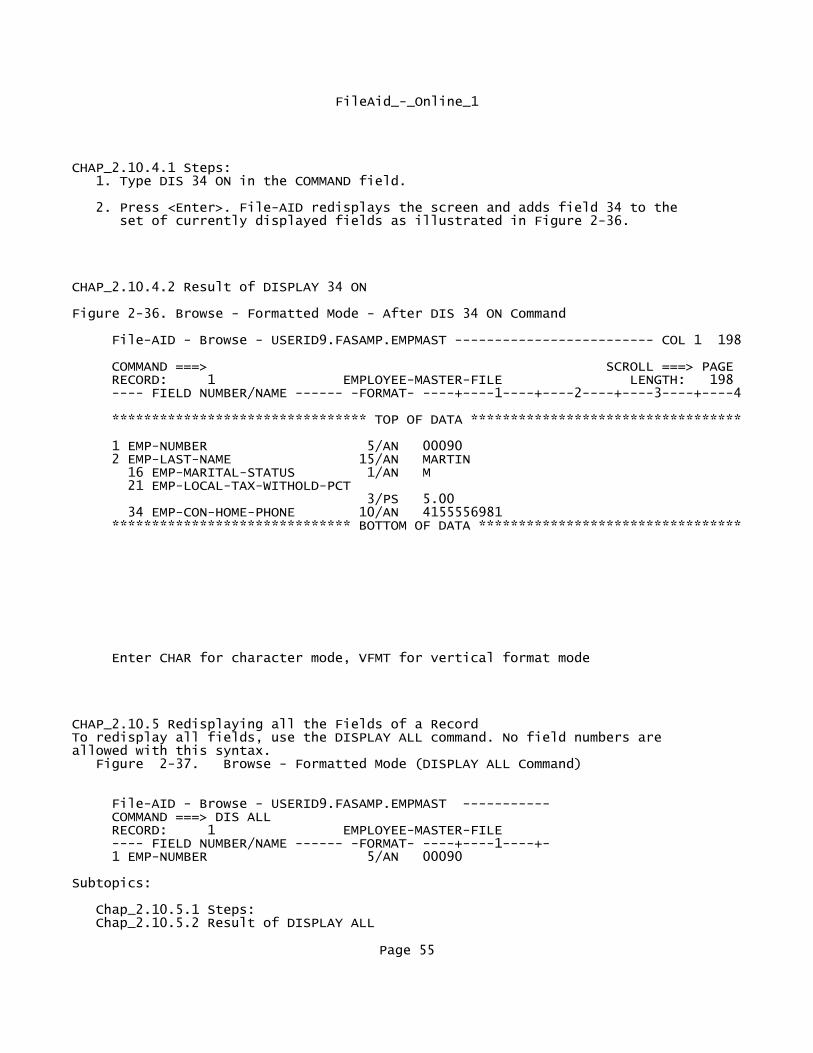
FileAid_-_Online_1
CHAP_2.10.4.1 Steps: 1. Type DIS 34 ON in the COMMAND field.
2. Press <Enter>. File-AID redisplays the screen and adds field 34 to the set of currently displayed fields as illustrated in Figure 2-36.
CHAP_2.10.4.2 Result of DISPLAY 34 ON
Figure 2-36. Browse - Formatted Mode - After DIS 34 ON Command
File-AID - Browse - USERID9.FASAMP.EMPMAST ------------------------- COL 1 198
COMMAND ===> SCROLL ===> PAGE RECORD: 1 EMPLOYEE-MASTER-FILE LENGTH: 198 ---- FIELD NUMBER/NAME ------ -FORMAT- ----+----1----+----2----+----3----+----4
******************************** TOP OF DATA **********************************
1 EMP-NUMBER 5/AN 00090 2 EMP-LAST-NAME 15/AN MARTIN 16 EMP-MARITAL-STATUS 1/AN M 21 EMP-LOCAL-TAX-WITHOLD-PCT 3/PS 5.00 34 EMP-CON-HOME-PHONE 10/AN 4155556981 ****************************** BOTTOM OF DATA *********************************
Enter CHAR for character mode, VFMT for vertical format mode
CHAP_2.10.5 Redisplaying all the Fields of a RecordTo redisplay all fields, use the DISPLAY ALL command. No field numbers are allowed with this syntax. Figure 2-37. Browse - Formatted Mode (DISPLAY ALL Command)
File-AID - Browse - USERID9.FASAMP.EMPMAST ----------- COMMAND ===> DIS ALL RECORD: 1 EMPLOYEE-MASTER-FILE ---- FIELD NUMBER/NAME ------ -FORMAT- ----+----1----+- 1 EMP-NUMBER 5/AN 00090
Subtopics:
Chap_2.10.5.1 Steps: Chap_2.10.5.2 Result of DISPLAY ALL
Page 55

FileAid_-_Online_1
CHAP_2.10.5.1 Steps: 1. Type DIS ALL in the COMMAND field.
2. Press <Enter>. File-AID redisplays the screen with all of the fields for record 1 as illustrated in Figure 2-38.
CHAP_2.10.5.2 Result of DISPLAY ALL
Figure 2-38. Browse - Formatted Mode - After DISPLAY ALL
File-AID - Browse - USERID9.FASAMP.EMPMAST ------------------------- COL 1 101
COMMAND ===> SCROLL ===> PAGE RECORD: 1 EMPLOYEE-MASTER-FILE LENGTH: 198 ---- FIELD NUMBER/NAME ------ -FORMAT- ----+----1----+----2----+----3----+----4
******************************** TOP OF DATA **********************************
1 EMP-NUMBER 5/AN 00090 2 EMP-LAST-NAME 15/AN MARTIN 3 EMP-FIRST-NAME 10/AN EDWARD 4 EMP-MID-INIT 1/AN M 5 FILLER 2/AN 6 EMP-TITLE 30/AN AIRPLANE MANUFACTURER 7 EMP-PERSONAL-INFO SYNC 23/GRP 8 EMP-NATL-ID-NUMBER 9/NUM 427890125 9 FILLER 1/AN 10 EMP-DATE-OF-BIRTH 6/AN 101954 15 EMP-HIRE-DATE 6/AN 920101 16 EMP-MARITAL-STATUS 1/AN M 17 EMP-PERSONAL-INFO SYNC 15/GRP 18 EMP-LIFE-INS-WITHOLD-AMT 6/SNUM -3000.00 19 EMP-NATL-TAX-WITHOLD-PCT 3/PS -74.00 20 EMP-REGION-TAX-WITHOLD-PCT 3/PS 25.00 21 EMP-LOCAL-TAX-WITHOLD-PCT Enter CHAR for character mode, VFMT for vertical format mode
CHAP_2.11 Searching for Data Using the FIND Primary CommandThe FIND primary command searches for and displays, if found, data meeting specified conditions. Subtopics: Chap_2.11.1 Displaying the FIND Command Screen Chap_2.11.2 Specifying a FIND Using The Command Prompt Screen
CHAP_2.11.1 Displaying the FIND Command ScreenWhen you enter the FIND command without parameters, File-AID displays the FIND Command screen. Use the FIND Command screen to specify the search conditions. Figure 2-39. FIND command with no parameters
File-AID - Browse - USERID9.FASAMP.EMPMAST ----------- Page 56
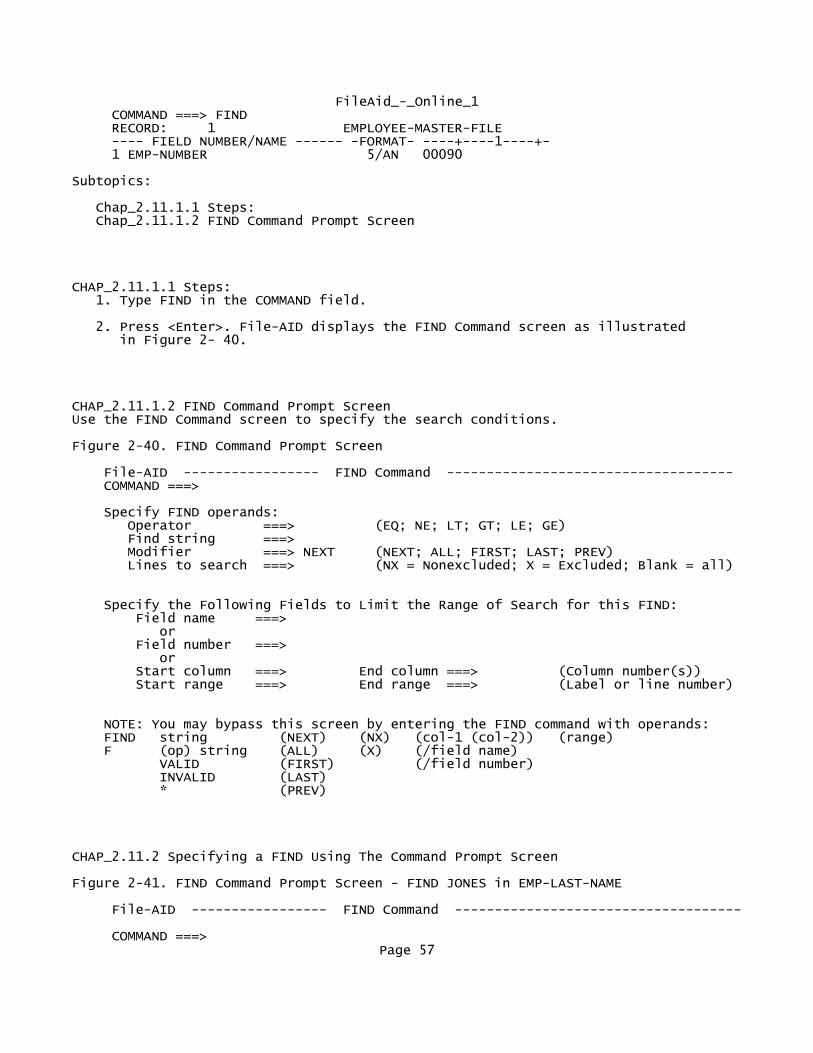
FileAid_-_Online_1 COMMAND ===> FIND RECORD: 1 EMPLOYEE-MASTER-FILE ---- FIELD NUMBER/NAME ------ -FORMAT- ----+----1----+- 1 EMP-NUMBER 5/AN 00090
Subtopics:
Chap_2.11.1.1 Steps: Chap_2.11.1.2 FIND Command Prompt Screen
CHAP_2.11.1.1 Steps: 1. Type FIND in the COMMAND field.
2. Press <Enter>. File-AID displays the FIND Command screen as illustrated in Figure 2- 40.
CHAP_2.11.1.2 FIND Command Prompt ScreenUse the FIND Command screen to specify the search conditions.
Figure 2-40. FIND Command Prompt Screen
File-AID ----------------- FIND Command ------------------------------------ COMMAND ===>
Specify FIND operands: Operator ===> (EQ; NE; LT; GT; LE; GE) Find string ===> Modifier ===> NEXT (NEXT; ALL; FIRST; LAST; PREV) Lines to search ===> (NX = Nonexcluded; X = Excluded; Blank = all)
Specify the Following Fields to Limit the Range of Search for this FIND: Field name ===> or Field number ===> or Start column ===> End column ===> (Column number(s)) Start range ===> End range ===> (Label or line number)
NOTE: You may bypass this screen by entering the FIND command with operands: FIND string (NEXT) (NX) (col-1 (col-2)) (range) F (op) string (ALL) (X) (/field name) VALID (FIRST) (/field number) INVALID (LAST) * (PREV)
CHAP_2.11.2 Specifying a FIND Using The Command Prompt Screen
Figure 2-41. FIND Command Prompt Screen - FIND JONES in EMP-LAST-NAME
File-AID ----------------- FIND Command ------------------------------------
COMMAND ===> Page 57

FileAid_-_Online_1
Specify FIND operands: Operator ===> EQ (EQ; NE; LT; GT; LE; GE) Find string ===> JONES Modifier ===> NEXT (NEXT; ALL; FIRST; LAST; PREV) Lines to search ===> (NX = Nonexcluded; X = Excluded; Blank = all)
Specify the Following Fields to Limit the Range of Search for this FIND: Field name ===> EMP-LAST-NAME or Field number ===> or Start column ===> End column ===> (Column number(s)) Start range ===> End range ===> (Label or line number)
NOTE: You may bypass this screen by entering the FIND command with operands: FIND string (NEXT) (NX) (col-1 (col-2)) (range) F (op) string (ALL) (X) (/field name) VALID (FIRST) (/field number) INVALID (LAST) * (PREV)
The fields on the FIND Command screen correspond to the FIND primary command syntax parameters. Refer to the File-AID/MVS Online Reference Manual (SPF and XE) for information on the FIND command syntax. A sample of the FIND syntax is displayed on the bottom half of the screen. Subtopics: Chap_2.11.2.1 Steps: Chap_2.11.2.2 Result of FIND command
CHAP_2.11.2.1 Steps: 1. Type EQ in the Operator field.
The relational operator EQ indicates that data must equal the value specified in the Find string field. Other valid operators are listed to the right of the field name. EQ is assumed when no operator is specified.
2. Type JONES in the Find string field.
The Find string field contains the value that you want to match defined by the value you specify in the Operator field.
3. Type NEXT in the Modifier field.
The value you specify in the Modifier field tells File-AID where to begin and in which direction to search. Using the NEXT value, File-AID searches forward in the dataset starting at the current cursor position.
4. Type EMP-LAST-NAME in the Field name field.
Use the Field name field to limit the search to this field only in each record.
5. Press <Enter>. File-AID searches the EMP-LAST-NAME field in each record to find the value JONES. When found, the screen is automatically scrolled to show the data found as illustrated in Figure 2-42 on page
Page 58

FileAid_-_Online_1 2-36.
CHAP_2.11.2.2 Result of FIND command
Figure 2-42. Browse - FIND Result - JONES found in Record 6
File-AID - Browse - USERID9.FASAMP.EMPMAST ----------- 'JONES ' FOUND COMMAND ===> SCROLL ===> PAGE RECORD: 6 EMPLOYEE-MASTER-FILE LENGTH: 198 ---- FIELD NUMBER/NAME ------ -FORMAT- ----+----1----+----2----+----3----+----4
2 EMP-LAST-NAME 15/AN JONES 3 EMP-FIRST-NAME 10/AN GEORGE 4 EMP-MID-INIT 1/AN B 5 FILLER 2/AN 6 EMP-TITLE 30/AN COUNTRY SINGER 7 EMP-PERSONAL-INFO SYNC 23/GRP 8 EMP-NATL-ID-NUMBER 9/NUM 463813456 9 FILLER 1/AN 10 EMP-DATE-OF-BIRTH 6/AN 090944 15 EMP-HIRE-DATE 6/AN 920221 16 EMP-MARITAL-STATUS 1/AN S 17 EMP-PERSONAL-INFO SYNC 15/GRP
Subtopics:
Chap_2.11.2.2.1 More About the FIND Command
CHAP_2.11.2.2.1 More About the FIND Command o In order for File-AID to search for exact case data, you must specify the Find value as a delimited string with a C (explicit character) data type. For example, 'Jones' matches the values of Jones, jones, and JONES. However, C'Jones' matches only the value of Jones.
o The Find string parameter can be any one of the following data type strings:
Simple Value without quotes or data types specified. Matches both upper and lowercase values. The Find string, JONES, in Figure 2-41 on page 2-35 is an example of a simple data type string.
Delimited Specified with single quotes. The string can include imbedded spaces
For example, 'delim ited' and T'delim ited' are equivalent.
Character Expressed as C'string' explicit case
Hexadecimal Expressed as X'hex digits'.
Decimal A number using digits 0_9. Used when a Page 59

FileAid_-_Online_1 field-name/number is also specified.
Packed Expressed as P'signed decimal number'.
VALID and These validity keywords are used with a INVALID field-name/number to determine if the field contains valid or invalid data based on the layout definition of the field (a layout is required).
CHAP_2.12 Invoking Character Mode (CHAR) from Formatted ModeCharacter mode data displays are full-screen presentations of multiple records of a dataset. The command structure and display layout are similar to those of ISPF. The displayed data can consist of the entire dataset or only a selected subset of records (when selection criteria is used). Figure 2-43. Browse - Invoking Character Mode (CHAR Command)
File-AID - Browse - USERID9.FASAMP.EMPMAST ----------- COMMAND ===> CHAR RECORD: 6 EMPLOYEE-MASTER-FILE ---- FIELD NUMBER/NAME ------ -FORMAT- ----+----1----+- 2 EMP-LAST-NAME 15/AN JONES
Subtopics:
Chap_2.12.1 Steps: Chap_2.12.2 Controlling the Records Not Selected Line
CHAP_2.12.1 Steps: 1. Type CHAR in the COMMAND field.
2. Press <Enter>. File-AID displays your data records in character mode as shown in Figure 2-44.
Figure 2-44. Browse - Character Mode Full Screen Display
File-AID - Browse - USERID9.FASAMP.EMPMAST ---------------- LINE 0000 COL 1 80
COMMAND ===> SCROLL ===> PAGE ********************************* TOP OF DATA **********************-CAPS OFF-* 00090MARTIN EDWARD M AIRPLANE MANUFACTURER 427890125 1019549
- - - - - - - - - - - - - - - - - - - - - - - - - - - 1 RECORD(S) NOT SELECTED 00200JACKSON JOSEPH C ORATOR 275587177 0204629
10000ANDREWS GEORGE ACTOR 576312032 0422489
15000MURPHY RONALD L PAINTER 987654321 1202559
18034SCHNEIDER ELLEN C NURSE 341559549 0329609
21035JONES GEORGE B COUNTRY SINGER 463813456 0909449
Page 60
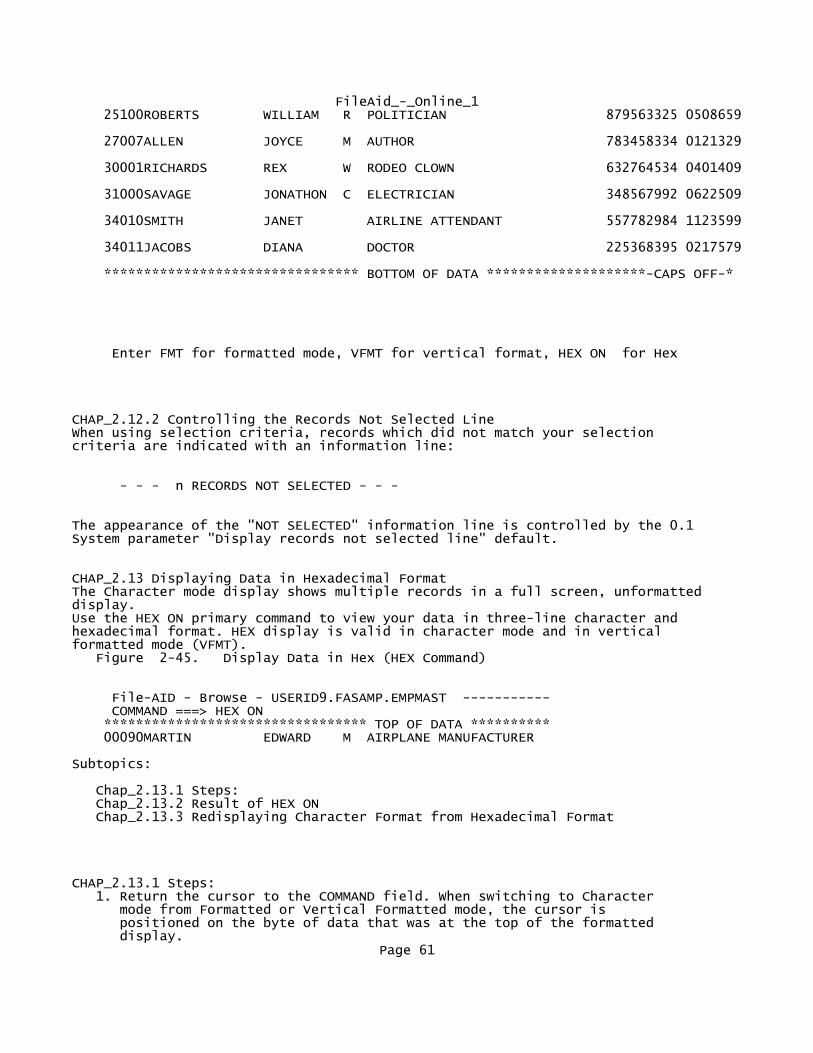
FileAid_-_Online_1 25100ROBERTS WILLIAM R POLITICIAN 879563325 0508659
27007ALLEN JOYCE M AUTHOR 783458334 0121329
30001RICHARDS REX W RODEO CLOWN 632764534 0401409
31000SAVAGE JONATHON C ELECTRICIAN 348567992 0622509
34010SMITH JANET AIRLINE ATTENDANT 557782984 1123599
34011JACOBS DIANA DOCTOR 225368395 0217579
******************************** BOTTOM OF DATA ********************-CAPS OFF-*
Enter FMT for formatted mode, VFMT for vertical format, HEX ON for Hex
CHAP_2.12.2 Controlling the Records Not Selected LineWhen using selection criteria, records which did not match your selection criteria are indicated with an information line:
- - - n RECORDS NOT SELECTED - - -
The appearance of the "NOT SELECTED" information line is controlled by the 0.1 System parameter "Display records not selected line" default.
CHAP_2.13 Displaying Data in Hexadecimal FormatThe Character mode display shows multiple records in a full screen, unformatted display. Use the HEX ON primary command to view your data in three-line character and hexadecimal format. HEX display is valid in character mode and in vertical formatted mode (VFMT). Figure 2-45. Display Data in Hex (HEX Command)
File-AID - Browse - USERID9.FASAMP.EMPMAST ----------- COMMAND ===> HEX ON ********************************* TOP OF DATA ********** 00090MARTIN EDWARD M AIRPLANE MANUFACTURER
Subtopics:
Chap_2.13.1 Steps: Chap_2.13.2 Result of HEX ON Chap_2.13.3 Redisplaying Character Format from Hexadecimal Format
CHAP_2.13.1 Steps: 1. Return the cursor to the COMMAND field. When switching to Character mode from Formatted or Vertical Formatted mode, the cursor is positioned on the byte of data that was at the top of the formatted display.
Page 61

FileAid_-_Online_1
2. Type HEX ON in the COMMAND field.
3. Press <Enter>. File-AID redisplays the screen and presents the data in its hexadecimal notation.
CHAP_2.13.2 Result of HEX ON Figure 2-46. Character Mode - After HEX ON
File-AID - Browse - USERID9.FASAMP.EMPMAST ---------------- LINE 0000 COL 1 80
COMMAND ===> SCROLL ===> PAGE ********************************* TOP OF DATA **********************-CAPS OFF-* 00090MARTIN EDWARD M AIRPLANE MANUFACTURER 427890125 1019549
FFFFFDCDECD444444444CCECDC4444D44CCDDDCDC4DCDECCCEEDCD444444444FFFFFFFFF4FFFFFFF
00090419395000000000546194000040019973155041546133495900000000042789012501019549
- - - - - - - - - - - - - - - - - - - - - - - - - - - 1 RECORD(S) NOT SELECTED 00200JACKSON JOSEPH C ORATOR 275587177 0204629
FFFFFDCCDEDD44444444DDECDC4444C44DDCEDD444444444444444444444444FFFFFFFFF4FFFFFFF
00200113226500000000162578000030069136900000000000000000000000027558717700204629
------------------------------------------------------------------------------- 10000ANDREWS GEORGE ACTOR 576312032 0422489
FFFFFCDCDCEE44444444CCDDCC4444444CCEDD4444444444444444444444444FFFFFFFFF4FFFFFFF
10000154956200000000756975000000013369000000000000000000000000057631203200422489
------------------------------------------------------------------------------- 15000MURPHY RONALD L PAINTER 987654321 1202559
FFFFFDEDDCE444444444DDDCDC4444D44DCCDECD44444444444444444444444FFFFFFFFF4FFFFFFF
15000449788000000000965134000030071953590000000000000000000000098765432101202559
------------------------------------------------------------------------------- 18034SCHNEIDER ELLEN C NURSE 341559549 0329609
FFFFFECCDCCCCD444444CDDCD44444C44DEDEC4444444444444444444444444FFFFFFFFF4FFFFFFF
18034238559459000000533550000030054925000000000000000000000000034155954900329609
------------------------------------------------------------------------------- Enter FMT for formatted mode, VFMT for vertical format, HEX OFF for Char
CHAP_2.13.3 Redisplaying Character Format from Hexadecimal FormatUse HEX OFF to return to display only the character value for each line. Figure 2-47. Display Characters Only (HEX OFF)
File-AID - Browse - USERID9.FASAMP.EMPMAST ----------- Page 62

FileAid_-_Online_1 COMMAND ===> HEX OFF ********************************* TOP OF DATA ********** 00090MARTIN EDWARD M AIRPLANE MANUFACTURER FFFFFDCDECD444444444CCECDC4444D44CCDDDCDC4DCDECCCEEDCD44 00090419395000000000546194000040019973155041546133495900 - - - - - - - - - - - - - - - - - - - - - - - - - - - 1
Subtopics:
Chap_2.13.3.1 Steps:
CHAP_2.13.3.1 Steps: 1. Type HEX OFF in the COMMAND field.
2. Press <Enter>. File-AID redisplays the screen in character format as illustrated in Figure 2-48.
Figure 2-48. Browse - Character Mode - After HEX OFF
File-AID - Browse - USERID9.FASAMP.EMPMAST ---------------- LINE 0000 COL 1 80
COMMAND ===> SCROLL ===> PAGE ********************************* TOP OF DATA **********************-CAPS OFF-* 00090MARTIN EDWARD M AIRPLANE MANUFACTURER 427890125 1019549
- - - - - - - - - - - - - - - - - - - - - - - - - - - 1 RECORD(S) NOT SELECTED 00200JACKSON JOSEPH C ORATOR 275587177 0204629
10000ANDREWS GEORGE ACTOR 576312032 0422489
15000MURPHY RONALD L PAINTER 987654321 1202559
18034SCHNEIDER ELLEN C NURSE 341559549 0329609
21035JONES GEORGE B COUNTRY SINGER 463813456 0909449
25100ROBERTS WILLIAM R POLITICIAN 879563325 0508659
27007ALLEN JOYCE M AUTHOR 783458334 0121329
30001RICHARDS REX W RODEO CLOWN 632764534 0401409
31000SAVAGE JONATHON C ELECTRICIAN 348567992 0622509
34010SMITH JANET AIRLINE ATTENDANT 557782984 1123599
34011JACOBS DIANA DOCTOR 225368395 0217579
******************************** BOTTOM OF DATA ********************-CAPS OFF-*
Enter FMT for formatted mode, VFMT for vertical format, HEX ON for Hex
Page 63

FileAid_-_Online_1CHAP_2.14 Displaying the Column Number Information LineThe COLS primary command displays the COLS information line. The information line is a ruler which allows you to identify the specific location of data in the data area of the screen. Figure 2-49. Display COLS Ruler (COLS command)
File-AID - Browse - USERID9.FASAMP.EMPMAST ----------- COMMAND ===> COLS ********************************* TOP OF DATA ********** 00090MARTIN EDWARD M AIRPLANE MANUFACTURER
Subtopics:
Chap_2.14.1 Steps: Chap_2.14.2 More About COLS Command
CHAP_2.14.1 Steps: 1. Type COLS in the COMMAND field.
2. Press <Enter>. File-AID displays the ruler line at the top of the data display as illustrated in Figure 2-50.
Figure 2-50. Browse - Character Mode - After COLS Command
File-AID - Browse - USERID9.FASAMP.EMPMAST ---------------- LINE 0000 COL 1 80
COMMAND ===> SCROLL ===> PAGE ----+----1----+----2----+----3----+----4----+----5----+----6----+----7----+----8
********************************* TOP OF DATA **********************-CAPS OFF-* 00090MARTIN EDWARD M AIRPLANE MANUFACTURER 427890125 1019549
- - - - - - - - - - - - - - - - - - - - - - - - - - - 1 RECORD(S) NOT SELECTED 00200JACKSON JOSEPH C ORATOR 275587177 0204629
10000ANDREWS GEORGE ACTOR 576312032 0422489
15000MURPHY RONALD L PAINTER 987654321 1202559
18034SCHNEIDER ELLEN C NURSE 341559549 0329609
21035JONES GEORGE B COUNTRY SINGER 463813456 0909449
25100ROBERTS WILLIAM R POLITICIAN 879563325 0508659
27007ALLEN JOYCE M AUTHOR 783458334 0121329
30001RICHARDS REX W RODEO CLOWN 632764534 0401409
31000SAVAGE JONATHON C ELECTRICIAN 348567992 0622509
34010SMITH JANET AIRLINE ATTENDANT 557782984 1123599
34011JACOBS DIANA DOCTOR 225368395 0217579
******************************** BOTTOM OF DATA ********************-CAPS OFF-*
Page 64

FileAid_-_Online_1
Enter FMT for formatted mode, VFMT for vertical format, HEX ON for Hex
CHAP_2.14.2 More About COLS Command o When you scroll the data display to the right beyond column 100, the ruler is useful for determining the last two (low-order) digits of the column number. The range of columns displayed is indicated in the top right corner of the display (except when overwritten by an error message).
o If the record key is included in the display, the COLS line contains spaces to separate the key's position.
o In the Edit function, COLS is a line command not a primary command.
CHAP_2.15 Searching for Data In a Specific ColumnThis example illustrates how you can use the column numbers of the ruler line in combination with the FIND primary command to search an exact location for a data value. Figure 2-51. FIND Command Example
File-AID - Browse - USERID9.FASAMP.EMPMAST ----------- COMMAND ===> FIND POLITICIAN 34 ----+----1----+----2----+----3----+----4----+----5----+- ********************************* TOP OF DATA ********** 00090MARTIN EDWARD M AIRPLANE MANUFACTURER
Subtopics:
Chap_2.15.1 Steps:
CHAP_2.15.1 Steps: 1. Type FIND POLITICIAN 34 in the COMMAND field.
In the FIND primary command syntax, POLITICIAN is the Find string field value and 34 is the value of the Start column field. When you specify a Start column number, the value you specify as the Find string value must begin in the specified column position. If the value you are looking for is a number, enclose the number in single quotes (for example, FIND '18034' 1).
2. Press <Enter>. File-AID positions the cursor on the P in POLITICIAN. If necessary the display is automatically scrolled so that the found string is visible. File-AID indicates that it has found the search value by displaying the message 'POLITICIAN' FOUND in the upper-right hand corner of the screen as shown in Figure 2-52.
Figure 2-52. FIND result - Cursor on P in POLITICIAN
File-AID - Browse - USERID9.FASAMP.EMPMAST ---------------- 'POLITICIAN' FOUND COMMAND ===> SCROLL ===> PAGE ----+----1----+----2----+----3----+----4----+----5----+----6----+----7----+----8
Page 65
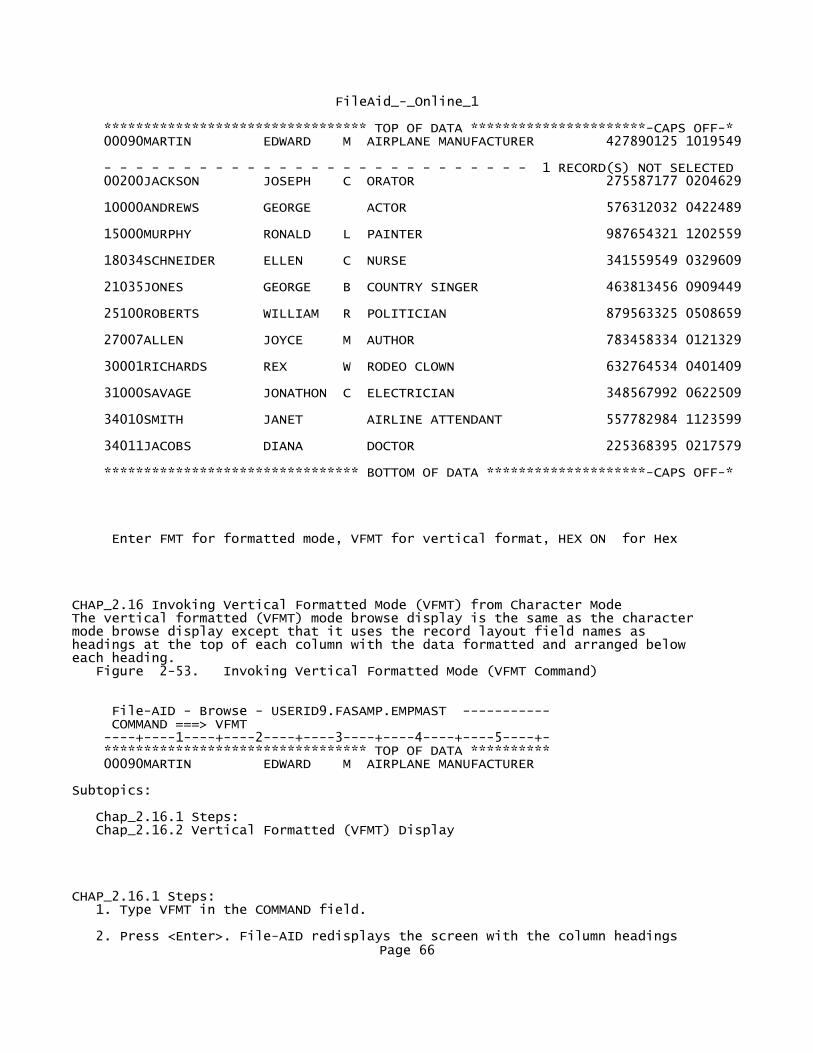
FileAid_-_Online_1
********************************* TOP OF DATA **********************-CAPS OFF-* 00090MARTIN EDWARD M AIRPLANE MANUFACTURER 427890125 1019549
- - - - - - - - - - - - - - - - - - - - - - - - - - - 1 RECORD(S) NOT SELECTED 00200JACKSON JOSEPH C ORATOR 275587177 0204629
10000ANDREWS GEORGE ACTOR 576312032 0422489
15000MURPHY RONALD L PAINTER 987654321 1202559
18034SCHNEIDER ELLEN C NURSE 341559549 0329609
21035JONES GEORGE B COUNTRY SINGER 463813456 0909449
25100ROBERTS WILLIAM R POLITICIAN 879563325 0508659
27007ALLEN JOYCE M AUTHOR 783458334 0121329
30001RICHARDS REX W RODEO CLOWN 632764534 0401409
31000SAVAGE JONATHON C ELECTRICIAN 348567992 0622509
34010SMITH JANET AIRLINE ATTENDANT 557782984 1123599
34011JACOBS DIANA DOCTOR 225368395 0217579
******************************** BOTTOM OF DATA ********************-CAPS OFF-*
Enter FMT for formatted mode, VFMT for vertical format, HEX ON for Hex
CHAP_2.16 Invoking Vertical Formatted Mode (VFMT) from Character ModeThe vertical formatted (VFMT) mode browse display is the same as the character mode browse display except that it uses the record layout field names as headings at the top of each column with the data formatted and arranged below each heading. Figure 2-53. Invoking Vertical Formatted Mode (VFMT Command)
File-AID - Browse - USERID9.FASAMP.EMPMAST ----------- COMMAND ===> VFMT ----+----1----+----2----+----3----+----4----+----5----+- ********************************* TOP OF DATA ********** 00090MARTIN EDWARD M AIRPLANE MANUFACTURER
Subtopics:
Chap_2.16.1 Steps: Chap_2.16.2 Vertical Formatted (VFMT) Display
CHAP_2.16.1 Steps: 1. Type VFMT in the COMMAND field.
2. Press <Enter>. File-AID redisplays the screen with the column headings Page 66

FileAid_-_Online_1 positioned at the top of the data display as illustrated in Figure 2-54.
CHAP_2.16.2 Vertical Formatted (VFMT) Display
Figure 2-54. Browse - Vertical Formatted Mode
File-AID - Browse - USERID9.FASAMP.EMPMAST ---------------- LINE 0000 COL 1 49
COMMAND ===> SCROLL ===> PAGE EMP-NUMBER EMP-LAST-NAME EMP-FIRST-NAME EMP-MID-INIT FILLER EMP-TITLE 5/AN 15/AN 10/AN 1/AN 2/AN 30/AN (1-5) (6-20) (21-30) (31-31) (32-33) (34-49) 1--------- 2-------------- 3------------- 4----------- 5------- 6---------------
********************************* TOP OF DATA **********************-CAPS OFF-* 00090 MARTIN EDWARD M AIRPLANE MANUFAC
- - - - - - - - - - - - - - - - - - - - - - - - - - - 1 RECORD(S) NOT SELECTED 00200 JACKSON JOSEPH C ORATOR 10000 ANDREWS GEORGE ACTOR 15000 MURPHY RONALD L PAINTER 18034 SCHNEIDER ELLEN C NURSE 21035 JONES GEORGE B COUNTRY SINGER 25100 ROBERTS WILLIAM R POLITICIAN 27007 ALLEN JOYCE M AUTHOR 30001 RICHARDS REX W RODEO CLOWN 31000 SAVAGE JONATHON C ELECTRICIAN 34010 SMITH JANET AIRLINE ATTENDAN
34011 JACOBS DIANA DOCTOR ******************************** BOTTOM OF DATA ********************-CAPS OFF-*
Enter FMT for formatted mode, CHAR for character format, HEX ON for Hex
Subtopics:
Chap_2.16.2.1 More About Vertical Formatted Mode
CHAP_2.16.2.1 More About Vertical Formatted Mode o A single record layout must be available to use the VFMT command. You cannot invoke the VFMT command if you are using an XREF or you have not specified a layout.
o If no layout was specified (layout usage=N), the COMPILE primary command lets you dynamically compile a layout for use by VFMT and FMT.
o Field offsets are always shown in the heading. For example (1-5).
o File-AID assigned field numbers are indicated by the dash line in each field heading. For example 1------ means "field number 1".
o The VPRINT primary command prints the current record and any number of subsequent records in a vertical formatted report. Use the FIELDS operand to specify exactly which fields to include in the report.
Page 67
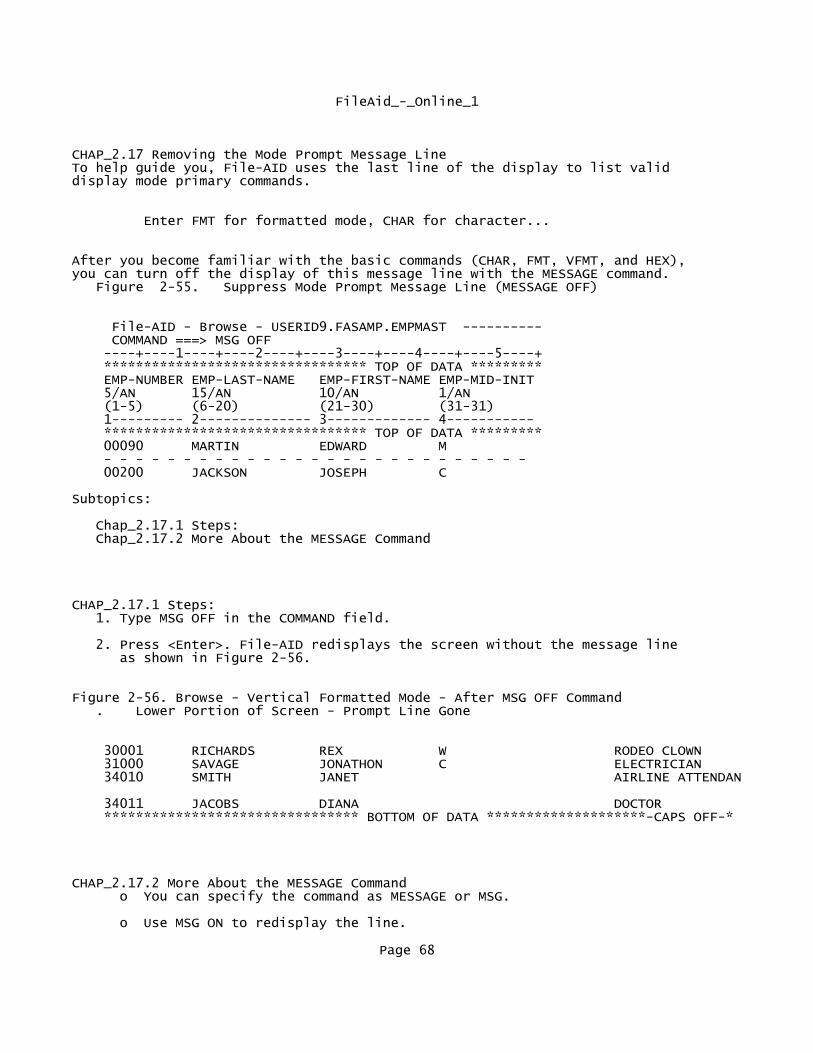
FileAid_-_Online_1
CHAP_2.17 Removing the Mode Prompt Message LineTo help guide you, File-AID uses the last line of the display to list valid display mode primary commands.
Enter FMT for formatted mode, CHAR for character...
After you become familiar with the basic commands (CHAR, FMT, VFMT, and HEX), you can turn off the display of this message line with the MESSAGE command. Figure 2-55. Suppress Mode Prompt Message Line (MESSAGE OFF)
File-AID - Browse - USERID9.FASAMP.EMPMAST ---------- COMMAND ===> MSG OFF ----+----1----+----2----+----3----+----4----+----5----+ ********************************* TOP OF DATA ********* EMP-NUMBER EMP-LAST-NAME EMP-FIRST-NAME EMP-MID-INIT 5/AN 15/AN 10/AN 1/AN (1-5) (6-20) (21-30) (31-31) 1--------- 2-------------- 3------------- 4----------- ********************************* TOP OF DATA ********* 00090 MARTIN EDWARD M - - - - - - - - - - - - - - - - - - - - - - - - - - - 00200 JACKSON JOSEPH C
Subtopics:
Chap_2.17.1 Steps: Chap_2.17.2 More About the MESSAGE Command
CHAP_2.17.1 Steps: 1. Type MSG OFF in the COMMAND field.
2. Press <Enter>. File-AID redisplays the screen without the message line as shown in Figure 2-56.
Figure 2-56. Browse - Vertical Formatted Mode - After MSG OFF Command . Lower Portion of Screen - Prompt Line Gone
30001 RICHARDS REX W RODEO CLOWN 31000 SAVAGE JONATHON C ELECTRICIAN 34010 SMITH JANET AIRLINE ATTENDAN
34011 JACOBS DIANA DOCTOR ******************************** BOTTOM OF DATA ********************-CAPS OFF-*
CHAP_2.17.2 More About the MESSAGE Command o You can specify the command as MESSAGE or MSG.
o Use MSG ON to redisplay the line.
Page 68
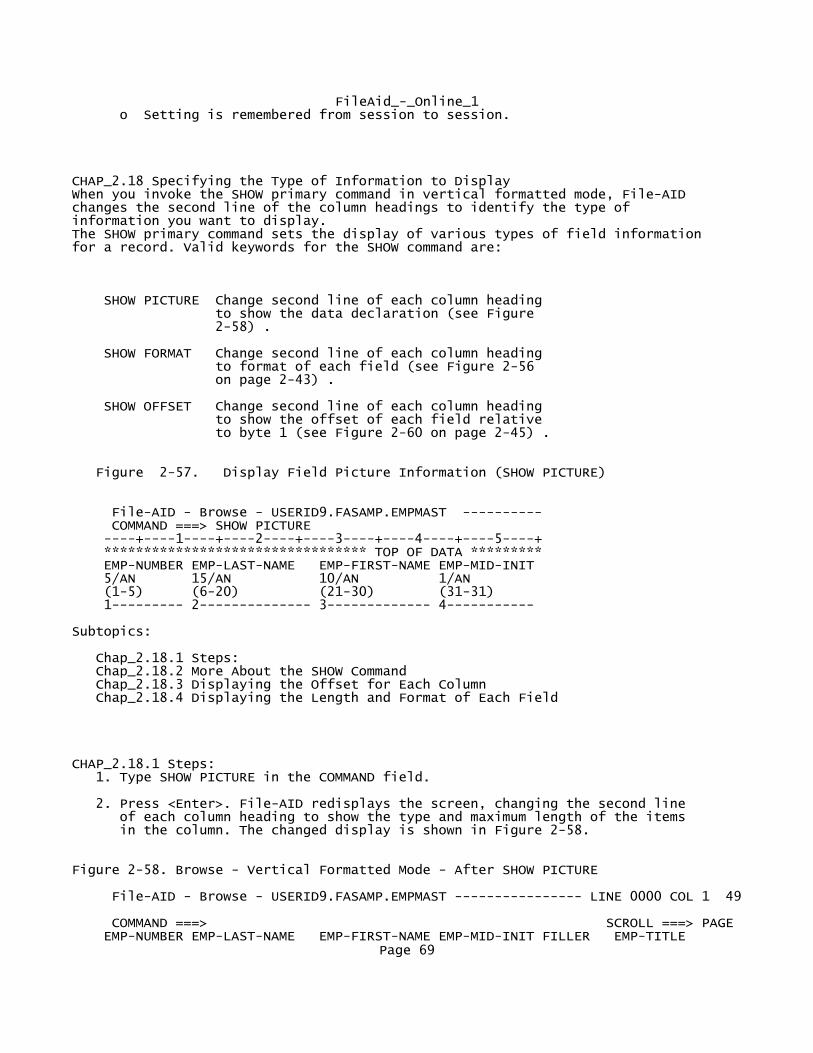
FileAid_-_Online_1 o Setting is remembered from session to session.
CHAP_2.18 Specifying the Type of Information to DisplayWhen you invoke the SHOW primary command in vertical formatted mode, File-AID changes the second line of the column headings to identify the type of information you want to display. The SHOW primary command sets the display of various types of field information for a record. Valid keywords for the SHOW command are:
SHOW PICTURE Change second line of each column heading to show the data declaration (see Figure 2-58) .
SHOW FORMAT Change second line of each column heading to format of each field (see Figure 2-56 on page 2-43) .
SHOW OFFSET Change second line of each column heading to show the offset of each field relative to byte 1 (see Figure 2-60 on page 2-45) .
Figure 2-57. Display Field Picture Information (SHOW PICTURE)
File-AID - Browse - USERID9.FASAMP.EMPMAST ---------- COMMAND ===> SHOW PICTURE ----+----1----+----2----+----3----+----4----+----5----+ ********************************* TOP OF DATA ********* EMP-NUMBER EMP-LAST-NAME EMP-FIRST-NAME EMP-MID-INIT 5/AN 15/AN 10/AN 1/AN (1-5) (6-20) (21-30) (31-31) 1--------- 2-------------- 3------------- 4-----------
Subtopics:
Chap_2.18.1 Steps: Chap_2.18.2 More About the SHOW Command Chap_2.18.3 Displaying the Offset for Each Column Chap_2.18.4 Displaying the Length and Format of Each Field
CHAP_2.18.1 Steps: 1. Type SHOW PICTURE in the COMMAND field.
2. Press <Enter>. File-AID redisplays the screen, changing the second line of each column heading to show the type and maximum length of the items in the column. The changed display is shown in Figure 2-58.
Figure 2-58. Browse - Vertical Formatted Mode - After SHOW PICTURE
File-AID - Browse - USERID9.FASAMP.EMPMAST ---------------- LINE 0000 COL 1 49
COMMAND ===> SCROLL ===> PAGE EMP-NUMBER EMP-LAST-NAME EMP-FIRST-NAME EMP-MID-INIT FILLER EMP-TITLE
Page 69
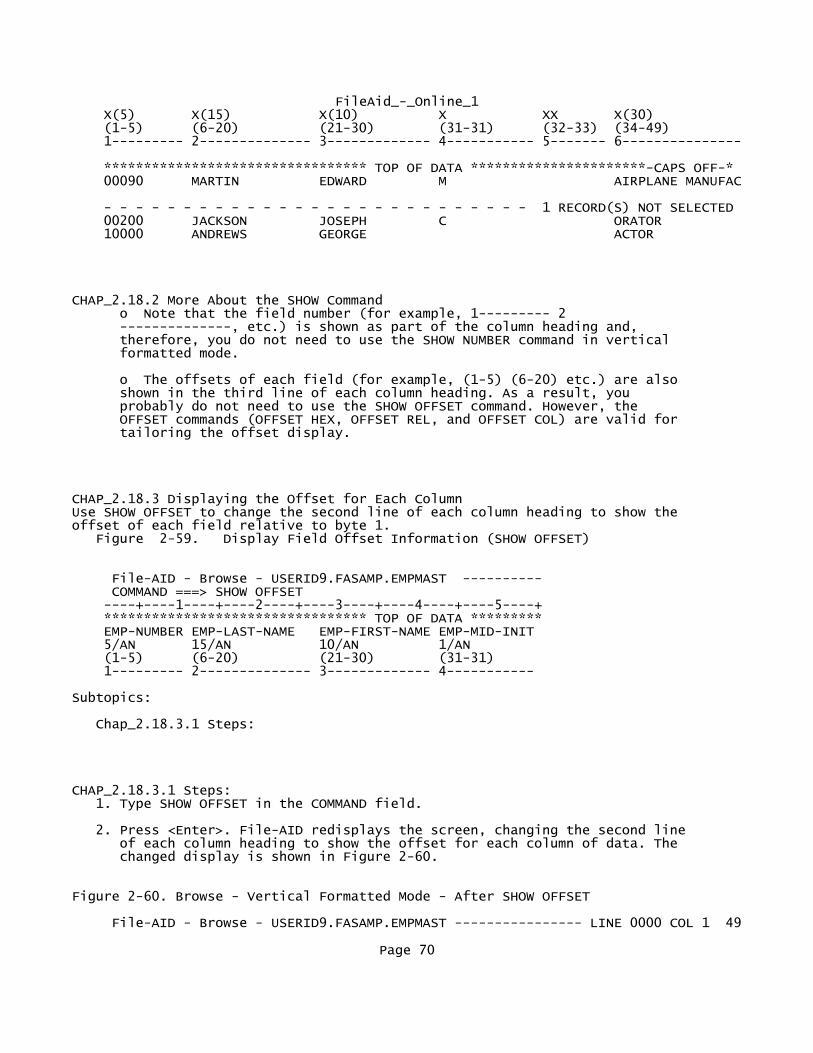
FileAid_-_Online_1 X(5) X(15) X(10) X XX X(30) (1-5) (6-20) (21-30) (31-31) (32-33) (34-49) 1--------- 2-------------- 3------------- 4----------- 5------- 6---------------
********************************* TOP OF DATA **********************-CAPS OFF-* 00090 MARTIN EDWARD M AIRPLANE MANUFAC
- - - - - - - - - - - - - - - - - - - - - - - - - - - 1 RECORD(S) NOT SELECTED 00200 JACKSON JOSEPH C ORATOR 10000 ANDREWS GEORGE ACTOR
CHAP_2.18.2 More About the SHOW Command o Note that the field number (for example, 1--------- 2 --------------, etc.) is shown as part of the column heading and, therefore, you do not need to use the SHOW NUMBER command in vertical formatted mode.
o The offsets of each field (for example, (1-5) (6-20) etc.) are also shown in the third line of each column heading. As a result, you probably do not need to use the SHOW OFFSET command. However, the OFFSET commands (OFFSET HEX, OFFSET REL, and OFFSET COL) are valid for tailoring the offset display.
CHAP_2.18.3 Displaying the Offset for Each ColumnUse SHOW OFFSET to change the second line of each column heading to show the offset of each field relative to byte 1. Figure 2-59. Display Field Offset Information (SHOW OFFSET)
File-AID - Browse - USERID9.FASAMP.EMPMAST ---------- COMMAND ===> SHOW OFFSET ----+----1----+----2----+----3----+----4----+----5----+ ********************************* TOP OF DATA ********* EMP-NUMBER EMP-LAST-NAME EMP-FIRST-NAME EMP-MID-INIT 5/AN 15/AN 10/AN 1/AN (1-5) (6-20) (21-30) (31-31) 1--------- 2-------------- 3------------- 4-----------
Subtopics:
Chap_2.18.3.1 Steps:
CHAP_2.18.3.1 Steps: 1. Type SHOW OFFSET in the COMMAND field.
2. Press <Enter>. File-AID redisplays the screen, changing the second line of each column heading to show the offset for each column of data. The changed display is shown in Figure 2-60.
Figure 2-60. Browse - Vertical Formatted Mode - After SHOW OFFSET
File-AID - Browse - USERID9.FASAMP.EMPMAST ---------------- LINE 0000 COL 1 49
Page 70

FileAid_-_Online_1 COMMAND ===> SCROLL ===> PAGE EMP-NUMBER EMP-LAST-NAME EMP-FIRST-NAME EMP-MID-INIT FILLER EMP-TITLE 1 6 21 31 32 34 (1-5) (6-20) (21-30) (31-31) (32-33) (34-49) 1--------- 2-------------- 3------------- 4----------- 5------- 6---------------
********************************* TOP OF DATA **********************-CAPS OFF-* 00090 MARTIN EDWARD M AIRPLANE MANUFAC
- - - - - - - - - - - - - - - - - - - - - - - - - - - 1 RECORD(S) NOT SELECTED 00200 JACKSON JOSEPH C ORATOR 10000 ANDREWS GEORGE ACTOR
CHAP_2.18.4 Displaying the Length and Format of Each FieldUse SHOW FORMAT (abbrev: S F) to change the heading to show the length and usage of each field. Figure 2-61. Display Field Format Information (SHOW FORMAT)
File-AID - Browse - USERID9.FASAMP.EMPMAST ---------- COMMAND ===> S F ----+----1----+----2----+----3----+----4----+----5----+ ********************************* TOP OF DATA ********* EMP-NUMBER EMP-LAST-NAME EMP-FIRST-NAME EMP-MID-INIT 1 6 21 31 (1-5) (6-20) (21-30) (31-31) 1--------- 2-------------- 3------------- 4-----------
Subtopics:
Chap_2.18.4.1 Steps:
CHAP_2.18.4.1 Steps: 1. Type S F in the COMMAND field.
2. Press <Enter>. File-AID redisplays the screen, changing the second line of the column headings to describe the field length and format of each column of data items. The changed display is shown in Figure 2-62.
The length of a field is expressed in bytes. The length indicates the actual number of bytes occupied by the field and not the data item size. The PICTURE parameter displays the size of the data item.
Figure 2-62. Browse - Vertical Formatted Mode - After SHOW FORMAT Command
File-AID - Browse - USERID9.FASAMP.EMPMAST ---------------- LINE 0000 COL 1 49
COMMAND ===> SCROLL ===> PAGE EMP-NUMBER EMP-LAST-NAME EMP-FIRST-NAME EMP-MID-INIT FILLER EMP-TITLE 5/AN 15/AN 10/AN 1/AN 2/AN 30/AN (1-5) (6-20) (21-30) (31-31) (32-33) (34-49) 1--------- 2-------------- 3------------- 4----------- 5------- 6---------------
********************************* TOP OF DATA **********************-CAPS OFF-* 00090 MARTIN EDWARD M AIRPLANE MANUFAC
Page 71

FileAid_-_Online_1 - - - - - - - - - - - - - - - - - - - - - - - - - - - 1 RECORD(S) NOT SELECTED 00200 JACKSON JOSEPH C ORATOR 10000 ANDREWS GEORGE ACTOR
CHAP_2.19 Selecting Fields to Display by Field NumberYou can use the DISPLAY primary command to display two types of information: o All or selected fields of a record;
o The display format for individual layout fields.
In vertical formatted mode, the field number associated with the data in a column is displayed on the screen in the fourth line of the column heading information (for example, 1--------- 2--------------, etc.). Figure 2-63. Display Specific Fields (DISPLAY fields ONLY)
File-AID - Browse - USERID9.FASAMP.EMPMAST ---------- COMMAND ===> DIS 16 21 34 ONLY ----+----1----+----2----+----3----+----4----+----5----+ ********************************* TOP OF DATA ********* EMP-NUMBER EMP-LAST-NAME EMP-FIRST-NAME EMP-MID-INIT 5/AN 15/AN 10/AN 1/AN (1-5) (6-20) (21-30) (31-31) 1--------- 2-------------- 3------------- 4-----------
Subtopics:
Chap_2.19.1 Steps:
CHAP_2.19.1 Steps: 1. Type DIS 16 21 34 ONLY in the COMMAND field.
2. Press <Enter>. The data items for fields 16, 21, and 34 only are redisplayed on the screen as illustrated in Figure 2-64.
Figure 2-64. Vertical Formatted Mode - After DISPLAY 16 21 34 ONLY
File-AID - Browse - USERID9.FASAMP.EMPMAST -------------- LINE 0000 COL 86 198
COMMAND ===> SCROLL ===> PAGE EMP-MARITAL-STATUS EMP-LOCAL-TAX-WITHOLD-PCT EMP-CON-HOME-PHONE 1/AN 3/PS 10/AN (86-86) (99-101) (189-198) 16---------------- 21----------------------- 34---------------- ********************************* TOP OF DATA **********************-CAPS OFF-* M 5.00 4155556981 - - - - - - - - - - - - - - - - - - - - - - - - - - - 1 RECORD(S) NOT SELECTED S 0 2125559021 S 15.00 4045559021 S 0 3125559021 S 0 4085551245 S 7.00 4085551245 S 0 4085559021 S 0 7135559021
Page 72

FileAid_-_Online_1
CHAP_2.20 Changing the Display Format of a FieldYou can use the DISPLAY primary command to change the display format of one or more fields on the display. The DISPLAY command enables you to display field data in different formats. The default format is the format defined in the record layout for each field. You can specify the following formats: binary (BIN), bit (BIT), character (CHAR), packed decimal data (DEC), decimal floating point number (FLOAT), DBCS character (DBCS), and hexadecimal (HEX). This command changes the display format; it does not change the record layout definition of the field. Refer to the File-AID/MVS Online Reference Manual (SPF and XE) for a complete description of the DISPLAY primary command. Subtopics: Chap_2.20.1 Displaying Hexadecimal Notation for a Specified Field Chap_2.20.2 Returning Fields to Their Standard Display Format Chap_2.20.3 Redisplaying All Fields
CHAP_2.20.1 Displaying Hexadecimal Notation for a Specified FieldUse the DISPLAY fields HEX command to change the display format of one or more fields to horizontal hex. In this example, the field EMP-LOCAL-TAX-WITHOLD-PCT (field number 21) is shown in hex. Figure 2-65. Display Field Data in HEX - (DISPLAY field HEX)
File-AID - Browse - USERID9.FASAMP.EMPMAST ---------- COMMAND ===> DIS 21 HEX ----+----1----+----2----+----3----+----4----+----5----+ ********************************* TOP OF DATA ********* EMP-MARITAL-STATUS EMP-LOCAL-TAX-WITHOLD-PCT EMP-CON-HO 1/AN 3/PS 10/AN (86-86) (99-101) (189-198) 16---------------- 21----------------------- 34-------- ********************************* TOP OF DATA ********* M 5.00 4155556981 - - - - - - - - - - - - - - - - - - - - - - - - - - - S 0 2125559021 S 15.00 4045559021
Subtopics:
Chap_2.20.1.1 Steps: Chap_2.20.1.2 Result of DISPLAY 21 HEX
CHAP_2.20.1.1 Steps: 1. Type DIS 21 HEX in the COMMAND field.
2. Press <Enter>. The data items in field 21 only are redisplayed in hexadecimal notation as illustrated in Figure 2-66.
CHAP_2.20.1.2 Result of DISPLAY 21 HEXThe display format of the 3-byte packed signed numeric field, EMP-LOCAL-TAX-WITHOLD-PCT changes from a normalized, zero suppressed, decimal value (5.00) to the horizontal hex value (000500C). The format information in the heading of field 21 also changes to 3/HEX.
Page 73

FileAid_-_Online_1
Figure 2-66. Vertical Formatted Mode - After DISPLAY 21 HEX
File-AID - Browse - USERID9.FASAMP.EMPMAST -------------- LINE 0000 COL 86 198
COMMAND ===> SCROLL ===> PAGE EMP-MARITAL-STATUS EMP-LOCAL-TAX-WITHOLD-PCT EMP-CON-HOME-PHONE 1/AN 3/HEX 10/AN (86-86) (99-101) (189-198) 16---------------- 21----------------------- 34---------------- ********************************* TOP OF DATA **********************-CAPS OFF-* M 00500C 4155556981 - - - - - - - - - - - - - - - - - - - - - - - - - - - 1 RECORD(S) NOT SELECTED S 00000C 2125559021 S 01500C 4045559021 S 00000C 3125559021 S 00000C 4085551245 S 00700C 4085551245 S 00700C 7175550855
Subtopics:
Chap_2.20.1.2.1 More About the DISPLAY Command
CHAP_2.20.1.2.1 More About the DISPLAY Command o The DISPLAY field definitions you specify are retained until you exit the Browse/Edit function.
o DISPLAY and SHOW command settings affect both Vertical (VFMT) and Formatted (FMT) modes.
CHAP_2.20.2 Returning Fields to Their Standard Display FormatTo return a field to its internal format as defined by the record layout, use the RESET keyword of the DISPLAY primary command. Figure 2-67. Return Field Display to Standard - (DISPLAY field RESET)
File-AID - Browse - USERID9.FASAMP.EMPMAST ---------- COMMAND ===> DIS 21 RESET ----+----1----+----2----+----3----+----4----+----5----+ ********************************* TOP OF DATA ********* EMP-MARITAL-STATUS EMP-LOCAL-TAX-WITHOLD-PCT EMP-CON-HO 1/AN 3/HEX 10/AN (86-86) (99-101) (189-198) 16---------------- 21----------------------- 34-------- ********************************* TOP OF DATA ********* M 00500C 4155556981 - - - - - - - - - - - - - - - - - - - - - - - - - - - S 00000C 2125559021 S 01500C 4045559021
Subtopics:
Chap_2.20.2.1 Steps:
Page 74

FileAid_-_Online_1
CHAP_2.20.2.1 Steps: 1. Type DIS 21 RESET in the COMMAND field.
2. Press <Enter>. Field 21 is displayed normalized in decimal format as illustrated in Figure 2-68.
Figure 2-68. Vertical Formatted Mode - After DISPLAY 21 RESET
File-AID - Browse - USERID9.FASAMP.EMPMAST -------------- LINE 0000 COL 86 198
COMMAND ===> SCROLL ===> PAGE EMP-MARITAL-STATUS EMP-LOCAL-TAX-WITHOLD-PCT EMP-CON-HOME-PHONE 1/AN 3/PS 10/AN (86-86) (99-101) (189-198) 16---------------- 21----------------------- 34---------------- ********************************* TOP OF DATA **********************-CAPS OFF-* M 5.00 4155556981 - - - - - - - - - - - - - - - - - - - - - - - - - - - 1 RECORD(S) NOT SELECTED S 0 2125559021 S 15.00 4045559021 S 0 3125559021 S 0 4085551245 S 7.00 4085551245 S 0 4085559021
CHAP_2.20.3 Redisplaying All FieldsUse the DISPLAY ALL command to redisplay all fields. Figure 2-69. Redisplay All Fields - (DISPLAY ALL)
File-AID - Browse - USERID9.FASAMP.EMPMAST ---------- COMMAND ===> DIS ALL ----+----1----+----2----+----3----+----4----+----5----+ ********************************* TOP OF DATA ********* EMP-MARITAL-STATUS EMP-LOCAL-TAX-WITHOLD-PCT EMP-CON-HO 1/AN 3/PS 10/AN (86-86) (99-101) (189-198) 16---------------- 21----------------------- 34-------- ********************************* TOP OF DATA ********* M 5.00 4155556981 - - - - - - - - - - - - - - - - - - - - - - - - - - - S 0 2125559021 S 15.00 4045559021
Subtopics:
Chap_2.20.3.1 Steps: Chap_2.20.3.2 Result of DISPLAY ALL
CHAP_2.20.3.1 Steps: 1. Type DIS ALL in the COMMAND field.
2. Press <Enter>. File-AID redisplays all of the fields.
Page 75
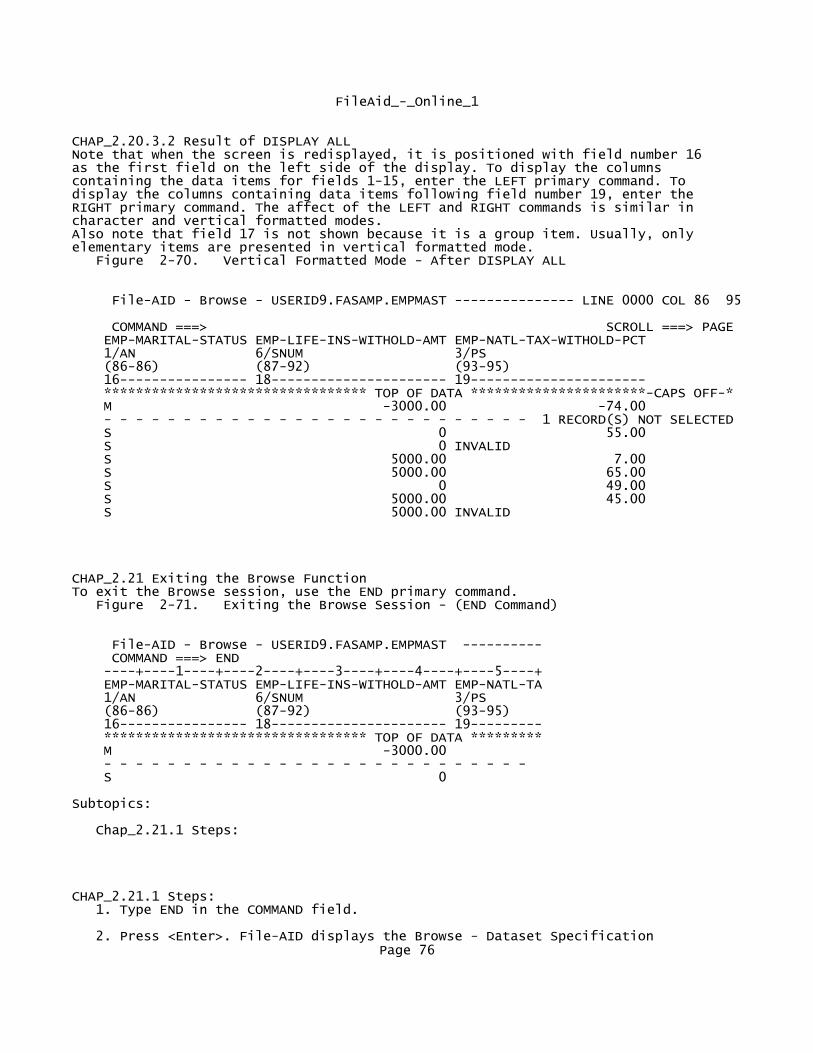
FileAid_-_Online_1
CHAP_2.20.3.2 Result of DISPLAY ALLNote that when the screen is redisplayed, it is positioned with field number 16 as the first field on the left side of the display. To display the columns containing the data items for fields 1-15, enter the LEFT primary command. To display the columns containing data items following field number 19, enter the RIGHT primary command. The affect of the LEFT and RIGHT commands is similar in character and vertical formatted modes. Also note that field 17 is not shown because it is a group item. Usually, only elementary items are presented in vertical formatted mode. Figure 2-70. Vertical Formatted Mode - After DISPLAY ALL
File-AID - Browse - USERID9.FASAMP.EMPMAST --------------- LINE 0000 COL 86 95
COMMAND ===> SCROLL ===> PAGE EMP-MARITAL-STATUS EMP-LIFE-INS-WITHOLD-AMT EMP-NATL-TAX-WITHOLD-PCT 1/AN 6/SNUM 3/PS (86-86) (87-92) (93-95) 16---------------- 18---------------------- 19---------------------- ********************************* TOP OF DATA **********************-CAPS OFF-* M -3000.00 -74.00 - - - - - - - - - - - - - - - - - - - - - - - - - - - 1 RECORD(S) NOT SELECTED S 0 55.00 S 0 INVALID S 5000.00 7.00 S 5000.00 65.00 S 0 49.00 S 5000.00 45.00 S 5000.00 INVALID
CHAP_2.21 Exiting the Browse FunctionTo exit the Browse session, use the END primary command. Figure 2-71. Exiting the Browse Session - (END Command)
File-AID - Browse - USERID9.FASAMP.EMPMAST ---------- COMMAND ===> END ----+----1----+----2----+----3----+----4----+----5----+ EMP-MARITAL-STATUS EMP-LIFE-INS-WITHOLD-AMT EMP-NATL-TA 1/AN 6/SNUM 3/PS (86-86) (87-92) (93-95) 16---------------- 18---------------------- 19--------- ********************************* TOP OF DATA ********* M -3000.00 - - - - - - - - - - - - - - - - - - - - - - - - - - - S 0
Subtopics:
Chap_2.21.1 Steps:
CHAP_2.21.1 Steps: 1. Type END in the COMMAND field.
2. Press <Enter>. File-AID displays the Browse - Dataset Specification Page 76

FileAid_-_Online_1 screen ( Figure 2-72 on page 2-53) .
CHAP_2.22 Viewing the Last Referenced File ListBy default, File-AID prefills the fields of the Browse or Edit Dataset Specification screen with your last saved entries. Another way to select a browse or edit dataset is to use the Last Referenced File List, shown in Figure 2-73 on page 2-54. It lists up to the last 50 files that you Browsed and/or Edited with File-AID. It is displayed when you enter the FILELIST primary command (see Figure 2-72) or blank out the Dataset name or HFS path field on the Browse or Edit Dataset Specification screen. Primary commands enable you to sort by filename or referenced date and locate an entry by filename. Line commands allow you to select a file for processing, lock, unlock, and delete entries from the list, display the complete HFS path name, and display related dataset information.
Figure 2-72. Browse - Dataset Specification with FILELIST Screen
File-AID -------------- Browse - Dataset Specification ----------------------
COMMAND ===> FILELIST
Browse Mode ===> F (F=Fmt; C=Char; V=Vfmt; U=Unfmt)
Specify Browse Information: Dataset name or HFS path ===> FASAMP.EMPMAST' Member name ===> (Blank or pattern for member list) Volume serial ===> (If dataset is not cataloged)
Specify Record Layout and XREF Information: Record layout usage ===> S (S = Single; X = XREF; N = None) Record layout dataset ===> FASAMP.LAYOUTS Member name ===> EMPLOYEE (Blank or pattern for member list) XREF dataset name ===> Member name ===> (Blank or pattern for member list)
Specify Selection Criteria Information: (E = Existing; T = Temporary; Selection criteria usage ===> T M = Modify; Q = Quick; N = None) Selection dataset name ===> Member name ===> (Blank or pattern for member list)
Subtopics:
Chap_2.22.1 Steps: Chap_2.22.2 Requesting Related File List Chap_2.22.3 Locking Dataset in File List Chap_2.22.4 Returning To Primary Menu
CHAP_2.22.1 Steps: 1. Type FILELIST in the COMMAND field (or blank out the Dataset name or HFS path field).
2. Press <Enter>. File-AID displays the Last Referenced File List screen as shown in Figure 2-73 on page 2-54.
Page 77

FileAid_-_Online_1CHAP_2.22.2 Requesting Related File ListThe related dataset information includes the Record Layout/XREF and Selection Criteria files that you associated with the referenced files.
Figure 2-73. Last Referenced File List Screen
File-AID ------------- Last Referenced File List ----------- Row 1 to 3 of 3 COMMAND ===> SCROLL ===> CSR S = Select for processing; M = Modify before processing I = Info; L = Lock; U = Unlock; D = Delete; P = HFS Pathname display File Name SETS RL SC LOCK REFERENCED I USERID0.FASAMP.EMPMAST 1 2001/01/13 USERID0.FASAMP.ORDRFILE 1 X 2001/01/03 USERID0.FASAMP.EMPLOYEE 2 1 2001/01/03 ******************************* Bottom of data ********************************
Subtopics:
Chap_2.22.2.1 Steps: Chap_2.22.2.2 More About the Last Referenced File List
CHAP_2.22.2.1 Steps: 1. Enter the I line command to the left of file name EMPMAST.
2. Press <Enter>. File-AID displays the Related File List screen (shown in Figure 2-74) .
CHAP_2.22.2.2 More About the Last Referenced File List o The SORT primary command lets you sort the list by filename (SORT NAME) or referenced date (SORT DATE).
o The LOCATE primary command finds the first occurence of the specified beginning filename string (LOCATE USERID0.FASAMP.ORD).
CHAP_2.22.3 Locking Dataset in File ListThe Related File list, shown in Figure 2-74, shows detailed information for a selected entry on the Last Referenced File List including the Record Layout, XREF, and Selection Criteria file(s) associated with that file. When there are multiple sets of Related File(s) they are all displayed. If you want to make sure that a file and its related entries stay in the list, enter the Lock line command.
Page 78
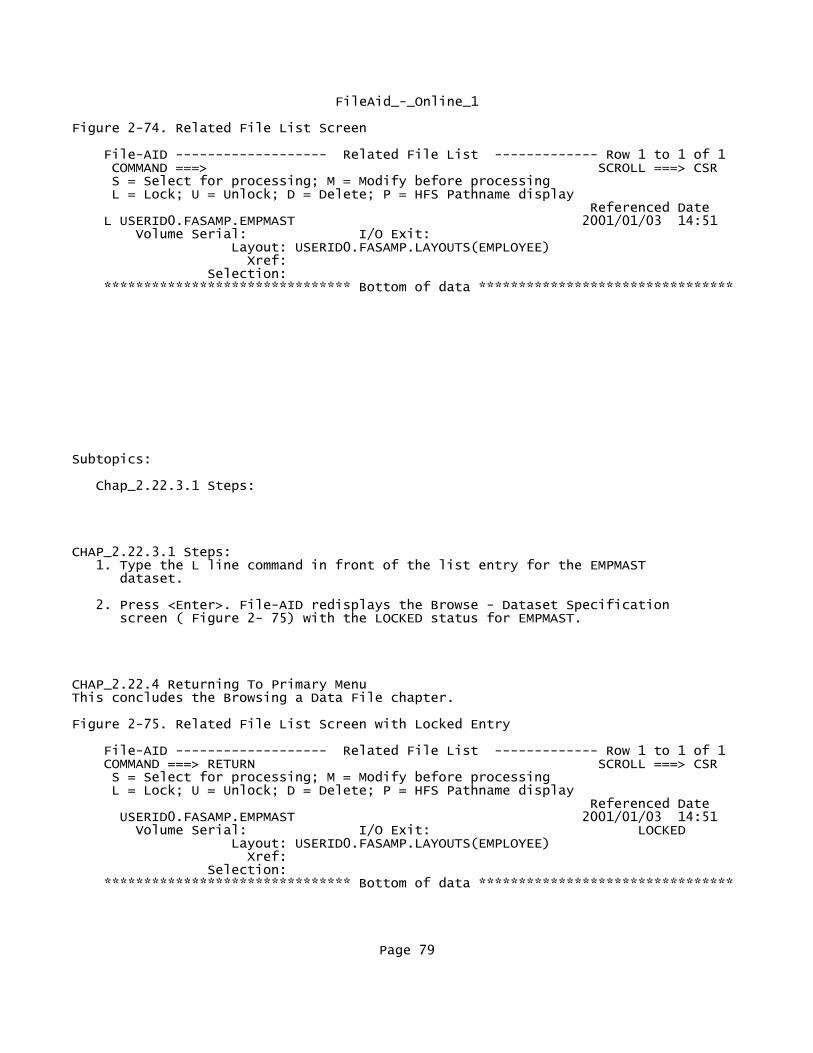
FileAid_-_Online_1
Figure 2-74. Related File List Screen
File-AID ------------------- Related File List ------------- Row 1 to 1 of 1 COMMAND ===> SCROLL ===> CSR S = Select for processing; M = Modify before processing L = Lock; U = Unlock; D = Delete; P = HFS Pathname display Referenced Date L USERID0.FASAMP.EMPMAST 2001/01/03 14:51 Volume Serial: I/O Exit: Layout: USERID0.FASAMP.LAYOUTS(EMPLOYEE) Xref: Selection: ******************************* Bottom of data ********************************
Subtopics:
Chap_2.22.3.1 Steps:
CHAP_2.22.3.1 Steps: 1. Type the L line command in front of the list entry for the EMPMAST dataset.
2. Press <Enter>. File-AID redisplays the Browse - Dataset Specification screen ( Figure 2- 75) with the LOCKED status for EMPMAST.
CHAP_2.22.4 Returning To Primary MenuThis concludes the Browsing a Data File chapter.
Figure 2-75. Related File List Screen with Locked Entry
File-AID ------------------- Related File List ------------- Row 1 to 1 of 1 COMMAND ===> RETURN SCROLL ===> CSR S = Select for processing; M = Modify before processing L = Lock; U = Unlock; D = Delete; P = HFS Pathname display Referenced Date USERID0.FASAMP.EMPMAST 2001/01/03 14:51 Volume Serial: I/O Exit: LOCKED Layout: USERID0.FASAMP.LAYOUTS(EMPLOYEE) Xref: Selection: ******************************* Bottom of data ********************************
Page 79

FileAid_-_Online_1
Subtopics:
Chap_2.22.4.1 Steps:
CHAP_2.22.4.1 Steps: 1. Type RETURN in the COMMAND field.
2. Press <Enter>. File-AID displays the File-AID Primary Option Menu. ( Figure 1-2 on page 1-2) .
3
CHAP_3 Allocating a VSAM ClusterFile-AID has a utility for managing VSAM datasets and IAM datasets. The features of this utility include: o Allocating clusters (KSDS, ESDS, RRDS, and LINEAR)
o Allocating alternate indexes
o Building alternate indexes
o Deleting objects
o Renaming objects
o Displaying detailed information
o Modifying cluster attributes
o Generating IDCAMS control statements
o Redefining (Delete/Define) clusters
o Allocating and deleting dataspaces
o Allocating IAM datasets.
Subtopics: Chap_3.1 Accessing the VSAM Utility (Option 3.5) Chap_3.2 Choosing a VSAM Utility Option Chap_3.3 Using an Existing Dataset's Allocation Attributes Chap_3.4 Allocating a Cluster Chap_3.5 Verifying Allocation Parameters Chap_3.6 Specifying Extended Allocation Parameters Chap_3.7 Generating the Batch JCL Information Chap_3.8 Executing the JCL Chap_3.9 Saving the JCL Chap_3.10 Exit the VSAM Utility
Page 80
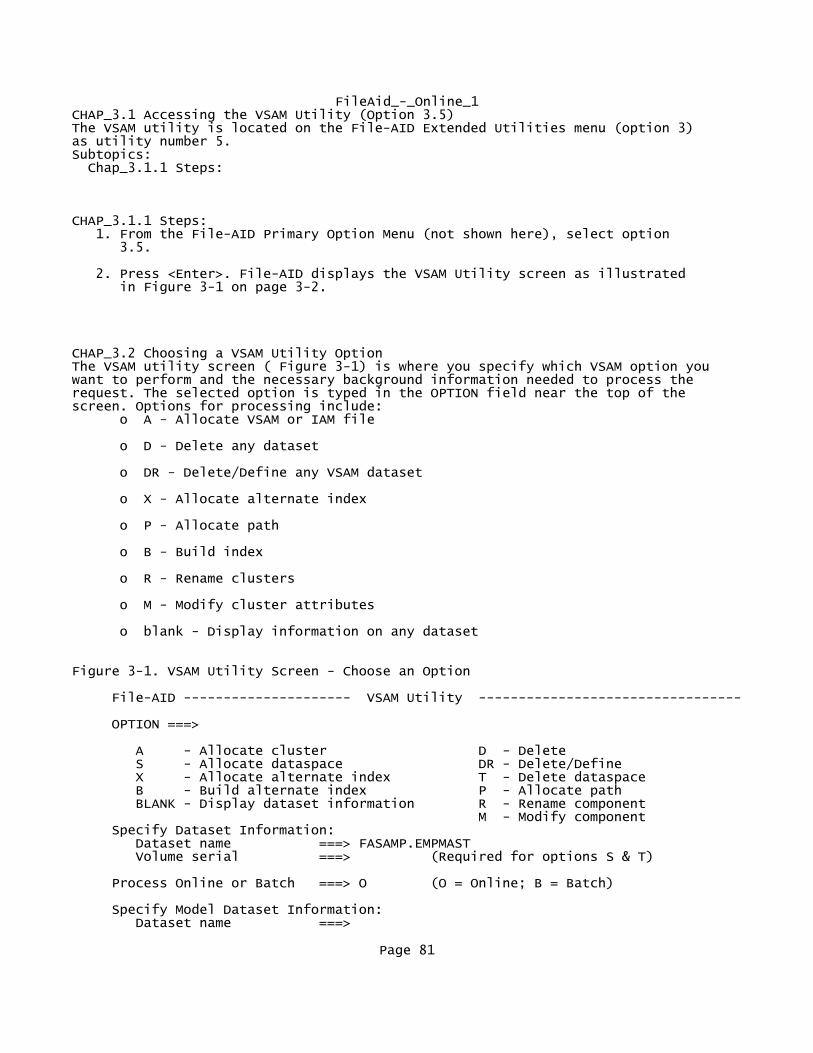
FileAid_-_Online_1CHAP_3.1 Accessing the VSAM Utility (Option 3.5)The VSAM utility is located on the File-AID Extended Utilities menu (option 3) as utility number 5. Subtopics: Chap_3.1.1 Steps:
CHAP_3.1.1 Steps: 1. From the File-AID Primary Option Menu (not shown here), select option 3.5.
2. Press <Enter>. File-AID displays the VSAM Utility screen as illustrated in Figure 3-1 on page 3-2.
CHAP_3.2 Choosing a VSAM Utility OptionThe VSAM utility screen ( Figure 3-1) is where you specify which VSAM option you want to perform and the necessary background information needed to process the request. The selected option is typed in the OPTION field near the top of the screen. Options for processing include: o A - Allocate VSAM or IAM file
o D - Delete any dataset
o DR - Delete/Define any VSAM dataset
o X - Allocate alternate index
o P - Allocate path
o B - Build index
o R - Rename clusters
o M - Modify cluster attributes
o blank - Display information on any dataset
Figure 3-1. VSAM Utility Screen - Choose an Option
File-AID --------------------- VSAM Utility ---------------------------------
OPTION ===>
A - Allocate cluster D - Delete S - Allocate dataspace DR - Delete/Define X - Allocate alternate index T - Delete dataspace B - Build alternate index P - Allocate path BLANK - Display dataset information R - Rename component M - Modify component Specify Dataset Information: Dataset name ===> FASAMP.EMPMAST Volume serial ===> (Required for options S & T)
Process Online or Batch ===> O (O = Online; B = Batch)
Specify Model Dataset Information: Dataset name ===>
Page 81

FileAid_-_Online_1 Specify Catalog to use if other than Default System Catalog: Catalog name ===> Catalog password ===> (If catalog is password protected) ------------------------------------------------------------------------------- For dataset allocations only, the optional model dataset is used to prefill the allocation information on the allocation panel.
CHAP_3.3 Using an Existing Dataset's Allocation AttributesProcessing information you supply includes: o Name of the dataset to act on
o How to process the option (online or batch)
o Name of a dataset to use as a model for allocation attributes (optional)
If you want to model a new VSAM cluster after a specific existing dataset, you can enter the name of the existing dataset in the Model Dataset Information area. You may use a pattern in the name field to get a list of matching dataset names to select from (for example, FASAMP.*). File-AID copies the allocation attributes of the existing dataset to the new dataset. The existing dataset must be cataloged and accessible through a normal catalog search. Any type of dataset can be used as a model including sequential files. If you do not select a dataset as a model, File-AID uses allocation attributes of the most recently allocated or displayed dataset to define a new cluster.
CHAP_3.4 Allocating a ClusterThe Allocate cluster option (A) lets you allocate new VSAM clusters and IAM datasets online or in batch. All VSAM dataset types (KSDS, ESDS, RRDS, and LINEAR) are supported. Figure 3-2. VSAM Utility Screen
File-AID --------------------- VSAM Utility -------------------------------- - OPTION ===> A A - Allocate cluster D - Delete S - Allocate dataspace DR - Delete/Define X - Allocate alternate index T - Delete dataspace B - Build alternate index P - Allocate path BLANK - Display dataset information R - Rename component M - Modify component Specify Dataset Information: Dataset name ===> FASAMP.EMPLOYE1 Volume serial ===> (Required for options S & T)
Process Online or Batch ===> B (O = Online; B = Batch)
Specify Model Dataset Information: Dataset name ===> FASAMP.EMPLOYEE
Specify Catalog to use if other than Default System Catalog: Catalog name ===> Catalog password ===> (If catalog is password protected) ------------------------------------------------------------------------------- For dataset allocations only, the optional model dataset is used to prefill the allocation information on the allocation panel.
Subtopics:Page 82

FileAid_-_Online_1
Chap_3.4.1 Steps:
CHAP_3.4.1 Steps: 1. Type an A in the OPTION field.
2. Type FASAMP.EMPLOYE1 in the Dataset name field under the Specify Dataset Information section.
3. Type a B in the Process Online or Batch field to request batch processing which generates IDCAMS control statements.
4. Type FASAMP.EMPLOYEE in the Dataset name field under the Specify Model Dataset Information section.
5. Press <Enter>. File-AID displays the Allocate New VSAM Cluster screen as illustrated in Figure 3-3 on page 3-4.
CHAP_3.5 Verifying Allocation ParametersYou can type over any of the fields to customize your cluster attributes. A second screen of attributes is available by specifying a value of YES in the "Extended allocate" field located at the bottom of the screen.
Figure 3-3. Allocate New VSAM Cluster Screen
File-AID --------------- Allocate New VSAM Cluster --------------------------
COMMAND ===> Component names: Cluster: 'USERID9.FASAMP.EMPLOYE1' Data component ===> 'USERID9.FASAMP.EMPLOYE1.DATA' Index component ===> 'USERID9.FASAMP.EMPLOYE1.INDEX' Dataset type ===> KSDS (KSDS; ESDS; RRDS; LINEAR) Owner ID ===> USERID9
Space Allocation: DATA Component KSDS INDEX Component (Blank for default) Generic unit ===> ===> (Generic group name or unit)
Volume serial ===> PRD928 ===> PRD902 Units ===> TRKS ===> TRKS (TRKs; CYLs; RECs; K; M) Primary ===> 1 ===> 1 (Amount in above units) Secondary ===> 1 ===> 1 (Amount in above units) Reuseable ===> YES (Y = Yes; N = No) Key length ===> 5 (1 - 255 - Required for KSDS only) Key position ===> 0 (0 - maximum record - KSDS only) Average Recordsize ===> 198 (Not allowed for LINEAR) Maximum Recordsize ===> 198 (Not allowed for LINEAR) Expiration date ===> (YYYY/MM/DD or blank) Type ===> UNIQUE (U = Unique; S = Sub-allocate) Extended allocate ===> YES (Y = Yes; N = No)
Subtopics:
Chap_3.5.1 Steps: Chap_3.5.2 More About VSAM Allocation
Page 83

FileAid_-_Online_1
CHAP_3.5.1 Steps: 1. Verify that the value in the "Extended allocate" field is YES. If it is not, type YES in the field.
2. Press <Enter>. Since you specified a value of YES in the Extended allocate field, File-AID displays an additional allocation attributes screen as shown in Figure 3-4 on page 3-5.
Note: The value displayed in the Volume serial field will not be the same value shown in this example. The value you see is unique to your installation and is the same as the model dataset (FASAMP.EMPLOYEE).
CHAP_3.5.2 More About VSAM Allocation o Use an OWNER ID of $IAM to identify the dataset as an IAM dataset.
o For variable length records, "Maximum Recordsize" must be larger than "Average Recordsize" but not larger than the "Data C/I size".
CHAP_3.6 Specifying Extended Allocation ParametersThe second allocation screen contains additional attributes for defining a VSAM cluster that you may want to specify to customize your cluster attributes. Subtopics: Chap_3.6.1 Step: Chap_3.6.2 More About Allocate New VSAM Cluster
CHAP_3.6.1 Step: 1. Press <Enter>. File-AID displays the JCL Specification screen as illustrated in Figure 3- 5 on page 3-6.
Figure 3-4. Allocate VSAM Cluster Screen (continued)
File-AID ------------ Allocate VSAM Cluster (continued) ---------------------
COMMAND ===>
Control Interval - percent free ===> 0 Data C/I size ===> 2048 Control Area - percent free ===> 0 Index C/I size ===> 2048 Buffer space ===> 6144 Specify Allocation options: Region share option ===> 3 (1; 2; 3; 4) System share option ===> 3 (3; 4) Write check ===> NO (Y = Yes; N = No) Erase on delete ===> NO (Y = Yes; N = No) Imbedded index ===> NO (Y = Yes; N = No) Replicated index ===> NO (Y = Yes; N = No) Load option ===> RECOV (S = Speed; R = Recovery) Spanned records ===> NO (Y = Yes; N = No)
Specify Mass Storage Options: Stage option ===> STAGE (S = Stage; B = Bind; C = Cylinder fault) Destage wait ===> NO (Y = Yes; N = No)
Page 84

FileAid_-_Online_1
Specify Passwords: (Fill in or leave blank for no password protection) Master ===> Control ===> Update ===> Read ===> Code ===> Attempts ===> 0
CHAP_3.6.2 More About Allocate New VSAM Cluster o If the Data C/I size, Index C/I size, or Buffer space fields contain a value of zero or blanks, File-AID automatically calculates the optimum size for each one.
o If you perform the allocation request online, File-AID processes the request immediately and redisplays the VSAM utility screen with a message:
CLUSTER ALLOCATED
o If any errors occur, issue the HELP command (PF1) once to see a long message describing the error and twice to access the File-AID tutorial describing the return code. If errors occur during IDCAMS invocation, File-AID displays an IDCAMS error screen when you issue the VIEW command.
CHAP_3.7 Generating the Batch JCL InformationUse the JCL Specification screen to specify the JCL information for batch processing. As illustrated in this step, enter the JCL primary command to generate and display the JCL before you submit it for processing. Subtopics: Chap_3.7.1 Steps:
CHAP_3.7.1 Steps: 1. Type JCL in the COMMAND field.
2. Type an asterisk (*) in the Sysout class field.
3. If necessary, change information in the JOB statement information fields to represent a valid JOB statement for you at your site:
Your JOB statement information stays set from function to function and session to session until you change it on any JCL Specification screen in File-AID.
4. Press <Enter>. File-AID generates the JCL and displays it on the ISPF/EDIT screen as illustrated in Figure 3-6 on page 3-7.
Figure 3-5. JCL Specification Screen
File-AID ------------------ JCL Specification ------------------------------ - COMMAND ===> JCL
Page 85
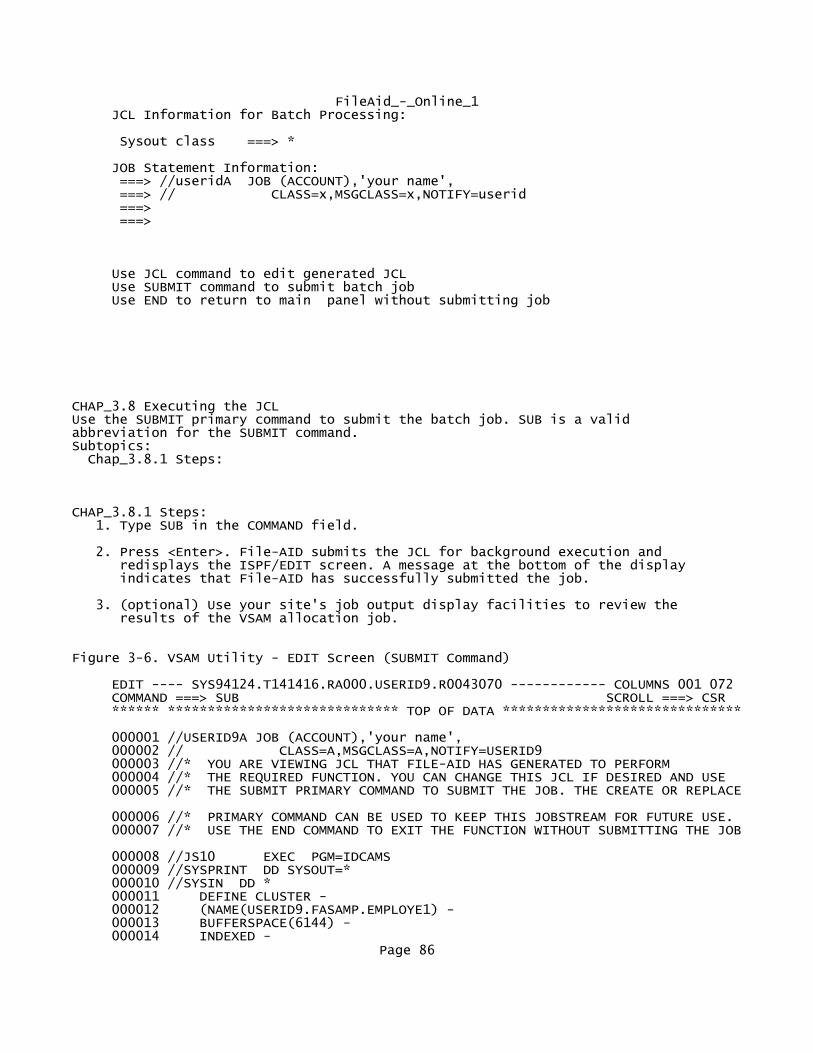
FileAid_-_Online_1 JCL Information for Batch Processing:
Sysout class ===> *
JOB Statement Information: ===> //useridA JOB (ACCOUNT),'your name', ===> // CLASS=x,MSGCLASS=x,NOTIFY=userid ===> ===>
Use JCL command to edit generated JCL Use SUBMIT command to submit batch job Use END to return to main panel without submitting job
CHAP_3.8 Executing the JCLUse the SUBMIT primary command to submit the batch job. SUB is a valid abbreviation for the SUBMIT command. Subtopics: Chap_3.8.1 Steps:
CHAP_3.8.1 Steps: 1. Type SUB in the COMMAND field.
2. Press <Enter>. File-AID submits the JCL for background execution and redisplays the ISPF/EDIT screen. A message at the bottom of the display indicates that File-AID has successfully submitted the job.
3. (optional) Use your site's job output display facilities to review the results of the VSAM allocation job.
Figure 3-6. VSAM Utility - EDIT Screen (SUBMIT Command)
EDIT ---- SYS94124.T141416.RA000.USERID9.R0043070 ------------ COLUMNS 001 072 COMMAND ===> SUB SCROLL ===> CSR ****** ***************************** TOP OF DATA ******************************
000001 //USERID9A JOB (ACCOUNT),'your name', 000002 // CLASS=A,MSGCLASS=A,NOTIFY=USERID9 000003 //* YOU ARE VIEWING JCL THAT FILE-AID HAS GENERATED TO PERFORM 000004 //* THE REQUIRED FUNCTION. YOU CAN CHANGE THIS JCL IF DESIRED AND USE 000005 //* THE SUBMIT PRIMARY COMMAND TO SUBMIT THE JOB. THE CREATE OR REPLACE
000006 //* PRIMARY COMMAND CAN BE USED TO KEEP THIS JOBSTREAM FOR FUTURE USE. 000007 //* USE THE END COMMAND TO EXIT THE FUNCTION WITHOUT SUBMITTING THE JOB
000008 //JS10 EXEC PGM=IDCAMS 000009 //SYSPRINT DD SYSOUT=* 000010 //SYSIN DD * 000011 DEFINE CLUSTER - 000012 (NAME(USERID9.FASAMP.EMPLOYE1) - 000013 BUFFERSPACE(6144) - 000014 INDEXED -
Page 86

FileAid_-_Online_1 000015 KEYS(5 0) - 000016 OWNER(USERID9) - 000017 RECORDSIZE(198 198) - 000018 REUSE - 000019 SHAREOPTIONS(3 3) - 000020 STAGE) - 000021 DATA(NAME(USERID9.FASAMP.EMPLOYE1.DATA) -
CHAP_3.9 Saving the JCLSince you are in an Edit session, you can use the primary commands CREATE or REPLACE with the "C999" line command to save the JCL to a PDS of your choice.
CHAP_3.10 Exit the VSAM UtilityUse the END command several times to exit the VSAM utility and return to the File-AID Primary Option Menu now. Subtopics: Chap_3.10.1 Steps:
CHAP_3.10.1 Steps: 1. Enter the END command (press PF3) TWO OR THREE TIMES until the File-AID Primary Option Menu reappears.
4
CHAP_4 Full-Screen EditingFile-AID enables you to edit a file created through any standard MVS access method (including IAM files). You can edit the entire dataset or a selected subset of records. You can supply record layouts and edit your data in four display modes: o Character
o Formatted
o Vertical formatted.
o Unformatted (not available for DBCS terminals).
This chapter discusses several of the primary commands and line commands that you can use in the Edit function. Refer to the File-AID/MVS Online Reference Manual (SPF and XE) for a complete list of the primary and line commands that are supported in the Edit function. Subtopics: Chap_4.1 Character Mode Chap_4.2 Formatted Mode Chap_4.3 Vertical Formatted Mode Chap_4.4 Unformatted Mode Chap_4.5 Accessing the Edit Function (Option 2) Chap_4.6 Specifying the Dataset to Edit Chap_4.7 Copying Data Into a File With the COPY Command Chap_4.8 Invoking Formatted Mode Chap_4.9 Controlling the Display of Redefines Fields Chap_4.10 Holding and Hiding Fields Chap_4.11 Specifying a Field Number to Conduct a Search For Invalid Data Chap_4.12 Resetting Hold and Hide Chap_4.13 Printing the Currently Displayed Record
Page 87

FileAid_-_Online_1 Chap_4.14 Changing Data Using the CHANGE Command Chap_4.15 Navigating within a Formatted Record Chap_4.16 Creating a New Record by Copying the Currently Displayed Record Chap_4.17 Entering New Data Values in a Repeated Record Chap_4.18 Navigating to a Record by Its Key Value Chap_4.19 Using Character Mode Chap_4.20 Editing With Line Commands Chap_4.21 Sorting the Records of the Dataset Chap_4.22 Invoking Vertical Formatted Mode Chap_4.23 Printing Records in Vertical Formatted Mode Chap_4.24 Terminate Edit Function
CHAP_4.1 Character ModeThe character edit mode provides full-screen editing of the data. You can use line commands, similar to ISPF line commands, to move (M), copy (C), insert (I), delete (D), repeat (R), and exclude (X) records. From character mode, you can use the FMT primary command to redisplay the data in formatted mode, the VFMT primary command to redisplay the data in Vertical Formatted mode, or UNFMT primary command to redisplay the data in Unformatted mode.
CHAP_4.2 Formatted ModeThe formatted edit mode lets you edit data using a record layout. This mode presents data one record at a time and formats each record field-by-field. Record layouts can be either COBOL (FD: 01 level) or PL/I (Declare). Cross references (XREFs) are used to define multiple record layouts for datasets with varying record types. From formatted mode, you can use the CHAR primary command to redisplay the data in character mode , the VFMT primary command to redisplay the data in Vertical Formatted mode, or UNFMT primary command to redisplay the data in Unformatted mode
CHAP_4.3 Vertical Formatted ModeThe vertical formatted edit mode also provides a full-screen view of the data. This mode, however, uses the record layout fields as column headers. From vertical formatted mode, you can use the CHAR primary command to redisplay the data in character mode, the FMT primary command to redisplay the data in Formatted mode, or UNFMT primary command to redisplay the data in Unformatted mode.
CHAP_4.4 Unformatted ModeThe unformatted browse mode provides a full-screen display of your data one record at a time without record layout formatting. File-AID displays 70 characters of data per line until all data for the record is shown or the screen is filled. Unformatted mode is accessed by selecting Browse or Edit mode U (Unformatted) or entering the UNFMT primary command from Character, Formatted, or Vertical Formatted mode of Browse or Edit. From Unformatted mode, use the CHAR primary command to redisplay the data in Character mode, the FMT primary command to redisplay the data in Formatted mode, or VFMT primary command to redisplay the data in Vertical Formatted mode. Note: Unformatted mode is not available for DBCS terminals.
Page 88

FileAid_-_Online_1
CHAP_4.5 Accessing the Edit Function (Option 2)Subtopics: Chap_4.5.1 Steps:
CHAP_4.5.1 Steps: 1. To access the Edit function, enter a 2 in the OPTION field on the File-AID Primary Option Menu (not shown here).
2. Press <Enter>. File-AID displays the Edit - Dataset Specification screen as illustrated in Figure 4-1.
CHAP_4.6 Specifying the Dataset to EditUse the Edit - Dataset Specification screen to define your edit request, which consists of: o Edit Mode
o Edit Dataset
o Audit trail usage
o Record Layout and XREF Information
o Selection Criteria Usage Information.
Figure 4-1. Edit - Dataset Specification Screen
File-AID --------------- Edit - Dataset Specification -----------------------
COMMAND ===>
Edit Mode ===> C (F=Formatted; C=Char; V=Vertical)
Specify Edit Information: Dataset name or HFS path ===> FASAMP.EMPLOYE1 Member name ===> (Blank or pattern for member list) Volume serial ===> (If dataset is not cataloged) Disposition ===> OLD (SHR or OLD) Create audit trail ===> Y (Y = Yes; N = No)
Specify Record Layout and XREF Information: Record layout usage ===> S (S = Single; X = XREF; N = None) Record layout dataset ===> FASAMP.LAYOUTS Member name ===> EMPLOYEE (Blank or pattern for member list) XREF dataset name ===> Member name ===> (Blank or pattern for member list)
Specify Selection Criteria Information: (E = Existing; T = Temporary; Selection criteria usage ===> N M = Modify; Q = Quick; N = None) Selection criteria DSN ===> Member ===> (Blank or pattern for member list)
Subtopics:
Chap_4.6.1 Steps:
Page 89

FileAid_-_Online_1
CHAP_4.6.1 Steps: 1. Type a C in the Edit Mode field.
2. Type FASAMP.EMPLOYE1 in the Edit dataset name field.
Note: If you did not create the new cluster FASAMP.EMPLOYE1 in Chapter 3, "Allocating a VSAM Cluster", use the dataset FASAMP.EMPLOYEE.
3. Type OLD in the Disposition field.
The value of OLD prevents other users from accessing the dataset while you are editing it.
4. Type a Y in the Create audit trail field.
File-AID lets you specify whether or not you want to create an audit trail dataset, which stores the before and after images of any changed, new, and deleted records. File-AID provides the opportunity for you to print the audit trail report at the end of the Edit session. For information on audit trail dataset allocation, naming conventions, and how to print the dataset, refer to File-AID/MVS Online Reference Manual (SPF and XE).
5. Type an S in the Record layout usage field.
The S value tells File-AID to use a single record layout dataset to describe the edit dataset.
6. Type FASAMP.LAYOUTS in the Record layout dataset field and EMPLOYEE in the Member name field.
7. Type an N in the Selection criteria usage field.
8. Press <Enter>. If you specified your new cluster, USERID9.FASAMP.EMPLOYE1, File-AID displays the Edit screen as shown in Figure 4-2 on page 4-4.
Note: If you did not create a new VSAM cluster, and specified dataset FASAMP.EMPLOYEE, skip the next few pages and resume with "Invoking Formatted Mode" on page 4-8.
CHAP_4.7 Copying Data Into a File With the COPY CommandIf you did not create a new VSAM cluster, FASAMP.EMPLOYE1, in Chapter 3, "Allocating a VSAM Cluster", skip this step and resume with "Invoking Formatted Mode" on page 4-8. Since the dataset is empty you are shown a full screen of input lines just like ISPF. Use the COPY primary command to display the Edit COPY screen where you specify the source dataset. Subtopics: Chap_4.7.1 Steps: Chap_4.7.2 More About the COPY Command Chap_4.7.3 Specifying the "Copy From" Dataset Chap_4.7.4 Removing Informational Flags from the Display Chap_4.7.5 Protecting Keys
Page 90

FileAid_-_Online_1
CHAP_4.7.1 Steps: 1. Type COPY in the COMMAND field.
2. Press <Enter>. File-AID displays the Edit COPY screen as shown in Figure 4-3 on page 4-5.
Figure 4-2. Character Edit - COPY Command
File-AID - Edit - USERID9.FASAMP.EMPLOYE1 ----------------- COLUMNS 00001 00071 COMMAND ===> COPY SCROLL ===> PAGE ****** ***************************** TOP OF DATA ****************************** '''''' '''''' '''''' '''''' '''''' '''''' '''''' '''''' '''''' '''''' '''''' '''''' '''''' '''''' '''''' '''''' '''''' '''''' ''''''
CHAP_4.7.2 More About the COPY Command o Usually, when using the external file command COPY, you must specify a destination using the A (After) or B (Before) line commands. In this case, since the file is empty, no destination marker is needed.
o If you know the name of the dataset you want to copy, you may specify the dataset name with the COPY command by using the following syntax: COPY datasetname. Pattern dataset names are permitted with the COPY command.
o When copying records into a keyed file, the file being copied from must have records in key sequence.
o For keyed files, the MERGE command is similar to the COPY command except records are automatically inserted in key sequence and no destination marker (A, B) is needed.
CHAP_4.7.3 Specifying the "Copy From" DatasetUse the Edit COPY screen to specify the name of the dataset from which you want to copy records for the new dataset.
Figure 4-3. Edit COPY Screen
Page 91

FileAid_-_Online_1 File-AID ----------------------- Edit COPY ----------------------------------- COMMAND ===>
Current dataset: USERID9.FASAMP.EMPLOYE1
Enter "FROM" dataset: Dataset name ===> FASAMP.EMPLOYEE Member ===> (Blank/pattern for member list) Volume serial ===> (If not cataloged)
Use ENTER to perform copy/merge Use END to cancel
Subtopics:
Chap_4.7.3.1 Steps: Chap_4.7.3.2 Result of COPY
CHAP_4.7.3.1 Steps: 1. Type FASAMP.EMPLOYEE in the Dataset name field.
2. Press <Enter>. File-AID executes the copy process, reads the records of your FASAMP.EMPLOYEE file into your current edit session, and displays the Edit screen as illustrated in Figure 4-4.
CHAP_4.7.3.2 Result of COPY
Figure 4-4. Character Mode Edit - After COPY of FASAMP.EMPLOYEE
File-AID - Edit - USERID9.FASAMP.EMPLOYE1 --------------------- DATASET COPIED COMMAND ===> SCROLL ===> PAGE ****** ***************************** TOP OF DATA ****************************** ==NEW> 00090 MARTIN EDWARD M AIRPLANE MANUFACTURER 42789012 ==NEW> 00100 MULSTROM ROBERTA A HOLLYWOOD SEAMSTRESS 34657365 ==NEW> 00200 JACKSON JOSEPH C ORATOR 27558717 ==NEW> 10000 ANDREWS GEORGE ACTOR 57631203 ==NEW> 15000 MURPHY RONALD L PAINTER 98765432 ==NEW> 18034 SCHNEIDER ELLEN C NURSE 34155954 ==NEW> 21035 JONES GEORGE B COUNTRY SINGER 46381345 ==NEW> 25100 ROBERTS WILLIAM R POLITICIAN 87956332 ==NEW> 27007 ALLEN JOYCE M AUTHOR 78345833 ==NEW> 30001 RICHARDS REX W RODEO CLOWN 63276453 ==NEW> 31000 SAVAGE JONATHON C ELECTRICIAN 34856799
CHAP_4.7.4 Removing Informational Flags from the DisplayFile-AID adds the newly copied records to the display and flags each new record
Page 92

FileAid_-_Online_1with a ==NEW> marker. File-AID also displays the message DATASET COPIED in the upper right corner of the screen to indicate that the copy process was successful. To clear the NEW flags from the display, use the RESET primary command. Figure 4-5. Issue RESET Command to Clear Flags and Pending Commands
File-AID - Edit - USERID9.FASAMP.EMPLOYE1 --------------------- DATASET COPIED COMMAND ===> RESET SCROLL ===> PAGE ****** ***************************** TOP OF DATA ****************************** ==NEW> 00090 MARTIN EDWARD M AIRPLANE MANUFACTURER 42789012 ==NEW> 00100 MULSTROM ROBERTA A HOLLYWOOD SEAMSTRESS 34657365
Subtopics:
Chap_4.7.4.1 Steps: Chap_4.7.4.2 RESET result
CHAP_4.7.4.1 Steps: 1. Type RESET in the COMMAND field.
2. Press <Enter>. File-AID redisplays the Edit screen with the sequence number field column replacing the NEW flags as shown in Figure 4-6.
CHAP_4.7.4.2 RESET result
Figure 4-6. After RESET Command - ==NEW> Markers Removed
File-AID - Edit - USERID9.FASAMP.EMPLOYE1 ----------------- COLUMNS 00001 00071 COMMAND ===> SCROLL ===> PAGE ****** ***************************** TOP OF DATA ****************************** 000001 00090 MARTIN EDWARD M AIRPLANE MANUFACTURER 42789012 000002 00100 MULSTROM ROBERTA A HOLLYWOOD SEAMSTRESS 34657365 000003 00200 JACKSON JOSEPH C ORATOR 27558717 000004 10000 ANDREWS GEORGE ACTOR 57631203 000005 15000 MURPHY RONALD L PAINTER 98765432 000006 18034 SCHNEIDER ELLEN C NURSE 34155954 000007 21035 JONES GEORGE B COUNTRY SINGER 46381345 000008 25100 ROBERTS WILLIAM R POLITICIAN 87956332 000009 27007 ALLEN JOYCE M AUTHOR 78345833 000010 30001 RICHARDS REX W RODEO CLOWN 63276453 000011 31000 SAVAGE JONATHON C ELECTRICIAN 34856799 000012 34010 SMITH JANET AIRLINE ATTENDANT 55778298 000013 34011 JACOBS DIANA DOCTOR 22536839 000014 36010 SIMPSON ALEX CARTOONIST 12345678 000015 39310 BARNETT EDWARD E SALESMAN 54378914 000016 39500 WILLIAMS EDITH A DESIGNER 98765432 000017 41000 RICHARDSON MARJORIE M PROGRAMMER ANALYST 34658365 000018 41400 MOORE THOMAS M SYSTEMS ADMINISTRATOR 22637364 000019 42017 BENNETT WILLIAM D SALES SUPPORT 14657355 000020 44018 WILHELM HEINRICH L DIPLOMAT 46657335
CHAP_4.7.5 Protecting KeysSince this is a keyed file, all newly inserted records have the key field
Page 93

FileAid_-_Online_1unprotected to let you enter a new key value. Once you have set new key values, you can use the P (Protect) line command to lock the key fields. The P (Protect) line command sets key protection on for keyed records preventing the inadvertant overtyping of key values. To protect all the new keys, use the P99 (Protect 99 lines) line command. Figure 4-7. Protect New Keys - P99 Line Command
File-AID - Edit - USERID9.FASAMP.EMPLOYE1 ------------- COMMAND ===> ****** ***************************** TOP OF DATA ****** P99 01 00090 MARTIN EDWARD M AIRPLANE MANUF 000002 00100 MULSTROM ROBERTA A HOLLYWOOD SEAM 000003 00200 JACKSON JOSEPH C ORATOR
Subtopics:
Chap_4.7.5.1 Steps: Chap_4.7.5.2 P99 result
CHAP_4.7.5.1 Steps: 1. Type P99 in the line command area for line 1.
2. Press <Enter>. File-AID redisplays the Edit screen with keys protected.
CHAP_4.7.5.2 P99 resultAfter the P99 line command you can see that the keys (first five characters of each record) are highlighted and protected. Figure 4-8. After P99 Line Command - Keys are Highlighted and Protected
File-AID - Edit - USERID9.FASAMP.EMPLOYE1 ----------------- COLUMNS 00001 00071 COMMAND ===> SCROLL ===> PAGE ****** ***************************** TOP OF DATA ****************************** 000001 00090 MARTIN EDWARD M AIRPLANE MANUFACTURER 42789012 000002 00100 MULSTROM ROBERTA A HOLLYWOOD SEAMSTRESS 34657365 000003 00200 JACKSON JOSEPH C ORATOR 27558717 000004 10000 ANDREWS GEORGE ACTOR 57631203 000005 15000 MURPHY RONALD L PAINTER 98765432 000006 18034 SCHNEIDER ELLEN C NURSE 34155954 000007 21035 JONES GEORGE B COUNTRY SINGER 46381345 000008 25100 ROBERTS WILLIAM R POLITICIAN 87956332 000009 27007 ALLEN JOYCE M AUTHOR 78345833 000010 30001 RICHARDS REX W RODEO CLOWN 63276453 000011 31000 SAVAGE JONATHON C ELECTRICIAN 34856799 000012 34010 SMITH JANET AIRLINE ATTENDANT 55778298 000013 34011 JACOBS DIANA DOCTOR 22536839 000014 36010 SIMPSON ALEX CARTOONIST 12345678 000015 39310 BARNETT EDWARD E SALESMAN 54378914 000016 39500 WILLIAMS EDITH A DESIGNER 98765432 000017 41000 RICHARDSON MARJORIE M PROGRAMMER ANALYST 34658365 000018 41400 MOORE THOMAS M SYSTEMS ADMINISTRATOR 22637364 000019 42017 BENNETT WILLIAM D SALES SUPPORT 14657355 000020 44018 WILHELM HEINRICH L DIPLOMAT 46657335
Page 94
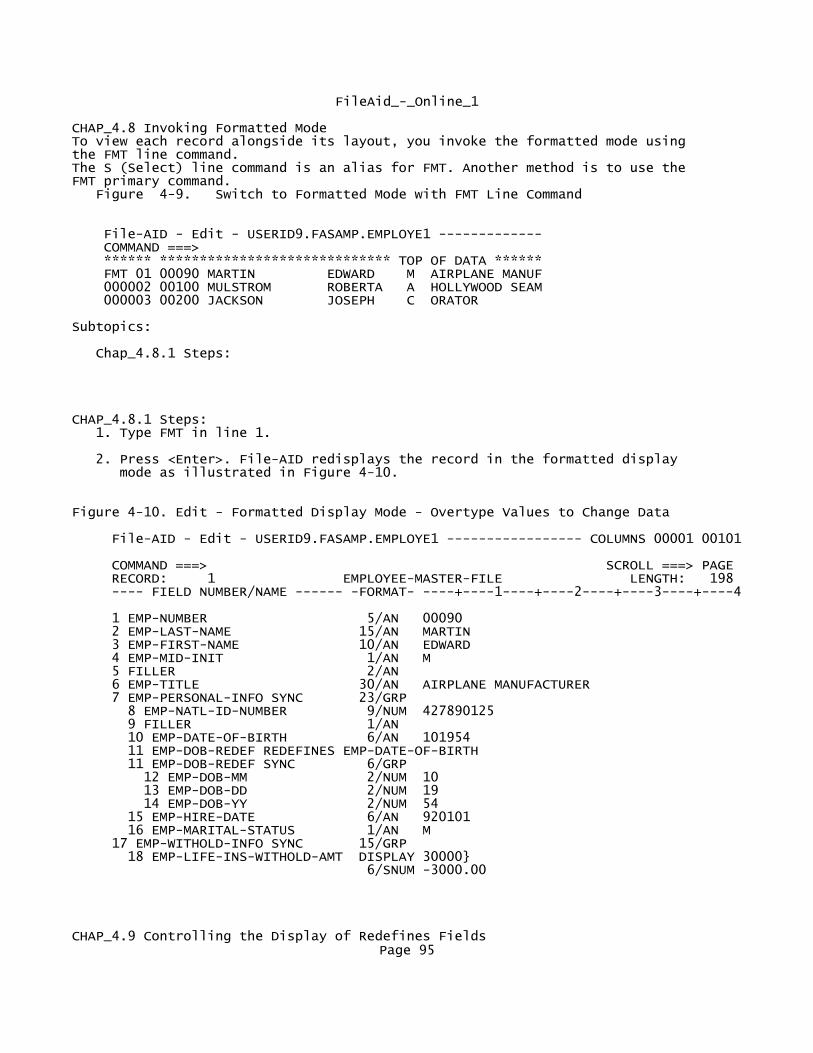
FileAid_-_Online_1
CHAP_4.8 Invoking Formatted ModeTo view each record alongside its layout, you invoke the formatted mode using the FMT line command. The S (Select) line command is an alias for FMT. Another method is to use the FMT primary command. Figure 4-9. Switch to Formatted Mode with FMT Line Command
File-AID - Edit - USERID9.FASAMP.EMPLOYE1 ------------- COMMAND ===> ****** ***************************** TOP OF DATA ****** FMT 01 00090 MARTIN EDWARD M AIRPLANE MANUF 000002 00100 MULSTROM ROBERTA A HOLLYWOOD SEAM 000003 00200 JACKSON JOSEPH C ORATOR
Subtopics:
Chap_4.8.1 Steps:
CHAP_4.8.1 Steps: 1. Type FMT in line 1.
2. Press <Enter>. File-AID redisplays the record in the formatted display mode as illustrated in Figure 4-10.
Figure 4-10. Edit - Formatted Display Mode - Overtype Values to Change Data
File-AID - Edit - USERID9.FASAMP.EMPLOYE1 ----------------- COLUMNS 00001 00101
COMMAND ===> SCROLL ===> PAGE RECORD: 1 EMPLOYEE-MASTER-FILE LENGTH: 198 ---- FIELD NUMBER/NAME ------ -FORMAT- ----+----1----+----2----+----3----+----4
1 EMP-NUMBER 5/AN 00090 2 EMP-LAST-NAME 15/AN MARTIN 3 EMP-FIRST-NAME 10/AN EDWARD 4 EMP-MID-INIT 1/AN M 5 FILLER 2/AN 6 EMP-TITLE 30/AN AIRPLANE MANUFACTURER 7 EMP-PERSONAL-INFO SYNC 23/GRP 8 EMP-NATL-ID-NUMBER 9/NUM 427890125 9 FILLER 1/AN 10 EMP-DATE-OF-BIRTH 6/AN 101954 11 EMP-DOB-REDEF REDEFINES EMP-DATE-OF-BIRTH 11 EMP-DOB-REDEF SYNC 6/GRP 12 EMP-DOB-MM 2/NUM 10 13 EMP-DOB-DD 2/NUM 19 14 EMP-DOB-YY 2/NUM 54 15 EMP-HIRE-DATE 6/AN 920101 16 EMP-MARITAL-STATUS 1/AN M 17 EMP-WITHOLD-INFO SYNC 15/GRP 18 EMP-LIFE-INS-WITHOLD-AMT DISPLAY 30000} 6/SNUM -3000.00
CHAP_4.9 Controlling the Display of Redefines FieldsPage 95

FileAid_-_Online_1When the source language is COBOL, the REDEFINES ON/OFF command gives you control of the appearance of fields which redefine other fields. REDEFINES is a profile option and remains set from session to session until you change it. To suppress the display of fields which redefine other fields, use the REDEFINES (REDEF) OFF command. Figure 4-11. Suppress REDEFINES Fields - REDEF OFF
File-AID - Edit - USERID9.FASAMP.EMPLOYE1 ------------- COMMAND ===> REDEF OFF RECORD: 1 EMPLOYEE-MASTER-FILE ---- FIELD NUMBER/NAME ------ -FORMAT- ----+----1----+- 1 EMP-NUMBER 5/AN 00090 2 EMP-LAST-NAME 15/AN MARTIN
Subtopics:
Chap_4.9.1 Steps: Chap_4.9.2 More About the REDEFINES Command
CHAP_4.9.1 Steps: 1. Type REDEF OFF in the COMMAND field.
2. Press <Enter>. File-AID redisplays the screen and suppresses the display of the EMP- DOB-REDEF group and elementary subordinate items as illustrated in Figure 4-17.
Figure 4-12. Edit - Formatted Mode - After REDEF OFF Command
File-AID - Edit - USERID9.FASAMP.EMPLOYE1 ----------------- COLUMNS 00001 00101
COMMAND ===> SCROLL ===> PAGE RECORD: 1 EMPLOYEE-MASTER-FILE LENGTH: 198 ---- FIELD NUMBER/NAME ------ -FORMAT- ----+----1----+----2----+----3----+----4
1 EMP-NUMBER 5/AN 00090 2 EMP-LAST-NAME 15/AN MARTIN 3 EMP-FIRST-NAME 10/AN EDWARD 4 EMP-MID-INIT 1/AN M 5 FILLER 2/AN 6 EMP-TITLE 30/AN AIRPLANE MANUFACTURER 7 EMP-PERSONAL-INFO SYNC 23/GRP 8 EMP-NATL-ID-NUMBER 9/NUM 427890125 9 FILLER 1/AN 10 EMP-DATE-OF-BIRTH 6/AN 101954 15 EMP-HIRE-DATE 6/AN 920101 16 EMP-MARITAL-STATUS 1/AN M 17 EMP-WITHOLD-INFO SYNC 15/GRP 18 EMP-LIFE-INS-WITHOLD-AMT DISPLAY 30000} 6/SNUM -3000.00 19 EMP-NATL-TAX-WITHOLD-PCT 3/PS -74.00 20 EMP-REGION-TAX-WITHOLD-PCT 3/PS 25.00 21 EMP-LOCAL-TAX-WITHOLD-PCT 3/PS 5.00
Page 96

FileAid_-_Online_1CHAP_4.9.2 More About the REDEFINES Command o You can specify the command as REDEFINES, REDEF, or RED. Refer to the primary commands section of the File-AID/MVS Online Reference Manual (SPF and XE) for more information on the REDEFINES command syntax.
o The REDEFINES setting is part of your user profile.
o Use the PROFILE command to display the current REDEFINES value.
o If REDEFINES is set to OFF, you may issue the DISPLAY REDEFINES n command (where n is a field number or name of a redefined or redefining data structure that is not currently visible because REDEFINES are suppressed). The DISPLAY REDEFINES n command displays the hidden structure while hiding the currently displayed definition of the data area. For example (see Figure 4-10 on page 4-8 for reference), DISPLAY REDEF 11, redisplays the hidden redefines structure EMP-DOB-REDEF and suppresses the display of the redefined field EMP-DATE-OF-BIRTH.
CHAP_4.10 Holding and Hiding FieldsWhen in formatted display mode you can customize the display of the fields with the HIDE and HOLD commands. The HOLD command specifies the ORDER of data items to HOLD on the screen when scrolling in Formatted and Vertical Formatted mode of Browse and Edit. The fields are kept on the screen in the ORDER specified. The HIDE command enables you to exclude fields or a range of fields from your display. It is similar to the "Display OFF field" command. To display the HIDE and HOLD Settings window use either the HOLD, HIDE, or HIDE ALL command. Figure 4-13. Enter HOLD command
File-AID - Edit - USERID9.FASAMP.EMPLOYE1 ------------- COMMAND ===> HOLD RECORD: 1 EMPLOYEE-MASTER-FILE ---- FIELD NUMBER/NAME ------ -FORMAT- ----+----1----+- 1 EMP-NUMBER 5/AN 00090 2 EMP-LAST-NAME 15/AN MARTIN
Subtopics:
Chap_4.10.1 Steps: Chap_4.10.2 Steps: Chap_4.10.3 Steps: Chap_4.10.4 More About the HIDE and HOLD Commands
CHAP_4.10.1 Steps: 1. Type HOLD in the COMMAND field.
2. Press <Enter>. File-AID displays the HIDE and HOLD Settings window as illustrated in Figure 4-14.
Figure 4-14. HIDE and HOLD Settings window
File-AID - Edit - USERID9.FASAMP.EMPLOYE1 --------------- COLUMNS 000001 000098
C +------------- HIDE and HOLD Settings -------------+ SCROLL ===> CSR Page 97

FileAid_-_Online_1 R | Row 1 to 9 of 34 | LENGTH: 198 - | Command ===> Scroll ===> CSR | ---2----+----3----+----4
* | | ************************
1 | Line Commands: H - HOLD, X - HIDE, R - RESET | 2 | | 3 | NUM FIELD NAME STATUS | 4 | ---- -------------------------------- ------ | 5 | _ 1 EMP-NUMBER | 6 | H 2 EMP-LAST-NAME | TURER 7 | _ 3 EMP-FIRST-NAME | | _ 4 EMP-MID-INIT | | _ 5 FILLER | | _ 6 EMP-TITLE | | X 7 EMP-PERSONAL-INFO | | X 8 EMP-NATL-ID-NUMBER | 1 | X 9 FILLER | +--------------------------------------------------+ 6/SNUM -3000.00 19 EMP-NATL-TAX-WITHOLD-PCT 3/PS -74.00 20 EMP-REGION-TAX-WITHOLD-PCT 3/PS 25.00 Enter CHAR (character mode), VFMT (vertical format), UNFMT (unformatted)
CHAP_4.10.2 Steps: 1. Type H in front of field EMP-LAST-NAME.
2. Type X in front of fields EMP-PERSONAL-INFO, EMP-NATL-ID-NUMBER, and FILLER.
3. Press <Enter>. File-AID redisplays the window with the updated STATUS as illustrated in Figure 4-15 on page 4-12. Notice that the list has been reordered with the held field EMP-LAST-NAME on top.
Figure 4-15. HIDE and HOLD Status displayed
File-AID - Edit - USERID9.FASAMP.EMPLOYE1 --------------- COLUMNS 000001 000098
C +------------- HIDE and HOLD Settings -------------+ SCROLL ===> CSR R | Row 1 to 9 of 34 | LENGTH: 198 - | Command ===> END Scroll ===> CSR | ---2----+----3----+----4
* | | ************************
1 | Line Commands: H - HOLD, X - HIDE, R - RESET | 2 | | 3 | NUM FIELD NAME STATUS | 4 | ---- -------------------------------- ------ | 5 | _ 2 EMP-LAST-NAME HOLD | 6 | _ 1 EMP-NUMBER | TURER 7 | _ 3 EMP-FIRST-NAME | | _ 4 EMP-MID-INIT | | _ 5 FILLER | | _ 6 EMP-TITLE | | _ 7 EMP-PERSONAL-INFO HIDE | | _ 8 EMP-NATL-ID-NUMBER HIDE | 1 | _ 9 FILLER HIDE | +--------------------------------------------------+
Page 98

FileAid_-_Online_1 6/SNUM -3000.00 19 EMP-NATL-TAX-WITHOLD-PCT 3/PS -74.00 20 EMP-REGION-TAX-WITHOLD-PCT 3/PS 25.00 Enter CHAR (character mode), VFMT (vertical format), UNFMT (unformatted)
CHAP_4.10.3 Steps: 1. Type END in the COMMAND field.
2. Press <Enter>. File-AID redisplays the Edit screen as illustrated in Figure 4-16. Notice that the list has been reordered with the held field on top.
Figure 4-16. Edit - Formatted Mode - After HIDE and HOLD
File-AID - Edit - USERID9.FASAMP.EMPLOYE1 ----------------- COLUMNS 00001 00101
COMMAND ===> SCROLL ===> PAGE RECORD: 1 EMPLOYEE-MASTER-FILE LENGTH: 198 ---- FIELD NUMBER/NAME ------ -FORMAT- ----+----1----+----2----+----3----+----4
2 EMP-LAST-NAME 15/AN MARTIN 1 EMP-NUMBER 5/AN 00090 3 EMP-FIRST-NAME 10/AN EDWARD 4 EMP-MID-INIT 1/AN M 5 FILLER 2/AN 6 EMP-TITLE 30/AN AIRPLANE MANUFACTURER 10 EMP-DATE-OF-BIRTH 6/AN 101954 15 EMP-HIRE-DATE 6/AN 920101 16 EMP-MARITAL-STATUS 1/AN M 17 EMP-WITHOLD-INFO SYNC 15/GRP 18 EMP-LIFE-INS-WITHOLD-AMT DISPLAY 30000} 6/SNUM -3000.00 19 EMP-NATL-TAX-WITHOLD-PCT 3/PS -74.00 20 EMP-REGION-TAX-WITHOLD-PCT 3/PS 25.00 21 EMP-LOCAL-TAX-WITHOLD-PCT 3/PS 5.00 22 EMP-HOME-ADDRESS SYNC 50/GRP 23 EMP-STREET-ADDRESS 25/AN 859 O'FARREL ST. 24 FILLER 1/AN
CHAP_4.10.4 More About the HIDE and HOLD Commands o You can redisplay the HIDE and HOLD Settings pop-up at any time by entering HOLD <blank>, HIDE <blank>, or HIDE ALL in the Command field.
o The fields which are HIDDEN using the HIDE (or Display OFF) are redisplayed by using RESET (or RESET HIDE), Display ON, DISPLAY ONLY, or HOLD on that field.
o Fields are identified by their field numbers. In VFMT mode each field number is always shown at the left of each field's heading "ruler". Reverse range is supported with the HIDE command.
o Entering a second HOLD command on a field already HELD moves that field to the end of the HOLD fields displayed. For example, HOLD 3,2,1
Page 99
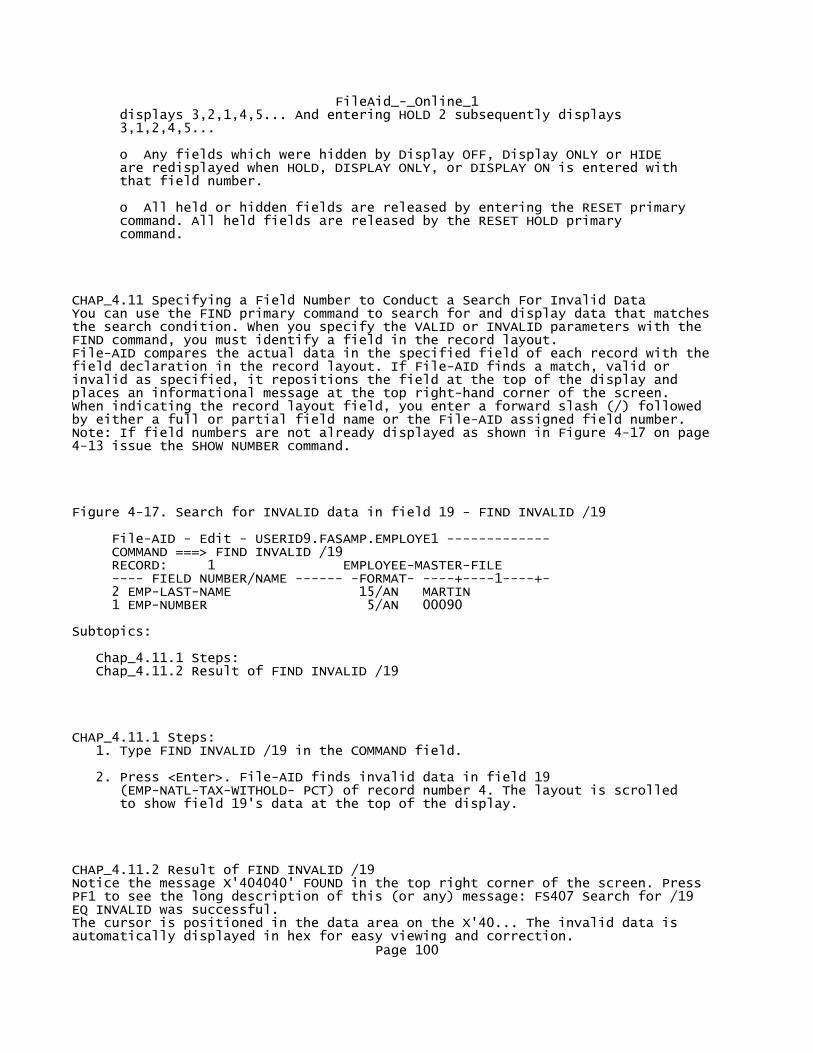
FileAid_-_Online_1 displays 3,2,1,4,5... And entering HOLD 2 subsequently displays 3,1,2,4,5...
o Any fields which were hidden by Display OFF, Display ONLY or HIDE are redisplayed when HOLD, DISPLAY ONLY, or DISPLAY ON is entered with that field number.
o All held or hidden fields are released by entering the RESET primary command. All held fields are released by the RESET HOLD primary command.
CHAP_4.11 Specifying a Field Number to Conduct a Search For Invalid DataYou can use the FIND primary command to search for and display data that matches the search condition. When you specify the VALID or INVALID parameters with the FIND command, you must identify a field in the record layout. File-AID compares the actual data in the specified field of each record with the field declaration in the record layout. If File-AID finds a match, valid or invalid as specified, it repositions the field at the top of the display and places an informational message at the top right-hand corner of the screen. When indicating the record layout field, you enter a forward slash (/) followed by either a full or partial field name or the File-AID assigned field number. Note: If field numbers are not already displayed as shown in Figure 4-17 on page 4-13 issue the SHOW NUMBER command.
Figure 4-17. Search for INVALID data in field 19 - FIND INVALID /19
File-AID - Edit - USERID9.FASAMP.EMPLOYE1 ------------- COMMAND ===> FIND INVALID /19 RECORD: 1 EMPLOYEE-MASTER-FILE ---- FIELD NUMBER/NAME ------ -FORMAT- ----+----1----+- 2 EMP-LAST-NAME 15/AN MARTIN 1 EMP-NUMBER 5/AN 00090
Subtopics:
Chap_4.11.1 Steps: Chap_4.11.2 Result of FIND INVALID /19
CHAP_4.11.1 Steps: 1. Type FIND INVALID /19 in the COMMAND field.
2. Press <Enter>. File-AID finds invalid data in field 19 (EMP-NATL-TAX-WITHOLD- PCT) of record number 4. The layout is scrolled to show field 19's data at the top of the display.
CHAP_4.11.2 Result of FIND INVALID /19Notice the message X'404040' FOUND in the top right corner of the screen. Press PF1 to see the long description of this (or any) message: FS407 Search for /19 EQ INVALID was successful. The cursor is positioned in the data area on the X'40... The invalid data is automatically displayed in hex for easy viewing and correction.
Page 100

FileAid_-_Online_1 Figure 4-18. Edit - Formatted Mode - FIND INVALID Result
File-AID - Edit - USERID9.FASAMP.EMPLOYE1 -------------------- X'404040' FOUND COMMAND ===> SCROLL ===> PAGE RECORD: 4 EMPLOYEE-MASTER-FILE LENGTH: 198 ---- FIELD NUMBER/NAME ------ -FORMAT- ----+----1----+----2----+----3----+----4
2 EMP-LAST-NAME 15/AN ANDREWS 19 EMP-NATL-TAX-WITHOLD-PCT 3/PS X'404040' 20 EMP-REGION-TAX-WITHOLD-PCT 3/PS 25.00 21 EMP-LOCAL-TAX-WITHOLD-PCT 3/PS 15.00 22 EMP-HOME-ADDRESS SYNC 50/GRP
Subtopics:
Chap_4.11.2.1 More About the FIND Command
CHAP_4.11.2.1 More About the FIND Command o If you enter the FIND command without specifying any parameters, the FIND Command screen is displayed to assist you with FIND command entry and syntax (see Figure 2-41 on page 2-35) .
o File-AID assigns field numbers sequentially, starting at the top of the record layout. Each elementary or group data item name is assigned a unique field number. If a data item occurs more than once, each occurrence is assigned the same field number, since each data item shares the same data name. To search a specific array element indicate the subscript in the following way - FIND INVALID /field(subscript).
You can use the File-AID-assigned field number in conjunction with several primary commands to selectively display your data. You can use the field number to:
Indicate the field to search when using the FIND INVALID command (Ex. FIND INVALID /field-number).
Use the DISPLAY command to specify a field or range of fields that you want to display in a format that is different from the default display format (Ex. DISPLAY 1 2-5 10 HEX).
Reposition the display to a specified field by using the field number(s) with the LOCATE primary command (Ex. LOCATE /field-number).
Specify which fields you want to display or hide by using the field number(s) with the DISPLAY primary command (Ex. DISPLAY 1 2 18 ONLY).
CHAP_4.12 Resetting Hold and HideUse the RESET command to reverse the effects of the previously specified HIDE and HOLD Settings. Figure 4-19. Enter RESET command
File-AID - Edit - USERID9.FASAMP.EMPLOYE1 ------------- COMMAND ===> RESET HIDE HOLD
Page 101
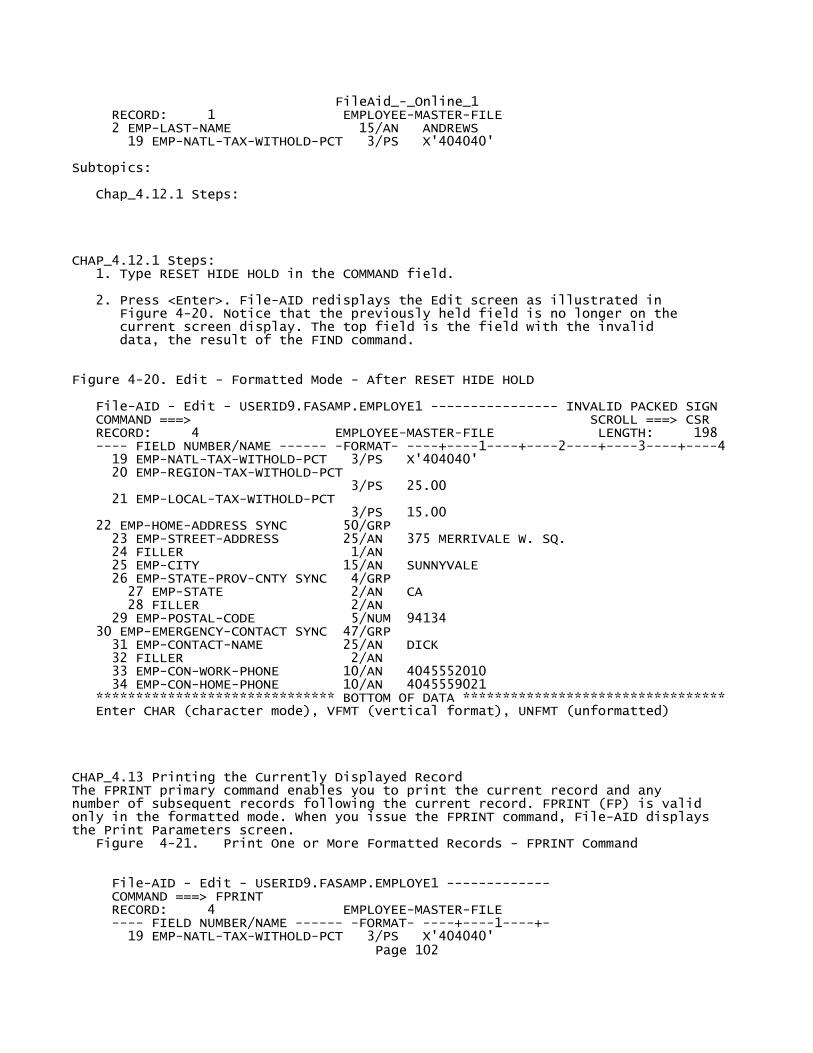
FileAid_-_Online_1 RECORD: 1 EMPLOYEE-MASTER-FILE 2 EMP-LAST-NAME 15/AN ANDREWS 19 EMP-NATL-TAX-WITHOLD-PCT 3/PS X'404040'
Subtopics:
Chap_4.12.1 Steps:
CHAP_4.12.1 Steps: 1. Type RESET HIDE HOLD in the COMMAND field.
2. Press <Enter>. File-AID redisplays the Edit screen as illustrated in Figure 4-20. Notice that the previously held field is no longer on the current screen display. The top field is the field with the invalid data, the result of the FIND command.
Figure 4-20. Edit - Formatted Mode - After RESET HIDE HOLD
File-AID - Edit - USERID9.FASAMP.EMPLOYE1 ---------------- INVALID PACKED SIGN COMMAND ===> SCROLL ===> CSR RECORD: 4 EMPLOYEE-MASTER-FILE LENGTH: 198 ---- FIELD NUMBER/NAME ------ -FORMAT- ----+----1----+----2----+----3----+----4 19 EMP-NATL-TAX-WITHOLD-PCT 3/PS X'404040' 20 EMP-REGION-TAX-WITHOLD-PCT 3/PS 25.00 21 EMP-LOCAL-TAX-WITHOLD-PCT 3/PS 15.00 22 EMP-HOME-ADDRESS SYNC 50/GRP 23 EMP-STREET-ADDRESS 25/AN 375 MERRIVALE W. SQ. 24 FILLER 1/AN 25 EMP-CITY 15/AN SUNNYVALE 26 EMP-STATE-PROV-CNTY SYNC 4/GRP 27 EMP-STATE 2/AN CA 28 FILLER 2/AN 29 EMP-POSTAL-CODE 5/NUM 94134 30 EMP-EMERGENCY-CONTACT SYNC 47/GRP 31 EMP-CONTACT-NAME 25/AN DICK 32 FILLER 2/AN 33 EMP-CON-WORK-PHONE 10/AN 4045552010 34 EMP-CON-HOME-PHONE 10/AN 4045559021 ****************************** BOTTOM OF DATA ********************************* Enter CHAR (character mode), VFMT (vertical format), UNFMT (unformatted)
CHAP_4.13 Printing the Currently Displayed RecordThe FPRINT primary command enables you to print the current record and any number of subsequent records following the current record. FPRINT (FP) is valid only in the formatted mode. When you issue the FPRINT command, File-AID displays the Print Parameters screen. Figure 4-21. Print One or More Formatted Records - FPRINT Command
File-AID - Edit - USERID9.FASAMP.EMPLOYE1 ------------- COMMAND ===> FPRINT RECORD: 4 EMPLOYEE-MASTER-FILE ---- FIELD NUMBER/NAME ------ -FORMAT- ----+----1----+- 19 EMP-NATL-TAX-WITHOLD-PCT 3/PS X'404040'
Page 102

FileAid_-_Online_1 20 EMP-REGION-TAX-WITHOLD-PCT 3/PS 25.00
Subtopics:
Chap_4.13.1 Steps: Chap_4.13.2 More About the FPRINT Command Chap_4.13.3 Directing The FPRINT Report to a Dataset or SYSOUT Chap_4.13.4 Specifying Additional Print Parameters for New Dataset
CHAP_4.13.1 Steps: 1. Type FPRINT in the COMMAND field.
2. Press <Enter>. File-AID displays the Print Parameters screen illustrated in Figure 4-22.
Figure 4-22. Print Parameters Screen
File-AID ------------------- Print Parameters ------------------------------ - COMMAND ===>
Number of lines/page ===> 55 (0 = Suppress page headings) Sysout class ===> A Number of copies ===> 1
Enter One of the Following Optional Destinations:
Destination printer ===> (Local or remote printer) - - - OR - - - External JES Node ID ===> (Predefined JES Node and symbolic ID Target VM/TSO ident ===> of intended receiver of output) - - - OR - - - Sysout writer name ===> (Installation assigned output writer) - - - OR - - - (DSORG=PS, RECFM=V, LRECL=125) Print dataset name ===> Disposition ===> (NEW, SHR, MOD, OLD) Volume serial ===>
Use ENTER to continue, END to cancel
CHAP_4.13.2 More About the FPRINT Command o FPRINT without any parameters prints one (1) record. To print several records starting at this record, use the command FPRINT n where n is the number of records to print. If n is "0" or "ALL", File-AID prints all records starting at the currently displayed record.
CHAP_4.13.3 Directing The FPRINT Report to a Dataset or SYSOUTFPRINT output may be routed to SYSOUT, a local or remote printer, a JES Node ID, a sysout writer, or to a new or existing dataset. You now route your FPRINT output to a new dataset.
Page 103
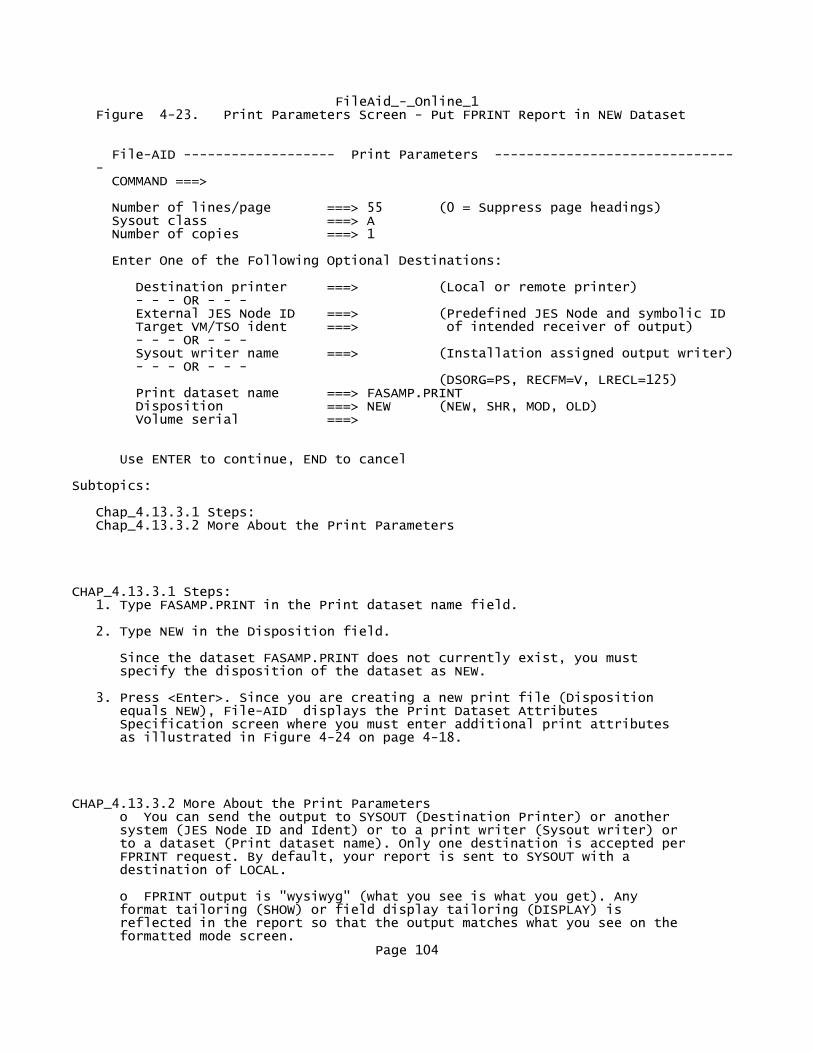
FileAid_-_Online_1 Figure 4-23. Print Parameters Screen - Put FPRINT Report in NEW Dataset
File-AID ------------------- Print Parameters ------------------------------ - COMMAND ===>
Number of lines/page ===> 55 (0 = Suppress page headings) Sysout class ===> A Number of copies ===> 1
Enter One of the Following Optional Destinations:
Destination printer ===> (Local or remote printer) - - - OR - - - External JES Node ID ===> (Predefined JES Node and symbolic ID Target VM/TSO ident ===> of intended receiver of output) - - - OR - - - Sysout writer name ===> (Installation assigned output writer) - - - OR - - - (DSORG=PS, RECFM=V, LRECL=125) Print dataset name ===> FASAMP.PRINT Disposition ===> NEW (NEW, SHR, MOD, OLD) Volume serial ===>
Use ENTER to continue, END to cancel
Subtopics:
Chap_4.13.3.1 Steps: Chap_4.13.3.2 More About the Print Parameters
CHAP_4.13.3.1 Steps: 1. Type FASAMP.PRINT in the Print dataset name field.
2. Type NEW in the Disposition field.
Since the dataset FASAMP.PRINT does not currently exist, you must specify the disposition of the dataset as NEW.
3. Press <Enter>. Since you are creating a new print file (Disposition equals NEW), File-AID displays the Print Dataset Attributes Specification screen where you must enter additional print attributes as illustrated in Figure 4-24 on page 4-18.
CHAP_4.13.3.2 More About the Print Parameters o You can send the output to SYSOUT (Destination Printer) or another system (JES Node ID and Ident) or to a print writer (Sysout writer) or to a dataset (Print dataset name). Only one destination is accepted per FPRINT request. By default, your report is sent to SYSOUT with a destination of LOCAL.
o FPRINT output is "wysiwyg" (what you see is what you get). Any format tailoring (SHOW) or field display tailoring (DISPLAY) is reflected in the report so that the output matches what you see on the formatted mode screen.
Page 104

FileAid_-_Online_1
CHAP_4.13.4 Specifying Additional Print Parameters for New DatasetWhenever you request a NEW dataset, you must specify space allocation values.
Figure 4-24. New Print Dataset Attributes Specification Screen . (SMS Allocation Fields Not Shown Automatically Appear If Applicable)
File-AID ------------ Print Dataset Attributes Specification --------------- - COMMAND ===>
Print Dataset Allocation Information: Generic unit ===> Space units ===> TRKS (BLKS; TRKS; CYLS) Primary quantity ===> 1 (In above units) Secondary quantity ===> 1 (In above units)
Use ENTER to print, END to cancel print
Subtopics:
Chap_4.13.4.1 Steps:
CHAP_4.13.4.1 Steps: 1. Accept the default space allocation values or specify your own values.
2. Press <Enter>. File-AID processes your print request, writing the output to the dataset FASAMP.PRINT. You can then browse the file or copy it to a printer at a later time.
CHAP_4.14 Changing Data Using the CHANGE CommandUse the CHANGE primary command to search for a specified value or condition and change it to a new value. If File-AID finds a match, it changes the data to the new value that you specify. If you enter the CHANGE command without specifying any parameters, File-AID displays the CHANGE Command screen where you can enter your change parameters. Figure 4-25. Initiate a Change - CHANGE Command With No Parameters
File-AID - Edit - USERID9.FASAMP.EMPLOYE1 ---------------- 1 RECORD(S) PRINTED COMMAND ===> CHANGE SCROLL ===> PAGE RECORD: 4 EMPLOYEE-MASTER-FILE LENGTH: 198
Page 105

FileAid_-_Online_1 ---- FIELD NUMBER/NAME ------ -FORMAT- ----+----1----+----2----+----3----+----4
19 EMP-NATL-TAX-WITHOLD-PCT 3/PS X'404040' 20 EMP-REGION-TAX-WITHOLD-PCT 3/PS 25.00
Subtopics:
Chap_4.14.1 Steps: Chap_4.14.2 Specifying the CHANGE Parameters
CHAP_4.14.1 Steps: 1. Type CHANGE in the COMMAND field.
2. Press <Enter>. File-AID displays the CHANGE Command screen as shown in Figure 4- 26 on page 4-19.
Figure 4-26. CHANGE Command Prompt Screen
File-AID ----------------- CHANGE Command -----------------------------------
COMMAND ===>
Specify CHANGE operands: Operator ===> (EQ, NE, LT, GT, LE, GE) From string ===> To string ===> Modifier ===> NEXT (NEXT, ALL, FIRST, LAST, PREV) Lines to search ===> (NX = Nonexcluded; X = Excluded; Blank = all)
Specify the Following Fields to Limit the Range of Search for this CHANGE: Field name ===> or Field number ===> or Start column ===> End column ===> (Column number(s)) Start range ===> End range ===> (Label or line number)
NOTE: You may bypass this screen by entering the CHANGE command with operands: CHANGE string string2 (NEXT) (NX) (col-1 (col-2)) (range) CHG (op) string (ALL) (X) (/field name) C VALID (FIRST) (/field number) INVALID (LAST) ANY or * (PREV)
CHAP_4.14.2 Specifying the CHANGE ParametersUse the CHANGE Command prompt screen to enter your change criteria. Using this screen helps you to enter valid values and to learn about the CHANGE command syntax. Figure 4-27. CHANGE Command Screen - CHANGE ALL INVALID to 0 (zero)
File-AID ----------------- CHANGE Command -----------------------------------
Page 106

FileAid_-_Online_1 COMMAND ===>
Specify CHANGE operands: Operator ===> (EQ, NE, LT, GT, LE, GE) From string ===> INVALID To string ===> 0 Modifier ===> ALL (NEXT, ALL, FIRST, LAST, PREV) Lines to search ===> (NX = Nonexcluded; X = Excluded; Blank = all)
Specify the Following Fields to Limit the Range of Search for this CHANGE: Field name ===> EMP-NATL-TAX-WITHOLD-PCT or Field number ===> or Start column ===> End column ===> (Column number(s)) Start range ===> End range ===> (Label or line number)
NOTE: You may bypass this screen by entering the CHANGE command with operands: CHANGE string string2 (NEXT) (NX) (col-1 (col-2)) (range) CHG (op) string (ALL) (X) (/field name) C VALID (FIRST) (/field number) INVALID (LAST) ANY or * (PREV)
Subtopics:
Chap_4.14.2.1 Steps: Chap_4.14.2.2 CHANGE Result
CHAP_4.14.2.1 Steps: 1. Type INVALID in the "From string" field.
Using the INVALID keyword in the "From string" field tells File-AID to search the specified field for data that does not match its field declaration in the record layout.
2. Type a 0 (zero) in the "To string" field.
The value you enter in the "To string" field is the value that you want File-AID to substitute for the "From String" value. In this case, for any value that File-AID finds to be invalid.
3. Type ALL in the Modifier field.
The ALL modifier tells File-AID to search all records for the condition you specified.
4. Type EMP-NATL-TAX-WITHOLD-PCT in the "Field name" field.
This value tells File-AID which field in the layout to search for invalid values.
5. Press <Enter>. File-AID applies the CHANGE command as illustrated in Figure 4-28.
Page 107

FileAid_-_Online_1CHAP_4.14.2.2 CHANGE ResultAfter the CHANGE, File-AID displays record number 4 on the Edit screen with EMP-NATL-TAX-WITHOLD-PCT positioned at the top of the display and a value of 0 (zero) has replaced the invalid value. The cursor is placed on the new 0. The message, EQ INVALID CHANGED, appears in the top right-hand corner of the display. Press PF1 (HELP) for details regarding the number of times File-AID applied the change you specified.
Figure 4-28. Edit - CHANGE Result - INVALID Data In Record 4 Changed
File-AID - Edit - USERID9.FASAMP.EMPLOYE1 ----------------- EQ INVALID CHANGED COMMAND ===> SCROLL ===> PAGE RECORD: 4 EMPLOYEE-MASTER-FILE LENGTH: 198 ---- FIELD NUMBER/NAME ------ -FORMAT- ----+----1----+----2----+----3----+----4
19 EMP-NATL-TAX-WITHOLD-PCT 3/PS 0 20 EMP-REGION-TAX-WITHOLD-PCT 3/PS 25.00 21 EMP-LOCAL-TAX-WITHOLD-PCT 3/PS 15.00 22 EMP-HOME-ADDRESS SYNC 50/GRP
Subtopics:
Chap_4.14.2.2.1 More About the CHANGE Command
CHAP_4.14.2.2.1 More About the CHANGE Command o You can specify the CHANGE command parameters on the CHANGE Command screen or specify the parameters with the CHANGE keyword in the COMMAND field.
CHAP_4.15 Navigating within a Formatted RecordYou can use the UP, DOWN, BACK (or LEFT), and FORWARD (or RIGHT) primary commands to navigate within a formatted display of a record and to move to the next or previous record.In formatted mode, the UP and DOWN primary commands enable you to view more fields within the current record. The BACK (alias LEFT) and FORWARD (aliases: FWD, RIGHT) primary commands scroll the display to the previous and next records, respectively. Each of these primary commands has a corresponding PF key set as the default in your user profile. The default settings are:
PF7 UP
PF8 DOWN
PF10 LEFT (BACK)
PF11 RIGHT (FORWARD)
Figure 4-29. Scroll UP to See Beginning of Layout
File-AID - Edit - USERID9.FASAMP.EMPLOYE1 ------------- COMMAND ===> UP
Page 108

FileAid_-_Online_1 RECORD: 4 EMPLOYEE-MASTER-FILE ---- FIELD NUMBER/NAME ------ -FORMAT- ----+----1----+- 19 EMP-NATL-TAX-WITHOLD-PCT 3/PS 0 20 EMP-REGION-TAX-WITHOLD-PCT 3/PS 25.00
Subtopics:
Chap_4.15.1 Steps: Chap_4.15.2 Scroll UP Result
CHAP_4.15.1 Steps: 1. Type UP in the COMMAND field.
2. Press <Enter>. Since you did not specify a specific number of lines to scroll, File-AID repositions the cursor based on the value specified in the SCROLL field located in the upper right corner of the display. File-AID redisplays record number 4 with the first field of the record located at the top of the screen as shown in Figure 4-30.
CHAP_4.15.2 Scroll UP ResultIn this example, the EMP-NUMBER field name is highlighted to distinguish it as the key field of the record, and therefore, a protected field. The key field data (number 10000 in this example) is protected and may not be changed, protected data is not highlighted. The remainder of the data items are highlighted to distinguish them as unprotected fields which you may change.
Figure 4-30. Formatted Mode - After UP (PAGE) Scroll Command
File-AID - Edit - USERID9.FASAMP.EMPLOYE1 ----------------- COLUMNS 00001 00101
COMMAND ===> SCROLL ===> PAGE RECORD: 4 EMPLOYEE-MASTER-FILE LENGTH: 198 ---- FIELD NUMBER/NAME ------ -FORMAT- ----+----1----+----2----+----3----+----4
******************************** TOP OF DATA **********************************
1 EMP-NUMBER 5/AN 10000 2 EMP-LAST-NAME 15/AN ANDREWS 3 EMP-FIRST-NAME 10/AN GEORGE 4 EMP-MID-INIT 1/AN 5 FILLER 2/AN 6 EMP-TITLE 30/AN ACTOR 7 EMP-PERSONAL-INFO SYNC 23/GRP 8 EMP-NATL-ID-NUMBER 9/NUM 576312032 9 FILLER 1/AN 10 EMP-DATE-OF-BIRTH 6/AN 042248 15 EMP-HIRE-DATE 6/AN 920131 16 EMP-MARITAL-STATUS 1/AN S 17 EMP-WITHOLD-INFO SYNC 15/GRP 18 EMP-LIFE-INS-WITHOLD-AMT DISPLAY 00000{ 6/SNUM 0 19 EMP-NATL-TAX-WITHOLD-PCT 3/PS 0 20 EMP-REGION-TAX-WITHOLD-PCT 3/PS 25.00
Subtopics:Page 109

FileAid_-_Online_1
Chap_4.15.2.1 More About Scroll Commands
CHAP_4.15.2.1 More About Scroll Commands o In formatted mode, the SCROLL field value of CSR (cursor) moves the line on which the cursor is positioned to the bottom (UP) or top (DOWN) of the display. (If the cursor is already on the top or bottom of the display or not visible on the screen, File-AID scrolls the data a full page.)
CHAP_4.16 Creating a New Record by Copying the Currently Displayed RecordThe REPEAT primary command lets you copy the currently displayed record and to add one or more copies of it immediately following the currently displayed record. Figure 4-31. Create a New Record - REPEAT Command
File-AID - Edit - USERID9.FASAMP.EMPLOYE1 ------------- COMMAND ===> REPEAT RECORD: 4 EMPLOYEE-MASTER-FILE ---- FIELD NUMBER/NAME ------ -FORMAT- ----+----1----+- 1 EMP-NUMBER 5/AN 10000 2 EMP-LAST-NAME 15/AN ANDREWS 3 EMP-FIRST-NAME 10/AN GEORGE
Subtopics:
Chap_4.16.1 Steps: Chap_4.16.2 Record REPEATED Result Chap_4.16.3 Displaying the New Record
CHAP_4.16.1 Steps: 1. Type REPEAT in the COMMAND field.
2. Press <Enter>. File-AID copies record number 4, inserts the new record (number 5) immediately following the currently displayed record. File-AID redisplays the screen with the message RECORD REPEATED displayed in the top right corner as shown in Figure 4-32.
CHAP_4.16.2 Record REPEATED Result
Figure 4-32. Edit - Formatted Mode - REPEAT a Record
File-AID - Edit - USERID9.FASAMP.EMPLOYE1 -------------------- RECORD REPEATED COMMAND ===> SCROLL ===> PAGE RECORD: 4 EMPLOYEE-MASTER-FILE LENGTH: 198 ---- FIELD NUMBER/NAME ------ -FORMAT- ----+----1----+----2----+----3----+----4
******************************** TOP OF DATA **********************************
1 EMP-NUMBER 5/AN 10000 Page 110

FileAid_-_Online_1 2 EMP-LAST-NAME 15/AN ANDREWS 3 EMP-FIRST-NAME 10/AN GEORGE 4 EMP-MID-INIT 1/AN 5 FILLER 2/AN 6 EMP-TITLE 30/AN ACTOR 7 EMP-PERSONAL-INFO SYNC 23/GRP 8 EMP-NATL-ID-NUMBER 9/NUM 576312032 9 FILLER 1/AN 10 EMP-DATE-OF-BIRTH 6/AN 042248 15 EMP-HIRE-DATE 6/AN 920131 16 EMP-MARITAL-STATUS 1/AN S 17 EMP-WITHOLD-INFO SYNC 15/GRP 18 EMP-LIFE-INS-WITHOLD-AMT DISPLAY 00000{ 6/SNUM 0 19 EMP-NATL-TAX-WITHOLD-PCT 3/PS 0 20 EMP-REGION-TAX-WITHOLD-PCT 3/PS 25.00
Subtopics:
Chap_4.16.2.1 More About the REPEAT Command
CHAP_4.16.2.1 More About the REPEAT Command o You can specify the REPEAT command as REPEAT, REP, or R. Refer to the information on primary commands in the File-AID/MVS Online Reference Manual (SPF and XE) for a complete explanation of the command syntax.
o To insert more than one copy of a record, specify a numerical value as a parameter with the command (for example, REPEAT 5).
o You can use the INSERT primary command to create a new formatted data record. If you use the FORWARD (FWD, RIGHT) command from a record you create with the INSERT command, File-AID adds the edited record to the dataset and creates a new initialized input record. This is called INPUT mode. You must enter values in one or more fields of an INPUT record in order for the record to be added. INPUT mode ends when you issue any other command except scroll FWD.
o Key fields of inserted and repeated records are unprotected so that you can enter values for the key of the new record.
CHAP_4.16.3 Displaying the New RecordTo display the new record you created with the REPEAT command, use the FWD (forward) primary command. The FWD command tells File-AID to display the next sequential record, which is record number 5 in this example. Figure 4-33. Edit - Use FWD Command To See Repeated New Record
File-AID - Edit - USERID9.FASAMP.EMPLOYE1 ------------- COMMAND ===> FWD RECORD: 4 EMPLOYEE-MASTER-FILE ---- FIELD NUMBER/NAME ------ -FORMAT- ----+----1----+- 1 EMP-NUMBER 5/AN 10000 2 EMP-LAST-NAME 15/AN ANDREWS 3 EMP-FIRST-NAME 10/AN GEORGE
Page 111

FileAid_-_Online_1Subtopics:
Chap_4.16.3.1 Steps: Chap_4.16.3.2 FWD Result - Record 5 is a Repeat of Record 4
CHAP_4.16.3.1 Steps: 1. Type FWD in the COMMAND field.
2. Press <Enter>. File-AID scrolls to record number 5 as shown in Figure 4-34.
CHAP_4.16.3.2 FWD Result - Record 5 is a Repeat of Record 4Note the change to the key field's (EMP-NUMBER) protection status when you use the FWD command to display record number 5, the new repeated record.
Figure 4-34. After FWD - Repeated Record 5 Appears
File-AID - Edit - USERID9.FASAMP.EMPLOYE1 ----------------- COLUMNS 00001 00101
COMMAND ===> SCROLL ===> PAGE RECORD: 5 EMPLOYEE-MASTER-FILE LENGTH: 198 ---- FIELD NUMBER/NAME ------ -FORMAT- ----+----1----+----2----+----3----+----4
******************************** TOP OF DATA **********************************
1 EMP-NUMBER 5/AN 10000 2 EMP-LAST-NAME 15/AN ANDREWS 3 EMP-FIRST-NAME 10/AN GEORGE 4 EMP-MID-INIT 1/AN 5 FILLER 2/AN 6 EMP-TITLE 30/AN ACTOR 7 EMP-PERSONAL-INFO SYNC 23/GRP 8 EMP-NATL-ID-NUMBER 9/NUM 576312032 9 FILLER 1/AN 10 EMP-DATE-OF-BIRTH 6/AN 042248 15 EMP-HIRE-DATE 6/AN 920131 16 EMP-MARITAL-STATUS 1/AN S 17 EMP-WITHOLD-INFO SYNC 15/GRP 18 EMP-LIFE-INS-WITHOLD-AMT DISPLAY 00000{ 6/SNUM 0 19 EMP-NATL-TAX-WITHOLD-PCT 3/PS 0 20 EMP-REGION-TAX-WITHOLD-PCT 3/PS 25.00 21 EMP-LOCAL-TAX-WITHOLD-PCT
CHAP_4.17 Entering New Data Values in a Repeated RecordKey fields are automatically protected from change in existing records. When you use the REPEAT (or INSERT) command to add a record to the dataset, the protection status of the key field is off to enable you to define the value of the new key. In this example, you enter new data for the new record (number 5) that you created using the REPEAT command on record number 4. To change data, type over the existing data values as shown in Figure 4-35.
Page 112

FileAid_-_Online_1Figure 4-35. Edit - Formatted Mode - Entering Data Values For New Record 5
File-AID - Edit - USERID9.FASAMP.EMPLOYE1 ----------------- COLUMNS 00001 00101
COMMAND ===> SCROLL ===> PAGE RECORD: 5 EMPLOYEE-MASTER-FILE LENGTH: 198 ---- FIELD NUMBER/NAME ------ -FORMAT- ----+----1----+----2----+----3----+----4
******************************** TOP OF DATA **********************************
1 EMP-NUMBER 5/AN 10001 2 EMP-LAST-NAME 15/AN SMITH 3 EMP-FIRST-NAME 10/AN MARY 4 EMP-MID-INIT 1/AN 5 FILLER 2/AN 6 EMP-TITLE 30/AN ACTRESS 7 EMP-PERSONAL-INFO SYNC 23/GRP 8 EMP-NATL-ID-NUMBER 9/NUM 536340982 9 FILLER 1/AN 10 EMP-DATE-OF-BIRTH 6/AN 052858 15 EMP-HIRE-DATE 6/AN 940504 16 EMP-MARITAL-STATUS 1/AN S 17 EMP-WITHOLD-INFO SYNC 15/GRP 18 EMP-LIFE-INS-WITHOLD-AMT DISPLAY 00000{ 6/SNUM 0 19 EMP-NATL-TAX-WITHOLD-PCT 3/PS 0 20 EMP-REGION-TAX-WITHOLD-PCT 3/PS 15.00 21 EMP-LOCAL-TAX-WITHOLD-PCT
Subtopics:
Chap_4.17.1 Steps: Chap_4.17.2 Protecting New Record Key Fields
CHAP_4.17.1 Steps: 1. Since record number 4 was copied, record number 5 contains the same values. Type over the existing values with new data exactly as shown above in Figure 4-35.
2. Press <Enter>.
CHAP_4.17.2 Protecting New Record Key FieldsOnce you have entered values for a new key, you can turn on key protection to prevent typeover changes. To turn the protection status on, use the PROTECT primary command. When you set the protection status to ON, you cannot edit the data in the key field for the currently displayed record. When the protection status is on, the name of the key field is highlighted. Figure 4-36. Edit - PROTECT New Key
File-AID - Edit - USERID9.FASAMP.EMPLOYE1 ------------- COMMAND ===> PROTECT RECORD: 5 EMPLOYEE-MASTER-FILE ---- FIELD NUMBER/NAME ------ -FORMAT- ----+----1----+- 1 EMP-NUMBER 5/AN 10001
Page 113

FileAid_-_Online_1 2 EMP-LAST-NAME 15/AN SMITH 3 EMP-FIRST-NAME 10/AN MARY
Subtopics:
Chap_4.17.2.1 Steps: Chap_4.17.2.2 PROTECT Result
CHAP_4.17.2.1 Steps: 1. Type PROTECT in the COMMAND field.
Since the default value of the PROTECT command is ON, you do not have to enter the ON parameter with the command.
2. Press <Enter>. File-AID prohibits you from editing the key field for the currently displayed record.
CHAP_4.17.2.2 PROTECT ResultSince you invoked the PROTECT command on record number 5, the key field (EMP-NUMBER) and its data are protected. As illustrated in Figure 4-37, the field name is highlighted to distinguish it as a protected field. The other data items remain unprotected, as distinguished by the highlighting.
Figure 4-37. After PROTECT - EMP-NUMBER is Protected
File-AID - Edit - USERID9.FASAMP.EMPLOYE1 ----------------- COLUMNS 00001 00101
COMMAND ===> SCROLL ===> PAGE RECORD: 5 EMPLOYEE-MASTER-FILE LENGTH: 198 ---- FIELD NUMBER/NAME ------ -FORMAT- ----+----1----+----2----+----3----+----4
******************************** TOP OF DATA **********************************
1 EMP-NUMBER 5/AN 10001 2 EMP-LAST-NAME 15/AN SMITH 3 EMP-FIRST-NAME 10/AN MARY 4 EMP-MID-INIT 1/AN 5 FILLER 2/AN 6 EMP-TITLE 30/AN ACTRESS 7 EMP-PERSONAL-INFO SYNC 23/GRP 8 EMP-NATL-ID-NUMBER 9/NUM 536340982
Subtopics:
Chap_4.17.2.2.1 More About the PROTECT Command
CHAP_4.17.2.2.1 More About the PROTECT Command o Use the PROFILE command to display the current PROTECT value.
CHAP_4.18 Navigating to a Record by Its Key ValueUse the KEY command to scroll directly to the record that matches the value of
Page 114
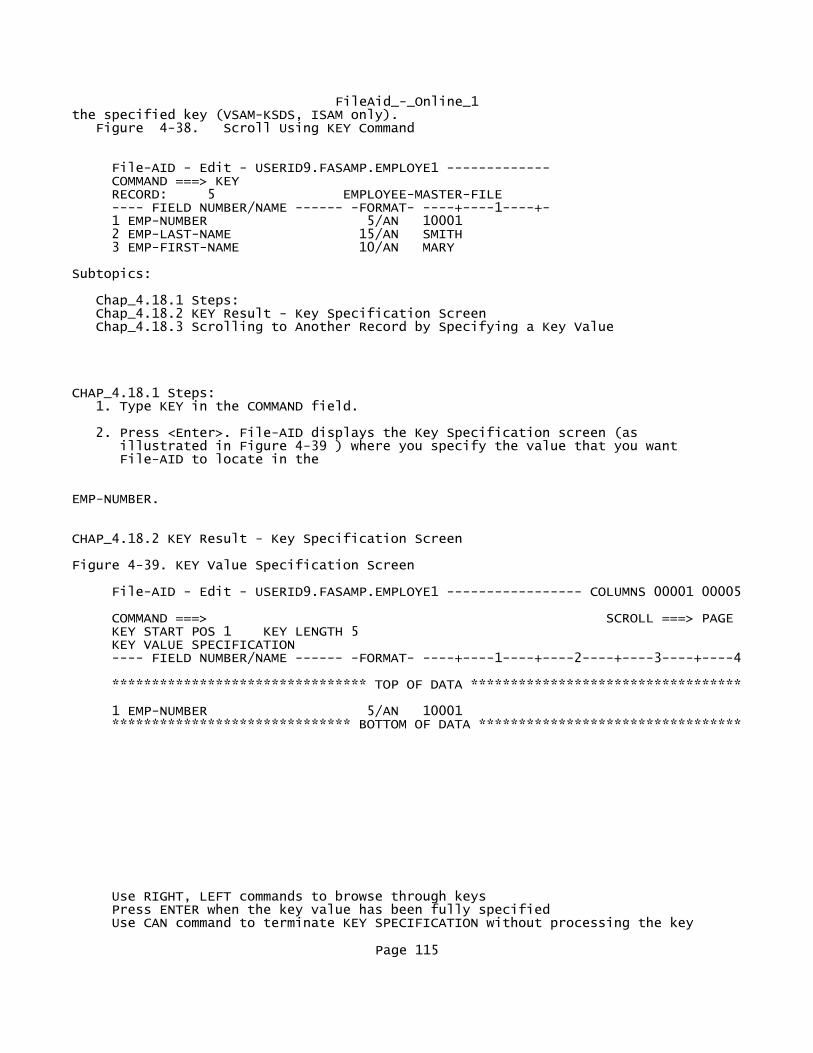
FileAid_-_Online_1the specified key (VSAM-KSDS, ISAM only). Figure 4-38. Scroll Using KEY Command
File-AID - Edit - USERID9.FASAMP.EMPLOYE1 ------------- COMMAND ===> KEY RECORD: 5 EMPLOYEE-MASTER-FILE ---- FIELD NUMBER/NAME ------ -FORMAT- ----+----1----+- 1 EMP-NUMBER 5/AN 10001 2 EMP-LAST-NAME 15/AN SMITH 3 EMP-FIRST-NAME 10/AN MARY
Subtopics:
Chap_4.18.1 Steps: Chap_4.18.2 KEY Result - Key Specification Screen Chap_4.18.3 Scrolling to Another Record by Specifying a Key Value
CHAP_4.18.1 Steps: 1. Type KEY in the COMMAND field.
2. Press <Enter>. File-AID displays the Key Specification screen (as illustrated in Figure 4-39 ) where you specify the value that you want File-AID to locate in the
EMP-NUMBER.
CHAP_4.18.2 KEY Result - Key Specification Screen
Figure 4-39. KEY Value Specification Screen
File-AID - Edit - USERID9.FASAMP.EMPLOYE1 ----------------- COLUMNS 00001 00005
COMMAND ===> SCROLL ===> PAGE KEY START POS 1 KEY LENGTH 5 KEY VALUE SPECIFICATION ---- FIELD NUMBER/NAME ------ -FORMAT- ----+----1----+----2----+----3----+----4
******************************** TOP OF DATA **********************************
1 EMP-NUMBER 5/AN 10001 ****************************** BOTTOM OF DATA *********************************
Use RIGHT, LEFT commands to browse through keys Press ENTER when the key value has been fully specified Use CAN command to terminate KEY SPECIFICATION without processing the key
Page 115

FileAid_-_Online_1Subtopics:
Chap_4.18.2.1 More About the KEY Command
CHAP_4.18.2.1 More About the KEY Command o You may enter a key value with the KEY command. You may also use the optional keyword "NEXT" to find the record with same or next highest key value. Example, KEY 23456 NEXT, positions you to the record with a key equal to 23456 or the next highest key.
o The KEY command is only valid for VSAM-KSDS and ISAM files.
o For RRDS and BDAM files use the LR (Locate Record) command in Formatted Mode. In Character and Vertical modes use the LOCATE (L) primary command.
CHAP_4.18.3 Scrolling to Another Record by Specifying a Key ValueIn this example, the key field is EMP-NUMBER and you want to scroll to the record for employee number 34010. Using the KEY Value Specification screen, you can specify 34010 as the key value that you want File-AID to search for and locate. The KEY command and the KEY Value Specification screen feature eliminate the need to scroll through a dataset to find a specific record. Figure 4-40. Scroll Using KEY Command
File-AID - Edit - USERID9.FASAMP.EMPLOYE1 --------------- COMMAND ===> KEY START POS 1 KEY LENGTH 5 KEY VALUE SPECIFICATION ---- FIELD NUMBER/NAME ------ -FORMAT- ----+----1----+--- ******************************** TOP OF DATA ************ 1 EMP-NUMBER 5/AN 34010 ****************************** BOTTOM OF DATA ***********
Subtopics:
Chap_4.18.3.1 Steps: Chap_4.18.3.2 Successful KEY Specification - Key 34010 Found
CHAP_4.18.3.1 Steps: 1. Type 34010 over the displayed key field value 10001.
2. Press <Enter>. File-AID locates employee number 34010 in record number 13 and displays that record as shown in Figure 4-41 on page 4-28.
CHAP_4.18.3.2 Successful KEY Specification - Key 34010 FoundWhen the key is found, the message KEY OR KEY NEXT FOUND, is displayed at the top right corner of the screen.
Figure 4-41. Edit - Formatted Mode - Scrolled To Key 34010 - Record 13
Page 116

FileAid_-_Online_1 File-AID - Edit - USERID9.FASAMP.EMPLOYE1 -------------- KEY OR KEY NEXT FOUND COMMAND ===> SCROLL ===> PAGE RECORD: 13 EMPLOYEE-MASTER-FILE LENGTH: 198 ---- FIELD NUMBER/NAME ------ -FORMAT- ----+----1----+----2----+----3----+----4
******************************** TOP OF DATA **********************************
1 EMP-NUMBER 5/AN 34010 2 EMP-LAST-NAME 15/AN SMITH 3 EMP-FIRST-NAME 10/AN JANET 4 EMP-MID-INIT 1/AN 5 FILLER 2/AN 6 EMP-TITLE 30/AN AIRLINE ATTENDANT 7 EMP-PERSONAL-INFO SYNC 23/GRP 8 EMP-NATL-ID-NUMBER 9/NUM 557782984 9 FILLER 1/AN 10 EMP-DATE-OF-BIRTH 6/AN 112359 15 EMP-HIRE-DATE 6/AN 920411 16 EMP-MARITAL-STATUS 1/AN S 17 EMP-WITHOLD-INFO SYNC 15/GRP 18 EMP-LIFE-INS-WITHOLD-AMT DISPLAY 40000{ 6/SNUM 4000.00 19 EMP-NATL-TAX-WITHOLD-PCT 3/PS 30.00 20 EMP-REGION-TAX-WITHOLD-PCT 3/PS 15.00
CHAP_4.19 Using Character ModeThe Character mode command structure and display layout are similar to those of the ISPF/PDF editor. The displayed or edited data can consist of the entire dataset or can be restricted, by using selection criteria, to a selected subset of records. Subtopics: Chap_4.19.1 Switching To Character Mode Chap_4.19.2 Removing Informational Lines and Markers (RESET Command) Chap_4.19.3 Assigning Labels Chap_4.19.4 Using the CHANGE Command With Labels Chap_4.19.5 Reversing Changes (UNDO) Chap_4.19.6 Removing the Line Label Values
CHAP_4.19.1 Switching To Character ModeUse the CHAR command to switch from Formatted to Character mode. Figure 4-42. Switch to Character Mode Using the CHAR Command
File-AID - Edit - USERID9.FASAMP.EMPLOYE1 --------------- COMMAND ===> CHAR RECORD: 13 EMPLOYEE-MASTER-FILE ---- FIELD NUMBER/NAME ------ -FORMAT- ----+----1----+--- ******************************** TOP OF DATA ************ 1 EMP-NUMBER 5/AN 34010 2 EMP-LAST-NAME 15/AN SMITH
Subtopics:
Chap_4.19.1.1 Steps: Chap_4.19.1.2 More About Switching to Character Mode
Page 117

FileAid_-_Online_1
CHAP_4.19.1.1 Steps: 1. Type CHAR in the COMMAND field.
2. Press <Enter>. File-AID redisplays the dataset in character format as shown in Figure 4-43.
Figure 4-43. Edit - Character Mode
File-AID - Edit - USERID9.FASAMP.EMPLOYE1 ----------------- COLUMNS 00001 00071
COMMAND ===> SCROLL ===> PAGE ****** ***************************** TOP OF DATA ******************************
000001 00090 MARTIN EDWARD M AIRPLANE MANUFACTURER 42789012
000002 00100 MULSTROM ROBERTA A HOLLYWOOD SEAMSTRESS 34657365
000003 00200 JACKSON JOSEPH C ORATOR 27558717
==CHG> 10000 ANDREWS GEORGE ACTOR 57631203
==NEW> 10001 SMITH MARY ACTRESS 53634098
000006 15000 MURPHY RONALD L PAINTER 98765432
000007 18034 SCHNEIDER ELLEN C NURSE 34155954
000008 21035 JONES GEORGE B COUNTRY SINGER 46381345
000009 25100 ROBERTS WILLIAM R POLITICIAN 87956332
==CHG> 27007 ALLEN JOYCE M AUTHOR 78345833
000011 30001 RICHARDS REX W RODEO CLOWN 63276453
000012 31000 SAVAGE JONATHON C ELECTRICIAN 34856799
000013 34010 SMITH JANET AIRLINE ATTENDANT 55778298
000014 34011 JACOBS DIANA DOCTOR 22536839
000015 36010 SIMPSON ALEX CARTOONIST 12345678
000016 39310 BARNETT EDWARD E SALESMAN 54378914
000017 39500 WILLIAMS EDITH A DESIGNER 98765432
000018 41000 RICHARDSON MARJORIE M PROGRAMMER ANALYST 34658365
000019 41400 MOORE THOMAS M SYSTEMS ADMINISTRATOR 22637364
000020 42017 BENNETT WILLIAM D SALES SUPPORT 14657355
000021 44018 WILHELM HEINRICH L DIPLOMAT 46657335
CHAP_4.19.1.2 More About Switching to Character ModePage 118

FileAid_-_Online_1 o When switching from Formatted mode to Character or Vertical modes, the cursor is positioned on the data of the current record. This helps you see which record you were on in Formatted mode.
Note: IMPORTANT. Be sure to HOME the cursor before typing a command so as to not change any data values. If you do happen to type a command into your data, use PA2 to reset the display. Or, if you pressed <Enter>, use the UNDO command to reverse your overtype.
o If the cursor is located on a data value in formatted mode, the cursor is displayed on the same byte in character mode.
o Use the MSG ON command to see the help line showing valid mode switching commands on the last line of your screen.
CHAP_4.19.2 Removing Informational Lines and Markers (RESET Command)You can use the RESET primary command to remove from the display the following line types: o Special lines (=INFO>, =NOTE>, =PROF>, =COLS>, =MASK>, =OVLY>, =BNDS>, etc.)
o Excluded lines (n LINES NOT DISPLAYED)
o Status flags in sequence number fields (==CHG>, ==NEW>, ==SEQ>, =UNDO>, etc.)
o Pending line commands (C, A, B, etc.).
Figure 4-44. Clear Status Flags - RESET Command
File-AID - Edit - USERID9.FASAMP.EMPLOYE1 --------------- COMMAND ===> RESET ****** ***************************** TOP OF DATA ******** 000001 00090 MARTIN EDWARD M AIRPLANE MANUFAC 000002 00100 MULSTROM ROBERTA A HOLLYWOOD SEAMST
Subtopics:
Chap_4.19.2.1 Steps: Chap_4.19.2.2 More About the RESET Command
CHAP_4.19.2.1 Steps: 1. HOME the cursor.
2. Type RESET in the COMMAND field.
3. Press <Enter>. File-AID clears the display of the results from all previously entered commands as illustrated in Figure 4-45.
Figure 4-45. Edit - Character Mode - After RESET Command
File-AID - Edit - USERID9.FASAMP.EMPLOYE1 ----------------- COLUMNS 00001 00071
Page 119

FileAid_-_Online_1 COMMAND ===> SCROLL ===> PAGE ****** ***************************** TOP OF DATA ******************************
000001 00090 MARTIN EDWARD M AIRPLANE MANUFACTURER 42789012
000002 00100 MULSTROM ROBERTA A HOLLYWOOD SEAMSTRESS 34657365
000003 00200 JACKSON JOSEPH C ORATOR 27558717
000004 10000 ANDREWS GEORGE ACTOR 57631203
000005 10001 SMITH MARY ACTRESS 53634098
000006 15000 MURPHY RONALD L PAINTER 98765432
000007 18034 SCHNEIDER ELLEN C NURSE 34155954
000008 21035 JONES GEORGE B COUNTRY SINGER 46381345
000009 25100 ROBERTS WILLIAM R POLITICIAN 87956332
000010 27007 ALLEN JOYCE M AUTHOR 78345833
000011 30001 RICHARDS REX W RODEO CLOWN 63276453
000012 31000 SAVAGE JONATHON C ELECTRICIAN 34856799
000013 34010 SMITH JANET AIRLINE ATTENDANT 55778298
000014 34011 JACOBS DIANA DOCTOR 22536839
000015 36010 SIMPSON ALEX CARTOONIST 12345678
CHAP_4.19.2.2 More About the RESET Command o RESET does not have any effect on NOT SELECTED lines.
CHAP_4.19.3 Assigning LabelsA line label refers to the location of a line in a dataset. A line label is specified as a period followed by a 1-5 character alphabetic string entered in a sequence number field. You can assign a label to any line. You can then use the labels at a later time to delimit the range of some commands including: CHANGE, FIND, and SORT. Figure 4-46. Edit - Assigning Line Labels .A and .B
File-AID - Edit - USERID9.FASAMP.EMPLOYE1 ----------------- COLUMNS 00001 00071
COMMAND ===> SCROLL ===> PAGE ****** ***************************** TOP OF DATA ******************************
000001 00090 MARTIN EDWARD M AIRPLANE MANUFACTURER 42789012
000002 00100 MULSTROM ROBERTA A HOLLYWOOD SEAMSTRESS 34657365
.A 03 00200 JACKSON JOSEPH C ORATOR 27558717
Page 120

FileAid_-_Online_1 000004 10000 ANDREWS GEORGE ACTOR 57631203
000005 10001 SMITH MARY ACTRESS 53634098
000006 15000 MURPHY RONALD L PAINTER 98765432
000007 18034 SCHNEIDER ELLEN C NURSE 34155954
000008 21035 JONES GEORGE B COUNTRY SINGER 46381345
000009 25100 ROBERTS WILLIAM R POLITICIAN 87956332
.B 10 27007 ALLEN JOYCE M AUTHOR 78345833
000011 30001 RICHARDS REX W RODEO CLOWN 63276453
000012 31000 SAVAGE JONATHON C ELECTRICIAN 34856799
000013 34010 SMITH JANET AIRLINE ATTENDANT 55778298
000014 34011 JACOBS DIANA DOCTOR 22536839
Subtopics:
Chap_4.19.3.1 Steps:
CHAP_4.19.3.1 Steps: 1. Type .A in the sequence number field of line 3.
2. Type .B in the sequence number field of line 10.
3. Press <Enter>. You use these labels as part of the syntax of the CHANGE command syntax as illustrated in Figure 4-47.
CHAP_4.19.4 Using the CHANGE Command With LabelsYou can use line labels in character (and vertical formatted) mode in conjunction with the CHANGE primary command as parameters. Using labels restricts the scope of the CHANGE to only those lines within the labeled lines (inclusive). The CHANGE command also accepts boolean comparison operators in the search string, including:
EQ Equal (default)
NE Not equal
GT Greater than
GE Greater or equal
LT Less than
Page 121

FileAid_-_Online_1 LE Less or equal.
For example, the command CHANGE NE 'XXX' 'XXX' 1 3 changes columns 1 thru 3 to XXX if they are not equal to XXX.
Figure 4-47. CHANGE Command - Using column and line label ranges
File-AID - Edit - USERID9.FASAMP.EMPLOYE1 --------------- COMMAND ===> C NE ' ' 'Z' .A .B 15 45 ALL ****** ***************************** TOP OF DATA ******** 000001 00090 MARTIN EDWARD M AIRPLANE MANUFAC 000002 00100 MULSTROM ROBERTA A HOLLYWOOD SEAMST
Subtopics:
Chap_4.19.4.1 Steps: Chap_4.19.4.2 CHANGE Result
CHAP_4.19.4.1 Steps: 1. Type C NE ' ' 'Z' .A .B 15 45 ALL in the COMMAND field.
The syntax of this CHANGE command consists of the CHANGE command keyword, a relational operator, the "from" and "to" values, and the range within which the change must occur. Ranges for records (lines) to change and columns are optional.
The CHANGE command in this example changes all non-blank (NE ' ') values to the letter Z between column number 15 and 45 starting at line label .A and ending at line label .B..
2. Press <Enter>. File-AID redisplays the screen and identifies those lines that have been changed by ===CHG> label in the sequence number fields as shown in Figure 4-48 on page 4-32.
CHAP_4.19.4.2 CHANGE Result
Figure 4-48. Edit - After CHANGE Command
File-AID - Edit - USERID9.FASAMP.EMPLOYE1 --------------------- NE ' ' CHANGED COMMAND ===> SCROLL ===> PAGE ****** ***************************** TOP OF DATA ******************************
000001 00090 MARTIN EDWARD M AIRPLANE MANUFACTURER 42789012
000002 00100 MULSTROM ROBERTA A HOLLYWOOD SEAMSTRESS 34657365
==CHG> 00200 JACKSON ZZZZZZ Z ZZZZZZ 27558717
==CHG> 10000 ANDREWS ZZZZZZ ZZZZZ 57631203
==CHG> 10001 SMITH ZZZZ ZZZZZZZ 53634098
==CHG> 15000 MURPHY ZZZZZZ Z ZZZZZZZ 98765432
==CHG> 18034 SCHNEIDER ZZZZZ Z ZZZZZ 34155954
Page 122

FileAid_-_Online_1 ==CHG> 21035 JONES ZZZZZZ Z ZZZZZZZ ZZZZER 46381345
==CHG> 25100 ROBERTS ZZZZZZZ Z ZZZZZZZZZZ 87956332
==CHG> 27007 ALLEN ZZZZZ Z ZZZZZZ 78345833
000011 30001 RICHARDS REX W RODEO CLOWN 63276453
000012 31000 SAVAGE JONATHON C ELECTRICIAN 34856799
000013 34010 SMITH JANET AIRLINE ATTENDANT 55778298
000014 34011 JACOBS DIANA DOCTOR 22536839
000015 36010 SIMPSON ALEX CARTOONIST 12345678
CHAP_4.19.5 Reversing Changes (UNDO)You can use the UNDO primary command to reverse the last change you made to your records. All changes are reversible, including: o Typing over data and pressing <Enter>
o CHANGE command
o DELETE command
o COPY and MERGE commands
o C, D, R, and M line commands
o ( shift left
o ) shift right.
Figure 4-49. Reverse CHANGE - UNDO Command
File-AID - Edit - USERID9.FASAMP.EMPLOYE1 --------------- COMMAND ===> UNDO ****** ***************************** TOP OF DATA ******** 000001 00090 MARTIN EDWARD M AIRPLANE MANUFAC 000002 00100 MULSTROM ROBERTA A HOLLYWOOD SEAMST ==CHG> 00200 JACKSON ZZZZZZ Z ZZZZZZ ==CHG> 10000 ANDREWS ZZZZZZ ZZZZZ
Subtopics:
Chap_4.19.5.1 Steps: Chap_4.19.5.2 UNDO Result
CHAP_4.19.5.1 Steps: 1. Type UNDO in the COMMAND field.
2. Press <Enter>. File-AID redisplays the screen with the dataset restored to the values prior to the CHANGE command. File-AID indicates the number of changes that were undone in the message located in the top right corner of the display as shown in Figure 4-50 on page 4-33.
Page 123

FileAid_-_Online_1
CHAP_4.19.5.2 UNDO Result
Figure 4-50. Edit - Character Mode After UNDO Command
File-AID - Edit - USERID9.FASAMP.EMPLOYE1 ----------------- 108 CHANGES UNDONE COMMAND ===> SCROLL ===> PAGE ****** ***************************** TOP OF DATA ******************************
000001 00090 MARTIN EDWARD M AIRPLANE MANUFACTURER 42789012
000002 00100 MULSTROM ROBERTA A HOLLYWOOD SEAMSTRESS 34657365
=UNDO> 00200 JACKSON JOSEPH C ORATOR 27558717
=UNDO> 10000 ANDREWS GEORGE ACTOR 57631203
=UNDO> 10001 SMITH MARY ACTRESS 53634098
=UNDO> 15000 MURPHY RONALD L PAINTER 98765432
=UNDO> 18034 SCHNEIDER ELLEN C NURSE 34155954
=UNDO> 21035 JONES GEORGE B COUNTRY SINGER 46381345
=UNDO> 25100 ROBERTS WILLIAM R POLITICIAN 87956332
=UNDO> 27007 ALLEN JOYCE M AUTHOR 78345833
000011 30001 RICHARDS REX W RODEO CLOWN 63276453
000012 31000 SAVAGE JONATHON C ELECTRICIAN 34856799
000013 34010 SMITH JANET AIRLINE ATTENDANT 55778298
000014 34011 JACOBS DIANA DOCTOR 22536839
Subtopics:
Chap_4.19.5.2.1 More About the UNDO Command
CHAP_4.19.5.2.1 More About the UNDO Command o The SETUNDO OFF command can be issued to disable UNDO processing. This might be used to improve performance when performing large changes (CHANGE ALL, DELETE, COPY etc.).
CHAP_4.19.6 Removing the Line Label ValuesWhen you define a line label, File-AID continues to display the line label(s) in the sequence number field. Use the RESET primary command with its line-type parameter LABEL to remove the line label(s). Figure 4-51. Issue the RESET and RESET LABEL commands
Page 124

FileAid_-_Online_1 File-AID - Edit - USERID9.FASAMP.EMPLOYE1 --------------- COMMAND ===> RESET;RESET LABEL ****** ***************************** TOP OF DATA ******** 000001 00090 MARTIN EDWARD M AIRPLANE MANUFAC 000002 00100 MULSTROM ROBERTA A HOLLYWOOD SEAMST =UNDO> 00200 JACKSON JOSEPH C ORATOR =UNDO> 10000 ANDREWS GEORGE ACTOR
Subtopics:
Chap_4.19.6.1 Steps:
CHAP_4.19.6.1 Steps: 1. Type RESET;RESET LABEL in the COMMAND field.
The semi-colon (;) is a command delimiter permitting you to enter multiple commands with one press of <Enter>.
2. Press <Enter>. The UNDO flags disappear and the labels .A and .B are cleared as shown in Figure 4-52 on page 4-34.
Figure 4-52. Edit - Character Mode - After RESET LABEL
File-AID - Edit - USERID9.FASAMP.EMPLOYE1 ----------------- COLUMNS 00001 00071
COMMAND ===> SCROLL ===> PAGE ****** ***************************** TOP OF DATA ******************************
000001 00090 MARTIN EDWARD M AIRPLANE MANUFACTURER 42789012
000002 00100 MULSTROM ROBERTA A HOLLYWOOD SEAMSTRESS 34657365
000003 00200 JACKSON JOSEPH C ORATOR 27558717
000004 10000 ANDREWS GEORGE ACTOR 57631203
000005 10001 SMITH MARY ACTRESS 53634098
000006 15000 MURPHY RONALD L PAINTER 98765432
000007 18034 SCHNEIDER ELLEN C NURSE 34155954
000008 21035 JONES GEORGE B COUNTRY SINGER 46381345
000009 25100 ROBERTS WILLIAM R POLITICIAN 87956332
000010 27007 ALLEN JOYCE M AUTHOR 78345833
000011 30001 RICHARDS REX W RODEO CLOWN 63276453
000012 31000 SAVAGE JONATHON C ELECTRICIAN 34856799
000013 34010 SMITH JANET AIRLINE ATTENDANT 55778298
000014 34011 JACOBS DIANA DOCTOR 22536839
000015 36010 SIMPSON ALEX CARTOONIST 12345678
000016 39310 BARNETT EDWARD E SALESMAN 54378914Page 125

FileAid_-_Online_1
000017 39500 WILLIAMS EDITH A DESIGNER 98765432
000018 41000 RICHARDSON MARJORIE M PROGRAMMER ANALYST 34658365
000019 41400 MOORE THOMAS M SYSTEMS ADMINISTRATOR 22637364
000020 42017 BENNETT WILLIAM D SALES SUPPORT 14657355
000021 44018 WILHELM HEINRICH L DIPLOMAT 46657335
CHAP_4.20 Editing With Line CommandsFile-AID supports most of the familiar ISPF Edit line commands and has some additional commands. Refer to the File-AID Reference Summary for a complete list of valid edit line commands. The following example illustrates using some of the File-AID line commands. Subtopics: Chap_4.20.1 C (Copy) Line Command
CHAP_4.20.1 C (Copy) Line CommandYou can place one or more copies of the data on a line to one or more destinations using the destination line commands A (After), B (Before) or H (Here). Figure 4-53. Edit - Character Mode (Copy Line Command)
File-AID - Edit - USERID9.FASAMP.EMPLOYE1 ----------------- COLUMNS 00001 00071
COMMAND ===> SCROLL ===> PAGE ****** ***************************** TOP OF DATA ******************************
000001 00090 MARTIN EDWARD M AIRPLANE MANUFACTURER 42789012
C 02 00100 MULSTROM ROBERTA A HOLLYWOOD SEAMSTRESS 34657365
000003 00200 JACKSON JOSEPH C ORATOR 27558717
000004 10000 ANDREWS GEORGE ACTOR 57631203
000005 10001 SMITH MARY ACTRESS 53634098
A 006 15000 MURPHY RONALD L PAINTER 98765432
000007 20367 SCHNEIDER ELLEN C NURSE 34155954
000008 21035 JONES GEORGE B COUNTRY SINGER 46381345
A 009 25100 ROBERTS WILLIAM R POLITICIAN 87956332
000010 27007 ALLEN JOYCE M AUTHOR 78345833
000011 30001 RICHARDS REX W RODEO CLOWN 63276453
A3 12 31000 SAVAGE JONATHON C ELECTRICIAN 34856799
000013 34010 SMITH JANET AIRLINE ATTENDANT 55778298
Page 126

FileAid_-_Online_1
Subtopics:
Chap_4.20.1.1 Steps: Chap_4.20.1.2 C (Copy) Line command Result
CHAP_4.20.1.1 Steps: 1. Type a C in line 2.
2. Type an A in the sequence number field of line numbers 6 and 9.
3. Type an A3 in the sequence number field of line number 12.
4. Press <Enter>. File-AID inserts a single copy of the data in line number 2 after line numbers 6 and 9 and three copies of the data after line number 12. The inserted copies and the resulting change to the line numbers are illustrated in Figure 4-54.
CHAP_4.20.1.2 C (Copy) Line command Result
Figure 4-54. Edit - Character Mode - After Copy
File-AID - Edit - USERID9.FASAMP.EMPLOYE1 ----------------- COLUMNS 00001 00071
COMMAND ===> SCROLL ===> PAGE ****** ***************************** TOP OF DATA ******************************
000001 00090 MARTIN EDWARD M AIRPLANE MANUFACTURER 42789012
000002 00100 MULSTROM ROBERTA A HOLLYWOOD SEAMSTRESS 34657365
000003 00200 JACKSON JOSEPH C ORATOR 27558717
000004 10000 ANDREWS GEORGE ACTOR 57631203
000005 10001 SMITH MARY ACTRESS 53634098
000006 15000 MURPHY RONALD L PAINTER 98765432
==SEQ> 00100 MULSTROM ROBERTA A HOLLYWOOD SEAMSTRESS 34657365
000008 20367 SCHNEIDER ELLEN C NURSE 34155954
000009 21035 JONES GEORGE B COUNTRY SINGER 46381345
000010 25100 ROBERTS WILLIAM R POLITICIAN 87956332
==SEQ> 00100 MULSTROM ROBERTA A HOLLYWOOD SEAMSTRESS 34657365
000012 27007 ALLEN JOYCE M AUTHOR 78345833
000013 30001 RICHARDS REX W RODEO CLOWN 63276453
000014 31000 SAVAGE JONATHON C ELECTRICIAN 34856799
==SEQ> 00100 MULSTROM ROBERTA A HOLLYWOOD SEAMSTRESS 34657365
Page 127

FileAid_-_Online_1 ==DUP> 00100 MULSTROM ROBERTA A HOLLYWOOD SEAMSTRESS 34657365
==DUP> 00100 MULSTROM ROBERTA A HOLLYWOOD SEAMSTRESS 34657365
000018 34010 SMITH JANET AIRLINE ATTENDANT 55778298
000019 34011 JACOBS DIANA DOCTOR 22536839
000020 36010 SIMPSON ALEX CARTOONIST 12345678
000021 39310 BARNETT EDWARD E SALESMAN 54378914
Subtopics:
Chap_4.20.1.2.1 More About the C (Copy) Line Command
CHAP_4.20.1.2.1 More About the C (Copy) Line Command o Multiple destination markers (A, B, or H) may be used with any single line copy (C) or move (M) or block copy (CC) or block move (MM).
o Multiple copy or move lines or multiple blocks are not permitted.
o Use the OVERLAY primary command or the OVLY line command to establish an overlay mask before using the O (Overlay) or OO (Overlay block) line commands as a destination for C (Copy) or M (Move).
CHAP_4.21 Sorting the Records of the DatasetUse the SORT KEYS primary command to sort the records of your dataset based on the record key. Figure 4-55. Arrange Records in Key Sequence - SORT KEYS
File-AID - Edit - USERID9.FASAMP.EMPLOYE1 --------------- COMMAND ===> SORT KEYS ****** ***************************** TOP OF DATA ******** 000001 00090 MARTIN EDWARD M AIRPLANE MANUFAC 000002 00100 MULSTROM ROBERTA A HOLLYWOOD SEAMST 000003 00200 JACKSON JOSEPH C ORATOR 000004 10000 ANDREWS GEORGE ACTOR 000005 10001 SMITH MARY ACTRESS 000006 15000 MURPHY RONALD L PAINTER ==SEQ> 00100 MULSTROM ROBERTA A HOLLYWOOD SEAMST
Subtopics:
Chap_4.21.1 Steps: Chap_4.21.2 More About the SORT Command Chap_4.21.3 Deleting Duplicate Records - D (Delete) Line Command
CHAP_4.21.1 Steps: 1. Type SORT KEYS in the COMMAND field.
2. Press <Enter>. File-AID redisplays the dataset in ascending key (first Page 128

FileAid_-_Online_1 five characters of each record) order. The number of records sorted is indicated in the message in the top right corner of the display as illustrated in Figure 4-56 on page 4-37.
Figure 4-56. Edit - After SORT KEYS
File-AID - Edit - USERID9.FASAMP.EMPLOYE1 ------------------ 56 RECORDS SORTED COMMAND ===> SCROLL ===> PAGE ****** ***************************** TOP OF DATA ******************************
000001 00090 MARTIN EDWARD M AIRPLANE MANUFACTURER 42789012
000002 00100 MULSTROM ROBERTA A HOLLYWOOD SEAMSTRESS 34657365
==DUP> 00100 MULSTROM ROBERTA A HOLLYWOOD SEAMSTRESS 34657365
==DUP> 00100 MULSTROM ROBERTA A HOLLYWOOD SEAMSTRESS 34657365
==DUP> 00100 MULSTROM ROBERTA A HOLLYWOOD SEAMSTRESS 34657365
==DUP> 00100 MULSTROM ROBERTA A HOLLYWOOD SEAMSTRESS 34657365
==DUP> 00100 MULSTROM ROBERTA A HOLLYWOOD SEAMSTRESS 34657365
000008 00200 JACKSON JOSEPH C ORATOR 27558717
000009 10000 ANDREWS GEORGE ACTOR 57631203
CHAP_4.21.2 More About the SORT Command o You can sort records on one or more fields by using the syntax:
SORT from to A/D from to A/D ...
or
SORT /field-name A/D /field-name A/D
where "from" and "to" are column locations of the field(s) to be used as sort fields and /field-name is the name of field in a supplied record layout. A/D indicates ascending (A) or descending (D) sequence; if you do not specify either A or D, File-AID assumes an A (ascending) sequence order.
o If a keyed file is sorted on a field other than the key field, you are not able to save your changes until all records are in key sequence. In this case, use the SORT KEY command to return the records to key sequence before saving your changes.
o The default parameter for SORT is KEYS for a keyed file. Thus the commands SORT and SORT KEYS are the same.
o For RRDS and BDAM files the SORT command sorts records in relative Page 129

FileAid_-_Online_1 record number (RRN or RBN) order.
CHAP_4.21.3 Deleting Duplicate Records - D (Delete) Line CommandUse the D (Delete) and DD (Delete Block) line commands to delete records. Figure 4-57. DD (Delete block) - Delete Duplicate Records
File-AID - Edit - USERID9.FASAMP.EMPLOYE1 --------------- COMMAND ===> ****** ***************************** TOP OF DATA ******** 000001 00090 MARTIN EDWARD M AIRPLANE MANUFAC 000002 00100 MULSTROM ROBERTA A HOLLYWOOD SEAMST DD P> 00100 MULSTROM ROBERTA A HOLLYWOOD SEAMST ==DUP> 00100 MULSTROM ROBERTA A HOLLYWOOD SEAMST ==DUP> 00100 MULSTROM ROBERTA A HOLLYWOOD SEAMST ==DUP> 00100 MULSTROM ROBERTA A HOLLYWOOD SEAMST DD P> 00100 MULSTROM ROBERTA A HOLLYWOOD SEAMST 000008 00200 JACKSON JOSEPH C ORATOR File-AID - Edit - USERID9.FASAMP.EMPLOYE1 --------------- COMMAND ===> ****** ***************************** TOP OF DATA ******** 000001 00090 MARTIN EDWARD M AIRPLANE MANUFAC 000002 00100 MULSTROM ROBERTA A HOLLYWOOD SEAMST DD P> 00100 MULSTROM ROBERTA A HOLLYWOOD SEAMST ==DUP> 00100 MULSTROM ROBERTA A HOLLYWOOD SEAMST ==DUP> 00100 MULSTROM ROBERTA A HOLLYWOOD SEAMST ==DUP> 00100 MULSTROM ROBERTA A HOLLYWOOD SEAMST DD P> 00100 MULSTROM ROBERTA A HOLLYWOOD SEAMST 000008 00200 JACKSON JOSEPH C ORATOR File-AID - Edit - USERID9.FASAMP.EMPLOYE1 --------------- COMMAND ===> ****** ***************************** TOP OF DATA ******** 000001 00090 MARTIN EDWARD M AIRPLANE MANUFAC 000002 00100 MULSTROM ROBERTA A HOLLYWOOD SEAMST DD P> 00100 MULSTROM ROBERTA A HOLLYWOOD SEAMST ==DUP> 00100 MULSTROM ROBERTA A HOLLYWOOD SEAMST ==DUP> 00100 MULSTROM ROBERTA A HOLLYWOOD SEAMST ==DUP> 00100 MULSTROM ROBERTA A HOLLYWOOD SEAMST DD P> 00100 MULSTROM ROBERTA A HOLLYWOOD SEAMST 000008 00200 JACKSON JOSEPH C ORATOR
Subtopics:
Chap_4.21.3.1 Steps:
CHAP_4.21.3.1 Steps: 1. Type DD (delete block) in the sequence number field of line numbers 3 and 7.
2. Press <Enter>. File-AID deletes the lines of data between the delete block commands as illustrated in Figure 4-58 on page 4-38.
Figure 4-58. After Duplicates Have Been Deleted
File-AID - Edit - USERID9.FASAMP.EMPLOYE1 ----------------- COLUMNS 00001 00071
Page 130

FileAid_-_Online_1 COMMAND ===> SCROLL ===> PAGE ****** ***************************** TOP OF DATA ******************************
000001 00090 MARTIN EDWARD M AIRPLANE MANUFACTURER 42789012
000002 00100 MULSTROM ROBERTA A HOLLYWOOD SEAMSTRESS 34657365
000003 00200 JACKSON JOSEPH C ORATOR 27558717
000004 10000 ANDREWS GEORGE ACTOR 57631203
000005 10001 SMITH MARY ACTRESS 53634098
000006 15000 MURPHY RONALD L PAINTER 98765432
000007 20367 SCHNEIDER ELLEN C NURSE 34155954
000008 21035 JONES GEORGE B COUNTRY SINGER 46381345
000009 25100 ROBERTS WILLIAM R POLITICIAN 87956332
000010 27007 ALLEN JOYCE M AUTHOR 78345833
000011 30001 RICHARDS REX W RODEO CLOWN 63276453
000012 31000 SAVAGE JONATHON C ELECTRICIAN 34856799
000013 34010 SMITH JANET AIRLINE ATTENDANT 55778298
000014 34011 JACOBS DIANA DOCTOR 22536839
CHAP_4.22 Invoking Vertical Formatted ModeThe vertical formatted mode edit display is similar to the character mode edit display except that it uses the record layout field names as headings at the top of each column with the data formatted and arranged below each heading. Figure 4-59. Switch to Vertical Formatted Mode - VFMT Command
File-AID - Edit - USERID9.FASAMP.EMPLOYE1 --------------- COMMAND ===> VFMT ****** ***************************** TOP OF DATA ******** 000001 00090 MARTIN EDWARD M AIRPLANE MANUFAC 000002 00100 MULSTROM ROBERTA A HOLLYWOOD SEAMST 000003 00200 JACKSON JOSEPH C ORATOR
Subtopics:
Chap_4.22.1 Steps: Chap_4.22.2 Displaying a Subset of Fields Chap_4.22.3 Using the CHANGE ANY Command
CHAP_4.22.1 Steps: 1. Type VFMT in the COMMAND field.
2. Press <Enter>. File-AID redisplays the Edit screen in vertical formatted mode as shown in Figure 4-60 on page 4-39.
Page 131

FileAid_-_Online_1
Figure 4-60. Edit - Vertical Formatted Mode
File-AID - Edit - USERID9.FASAMP.EMPLOYE1 ----------------- COLUMNS 00001 00033 COMMAND ===> SCROLL ===> PAGE EMP-NUMBER EMP-LAST-NAME EMP-FIRST-NAME EMP-MID-INIT FILLER 5/AN 15/AN 10/AN 1/AN 2/AN (1-5) (6-20) (21-30) (31-31) (32-33) 1--------- 2-------------- 3------------- 4----------- 5------- ****** ***************************** TOP OF DATA ***************************** * 000001 00090 MARTIN EDWARD M 000002 00100 MULSTROM ROBERTA A 000003 00200 JACKSON JOSEPH C 000004 10000 ANDREWS GEORGE 000005 10001 SMITH MARY 000006 15000 MURPHY RONALD L 000007 20367 SCHNEIDER ELLEN C 000008 21035 JONES GEORGE B 000009 25100 ROBERTS WILLIAM R 000010 27007 ALLEN JOYCE M 000011 30001 RICHARDS REX W 000012 31000 SAVAGE JONATHON C 000013 34010 SMITH JANET 000014 34011 JACOBS DIANA 000015 36010 SIMPSON ALEX 000016 39310 BARNETT EDWARD E 000017 39500 WILLIAMS EDITH A
CHAP_4.22.2 Displaying a Subset of FieldsYou can tailor the vertical formatted display to show only certain fields by using the DISPLAY command, just like in formatted mode. The full syntax of the DISPLAY command is shown in the File-AID Reference Summary and the File-AID/MVS Online Reference Manual (SPF and XE) and in the online tutorials.
DISPLAY ON/OFF/ONLY field-list/ALL
where field-list is a list of up to 10 field numbers or field-number ranges (for example, DISPLAY ONLY 1 2 5-8 15-20). Figure 4-61. Tailoring the Fields To Appear - DISPLAY ONLY
File-AID - Edit - USERID9.FASAMP.EMPLOYE1 --------------- COMMAND ===> DISPLAY 1 2 18 ONLY EMP-NUMBER EMP-LAST-NAME EMP-FIRST-NAME EMP-MID- 5/AN 15/AN 10/AN 1/AN (1-5) (6-20) (21-30) (31-31) 1--------- 2-------------- 3------------- 4------- ****** ***************************** TOP OF DATA ******** 000001 00090 MARTIN EDWARD M
Subtopics:
Chap_4.22.2.1 Steps:
Page 132

FileAid_-_Online_1
CHAP_4.22.2.1 Steps: 1. Type DISPLAY 1 2 18 ONLY in the COMMAND field.
2. Press <Enter>. File-AID redisplays the screen with columns 1, 2, and 18 only as illustrated in Figure 4-62 on page 4-40.
Figure 4-62. Edit - Vertical Mode - Fields 1 2 and 18 Only
File-AID - Edit - USERID9.FASAMP.EMPLOYE1 ----------------- COLUMNS 00001 00092 COMMAND ===> SCROLL ===> PAGE EMP-NUMBER EMP-LAST-NAME EMP-LIFE-INS-WITHOLD-AMT 5/AN 15/AN 6/SNUM (1-5) (6-20) (87-92) 1--------- 2-------------- 18---------------------- ****** ***************************** TOP OF DATA ***************************** * 000001 00090 MARTIN -3000.00 000002 00100 MULSTROM 8000.00 000003 00200 JACKSON 0 000004 10000 ANDREWS 0 000005 10001 SMITH 0 000006 15000 MURPHY 5000.00 000007 20367 SCHNEIDER 5000.00 000008 21035 JONES 0 000009 25100 ROBERTS 5000.00 000010 27007 ALLEN 5000.00 000011 30001 RICHARDS 3000.00 000012 31000 SAVAGE 5000.00 000013 34010 SMITH 4000.00 000014 34011 JACOBS 400.00 000015 36010 SIMPSON 5000.00 000016 39310 BARNETT 5000.00 000017 39500 WILLIAMS 0
CHAP_4.22.3 Using the CHANGE ANY CommandYou can unconditionally change data in one or more records using the CHANGE ANY command. If you specify the CHANGE command without any parameters, File-AID displays the CHANGE Command screen (see Figure 4-26 on page 4-19) . Figure 4-63. Unconditional Change - CHANGE ANY
File-AID - Edit - USERID9.FASAMP.EMPLOYE1 --------------- COMMAND ===> CHANGE ANY /18 0 ALL EMP-NUMBER EMP-LAST-NAME EMP-LIFE-INS-WITHOLD-AMT 5/AN 15/AN 6/SNUM (1-5) (6-20) (87-92) 1--------- 2-------------- 18---------------------- ****** ***************************** TOP OF DATA ********* 000001 00090 MARTIN -3000.00 000002 00100 MULSTROM 8000.00
Subtopics:
Chap_4.22.3.1 Steps: Chap_4.22.3.2 CHANGE ANY Result
Page 133

FileAid_-_Online_1
CHAP_4.22.3.1 Steps: 1. Type CHANGE ANY /18 0 ALL in the COMMAND field.
The CHANGE command in this example changes any value in field number 18 (EMP- LIFE-INS-WITHOLD-AMT) of all records to a value of 0 (zero).
2. Press <Enter>.
CHAP_4.22.3.2 CHANGE ANY ResultFile-AID redisplays the screen with the changed values and displays a confirmation message at the top right corner of the screen as shown in Figure 4-64 on page 4-41. File-AID displays a change flag (===CHG>) next to each changed line in the dataset.
Figure 4-64. Edit - After CHANGE ANY /18 0 Command
File-AID - Edit - USERID9.FASAMP.EMPLOYE1 ----------- /18 EQ ANY VALUE(S) Chan COMMAND ===> SCROLL ===> PAGE EMP-NUMBER EMP-LAST-NAME EMP-LIFE-INS-WITHOLD-AMT 5/AN 15/AN 6/SNUM (1-5) (6-20) (87-92) 1--------- 2-------------- 18---------------------- ****** ***************************** TOP OF DATA ******************************
==CHG> 00090 MARTIN 0 ==CHG> 00100 MULSTROM 0 ==CHG> 00200 JACKSON 0 ==CHG> 10000 ANDREWS 0 ==CHG> 10001 SMITH 0 ==CHG> 15000 MURPHY 0 ==CHG> 20367 SCHNEIDER 0 ==CHG> 21035 JONES 0 ==CHG> 25100 ROBERTS 0 ==CHG> 27007 ALLEN 0 ==CHG> 30001 RICHARDS 0 ==CHG> 31000 SAVAGE 0
CHAP_4.23 Printing Records in Vertical Formatted ModeThe VPRINT primary command enables you to print the current record and any number of subsequent records following the current record. The default is print ALL records when a limit is not specified. VPRINT (VP) is valid only in the vertical formatted mode. You can send output to SYSOUT or a dataset. The VPRINT online report output width is 120 characters. The report format includes spaces separating the fields. When the VPRINT output exceeds the report width, File-AID displays the VPRINT DATA TRUNCATION informational message, VP001-Data truncation occurred while processing VPRINT request. Use the FIELDS operand to specify exactly which fields to include in the report. When you issue the VPRINT command, File-AID displays the Print Parameters screen. Figure 4-65. Printing Records in Vertical Formatted Mode - VPRINT Command
File-AID - Edit - USERID9.FASAMP.EMPLOYE1 --------------- COLUMNS 000001 000033
Page 134

FileAid_-_Online_1 COMMAND ===> VPRINT EMP-NUMBER EMP-LAST-NAME EMP-FIRST-NAME EMP-MID-INIT FILLER 5/AN 15/AN 10/AN 1/AN 2/AN (1-5) (6-20) (21-30) (31-31) (32-33) 1--------- 2-------------- 3------------- 4----------- 5------- ****** ***************************** TOP OF DATA ***************************** * 000001 00090 MARTIN EDWARD M 000002 00100 MULSTROM ROBERTA A 000003 00200 JACKSON JOSEPH C 000004 10000 ANDREWS GEORGE 000005 10001 SMITH MARY 000006 15000 MURPHY RONALD L 000007 20367 SCHNEIDER ELLEN C 000008 21035 JONES GEORGE B 000009 25100 ROBERTS WILLIAM R 000010 27007 ALLEN JOYCE M 000011 30001 RICHARDS REX W 000012 31000 SAVAGE JONATHON C 000013 34010 SMITH JANET 000014 34011 JACOBS DIANA 000015 36010 SIMPSON ALEX 000016 39310 BARNETT EDWARD E 000017 39500 WILLIAMS EDITH A
Subtopics:
Chap_4.23.1 Steps:
CHAP_4.23.1 Steps: 1. Type VPRINT in the COMMAND field.
2. Press <Enter>. File-AID displays the Print Parameters screen illustrated in Figure 4-66. See "Directing The FPRINT Report to a Dataset or SYSOUT" on page 4-16 for information of specifying Print Parameters.
Figure 4-66. Print Parameters Screen
File-AID ------------------- Print Parameters ------------------------------ - COMMAND ===>
Number of lines/page ===> 55 (0 = Suppress page headings) Sysout class ===> A Number of copies ===> 1
Enter One of the Following Optional Destinations:
Destination printer ===> (Local or remote printer) - - - OR - - - External JES Node ID ===> (Predefined JES Node and symbolic ID Target VM/TSO ident ===> of intended receiver of output) - - - OR - - - Sysout writer name ===> (Installation assigned output writer) - - - OR - - - (DSORG=PS, RECFM=V, LRECL=125) Print dataset name ===> Disposition ===> (NEW, SHR, MOD, OLD)
Page 135

FileAid_-_Online_1 Volume serial ===>
Use ENTER to continue, END to cancel
CHAP_4.24 Terminate Edit FunctionUse the END command to terminate processing of your Edit session. Subtopics: Chap_4.24.1 Controlling Automatic Save Processing Chap_4.24.2 Specify Audit Trail Dataset and JOB Statements
CHAP_4.24.1 Controlling Automatic Save ProcessingWhen you END the edit session File-AID checks the value of your AUTOSAVE user profile value. If AUTOSAVE is OFF, File-AID prompts you to save or cancel the changes made to the dataset before it terminates the Edit function by displaying the message DATA CHANGED-SAVE/CANCEL at the top right corner of the screen. You must then type SAVE to save your changes, or CANCEL to cancel your changes leaving the original dataset undisturbed. If AUTOSAVE is ON, your data is checked for correct key sequence and, if valid, the changes you have made are used to update the dataset. Figure 4-67. Exit Edit and Save Changes - END Command
File-AID - Edit - USERID9.FASAMP.EMPLOYE1 --------------- COMMAND ===> END EMP-NUMBER EMP-LAST-NAME EMP-LIFE-INS-WITHOLD-AMT 5/AN 15/AN 6/SNUM (1-5) (6-20) (87-92) 1--------- 2-------------- 18---------------------- ****** ***************************** TOP OF DATA ********* 000001 00090 MARTIN 0 000002 00100 MULSTROM 0
Subtopics:
Chap_4.24.1.1 Steps:
CHAP_4.24.1.1 Steps: 1. Type END in the COMMAND field.
2. Press <Enter>. File-AID displays the Disposition of Audit Trail screen as shown in Figure 4-68 on page 4-44.
CHAP_4.24.2 Specify Audit Trail Dataset and JOB StatementsFile-AID displays the Disposition of Audit Trail screen when you specify a value of Y in the Create audit trail field on the Edit - Dataset Specification screen. To generate the Audit report, complete the Disposition of Audit Trail screen fields and press <Enter>.
Figure 4-68. Disposition of Audit Trail Screen
File-AID --------------- Disposition of Audit Trail ------------------------ Page 136

FileAid_-_Online_1 - COMMAND ===>
Audit trail disposition ===> PD (PK = Print dataset and keep PD = Print dataset and delete D = Delete dataset without printing)
Audit trail dataset ===> 'USERID9.FILEAID.AUDT.D940504.T165047'
Audit trail description ===> Enter a description of your edit session ===> on these two lines.
Specify Batch JCL Information: Sysout class ===> *
Specify JOB Statement Information: ===> //useridA JOB (ACCOUNT),'your name', ===> // CLASS=x,MSGCLASS=x,NOTIFY=userid ===> ===> Use JCL command to edit generated JCL Use ENTER to submit batch job Use END to keep audit trail without printing
Subtopics:
Chap_4.24.2.1 Steps: Chap_4.24.2.2 More About the Disposition of Audit Trail Screen
CHAP_4.24.2.1 Steps: 1. Type PD in the Audit trail disposition field.
2. Verify that the JOB statement shown is valid for your site. Use a hold Sysout class to enable online viewing of the report.
3. Press <Enter>. File-AID submits the audit trail batch job.
4. When the job completes, use your online Sysout browsing facilities to examine the report.
CHAP_4.24.2.2 More About the Disposition of Audit Trail Screen o Use the JCL command to view the generated Audit Trail report print JCL.
o Use the END command to save the audit trail dataset without printing the report. The Audit Trail report can be printed later by using the File-AID Print Audit Trail utility option 5.5.
o The name of the audit trail dataset cannot be changed on this screen.
5
CHAP_5 Comparing FilesThe File-AID Compare function compares any two similar files and produces
Page 137

FileAid_-_Online_1reports showing any differences. Special features let you use existing keys or your own sort fields to synchronize the files. You can also supply record layouts to the Compare function that can be used for: o Reporting differences field by field
o Specifying certain fields to be excluded from the compare
o Specifying sync keys using field names.
You may optionally use standard File-AID selection criteria to select only a subset of records to be compared. Other features let you control the format and level of results reporting and to limit the number of records compared or the number of differences to report. Like many other File-AID utilities, you can specify online or batch processing of your compare. Subtopics: Chap_5.1 Accessing the Compare Function (Option 10) Chap_5.2 Specifying the "Old" Dataset Chap_5.3 Specifying the "New" Dataset Chap_5.4 Specifying Execution Options Chap_5.5 Selecting Your Compare - Criteria Options Chap_5.6 Specifying Print Options for a Formatted Compare Chap_5.7 Specifying Formatted Field Criteria Chap_5.8 Viewing Formatted Compare Criteria Chap_5.9 Executing Compare Chap_5.10 Analyzing the Compare Report Chap_5.11 Viewing the Compare Summary Report Chap_5.12 Printing the Report Chap_5.13 Load Library Compare Chap_5.14 Specifying the "New" Load Library Chap_5.15 Specifying Execution Options Chap_5.16 Selecting Your Compare - Load Library Criteria Chap_5.17 Specifying Load Library Print Options Chap_5.18 Viewing Formatted Compare Criteria Chap_5.19 Executing Compare Chap_5.20 Analyzing the Compare Report Chap_5.21 Viewing the Compare Summary Report Chap_5.22 Printing the Report
CHAP_5.1 Accessing the Compare Function (Option 10)The Compare function is located on the File-AID Primary Option Menu as option 10. Subtopics: Chap_5.1.1 Steps:
CHAP_5.1.1 Steps: 1. From the File-AID Primary Option Menu (not shown here), select File-AID option 10.
2. Press <Enter>. File-AID displays the Compare - OLD Dataset Specification screen as illustrated in Figure 5-1 on page 5-2.
CHAP_5.2 Specifying the "Old" DatasetThis example illustrates the process of comparing two keyed VSAM (KSDS) clusters. It compares an updated file to a backup of the file saved before the file was changed. The training datasets ...FASAMP.COMPARE and ...FASAMP.EMPLOYEE
Page 138
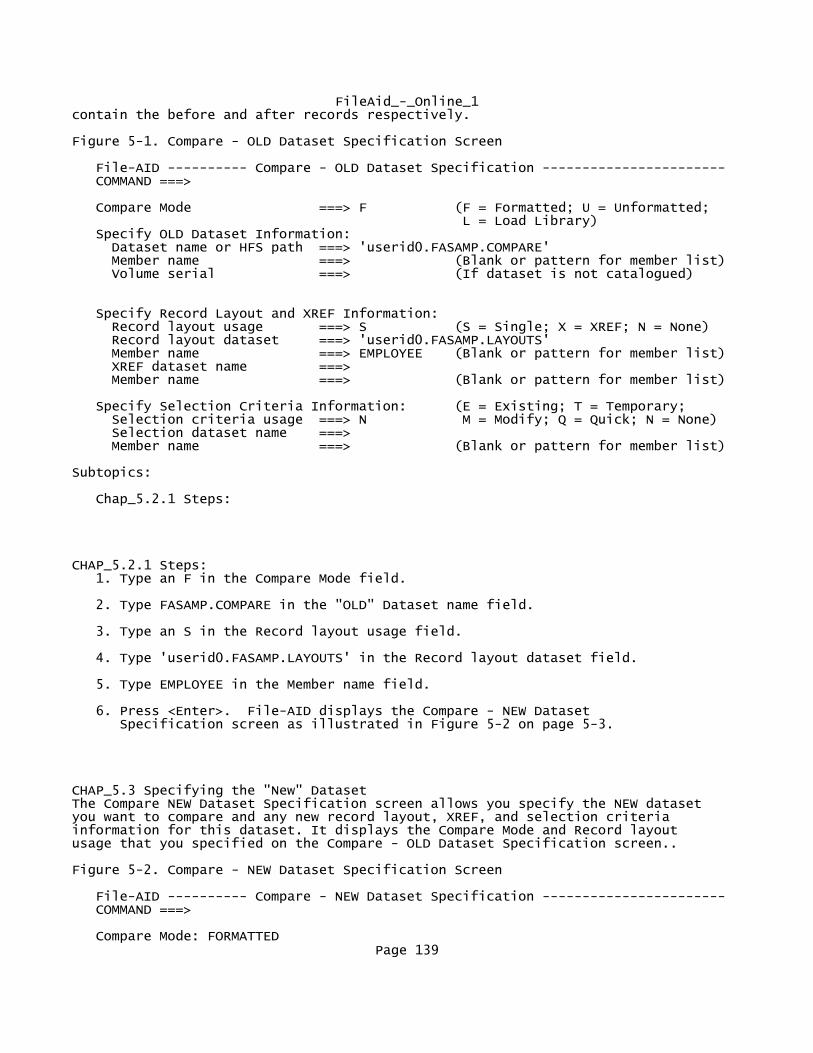
FileAid_-_Online_1contain the before and after records respectively.
Figure 5-1. Compare - OLD Dataset Specification Screen
File-AID ---------- Compare - OLD Dataset Specification ----------------------- COMMAND ===>
Compare Mode ===> F (F = Formatted; U = Unformatted; L = Load Library) Specify OLD Dataset Information: Dataset name or HFS path ===> 'userid0.FASAMP.COMPARE' Member name ===> (Blank or pattern for member list) Volume serial ===> (If dataset is not catalogued)
Specify Record Layout and XREF Information: Record layout usage ===> S (S = Single; X = XREF; N = None) Record layout dataset ===> 'userid0.FASAMP.LAYOUTS' Member name ===> EMPLOYEE (Blank or pattern for member list) XREF dataset name ===> Member name ===> (Blank or pattern for member list)
Specify Selection Criteria Information: (E = Existing; T = Temporary; Selection criteria usage ===> N M = Modify; Q = Quick; N = None) Selection dataset name ===> Member name ===> (Blank or pattern for member list)
Subtopics:
Chap_5.2.1 Steps:
CHAP_5.2.1 Steps: 1. Type an F in the Compare Mode field.
2. Type FASAMP.COMPARE in the "OLD" Dataset name field.
3. Type an S in the Record layout usage field.
4. Type 'userid0.FASAMP.LAYOUTS' in the Record layout dataset field.
5. Type EMPLOYEE in the Member name field.
6. Press <Enter>. File-AID displays the Compare - NEW Dataset Specification screen as illustrated in Figure 5-2 on page 5-3.
CHAP_5.3 Specifying the "New" DatasetThe Compare NEW Dataset Specification screen allows you specify the NEW dataset you want to compare and any new record layout, XREF, and selection criteria information for this dataset. It displays the Compare Mode and Record layout usage that you specified on the Compare - OLD Dataset Specification screen..
Figure 5-2. Compare - NEW Dataset Specification Screen
File-AID ---------- Compare - NEW Dataset Specification ----------------------- COMMAND ===>
Compare Mode: FORMATTED Page 139
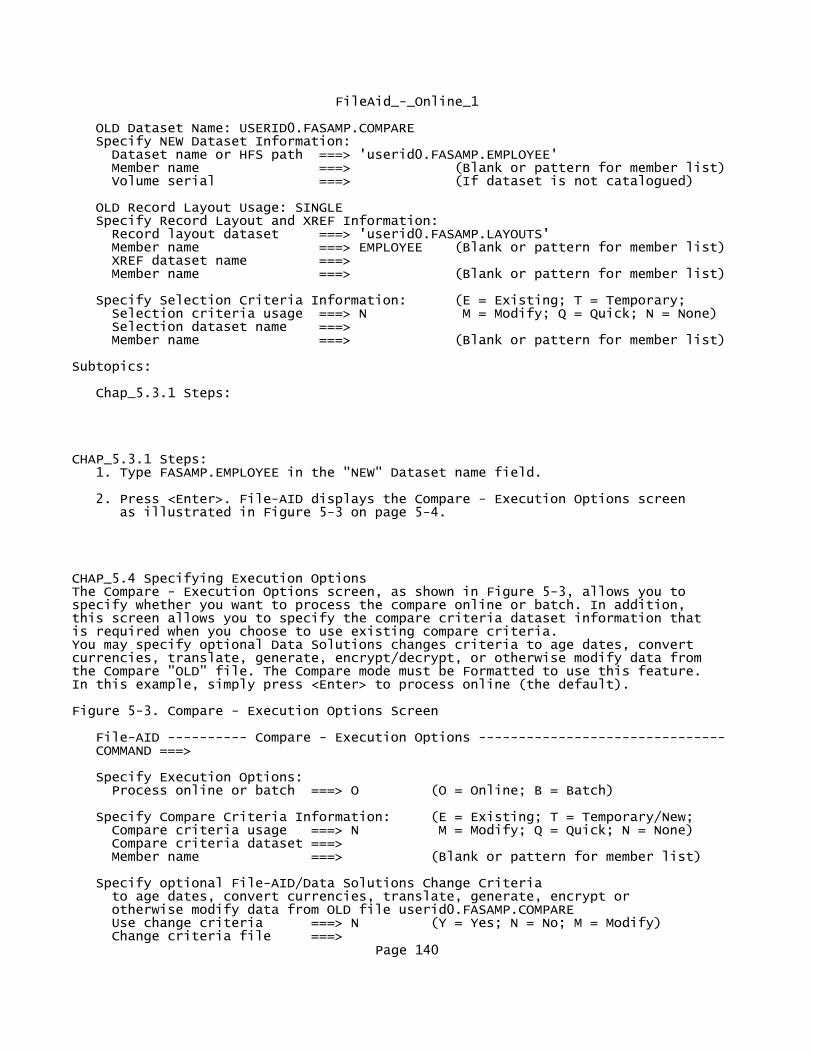
FileAid_-_Online_1
OLD Dataset Name: USERID0.FASAMP.COMPARE Specify NEW Dataset Information: Dataset name or HFS path ===> 'userid0.FASAMP.EMPLOYEE' Member name ===> (Blank or pattern for member list) Volume serial ===> (If dataset is not catalogued)
OLD Record Layout Usage: SINGLE Specify Record Layout and XREF Information: Record layout dataset ===> 'userid0.FASAMP.LAYOUTS' Member name ===> EMPLOYEE (Blank or pattern for member list) XREF dataset name ===> Member name ===> (Blank or pattern for member list)
Specify Selection Criteria Information: (E = Existing; T = Temporary; Selection criteria usage ===> N M = Modify; Q = Quick; N = None) Selection dataset name ===> Member name ===> (Blank or pattern for member list)
Subtopics:
Chap_5.3.1 Steps:
CHAP_5.3.1 Steps: 1. Type FASAMP.EMPLOYEE in the "NEW" Dataset name field.
2. Press <Enter>. File-AID displays the Compare - Execution Options screen as illustrated in Figure 5-3 on page 5-4.
CHAP_5.4 Specifying Execution OptionsThe Compare - Execution Options screen, as shown in Figure 5-3, allows you to specify whether you want to process the compare online or batch. In addition, this screen allows you to specify the compare criteria dataset information that is required when you choose to use existing compare criteria. You may specify optional Data Solutions changes criteria to age dates, convert currencies, translate, generate, encrypt/decrypt, or otherwise modify data from the Compare "OLD" file. The Compare mode must be Formatted to use this feature. In this example, simply press <Enter> to process online (the default).
Figure 5-3. Compare - Execution Options Screen
File-AID ---------- Compare - Execution Options ------------------------------- COMMAND ===>
Specify Execution Options: Process online or batch ===> O (O = Online; B = Batch)
Specify Compare Criteria Information: (E = Existing; T = Temporary/New; Compare criteria usage ===> N M = Modify; Q = Quick; N = None) Compare criteria dataset ===> Member name ===> (Blank or pattern for member list)
Specify optional File-AID/Data Solutions Change Criteria to age dates, convert currencies, translate, generate, encrypt or otherwise modify data from OLD file userid0.FASAMP.COMPARE Use change criteria ===> N (Y = Yes; N = No; M = Modify) Change criteria file ===>
Page 140

FileAid_-_Online_1 Member name ===> (Blank or pattern for member list) Maximum invalid fields ===> ALL (ALL or number of invalid fields)
Subtopics:
Chap_5.4.1 Steps:
CHAP_5.4.1 Steps: 1. Press <Enter>. File-AID displays the Compare - Criteria Options screen as illustrated in Figure 5-4 on page 5-5.
CHAP_5.5 Selecting Your Compare - Criteria OptionsThe Compare - Criteria Options screen, as shown in Figure 5-4, allows you to specify processing and output options for your compare. Subtopics: Chap_5.5.1 Compare Type Chap_5.5.2 Controlling Processing Limits Chap_5.5.3 Steps:
CHAP_5.5.1 Compare Type
S is the default compare type for a keyed (Sorted/Keyed) file.
R (ReadAhead) is the default for a non-keyed file.
1 (1-TO-1) For a 1-TO-1 record compare, specify 1 (one) in the Compare type file. File- AID compares "OLD" record 1 to "NEW" record 1, "OLD" record 2 to "NEW" record 2, etc.
CHAP_5.5.2 Controlling Processing LimitsYou can control the number of records to compare and the number of differences to report before stopping the compare. By default, all records are compared and all differences are reported. Use a number (1- 999) to specify the maximum number of records to process.
Figure 5-4. Compare - Criteria Options Screen
File-AID ---------- Compare - Criteria Options ------------------------------- COMMAND ===>
Specify Initial Compare Options:
Compare type ===> S (S = Sorted/Keyed; R = ReadAhead; 1 = 1-to-1)
Read-ahead record count ===> 100 (If type = R, specify read-ahead count) Read-ahead sequence ===> E (E= Enforce; I = Ignore)
Page 141

FileAid_-_Online_1 Records to compare ===> ALL (All or maximum number of records) Differences to compare ===> ALL (All or maximum number of differences)
Modify print defaults ===> Y (Y = Yes; N = No) Specify output criteria ===> N (Y = Yes; N = No)
Associate Corresponding ===> Y (Associate like field names? Y=Yes; N=No) Ignore Prefix OLD file ===> NEW file ===> Ignore Suffix OLD file ===> NEW file ===>
CHAP_5.5.3 Steps: 1. Type Y in the Modify print defaults field.
2. Press <Enter>. File-AID displays the Compare - Print Options screen as illustrated in Figure 5-5 on page 5-6.
CHAP_5.6 Specifying Print Options for a Formatted CompareThe Compare - Print Options screen, as shown in Figure 5-5, is displayed when you specify a Y in the Modify print defaults field on the Compare - Criteria Options screen. The Compare Print Options screens ( Figure 5-5 on page 5-6 and Figure 5-6 on page 5-7) enable you to control your compare report. The Compare mode (Formatted or Unformatted) specified on the Compare - OLD Dataset Specification screen determines which Print Options are presented. Subtopics: Chap_5.6.1 Specifying Print Format Chap_5.6.2 Specifying a Reporting Limit Chap_5.6.3 Specifying the Level of Information to Report Chap_5.6.4 Steps: Chap_5.6.5 Formatted Report Option Chap_5.6.6 Compared Fields Option Chap_5.6.7 Field Statistics Report Chap_5.6.8 Steps:
CHAP_5.6.1 Specifying Print FormatFile-AID has four different formats available to report differences in records:
F Uses record layouts to show differences (Formatted) field by field. Old fields are printed next to new fields in side-by-side columns.
H (Hex) Prints each differing record showing character and vertical hexadecimal values for each byte of data. Differences are underlined.
C Prints each differing record showing only (Character) printable characters (default).
M (Mixed) Prints valid character data as characters and unprintable data in hexadecimal.
Page 142

FileAid_-_Online_1
CHAP_5.6.2 Specifying a Reporting LimitThe Max differences to report field (default ALL) is used to limit the size of the report when a large number of differences are expected.
CHAP_5.6.3 Specifying the Level of Information to ReportThe next four options allow you to control the level of information to include in the Compare report: o Print CHANGED records
o Print INSERTED records
o Print DELETED records
o Print MATCHED records
Note: Even if you specify No for the above four options, a Summary Report is generated.
Figure 5-5. Compare - Print Options (Page 1) Screen
File-AID ------------ Compare - Print Options (Page 1 ) ----------------------- COMMAND ===>
Specify initial print options:
Print format ===> F (F = Formatted; H = Hex; C = Char; M = Mixed) Max differences to report ===> ALL (All or maximum number to report)
Print CHANGED records ===> Y (Y = Yes; N = No) Print INSERTED records ===> N (Y = Yes; N = No) Print DELETED records ===> N (Y = Yes; N = No) Print MATCHED records ===> N (Y = Yes; N = No) (a Summary Report is ALWAYS generated)
CHAP_5.6.4 Steps: 1. Press <Enter>. File-AID displays the Compare - Print Options (Page 2) screen as illustrated in Figure 5-6 on page 5-7.
CHAP_5.6.5 Formatted Report OptionThe Formatted Report Option allows you to specify one of the following print formats:
E (Entire) Print the entire report (this is the default).
A Print all associated (Associated) fields.
Page 143

FileAid_-_Online_1
C (Compared) Print only the compared fields.
CHAP_5.6.6 Compared Fields OptionThe Compared Fields Option allows you to specify one of the following options:
A (All) Print all fields that are selected for comparison (this is the default).
C Print only the fields that are selected for (Changed) comparison and are changed.
CHAP_5.6.7 Field Statistics ReportThe Field Statistics Report option allows you to specify one of the following options
Y (Yes) Create a list of compared fields and report the number of times changes were found for that field and the percentage that this field's changes represent of the total number of changed records.
N (No) Suppress this report.
Figure 5-6. Compare - Print Options (Page 2 of 2) Screen
File-AID ------------ Compare - Print Options (Page 2 of 2) ------------------- COMMAND ===>
Specify print options for formatted reports:
Formatted Report Option ===> C ( E = Entire Report; A = All Associated Fields; C = Compared Fields Only)
Compared Fields Option ===> A ( A = Print All Fields; C = Print Changed Fields Only)
Field Statistics Report ===> N ( Y = Yes; N = No)
CHAP_5.6.8 Steps:Page 144

FileAid_-_Online_1 1. Type C in the Formatted Report Option field.
2. Press <Enter>. File-AID displays the Compare - Formatted Criteria screen as illustrated in Figure 5-3 on page 5-4
CHAP_5.7 Specifying Formatted Field CriteriaThe Compare - Formatted Criteria screen, as shown in Figure 5-7, enables you to tailor field criteria for your compare. The default is to compare all fields. Subtopics: Chap_5.7.1 Sync/Key Specification Chap_5.7.2 Tolerance Value Specification Chap_5.7.3 Select Print Only Chap_5.7.4 Select Field for Compare Chap_5.7.5 Reset Status Chap_5.7.6 Step:
CHAP_5.7.1 Sync/Key SpecificationEntering an S in the Cmd field for a particular field displays the Sorted Sync/Key Specification pop-up. This pop-up enables you to specify the key order and direction for the selected field (or position). If comparing like formatted keyed files, File-AID automatically knows where the key field is and you do not need to specify any sync key information. Sync key information is used to detect more precisely when new records have been added and old records deleted. You can specify any elementary item(s) to be used as the key field(s). You can identify the sync key(s) using a record layout (F - Formatted) or without a layout (U - Unformatted).
CHAP_5.7.2 Tolerance Value SpecificationEntering a T in the Cmd field for a numeric field displays the Tolerance Value Specification pop-up. This pop-up enables you to specify a tolerance amount for a field that File-AID uses to determine "close-enough" matches for your compare.
CHAP_5.7.3 Select Print OnlyEntering a P in the Cmd field for a field sets the field to print only. The field is shown on the report but File-AID does not compare the field.
CHAP_5.7.4 Select Field for CompareEntering a C in the Cmd field for a field selects the field for comparison. This is the default.
CHAP_5.7.5 Reset StatusEntering an R in the Cmd field for a field resets the Status Display field (to blanks).
Figure 5-7. Compare - Formatted Criteria Screen
File-AID ----------- Compare - Formatted Criteria ---------------------------- COMMAND ===> SCROLL ===> PAGE
Page 145
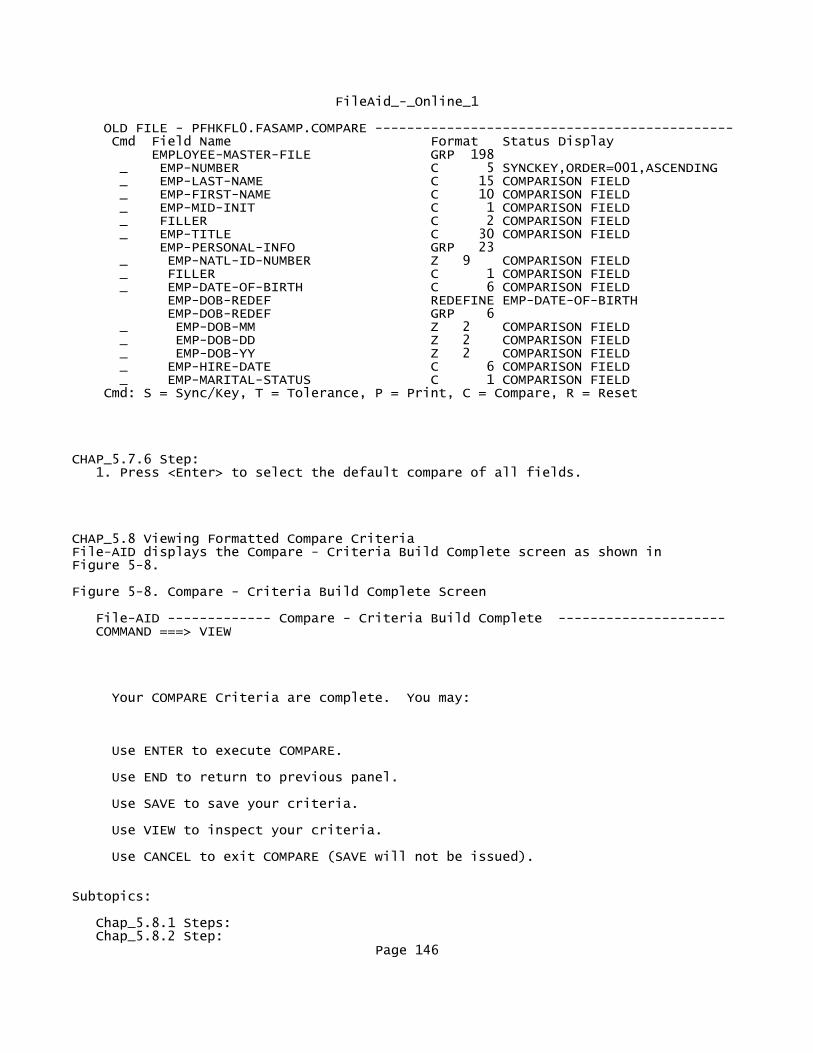
FileAid_-_Online_1
OLD FILE - PFHKFL0.FASAMP.COMPARE --------------------------------------------- Cmd Field Name Format Status Display EMPLOYEE-MASTER-FILE GRP 198 _ EMP-NUMBER C 5 SYNCKEY,ORDER=001,ASCENDING _ EMP-LAST-NAME C 15 COMPARISON FIELD _ EMP-FIRST-NAME C 10 COMPARISON FIELD _ EMP-MID-INIT C 1 COMPARISON FIELD _ FILLER C 2 COMPARISON FIELD _ EMP-TITLE C 30 COMPARISON FIELD EMP-PERSONAL-INFO GRP 23 _ EMP-NATL-ID-NUMBER Z 9 COMPARISON FIELD _ FILLER C 1 COMPARISON FIELD _ EMP-DATE-OF-BIRTH C 6 COMPARISON FIELD EMP-DOB-REDEF REDEFINE EMP-DATE-OF-BIRTH EMP-DOB-REDEF GRP 6 _ EMP-DOB-MM Z 2 COMPARISON FIELD _ EMP-DOB-DD Z 2 COMPARISON FIELD _ EMP-DOB-YY Z 2 COMPARISON FIELD _ EMP-HIRE-DATE C 6 COMPARISON FIELD _ EMP-MARITAL-STATUS C 1 COMPARISON FIELD Cmd: S = Sync/Key, T = Tolerance, P = Print, C = Compare, R = Reset
CHAP_5.7.6 Step: 1. Press <Enter> to select the default compare of all fields.
CHAP_5.8 Viewing Formatted Compare CriteriaFile-AID displays the Compare - Criteria Build Complete screen as shown in Figure 5-8.
Figure 5-8. Compare - Criteria Build Complete Screen
File-AID ------------- Compare - Criteria Build Complete --------------------- COMMAND ===> VIEW
Your COMPARE Criteria are complete. You may:
Use ENTER to execute COMPARE.
Use END to return to previous panel.
Use SAVE to save your criteria.
Use VIEW to inspect your criteria.
Use CANCEL to exit COMPARE (SAVE will not be issued).
Subtopics:
Chap_5.8.1 Steps: Chap_5.8.2 Step:
Page 146

FileAid_-_Online_1
CHAP_5.8.1 Steps: 1. Type VIEW in the Command field to display the Compare criteria.
2. Press <Enter> to select the default compare of all fields.
Figure 5-9 through Figure 5-11 display the current Compare Criteria. Press <PF8> to scroll forward through the criteria.
Figure 5-9. Compare - View Criteria Screen (Page 1 of 3)
Menu Utilities Compilers Help ssssssssssssssssssssssssssssssssssssssssssssssssssssssssssssssssssssssssssssss BROWSE userid0.FILEAID.CC.D01064.T160701 Line 00000000 Col 001 080 Command ===> Scroll ===> CSR ********************************* Top of Data ********************************* * * COMPARE OPTIONS 0000 COMPARE_MODE=FORMATTED 0000 COMPARE_TYPE=SORTED 0000 RECORDS_TO_COMPARE=ALL 0000 DIFFERENCES_TO_COMPARE=ALL 0000 USE_DATA_SOLUTIONS_CHANGE_CRITERIA=NO 0000 DATA_SOLUTIONS_MAXIMUM_INVALID_FIELDS=ALL * * PRINT OPTIONS 0000 PRINT_FORMAT=FORMATTED 0000 MAX_DIFFERENCES_TO_REPORT=ALL 0000 RECORD_TYPES_TO_PRINT=CHANGED 0000 FORMATTED_REPORT_STYLE=COMPARED
0000 COMPARED_FIELDS_PRINT_OPTION=ALL 0000 FIELD_STATISTICS_REPORT=NO * * OUTPUT OPTIONS * NOT SPECIFIED
Figure 5-10. Compare - View Criteria Screen (Page 2 of 3)
Menu Utilities Compilers Help ssssssssssssssssssssssssssssssssssssssssssssssssssssssssssssssssssssssssssssss BROWSE userid.FILEAID.CC.D01064.T160701 Line 00000020 Col 001 080 Command ===> Scroll ===> CSR * * SYNC/KEY OPTIONS 0000 OLD_SYNC/KEY_MEMBER=EMPLOYEE, LAYOUT_NAME=EMPLOYEE-MASTER-FILE 0000 SYNC/KEY001:OLD_NAME=EMP-NUMBER,OLD_POSITION=00001, SORTED=YES,SEQUENCE=ASCENDING * * COMPARE FIELDS SET 0001 0001 OLD_LAYOUT_MEMBER=EMPLOYEE, LAYOUT_NAME=EMPLOYEE-MASTER-FILE 0001 FIELD0002:OLD_NAME=EMP-NUMBER,OLD_POSITION=00001 0001 FIELD0003:OLD_NAME=EMP-LAST-NAME,OLD_POSITION=00006 0001 FIELD0004:OLD_NAME=EMP-FIRST-NAME,OLD_POSITION=00021 0001 FIELD0005:OLD_NAME=EMP-MID-INIT,OLD_POSITION=00031 0001 FIELD0006:OLD_NAME=FILLER,OLD_POSITION=00032
Page 147
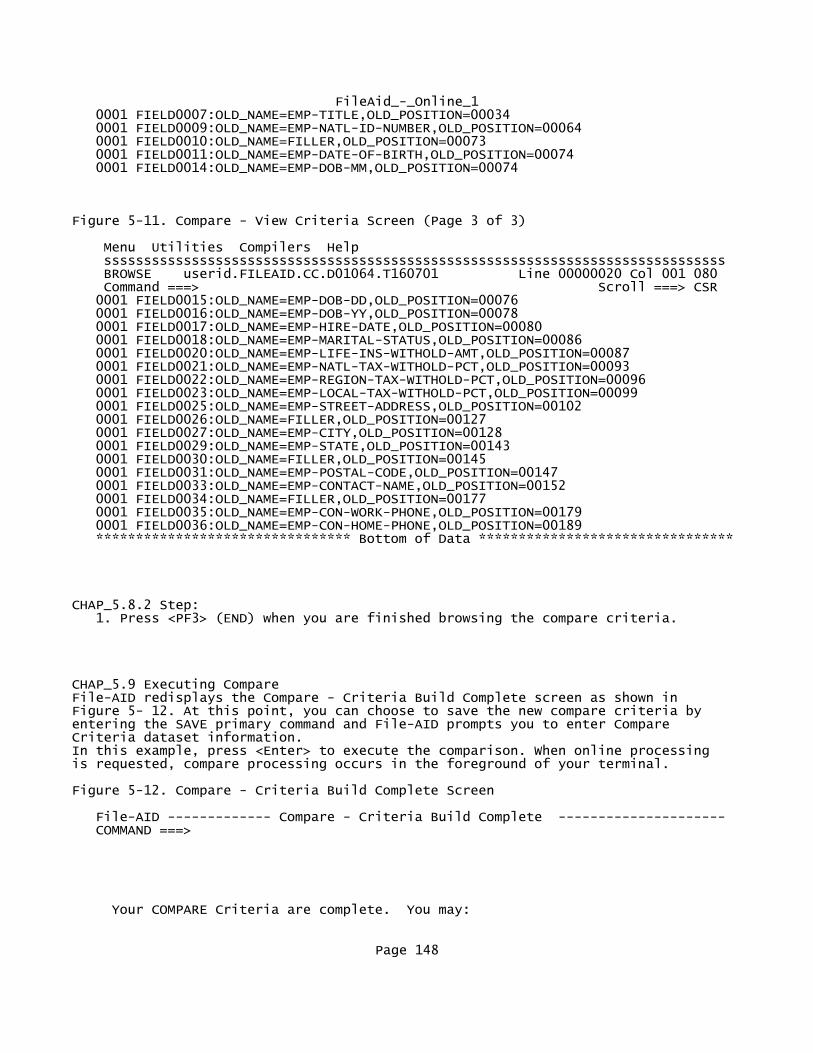
FileAid_-_Online_1 0001 FIELD0007:OLD_NAME=EMP-TITLE,OLD_POSITION=00034 0001 FIELD0009:OLD_NAME=EMP-NATL-ID-NUMBER,OLD_POSITION=00064 0001 FIELD0010:OLD_NAME=FILLER,OLD_POSITION=00073 0001 FIELD0011:OLD_NAME=EMP-DATE-OF-BIRTH,OLD_POSITION=00074 0001 FIELD0014:OLD_NAME=EMP-DOB-MM,OLD_POSITION=00074
Figure 5-11. Compare - View Criteria Screen (Page 3 of 3)
Menu Utilities Compilers Help ssssssssssssssssssssssssssssssssssssssssssssssssssssssssssssssssssssssssssssss BROWSE userid.FILEAID.CC.D01064.T160701 Line 00000020 Col 001 080 Command ===> Scroll ===> CSR 0001 FIELD0015:OLD_NAME=EMP-DOB-DD,OLD_POSITION=00076 0001 FIELD0016:OLD_NAME=EMP-DOB-YY,OLD_POSITION=00078 0001 FIELD0017:OLD_NAME=EMP-HIRE-DATE,OLD_POSITION=00080 0001 FIELD0018:OLD_NAME=EMP-MARITAL-STATUS,OLD_POSITION=00086 0001 FIELD0020:OLD_NAME=EMP-LIFE-INS-WITHOLD-AMT,OLD_POSITION=00087 0001 FIELD0021:OLD_NAME=EMP-NATL-TAX-WITHOLD-PCT,OLD_POSITION=00093 0001 FIELD0022:OLD_NAME=EMP-REGION-TAX-WITHOLD-PCT,OLD_POSITION=00096 0001 FIELD0023:OLD_NAME=EMP-LOCAL-TAX-WITHOLD-PCT,OLD_POSITION=00099 0001 FIELD0025:OLD_NAME=EMP-STREET-ADDRESS,OLD_POSITION=00102 0001 FIELD0026:OLD_NAME=FILLER,OLD_POSITION=00127 0001 FIELD0027:OLD_NAME=EMP-CITY,OLD_POSITION=00128 0001 FIELD0029:OLD_NAME=EMP-STATE,OLD_POSITION=00143 0001 FIELD0030:OLD_NAME=FILLER,OLD_POSITION=00145 0001 FIELD0031:OLD_NAME=EMP-POSTAL-CODE,OLD_POSITION=00147 0001 FIELD0033:OLD_NAME=EMP-CONTACT-NAME,OLD_POSITION=00152 0001 FIELD0034:OLD_NAME=FILLER,OLD_POSITION=00177 0001 FIELD0035:OLD_NAME=EMP-CON-WORK-PHONE,OLD_POSITION=00179 0001 FIELD0036:OLD_NAME=EMP-CON-HOME-PHONE,OLD_POSITION=00189 ******************************** Bottom of Data ********************************
CHAP_5.8.2 Step: 1. Press <PF3> (END) when you are finished browsing the compare criteria.
CHAP_5.9 Executing CompareFile-AID redisplays the Compare - Criteria Build Complete screen as shown in Figure 5- 12. At this point, you can choose to save the new compare criteria by entering the SAVE primary command and File-AID prompts you to enter Compare Criteria dataset information. In this example, press <Enter> to execute the comparison. When online processing is requested, compare processing occurs in the foreground of your terminal.
Figure 5-12. Compare - Criteria Build Complete Screen
File-AID ------------- Compare - Criteria Build Complete --------------------- COMMAND ===>
Your COMPARE Criteria are complete. You may:
Page 148

FileAid_-_Online_1
Use ENTER to execute COMPARE.
Use END to return to previous panel.
Use SAVE to save your criteria.
Use VIEW to inspect your criteria.
Use CANCEL to exit COMPARE (SAVE will not be issued).
Subtopics:
Chap_5.9.1 Steps:
CHAP_5.9.1 Steps: 1. Press <Enter> to select the default compare of all fields.
CHAP_5.10 Analyzing the Compare ReportThe compare report is written to a temporary dataset and, upon completion, File-AID displays the temporary dataset in an ISPF Browse session as shown in Figure 5-13. You may need to scroll the report to the right to see information beyond column 80. All Browse commands are active including the FIND primary command and standard scroll commands (PF7, PF8, PF10, PF11). If batch processing is specified, File-AID displays the JCL Specification screen (not shown here) from which you can enter the SUBMIT command to run the Compare function in the background. Use standard batch output review facilities to browse and print your compare report.
Figure 5-13. Compare - Online Report Screen
Menu Utilities Compilers Help sssssssssssssssssssssssssssssssssssssssssssssssssssssssssssssssssssssssssssssss BROWSE userid0.FILEAID.CR.D01064.T160614 Line 00000000 Col 001 080 Command ===> Scroll ===> CSR ********************************* Top of Data ********************************** File-AID 8.8 COMPARE DETAIL REPORT USERID-userid0 DATE 20 "OLD" DSN: userid0.FASAMP.COMPARE "NEW" DSN: use ================================================================================ CHANGED RECORD "OLD" FILE RECORD: 6 | NUM DATA-FIELD-NAME FORMAT FIELD VALUES | NUM DATA-FIEL ---- ---------------------------- -------- -------------------- |---- --------- 1 EMPLOYEE-MASTER-FILE | 1 EMPLOYEE- | >>> COMPARED FIELDS - - - - - - - - - | - - | 2 EMP-NUMBER C 5 18034 | 2 EMP-NUMBE 3 EMP-LAST-NAME C 15 SMITH | 3 EMP-LAST- 4 EMP-FIRST-NAME C 10 ELLEN | 4 EMP-FIRST 5 EMP-MID-INIT C 1 C | 5 EMP-MID-I 6 FILLER C 2 | 6 FILLER 7 EMP-TITLE C 30 NURSE | 7 EMP-TITLE (POS 21-30) | (POS 21-3 9 EMP-NATL-ID-NUMBER Z 9 341559549 | 9 EMP-NATL- 10 FILLER C 1 | 10 FILLER
Page 149

FileAid_-_Online_1
Subtopics:
Chap_5.10.1 Step:
CHAP_5.10.1 Step: 1. Enter DOWN MAX and LEFT MAX to display the last page of the report, which shows the COMPARE SUMMARY REPORT (see Figure 5-14 on page 5-13) .
CHAP_5.11 Viewing the Compare Summary ReportAt the end of the Compare output, a summary report of the results of the compare is produced as shown in Figure 5-14. Also shown are the results of the selection criteria and any special compare criteria specified. After reviewing the summary report, use the END command to exit the Compare function and return to the File-AID Primary Option Menu.
Figure 5-14. Compare Report - Summary
Menu Utilities Compilers Help sssssssssssssssssssssssssssssssssssssssssssssssssssssssssssssssssssssssssssssss BROWSE userid0.FILEAID.CR.D01064.T160614 Line 00000297 Col 001 080 Command ===> Scroll ===> CSR REPORT FORMAT PARAMETERS: PRINT FORMAT: FORMATTED MAX NUMBER OF DIFFERENCES TO REPORT: 0 (0 = NO LIMIT) PRINT RECORDS SELECTED: CHANGED FORMATTED REPORT OPTION: COMPARED FIELDS ONLY COMPARED FIELDS OPTION: ALL FIELD STATISTICS REPORT: NO
COMPARE STATISTICS: "OLD" DATASET RECORDS READ: 49 "NEW" DATASET RECORDS READ: 50 "OLD" DATASET RECORDS COMPARED: 49 "NEW" DATASET RECORDS COMPARED: 50 NUMBER OF RECORDS MATCHED: 42 NUMBER OF RECORDS CHANGED: 5 NUMBER OF RECORDS INSERTED: 3 NUMBER OF RECORDS DELETED: 2
**** E N D O F R E P O R T * ******************************** Bottom of Data ********************************
Subtopics:
Chap_5.11.1 Step:
CHAP_5.11.1 Step: 1. Press <PF3> (END) to exit the report.
Page 150
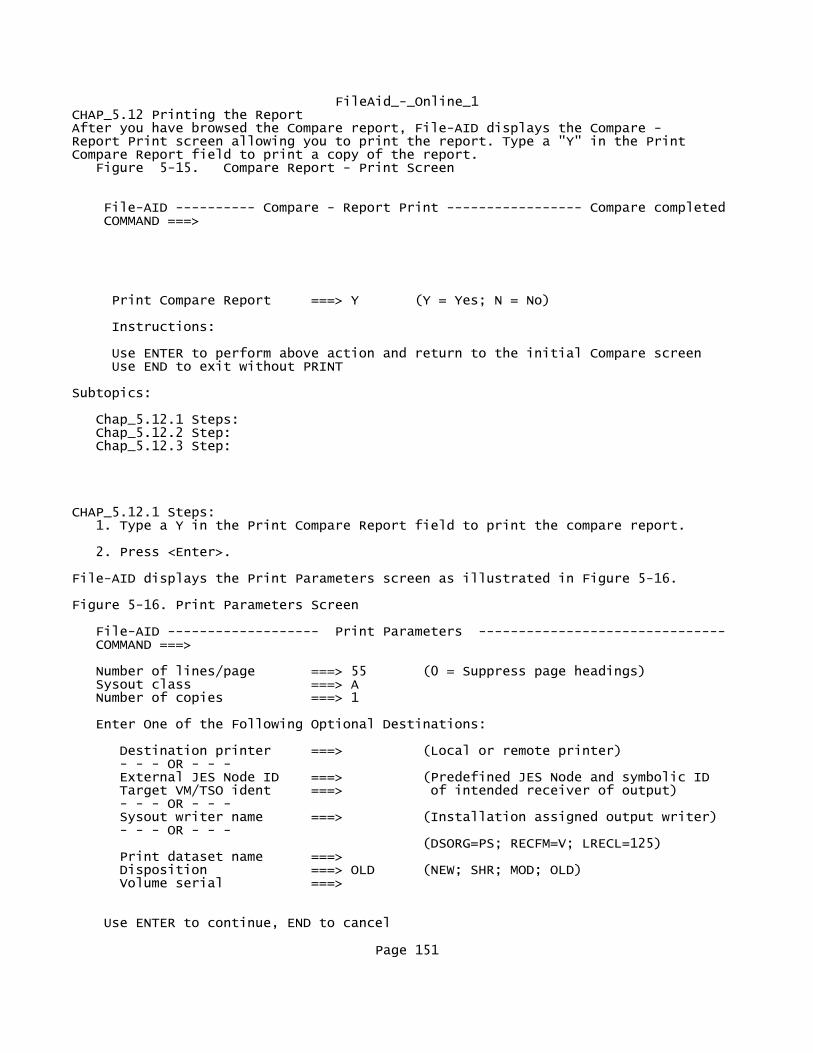
FileAid_-_Online_1CHAP_5.12 Printing the ReportAfter you have browsed the Compare report, File-AID displays the Compare - Report Print screen allowing you to print the report. Type a "Y" in the Print Compare Report field to print a copy of the report. Figure 5-15. Compare Report - Print Screen
File-AID ---------- Compare - Report Print ----------------- Compare completed COMMAND ===>
Print Compare Report ===> Y (Y = Yes; N = No)
Instructions:
Use ENTER to perform above action and return to the initial Compare screen Use END to exit without PRINT
Subtopics:
Chap_5.12.1 Steps: Chap_5.12.2 Step: Chap_5.12.3 Step:
CHAP_5.12.1 Steps: 1. Type a Y in the Print Compare Report field to print the compare report.
2. Press <Enter>.
File-AID displays the Print Parameters screen as illustrated in Figure 5-16.
Figure 5-16. Print Parameters Screen
File-AID ------------------- Print Parameters ------------------------------- COMMAND ===>
Number of lines/page ===> 55 (0 = Suppress page headings) Sysout class ===> A Number of copies ===> 1
Enter One of the Following Optional Destinations:
Destination printer ===> (Local or remote printer) - - - OR - - - External JES Node ID ===> (Predefined JES Node and symbolic ID Target VM/TSO ident ===> of intended receiver of output) - - - OR - - - Sysout writer name ===> (Installation assigned output writer) - - - OR - - - (DSORG=PS; RECFM=V; LRECL=125) Print dataset name ===> Disposition ===> OLD (NEW; SHR; MOD; OLD) Volume serial ===>
Use ENTER to continue, END to cancel
Page 151

FileAid_-_Online_1
CHAP_5.12.2 Step: 1. Press <Enter> after making any necessary adjustments to the print parameters.
File-AID redisplays the Compare - OLD Dataset Specification screen as shown in Figure 5-17.
Figure 5-17. Compare - OLD Dataset Specification Screen
File-AID ---------- Compare - OLD Dataset Specification ----------------------- COMMAND ===>
Compare Mode ===> F (F = Formatted; U = Unformatted; L = Load Library) Specify OLD Dataset Information: Dataset name or HFS path ===> 'userid0.FASAMP.COMPARE' Member name ===> (Blank or pattern for member list) Volume serial ===> (If dataset is not catalogued)
Specify Record Layout and XREF Information: Record layout usage ===> S (S = Single; X = XREF; N = None) Record layout dataset ===> 'userid0.FASAMP.LAYOUTS' Member name ===> EMPLOYEE (Blank or pattern for member list) XREF dataset name ===> Member name ===> (Blank or pattern for member list)
Specify Selection Criteria Information: (E = Existing; T = Temporary; Selection criteria usage ===> N M = Modify; Q = Quick; N = None) Selection dataset name ===> Member name ===> (Blank or pattern for member list)
CHAP_5.12.3 Step: 1. Continue with "Load Library Compare" on page 5-16 or enter the END command (press PF3) to redisplay the File-AID Primary Option Menu.
CHAP_5.13 Load Library CompareThe following example illustratest the t process of comparing two Load Libraries. o Compare on Entry Point and Link Attributes of the load modules.
o Compare all modules in the Load Libraries.
o Report only changes resulting from the compare.
o Process on-line.
o Use Temporary/New/None Compare Criteria.
o Produce 4 Reports:
Detailed
Member Summary Page 152

FileAid_-_Online_1
Load Library Summary
Member Name.
The training datasets ...FASAMP.LOADLIB1 and ...FASAMP.LOADLIB1 contain the before and after records respectively.
Figure 5-18. Compare - OLD Dataset Specification Screen
File-AID ---------- Compare - OLD Dataset Specification ----------------------- COMMAND ===>
Compare Mode ===> L (F = Formatted; U = Unformatted; L = Load Library) Specify OLD Dataset Information: Dataset name or HFS path ===> 'userid0.FASAMP.LOADLIB1' Member name ===> * (Blank or pattern for member list) Volume serial ===> (If dataset is not catalogued)
Specify Record Layout and XREF Information: Record layout usage ===> N (S = Single; X = XREF; N = None) Record layout dataset ===> Member name ===> (Blank or pattern for member list) XREF dataset name ===> Member name ===> (Blank or pattern for member list)
Specify Selection Criteria Information: (E = Existing; T = Temporary; Selection criteria usage ===> N M = Modify; Q = Quick; N = None) Selection dataset name ===> Member name ===> (Blank or pattern for member list)
Subtopics:
Chap_5.13.1 Steps:
CHAP_5.13.1 Steps: 1. Type an L in the Compare Mode field.
2. Type FASAMP.LOADLIB1 in the "OLD" Dataset name field.
3. Specify an * for member name to include all modules.
4. Type an N in the Record layout usage field.
5. Press <Enter>. File-AID displays the Compare - NEW Dataset Specification screen as illustrated in Figure 5-19 on page 5-17.
CHAP_5.14 Specifying the "New" Load LibraryThe Compare NEW Dataset Specification screen allows you specify the NEW load library you want to compare. It displays the Compare Mode that you specified on the Compare - OLD Dataset Specification screen.
Figure 5-19. Compare - NEW Dataset Specification Screen
File-AID ---------- Compare - NEW Dataset Specification ----------------------- Page 153
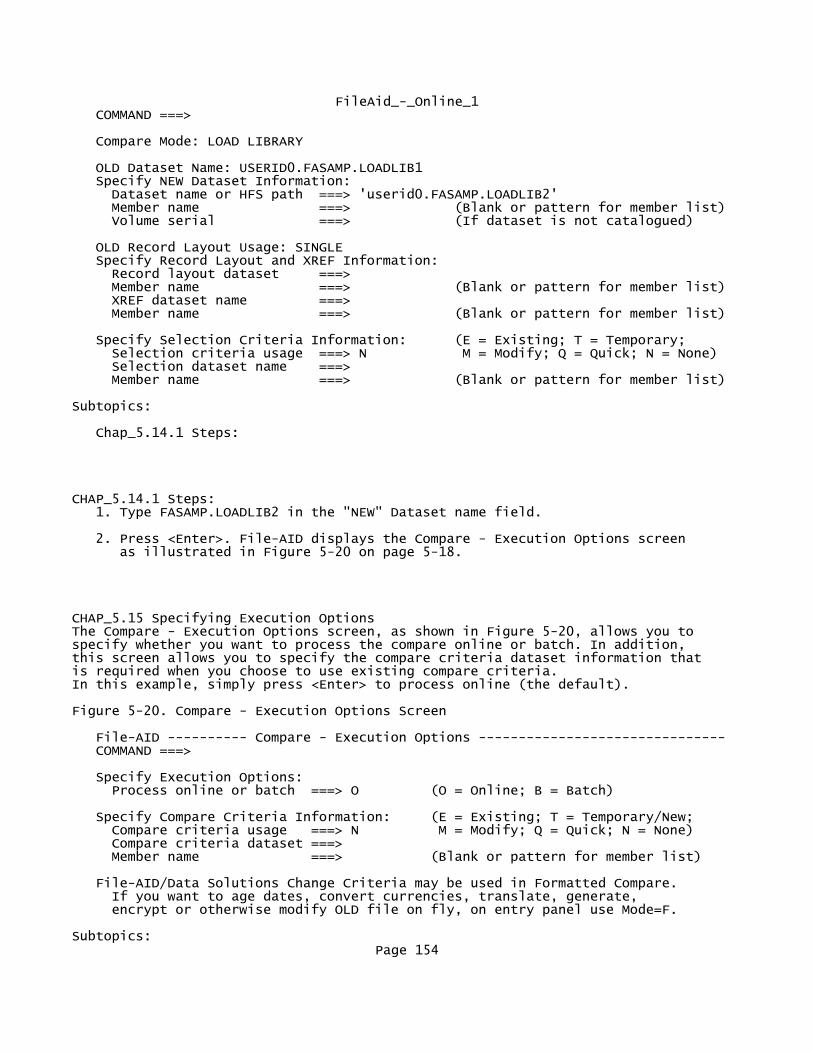
FileAid_-_Online_1 COMMAND ===>
Compare Mode: LOAD LIBRARY
OLD Dataset Name: USERID0.FASAMP.LOADLIB1 Specify NEW Dataset Information: Dataset name or HFS path ===> 'userid0.FASAMP.LOADLIB2' Member name ===> (Blank or pattern for member list) Volume serial ===> (If dataset is not catalogued)
OLD Record Layout Usage: SINGLE Specify Record Layout and XREF Information: Record layout dataset ===> Member name ===> (Blank or pattern for member list) XREF dataset name ===> Member name ===> (Blank or pattern for member list)
Specify Selection Criteria Information: (E = Existing; T = Temporary; Selection criteria usage ===> N M = Modify; Q = Quick; N = None) Selection dataset name ===> Member name ===> (Blank or pattern for member list)
Subtopics:
Chap_5.14.1 Steps:
CHAP_5.14.1 Steps: 1. Type FASAMP.LOADLIB2 in the "NEW" Dataset name field.
2. Press <Enter>. File-AID displays the Compare - Execution Options screen as illustrated in Figure 5-20 on page 5-18.
CHAP_5.15 Specifying Execution OptionsThe Compare - Execution Options screen, as shown in Figure 5-20, allows you to specify whether you want to process the compare online or batch. In addition, this screen allows you to specify the compare criteria dataset information that is required when you choose to use existing compare criteria. In this example, simply press <Enter> to process online (the default).
Figure 5-20. Compare - Execution Options Screen
File-AID ---------- Compare - Execution Options ------------------------------- COMMAND ===>
Specify Execution Options: Process online or batch ===> O (O = Online; B = Batch)
Specify Compare Criteria Information: (E = Existing; T = Temporary/New; Compare criteria usage ===> N M = Modify; Q = Quick; N = None) Compare criteria dataset ===> Member name ===> (Blank or pattern for member list)
File-AID/Data Solutions Change Criteria may be used in Formatted Compare. If you want to age dates, convert currencies, translate, generate, encrypt or otherwise modify OLD file on fly, on entry panel use Mode=F.
Subtopics:Page 154
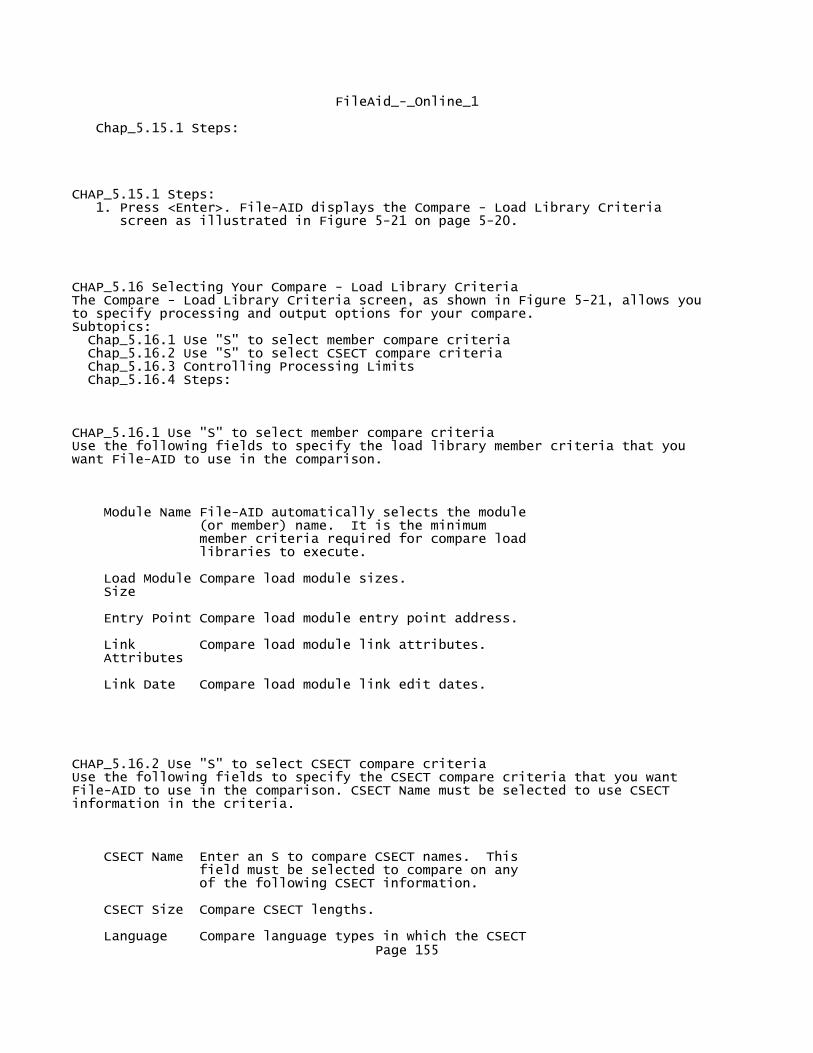
FileAid_-_Online_1
Chap_5.15.1 Steps:
CHAP_5.15.1 Steps: 1. Press <Enter>. File-AID displays the Compare - Load Library Criteria screen as illustrated in Figure 5-21 on page 5-20.
CHAP_5.16 Selecting Your Compare - Load Library CriteriaThe Compare - Load Library Criteria screen, as shown in Figure 5-21, allows you to specify processing and output options for your compare. Subtopics: Chap_5.16.1 Use "S" to select member compare criteria Chap_5.16.2 Use "S" to select CSECT compare criteria Chap_5.16.3 Controlling Processing Limits Chap_5.16.4 Steps:
CHAP_5.16.1 Use "S" to select member compare criteriaUse the following fields to specify the load library member criteria that you want File-AID to use in the comparison.
Module Name File-AID automatically selects the module (or member) name. It is the minimum member criteria required for compare load libraries to execute.
Load Module Compare load module sizes. Size
Entry Point Compare load module entry point address.
Link Compare load module link attributes. Attributes
Link Date Compare load module link edit dates.
CHAP_5.16.2 Use "S" to select CSECT compare criteriaUse the following fields to specify the CSECT compare criteria that you want File-AID to use in the comparison. CSECT Name must be selected to use CSECT information in the criteria.
CSECT Name Enter an S to compare CSECT names. This field must be selected to compare on any of the following CSECT information.
CSECT Size Compare CSECT lengths.
Language Compare language types in which the CSECT Page 155

FileAid_-_Online_1 is coded (i.e. Assembler, COBOL, C, PL/I, etc.).
CSECT Date Compare CSECT (compile/assembly) dates.
IDR ZAP Compare zap identification information. Data
Text Compare CSECT content, such as instructions or constants.
CHAP_5.16.3 Controlling Processing Limits
Stop text Specify ALL or a number from 0 to 99999 compare that specifies the maximum number of threshold unlike bytes that File-AID includes on the Compare Detail Report for each CSECT.
The Stop text compare threshold is used to minimize the report print lines when instructions have been added/deleted near the beginning of a a CSECT. ALL or 0 eliminates a threshold.
Specify Specify Y (Yes) to display the CSECT CSECT Selection Criteria screen. The default selection is N (No) which compares all CSECTs. criteria E (Existing) is displayed as an option if an M was specified for the Compare criteria usage field on the Compare Executions Options screen and the compare criteria specified contains CSECT selection criteria. Specify an E to simply use the existing criteria. Specify Y to override the existing criteria or an N to compare all CSECTs.
Modify Specify whether you want to modify the print print options for the Compare Report. All defaults default print option values are the last print option values that you entered for the load library compare.
Figure 5-21. Compare - Load Library Criteria Screen
File-AID ----------------- Compare - Load Library Criteria -------------------- COMMAND ===>
Use "S" to select member compare criteria: S Module Name _ Load Module Size S Entry Point S Link Attributes _ Link Date
Page 156

FileAid_-_Online_1 Use "S" to select CSECT compare criteria: _ CSECT Name _ CSECT Size _ Language _ CSECT Date _ IDR ZAP Data _ Text
Stop text compare threshold ===> 100 (All or maximum number of differences for a CSECT) Specify CSECT selection criteria ===> N (Y = Yes; N = No) Modify print defaults ===> Y (Y = Yes; N = No)
CHAP_5.16.4 Steps: 1. Type S in the Entry Point field.
2. Type S in the Link Attributes field.
3. Type Y in the Modify print defaults field.
4. Press <Enter>. File-AID displays the Compare - Load Library Print Options screen as illustrated in Figure 5-22 on page 5-21.
CHAP_5.17 Specifying Load Library Print OptionsThe Compare - Load Library Print Options screen, as shown in Figure 5-22, is displayed when you specify a Y in the Modify print defaults field on the Compare - Load Library Criteria screen. The Compare Load Library Print Options screen enables you to control your compare report. Subtopics: Chap_5.17.1 Specify Detail Report Print Options Chap_5.17.2 Even if you suppress printing the CHANGED, INSERTED, DELETED, and MATCHED members, Compare always generates a Summary Report. Chap_5.17.3 Specify Member Name Report Print Options Chap_5.17.4 Steps:
CHAP_5.17.1 Specify Detail Report Print OptionsFile-AID has six different detail report print options:
Print detail Y (Yes) includes the details report specified on Load Library Criteria screen in the Compare Report.
Print member Y (Yes) prints a summary of summary report differences by member.
Print changed Y (Yes) prints the changed members. members
Print inserted Y (Yes) prints the inserted members. members
Print deleted Y (Yes) prints the deleted members. members
Page 157

FileAid_-_Online_1
Print matched Y (Yes) prints the matched members. members
CHAP_5.17.2 Even if you suppress printing the CHANGED, INSERTED, DELETED, and MATCHED members, Compare always generates a Summary Report.
CHAP_5.17.3 Specify Member Name Report Print Options
Print member name Y (Yes) prints a list of the members report processed and their status (changed, inserted, deleted, or matched).
Member name report Specify the number of columns to use columns for the Member Name Report. Valid entries are 1-8.
Figure 5-22. Compare - Print Options (Page 1) Screen
File-AID ------------ Compare - Load Library Print Options -------------------- COMMAND ===>
Specify Detail Report Print Options: Print detail report ===> Y (Y = Yes; N = No) Print member summary report ===> Y (Y = Yes; N = No)
Print CHANGED members ===> Y (Y = Yes; N = No) Print INSERTED members ===> N (Y = Yes; N = No) Print DELETED members ===> N (Y = Yes; N = No) Print MATCHED members ===> N (Y = Yes; N = No) (a Summary Report is ALWAYS generated)
Specify Member Name Report Print Options: Print member name report ===> Y (Y = Yes; N = No) Member name report columns ===> 8 (1 - 8 print columns)
CHAP_5.17.4 Steps: 1. Type Y in the Print detail report field.
2. Type Y in the Print member summary report field.
3. Type Y in the Print CHANGED members field.
4. Type Y in the Print member name report field.
5. Press <Enter>. File-AID displays the Compare - Criteria Build Complete screen as illustrated in Figure 5-23 on page 5-22.
Page 158

FileAid_-_Online_1
CHAP_5.18 Viewing Formatted Compare CriteriaFile-AID displays the Compare - Criteria Build Complete screen as shown in Figure 5-23.
Figure 5-23. Compare - Criteria Build Complete Screen
File-AID ------------- Compare - Criteria Build Complete --------------------- COMMAND ===> VIEW
Your COMPARE Criteria are complete. You may:
Use ENTER to execute COMPARE.
Use END to return to previous panel.
Use SAVE to save your criteria.
Use VIEW to inspect your criteria.
Use CANCEL to exit COMPARE (SAVE will not be issued).
Subtopics:
Chap_5.18.1 Steps: Chap_5.18.2 Step:
CHAP_5.18.1 Steps: 1. Type VIEW in the Command field to display the Compare criteria.
2. Press <Enter> to select the default compare of all fields.
Figure 5-24 displays the current Compare Criteria.
Figure 5-24. Compare - View Criteria Screen
Menu Utilities Compilers Help sssssssssssssssssssssssssssssssssssssssssssssssssssssssssssssssssssssssssssssss BROWSE userid0.FILEAID.CC.D01066.T153225 Line 00000000 Col 001 080 Command ===> Scroll ===> CSR ********************************* Top of Data ********************************** * * COMPARE OPTIONS 0000 COMPARE_MODE=LOAD_LIBRARY 0000 MEMBER= 0000 LOAD_LIBRARY_MEMBER_CRITERIA=NAME,EPA,ATTRIBUTES 0000 LOAD_LIBRARY_TEXT_COMPARE_THRESHOLD=00100 0000 LOAD_LIBRARY_CSECT_SELECTION_LIST_TYPE=NONE * * PRINT OPTIONS 0000 RECORD_TYPES_TO_PRINT=CHANGED 0000 PDS_COMPARE=BOTH 0000 MEMBER_NAME_REPORT_COLUMNS=8 0000 LOAD_LIBRARY_MEMBER_SUMMARY_REPORT=YES
Page 159

FileAid_-_Online_1 ******************************** Bottom of Data ********************************
CHAP_5.18.2 Step: 1. Press <PF3> (END) when you are finished viewing the compare load library criteria.
CHAP_5.19 Executing CompareFile-AID redisplays the Compare - Criteria Build Complete screen as shown in Figure 5- 25. At this point, you can choose to save the new compare criteria by entering the SAVE primary command and File-AID prompts you to enter Compare Criteria dataset information. In this example, press <Enter> to execute the comparison. When online processing is requested, compare processing occurs in the foreground of your terminal.
Figure 5-25. Compare - Criteria Build Complete Screen
File-AID ------------- Compare - Criteria Build Complete --------------------- COMMAND ===>
Your COMPARE Criteria are complete. You may:
Use ENTER to execute COMPARE.
Use END to return to previous panel.
Use SAVE to save your criteria.
Use VIEW to inspect your criteria.
Use CANCEL to exit COMPARE (SAVE will not be issued).
Subtopics:
Chap_5.19.1 Steps:
CHAP_5.19.1 Steps: 1. Press <Enter> to select the default compare of all fields.
CHAP_5.20 Analyzing the Compare ReportThe compare report is written to a temporary dataset and, upon completion, File-AID displays the temporary dataset in an ISPF Browse session as shown in Figure 5-26. You may need to scroll the report to the right to see information beyond column 80. All Browse commands are active including the FIND primary command and
Page 160

FileAid_-_Online_1standard scroll commands (PF7, PF8, PF10, PF11). If batch processing is specified, File-AID displays the JCL Specification screen (not shown here) from which you can enter the SUBMIT command to run the Compare function in the background. Use standard batch output review facilities to browse and print your compare report.
Figure 5-26. Compare - Online Report Screen
Menu Utilities Compilers Help sssssssssssssssssssssssssssssssssssssssssssssssssssssssssssssssssssssssssssssss BROWSE userid0.FILEAID.CR.D01066.T105050 Line 00000000 Col 001 080 Command ===> Scroll ===> CSR ********************************* Top of Data ********************************** File-AID 8.8 COMPARE LOAD LIBRARY DETAIL REPORT USERID-userid0 DATE "OLD" DSN: userid0.FASAMP.LOADLIB1 "NEW" DSN: use ================================================================================ MEMBER FILE STATUS EPA/ADDR RMODE AMODE ATTRIBUTES -------- ------- -------- -------- ----- ----- --------------------------- AGER0100 OLD CHANGED 0 ANY 31 RENT REUS NEW CHANGED 24 24 REUS
DACOMMON OLD CHANGED 1A10 24 24 RENT REUS NEW CHANGED 0
IGZEOPT OLD CHANGED 0 ANY 31 RENT REUS NEW CHANGED REUS
**** E N D O F R E File-AID 8.8 LOAD LIBRARY MEMBER SUMMARY REPORT USERID-userid0 DATE "OLD" DSN: userid0.FASAMP.LOADLIB1 "NEW" DSN: use ================================================================================
Subtopics:
Chap_5.20.1 Step:
CHAP_5.20.1 Step: 1. Enter DOWN MAX and LEFT MAX to display the last page of the report, which shows the COMPARE SUMMARY REPORT (see Figure 5-14 on page 5-13) .
CHAP_5.21 Viewing the Compare Summary ReportAt the end of the Compare output, a summary report of the results of the compare is produced as shown in Figure 5-14. Also shown are the results of the selection criteria and any special compare criteria specified. After reviewing the summary report, use the END command to exit the Compare function and return to the File-AID Primary Option Menu. Figure 5-27. Compare Report - Summary
Menu Utilities Compilers Help sssssssssssssssssssssssssssssssssssssssssssssssssssssssssssssssssssssssssssssss BROWSE userid0.FILEAID.CR.D01064.T160614 Line 00000297 Col 001 080 Command ===> Scroll ===> CSR REPORT FORMAT PARAMETERS: PRINT FORMAT: FORMATTED MAX NUMBER OF DIFFERENCES TO REPORT: 0 (0 = NO LIMIT)
Page 161

FileAid_-_Online_1 PRINT RECORDS SELECTED: CHANGED FORMATTED REPORT OPTION: COMPARED FIELDS ONLY COMPARED FIELDS OPTION: ALL FIELD STATISTICS REPORT: NO
COMPARE STATISTICS: "OLD" DATASET RECORDS READ: 49 "NEW" DATASET RECORDS READ: 50 "OLD" DATASET RECORDS COMPARED: 49 "NEW" DATASET RECORDS COMPARED: 50 NUMBER OF RECORDS MATCHED: 42 NUMBER OF RECORDS CHANGED: 5 NUMBER OF RECORDS INSERTED: 3 NUMBER OF RECORDS DELETED: 2
**** E N D O F R E P O R T * ******************************** Bottom of Data ********************************
Subtopics:
Chap_5.21.1 Step:
CHAP_5.21.1 Step: 1. Press <PF3> (END) to exit the report.
CHAP_5.22 Printing the ReportAfter you have browsed the Compare report, File-AID displays the Compare - Report Print screen allowing you to print the report. Type a "Y" in the Print Compare Report field to print a copy of the report. Figure 5-28. Compare Report - Print Screen
File-AID ---------- Compare - Report Print ----------------- Compare completed COMMAND ===>
Print Compare Report ===> Y (Y = Yes; N = No)
Instructions:
Use ENTER to perform above action and return to the initial Compare screen Use END to exit without PRINT
Subtopics:
Chap_5.22.1 Steps: Chap_5.22.2 Step: Chap_5.22.3 Step:
CHAP_5.22.1 Steps: 1. Type a Y in the Print Compare Report field to print the compare report.
Page 162

FileAid_-_Online_1
2. Press <Enter>.
File-AID displays the Print Parameters screen as illustrated in Figure 5-16. Figure 5-29. Print Parameters Screen
File-AID ------------------- Print Parameters ------------------------------- COMMAND ===>
Number of lines/page ===> 55 (0 = Suppress page headings) Sysout class ===> A Number of copies ===> 1
Enter One of the Following Optional Destinations:
Destination printer ===> (Local or remote printer) - - - OR - - - External JES Node ID ===> (Predefined JES Node and symbolic ID Target VM/TSO ident ===> of intended receiver of output) - - - OR - - - Sysout writer name ===> (Installation assigned output writer) - - - OR - - - (DSORG=PS; RECFM=V; LRECL=125) Print dataset name ===> Disposition ===> OLD (NEW; SHR; MOD; OLD) Volume serial ===>
Use ENTER to continue, END to cancel
CHAP_5.22.2 Step: 1. Press <Enter> after making any necessary adjustments to the print parameters.
File-AID redisplays the Compare - OLD Dataset Specification screen as shown in Figure 5-30.
Figure 5-30. Compare - OLD Dataset Specification Screen
File-AID ---------- Compare - OLD Dataset Specification ----------------------- COMMAND ===>
Compare Mode ===> L (F = Formatted; U = Unformatted; L = Load Library) Specify OLD Dataset Information: Dataset name or HFS path ===> 'userid0.FASAMP.LOADLIB1' Member name ===> * (Blank or pattern for member list) Volume serial ===> (If dataset is not catalogued)
Specify Record Layout and XREF Information: Record layout usage ===> N (S = Single; X = XREF; N = None) Record layout dataset ===> Member name ===> (Blank or pattern for member list) XREF dataset name ===> Member name ===> (Blank or pattern for member list)
Specify Selection Criteria Information: (E = Existing; T = Temporary; Selection criteria usage ===> N M = Modify; Q = Quick; N = None)
Page 163

FileAid_-_Online_1 Selection dataset name ===> Member name ===> (Blank or pattern for member list)
CHAP_5.22.3 Step: 1. Enter the END command (press PF3) to redisplay the File-AID Primary Option Menu.
6
CHAP_6 Scanning and Updating DatasetsThe File-AID 3.6 Search/Update utility is a powerful utility for scanning and making changes to any MVS file, including CA-Panvalet and CA-Librarian libraries. The M suboption (PDS Find/Change and Member List Processing) gives you an easy to use FIND command to isolate a list of members matching your criteria. For PDS datasets you may use the CHANGE command to perform changes across all or selected members. Subtopics: Chap_6.1 Accessing the Search/Update Utility (Option 3.6) Chap_6.2 Defining Your Search/Update Request Chap_6.3 Generating a PDS Find/Change Member List of Selected Members Chap_6.4 Scanning Datasets for Specific Records (Option B) Chap_6.5 Specifying Global Changes - (Option U)
CHAP_6.1 Accessing the Search/Update Utility (Option 3.6)The Search/Update utility is located on File-AID's Extended Utilities menu (Option 3) as utility number 6. Subtopics: Chap_6.1.1 Step:
CHAP_6.1.1 Step: 1. From the File-AID Primary Option Menu (not shown here), select File-AID option3.6 to access the Search/Update utility entry screen ( Figure 6-1 on page 6-2) .
Note: When viewing a list of datasets presented by the File-AID 3.4 Catalog utility or 3.7 VTOC utility, you can select a dataset for Search/Update processing by issuing the line command 6.
CHAP_6.2 Defining Your Search/Update RequestThe Search/Update entry screen (see Figure 6-1 on page 6-2) captures your: o Main request option:
M for PDS Find/Change and Member List Processing
B for scanning any dataset
U for dataset global change preview and update (including PDS, Panvalet, and Librarian libraries)
o Dataset name Page 164
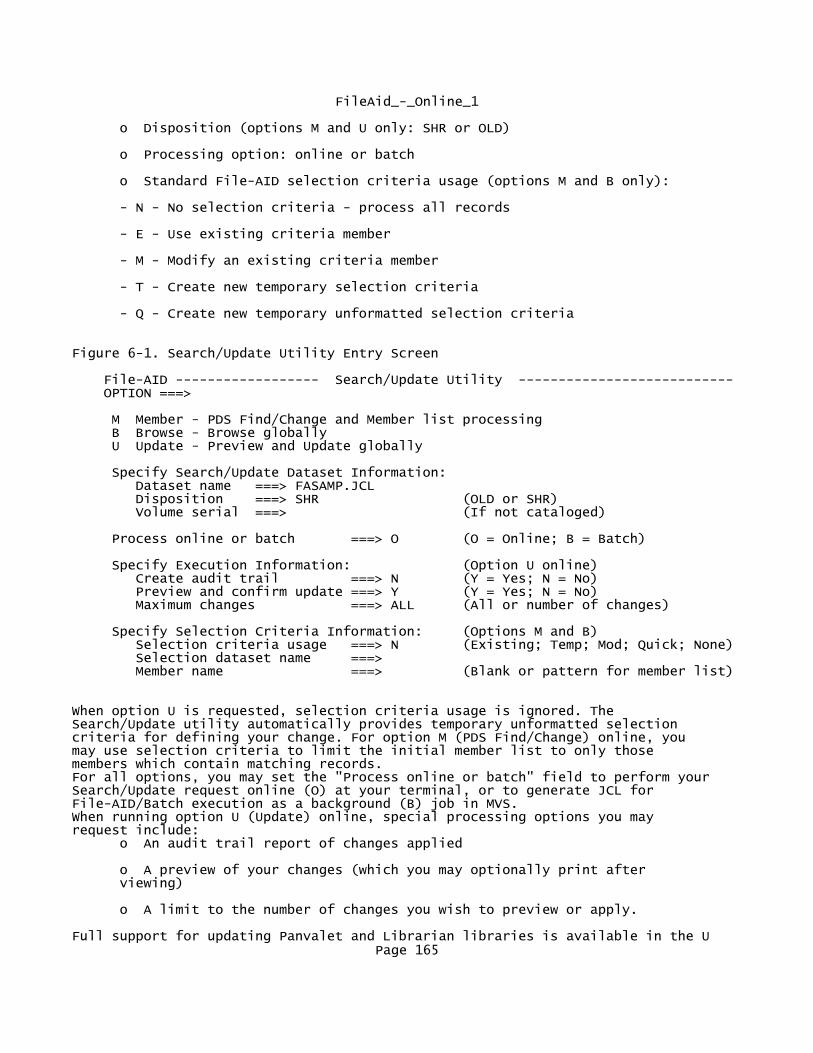
FileAid_-_Online_1
o Disposition (options M and U only: SHR or OLD)
o Processing option: online or batch
o Standard File-AID selection criteria usage (options M and B only):
N - No selection criteria - process all records
E - Use existing criteria member
M - Modify an existing criteria member
T - Create new temporary selection criteria
Q - Create new temporary unformatted selection criteria
Figure 6-1. Search/Update Utility Entry Screen
File-AID ------------------ Search/Update Utility --------------------------- OPTION ===>
M Member - PDS Find/Change and Member list processing B Browse - Browse globally U Update - Preview and Update globally
Specify Search/Update Dataset Information: Dataset name ===> FASAMP.JCL Disposition ===> SHR (OLD or SHR) Volume serial ===> (If not cataloged)
Process online or batch ===> O (O = Online; B = Batch)
Specify Execution Information: (Option U online) Create audit trail ===> N (Y = Yes; N = No) Preview and confirm update ===> Y (Y = Yes; N = No) Maximum changes ===> ALL (All or number of changes)
Specify Selection Criteria Information: (Options M and B) Selection criteria usage ===> N (Existing; Temp; Mod; Quick; None) Selection dataset name ===> Member name ===> (Blank or pattern for member list)
When option U is requested, selection criteria usage is ignored. The Search/Update utility automatically provides temporary unformatted selection criteria for defining your change. For option M (PDS Find/Change) online, you may use selection criteria to limit the initial member list to only those members which contain matching records. For all options, you may set the "Process online or batch" field to perform your Search/Update request online (O) at your terminal, or to generate JCL for File-AID/Batch execution as a background (B) job in MVS. When running option U (Update) online, special processing options you may request include: o An audit trail report of changes applied
o A preview of your changes (which you may optionally print after viewing)
o A limit to the number of changes you wish to preview or apply.
Full support for updating Panvalet and Librarian libraries is available in the U Page 165

FileAid_-_Online_1(Update) option. When you select online processing, you may see a preview of the change statements. Updating is always performed in batch as a background job in MVS. File-AID automatically generates the correct JCL for the appropriate update utility. If you just wish to scan Panvalet or Librarian libraries, you may choose either the M option to work with a member list matching your FIND command entries, or the B option to generate a display or report summarizing the members matching your selection criteria.
CHAP_6.3 Generating a PDS Find/Change Member List of Selected MembersThis example lists all members of your sample JCL partitioned dataset (PDS) library (FASAMP.JCL) that contain a job step that executes program name FILEAID (for example, EXEC PGM=FILEAID). Then it shows you how to use the CHANGE command to update selected members. You use option M (Member) - PDS Find/Change and Member list processing. Temporary unformatted selection criteria (usage code Q) is defined to determine the initial list of matching members. Figure 6-2. Search/Update Utility Entry Screen
File-AID ------------------ Search/Update Utility --------------------------- OPTION ===> M
M Member - PDS Find/Change and Member list processing B Browse - Browse globally U Update - Preview and Update globally
Specify Search/Update Dataset Information: Dataset name ===> FASAMP.JCL Disposition ===> SHR (OLD or SHR) Volume serial ===> (If not cataloged)
Process online or batch ===> O (O = Online; B = Batch)
Specify Execution Information: (Option U online) Create audit trail ===> N (Y = Yes; N = No) Preview and confirm update ===> Y (Y = Yes; N = No) Maximum changes ===> ALL (All or number of changes)
Specify Selection Criteria Information: (Options M and B) Selection criteria usage ===> Q (Existing; Temp; Mod; Quick; None) Selection dataset name ===> Member name ===> (Blank or pattern for member list)
Subtopics:
Chap_6.3.1 Steps: Chap_6.3.2 More About the Search/Update Entry Screen Chap_6.3.3 Using PDS Member Selection Features Chap_6.3.4 Specifying Quick Selection Criteria Chap_6.3.5 Viewing the Initial PDS Find/Change Member List Chap_6.3.6 Issuing Commands on the PDS Find/Change Screen Chap_6.3.7 Specifying a CHANGE to All Selected Members
CHAP_6.3.1 Steps: 1. Type M in the OPTION field.
2. Enter FASAMP.JCL in the Dataset name field.
3. Enter the Disposition as SHR. Page 166

FileAid_-_Online_1
4. Make sure processing option is O (online).
5. Type Q in the selection criteria usage field.
Q (Quick) requests temporary unformatted field selection criteria only.
6. Press <Enter>.
CHAP_6.3.2 More About the Search/Update Entry Screen o Standard File-AID dataset and member name entry is supported including using a wildcard character in either dataset name (for example, FASAMP.*) or member name (for example, FASAMP.JCL(CNV*)).
o For option M only, the dataset specified must be a PDS, Panvalet, or Librarian library.
o For options B or U, all file types are valid including VSAM, BDAM, PDS, sequential, Panvalet and Librarian, File-AID considers PDS, Panvalet, and Librarian libraries as if they were one big sequential file, processing all members together.
CHAP_6.3.3 Using PDS Member Selection FeaturesWhen your dataset is a PDS, Panvalet, or Librarian file, special member processing is automatically provided to let you select all members or a subset of members based on: o Member name
Name mask (for example, A?B or AB*)
Name range (for example, From AB thru BC)
o ISPF statistics
Last modified user ID range (PDS, Panvalet only)
Date created range (PDS only)
Date last modified range
o Manual selection or exclusion of individual members from a list of members matching your member criteria.
The default is to select all members. Figure 6-3. Search/Update Utility - PDS Processing Options Screen
File-AID ----------------- PDS Processing Options ----------------------------- COMMAND ===>
Dataset: USERID9.FASAMP.JCL
Process in JCL format ===> N (Y = Yes; N = No)
Page 167
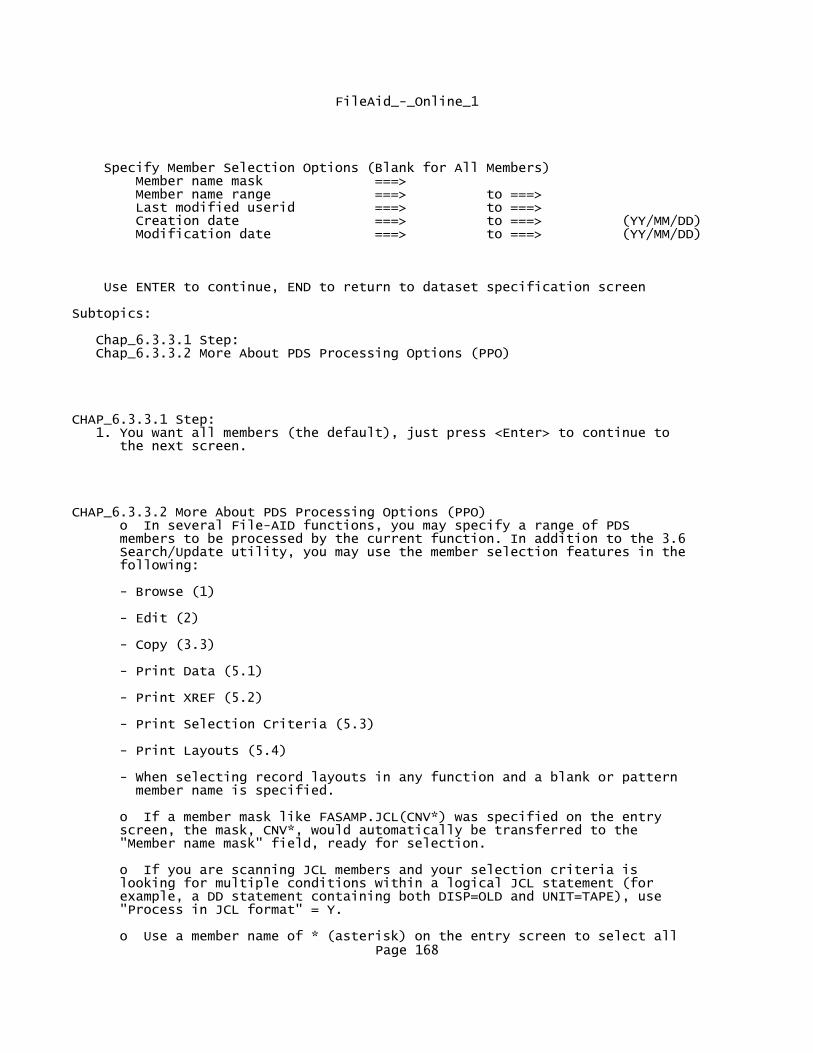
FileAid_-_Online_1
Specify Member Selection Options (Blank for All Members) Member name mask ===> Member name range ===> to ===> Last modified userid ===> to ===> Creation date ===> to ===> (YY/MM/DD) Modification date ===> to ===> (YY/MM/DD)
Use ENTER to continue, END to return to dataset specification screen
Subtopics:
Chap_6.3.3.1 Step: Chap_6.3.3.2 More About PDS Processing Options (PPO)
CHAP_6.3.3.1 Step: 1. You want all members (the default), just press <Enter> to continue to the next screen.
CHAP_6.3.3.2 More About PDS Processing Options (PPO) o In several File-AID functions, you may specify a range of PDS members to be processed by the current function. In addition to the 3.6 Search/Update utility, you may use the member selection features in the following:
Browse (1)
Edit (2)
Copy (3.3)
Print Data (5.1)
Print XREF (5.2)
Print Selection Criteria (5.3)
Print Layouts (5.4)
When selecting record layouts in any function and a blank or pattern member name is specified.
o If a member mask like FASAMP.JCL(CNV*) was specified on the entry screen, the mask, CNV*, would automatically be transferred to the "Member name mask" field, ready for selection.
o If you are scanning JCL members and your selection criteria is looking for multiple conditions within a logical JCL statement (for example, a DD statement containing both DISP=OLD and UNIT=TAPE), use "Process in JCL format" = Y.
o Use a member name of * (asterisk) on the entry screen to select all Page 168

FileAid_-_Online_1 members and to bypass the PPO screen. For example, FASAMP.JCL(*).
CHAP_6.3.4 Specifying Quick Selection CriteriaBecause you specified selection criteria usage code Q (Quick), the next screen displayed is the Unformatted Selection Criteria screen as shown in Figure 6-4. You use this screen to specify what data condition(s) you are looking for in a record in order for the member containing that record to be included on your member list. In this example, you are looking for a JCL statement containing the string PGM=FILEAID. You use the CO (Contains) relational operator (RO) to specify a scan of each statement starting at Position 1. No length is specified because File-AID defaults the length of a scan to: "end of the record".
Figure 6-4. Search/Update Utility - Unformatted Field Selection Criteria Screen
File-AID ------------- Unformatted Selection Criteria --- ROW 1 TO 16 OF 25 COMMAND ===> END SCROLL ===> CSR
Use END command to continue, use CANCEL command to return to main screen.
AND Cmd /OR Position Length RO Data Value --- --- -------- ------ -- ---------------------------------------------------- ___ 1____ _____ CO PGM=FILEAID_________________________________________ ___ AND _____ _____ EQ ____________________________________________________ ___ AND _____ _____ EQ ____________________________________________________ ___ AND _____ _____ EQ ____________________________________________________ ___ AND _____ _____ EQ ____________________________________________________ ___ AND _____ _____ EQ ____________________________________________________ ___ AND _____ _____ EQ ____________________________________________________ ___ AND _____ _____ EQ ____________________________________________________ ___ AND _____ _____ EQ ____________________________________________________ ___ AND _____ _____ EQ ____________________________________________________ ___ AND _____ _____ EQ ____________________________________________________ ___ AND _____ _____ EQ ____________________________________________________ ___ AND _____ _____ EQ ____________________________________________________ ___ AND _____ _____ EQ ____________________________________________________ ___ AND _____ _____ EQ ____________________________________________________ ___ AND _____ _____ EQ ____________________________________________________
Subtopics:
Chap_6.3.4.1 Steps: Chap_6.3.4.2 More About Unformatted Selection Criteria
CHAP_6.3.4.1 Steps: 1. On the first line type 1 in the Position column.
2. Type CO in the RO column.
3. Type PGM=FILEAID in the Data Value area.
4. Use the END command or PF key (default PF3) to proceed with PDS scanning and member list generation.
Page 169

FileAid_-_Online_1
CHAP_6.3.4.2 More About Unformatted Selection Criteria o Use the END command immediately on entry to select all members before specifying any conditions.
o In the AND/OR column, AND is used to define complex criteria conditions, OR starts a new set of selection criteria. If a record fails to meet the conditions of a set, the next set is examined.
o After using a CO (Contains) relational operator, you can specify a Position value as relative to the location of the matching string (for example, Position +5 means the fifth byte after the first byte of the matched string).
o Valid RO include: EQ, NE, LT, LE, GT, GE, BT (Between), NB (Not Between), CO (Contains), NC (Not Contains), NV (Not Valid), and VA (Valid).
o Data Value is assumed to be mixed case text (matches any case in data), as if data type T (Text) is specified.
o If data string contains special characters or embedded blanks, enclose the string in single (') or double quotes ("). If the special character is a comma, use double quotes.
o For exact case searches, enclose the string in quotes and use the C (Character) data type (for example, C'John Smith').
o You can use CO or EQ relational operators to look for multiple strings by separating the strings with commas (for example, ABC,DEF,GHI looks for ABC or DEF or GHI at the specified position).
o For BT or NB, use a colon (:) to delimit the endpoints of the range. BT includes the endpoints. NB excludes the endpoints. For example, BT C'A:C' means a value between A and C.
o Valid Data Value types include:
T (text) Any case
C (text) Explicit case
P (packed Numeric values (for example, P'1', decimal) P'-50', P'1,22,333')
X (hex) Hex value (for example, X'F1F2' X'C1C2C3')
N (numeric) Display format (for example, N'11' = X'F1F1')
B (binary) Numeric value of binary field (for example, B'16' is equivalent to X'00000010')
M (mask) One byte of 8 bits or 2 hexadecimal digits (for example, M'11110000' and M'F0' are equivalent).
Page 170

FileAid_-_Online_1
Japanese Data: DBCS and single byte Katakana data is accepted as data values for C (Character) and T (Text) data types. File-AID removes leading or trailing shift characters from DBCS data unless the value is enclosed in double quotes. When the KANA install option is specified for the Character Set Table in the Batch Product Option Variables, C (Character) and T (Text) identifiers are both treated as case- senstitive C (Character) data.
CHAP_6.3.5 Viewing the Initial PDS Find/Change Member ListFile-AID scans your PDS looking at members meeting your member selection criteria and looks at each record to see if it meets the conditions you specified in your Unformatted Selection Criteria. A list of matching members is generated and presented with the PDS Find/Change member list screen as shown below in Figure 6-5.
Figure 6-5. Search/Update Utility - PDS Find/Change Member List (M Option)
File-AID - PDS Find/Change - USERID9.FASAMP.JCL ----------- ROW 1 TO 15 OF 15 COMMAND ===> SCROLL ===> PAGE Use FIND or CHANGE command to process across the following members. (Omit FIND/CHANGE operands for a prompt panel.) Use RESET command to get a full member list. Use E, S, B or X line commands to Edit, Browse or eXclude members. -------------------------------------------------------------------------------- S NAME HITS VV.MM CREATED CHANGED SIZE INIT MOD ID BATVTOC 1 01.00 95/02/06 95/02/06 11:08 23 23 0 USERID9 S COPY 1 01.00 95/02/06 95/02/06 11:08 22 22 0 USERID9 X CVT6XMAP 1 01.00 95/02/06 95/02/06 11:08 37 37 0 USERID9 X CVT70SEL 1 01.00 95/02/06 95/02/06 11:08 22 22 0 USERID9 X CVT70XRF 1 01.00 95/02/06 95/02/06 11:08 21 21 0 USERID9 DROP 1 01.00 95/02/06 95/02/06 11:08 20 20 0 USERID9 DUMP 1 01.00 95/02/06 95/02/06 11:08 18 18 0 USERID9 JCLCNVRT 1 01.00 95/02/06 95/02/06 11:08 23 23 0 USERID9 LIST 1 01.00 95/02/06 95/02/06 11:08 17 17 0 USERID9 PRINT 1 01.00 95/02/06 95/02/06 11:08 18 18 0 USERID9 SKELETON 1 01.00 95/02/06 95/02/06 11:08 23 23 0 USERID9 SPACE 1 01.00 95/02/06 95/02/06 11:08 20 20 0 USERID9 TALLY 1 01.00 95/02/06 95/02/06 11:08 21 21 0 USERID9 UPDATE 1 01.00 95/02/06 95/02/06 11:08 27 27 0 USERID9 USER 1 01.00 95/02/06 95/02/06 11:08 31 31 0 USERID9 ******************************* BOTTOM OF DATA ********************************
Subtopics:
Chap_6.3.5.1 Steps:
CHAP_6.3.5.1 Steps: 1. Use the S (Select for PDF/Edit) line command in the S column to the left of member COPY.
2. Use the X (Exclude) line command to the left of the members: CVT6XMAP, CVT70SEL, and CVT70XRF.
3. Press <Enter>.
Page 171

FileAid_-_Online_1CHAP_6.3.6 Issuing Commands on the PDS Find/Change ScreenUse the primary commands FIND and CHANGE to specify scans and changes to the list of members. Both commands feature a prompt screen to help you specify parameters. The CONDENSE/NOCONDENSE option lets you compress the member list result to include only matching members. Both commands have a default preview to let you view a summary of results. Use the S (or E) (Edit) line command to select a member for Edit processing (ISPF Edit). The B (Browse) line command selects a member for Browse processing. The X (Exclude) line command removes a member from the list. The RESET primary command re-reads the file directory and generates a list of all members. PDS processing options and selection criteria are not used when the RESET command is issued. Subtopics: Chap_6.3.6.1 More About the PDS Find/Change Member List Chap_6.3.6.2 Editing or Browsing Selected Members
CHAP_6.3.6.1 More About the PDS Find/Change Member List o The HITS column is displayed when selection criteria has been specified. The HITS value indicates the number of times the criteria was found in each member.
o Standard ISPF-like UP/DOWN scrolling is supported as is the use of the LOCATE mem and SELECT mem primary commands.
o You can sort the list using the SORT command with one of the following parameters: VV.MM, CREATED, CHANGED, SIZE, INIT, MOD, ID (for example, SORT CHANGED).
CHAP_6.3.6.2 Editing or Browsing Selected MembersWhen you use the S or E (Select for Edit) line command, File-AID invokes an ISPF Edit session on the member as shown below in Figure 6-6. Use the END command to exit the Edit session and save your changes. Use the CANCEL command to exit the Edit session and discard any changes you have made to this member. In either case you are returned to the member list. Subtopics: Chap_6.3.6.2.1 Steps: Chap_6.3.6.2.2 More About Member Browsing or Editing
CHAP_6.3.6.2.1 Steps: 1. Notice the //JOBLIB DD and the DSN=????????.FA.VVRRMM.LOAD string. Later in this example you specify a CHANGE to this DSN.
2. Use the END primary command (PF3) to return to the member list.
Figure 6-6. Search/Update Utility - Edit Session From Member List
EDIT ---- USERID9.FASAMP.JCL(COPY) - 01.00 ------------------- COLUMNS 001 072 COMMAND ===> END SCROLL ===> PAGE ****** ***************************** TOP OF DATA ****************************** 000001 //??????A JOB (####,CCCC),'YOUR USERNAME', 000002 // CLASS=A,TIME=2,MSGCLASS=A,NOTIFY=?????? 000003 //* 000004 //* THIS IS A SAMPLE JOB TO COPY AN INPUT DATASET TO AN OUTPUT DATASET. 000005 //* ONLY THOSE RECORDS WHICH MEET THE FOLLOWING CRITERIA WILL BE COPIED 000006 //* AND PRINTED.
Page 172

FileAid_-_Online_1 000007 //* - IF POSITION 1 IS EQUAL TO '3' 000008 //* - IF POSITION 56 IS EQUAL TO 'A' OR 'B' 000009 //* 000010 //JOBLIB DD DSN=????????.FA.VVRRMM.LOAD,DISP=SHR 000011 //STEP1 EXEC PGM=FILEAID 000012 //SYSPRINT DD SYSOUT=* 000013 //SYSLIST DD SYSOUT=* 000014 //SYSTOTAL DD SYSOUT=* 000015 //SYSUDUMP DD SYSOUT=* 000016 //DD01 DD DSN=??????.FASAMP.INVFILE,DISP=SHR 000017 //DD01O DD DSN=??????.FASAMP.INVCOPY,DISP=(NEW,CATLG,DELETE), 000018 // UNIT=####,SPACE=(TRK,(1,1)) 000019 //SYSIN DD * 000020 $$DD01 COPY RDW=3,IF=(1,EQ,C'3'),IF=(56,EQ,C'A,B'),PRINT=0 000021 /*
CHAP_6.3.6.2.2 More About Member Browsing or Editing o PF keys remain set as you have them defined in File-AID. The ISPF PF keys are not re- established until you exit from File-AID.
o The COPY member in the example shows you the sample JCL and control cards needed for a typical File-AID/Batch execution.
o If you have selected multiple members from the member list, when you exit from one member, the next member is displayed in an Edit session rather than returning you to the member list.
o If the member is from a Panvalet or Librarian library, File-AID Edit is used to present the data and you are not permitted to save any changes you key in.
CHAP_6.3.7 Specifying a CHANGE to All Selected MembersUpon return to the member list, notice that the excluded members (CVT6XMAP, CVT70SEL, CVT70XRF) are no longer listed. Once a member has been excluded (or compressed for not matching a FIND/CHANGE) it can only be redisplayed by using the RESET command or returning to the Search/Update entry screen. Use the CHANGE command without parameters to access the CHANGE command prompt screen. Figure 6-7. Search/Update Utility - Member List After Edit and Excludes
File-AID - PDS Find/Change - USERID9.FASAMP.JCL ----------- ROW 1 TO 12 OF 12 COMMAND ===> CHANGE SCROLL ===> PAGE Use FIND or CHANGE command to process across the following members. (Omit FIND/CHANGE operands for a prompt panel.) Use RESET command to get a full member list. Use E, S, B or X line commands to Edit, Browse or eXclude members. -------------------------------------------------------------------------------- S NAME HITS VV.MM CREATED CHANGED SIZE INIT MOD ID BATVTOC 1 01.00 95/02/06 95/02/06 11:08 23 23 0 USERID9 COPY 1 01.00 95/02/06 95/02/06 11:08 22 22 0 USERID9 DROP 1 01.00 95/02/06 95/02/06 11:08 20 20 0 USERID9 DUMP 1 01.00 95/02/06 95/02/06 11:08 18 18 0 USERID9 JCLCNVRT 1 01.00 95/02/06 95/02/06 11:08 23 23 0 USERID9 LIST 1 01.00 95/02/06 95/02/06 11:08 17 17 0 USERID9 PRINT 1 01.00 95/02/06 95/02/06 11:08 18 18 0 USERID9 SKELETON 1 01.00 95/02/06 95/02/06 11:08 23 23 0 USERID9
Page 173

FileAid_-_Online_1 SPACE 1 01.00 95/02/06 95/02/06 11:08 20 20 0 USERID9 TALLY 1 01.00 95/02/06 95/02/06 11:08 21 21 0 USERID9 UPDATE 1 01.00 95/02/06 95/02/06 11:08 27 27 0 USERID9 USER 1 01.00 95/02/06 95/02/06 11:08 31 31 0 USERID9 ******************************* BOTTOM OF DATA ********************************
Subtopics:
Chap_6.3.7.1 Steps: Chap_6.3.7.2 Using the CHANGE Command Prompt Screen Chap_6.3.7.3 Viewing the Change Results Preview Chap_6.3.7.4 Confirming Your Update Chap_6.3.7.5 Returning to the Search/Update Entry Screen
CHAP_6.3.7.1 Steps: 1. Type CHANGE in the command line
2. Press <Enter>.
CHAP_6.3.7.2 Using the CHANGE Command Prompt ScreenThe CHANGE command prompt screen in the PDS Find/Change utility is similar to the File-AID Edit CHANGE command screen. Basically, you specify the "From string" and the "To string", set any other optional parameters you want and press <Enter>. Usually you use the CO (Contains) relational operator and leave the "Start column" and "End column" fields blank to search from the beginning to the end of each record. Figure 6-8. Search/Update Utility - Specify CHANGE Parameters
File-AID ------------------- PDS Change Command -----------------------------
COMMAND ===>
From string ===> ????????.FA.VVRRMM.LOAD To string ===> SYS9.FA.V8R8M0.LOAD
Start column ===> End column ===> Relational operator ===> CO (CO, EQ, NE, LT, LE, GE, GT)
Confirm changes ===> Y (Y = Yes; N = No) Condense member list ===> N (Y = Yes; N = No) PDS statistics ===> Y (Y = Yes; N = No; A = Add)
Maximum changes ===> ALL (ALL or number of changes)
You may bypass this screen by entering the CHANGE command with operands:
C(HANGE) string-1 string-2 ((NO)CONFirm) ((NO)CONDense) (col-1 (col-2)) Max(n)
EXAMPLES: c abc xyz change abc (upper or lower case) to XYZ c c'Abc' c'xyz' change Abc (exactly as entered) to xyz c a,b,c xyz change a or b or c (upper or lower case) to XYZ c "a,b,c" xyz change a,b,c (upper or lower case) to XYZ
Page 174

FileAid_-_Online_1Subtopics:
Chap_6.3.7.2.1 Steps: Chap_6.3.7.2.2 More About the CHANGE Command Prompt Screen
CHAP_6.3.7.2.1 Steps: 1. Type ????????.FA.VVRRMM.LOAD in the "From string"
2. Type SYS9.FA.V8R8M0.LOAD in the "To string"
3. Type CO in the "Relational operator" field
4. Type Y in the "Confirm changes" field
5. Type N in the "Condense member list" field
6. Type Y in the "PDS Statistics" field
7. Type ALL in the "Maximum changes" field
8. Press <Enter>.
CHAP_6.3.7.2.2 More About the CHANGE Command Prompt Screen o Most of the entries you make on this screen are saved from session to session (From and To strings reset on exit from 3.6).
o The "Confirm changes" field gives you a chance to preview your changes before you apply them. You may optionally print the preview if you choose.
o The "Condense member list" field gives you a option to automatically exclude from the member list all those members which did not contain the "From string".
o The "Maximum changes" field lets you control the number of changes to preview (Confirm = yes) or apply (Confirm = no). When you confirm your preview of changes, you may specify a different value (ALL for example) for number of changes to apply.
o Advanced users can issue the CHANGE command on the PDS Find/Change Member List command line by using the correct syntax. A sample of the syntax is shown in the lower portion of the prompt screen. For example,
CHANGE ABC XYZ NOCONDENSE.
CHAP_6.3.7.3 Viewing the Change Results PreviewFile-AID scans all members listed, then copies matching records to a temporary work file where it applies your change. The temporary work file is then presented using ISPF Browse as shown in Figure 6-9. When you are done viewing the changes, use the END command to continue to the Confirm Update screen. The results preview is not shown if you specify the NOCONFIRM parameter with the CHANGE command or set the "Preview changes" field to N on the CHANGE command prompt screen.
Page 175

FileAid_-_Online_1Figure 6-9. Search/Update Utility - CHANGE Results Preview
BROWSE -- USERID9.D95089.T120922.FILEAID ----------- LINE 00000000 COL 001 080 COMMAND ===> END SCROLL ===> CSR ER041-Records-read=263 listed=9 with 9 changes ==>USERID9.FASAMP.JCL OPENED AS PO,RECFM=FB,LRECL=80,BLKSIZE=3120,VOL=PRD912 ********************************MEMBER BATVTOC ******************************** //JOBLIB DD DSN=SYS9.FA.V8R8M0.LOAD,DISP=SHR ********************************MEMBER COPY ******************************** //JOBLIB DD DSN=SYS9.FA.V8R8M0.LOAD,DISP=SHR ********************************MEMBER DROP ******************************** //JOBLIB DD DSN=SYS9.FA.V8R8M0.LOAD,DISP=SHR ********************************MEMBER DUMP ******************************** //JOBLIB DD DSN=SYS9.FA.V8R8M0.LOAD,DISP=SHR ********************************MEMBER PRINT ******************************** //JOBLIB DD DSN=SYS9.FA.V8R8M0.LOAD,DISP=SHR ********************************MEMBER SPACE ******************************** //JOBLIB DD DSN=SYS9.FA.V8R8M0.LOAD,DISP=SHR ********************************MEMBER TALLY ******************************** //JOBLIB DD DSN=SYS9.FA.V8R8M0.LOAD,DISP=SHR ********************************MEMBER UPDATE ******************************** //JOBLIB DD DSN=SYS9.FA.V8R8M0.LOAD,DISP=SHR ********************************MEMBER USER ******************************** //JOBLIB DD DSN=SYS9.FA.V8R8M0.LOAD,DISP=SHR ******************************** BOTTOM OF DATA ********************************
Subtopics:
Chap_6.3.7.3.1 Step:
CHAP_6.3.7.3.1 Step: 1. Use the END primary command (PF3) in the COMMAND field to continue to the Confirm Update screen.
CHAP_6.3.7.4 Confirming Your UpdateWhen you END from the preview of changes, the Confirm Update screen is presented as shown in Figure 6-10. Press <Enter> to apply the changes and to return to the member list. Optionally, you may request a report of your previewed changes or change the maximum number of changes to perform. If you request printing, a Print Options screen (not shown here) is displayed to capture your report destination (Sysout or dataset).
Figure 6-10. Search/Update Utility - Confirm Update Screen
File-AID -------------- Search/Update Confirm Update ------------------------ COMMAND ===> ER041-Records-read=263 listed=9 with 9 changes
Ready to perform update
Perform update ===> Y (Y = Yes; N = No) Print previewed changes ===> N (Y = Yes; N = No) Maximum changes ===> ALL (All or number of changes to perform)
Instructions: Page 176

FileAid_-_Online_1
Use ENTER to perform above actions and return to the initial screen Use END to exit without UPDATE or PRINT
CAUTION: DISP=SHR was specified. Other users may be editing this file and some of your changes may be lost.
Subtopics:
Chap_6.3.7.4.1 Step: Chap_6.3.7.4.2 More About Confirm Update
CHAP_6.3.7.4.1 Step: 1. Press <Enter> to perform the update and return to the member list.
CHAP_6.3.7.4.2 More About Confirm Update o If your initial dataset disposition was SHR, a CAUTION message appears to warn you of the potential of another user simultaneously editing a member you are about to update. If this condition exists and a member you update is saved by another user, your change could be lost. If this is a concern, use the OLD disposition when performing changes.
o To print without updating, change the "Perform update" field to N and the "Print previewed changes" field to Y, then press <Enter>.
o To return to the member list without printing or performing your update, use the END command (PF3).
CHAP_6.3.7.5 Returning to the Search/Update Entry ScreenThe member list is redisplayed after performing your update as shown in Figure 6-11. Note the confirmation message on line three of the screen: ER042-Records-read=263 updated=9 with 9 changes. Observe the HITS count indicating the number of times the change was performed in each member. Some members show a HITS count of 0 (zero). If you had requested the "Condense member list = Y" option, these members would not appear but would be excluded. You may continue to work with your list of members, using the B (Browse) and S (Edit) line commands and the FIND and CHANGE primary commands. The END command returns you to the Search/Update Utility screen.
Figure 6-11. Search/Update Utility - Member List After CHANGE
File-AID - PDS Find/Change - USERID9.FASAMP.JCL ----------- ROW 1 TO 12 OF 12 COMMAND ===> END SCROLL ===> PAGE ER042-Records-read=263 updated=9 with 9 changes (Omit FIND/CHANGE operands for a prompt panel.) Use RESET command to get a full member list. Use E, S, B or X line commands to Edit, Browse or eXclude members. -------------------------------------------------------------------------------- S NAME HITS VV.MM CREATED CHANGED SIZE INIT MOD ID BATVTOC 1 01.00 95/02/06 95/02/06 11:08 23 23 0 USERID9 COPY 1 01.00 95/02/06 95/02/06 11:08 22 22 0 USERID9
Page 177
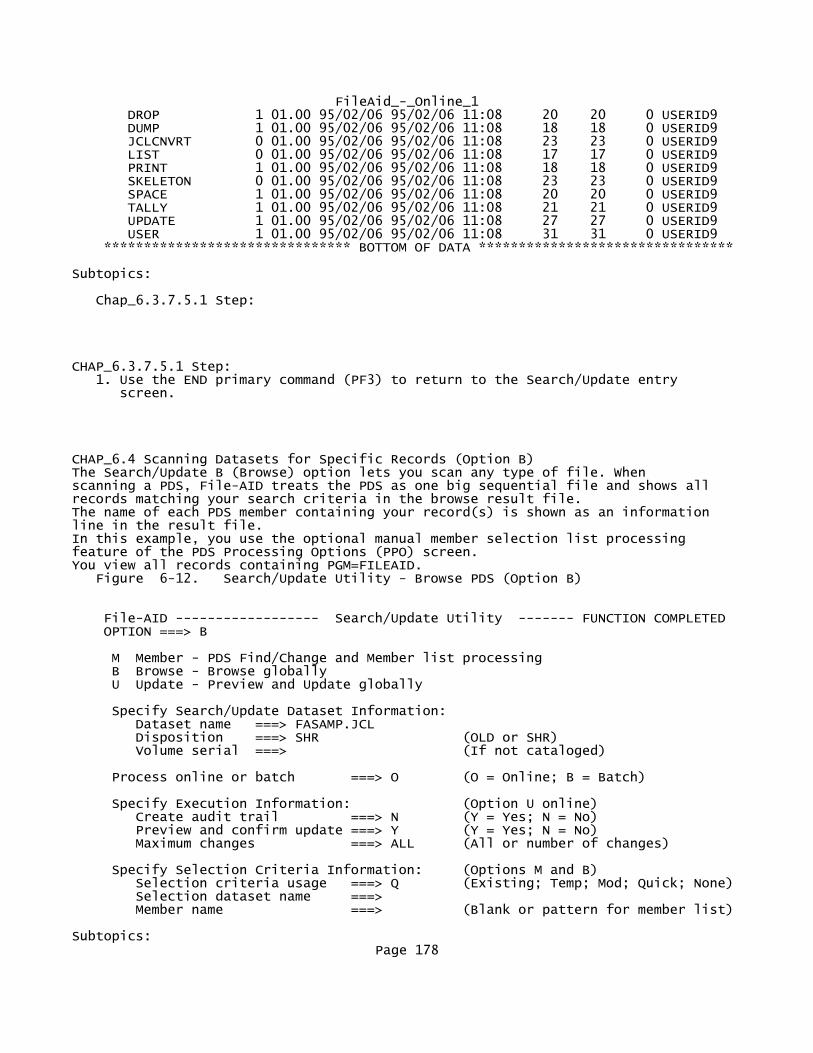
FileAid_-_Online_1 DROP 1 01.00 95/02/06 95/02/06 11:08 20 20 0 USERID9 DUMP 1 01.00 95/02/06 95/02/06 11:08 18 18 0 USERID9 JCLCNVRT 0 01.00 95/02/06 95/02/06 11:08 23 23 0 USERID9 LIST 0 01.00 95/02/06 95/02/06 11:08 17 17 0 USERID9 PRINT 1 01.00 95/02/06 95/02/06 11:08 18 18 0 USERID9 SKELETON 0 01.00 95/02/06 95/02/06 11:08 23 23 0 USERID9 SPACE 1 01.00 95/02/06 95/02/06 11:08 20 20 0 USERID9 TALLY 1 01.00 95/02/06 95/02/06 11:08 21 21 0 USERID9 UPDATE 1 01.00 95/02/06 95/02/06 11:08 27 27 0 USERID9 USER 1 01.00 95/02/06 95/02/06 11:08 31 31 0 USERID9 ******************************* BOTTOM OF DATA ********************************
Subtopics:
Chap_6.3.7.5.1 Step:
CHAP_6.3.7.5.1 Step: 1. Use the END primary command (PF3) to return to the Search/Update entry screen.
CHAP_6.4 Scanning Datasets for Specific Records (Option B)The Search/Update B (Browse) option lets you scan any type of file. When scanning a PDS, File-AID treats the PDS as one big sequential file and shows all records matching your search criteria in the browse result file. The name of each PDS member containing your record(s) is shown as an information line in the result file. In this example, you use the optional manual member selection list processing feature of the PDS Processing Options (PPO) screen. You view all records containing PGM=FILEAID. Figure 6-12. Search/Update Utility - Browse PDS (Option B)
File-AID ------------------ Search/Update Utility ------- FUNCTION COMPLETED OPTION ===> B
M Member - PDS Find/Change and Member list processing B Browse - Browse globally U Update - Preview and Update globally
Specify Search/Update Dataset Information: Dataset name ===> FASAMP.JCL Disposition ===> SHR (OLD or SHR) Volume serial ===> (If not cataloged)
Process online or batch ===> O (O = Online; B = Batch)
Specify Execution Information: (Option U online) Create audit trail ===> N (Y = Yes; N = No) Preview and confirm update ===> Y (Y = Yes; N = No) Maximum changes ===> ALL (All or number of changes)
Specify Selection Criteria Information: (Options M and B) Selection criteria usage ===> Q (Existing; Temp; Mod; Quick; None) Selection dataset name ===> Member name ===> (Blank or pattern for member list)
Subtopics:Page 178

FileAid_-_Online_1
Chap_6.4.1 Steps: Chap_6.4.2 Requesting PDS Member Selection Processing
CHAP_6.4.1 Steps: 1. Type a B in the OPTION field.
2. Press <Enter>.
CHAP_6.4.2 Requesting PDS Member Selection ProcessingSince you are scanning a PDS, the PDS Processing Options (PPO) screen is displayed to let you specify processing options and member selection. You select members whose names fall in the range D through U and request a display of the Member Selection List. Figure 6-13. Search/Update Utility Option B - PDS Processing Options
File-AID ----------------- PDS Processing Options -----------------------------
COMMAND ===>
Dataset: USERID9.FASAMP.JCL
Include record information ===> N (Y = Yes; N = No) Process in JCL format ===> N (Y = Yes; N = No)
Specify Member Selection Options (Blank for All Members) Member name mask ===> Member name range ===> D to ===> U Last modified userid ===> to ===> Creation date ===> to ===> (YY/MM/DD) Modification date ===> to ===> (YY/MM/DD)
Display member selection list ===> Y (Y = Yes; N = No)
Use ENTER to continue, END to return to dataset specification screen
Subtopics:
Chap_6.4.2.1 Steps: Chap_6.4.2.2 Using the Manual Member S/X Selection List Chap_6.4.2.3 Specify Selection Criteria Chap_6.4.2.4 Browsing Scan Results
CHAP_6.4.2.1 Steps: 1. Type a D in the "Member name" range (from) and U in the corresponding "to" field.
Page 179

FileAid_-_Online_1 2. Type a Y in the "Display member selection list" field.
The "Display member selection list" field displays only for Search/Update options B (Browse) and U (Update) and in the Copy utility (3.3) and Print functions (5.x). You may set a default (Y/N) for this field in the 0.4 Processing Parameters function.
3. Press <Enter>.
CHAP_6.4.2.2 Using the Manual Member S/X Selection ListWhen you specify a Y in the "Display member selection list" field, File-AID displays a list of members that match the specified PPO ranges. You must either: o Select one or more members using the S or SS (block) line command; or,
o Exclude one or more members using the X or XX (block) line command.
Only those members that you select are examined to see if they have any records matching any selection criteria you specify. After using the S or X line commands to indicate which of your member(s) are to be selected or excluded, use the END command or PF key (default PF3) to continue processing your scan. Figure 6-14. Search/Update Utility - Member S/X List Processing
File-AID Member S/X - USERID9.FASAMP.JCL ------------------ ROW 1 TO 12 OF 12 COMMAND ===> END SCROLL ===> PAGE S/X NAME VV.MM CREATED CHANGED SIZE INIT MOD ID DROP 01.01 95/02/06 95/03/30 12:16 20 20 0 USERID9 DUMP 01.01 95/02/06 95/03/30 12:16 18 18 0 USERID9 JCLCNVRT 01.00 95/02/06 95/02/06 11:08 23 23 0 USERID9 LIST 01.00 95/02/06 95/02/06 11:08 17 17 0 USERID9 PRINT 01.01 95/02/06 95/03/30 12:16 18 18 0 USERID9 XX SAMPLE01 01.00 95/02/06 95/02/06 11:08 14 14 0 USERID9 SAMPLE02 01.00 95/02/06 95/02/06 11:08 17 17 0 USERID9 XX SKELETON 01.00 95/02/06 95/02/06 11:08 23 23 0 USERID9 SPACE 01.01 95/02/06 95/03/30 12:16 20 20 0 USERID9 TALLY 01.01 95/02/06 95/03/30 12:16 21 21 0 USERID9 UPDATE 01.01 95/02/06 95/03/30 12:16 27 27 0 USERID9 USER 01.01 95/02/06 95/03/30 12:16 31 31 0 USERID9 ******************************* BOTTOM OF DATA ********************************
Subtopics:
Chap_6.4.2.2.1 Steps: Chap_6.4.2.2.2 More About the Manual Member Selection List
CHAP_6.4.2.2.1 Steps: 1. Type XX line commands to the left of the SAMPLE01 and SKELETON members.
2. Use the END command or PF key (PF3) to continue processing.
CHAP_6.4.2.2.2 More About the Manual Member Selection ListPage 180

FileAid_-_Online_1 o You may use S (or SS) to select members; any members not selected are excluded.
o You may use X (or XX) to exclude members; any members not excluded are selected.
o You cannot mix the S and X line commands.
o If you press <Enter> after marking one or more members (S or X), each member marked is indicated with the word SELECTED or EXCLUDED.
o At least one member must be marked (S or X).
CHAP_6.4.2.3 Specify Selection CriteriaBecause you requested selection criteria usage Q (Quick), the next screen displayed is the Unformatted Selection Criteria screen (see Figure 6-15) . Temporary criteria last used remains in memory until you exit the current utility so that you can re-use the values. You leave the criteria the same as before to see the difference in the browse results when using the B option instead of the M option.
Figure 6-15. Search/Update Utility - Quick Unformatted Selection Criteria
File-AID ------------- Unformatted Selection Criteria ----- ROW 1 TO 1 OF 1 COMMAND ===> END SCROLL ===> CSR
Use END command to continue, use CANCEL command to return to main screen.
AND Cmd /OR Position Length RO Data Value --- --- -------- ------ -- ---------------------------------------------------- ___ 1 CO T'PGM=FILEAID' ************************** END OF SELECTION CRITERIA **************************
Subtopics:
Chap_6.4.2.3.1 Step: Chap_6.4.2.3.2 More About Selection Criteria
CHAP_6.4.2.3.1 Step: 1. Use the END command (PF3) to continue processing.
CHAP_6.4.2.3.2 More About Selection Criteria o The selection shown above scans records from position 1 to the end of the record to see if the record contains (CO) the text string PGM=FILEAID (any case).
Page 181

FileAid_-_Online_1
o Line commands (Cmd) you may use include:
D(n) Delete (n) lines (for example, D, D2, D99)
I(n) Insert (n) lines (for example, I, I2, I99)
R(n) Repeat this line (n) times (for example, R, R2)
C(n) Copy (n) lines to destination marker (A (After) or B (Before)
M(n) Move (n) lines to destination marker (A (After) or B (Before).
o Use the CANCEL command to stop Browse processing and return to the Search/Update Utility screen.
Note: The CANCEL command clears all temporary criteria entries.
CHAP_6.4.2.4 Browsing Scan ResultsThe selected members are scanned for matching records and the results are written to a temporary work file. You are then placed into an ISPF Browse session on the work file. All standard browse commands are valid, including the scroll commands, FIND, HEX, and COLS. Each PDS member is identified with a record containing a line of asterisks and the PDS member name. A message is displayed near the top of the screen to indicate the number of records read and matched (selected) in the selected members. A dataset OPENED information line is also included in the results to show the attributes of the dataset that was scanned. Figure 6-16. Search/Update Utility
. Scanning Results in Work File (Option B)
BROWSE -- USERID9.D94136.T105329.FILEAID ----------- LINE 00000000 COL 001 080 COMMAND ===> END SCROLL ===> PAGE FA223- Records read = 58, selected = 9, error records skipped = 0 ==>USERID9.FASAMP.JCL OPENED AS PO,RECFM=FB,LRECL=80,BLKSIZE=3120,VOL=PRD904 ********************************MEMBER DROP ******************************** //STEP1 EXEC PGM=FILEAID ********************************MEMBER DUMP ******************************** //STEP1 EXEC PGM=FILEAID ********************************MEMBER JCLCNVRT******************************** //STEP1 EXEC PGM=FILEAID ********************************MEMBER LIST ******************************** //STEP1 EXEC PGM=FILEAID ********************************MEMBER PRINT ******************************** //STEP1 EXEC PGM=FILEAID ********************************MEMBER SPACE ******************************** //STEP1 EXEC PGM=FILEAID ********************************MEMBER TALLY ********************************
Page 182

FileAid_-_Online_1 //STEP1 EXEC PGM=FILEAID ********************************MEMBER UPDATE ******************************** //STEP1 EXEC PGM=FILEAID ********************************MEMBER USER ******************************** //STEP1 EXEC PGM=FILEAID ******************************** BOTTOM OF DATA ********************************
Subtopics:
Chap_6.4.2.4.1 Step:
CHAP_6.4.2.4.1 Step: 1. Use the END command (PF3) to return to the Search/Update Utility screen.
CHAP_6.5 Specifying Global Changes - (Option U)The Search/Update option U (update) lets you specify, preview, and apply global changes to any type of file. Support is provided for updating Panvalet and Librarian libraries as well as any type of standard MVS file including: VSAM-KSDS, VSAM-RRDS, VSAM-ESDS, ISAM, BDAM, IAM, sequential and PDS. Updating of VSAM-LINEAR is not currently supported. Options provided for Update processing let you select online or batch processing. For online processing, you may select to preview (and print) your changes before you update the file. You may also request an optional audit trail of your changes. In this example, you set up a simple change to the program name. You change program name FILEAID to FILEAID8. Since your dataset is a PDS, you use a member name of asterisk (*) to select all members for processing and to bypass the PPO screens. Figure 6-17. Search/Update Utility
. Updating All Members of a PDS (Option U).
File-AID ------------------ Search/Update Utility --------------------------- OPTION ===> U
M Member - PDS Find/Change and Member list processing B Browse - Browse globally U Update - Preview and Update globally
Specify Search/Update Dataset Information: Dataset name ===> FASAMP.JCL(*) Disposition ===> SHR (OLD or SHR) Volume serial ===> (If not cataloged)
Process online or batch ===> O (O = Online; B = Batch)
Specify Execution Information: (Option U online) Create audit trail ===> N (Y = Yes; N = No) Preview and confirm update ===> Y (Y = Yes; N = No) Maximum changes ===> ALL (All or number of changes)
Specify Selection Criteria Information: (Options M and B) Selection criteria usage ===> N (Existing; Temp; Mod; Quick; None) Selection dataset name ===> Member name ===> (Blank or pattern for member list)
Page 183

FileAid_-_Online_1
Subtopics:
Chap_6.5.1 Steps: Chap_6.5.2 Specifying Change Criteria Chap_6.5.3 Preview Changes Chap_6.5.4 Apply Changes (Confirm Update) Chap_6.5.5 Processing Your Update In Batch Chap_6.5.6 Reviewing Change Criteria Chap_6.5.7 Submit Batch JCL
CHAP_6.5.1 Steps: 1. Type a U in the OPTION field.
2. Type (*) at the end of the Dataset name to indicate processing of all members and to bypass the presentation of the PPO screen.
3. Verify that the Process online or batch option is O.
4. Verify that the Create Audit Trail option is N.
5. Verify that the Preview and Confirm update option is Y.
6. Verify that the Maximum changes value is ALL.
7. Type an N in the selection criteria usage field. Press <Enter>.
Selection criteria usage is ignored when using option U. Option U automatically provides temporary change criteria screens.
CHAP_6.5.2 Specifying Change CriteriaStandard selection criteria is not used. Instead, changes are defined using the Search/Update Change Criteria screen, which is nearly identical to the Unformatted Selection Criteria screen. Changes are identified by using special relational operator (RO) "replacement" codes:
R (replace) Put data at specified position, overlaying data in the record at that point.
E (edit) Changes found data to new data. Shifts data when lengths of found data and new data are different. Must be preceded by a conditional test.
RA (replace Puts new data in record at all found data all) points within each record. Overlays existing data. Must be preceded by a conditional test.
EA (edit Changes all found data in a record to new all) data. Shifts data when lengths of found data and new data are different. Must be preceded by a conditional test.
Page 184

FileAid_-_Online_1The selection and change criteria you define remains in memory until you exit from the Search/Update utility. As you see in Figure 6-18, the selection from the Browse example is still in memory. You must define a change when using the U (update) option. You use the I (Insert) line command to insert a new criteria line so that you can specify your change.
Figure 6-18. Search/Update Utility - Change Criteria Screen
File-AID ------------- Search/Update Change Criteria ------ ROW 1 TO 1 OF 1 COMMAND ===> SCROLL ===> PAGE
Use END to continue, CANCEL to return to main screen.
Relational Operator R (Replace) overlays existing data. E (Edit) shifts existing data. When preceded by CO (Contains), R or E changes first occurrence of search value in each record, RA or EA changes all occurrences.
AND Cmd /OR Position Length RO Search Value / Update Value --- --- -------- ------ -- ---------------------------------------------------- I 1 CO T'PGM=FILEAID' ************************** END OF SELECTION CRITERIA **************************
Subtopics:
Chap_6.5.2.1 Steps: Chap_6.5.2.2 Entering the Change
CHAP_6.5.2.1 Steps: 1. Use the I line command to insert a new criteria line.
2. Press <Enter>.
CHAP_6.5.2.2 Entering the ChangeTo specify a change, you must use one of the special relational operator replacement codes (R, E, RA, or EA). You use E (Edit) and type in a new value of PGM=FILEAID8 to change the value of PGM=FILEAID in all records and members. Figure 6-19. Search/Update Utility - E Edit - New Value Entry
File-AID ------------- Search/Update Change Criteria ------ ROW 1 TO 2 OF 2 COMMAND ===> END SCROLL ===> PAGE
Use END to continue, CANCEL to return to main screen.
Relational Operator R (Replace) overlays existing data. E (Edit) shifts existing data. When preceded by CO (Contains), R or E changes first occurrence of search value in each record, RA or EA changes all occurrences.
AND Page 185

FileAid_-_Online_1 Cmd /OR Position Length RO Search Value / Update Value --- --- -------- ------ -- ---------------------------------------------------- ___ 1 CO T'PGM=FILEAID' ___ ______ _____ E PGM=FILEAID8 ************************** END OF SELECTION CRITERIA **************************
Subtopics:
Chap_6.5.2.2.1 Steps: Chap_6.5.2.2.2 More About Change Criteria
CHAP_6.5.2.2.1 Steps: 1. On line 2, specify E in the RO column and PGM=FILEAID8 in the Search Value / Update Value area.
2. Use the END command (PF3) to continue processing.
CHAP_6.5.2.2.2 More About Change Criteria o When you use the EA or RA operators, you must precede them with a CO to identify the "from" data to be changed.
o Only the R (replace) operator may be specified without a preceding condition.
o When you enter replacement text without an explicit data type, File-AID treats your value as uppercase. Use the C data type to specify exact case replacement data (for example, C'McDonald').
o Specifying an OR in the AND/OR column starts a new change criteriaset. The new set must contain at least one replacement operator (R, RA, E, EA).
Note: File-AID always processes all sets for the current record. If the first set is applied, the next set is still checked and processed for the current record.
CHAP_6.5.3 Preview ChangesSince you requested a preview of your changes (Preview and Confirm Update = Y), File-AID scans all (or selected) members of your PDS looking for matching records. All matching records are then copied to a temporary work file where they are updated based on your change criteria. You are then placed into an ISPF Browse session on the work file to preview the results of your changes. If the work file is too small to hold all previewed records, use option 0.1 System Parameters to increase the size of your File-AID work file. Your file is not updated until you "Confirm Update" your changes after viewing the preview. After reviewing the preview of your changes, use the END command to access the Confirm Update screen (see Figure 6-21 on page 6-23) .
Page 186
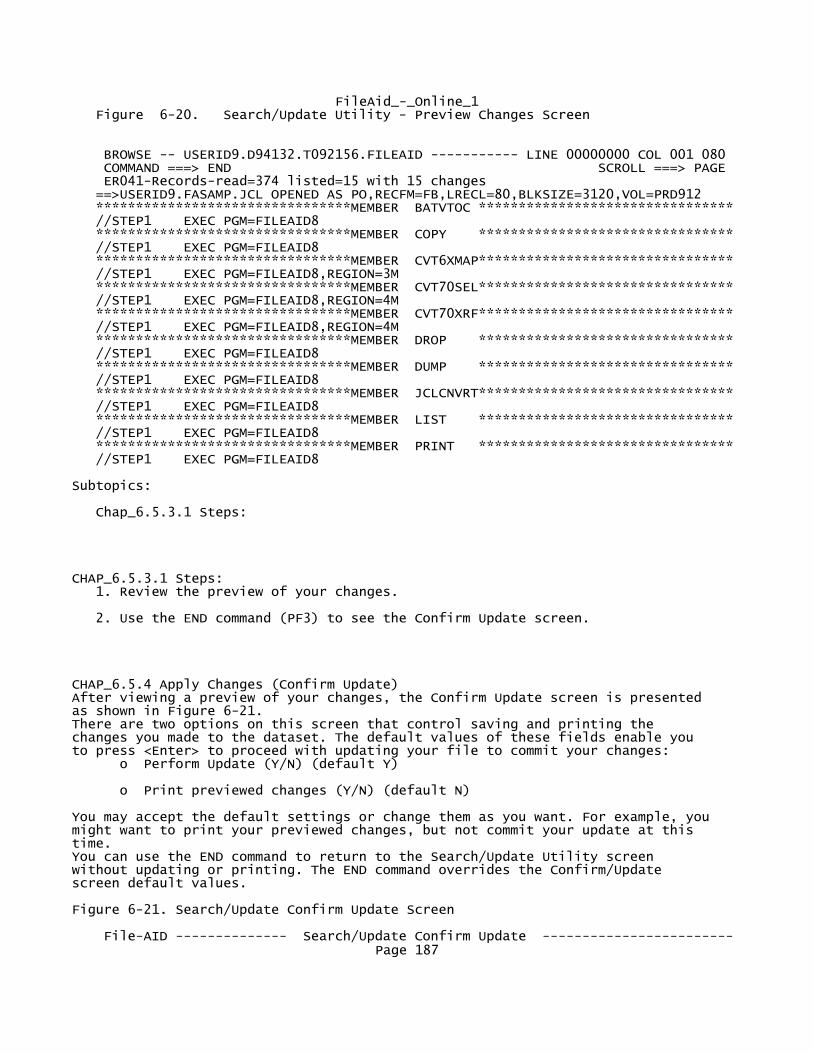
FileAid_-_Online_1 Figure 6-20. Search/Update Utility - Preview Changes Screen
BROWSE -- USERID9.D94132.T092156.FILEAID ----------- LINE 00000000 COL 001 080 COMMAND ===> END SCROLL ===> PAGE ER041-Records-read=374 listed=15 with 15 changes ==>USERID9.FASAMP.JCL OPENED AS PO,RECFM=FB,LRECL=80,BLKSIZE=3120,VOL=PRD912 ********************************MEMBER BATVTOC ******************************** //STEP1 EXEC PGM=FILEAID8 ********************************MEMBER COPY ******************************** //STEP1 EXEC PGM=FILEAID8 ********************************MEMBER CVT6XMAP******************************** //STEP1 EXEC PGM=FILEAID8,REGION=3M ********************************MEMBER CVT70SEL******************************** //STEP1 EXEC PGM=FILEAID8,REGION=4M ********************************MEMBER CVT70XRF******************************** //STEP1 EXEC PGM=FILEAID8,REGION=4M ********************************MEMBER DROP ******************************** //STEP1 EXEC PGM=FILEAID8 ********************************MEMBER DUMP ******************************** //STEP1 EXEC PGM=FILEAID8 ********************************MEMBER JCLCNVRT******************************** //STEP1 EXEC PGM=FILEAID8 ********************************MEMBER LIST ******************************** //STEP1 EXEC PGM=FILEAID8 ********************************MEMBER PRINT ******************************** //STEP1 EXEC PGM=FILEAID8
Subtopics:
Chap_6.5.3.1 Steps:
CHAP_6.5.3.1 Steps: 1. Review the preview of your changes.
2. Use the END command (PF3) to see the Confirm Update screen.
CHAP_6.5.4 Apply Changes (Confirm Update)After viewing a preview of your changes, the Confirm Update screen is presented as shown in Figure 6-21. There are two options on this screen that control saving and printing the changes you made to the dataset. The default values of these fields enable you to press <Enter> to proceed with updating your file to commit your changes: o Perform Update (Y/N) (default Y)
o Print previewed changes (Y/N) (default N)
You may accept the default settings or change them as you want. For example, you might want to print your previewed changes, but not commit your update at this time. You can use the END command to return to the Search/Update Utility screen without updating or printing. The END command overrides the Confirm/Update screen default values.
Figure 6-21. Search/Update Confirm Update Screen
File-AID -------------- Search/Update Confirm Update ------------------------ Page 187

FileAid_-_Online_1 COMMAND ===> END ER041-Records-read=374 listed=15 with 15 changes
Ready to perform update
Perform update ===> Y (Y = Yes; N = No) Print previewed changes ===> N (Y = Yes; N = No) Maximum changes ===> ALL (All or number of changes to perform)
Instructions:
Use ENTER to perform above actions and return to the initial screen Use END to exit without UPDATE or PRINT
CAUTION: DISP=SHR was specified. Other users may be editing this file and some of your changes may be lost.
Subtopics:
Chap_6.5.4.1 Steps: Chap_6.5.4.2 More About the Confirm Update Screen
CHAP_6.5.4.1 Steps: 1. Use the END command (PF3) to cancel the change and to return to the Search/Update Utility screen. Note the message, UPDATE CANCELLED, in the top right corner of the screen as shown in Figure 6-22 on page 6-24.
CHAP_6.5.4.2 More About the Confirm Update Screen o When you apply changes, all records are examined and the number of changes you specify here in the "Maximum changes" field are performed. The preview may only show you a limited number of changes (if you specified a numerical value in the "Maximum Changes" field on the Search/Update utility screen).
o If you request printing, a print prompt screen is displayed where you specify your print routing request.
o For Panvalet and Librarian updates, this screen is not shown. Instead, File-AID generates JCL to perform the update in batch and displays the SEARCH - JCL Specification screen (see Figure 6-24 on page 6-26) .
CHAP_6.5.5 Processing Your Update In BatchIf the dataset you are changing is large, you may set up JCL to run the change as a background batch job.
Figure 6-22. Search/Update Utility - Batch Processing Request
File-AID ------------------ Search/Update Utility ---------- UPDATE CANCELLED OPTION ===> U
Page 188

FileAid_-_Online_1 M Member - PDS Find/Change and Member list processing B Browse - Browse globally U Update - Preview and Update globally
Specify Search/Update Dataset Information: Dataset name ===> FASAMP.JCL(*) Disposition ===> SHR (OLD or SHR) Volume serial ===> (If not cataloged)
Process online or batch ===> B (O = Online; B = Batch)
Specify Execution Information: (Option U online) Create audit trail ===> N (Y = Yes; N = No) Preview and confirm update ===> Y (Y = Yes; N = No) Maximum changes ===> ALL (All or number of changes)
Specify Selection Criteria Information: (Options M and B) Selection criteria usage ===> N (Existing; Temp; Mod; Quick; None) Selection dataset name ===> Member name ===> (Blank or pattern for member list)
Subtopics:
Chap_6.5.5.1 Steps:
CHAP_6.5.5.1 Steps: 1. Change the Process online or batch option to B.
2. Press <Enter>.
CHAP_6.5.6 Reviewing Change CriteriaWhen the Change Criteria screen is displayed as shown below in Figure 6-23, it still contains the values you specified when you previewed your change. Just use the END command to continue.
Figure 6-23. Search/Update utility - Change Criteria To Be Applied
File-AID ------------- Search/Update Change Criteria ------ ROW 1 TO 2 OF 2 COMMAND ===> END SCROLL ===> CSR
Use END command to continue, use CANCEL command to return to main screen.
Relational Operator R (Replace) overlays existing data. E (Edit) shifts existing data. When preceded by CO (Contains), R or E changes first occurrence of search value in each record, RA or EA changes all occurrences.
AND Cmd /OR Position Length RO Search Value / Update Value --- --- -------- ------ -- ---------------------------------------------------- ___ 1 CO T'PGM=FILEAID' ___ +0 EA C'PGM=FILEAID8' ************************** END OF SELECTION CRITERIA **************************
Subtopics:Page 189

FileAid_-_Online_1
Chap_6.5.6.1 Step:
CHAP_6.5.6.1 Step: 1. Use the END command (PF3) to continue.
CHAP_6.5.7 Submit Batch JCLThe SEARCH - JCL Specification screen is similar to many batch JCL screens in File-AID. The JOB statement is saved from screen to screen and session to session. You have several options: o Enter the SUBMIT command to generate the JCL and submit the job.
o Enter the JCL command to generate the JCL and place it in a temporary work file that you are editing.
From the Edit session, you can use the CREATE or REPLACE primary command with the C999 line command to save the JCL to a PDS, and/or use the SUBMIT command to submit the JCL.
o Enter the END command to exit without JCL generation or submission.
Figure 6-24. Search/Update Utility - SEARCH - JCL Specification Screen
File-AID ---------------- - SEARCH - JCL Specification ----------------------- COMMAND ===> JCL
JCL Information for Batch Processing:
Sysout class ===> *
JOB Statement Information: ===> //USERID9 JOB (0100,PMGT),'your name',CLASS=A, ===> // MSGCLASS=R,NOTIFY=USERID9 ===> ===>
Use JCL command to edit generated JCL Use SUBMIT command to submit batch job Use END to return to main - SEARCH panel without submitting job
Subtopics:
Chap_6.5.7.1 Steps:
CHAP_6.5.7.1 Steps: 1. Type JCL on the command line to view the generated JCL.
Note: If you intend to save this JCL, be sure to change the //DD01SC DD statement. Change DISP=(OLD,DELETE) to DISP=SHR to ensure that your temporary
Page 190
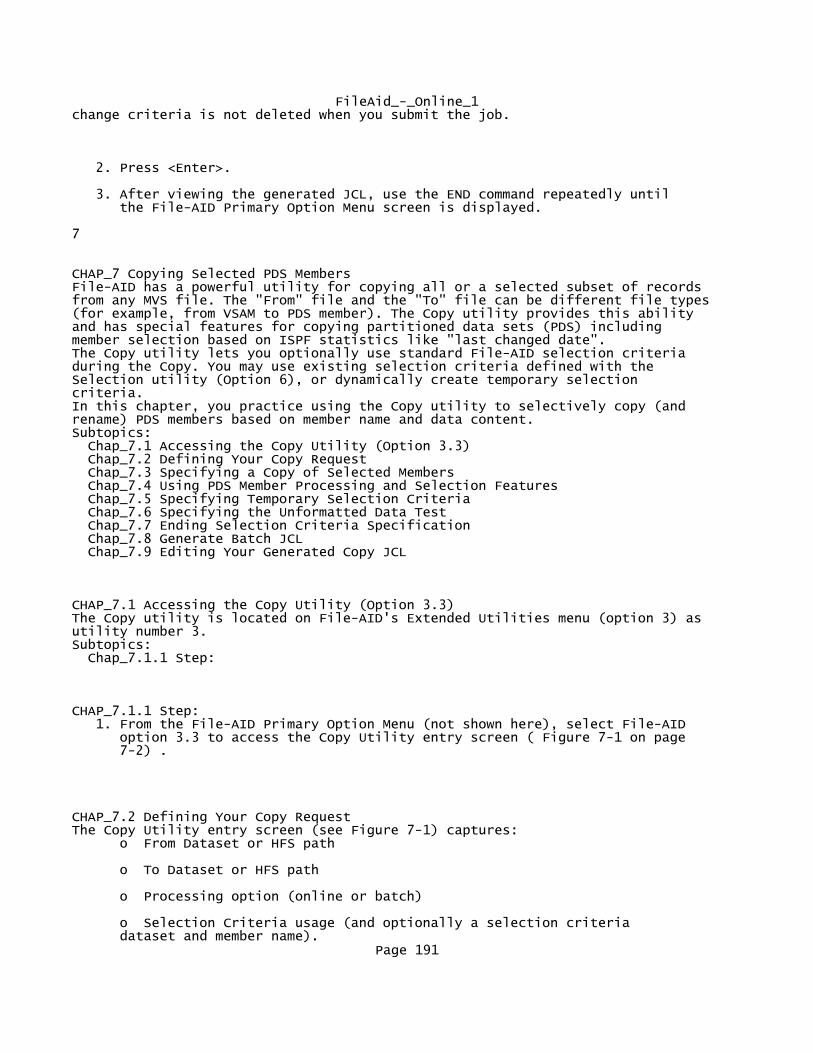
FileAid_-_Online_1change criteria is not deleted when you submit the job.
2. Press <Enter>.
3. After viewing the generated JCL, use the END command repeatedly until the File-AID Primary Option Menu screen is displayed.
7
CHAP_7 Copying Selected PDS MembersFile-AID has a powerful utility for copying all or a selected subset of records from any MVS file. The "From" file and the "To" file can be different file types (for example, from VSAM to PDS member). The Copy utility provides this ability and has special features for copying partitioned data sets (PDS) including member selection based on ISPF statistics like "last changed date". The Copy utility lets you optionally use standard File-AID selection criteria during the Copy. You may use existing selection criteria defined with the Selection utility (Option 6), or dynamically create temporary selection criteria. In this chapter, you practice using the Copy utility to selectively copy (and rename) PDS members based on member name and data content. Subtopics: Chap_7.1 Accessing the Copy Utility (Option 3.3) Chap_7.2 Defining Your Copy Request Chap_7.3 Specifying a Copy of Selected Members Chap_7.4 Using PDS Member Processing and Selection Features Chap_7.5 Specifying Temporary Selection Criteria Chap_7.6 Specifying the Unformatted Data Test Chap_7.7 Ending Selection Criteria Specification Chap_7.8 Generate Batch JCL Chap_7.9 Editing Your Generated Copy JCL
CHAP_7.1 Accessing the Copy Utility (Option 3.3)The Copy utility is located on File-AID's Extended Utilities menu (option 3) as utility number 3. Subtopics: Chap_7.1.1 Step:
CHAP_7.1.1 Step: 1. From the File-AID Primary Option Menu (not shown here), select File-AID option 3.3 to access the Copy Utility entry screen ( Figure 7-1 on page 7-2) .
CHAP_7.2 Defining Your Copy RequestThe Copy Utility entry screen (see Figure 7-1) captures: o From Dataset or HFS path
o To Dataset or HFS path
o Processing option (online or batch)
o Selection Criteria usage (and optionally a selection criteria dataset and member name).
Page 191

FileAid_-_Online_1
You may either perform the Copy processing online at your terminal, or generate JCL for File-AID/Batch execution to run your request as a background job in MVS.
Figure 7-1. Copy Utility Entry Screen
File-AID --------------------- Copy Utility --------------------------------- COMMAND ===>
Specify "FROM" Dataset or HFS Path Information: Dataset or path ===> FASAMP.JCL Volume serial ===> (If not cataloged)
Specify "TO" Dataset Information: Dataset or path ===> FASAMP.LAYOUTS Volume serial ===> (If not cataloged) Disposition ===> OLD (OLD, MOD, NEW)
Specify Execution Information: Process online or batch ===> B (O = Online; B = Batch)
Specify Selection Criteria Information: (E = Existing; T = Temporary; Selection criteria usage ===> T M = Modify; Q = Quick; N = None) Selection criteria dataset ===> Member name ===> (Blank or pattern for member list)
CHAP_7.3 Specifying a Copy of Selected MembersThis example shows how to set up batch JCL to copy selected members of your sample JCL library (FASAMP.JCL) to your sample record layouts library (FASAMP.LAYOUTS). Only members with names between SPACE and USER, that execute program name FILEAID (for example, EXEC PGM=FILEAID), are copied. A new member name is assigned in the target PDS by appending an X to the original member name (for example, SPACEX, USERX). Subtopics: Chap_7.3.1 Steps: Chap_7.3.2 More About the Copy Utility Screen
CHAP_7.3.1 Steps: 1. Make sure the FROM dataset name is FASAMP.JCL (no member name).
2. Overtype the TO dataset name to read FASAMP.LAYOUTS.
3. Type B in the Process online or batch field.
4. Type T in the Selection criteria usage field.
5. Press <Enter>.
CHAP_7.3.2 More About the Copy Utility Screen o Standard File-AID dataset and member name entry is supported including using wildcard characters in the dataset names (for example, FASAMP.*) or "FROM" member name (for example, FASAMP.JCL(CNV*)).
Page 192

FileAid_-_Online_1 o The FROM and TO datasets can be different types and record lengths. A Confirm Copy screen may be displayed to warn you of differences and potential record truncation or padding.
o When selection criteria usage is T (Create temporary), Q (Quick temporary) or N (None), the Selection criteria dataset and member are not validated or used.
For E (Use existing) or M (Modify existing), a valid selection criteria dataset and member must be provided.
o When processing a PDS, a member name of asterisk (*) means to copy all members matching your selection criteria. Otherwise, the PDS Processing Options (PPO) screen is always presented to let you specify member handling options.
CHAP_7.4 Using PDS Member Processing and Selection FeaturesWhen your "FROM" (and "TO") dataset(s) are partitioned (PDS), special member processing is automatically provided. Subtopics: Chap_7.4.1 "FROM" PDS Member Processing Chap_7.4.2 "TO" PDS Member Processing
CHAP_7.4.1 "FROM" PDS Member Processing o You may specify JCL format processing.
o You may specify copying of complete members or just records in each member that match your selection criteria.
o You may select all members or a subset of members based on:
Member name
o Name mask (for example, A?B or AB*)
o Name range (for example, From AB to BZZZZZ)
ISPF statistics
o Date last modified range
o Date created range
o Last modified user ID range
Manual selection and/or exclusion of individual members from a list of members matching your member criteria.
o You can also leave the fields blank and press <Enter> to select all members (the default).
CHAP_7.4.2 "TO" PDS Member ProcessingIf your "TO" dataset is also a PDS, you may specify options to control: o Copying of empty members
Page 193

FileAid_-_Online_1 o Renaming of members based on a name mask
o Replacement of existing members.
Subtopics: Chap_7.4.2.1 Specifying PPO Options
CHAP_7.4.2.1 Specifying PPO OptionsThe PDS Processing Options (PPO) screen (see Figure 7-2 ) lets you define a subset of members to be copied based on member name and/or ISPF statistics. It also can be used to specify member renaming and other options for copied members.
Figure 7-2. Copy Utility - PDS to PDS Processing Options Screen
File-AID ----------------- PDS Processing Options ----------------------------- COMMAND ===>
FROM Dataset: USERID9.FASAMP.JCL Copy entire member ===> Y (Y = Yes; N = No, selected records only) Copy empty members ===> N (Y = Yes; N = No) Process in JCL format ===> N (Y = Yes; N = No)
TO Dataset: USERID9.FASAMP.LAYOUTS Replace like-named members ===> Y (Y = Yes; N = No)
Rename copied members mask ===> ???????X
Specify Member Selection Options (Blank for All Members) Member name mask ===> Member name range ===> SPACE to ===> USER Last modified userid ===> to ===> Creation date ===> to ===> (YY/MM/DD) Modification date ===> to ===> (YY/MM/DD)
Display member selection list ===> N (Y = Yes; N = No)
Subtopics:
Chap_7.4.2.1.1 Steps: Chap_7.4.2.1.2 More About the Copy PPO Screen
CHAP_7.4.2.1.1 Steps: 1. Type ???????X in the Rename copied members mask field.
A question mark (?) means to keep original member name character.
2. Type SPACE in the "Member name range" (from) and USER in the "to" field.
3. Type an N in the Display member selection list field.
4. Press <Enter>.
Page 194

FileAid_-_Online_1CHAP_7.4.2.1.2 More About the Copy PPO Screen o If a member mask was specified on the entry screen for the FROM dataset (for example, FASAMP.JCL(CNV*)), File-AID automatically copies the mask (CNV*) to the Member name mask field, ready for selection.
o If you are scanning JCL members and looking for multiple conditions within a single statement (for example, DISP=OLD and UNIT=TAPE), use Process In JCL format=Y.
o Use option 0.4 (Processing Parameters) to establish permanent choices for options like Replace like-named members and Copy entire member and Display member selection list fields.
o See "Using the Manual Member S/X Selection List" on page 6-15 for examples of using the member selection list.
CHAP_7.5 Specifying Temporary Selection CriteriaWhen you have chosen selection criteria usage T (Create Temporary), the next screen displayed is the Selection Criteria Menu screen (TEMPORARY) as shown in Figure 7-3. You use this screen to access the selection criteria screens to specify what data condition(s) you are looking for in a member in order for that member to be copied. In this example, you are looking for a JCL statement containing the string PGM=FILEAID. You define this test using Unformatted Selection Criteria. First, you request access to the Unformatted Selection Criteria screen. Subtopics: Chap_7.5.1 Steps: Chap_7.5.2 More About the Selection Criteria Menu Screen
CHAP_7.5.1 Steps: 1. Type 3 on the OPTION line to Edit unformatted selection criteria.
2. Press <Enter>.
Figure 7-3. Copy Utility - TEMPORARY Selection Criteria Menu Screen
File-AID - Selection Criteria Menu - TEMPORARY -------------------------------- OPTION ===> 3 - Status - 1 OPTIONS - Enter selection criteria options default 2 FORMATTED - Edit formatted selection criteria 0 sets 3 UNFORMATTED - Edit unformatted selection criteria 0 sets
Member list description ===> ______________________________
Long ===> ______________________________________________________________ Description ===> ______________________________________________________________
Use VIEW command to display selection criteria summary Use SAVE command to write selection criteria request
Page 195
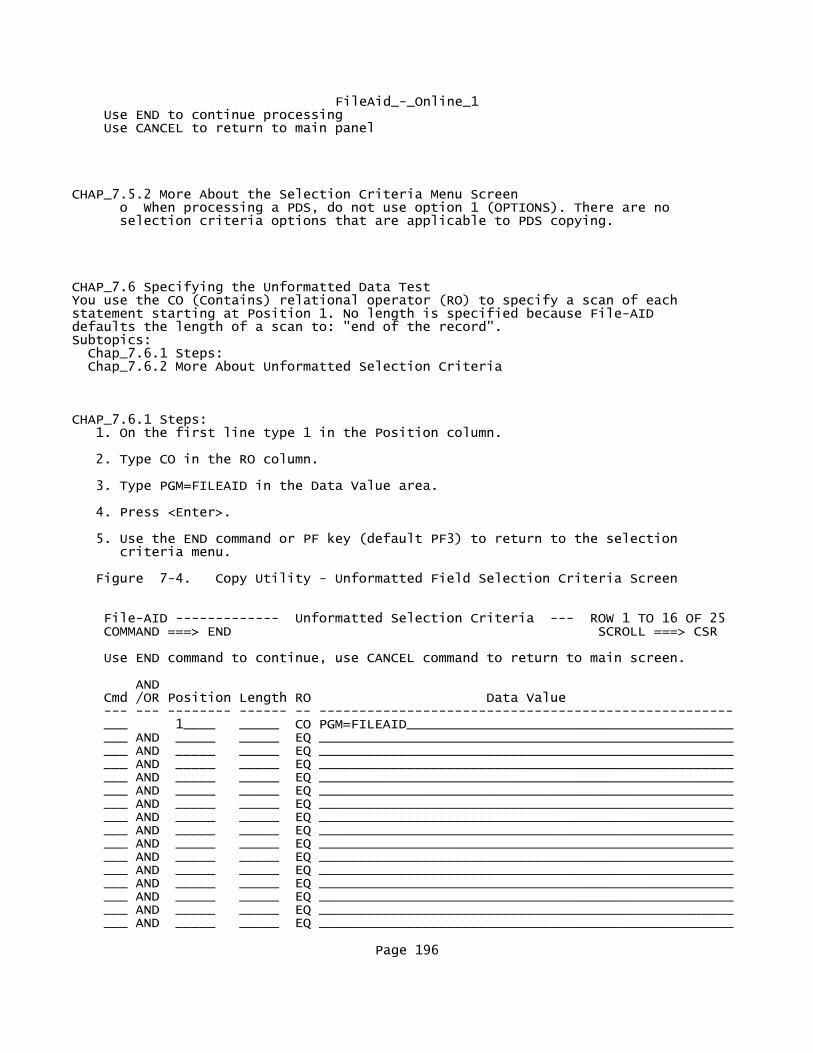
FileAid_-_Online_1 Use END to continue processing Use CANCEL to return to main panel
CHAP_7.5.2 More About the Selection Criteria Menu Screen o When processing a PDS, do not use option 1 (OPTIONS). There are no selection criteria options that are applicable to PDS copying.
CHAP_7.6 Specifying the Unformatted Data TestYou use the CO (Contains) relational operator (RO) to specify a scan of each statement starting at Position 1. No length is specified because File-AID defaults the length of a scan to: "end of the record". Subtopics: Chap_7.6.1 Steps: Chap_7.6.2 More About Unformatted Selection Criteria
CHAP_7.6.1 Steps: 1. On the first line type 1 in the Position column.
2. Type CO in the RO column.
3. Type PGM=FILEAID in the Data Value area.
4. Press <Enter>.
5. Use the END command or PF key (default PF3) to return to the selection criteria menu.
Figure 7-4. Copy Utility - Unformatted Field Selection Criteria Screen
File-AID ------------- Unformatted Selection Criteria --- ROW 1 TO 16 OF 25 COMMAND ===> END SCROLL ===> CSR
Use END command to continue, use CANCEL command to return to main screen.
AND Cmd /OR Position Length RO Data Value --- --- -------- ------ -- ---------------------------------------------------- ___ 1____ _____ CO PGM=FILEAID_________________________________________ ___ AND _____ _____ EQ ____________________________________________________ ___ AND _____ _____ EQ ____________________________________________________ ___ AND _____ _____ EQ ____________________________________________________ ___ AND _____ _____ EQ ____________________________________________________ ___ AND _____ _____ EQ ____________________________________________________ ___ AND _____ _____ EQ ____________________________________________________ ___ AND _____ _____ EQ ____________________________________________________ ___ AND _____ _____ EQ ____________________________________________________ ___ AND _____ _____ EQ ____________________________________________________ ___ AND _____ _____ EQ ____________________________________________________ ___ AND _____ _____ EQ ____________________________________________________ ___ AND _____ _____ EQ ____________________________________________________ ___ AND _____ _____ EQ ____________________________________________________ ___ AND _____ _____ EQ ____________________________________________________ ___ AND _____ _____ EQ ____________________________________________________
Page 196

FileAid_-_Online_1
CHAP_7.6.2 More About Unformatted Selection Criteria o When you specify CO or EQ relational operators, you can look for multiple strings by separating the strings with commas (for example, ABC,DEF,GHI looks for ABC or DEF or GHI at the specified position).
o Since this example defines unformatted selection criteria only, you could have come directly to this screen by using the Q (Quick) selection criteria usage code on the main Copy screen. When you use the Q (Quick) option, the Selection Criteria Menu screen does not appear and processing occurs immediately after you END from this Unformatted Selection Criteria screen.
CHAP_7.7 Ending Selection Criteria SpecificationAfter returning to the Selection Criteria Menu, use the END command to continue your Copy processing. Notice that the Status for UNFORMATTED shows "1 sets". Figure 7-5. Copy Utility - End Criteria Specification - Begin Copy
File-AID - Selection Criteria Menu - TEMPORARY -------------------------------- OPTION ===> END - Status - 1 OPTIONS - Enter selection criteria options default 2 FORMATTED - Edit formatted selection criteria 0 sets 3 UNFORMATTED - Edit unformatted selection criteria 1 sets
Member list description ===> ______________________________
Long ===> ______________________________________________________________ Description ===> ______________________________________________________________
Use VIEW command to display selection criteria summary Use SAVE command to write selection criteria request Use END to continue processing Use CANCEL to return to main panel
Subtopics:
Chap_7.7.1 Step:
CHAP_7.7.1 Step: 1. Use the END command (PF3) to proceed with PDS scanning and member copying (or batch JCL generation).
CHAP_7.8 Generate Batch JCLPage 197

FileAid_-_Online_1Because you requested batch processing, the COPY - JCL Specification screen is displayed next. If you had requested online processing, your copy would execute immediately and you would be returned to the Copy Utility entry screen with a message indicating the results of your copy. The COPY - JCL Specification screen is similar to many batch JCL screens in File-AID. The JOB statement is saved from screen to screen and session to session. You have several options: o Enter the SUBMIT command to generate the JCL and submit the job.
o Enter the JCL command to generate the JCL and place it in a temporary work file that you are Editing.
o Enter the END command to exit without JCL generation or submission.
Figure 7-6. Copy Utility - COPY - JCL Specification
File-AID ---------------- COPY - JCL Specification --------------------------- COMMAND ===> JCL
JCL Information for Batch Processing:
Sysout class ===> *
JOB Statement Information: ===> //USERID9A JOB (ACCT,INFO),'FILE-AID',CLASS=A, ===> // MSGCLASS=A,NOTIFY=USERID9 ===> ===>
Use JCL command to edit generated JCL Use SUBMIT command to submit batch job Use END to return to main COPY panel without submitting job
Subtopics:
Chap_7.8.1 Steps:
CHAP_7.8.1 Steps: 1. Type JCL on the command line to view the generated JCL.
2. Press <Enter>.
CHAP_7.9 Editing Your Generated Copy JCLFrom the Edit session, you can use the CREATE or REPLACE primary command with the C999 line command to save the JCL to a PDS, and/or use the SUBMIT command to submit the JCL. Subtopics: Chap_7.9.1 Step:
Page 198
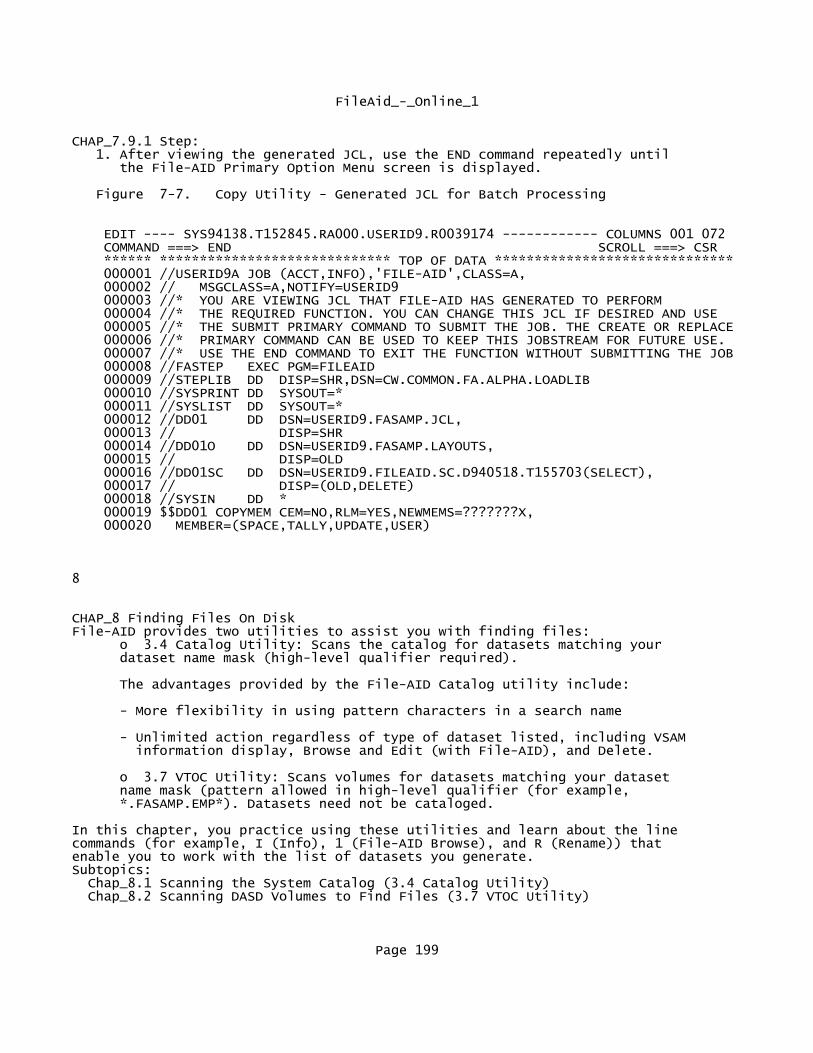
FileAid_-_Online_1
CHAP_7.9.1 Step: 1. After viewing the generated JCL, use the END command repeatedly until the File-AID Primary Option Menu screen is displayed.
Figure 7-7. Copy Utility - Generated JCL for Batch Processing
EDIT ---- SYS94138.T152845.RA000.USERID9.R0039174 ------------ COLUMNS 001 072 COMMAND ===> END SCROLL ===> CSR ****** ***************************** TOP OF DATA ****************************** 000001 //USERID9A JOB (ACCT,INFO),'FILE-AID',CLASS=A, 000002 // MSGCLASS=A,NOTIFY=USERID9 000003 //* YOU ARE VIEWING JCL THAT FILE-AID HAS GENERATED TO PERFORM 000004 //* THE REQUIRED FUNCTION. YOU CAN CHANGE THIS JCL IF DESIRED AND USE 000005 //* THE SUBMIT PRIMARY COMMAND TO SUBMIT THE JOB. THE CREATE OR REPLACE 000006 //* PRIMARY COMMAND CAN BE USED TO KEEP THIS JOBSTREAM FOR FUTURE USE. 000007 //* USE THE END COMMAND TO EXIT THE FUNCTION WITHOUT SUBMITTING THE JOB 000008 //FASTEP EXEC PGM=FILEAID 000009 //STEPLIB DD DISP=SHR,DSN=CW.COMMON.FA.ALPHA.LOADLIB 000010 //SYSPRINT DD SYSOUT=* 000011 //SYSLIST DD SYSOUT=* 000012 //DD01 DD DSN=USERID9.FASAMP.JCL, 000013 // DISP=SHR 000014 //DD01O DD DSN=USERID9.FASAMP.LAYOUTS, 000015 // DISP=OLD 000016 //DD01SC DD DSN=USERID9.FILEAID.SC.D940518.T155703(SELECT), 000017 // DISP=(OLD,DELETE) 000018 //SYSIN DD * 000019 $$DD01 COPYMEM CEM=NO,RLM=YES,NEWMEMS=???????X, 000020 MEMBER=(SPACE,TALLY,UPDATE,USER)
8
CHAP_8 Finding Files On DiskFile-AID provides two utilities to assist you with finding files: o 3.4 Catalog Utility: Scans the catalog for datasets matching your dataset name mask (high-level qualifier required).
The advantages provided by the File-AID Catalog utility include:
More flexibility in using pattern characters in a search name
Unlimited action regardless of type of dataset listed, including VSAM information display, Browse and Edit (with File-AID), and Delete.
o 3.7 VTOC Utility: Scans volumes for datasets matching your dataset name mask (pattern allowed in high-level qualifier (for example, *.FASAMP.EMP*). Datasets need not be cataloged.
In this chapter, you practice using these utilities and learn about the line commands (for example, I (Info), 1 (File-AID Browse), and R (Rename)) that enable you to work with the list of datasets you generate. Subtopics: Chap_8.1 Scanning the System Catalog (3.4 Catalog Utility) Chap_8.2 Scanning DASD Volumes to Find Files (3.7 VTOC Utility)
Page 199
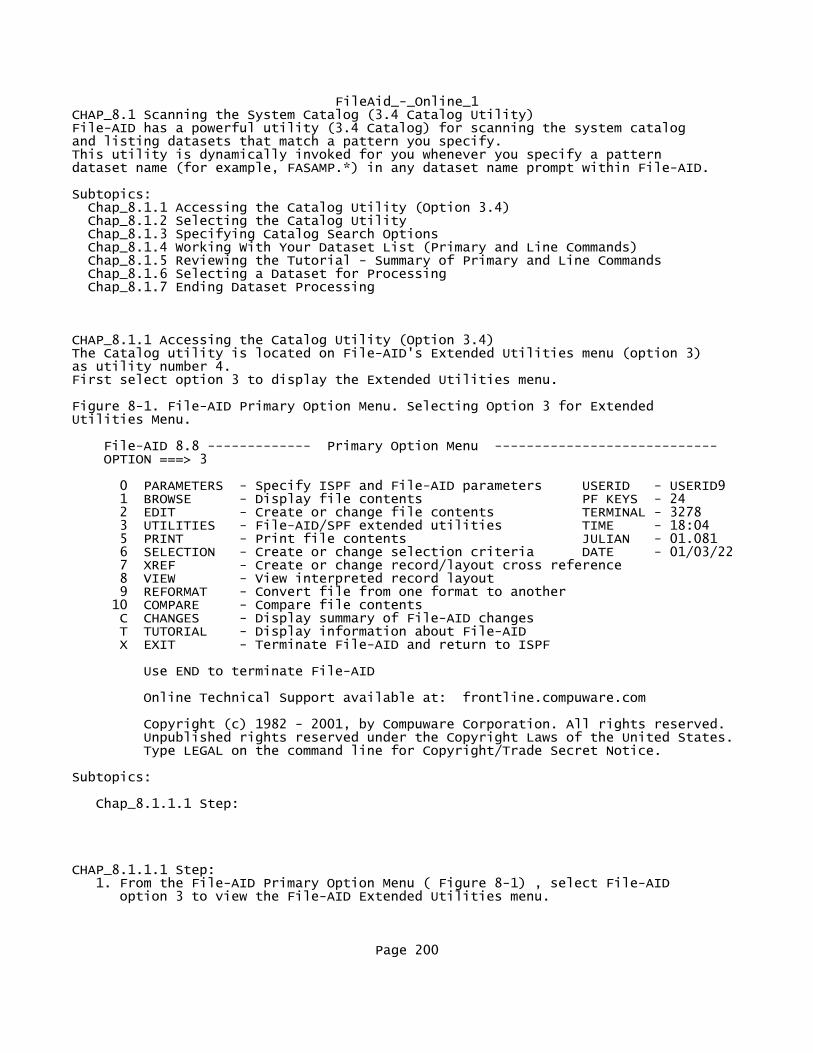
FileAid_-_Online_1CHAP_8.1 Scanning the System Catalog (3.4 Catalog Utility)File-AID has a powerful utility (3.4 Catalog) for scanning the system catalog and listing datasets that match a pattern you specify. This utility is dynamically invoked for you whenever you specify a pattern dataset name (for example, FASAMP.*) in any dataset name prompt within File-AID.
Subtopics: Chap_8.1.1 Accessing the Catalog Utility (Option 3.4) Chap_8.1.2 Selecting the Catalog Utility Chap_8.1.3 Specifying Catalog Search Options Chap_8.1.4 Working With Your Dataset List (Primary and Line Commands) Chap_8.1.5 Reviewing the Tutorial - Summary of Primary and Line Commands Chap_8.1.6 Selecting a Dataset for Processing Chap_8.1.7 Ending Dataset Processing
CHAP_8.1.1 Accessing the Catalog Utility (Option 3.4)The Catalog utility is located on File-AID's Extended Utilities menu (option 3) as utility number 4. First select option 3 to display the Extended Utilities menu.
Figure 8-1. File-AID Primary Option Menu. Selecting Option 3 for Extended Utilities Menu.
File-AID 8.8 ------------- Primary Option Menu ---------------------------- OPTION ===> 3
0 PARAMETERS - Specify ISPF and File-AID parameters USERID - USERID9 1 BROWSE - Display file contents PF KEYS - 24 2 EDIT - Create or change file contents TERMINAL - 3278 3 UTILITIES - File-AID/SPF extended utilities TIME - 18:04 5 PRINT - Print file contents JULIAN - 01.081 6 SELECTION - Create or change selection criteria DATE - 01/03/22 7 XREF - Create or change record/layout cross reference 8 VIEW - View interpreted record layout 9 REFORMAT - Convert file from one format to another 10 COMPARE - Compare file contents C CHANGES - Display summary of File-AID changes T TUTORIAL - Display information about File-AID X EXIT - Terminate File-AID and return to ISPF
Use END to terminate File-AID
Online Technical Support available at: frontline.compuware.com
Copyright (c) 1982 - 2001, by Compuware Corporation. All rights reserved. Unpublished rights reserved under the Copyright Laws of the United States. Type LEGAL on the command line for Copyright/Trade Secret Notice.
Subtopics:
Chap_8.1.1.1 Step:
CHAP_8.1.1.1 Step: 1. From the File-AID Primary Option Menu ( Figure 8-1) , select File-AID option 3 to view the File-AID Extended Utilities menu.
Page 200

FileAid_-_Online_1
CHAP_8.1.2 Selecting the Catalog UtilityNext, select option 4 to view the Catalog Utility entry screen.
Figure 8-2. File-AID Extended Utilities Menu - Choose Option 4 CATALOG
File-AID ------------------ Extended Utilities ------------------------------ OPTION ===> 4
1 LIBRARY - Display and modify directory entries; display load module CSECT maps; Browse, Delete, Rename PDS members 2 DATASET - Display dataset information; allocate non-VSAM datasets and GDGs; catalog, uncatalog, delete, or rename datasets 3 COPY - Copy entire datasets; copy selected records; copy PDS members based on name, statistics and/or content 4 CATALOG - Display generic catalog entries or VSAM datasets on a volume in list form and do dataset list processing 5 VSAM - Allocate, display, delete, modify, or rename VSAM clusters, alternate indexes, or paths; manage IAM files 6 SEARCH/UPDATE - FIND and CHANGE across PDS members. Search for and/or update data globally in any type of dataset. 7 VTOC - Display and process datasets on a volume(s)
8 INTERACTIVE - Execute File-AID/Batch
9 BATCH SUBMIT - Build batch jobstreams
G XMLGEN - Generate an XML tagged document from data file
Copyright (c) 1982, 2001, by Compuware Corporation. All rights reserved.
Subtopics:
Chap_8.1.2.1 Step:
CHAP_8.1.2.1 Step: 1. From the File-AID Extended Utilities menu ( Figure 8-2) , select option 4 to access the Catalog Utility entry screen.
CHAP_8.1.3 Specifying Catalog Search OptionsThe Catalog Utility entry screen enables you to generate a list of datasets that start with your user ID prefix by pressing the <Enter> key just once. You may choose to specify an explicit search name or other options, including: o Format option: select the amount of information you want to see in your list of datasets:
Q (Quick)
Very fast; just looks up catalog entry.
S (Short)
Reads catalog entry to show volume.
L (Long)
Page 201

FileAid_-_Online_1 Gets information from dataset label including space allocated and percent of space used and record format.
Multi-volume datasets are identified by the + (plus sign) following the Volume field with the Short and Long formats.
The default value for the Format option is set by the Format option field on the Parameters screen (option 0.4).
o Clusters only: option to show just cluster name or all components of VSAM clusters (for example, .DATA and .INDEX). The default is to show cluster name only.
o Display confirm delete: option to suppress the display of the confirm screen for each delete request.
In this example, you list your user ID datasets using the LONG format. Figure 8-3. Catalog Utility Entry Screen
File-AID -------------------- Catalog Utility ------------------------------- OPTION ===> ____
V - Produce volume list of VSAM datasets (non-ICF catalogs only) BLANK - Generic catalog search
Generic Catalog Search Function: Search name ===> ____________ Format option ===> L (Q = Quick; S = Short; L = Long) Clusters only ===> Y (Y = Yes; N = No)
Volume Dataset List Function: Volume serial ===> (Required for option V) Translate DSN ===> N (Y = Yes; N = No)
Catalog to Search if other than Default System Catalog: Catalog name ===> Catalog password ===> (If catalog is password protected)
Display confirm delete ===> Y (Y = Yes; N = No)
Subtopics:
Chap_8.1.3.1 Steps: Chap_8.1.3.2 More About the Catalog Utility Entry Screen
CHAP_8.1.3.1 Steps: 1. Leave the OPTION field blank.
2. Leave the Search name field blank.
3. Set Format option field to L (long).
4. Press <Enter>. File-AID generates the list of datasets and displays them on the Catalog Utility Dataset List screen as shown in Figure 8-4 on page 8-6.
Page 202

FileAid_-_Online_1CHAP_8.1.3.2 More About the Catalog Utility Entry Screen o Rules for the Search Name field include:
If you leave the field blank, File-AID automatically lists those datasets starting with your user ID. It also lists any datasets that start with your site optional VSAM high-level qualifier plus your VSAM intermediate name as defined in your 0.1 System Parameters default.
If you specify a name, you must enter the full, high-level qualifier name without quotes (for example, SYS1).
Valid pattern characters include:
? (Question Single character wildcard (for mark) example, SYS1.DB?LIB)
* (Asterisk) Multiple character wildcard (for example, SYS1.DB* and SYS1.FA.*.NODEFOUR)
+ (Plus) Multiple node wildcard (for example, SYS1.+.NODEFOUR).
The Search Name is reset to blanks when you exit the Catalog utility.
The V option (Produce volume list of VSAM) is used primarily for sites having pre-ICF catalogs.
CHAP_8.1.4 Working With Your Dataset List (Primary and Line Commands)File-AID scans the system catalog and generates a list of datasets matching your search name. In this case, you used the default search name and are viewing a list of your user ID prefix datasets. You can scroll the list down or up, use the FIND command, print the list, or use line commands to select one or more datasets for processing. In this example, you look at the File-AID tutorial screen available on any screen by issuing the HELP command or pressing the PF key assigned to the HELP command (PF1). Later, you use the I (Info) line command to view information about a VSAM cluster.
Figure 8-4. Catalog Utility Dataset List - Long Format
File-AID ------------- Catalog Utility Dataset List --- 22 DATASETS SELECTED COMMAND ===> SCROLL ===> CSR ----- D A T A S E T N A M E -------------- Org Volume Fmt Trks %Us Xt USERID9.FASAMP.COMPARE VS PRD928 F 1 100 1 USERID9.FASAMP.EMPLOYEE VS PRD928 F 1 100 1 USERID9.FASAMP.EMPLOYE2 PS PRD927 FB 1 0 1 USERID9.FASAMP.EMPMAST PS PRD927 FB 1 100 1 USERID9.FASAMP.INVFILE PS PRD927 VB 1 100 1 USERID9.FASAMP.INVFILE2 PS PRD927 VB 1 0 1 USERID9.FASAMP.JCL PO PRD927 FB 2 100 1 USERID9.FASAMP.LAYOUTS PO PRD927 FB 1 100 1 USERID9.FASAMP.ORDRFILE PS PRD927 VB 1 100 1 USERID9.FASAMP.RFMTDEF PO PRD927 VB 1 100 1 USERID9.FASAMP.SEGFILE PS PRD927 VB 1 100 1
Page 203

FileAid_-_Online_1 USERID9.FASAMP.SELCRIT PO PRD927 VB 1 100 1 USERID9.FASAMP.SEQBLK PS PRD904 FB 3 33 1 USERID9.FASAMP.XREF PO PRD927 VB 1 100 1
Subtopics:
Chap_8.1.4.1 Step:
CHAP_8.1.4.1 Step: 1. Press PF1 (HELP) two times.
File-AID contains comprehensive tutorials about each screen and command. Pressing PF1 (HELP) displays the tutorial describing your current screen.
If a short message is displayed in the upper right corner (for example, 22 DATASETS SELECTED), the first time you press PF1, File-AID displays the long message associated with the short message. The long message appears on screen line three or sometimes in a message window near the lower portion of your screen. The second time you press PF1, File-AID invokes the related tutorial screen that describes the current function or message.
From the tutorial, you can either select a specific topic when choices are provided or just press <Enter> from each tutorial screen to sequentially view the information.
CHAP_8.1.5 Reviewing the Tutorial - Summary of Primary and Line CommandsThis tutorial on dataset selection lists summarizes the valid primary and line commands for the Catalog utility and the VTOC utility. Use the END command (PF3) to return to the File-AID screen you were on when you requested help.
Figure 8-5. Catalog Utility. The Dataset List Processing Commands Tutorial Screen.
File-AID -------------- CATALOG - DATASET SELECTION LISTS ------------ TUTORIAL OPTION ===> +-------------------------------------+ | DATASET SELECTION LIST PROCESSING | +-------------------------------------+ DATASET SELECTION LISTS allow specific primary commands and line commands. Note: When the Catalog Utility is invoked by specifying a pattern for a DSN, the only valid line command is S, to select a dataset for processing.
The following topics are presented in sequence or may be selected by number: 1 - SCROLLING through dataset selection lists Primary commands 2 - F (FIND).....scroll to dataset name containing search text 3 - L (LOCATE)...scroll to dataset starting with search text 4 - P (PRINT)....print the list Line commands----- -------------------- ------------------------------- 5 - B (BROWSE) 10 - I (INFO-long) 15 - 1 (File-AID Browse) 6 - C (CATLG) 11 - M (MODIFY) 16 - 2 (File-AID Edit) 7 - D (DELETE) 12 - R (RENAME) 17 - 6 (File-AID Search /Update) 8 - E (EDIT) 13 - S (INFO-short or Select) 9 - F (FREE) 14 - U (UNCATLG)
Page 204
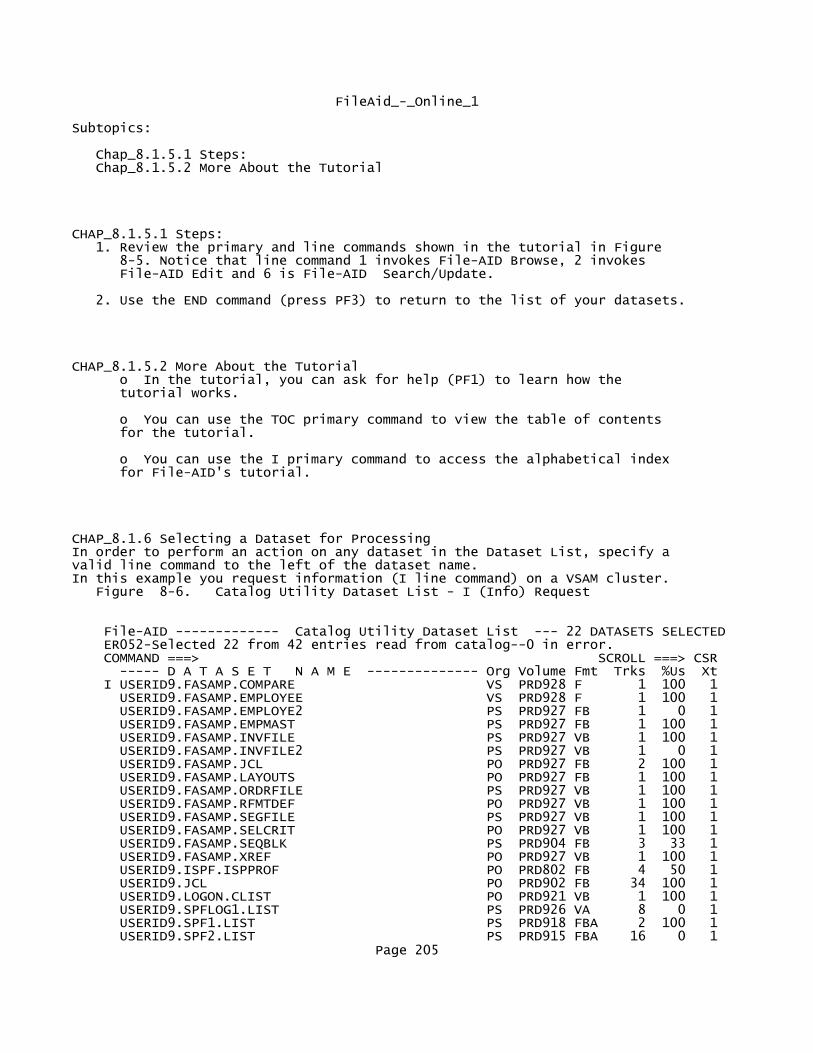
FileAid_-_Online_1
Subtopics:
Chap_8.1.5.1 Steps: Chap_8.1.5.2 More About the Tutorial
CHAP_8.1.5.1 Steps: 1. Review the primary and line commands shown in the tutorial in Figure 8-5. Notice that line command 1 invokes File-AID Browse, 2 invokes File-AID Edit and 6 is File-AID Search/Update.
2. Use the END command (press PF3) to return to the list of your datasets.
CHAP_8.1.5.2 More About the Tutorial o In the tutorial, you can ask for help (PF1) to learn how the tutorial works.
o You can use the TOC primary command to view the table of contents for the tutorial.
o You can use the I primary command to access the alphabetical index for File-AID's tutorial.
CHAP_8.1.6 Selecting a Dataset for ProcessingIn order to perform an action on any dataset in the Dataset List, specify a valid line command to the left of the dataset name. In this example you request information (I line command) on a VSAM cluster. Figure 8-6. Catalog Utility Dataset List - I (Info) Request
File-AID ------------- Catalog Utility Dataset List --- 22 DATASETS SELECTED ER052-Selected 22 from 42 entries read from catalog--0 in error. COMMAND ===> SCROLL ===> CSR ----- D A T A S E T N A M E -------------- Org Volume Fmt Trks %Us Xt I USERID9.FASAMP.COMPARE VS PRD928 F 1 100 1 USERID9.FASAMP.EMPLOYEE VS PRD928 F 1 100 1 USERID9.FASAMP.EMPLOYE2 PS PRD927 FB 1 0 1 USERID9.FASAMP.EMPMAST PS PRD927 FB 1 100 1 USERID9.FASAMP.INVFILE PS PRD927 VB 1 100 1 USERID9.FASAMP.INVFILE2 PS PRD927 VB 1 0 1 USERID9.FASAMP.JCL PO PRD927 FB 2 100 1 USERID9.FASAMP.LAYOUTS PO PRD927 FB 1 100 1 USERID9.FASAMP.ORDRFILE PS PRD927 VB 1 100 1 USERID9.FASAMP.RFMTDEF PO PRD927 VB 1 100 1 USERID9.FASAMP.SEGFILE PS PRD927 VB 1 100 1 USERID9.FASAMP.SELCRIT PO PRD927 VB 1 100 1 USERID9.FASAMP.SEQBLK PS PRD904 FB 3 33 1 USERID9.FASAMP.XREF PO PRD927 VB 1 100 1 USERID9.ISPF.ISPPROF PO PRD802 FB 4 50 1 USERID9.JCL PO PRD902 FB 34 100 1 USERID9.LOGON.CLIST PO PRD921 VB 1 100 1 USERID9.SPFLOG1.LIST PS PRD926 VA 8 0 1 USERID9.SPF1.LIST PS PRD918 FBA 2 100 1 USERID9.SPF2.LIST PS PRD915 FBA 16 0 1
Page 205

FileAid_-_Online_1 USERID9.SUPERC.LIST PS PRD912 FBA 1 100 1
Subtopics:
Chap_8.1.6.1 Steps:
CHAP_8.1.6.1 Steps: 1. If necessary, use the command FIND FASAMP.COMPARE, to scroll the list of datasets so that your userid.FASAMP.COMPARE dataset is visible in the list of datasets.
2. Write down the VOLUME number of the ...FASAMP.COMPARE dataset in the space below this sentence. You use this volume in a later example.
VOLUME = ________ <-- Write VOLSER here
3. Place an I to the left of the ...FASAMP.COMPARE dataset.
4. Press <Enter>. File-AID displays information about FASAMP.COMPARE on the VSAM Information screen shown in Figure 8-7 on page 8-9.
CHAP_8.1.7 Ending Dataset ProcessingAfter performing the function you requested, use the END command to return to the Catalog Utility Dataset List screen. If you selected more than one dataset to process, File-AID immediately processes the next command request and displays the appropriate screen (File-AID does not display the Catalog Utility Dataset List screen first). After processing your last dataset request, File-AID redisplays the Catalog Utility Dataset List screen scrolled to the last processed dataset. This example illustrates the processing of a single dataset. In this step, you exit from the Catalog utility and return to the Extended Utilities menu.
Figure 8-7. Catalog Utility - Sample VSAM Information Display
File-AID ------ VSAM Information - (Page 1 of 2) ---------------------------- COMMAND ===> END Catalog: CATALOG.TSO2.VPRD915 Cluster: 'USERID9.FASAMP.COMPARE' Data: 'USERID9.FASAMP.COMPARE.DATA' Data Volume: PRD928 Index: 'USERID9.FASAMP.COMPARE.INDEX' Index Volume: PRD928 - - - - - - - - - - - - - - - - - - - - - - - - - - - - - - - - - - - - - - - Data Component Information: Current Allocation Options: Device type: 3390 Load option: RECOVERY Organization: KSDS Write check: NO KSDS key length: 5 Buffer space: 6144 KSDS key location: 0 Erase on delete: NO Average record size: 211 Imbedded index: NO Maximum record size: 211 Replicated index: NO Allocated Space: Unit Primary Secondary Reuse option: YES Data: TRACKS 1 1 Share option: 3-3 Index: TRACKS 1 1 Spanned records: NO Dataset Date Information: MSS Binding: STAGED Creation date: 1994/05/09 MSS-Destage wait: NO Expiration date: Key ranges present: NO Modification date: 1994/05/09 AIX-unique keys: Modification time: 05:48 PM GMT AIX-upgrade:
Page 206

FileAid_-_Online_1 Use ENTER to go to page 2, END to return to utility menu
Subtopics:
Chap_8.1.7.1 Step:
CHAP_8.1.7.1 Step: 1. Use the END command (press PF3) THREE TIMES to return to the Extended Utilities menu.
CHAP_8.2 Scanning DASD Volumes to Find Files (3.7 VTOC Utility)File-AID has a convenient DASD utility (3.7 VTOC) for scanning the VTOCs of one or more individual (or ranges of) volumes to find datasets. Datasets you are looking for may be uncataloged. Special displays let you: o View a summary of space utilization on your volumes.
o View the extents on a volume in physical sequence.
o Find and list datasets using pattern names including high-level qualifier patterns.
You can also perform many of these functions with File-AID/Batch by submitting JCL to produce reports. Subtopics: Chap_8.2.1 Accessing the VTOC Utility (Option 3.7) Chap_8.2.2 Specifying VTOC Search Options Chap_8.2.3 Performing the Name Search Chap_8.2.4 Selecting a Dataset for Processing
CHAP_8.2.1 Accessing the VTOC Utility (Option 3.7)The VTOC utility is located on File-AID's Extended Utilities menu (option 3) as utility number 7.
Figure 8-8. File-AID Extended Utilities Menu. Selecting the VTOC Utility.
File-AID ------------------ Extended Utilities ------------------------------ OPTION ===> 7
1 LIBRARY - Display and modify directory entries; display load module CSECT maps; Browse, Delete, Rename PDS members 2 DATASET - Display dataset information; allocate non-VSAM datasets and GDGs; catalog, uncatalog, delete, or rename datasets 3 COPY - Copy entire datasets; copy selected records; copy PDS members based on name, statistics and/or content 4 CATALOG - Display generic catalog entries or VSAM datasets on a volume in list form and do dataset list processing 5 VSAM - Allocate, display, delete, modify, or rename VSAM clusters, alternate indexes, or paths; manage IAM files 6 SEARCH/UPDATE - FIND and CHANGE across PDS members. Search for and/or update data globally in any type of dataset. 7 VTOC - Display and process datasets on a volume(s)
8 INTERACTIVE - Execute File-AID/Batch
9 BATCH SUBMIT - Build batch jobstreams Page 207
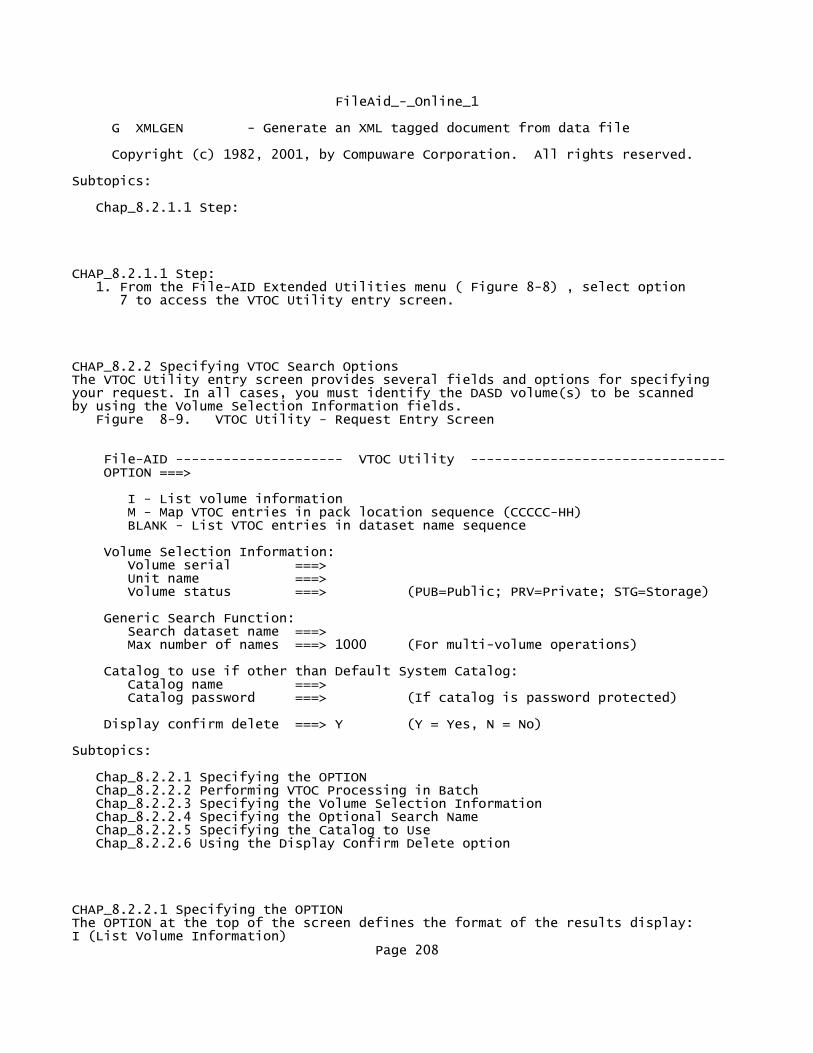
FileAid_-_Online_1
G XMLGEN - Generate an XML tagged document from data file
Copyright (c) 1982, 2001, by Compuware Corporation. All rights reserved.
Subtopics:
Chap_8.2.1.1 Step:
CHAP_8.2.1.1 Step: 1. From the File-AID Extended Utilities menu ( Figure 8-8) , select option 7 to access the VTOC Utility entry screen.
CHAP_8.2.2 Specifying VTOC Search OptionsThe VTOC Utility entry screen provides several fields and options for specifying your request. In all cases, you must identify the DASD volume(s) to be scanned by using the Volume Selection Information fields. Figure 8-9. VTOC Utility - Request Entry Screen
File-AID --------------------- VTOC Utility -------------------------------- OPTION ===>
I - List volume information M - Map VTOC entries in pack location sequence (CCCCC-HH) BLANK - List VTOC entries in dataset name sequence
Volume Selection Information: Volume serial ===> Unit name ===> Volume status ===> (PUB=Public; PRV=Private; STG=Storage)
Generic Search Function: Search dataset name ===> Max number of names ===> 1000 (For multi-volume operations)
Catalog to use if other than Default System Catalog: Catalog name ===> Catalog password ===> (If catalog is password protected)
Display confirm delete ===> Y (Y = Yes, N = No)
Subtopics:
Chap_8.2.2.1 Specifying the OPTION Chap_8.2.2.2 Performing VTOC Processing in Batch Chap_8.2.2.3 Specifying the Volume Selection Information Chap_8.2.2.4 Specifying the Optional Search Name Chap_8.2.2.5 Specifying the Catalog to Use Chap_8.2.2.6 Using the Display Confirm Delete option
CHAP_8.2.2.1 Specifying the OPTIONThe OPTION at the top of the screen defines the format of the results display: I (List Volume Information)
Page 208

FileAid_-_Online_1 Produces a summary of your volumes showing space used and free. From the list of volumes, you can use the S line command to view the datasets on the volume in name order, or the M line command to view the extents on the volume in pack location sequence.
M (Map VTOC entries in pack location sequence) Shows physical order of extents on exactly one volume.
(blank) (List VTOC entries in dataset name sequence) Produces a list of datasets for one volume or a list of all datasets matching the search name pattern on a range of volumes.
CHAP_8.2.2.2 Performing VTOC Processing in BatchFile-AID/Batch has several functions corresponding to the OPTIONS of the VTOC utility. Using these functions you can produce hard copy reports of VTOC information. Sample JCL for performing VTOC functions in batch is provided in your sample JCL library (FASAMP.JCL) member name BATVTOC. The functions include:
VTOCINFO (List Volume Information) Produces a summary of your volumes showing space used and free. Following the summary, each volume is listed in dataset name order.
VTOCMAP (Map VTOC entires in pack location sequence) Produces a report of one or more volumes by extent in physical order.
VTOCDSN (List VTOC entries in dataset name sequence) Produces a list of datasets for one volume or a list of all datasets matching the search name pattern on a range of volumes.
CHAP_8.2.2.3 Specifying the Volume Selection InformationThe Volume Selection Information fields are used to specify the volume(s) to be scanned. At least one field must contain a value, multiple fields may be used (for example, Volume serial and Unit name). o Volume Serial
A list of one or more full or partial volume serial numbers (for example, DISK21,TSO,PROD9). (Asterisk (*) means all volumes currently online.)
o Unit
A list of one or more valid UNIT names (for example, SYSDA,3390,WORK).
o Volume status
Valid status codes are PUB, PRV, and STG.
CHAP_8.2.2.4 Specifying the Optional Search NameThe Search name field accepts all standard File-AID pattern characters including pattern characters in the high-order node of the dataset. Valid pattern characters are as follows: ? (Question mark) Single character wildcard (for example, SYS1.DB?LIB)
Page 209

FileAid_-_Online_1
* (Asterisk) Multiple character wildcard (for example, SYS1.DB* and SYS1.FA.*.NODEFOUR)
+ (Plus) Multiple node wildcard (for example, +.NODEFOUR).
Use the "Max number of names" field to limit the search and display of found datasets if your pattern might match a large number of datasets.
CHAP_8.2.2.5 Specifying the Catalog to UseThese fields are used only to catalog datasets using a catalog other than the system catalog. It only applies to the C (Catalog) line command.
CHAP_8.2.2.6 Using the Display Confirm Delete optionUse the Display confirm delete field to suppress the display of a panel to confirm each delete request. This can be convenient when you are performing DASD maintenance and you do not need a confirmation of your delete requests.
CHAP_8.2.3 Performing the Name SearchIn this example, you scan a volume and list all datasets matching the search pattern +.FASAMP.COMPARE.*. The pattern matches datasets with names:
starting with any number of qualifiers and ending with FASAMP.COMPARE.any-single-qualifier.
Figure 8-10. VTOC Utility - Specifying a Name Search
File-AID --------------------- VTOC Utility -------------------------------- OPTION ===> __
I - List volume information M - Map VTOC entries in pack location sequence (CCCCC-HH) BLANK - List VTOC entries in dataset name sequence
Volume Selection Information: Volume serial ===> xxxxxx Unit name ===> Volume status ===> (PUB=Public; PRV=Private; STG=Storage)
Generic Search Function: Search dataset name ===> +.FASAMP.COMPARE.* Max number of names ===> 1000 (For multi-volume operations)
Catalog to use if other than Default System Catalog: Catalog name ===> Catalog password ===> (If catalog is password protected)
Display confirm delete ===> Y (Y = Yes, N = No)
Subtopics:
Chap_8.2.3.1 Steps:
Page 210

FileAid_-_Online_1
CHAP_8.2.3.1 Steps: 1. Leave the OPTION field blank.
2. Specify the Volume serial as the value you noted earlier in "Selecting a Dataset for Processing" on page 8-8.
3. Type +.FASAMP.COMPARE.* in the Search dataset name field.
4. Press <Enter> . File-AID lists the datasets for the specified volume as shown in Figure 8-11 on page 8-14.
CHAP_8.2.4 Selecting a Dataset for ProcessingIn order to perform an action on any dataset listed, enter a valid line command to the left of the dataset name. See Figure 8-5 on page 8-7 for a list of the valid primary and line commands available for acting on any dataset (or extent when viewing pack location sequence) displayed.
Figure 8-11. VTOC Utility - List of Datasets Matching a Search Name
File-AID ----------- Utility VTOC List for XXX926 (3390) -- ROW 1 TO 8 OF 8 COMMAND ===> SCROLL ===> CSR
VTOC: 69 Tracks ( 23 %used) 2640 Free DSCB'S 8 Datasets VOL: 50085 Tracks ( 90 %used) 15 Tracks/cylinder 15 ALT Tracks
FREE: 306 Cyls (MAX= 133) 5026 Trks (MAX= 2004) 130 Free Xtnts
Selected Datasets: 8 Tracks, using 0 % of volume --------- D A T A S E T N A M E ---------- ORG Trks %Used XTS= Status XXX010.FASAMP.COMPARE.DATA VS 1 ? 1 XXX010.FASAMP.COMPARE.INDEX VS 1 ? 1 XXX022.FASAMP.COMPARE.DATA VS 1 ? 1 XXX022.FASAMP.COMPARE.INDEX VS 1 ? 1 XXX028.FASAMP.COMPARE.DATA VS 1 ? 1 XXX028.FASAMP.COMPARE.INDEX VS 1 ? 1 XXX029.FASAMP.COMPARE.DATA VS 1 ? 1 XXX029.FASAMP.COMPARE.INDEX VS 1 ? 1 ******************************* BOTTOM OF DATA *********************************
Subtopics:
Chap_8.2.4.1 Ending Dataset Processing
CHAP_8.2.4.1 Ending Dataset ProcessingAfter viewing a list, use the END command to return to the VTOC Utility entry screen. You are done with this example; return to the File-AID Primary Option Menu now. Subtopics: Chap_8.2.4.1.1 Step:
Page 211

FileAid_-_Online_1CHAP_8.2.4.1.1 Step: 1. Use the END command (press PF3) THREE TIMES to display the File-AID Primary Option Menu.
9
CHAP_9 Viewing Load Module InformationFile-AID has a utility similar to ISPF's 3.1 Library Utility for displaying and managing PDS and PDSE members. Special features for load modules let you display and change the link-edit attributes and to view CSECT information in name or address order. The File-AID 3.1 Library utility provides these capabilities and other features for managing partitioned data sets (PDS). Subtopics: Chap_9.1 Accessing the Library Utility (Option 3.1) Chap_9.2 Defining Your Library Request Chap_9.3 Generating a Member List Chap_9.4 Using the Load Library Processing Options Chap_9.5 Processing the Member List Using Primary Commands Chap_9.6 Processing the Member List Using Line Commands Chap_9.7 Viewing the Load Module's CSECTS in Address Order
CHAP_9.1 Accessing the Library Utility (Option 3.1)The Library utility is located on File-AID's Extended Utilities menu (option 3) as utility number 1. Subtopics: Chap_9.1.1 Step:
CHAP_9.1.1 Step: 1. From the File-AID Primary Option Menu (not shown here), select File-AID option 3.1 to access the Library Utility entry screen ( Figure 9-1) .
Figure 9-1. Library Utility Entry Screen
File-AID ------------------- Library Utility ------------------------------- OPTION ===>
A - Map CSECTs in address order B - Browse member N - Map CSECTs in name order D - Delete member I - Display directory entry of member R - Rename member blank - Display member list
Dataset name ===> 'SYS1.LINKLIB'
Member name ===> (Blank or pattern for member list)
New name ===>
Volume serial ===> (If not cataloged)
Disposition ===> SHR (SHR or OLD)
Process Option ===> O (O = Online, B = Batch)
CHAP_9.2 Defining Your Library RequestPage 212

FileAid_-_Online_1The Library Utility entry screen ( Figure 9-2 on page 9-3) captures your: o Main request option:
A list CSECTS in address order
N list CSECTS in name order
I show directory entry in hex
B browse member
D delete member
R rename member
blank list members After File-AID produces a list of members, all of the options become valid line commands that may be specified for any member listed.
o Dataset name
Standard File-AID dataset name entry is supported including using wildcard character in the dataset name (for example, FASAMP.*)
o Member name (required for all but blank option)
If a member name is specified, it must be a valid full member name, no pattern characters are allowed.
o New name (required and used only by R (Rename))
o Disposition (SHR or OLD)
If the disposition is OLD for a load module library, the S (list directory) option displays (and allows update to some of) the load module's link-edit attributes.
o Process Option
Specify whether to process your Library utility request O (Online) or B (Batch). Batch processing is valid only for load library processing.
CHAP_9.3 Generating a Member ListThis example lists all members of the system load library (SYS1.LINKLIB). Later you are shown how to select a member to view the CSECTS in address order. You use option blank (Display member list).
Figure 9-2. Library Utility Entry Screen. Requesting a Member List.
File-AID ------------------- Library Utility ------------------------------- OPTION ===> ___
A - Map CSECTs in address order B - Browse member N - Map CSECTs in name order D - Delete member
Page 213
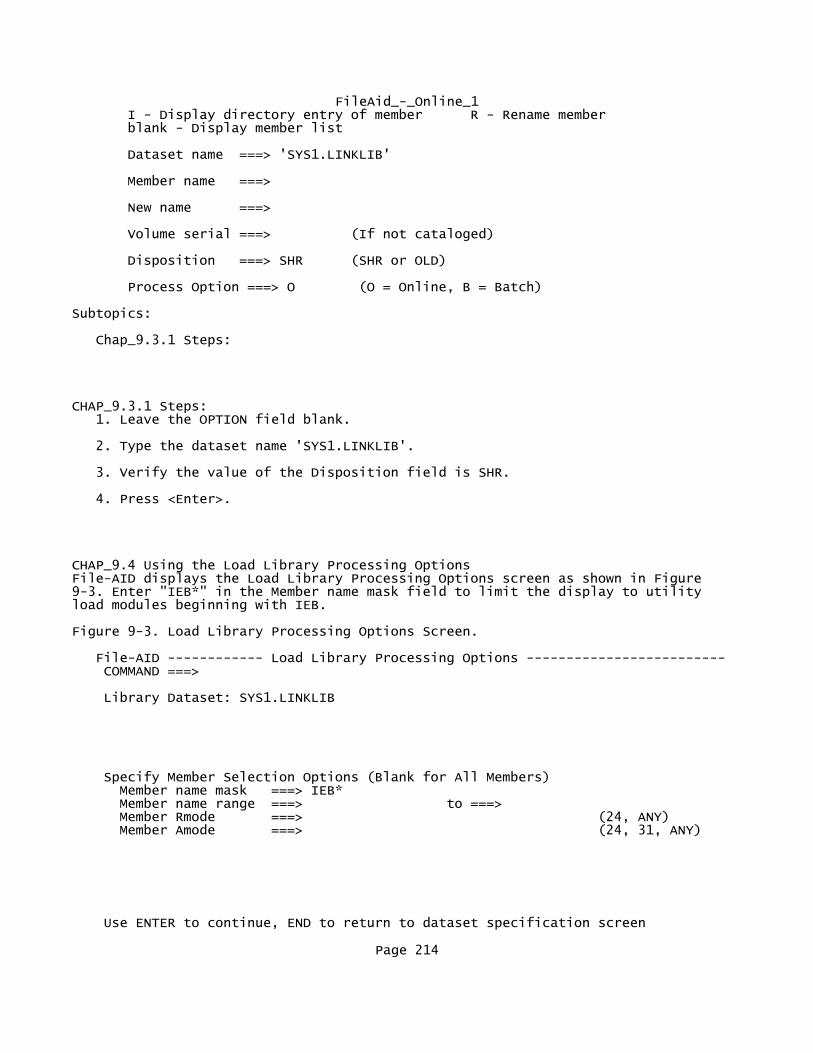
FileAid_-_Online_1 I - Display directory entry of member R - Rename member blank - Display member list
Dataset name ===> 'SYS1.LINKLIB'
Member name ===>
New name ===>
Volume serial ===> (If not cataloged)
Disposition ===> SHR (SHR or OLD)
Process Option ===> O (O = Online, B = Batch)
Subtopics:
Chap_9.3.1 Steps:
CHAP_9.3.1 Steps: 1. Leave the OPTION field blank.
2. Type the dataset name 'SYS1.LINKLIB'.
3. Verify the value of the Disposition field is SHR.
4. Press <Enter>.
CHAP_9.4 Using the Load Library Processing OptionsFile-AID displays the Load Library Processing Options screen as shown in Figure 9-3. Enter "IEB*" in the Member name mask field to limit the display to utility load modules beginning with IEB.
Figure 9-3. Load Library Processing Options Screen.
File-AID ------------ Load Library Processing Options ------------------------- COMMAND ===>
Library Dataset: SYS1.LINKLIB
Specify Member Selection Options (Blank for All Members) Member name mask ===> IEB* Member name range ===> to ===> Member Rmode ===> (24, ANY) Member Amode ===> (24, 31, ANY)
Use ENTER to continue, END to return to dataset specification screen
Page 214

FileAid_-_Online_1Subtopics:
Chap_9.4.1 Steps:
CHAP_9.4.1 Steps: 1. Type IEB* in the Member name mask field.
2. Press <Enter>.
CHAP_9.5 Processing the Member List Using Primary CommandsThe Library utility member list accepts several primary commands including: LOCATE mem Scrolls the list to the member with this name
P Print the directory list to your default printer
DOWN Scroll down by the scroll amount
UP Scroll up by the scroll amount
x mem where x is either: A (Address order), N (Name order), B (Browse), or S (Show directory).
Use the LOCATE command to scroll the list to look for load module IEBCOPY. Figure 9-4. Library Utility. Using LOCATE to Scroll a Member List.
File-AID Library Utility - SYS1.LINKLIB ---------------- 2804 MEMBERS SELECTED COMMAND ===> L IEBCOP SCROLL ===> CSR A/N = CSECT Map; I = Directory Entry; D = Delete; R = Rename; B = Browse ------------------------------------------------------------------------------ Name Rename Size TTR Alias-of AC EP R/M A/M Attributes IEBCOMPR 005508 01780E 94 0048C0 24 24 FO IEBCOPY 01B438 02E616 00 00E628 24 24 FO IEBCRANL 000CD0 01751A 43 000000 24 24 FO RF RN RU IEBCREAT 000D80 017523 26 000000 24 24 FO RF RN RU IEBDG 0010E0 01752B 42 000000 24 24 FO RN RU IEBDGCUP 000418 017534 00 000000 24 24 FO RN RU IEBDGMSG 000FB8 017601 26 000000 24 24 FO RF RN RU IEBEDIT 001FB8 018C04 27 000000 24 24 FO RU IEBFDANL 000D00 01760A 43 000000 24 24 FO RF RN RU IEBFDTBL 000A80 017613 94 000000 24 24 FO RF RN RU IEBGENER 009270 02F505 00 003298 24 24 FO IEBIMAGE 00BC18 018C0E 00 000000 24 24 FO RU IEBISAM 0004D0 01AE17 26 000000 24 24 FO RN RU IEBISC 000658 01AE1F 26 000000 24 24 FO RN RU IEBISF 0007B0 01AE28 26 000000 24 24 FO RN RU IEBISL 000968 01AF04 26 000000 24 24 FO RN RU IEBISPL 0007D8 01AF0D 94 000000 24 24 FO RN RU IEBISU 000770 01AF16 94 0003F0 24 24 FO RN RU IEBPTPCH 005CA8 017904 00 0053A0 24 24 FO IEBUPDTE 005498 017801 26 001618 24 24 FO IECDLGRT 0026D8 017120 00 000000 24 31 FO RN RU
Page 215
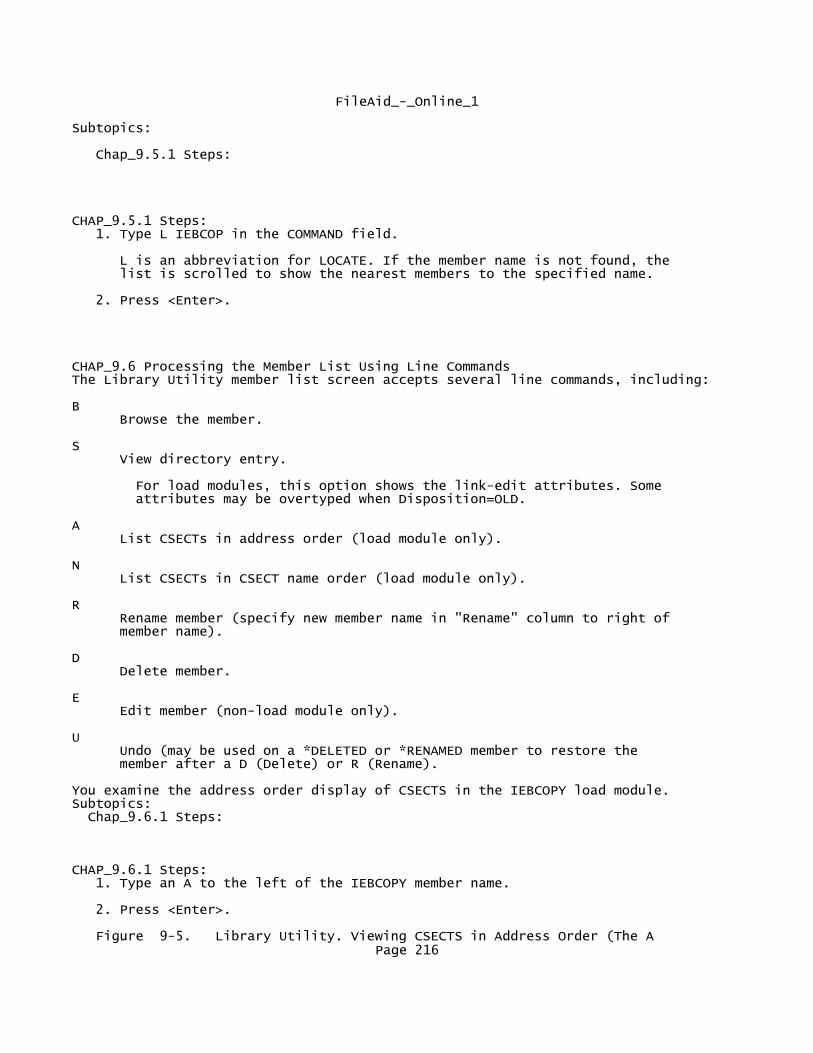
FileAid_-_Online_1
Subtopics:
Chap_9.5.1 Steps:
CHAP_9.5.1 Steps: 1. Type L IEBCOP in the COMMAND field.
L is an abbreviation for LOCATE. If the member name is not found, the list is scrolled to show the nearest members to the specified name.
2. Press <Enter>.
CHAP_9.6 Processing the Member List Using Line CommandsThe Library Utility member list screen accepts several line commands, including:
B Browse the member.
S View directory entry.
For load modules, this option shows the link-edit attributes. Some attributes may be overtyped when Disposition=OLD.
A List CSECTs in address order (load module only).
N List CSECTs in CSECT name order (load module only).
R Rename member (specify new member name in "Rename" column to right of member name).
D Delete member.
E Edit member (non-load module only).
U Undo (may be used on a *DELETED or *RENAMED member to restore the member after a D (Delete) or R (Rename).
You examine the address order display of CSECTS in the IEBCOPY load module. Subtopics: Chap_9.6.1 Steps:
CHAP_9.6.1 Steps: 1. Type an A to the left of the IEBCOPY member name.
2. Press <Enter>.
Figure 9-5. Library Utility. Viewing CSECTS in Address Order (The A Page 216
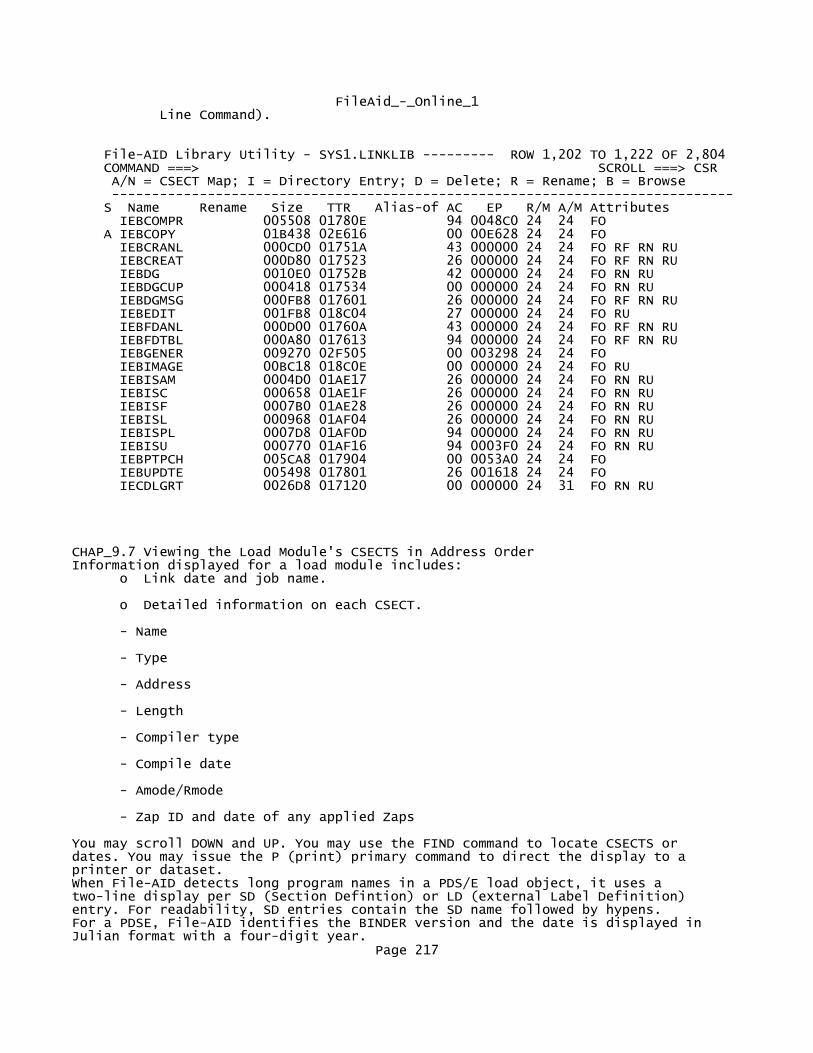
FileAid_-_Online_1 Line Command).
File-AID Library Utility - SYS1.LINKLIB --------- ROW 1,202 TO 1,222 OF 2,804 COMMAND ===> SCROLL ===> CSR A/N = CSECT Map; I = Directory Entry; D = Delete; R = Rename; B = Browse ------------------------------------------------------------------------------ S Name Rename Size TTR Alias-of AC EP R/M A/M Attributes IEBCOMPR 005508 01780E 94 0048C0 24 24 FO A IEBCOPY 01B438 02E616 00 00E628 24 24 FO IEBCRANL 000CD0 01751A 43 000000 24 24 FO RF RN RU IEBCREAT 000D80 017523 26 000000 24 24 FO RF RN RU IEBDG 0010E0 01752B 42 000000 24 24 FO RN RU IEBDGCUP 000418 017534 00 000000 24 24 FO RN RU IEBDGMSG 000FB8 017601 26 000000 24 24 FO RF RN RU IEBEDIT 001FB8 018C04 27 000000 24 24 FO RU IEBFDANL 000D00 01760A 43 000000 24 24 FO RF RN RU IEBFDTBL 000A80 017613 94 000000 24 24 FO RF RN RU IEBGENER 009270 02F505 00 003298 24 24 FO IEBIMAGE 00BC18 018C0E 00 000000 24 24 FO RU IEBISAM 0004D0 01AE17 26 000000 24 24 FO RN RU IEBISC 000658 01AE1F 26 000000 24 24 FO RN RU IEBISF 0007B0 01AE28 26 000000 24 24 FO RN RU IEBISL 000968 01AF04 26 000000 24 24 FO RN RU IEBISPL 0007D8 01AF0D 94 000000 24 24 FO RN RU IEBISU 000770 01AF16 94 0003F0 24 24 FO RN RU IEBPTPCH 005CA8 017904 00 0053A0 24 24 FO IEBUPDTE 005498 017801 26 001618 24 24 FO IECDLGRT 0026D8 017120 00 000000 24 31 FO RN RU
CHAP_9.7 Viewing the Load Module's CSECTS in Address OrderInformation displayed for a load module includes: o Link date and job name.
o Detailed information on each CSECT.
Name
Type
Address
Length
Compiler type
Compile date
Amode/Rmode
Zap ID and date of any applied Zaps
You may scroll DOWN and UP. You may use the FIND command to locate CSECTS or dates. You may issue the P (print) primary command to direct the display to a printer or dataset. When File-AID detects long program names in a PDS/E load object, it uses a two-line display per SD (Section Defintion) or LD (external Label Definition) entry. For readability, SD entries contain the SD name followed by hypens. For a PDSE, File-AID identifies the BINDER version and the date is displayed in Julian format with a four-digit year.
Page 217

FileAid_-_Online_1The END command is used to exit the display. You are done with this example so return to the File-AID Primary Option Menu now. Subtopics: Chap_9.7.1 Step:
CHAP_9.7.1 Step: 1. Use the END command (press PF3) THREE TIMES to redisplay the File-AID Primary Option Menu.
Figure 9-6. Library Utility - CSECT Information - Address Order
File-AID ADDRESS List of SYS1.LINKLIB(IEBCOPY) ----------- FUNCTION COMPLETED COMMAND ===> END SCROLL ===> CSR IEBCOPY was linked on 93/09/08 by LINKXA - Symbol - Type ADDR Length Tname 1 Tdate 1 Tname 2 Tdate 2 A/R mode ---------- ---- ------ ------ ---------- -------- ---------- -------- -------- IEBCOMCA SD 00000 1000 ASM H V2 97/06/30 24/ 24 IDENT 93/09/08 UY92656 IEBMCA LD 00000 PATCHMCA LD 00FC8 IEBCOMCB SD 01000 2000 ASM H V2 97/06/30 24/ 24 IND$C LD 01000 OUTD$C LD 01200 UT3D$C LD 01400 UT4D$C LD 01600 LOADD$C LD 01800 UNLDD$C LD 01A00 BPAMD$C LD 01C00 PRTAREA LD 02000 RDCAREA LD 02200 H1AREA LD 02300 H2AREA LD 02340 DDNTAB LD 0245C STKAREA LD 024E0 STKEND LD 02FF8
10
CHAP_10 Viewing LayoutsFile-AID has a helpful function for interpreting COBOL or PL/I record layouts and presenting an information display showing the following information for each field: o Field name
o Field level as defined in data declaration
o Field length
o Field start and end locations
o Picture of field as defined in data declaration
o System-assigned field number.
Subtopics: Page 218
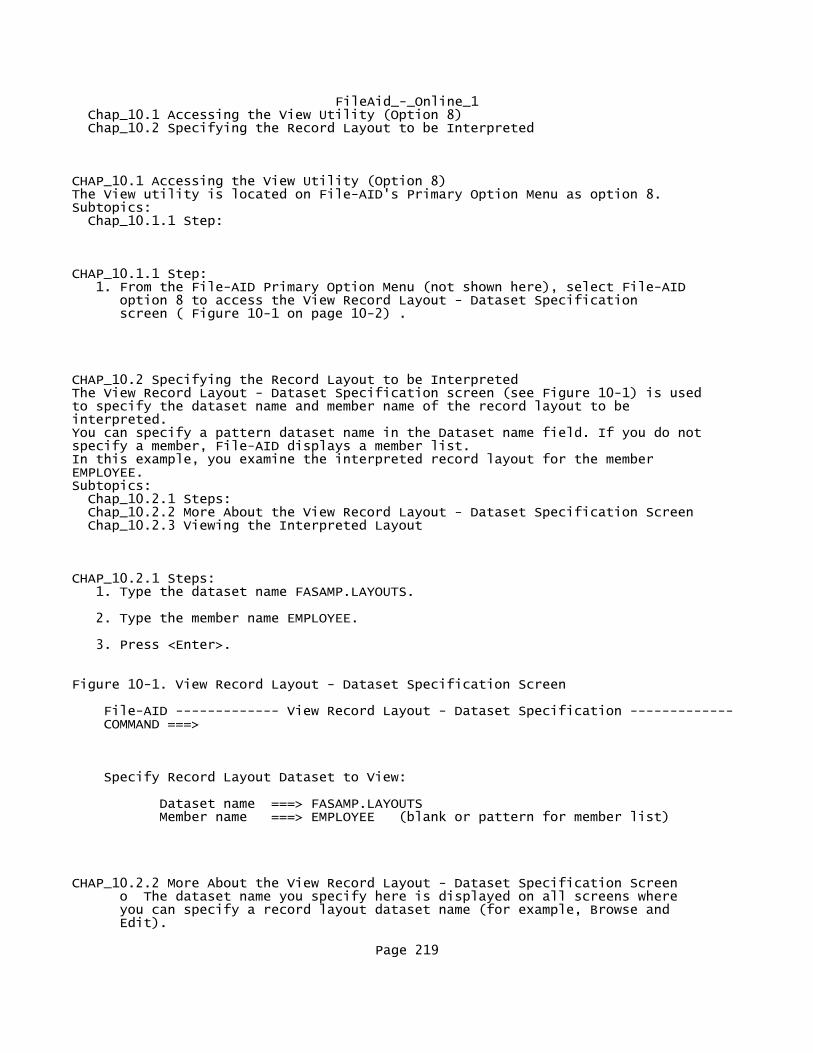
FileAid_-_Online_1 Chap_10.1 Accessing the View Utility (Option 8) Chap_10.2 Specifying the Record Layout to be Interpreted
CHAP_10.1 Accessing the View Utility (Option 8)The View utility is located on File-AID's Primary Option Menu as option 8. Subtopics: Chap_10.1.1 Step:
CHAP_10.1.1 Step: 1. From the File-AID Primary Option Menu (not shown here), select File-AID option 8 to access the View Record Layout - Dataset Specification screen ( Figure 10-1 on page 10-2) .
CHAP_10.2 Specifying the Record Layout to be InterpretedThe View Record Layout - Dataset Specification screen (see Figure 10-1) is used to specify the dataset name and member name of the record layout to be interpreted. You can specify a pattern dataset name in the Dataset name field. If you do not specify a member, File-AID displays a member list. In this example, you examine the interpreted record layout for the member EMPLOYEE. Subtopics: Chap_10.2.1 Steps: Chap_10.2.2 More About the View Record Layout - Dataset Specification Screen Chap_10.2.3 Viewing the Interpreted Layout
CHAP_10.2.1 Steps: 1. Type the dataset name FASAMP.LAYOUTS.
2. Type the member name EMPLOYEE.
3. Press <Enter>.
Figure 10-1. View Record Layout - Dataset Specification Screen
File-AID ------------- View Record Layout - Dataset Specification ------------- COMMAND ===>
Specify Record Layout Dataset to View:
Dataset name ===> FASAMP.LAYOUTS Member name ===> EMPLOYEE (blank or pattern for member list)
CHAP_10.2.2 More About the View Record Layout - Dataset Specification Screen o The dataset name you specify here is displayed on all screens where you can specify a record layout dataset name (for example, Browse and Edit).
Page 219

FileAid_-_Online_1 o Record layouts to be interpreted may reside in any supported source library including:
PDS (80 byte records)
CA-PANVALET
CA-LIBRARIAN
Compuware map library (Release 6 and prior).
o The member specified must contain only data declarations for one or more structures of data beginning at structure level 01. You can specify a data declaration with COBOL or PL/I, but you cannot specify both within a single member.
o When using a multiple structure member in Browse or Edit, issue the formatted mode command, USE, to see a list of all layouts from which you may select an alternate layout.
CHAP_10.2.3 Viewing the Interpreted LayoutThe VIEW LAYOUT display screen ( Figure 10-2) accepts the following primary commands: DOWN Scrolls down by the scroll amount.
END Exits from the VIEW LAYOUT screen.
FIND xx Searches for string xx and scrolls to the field.
REPEAT Repeats previous find.
UP Scrolls up by the scroll amount.
You are done with this example so return to the File-AID Primary Option Menu now. Subtopics: Chap_10.2.3.1 Step: Chap_10.2.3.2 More About the View Display
CHAP_10.2.3.1 Step: 1. Use the END command (press PF3) TWO TIMES to redisplay the File-AID Primary Option Menu.
Figure 10-2. View Utility - Display of Interpreted Layout
File-AID ---------------------- VIEW LAYOUT --------------- ROW 1 TO 19 OF 38 COMMAND ===> END SCROLL ===> CSR Layout: USERID9.FASAMP.LAYOUTS(EMPLOYEE) FIELD --------- FIELD LEVEL/NAME ---------- -PICTURE- -NUMBER START END LENGTH EMPLOYEE-MASTER-FILE 1 198 198 5 EMP-NUMBER X(5) 1 1 5 5
Page 220

FileAid_-_Online_1 5 EMP-LAST-NAME X(15) 2 6 20 15 5 EMP-FIRST-NAME X(10) 3 21 30 10 5 EMP-MID-INIT X 4 31 31 1 5 FILLER XX 5 32 33 2 5 EMP-TITLE X(30) 6 34 63 30 5 EMP-PERSONAL-INFO GROUP 7 64 86 23 10 EMP-NATL-ID-NUMBER 9(9) 8 64 72 9 10 FILLER X 9 73 73 1 10 EMP-DATE-OF-BIRTH X(6) 10 74 79 6 10 EMP-DOB-REDEF REDEFINES EMP-DATE-OF-BIRTH 10 EMP-DOB-REDEF GROUP 11 74 79 6 15 EMP-DOB-MM 99 12 74 75 2 15 EMP-DOB-DD 99 13 76 77 2 15 EMP-DOB-YY 99 14 78 79 2 10 EMP-HIRE-DATE X(6) 15 80 85 6 10 EMP-MARITAL-STATUS X 16 86 86 1 5 EMP-WITHOLD-INFO GROUP 17 87 101 15
CHAP_10.2.3.2 More About the View Display o If the source member contains more than one 01 level structure, you may scroll down to see additional structures. A marker line is inserted in the display to signify the new structure:
> > >START OF LAYOUT NUMBER 2< < <
11
CHAP_11 Reformatting RecordsThe Reformat function extends the capabilities of the Copy utility by allowing you to change the format of your file as you are copying it. You define the rules for reformatting by supplying record layouts for the file being copied and for the target file. Typically you start with a layout which matches a data file. Then, make a copy of the layout and make changes to the new version to reflect the new format of your data file. In the new layout you reorganize the source fields by adding new fields, deleting unwanted fields, changing field sizes and/or reordering fields.
Next you create a reformat definition using the Reformat function. Then, execute the definition to read your original file and write reformatted records to your new file. You create a reformat definition for the target file by: o Using optional field selection criteria to selectively copy and/or reformat records
o Defining fields to be moved (including numeric format translations)
o Specifying constant values for new or existing fields
After you create a reformat definition, you can execute the Reformat function online or in batch. Japanese Users: Reformat does not support Graphic-defined DBCS data fields. Subtopics: Chap_11.1 Accessing the Reformat Function (Option 9) Chap_11.2 Creating a New Reformat Definition Chap_11.3 Identifying the Source and Target Record Layouts Chap_11.4 Using the Reformat Definition Editor
Page 221

FileAid_-_Online_1 Chap_11.5 Entering Constants Chap_11.6 Initializing New Fields Chap_11.7 Hiding Sensitive Data On Output Chap_11.8 Establishing Selection Criteria Chap_11.9 Executing the Reformat Online at Your Terminal Chap_11.10 Browsing the Reformatted File
CHAP_11.1 Accessing the Reformat Function (Option 9)The Reformat function is located on File-AID's Primary Option Menu as option 9. Subtopics: Chap_11.1.1 Steps:
CHAP_11.1.1 Steps: 1. Enter a 9 in the OPTION field on the Primary Option Menu (not shown here).
2. Press <Enter>. File-AID displays the first screen of the Reformat function as shown in Figure 11-1 on page 11-2.
CHAP_11.2 Creating a New Reformat DefinitionThis example illustrates the process of creating a new reformat definition.
Figure 11-1. Reformat Definition - Specify Reformat Definition Member
File-AID ------------------------- REFORMAT DEFINITION ------------------------ OPTION ===> ___
blank - Create a new or change an existing reformat definition D - Dynamically create and execute a temporary reformat definition E - Execute a previously saved reformat definition
Specify Reformat Definition Dataset: Dataset name ===> FASAMP.RFMTDEF Member name ===> EMPNEW Volume serial ===> (If not cataloged) Description ===>
Specify Execution Information: Process online or batch ===> O (O = Online; B = Batch)
Subtopics:
Chap_11.2.1 Steps: Chap_11.2.2 More About the Reformat Definition Screen
CHAP_11.2.1 Steps: 1. Leave OPTION field blank to specify that you want to create a new reformat definition.
Page 222

FileAid_-_Online_1
2. Enter FASAMP.RFMTDEF in the Dataset name field.
The attributes of this dataset are
DSORG=PO,RECFM=VB,LRECL=1580,BLKSIZE=7870. 3. Enter EMPNEW in the Member name field.
4. Type an O in the Process online or batch field.
5. Press <Enter>. File-AID displays the Reformat Record Layouts - Create Mode screen as shown in Figure 11-2 on page 11-3.
CHAP_11.2.2 More About the Reformat Definition Screen o If the member name you specify already exists, File-AID invokes the editor where you can make changes to your reformat definition.
You cannot change record layouts in an existing member; you must create a new member in order to use different layouts or when a layout you want to use has changed.
o You can create and execute a temporary reformat definition by specifying option D. File-AID does not save the reformat definition you create through this option unless you specifically request to save it.
o You can execute an existing reformat definition by specifying option E. This option lets you execute a reformat definition that you previously created and saved. You bypass the editing process when you select option E.
o Contents of your sample reformat library (FASAMP.RFMTDEF) include a member EMPLOYE2, which matches the new member EMPNEW you are defining in this example.
CHAP_11.3 Identifying the Source and Target Record LayoutsThe Reformat Record Layouts - Create Mode screen is displayed only when you are creating a new reformat definition. The information you enter on this screen defines the record layouts (source and target) for your new reformat definition.
Figure 11-2. Reformat Record Layouts - Create Mode. Identify Source and Target Record Layouts and Options
File-AID ----------------------- Reformat Record Layouts --------- CREATE MODE COMMAND ===>
Specify Source Record Layout and XREF Information: Record layout usage ===> S (S = Single; X = XREF) Record layout dataset ===> FASAMP.LAYOUTS Member name ===> EMPLOYEE (Blank or pattern for member list) XREF dataset name ===> Member name ===> (Blank or pattern for member list)
Specify Target Record Layout and XREF Information: Record layout usage ===> S (S = Single; X = XREF) Record layout dataset ===> FASAMP.LAYOUTS
Page 223

FileAid_-_Online_1 Member name ===> EMPLOYE2 (Blank or pattern for member list) XREF dataset name ===> Member name ===> (Blank or pattern for member list)
Move corresponding? ===> YES (YES or NO)
Ignore prefix ===> Ignore suffix ===>
Subtopics:
Chap_11.3.1 Steps: Chap_11.3.2 More About the Reformat Record Layouts Screen
CHAP_11.3.1 Steps: 1. Verify that the Record layout usage field in the Source information area of the screen contains a value of S.
2. Type FASAMP.LAYOUTS in the Record layout dataset field.
3. Type EMPLOYEE in the Member name field.
4. Verify that the Record layout usage field in the Target information area of the screen contains a value of S.
5. Type FASAMP.LAYOUTS in the Record layout dataset field.
6. Type EMPLOYE2 in the Member name field.
7. Verify YES in the Move corresponding field.
8. Press <Enter>. File-AID displays the Reformat Definition Editor screen as shown in Figure 11-3 on page 11-5.
CHAP_11.3.2 More About the Reformat Record Layouts Screen o When you leave the OPTION field blank to create a new reformat definition, File-AID displays the information flag CREATE MODE in the top right corner of the display.
o When you specify YES in the Move corresponding field, File-AID matches the source and target layout field names and automatically assigns field references to request data movement during the reformat. File-AID does not automatically match COBOL FILLER fields.
Use the optional Ignore prefix and Ignore suffix fields when field names in the source and target layouts are similar, but have a different prefix or suffix. File-AID uses the values in these fields to match field names in this case.
o If you use an XREF for either the source or target layout, File-AID presents a list of layout members for you to choose. If you choose a BASE layout for the source, File-AID automatically reformats only those records with the matching record type values. You must not choose a DEFAULT-BASE layout for a target. If you execute in batch, you need to add DD01XR and DD01RL statements to the batch JCL to identify the XREF member and layouts library.
Page 224

FileAid_-_Online_1
CHAP_11.4 Using the Reformat Definition EditorIn this example, you use the Reformat Definition Editor to define the new format of the FASAMP.EMPLOYE2 dataset. Using the editor, complete the following tasks: o Initialize new and existing fields with literals.
o Define selection criteria to select only those records that meet the criteria for reformatting.
The Reformat Definition Editor screen as shown in Figure 11-3, is divided into two parts: the source record layout fields are located in the top portion of the screen and the target record layout fields are located in the bottom portion of the screen.
Figure 11-3. Reformat Definition Editor
File-AID ---- REFORMAT Definition Editor - DS:USERID9.FASAMP.RFMTDEF(EMPNEW) - COMMAND ===> SCROLL ===> PAGE
Source COBOL - EMPLOYEE-MASTER-FILE ---- USERID9.FASAMP.LAYOUTS(EMPLOYEE) ----- Num Field Name Format Pic OP Data Row 1 of 35 0 EMPLOYEE-MASTER-FILE GRP/198 1 EMP-NUMBER AN/5 2 EMP-LAST-NAME AN/15 3 EMP-FIRST-NAME AN/10 4 EMP-MID-INIT AN/1 5 FILLER AN/2 6 EMP-TITLE AN/30 7 EMP-PERSONAL-INFO GRP/23 Target COBOL - EMPLOYEE-MASTER-FILE ---- USERID9.FASAMP.LAYOUTS(EMPLOYE2) ----- Num Field Name Format Pic Data Row 1 of 36 0 EMPLOYEE-MASTER-FILE GRP/211 1 EMP-NUMBER AN/5 /EMP-NUMBER 2 EMP-FIRST-NAME AN/15 /EMP-FIRST-NAME 3 EMP-MID-INIT AN/1 /EMP-MID-INIT 4 EMP-LAST-NAME AN/20 /EMP-LAST-NAME 5 EMP-TITLE AN/30 /EMP-TITLE 6 EMP-PERSONAL-INFO GRP/24 7 EMP-NATL-ID-NUMBER NUM/9 9v00 /EMP-NATL-ID-NUMBER Use END Command to Save then End, CANCEL to Cancel, or EX to Execute Reformat
Because we asked for Move Corresponding = Y, target fields are pre-filled with references to corresponding source layout fields by field name. For example, /EMP-NUMBER in the target field EMP-NUMBER means to move data from source field name EMP-NUMBER. When you execute your reformat, moves are performed using the rules of COBOL. If an alphanumeric field is moved to a larger field, blanks are added on the right. If move to a shorter field, data is truncated to the length of the target field.
Subtopics: Chap_11.4.1 Scrolling Chap_11.4.2 The Existing (Source) Record Layout (Upper Window) Chap_11.4.3 The New (Target) Record Layout (Lower Window) Chap_11.4.4 Commands EX, SAVE, CANCEL, END Chap_11.4.5 Scrolling Both Windows Chap_11.4.6 Steps: Chap_11.4.7 Result of Scrolling DOWN Both Windows.
Page 225

FileAid_-_Online_1
CHAP_11.4.1 ScrollingYou can scroll the data in both the source and target windows of the editor independently or at the same time. The location of the cursor determines which window(s) is scrolled. If the cursor is located within the source layout fields, then only the upper window is scrolled. The lower window only scrolls when the cursor is located in the lower window fields. If the cursor is on the command line, both windows scroll.
CHAP_11.4.2 The Existing (Source) Record Layout (Upper Window)The source window displays information about the source record layout. It is in this window that you specify the field selection criteria to use to select specific records to be reformatted.
CHAP_11.4.3 The New (Target) Record Layout (Lower Window)Use the target window fields to specify which source fields to use as a source of data. Optionally, you can specify a constant for a target field to initialize new fields or to mask sensitive data during the reformat. Field references are specified in the Data Area to the right of each target field, by entering a slash (/) followed by the field name or number.Constants are specified by entering a string of decimal digits for numeric fields or a quoted string for alphanumeric fields. Notice that on entry to the Reformat Editor, the target fields already contain field references (for example, /EMP-NUMBER, /EMP-FIRST-NAME, etc.). These references are automatically generated when you specify a value of YES in the Move corresponding field.
CHAP_11.4.4 Commands EX, SAVE, CANCEL, ENDUse the following commands from the Reformat Definition Editor: SAVE Saves the reformat definition member in the reformat dataset.
EX Saves the reformat definition and displays either the online or batch Execute Reformat screen.
END Saves the reformat definition and redisplays the Reformat Definition screen.
CANCEL Terminates the reformat definition session without saving any changes you made to the reformat definition.
CHAP_11.4.5 Scrolling Both WindowsWhen the cursor is positioned in the command line and you specify a scrolling command or press a scrolling PF key (for example: PF8=DOWN, PF7=UP), File-AID scrolls both windows in the reformat definition editor. Figure 11-4. Reformat Editor - DOWN command Scrolling Both Windows.
File-AID ---- REFORMAT Definition Editor - DS:USERID9.FA COMMAND ===> DOWN
Page 226

FileAid_-_Online_1 Source COBOL - EMPLOYEE-MASTER-FILE ---- USERID9.FASAMP. Num Field Name Format Pic OP Data 0 EMPLOYEE-MASTER-FILE GRP/198
CHAP_11.4.6 Steps: 1. Position the cursor in the command line (HOME).
2. Press the PF key for DOWN (PF8),
or
Type the command DOWN in the COMMAND field and press <Enter>.
CHAP_11.4.7 Result of Scrolling DOWN Both Windows.
Figure 11-5. Reformat Definition Editor. Establishing Constants in the Target Layout.
File-AID ---- REFORMAT Definition Editor - DS:USERID9.FASAMP.RFMTDEF(EMPNEW) - COMMAND ===> DOWN SCROLL ===> PAGE Source COBOL - EMPLOYEE-MASTER-FILE ---- USERID9.FASAMP.LAYOUTS(EMPLOYEE) ----- Num Field Name Format Pic OP Data Row 9 of 35 8 EMP-NATL-ID-NUMBER NUM/9 9v00 9 FILLER AN/1 10 EMP-DATE-OF-BIRTH AN/6 11 EMP-DOB-REDEF GRP/6 Redefines EMP-DATE-OF-BIRTH 12 EMP-DOB-MM NUM/2 2v00 13 EMP-DOB-DD NUM/2 2v00 14 EMP-DOB-YY NUM/2 2v00 Target COBOL - EMPLOYEE-MASTER-FILE ---- USERID9.FASAMP.LAYOUTS(EMPLOYE2) ----- Num Field Name Format Pic Data Row 9 of 36 8 EMP-NEW-BIRTH-DATE GRP/7 9 EMP-DOB-CENTURY AN/1 '1' 10 EMP-BIRTH-DATE GRP/6 11 EMP-DOB-YY NUM/2 2v00 /14 12 EMP-DOB-MM NUM/2 2v00 /12 13 EMP-DOB-DD NUM/2 2v00 /13 14 EMP-NEW-HIRE-DATE GRP/7 15 EMP-HD-CENTURY AN/1 '1' Use END Command to Save then End, CANCEL to Cancel, or EX to Execute Reformat
CHAP_11.5 Entering ConstantsAfter the DOWN scroll, both layouts are scrolled to show the BIRTH-DATE field (see Figure 11-5) . Notice how the target layout re- arranges the date from MMDDYY format to YYMMDD format and inserts a new EMP-DOB-CENTURY field. You assign a constant value of '1' (meaning 19xx) to the new century fields for birth date and hire date. Subtopics: Chap_11.5.1 Steps: Chap_11.5.2 Resetting Existing Values to a Constant Chap_11.5.3 Steps:
Page 227

FileAid_-_Online_1
CHAP_11.5.1 Steps: 1. Type '1' in EMP-DOB-CENTURY target field Data area.
You must surround an alphanumeric field constant with single quotes.
2. Type /14 in EMP-DOB-YY target field Data area. /14 references the EMP-DOB-YY source field.
3. Type /12 in EMP-DOB-MM target field Data area.
4. Type /13 in EMP-DOB-DD target field Data area.
5. Type '1' in EMP-HD-CENTURY target field Data area.
6. Position the cursor in the command line.
7. Press the PF key for DOWN (PF8),
or
Type the command DOWN in the COMMAND field and press <Enter>.
CHAP_11.5.2 Resetting Existing Values to a ConstantYou may specify a new constant value for any target field. Just type over the field reference with a constant. In this example, you assign values to the new fields EMP-PAY-GRADE and EMP-NEW- 401K-WITHOLD-AMT and also assign a new constant value of 28.5 to the EMP-NATL- TAX-WITHOLD-PCT field. Figure 11-6. Reformat Definition Editor. Resetting Existing Values to a Constant Value.
File-AID ---- REFORMAT Definition Editor - DS:USERID9.FASAMP.RFMTDEF(EMPNEW) - COMMAND ===> DOWN SCROLL ===> PAGE Source COBOL - EMPLOYEE-MASTER-FILE ---- USERID9.FASAMP.LAYOUTS(EMPLOYEE) ----- Num Field Name Format Pic OP Data Row 16 of 35 15 EMP-HIRE-DATE AN/6 16 EMP-MARITAL-STATUS AN/1 17 EMP-PERSONAL-INFO GRP/15 18 EMP-LIFE-INS-WITHOLD-AMT NUMS/6 4v02 19 EMP-NATL-TAX-WITHOLD-PCT PS/3 3v02 20 EMP-REGION-TAX-WITHOLD-PCT PS/3 3v02 21 EMP-LOCAL-TAX-WITHOLD-PCT PS/3 3v02 22 EMP-HOME-ADDRESS GRP/50 Target COBOL - EMPLOYEE-MASTER-FILE ---- USERID9.FASAMP.LAYOUTS(EMPLOYE2) ----- Num Field Name Format Pic Data Row 17 of 36 16 EMP-HIRE-DATE AN/6 /15 17 EMP-MARITAL-STATUS AN/1 /EMP-MARITAL-STATUS 18 EMP-PERSONAL-INFO GRP/20 19 EMP-PAY-GRADE AN/3 'PAY' 20 EMP-LIFE-INS-WITHOLD-AMT PS/5 7v02 /EMP-LIFE-INS-WITHOLD-AMT 21 EMP-NATL-TAX-WITHOLD-PCT PS/3 3v02 28.5 22 EMP-NEW-401K-WITHOLD-AMT PS/3 3v02 0 23 EMP-REGION-TAX-WITHOLD-PCT PS/3 3v02 /20 Use END Command to Save then End, CANCEL to Cancel, or EX to Execute Reformat
Page 228

FileAid_-_Online_1CHAP_11.5.3 Steps: 1. Type /15 in EMP-HIRE-DATE target field Data area. /15 references the EMP-HIRE- DATE source field.
2. Type 'PAY' in the EMP-PAY-GRADE target field Data area.
3. Type 28.5 in the EMP-NATL-TAX-WITHOLD-PCT target field Data area.
Numeric field constants are entered as one or more decimal digits (with optional decimal points or signs) and are not quoted.
4. Type 0 in the EMP-NEW-401K-WITHOLD-AMT target field Data area.
Numeric fields are automatically initialized to zero if no constant value or field reference is specified. Alphanumeric fields are initialized to blanks.
5. Position the cursor in the command line.
6. Press the PF key for DOWN (PF8),
or
Type the command DOWN in the COMMAND field and press <Enter>.
CHAP_11.6 Initializing New FieldsThis example illustrates the process of initializing a new field. The zip code needs to be expanded from a five to a nine digit field. You assign a constant "0000" for the new EMP-ZIP-CODE-PLUS-4 field. Figure 11-7. Reformat Definition Editor. Initializing New Fields.
File-AID ---- REFORMAT Definition Editor - DS:USERID9.FASAMP.RFMTDEF(EMPNEW) - COMMAND ===> DOWN SCROLL ===> PAGE Source COBOL - EMPLOYEE-MASTER-FILE ---- USERID9.FASAMP.LAYOUTS(EMPLOYEE) ----- Num Field Name Format Pic OP Data Row 24 of 35 23 EMP-STREET-ADDRESS AN/25 24 FILLER AN/1 25 EMP-CITY AN/15 26 EMP-STATE-PROV-CNTY GRP/4 27 EMP-STATE AN/2 28 FILLER AN/2 29 EMP-POSTAL-CODE NUM/5 5v00 30 EMP-EMERGENCY-CONTACT GRP/47 Target COBOL - EMPLOYEE-MASTER-FILE ---- USERID9.FASAMP.LAYOUTS(EMPLOYE2) ----- Num Field Name Format Pic Data Row 25 of 36 24 EMP-LOCAL-TAX-WITHOLD-PCT PS/3 3v02 /EMP-LOCAL-TAX-WITHOLD-PCT 25 EMP-HOME-ADDRESS GRP/51 26 EMP-STREET-ADDRESS AN/25 /EMP-STREET-ADDRESS 27 EMP-CITY AN/15 /EMP-CITY 28 EMP-STATE AN/2 /27 29 EMP-NINE-DIGIT-ZIP GRP/9 30 EMP-POSTAL-CODE NUM/5 5v00 /29 31 EMP-ZIP-CODE-PLUS-4 AN/4 '0000' Use END Command to Save then End, CANCEL to Cancel, or EX to Execute Reformat
Subtopics:
Chap_11.6.1 Steps:Page 229
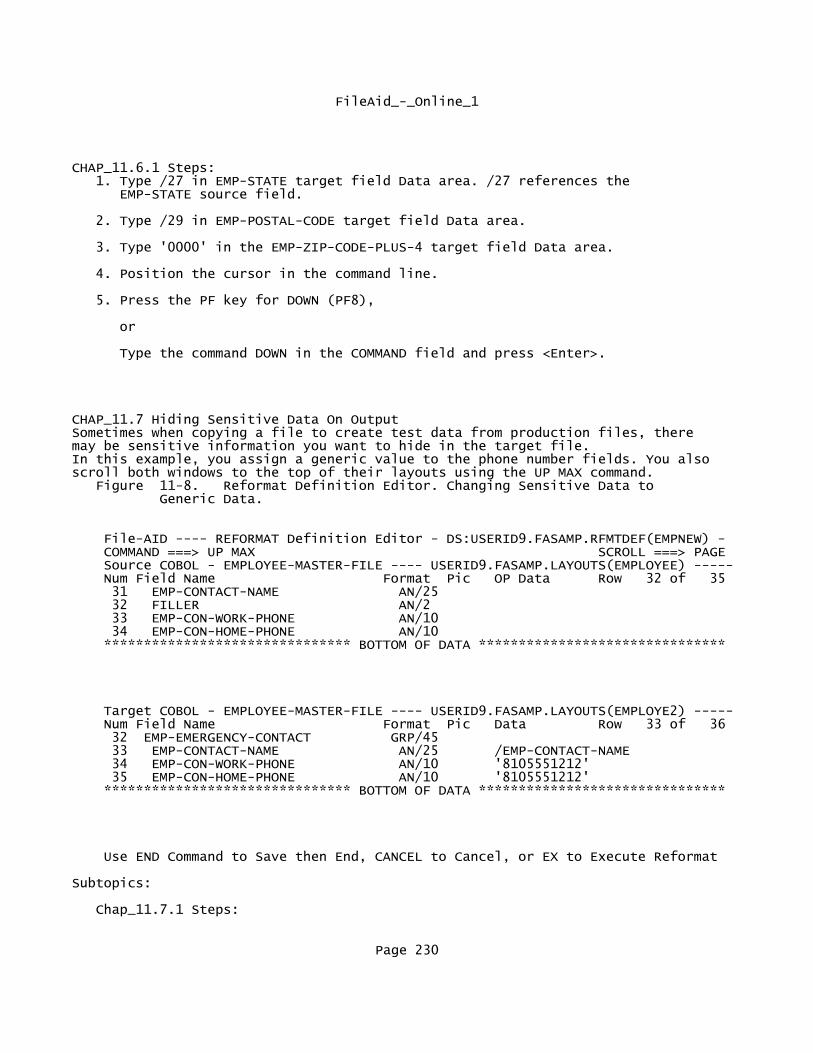
FileAid_-_Online_1
CHAP_11.6.1 Steps: 1. Type /27 in EMP-STATE target field Data area. /27 references the EMP-STATE source field.
2. Type /29 in EMP-POSTAL-CODE target field Data area.
3. Type '0000' in the EMP-ZIP-CODE-PLUS-4 target field Data area.
4. Position the cursor in the command line.
5. Press the PF key for DOWN (PF8),
or
Type the command DOWN in the COMMAND field and press <Enter>.
CHAP_11.7 Hiding Sensitive Data On OutputSometimes when copying a file to create test data from production files, there may be sensitive information you want to hide in the target file. In this example, you assign a generic value to the phone number fields. You also scroll both windows to the top of their layouts using the UP MAX command. Figure 11-8. Reformat Definition Editor. Changing Sensitive Data to Generic Data.
File-AID ---- REFORMAT Definition Editor - DS:USERID9.FASAMP.RFMTDEF(EMPNEW) - COMMAND ===> UP MAX SCROLL ===> PAGE Source COBOL - EMPLOYEE-MASTER-FILE ---- USERID9.FASAMP.LAYOUTS(EMPLOYEE) ----- Num Field Name Format Pic OP Data Row 32 of 35 31 EMP-CONTACT-NAME AN/25 32 FILLER AN/2 33 EMP-CON-WORK-PHONE AN/10 34 EMP-CON-HOME-PHONE AN/10 ******************************* BOTTOM OF DATA *******************************
Target COBOL - EMPLOYEE-MASTER-FILE ---- USERID9.FASAMP.LAYOUTS(EMPLOYE2) ----- Num Field Name Format Pic Data Row 33 of 36 32 EMP-EMERGENCY-CONTACT GRP/45 33 EMP-CONTACT-NAME AN/25 /EMP-CONTACT-NAME 34 EMP-CON-WORK-PHONE AN/10 '8105551212' 35 EMP-CON-HOME-PHONE AN/10 '8105551212' ******************************* BOTTOM OF DATA *******************************
Use END Command to Save then End, CANCEL to Cancel, or EX to Execute Reformat
Subtopics:
Chap_11.7.1 Steps:
Page 230

FileAid_-_Online_1
CHAP_11.7.1 Steps: 1. Type '8105551212' in the EMP-CON-WORK-PHONE and the EMP-CON-HOME- PHONE target field Data areas.
2. Position the cursor in the COMMAND field.
3. Type the command UP MAX and press <Enter>.
CHAP_11.8 Establishing Selection CriteriaIn the upper (Source) window you may specify selection criteria by entering values in the OP and Data fields at the right side of one or more field names. Only records matching your selection condition are considered for reformatting. During execution you have an option to include or exclude non-selected records in the output file. To complete your reformat definition you: 1. Set up a selection condition to reformat only those records with an EMP-NUMBER greater than or equal to spaces.
2. Place generic number 999,999,999 in the EMP-NATL-ID-NUMBER field; and
3. Request execution of your reformat with the EX command.
Figure 11-9. Reformat Definition Editor. Specifying Selection Criteria and Requesting Execution.
File-AID ---- REFORMAT Definition Editor - DS:USERID9.FASAMP.RFMTDEF(EMPNEW) - COMMAND ===> EX SCROLL ===> PAGE Source COBOL - EMPLOYEE-MASTER-FILE ---- USERID9.FASAMP.LAYOUTS(EMPLOYEE) ----- Num Field Name Format Pic OP Data Row 1 of 35 0 EMPLOYEE-MASTER-FILE GRP/198 1 EMP-NUMBER AN/5 GE ' ' 2 EMP-LAST-NAME AN/15 3 EMP-FIRST-NAME AN/10 4 EMP-MID-INIT AN/1 5 FILLER AN/2 6 EMP-TITLE AN/30 7 EMP-PERSONAL-INFO GRP/23 Target COBOL - EMPLOYEE-MASTER-FILE ---- USERID9.FASAMP.LAYOUTS(EMPLOYE2) ----- Num Field Name Format Pic Data Row 1 of 36 0 EMPLOYEE-MASTER-FILE GRP/211 1 EMP-NUMBER AN/5 /EMP-NUMBER 2 EMP-FIRST-NAME AN/15 /EMP-FIRST-NAME 3 EMP-MID-INIT AN/1 /EMP-MID-INIT 4 EMP-LAST-NAME AN/20 /EMP-LAST-NAME 5 EMP-TITLE AN/30 /EMP-TITLE 6 EMP-PERSONAL-INFO GRP/24 7 EMP-NATL-ID-NUMBER NUM/9 9v00 999999999 Use END Command to Save then End, CANCEL to Cancel, or EX to Execute Reformat
Subtopics:
Chap_11.8.1 Steps: Chap_11.8.2 More About Selection Criteria
Page 231

FileAid_-_Online_1CHAP_11.8.1 Steps: 1. Type GE in the OP column to the right of the EMP-NUMBER field.
2. Type ' ' (quote five spaces quote) in the Data column to the right of the GE in the EMP-NUMBER field.
If you specify another field test, the two conditions are ANDed; both must be valid before the record is selected for reformatting.
3. Overtype reference/8 with the value 999999999 (nine 9s) in the data area to the right of the target EMP-NATL-ID-NUMBER field to provide a generic value on the output file.
4. Type EX in the COMMAND field. Press <Enter>.
CHAP_11.8.2 More About Selection Criteria o If you had used an XREF to define the source layout, record type fields are automatically set and locked by File-AID. Only records of the chosen record type are reformatted.
o You may choose to run your reformat in batch. If you do so you may include a DD01SC (Selection criteria) DD to identify a saved selection criteria definition you created with the Selection Criteria function (option 6).
o At execution time, you have an option to copy all records or only those records matching your selection criteria. Reformatting is only applied to records matching any selection criteria.
CHAP_11.9 Executing the Reformat Online at Your TerminalWhen you request execution, your current reformat definition member is saved in your reformat dataset.The message, DEFINITION SAVED, is displayed at the top right corner of the display. Figure 11-10. Reformat Execution Screen
File-AID -------------- Reformat Execution - Online ------- DEFINITION SAVED OPTION ===>
Display file after reformat ===> N (N=No, B=File-AID Browse, E=File-AID Edit)
Specify Input Dataset: Dataset name ===> Member name ===> Volume serial ===> (If not cataloged) Disposition ===> SHR (OLD or SHR)
Specify Output Dataset: Dataset name ===> Member name ===> Volume serial ===> (If not cataloged) Disposition ===> OLD (OLD, SHR or MOD)
Copy unselected records ===> (Y = Yes, N = No, drop unselected) Number of records to process ===> 0 (1-9999, 0 = all)
Page 232

FileAid_-_Online_1
Use END command to END or ENTER to continue REFORMAT MODE
Subtopics:
Chap_11.9.1 Viewing Results Immediately Chap_11.9.2 Controlling Copying of Unselected Records Chap_11.9.3 Limiting the Total Records Copied Chap_11.9.4 Specifying the Input and Output Datasets Chap_11.9.5 Steps:
CHAP_11.9.1 Viewing Results ImmediatelyThe Display file after reformat field lets you choose to browse or edit the output file after the reformat has been performed.If you select B (Browse) or E (Edit), File-AID invokes a browse or edit session on the output file. This lets you review and verify your definition.
CHAP_11.9.2 Controlling Copying of Unselected RecordsYou can further tailor the reformat process with the "Copy unselected records" and "Number of records to process" fields. The "Copy unselected records" field enables you to specify whether or not you want to copy records that did not match the selection criteria from the input to the output file. If you choose to copy the records that do not match the selection criteria, those records are copied without any changes or reformatting.
CHAP_11.9.3 Limiting the Total Records CopiedThe "Number of records to process" field enables you to control the final size of the dataset. This is usually used to test your reformat definition by limiting processing to a small number of records so that the results are available very quickly.
CHAP_11.9.4 Specifying the Input and Output DatasetsOn the Reformat Execution screen ( Figure 11-11 on page 11-14) , you identify the actual input and output datasets that are to participate in the reformat process. The Input Dataset contains the records to be read, selected, and reformatted. The Output Dataset contains the results of the reformat. Note: If the Output Dataset is fixed length (RECFM=F or FB), the record length (LRECL) must exactly match the size of the target record layout. Target field number 0 (zero) (see Figure 11-9 on page 11-11) contains the size of the layout in the Format area (for example, GRP/211 - means length 211).
Figure 11-11. Reformat Execution Screen. Identifying Datasets.
File-AID -------------- Reformat Execution - Online ------- DEFINITION SAVED OPTION ===>
Display file after reformat ===> B (N=No, B=File-AID Browse, E=File-AID Edit)
Specify Input Dataset: Page 233

FileAid_-_Online_1 Dataset name ===> FASAMP.EMPLOYEE Member name ===> Volume serial ===> (If not cataloged) Disposition ===> SHR (OLD or SHR)
Specify Output Dataset: Dataset name ===> FASAMP.EMPLOYE2 Member name ===> Volume serial ===> (If not cataloged) Disposition ===> OLD (OLD, SHR or MOD)
Copy unselected records ===> Y (Y = Yes, N = No, drop unselected) Number of records to process ===> 0 (1-9999, 0 = all)
Use END command to END or ENTER to continue REFORMAT MODE
CHAP_11.9.5 Steps: 1. Type a B in the Display file after reformat field.
2. Enter FASAMP.EMPLOYEE in the input Dataset name field.
3. Enter FASAMP.EMPLOYE2 in the output Dataset name field.
4. Type a Y in the Copy unselected records field.
5. Ensure that there is a 0 (zero) in the "Number of records to process" field. The value 0 tells File-AID to copy all records.
6. Press <Enter>. File-AID executes the Reformat function and displays the dataset in Browse mode as illustrated in Figure 11-12 on page 11-15.
CHAP_11.10 Browsing the Reformatted FileNote that File-AID indicates that the reformatting process is complete with the message, FILE REFORMATTED, at the top right corner of the display as shown in Figure 11-12. File-AID displays the reformatted file in formatted Browse mode. Refer to Chapter 2, "Browsing a Data File" to review which commands you can use to navigate through a dataset in the Browse function. Use the DOWN and UP scroll commands to examine the reformat results. When you are done with your review, return to the File-AID Primary Option Menu now.
Figure 11-12. Browsing the Reformatted File
File-AID - Browse - USERID9.FASAMP.EMPLOYE2 ----------------- FILE REFORMATTED COMMAND ===> END SCROLL ===> PAGE RECORD: 1 EMPLOYEE-MASTER-FILE LENGTH: 211 ---- FIELD NUMBER/NAME ------ -FORMAT- ----+----1----+----2----+----3----+----4 1 EMP-NUMBER 5/AN 00090 2 EMP-FIRST-NAME 15/AN EDWARD 3 EMP-MID-INIT 1/AN M 4 EMP-LAST-NAME 20/AN MARTIN 5 EMP-TITLE 30/AN AIRPLANE MANUFACTURER 7 EMP-NATL-ID-NUMBER 9/NUM 999999999 9 EMP-DOB-CENTURY 1/AN 1 11 EMP-DOB-YY 2/NUM 54
Page 234

FileAid_-_Online_1 12 EMP-DOB-MM 2/NUM 10 13 EMP-DOB-DD 2/NUM 19 15 EMP-HD-CENTURY 1/AN 1 16 EMP-HIRE-DATE 6/AN 920101 17 EMP-MARITAL-STATUS 1/AN M 19 EMP-PAY-GRADE 3/AN PAY 20 EMP-LIFE-INS-WITHOLD-AMT 5/PS -3000.00 21 EMP-NATL-TAX-WITHOLD-PCT 3/PS 28.50 22 EMP-NEW-401K-WITHOLD-AMT 3/PS 0 23 EMP-REGION-TAX-WITHOLD-PCT 3/PS 25.00 24 EMP-LOCAL-TAX-WITHOLD-PCT
Subtopics:
Chap_11.10.1 Steps:
CHAP_11.10.1 Steps: 1. If necessary, use the FMT command to view the data in Formatted Mode.
2. Type DOWN in the COMMAND field.
3. Press <Enter>.
4. Type RIGHT in the COMMAND field.
5. Press <Enter>.
6. Press PF3 (END) several times until the File-AID Primary Option Menu is displayed.
12
CHAP_12 Printing File ContentsFile-AID has several utilities for generating reports that show the contents of your data files as well as contents of the files you create and maintain with File-AID. When you select the Print utility (option 5), File-AID displays a selection menu where you can choose the type of file you want to print, including: o Data files
o XREF members (and referenced layouts if requested)
o Selection criteria members
o Interpreted record layouts (similar to the View utility)
o Audit trail files.
Subtopics: Chap_12.1 Accessing the Print Selection Menu (Option 5) Chap_12.2 Selecting the Type of File To Be Printed Chap_12.3 Requesting a Print of a Data File Chap_12.4 Submitting the Print Job Chap_12.5 Viewing the Report Output Chap_12.6 Exiting the Print Function
Page 235
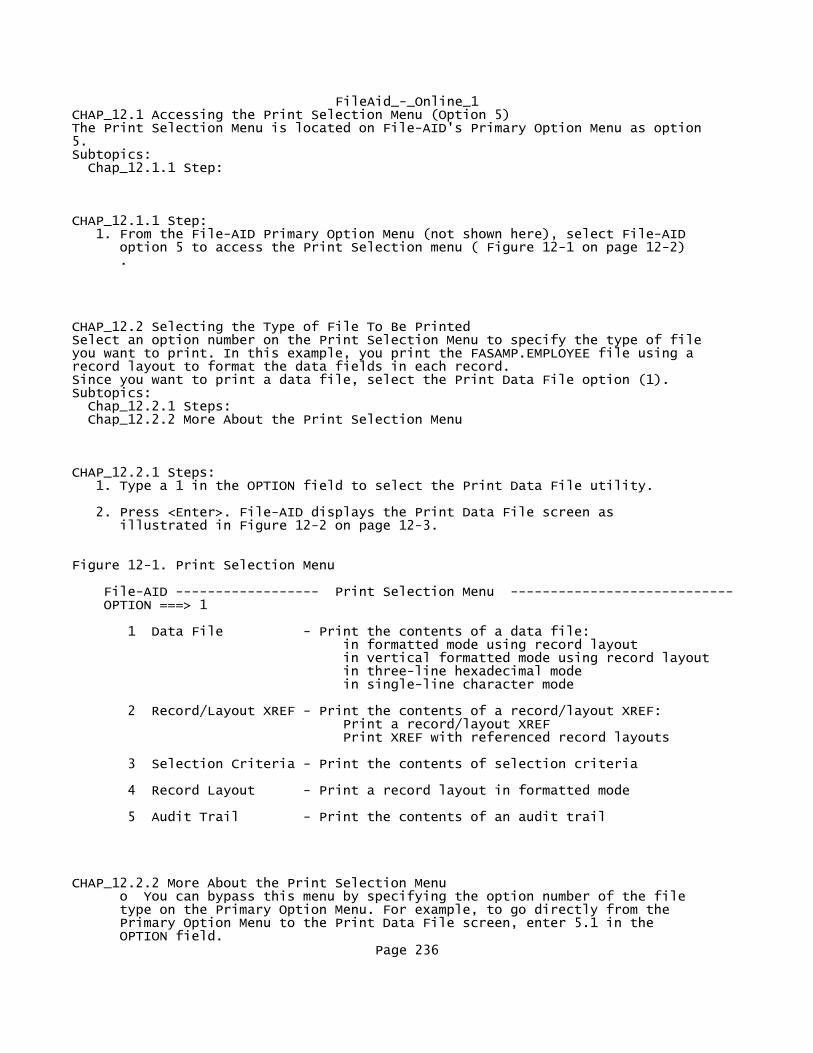
FileAid_-_Online_1CHAP_12.1 Accessing the Print Selection Menu (Option 5)The Print Selection Menu is located on File-AID's Primary Option Menu as option 5. Subtopics: Chap_12.1.1 Step:
CHAP_12.1.1 Step: 1. From the File-AID Primary Option Menu (not shown here), select File-AID option 5 to access the Print Selection menu ( Figure 12-1 on page 12-2) .
CHAP_12.2 Selecting the Type of File To Be PrintedSelect an option number on the Print Selection Menu to specify the type of file you want to print. In this example, you print the FASAMP.EMPLOYEE file using a record layout to format the data fields in each record. Since you want to print a data file, select the Print Data File option (1). Subtopics: Chap_12.2.1 Steps: Chap_12.2.2 More About the Print Selection Menu
CHAP_12.2.1 Steps: 1. Type a 1 in the OPTION field to select the Print Data File utility.
2. Press <Enter>. File-AID displays the Print Data File screen as illustrated in Figure 12-2 on page 12-3.
Figure 12-1. Print Selection Menu
File-AID ------------------ Print Selection Menu ---------------------------- OPTION ===> 1
1 Data File - Print the contents of a data file: in formatted mode using record layout in vertical formatted mode using record layout in three-line hexadecimal mode in single-line character mode
2 Record/Layout XREF - Print the contents of a record/layout XREF: Print a record/layout XREF Print XREF with referenced record layouts
3 Selection Criteria - Print the contents of selection criteria
4 Record Layout - Print a record layout in formatted mode
5 Audit Trail - Print the contents of an audit trail
CHAP_12.2.2 More About the Print Selection Menu o You can bypass this menu by specifying the option number of the file type on the Primary Option Menu. For example, to go directly from the Primary Option Menu to the Print Data File screen, enter 5.1 in the OPTION field.
Page 236

FileAid_-_Online_1
CHAP_12.3 Requesting a Print of a Data FileYou can print your data file in one of four formats: formatted (using a record layout), vertical formatted (using a record layout), character, or hexadecimal. If you select the F (formatted) print option, you must specify record layout or XREF information. You must also specify the type of field description information to show on the report. The field description options are: o F (Format) - Field length and current field format
o N (Number) - System-assigned field numbers
o O (Offset) - Offset of each field from beginning of the dataset
o P (Picture) - Representation of the original data declaration for each elementary item.
Subtopics: Chap_12.3.1 Record Layout Usage Chap_12.3.2 Selection Criteria Chap_12.3.3 Steps:
CHAP_12.3.1 Record Layout UsageIf you choose print format F (Formatted), you must specify a single record layout or XREF dataset member to define the layout(s) to use for printing the data records. If you select the V (vertical formatted) print option, you must specify a single record layout dataset member. Layout usage is ignored for print formats C (Character) and H (Hex).
CHAP_12.3.2 Selection CriteriaYou may use standard File-AID selection criteria to select specific records for printing. You can use existing field selection criteria (created using the Selection Criteria function) or create temporary field selection criteria (options T (temporary) or Q (quick)).
Figure 12-2. Print Data File Screen
File-AID --------------------- Print Data File -------------------------------- COMMAND ===>
Specify Print Information: Print format ===> F (F = Fmt;V = Vfmt;C = Char;H = Hex) Show ===> O (Format, Number, Offset or Picture)
Specify Print Dataset or HFS Path Information: Dataset or path ===> FASAMP.EMPLOYEE Member ===> (Blank or pattern for member list) Volume serial ===>
Specify Record Layout and XREF Information: Record layout usage ===> S (S = Single; X = XREF; N = None) Record layout dataset ===> FASAMP.LAYOUTS Member ===> EMPLOYEE (Blank or pattern for member list) XREF dataset ===> Member ===> (Blank or pattern for member list)
Specify Selection Criteria Information: (E=Use existing; M=Modify existing Page 237

FileAid_-_Online_1 Selection criteria usage ===> N T=Create temporary; N=None) Selection dataset ===> Member ===> (Blank or pattern member list)
CHAP_12.3.3 Steps: 1. Type an F in the Print format field.
2. Type an O in the Show field to request field offsets in the formatted report.
3. Verify the values in the other fields are specified as shown in Figure 12-2. If they are not the same, type over the existing values to change them.
4. Press <Enter>. File-AID displays the PRINT - JCL Specification screen where you specify the print JCL information for batch processing. This screen is shown in Figure 12-3 on page 12-4.
CHAP_12.4 Submitting the Print JobFile-AID executes a print request only through a batch job. The PRINT - JCL Specification screen ( Figure 12-3) is displayed to let you set your output class and JOB parameters. From the PRINT - JCL Specification screen, you can invoke several processing commands, including: JCL Generates and displays the JCL so you can edit it before you submit it. While editing the JCL you can use the Edit commands CREATE, REPLACE or SUBMIT to save or submit your Print JCL.
SUBMIT Generates the JCL and processes your print request.
END Returns to the Print Data File screen without submitting the job.
Subtopics: Chap_12.4.1 Steps:
CHAP_12.4.1 Steps: 1. Type SUBMIT in the COMMAND field to generate and submit the JCL to perform your print request.
2. Verify your JOB parameters and Sysout class. Use a hold class so that you can browse your report online.
3. Press <Enter>. File-AID processes your print request. You can see the results of your print request online as illustrated in Figure 12-4 on page 12-5.
Figure 12-3. PRINT - JCL Specification Screen (SUBMIT Command)
File-AID ---------------- PRINT - JCL Specification -------------------------- COMMAND ===> SUBMIT
Page 238

FileAid_-_Online_1 JCL Information for Batch Processing:
Sysout class ===> *
JOB Statement Information: ===> //USERID9 JOB (0100,PMGT),'your name',CLASS=A, ===> // MSGCLASS=R,NOTIFY=USERID9 ===> ===>
Use JCL command to edit generated JCL Use SUBMIT command to submit batch job Use END to return to main PRINT panel without submitting job
CHAP_12.5 Viewing the Report OutputYour report is printed and routed to the printer you specified in your JOB statement and sysout class. If you specified a hold queue for your sysout class (or MSGCLASS if Sysout class=*), use split screen and access your output viewing facility to examine the report. A portion of the report is shown in Figure 12-4.
Figure 12-4. Print Data File Result (Formatted Output, Show Offset)
SDSF OUTPUT DISPLAY USERID9B JOB05403 DSID 103 LINE 2 COLUMNS 01- 80 COMMAND INPUT ===> SCROLL ===> CSR 02 MAR 2001 FILE-AID 8.8 PRINT FACILITY 12:40:29 PAGE 1
FILE CONTENTS REPORT File Printed USERID9.FASAMP.EMPLOYEE Type VSAM KSDS
RECORD: 1 EMPLOYEE-MASTER-FILE
---- FIELD LEVEL/NAME ------- RELATIVE ----+----1----+----2----+----3----+----4
5 EMP-NUMBER 0 00090 5 EMP-LAST-NAME 5 MARTIN 5 EMP-FIRST-NAME 20 EDWARD 5 EMP-MID-INIT 30 M 5 FILLER 31 5 EMP-TITLE 33 AIRPLANE MANUFACTURER 5 EMP-PERSONAL-INFO SYNC 63 10 EMP-NATL-ID-NUMBER 63 427890125 10 FILLER 72 10 EMP-DATE-OF-BIRTH 73 101954 10 EMP-HIRE-DATE 79 920101 10 EMP-MARITAL-STATUS 85 M
Subtopics:
Chap_12.5.1 More About the Print Function
Page 239

FileAid_-_Online_1CHAP_12.5.1 More About the Print Function o Through the Print function, you can also print XREF members, selection criteria members (existing, not temporary), record layouts, and audit trails from edited files. See the File-AID/MVS Online Reference Manual (SPF and XE) for a complete description of the features of the Print function.
CHAP_12.6 Exiting the Print FunctionTo return to the File-AID Primary Option Menu, use PF3 (the END command). Subtopics: Chap_12.6.1 Step:
CHAP_12.6.1 Step: 1. Press PF3 (END) until the File-AID Primary Option Menu is displayed.
13
CHAP_13 Extracting a Selected Subset of Records to Create a Test FileIn Chapter 2, "Browsing a Data File" you created temporary selection criteria and in Chapter 7, "Copying Selected PDS Members" you learned about the Copy utility. In this chapter you learn how to create permanent selection criteria with the File-AID Selection utility (option 6). You then use the selection criteria in the File-AID Copy utility (option 3.3) to create test data by extracting a subset of the records of the sample inventory file (FASAMP.INVFILE) to a test file (FASAMP.INVFILE2). Subtopics: Chap_13.1 Accessing the Selection Criteria Function (Option 6) Chap_13.2 Specifying the Selection Criteria Datasets Chap_13.3 Defining Formatted Field Selections Chap_13.4 Viewing a Layout in Column Location Order Chap_13.5 Defining Formatted Field Selection Criteria Chap_13.6 Saving Your Permanent Selection Criteria Member Chap_13.7 Exiting the Selection Criteria Utility Chap_13.8 Accessing the Copy Utility (3.3) Chap_13.9 Specifying the "FROM" and "TO" Datasets and Selection Criteria Member Chap_13.10 Exiting the Copy Utility
CHAP_13.1 Accessing the Selection Criteria Function (Option 6)The Selection Criteria function is option 6 on the File-AID Primary Option Menu.
Subtopics: Chap_13.1.1 Steps:
CHAP_13.1.1 Steps: 1. Enter a 6 in the OPTION field on the File-AID Primary Option Menu (not shown here).
2. Press <Enter>. File-AID displays the Selection Criteria - Dataset Specification screen as illustrated in Figure 13-1 on page 13-2.
Page 240

FileAid_-_Online_1
CHAP_13.2 Specifying the Selection Criteria DatasetsYou must specify a partitioned selection dataset to save your criteria members when using this function. The attributes of the dataset are:
DSORG=PO,RECFM=VB,LRECL=300,BLKSIZE=x (x = 304 or more)
A sample Selection dataset (FASAMP.SELCRIT) is created for you with your other training files. Create a new member "INVSEL" to select inventory file records that have a status of "AVAIL". Use record layouts to define your selection using formatted field selection criteria. When you define or maintain formatted field selection criteria members, you must specify a single record layout or an XREF member.
Figure 13-1. Selection Criteria - Dataset Specification Screen
File-AID -------- Selection Criteria - Dataset Specification ---------------- COMMAND ===>
Specify Selection Criteria Member to be Created or Edited: Selection dataset name ===> FASAMP.SELCRIT Member name ===> INVSEL (Blank or pattern for member list)
Specify Record Layout and XREF Information: Record layout usage ===> S (S = Single; X = XREF; N = None)
Record layout dataset ===> FASAMP.LAYOUTS Member name ===> INVFILE (Blank or pattern for member list)
XREF dataset name ===> Member name ===> (Blank or pattern for member list)
------------------------------------------------------------------------------- This function creates and maintains existing File-AID selection criteria. You can then apply these criteria in other functions (BROWSE, EDIT, COPY, COMPARE, and PRINT).
Specify either a record layout dataset and/or an XREF dataset when creating or maintaining formatted selection criteria.
Subtopics:
Chap_13.2.1 Steps:
CHAP_13.2.1 Steps: 1. Type FASAMP.SELCRIT in the selection Dataset name field.
2. Type INVSEL in the selection Member name field.
If this member exists, you see the member and are able to specify and save changes. If this is a new member, you define and save a new criteria member. If you leave this field blank or use a mask (for example, MEM*), a member list is displayed from which you can select a member for criteria display and modification.
3. Type S in the Record layout usage field.
4. Type FASAMP.LAYOUTS in the Record layout dataset name field. Page 241

FileAid_-_Online_1
5. Type INVFILE in the layout Member name field.
6. Press <Enter>. File-AID displays the Selection Criteria Menu screen as illustrated in Figure 13-2 on page 13-3.
CHAP_13.3 Defining Formatted Field SelectionsThe Selection Criteria Menu lets you access the three components of selection criteria: OPTIONS Control selection based on record counts
FORMATTED Use record layout to define tests for record data
UNFORMATTED Define tests for record data without using layouts (by specifying location, length, operator, and data for each field to be tested).
In this example, you are going to define one test with formatted selection criteria. Criteria Menu option 2 lets you access the Formatted Selection Criteria screen.
Figure 13-2. Selection Criteria Menu Screen
File-AID - Selection Criteria Menu - USERID9.FASAMP.S CREATE NEW CRITERIA OPTION ===> 2
- Status - 1 OPTIONS - Enter selection criteria options default 2 FORMATTED - Edit formatted selection criteria 0 sets 3 UNFORMATTED - Edit unformatted selection criteria 0 sets
Member list description ===> SELECT AVAIL PARTS
Long ===> ______________________________________________________________ Description ===> ______________________________________________________________
Use VIEW command to display selection criteria summary Use SAVE command to write selection criteria request Use END to save selection criteria & return to dataset specification Use CANCEL to cancel changes & return to dataset specification
Subtopics:
Chap_13.3.1 Steps:
CHAP_13.3.1 Steps: 1. Type 2 (Formatted Criteria) in the OPTION field.
2. Type SELECT AVAIL PARTS in the Member list description field. Page 242
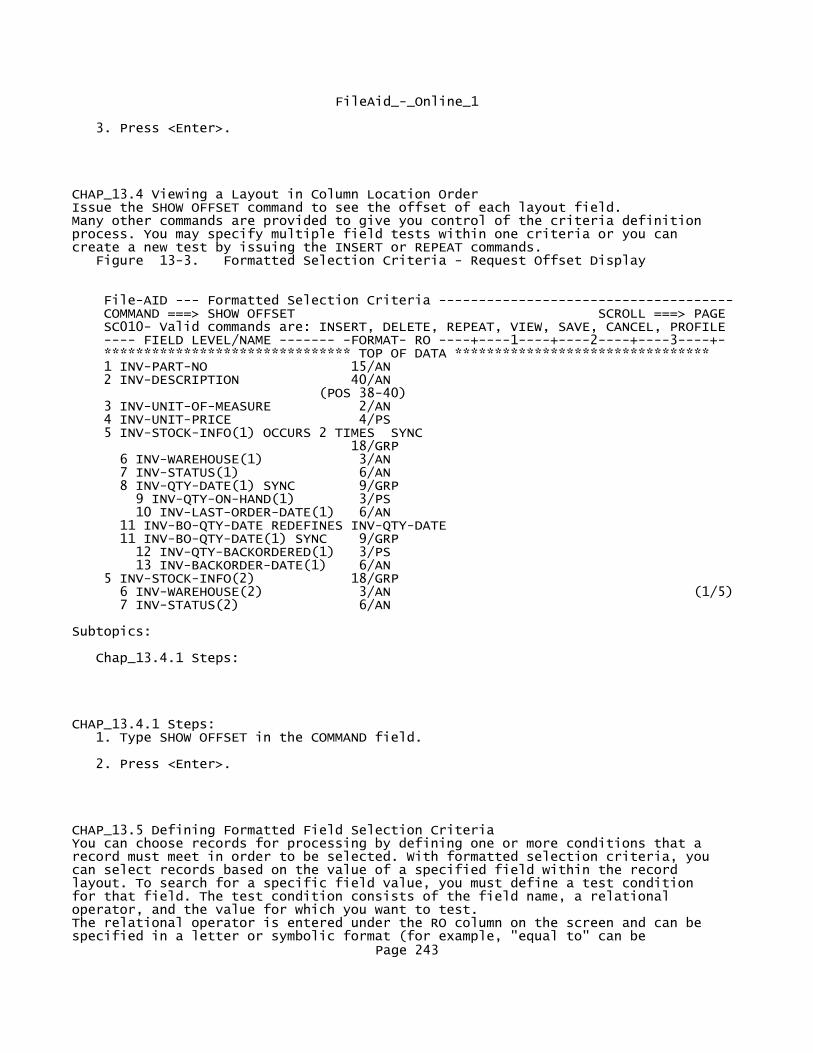
FileAid_-_Online_1
3. Press <Enter>.
CHAP_13.4 Viewing a Layout in Column Location OrderIssue the SHOW OFFSET command to see the offset of each layout field. Many other commands are provided to give you control of the criteria definition process. You may specify multiple field tests within one criteria or you can create a new test by issuing the INSERT or REPEAT commands. Figure 13-3. Formatted Selection Criteria - Request Offset Display
File-AID --- Formatted Selection Criteria ------------------------------------- COMMAND ===> SHOW OFFSET SCROLL ===> PAGE SC010- Valid commands are: INSERT, DELETE, REPEAT, VIEW, SAVE, CANCEL, PROFILE ---- FIELD LEVEL/NAME ------- -FORMAT- RO ----+----1----+----2----+----3----+- ******************************* TOP OF DATA ******************************** 1 INV-PART-NO 15/AN 2 INV-DESCRIPTION 40/AN (POS 38-40) 3 INV-UNIT-OF-MEASURE 2/AN 4 INV-UNIT-PRICE 4/PS 5 INV-STOCK-INFO(1) OCCURS 2 TIMES SYNC 18/GRP 6 INV-WAREHOUSE(1) 3/AN 7 INV-STATUS(1) 6/AN 8 INV-QTY-DATE(1) SYNC 9/GRP 9 INV-QTY-ON-HAND(1) 3/PS 10 INV-LAST-ORDER-DATE(1) 6/AN 11 INV-BO-QTY-DATE REDEFINES INV-QTY-DATE 11 INV-BO-QTY-DATE(1) SYNC 9/GRP 12 INV-QTY-BACKORDERED(1) 3/PS 13 INV-BACKORDER-DATE(1) 6/AN 5 INV-STOCK-INFO(2) 18/GRP 6 INV-WAREHOUSE(2) 3/AN (1/5) 7 INV-STATUS(2) 6/AN
Subtopics:
Chap_13.4.1 Steps:
CHAP_13.4.1 Steps: 1. Type SHOW OFFSET in the COMMAND field.
2. Press <Enter>.
CHAP_13.5 Defining Formatted Field Selection CriteriaYou can choose records for processing by defining one or more conditions that a record must meet in order to be selected. With formatted selection criteria, you can select records based on the value of a specified field within the record layout. To search for a specific field value, you must define a test condition for that field. The test condition consists of the field name, a relational operator, and the value for which you want to test. The relational operator is entered under the RO column on the screen and can be specified in a letter or symbolic format (for example, "equal to" can be
Page 243
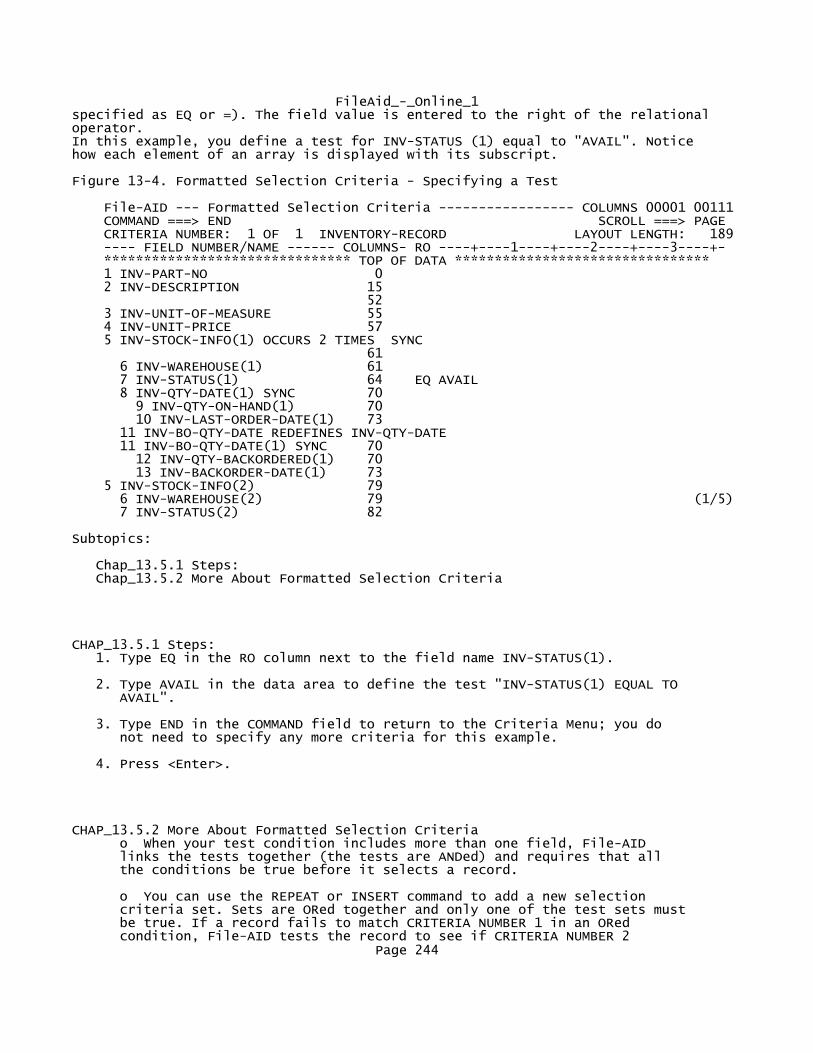
FileAid_-_Online_1specified as EQ or =). The field value is entered to the right of the relational operator. In this example, you define a test for INV-STATUS (1) equal to "AVAIL". Notice how each element of an array is displayed with its subscript.
Figure 13-4. Formatted Selection Criteria - Specifying a Test
File-AID --- Formatted Selection Criteria ----------------- COLUMNS 00001 00111 COMMAND ===> END SCROLL ===> PAGE CRITERIA NUMBER: 1 OF 1 INVENTORY-RECORD LAYOUT LENGTH: 189 ---- FIELD NUMBER/NAME ------ COLUMNS- RO ----+----1----+----2----+----3----+- ******************************* TOP OF DATA ******************************** 1 INV-PART-NO 0 2 INV-DESCRIPTION 15 52 3 INV-UNIT-OF-MEASURE 55 4 INV-UNIT-PRICE 57 5 INV-STOCK-INFO(1) OCCURS 2 TIMES SYNC 61 6 INV-WAREHOUSE(1) 61 7 INV-STATUS(1) 64 EQ AVAIL 8 INV-QTY-DATE(1) SYNC 70 9 INV-QTY-ON-HAND(1) 70 10 INV-LAST-ORDER-DATE(1) 73 11 INV-BO-QTY-DATE REDEFINES INV-QTY-DATE 11 INV-BO-QTY-DATE(1) SYNC 70 12 INV-QTY-BACKORDERED(1) 70 13 INV-BACKORDER-DATE(1) 73 5 INV-STOCK-INFO(2) 79 6 INV-WAREHOUSE(2) 79 (1/5) 7 INV-STATUS(2) 82
Subtopics:
Chap_13.5.1 Steps: Chap_13.5.2 More About Formatted Selection Criteria
CHAP_13.5.1 Steps: 1. Type EQ in the RO column next to the field name INV-STATUS(1).
2. Type AVAIL in the data area to define the test "INV-STATUS(1) EQUAL TO AVAIL".
3. Type END in the COMMAND field to return to the Criteria Menu; you do not need to specify any more criteria for this example.
4. Press <Enter>.
CHAP_13.5.2 More About Formatted Selection Criteria o When your test condition includes more than one field, File-AID links the tests together (the tests are ANDed) and requires that all the conditions be true before it selects a record.
o You can use the REPEAT or INSERT command to add a new selection criteria set. Sets are ORed together and only one of the test sets must be true. If a record fails to match CRITERIA NUMBER 1 in an ORed condition, File-AID tests the record to see if CRITERIA NUMBER 2
Page 244

FileAid_-_Online_1 matches. This process continues until a record has been tested for each set. As soon as a record matches any set, File-AID selects it.
o Use FWD and BACK commands (RIGHT, LEFT) to scroll among multiple criteria sets.
o Use the DELETE command to remove a set.
CHAP_13.6 Saving Your Permanent Selection Criteria MemberNotice that the status for FORMATTED criteria now shows "1 sets" to reflect the test you just defined. When you enter the END primary command from the Selection Criteria menu, File-AID automatically stores the selection criteria member (INVSEL) in the selection criteria dataset (FASAMP.SELCRIT). Figure 13-5. Selection Criteria Menu. Specifying END to Save Selection Criteria.
File-AID - Selection Criteria Menu - USERID9.FASAMP.SELCRIT(INVSEL) ----------- OPTION ===> END - Status - 1 OPTIONS - Enter selection criteria options default 2 FORMATTED - Edit formatted selection criteria 1 sets 3 UNFORMATTED - Edit unformatted selection criteria 0 sets
Member list description ===> SELECT AVAIL PARTS____________
Long ===> ______________________________________________________________ Description ===> ______________________________________________________________
Use VIEW command to display selection criteria summary Use SAVE command to write selection criteria request Use END to save selection criteria & return to dataset specification Use CANCEL to cancel changes & return to dataset specification
Subtopics:
Chap_13.6.1 Steps: Chap_13.6.2 More About Selection Criteria Menu
CHAP_13.6.1 Steps: 1. Type END in the OPTION field.
2. Press <Enter>. File-AID displays the Selection Criteria - Dataset Specification screen ( Figure 13-6 on page 13-7) with the message: CRITERIA MEMBER ADDED, if new or CRITERIA MEMBER REPLACED, if member already exists.
Page 245

FileAid_-_Online_1
CHAP_13.6.2 More About Selection Criteria Menu o If you want to review the criteria you created before you save it, the VIEW primary command summarizes the specified options and all of the sets of formatted and unformatted selection criteria into a scrollable display.
o The SAVE command saves your changes but remains on the Selection Criteria Menu screen.
o The CANCEL command lets you exit without saving your member. Any entries you have made are lost and no new member is created.
o If you do not specify any options or change any of the default values, File-AID reads all of the records starting at the beginning of the dataset and stopping when the "Number of Records to Select" default (established in 0.2 Selection Parameters) is reached. File-AID is distributed with a default of "ALL" for "Number of Records to Select". Use the "1 OPTIONS" menu choice to view and change this value for this selection criteria, and/or use option 0.2 to set a different permanent default for yourself.
CHAP_13.7 Exiting the Selection Criteria UtilityUse the END command to exit the Selection Criteria function and return to the File-AID Primary Option Menu now. Subtopics: Chap_13.7.1 Steps:
CHAP_13.7.1 Steps: 1. Enter the END command (or press PF3) to redisplay the Primary Option Menu.
2. Press <Enter>.
Figure 13-6. Selection Criteria Function. CRITERIA MEMBER ADDED Message.
File-AID -------- Selection Criteria - Dataset Speci CRITERIA MEMBER ADDED COMMAND ===> END
Specify Selection Criteria Member to be Created or Edited: Selection dataset name ===> FASAMP.SELCRIT Member name ===> INVSEL (Blank or pattern for member list)
Specify Record Layout and XREF Information: Record layout usage ===> S (S = Single; X = XREF; N = None)
Record layout dataset ===> FASAMP.LAYOUTS Member name ===> INVFILE (Blank or pattern for member list)
XREF dataset name ===> Member name ===> (Blank or pattern for member list)
------------------------------------------------------------------------------- This function creates and maintains existing File-AID selection criteria. You can then apply these criteria in other functions (BROWSE, EDIT, COPY, COMPARE,
Page 246

FileAid_-_Online_1 and PRINT).
Specify either a record layout dataset and/or an XREF dataset when creating or maintaining formatted selection criteria.
CHAP_13.8 Accessing the Copy Utility (3.3)Now that you have defined and saved your selection criteria, you can use your criteria with the Copy utility to extract a subset of records from a master file to create a test file. The Copy utility is located on the Extended Utilities menu (option 3). You can access it directly by accessing option 3.3 from the Primary Option Menu. Subtopics: Chap_13.8.1 Steps:
CHAP_13.8.1 Steps: 1. From the File-AID Primary Option Menu ( Figure 13-7) , select File-AID option 3.3.
2. Press <Enter>. File-AID displays the Copy Utility screen as illustrated in Figure 13-8 on page 13-9.
Figure 13-7. File-AID Primary Option Menu. Selecting 3.3 COPY Utility.
File-AID Release 8.8 ------------- Primary Option Menu ---------------------------- OPTION ===> 3.3
0 PARAMETERS - Specify ISPF and File-AID parameters USERID - USERID9 1 BROWSE - Display file contents PF KEYS - 24 2 EDIT - Create or change file contents TERMINAL - 3278 3 UTILITIES - File-AID/SPF extended utilities TIME - 14:28 5 PRINT - Print file contents JULIAN - 01.058 6 SELECTION - Create or change selection criteria DATE - 01/02/27 7 XREF - Create or change record/layout cross reference 8 VIEW - View interpreted record layout 9 REFORMAT - Convert file from one format to another 10 COMPARE - Compare file contents C CHANGES - Display summary of File-AID changes T TUTORIAL - Display information about File-AID X EXIT - Terminate File-AID and return to ISPF
Use END to terminate File-AID
Online Technical Support available at: frontline.compuware.com
Copyright (c) 1995-2001, by Compuware Corporation. All rights reserved. Unpublished rights reserved under the Copyright Laws of the United States. Type LEGAL on the command line for Copyright/Trade Secret Notice.
CHAP_13.9 Specifying the "FROM" and "TO" Datasets and Selection Criteria MemberThe last dataset you referenced in any File-AID function or utility is automatically displayed in the FROM dataset or path field. The TO dataset or path field retains the last dataset or path you specified in the Copy utility. The Selection Criteria dataset and member you last referenced (in this case,
Page 247

FileAid_-_Online_1through the Selection Criteria function) is displayed in the lower portion of the screen. You must identify the FROM dataset and the TO dataset and whether or not you want to use selection criteria (Selection criteria usage field). You can choose to run your copy online at your terminal or in batch by specifying the processing option in the Process online or batch field. In this example, specify an E in the Selection criteria usage field to use existing criteria in the online copy process.
Figure 13-8. Copy Utility Screen. Use Existing Selection Criteria.
File-AID --------------------- Copy Utility --------------------------------- COMMAND ===>
Specify "FROM" Dataset or HFS Path Information: Dataset or path ===> FASAMP.INVFILE Volume serial ===> (If not cataloged)
Specify "TO" Dataset or HFS Path Information: Dataset or path ===> FASAMP.INVFILE2 Volume serial ===> (If not cataloged) Disposition ===> OLD (OLD, MOD, NEW)
Specify Execution Information: Process online or batch ===> O (O = Online; B = Batch)
Specify Selection Criteria Information: (E = Existing; T = Temporary; Selection criteria usage ===> E M = Modify; Q = Quick; N = None) Selection dataset name ===> FASAMP.SELCRIT Member name ===> INVSEL (Blank or pattern for member list)
Subtopics:
Chap_13.9.1 Steps:
CHAP_13.9.1 Steps: 1. Type FASAMP.INVFILE in the "FROM" Dataset or path field.
2. Type FASAMP.INVFILE2 in the "TO" Dataset or path field.
3. Type OLD in the Disposition field.
4. Type an O in the Process online or batch field.
If you specify to run the copy in batch, File-AID displays the standard JCL Specification screen where you can define the batch processing options.
5. Type an E in the Selection criteria usage field.
Note: Make sure you always check this field before you press Enter. The value last used remains set from session to session.
6. Press <Enter>. File-AID executes the copy process immediately and returns with a confirmation message, 17 RECORDS COPIED.
Page 248

FileAid_-_Online_1
CHAP_13.10 Exiting the Copy UtilityUse PF3 (the END command) to exit the Copy utility and return to the File-AID Primary Option Menu now. Figure 13-9. Copy Utility Screen. RECORDS COPIED Message.
File-AID --------------------- Copy Utility -------------- 17 RECORDS COPIED COMMAND ===> END ER050-41 records were read from USERID9.FASAMP.INVFILE Specify "FROM" Dataset or HFS Path Information: Dataset or path ===> FASAMP.INVFILE Volume serial ===> (If not cataloged)
Specify "TO" Dataset Information: Dataset or path ===> FASAMP.INVFILE2 Volume serial ===> (If not cataloged) Disposition ===> OLD (OLD, MOD, NEW)
Specify Execution Information: Process online or batch ===> O (O = Online; B = Batch)
Specify Selection Criteria Information: (E = Existing; T = Temporary; Selection criteria usage ===> E M = Modify; Q = Quick; N = None) Selection dataset name ===> FASAMP.SELCRIT Member name ===> INVSEL (Blank or pattern for member list)
Subtopics:
Chap_13.10.1 Steps:
CHAP_13.10.1 Steps: 1. Press PF1 (HELP) to view the long message associated with 17 RECORDS COPIED.
ER050-41 records were read from USERID9.FASAMP.INVFILE
2. Enter the END command (press PF3) until the File-AID Primary Option Menu is displayed.
(Optional) Use File-AID Browse to view the FASAMP.INVFILE2 dataset in vertical formatted mode using the FASAMP.LAYOUTS record layout member INVFILE. Check that all INV-STATUS (1) fields have a value of AVAIL in them. 14
CHAP_14 Automating Layout Usage with XREFFile-AID provides a special function, option 7 XREF, for automating the selection and usage of record layouts for files with different record types. These files have different records that are described by more than one record layout. File-AID determines the record layout to use for each different record type by the value in one or more data fields in each record. These data fields are typically referred to as record type fields. With the XREF function, you can create a permanent member of a PDS that contains
Page 249

FileAid_-_Online_1the rules for selecting a record layout. The rules are based on the data conditions found in each record being processed by any of the following File-AID functions: o Browse - formatted display mode and FPRINT command
o Edit - formatted display mode and FPRINT command
o Print - formatted data record printing
o Selection - formatted selection criteria specification
o Reformat - source layout and record selection
o Compare - formatted field comparison and differences reporting.
XREF layouts are compiled when needed by the function. In addition to defining layout member selection rules for multi-record type files, the XREF function can also be used to describe the rules for selecting layouts for a file with records that require different layouts to define each of several possible segments of one record. The procedure for defining segmented record XREF members is discussed in Chapter 16, "Segmented Record File Layout Automation". The XREF function uses the actual record layouts themselves to define the rules for selecting a layout when the formatted display of a data record is requested in any File-AID function. Using a formatted display of a record layout as a template, you establish layout selection rules by entering data value(s) in the record type field(s). Optionally, you can specify layout selection conditions with unformatted criteria. XREF layout selection criteria specification is similar to defining record selection criteria in other functions of File-AID (for example, Selection and Search/Update). Subtopics: Chap_14.1 Accessing the XREF Function (Option 7) Chap_14.2 Creating a New XREF Member Chap_14.3 Defining the XREF Chap_14.4 Defining Layout Selection Rules Using Formatted Criteria Chap_14.5 Using the PPO Member Filters Chap_14.6 Selecting a Layout Member from a Member List Chap_14.7 Defining the Formatted XREF Criteria Chap_14.8 Defining the Formatted Layout Selection Condition Chap_14.9 Defining Unformatted XREF Criteria Chap_14.10 Defining the Unformatted Layout Selection Condition Chap_14.11 Defining Formatted XREF Criteria Using Beginning Data-Name Chap_14.12 Selecting a Layout Structure from an Available Layouts List Chap_14.13 Defining the Formatted Layout Selection - Compound Condition Chap_14.14 Setting a Default Base Layout Chap_14.15 Saving the New XREF Member Chap_14.16 Exiting XREF and Returning to Main Menu Chap_14.17 Using the XREF Member - Record Layout Usage Chap_14.18 Browsing Formatted Data Records with an XREF Chap_14.19 Requesting the XREF Usage Chap_14.20 Scrolling with the FWD Command Chap_14.21 Printing Your Data Records with XREF Chap_14.22 Routing Your FPRINT
CHAP_14.1 Accessing the XREF Function (Option 7)The XREF function is located on the File-AID Primary Option Menu as option 7. Subtopics: Chap_14.1.1 Steps:
Page 250

FileAid_-_Online_1
CHAP_14.1.1 Steps: 1. From the File-AID Primary Option Menu, select option 7.
2. Press <Enter>. File-AID displays the Record Layout Cross Reference screen as illustrated in Figure 14-1.
CHAP_14.2 Creating a New XREF MemberIn this chapter you create a new member, ORDERXRF, in your sample XREF dataset (FASAMP.XREF). The new ORDERXRF member is used to describe the layout selection rules for the sample order file (FASAMP.ORDRFILE). The file contains four types of records, each of which is described by a different record layout. Two data fields are used to identify each record type as shown in Table 14-1 :
Table 14-1. FASAMP.ORDRFILE Records
___________________________________________________________________ |Layout |01 Level Name |Field 1 |Field 2 | |Member | |ORDER-TYPE |CONTRACT-INDICATOR| |_______|_________________________|______________|__________________| |ORDERPO|ORDER-LINE-DATA-PO |PO |(not applicable) | |_______|_________________________|______________|__________________| |ORDERSC|ORDER-LINE-DATA-SC |SC |(not applicable) | |_______|_________________________|______________|__________________| |ORDERWO|OUTSIDE-VENDOR-WORK-ORDER|WO |OV | |_______|_________________________|______________|__________________| |ORDERWO|INTERNAL-WORK-ORDER |WO |IN | |_______|_________________________|______________|__________________|
Notice that two of the layouts are stored in the same member (ORDERWO) of the sample layouts library (FASAMP.LAYOUTS). You are shown how to identify each of the two structures independently.
Figure 14-1. Record Layout Cross Reference (XREF) Function Entry Screen
File-AID -------------- Record Layout Cross Reference ----------------------- COMMAND ===>
Specify Cross Reference Dataset to be Created or Edited: XREF dataset name ===> FASAMP.XREF Member name ===> ORDERXRF (Blank or pattern for member list)
Specify Record Layout Information: Record layout dataset ===> FASAMP.LAYOUTS
------------------------------------------------------------------------------- This function creates and maintains existing File-AID Record Layout Cross References. These XREF's are used to match record layouts to data records in File-AID functions that use formatting.
Page 251

FileAid_-_Online_1Subtopics:
Chap_14.2.1 Steps:
CHAP_14.2.1 Steps: 1. Type FASAMP.XREF in the XREF Dataset name field under the Specify Cross Reference Dataset information section.
If you want to create a new XREF dataset, the attributes are:
DSORG=PO,RECFM=VB,LRECL=300,BLKSIZE=x (x = 304 or more)
You may store XREF members and permanent selection criteria members in the same dataset. Any entry you make here is reflected on all File-AID screens where an XREF dataset is permitted.
2. Type ORDERXRF in the Member name field.
You are creating a new member, ORDERXRF. You can enter the name of an existing member. You can also leave the field blank or specify a pattern to display a list of existing XREF members from which you can select. The member you identify here is reflected on all File-AID screens where an XREF member is permitted.
3. Type FASAMP.LAYOUTS in the Record layout dataset field.
This is the name of the library containing the record layouts you reference during XREF creation and XREF usage. The last referenced layout library entered on any File-AID screen is shown as a default. Any entry you make here is reflected on all File-AID screens where a record layout library is referenced.
4. Press <Enter>. File-AID displays the Define XREF screen as illustrated in Figure 14-2.
CHAP_14.3 Defining the XREFThe Define XREF screen ( Figure 14-2) is where you specify which source layout library members are to be used for formatting the data records of your file. The scrollable area in the lower half of the screen is where you enter line commands and member names (or patterns). Note: You must use the line command S (Select Formatted) or SU (Select Unformatted) to access the selection rules definition screen for each member you enter.
Figure 14-2. Define XREF Screen. Requesting a Pattern Member List.
File-AID ----- Define XREF - ORDERXRF --------------------- ROW 1 TO 12 OF 15 COMMAND ===> SCROLL ===> PAGE XR105-Valid line CMDS: C/M, B/A, I, R, D, EX, S, SF, SU, DEF, BAS, SEG Member list description ===> ______________________________
Page 252

FileAid_-_Online_1 Long ===> ______________________________________________________________ Description ===> ______________________________________________________________
Generated filler length ===> 0 (0 to suppress filler)
Cmd Member Beginning Data-Name Description Status --- ---------- ------------------------------ --------------- ---------------- S__ ORD*_______ ______________________________ _______________ ___ __________ ______________________________ _______________ ___ __________ ______________________________ _______________ ___ __________ ______________________________ _______________ ___ __________ ______________________________ _______________ ___ __________ ______________________________ _______________ ___ __________ ______________________________ _______________ ___ __________ ______________________________ _______________ ___ __________ ______________________________ _______________ ___ __________ ______________________________ _______________ ___ __________ ______________________________ _______________ ___ __________ ______________________________ _______________
The optional Beginning Data-Name field is provided for cases when the referenced source layout library member contains multiple 01-level data structures, or is a source language program (COBOL or PL/I) containing an embedded data structure that you want to use for formatting your data records. File-AID examines the source code for the data-name and extracts the data structure at the level of the data-name specified, stopping when an equal or lower level data structure or other non-data declarative source statement is encountered. If you do not specify a value in the Beginning Data-Name field for a source member with multiple 01-level data structures, File-AID displays a list of structures from which you can select. Whenever File-AID is unable to clearly determine the structure to use (for example the layout member is a source program), the Source Statement Selection screen is displayed to capture the starting and ending data names or line numbers of the source statements which define the data structure you want to use. The EX (Extract) layout line command is provided to give you direct access to the Source Statement Selection screen to enable source data structure extraction from within a program when starting-data-name or line-number is not adequate for isolating the data structure to use for formatting. Use the Description field to document your comments to help you identify each of the layout usage conditions you define for each layout member. Fields at the top half of the screen capture information about this XREF to help with future identification. One of these fields is the Generated filler length field, which can be used to request that File-AID automatically generate a filler field before each of the layouts when presenting formatted data displays.
CHAP_14.4 Defining Layout Selection Rules Using Formatted CriteriaIn this example, there are four layouts corresponding to the four different record types found in the ORDRFILE. You now define the rules for the "PO" record type to be formatted by the layout member ORDERPO. The S (Select Formatted) line command requests formatted criteria definition which uses the layout to help you enter a test for the record type field. Subtopics: Chap_14.4.1 Steps: Chap_14.4.2 More About the Define XREF Screen
Page 253
FileAid_-_Online_1
CHAP_14.4.1 Steps: 1. Type S in the Cmd column on the first line of the scrollable member entry area.
2. Type ORD* in the Member name column.
A full member name is expected in this field. If you specify an * (asterisk), File-AID displays a list of all members of the layout library. If you leave the member name blank or specify a pattern, File-AID presents the PDS Processing Options (PPO) screen to help you filter the list of members. In this example you specify a pattern (ORD*). The pattern is carried over to the "Member mask" field of the PPO screen.
3. Press <Enter>. File-AID displays the PDS Processing Options screen as illustrated in Figure 14-3 on page 14-6.
CHAP_14.4.2 More About the Define XREF Screen o You can use the following primary commands on the XREF Define screen:
END End Define XREF, validate entries, and SAVE the XREF member in the XREF dataset.
CANCEL Abort Define XREF; do not SAVE member.
SAVE Save the current XREF member; remain on the Define XREF screen.
VIEW Display all entries for this XREF member in a scrollable, readable, browse screen.
o The S (Select Formatted, alias SF) or the SU (Select Unformatted) line command is required for all member entries. A full member name or a pattern is required in the Member field.
o Editing line commands are provided to help you to build complex XREF members. The editing line commands include:
A (After)
B (Before)
C (Copy a line to A or B marker)
D (Delete line)
I (Insert)
M (Move)
R (Repeat)
o There are three types of layout members. The layout member type is Page 254

FileAid_-_Online_1 identified by its status as displayed in the Status column. The status of a layout member is established in one of two ways. Either File-AID defines the status (the default) or you can explicitly set the status of a layout member (invoke the BAS or SEG line command) during XREF definition. There are three status types and commands, including:
BAS (Status BASE). A BASE layout defines the beginning of the record and at least one condition has been specified with the Formatted (S) or Unformatted (SU) commands.
SEG (Status SEGMENT). A SEGMENT layout defines a segment of the record following the last displayed BASE or SEGMENT. At least one condition (typically at a position relative to the end of the last displayed BASE or SEGMENT) has been specified with the Formatted (S) or Unformatted (SU) commands.
DEF (Status DEFAULT-BASE). A DEFAULT-BASE layout defines the beginning of the record when no other BASE record conditions can be matched. No conditions are allowed for a DEFAULT- BASE. DEF is not allowed if status is BASE or SEGMENT, you must use the S or SU line commands and delete all conditions to make a layout a DEFAULT-BASE.
Note: Only one layout member may be designated as a DEFAULT-BASE. The DEFAULT-BASE must be the last (or only) base layout in the XREF.
o Description fields are optional and provided to assist with layout identification.
CHAP_14.5 Using the PPO Member FiltersWhenever you use the Define XREF S or SF (Select Formatted), or SU (Select Unformatted) line commands, and leave the Member name column blank or use a pattern, File-AID displays a PDS Processing Options screen as shown in Figure 14-3. Any pattern you specified is automatically carried forward and placed in the "Member name mask" field. You may specify additional filters (for example, Last modified userid), or just press <Enter> to get a list of all members whose names match your pattern.
Figure 14-3. PDS Processing Options - Member Name Mask ORD*. Filtering the Layout Members.
File-AID ----------------- PDS Processing Options ----------------------------- COMMAND ===>
Layout Dataset: USERID9.FASAMP.LAYOUTS
Page 255

FileAid_-_Online_1
Specify Member Selection Options (Blank for All Members) Member name mask ===> ORD* Member name range ===> to ===> Last modified userid ===> to ===> Creation date ===> to ===> (YY/MM/DD) Modification date ===> to ===> (YY/MM/DD)
Use ENTER to continue, END to return to dataset specification screen
Subtopics:
Chap_14.5.1 Step: Chap_14.5.2 More About PDS Processing Options For Layout Member List
CHAP_14.5.1 Step: 1. Press <Enter>. File-AID displays the RECORD LAYOUT FILE MEMBER LIST screen, showing all members starting with ORD as illustrated in Figure 14-4 on page 14-7.
CHAP_14.5.2 More About PDS Processing Options For Layout Member List o Use a member name of * (asterisk) on the Define XREF screen to list all members and to bypass the PPO screen. Note that if your record layout dataset contains a large number of members it may take some time to generate the member list.
CHAP_14.6 Selecting a Layout Member from a Member ListFile-AID displays the list of matching members as shown in Figure 14-3 on page 14-6. Use the S line command to the left of the member you want, in this case, member ORDERPO.
Figure 14-4. Record Layout Member List Screen. Selecting a Layout Member.
File-AID Member Select - USERID9.FASAMP.LAYOUTS ------------- ROW 1 TO 3 OF 3 COMMAND ===> SCROLL ===> CSR S NAME VV.MM CREATED CHANGED SIZE INIT MOD ID S ORDERPO ORDERSC ORDERWO ************************** END OF SELECTION CRITERIA **************************
Subtopics:
Chap_14.6.1 Steps:
CHAP_14.6.1 Steps:Page 256

FileAid_-_Online_1 1. Type S in the input area just left of member name ORDERPO.
2. Press <Enter>. File-AID displays the Formatted XREF Definition screen showing the ORDERPO member layout, as illustrated in Figure 14-5 on page 14-8.
CHAP_14.7 Defining the Formatted XREF CriteriaThe selected ORDERPO layout is displayed in formatted mode. As described earlier, the ORDERPO layout defines all records with ORDER-TYPE equal to "PO".
Figure 14-5. Formatted XREF Definition - ORDERPO - ORDER-LINE-DATA-PO
File-AID --- Formatted XREF Definition -------------- LAYOUTS HAVE BEEN LOADED COMMAND ===> SCROLL ===> CSR CRITERIA NUMBER: 1 OF 1 ORDER-LINE-DATA-PO LAYOUT LENGTH: 184 ---- FIELD NUMBER/NAME ------ COLUMNS- RO ----+----1----+----2----+----3----+- ******************************* TOP OF DATA ******************************** 1 RECORD-LENGTH 0 2 ORDER-NO 2 3 ORDER-LINE-KEY SYNC 8 4 LINE-NUMBER 8 5 ORDER-TYPE 10 6 LINE-STATUS 12 7 PART-NO 19 8 DESCRIPTION 25 9 UNIT-OF-MEASURE 55 10 PURCHASE-ORDER-INFO SYNC 57 11 PO-CODE 57 12 PO-NUMBER 61 13 PO-COMPANY 73 14 PO-VENDOR-NUMBER 103 15 PO-VENDOR-CODE 108 16 FILLER 113 17 ORDER-QUANTITIES SYNC 143 18 QTY-ORDERED 143 19 QTY-BACKORDERED 146
Subtopics:
Chap_14.7.1 Showing Field Offsets with the SHOW OFFSET Command Chap_14.7.2 Steps:
CHAP_14.7.1 Showing Field Offsets with the SHOW OFFSET CommandBefore you specify the condition, notice that all standard File-AID formatted mode commands are available including the SHOW and DISPLAY commands.You now use the SHOW OFFSET command to set the display to show the offset of each field so that you can see the location of the ORDER-TYPE field. Figure 14-6. Display Offset Information - SHOW OFFSET
File-AID --- Formatted XREF Definition ----------------- COMMAND ===> SHOW OFFSET CRITERIA NUMBER: 1 OF 1 ORDER-LINE-DATA-PO ---- FIELD NUMBER/NAME ------ COLUMNS- RO ----+----1----+----2----+----3----+- ******************************* TOP OF DATA ******************************** 1 RECORD-LENGTH 1
Page 257

FileAid_-_Online_1
CHAP_14.7.2 Steps: 1. If COLUMNS already appears in the center portion of the screen, you may skip these steps.
2. Type SHOW OFFSET in the COMMAND field.
3. Press <Enter>. File-AID redisplays the Formatted XREF Definition screen showing the offsets of each field, as illustrated in Figure 14-7 on page 14-9.
CHAP_14.8 Defining the Formatted Layout Selection ConditionField number 5, the ORDER-TYPE field, is located in column 11 of each data record. When the ORDER-TYPE field in a data record is equal to "PO" this ORDERPO member is to be used to format the data. Subtopics: Chap_14.8.1 Steps: Chap_14.8.2 More About the Formatted XREF Definition Screen
CHAP_14.8.1 Steps: 1. Type END in the COMMAND field.
2. Type EQ (equal) in the RO column to the right of the ORDER-TYPE field.
3. Type PO in the data value area to the right of the RO column for the ORDER-TYPE field.
4. Press <Enter>. File-AID captures your condition and returns to the Define XREF screen, as illustrated in Figure 14-8 on page 14-10.
Figure 14-7. Formatted XREF Definition. Specifying the Selection Condition.
File-AID --- Formatted XREF Definition -------------------- COLUMNS 00001 00149 COMMAND ===> END SCROLL ===> PAGE CRITERIA NUMBER: 1 OF 1 ORDER-LINE-DATA-PO LAYOUT LENGTH: 184 ---- FIELD NUMBER/NAME ------ COLUMNS- RO ----++----1----+----2----+----3----+- ******************************* TOP OF DATA ********************************* 1 RECORD-LENGTH 1 2 ORDER-NO 3 3 ORDER-LINE-KEY SYNC 9 4 LINE-NUMBER 9 5 ORDER-TYPE 11 EQ PO 6 LINE-STATUS 13 7 PART-NO 20 8 DESCRIPTION 26 9 UNIT-OF-MEASURE 56 10 PURCHASE-ORDER-INFO SYNC 58 11 PO-CODE 58 12 PO-NUMBER 62 13 PO-COMPANY 74 14 PO-VENDOR-NUMBER 104 15 PO-VENDOR-CODE 109 16 FILLER 114 17 ORDER-QUANTITIES SYNC 144 18 QTY-ORDERED 144
Page 258
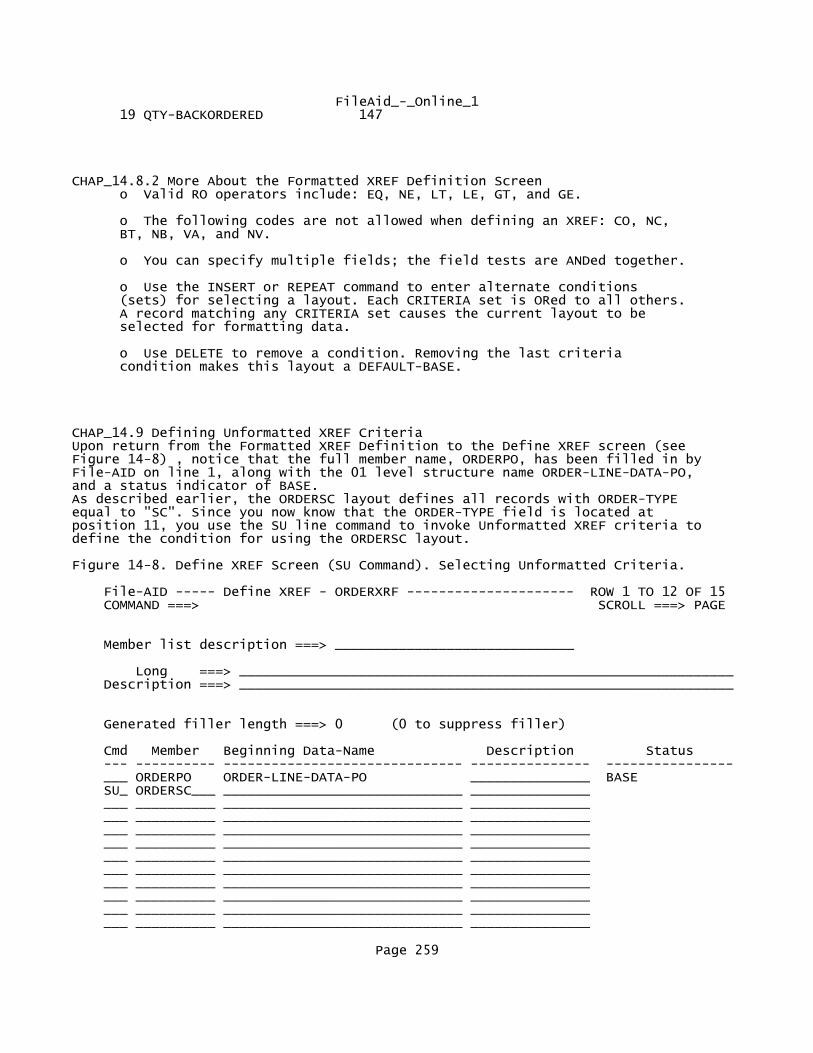
FileAid_-_Online_1 19 QTY-BACKORDERED 147
CHAP_14.8.2 More About the Formatted XREF Definition Screen o Valid RO operators include: EQ, NE, LT, LE, GT, and GE.
o The following codes are not allowed when defining an XREF: CO, NC, BT, NB, VA, and NV.
o You can specify multiple fields; the field tests are ANDed together.
o Use the INSERT or REPEAT command to enter alternate conditions (sets) for selecting a layout. Each CRITERIA set is ORed to all others. A record matching any CRITERIA set causes the current layout to be selected for formatting data.
o Use DELETE to remove a condition. Removing the last criteria condition makes this layout a DEFAULT-BASE.
CHAP_14.9 Defining Unformatted XREF CriteriaUpon return from the Formatted XREF Definition to the Define XREF screen (see Figure 14-8) , notice that the full member name, ORDERPO, has been filled in by File-AID on line 1, along with the 01 level structure name ORDER-LINE-DATA-PO, and a status indicator of BASE. As described earlier, the ORDERSC layout defines all records with ORDER-TYPE equal to "SC". Since you now know that the ORDER-TYPE field is located at position 11, you use the SU line command to invoke Unformatted XREF criteria to define the condition for using the ORDERSC layout.
Figure 14-8. Define XREF Screen (SU Command). Selecting Unformatted Criteria.
File-AID ----- Define XREF - ORDERXRF --------------------- ROW 1 TO 12 OF 15 COMMAND ===> SCROLL ===> PAGE
Member list description ===> ______________________________
Long ===> ______________________________________________________________ Description ===> ______________________________________________________________
Generated filler length ===> 0 (0 to suppress filler)
Cmd Member Beginning Data-Name Description Status --- ---------- ------------------------------ --------------- ---------------- ___ ORDERPO ORDER-LINE-DATA-PO _______________ BASE SU_ ORDERSC___ ______________________________ _______________ ___ __________ ______________________________ _______________ ___ __________ ______________________________ _______________ ___ __________ ______________________________ _______________ ___ __________ ______________________________ _______________ ___ __________ ______________________________ _______________ ___ __________ ______________________________ _______________ ___ __________ ______________________________ _______________ ___ __________ ______________________________ _______________ ___ __________ ______________________________ _______________ ___ __________ ______________________________ _______________
Page 259

FileAid_-_Online_1Subtopics:
Chap_14.9.1 Steps:
CHAP_14.9.1 Steps: 1. Type SU in the Cmd column on the second line of the scrollable member entry area.
2. Type ORDERSC in the Member name column on the second line.
3. Press <Enter>. File-AID displays the Unformatted XREF Definition screen, as illustrated in Figure 14-9 on page 14-11.
CHAP_14.10 Defining the Unformatted Layout Selection ConditionAs illustrated in Figure 14-7 on page 14-9, the ORDER-TYPE field is located in column 11 of each data record. When the ORDER-TYPE field is equal to "SC", the ORDERSC member is to be used to format the data.
Figure 14-9. Unformatted XREF Definition Screen. Specifying the Layout Selection Condition.
File-AID -------------- Unformatted XREF Definition LAYOUTS HAVE BEEN LOADED COMMAND ===> END SCROLL ===> PAGE
Use END to continue, CANCEL to return to main screen.
Record Layout Member: ORDERSC Beginning Data Name: ORDER-LINE-DATA-SC
AND Cmd /OR Position Length RO Data Value --- --- -------- ------ -- ---------------------------------------------------- ___ 11___ _____ EQ SC__________________________________________________ ___ AND _____ _____ EQ ____________________________________________________ ___ AND _____ _____ EQ ____________________________________________________ ___ AND _____ _____ EQ ____________________________________________________ ___ AND _____ _____ EQ ____________________________________________________ ___ AND _____ _____ EQ ____________________________________________________ ___ AND _____ _____ EQ ____________________________________________________ ___ AND _____ _____ EQ ____________________________________________________ ___ AND _____ _____ EQ ____________________________________________________ ___ AND _____ _____ EQ ____________________________________________________ ___ AND _____ _____ EQ ____________________________________________________ ___ AND _____ _____ EQ ____________________________________________________ ___ AND _____ _____ EQ ____________________________________________________ ___ AND _____ _____ EQ ____________________________________________________
Subtopics:
Chap_14.10.1 Steps: Chap_14.10.2 More About Unformatted XREF Definition
CHAP_14.10.1 Steps:Page 260

FileAid_-_Online_1 1. Type END on the COMMAND line.
2. Type 11 in the Position column on the first input line.
3. Type EQ (equal) in the RO column on the first input line.
4. Type SC in the data value column to the right of the EQ on the first input line.
5. Press <Enter>. File-AID captures your condition and returns to the Define XREF screen, as illustrated in Figure 14-10 on page 14-13.
CHAP_14.10.2 More About Unformatted XREF Definition o Valid RO operators include: BT, EQ, GE, GT, LE, LT, MX, NB, NE, NO, NV and VA.
o The following codes are not allowed when defining an XREF: CO and NC.
o The value you specify in the Position field can be a relative position by using one of the following Position values:
*n (asterisk "n") where n represents a byte of data relative to data record byte 1. The *n notation is used for SEG (segment) type layouts when the determination of the presence of a segment is based on a data field in the base portion of the record rather than the segment itself.
-n (minus "n") where n represents a byte of data relative to the end of the currently displayed layout. The -n notation is used for SEG (segment) type layouts when the determination of the presence and format of the next segment of record data is based on a data field in the currently displayed segment (or base) portion of the record rather than the next segment itself.
+n (plus n) where n represents a byte of data beyond the end of the currently displayed layout. The+n notation is implied when no special character (+, -, *) precedes a Position value for SEGMENT status layouts. With +n or n alone, the determination of the presence and format of the next segment of record data is based on a data field in the next segment itself.
o Valid line commands include:
A (After)
B (Before)
Page 261
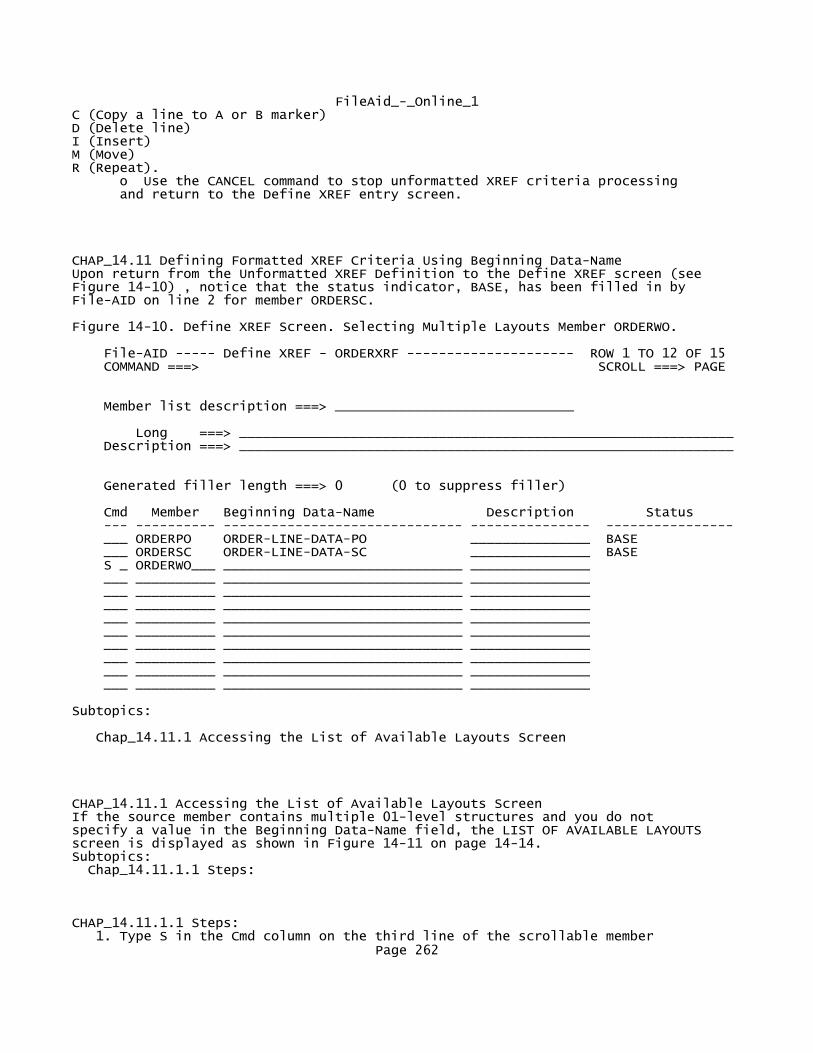
FileAid_-_Online_1C (Copy a line to A or B marker) D (Delete line) I (Insert) M (Move) R (Repeat). o Use the CANCEL command to stop unformatted XREF criteria processing and return to the Define XREF entry screen.
CHAP_14.11 Defining Formatted XREF Criteria Using Beginning Data-NameUpon return from the Unformatted XREF Definition to the Define XREF screen (see Figure 14-10) , notice that the status indicator, BASE, has been filled in by File-AID on line 2 for member ORDERSC.
Figure 14-10. Define XREF Screen. Selecting Multiple Layouts Member ORDERWO.
File-AID ----- Define XREF - ORDERXRF --------------------- ROW 1 TO 12 OF 15 COMMAND ===> SCROLL ===> PAGE
Member list description ===> ______________________________
Long ===> ______________________________________________________________ Description ===> ______________________________________________________________
Generated filler length ===> 0 (0 to suppress filler)
Cmd Member Beginning Data-Name Description Status --- ---------- ------------------------------ --------------- ---------------- ___ ORDERPO ORDER-LINE-DATA-PO _______________ BASE ___ ORDERSC ORDER-LINE-DATA-SC _______________ BASE S _ ORDERWO___ ______________________________ _______________ ___ __________ ______________________________ _______________ ___ __________ ______________________________ _______________ ___ __________ ______________________________ _______________ ___ __________ ______________________________ _______________ ___ __________ ______________________________ _______________ ___ __________ ______________________________ _______________ ___ __________ ______________________________ _______________ ___ __________ ______________________________ _______________ ___ __________ ______________________________ _______________
Subtopics:
Chap_14.11.1 Accessing the List of Available Layouts Screen
CHAP_14.11.1 Accessing the List of Available Layouts ScreenIf the source member contains multiple 01-level structures and you do not specify a value in the Beginning Data-Name field, the LIST OF AVAILABLE LAYOUTS screen is displayed as shown in Figure 14-11 on page 14-14. Subtopics: Chap_14.11.1.1 Steps:
CHAP_14.11.1.1 Steps: 1. Type S in the Cmd column on the third line of the scrollable member
Page 262

FileAid_-_Online_1 entry area.
2. Type ORDERWO in the Member name column on the third line.
3. Press <Enter>.
CHAP_14.12 Selecting a Layout Structure from an Available Layouts ListAs described earlier, the ORDERWO layout member contains two 01 level structures: o OUTSIDE-VENDOR-WORK-ORDER
o INTERNAL-WORK-ORDER
The OUTSIDE-VENDOR-WORK-ORDER layout is used when the ORDER-TYPE is "WO" and the CONTRACT-INDICATOR is "OV". The INTERNAL-VENDOR-WORK-ORDER layout is used when the ORDER-TYPE is "WO" and the CONTRACT-INDICATOR is "IN". Since both of these structures exist within the same source layout member, you can use the Beginning Data-Name field to specify which structure to use for each set of rules. You may either type in the data-name or leave the data-name field blank when you use either of the criteria access line commands: S or SU. Use the S line command to the left of the 01-level structure you want, in this case, OUTSIDE-VENDOR-WORK-ORDER.
Figure 14-11. List of Available Layouts Screen. Selecting an 01-Level Structure.
File-AID ---- LIST OF AVAILABLE RECORD LAYOUTS -------------- ROW 1 TO 2 OF 2 COMMAND ===> SCROLL ===> CSR Member S Nbr name 01-level Name Status --- --- -------- ------------------------------ ------------------------ 1 ORDERWO INTERNAL-WORK-ORDER S 2 ORDERWO OUTSIDE-VENDOR-WORK-ORDER ************************** END OF SELECTION CRITERIA **************************
Subtopics:
Chap_14.12.1 Steps:
CHAP_14.12.1 Steps: 1. Type S in the S column just left of member number 2, member name ORDERWO with an 01-level Name of OUTSIDE-VENDOR-WORK-ORDER.
2. Press <Enter>. File-AID displays the Formatted XREF Definition screen showing the ORDERWO member's structure for OUTSIDE-VENDOR-WORK-ORDER layout, as illustrated in Figure 14-12 on page 14-15.
CHAP_14.13 Defining the Formatted Layout Selection - Compound ConditionWhen the ORDER-TYPE field is equal to "WO" and the CONTRACT-INDICATOR field is equal to "OV", the OUTSIDE-VENDOR-WORK-ORDER structure contained in the ORDERWO layout library member is selected to format the data.
Figure 14-12. Formatted XREF Definition. Specifying a Compound Condition. Page 263

FileAid_-_Online_1
File-AID --- Formatted XREF Definition ---------------------------------------- COMMAND ===> END SCROLL ===> PAGE SC010- Valid commands are: INSERT, DELETE, REPEAT, VIEW, SAVE, CANCEL, PROFILE ---- FIELD NUMBER/NAME ------ COLUMNS RO ----+----1----+----2----+----3----+- ******************************* TOP OF DATA ******************************** 1 RECORD-LENGTH 1 2 ORDER-NO 3 3 ORDER-LINE-KEY SYNC 9 4 LINE-NUMBER 9 5 ORDER-TYPE 11 EQ WO 6 LINE-STATUS 13 7 PART-NO 20 8 DESCRIPTION 26 9 CONTRACT-INDICATOR 56 EQ OV 10 UNIT-OF-MEASURE 58 11 VENDOR-INFO SYNC 60 12 VENDOR-NUMBER 60 13 VENDOR-NAME 65 14 VENDOR-AREA-CODE 85 15 VENDOR-TELEPHONE 88 16 VENDOR-START-DATE 95 17 VENDOR-COMPLETE-DATE 101 18 FILLER 107
Subtopics:
Chap_14.13.1 Steps:
CHAP_14.13.1 Steps: 1. Type END in the COMMAND field.
2. Type EQ (equal) in the RO column to the right of the ORDER-TYPE field.
3. Type WO in the data value area to the right of the RO column for the ORDER-TYPE field.
4. Type EQ (equal) in the RO column to the right of the CONTRACT-INDICATOR field.
5. Type OV in the data value column to the right of the RO column for the
CONTRACT-INDICATOR field. Multiple tests within one criteria are ANDed together.
6. Press <Enter>. File-AID captures your condition and returns to the Define XREF screen, as illustrated in Figure 14-13 on page 14-16.
CHAP_14.14 Setting a Default Base LayoutUpon return from the Formatted XREF Definition screen to the Define XREF screen (see Figure 14-13) , notice that File-AID has entered the member name on line 3, along with the 01-level structure name OUTSIDE-VENDOR-WORK-ORDER, and a status indicator of BASE. When no conditions are specified for a layout, File-AID assigns a status of DEFAULT- BASE to that layout and uses the default layout whenever it encounters a data record that does not match any of the XREF criteria specified. In this
Page 264
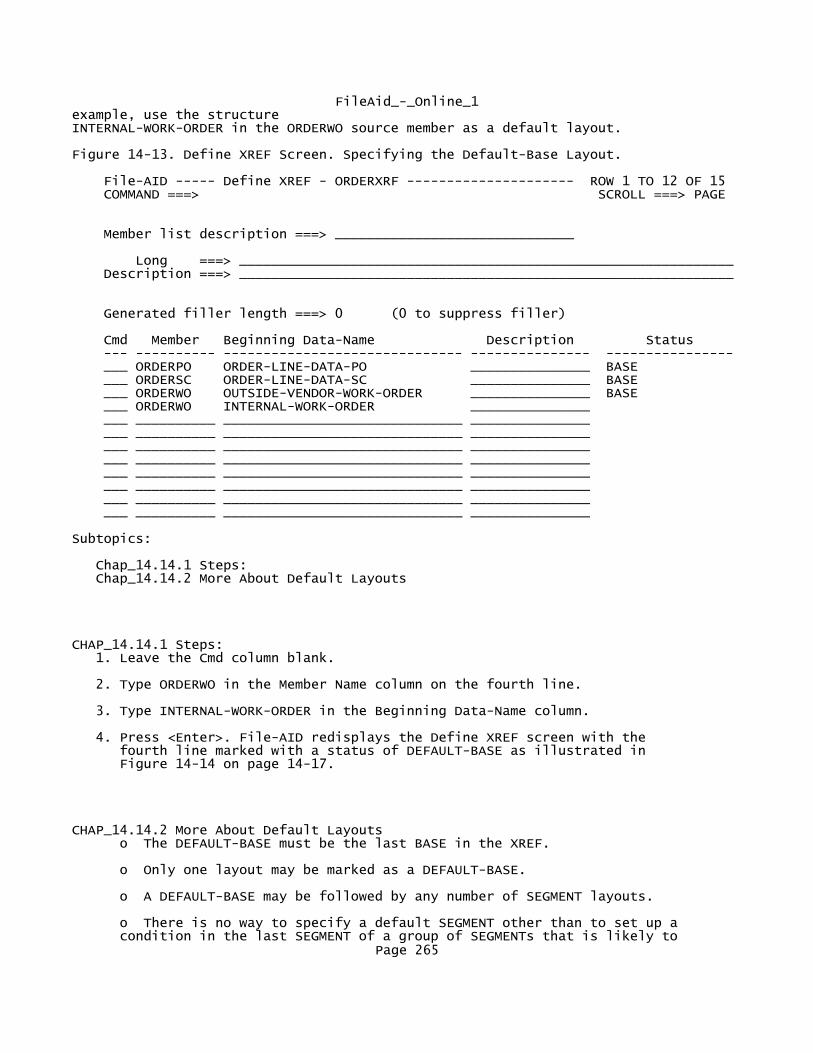
FileAid_-_Online_1example, use the structure INTERNAL-WORK-ORDER in the ORDERWO source member as a default layout.
Figure 14-13. Define XREF Screen. Specifying the Default-Base Layout.
File-AID ----- Define XREF - ORDERXRF --------------------- ROW 1 TO 12 OF 15 COMMAND ===> SCROLL ===> PAGE
Member list description ===> ______________________________
Long ===> ______________________________________________________________ Description ===> ______________________________________________________________
Generated filler length ===> 0 (0 to suppress filler)
Cmd Member Beginning Data-Name Description Status --- ---------- ------------------------------ --------------- ---------------- ___ ORDERPO ORDER-LINE-DATA-PO _______________ BASE ___ ORDERSC ORDER-LINE-DATA-SC _______________ BASE ___ ORDERWO OUTSIDE-VENDOR-WORK-ORDER _______________ BASE ___ ORDERWO INTERNAL-WORK-ORDER _______________ ___ __________ ______________________________ _______________ ___ __________ ______________________________ _______________ ___ __________ ______________________________ _______________ ___ __________ ______________________________ _______________ ___ __________ ______________________________ _______________ ___ __________ ______________________________ _______________ ___ __________ ______________________________ _______________ ___ __________ ______________________________ _______________
Subtopics:
Chap_14.14.1 Steps: Chap_14.14.2 More About Default Layouts
CHAP_14.14.1 Steps: 1. Leave the Cmd column blank.
2. Type ORDERWO in the Member Name column on the fourth line.
3. Type INTERNAL-WORK-ORDER in the Beginning Data-Name column.
4. Press <Enter>. File-AID redisplays the Define XREF screen with the fourth line marked with a status of DEFAULT-BASE as illustrated in Figure 14-14 on page 14-17.
CHAP_14.14.2 More About Default Layouts o The DEFAULT-BASE must be the last BASE in the XREF.
o Only one layout may be marked as a DEFAULT-BASE.
o A DEFAULT-BASE may be followed by any number of SEGMENT layouts.
o There is no way to specify a default SEGMENT other than to set up a condition in the last SEGMENT of a group of SEGMENTs that is likely to
Page 265

FileAid_-_Online_1 be true (for example,
FIELDX NE CPWR). o The beginning data name can be abbreviated as long as the partial name is unique or matches the first structure starting with the name specified. For example,
INTERNAL-W is valid in this case.
CHAP_14.15 Saving the New XREF MemberYour XREF for the ORDRFILE is now complete. Use the END command or PF key (default PF3) to exit from the Define XREF screen and to save your XREF criteria member.
Figure 14-14. Define XREF Screen. Entering Description and Saving XREF Definition.
File-AID ----- Define XREF - ORDERXRF --------------------- ROW 1 TO 12 OF 15 COMMAND ===> END SCROLL ===> PAGE
Member list description ===> XREF FOR ORDER FILE
Long ===> ______________________________________________________________ Description ===> ______________________________________________________________
Generated filler length ===> 0 (0 to suppress filler)
Cmd Member Beginning Data-Name Description Status --- ---------- ------------------------------ --------------- ---------------- ___ ORDERPO ORDER-LINE-DATA-PO _______________ BASE ___ ORDERSC ORDER-LINE-DATA-SC _______________ BASE ___ ORDERWO OUTSIDE-VENDOR-WORK-ORDER _______________ BASE ___ ORDERWO INTERNAL-WORK-ORDER ______________ DEFAULT BASE ___ __________ ______________________________ _______________ ___ __________ ______________________________ _______________ ___ __________ ______________________________ _______________ ___ __________ ______________________________ _______________ ___ __________ ______________________________ _______________ ___ __________ ______________________________ _______________ ___ __________ ______________________________ _______________ ___ __________ ______________________________ _______________
Subtopics:
Chap_14.15.1 Steps:
CHAP_14.15.1 Steps: 1. Type END in the COMMAND field.
2. Type XREF FOR ORDER FILE in the Member list description field.
3. Press <Enter>. File-AID saves your new member ORDERXRF in the sample dataset FASAMP.XREF and returns to the Record Layout Cross Reference screen, as illustrated in Figure 14-15 on page 14-18.
Page 266

FileAid_-_Online_1
CHAP_14.16 Exiting XREF and Returning to Main MenuNotice that the message, CRITERIA MEMBER SAVED, is displayed to confirm that your XREF member has been created. Use the END command to exit from the XREF function and to return to the File-AID Primary Option Menu.
Figure 14-15. Record Layout Cross Reference. Saving the XREF Member and Exiting XREF Using the END Command.
File-AID -------------- Record Layout Cross Referenc CRITERIA MEMBER SAVED COMMAND ===> END
Specify Cross Reference Dataset to be Created or Edited: XREF dataset name ===> FASAMP.XREF Member name ===> ORDERXRF (Blank or pattern for member list)
Specify Record Layout Information: Record layout dataset ===> FASAMP.LAYOUTS
------------------------------------------------------------------------------- This function creates and maintains existing File-AID Record Layout Cross References. These XREF's are used to match record layouts to data records in File-AID functions that use formatting.
Subtopics:
Chap_14.16.1 Steps: Chap_14.16.2 More About XREF Members
CHAP_14.16.1 Steps: 1. Type END in the COMMAND field.
2. Press <Enter>. File-AID returns to the Primary Option Menu screen, as illustrated in Figure 14-17 on page 14-20.
CHAP_14.16.2 More About XREF Members o Use function 5.2 Print XREF to print an XREF member. When you print an XREF, you can request a print of all referenced record layouts.
CHAP_14.17 Using the XREF Member - Record Layout UsageXREF members are most often used when browsing, editing, or printing a multi-record type data file. XREF members contain the criteria for selecting the correct record layout for formatting each data record. On the entry screen of
Page 267

FileAid_-_Online_1the Browse and Edit functions, as well as many other File-AID functions and utilities, there are specific fields for you to specify layout usage and the layout dataset name as shown in the following partial Browse screen: Figure 14-16. Record Layout Usage Section of Function Entry Screens in File-AID
Specify Record Layout and XREF Information: Record layout usage ===> X (S = Single; X = XREF; N = None) Record layout dataset ===> FASAMP.LAYOUTS Member ===> (Blank or pattern for member list) XREF dataset ===> FASAMP.XREF Member ===> ORDERXRF (Blank or pattern for member list)
Use the Record layout usage field to indicate whether you are using a single record layout (S), an XREF (X), or no layouts (N) to format your data records. The last XREF dataset and member name referenced in the XREF utility is automatically transferred to all File-AID screens that contain an XREF dataset name field. If you specify Record layout usage X (use XREF), you must enter the valid record layout dataset name that contains the source layout members referenced in the XREF dataset member. The Record layout member name field is not used and may be left blank when using an XREF.
CHAP_14.18 Browsing Formatted Data Records with an XREFYou now start a Browse session and specify layout usage X to use the new XREF you created earlier in this chapter. Subtopics: Chap_14.18.1 Steps:
CHAP_14.18.1 Steps: 1. Type 1 in the OPTION field.
2. Press <Enter>. File-AID displays the Browse - Dataset Specification screen, as illustrated in Figure 14-18 on page 14-21.
Figure 14-17. File-AID Primary Option Menu. Starting a Browse Session (Select Option 1).
File-AID Release 8.8 ------------- Primary Option Menu ---------------------------- OPTION ===> 1
0 PARAMETERS - Specify ISPF and File-AID parameters USERID - USERID9 1 BROWSE - Display file contents PF KEYS - 24 2 EDIT - Create or change file contents TERMINAL - 3278 3 UTILITIES - File-AID/SPF extended utilities TIME - 14:28 5 PRINT - Print file contents JULIAN - 01.058 6 SELECTION - Create or change selection criteria DATE - 01/02/27 7 XREF - Create or change record/layout cross reference 8 VIEW - View interpreted record layout 9 REFORMAT - Convert file from one format to another 10 COMPARE - Compare file contents C CHANGES - Display summary of File-AID changes T TUTORIAL - Display information about File-AID X EXIT - Terminate File-AID and return to ISPF
Page 268

FileAid_-_Online_1 Use END to terminate File-AID
Online Technical Support available at: frontline.compuware.com
Copyright (c) 1995-2001, by Compuware Corporation. All rights reserved. Unpublished rights reserved under the Copyright Laws of the United States. Type LEGAL on the command line for Copyright/Trade Secret Notice.
CHAP_14.19 Requesting the XREF UsageAs mentioned earlier, the Record layout usage field controls the XREF usage. Here you request a formatted display of the ORDRFILE using your new XREF.
Figure 14-18. Browse - Dataset Specification Screen. Using the XREF for Browsing a Data File.
File-AID -------------- Browse - Dataset Specification ---------------------- COMMAND ===>
Browse Mode ===> F (F=Formatted; C=Char; V=Vertical)
Specify Browse Information: Dataset name or HFS path ===> FASAMP.ORDRFILE Member ===> (Blank or pattern for member list) Volume serial ===> (If dataset is not cataloged)
Specify Record Layout and XREF Information: Record layout usage ===> X (S = Single; X = XREF; N = None) Record layout dataset ===> FASAMP.LAYOUTS Member ===> ________ (Blank or pattern for member list) XREF dataset ===> FASAMP.XREF Member ===> ORDERXRF (Blank or pattern for member list)
Specify Selection Criteria Information: (E = Existing; T = Temporary; Selection criteria usage ===> N M = Modify; Q = Quick; N = None) Selection dataset name ===> FASAMP.SELCRIT Member name ===> INVSEL (Blank or pattern for member list)
Subtopics:
Chap_14.19.1 Steps:
CHAP_14.19.1 Steps: 1. Type F (formatted) in the Browse Mode field.
2. Type FASAMP.ORDRFILE in the Browse dataset field.
3. Type X in the Record layout usage field.
Note: Vertical format (VFMT command or Browse mode V) is not allowed when using an XREF.
4. Type FASAMP.LAYOUTS in the Record layout dataset field.
Page 269

FileAid_-_Online_1 5. Blank out the record layout Member field.
6. Verify the XREF dataset is FASAMP.XREF.
7. Verify the XREF member is ORDERXRF.
Note: If you did not complete the steps described earlier in this chapter to build a new XREF member, you may use a sample member name, ORDRFILE, for your XREF member name.
8. Make sure that the value of the Selection criteria usage field is N.
9. Press <Enter>. File-AID displays the first record of the ORDRFILE file, which is formatted with the ORDER-LINE-DATA-PO layout. The XREF selected this layout because the the data value in the ORDER-TYPE field for record 1 is PO. This record is shown in Figure 14-19 on page 14-22.
CHAP_14.20 Scrolling with the FWD CommandEach time you move to a new record when you are in formatted mode, File-AID examines the XREF logic to determine which layout to use to format the data.
Figure 14-19. Scrolling to the Next Formatted Record. Triggering the XREF Logic.
FILE-AID - BROWSE - USERID9.FASAMP.ORDRFILE ------------------------ COL 1 152 COMMAND ===> FWD SCROLL ===> PAGE RECORD: 1 ORDER-LINE-DATA-PO LENGTH: 184 ---- FIELD NUMBER/NAME ------ COLUMNS- ----+----1----+----2----+----3----+----4 1 RECORD-LENGTH 1 184 2 ORDER-NO 3 AA2222 3 ORDER-LINE-KEY SYNC 9 4 LINE-NUMBER 9 01 5 ORDER-TYPE 11 PO 6 LINE-STATUS 13 OPEN 7 PART-NO 20 C7477A 8 DESCRIPTION 26 BLACK COAXIAL CABLE 9 UNIT-OF-MEASURE 56 EA 10 PURCHASE-ORDER-INFO SYNC 58 11 PO-CODE 58 WXWW 12 PO-NUMBER 62 AA2222-22 13 PO-COMPANY 74 ZENITH WIRE 14 PO-VENDOR-NUMBER 104 2224 15 PO-VENDOR-CODE 109 34552 16 FILLER 114 17 ORDER-QUANTITIES SYNC 144 18 QTY-ORDERED 144 12 19 QTY-BACKORDERED 147 1 Enter CHAR for character mode, VFMT for vertical format mode
Subtopics:
Chap_14.20.1 Step: Chap_14.20.2 More about Scrolling Methods and XREF Usage
CHAP_14.20.1 Step:Page 270

FileAid_-_Online_1 1. Type FWD in the COMMAND field of the formatted screen and press <Enter>.
Or,
Press PF11 (RIGHT, FWD). (PF11 is assigned to the RIGHT command by default.) File-AID displays the next record, record 2, of the ORDRFILE file formatted with the INTERNAL-WORK-ORDER layout, because the data value in the ORDER-TYPE field is WO, but the CONTRACT-INDICATOR is not OV. Record number 2 is illustrated in Figure 14-20 on page 14-23.
CHAP_14.20.2 More about Scrolling Methods and XREF Usage o Some of the methods for moving to a new record in formatted mode include using the following commands:
RIGHT (alias Moves to the next record in the file. FWD)
LEFT (alias Moves to the previous record in the BACK) file.
FIND Moves to the record matching your search condition.
Note: If you use the FIND /field-name or FIND /field-number syntax when you have an XREF, only those record types that match the XREF conditions for the current layout are searched for matching data.
CHANGE (Edit) Works the same as the FIND command.
KEY (Keyed Relocates to a specific record using files only) the key fields to specify the desired key value.
LR Locates a record by record number.
o The FPRINT n command automatically invokes XREF logic for each subsequent record printed.
o XREF logic is also triggered whenever a record is selected for formatted mode from the CHARACTER mode.
o You may manually select a different layout from among all layouts referenced in the XREF by issuing the USE command.
CHAP_14.21 Printing Your Data Records with XREFWhen the FPRINT command is used to print formatted data records, your XREF logic is examined to determine which layout to use for each record printed. XREF logic is also checked when you use an XREF in the Print Data File function
Page 271
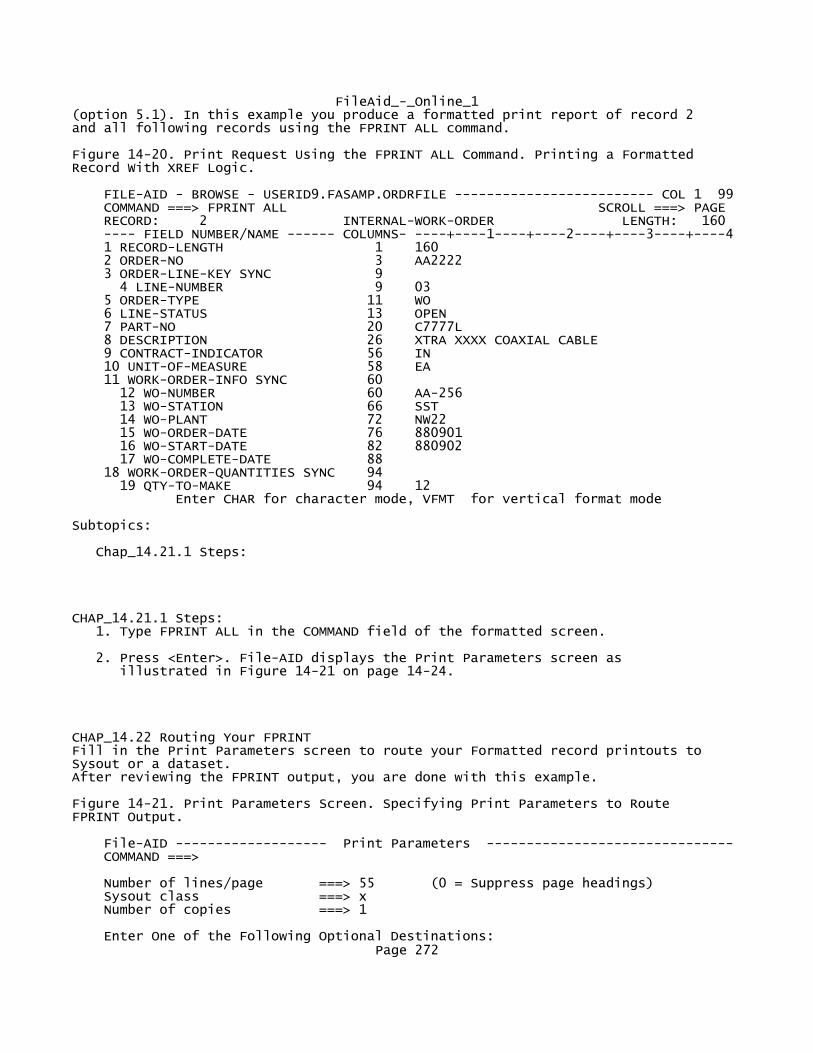
FileAid_-_Online_1(option 5.1). In this example you produce a formatted print report of record 2 and all following records using the FPRINT ALL command.
Figure 14-20. Print Request Using the FPRINT ALL Command. Printing a Formatted Record With XREF Logic.
FILE-AID - BROWSE - USERID9.FASAMP.ORDRFILE ------------------------- COL 1 99 COMMAND ===> FPRINT ALL SCROLL ===> PAGE RECORD: 2 INTERNAL-WORK-ORDER LENGTH: 160 ---- FIELD NUMBER/NAME ------ COLUMNS- ----+----1----+----2----+----3----+----4 1 RECORD-LENGTH 1 160 2 ORDER-NO 3 AA2222 3 ORDER-LINE-KEY SYNC 9 4 LINE-NUMBER 9 03 5 ORDER-TYPE 11 WO 6 LINE-STATUS 13 OPEN 7 PART-NO 20 C7777L 8 DESCRIPTION 26 XTRA XXXX COAXIAL CABLE 9 CONTRACT-INDICATOR 56 IN 10 UNIT-OF-MEASURE 58 EA 11 WORK-ORDER-INFO SYNC 60 12 WO-NUMBER 60 AA-256 13 WO-STATION 66 SST 14 WO-PLANT 72 NW22 15 WO-ORDER-DATE 76 880901 16 WO-START-DATE 82 880902 17 WO-COMPLETE-DATE 88 18 WORK-ORDER-QUANTITIES SYNC 94 19 QTY-TO-MAKE 94 12 Enter CHAR for character mode, VFMT for vertical format mode
Subtopics:
Chap_14.21.1 Steps:
CHAP_14.21.1 Steps: 1. Type FPRINT ALL in the COMMAND field of the formatted screen.
2. Press <Enter>. File-AID displays the Print Parameters screen as illustrated in Figure 14-21 on page 14-24.
CHAP_14.22 Routing Your FPRINTFill in the Print Parameters screen to route your Formatted record printouts to Sysout or a dataset. After reviewing the FPRINT output, you are done with this example.
Figure 14-21. Print Parameters Screen. Specifying Print Parameters to Route FPRINT Output.
File-AID ------------------- Print Parameters ------------------------------- COMMAND ===>
Number of lines/page ===> 55 (0 = Suppress page headings) Sysout class ===> x Number of copies ===> 1
Enter One of the Following Optional Destinations: Page 272

FileAid_-_Online_1
Destination printer ===> (Local or remote printer) - - - OR - - - External JES Node ID ===> (Predefined JES Node and symbolic ID Target VM/TSO ident ===> of intended receiver of output) - - - OR - - - Sysout writer name ===> (Installation assigned output writer) - - - OR - - - (DSORG=PS, RECFM=V, LRECL=125) Print dataset name ===> Disposition ===> OLD (NEW, SHR, MOD, OLD) Volume serial ===>
Use ENTER to continue, END to cancel
Subtopics:
Chap_14.22.1 Steps:
CHAP_14.22.1 Steps: 1. Type a valid Sysout "hold" class in the Sysout class field.
2. Press <Enter>.
3. Use standard output browsing facilities to review your FPRINT report.
4. Exit File-AID by entering the RETURN command.
15
CHAP_15 Using File-AID/BatchFile-AID/Batch is a data manipulation program that consolidates the functions of many standard IBM utilities. Rather than learn JCL and the control syntax of several different utilities, you can use one tool, File-AID/Batch, to perform the following tasks: o Process data on tape or in very large, multi-volume disk files.
o Selectively edit, copy, reformat, total, compare, and print records contained in any standard MVS file type.
o Define a file processing task that may be run multiple times.
o Perform many functions of the following utilities: IEBGENER, IDCAMS (REPRO), IEBPTPCH, IEHMOVE, IEBCOPY, IEBISAM, IEBDG, IEHPROGM, IEBUPDTE.
o Generate DASD reports of VTOC information.
o Copy records or portions of records from one dataset type to another, including copying of PDS members based on ISPF statistics.
o Selectively print data records using record layouts, enabling you to tailor the format of the output to meet your specific data requirements.
o Change record format by reformatting any type of dataset (that is, enlarge data fields, add new data fields).
o Process datasets selectively to view or update information. Page 273

FileAid_-_Online_1
o Recognize logical JCL continuations for JCL changes and search conditions.
o Accumulate totals to verify reports.
o Read all VSAM and sequential datasets forward or backward.
o Reformat multiple record type files in one pass.
o Create a complete subset of related files for testing.
o Check control statement syntax online and execute actions in the foreground with File-AID's Interactive utility (option 3.8).
o Generate the JCL required to submit a File-AID/Batch job or any other non File-AID batch utility with File-AID's Batch Submit utility (option 3.9).
Subtopics: Chap_15.1 Specifying Your Batch Processing Request Chap_15.2 Executing the File-AID Batch Utility Interactively (Option 3.8) Chap_15.3 Defining Datasets to Process Chap_15.4 Performing the Totaling Function Chap_15.5 Entering Control Statements Chap_15.6 Submitting File-AID/Batch JCL Chap_15.7 Examples of Customer Uses of File-AID/Batch
CHAP_15.1 Specifying Your Batch Processing RequestFile-AID/Batch actions are directed by a simple control language. Action requests consist of the following: o Dataset identification label
o Name of the function
o Set of optional selection, action, and control parameters.
You can include multiple control statements in one execution of File-AID/Batch to perform several actions on the same file or as many as 99 different files if needed. Subtopics: Chap_15.1.1 Example Control Statement Chap_15.1.2 Dataset Identifier Chap_15.1.3 Function Name Chap_15.1.4 Selection, Action, and Control Parameters
CHAP_15.1.1 Example Control Statement
$$DD01 COPY IN=100,IF=(1,EQ,C'A'),DUMP=0 COPY AND PRINT A RECS
Dataset Identifier $$DD01
Function Name COPY
Selection, Action, and Control Parameters Page 274

FileAid_-_Online_1 IN=100,IF=(1,EQ,C'A'),DUMP=0
Comments COPY AND PRINT A RECS
CHAP_15.1.2 Dataset IdentifierThe first element on a File-AID/Batch control statement is the dataset identifier. This identifier connects an input dataset DD to a function that you want to perform. The dataset identifier begins in location 1 of the control statement as follows:
$$DDxx
where xx is a number from 01 to 99 that corresponds to a matching //DDxx DD JCL statement. The xx is also used to match the optional //DDxxO DD (output dataset) JCL statement.
CHAP_15.1.3 Function NameFunctions identify the action you want to perform on the input dataset. Most functions can be abbreviated to save keystrokes. Some functions accept modifiers (ALL, MEM, BACK) that expand or modify the processing of a function. See the File-AID/MVS Batch Reference Manual for a complete description of any of the following functions:
________________________________________________________ |Function |Description | |____________|___________________________________________| |APRINT |Prints the audit trail file in formatted, | | |character, or hexadecimal format. | |____________|___________________________________________| |COMPARE |Compares the contents of two files. | |____________|___________________________________________| |CONVERT |Converts existing File-AID Release 6.5 and | | |below selection tables and Release 7 XREFs | | |to File-AID's Release 8 new XREF format. | | |Also converts Release 7 saved selection | | |criteria to Release 8 selection criteria | | |format. | |____________|___________________________________________| |COPY |Copies data selectively or nonselectively. | |____________|___________________________________________| |DROP |Eliminates unwanted records from a dataset | | |while copying it. | |____________|___________________________________________| |DUMP |Prints datasets in vertical hexadecimal | | |format. | |____________|___________________________________________| |FPRINT |Prints one or more records in formatted | | |mode. | |____________|___________________________________________| |LIST |Prints alphanumeric data. | |____________|___________________________________________| |LMODDIR |Lists directory entry(ies) of member(s). | |____________|___________________________________________| |LMODMAPA |Lists modules (maps CSECTs) in address | | |order. |
Page 275

FileAid_-_Online_1 |____________|___________________________________________| |LMODMAPN |Lists modules (maps CSECTs) in name order. | |____________|___________________________________________| |PRINT |Prints alphanumeric data and labels each | | |record with its record number and RBA. | |____________|___________________________________________| |REFORMAT |Reformats data as it is being copied. | |____________|___________________________________________| |RLPRINT |Prints a COBOL or PL/I record layout | | |displaying the field level, field name, | | |format, field number, start location, end | | |location, and field length. | |____________|___________________________________________| |SCPRINT |Prints the dataset containing selection | | |criteria created from File-AID online | | |functions. | |____________|___________________________________________| |SPACE |Moves the current record pointer through | | |the input file. | |____________|___________________________________________| |TALLY |Allows selection parameters to be combined | | |with ACCUM parameters to provide audit-type| | |totals for files. | |____________|___________________________________________| |UPDATE |Alters records on a file. | |____________|___________________________________________| |USER |Performs a copy function that provides | | |greater control over the writing of output | | |records and datasets. | |____________|___________________________________________| |VPRINT |Prints records in a vertically formatted | | |report using the specified COBOL or PL/I | | |record layout. | |____________|___________________________________________| |VTOCDSN |Displays VTOC summary information and | | |dataset names in alphabetical sequence | | |based on the specified parameters. | |____________|___________________________________________| |VTOCINFO |Displays volume information based on the | | |specified parameters. | |____________|___________________________________________| |VTOCMAP |Displays volume information and datasets in| | |address location sequence based on the | | |specified parameters. | |____________|___________________________________________| |XMLGEN |The XMLGEN function creates XML documents | | |from existing files using COBOL or PL/I | | |layout fields as the tag names. | |____________|___________________________________________| |XRPRINT |Prints record layout cross reference (XREF)| | |dataset. | |____________|___________________________________________|
CHAP_15.1.4 Selection, Action, and Control ParametersParameters are code words that control or limit processing actions. Parameters define how to select and manipulate records. They are discussed in the Interactive utility online tutorial (press PF1 for HELP) and in the File-AID/MVS Batch Reference Manual. Parameters are described below, grouped according to type.
Page 276

FileAid_-_Online_1
________________________________________________________ |Parameter |Description | |Type | | |____________|___________________________________________| |SELECTION |Specifies the processing of records based | | |on their contents. AND, ELSE, IF, ORIF. | |____________|___________________________________________| |ACTION |Indicates movement or change of data. | | |DFLT_WRITE, EDIT, EDITALL, MOVE, READNEXT, | | |REPL, REPLALL, TYPRUN, WRITE. | |____________|___________________________________________| |CONTROL |Defines basic environment conditions during| | |execution. ABEND, AMODE, CEM, CHANGED, | | |CHARSET, COPTNS, CREATED, DSNAME, ERRS, | | |EXPAND, FEOV, FIELDS, FORM, IOEXIT, KEY, | | |KEYINFO, LANGTYPE, LAYOUT, LINKDATE, LPI, | | |MAP, MAXENT, MAXOUT, MBRNAME, MEMBER, | | |MEMBERS, NEWMEM, NEWMEMS, PADCHAR, PANSTAT,| | |PDSSTAT, PRTRECS, RBA, RDW, REFOUT, RLM, | | |RMODE, RRN, SHOW, STOP, TYPE, UNIT, USERID,| | |VOLSER, VOLSTAT. | |____________|___________________________________________| |LIMIT |Places record count limits on the datasets | | |being processed. DROP, IN, OUT, SELECT. | |____________|___________________________________________| |PRINT |Provides a hardcopy report of records being| | |processed. ACCUM, DUMP, FPRINT, LIST, | | |PRINT, RLPRINT, VPRINT. | |____________|___________________________________________|
CHAP_15.2 Executing the File-AID Batch Utility Interactively (Option 3.8)File-AID/Batch utility can be executed in any of the following ways: o Code JCL and submit a job for background batch execution.
o Call from a program as a subroutine.
o Invoke the optional CLIST, FABATCH, to interactively execute at your TSO terminal.
o Use online File-AID, Interactive utility (option 3.8).
In this example you practice using the Interactive utility (option 3.8) to perform some Batch functions. This utility is used to support File-AID/Batch control statement coding and testing and online execution, including: o Verifying the logic of a batch job before it is submitted.
o Performing functions and using logic not available through other utilities.
o Using most of the functions and parameters of File-AID/Batch (except USER).
o Entering control cards interactively.
o Viewing results and output at the terminal.
o Accessing File-AID/Batch online tutorials.
Page 277

FileAid_-_Online_1The Interactive utility is located on File-AID's Extended Utilities menu (option 3) as utility number 8. Subtopics: Chap_15.2.1 Step:
CHAP_15.2.1 Step: 1. From the File-AID Primary Option Menu (not shown here), select File-AID option 3.8 to access the Interactive Utility entry screen ( Figure 15-1 on page 15-5) .
CHAP_15.3 Defining Datasets to ProcessThe Interactive Utility entry screen (see Figure 15-1 on page 15-5) captures your: o Input Dataset Name
o TO Dataset for Copy Functions
o Optional Control Dataset
o File-AID Run Options.
CHAP_15.4 Performing the Totaling FunctionThe function TALLY is used to perform intelligent totalling of record fields. The ACCUM parameter specifies the location, description, type and size of each total to be reported. The ACCUM parameter is valid with most File-AID/Batch functions (for example, COPY, UPDATE, and PRINT) to provide the capability to report totals at the same time as performing other actions. Use the 3.8 Interactive utility to produce a report showing the total quantity of non- backordered inventory items in one of two warehouses in the inventory file.
Figure 15-1. 3.8 Interactive Utility: Running File-AID/Batch Online
File-AID ------------------ Interactive Utility ----------------------------- COMMAND ===>
Input Dataset Information: Dataset name ===> FASAMP.INVFILE Volume serial ===> (If not cataloged) Password ===> (If password protected)
"TO" Dataset Information for Copy Functions: Dataset name ===> Volume serial ===> (If not cataloged) Disposition ===> OLD (MOD or OLD) Password ===> (If password protected)
Optional Control Dataset Information: Dataset name ===> Volume serial ===> (If not cataloged)
File-AID Run Options: Allow File-AID prompting ===> Y (Y = Yes; N = No) Include record information ===> N (Y = Yes; N = No) Replace like named members ===> Y (Y = Yes, N = No)
Page 278

FileAid_-_Online_1 Use ENTER to begin interactive mode; END key to cancel function
Subtopics:
Chap_15.4.1 Steps: Chap_15.4.2 More About the Interactive Utility Screen
CHAP_15.4.1 Steps: 1. Type FASAMP.INVFILE in the Dataset name field.
2. Press <Enter>. File-AID/Batch starts as a foreground task, and a Control Statement Entry screen is displayed ( Figure 15-2 on page 15-6) .
CHAP_15.4.2 More About the Interactive Utility Screen o If you specified the name of a dataset in the "Dataset name" field in the "Optional Control Dataset Information" section, File-AID uses the control statements in the specified dataset to complete your request. The results of execution are immediately shown on the Control Statement screen. You are not prompted for control statements.
CHAP_15.5 Entering Control StatementsTo perform a function, type the control statement on the screen followed by ",GO" (comma GO) and press <Enter>.File-AID executes the statement and immediately displays any results on the screen. Enter the END command to exit. Because this is a foreground process, no tutorial information is available for the Control Statement screen. Also, ISPF facilities such as PF keys and scrolling are disabled. As in ISPF, three asterisks (***) indicate additional information is awaiting display. Press <Enter>to display this information. You selectively (IF) total (ACCUM) the quantity field in the sample inventory file ...FASAMP.INVFILE. You use the TALLY function to process the dataset. If the warehouse status (location 69) is equal to "AVAIL", total the quantity on hand (packed field at location 75). Subtopics: Chap_15.5.1 Steps: Chap_15.5.2 More About Control Statement Entry Chap_15.5.3 Exiting Interactive Execution
CHAP_15.5.1 Steps: 1. Type the control statement:
TALLY IF=(69,EQ,C'AVAIL'),ACCUM=(75,'QTY AVAIL WH-1'),GO
2. Press <Enter>. File-AID reads the records of the input dataset, tests each record for the condition specified in the control statement, and displays the results as shown in Figure 15-3 on page 15-7.
Page 279

FileAid_-_Online_1Figure 15-2. Interactive Utility. Requesting a TALLY on the Foreground Control Statements Screen.
F I L E - A I D V8.8 RELEASE DATE 04/07/01 ....ENTER NEXT FUNCTION OR END TALLY IF=(69,EQ,C'AVAIL'),ACCUM=(75,'QTY AVAIL WH-1'),GO
CHAP_15.5.2 More About Control Statement Entry o Notice that the dataset identifier $$DD01 portion of the control statement is not required with the Interactive utility.
o If you use the optional Control Statement Dataset to supply control statements to the Interactive utility, the dataset identifier must be specified as $$DD01.
o For non-packed data, use the ACCUM syntax:
ACCUM=(location,length,data-type,description)
Valid data-types are C for display numeric (maximum length 15) and B for binary (maximum length 4). Type BS is also provided to indicate binary signed data for lengths 1, 2, and 3.
o When processing a variable length sequential file in File-AID/Batch, location 1 references the 4-byte record descriptor word (RDW). Location 5 references the first byte of data in the record. Use the parameter RDW=3 to bypass the RDW and have location 1 reference the first byte of data. In this example, you notice that the RDW parameter is not used. The locations are four (4) bytes larger than the offset of the STATUS and QUANTITY fields shown when using formatted browse to view this file with a record layout (see Figure 13-4 on page 13-5) .
o Use the PA1 or ATTN keys to abort processing of your request.
CHAP_15.5.3 Exiting Interactive ExecutionResults of your request are displayed immediately at your terminal as shown in Figure 15- 3. When the ...ENTER NEXT FUNCTION OR END prompt is displayed, you may specify another function to act on the same file, or enter the END command to exit and return to the Interactive Utility screen. Subtopics: Chap_15.5.3.1 Steps:
CHAP_15.5.3.1 Steps: 1. Type END.
2. Press <Enter>. The three asterisk (***) prompt is displayed. Press <Enter> again to display the Interactive Utility screen ( Figure 15-1 on page 15-5) . Note the message, FUNCTION COMPLETED, in the top right corner of the screen.
Page 280

FileAid_-_Online_1Figure 15-3. Foreground Control Statements Screen - TALLY Results
F I L E - A I D V8.8.0 RELEASE DATE 04/07/01 ....ENTER NEXT FUNCTION OR END TALLY IF=(69,EQ,C'AVAIL'),ACCUM=(75,'QTY AVAIL WH-1'),GO SYS00009 DSN=USERID9.FASAMP.INVFILE OPENED AS PS, RECFM=VB,LRECL=517,BLKSIZE=5170,VOL=PRD900 ABOVE FUNCTION ENDED ON NORMAL EOD RECORDS/READ-41
QTY AVAIL WH-1----------------------14512
....ENTER NEXT FUNCTION OR END
CHAP_15.6 Submitting File-AID/Batch JCLJCL for File-AID/Batch is very simple to specify. After you have created the JCL once, you can use the same JCL as a model for subsequent runs just by changing control statements and dataset names. You can use one of the many File-AID functions which support batch submit to generate File-AID/Batch JCL including: o 3.3 Copy
o 3.6 Search/Update
o 5.x Print
o 9 Reformat
o 10 Compare
You can copy and tailor one of the many samples of File-AID/Batch JCL provided for you in your sample JCL file (FASAMP.JCL). The following FASAMP.JCL members are good examples of File-AID/Batch: o BATVTOC - Batch VTOC examples
o COPY - Sample selective COPY
o DROP - Sample DROP function of dropping bad records
o DUMP - Sample hex report of 5 records
o JCLCNVRT - Sample USER function to insert a SYSUDUMP DD in JCL
o LIST - Sample print of JCL member of PDS
o PRINT - Sample print of variable file
o SKELETON - Sample of all possible File-AID/Batch JCL statements
o SPACE - Sample SPACE function to skip to desired record
o TALLY - Sample TALLY function on INVFILE
o UPDATE - Sample UPDATE conditional logic IF-REPL
o USER - Sample USER function to create 3 files from 1 input file
Other ways to generate batch JCL including typing in the JCL using ISPF Edit or using File-AID option 3.9 (Batch Submit).
Page 281

FileAid_-_Online_1
CHAP_15.7 Examples of Customer Uses of File-AID/BatchThis section describes a few of examples of the many uses for File-AID/Batch. If you do not specify any control statements (SYSIN DD DUMMY), File-AID/Batch automatically copies all records in DD01 to DD01O. Notice how quickly that File-AID performs a VSAM copy. Subtopics: Chap_15.7.1 Applying Mass Changes to a JCL Library Chap_15.7.2 Copying From One Input File to Create Multiple Output Files Chap_15.7.3 Scanning and Printing Data in a Load Library
CHAP_15.7.1 Applying Mass Changes to a JCL LibraryFile-AID lets you make mass changes to a JCL library in batch and online modes. You need to update the JCL for 15,000 jobs because you upgraded from 3350 to 3380 disk drives. You want to change the UNIT and SPACE parameters to avoid overallocation with the larger disk drives.
//JOBNAME JOB (REST OF JOB CARD) //STEP1 EXEC PGM=FILEAID //STEPLIB DD (REQUIRED ONLY IF FILEAID IS NOT ON THE LINK LIST) //SYSPRINT DD SYSOUT=* //DD01 DD DSN=OLD.JCL.LIB,DISP=OLD //DD01O DD DSN=NEW.JCL.LIB,DISP=OLD //SYSIN DD * $$DD01 COPYALL MEMBERS=ALL,FORM=JCL, CONTROL PARAMETERS COMMENT EDIT=(3,0,C'UNIT=DISK,UNIT=SYSDA,UNIT=3350',C'UNIT=3380'), REPL=(3,0,C'SPACE=(CYL',C'SPACE=(TRK')
The following JCL considerations apply to this example: o A SYSPRINT DD statement is used for all hardcopy output, control card analysis, and log of actions taken.
o Statement DD01 defines the input dataset.
o Statement DD01O defines the output dataset.
o SYSIN DD statement specifies control statements.
o Control statements use the $$DD01 dataset identifier to identify the file(s) to be acted on (DD01 and DD01O).
The following control statement considerations apply to this example: o The COPYALL function directs File-AID/Batch to copy all records from the input file (DD01) to the output file (DD01O).
o The MEMBERS=ALL parameter directs File-AID/Batch to include all input PDS members.
o The FORM=JCL parameter tells File-AID/Batch that the data being processed is JCL. File-AID/Batch interprets JOB, EXEC, and DD statements and handles continuations and syntax correctly.
o The EDIT parameter directs a search of each JCL statement beginning in position 3 (after the //). It searches all characters until the end of the JCL statement is found (length 0) and looks for any of the three strings:
o UNIT=DISK
Page 282

FileAid_-_Online_1 o UNIT=SYSDA
o UNIT=3350
o If any of the three strings are found, File-AID/Batch changes the string to UNIT=3380 and adjusts the JCL if needed.
o The REPL (replace) parameter is also applied to each JCL statement as it is copied. The REPL parameter tells File-AID/Batch to search for the string SPACE=(CYL, then change the string to SPACE=(TRK. When changing JCL, the EDIT parameter is preferred over the REPL parameter unless the data that is searched for and the replacement data are the same length.
You can continue File-AID/Batch control statements as needed by placing a comma at the end of a parameter and continuing after column 1 and before column 26 of the next line. Comments may be entered on any control statement after one space following a parameter. You can also code them on a control card by placing an asterisk (*) in location 1.
CHAP_15.7.2 Copying From One Input File to Create Multiple Output FilesA large company collects file selection requests through the week and creates File-AID /Batch control cards on the weekend. This example illustrates how you can make a single pass through a master file (in this case 34 reels of tape) to create two extract output files that contain different subsets of data. File-AID/Batch lets you create up to 99 output files. While the COPY function copies records to a single target file, the USER function can copy records to multiple target files. Use the WRITE parameter with the USER function to indicate the DDNAME to which you want to write a record.
//STEP1 EXEC PGM=FILEAID //STEPLIB DD (REQUIRED ONLY IF FILEAID IS NOT ON THE LINK LIST) //SYSPRINT DD SYSOUT=* //DD01 DD DSN=MASTER.FILE.REELS34,DISP=OLD //SELECT1 DD DSN=SELECT1.FILE,DISP=OLD //SELECT2 DD DSN=SELECT2.FILE,DISP=OLD //SYSIN DD * $$DD01 USER IF=(27,EQ,X'15'), WRITE=SELECT1, IF=(14,EQ,C'20,21,22'), IF 14 EQUAL 20 OR 21 OR 22, WRITE=SELECT2
CHAP_15.7.3 Scanning and Printing Data in a Load LibraryXYZ Corporation changed its name. The following control statement determines which programs must be changed to reflect the new company name.
$$DD01 PRINT IF=(1,0,C'XYZ CORP'),MOVE=(1,9,+0)
File-AID scans the production load library for XYZ CORP. Because a MOVE parameter is used with a PRINT function, File-AID interprets PRINT as a request to print only the data that is moved, regardless of the length of the input record. Therefore, only the member name and XYZ CORP are printed. Code PARM=TSO on the EXEC statement to eliminate needless page skipping for each member. Note: File-AID can also update load module libraries with the UPDATE function and the REPL parameter.
Page 283

FileAid_-_Online_1
16
CHAP_16 Segmented Record File Layout AutomationIn Chapter 14, "Automating Layout Usage with XREF", you learned about the XREF function (option 7) and how to create an XREF member for automating the selection and usage of record layouts for files with different record types. In this chapter, you learn how to set up an XREF for formatting data records when two or more layouts are needed to describe all of the fields in one record. Files containing segmented records are often found in older application systems such as insurance, government, utilities, and banking. Subtopics: Chap_16.1 How to Identify Segments in a Segmented Record File Chap_16.2 Review the Sample Segmented Record XREF Chap_16.3 Viewing an Existing XREF Member Chap_16.4 Using the VIEW Command Chap_16.5 Browsing the XREF View Criteria Chap_16.6 Using the XREF to Browse a Segmented Record File Chap_16.7 Viewing the Next Segment Using the NEXT Command Chap_16.8 Jumping to Another Record with the LR (Locate Record) Command Chap_16.9 Keeping a Command On the Command Line with & (Ampersand) Chap_16.10 Exiting File-AID with the RETURN Command
CHAP_16.1 How to Identify Segments in a Segmented Record FileA file with segmented records looks something like this:
RECORD DATA CONTENTS +---------------------------------------------------------------+ 1 ] BASE-LAYOUT ] 01 SEGMENT-01 ] 02 SEGMENT-02 ] 03 SEGMENT-03 ] +---------------------------------------------------------------+ +----------------------------------------------+ 2 ] BASE-LAYOUT ] 01 SEGMENT-01 ] 03 SEGMENT-03 ] +----------------------------------------------+ +-----------------------------------------------+ 3 ] BASE-LAYOUT ] 01 SEGMENT-01 ] 02 SEGMENT-02 ] +-----------------------------------------------+ +------------------------------+ 4 ] BASE-LAYOUT ] 01 SEGMENT-01 ] +------------------------------+ +------------------------------+ 5 ] BASE-LAYOUT ] 02 SEGMENT-02 ] +------------------------------+ +------------------------------+ 6 ] BASE-LAYOUT ] 03 SEGMENT-03 ] +------------------------------+ +-----------------------------------------------+ 7 ] BASE-LAYOUT ] 02 SEGMENT-02 ] 04 SEGMENT-04 ] +-----------------------------------------------+ +---------------------------------------------------------------+ 8 ] BASE-LAYOUT ] 03 SEGMENT-03 ] 03 SEGMENT-03 ] 01 SEGMENT-01 ] +---------------------------------------------------------------+
In a typical segmented record file, each segment of a record is defined by a unique data structure or record layout. There are also data field(s) in the file that identify the presence of each segment. This data field is referred to as a segment identifier. Sometimes segment identifiers are located in the beginning, or base, portion of each record.
Page 284

FileAid_-_Online_1Often, segment identifiers are found within each segment, as a self-identifying field. In still other instances, segments may be chained by having a segment identifier at the end of one segment which identifies the next segment. Regardless of which of these methods applies to your segmented record file, File-AID provides a way for you to define an XREF to automate the selection of a layout as you view each record segment when using Browse or Edit or in other File-AID functions including: o Browse - formatted display mode: NEXT and FPRINT command
o Edit - formatted display mode: NEXT and FPRINT command
o Print - formatted data record printing
o Selection - formatted selection criteria specification
o Reformat - source record selection
o Compare - formatted field comparison and differences reporting.
Subtopics: Chap_16.1.1 Specifying XREF Layout Status Chap_16.1.2 Understanding the XREF Logic Processing Technique Chap_16.1.3 Using the NEXT Command to See the Next Segment Chap_16.1.4 Using the PREV Command to See the Previous Segment Chap_16.1.5 Using the TOP Command to Return to the BASE Segment Chap_16.1.6 Editing Commands for Segmented Records Chap_16.1.7 Manual Layout Selection
CHAP_16.1.1 Specifying XREF Layout StatusWhen defining an XREF for segmented files, each layout is defined as either a BASE or a SEGMENT. A BASE layout defines the first portion of each data record.The BASE is then followed by one or more SEGMENT layouts to form a group. Multiple groups (BASE followed by one or more SEGMENTs) are supported where each BASE has a unique data condition. During XREF definition, the SEG line command is used to mark a layout as a SEGMENT.
CHAP_16.1.2 Understanding the XREF Logic Processing TechniqueWhen browsing or editing a segmented record file using the segmented XREF definition, File-AID examines each record to be formatted and attempts to determine which BASE layout to use for displaying the first part of the record. An information line at the end of the BASE layout indicates additional data in the record like:
*** END OF LAYOUT - DATA EXCEEDS LAYOUT BY 107 BYTES ***
CHAP_16.1.3 Using the NEXT Command to See the Next SegmentWhen additional data remains to be formatted beyond the end of the BASE, you use the primary command NEXT (available only in formatted mode) to trigger the XREF logic to determine the layout to use to format the next portion of record data. Each SEGMENT layout in the XREF is then examined and tested against the current position in the data record to determine which layout to select to format the next segment of record data.
Page 285

FileAid_-_Online_1
CHAP_16.1.4 Using the PREV Command to See the Previous SegmentAfter a NEXT has positioned you to a new segment, you can use the PREV command to return to the previous segment (or BASE). You may go backwards until you have returned to the base layout.
CHAP_16.1.5 Using the TOP Command to Return to the BASE SegmentIf the record contains additional segments, invoke the NEXT command repeatedly to trigger the XREF logic to determine each subsequent layout until there is no more data to format in the record. The TOP primary command redisplays the beginning of the file (positioning the file at the BASE segment). Whenever you move to a new record in the formatted mode (scrolling using the RIGHT command, for example), formatting begins with the BASE segment at byte 1.
CHAP_16.1.6 Editing Commands for Segmented RecordsWhen editing a segmented record, you can use the primary commands ADD and REMOVE to insert or delete segments in the current record.
CHAP_16.1.7 Manual Layout SelectionAt any time when using an XREF, you can issue the USE command to see a list of all referenced layouts. You can select and use a layout from the list to format the data from any starting point in the record. Refer to the File-AID Reference Summary for syntax of the NEXT, TOP, ADD, REMOVE, PREV, and USE commands.
CHAP_16.2 Review the Sample Segmented Record XREFIn this chapter you review the sample XREF member, SEGFILE, in your sample XREF dataset, FASAMP.XREF. The SEGFILE member is already set up to format the sample file FASAMP.SEGFILE. It contains a BASE and several potential segments. Each segment is identified by a segment type indicator field located at the second data byte within each segment. Table 16-1 summarizes the SEGFILE XREF definition:
Table 16-1. (Page of ) SEGFILE XREF Definition
____________________________________________________________ |Layout |01 Level Name |Status |Record-Type Field - | |Member | | |Value | |________|_________________|________|________________________| |SEGRECS |INS-BASE-FILE |BASE |(always used) | |________|_________________|________|________________________| |SEGRECS |CLI-BOAT-DATA |SEGMENT |BOAT-RECORD-TYPE-01 | |________|_________________|________|________________________| |SEGRECS |CLI-BUSINESS-DATA|SEGMENT |BUSINESS-RECORD-TYPE-02 | |________|_________________|________|________________________| |SEGRECS |CLI-CAR-DATA |SEGMENT |CAR-RECORD-TYPE-03 | |________|_________________|________|________________________| |SEGRECS |CLI-HOME-DATA |SEGMENT |HOME-RECORD-TYPE-04 | |________|_________________|________|________________________| |SEGRECS |CLI-LIFE-DATA |SEGMENT |LIFE-RECORD-TYP-05 | |________|_________________|________|________________________|
Page 286

FileAid_-_Online_1
Notice that all of the layouts are stored in the same member (SEGRECS) of the sample layouts library (FASAMP.LAYOUTS).
CHAP_16.3 Viewing an Existing XREF MemberYou access the XREF function and select sample XREF member SEGFILE.
Figure 16-1. Record Layout Cross Reference (XREF) Function Entry Screen
File-AID -------------- Record Layout Cross Reference ----------------------- COMMAND ===>
Specify Cross Reference Dataset to be Created or Edited: XREF dataset name ===> FASAMP.XREF Member name ===> SEGFILE (Blank or pattern for member list)
Specify Record Layout Information: Record layout dataset ===> FASAMP.LAYOUTS
------------------------------------------------------------------------------- This function creates and maintains existing File-AID Record Layout Cross References. These XREF's are used to match record layouts to data records in File-AID functions that use formatting.
Subtopics:
Chap_16.3.1 Steps:
CHAP_16.3.1 Steps: 1. From the File-AID Primary Option Menu (not shown here), select option 7 (XREF).
2. Press <Enter>. File-AID displays the Record Layout Cross Reference screen as illustrated in Figure 16-1.
3. Type FASAMP.XREF in the XREF dataset name field under the Specify Cross Reference Dataset information section.
4. Type SEGFILE in the Member name field
5. Type FASAMP.LAYOUTS in the Record layout dataset field.
6. Press <Enter>. File-AID displays the Define XREF screen as illustrated in Figure 16-2 on page 16-5.
CHAP_16.4 Using the VIEW CommandThe Define XREF screen ( Figure 16-2) shows the entries already established for formatting the segmented record file FASAMP.SEGFILE. Notice the status of BASE for the first layout (INS-BASE-FILE) and a status of SEGMENT for all other
Page 287

FileAid_-_Online_1layout usages. In order to see all of the conditions that have been specified for all layout references, you can use the primary command, VIEW, to see a list of the XREF control statements for this XREF member.
Figure 16-2. Define XREF Screen (VIEW Command)
File-AID ----- Define XREF - SEGFILE ------------------------ ROW 1 TO 6 OF 6 COMMAND ===> VIEW SCROLL ===> PAGE XR105-Valid line CMDS: C/M, B/A, I, R, D, EX, S, SF, SU, DEF, BAS, SEG Member list description ===> SEGFILE XREF
Long ===> FILE CONTAINS INS-BASE FOLLOWED BY ANY NUMBER OF ADDITIONAL Description ===> TRAILER SEGMENTS IN ANY ORDER - BOAT CAR BUSINESS ETC.
Generated filler length ===> 0 (0 to suppress filler)
Cmd Member Beginning Data-Name/Line Number Description Status --- ---------- ------------------------------ --------------- ---------------- ___ SEGRECS INS-BASE-FILE BASE ___ SEGRECS CLI-BOAT-DATA SEGMENT ___ SEGRECS CLI-BUSINESS-DATA SEGMENT ___ SEGRECS CLI-CAR-DATA SEGMENT ___ SEGRECS CLI-HOME-DATA SEGMENT ___ SEGRECS CLI-LIFE-DATA SEGMENT ************************** END OF SELECTION CRITERIA **************************
Subtopics:
Chap_16.4.1 Steps:
CHAP_16.4.1 Steps: 1. Type VIEW in the COMMAND field.
2. Press <Enter>. File-AID displays the View Criteria screen as illustrated in Figure 16-3 on page 16-6.
CHAP_16.5 Browsing the XREF View CriteriaXREF criteria are stored internally in keyword form. The View Criteria screen lets you examine the internal format. You can scroll up and down to see all specified conditions.
Figure 16-3. XREF Function - View Criteria Screen
File-AID ------------------------ View Criteria ----------- ROW 1 TO 20 OF 60 COMMAND ===> SCROLL ===> PAGE Use END to exit View Display
******************************* TOP OF CRITERIA ***************************** DEFINE BLOCKS=XREF,
DESCRIPTION =SEGFILE XREF, DESCRIPTION1=FILE CONTAINS INS-BASE FOLLOWED BY ANY NUMBER OF ADDITIONAL, DESCRIPTION2=TRAILER SEGMENTS IN ANY ORDER - BOAT CAR BUSINESS ETC.,
XREF_DSNAME=FASAMP.XREF, XREF_MBRNAME=SEGFILE,
Page 288

FileAid_-_Online_1
LAYOUT_DSNAME=XXXXXXX.FASAMP.LAYOUTS
SELECT SET=1,LAYOUT=INS-BASE-FILE, LAYOUT_MBRNAME=SEGRECS, LAYOUT_TYPE=BASE IF FIELD_NAME=CLI-NUMBER, POSITION=1,LENGTH=5,OPERATOR=NE, TYPE=T,VALUE=XXXXX
Subtopics:
Chap_16.5.1 Steps: Chap_16.5.2 More About Segment Definitions
CHAP_16.5.1 Steps: 1. Use the scroll PF keys (PF8 DOWN, PF7 UP) to review the criteria for the SEGFILE member.
2. Notice that the POSITION value for each SEGMENT is 2 meaning the 2nd byte of data at the beginning of each segment.
3. Use the END command THREE TIMES to return to the File-AID Primary Option Menu.
CHAP_16.5.2 More About Segment Definitions o If the presence of a segment is indicated by a field in the base, the XREF must use Unformatted criteria and a Location of *n (asterisk "n") wheren is the actual data byte in the record where the segment presence indicator is located. This notation only supports 0 or 1 occurrence of the segment. The order of SEGMENTS in the XREF determines the order of formatting segments of this type. An absolute (*n) segment, once used to format a portion of the record is marked as "used" and is not selected again until you leave the current record and view a different record.
CHAP_16.6 Using the XREF to Browse a Segmented Record FileYou now use the SEGFILE member of your XREF dataset to browse the SEGFILE segmented record data file using different layouts for each segment of a record.
Figure 16-4. Using the XREF for Browsing a Data File With Segmented Records
File-AID -------------- Browse - Dataset Specification ---------------------- COMMAND ===>
Browse Mode ===> F (F=Fmt; C=Char; V=Vfmt; U=Unfmt)
Specify Browse Information: Dataset name or HFS path ===> FASAMP.SEGFILE Member name ===> (Blank or pattern for member list) Volume serial ===> (If dataset is not cataloged)
Page 289

FileAid_-_Online_1 Specify Record Layout and XREF Information: Record layout usage ===> X (S = Single; X = XREF; N = None) Record layout dataset ===> FASAMP.LAYOUTS Member name ===> (Blank or pattern for member list) XREF dataset name ===> FASAMP.XREF Member name ===> SEGFILE (Blank or pattern for member list)
Specify Selection Criteria Information: (E = Existing; T = Temporary; Selection criteria usage ===> N M = Modify; Q = Quick; N = None) Selection dataset name ===> Member name ===> (Blank or pattern for member list)
Subtopics:
Chap_16.6.1 Steps:
CHAP_16.6.1 Steps: 1. Type 1 in the OPTION field of the Primary Option Menu (not shown).
2. Press <Enter>. File-AID displays the Browse - Dataset Specification screen, as illustrated in Figure 16-4.
3. Type F (Formatted) in the Browse Mode field.
4. Type FASAMP.SEGFILE in the Browse dataset field.
5. Type X in the Record layout usage field.
6. Type FASAMP.LAYOUTS in the Record layout dataset field.
7. Blank out the record layout member field.
You do not need to specify the record layout member when you are using an XREF, because the record layout member is already defined in the XREF dataset.
8. Verify the XREF dataset is FASAMP.XREF.
9. Verify the XREF member is SEGFILE.
10.Make sure the value in the Selection criteria usage field is N.
11.Press <Enter>.
CHAP_16.7 Viewing the Next Segment Using the NEXT CommandFile-AID displays the first record of the SEGFILE formatted with the INS-BASE-FILE (BASE) layout. File-AID displays an information line at the end of the layout, DATA EXCEEDS LAYOUT, indicating that additional segment(s) are present as illustrated in Figure 16-5. To view the segment following the current segment (in this case, the base segment), issue the NEXT command.
Figure 16-5. Browsing the Segmented File - FASAMP.SEGFILE
FILE-AID - BROWSE - USERID9.FASAMP.SEGFILE ------------------- INVALID COMMAND COMMAND ===> NEXT SCROLL ===> PAGE RECORD: 1 INS-BASE-FILE LENGTH: 231
Page 290

FileAid_-_Online_1 ---- FIELD NUMBER/NAME ------ COLUMNS- ----+----1----+----2----+----3----+----4 1 CLI-NUMBER 1 09876 2 FILLER 6 3 CLI-FIRST-NAME 7 GEORGE 4 CLI-MID-INIT 17 C 5 CLI-LAST-NAME 18 SCOTT 6 CLI-OCCUPATION 33 ACTOR 7 CLI-SMOKER 53 N 8 CLI-PHONE-NUMBER 54 9005680284 9 CLI-ADDRESS SYNC 64 10 CLI-STREET 64 54 MOVIE RD 11 CLI-CITY 79 LOS ANGELES 12 CLI-STATE 94 CA 13 CLI-ZIP-CODE 96 510807054 14 FILLER 105 ************* END OF LAYOUT - DATA EXCEEDS LAYOUT BY 107 BYTES ****************
Subtopics:
Chap_16.7.1 Steps: Chap_16.7.2 Understanding NEXT Command Processing
CHAP_16.7.1 Steps: 1. Type NEXT in the COMMAND field.
2. Press <Enter>.
CHAP_16.7.2 Understanding NEXT Command ProcessingWhen the NEXT command is issued, File-AID examines the criteria stored in the XREF member and tries to find a matching SEGMENT. As shown in Figure 16-6 on page 16-9, the next segment of record data for record 1 of the SEGFILE is defined by the CLI-BOAT-DATA layout. Notice that the "record type field", BOAT-RECORD-TYPE-01, contains a value of "01". This is the condition specified in the XREF that is used to determine that the layout for this segment is in fact the CLI-BOAT-DATA layout. The second data byte of each segment contains the "segment identifier" used to determine which layout to select for this portion of the record. Notice that the column offset of the CLI-BOAT-DATA layout has the first field (FILLER) starting at location 125.When formatting segmented records it is a good idea to set up your formatted display to SHOW OFFSET and OFFSET COLUMN so that you can be sure of where in the record you are currently positioned. In this example, the CLI-BOAT- DATA segment is the second and last segment of data in this record as indicated by the information line at the end of the layout:
*** BOTTOM OF DATA ***
Figure 16-6. NEXT Command Results. Displaying the CLI-BOAT-DATA Segment.
FILE-AID - BROWSE - USERID9.FASAMP.SEGFILE ----------------------- COL 125 231 COMMAND ===> SCROLL ===> PAGE RECORD: 1 CLI-BOAT-DATA LENGTH: 231 ---- FIELD NUMBER/NAME ------ COLUMNS- ----+----1----+----2----+----3----+----4 1 FILLER 125 2 BOAT-RECORD-TYPE-01 126 01
Page 291

FileAid_-_Online_1 3 BOAT-DATE-INSURED 128 071973 4 BOAT-REGISTER-NO 134 91380 5 BOAT-INSURED-AMT 139 75000.00 6 BOAT-DOCK-NO 143 300 7 BOAT-MARINA-NAME 146 BLUE WATERS 8 BOAT-NAME 176 9 FILLER 196 ****************************** BOTTOM OF DATA *********************************
Notes:
1. If you wish to return to the previously viewed segment, use the PREV command.
2. Another way to issue the NEXT command is to assign the command NEXT to a PF key. Use the KEYS primary command to access your PF key settings to review or change your PF key command defaults.
CHAP_16.8 Jumping to Another Record with the LR (Locate Record) CommandYou now move to record 13 by using the command: LR 13. Record 13 is a record that contains many segments and gives you a better idea of the functioning of the NEXT command and the logic defined in the XREF. Figure 16-7. Move to record 13 - LR 13 Command
FILE-AID - BROWSE - USERID9.FASAMP.SEGFILE ------------ COMMAND ===> LR 13 RECORD: 1 CLI-BOAT-DATA ---- FIELD NUMBER/NAME ------ COLUMNS- ----+----1----+- 1 FILLER 125 2 BOAT-RECORD-TYPE-01 126 01 3 BOAT-DATE-INSURED 128 071973
Subtopics:
Chap_16.8.1 Steps: Chap_16.8.2 Result of LR 13
CHAP_16.8.1 Steps: 1. Type LR 13 in the COMMAND field.
2. Press <Enter>.
CHAP_16.8.2 Result of LR 13File-AID displays the BASE (layout INS-BASE-FILE) for record 13, as illustrated in Figure 16-8. Notice that the information line at the end of the layout, DATA EXCEEDS LAYOUT, indicates that 555 bytes of additional segment data still remains to be formatted.
Figure 16-8. Browsing Record 13 (BASE Segment) Page 292
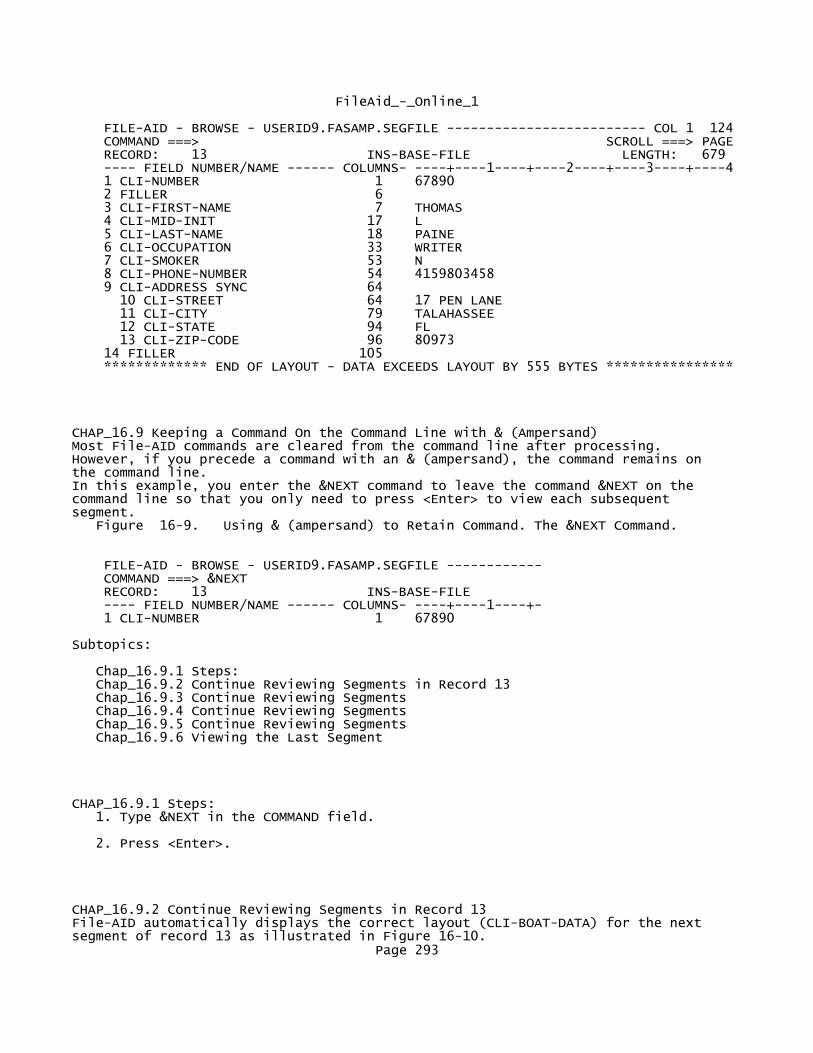
FileAid_-_Online_1
FILE-AID - BROWSE - USERID9.FASAMP.SEGFILE ------------------------- COL 1 124 COMMAND ===> SCROLL ===> PAGE RECORD: 13 INS-BASE-FILE LENGTH: 679 ---- FIELD NUMBER/NAME ------ COLUMNS- ----+----1----+----2----+----3----+----4 1 CLI-NUMBER 1 67890 2 FILLER 6 3 CLI-FIRST-NAME 7 THOMAS 4 CLI-MID-INIT 17 L 5 CLI-LAST-NAME 18 PAINE 6 CLI-OCCUPATION 33 WRITER 7 CLI-SMOKER 53 N 8 CLI-PHONE-NUMBER 54 4159803458 9 CLI-ADDRESS SYNC 64 10 CLI-STREET 64 17 PEN LANE 11 CLI-CITY 79 TALAHASSEE 12 CLI-STATE 94 FL 13 CLI-ZIP-CODE 96 80973 14 FILLER 105 ************* END OF LAYOUT - DATA EXCEEDS LAYOUT BY 555 BYTES ****************
CHAP_16.9 Keeping a Command On the Command Line with & (Ampersand)Most File-AID commands are cleared from the command line after processing. However, if you precede a command with an & (ampersand), the command remains on the command line. In this example, you enter the &NEXT command to leave the command &NEXT on the command line so that you only need to press <Enter> to view each subsequent segment. Figure 16-9. Using & (ampersand) to Retain Command. The &NEXT Command.
FILE-AID - BROWSE - USERID9.FASAMP.SEGFILE ------------ COMMAND ===> &NEXT RECORD: 13 INS-BASE-FILE ---- FIELD NUMBER/NAME ------ COLUMNS- ----+----1----+- 1 CLI-NUMBER 1 67890
Subtopics:
Chap_16.9.1 Steps: Chap_16.9.2 Continue Reviewing Segments in Record 13 Chap_16.9.3 Continue Reviewing Segments Chap_16.9.4 Continue Reviewing Segments Chap_16.9.5 Continue Reviewing Segments Chap_16.9.6 Viewing the Last Segment
CHAP_16.9.1 Steps: 1. Type &NEXT in the COMMAND field.
2. Press <Enter>.
CHAP_16.9.2 Continue Reviewing Segments in Record 13File-AID automatically displays the correct layout (CLI-BOAT-DATA) for the next segment of record 13 as illustrated in Figure 16-10.
Page 293

FileAid_-_Online_1The &NEXT command remains on the command line so that you need only press <Enter> to continue to examine segments in record 13. The information line (END OF LAYOUT) now shows that 448 bytes of record data follow the current segment. Subtopics: Chap_16.9.2.1 Step:
CHAP_16.9.2.1 Step: 1. Press <Enter>.
Figure 16-10. Browsing Record 13. CLI-BOAT-DATA Segment.
FILE-AID - BROWSE - USERID9.FASAMP.SEGFILE ----------------------- COL 125 231 COMMAND ===> &NEXT SCROLL ===> PAGE RECORD: 13 CLI-BOAT-DATA LENGTH: 679 ---- FIELD NUMBER/NAME ------ COLUMNS- ----+----1----+----2----+----3----+----4 1 FILLER 125 2 BOAT-RECORD-TYPE-01 126 01 3 BOAT-DATE-INSURED 128 021194 4 BOAT-REGISTER-NO 134 70392 5 BOAT-INSURED-AMT 139 6000.00 6 BOAT-DOCK-NO 143 999 7 BOAT-MARINA-NAME 146 THOMAS MARINA 8 BOAT-NAME 176 ALMANAC 9 FILLER 196 ************* END OF LAYOUT - DATA EXCEEDS LAYOUT BY 448 BYTES ****************
CHAP_16.9.3 Continue Reviewing SegmentsFile-AID automatically displays the correct layout (CLI-BUSINESS-DATA) for the next segment of record data for record number 13 as illustrated in Figure 16-11.
As before, since &NEXT remains on the COMMAND line, just press <Enter> to continue your review of segments. If you wish to return to the previously viewed segment, use the PREV command.
Figure 16-11. Browsing Record 13. CLI-BUSINESS-DATA Segment.
FILE-AID - BROWSE - USERID9.FASAMP.SEGFILE ----------------------- COL 232 356 COMMAND ===> &NEXT SCROLL ===> PAGE RECORD: 13 CLI-BUSINESS-DATA LENGTH: 679 ---- FIELD NUMBER/NAME ------ COLUMNS- ----+----1----+----2----+----3----+----4 1 FILLER 232 2 BUSINESS-RECORD-TYPE-02 233 02 3 BUS-DATE-INSURED 235 021194 4 BUS-NAME 241 WRITERS CAMP 5 BUS-INSURED-AMT 271 3000.00 6 BUS-ADDRESS 277 32 BOOK STREET 7 BUS-PHONE-NUMBER 307 4159809852 8 FILLER 317 ************* END OF LAYOUT - DATA EXCEEDS LAYOUT BY 323 BYTES ****************
Subtopics:
Chap_16.9.3.1 Step:
Page 294

FileAid_-_Online_1CHAP_16.9.3.1 Step: 1. Press <Enter>.
Note: If you wish to return to the previously viewed segment, use the PREV command.
CHAP_16.9.4 Continue Reviewing SegmentsFile-AID automatically displays the correct layout (CLI-CAR-DATA) for the next segment of record data for record number 13 as illustrated in Figure 16-12.
Figure 16-12. Browsing Record 13. CLI-CAR-DATA Segment.
FILE-AID - BROWSE - USERID9.FASAMP.SEGFILE ----------------------- COL 357 499 COMMAND ===> &NEXT SCROLL ===> PAGE RECORD: 13 CLI-CAR-DATA LENGTH: 679 ---- FIELD NUMBER/NAME ------ COLUMNS- ----+----1----+----2----+----3----+----4 1 FILLER 357 2 CAR-RECORD-TYPE-03 358 03 3 CAR-DATE-INSURED 360 021194 4 CAR-VEHICLE-NUMBER 366 2225439047 5 CAR-INSURED-AMT 376 100.00 6 CAR-MFG 380 FORD 7 CAR-STYLE 390 MODEL T 8 CAR-OWNER-NAME 420 THOMAS PAINE 9 FILLER 460 ************* END OF LAYOUT - DATA EXCEEDS LAYOUT BY 180 BYTES ****************
Subtopics:
Chap_16.9.4.1 Step:
CHAP_16.9.4.1 Step: 1. To view the next segment, press <Enter>.
CHAP_16.9.5 Continue Reviewing SegmentsFile-AID displays the next segment of record data for record number 13. The next segment is the CLI-HOME-DATA segment as illustrated in Figure 16-13.
Figure 16-13. Browsing Record 13. CLI-HOME-DATA Segment.
FILE-AID - BROWSE - USERID9.FASAMP.SEGFILE ----------------------- COL 500 578
COMMAND ===> &NEXT SCROLL ===> PAGE RECORD: 13 CLI-HOME-DATA LENGTH: 679 ---- FIELD NUMBER/NAME ------ COLUMNS- ----+----1----+----2----+----3----+----4 1 FILLER 500 2 HOME-RECORD-TYPE-04 501 04 3 HOME-DATE-INSURED 503 021194 4 HOME-ADDRESS 509 0000000032 5 HOME-PROPERTY-AMT 519 14000.00 6 HOME-CONTENTS-AMT 524 3500.00 7 HOME-STYLE 529 COLONIAL 8 FILLER 539
Page 295
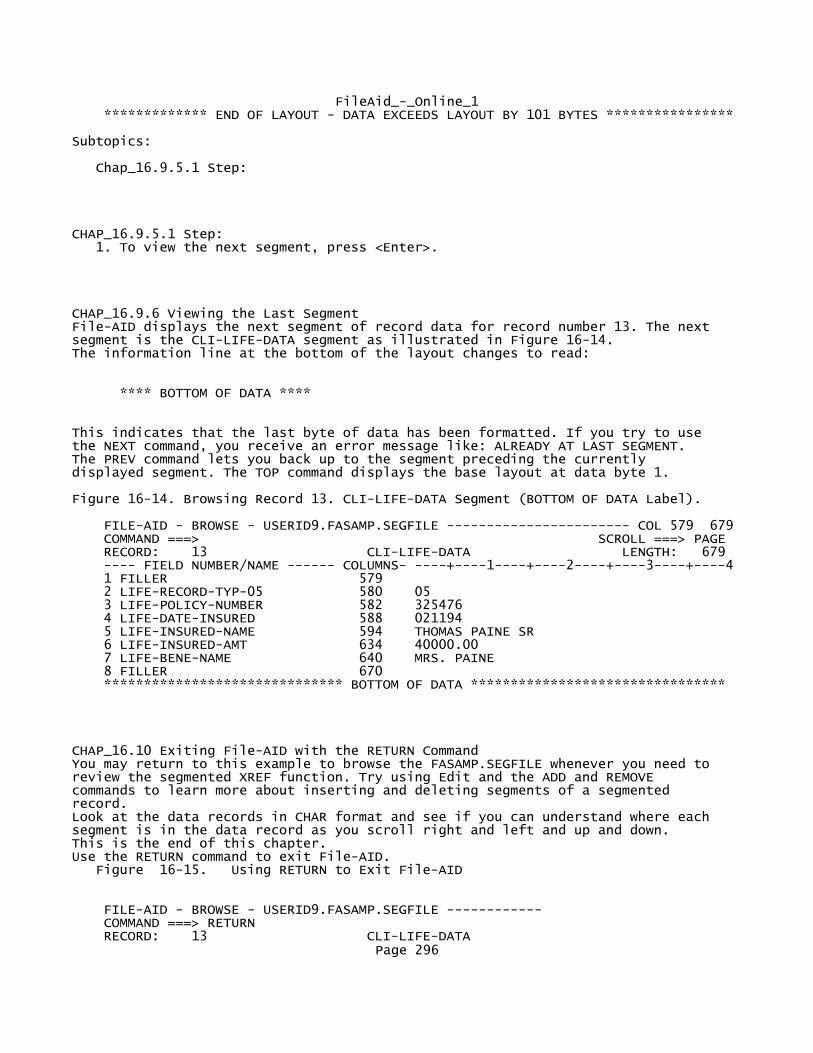
FileAid_-_Online_1 ************* END OF LAYOUT - DATA EXCEEDS LAYOUT BY 101 BYTES ****************
Subtopics:
Chap_16.9.5.1 Step:
CHAP_16.9.5.1 Step: 1. To view the next segment, press <Enter>.
CHAP_16.9.6 Viewing the Last SegmentFile-AID displays the next segment of record data for record number 13. The next segment is the CLI-LIFE-DATA segment as illustrated in Figure 16-14. The information line at the bottom of the layout changes to read:
**** BOTTOM OF DATA ****
This indicates that the last byte of data has been formatted. If you try to use the NEXT command, you receive an error message like: ALREADY AT LAST SEGMENT. The PREV command lets you back up to the segment preceding the currently displayed segment. The TOP command displays the base layout at data byte 1.
Figure 16-14. Browsing Record 13. CLI-LIFE-DATA Segment (BOTTOM OF DATA Label).
FILE-AID - BROWSE - USERID9.FASAMP.SEGFILE ----------------------- COL 579 679 COMMAND ===> SCROLL ===> PAGE RECORD: 13 CLI-LIFE-DATA LENGTH: 679 ---- FIELD NUMBER/NAME ------ COLUMNS- ----+----1----+----2----+----3----+----4 1 FILLER 579 2 LIFE-RECORD-TYP-05 580 05 3 LIFE-POLICY-NUMBER 582 325476 4 LIFE-DATE-INSURED 588 021194 5 LIFE-INSURED-NAME 594 THOMAS PAINE SR 6 LIFE-INSURED-AMT 634 40000.00 7 LIFE-BENE-NAME 640 MRS. PAINE 8 FILLER 670 ****************************** BOTTOM OF DATA ********************************
CHAP_16.10 Exiting File-AID with the RETURN CommandYou may return to this example to browse the FASAMP.SEGFILE whenever you need to review the segmented XREF function. Try using Edit and the ADD and REMOVE commands to learn more about inserting and deleting segments of a segmented record. Look at the data records in CHAR format and see if you can understand where each segment is in the data record as you scroll right and left and up and down. This is the end of this chapter. Use the RETURN command to exit File-AID. Figure 16-15. Using RETURN to Exit File-AID
FILE-AID - BROWSE - USERID9.FASAMP.SEGFILE ------------ COMMAND ===> RETURN RECORD: 13 CLI-LIFE-DATA
Page 296

FileAid_-_Online_1 ---- FIELD NUMBER/NAME ------ COLUMNS- ----+----1----+- 1 FILLER 579 2 LIFE-RECORD-TYP-05 580 05
Subtopics:
Chap_16.10.1 Steps:
CHAP_16.10.1 Steps: 1. Type RETURN in the COMMAND field.
2. Press <Enter>.
A
APP_A Convert File-AID for IMS XREF Members to
File-AID/MVS Release 8 Format File-AID/MVS enhanced its batch CONVERT function to allow you to convert your File-AID for IMS XREFs to the File-AID Release 8 format. Release 8.0.2 gives you three new sample JCL members that you can use as models for this conversion. You can use Release 8 format XREFs in File-AID/MVS functions and in File-AID/Data Solutions to build change criteria to modify File-AID for IMS extract file data.
The following JCL members are provided with your install PDS: CVTIMSXR Convert one File-AID for IMS XREF to one File-AID/MVS XREF
CVTIMSX2 Convert multiple File-AID for IMS XREFs to one File-AID/MVS XREF
CVTIMSX3 Convert multiple File-AID for IMS XREFs to multiple File-AID/MVS XREFs.
Subtopics: App_A.1 Convert One File-AID for IMS XREF to One App_A.2 Convert Multiple File-AID for IMS XREFs to One App_A.3 Convert Multiple File-AID for IMS XREFs to INDEX Index
APP_A.1 Convert One File-AID for IMS XREF to One
File-AID/MVS XREF Complete the following procedure to convert one File-AID for IMS XREF member to the Release 8 format. CONVERT processes one XREF member per DD statement. You may specify up to 100 (00 - 99) DD statements per Job Step execution. You must specify the matching extract for each XREF DD (DDnn) using DDnnXT: 1. Copy the JCL located in FASAMP.JCL(CVTIMSXR).
2. Tailor JOBLIB to point to your Release 8 load library.
3. Tailor DDnn to point to your File-AID for IMS XREF library member.
4. Tailor DDnnXT to point to the extract file that matches the XREF member.
5. Preallocate a PDS for your new Release 8 XREF library (DDnnO). It must Page 297

FileAid_-_Online_1 be RECFM=VB and LRECL=300. Allocate enough space and directory blocks to hold all of your XREF members.
6. Tailor DDnnO to the name of your new Release 8 XREF library. The output XREF member is named the same as the input XREF member unless you specify a new member name on DDnnO.
7. Submit the job.
Figure A-1. FASAMP.JCL Member CVTIMSXR
//??????A JOB (####,CCCC),'YOUR USERNAME', // CLASS=A,MSGCLASS=A,NOTIFY=?????? //* //* THIS IS A SAMPLE JOB TO CONVERT FILE-AID/IMS XREF LIBRARY //* MEMBER(S) TO THE NEW FILE-AID RELEASE 8 XREF LIBRARY FORMAT. //* ONE XREF MEMBER IS CONVERTED PER DDXX STATEMENT. //* DDXX0 SHOULD BE A PREALLOCATED PDS RECFM=VB,LRECL=300 //* //JOBLIB DD DSN=????????.FA.VVRRMM.LOAD,DISP=SHR //STEP1 EXEC PGM=FILEAID,REGION=6M //SYSPRINT DD SYSOUT=* //SYSLIST DD SYSOUT=* //SYSTOTAL DD SYSOUT=* //SYSUDUMP DD SYSOUT=* //ABNLDUMP DD SYSOUT=* //DD01 DD DISP=SHR,DSN=YOUR.FA.IMS.XREF(MEMBER1) //DD01XT DD DISP=SHR,DSN=YOUR.FA.IMS.EXTRACT1 //DD01O DD DISP=SHR,DSN=YOUR.FILEAID.XREF //* //DD02 DD DISP=SHR,DSN=YOUR.FA.IMS.XREF(MEMBER2) //* //DD02XT DD DISP=SHR,DSN=YOUR.FA.IMS.EXTRACT2 //* //DD02O DD DISP=SHR,DSN=YOUR.FILEAID.XREF //SYSIN DD * $$DD01 CONVERT TYPE=IMSXREF * $$DD02 CONVERT TYPE=IMSXREF /* //
APP_A.2 Convert Multiple File-AID for IMS XREFs to One
File-AID/MVS XREF Complete the following procedure to convert multiple File-AID for IMS XREF members to one Release 8 File-AID/MVS XREF. This version allows you to create a "super" XREF for mapping all records the specified File-AID for IMS extract file from multiple databases. You may specify up to 100 (00 - 99) DD statements per Job Step execution. You must specify the matching extract for each XREF DD (DDnn) using DDnnXT: 1. Copy the JCL located in FASAMP.JCL(CVTIMSX2).
2. Tailor JOBLIB to point to your Release 8 load library.
3. Tailor DDnn to point to your File-AID for IMS XREF library. Do not specify a member name for DDnn.
4. Tailor DDnnXT to point to the extract file that matches the XREF file.
5. Preallocate a PDS for your new Release 8 XREF library (DDnnO). It must be RECFM=VB and LRECL=300. Allocate enough space and directory blocks to hold all of your XREF members.
Page 298

FileAid_-_Online_1
6. Tailor DDnnO to the name of your new Release 8 XREF library. You must specify a member name for DDnnO.
7. Submit the job.
Figure A-2. FASAMP.JCL Member CVTIMSX2
//??????A JOB (####,CCCC),'YOUR USERNAME', // CLASS=A,MSGCLASS=A,NOTIFY=?????? //* //* THIS IS A SAMPLE JOB TO CONVERT FILE-AID/IMS XREF LIBRARY //* MEMBER(S) TO THE NEW FILE-AID RELEASE 8 XREF LIBRARY FORMAT. //* MANY FA/IMS XREF MEMBERS ARE CONVERTED AND COMBINED INTO ONE //* FILE-AID RELEASE 8 XREF MEMBER. //* DDXX0 SHOULD BE A PREALLOCATED PDS WITH RECFM=VB,LRECL=300 //* //JOBLIB DD DSN=????????.FA.VVRRMM.LOAD,DISP=SHR //STEP1 EXEC PGM=FILEAID,REGION=6M //SYSPRINT DD SYSOUT=* //SYSLIST DD SYSOUT=* //SYSTOTAL DD SYSOUT=* //SYSUDUMP DD SYSOUT=* //ABNLDUMP DD SYSOUT=* //DD01 DD DISP=SHR,DSN=YOUR.FA.IMS.XREF1 //DD01XT DD DISP=SHR,DSN=YOUR.FA.IMS.EXTRACT1 //DD01O DD DISP=SHR,DSN=YOUR.FILEAID.XREF(REL8MEM1) //* //DD02 DD DISP=SHR,DSN=YOUR.FA.IMS.XREF2 //* //DD02XT DD DISP=SHR,DSN=YOUR.FA.IMS.EXTRACT2 //* //DD02O DD DISP=SHR,DSN=YOUR.FILEAID.XREF(REL8MEM2) //SYSIN DD * $$DD01 CONVERT TYPE=IMSXREF * $$DD02 CONVERT TYPE=IMSXREF /* //
APP_A.3 Convert Multiple File-AID for IMS XREFs to
File-AID/MVS XREFs (One for One) Complete the following procedure to convert one for one multiple File-AID for IMS XREF members to the Release 8 format. You may specify up to 100 (00 - 99) DD statements per Job Step execution. You must specify the matching extract for each XREF DD (DDnn) using DDnnXT: 1. Copy the JCL located in FASAMP.JCL(CVTIMSX3).
2. Tailor JOBLIB to point to your Release 8 load library.
3. Tailor DDnn to point to your File-AID for IMS XREF library.
4. Tailor DDnnXT to point to the extract file that matches the XREF members.
5. Preallocate a PDS for your new Release 8 XREF library (DDnnO). It must be RECFM=VB and LRECL=300. Allocate enough space and directory blocks to hold all of your XREF members.
6. Tailor DDnnO to the name of your new Release 8 XREF library.
7. Submit the job. Page 299

FileAid_-_Online_1
Figure A-3. FASAMP.JCL Member CVTIMSX3
//??????A JOB (####,CCCC),'YOUR USERNAME', // CLASS=A,MSGCLASS=A,NOTIFY=?????? //* //* THIS IS A SAMPLE JOB TO CONVERT FILE-AID/IMS XREF LIBRARY //* MEMBERS TO THE NEW FILE-AID RELEASE 8 XREF LIBRARY FORMAT. //* MANY FA/IMS XREF MEMBERS ARE CONVERTED AND WRITTEN USING THE //* SAME MEMBER NAMES AS THE INPUT XREF MEMBER(S). //* DDXX0 SHOULD BE A PREALLOCATED PDS WITH RECFM=VB,LRECL=300 //* //JOBLIB DD DSN=????????.FA.VVRRMM.LOAD,DISP=SHR //STEP1 EXEC PGM=FILEAID,REGION=6M //SYSPRINT DD SYSOUT=* //SYSLIST DD SYSOUT=* //SYSTOTAL DD SYSOUT=* //SYSUDUMP DD SYSOUT=* //ABNLDUMP DD SYSOUT=* //DD01 DD DISP=SHR,DSN=YOUR.FA.IMS.XREF1 //DD01XT DD DISP=SHR,DSN=YOUR.FA.IMS.EXTRACT1 //DD01O DD DISP=SHR,DSN=YOUR.FILEAID.XREF1 //* //DD02 DD DISP=SHR,DSN=YOUR.FA.IMS.XREF2 //* //DD02XT DD DISP=SHR,DSN=YOUR.FA.IMS.EXTRACT2 //* //DD02O DD DISP=SHR,DSN=YOUR.FILEAID.XREF2 //SYSIN DD * $$DD01 CONVERT TYPE=IMSXREF * $$DD02 CONVERT TYPE=IMSXREF /* //
INDEX Index
A
accessing File-AID CLIST, allocation, Chap_1.2 File-AID primary menu, Chap_1.2 ISPF/PDF option menu, Chap_1.2 PROC, logon, Chap_1.2 Acrobat PDF online documentation, Intro.2 ADD primary command add segment in segmented record, Chap_16.1.6 audit trail dataset generating, Chap_4.6 printing, Chap_12.5.1 specifying disposition, Chap_4.24.2B
Batch Submit utility control statement, Chap_15.1.1 Chap_15.1.2 Chap_15.1.3 Chap_15.1.4 dataset identifier, Chap_15.1.2 example, Chap_15.1.1 function name, Chap_15.1.3
Page 300

FileAid_-_Online_1 parameters, Chap_15.1.4 control statements, entering, Chap_15.5 examples, Chap_15.7 Chap_15.7.1 Chap_15.7.2 Chap_15.7.3 creating multiple output files, Chap_15.7.2 mass changes to library, Chap_15.7.1 scanning/printing load library data, Chap_15.7.3 executing, Chap_15.2 features, Chap_15 Interactive utility support, Chap_15.2 JCL, submitting, Chap_15.6 processing request, defining, Chap_15.1 TALLY function, Chap_15.4 Browse function accessing, Chap_2.5 browse request, defining, Chap_2.6 character format, displaying, Chap_2.13.3 character mode, invoking, Chap_2.12 COLS information line, displaying, Chap_2.14 dataset list, selecting, Chap_2.6.2 display format of a field, changing, Chap_2.20 Chap_2.20.2 display modes, Chap_2 field data declaration, displaying, Chap_2.9.1 Chap_2.18.1 field length and format, displaying, Chap_2.9.4 field offset, displaying, Chap_2.6.6 Chap_2.9.3.1 Chap_2.18.3 Formatted Selection Criteria screen (FMT), Chap_2.6.4.1 formatted selection criteria, specifying, Chap_2.6.8 hexadecimal format, displaying, Chap_2.13 last referenced file list, Chap_2.22 mode prompt message line (MESSAGE), Chap_2.17 scrolling formatted record, Chap_2.7.3 searching for data (FIND), Chap_2.11.1 Chap_2.15 selection criteria, temporary, Chap_2.6.1 Chap_2.6.3 defining selection conditions, Chap_2.6.3 requesting, Chap_2.6.1 specific fields, displaying, Chap_2.10.2.1 Chap_2.10.3 Chap_2.10.4 Chap_2.10.5 system-assigned field number, displaying, Chap_2.9.5 unformatted selection criteria, specifying, Chap_2.6.10 vertical formatted mode, invoking, Chap_2.16C
CAPS primary command searching case-sensitive data (OFF), Chap_2.6.8.2 catalog search, Chap_8.1 Catalog utility accessing, Chap_8.1.1 datasets, Chap_8.1.4 Chap_8.1.6 processing, Chap_8.1.4 selecting, Chap_8.1.6 exiting, Chap_8.1.7 extended help message, displaying, Chap_8.1.4
Page 301

FileAid_-_Online_1 line commands, Chap_8.1.5 primary commands, Chap_8.1.5 searching the catalog, Chap_8.1.3 Search name field rules, Chap_8.1.3.2 tutorial, accessing, Chap_8.1.4 CHANGE primary command CHANGE Command screen, Chap_4.14 Chap_4.14.2 displaying, Chap_4.14 specifying parameters, Chap_4.14.2 modifying value of specific field, Chap_4.22.3 changing default values, Chap_1.5 CHAR primary command from formatted mode, Chap_2.12 Chap_4.19 COLS primary command, Chap_2.14 Compare function accessing, Chap_5.1 analyzing report, Chap_5.10 Chap_5.20 dataset, Chap_5.2 Chap_5.3 specifying new, Chap_5.3 specifying old, Chap_5.2 executing, Chap_5.9 Chap_5.19 execution options, Chap_5.4 Chap_5.15 features, Chap_5 formatted field criteria, specifying, Chap_5.7 formatted field criteria, viewing, Chap_5.8 Chap_5.18 load library, Chap_5.13 Chap_5.14 specifying new, Chap_5.14 specifying old, Chap_5.13 summary report, Chap_5.11 Chap_5.21 Copy (C) line command character mode, Chap_4.20.1 COPY primary command Edit COPY screen, Chap_4.7 Chap_4.7.3 displaying, Chap_4.7 source dataset, specifying, Chap_4.7.3 Copy utility accessing, Chap_7.1 Chap_13.8 batch JCL, Chap_7.8 Chap_7.9 editing, Chap_7.9 generating, Chap_7.8 datasets, specifying "from" and "to", Chap_7.3 Chap_13.9 defining copy request, Chap_7.2 exiting, Chap_7.9 Chap_13.10 extracting selected data, Chap_13.8 field selection criteria, Chap_7.5 Chap_7.6 Chap_7.7 exiting Selection Criteria Menu, Chap_7.7 temporary, specifying, Chap_7.5
Page 302
FileAid_-_Online_1 unformatted, specifying, Chap_7.6 ISPF statistics, Chap_7.4.1 JCL command, Chap_7.9 PDS member processing, Chap_7.4 PDS processing options, Chap_7.4.2.1 selection criteria member, specifying, Chap_7.4 Chap_13.9 customer support web site, Intro.2 CVTIMSX2 JCL, App_A.2 CVTIMSX3 JCL, App_A.3 CVTIMSXR JCL, App_A.1D
dataset selection list processing commands, Chap_8.1.5 dataset specification FILELIST command, Chap_2.22 Delete (D) line command character mode, Chap_4.21.3 DISPLAY primary command HEX command, using with, Chap_2.20.1 RESET command, using with, Chap_2.20.2 specifying all fields (ALL), Chap_2.10.5 Chap_2.20.3 specifying selected fields, Chap_2.10.2.1 Chap_2.10.3 Chap_2.10.4 Chap_2.19E
Edit function accessing, Chap_4.5 audit trail, generating, Chap_4.6 CHANGE command, Chap_4.14 Chap_4.22.3 COPY command, invoking, Chap_4.7 DISPLAY command, Chap_4.22.2 END command, Chap_4.24.1 formatted mode, invoking, Chap_4.8 FPRINT command, Chap_4.13 INPUT command, Chap_4.16.3 invoking character mode, Chap_4.19 invoking vertical formatted mode, Chap_4.22 KEY command, Chap_4.18 line commands, Chap_4 Chap_4.20.1 Chap_4.21.3 C (Copy), Chap_4.20.1 D (Delete), Chap_4.21.3 line labels, Chap_4.19.3 Chap_4.19.4 Chap_4.19.6 assigning, Chap_4.19.3 CHANGE command, Chap_4.19.4 RESET command, Chap_4.19.6 PROTECT command, Chap_4.17 Chap_4.17.2 REPEAT command, Chap_4.16 RESET command, Chap_4.19.2 RIGHT command, Chap_4.16.3 scrolling formatted record, Chap_4.15 scrolling to a key field, Chap_4.18 SORT KEYS command, Chap_4.21 specifying dataset to edit, Chap_4.6
Page 303

FileAid_-_Online_1 UNDO command, Chap_4.19.5 VPRINT command, Chap_4.23 END primary command exiting, Chap_1 Chap_2.20.3.2 Chap_4.24.1 Browse, Chap_2.20.3.2 Edit, Chap_4.24.1 Extract (EX) line command Source Statement Selection screen, Chap_14.3 extracting selected data, Chap_13F
file list, last referenced, Chap_2.22 FILELIST primary command, Chap_2.22 File primary option menu, Chap_1.2.1 finding uncataloged files, Chap_8.2 FIND primary command COLS command, using with, Chap_2.15 FIND command screen, Chap_2.11.1 search conditions, specifying, Chap_2.11.1 Chap_4.11 FMT line command from character mode, Chap_4.8 formatting segmented records, Chap_16 FPRINT primary command printing with XREF, Chap_14.21 Print Parameters screen, Chap_1 Chap_4.13 Chap_4.13.3 Chap_4.13.4 Chap_11.5 Chap_11.5.2 Chap_14.22 displaying, Chap_4.13 new dataset attributes, Chap_4.13.4 Chap_11.5 Chap_11.5.2 specifying print information, Chap_4.13.3 with XREF, Chap_14.22 FrontLine support web site, Intro.2G
global changes, Chap_6 Chap_6.5H
HEX primary command displaying hexadecimal format (ON), Chap_2.13 redisplaying prior format (OFF), Chap_2.13.3 HIDE primary command, Chap_4.10 Chap_4.10.1 HOLD primary command, Chap_4.10 HTML documentation, Intro.2I
Interactive utility control statements, entering, Chap_15.5 exiting, Chap_15.5.3 features, Chap_15.2 terminate processing, Chap_15.5.2 Internet, Compuware WWW address, Intro.2 introduction
Page 304

FileAid_-_Online_1 related publications, Intro.2 technical support, Intro.3J
JCL primary command Copy utility, Chap_7.8K
KEY Value Specification screen scrolling to a key field, Chap_4.18.3L
last referenced file list, Chap_2.22 LEFT primary command formatted mode, Chap_2.7.4 displaying previous record, Chap_2.7.4 Library utility accessing, Chap_9.1 load module information, viewing, Chap_9.7 member list, Chap_9.3 Chap_9.5 Chap_9.6 generating, Chap_9.3 line command processing, Chap_9.6 primary command processing, Chap_9.5 line commands Catalog and VTOC utilities, Chap_8.1.5 C (copy), Chap_4.20.1 using destination parameters, Chap_4.20.1 D (delete), Chap_4.21.3 block command, Chap_4.21.3 EX (extract), Chap_14.3 Source Statement Selection screen, Chap_14.3 SF (select formatted), Chap_14.3 XREF function, Chap_14.3 S (select), Chap_1 Chap_2.6.2 Chap_14.5 Chap_14.6 dataset selection list, Chap_2.6.2 member selection list, Chap_14.5 Chap_14.6 SU (select unformatted), Chap_14.3 XREF function, Chap_14.3 line labels primary commands, use with, Chap_4.19.3 remove with RESET LABEL command, Chap_4.19.6 load library compare function, Chap_5.13 load module information, Chap_9 locking dataset in file list, Chap_2.22.3 logging on, Chap_1.1 LR primary command displaying a record by record number, Chap_16.7.2M
member management, Chap_9 MESSAGE primary command display mode command line, removing, Chap_2.17 more about allocate new VSAM cluster, Chap_3.6.2 Catalog utility dataset list, Chap_2.6.2.2 Catalog utility entry screen, Chap_8.1.3.2
Page 305

FileAid_-_Online_1 C (Copy ) line command, Chap_4.20.1.2.1 CHANGE command, Chap_4.14.2.2.1 CHANGE command prompt screen, Chap_6.3.7.2.2 change criteria, Chap_6.5.2.2.2 COLS command, Chap_2.14.2 confirm update, Chap_6.3.7.4.2 Confirm Update screen, Chap_6.5.4.2 control statement entry, Chap_15.5.2 COPY command, Chap_4.7.2 Copy PPO screen, Chap_7.4.2.1.2 Copy utility screen, Chap_7.3.2 default layouts, Chap_14.14.2 Define XREF screen, Chap_14.4.2 DISPLAY command, Chap_2.10.2.1 Chap_2.20.1.2.1 Disposition of Audit Trail screen, Chap_4.24.2.2 FIND command, Chap_2.11.2.2.1 Chap_4.11.2.1 formatted selection criteria, Chap_13.5.2 Formatted XREF Definition screen, Chap_14.8.2 FPRINT command, Chap_4.13.2 HIDE and HOLD commands, Chap_4.10.4 Interactive utility screen, Chap_15.4.2 KEY command, Chap_4.18.2.1 last referenced file list, Chap_2.22.2.2 manual member selection list, Chap_6.4.2.2.2 member browsing or editing, Chap_6.3.6.2.2 MESSAGE command, Chap_2.17.2 navigating to browse formatted records, Chap_2.7.3.2 PDS Find/Change member list, Chap_6.3.6.1 PDS Processing Options for layout member list, Chap_14.5.2 PDS processing options (PPO), Chap_6.3.3.2 Print function, Chap_12.5.1 print parameters, Chap_4.13.3.2 Print Selection Menu, Chap_12.2.2 profile settings, Chap_2.8.2 PROTECT command, Chap_4.17.2.2.1 REDEFINES command, Chap_4.9.2 Reformat Definition screen, Chap_11.2.2 Reformat Record Layouts screen, Chap_11.3.2 REPEAT command, Chap_4.16.2.1 RESET command, Chap_4.19.2.2 scroll commands, Chap_4.15.2.1 scrolling methods and XREF usage, Chap_14.20.2 Search/Update entry screen, Chap_6.3.2 segment definitions, Chap_16.5.2 selection criteria, Chap_2.6.8.2 Chap_6.4.2.3.2 Chap_11.8.2 Selection Criteria Menu, Chap_7.5.2 Chap_13.6.2 selection criteria options, Chap_2.6.4.2 SHOW command, Chap_2.9.2.1 Chap_2.18.2 SHOW OFFSET command, Chap_2.9.3.2.1 SORT command, Chap_4.21.2 switching to Character mode, Chap_4.19.1.2 temporary selection criteria, Chap_2.6.3.2 tutorials, Chap_8.1.5.2 UNDO command, Chap_4.19.5.2.1 unformatted selection criteria, Chap_6.3.4.2 Chap_7.6.2 unformatted XREF definition, Chap_14.10.2
Page 306

FileAid_-_Online_1 vertical formatted mode, Chap_2.16.2.1 View display, Chap_10.2.3.2 View Record Layout - Dataset Specification screen, Chap_10.2.2 VSAM allocation, Chap_3.5.2 XREF members, Chap_14.16.2N
NEXT primary command invoking XREF logic for segmented record, Chap_16.1.3O
OFFSET primary command column format (COLUMN), Chap_2.9.3.2.1 decimal offset (RELATIVE), Chap_2.9.3.2.1 hexadecimal format (HEX), Chap_2.9.3.2.1P
pattern characters dataset name field, using in, Chap_2.6.1 displaying a dataset list, Chap_2.6.2 PDF documentation, Intro.2 PDS member copying, Chap_6.5.3 Chap_7 PDS member management, Chap_9 primary command, keeping on command line, Chap_16.9 primary option menu, Chap_1.2.1 Print function accessing, Chap_12.1 character display, Chap_12.3 exiting, Chap_12.6 formatted display, Chap_12.3 Chap_12.3.1 Chap_12.3.2 field description option, Chap_12.3 record layout requirement, Chap_12.3.1 selection criteria, specifying, Chap_12.3.2 hexadecimal display, Chap_12.3 print job parameters, Chap_12.4 Chap_12.5 process in batch, Chap_12.4 view report online, Chap_12.5 Print Selection Menu, Chap_12.2 specifying file type, Chap_12.2 submitting print job, Chap_12.4 PROFILE primary command profile lines, displaying, Chap_2.8 profile lines, removing, Chap_2.8.3 table of options, Chap_2.8.2 PROTECT primary command controlling protection status, Chap_4.17 Chap_4.17.2 publications, related, Intro.2Q
questions, File-AID/MVS frequently asked, Intro.2.1R
Reformat function accessing, Chap_11.1 create mode, Chap_11.3.2 executing online, Chap_11.9 exiting, Chap_11.10 field references, generating, Chap_11.3.2
Page 307

FileAid_-_Online_1 output file, Chap_11.9.1 Chap_11.10 browsing, Chap_11.9.1 Chap_11.10 editing, Chap_11.9.1 reformat definition, Chap_11.3 source record layout, specifying, Chap_11.3 target record layout, specifying, Chap_11.3 reformat definition editor, Chap_11.4.1 Chap_11.4.2 Chap_11.4.3 Chap_11.7 Chap_11.8 constants, specifying, Chap_11.4.3 field references, specifying, Chap_11.4.3 hiding sensitive data, Chap_11.7 scrolling, Chap_11.4.1 source record layout window, Chap_11.4.2 specifying field selection criteria, Chap_11.8 target record layout window, Chap_11.4.3 size of reformatted dataset, controlling, Chap_11.9 reformat records, Chap_11 REPEAT primary command copying the displayed record, Chap_4.16 RESET primary command HIDE, Chap_4.12 HOLD, Chap_4.12 informational flags, Chap_4.7.4 Chap_4.7.5 Chap_4.19.2 line labels, Chap_4.19.6 profile lines, Chap_2.8.3 RIGHT primary command formatted mode, Chap_2.7.3 displaying next record, Chap_2.7.3S
sample training files creating, Chap_1.3 executing FACOPY CLIST, Chap_1.3 scanning files, Chap_6 Chap_8.2 search for invalid data, by field number, Chap_4.11 Search/Update utility accessing, Chap_6.1 batch processing, Chap_6.5.7 browsing PDS members, Chap_6.4.2.4 change criteria, Chap_6.5.2 specifying, Chap_6.5.2 editing a member, Chap_6.3.6.2 global changes, Chap_6.5.4 Chap_6.5.5 confirming, Chap_6.5.4 processing in batch, Chap_6.5.5 member list, Chap_6.3.5 Chap_6.3.7.5 exiting (END), Chap_6.3.7.5 selecting from, Chap_6.3.5 option B (browse), Chap_6.4 option M (member), Chap_6.3 option U (update), Chap_6.5 PDS member, Chap_6 Chap_6.3.3
Page 308

FileAid_-_Online_1 Chap_6.3.3.2 Chap_6.3.4 Chap_6.4 Chap_6.4.2 Chap_6.4.2.2 Chap_7.3 copying, Chap_7.3 data selection criteria, specifying, Chap_6.3.4 list, Chap_6.4.2.2 PDS Processing Options screen, Chap_6.4.2 scanning/updating, Chap_6 Chap_6.4 selecting, Chap_6.3.3.2 special features, Chap_6.3.3 search request, defining, Chap_6.2 unformatted selection criteria, specifying, Chap_6.4.2.3 update request, defining, Chap_6.2 segmented record accessing XREF function, Chap_16.3.1 ADD primary command, Chap_16.1.6 BASE layout, Chap_16.1.1 browsing, Chap_16.5 Chap_16.6 using an XREF, Chap_16.6 view criteria, Chap_16.5 determining position within record, Chap_16.7.2 editing, Chap_16.1.6 exiting XREF function, Chap_16.10 formatting each record segment, Chap_16.1.3 formtted display, setting up, Chap_16.7.2 LR primary command, Chap_16.7.2 NEXT primary command, Chap_16.1.3 Chap_16.7 record layout selection using XREF, Chap_16.1 REMOVE primary command, Chap_16.1.6 SEGMENT layout, Chap_16.1.1 selecting an existing XREF member, Chap_16.3.1 subsequent segments, displaying, Chap_16.9.2 Chap_16.9.6 TOP primary command, Chap_16.1.5 USE primary command, Chap_16.1.7 VIEW primary command, Chap_16.4 segment identifier, Chap_16.1 Select Formatted (SF) line command XREF function, Chap_14.3 selection criteria formatted selection criteria, defining, Chap_2.6.8 function, Chap_13.1 multiple condition testing (AND/OR), Chap_2.6.9 Chap_13.5.2 pattern selection, specifying, Chap_2.6.4 selection options, Chap_2.6.1 Chap_2.6.3 formatted selection criteria, Chap_2.6.1 pattern selection, Chap_2.6.3 unformatted selection criteria, Chap_2.6.1 temporary, Chap_2.6.1 Chap_2.6.3 defining, Chap_2.6.3 requesting, Chap_2.6.1 saving, Chap_2.6.1 unformatted selection criteria, defining, Chap_2.6.10 Selection Criteria function
Page 309

FileAid_-_Online_1 accessing, Chap_13.1 CANCEL primary command, Chap_13.6.2 creating new test, Chap_13.5.2 INSERT and REPEAT primary commands, Chap_13.5.2 multiple condition test, Chap_13.5.2 exiting, Chap_13.7 formatted field selection criteria test, Chap_13.5 record layout dataset, specifying, Chap_13.2 saving selection criteria, Chap_13.6 selection criteria, Chap_13.3 Chap_13.6 Chap_13.6.2 formatted, Chap_13.3 option, Chap_13.3 reviewing, Chap_13.6.2 saving, Chap_13.6 unformatted, Chap_13.3 selection criteria dataset, specifying, Chap_13.2 SHOW OFFSET command, Chap_13.4 VIEW primary command, Chap_13.6.2 Select Unformatted (SU) line command XREF function, Chap_14.3 SHOW primary command character mode, Chap_2.18 Chap_2.18.1 Chap_2.18.3 Chap_2.18.4 data declaration (PICTURE), Chap_2.18 Chap_2.18.1 field length and format (FORMAT), Chap_2.18 Chap_2.18.4 field level number (LEVEL), Chap_2.18 field offset (OFFSET), Chap_2.18 Chap_2.18.3 system-assigned field number (NUMBER), Chap_2.18 formatted mode, Chap_1 Chap_2.6.6 Chap_2.9 Chap_2.9.3.1 Chap_2.9.4 Chap_2.9.5 Chap_14.7.1 data declaration (PICTURE), Chap_2.9 field length and format (FORMAT), Chap_2.9 Chap_2.9.4 field level number (LEVEL), Chap_2.9 field offset (OFFSET), Chap_2.6.6 Chap_2.9 Chap_2.9.3.1 Chap_14.7.1 system-assigned field number (NUMBER), Chap_2.9 Chap_2.9.5 SORT KEYS primary command sorting based on dataset record key, Chap_4.21 system defaults changing, Chap_1.5 initial set-up, Chap_1.4 Parameter Selection Menu, Chap_1.4.1T
technical support, Intro.3 TOP primary command returning to BASE segment, Chap_16.1.5
Page 310

FileAid_-_Online_1 training files, Chap_1.3 tutorial Catalog utility, Chap_8.1.5.2 navigating through, Chap_8.1.5.2U
UNDO primary command restore pre-existing values, Chap_4.19.5 SETUNDO OFF, Chap_4.19.5.2.1 unformatted selection criteria guidelines, Chap_6.3.4.2 member browsing or editing, Chap_6.3.6.2.2 selecting from, Chap_6.3.6.2.2 specifying in Search/Update utility, Chap_6.3.4 updating MVS files, Chap_6 UP primary command formatted mode, Chap_4.15 move forward within same record, Chap_4.15 USE primary command display list of record layouts within XREF, Chap_16.1.7 User Guide conventions entering values, Chap_1V
VFMT primary command from character mode, Chap_2.16 View function accessing, Chap_10.1 exiting, Chap_10.2.3 primary commands, Chap_10.2.3 record layout, specifying, Chap_10.2 VIEW primary command XREF control statements, displaying, Chap_16.4 VSAM utility accessing, Chap_3.1.1 allocating, Chap_3.3 allocation attributes, Chap_3.3 extended allocation parameters, Chap_3.6 impact on system performance, Chap_3.6 specifying model dataset, Chap_3.3 VTOC search options, Chap_8.2.2 Chap_8.2.2.4 Chap_8.2.2.5 Chap_8.2.2.6 catalog specification, Chap_8.2.2.5 delete confirmation, Chap_8.2.2.6 search name field, Chap_8.2.2.4W
website, File-AID/MVS frequently asked questions, Intro.2.1 World Wide Web, Compuware address, Intro.2X
XREF function accessing, Chap_14.1 compound criteria set, creating, Chap_14.13 criteria set, creating, Chap_14.8 default base layout, Chap_14.14 Chap_14.14.2 DEF line command, Chap_14.14.2 guidelines, Chap_14.14.2 specifying, Chap_14.14
Page 311
FileAid_-_Online_1 exiting, Chap_14.16 formatted criteria, Chap_14.3 defining record layout selection rules, Chap_14.3 FPRINT primary command, Chap_14.21 line commands, Chap_14.3 Chap_14.5 Chap_14.6 EX (extract), Chap_14.3 SF (select formatted), Chap_14.3 S (select), Chap_14.5 Chap_14.6 SU (select unformatted), Chap_14.3 moving to another record (formatted mode), Chap_14.20 record layout, Chap_14.2 Chap_14.3 Chap_14.4.2 Chap_14.5 Chap_14.6 defining selection rules for, Chap_14.2 Chap_14.3 member types, Chap_14.4.2 selecting member from list, Chap_14.5 Chap_14.6 RIGHT primary command, Chap_14.20.1 segmented record, Chap_14 selecting member from list of record layouts, Chap_14.11.1 SHOW OFFSET primary command, Chap_14.7.1 specifying data structure, Chap_14.3 Chap_14.11 Beginning Data-Name/Line Number field, Chap_14.3 Chap_14.11 Source Statement Selection screen, Chap_14.3 unformatted criteria, Chap_14.10 defining record layout selection rules, Chap_14.10 XREF member, Chap_14.2.1 Chap_14.3 Chap_14.4.2 Chap_14.15 Chap_14.17 Chap_14.18 Chap_14.21 browsing formatted data, Chap_14.18 creating, Chap_14.2.1 defining, Chap_14.3 editing line commands, Chap_14.4.2 printing data records, Chap_14.21 saving, Chap_14.15 using, Chap_14.17
IBM BookManager Print Preview
DOCNUM = CWFAUX8HDATETIME = 03/30/01 17:09:37BLDVERS = 1.3 BUILD NT 2.1TITLE = File-AID/MVS User's GuideAUTHOR = COPYR = PATH = /man/compuware/books
Page 312

FileAid_-_Online_1
Page 313