fileroom add-in installation guide 2015 · pdf filefileroom add-in guide 4 last updated...
TRANSCRIPT

WORKFLOW TOOLSFileRoom Add-In Guide
Last updated February 2016
© THOMSON REUTERS 2016. ALL RIGHTS RESERVED. Thomson Reuters disclaims any and all liability arising from the use of this document and does not guarantee that any information contained herein is accurate or complete. This document contains information proprietary to Thomson Reuters and may not be reproduced, transmitted, or distributed in whole or part without the express written permission of Thomson Reuters.
Acknowledgment is made to all other brand or product names referred to in the text that are registered
trademarks, trademarks, or trade names of their respective owners.
WORKFLOW TOOLS
FileRoom Add-In Guide 2 Last updated February 2016

WORKFLOW TOOLS
TABLE OF CONTENTSLEARNING ABOUT THE FILEROOM ADD-IN.......................................................................5Adobe Acrobat component .......................................................................................................................5
Microsoft Office component ......................................................................................................................5
Microsoft Outlook component ...................................................................................................................5
Control Panel component .........................................................................................................................5
Additional features ....................................................................................................................................6
System requirements ................................................................................................................................6
INSTALLING THE MICROSOFT .NET FRAMEWORK 4.0..................................................... 7INSTALLING THE FILEROOM ADD-IN.................................................................................12OPENING THE CONTROL PANEL COMPONENT .............................................................. 19ADDING DOCUMENTS FROM YOUR DESKTOP .............................................................. 20Adding documents to a drawer ...............................................................................................................21
Adding documents to a workflow ............................................................................................................22
ADDING DOCUMENTS FROM MICROSOFT WORD AND EXCEL ....................................24Saving changes to documents................................................................................................................25
Using the “Version Control” feature ........................................................................................................25
ADDING PDF FILES FROM ADOBE ACROBAT.................................................................. 27PRINTING TO FILEROOM ....................................................................................................28Saving web pages to FileRoom .............................................................................................................29
ADDING EMAIL MESSAGES TO FILEROOM FROM OUTLOOK.........................................31Importing an email message as a single file ...........................................................................................31
Importing an email message and attachments as separate files ............................................................32
Working with outgoing email messages..................................................................................................33
USING THE FILEROOM ADD-IN TO MODIFY PDF FILES..................................................35Learning about the Acrobat FileRoom TaxTools menu ..........................................................................35
Learning about FileRoom-specific Acrobat tools ....................................................................................35
Learning about ScanFlow Acrobat tools .................................................................................................35
Learning about TaxSort Acrobat tools ....................................................................................................36
EDITING PDF FILES USING THE ACROBAT TOOLBAR .................................................... 37Using the Acrobat Annotations tools.......................................................................................................37
Saving and deleting annotations ............................................................................................................38
Viewing the Comments List section ........................................................................................................38
Searching for text in a PDF file ...............................................................................................................38
FileRoom Add-In Guide 3 Last updated February 2016

WORKFLOW TOOLS
TROUBLESHOOTING.......................................................................................................... 40Working with a proxy server....................................................................................................................40
Configuring toolbars to appear in Adobe Acrobat ...................................................................................41
FileRoom Add-In Guide 4 Last updated February 2016
WORKFLOW TOOLS
LEARNING ABOUT THE FILEROOM ADD-INThe FileRoom Add-In is the prerequisite for all other Add-Ins, and includes functionality for Adobe
Acrobat, Microsoft Word and Excel, and Microsoft Outlook.
The FileRoom Add-In will remove previous versions of this Add-In prior to installation. It includes
InstallShield’s Update Service client, which facilitates the installation of patches and updates to all
Add-Ins. It also includes a component for Control Panel.
ADOBE ACROBAT COMPONENT
The Adobe Acrobat component of the FileRoom Add-In allows you to
• Add and view Adobe Acrobat annotations in stored PDF files
• Edit stored PDF files (e.g., insert and delete pages, edit bookmarks)
• Upload local PDF files by clicking the Add to FileRoom button on the Adobe Acrobat toolbar
• Use stamps and accounting tick marks for reviewing documents online
• Track and save multiple versions of the same document (if this feature is enabled for you)
MICROSOFT OFFICE COMPONENT
The Microsoft Office component of the FileRoom Add-In allows you to
• Edit stored Microsoft Word and Excel files
• Add Microsoft Word and Excel files from the respective Microsoft Office application
• Track and save multiple versions of the same document (if this feature is enabled for you)
• Retrieve documents from FileRoom
• Retrieve the 10 most recent documents accessed by using the Recent Documents drop-
down list
• Store files offline for extended use of the document
MICROSOFT OUTLOOK COMPONENT
The Microsoft Outlook component of the FileRoom Add-In allows you to
• Email documents using Microsoft Outlook
• Save incoming and outgoing email messages and attachments (requires the Upload
Documents Service Add-In)
CONTROL PANEL COMPONENT
The Control Panel component of the FileRoom Add-In allows you to
• Add a single file, multiple files, or an entire folder to FileRoom by dragging and dropping the
files or folders on a desktop shortcut
FileRoom Add-In Guide 5 Last updated February 2016
WORKFLOW TOOLS
• Add a single email message or multiple email messages by dragging the messages to your
Microsoft Outlook FileRoom folder
NOTE: To use this functionality within Microsoft Outlook 2010 64-bit, click the Windows Start button, then select All Programs, then Thomson Reuters, then FileRoom, then select Enable Control Panel Outlook Integration.
• Perform uploads in Silent mode. Send to FileRoom profiles can be configured to run in
Interactive or Silent mode. When you enable Silent mode, an indexing window will not appear
when uploading files to FileRoom.
• Monitor the status of uploaded files
• View uploaded files
• Maintain your files, other than Word, Excel, and PDF, that are currently checked out for editing
from FileRoom
ADDITIONAL FEATURES
Additional features included in this Add-In include the following:
• Print to FileRoom functionality uses the Print option from any application to upload
documents as PDF files
• Windows Explorer Send To option facilitates a quick import of documents
• Save to FileRoom shortcut is added to your desktop
• Right-click option is available to send documents
SYSTEM REQUIREMENTS
For more information regarding the current system requirements for the FileRoom Add-In and
other WorkFlow Tools applications, please refer to the System Requirements document available
from the following locations:
• Platform Help menu (select Help, then select System Requirements)
• Product Assistance
• Release Notes gadget
FileRoom Add-In Guide 6 Last updated February 2016
WORKFLOW TOOLS
INSTALLING THE MICROSOFT .NET FRAMEWORK 4.0Prior to downloading and installing the FileRoom Add-In, you must install the Microsoft .NET
Framework 4.0 on the server that will be the centralized upload location. To do so, complete the
following steps.
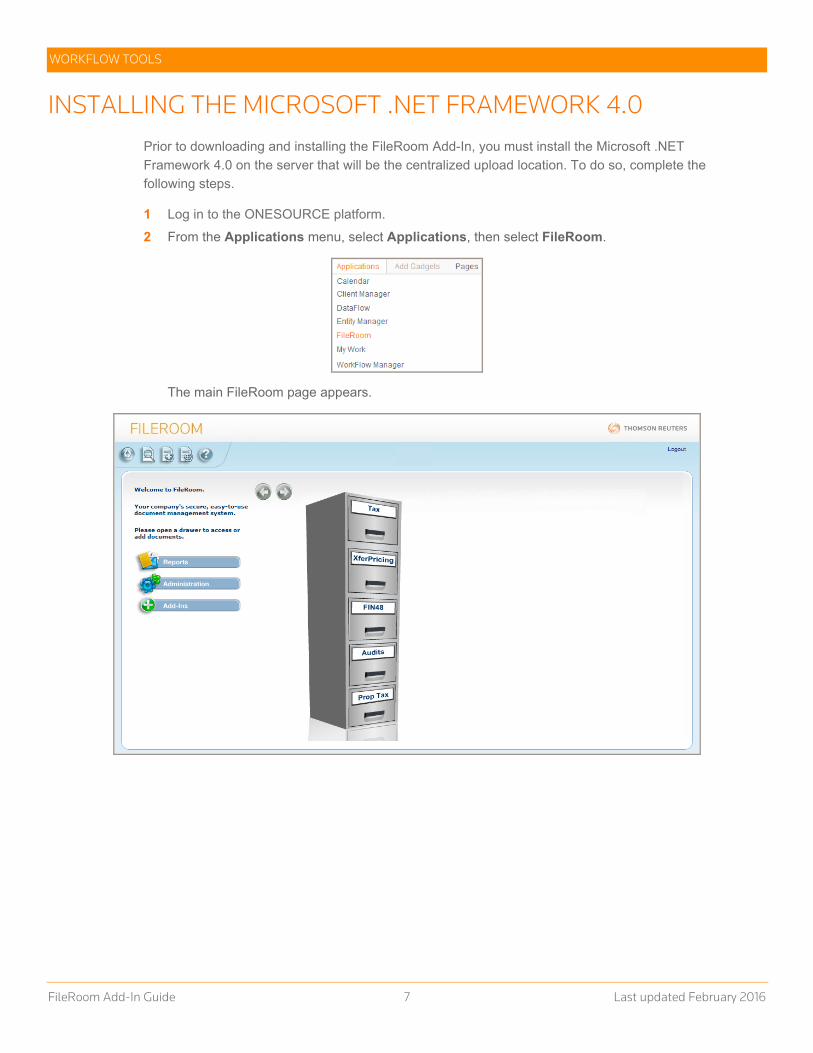
1 Log in to the ONESOURCE platform.
2 From the Applications menu, select Applications, then select FileRoom.
The main FileRoom page appears.
FileRoom Add-In Guide 7 Last updated February 2016

WORKFLOW TOOLS
3 Click Add-Ins. The Add-Ins page appears.
4 In the List of Add-ins to Download, locate the FileRoom Add-In section, then click the Microsoft .NET Framework 4.0 link. The Microsoft Download Center page for Microsoft .NET Framework Version 4.0 appears.
FileRoom Add-In Guide 8 Last updated February 2016

WORKFLOW TOOLS
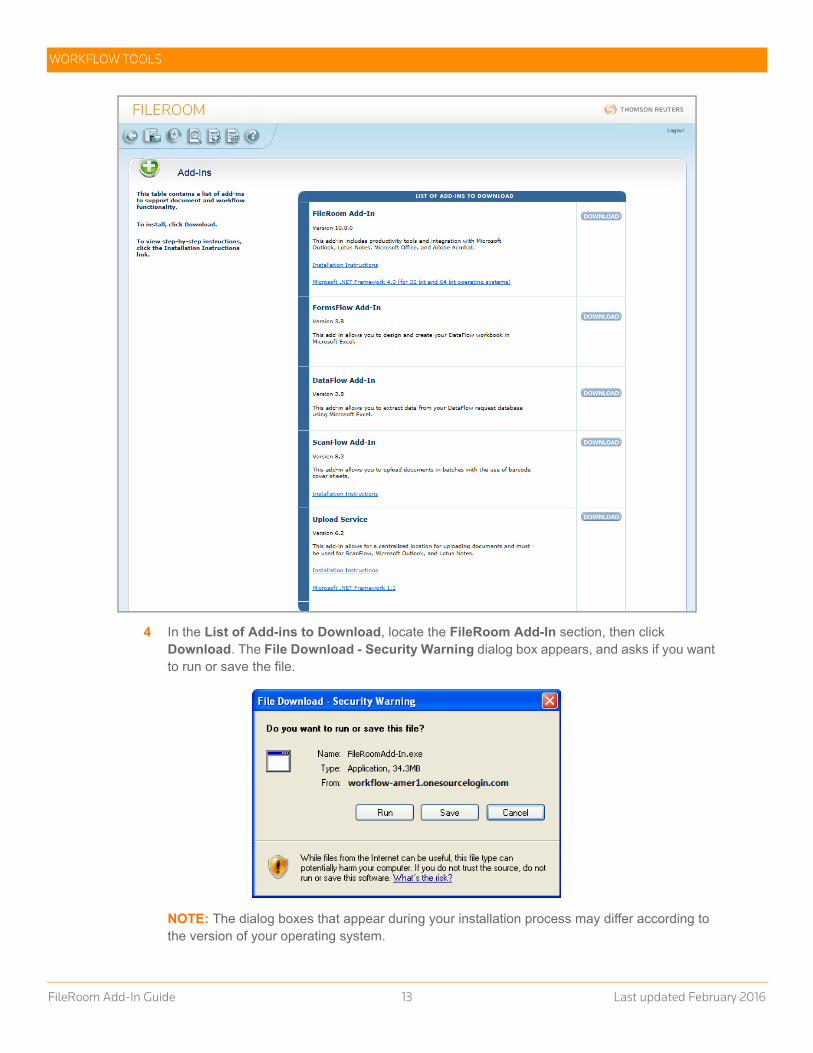
5 Click Download. The File Download - Security Warning dialog box appears, and asks if you want to run or save the file.
6 Click Run to download the file and start the installation process. The download’s progress appears in a dialog box.
FileRoom Add-In Guide 9 Last updated February 2016

WORKFLOW TOOLS
NOTE: A Security Warning dialog box may appear, depending on your computer’s security settings. Click Run to begin installing the .NET 4.0 Framework.
A series of dialog boxes appears, including the Extracting files dialog box.
FileRoom Add-In Guide 10 Last updated February 2016

WORKFLOW TOOLS
7 In the Microsoft .NET Framework 4 Setup dialog box, select the I have read and accept the license terms check box, then click Install.
The installation progress appears in a separate dialog box.
8 When the installation is complete, click Finish.
FileRoom Add-In Guide 11 Last updated February 2016

WORKFLOW TOOLS
INSTALLING THE FILEROOM ADD-INBefore you begin installing the FileRoom Add-In, make sure that you have installed the Microsoft
.NET Framework 4.0. This Framework for 32-bit and 64-bit operating systems is required.
IMPORTANT!
• If multiple users share the same computer, the FileRoom Add-In must be installed under each
network profile.
• Make sure that you do not have Adobe Reader installed on your computer when downloading
and installing the FileRoom Add-In. If you do have Adobe Reader installed, please remove it,
then proceed with the FileRoom Add-In installation.
To install the FileRoom Add-In, complete the following steps.
1 Log in to the ONESOURCE platform.
2 From the Applications menu, select Applications, then select FileRoom.
The main FileRoom page appears.
3 Click Add-Ins. The Add-Ins page appears.
FileRoom Add-In Guide 12 Last updated February 2016
WORKFLOW TOOLS
4 In the List of Add-ins to Download, locate the FileRoom Add-In section, then click Download. The File Download - Security Warning dialog box appears, and asks if you want to run or save the file.
NOTE: The dialog boxes that appear during your installation process may differ according to the version of your operating system.
FileRoom Add-In Guide 13 Last updated February 2016

WORKFLOW TOOLS
5 Click Run to download the file and start the installation process. The download’s progress appears in a dialog box.
NOTE: A Security Warning dialog box may appear, depending on your computer’s security settings. Click Run to begin installing the FileRoom Add-In.
The Preparing to Install window appears.
FileRoom Add-In Guide 14 Last updated February 2016
WORKFLOW TOOLS
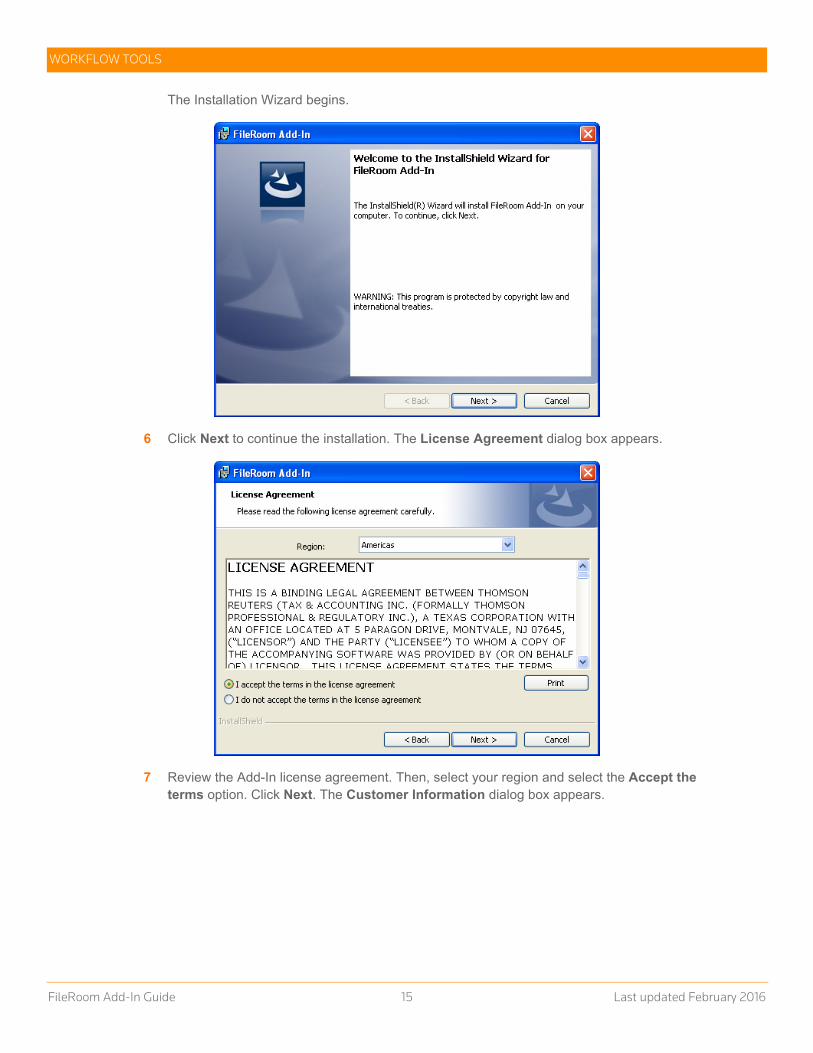
The Installation Wizard begins.
6 Click Next to continue the installation. The License Agreement dialog box appears.
7 Review the Add-In license agreement. Then, select your region and select the Accept the terms option. Click Next. The Customer Information dialog box appears.
FileRoom Add-In Guide 15 Last updated February 2016
WORKFLOW TOOLS
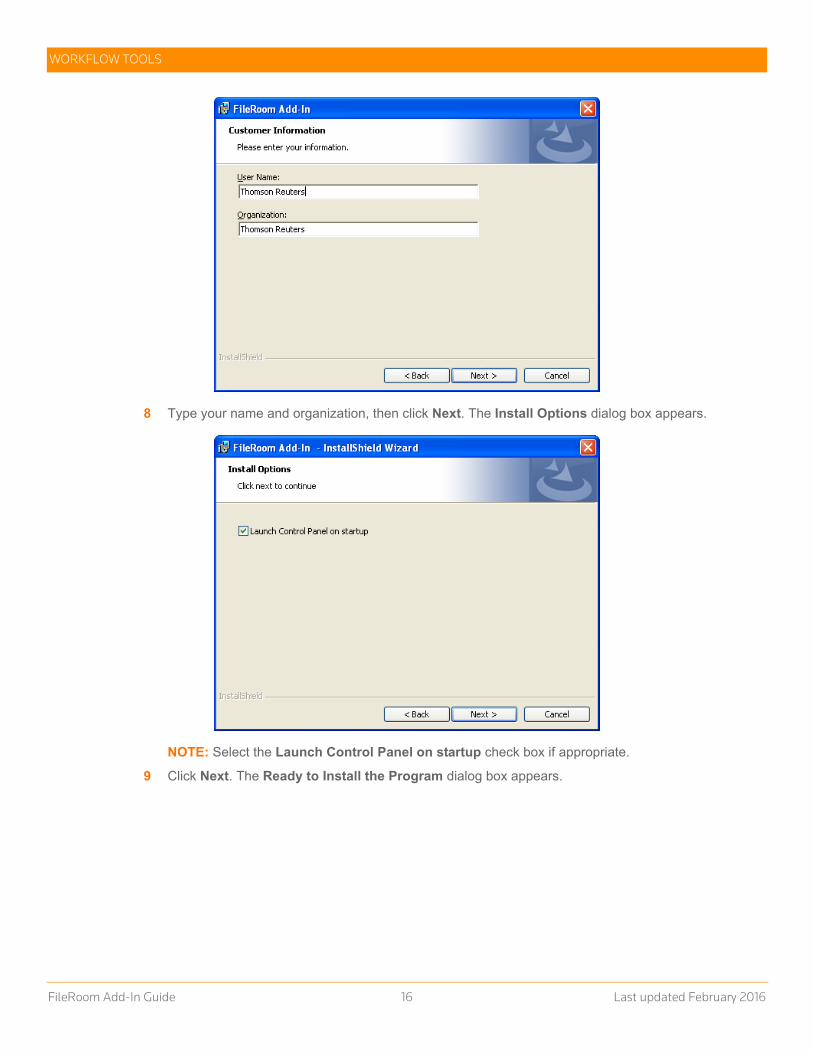
8 Type your name and organization, then click Next. The Install Options dialog box appears.
NOTE: Select the Launch Control Panel on startup check box if appropriate.
9 Click Next. The Ready to Install the Program dialog box appears.
FileRoom Add-In Guide 16 Last updated February 2016

WORKFLOW TOOLS
10 Click Install to begin the software installation. The Installing FileRoom Add-In dialog box appears and shows the progress of the installation.
The InstallShield Wizard Complete dialog box appears.
FileRoom Add-In Guide 17 Last updated February 2016

WORKFLOW TOOLS
11 Click Finish. The FileRoom Add-In Installer Information dialog box appears, and tells you to restart your system to complete the configuration changes.
12 Click Yes to restart your computer immediately or click No to restart your computer at a later time.
FileRoom Add-In Guide 18 Last updated February 2016
WORKFLOW TOOLS
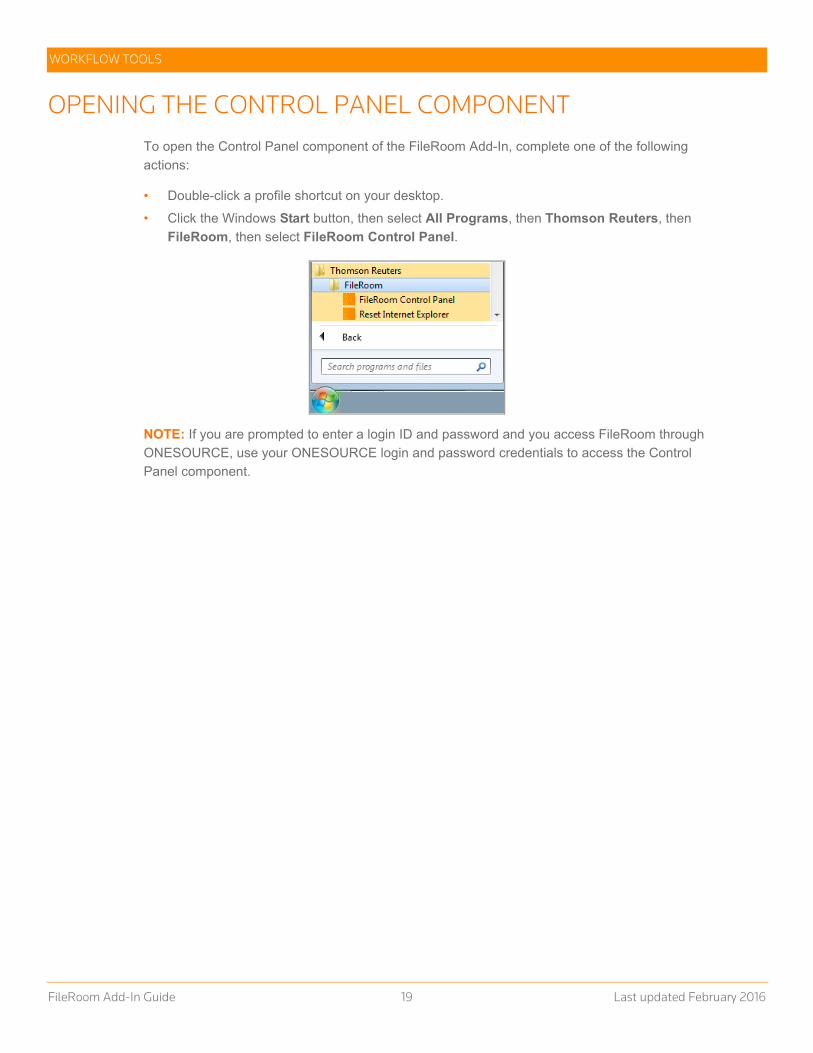
OPENING THE CONTROL PANEL COMPONENTTo open the Control Panel component of the FileRoom Add-In, complete one of the following
actions:
• Double-click a profile shortcut on your desktop.
• Click the Windows Start button, then select All Programs, then Thomson Reuters, then
FileRoom, then select FileRoom Control Panel.
NOTE: If you are prompted to enter a login ID and password and you access FileRoom through
ONESOURCE, use your ONESOURCE login and password credentials to access the Control
Panel component.
FileRoom Add-In Guide 19 Last updated February 2016

WORKFLOW TOOLS
ADDING DOCUMENTS FROM YOUR DESKTOPYou can add documents to FileRoom or a specific workflow without going through the file cabinet.
To do so, locate the file on your system that you want to add, then do one of the following:
• Right-click the file name, select Send To, then select FileRoom.
OR
• Drag-and-drop the file name onto the Send to FileRoom shortcut on your desktop.
The Send to ONESOURCE WorkFlow Manager window appears, and includes options for
> Adding your document to a drawer
> Adding a document to a specific workflow
FileRoom Add-In Guide 20 Last updated February 2016

WORKFLOW TOOLS
NOTE: If you are not logged in to Control Panel, the ONESOURCE WorkFlow Manager Login dialog box may appear. If so, type your ONESOURCE login information in the Login and Password fields, then click Login.
ADDING DOCUMENTS TO A DRAWER
To add a document to a drawer from your desktop, complete the following steps.
1 In the Send to ONESOURCE WorkFlow Manager window, select the Add document to Drawer option.
2 From the drop-down menu, select a drawer. The index fields that appear are relevant to the selected drawer.
3 Complete the information in each index field. Bold fields are required.
• Click Clear to delete all data in the index fields and re-enter data.
• Click Recall Index to recall the last values entered, then make changes as needed.
4 Click OK to save your document as indexed or click Cancel to exit without saving.
FileRoom Add-In Guide 21 Last updated February 2016

WORKFLOW TOOLS
ADDING DOCUMENTS TO A WORKFLOW
To add a document to a workflow from your desktop, complete the following steps.
1 In the Send to ONESOURCE WorkFlow Manager window, select the Add document to specific WorkFlow option. A wizard begins, allowing you to select a specific workflow for your document.
2 In Step 1 of the wizard, select a drawer, then complete the information in the Folder Criteria and Workflow Criteria sections.
3 Click Next. The Select WorkFlow (Step 2 of 3) window appears. Any workflows that meet the criteria specified in Step 1 appear.
FileRoom Add-In Guide 22 Last updated February 2016

WORKFLOW TOOLS
4 In the Select WorkFlow (Step 2 of 3) window, select the workflow to which your document will be assigned, then click Next. The Index Document (Step 3 of 3) window appears.
5 In the Index Document (Step 3 of 3) window, complete the fields in the Document Indexes and Document Assignment sections as required, then click Finish to save the document to the workflow.
FileRoom Add-In Guide 23 Last updated February 2016

WORKFLOW TOOLS
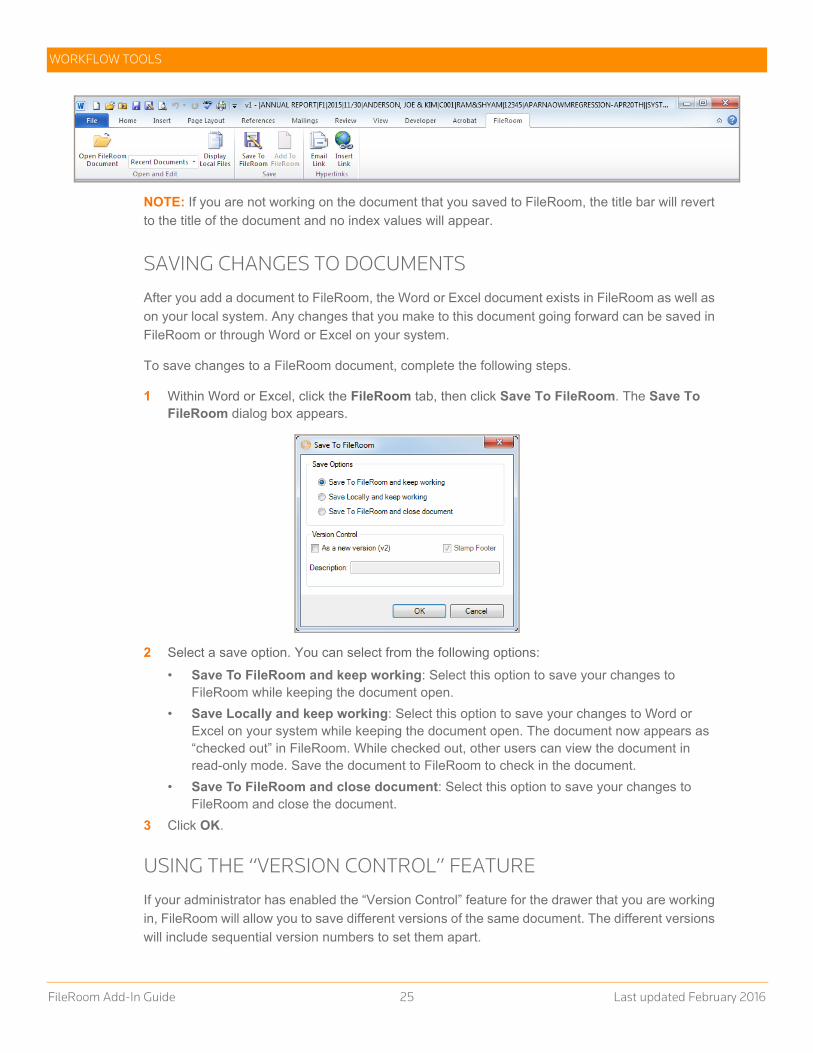
ADDING DOCUMENTS FROM MICROSOFT WORD AND EXCEL You can add documents to FileRoom directly from Microsoft Word and Excel by clicking Add To
FileRoom on the FileRoom tab of the Word and Excel ribbons as shown in the example below.
To add a document to FileRoom from Word or Excel, complete the following steps.
1 Open a new Word or Excel document.
2 From the FileRoom tab, click Add to FileRoom. The Index Documents window appears.
NOTE: If you are not logged in to FileRoom, a Login dialog box appears first where you can enter your ONESOURCE login ID and password. After logging in to FileRoom, the Index Documents window appears.
3 Select an option for adding your document to FileRoom, then complete any required fields that appear in blue.
4 Click OK. The document is added to FileRoom, and remains open on your computer. The title of the document appears with the FileRoom index values that you created, similar to the following example.
FileRoom Add-In Guide 24 Last updated February 2016
WORKFLOW TOOLS
NOTE: If you are not working on the document that you saved to FileRoom, the title bar will revert
to the title of the document and no index values will appear.
SAVING CHANGES TO DOCUMENTS
After you add a document to FileRoom, the Word or Excel document exists in FileRoom as well as
on your local system. Any changes that you make to this document going forward can be saved in
FileRoom or through Word or Excel on your system.
To save changes to a FileRoom document, complete the following steps.
1 Within Word or Excel, click the FileRoom tab, then click Save To FileRoom. The Save To FileRoom dialog box appears.
2 Select a save option. You can select from the following options:
• Save To FileRoom and keep working: Select this option to save your changes to FileRoom while keeping the document open.
• Save Locally and keep working: Select this option to save your changes to Word or Excel on your system while keeping the document open. The document now appears as “checked out” in FileRoom. While checked out, other users can view the document in read-only mode. Save the document to FileRoom to check in the document.
• Save To FileRoom and close document: Select this option to save your changes to FileRoom and close the document.
3 Click OK.
USING THE “VERSION CONTROL” FEATURE
If your administrator has enabled the “Version Control” feature for the drawer that you are working
in, FileRoom will allow you to save different versions of the same document. The different versions
will include sequential version numbers to set them apart.
FileRoom Add-In Guide 25 Last updated February 2016

WORKFLOW TOOLS
To use version control for an open document, complete the following steps.
1 Within Word or Excel, click the FileRoom tab, then click Save To FileRoom. The Save To FileRoom dialog box appears.
2 In the Save Options section, select Save To FileRoom and keep working or Save To FileRoom and close document.
3 In the Version Control section, select the As a new version check box.
NOTE: Select the Stamp Footer check box to add a footer to the bottom of the document.
4 In the Description field, type a description of this version of the document.
5 Click Save.
FileRoom Add-In Guide 26 Last updated February 2016
WORKFLOW TOOLS
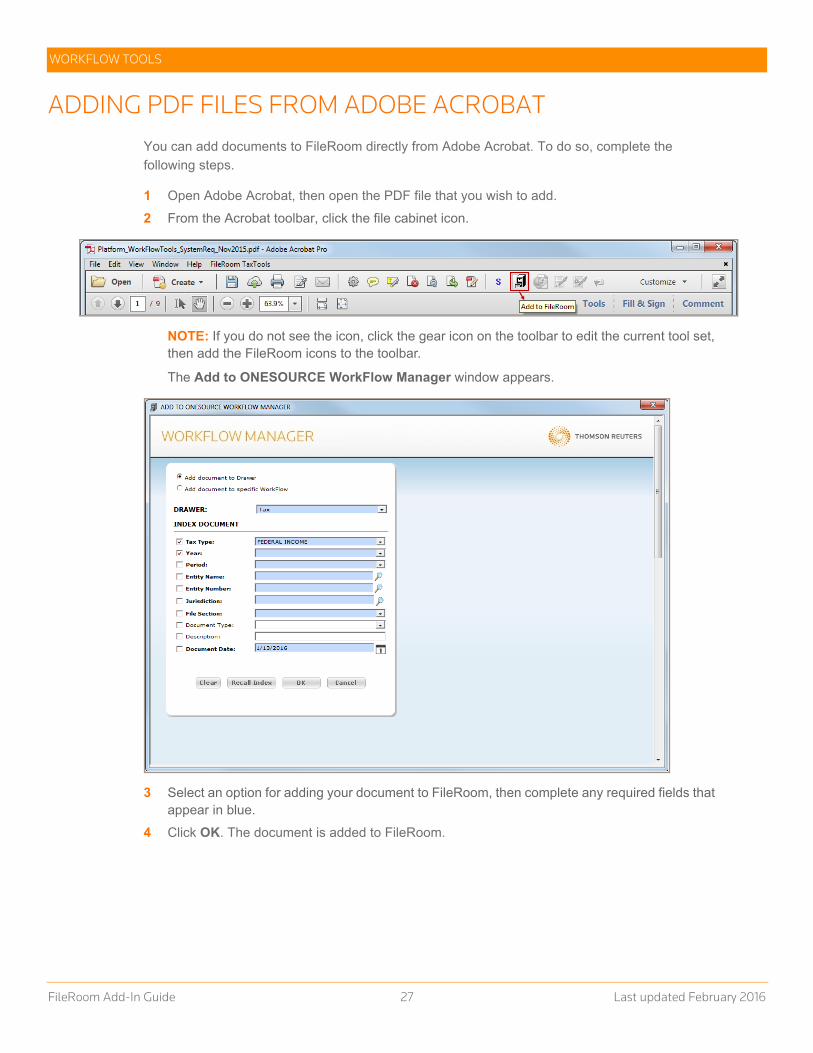
ADDING PDF FILES FROM ADOBE ACROBATYou can add documents to FileRoom directly from Adobe Acrobat. To do so, complete the
following steps.
1 Open Adobe Acrobat, then open the PDF file that you wish to add.
2 From the Acrobat toolbar, click the file cabinet icon.
NOTE: If you do not see the icon, click the gear icon on the toolbar to edit the current tool set, then add the FileRoom icons to the toolbar.
The Add to ONESOURCE WorkFlow Manager window appears.
3 Select an option for adding your document to FileRoom, then complete any required fields that appear in blue.
4 Click OK. The document is added to FileRoom.
FileRoom Add-In Guide 27 Last updated February 2016

WORKFLOW TOOLS
PRINTING TO FILEROOMYou can add documents created in programs other than Word, Excel, Acrobat, or Outlook using
the Print to FileRoom option. Selecting this option prints the document to a PDF file, which is then
added to FileRoom.
To print a document to FileRoom, complete the following steps.
1 From the File menu, select Print. The Print dialog box appears.
2 In the Select Printer section of the General tab, select FileRoom, then click Print. The Print to ONESOURCE WorkFlow Manager window appears.
FileRoom Add-In Guide 28 Last updated February 2016

WORKFLOW TOOLS
3 Select an option for adding your document to FileRoom, then complete any required fields that appear in blue.
4 Click OK. The document is added to FileRoom.
SAVING WEB PAGES TO FILEROOM
Occasionally, you may wish to save a web page to FileRoom without converting the page to a PDF
file. To do so, complete the following steps.
1 Open the web page that you wish to save to FileRoom.
2 From the File menu, select Print. The Print dialog box appears.
3 In the Select Printer section of the General tab, select FileRoom, then click Print. The Print to ONESOURCE WorkFlow Manager window appears.
FileRoom Add-In Guide 29 Last updated February 2016
WORKFLOW TOOLS
4 Select an option for adding your document to FileRoom, then complete any required fields that appear in blue.
5 Click OK. The web page is added to FileRoom.
FileRoom Add-In Guide 30 Last updated February 2016

WORKFLOW TOOLS
ADDING EMAIL MESSAGES TO FILEROOM FROM OUTLOOKYou can import email messages from Microsoft Outlook to FileRoom. Email messages retain their
characteristics after you import them to FileRoom, allowing you to perform all normal email
functions such as replying, forwarding, or viewing recipient lists.
When you import an email message, you can select to add the email and any attachments as a
single file or as separate files. For example, suppose that you want to import an email message
that has two attachments. You can either import the email messages and the attachments as one
file or as three separate files (the message body plus the two attachments).
IMPORTING AN EMAIL MESSAGE AS A SINGLE FILE
To import an existing email message and attachments as a single file, complete the following
steps.
1 In Outlook, open the email message that you wish to add.
2 From the FileRoom tab, click the Add to FileRoom icon. The Import to FileRoom dialog box appears.
3 Select the Add as single file (MSG) option. Select this option to import the email message and all attachments as one document.
4 Click OK. The Index Documents dialog box appears.
5 Select a drawer, then complete the index fields as appropriate, then click Save. A confirmation appears and the import process begins.
FileRoom Add-In Guide 31 Last updated February 2016

WORKFLOW TOOLS
IMPORTING AN EMAIL MESSAGE AND ATTACHMENTS AS SEPARATE FILES
To import an existing email message and attachments as separate files, complete the following
steps.
1 In Outlook, open the email message that you wish to add.
2 From the FileRoom tab, click the Add to FileRoom icon. The Import to FileRoom dialog box appears.
3 Select the Add as separate files option. Select this option to import the email message and all attachments as separate indexed documents.
EXAMPLE: You could import and index the message as “correspondence” then index the attachments as “client research”.
4 Click OK. The Index Documents dialog box appears.
5 Select a drawer, then select the document to index from the Document being indexed list.
6 Complete the index fields as appropriate, then click the right arrow. Click Skip to skip a document without saving it to FileRoom.
IMPORTANT! If you click Save, FileRoom will import and index the selected document only, and will not import or index any other documents.
FileRoom Add-In Guide 32 Last updated February 2016
WORKFLOW TOOLS
7 Repeat steps 6-7 for each document that you want to import.
8 Click Save. A confirmation appears and the import process begins
WORKING WITH OUTGOING EMAIL MESSAGES
You can add outgoing emails directly to FileRoom, as well as attach an existing FileRoom
document to an outgoing email message.
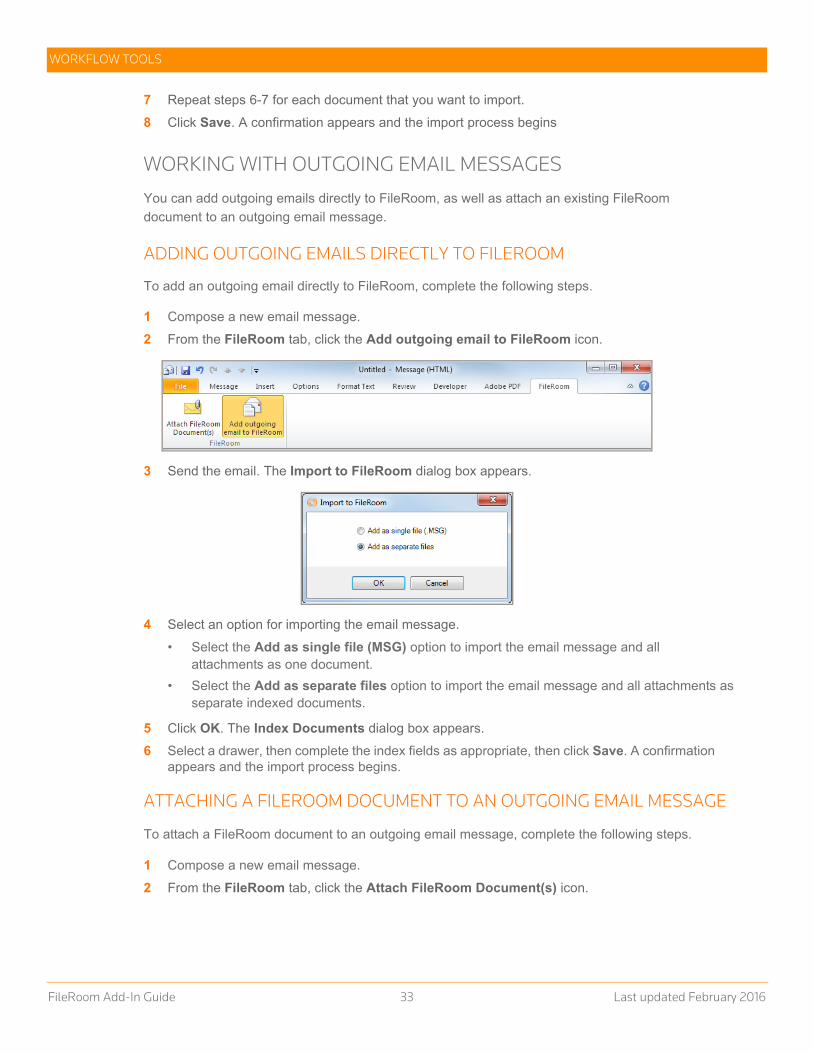
ADDING OUTGOING EMAILS DIRECTLY TO FILEROOM
To add an outgoing email directly to FileRoom, complete the following steps.
1 Compose a new email message.
2 From the FileRoom tab, click the Add outgoing email to FileRoom icon.
3 Send the email. The Import to FileRoom dialog box appears.
4 Select an option for importing the email message.
• Select the Add as single file (MSG) option to import the email message and all attachments as one document.
• Select the Add as separate files option to import the email message and all attachments as separate indexed documents.
5 Click OK. The Index Documents dialog box appears.
6 Select a drawer, then complete the index fields as appropriate, then click Save. A confirmation appears and the import process begins.
ATTACHING A FILEROOM DOCUMENT TO AN OUTGOING EMAIL MESSAGE
To attach a FileRoom document to an outgoing email message, complete the following steps.
1 Compose a new email message.
2 From the FileRoom tab, click the Attach FileRoom Document(s) icon.
FileRoom Add-In Guide 33 Last updated February 2016

WORKFLOW TOOLS
The Attach FileRoom Document(s) window appears.
3 Select a drawer, then complete the index fields as appropriate, then click Save. A confirmation appears and the import process begins.
FileRoom Add-In Guide 34 Last updated February 2016

WORKFLOW TOOLS
USING THE FILEROOM ADD-IN TO MODIFY PDF FILESAfter installing the FileRoom Add-In, Adobe Acrobat provides an enhanced selection of tools both
on the Acrobat toolbar and within the FileRoom TaxTools menu.
LEARNING ABOUT THE ACROBAT FILEROOM TAXTOOLS MENU
The FileRoom TaxTools menu includes the following options:
• Calculator: Select this option to open a calculator on your screen.
• Dual Monitors: Select this option to display Acrobat across two monitors while maximizing the
PDF display on each screen.
• Expand All Bookmarks: Select this option to expand the active file’s bookmarks in one click.
The Adobe Acrobat toolbar includes several FileRoom-specific icons that allow you to add
documents to FileRoom or edit existing FileRoom documents.
NOTE: We recommend using ScanFlow for uploading large quantities of paper documents. Many
of the options described in this section are used in conjunction with ScanFlow. Please refer to the
ScanFlow User Guide for a detailed description of ScanFlow and its functions.
LEARNING ABOUT FILEROOM-SPECIFIC ACROBAT TOOLS
• Scan with Adobe Acrobat: Click the icon to scan a single-page document and add it to
FileRoom.
• Add to FileRoom: Click the icon to add a PDF file to FileRoom, including creating index
entries for the file.
• Save Back to FileRoom: Click the icon to save changes made to a PDF file that was
checked out for editing. You have the option to keep working or to close the document after
saving.
LEARNING ABOUT SCANFLOW ACROBAT TOOLS
• Create Predefined Bookmark Lists: Click the icon to add predefined bookmarks to a
PDF stored in FileRoom.
• Create Page Bookmarks: Click the icon to add page-level bookmarks to a PDF stored
in FileRoom.
NOTE: This options are available only when the following criteria are met:
• The document is in “Checked Out” mode.
FileRoom Add-In Guide 35 Last updated February 2016
WORKFLOW TOOLS
• The “PDF Bookmarks” flag is enabled for your database.
LEARNING ABOUT TAXSORT ACROBAT TOOLS
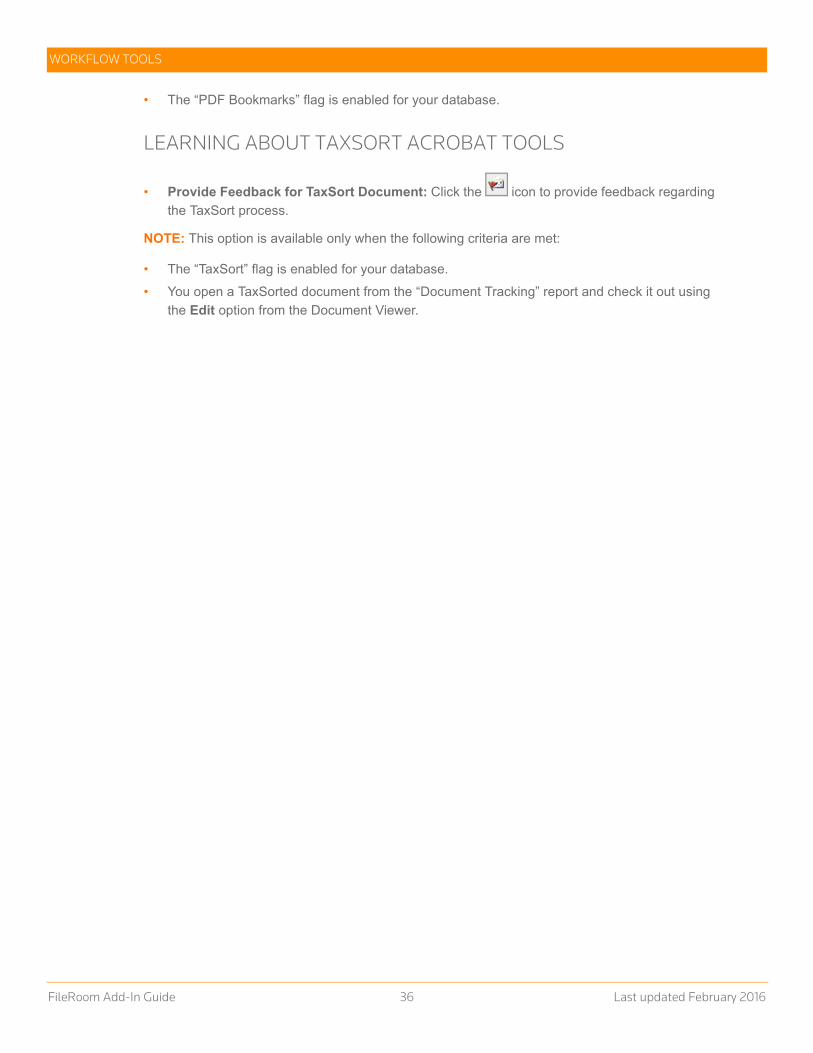
• Provide Feedback for TaxSort Document: Click the icon to provide feedback regarding
the TaxSort process.
NOTE: This option is available only when the following criteria are met:
• The “TaxSort” flag is enabled for your database.
• You open a TaxSorted document from the “Document Tracking” report and check it out using
the Edit option from the Document Viewer.
FileRoom Add-In Guide 36 Last updated February 2016

WORKFLOW TOOLS
EDITING PDF FILES USING THE ACROBAT TOOLBARYou can use icons from the Adobe Acrobat toolbars for editing PDF files already saved in
FileRoom. Editing options include:
• Zoom in and out
• Rotate pages
• Adjust your view to fit the window
• Save
NOTE: Toolbar appearance may vary depending on your version of Adobe Acrobat.
USING THE ACROBAT ANNOTATIONS TOOLS
The Annotations section located within the Comment menu provides electronic editing tools,
including stamping, highlighting, notes, and check marks. To access the Annotations section,
click Comment from the Acrobat toolbar, then click Annotations.
Refer to the following table for more information about the Annotations menu icons.
TOOLBAR ICON DEFINITION
Click the Sticky Note icon to create a note about the content. The user’s name, time, and date appear automatically on notes added to documents. Double-click the icon to add text to the note.
To move the note within the document, click and drag the icon to another location.
Click the Highlight text icon, then double-click the text that you wish to highlight. Right-click the icon to choose colors and opacity.
NOTE: Graphics cannot be highlighted.
FileRoom Add-In Guide 37 Last updated February 2016

WORKFLOW TOOLS
SAVING AND DELETING ANNOTATIONS
To save any annotations made to a PDF file, click the Save icon before closing or select Save
from the File menu.
To delete annotations, right-click the edited items, then select Delete.
VIEWING THE COMMENTS LIST SECTION
The Comments List section allows you to view a list of comments made about the selected PDF
file, To access the Comments List section, click Comment from the Acrobat toolbar, then click
Comments List.
SEARCHING FOR TEXT IN A PDF FILE
Because scanned documents are processed through an optical character recognition (OCR)
process, text is embedded in PDF documents and can be searched.
Click the Add Text Comment icon to insert text into the document. The Add Text Comment dialog box appears and allows you to select a font and point size for your comment.
Click the Stamps icon to add a stamp to your document. You can add dynamic, standard, and custom stamps to call attention to various items.
Click the arrow to open a menu with extra stamp types.
Click the Insert text at cursor icon to insert text at the cursor mark, then double-click the text in the document where you wish to insert new text. A dialog box appears and allows you to type the text that you wish to insert.
Click the Strikethrough icon, then double-click the text that you wish to cross out. Then, double-click the crossed-out text to open a dialog box where you can enter information about the selected text.
Click the Underline icon, then double-click the text that you wish to underline. Then, double-click the underlined text to open a dialog box where you can enter information about the selected text.
Click the Add note to text icon, then double-click the text for which you wish to create a note.
NOTE: This icon is different from the Sticky Note icon. The Add note to text icon is appropriate to use for a specific word or sentence, and the Sticky Note icon is appropriate for a larger part of a document, such as a paragraph or section.
Click the Text Correction Markup icon to open the How to use Text Edit tools dialog box. This dialog box contains information on inserting, deleting, and replacing text.
TOOLBAR ICON DEFINITION
FileRoom Add-In Guide 38 Last updated February 2016

WORKFLOW TOOLS
To search for a keyword in a PDF file, complete the following steps.
1 On the Acrobat toolbar, click the icon. The Find dialog box appears.
2 In the Find field, type a keyword to use in your search. Acrobat selects the first instance of the keyword appearing in the PDF file.
3 Click Next to move to the next instance of the keyword in the PDF file.
4 Click the arrow next to the Find field to open a sub-menu with more search options.
TIP: Select Open Full Acrobat Search to open the Search dialog box where you can enter additional search parameters.
FileRoom Add-In Guide 39 Last updated February 2016

WORKFLOW TOOLS
TROUBLESHOOTING
WORKING WITH A PROXY SERVER
If your company requires that you go through a proxy server to use the Internet, you will need to
update the GFRCommon.ini file.
To do so, navigate to C:\Documents and Settings\All Users\Application
Data\GoFileRoom\Common Files, double-click GFRcommon.ini, and configure the following:
• proxy_port= Enter the Proxy Port number
• has_proxy= Set the value to 1
• proxy_ipaddress= Enter the IP address
FileRoom Add-In Guide 40 Last updated February 2016

WORKFLOW TOOLS
To use the Print to FileRoom feature with the Upload Documents Service, set the useUpload
value to True.
CONFIGURING TOOLBARS TO APPEAR IN ADOBE ACROBAT
If the Adobe Acrobat Add-In is installed, but the toolbars do not appear within Adobe Acrobat,
review the Acrobat plug-ins (.api files) in the following directory:
• For Windows Vista/Windows 7 32-bit: C:\Program Files\Adobe\Acrobat
x.0\Acrobat\plug_ins\
• For Windows 7 64-bit: C:\Program Files(x86)\Adobe\Acrobat x.0\Acrobat\plug_ins\
NOTE: The x in the directories listed above denotes your Acrobat version number.
To move all the files found in this directory into your Acrobat plug-ins directory, complete the
following steps.
1 Locate your Acrobat plug-ins directory. To do so, open Acrobat, then complete the listed steps.
> From the Help menu, select Online Support, then select Generate System Report. The System Information dialog box appears, and displays information about your computer, including the location of your plug-ins folder.
> Make a note of the plug-ins folder found under the Installed Plug-ins section.
NOTE: In the example above, the plug-ins folder is C:\ProgramFiles (x86)\Adobe\Acrobat 11.0\Acrobat\plug_ins\.
2 Click OK to close the System Information dialog box.
3 Close Acrobat.
FileRoom Add-In Guide 41 Last updated February 2016
WORKFLOW TOOLS
4 Open Windows Explorer and navigate to your Acrobat plug-ins directory.
5 Copy all.api files and the Annotations folder.
6 Paste all of the.api file and Annotations folder into your Acrobat plug-ins directory.
NOTE: If prompted, click Yes to overwrite all.
FileRoom Add-In Guide 42 Last updated February 2016