final journal
DESCRIPTION
ÂTRANSCRIPT

Michael Chun Wai WONG 634 251Reactive Dynamism
Group 12
Semester 2/2013

MODULE 1 IDEATIONMeasure Drawing and Materials system
Skin and Bone
This module focused on the studies of different materials systems. My topic is skin and bone and we made a measure drawing base on our material system. After that, we will also need to think about some ideas and make sketches base on the studied material system and connect to our personal space.

Skin and BoneMeasure Drawings
I created a measure drawings by breaking up each components of the object. After that, I draw all of the elements on a paper includ-ing the elements inside the object such as the spring and the push button.
The elevation view drawing is 1:1 and it was drawn by doing a detail measurement.
The top view measure drawing is drawn on a tracing paper and it is also a 1:1 drawing.
The system of the object is using string (the bone) tension to keep the the skin place.On the other hand, loosening the tension is going to ‘free form’ the skin.
The spring is the tool for increasing the decreasing the tension of the strings

IdeationsFirst Idea
The First idea of the second skin with the characteristic of skin and bone is a movable shoulder pad.
After reading the Personal Space: the behavioural basis of design by Robert Sommer, the meaning of personal space is people are actu-ally want some more spaces than normal, but their bodies can only provide them a limited space.
The reason I had my idea on my shoulder is because I think our shoulders is one of our strong body part, people usually use their shoul-ders to protect themselves.It is a strong body part for provid-ing a further personal space. So I think it is a good position for my second skin to develop.
Same as my material system (skin and bone) before, it will has a string connected between my wrist and the shoulder pad. The string is presenting the bone of my idea and the shoulder pad is the bone.
The idea of the design is that when I move my elbow, the string will has a tension force to pull the shoulder pad.
Therefore, the shoulder pad would has a movement created by the tension forces and it is able to provide a stronger message for my personal space.

IdeationsSecond Idea
The second idea is a wing which can wear at the back. From the reading of the personal space, I have learnt one of the reason people want more personal space because they want to protect themselves from the invasion.
Therefore, I think our backs is one of the weakness because it is be-hind our visions.
So, my second idea is placed on the back of our bodies and it is a wing which has a flexibility. From the wing, it can be used to scare people out from our back but also can open for providing a larger personal space.
The skin and bone will be repre-sented by the flexibility. The idea of this skin and bone is from the char-acteristic of an umbrella which content joints so the second skin can change in it’s shape.

MODULE 2 DESIGN Reverse Mechanism
Skin and Bone/Panel and fold
This module focused on the design of the second skin. We have been grouped as three and we try to combine our studied material systems together and design a second skin. We will need to decide our personal space connection with the final second skin design.
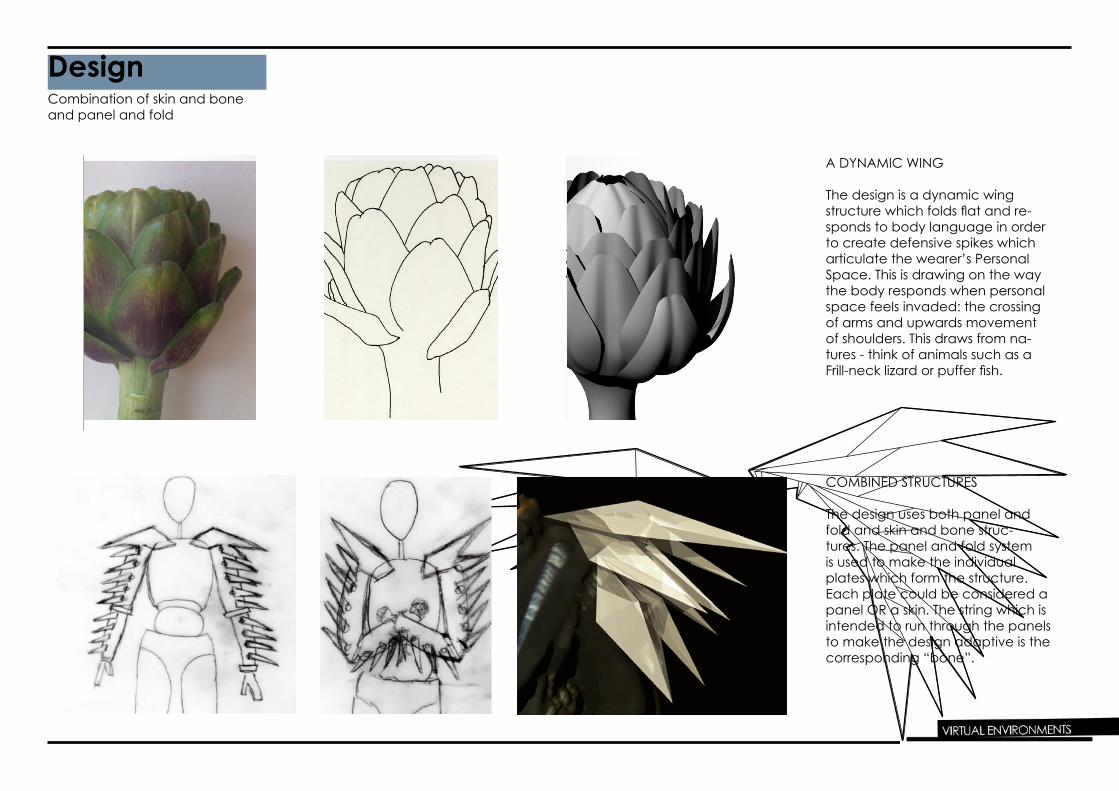
DesignCombination of skin and bone and panel and fold
A DYNAMIC WING
The design is a dynamic wing structure which folds flat and re-sponds to body language in order to create defensive spikes which articulate the wearer’s PersonalSpace. This is drawing on the way the body responds when personal space feels invaded: the crossing of arms and upwards movement of shoulders. This draws from na-tures - think of animals such as aFrill-neck lizard or puffer fish.
COMBINED STRUCTURES
The design uses both panel and fold and skin and bone struc-tures. The panel and fold system is used to make the individual plates which form the structure. Each plate could be considered a panel OR a skin. The string which is intended to run through the panels to make the design adaptive is the corresponding “bone”.

DesignConnection between speronal space and second skin
The interesting part of this second skin design is the movement. As I have mention before, my personal space is demonstrated by the movement of my arms.
Also, the second skin will provide a stronger message for my personal space to the people around. In this second skin design, each compo-nents will move upward with sharp angle when my arms are moved.
Therefore, when I want to protect my first skin of my body, my second skin will give me a larger personal space and strong message.And this design will also be de-veloped by the skin and bones system.
For my personal space, I think my arms can perfectly show it. It is because we always use our arms to protect ourselves. For example, when we feel danger, we might move our arms in front of our bod-ies to protect our most import part of body.
We also move around our arms to create our personal space. There-fore, for the further idea of my second skin, I would like to improve the function of our arms to create a larger personal space or cre-ate a stronger message from the second skin.

DesignPanel design on Rhino
Because we need to combine those geometries together, so we had created this new panels with our design on Rhino. Those planes are placed here. Now, each of the geometry has a gap so we can place another one on the top nicely.
To print it out from the rhino and make the physical model, we will first need to transfer the 3D mod-elling into a flat and 2D surface. Therefore, we need to unroll it on rhino. As we want to create a gap, we need to create an extra sur-face here, and then we will use this

DesignPrecedent
Fans are very simple items which are well resolved and elegant in a design sense. When we thought about the type of movement we wanted for the second skin, fans showed a number of desirable characteristics.
Fans use a series of repeated geometries which can be seen in two states: open or closed. They pivot around a screw in order to do this but the most important aspect of the fan design in terms of our design was how they stop from swinging too far. This is done with a string which ties the ends together which also forces the blades to follow each other. When you move one blade, the next must do so also and so on.
After using the fan structure on our prototype, it successfully works. And that is our first prototype model.

DesignFirst Pototype
Fan Mechanism: Prototype ONE
This prototype worked in essentials. The three panels fan out when the string is pulled. However it had several problems which need to be resolved. In order to make a pivot I had to add ribbing to the interior of each panel. This is not an elegant solution. Because of the way the ribs must be stacked to imitate a fan, they crush the panel below when the prototype is closed and pull laterally when it’s open.WThe other issue is the inelegance of the pivot system. That is the reason we have developed the new workable panel on the previous pages.

DesignSecond Pototype
Fan Mechanism: Prototype Two
This prototype, we had used pasteboard and fishing wire rather than paper and cotton to make, because we wanted to experiment with materials more like the ones we will eventually use in the final second skin. It also uses the new panel with the fold which will replace the ribbing.
The extra weight of the card created an issue with the mechanism, In this version the movement is certainly not as smooth as the original one. This was resolved when we added a wire guide to the pivot section which ensure the single of the “pulley is sufficient to move the panels.
The other issue we faced was the new flattened version of the panel. Because the main slit which flattens the design is behind the string it is not very strong and the string may slip down and break it. This may be fixed by moving the slit.
Although there are still some problems with the prototype, it was a successful trial. We also tried to put it onto our wrist and it was not very smooth. The next aspect of the design is to work on the application of this mechanism to a larger scale and work well on a human’s bodies.
This module readings gave us some senses of our prototype model such as using a simple geometry for our designing model and understand the system first rather then go directly to a complex design. Actually, the readings and the lecture are having a similar points of view, they encourage us to use a simple geometry and rule to create a interesting design effect, we shouldn’t think about the design complexity at the beginning.

MODULE 3 FABRICATION Reactive Dynamism
This module focused on the fabrication of our full scale prototype and the final second skin. We will be solving all the problems we had discovered from the first and second prototype. We will also decide what type of material going to be used for the final second skin model.

FAERICATIONFull scale Pototype
Fan Mechanism: Full Scale Prototype
In this prototype, we had focused on the mechanism function on a human’s bodies in a larger scale. The photos above show our first full scale prototype, we had spent a lot of times on working out the mechanism on a body.
Finally, we realised that we must use the right arm to provide a tension force to the string for creating the mechanism. In this case, each set of the panel has their owned string for the connection, so all of the string will go through the back of the body to the right arm. The photos show the effect when the panel are opened with the force and also closed without any net force. That was a big gaol for this prototype mod-ule, because we have successfully worked out the hardest part of the project (Mechanism).
Although it was a successful mechanism, there are still many issues have to solve. We have used Velcro to attach the panels on the arm, but the panel is not very stable and it moves around. Also, the pattern of the panel was totally placed on my arm randomly, so the string was too messy and the panels couldn’t cover the whole arm. There are many gaps between the panels.

FAERICATIONNesting and Material
The way the panels were initially nested for the first prototype was inefficient in terms of both time and materials.
In the final design the panels were nested much closer and with shared lines. This meant the panels could be cut faster us-ing materials.
MaterialsFor the full scale prototype, we used mount board as the ma-terials. However, the burn marks on the board didn’t look nice and it is a bit heavy for the mechanism.In the final skin, we decided to use polypropylene and it was much stronger than the mount board but also lighter. We think that is the prefect materials to be used for our project as it’s colour, texture and weight.

FAERICATIONFinal Piece
In the final model, we have to make sure each of the panel must be stable, so we have designed a new series for the pattern of the panels. They are new with a set of three, and there are four sets in total plus the biggest panel for the shoulder pad, In this case, the string can go through directly with other, the string will finally comes into one. Therefore, the string would be too messy and hence better for the organisation of the mechanism.
We also realised that the most sta-ble set of the panel from the proto-type is the bottom one with a ring for attaching it to the finger. There-fore, in our final design, we will add two more rings to the finger (shown in the picture), and they will make the panels more stable. Moreover, Some of the bottom panels will be attached to the front panel, so they can become much more stable for the mechanism.

FAERICATIONFinal Piece
The pivots used on our previous mount board prototype were much different. The previous pivots were unique to each of the dif-ferent panels. It was very messy and inconsistent as it did not match the smart repetition of the panels. To change the aesthetical look of the pivot they were moulded using pliers. You are able to see a much cleaner and refined look that it emphasizes.
The re-design of the pivot was also created from thicker wire to result in a sturdier product. Additionally the design of the pivot creates a tunnel-like feature which aids in guiding the string in the right direction. It works better than the previous pivot as it is much longer this helps to avoid the fishing line getting caught on angles which could prevent the panels lifting.


MODULE 4 REFLECTION
This module focused on the reflection of the whole project. I will write about how were the lectures and readings influenced our ideas and design. How were they important my thinking and weakness. This module will help me to step further in the future as a design aspect.

At this stage, we have achieved the final process which is the fabrication of our second skin. For getting to this stage, I have found that the weekly readings and also the lectures were useful tools to help us to understand the concepts of design. They push our thinking to another level.
The course was started with four different materi-als systems and they gave us a basic idea of the designs we see in everyday. The measure drawing of the materials system gave us a clearer sense of the principle for each of the materials systems. I was really interested in the skin and bone system because of it’s movement created by the differ-ent components. The first idea came into my mind was that “if the second skin can have a move-ment and it will be so cool.”
The first reading is 300 Years of Industrial Design, it gave us a more clearer sense of how individual components of a products were put together to form an object. Although we were still not very sure how it can be useful for our project at that stage, we could still have some imaginations in our minds for our projects.
After that, a huge reading for me which is Robert Sommer’s Personal Space (1969). He explained to us what is personal space. He said that it cannot be sphere and everyone has their owned person-al space. So we had our three ideas of drawings to show how personal space mean to us. My idea of personal space is about creating messages by using body movement so I had set my future sec-ond skin in my mind should be placed on my arm, because our arms are the most common body part for creating body movement.
After that, Paul brought us further to the idea of design. In the first few lectures, Paul Loh (2013) mentioned about the “thinking out of the box” and was saying that design is used to solving problems in our lives. It was a easy way to intro-duce us what is the meaning of design. He also mentioned that Le Corbusier believed Architec-ture ought to look like something rather than try to be it. The software tools is used to help us to achieve our design ideas, we should not rely on those tools to create the design for us. This idea was influenced our process of the design, be-cause our design is about mechanism, and it was a huge challenge for us. It was not easy to create the mechanism and the movement on our sec-ond skin, but we kept trying to achieve the goal rather than changing our design idea.
Our tutor also reminded us to look at the TED TALK by Lucy McRae in the lecture. It talked about how can technology transform the human body. It demonstrated some of the designs which can help the project become more sustainable. For example, she had a design on a human’s face and those little designed elements on the face can really help the final project. Therefore, we have focused more on the little design such as the pivots and pattern of the panels.
In another lecture, Paul Loh (2013) had intro-duced us the concept of design effect and it was the most impressive lecture for me in the whole subject, he explained the design effect very clear-ly and it had influenced our design a lot. At he beginning, we thought that a good design should be complexes. Actually, a good design can be very simple by using a same panel but in different scales, colours, positions and patterns. That is the reason our final design only has one type of panel but has a strong design effect.

The module two and three were the most impor-tant and challenging part of the project. Many changes and issues were happening between those two module. I remembered Paul Lou (2013) gave us a lecture about “The power of making”, and it made me realised that the idea of the design and drawing were only a small part of the process.
The reality is always turn out differently. Our sec-ond skin design really proved this statement, because our imagination of the mechanism was so difficult to achieve in the reality. Therefore, we had to make many prototypes and experiences to get to the goal. Although our mechanism could not show the in Rhino, the digital like that help us to organise the pattern of the panels. As RifKin (2011) mentioned the digital world give powers to designers to make their imagination a reality.
When fabricating the prototypes and final project, it was really important to be aware of the practi-cality of certain constructing methods. Architec-ture in the Digital Age (2003) was one of the useful reading to understand the context of design fabri-cation. It specified the various methods of 2D and 3D fabrication, some of the process can substrate physical material from a base shape. This reading also mentioned about the strengths and inabili-ties of the different fabricating machines. For our project, we used the laser cutter, it dramatically shortened the time taken to translate our models from digital to physical form. Overall, it is a very useful tool although there are some limitation such as the burning marks.
I would say our choices of the material and the fabrication method are not prefect but they are presenting exactly what we wanted at the begin-ning of the subject. It is affected by the readings and also the lectures. We have also created a successful model of the second skin and it is very different to the others because we have the de-sign effect of “the changing of personal space”. I believed that the mechanism of the model had brought us to the other level of virtual design.
In the end, virtual environment is a huge subject for me, it is because I was introduced some new technique and knowledge for design. Although our second skin design doesn’t require many Rhino skill, but I think it is enough for me to have more confidences for the architecture course in the future for both Rhino skill and the design spirit. Before taking this subject, I only knew about draw-ing, but now, I have learnt to use digital software such as Rhino and the fabrication method such as laser cutting. They made me become a better person and a better designer.

Heath, A., Heath, D., & Jensen, A. (2000). 300 years of industrial design : function, form, technique, 1700-2000
Sommer, R. (1969). ‘Personal space : the behavioral basis of de-sign’
Architecture in the Digital Age - Design and Manufacturing /Branko Kolarevic. Spon Press, London, c2003
Digital fabrications: architectural and material techniques / Lisa Iwamoto. New York : Princeton Architectural Press, c2009.
TED talks - Lucy McRae [http://www.ted.com/talks/LucyMcRae technologytransform.html] viewed on 9/27/2013
The third Industrial Revolution / Jeremy Rifkin. Palgrave Macmil-lan, C2011.pp107-126
REFERENCES