final op and installation guide el-usb-2-lcd...
TRANSCRIPT

INSTALLATION ANDOPERATION GUIDEGUIDE D'OPERATIONGUÍA DE OPERACIÓNGUIDA DI FUNZIONAMENTOBEDIENUNGSANLEITUNG
LASCAR ELECTRONICS LTD. Module HouseWhiteparish, SalisburyWiltshire, SP5 2SJ UNITED KINGDOM T +44 (0) 1794 884567 F +44 (0) 1794 884616 E [email protected]
Installation and Operation Guide issue 1.2 8/09 www.lascarelectronics.com
LASCAR ELECTRONICS (HK) LTD. Unit Nos. 6-8, on 19/F Futura Plaza 111-113 How Ming StreetKwun Tong, Kowloon HONG KONG T +852 2389 6502 F +852 2389 6535 E [email protected]
LASCAR ELECTRONICS INC. 4258 West 12th StreetErie, PA 16505 UNITED STATEST +1 (814) 835-0621 F +1 (814) 838-8141 E [email protected]

CCOONNTTEENNTTSS
Environmental disposal/warnings 11
Battery installation 22
Important notes before installing 33
Software installation 44
Driver install Windows™ 2000 55
Driver install Windows™ Windows XP 66
Driver install Windows™ Windows Vista 32 77
Using your data logger (quick start) 88
Status indication (EN) 99
Button operation (EN) 1111
Indication d’etat (FR) 1133
Fonctionnement du bouton (FR) 1155
Indicación de estado (ES) 1177
Funcionamiento del botón (ES) 1199
Indicazione di stato (IT) 2211
Funzionamento del pulsante (IT) 2233
Statusanzeige (DE) 2255
Steuerung per Knopf (DE) 2277
LLAASSCCAARR’’SS DDAATTAA LLOOGGGGEERR RRAANNGGEE
Temperature
Temperature & RH
Voltage
4-20mA
Thermocouple Temperature
Real-time Temperature & RH
Carbon Monoxide
Low Cost Temperature
Temperature & RH with LCD
Description Range
-35 to +80°C (-31 to +176°F)
-35 to +80°C (-31 to +176°F) & 0 to 100% RH
0 to 30VDC
4 to 20mA
-200 to +1300°C (-328 to +2372°F)
-20 to +70°C (-4 to +158°F) & 0 to 100% RH
0 to 1000ppm
-10 to +50°C (+14 to +122°F)
-35 to +80°C (-31 to +176°F) & 0 to 100% RH
Lascar Model
EL-USB-1
EL-USB-2
EL-USB-3
EL-USB-4
EL-USB-TC
EL-USB-RT
EL-USB-CO
EL-USB-LITE
EL-USB-2-LCD

EENNVVIIRROONNMMEENNTTAALL DDIISSPPOOSSAALL//WWAARRNNIINNGGSS
This product may contain substances that can be hazardous to the environment if not disposed of
properly. Electrical and electronic equipment should never be disposed of with general household waste
but must be separately collected for their proper treatment and recovery. The crossed-out bin symbol,
placed on the product, reminds you of the need to dispose of the product correctly at the end of its life.
In this way you will assist in the recovery, recycling and re-use of many of the materials used in this
product. At the end of the life of your product please contact your distributor for information on collection
arrangements.
Most batteries end up in landfill where their hazardous material can leach into the soil and cause harm.
It is much more environmentally friendly to recycle batteries in a safe, correct manner. Follow applicable
country, state, and local regulations for disposal/recycling of the ½AA battery supplied with your data logger.
The Restriction of Hazardous Substances (RoHS) Directive 2002/95/EC of the European Parliament
stipulates that certain hazardous substances must not be present above defined levels in products.
This data logging product is manufactured to be RoHS compliant.
For further information visit: www.lascarelectronics.com/main/environmental-data-logging.php
BBaatttteerryyddiissppoossaall
21
WWEEEEEE
RRooHHSS
EEiinnsseettzzeenn ddeerr BBaatttteerriiee
Vor der Benutzung des datenloggers muss eine 3,6V 1/2AA Batterieentsprechend der untenstehenden anweisungeneingesetzt werden.
Ersatzbatterien können überwww.lascarelectronics.combezogen werden; PN: BAT 3V6 1/2AA.
IInnssttaallllaazziioonnee ddeellllaa bbaatttteerriiaa
Prima di utilizzare il data logger, inserire la batteria 1/2 AA da 3,6 V fornita indotazione seguendo leistruzioni.
Le batterie di ricambio sonodisponibili sul sito webwww.lascarelectronics.com, N. art.: BAT 3 V6 1/2 AA.
BBaatttteerryy IInnssttaallllaattiioonn
Before using the data loggeryou will need to insert the3.6V 1/2AA battery provided,following the instructionsbelow.
Replacement batteries available from www.lascarelectronics.com,PN: BAT 3V6 1/2AA.
CCóómmoo ccoollooccaarr llaa bbaatteerrííaa
Antes de utilizar el registrador de datos, necesitará colocarla batería 1/2AA de 3,6V suministrada, siguiendo estas instrucciones.
Pueden adquirirse baterías de repuesto en www.lascarelectronics.com, Pieza número: BAT 3V6 1/2AA.
4 5 6
3
IInnssttaallllaattiioonn ddee llaa bbaatttteerriiee
Avant d'utiliser l'enregistreurde données, vous devez suivre les instructions ci-dessous pour installer la batterie 1/2AA de 3,6 V.
Vous pouvez vous procurerdes batteries de rechangeauprès de www.lascarelectronics.com,N° de réf. : BAT 3V6 1/2AA.
1
BBAATTTTEERRYY IINNSSTTAALLLLAATTIIOONN
2
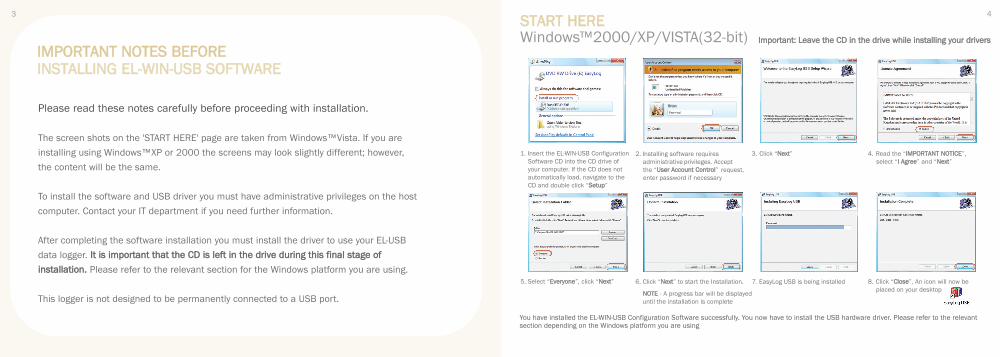
43SSTTAARRTT HHEERREEWindows™2000/XP/VISTA(32-bit)
1. Insert the EL-WIN-USB Configuration Software CD into the CD drive of your computer. If the CD does not automatically load, navigate to the CD and double click “SSeettuupp”
3. Click “NNeexxtt” 4. Read the “IIMMPPOORRTTAANNTT NNOOTTIICCEE”, select “II AAggrreeee” and “NNeexxtt”
5. Select “EEvveerryyoonnee”, click “NNeexxtt” 6. Click “NNeexxtt” to start the Installation.
NNOOTTEE - A progress bar will be displayed until the installation is complete
7. EasyLog USB is being installed 8. Click “CClloossee”. An icon will now be placed on your desktop
2. Installing software requires administrative privileges. Accept the “UUsseerr AAccccoouunntt CCoonnttrrooll” request, enter password if necessary
You have installed the EL-WIN-USB Configuration Software successfully. You now have to install the USB hardware driver. Please refer to the relevantsection depending on the Windows platform you are using
IImmppoorrttaanntt:: LLeeaavvee tthhee CCDD iinn tthhee ddrriivvee wwhhiillee iinnssttaalllliinngg yyoouurr ddrriivveerrss
IIMMPPOORRTTAANNTT NNOOTTEESS BBEEFFOORREEIINNSSTTAALLLLIINNGG EELL--WWIINN--UUSSBB SSOOFFTTWWAARREE
Please read these notes carefully before proceeding with installation.
The screen shots on the 'START HERE' page are taken from Windows™Vista. If you are
installing using Windows™XP or 2000 the screens may look slightly different; however,
the content will be the same.
To install the software and USB driver you must have administrative privileges on the host
computer. Contact your IT department if you need further information.
After completing the software installation you must install the driver to use your EL-USB
data logger. IItt iiss iimmppoorrttaanntt tthhaatt tthhee CCDD iiss lleefftt iinn tthhee ddrriivvee dduurriinngg tthhiiss ffiinnaall ssttaaggee ooff
iinnssttaallllaattiioonn.. Please refer to the relevant section for the Windows platform you are using.
This logger is not designed to be permanently connected to a USB port.

5 6
6. Windows™2000 now refers to the data logger as the “FF3322xx EExxpprreessss UUSSBB DDeevviiccee” then click “FFiinniisshh”
1. Insert the USB data logger into a USB port on the computer. The following screens should automatically appear. Windows™2000 refers to the data logger as “UUSSBB AAPPII” until the end of this installation
2. Click “NNeexxtt” 3. Select “SSeeaarrcchh ffoorr aa ssuuiittaabbllee ddrriivveerr ffoorr mmyy ddeevviiccee ((rreeccoommmmeennddeedd))” then click “NNeexxtt”
4. Select “CCDD--RROOMM ddrriivveerrss” only, then click “NNeexxtt”
5. Click “NNeexxtt”
WWIINNDDOOWWSS ™™22000000USB Driver Installation IImmppoorrttaanntt:: LLeeaavvee tthhee CCDD iinn tthhee ddrriivvee wwhhiillee iinnssttaalllliinngg yyoouurr ddrriivveerrss
You have successfully installed the necessary software and driver for your EL-USB data logger. Please refer to page 8 within this manual for a guide on how to use the data logger
WWIINNDDOOWWSS ™™ XXPPUSB Driver Installation
1. Insert the USB data logger into a USB port on the computer. The following screens should automatically appear. Windows™ XP refers to the data logger as “UUSSBB AAPPII” and “FF3322xx EExxpprreessss UUSSBB DDeevviiccee” throughout this installation
2. Ensure the CD is in the CD drive. Select “IInnssttaallll tthhee ssooffttwwaarree aauuttoommaattiiccaallllyy ((RReeccoommmmeennddeedd))” then click “NNeexxtt”
NNOOTTEE - A screen appears, showing files being copied to your computer
3. When this window appears, click “Continue Anyway”
NNOOTTEE -- This is a feature of Windows™XP. Selecting “Continue Anyway” will not cause any adverse changes/effects on your computer
4. Installation is now complete, click “FFiinniisshh”
5. The Window will close and you will see the following message
IImmppoorrttaanntt:: LLeeaavvee tthhee CCDD iinn tthhee ddrriivvee wwhhiillee iinnssttaalllliinngg yyoouurr ddrriivveerrss
WWIINNDDOOWWSS ™™XXPP
You have successfully installed the necessary software and driver for your EL-USB data logger. Please refer to page 8 within this manual for a guide on how to use the data logger

7 8
WWIINNDDOOWWSS ™™VVIISSTTAA((3322--bbiitt))USB Driver Installation
1. Insert the USB data logger into a USB port on the computer. The following screens should automatically appear
2. Select “LLooccaattee aanndd iinnssttaallll ddrriivveerr ssooffttwwaarree ((rreeccoommmmeennddeedd))” then click “NNeexxtt”
3. Installing the driver requires administrative privileges. Accept the “UUsseerr AAccccoouunntt CCoonnttrrooll” request, enter password if necessary
4. The following screen should automatically appear
5. The above window will appear after a few seconds. Click “NNeexxtt”
6. When this window appears, click “IInnssttaallll tthhiiss ddrriivveerr ssooffttwwaarree aannyywwaayy”
NNOOTTEE - This is a feature of Windows™ Vista. Selecting “IInnssttaallll tthhiiss ssooffttwwaarree aannwwaayy”” will not cause any adverse changes/effects on your computer
7. Installation is now complete, Click “FFiinniisshh”
IImmppoorrttaanntt:: LLeeaavvee tthhee CCDD iinn tthhee ddrriivvee wwhhiillee iinnssttaalllliinngg yyoouurr ddrriivveerrss
You have successfully installed the necessary software and driver for your EL-USB data logger. Please refer to page 8 within this manual for a guide on how to use the data logger
NNOOTTEEAt various times Vista may asksecurity questions; allow accesswhen prompted
UUSSIINNGG YYOOUURR DDAATTAA LLOOGGGGEERR ((QQUUIICCKK SSTTAARRTT))
The EL-USB data logger you have purchased is a stand-alone device. All communication with the data logger is via a USB port of a PC which has Lascar's configuration software and driver installed. To begintake the following steps:
1. Ensure the battery is correctly installed2. Insert the data logger into an available USB port on your PC3. Double click on the EasyLog USB icon on your Windows™ desktop
This will load the configuration software. Here you can setup the data logger for a new log, stop anddownload a data logger that has been recording, view previously saved data in graph format, and checkthe current status of the attached data logger (including the serial number). Follow screen instructions or consult the help file for further information on running the software.
When setup is complete the data logger should be removed from the USB port to begin recording. If you would like advice on how best to use the data logger for a particular application please contact your nearest Lascar representative.

GGrreeeenn ttrriippllee ffllaasshh
Logger full, no alarm on the channel
RReedd ttrriippllee ffllaasshh
Logger full, alarm on the channel
GGrreeeenn ddoouubbllee ffllaasshh
Delayed start
GGrreeeenn ssiinnggllee ffllaasshh
Logging, no alarm
RReedd ssiinnggllee ffllaasshh
Logging, low alarm on the channel
RReedd ddoouubbllee ffllaasshh
Logging, high alarm on the channel
NNoo LLEEDDss ffllaasshh
Logger stopped or battery empty
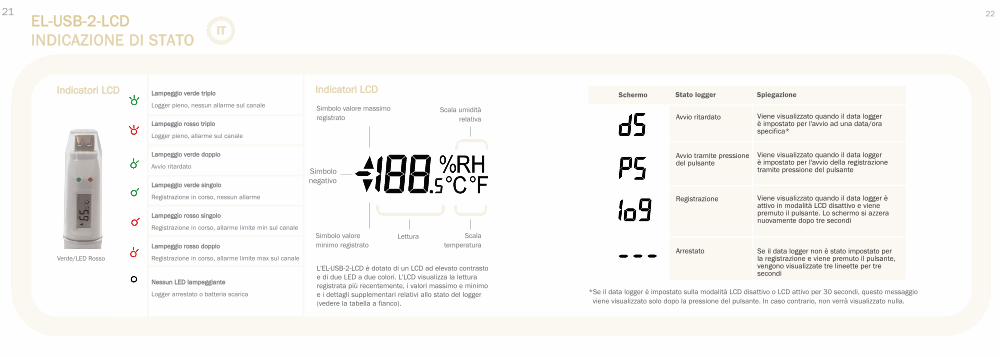
Green LED/Red
Maximum logged value symbol
Negative symbol
Minimum logged value symbol
Relative Humidityscale
The EL-USB-2-LCD features a high contrast LCD andtwo bi-colour LEDs. The LCD shows the latest loggedreading, maximum, minimum and supplementarydetails on the logger status (see table opposite).
Temperaturescale
LLCCDD IInnddiiccaattoorrss
Reading
*If the logger is set to ‘LCD off’ or ‘LCD on for 30 seconds’ mode, then this will only be shown after the button is pressed. Otherwise the display will remain blank.
ExplanationLogger statusDisplay
Delayed Start
Push to Start
Logging
Stopped
This is shown when the logger is set to start at a specific date and time *
This is shown when the logger is setup for‘push to start’ logging
This is shown when the logger is runningin ‘LCD off’ mode, and the button ispressed. The display clears again afterthree seconds
If the logger has not been set to log andthe button is pressed, three dashes aredisplayed for three seconds
9 10
EENN
LLEEDDIInnddiiccaattoorrss
EELL--UUSSBB--22--LLCCDD SSTTAATTUUSS IINNDDIICCAATTIIOONN

EELL--UUSSBB--22--LLCCDD BBUUTTTTOONN OOPPEERRAATTIIOONN
LCD Mode
LCD always on
LCD on for 30seconds
LCD off
LCD behaviour on button press
Each button press changes the LCD, as per the diagram
The first press enables the LCD and displays the last loggedtemperature. Each subsequent press changes the LCD, as per the diagram. If the button is not pressed for 30 seconds, the LCD disables and the logger returns to the beginning of the display cycle
‘Log’ is displayed, to show that the logger is working. No datais displayed in this mode
Last logged temperature reading
Highest loggedtemperature reading
Highest logged humidity reading
Lowest logged humidity reading
Lowest logged temperature reading
Last logged humidity reading
TThhee bbuuttttoonn ppeerrffoorrmmss 22 ffuunnccttiioonnss::
• To start the logger when in ‘push to start’ mode
• To enable the display and cycle through the available display modes (see table below)
11 12

IInnddiiccaatteeuurrss LLCCDD
Verte/Diode Rouge
Symbole de la valeurmaximale enregistrée
Symbolenégatif
Symbole de la valeur minimale enregistrée
Échelle de l’humiditérelative
Le EL-USB-2-LCD est doté d’un LCD à fort contraste et de deux voyants DEL bicolores. Le LCD affiche la dernièrelecture enregistrée, le maximum, le minimum et desdétails supplémentaires sur l’état de l’enregistreur (voirtableau ci-contre).
Échelle de température
IInnddiiccaatteeuurrss LLCCDD
*Si l’enregistreur de données est réglé sur le mode ‘LCD désactivé’ ou ‘LCD activé pendant 30 secondes’, ce message ne s’affiche qu’après la pression sur le bouton. L’écran reste vide autrement.
ExplicationÉtat de l’enregistreurAffichage
Démarrage retardé
Appuyer pour démarrer
Enregistrement
Arrêté
Ceci est indiqué quand l’enregistreur de donnéesest réglé pour démarrer à une date et une heurespécifiques*
Ceci est indiqué quand l’enregistreur de données est réglé sur ‘Appuyer pour démarrer’ l’enregistrement
Ceci est indiqué quand l’enregistreur de données fonctionne en mode ‘LCD désactivé’et que le bouton est enfoncé. L’écran s’effacede nouveau après trois secondes
Si l’enregistreur de données n’est pas réglépour enregistrer et que le bouton est enfoncé,trois tirets s’affichent pendant trois secondes
13 14
TTrriippllee cclliiggnnootteemmeenntt vveerrtt
Enregistreur plein, pas d'alarme sur la voie
TTrriippllee cclliiggnnootteemmeenntt rroouuggee
Enregistreur plein, alarme sur la voie
DDoouubbllee cclliiggnnootteemmeenntt vveerrtt
Retard au démarrage
SSiimmppllee cclliiggnnootteemmeenntt vveerrtt
Enregistrement en cours, pas d'alarme
SSiimmppllee cclliiggnnootteemmeenntt rroouuggee
Enregistrement en cours, basse alarme sur la voie
DDoouubbllee cclliiggnnootteemmeenntt rroouuggee
Enregistrement en cours, haute alarme sur la voie
PPaass ddee cclliiggnnootteemmeenntt
Enregistreur arrêté ou batterie déchargée
EELL--UUSSBB--22--LLCCDD IINNDDIICCAATTIIOONN DD’’ÉÉTTAATT
Lecture
FFRR

EELL--UUSSBB--22--LLCCDD FFOONNCCTTIIOONNNNEEMMEENNTT DDUU BBOOUUTTOONN
Mode LCD
LCD toujours activé
LCD activé pendant30 secondes
LCD désactivé
Comportement du LCD à la pression du bouton
Chaque pression sur le bouton modifie le LCD, selon le schéma
La première pression active le LCD et affiche la dernière température enregistrée. Chaque pression qui suit modifie le LCD, selon le schéma. Si le bouton n’est pas enfoncé pendant 30 secondes, le LCD se désactive et l’enregistreur retourne audébut du cycle d’affichage
Le ‘journal’ s’affiche pour indiquer que l’enregistreur fonctionne.Aucune donnée n’est affichée dans ce mode
Dernière lecture enregistréede la température
Lecture enregistrée la plusélevée de température
Lecture enregistrée la plusélevée d’humidité
Lecture enregistrée lamoins élevée d’humidité
Lecture enregistrée la moinsélevée de température
Dernière lecture enregistréede l’humidité
LLee bboouuttoonn rreemmpplliitt 22 ffoonnccttiioonnss
• Démarrer l’enregistreur lorsqu’il est en mode ‘Appuyer pour démarrer’
• Activer l’écran et le cycle par les modes d’affichage disponibles (voir ci-dessous)
15 16

EELL--UUSSBB--22--LLCCDD IINNDDIICCAACCIIÓÓNN DDEE EESSTTAADDOO
IInnddiiccaaddoorreess ddeellaa ppaannttaallllaa LLCCDD
Verde/LED Rojo
Símbolo del valor máximo registrado
Símbolonegativo
Símbolo del valor mínimo registrado
Escala de humedad relativa
El EL-USB-2-LCD tiene una pantalla LCD de elevado contraste y dos LED bicolores. La pantalla LCD muestra la última lectura registrada, la máxima, la mínima y mensajes sobre el estado del registrador (ver la tablasiguiente).
Escala de temperatura
IInnddiiccaaddoorreess ddee llaa ppaannttaallllaa LLCCDD
Lectura
*Si el registrador de datos está configurado en los modos "LCD apagada" o "LCD encendida durante 30 segundos", estas letras sólo aparecerán tras pulsar el botón. De lo contrario, la pantalla estará en blanco.
ExplicaciónEstado del registradorPantalla
Inicio retardado
Pulsar para iniciar
Registrando
Detenido
Estas letras aparecen cuando el registrador dedatos está configurado para iniciarse en unafecha y a una hora determinadas*
Estas letras aparecen cuando el registrador de datos está configurado para empezar a registrar cuando se pulse el botón
Estas letras aparecen cuando el registradorde datos funciona en modo "LCD apagada" yse aprieta el botón. La pantalla se vuelve aquedar en blanco al cabo de tres segundos
Si el registrador de datos no se ha configuradopara registrar y se aprieta el botón, aparecentres guiones durante tres segundos
PPaarrppaaddeeoo vveerrddee ttrriippllee
Registrador lleno, sin alarma en el canal
PPaarrppaaddeeoo rroojjoo ttrriippllee
Registrador lleno, alarma en el canal
PPaarrppaaddeeoo vveerrddee ddoobbllee
Inicio demorado
PPaarrppaaddeeoo vveerrddee ssiimmppee
Registrando, no alarma
PPaarrppaaddeeoo rroojjoo ssiimmppllee
Registrando, alarma baja en el canal
PPaarrppaaddeeoo rroojjoo ddoouubbllee
Registrando, alarma alta en el canal
NNiinnggúúnn LLEEDD ppaarrppaaddeeaannddoo
Registrador parado batería vacía
17 18
EESS

EELL--UUSSBB--22--LLCCDD FFUUNNCCIIOONNAAMMIIEENNTTOO DDEELL BBOOTTÓÓNN
Modo de la LCD
LCD siempreencendida
LCD encendida durante 30 segundos
LCD apagada
Comportamiento de la LCD al pulsar el botón
Cada vez que se pulsa el botón la pantalla LCD cambia, como se indica en el diagrama
Al pulsar el botón por primera vez la pantalla LCD se activa y muestrala última temperatura registrada. Cada vez que se vuelve a pulsar elbotón la pantalla LCD cambia, como se indica en el diagrama. Si elbotón no se pulsa durante 30 segundos, la pantalla LCD se desactivay el registrador vuelve al principio del ciclo de la pantalla
Aparece el mensaje "Log", que indica que el registrador está en funcionamiento. En este modo no aparecen datos en la pantalla
Lectura de la última temperatura registrada
Lectura de la máxima temperatura registrada
Lectura de la máximahumedad registrada
Lectura de la mínimahumedad registrada
Lectura de la mínima temperatura registrada
Lectura de la últimahumedad registrada
19 20
EEll bboottóónn ttiieennee ddooss ffuunncciioonneess
• Iniciar el registrador cuando está en modo "pulsar para iniciar"
• Activar la pantalla y recorrer los distintos modos de pantalla (ver a continuación)
IInnddiiccaattoorrii LLCCDD
Verde/LED Rosso
Simbolo valore massimoregistrato
Simbolonegativo
Simbolo valore minimo registrato
Scala umidità relativa
L'EL-USB-2-LCD è dotato di un LCD ad elevato contrasto e di due LED a due colori. L'LCD visualizza la lettura registrata più recentemente, i valori massimo e minimo e i dettagli supplementari relativi allo stato del logger(vedere la tabella a fianco).
Scala temperatura
IInnddiiccaattoorrii LLCCDD
Lettura
*Se il data logger è impostato sulla modalità LCD disattivo o LCD attivo per 30 secondi, questo messaggio viene visualizzato solo dopo la pressione del pulsante. In caso contrario, non verrà visualizzato nulla.
SpiegazioneStato loggerSchermo
Avvio ritardato
Avvio tramite pressionedel pulsante
Registrazione
Arrestato
Viene visualizzato quando il data logger è impostato per l'avvio ad una data/ora specifica*
Viene visualizzato quando il data logger è impostato per l'avvio della registrazione tramite pressione del pulsante
Viene visualizzato quando il data logger è attivo in modalità LCD disattivo e viene premuto il pulsante. Lo schermo si azzeranuovamente dopo tre secondi
Se il data logger non è stato impostato per la registrazione e viene premuto il pulsante, vengono visualizzate tre lineette per tre secondi
LLaammppeeggggiioo vveerrddee ttrriipplloo
Logger pieno, nessun allarme sul canale
LLaammppeeggggiioo rroossssoo ttrriipplloo
Logger pieno, allarme sul canale
LLaammppeeggggiioo vveerrddee ddooppppiioo
Avvio ritardato
LLaammppeeggggiioo vveerrddee ssiinnggoolloo
Registrazione in corso, nessun allarme
LLaammppeeggggiioo rroossssoo ssiinnggoolloo
Registrazione in corso, allarme limite min sul canale
LLaammppeeggggiioo rroossssoo ddooppppiioo
Registrazione in corso, allarme limite max sul canale
NNeessssuunn LLEEDD llaammppeeggggiiaannttee
Logger arrestato o batteria scarica
EELL--UUSSBB--22--LLCCDD IINNDDIICCAAZZIIOONNEE DDII SSTTAATTOO
21 22
IITT

EELL--UUSSBB--22--LLCCDD FFUUNNZZIIOONNAAMMEENNTTOO DDEELL PPUULLSSAANNTTEE
Modalità LCD
LCD sempre attivo
LCD attivo per30 secondi
LCD disattivo
Comportamento LCD alla pressione del pulsante
Pressione del pulsante modifica l'LCD, come riportato nel diagramma
La prima pressione abilita l'LCD e visualizza l'ultima temperaturaregistrata. Ciascuna pressione successiva modifica l'LCD, comeriportato nel diagramma. Se il pulsante non viene premuto per30 secondi, l'LCD viene disabilitato e il logger ritorna all'inizio delciclo di visualizzazione
Viene attivata la modalità "Registrazione" a indicare che il logger è in funzione. In questa modalità, non vengono visualizzati dati
Lettura dell'umidità massima registrata
Lettura dell'umidità minima registrata
Lettura della temperaturaminima registrata
23 24
Lettura dell'ultima temperatura registrata
Lettura della temperaturamassima registrata
Lettura dell'ultima umidità relativa registrata
IIll ppuullssaannttee ccoonnsseennttee ddii eesseegguuiirree 22 ffuunnzziioonnii
• Avviare il logger in modalità di avvio tramite pressione del pulsante
• Abilitare la visualizzazione e scorrere le modalità di visualizzazione disponibili (vedere di seguito)

EELL--UUSSBB--22--LLCCDD SSTTAATTUUSSAANNZZEEIIGGEE
25 26
LLCCDD--AAnnzzeeiiggee
Grüne LED/Rote
Symbol für höchstenerfassten Wert
Minuszeichenfür negativeWerte
Symbol für niedrigstenerfasstenWert/Messwert
Scala umidità relativa
Das EL-USB-2-LCD verfügt über ein kontrastreiches Display sowie zwei zweifarbige LEDs. Im Display werden die letzte gespeicherte Messung, Höchstwerte,Tiefstwerte sowie zusätzliche Daten zum Loggerstatusangezeigt (siehe Tabelle auf der gegenüberliegendenSeite).
Temperatur
LLCCDD--AAnnzzeeiiggee
Messwert
*Wenn für das Datenerfassungsgerät der Modus „LCD off“ (LCD aus) oder „LCD on for 30 seconds“ (LCD 30Sekunden lang an) eingestellt ist, wird der Status erst nach dem Drücken des Knopfes angezeigt. Ansonsten bleibt das Display aus.
BeschreibungGerätestatusDisplay
Delayed Start(Verzögerter Start)
Push to Start (ZumStarten drücken)
Logging(Speichervorgang)
Stopped (Angehalten)
Wird angezeigt, wenn das Datenerfassungsgerätzu einen bestimmten Termin gestartet werdensoll*
Wird angezeigt, wenn das Datenerfassungsgerätdurch Knopfdruck gestartet werden muss
Wird angezeigt, wenn der Knopf gedrückt wird und das Datenerfassungsgerät mit ausgeschaltetem Display arbeitet. Das Displayschaltet sich nach drei Sekunden wieder aus
Wenn der Knopf gedrückt wird und keineMessung geplant ist, werden drei Sekundenlang drei Balken angezeigt
LLeeuucchhtteett ddrreeiimmaall ggrrüünn aauuff
Logger voll, kein alarm am kanal
LLeeuucchhtteett ddrreeiimmaall rroott aauuff
Logger voll, alarm am kanal
LLeeuucchhtteett zzwweeiimmaall ggrrüünn aauuff
Verzögerter start
LLeeuucchhtteett eeiinnmmaall ggrrüünn aauuff
Aufzeichnung, kein alarm
LLeeuucchhtteett zzwweeiimmaall rroott aauuffAufzeichnung, alarm wegen überschreitungam kanal
LLeeuucchhtteett eeiinnmmaall rroott aauuffAufzeichnung, alarm wegen ünterschreitungam kanal
KKeeiinn AAuufflleeuucchhtteenn ddeerr LLEEDDss
Logger gestoppt oder batterie leer
DDEE
27 28
Display-Modus
LCD always on (LCD istimmer eingeschaltet)
LCD on for 30 seconds(LCD 30 Sekundenlang an)
LCD off (LCD aus)
Verhalten des Displays bei Knopfdruck
Die Anzeige wechselt bei Knopfdruck (siehe Diagramm)
Durch einmaliges Drücken wird das Display eingeschaltet, und die zuletzterfasste Temperatur wird angezeigt. Durch erneutes Drücken des Knopfeswerden im Display weitere Informationen angezeigt (siehe Diagramm). Wirdder Knopf innerhalb von 30 Sekunden nicht noch einmal gedrückt, schaltetsich das Display ab, und das Datenerfassungsgerät kehrt zum Anfang desAnzeigezyklus zurück
Log“ zeigt an, dass das Datenerfassungsgerät funktioniert. In diesem Moduswerden keine Daten angezeigt
Höchste erfasste
Temperatur
Höchste erfassteLuftfeuchtigkeit
Niedrigste erfassteLuftfeuchtigkeit
Niedrigste erfassteTemperatur
Letzte erfassteLuftfeuchtigkeit
EELL--UUSSBB--22--LLCCDD SSTTEEUUEERRUUNNGG PPEERR KKNNOOPPFF
Letzte erfasste Temperatur
ÜÜbbeerr ddeenn KKnnooppff kköönnnneenn zzwweeii VVoorrggäännggee ggeesstteeuueerrtt wweerrddeenn
• Starten der Protokollierung, wenn für das Gerät der Modus “Push to Start“ (Zum Starten drücken) eingestellt wurde
• Einschalten des Displays und Anzeigen der verschiedenen Modi (siehe unten)

INSTALLATION ANDOPERATION GUIDEGUIDE D'OPERATIONGUÍA DE OPERACIÓNGUIDA DI FUNZIONAMENTOBEDIENUNGSANLEITUNG
LASCAR ELECTRONICS LTD. Module HouseWhiteparish, SalisburyWiltshire, SP5 2SJ UNITED KINGDOM T +44 (0) 1794 884567 F +44 (0) 1794 884616 E [email protected]
Installation and Operation Guide issue 1.2 8/09 www.lascarelectronics.com
LASCAR ELECTRONICS (HK) LTD. Unit Nos. 6-8, on 19/F Futura Plaza 111-113 How Ming StreetKwun Tong, Kowloon HONG KONG T +852 2389 6502 F +852 2389 6535 E [email protected]
LASCAR ELECTRONICS INC. 4258 West 12th StreetErie, PA 16505 UNITED STATEST +1 (814) 835-0621 F +1 (814) 838-8141 E [email protected]