final year project dissertation 2007 - skemmanthis dissertation is about a final year project by...
TRANSCRIPT

1
Háskólinn á Akureyri
Viðskipta - og raunvísindadeild
Final Year Project Dissertation
2007
Baldvin H. Ásgeirsson
2
Salmon Sign Up
Baldvin H. Ásgeirsson
Supervisor: Nik Whitehead
School of Computing,
Faculty of Business and Science, University of Akureyri.
Submitted April 2007, in partial fulfilment of the conditions of
the award of the degree BSc.
I hereby declare that this final report is all my own work, except as indicated
in the text:
Signature ______________________
Date 13/04/2007
3
Abstract This dissertation is about a final year project by Baldvin Hermann Ásgeirsson, a student in the
faculty of Business and Science at the University of Akureyri. The aim of this document is to
give a report about the project in detail.
The name of the project is Salmon Sign Up System (from now on named Salmon Sign). It is
designed with Icelandic rivers in mind. The Salmon Sign is designed to register caught fish in
rivers and let the user view statistics regarding all registered fish.
The report starts of by giving a description of the project. How the current situation of
registering caught fish is. What problems the current situation has and how these problems
might be dealt with. Motivation for the work is discussed, the description of the work is
discussed in detail where the interface is explained step by step. Related work is discussed,
and the design is discussed in detail. The implementation is discussed what i.e. what problems
were dealt with, why the design had to be changed and why many of the features of the
project had to be changed.
1
1. Motivation for the Work ............................................................................................... 2
1.1 Introduction ........................................................................................................... 2
1.2 Background ............................................................................................................ 3
1.3 Existing Systems .................................................................................................. 4
1.4 Problems encountered so far .......................................................................... 4
1.4.1 Software and Hardware .................................................................................... 5
1.4.2 Microsoft Office Access 2003 ...................................................................... 5
1.4.3 Adobe Photoshop ............................................................................................. 5
1.4.4 Microsoft Office Visio 2003 .......................................................................... 5
1.4.5 Operating System ............................................................................................ 5
1.4.6 Software Conclusion ....................................................................................... 5
1.4.7 Hardware ............................................................................................................. 6
1.4.8 Hardware Conclusion ...................................................................................... 7
2. Description of the Work ............................................................................................... 7
2.1 The Idea ...................................................................................................................... 7
2.2 Type of Users ............................................................................................................ 9
2.3 The Interface ........................................................................................................... 10
2.3.1 Menu Sections First Interface ....................................................................... 11
2.3.2 Menu Sections Second Interface ................................................................. 16
.................................................................................................................................................. 16
2.3.3 Menu Sections Current Interface ................................................................. 23
2.3.4 Demonstration Section Summary ............................................................... 27
2.3.5 Demonstration Section Detailed .................................................................. 27
. ................................................................................................................................................ 28
3.0 Related Work ............................................................................................................... 29
4.0 Design ........................................................................................................................ 30
5.0 Implementation .......................................................................................................... 32
5.1 Forms .......................................................................................................................... 32
5.2 Tables ......................................................................................................................... 32
5.3 Queries ....................................................................................................................... 33
5.4 Type of User............................................................................................................. 33
6.0 Testing ........................................................................................................................... 34
7.0 References .................................................................................................................... 35
Menu Sections First Interface Design .................................................................... 36
Menu Sections Second Interface Design .............................................................. 41
.................................................................................................................................................. 41
2
1. Motivation for the Work
The Salmon Sign is a system for managing caught fish in rivers in Iceland. This system is
designed for lessee of rivers in Iceland, this system could solve the book that has been used
for decades in registering caught fish. This system could make the registering of caught fish
easier and simpler. Each year the lessee of the rivers hold meetings where the fisherman come
together and look at the past year in the river. At these meeting they are presented with
statistics regarding the last summer in the river. As said before today all registering of caught
fish is done in a simple book and has to be from there entered into a computer.
The Salmon Sign could do the work that the book has done for decades with more reliability,
and could save a lot of work that has to be done from the registering book.
1.1 Introduction
The Salmon Sign contains step by step instructions on how to register a Salmon one at a time.
The idea behind the Salmon Sign is to make a program with a friendly GUI and a database
that can be used to sign into the system caught Salmon in rivers in Iceland. There are some
software’s that can do these kind of registration on Salmon e.g. Excel which most people have
access to but for people to use Excel a basic knowledge or background is needed, for people
to use Salmon Sign no knowledge or background information is needed, the GUI will only
contain windows that will be used to register caught fish and buttons to validate these
registrations.
There are many Salmon rivers in Iceland and most if not all of them are leased by a group of
people. This is the year 2007 and in my own experiment most of these groups that lease the
rivers are over 50 years of age, and many of these lease groups have little or no knowledge of
computers or software that can be used to register the fish that is caught, this of course does
not apply to all the lease groups, but many of them have to pay others to register their caught
fish after each summer, these information about caught fish are used in meetings and the
yearly meetings, most of the groups have to present how the summer was in that river to other
people that spend their summer in that river. The Salmon Sign could be a good solution for
3
these meetings where a single push of a button would give required average or required graph
showing statistics or graphs or what ever information would be needed.
1.2 Background
The purpose of this project is to show that a student can do a project of this size alone and do
all the work needed to complete this kind of project, some of the aspects will be learned are as
follows:
I. How to work alone on a project of this size.
II. How to take full responsibility for all the work.
III. How to set up a plan when working on a big project like this.
IV. How to deal with problems that might and will occur in this project.
If this project goes well there is always the possibility it might be used by many of the lease
groups during these meeting they have.
Salmon fishing in Iceland has been done for decades. Through out the history of Salmon
fishing a simple book has been used to register caught fish in each river. Each river in Iceland
has one of these books where all information is kept, information such as.
Name of the river
Name of the fisherman
Name of the place the fish was caught
Number of the place the fish was caught
The date
The type of fish
The gender of the fish
The size of the fish
The length of the fish
The bait used
Was the fish released back to the river
4
All these above information are done by a pen and the register book, where the user has to fill
in detail everything regarding the caught fish. This takes a long time and it is easy to make
error in filling out the book since there is much information on each page and going from one
line to the next is a mistake that many people make. After the summer all these books are
taken and sent to Veiðimálastofnun which stores these books and uses them to hold
information about each year. It is a lot of work for Veiðimálastofnun to take all the
information from the books and getting it into digital form.
Taking this information from the book and having them in a digital form is needed since
Veiðimálastofnun has to present these numbers after each summer. From Veiðimálastofnun
the lessee can get their information which they use in their annual meetings to give the
fisherman statistics regarding last summer in the river.
1.3 Existing Systems
There doesn’t seem to be a system out there that can do the same things as the Salmon Sign
Up system is set out to do. No systems could be found for rivers and to hold information
about caught fish and that could give statistics the way Salmon Sign is set out to do. There
was no system found not even a hunting system, even though there has to be some kind of
hunting system used today, but no one could be found to hold information about caught pray.
As said before there are few software that could hold information about caught fish but they
are thought of for all kinds of usage and require background knowledge of some kind.
1.4 Problems encountered so far
When designing a project like this there are many things which have to be taken into
consideration, most of the problems encountered are what to include since there are in most
cases many possibilities for each aspect of the project. The middle ground was chosen and
some aspects are left out but all the important and the aspects that are needed are kept and
many more. Both problems on the database and the GUI environment have been met. The
problems regarding the database were connecting the tables together so they would work as
desired. The tables, queries, reports and the forms all had problems on some stages, these
problems were dealt with and some took much time but for other problems the solutions were
simpler.
5
1.4.1 Software and Hardware
The software that has been chosen to use for developing the Salmon Sign Project is as
follows:
1.4.2 Microsoft Office Access 2003
Microsoft Office Access 2003 was chosen for this project for its ability to create a GUI
interface and database. It has all the features needed in constructing this project though some
of the project might be prepared before it can be used with Microsoft Office Access 2003.
1.4.3 Adobe Photoshop
Adobe Photoshop will be used for all graphical use required, from editing pictures to editing
the interface windows in the Salmon Sign.
1.4.4 Microsoft Office Visio 2003
Microsoft Office Visio 2003 will be used for similar purpose as Adobe Photoshop i.e.
graphical use, creating some of the interface i.e. buttons and some of the drawings.
1.4.5 Operating System
Windows XP is the operating system of choice. The reason is that in this project most of the
software used is for Windows XP and most of the operating system knowledge comes from
Windows XP.
1.4.6 Software Conclusion
The software above Microsoft Office Access 2003, Adobe Photoshop, Microsoft Office Visio
2004 and Windows XP is all the software needed, no other software was needed.
6
1.4.7 Hardware
The Hardware that will be used are PC computers, all the PC computers are powerful enough
to run the software above. The reason for selecting PC is obvious, all the computers around
are PC computers and the operating system and all the software that will be used in
developing the Salmon Sign project run on PC computers.
One other thing that might fall in the category of hardware is a Casio 7.2 Exilim digital
camera, that will be used to take pictures if needed e.g. of river location, flies and any pictures
needed. The hardware needed to run Microsoft Access 2003 is as follows.
Operating System Microsoft Windows® 2000 with Service Pack 3 (SP3), Windows
XP, or later.
Processor Personal computer with an Intel Pentium 233-MHz or faster processor
(Pentium III recommended).
Memory128 MB of RAM or greater.
Hard Disk 260 MB of available hard-disk space; optional installation files cache
(recommended) requires an additional 250 MB of available hard-disk space.
Drive CD-ROM or DVD drive.
Display Super VGA (800 × 600) or higher-resolution monitor.
Internet Connection Internet functionality requires dial-up or broadband Internet
access (provided separately); local or long-distance charges may apply.
7
1.4.8 Hardware Conclusion
The PC computer and the Casio digital camera is the only hardware needed for the
development of the Salmon Sign project.
2. Description of the Work
2.1 The Idea
To start the design, and start to think about all the things that are required both from the user
view and from the designer view.
Today the Salmon Sign is simpler that it has been since this project started both the Forms and
the Tables have been emerged and look and work simpler.
When the user opens the Salmon Sign up he is presented with a form which contains two
buttons they are “Sign Up” a salmon or view “Statistics”
When the “Sign Up” button is pressed another form will open which is the main form of the
registration process. This form has all the information needed to sign up a fish into the
database.
This main form contains buttons, dropdown menus, radio buttons and text boxes which the
user fills out when all the information have been filled out there is a button called “Sign Up”
which completes the registration.
First option the user is presented with is the “Name of the fisherman” where the user enters
his name. The next option that is presented to the user is to enter the “Name of the river”
This option is will be used the way that the river will be set as default so the user doesn’t have
to enter the name of the river. This idea of having the default river is because the Salmon Sign
will be located at a specific river and will be used for only one river. The Salmon Sign will of
course be in many river locations but for each river the river name will be set as default.
The next option the user is presented is the “Date” where he enters the date the fish was
caught. This option is as simple as it can be, the date can only be entered in one way that is
the day, month and the year e.g. 24.04.2005 all other attempts to enter the date in other format
will give the user error.
Next option the user is presented with is the “Number of the place” the fish was caught. For
this option the same applies as for the “River Name” since the Salmon Sign will be located as
8
a specific river the “Name of the place” will be all pre entered in so the user will then select
his name of place from that list.
Species is the next option that the user has to select, is the caught fish a Salmon or a Trout,
this is simply done by the use of radio buttons where only one can be selected.
The gender of the fish is the next step in the registration form the options the user has are
Snag which is male and Spawn which is the female fish. This is simply done by clicking on
one of them by the mouse, and only one option can be selected, radio buttons are used for this
selection.
Size in pounds is the next information the user has to fill out, a dropdown menu is used for
this selection where the user can select numbers from 0.5 and up to 35+ where 0.5 is in
between each number.
Length in centimetres is the next option the user has fill out, this is done by a text box where
the user enter the size of the fish with the keyboard. It was considered to use a dropdown
menu, since the users often don’t know the length of the fish and could there fore misuse the
dropdown menu to select some size from the dropdown menu that doesn’t apply. A text box
where the user has to enter the information in will give more accurate information.
What kind of bait was used is the next option in the registration process the option here are
worm, fly or spinner this is done by the use of radio buttons and is done by a click of the
mouse, only one bait can be selected.
Fish released is the next option the user has to perform this is only one radio button where the
user selects it if the fish was released back to the river.
Weather conditions are the next option in the registration process the option here are sun, rain,
fog and snow. Radio buttons are used for this selection and only one can be selected by the
click of the mouse.
Air Temperature is the next option in the registration process, a dropdown menu is used for
this option which has numbers from -15 and up to 23+.
River Temperature is the next option in the registration process, a dropdown menu is used for
this option which has numbers from -15 and up to 23+.
Other information is the next option in the registration process this is the place where the user
can basically write what ever information he wants to write. Examples of this would be
First fish ever caught, the fish had seal bite, the fish had sea louse and etc.
Now the user has finished the registration of the fish into the database, now he is presented
with two options one is “Sign Up” the fish into the database which will save all the entered
9
information, or the “Cancel” option which will cancel this registration and take him back to
the starting form.
When the “Sign Up” button is pressed the user will be presented with another window which
has the following option “Sign up another Salmon”, “View Statistics” or “Quit Program”.
The above options basically do exactly what their name indicates.
When the main registration window is open where the user enters all the information about
the caught fish, if he starts to write something into the e.g. first two options and presses the
“Cancel” button that record will be stored into the database, if nothing has been entered into
the information windows and the “Cancel” button is pressed that record will be cancelled and
nothing will be stored into the database.
2.2 Type of Users
Three types of users will have access to the Salmon Sign first there is the administrator
access, operator access and user access.
Administrator will have full access to everything i.e. every part of software and can therefore
modify everything.
Operator has access to change some functions e.g. set a specific river as default set the place
name as default since the software could likely be in a computer at a specific river. Fix error
that the user has reported that he entered which could be written in e.g. “Weather conditions”
the “other” window, and delete entered information if required.
User is the typical user can only se the GUI and the windows needed to register caught fish,
and therefore can’t modify anything.
Administrator access
Operator access
User access
These three user groups are enough for all needed operations and maintenance.
10
2.3 The Interface
The interface is as simple as I could make it, it is not fully developed since there are some
graphical changed that will be made and some functions of the interface that will be changed,
these changes will be done for the demonstration which is in the 27th
April.
The interface has in total four windows, there is the first window which is presented to the
user which has the option of “Sign Up” a salmon or “View Statistics” or “Quit Program”
The “Sign Up” button will take the user to the registration form where all the information
about the fish is filled out. The “View Statistics” is the button which will take the user to the
statistics window where he can select what kind of statistics he wants to view.
The user has to fill in all the information into the main registration form, if some information
are not entered and the “Sign Up” button is pressed the user will be presented with a message
that has to enter desired information to be able to proceed.. The interface was shown to a
friend of mine who has been fishing for 10 years, and to a man who is the head of a lease
group called Laxmenn, both these persons did not think of any thing to add to the interface.
But one of them talked about that the windows were too many and it would be better to take
some of them and join them together. This idea was considered i.e. having fewer windows
and after merging the windows together they are only four windows today instead of nine
windows at the first design.
11
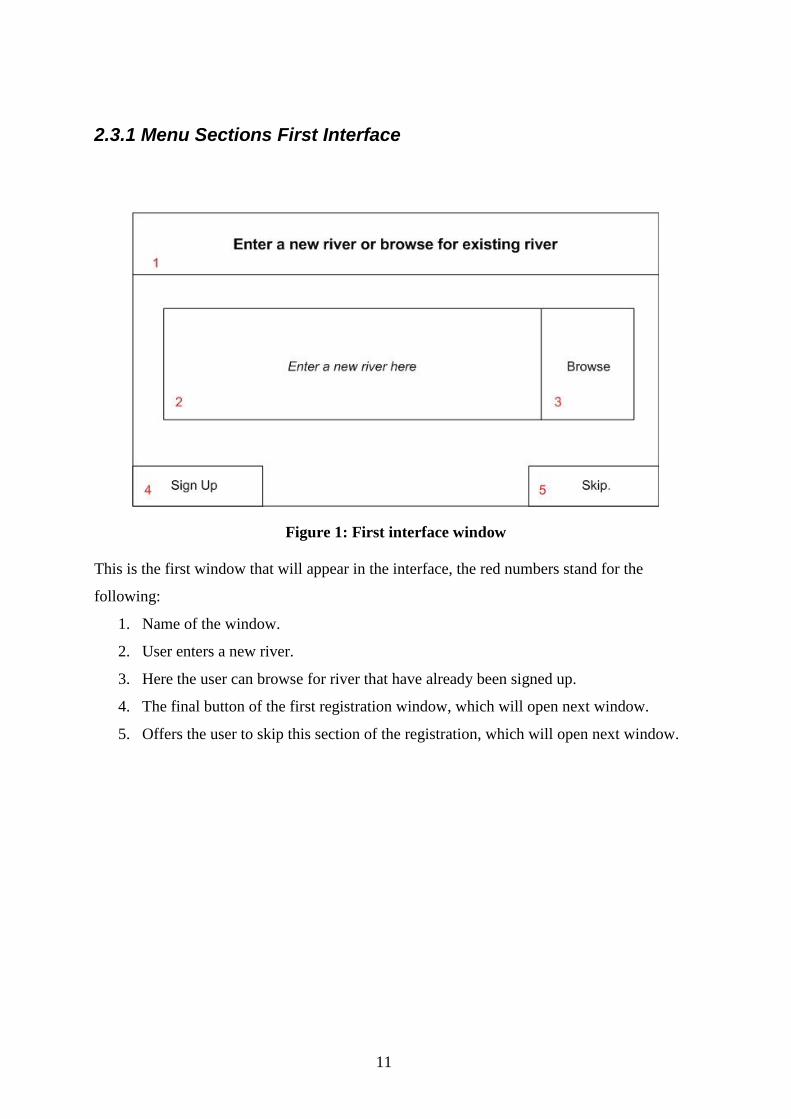
2.3.1 Menu Sections First Interface
Figure 1: First interface window
This is the first window that will appear in the interface, the red numbers stand for the
following:
1. Name of the window.
2. User enters a new river.
3. Here the user can browse for river that have already been signed up.
4. The final button of the first registration window, which will open next window.
5. Offers the user to skip this section of the registration, which will open next window.
12
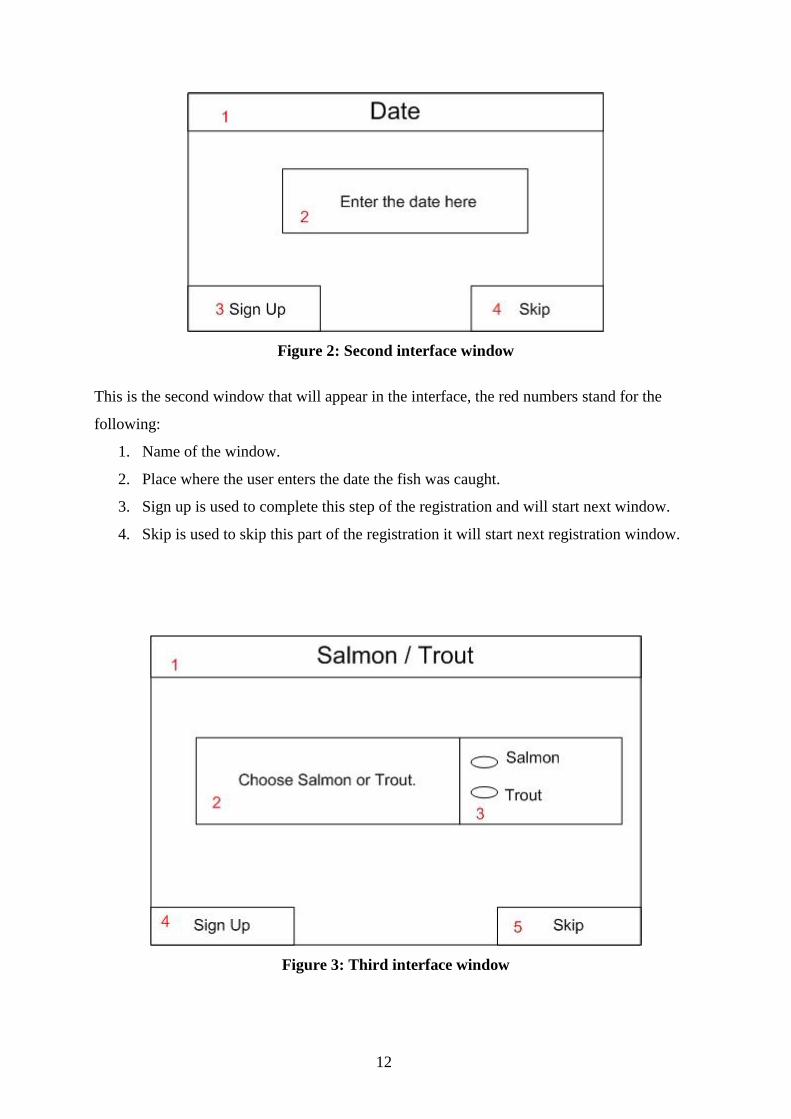
Figure 2: Second interface window
This is the second window that will appear in the interface, the red numbers stand for the
following:
1. Name of the window.
2. Place where the user enters the date the fish was caught.
3. Sign up is used to complete this step of the registration and will start next window.
4. Skip is used to skip this part of the registration it will start next registration window.
Figure 3: Third interface window

13
This is the third window that appears in the interface, the red numbers stand for the
following:
1. The name of the window.
2. Description what to do in window 3.
3. User selects the Salmon or Trout.
4. Sign up is used to complete this step of the registration and will start next window.
5. Skip is used to skip this part of the registration it will start next registration
window.
Figure 4: Fourth interface window
This is the fourth window that appears in the interface, the red numbers stand for the
following:
1. Name of the window.
2. Description of what to select.
3. Snag or Spawn chosen i.e. male or female.
4. Sign up is used to complete this step of the registration and will start next window.
5. Skip is used to skip this part of the registration it will start next registration window.
14
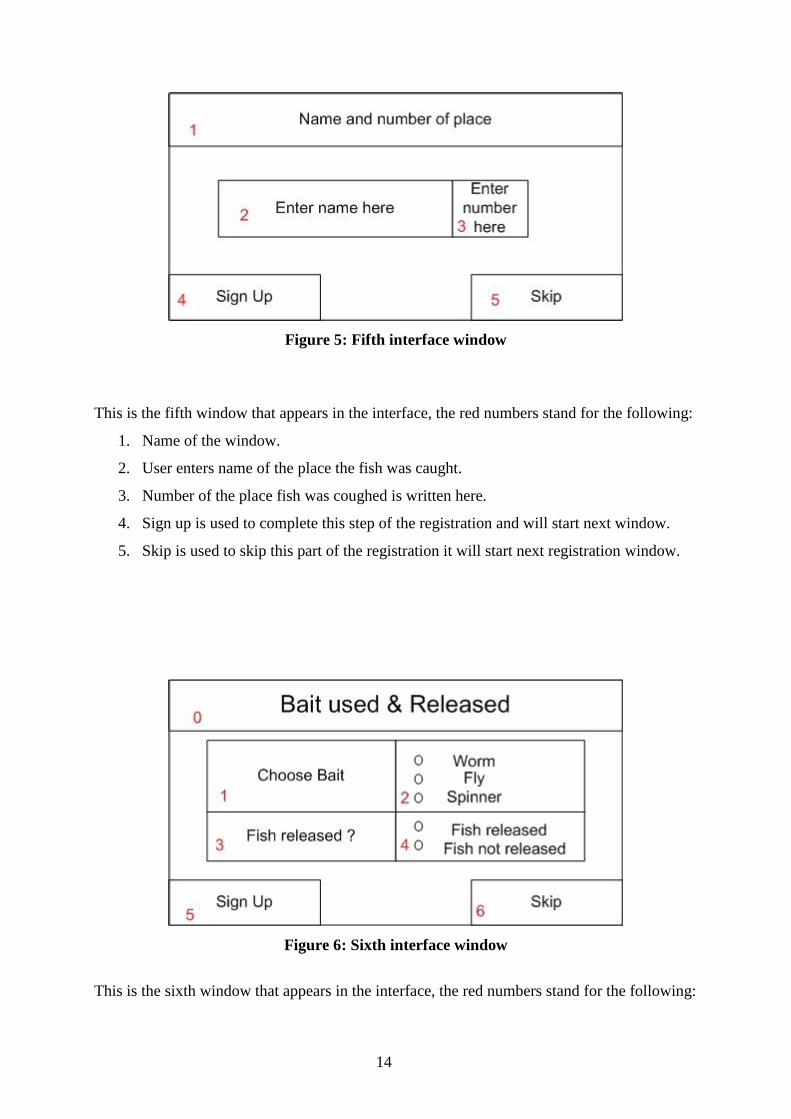
Figure 5: Fifth interface window
This is the fifth window that appears in the interface, the red numbers stand for the following:
1. Name of the window.
2. User enters name of the place the fish was caught.
3. Number of the place fish was coughed is written here.
4. Sign up is used to complete this step of the registration and will start next window.
5. Skip is used to skip this part of the registration it will start next registration window.
Figure 6: Sixth interface window
This is the sixth window that appears in the interface, the red numbers stand for the following:
15
0. Name of the window.
1. Choose Bait describing what to do with window 2.
2. Worm, Fly or spinner is chosen by clicking on it with the mouse.
3. Fish released describing what to chose in window 4.
4. Fish released or fish not released is chosen by clicking with the mouse.
5. Sign up is used to complete this step of the registration and will start next window.
6. Skip is used to skip this part of the registration it will start next registration
window.
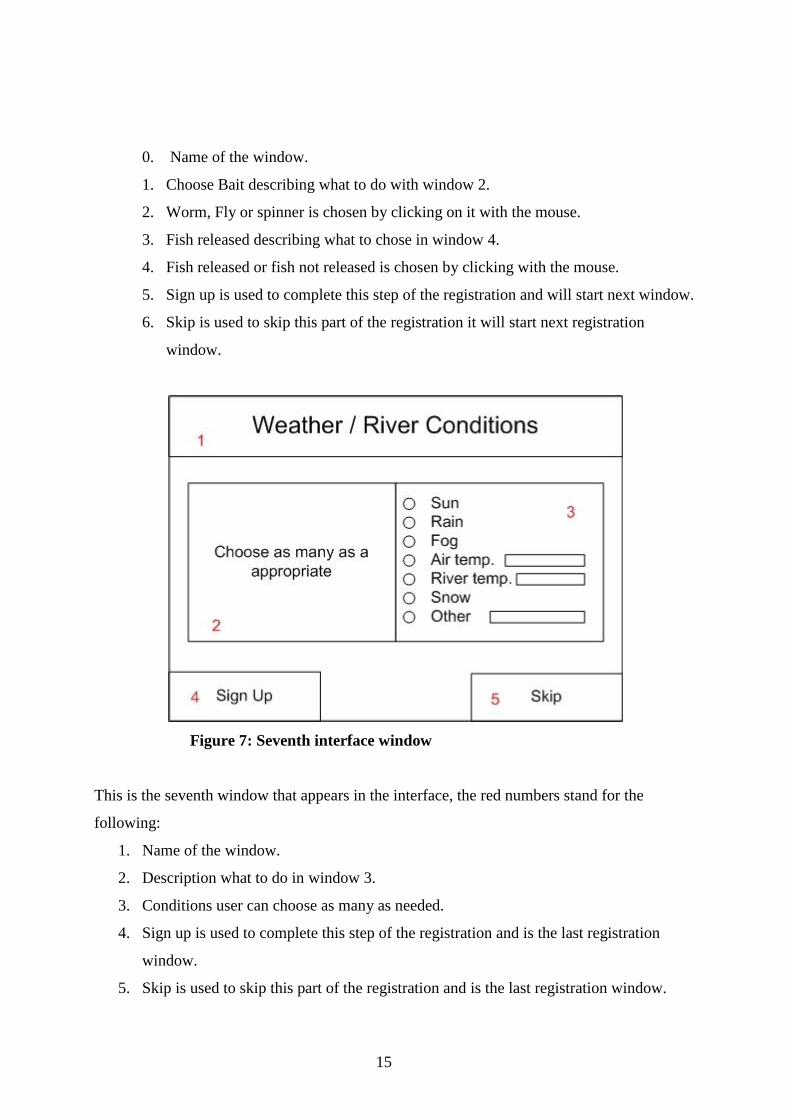
Figure 7: Seventh interface window
This is the seventh window that appears in the interface, the red numbers stand for the
following:
1. Name of the window.
2. Description what to do in window 3.
3. Conditions user can choose as many as needed.
4. Sign up is used to complete this step of the registration and is the last registration
window.
5. Skip is used to skip this part of the registration and is the last registration window.
16
2.3.2 Menu Sections Second Interface
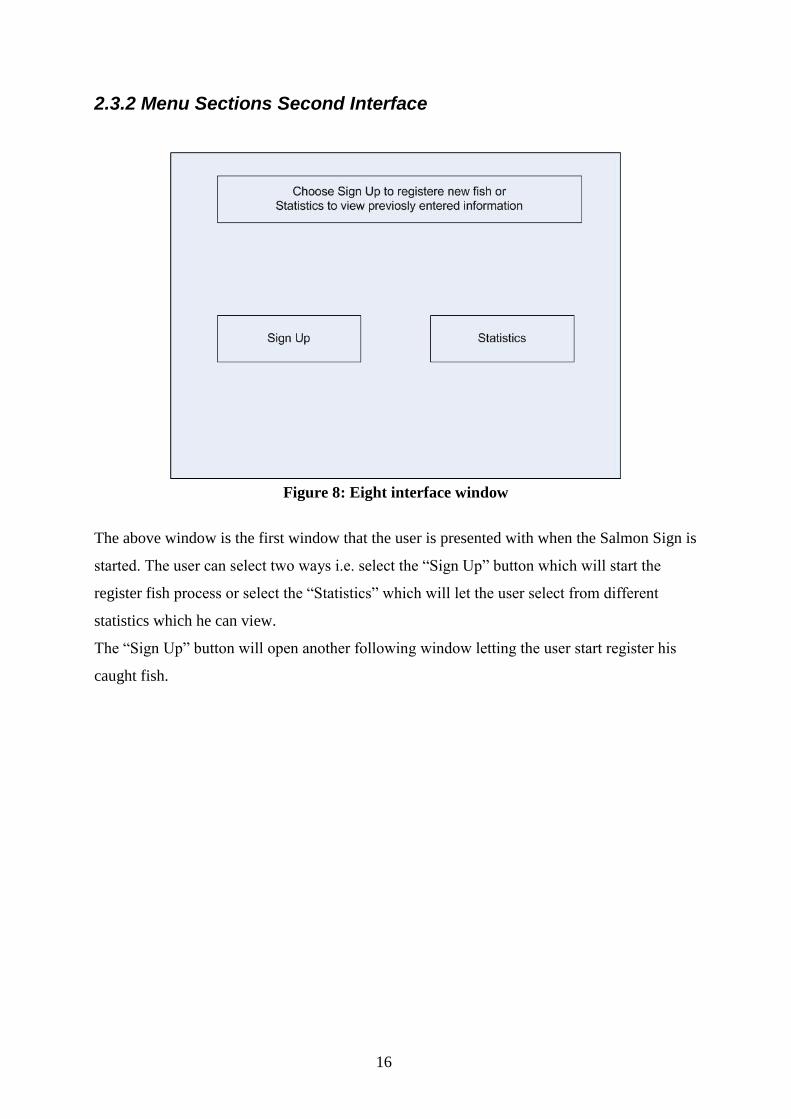
Figure 8: Eight interface window
The above window is the first window that the user is presented with when the Salmon Sign is
started. The user can select two ways i.e. select the “Sign Up” button which will start the
register fish process or select the “Statistics” which will let the user select from different
statistics which he can view.
The “Sign Up” button will open another following window letting the user start register his
caught fish.
17
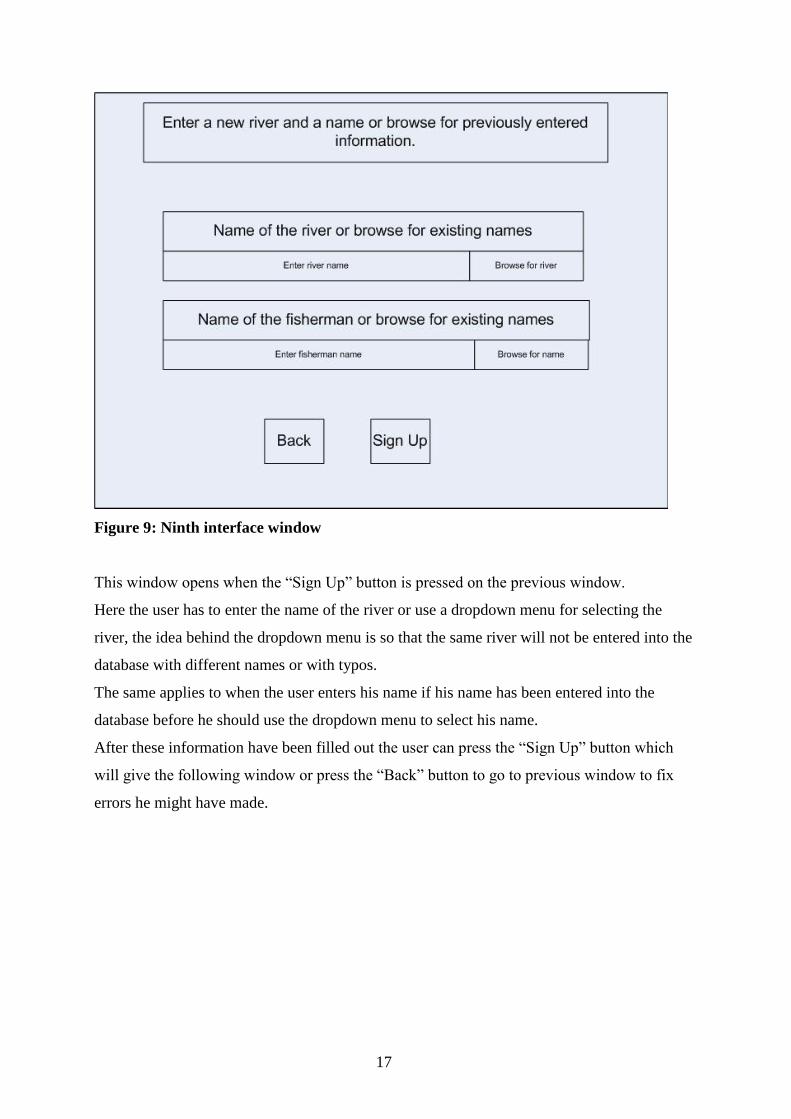
Figure 9: Ninth interface window
This window opens when the “Sign Up” button is pressed on the previous window.
Here the user has to enter the name of the river or use a dropdown menu for selecting the
river, the idea behind the dropdown menu is so that the same river will not be entered into the
database with different names or with typos.
The same applies to when the user enters his name if his name has been entered into the
database before he should use the dropdown menu to select his name.
After these information have been filled out the user can press the “Sign Up” button which
will give the following window or press the “Back” button to go to previous window to fix
errors he might have made.

18
Figure 10: Tenth interface window
This window hold information about the name of the place in the river the fish was caught the
number of the place and the date. The name of the place is entered by the user, this option
could be pre entered if the software is at a specific river so the user can then use a dropdown
menu to select the name of the place. The number of the place is entered and can also be pre
entered so the user selects from a dropdown menu if the software is located at a specific river.
The date is just the date the fish was caught and is entered in the form 25.10.2007 i.e. 25
October 2005, the user can’t enter a date in a wrong format since the Salmon Sign will present
the user with an error.
After entering all the information needed the user can press the “Sign Up” button or the
“Back” button, pressing the “Sign Up” button will present the user with the next window in
registering the fish, or he can press the “Back” window If he wants to go back and fix errors.

19
Figure 11: Eleventh interface window
This is the next window in the register process here the user enters the kind, gender, size and
the length of the fish.
For the kind radio buttons are used so the user can only select Salmon or Trout the same goes
for gender of the fish radio buttons are used so the user can only click one of these button, as
soon as the user has chosen snag or spawn the other option is no longer available. Size in
pounds is chosen by a dropdown menu where the numbers are 0.5 and up to 35+ these
numbers all have 0.5 between them. The number 35+ is the highest numbers since the largest
fish ever caught in Iceland is less than 35 pounds. The length in centimetres is done by the
keyboard i.e. the user enters the numbers him self. After talking to fishermen I decided not to
use a dropdown menu for the length in cm since fisherman often don’t know the length of the
fish and could use the dropdown menu to choose any length.
20
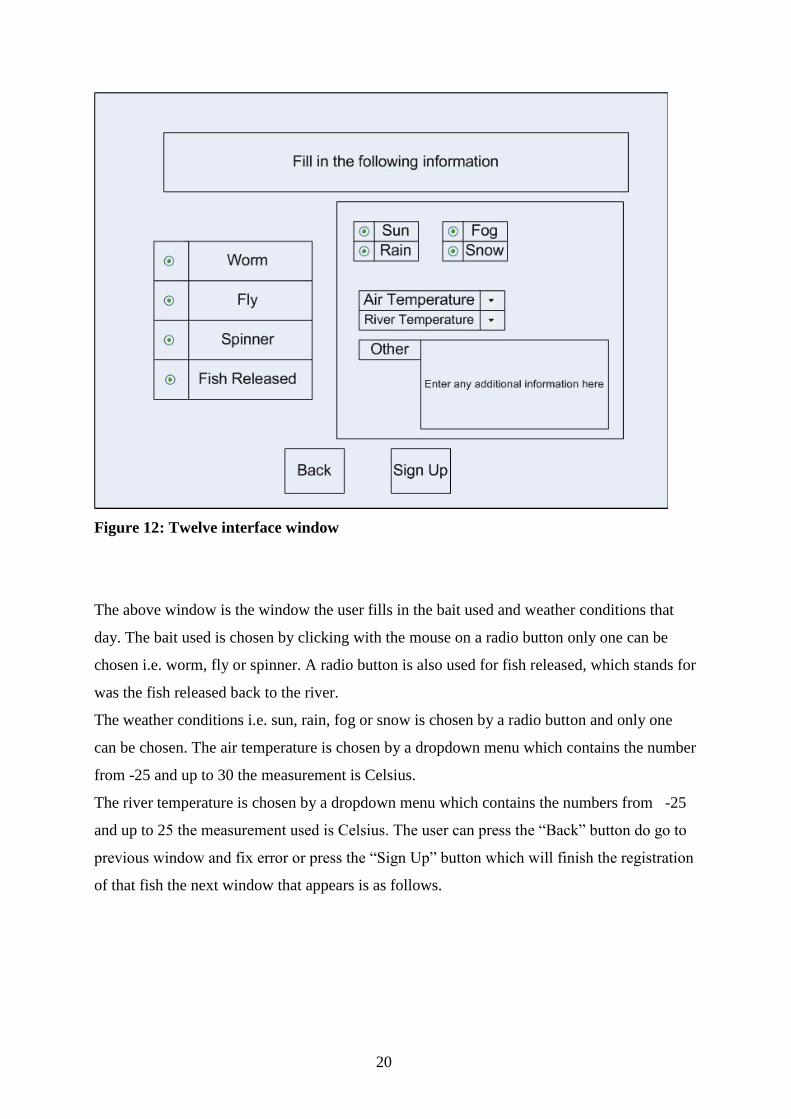
Figure 12: Twelve interface window
The above window is the window the user fills in the bait used and weather conditions that
day. The bait used is chosen by clicking with the mouse on a radio button only one can be
chosen i.e. worm, fly or spinner. A radio button is also used for fish released, which stands for
was the fish released back to the river.
The weather conditions i.e. sun, rain, fog or snow is chosen by a radio button and only one
can be chosen. The air temperature is chosen by a dropdown menu which contains the number
from -25 and up to 30 the measurement is Celsius.
The river temperature is chosen by a dropdown menu which contains the numbers from -25
and up to 25 the measurement used is Celsius. The user can press the “Back” button do go to
previous window and fix error or press the “Sign Up” button which will finish the registration
of that fish the next window that appears is as follows.

21
Figure 13: Thirteenth interface window
This window appears after the registration of the fish has been entered. Now the user has the
option of signing up another salmon for the same river, which will let the user skip the first
window in the registration process i.e. river name and fisherman name.
If the “Button sign up another salmon for new river” is pressed the user will be taken back to
the first window where he has to enter the river name and fisherman name again.
“Quit Program” window will simply close the Salmon sign up software, Only Administrator
and Operator access will have the option of pressing this button, the normal user cant close
the program.
“View Statistics” button will give the user the option of viewing statistics as the following
window shows. This is the same window that will appear if the user selects this option from
the first window.
22
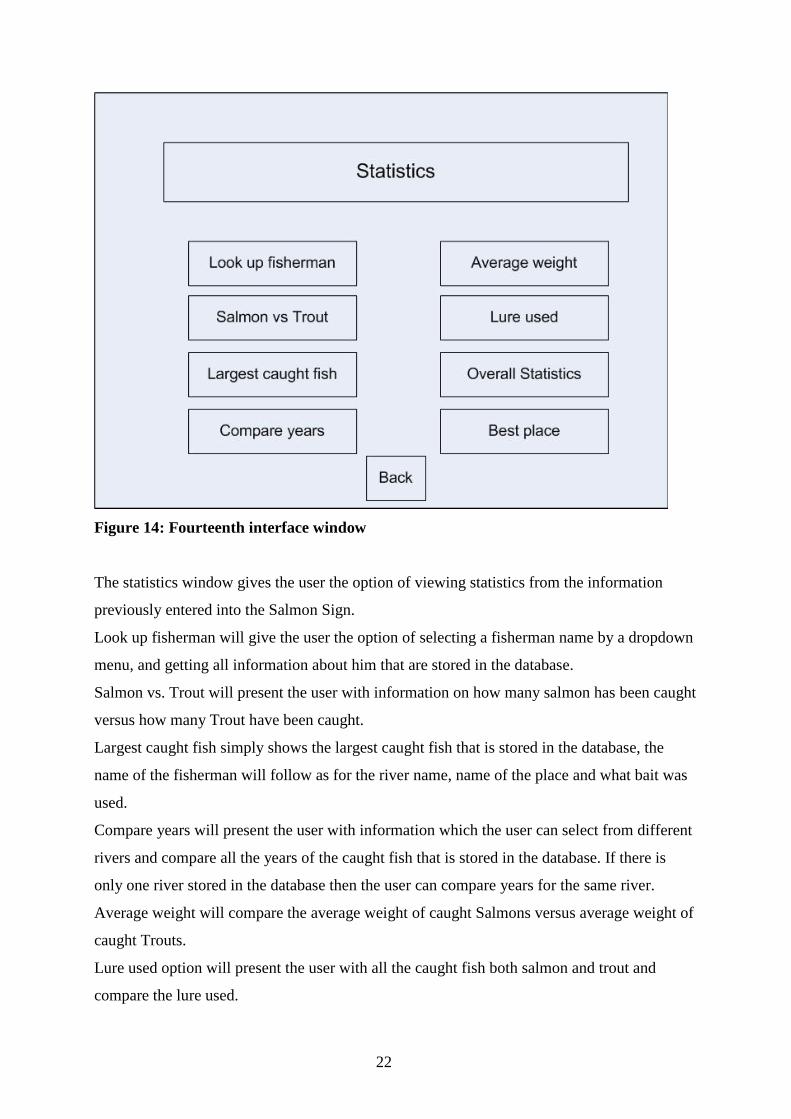
Figure 14: Fourteenth interface window
The statistics window gives the user the option of viewing statistics from the information
previously entered into the Salmon Sign.
Look up fisherman will give the user the option of selecting a fisherman name by a dropdown
menu, and getting all information about him that are stored in the database.
Salmon vs. Trout will present the user with information on how many salmon has been caught
versus how many Trout have been caught.
Largest caught fish simply shows the largest caught fish that is stored in the database, the
name of the fisherman will follow as for the river name, name of the place and what bait was
used.
Compare years will present the user with information which the user can select from different
rivers and compare all the years of the caught fish that is stored in the database. If there is
only one river stored in the database then the user can compare years for the same river.
Average weight will compare the average weight of caught Salmons versus average weight of
caught Trouts.
Lure used option will present the user with all the caught fish both salmon and trout and
compare the lure used.
23
Overall statistics will give the user overall statistics about a certain river, this will contain
Salmon vs. Trout
Largest caught fish
Average weight
Lure used
Best Place
The overall statistics will not present the user with detailed information of all the statistics but
an overall statistic window which is thought of as for quick viewing.
Best place option will present the user with a list of names in the river, with the best place at
the top of the list and the second best place below the fist place and so on.
The best place is the place where most fish has been caught.
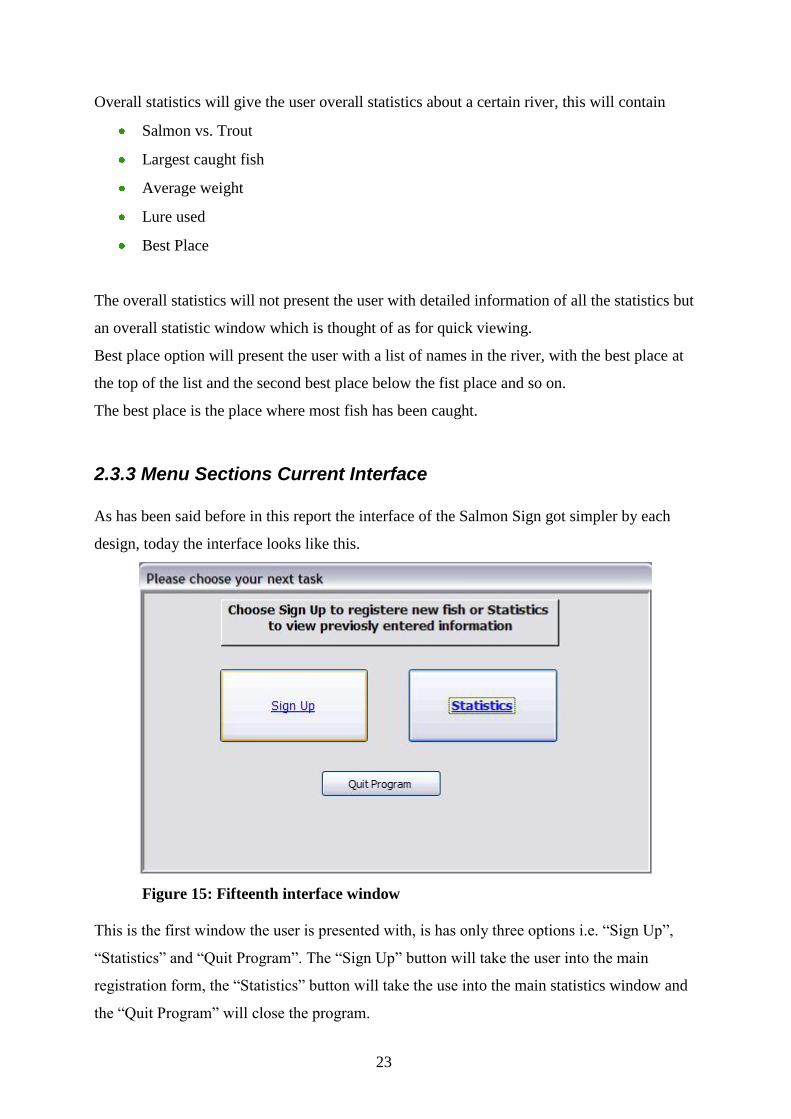
2.3.3 Menu Sections Current Interface
As has been said before in this report the interface of the Salmon Sign got simpler by each
design, today the interface looks like this.
Figure 15: Fifteenth interface window
This is the first window the user is presented with, is has only three options i.e. “Sign Up”,
“Statistics” and “Quit Program”. The “Sign Up” button will take the user into the main
registration form, the “Statistics” button will take the use into the main statistics window and
the “Quit Program” will close the program.
24
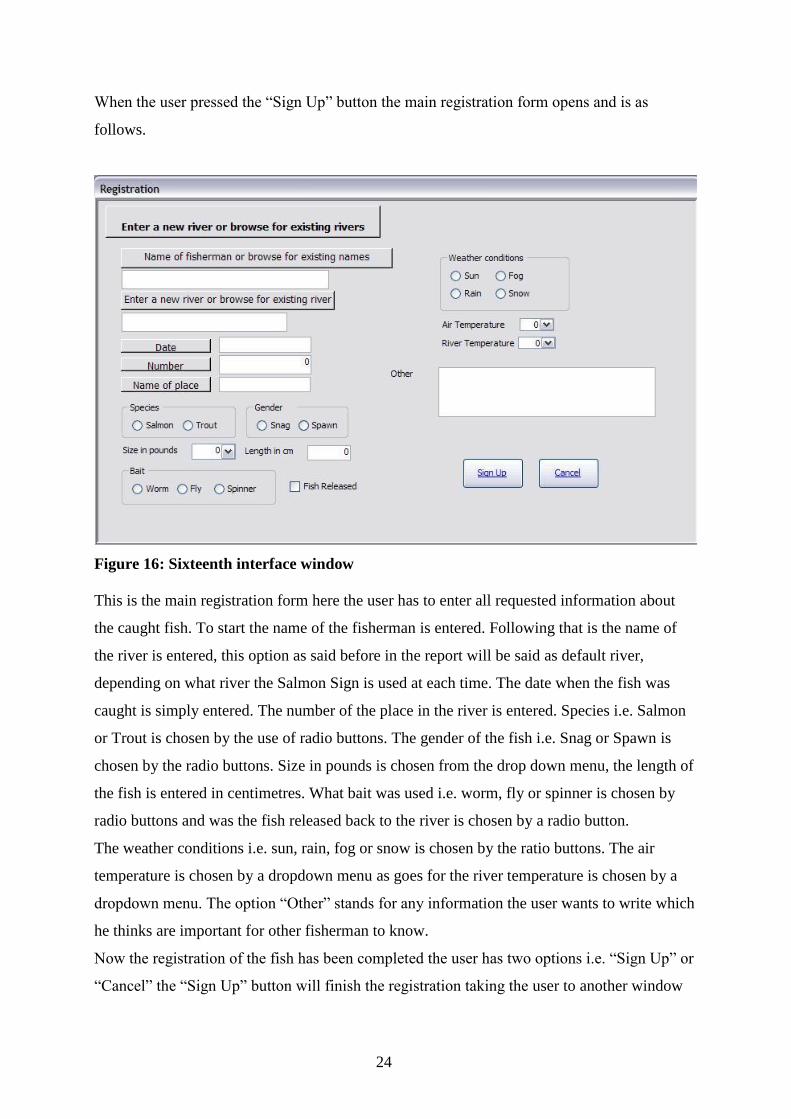
When the user pressed the “Sign Up” button the main registration form opens and is as
follows.
Figure 16: Sixteenth interface window
This is the main registration form here the user has to enter all requested information about
the caught fish. To start the name of the fisherman is entered. Following that is the name of
the river is entered, this option as said before in the report will be said as default river,
depending on what river the Salmon Sign is used at each time. The date when the fish was
caught is simply entered. The number of the place in the river is entered. Species i.e. Salmon
or Trout is chosen by the use of radio buttons. The gender of the fish i.e. Snag or Spawn is
chosen by the radio buttons. Size in pounds is chosen from the drop down menu, the length of
the fish is entered in centimetres. What bait was used i.e. worm, fly or spinner is chosen by
radio buttons and was the fish released back to the river is chosen by a radio button.
The weather conditions i.e. sun, rain, fog or snow is chosen by the ratio buttons. The air
temperature is chosen by a dropdown menu as goes for the river temperature is chosen by a
dropdown menu. The option “Other” stands for any information the user wants to write which
he thinks are important for other fisherman to know.
Now the registration of the fish has been completed the user has two options i.e. “Sign Up” or
“Cancel” the “Sign Up” button will finish the registration taking the user to another window
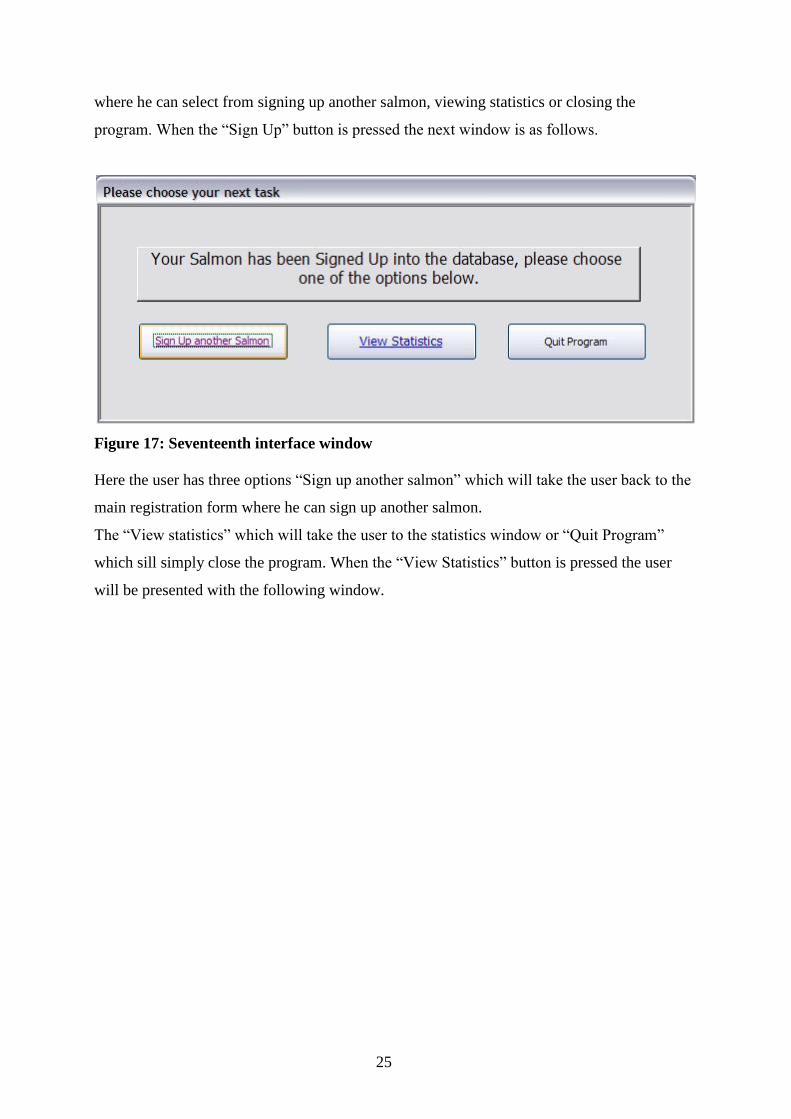
25
where he can select from signing up another salmon, viewing statistics or closing the
program. When the “Sign Up” button is pressed the next window is as follows.
Figure 17: Seventeenth interface window
Here the user has three options “Sign up another salmon” which will take the user back to the
main registration form where he can sign up another salmon.
The “View statistics” which will take the user to the statistics window or “Quit Program”
which sill simply close the program. When the “View Statistics” button is pressed the user
will be presented with the following window.
26
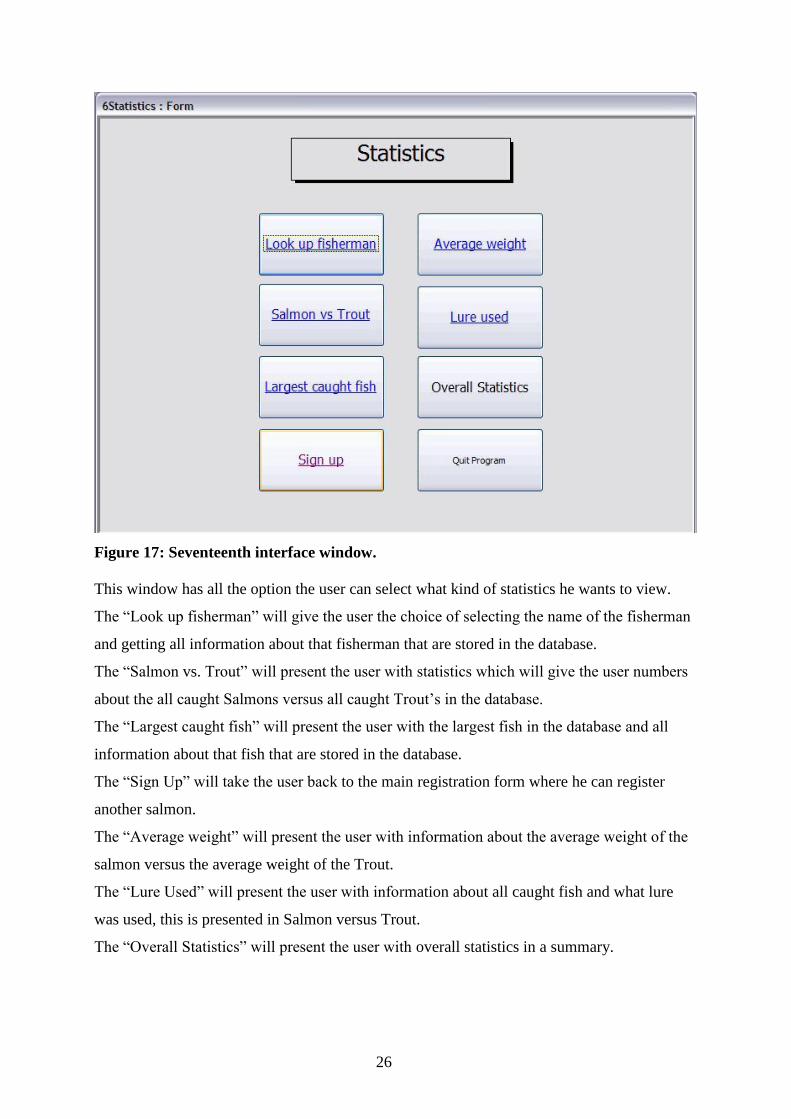
Figure 17: Seventeenth interface window.
This window has all the option the user can select what kind of statistics he wants to view.
The “Look up fisherman” will give the user the choice of selecting the name of the fisherman
and getting all information about that fisherman that are stored in the database.
The “Salmon vs. Trout” will present the user with statistics which will give the user numbers
about the all caught Salmons versus all caught Trout’s in the database.
The “Largest caught fish” will present the user with the largest fish in the database and all
information about that fish that are stored in the database.
The “Sign Up” will take the user back to the main registration form where he can register
another salmon.
The “Average weight” will present the user with information about the average weight of the
salmon versus the average weight of the Trout.
The “Lure Used” will present the user with information about all caught fish and what lure
was used, this is presented in Salmon versus Trout.
The “Overall Statistics” will present the user with overall statistics in a summary.
27
2.3.4 Demonstration Section Summary
The Salmon Sign starts of as one interface window where the user selects if he want to
register a new fish into the database or view statistics about caught fish previously entered
into the database.
When the option of registering new fish into the database is selected a main registration
window will open, in that window the user enters all the information about the fish and then
presses a button to finish that registration. After the registration is completed the user can
select if he want to register another fish into the database or view statistics. The view statistics
window will then give the user options of what statistics he wants to view.
2.3.5 Demonstration Section Detailed
The interface has been changed from the first design, it has been made as simple as possible,
there is simply one window appearing at a time were information can be entered.
Figure 15 is the first window the user will see when he starts to use the Salmon Sign, this
window only has three options i.e. “Sign Up” a fish, “View Statistics” or “Quit Program”.
To start this demonstration we will pretend the user pressed the “Sign Up” button, when the
“Sign Up” button is pressed another window will appear which the main window in
registering caught fish. Figure 16, or the main registration window it has all the information
needed to complete the registration.
Name of the fisherman is the first option the user is presented with, here the user enters his
name with the keyboard. The next option in the registration process is where the user enters
the river name by the keyboard. Date is the next option that the user has to fill out, after the
date there is the number of the place in the river which is entered using the keyboard. The
name of the place the fish was caught done by the keyboard. Species or the kind of fish is the
next option where the user has the option of selecting Salmon or Trout this is done by
choosing one option by the mouse. Gender of the fish is the next option which has snag for
male and spawn for female, this option is done by the mouse.
Size in pounds is selected by a dropdown menu where the user selects the size of the fish.
Length of the fish is selected by a dropdown menu where the user selects the length of the fish
in centimetres.
28
What bait was used to catch the fish is selected the option are
Worm
Fly
Spinner
Here the user can only select one option which is done by the mouse. Was the fish released
back to the river is the next option where the mouse is used to select. Weather conditions are
selected by the mouse and are as follows.
Sun
Rain
Fog
Snow
This selection is made by the mouse and only one can be selected.
Air temperature is chosen by a dropdown menu where the user selects the temperature that
day.
River temperature is chosen by a dropdown menu where the user selects the temperature of
the river that day.
The last option on the main registration form is called other, in this option the user can write
any information he wants this information could be e.g.
First fish ever caught
The fish had sea louse
The fish had a seal bite
This last option “Other” is important since the user can write any information he thinks is
important for other fishermen to know.
29
3.0 Related Work
An investigation about systems capable of solving this kind of work i.e. registering caught
fish was conducted the results were that a system that meets all the requirements does not
exist at this time. There is no system available at this time that can handle this kind of
registration and give statistics like the Salmon Sign is capable of doing.
Software that can do this kind of statistics is available such software is e.g. Excel. For the user
to use Excel some background knowledge is required. For this reason that there is no system
out there that can be used and fills all the requirements to do what Salmon Sign does, that’s
why the Salmon Sign is something that is needed for registering caught fish in rivers.
30
4.0 Design The design started of with a pen and a paper with drawing up the interface windows, the
interface started of with nine windows. Each window was drawn and all the information
needed to register caught fish was made e.g. buttons, text boxes, dropdown menus and radio
buttons. The design was taken to a fisherman that has been fishing for many years and lessee
of a river called Mýrarhvísl both the fisherman and the lessee found that the design looked
good but if I could make it simpler then it would look even better. After considering their
advice the interface windows were decreased down to six, with emerging them together.
Again the design of the interface was taken to the fisherman and the lessee and they liked it
better but still they thought the interface had too many windows. Again this problem was
tackled and the interface windows today are four. The first interface window is where the user
selects if he wants to sign up a new fish or view statistics. The second interface window is the
window where the user registers the fish into the database. The third form is if the user wants
to view statistics. The fourth form is where the use can select if he wants to sign up another
salmon or go straight to viewing statistics or quit program. The quit program option is only
available to the administrator access and the operator access.
The design of the tables started with nine tables i.e. one table for each form, soon it was
discovered that there was no reason to have some tables active. Forms where the user was
registering caught fish needed tables other forms didn’t need any table. Today the tables are
five one main table that hold most of the information needed and then there are three other
tables that hold information about the bait, the gender and the weather.

31
Figure 18. The tables.
The above picture shows the tables in the database as can be seen the
3KindGenderSizeLength table holds all the information about the caught fish. The species
table hold information about the name of the species which the 3KindGenderSizeLength table
gets the name of the specie from i.e. is it a Salmon or Trout. The Gender table hold the
information about the gender of the fish, this is where the 3KindGenderSizeLength table gets
the gender name from i.e. is it a snag or a spawn. The weather table hold information about
the weather conditions that day this is where the 3KindGenderSizeLength table gets the
information from i.e. sun, rain, fog or snow.
32
5.0 Implementation
This section addresses the Implementation of the Salmon Sign with description about how the
design changed from day to day and became simpler and why these changes were made.
Some of the changes were small and were done as the project evolved, other were bigger and
were made the last days of the project. These changes were considered necessary since the
current design was not working out. Since I had no knowledge of working with Access or
little as no knowledge of working with databases the design changed from week to week and
is today not what was started out with but much simpler and better designed.
5.1 Forms
The first forms were designed using a pen and a paper from there the forms were done using
Microsoft Visio 2003. By each design of the forms they got simpler and fewer, in my opinion
this is good for the user as for the administrator who has to handle the Salmon Sign.
The forms started of as nine forms, from there they went down to six, and today the forms are
four. Each form is simpler than from previous design, and has more information on them
The idea of having the user entering the river name into the form is something that changed
and is today set as default to the river that it will be handling registration for.
By doing this the form looks even simpler, where the user doesn’t have to fill out information
about the river.
5.2 Tables
The tables in the Salmon Sign have changed much since the first design, it started of as nine
tables i.e. one table for each form, this way was very confusing to me because keeping track
the record gave me a lot of problems.
The biggest problems with keeping track of the record was to be able to have the id follow the
form and going from one table to the next. After spending much time on the table part of the
design I decreased the tables by four. These tables still had problem with the record Id and
33
having the id follow the form to the next table still didn’t work, after much time spend and
many forums, the decision of having even fewer tables was made.
Today the tables are only four, there is a main table that holds all the information and that
table uses three other tables that hold information about species, gender and weather.
This way seems to work but it still has minor problems that will be fixed before the
demonstration of the project.
5.3 Queries
The query part of the Salmon Sign is the part that has to be worked on the most before the
demonstration. The queries work but the output is not with all the graphics that it will have.
The queries give the right output, but the output is raw and needs to be worked on.
5.4 Type of User
The type of user is not fully working, there will be three types of users which are
Administrator access
Operator access
User access
These three types of users all have different type of access to the Salmon Sign, the
administrator will have full access to every aspect of the program.
The operator will have access to e.g. set a default river to the program, set the name of the
place in the river and deleting records that are in the database but are not right registered.
The user access will only have access to the program and cant for that reason change or
modify anything.
34
6.0 Testing
As being stated, the system has not been tested on real users yet, that will be done when it has
been fully implemented and feedback then retrieved. The plan is to have the Salmon Sign up
tested at a river location with real users in real circumstances. As said before the lessee Fossar
had already approved of testing the Salmon Sign at a river called Mýrarhvísl, but that lessee
group lost the right to that river. Hopefully Stefán Sigðursson at the company Laxá will
approve of testing it at one of the river they lease.
Black box testing was made as the program developed to make sure all the functions in the
program worked the way they should work. They were made along with the design and
implementation of the project.
User testing was made with 2 users where they had to use the program and enter caught fish
into the database this was done to see how the tables would handle the registration. This
testing went well and gave positive feedback that the program was working and the user liked
the interface. The statistics part of the program gave raw output but an output that will be
fixed before the demonstration.

35
7.0 References
Access 2003, (2003), All-In-One Desk reference, Alan Simpson, Margaret Levine Young,
Alison Barrow, Indianapolis Indiana.
36
Appendix A – Diagram
Menu Sections First Interface Design
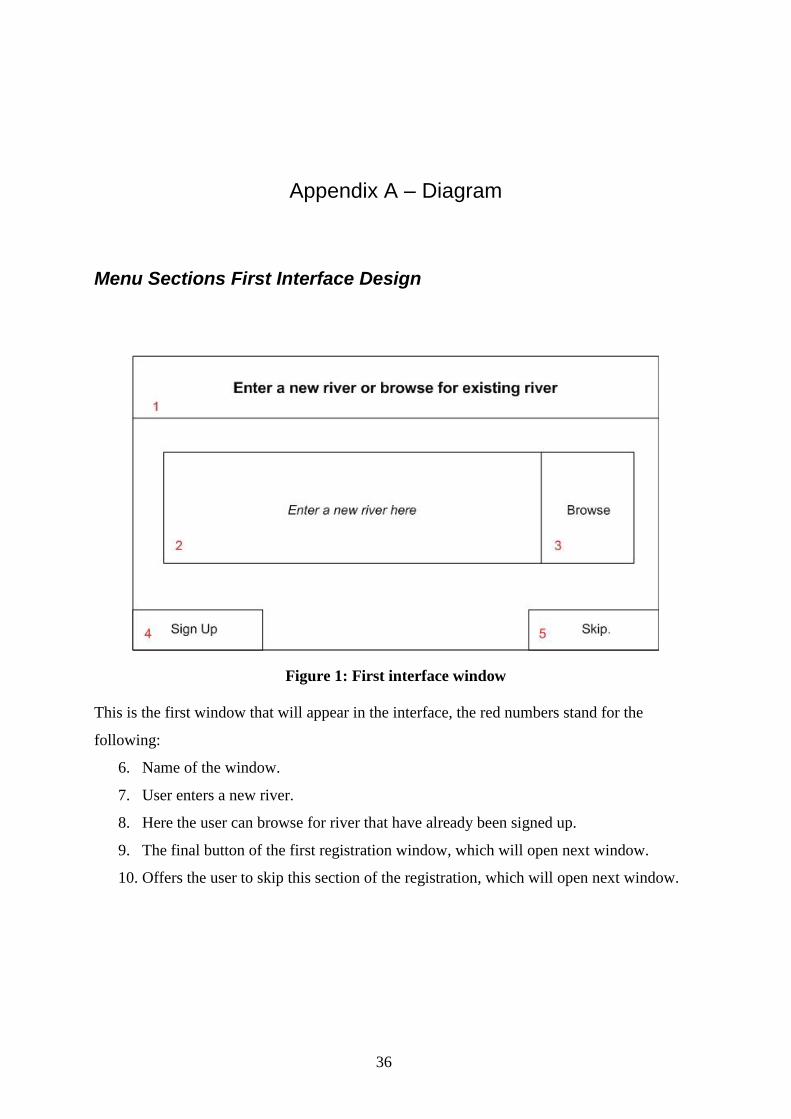
Figure 1: First interface window
This is the first window that will appear in the interface, the red numbers stand for the
following:
6. Name of the window.
7. User enters a new river.
8. Here the user can browse for river that have already been signed up.
9. The final button of the first registration window, which will open next window.
10. Offers the user to skip this section of the registration, which will open next window.

37
Figure 2: Second interface window
This is the second window that will appear in the interface, the red numbers stand for the
following:
5. Name of the window.
6. Place where the user enters the date the fish was caught.
7. Sign up is used to complete this step of the registration and will start next window.
8. Skip is used to skip this part of the registration it will start next registration window.
Figure 3: Third interface window
38
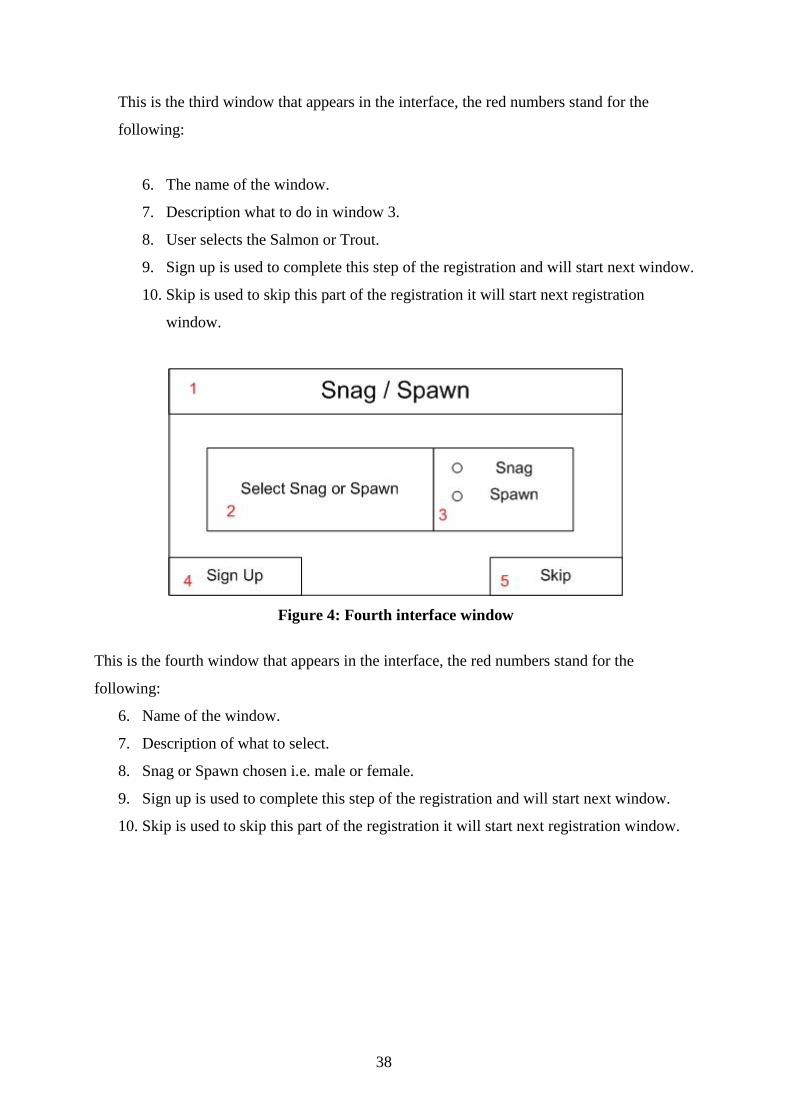
This is the third window that appears in the interface, the red numbers stand for the
following:
6. The name of the window.
7. Description what to do in window 3.
8. User selects the Salmon or Trout.
9. Sign up is used to complete this step of the registration and will start next window.
10. Skip is used to skip this part of the registration it will start next registration
window.
Figure 4: Fourth interface window
This is the fourth window that appears in the interface, the red numbers stand for the
following:
6. Name of the window.
7. Description of what to select.
8. Snag or Spawn chosen i.e. male or female.
9. Sign up is used to complete this step of the registration and will start next window.
10. Skip is used to skip this part of the registration it will start next registration window.

39
Figure 5: Fifth interface window
This is the fifth window that appears in the interface, the red numbers stand for the following:
6. Name of the window.
7. User enters name of the place the fish was caught.
8. Number of the place fish was coughed is written here.
9. Sign up is used to complete this step of the registration and will start next window.
10. Skip is used to skip this part of the registration it will start next registration window.
Figure 6: Sixth interface window
This is the sixth window that appears in the interface, the red numbers stand for the following:

40
7. Name of the window.
8. Choose Bait describing what to do with window 2.
9. Worm, Fly or spinner is chosen by clicking on it with the mouse.
10. Fish released describing what to chose in window 4.
11. Fish released or fish not released is chosen by clicking with the mouse.
12. Sign up is used to complete this step of the registration and will start next window.
13. Skip is used to skip this part of the registration it will start next registration
window.
Figure 7: Seventh interface window
This is the seventh window that appears in the interface, the red numbers stand for the
following:
6. Name of the window.
7. Description what to do in window 3.
8. Conditions user can choose as many as needed.
9. Sign up is used to complete this step of the registration and is the last registration
window.
10. Skip is used to skip this part of the registration and is the last registration window.

41
Menu Sections Second Interface Design
Figure 8: Eight interface window
The above window is the first window that the user is presented with when the Salmon Sign is
started. The user can select two ways i.e. select the “Sign Up” button which will start the
register fish process or select the “Statistics” which will let the user select from different
statistics which he can view.
The “Sign Up” button will open another following window letting the user start register his
caught fish.

42
Figure 9: Ninth interface window
This window opens when the “Sign Up” button is pressed on the previous window.
Here the user has to enter the name of the river or use a dropdown menu for selecting the
river, the idea behind the dropdown menu is so that the same river will not be entered into the
database with different names or with typos.
The same applies to when the user enters his name if his name has been entered into the
database before he should use the dropdown menu to select his name.
After these information have been filled out the user can press the “Sign Up” button which
will give the following window or press the “Back” button to go to previous window to fix
errors he might have made.
43
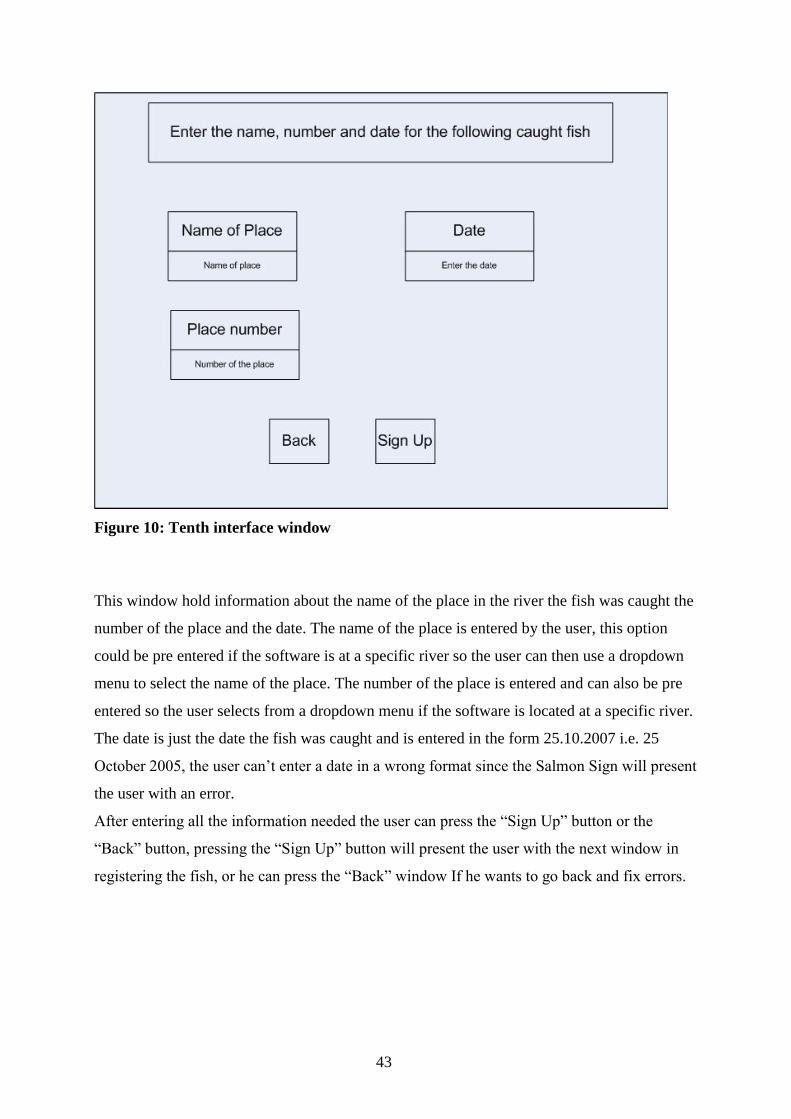
Figure 10: Tenth interface window
This window hold information about the name of the place in the river the fish was caught the
number of the place and the date. The name of the place is entered by the user, this option
could be pre entered if the software is at a specific river so the user can then use a dropdown
menu to select the name of the place. The number of the place is entered and can also be pre
entered so the user selects from a dropdown menu if the software is located at a specific river.
The date is just the date the fish was caught and is entered in the form 25.10.2007 i.e. 25
October 2005, the user can’t enter a date in a wrong format since the Salmon Sign will present
the user with an error.
After entering all the information needed the user can press the “Sign Up” button or the
“Back” button, pressing the “Sign Up” button will present the user with the next window in
registering the fish, or he can press the “Back” window If he wants to go back and fix errors.

44
Figure 11: Eleventh interface window
This is the next window in the register process here the user enters the kind, gender, size and
the length of the fish.
For the kind radio buttons are used so the user can only select Salmon or Trout the same goes
for gender of the fish radio buttons are used so the user can only click one of these button, as
soon as the user has chosen snag or spawn the other option is no longer available. Size in
pounds is chosen by a dropdown menu where the numbers are 0.5 and up to 35+ these
numbers all have 0.5 between them. The number 35+ is the highest numbers since the largest
fish ever caught in Iceland is under 35 pounds. The length in centimetres is done by the
keyboard i.e. the user enters the numbers him self. After talking to fishermen I decided not to
use a dropdown menu for the length in cm since fisherman often don’t know the length of the
fish and could use the dropdown menu to choose any length.

45
Figure 12: Twelve interface window
The above window is the window the user fills in the bait used and weather conditions that
day. The bait used is chosen by clicking with the mouse on a radio button only one can be
chosen i.e. worm, fly or spinner. A radio button is also used for fish released, which stands for
was the fish released back to the river.
The weather conditions i.e. sun, rain, fog or snow is chosen by a radio button and only one
can be chosen. The air temperature is chosen by a dropdown menu which contains the number
from -25 and up to 30 the measurement is Celsius.
The river temperature is chosen by a dropdown menu which contains the numbers from -25
and up to 25 the measurement used is Celsius. The user can press the “Back” button do go to
previous window and fix error or press the “Sign Up” button which will finish the registration
of that fish the next window that appears is as follows.
46
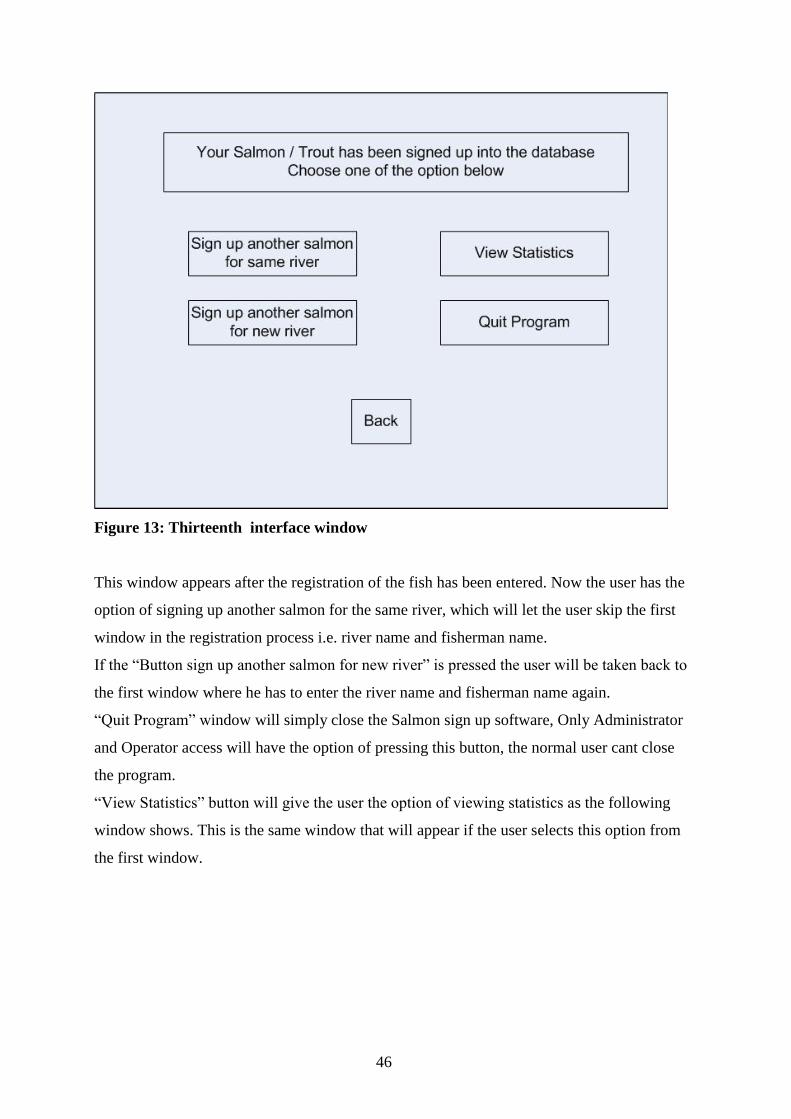
Figure 13: Thirteenth interface window
This window appears after the registration of the fish has been entered. Now the user has the
option of signing up another salmon for the same river, which will let the user skip the first
window in the registration process i.e. river name and fisherman name.
If the “Button sign up another salmon for new river” is pressed the user will be taken back to
the first window where he has to enter the river name and fisherman name again.
“Quit Program” window will simply close the Salmon sign up software, Only Administrator
and Operator access will have the option of pressing this button, the normal user cant close
the program.
“View Statistics” button will give the user the option of viewing statistics as the following
window shows. This is the same window that will appear if the user selects this option from
the first window.
47
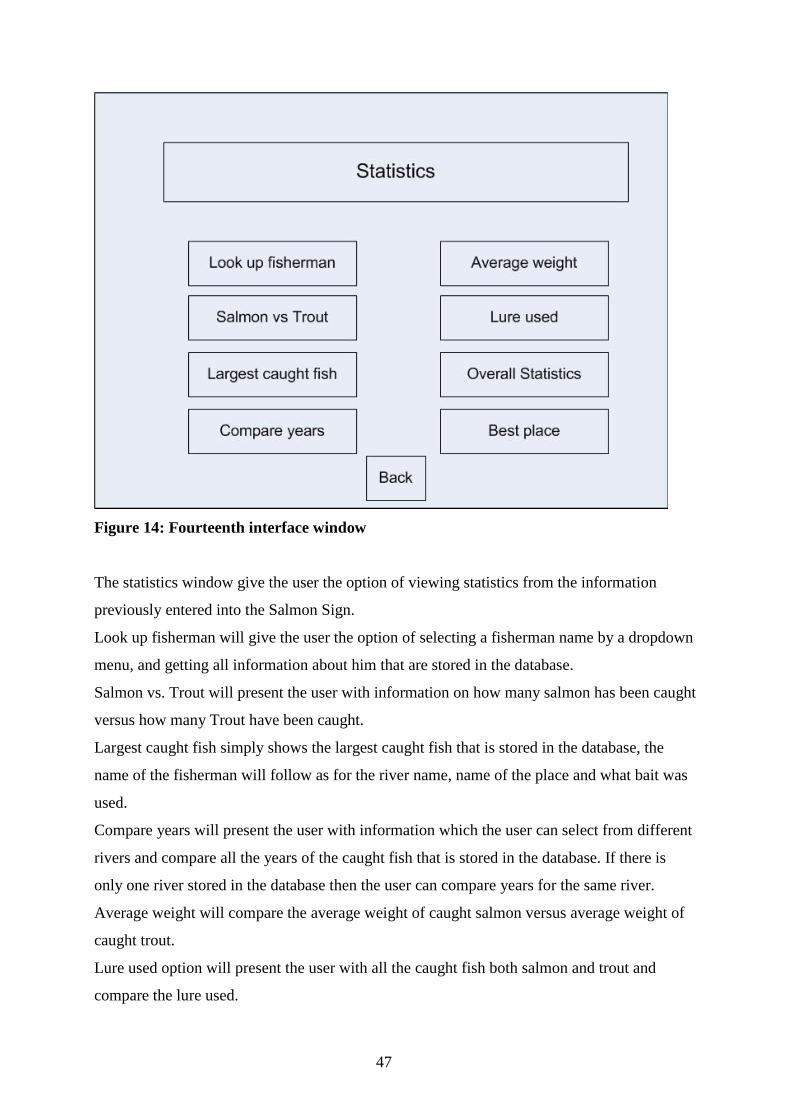
Figure 14: Fourteenth interface window
The statistics window give the user the option of viewing statistics from the information
previously entered into the Salmon Sign.
Look up fisherman will give the user the option of selecting a fisherman name by a dropdown
menu, and getting all information about him that are stored in the database.
Salmon vs. Trout will present the user with information on how many salmon has been caught
versus how many Trout have been caught.
Largest caught fish simply shows the largest caught fish that is stored in the database, the
name of the fisherman will follow as for the river name, name of the place and what bait was
used.
Compare years will present the user with information which the user can select from different
rivers and compare all the years of the caught fish that is stored in the database. If there is
only one river stored in the database then the user can compare years for the same river.
Average weight will compare the average weight of caught salmon versus average weight of
caught trout.
Lure used option will present the user with all the caught fish both salmon and trout and
compare the lure used.
48
Overall statistics will give the user overall statistics about a certain river, this will contain
Salmon vs. Trout
Largest caught fish
Average weight
Lure used
Best Place
The overall statistics will not present the user with detailed information of all the statistics but
an overall statistic window which is thought of as for quick viewing.
Best place option will present the user with a list of names in the river, with the best place at
the top of the list and the second best place below the fist place and so on.
The best place is the place where most fish has been caught.
49
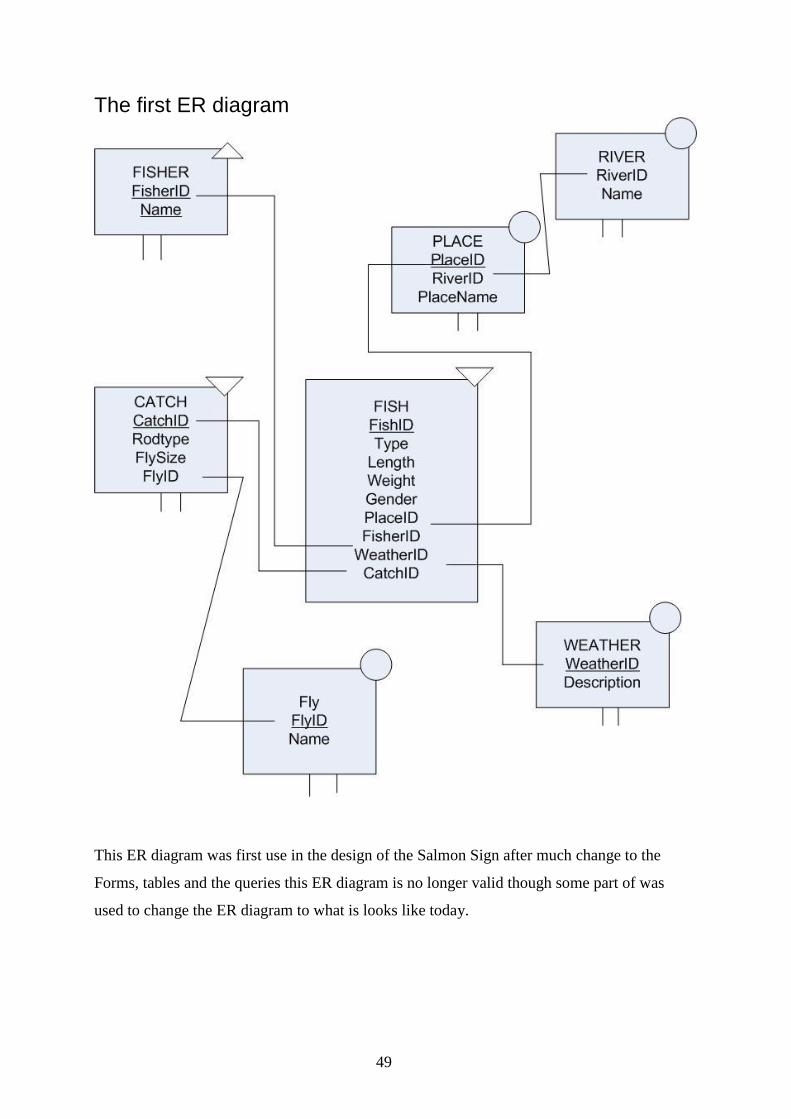
The first ER diagram
This ER diagram was first use in the design of the Salmon Sign after much change to the
Forms, tables and the queries this ER diagram is no longer valid though some part of was
used to change the ER diagram to what is looks like today.
50
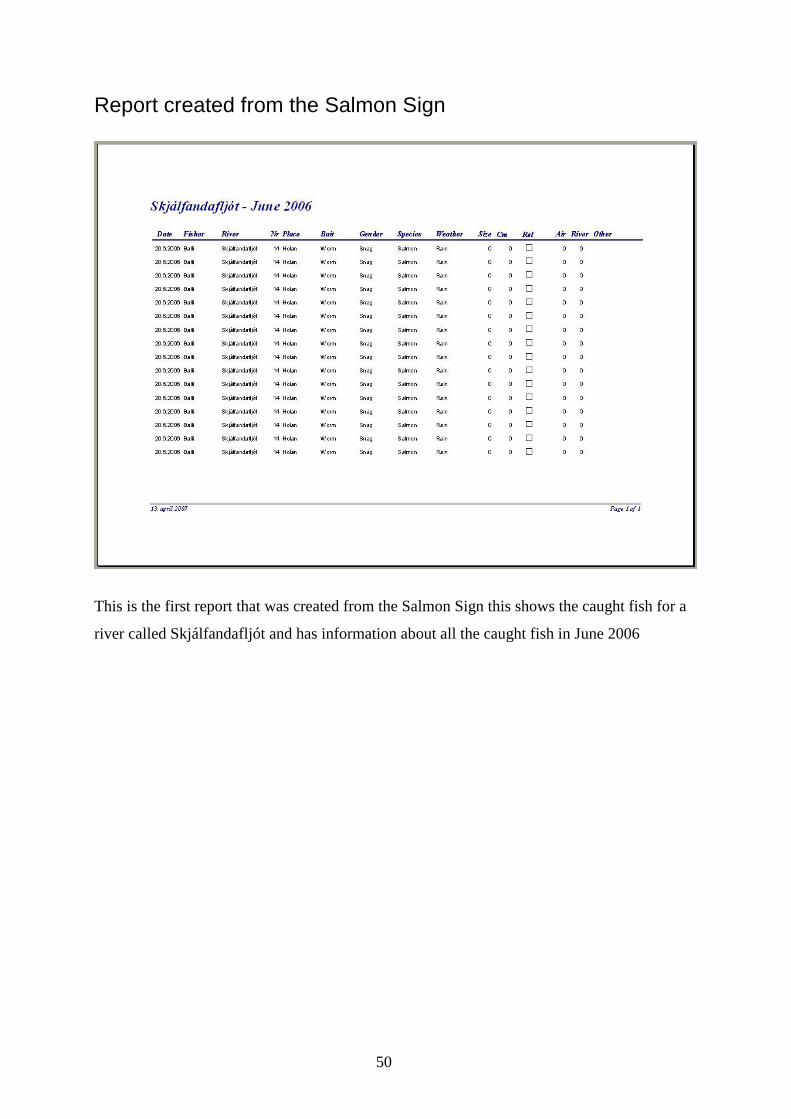
Report created from the Salmon Sign
This is the first report that was created from the Salmon Sign this shows the caught fish for a
river called Skjálfandafljót and has information about all the caught fish in June 2006
51
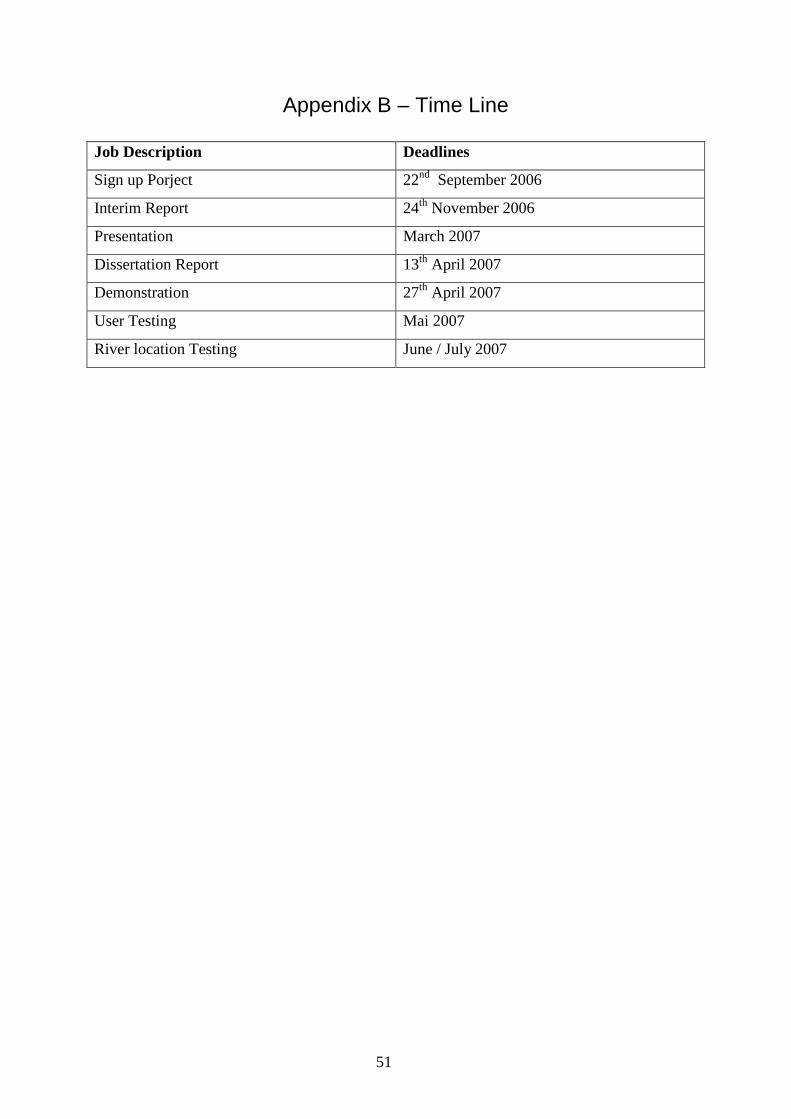
Appendix B – Time Line
Job Description Deadlines
Sign up Porject 22nd
September 2006
Interim Report 24th
November 2006
Presentation March 2007
Dissertation Report 13th
April 2007
Demonstration 27th
April 2007
User Testing Mai 2007
River location Testing June / July 2007