financial system procurement reference guide system procurement reference guide . procurement...
TRANSCRIPT
Financial System Procurement
Reference Guide

Procurement Reference Guide
June 11, 2012 i
Table of Contents
How to use this Reference Guide ........................................................................... 4
Introduction to Procurement ................................................................................... 5
Module Objectives ............................................................................................................. 5
Unit I: General System Process ............................................................................. 6
Unit Objectives................................................................................................................... 6
Chapter 1: General System Processes .................................................................. 7
Chapter Objectives ............................................................................................................ 7
Topic 1: Search for a Record ............................................................................................ 7
Topic 2: Run a Process ................................................................................................... 10
Topic 3: Run a Report ..................................................................................................... 15
Topic 4: Notify Process ................................................................................................... 19
Unit II: Purchase Order: Requisition to Receipt ................................................. 21
Unit Introduction............................................................................................................... 21
Unit Objectives................................................................................................................. 26
Chapter 1: Requisitions ........................................................................................ 27
Chapter Objectives .......................................................................................................... 28
Topic 1: Create Requisitions ........................................................................................... 29
Topic 2: Manage Requisitions ......................................................................................... 35
Topic 3: Budget Checking Requisitions ........................................................................... 39
Topic 4: Approve Requisitions ........................................................................................ 41
Topic 5: Cancel Requisitions ........................................................................................... 45
Topic 6: Close Re-Open Requisitions ............................................................................. 48
Topic 7: Reconciliation Workbench ................................................................................. 52
Chapter 2: Purchase Orders ................................................................................. 59
Chapter Objectives .......................................................................................................... 62
Topic 1: Create Purchase Orders ................................................................................... 64
Topic 2: Manage Purchase Orders ................................................................................. 75
Topic 3: Budget Check Purchase Orders ........................................................................ 76
Topic 4: Approve Purchase Orders ................................................................................. 79
Topic 5: Dispatch Purchase Orders ................................................................................ 83
Topic 6: Manage and Approve Purchase Order Changes ............................................... 88
Topic 7: Close and Re-Open Purchase Orders ............................................................... 97

Procurement Reference Guide
June 11, 2012 ii
Topic 8: Document Tolerance ....................................................................................... 101
Chapter 3: Receive Goods and Services ........................................................... 102
Chapter Objectives ........................................................................................................ 102
Topic 1: Receive and Inspect Goods and Services ....................................................... 103
Chapter 4: Year End Process ............................................................................. 107
Chapter Objectives ........................................................................................................ 107
Topic 1: Year End Process ............................................................................................... 1
Chapter 5: Procurement Contracts ........................................................................ 5
Chapter Objectives ............................................................................................................ 5
Topic 1: Procurement Contracts ....................................................................................... 7
Unit III: Accounts Payable: Voucher to Payment................................................ 14
Unit Introduction............................................................................................................... 14
Unit Objectives................................................................................................................. 18
Chapter 1: Voucher ............................................................................................... 19
Topic 1: PO Voucher....................................................................................................... 21
Topic 2: Year End Process ............................................................................................. 29
Topic 3: Non-PO Voucher ............................................................................................... 36
Topic 4: ChartField Editing .............................................................................................. 45
Topic 5: Matching ........................................................................................................... 48
Topic 6: Budget Checking ............................................................................................... 50
Topic 7: Document Tolerance ......................................................................................... 54
Topic 8: Voucher Approval .............................................................................................. 56
Topic 9: Voucher Build .................................................................................................... 59
Topic 10: Voucher Maintenance ..................................................................................... 64
Topic 11: Voucher Post ................................................................................................... 66
Topic 12: Voucher Close ................................................................................................. 68
Topic 13: Voucher Delete ............................................................................................... 71
Topic 14: Voucher Unpost .............................................................................................. 73
Topic 15: Voucher Unmatch ............................................................................................ 75
Topic 16: Imprest Fund Initial Funding and Reimbursement Vouchers ........................... 77
Topic 17: City Year End Processing ................................................................................ 78
Chapter 2: Payment ............................................................................................... 79
Chapter Objectives .......................................................................................................... 80
Topic 1: Pay Cycle Manager Steps ................................................................................. 81

Procurement Reference Guide
June 11, 2012 iii
Topic 2: Business Procedure – Pay Cycle Process ......................................................... 85
Topic 3: Business Procedure – Post Payment ................................................................ 93
Topic 4: Business Procedure – City Accepted/Rejected File ........................................... 95
Topic 5: Business Procedure – Cancel Payment ............................................................ 96
Chapter 3: Vendor Maintenance........................................................................... 99
Chapter Objectives .......................................................................................................... 99
Topic 1: Add City Vendor .............................................................................................. 100
Topic 2: City Vendor Maintenance ................................................................................ 106
Chapter 4: Inquiries and Reports ....................................................................... 111
Chapter Objectives ........................................................................................................ 111
Topic 1: Accounts Payable Inquiries ............................................................................. 112
Topic 2: Accounts Payable Reports .............................................................................. 117
Unit IV: Accounts Payable: Student Payment .................................................. 119
Unit Introduction............................................................................................................. 119
Unit Objectives............................................................................................................... 119
Chapter 1: Student Refunds ............................................................................... 120
Chapter Objectives ........................................................................................................ 120
Topic 1: Student Refund Transactions – Voucher Processing ....................................... 121
Topic 2: Student Refund Transactions – Payment Processing ...................................... 125
Unit V: Accounts Payable: Bank Statement to Cash ........................................ 130
Unit Introduction............................................................................................................. 130
Unit Objectives............................................................................................................... 130
Chapter 1: Bank Statement to Cash .................................................................. 131
Chapter Objectives ........................................................................................................ 131
Topic 1: Bank Statement to Cash – Import Bank Statement.......................................... 132
Topic 2: Bank Statement to Cash – Enter Bank Statement ........................................... 135
Topic 3: Bank Statement to Cash – Reconcile Statements ........................................... 138
Appendix........................................................................................................................ 141
A: P-Card processing ..................................................................................................... 141
B: Travel Card Processing ............................................................................................. 144
C: Run Reports .............................................................................................................. 146

Procurement Reference Guide
June 11, 2012
4
How to use this Reference Guide This reference guide l contains sections that include information on business processes related to Procurement. The first section is the introduction of the module. It is followed by Chapter and Topic sections which include a step summary, detailed information, field definitions and screen shots.
Below is a description for each section type contained in the reference guide.
Introduction
The Introduction contains conceptual information on Procurement. It also describes the business processes that are used in Procurement.
Module Objectives
The Module Objectives contain a bulleted list of the learning objectives for the module.
Unit
The Unit information consists of a high-level explanation of a single content area of a module.
Chapter
The Chapter information includes introductory concepts that are needed for understanding the business processes that are presented in the chapter.
Chapter Objectives
The Chapter Objectives contain a bulleted list of the learning objectives for the chapter.
Procedure
The Procedure section contains the relevant application system navigational path used to locate a component page within the application in which the user will complete applicable transactions.
Topic
Topics instruct the user on executing a specific business process.
Step Summary
Step Summary consists of the high-level steps needed to complete a business process.
Detailed Information
Detailed information contains a complete narrative of a business process, including screenshots and tables of items (field names) with their definitions and/or selection criteria.
Appendix
Appendix may contain the following types of information:
Running Reports Step-by-step guide to running reports and processes in CUNYfirst

Procurement Reference Guide
June 11, 2012
5
Introduction to Procurement The Procurement module allows institutions to manage all aspect of CUNY purchasing activity. Procurement supports the major procurement processes including General Processes, Purchase Orders, Accounts Payable. Within Procurement users will learn to process and manage:
Requisitions
Purchase Orders
Receive Goods and Services
Year End Processes
Contracts
Vouchers
Payments
Vendor Maintenance
Inquiries and Reports
Accounts Payable: Student Accounts Payable: Banks/Cash
Module Objectives Upon completion of this module, the learner will be able to:
Demonstrate understanding of the key concepts and terminology in the Procurement Module.
Perform tasks related to the management and maintenance of Procurement Activities.

Procurement Reference Guide
June 11, 2012
6
Unit I: General System Process
Unit Objectives Upon completion of this module, the learner will be able to:
Search
Run reports
Run processes and as needed notify interested parties

Procurement Reference Guide
June 11, 2012
7
Chapter 1: General System Processes
Chapter Objectives Upon completion of this chapter, the learner will be able to:
Search for a record or list of records
Run and monitor the Process Scheduler
Create a custom report and run a report
Notify by email interested parties with a link to a specific page
Topic 1: Search for a Record This topic will provide instruction on searching for a specific record or list of records. The Search functionality is similar across all applications. The criteria (fields) for each search are shown on the beginning page. Criteria data is entered in one or more of the variables, or fields. If the criteria are left blank, then up to 300 rows of the search results will be displayed. Please know that if 300 display, there are invariably more results. CUNYfirst will only show 300 at a time. In this case, revise your search criteria to narrow your results. Search functionality is available to everyone who uses the applications and is based on their security access.
Authorized Roles
CU_FSPO_General_Buyer
CU_FSFS_Production_Support
Step Summary
To Search for a record or list of records:
1. Navigate to the desired menu item. 2. Enter search criteria into a field or fields. 3. Select the Search button. 4. Select the desired result value.
Procurement Reference Guide
June 11, 2012
8
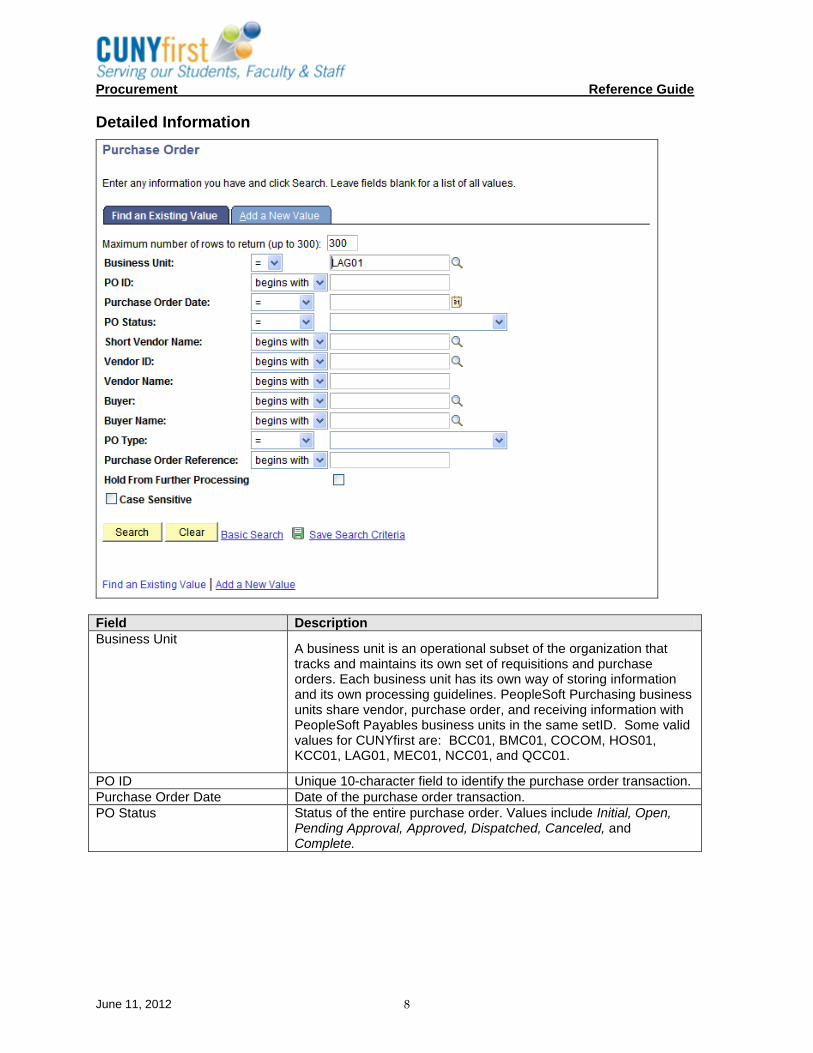
Detailed Information
Field Description
Business Unit A business unit is an operational subset of the organization that tracks and maintains its own set of requisitions and purchase orders. Each business unit has its own way of storing information and its own processing guidelines. PeopleSoft Purchasing business units share vendor, purchase order, and receiving information with PeopleSoft Payables business units in the same setID. Some valid values for CUNYfirst are: BCC01, BMC01, COCOM, HOS01, KCC01, LAG01, MEC01, NCC01, and QCC01.
PO ID Unique 10-character field to identify the purchase order transaction.
Purchase Order Date Date of the purchase order transaction.
PO Status Status of the entire purchase order. Values include Initial, Open, Pending Approval, Approved, Dispatched, Canceled, and Complete.

Procurement Reference Guide
June 11, 2012
9
Field Description
Short Vendor Name Provides an alternate search key to access vendor data. The system enables you to assign the same vendor short name to multiple vendors, and it makes the short name unique by adding a numeric value to the end. For example, if you enter the vendor short name SMITH, when you save, the system makes the short name SMITH-001. If you ever have another vendor for whom you want to use SMITH as the short name, the system enters SMITH-002, and so on.
Vendor ID 10-character unique ID for a vendor.
Vendor Name A purchase order can have only one vendor. When you enter a vendor, the vendor order location, price location, primary buyer, freight terms, payment terms, vendor currency, dispatch methods, and VAT option appear by default on the purchase order. You can override the defaults from the vendor on the Vendor Details page.
Buyer A purchase order can only have one buyer. Buyers available to a user are defined on the User Preferences - Procurement: Purchase Order Authorizations page.
Buyer Name Displays the buyer’s description and ID. The buyers are those that are authorized for the user ID on the User Preferences - Procurement Page: Purchase Order Authorizations page.
PO Type Select the type of purchase order that you are creating from a user-defined selection list. This value, with the exception of Kanban, is not used in purchase order processing, but can be used for informational purposes.
Purchase Order Reference Enter any reference information. The information that you enter here appears on the purchase order approval pages.
Hold From Further Processing This check box temporarily prevents further processing of the purchase order. The purchase order will not be eligible for approval, unapproval, cancelation, closure, or dispatch processing.
In addition, budget checking is now determined by the selection criteria that you define as part of the Source Transaction definition for the Commitment Control Budget Processor process and whether you have selected the Hold From Further Processing check box for the purchase order.
If the HOLD_STATUS = N for the Selection Criteria for the Source Transaction, and the Hold From Further Processing check box is selected, and you perform budget checking, no budget checking will occur for the purchase order.
If the HOLD_STATUS is not entered as Selection Criteria for the Source Transaction, and the Hold From Further Processing check box is selected, and you perform budget checking the budget checking process will execute for the purchase order.
If the HOLD_STATUS = Y for the Selection Criteria for the Source Transaction, and the Hold From Further Processing check box is selected, and you perform budget checking, the budget checking process will execute but will only process the purchase orders that are marked on hold.

Procurement Reference Guide
June 11, 2012
10
Topic 2: Run a Process This topic will instruct users on running or monitoring the Process Scheduler, which is also known as the server processes responsible for running and managing batch processes including SQR, Application Engine, and Crystal Reports. Each process has a name which is attached to a Run Control ID. The Run Control ID is unique to each user authorized to run the process. It identifies not only the processes but also variables that a specific user requires. Only CUNY personnel with the proper security access will be permitted to run processes.
Authorized Roles:
CU_FSPO_General_Buyer
CU_FSFS_Production_Support
CU_FSPO_PO_Processor
Step Summary
1. Navigate to the process to be run. 2. Find an Existing Run Control ID or Add a New Value to input a Run Control ID. 3. On the Process Control page, enter criteria to run the process, and click the Save button. 4. Click the Run button. 5. Click the OK button. 6. Select the Process Monitor link. Validate checkbox “Save on Refresh” is checked. 7. Monitor the Run Status. Run Status column will indicate “Success” and Distribution Status will
indicate “Posted”. Select the Details hyperlink to launch the Process Details page. 8. Click the View/Trace Log hyperlink to view a list of logs associated to the process.
Detailed Information

Procurement Reference Guide
June 11, 2012
11

Procurement Reference Guide
June 11, 2012
12
Field Description
Run Control ID A run control ID is a unique name used to identify which inputs on a page are saved and used to run a report or process. It is case sensitive, can be up to 30 characters in length and can contain underlines and dashes. It cannot contain spaces. The same run control ID can be used for different reports or processes (except in the case of dynamic reports, each of these must have their own unique run control ID) and the inputs from the different pages are saved unique to the particular report or process. There are some cases where you might want to create multiple run control IDs for the same report or process to be run under different circumstances.
Language Set to English.
Business Unit A business unit is an operational subset of the organization that tracks and maintains its own set of requisitions and purchase orders. Each business unit has its own way of storing information and its own processing guidelines. PeopleSoft Purchasing business units share vendor, purchase order, and receiving information with PeopleSoft Payables business units in the same setID. Some valid values for CUNYfirst are: BCC01, BMC01, COCOM, HOS01, KCC01, LAG01, MEC01, NCC01, and QCC01.
To Select the business unit to dispatch purchase orders based on purchase order business unit values.

Procurement Reference Guide
June 11, 2012
13
Field Description
PO ID Select purchase order ID to dispatch. Unique 10-character field to identify the purchase order transaction.
PO Status Status of the entire purchase order. Values include Initial, Open, Pending Approval, Approved, Dispatched, Canceled, and Complete.
Contract SetID Select a contract setID, if the purchase orders that you are to dispatch are associated with a contract.
Contract ID Select a contract number, if the purchase orders that you are to dispatch are associated with a contract.
Release Select the release number of the contract.
From Date Select dates to dispatch purchase orders based on purchase order date value.
Through Date Select dates to dispatch purchase orders based on purchase order date value.
Vendor ID 10-character unique ID for a vendor.
Buyer Buyers available to a user are defined on the User Preferences - Procurement: Purchase Order Authorizations page.
Fax Cover Page Select a fax cover page if some of the purchase orders that you are dispatching are to be sent by fax. Define fax cover letters in the system on the Fax Cover Letters page.
The PO Dispatch/Print process writes to the fax control file the file name associated with the selected cover letter combined with the cover letter file extension that you defined on the Dispatch Configuration page.
Statuses to Include In the Statuses to Include group box, select whether to include purchase orders with approved, dispatched, or pending cancel statuses in this run of the dispatch. When a specific purchase order ID is not entered, you must select at least one option.
Approved
Dispatched Select to re-dispatch a dispatched purchase order or to print copies of dispatched purchase orders
Pending Cancel
Dispatch Methods to Include Select which dispatch methods to include in this run of the process. Selected values are only used as a part of the data selection criteria. To change the method by which the purchase order is to be dispatched, you must modify the dispatch method on the Maintain Purchase Order - Purchase Order page.
FAX
EDX
Phone
Miscellaneous Options
Chartfields Select Recycled AND Valid ChartFields to process purchase orders regardless of whether the ChartFields are valid or recycled.
Select Recycled Chartfields to process only purchase orders with distribution lines whose ChartFields are identified as Recycled. (PO_LINE_DISTRIB.CHARTFIELD_STATUS = 'R').
Select Valid Chartfields to process only purchase orders with distribution lines whose ChartFields are identified as Valid. (PO_LINE_DISTRIB.CHARTFIELD_STATUS = 'V').

Procurement Reference Guide
June 11, 2012
14
Field Description
Change Orders Select Changed Orders to process only purchase orders that have been changed.
Select Changed and Unchanged Orders to process changed and unchanged purchase orders.
Select Unchanged Orders to process only purchase orders that have never been changed.
Print Changes Only If you select to dispatch changed orders in the Change Orders field, the Print Changes Only check box becomes available. Select to dispatch only the changes to the purchase order, rather than the entire purchase order.
If you create the purchase order from a contract with the Release To Single PO Only option selected, select this check box to have the system send only the latest changes to the supplier.
Test Dispatch Select this check box to perform a test run of the dispatch. When you select this check box, the process runs, but the purchase orders processed do not appear in Dispatched status, and the purchase orders are printed with the word Unauthorized at the bottom of the page. This enables you to test the EDX, email, or fax setup without updating the system.
Print Copy Select this check box to produce a printed copy of each processed purchased order. If any of the processed purchase orders are done by phone, fax, email, or EDX, the system prints a hard copy for review.
Print BU Comments Select this check box to print comments (terms and conditions) defined for the PeopleSoft Purchasing business unit on the purchase order upon dispatch. Assign comments to the PeopleSoft Purchasing business unit by clicking the Comments link on the Purchasing Definition - Business Unit Definition page.
Sort By
Print PO Item Description Select this check box to print the item description from the Maintain Purchase Order - Purchase Order page, instead of from the Purchasing Attributes page. The item description stored on the purchase order is in the base language and may have been modified on the purchase order.
Print Duplicate Select this check box to print the word Duplicate on each purchase order.

Procurement Reference Guide
June 11, 2012
15
Topic 3: Run a Report This topic outlines the steps necessary to run generic or custom any report in Procurement. Only CUNY personnel with the proper security access will be permitted to run processes.
Each report has a name which is attached to a Run Control ID. The Run Control ID is unique to each user authorized to run the report. It also identifies not only the report but may also include variables that a specific user requires. Only CUNY personnel with the proper security access will be permitted to run processes.
Authorized Roles
CU_FSPO_General_Buyer
CU_FSPO_PO_Approver
CU_FSFS_Production_Support
CU_FSPO_Requestor
CU_FSPO_Requisition_Approver
CU_FSPO_General_Receiver
CU_FSPO_Proc_Func_Security
CU_FSPO_Workflow_Approval_Adm
CU_FSPO_Purchasing_Sys_Maint
CU_FSPO_PO_Processor
CU_FSPO_Proc_Inquiry
CU_FSPO_Reporting
CU_FSPO_General_Inspector
Step Summary
To Run a Report:
1. Navigate to any report or custom report menu. 2. Find an Existing Run Control ID or Add a New Value to input a Run Control ID. 3. Enter report criteria and click the Save button. 4. Click the Run button which launches the Process Scheduler page. 5. Click the OK button which launches the server to run the report and returns you to the Run
Control page. Note the Process Instance Number. 6. Select the Process Monitor link, select the Refresh button until the Run Status indicates
“Success” and the Distribution Status indicates “Posted”. 7. Select the Go Back to Link which returns you back to the Run Control page. 8. Select the Report Manager link and select the Administration tab. 9. Select the Details link.

Procurement Reference Guide
June 11, 2012
16
10. In the File List Section, select the filename.PDF hyperlink. This will display the report in a new window.
Detailed Information

Procurement Reference Guide
June 11, 2012
17

Procurement Reference Guide
June 11, 2012
18
Field Description
Run Control ID A run control ID is a unique name used to identify which inputs on a page are saved and used to run a report or process. It is case sensitive, can be up to 30 characters in length and can contain underlines and dashes. It cannot contain spaces. The same run control ID can be used for different reports or processes (except in the case of dynamic reports, each of these must have their own unique run control ID) and the inputs from the different pages are saved unique to the particular report or process. There are some cases where you might want to create multiple run control IDs for the same report or process to be run under different circumstances.
Language Set to English.
Report Request Parameters
From Date Select dates to dispatch purchase orders based on purchase order date value.
Through Date Select dates to dispatch purchase orders based on purchase order date value.
Vendor SetID Select or enter the setID for the vendor.
Vendor ID Select or enter a 10-character unique ID for a vendor.
Buyer Buyers available to a user are defined on the User Preferences - Procurement: Purchase Order Authorizations page.

Procurement Reference Guide
June 11, 2012
19
Topic 4: Notify Process This process provides email capability throughout the system wherever there is an output that could be shared with interested parties. Interested parties can be notified via CUNY email from within the application. Only CUNY personnel with the proper security access will be permitted to utilize this functionality. The email the user receives will contain the message the sender wrote and a link to the specific page from which the sender is emailing.
Only users with security roles for HR and Payroll may access these pages using a link from the Notify process. All other email recipients will receive a security error when they click on this link.
Authorized Roles
All Users
Step Summary
To Notify:
1. Navigate to the component page. 2. Click the Notify button. The Send Notification page will display. 3. Enter Notification Details (To, CC, BCC, Priority, Subject, and Message). 4. Click the Ok button to send the notification, click the Cancel button, to cancel the notification, or
click the Apply button to apply the changes.
Detailed Information

Procurement Reference Guide
June 11, 2012
20
Field Description
To Enter the email addresses. Use a semi-colon to separate multiple addresses. CC
BCC
Priority Valid values are: 1-High, 2-Medium, and 3-Low.
Subject Enter a subject description.
Template Text Click on the up and down arrows to review the template.
Message Enter your message.

Procurement Reference Guide
June 11, 2012
21
Unit II: Purchase Order: Requisition to Receipt
Unit Introduction The purchase to pay process begins when a Requisitioner decides that goods or services are needed to complete a work task or goal. Prior to the purchase of goods and services there must be sufficient justification to demonstrate that there is a need for the goods and services to be provided and that funding is available. Procurement personnel are expected to make informed purchasing decisions in line with the University’s procurement policies.
Create & Manage Requisitions A requisition must be created in order to request goods or services for purchase. Requisition data is entered through the CUNYfirst eProcurement online Requisition document. For CUNY, the request is entered using special request functionality, which allows the user to enter a full manual description of the goods or services to be procured.
Requisitions can also be created by using the “copy” requisition functionality, regardless of the status of the source requisition. Requisitioners can copy a canceled requisition or a requisition that has canceled lines to a new requisition.
Requisitions Linked to Contracts If the Requisitioner is requesting goods or services that they want to link to a contract or they are requesting goods or services based on specific contract pricing or terms the Requisitioner can provide specific contract information on the requisition. Requisition Approvals CUNYfirst delivered workflow will be used and configured to have Supervisory Approval, Chartfield Approval, and Category Approval (Hazmat, IT, Furnishings). The workflow will notify the approver by email and a worklist entry generated when a requisition needs a specific approval. During the approval step, a notification will be sent to the requester by email that the requisition has been approved or denied (with reason) and after approval, the next approver will be notified of the impending approval. After an approval or rejection the previous approver will be notified by email and worklist, that the requisition has been denied or recycled. Supervisory should come first, Chartfield and Category should be run in parallel after the supervisory approval.
Supervisory Approval: all requisitions, regardless of dollar amount and based on the Requisitioner’s name entered, will require one level of supervisory approval.
Category Approval: requisitions lines with specific category codes such as hazardous material, IT, Furniture and Equipment etc. will be routed to specific individuals for the additional approval.
Chartfield Approval: requisitions lines with department accounting distribution will require the approval of the department budget owner. The approval routing will be based on the department entered into the department field of the Chartfield accounting distribution string.
There will be a set of Chartfield approvals that will be based solely on the Department entered in the accounting distribution. In this case, the Operating Unit will have no role in the routing. It was determined that ad hoc approvals would be used for Requisitions charging Special Programs.
There will be a set of Chartfield approvals that will be based on various combinations of Department and Special Initiatives entered in the accounting distribution. In this case, the combination of the

Procurement Reference Guide
June 11, 2012
22
Chartfields will determine the routing. It was determined that ad hoc approvals would be used for Reqs charging Special Programs. Requisition Budget Check Once the requisition information is entered and approved, the Budget Checking process is run. The Budget Checking process compares the total amounts on each transaction (distribution) line to the available amounts in the referenced General Ledger budget. During the process, pre-encumbrances are generated against the requisitions and the requisition is ready to be submitted for approval. When the requisition is submitted, the Workflow is initiated, and route through the approval cycle. If a requisition fails budget check, the Requisitioner must edit the requisition to change the accounting distribution and resubmit it to workflow approvals or seek additional budget funds. The process for obtaining additional funds will be handled externally to these Procurement processes.
Cancel or Change Requisitions
A Requisitioner may choose to cancel the entire requisition or any line on a requisition at any time without involving other users such as the Buyer as long as that requisition line has not been sourced to a purchasing order. Changes made to a requisition prior to sourcing to a PO will re-initiate the requisition approval and budget check processes.
The Requisitioner can NOT make changes to the requisition after it has been sourced to a purchase order. If changes are required the Requisitioner must contact the Buyer directly to cancel the purchase order to reopen the sourced requisition lines or ask the Buyer to make changes to the purchase order directly.
When a Requisitioner changes or updates a requisition after it has been approved but before sourcing to a PO or dispatch, the user is notified online at the time the user executes the “Edit Requisition” function, that the approval process will be reinitiated after the changed are made.
Issue Purchase Orders from Requisitions After all approvals and budget checks occur, requisitions are ready for selection for sourcing to Vendors. Manually selecting requisitions for sourcing will enable CUNY to maintain a finer degree of control than available using batch requisition selection and purchase order creation. Manual selection provides Buyers with these options:
Source individual items that have ordered by description. This is also available using batch processing.
Assign or change a vendor. This feature is not available using batch processing.
Add requisition to existing purchase orders.
Purchasing Directors will use the Requisition Selection pages to manually assign Buyers to work specific requisitions. The Buyer will then review the Approved Requisition to verify that the line item is assigned to the correct category and if there is additional processing required (Bid, Contract, and Special Handling).
After the requisition is selected as a candidate for PO creation by the Buyer, the sourcing selection process can begin. The sourcing process can be either be a manual process or an “Auto” or systematic process using the CUNYfirst Auto Sourcing process (Req Select, PO Calc, PO Build). Manual Sourcing of Requisitions to PO’s Buyers can manually “select” requisitions for sourcing by copying those requisitions to a purchase order using delivered CUNYfirst “copy from” functionality. Manually sourcing requisitions to purchase orders does not require the running of any system processes.

Procurement Reference Guide
June 11, 2012
23
Auto Sourcing of Requisitions to PO’s Buyers can use several system processes to “Auto” source requisitions to purchase orders.
PO Calculation
After the requisition is selected, the Buyer will execute the PO Calculations process which performs the processing necessary to create a purchase order. After running the PO Calculations process, the Buyer can review the results of the process and make changes using the Sourcing Workbench before the purchase order is created. After the PO Calculations process is completed, the Create Purchase Orders process is run to create the purchase order.
During PO Calc, the system may source the requisition to another vendor based on contracts in the system or other criteria. Buyers can review the results of the PO Calculations process on the Sourcing Workbench - Sourcing Details page and change the recommended vendor. If the vendor is changed through the Sourcing Workbench, the Buyer must run the PO Calculations process again to recalculate the staged row. Staged purchase orders are now ready to be turned into actual purchase orders.
PO Creation
CUNY will use the Create Purchase Orders functionality to create purchase orders from rows in the staging tables that have been processed by the PO Calculations process. The Create Purchase Orders process maintains the purchase order groupings created by the PO Calculations process to create purchase orders.
The Create Purchase Orders process determines:
The purchase order ID
Assigns line, schedule, and distribution numbers
Creates contract release information for staged rows.
Document Tolerances
The resulting purchase orders are subject to the document tolerances set up in configuration. Document tolerance checking compares the balance of all documents distributions tied to the requisition distribution based on a tolerance tied to a specific Chartfield. Document tolerances compare the extended amount of the requisition lines to the extended amounts of the PO lines to identify differences.
If a PO line is within the configured document tolerance, then the PO proceeds to budget check.
If a PO line is outside of the configured document tolerance, then:
Buyer is required to create a requisition change order that will be subject to Supervisory approval only.
Override document tolerance will be allowed by Purchasing Director only.
The Requisitioner must be contacted to either submit a new requisition or authorize the override of the tolerance.
PO Budget Check & Approval
Once all PO lines pass document tolerance, they proceed (Click the Check box) to run the Budget Checking process and are submitted for approval. At Budget Check, encumbrances are generated for purchase orders and the pre-encumbrance set by the requisition is relieved. At CUNY, all purchase orders must be reviewed and approved by the Purchasing Director or their designee. As a result, there will be a pool of approvers for PO approval. As long as one of the approvers in the pool approves the document, the status will change to “approve prior to dispatch”.
PO Dispatch
Once approved, purchase orders are available for dispatch. The PO Dispatch process is run and the Purchase Order is:

Procurement Reference Guide
June 11, 2012
24
printed for manual faxing, signatures, postal mailing, or special handling and/or
sent by email to the vendor automatically by the system or manually by the Buyer.
The dispatch process can be run on demand for each purchase order or the batch process can be scheduled to run at specific times using the CUNYfirst Process Scheduler. The status of the Purchase Order will reflect when it has been successfully dispatched.
PO Change Orders
After dispatch, one of three things can happen to the purchase order:
The purchase order can be changed by the Buyer thus creating a change order which sets the status back to Pending Approval.
The purchase order can be closed by the Buyer which changes the status to Complete. Purchase Orders should never be closed until a receipt for the goods/services has been entered in to the system. For additional detail, see the Close/Reopen Purchase Orders section of this document.
Canceling the entire purchase order changes the purchase order status to Canceled. Canceling a purchase order can be done using the purchase order Reconciliation Workbench page. Individual lines on a purchase order can be canceled without the entire purchase order being canceled.
A purchase order does not have to be dispatched to be canceled. It can be canceled at any time during its life cycle until it has been received or vouchered. After the quantity has been received or vouchered Buyers cannot cancel it.
When there is a need for a Buyer to change a purchase order that has been dispatched, the Buyer will contact the Requisitioner ask for an additional requisition or the original Requisitioner will initiate a requisition change request. This requisition change request will be subject to only supervisory approval and then budget check. Once approved and a valid budget check status is obtained, the requisition change order is sourced to the original purchase order and a purchase change order is generated. The purchase change order must be budget checked and approved by the Purchasing Director prior to dispatch to the supplier.
When Buyers use online pages to update previously dispatched purchase orders, the actual purchase order is updated and the change order tracking tables are updated with the change to the purchase order.
Chartfield changes do not trigger change orders in delivered CUNYfirst. The State and City encumbrance interfaces require these chartfield changes to be sent as distinct transactions every time there is a change to chartfields on the distribution lines of purchase orders. Buyers must manually initiate a purchase order change order when making changes to distributions lines on a purchase order.
Receiving
CUNYfirst Purchasing provides components that will enable appropriate CUNY personnel to receive goods, create receipts, and enter receiving details. When persons enter a requisition it is sourced to purchase order. The purchase order is then dispatched to the vendor, which makes it available for receiving. Once a shipment is received at the loading dock or at the requester’s desktop, a receipt is recorded based on the quantity that is received. Requisitioners or receiving personnel can also receive by amount only.
When a receipt is entered, The CUNYfirst application assigns a receipt ID to each saved receipt. Because a one-to-one ratio does not exist between POs and receipts—a PO might have multiple receipt IDs due to multiple shipments or a shipment might have multiple POs—this ID is stored separately from the dispatched purchase order or the original requisition. During the voucher entry a process matches the receipts to the POs (to confirm that the goods were shipped) before the vendor is paid.

Procurement Reference Guide
June 11, 2012
25
Requisitioners or Receiving personnel in the central receiving department will record receipts by entering received items against a valid PO by using the receiving pages in CUNYfirst Purchasing.
All CUNY campuses will require a formal CUNYfirst inspection for selected categories which will result in a 4-way matching process for voucher payment. A separate inspection will be created in the system for each of these selected categories. The inspection process to be followed will be detailed in the inspection instructions.
Requisition Close
CUNY will use the Close Requisitions process to close requisitions that are fully canceled or fully sourced and no longer need to be modified. Closing the requisitions allows the Commitment Control Budget Processor process to liquidate pre-encumbrance budget amounts for outstanding requisitions.
Although the Close Requisitions process is optional and can be run at any time, it should be run at the end of each month to help improve the efficiency of the requisitioning process.
CUNY will determine how often the Close Requisition process can be run. CUNY can schedule the Close Requisitions process to run at an interval using the CUNYfirst Process Scheduler or it can be run manually using the Close Requisitions page.
Requisitioners and Buyers will use the Requisition Reconciliation Workbench to preview the results of the Close Requisitions process on selected transactions. Once the Requisitioner or Buyer confirms that the process will produce the desired results, Requisitioners can run the Close Requisitions process from the Requisition Reconciliation Workbench.
Requisition Re-Open
CUNY Buyers will use the Requisition Reopen process to reopen previously closed requisitions. The Requisition Reopen process will be used to reopen requisitions in two different ways:
Undo changes made by the last run of the Close Requisition process. This process reverses the effects of the Close Requisitions process on the most recently processed group of requisitions.
Reopen any requisition at any time. This process gives the ability to reopen a range of requisitions, a specific requisition, or all requisitions associated with a business unit.
A requisition that has been cancelled at the header level is not eligible for reopening.
Purchase Orders Close
Although the Close Purchase Orders process is optional and can be run at any time, it should be run at the end of each month to help improve the efficiency of the purchase order process.
CUNY will determine how often the Close Purchase Order process can be run. CUNY can schedule the Close Purchase Order process to run at an interval to be determined using the CUNYfirst Process Scheduler or it can be run manually using the Close Purchase Order page.
Buyers will use the Purchasing Reconciliation Workbench to preview the results of the Close PO process on selected transactions. Once the Buyer confirms that the process will produce the desired results, the Buyer can run the Close PO process from the Purchasing Reconciliation Workbench.
Purchase Order Re-Open
CUNY will use the Purchase Order Reopen process to reopen previously closed purchase orders.
Using the Purchase Order Reopen process CUNY will have the ability to reopen purchase orders in two different ways:
Undo changes made by the Close Purchase Orders process. The process reverses the effects of the Close Purchase Orders process on the most recently processed group of purchase orders.

Procurement Reference Guide
June 11, 2012
26
Reopen any purchase order at any time. This process gives the ability to reopen a range of purchase orders, a specific purchase order, or all purchase orders associated with a business unit.
A purchase order that has been cancelled at the header level is not eligible for reopening.
Buyers will initiate the re-open purchase order process only as an extraordinary event and with high-level business approval. This is required as encumbrances to the State and City must reconcile.
Budget Year-End Processing
CUNY will close a budget at the end of a budget period and re-establish a new budget in the next fiscal period. CUNY wishes to “roll over” certain outstanding purchase order transactions and make them active in the next budget period. In order to accomplish this, the following actions must occur:
Buyers will access the purchase order to be rolled over via the Mange Purchase Orders page. From this page, the Buyer will execute the “Create Change Order” function. The Buyer should then access the Header Details of the PO. In the header details, the Buyer will find the Accounting Date field under Process Control Options. The value in this field must be changed to the first day of the new budget period.
The Buyer should then access the Chartfield distributions of the line to be rolled over via the Manage Purchase Orders page. The Buyer should insert a new distribution line with the accounting distribution to be charged in the new fiscal y ear. The Budget Year filed under the Details tab should be changed to the same date as the Accounting Date in the PO Header Details. The accounting distribution line referencing the previous budget year should be cancelled and the transaction Saved.
Unit Objectives Upon completion of this module, the learner will be able to:

Procurement Reference Guide
June 11, 2012
27
Chapter 1: Requisitions A requisition must be created in order to request goods or services for purchase. Requisition data is entered through the CUNYfirst eProcurement online Requisition document. The request is entered through a special request. Use of the special request functionality requires the user to enter a full manual description of the goods or services to be procured.
The different stages of requisition creation are Define Requisition, Add Items and Services, and Review and Submit.
In the Define Requisition stage, line item defaults outline the fields that may be entered and applied to the entire requisition at the line, shipment, and distribution levels. Many of the values that appear in these fields are derived from the Requisitioner’s Defaults, User Preferences and item category definitions. When no predefined values exist, any data entered in the line defaults section replaces the fields as defaults. Business Unit Security limits the Requisitioner to transactions for the Business Units that they are assigned to view through Business Unit Security permission lists. Requisitioners may create their own requisitions or create requisitions on behalf of other persons. User Preferences allow Requisitioners to “work” requisitions created by other Requisitioners. The actions that can be taken for other Requisitioners include requisition add, update, change, cancel and delete transactions.
After the Define Requisitions stage, the user will enter the “Add Items and Services” stage. There are options for adding items and services lines to the requisition. These are outlined below. Item Favorites and Favorites Groups
Item favorites are items that are frequently ordered and are maintained in a single location. The user can reduce the time that is needed to find an item by using item favorites. The list of favorite items that are created is private, accessible only to that user, and is stored by user ID.
Favorites groups enable Requisitioners to group their favorite items, which enables them to find the items quickly when creating a requisition. Favorites groups can be shared with other Requisitioners and a Requisitioner can copy the favorite groups of another user.
Item Templates
If an item master exists, the user can reduce the time that is needed to enter requisitions by creating item templates, which consist of sets of items that are frequently ordered together. During entry, use the templates to add these items to the requisition without searching the item catalog.
CUNYfirst eProcurement offers these templates:
Personal Templates - Personal templates are private and accessible only to the user who creates them
Company Templates: Company templates, also called Purchasing Kits, are used throughout the business. Only users with the correct authority can create or change company templates, but all users in the CUNYfirst Purchasing business unit have access to them.
After a template has been added to a requisition, users can change the quantity of any item, delete items, or add additional items to the request. When Requisitioners add a template to a requisition, the system adds only the active items in the template to the requisition.
Special Request
This will be the primary way that CUNY will add items and services to requisitions where there is no item master to access. When users enter a special request, the Requisitioner is required to manually enter a full description of the good or service they are requesting. Selection of a vendor is not required, but remains an optional field to complete. There is also functionality to allow a Requisitioner to “suggest a vendor” without populating the vendor field.

Procurement Reference Guide
June 11, 2012
28
Copy Requisition
Requisitioners may copy an existing requisition regardless of the status. The new requisition remains editable in all fields. In addition, the Requisitioner may continue to insert additional lines to the requisition using any of the other available options.
After adding items and services to a requisition, use the Review and Submit stage to review the contents, make final adjustments, change Chartfield and/or Shipping information or add last-minute items. The Requisition Summary, or shopping cart, appears as a sidebar to the left and below the CUNYfirst menu. The requisition summary displays all of the items that have been added to the requisition plus the number of line items on the order and the total amount expressed in the transaction currency.
After submitting the requisition and receiving full approval, the Requisitioner must budget check the requisition. The Budget Checking process compares the total amounts on each transaction (distribution) line to the available amounts in the referenced General Ledger budget in a specific budget period. Pre-encumbrances are generated for requisitions that have been budget checked. “Submit & save” will enter the requisition in to workflow.
Chapter Objectives Upon completion of this chapter, the learner will be able to:
1. Create and manage requisitions 2. Submit requisitions for approval 3. Conduct a budget check 4. Cancel and re-open requisitions
Policy
A requisition must be created in order to request goods or services for purchase. Requisition data is entered through the PeopleSoft eProcurement online Requisition document. For CUNY, the request is entered using a special request, the special request functionality allows the user to enter a full manual description of the goods or services to be procured.
Authorized Roles
CU_FSFS_Production_Support
CU_FSPO_Requestor
CU_FSPO_Requisition_Approver

Procurement Reference Guide
Update: October 28, 2011 29
Topic 1: Create Requisitions To purchase an item, users need to create a requisition. To create requisitions user needs to fill out an online form for requesting items or services. Note: Before users can create requisitions, they must be setup as an authorized user on the User Preferences page. In addition, their user ID must be identified as a requestor on the Requester Setup page.
You can only cancel a payment if the payment has been interfaced or rejected by the City. For vouchers that are rejected by the City, follow the process in the City Interface Error Correction matrix to identify the appropriate use of the Cancel Payment function. City payments that have been disbursed by FMS, require that CUNY contact the NYC Dept of Finance to cancel the payment. To close the liability in , the cancel payment transaction must be executed.
It is the policy of the University to acquire goods and/or services through competitive selection to the maximum practical extent while complying with all applicable city, state, federal and CUNY requirements. Procurement systems and methods shall be well defined, consistently applied, and follow good business and procurement best practices appropriate for the requirement, and type and value of procurement involved. The procurement process shall:
• Ensure fair and open competition;
• Guard against favoritism, improvidence, extravagance, fraud and corruption;
• Ensure that the results meet CUNY’s needs at a fair and reasonable price;
• Provide for checks and balances to regulate and oversee procurement activities; and
• Protect the interests of the state, city and its taxpayers.
Every acquisition by the University requires a properly prepared and approved requisition and purchase order prior to the receipt of goods or services. The only authorized entity to process requests for goods or services is the Purchasing Department for the appropriate CUNY entity.
Only with exceptions identified in CUNY Procurement Policy, (such as authorized use of P-card) all purchases require pre-approval prior to the issuance of a purchase order by the Purchasing Director. The approvals are applied to the requisition and consist of :
1. A Supervisory approval—this will be one individual to whom the Requester reports directly per the HCM system record.
2. A Department approval—this could be one or two individuals who approve the department expenditures in a hierarchical manner, i.e.—requisitions submitted by academic departments often are approved by the department chair and then the Provost before being processed by Purchasing.
Certain categories of goods and services require additional approval prior to processing. (To expedite pre-approvals, requestors are encouraged to review goods or services being requested with the appropriate control department prior to submitting the requisition.)
The following category of goods/services require additional pre-approval:
Goods with environmental, health or safety concerns
Pre-approval from the College’s or BU’s Environmental, Health & Safety Officer.
Information Technology/Telecommunications Pre-approval from the college’s or BU’s Information Services.

Procurement Reference Guide
Update: October 28, 2011 30
Furniture Pre-approval from College’s or BU’s Facilities and Planning departments.
Outside Legal Services Pre-approval in writing from the State Attorney General, coordinated by CUNY’s Office of General Counsel. OGC will be the category approvers in the system.
Authorized Roles
CU_FSFS_Production_Support
CU_FSPO_Requestor
CU_FSPO_Requisition_Approver
Create Requisitions is found by navigating to eProcurement > Create Requisition.
Step Summary
1. Navigate to Create Requisition. 2. Verify or edit the requisition defaults. 3. Enter the item/s or service/s including, as needed, special request details. 4. On the Review and Submit page, verify the data. 5. Click the Save & submit button.
Detailed Information
On the Create Requisition page, enter values for Business Unit, Requester and Currency. These values are normally defaulted.
Click the Continue button. Add Items and Services:
The first step in creating a requisition is to select the items for the requisition. To select items, you can: • Use the Search field to enter key words or phrases for a search. • Browse catalogs. • Search catalogs for item attributes such as manufacturer, item ID or vendor name, and price ranges.

Procurement Reference Guide
Update: October 28, 2011 31
Click the folder icon ( ) to browse the catalog.
Key policies related to the procedure
CUNY will utilize the Special Request functionality.
Create a Requisition Using Special Request
1. Click on the Special Request tab. 2. Click on the Special Item hyperlink. 3. Fill in the required information. 4. When done, click on the Add Item button.

Procurement Reference Guide
Update: October 28, 2011 32
Field Description
Item Description Enter a description for the item or service.
Price Enter a unit price for the item or service.
Currency This is defaulted to USD (US dollars).
Quantity Enter the quantity for the item.
Unit of Measure Enter the default unit of measure for this express form item. This is used on the requisition.
Category The item category to which this item or service belongs. This category ID enables the system to retrieve default values for the requisition and purchase order.
Due Date Enter a due date. This is optional. This is the arrival date of this shipment. The date that you enter here is a suggested date. When the purchase order is created, the system or buyer attempts to meet this date or changes it to a realistic due date.
Vendor ID Enter a name that identifies a specific vendor.
Suggest New Vendor Enter a suggested vendor.
Vendor Item ID Enter the corresponding vendor item ID (if available).
Mfg ID Enter the manufacturer’s ID.
Mfg Item ID Enter the manufacturer’s item ID.
Additional Information Enter comments that help describe or support a special request. Determine whether comments are sent to the vendor, printed on the receipt, or printed on the voucher.
Send to Vendor Select to send the comments that you entered in the Line Comments field to the vendor. This is available only for line-level comments.
Show at Receipt Select to display the comments that you entered in the Line Comments field on receipt. This is available only for line-level comments.

Procurement Reference Guide
Update: October 28, 2011 33
5. Click the Review and Submit link.
6. On the Review and Submit page, click the Line Details icon to enter or Look Up the Contract ID. 7. Click the OK button. 8. On the Review and Submit page, click the disclosure icon (this icon has a label of “Expand
Section”. 9. Verify and as needed edit the Item, Shipping, and Chartfield data. 10. Click the Save & submit button.
Show at Voucher Select to display the comments that you entered in the Line Comments field on the voucher. This is available only for line-level comments.
Request New Item Select to request that the item be added to the item master. When this option is selected, a “request new item” worklist notification is sent based on the following conditions:
If workflow approval is required and the requisition is approved, a worklist notification is sent to all users that have the Item Notification (ITEM_NOTIFICATION) role action.
If workflow approval is not required and the requisition is saved and submitted, a worklist notification is sent to all users that have the Item Notification role action.
When the requisition is saved and submitted, the status of the new item request appears in the Request New Item group box and has a value of Pending.
The authorized user can approve or reject the item request by using the eProcurement New Item Request page. When the new item request is approved, the set ID and the item ID are specified on the eProcurement New Item Request page. The requester receives an email notification when the item is created or rejected and the status changes to Created or Denied. If the new item request is approved, the set ID and the item
ID are included on the email notification.
Add Item Click this button to add the item to the requisition summary.
Cancel Click any of these buttons to go back to the Special Request sub-menu without saving the item. Add or Start New Type

Procurement Reference Guide
Update: October 28, 2011 34
a. Upon save, the system will perform a combination edit that will ensure the chartfields entered can be used together. If the chartfields cannot be used together, the system will not allow you to save the requisition.
b. If the combination edit fails, check with your budget office to provide a valid combination. 11. When the requisition is fully approved, the budget process can be submitted.
Field Description
Account or Accounting Defaults
Due Date Review or change the arrival date of this shipment. The date that you enter here is a suggested date. When the purchase order is created, the system or buyer attempts to meet this date or changes it to a realistic due date.
Ship to: Review or change the ship to location code. This code identifies the shipping address for this request.
Attention Select the name of the individual who should receive the items. This name appears on the shipping documents.
Distribute by Value by which the line is to be distributed. If the material is being received by amount only, the default distribution method is Amt.
Qty (quantity): Designates that the line is to be distributed by quantity.
Amt (amount): Designates that the line is to be distributed by amount. SpeedChart Select a speed chart. The SpeedChart field enables you to use a code
that contains preset distributions. This speed chart is not itself a defaulting element. Instead use it here to assist you in defining default chart field elements.
Location Internal destination of the item, once it is received. This can be different from the ship to location of the schedule. For instance, the ship to location of the schedule could be corporate headquarters, and the distribution location could be a particular floor's supply room.
Quantity Displays the units of this requisition item that you are ordering. You can change the value.
Percent Per cent of distribution.
Amount Amount of distribution.
GL Unit General ledger business unit.
Account Classifies the nature of a transaction. This field is required.

Procurement Reference Guide
Update: October 28, 2011 35
Topic 2: Manage Requisitions
Requisitioners will use the Manage Requisition feature in order to view approvals, edit, copy, budget check or cancel requisitions. Requisitioners can only edit active requisitions that have not been sourced and do not have a status of “Complete”, or “Cancel”.
From the Manage Requisition page, Requisitioners and buyers can access other pages to perform actions to requisitions. The following actions that can be performed on a requisition from the Manage Requisition page:
View Requisition - Allow a read only view of the requisition.
View Approvals – Allows a view of the workflow mapping and the appropriate status of each level.
Copy Requisition – Allows the user to copy any requisition and create a new requisition. After the Requisitioner copies a requisition, the Requisitioner will be taken to the Requisition page to make appropriate edits and changes for the new requisition.
Edit Requisition – Tales the Requisitioner to the Edit Requisition page to make appropriate edits. If the requisition is approved, it will re-open the requisition to be re-routed for approval upon submission.
Cancel Requisition – Allows the Requisitioner or Buyer to cancel the requisition. Requisitioners are only allowed to cancel a requisition if it is in Approved or Pending/Open status.
Receive Order – Routes the receiver to the appropriate receiving pages for them to receive the product or service. This function is for casual or desktop receiving. If a good or service requires inspection, inspection must take place in the Purchasing Module
Re-Open Requisition – Allows the Requisitioner to open a previously cancelled requisition. The Requisitioner will be taken to the Requisition page to make appropriate edits and changes for the new requisition.
If a requisition has been previously budget checked during its lifecycle and a Requisitioner wishes to cancel a line on the requisition, the requisition must be fully budget checked in order to cancel any line. The Manage Requisition feature provides you with the ability to review, edit, approve, or cancel requisitions. Managing requisition involves performing activities such as adding comments, changing the quantity of items, and distributing the items among departments. You can view requisitions in any status. You can only edit active requisitions that have not been sourced and do not have a status of Complete, or Canceled. Requisitions are considered sourced when a purchase order has been created to satisfy the requisition and that purchase order has been saved.
Authorized Roles
CU_FSFS_Production_Support
CU_FSPO_Requestor
CU_FSPO_Requisition_Approver
Manage Requisitions is found by navigating to: eProcurement > Manage Requisitions
Step Summary
1. Navigate to Manage Requisitions. 2. Enter search criteria, select the Search button, and select the correct requisition.

Procurement Reference Guide
Update: October 28, 2011 36
3. On the Action dropdown box, select the Cancel, Copy, Edit or View Approvals action and click the Go button.
4. Alternatively, select the Requisition Life Cycle disclosure icon to view associated documents, approvals or click the Requisition ID link to view requisition inquiry screens.
Detailed Information
Manage Requisitions Page:
Use the Manage Requisitions page to view a list of requisitions in various statuses. From this page, you can access other pages to perform tasks, such as review requisition details, edit or cancel requisitions, create change requests, receive stock, or return stock to the vendor. You can search for specific requisitions by specifying the requisition ID, dates, requester, who entered the PO, and by PO number and status.
Click the Req ID link to access the Requisition Details page where you can view details about individual requisitions. The PO Information header bar appears only if a purchase order was created for the requisition.
1. Navigate to Manage Requisitions. 2. On the dropdown box menu, select from Cancel Requisition, Copy Requisition, Edit Requisition,
Re-Open Requisition, and View Approvals. 3. Click the Go icon. 4. Select the disclosure icon to view the Requisition Life Cycle. 5. Select any of the available associated documents. 6. To view approvals, select view approvals. 7. Select the Requisition ID link to view requisition inquiry screens.
Field Description

Procurement Reference Guide
Update: October 28, 2011 37
Field Description
Business Unit A business unit is an operational subset of the organization that tracks and maintains its own set of requisitions and purchase orders. Each business unit has its own way of storing information and its own processing guidelines. PeopleSoft Purchasing business units share vendor, purchase order, and receiving information with PeopleSoft Payables business units in the same setID. Some valid values for CUNYfirst are: BCC01, BMC01, COCOM, HOS01, KCC01, LAG01, MEC01, NCC01, and QCC01.
Requisition Name Optional description of the request to help you identify this requisition as it flows through the system. You can also track the request using the requisition ID that is assigned when it is saved.
Requisition ID Select a specific system-assigned identifier of the requisition that you want to review or maintain. This limits the search results to one specific requisition.
Request Status All but Complete: Displays all requisitions except those with the status Complete.
Approved: The requisition is approved and can become a PO.
Canceled: The requisition was entered and saved but was canceled. A canceled requisition can be reopened within a certain number of days as specified for the Purchasing business unit; otherwise, it is closed permanently.
Complete: After the requisition is dispatched on a PO, the goods are received and the vendor is paid. A background process identifies the requisition status as Complete. Canceled requisitions and those that are fulfilled by inventory stock are also identified as Complete.
Denied: The requisition is denied in the approval process.
Open: The requisition has been entered and saved but not yet submitted, or the receipt has been entered and saved but might have errors.
PO(s) Created: The requisition has been placed on a PO.
PO(s) Dispatched: The requisition has been placed on a PO, and the PO has been dispatched to the vendor.
Pending: The requisition has been submitted and is awaiting approval.
Received: The requisition has been placed on a PO. The PO has been dispatched to the vendor, and the goods have been partially or fully received.

Procurement Reference Guide
Update: October 28, 2011 38
Field Description
Budget Status The budget-checking status of the requisition is “Not Chk’d” if the requisition has not already been budget-checked or if fields on the requisition that affect budget-checking have been changed. The status is “Valid” if the requisition has already been budget-checked successfully and “Error” if the requisition has been budget-checked and failed. You must run budget-checking again whenever you change a budget-checked requisition.
Date From Select a range of dates for which you want to review or maintain requisitions. Date To
Requester The user ID of the person for whom the requisition is created.
Entered By Select an operator for which you want to manage requisitions. Operators are people who have created requisitions for someone else. Only the requisitions submitted by this specific operator appear in the list.
PO ID Related purchase order sourced from the requisition. Unique 10-character field to identify the purchase order transaction.

Procurement Reference Guide
Update: October 28, 2011 39
Topic 3: Budget Checking Requisitions
Requisitioners are required to budget check each requisition prior to submitting the requisition for approval.
When budget checking is executed, it seeks to establish that for the accounting distributions on each requisition line, there are sufficient budget dollars for the value of the requested item. If there are sufficient budget dollars, the system returns a status of Valid and records a pre-encumbrance. The requisition is then ready to be submitted for approval.
When a transaction exceeds the available budget amount, the system stops the transaction and issues an error notice and the Requisitioner then must either change the Chartfield accounting to use funds from a different budget or access the offline process to secure additional budget dollars. The offline process will include contacting the Budget Liaison.
Process to validate the Budget against the Commitment Control and once validated, create pre-encumbrance entries.
Key policies related to the procedure
Every requisition will be budget checked before it is sourced to purchasing. If there are insufficient funds in the budget, no budget override is permissible.
To be eligible for selection for the budget checking process, a requisition must be fully approved.
Associated Roles
CU_FSPO_Requestor
Budget Checking Requisitions is found by navigating to: eProcurement > Manage Requisitions > Select Action of Check Budget
Step Summary
1. Navigate to Manage Requisitions. 2. If a previously created requisition has a Budget Check status of “Not Valid”, then verify and
correct the Chartfields as needed. 3. Re-run the Budget Check process. 4. If the result is still “Not Valid”, then contact the Budget Liaison. 5. If the result is “Valid”, then the requisition is pre-encumbered and moved to the Approve
Requisitions procedure. 6. If the result is “Not Valid”, then navigate to the Review and Submit line. 7. Select the disclosure icon to open the distributions. 8. Verify and correct the Chartfields as needed. 9. Re-run the Budget Check process. 10. If the result is still “Not Valid”, then contact the Budget Liaison.

Procurement Reference Guide
Update: October 28, 2011 40
Detailed Information
Field Description
Account Classifies the nature of a transaction. This field is required. Account determines whether the value is an asset, liability, equity, revenue, expenditure, non budgeted, or statistical.
Oper Unit Use to correlate transactions between operating units when using a single intra unit account.
Fund Fund is the building block of governmental accounting. Fund assures that dollars are spent for the purpose intended.
Dept Department ID defines lower levels of the organizational structure.
Program Tracks revenue and expenditures for programs within or across CUNY agencies. This value can be used to identify groups of related activities, cost centers, revenue centers, responsibility centers, and academic programs.

Procurement Reference Guide
Update: October 28, 2011 41
Topic 4: Approve Requisitions Once requisitions are saved and submitted, they enter the CUNY approval workflows. Once the workflow has triggered an approval requirement, the system routes the request to approvers within the approver list where the following actions will take place:
Approve - Select to move the workflow onto the next step or path. Deny - Select to send the requisition back to the Requisitioner with the status of denied. Pushback - Select to move the requisition back one step in the workflow route.
The first approver for every requisition will be generated from the Supervisor field in the Requisitioner’s security profile. All requisitions at CUNY must receive supervisory management level approval regardless of the dollar value of the requisition. A workflow notification is generated and an e-mail and work-list entry generated to the approver. There will be instances at some colleges where there will be a pool of approvers for a specified Requisitioner. As long as one person in the pool approves the requisition, the approval is valid. In specific situations, Chartfield approvals will be required. This routing will be based on department entered on the accounting distribution line. When the department in the accounting distribution line is changed from the default department accounting distribution of the Requisitioner, the target department budget owner will be notified. A workflow notification is generated and an e-mail and work-list entry generated to the approver. There will be instances at some colleges where there will be a pool of approvers for a specified budget. As long as one person in the pool approves the requisition, the approval is valid.
When necessary, certain categories may generate an additional Category Approval. In this case, the requisition will be routed simultaneously both to the Chart-field Approver (Department Budget Owner) and to the Commodity Approver for the category entered on the line of each item categories that will trigger category approval. CUNY has identified that Facilities, Legal Services, Hazardous Materials and, IT categories will be used. A workflow notification is generated and an e-mail and work-list entry generated to the approver. There will be instances at some colleges where there will be a pool of approvers for a specified category. As long as one person in the pool approves the requisition, the approval is valid.
Errors may occur during the course of workflow routing. When there is a workflow error the system will route the document to a CUNY Production Support team member(s) who have been associated with the CUNYfirst Security Role “Workflow Administrator”. They will make the necessary corrections and route the document to the appropriate user for approval.
After all approvals occur, the requisition is ready to be selected. This is outlined in the Issue Purchase Orders process. Requisition Approval is the process of taking a transaction through the organization until it is accomplished or stopped. Using the Approve Requisitions feature, fiscal approvers join the commodity approvers where necessary and requesters to complete the approval workflow process. When the process is complete, the transaction is promoted to its next stage. In the case of a requisition, the next stage is that it's sourced as a purchase order.
Key policies related to the procedure
1. Regardless of position, if the requester is the primary beneficiary of the goods or services procured, the requester cannot approve the requisition. Self-approvals of requisitions are not permitted in CUNY.
2. Requisitions will be routed for appropriate supervisor, departmental, and category (if appropriate) approvals before the purchasing department begins the process to obtain the requested goods and services. If the requester and the department approver are the same person the requisition will be routed to the requestor’s supervisor.

Procurement Reference Guide
Update: October 28, 2011 42
3. Specific approvers are required for procurement categories related to IT (information technology), facilities, hazardous materials, and legal services as specified in Section 6.5 of the CUNY Purchasing and Contract Manual.
4. If category approvals are required they are routed in parallel to department approvals.
5. A requisition may be created on behalf of another person, the creator. In that instance, the approver will be the requester's supervisor, not the creator’s supervisor.
6. If supervisor approval is different from the fiscal approver, (the department charged is different from the supervisory department) the requisition will require an additional approval for the chart fields.
Authorized Roles
CU_FSFS_Production_Support
CU_FSPO_Requestor
CU_FSPO_Requisition_Approver
Approve Requisitions is found by navigating to: eProcurement > Approve Requisitions or click on the Worklist link.
Step Summary
1. Navigate to Approve Requisitions. 2. Workflow sends an email to a person with security access to approve the requisition. 3. Click the worklist link in the email to view the specified requisition. 4. Review the requisition and determine whether or not to approve the requisition. 5. If approved and not requiring further approval, the requisition is entered into workflow to
purchasing. 6. If not approved or the requisition is denied, send the reason(s) in a return email to the requestor. 7. Note: The requestor may edit and resubmit the requisition using Manage Requisitions. 8. If approved and requiring special commodity approval, the requisition is entered into workflow for
commodity approval. 9. If not approved or the requisition is denied for special commodity approval, then the reasons are
sent in a return email to the requestor 10. Note: The requestor may edit and resubmit the requisition using Manage Requisitions. 11. If another department is to be charged for the requisition, then an additional fiscal approver is
required for the chartfields. 12. If approved by the additional fiscal approver, the requisition is entered into workflow for
commodity approval. 13. If not approved or the requisitions is denied by the additional fiscal approver, send the reason(s)
in a return email to the requestor. 14. Note: The requestor may edit and resubmit the requisition using Manage Requisitions.
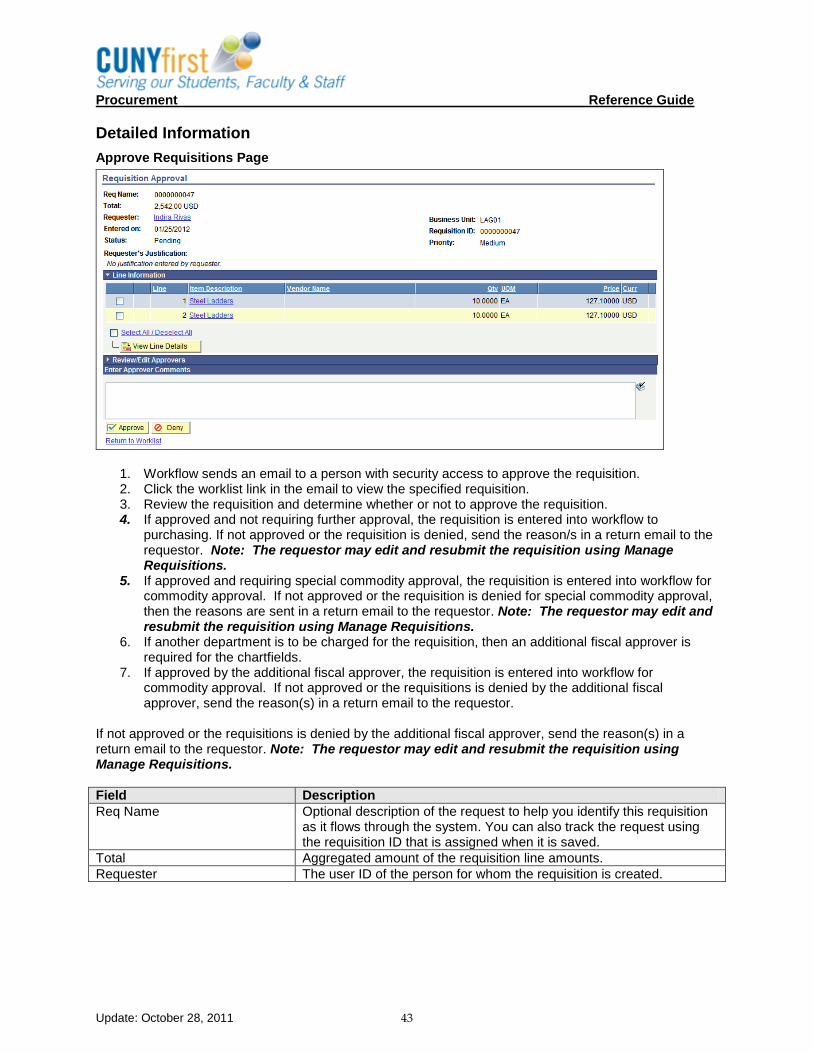
Procurement Reference Guide
Update: October 28, 2011 43
Detailed Information
Approve Requisitions Page
1. Workflow sends an email to a person with security access to approve the requisition. 2. Click the worklist link in the email to view the specified requisition. 3. Review the requisition and determine whether or not to approve the requisition. 4. If approved and not requiring further approval, the requisition is entered into workflow to
purchasing. If not approved or the requisition is denied, send the reason/s in a return email to the requestor. Note: The requestor may edit and resubmit the requisition using Manage Requisitions.
5. If approved and requiring special commodity approval, the requisition is entered into workflow for commodity approval. If not approved or the requisition is denied for special commodity approval, then the reasons are sent in a return email to the requestor. Note: The requestor may edit and resubmit the requisition using Manage Requisitions.
6. If another department is to be charged for the requisition, then an additional fiscal approver is required for the chartfields.
7. If approved by the additional fiscal approver, the requisition is entered into workflow for commodity approval. If not approved or the requisitions is denied by the additional fiscal approver, send the reason(s) in a return email to the requestor.
If not approved or the requisitions is denied by the additional fiscal approver, send the reason(s) in a return email to the requestor. Note: The requestor may edit and resubmit the requisition using Manage Requisitions.
Field Description
Req Name Optional description of the request to help you identify this requisition as it flows through the system. You can also track the request using the requisition ID that is assigned when it is saved.
Total Aggregated amount of the requisition line amounts.
Requester The user ID of the person for whom the requisition is created.

Procurement Reference Guide
Update: October 28, 2011 44
Field Description
Status Status values are:
Approved: Displays all requisitions that you have approved.
Denied: Displays all requisitions that you have denied.
Pending: Displays all requisition that are waiting on you for action.
Pushedback: Displays all requisitions you have push back to the previous approver.
Requester’s Justification Displays the comments the requester entered to justify the need for the requisition.
Business Unit A business unit is an operational subset of the organization that tracks and maintains its own set of requisitions and purchase orders. Each business unit has its own way of storing information and its own processing guidelines. PeopleSoft Purchasing business units share vendor, purchase order, and receiving information with PeopleSoft Payables business units in the same setID. Some valid values for CUNYfirst are: BCC01, BMC01, COCOM, HOS01, KCC01, LAG01, MEC01, NCC01, and QCC01.
Requisition ID Specific system-assigned identifier of the requisition that you want to review and approve.
Priority Values: High, Medium, Low.
Line Information
Line System-generated sequential number.
Item Description Click this link to view details about an item contained on a requisition. As you review approvals, you can see the item details and an image of the item.
Vendor Name Name of the vendor or supplier for this line item.
Qty Quantity for this line item.
UOM Unit of measure for this line item.
Price Price for this line item.
Curr Currency for this line item.
Procurement Reference Guide
Update: October 28, 2011 45
Topic 5: Cancel Requisitions A Requisitioner may choose to cancel the entire requisition or any line on a requisition at any time. The Requisitioner can cancel an entire requisition if:
The requisition is not on hold.
No requisition lines have been sourced to a purchase order.
No requisition schedules have been staged.
The requisition has never been successfully budget checked. If it has been successfully budget checked before, the budget status must be valid before the requester cancels the requisition.
A Requisitioner may cancel a requisition line if:
The requisition budget status in the header is Valid. This means the budget has been checked and the Requisitioner can cancel a requisition line.
The requisition budget status in the header is Not Chk’d and the requisition has never been budget checked in its life cycle. This means the budget has never been checked and the Requisitioner can cancel a requisition line.
The requisition budget status in the header is Error. This means the budget checking process found an error.
Requisitioner can cancel a requisition line.
The process of cancelling a requisition and preventing it from moving forward in the process.
Key policies related to the procedure
Any requisition can be cancelled provided that it has not been “sourced” by the Purchasing Department. If the requisition has been sourced (linked to a purchase order that has been saved), the buyer must be contacted.
Authorized Roles
User Preferences
Cancel Requisitions is found by navigating to: eProcurement > Manage Requisitions
Step Summary
1. Navigate to Manage Requisitions. 2. Requisitions may not be cancelled that are on hold, sourced to Purchase Orders, are part of a
staged Purchase Order, or have “valid” Budget Check results. 3. On the Requisition Search page, enter search criteria, select the Search button, and select the
correct requisition. 4. On the Action dropdown box, select the Cancel action and click the Go button.

Procurement Reference Guide
Update: October 28, 2011 46
Detailed Information
Field Description
Business Unit A business unit is an operational subset of the organization that tracks and maintains its own set of requisitions and purchase orders. Each business unit has its own way of storing information and its own processing guidelines. PeopleSoft Purchasing business units share vendor, purchase order, and receiving information with PeopleSoft Payables business units in the same setID. Some valid values for CUNYfirst are: BCC01, BMC01, COCOM, HOS01, KCC01, LAG01, MEC01, NCC01, and QCC01.
Requisition Name Optional description of the request to help you identify this requisition as it flows through the system. You can also track the request using the requisition ID that is assigned when it is saved.
Requisition ID Select a specific system-assigned identifier of the requisition that you want to review or maintain. This limits the search results to one specific requisition.
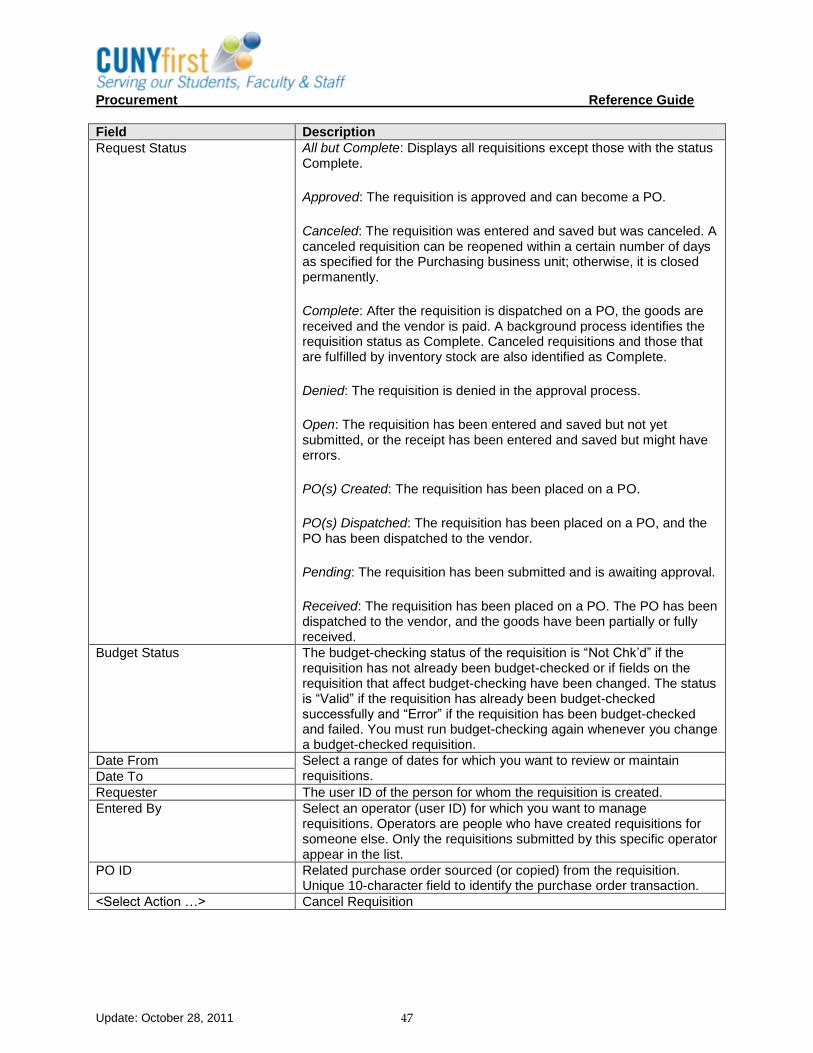
Procurement Reference Guide
Update: October 28, 2011 47
Field Description
Request Status All but Complete: Displays all requisitions except those with the status Complete.
Approved: The requisition is approved and can become a PO.
Canceled: The requisition was entered and saved but was canceled. A canceled requisition can be reopened within a certain number of days as specified for the Purchasing business unit; otherwise, it is closed permanently.
Complete: After the requisition is dispatched on a PO, the goods are received and the vendor is paid. A background process identifies the requisition status as Complete. Canceled requisitions and those that are fulfilled by inventory stock are also identified as Complete.
Denied: The requisition is denied in the approval process.
Open: The requisition has been entered and saved but not yet submitted, or the receipt has been entered and saved but might have errors.
PO(s) Created: The requisition has been placed on a PO.
PO(s) Dispatched: The requisition has been placed on a PO, and the PO has been dispatched to the vendor.
Pending: The requisition has been submitted and is awaiting approval.
Received: The requisition has been placed on a PO. The PO has been dispatched to the vendor, and the goods have been partially or fully received.
Budget Status The budget-checking status of the requisition is “Not Chk’d” if the requisition has not already been budget-checked or if fields on the requisition that affect budget-checking have been changed. The status is “Valid” if the requisition has already been budget-checked successfully and “Error” if the requisition has been budget-checked and failed. You must run budget-checking again whenever you change a budget-checked requisition.
Date From Select a range of dates for which you want to review or maintain requisitions. Date To
Requester The user ID of the person for whom the requisition is created.
Entered By Select an operator (user ID) for which you want to manage requisitions. Operators are people who have created requisitions for someone else. Only the requisitions submitted by this specific operator appear in the list.
PO ID Related purchase order sourced (or copied) from the requisition. Unique 10-character field to identify the purchase order transaction.
<Select Action …> Cancel Requisition

Procurement Reference Guide
Update: October 28, 2011 48
Topic 6: Close Re-Open Requisitions
The Close Requisitions process will be an optional process at CUNY. In general, the Close Requisitions process is used to close requisitions that are fully canceled or fully sourced and no longer need to be modified. When Buyers run the Close Requisitions process, it reconciles requisition-related settings and statuses to change the status of applicable requisitions to “Complete”.
The benefit of this status change is that completed requisitions no longer appear in the Buyer’s list of available requisitions when they access requisition pages in update or display mode. These completed requisitions are also removed from the view in many other situations in which the available options have been set to exclude completed or canceled requisitions. Removing these requisitions from these prompts improves system performance and decreases the time required to find requisitions that must be modified.
The Close Requisitions process will also set the budget header and line statuses, as well as the requisition distribution close flags. This allows the Commitment Control Budget Processor process to liquidate pre-encumbrance budget amounts for outstanding requisitions.
Although the Close Requisitions process is optional and can be run at any time, Requisitioners should minimally run the process at the end of each month to help improve the efficiency of the requisitioning process. The Close Requisitions process can be scheduled to run at an interval of CUNY’s choosing using the Process Scheduler or run manually using the Close Requisitions page. The Close/Re-Open Requisition process is generally to be run after the Close Purchase Order process.
Requisitioners can use the Requisition Reconciliation Workbench to preview the results of the Close Requisitions process on selected transactions. Once it is confirmed that the process will produce the desired results, the Requisitioner can run the Close Requisitions process from the Requisition Reconciliation Workbench.
The Requisition Reopen process gives the Requisitioner the ability to reopen requisitions. This process gives the Requisitioner the ability to reopen requisitions in a couple of different ways. The Requisitioner can:
Undo changes made by the last run of the Close Requisition process. This process reverses the effects of the Close Requisitions process on the most recently processed group of requisitions.
Reopen any requisition at any time. This process gives the Requisitioner the ability to reopen a range of requisitions, a specific requisition, or all requisitions associated with a business unit.
A requisition that has been canceled at the header level is not eligible for reopening.
The Close Requisitions process will be an optional process at CUNY. In general, the Close Requisitions process is used to close requisitions that are fully canceled or fully sourced and received and no longer need to be modified. This process allows the Commitment Control budget process to liquidate pre-encumbrance budget amounts and should be run on a pre-scheduled basis.
Key policies related to the procedure
Close Requisitions is a process that is typically run on a periodic basis for requisitions that have been sourced, received and paid. This function should not be available to requestors on a normal basis.
Once a requisition is sourced it cannot be re-opened for modifications. Requisitions are considered sourced once they are linked to a purchase
Procurement Reference Guide
Update: October 28, 2011 49
order that has been saved.
Authorized Roles
CU_FSPO_Proc_Func_Security
CU_FSFS_Production_Support – Allow to re-open
CU_FSPO_PO_Processor – Allow to re-open
Close Re-Open Requisitions is found by navigating to: Purchasing > Requisitions > Reconcile Requisitions > Close Requisitions
Step Summary
1. Navigate to Reconcile Requisitions. 2. On the Requisition Search page, enter search criteria, select the Search button, and select the
correct requisition. 3. Determine that the Requisition needs to be closed. 4. Navigate to: Purchasing > Requisitions > Reconcile Requisitions > Close Requisitions 5. On the Close Requisition page, enter or select the correct existing Run Control ID and click the
OK button. 6. Enter the Business Unit and Requisition ID. 7. As needed, uncheck the Update Budget Status of Distribution Lines. 8. Run the process on the Process Scheduler Request page.
Note: For additional information, refer to Unit 1, Topic 2 Run a Process.
Detailed Information
1. On the Requisition Search page, enter search criteria, select the Search button, and select the correct requisition.
2. Determine that the Requisition needs to be closed. 3. Determine if a Purchase Order needs to be closed and if so, then navigate to Close Re-Open
Purchase Orders and close the corresponding Purchase Order. 4. Navigate to: Purchasing > Requisitions > Reconcile Requisitions > Close Requisitions 5. On the Close Requisition page, enter or select the correct existing Run Control ID and click the
OK button. 6. Enter the Business Unit and Requisition ID. 7. As needed, uncheck the Update Budget Status of Distribution Lines. 8. Run the process on the Process Scheduler Request page.
Note: For additional information, refer to Unit 1, Topic 2 Run a Process.
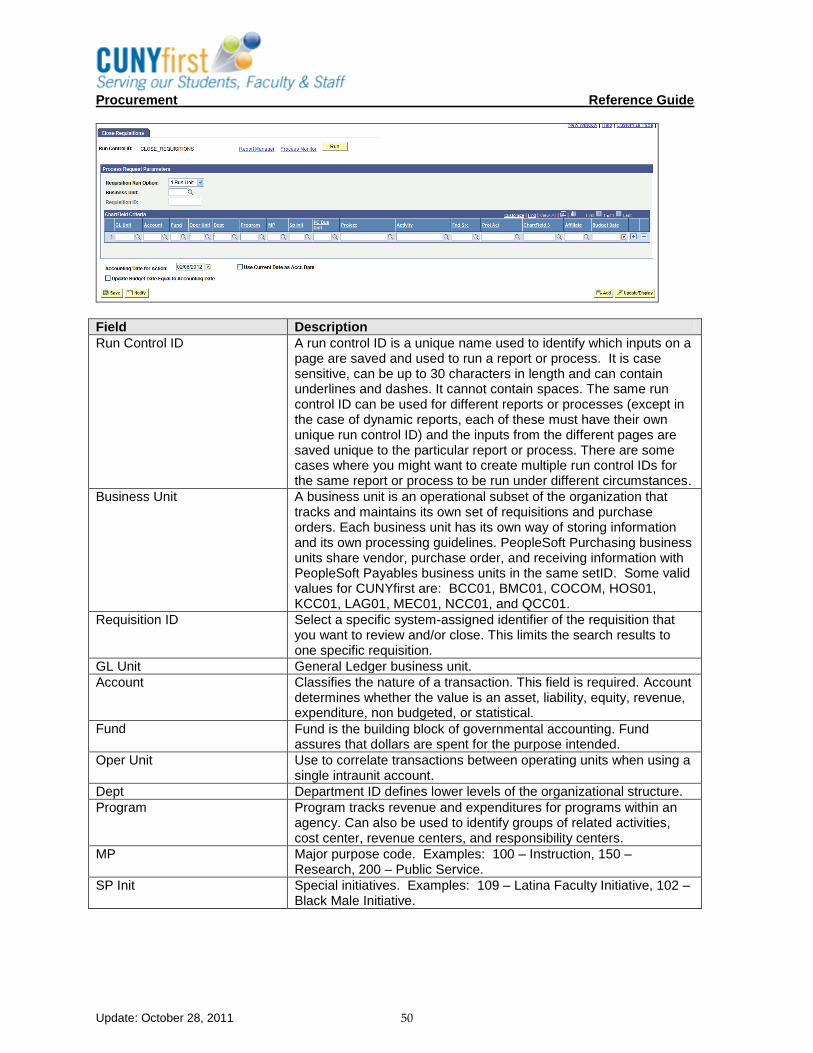
Procurement Reference Guide
Update: October 28, 2011 50
Field Description
Run Control ID A run control ID is a unique name used to identify which inputs on a page are saved and used to run a report or process. It is case sensitive, can be up to 30 characters in length and can contain underlines and dashes. It cannot contain spaces. The same run control ID can be used for different reports or processes (except in the case of dynamic reports, each of these must have their own unique run control ID) and the inputs from the different pages are saved unique to the particular report or process. There are some cases where you might want to create multiple run control IDs for the same report or process to be run under different circumstances.
Business Unit A business unit is an operational subset of the organization that tracks and maintains its own set of requisitions and purchase orders. Each business unit has its own way of storing information and its own processing guidelines. PeopleSoft Purchasing business units share vendor, purchase order, and receiving information with PeopleSoft Payables business units in the same setID. Some valid values for CUNYfirst are: BCC01, BMC01, COCOM, HOS01, KCC01, LAG01, MEC01, NCC01, and QCC01.
Requisition ID Select a specific system-assigned identifier of the requisition that you want to review and/or close. This limits the search results to one specific requisition.
GL Unit General Ledger business unit.
Account Classifies the nature of a transaction. This field is required. Account determines whether the value is an asset, liability, equity, revenue, expenditure, non budgeted, or statistical.
Fund Fund is the building block of governmental accounting. Fund assures that dollars are spent for the purpose intended.
Oper Unit Use to correlate transactions between operating units when using a single intraunit account.
Dept Department ID defines lower levels of the organizational structure.
Program Program tracks revenue and expenditures for programs within an agency. Can also be used to identify groups of related activities, cost center, revenue centers, and responsibility centers.
MP Major purpose code. Examples: 100 – Instruction, 150 – Research, 200 – Public Service.
SP Init Special initiatives. Examples: 109 – Latina Faculty Initiative, 102 – Black Male Initiative.

Procurement Reference Guide
Update: October 28, 2011 51
Field Description
PC Bus Unit Use as an operational subset to organize project activity independently of the constraints of the standard accounting procedures for financial posting and reporting. Create PC Business Units on the Project Costing Definition page.
Project Project captures additional information useful for grant and project accounting.
Activity Activities are the specific tasks that make up a project. You create activities on the Project Activities page or the Activity Details page.
Fnd Src Funding source. Examples: 300002 – Community College Tuition, 802068 – School of Journalism Stipend.
Proj Act Project activity.
Chartfield 3 Generic expansion ChartField is delivered Inactive. It can be configured for use, hidden, or deleted.
Affiliate Used to map transactions between business units when using a single interunit account.
Budget Date Budget date of the transaction line. You define which field the system uses for the budget date for the transaction in the source transaction definition

Procurement Reference Guide
Update: October 28, 2011 52
Topic 7: Reconciliation Workbench Use the Requisition Reconciliation Workbench to retrieve, review, and close multiple requisitions.
Users must have the authority to close the requisitions that they retrieve and select. Set up is done on the User Preferences: Procurement - Requisition Authorizations page.
Key policies related to the procedure
Reconciliation Workbench is a process available to requesters that allow them to review and close multiple requisitions.
Authorized Roles
CU_FSFS_Production_Support
CU_FSPO_Requestor
CU_FSPO_Requisition_Approver
Close Re-Open Requisitions is found by navigating to: Purchasing > Requisitions > Reconcile Requisitions > Reconciliation Workbench
Step Summary
1. Navigate to Reconciliation Workbench. 2. Add a workbench ID. 3. Fill in the search criteria. 4. Review the selected requisitions. 5. Close any requisitions if needed.
Detailed Information
1. On the Reconciliation Workbench, click on the “Add a New Value” tab. 2. Select a business unit if there is no default value. 3. Create a workbench ID. 4. Click the Add button. 5. On the Filter Options page, fill in the search values. 6. Click the Search button. 7. On the Reconciliation Workbench page, review the List of Requisitions. 8. Click on the checkboxes of selected requisitions. 9. Click the Close button. 10. End of process.

Procurement Reference Guide
Update: October 28, 2011 53
Field Description
Requester Select the requester that created the requisitions. Once you select the requester if they use procurement cards the Card Number field will become available.
Partially or Fully Sourced Select this check box to view requisitions were one or more lines on a requisition have been sourced to a purchase order.
Open Pre-encumbrances If you are using commitment control, the Open Encumbrances check box appears as a search parameter. This check box enables you to search for requisitions that are tied to purchase orders with an open balance.
Chartfields You can enter multiple ChartField combinations as search criteria.

Procurement Reference Guide
Update: October 28, 2011 54
Field Description
Description Enter a description for the workbench. The first time in the workbench you must enter a description before you can save the workbench.
Requisition ID Click a linked requisition ID to access the corresponding Requisitions inquiry page.
Click the Doc Status button for the selected requisition to access the Requisition Document Status inquiry page for the requisition.
Click the Doc Status button for the selected requisition to access the Requisition Document Status inquiry page for the requisition.
Close Click to close the selected requisitions from further processing. To override requisitions that are not qualified and make them available for closing, select the requisition IDs and click the Override button.
To give a user the authority to override non-qualified requisitions, click the Override Non-Qualified Requisitions for Close check box on the User Preferences - Procurement: Requisition Authorizations page.
Requisitions that are associated with purchase orders which have not yet been closed will not be qualified for override. If you are using commitment control, you will not be able to close requisitions that are associated to purchase orders unless the purchase orders are closed and have successfully been budget checked.
Save Click to save the selected requisitions.
Set Filter Options Click this link to access the Reconciliation WorkBench - Filter Options page, where you can enter selection criteria for a new subset of requisitions to review, modify, or act upon.

Procurement Reference Guide
Update: October 28, 2011 55
Field Description
View Processing Results Click this link to access the Reconciliation WorkBench - Processing Results page, where you can view the results of the actions that you have performed.

Procurement Reference Guide
Update: October 28, 2011 56
Field Description
Click the Override button to move not qualified requisitions in the Not Qualified group box to be qualified for the action in the Qualified group box.
When closing the requisition, the system displays this button that you can click to override the edits on selected lines that are not qualified if you have the authority to do so. This makes the lines available for closing and moves the lines to the qualified side.
To give a user authority to override non-qualified requisitions, click the Override Non-Qualified Requisitions for Close check box on the User Preferences - Procurement: Requisition Authorizations page.
Note. This button will only be available if the user has the authority
to override non-qualified purchase orders for close.
Accounting Date for Action, Update Budget Date Equal to Accounting Date
Displays the accounting date for action, which is used to determine the open period or allowable open date range for budget checking a requisition when you are using commitment control. The system updates the accounting dates with this date for the requisitions being closed or canceled by using the Requisition Reconciliation Workbench.
Click the Log button to access the Reconciliation WorkBench - Processing Log page. This page is a log for the selected nonqualified requisition that states why the requisition was not qualified for the previous processing action.
Yes Click this button to proceed with the processing of the qualified requisitions. The system prompts you to confirm this selection.

Procurement Reference Guide
Update: October 28, 2011 57
Field Description Delete Click this button to cancel the processing.

Procurement Reference Guide
Update: October 28, 2011 58

Procurement Reference Guide
Update: October 28, 2011 59
Chapter 2: Purchase Orders Once the requisition is approved in the Approved Requisitions process, the approved requisition will enter the initial stage of Sourcing. The buyer, at the requisition selection screen can:
Source individual items that have been ordered by description.
Assign or change a vendor.
Add to an existing purchase order.
Purchasing Directors will use the Requisition Selection pages to manually assign Buyers to work specific requisitions. In addition, the Buyer will then review the Approved Requisition to verify that the line item is assigned to the correct category. After the requisition is selected as a candidate for PO creation by the Buyer, the sourcing selection process is executed to run online.
The sourcing process will be a manual off line process. The Buyer and Requisitioner will have to work together to determine if an existing contract will be referenced or if a new contract will be created.
After requisition selection, the PO Calculations process performs most of the processing necessary to create a purchase order. After running the PO Calculations process, Buyers can review the results of the process and make changes using the Sourcing Workbench. If Requisitioners change a vendor through the Sourcing Workbench, they must run the PO Calculations process again to recalculate the staged row(s). The PO Calculations process performs twelve functions, but only those pertinent to the CUNY process are highlighted here:
Selects a vendor using one of the four different sourcing methods. There are four methods of vendor selection from which Buyers can choose: basic, flexible, schedule split, or cumulative split sourcing. At CUNY, the Basic sourcing method will be used.
Changes purchase order values using the business unit, vendor, item, or contract, based on the CUNYfirst Purchasing default hierarchy. Consolidates requisitions onto purchase orders when the Consolidate Flag is Y. If Buyers have requisition lines with the same business unit, vendor, and buyer, or just the same business unit and vendor, they can consolidate these lines onto single purchase orders. This feature is useful if Buyer does not want to send multiple purchase orders to the same vendor for the same business unit.
If the Buyer consolidates the requisition lines onto a single purchase order, the vendor receives only one purchase order from each business unit (or each business unit and buyer combination) each time that the Buyer creates purchase orders using the PO Calculations and the Create Purchase Orders processes. When the Buyer chooses the consolidate option, lines for the same item ID (marked as consolidated) for multiple requisitions will be consolidated onto one line on the purchase order. However, the schedules do not get consolidated. Buyers will see a separate schedule (along with its original distributions) for each schedule on the originating requisitions.
On the requisition, if the Buyers choose to consolidate the purchase orders on the Sourcing Controls page, when they order by item ID on a requisition, the requisition line is eligible for consolidation by default. The buyer can override this setting.
Finds a contract. If no contract is specified on the transaction and the transaction source is a requisition, the PO Calculations process attempts to find the most recent effective contract for the

Procurement Reference Guide
Update: October 28, 2011 60
already determined vendor. If the contract does not meet minimum or maximum requirements, the PO Calculations process goes to the next most recent effective contract, if available.
Finds a procurement card or vendor card to use as the payment method. If the Requisitioner is using the procurement card functionality, this process will determine and assign the appropriate procurement card or vendor card to the purchase order line.
Calculates the price. If Buyers select the calculate price option, the PO Calculations process recalculates the price. The process begins with the price from the item. If it finds a contract or if a contract is specified, and the contract indicates to use the contract base price, the PO Calculations process uses the contract base price as the starting price instead of the item price. If there is no contract, or if the contract does not indicate to use the contract base price, and PO Calculations process finds an item vendor price, it uses the item vendor price as the starting price instead of the item price.
Buyers may want to review the contents of the staging tables before and after each step in the sourcing process. Use the Sourcing Workbench selection criteria component to search for the requisition ID or the process instance. If the requisition line appears in the Sourcing Workbench component, review the row and check the stage status.
Select rows that are in error from previous process runs by selecting the Stage Status field in the search criteria to Error. The error code and a plain text error message appear on the Sourcing Workbench - Sourcing Details page and the Eligible Vendors page. In many cases, the error is a result of the vendor defaults. For example, suppose that the vendor does not ship to the requested ship to location. If the error is vendor-related, change the vendor or location on the Sourcing Workbench - Sourcing Details page and update the stage status to Recycle so that the PO Calculations process can reprocess the row.
Another common error is due to exceeded price tolerances. Use the Sourcing Workbench - Sourcing Details page to view the requested price, calculated price, value adjustments, and the tolerances that were used. Based on this information, Buyers can take the appropriate actions to bring the transaction within tolerances.
Buyers can also fix errors that are not a result of the choice of vendor and reset the rows for restaging. On the Sourcing Workbench - Sourcing Details page, update the stage status to Reset/Purge (reset/purge) to release the original requisition or contract release so that they can make changes to it. After the Buyer changes the status to Reset/Purge and purge the staged transaction, they can click the Source Document link in the Source Transaction Information section of the Sourcing Workbench - Sourcing Details page to access the source requisition or contract so they can make changes. The Buyer must restage the source document through its normal staging process.
The Sourcing Workbench provides Buyers and the Purchasing Director with a view of the results of each of the sourcing steps. The Sourcing Workbench enables them to view staged rows, along with any errors accompanying them. Buyers can use the Workbench to transfer from the staged row to the source transaction data, change the status of the source record, correct the source, and recycle the staged row for reprocessing.
Once the PO Calculations Process completes, the PO Creation Process is initiated. The Create PO process builds purchase orders by using rows on the stage tables that have been processed successfully by the PO Calculations process. The creation process creates the purchase order ID; assigns line, schedule, and distribution numbers; and creates contract release information when applicable. Once a requisition has been sourced to a purchase order, Requisitioners or Buyers may need the PO number (for example, to phone in to a vendor). This information can be obtained using the Document Status inquiry for the requisition. The buyer than can refer to the purchase order to determine if the purchase order was properly approved and dispatched.

Procurement Reference Guide
Update: October 28, 2011 61
After the Requisition is successfully converted in to a Purchase Order, the Purchase Order will move into the process Authorize Purchase Orders.

Procurement Reference Guide
Update: October 28, 2011 62
Chapter Objectives Upon completion of this chapter, the learner will be able to:
Issue Purchase Orders.
Budget Check Purchase Orders.
Approve Purchase Orders.
Dispatch Purchase Orders.
Manage and Approve Purchase Order Changes.
Close and re-open Purchase Orders.
Policy
All University entities must follow the order of precedence when choosing the proper procurement method. Refer to Section 7.1 of the CUNY Purchasing and Contract Manual.
If the procurement policy requires that CUNY solicit bids for goods or services, the buyer will create a bid document outside of the system using the CUNY approved template. The selected vendor's bid document and bid tabulation must be attached to the PO. (If there is a share drive where the bid documents can be stored, then only the bid tabulation need be attached) OGC approval is required for any solicitation where changes are made to the CUNY approved solicitation template.
The process to copy requisition lines into a PO requires that a vendor be assigned. When fully approved requisitions can be assigned to Buyers. If the vendor is known, the buyer can enter the correct vendor name and number into the PO. If the vendor is not known at this time, the buyer can assign as a vendor “Purchase Order in Process” which will alert all that the vendor selection has not been finalized.
All purchase orders must indicate a Method of Procurement (additional information must be added based on CEMLI E-655)
If a buyer identifies that a change needs to be made in a requisition, the following procedures will apply.
For non-material changes, the buyer will make the change to the PO. Buyers can change commodity and account codes, reword a product description, clarify a unit of measure and quantity (1 doz vs. 12 each) as per current practice
For material changes, the buyer will contact the requester who will make the appropriate changes and resubmit the requisition, then require that the Buyer cancel the associated PO lines to reopen the requisition lines for editing.
Changes are deemed to be non-material if the replacement goods or services are functionally equivalent to those in the initial requisition, the prices is the same or lower than the one in the initial requisition, and no third party approvals are required.
Changes are deemed to be material if there is a functional difference from the goods or services in the initial requisition, the price is greater than the original requisition, a third party approval is required or there is a change in the chart of accounts.
Blanket Purchase Order: Blanket Purchase Orders are put in place for a single fiscal year for purchasing situations where the requester cannot predict the specific goods or services or the associated quantities. In all situations, a blanket PO must adhere to the CUNY procurement guidelines. Blanket contracts should never be used to avoid standard purchasing policies and procedures when goods/services and the associated quantities are known. A blanket PO should be issued against which P card purchases will be charged.
Procurement Reference Guide
Update: October 28, 2011 63
Blanket Purchase Order process:
1. Requester submits requisition for blanket order.
2. Purchasing creates blanket purchase order based on amount only.
3. Department orders goods or services directly from the vendor referencing the PO number.
4. The Blanket PO should have as an attachment the most commonly ordered items from this vendor along with a quote, and/or a contract, if available.
Purchase Order attachments
Some purchase order are based on documentation that must accompany the purchase order for the benefit of receivers, vendors, and A/P. These may include: vendor quote or contract, specifications for the goods/services to be procured, and any additional agreements, photos, cut sheets, etc. This documentation must be scanned and attached to the purchase order. Attachments are made as part of the Comments section of the purchase order.
P-card processing; P-cards will be processed in several ways, depending on how they are distributed across the business unit. Please see appendix: P-Card Processing for detailed processing requirements.
Travel card processing : Please See appendix: Travel Card Processing for travel cards Procedure.
Procurement Reference Guide
Update: October 28, 2011 64
Topic 1: Create Purchase Orders Create Purchase Orders is the entire process from selecting requisition lines to creating a purchase order. Once the requisition is approved in the Approved Requisitions process, the approved requisition will enter the initial stage of Sourcing.
The buyer, at the requisition selection screen can:
Source individual items that have been ordered by description.
Assign or change a vendor.
Add to an existing purchase order.
Purchasing Directors will use the Requisition Selection pages to manually assign Buyers to work specific requisitions. In addition, the Buyer will then review the Approved Requisition to verify that the line item is assigned to the correct category. After the requisition is selected as a candidate for PO creation by the Buyer, the sourcing selection process is executed to run online.
The sourcing process will be a manual off line process. The Buyer and Requisitioner will have to work together to determine if an existing contract will be referenced or if a new contract will be created.
After requisition selection, the PO Calculations process performs most of the processing necessary to create a purchase order. After running the PO Calculations process, Buyers can review the results of the process and make changes using the Sourcing Workbench.
If Requisitioners change a vendor through the Sourcing Workbench, they must run the PO Calculations process again to recalculate the staged row(s).
The PO Calculations process performs twelve functions, but only those pertinent to the CUNY process are highlighted here:
Selects a vendor using one of the four different sourcing methods. There are four methods of vendor selection from which Buyers can choose: basic, flexible, schedule split, or cumulative split sourcing. At CUNY, the Basic sourcing method will be used.
Changes purchase order values using the business unit, vendor, item, or contract, based on the CUNYfirst Purchasing default hierarchy. Consolidates requisitions onto purchase orders when the Consolidate Flag is Y. If Buyers have requisition lines with the same business unit, vendor, and buyer, or just the same business unit and vendor, they can consolidate these lines onto single purchase orders. This feature is useful if Buyer does not want to send multiple purchase orders to the same vendor for the same business unit.
If the Buyer consolidates the requisition lines onto a single purchase order, the vendor receives only one purchase order from each business unit (or each business unit and buyer combination) each time that the Buyer creates purchase orders using the PO Calculations and the Create Purchase Orders processes. When the Buyer chooses the consolidate option, lines for the same item ID (marked as consolidated) for multiple requisitions will be consolidated onto one line on the purchase order. However, the schedules do not get consolidated. Buyers will see a separate schedule (along with its original distributions) for each schedule on the originating requisitions.
On the requisition, if the Buyers choose to consolidate the purchase orders on the Sourcing Controls page, when they order by item ID on a requisition, the requisition line is eligible for consolidation by default. The buyer can override this setting.

Procurement Reference Guide
Update: October 28, 2011 65
Finds a contract. If no contract is specified on the transaction and the transaction source is a requisition, the PO Calculations process attempts to find the most recent effective contract for the already determined vendor. If the contract does not meet minimum or maximum requirements, the PO Calculations process goes to the next most recent effective contract, if available.
Finds a procurement card or vendor card to use as the payment method. If the Requisitioner is using the procurement card functionality, this process will determine and assign the appropriate procurement card or vendor card to the purchase order line.
Calculates the price. If Buyers select the calculate price option, the PO Calculations process recalculates the price. The process begins with the price from the item. If it finds a contract or if a contract is specified, and the contract indicates to use the contract base price, the PO Calculations process uses the contract base price as the starting price instead of the item price. If there is no contract, or if the contract does not indicate to use the contract base price, and PO Calculations process finds an item vendor price, it uses the item vendor price as the starting price instead of the item price.
Buyers may want to review the contents of the staging tables before and after each step in the sourcing process. Use the Sourcing Workbench selection criteria component to search for the requisition ID or the process instance. If the requisition line appears in the Sourcing Workbench component, review the row and check the stage status.
Select rows that are in error from previous process runs by selecting the Stage Status field in the search criteria to Error. The error code and a plain text error message appear on the Sourcing Workbench - Sourcing Details page and the Eligible Vendors page. In many cases, the error is a result of the vendor defaults. For example, suppose that the vendor does not ship to the requested ship to location. If the error is vendor-related, change the vendor or location on the Sourcing Workbench - Sourcing Details page and update the stage status to Recycle so that the PO Calculations process can reprocess the row.
Another common error is due to exceeded price tolerances. Use the Sourcing Workbench - Sourcing Details page to view the requested price, calculated price, value adjustments, and the tolerances that were used. Based on this information, Buyers can take the appropriate actions to bring the transaction within tolerances.
Buyers can also fix errors that are not a result of the choice of vendor and reset the rows for restaging. On the Sourcing Workbench - Sourcing Details page, update the stage status to Reset/Purge (reset/purge) to release the original requisition or contract release so that they can make changes to it. After the Buyer changes the status to Reset/Purge and purge the staged transaction, they can click the Source Document link in the Source Transaction Information section of the Sourcing Workbench - Sourcing Details page to access the source requisition or contract so they can make changes. The Buyer must restage the source document through its normal staging process.
The Sourcing Workbench provides Buyers and the Purchasing Director with a view of the results of each of the sourcing steps. The Sourcing Workbench enables them to view staged rows, along with any errors accompanying them. Buyers can use the Workbench to transfer from the staged row to the source transaction data, change the status of the source record, correct the source, and recycle the staged row for reprocessing.
Once the PO Calculations Process completes, the PO Creation Process is initiated. The Create PO process builds purchase orders by using rows on the stage tables that have been processed successfully by the PO Calculations process. The creation process creates the purchase order ID; assigns line, schedule, and distribution numbers; and creates contract release information when applicable.
Once a requisition has been sourced to a purchase order, Requisitioners or Buyers may need the PO number (for example, to phone in to a vendor). This information can be obtained using the Document

Procurement Reference Guide
Update: October 28, 2011 66
Status inquiry for the requisition. The buyer than can refer to the purchase order to determine if the purchase order was properly approved and dispatched.
After the Requisition is successfully converted in to a Purchase Order, the Purchase Order will move into the process Authorize Purchase Orders.
Authorized Roles
CU_FSPO_General_Buyer
CU_FSFS_Production_Support
Issue Purchase Orders is found by navigating to: Purchasing > Purchase Orders > Add/Update POs
Step Summary
Issue Purchase Orders:
1. Navigate to: Purchasing > Purchase Orders > Add/Update POs 2. On the Add a New Value tab, enter the Business Unit and click the Add button. 3. Define the Purchase Order. 4. On the Contract tab, enter the Contract reference for each line. 5. Run the Check Budget process. 6. If valid navigate to: Purchasing > Reconcile PO > Reconciliation Workbench. 7. Verify the Purchase Order. 8. Forward the Purchase Order to dispatch.
Detailed Information
Issue Purchase Orders Page
1. To create an online Purchase Order navigate to: Purchasing > Purchase Orders > Add/Update POs
2. On the Add a New Value tab, as needed, enter the Business Unit. 3. Click the Add button. 4. On the Define Purchase Order page, enter the Vendor ID on the requisition to copy for the
Purchase Order. 5. On the Copy From dropdown box menu select Requisition. 6. In the Copy From field, enter the Requisition Number or search criteria, and click the Search
button. 7. Select the requisition lines to copy into the Purchase Order. 8. On the Copy To dropdown box, select Purchase Order. 9. On the Define Purchase Order page, click the Purchase Order tab and verify and enter data
on the Purchase Order Header page. 10. To enter Purchase Order default information, select the Header Details or Purchase Order
Defaults links. 11. As needed, select the Add Comments or Add Ship to Comments link. 12. As needed, click the Header Details link to enter PO Header default information including the
PO type. 13. As needed to hold the Purchase Order, select the Hold from Further Processing checkbox.
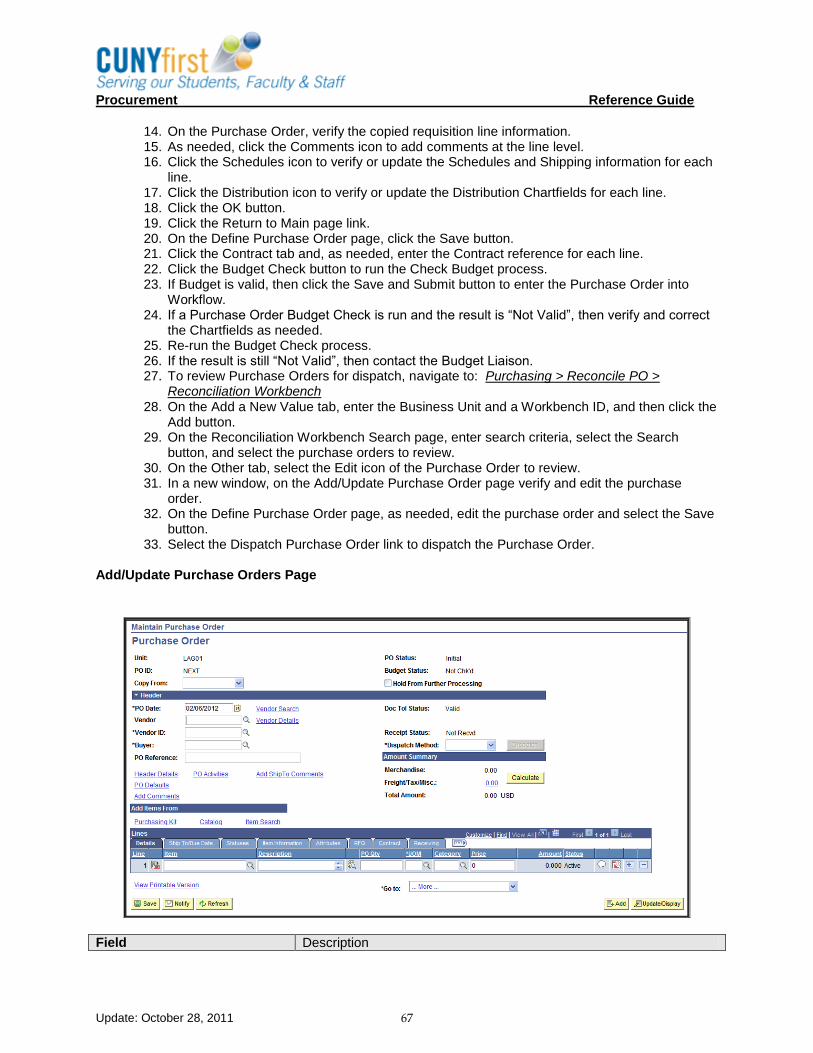
Procurement Reference Guide
Update: October 28, 2011 67
14. On the Purchase Order, verify the copied requisition line information. 15. As needed, click the Comments icon to add comments at the line level. 16. Click the Schedules icon to verify or update the Schedules and Shipping information for each
line. 17. Click the Distribution icon to verify or update the Distribution Chartfields for each line. 18. Click the OK button. 19. Click the Return to Main page link. 20. On the Define Purchase Order page, click the Save button. 21. Click the Contract tab and, as needed, enter the Contract reference for each line. 22. Click the Budget Check button to run the Check Budget process. 23. If Budget is valid, then click the Save and Submit button to enter the Purchase Order into
Workflow. 24. If a Purchase Order Budget Check is run and the result is “Not Valid”, then verify and correct
the Chartfields as needed. 25. Re-run the Budget Check process. 26. If the result is still “Not Valid”, then contact the Budget Liaison. 27. To review Purchase Orders for dispatch, navigate to: Purchasing > Reconcile PO >
Reconciliation Workbench 28. On the Add a New Value tab, enter the Business Unit and a Workbench ID, and then click the
Add button. 29. On the Reconciliation Workbench Search page, enter search criteria, select the Search
button, and select the purchase orders to review. 30. On the Other tab, select the Edit icon of the Purchase Order to review. 31. In a new window, on the Add/Update Purchase Order page verify and edit the purchase
order. 32. On the Define Purchase Order page, as needed, edit the purchase order and select the Save
button. 33. Select the Dispatch Purchase Order link to dispatch the Purchase Order.
Add/Update Purchase Orders Page
Field Description

Procurement Reference Guide
Update: October 28, 2011 68
Field Description
Business Unit A business unit is an operational subset of the organization that tracks and maintains its own set of requisitions and purchase orders. Each business unit has its own way of storing information and its own processing guidelines. PeopleSoft Purchasing business units share vendor, purchase order, and receiving information with PeopleSoft Payables business units in the same setID. Some valid values for CUNYfirst are: BCC01, BMC01, COCOM, HOS01, KCC01, LAG01, MEC01, NCC01, and QCC01.
PO ID System-generated 10-character transaction ID.
Chng Order If applicable, displays the change order batch number for the purchase order.

Procurement Reference Guide
Update: October 28, 2011 69
Field Description
Copy From Select from these values: Contract: Select to access the Copy Purchase Order From Contracts page, where you can copy the purchase order from an existing contract. Enter the contract setID, contract ID, vendor, vendor ID, and master contract of the contract that you want to copy. You can copy multiple contracts into an existing purchase order. You have the option of manually entering the order quantity or using the scheduled ship quantity from the contract. Blanket purchase orders are not available for selection. Plus, the system will use the vendor and location or the buyer from the copied contract to determine the valid procurement card information for the new purchase order. Purchase Order: Select to access the Copy Purchase Order From Purchase Order page, where you can copy the purchase order from an existing purchase order. Enter relative information like purchase order ID, vendor ID, and buyer information from the purchase order that you want to copy. The copy function only enables you to copy from one purchase order. If you attempt to copy more than one purchase order, the most recently copied purchase order overrides the previous purchase order information. Plus, the procurement card information is not copied over to the new purchase order. The system will re-determine the valid procurement card or vendor card to be used on the new purchase order by looking at the vendor and location or the buyer. You can copy a canceled purchase order or a purchase order that has canceled lines to a new purchase order. If you copy a canceled purchase order all the lines from the canceled purchase order are copied over to the new purchase order and the status of the lines is made active. If you copy a purchase order that has one or more lines canceled, only the active lines from the existing purchase order are copied to the new purchase order. Plus, if you are using the vendor rebate agreement functionality, when a purchase order is created from another purchase order, the vendor rebate agreement will be assigned based on the purchase order date of the new purchase order and is not copied from the source purchase order lines. Finally, if you are copying a purchase order that is associated with a PeopleSoft Maintenance Management work order, the work order information will not be copied to the new purchase order. Requisition: Select this option to access the Copy Purchase Order From Requisition page, where you can copy the purchase order from an existing requisition. When you copy from a requisition, you are sourcing the requisition onto the purchase order. The Copy From field enables you to turn a requisition into a purchase order without going through sourcing. When you copy from a requisition into a purchase order, if the Calculate Price field is Y, then the line will be repriced. If the Calculate Price field is N, then the requisition price is used. If you want to partially source, split source, or consolidate requisitions, use the Requisition Selection component. If a blanket purchase order is specified on the requisition line, it cannot be sourced to the purchase order here. Plus, the procurement card information will be copied over to the new purchase order if all the requisitions selected are using the same procurement card information. If the information between the requisitions is not the same, the procurement card will be blank or the buyer's procurement card will become the default value. If a vendor card currently exists on the purchase order it will not be overridden by the requisitions procurement card information. If you are copying a requisition that is associated with a PeopleSoft Maintenance Management work order, the work order information will

Procurement Reference Guide
Update: October 28, 2011 70
Field Description
PO Status Status of the entire purchase order. Values include Initial, Open, Pending Approval, Approved, Dispatched, Canceled, and Complete.
Budget Status Appears only if budget checking is enabled. Values are: Not Chk'd (not checked): The purchase order has not been budget checked. Valid: The purchase order has been successfully budget checked. Error: The purchase order has failed budget checking. The text is enabled as a link, which you can click to access the Purchase Order Exceptions page where you can view budget check exceptions for this purchase order. Users with appropriate authority can override the budget exceptions on the Purchase Order Exceptions page.
Hold From Further Processing Select this check box to temporarily prevent further processing of the purchase order. The purchase order will not be eligible for approval, unapproval, cancelation, closure, or dispatch processing. In addition, budget checking is now determined by the selection criteria that you define as part of the Source Transaction definition for the Commitment Control Budget Processor process and whether you have selected the Hold From Further Processing check box for the purchase order. If the HOLD_STATUS = N for the Selection Criteria for the Source Transaction, and the Hold From Further Processing check box is selected, and you perform budget checking, no budget checking will occur for the purchase order. If the HOLD_STATUS is not entered as Selection Criteria for the Source Transaction, and the Hold From Further Processing check box is selected, and you perform budget checking the budget checking process will execute for the purchase order. If the HOLD_STATUS = Y for the Selection Criteria for the Source Transaction, and the Hold From Further Processing check box is selected, and you perform budget checking, the budget checking process will execute but will only process the purchase orders that are marked on hold.
Approve PO Click the Approve PO button to change the status of the purchase order to Approved. The purchase order receives an approved or pending approval status based on the purchase order approval rules defined for the PeopleSoft Purchasing business unit. Once the status changes to Approved or Pending Approval, this button is no longer available. The Approve PO button is not available if you do not have the authority to approve a purchase order. Set up approval authority on the User Preferences - Procurement: Purchase Order Authorizations page.
Delete PO Click this button to delete the entire purchase order. When you click this button, you must confirm that you want to delete the purchase order. Once you delete a purchase order, the same purchase order ID can be reused. You can only delete purchase orders if you have been authorized for purchase order deletion on the User Preferences - Procurement: Purchase Order Authorizations page.

Procurement Reference Guide
Update: October 28, 2011 71
Field Description
Budget Check Click the Budget Check button to run budget checking for this purchase order. This button is available if commitment control is enabled for PeopleSoft Purchasing. When you run budget checking, the Comm. Cntrl. Budget Processor (commitment control budget processor) process (FS_BP) runs to check the budget. This process updates the budget header status to either Valid or Error.
PO Date Automatically changes to the current system date. You can override the purchase order date. This appears on the purchase order and is the date used for price calculation if the price date is defined as the purchase order date.
Vendor A purchase order can have only one vendor. When you enter a vendor, the vendor order location, price location, primary buyer, freight terms, payment terms, vendor currency, dispatch methods, and VAT option appear by default on the purchase order. You can override the defaults from the vendor on the Vendor Details page.
Buyer Buyers available to a user are defined on the User Preferences - Procurement: Purchase Order Authorizations page.
Doc Tol Status If document tolerance checking is enabled, the system displays the document tolerance status. The system runs the Document Tolerance process before budget checking when you click the Budget Check button, or you can run the process separately. Document tolerance checks the change in percentage or a fixed dollar amount between the purchase order and requisition at the ChartField distribution level. Values are: V (valid): The purchase order has passed document tolerance checking. N (not checked): The purchase order requires document tolerance checking. If any amounts, quantities, or ChartFields are modified after the document tolerance is checked, the system resets the document tolerance status to Not Checked. E (error): Exceptions were generated for the purchase order during document tolerance checking. You can override document tolerance exceptions on the Document Tolerance Exception page.
Backorder Status Displays the backorder status. Values are: None. Backorder. BO Recv (backorder received).
Receipt Status Displays the receipt status of the purchase order. Values are: Not Recvd (not received). Partial (partially received). Received (fully received).
Dispatch Method Select which dispatch methods for this purchase order. Valid values: Print, Phone, eMail, Fax, EDX.
Amount Summary
Merchandise Displays the merchandise amount according to the quantities and prices of the items on the purchase order. This field is not available if this purchase order is used with a recurring purchase order voucher.

Procurement Reference Guide
Update: October 28, 2011 72
Field Description
Freight Tax Misc Click the link associated with the Freight/Tax/Misc. field. When you click this link the PO Total Amount Details page appears. Using this page you can view the total amount of adjustments made to this purchase order. This includes VAT, sales tax, miscellaneous charges, and freight.
Total Amount The total amount on the purchase order calculated from the merchandise and adjustment amounts appears.
Lines
Details
Line
Item Depending on how you set up PO Item Vendor Security on the Purchasing Definition - Business Unit Options page, the items available may be limited to predefined choices that you established for the selected vendor. When you select an item, the description, category, unit of measure, and price tolerances appear by default. You may also choose to order by description-only when an item is not defined in the system. Enter a description of the item in the Description field, a value in the Category field, and the item price on the Maintain Purchase Orders - Schedule page. Purchase orders can contain standard and stockless items, but you cannot mix them on the same purchase order. This field is not available if the purchase order is used with a recurring purchase order voucher. If you perform one of these actions on a purchase order line that is associated with a PeopleSoft Maintenance Management work order, the system will remove the work order information and the peg to the non-inventory work order: Change a description only or non-inventory item to an inventory item. Change the category.
Description 254-character description of the item or service.

Procurement Reference Guide
Update: October 28, 2011 73
Field Description
PO Qty Enter the quantity of the item that you want to order. If you are using the order multiples functionality, when you enter the purchase order quantity the system will validate the line quantity against the order quantity multiple factor that you specified for this item vendor and unit of measure on the Vendor's UOM & Pricing Information page. If the quantity you enter is not a multiple of the order quantity multiple factor, based on the rounding rule, the system will issue a warning message that the item should be ordered in multiples of this factor and it suggests the correct order quantity. You can accept the system suggested quantity at that time or keep the original quantity that you entered. Order quantity multiples are not validated and checked for these information: Non item vendor UOMs. Inventory item UOMs. Adhoc or description only transaction lines. Purchase orders that have a status of Dispatched or Canceled. Note. Order multiple checks are only applicable to item vendor UOMs. If the purchase order line built by the PO Calculations (PO_POCALC) and Create Purchase Order (PO_POBUILD) processes references an RFQ and you change the purchase order quantity, the system prompts you asking whether you want to increase or decrease the RFQ order quantity. For example, if you decrease the purchase order quantity from 10 to 5 and want to award the difference to another vendor, choose to decrease the RFQ award quantity. This makes the remaining quantity of 5 available to be awarded to another vendor. If applicable, a similar prompt appears asking whether you want to increase or decrease the requisition line quantity. This field is not available for entry for amount only lines.
UOM Select the UOM of the item that you want to use to place the order. This field is not available if the purchase order is used with a recurring purchase order voucher.
Category UNSPSC code.
Price Unit price.
Amount Purchase order quantity multiplied by the unit price. Appears in the transaction currency or the vendor preferred currency. If the line has been designated as an amount-only line on the Line Details page, you can edit this field. This field is not available if the purchase order is used with a recurring purchase order voucher.
Status Status of the line appears. Values are: Active, Canceled, Hold, or Closed.
Key policies related to the procedure
Requesters will be required to copy a requisition (budget checked and approved) into a purchase order.
Shipping costs must be reflected as a separate line on the PO.
PO lines may not be deleted if the PO has been budget checked and/or dispatched.
In the event that there is a need to remove a line from a dispatched PO, the buyer should cancel the line. This will generate a change order to the PO which will be sent to the vendor and interfaced to the City.

Procurement Reference Guide
Update: October 28, 2011 74
The City deadline for running transactions into their system is before close of business. As a result, we will be capturing transactions completed up until 3pm only. Transactions completed after that—vouchers approved, purchase orders dispatched—will not be picked up and sent to the City until the following day.

Procurement Reference Guide
Update: October 28, 2011 75
Topic 2: Manage Purchase Orders Manage Purchase Orders is the process of Updating or Reviewing a previously entered Purchase Order. Buyers can manage their list of purchase orders including either by using the Purchasing Reconciliation Workbench or through the eProcurement Buyer Center.

Procurement Reference Guide
Update: October 28, 2011 76
Topic 3: Budget Check Purchase Orders
Buyers are required to budget check each purchase order prior to submitting the purchase order for physical signature approval to the Purchasing Director.
When budget checking is executed, it seeks to establish that for the accounting distributions on each PO line, there are sufficient budget dollars for the value of the requested item. If there are sufficient budget dollars, the system returns a status of Valid and records an encumbrance. The purchase order is then ready to be submitted for approval.
When a transaction exceeds the available budget amount, the system stops the transaction and issues an error notice and the Buyer then must either change the Chartfield accounting to use funds from a different budget or access the offline process to secure additional budget dollars. The offline process will include contacting the Budget Liaison.
Process to validate the Budget against the Commitment Control and then once validated, create encumbrance entries.
Authorized Roles
CU_FSPO_General_Buyer
CU_FSFS_Production_Support Budget Check Purchase Orders is found by navigating to: Purchasing > Purchase Orders > Find an Existing Value or Add A New Value
Step Summary
Budget Check Purchase Orders 1. Navigate to Budget Check for purchase orders. 2. If a previously created requisition has a Budget Check result of “Not Valid”, then verify and
correct the Chartfields as needed. 3. Re-run the Budget Check process. 4. If the result is still “Not Valid”, then contact the Budget Liaison. 5. If the Budget Check is run and the result is “Valid”, then the Purchase Order enter into
Workflow. 6. If the result is “Not Valid”, then navigate to the Review and Submit line. 7. Select the disclosure icon to open the distributions. 8. Verify and correct the Chartfields as needed. 9. Re-run the Budget Check process. 10. If the result is still “Not Valid”, then contact the Budget Liaison.

Procurement Reference Guide
Update: October 28, 2011 77
Detailed Information
Budget Check Purchase Orders Page
Field Description
Run Control ID A run control ID is a unique name used to identify which inputs on a page are saved and used to run a report or process. It is case sensitive, can be up to 30 characters in length and can contain underlines and dashes. It cannot contain spaces. The same run control ID can be used for different reports or processes (except in the case of dynamic reports, each of these must have their own unique run control ID) and the inputs from the different pages are saved unique to the particular report or process. There are some cases where you might want to create multiple run control IDs for the same report or process to be run under different circumstances.
Process Frequency Select from the values: Once, Always, Don’t Run.
Request Number System-generated number.
Description Enter a description. This is required.
Process Options

Procurement Reference Guide
Update: October 28, 2011 78
Field Description
Business Unit A business unit is an operational subset of the organization that tracks and maintains its own set of requisitions and purchase orders. Each business unit has its own way of storing information and its own processing guidelines. PeopleSoft Purchasing business units share vendor, purchase order, and receiving information with PeopleSoft Payables business units in the same setID. Some valid values for CUNYfirst are: BCC01, BMC01, COCOM, HOS01, KCC01, LAG01, MEC01, NCC01, and QCC01.
PO ID Values are:
All: Budget checks all purchase orders.
Some: Select to display the From and To fields. Budget checks all purchase orders that match the range specified in the From and To fields.
Value: Select to display the PO ID field. Budget checks the purchase order that matches the ID specified in the PO ID field.
PO Date Values are: All: Select to budget check all purchase orders. Some: Displays the From and To fields. Budget checks all purchase orders for which creation dates fall within the dates specified in the From and To fields. Value: Displays the PO Date field. Budget checks purchase orders for which creation dates match the date specified in the PO Date field.
Actg Date Values are: All, Range, Value.
PO Type Values are: All, Value.
Buyer ID Values are: All, Value.
Origin Values are: All, Value.
PO Status Values are: All, Some.
Mid Roll Status Values are: All, Value.

Procurement Reference Guide
Update: October 28, 2011 79
Topic 4: Approve Purchase Orders In the Approve Purchase Order process, the purchase order is reviewed, document tolerance is run and budget check is verified.
Document Tolerance
Document tolerances are allowable percentages and/or amounts by which related procurement documents can differ. CUNY will set dollar/percentage tolerances between pre-encumbrances and encumbrances.
The system uses the lower value (either the percentage or amount) to calculate the tolerance. If you enter 0.00 in the Percent or Amount fields, the system calculates a zero tolerance, and the successor document must equal the predecessor document to pass document tolerance checking.
If a PO line is within the configured document tolerance, then the PO proceeds to budget check.
If the allowable percentage or amount is exceeded, the system creates a document tolerance exception. The options for proceeding are as follows:
CUNY Purchasing Directors will have the ability to override the document tolerance exception
Cancel the PO line which will re-open the requisition line for future sourcing and then notify the Requisitioner that the allowable percentage or amount is exceeded using an offline communication process. Once cancelled, the Requisitioner must edit the requisition and resubmit it to workflow approvals.
PO Budget Check & Approval
Once all PO lines pass document tolerance, they proceed to the Budget Checking process prior to being submitted for approval. The Budget Checking process compares the total amounts on each transaction (distribution) line to the available amounts in the referenced General Ledger budget. At Budget Check, encumbrances are generated for purchase orders and the pre-encumbrance set by the requisition is relieved.
The status is updated to “Valid” if there are sufficient funds in the associated budget based on the accounting information that has been entered for each line of the purchase order.
If the status is “Invalid”:
o The Buyer will cancel the PO line and notify the Requisitioner that it has failed budget check. Once cancelled, the Requisitioner must either edit the requisition to change the accounting distribution to use funds from a different budget and resubmit it to workflow approvals or the budget must be manually adjusted to add additional funds if they are made available. When the status of the purchase order is “Valid”, the Purchasing Director can approve the purchase order.
o The process for adjusting budgets to obtain additional funds will be handled externally to these Procurement processes.
o All purchase orders will be reviewed and approved by the Purchasing Director at each college prior to dispatch. The Director will use the Purchasing Reconciliation Workbench to “approve”, “unapproved”, “close” or “cancel” purchase orders. Alternatively, they may go directly to the purchase order page to approve the document. There is no workflow or email required.
CUNY Interface Requirements

Procurement Reference Guide
Update: October 28, 2011 80
There are CUNY interface requirements that must be met when creating PO’s that will allow those PO’s to interface properly with both the City and State financial systems. The PO Type must be selected properly this will determine how the PO is transacted by the interface processes. Note: The City deadline for running transactions into their system is before close of business. As a result, we will be capturing transactions completed up until 3pm only. Transactions completed after that—vouchers approved, purchase orders dispatched—will not be picked up and sent to the City until the following day.
Key policies related to the procedure
No self–approval of purchase orders is permitted.
Authorized Roles
CU_FSFS_Production_Support
CU_FSPO_PO_Approver
Approve Purchase Orders is found by navigating to: Worklist > {Click on the link}
Step Summary
Approve Purchase Orders:
1. Newly created Purchase Orders are entered into Workflow for approval of the Purchase Order. 2. A person with security access to approve the Purchase Order receives an email with a link to the
worklist to view a specified Purchase Order. 3. Navigate to Approve Purchase Orders. 4. Unapproved or denied Purchase Orders require the reasons to be sent in a return email to the
requestor. 5. As needed, edit the Purchase Order and run Budget Checking. 6. If the Budget Checking result is “Not Valid”, then verify and correct the Chartfields as needed. 7. Re-run the Budget Check process. 8. If the result is still “Not Valid”, then contact the Budget Liaison. 9. Approved Purchase Orders are sent to the Purchasing Director for further approval.

Procurement Reference Guide
Update: October 28, 2011 81
Detailed Information
Approve Purchase Orders Page
1. Workflow sends an email to a person with security access to approve the Purchase Order. 2. Click the worklist link in the email to view the specified Purchase Order. 3. Review the Purchase Order and determine whether or not to approve the Purchase Order. 4. If approved and not requiring further approval, the Purchase Order is entered into Workflow to
Dispatch Purchase Orders. 5. If not approved or the Purchase Order is denied, send the reason(s) in a return email to the
requestor. 6. As needed edit the Purchase Order and run Budget Checking. 7. If the Budget Checking result is “Not Valid”, then verify and correct the Chartfields as needed. 8. Re-run the Budget Check process. 9. If the result is still “Not Valid”, then contact the Budget Liaison. 10. Approved Purchase Orders are sent to the Purchasing Director for further approval.
Field Description
Unit A business unit is an operational subset of the organization that tracks and maintains its own set of requisitions and purchase orders. Each business unit has its own way of storing information and its own processing guidelines. PeopleSoft Purchasing business units share vendor, purchase order, and receiving information with PeopleSoft Payables business units in the same setID. Some valid values for CUNYfirst are: BCC01, BMC01, COCOM, HOS01, KCC01, LAG01, MEC01, NCC01, and QCC01.
PO ID Unique 10-character field to identify the purchase order transaction.
Vendor Seller/supplier

Procurement Reference Guide
Update: October 28, 2011 82
Field Description
Approval Action Select one of these actions. If you don't have the authority to complete the approval or if you deny or recycle the purchase order, the approval status remains In Process and routes to the next role user in the approval definition.
Approve: Select to approve the purchase order amount or ChartField. If requirements are met, the approval status changes to Complete when you save this page, and the purchase order is made available for dispatch. If workflow is implemented, the system sends an email to the buyer telling him or her that the purchase order has been approved.
Deny: Select to deny the amount or ChartField for this purchase order and deny dispatch. If this value is selected and workflow is enabled, the system generates a worklist entry and an email message to the buyer.
Recycle: Select to send the purchase order back to the buyer or previous approver. If this value is selected and workflow is enabled, the system generates a worklist entry to the last user who approved the purchase order amount.
Approval Status Displays the overall status of the purchase order.
Comment Enter comments pertinent to the approval action. These comments are saved with the purchase order and are visible only on the originating page, either the Approve Amounts - Approval page or Approve ChartFields - Approval page.
PO Amount Amount of the purchase transaction.
Buyer A purchase order can only have one buyer. Buyers available to a user are defined on the User Preferences - Procurement: Purchase Order Authorizations page.
PO Reference Displays free-form text that appears by default from the Maintain Purchase Order - Purchase Order page.
PO Date This is the date that appears on the purchase order.
Merchandise Total Amount Displays the quantity of items multiplied by the unit price in the purchase order currency.
Merchandise Total Base Displays the quantity of items multiplied by the unit price in the base currency for the business unit.
PO Total Value Displays the merchandise total amount plus taxes, freight, and miscellaneous charges in the purchase order currency.
PO Total Base Displays the merchandise total amount plus taxes, freight, and miscellaneous charges in the base currency for the business unit.

Procurement Reference Guide
Update: October 28, 2011 83
Topic 5: Dispatch Purchase Orders Once a purchase order is verified and approved in the Approve Purchase Orders process, the purchase order will need to be dispatched. The dispatch method for all CUNY purchase orders will be set to Print. Approved purchase orders will be printed and routed to CUNY Purchasing Directors for manual signatures. Once signature is obtained, Buyers will dispatch the signed PO by manual fax, postal mail or using the CUNY email system. The Buyer will also digitalize the signed purchase order and attach it to the un-signed PO document in the CUNYfirst system.
An OTPS encumbrance file will be interfaced to the City/State system. The interface will occur daily or based on CUNY Policy. The City/State accounting system will determine if the purchase order is acceptable. A daily file is run through an interface that displays all of the reject/accepted purchase orders. If the encumbrance is accepted, it will be encumbered by the City/State system. If the encumbrance is rejected, the rejected purchase order will be entered in to the Accepted/Rejection file. The buyer will review this file, and review the rejected items. If there is a change on the purchase order that requires a Purchase Order change, a requisition change order will be needed. If the file is accepted, the purchase order is ready to be filled.
The City/State Accounting system will also provide a daily Reconciliation file. The reconciliation file will be reviewed by the buyer to ensure that purchase order funds have been encumbered correctly. If the funds reconcile, no further action is need and the purchase order is ready for receiving, if there is a discrepancy, the buyer will have to perform a change order to the purchase order.
Key policies related to the procedure
The City deadline for running transactions into their system is before close of business. As a result, we will be capturing transactions completed up until 3pm only. Transactions completed after that—vouchers approved, purchase orders dispatched—will not be picked up and sent to the City until the following day.
Authorized Roles
CU_FSPO_General_Buyer
CU_FSFS_Production_Support
CU_FSPO_PO_Processor
Dispatch Purchase Orders is found by navigating to: Purchasing > Purchase Orders > Add/Update POs
Step Summary
1. Navigate to Purchase Orders. 2. On the Add/Update POs Search page, enter search criteria, select the Search button, and select
the correct Purchase Order. 3. Select the Dispatch method and click the Dispatch button. 4. On the Dispatch Options page, select the Server and click the OK button. 5. On the Dispatch PO’s page click the Add a New Value Tab, create a new Run Control ID and
click the Add button. 6. On the Dispatch Purchase Order page, enter the parameters and click the Save button. 7. Run the process on the Process Scheduler Request page. Note: For additional information, refer to Unit 1, Topic 2 Run a Process.

Procurement Reference Guide
Update: October 28, 2011 84
Detailed Information
1. Navigate to: Purchasing > Purchase Orders > Add/Update POs 2. On the Add/Update POs Search page, enter search criteria. 3. Select the Search button. 4. Select the correct Purchase Order. 5. On the Define Purchase Order page, verify or modify the Dispatch Method. 6. Click the Dispatch button. 7. On the Dispatch Options page, select the Server. 8. Click the OK button.

Procurement Reference Guide
Update: October 28, 2011 85
9. Navigate to: Purchasing > Purchase Orders > Dispatch POs 10. On the Dispatch PO’s page, select the Add a New Value tab. 11. Enter a new Run Control ID 12. Click the Add button. 13. On the Dispatch Purchase Order page, enter the dispatch parameters. 14. Click the Run button. 15. Run the process on the Process Scheduler Request page. Note: For additional information, refer to Unit 1, Topic 2 Run a Process.
Field Description
Run Control ID A run control ID is a unique name used to identify which inputs on a page are saved and used to run a report or process. It is case sensitive, can be up to 30 characters in length and can contain underlines and dashes. It cannot contain spaces. The same run control ID can be used for different reports or processes (except in the case of dynamic reports, each of these must have their own unique run control ID) and the inputs from the different pages are saved unique to the particular report or process. There are some cases where you might want to create multiple run control IDs for the same report or process to be run under different circumstances.
Language Set to English.
Business Unit A business unit is an operational subset of the organization that tracks and maintains its own set of requisitions and purchase orders. Each business unit has its own way of storing information and its own processing guidelines. PeopleSoft Purchasing business units share vendor, purchase order, and receiving information with PeopleSoft Payables business units in the same setID. Some valid values for CUNYfirst are: BCC01, BMC01, COCOM, HOS01, KCC01, LAG01, MEC01, NCC01, and QCC01.
To
PO ID Select or enter the purchase order ID. Unique 10-character field to identify the purchase order transaction.
PO Status Status of the entire purchase order. Values include Initial, Open, Pending Approval, Approved, Dispatched, Canceled, and Complete.
Contract SetID Select a contract setID, if the purchase orders that you are to dispatch are associated with a contract.
Contract ID Select a contract number, if the purchase orders that you are to dispatch are associated with a contract.
Release Enter the release number of the contract, if applicable.
From Date Select dates to dispatch purchase orders based on purchase order date values. Through Date
Vendor ID Enter a vendor ID.
Buyer A purchase order can only have one buyer. Buyers available to a user are defined on the User Preferences - Procurement: Purchase Order Authorizations page.

Procurement Reference Guide
Update: October 28, 2011 86
Field Description
Fax Cover Page Select a fax cover page if some of the purchase orders that you are dispatching are to be sent by fax. Define fax cover letters in the system on the Fax Cover Letters page.
The PO Dispatch/Print process writes to the fax control file the file name associated with the selected cover letter combined with the cover letter file extension that you defined on the Dispatch Configuration page.
Statuses to Include Select which statuses to include in this run of the process.
Approved
Dispatched
Pending Cancel
Dispatch Methods to Include Select which dispatch methods to include in this run of the process. Selected values are only used as a part of the data selection criteria. To change the method by which the purchase order is to be dispatched, you must modify the dispatch method on the Maintain Purchase Order - Purchase Order page.
FAX
EDX
Phone
Miscellaneous Options
Chartfields Select Recycled AND Valid ChartFields to process purchase orders regardless of whether the ChartFields are valid or recycled.
Select Recycled Chartfields to process only purchase orders with distribution lines whose ChartFields are identified as Recycled. (PO_LINE_DISTRIB.CHARTFIELD_STATUS = 'R').
Select Valid Chartfields to process only purchase orders with distribution lines whose ChartFields are identified as Valid. (PO_LINE_DISTRIB.CHARTFIELD_STATUS = 'V').
Change Orders Select Changed Orders to process only purchase orders that have been changed.
Select Changed and Unchanged Orders to process changed and unchanged purchase orders.
Select Unchanged Orders to process only purchase orders that have never been changed.
Print Changes Only If you select to dispatch changed orders in the Change Orders field, the Print Changes Only check box becomes available. Select to dispatch only the changes to the purchase order, rather than the entire purchase order.
If you create the purchase order from a contract with the Release To Single PO Only option selected, select this check box to have the system send only the latest changes to the supplier.
Test Dispatch Select this check box to perform a test run of the dispatch. When you select this check box, the process runs, but the purchase orders processed do not appear in Dispatched status, and the purchase orders are printed with the word Unauthorized at the bottom of the page. This enables you to test the EDX, email, or fax setup without updating the system.

Procurement Reference Guide
Update: October 28, 2011 87
Field Description
Print Copy Select this check box to produce a printed copy of each processed purchased order. If any of the processed purchase orders are done by phone, fax, email, or EDX, the system prints a hard copy for review.
Print BU Comments Select this check box to print comments (terms and conditions) defined for the PeopleSoft Purchasing business unit on the purchase order upon dispatch. Assign comments to the PeopleSoft Purchasing business unit by clicking the Comments link on the Purchasing Definition - Business Unit Definition page.
Sort By Select whether to sort the lines on the dispatched purchase order by Line No (line number) or ShipTo ID.
Print PO Item Description Select this check box to print the item description from the Maintain Purchase Order - Purchase Order page, instead of from the Purchasing Attributes page. The item description stored on the purchase order is in the base language and may have been modified on the purchase order.
Print Duplicate Select this check box to print the word Duplicate on each purchase order.
Procurement Reference Guide
Update: October 28, 2011 88
Topic 6: Manage and Approve Purchase Order Changes A buyer will be notified that there needs to be a change order generated. The buyer can be notified from a Requisitioner who has made a change on the Manage Requisitions page to create a requisition change order. Requisition change orders must be approved and budget checked just as the original PO was approved and budget checked. Once the requisition is re-approved, as defined in the Approve Requisition process, the Buyers must run a process to turn approved requisition change orders into Purchase Orders. Purchase Orders must be dispatched to Print and a physical signature obtained from the Director of Purchasing. The change order follows the Approve Purchase Order process and the Dispatch Purchase Order process and is sent to the vendor via manual fax, mail or CUNY email.
A Buyer can choose to cancel an entire PO or lines on a PO at any time. Canceling the entire purchase order changes the purchase order status to Canceled. Canceling a purchase order can be done using the purchase order Reconciliation Workbench page. A purchase order does not have to be dispatched to be canceled. It can be canceled at any time during its life cycle until it has been received or invoiced. After the quantity has been received or invoiced, Buyers cannot cancel it.
When Buyers run the Change Purchase Order process to update previously dispatched purchase orders, three events take place:
1. The actual purchase order is updated. Buyers make the change to the online purchase order manually.
2. The change order tracking tables are updated with the change to the purchase order.
3. A change order number identifies the batch of changes that get submitted to the vendor for a purchase order after its initial dispatch. The first time that a Buyer updates a dispatched purchase order, the system displays Change Order 1 next to the purchase order number in the purchase order header. Each time a Buyer updates the purchase order after dispatching a batch of changes to the vendor, the change order number is increased by one.
A change sequence number tracks the sequence of changes made within each purchase order at the header, line, and schedule levels. After the initial dispatch of a purchase order, a change sequence number is assigned to each change. These sequence numbers don't appear on the purchase order, but appear in the purchase order history.
If cancelled, a dispatched Purchase Order becomes a change order. To create a change order in a cancelled status, the purchase order must meet the following conditions are in place;
If cancelled, a purchase order, all lines and schedules are canceled, with change records created for each line and schedule.
If a Buyer tries to create a change order to cancel a line or a schedule that has already been partially or fully received, the system rejects the transaction.
The only active schedule for a line cannot be canceled.
The only active line for a purchase order cannot be canceled.
After the change order for the purchase order is created, the change order will follow the same path as a newly created purchase order as it goes through Approve Purchase Orders and Dispatch Purchase Order process

Procurement Reference Guide
Update: October 28, 2011 89
Authorized Roles
CU_FSPO_General_Buyer
CU_FSFS_Production_Support
Manage and Approve Purchase Order Changes is found by navigating to: Purchasing > Manage Change Orders > Approve Change Requests
Step Summary
1. Navigate to Manage Change Orders. 2. Determine the origin of the change order. 3. Any change order that did not originate by eProcurement Requistions is advanced in the Process
Change Orders component. 4. Any change order that is originated by eProcurement Requisitions is advanced in the Approve
Change Requests component. 5. On the PO Form page, click the Header Delta Change icon and as needed, modify details. 6. Click Save and note the Change Order number and PO Status. 7. On the PO Form page, click the Line Level Delta Change icon and as needed, modify details. 8. Click Save and note the Change Order number and PO Status. 9. On the PO Form page, click the Schedule Delta Change icon and as needed, modify details. 10. Click Save and note the Change Order number and PO Status.
Detailed Information
1. Determine the origin of the change order. 2. If the change order was not generated by eProcurement Requisitions, then navigate to:
Purchasing > Process Change Order (Is this Manage and Approve Purchase Order Changes?) 3. If the change order is generated by eProcurement Requisitions, then navigate to: Purchasing >
Manage Change Orders > Approve Change Requests
Procurement Reference Guide
Update: October 28, 2011 90
4. To create a change order, on the PO Form page, click the Header Delta Change icon. 5. Click the Change Header button and, as needed, modify details including Buyer, Vendor, Billing
Location and Tax Exempt Status and ID. 6. Click the OK button to return to the PO Form page. 7. Click the Save button.
Note: Keep a record of the Change Order number and PO Status. 8. On the PO Form page, click the Line Level Delta Change icon. 9. As needed, modify line details including Contract number, Receiving Required, Quantity, and
Amount. 10. Click the OK button to return to the PO Form page. 11. Click the Save button.
Note: Keep a record of the Change Order number and PO Status. 12. On the PO Form page, click the Schedule Delta Change icon. 13. Click the Change Schedule icon. 14. As needed modify details including Due Date, Ship To, Quantity, and Price. 15. Click the OK button to return to the PO Form page. 16. Click the Save button.
Note: Keep a record of the Change Order number and PO Status.
Field Description
Unit A business unit is an operational subset of the organization that tracks and maintains its own set of requisitions and purchase orders. Each business unit has its own way of storing information and its own processing guidelines. PeopleSoft Purchasing business units share vendor, purchase order, and receiving information with PeopleSoft Payables business units in the same setID. Some valid values for CUNYfirst are: BCC01, BMC01, COCOM, HOS01, KCC01, LAG01, MEC01, NCC01, and QCC01.
PO ID Unique 10-character field to identify the purchase order transaction.
Change Order If applicable, displays the change order batch number for the purchase order.

Procurement Reference Guide
Update: October 28, 2011 91
Field Description
Copy From Select from these values:
Contract: Select to access the Copy Purchase Order From Contracts page, where you can copy the purchase order from an existing contract. Enter the contract setID, contract ID, vendor, vendor ID, and master contract of the contract that you want to copy. You can copy multiple contracts into an existing purchase order. You have the option of manually entering the order quantity or using the scheduled ship quantity from the contract. Blanket purchase orders are not available for selection. Plus, the system will use the vendor and location or the buyer from the copied contract to determine the valid procurement card information for the new purchase order.
Purchase Order: Select to access the Copy Purchase Order From Purchase Order page, where you can copy the purchase order from an existing purchase order. Enter relative information like purchase order ID, vendor ID, and buyer information from the purchase order that you want to copy. The copy function only enables you to copy from one purchase order. If you attempt to copy more than one purchase order, the most recently copied purchase order overrides the previous purchase order information. Plus, the procurement card information is not copied over to the new purchase order. The system will redetermine the valid procurement card or vendor card to be used on the new purchase order by looking at the vendor and location or the buyer.
You can copy a canceled purchase order or a purchase order that has canceled lines to a new purchase order. If you copy a canceled purchase order all the lines from the canceled purchase order are copied over to the new purchase order and the status of the lines is made active. If you copy a purchase order that has one or more lines canceled, only the active lines from the existing purchase order are copied to the new purchase order.
Plus, if you are using the vendor rebate agreement functionality, when a purchase order is created from another purchase order, the vendor rebate agreement will be assigned based on the purchase order date of the new purchase order and is not copied from the source purchase order lines.
Finally, if you are copying a purchase order that is associated with a PeopleSoft Maintenance Management work order, the work order information will not be copied to the new purchase order.
Requisition: Select this option to access the Copy Purchase Order From Requisition page, where you can copy the purchase order from an existing requisition.
When you copy from a requisition, you are sourcing the requisition onto the purchase order. The Copy From field enables you to turn a requisition into a purchase order without going through sourcing. When you copy from a requisition into a purchase order, if the Calculate Price field is Y, then the line will be repriced. If the Calculate Price field is N, then the requisition price is used.
If you want to partially source, split source, or consolidate requisitions, use the Requisition Selection component. If a blanket purchase order is specified on the requisition line, it cannot be sourced to the purchase order here.
Plus, the procurement card information will be copied over to the new purchase order if all the requisitions selected are using the same procurement card information. If the information between the requisitions is not the same, the procurement card will be blank or the buyer's procurement card will become the default value. If a vendor card currently exists on the purchase order it will not be overridden by the requisitions procurement card information.
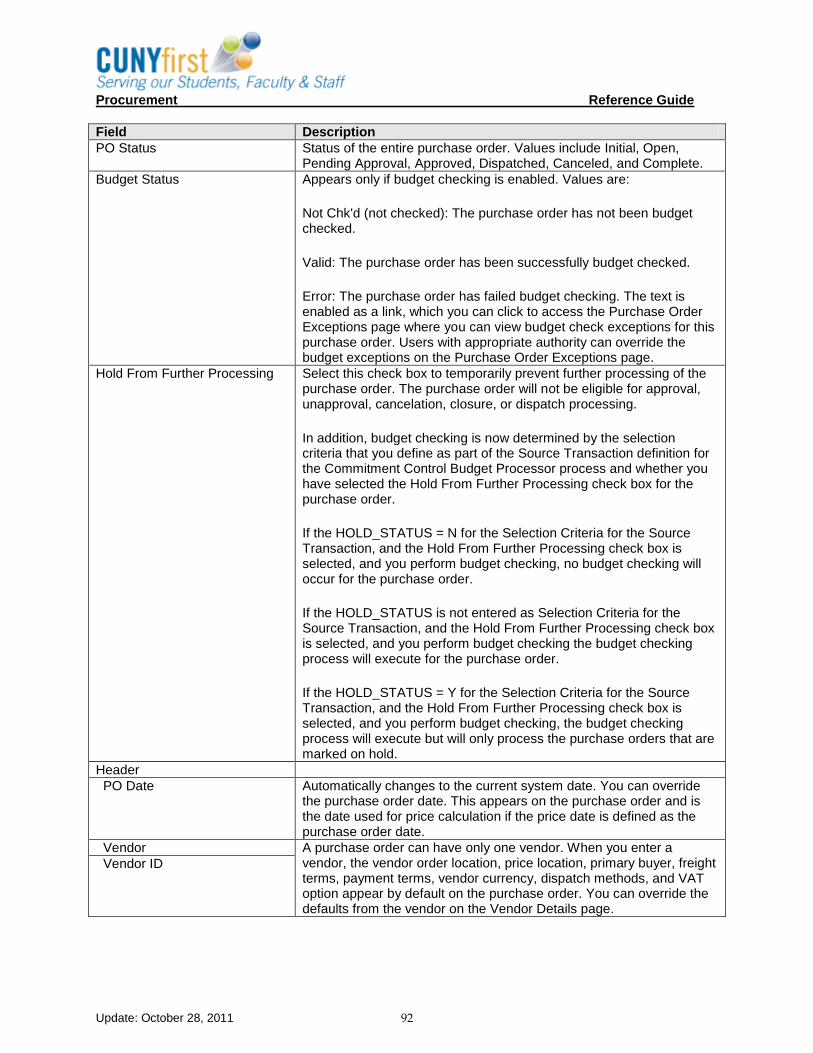
Procurement Reference Guide
Update: October 28, 2011 92
Field Description
PO Status Status of the entire purchase order. Values include Initial, Open, Pending Approval, Approved, Dispatched, Canceled, and Complete.
Budget Status Appears only if budget checking is enabled. Values are:
Not Chk'd (not checked): The purchase order has not been budget checked.
Valid: The purchase order has been successfully budget checked.
Error: The purchase order has failed budget checking. The text is enabled as a link, which you can click to access the Purchase Order Exceptions page where you can view budget check exceptions for this purchase order. Users with appropriate authority can override the budget exceptions on the Purchase Order Exceptions page.
Hold From Further Processing Select this check box to temporarily prevent further processing of the purchase order. The purchase order will not be eligible for approval, unapproval, cancelation, closure, or dispatch processing.
In addition, budget checking is now determined by the selection criteria that you define as part of the Source Transaction definition for the Commitment Control Budget Processor process and whether you have selected the Hold From Further Processing check box for the purchase order.
If the HOLD_STATUS = N for the Selection Criteria for the Source Transaction, and the Hold From Further Processing check box is selected, and you perform budget checking, no budget checking will occur for the purchase order.
If the HOLD_STATUS is not entered as Selection Criteria for the Source Transaction, and the Hold From Further Processing check box is selected, and you perform budget checking the budget checking process will execute for the purchase order.
If the HOLD_STATUS = Y for the Selection Criteria for the Source Transaction, and the Hold From Further Processing check box is selected, and you perform budget checking, the budget checking process will execute but will only process the purchase orders that are marked on hold.
Header
PO Date Automatically changes to the current system date. You can override the purchase order date. This appears on the purchase order and is the date used for price calculation if the price date is defined as the purchase order date.
Vendor A purchase order can have only one vendor. When you enter a vendor, the vendor order location, price location, primary buyer, freight terms, payment terms, vendor currency, dispatch methods, and VAT option appear by default on the purchase order. You can override the defaults from the vendor on the Vendor Details page.
Vendor ID

Procurement Reference Guide
Update: October 28, 2011 93
Field Description
Buyer A purchase order can only have one buyer. Buyers available to a user are defined on the User Preferences - Procurement: Purchase Order Authorizations page.
PO Reference Displays free-form text that appears by default from the Maintain Purchase Order - Purchase Order page.
Doc Tol Status If document tolerance checking is enabled, the system displays the document tolerance status. The system runs the Document Tolerance process before budget checking when you click the Budget Check button, or you can run the process separately. Document tolerance checks the change in percentage or a fixed dollar amount between the purchase order and requisition at the ChartField distribution level. Values are:
V (valid): The purchase order has passed document tolerance checking.
N (not checked): The purchase order requires document tolerance checking. If any amounts, quantities, or ChartFields are modified after the document tolerance is checked, the system resets the document tolerance status to Not Checked.
E (error): Exceptions were generated for the purchase order during document tolerance checking. You can override document tolerance exceptions on the Document Tolerance Exception page.
Receipt Status Displays the receipt status of the purchase order. Values are:
Not Recvd (not received).
Partial (partially received).
Received (fully received).
Dispatch Method Select which dispatch methods for this purchase order. Valid values: Print, Phone, eMail, Fax, EDX.
Amount Summary
Merchandise Displays the merchandise amount according to the quantities and prices of the items on the purchase order.
This field is not available if this purchase order is used with a recurring purchase order voucher.
Freight Tax Misc Click the link associated with the Freight/Tax/Misc. field. When you click this link the PO Total Amount Details page appears. Using this page you can view the total amount of adjustments made to this purchase order. This includes VAT, sales tax, miscellaneous charges, and freight.
Total Amount The total amount on the purchase order calculated from the merchandise and adjustment amounts appears.
Lines
Details
Line

Procurement Reference Guide
Update: October 28, 2011 94
Field Description
Item Depending on how you set up PO Item Vendor Security on the Purchasing Definition - Business Unit Options page, the items available may be limited to predefined choices that you established for the selected vendor.
When you select an item, the description, category, unit of measure, and price tolerances appear by default.
You may also choose to order by description-only when an item is not defined in the system. Enter a description of the item in the Description field, a value in the Category field, and the item price on the Maintain Purchase Orders - Schedule page.
Purchase orders can contain standard and stockless items, but you cannot mix them on the same purchase order.
This field is not available if the purchase order is used with a recurring purchase order voucher.
If you perform one of these actions on a purchase order line that is associated with a PeopleSoft Maintenance Management work order, the system will remove the work order information and the peg to the non-inventory work order:
Change a description only or non-inventory item to an inventory item.
Change the category.
Description You may also choose to order by description-only when an item is not defined in the system. Enter a description of the item in the Description field, a value in the Category field, and the item price on the Maintain Purchase Orders - Schedule page.

Procurement Reference Guide
Update: October 28, 2011 95
Field Description
PO Qty Enter the quantity of the item that you want to order.
If you are using the order multiples functionality, when you enter the purchase order quantity the system will validate the line quantity against the order quantity multiple factor that you specified for this item vendor and unit of measure on the Vendor's UOM & Pricing Information page. If the quantity you enter is not a multiple of the order quantity multiple factor, based on the rounding rule, the system will issue a warning message that the item should be ordered in multiples of this factor and it suggests the correct order quantity. You can accept the system suggested quantity at that time or keep the original quantity that you entered.
Order quantity multiples are not validated and checked for these information:
Non item vendor UOMs.
Inventory item UOMs.
Adhoc or description only transaction lines.
Purchase orders that have a status of Dispatched or Canceled.
Note. Order multiple checks are only applicable to item vendor UOMs.
If the purchase order line built by the PO Calculations (PO_POCALC) and Create Purchase Order (PO_POBUILD) processes references an RFQ and you change the purchase order quantity, the system prompts you asking whether you want to increase or decrease the RFQ order quantity. For example, if you decrease the purchase order quantity from 10 to 5 and want to award the difference to another vendor, choose to decrease the RFQ award quantity. This makes the remaining quantity of 5 available to be awarded to another vendor.
If applicable, a similar prompt appears asking whether you want to increase or decrease the requisition line quantity.
This field is not available for entry for amount only lines. UOM Select the UOM of the item that you want to use to place the order.
This field is not available if the purchase order is used with a recurring purchase order voucher.
Category Search for and select an appropriate category ID for the item when entering an ad hoc item. The search for the category ID is done using a category hierarchy tree.

Procurement Reference Guide
Update: October 28, 2011 96
Field Description
Price The system calculates the price for the items.
Price calculations can range from simple to complex, depending on the factors you set up.
If there is a contract associated with the line, the system uses the contract rules to determine the price. Contract rules include whether to use the contract base price or the vendor price for the unit of measure on the purchase order. Contract rules also determine which sets of price adjustments the system considers (contract price adjustments and vendor base price adjustments) and in what order.
If you are ordering items by description only, you must enter the price manually. While price is not required, if you have entered schedules without prices, you'll get a warning when you save the purchase order.
This field is not available if the purchase order is used with a recurring purchase order voucher.
Amount Purchase order quantity multiplied by the unit price. Appears in the transaction currency or the vendor preferred currency. If the line has been designated as an amount-only line on the Line Details page, you can edit this field.
This field is not available if the purchase order is used with a recurring purchase order voucher.
Status Status of the line appears. Values are: Active, Canceled, Hold, or Closed.

Procurement Reference Guide
Update: October 28, 2011 97
Topic 7: Close and Re-Open Purchase Orders
The Close Purchase Orders process occurs at the end of the CUNYfirst Purchasing transaction life cycle. Buyers will use the Close Purchase Orders process to close qualifying purchase orders that have been fully received, cancelled or no longer available. When the Close Purchase Orders process runs, it reconciles various purchase-order-related settings and statuses to change the status of applicable purchase orders to Complete.
The benefit of this status change is that completed purchase orders no longer appear in the list of available purchase orders when Buyers access purchase order pages in update and display mode. These completed purchase orders are also removed from the view in many of the other situations in which the available options have been set to exclude completed or canceled purchase orders. Removing these purchase orders decreases the time required to find purchase orders that need to modified.
At CUNY, commitment control is enabled. The Close Purchase Orders process resets the budget header and line statuses, and sets the close flags on the purchase order distributions. This allows the Commitment Control Budget Processor process to liquidate encumbrance budget amounts for outstanding purchase orders.
Although the Close Purchase Orders process is optional and can be set to run at any time, running the process at the end of each month helps to improve the efficiency of the purchase order process. Buyers can schedule this process to run automatically by using the Process Scheduler or initiate it manually by using the Close PO page. When Buyers run the Close Purchase Orders process from the Close PO page, they have three processing options on the Process Scheduler Request page:
Select Close Purchase Order SQR Report to produce the Close Purchase Order report.
Select Close Purchase Orders Application Engine process to run the Close Purchase Orders process.
Select Close Purchase Orders multi-process job to run the Close Purchase Orders process and produce the Close Purchase Order report.
The Close Purchase Orders process closes a dispatched purchase order and sets its status to Complete if any of these sets of criteria are met for a purchase order:
If receiving is required:
The purchase order is dispatched.
The purchase order matched status is either Matched, Not Required, or Override Match.
All line items are fully received.
(Last Activity Date) ≤ (Current Date) - (Close Days).
If receiving is not required:
The purchase order is dispatched.
The purchase order matched status is either Matched, Not Required, or Override Match.
(Shipment Due Date) ≤ (Current Date).
(Last Activity Date) ≤ (Current Date) - (Close Days).

Procurement Reference Guide
Update: October 28, 2011 98
If Buyers determine that a previously closed purchase order needs to be re-opened, they will use the Purchase Order Reopen process. The Purchase Order Reopen process can reopen previously closed purchase orders in two different ways;
Undo changes made by the Close Purchase Orders process. The process reverses the effects of the Close Purchase Orders process on the most recently processed group of purchase orders.
Reopen any purchase order at any time. This process gives the Buyer the ability to reopen a range of purchase orders, a specific purchase order, or all purchase orders associated with a business unit.
A Purchase Order that has been canceled at the header level is not eligible for reopening.
Authorized Roles
CU_FSFS_Production_Support
CU_FSPO_PO_Processor
Close and Re-Open Purchase Orders is found by navigating to: Purchasing > Purchase Orders> Reconcile POs > Close Purchase Orders
Step Summary
1. Navigate to Purchase Orders. 2. On the Purchase Order Search page, enter search criteria, select the Search button, and select
the correct requisition. 3. Determine that the Requisition needs to be closed. 4. Navigate to Close Purchase Orders. 5. For each distribution line, uncheck the Budget Status checkbox and run the Budget process.
Detailed Information
1. On the Purchase Order Search page, enter the search criteria 2. Select the Search button. 3. Select the correct requisition. 4. Determine that the requisition needs to be closed. 5. Determine if the Purchase Order has been fully matched. 6. If so, then navigate to: Purchasing > Purchase Orders > Purchase Orders > Close Purchase
Orders 7. On each distribution line, uncheck the Budget Status checkbox.

Procurement Reference Guide
Update: October 28, 2011 99
8. To relieve the encumbrance, run the Budget Process.
Field Description
Run Control ID A run control ID is a unique name used to identify which inputs on a page are saved and used to run a report or process. It is case sensitive, can be up to 30 characters in length and can contain underlines and dashes. It cannot contain spaces. The same run control ID can be used for different reports or processes (except in the case of dynamic reports, each of these must have their own unique run control ID) and the inputs from the different pages are saved unique to the particular report or process. There are some cases where you might want to create multiple run control IDs for the same report or process to be run under different circumstances.
Process Request Parameters
PO Post Run Option
Business Unit A business unit is an operational subset of the organization that tracks and maintains its own set of requisitions and purchase orders. Each business unit has its own way of storing information and its own processing guidelines. PeopleSoft Purchasing business units share vendor, purchase order, and receiving information with PeopleSoft Payables business units in the same setID. Some valid values for CUNYfirst are: BCC01, BMC01, COCOM, HOS01, KCC01, LAG01, MEC01, NCC01, and QCC01.
PO Number Enter the purchase order ID number.
Chartfield Criteria
GL Unit Enter the General Ledger business unit.
Account Classifies the nature of a transaction. This field is required. Account determines whether the value is an asset, liability, equity, revenue, expenditure, non budgeted, or statistical.
Fund Fund is the building block of governmental accounting. Fund assures that dollars are spent for the purpose intended.
Dept Department ID defines lower levels of the organizational structure.
MP Major purpose code. Examples: 100 – Instruction, 150 – Research, 200 – Public Service.
Oper Unit Use to correlate transactions between operating units when using a single intraunit account.
Program Program tracks revenue and expenditures for programs within an agency. Can also be used to identify groups of related activities, cost center, revenue centers, and responsibility centers.
Fnd Src Funding source. Examples: 300002 – Community College Tuition, 802068 – School of Journalism Stipend.
Sp Init Special initiatives. Examples: 109 – Latina Faculty Initiative, 102 – Black Male Initiative.
Proj Act Project activity.
PC Bus Unit Use as an operational subset to organize project activity independently of the constraints of the standard accounting procedures for financial posting and reporting. Create PC Business Units on the Project Costing Definition page.
Project Project captures additional information useful for grant and project accounting.
Activity Activities are the specific tasks that make up a project. You create activities on the Project Activities page or the Activity Details page.

Procurement Reference Guide
Update: October 28, 2011 100
Field Description
Affiliate If the vendor is an interunit vendor, this field is not editable and the affiliate code appears by default.
Budget Date If you are using commitment control, this field is available. The default date is the accounting date, but you can override it. When you save the purchase order, the system confirms that the budget date is within the valid open period date range for the general ledger business unit.

Procurement Reference Guide
Update: October 28, 2011 101
Topic 8: Document Tolerance Document Tolerances run in conjunction with Budget checking either in batch or on demand (manual). If the purchase order fails document tolerance, select the error hyperlink to review what tolerance issue is the cause. The new window will show the user what tolerance definition is causing the error.
Authorized Roles
CU_FSFS_Production_Support
CU_FSPO_PO_Processor
Document Tolerance is found by navigating to: Purchasing > Purchase Orders> Verify Document Tolerance > Document Tolerance.
Step Summary
1. Navigate to Document Tolerance. 2. To add a run control ID, click on the tab Add a Value. Enter a run control ID. Click on the Add
button. 3. Otherwise, click on the tab Find an Existing Value. Enter an existing run control ID. Click on the
Search button. 4. Enter or select values for Description, Process Frequency, Document Type, Run Option,
Business Unit, and PO number. 5. Click on the Run button. 6. Click on the OK button. 7. The system will generate a process instance. 8. Click on the Process Monitor link. 9. Monitor the process and make sure that the process runs to Success.
Detailed Information

Procurement Reference Guide
Update: October 28, 2011 102
Chapter 3: Receive Goods and Services A power user is usually an individual in the receiving department, or a purchasing professional, who receives goods/services by using the receiving pages in CUNYfirst Purchasing. This person is usually in the College’s loading dock area. The power receiver has the same capabilities as the desktop receiver, plus the ability to:
• Receive against any purchase order created in their business unit. • Enter additional details such as packing slip number and bill of lading.
Colleges with a central receiving dock that is not charged with conducting a physical count of goods received will continue to use the Pitney Bowes tracking devices to track the physical receipt of the goods and then deliver the goods to the desktop of the Requisitioner. The Requisitioner will then have the responsibility for entering a receipt to the CUNYfirst system using the casual receipt functionality in eProcurement. Before entering the receipt, the Requisitioner is required to perform any functional inspection of the goods to determine quality of the order. The Requisitioner will be required to enter an inspection in CUNYfirst. Quality and return to vendor issues will be handled outside of the CUNYfirst system. On a failed inspection, the Requisitioner will modify the receipt to reflect the failure by decreasing quantity or cancelling the receipt. The Requester records only the accepted quantity or amount for each receipt entered. Receipts by amount can be entered when no items are specified on the PO (Such as Blanket Orders). All receipts will be blind receiving. Blind receiving will not reveal the quantity of the purchase order to the receiver. The purchase order lines that have been received and inspected are then available to be copied into a CUNYfirst Accounts Payable Voucher to be paid.
Colleges with a central receiving dock that is charged with conducting a physical count of goods received will continue to use the Pitney Bowes tracking devices to track the physical receipt of the goods. Dock personnel will then enter a receipt to the CUNYfirst system using the receipt functionality in Purchasing. The goods will then be delivered to the desktop of the Requisitioner. The Requisitioner will be required to enter an inspection in CUNYfirst. Quality and return to vendor issues will be handled outside of the CUNYfirst system. On a failed inspection, the Requisitioner will modify the receipt to reflect the failure by decreasing quantity or cancelling the receipt. The Requester records only the accepted quantity or amount for each receipt entered. The purchase order lines that have been received and inspected are then available to be copied into a CUNYfirst Accounts Payable Voucher to be paid.
Colleges with no central receiving dock will have received goods delivered to the desktop of the Requisitioner. The Requisitioner will then have the responsibility for entering a receipt to the CUNYfirst system using the casual receipt functionality in eProcurement. After entering the receipt, the Requisitioner is required to perform any functional inspection of the goods to determine quality of the order. Once this is completed, the Requisitioner will be required to enter the inspection in to the CUNYfirst System. Quality and return to vendor issues will be handled outside of the CUNYfirst system. The purchase order lines that have been received are then available to be copied into a CUNYfirst Accounts Payable Voucher to be paid.
Chapter Objectives Upon completion of this chapter, the learner will be able to:
Receive and Inspect Goods and Services

Procurement Reference Guide
Update: October 28, 2011 103
Topic 1: Receive and Inspect Goods and Services A Power user is usually an individual in the receiving department, or a purchasing professional, who receives goods/services by using the receiving pages in CUNYfirst Purchasing. This person is usually in the College’s loading dock area. The power receiver has the same capabilities as the desktop receiver, plus the ability to:
• Receive against any purchase order created in their business unit. • Enter additional details such as packing slip number and bill of lading.
Colleges with a central receiving dock that is not charged with conducting a physical count of goods received will continue to use the Pitney Bowes tracking devices to track the physical receipt of the goods and then deliver the goods to the desktop of the Requisitioner. The Requisitioner will then have the responsibility for entering a receipt to the CUNYfirst system using the casual receipt functionality in eProcurement. Before entering the receipt, the Requisitioner is required to perform any functional inspection of the goods to determine quality of the order. The Requisitioner will be required to enter an inspection in CUNYfirst. Quality and return to vendor issues will be handled outside of the CUNYfirst system. On a failed inspection, the Requisitioner will modify the receipt to reflect the failure by decreasing quantity or cancelling the receipt. The Requester records only the accepted quantity or amount for each receipt entered. Receipts by amount can be entered when no items are specified on the PO (Such as Blanket Orders). All receipts will be blind receiving. Blind receiving will not reveal the quantity of the purchase order to the receiver. The purchase order lines that have been received and inspected are then available to be copied into a CUNYfirst Accounts Payable Voucher to be paid.
Colleges with a central receiving dock that is charged with conducting a physical count of goods received will continue to use the Pitney Bowes tracking devices to track the physical receipt of the goods. Dock personnel will then enter a receipt to the CUNYfirst system using the receipt functionality in Purchasing. The goods will then be delivered to the desktop of the Requisitioner. The Requisitioner will be required to enter an inspection in CUNYfirst. Quality and return to vendor issues will be handled outside of the CUNYfirst system. On a failed inspection, the Requisitioner will modify the receipt to reflect the failure by decreasing quantity or cancelling the receipt. The Requester records only the accepted quantity or amount for each receipt entered. The purchase order lines that have been received and inspected are then available to be copied into a CUNYfirst Accounts Payable Voucher to be paid. Colleges with no central receiving dock will have received goods delivered to the desktop of the Requisitioner. The Requisitioner will then have the responsibility for entering a receipt to the CUNYfirst system using the casual receipt functionality in eProcurement. After entering the receipt, the Requisitioner is required to perform any functional inspection of the goods to determine quality of the order. Once this is completed, the Requisitioner will be required to enter the inspection in to the CUNYfirst System. Quality and return to vendor issues will be handled outside of the CUNYfirst system. The purchase order lines that have been received are then available to be copied into a CUNYfirst Accounts Payable Voucher to be paid.
Authorized Roles
CU_FSFS_Production_Support
CU_FSPO_Requestor
CU_FSPO_General_Receiver
Receive and Inspect Goods and Services is found by navigating to: Purchasing > Receipts > Add/Update Receipts

Procurement Reference Guide
Update: October 28, 2011 104
Step Summary
1. Confirm that the Goods are received from a shipping supplier, who is responsible for counting the goods and resolve shortfalls of quantity or quality with the supplier.
2. If the goods are to be received, then navigate to: Purchasing > Receipts > Add/Update Receipts. 3. Deliver the Goods to the Requestor. 4. If the goods were received by the loading dock then navigate to: Purchasing > Receipts >
Add/Update Receipts. 5. Search and select the Purchase Order to enter the Business Unit, Receipt Number and select the
PO Receipt checkbox. 6. Retrieve the item rows to be received and click the OK button. 7. For each retrieved row enter the receiving information and click the Save button. 8. Inspect the good and resolve issues with the Supplier. 9. Navigate to Purchasing > Receipts > Inspect Receipts. 10. As needed, Cancel the Receipt and start over.
Detailed Information
1. Confirm that the Goods are received from a shipping supplier. 2. If so, then determine if the Loading Dock is responsible for counting the goods. 3. If the quantity is incorrect and/or the quality is unacceptable, then resolve with the supplier. 4. If the quantity is correct and the quality is acceptable, then navigate to: Purchasing > Receipts >
Add/Update Receipts. 5. Deliver the Goods to the Requestor. 6. Determine if the Loading Dock received the goods. 7. If so and there is a Purchase Order, then navigate to: Purchasing > Receipts > Add/Update
Receipts. 8. Enter the Business Unit and Receipt Number.
Note: Check the PO Receipt checkbox. 9. Click the Add button. 10. On the Select Purchase Order page, enter the search criteria. 11. Click the Search button to retrieve the item’s rows. 12. Select the OK button. 13. Enter the receiving information for the Line, Item Description, Receipt QTY, and Accept QTY.
Note: As needed, change the receipt quantity to the actual quantity to be received. 14. As needed, select the More Details tab and on the More Details page, enter additional data. 15. Click the Optional Input tab. 16. Click the Save button. 17. Inspect the Goods to determine if the quality is acceptable.
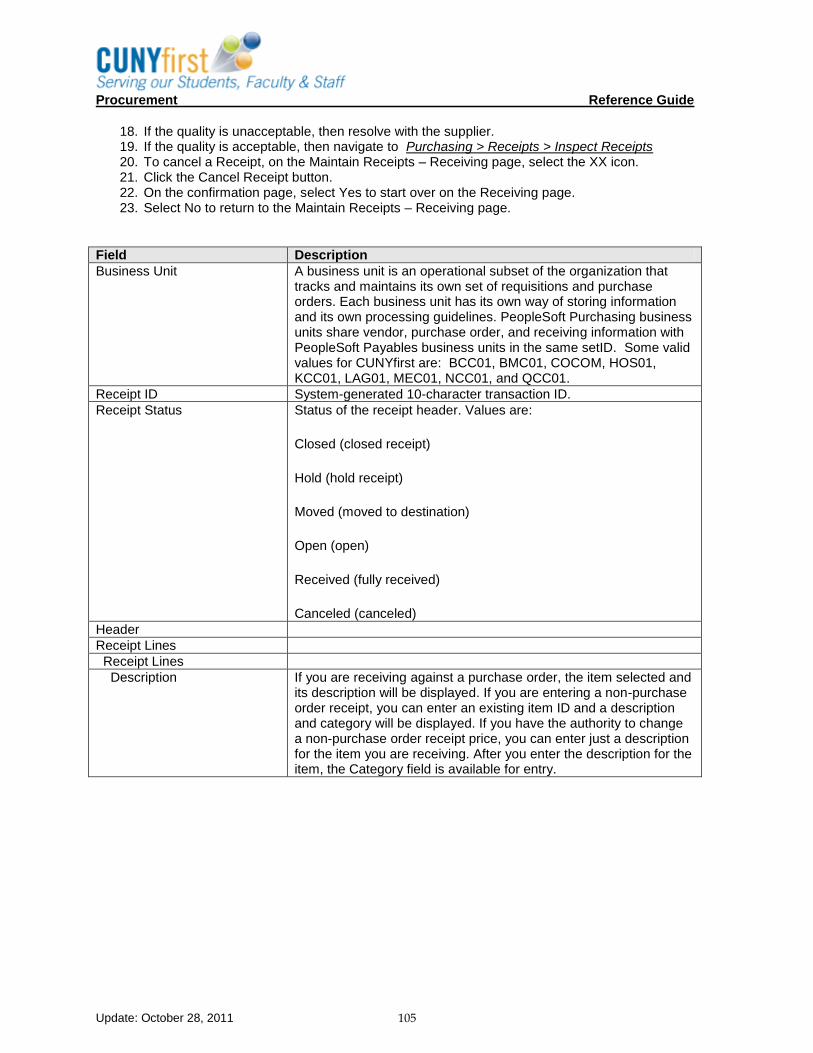
Procurement Reference Guide
Update: October 28, 2011 105
18. If the quality is unacceptable, then resolve with the supplier. 19. If the quality is acceptable, then navigate to Purchasing > Receipts > Inspect Receipts 20. To cancel a Receipt, on the Maintain Receipts – Receiving page, select the XX icon. 21. Click the Cancel Receipt button. 22. On the confirmation page, select Yes to start over on the Receiving page. 23. Select No to return to the Maintain Receipts – Receiving page.
Field Description
Business Unit A business unit is an operational subset of the organization that tracks and maintains its own set of requisitions and purchase orders. Each business unit has its own way of storing information and its own processing guidelines. PeopleSoft Purchasing business units share vendor, purchase order, and receiving information with PeopleSoft Payables business units in the same setID. Some valid values for CUNYfirst are: BCC01, BMC01, COCOM, HOS01, KCC01, LAG01, MEC01, NCC01, and QCC01.
Receipt ID System-generated 10-character transaction ID.
Receipt Status Status of the receipt header. Values are:
Closed (closed receipt)
Hold (hold receipt)
Moved (moved to destination)
Open (open)
Received (fully received)
Canceled (canceled) Header
Receipt Lines
Receipt Lines
Description If you are receiving against a purchase order, the item selected and its description will be displayed. If you are entering a non-purchase order receipt, you can enter an existing item ID and a description and category will be displayed. If you have the authority to change a non-purchase order receipt price, you can enter just a description for the item you are receiving. After you enter the description for the item, the Category field is available for entry.

Procurement Reference Guide
Update: October 28, 2011 106
Field Description
Price When an item is received against the purchase order, the item's purchase order price is displayed. If you are entering a non-purchase order receipt and have specified an item ID, the item's purchasing item attributes price is displayed. If you have the authority to change a non-purchase order receipt price, you can make modifications here. Additionally, if you entered a description only item, you would enter the price here.
When the price is changed the new price will be used to recalculate transaction and base merchandise amounts on the receipt line.
Note. The item description, price, and category will no longer be available for modification once the non-purchase order receipt line has been moved to inventory, moved to assets, moved to manufacturing, or accounts payable matching has fully or partially matched a voucher.
Receipt Qty Enter the quantity delivered and the UOM in which it was received. When you enter the receipt quantity for a line, the Accept Qty value is calculated by subtracting the rejected quantity from the receipt quantity.
Rec UOM
Accept Qty Displays the quantity of items accepted. When you enter a Receipt Qty value for a line, the accepted quantity is calculated by subtracting the rejected quantity from the receipt quantity.
Status Displays the status of the receipt line.
Closed (closed schedule)
Hold (hold schedule)
Open (open schedule)
Received (received schedule)
Canceled (canceled schedule) Serial Identifies if the receipt line is serial controlled. If you are receiving a
description-only purchase order line (no item ID) and the line is asset-related, the serial check box can be selected. For serial-controlled items, you must enter the serial ID at the time of receipt or the receipt line status stays in the Open status and is not eligible for interfacing to inventory or assets.
Track Indicates whether a receipt line is device tracked. The default value is selected and unavailable for device-tracked items unless they are description only (no item ID). The field is available for items that are description only.
Stock UOM N/A
Device Track N/A

Procurement Reference Guide
Update: October 28, 2011 107
Chapter 4: Year End Process
Chapter Objectives Upon completion of this chapter, the learner will be able to:
Manage the Year End Process
Policy
CUNY will close a budget at the end of a budget period and re-establish a new budget in the next fiscal period. CUNY wishes to “roll over” certain outstanding purchase order transactions and make them active in the next budget period. In order to accomplish this, the following actions must occur:
Buyers will access the purchase order to be rolled over via the Manage Purchase Orders page. From this page, the Buyer will execute the “Create Change Order” function. The Buyer should then access the Header Details of the PO. In the header details, the Buyer will find the Accounting Date field under Process Control Options. The value in this field must be changed to the first day of the new budget period.
The Buyer should then access the Chartfield distributions of the line to be rolled over via the Manage Purchase Orders page. The Buyer should insert a new distribution line with the accounting distribution to be charged in the new fiscal year. The Budget Year filed under the Details tab should be changed to the same date as the Accounting Date in the PO Header Details. The accounting distribution line referencing the previous budget year should be cancelled and the transaction Saved.
A change order for this PO has now been created. The Buyer should now Budget Check the change order in order to verify that sufficient budget amounts in the new fiscal year are available. If sufficient budget amounts are available, the system returns a Budget Status of Valid. If there are not sufficient budget amounts, the Buyer must either change the accounting distribution of the line or access processes external to Procurement to obtain sufficient budget amounts.
The Buyer can then access the Budget Overview Pages under Commitment Control to view the results of the change order created. The previous year’s accounting line will be de-encumbered and an encumbrance for the new accounting distribution line will be set.
The PO change order is now ready to be dispatched. Dispatch of the change order will trigger the OTPS Encumbrance interface to the City and State.
The City deadline for running transactions into their system is before close of business. As a result, we will be capturing transactions completed up until 3pm only. Transactions completed after that—vouchers approved, purchase orders dispatched—will not be picked up and sent to the City until the following day.

Procurement Reference Guide
Update: October 28, 2011 1
Topic 1: Year End Process Interface the bank statement(s) with the system and run the Bank Reconciliation process to mark payments that have cleared the bank system.
Bank statement reconciliation with will be run for all payments processed through the Student Financials to AP interface – namely, Financial Aid disbursements and Student tuition refunds. Since these checks will be processed centrally through , the bank reconciliation will also be handled centrally. Bank statement reconciliation will be performed on a daily basis by the OUC Data Integrity team.
There will be a single bank selected by CUNY to process both Financial Aid disbursements and tuition refunds. Two zero balance accounts will be established, one for each payment type that will be reconciled with the payments processed using the Student Financials to AP interface.
Associated Roles
No Roles Defined
Year End Process is found by navigating to: Purchasing > Purchase Order > Add/Update Purchase Orders
Step Summary
1. On the Add/Update Purchase Orders Search page, enter search criteria click the Search button, and select the Purchase Order to roll over.
2. Change the Accounting Date to 6/30/20nn. 3. Insert a Distribution Line and change the Budget Date to the new Fiscal year. 4. Cancel the Distribution Line with the Budget Date of the previous Fiscal Year. 5. Click the Budget Check button to run the Check Budget process. 6. If Budget is valid, then click the Save and Submit button to enter the Purchase Order into
Workflow to Dispatch Purchase Order. 7. If a Purchase Order Budget Check is run and the result is “Not Valid”, then verify and correct the
Chartfields as needed. 8. Re-run the Budget Check process. 9. If the result is still “Not Valid”, then contact the Budget Liaison.

Procurement Reference Guide
Update: October 28, 2011 2
Detailed Information
Year End Process Page
1. Navigate to Purchase Orders. 2. On the Add/Update Purchase Orders Search page, enter search criteria. 3. Click the Search button. 4. Select the Purchase Order to roll over. 5. Create a Change Order by changing the Accounting Date to 6/30/20nn. 6. Insert a Distribution Line and change the Budget Date to the new Fiscal year. 7. Cancel the Distribution Line with the Budget Date of the previous Fiscal Year. 8. Click the Budget Check button to run the Check Budget process. 9. If Budget is valid, then click the Save and Submit button to enter the Purchase Order into
Workflow to Dispatch Purchase Order. 10. If a Purchase Order Budget Check is run and the result is “Not Valid”, then verify and correct the
Chartfields as needed. 11. Re-run the Budget Check process. 12. If the result is still “Not Valid”, then contact the Budget Liaison.
Field Description
Unit A business unit is an operational subset of the organization that tracks and maintains its own set of requisitions and purchase orders. Each business unit has its own way of storing information and its own processing guidelines. PeopleSoft Purchasing business units share vendor, purchase order, and receiving information with PeopleSoft Payables business units in the same setID. Some valid values for CUNYfirst are: BCC01, BMC01, COCOM, HOS01, KCC01, LAG01, MEC01, NCC01, and QCC01.
PO ID Unique 10-character field to identify the purchase order transaction.
Line System-generated sequence number for the line.
Sched System-generated sequence number for the schedule.
Distribute by Select the method by which you want to allocate or charge the expense account distribution. Values are:
Amount: Select if the sum of all distribution amounts must equal the schedule amount (merchandise amount). Inventory items cannot be distributed by amount.
Quantity: Select if the sum of all distribution quantities must equal the schedule quantity.

Procurement Reference Guide
Update: October 28, 2011 3
Field Description
SpeedChart Select a speed chart. The SpeedChart field enables you to use a code that contains preset distributions. This speed chart is not itself a defaulting element. Instead use it here to assist you in defining default chart field elements.
Vendor Supplier’s short name.
Item Description of the item ordered.
Status Purchase order schedule status. Values are: Active, Canceled, or Closed.
Schedule Qty Quantity for this schedule.
Merchandise Amt Amount for this schedule.
Doc. Base Amount Displays the document base amount. This is the Amount value converted to the base currency of the purchase order. The base currency is the currency of the PeopleSoft General Ledger business unit for this PeopleSoft Purchasing business unit.
Distribution
Details/Tax
Dist System-generated sequence number for the distribution.
Status Distribution line status. Values are:
Complete: The distribution line is closed.
Open: The distribution line is open.
Processed: The distribution line has been processed and is
unavailable for sourcing.
Canceled: The distribution line has been canceled.
Percent Enter the distribution percentage for the line. If you distribute by amount or quantity and change either of the values, the percent is adjusted. If you change the percent, the amount or quantity is adjusted. In either case, the percent total must be 100.
Base Amt Distribution amount expressed in the base currency. This amount is converted from the purchase order transaction currency to the base currency on the general ledger unit.
Base Currency The currency to use on the purchase order displays. The currency code can be changed only when the business unit allows multicurrency.
Currency
Budg Dt If you are using commitment control, this field is available. The default date is the accounting date, but you can override it. When you save the purchase order, the system confirms that the budget date is within the valid open period date range for the general ledger business unit.
Location Internal destination of the item, once it is received. This can be different from the ship to location of the schedule. For instance, the ship to location of the schedule could be corporate headquarters, and the distribution location could be a particular floor's supply room.
IN Unit PeopleSoft Inventory business unit for the item.
Statistics Code Statistics codes are used to maintain statistical amounts to facilitate financial analysis and reporting. If you plan to use statistics codes, you must also establish units of measure.

Procurement Reference Guide
Update: October 28, 2011 4
Field Description
Consigned If selected, the distribution contains a consignment item. If the inventory business unit is not defined, the consigned check box is clear and cannot be overridden.

Procurement Reference Guide
Update: October 28, 2011 5
Chapter 5: Procurement Contracts
Chapter Objectives Upon completion of this chapter, the learner will be able to:
Create, Process, and Update Supplier Contracts
Policy
When CUNY adds a contract, the system uses the contract process option type to determine the functionality for the transactional contract. CUNYfirst Procurement contracts enable CUNY to manage purchase order releases over any time period. CUNYfirst order contracts support both product and service contracts and enable CUNY to share contracts across business units. CUNY can define a master contract to group contracts that are similar in nature and that are agreements with one supplier.
The master contract ID can be used as the number for referencing the agreement with a supplier. Each contract ID that is associated with the master contract can serve as an internal identification number for use at CUNY. Using the CUNYfirst PS Query tool, CUNY can report across all of the individual contracts that CUNY have associated with this master contract. Master contracts are used to group several contracts for the same supplier and then track them using one master contract ID. CUNY can associate the individual contracts with the master contract ID by designating the master contract ID on the Contract Header - Entry page.
Contract process options enable CUNY to determine a specific contract type that CUNY will use throughout the entire contract life cycle. Select a contract process (type) option upon first entering the Contract Entry component. Contract process options include, Purchase Order, Release to Single PO Only, and General Contract contracts. Use a specific contract process option to drive the functionality for the entire contract.
The contract options provides for variations of the contract. The two variations of blanket purchase orders are (1) Purchase Order contract process option (new purchase orders created each time), and (2) Release to Single PO Only contract process option (all releases ultimately are on one purchase order). In CUNYfirst Purchasing, CUNY can use one purchase order to track the life of a contract. When CUNY creates the contract, CUNY assigns a purchase order to it and use the single purchase order to track the contract's activity. This is often referred to as a blanket purchase order contract, which buyers, accounts payable departments, and suppliers can use to track activities such as the amount ordered, amount invoiced, and balance remaining on the purchase order.
CUNY can create purchase order contracts that establish pricing terms and conditions that may offset or supplement regular pricing agreement with suppliers. From these purchase order contracts, CUNY can generate order contract releases that use the contract for their terms and conditions. These contracts may have been established by the awarding of a request for quote (RFQ) response or Strategic Sourcing Event to a contract. In turn, this RFQ or Strategic Sourcing event may have been created from a requisition.
Purchase Order contracts support milestones, also known as progress payments. Milestones are generally based on a percentage of work done or an amount of items received. Using milestones enables CUNY to divide a contract line into multiple schedules and release the schedules when CUNY can reach a target date or percentage of job completion. Contract releases (purchasing releases) enable CUNY to set up standard purchase orders that are the by-product of the agreement that is identified in a contract. They also enable CUNY to generate releases. CUNY processes the staged orders using the CUNYfirst

Procurement Reference Guide
Update: October 28, 2011 6
Purchasing Purchase Order Contracts process (PO_POCNTRCT), PO Calculations process (PO_POCALC), and Create Purchase Orders process (PO_POCREATE).
When a contract originates from a requisition, the purchasing releases carry the requisition keys to the purchase order. When budget checking is run against this purchase order, the requisition amounts or quantities are liquidated. CUNY can also create, retrieve, and receive purchase orders by referencing the contract and appropriate release number. The combination of the contract ID, contract line number, and contract release number provides the chronological audit trail that the business community generally associates with blanket orders.
Use the Release to Single PO Only contract process option to indicate that the contract is a Release to Single PO Only contract. CUNY would use the Release to Single PO Only contract to use one purchase order for the life of the contract. CUNY can define the purchase order on the Contract page. When the contract is saved, a purchase order is reserved for this contract and this contract process option cannot be cleared. CUNY can use CUNYfirst Purchasing Release to Single PO Only contracts with transactions that use the PO Calculations process, including: requisitions and contracts. When one of these transactions is assigned to a Release to Single PO Only contract by the PO Calculations process, the Create Purchase Orders process adds the necessary lines and schedules to the existing purchase order.
If the line item does not exist on the purchase order, the Create Purchase Orders process inserts a line with the same line number as the contract.
If the line already exists, the Create Purchase Orders process inserts an additional schedule into the existing purchase order.
If the purchase order was dispatched before the line or schedule was added, the Create Purchase Orders process creates a change order.
Note: Release to Single PO Only contracts cannot be corporate contracts, because they are assigned to only one purchase order and a purchase order can associate with one business unit
There is also a feature of the Open Item Contracts which are agreements that apply to any item that is purchased from the supplier while the contract is in effect. Open item contracts are typically used to set up a percentage-off list price that applies to any item that is purchased from the supplier
Procurement Reference Guide
Update: October 28, 2011 7
Topic 1: Procurement Contracts
Create, Process, and Update Supplier Contracts.
.
Authorized Roles
CU_FSFS_Production_Support
CU_FSPO_Proc_Contract_Admin
Procurement Contracts is found by navigating to: Purchasing > Procurement Contracts > Manage Master Contracts
Step Summary
1. Navigate to Manage Master Contracts. 2. On the Manage Master Contracts Search page, enter or select the correct existing Run Control ID
and then click the Save button. 3. Navigate to: Purchasing > Procurement Contracts > Manage Master Contracts 4. Update an existing contract or enter new details on the Contract Entry page. 5. Click the Save button.
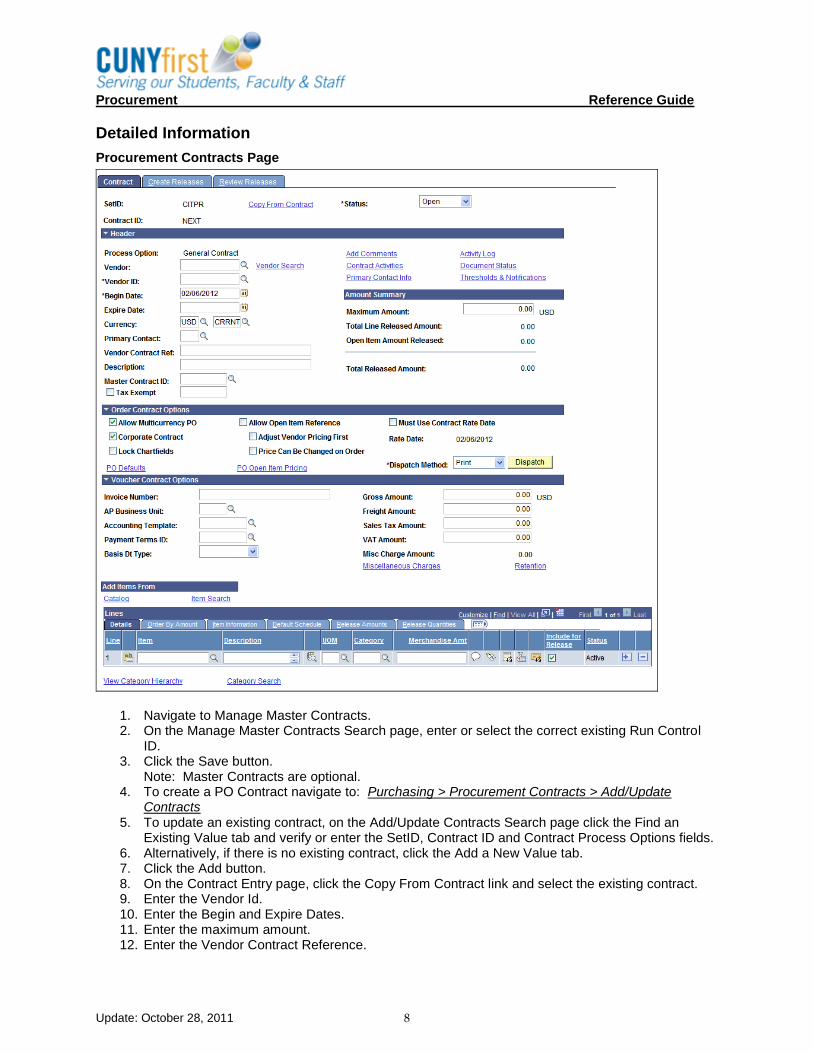
Procurement Reference Guide
Update: October 28, 2011 8
Detailed Information
Procurement Contracts Page
1. Navigate to Manage Master Contracts. 2. On the Manage Master Contracts Search page, enter or select the correct existing Run Control
ID. 3. Click the Save button.
Note: Master Contracts are optional. 4. To create a PO Contract navigate to: Purchasing > Procurement Contracts > Add/Update
Contracts 5. To update an existing contract, on the Add/Update Contracts Search page click the Find an
Existing Value tab and verify or enter the SetID, Contract ID and Contract Process Options fields. 6. Alternatively, if there is no existing contract, click the Add a New Value tab. 7. Click the Add button. 8. On the Contract Entry page, click the Copy From Contract link and select the existing contract. 9. Enter the Vendor Id. 10. Enter the Begin and Expire Dates. 11. Enter the maximum amount. 12. Enter the Vendor Contract Reference.

Procurement Reference Guide
Update: October 28, 2011 9
13. On converted contracts, enter the Master Contract ID. 14. Select the Tax Exempt checkbox and enter the Tax ID. 15. On the Order Contract Options header, select the correct checkbox. 16. On the Contract lines, enter the Description, UOM and Category fields. 17. Click the Add a New row button to create additional Contract lines. 18. For each line, click the Line Information Detail icon. 19. On the Details for Line page, click the Expand All link. 20. As needed, verify or enter the Minimum and Maximum Amount and Quantity. 21. Click the OK button. 22. On the Contract tab, select the Comments icon. 23. On the Comments for Line page, enter your comments and/or click the Attach button to attach a
file. 24. Click OK to return to the Contract tab. 25. Click the Save button.
Field Description
SetID Value is CITPR.
Contract ID This value can be user-defined or syste-generated.
Status Select the status of the contract. Values are Approved, Canceled, Closed, On-Hold, and Open.
When you create a contract, the status appears by default as either Open or Approved based on the settings for the user on the User Preferences - Contracts page. Only contracts with an Approved status are eligible to have releases created against them, or to be referenced by other transactions. Only contracts in Add mode or in Open status can be modified.
You cannot set the status to Closed or Canceled if there are open lines or staged releases against the contract. If a contract's status is returned to Open, purchase orders that reference the contract are not available for modification until the contract is approved again. This is necessary to maintain data integrity.
When vouchers exist for a contract and the contract is closed, all vouchers that are eligible for closure are also closed. Eligible vouchers include those that have not been posted, paid, matched, or budget checked. If the contract is later reopened, releases can be created for these vouchers again, and a new voucher ID will be assigned.
If the contract originated from an RFQ and the contract is canceled, you can return quantities to the RFQ.
Header
Process Option The process option displays that you selected before you entered the Contract page.
Vendor Select the vendor for this contract. After you enter lines, create releases, or reference this contract on a requisition or purchase order, the vendor cannot be changed. This is a required field.
Vendor ID Select the vendor ID for the contract.
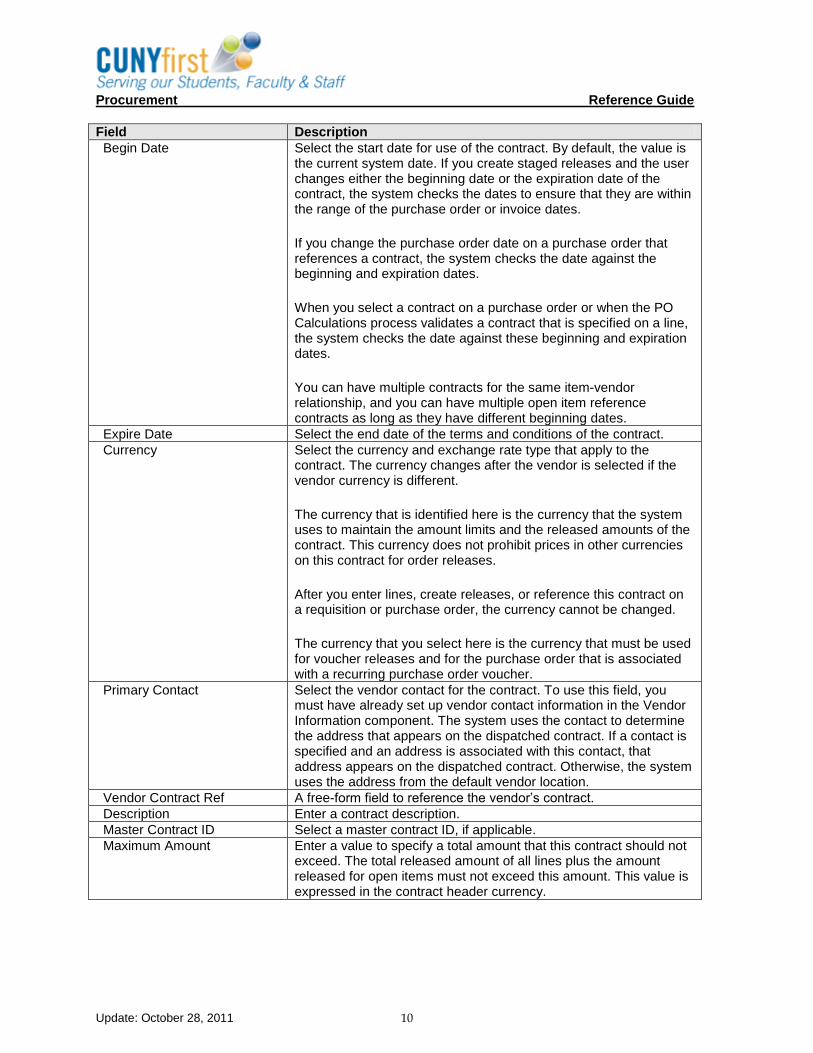
Procurement Reference Guide
Update: October 28, 2011 10
Field Description
Begin Date Select the start date for use of the contract. By default, the value is the current system date. If you create staged releases and the user changes either the beginning date or the expiration date of the contract, the system checks the dates to ensure that they are within the range of the purchase order or invoice dates.
If you change the purchase order date on a purchase order that references a contract, the system checks the date against the beginning and expiration dates.
When you select a contract on a purchase order or when the PO Calculations process validates a contract that is specified on a line, the system checks the date against these beginning and expiration dates.
You can have multiple contracts for the same item-vendor relationship, and you can have multiple open item reference contracts as long as they have different beginning dates.
Expire Date Select the end date of the terms and conditions of the contract.
Currency Select the currency and exchange rate type that apply to the contract. The currency changes after the vendor is selected if the vendor currency is different.
The currency that is identified here is the currency that the system uses to maintain the amount limits and the released amounts of the contract. This currency does not prohibit prices in other currencies on this contract for order releases.
After you enter lines, create releases, or reference this contract on a requisition or purchase order, the currency cannot be changed.
The currency that you select here is the currency that must be used for voucher releases and for the purchase order that is associated with a recurring purchase order voucher.
Primary Contact Select the vendor contact for the contract. To use this field, you must have already set up vendor contact information in the Vendor Information component. The system uses the contact to determine the address that appears on the dispatched contract. If a contact is specified and an address is associated with this contact, that address appears on the dispatched contract. Otherwise, the system uses the address from the default vendor location.
Vendor Contract Ref A free-form field to reference the vendor’s contract.
Description Enter a contract description.
Master Contract ID Select a master contract ID, if applicable.
Maximum Amount Enter a value to specify a total amount that this contract should not exceed. The total released amount of all lines plus the amount released for open items must not exceed this amount. This value is expressed in the contract header currency.

Procurement Reference Guide
Update: October 28, 2011 11
Field Description
Total Line Released Amount Displays the total released amount of the contract. This is the open item plus the total of the line amounts. This amount is updated during the PO Calculations process, online purchase order creation, and the PeopleSoft Payables Batch Voucher process when the contract is referenced. This amount is expressed in the contract header currency.
Open Item Amount Released Displays the amount that is released for open items in an open item contract. This information appears only if the contract is referenced on a purchase order using open item referencing. You do not need to reference an open item contract. The system can do it for you during the PO Calculations process. This amount is updated during the PO Calculations process or online purchase order creation. This amount is expressed in the contract header currency.
Order Contract Options
Allow Multicurrency PO Select this check box if the purchase order that you create to satisfy the contract can be in a currency other than the one that is specified on this vendor contract. If so, the currencies from the contract are converted to the currency of the purchase order.
Corporate Contract Select this check box if you want this contract to apply to all business units within the specified setID. If you do not select this option, you must enter a list of valid business units for this contract on the PO Defaults page. At the time of release, the release business unit must be defined on the Contract Defaults page. This option is selected by default for order contracts. This option does not apply to voucher contracts.
The business unit of the purchase order that is associated with the contract populates this field and cannot be changed. You cannot insert additional business-unit default rows.
Lock Chartfields Select this check box to prevent changes to purchase order ChartFields at the purchase order distribution level that are released from this contract. When this check box is selected, you cannot manually reference this contract on requisitions and purchase order lines. Purchase orders that reference contracts with the Lock Chartfields check box selected must be created as releases from the contract or created by copying the contract
The following rules also apply to this option:
Transactions undergoing the PO Calculation process do not pick this contract.
When the Lock Chartfields check box is selected, you cannot add a schedule or a distribution to the purchase order for a line that was directly released from a contract.
Note. This option is enabled only when the Commitment Control feature is used.

Procurement Reference Guide
Update: October 28, 2011 12
Field Description
Allow Open Item Reference Select this check box to enable items that are not specified on the contract to be purchased against it. Whether you're defining an open or fixed item contract, this check box enables you to reference the contract for any requisition and purchase order item that is ordered from this vendor within the terms and limits of this contract. This check box also enables you to add open-item price adjustments to the contract. This check box is available only for PO and General contract process options with purchase order releases.
If you do not select the Allow Open Item Reference check box, you must enter at least one contract line before you can save the contract.
Requisitions, the PO Calculations process, and online purchase orders can use the Allow Open Item Reference check box.
If a contract is set up for open item reference, you can select a contract ID on a requisition without specifying a contract line number, regardless of whether the requisition line contains an item ID or an ad hoc item (description-only). This functionality is also available for online purchase orders.
Adjust Vendor Pricing First If you're defining price adjustments for open items and vendor adjustments also apply, you can specify which adjustments the system applies first. To apply vendor adjustments before the contract adjustments, select this check box. If you do not select this check box, only the contract adjustments are applied.
Price Can Be Changed on Order
Select this check box, if you want to be able to change the system calculated prices on purchase orders for this contract. This field setting applies only to open items that are referenced on a purchase order. If you do not select this check box, the price fields on the purchase order are unavailable for entry.
Must Use Contract Rate Date Select this check box to have any purchase orders that are created against this contract use the rate dat
Rate Date If you select the Must Use Contract Rate Date check box, enter the rate date that you want to use. The rate date is the date that the system uses to determine the correct currency conversion rate to use on the purchase orders that are created to satisfy the contract. The default value for this field is the current system date.
Dispatch Method Select the dispatch method for this contract. Values are Email, Fax, Phone, and Print. This value appears by default from the default vendor location.
Voucher Contract Options
Invoice Number (Optional) Enter an invoice number that is associated with every voucher in the contract. The invoice number must be no longer than 12 characters. For voucher contracts, the system adds an ID extension consisting of a hyphen and one to three digits to uniquely identify the exploded vouchers. For example, for a contract with four release vouchers, an invoice number of 500 may be calculated as 500-001, 500-002, 500-003, and 500-004.
Accounting Template Select the accounting template for offsetting entries of transactions for this contract. Accounting templates are set up on the Accounting Entry Template page.

Procurement Reference Guide
Update: October 28, 2011 13
Field Description
Payment Terms ID Select the payment terms that are expected for the vouchers corresponding to any purchase orders or vouchers that are generated from this contract. Payment terms are defined on the Payment Terms pages. This value appears by default from the default vendor location.
Basis Dt Type Select to determine the date used to calculate the voucher due date and discount due date, if applicable. This is a voucher-related field that is used in combination with payment terms.
Note. If you have specified a specific payment term for the vendor in the Vendor Information component, the Basis Dt Type field displays the default value. Payment terms can also be specified at the business unit level, but they do not appear as default values here because the contract is defined at the setID level, not the business unit level.
Gross Amount Enter the gross amount for the contract. This is required for voucher contracts and is applicable only to voucher and general contracts. The sum of all contract line amounts, plus miscellaneous charges and voucher contract charges (freight, sales tax, and VAT amount) must equal the gross amount.
If you enter the gross amount before you enter a value in the Merch Amt (merchant amount) field, the field is updated with the gross amount.
If you change the merchandise amount and insert a new line, the merchandise amount on the new line appears automatically so that the total is equal to the gross amount.
For example, if you enter a gross amount of 100.00 USD, this value becomes the default merchandise amount. If you then add 10.00 USD of freight, the merchandise amount is updated to 90.00 USD. If you then change the merchandise amount to 40.00 USD and add a new line, the merchandise amount on the second line appears automatically as 50.00 USD.
The freight, sales tax, and VAT amounts are allocated on the voucher based on the defaults that are set on the Procurement Acctg Control - General Controls page for the PeopleSoft Payables business unit.
Freight Amount Enter the freight amount to be included on the voucher.
Sales Tax Amount Enter the sales tax amount to be included on the voucher.
VAT Amount Enter the VAT amount to be included on the voucher.
Misc Charge Amount Displays the miscellaneous charges that are applied to a voucher contract. You define miscellaneous charges on the Voucher Misc. Charges page.
Procurement Reference Guide
Update: October 28, 2011 14
Unit III: Accounts Payable: Voucher to Payment
Unit Introduction
Accounts Payable provides the ability to record and manage invoice and payment activity for an organization in order for vendors to be paid for goods and services they provide. Invoice information from external and internal sources can be entered into a Voucher document that captures all of the essential information to make payments and record the accounting information of the expenditures. Vouchers can be manually entered or created by copying information from related Purchase Orders and Purchase Receipts. In addition, Vouchers can be automatically created when interfaced from various external and related systems.
In Accounts Payable all processes are run by Business Unit and security is enforced by Business Unit. Business Activity is recorded through Vouchers and Payments. These documents are then posted and journal generated to create General Ledger Journal Entries. In General Ledger the journals are posted to the General Ledger.
Voucher documents record accounting information using ChartFields to categorize transactions which drives financial reporting and analysis. The system uses control tables to store information that defines the accounting structure and processing rules used when a voucher or payment is entered. Examples include ChartField values, vendor information, payment terms and matching rules.
Business units can share accounting control information through TableSet sharing. For example, all colleges will use the same set of certain ChartFields but have their own specific programs and funding sources. All colleges will share the same matching rules but have different Imprest Bank accounts.
User Preferences can be set up to default specific values, such as Business Unit and SetID as well as limit or grant specific processing access.
The major control record used most often by Accounts Payable is the Vendor record. The Vendor record contains all of the detail information about each vendor that will be paid. All community and senior colleges will use the same Vendor record controlled by the SetID value of SHARE. The Vendor record values must be coordinated with the City of New York and, eventually, the State of New York. It is imperative that community colleges only use vendor records that have been first entered in the City system. Initially the senior colleges are not required to verify vendor information with the state. Adding and maintaining vendor information is critical to the success of this system.
Since the system will provide the ability to pay student refunds interfaced from the Campus Solutions Student Financials system, a separate Accounts Payable Business Unit will be created to process these payments. Each college will have its own student refund business unit. This will allow for segregation of the Student vendors from the city and state vendors. Each college’s student vendors will have a SetID equal to the value of the primary college Business Unit. Student refund vouchers will be set to not require approval since the authority to write the refunds originates in the Campus Solutions Student Financials system.
Voucher documents will require certain verification processes to be run in order to confirm they conform to the processing limitations and rules established for the system. These processes include Document Tolerance, Matching and Budget Checking. In addition most vouchers will be required to be approved prior to being available for payment processing.
Document Tolerance ensures the Voucher is within a certain dollar amount of the Purchase Order. The tolerance amount is controlled by Fund number and is the lesser of a fixed dollar amount or a percentage of the Purchase Order.
The Matching process checks to verify certain predetermined rules are followed. Some of the rules include:
Procurement Reference Guide
Update: October 28, 2011 15
Verification a PO Receipt exists and contains an adequate quantity that matches the Purchase Order and Voucher.
Verification the Voucher is tied to a Purchase Order and the amounts agree or do not exceed the PO quantity and dollar amounts.
The Budget Checking process verifies that adequate budget funds exist for the transaction. Normally this is not an issue with Accounts Payable documents since they most often reference a Purchase Order which has encumbered the funds. A successful Voucher Budget Check process reverses the encumbrance amount and simultaneously records the expense amount in the budget ledgers.
All three processes provide pages that can be accessed to view errors that might occur. Adequate information is provided to assist the user to resolve the problem or assign the issue to the proper person or office.
Vouchers for Community Colleges will be interfaced to the City of New York for payment processing. Likewise Senior College vouchers will be interfaced to the State of New York for payment processing. Both the City and State will transmit files to CUNY that contain the payment information related to each voucher. This information will be recorded in the system for reference.
Because of the need to interface information to and from both the City and State, several interface files will be processed to both capture and provide the information required to successfully maintain the system. Note: The City deadline for running transactions into their system is before close of business. As a result, we will be capturing transactions completed up until 3pm only. Transactions completed after that—vouchers approved, purchase orders dispatched—will not be picked up and sent to the City until the following day.
The system will also provide the ability to write imprest and student refund payments from the college’s local banks. In addition, the system will provide the ability to perform bank reconciliation processing for the payments.
The Accounts Payable system provides many different components that can be used to view document information. These pages allow the user to see all related documents and research issues and problems that may occur. The system also provides several reports that can be run that provide pertinent detail and summary information.
This document contains conceptual design considerations that will be used as a basis to configure the General Ledger module and the Commitment Control features and functionality of CUNYfirst with best business processes and practices.

Procurement Reference Guide
Last Updated: June 11, 2012 16
Accounts Payable Process/Configuration
The Accounts Payable application will be configured to provide for CUNY’s business requirements. CUNY personnel must interact with vendors and either the City or the State payment systems. Vendors will be required to register with the City of New York and be approved to sell to City entities. At this time State vendors are not required to interact with the State prior to being paid by senior colleges. This may change once the State of New York implements their new accounting system.
The diagram below shows, at a high level, how vendors, the State of New York, the City of New York and the Accounts Payable system interrelate.
City of New York State of New York
CUNYfirst Accounts Payable
CUNYfirst General
Ledger
Vendors
Voucher information will be interfaced from the Accounts Payable system to the City and the State for payment processing. Once the vendor payments have been made, the City and State will transmit payment information to the system where it will be recorded. This information will be accessible by both CUNY personnel as well as Vendors. Vendor access will be limited to allow them to only view their data. CUNY personnel will be limited to view only the information related to their business unit. Note: The City deadline for running transactions into their system is before close of business. As a result, we will be capturing transactions completed up until 3pm only. Transactions completed after that—vouchers approved, purchase orders dispatched—will not be picked up and sent to the City until the following day.
The following section of this document provides conceptual information on how Accounts Payable will be configured to provide for the CUNY business requirements. Additionally, configuration values are documented where these detail values have been finalized based on the outcomes from previous sessions.
Procurement Reference Guide
Last Updated: June 11, 2012 17

Procurement Reference Guide
Last Updated: June 11, 2012 18
Unit Objectives Upon completion of this module, the learner will be able to:
Create a PO Voucher
Create a Non-PO Voucher
Manage Chartfield Editing
Run the Matching Process
Run Budget Checking
Run the Document Tolerance Process
Manage Vouchers including the following actions: Voucher Approval Voucher Build Voucher Maintenance Voucher Post Voucher Close Voucher Delete Voucher Unpost Voucher Unmatch
Imprest Fund Initial Funding and Reimbursement Vouchers
City Year End Processing
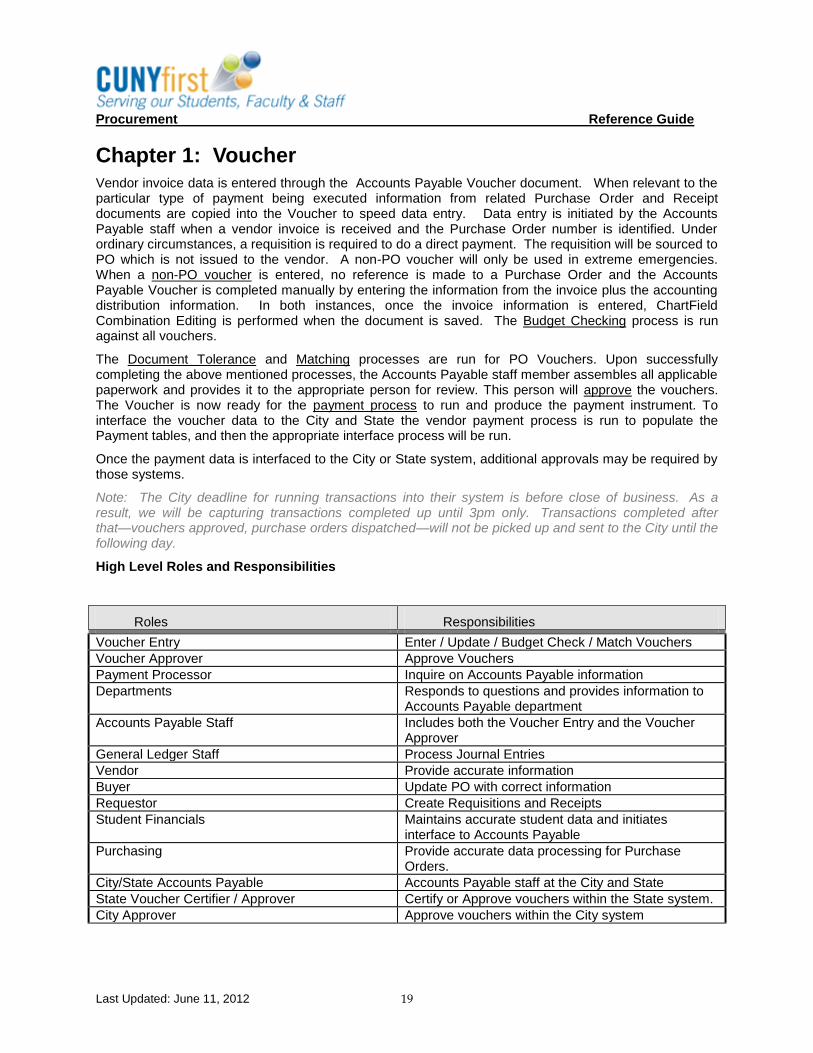
Procurement Reference Guide
Last Updated: June 11, 2012 19
Chapter 1: Voucher
Vendor invoice data is entered through the Accounts Payable Voucher document. When relevant to the particular type of payment being executed information from related Purchase Order and Receipt documents are copied into the Voucher to speed data entry. Data entry is initiated by the Accounts Payable staff when a vendor invoice is received and the Purchase Order number is identified. Under ordinary circumstances, a requisition is required to do a direct payment. The requisition will be sourced to PO which is not issued to the vendor. A non-PO voucher will only be used in extreme emergencies. When a non-PO voucher is entered, no reference is made to a Purchase Order and the Accounts Payable Voucher is completed manually by entering the information from the invoice plus the accounting distribution information. In both instances, once the invoice information is entered, ChartField Combination Editing is performed when the document is saved. The Budget Checking process is run against all vouchers.
The Document Tolerance and Matching processes are run for PO Vouchers. Upon successfully completing the above mentioned processes, the Accounts Payable staff member assembles all applicable paperwork and provides it to the appropriate person for review. This person will approve the vouchers. The Voucher is now ready for the payment process to run and produce the payment instrument. To interface the voucher data to the City and State the vendor payment process is run to populate the Payment tables, and then the appropriate interface process will be run.
Once the payment data is interfaced to the City or State system, additional approvals may be required by those systems.
Note: The City deadline for running transactions into their system is before close of business. As a result, we will be capturing transactions completed up until 3pm only. Transactions completed after that—vouchers approved, purchase orders dispatched—will not be picked up and sent to the City until the following day.
High Level Roles and Responsibilities
Roles Responsibilities
Voucher Entry Enter / Update / Budget Check / Match Vouchers
Voucher Approver Approve Vouchers
Payment Processor Inquire on Accounts Payable information
Departments Responds to questions and provides information to Accounts Payable department
Accounts Payable Staff Includes both the Voucher Entry and the Voucher Approver
General Ledger Staff Process Journal Entries
Vendor Provide accurate information
Buyer Update PO with correct information
Requestor Create Requisitions and Receipts
Student Financials Maintains accurate student data and initiates interface to Accounts Payable
Purchasing Provide accurate data processing for Purchase Orders.
City/State Accounts Payable Accounts Payable staff at the City and State
State Voucher Certifier / Approver Certify or Approve vouchers within the State system.
City Approver Approve vouchers within the City system
Procurement Reference Guide
Last Updated: June 11, 2012 20
Summary of Business Sub-Processes and Process Flows
The following is a listing of the Business Processes that were outlined in the FN.02. Related or sub-group processes are further detailed in this document.

Procurement Reference Guide
Last Updated: June 11, 2012 21
Topic 1: PO Voucher Create a Voucher by copying in the Purchase Order information.
Vendors submit invoices to Accounts Payable (AP) for processing. Invoices received from the vendor should have the purchase order number on the invoice document. If the invoice is not the result of a PO transaction and does not reference a PO number, it will be handled as a Non Purchase Order invoice. See Non PO Voucher for the process flow. If the Accounts Payable associate knows the PO #, it will be entered on the invoice and processed. If the PO number is not known, the invoice is returned to the Vendor for the missing PO number.
Since a Vendor must be created in the Vendor records before a PO can be created, there is not a requirement to enter the Vendor. However, the “Remit to” address may not be included in the Vendor records and would need to be included to allow payment to be made to the Remit to address of the vendor. See the Vendor process to make changes to the Vendor records.
The requirements for entering invoice information differ between the city and state vouchers as shown
below in the table:
Required Fields State Voucher City Voucher Custom Field/Delivered
Batch Type n/a ? Custom
Batch Number ? n/a ? Custom
Invoice Received Date ? Custom
Goods Received date ? Delivered
Voucher Approved Date ? Delivered
Interest Eligibility Date ? n/a ? Custom (placed on voucher component
MIR Date ? n/a ? System calculated
Accounts Payable enters the invoice information into the system including invoice number, invoice date, and total invoice amount for the city and state vouchers. Next an attempt is made to associate the invoice to a purchase order receipt. If no receipt is found, the invoice is associated to the purchase order. In either case, the purchase order lines and ChartField values are copied into the voucher. If neither the purchase order nor receipt is found, the invoice is returned to the sender (Vendor/Department) with a message written or stamped on the document requesting the PO number be furnished.
After successfully copying purchase order line item and ChartField values to the voucher lines, ChartField edit checking is accomplished by “saving” the transaction. The Voucher number is assigned by the system during a successful “Save” process. After successfully passing ChartField Editing, the PO voucher will be subjected to Budget Checking, Document Tolerance, Matching and Approval for payment Processes. See the appropriate sub-process for the detail process flows. Note: A successful matching process will cause the association of the purchase order receipt to the invoice. When a voucher references a Purchase Order that requires a Receipt, the Matching process will not be successful until the voucher also references the matching Receipt. If the PO requires an inspection, then it has to also have an Inspection report entered. For State vouchers, the MIR date will be calculated as the later of the Receipt Date or the Invoice Received Date. For Vouchers not requiring a Receipt, the Matching process will verify the PO and Voucher information.
Procurement Reference Guide
Last Updated: June 11, 2012 22
Entering vouchers in the system will be a business process change, since currently all vouchers are entered in either the City or State system. In the situation of PO Voucher transactions, this new process will record the expenses and relieve the encumbrances prior to sending the information to the City or State. The current process records the expense and relieves the encumbrance at the City and State and then transmits the information to the CUNY institutions. The new process allows CUNY to have financial information available sooner. Senior College Vouchers will be interfaced to the State system and Community College Vouchers will be interfaced to the City system, thus eliminating the need for duplicate voucher entry. A voucher line can be marked as “Final” and it will close out the remaining balance of the referenced PO line. In addition this information will be interfaced to the City and State. However, this functionality should only be used with the entry originated in and a Voucher line should not be marked “Final” after the City and State interface is processed. Note: The City deadline for running transactions into their system is before close of business. As a result, we will be capturing transactions completed up until 3pm only. Transactions completed after that—vouchers approved, purchase orders dispatched—will not be picked up and sent to the City until the following day. A PO Voucher can not only be paid by the City or State but also by an impress bank account. The default value for each college will be that the voucher is paid by the City or State, depending on the college. In order to pay using the imprest bank account, the Bank and related information is appropriately changed on the Payment page of the Voucher. Once this is changed the proper pay cycle process is run to create the check from the imprest bank account. Multiple vouchers can be included in one check if the Separate Payment flag is unchecked on each Voucher.
Key policies related to the procedure
When creating a PO voucher, the user must copy the purchase order using the “Worksheet Copy Option”. If the “Copy PO” button is used, payments will not be “interfaced” to the City to be paid!
PO and non-PO purchases cannot be paid on the same voucher.
A single voucher can pay only one PO Type (PON1, CT1).
Payment for P-card purchases must be processed as PO vouchers.
There may be one and only one distribution per voucher line when interfacing to the City.
Authorized Roles
CU_FSAP_Voucher_Entry
The Voucher component is found by navigating to Accounts Payable > Vouchers > Add/Update > Regular Entry > Add a New Value.
Step Summary
1. Navigate to Voucher Entry. 2. Enter required fields, including Business Unit, Voucher Style. Others may be entered or may
default in, such as Vendor, Vendor Location, and Invoice Number.

Procurement Reference Guide
Last Updated: June 11, 2012 23
3. Click the Add button to access the Invoice Information page. 4. Select the Worksheet Copy Option (Purchase Order Only or PO Receipt) from the drop down
menu. 5. Enter any information for payment, such as PO number, to find corresponding receipts and select
the search button. 6. Select the receipt lines desired for copy into the voucher by checking the box to the left and
selecting the Copy Selected Lines button. This will return the user to the Invoice Information tab and will copy Item and Chartfield information into your voucher.
7. On the Voucher Header information review and validate the correct information copied correctly from the receipt and that it matches the information on the invoice.
8. In the Distribution Line(s) section verify the Budget Date on the Distribution Line(s) is in the appropriate Budget Fiscal Year.
9. Select the Payments Tab and enter or review the necessary information including Voucher heading, payment information, payment method, payment options.
10. Save. End of process.
Detailed Information
Field Description

Procurement Reference Guide
Last Updated: June 11, 2012 24
Field Description
Vendor and Name Select the vendor by entering the vendor ID or short name.
After you press Tab to exit either field, the system retrieves and populates the voucher with the full vendor name, primary address, default location information, and payment terms. In addition, the system uses default information from the vendor table in conjunction with information from other default levels (business unit, origin, and control group) to determine how the system processes this voucher.
Location Override the default location by selecting a new location. The vendor location controls much of the default voucher processing.
Address Override the default address by selecting a new address.
Advanced Vendor Search Click to search for vendors using partial names and wildcard symbols.
Pay Terms Select the payment terms. These terms are supplied from the PeopleSoft Payables default hierarchy. Click the Transfer to Pay Terms Detail button to access the Payment Terms page, where you can override the defaults or change associated information.
Basis Dt Type Displays the basis date type which controls the basis date on which the payment terms are based. You can override the basis date type on the Payment Terms page.
(USF) Pay Schedule Indicate a federal payment schedule type for this voucher. The system uses this information to group this voucher with others and assign it to the appropriate payment schedule. Select from:
Manual
Other
Transport (transportation)
Invoice Information
Invoice Number Enter the invoice number or some other control number from the voucher's supporting document. The system uses this number as a reference for duplicate invoice checking if you have selected it to be one of your match criteria.
Invoice Date Enter the date that the invoice is entered into the system. It is usually the current date.
Print Invoice Click to create the invoice in a PDF file format. The system opens a new window where you can view and print the invoice.
Related Voucher Journal vouchers only.
Accounting Date Displays the accounting control date, which is based on the settings that are defined in the PeopleSoft Payables default hierarchy. You can override it here on the voucher.
Group Select a control group for the voucher if applicable. The default is the earliest assigned group for the business unit and user ID. If no groups are assigned for your user ID, the Group field does not appear.

Procurement Reference Guide
Last Updated: June 11, 2012 25
Field Description
Total and Currency Enter the full amount of the voucher, including merchandise and service amounts (entered on the voucher lines), freight, and tax. Enter the gross amount to ensure balancing between the voucher header and voucher lines. You can enter gross amounts only up to the limit that is specified on your PeopleSoft Payables user profile.
Difference Displays the amount that you are currently out of balance. To arrive at this figure, the system compares the sum of the invoice lines plus the applicable charge amounts and the entered gross amount.
Lease Number Enter the lease number for a lease payment voucher. This field appears only when you have also installed the Real Estate Management module.
Packing Slip Enter a packing slip number from the supplier's invoice. The packing slip number can be used by the Matching Application Engine process (AP_MATCH) to associate the voucher with the receiver if the document association rule is set up to use this criteria.
Comments (n) Click to enter comments for a voucher to explain payment schedules, issues with the vendor, or anything else that you need to document the invoice. Any comments that you enter in this field are meant for your reference only. You can enter up to 254 characters for a comment. If you exceed 254 characters, the system displays a warning message that it can save only 254 characters and truncates the message.
The system displays (0) if no comment is attached to this voucher. The system displays (1) if a comment is attached.
Dispatch Method Debit Memo adjustment vouchers only.
Select a dispatch method for this debit memo adjustment voucher. This field is available only if the voucher style is Adjustment and the voucher source is Match Adjustment. You can override the dispatch method that is defined in the Debit Memo Options collapsible region on the Vendor Information - Payables Options page. Values include Blank, EDI/XML, Email, Fax, Phone, and Print.
Misc Charge Amount Enter any miscellaneous charge amount, freight amount, or sales tax amount. To allocate these charges at a more detailed level, click the icons next to these fields to access detail pages (the Miscellaneous Charges, Freight Charges, and Sales Tax Charges pages).
Freight Amount You should enter any amounts on the voucher page first before accessing the detail page. When you save the voucher, the system allocates the charges that you enter to the voucher lines based on the defaults that you set in the Procurement Control component (BUS_UNIT_INTFC2) for the PeopleSoft Payables business unit.
Sales Tax Amount
Tax Exempt Flag Select if you want to override the default sales and use tax setup for this voucher and make it exempt from taxation.

Procurement Reference Guide
Last Updated: June 11, 2012 26
Field Description
Use Tax Displays the calculated use tax. The system calculates the use tax either from:
A use tax code that is entered on the Invoice Line Tax Information page.
The difference between the sales tax that is entered on the voucher header and the sales tax that is entered or calculated for the voucher lines if the voucher lines are tax applicable but the header sales tax amount is less than the total for the lines.
Click the Transfer to Use Tax Detail icon to access the Use Tax Charges page, where you can specify how to allocate the use tax charges.
Invoice Lines
Distribute by Select a distribution method:
Amount: You must enter the merchandise extended amount for the voucher line. You can also enter the quantity, unit price, and unit of measure (UOM) on the voucher line and a quantity on the distribution line for informational purposes only.
If you change the value in the merchandise Extended Amount field, the Unit Price field is recalculated.
Quantity: The system calculates the merchandise amount on the invoice lines and distribution lines based on the quantity and unit price. You must enter the quantity, unit price, and UOM. The Extended Amount field is not available for entry.
Select the Force Price option if you want to force the unit price based on the entered merchandise amount. This option is described subsequently.
Item Enter an item ID reference code and a line item description of up to 30 characters. If you also have PeopleSoft Purchasing installed, you can use an existing item from the PeopleSoft Purchasing item table. When you press Tab to move out of this field, the system populates the Description field with the associated description.
SpeedChart Enter a SpeedChart. When you press Tab to move out of the edit box, prorated amounts and distribution ChartFields appear on the voucher distribution lines. If the SpeedChart was defined with no proration percentages, you must enter the distribution amounts yourself.
SpeedChart is not available on the reversal or prepaid voucher, as these voucher styles do not enable you to add voucher lines.
Related Voucher For reversal and adjustment vouchers, displays the voucher ID of the voucher line that is being reversed or adjusted.

Procurement Reference Guide
Last Updated: June 11, 2012 27
Field Description
Use One Asset ID Select to override all assets on the voucher line to use the same asset ID.
Selecting this option causes the system to update all of the asset IDs for all asset-applicable distribution lines under the voucher line to NEXT, each sequence number to 1, and the profile ID to the profile ID of the first distribution line.
You can override these values on individual distribution lines. Force Price Select if you want to force a change to the unit price to achieve the
entered extended amount. Use when the sum of the merchandise amounts on the distribution lines does not match, usually because of rounding. Selecting Force Price enables you to change the extended amount and have the unit price recalculated to achieve that extended amount.
Note. This check box is available only if you are distributing by quantity and copying from either a purchase order or a receiver. You must refresh the page to enable the Force Price check box.
Sales/Use Tax Click to access the Invoice Line Tax Information page, where you can override the default tax settings for the voucher line.
Purchase Order & Receiver Info
Click to access the View Source PO/Receiver Information page, where you can view information about the source purchase order or receiver, including comments of various types, including header, line, and ship-to comments. This link appears only if you have PeopleSoft Purchasing installed on the same database.
Distribution Lines
GL Chart Tab
Copy Down Select the check box on a distribution line to copy that line's general ledger business unit and ChartField values to new distribution lines.
Amount Enter the amount that you want to charge to the ChartField values that follow. The total of all amounts that you enter on the distribution lines for a voucher line must equal the merchandise amount on the parent voucher line. An error message appears if an imbalance occurs.
Quantity Enter the number of units purchased that should be associated with the distribution line. This field is required if you are distributing by quantity. It is optional if you are distributing by amount. If you have entered a quantity on the voucher line, the total of all quantities entered on the distribution lines for that voucher line must equal the quantity on the parent voucher line. If you are entering a voucher line for a fixed asset that you will send to PeopleSoft Asset Management, you must enter a quantity for the asset.

Procurement Reference Guide
Last Updated: June 11, 2012 28
Field Description
GL Unit Identifies the general ledger business unit that will be charged with the expense that is coded on the distribution line.
The default value is the general ledger business unit of the PeopleSoft Payables business unit under which the voucher is being entered. If you change the value to charge a different PeopleSoft General Ledger business unit, the system creates interunit accounting entries. This occurs during voucher and payment posting. In this case, ChartField validation occurs based on the ChartFields of the PeopleSoft General Ledger business unit.
Entry Event Enter the entry event code for the voucher if applicable. The system displays this field if you have enabled entry events.
Account Enter an account. When you save the voucher, the system validates the account that you enter along with any other ChartField values. If the account that you select has been set up as a statistical account, the Amount and Quantity fields on the invoice line become inactive and any values that you may have already entered are deleted.
If the Installation option is enabled, the Altacct field appears next to the Account field in the grid.
Open Item If the account that you enter has been set up as an OpenItem account, you must enter an open item reference.
Select a reference by prompting. If you enter a reference for an account that is not an open item account, an error message appears when you attempt to save the voucher. You must remove the invalid reference before you can save the voucher.
Project ID Enter a project identifier. This field appears if you do not have PeopleSoft Project Costing installed on your database.
Budget Date Displays the budget date of the distribution line if the Commitment Control feature is enabled. You define which field the system uses for the budget date on a voucher in the Source Transactions component when you set up the Commitment Control feature in PeopleSoft General Ledger. You can also specify at the installation options whether the default budget date is the accounting date of the voucher or of the predecessor document (purchase order).
Affiliate If the vendor is an interunit vendor, this field is not editable and the affiliate code appears by default.
Procurement Reference Guide
Last Updated: June 11, 2012 29
Topic 2: Year End Process Interface the bank statement(s) with the system and run the Bank Reconciliation process to mark payments that have cleared the bank system.
All invoices to be paid by CUNY must be delivered to the designated AP payment address. Invoices must identify the associated purchase order, and must be properly prepared to be consistent with the lines in the PO. PO and non-PO purchases cannot be paid on the same voucher. In addition, a single voucher can pay only one PO Type (PON1, CT1).
PO Vouchers must be copied from the appropriate receipt(s) to ensure that the payments interface to the City functions as designed.
Note: The City deadline for running transactions into their system is before close of business. As a result, we will be capturing transactions completed up until 3pm only. Transactions completed after that—vouchers approved, purchase orders dispatched—will not be picked up and sent to the City until the following day.
Bank statement reconciliation will be run for all payments processed through the Student Financials to AP interface – namely, Financial Aid disbursements and Student tuition refunds. Since these checks will be processed centrally through , the bank reconciliation will also be handled centrally. Bank statement reconciliation will be performed on a daily basis by the OUC Data Integrity team.
There will be a single bank selected by CUNY to process both Financial Aid disbursements and tuition refunds. Two zero balance accounts will be established, one for each payment type that will be reconciled with the payments processed using the Student Financials to AP interface.
Business Process Policy Changes
Responsibility Action Policy/Procedure
Voucher Entry Enter Vouchers only in the system.
To assure the integrity of the financial system, all Vouchers must only be entered into the system and not into the State or City systems.
Voucher Entry Modify Vouchers only in the system.
To assure the integrity of the financial system, all Vouchers must be modified in the system and not in the State or City systems.
Voucher Approver Reconcile Vouchers It is critical that vouchers are reconciled on a regular basis between the City or State systems and the system.
Authorized Roles
CU_FSAP_Voucher_Entry
The Voucher component is found by navigating to Accounts Payable > Vouchers > Add/Update > Regular Entry > Add a New Value.
Step Summary
1. Navigate to Voucher Entry.

Procurement Reference Guide
Last Updated: June 11, 2012 30
2. Enter the Voucher into the System. 3. Required fields include: Business Unit and Voucher Styles. Vendor, Vendor Location, and
Invoice Number may default or be added. 4. Select ADD button to move to Invoice Information of the Voucher. Enter the appropriate
information to create the Voucher. Note: If entered on Add a New Value page, most will default throughout the voucher.
5. Select the Payments Tab to review all payment information and method details. 6. Select the Hold Payment box to keep payment from processing any further, if needed. Also
select the Separate Payment box to keep this invoice from being combined with other payments to this vendor.
7. If distributing by quantity in the Invoice Lines section, enter the appropriate information. In the accounting defaults section of the line enter the correct distribution for the payment. The system will populate the Distribution lines with the Quantity and total amount from the Line information.
Detailed Information
Field Description
Vendor and Name Select the vendor by entering the vendor ID or short name.
After you press Tab to exit either field, the system retrieves and populates the voucher with the full vendor name, primary address, default location information, and payment terms. In addition, the system uses default information from the vendor table in conjunction with information from other default levels (business unit, origin, and control group) to determine how the system processes this voucher.

Procurement Reference Guide
Last Updated: June 11, 2012 31
Field Description
Location Override the default location by selecting a new location. The vendor location controls much of the default voucher processing.
Address Override the default address by selecting a new address.
Advanced Vendor Search Click to search for vendors using partial names and wildcard symbols.
Pay Terms Select the payment terms. These terms are supplied from the PeopleSoft Payables default hierarchy. Click the Transfer to Pay Terms Detail button to access the Payment Terms page, where you can override the defaults or change associated information.
Basis Dt Type Displays the basis date type which controls the basis date on which the payment terms are based. You can override the basis date type on the Payment Terms page.
(USF) Pay Schedule Indicate a federal payment schedule type for this voucher. The system uses this information to group this voucher with others and assign it to the appropriate payment schedule. Select from:
Manual
Other
Transport (transportation)
Invoice Information
Invoice Number Enter the invoice number or some other control number from the voucher's supporting document. The system uses this number as a reference for duplicate invoice checking if you have selected it to be one of your match criteria.
Invoice Date Enter the date that the invoice is entered into the system. It is usually the current date.
Print Invoice Click to create the invoice in a PDF file format. The system opens a new window where you can view and print the invoice.
Related Voucher Journal vouchers only.
Accounting Date Displays the accounting control date, which is based on the settings that are defined in the PeopleSoft Payables default hierarchy. You can override it here on the voucher.
Group Select a control group for the voucher if applicable. The default is the earliest assigned group for the business unit and user ID. If no groups are assigned for your user ID, the Group field does not appear.
Total and Currency Enter the full amount of the voucher, including merchandise and service amounts (entered on the voucher lines), freight, and tax. Enter the gross amount to ensure balancing between the voucher header and voucher lines. You can enter gross amounts only up to the limit that is specified on your PeopleSoft Payables user profile.
Difference Displays the amount that you are currently out of balance. To arrive at this figure, the system compares the sum of the invoice lines plus the applicable charge amounts and the entered gross amount.
Lease Number Enter the lease number for a lease payment voucher. This field appears only when you have also installed the Real Estate Management module.

Procurement Reference Guide
Last Updated: June 11, 2012 32
Field Description
Packing Slip Enter a packing slip number from the supplier's invoice. The packing slip number can be used by the Matching Application Engine process (AP_MATCH) to associate the voucher with the receiver if the document association rule is set up to use this criteria.
Comments (n) Click to enter comments for a voucher to explain payment schedules, issues with the vendor, or anything else that you need to document the invoice. Any comments that you enter in this field are meant for your reference only. You can enter up to 254 characters for a comment. If you exceed 254 characters, the system displays a warning message that it can save only 254 characters and truncates the message.
The system displays (0) if no comment is attached to this voucher. The system displays (1) if a comment is attached.
Dispatch Method Debit Memo adjustment vouchers only.
Select a dispatch method for this debit memo adjustment voucher. This field is available only if the voucher style is Adjustment and the voucher source is Match Adjustment. You can override the dispatch method that is defined in the Debit Memo Options collapsible region on the Vendor Information - Payables Options page. Values include Blank, EDI/XML, Email, Fax, Phone, and Print.
Misc Charge Amount Enter any miscellaneous charge amount, freight amount, or sales tax amount. To allocate these charges at a more detailed level, click the icons next to these fields to access detail pages (the Miscellaneous Charges, Freight Charges, and Sales Tax Charges pages).
Freight Amount You should enter any amounts on the voucher page first before accessing the detail page. When you save the voucher, the system allocates the charges that you enter to the voucher lines based on the defaults that you set in the Procurement Control component (BUS_UNIT_INTFC2) for the PeopleSoft Payables business unit.
Sales Tax Amount
Tax Exempt Flag Select if you want to override the default sales and use tax setup for this voucher and make it exempt from taxation.
Use Tax Displays the calculated use tax. The system calculates the use tax either from:
A use tax code that is entered on the Invoice Line Tax Information page.
The difference between the sales tax that is entered on the voucher header and the sales tax that is entered or calculated for the voucher lines if the voucher lines are tax applicable but the header sales tax amount is less than the total for the lines.
Click the Transfer to Use Tax Detail icon to access the Use Tax Charges page, where you can specify how to allocate the use tax charges.

Procurement Reference Guide
Last Updated: June 11, 2012 33
Field Description
Invoice Lines
Distribute by Select a distribution method:
Amount: You must enter the merchandise extended amount for the voucher line. You can also enter the quantity, unit price, and unit of measure (UOM) on the voucher line and a quantity on the distribution line for informational purposes only.
If you change the value in the merchandise Extended Amount field, the Unit Price field is recalculated.
Quantity: The system calculates the merchandise amount on the invoice lines and distribution lines based on the quantity and unit price. You must enter the quantity, unit price, and UOM. The Extended Amount field is not available for entry.
Select the Force Price option if you want to force the unit price based on the entered merchandise amount. This option is described subsequently.
Item Enter an item ID reference code and a line item description of up to 30 characters. If you also have PeopleSoft Purchasing installed, you can use an existing item from the PeopleSoft Purchasing item table. When you press Tab to move out of this field, the system populates the Description field with the associated description.
SpeedChart Enter a SpeedChart. When you press Tab to move out of the edit box, prorated amounts and distribution ChartFields appear on the voucher distribution lines. If the SpeedChart was defined with no proration percentages, you must enter the distribution amounts yourself.
SpeedChart is not available on the reversal or prepaid voucher, as these voucher styles do not enable you to add voucher lines.
Related Voucher For reversal and adjustment vouchers, displays the voucher ID of the voucher line that is being reversed or adjusted.
Use One Asset ID Select to override all assets on the voucher line to use the same asset ID.
Selecting this option causes the system to update all of the asset IDs for all asset-applicable distribution lines under the voucher line to NEXT, each sequence number to 1, and the profile ID to the profile ID of the first distribution line.
You can override these values on individual distribution lines.

Procurement Reference Guide
Last Updated: June 11, 2012 34
Field Description
Force Price Select if you want to force a change to the unit price to achieve the entered extended amount. Use when the sum of the merchandise amounts on the distribution lines does not match, usually because of rounding. Selecting Force Price enables you to change the extended amount and have the unit price recalculated to achieve that extended amount.
Note. This check box is available only if you are distributing by quantity and copying from either a purchase order or a receiver. You must refresh the page to enable the Force Price check box.
Sales/Use Tax Click to access the Invoice Line Tax Information page, where you can override the default tax settings for the voucher line.
Purchase Order & Receiver Info
Click to access the View Source PO/Receiver Information page, where you can view information about the source purchase order or receiver, including comments of various types, including header, line, and ship-to comments. This link appears only if you have PeopleSoft Purchasing installed on the same database.
Distribution Lines
GL Chart Tab
Copy Down Select the check box on a distribution line to copy that line's general ledger business unit and ChartField values to new distribution lines.
Amount Enter the amount that you want to charge to the ChartField values that follow. The total of all amounts that you enter on the distribution lines for a voucher line must equal the merchandise amount on the parent voucher line. An error message appears if an imbalance occurs.
Quantity Enter the number of units purchased that should be associated with the distribution line. This field is required if you are distributing by quantity. It is optional if you are distributing by amount. If you have entered a quantity on the voucher line, the total of all quantities entered on the distribution lines for that voucher line must equal the quantity on the parent voucher line. If you are entering a voucher line for a fixed asset that you will send to PeopleSoft Asset Management, you must enter a quantity for the asset.
GL Unit Identifies the general ledger business unit that will be charged with the expense that is coded on the distribution line.
The default value is the general ledger business unit of the PeopleSoft Payables business unit under which the voucher is being entered. If you change the value to charge a different PeopleSoft General Ledger business unit, the system creates interunit accounting entries. This occurs during voucher and payment posting. In this case, ChartField validation occurs based on the ChartFields of the PeopleSoft General Ledger business unit.
Entry Event Enter the entry event code for the voucher if applicable. The system displays this field if you have enabled entry events.

Procurement Reference Guide
Last Updated: June 11, 2012 35
Field Description
Account Enter an account. When you save the voucher, the system validates the account that you enter along with any other ChartField values. If the account that you select has been set up as a statistical account, the Amount and Quantity fields on the invoice line become inactive and any values that you may have already entered are deleted.
If the Installation option is enabled, the Altacct field appears next to the Account field in the grid.
Open Item If the account that you enter has been set up as an OpenItem account, you must enter an open item reference.
Select a reference by prompting. If you enter a reference for an account that is not an open item account, an error message appears when you attempt to save the voucher. You must remove the invalid reference before you can save the voucher.
Project ID Enter a project identifier. This field appears if you do not have PeopleSoft Project Costing installed on your database.
Budget Date Displays the budget date of the distribution line if the Commitment Control feature is enabled. You define which field the system uses for the budget date on a voucher in the Source Transactions component when you set up the Commitment Control feature in PeopleSoft General Ledger. You can also specify at the installation options whether the default budget date is the accounting date of the voucher or of the predecessor document (purchase order).
Affiliate If the vendor is an interunit vendor, this field is not editable and the affiliate code appears by default.

Procurement Reference Guide
Last Updated: June 11, 2012 36
Topic 3: Non-PO Voucher Create a Voucher by entering information directly into the system. Both vendors and departments submit invoices to Accounts Payable (AP) for processing. If invoices received from the vendor have the purchase order number on the invoice document, see PO Voucher for process flow. If the invoice should not reference a PO number, it will be handled as a Non Purchase Order invoice. Sometimes requests to process payments come from internal sources. The documentation sent to Accounts Payable should include all of the required information needed to process a payment, including the proper approvals. Examples of these payments include postage requests and stipend payments to students. Departments will manually enter accounting information on the invoice and sign the invoice as an approval to pay before sending it to the Accounts Payable office or departments will prepare a manual requisition identifying the accounting information and authorized signatures. The accounting information informs Accounts Payable of the ChartField string to be charged which, in turn, determines the budget value to be used for the budget checking process. If invoices are received without accounting information, the department responsible for the charge is contacted to obtain the data values. The requirements for entering invoice information differ between the city and state vouchers (please see PO-Voucher 1.01) for City and State requirements. Before an invoice can be entered the Vendor must be created in the Vendor records with the correct address necessary for payment processing. See the Vendor Process for the process flow. After successfully entering invoice information into the voucher page, the ChartField Edit process is accomplished during the “Save” process. The Voucher number is assigned by the system during a successful “Save” process. After successfully passing ChartField editing, the Non-PO voucher will be subjected to Budget Checking and Approval for payment processes. The voucher approval process is same for both non-PO and PO vouchers. However, the City requires two approvers and the State requires only one approver on the voucher. See the appropriate sub-process for the detail process flows. Entering vouchers in the system will be a business process change for Tax Levy Business Units. Currently all Tax Levy vouchers are entered in either the City or State system. The Voucher will record the expenses prior to sending the information to the City or State. The current process records the expense at the City and State and then transmits the information to the CUNY institutions. The new process allows CUNY to have financial information available sooner. The Voucher processes record the expenses in both the Budget Ledgers and the General Ledger.
Senior College Vouchers will be interfaced to the State system and Community College Vouchers will be interfaced to the City system, thus eliminating the need for duplicate voucher entry. Note: The City deadline for running transactions into their system is before close of business. As a result, we will be capturing transactions completed up until 3pm only. Transactions completed after that—vouchers approved, purchase orders dispatched—will not be picked up and sent to the City until the following day. A non-PO Voucher can be paid either by the City or State or by an imprest bank account. The default value for each college will be that the voucher is paid by the City or State, depending on the college. In order to pay using the imprest bank account, the Bank and related information is appropriately changed on the Payment page of the Voucher. Once this is changed the proper pay cycle process is run to create the check from the imprest bank account. Multiple vouchers can be included in one check if the Separate Payment flag is unchecked on each Voucher.

Procurement Reference Guide
Last Updated: June 11, 2012 37
Business Process Policy Changes
Responsibility Action Policy/Procedure
Voucher Entry Enter Vouchers only in the system.
To assure the integrity of the financial system, all Vouchers must only be entered into the system and not into the State or City systems.
Voucher Entry Modify Vouchers only in the system.
To assure the integrity of the financial system, all Vouchers must be modified in the system and not in the State or City systems.
Voucher Approver Reconcile Vouchers It is critical that vouchers are reconciled on a regular basis between the City or State systems and the system.
Key policies related to the Non-PO Voucher procedure: All invoices to be paid by CUNY must be delivered to the designated AP payment address. Invoices must identify the associated purchase order, and must be properly prepared to be consistent with the lines in the PO. PO and non-PO purchases cannot be paid on the same voucher. In addition, a single voucher can pay only one PO Type (PON1, CT1)
PO Vouchers must be copied from the appropriate receipt(s) to ensure that the payments interface to the City functions as designed.
City or CUNY procurement policies. CUNY will establish and communicate a dollar limit for non-PO purchases as well as a short list of approved non-PO purchase categories. Non-PO Vouchers will only be accepted if both of these conditions exist:
1. Purchase is planned and required for a future event 2. Credit card or purchase order will not be accepted by vendor – examples might include event pre-
registration, NYPD fingerprinting, pistol carry licenses or a membership renewal. Purchases that are unplanned, or do not meet the criteria for non-PO purchases listed above, will be considered confirming orders. Confirming orders will be required to execute the complete procurement cycle, beginning with a requisition. Purchases that conform to the requirements for a non-PO voucher must execute the following steps:
1. Submit a requisition. 2. Non-PO purchase must be authorized using the standard requisition approval workflow. Once
the requisition is approved the last approver will take a screen shot of the approved requisition, save it locally and send it to the Accounts Payable department along with the required e-form.
3. The Accounts Payable processor can then attach the file to the non-purchase order voucher. 4. Once the voucher has been interfaced to the City and the payment successfully processed, the
requestor must cancel the requisition. AP will be responsible for notifying the requestor that payment has been made and the requisition must be cancelled.
Purchases made before the steps above are executed will be considered confirming orders. For confirming orders
1. Notify the end user to put a requisition into the system and attach documentation/justification for "after the fact" requisition.
2. Copy approved requisition into a purchase order and issue PO to vendor with notation that it is a confirming order.
3. Receive the purchase order.
Procurement Reference Guide
Last Updated: June 11, 2012 38
4. Invoice data can be entered into a voucher and put on hold without a PO number as long as chartfield information is available, including Dept, MOP, Fund, Business Unit and Account Code 999999 can be used in lieu of the correct account code if not known.
5. Once the receipt is created you can copy it into your existing voucher or enter a new voucher and copy in the receipt.
Alternative to non-PO vouchers For purchases where there is an ability to estimate the spending requirements (e.g. postage, phone charges) the business unit should establish a blanket purchase order
As requisitions for spending are received by purchasing, they are applied to this blanket purchase order and processed as a PO voucher.
Additional funds can be added to the blanket purchase order, if required during the fiscal year, using the change order process.
Off-line process includes:
Vendor sends invoice to Accounts Payable
Receive Invoice, date stamp, and review for all required information; no PO number will be available.
Verify the authenticity of the invoice and receive approval from the appropriate authority to process it. Identify approved requisition which validates that the invoice meets the criteria for a non-PO voucher and that it has satisfied the approval workflow. Chartfields for voucher processing will be available from the approved requisition. The CUNY e-form will be sent to Accounts Payable with this information.
Key policies related to the procedure
Select the Hold Payment box (if appropriate) to keep this payment from processing any further.
Always select the Separate Payment box to keep this invoice from being combined with other potential payments to this vendor.
Authorized Roles
CU_FSAP_Voucher_Entry
The Non-PO Vouchers can be processed via navigating to Accounts Payable > Regular Entry > Add a New Value.
Step Summary
1. Navigate to Voucher Entry. 2. Enter the Voucher into the System. 3. Required fields include: Business Unit and Voucher Styles. Vendor, Vendor Location, and
Invoice Number may default or be added. 4. Select ADD button to move to Invoice Information of the Voucher. Enter the appropriate
information to create the Voucher. Note: If entered on Add a New Value page, most will default throughout the voucher.
5. Select the Payments Tab to review all payment information and method details.

Procurement Reference Guide
Last Updated: June 11, 2012 39
6. Select the Hold Payment box to keep payment from processing any further, if needed. Also select the Separate Payment box to keep this invoice from being combined with other payments to this vendor.
7. If distributing by quantity in the Invoice Lines section, enter the appropriate information. In the accounting defaults section of the line enter the correct distribution for the payment. The system will populate the Distribution lines with the Quantity and total amount from the Line information.
Detailed Information
Field Description
Vendor and Name Select the vendor by entering the vendor ID or short name.
After you press Tab to exit either field, the system retrieves and populates the voucher with the full vendor name, primary address, default location information, and payment terms. In addition, the system uses default information from the vendor table in conjunction with information from other default levels (business unit, origin, and control group) to determine how the system processes this voucher.
Location Override the default location by selecting a new location. The vendor location controls much of the default voucher processing.
Address Override the default address by selecting a new address.
Advanced Vendor Search Click to search for vendors using partial names and wildcard symbols.

Procurement Reference Guide
Last Updated: June 11, 2012 40
Field Description
Pay Terms Select the payment terms. These terms are supplied from the PeopleSoft Payables default hierarchy. Click the Transfer to Pay Terms Detail button to access the Payment Terms page, where you can override the defaults or change associated information.
Basis Dt Type Displays the basis date type which controls the basis date on which the payment terms are based. You can override the basis date type on the Payment Terms page.
(USF) Pay Schedule Indicate a federal payment schedule type for this voucher. The system uses this information to group this voucher with others and assign it to the appropriate payment schedule. Select from:
Manual
Other
Transport (transportation)
Invoice Information
Invoice Number Enter the invoice number or some other control number from the voucher's supporting document. The system uses this number as a reference for duplicate invoice checking if you have selected it to be one of your match criteria.
Invoice Date Enter the date that the invoice is entered into the system. It is usually the current date.
Print Invoice Click to create the invoice in a PDF file format. The system opens a new window where you can view and print the invoice.
Related Voucher Journal vouchers only.
Accounting Date Displays the accounting control date, which is based on the settings that are defined in the PeopleSoft Payables default hierarchy. You can override it here on the voucher.
Group Select a control group for the voucher if applicable. The default is the earliest assigned group for the business unit and user ID. If no groups are assigned for your user ID, the Group field does not appear.
Total and Currency Enter the full amount of the voucher, including merchandise and service amounts (entered on the voucher lines), freight, and tax. Enter the gross amount to ensure balancing between the voucher header and voucher lines. You can enter gross amounts only up to the limit that is specified on your PeopleSoft Payables user profile.
Difference Displays the amount that you are currently out of balance. To arrive at this figure, the system compares the sum of the invoice lines plus the applicable charge amounts and the entered gross amount.
Lease Number Enter the lease number for a lease payment voucher. This field appears only when you have also installed the Real Estate Management module.
Packing Slip Enter a packing slip number from the supplier's invoice. The packing slip number can be used by the Matching Application Engine process (AP_MATCH) to associate the voucher with the receiver if the document association rule is set up to use this criteria.

Procurement Reference Guide
Last Updated: June 11, 2012 41
Field Description
Comments (n) Click to enter comments for a voucher to explain payment schedules, issues with the vendor, or anything else that you need to document the invoice. Any comments that you enter in this field are meant for your reference only. You can enter up to 254 characters for a comment. If you exceed 254 characters, the system displays a warning message that it can save only 254 characters and truncates the message.
The system displays (0) if no comment is attached to this voucher. The system displays (1) if a comment is attached.
Dispatch Method Debit Memo adjustment vouchers only.
Select a dispatch method for this debit memo adjustment voucher. This field is available only if the voucher style is Adjustment and the voucher source is Match Adjustment. You can override the dispatch method that is defined in the Debit Memo Options collapsible region on the Vendor Information - Payables Options page. Values include Blank, EDI/XML, Email, Fax, Phone, and Print.
Misc Charge Amount Enter any miscellaneous charge amount, freight amount, or sales tax amount. To allocate these charges at a more detailed level, click the icons next to these fields to access detail pages (the Miscellaneous Charges, Freight Charges, and Sales Tax Charges pages).
Freight Amount You should enter any amounts on the voucher page first before accessing the detail page. When you save the voucher, the system allocates the charges that you enter to the voucher lines based on the defaults that you set in the Procurement Control component (BUS_UNIT_INTFC2) for the PeopleSoft Payables business unit.
Sales Tax Amount
Tax Exempt Flag Select if you want to override the default sales and use tax setup for this voucher and make it exempt from taxation.
Use Tax Displays the calculated use tax. The system calculates the use tax either from:
A use tax code that is entered on the Invoice Line Tax Information page.
The difference between the sales tax that is entered on the voucher header and the sales tax that is entered or calculated for the voucher lines if the voucher lines are tax applicable but the header sales tax amount is less than the total for the lines.
Click the Transfer to Use Tax Detail icon to access the Use Tax Charges page, where you can specify how to allocate the use tax charges.
Invoice Lines

Procurement Reference Guide
Last Updated: June 11, 2012 42
Field Description
Distribute by Select a distribution method:
Amount: You must enter the merchandise extended amount for the voucher line. You can also enter the quantity, unit price, and unit of measure (UOM) on the voucher line and a quantity on the distribution line for informational purposes only.
If you change the value in the merchandise Extended Amount field, the Unit Price field is recalculated.
Quantity: The system calculates the merchandise amount on the invoice lines and distribution lines based on the quantity and unit price. You must enter the quantity, unit price, and UOM. The Extended Amount field is not available for entry.
Select the Force Price option if you want to force the unit price based on the entered merchandise amount. This option is described subsequently.
Item Enter an item ID reference code and a line item description of up to 30 characters. If you also have PeopleSoft Purchasing installed, you can use an existing item from the PeopleSoft Purchasing item table. When you press Tab to move out of this field, the system populates the Description field with the associated description.
SpeedChart Enter a SpeedChart. When you press Tab to move out of the edit box, prorated amounts and distribution ChartFields appear on the voucher distribution lines. If the SpeedChart was defined with no proration percentages, you must enter the distribution amounts yourself.
SpeedChart is not available on the reversal or prepaid voucher, as these voucher styles do not enable you to add voucher lines.
Related Voucher For reversal and adjustment vouchers, displays the voucher ID of the voucher line that is being reversed or adjusted.
Use One Asset ID Select to override all assets on the voucher line to use the same asset ID.
Selecting this option causes the system to update all of the asset IDs for all asset-applicable distribution lines under the voucher line to NEXT, each sequence number to 1, and the profile ID to the profile ID of the first distribution line.
You can override these values on individual distribution lines.
Procurement Reference Guide
Last Updated: June 11, 2012 43
Field Description
Force Price Select if you want to force a change to the unit price to achieve the entered extended amount. Use when the sum of the merchandise amounts on the distribution lines does not match, usually because of rounding. Selecting Force Price enables you to change the extended amount and have the unit price recalculated to achieve that extended amount.
Note. This check box is available only if you are distributing by quantity and copying from either a purchase order or a receiver. You must refresh the page to enable the Force Price check box.
Sales/Use Tax Click to access the Invoice Line Tax Information page, where you can override the default tax settings for the voucher line.
Distribution Lines
GL Chart Tab
Copy Down Select the check box on a distribution line to copy that line's general ledger business unit and ChartField values to new distribution lines.
Amount Enter the amount that you want to charge to the ChartField values that follow. The total of all amounts that you enter on the distribution lines for a voucher line must equal the merchandise amount on the parent voucher line. An error message appears if an imbalance occurs.
Quantity Enter the number of units purchased that should be associated with the distribution line. This field is required if you are distributing by quantity. It is optional if you are distributing by amount. If you have entered a quantity on the voucher line, the total of all quantities entered on the distribution lines for that voucher line must equal the quantity on the parent voucher line. If you are entering a voucher line for a fixed asset that you will send to PeopleSoft Asset Management, you must enter a quantity for the asset.
GL Unit Identifies the general ledger business unit that will be charged with the expense that is coded on the distribution line.
The default value is the general ledger business unit of the PeopleSoft Payables business unit under which the voucher is being entered. If you change the value to charge a different PeopleSoft General Ledger business unit, the system creates interunit accounting entries. This occurs during voucher and payment posting. In this case, ChartField validation occurs based on the ChartFields of the PeopleSoft General Ledger business unit.
Entry Event Enter the entry event code for the voucher if applicable. The system displays this field if you have enabled entry events.
Account Enter an account. When you save the voucher, the system validates the account that you enter along with any other ChartField values. If the account that you select has been set up as a statistical account, the Amount and Quantity fields on the invoice line become inactive and any values that you may have already entered are deleted.
If the Installation option is enabled, the Altacct field appears next to the Account field in the grid.
Procurement Reference Guide
Last Updated: June 11, 2012 44
Field Description
Open Item If the account that you enter has been set up as an OpenItem account, you must enter an open item reference.
Select a reference by prompting. If you enter a reference for an account that is not an open item account, an error message appears when you attempt to save the voucher. You must remove the invalid reference before you can save the voucher.
Project ID Enter a project identifier. This field appears if you do not have PeopleSoft Project Costing installed on your database.
Budget Date Displays the budget date of the distribution line if the Commitment Control feature is enabled. You define which field the system uses for the budget date on a voucher in the Source Transactions component when you set up the Commitment Control feature in PeopleSoft General Ledger. You can also specify at the installation options whether the default budget date is the accounting date of the voucher or of the predecessor document (purchase order).
Affiliate If the vendor is an interunit vendor, this field is not editable and the affiliate code appears by default.

Procurement Reference Guide
Last Updated: June 11, 2012 45
Topic 4: ChartField Editing
ChartField Editing is a background process that runs automatically when a voucher is saved. All changes to the chartfield values must be done prior to voucher “Post” and selection for the Interface to the City. No changes to chartfield values can be made once the payment request is interfaced to the City.
For PO vouchers that are rejected by the City, chartfield errors cannot be corrected in and the same voucher resubmitted. The original payment must be canceled, and a selection made to relieve the liability, The voucher will be marked for closure. A new voucher must be created and interfaced.
Note: The City deadline for running transactions into their system is before close of business. As a result, we will be capturing transactions completed up until 3pm only. Transactions completed after that—vouchers approved, purchase orders dispatched—will not be picked up and sent to the City until the following day.
Key policies related to the procedure
For PO vouchers, any changes to the chartfields requires a change order to the PO.
Authorized Roles
CU_FSAP_Voucher_Entry
The Invoice Information page is found by navigating to Accounts Payable > Vouchers > Add/Update > Regular Entry:
Step Summary
1. Navigate to Voucher Update. 2. If there are non-Chartfield errors, correct the errors and save. 3. If there are Chartfield errors, review the Chartfield string and verify if it was entered correctly. If
the Chartfield(s) were entered incorrectly, correct the Chartfield value(s) and save the Voucher. 4. If the Chartfields are entered correctly and you still receive an error then contact your Budget
Liaison or Department owner to retrieve the correct values .(this would be for non-PO vouchers only).
5. Send the correct Chartfield values to Accounts Payable staff, who will enter the correct Chartfield string.
Detailed Information
Field Description
GL Chart Tab

Procurement Reference Guide
Last Updated: June 11, 2012 46
Field Description
Copy Down Select the check box on a distribution line to copy that line's general ledger business unit and ChartField values to new distribution lines.
Amount Enter the amount that you want to charge to the ChartField values that follow. The total of all amounts that you enter on the distribution lines for a voucher line must equal the merchandise amount on the parent voucher line. An error message appears if an imbalance occurs.
Quantity Enter the number of units purchased that should be associated with the distribution line. This field is required if you are distributing by quantity. It is optional if you are distributing by amount. If you have entered a quantity on the voucher line, the total of all quantities entered on the distribution lines for that voucher line must equal the quantity on the parent voucher line. If you are entering a voucher line for a fixed asset that you will send to PeopleSoft Asset Management, you must enter a quantity for the asset.
GL Unit Identifies the general ledger business unit that will be charged with the expense that is coded on the distribution line.
The default value is the general ledger business unit of the PeopleSoft Payables business unit under which the voucher is being entered. If you change the value to charge a different PeopleSoft General Ledger business unit, the system creates interunit accounting entries. This occurs during voucher and payment posting. In this case, ChartField validation occurs based on the ChartFields of the PeopleSoft General Ledger business unit.
Entry Event Enter the entry event code for the voucher if applicable. The system displays this field if you have enabled entry events.
Account Enter an account. When you save the voucher, the system validates the account that you enter along with any other ChartField values. If the account that you select has been set up as a statistical account, the Amount and Quantity fields on the invoice line become inactive and any values that you may have already entered are deleted.
If the Installation option is enabled, the Altacct field appears next to the Account field in the grid.
OpenItem If the account that you enter has been set up as an OpenItem account, you must enter an open item reference.
Select a reference by prompting. If you enter a reference for an account that is not an open item account, an error message appears when you attempt to save the voucher. You must remove the invalid reference before you can save the voucher.
Project ID Enter a project identifier. This field appears if you do not have PeopleSoft Project Costing installed on your database.
Procurement Reference Guide
Last Updated: June 11, 2012 47
Field Description
Budget Date Displays the budget date of the distribution line if the Commitment Control feature is enabled. You define which field the system uses for the budget date on a voucher in the Source Transactions component when you set up the Commitment Control feature in PeopleSoft General Ledger. You can also specify at the installation options whether the default budget date is the accounting date of the voucher or of the predecessor document (purchase order).
Affiliate If the vendor is an interunit vendor, this field is not editable and the affiliate code appears by default.

Procurement Reference Guide
Last Updated: June 11, 2012 48
Topic 5: Matching Matching compares the Voucher amounts and quantities to the PO and related receipts generating exceptions if they exceed predetermined tolerances. Matching is a batch process that will run on a regularly scheduled basis throughout the day, and will be initiated centrally.
To conform to three-way matching, the voucher, purchase order and receipt must exist and match within the set tolerance limits. All PO vouchers require three way matching. P-card payments and non-PO vouchers will typically fail matching and will require an override from the AP Director. To conform to four-way matching, the voucher, purchase order, receipt and a system inspection must exist and match within the set tolerance limits. The types of procurements subject to four-way matching are:
Information Technology equipment and software
Hazardous materials
Furniture
Key policies related to the procedure
All PO vouchers require three way matching.
To ensure that the interface of a voucher to FMS is accurate, no matching exceptions can be overridden in CUNYfirst.
Authorized Roles
CU_FSAP_Voucher_Entry
The Matching component is found by navigating to Accounts Payable > Batch Processes > Vouchers > Matching > Add a New Value. Once a value has been created, select the Find an Existing Value tab.
Step Summary
1. Navigate to Matching. 2. To run the Matching process, select “Matching” and the level at which to run the process: All
Business Units, Business Unit, Origin, Voucher. 3. Select the appropriate additional values for selected level. 4. Enter a specific date to limit the selection of vouchers through a certain date. Leave the date field
blank to have the process use the system date.
5. Check the “Run the Document Association Only” box to only run the document association sub-process, this is optional.
6. Save the page and Click the Run button for the Process Scheduler Request page. 7. As with any other CUNYfirst scheduling process, select the Process Monitor button to view
Matching Process status. Click the Details hyperlink and Message Log hyperlink to identify any vouchers that did not pass.
8. Return to Match Request Run Control page. Click “Go back to Match Request” and “Match Workbench” hyperlink. A new window will display selection criteria for Match Workbench.
9. Select appropriate fields: Business Unit, Match Status, Vendor SetID and Search.

Procurement Reference Guide
Last Updated: June 11, 2012 49
10. Select the “Match Exceptions Exist” hyperlink to view the specific exceptions in the Search Results. On the new page, the “Match Exception Summary” hyperlink displays the Matching rules that identified exceptions.
11. Review the exceptions listed for each voucher and take appropriate action to correct issues. When complete, notify AP that issues have been resolved.
12. Process complete.
Detailed Information
Field Description
Match Workbench Click to access the Match Workbench page to view voucher match information. You can override exceptions, correct errors, create debit memos, put vouchers on a match hold, initiate the Matching process, undo matched vouchers, and send notifications.
Match Action Select a match action to run. Options include:
Matching: Executes the Matching process and matching is performed. No email notification or workflow worklist items are created.
Workflow/Email Notify: Executes the Matching process only to call the Matching Notification process. The Matching Notification process calls the Process Match Exceptions process if workflow worklist items exist. No matching is performed.
Options Select the level at which the system runs the Matching process. Options are All Business Units, Business Unit, Control Group, Origin, and Voucher.
As of Date Enter the date for which the Matching process includes data. The system selects vouchers with a match due date on or before the as of date.
Run Document Association Only
Click to run the document association subprocess only.

Procurement Reference Guide
Last Updated: June 11, 2012 50
Topic 6: Budget Checking Run the Budget Checking process to relieve any related encumbrances and to verify sufficient funds exist for the voucher. For vouchers that do not pass the Budget check, the department will be contacted to determine if the correct chartfield data was used. If there is insufficient budget available, the department must work with the appropriate CUNY budget office to obtain the necessary funding. CUNY’s tolerance policy for City processing is the lesser of 10% of the extended price per line or $500. Because of these tolerance rules, CUNY budget must be aware that funds need to be managed to accommodate possible tolerance "overpayment" of vouchers. The budget check process will be run as a batch process on a scheduled basis. Accounts Payable staff will be able to individually budget check vouchers as required.
Key policies related to the procedure
If the voucher is within tolerance but there are insufficient funds in the budget account, the Budget Office must be contacted.
Authorized Roles
CU_FSAP_Voucher_Entry
The Budget Checking component is found by navigating to Accounts Payable > Batch Processes > Vouchers > Budget Check > Add a New Value.
Step Summary
1. Navigate to Voucher Budget Check. 2. Select the criteria upon which to run the Budget Check, such as one Voucher, multiple Vouchers,
Accounting Date, Control Group, Invoice, etc. 3. Save the selected criteria and press the Run button. 4. Select the Process Monitor button to view the status of the Budget Check process. Click the
Details hyperlink on the Process Monitor page to view the process status. 5. In the case of Voucher errors, identify the Vouchers with the Budget Checking errors by
navigating to: Commitment Control > Review Budget Check Exceptions > Accounts Payable > Voucher.
6. Enter Search criteria to find vouchers with errors, review, and use the “More Details” hyperlink for additional information. Make the appropriate changes.
7. Process complete.
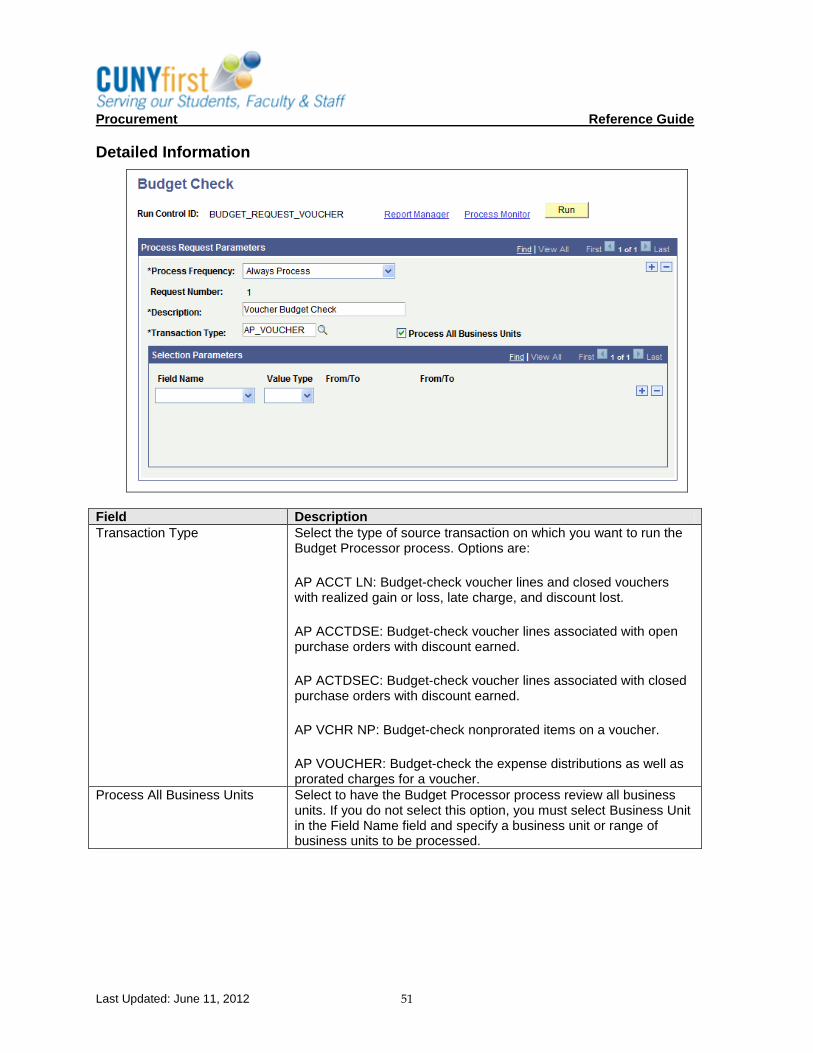
Procurement Reference Guide
Last Updated: June 11, 2012 51
Detailed Information
Field Description
Transaction Type Select the type of source transaction on which you want to run the Budget Processor process. Options are:
AP ACCT LN: Budget-check voucher lines and closed vouchers with realized gain or loss, late charge, and discount lost.
AP ACCTDSE: Budget-check voucher lines associated with open purchase orders with discount earned.
AP ACTDSEC: Budget-check voucher lines associated with closed purchase orders with discount earned.
AP VCHR NP: Budget-check nonprorated items on a voucher.
AP VOUCHER: Budget-check the expense distributions as well as prorated charges for a voucher.
Process All Business Units Select to have the Budget Processor process review all business units. If you do not select this option, you must select Business Unit in the Field Name field and specify a business unit or range of business units to be processed.

Procurement Reference Guide
Last Updated: June 11, 2012 52
Field Description
Field Name Specify the criteria for selecting vouchers on which to run the Budget Processor process. The list of available fields depends on the transaction type selected and whether you process all business units. Values include:
Blank: The Budget Processor process reviews all vouchers. This selection is available for any transaction type and if you select Process All Business Units.
Accounting Date: The Budget Processor process reviews vouchers using the accounting dates entered in the From and To fields. This field is available for any transaction type, regardless of whether you select Process All Business Units.
Business Unit: The Budget Processor process reviews vouchers using the business units entered in the From and To fields. This field is available for any transaction type and if you do not select Process All Business Units.
Close Status Indicator: The Budget Processor process reviews vouchers using the close status indicator. This field is available for AP_VOUCHER and AP_VCHR_NP transaction types, regardless of whether you select Process All Business Units.
Invoice Number: The Budget Processor process reviews vouchers using the invoice numbers entered in the From and To fields. Prompt table validation does not occur on values entered in the From and To fields. This field is available for AP_VOUCHER and AP_VCHR_NP transaction types and if you do not select Process All Business Units.
Vendor ID: The Budget Processor process reviews vouchers using the vendor ID entered in the From and To fields. This field is available for AP_VOUCHER and AP_VCHR_NP transaction types, regardless of whether you select Process All Business Units.
Vendor Set ID: The Budget Processor process reviews vouchers using the vendor set ID entered in the From and To fields. This field is available for AP_VOUCHER and AP_VCHR_NP transaction types, regardless of whether you select Process All Business Units.
Voucher ID: The Budget Processor process reviews vouchers using the voucher IDs entered in the From and To fields. This field is available for any transaction type and if you do not select Process All Business Units.

Procurement Reference Guide
Last Updated: June 11, 2012 53
Field Description
Value Type Options are:
Range: The Budget Processor process reviews a range of values entered using the From and To fields
Value: The Budget Processor process reviews an individual value entered using the From and To field.

Procurement Reference Guide
Last Updated: June 11, 2012 54
Topic 7: Document Tolerance Document Tolerance compares the PO to the Voucher and will show an error if the difference exceeds predetermined tolerances.
The pre-encumbrance (requisition) to encumbrance (purchase order) tolerance policy for City processing is the lesser of 10% of the extended price per line or $500. Because there are these tolerances, CUNY Budget office(s) must be aware that funds should be managed to accommodate possible “overpayments” of vouchers. Since CUNY will run Budget checking as a batch process, the document tolerance process will also be run in conjunction with that process. When budget checking is run on an individual voucher, the document tolerance process will be run as a prerequisite to the pay cycle.
Key policies related to the procedure
In an extreme event, AP Managers will have the ability to actually override the error and the document can continue to be processed.
Authorized Roles
CU_FSAP_Voucher_Entry
The Document Tolerance Process is run by navigating to Accounts Payable > Batch Processes > Vouchers > Document Tolerance > Add a New Value:
Step Summary
1. Navigate to Document Tolerance. 2. Select the appropriate criteria upon which to run the process, such as Business Unit, Voucher,
etc. 3. Save the selected criteria. Press the Run button for the Process Scheduler Request page. 4. Select the Process Monitor button to view status of the Document Tolerance process. Click the
Details and Message Log hyperlinks for detailed information. 5. Navigate to the Document Tolerance Override component: Accounts Payable > Review
Accounts Payable Info > Vouchers > Document Tolerance Override > Find an Existing Value. Select Search button.
6. Review list of Vouchers that failed the Document Tolerance Process. The error is displayed in the Description field.
7. Process complete.

Procurement Reference Guide
Last Updated: June 11, 2012 55
Detailed Information
Field Description
Description Free flow text up to 30 characters
Process Frequency Designates the appropriate processing frequency:
Once: Executes the request the next time the batch process runs. After the batch process runs, the process frequency is automatically set to Don't Run.
Always: Executes the request every time the batch process runs.
Don't Run: Ignores the request when the batch process runs.

Procurement Reference Guide
Last Updated: June 11, 2012 56
Topic 8: Voucher Approval Approvals Vouchers are input by the AP staff but cannot be posted or paid unless they are certified approved by an AP Approver (in the case of the State) or two AP approvers (in the case of the City) who have access to all supporting documentation. In the case of the State, an AP Approver cannot be an AP data enterer or the reverse. In the case of the City, an AP data enterer can also hold the role of an approver but cannot execute both roles on a single voucher. For the City, there are three roles that must be filled for each voucher:
Voucher Entry
Voucher Approver 1
Voucher Approver 2 Separation of Duties The function of approving vouchers, preparing checks and recording disbursements should be handled by different employees. Employees handling disbursements should not have duties relating to cash receipts or the reconciliation of bank accounts. A periodic review of vouchers should be made by an authorized person to determine that all processing steps and approvals are being followed properly. Vouchers must be built by the AP staff and approved by the AP Director before they can be posted or paid.
I. CONTROL OF DISBURSEMENTS a. A limited number of persons should be duly authorized to sign checks and the signatures
of these persons should be on file. b. The supporting vouchers and documents should accompany the checks and be
examined before the check is signed. The documents should have the prescribed approvals showing compliance with purchasing, receiving and payment routines. Signature cards, properly approved, should be on file for those employees authorized to approve documents, such as purchase orders and vouchers and receiving reports.
c. Checks should not be distributed or mailed by the same employee who prepares the checks if s/he has access to records which pertain thereto.
d. When dual signatures are required, the two employees authorized to sign checks should be administratively independent of each other. Rubber stamps should not be used for check signing purposes.
II. PAYMENT DOCUMENTATION a. There should be evidence that an agency has received proper value before a voucher is
authorized for payment. This should consist of evidence that: (a) goods or services have been received; (b) items delivered were as specified; and (c) prices, terms and extensions shown on the vendor's invoices are correct. To ensure that maximum discounts are taken, vouchers should be paid within the due dates.
b. The purchasing department is responsible for ordering goods or services on the basis of requisitions from other departments and will enter purchase orders into .
c. A receiving department, either Central Receiving or department receiving, enters receipts into to record the quantity and quality of received material.
d. Incoming invoices would be delivered directly to the accounts payable unit. e. The accounts payable unit, having submitted a request for payment (voucher) into will
determine if the voucher passes the matching rules based on the commodity code. When the voucher passes the matching, budget check and document tolerance requirements, the voucher will be approved as authorization for payment to the vendor.

Procurement Reference Guide
Last Updated: June 11, 2012 57
Key policies related to the procedure
City vouchers require two approvers in addition to the individual who enters the voucher.
Only vouchers that have been successfully matched, and passed document tolerance and budget checking should be approved.
Authorized Roles
CU_FSAP_Voucher_Approval
CU_FSAP_Voucher_Approval1
CU_FSAP_Voucher_Approval2
Voucher Approval Workflow – Batch Request is found by navigating to Accounts Payable > Vouchers > Approve > Request Voucher Batch > Add a New Value. Voucher Approval workflow – Approve Voucher is found by navigating to Accounts Payable > Vouchers > Approve > Approve Voucher. Or Voucher Approval workflow is found by navigating to Worklist.
Step Summary
1. Navigate to Voucher Approval Workflow Batch Request. 2. Select the Run button to access the Process Scheduler Request page. Populate the Server
Name and confirm the Select box is checked. 3. Click OK to return to the Voucher Approval Workflow page with the Process Instance number. 4. Voucher Approvers are notified of all Vouchers to be approved. 5. Navigate to the Voucher Approval component: Accounts Payable > Vouchers > Approve >
Approve Voucher > Find an Existing Value. 6. Enter selection criteria for Business Unit or Voucher. Click Search. 7. The Approval page displays summaries of voucher information. Review Line and Charge
Information pages. 8. Select the Approved or Denied radio button and Save the document. 9. Resolve issues regarding any Denials including corrections/editing. 10. Process complete.

Procurement Reference Guide
Last Updated: June 11, 2012 58
Detailed Information
Field Description
Approval Information The Approval Information group box displays the current approval status of the voucher: Pending, Approved, or Denied.
Voucher Details The Voucher Details group box displays voucher header totals.
Details The Details group box displays vendor details.
Procurement Reference Guide
Last Updated: June 11, 2012 59
Topic 9: Voucher Build
The Voucher Build process creates vouchers from data interfaced from various sources including Student Financials, and Work Study Payroll.
CUNY will use Voucher Build to create pre-approved vouchers that are generated from Student Financials and Work Study payroll for the payment of taxes. These vouchers will be interfaced to the AP system directly from Student Financials and Work Study payroll via a batch process.
Authorized Roles
CU_FSAP_Voucher_Entry
The Voucher Build component is found by navigating to Accounts Payable > Batch Processes > Vouchers > Voucher Build > Add a New Value
Step Summary
1. Navigate to Voucher Build. 2. Enter Run Control name depending on source of vouchers. 3. Select ADD if a new request or search via Find an Existing Value. 4. If new, enter appropriate search fields. Do not check “Assign Invoice ID” or “Assign Invoice
Date”. 5. Select appropriate value for Voucher Source, such as New Voucher Data, Errors, etc. 6. Select the Business Unit for selection parameter. 7. Select the Voucher Build Interface to run, if available. Do not check the “Publish Voucher
Messages”. 8. Select Save. 9. Click the Run button for the Process Scheduler Request page. 10. Select Server Name, Select box, and OK to return to Voucher build page and view process
instance. 11. Review and correct any errors on the Build errors page. 12. Process is complete.

Procurement Reference Guide
Last Updated: June 11, 2012 60
Detailed Information
Field Description
Run Control Options
From Date and To Date Enter dates to have the Voucher Build process select vouchers for which invoices are dated within the specified range.
Assign Invoice ID
Select to have the Voucher Build process assign an invoice ID to vouchers that were built from voucher sources that have no invoice ID or an invoice ID value of NEXT. The process assigns the
voucher ID as the invoice ID.
Assign Invoice Date Select to have the Voucher Build process assign the current date as the invoice date to vouchers that are built from voucher sources that have no invoice date.

Procurement Reference Guide
Last Updated: June 11, 2012 61
Field Description
Process Option
Select the level at which to process vouchers. Depending on the option that you select, different fields become available in the Selection Parameters group box. Values are:
Business Unit: The system processes vouchers that belong to the business unit that you enter in Selection Parameters.
Process All Units: The system processes all business units. No
fields are available in Selection Parameters.
Process Contract: The system processes vouchers that belong to the contract ID that you enter in Selection Parameters. You must also enter a business unit.
Process Group: The system processes vouchers that belong to the control group ID that you enter in Selection Parameters. You must also enter a business unit.
Process Origin: The system processes vouchers that belong to the origin that you enter in Selection Parameters. You must also enter a setID.
Process Vendor: The system processes vouchers that belong to the vendor ID that you enter in Selection Parameters. You must also enter a business unit.
Process Voucher: The system processes the voucher with the voucher ID that you enter in Selection Parameters. You must also enter a business unit. This value is valid only for quick invoices and transactions in the online voucher tables. This value does not appear if you have selected a Voucher Edit Source of All.
Voucher Sources
Select the status of the sources that you want to process. Values are:
All (Unrestricted): Both new and recycled vouchers.
Errors/Staged Vouchers: Only vouchers that have pre-edit errors from prior Voucher Build process runs or that were staged for review during a prior run.
New Voucher Data: New transactions from selected interface sources.
Recycled Vouchers: Recycled vouchers in the online voucher
tables.
Voucher Maintenance: Vouchers that have been modified using the Voucher Maintenance component.
Voucher Mass Maintenance: Vouchers that have been modified using the Voucher Mass Maintenance component.

Procurement Reference Guide
Last Updated: June 11, 2012 62
Field Description
Voucher Build Interfaces
Select a source from which to create vouchers. Values are:
All Interfaces: All sources.
Billing Vouchers: Source transactions that are created through the Billing Generate AP Vouchers SQR process (BIGNAP01).
Consignment Inventory: Consignment inventory source transactions.
Contracts: Source transactions that are created through the
Purchasing voucher contracts functionality.
Custom: Voucher EIP source transactions from customized external interfaces. This value is delivered as inactive and must be activated to appear.
Debit Memo from Matching: Source transactions that are created
from the Matching process.
EDI: EDI source transactions.
Evaluated Receipts (ERS): ERS source transactions.
Lease Payments: Real Estate Management lease payment transactions.
Pay/Bill Management: Contractors' payable time transactions from
Pay/Bill Management.
Payroll Interface: Voucher EIP source transactions from Payroll.
Procurement Card: Procurement card source transactions from Purchasing.
Promotions Management: Promotions Management source
transactions.
Quick Invoice: Quick invoice entry source transactions. The system
considers summary invoices as quick invoices after they are saved.
Receivables Customer Refunds: Refund source transactions that are created in Receivables.
Return to Vendor: RTV source transactions.
Self Service Invoices: Self-service invoice transactions from
eSettlements.
Services Procurement: Services Procurement transactions.
Student Administration: Voucher EIP source transactions from Student Administration.
Vendor Rebates/Claimbacks: Voucher source transactions and claim vendor rebate transactions from Purchasing, and indirectly from Receivables.
XML Invoice: Spreadsheet vouchers and XML invoices that are interfaced using the EM_VOUCHER_IN application message definition or the SelfServiceInvoice web service.

Procurement Reference Guide
Last Updated: June 11, 2012 63
Field Description
Contract Voucher Action
This field is enabled when you select All Interfaces or Contracts in Voucher Build Interfaces. The default is to stage contract vouchers. Values are:
Build Voucher: Create vouchers for all contracts that are processed and successfully pass all Voucher Build process editing requirements.
Stage Voucher: Stage all contract vouchers that have been created in the pre-edit step of the Voucher Build process in the quick invoice entry tables for user review. Before you can run the voucher edit step of the Voucher Build process for these vouchers, you must release them by reviewing them in the Quick Invoice Entry component, modifying them as needed, and setting their build status to To Build.
Publish Voucher Messages
Select to publish the voucher message in XML format when the Voucher Build process successfully creates the voucher and the data exists in the PS_VOUCHER table. The outbound AP_VCHR_MESSAGE_OUT EIP application message or the VoucherOut web service dispatches the voucher information to a predefined location that the vendor can access to retrieve their voucher information.
Procurement Reference Guide
Last Updated: June 11, 2012 64
Topic 10: Voucher Maintenance Voucher Maintenance tables allow mass changes to groups of vouchers whenever incorrect data is originally entered.
If voucher(s) have been posted or interfaced and maintenance needs to be made to one or more then see the error correction matrix. Only AP Directors will have the ability to maintain vouchers.
Vouchers can be corrected by using the Voucher Maintenance component. This component allows the user to select all of the vouchers that meet the selection criteria. This function is only applicable for vouchers that have not been interfaced to the City. Corrections to vouchers that have been interfaced must follow the rules of the City error correction matrix.
Chartfield changes cannot be made to a voucher once the voucher has been posted. Only vouchers that have not been posted and interfaced to the City can have changes made to the chartfields. These changes should be made only to reflect inaccurate entry of chartfield values. If the chartfield values on the purchase order which have been copied to the voucher from either the receipt or PO are incorrect, AP should contact purchasing to resolve.
Note: The City deadline for running transactions into their system is before close of business. As a result, we will be capturing transactions completed up until 3pm only. Transactions completed after that—vouchers approved, purchase orders dispatched—will not be picked up and sent to the City until the following day.
Authorized Roles
CU_FSAP_Voucher_Entry
The Voucher Maintenance component is found by navigating to Accounts Payable > Vouchers > Maintain > Voucher Maintenance Search.
Step Summary
1. Navigate to Voucher Maintenance. 2. Select the appropriate values to locate desired vouchers and click Search. 3. Review listing of vouchers and click the voucher number to view in Voucher Maintenance
component. 4. Use available fields to select desired voucher and made any necessary changes. 5. Save the document. 6. End of procedure.

Procurement Reference Guide
Last Updated: June 11, 2012 65
Detailed Information
Field Description
Vendor Displays vendor information.
Invoice Modify invoice fields, as necessary.

Procurement Reference Guide
Last Updated: June 11, 2012 66
Topic 11: Voucher Post Vouchers are posted to populate the Voucher Accounting Line records. These transactions are then journal generated to create GL Journal Entries.
Vouchers must be built by AP staff, matched, budget checked and approved by the appropriate AP Approver(s) before they can be posted and paid. Posting operations and pay cycles will be scheduled batch programs run by Operations. Vouchers must be posted before the City interface is run.
Note: The City deadline for running transactions into their system is before close of business. As a result, we will be capturing transactions completed up until 3pm only. Transactions completed after that—vouchers approved, purchase orders dispatched—will not be picked up and sent to the City until the following day.
Authorized Roles
CU_FSAP_Voucher_Entry
The Voucher Post component is found by navigating to Accounts Payable > Batch Processes > Vouchers > Voucher Posting >Add a New Value
Step Summary
1. Navigate to Voucher Posting. 2. Select the desired Post Voucher Option, such as Post All Units, Business Unit, Voucher, etc.
CUNY will mainly use posting by Business Unit and Vouchers. 3. Save the selected criteria. 4. Click Run to display the Process Scheduler Request. Select the Server Name, select the check
box, and click OK. 5. On the Voucher Posting Request page, select the Process Monitor hyperlink. 6. Identify the Posting process and monitor the progress. After Run Status is Success, click the
Details and Message Log hyperlinks for more information. 7. Take any necessary action required by the messages. 8. Process complete.

Procurement Reference Guide
Last Updated: June 11, 2012 67
Detailed Information
Field Description
Post Voucher Option
Specify which vouchers to include in the Voucher Posting process. For each value that you select, different fields are available for entry in the grid at the bottom of the page. Regardless of which value you select, the system posts only those vouchers that are eligible to post. Values are:
Post All Units: Post all eligible vouchers for all of the business units
in the system.
Post All Vchrs for Closed Pymt (post all vouchers for closed
payments): Post all eligible vouchers for closed payments.
Post Business Unit: Enter a business unit to post all eligible vouchers within that payables business unit.
Post Contract: Enter a business unit and contract ID to post all
eligible transactions covered by the contract.
Post Group: Specify the business unit and control group ID. The control group must be ready to post; otherwise, no vouchers in the group are posted. You can select groups for posting on the Post Control Group page.
Post Origin: Enter a setID and origin to post all eligible vouchers
from the origin that you specify.
Post Voucher: Enter a business unit and voucher to post. Multiple vouchers can be selected.

Procurement Reference Guide
Last Updated: June 11, 2012 68
Topic 12: Voucher Close Whenever a posted voucher needs to be removed from the system, the Voucher Close process is used to reverse the effects of the voucher on the related transaction records.
Only vouchers that are posted, but not paid, and not interfaced to the City can be closed. Closed vouchers are removed from the system and cannot be accessed or the process reversed.
If you close a Voucher with associated purchase orders (PO), the PO voucher close functionality gives you the option to un-match vouchers. The PO voucher close functionality gives you options by which to make further adjustments to a PO voucher transaction after it has been matched, budget checked, and posted. The PO voucher close functionality enables you to either restore the encumbrance or reopen a purchase order (PO) or to liquidate the remaining liability on a purchase order.
Authorized Roles
CU_FSAP_Voucher_Entry
The Voucher Close component is found by navigating to Accounts Payable > Vouchers > Add/Update > Close Voucher.
Step Summary
1. Navigate to Voucher Close. 2. On the Close Voucher page, review the Voucher, verify the manual close date and change as
appropriate. 3. Check the checkbox with the label “Mark Voucher for Closure”. 4. Click on the Save button.

Procurement Reference Guide
Last Updated: June 11, 2012 69
Detailed Information
Field Description
Manual Close Date Enter the date on which the expense will be credited and the liability debited.

Procurement Reference Guide
Last Updated: June 11, 2012 70
Field Description
Mark Voucher for Closure
Select to indicate that this voucher is to be closed with the next posting run for this business unit.
• If the voucher is a direct voucher, no further change is needed.
• If the voucher is a PO voucher and Commitment Control is not enabled, the system displays a message regarding unmatching the voucher. If the voucher is associated to a closed receiver line, this message also contains a reminder that unmatching the voucher also unmatches the closed receiver line.
Select Yes to unmatch the voucher. The system determines if there are any partial payments. If there are partial payments, the system does not unmatch the voucher, but only closes the liability.
Select No and the system only closes the liability.
• If the voucher is a PO voucher and Commitment Control is enabled, the system displays a message regarding reversing encumbrances.
Select Yes to restore the encumbrance and reopen the purchase order. When you select Yes to restore the encumbrance, the system determines if the purchase order linked to the voucher is reconciled. If the purchase order is reconciled, the PO Voucher Close feature prevents you from reopening the purchase order and restoring the encumbrance; the system liquidates only the remaining liability on the PO voucher. If the PO is not reconciled, the system displays the PO Associated with the Voucher page.
Select No and the system only liquidates the liability.
Note. Once you mark a voucher for closure and save the voucher, you must run the Voucher Posting process to create the accounting entries to relieve the liability and activate the Budget Processor process. The amount relieved is applied against the original accounts.
Important! If your organization uses Commitment Control, saving a voucher marked for closure is irreversible; you cannot undo this action. You should carefully review all vouchers marked for closure before saving.

Procurement Reference Guide
Last Updated: June 11, 2012 71
Topic 13: Voucher Delete Vouchers can be deleted if they have never been posted. Deleting a voucher removes the voucher from the system.
Vouchers can only be deleted if have been created but not posted. Once a voucher is posted, refer to the City error correction document for vouchers.
Authorized Roles
CU_FSAP_Voucher_Entry
The Voucher Delete page is found by navigating to Accounts Payable > Vouchers > Add/update > Delete Voucher:
Step Summary
1. Navigate to Voucher Delete. 2. Click on the Delete button.
Detailed Information
Field Description

Procurement Reference Guide
Last Updated: June 11, 2012 72
Field Description
Delete
Click to delete the voucher. The system prompts you to confirm your action. If document sequencing is enabled for the business unit, the system also prompts you to enter a deletion reason. If you choose to continue, the voucher is deleted from the database, and you receive another message verifying this.
If you are using the Commitment Control feature, the Budget Processor process is automatically invoked after you confirm deletion.
Warning: Once you delete a voucher, you cannot retrieve it or undo the deletion. The data rows that are associated with the voucher remain in the tables so that you cannot reuse the voucher number.

Procurement Reference Guide
Last Updated: June 11, 2012 73
Topic 14: Voucher Unpost In order to make changes to a voucher that has been posted, the voucher must first be Un-posted.
Voucher Un-post can be used in preparation for un-matching a voucher that needs to be edited. Vouchers that have been posted, but not paid, can be un-posted and then un-matched to permit changes to the voucher. For CUNY, the primary use of Unpost is to edit vouchers that are in “Hold” status (have the hold flag checked).
For Vouchers that have been interfaced to the City see the error correction document for more details on when this function will be used.
Note: The City deadline for running transactions into their system is before close of business. As a result, we will be capturing transactions completed up until 3pm only. Transactions completed after that—vouchers approved, purchase orders dispatched—will not be picked up and sent to the City until the following day.
Authorized Roles
CU_FSAP_Voucher_Entry
The Voucher Unpost page is found by navigating to Accounts Payable > Vouchers > Add/Update > UnPost Voucher:
Step Summary
1. Navigate to Voucher Unpost. 2. On the Unposting Vouchers page, select or enter the accounting date. 3. Select the reversal accounting date. 4. Click on the Unpost button.

Procurement Reference Guide
Last Updated: June 11, 2012 74
Detailed Information
Field Description
Update Voucher
Accounting Date Override the accounting date, which defaults from the original voucher. This field is required.
Reversal Accounting Date
Business Unit Default
Select this option to accept the business unit default as the date of the accounting reversal. The system checks the accounting date indicator on the Payables Options page and uses the specified accounting date.
Use Current Date Select this option to make the current date the date of the accounting reversal.
Use Specific Date Select this option if you want to enter the accounting date to which the reversals will post.
Unpost
Click to start the un-posting process. The system issues a message prompting you to confirm the unpost. If you want to continue with the un-post, click OK.
Before you un-post the voucher, view voucher details on the Voucher Details page.

Procurement Reference Guide
Last Updated: June 11, 2012 75
Topic 15: Voucher Unmatch
Once a voucher successfully completes the matching process, authorized users are able to Unmatch the voucher in order to make changes to the voucher or remove the relationship to the matched Receipt.
This function will be used when a voucher is matched to the wrong receipt or purchase order, the voucher is entered for an incorrect amount, or other updates must be made to a matched, but unposted, voucher. This process will be used anytime a voucher must be corrected after matching has run successfully, but before the voucher is posted. Refer to the City Voucher Correction document for the appropriate use of the Unmatch function.
Authorized Roles
CU_FSAP_Voucher_Entry
The Voucher Unmatch page is found by navigating to Accounts Payable > Review Accounts Payable > Vouchers > Match Workbench:
Step Summary
1. Navigate to Match Workbench. 2. Select the business unit and match status of “Matched”. 3. Click on the Search button.
Detailed Information
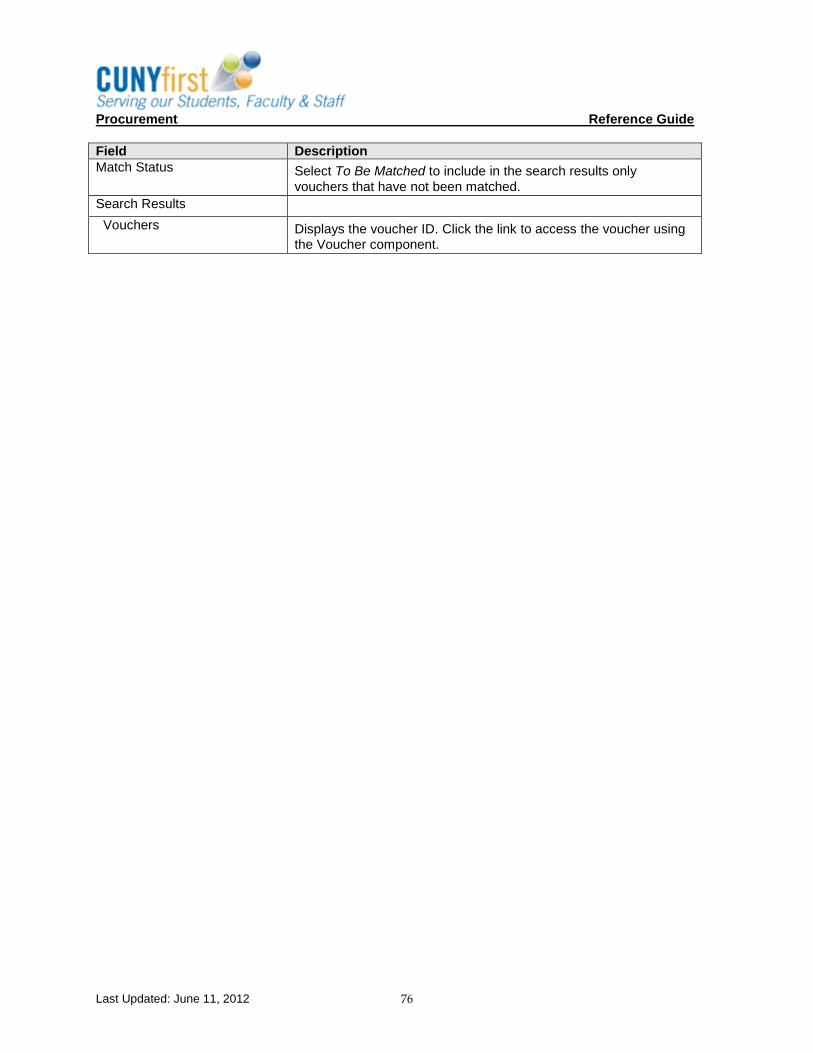
Procurement Reference Guide
Last Updated: June 11, 2012 76
Field Description
Match Status Select To Be Matched to include in the search results only
vouchers that have not been matched.
Search Results
Vouchers Displays the voucher ID. Click the link to access the voucher using the Voucher component.

Procurement Reference Guide
Last Updated: June 11, 2012 77
Topic 16: Imprest Fund Initial Funding and Reimbursement Vouchers Vouchers are entered into the City and State system to fund and reimburse the respective college Imprest cash accounts.
Purchases up to $250 can be made from an Imprest fund. Typical transactions are small purchases and petty cash transactions such as supplies, materials, equipment, non-personal services, employee expenses (e.g., local transportation) and other allowable expenses. Imprest account transactions other than initial funding and reimbursement will not be processed through . Vouchers to initially fund and reimburse the Imprest fund will be treated like a non-PO vouchers.
Authorized Roles
CU_FSAP_Voucher_Entry
The Non-PO Vouchers can be processed by navigating to Accounts Payable > Regular Entry > Add a New Value.
Step Summary
1. Imprest Fund Reimbursement Vouchers will be created using the standard Voucher Create process for non-PO vouchers.
2. These vouchers will be selected for the interface process (I-003) to the City. Note: The City deadline for running transactions into their system is before close of business. As a result, we will be capturing transactions completed up until 3pm only. Transactions completed after that—vouchers approved, purchase orders dispatched—will not be picked up and sent to the City until the following day.
Detailed Information

Procurement Reference Guide
Last Updated: June 11, 2012 78
Topic 17: City Year End Processing Year End processing and impacts to City Year End processing.
CUNY must adhere to the year-end processing calendar and procedures mandated by the NYC Comptroller’s Office.
Navigate to the following link: http://www.comptroller.nyc.gov/bureaus/acc/index.asp
Click on the link to the Fiscal Year End Closing Instructions: http://www.comptroller.nyc.gov/bureaus/acc/FY_closing-instruct-2011/index.shtm
The embedded document below reflects the processing requirements in FMS to ensure that CUNY meets those requirements.
City Year End Accrual processing 09-28-11.ppt
Associated Roles
CU_FSAP_AP_System_Maintain
CU_FSAP_Create_Pay_Cycle
CU_FSAP_Process_Pay_Cycle
CU_FSAP_Review_AP_Info
CU_FSAP_Review_Proc_Info
The City Year-end Processing is found by navigating to:
Step Summary
1. Download/review the available documents on the Fiscal Year End Closing Instructions. 2. Pay as final any invoices on PO’s where there are no additional receipts or invoices expected.
See Chapter 2 - Payment. 3. Pay any remaining vouchers for goods/services received by June 30 of prior fiscal year. See
Chapter 2 - Payment.
Detailed Information
See Chapter 2 – Payment. Refer to the City Comptroller’s Fiscal Year End Closing Instructions documents.
Field Description
N/A N/A

Procurement Reference Guide
Last Updated: June 11, 2012 79
Chapter 2: Payment
Policy
Once Vendor invoice data is entered and processed through the Accounts Payable system, it is ready for payment. CUNY will make payments in various ways. City Colleges will run the Payment process and interface process which will create a file to interface with the City system. State Colleges will run the Payment process and an interface process which will create a file to interface with the State system. The State interface process will group vouchers by Business Unit and assign them to a Batch number. This Batch number is required for the interface.
The one exception for City and State Colleges is that Imprest bank accounts can be used to make payments locally. The system will also create Positive Payment files. City and State files will be interfaced to the respective agencies for payment processing. Once the City and State systems create payments, interfaces will be used to provide the City and State payment information and populate the system.
Note: The City deadline for running transactions into their system is before close of business. As a result, we will be capturing transactions completed up until 3pm only. Transactions completed after that—vouchers approved, purchase orders dispatched—will not be picked up and sent to the City until the following day.
High Level Roles and Responsibilities
Roles Responsibilities
Payment Processor Write Imprest Checks
Accounts Payable Staff Includes Voucher Entry and Voucher Approver
Employee Enter accurate Expense transactions
Vendor Receive payments
Bank Receive payment files
City/State Accounts Payable Process interfaced vouchers
Expenses Transactions originate in this module
General Ledger Staff Maintain General Ledger journals

Procurement Reference Guide
Last Updated: June 11, 2012 80
Chapter Objectives Upon completion of this chapter, the learner will be able to:
Build the pay cycle selection criteria
Run the pay cycle process
Post a payment
Cancel a payment

Procurement Reference Guide
Last Updated: June 11, 2012 81
Topic 1: Pay Cycle Manager Steps Pay cycle Manager is the process used to manage all of the steps to successfully complete a pay cycle.
Pay cycle Manager for vendor payments is a batch process run daily and initiated centrally for all business units. There will be separate pay cycle managers at a minimum, for Student refunds and Work Study payroll taxes. Separate procedures are required for each of the Pay cycles.
Authorized Roles.
CU_FSAP_CREATEPAYCYCLE
CU_FSAP_Process_Pay_Cycle
The Pay Cycle Manager Steps is found by navigating to Accounts Payable > Payments > Payment Selection Criteria.
Step Summary
1. Navigate to Payment Selection Criteria. 2. Select the Pay From Date, Pay Through Date, Payment Date, Next Pay Through Date, Next
Payment Date. 3. Set the Accounting Date and Withholding Date. 4. Select the Source/BU tab. 5. Select the source transaction(s), i.e. VCHR. 6. Select the business unit(s). 7. Click on the Dates tab. 8. Run the Pay Cycle Manager.

Procurement Reference Guide
Last Updated: June 11, 2012 82
Detailed Information
Field Description
Pay Cycle Enter a description for the pay cycle.
Go to Pay Cycle Manager Click to save the pay cycle and open the Pay Cycle Manager, where you initiate and control processing for the pay cycle.
Pay Cycle Selection Dates
Pay From Date Enter the beginning date of the pay cycle. The system compares this date to the scheduled pay date for the voucher payment schedule. If the scheduled pay date is equal to or greater than the pay from date, the voucher payment schedule can be paid in the current pay cycle if the schedule meets the other payment selection criteria.
Pay Through Date Enter the ending date of the pay cycle. The system compares this date to the scheduled pay date for the voucher payment schedule. If the scheduled pay date is on or before the pay through date, the voucher payment schedule can be paid in the current pay cycle if the schedule meets the other payment selection criteria
Payment Date Enter the payment date. The system tags all payments created in the pay cycle with this date and prints it on checks or shows it on other payment methods. It can differ from the pay through date. The scheduled pay date has to be between the pay from date and the pay through date so that it is included in the pay cycle.
Next Pay Through Date Enter the estimated end date for the next pay cycle payment period. This estimate is used to help determine whether or not discounts will be lost if a payment is made in the next pay cycle.
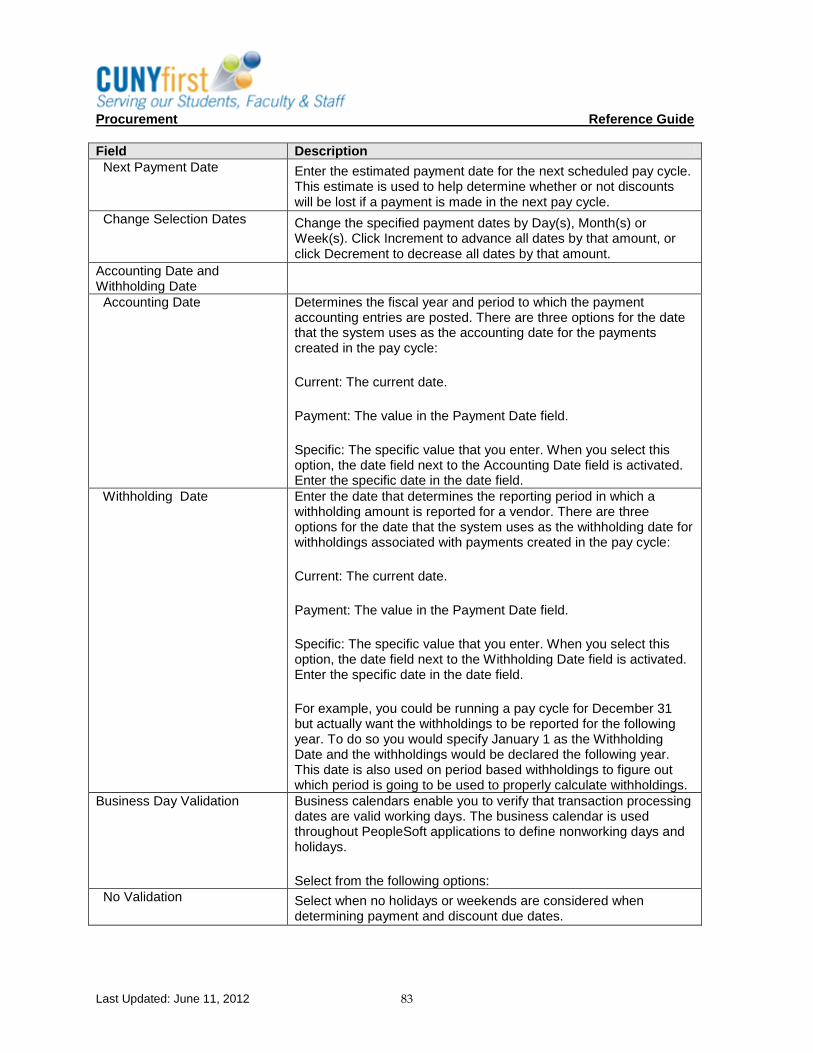
Procurement Reference Guide
Last Updated: June 11, 2012 83
Field Description
Next Payment Date Enter the estimated payment date for the next scheduled pay cycle. This estimate is used to help determine whether or not discounts will be lost if a payment is made in the next pay cycle.
Change Selection Dates Change the specified payment dates by Day(s), Month(s) or Week(s). Click Increment to advance all dates by that amount, or click Decrement to decrease all dates by that amount.
Accounting Date and Withholding Date
Accounting Date Determines the fiscal year and period to which the payment accounting entries are posted. There are three options for the date that the system uses as the accounting date for the payments created in the pay cycle:
Current: The current date.
Payment: The value in the Payment Date field.
Specific: The specific value that you enter. When you select this option, the date field next to the Accounting Date field is activated. Enter the specific date in the date field.
Withholding Date Enter the date that determines the reporting period in which a withholding amount is reported for a vendor. There are three options for the date that the system uses as the withholding date for withholdings associated with payments created in the pay cycle:
Current: The current date.
Payment: The value in the Payment Date field.
Specific: The specific value that you enter. When you select this option, the date field next to the Withholding Date field is activated. Enter the specific date in the date field.
For example, you could be running a pay cycle for December 31 but actually want the withholdings to be reported for the following year. To do so you would specify January 1 as the Withholding Date and the withholdings would be declared the following year. This date is also used on period based withholdings to figure out which period is going to be used to properly calculate withholdings.
Business Day Validation Business calendars enable you to verify that transaction processing dates are valid working days. The business calendar is used throughout PeopleSoft applications to define nonworking days and holidays.
Select from the following options: No Validation Select when no holidays or weekends are considered when
determining payment and discount due dates.

Procurement Reference Guide
Last Updated: June 11, 2012 84
Field Description
Use Standard Week Select to use business days from Monday through Friday to determine valid payment dates. You can select Validate Pay Through Dates and Validate Payment Dates, if you select this option.
Use Holiday Calendar Select to use both business days and holidays to determine valid discount and payment dates. If you select this option, you must select an appropriate holiday business calendar from the Holiday List ID field. You can select Validate Pay Through Dates and Validate Payment Dates, if you select this option.
Validate Pay Through Dates Select to validate the pay through date that you enter, ensuring that the date falls on a valid business day.
Validate Payment Dates Select to validate the payment date you enter, ensuring that the date falls on a valid business day.

Procurement Reference Guide
Last Updated: June 11, 2012 85
Topic 2: Business Procedure – Pay Cycle Process The pay cycle process includes the series of jobs executed by a pay cycle manager.
Key policies related to the procedure
The pay cycle process will create payments that will be used by the I-003 payment interface for City payments.
The Student Refund process will produce checks and direct deposit payments for Financial Aid and tuition refunds.
Authorized Roles
CU_FSAP_CREATEPAYCYCLE
CU_FSAP_Process_Pay_Cycle
The Pay Cycle Process is found by navigating to Accounts Payable > Payments > Pay Cycle Processing > Pay Cycle Manager:
Step Summary
Detailed Information
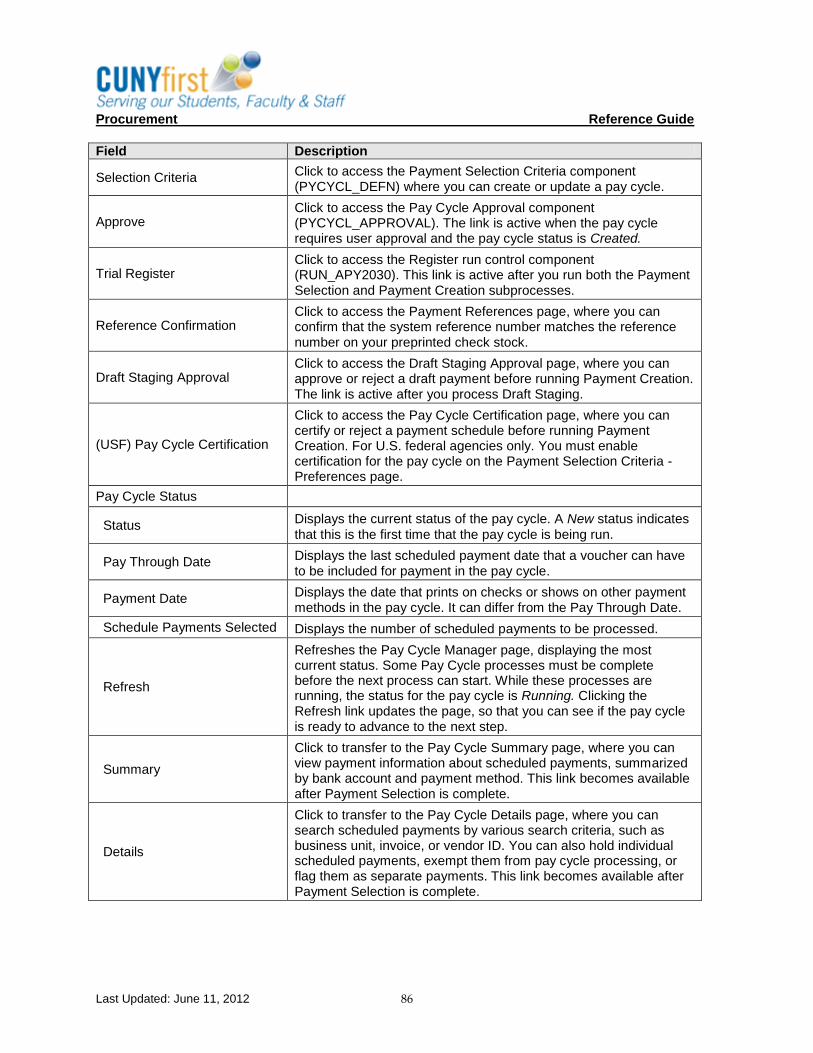
Procurement Reference Guide
Last Updated: June 11, 2012 86
Field Description
Selection Criteria Click to access the Payment Selection Criteria component (PYCYCL_DEFN) where you can create or update a pay cycle.
Approve Click to access the Pay Cycle Approval component (PYCYCL_APPROVAL). The link is active when the pay cycle requires user approval and the pay cycle status is Created.
Trial Register Click to access the Register run control component (RUN_APY2030). This link is active after you run both the Payment Selection and Payment Creation subprocesses.
Reference Confirmation Click to access the Payment References page, where you can confirm that the system reference number matches the reference number on your preprinted check stock.
Draft Staging Approval Click to access the Draft Staging Approval page, where you can approve or reject a draft payment before running Payment Creation. The link is active after you process Draft Staging.
(USF) Pay Cycle Certification
Click to access the Pay Cycle Certification page, where you can certify or reject a payment schedule before running Payment Creation. For U.S. federal agencies only. You must enable certification for the pay cycle on the Payment Selection Criteria - Preferences page.
Pay Cycle Status
Status Displays the current status of the pay cycle. A New status indicates
that this is the first time that the pay cycle is being run.
Pay Through Date Displays the last scheduled payment date that a voucher can have to be included for payment in the pay cycle.
Payment Date Displays the date that prints on checks or shows on other payment methods in the pay cycle. It can differ from the Pay Through Date.
Schedule Payments Selected Displays the number of scheduled payments to be processed.
Refresh
Refreshes the Pay Cycle Manager page, displaying the most current status. Some Pay Cycle processes must be complete before the next process can start. While these processes are running, the status for the pay cycle is Running. Clicking the Refresh link updates the page, so that you can see if the pay cycle is ready to advance to the next step.
Summary
Click to transfer to the Pay Cycle Summary page, where you can view payment information about scheduled payments, summarized by bank account and payment method. This link becomes available after Payment Selection is complete.
Details
Click to transfer to the Pay Cycle Details page, where you can search scheduled payments by various search criteria, such as business unit, invoice, or vendor ID. You can also hold individual scheduled payments, exempt them from pay cycle processing, or flag them as separate payments. This link becomes available after Payment Selection is complete.

Procurement Reference Guide
Last Updated: June 11, 2012 87
Field Description
Process
Each row contains a Process button, a Server field, and a display-only description of an available pay cycle process. Some processes are available only if you are creating certain types of payments. For example, Draft Staging is only available if you are processing draft payments.
Processes are not available and no longer appear once they have been completed.
To run a process, select a server and click the process button for the process row. The server drop-down list shows only servers that have a status of Running on the Process Monitor Server List page. The system performs validation before a process is initiated to ensure that the Process Scheduler server is currently running.
The standard processes are:
Payment Selection
Runs the Payment Selection process only, so that you can review and handle pay cycle exceptions, take action on individual scheduled payments using the Pay Cycle Details page, and certify payment schedules (for U.S. federal agencies only) before you run the Payment Creation process.
If you are processing drafts, run the Payment Selection process alone to enable you to then run the Draft Staging process alone. This enables you to use Draft Staging Approval before you run the Payment Creation process.
Payment Selection & Creation
Runs all processes in one step, including Payment Selection, Draft Staging (if necessary), and Payment Creation. You cannot perform any exception handling, take action on individual scheduled payments, certify payment schedules (U.S. federal only), or use draft staging approval.
Note. This option is unavailable for U.S. federal agencies or for PeopleSoft eSettlements users if Pay Cycle Payment Approval is enabled at buyer registration.
Draft Staging
Runs the Draft Staging process. Draft staging groups the draft payments, then performs draft rounding and draft optimization, according to your payment selection criteria. You can approve or reject the draft payments on the Draft Staging Approval page. You must either approve or reject draft payments before the Payment Creation process. This option is only active if you are processing draft payments and you have run the Payment Selection option.
Payment Creation
Runs the Payment Creation process to prepare payments for output processing. This option is available only after you have run the Payment Selection process—or, if there are draft payments in your pay cycle, after you have run the Draft Staging process.
Pay Cycle Rest
Server Select a server on which to run the pay cycle reset process.

Procurement Reference Guide
Last Updated: June 11, 2012 88
Field Description
Reset
Click to initiate a process to clear all of the scheduled payments currently being processed in the pay cycle. This button is active during Payment Selection, if the pay cycle is rejected, or if a system error is encountered, such as a server running out of storage memory or the occurrence of a power failure. The button remains active until the Pay Cycle status is Approved.
Pay Cycle Exceptions
The links in this group box become active only if there are pay cycle exceptions after the Payment Selection and/or Payment Creation processes have been run. If a payment is marked with an exception (except for discounts lost exceptions), it is rejected for further processing within the pay cycle. You must either correct or override the exception and run the payment as part of another pay cycle.
Pay Cycle Error Click to access the Pay Cycle Error page, where you can view errors encountered during this pay cycle run.
Discount Lost Click to access the Lost Discount Alert page, where you can review and handle potential lost discounts calculated during the Payment Selection process.
Discount Denied
Click to access the Discounts Denied page, where you can review discounts that were not taken because they failed discount evaluation (that is, the bank interest earned on the net voucher amount is greater than the amount of the discount you would gain by paying early).
Withholding Click to access the Withholding Exception page, so that you can review and handle withholding exceptions generated during pay cycle processing.
Bank Replacement
Click to access the Bank Replacement Exceptions component, where you can review bank replacement exceptions generated during pay cycle processing. Some bank replacement exceptions appear after Payment Selection; others appear only after Payment Creation.
Financial Sanctions Exceptions
Click to access the Pay Cycle Financial Sanction Warnings page, where you can review financial sanctions exceptions generated during pay cycle processing. If the system validates the vendors during the Selection process and the vendor's financial sanctions status changes to Review, the system creates payment validation errors for this vendor's payments. The system also adds this vendor to the Financial Sanctions Validation Log page.
Pay Cycle Results
Once the Payment Creation process is complete, the Pay Cycle Results grid displays a row of data for each output process that must be run to generate payment files and negotiable documents. For EFT payments, as all payments regardless of bank account run as one output process, only one EFT row can appear. For checks, advices, positive payment files, and file copies, each bank account and payment method combination runs as a separate output process. This means multiple check rows, positive payment rows, and so forth, can appear in the grid.

Procurement Reference Guide
Last Updated: June 11, 2012 89
Field Description
Process
Click to initiate an output process, such as creating an EFT file, or printing checks or advices.
Note. Depending on the output process, you may need to click the Process button repeatedly as each subprocess within the output process is run.
Recreate
Click to access the Recreate Checks page, where you can recreate an EFT file or reprint checks.
When the button is labeled Recreate Positive Pay, you can click it to recreate a positive payment file.
Server Name Select a specific Process Scheduler server from which to execute the pay cycle output process.
Output Type
Displays the resulting output type. Select from the following:
File: Specifies that the pay cycle output is created in a file format. This is used for electronic payment formats, such as EFT or ACH payments.
Printer: Specifies that the output is printed on the selected printer. This is used for printed payment formats, such as for system checks or advices.
Web: Specifies that the output file is sent to the Report Repository and authorized users can download the output file via the Report Manager. You do not need to specify an Output Destination if you select this option.
If you distribute output files using the Web option, you must set up
distribution options using the Process Schedule Manager.
Once the report or output file is generated in the report repository, select the View link on the Report List page in the Report Manager to access the Report/Log Viewer. Click the report link on the Report/Log Viewer and you will have the option to open the file online, or download the report file
Output Destination
Specifies the Output File directory or the Printer name for the output file creation.
If the File option is selected, the Output Destination value defaults from the Server File Destination specified on the User Preferences - PayCycle page. You can override the default with a valid directory path, but remember that a meta string (such as %%OutputDirectory%%) is not permitted. You must specify a full directory path with a backslash at the end (for example: C:\TEMP\).
Pay Cycle Results
Instance Displays the process instance for the latest process you initiated for the row.
Payment File Displays the name of the payment output file that is created.
Form ID Displays the form ID specified on the bank account definition for the document formatting.

Procurement Reference Guide
Last Updated: June 11, 2012 90
Field Description
Positive Pymnt Specifies the positive payment form ID on the bank account definition for formatting the positive payment file. This applies only to system checks.
File Copy From
Displays the form ID specified on the bank account definition for formatting check copy files. You enable file copying and specify the file copy form ID on the External Accounts - Payment Methods page.
First Payment Displays the beginning payment reference number for the pay cycle.
Resetting Pay Cycles
You can reset a payment cycle in the Pay Cycle Manager if you decide against creating any payments for the selected vouchers. This option gives you the flexibility to deselect vouchers for payment after you run a pay cycle, but before you print the checks. You can reset a pay cycle after Payment Selection, but to reset after Payment Creation requires extra steps. To reset after Payment Creation, go through Pay Cycle Approval to reject the pay cycle. Then perform the reset.
Note. PeopleSoft Payables marks vouchers as selected once Payment Selection runs. No other transactions may occur on the selected vouchers. If you decide not to produce payment files or print checks for these vouchers, reset the selection so that a later pay cycle can reselect the vouchers.
Note. Resetting a pay cycle that is using bank account replacement reverses the bank replacement. For example, say that a payment is coming from bank account A, and that during the pay cycle, bank account B replaces bank account A. If you reset the pay cycle for this payment, the payment reverts to the original account, which is bank account A.
Note. If EFT and ACH prenotes are included in the pay cycle, the system reverses the prenote status on the Vendor Information component (VNDR_ID) from Pending to New when you reset a pay cycle.
Completing the Pay Cycle
When you have successfully selected your payments, viewed and processed any exceptions, generated payments, approved the pay cycle, produced payment outputs, confirmed payment reference numbering, and formatted and produced the positive payment file (if required), the Pay Cycle Manager shows a status of Completed.

Procurement Reference Guide
Last Updated: June 11, 2012 91
Field Description

Procurement Reference Guide
Last Updated: June 11, 2012 92
Field Description
Source The Source Transactions define the types of payments processed in a pay cycle. You set up new or review delivered source transaction definitions on the Payment Source and Payment Source Search Definition pages, and source transaction mapping detail on the Pay Cycle Mapping and Pay Cycle Mapping Detail pages. If you set up a new payment source, you must map it to the payables payment tables using the mapping pages.
Select or clear each source transaction by selecting the Process check box next to the appropriate source transaction. These are the delivered values:
EXAD Employee Advances Definition.
EXPN
Employee Expense Sheet Definition.
TR Treasury Settlement Payments.
TRET Treasury EFT Settlement Payments.
VCHR Accounts Payable Vouchers.
Note. You must select a least one source. At a minimum, you should select the Accounts Payable Vouchers source transaction.
Note. If you create a new payment source, you must map it in the
Pay Cycle Mapping component.
Business Unit You can select multiple business units. For example, your regular pay cycle can include all business units. Select the Process check box for each business unit that you want to include during the pay cycle to narrow the selection criteria. Only vouchers for the business units that you specify are included in the pay cycle. The system uses the vendor and voucher information at the business unit level unless you override that information. If you do not want to process a particular business unit during a specific run of the Pay Cycle process, clear the Process check box for that business unit.
Note. You must select at least one business unit for the pay cycle to create any payments.

Procurement Reference Guide
Last Updated: June 11, 2012 93
Topic 3: Business Procedure – Post Payment All payments must be posted to generate data in the Voucher Accounting Line record. These transactions are then journal generated to create GL Journal Entries.
Payment posting will be executed as a batch job, run centrally.
Authorized Roles
CU_FSAP_Process_Pay_Cycle
The Payment Posting page is found by navigating to Accounts Payable > Batch Processes > Payment > Payment Posting.
Step Summary
1. Navigate to Payment Posting Request. 2. Select (or add) a run control ID. 3. Fill in the values as shown below. 4. Click on the Run button. 5. Click on the OK button to submit the request.
Detailed Information

Procurement Reference Guide
Last Updated: June 11, 2012 94
Field Description
Request ID Enter a 10-character ID.
Post Payment Option Specify which payments to include in the Payment Posting process. For each value that you select, different entry fields appear for you to complete. The system saves these settings with the run control ID:
Post All Banks: Posts all eligible payments that belong to any of the bank accounts in the system. Because you are posting payments for all banks, the Post Payment List group box shows no data.
Post Bank Account: Posts all eligible payments for the specified bank account. The SetID, Bank Code, and Bank Account fields become available for entry.
Post Payment: Posts only the payment that you specify. The SetID, Bank Code, Bank Account, Payment Method, and Payment Reference fields become available for entry.
Post Payment Method: Posts all payments using the specified payment method for the bank account that you enter. The SetID, Bank Code, Bank Account, and Payment Method fields become available for entry.

Procurement Reference Guide
Last Updated: June 11, 2012 95
Topic 4: Business Procedure – City Accepted/Rejected File The payment process is run for Community Colleges and the OUC City processing unit. The I-003 payment request interface to the City will then be run to create files that are transmitted to the City for payment processing.
Vouchers to be paid by the City must be posted and paid in order to be selected for transmission to the City via the interface. Both PO and non-PO vouchers will be transmitted to the City via the interface. This interface will be run on a daily basis. The City will return an accept/reject file that identifies the status of each payment request sent to the City. If a payment request is rejected by the City, the file will include rejection reasons. Vouchers that were rejected by the City cannot be corrected and resubmitted via the interface. Refer to the Voucher Correction scenarios attached for the appropriate actions.
Note: The City deadline for running transactions into their system is before close of business. As a result, we will be capturing transactions completed up until 3pm only. Transactions completed after that—vouchers approved, purchase orders dispatched—will not be picked up and sent to the City until the following day.
The City Accepted/Rejected File page is found by navigating to Accounts Payable > CUNY Processes > City Accepted/Rejected File.
Step Summary
1. On the City Accepted/Rejected File page, create a run control ID or select an existing run control ID.
2. Click on the Run button. 3. On the next page, click on the OK button to start the process.
Detailed Information

Procurement Reference Guide
Last Updated: June 11, 2012 96
Topic 5: Business Procedure – Cancel Payment Payments may be canceled so they can be reissued or so the related Voucher can be un-posted or deleted. For vouchers that are rejected by the City, follow the process in the City Interface Error Correction matrix to identify the appropriate use of the Cancel Payment function. City payments that have been disbursed by FMS, require that CUNY contact the NYC Dept of Finance to cancel the payment. To close the liability, the cancel payment transaction must be executed.
Key policies related to the procedure
You should cancel a payment in CUNYfirst prior to the nightly interface to the City. If the payment has been interfaced and is in rejected status in FMS, the payment can also be cancelled.
Note: The City deadline for running transactions into their system is before close of business. As a result, we will be capturing transactions completed up until 3pm only. Transactions completed after that—vouchers approved, purchase orders dispatched—will not be picked up and sent to the City until the following day.
Authorized Roles
CU_FSAP_Process_Pay_Cycle
The Cancel Payment is found by navigating to Accounts Payable > Payments > Cancel/Void Payments:
Step Summary
1. Navigate to Cancel/Void Payments. 2. Select the Payment Cancellation link. 3. On the Payment Cancellation page, enter or select the values for Bank SetID (should have a
defaulted value), Bank code (this is required), Bank Account (this is required), Payment Reference, and Payment Method (if available).
4. Click on the Search button.

Procurement Reference Guide
Last Updated: June 11, 2012 97
Detailed Information
Field Description
Bank SetID Displays your bank setID, bank code, and account number and descriptions.
Remit Vendor Displays remit vendor number and description.
Reference ID Displays payment reference ID.
Creation Date Displays the date the payment was created.
Payment Date Displays the date the payment was issued.
Settle By Displays whether the payment was settled through Financial Gateway or Pay Cycle functionality.
Settlement Status Displays the settlement status of Error, Hold, Loaded, Paid, Canceled, or None.
Date Cancelled Enter the date that you want to cancel the payment.
Payment Status Select a payment action. Options include:
Void: Select to void the payment. You void a payment when it has not been released.
Stop: Select to stop the payment. You stop a payment when it has
been released.
Undo Cancel: You can undo any cancellation until you post the
canceled payment.
Warning! After posting, you cannot undo the cancellation.

Procurement Reference Guide
Last Updated: June 11, 2012 98
Field Description
Cancel Action Select a cancel action. Options include:
Re-Open Voucher(s)/Re-Issue: Use to reselect the scheduled payments and reissue them the next time that you run a pay cycle, assuming that the vouchers meet the selection criteria for that pay cycle.
Important! If you reopen and reissue the voucher, the existing schedule payment will be cancelled in the Payment Posting process and a new schedule is added.
Note. If you decide to reopen vouchers and reissue, remember that you must run the Payment Posting process twice to record the reversal before those vouchers are available for a new payment selection. You can undo your cancellation, as long as the canceled payment is not posted.
Re-Open Voucher(s)/Put on Hold: Use to reopen the scheduled payments, but places the reopened scheduled payments on hold for your review. Select this option if you need to perform additional investigation or revise voucher information before proceeding with payment. A pay cycle process does not select the scheduled payments until the hold is removed on the Payments page of the Voucher component.
If you select this value, you must also select a reason code in the Hold Reason field.
Do Not Reissue/Close Liability: Use to cancel the payment and close any liabilities associated with it. The amount of the liability to close is calculated as the amount of unpaid liability remaining. The system takes into account whether the business unit is accounting at gross or net. The Payment Posting process identifies the voucher as process manual close, and the amount of the outstanding liability is reversed the next time the Voucher Posting process runs.
Hold Reason Specify a hold reason for payment cancellations placed on hold. The system defaults this hold reason onto the cancelled payment's new payment schedule. Select from the following: Accounting, Amount, CCR Expire (Central Contractor Registry vendor expiration), Cntrct Ret (contract return), Goods, IPAC (Intra-Governmental Payment and Collection System ), Other, Quantity, and Wthd hold (withholding hold).
Description Enter comments or an explanation for the cancellation.
Document Sequencing If you have document sequencing enabled, click the Document Sequence link to access the Document Sequence page, where you can change the payment document type.

Procurement Reference Guide
Last Updated: June 11, 2012 99
Chapter 3: Vendor Maintenance
Chapter Objectives Upon completion of this chapter, the learner will be able to:
Add a city vendor
Update a city vendor
Procurement Reference Guide
Last Updated: June 11, 2012 100
Topic 1: Add City Vendor
Add a new vendor to be used by a Community College.
Authorized Roles
CU_FSAP_Vendor_Entry
CU_FSAP_VENDORENTRY
The Vendor Information page is found by navigating to Vendors > Vendor Information > Add/Update > Vendor.
Step Summary
CUNY Policy to Add a City Vendor to : I. Adding a new vendor
A vendor is defined as an entity that provides goods and/or services to CUNY. Due to the fact that payments to suppliers and vendors are disbursed directly from the City for CUNY, the information transmitted from the vendor master MUST mirror the data in the New York City Comptroller’s Financial Management System (FMS). Consequently, any new vendor will need to first be added to FMS prior to being finalized for use in the vendor master. When CUNY decides to do business with a new vendor and the vendor is not an existing NYC FMS vendor, the vendor should submit the application through the on-line NYC-FMS Vendor Application website. (More information at www.nyc.gov/html/selltonyc/html/new_vendors.html#agenciesvendorapps. After they have received their NYC FMS vendor number, then the vendor should complete the CUNY Vendor Registration Form and return it to college procurement or CUNY Central Vendor Management Unit. If the vendor is already an FMS vendor, then they can complete the CUNY Vendor Registration Form and return it to college procurement or CUNY Central Vendor Management Unit. End users and buyers will not have “Vendor Add” access to the vendor file. A request for the addition of a vendor should be directed to the CUNY Central Vendor Management Unit (VMU) in the Office of the University Controller.
The entity requesting addition of a vendor must forward the following information to the CUNY VMU:
1. vendor legal name 2. vendor Doing Business As name 3. vendor address 4. vendor taxpayer identification number (TIN) 5. vendor contact name 6. vendor contact email 7. 1099 withholding status (Yes or No for tax withholding) 8. IRS W-9

Procurement Reference Guide
Last Updated: June 11, 2012 101
9. remittance address, contact name, email and telephone number 10. corporate address, contact name, email and telephone number
Once the vendor has been added in both FMS and , a notification will be sent to the requestor with information regarding the vendor’s new vendor identification number (vendor ID).
II. Vendor Naming Standards 1. Determine the legal name of the vendor and if applicable, their DBA. The business legal
name is the name on the business formation documents, such as Articles of Incorporation and for a sole proprietor; the legal name is the individual’s name. The DBA name may be the name the vendor is more likely known as. Only 1 DBA will be used in . If a vendor has multiple DBA’s, no DBA will be recorded.
2. Vendor Short Name – is a 10-character field that is an abbreviation of the Vendor Name 1 field. The entity’s short name consists of the first 10 characters of Vendor Name 1 without any punctuation or spaces.
3. Vendor Name 1 – is a 40 character field to record the vendor’s legal name and a single DBA name.
4. Vendor Name 2 – is a 40 character field to record the remainder of the vendor’s legal name and/or single DBA.
Withholding Alternate Name 1 & 2 – are two 40 character fields to record the vendor’s withholding name (name know to the IRS, which is most likely the vendor’s legal name).
A daily synchronization process for City Vendors will send a file to containing the incremental changes to the master vendor list as of the previous business day. This file is then matched to the vendor file using the 10 digit FMS vendor number. This process updates and adds effective dated rows to the vendor record to match what is in the City’s incremental vendor file for each vendor which is in the City’s FMS vendor master and the vendor master. The synchronization can also be executed with the weekly and monthly files depending on the schedules of the control files. .

Procurement Reference Guide
Last Updated: June 11, 2012 102
Detailed Information
Field Description
SetID CITPR
Vendor Short Name Provides an alternate search key to access vendor data. The system enables you to assign the same vendor short name to multiple vendors, and it makes the short name unique by adding a numeric value to the end. For example, if you enter the vendor short name SMITH, when you save, the system makes the short name SMITH-001. If you ever have another vendor for whom you want to use SMITH as the short name, the system enters SMITH-
002, and so on.

Procurement Reference Guide
Last Updated: June 11, 2012 103
Field Description
Vendor Name 1 and Name 2 Enter the vendor's name. There are two lines for the vendor name (vendor name 1 and vendor name 2), in case you're dealing with divisions, subsidiaries, or other complex organization entities that require detailed identification.
If you enabled alternate characters in your user preferences and want to enter alternate characters for the vendor, click the Alternate Name button next to either of the vendor name fields to enter or display alternate characters on the page that appears.
Status Displays the vendor's status. You can change the status if you have vendor processing authority defined on the Procurement - Vendor Processing Authority page. Values are:
Approved: If you have authority to approve vendors, the system automatically assigns a status of Approved to the vendor. The system does not recognize a vendor as approved unless an authorized payables or purchasing user enters or approves it.
Inactive: If you have the authority to inactivate vendors you can select this option. Users cannot enter new vouchers for this vendor.
To Archive: If you have the authority to inactivate vendors you can select this options. Users cannot enter new vouchers for this vendor; the vendor is purged from the system.
Classification Select the vendor's classification. Values are:
Attorney: Indicates that the vendor is an attorney.
Employee: Assign this classification to vendors only if they are company personnel.
HCM (human capital management): Indicates that the vendor is a third-party vendor from the PeopleSoft Enterprise Human Capital Management (HCM) system, such as an insurance carrier or taxing authority.
Selecting this value activates the HCM Class field.
Supplier: Most vendors are suppliers.

Procurement Reference Guide
Last Updated: June 11, 2012 104
Field Description
HCM Class Select a human resources class. This field is available for entry only if you select HCM in the Classification field.
If you use HCM in conjunction with PeopleSoft Payables, select one of the following values to define HCM vendors. Most of these classifications define third-party vendors who need to be paid the amounts that were deducted from employee paychecks in the HCM software (benefits and payroll). Deduction amounts from these systems, consisting of both employee and employer contributions for third parties, are paid through accounts payable as standard vendor vouchers.
Garn Pay (garnishment payee): Indicates that the vendor is a garnishment payee—that is, the recipient of garnishments such as child support or alimony payments.
Gen Deduct (general deductions): Indicates that the vendor receives general deductions such as union dues, health club dues, stock purchase contributions, credit union deposits, and so on.
Gen Prov (general provider): Indicates that the vendor is a general provider.
Ins Prov (insurance provider): Indicates that the vendor is an industrial insurance board provider.
Nat'l Prov (national provider): Indicates that the vendor is a national health service provider.
Part Prov (partner provider): Indicates that the vendor is an implementation partner provider.
Tax Col (tax collector): Indicates that the vendor is a tax collector.

Procurement Reference Guide
Last Updated: June 11, 2012 105
Field Description
Persistence Select the vendor's persistence. Values are:
One-Time: Select for vendors you know you will use only once. You can enter only one voucher for this vendor, after which the vendor status changes to Inactive automatically.
Permanent: Select for vendors you know your organization will always use, even if not on a frequent basis. You can create an unlimited number of vouchers for this vendor. The vendor is not purged from the system unless you specifically request that they be archived in a vendor archive request.
Regular: Select for a vendor only if you don't mind that it is removed from the system once activity for the vendor stops for a designated period. You can create an unlimited number of vouchers for this vendor. However, if there is no activity for the vendor by the as of date in a vendor archive request, the vendor is purged from the system.
Withholding When entering withholding or 1099 vendors, select to enable withholding for the vendor. You specify withholding options on the Withholding Vendor Information page.
Open for Ordering Select to certify the vendor for purchasing goods and services. If this check box is clear, you cannot enter purchase orders (POs) for this vendor in PeopleSoft Purchasing.
Vendor Relationships
Corporate Vendor and Corporate Vendor ID
Select to associate the vendor that you are creating with a corporate vendor. Select a corporate vendor ID.

Procurement Reference Guide
Last Updated: June 11, 2012 106
Topic 2: City Vendor Maintenance Maintain vendors used by a Community College.
After a vendor has been added to the vendor file, there will be updates to the data that will be entered directly by CUNY and information updated via the City Vendor Synchronization Interface I-095.
The Vendor Management Unit at CUNY will be responsible for entering new vendors into the system and for maintaining specific vendor information including contact information, and address information
If updates need to be made the vendor should make the updates in the NYC FMS vendor file. After the vendor has submitted the changes to NYC FMS vendor file, the scheduled synchronization will ensure accurate and updated vendor information in the with database. Vendors should use NYC’s Payee Information Portal (PIP) to update information. More information about the PIP system can be found at www.nyc.gov/html/dycd/html/resources/pip_seach_for_payment.shtml
Authorized Roles
CU_FSAP_VENDORMAINT
The Identifying Information page is found by navigating to Vendors > Vendor Information > Add/Update > Vendor.
Step Summary
1. Navigate to Vendor Identifying Information. 2. Select the fields that need to be updated. 3. Make the changes. 4. Click on the Save button.

Procurement Reference Guide
Last Updated: June 11, 2012 107
Detailed Information
Field Description
Field Description
Vendor Short Name Provides an alternate search key to access vendor data. The system enables you to assign the same vendor short name to multiple vendors, and it makes the short name unique by adding a numeric value to the end. For example, if you enter the vendor short name SMITH, when you save, the system makes the short name SMITH-001. If you ever have another vendor for whom you want to use SMITH as the short name, the system enters SMITH-
002, and so on.
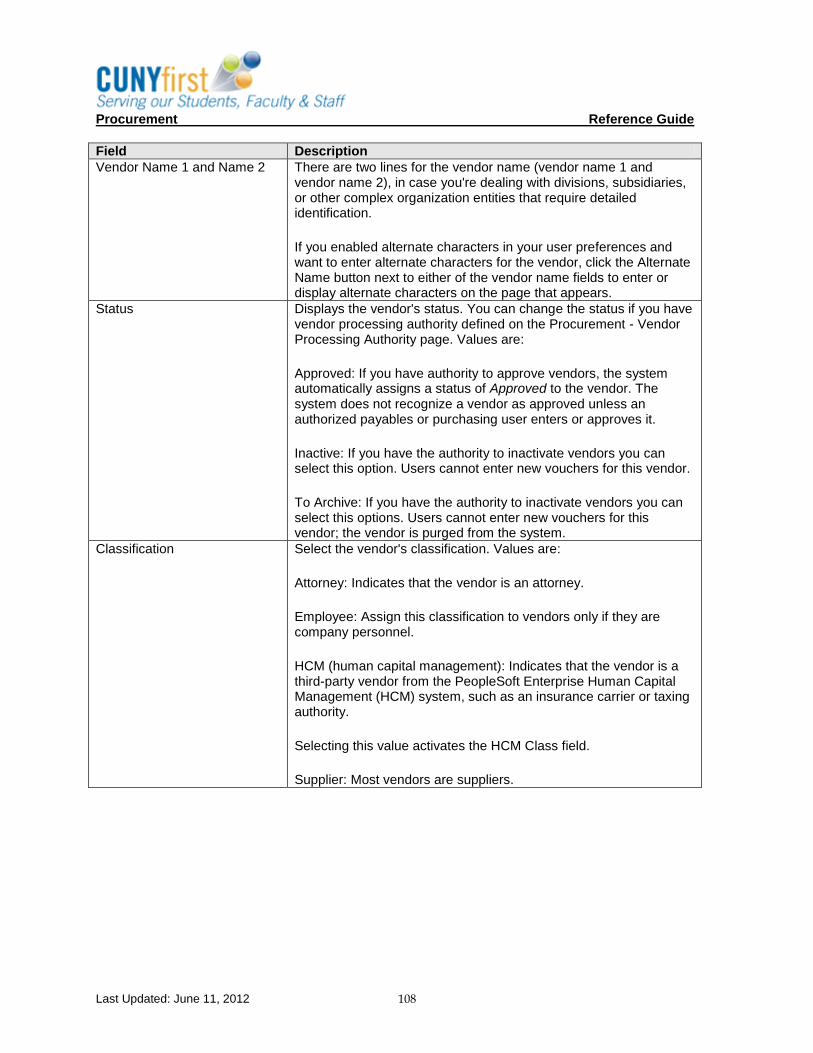
Procurement Reference Guide
Last Updated: June 11, 2012 108
Field Description
Vendor Name 1 and Name 2 There are two lines for the vendor name (vendor name 1 and vendor name 2), in case you're dealing with divisions, subsidiaries, or other complex organization entities that require detailed identification.
If you enabled alternate characters in your user preferences and want to enter alternate characters for the vendor, click the Alternate Name button next to either of the vendor name fields to enter or display alternate characters on the page that appears.
Status Displays the vendor's status. You can change the status if you have vendor processing authority defined on the Procurement - Vendor Processing Authority page. Values are:
Approved: If you have authority to approve vendors, the system automatically assigns a status of Approved to the vendor. The system does not recognize a vendor as approved unless an authorized payables or purchasing user enters or approves it.
Inactive: If you have the authority to inactivate vendors you can select this option. Users cannot enter new vouchers for this vendor.
To Archive: If you have the authority to inactivate vendors you can select this options. Users cannot enter new vouchers for this vendor; the vendor is purged from the system.
Classification Select the vendor's classification. Values are:
Attorney: Indicates that the vendor is an attorney.
Employee: Assign this classification to vendors only if they are company personnel.
HCM (human capital management): Indicates that the vendor is a third-party vendor from the PeopleSoft Enterprise Human Capital Management (HCM) system, such as an insurance carrier or taxing authority.
Selecting this value activates the HCM Class field.
Supplier: Most vendors are suppliers.

Procurement Reference Guide
Last Updated: June 11, 2012 109
Field Description
HCM Class Select a human resources class. This field is available for entry only if you select HCM in the Classification field.
If you use HCM in conjunction with PeopleSoft Payables, select one of the following values to define HCM vendors. Most of these classifications define third-party vendors who need to be paid the amounts that were deducted from employee paychecks in the HCM software (benefits and payroll). Deduction amounts from these systems, consisting of both employee and employer contributions for third parties, are paid through accounts payable as standard vendor vouchers.
Garn Pay (garnishment payee): Indicates that the vendor is a garnishment payee—that is, the recipient of garnishments such as child support or alimony payments.
Gen Deduct (general deductions): Indicates that the vendor receives general deductions such as union dues, health club dues, stock purchase contributions, credit union deposits, and so on.
Gen Prov (general provider): Indicates that the vendor is a general provider.
Ins Prov (insurance provider): Indicates that the vendor is an industrial insurance board provider.
Nat'l Prov (national provider): Indicates that the vendor is a national health service provider.
Part Prov (partner provider): Indicates that the vendor is an implementation partner provider.
Tax Col (tax collector): Indicates that the vendor is a tax collector.

Procurement Reference Guide
Last Updated: June 11, 2012 110
Field Description
Persistence Select the vendor's persistence. Values are:
One-Time: Select for vendors you know you will use only once. You can enter only one voucher for this vendor, after which the vendor status changes to Inactive automatically.
Permanent: Select for vendors you know your organization will always use, even if not on a frequent basis. You can create an unlimited number of vouchers for this vendor. The vendor is not purged from the system unless you specifically request that they be archived in a vendor archive request.
Regular: Select for a vendor only if you don't mind that it is removed from the system once activity for the vendor stops for a designated period. You can create an unlimited number of vouchers for this vendor. However, if there is no activity for the vendor by the as of date in a vendor archive request, the vendor is purged from the system.
Withholding When entering withholding or 1099 vendors, select to enable withholding for the vendor. You specify withholding options on the Withholding Vendor Information page.
Open for Ordering Select to certify the vendor for purchasing goods and services. If this check box is clear, you cannot enter purchase orders (POs) for this vendor in PeopleSoft Purchasing.
Vendor Relationships
Corporate Vendor and Corporate Vendor ID
Select to associate the vendor that you are creating with a corporate vendor. Select a corporate vendor ID.

Procurement Reference Guide
Last Updated: June 11, 2012 111
Chapter 4: Inquiries and Reports
Chapter Objectives Upon completion of this chapter, the learner will be able to:
Select appropriate inquiries and reports on vouchers, payments, or vendors.
View inquiry pages on vouchers, payments, or vendors.
Run and view reports on vouchers, payments, or vendors.

Procurement Reference Guide
Last Updated: June 11, 2012 112
Topic 1: Accounts Payable Inquiries
CUNYfirst delivers many different components that can be used to research voucher, payments and vendor related information.
Voucher Inquiry
Payments Inquiry
Vendor Inquiry

Procurement Reference Guide
Last Updated: June 11, 2012 113
Authorized Roles
CU_FSAP_Review_AP_Info
The Accounts Payable Inquiries is found by navigating to Accounts Payable > Review Accounts Payable Info.
Step Summary
1. Navigate to Voucher Document search page. 2. Select the business unit. 3. Click on the Search button. 4. If multiple rows come up on the Search Results section, select the desired row or voucher. 5. The Voucher Document Status page comes up.

Procurement Reference Guide
Last Updated: June 11, 2012 114
Detailed Information

Procurement Reference Guide
Last Updated: June 11, 2012 115
Field Description
Vendor ID Click the View Related Links button to access the Vendor Information, Conversations, or Contact components (VNDR_ID, VNDR_CNVRSTN, or VENDOR_CONTACT, respectively).
Voucher ID Click to access the Voucher Inquiry page in a separate browser.
Status Click to access the Voucher Accounting Entries inquiry page in a separate browser. This link appears if the voucher posting status is Posted.
Document Tolerance Status Click to access the Document Tolerance Exceptions page in a separate browser if the document tolerance status is Error.
Budget Misc Status Click to access the Voucher (NP) Exceptions page in a separate browser if the budget miscellaneous status is Error.
Budget Status Click to access the Voucher Exceptions page in a separate browser if the budget status is Error.
Match Status Click to access one of the Match Workbench pages in a separate browser. The inquiry you access is dependent on the voucher's match status. This link is only active for vouchers that require matching.
Documents Tab
DOC ID Click to go to the inquiry page for that document in a separate browser. You access an inquiry page related to the document type you select. For example, for a PO, you access the Purchase Order Inquiry - Purchase Order page, but for a receipt, you access the Receipts page.
Related Info Tab
Match Workbench Click to access one of the Match Workbench pages in a separate browser. This link is only active for related vouchers that require matching. The inquiry you access is dependent on the related voucher's match status.

Procurement Reference Guide
Last Updated: June 11, 2012 116
Field Description
Accounting Entries Click to access the Voucher Accounting Entries page in a separate browser. Payment accounting entries are based on vouchers. This link appears if the transaction was posted.

Procurement Reference Guide
Last Updated: June 11, 2012 117
Topic 2: Accounts Payable Reports CUNYfirst delivers many different reports that can be used to research voucher, payments and vendor related information. Voucher Reports
Payments Reports
Vendor Reports
Authorized Roles
CU_FSAP_Review_AP_Info

Procurement Reference Guide
Last Updated: June 11, 2012 118
The Accounts Payable Reports is found by navigating to Accounts Payable > Reports.
Step Summary
1. Navigate to Voucher Activity. 2. Select the Business Unit, Account, Department, Remaining Amount, Due Date, Accounting Date
From, Accounting Date To, Agency Location, and chartfields. 3. Click on the Run button. 4. Click on the OK button. 5. Click on the Process Monitor hyperlink.
Detailed Information
Voucher Activity Report
Report Description
APS8001J Voucher Activity Lists voucher activity by business unit, fund, department, program, class, account, budget period, project/grant, remaining amount, due date, and agency location code. (Crystal Report)

Procurement Reference Guide
Last Updated: June 11, 2012 119
Unit IV: Accounts Payable: Student Payment
Unit Introduction Voucher information can be interfaced from various CUNYfirst subsystems or external sources to create vouchers in the CUNYfirst Accounts Payable system. CUNY will use this interface for student refund (Bursar) vouchers. The office responsible for Student Refunds at each college will run the Voucher Build process for Student Refunds. The pay cycle process will be used to generate payments for Student Refunds. Only colleges with the Campus Solutions Student Financials systems active will use this process.
Unit Objectives Upon completion of this module, the learner will be able to:
1. Create student refund vouchers.
2. Review student refund vouchers.
3. Pay student refund vouchers.
Procurement Reference Guide
Last Updated: June 11, 2012 120
Chapter 1: Student Refunds
Chapter Objectives Upon completion of this chapter, the learner will be able to:
Extract refund transactions from Campus Solutions – Student Financials and create the corresponding vouchers.
Run the budget check process on these vouchers.
Review refund transactions.
Generate payments.
Post vouchers and payments.
Transmit the transactions to the City FMS.

Procurement Reference Guide
Last Updated: June 11, 2012 121
Topic 1: Student Refund Transactions – Voucher Processing
CUNYfirst provides the Voucher Build process to build vouchers in batch from Campus Solutions – Student Financials.
Pre-Authorized Roles
CU_FSAP_Review_AP_Info CU_FSAP_Voucher_Entry
The Accounts Payable Voucher Build is found by navigating to Accounts Payable > Batch Processes > Vouchers > Voucher Build.
The Accounts Payable Voucher Build is found by navigating to Accounts Payable > Batch Processes > Vouchers > Budget Check.
Step Summary
1. Navigate to the Voucher Build. 2. If there is no existing run control ID, click on the Add button. Otherwise, use an existing run
control ID. 3. Do not check “Assign Invoice ID” or “Assign Invoice Date”. 4. Select appropriate value for Voucher Source, such as New Voucher Data, Errors, etc. 5. Select the Business Unit for selection parameter. 6. Select the Voucher Build Interface “XML Invoice” to run. 7. Do not check the “Publish Voucher Messages”. 8. Select Save. 9. Click the Run button for the Process Scheduler Request page. 10. Click the OK button to initiate the process. The system will return to the Voucher Build page and
generate a process instance. 11. Review and correct any errors on the Build errors page. 12. Navigate to the Vouchers > Budget Check. 13. Submit the process Vouchers > Budget Check. 14. Process is complete.
Detailed Information
Voucher Build and Budget Check – Student Refunds

Procurement Reference Guide
Last Updated: June 11, 2012 122
Options Description
Request ID Enter a short description, ex: VB_SF.
Description Enter a long description, ex: Student Refunds.
From Date Enter dates to have the Voucher Build process select vouchers for which invoices are dated within the specified range. To Date
Assign Invoice ID Leave this checkbox UNCHECKED.
Assign Invoice Date Leave this checkbox UNCHECKED.

Procurement Reference Guide
Last Updated: June 11, 2012 123
Options Description
Process Option Select the level at which to process vouchers. Depending on the option that you select, different fields become available in the Selection Parameters group box. Values are:
Business Unit: The system processes vouchers that belong to the business unit that you enter in Selection Parameters.
Process All Units: The system processes all business units. No
fields are available in Selection Parameters.
Process Contract: The system processes vouchers that belong to the contract ID that you enter in Selection Parameters. You must also enter a business unit.
Process Group: The system processes vouchers that belong to the control group ID that you enter in Selection Parameters. You must also enter a business unit.
Process Origin: The system processes vouchers that belong to the origin that you enter in Selection Parameters. You must also enter a setID.
Process Vendor: The system processes vouchers that belong to the vendor ID that you enter in Selection Parameters. You must also enter a business unit.
Process Voucher: The system processes the voucher with the voucher ID that you enter in Selection Parameters. You must also enter a business unit. This value is valid only for quick invoices and transactions in the online voucher tables. This value does not appear if you have selected a Voucher Edit Source of All.
Voucher Sources Select the status of the sources that you want to process. Values are:
All (Unrestricted): Both new and recycled vouchers.
Errors/Staged Vouchers: Only vouchers that have pre-edit errors from prior Voucher Build process runs or that were staged for review during a prior run.
New Voucher Data: New transactions from selected interface sources.
Recycled Vouchers: Recycled vouchers in the online voucher
tables.
Voucher Maintenance: Vouchers that have been modified using the Voucher Maintenance component.
Voucher Mass Maintenance: Vouchers that have been modified using the Voucher Mass Maintenance component.
Interfaces Select “XML Invoice”. XML Invoice: Spreadsheet vouchers and XML invoices that are interfaced using the EM_VOUCHER_IN application message definition or the SelfServiceInvoice web service.
Publish Voucher Messages Leave this checkbox UNCHECKED.

Procurement Reference Guide
Last Updated: June 11, 2012 124
Options Description
Process Frequency Designates the appropriate processing frequency:
Once: Executes the request the next time the batch process runs. After the batch process runs, the process frequency is automatically set to Don't Run.
Always: Executes the request every time the batch process runs.
Don't Run: Ignores the request when the batch process runs.
Record Number System-generated sequence number.
Description Free flow text up to 30 characters. Enter a description, ex: BUDGET_CHECK_VOUCHERS_SF.
Transaction Type Set value to AP VOUCHER: Budget-check the expense
distributions as well as prorated charges for a voucher.
Process All Business Units Set this checkbox to CHECKED. Select to have the Budget Processor process review all business units. If you do not select this option, you must select Business Unit in the Field Name field and specify a business unit or range of business units to be processed.
Selection Parameters
Field Name Leave blank.
Value Type Leave blank.

Procurement Reference Guide
Last Updated: June 11, 2012 125
Topic 2: Student Refund Transactions – Payment Processing
CUNYfirst provides the Pay Cycle process to generate payments for student refunds.
Pre-Authorized Roles
CU_FSAP_Review_AP_Info
CU_FSAP_Voucher_Entry CU_FSAP_Create_Pay_Cycle CU_FSAP_Process_Pay_Cycle
The Accounts Payable Pay Cycle Processing 1 is found by navigating to Accounts Payable > Payments > Pay Cycle Processing > Payment Selection Criteria.
The Accounts Payable Pay Cycle Processing 2 is found by navigating to Accounts Payable > Payments > Pay Cycle Processing > Pay Cycle Manager.
Step Summary
1. Navigate to the Pay Cycle Processing. 2. If there is no existing run control ID, click on the Add button. Otherwise, use an existing run
control ID, ex. FACHK2. 3. On the Dates tab, select appropriate values for Pay From Date, Pay Through Date, Payment
Date, Next Pay Through Date, Next Payment Date. 4. On the Preferences tab, check the box “Automatic Increment Dates”. 5. On the Source/BU tab, select “VCHR” for Source Transaction. Select the business unit(s). 6. Select Save. 7. Click the “Dates” tab. 8. Click the link “Pay Cycle Manager”. 9. Commence the pay cycle by selecting the server for either “Payment Selection” or “Payment
Selection & Creation”. 10. Click the Process button. 11. Click the Refresh button to update the pay cycle status. 12. Process is complete.
Detailed Information
Pay Cycle Processing – Student Refunds
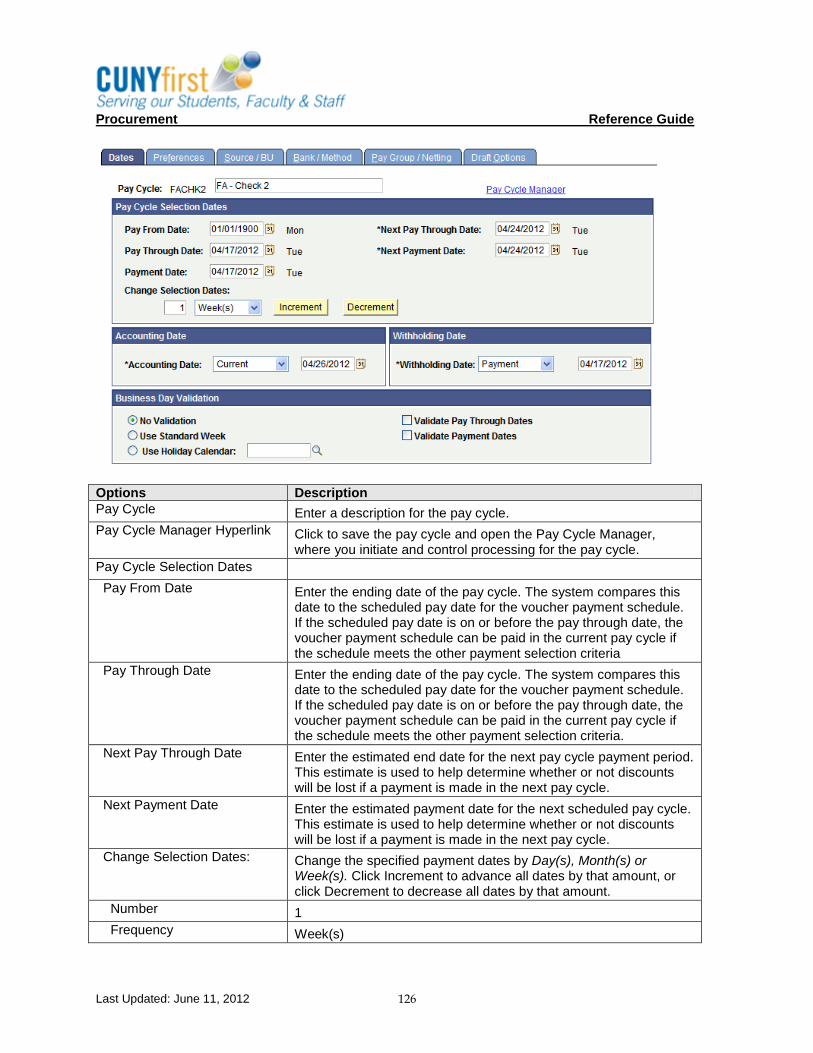
Procurement Reference Guide
Last Updated: June 11, 2012 126
Options Description
Pay Cycle Enter a description for the pay cycle.
Pay Cycle Manager Hyperlink Click to save the pay cycle and open the Pay Cycle Manager, where you initiate and control processing for the pay cycle.
Pay Cycle Selection Dates
Pay From Date Enter the ending date of the pay cycle. The system compares this date to the scheduled pay date for the voucher payment schedule. If the scheduled pay date is on or before the pay through date, the voucher payment schedule can be paid in the current pay cycle if the schedule meets the other payment selection criteria
Pay Through Date Enter the ending date of the pay cycle. The system compares this date to the scheduled pay date for the voucher payment schedule. If the scheduled pay date is on or before the pay through date, the voucher payment schedule can be paid in the current pay cycle if the schedule meets the other payment selection criteria.
Next Pay Through Date Enter the estimated end date for the next pay cycle payment period. This estimate is used to help determine whether or not discounts will be lost if a payment is made in the next pay cycle.
Next Payment Date Enter the estimated payment date for the next scheduled pay cycle. This estimate is used to help determine whether or not discounts will be lost if a payment is made in the next pay cycle.
Change Selection Dates: Change the specified payment dates by Day(s), Month(s) or Week(s). Click Increment to advance all dates by that amount, or click Decrement to decrease all dates by that amount.
Number 1
Frequency Week(s)

Procurement Reference Guide
Last Updated: June 11, 2012 127
Options Description
Accounting Date Determines the fiscal year and period to which the payment accounting entries are posted. There are three options for the date that the system uses as the accounting date for the payments created in the pay cycle:
Current: The current date.
Payment: The value in the Payment Date field.
Specific: The specific value that you enter. When you select this option, the date field next to the Accounting Date field is activated. Enter the specific date in the date field.
Accounting Date Current
Withholding Date Enter the date that determines the reporting period in which a withholding amount is reported for a vendor. There are three options for the date that the system uses as the withholding date for withholdings associated with payments created in the pay cycle:
Current: The current date.
Payment: The value in the Payment Date field.
Specific: The specific value that you enter. When you select this option, the date field next to the Withholding Date field is activated. Enter the specific date in the date field.
For example, you could be running a pay cycle for December 31 but actually want the withholdings to be reported for the following year. To do so you would specify January 1 as the Withholding Date and the withholdings would be declared the following year. This date is also used on period based withholdings to figure out which period is going to be used to properly calculate withholdings.
Withholding Date Payment
Business Day Validation Business calendars enable you to verify that transaction processing dates are valid working days. The business calendar is used throughout PeopleSoft applications to define nonworking days and holidays.
No Validation Checked. Select when no holidays or weekends are considered when determining payment and discount due dates.

Procurement Reference Guide
Last Updated: June 11, 2012 128
Options Description
General Options
Automatic Increment Dates Checked. Select to enable a process that automatically advances the Pay From Date, Pay Through Date, Payment Date, Next Pay Through Date, and Next Payment Date fields on the Dates page. The new dates are validated, based upon the calendar and validation options set on the Dates page. Pay through dates automatically advance, taking into account non-work days (holidays, weekends) when such days immediately follow the calculated pay through date. The next pay cycle run date advances to the next working day. The increment is controlled on the Dates page and may be any number of days, weeks, or months.

Procurement Reference Guide
Last Updated: June 11, 2012 129
Options Description
Source The Source Transactions define the types of payments processed in a pay cycle. You set up new or review delivered source transaction definitions on the Payment Source and Payment Source Search Definition pages, and source transaction mapping detail on the Pay Cycle Mapping and Pay Cycle Mapping Detail pages. If you set up a new payment source, you must map it to the payables payment tables using the mapping pages.
Process Checked
Source Transaction VCHR
Business Unit You can select multiple business units. For example, your regular pay cycle can include all business units. Select the Process check box for each business unit that you want to include during the pay cycle to narrow the selection criteria. Only vouchers for the business units that you specify are included in the pay cycle. The system uses the vendor and voucher information at the business unit level unless you override that information. If you do not want to process a particular business unit during a specific run of the Pay Cycle process, clear the Process check box for that business unit.
Process Checked
Business Unit Examples: LAGPR, QCCSF

Procurement Reference Guide
Last Updated: June 11, 2012 130
Unit V: Accounts Payable: Bank Statement to Cash
Unit Introduction Interface the bank statement(s) with the system and run the Bank Reconciliation process to mark payments that have cleared the bank system.
Bank statement reconciliation with will be run for all payments processed through the Student Financials to AP interface – namely, Financial Aid disbursements and Student tuition refunds. Since these checks will be processed centrally through , the bank reconciliation will also be handled centrally. Bank statement reconciliation will be performed on a daily basis by the OUC Data Integrity team.
There will be a single bank selected by CUNY to process both Financial Aid disbursements and tuition refunds. Two zero balance accounts will be established, one for each payment type that will be reconciled with the payments processed using the Student Financials to AP interface.
Unit Objectives Upon completion of this module, the learner will be able to:

Procurement Reference Guide
Last Updated: June 11, 2012 131
Chapter 1: Bank Statement to Cash
Chapter Objectives Upon completion of this chapter, the learner will be able to:
Load the bank statement electronically.
Load the bank statement manually.
Reconcile the bank transactions with the system transactions.

Procurement Reference Guide
Last Updated: June 11, 2012 132
Topic 1: Bank Statement to Cash – Import Bank Statement
CUNYfirst provides the Import Bank Statement process to bring in the bank statement transactions.
Pre-Authorized Roles
CU_FSAP_Bank_Statement_Maint
The Import Bank Statements is found by navigating to Banking > Bank Statements > Import Bank Statements.
Step Summary
1. Navigate to the Import Bank Statement. 2. If there is no existing run control ID, click on the Add button. Otherwise, use an existing run
control ID. 3. Enter a value for Request Number. 4. Select an appropriate value for Import Type. 5. Enter a value for File Path. 6. Enter a value for File Name. 7. Select an appropriate value for Statement Type. 8. Select an appropriate value for Layout. 9. Click the Run button for the Process Scheduler Request page. 10. Click the OK button to initiate the process. The system will return to the Import Bank Statement
page and generate a process instance. 11. Process is complete.
Detailed Information
Import Bank Statements

Procurement Reference Guide
Last Updated: June 11, 2012 133
Options Description
Import Type Options are:
FTP (file transfer protocol): Select if you are importing the file by using file transfer protocol, and enter a bank node through which to transfer the data.
File: Select if you are importing a file located on a shared server directory within your network.
HTTP: Select if you are importing a file using a URL that is included as part of the node configuration. No file path or file name is required.
View Bank Node Details Click to access the Bank Node Details page and review the property details of the selected node. This link is available only if FTP or HTTP is selected in the Import Type field.
File Path Enter the complete file path location. To select files by clicking the Select File button, the file path must have a trailing backslash (\).
You can also search for files of a specific type by entering an asterisk and the extension suffix. For example, to search all files with a .txt suffix, enter: \*.txt
File Selection Help Click to view help information on specifying file paths and file names.
File Name Select the specific file to import. If you want to import multiple files based on extension, leave this field blank.

Procurement Reference Guide
Last Updated: June 11, 2012 134
Options Description
Layout Select the file layout of the bank statement file being imported. Unless Cash Management 8.9 or later is installed, select PSBD1 or PSBD2. (for PeopleSoft Enterprise 8.8 or later).
Note. You can import bank-statement, data files using the PSBD2 layout if you have Cash Management 8.8 installed and are using a third-party, communication toolkit that has the capability of processing files in XML format. Sample files that can be used as guidelines for transforming bank-statement, date files into the PSBD2 layout can be found on Customer Connection.
Note. If you are importing multiple files for a single run control ID, you must add requests (by clicking the Add button) for each file that you are requesting. Do not enter a file name, run the import process, and then edit the file name and run the import process again. Doing this can result in duplicate statement loading errors.

Procurement Reference Guide
Last Updated: June 11, 2012 135
Topic 2: Bank Statement to Cash – Enter Bank Statement
CUNYfirst provides the Enter Bank Statement process to bring in the bank statement transactions.
Pre-Authorized Roles
CU_FSAP_Bank_Statement_Maint
The Enter Bank Statements is found by navigating to Banking > Bank Statements > Enter Bank Statements.
Step Summary
1. Navigate to the Enter Bank Statement. 2. If there is no existing run control ID, click on the Add button. Otherwise, use an existing run
control ID. 3. Enter a value for Request Number. 4. Select an appropriate value for Import Type. 5. Enter a value for File Path. 6. Enter a value for File Name. 7. Select an appropriate value for Statement Type. 8. Select an appropriate value for Layout. 9. Click the Run button for the Process Scheduler Request page. 10. Click the OK button to initiate the process. The system will return to the Import Bank Statement
page and generate a process instance. 11. Process is complete.
Detailed Information
Enter Bank Statements

Procurement Reference Guide
Last Updated: June 11, 2012 136
Options Description
Bank Balances Enter the statement code, value date, and balance amount for each item. If you receive bank statements electronically, the system populates these fields.
Note. The system balances the opening and closing ledger amounts with the sum of the daily transactions and displays a warning message if the amounts are unbalanced. It uses the default balance codes 010 - OPENING BALANCE and 015 - CLOSING BALANCE. If your organization uses different balance codes, you must edit the following with your preferred default code values: the component BANK_BALSTMT_ENTRY, the record BNK_RCN_CYC, and Saveedit PeopleCode.
Statement Code Determines the type of balance that is being entered. The system uses these balances for various bank features and processes, such as the cash position worksheet.
Balance Enter the total amount of funds that are available on the specified value date.
Options Description

Procurement Reference Guide
Last Updated: June 11, 2012 137
Options Description
Statement Code Select a statement code to indicate if the transaction is a debit or a credit. This value determines the default transaction code and statement activity type that is on the Recon Information grid.
Reference Enter a transaction reference number.
Bank Date Select the entry date of the transaction. The default is the statement date.

Procurement Reference Guide
Last Updated: June 11, 2012 138
Topic 3: Bank Statement to Cash – Reconcile Statements
CUNYfirst provides the Reconcile Statement process to reconcile the bank statement transactions with the system transactions.
Pre-Authorized Roles
CU_FSAP_Bank_Reconciliation
The Reconcile Statements is found by navigating to Banking > Reconcile Statements > Semi-Manual Reconciliation.
Step Summary
1. Navigate to the Semi-Manual Reconciliation. 2. Select a bank ID. 3. Select an account number. 4. Select values for From Date and Thru Date. 5. Select value “Unreconciled” for Reconciliation Status. 6. Click on the Search button. 7. Click on the Select checkbox for a bank transaction. 8. Select on the Select checkbox for a system transaction. 9. Select the Reconcile button. 10. Process is complete.
Detailed Information
Enter Bank Statements
Options Description
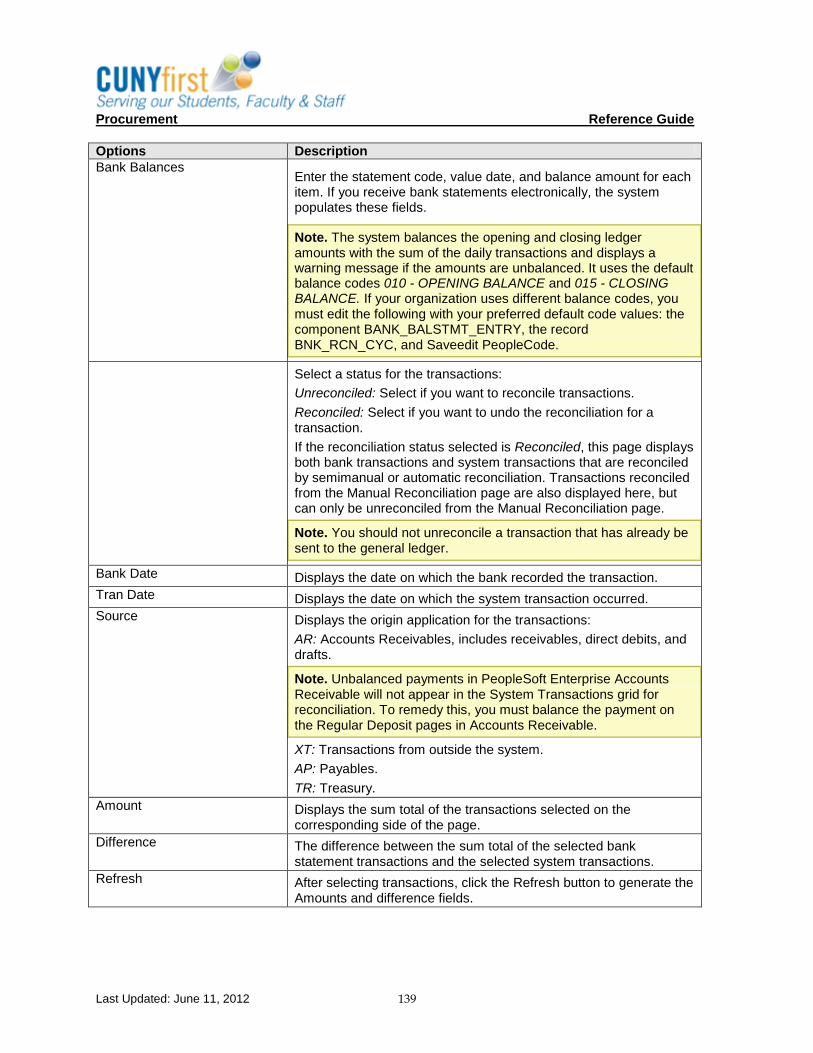
Procurement Reference Guide
Last Updated: June 11, 2012 139
Options Description
Bank Balances Enter the statement code, value date, and balance amount for each item. If you receive bank statements electronically, the system populates these fields.
Note. The system balances the opening and closing ledger amounts with the sum of the daily transactions and displays a warning message if the amounts are unbalanced. It uses the default balance codes 010 - OPENING BALANCE and 015 - CLOSING BALANCE. If your organization uses different balance codes, you must edit the following with your preferred default code values: the component BANK_BALSTMT_ENTRY, the record BNK_RCN_CYC, and Saveedit PeopleCode.
Select a status for the transactions:
Unreconciled: Select if you want to reconcile transactions.
Reconciled: Select if you want to undo the reconciliation for a transaction.
If the reconciliation status selected is Reconciled, this page displays both bank transactions and system transactions that are reconciled by semimanual or automatic reconciliation. Transactions reconciled from the Manual Reconciliation page are also displayed here, but can only be unreconciled from the Manual Reconciliation page.
Note. You should not unreconcile a transaction that has already be sent to the general ledger.
Bank Date Displays the date on which the bank recorded the transaction.
Tran Date Displays the date on which the system transaction occurred.
Source Displays the origin application for the transactions:
AR: Accounts Receivables, includes receivables, direct debits, and drafts.
Note. Unbalanced payments in PeopleSoft Enterprise Accounts Receivable will not appear in the System Transactions grid for reconciliation. To remedy this, you must balance the payment on the Regular Deposit pages in Accounts Receivable.
XT: Transactions from outside the system.
AP: Payables.
TR: Treasury.
Amount Displays the sum total of the transactions selected on the corresponding side of the page.
Difference The difference between the sum total of the selected bank statement transactions and the selected system transactions.
Refresh After selecting transactions, click the Refresh button to generate the Amounts and difference fields.

Procurement Reference Guide
Last Updated: June 11, 2012 140

Procurement Reference Guide
Last Updated: June 11, 2012 141
Appendix
A: P-Card processing Draft 06-10 Updated 5/14/2012
Policies
1. P-cards are assigned transaction and monthly limits as well as limitations on eligible vendors purchases. These limits are managed by Purchasing the P-card Program Administrator in the college or Central Office.
2. For fixed assets, CUNY will establish a maximum transaction limit over which these assets must be acquired using standard PO processing:
Today, fixed assets valued at > $5000 must be asset tagged and, as a consequence, must be processed through a PO.
Computer equipment requires asset tagging based on the limits established by the business unit. For example, all Central Office computer equipment, regardless of price, must now be tagged.
3. For non-fixed assets, the individual transaction limits for the card will apply. Scenario 1: P-cards are assigned to departments or individuals within a department. Blanket purchase orders are created for each P-card by department. Assumptions:
1. CUNY OUC will identify a limited number of commonly used account codes that represent typical purchases on a P-card. Examples include subscriptions, memberships, conference registrations, books, office supplies. There is a requirement for a miscellaneous supplies category to accommodate unexpected charges. {Include specific list.}
These account codes will be used to facilitate reconciliation of charges and assignment to the appropriate budget codes.
2. Blanket purchase orders will be created to encumber funds for P-cards. Procedure:
At the beginning of the fiscal year, each department that has deployed one or more P-cards will estimate their annual P-card charges, and the approximate distribution of those charges across the designated P-card account codes.
The department will enter a requisition for its P-card(s) that contains a single line with their estimated annual P-card charges.
Purchasing will open a blanket purchase order for each department. o Each blanket purchase order will have a single line with multiple distributions established
for each of the established account codes (see #1). P-Card reconciliation and payment Assumptions:
1. AP receives a master statement with all relevant P-cards for the business unit. 2. Department or individual P-Card holders in a department will also be able to access the monthly
statement for each P-card. Procedure:

Procurement Reference Guide
Last Updated: June 11, 2012 142
For P-cards that are assigned to a department or to individuals within a department, the P-card holder is responsible for all the following actions:
o Review the monthly electronic statement. o Validate that charges are accurate. o Notify both Program Administrator and Citibank Visa of any disputes, fraudulent or
erroneous charges. o Complete the P-card payment form as follows:
- Enter the appropriate Purchase Order number on the form.
- Print the statement and assign a category code to each charge on the statement. These codes will map to the designated P-card account codes.
- Scan and attach the statement to the P-card payment form.
- Fill in the amount of purchase for each applicable account code. Ensure that the total matches the statement total.
- Scan and attach receipts to the form. - Send the completed form to the card holder’s supervisor for approval.
o Assign one of the designated account codes to each transaction on the statement and indicate the total dollar amount for each category using a reconciliation template spreadsheet.
o Forward the reconciliation spreadsheet template via e-mail to his/her supervisor with attached electronic copy of the statement and scanned receipts.
The supervisor is responsible for forwarding the reconciliation template to AP with his/her approval. will:
- Review the form, the scanned statement, and the attached scanned receipts.
- Enter the approval date and forward the form, and attachments to AP via email.
AP will create a voucher for each P-card or department, assigning the charges to the appropriate distributions corresponding to the account codes on the reconciliation template. These vouchers will be paid against the blanket PO.
In the event that a department does not return the reconciliation spreadsheet template in a timely fashion, AP must still pay the Citibank bill. Any charges for which account codes have not been identified will be charged to a miscellaneous supplies code.
Since there is no receipt, the voucher will fail matching and the AP Director must override the match failure.
Scenario 2: The Purchasing Department at the college has one or more P-cards. Buyers will procure goods/services with their P-cards on behalf of other departments Assumptions:
1. CUNY OUC will identify a limited number of commonly used account codes that represent the majority of purchases on a P-card. These must correspond to budget categories. Examples include subscriptions, memberships, conference registrations, books, office supplies. There is a requirement for a miscellaneous supplies category to accommodate unexpected charges. {Include specific list.}
These account codes will be used to facilitate reconciliation of charges and assignment to the appropriate budget codes.
2. Purchasing may have one or multiple P-cards that are used by buyers for purchases where the P-card can be used for payment.
Purchasing can buy on behalf of departments that do not have P-cards or those that may be unaware that the goods/services requested can be procured using a P-card.
Procedure:
Requesters enter requisitions for goods or services using the standard requisition function.

Procurement Reference Guide
Last Updated: June 11, 2012 143
As requesters enter requisitions, buyers may elect to procure the goods/services through the use of a P-card. For goods/services that are eligible to be procured using a P-card, buyers should source the requisition using the P-card.
Buyers can create a purchase order to Citibank for each requisition, as the requisitions are received, while actually procuring the goods and services using the P-card. This purchase order should include the appropriate distributions as determined by the requisitions received during that period. The PO should be dispatched in CUNYfirst, but not sent to Citibank.
Requesters will be responsible for entering receipts in CUNYfirst for goods/services that were procured on their behalf through Purchasing as they are received.
P-Card reconciliation and payment Assumptions:
1. AP receives a master statement with all relevant P-cards for the business unit. 2. Purchasing will have access to the monthly statement for each P-card held by purchasing.
Procedure:
For P-cards that are assigned to Purchasing or to individuals within Purchasing department, the P-card holder is responsible for all the following actions:
Review the monthly electronic statement.
Validate that charges are accurate.
Notify both Program Administrator and Citibank Visa of any disputes, fraudulent or erroneous charges.
Buyers will review the monthly electronic statement to validate that the charges are accurate.
Buyers will notify both the P-card Program Administrator and Citibank VISA of any disputes, fraudulent or erroneous charges.
Buyers will create a purchase order for those requisitions reflected on the current monthly statement.
Complete the P-card payment form as follows: - Print the Statement and assign the PO and line numbers to each charge on the
statement.
- Scan and attach the statement to the P-card payment form.
- Fill in the amount of purchase for each applicable account code. Ensure that the total matches the statement total.
- Purchasing will collect receipts from the end users for all requisitions included in the PO. Scan and attach receipts to the form.
- Send the completed form to Accounts Payable.
AP will create a voucher for each P-card, paying the appropriate distributions corresponding to the categories charged and referencing the blanket PO.
If receipts are missing for any of the charges on the statement, the requester will be notified via e-mail to enter the receipt. In the event that the receipt is not entered in a timely fashion, the bill must be paid. The voucher will fail matching and the AP Director will override the match failure.
AP can issue one voucher per P-card or can issue a single voucher to pay charges for multiple P-cards.

Procurement Reference Guide
Last Updated: June 11, 2012 144
B: Travel Card Processing
Policies
The travel card program is designed to provide employees with a mechanism to pay for travel expenses. The card will be made available to employees who are expected to travel at least once a year as part of their job.
Only appropriate travel expenses may be charged to the card.
A reconciliation process for travel expenses, including travel card expenses will be developed and referenced here. The following requirements (from the OSC travel manual statements will likely be revamped based on that process.
o A travel voucher must be submitted detailing all expenses including both travel card charges and out-of-pocket expenses.
o Vouchers must be submitted in a timely fashion, along with required receipts, to ensure timely reconciliation of the travel card bill.
o Revocation of the travel card may occur upon repeated delays in the submission of vouchers.
Travel cards are assigned to individuals within a department. Blanket purchase orders are created for each P-card by department. Assumptions:
3. CUNY will handle all travel expenses as a single account code for purposes of the GL. 4. Each department will create a blanket purchase orders to encumber funds for travel cards for the
fiscal year. Procedure:
At the beginning of the fiscal year, each department that has deployed one or more travel cards will estimate their annual travel card charges.
The department will enter a requisition for its travel cards that contains a single line with their estimated annual travel card charges.
Purchasing will open a blanket purchase order for each department’s travel expenses. Travel Card reconciliation and payment Assumptions:
3. AP receives a master statement with all relevant travel cards for the business unit. 4. Department or individual travel card holders in a department will also be able to access the
monthly statement for each travel card. Procedure:
The travel card holder is responsible for all the following actions: o Review the monthly electronic statement. o Validate that charges are accurate. o Notify both Program Administrator (is there a Program Administrator for the travel card
program?) and Citibank Visa of any disputes, fraudulent or erroneous charges. o Forward an email to the supervisor, containing the appropriate Chartfields, and scanned
copies of the statement and receipts.
The supervisor is responsible for forwarding the reconciliation template to AP with his/her approval.

Procurement Reference Guide
Last Updated: June 11, 2012 145
AP will create a voucher for each travel card or department. These vouchers will be paid against the blanket PO for the department.
Since there is no receipt, the voucher will fail matching and the AP Director must override the match failure.

Procurement Reference Guide
Last Updated: June 11, 2012 146
C: Run Reports For many of the processes and transactions that are carried out in , it is necessary at certain key points to run a report.
When a report is run, its results may be viewed or printed either:
for analysis by the user, a manager, or other individual within CUNY.
for use in subsequent processes or transactions.
to verify that data has been entered and/or processed accurately.
The opportunity to run a report is available in a wide variety of components within.
To run a report in , it is necessary to navigate to the specific component from which that report is launched. For example, to run the Print Course Catalog report, the user first would navigate to the component called Print Course Catalog. After determining the appropriate component from which to run the desired report, continue as follows.
Step Summary
To run reports:
1. Navigate to the component from which the report is launched. 2. Search for a Run Control ID already created.
--or-- 3. Add a New Value with a new Run Control ID (create a name that can be recognized later for re-
use). 4. On the Report Request page, enter criteria and parameters for data to be returned in this report. 5. Click the Save button to save this report request. 6. Click the Run button. 7. Note the report request details listed in the Process List area. 8. Select report Type and Format (i.e. Web, PDF). 9. Click the OK button (this launches the request and returns us to the Report Request page). 10. Note the Process Instance number for this running of the report, which now appears on the
Report Request page. To view, save, or print the report:
11. Click the Report Manager link. 12. On the Administrative tab, click the Refresh button to update the Report List, and verify that the
status of the desired Process Instance is “Posted.” 13. Click on the Description link of the desired report to view the report. 14. With the report displayed (i.e. in PDF format) click the Print or Save icon to print or save the
report.
Note: The above steps are sufficient for viewing, saving or printing a report.
The following steps are for retrieving system information pertaining to a report, and are not needed for simply viewing or printing a report that has been successfully run.
To view the status of the report request and further details (if necessary):
15. If necessary, close the window displaying the report. 16. Click the “Go Back to [page name]” link to return to the Report Request page. 17. Click the Process Monitor link (this enables us to see the status of any job in the queue and other
processes that we have initiated).

Procurement Reference Guide
Last Updated: June 11, 2012 147
18. Note the status of the requested report. If necessary, click the Refresh button to update the status.
19. If necessary, click the Details link of the desired process instance to display system details pertaining to this running of a report.
20. On the Process Detail page, clicking on the “Parameters,” “Message Log” or “View Log/Trace” links will display further system details pertaining to this report.
21. If necessary, click the Return button to return to the Process Detail page. 22. Click OK or Cancel to return to the Process Monitor page. 23. Click the “Go Back to [page name]”link to return to Report Request page.
Detailed Information
Navigate to the component from which the desired report is run (the example shown below is the Print Course Catalog component). Find an existing Run Control ID and select it, -or- create a new Run Control ID, using Add a New Value. Create a recognizable name for later re-use, click the Add button.
Run Control ID
A Run Control ID stores the requester’s report selection criteria. In cases where the same report criteria will be used to run a report on a regular basis, CUNY suggests that the requester create their own descriptive Run Control ID. The user should use a name that will be easy to remember. Only the user will be able to see one’s Run Control IDs. A Run Control ID can be used repeatedly. There is no need to create a new one each time the same kind of information is required for a report.
Do not use spaces or special characters in the name. You may use a dash ( – ) or an underscore ( _ ) character in place of a space. Be advised that Run Control IDs are Case Sensitive and cannot be deleted. Because Run Control IDs cannot be deleted, a good habit to get into is to search before adding a new value. If we know the name of the Run Control ID, we may type in that value in the search field and then click the Search button. If the whole name is not known a partial value may be typed into the field. The Run Control ID search operates the same as other searches in .

Procurement Reference Guide
Last Updated: June 11, 2012 148
Report Request Page
Once a Run Control ID has been selected, or a new one created, the criteria and parameters to be used in running the report must be entered on the Report Request page. Enter here the parameters and criteria to be applied to this running of the report. (The example shown below is of the Print Course Catalog component. Different criteria and/or parameter fields will appear, depending on the specific report being requested).
Some reports have no predefined selection criteria to narrow the search results. Other reports have several fields available for the requester to define the information needed. These fields can be used to avoid “run-away reports”, or reports that return too much information and aren’t specific to what the requester is looking for. Run-away reports have the potential to hold up or prevent other reports that this user or other users want to run.
Once the criteria are entered, save the criteria for this request by clicking the Save button (bottom of page). Saving will capture what you selected on this page and show the next time this Run Control is opened (values can be changed at that time). Click the Run button to start running the process.

Procurement Reference Guide
Last Updated: June 11, 2012 149
Process Scheduler Request Page
The Process Scheduler Request Page lists the process (report) that the user has requested to run and basic information about this report (Description, Process Name, Process Type, (Output) Type, Format and Distribution). If the report is to run immediately, leave the default values in the Run Date and Run Time fields. If the report is to run in the future, set the Run Date and Run Time accordingly.
Select the Type and Format of the report. The Type will normally be Web and the Format should be PDF or CSV.
To continue, click OK.
Clicking the OK button returns us to the Report Request page. The results of the process request (including the report itself, when complete) can be found through either of the following two links on the page:
Report Manager link & Process Monitor link
Report Manager and Process Monitor links
Before selecting Report Manager or Process Monitor link, note the process instance number which has resulted from the running of the report request, and which will be needed to distinguish this report request from others that may be displayed.

Procurement Reference Guide
Last Updated: June 11, 2012 150
Report Manager
The Report Manager Stores reports run through Process Scheduler and let user view, print, or save online reports. As users have different levels of access to Report Manager functionality based on their security, they may or may not be able to do everything described in this manual.
Click the Report Manager link, and on the Report Manager page, click on the Administration tab.
By default, all the reports requested under the current user’s ID within the last 1-day period are displayed. The list can be narrowed or broadened by increasing the time criteria to include more days, or by limiting it to a specific number of hours or minutes.
After resetting the report search criteria, click the Refresh button.
The Refresh button also updates the Status of the report.
Note: Repeated, rapid clicking of the Refresh button will not speed the process and may be counterproductive to the system, and so is not recommended.
Click on the link of the desired report in the Description column to display the report.

Procurement Reference Guide
Last Updated: June 11, 2012 151
View, Print or Save a Report
On the Administration page of the Report Manager, click on the hyperlink of the desired report in the Description column (if pop-ups are blocked on your computer, hold the Ctrl button as you click the link). The report appears in a new window and may be viewed, saved or printed from there.
Report Detail page
On the Administration page of the Report Manager, click on the Details link to view the Report Detail page.
In this example, the report link appears in the File List with a file extension “PDF.” Clicking this link is an alternative means of displaying the report, which can be viewed, saved or printed in the same way as above.
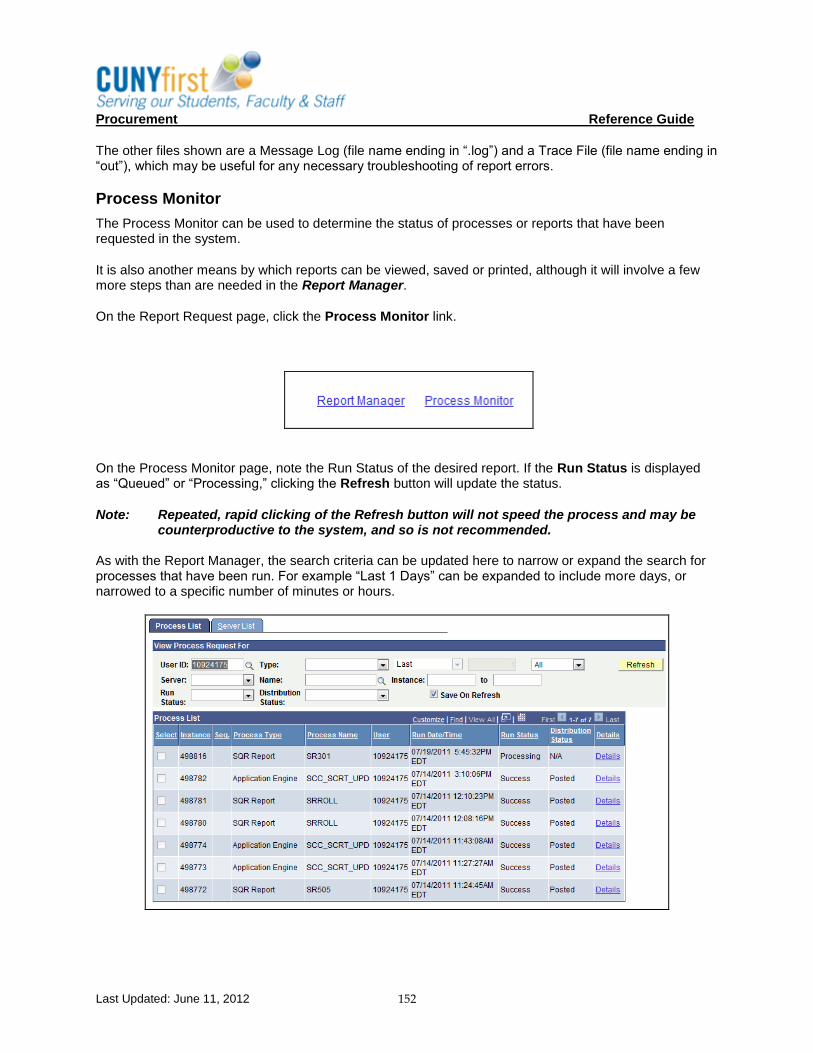
Procurement Reference Guide
Last Updated: June 11, 2012 152
The other files shown are a Message Log (file name ending in “.log”) and a Trace File (file name ending in “out”), which may be useful for any necessary troubleshooting of report errors.
Process Monitor
The Process Monitor can be used to determine the status of processes or reports that have been requested in the system.
It is also another means by which reports can be viewed, saved or printed, although it will involve a few more steps than are needed in the Report Manager.
On the Report Request page, click the Process Monitor link.
On the Process Monitor page, note the Run Status of the desired report. If the Run Status is displayed as “Queued” or “Processing,” clicking the Refresh button will update the status.
Note: Repeated, rapid clicking of the Refresh button will not speed the process and may be counterproductive to the system, and so is not recommended.
As with the Report Manager, the search criteria can be updated here to narrow or expand the search for processes that have been run. For example “Last 1 Days” can be expanded to include more days, or narrowed to a specific number of minutes or hours.

Procurement Reference Guide
Last Updated: June 11, 2012 153
Details link Click the Details link to view details such as request parameters, message log, and process server assignment for the desired report. This is also another means of accessing the actual report (in addition to the simpler use of the Report Manager).
Clicking this link will open the Process Detail page for the selected report.
Process Detail Page
Many of the items on the Process Detail page are read-only. If security access is granted, requestors may choose to select the Cancel Request or Delete Request radio button for the process.
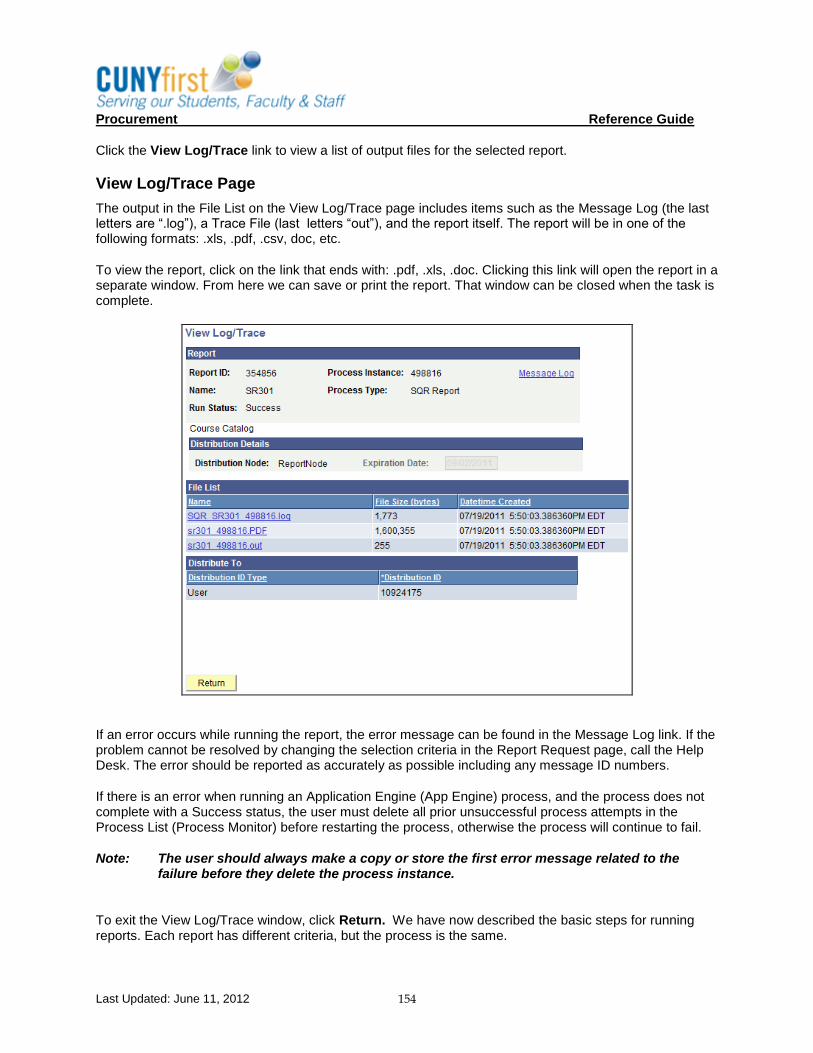
Procurement Reference Guide
Last Updated: June 11, 2012 154
Click the View Log/Trace link to view a list of output files for the selected report.
View Log/Trace Page
The output in the File List on the View Log/Trace page includes items such as the Message Log (the last letters are “.log”), a Trace File (last letters “out”), and the report itself. The report will be in one of the following formats: .xls, .pdf, .csv, doc, etc.
To view the report, click on the link that ends with: .pdf, .xls, .doc. Clicking this link will open the report in a separate window. From here we can save or print the report. That window can be closed when the task is complete.
If an error occurs while running the report, the error message can be found in the Message Log link. If the problem cannot be resolved by changing the selection criteria in the Report Request page, call the Help Desk. The error should be reported as accurately as possible including any message ID numbers.
If there is an error when running an Application Engine (App Engine) process, and the process does not complete with a Success status, the user must delete all prior unsuccessful process attempts in the Process List (Process Monitor) before restarting the process, otherwise the process will continue to fail.
Note: The user should always make a copy or store the first error message related to the failure before they delete the process instance.
To exit the View Log/Trace window, click Return. We have now described the basic steps for running reports. Each report has different criteria, but the process is the same.