financials system overview - · pdf filefrequently asked g/l questions 72 ... 107 audit...
TRANSCRIPT

ACTIVANT STANPAK™Financials Manual – General Ledger and Accounts Payable Version 8.xx


This manual contains reference information about software products from Activant Solutions Inc. The software described in this manual and the manual itself are furnished under the terms and conditions of a license agreement. The software consists of software options that are separately licensed. It is against the law to copy the software on any medium, or to enable any software options, except as specifically permitted under the license agreement. In addition, no part of this manual may be copied or transmitted in any form or by any means without the prior written permission of Activant Solutions Inc.
From time to time, Activant makes changes to its software products. Therefore, information in this manual is subject to change, and the illustrations and screens that appear in the manual may differ somewhat from the version of the software provided to you.
Created by: Yardley Technical Communication
2006, Activant Solutions Inc. All rights reserved. Activant and the Activant logo are registered trademarks and Activant Prophet 21 is a trademark of Activant Solutions Inc. All other company or product names are the trademarks or registered trademarks of their respective companies.
Activant Solutions Inc. 7683 Southfront Road Livermore, CA 94551
Version 8.xx Publication Date: 12.10.2007
Stanpak Financials Page iii

Documentation Changes
Date Change Where 10/03/07 General Ledger Roadmap updates for version 8 Page 169 10/18/07 Clarification to Inventory Reconciliation section Page 85 11/01/07 Change IFI to IFPCHR Page 81
Page iv Table of Contents

Table of Contents Documentation Changes iv
General Ledger Overview 11 Tables................................................................................................................................12
Currency Codes ..................................................................................................12 Options..............................................................................................................................12
Number of Accounting Periods ..........................................................................12 Financial Reporting ............................................................................................12 General Ledger Detail History Listing ...............................................................13 Multiple Currencies ............................................................................................13
G/L Master File Maintenance 15 G/L Master File Maintenance Flow Diagram...................................................................16 GMM – G/L Master File Maintenance .............................................................................19
Establishing the Chart of Accounts ....................................................................19 Account Entry.....................................................................................................19 Account Maintenance.........................................................................................21 Account Deletion................................................................................................22 Account Listings.................................................................................................22
The Budget File ................................................................................................................22 GBM - Budget File Maintenance .......................................................................22 GBL- Budget File Listing...................................................................................23
General Ledger Inquiries ..................................................................................................24 GTL - G/L Activity Inquiry................................................................................24
G/L Summary History ......................................................................................................25 Loading the G/L History File .............................................................................25 GHM – G/L History File Maintenance...............................................................25 GHX - History Listing........................................................................................26
Allocating Journals ...........................................................................................................26 GAM - Allocating Journal Maintenance ............................................................26 GAL - Allocating Journal Listing.......................................................................28
Recurring Journals ............................................................................................................28 GRM - Recurring Journal Maintenance .............................................................28 GRL - Recurring Journal Listing........................................................................31
Purging Records................................................................................................................31 GYP - YTD Transaction Purge ..........................................................................31 GLP - History/Budget File Purge .......................................................................31
Journal Processing 33 Journal Processing Flow Diagram ....................................................................................33 General Journal Processing...............................................................................................37
GIP - General Journal Entry ...............................................................................37 GPL - General Journal Register..........................................................................38
Stanpak Financials Page v

GUP - General Journal Update ...........................................................................39 Automatic Journal Processing...........................................................................................39
GPI - Automatic Journal Register.......................................................................39 GUI - Automatic Journal Update........................................................................39
Recurring Journal Processing............................................................................................40 GRJ - Recurring Journal Register.......................................................................40 GRP - Recurring Journal Update ........................................................................40
Allocating Journal Processing...........................................................................................40 GAJ - Allocating Journal Register......................................................................40 GAP - Allocating Journal Update.......................................................................40
Journals from Stanpak Accounts Payable .........................................................................40 GJ - Interface Journal Scheduler.........................................................................41
Period-End Processing ......................................................................................................41 Terminal Date (ZE Date) ....................................................................................41 Profit Postings ....................................................................................................42 Financial Statements...........................................................................................42
Standard Financial Statements ..........................................................................................42 Reprinting Reports..............................................................................................42
Financial Statement Generator Reports ............................................................................42 Reprinting Reports..............................................................................................42
G/L File Updating.............................................................................................................43
Financial Statement Processing 45 Financial Statement Generator Flow Diagram..................................................................45 Financial Statement Generator Reports ............................................................................49
Report Formats ...................................................................................................49 Report Numbers..................................................................................................49 Printing Reports..................................................................................................49 Multiple Currencies ............................................................................................50
Printing Report Specifications ..........................................................................................50 GHH - Header Listing ........................................................................................50 GFL - Format Listing .........................................................................................50 GXR - Cross Reference Listing..........................................................................50
Financial Reporting 51 Financial Reporting Flow Diagram...................................................................................51
GAR - G/L Activity Report ................................................................................55 GHL - Comparative Analysis Listing.................................................................55 GPO - G/L Operating Report..............................................................................55 GTB - Trial Balance ...........................................................................................55 GIS - Income Statement .....................................................................................56 GTB - Balance Sheet ..........................................................................................56 GYL - G/L Detail History Listing ......................................................................56
Additional Stanpak Programs 57 GEA - Expense Analysis Report ........................................................................57 GYL - YTD Transactions Listing.......................................................................59 Listings for a Single Organization or Consolidation ..........................................59
General Ledger Calendar Ledger Calendar.......................................................................60 Migrating Your General Ledger from Your Old System..................................................61
Posting Balance Forward Values........................................................................61 Posting Monthly Activity from the Beginning of the Year ................................61 Manual Posting versus Automated Conversion..................................................62
CHART OF ACCOUNTS ................................................................................................62
Page vi Table of Contents

Creating the Chart of Accounts ..........................................................................62 Creating the Accounts - Step-by-Step: ...............................................................62
BUDGETS........................................................................................................................65 Creating a Budget ...............................................................................................65 Creating, Changing, & Updating - Step-by-Step:...............................................66
FINANCIAL STATEMENTS..........................................................................................67 Creating a Financial Statement...........................................................................67 Creating, Changing, & Updating - Step-by-Step:...............................................67
GFM - Format Maintenance .............................................................................................68 GFM Format Maintenance Template................................................................................69 Chart of Accounts Worksheet...........................................................................................71
Frequently Asked G/L Questions 72 How do you define NET PROFIT and GROSS PROFIT?.................................72 How does the system calculate AVERAGE DAYS/$ ? .....................................72 What does a Sample Chart Of Accounts include?..............................................73 What are the NPTA G/L Expense Definitions For PAR Breakouts? .................75 How do I Setup the G/L for a Consolidated F/S? ...............................................77 How do I Post Profit to the G/L account [PROFIT]? .........................................78 What are reasons that report generator reports and Stanpak reports might not agree?............................................................................................................................79 How do I reconcile my Inventory Value?...........................................................79 How do I Setup A/P to interface with the G/L?..................................................79
G/L Discussions 81 FIFO Inventory Value Tracking .......................................................................................81
FIFO Reporting Programs ..................................................................................81 FIFO Maintenance Program ...............................................................................81 Purchasing Programs and FIFO..........................................................................82 Invoicing Programs and FIFO ............................................................................82 Rebate posting for FIFO Inventory Valuation Method.......................................82
Inventory Reconciliation...................................................................................................85 Activity Based Cost Accounting.......................................................................................89
Cost Accounting .................................................................................................89 LIFO Cost Valuation ........................................................................................................92
A Technical Discussion of LIFO for Your Accountant......................................93 Computing the LIFO Value................................................................................94
Accounts Payable Processing Overview 99 Tables................................................................................................................................99
Country Codes....................................................................................................99 Currency Codes ..................................................................................................99 Language Codes ...............................................................................................100 Payment Terms Codes......................................................................................100
Options............................................................................................................................100 1099 or GST Reporting ....................................................................................100 A/P Detail History ............................................................................................100 A/P-G/L Interface.............................................................................................100 A/P-P.O. Interface ............................................................................................100 Check Reconciliation........................................................................................100 Country Code ...................................................................................................101 Fixed Expenses.................................................................................................101 Foreign Currency..............................................................................................101 Foreign Language.............................................................................................101
Stanpak Financials Page vii

Journals.............................................................................................................101
A/P File Maintenance 103 A/P File Maintenance Flow Diagram .............................................................................103 File Building Programs ...................................................................................................107
Vendor Master Maintenance.............................................................................107 Fixed Expenses .................................................................................................107 Audit Trails.......................................................................................................108
A/P File Maintenance Reports & Inquiries.....................................................................108
A/P Reports & Inquiries 109 Reports............................................................................................................................109
NTB - A/P Aged Trial Balance ........................................................................109 NDU - Accounts Payable Analysis...................................................................109 NDS - Discount Status Report ..........................................................................109 NMD - Monthly Disbursement Register ..........................................................109 NMS - Monthly Check Summary Listing.........................................................109 NRA - G/L Distribution Report ........................................................................109
Inquiries ..........................................................................................................................110 NI – A/P Inquiry ...............................................................................................110
Month-End Updating ......................................................................................................110 MVU - Month-End Vendor File Update...........................................................110
A/P Invoice Processing 111 A/P Invoice Processing Flow Diagram...........................................................................111 Invoice Entry...................................................................................................................115
Debit Memos ....................................................................................................115 Credit Memos ...................................................................................................115
ENTERING VENDOR INVOICES ...............................................................................116 NE – Vendor Invoice Entry ..............................................................................116
Distribution Line Entry ...................................................................................................118 Entering Invoices in a Foreign Currency ........................................................................118 Releasing Fixed Expenses...............................................................................................119
NFP – Fixed Expense Processing .....................................................................119 Verifying Entry of Payables Transactions ......................................................................119
NPR – A/P Invoice Preview Register ...............................................................119 NR - Vendor Invoice Register ..........................................................................119 File Updates......................................................................................................120 Foreign Currency Invoices ...............................................................................120
NM - Accounts Payable Maintenance.............................................................................121 Vendor Invoices................................................................................................121 Fixed Expenses .................................................................................................121 On-Account ......................................................................................................121
NFP – Fixed Expense Processing ...................................................................................122
A/P Payment & Purge Processing 125 A/P Payment & Purge Processing Flow Diagrams .........................................................125 Invoice Payment Selection..............................................................................................129
NC – Vendor Invoice Payments .......................................................................129 NCF – Fixed Expenses Payemnts.....................................................................132 NCM - Special Payments .................................................................................134 On-Account Items.............................................................................................134 NJ - Cash Requirements ...................................................................................139
Page viii Table of Contents

NJM - Cash Requirements Maintenance ..........................................................140 NCP - Printing Checks .....................................................................................143 NCR – Check/Voucher Register.......................................................................145
Void and Reversal Check Processing .............................................................................146 NVC - Void and Reversal Entry.......................................................................146 NVL - Void and Reversal Register...................................................................148
Accounts Payable History...............................................................................................149 Purging Records..............................................................................................................149
NP - Accounts Payable Purge..........................................................................149 NHP - Accounts Payable History Purge...........................................................150
A/P Check Reconciliation 151 A/P Check Reconciliation Flow Diagram.......................................................................151 Check Reconciliation......................................................................................................155
NBC – A/P Check Reconciliation Data Entry ..................................................155 Check Reconciliation Reports ........................................................................................158
NBL - A/P Check Reconciliation Register.......................................................158 NBO - A/P Outstanding Check Register ..........................................................159
1099 Processing 161 Options............................................................................................................................161 Processing.......................................................................................................................161
N99M - 1099 Detail Maintenance by Vendor ..................................................161 Reports & Inquiries.........................................................................................................163
N99P - 1099 Form Print ...................................................................................163 N99Q - Detail Inquiry by Vendor.....................................................................163 N99R - 1099 Detail Reporting and Purge.........................................................164
Getting Started 165 Accounts Payable Master File ..........................................................................165 Vendor Master File, program VM....................................................................165 Vendor Master File Listing, program VL.........................................................165 Fixed Expenses Maintenance, program NFM ..................................................165 Fixed Expenses Change Listing, program NFC ...............................................166 Fixed Expenses Master File Listing, program NFL .........................................166 IE - Inventory Adjustment Program .................................................................166
Frequently Asked A/P Questions 167 How Do I Apply Multiple Invoices To One A/P Proforma? ............................167 How do I Apply Multiple Proformas To One Invoice? ....................................167 How do I Clear Multiple On-Accounts?...........................................................168 How do I print Check/Voucher Register when I get an error message?...........168
General Ledger Interface Roadmap 169 Introduction ......................................................................................................169 OCJ – Order Entry Cash Journal ......................................................................170 RR – Invoice Summary Register ......................................................................171 RCA – Service Charge Audit ...........................................................................173 QC – Purchase Order Receiving (for IBT transactions only) ...........................174 NR – Vendor Invoice Register .........................................................................175 NCR – Check/Voucher Register.......................................................................176 NVL – Check Void/Reversal Register .............................................................177
Stanpak Financials Page ix

KJ – Cash Receipts Journal ..............................................................................178 IE – Item Adjustment Entry..............................................................................179 GUP – General Journal Update ........................................................................180 GUI – Automatic Journal Update .....................................................................181 GRJ – Recurring Journal Register ....................................................................182 G-2/GAJ – Allocating Journal Register............................................................183 GME – G/L Period End Closing.......................................................................184
Page x Table of Contents

General Ledger Overview
The General Ledger module includes a financial statement generator that allows flexible reporting with this year versus last year and budget versus actual comparisons. Other highlights of this module include:
• 12 or 13 accounting periods • ability to keep multiple periods open • alphanumeric organization codes and account numbers • amounts up to $999,999,999,999.99 supported • recurring and allocating journal entries • optional interfaces to accounts receivable, accounts payable, fixed assets, labor reporting,
inventory, and work in process. • reports can be printed for a single organization, a range of organizations, or for all
organizations
The General Ledger module includes five menus:
• G/L Master File Maintenance • Journal Processing • Financial Statement Generator • Financial Reporting • Special Functions
Each menu is discussed in detail in the sections that follow.
Before attempting to process transactions, you must create the chart of accounts in the G/L Master file and establish the beginning balances of the accounts through journal entries. Detailed operator procedures for the General Ledger programs are contained in the on-line documentation.
Although not available at this time, the General Ledger module supports multiple currencies in the general ledger with currency codes allowed in asset, liability, and capital accounts. When a balance sheet is printed, the program prompts for a currency date to translate the balances of foreign currency accounts to base currency.
General Ledger Overview Financials Page 11

Tables
Currency Codes If the multi-currency feature is activated either during installation or later, with CX, currency codes and exchange rates must be established in Currency Code Maintenance (TCU). At this time, this feature is not available.
Options
Number of Accounting Periods An accounting year can consist of 12 or 13 periods. The ending dates for each of the periods are established in Accounting Period Maintenance (GDM).
Financial Reporting Two methods of generating financial statements are available: Financial Statement Generator (FSG) and standard financial reports.
Financial Statement Generator FSG reports are very flexible, allowing the user to specify the format in which financial statements are to print. Other FSG features include:
• multi-period reporting (allows the current quarter of the current year to be compared to the same quarter of the previous year)
• this year versus last year and budget versus actual comparisons • reprinting of statements for closed periods • profit/cost center statements • ability to modify subtotal and total breaks with ease • assignment of same print format to other reports • only actual general ledger accounts need to be entered in G/L Master File Maintenance, GMM • generation of reports that accumulate totals and pass the results to other reports
Standard Financial Reports Standard financial reports include a balance sheet and an income statement that is formatted according to the way G/L accounts are established in GMM. Account numbers are assigned to titles, subtotals, and totals when this format is used. Account numbers are actually line numbers for the purpose of printing financial statements. When standard reports are used, account numbers must be assigned in the order in which the lines are to appear on the financial statements. Once the chart of accounts is established, changing the print format can be tedious.
Page 12 Financials General Ledger Overview

General Ledger Detail History Listing General ledger transactions for closed periods can be transferred to the G/L Detail History file so that the transactions can be distinguished from the ones in open periods. This option serves two purposes:
1. It allows the user to readily identify the transactions of a closed period. 2. It keeps a history of detail transactions for as long as the user chooses.
Multiple Currencies Although currently not available, if you plan on using the multi-currency feature, you will need to establish separate general ledger accounts by currency for Accounts Receivable, Accounts Payable, and Cash. Currency codes and exchange rates are maintained in Currency Code Maintenance, TCU.
Page 13 Financials General Ledger


G/L Master File Maintenance
The G/L Master File Maintenance menu includes the following programs: GMM G/L Master File Maintenance GML G/L Master File Listing GCL Chart of Accounts Listing GBM Budget File Maintenance GBL Budget File Listing GTL G/L Activity Inquiry GHM G/L Summary History Maintenance GHX G/L Summary History Listing GAM Allocating Journal Maintenance GAL Allocating Journal Listing GRM Recurring Journal Maintenance GRL Recurring Journal Listing GYP G/L Detail History Purge GLP G/L Summary History/Budget Purge GSM Standard Journal Maintenance GSL Standard Journal Listing
G/L Master File Maintenance Financials Page 15

G/L Master File Maintenance Flow Diagram The diagram on the following page shows the programs that are used to load and change the files that make up the general ledger database. Also shown are inquiries and reports that can be used to examine and list the contents of the files; and purge programs that can be used periodically to reduce the size of the files by eliminating obsolete data. The diagram also includes references to other modules that, when interfaced to G/L, automatically post to the general ledger through normal processing.
Page 16 Financials G/L Master File Maintenance

G/L Master File Maintenance Financials Page 17 G/L Master File Maintenance Financials Page 17


GMM – G/L Master File Maintenance
Establishing the Chart of Accounts When establishing the chart of accounts for the first time, the first organization created must have an asterisk (*) in the first position of the code (e.g., *0). This is referred to as the parent or consolidation organization. The complete chart of accounts must be entered under the consolidation organization. When the chart of accounts is completed, additional organization codes can be created to establish departments. The organization code for the department(s) can be any 2 character alphanumeric code, but it cannot be prefixed with an asterisk (*), as the asterisk is reserved for the parent organization only. The chart of accounts for the department(s) does not have to be entered into the system again. Instead, the specifications for the G/L accounts relevant to the department can be copied from the parent company by recalling the account in GMM.
The chart of accounts is entered through GMM, which allows the user to: • copy the chart of accounts from an existing organization to a new organization • add, change, or delete accounts • change organization titles • add, change, or delete accounts used exclusively in the preparation of standard financial
statements (i.e., accounts used solely to accumulate and print subtotals, totals, and titles) • specify the profit account for the Period-End Closing program
Account Entry Data entered in GMM is discussed below. If Financial Statement Generator is the reporting option selected, responses appropriate to FSG reports (where appropriate) are suggested for each of the fields in GMM. If the standard financial reporting method is selected, additional planning is required before setting up the chart of accounts. Detailed instructions for standard financial reporting are described in the on-line documentation for GMM.
G/L Account # (Required/ up to 10 alphanumeric characters) Enter the account number to be added or maintained. The standard G/L account lookup provides a list of the accounts already on file by number (?) or title (>); the (N)ext option displays the next account number on file.
01 Account Title (Required/ up to 32 alphanumeric characters) Enter the title of the account. The title is used for verification whenever the G/L account is entered. You may also search for G/L account numbers using this description.
Account Type (Required/ A, L, C, R, or E)Defines the account for financial statements as one of the following types:
A Asset L Liability C Capital/Stockholders' Equity R Revenue E Expense
02 Function Code (Required/ 1, 2, 3, or 4) If using the FSG, enter 3; otherwise enter one of the following:
1 Title printed 2 Subtotal/total printed
G/L Master File Maintenance Financials Page 19

3 Account balance and title printed 4 Account balance added to a total but not printed.
03 Total Level (Required/ 1-digit) This code is used to group a number of accounts together for totaling on the standard reports. For FSG, enter 5.
04 Line Spacing (Required/ 1-digit) For FSG, enter 0; otherwise enter the number of blank lines that are printed prior to this account on the standard reports (may be 0).
05 Indentation (Optional/ 1-digit) For FSG, enter 0; otherwise enter the number of spaces to indent before this account is printed on standard reports.
06 Column/% Base (Conditionally required/ 1-digit or 1-character field) This field is skipped for expense accounts. If the account is a balance sheet account, the field is used to specify a Column and is a required field. If it is a revenue account, the field is used to specify whether the account is included in the base total for Percent of Base.
1. On standard reports, balance sheet accounts (types A, L, or C), this code indicates the placement of the amount (i.e., in column 1, 2, or 3). For FSG purposes, enter 1.
2. For standard reports, income statement accounts (types R and E), all or some of the revenue balances can be accumulated as the percentage base when Y is entered. The remainder of the lines on the income statement are then compared to this amount and the percentage of base is calculated. For FSG, press [TAB] to leave the field blank.
07 Operating Report (Optional/ Y or N) Enter Y to include this account on the G/L Operating Report (GPO). Only accounts specified here are printed in GPO. Press <TAB> or N to omit this account from the report.
Active Account (Required/ Y or N) Enter Y or press <TAB> to flag this account as active and allow transactions to be posted to it. (The active flag is only applicable for accounts with function codes of 3 or 4, since you cannot post to accounts with function codes of 1 or 2). Enter N if the account is inactive; operators will not be allowed to enter the account for posting transactions within the G/L module or any subsidiary leders (i.e., Invoice Summary Register program RR). Note: An account cannot be made inactive if it is referenced in Posting Maintenance programs.
09 Post Summary/Detail (Optional/ S or D) Enter S to specify summary posting for this account; use D to specify detail posting. This code may be used to override the summary or detail posting flag established for a journal (set up in program XGJ). The journal flag is used as a default; however, if an account also has a posting flag, it takes precedence over the journal flag. For example, you may want to post the NR (A/P Register) in detail for all accounts except the A/P account. You can set the NR/GJN flag in XGJ to D, and the individual A/P account flag here to S.
Date of Last Update (Display only) This field is updated by the system whenever the account balance is updated. The date will be displayed in the period/year (PP/YY) format when the account was last updated during Period-End Closing (GME).
Current Open Activity (Display only) This amount represents the total of the transactions that have been posted to the account in open periods (includes current and future).
Page 20 Financials G/L Master File Maintenance

Balance as of Last Close (Optional or display only/ up to 999,999,999,999.99) This amount represents the ending balance of the account as of the last period-end close. It is maintained by the system once an account is established and cannot be maintained. If you are setting up new accounts and are transferring balances from another system, you may enter the accounts’ balance. For balance sheet accounts, enter the ending balance as of the date you specified for the last period closed during the install process. For revenue and expense accounts, enter the year-to-date total activity for the account; if you are starting with a new fiscal year, the balance for revenue and expense accounts should be zero.
10 Last Year Total (Optional or display only/ up to 999,999,999,999.99) This balance, maintained by the system for existing accounts, represents the account balance as of the last fiscal year end. This amount can be used in reports that compare the current year to last year. You are prompted for this field when setting up new accounts if you want to enter the existing totals from another system.
Currency (Currently not available) (Conditionally required/ valid currency code) This field is displayed only if the multi-currency feature is active. If the multi-currency is active, currency codes must be assigned to all balance sheet accounts (asset, liability, and capital). It is recommended that you establish, at a minimum, cash, A/P, and A/R accounts for any foreign currencies you will be using. Once the currency code is entered for an account, it cannot be changed if the account has a balance (if no transactions have been posted and balances are zero, the currency may be changed). Revenue and expense accounts are automatically set to the base currency code specified for the organization. The currency code must be valid (established in TCU).
Memo Fields (Conditionally required) There may be up to 10 memo fields added to the account to include additional information (i.e., department, revenue center). The titles, types of fields, whether required or optional, and other information about the memo fields must be set up in XMO for the memo fields to appear in this program. Enter ?MEMO for more information about memo fields.
Memo field 1 (Optional/ enter 1 – 8) This is set up for use with program GEA – G/L Expense Analysis.
Account Maintenance After the chart of accounts has been created, it requires little or no maintenance. If changes are desired, they are made with GMM, though several restrictions apply to maintaining G/L account records. Balances of individual G/L accounts and their Date of Last Update are not maintainable by GMM; they can only be changed through normal G/L processing. Account Type (asset, liability, capital, revenue, or expense) cannot be changed; the incorrect account must be deleted, and a new account established with the correct account type.
Changing an account's Function Code is also restricted. Accounts that are established with function codes 1 or 2 are print control records for standard financial reports and cannot be changed to chart of account records designated by function codes 3 or 4. Likewise, chart of account records (i.e., function codes 3 or 4) cannot become print control records (with function codes 1 or 2). Again, the incorrect record must be deleted, and a new record established with the correct function code. Print control records can be deleted at any time. An account with function code 3 or 4 cannot be deleted from the chart of accounts unless it has a zero balance with no activity in the last and current accounting years. Also, a chart of account record cannot be deleted from the parent organization until the same account has been deleted from all of the parent's subsidiary organizations.
G/L Master File Maintenance Financials Page 21

Account Deletion To prevent erroneous posting of journal entries to an account scheduled for deletion, the account title can be changed to a short message such as Deleted -- Use Acct #nnnnnnnnnn. Then, if the account number is used on a journal entry, the message is displayed as a warning to the operator to change the account number before updating the journal entry.
G/L accounts that are updated with data from other Stanpak applications should not be deleted until the appropriate posting references for the application have been changed to post to a different G/L account. If the posting references are not changed correctly, an exception condition could occur during G/L updating. The deleted record must then be re-entered as it originally existed to allow the update program to continue. Look for G/L account references in the following programs:
ZPOSTOP Posting Criteria Maintenance ZPM A/P-G/L Interface Account Maintenance FA Fixed Asset Addition FM Fixed Assets Maintenance
Account Listings Two programs are provided for listing the general ledger accounts: G/L Master File Listing (GML) and Chart of Accounts Listing (GCL).
GML - G/L Master File Listing GML lists the entire record (including the standard financial statement specifications) for every account. The accounts established strictly for the standard financial statements can be excluded from the listing by using the chart of accounts only option. Still, the entire record is printed, but only for those accounts that make up the actual G/L accounts (function codes 3 and 4) for the organization.
GCL - Chart of Accounts Listing The Chart of Accounts Listing (GCL) prints only the account numbers and descriptions for the specified organization. The listing is designed to print on 8½" x 11" paper.
The Budget File
GBM - Budget File Maintenance Budget figures can be entered and maintained by using the Budget File Maintenance program (GBM). Only G/L accounts with function codes 3 or 4 can be budgeted. A budget record can be set up in one of two ways:
1. As an incremental net change for the period. 2. As a total amount for the year. If you enter the total budget for a year, GBM divides the
amount by the number of accounting periods and distributes the resulting amount to each period. If the total budget amount is not evenly divisible, the uneven amount is allocated to the last period.
The actual amounts that have been applied to each G/L account are automatically accumulated through normal general ledger processing, and are displayed by GBM as a useful reference when estimating budgets or entering a new budget record. Budgets can be maintained for last year, this year, and next year. The DUP (duplicate) function allows budget amounts to be copied from one account to another
Page 22 Financials G/L Master File Maintenance

within the same or different organization. Budget amounts can also be copied for one account in one year to the same account in another year.
Year (YYYY) (Required) The accounting year entered here identifies the budget year currently being set up or maintained. » Enter the YEAR to add or maintain the budget. » Press <Tab> to exit to the General Ledger (G-1) Menu.
Organization (Required) Separate budgets can be set up for the parent and subsidiaries. » Enter a valid organization code. » Press <Tab> to return to the YEAR (YYYY) field.
Account No. (Required) » Enter a valid G/L account number.
Exit Update Next Prev Total peRcent Copy Delete Field # » Enter E to enter another account/year. » Enter U to update all budgeted amounts. » Enter N to advance to the next budgeted account number. » Enter P to return to the previous budgeted account number. » Enter T to distribute the total budget amount evenly over all periods. » Enter R to change the budgeted amounts by a percentage. » Enter C to duplicate the budgeted account in another organization, account, and/or year. » Enter D to delete the budget for this account and year.
» Type in a period number (field #)to edit a specific period’s budget.
GBL- Budget File Listing Budget Worksheet option A budget worksheet for estimating the following year's budget can be printed with the Budget File Listing (GBL). The worksheet includes the budget and actual totals for each accounting period (last year and the current year) and general ledger account in a specified organization or group of organizations. It also includes the budget total for the following year and a work column.
Detail Budget Report option GBL also prints a detail budget report that shows the budget amount for each period in the specified year (last, current, or next) and general ledger account in the specified organization or group of organizations.
Budget records are deleted with GLP (discussed under the Purging Records heading of this section).
The system then prompts for the organization(s):
List Organization
OPTIONS: --Enter the Code of the Organization you want listed --Enter "RANGE" to specify Range --Enter "ALL" for a Full File Listing --(Tab) to Return to the Menu
» Press <Tab> to exit to the General Ledger (G-1) Menu. » Enter ALL to print all organizations on file.
G/L Master File Maintenance Financials Page 23

» Enter RANGE to print a range of organizations. » Enter an organization code to print that organization. The program prompts for verification:
Correct Organization? (Y/N) » Enter Y to accept the organization. » Enter N to return to List Organization prompt to enter a different code.
General Ledger Inquiries
GTL - G/L Activity Inquiry General ledger transactions can be examined at any time, for any given general ledger account and date range, using the G/L Activity Inquiry (GTL). All transactions for the specified account or range of accounts are displayed, with a hard copy option. If the option to retain G/L Detail History is selected at installation, general ledger transactions for closed periods can also be viewed in GTL. All amounts displayed or printed are in the currency of the account.
Organization Code (Required) This code identifies the organization.
» Enter a valid organization code. » Press <Tab> to exit to the General Ledger (G-1) Menu.
From G/L Account (Required) The account title is displayed when a valid account number is entered.
» Enter a valid G/L account number. » Enter ? or > to use the G/L account lookup routine (displayed at the bottom of the screen).
To G/L Account (Required) The account title and the first open period are displayed when a valid account number is entered.
» Enter a valid G/L account number. » Enter ? or > to use the G/L account lookup routine (displayed at the bottom of the screen).
Date Range: From (Required / date format, MM/DD/YY) The program displays the beginning date of the first open accounting period as the default.
» Press <Tab> to accept the default date. » Press <Clear> and enter a different date.
to (Required) The program displays your terminal date (ZE Date) as the default to date.
» Press <Tab> to accept the default date. » Press <Clear> and enter a different date.
Summary or Detail (Required) The program will display Summary information including the account(s) beginning balance, summary debit and credit amounts, net activity, period balance and ending balance. The Detail option will display the account(s) beginning balance, detailed debit and credit transactions, net activity, period balance and ending balance.
Page 24 Financials G/L Master File Maintenance

» Enter S to display Summary Information. » Enter D to display Detail Information.
G/L Summary History The information in the G/L Summary History file is used to generate financial statements. It provides a quick and efficient way of producing reports. When producing coomparative statements (i.e., this year versus last year), data for the previous year can be entered through the G/L Summary History Maintenance program (GHM). This file contains the net of all transactions processed within each accounting period. The data is accumulated and retained through normal G/L processing.
Loading the G/L History File
GHM – G/L History File Maintenance History records for closed accounting periods can be loaded into the G/L Summary History file using G/L Summary History Maintenance (GHM). History records are deleted when their corresponding G/L Master records are deleted or when G/L history records are purged with G/L Summary History/Budget Purge (GLP), discussed under the heading Purging Records.
Year (YYYY) (Required)
» Enter a year to view or maintain history balances for that year.
Organization (Required)
» Enter a valid G/L organization. » Press <Tab> to return to the previous prompt.
Account No. (Required)
» Enter a valid G/L account number. » Press <Tab> to return to the previous prompt.
Exit Field # Next Previous Delete
» Enter E to exit or to enter another account/year. » Enter a period number (field #) make changes to a closed period. » Enter N to view the Next record for the current G/L account. If there is no activity for the next
year, it will display the next account AFTER the selected G/L account that has activity. » Enter P to view the Previous record for the current G/L account. If there is no activity for the
previous year, it will display the 1st account listed BEFORE the selected G/L account that has activity.
» Enter D to delete a closed period’s history. If you select an open period the message will display: “Cannot Delete Open Periods’ History”.
G/L Master File Maintenance Financials Page 25

GHX - History Listing History data for the G/L accounts of one or all organizations can be listed using G/L Summary History Listing (GHX). History records for the current year, last year, or the following year can be printed giving the historical balance of each accounting period.
List Organization
OPTIONS: --Enter the Code of the Organization you want Listed --Enter "ALL" for a Full File Listing --[TAB] to Return to the Menu » Enter ALL to print information for all organizations. » Enter an organization code to print for a single organization.
Correct Organization? (Y/N) » Press <Tab> to accept default of Y, the organization is correct. » Enter N to return to the previous prompt.
Print history for year (YYYY): » Enter the year for which you want the history information to print. » Press <Tab> to return to the Organization prompt.
Allocating Journals An allocating journal is set up to automatically distribute the current balance of a control account to other accounts within the same consolidation. Typically, allocating entries are used to distribute current and prepaid expenses to cost centers or departments (e.g., to allocate rent expense to the various departments in a company). The entire control account's balance must be allocated; however, any portion of the balance not distributed to other accounts can be allocated back to the control account.
GAM - Allocating Journal Maintenance The master records for the allocating journal entries are recorded in Allocating Journal Maintenance, GAM. Each journal entry consists of the control account (the account that is to be allocated), the G/L accounts that are to receive a distribution, and the percentage to be distributed. The following applies when entering data in the Allocation Percentage field:
• Percentages can have positive or negative values. Positive entries are used when the account types for both the control and distribution accounts have the same normal balance (i.e., assets and expenses have debit balances; liability, capital, and revenue accounts have credit balances). If the control account is an asset and the distribution accounts are expenses, a positive rate would apply. Conversely, if the control account is an expense and the distribution account is a liability, a negative percentage would apply against the liability account.
• The total percentage allocated must equal 100%. The total on the control account cannot be allocated to a single account; however, a portion can be allocated back to the control account.
Note: Even though the allocation to one account cannot be 100%, you may enter the same G/L distribution account twice with percentages that add up to 100%. In effect, transferring the balance from one account to another is possible.
Page 26 Financials G/L Master File Maintenance

Reference (Required / 10-character alphanumeric field) This is a user-defined field used to identify the source of the entry. Follow your company's accounting conventions.
» Enter any appropriate user-defined code. » Press <Tab> to exit to the General Ledger (G-1) Menu.
Description (Required / 17-character alphanumeric field) This is an explanation of the current entry.
» Enter any applicable comment used to describe the current entry.
Source (Display Only) GAM displays AJ which is the source code for the Allocating Journal.
Organization (Required) This is the organization code of the Control Account.
» Enter a valid organization code.
Control Acct (Required) Typically, the current balance of this account will be allocated to other accounts within the same consolidation; however, allocations back to this account are allowed.
» Enter the control account number. The account title and type (asset, liability, etc.) are displayed.
Authority (Optional / 34-character alphanumeric field) This field is used to identify the person or department authorizing the journal entry. Follow your company's accounting conventions.
» Enter the name or code identifying the authority approving this entry.
GAM prompts for verification of the Control Account and authority before proceeding:
Is this correct? (Yes/N/DELETE) » Press <Tab> to accept default of Y, the data entered is correct. » Enter N to return to the Control Acct's description field. » Enter DELETE to delete the entry and clear the screen.
At this point, the Unallocated Percentage is equal to 100.00000 (100%) and the cursor is located on Ln No 1, where the first distribution account receiving a distribution from the control account will be entered.
Org Code (Required)
» Enter the organization code identified with the distribution account. Distribution and control accounts must be in the same consolidation.
Account Number (Required) Control account balances may be distributed to any number of accounts as long as the balance is fully allocated (i.e., the Unallocated Percentage must equal 0). Remember, an amount can be allocated back to the Control Account and allocated again, the next time GAP is used (e.g., prepaid expenses).
» Enter a valid account number for the account receiving a portion of the control account's balance.
The account type (Acct Type) for each account is displayed after the account number is entered. In addition, the Unallocated (percentage) is displayed and will be equal to 100.00000 for the first line. The cursor will move to the Allocation Percentage field.
G/L Master File Maintenance Financials Page 27

Allocation Percentage (Required / 7-character numeric field with the following format: 99.99999) The percentage rate entered here is applied to the Control Account balance to determine the amount allocated to each distribution account.
» Enter the applicable percentage rate.
After all distribution accounts are entered and the Unallocated percentage is equal to 0, GAM displays the following prompt:
Enter line #, (L)ist, 'DELETE', or (E)xit
» Enter the line number of the entry you want to change. » Enter DELETE to delete the entry. » Enter E to enter the allocation into the system and return to the Reference field.
GAL - Allocating Journal Listing The distribution for a specified or group of allocating journals can be printed using the Allocating Journal Listing (GAL). The listing includes the control account, the G/L distribution accounts to which the balance of the control account are to be allocated, and the percentages that apply.
LIST REFERENCE #
OPTIONS: --Enter the Reference Number you want Listed --Enter "RANGE" to specify Range --Enter "ALL" for a Full File Listing --[TAB] to Return to the Menu » Press <Tab> to exit to the General Ledger (G-1) Menu. » Enter a reference number to print one journal. » Enter ALL to print all journals on file. » Enter RANGE to print a range of journals.
Recurring Journals Journal entries that recur monthly, such as depreciation, can be established in a recurring journal master file so that monthly entries are not required. Recurring Journals can be set up to process (W)eekly, (S)emi-monthly, (M)onthly, (P)eriod-end, and (Q)uarterly.
GRM - Recurring Journal Maintenance The master records for recurring journal entries are recorded in Recurring Journal Maintenance (GRM). Each journal entry contains a G/L account referred to as the control account. If the control account is a debit balance account (asset or expense), the first entry for the journal entry is automatically a debit posting; if the control account is a credit balance account (liability or revenue), the first posting is a credit posting.
The recurring journal master record includes a start date, the dollar amount to debit or credit the control account, and the number of accounting periods the entry is to recur. The start date is used to initiate the automatic monthly posting, and the number of periods is used to terminate the automatic monthly postings; however, if a zero limit is recorded then the number of periods is ignored and the
Page 28 Financials G/L Master File Maintenance

recurring journal entry is processed every month until an amount is entered in the Limit field or the recurring entry is deleted from the system.
The entries in the Amount/Period and Limit fields can be changed at any time. When an entry is made in the No. of Periods field, the system accumulates the amount that has been posted in the Balance field and prevents the balance from exceeding the limit.
Unlike allocating journals, the control account cannot be referenced more than once in recurring journal entries.
Reference (Required / 15-character alphanumeric field). The reference indicates the source of the entry. Follow your company’s accounting conventions.
» Enter an unassigned reference. » Press <Tab> to exit to the General Ledger (G-1) Menu.
Description (Required/ 26 -character alphanumeric field). The description is an explanation of the current entry.
» Enter a description of the entry.
Frequency (Required). The system Prompts (W)eekly, (S)emi-monthly, (M)onthly, (P)eriod-end, (Q)uarterly RJ, which is the source code for the Recurring Journal.
Authority (Optional/17-character alpha-numeric field.) The authority identifies the person or department approving this journal entry. Follow your company’s accounting conventions.
» Enter the name of the person or department authorizing the entry. » Press <Tab> to leave the field blank.
Organization (Required.) This is the organization code identified with the Control Account.
» Enter a valid organization code.
Control Account (Required.) The Control Account can be either a debit or credit entry and will offset by one or more entries set up in the Account No.
» Enter a valid account number. » Enter ? or > to use the G/L account lookup routine.
Note: Complex journal entries can be set up by using the next account field, Account No., for additional debit or credit entries as well as the offsetting entries required to maintain the equality of debits and credits.
Start Date (Required / Date format MM/DD/YY.) Each recurring journal contains a start date that determines when a journal becomes available for processing. The journal is bypassed until the date becomes available.
» Enter the Date the journal will be available for processing. (This is the Posting Date for the G/L accounts).
Amount/Period (Required / 14-character numeric field in the format: 999999999999.99) This is the amount posted to the Control Account for each period. Positive (+) amounts are debits (DR) and negative (-) amounts are credits (CR).
» Enter a positive amount for a debit entry.
G/L Master File Maintenance Financials Page 29

» Enter a negative amount for a credit entry.
No. of Periods (Required / 4-character field). This field determines the number of times this recurring entry will be posted. (The number of accounting periods).
» Enter the number of posting periods required for this recurring entry. » Enter 0 (zero). The number of periods will be calculated and displayed if an amount is entered
in the next field, Limit.
Limit (Display). The input limit automatically calculated (Amount/Period X No. of Periods). The journal will not be processed once the limit is reached. Processing will stop for the journal. The amount in this field can be overridden by a manual entry.
» Press <Tab> to accept the default amount. » Press <Clear> and enter a different amount. » Press <Clear> and enter 0 zero to override the limit option. Processing will not stop until the
journal is deleted.
Balance (Display Only) The amount in this field is the balance posted to date. At this point, the first part of the recurring entry is set up and GRM prompts for verification:
Journal Header Lines Delete Reset Copy Exit
» Enter (J)ournal to go to another journal. » Enter (H)eader or SPACEBAR over to maintain header information. » Enter (L)ines or SPACEBAR over to maintain distribution lines. » Enter (R)eset or SPACEBAR over to initialize balance and start date. » Enter (C)opy or SPACEBAR over to duplicate this journal with a new Reference and Source. » Enter (E)xit or SPACEBAR over to Exit to return to the (G-1) menu.
The offsetting line entries and/or any of the additional entries needed for a complex recurring entry are set up next.
Org Code (Required)
» Enter a valid organization code identified with the account entered in the next field.
Account No. (Required) two types of entries are allowed in this field: 1) entries required to offset the Control Account (e. g., if the control account is a debit account, credit entries equal to the debit amount are required); or 2) additional entries required for complex journal entry (e. g., after entering the first debit entry in the Control Account, the remaining debit(s) are entered here in addition to offsetting credit entries.
» Enter a valid account number. » Enter ? or > to use the G/L account lookup routine. » Press <Tab> to end the session, clear the screen and return to Reference. » Enter E to exit to the G-1 menu.
Debit/ Credit (Required/ 14-character numeric field in the format: 999999999999.99).
» Enter the debit amount to be posted. » Press <Tab> to advance to the credit field to enter the credit amount to be posted.
Page 30 Financials G/L Master File Maintenance

GRL - Recurring Journal Listing The recurring journal master records can be printed using Recurring Journal Listing (GRL). The listing includes the specifications for the recurring journal entry, the individual credit and debit posting, and the limit and balance amounts.
List Reference #
OPTIONS: --Enter the Reference Number you want Listed --Enter "RANGE" to specify Range --Enter "ALL" for a Full File Listing --[TAB] to Return to the Menu » Enter a reference number to print a single entry. » Enter RANGE to print a range of entries. » Enter ALL to print all entries. » Press <Tab> to exit to the General Ledger (G-1) Menu.
Purging Records The General Ledger module includes two purge programs:
1. One for purging G/L detail history transactions in closed periods (GYP) 2. Another for purging G/L summary history and budget records (GLP).
GYP - YTD Transaction Purge Transactions are transferred from the G/L Transaction file to the G/L Detail History file during G/L period-end processing. When transactions in the G/L Detail History file are no longer needed, they can be purged from the file with GYP.
By entering the latest transaction date to be purged, the user initiates a transaction listing that includes all transactions dated on or prior to the date entered (which must be on or before the last closed accounting period). Transactions listed are those that will be purged if the listing is approved. If transactions appear on the listing that should not be purged, run GYP again, specifying a new purge date. Once the operator confirms that the listing has printed correctly, GYP proceeds to purge all of the listed transactions from the file. The program prompts are displayed below:
Enter the latest date of the YTD transactions to be listed and purged: (MM/DD/YY)
Suppress printing of accounts with no activity? (Y/N)
Enter "PROCEED" or [TAB] to Exit
Did the listing print correctly? (Y/N) --Enter "Y" to proceed with purge --Enter "N" to reprint the listing --[TAB] to Return to the Menu
GLP - History/Budget File Purge Program GLP is used to purge all or part of the G/L history file (period-end balances) and the G/L budget file (period budgets). Only closed accounting years prior to the system’s last year can be purged. The period-ending dates corresponding to the year are also purged in GLP.
G/L Master File Maintenance Financials Page 31

Generally, these files are purged when there is a lack of disk storage. If storage is adequate, the data in these files can be retained indefinitely and used for reporting (i.e., trends etc.) through the Financial Statement Generator.
Note: For audit purposes, general ledger files should be archived to tape before a purge, as purged records are permanently erased from the system. Should reloading the data become necessary, it should be restored to a directory not accessible by normal user passwords. While this technique provides a relatively safe way to reload the saved data and access the information, reloading saved information should only be done with the help of a support representative.
Page 32 Financials G/L Master File Maintenance

Journal Processing
The general ledger can be updated by entries from other Stanpak modules, journals produced by custom applications, and journals generated by one of the following programs on the General Ledger Journal Processing menu:
GIP General Journal Entry GPL General Journal Register GUP General Journal Update GPI Automatic Journal Register GUI Automatic Journal Update GRP Recurring Journal Processing GRJ Recurring Journal Register & Update GAP Allocating Journal Processing GAJ Allocating Journal Register & Update GJ Interface Journal Scheduler GME G/L Period-End Closing
Journal Processing Flow Diagram The diagram on the following page illustrates the flow of information within the journal programs, including the processing of general journals, automatic journals, recurring journals and allocating journals.
Journal Processing Financials Page 33


Journal Processing Financials Page 35 Journal Processing Financials Page 35


General Journal Processing
GIP - General Journal Entry General Journal Entry (GIP) creates standard journal entries. A journal is created by entering a journal source code and description. After a journal has been established, the journal source code is used to access the journal for the purpose of adding, changing, or deleting entries. Posting entries are made in the journal by specifying the organization and general ledger account number, the date of the entry, a reference number, a description of the posting entry, and an amount. Each posting entry on a journal is automatically assigned a sequential transaction number, with a maximum of 997 lines accepted. The posting entries are stored in a temporary file called the Journal Input file. The journal source code, reference number, and transaction number serve as identification for each posting entry (to recall it if changing or deleting is required) as well as providing an audit trail.
Journal Template (10-character alphanumeric field) The user defined Journal Template Codes are set up using program GSM - Standard Journal Maintenance. The templates can be edited within General Journal Entry, however if you want to change the template, GSM - Standard Journal Maintenance should be used to save the changes.
» Enter a valid Journal Template Code. » Enter a ? to view available Journal Template Codes. » Press <TAB> to continue to the Journal Source Code field.
Journal Source Code (Required/ 3-character alphanumeric field) This field is user defined, and serves as a reference code to identify each journal. This code is also used to call up the journal if transactions need to be changed or deleted.
» Enter a new code to be associated with these entries. » Enter a ? to display existing Journal Source Codes. » Press <TAB> to return to the General Ledger (G-2) Menu.
Journal Description (Required/ 25-character alphanumeric field) Enter a description for the purpose of the entries. The description is for information only; it appears on the journal listing (GPL) and on the lookup of the journal source codes. The journal description is user defined, and can be any statement describing the journal.
» Enter a description for this journal.
Auto Reverse? (Y/N) (Required) This indicator is used to automatically set up the entries for reversal in the next month. This is used mainly for accruals.
» Enter Y to have the system automatically post to the same accounts, with the sign reversed, on the first day of the following month.
» Enter N to post only this month's entries.
Trx (Transaction Number) The system automatically assigns and displays the transaction numbers or sequences to be used for each transaction. Up to 997 transaction numbers may be used for a single source code. When the
Journal Processing Financials Page 37

transaction number exceeds 950, a warning message is displayed indicating the number of transactions remaining for that journal.
Org (Required) Enter the organization to be debited/credited with this transaction. More than one organization code may be used within one journal source code; however, all organizations must be within the same consolidation.
When a standard journal is used and the journal indicates that an override is not allowed, the cursor does not move to the organization or account fields. (See the on-line documentation for GSM.)
G/L Account (Required) Enter the G/L account (within the organization specified above) to be used when posting this transaction. The below listed criteria must be met:
• the account must be valid (one established in GMM or the system-defined [PROFIT]) • the account must have a function code of 3 or 4 • the account’s status must be active
Enter ? or > to use the G/L lookup functions
When a standard journal is used, an optional help message (entered with the standard journal in GSM) is displayed when the cursor is in the G/L Account field.
When posting to accounts in different currencies, any applicable currency exchange must be calculated and entered; these transactions are not automatically written or updated by GIP or GUP. After the journal entries are complete, you will need to clear the ORG code (Press <ESC>) to move out of the general journal line entry. The screen will then prompt: Redisplay Add Change Delete Journal List Exit
» Enter R to redisplay the entries made. » Enter A to add more journal entries. » Enter C to change existing line entries. » Enter D to delete line entries. » Enter J to open a new Journal Source for editing or entry. » Enter L to run a Journal Listing - program GPL. » Enter E to exit to the G-2 menu.
GPL - General Journal Register The entries in the Journal Input file must be printed on a register using the General Journal Register (GPL). The register is organized by journal source code so that all transactions are grouped by journal entry. For each journal source code, the total debit and credit amounts are provided. In addition, debit and credit totals for all posting entries from all journals are accumulated in the register's debit and credit grand totals. The grand totals of debits and credits must be in balance before the entries in the Journal Input file can be posted to the general ledger. If debit and credit balances are not in balance, GIP must be used to add, change, or delete entries to bring the debit and credit amounts into balance, and GPL must be run again to print a new journal register. Transaction numbers for deleted entries are printed on the register to preserve the transaction number continuity.
Each journal register is automatically assigned a register number, which is printed as part of the heading. The register number is added to each posting entry in the Journal Input file, expanding the audit trail to provide a means of tracing an entry to a specific journal on the journal register.
List Reference #
OPTIONS: --Enter the Reference Number you want Listed --Enter "RANGE" to specify Range --Enter "ALL" for a Full General Journal Register --[TAB] to Return to the Menu
Page 38 Financials Journal Processing

» Enter a reference number to print a single entry. » Enter RANGE to print a range of entries. » Enter ALL to print all entries. » Press <Tab> to exit to the General Ledger (G-2) Menu.
GUP - General Journal Update After a balanced General Journal Register has been printed, the general ledger accounts can be updated using the General Journal Update program (GUP). If transactions are added, changed, or deleted after the printing of the register, a new register must be printed before updating can begin. The update program applies the posting amounts to the current balances of the general ledger accounts, copies the entries in Journal Input file to the General Ledger Transaction and G/L Summary History files, and clears the Journal Input file.
Do you wish to perform this update now? (Y/N)
» Enter Y to update the Journals entered in GIP and printed in GPL. NOTE: You must print ALL Journal Source Codes, and they must ALL be in balance in order to run this update!
» Enter N to return to the G-2 menu.
The program will return to the G-2 menu when it has finished the update.
Automatic Journal Processing
GPI - Automatic Journal Register The first step to processing the G/L data in the Interface file is to list the data using the Automatic Journal Register program (GPI). The register groups the data by source so that all data from one application is grouped together. Total debit and credit amounts are provided for each journal source, and each journal source must be in balance before updating can proceed. The Automatic Journal Register’s entries cannot be maintained however, if the Automatic Journal Register (GPI) is out of balance, an additional line can be added to the Automatic Journal Register using the program for Automatic Journal Maintenance (GMI). If the Accounts Receivable to General Ledger interface option is set to YES in INSTALL, transactions from OCJ – Cash and Carry Journal, RR – Invoice Summary Register and KJ – Cash Receipts Journal amounts will be represented. This Interface file will also include postings from program RCA – Service Charge Audit. Any changes to the information must be handled as general ledger adjustments after the contents of the Interface file have been updated to the General Ledger. Each Automatic Journal Register is assigned a register number, which is printed as part of the heading.
GUI - Automatic Journal Update After the register has been printed, general ledger accounts can be updated by the Automatic Journal Update program (GUI). Only the transactions that are printed on the register are updated to the general ledger. After the transactions are posted to the general ledger, they are deleted from the Interface file.
Journal Processing Financials Page 39

Recurring Journal Processing Recurring Journal Processing (GRP) creates the applicable journal entries (where start date and limit allow) for regular monthly recurrences that have been established in the Recurring Journal Master file (see the G/L Master File Maintenance section). The entries created are not posted directly to the general ledger. Instead, they are stored in a temporary work file so a register of the entries can be printed before the G/L is updated. If there are changes and/or additions to the Recurring Journal Master file after GRP is run, GRP must be re-run to reflect the changes.
GRJ - Recurring Journal Register The Recurring Journal Register & Update (GRJ) prints the entries in the Recurring Journal Master file. After the register is printed, GRJ pauses for operator confirmation that the register is correct. If changes are required, records in the Recurring Journal Master file can be maintained and revised as required (using GRM). GRP can then be re-run.
GRP - Recurring Journal Update After the operator confirms that the Recurring Journal Register has printed correctly, the general ledger is updated with the journal entries and the Balance field in Recurring Journal Maintenance (GRM) is decremented by the amount processed.
Allocating Journal Processing Journal entries for allocating G/L account distributions are created from the Allocating Journal Master file (see the G/L Master File Maintenance section) by the Allocating Journal Processing program (GAP). The entries created are not posted directly to the general ledger. Instead, they are stored in a temporary work file so a register of the entries can be printed before the G/L is updated.
GAJ - Allocating Journal Register The Allocating Journal Register & Update (GAJ) prints the register of journal entries created from the Allocating Journal Master file. If necessary, the Allocating Journal Master file can be maintained and revised (using GAM, Allocating Journal Maintenance) and GAP can be re-run.
GAP - Allocating Journal Update After the operator confirms that the register is correct, the Allocating Journal Register & Update (GAJ) updates the general ledger with the journal entries.
Journals from Stanpak Accounts Payable The General Ledger module provides an interface to the Accounts Payable Module. Before automatic posting can occur, the General Ledger module must be installed, and the Accounts Payable to General
Page 40 Financials Journal Processing

Ledger interface option (INSTALL) must be set to YES. The Interface Journal Scheduler (GJ) replaces the Accounts Payable program NGJ – Register Print and Update. This program is used when needed to update the Vendor Invoice Register (NR) and the Check Voucher Register (NCR).
GJ - Interface Journal Scheduler Each of the above source registers has a corresponding G/L journal that can be run immediately after it is confirmed as having been printed correctly, or under the control of the Interface Journal Scheduler (GJ). The printing and posting options for the interface journal scheduler are maintained in Journal Print Control Parameters (XGJ). Refer to the on-line documentation for XGJ for additional information about journal printing and posting options.
For each source register, the following options are available: 1. Print the G/L journal after the source register. 2. Print the G/L journal under the control of the Interface Journal Scheduler.
Note: At least one of the above options must be Y.
3. Post detail or summary data to the general ledger (D or S) 4. Post to the general ledger after the source register prints or after the G/L journal prints (R or J)
If option 1 is Y and option 4 is R, the operator is prompted to clear the file after the journal prints. However, if option 2 is also Y, the operator has the option of reprinting the journal from the Interface Journal Scheduler (GJ).
Period-End Processing Before an accounting period can be closed, all standard, recurring, and allocating journal entries for the period, and journals from other Stanpak applications must be completely processed and updated to the general ledger.
The profit or loss for the period can be posted manually through GIP or automatically through G/L Period-End Closing (GME). Automatic profit posting by GME requires that the default Consolidated Profit Account be specified in GMM. The profit or loss for the period is posted to the Consolidated Profit Account and a special account called the [PROFIT] account.
After the journal entries for the profit/loss for the period have been processed, the Period-End Closing program (GME) can be run. GME performs the following functions:
• prints the financial statements for the period • prints an activity report, listing all general ledger transactions processed for each organization
during the period • clears the period's transactions from the G/L Transaction file • copies the period's transactions to the G/L Detail History file (if the option is active) • updates the Balance as of Last Close and decrements the Current Open Activity fields in
the G/L Master file (displayed by GMM)
While GME is in progress, programs that post directly to the G/L files cannot be run. Attempting to run any of those programs displays a message that the program cannot proceed until Period-End Closing is completed.
Terminal Date (ZE Date) The date on the terminal that executes GME must be on or after the ending date of the accounting period being closed. GME determines the accounting period to be closed, and displays the period
Journal Processing Financials Page 41

number and corresponding ending date. Before processing can proceed, the user must confirm that all transactions and adjustments for the period have been completely processed and updated to the general ledger, and that all profit postings have been completed.
Profit Postings When GME is run, it validates the profit postings. If the amount posted is not correct and you do not choose to post profit automatically, an exception report is printed and the closing process is discontinued. The correct profit should be posted through GIP and period-end processing should be restarted.
Financial Statements After successfully validating the profit postings, GME proceeds with printing the final financial statements for the period. Financial statements printed by GME can be the standard financial statements or the Financial Statement Generator period-end statements, depending on the installation options selected.
Standard Financial Statements If the period-end financial reporting uses standard financial statements, GME first produces the Income Statement and then the Balance Sheet. A single consolidated Income Statement and Balance Sheet is produced for each parent organization. After the financial statement printing is completed, a G/L Activity Report is produced that lists all G/L transactions for the period for each organization.
Reprinting Reports An option is provided to reprint the report after each of the three standard financial reports is printed. Reprinting can be done immediately or delayed until later. If reprinting is delayed and the Period-End Closing process is not completed, journal processing cannot continue. When GME is run a second time, a restart mode is assumed, and processing advances to the standard financial report that had been designated for reprinting.
Financial Statement Generator Reports If period-end reporting uses Financial Statement Generator (FSG), GME produces the FSG reports that are designated for period-end printing. The FSG reports that are printed are selected and individually defined within FSG to produce a particular financial report for a pre-specified organization, group of independent organizations, or group of organizations to be consolidated. See the Financial Statement Generator section for a discussion on setting up custom financial statements.
Reprinting Reports A reprint option is provided upon completion of FSG report printing. If for any reason the period-end FSG reports need to be printed again, the reprint option can be used. If reprinting is delayed, journals remain unavailable for processing until the Period-End Closing is completed. When GME is run again, restart mode is assumed, and processing begins with FSG report printing.
Page 42 Financials Journal Processing

G/L File Updating After the period-end financial statements have been printed, GME performs the following:
• Closes the current accounting period. • Updates the Balance as of Last Close field in the G/L Master file for each account. • Purges the transactions from the G/L Transaction file. If the G/L Detail History option is
active, the closed period's transactions are copied to the G/L Detail History file before they are purged.
If the close is a fiscal year-end, GME performs the following tasks in addition to those listed above. • Updates the Last Year Total field in the G/L Master file with the balance of each account
before it was closed for the year. • Updates the general ledger system control record so that the "current" year becomes "last"
year and "next" year becomes the "current" year in GHM and GBM.
Journal Processing Financials Page 43


Financial Statement Processing
The programs that follow are listed on the Financial Statement Generator (FSG) menu: GHH Financial Statement Generator Report Header Maintenance GPH Financial Statement Generator Header Listing GFM Financial Statement Generator Format Maintenance GFL Financial Statement Generator Format Listing GXR Financial Statement Generator Cross reference Listing GP Financial Statement Generator Reports
Financial Statement Generator Flow Diagram The diagram on the following page illustrates the programs that are used in developing and printing Financial Statement Generator reports.
Financial Statement Processing Financials Page 45


Financial Statement Processing Financials Page 47


Financial Statement Generator Reports
Report Formats The Financial Statement Generator features the following 14 basic report formats (two asterisks (**) following the report title indicates that the report may be printed for multiple periods):
A Balance Sheet B Comparative Income Statement C Comparative Income Statement (Actual/Budget) D Income Statement - Percentage of Net Sales E Statement of Changes F Activity Report G Trial Balance H Budget Planner I Comparative Income Statement (Last/Actual/Budget) J Comparative Income Statement (Last/Actual/Budget) ** K Comparative Income Statement (Current/Last) ** L Comparative Income Statement (Actual/Budget) ** M Income Statement - Percent of net sales ** N Statement of Changes **
Report Numbers The Financial Statement Generator can create reports that only serve the purpose of accumulating the balances of accounts that are used in other reports. Such reports must be processed before the reports that use the resulting calculations. The FSG report printing program (GP) accommodates the sequence requirements by processing the FSG reports in the order specified by the user.
Printing Reports When GP is run, the following print options are offered:
ALL GP processes each FSG report on file, by report number when the ALL option is selected
TYPE Allows the user to print all reports coded in GHH with a specific type. The reports are printed in report number order. Valid report types are the letters A through N. For a description of the different report types, see the Report Formats heading above.
MONTH All reports coded with a Y in the Month End field (defined in GHH, Financial Statement Generator Header Maintenance) are printed when GME is run.
RANGE Prints a range of reports, by report number. Be sure when establishing the beginning of the range to include any reports used for accumulating totals that are necessary for the other reports within the range.
LIST Allows any number of reports to be specified for processing in any sequence. Reports that are used to perform calculations or accumulate totals used by other reports should be specified before all reports that
Financial Statement Processing Financials Page 49

perform a printing function. If the reports that accumulate or calculate totals are not specified or specified out of sequence, the accumulation will not be available for the report that is to use it.
REPORT # Processes a single FSG report.
Note: If multiple copies of a report are required, do not list a report multiple times since totals are retained and will be accumulated.
All FSG reports, regardless of the print option, can be produced in either report or worksheet format, as specified by the user at runtime.
Multiple Currencies If the multi-currency feature is active, GP converts amounts to base currency using the exchange rate effective as of an input date, or the period-ending date if the reports are processed through GME.
Printing Report Specifications Specifications for Financial Statement Generator (FSG) reports are contained in two files:
1. the Header Print Control file 2. the Format Print Control file
GHH - Header Listing The Header Print Control file identifies the title, type, format number, and organizations for which the report is to be printed. The FSG header listing program (GPH) prints the contents of the Header Print Control file.
GFL - Format Listing The Format Print Control file contains the G/L account numbers to be printed, information that identifies how the amounts are to be totaled, and data that identifies the organization. The Financial Statement Generator Format Listing program (GFL) prints the contents of the Format Print Control file.
GXR - Cross Reference Listing The Financial Statement Generator Cross reference Listing (GXR) associates organizations and account numbers with FSG report formats, identifying all formats (by number) that reference each combination of organization and account number. GXR identifies accounts that have been established in GMM, but are not referenced by any FSG report format, and indicates report formats that list accounts that are not on file.
Page 50 Financials Financial Statement Processing

Financial Reporting
The Financial Reporting menu includes the following programs: GAR G/L Activity Report GHL Comparative Analysis Listing GPO G/L Operating Report GTB Trial Balance GIS Income Statement GBS Balance Sheet GYL G/L Detail History Listing
If you have selected the Financial Statement Generator option, you can still run standard financial reports as required.
Financial Reporting Flow Diagram The diagram on the following page lists the financial reporting programs and their interaction with the general ledger files.
Financial Reporting Financials Page 51


Financial Reporting Financials Page 53 Financial Reporting Financials Page 53


GAR - G/L Activity Report The G/L transactions for any open period can be printed with the G/L Activity Report (GAR).
Summary versus Detail GAR can be produced in either detail or summary form. The detail format includes all transactions for the specified organization and period, with the additional option of excluding inactive accounts. A detail activity report for all organizations is produced by GME (Period-End Closing) when standard financial reporting is used. The summary format totals all transactions by account type.
GHL - Comparative Analysis Listing GHL, Comparative Analysis Listing, is a report that compares the current and year-to-date actuals with the prior year actual and budget figures for the corresponding periods.
GPO - G/L Operating Report The G/L Operating Report (GPO) summarizes the G/L transactions for the specified organization and date range. Accounts that are to be included on the report are designated in the G/L Master file (through GMM). Each G/L account record includes an operating report flag that determines if the account and the accumulation of the account's transactions are included on this report.
Data Requirements GPO obtains its data from the G/L Master file, the G/L Transaction file, and the G/L Detail History file (if available). The program tallies the transactions processed within the specified period and prints the total transactions processed and Current Open Activity (from GMM). Printing this report for a closed period is dependent on whether the information is available in the G/L Detail History file.
Operating Report Examples An example for a G/L Operating Report would be to create a branch office revenue/expense report. The revenue and expense accounts for the branch office would have a Y in the Operating Report field (maintained in GMM). The G/L Operating Report would then include only those accounts that have been flagged.
GTB - Trial Balance The Trial Balance (GTB) can be run at any time during the month. When printing the Trial Balance for a group of organizations, the organizations listed must be within the same consolidation.
A trial balance can be printed for any open accounting period, and the printing of zero-balance accounts can be suppressed. The report can be in worksheet, detail, or summary form. The trial balance worksheet includes the general ledger account numbers, titles, and the current balance of each listed account.
Summary versus Detail The detail trial balance includes the general ledger account numbers, their titles, beginning balances, total debits, total credits, and ending balances. The summary trial balance provides a beginning balance, total debits, total credits, net change, and ending balance for each type of account (i.e., asset, liability) including the special [PROFIT] account. The current month's profit is the net of total revenue less total expenses. A summary trial balance is automatically printed following a worksheet or detail trial balance.
Financial Reporting Financials Page 55

GIS - Income Statement
GTB - Balance Sheet If the chart of accounts established in GMM accommodates standard financial reporting, GIS (Income Statement) and GBS (Balance Sheet) can be used at any time to produce a pro-forma income statement and balance sheet. The Financial Statement Generator can be used to print financial statements when the statement specifications in G/L Master File Maintenance are not appropriate for standard financial reporting.
Both the standard Income Statement and Balance Sheet can be printed for any open period. In addition, zero balance accounts can be suppressed. The Balance Sheet has an option to include last year's balances on the report.
If multiple currencies are used, GBS converts the amounts to the base currency using the exchange rate effective as of the specified date, or the period ending date if the report is run through GME.
GYL - G/L Detail History Listing If the G/L Detail History option is activated, the contents of the history file can be printed with G/L Detail History Listing (GYL). The listing includes all transactions within the starting and ending dates specified. If the ending date is after the last closed period then the listing may include transactions in closed and open periods.
Page 56 . Financial Reporting

Additional Stanpak Programs
GEA - Expense Analysis Report Program GEA prints a spreadsheet that evaluates general ledger expenses by functional category for cost accounting. To utilize this report, you must define the G/L Accounts that you want included on this report in G/L Master File Maintenance (GMM). The field used to designate whether or not an account will print on this report is Memo Field #1. There are 8 options defined to departmentalize the accounts for use in cost accounting (see the G/L Master file documentation for further help).
NOTE: MIU, part of the system’s Month-End Processing, will give information necessary to run this program. The number of lines and number of orders must be collected for no less than three months.
Enter GEA from any Menu. The system prompts:
EXPENSE ANALYSIS PRINTING TO BEGIN. PRINTER? (LP-/SP-):
» Response may be any valid line printer or spooler designation on the system. The default device will be displayed in place of [LP1]. The default and valid responses vary according to the system on which the program is installed.
DO YOU WANT A CONSOLIDATED EXPENSE ANALYSIS? (Y/N) » Enter Y to get a consolidated print out. » Enter N to print the report for only one organization.
Single Organization When a single organization is selected, the system prompts for the organization:
ENTER ORGANIZATION CODE OR END 00 » Enter a valid organization code. » Enter END to exit the program.
The system prompts for verification:
CORRECT ORGANIZATION? (Y/N)
» Enter Y to accept the organization. » Enter N to return to the previous prompt.
Consolidated Spreadsheet If you choose a consolidated printout the program will prompt:
FOR ALL ORGANIZATION CODES? (Y/N/END)
» Enter Y to print G/L Operating Reports for all organizations. » Enter N to print for selected organizations. » Enter END to return to General Ledger Menu.
If you choose to print selected organizations, the system displays the following:
ENTER ORGANIZATION CODES IN ASCENDING ORDER:
» Enter up to 10 organization codes to include in the consolidated spreadsheet.
Additional Stanpak Programs Financials Page 57

ENTER DATE:
» Enter the date to print on the report.
ENTER THE NUMBER OF INVOICES:[ 0]
» Enter the number of invoices processed for the organizations being printed.
ENTER THE NUMBER OF LINE ITEMS: » Enter the number of line items processed for the organizations being printed.
Page 58 . Additional Stanpak Programs

GYL - YTD Transactions Listing Use program GYL to print the contents of the G/L YTD Transaction file. You can print the report for one organization, all organizations, and a parent and all of its subsidiaries.
The option to retain a history of G/L transactions must be activated during installation of the system. If the option is not active, G/L transactions are automatically purged at the close of each accounting period, and this list is not available. See Program GYP for instructions to purge the contents of this file.
The YTD Transactions Listing shows each entry to G/L accounts in account number order for the period specified.
You can print the entire file, or only those transactions within a range of dates that you specify.
To Begin Enter GYL from either General Ledger (G) Menu. The program prompts:
PRINTER? (LP-/SP-): [LP1]
» Response may be any valid line printer or spooler designation on the system. The default device will be displayed in place of [LP1]. The default and valid responses vary according to the system on which the program is installed.
The system then prompts:
List Organization
OPTIONS: --Enter the Code of the Organization you want Listed --Enter "ALL for a full file listing --[TAB] to Return to the Menu
» Enter a valid organization code to print a YTD Listing for a single organization. OR » Enter ALL to print listings for all organizations on file. OR » Press <Tab> to exit to the G2 menu.
Listings for a Single Organization or Consolidation When a single organization is selected, GYL prompts for verification when the following prompt is displayed:
Correct Organization? (Y/N) [Y]
» Press <Tab> to accept the organization code displayed. OR » Enter N to return to the preceding prompt requesting organization codes.
This additional prompt is displayed if you enter a parent organization code:
Print the whole Consolidation? (Y/N)
» Enter Y to print listings for all organizations identified with the same consolidation code.
OR
Additional Stanpak Programs Financials Page 59

» Enter N to print a YTD Listing for the parent organization only.
Print Zero Balances Inactive accounts may be excluded from the listings when the system prompts:
Suppress inactive accounts? (Y/N)
» Enter Y to suppress accounts with no year-to-date activity. OR » Enter N to include both active and inactive accounts in the listing. OR » Press <Tab> to exit to the G2 menu.
Selecting Dates YTD Listings can be printed for any length of time as long as the periods are on file and when the prompt shown below is displayed:
Beginning Date Ending Date
[TAB] at "Beginning Date" Lists from Beginning of File [TAB] at "Ending Date" Lists Through End of File.
» Enter beginning and ending dates. OR » Press <Tab> twice to print the entire file.
The YTD Listing can be printed in either foreground or background partitions when the following prompt is displayed:
Do you wish to run in (F)oreground/(B)ackground/(E)xit?
» Enter F to print in foreground. OR » Enter B to print in background. OR » Enter E to exit the program without printing.
General Ledger Calendar Ledger Calendar The general ledger calendar controls how the G/L Summary History file is updated and the period to which G/L data corresponds when it is printed on financial statements. The general ledger calendar is established by entering the ending dates of each period in Accounting Period Maintenance (GDM). Only the ending dates for open periods can be changed. When a G/L period ending date is changed, all open transactions are recalculated, and balances in the G/L Summary History file are updated.
Page 60 . Additional Stanpak Programs

Migrating Your General Ledger from Your Old System
When migrating from another General Ledger onto Stanpak in the middle of the year, you have the choice of
1. move the closing balances from the old system over to Stanpak, or
2. move all transactional activity from the beginning of the year from the old system into Stanpak.
Posting Balance Forward Values
To move the closing balances, the user posts the closing balances for each account from the old system into Stanpak. For example, if a customer cut over to Stanpak on September 20, 1999, they could post the closing balances for the Balance Sheet and Profit and Loss accounts on their old system as of September 20th into Stanpak using the General Journal Entry program GIP with September 20 as the posting date.
The advantage of this procedure is that it is simple and fast, requiring a minimum of effort. Where limited time is a factor, this is the preferred method, and is the choice of most users when converting. The disadvantage is that you will not have a full years historical information to evaluate until you have begun and completed your next fiscal year; and you will not have Year-to-Date to Last Year-to-Date comparisons until two full years are begun and completed.
Posting Monthly Activity from the Beginning of the Year To move all transactional activity from the beginning of the year, the user should
use the General Journal Entry program GIP. First, post the opening balances at the beginning of the year. When that is completed, post the transaction total for each account for month one, closing the month in the normal fashion when finished.. Repeat this process for each month, until you have posted the totals up to the present. If the cut over is not done at the close of a month, for activity for the current month, post the month-to-date totals for each account. This should result in each account balance in the balance sheet and profit and loss statement on the Stanpak system matching the balance of the same account on the old system. Do not close the month. Instead, continue activity on the new system until the end of the month, at which time you would close the month in the conventional way.
The advantage of this procedure is that you will have month to month historical information to compare with immediately; and you will have Year-to-Date to Last Year-to-Date comparisons once you have completed this fiscal year. The disadvantages are, of course, that you will have many more transactions to post and that it could take longer to get current on your financial reporting.
If your company wishes to post the full year, but needs to get going quickly and keep current reporting up to date, a variation of this method would be to post the month-to-date cumulative balance for profit and loss account for the current month. This would allow your company to continue general ledger activity on Stanpak until the end of the month, at which time you would close the month in the conventional way and generate a profit and loss statement for the month. When you are caught up and
Additional Stanpak Programs Financials Page 61

have time, you must post all historical values for the year. Start by posting the opening balances at the beginning of the year. When that is completed, you must post the transaction total for each account for month one, closing the month in the normal fashion when finished.. By repeating this process for each unposted month, your will be able to add the historical information to your General Ledger.
If you wish to post year totals, enter the dollar amount in GMM. If you want period-end balances for accounts for each period in a closed year, enter the period-end balances in GHM. If you want actual transactions (detail) for certain periods (maybe closed periods for the current year), you can enter them using the Adjustments to Closed Periods (GIC, GLC, GUC).
Manual Posting versus Automated Conversion For most companies, the decision to convert historical data from an old system is based on a comparison of the cost of manual posting versus automated conversion. Because the file layout and coding method varies from system to system, each conversion must be managed individually. This requires a programmer with system analysis capabilities to provide media conversion management, system analysis, custom programming, testing and quality assurance, plus manage the task of coordinating the cutoff and executing the actual conversion. This typically costs in the range of $1,000 per file. That is only 10 hours at $100 per hour. Because the relationship of general ledger accounts involves more complexity than for most files, conversion of the general ledger activity is likely to cost more.
In all cases I am familiar with, customers have concluded that the cost of converting general ledger activity and balances automatically is more costly that the alternative of manually posting these values into a new system, and have elected to post the balances manually.
CHART OF ACCOUNTS
Creating the Chart of Accounts How To Get There ZMENU input 14 - General Ledger; GENERAL LEDGER MENU input 1 – G/L Master File Maintenance; G-1 MENU input 1- GMM-G/L Master File Maintenance
Before You Begin Many accounting software packages use an accounting numbering system that has 5 characters, a dash, and two or three more characters (XXXXX-XX). The first five characters usually identify the actual account (assets, liabilities, capital, revenues, expenses, etc.), while the second group of characters identifies a group or subsidiary. For example: 51100-01 could be Salaries for Administration or Parent Company, while 51100-02 could be Salaries for the Sales Department or the Branch Office in Maryland. In Stanpak the second set of characters are setup separately as Organizational Codes.
Creating the Accounts - Step-by-Step: 1. Review your existing chart of accounts. This is a good time to delete unused
accounts and add new accounts.
2. Make several copies of the Chart of Accounts Work Sheet included in this manual (page 71)
3. Now start setting up, using CAWS, the Accounts you want to use with Stanpak.
•
TIP List all of the Account titles first before completing the rest of the sheet. This way you have all your accounts straight before coding them. Remember when deciding on account numbers that they will be printed on Financial Statements
Page 62 . Additional Stanpak Programs

in numerical order
Important! The first Consolidation Code must have “*” as it’s first of two required characters. This code will consolidate all the amounts for each account of the organizations and/or subsidiaries. Many companies use “*0” .
4. The first Organization Code and Title is usually set up for the overall organization, such as the Parent Company or the Main Office. Many companies use the Code “00”. With Stanpak you can copy the Chart of Accounts from one internal organization to another so it makes it easier to list all accounts under your first Organization. Don’t list your other Organization Codes and Titles until later (Step19). Organization Codes are required and are two characters long, while Organization Titles are also required and allow up to 2 alphanumeric characters.
5. On your CAWS you should have all the account titles required for your entire business. Now let’s give these account titles their corresponding account numbers. These numbers are required and you have up to 10 alphanumeric characters.
•
TIP Most companies use the first character of their account numbers to represent one of these categories: 1-Assets, 2-Liabilities, 3-Capital/Stockholder’s Equity, 4-Revenues and 5-Expenses. It is also beneficial to have one or two zeros at the end of the codes in case you need to add an account later that goes between two existing accounts. Example: Cash-Regular Checking could be account number 111100, while Cash-Payroll Checking could be 111200. If later you added Cash-Regular Savings, you could code it 111150. Since most people have a tough time remembering account numbers, many use a system to help them remember by using coding for categories. Example: above, Cash-Regular Savings is code 111150. The first character, “1”, states the account is an asset. The second character, “1”, states it is a current asset, and the third character, “1”, states that it is one of the cash accounts. The last three characters state exact type of cash account.
6. ACCOUNT TYPE – You are required to input one of the follow letters to distinguish the category of the account:
• A = Asset
• L = Liabilities
• C = Capital/Stockholders Equity
• R = Revenues
• E = Expenses
Important! Before continuing, you must realize that the G/L Chart of Accounts coding includes deciding how each account will appear in the Financial Statements. There are two ways in which to set up Financial Statements. The first method, which is used by 99.9% of our clients, is to use the Financial Statement Generator (FSG). This uses the accounts and their balances as if they are part of a database, which means you can include and/or change how each account is used in your Financial Statements easily. The second
Additional Stanpak Programs Financials Page 63

method is Standard Financial Reporting (SFR). This system requires account names for items such as “Total Assets”. It is very difficult to work with, especially if you want to make changes. The rest of the Step-By-Step procedures will be based on FSG. If for some reason you plan on using SFR, the procedures are included in the Appendix.
7. 02 Function Codes requires you to input one of the four numeric codes (a, b, c, or d). These indicate what is inputted on the financial statements for the G/L account you are working on. With Financial Statement Generator (FSG) you must use “c”.
a) Title Printed (Only the title of the account is printed on the financial statements).
b) Subtotal/Total Printed (Only the subtotal or total amounts are printed on the financial statements).
c) Account Title and Balance Printed (The current balance for the account and its title are printed on the financial statements). This is standard procedure for most accounts.
d) Account Balance Added to a Total but Not Printed (The amount balance is totaled, but not printed).
8. 03 Total Level requires a one-digit input. They are accumulators, so when each time an amount is accumulated and/or printed, a total level must be specified. There are 9 possible total levels available. With Financial Statement Generator (FSG) you must use “5”.
9. 04 Line Spacing requires a one-digit input. This states the number of blank lines that are inputted prior to the account on your financial statements. With Financial Statement Generator (FSG) you must use “0”.
10. 05 Indention allows you to select up to 10 blank spaces before the financial statement begins to print the account name. With Financial Statement Generator (FSG) you must use “0”.
11. 06 Column / Percentage Base is used for Balance Sheet accounts and Income Statement accounts in different ways: With Financial Statement Generator (FSG) you leave it blank:
• Balance Sheet – The digit (1, 2, or 3) indicates which column accepts the account balance. This column is generally used if you are specifying subtotals.
• Income Statement – Entering a “Y” stipulates that the Income Statement account will have a “%” next to it indicating what percent that account balance is to Total Revenue. An example: if Total Revenue is $1,000,000 and Salaries Expense is $300,000, next to the $300,000 will be 30%, which means that Salaries Expense is 30% of Total Revenue.
12. 07 Operating Report is an optional area. If “Y” is inputted, it means that this account will be included on the G/L Operating Report (GPO). Press “TAB” (leaves it blank) or N for it not to be included. With Financial Statement Generator (FSG) you leave it blank.
13. 08 Active Account is required to have a “N” or “Y” in it. With Financial Statement Generator (FSG) you must use “Y ”. By setting this account at Y, this allows transactions to be posted to it. Only accounts with Function Codes 3 or 4 can have a Y.
Page 64 . Additional Stanpak Programs

14. 09 Post Summary/Detail is optional and allows specific summary posting by inputting “S” and when inputting “D” allows the user to specify detail posting. This allows you to override flags for summary and detail . Main use would be if you wanted a group of accounts to post detail, but one of these accounts you want only summary posting, this will allow you to override the specific account. With Financial Statement Generator (FSG) you leave it blank.
15. Date of Last Update is a display-only date, which is updated by the system whenever the account balance is updated. The display is the month and year when the Period–End Closing (GME) is run.
16. Current Open Activity is also a display only activity generated by the system. It represents the total of the transaction that has been posted to the account in open periods.
17. Balance as of Last Close is optional. When you set up a new account, this category allows you to input the current account balance that you are transferring over from another accounting system. For example, if you are just starting Stanpak, and the balance of your Cash account is $1,000, you input the amount of $1,000 into this area. After you input your opening balance, the system will display the up-to-date balances from then on. For revenue and expense accounts, you should input year-to-date total activity. For balance sheet accounts, you should use the last closed balance during the install process. If you are starting with a new fiscal year, revenue and expenses should be zeros.
18. Last Year Total is optional and displayed. This balance provides you with the opportunity to compare last year’s balances with this year’s balances. After inputting the amount when initially setting up an account, the system will provide this balance for all future periods.
19. Memo Fields allows you add up to 10 additional fields of information about the account, such as department, revenue center. “?MEMO” provides more information about Memo Fields.
BUDGETS
Creating a Budget How To Get There ZMENU input 14 - General Ledger; GENERAL LEDGER MENU input 1 – G/L Master File Maintenance; G-1 MENU input 5- GBM-Budget File Maintenance
Before You Begin Budget amounts are used to compare projected amounts and actual amounts. In Stanpak you can include budget amounts from last year, this year, and next year. By using the “DUP” function, you can copy budget amounts from one account to another within the same or different organization. The amounts can also be copied from one year to the next. Remember only G/L accounts with function codes 3 or 4 can have budget amounts.
Additional Stanpak Programs Financials Page 65

Creating, Changing, & Updating - Step-by-Step: 1. First decide which account will have budgeted amounts and what the amounts
will be.
Important! Budgets can be set up one of two ways: 1) You can input an amount in period one and have the system increase or decrease it by incremental amounts over the year. Example, if Sales are expected to increase every period by 3%, you would input the first period amount and then input the 3% increase. 2) You can input a total amount that is evenly distributed over the year. Example, Rent Expense for the year is expected to be $12,000 . You input the $12,000 and the system distributes $1,000 every month.
TIP When deciding which order account budgets should be inputted, you should group them by similar amounts. For example, if each division has total Insurance Expense of $2,000, you should input for one division and then duplicate it for the other division. This is different then G/L File Maintenace where you did all the accounts for the parent and then duplicated them for each division. With Budget File Maintenance you take one account and then duplicate it through the divisions.
2. Year (YYYY) is required. This stipulates the year you want the budget amounts to be inputted.
3. Organization is required. This allows definition of budgets for parent and subsidiaries. Enter the organization code you want.
4. Account No. is required. Enter the valid G/L account code wanted.
5. Next, choose which activity is to be performed:
Exit Update Next Prev Total peRcent Copy Delete Field #
ENTER:
• E to enter another account or year
• U to update all budgeted amounts.
• N to advance to the next budgeted account number
• P to return to previous budgeted account number
• T to distribute the total budget amount evenly over all periods.
• R to change the budgeted amount by a percentage.
• C to duplicate the budgeted account in another organization, account, and/or year
• D to delete the budget for this account and year
• Type in a period number (Field #) to edit a specific period’s budget
After entering all of budget amounts to all of the accounts, go to Financial Statement Generator.
Page 66 . Additional Stanpak Programs

FINANCIAL STATEMENTS
Creating a Financial Statement How To Get There ZMENU input 14 - General Ledger; GENERAL LEDGER MENU input 3 – Financial Statement Processing Menu (G-3).
Before You Begin When designing Financial Statement formats you are basically designing database reports, which means there is some flexibility. While the software gives you a choice between using the Financial Statement Generator (FSG) or the Standard Financial Reporting (SFR), you should use FSG unless you are absolutely in need of using SFR. The reason for this is FSG can design and change your financial statements to give the information you want in the format desired, while SFR dictates the format and information that the financial statements provide. Besides designing the basic Financial Statements, you also must design the Report Maintenance (GFM) and the Header Maintenance (GHH).
Creating, Changing, & Updating - Step-by-Step: 1. First, you must decide what type of Financial Statements that you want, what
information you want on them, and what it should look like.
2. Make numerous copies of the Financial Statement Generator Reports-Work Sheet (FSGR) and the GFM Format Maintenance Template (GFMT).
3. Using one the FSGR sheets, design a template of your Financial Statements. The first seven small boxes on the left lets you indent the title of what ever you want printed on that line. After you decide how much you want to indent write the title that you want in your space.
TIP Use a pencil because you will probably make many changes. When deciding the number of indents, remember that there are category titles and subtitles, totals and subtotal titles that are indented differently then account titles.
4. Next, decide which of the three large columns on the right you want the amount relating to the title to go. If the title used for that line is an account name, in the column where the amount is to go insert the account’s number code. For example, starting from the right, in the third column you want the amount for the account Building, input 12000, which is the G/L Account number for Building. Staring with the third column from the right, many people use the first large column as the account amounts, the second column for sub-totals, and the third column for totals.
5. After all the information has been recorded on the sheet, checked, you then input it in the computer on the Financial Statement format that want.
After you complete the Financial Statement format design, and input in the Financial Statement Generator (FSG), you need to complete the Format Maintenance and the Header Maintenance for the specific Financial Statement you are working on.
Additional Stanpak Programs Financials Page 67

GFM - Format Maintenance Before You Begin Program GFM is used to add, change, copy, or delete a report format. A single report format can be used by multiple report headers. Once you have set up your routine formats, we recommend that you experiment by combining different formats and report types to get the most out of your Financial Statement Generator. For example, you can combine a balance sheet format with an activity report type. Then you can print the resulting report in a worksheet format to use in auditing your balance sheet.
The Format Number uniquely identifies the report format. Format numbers can be assigned randomly; there is no requirement for a specific sequence. For convenience, the format number can be the same as the report number that uses the format.
Separate format lines are used to set up the following line detail for each report format:
• line titles, headings, and descriptions
• G/L accounts (printed and/or totaled)
• subtotals or totals (printed and/or accumulated)
• printing specifications (indentation, columns, etc.)
How To Get There Enter GFM from either General Ledger (G) Menu
Page 68 . Additional Stanpak Programs

GFM Format Maintenance Template FORM AT #
# 1 #2 #4 #10 #11 #12 #13 #14 #16SEQUENCE # PRINT G/L ACCT # PRINT CALC % ACCT TYPE ADD TO DESCRIPTION INDENT LINES TO
Y/N/T/D TOTAL OF TOTAL A/L/C/R/E SPACE
Additional Stanpak Programs Financials Page 69


Chart of Accounts Worksheet CONSOLIDATION
CODE
ORGANIZATION
CODE O R G A N T I T L E G
/ L A C C T # A C C O U N T T I T L E
ACCT TYPE
FUNC CODE
TOT LEVEL
LN SPACING
INDENTION
COL/
% BASE
OPER REPORT
ACTIVE ACCT
POST SUMMARY
* 0 0 0 P a r e n t 1 1 1 0 0 0 C a s h - I n - B a n k R e g u l a r A 3 5 0 0 1 Y
Additional Stanpak Programs Financials Page 71

Frequently Asked G/L Questions
How do you define NET PROFIT and GROSS PROFIT? Two profit values are reported on several reports including the BCBI Report (BM), Proformas (OPF) and the right side of the invoice (RP). The following defines how the two profits differ.
Gross Profit or Profit = Sell Price - Current Cost (Current Cost is defined in (I)IM field 51)
Net Profit = Sell Price - Actual Cost - Sales commission paid - (Net Profit Variables) (Actual Cost = Last Paid Cost + Last Paid Freight) (If Actual Cost = 0, then the system uses the Current Cost) (Net Profit Variables = values defined in (Z)ZM i.e. Sales, Sales Service, Storage, Handling, Delivery, Office and Administration)
How does the system calculate AVERAGE DAYS/$ ? This variable represents the number of days of sales the A/R value represents. In other words, how many days worth of your customer’s inventory are you financing.
If all A/R is current then:
Ave Days/$ = (A/R total ($) ÷ A/R current ($)) * Days (where Days = current day of month)
If A/R total <= Current A/R + last month’s sales:
Ave days/$ = [(A/R total ($) - A/R Current ($)) * 30 / Last months sales ($)] + Days
If A/R total <= Current A/R + last month’s sales + sales 2 months ago:
Ave days/$ = [(A/R total ($) -A/R Current ($)- Sales last month ($)) * 30 / Last month's sales ($)] + Days
Pattern continues through
A/R total <= Current A/R + last month’s sales + sales 2 months ago + ...+ ...+sales 5 months ago
Frequently Asked G/L Questions Financials Page 72

What does a Sample Chart Of Accounts include?
Assets
10000 Petty Cash
10100 Cash in Bank
11000 Employee Advances
11200 Loans Receivable
12000 Accounts Receivable
12100 Reserve for Bad Debts
14000 Inventory - Warehouse
14100 Inventory - Direct
14200 Inventory - Freight
15000 Prepaid Insurance
15200 Prepaid Interest
15400 Prepaid Forms
15500 Prepaid Expenses - other
17000 Vehicles
17100 Depreciation - Vehicles
17200 Furniture & Fixtures
17300 Depreciation - Furn. & Fixtures
17400 Office Equipment
17500 Depreciation - Office Equipt.
17600 Warehouse Equipment
17700 Depreciation - Warehouse Equipt.
17800 Leasehold Improvements
17900 Depreciation - Leasehold Improv.
19000 Cash Value - Key Man Insurance
19200 Investments
19400 Deposits
19600 Organization Fees
19700 Amortization
Liability
20000 Accounts Payable
Liability (cont'd)
21000 P/R Taxes - FICA (Employee)
21100 P/R Taxes - Medicare (Employee)
21200 P/R Taxes - Federal Withholdings
21600 P/R Taxes - State Withholdings
22000 P/R Taxes - FICA (Comp)
22100 P/R Taxes - Medicare (Comp)
22200 P/R Taxes - Federal Unemployment
22400 P/R Taxes - State Unemployment
22800 P/R W/H - Medical Insurance
23000 Salaries Payable
23500 Commissions Payable
24000 Lease Payable
25000 Sales Tax Payable
26000 Interest Payable
27000 Notes Payable - Misc.
28000 Notes Payable – Stockholders
Capital
30000 Common Stock
31000 Treasury Stock
32000 Paid in Capital
33000 Current Earnings
34000 Retained Earnings
Revenue
40000 Sales - Cash & Charge
42000 Discounts Earned
45000 Miscellaneous Income
Frequently Asked G/L Questions Financials Page 73

Expense Expenses (cont'd)
50000 Cost of Goods Sold 75000 P/R Taxes - Admin
60000 Sales Commissions 75500 Postage
60100 Sales Salaries 76000 Purchased Services - Admin
61000 Advertising 76200 Rent
62000 Discounts Allowed 76500 Repairs & Maintenance
62800 Insurance - Life - Sales 76700 Supplies - Forms
62900 Insurance - Medical - Sales 77000 Supplies - Office
63000 Insurance - Wkmn Comp. - Sales 77400 Telephone - Long Distance
65000 P/R Taxes - Sales 77500 Telephone - Service
66000 Promotions & Purchased Services
78000 Training/Seminars - Admin
78500 Travel - Admin 67000 Supplies - Sales 79000 Utilities 68000 Training/Seminars - Sales 80000 Salaries - Whse. & Delv. 68500 Travel - Sales 81200 Contract Labor - Whse. & Delv. 70000 Salaries & Wages - Admin 81500 Depreciation 70700 Bad Debts 82100 Gas & Oil 71000 Bank Charges 82400 Freight Out 71200 Contract Labor - Admin 82800 Insurance - Life - Whse. & Delv. 71500 Depreciation 82900 Insurance - Medical - Whse. &
Delv. 72000 Donations
72200 Dues & Subscriptions 83000 Insurance - W/C - Whse. & Delv.
72400 Employee Relations 84000 Lease - Whse. Equipment
72500 Gifts & Flowers 84100 Lease - Trucks
72700 Insurance - G/L 84500 Licenses/Taxes/Permits - Whse. & Delv.
72800 Insurance - Life - Admin 85000 P/R Taxes - Whse. & Delv.
72900 Insurance - Medical - Admin 86000 Purchased Services - Whse. & Delv. 73000 Insurance - Wkmn Comp. -
Admin 86500 Repairs & Maintenance - Whse. & Delv. 73500 Interest
74000 Lease - Equipment
Revenue 74200 Legal & Accounting 87000 Supplies - Whse. 74500 Licenses/Taxes/Permits - Admin 90000 Discounts Earned 74800 Miscellaneous Expenses 91000 Miscellaneous Income [PROFIT] Special Profit Account
Page 74 . Frequently Asked G/L Questions

What are the NPTA G/L Expense Definitions For PAR Breakouts? Brokerage any item you do not bill for but receive commission on should be excluded from sales information and put under "other income".
Converting Operation include roll-to sheet changes, box and envelope manufacturing, in addition to sheeting, slitting and rewinding. Do not consider items such as cutting and hole punching as converting operation.
Storage Personnel: none
Accounts:
1. rent and/or depreciation, taxes, repairs, and maintenance, and insurance apportioned to warehouse space;
2. heat and power apportioned to warehouse space;
3. payments for storage in public warehouses; and
4. insurance on merchandise.
Handling
Personnel: warehouse foremen, paper cutters, shipping and receiving clerks, janitors and other warehouse employees.
Accounts:
1. salaries, wages and benefits (including pension, profit sharing, workmen's compensation insurance and payroll taxes) for warehouse employees;
2. packing and shipping supplies:
3. depreciation, insurance, maintenance and repairs on storage and handling equipment; and
4. trimming, cutting and punching.
Delivery
Personnel: drivers, helpers and garage employees.
Accounts:
1. salaries, wages and benefits (including pension, profit sharing, workmen's compensation insurance and payroll taxes) for delivery employees:
2. trucking rentals and payments to public carriers for warehouse sales (transportation costs on direct sales should be charged to cost of goods sold);
3. vehicle taxes, licenses and insurance;
4. portion of occupancy expense (rent, heat, power) allotted the garage:
Frequently Asked G/L Questions Financials Page 75

5. gas, oil, tires, etc.;
6. vehicle depreciation, repairs and maintenance; and
7. parcel post for warehouse sales.
Office
Personnel: typists, office machine operators, accounting department employees and managers, data processing employees and managers, general office employees, teletype and switchboard operators, office managers and office personnel.
Accounts:
1. salaries, wages and benefits (including pension, profit sharing, workmen's compensation insurance and payroll taxes) for office employees, excluding Administration and Sales Service Personnel (see separate definitions);
2. apportionment of occupancy expense for office area (rent, heat, power);
3. rent or depreciation, repairs and maintenance on furniture, fixtures and equipment;
4. postage for general correspondence;
5. stationery, forms and office supplies; and
6. outside office services.
Administration
Personnel: executives of the company, branch managers and those charged with the overall management, financial and credit policies of the business, including their personal secretaries and assistants.
Accounts:
1. salaries and benefits (including pension, profit sharing, workmen's compensation insurance and payroll taxes) of administrative employees (less compensation attributable to other activities);
2. apportionment of occupancy expense for executive space (rent, heat, power);
3. rent, depreciation, repairs and maintenance on furniture, fixtures and equipment;
4. general liability insurance, employee bonds and other insurance (exclusive of employee benefits);
5. telephone, telegraph and teletype expenses exception sales and office activities;
6. bad debt, credit and collection expenses;
7. legal, auditing, consulting and directors' fees;
8. taxes exclusive of Federal, City ad State income taxes and payroll taxes;
9. membership dues and subscriptions:
10. donations; and
11. executive entertainment and travel.
Page 76 . Frequently Asked G/L Questions

Sales Service
Personnel: advertising, merchandising, mill order, inventory, order desk, traffic, specification sales, packaging technicians and specialists, sample department personnel and purchasing agent.
Accounts:
1. salaries and benefits for sales service employees including managers (exclusive of compensation attributable to other significant activities);
2. apportionment of occupancy expense (rent, heat, power);
3. catalogs, samples and direct-mail advertising and samples;
4. postage and messenger service on advertising and samples.
5. media advertising;
6. telephone, telegraph and teletype related to selling;
7. salesmen's equipment an supplies; and
8. sales service personnel travel and entertainment.
Selling
Personnel: outside salesmen, sales management, trainees and telemarketers.
Accounts:
1. salaries, wages and benefits (including pension, profit sharing workmen's compensation insurance and payroll taxes) paid for sales produced (includes attributable portion of executive and other salaries);
2. apportionment of occupancy expense (rent, heat, power);
3. automobile allowances;
4. travel and entertainment; and
5. incidental expenses.
Indirect Orders Indirect Orders are those orders that are delivered from the manufacturer to the merchant for immediate final shipment as a unit (at the merchant's expense) to the merchant's customer. Normally, such orders are not put into inventory, but are handled to an from the receiving/shipping area of the merchant.
Invoice Line Item On each invoice a "line item" is each separate product item shipped.
How do I Setup the G/L for a Consolidated F/S? Make sure that the INSTALL questions have been answered to fit your needs. Determine what your FISCAL year is. You will need to load the FISCAL PERIOD ending dates into the system. To load your PERIOD ending dates, from the (G) Menu type GDM. For help with the prompts on the screen, please refer to the G/L Manual section labeled GDM.
Next the program GFISCAL should be run. This will establish your current period for general ledger entries. From the G Menu type GFISCAL. For help with the prompts on the screen, please refer to the G/L Manual section labeled GFISCAL.Once the above two programs have been run, you are ready to establish your Company information and enter your chart of accounts.
Frequently Asked G/L Questions Financials Page 77

Note: GFISCAL does NOT appear on the menu, it is a ‘one’ time only hidden option program.
To set up your Company: First the consolidation organization must be created:
1. Menu, type GMM
2. @ Organization Code: type *0
3. @ Organization Title: type Your Company Name
4. @ G/L Account #: enter YOUR chart of accounts
This is now your ‘Parent’ or ‘Consolidation’ organization.
To set up the working organization: Repeat #1 through #3 of the above steps, putting in 00 (or a number of your choice) for Organization Code. When you reach the question "Copy records from another Organization? (Y/N)" you will most likely wish to say "Y". Please refer to the G/L Manual section labeled GMM for help copying the chart of accounts from *0 to 00 (or your organization #).
If you have turned on the Automatic A/R -> G/L Interface in INSTALL, then you must run program ZPOSTOP from the (N) Menu for A/R. It does not appear on the menu because it is a ‘hidden’ option. This program will allow you to set up your posting accounts utilized when OCJ, KJ, and RR are run. Please refer to the A/P Manual section labeled ZPOSTOP for help with entry.
If you have turned on the Automatic A/P -> G/L Interface in INSTALL, then you must run program ZPOSTOP from the (N) Menu for A/P. This program will allow you to set up your posting accounts utilized when NR and NCR are run.
After the above has been setup, you are ready to begin processing with the G/L. When you are ready to format your Financial Statements, review the G/L Manual Appendix C, and call Stanpak with any questions.
How do I Post Profit to the G/L account [PROFIT]? 1. Print [G]GAR Summary to get the monthly PROFIT. The system has figured the
PROFIT based on the total of all the Revenue accounts LESS all the Expense accounts.
2. If your profit figure from the [G]GAR report appears to be correct, make a manual Journal Entry through program [G]GIP to post the profit figure. The entry will be as follows:
If profit is a GAIN: Organization G/L Account # Description Amount *0 [PROFIT] optional Debit Profit Amount 00 Earnings # optional Credit Profit Amount
If profit is a LOSS: Organization G/L Account # Description Amount 00 Earnings # optional Debit Profit Amount *0 [PROFIT] optional Credit Profit Amount
Note: "Organization #" if you are consolidated, you will be posting the total Profit to the [PROFIT] account of your PARENT or *0 organization. The offsetting entry is posted to your earnings account and can be split between your different G/L organizations. If NOT consolidated (INSTALL option), you will be posting the profit in your working organization. The "Earnings #" is your G/L account number for your earnings account.
Page 78 . Frequently Asked G/L Questions

3. After [G]GIP has been done, run [G]GPL to print the J/E’s and [G]GUP to update the entries.
4. Run [G]GAR in detail, and a [G]GTB (G/L Trial Balance). The [G]GTB is optional if you do not utilize this report, you do not need to run it.
5. Print out Financial Statements; Balance Sheet and Income Statement through program [G]GP, and verify the figures.
6. Run [G]GME, and close the month. This step is optional, this will close the period to any additional transactions and/or postings
What are reasons that report generator reports and Stanpak reports might not agree?
1. Customer sales YTD is only updated once a month -- when MCU is run. Salesman sales YTD are updated daily -- during the post invoice print update.
2. If a salesman's sales are modified in SMT or SMH, no adjustments are made to the sales values in the customer C1B or BCBI file.
3. Last Sell, Last Cost and Current Cost rarely stay the same from the beginning of the year to the end of the year. Extending a sell or cost from these values for a true YTD value is impossible. The best you can hope for is to be "somewhere in the ballpark" during times of "stable" costs.
4. MTD, QTD, and YTD sales and cost figures are based on the sell and cost at the time the order was entered (or price confirmed). These values represent the dynamic accumulation of sell/cost as it occurred.
5. $PRODTYPS uses catalog sequence number to select whereas $MISC uses category code. I have no idea how these fields are related or even if they are related. When the selection criteria is not the same, you have created the conditions for a "apples to oranges" comparison.
6. $MISCDDS is calculating a YTD sales value using Last Sell. See number 3 and 4 above as to why this number is unlikely to be accurate.
7. Customer Sales history does not include Non-Qual charges while Salesman history does include Non-Qual charges.
How do I reconcile my Inventory Value? See discussion on page 85.
How do I Setup A/P to interface with the G/L? Make sure that the INSTALL questions have been answered to fit your needs. Enter your vendors through program (V)VM, the Vendor Maintenance program. There are two fields in VM which pertain to the G/L - field #33, and field #34. They are the G/L organization and G/L purchasing account. These fields can be updated through Accounts Payable Vendor Invoice Entry, or input when setting up the vendor accounts.
You are ready to proceed to the next step if the following have been completed:
1. Vendors entered - (V)VM
Frequently Asked G/L Questions Financials Page 79

2. Chart of Accounts entered - (G)GMM
3. Posting accounts established using (N)ZPOSTOP.
From the (N) Menu type in NX. This program does not appear on the menu - it is a ‘hidden’ option because it should only be run at the time you begin interfacing A/P with the G/L.
If you are just beginning on the system, you will want to choose option #1. Payable Items Review.
If you have been using the A/P module without the G/L interface, you may also need to do option #2. Payable Items Maintenance to edit the G/L posting accounts for invoices already in the system. This program needs to run to completion, please refer to the A/P Manual section labeled NX for help answering the program prompts. Once this program is complete, you are ready to begin processing A/P.
Page 80 . Frequently Asked G/L Questions

G/L Discussions
FIFO Inventory Value Tracking Stanpak purchasing captures and tracks true FIFO (First in/First Out) costing.
FIFO Reporting Programs IFPCHR - Purchase Cost History Report The Purchase Cost History report uses FIFO Purchase Cost data to provide a history of the purchasing of inventory items. IFPCHR reports on dates of purchase, costs, quantities, vendor, purchase order number, and past purchases.
IFQ - FIFO Cost Inquiry Program The FIFO Cost Inquiry program provides the user with the FIFO cost history data for a chosen inventory item. The program provides a listing of all recent purchases which are available in the history file.
IQ - Master Item Inquiry The Inventory Purchase Cost FIFO file is opened for the FIFO Cost Inquiry Program (IFQ). The FIFO Cost Inquiry program will be called when the PH option is selected.
IVF - New FIFO Cost Inventory Valuation The FIFO Cost Inventory Valuation program is used to report on inventory valuation using FIFO Cost.
IAGE - Aging Inventory Program The Aging Inventory report will print a 30/60/90/120 day aging list of Items sorted by Vendor Number and age the inventory on hand according to stock arrival. The program uses the data in the FIFO cost file (I12) to track the order of stock received. For each item, the report prints the transactions required to account of all on-hand stock. The report prints the value for each transaction. The report will print the information in FIFO order. The first transaction to print will identify the next stock to leave the warehouse. Note that the report might print only a partial amount of the stock received for the first transaction (depending upon the current quantity on hand).
FIFO Maintenance Program IFP - Purchase History Purge Program The Purchase History Purge program is used to purge old history data from the Inventory Purchase Cost FIFO file (I12). The program gives the operator the ability to save a number of transactions beyond that required to satisfy the Quantity on Hand.
G/L Discussions Financials Page 81

Purchasing Programs and FIFO QPU - Purchase Order Price Confirmation The Purchase Order Price Confirmation program is responsible for recording the purchase history in the Inventory Purchase Cost FIFO file (I12). For each item, a new record is written to the file. The file is keyed by item number, receipt date and sequence number. The sequence number is required to allow multiple items to be received on the same day. The Invoice Update Program will use this data to determine the FIFO Purchase cost for each item taken from inventory. The FIFO Cost Inventory Valuation Report (IVF) can be used to report the FIFO Purchase value for the stock inventory. The Purchase History Purge program is used to purge old FIFO Cost information. The Purchase Cost History report is used to report on the FIFO Purchase Cost data.
Invoicing Programs and FIFO RPU - Invoice Update Program
Note: The Invoice Update program (RPU) is run automatically by the Invoice Print and Post program (RP).
The Invoice Update program is responsible for totaling the Average and FIFO costs for each line item. The two sum values are stored in the Open Order Header “B” file (O1B). The values will be used for posting to the General Ledger interface. The O1B file was created to store additional open order header data. The information could not fit in either the A or B records of the Open Order Header file (O1A), or Open Order Total record in the Open Order Line file (O1). Open Order Header “B” file currently stores the new Average and FIFO costs. Currently, the file is written only by the Invoice Update program (RPU), however, in the future it might be loaded by other open order programs as new fields are added to the file.
The Open Order Line file layout has been changed to store the line item extension for FIFO cost and average cost. The sum of these extensions is stored in the Open Order Header file. The Average and FIFO Cost figures are copied to the Order Line Invoice History File (O1X) and Order Header Invoice History “B” file (O1BX) when the invoice is purged (moved to history). The Order Header Invoice History “B” file is a new file which records open order history. The RPU program totals the order average cost value.
The average cost (O1AVECST) and FIFO cost (O1FIFCST) variables are used to store the line item extended value for the average and FIFO cost amounts, respectively, at the time of invoicing. Note, these values are extended costs and not price unit costs. These variables are only valid after the Invoice Update program (RPU) is executed. Their primary purpose is simply to get loaded into the Order Line Invoice History File when Invoice Register program (RR) is executed and the open order is purged. The Order Line Invoice History file retains these for historical purposes.
RR - Invoice Summary Register The Total FIFO cost and total average cost values from the Order Header Record are now totaled and posted to the General Ledger (if ZPOSTOP setting are set to post).
Rebate posting for FIFO Inventory Valuation Method If INSTALL, G/L Config. is set to 'F', for FIFO Inventory Valuation, then the Customer Invoice Register will print a 'CAUTION:' message as follows:
''INSTALL is set to update G/L cost of goods sold by FIFO cost. This is not adjusted for contract rebates which must be posted separately.''
Page 82 . G/L Discussions

A Journal Entry must be made to Debit a Rebates Receivable account and Credit Cost of Goods Sold when a Rebate is submitted to a Vendor.
The Customer Invoicing programs do not capture the Contract Actual Cost for Rebate Items when Install is set for the FIFO Inventory Valuation Method. The programs capture the FIFO Layer Actual Cost that is updated from the Purchasing Module or IE, then Credit Inventory in the General Ledger based on this cost. That is why a Manual Journal Entry must be made to Credit CGS for the Rebate when it is posted as a Receivable.
The Journal Entries that the System creates for a Rebate Contract Item purchased at $500.00 are as follows:
Purchase of the Rebate Contract Item: DEBIT CREDIT Inventory 500.00 A/P 500.00
Sale of the Item when system is set for FIFO Inventory Valuation:
CGS 500.00
Inventory 500.00
For posting of Rebate Receivable of $10.00
Rebates Rec. 10.00
CGS 10.00
G/L Discussions Financials Page 83


Inventory Reconciliation The reconciliation process begins by printing an Inventory Valuation Report (I)IV, on the last day of the month after all items have been received and posted. This report should be reviewed carefully for proper costing, units of measure, etc.
CUT-OFF
An issue in any reconciliation is the timing of when transactions are recorded in the subsidiary ledgers and the general ledger. These types of transactions are broadly referred to as cut-off items. On the Stanpak system, the receipt date for inventory and non-stock items determines the posting date to the general ledger. This reduces the possibility for cut-off errors.
Direct shipments do not have a receipt date, and accordingly, sufficient care should be exercised in posting to make sure that the purchase transaction and the sale transaction are recorded in the same period. In order to reduce the possibility of recording the transactions in different periods, several companies invoice their customers after receiving the invoice from the vendor.
One method for determining the accuracy of this matching process is to create a separate general ledger "Direct Ship" Purchase (inventory) Account. All direct ship vendor invoices would then be coded to this account. At the end of the month the balance in the account should be compared to the cost of sales on direct ships. Theoretically, the two amounts should be equal if all transactions are posted in the proper period.
At the end of each month there will be items that have been received in the warehouse and posted to inventory which have not been invoiced by the vendor. On the date that you reconcile the inventory to the general ledger, print the Unconfirmed P/O Value Report (QUPV). This report lists all items received and included in the Inventory Valuation Report which have not yet been entered into the general ledger. The total of those items with receipt dates prior to the general ledger month end date will become a reconciling item. It is important that all P/Os be properly priced for this number to be meaningful.
REBATES/SPECIAL COSTS
There is an improper matching of purchase cost and cost of sales for special cost inventory items. i.e. vendor rebates. For all rebate items, the vendor invoices at "normal" cost. When the item is sold to a qualifying customer, a rebate request is filed for a lower cost. Accordingly, when the item is purchased, the inventory account on the general ledger is increased by the "normal" cost. When the sale occurs, and Install is set to Last Paid, inventory is relieved and costed at the contract "rebate" cost. The result is that the inventory balance is overstated while cost of sales is properly stated and in effect, a receivable from the vendor has been created. As an example, assume that the normal cost of a product is $50.00 per case and that for a specific customer, the vendor has agreed to a $5.00 per case price deviation.
G/L Discussions Financials Page 85

Assuming a 10 case purchase and sale, the following entries to the general ledger would result.
Purchase Inventory 500.00 Accounts Payable 500.00Sale Cost of Sales 450.00 Inventory 450.00
At the end of the month, a rebate request for the $50.00 would be filed with the vendor. There are two methods of accounting for theses types of transactions on the general Ledger. The first is to create a Rebate Receivable account and to prepare the following entry on a monthly basis.
Rebate Receivable 50.00 Inventory 50.00
If this method is chosen, when the rebate is received from the vendor, the coding would be to Rebates Receivable. The other method results in no general ledger entry but uses the total amount as a reconciling item between the Inventory Valuation Report and the general ledger. When the rebates are received from the vendor the coding would be directly to the inventory account.
The Information regarding the amounts of rebates receivable can be obtained by running program CSV from the contact menu.
When the Install parameter for the FIFO or Average Cost Inventory Valuation Method is selected, the Inventory account on the General Ledger is relieved and costed by the “normal” cost for the sale of an item. The result is that the Cost of Sales balance is overstated while inventory is properly stated. The following entries for the sale would result:
Sale Cost of Sales 500.00 Inventory 500.00
The entry to a Rebate Receivable account would be as follows:
Rebate Receivable 50.00 Cost of Sales 50.00
ADJUSTMENTS
As of Stanpak 6.0, inventory adjustments posted through program IE will optionally result in an adjustment to the general ledger. If the Install parameter is set to not update general ledger, at the end of each month, or more frequently if desired, print an Inventory Adjustment Report (option T in the IE program) to ascertain which items have been adjusted during the month. This report includes costs and extensions. Once the amount is determined, a journal entry should be prepared to either increase or decrease inventory in the general ledger.
LOADS
Most paper companies load costs for purposes of computing salesman commissions. The Stanpak system keeps track of three separate inventory costs, current cost (loaded cost), last paid cost and average cost. For sales of inventory items, the programs properly charge cost of sales with the last paid cost, including freight. When a cost contract is in place, the contract costs including sales (loaded) and actual contract cost are automatically used instead.
Page 86 . G/L Discussions

It is necessary to enter both the loaded cost and actual cost for non-stock items. The cost of these sales is entered through the order entry system; Order Entry program OE, Order Price Confirmation program OCP and the Order Maintenance program OM. The mechanism for entering actual cost for non-stock items was introduced in Release 4.0. As the item is entered and the cursor stops at the cost field to enter a cost, clear the field, enter "A" and <Enter>. Enter the actual cost per pricing unit (including any freight) and <Enter>. The field will clear and await entry of the sales (loaded) cost. Enter the cost and <Enter> in the usual fashion. If you do not know either cost at this time, you may enter them later using the Order Price Confirmation program OCP or the Order Maintenance program OM by following the same procedure. The net result is to cost the item at actual in the general ledger while properly computing commission based on actual cost plus the load.
BILL AND HOLD
On occasion, a customer will place an order for a special product and request that he be billed for the entire order and to make partial shipments. In these instances, an item number should be created through IM for the quantities retained in the warehouse. An inventory adjustment should then be made to add the quantities on hand to inventory. Since the inventory has already been invoiced, the value in inventory should be zero. All cost fields i.e. current, actual and average should be set to $.01. When shipments are made the customer is billed at a zero sales price and the cost is $.01 per item The effect on inventory and cost of sales will be negligible.
At this point, you may be wondering what this has to do with the reconciliation of inventory. If you are recording last paid cost as cost of sales, you need to be extremely careful that the posting of the vendor invoice through QPC and the resulting update in QPU does not update last paid cost. In the event this occurs, these shipments will be costed incorrectly for general ledger purposes. If a cost other than zero is present for any of these types of items, the Inventory Valuation Report will also be overstated. Either of these costing problems can cause an adjustment or a reconciling item at month end.
The best way to assure that this does not happen is to have two items. One for purchase and initial sales, and a second for Bill-and-hold. Use the Inventory Adjustment program IE to add the inventory to the Bill-and-hold item. This will allow you to keep track of the inventory activity on the Bill-and-hold item. Because it is never purchased, it can never have an actual cost other than Zero. It would be wise to prefix Bill-and-hold item numbers with a special prefix so they can be readily identified. They should also have the Track Quantity in the Item Record set to -1 to track all activity.
PRELIMINARY RECONCILIATION
In summary, the preliminary reconciliation of the general ledger to the Inventory Valuation Report would normally be as follows:
Balance per general ledger $xxx,xxx.xx +/- Inventory adjustments * x,xxx.xx + Unconfirmed purchase orders xx,xxx.xx - Rebates receivable ** x,xxx.xx Balance per Inventory Valuation Report $xxx,xxx.xx
* Skip this step if the Release 6.0 Install parameter is set to automatically update general ledger, otherwise a journal entry required
** Journal entry optional based on method of accounting. Posting can be done by template, making this an easier task.
G/L Discussions Financials Page 87


Activity Based Cost Accounting
Cost Accounting It is important to be able to understand the cost of doing business in the paper business and to be able to determine what is a profitable order. To do this, it is first necessary to do some preparation and analysis of expenses. It is only with this knowledge that a paper distributor can begin to set meaningful policies on order profitability for his sales people.
Price Waterhouse designed a chart of accounts for the National Paper Trade Association to divide all expenses into expense centers and establish for all paper distributors a common chart of accounts for reporting performance. The NPTA publication "Guide to Profitable Management" details this chart of accounts and explains this innovative approach of functional cost accounting.
Everything the paper distributor does is one of eight different functions:
1. Administration 5. Storage
2. Office 6. Handling
3. Sales Service 7. Delivery
4. Sales 8. Commissions
Everything we do is one of those eight things. We have taken all of our expenses and allocated each of them into these seven individual functions.
Let us look at rent as an example -- the warehouse is charged to Storage, the truck docks are charged to Delivery, the order staging area is charged to Handling and the office area is charged to Office (excluding Sales Service and Administration which are separate). The total rent expense is broken down into its functional parts and is proportionally allocated by percentage from a predetermined schedule based on floor plan and relative space costs. The allocation of expense and methods and procedures for determining allocation schedules are explained in detail in "Guide to Profitable Management".
In breaking expenses into functional expense pools, a great many new expense accounts are created. To allow a bookkeeper to handle the more complex allocation of expenses without additional effort, the system automatically calculates and allocates expenses. We make one posting to a "Distribution" account and the system automatically reallocates and posts a charge to each appropriate expense account according to preloaded percentage distribution table.
The Expense Analysis Report, (G)GEA, looks at all of the expenses for an accounting period broken down into the seven functional expense pools. In the example, Administration cost is $40,000; Office is $13,000; Sales Service is approximately $3,000; and so on for a total expense for the period of $177,119.40. These are not budgeted figures. They are the total out of pocket expenses of this particular company for this accounting period.
What we must do is find a way to relate each of these functional expense pools to a particular order with a formula to allocate costs based on the proportional amount of effort and resources consumed that will fairly determine what it actually costs to process.
1. Administration costs can be fairly allocated against the cost of goods sold as an across the board charge ($40,000 applied against $900,000 sales at cost is 4.37% of cost of goods sold).
2. Office expense is allocated in a different way. Certain functions within the office cost the same for large or small orders. For other functions, a longer order will take more time and will cost more than a smaller order. We take 40% of the office expense of $13.000 and divide by the number of
G/L Discussions Financials Page 89

orders (4,200 orders at $1.21 per order); take 60% of the office expense and divide by the number of line items. (12,600 line items at $.61 per line item).
3. Sales service is a function of line items because longer orders take longer to sell and service.
4. Sales are broken into two expense pools. Commissions are calculated as a percentage of the gross profit. Other fixed expenses (car allowance, insurance, Social Security, etc.) are allocated as a percentage of cost of goods sold.
5. Storage is calculated as a percentage of the cost of goods sold. This presumes little variation in the relationship between cube and dollar value. Exceptions such as foam cups, free flowing expanded fill can be weighted on deviation from the average. Most items do have the same relative cube per dollar value, so the percentage of goods sold is an appropriate way to take an average measurement; as long as we remember that, if the item varies, we have to make an appropriate adjustment.
6. Handling costs are broken down by the number of line items. It takes about the same amount of time to pick one carton as to pick five. Again, exceptions for extremely large orders of items that require repacking might need adjustment. On the average, however, it takes about the same time per line item. The handling cost per line item is calculated by dividing the total handling cost by the number of line items.
7. Delivery costs are calculated by dividing the total number of dollars required to support the delivery activity by the number of orders delivered ($19,600 divided by 4,200 orders equal $4.67 per order). A driver who goes out with 25 small stops does not come back any sooner than if he went out with 25 large stops. Extremely large orders are exceptions and, again, may require adjustment. On the average, however, it would be appropriate to say that most orders take about the same amount of time to deliver, and should bear an equal share of expense.
If we look at the totals of each of the columns on the profit analysis report, we see that to process the average order costs $5.88 per order, plus $2.42 per line item, plus 6.24% of cost of goods sold, plus sales commissions. Since the functional expense pools are calculated from real out of pocket expenses, this algorithm yields the actual average cost of processing an order.
In order to demonstrate these costs in a meaningful way to salesmen, the system creates a graph of this algorithm. Based on the order size (at cost), the number of lines per order, and the commission rate, the curve created shows dramatically what happens to profit when the order size gets larger or smaller. On this break-even curve, orders appearing above and to the right of the curve are profitable; those that fall below the curve are not.
We see, for instance, that a $100 order (at cost) requires 23-1/2 to 24% margin to cover expenses. To make a net profit of 2-1/2 to 3% on sales, the order must generate a margin of 26 to 27% ($137 to $138). A $50 order (at cost) requires 35% margin to cover costs and 37% to meet desired profit objectives. When you tell your salesmen that they are taking a $75.00 order at 33% and losing money, they find it very hard to believe. With this graph you can demonstrate to them the significance of order size on profitability.
This break-even curve can be technically defined as "the average contribution to cost, based on the standard volume of business, as defined by current financial figures." If volume increases significantly, the curve would move to the left. If volume drops, the curve would move to the right. By making adjustments to costs based on anticipated change, we are able to model our activity, and see what effect change would have on our business and on our ability to process orders profitably.
For the first time, we have a policy tool that we can give our salesmen. We can make the following statement of policy:
"This is what a profitable order looks like. We want 2-1/2 to 3-l/2% return on sales. Desirable orders are orders that fall 2-1/2 to 3-1/2 points above the curve."
Would it be appropriate to take an order that falls below the break even line; an order that would not cover its own generated expenses? You might take a less profitable order to put yourself in a position to take a lager, more profitable order. For instance, you might sell a substantial order at a loss to
Page 90 . G/L Discussions

increase your buying power to take many more orders at a higher profit. In a competitive situation, you might take an order at a loss to protect other orders at a profitable level. You might choose to support a new salesman and to build an equity in a market by taking lower margin sales for a period of time to penetrate and to establish profitable business in the future.
All these might be appropriate reasons for taking an order below the profit line. What about reasons that are not appropriate? How about, "I hadn't really considered it", or "I thought it might turn out to be a profitable order"? The point is, it is difficult without this type of detailed information for your people to know what is a profitable order. In an industry that averages 2-1/2% return on sales for the average order, it is almost impossible to guess with the necessary precision. Without the tools, you are not really in a position to communicate to your salesmen what the profile of a profitable order looks like.
What we are beginning to do is to teach our salesmen how to make effective decisions and to be good sales managers. We are teaching them to be responsible for bringing in orders that are profitable to the company.
How do we turn this into a reality on an order-by-order basis? Since the computer is able to do arithmetic very quickly, and since the system knows the charges per order (flat rate), per line item, and per dollar of cost of goods sold, and it knows the salesman's commission rate and the number of lines on the order; it is easy to calculate this algorithm for each order. The Proforma (the document that we use to price and evaluate the profitability of the order prior to invoicing) contains a number labeled "net profit". It is calculated as the gross trading profit (see insert) minus the cost allocated to the order to cover the order processing expense.
While this technique of evaluating the cost of business has been promoted by the NPTA since l967, this is, to the best of our knowledge, the first time that it has been totally automated through general ledger and turned back on an order-by-order basis for evaluation. With this tool, we can begin to determine what are and what are not profitable orders.
The net profit calculation uses actual purchase cost. To get a true picture, it is important in evaluating orders, to use the actual cost rather than the "sales cost". In reporting these figures this way, we allow your sales people to evaluate the profitability of the order without revealing to anyone the actual purchase cost of each item.
It is our opinion, and, we think that most managers will agree, that we take good orders and bad orders. We do not believe that you have to take bad orders. We further believe that by identifying those orders that are not profitable, and by asking salesmen to increase pricing levels, most bad orders can be turned into good orders. By evaluating orders on bottom line profitability, we begin to identify those orders which we really should not take. Occasionally saying "no" makes us become stronger in insisting on a better profit. It is our experience that in most instances when we try to apply this technique to our orders, we find that we turn bad orders into good ones.
There are, of course, orders that cannot be taken at a profit. There are customers who will not allow us to make a profit. Many managers think that those customers are wonderful opportunities for competition. I think that they can very quickly be identified and passed over. If we direct our attention to developing an equity with good customers on which we can make a return on our effort, we can improve our bottom line.
By teaching salesmen to understand the true cost of doing business, by setting meaningful policies for profit objectives and order profits, by identifying opportunities for improvement, by continually evaluating price levels and performance and by providing a decision making ability prior to invoicing (when the decision will have an impact) we can effectively increase our profitability. The application of the tools provided by the system are the best way we know to do this.
G/L Discussions Financials Page 91

GEA2 RUN DATE: 11/10/96 18:30:35 EXPENSE ANALYSIS PER ORDER FLAT RATE LINE RATE RATE/$100 COST % OF PROFIT TOTAL % SALES ADMINISTRATION 4.37 39311.08 3.28 % OFFICE 1.21 .61 12743.77 1.06 % SALES SERVICE .63 7961.44 .66 % SALES 1.12 10043.74 .84 % (COMMISSIONS) COMMISSION 57580.56 ___________ ___________ ___________ ___________ DIRECT SALES 1.21 /ORDER 1.24 /LINE 5.49 /$100 COST COMMISSION STORAGE .75 * 6747.27 .56 % HANDLING 1.18 * 14924.77 1.24 % DELIVERY 4.67 * 19629.47 1.64 % ___________ ___________ ___________ WAREHOUSE SALES 5.88/ORDER 2.42 /LINE 6.24 /$100 COST COMMISSION 177119.40 * WEIGHTED ON DEVIATION FROM AVERAGE ORDER BY PACKING, CUBE & SPECIAL SERVICE NO OF INVOICES 4200 LINE ITEMS 12600 SALES 1200000.00 COST 900000.00
Figure 1 - Expense Analysis per Order, (G)GEA
LIFO Cost Valuation LIFO (Last In First Out) is one of several methods of inventory valuation that a distributor can elect to use to calculate taxable profit. In an inflationary period when prices are constantly rising, more dollars are required each year just to maintain the same quantity of inventory. By buying in against price increases and appreciating inventory value, a distributor can take advantage of the rising prices to keep up with inflation. The problem is that any increase in dollar value (even one that only allows a company to afford the same inventory at inflated prices) is considered by the IRS to be taxable profit and is heavily taxed.
In order to allow the hard pressed distributor to retain enough earned capital to continue to run his business, congress authorized LIFO (a Last In First Out method of pricing inventory). The Purchase Order Module provides the proper database to maintain LIFO valuation with the use of a dollar value pool and double extension.
To adopt LIFO, you must file with the Internal Revenue Service. However, it is not that simple. There are strict requirements you must follow. Also, once you do adopt it, you must use it consistently - even to the point of reflecting it in financial reports and statements. Failure to do so will cost you its benefits.
The LIFO method is a technical and highly complex procedure that can best be evaluated with the help of your accountant. The following technical article is provided for the use of you and your accountant in this evaluation. It is beyond the scope of Stanpak Systems to offer accounting advice, which should only be provided by a qualified professional accountant.
Page 92 . G/L Discussions

A Technical Discussion of LIFO for Your Accountant Ordinary inventory valuation, FIFO (First In First Out), for valuation purposes, presumes that the oldest stock is sold first. This means that newer stock (at higher prices) replaces older stock, and that valuation is based on the last paid price, or the average value of stock.
LIFO presumes for valuation purposes that the newest stock (at higher prices) is sold first, preserving the value of the inventory at the older levels. Detailed records must be kept to show the quantity and cost of each successive layer of stock that make up the composite value of each inventory item.
For example: PURCHASE DATE
ORIGINAL QUAN. PURCH
QUANTITY REMAINING
COST EXTENSION
10/10/70 300 160 $ 9.25 $1480.0003/25/74 300 84 12.25 l029.0009/03/80 240 38 14.00 532.0012/20/81 240 167 15.00 2505.00 449 $5546.00
Current Cost 449 $15.00 $6735.00Reduction Of Valuation Taxable Income
$1189.00
As inventory levels rise and fall from year to year, successive layers are built up and drawn down with the newest layer being consumed first. Because of the excessive demand for record keeping (both mass storage and computational power) required for maintaining a specific item LIFO system, a simpler, less demanding procedure called "Dollar Value" is more often used.
The Dollar Value Method Instead of tracking individual items, related products are grouped together into dollar pools. Since most items in a paper distributors inventory appreciate at the same rate, it is appropriate to group the entire inventory into one pool. A dollar pool is treated as if it were a single item and is measured by total dollar value. In the event that all items cannot be included in a single pool, a LIFO Pool Flag exists in the item file for designating into which pool each item belongs. This flag is purely informational and is not used in any calculations. Unique LIFO structures can be addressed with the Report Generator or specially written programs.
The Dollar-Value Method is based on the concept of measuring changes in inventory between the beginning and the end of a period in terms of dollar change - rather than physical quantity change. This is possible in a period of rising prices by using an index approach that has the effect of restating inventories at the same price levels so that real dollar value changes may be observed.
If an increase in the inventory from the beginning of the year has occurred, then the increase must be valued at current-year cost. If an increase has occurred, the earlier, lower cost increments comprising the beginning inventory are liquidated or peeled off in the reverse order in which they were acquired (the most recent layer first, followed by successively most recent layers).
The Dollar-Value Method, by permitting a much broader range of items that comprise a pool, tends to mitigate the effect of substantial changes in the mix of inventory. Liquidation or decreases in one or more like kinds of items might be offset by increases in other items not of like kind, thus netting out increases and decreases. Because of this, management would be less pressured to manipulate inventory quantities to avoid a catch-up effect.
Double-Extension The relative value of each successive year is measured by a procedure called Double-Extension. The Double-Extension approach removes the effect of inflation from the determination of the difference
G/L Discussions Financials Page 93

between beginning and ending inventory for that year by stating the inventory in terms of the same price levels.
Under the Double-Extension approach, the quantity of all items in the inventory pool at the close of the tax year is extended at both base-year unit cost (cost in the year LIFO was elected) and current-year costs. The result is current inventory stated at two cost levels:
1. Current-year cost and
2. Base-year cost.
Current-year cost can be calculated by one of 3 following costs:
1. Most recent purchases or production, or reverse order of acquisition (latest-costs method).
2. Earliest purchases or production during the year or order of acquisition (earliest-costs method).
3. Weighted average of all goods purchased or purchased during the year (average-costs method).
The earliest-costs method will ordinarily yield a lower ending inventory and hence tax savings in times of rising costs and prices. It should ordinarily be used.
Computing the LIFO Value Once the double extension has been completed with the use of the Report Generator, we suggest the final computations be performed by your accountant. An explanation and an example of the procedure he will use follows:
To determine whether there is an increment or liquidation in the pool for a particular taxable year, you compare the ending inventory at base-year costs with the beginning inventory at base-year costs.
When an Increment Exists: If the ending inventory is greater, to get the difference (the amount of the increase), simply subtract beginning inventory from ending inventory at base year costs. You must then value the difference, or incremental layer for the year, in terms of the current year cost to which it relates.
The conversion factor for reevaluating an increment is a ratio of the entire pool valued at current-year cost to that same pool valued at base-year cost. In periods of rising prices, this percentage would be in excess of 100 percent. Apply this percentage to the increment of difference, previously determined, and the result is the LIFO value of an addition to the beginning inventory.
This LIFO increment, or layer, must be maintained as a separate chronological increment of the pool, and may not be combined with a layer of increment of a different year.
When a Liquidation Exists: When the ending inventory is less than the beginning inventory, then a liquidation has occurred. The effect is to remove the amount of the liquidation (beginning inventory at base-year cost less ending inventory at base-year cost) from the most recent increment or increments at base-year cost, and the same percentage ratio that had been applied to that particular increment to convert to LIFO value is reapplied to the new, lower base-cost increment. The result is simply a peeling-off effect, in which the LIFO value increments (at current year cost) are treated as if they were never accumulated
The following examples, illustrate the computation of the LIFO value inventories under the Double-Extension approach:
Page 94 . G/L Discussions

EXAMPLE 1 Standard Paper Co. elects, beginning with calendar year l976, to compute inventories under LIFO and to further use the Dollar-Value Method in pricing the inventories. Pool No. 1 for towels, toilet tissue and bags at the base date, January 1, 1976 is as follows:
ITEMS UNITS UNIT COST TOTAL COSTTowels 1,000 $5.00 $5,000.00 Toilet Tissue 2,000 4.00 8,000.00 Bags 500 2.00 1,000.00 =========== Total base-year cost at January 1, 1976
$14,000.00
The closing inventory of Pool No. 1 at December 31, 1976 contains 3,000 units of towels, 1,000 units of toilet tissue and 500 units of bags. Standard Paper Co. computes the current-year cost of the items making up the pool by reference to the actual cost of goods most recently purchased. The most recent purchases of towels, toilet tissue and bags are as follows:
ITEMS PURCHASE DATE QTY PURCHASED UNIT COSTTowels 12/15/76 3,500 $6.00 Toilet Tissue 12/10/76 2,000 $5.00 Bags 11/01/76 500 $2.50
The inventory of Pool No. 1 at December 31, 1976 shown at base-year and current-year cost is as follows:
INVENTORY AT JAN. 1 1976 BASE-YEAR COST
INVENTORY AT CURRENT-YEAR COST
ITEM UNITS UNIT COST AMOUNT UNIT COST AMOUNTTowels 3,000 $5.00 $l5,000 $6.00 $l8,000Toilet Tis 1,000 $4.00 4,000 5.00 5,000Bags 500 $2.00 $1,000 2.50 1,250 ======== ========Totals $20,000 $24,250
If the amount of the December 31, 1976 inventory at base-year cost were equal to, or less than, the base-year cost of $14,000 at January 1, 1976, the amount would be the closing LIFO inventory at December 31, 1976. However, since the base-year cost of the closing LIFO inventory at December 31, 1976 amounts to $20,000, and is in excess of the $14,000 base-year cost of the opening inventory for that year, there's a $6,000 increment in Pool No. 1 during the year. This increment must be valued at current-year cost, i.e., the ratio of 24, 250/20,000 or 121.25 percent. The LIFO value on December 31, 1976 is $21,275, computed as follows: POOL NO. 1
RATIO OF TOTAL INVENTORY AT JAN. 1, 1976 BASE-YEAR COST
CURRENT YEAR COST TO TOTAL BASE-YEAR COST
INVENTORY
OF LIFO VALUE
Jan 1,1976 Base Cost
$14,000 00.00% $l4,000
Dec. 31, 1976 Increment
6,000 121.25% 7,275
G/L Discussions Financials Page 95

=============== ===========Totals $20,000 $21,275
EXAMPLE 2 The closing inventory for 1977 at base year cost is $18,000, thereby producing a liquidation of $2,000 during 1977 opening inventory at base year cost of $20,000. This liquidation is to be reflected by reducing the most recent layer of increment. The LIFO value of the inventory at December 31, 1977 is $18,850, summarized as follows: POOL NO. 1
RATIO OF TOTAL INVENTORY AT JAN. 1, 1976 BASE-YEAR COST
CURRENT YEAR COST TO TOTAL BASE-YEAR COST
INVENTORY
OF LIFO VALUE
Jan 1,1976 Base Cost
$14,000 100.00% $l4,000
Dec. 31, 1976 Increment
4,000 121.25% 4,850
=============== ===========
Totals $18,000 $18,850
NOTE 1: Wholesale distributors wishing to use Dollar-Value LIFO must get Internal Revenue Service permission to establish pools by natural business units. The taxpayer must clearly show that the natural business unit method of pooling is appropriate and clearly reflects income.
NOTE 2: For items entering a pool for the first time after the beginning of the base year, the base-year unit cost shall be the cost of that item in the later year unless you establish another cost under one of the following procedures.
• A. If the item was not in existence in the base year, you may reconstruct what the cost of the item would have been had it been in existence in that year. Although this procedure could prove time consuming and impractical, it might allow lower cost items to be frozen into LIFO inventory values while more recent, higher costs are charged against income.
• B. If the item was in existence in the base year but not stocked, you may use records to figure what the cost would have been if the item had been stocked.
• C. If the base-year unit cost of the entering item is either reconstructed or otherwise established to the satisfaction of the revenue service, you may use the cost as the base-year unit cost in applying the double-extension approach.
• D. If you do not reconstruct or properly establish the base-year cost but do properly establish the cost of an item after the base year, you may use that cost as the base-year cost.
NOTE 3: Liquidation's and increments of items contained in a pool shall be reflected only in terms of a net liquidation or increment for the pool as a whole. Fluctuations may occur in quantities of various items within the pool. For example, new items may be added and old items may disappear - all without
Page 96 . G/L Discussions

necessarily affecting a change in the dollar value of the pool as a whole. An increment in the LIFO inventory occurs when the end-of-the-year inventory for any pool expressed in terms of base-year cost is in excess of the beginning-of-the-year inventory for that pool expressed in terms of base-year cost.
NOTE 4: When LIFO is adopted, all goods on hand at the beginning of the year are treated as if they were acquired at the same time, and their value is determined by average unit cost. Because you cannot use the lower of cost or market value under LIFO, you must restate at cost any ending inventory of the previous year that has been written down to market. This restatement would include earlier years' adjustments to inventory carrying values, such as those for normal goods under the lower of cost or market rules and those for subnormal goods. To make a proper election, you must include the restatement of ending inventory at cost in an amended return for the tax year preceding the year of adoption of LIFO, and pay any additional taxes over a three year period.
NOTE 5: There are special rules for a change to the Dollar-Value Method from the Specific-Goods Method, for changes in the method of pooling and in its approach, and for combining and splitting of pools. These rules are beyond the scope of this analysis.
G/L Discussions Financials Page 97


Accounts Payable Processing Overview
The Stanpak™ Accounts Payable module provides the ability to enter and track vendor invoices, select them for payment, and print checks. It includes programs to handle void and reversed checks, automatic fixed expense payments, and bank statement reconciliation. Interfaces to the General Ledger and Purchasing modules are optional. The interface to Purchasing permits tracking of purchase price variances and unvouchered receipts. The interface to General Ledger provides automatic posting of expense distributions.
Menus used with the Accounts Payable module include: Nl Master File Maintenance N2 Reports & Inquiries N3 Invoice Processing N4 Payment & Purge Processing N5 Check Reconciliation N6 1099 Processing FIN Financial Subsystem Menu
Before attempting to perform processing, it is necessary to load data into master files. The data for the master files must be carefully planned using the information provided in the General Procedures manual. Detailed operator procedures for loading the files are in the on-line documentation.
Tables
Before vendor records can be established in Vendor File Maintenance (VM), codes maintained by programs listed on the System Codes/Tables Maintenance menu must be created. The codes applicable to the A/P system are discussed in this section and in the Base System overview document.
Country Codes The value entered in the Country Code field of the vendor record is validated against the table of country codes maintained by Country Code Maintenance (TCC).
Currency Codes If the multi-currency feature is activated, the value entered in the Currency Code field in the vendor record is validated against the currency code table maintained by Currency Code Maintenance (TCU). Reports and screens display/print the currency code of the supplier and report totals are given in both base and foreign currencies. If you are not using the multi-currency feature, the value entered in Currency Code is not validated.
Accounts Payable Processing Overview Financials Page 99

Language Codes The language code table and foreign language item descriptions are maintained by Language Code Maintenance (TLM). The Language Code field in VM is validated only when the option to use foreign language descriptions is active. When the option is active and an item description exists in the language of the vendor, the foreign description replaces the standard inventory description on the purchase order for the vendor.
Payment Terms Codes The codes maintained by Terms Codes Maintenance (TER) are used to calculate potential cash payment discounts, discount dates, and invoice due dates. The vendor record contains fields for both A/P and purchase order terms; it is the value in the A/P Terms field that impacts processing in the Accounts Payable module.
Options
1099 or GST Reporting The Vendor Master file accommodates either 1099 (US) or GST (Canada's Goods and Services Tax) reporting. Use System Options Maintenance (XM) to activate the 1099/GST reporting feature. When activated, XM prompts for field descriptions for two fields: the first defines whether 1099, GST, or neither one applies to a particular vendor, and the second field is for recording an identification number. XM also allows you to specify the minimum reportable amount for 1099 reporting, your company's federal ID number, and an optional tax percentage to withhold from checks to vendors that have been flagged for 1099 reporting and tax withholding in VM.
A/P Detail History When this option is selected, paid invoices purged from the system with A/P Purge (NP) are transferred to a history file. Data in the history file can be displayed with A/P History Inquiry (NHI) and purged with A/P History Purge (NHP).
A/P-G/L Interface The expense and payment distribution for vendor invoices and checks can be posted to the General Ledger. A/P-G/L Interface Account Maintenance (ZPM) is used to establish default G/L posting accounts. If A/P and G/L are not interfaced during installation, you must run A/P to G/L Interface Initialization (NX) to initialize the interface. Be sure to read the on-line documentation for important steps that have to be completed before using NX. Once the interface is active, ZPM can be used as required to make changes to the posting accounts.
Through normal A/P processing, the appropriate posting account is displayed as the default G/L account to be posted, however, it can be changed as required.
A/P-P.O. Interface When A/P and Purchasing are interfaced the value of purchase order line items can be checked against vendor invoices. If the vendor charges are above or below the established tolerance percentage, the invoice is not accepted by the system. This interface is established in Stanpak’s INSTALL program.
Check Reconciliation If this option is activated, vendor check numbers and amounts are stored in a check reconciliation file, and compared with cancelled checks at month-end using the check reconciliation processing programs (NBC, NBL, and NBO). As a prerequisite to this feature, A/P and G/L must be interfaced. The check reconciliation option is selected during installation or with XM. Once activated, check reconciliation cannot be de-activated.
Page 100 . Accounts Payable Processing Overview

Country Code A base country code and field labels for the state/province and postal code fields can be established during installation or with XM. Additional country codes can be added to specify, by country code, the labels for the state/province and postal code fields that appear on vendor screens and reports. Country codes and corresponding field labels are maintained by TCC.
Fixed Expenses Recurring fixed expenses can be entered periodically as vendor invoices or can be processed automatically by utilizing the fixed expense option. This option can be activated with XM.
Foreign Currency All transactions operate in only one currency unless the multi-currency feature is activated (with CX, Activate Multiple Currencies). If it is activated, a currency code (validated against the currency code table maintained by TCU) is required in each vendor record (in VM). All A/P transactions and amounts in the vendor record (i.e., YTD invoices, payments) are recorded in the vendor's currency.
Foreign Language If you chose to use foreign language item descriptions (during installation or with XM), language codes entered in VM are validated against the table maintained by TLM. If a foreign item description is established for a specific language code and inventory item, the system displays that description during P.O. Entry and it is printed on the P.O. document.
Journals Every change to the Vendor Master file is recorded and an audit trail can be printed with Vendor Maintenance Journal (JVM), if the option is active. Use Journal Control Maintenance (JZ) to activate or de-activate the vendor change journal option.
Accounts Payable Processing Overview Financials Page 101


A/P File Maintenance
The A/P File Maintenance menu includes the programs for maintaining the master files required by the Accounts Payable module.
VM Vendor File Maintenance VQ Vendor File Inquiry VL Vendor File Listing JVM Vendor Maintenance Journal NFM Fixed Expenses File Maintenance NFC Fixed Expenses Change Listing NFL Fixed Expenses File Listing
A/P File Maintenance Flow Diagram The diagram on the following page shows the programs that are used to load and change vendor files and fixed expense data. Also shown are references to other applications that use vendor and fixed expense data.
A/P File Maintenance Financials Page 103


A/P File Maintenance Financials Page 105


File Building Programs Some fields and files in the Accounts Payable module can be skipped by the user if they are not important to the user's processing objectives. The purpose of each file in the data processing scheme is described in the program narrative section of the General Procedures manual.
Vendor Master Maintenance Vendor File Maintenance (VM) loads vendor descriptive and statistical data. VM and the Vendor Master file that it maintains is shared by the Accounts Payable and Purchasing modules. This may be a consideration in assigning program access security.
Any information in a vendor record, with the exception of the vendor number and the current A/P balance, can be changed using VM. Although a vendor number cannot be changed by VM, the existing vendor record can be deleted, and then re-entered under the desired vendor number. Changes to a vendor's A/P balance are more restrictive because of audit trail requirements. To change an A/P balance, the A/P processing programs must be used.
1099 and GST Reporting XM lets you choose if you want to activate the 1099/GST reporting feature. For each vendor, fields 29 and 30 display the description that was maintained with XM. The value in field 29 can be:
T 1099. If T is entered, another message is displayed prompting if taxes are to be withheld. If you answer Y, when a check is issued an amount calculated by the percentage maintained with XM is retained and posted to the G/L account specified in ZPM.
G GST reporting N Neither
Field 30 can contain a 25-character number to represent a tax identification number for this purpose.
Deleting Vendor Records VM also deletes vendor records as required; however, there are several restrictions on deletions. A vendor record can be deleted only if there are:
• no A/P transactions in the A/P input file (i.e., invoices entered in NE but have not been updated in NR)
• no current A/P transactions (i.e., invoices, checks - paid or unpaid that have not been purged from the A/P Master file)
• no fixed expenses that reference the vendor in the Fixed Expense Master file • no open purchase orders for the vendor
Fixed Expenses Fixed Expenses File Maintenance (NFM) allows you to enter dates, fixed amounts and dollar limitations in the Fixed Expense Master file. Fixed expense processing is optional and may be selected at installation or with XM.
NFM can be used to add, change, or delete fixed expenses from the Fixed Expenses Master file. However, the vendor number and contract number associated with a fixed expense cannot be changed. Instead, the existing fixed expense can be deleted, and then re-entered with the desired vendor and contract numbers.
The most common types of fixed expenses are rental payments, fixed debt payments, loan payments, etc. These expenses are released as A/P transactions according to an established frequency defined in NFM, using the following codes:
SM Semi-monthly MO Monthly QT Quarterly SA Semi-annually
A/P File Maintenance Financials Page 107

AN Annually
Note: For semi-monthly frequency, the due date cannot exceed the 14th day of the month. All other due dates can be within the 1st through the 28th day of the month. This due date restriction guarantees the same payment date each cycle.
The Orig Balance field in NFM is used to enter the beginning balance of the fixed expense; payment automatically stops when this amount matches the amount in the Paid to Date field.
If A/P and G/L are interfaced, the General Ledger distribution is entered in NFM with the possibility of distributing one fixed expense to multiple General Ledger accounts. Fixed expenses cannot be assigned to one-time vendors (vendor number [***]).
Audit Trails The option to retain an audit trail of all changes made to the Vendor Master file can be activated with Journal Control Maintenance (JZ). Use Vendor Maintenance Journal (JVM) to print and purge the audit trail listing.
The Fixed Expenses Change Listing (NFC) provides an audit trail of additions, deletions, and changes made to the critical fields in the Fixed Expense Master file.
A/P File Maintenance Reports & Inquiries A comprehensive listing of vendor information is provided by Vendor File Listing (VL). Vendor File Inquiry (VQ) displays vendor records in the Vendor Master file with no maintenance option available. The Fixed Expenses File Listing (NFL) provides a comprehensive listing of the Fixed Expense Master file for all vendors, a range of vendors, all organizations, or a single organization.
Page 108 A/P File Maintenance

A/P Reports & Inquiries
The A/P Reports & Inquiries menu includes the following programs: NTB A/P Aged Trial Balance NI Accounts Payable Inquiry NDU Accounts Payable Analysis Report NDS Discount Status Report NMD Monthly Disbursement Register NMS Monthly Summary Check Listing NRA Accounts Payable Distribution Report MVU Month End Vendor File Update
Reports Accounts payable transactions in the Account Payable Master file can be printed in a variety of ways.
NTB - A/P Aged Trial Balance NTB can be run at any time during the month; however, it should be run at least once at month-end. It shows the summary or detail activity since the last time the Accounts Payable Purge (NP) was run. The number of days in each aging period is specified by the operator when NTB is run. The aging can be calculated based on invoice date or invoice due date. In addition, if the multi- currency feature is active, this report can be printed in the vendors' respective currency or converted to base currency.
NDU - Accounts Payable Analysis NDU prints an analysis of vendor history by invoice, for all vendors or range of vendors. Past due invoices are flagged with asterisks (***). The report lists the invoice amount, discount taken, payments and adjustments, and the account balance for each vendor.
NDS - Discount Status Report NDS prints a report that can be used to determine those invoices that should be paid in order to take advantage of prompt payment discounts. This report shows the potential and currently eligible discounts, and those discounts that have already been taken.
NMD - Monthly Disbursement Register NMD prints a listing of payments issued within a specified date range, and a summary of the General Ledger distribution. Once printed, the disbursement file can be cleared of all disbursements made.
NMS - Monthly Check Summary Listing NMS lists the checks that were issued for a specific organization, G/L account number, and period. It also includes void and reversed checks that were processed. The listing should be run at month-end and a copy retained for future reference as it summarizes all the checks that were issued for the month.
NRA - G/L Distribution Report NRA is available only if A/P and G/L are interfaced. It lists the expense distribution of invoices entered and/or paid.
A/P Reports & Inquiries Financials Page 109

Inquiries NI – A/P Inquiry
The Accounts Payable Inquiry (NI) displays vendor invoice information that includes (current and/or history) the following:
• transactions identified by number and type with corresponding amounts in the currency of the vendor
• transaction dates and invoice due dates (including fixed expenses) • the corresponding check number for invoices that have been paid • discounts taken
Month-End Updating MVU - Month-End Vendor File Update
Program MVU is used to update vendor accounts at month-end by adding current month-to-date (MTD) balances to the year-to-date (YTD) totals and then clearing (i.e., resetting to zero) the MTD fields in preparation for the next accounting period. At year-end processing, after the MTD balances are updated to the YTD totals, both the MTD and YTD balances are cleared and reset to zero in preparation for the next accounting year.
All invoices and payments affecting the vendor accounts for the current period in the Accounts Payable module must be processed before month-end updating.
TO BEGIN
Enter MVU from any menu. The message and prompt shown below are displayed:
MONTH-END VENDOR FILE UPDATE TO BEGIN. MTD TOTALS WILL CLEAR. THIS RUN WILL UPDATE THE VENDOR MASTER FILE FOR MONTH / YEAR OF: [ ] CONTINUE? (Y/N): Enter Y to accept the month and year displayed (i.e., the first current period available for
updating). Enter N to exit to the N-2 menu.
If the period being closed is not the last period in the fiscal year, the program displays the message:
THIS IS NOT A FISCAL YEAR END CLOSING RUN.
If the period being closed is the last period of the accounting year, the system displays the message:
THIS IS A FISCAL YEAR END CLOSING…
Before the actual update begins, you can terminate MVU when the system prompts:
ENTER (PROCEED OR END) Enter PROCEED to continue month-end updating. Enter END to exit to the N-2 menu without updating the Vendor Master file.
Page 110 A/P Reports & Inquiries

A/P Invoice Processing
The A/P Invoice Processing menu lists the following programs: NE Vendor Invoice Entry NPV Purchase/Invoicing Price Variance Report NR Vendor Invoice Register NM Accounts Payable Maintenance NFP Fixed Expenses Processing
A/P Invoice Processing Flow Diagram The diagram on the following page shows the programs used in processing A/P transactions. Also shown are references to other applications from which data is retrieved, and to which processed data becomes available.
A/P Invoice Processing Financials Page 111


A/P Invoice Processing Financials Page 113


Invoice Entry Accounts payable transactions can originate from two sources: either from a fixed expense using Fixed Expenses Processing (NFP), or from transactions entered through NE. The following types of transactions can be entered in NE:
BI Vendor Invoices CM Credit Memos DM Debit Memos
Note: A debit memo can be entered only for an invoice that has already been processed through both NE and NR.
Invoice numbers up to ten alphanumeric characters are assigned by the user to all three transaction types.
Fixed Expenses can be edited or cancelled in NE if necessary, they will have an invoice number (this can be found using the Preview Register or Vendor Invoice Register) and a transaction code of BF.
Debit Memos If a debit memo is to be applied to an invoice that is already in the Accounts Payable Master file, the debit memo is entered using the same number that was assigned to the invoice. Both the invoice and the debit memo are used in processing the invoice payment. If the invoice is not known, the debit memo can be entered using ON-ACCT as the invoice number. Only one on-account debit memo can be entered per vendor per batch, so its use must be planned accordingly. On-account debit memos may be applied to specific invoices using Accounts Payable Maintenance (NM).
Credit Memos When the invoice number to which the credit applies is known, the credit memo should be entered in NE with the same number as the invoice number. When the invoice is processed for payment, the system automatically combines the 2 transactions so that only the net amount (invoice minus credit amount) is paid. Standalone credit memos may also be entered into the system. Standalone credit memos do not have the same number as an existing invoice. Standalone credit memos can be applied against the vendor's payment in NC by selecting the transaction.
A/P Invoice Processing Financials Page 115

ENTERING VENDOR INVOICES
NE – Vendor Invoice Entry The following are descriptions of the information that is required for NE – Vendor Invoice Entry.
Vendor Number (Required/ up to 6 characters) Enter the vendor number which corresponds to the invoice you are processing. The vendor number field appears larger than 6 characters on the screen to allow room for the vendor lookup features. If you attempt to enter a vendor number larger than 6 characters, they system will display a message stating the size the field requires. Only vendors “on file”, or that have been set up in the Vendor Maintenance (VM) can be used in this program. Invoices for vendors “NOT ON FILE” should be entered using program NCM – Special Payments. Vendor numbers can be located using the lookup options displayed at the bottom of the screen.
Invoice Number (Required/ up to 10 characters) The vendor invoice number or credit/debit number is entered in this field. Debit memos must be applied against existing invoices; however, if you do not know the invoice number, us ON-ACCT to flag this transaction as a credit/debit memo to apply the credit/debit at a later time.
Tr Code (Required/ BI, CM or DM) The system displays a default code of BI (for vendor invoices). It is important to note that credit memos (CM) decrease vendor balances and debit memos (DM) increase them.
Terms (Required/ valid terms code) Terms codes are established in Terms Code Maintenance (VTER). A terms code is displayed if one was set up for the vendor in Vendor File Maintenance (VM). It can be changed to any valid terms code defined in TER.
Tr Date (Required/ date field) The transaction date is used to age invoices in A/P Aged Trial Balance (NTB). The transaction date defaults to the terminal date (ZE date), however, it can be changed to a different date.
Dsc Date (Required/ date field) The discount date is calculated based on the terms code and transaction date. It cannot precede the transaction date. The discount date can be used to select invoices for payment in Vendor Invoice Payments (NC).
Due Date (Required/ date field) The due date is calculated from the terms code and transactions date. It can be changed, provided it is the date is equal to or greater than the discount and transaction dates. This date can also be used to select invoices for payment in Vendor Invoice Payments (NC).
Hld/Pay (Required/ H or P) Invoices with a code P are eligible for payment, and invoices with a code H are withheld from payment until released in NM. Note: Invoices on hold are not selected for payment during Invoice Payment Selection (NC).
Dsc % (Optional/ up to 99.99) This prompt-payment discount percent is based on the terms code in the Terms field. The percentage displayed can be overridden in NE – a discount amount may be entered and the
Page 116 A/P Invoice Processing

program will calculate the discount percent for you. The discount percentage is displayed as defined by the terms code.
Reference (Optional/ up to 15 characters) This field may be used to enter additional information about the invoice. The reference is printed on standard check vouchers, displayed in A/P inquiry (NI), and may be transferred to the G/L transaction file (shown in GTL if posting in detail).
Tran Amount (Required/ up to 9999999.99) This is the vendor’s invoice amount. Credit memo amounts are automatically recorded and displayed as a negative amount. Enter a zero to create a zero balance invoice. Zero balance invoices are sometimes used to correct the G/L distribution of a previously entered invoice. The transaction amount is the total invoice amount. Do not deduct cash discounts from the invoice amount.
Currency (Conditionally required/ valid currency code) This field is displayed only when the multi-currency feature is active, and the currency code in the vendor record is not base currency.
Posting Date (Required/ date field) A date is required regardless of whether A/P and G/L are interfaced. The posting date is the date the transaction is posted to the general ledger. It is also used to select invoices that will be included on the A/P Aged Trial Balance (NTB) listing. The system displays the terminal date (ZE date) as the default.
Disc Amount (Optional/ up to 9999999.99) The discount amount is the discountable amount multiplied by the discount percent. If you leave the discount percent blank and enter an amount here, the program will calculate the discount percent for you. The discount number is calculated as Dsc % multiplied by the Discountable Amt.
Discountable Amt (Optional/ up to 9999999.99) This amount is used in the calculation of the discount amount. The discountable amount may be a portion of the Tran Amount to which a discount can be applied. The transaction amount is displayed as the default amount. The discountable amount is a basis for calculating the discount. Some companies do not allow discounts to be calculated on freight and taxes and so such charges may be excluded from this field.
[1099/GST] If the vendor record has a T in field 29 of VM, the 1099 field description is displayed, and you can change the 1099 amount. If the vendor record has a G in field 29 of VM, the GST description is displayed.
After the vendor invoice information is entered, the system prompts for the paying G/L Organization and account number This is the liability account to which the invoice will be recorded.
Paying Organization (Required/ valid organization code) The system displays the default organization code set up in ZPM (either the 1st organization on file, or the 1st organization specified for this vendor’ s currency).
A/P Account Number (Required/ valid G/L account number) The default A/P account is taken from ZPM for the organization or organization/currency specified. The account must be a liability account. When using multi-currency the A/P account must be the same currency as that of the Vendor
Exchange%/Account (Conditionally Required/ valid G/L organization and account) When multi-currency is active and the vendor wishes to be paid in a foreign currency, transactions posted to the G/L are in both base & foreign currency. The exchange account (default established in ZPM), balances the transactions that
A/P Invoice Processing Page 117

impact the two currencies. The account must be in base currency. See OLDOC for NR for more information re: Currency transactions.
Distribution Line Entry When A/P and G/L are interfaced, cumulative debit and credit amounts are displayed. In order for the debits and credits to be in balance, the G/L distribution of an invoice must be recorded in the second half of the Vendor Invoice Entry screen.
Seq (Display only) Sequence numbers are generated by the system. Sequence 1 is reserved for the posting to the A/P Trade Account, and it cannot be maintained. Sequence 98 is reserved for the currency exchange transaction; sequence 99 is reserved for inventory variance (not available). See the on-line documentation for NR.
Org/GL (Required/ valid G/L organization and account number) The organization and G/L account number for the invoice should be entered here. If the organization and G/L account number are set up are defined in the vendor master file they appear as the default, but can be maintained.
Description (Optional/ up to 25 characters) You may enter any additional text for this transaction line. If the description field is used, it is transferred to the A/P Distribution file (printed by NRA) and the G/L transaction file when posting in detail.
Amount (Required/ up to 999999999999.99) When the transaction code for the entry is BI or DM, you should enter a positive amount to debit the account and a negative amount to credit the account. When the transaction code for the entry is CM, you should enter a positive amount to credit the account and a negative amount to debit the account.
Entering Invoices in a Foreign Currency When you are entering a vendor’s invoice in a foreign currency, all amounts entered or displayed in NE are in the foreign currency: the transaction amount, the discount amount, all distribution line amounts, total debits and credits, etc. Do not be concerned with converting these amounts to base currency – this will be done when the register is printed (NR). For example, to enter an invoice for a vendor in Canadian dollars (when company’s base currency is US dollars), enter the following in NE:
A/P Trade (CD) 100.00cr Expense1 (US) 30.00dr Expense2 (CD) 70.00dr
Note that even though you are distributing the expense to two accounts in different currencies, NE treats all entries as though they are base currency. Here debits and credits both equal 100.00 and the invoice is in balance.
In NR, the currency exchange is calculated and printed on the register (using an exchange rate of .78 for this example):
A/P Trade (CD) 100.00cr Expense1 (US) 23.40dr Expense2 (CD) 70.00dr Curr Exch (US) 6.60dr
Totals 100.00dr 100.00cr
Page 118 A/P Invoice Processing

Releasing Fixed Expenses
NFP – Fixed Expense Processing Fixed Expenses Processing (NFP) can be run at any time during the month to release fixed expenses that become due during the month. Automatic date control of the expenses prevents duplication of any of the month's already released expenses if the program is run more than once. Similarly, if a month is skipped, the fixed expenses that should have been released in the prior month are released in the current month, along with the current month's expenses.
Verifying Entry of Payables Transactions Entered invoices, debit and credit memos, and released fixed expenses do not go directly into the Accounts Payable Master file, but are temporarily stored in an input file. The intermediate input file provides the opportunity to verify that the data entered is correct, and allows changes and/or corrections to be made before the data is updated in the Accounts Payable, Vendor and General Ledger files. NE can be used to change or cancel any of the data in the input file (except for the paying organization and A/P account that is specified when A/P and G/L are interfaced). To correct the paying organization, the existing payable transaction must be cancelled and then re-entered correctly. The invoices in the input file cannot be selected for payment until they are processed by the Vendor Invoice Register (NR). If A/P and G/L are interfaced, the G/L posting information in the input file must be in balance before it can be updated to the A/P Master file.
NPR – A/P Invoice Preview Register This is a preview register to verify the information entered (in NE) for a batch of invoices. The register is the same one printed by NR, except that NO updating takes place after the report has printed correctly. Also, unlike NR, NPR is used to preview individual invoice batches (i.e., there is no option to print all batches). NPR is a separate program and may be assigned a different level of user security than NR, thereby offering operators the ability to review entered invoices while limiting access to the update function (in NR).
NPR will print, and display on the screen, a control total for the batch and, if applicable, subtotals by currency. If the register contains posting errors (invalid G/L accounts, dates in closed periods, or total debits do not equal total credits), a message is printed on the register indicating the error(s).
Note: Invoices that have been printed on a preview register must still be printed by NR prior to updating. (NR – Vendor Invoice Register).
NR - Vendor Invoice Register Vendor Invoice Register (NR) lists the contents of the A/P input file, including each invoice, credit/debit memo and fixed expense, total due, eligible discounts, and G/L posting information. Each register is uniquely and sequentially numbered.
The accuracy of the vendor invoice register should be verified before the operator confirms that it has printed correctly. If the entries on the register are not correct or in balance, use NE to make the necessary change and/or deletions (Invoices that were entered and later deleted/cancelled are flagged with asterisks on the register). After the changes have been made, you must run NR again -and the accuracy of the register should be verified before proceeding with the update.
A/P Invoice Processing Page 119

G/L Interface When A/P and G/L are interfaced, the general ledger summary and detail distribution reports may be printed (depending on the options in XGJ) following the register. When the interface is turned on, all transactions in the A/P input file are verified to ensure that a debit/credit balance exists before the amounts are posted to the general ledger. If an out-of-balance condition exists, a message to that effect is printed on the vendor invoice register, and the out-of-balance transactions are individually identified. NE must be used to correct or cancel out-of-balance vendor invoice transactions.
Fixed Expenses Out of Balance The G/L distribution of fixed expenses is maintained in the Fixed Expenses Master file. If a fixed expense distribution is out of balance, the fixed expense is not released to the input file. Instead, a message is printed on the vendor invoice register to identify the out-of-balance fixed expense. The out-of-balance condition must be corrected in NFM, the corrected fixed expense must be released through NFP, and NR must be run before fixed expense transactions can be processed into the Accounts Payable Master file.
Batch Update Mode In batch update mode, you are given the option to update a single batch or all batches. Whether printing in single or ALL mode, each batch is printed as its own register. Following the print, the batch (register) totals are displayed and you can answer whether the report has printed correctly. If a particular batch is out-of-balance (or any other type of error condition exists), and you are updating in ALL mode, you are given the option to continue to the next batch for printing, or exit. You may not continue to update unless all batches selected have been printed and are in balance; you can either re-run NR and update the individual batches that did not print correctly, or correct the erroneous batch(es) and re-run NR in ALL mode.
Note: Fixed Expenses (when processed through NFP) are updated to the Invoice Entry work file. When using batch mode, Fixed Expense invoices are assigned a batch ID of FXP.
Since each batch is treated as a separate register, the file updates and the G/L summary and detail reports are also separate. Therefore, when running NR for five batches, you will see five prompts that ask whether the G/L journal printed correctly prior to updating the G/L files for that particular journal.
File Updates In addition to printing the vendor invoice register and the G/L distribution reports, NR transfers the transactions from the input file into the A/P Master file. Before this transfer occurs, the operator must indicate that the register printed correctly. If the operator indicates that the register is not correct, the files are not updated. The A/P Master file is updated after the data in the input file is brought into balance, and the register has been approved.
NR also updates the following fields in the vendor master file: A/P Balance, YTD Invoices, and YTD Credit Memos.
Foreign Currency Invoices When invoices are entered for vendors in a foreign currency, the amounts are entered in NE in the foreign currency. The A/P Trade account used must be in the currency of the vendor. However, the distribution of the invoice may be account(s) in any currency. When different currencies are used, a currency exchange calculation is performed by NR.
Example: A US company purchased $30 (Canadian dollars) worth of office supplies from a Canadian vendor and wants to pay the vendor in Canadian dollars. The currency exchange rate at the time was .78 (CD $1.00 to US 78 cents).
The A/P Trade account (a liability account) must be in Canadian dollars. The office supplies expense account in this case is US dollars.
In NE, the invoice is entered as follows: A/P Trade Account 30.00cr
Page 120 A/P Invoice Processing

Office Supplies 30.00dr
NR calculates the currency exchange and prints: A/P Trade Account 30.00cr Office Supplies 23.40dr Exchange Account 6.60dr
NM - Accounts Payable Maintenance Accounts Payable Maintenance (NM) maintains records in the Accounts Payable Master file. This program is used to change vendor transactions entered in NE and fixed expenses processed in NFP; and apply On-Acct transactions. Before On-Acct payments can be applied to invoices, they must be processed through NCP and NCR. On-Acct transactions cannot be applied during Invoice Payment Selection (NC). To preserve adequate financial controls and audit trails, only some of the data can be changed in this program.
Vendor Invoices For vendor invoices, NM allows the user to:
• maintain the invoice due date which cannot be earlier than the invoice date • maintain the discount date which cannot be later than the due date or earlier than the invoice
date • maintain the hold/pay status • maintain reference information (e.g., P.O. number or other descriptive information) • apply on-account transactions to existing invoices
Fixed Expenses For fixed expenses, NM allows maintenance to the following information:
• due date which cannot be earlier than the invoice date • hold/pay status • reference information
On-Account For on-account credit/debit memos or payments, changes are not possible except to apply the memo or payment to a specific invoice. However, application of the memo or payment cannot be done if invoice selection or check processing procedures are active (in the programs NC, NCF, NCM, NJ, NJM, NCP, or NCR). This restriction is necessary to ensure that an on-account transaction is not simultaneously applied to a specific invoice, and selected for processing on a vendor's check voucher.
TO BEGIN
Enter NM from any menu. The Accounts Payable Maintenance screen is displayed:
ENTER VEND # OR END: Enter a vendor number. Enter END or press TAB to exit to the N-3 menu.
ENTER INVOICE #, ON-ACCT, OR END Enter a valid invoice number. Enter ON-ACCT (see the section following for information). Enter END or press TAB to return to the previous prompt.
After an invoice number or On-Acct is entered, the system prompts: ENTER FIELD # OR END
A/P Invoice Processing Page 121

Enter the number of the incorrect field, press CLEAR (ESC), and enter the correction. This prompt will be repeatedly displayed until END is entered. Enter END or press TAB to return to the previous prompt.
APPLYING ON-ACCT TRANSACTIONS
Typically, CR and DR memos are applied against invoices already on file; however, when a memo is issued prior to the receipt or recording of a corresponding invoice (i.e., invoice not yet updated to vendor’s account), an On-Acct transaction will be applied later (after invoice is updated to the vendor’s account). When the prompt shown below is displayed: ENTER INVOICE #, ON-ACCT OR END: Enter ON-ACCT to display the vendor’s first On-Acct transaction. Enter END to return to the previous prompt.
When the first transaction is displayed, the system prompts: APPLY THIS TRANSACTION? (Y/N/END) Enter Y to apply the transaction displayed to the invoice specified in the next prompt. Enter N to display the next transaction. Enter END to return to the previous prompt.
When you select to apply the On-Acct Transaction, the system prompts for the Invoice # next: APPLY TO INVOICE # Enter the number of the applicable invoice. Press TAB to return to the previous prompt.
After the invoice number is entered, verification is requested when the system prompts: CORRECT INVOICE? (Y/N) Enter Y to select the current invoice. Enter N to return to the previous prompt, Apply to Invoice #.
You can apply the full amount or part of it in response to the prompt: ENTER AMOUNT TO APPLY Enter the applicable amount to offset the Tr Amount in the current invoice. Press TAB to return to the previous prompt, Correct Invoice?…
NFP – Fixed Expense Processing NFP is used to release any fixed expenses that are due. Fixed expenses must first be set up using NFM. Entries for the invoices are written to the Vendor Invoice Register and may be printed/updated using NR.
NFP cannot be run if the Vendor Invoice Register or the A/P Purge is in progress.
Fixed expenses are released according to the criteria in the Fixed Expense Master records. Fixed Expense Processing can take place any number of times during a single period without duplicating previously processed expenses for the same period.
A number of fixed expense invoices may be processed for the same master record. For example, if you process fixed expenses once at the end of the period and have a fixed expense that is due weekly, the program may create four invoices for the period.
NFP prompts:
All Fixed Expenses due will now be released to the Vendor Invoice Register
Enter “PROCEED” or [TAB] to Exit Enter PROCEED to begin processing.
Page 122 A/P Invoice Processing

Press TAB to exit to the menu.
Enter Posting Date:
Enter the posting cutoff date.
All fixed expenses due on or before this date will be processed. Today’s (ZE date) date is the default, but may be changed to process fixed expenses for a different date.
The program asks for validation that the date is correct before proceeding. It then reads the Fixed Expense Master file and checks the next due date of each expense. An invoice record is created if:
• The processing (posting) date is greater than the start date of the fixed expense • The next due date is prior to the posting date • The difference between the original balance and the amount paid-to-date is greater than zero (only if an original
balance has been entered for the expense; if the original balance is zero, the balance is not checked and the expense is processed).
The next due date is calculated, using the last posting date and the posting frequency set up in NFM, as follows:
Frequency Code Next Due Date Annually AN add 1 year Semi-annually SA add 6 months Quarterly QT add 3 months Monthly MO add 1 month Semi-monthly SM add 14 days Weekly WK add 7 days
When NFP is finished, you may print the invoice records created using NR. The update to the A/P master, G/L, and vendor master takes place when you confirm that the register printed correctly. The next due date is updated to the fixed expense master file in NFP as it is released to the A/P register file. The amount paid-to-date is updated when the invoice is paid and the check is processed (through NCR).
Using A/P Batch Mode When you are entering and updating A/P invoices in batch mode, the fixed expenses are created in a special batch called FXP. You may use NPR to list or NR to list/update the fixed expenses as a batch.
A/P Invoice Processing Page 123


A/P Payment & Purge Processing
The following programs are listed on the A/P Payment & Purge Processing menu: NC Vendor Invoice Payments NCF Fixed Expenses Payments NCM Special Payments NJ Cash Requirements Report NJM Cash Requirements Maintenance NCP Check/Voucher Printing NCR Check/Voucher Register NVC A/P Void and Reversal Check Entry NVL Void and Reversal Check Register NP Accounts Payable Purge NHP Accounts Payable History Purge
A/P Payment & Purge Processing Flow Diagrams
The diagram on the following page shows the programs, files and reports used in the A/P payments process.
A/P Payment & Purge Processing Financials Page 125


A/P Payment & Purge Processing Financials Page 127 A/P Payment & Purge Processing Financials Page 127


Invoice Payment Selection Accounts payable transactions in the Accounts Payable Master file can be selected for payment using Vendor Invoice Payments (NC) or Fixed Expenses Payments (NCF), and printed on computer generated checks. Both programs allow A/P transactions to be selected for payment for all vendors on file, or for a specific vendor. The selection criteria is as follows:
For All Vendors All invoices, or discount eligible invoices, or invoices due by a specific date
For a Specific Vendor Discount eligible invoices, invoices due by a specific date, a single invoice or all invoices for that vendor.
In the selection lists above, the Discount Eligible Invoices selection criterion is not used for selecting fixed expenses (use NCF).
Note: The amount to be paid against a specific vendor invoice is established at the time the invoice is selected for payment. If a credit/debit memo is applied to a vendor invoice after it has been selected for payment, the amount of payment does not reflect the newly entered credit/debit memo.
Both payment selection programs (NC and NCF) provide the option of automatically selecting all invoices for payment, or allowing the operator to review each invoice and change the discount, payment and 1099 amounts, if applicable.
NC – Vendor Invoice Payments Program NC is used to select vendor invoices for payment. To ensure correct payment to each vendor, all applicable invoices, debit and credit memos, and On-Acct transactions should be processed before proceeding with Invoice Payment Selection.
If you decide not to pay an invoice after it has been selected in NC, see the Cash Requirements Maintenance section for instructions. It is important to note that the amount to be paid against a specific payable item (invoice) is established at the time the item is selected for payment. If a credit/debit memo is applied to a payable item after it has been selected for payment, the amount of payment does not reflect the newly entered credit/debit memo.
TO BEGIN Enter NC from any menu. If the A/P-G/L interface is active, the first field of input is Organization Code: ORGANIZATION CODE Enter a valid organization code. Press TAB to exit to the N-4 menu.
BANK – G/L ACCT# (The default cash account will be displayed from ZPM setup if the A/P – G/L interface is active) Press TAB to accept the default. Press ESC to clear the field and enter a different G/L account number. Enter the bank reference number identified with the cash account if the A/P – G/L interface is not
active.
A/P Payment & Purge Processing Financials Page 129

Press ESC and TAB to return to Organization Code.
DISCOUNT – G/L ACCT# (The default discount account set up in ZPM will be displayed) Press TAB to accept the default account used to record purchase discounts. Press ESC and enter a different G/L account number. Press ESC and TAB to return to Organization Code.
After the G/L accounts are entered, the system prompts for a single vendor number or all vendors on file: ENTER VENDOR # OR ALL Enter a valid vendor number to select only 1 vendor. Enter ALL to include all vendors on file. Vendors will be displayed consecutively without
prompting for another vendor number. Press TAB to clear the screen and return to Organization Code.
Specific invoices can be selected when the system displays the next prompt: SELECT INVOICES FOR PAYMENT: A..ALL INVOICES E..INVOICES ELIGIBLE FOR DISCOUNT D..INVOICES DUE BY A SPECIFIC DATE S..ONE INVOICE AT A TIME
ENTER OPTION Enter 1 of the options listed above. Press TAB to return to the previous prompt.
NOTE: Option S, One Invoice At a Time, is only available when a single vendor number was entered in the previous prompt requesting a valid vendor number.
The following prompts are common to all the options listed in the previous prompt. Options E, D, and S have additional prompts unique to each and are discussed in the sections that follow.
Selected invoices may be reviewed before flagging them for payment when the system prompts:
REVIEW EACH PAYMENT? (Y/N/E) Enter Y to review each invoice before flagging for payment. Enter N to select invoices for payment without first reviewing them. Enter E to return to the previous prompt.
If you select to review each invoice, the system displays the first invoice on file for the vendor and prompts: 1…SKIP THIS INVOICE 2…PAY THIS INVOICE 3…CHANGE DISCOUNT/PAYMENT ENTER 1, 2, 3 OR END Enter 1 to skip the item currently displayed. Enter 2 to pay the full amount of the invoice. Enter 3 to change the amount to be paid (typically used when partial payments are being made). Enter END or press TAB to end payment selection for the current vendor. The last invoice
displayed is not flagged for payment.
If you need to change the amount to be paid for any reason (perhaps, this is a partial payment), select Option 3, Change Discount/Payment and the following 2 fields are displayed:
DISCOUNT PAYMENT Enter a different amount in either or both fields. Press TAB to skip either field.
Verification is requested after the Discount or Payment amount is changed when the system prompts:
CORRECT? (Y/N)
Page 130 A/P Payment & Purge Processing

Enter Y to accept the new amounts. The next invoice on file will be displayed after your response is entered.
Enter N to make additional changes. The cursor moves to Discount.
Option E – Invoices Eligible for Discount Invoices qualifying for prompt payment discounts are selected with Option E when the system prompts:
ENTER DISC DUE DATES: FROM TO Enter beginning and ending due dates to select invoices qualifying for discounts within the range
specified. Press TAB to return to the prompt, Select Invoices for Payment…
After you specify the range of discount dates, the prompt, Review Each Payment…is displayed (see preceding section for more information on this prompt).
Option D – Invoices By a Specific Due Date Use option D to select invoices by a specific date when the system prompts:
ENTER DUE DATE MM/DD/YY Press TAB to accept the default date (ZE date). Press ESC and enter a different date. Press ESC and TAB to return to the previous prompt.
If there are no invoices on file that meet the selection criteria defined in Options E and D (i.e., none eligible for discounts, or due on the date specified), the following prompt will be displayed:
NO INVOICES SELECTED – (TAB) TO CONTINUE Press TAB to return to the Vendor # field.
Option S – Single Invoices Invoices can be flagged for payment 1 at a time when option S is used and the system prompts for an invoice number:
ENTER INVOICE NUMBER OR END Enter a valid invoice number. If the invoice was previously selected for payment, the message,
Already Selected…is displayed. Enter END or press TAB to return to the Vendor # field.
Paying Invoices If you want to pay the invoice currently on the screen, enter 2 (Pay this Invoice). The total amount already paid for the current vendor will be displayed:
TOTAL PAYMENT AMOUNT: XXXXXXXXXXX.XX
The selected invoices will be released to the Accounts Payable payment cycle, the display will clear and the program will allow the selection criteria to be entered again.
When the selection process has been finished, TAB back to the N-4 menu, and run program NJ – Cash Requirements to proceed to the next payment step.
A/P Payment & Purge Processing Financials Page 131

NCF – Fixed Expenses Payemnts Program NCF is used to select fixed expenses for payment. Current fixed expenses must be processed in Fixed Expense Processing (NFP) and printed in an Invoice Register (NR) before they can be selected in Fixed Expenses Payment Selection. To ensure correct payment to vendors, all transactions affecting a vendor should be entered and updated to the Vendor Master file before proceeding with NCF.
If you decide not to pay a fixed expense after it has been selected for payment, see the Cash Requirement Maintenance section for instruction on deleting invoices and fixed expenses selected for payment.
It is important to note that the amount to be paid against a specific payable item (fixed expense) is established at the time the item is selected for payment. If a credit/debit memo is applied to a payable item after it has been selected for payment, the amount of payment does not reflect the newly entered credit/debit memo.
TO BEGIN
Enter NCF from any menu. If the A/P – G/L interface is active, the first field of input is Organization Code: ORGANIZATION CODE Enter a valid organization code. Press TAB to exit to the N-4 menu.
BANK – G/L ACCT# (The default cash account will be displayed from ZPM setup if the A/P – G/L interface is active) Press TAB to accept the default. Press ESC to clear the field and enter a different G/L account number. Enter the bank reference number identified with the cash account if the A/P – G/L interface is not
active. Press ESC and TAB to return to Organization Code.
DISCOUNT – G/L ACCT# (The default discount account set up in ZPM will be displayed) Press TAB to accept the default account used to record purchase discounts. Press ESC and enter a different G/L account number. Press ESC and TAB to return to Organization Code.
After the G/L accounts are entered, the system prompts for a single vendor number or all vendors on file: ENTER VENDOR # OR ALL Enter a valid vendor number to select only 1 vendor. Enter ALL to include all vendors in the fixed expense file. Press TAB to clear the screen and return to Organization Code.
Next the system prompts for the criteria used to select the fixed expenses for payment. Option S is displayed only if a single vendor number is entered in the preceding prompt.
SELECT FIXED EXPENSES FOR PAYMENT: A..ALL FIXED EXPENSES D.. FIXED EXPENSES DUE BY A SPECIFIC DATE S..ONE FIXED EXPENSES AT A TIME
ENTER OPTION Press TAB to return to the previous prompt. Enter 1 of the options listed above.
Page 132 A/P Payment & Purge Processing

The program prompts:
REVIEW EACH PAYMENT? (Y/N/E) Enter Y to review each fixed expense before flagging for payment. Enter N to select expenses for payment without reviewing them individually. Enter E to return to the Select Fixed Expenses For Payment prompt.
When fixed expenses are reviewed before selecting for payment, the following prompt is displayed: 1…SKIP THIS FIXED EXPENSE 2…PAY THIS FIXED EXPENSE 3…CHANGE PAYMENT AMOUNT ENTER 1, 2, 3 OR END Enter END or press TAB to end payment selection for the current vendor. The fixed expense
currently displayed is not flagged for payment. Enter 1 to skip this fixed expense. Enter 2 to pay this fixed expense. The program will display the message Total Payment Amount:
xxxxxxxxxxx. The selected expenses will be released to the Accounts Payable cycle, the display will clear and the program will return to the previous prompt.
Enter 3 to change the payment amount.
If you need to change the amount to be paid for any reason (perhaps, this is a partial payment), select Option 3, Change Discount/Payment and the following 2 fields are displayed:
PAYMENT AMOUNT Press TAB to skip either field. Enter a different amount. The program prompts:
CORRECT? (Y/N) Enter Y to accept the new amounts and display the next fixed expense on file and meeting the
selection criteria (if applicable). Enter N to make additional changes and return to Payment Amount.
Option D – Specific Due Date Use option D to select fixed expenses by a specific date when the system prompts:
ENTER DUE DATE MM/DD/YY Press TAB to accept the default date (ZE date). Press ESC and enter a different date. Press ESC and TAB to return to the previous prompt.
If there are no fixed expenses on file that meet the selection criteria defined in Option D (i.e., none are due on the date specified), the following prompt will be displayed:
NO FIXED EXPENSES SELECTED – (TAB) TO CONTINUE Press TAB to return to the Vendor # field.
The selected invoices will be released to the Accounts Payable payment cycle, the display will clear and the program will allow the selection criteria to be entered again.
When the selection process has been finished, TAB back to the N-4 menu, and run program NJ – Cash Requirements to proceed to the next payment step.
A/P Payment & Purge Processing Financials Page 133

NCM - Special Payments Program NCM is used to record special payments in the Cash Requirement file. The following four types of payments are recorded using special payments:
1…Record Manual Payments to Vendors This option is used for on-file vendors only. Manual checks are recorded in the check/voucher register printed by NCR, but they are not printed when checks are printed with NCP. The Invoice Number field must contain either a valid invoice number, a fixed expense number, or the word ON-ACCT for an on-account payment.
2…Process On-account Payments to Vendors When on-account payments are recorded in NCM, NCP generates a check that does not apply to any specific invoice on file. This option is also for use only with on-file vendors.
3…Record Manual Payments to Vendors Not on File NCM offers the option to record manual checks that have already been issued to vendors not set up in the Vendor Master file. If A/P and G/L are interfaced, the system prompts for the G/L distribution.
4…Process Payments to Vendors Not on File This option is used to generate checks printed with NCP, for one-time vendors not set up in the Vendor Master file. The system prompts for the vendor's address and the invoice number(s) covered by the check.
All special payments (including manually prepared checks) in the Cash Requirements journal will be posted to the Accounts Payable and General Ledgers (if applicable) during Check/Voucher Register Printing (NCR). With the exception of manual checks, all special payment checks are automatically prepared by the system (i.e., recorded in NCM and printed in NCP).
To record manual payments or to process On-Acct payments to vendors, vendor invoices must exist in the A/P Master file.
Note: Do not record or process special payments during check/voucher printing and posting.
On-Account Items Payments to vendors can be made on-account if the invoices and fixed expenses to which the payment should be applied are not known. NCM can be used to schedule on-account checks for printing or to record checks that were hand-written. After NCR is printed, records of computer printed and hand-written on-account checks are stored in the Accounts Payable Master file. The on-account transactions can then be applied to specific vendor invoices or fixed expenses with NM.
All on-account transactions (credit/debit memos and payments) can also be applied to specific invoices through Cash Requirements Maintenance (NJM).
TO BEGIN
Enter NCM from any menu. The system prompts: 1…RECORD MANUAL PAYMENTS TO VENDORS 2. PROCESS ON-ACCT PAYMENTS TO VENDORS 3. RECORD MANUAL PAYMENTS TO VENDORS NOT ON FILE 4. PROCESS PAYMENTS TO VENDORS NOT ON FILE
ENTER OPTION: Enter 1 to record manually prepared checks. These checks must be applied to specific invoices. Enter 2 to issue payments to vendors without specifying an invoice number (i.e., prepaying on
account).
Page 134 A/P Payment & Purge Processing

Enter 3 to record manually prepared checks issued to miscellaneous vendors. (Vendor Number [****]).
Enter 4 to record payments and print checks for vendors not on file.
Special Payments Header If the A/P – G/L interface is active, the system displays the following 3 fields:
ORGANIZATION CODE Enter a valid organization code.
BANK – G/L ACCT# The default cash account will be displayed. Press TAB to accept the default account. Press ESC to enter a valid G/L account number. Press ESC and TAB to return to Organization Code.
DISCOUNT – G/L ACCT# The default discount account will be displayed.
Press TAB to accept the default account. Press ESC and enter a valid G/L account number. Press ESC and TAB to return to Organization Code.
Option 1 – Record Manual Payments to Vendors on File Although the manual checks recorded in NCM are included in the Check/Voucher Register (NCR), they will not be printed during the Check Voucher Printing (NCP). After the header section is completed, the following fields are displayed:
CHECK NUMBER Enter the number of the check issued. Press TAB to clear the screen of the data already entered.
CHECK DATE The terminal date (ZE date) is displayed as the default date.
Press ESC and TAB to return to the previous prompt, Enter Option… Press TAB to accept the default date. Press ESC and enter the date the check was actually issued.
After the date is entered, the program prompts:
ENTER VENDOR NUMBER Enter a valid vendor number Press TAB to return to the Check Number field.
PAYMENT/DISCOUNT CORRECT? (Y/N/END) Enter Y to record the amount paid on the check. Enter N to change either the discount or payment amounts. Enter END to return to Invoice # without recording the payment. (This invoice or fixed expense is
still available for payment at a later date).
Note: If you enter an On-Acct payment, the payment and the discount amounts are zero. (Refer to the next topic for more information on On-Acct payments).
The cursor returns to Invoice Number after each payment is recorded. You may pay any number of invoices or fixed expenses for the same vendor on a single manual check.
A/P Payment & Purge Processing Financials Page 135
Option 2 – Process on Account Payments to Vendors When option 2 is selected and after the header section is completed, the system prompts: ENTER VENDOR NUMBER Enter a valid vendor number. Press TAB to return to the Organization Code field or the Bank – G/L Account # field.
On-Acct transactions are not numbered; instead, the word, On-Acct, is displayed in the invoice number field along with the organization code and the system prompts for the payment amount:
DISCOUNT PAYMENT Enter amount of the discount if applicable and the amount paid to the vendor. Press TAB to return to Vendor Number field.
If the A/P – G/L interface is active, the program also prompts:
ENTER PAYABLE G/L ACCT # Press TAB to accept the default account (set up in ZPM) Press ESC and enter a valid G/L account number.
The system prompts for verification:
PAYMENT/DISCOUNT CORRECT? (Y/N/END) Enter Y to record the On-Acct payment. Enter N to change either the discount or payment amounts. Press ESC and enter a different
amount. Enter END to return to the Invoice Number field without recording the payment.
After each On-Acct payment is recorded, the cursor returns to Vendor Number.
Option 3 – Record Manual Payments to Vendors not on File Header Entry. Use this function to record manual checks issued to vendors that are not set up in the Vendor Master file.
When you enter option 3, the fields below are displayed after the header section is completed.
CHECK NUMBER Enter the number of the check issued. Press TAB to return to Organization Code.
CHECK DATE Press TAB to accept the default date (Your ZE date). Press ESC and enter the date the check was issued.
After you enter the date the check was issued, these additional fields are displayed:
ENTER VENDOR NAME Enter the vendor’s name Press TAB to return to the Check Number.
INVOICE NUMBER Enter the number of the invoice paid. Press TAB to return to Vendor Name.
PAYMENT AMOUNT Enter the amount on the check.
DISCOUNT AMOUNT Enter the amount of the discount taken.
After you enter all the required data, the system prompts for verification:
Page 136 A/P Payment & Purge Processing

CORRECT (Y/N/CANCEL)? Enter Y to accept the credit portion of the manual payment entry. Enter N to return to Vendor Name, press TAB to the incorrect field, press ESC and enter the
correct data. Enter CANCEL to cancel the current entry and return to Check Number.
If your Accounts Payable is not interfaced with the General Ledger, the cursor returns to Check Number.
Note: Complex journal entries requiring more than 1 credit entry are discussed in the note that follows the Amount field discription.
Distribution Entry After the header portion of the manual payment is recorded, the corresponding distribution entry (or entries) is entered. Notice the display only fields, Entered Credits and Entered Debits, the amounts in these fields are maintained by the system and reflect the total debits and credits entered for this transaction.
SEQ This is the first line of the debit entry and is automatically displayed by the system.
ORG Enter a valid organization code identifying the organization that is debited with this entry.
G/L ACCT #
Enter the asset or expense account that is debited with the amount entered on this line. (Multiple debit entries are allowed to distribute the amount entered as the credit).
DESCRIPTION Enter any description applicable to the current sequence line (i.e., debit entry).
AMOUNT Enter the amount of the debit entry.
Note: A complex journal entry requiring more than 1 credit entry may be recorded on 1 of the sequence lines by entering a minus sign (-) after the amount.
After each sequence line is entered, the system prompts for verification:
CORRECT? (Y/N/CANCEL) Enter Y to accept the line and display the next sequence line with the cursor at Org. Enter N to return to Org. Press TAB to the incorrect field, press ESC and enter the correct data. Enter CANCEL to cancel the current sequence line only.
After all sequence lines are entered and the credit and debit amounts are equal, press TAB at the next blank sequence line, the program prompts:
ENTER SEQ#, ADD, END or “D” – DISPLAY LINES: Enter the number of an incorrect sequence line. Enter ADD to add another line. Enter END to accept the check as entered. Further processing in NJ, NCP, NCR is necessary
before the current manual check payment from the Cash Requirements file (i.e., from the system), do not use NJM before processing is completed.
Enter D to display sequence lines from the beginning. (This is helpful when the number of sequence lines exceeds number of lines on the screen).
A/P Payment & Purge Processing Financials Page 137

Option 4 – Process Payments to Vendors Not on File Use this option to record and print checks for the miscellaneous vendors not set up in the Vendor Master file.
The prompts and fields are the same as those described in the preceding topic, Record Manual Payments to Vendors Not on File. Refer to that section for help in recording transactions in Option 4. The additional fields displayed in Option 4 are described below:
ADDRESS LINE 1 Enter the first line of the vendor’s address.
ADDRESS LINE 2 Enter the 2nd line of the vendor’s address.
CITY Enter the vendor’s city.
STATE Enter the vendor’s state.
ZIP Enter the vendor’s zip code.
When you complete the last field of entry, the system prompts for verification:
IS THE ABOVE CORRECT? (Y/N) Enter Y to accept the address. The screen clears and the cursor returns to Vendor Name. Enter N to return to Address Line 1. Press TAB to the incorrect field. Then press ESC and enter
the correction.
Changing or Cancelling Checks Issued to Vendors Not on File For vendors on file, manual checks and scheduled checks cannot be changed or cancelled in NCM; however, they can be changed or cancelled in Cash Requirements Maintenance (NJM). To change or cancel checks for vendors not on file: Enter the name of the vendor and invoice number. In addition, enter the check number and date if
the check was prepared manually. Verification of the credit portion of the entry (i.e., Special Payments Header) is requested first:
CORRECT (Y/N/CANCEL)? Enter Y to accept the credit portion of the check. Enter N to return to Vendor Name. Press TAB to the incorrect field, press ESC and enter the
correct data. Enter CANCEL to cancel this check.
When the header is accepted, the system prompts for a sequence line entered in the debit part of the payment:
ENTER SEQ#, ADD, END OR “D” – DISPLAY LINES Enter the number of an incorrect sequence line. Enter ADD to add another line. Enter END or press TAB to verify the line and return to Check Number (if manual check) or
proceed to the address fields. Enter D to display sequence lines from beginning.
Page 138 A/P Payment & Purge Processing

Verification is requested when a line is changed:
CORRECT? (Y/N/CANCEL) Enter Y to accept the line and return to the previous prompt. Enter N to return the cursor to the Org. field. Press TAB to the incorrect field, press ESC and
enter the correct data. Enter CANCEL to cancel the current sequence line only.
If the payment is not a recorded manual check, but a payment scheduled to be printed in NCP, the address of the vendor is displayed and the system prompts:
IS THE ABOVE CORRECT? (Y/N) Enter Y to accept the address and return to the Vendor Name field. Enter N to make changes to the address fields.
NJ - Cash Requirements As vendor invoices are approved for payment, they are placed in the Cash Requirements file. Program NJ is used to print a listing of vendor invoices and fixed expenses selected for payment in NC and NCP and special payments processed in NCM and the cash required for payments.
The Cash Requirements Report (NJ) prints the contents of the Cash Requirements file, listing the A/P transactions in the A/P Master file that have been selected for payment, the information on manual checks, and the cash required to process the checks drawn on each bank account.
In addition to printing the cash requirements report, NJ translates the check scheduling information from the Cash Requirements file to check printing information in the Check Printing file. NJ also verifies that there are no checks to be printed with a negative or zero amount. A negative or zero check can occur if a credit memo is applied to a check that exceeds the total of all invoices being processed for payment. NJ allows you to exclude all zero or negative payments from the listing. If the multi-currency feature is active, NJ must be printed for all currencies before checks can be printed.
TO BEGIN
Enter NJ from any menu. The system displays:
PRINT CASH REQUIREMENTS REPORT? (Y/N): Enter Y to begin printing. Enter N or press TAB to exit to the N-4 menu.
When a combination of the current transactions processed in NC, NCM, and NCF exceed the current credit balance in a vendor’s account (i.e., vendor’s account is now zero or a debit balance), the cash required balance in the Cash Requirements Report will be zero or negative and the following prompt will be displayed:
DO YOU WISH TO AUTOMATICALLY DELTE REQUIREMENTS FOR VENDORS WITH A TOTAL PAYMENT OF LESS THAN OR EQUAL TO ZERO? (Y/N): N Press TAB to retain vendor’s with zero or negative check balances in the Cash Requirements file. Enter Y to flag all zero and negative amounts as deleted on the Cash Requirements Report. These
transactions are removed from the Cash Requirements file.
Note: Checks are not printed when the scheduled payment amount is zero or less.
The Cash Requirements Report can be printed in either the foreground or background option when the following prompt is displayed:
DO YOU WISH TO RUN IN THE FOREGROUND/BACKGROUND/END? (F/B/E) Enter F to run in foreground. Enter B to run in background. Enter E to end the program.
A/P Payment & Purge Processing Financials Page 139

NJM - Cash Requirements Maintenance Use NJM to delete A/P transactions selected for payment and to change the payment, discount, 1099 reportable, and tax withheld amounts. In addition, you can use NJM to erase the entire Cash Requirements file so that you can restart the A/P payment selection process. A new cash requirements report must be printed after changes to the cash requirements have been made so that check printing can proceed. Scheduled payments for fixed expenses, invoices, and special payments can be changed or deleted; in addition, On-Acct transactions (debit/credit memos) can be applied to payments (the amount of the On-Acct transaction is printed on the check stub). Scheduled checks with negative or zero amounts should be cleared from the print file by NJM. (Print the Cash Requirements Report to determine which checks have negative or zero amounts). After changes and deletions are made in NJM, the Cash Requirements Report must be printed again in NJ. All transactions (including manual checks recorded by NCM) can be deleted from the Cash Requirements Report (i.e., file is cleared); however, when the Cash Requirements file is cleared, all scheduled and special payments (i.e., including recording of manual checks) will require processing again in NC, NCF and NCM again.
TO BEGIN Enter NJM from any menu. The system displays the options shown below and prompts:
1. APPLY ON-ACCT TRANSACTIONS 2. CHANGE/DELETE CASH REQUIREMENTS 3. ERASE CASH REQUIREMENTS AND START OVER
ENTER OPTION Enter 1 to apply On-Acct transactions to open invoices in a vendor account. Enter 2 to adjust discount and payment amounts included in the Cash Requirements Report. Enter 3 to delete all transactions contained in the Cash Requirements Report. Press TAB to exit to the N-4 menu.
Applying On-Acct Transactions On-Acct transactions can be applied directly to a check scheduled for a vendor by using Option 1. On-Acct transactions are also applied in Vendor Invoice Entry (NE) as a credit or debit memo issued without offsetting an invoice; in Accounts Payable Maintenance (NM) as a credit or debit memo applied to a specific invoice; in Special Payments (NCM) when On-Acct payments (i.e., prepayments) are applied to vendors.
When On-Acct transactions are applied to payments in NJM, the following 2 fields are displayed:
ORGANIZATION CODE Enter the number of G/L cash account. Enter the bank reference number if the A/P – G/L interface is not active. Press TAB to exit to the N-4 menu.
VENDOR NUMBER Enter a valid vendor number Press TAB to return to Organization Code or Bank – G/L Acct #.
If there are any existing On-Acct transactions for this vendor, the system will display each transaction and prompt:
1..SKIP THIS TRANSACTION 2..INCLUDE THIS TRANSACTION ENTER 1, 2, or END Enter 1 to skip this transaction and review the next one. Enter 2 to apply the transaction to a scheduled payment on file. Enter END or press TAB to discontinue this session.
Page 140 A/P Payment & Purge Processing

If an On-Acct transaction was previously applied, the system displays a message to indicate that it was already selected. If you need to change the application of the On-Acct transaction, this next prompt is also displayed when the Already Selected message appears:
RE-SELECT ON-ACCT TRANSACTIONS? (Y/N) Enter Y to delete previously selected On-Acct transactions. Enter N to retain On-Acct transactions as currently applied.
Changing or Deleting Cash Requirements Use Option 2 to change or delete the discount and/or payment amount for scheduled payments in the Cash Requirements Report. When this option is selected and the A/P – G/L interface is active, the prompts below are displayed:
ORGANIZATION Enter the organization code used when the checks were recorded (i.e., NC, NCF, and NCM). Press TAB to return to the first prompt.
VENDOR NUMBER Enter the number of the vendor (payee) on file. Enter *** (3 asterisks) for a vendor not on file.
INVOICE NUMBER Enter the number of the applicable invoice or fixed expense scheduled for payment or being
recorded as a manual check. Press TAB to exit to the N-4 menu.
After the invoice or fixed expense is displayed, verification is requested when the system prompts:
IS THE ABOVE CORRECT? (Y/N/DELETE) Enter Y to accept the invoice as displayed. The screen is cleared and the cursor returns to the
Invoice Number field. Enter N to change the discount and/or payment amount. Enter DELETE to delete the scheduled payment or manual check from the Cash Requirements
Report. Deleted items must be processed again (i.e., selected for payment or in the case of manual checks, recorded again). The cursor returns to Invoice Number.
Note: Invoices associated with miscellaneous vendors can be deleted from the Cash Requirements Report, but special payments (NCM) is required to change the payment amounts.
If the discount and/or payment amounts are not correct, enter N in the preceding prompt to display the Discount and Payment fields:
DISCOUNT PAYMENT Press ESC and enter a different amount in either field. Press TAB to accept the amounts displayed.
Note: The sum of the discount and payment cannot exceed the amount due nor can it be zero or negative. Discounts cannot be taken on fixed expenses.
After you make changes to the discount and/or payment amount, the system will prompt for verification of the data.
A/P Payment & Purge Processing Financials Page 141

Erasing All Cash Requirements If you erase Cash Requirements Report (i.e., the report file is cleared), all the scheduled payments and manual checks included in the report file will be deleted and no longer available for processing in NCP. Invoices, fixed expenses, and special payments must be selected again in NC, NCF, and NCM and manual checks must be recorded again in NCM. Only those payments and manual checks included in a printed Cash Requirements Report are available for check printing and updating.
When you choose Option 3, the system displays the following warning:
WARNING – CASH REQUIREMENTS WILL BE ERASED (INCLUDING ALL SPECIAL PAYMENTS) CONTINUE WITH ERASE: (Y/N) Enter Y to erase the Cash Requirements Report. Enter N return to the Option prompt without deleting the report.
The message, Erasing Cash Requirements File, is displayed when the file is being cleared.
Page 142 A/P Payment & Purge Processing

NCP - Printing Checks Program NCP is used to print the checks and vouchers for vendor payments currently scheduled and included in the most recently printed Cash Requirements Report (NJ). The program can print all checks in the file even when the checks are drawn on several different banks. Before each group of checks is printed, the bank number is displayed, and check printing is interrupted for an optional forms line-up procedure. The check date and the beginning check number must be specified for each bank account. In the event that one or more checks do not print satisfactorily, the checks can be reprinted, either in their entirety or for a specific range of vendors.
TO BEGIN Enter NCP from any menu. If the A/P – G/L interface is active the system prompts:
LOAD CHECKS FOR: ORGANIZATION [ ] BANK – G/L # [ ] PRESS TRANSMIT TO PROCEED OR TYPE END Press TAB to begin printing. Enter END to exit to the N-4 menu.
Before printing begins, the system prompts:
PRINT FORMS LINE-UP PATTERN? (Y/N) Enter N to skip this option. Enter Y to print the forms alignment pattern. The forms print and the program prompts:
FORMS LINE-UP OK? (Y/N) Enter Y to accept the form alignment and begin processing. Enter N to adjust the checks (i.e., forms) again and print another forms line-up pattern.
Before checks are actually printed, the first check number for the current batch must be specified when the system prompts:
ENTER STARTING CHECK NUMBER Enter the first check number used in this run. Press TAB to return to the prompt, Load Checks For: …
The next prompt requests the date that will be printed on this batch of checks:
ENTER CHECK-DATE XX/XX/XX Press TAB to accept the default date (ZE date). Press ESC to enter a different date.
During printing, this message is displayed:
CHECK/VOUCHER PRINTING IN PROGRESS PRINTING CHECK # [ ]
Printed checks should be reviewed to determine if they were printed correctly before responding to this next prompt:
DID THE CHECKS PRINT CORRECTLY? (Y/N) Enter Y if the checks are correct. Enter N when some or all of the checks have printed incorrectly. (Incorrect checks must be
reprinted; see the topic Reprinting checks/vouchers for more information).
Reprinting Checks/Vouchers Generally, only a cluster of checks are printed incorrectly; therefore, to avoid reprinting all checks in the current batch, a range of checks (actually a range of vendors with the associated checks) can be scheduled for reprinting when the following prompt is displayed:
A/P Payment & Purge Processing Financials Page 143

ENTER REPRINT RANGE OR END STARTING VENDOR ENDING VENDOR Enter beginning and ending vendor numbers. Press TAB at Starting to start with the first check on file; and/or press TAB at Ending to include
through the last check on file. Or press TAB twice to reprint all checks. Enter END to exit to the N-4 menu.
After the range is specified, look at the To Begin topic for the prompts that are displayed.
Page 144 A/P Payment & Purge Processing

NCR – Check/Voucher Register NCR prints the current check/voucher register, updates the A/P Master and History files with the payment information, and updates vendor statistical information (i.e., year-to-date payments, last payment date, last payment amount, and current account balance) in the Vendor Master file. A record of the checks produced for each bank account and the invoices paid on each check is written to the Monthly Disbursement file.
Detail check information is written to the 1099 Detail file for all 1099 vendors. If the check reconciliation feature is active, the check information is updated to the file.
Any check that is reprinted during the check printing process is flagged as a reprint on the register. If it is necessary to reprint the register, further processing by NCR is halted by indicating that the register printed incorrectly. If reprinting is not required, confirming that the register printed correctly allows NCR to begin updating the A/P Master and History files.
The General Ledger will be updated at this time. The summary shows the amounts that are to be posted to the General Ledger for each organization and account number.
TO BEGIN
Enter NCR from any menu. The system displays the following prompt only if the corresponding checks and vouchers were processed in Check/Voucher Printing (NCP):
PRINT THE CHECK/VOUCHER REGISTER? (Y/N) Enter Y to begin printing Enter N or press TAB to exit to the N-4 menu.
The message appears during printing:
CHECK/VOUCHER REGISTER PRINTING IN PROGRESS
PRINTING CHECK #
After the register is printed, verification is requested when the system prompts:
DID THE REGISTER PRINT CORRECTLY? (Y/N) Enter Y if the register is correct. Enter N to exit to the N-4 menu.
If the register is accepted as correct, updating to the A/P master and history files begins and the following message is displayed:
CHECK/VOUCHER UPDATING IN PROGRESS
UPDATING VENDOR # [ ]
INVOICE # [ ]
If the A/P – G/L interface is active, the General Ledger will be updated at this time, and the following message will be displayed:
GENERAL LEDGER JOURNAL UPDATE IN PROGRESS
When the G/L is updated in NCR, the following message is displayed after updating is completed:
OK TO CLEAR CHECK/VOUCHER JOURNAL # [ ]? (Y/N) Enter Y to clear the transactions from the register. Enter N to retain the transactions in the Check/Voucher Journal.
A/P Payment & Purge Processing Financials Page 145

Void and Reversal Check Processing Checks that must be voided or reversed are processed by two programs: A/P Void and Reversal Check Entry (NVC) and Void and Reversal Check Register (NVL).
NVC - Void and Reversal Entry NVC allows you to void checks for reconciliation purposes or cancel checks with reversing entries posted to the General Ledger. Checks entered in this program are printed and updated in NVL (Void and Reversal Check Register). You can maintain data previously entered through NCV is the transaction has not yet been updated through NVL.
Void Checks You can void checks: • That are pre-numbered but are not useable (i.e., used for forms line-up print pattern). • For which detail information is not available (i.e., the check has been purged from the check detail
file using NMD), the check number can only be voided, the check CANNOT be reversed.
Voided checks are identified on the Monthly Disbursement Register (NMD).
Reversed Checks Checks processed and updated by the Check/Voucher Register (NCR) can be cancelled through this program if the checks were mistakenly issued or were never received by the vendor(s). Adjustments are made to the cash and A/P accounts to reverse the payment. In addition, invoices paid by the reversed checks may be cancelled or set up for repayment. When an invoice is cancelled, adjusting G/L entries are created to offset the original distribution.
For a check to be reversed, it must exist in the Monthly Disbursements (N11) file, which is purged by the Monthly Disbursements Register (NMD). For an invoice to be reinstated or cancelled, it must exist both in the A/P Master (N1) file (purged by NP) and the A/P Distribution (N15) file (purged by NRA). If you want to be able to reverse checks and reinstate the invoices that were paid by those checks, you need to retain the information in all three files. If your invoices are typically paid 30 to 60 days after the invoice is entered, you may want to keep A/P detail for two months longer than the check detail.
If you do not want to keep the information on-line, adjustments to the vendor account and to general ledger may be done manually by creating a journal entry to debit the cash and credit the accounts payable accounts (for a check reversal) and , if required, re-enter invoice(s) in NE (if reinstating an invoice). You should also update the vendor’s YTD totals for payments/invoices, the payments-to-date for fixed expenses, and any 1099 detail affected.
Restrictions Because the reversal process requires information from the check and invoice to update the correct G/L accounts, there are some restrictions to the types of transactions that can be processed in NVC. An error message is displayed if you try to:
• Reverse or void a check that has already been voided.
• Reverse and on-account payment.
• Void a check that has already been reconciled.
• Cancel an invoice that has multiple payments (i.e., other checks have already been applied to the invoice).
• Cancel or reinstate an invoice that has multiple transactions (i.e., an invoice and a debit adjustment with the same invoice number).
• Reinstate invoices for vendors not on file (the check can be reversed but the invoice(s) must be cancelled).
Page 146 A/P Payment & Purge Processing

NVC prompts for the following information:
Organiztion Enter the G/L organization for the cash (bank) account from which the check was drawn. The organization title is displayed for verification.
Bank G/L No. Enter the bank or cash account from which the check was drawn. The account title is displayed for verification.
Check No. Enter the number of the check to be voided or reversed. If the check details are on file, the program assumes a reversal: the vendor number and name, check amount, and any taxes withheld are displayed for verification. If the check details are not on file, the check cannot be reversed; however, the check number can be marked as “void”.
Authority Enter the name of the person authorizing the void or reversal. This field is for information only; the name is printed on the Void and Reversal Check Register.
Void Date Enter the date the void or reversal is effective. The ZE date is the default.
After entering the authority and date, you can correct the authorization and void date, delete the check entry from the NVC holding file, or continue to the invoice review (for a reversal) or enter another check number (for void).
Invoice Review If you are processing a reversal, each invoice paid by the check is displayed on the screen with the prompt:
(R)instate, (H)old, or ( C)ancel Invoice or (E)xit The invoice number, date, and invoice amount are shown. If there is no invoice detail on file (i.e., invoices were purged from the A/P master file using NP), the check will still be reversed, but no invoice updates will occur. If the invoice has already been transferred to history you will continue to see it in NI (if you opt to include history) since the invoice cannot be cancelled or reinstated once it has been deleted from the active file. If you need to reinstate the invoice, you must create a new invoice for the vendor (through NE) to correct the account.
The invoice displayed can be reinstated for payment, reinstated but placed on hold, or cancelled. If there are multiple invoices paid by a check, the invoices can be updated differently (i.e., reinstate one invoice and cancel the second).
Reinstate The invoice paid status is removed and the invoice is treated as any other unpaid invoice. If you process that vendor again in NC, the invoice appears for payment again (if it matches your payment selection parameters). G/L entries debiting the cash account and crediting the A/P account are created. The vendor balance is adjusted.
Hold The invoice paid status is removed and the invoice is retained in the A/P master file. However, the invoice will not be selected in NC until the Hold status is removed (changed to a Pay status) in NM. G/L entries debiting the cash account and crediting the A/P account are created. The vendor balance is adjusted.
Cancel The invoice is cancelled and cannot be selected again for repayment. G/L entries are created to debit the cash account and credit the expense or asset account(s) referenced on the original invoice distribution.
A/P Payment & Purge Processing Financials Page 147

NVL - Void and Reversal Register NVL processes checks entered in NVC. A register is printed of all checks to be voided or reversed. When you confirm that the register has printed correctly, the files are updated. When you specify that the register did not print correctly, you can change any of the check information entered through NVC and run the register again.
The following updates are performed in NVL:
Void Checks • The check is updated with a “void” status. The check appears as such on the Monthly
Disbursements Register (NMD).
Reversed Checks • The check number is removed from the check reconciliation file. (N12 file). • The check and any discounts taken are subtracted from the vendor’s total YTD payments and
discounts. When an invoice is reinstated, the vendor’s A/P balance is increased by the invoice amount. If an invoice is cancelled, the YTD invoice total for the vendor is decremented (in the V1 file).
• If the vendor is flagged for 1099 reporting, the 1099 details are deleted for the check (in the N10 file).
• If the check was applied to a fixed expense invoice, the total payments-to-date for that contract is decremented (in the N3 file).
• The payment record is deleted from the A/P master (N1) files. • The check record is retained, but the status is updated to “void” or “reversed” (in the N11
file). • The invoice(s) paid with the reversed check are updated with the new status (hold, pay, or
cancelled) in the N1 file.
Adjusting entries are created for posting to the G/L:
For the reversed check:
FOR DEBIT CREDITReversed check Cash Accounts Payable Cancelled invoice Accounts Payable Expense or Asset accounts
Page 148 A/P Payment & Purge Processing

Accounts Payable History The Accounts Payable module includes an option to retain A/P history. If you chose this option, paid A/P transactions are transferred to the A/P History file when the A/P Purge (NP) is run. A/P History Inquiry (NHI) displays A/P history by vendor and organization code and it includes a hard copy option; history transactions can be purged using A/P History Purge (NHP).
Purging Records NP - Accounts Payable Purge
Program NP is used to purge from the A/P Master file, those invoices and fixed expenses whose balance is zero. Once NP has been run, these transactions are no longer available to the check void and reversal programs (NVC, and NVL).
All accounts payable transactions (invoices and payments) to be included for the month being processed should be entered and updated before running this program.
The Accounts Payable Applied Transaction List is also printed. This report lists the transactions being purged from each vendors account.
Note: A/P transactions in the Accounts Payable Master file include the following:
• vendor invoices, • fixed expenses, • credit and debit memos, and • payments.
NP prompts for a date. The program only selects invoices that are dated on or before the specified date. A list of items pending purge is printed as an "applied transactions list", organized by vendor. After the operator confirms that the list printed correctly, all records on the applied transactions list are deleted from the A/P Master file or transferred to the A/P History file (when the option to retain A/P History is selected at installation or with XM).
NHP allows the user to purge the transactions in the history file by specifying a cut-off date.
TO BEGIN
Enter NP from any menu. This message appears:
BEFORE ACCOUNTS PAYABLE PURGE BEGINS, MAKE SURE THAT ALL A/P TRANSACTIONS (INVOICES AND PAYMENTS) ENTERED TODAY HAVE BEEN COMPLETELY PROCESSED
Note: This message is a reminder to include all transactions for each vendor for the month being purged.
In addition to the message shown above, the system prompts:
PROCEED WITH ACCOUNTS PAYABLE PURGE? (PROCEED/END) Enter PROCEED to being purging paid invoices from vendor accounts. Enter END or press TAB to exit to the N-4 menu.
Paid invoices can be purged by a specified cutoff date when the following prompt is displayed:
A/P Payment & Purge Processing Financials Page 149

PURGE ZERO BALANCE INVOICES DATED ON OR BEFORE THIS DATE: (XXXXXX): Enter the cutoff date through which paid invoices will be purged (i.e., all invoices paid on or
before the date entered will be erased from the file). Press TAB to exit to the N-4 menu.
Verification of the cut-off date is requested before the paid invoices are purged from file:
CORRECT (Y/N)? Enter Y to accept the cut-off date. Enter N to enter a different date.
This message appears when purging begins: ACCOUNTS PAYABLE PURGE IN PROGRESS PRINTING APPLIED TRANSACTIONS LIST FOR VENDOR # [ ]
After the Applied Transaction List is printed, the system prompts:
DID THE LIST PRINT CORRECTLY? (Y/N) Enter Y if the list is correct and you want to erase the transactions from the vendor accounts. Enter N if the list is incorrect and exit to the N-4 menu without purging the current transactions
from the A/P Master file.
When you accept the Applied Transactions List as correct, the vendor accounts are updated and the message shown below is displayed:
UPDATING A/P FILES FOR VENDOR # [ ]
When all transactions are purged and the corresponding vendor accounts are updated, the system displays the following prompt:
A/P PURGE IS COMPLETE, PLEASE (TAB) Press TAB to exit to the N-4 menu.
NHP - Accounts Payable History Purge If your system is configured to retain detailed accounts payable history, A/P detail is written to a history file when it is purged (by NP) from the Accounts Payable Master (N1) file. Program NHP, purges historical data from the Accounts Payable History (N1H) file.
When NHP is run, you must enter a cutoff date for the purge. All historical transactions with invoice due dates will be purged after you confirm the cutoff date. When it has completed, NHP displays a message of completion.
Data purged by NHP is no longer available for inquiry by NHI.
Page 150 A/P Payment & Purge Processing

A/P Check Reconciliation
The A/P Check Reconciliation menu lists the following programs: NBC A/P Check Reconciliation Data Entry NBL A/P Check Reconciliation Register NBO A/P Outstanding Check Register
A/P Check Reconciliation Flow Diagram The diagram on the next page shows the programs and reports available in the check reconciliation process.
A/P Check Reconciliation Financials Page 151


A/P Check Reconciliation Financials Page 153


Check Reconciliation Check reconciliation processing is available when A/P and G/L are interfaced and the check reconciliation option is selected at installation or with XM. All checks processed through the Check/Voucher Register (NCR) are written to the Check Reconciliation file. A check is removed from the file if it is reversed and updated through NVC and NVL. To access check records for reconciliation purposes, a passbook number and statement date must first be established for the bank G/L account. NBC prepares for entry of this data if the bank G/L account has no passbook record. The passbook number needs be established only once, however, it can be changed if necessary. The statement date must be specified after reconciliation of each statement is completed (i.e., NBL has been run), and before entry of transactions and/or paid checks can proceed for the next statement.
After the passbook number and statement date for a bank account have been established, NBC accesses the checks on file for that bank account. The Paid Checks Data Entry selection of NBC designates each check as paid or unpaid. Check numbers can be entered individually for specification of its status, or each check on file can be sequentially displayed (using the "next" option) so that they may be specified as paid or unpaid.
If a check is accidentally designated paid, its status can be changed back to unpaid using the "add" option of the Paid Checks Data Entry selection. Under the add option, when the check number is entered, its data is displayed and the flag may be respecified.
In addition to paid checks, NBC provides the Transaction Data Entry selection for entry of other transactions that update the bank account's balance using the following Type codes:
D deposits, and the beginning balance of the G/L cash account S bank service charges I interest received or paid (enter a negative amount for interest paid) M miscellaneous transactions
NBC – A/P Check Reconciliation Data Entry Program NBC is used to set up the cash accounts (i.e., Bank-G/L Accounts) for check reconciliation with the corresponding bank statements. In addition, A/P Check Reconciliation Data Entry (NBC) is used to enter cancelled checks, paid vouchers, and bank originated transactions included in the bank statements.
Before reconciliation begins, a starting balance (bank statement or G/L account balance) should be established. The starting balance can be entered as a deposit using the Transactions Data Entry selection.
Any deposits, interest payments, service charges, or miscellaneous entries not recorded by the system (i.e., entered during processing by another program) should be entered in GIP (General Journal Entry).
TO BEGIN
Enter NBC from any menu to display the A/P Check Reconciliation Data Entry screen:
If the A/P - G/L interface is active , the cursor is located in Organization:
ORGANIZATION Enter the organization code identifying the paying organization. Press TAB to exit to the N-5 menu.
BANK G/L NO Enter the G/L account number for the bank cash account. Press TAB to exit to Organization.
After you enter the G/L number, the system prompts for verification:
A/P Check Reconciliation Financials Page 155

CORRECT? (Y/N) Enter Y to accept the Bank - G/L account displayed. Enter N to enter a different account number.
Entries currently on file for the account selected will be displayed. If this is the first entry for the cash account, the cursor will go to Passbook No. with the notation, New Record.
PASSBOOK NO Enter the passbook number identified with the current account. If there is no passbook number,
this field can be skipped, or used as a memo field.
Before entering data in the remaining fields, the following prompt is displayed:
1. HEADER MAINTENANCE 2. TRANSACTIONS DATA ENTRY 3. PAID CHECKS DATA ENTRY
ENTER SELECTION:
Enter 1 to return to the Passbook No. field where either or both the passbook number or statement date can be changed.
Enter 2 to enter bank transactions that are not currently in the transactions displayed for this account (i.e., deposits from the A/R module, bank charges or returned check fees from the bank statement).
Enter 3 to prompt for the checks listed in the check/voucher register. See the Paid Checks section for more information.
Press TAB to return to the Organization field.
Transaction Data Entry Option 2 is used to enter bank originated transactions or when the G/L account is set up for check reconciliation in NBC. When this option is selected, the following prompts will appear:
TRANSACTIONS DATA ENTRY
ENTER A LINE #, A-ADD, L-LIST, E-END Enter a line number to display or change an existing transaction line. Enter L to display all transaction lines from the beginning. Enter E or press TAB to return to the preceding prompt, Enter Selection… Enter A to add a transaction line. The first available line number is displayed and the cursor
moves to the Date field.
DATE Enter the date the transaction originated at the bank.
TYPE Enter D to enter deposits and the beginning balance (or prior balance) of the G/L cash account. Enter S to enter a bank service charge. Enter I to record interest paid or collected by the bank. (Enter a negative amount for interest paid). Enter M to enter miscellaneous transactions (i.e., the difference between the amount paid by the
bank and the amount printed on the check). Enter ? to display a list of types (i.e., D, S, I , and M).
COMMENTS Press TAB to accept the comment displayed. Press ESC and enter a different comment.
AMOUNT Enter the amount of the transaction. Deposits are entered as positive values; service charges and
other bank charges are entered as negative values.
Page 156 A/P Check Reconciliation
To change a transaction line, enter the line number. Press TAB to the incorrect field. Then press ESC and enter the correct data.
Paid Checks Data Entry Use Option 3 to enter cancelled checks and paid vouchers when the system prompts:
A-ADD, N-NEXT, E-END Enter A to display and select checks from the Outstanding Checks Report. Enter N to display the next check on file in the Outstanding Checks Report. Enter E to return to the previous prompt, Enter Selection…
When A-Add is selected, the system prompts for the Check #:
Enter the applicable number (up to 8-numeric characters).
The check and new balance amounts are automatically updated when the status of a previously reconciled "paid" check is changed from Y to N.
Cancelled checks and paid vouchers are checked off (marked paid) against those listed on the Check/Voucher Register. When you enter the number of a check, you can check it off when the system prompts:
PAID (Y/N/E) Enter Y to code this check paid (i.e., the cancelled check is included in the statement). Enter N to display the next check in the Outstanding Checks Report. Enter E to return to the previous prompt.
A/P Check Reconciliation Financials Page 157
Check Reconciliation Reports NBL - A/P Check Reconciliation Register
Program NBL is used to print the Reconciliation Data Entry Registers (NBL) listing the bank transactions and cancelled checks/vouchers entered in A/P Check Reconciliation Data Entry (NBC). The total amount of all transactions and cancelled checks recorded in NBC plus the ending balance of the Bank-G/L account specified is also printed on the report.
NBL is most useful when the transactions and cancelled checks on file closely correspond to those included in the most recent bank statement. For this reason, you may want to clear the file after the register is printed, or the file can be retained.
TO BEGIN Enter NBL from any menu. If the A/P - G/L interface is active, the system prompts:
ENTER ORGANIZATION CODE Enter the organization code identifying the paying organization. Press TAB to exit to the N-5 menu.
Enter the bank reference number or G/L account identifying the cash account to be reconciled when the system prompts:
ENTER BANK G/L NUMBER Enter the applicable G/L cash account number if the A/P - G/L interface is active. Enter the bank reference number if the A/P - G/L interface is not active. Press TAB to return to the prompt requesting the organization code or if the A/P - G/L interface is
not active, to exit to the N-5 menu.
After you enter the account or bank number, the system prompts for verification:
CONTINUE OR RE-SPECIFY? (C/R) C Press TAB to accept the account and print the corresponding A/P Reconciliation Register. Enter R to return to the prompt requesting either the organization code or G/L account number.
During printing, this message is displayed:
REPORT PRINTING IN PROGRESS…
After the register is printed, the program prompts for verification:
REPORT PRINT CORRECTLY? (Y/N) Enter Y to accept the report and continue with NBL. Enter N to exit to the N-5 menu (all transactions remain in the Check Reconciliation file).
The Reconciliation Data Entry Register is most useful when the transactions and cancelled checks and vouchers on file closely correspond to those included in the most recent bank statement and for this reason you may want to clear the file, after the register is printed. After you accept the report as correct, the system prompts:
UPDATE THE CHECK RECONCILIATION FILES NOW? (Y/N): Enter Y to clear all transactions from the Check Reconciliation Data Entry Register. Enter N to keep the current transactions on file. Further entries made in NBC will accumulate
until cleared from this file.
The following message is displayed when the file is being cleared:
UPDATING THE CHECK RECONCILIATION FILE…..
Page 158 A/P Check Reconciliation

NBO - A/P Outstanding Check Register Program NBO is used to print the outstanding A/P checks. The A/P Outstanding Check Register includes the check number, date, and amount.
TO BEGIN
Enter NBO from any menu. If the A/P - G/L interface is active, the system prompts:
ENTER ORGANIZATION CODE Enter the organization code identified with the paying organization. Press TAB to exit to the N-5 menu.
Enter the bank reference number or G/L cash account when the system prompts:
ENTER BANK G/L NUMBER Enter a G/L cash account number. Enter the bank reference number if the A/P - G/L interface is not active.
Verification of the entries is requested when the system prompts:
CONTINUE OR RE-SPECIFY? (C/R) C Press TAB to continue. Enter R to return to the previous prompt.
If you want to print the Outstanding Checks Report to include only those checks that come before or on a cut-off date, enter N when the system prompts:
ALL CHECKS? (Y/N) Y Press TAB to print all outstanding checks on file for the cash account specified. Enter N to display the next prompt:
ENTER ENDING DATE TO PRINT TO: Enter the cut-off date.
During printing, this message is displayed:
REPORT PRINTING IN PROGRESS…..
After the register is printed, the system prompts:
DID THE REPORT PRINT CORRECTLY? (Y/N) Enter Y to accept the report and continue with NBO. Enter N to exit to the N-5 menu.
A/P Check Reconciliation Financials Page 159


1099 Processing The 1099 Processing menu includes the following programs:
N99M 1099 Detail Maintenance by Vendor N99P 1099 Form Print N99Q 1099 Detail Inquiry by Vendor N99R 1099 Detail Reporting and Purge
U.S. laws require businesses to keep records of payments for services. In some cases, a portion of the payment for services must be withheld from the vendor/supplier and remitted to the government. The programs on this menu are used for processing the information that must be reported to the government at the end of each calendar year.
Although the codes in the Vendor Master file can be used for either GST or 1099 purposes, the programs on this menu do not impact GST reporting.
Options The option to invoke 1099/GST reporting, specification of the minimum reportable amount, and the tax percentage to withhold from a vendor's check are selected at installation and can be changed with XM. The General Ledger posting account for withheld taxes is established in ZPM.
Processing Vendor records are coded for either 1099 or GST reporting in Vendor File Maintenance (VM). When the letter T is entered in field 29 (which indicates 1099 reporting applies to the vendor), the Withhold Tax? prompt is displayed. The letter G in field 29 indicates GST reporting is applicable. Field 30 is used for an employer's federal ID or social security number if 1099 reporting applies, or a GST registration number.
If a vendor record is flagged for 1099 reporting, the 1099 Amount field is displayed in NE. In check processing, the payment amount is displayed as the default 1099 amount and the amount withheld is calculated by the system when the vendor record is flagged for 1099 tax withholding. Both amounts can be overridden in NC and NJM.
N99M - 1099 Detail Maintenance by Vendor Use N99M to add, change,, and delete 1099 detail information. The 1099 tax information is written to the 1099 file by NCR (Check/Voucher Register) when the checks are processed for a vendor whose vendor record is flagged for 1099 reporting. Checks not processed through the system and those processed incorrectly can be added, maintained, or deleted in this function.
The 1099 detail record includes the vendor number, invoice number, check number, check date, invoice amount, check amount, 1099 reportable amount, and tax withheld.
1099 Processing Financials Page 161

TO BEGIN
Enter N1099M from any menu. The 1099 Detail Maintenance By Vendor screen is displayed. The cursor is in the Vendor # field.
Vendor # The system displays at the bottom of the screen:
Enter Vendor #, (N)ext, or ?, <, >+["] search value Enter N to display the next (or first) vendor number with 1099 detail records. Enter one of the lookup options (?, <, >+["] search value). Enter a vendor number that has been flagged for 1099 reporting. The system displays the 1099
detail records for the vendor number, and the cursor is on the Exit option of the following menu.
Exit Next Invoice# Line# Add Delete Redisplay Total Hardcopy Press TAB to return to the Vendor # prompt. Press N to list the next screen of 1099 detail information for the vendor. Press I to limit the display of 1099 detail information to a specified invoice. Enter a line number that corresponds to the 1099 detail information you wish to maintain. See the
ADDING A 1099 DETAIL RECORD heading for descriptions of the fields. Press A to add a 1099 invoice record or check against a specific invoice. See the ADDING A
1099 DETAIL heading. Press R to redisplay from the first record. Press T to total all 1099 reportable amounts for the year specified. Press H to print a listing of all 1099 detail records for the vendor. Press D to delete a 1099 detail record.
When you delete an invoice, all check records for the specified invoice are also deleted. The system prompts:
Enter Line # to Delete Enter the line number that you wish to delete. Press TAB to return to the previous menu.
ADDING A 1099 DETAIL RECORD After A is pressed at the Exit Next Invoice# Line# Add Delete Redisplay Total Hardcopy Menu, N99M prompts:
Add a new (I)nvoice or ( C)heck to an existing invoice Press I to add an invoice record. The cursor moves to the Invoice # field. Press C to add a check record. A check record specifies the amount that was paid to a vendor.
Check records can only be created if an invoice record exists. When you enter C to create a check record, N99M prompts:
Enter Invoice Line# or Invoice# to add check to Enter the line number that corresponds to the invoice number for which you wish to create a check
record. Press TAB and enter the invoice number for which you wish to create a check record. Press TAB twice to return to the menu.
When you enter an invoice or invoice line number, the cursor moves to the Check # field, and N99M displays the following information:
Line (display only) The system increments this number by one for each record that is displayed.
Invoice # (conditionally required) Required if you entered I to add an invoice record. Press TAB to return to the menu. Enter a unique number or reference for this record.
Page 162 1099 Processing

Check # (conditionally required) Required if you entered C to add a check. Press TAB to return to the menu. Enter a check number.
Date (required) This is the invoice or check date. The check date determines the year in which the 1099 is reported. Press TRANSMIT to return to the menu. Enter a date.
Actual Amount (required) This is the invoice or check amount. If you are entering a check against an existing invoice, the check and tax withheld amounts cannot be greater than the actual invoice amount less all checks issued against the invoice. Enter an amount.
1099 Reportable (optional) If you are entering a check record, the amount you enter here is included in the total that is reported on the 1099 tax form, and it cannot exceed the check amount plus any tax withheld. If you are entering and invoice, this amount cannot exceed the actual amount of the invoice. Enter an amount.
Tax Withheld (optional) The cursor only moves to this field if you are creating or maintaining a check record. This is the amount that was withheld from the A/P check(s). Enter an amount.
Reports & Inquiries N99P - 1099 Form Print
Program N99P (1099 Form Print) prints U.S. 1099 tax forms (Form 1099-MISC). The name of your company, your company's federal ID number (entered in XM), the vendor name and address, and the amounts paid and withheld are printed on the form. If the 1099 tax form is incorrect, use program N99M to make any corrections, and then reprint the tax form.
The 1099 reportable amount is printed under the category of non-employee compensation. The recipients' names and addresses are obtained from the vendor record, and the employer's ID is obtained from the Z1 file and can be maintained in XM.
When you execute N99P, the system prompts for the tax year and the minimum reportable amount. If the sum of the 1099 reportable amounts for a vendor is less than the minimum reportable amount specified in this program and taxes were not withheld, the 1099 tax form is NOT printed for that vendor.
N99Q - Detail Inquiry by Vendor Use program N99Q to list the 1099 detail records for a specific vendor.
This program functions in basically the same way as N99M (1099 Maintenance) with the exception that modifications cannot be made to the field values. See the documentation for program N99M for explanation of the fields.
The program displays the vendor number, name, invoice number, check number, date, actual amount, 1099 reportable amount, tax withheld, and the total YTD payments. You may optionally print a hard copy of the inquiry displayed on the screen.
1099 Processing Financials Page 163

N99R - 1099 Detail Reporting and Purge Use N99R to print the 1099 detail records for a range of vendors and dates. The default dates are the first and last dates of the previous year.
The report is sorted by vendor. There is a page break before each new vendor's information; this allows an individual report to be sent to each vendor.
After the listing is printed, the system allows you to purge the records for the vendors and date range that were printed.
=========================================
CAUTION
Do not purge 1099 information before all 1099 forms have been printed for the tax
year and the information has been verified.
=========================================
Page 164 1099 Processing

Getting Started
The important part of Accounts Payable, as well as other modules, is to make sure that the files are set up properly during the installation time, and that the user knows how to maintain (additions, deletions, and changes) the files after the initial installation. Vendor information and beginning payable balances are loaded into the Vendor and Accounts Payable Master files at the initial installation time. Once routine processing has begun, the Accounts Payable Master file is maintained by the system. Vendor statistics are also maintained by the system, but additions, changes and deletions can be made at any time.
Listed below are the Masters and Maintenance Files, and a short description about them, which are used during initial installation period and for maintenance during the processing cycles. The procedures for using the modules are in the following sections.
Accounts Payable Master File The Account Payable master file contains all the unpaid transactions in the accounts payable system. It includes vendor invoices, credit/debit memos, and released fixed expenses. The information for the Aged Trial Balance (NTB), the Accounts Payable Analysis, (NDU) and the Discount Status Report (NDS) is also in this file. All entries to the Accounts Payable Master file are made through routine processing.
Vendor Master File, program VM Vendors that are used only occasionally are grouped under Vendor Number [***]. This is a system assigned number and cannot be changed or deleted.
All maintenance to the Vendor Master file is performed with program (V)VM, Vendor Master File Maintenance. This program loads vendor descriptive and statistical data, establishing identification for vendors (vendor numbers). Any information in a Vendor Master file record, except the vendor number and the current A/P balance, can be changed with program VM. Although a vendor number cannot be changed, the existing vendor record can be deleted, and then re-entered using the desired vendor number. Changes to a vendor's A/P balance are more restrictive because of audit trial requirements. To change an A/P balance, routine-processing programs must be used. Program (V)VM can also be used to add or delete Vendor Master records as required; however, there can be no current transactions existing in the system for that vendor. When a vendor record is deleted, the year-to-date statistics for that vendor are not lost. They are combined with the statistical information in the Miscellaneous Vendors record ([***]).
Vendor Master File Listing, program VL Program (V)VL enables you to print a comprehensive listing of the vendors in the Vendor Master file. You can print the listing for one vendor., a range of vendors, or all vendors in die file. The listing is printed in vendor number sequence. This program can be run at any time.
Fixed Expenses Maintenance, program NFM Fixed expenses maintenance is an optional feature of Accounts Payable. Program NFM allows you to maintain a file of fixed expenses that can be automatically paid by the Accounts Payable application without operator intervention.
Getting Started Financials Page 165

The most common types of fixed expenses are rental payments, fixed debt, loan payments, etc. these expenses are released as payable transactions according to their established frequencies. The possible frequencies are: semi-monthly, semi-annually, monthly, annually, and quarterly
If Accounts Payable is interfaced with G/L, fixed expense distribution is entered using this program.
Fixed Expenses Change Listing, program NFC Program NFC produces a comprehensive report of the changes made to the Fixed Expenses Master file.
Clearing the report file is an optional function. The pro-rain prints only those changes C, added to the file since the last time it was cleared. The listing provides an audit trail of Fixed Expense changes, and can be used to check the accuracy of your entries. This program can be run at any time, providing there are entries in the file.
Fixed Expenses Master File Listing, program NFL Program NFL can produce a listing of all the fixed expenses entered in the system.
You can print all vendors, a range of vendors, vendors for all organizations, or vendors for a single organization. Totals on the listing can be compared with tapes of the data entry documents to verify the accuracy of your entries this program can be run at any time.
IE - Inventory Adjustment Program The program provides total calculations of Inventory Cost for General Ledger posting to be calculated in average cost or last paid cost. Transaction List prompts for using last paid cost + last paid freight or average cost in order to determine the displayed unit and extended costs. The selection is reflected in the column heading and the letter, next to the cost column tabulation.
Page 166 Getting Started

Frequently Asked A/P Questions
How Do I Apply Multiple Invoices To One A/P Proforma? Two methods are available to apply multiple invoices to one A/P Proforma. Use Method 1 if only a few invoices need to be applied. Use method 2 if you have many invoices to apply.
Method 1 - Recommended for applying a few invoices The recommended method if only a few invoices are to be applied.
1. Run QPC and call up individual lines to be confirmed on the first invoice and make necessary changes.
2. Run QPU to process the first invoice through to the accounts payable system. When QPU is run all the lines confirmed on the first invoice will be deleted.
3. After the first invoice has been updated to A/P, run QPC to confirm the lines on the next invoice and run QPU to update A/P.
4. Repeat this process for each invoice.
Method 2 - Recommended for applying many invoices If there are a lot of invoices to be applied to one proforma Method 1 can be time consuming. An alternate method is to price confirm the proforma as if there were only one big invoice, then break it down into multiple smaller invoices using NE.
1. In QPC use the first invoice number to price confirm the whole proforma (use the amount of the proforma as the invoice amount). This should be the same as the sum of all the invoices for the proforma.
2. Run QPU to update the invoice to A/P.
3. Once in A/P, NE can be run to credit the first invoice so the invoice amount is equal to the amount actually billed by the vendor
4. Then enter the rest of the invoices through NE.
How do I Apply Multiple Proformas To One Invoice? Multiple Proformas cannot be applied to one invoice. You must split the invoice into two invoices. Run QPC and call up the first proforma to be paid using the vendor invoice number and price confirm it. Make sure you use the amount from the proforma as the invoice merchandise amount. Price confirm the invoice.
To price confirm the second proforma use a different invoice number but make it as similar to vendor invoice number as possible. For example, if the vendor's invoice number was 123 (use to price confirm the first proforma) use 123-1 as the invoice number for the second proforma, and price confirm that proforma.
Frequently Asked A/P Questions Financials Page 167

How do I Clear Multiple On-Accounts? The system is designed to force application of on-accounts to specific transactions. This gives you total control of which invoices will be pre-paid, and which remain open to pay. In line with this feature, the system will NEVER purge a transaction labeled 'ON-ACCT'.
If you have tried to remove an 'ON-ACCT' transaction by creating a Credit or Debit Memo for it, and the invoice number for the Memo is 'ON-ACCT', the system will ignore the fact that the transactions net value is zero, and they will stay on the books regardless of how many purges you run.
In the same fashion, if the net value of any given invoice is not equal to zero that invoice will not purge. Follow these instructions to bring each invoice balance to zero prior to running the purge. To remove these entries follow these steps:
1. Create a 'dummy' invoice for one cent. This invoice will be used and then purged. For the sake of this example we will call our invoice 'DUMMY'. Use (N)NE to create the invoice and (N)NR to register it.
2. Once the invoice is registered and available for payment, you must apply the 'ON-ACCT' invoices to it. Use program (N)NM. When prompted, enter the Vendor Number. For the Invoice Number enter 'ON-ACCT'.
3. The system will display the 'ON-ACCT' transactions one at a time and ask if you wish to apply that transaction. Answer 'Y'. You will then be prompted for which invoice number to apply the 'ON-ACCT'. Enter the 'DUMMY' invoice number for each 'ON-ACCT' that the system calls up. When you have applied the last 'ON-ACCT' you will be prompted for another vendor.
4. If you run a Trial Balance now, you will see that the 'ON-ACCT' entries have all been applied against the 'DUMMY' invoice and no longer show 'ON-ACCT'. The Vendor's balance will be overstated by the one cent 'DUMMY' invoice.
5. Create a Credit Memo against the 'DUMMY' invoice to bring its balance to zero. Use (N)NE to create the Credit Memo and (N)NR to register it. Be sure to use the same 'DUMMY' invoice number.
6. If you run a Trial Balance now, you will see that the Vendor's balance is once again correct, and there are no entries with invoice number 'ON-ACCT'.
7. If you run (N)NP to purge Accounts Payable, the 'DUMMY' invoices will be purged from the system.
How do I print Check/Voucher Register when I get an error message? When you get the error message "Check/Voucher Register Printing cannot proceed until Check/Voucher Printing is completed?", the Check Print flag is SET, and can be cleared by running the [NCPCLR] program from [READY] or [*EDIT].
A common reason for this problem is that there is a blank check number or check date. When checks are being printed, the program scans through and verifies that all payments have an assigned check number to them. If there is not an accompanying check number or date, a message will appear similar to:
THERE IS EITHER A CHECK WITH A MISSING CHECK NUMBER OR DATE
Page 168 Frequently Asked A/P Questions

General Ledger Interface Roadmap
Introduction
The General Ledger is made up of three main data files: G/L Activity, G/L History, and G/L Master.
The G/L Activity File contains individual G/L transactions which are made up of Account Number, Posting Date, Journal Source, Amount, and Debit/Credit flag. Its contents can be viewed and printed from the G-1/GTL (G/L Activity Inquiry) program by date and account number range.
The G-4/GAR (G/L Activity Report) will print an activity report from the G/L Activity File for a single accounting period specified by the user, along with the calculated value of Revenue minus Expense account totals for the period. The program can be run to print in Detail to show individual transactions and period totals for each Account Type, i.e. Asset, Liability, Capital, Expense, and Revenue, or it can be run to print Summary Account Type period totals.
The G/L History File contains running Open Period Totals for G/L accounts and fixed Amounts for Closed G/L Periods. The contents of this file can be viewed through the G-1/GHM (G/L History File Maintenance) and can be printed from the G-1/GHX (Previous Balance Listing) program.
The G/L Master File contains the Chart of Accounts set up through the G-1/GMM (G/L Master File Maintenance) program. It also contains the running total of Open Period Activity and the Balance of Last Close figure that is updated when the G-2/GME (G/L Period End Closing) program is run. These latter two values are used by other G/L report programs.
The OCJ, RR, RCA, and QC (for IBT transactions) programs update their activity to the Automatic Journal Interface File, a holding place for transactions before they are posted to the General Ledger. The activity in the File is updated to the General Ledger by running the G-2/GPI(Automatic Journal Register) and the G-2/GUI(Automatic Journal Update) program.
The NR, NCR, NVL, KJ, GUP, GUI, GRJ, GAJ, and IE programs update their activity to General Ledger directly.
The GME program updates the G/L Master File.
General Ledger Interface Roadmap Financials Page 169

OCJ – Order Entry Cash Journal Information Posted Calculation of Value Payments to Customer Accounts Manually entered in Cash and Carry Order Entry. CASH PAYMENT DR Total of payments entered in Cash and Carry Order Entry since
the last time OCJ was run. CASH PAYMENT CR Total of payments entered in Cash and Carry Order Entry since
the last time OCJ was run.
Journal Source
C/C
Posting Process
Run daily to reconcile Cash Drawer totals with Payments entered in Cash and Carry Order Entry
Timing of Posting
System Date that is set in ZE is used as the G/L Posting Date for the Register totals.
Where Defaults are Defined
Default G/L Accounts are defined in program ZPOSTOP.
Page 170 General Ledger Interface Roadmap

RR – Invoice Summary Register Information Posted Calculation of Value Credit to GROSS MERCH SALES Merchandise Sell Price - Merchandise Discounts, for all
invoices on the Register. The Merchandise Total for an Invoice is calculated by taking the quantity of a Line Item and multiplying it by the Pricing Factor and Price of the Item.
Debit to MERCH DISCOUNT N/A This line on the report is not currently used by the system. Credit to SALES TAX Invoice Total Sales Tax charged on Merchandise and Freight.
Sum of the percentage that is calculated for each Line Item on an Invoice.
Credit to FREIGHT Total for all Invoices on the Register. Entered in OE/OM when the 'FRT' option is chosen.
Credit to NON-TAX SPECIAL CHGS Total Minimum Order and Fuel Charges, for all Invoices on the Register.
Debit to GROSS INVOICE AMT Merchandise Sell Price - Merchandise Discounts + Sales Tax + Freight + Minimum Order Charges + Fuel Surcharges, for all invoices on the Register.
SERVICE CHARGE DR N/A This line lists on the report but will never contain a value. Program RCA posts to this G/L Account.
SERVICE CHARGE CR N/A This line lists on the report but will never contain a value. Program RCA posts to this G/L Account.
CASH PAYMENT DR N/A This line lists on the report but will never contain a value. Program OCJ posts to this G/L Account.
CASH PAYMENT CR N/A This line lists on the report but will never contain a value. Program OCJ posts to this G/L Account.
INV CST GOODS DR LIFO CGS is captured from the Item File, as viewed in IM Field numbers 61 and 62, at the time that the Order is entered. Average Cost of Goods Sold is captured from the Item File, Field# 60 in IM, for each Line Item at the time of Order Entry. FIFO CGS is captured at the time that the Order is Invoiced from the I12 file, as viewed in Program IFQ. The value can be changed for an Order, before Invoicing, from changes made to the Actual Cost of a Line Item in OM or OCP, and by quantity changes made in OC.
INVENTORY CR This is the Inventory Account, and the offsetting entry for the Inventory CGS.
DIR CST GOODS DR Cost of Goods Sold for Direct Orders. DIR INVENTORY CR This is your Direct Inventory Account, and the offsetting entry
for the Direct Inventory CGS.
Journal Source
O/P
Posting Process
The A/R to G/L Interface must be turned "on" in INSTALL, General Ledger Configuration for the Invoice Register totals to post to the G/L from the RR program. Once the Interface is Active, the RR Program will prompt the user, "RECORD AMOUNTS FOR
General Ledger Interface Roadmap Financials Page 171

POSTING TO THE GENERAL LEDGER? (Y/N) Y". The Register totals will update to G/L if 'Y' is entered, and will have to be posted manually to the G/L if 'N' is entered.
Timing of Process
Transactions posted to the G/L from this Register will use the date that the system was set to when RR was run and updated as their Transaction Date.
Where Defaults are Defined
Define G/L Accounts from the A/R menu option in program ZPOSTOP. Define G/L Accounts from option B/T If orders are to be entered in OE for Branch Transfers of inventory. The INSTALL, General Ledger Configuration prompts under the Automatic G/L to A/R Interface screen must be answered, along with the Inventory Valuation Method prompt on the following INSTALL screen.
Page 172 General Ledger Interface Roadmap

RCA – Service Charge Audit Information Posted Calculation of Value Debit to an A/R account Sum of all Finance Charges calculated by program RC for
Customers' whose CM Service Charge Flag in Field# 18 is set to 'Y'. Program RC assesses Service Charges on all A/R Amounts Due, starting with an Aging Category defined in INSTALL, A/R Configuration. A Minimum Service Charge can be defined in the same INSTALL section. Any Service Charge calculated by program RC that falls under this minimum will not be assessed to Customers' accounts.
Credit to a Misc. Income account Sum of all Finance Charges calculated by program RC for Customers' whose CM Service Charge Flag in Field# 18 is set to 'Y'. Program RC assesses Service Charges on all A/R Amounts Due, starting with an Aging Category defined in INSTALL, A/R Configuration. A Minimum Service Charge can be defined in the same INSTALL section. Any Service Charge calculated by program RC that falls under this minimum will not be assessed to Customers' accounts.
Journal Source
S/C
Posting Process
Service Charges are calculated and posted to Customer's accounts by program RC. The G/L totals are updated by program RCA.
Timing of Posting
To be run as part of Month-End and is included as a step on the Month-End Checklist.
Where Defaults are Defined
Service Charge A/R (debit) account and Service Charge Income(credit) account is defined in program ZPOSTOP. Finance Charge percentage that is used by program RC is defined for all Customers in program ZM (System File Configuration).
General Ledger Interface Roadmap Financials Page 173

QC – Purchase Order Receiving (for IBT transactions only) Information Posted Calculation of Value Debit to Inventory Total value of the PO cost for merchandise received Less total
value of Rejected Inventory Credit to In Transit Total value of the PO cost for merchandise received to include
any rejected Inventory Debit to Rejected Inventory Total value of the PO cost for merchandise rejected Journal Source T/I Posting Process QC will automatically update to GL when the receipts are registered. The amounts of the postings can be viewed/verified on the BTAUDR report. Timing of Process The G/L Posting Date for IBT transactions processed in QC will be the Received Date that is entered when the QC transactions are registered. Where Defaults are Defined Default G/L Accounts for IBT Transactions are defined in the INSTALL 13 Branch Transfer Configuration after answering Yes to Update BRANCH TRANSFERS to the GL.
Page 174 General Ledger Interface Roadmap

NR – Vendor Invoice Register Information Posted Calculation of Value Credit to A/P Sum of Invoice Amounts entered in NE (Vendor Invoice Entry)
and processed from program NFP (Fixed Expenses Processing).Debits to Expenses Sorted by G/L Distribution Account Number that is entered in NE
and/or processed through program NFP.
Journal Source GJN
Posting Process
NR will automatically update the G/L if the flags in the hidden program XGJ are set to ‘R’. If they are set to ‘J’, then program GJ will have to be run to update the NR Journal Entries to the G/L.
Timing of Posting
The NE and NFP G/L Posting Date field defaults to the System Date and can be manually overridden in these same programs.
Where Defaults are Defined
Default A/P account is defined in Program ZPM (A/P-G/L INTERFACE ACCOUNT MAINTENANCE).
General Ledger Interface Roadmap Financials Page 175

NCR – Check/Voucher Register Information Posted Calculation of Value Credit to Cash Sum of all Invoice Amounts to be Paid Less Discounts Taken Debit to A/P Sum of all Check Amounts plus Discounts Taken Credit to Discounts Earned Discount Amounts Taken Debit or Credit to Expense and other G/L Accounts
Entered/defined in program NCM for Payments to Vendors Not on File
Journal Source GJD Posting Process
NCR will automatically update the G/L if the flags in the hidden program XGJ are set to ‘R’. If they are set to ‘J’, then program GJ will have to be run to update the NCR Journal Entries to the G/L.
Timing of Posting
The G/L Posting Date for Checks is entered into the Check Date field in Program NCP (Check Printing) for Printed Checks and in program NCM for Manual Checks.
Where Defaults are Defined
Defaults are defined in Program ZPM (A/P-G/L INTERFACE ACCOUNT MAINTENANCE). Default Cash and Discount accounts can be overridden in programs NC and NCM.
Page 176 General Ledger Interface Roadmap

NVL – Check Void/Reversal Register Information Posted Calculation of Value Debit to Cash Sum of all Check Amounts Voided Credit to A/P Sum of all Invoices Reinstated plus Discounts Taken Credit to Discounts Earned Discount Amounts Taken for Reinstated/Cancelled Invoices Credit to Expense and other G/L Accounts
Sum of all Invoices Cancelled posted back to expense account where originally expensed
Journal Source GJV Posting Process
NVL will automatically update the G/L if the flags in the hidden program XGJ are set to ‘R’. If they are set to ‘J’, then program GJ will have to be run to update the NVL Journal Entries to the G/L.
Timing of Posting
The G/L Posting Date for Checks Voided is entered into the Void Date field in Program NVC (Check Void/Reversal Entry). If invoices are reinstated for a different GL period than the Void Date then the Voided checks will be a reconciling item for NTB to GL A/P account.
Where Defaults are Defined
Defaults are defined in Program ZPM (A/P-G/L INTERFACE ACCOUNT MAINTENANCE) for Cash, A/P, and Discounts Earned.
General Ledger Interface Roadmap Financials Page 177

KJ – Cash Receipts Journal Information Posted Calculation of Value Cash Received (Debit to Cash Account) Total of the ‘AMT OF PAYMENT’ column on the Journal. Discounts Taken (Debit to Discounts and Allowances)
Total of the ‘DISC/ADJ ALLOWANCE’ column on the Journal for each code’s GL account as set up in program DCM
Amount Applied (Credit to A/R) Total of the ‘NET CHANGE’ column on the Journal. Debit/Credit to other G/L Account A G/L Account can be entered into the ‘REFERENCE
NUMBER’ field in KE, along with an amount to post to it in the ‘AMT OF PAYMENT’ field.
Journal Source GJC Posting Process After KJ is run for all reports, the Update option will post transactions entered through KE for a single Organization Code as entered when the KE batch was started. Timing of Process The G/L Posting Date for transactions entered through KE will be the Post Date that is entered when KJ is updated. The system defaults to the ZE date but it can be overridden in KJ when the batch is first accessed. Where Defaults are Defined Default G/L Account Numbers for Cash Received (Debit to Cash Account) and Amount Applied (Credit to A/R) are defined in program ZPOSTOP. Discounts Taken (Debit to Discounts and Allowances) default GL accounts are defined in DCM for each Discount Code.
Page 178 General Ledger Interface Roadmap
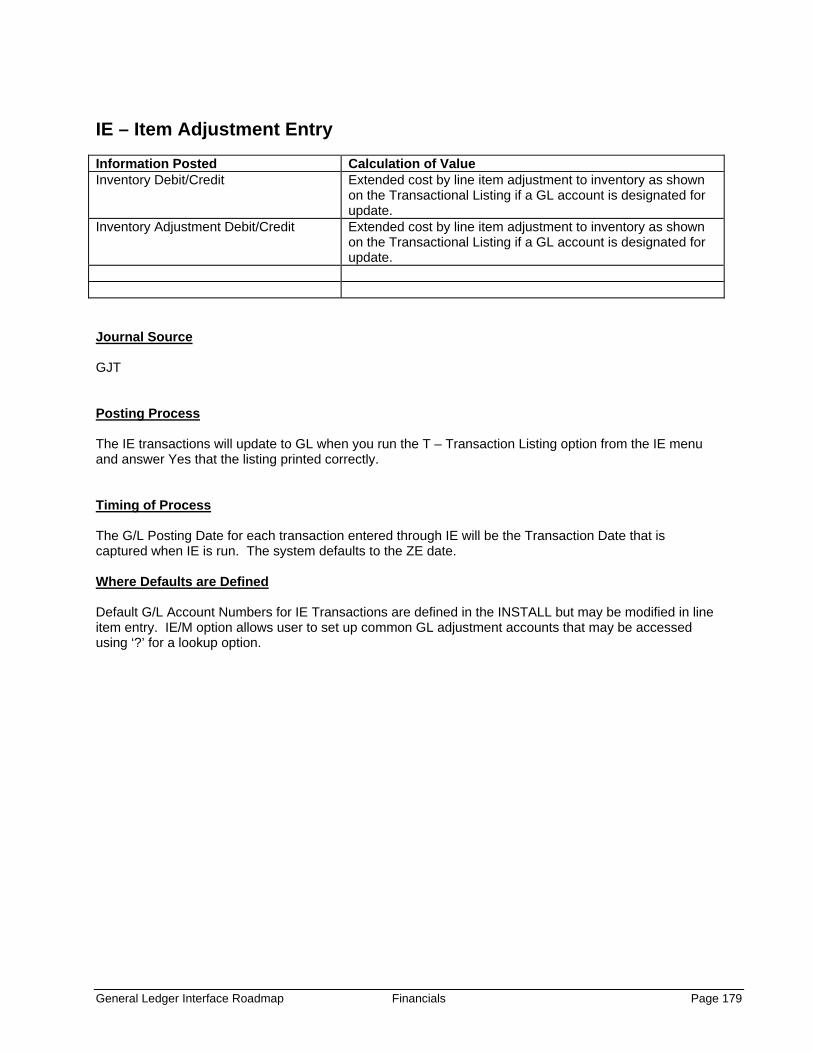
IE – Item Adjustment Entry Information Posted Calculation of Value Inventory Debit/Credit Extended cost by line item adjustment to inventory as shown
on the Transactional Listing if a GL account is designated for update.
Inventory Adjustment Debit/Credit Extended cost by line item adjustment to inventory as shown on the Transactional Listing if a GL account is designated for update.
Journal Source GJT Posting Process The IE transactions will update to GL when you run the T – Transaction Listing option from the IE menu and answer Yes that the listing printed correctly. Timing of Process The G/L Posting Date for each transaction entered through IE will be the Transaction Date that is captured when IE is run. The system defaults to the ZE date. Where Defaults are Defined Default G/L Account Numbers for IE Transactions are defined in the INSTALL but may be modified in line item entry. IE/M option allows user to set up common GL adjustment accounts that may be accessed using ‘?’ for a lookup option.
General Ledger Interface Roadmap Financials Page 179

GUP – General Journal Update Information Posted Calculation of Value Manual Journal Entries. Entries are defined in program GIP (General Journal Entry) for
specified Posting Dates and G/L Accounts.
Journal Source
Designated by user
Posting Process
Create or edit entries for a specified Journal Source Code in program GIP. Run program GPL (General Journal Register) to post entries made in GIP to the General Ledger. Run program GUP (General Journal Update) to post entries printed on the Register. GPL must be run for 'ALL' Journal Source Codes, and total Debits and Credits must be in balance for the program GUP to post to G/L.
Timing of Process
GUP will post entries to Open G/L Periods based on their Posting Date that was entered in GIP.
Where Defaults are Defined
A Journal Source Code is assigned by the user for a set of entries to be posted in program GIP. Journal Templates can also be set up in program GSM (Standard Journal Maintenance). GSM will allow G/L Organization Codes, Accounts, Notes, and Amounts if needed, to be set up as defaults for a Journal Source Code.
Page 180 General Ledger Interface Roadmap

GUI – Automatic Journal Update Information Posted Calculation of Value GUI updates Journal Entries that have been printed from GPI to the General Ledger that have been created by the OCJ, RR, and RCA programs.
All entries contained on the Automatic Journal Register are updated by programs OCJ, RR, and RCA.
Journal Source As designated by each program Posting Process The Automatic Journal File can be run periodically to update Journal Entries that have been created automatically by A/R Journal and Register programs. Timing of Process The Automatic Journal File is cleared when program GPI is run to print the Register and program GUI is run to post to the General Ledger. The File will accumulate more journal entries when A/R Journal and Register programs are run. Where Defaults are Defined There are not any defaults to define for the Automatic Journal programs. Program ZOSTOP is used to define the default G/L Accounts that the A/R Journal and Register programs use.
General Ledger Interface Roadmap Financials Page 181

GRJ – Recurring Journal Register Information Posted Calculation of Value Debit/Credit to Control Accounts Entries are calculated for journals, based on the Frequency,
Amount/Period, No. of Periods, Limit, and Balance set up in GRM, for all entries that have Due Dates that fall on or before the date to be processed that is entered in GRP.
Debit/Credit to Distribution Accounts Entries are calculated for journals, based on the Frequency, Amount/Period, No. of Periods, Limit, and Balance set up in GRM, for all entries that have Due Dates that fall on or before the date to be processed that is entered in GRP.
Journal Source RJ Posting Process
The GRP (Recurring Journal Processing) program will calculate entries for all journals set up in GRM that have Due Dates that fall on or before the date to be processed that is entered in GRP.
Timing of Posting
GRP will post all journal entries that have been set up in GRM, that have Due Dates that fall on or before the Date entered in GRP and that have not reached their Limit or exceeded their Balance.
Where Defaults are Defined
Debit to Control Acct. if a positive figure is entered into the Amount/Period field in GRM (Recurring Journal Maintenance). Credit to Control Acct. if a Negative figure is entered into the Amount/Period field in GRM (Recurring Journal Maintenance).
Page 182 General Ledger Interface Roadmap
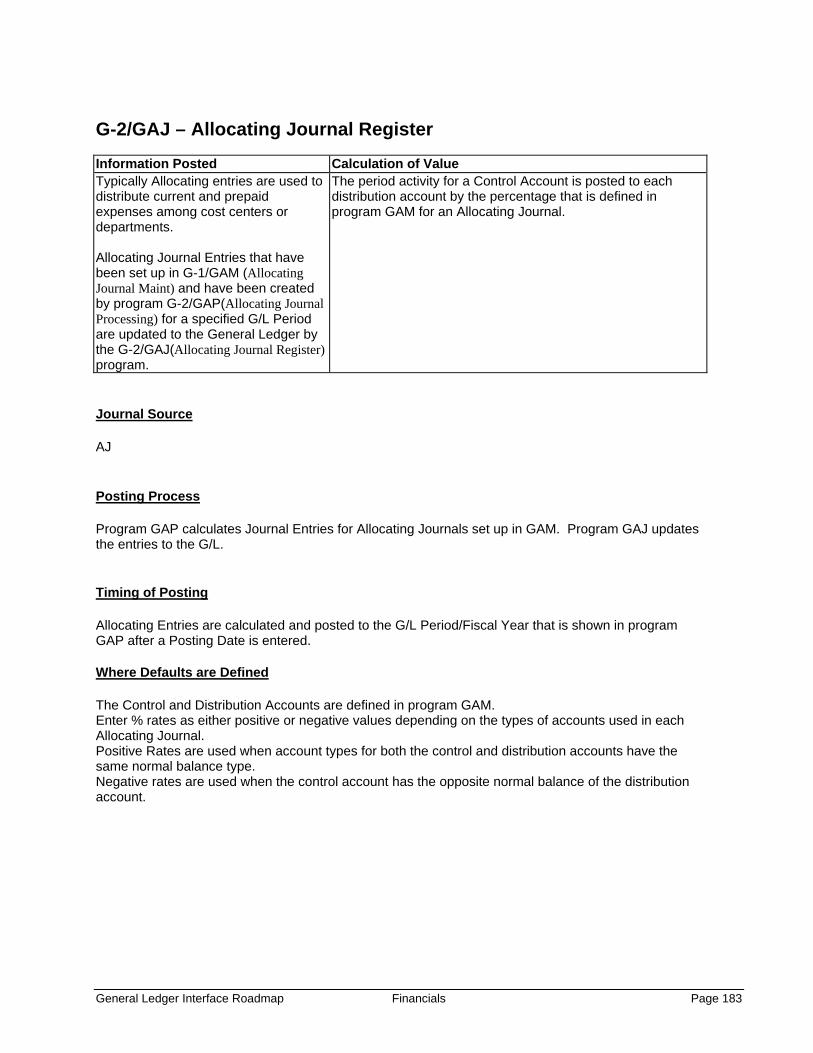
G-2/GAJ – Allocating Journal Register Information Posted Calculation of Value Typically Allocating entries are used to distribute current and prepaid expenses among cost centers or departments. Allocating Journal Entries that have been set up in G-1/GAM (Allocating Journal Maint) and have been created by program G-2/GAP(Allocating Journal Processing) for a specified G/L Period are updated to the General Ledger by the G-2/GAJ(Allocating Journal Register) program.
The period activity for a Control Account is posted to each distribution account by the percentage that is defined in program GAM for an Allocating Journal.
Journal Source
AJ
Posting Process
Program GAP calculates Journal Entries for Allocating Journals set up in GAM. Program GAJ updates the entries to the G/L.
Timing of Posting
Allocating Entries are calculated and posted to the G/L Period/Fiscal Year that is shown in program GAP after a Posting Date is entered.
Where Defaults are Defined
The Control and Distribution Accounts are defined in program GAM. Enter % rates as either positive or negative values depending on the types of accounts used in each Allocating Journal. Positive Rates are used when account types for both the control and distribution accounts have the same normal balance type. Negative rates are used when the control account has the opposite normal balance of the distribution account.
General Ledger Interface Roadmap Financials Page 183

GME – G/L Period End Closing Information Posted Calculation of Value Used to close a single accounting period. If the period is the last one in the accounting year, the year is also closed. Period-end financial statements are also printed.
The GME program calculates the Profit for the Period by totaling the activity of all Revenue accounts and subtracting the total activity for all Expense Accounts. The program will Close the Period only if the posted total of the [PROFIT] account equals the total calculated by GME.
Journal Source
As designated by user in GIP
Posting Process
Run program GAR for 'ALL' Org. Codes to obtain the G/L Period Profit or Loss figure from the “Grand Totals” page of the report. Post this amount to the Org. *0, “[PROFIT]” account. The offsetting entry should be made to an earnings account for each Working Organization (00, 01, 02…).
Timing of Process
Close the Period once Profit for the Period has been posted and the GAR program has been printed in Detail and Summary for 'ALL' Organization Codes. Financial Statements that have been flagged to be printed at Month-End in program GHH will automatically be printed when GME is run. Any Financial Statements can be printed from program GP for any Open or Closed G/L Periods, as well. After a period is closed, no further posting to that period is allowed. To avoid omission or loss of data, DO NOT CLOSE BEFORE: 1.) the profit or loss for the period is entered in GIP. 2.) journal entries from all sources are posted to the general ledger
Where Default Values are Defined
The G/L system automatically keeps track of which G/L Periods are Open and Closed.
Page 184 General Ledger Interface Roadmap