finescale modeler 2010-04 - vol. 28-04
TRANSCRIPT


Detailed engine, working spring suspension, black mesh grille and alii.
Even the master designers at Aoshima ACCURACY UNDER THE HOOD STRJKlNG EXTERIOR STYLING couldn't reproduce the driving experience The hood opens to reveal a finely The exterior design is neatly duplicated and performance of the SL 63's 500-hp, detailed engine. Battery, hoses, belts, with scale copies of the 19" aluminum 6,208cc V8 or the rush of fis 7,200 rpm fuel injection plenum and more are care wheels, trunk lid spoiler, and smart, redline. But by faithfully reproducing the fully reproduced. A separate, removable black mesh grille. It's the total package original in 1/24 scale, they captured the hardtop allows the SL 63 kit to be built as ready for you to build and enjoy. Slip into ambitious styling and assertive appear a convertible or with top. There's even a Aoshima's 2009 Mercedes Benz SL 63 ance of the Mercedes Benz SL 63 AMG. realistic, working spring suspension AMG at your hobby dealer.
www.mode'lrectifier.cem Aoshima. Details. Delivered M 0 D E L R E C T F E R C 0 R P 0 R A T 0 rlMRC ~, .'.'1 j\: ,_".':fil..' I C !\',' ,-'. . E~, i ; II, .....;.:, J ., .,.' tj :-; :~ ~, PI-, r:·rl;. -": ' ~ i :: ,'. J (,.) www.modelrectifler .com ~
TECHNOL DC Y. PERFEC TEO ..........P.!!!illlIliiI;ijlIl;.,..""--:.....' o Model railroads 0 Plastic' mode' kits CJ Bnlte!y charg!,rs D ,'.R.a.~ill eimlral helicopters, planes, cars 8. boats 0 Model ain:rah engines 0 Die cast
Mecedes-Benz I ' I owned by Daimler AG

Distributed by Dragon Models USA, Inc. Phone: 1 (626) 968-0322 1315 John Reed Court Fax: 1 (626) 968-0234 City of Industry, CA 91745 Emaii: , [email protected]
r Ie , iled pm il c I rr la ! ill md a lIer 1'1 'Jr YOII g" t http://www.dragonmodelsusa.com http://www.dragonmodelsusa.com/shop

11_ _.. --Our Trumneter R etrIs Coming In!
ITRUMPETER I PLASTIC MODEL KITS
Stevens~ ~--International · ~~....

Inside April 201 0 • Vol. 28 • No. 4
AIRBRUSHING & FINISHING18 It's olive drab, but more than
one color Livening up a monochromatic scheme MARK HEMBREE
SKILL BUilDER20 Soldering basics, step by step
A sensible skill for photoetched metal RICK LAWLER
24 Saving a Super Sabre Solving the problems of a vintage kit LEON SIMPSON
SHOWCASE30 BreH McDonald's snow plow
This county truck scoops up trophies!
COVER STORY 32 WaHling and detailing a StuG
Resin Zimmerit and photoetched metal stoke up a Sturmgeschutz. BILL PLUNK
AMERICAN AIR COMBAT HAU OF FAME46 Hal Marr's F-8E Crusader
Academy's 1/72 scale "MiG Master" PAUL BOYER
50 Canadian Forces LAV III A straightforward conversion JAMES WECHSLER
74 Kit Classics Revell's "whip-fly"F9F-8 Cougar MATIHEW USHER
Get Blowe at www.FineSeale_eO=~__Bl!
• Trumpeter AV-8B Harrier II
• Italeri Kfz 385
Tankwagen
• Zvezda Boeing 787-8
Dreamliner
• Trumpeter M 1117 Guardian ASV
• Art Model Ta 152H-l
• Tomiya JSU-152
• Tamiya Citroen Traction
1101 Siaff Car
In Every Issue 6 Editor's Page 8 Scale Talk
10 Spotlight 12 New products 38 Reader Gallery
On the Cover
WORKBENCH REVIEWS
•, 01
Bill Plunk puts plenty of pep in a 1/35 scale Dragon StuG III as
photoetched-metal assemblies for schiirzen, a modiRed mantlel, and
resin swatches of wafRe-patterned Zimmerit add extra zip to the kit.
...--..66
56 Questions & Answers 58 Reader Tips 70 Hobby Shop Directory 71 Advertiser Index 72 Classified Marketplace
FineScale MooderVisit our Web site! You can enjoy more modeling photos and Subscribers: Click on "Register," enter the customer number from (ISSN 0277 -979X, usPS No.
feature articles, access additional modeling resources, get your subscription label, and throughout your subscription you'll 679-590) is published monthly (except for June & August) by industry news, see previews of upcoming issues, or register to have unlimited access to bonus features, more than 1,000 kit Ka!mbad l Publishing Co., 21027
participate in discussions on our Forum. And it's free! reviews, and a database of more than 11 ,000 products! Crossroads Circle, P.O. Box 1612, Waukesha, Wl 53187.
--------~- ------------, I. I
I
I

The modeling love/hate relationship SCALE MODELING requires a long list of skills: We work with paint and glue, handle tiny parts, conduct historical research, and on and on. And for as much as all of us love model building, I'm sure most of us can name one part of the process we absolutely dread. Some requirement we consider a "necessary evil" on the road to a completed model. The thing I find so humorous about it is that ifyou can name a step you can't stand, some-
forward to the time I'll spend struggling to make sure a national insignia or a piece of nose art is properly located and aligned.
My friend Paul Boyer, however, absolutely loves applying decals, and if I'm not mistaken, it's his
THE MODEL LOOKS GREAT. ESPECIALLY THE DECALS
favorite part of modeling, something I simply cannot fathom. To me, it's like someone saying, "Of course I love sanding out a paint job gone wrong!" or "I really enjoy sorting out conflicting references
where there's another modeler who absolutely loves it.
For example, I absolutely dread applying decals. Don't get me wrong, I think decals .are wonderful things, and to be honest, I'm actually pretty good at applying them. But as I approach the end of a project, I certainly don't look
Contact Us
. , I"-Its great. Mind you, I'm more than will
ing to admit my own idiosyncrasies. I love masking, painting gloss finishes, and working with metal foil. And how many ofyou just winced at the thought ofone of those?
Speaking of Paul, he's back in
this issue with a new installment of the American Air Combat Hall of Fame series. This time Paul builds a scale replica of Hal Marr's MiG-killer F-8E Crusader.
It goes without saying the model looks great. Especially the decals.
Don't forget that our Web site, www.FineScale.com continues to expand to offer the best scalemodeling destination on the Web. Stop by and see all the new things we have to offer!
• www.FineScale.com Want to learn more? For the latest on mod· eling tips and techiques visit our web site at www.FineScale.com
GENERAL Editorial: FmeScale Modeler 21027 Crossroads Circle, P.O. Box 1612, Waukesha, WI 53187-1612 262-796-8776, weekdays 8:30 a.m. to 5p.m.CT Fax: 262-796-1383 [email protected] Web site: www.HneScale.com
Customer service (subscriptions, renewals, and consumer products): 800-533-6644, weekdays 8:30 a.m. to 4:30 p.m. CT; outside the U.S. and Canada 262-796-8776 .ext.421 Fax: 262-796-1615 [email protected]
Advertising and trade orders: 888-558-1544, weekdays 8:30 a.m. to 5 p.m. CT; outside the U.S., 262-796-8776 Fax: 262-796-0126 Advertising e-mail: jhagerty@ finescale.com Trade Sales e-mail: tradesales@ . kalmbach.com
SCALE TALK Let us know what you think! Comments, suggestions, corrections, and additional views on FSM articles are welcome. Mailed letters (address at left under Genera/) should be typed or hand-printed and clearly marked "To the Editor" on the envelope. You can e-mail your comments to [email protected] or visit HneScale.com and click on "Contact Us." Comments should be no more than 300 words. Please tell us your location.
READER GALLERY Show offyour handiwork! Send original high-res digital images, slides, or prints along with complete caption information to "Reader Gallery" (address at left under Genera/); you can submit digital images at www.Contribute. Kalmbach.com. Photos are paid for
upon publication; ifyou live in the U.S., include your Social Security number. FSM obtains all publication rights (including electronic rights) to the .images upon payment. Unu~cd photos are returned only ifyou provide sufficient postage and packing materials.
QUESTIONS & ANSWERS Got a modeling problem? Q&A is here to help. Mail your questions to "Q&.K{address at left under Genera/), e-mail them to [email protected], or visit HneScale.com and click on . "Contact Us" (here, you'll find "Hobby FAQ"which answers general modeling questions). We are unable to conduct lengthy research, such as answering questions On markings and unit histories. We publish letters of general interest; however, the
volume of mail prevents us from answering every question in the maga:tinc. Please include your name, address, and a daytime phone number.
READER TIPS Would you like to share an idea about a tool or technique - and make a few dollars too? Send a brief description along with a photograph or sketch to "Reader Tips" (address at left under Genera/). Please enclose a stamped, self-addressed envelope for the return ofphotos. E-mail your tips to [email protected] or visit HneScale.com and click on "Contact Us. "Tips are paid for upon publication; ifyou live in the U.S., include your Social Security number. FSM obtains all publication rights (including electronic rights) to the text and .images upon payment.
FineSc:ale Modeler April2010 6

FineScaie
Modele~ Editor Matthew W. Usher Associate Editor Mark Hembree Associate Editor Aaron Skinner Editorial Associate Monica Freitag Editorial Associate Megan McChain Art Diredor Elizabelh M. Weber Senior Graphic Designer Patti l. Keipe Graphic Designer Kelly Kallaps Illustrator Joy W. Smith Photographers Jim Forbes, William Zuback Production Manager Annette Wall Production Coordinator Cindy Border Group Circulation Manager Catherine Daniels Circulation Specialist Valerie Jensen Circulation Coordinator Maggie Sketch Publisher Terry D. Thompson
CONTACT US Customer Sales and Service 800-533-6644 Advertising Sales 888-558-1544 Ad Sales Manager Scott Redmond, Ext. 533 Ad Sales Representative Jim Hagerty, Ext. 549 Ad SeMces Representative Amanda Finch, Ext. 620
SEWNG F1 NESCALE MODELER MAGAZINE OR PRODUCTS IN YOUR STORE
Phone 800-5-58-1544, Ext. 818 Outside U.S. &Conada 262-796-8776, Ext. 818 Fax 262-798·6592 E·mail [email protected] Web site www.Retailers.Kalmbach.com
KALMBACH PUBLISHING CO. President Gerold B. Boettcher Executive Vice President Charles R. Croft Vice President, Advertising Scotl Stollberg Vice President, Editorial Kevin P. Keefe Vice President, Marketing Daniel R. lance Corporate Art Director Maureen M. Schimmel Managing Art Director Michael Soliday Corporate Circulation Director Michael Barbee Single Copy Sales Director Jerry Burstein
ADVISORY BOARD John Noack, Paul Boyer, Shep Paine, Bob Collignon, Cookie Sewell, Pot Covert, Rusty White, Pot Hawkey
©201O, Kalmbach Publishing Co. All rights reserved . Title is registered as trademark. This publication may not be reproduced in part or in whole without written permission from the publisher, except in the case of brief quotations used in reviews. Postmoster. Periodicals postage paid 01 Waukesha, Wisconsin, and odditional offices. Send address changes to FineSco/e Modeler, Kalmbach Publishing Co., 21027 Crossroads Circle. P.O. Box 1612, Woukesho, WI 53187·1612.
SUBSCRIPTION RATES: U.S., 10 issues, $39.95; 20 issues, $74.95; 30 issues, $106.95. Conado, 10 issues, US$47.95; 20 issues, US$87.95; 30 issues, US$126.95. Internationol, 10 issues, US$51.95; 20 issues, US$98 .95; 30 issues, US$142 .95. Canadian price includes GST [Canada publication Mail Agreement #40010760, BN 12271 3209 RT). Expedited Delivery Service: Domestic First Class, odd $20/yr.; Canadian Air, add US$20/yr.; Internationol Air, add US$45/yr.
laHars, new releases, ond new-product information ore accepted as gratis contributions to Fine5ca/e Modeler. Feature articles and scole drowings are paid for on acceptance. All other submissions ore paid for upon publication. at which time FineSca/e Modeler obtains all reproduction rights unless otherwise ogreed . Instructions for submitting features, photographs, and drawings for publkation ore available from the editorial associate. Unsolicited materiol will be returned only if postage and envelope are provided. FineSca/e Modeler is not responsible for the safe relurn of unsolicited malerial. Printed in U.S.A.
r'4 KALMBACHI t..' PUBLISHING Co.
Merit International Ltd. North America Sole Agent for a
M35A2
... thewarshop.com Models. Books. Movies and more!
.The War shOD WWII enthusiasts
'--.... ~
~ Custom ~
~ Display
~
~ Cases-'--....
High Quality Acrylic Protection Since 1989
Over 60 Standard Sizes Airplanes, Ships, Military, Cars, Trucks
Custom Sizes Available
www.customdisplaycases.com [email protected]
(888)889-0396
Free Brochure
ALWAYS MORE HOBBY_~ for your MONE
THOUSANDS of out-oF-production and
hard-to-Find plastic model kits
ALWAYS IN SrOCK! ILLUSTRATED Catalog Subscription
Only $15 Per Year (5 Issues) [u.s.Addr...., or E-Ma;1 Sub.:riptiom. Internriiood Alr Mail S.kriptionl $25.)
VISA • MASTERCARD • AMEX • DISCOVER • PAYPAL
_.rare.planedetective.com 702·564·2851 • rare·[email protected]
2325 Western Avenue • Suite 6 • Las Vegas, NY 89102
April 2010 www.nneScale.coln 7

Scale Talk Your voice in FSM
Mike added a wash of burnt sienna ta emphasize the rockylerrain.
Credit where credit's due A diorama featuring Mouse House's resin 1/35 scale M119 105mm towed howitzer on Page 41 ofFSMs February 2010 Reader Gallery was incorrecdy credited. The scene, composed by Mike Del Vecchio of Flemington, New Jersey, depicts a frrebase in Mghanistan fortified by Hesco Bastions (wall barriers) Mike made with Styrofoam, coated with Celluclay, and covered with airplane tissue to replicate fabric. The surrounding mesh came from a crafts store. More Celluclay supplied the sandbags, which he stacked while they were still wet to get the proper sag. Bang-up job on the model, Mike!
Mike painted his resin howitzer with a three·color camoflouge scheme, starting with a base coat of NATO green and following with NATO block and brown.
FiaeScale Modele.. April 2010 8

In with the new Just a quick thanks for the story "How to build a Buffalo," by James Wechsler, on the Buffalo MRAP in the January 2010 issue. I hope to see more articles (and new kits from the hobby manufacturers) on modern vehicles. I realize World War II pays your bills, but that story was a very welcome addition. - Sean Hadfield Madison, WIS.
Strained modeling eyes For senior modelers whose eyesight is waning, it would be great to see more 1/24 and 1/25 scale armor kits. Armor in 1/48 scale is making a comeback. Why not 1/24 or 1/25?
I feel it may also prove popular with radio-control enthusiasts who can't afford the high-end 1/16 radio-control Tamiya kits. These larger scales could provide an ideal chassis and platform for radio-control operation. Plus, think of all the detail that could be incorporated into an armor kit of this size, especially if aftermarket manufacturers produced resin conversion parts and photoetched-metal sets. . - WiDiam Mezzano Addison, Ill.
Back to the bench I have recently returned to modeling and just wanted to let you guys know how grateful I am to have your publication available. Your articles on how to tackle some of the pitfalls of modeling, such as airbrushing and decal placement, have been invaluable to me since my return to the pastime.
I would love to know how I can stop small parts from being fed to the demons that live in my carpet, but even with your combined experience at FSM, I know this is a big task! Keep up the good work, guys. -GrahamBaD
Newport, England
A modeler's artistic rights I have a couple of comments about the January 2010 FSM:
First, I really enjoyed Mike Mikolasek's article "Improving Tamiya's Mig-15."1 have been packing around a Monogram MiG-15 for about 20 years and plan on building it one day. I know I will refer to Mike's article when I finally build the Monogram kit. It will certainly be helpful when improving that old kit.
FSM's online home improvement I really enjoy the new FineScale.com. It works great, is much easier to navigate, and loads much faster than the old one. Keep up thegreat work on this informative and very enjoyable site. - RonaldPeete Gardnerville, Nev.
How-to heaven The face-lift of FineScale.com is a great ~;:- .. &~.::. ij~
-one. Everything seems to work, and it - - - ~ -~-
gives me what I need. - iZ The how-to videos are a great step.
I'm sure they will increase traffic on your site. Seeing how a modeling technique is done is often much more direct than just reading about it. For me, Associate Editor Aaron Skinner's video on adding decals was very helpful. I had some problems with decals on my last model. I had read three articles about decaling, and my local hobby shop owner did not provide me with all the information I needed. He sold me the Micro Sol but said I didn't really need the Micro Set. Mter seeing the video, applying decals became clear and I solved my decal problem. - Robert van der Gon Netscher Shady Side, Md.
Subscribers: Check out FineScale.com's entire collection ofhow-to videos at www.FineScale.com/VideosIHow%20To.aspx.
\
Second, I disagree with Dave Sanchez's comment in January's Scale Talk on the article "Improving on a Classic Spitfrre,"by Rafe Morrissey from the November 2009.
Dave wrote, "I am a longtime aviation maintainer, and it pains me to see an aviation diorama depicting bad maintenance practices. Aircraft are delicate machines, and care should be taken when performing maintenance on them."
The article is not about aircraft maintenance practices. It's about improving a 40plus-year-old Spitfire kit. I have no problems with the way the ground crew is posed, and I feel the figures add interest to the model.
I've been reading FSM since the first issue, and I've seen dioramas with factual errors. I believe a model builder should have artistic license. Anything else takes the fun out ofbuilding kits. - Chris Davis Cheyenne, Wyo.
Kit collecting In the February 2010 issue, FSM Editor Matthew Usher wrote on the Editor's Page about a problem common among many modelers: too many kits, not enough time. The editorial on collecting kits really struck a chord for me.
I have been building models since I was 5. That's now 51 years. I have a large collection of more than 400 kits, and I build a few a year. I don't really know why I keep buying them. I think it may be a Sarah Winchester kind of thing. IfI always have kits to build, I'll never die. Maybe I just want to hold on to my youth. I may be getting older, but I refuse to grow up. I love your magazine. Keep up the great work! - Robert SeweD Jacksonville, Fla.
April 2010 _.FineScale.co.... 9

t Compiled by Aaron Skinner
Tasca swings big with little Panzer
There have been large-scale armor models before Tamiya's 1125 and 1/16 scale remote-control tanks spring to mind - but I don't think too many
modelers expected to see the Panzer II in anything bigger than 1/35 scale. Enter Tasca's 1124 scale PzKpfw II AusfF (klt No. 24-001).
Molded in tan plastic, the parts exhibit the high quality and crispness we've come to expect from the Japanese manufacturer. Mold seams and ejector-pin marks are almost invisible, and most are in places that will be hidden on the finished model.
Despite the larger scale, the kit appears to have been designed with ease of construction in mind. Most
t I
of the initial eight steps involve assembling the running gear, with a note about keeping track of the suspension units which differ slightly from one another.
Clear periscope and headlight lenses are a nice touch, as is the small photoetched-metal fret. The tracks are individual links joined with metal pins and designed to be operational. Vinyl polycaps in the wheels allow them to roll.
Cartograf-printed decals provide markings for two vehicles: an overall gray tank from 116 PzAbt 16 Infantry Division on the Eastern Front in summer 1942; and a dunkelgelb-and-olivgrun example from 8 Co.,11 PzAbt, 6 pzDiv at Kursk in July 1943.
The model's sheer size makes it impressive and should lend itself to detailing projects. There's plenty of room to add engine and interior details. Look for a complete review in an upcoming issue of FSM.
Tasca's Panzer II is available from Pacific Coast Models, 707-538-4850, www.pacmodels.com.for $79.95.
10 nneSc:ale Modele.. Apri12010

Israeli phantoms revealed
HobbyBoss blows in with new Tornado
The Tornado, built by a European consor
tium, has been the centerpiece of British, German, Italian, and Saudi airstrike power for more than 20 years. HobbyBoss' 1/48 scale kit (No. 80353) features fine recessed panel lines, much of it represented by petite rivets.
Cockpit panels have raised details that should look great with precise painting. Decal panels are provided for the faint of heart, but you'll either need to sand off the raised detail or use strong setting solution.
Parts breakdown and construction look pretty standard for a variable-geometry aircraft: The wings are trapped between upper and lower rear-fuselage halves, while the front section is built up from left and right halves sandwiching the cockpit.
If you like F -4s in interesting schemes, you'll appreciate
Israeli Phantoms - The ''Kurnass'' in IDFIAF Service, a two-volume series by Andreas Klein and Shlomo Aloni.
The books provide a wealth of photos and color profiles about the history of the jet in Israel.
Volume One (ISBN 9783-935687-81-2) looks at the delivery ofIAF Phantoms and their service through 1988, including the Attrition War, 1973's Yom Kippur War, and Lebanon. Some of the details are day-to-day mission reports and operations. The book is appended by a section about IAF Phantoms in the movie "Iron Eagle II" and a bunch of details for modelers, including photos of the cockpit and
armament for a Yom Kippur War F-4E, scale drawings, camo colors and diagrams, illustrations of the panels, and a list ofIsraeli Phantom MiG kills and losses.
Volume Two (ISBN 9783-955687-82-9) deals with 1989 up to 2009, detailing the F-4E Kurnass 2000 update as well as reconnaissance variants RF-4E and Peace Jack. Nter that, the text examines each of the IAF Phantom squadrons and units. The end of the book includes walkarounds and scale drawings of Kurnass 2000, RF-4E, and Peace Jack aircraft. More color and camouflage details follow, as well as lists of aircraft and their disposition.
Published by Double Ugly! Books in cooperation with
The wings interlock, ostensibly so they can be movable, and the weapons pylons mount on a single, central pin with a
. retainer so they can be rotated. But the kit provides for the flaps, slats, and spoiler to be extended, making it impossible to move the wings from the full-forward (landing and takeoff) position. Also, beautifully molded gloves lock the wings forward.
Decals provide markings for a Luftwaffe Tornado in a colorful anniversary scheme, and an RAF GR.l in wraparound gray-and-green camouflage. HobbyBoss'Tornado is available from Squadron, www.squadron.com. 877-4140434, for $93.99. Look for a full review in a future FSM.
AirDoc, www.airdoc.eu, the volumes cost $57 each.
Canada's wartime aviation
I'm always on the lookout for something a little different to build, so CanadianAircraftofWWII(AviaDossier 1) (ISBN
978-0-9780696-3-6), by Carl Vincent, caught my eye. The landscape-format, softcover, 72-page book examines 18 aircraft types, including the de Havilland Fox Moth, Catalina, Sunderland, Hurricane, Boston, Lysander, and Hudson. The types' histories in Canadian service are accompanied by period photos and color profiles by artist Terry Higgins.
Information is naturally brief, given how much is being covered, but the narrative pictorial essays are a great introduction to an . interesting subject.
Canadian Aircraft of WWIIis available from Aviaeology/Skygrid,519742-6965, www.aviaeology.com, for Can$29.99.
April2010 www.FineScale.coln II

New P .. oducts Compiled by Monica Freitag
AIRCRAFT»
1/ 32 SCALE KITS
Eurofighter Typhoon and Engine, No. 04783, $63 .15. Look for a detailed review in an upcoming issue of FSM. From Revell AG/Revell Germany. F- 14D Super Tomcat, No. 03203, $229.95. Look for a detailed review in an upcoming issue of F5M. From Trumpeter, available from Stevens International.
1/ 48 SCAlE KITS
F- l11 A Aardvark. No. 80348, $109.99 . Decals and color painting guide for two USAF aircraft, 67-0113 Vietnam, August 1973 and 63-9770. Look for a detailed review in an upcoming issue of FSM. From HobbyBoss, available from Squadron Products. F6F-S Hellcat, No. 80339, $33 .99.Decals for two Navy aircraft. From HobbyBoss, available from Squadron Products.
Cessna 172 Civil Air Patrol, No. 11651, $27.99. Kit includes two marking options: US Civil Air Patrol Alaska Wing , 2009 and US Civil Air Patrol New Jersey Wing, 2008 . From Minicraft Models Inc.
1/ 48 DETAIL SETS BAC Lightning ladder for Airfix/ Eduard, No. 48632, $19.95. From Eduard and Associates.
50ab 37 Viggen main and nose wheels for
-' Airfix/ ESCI, No. K4826; 2
~===~~--~ x FFV Aden gun pods for AJ37 Viggen (& Sk60) for Airfix/ ESCI, No. K4828 .Contact your local dealer for price information. From Maestro Models Conversions.
1/ 48 DECAL SETS FM-2 Wildcats VC-8, VC-93 and .vC-99 (for HobbyBoss), No. MS481224, $10. Includes stencils and placement guide. From Superscale USA, available from Squadron Products.
Crane I and Polish Bamboo bomber (for Czech Model), No. MS481 23 1 , Pan Am
and "Guinea Short Lines" Bamboo bombers (for Czech Model), No. MS481232, $10 each. Includes color profiles and upper plan views. From Superscale USA, available from Squadron Products. r-'-----------:-....~.--, F- 16C Falcons -:::-:--:-
"""217 Oklahoma and Iowa ANG (for Tamiya), No. MS481227, $10. Includes stencils, placement guide and painting refer , ence. From Superscale USA, available from Squadron Products.
1/ 72 SCALE KITS
Focke Wulf fw 58B "South America," No. FRO 1 0, $40.45. From Azur Frrom. Blue Max pfalz D.III "Econo-kit," No. EC72004, $9.99. Detailed exterior, engine
12 nneScale Modele.. April2010

--
~===========; Conversions.
I1-----'._____ __----'
your local dealer for price information. From Maestro Models Conversions.
Viggen detail set coc:kpit and exte rior, No. K7208; Sk37E Viggen ECM detail set coc:kpit and exterior, No. K7209. Contact your local dealer for price information. From Maestro Models Conversions.
Manufacturer Directory Aero Research Co. 6468 Valley Wood Dr. Reno, NV 89523-1263 775-746-8615
Aviaeoiogy/SkyGrid Studio 123 Church Street
Kitchener, ON Canada N2G 2S3 www.aviacology.com
Azur Frrom 171 Avenue de Clichy Paris, France 75017 06-7860-5701
Borborossa Books 14 Maldon RO"Jd Tiptree, Essex England C05 OLL 44-01621-810810 www.barbarossabooks.cu
David Lee Design 107 S. Fair Oaks Avenue #327 Pasadena, CA 911 05 626-449-1689 www.davidleedesign.org
Double Ugly Books Am Weichselgartcn 5 Erlangen, Germany 91058 49-9131 -52828
Dragon Models USA Inc.
1315 John Reed Ct. City of Industry, CA 91745 626-968-0322 www.dragonmodelsusa.com
Eduard and Associales Obrnice 170 435 21, C • .ech Republic 420-47-611-825.9 www.eduard.com
HarVar-D Design Studio
H-I071 Budapest Damjanich ll. 38, Hungary www.harvar-d.hu
Maestro Models Conversions Box 2006 SE-169 02 Solna, Sweden 46-8-82.5206 www.macstfomodels.com or
www.greatmodels.com
Minicraft Models Inc. 1501 Commerce Dr.
Elgin, IL 60123 800-322-3692 www.minicraftrnodels.com
Missing Link Resin www.missinglinkrc.com
Mator City Resin Costers www.motorcityresincasters.com
Osprey Publishing Elms Court, Chapel Way Bodey, Oxford England 0X2 9LP 44-1865727022 www.ospreypublishing.com
Pacific Coast Models, Inc. 2987 Wiljan Court Santa Rosa, CA 95407 707-538-4850 www.pacmodels.com
Revell AG/Revell Germany Henschelsrrabe 20-30 1)-32257, Biinde, Germany 49-5223-965-223 www.revell.eu
Revell 1850 Howarcl Street, Unit A Elk Grove Village, lL 60007 847-897-5820 www.revell.com
Roden 7a Nevska Str., of. 35 Kiev, Ukraine 03062 380 (44) 4565404
www.rodenplant.com
Specialty Press 39966 Grand Ave. North Branch, MN 55056 651-277-1400
www.specialtypress.com
Squodron Products 1115 Crowley Dr. Carrollton,TX 75011-5010 877-414-0434 www.squadron.com
Stevens Inrernotional P.O. Box 126 706 N. White Horse Pike Magnoli., NJ 08049 856-435-1555
Tamiyo America, Inc. 36 Discovery, S teo 200 Irvine, CA 92618-3765 800-826-4922 www.[amiyausa.com
Gold Medal Models has the largest and most complete selection of photoetched superdelail sets and decals for buildors of plastic model modern navy warships. Railing, ladders, radars, flight deck netting, helicopter details, and more for modern USN, AN, JMSDF and USSR warships, in all popular plastic kit scales. 32-page handbook available fo r beginners. Order from selected dealers or direct. For catalog, send SASE and $1 to: GJAIAIShlps, PO Box 670, Lopez Island, WA 98261 USA.
www · dmm.com
ceCe6rati11fJ 40 years: TAIG
taigtoo's
TAIG TOOLSIWmi~n~~ ~ne (han~~r,Al~li~ ~~ - 480·895·6978 fax 480·895·9648
If you mention code 3713 when ordering
Micro-Mark Berkeley Heights, NJ 07922
1-800-225-1066 www.micromark.com
April2010 __FineScale.colft 13
and cockpit. From Encore Kits, available from Squadron Products.
1/72 DETAIL SETS Saab 37 Viggen upgrade co rrected a ir intakes, fuselage pylons a nd sidewinder rails for Heller, No. K7219. Contact your local dealer for price information. From Maestro Models Conversions. Saab 32 Lanse n va cform canopy x 2 for Heller, No. K7228; S32 Lansen details photoetch with resin air brake bays for He ller, No. K7202; AJ37 Viggen detai' set cockpit and exterior, No. K7206, $22.95; JA37
Saab J29 Tunnan detai' set, No. K7205, $15.25. From Maestro Models
Saab JA37 Viggen resin coc:kp it for Heller, No. K7218. Contact
A description of our new-product announcement and review policies is available from Product News Coordinator, FSM, 21027 Crossroods Circle, P.O. Box 1612, Waukesha, WI 53187, 262-796-8776, fax 262-796-1383, or e-mail at [email protected]. FineScale Modeler is not responsible for content of external sites linked through our site. Visit our FSM Web poge at www.FineScale.com.

New P .. oducts
1945 series. Smart Kit. From Dragon, available from Dragon Models USA Inc.
USMC AV-8B VMAJ-203 "Hawks""& VMA51 ~ "Flying Nightmares," No. 4617, $9.95. From Dragon, available from Dragon Models USA Inc.
1/200 SCAL~ KITS
Boeing MD-90 Japciln Airlines, No.1 0738, $22.95. From Hasegawa, available from Dragon Models USA Inc.
ARMOR»
1/35 SCALE KITS
Flammpanzer m(F-11 ·~...."'.,...· ""...0&..
1_0"
SdKfz 138 Paruerjiiger 38 Marder III H Fgst 38t Ausf E, No. 6420, $45.95. 1939
14 FineScale Modele.. April2010
SdKfz 1 8-ton half-track initial production, No. 6566, $49.95. 1939-1945 series. Smart Kit. From Dragon, available from Dragon Models USA Inc. L4500R Maultier German heavy halftrack, No. 3603, $38.95. From Zvezda, available from Dragon Models USA Inc.
ZTZ 99B MBT, No. 82440, $48.99. Decals and color painting reference for four People's Liberation Army tanks: No. 405, 0607, North Sword, and Nos. 202/208/210, Peace Mission 2009. Look for a detailed review in an upcoming issue of FSM. From HobbyBoss, available from Squadron Products.
German KubetW'agen Type 82 "Ramcke Parachute Brigade", No. 35304, $34. Five figures included with tropical caps, paratrooper helmets, and jumpsuits. From Tamiya America, Inc.

HOBBY SHOPS
Russian tank destroyer 5U-1 00, No. 89791 , $41. Tamiya Weathering Master included (red earth, sand, soot). Reissue kit. From Tamiya America, Iric.
1/35 DETAIL SETS
SHBlB w/AMMO =, '"",""",,=a:=
Soviet 85mm shells with ammo boxes, No. 35079, $12.50. WWII Miitary Miniatures Series. From MiniArt, available from Dragon Models USA Inc. Soviet infantry ammo boxes, No. 35090, $10.95. From MiniArt, available from Dragon Models USA Inc.
WWIIGerman
~GR l f F ON MODEL SdKfz.7/1 2cm FlakVierling 38 aug Selbstfahriafette premium edition (resin radiator housing inside) for Dragon 6525, No. BPL35009, $64.95. From Griffon Model, available from Dragon Models
L~~~~~~~~~ USA Inc.
WWII German ammo boxes for 7.5cm KwK 40/StuK 48 (two types of ammo boxes 'with decal inside), No. L35A030, $12.95. From Griffon Model, available from Dragon Models USA Inc.
Mounting brackets of hull side armor skirts for WWII German PzKpfw.IV Ausf. H/ Ausf.J (non thermo-wire mesh type) 2 types of forward most 5churzen Plates inside), No. L35A061 , $11 .50. From Griffon Model, available from Dragon Models USA Inc.
Engine compartment update set for WWII Gennon
series (engine compartment side panels with cooling slots inside), No. L35A053, $13.95. From Griffon Model, available from Dragon Models USA Inc.
WWlI German 7.5cm Kw.K40 L/ 48 barrel with late type muzzle brake (ammo crate inside), No. LB35023, $21.95. From Griffon Model, available from Dragon Models USA Inc.
1/48 SCALE KITS
MtI SPW SdKfz 251 / 1 Ausf D "Sluka Zu Fuss," No. 32566, $33. Military Miniature Series No. 66. From Tamiya America, Inc.
FineScale Modeler magazine receives new products from a variety of manufacturers an a daily basis and we are now able to share all of them with you through our interactive exclusive FSM product database. Click on the Product News link at www.FineSco/e.com.
WE OFFER THE WORLD
www.plasticmodels.com
OVER 200 Manufacturers
OVER 10,000 Products
ORDER ON-LINE
GET MORE of what you love on
&&..~~,~_&~.co~ ~~,~~~
April2010 www.FineScale.colt.l 15

New Plroducts
SHIPS»
1/700 SCALE KITS
USS LaHey DD·459 1942, No. 7086, $19.95. From Dragon, available from Dragon Models USA Inc.
MILITARY FIGURES»
1/35 SCALE KITS
2nd SAS regiment with Welbike and drop tube container France 1944, No. 6586, $10.95. Premium Edition. 1939-1945 series. From Dragon, available from Dragon Models USA Inc.
British tank crew, No. 35078; German soldiers at work (RAD), No. 35065, $12.50 each. From MiniArt, available from Dragon Models USA Inc. " Supplies, at last!" . German soldiers, 1944-1945, No. MB3553, $9.50. From Master Box Ltd., available from Dragon Models USA Inc. Soviet tank hunters with dogs, No. 3611, $14.95. From Zvezda, available from Dragon Models USA, Inc.
1/48 SCALE KITS
WWII US Navy pilots with "mota-tug," No. 61107, $29. From Tamiya America, Inc.
1/12 SCALE KITS
Honda GP Racer RCl66, No. 14113, $86. 1966 World Championship Winner. From Tamiya America, Inc. Yamaha YZR-Ml , No. 14114, $64. Series No. 114 50th Anniversary US inter-coloring edition No. 46. From Tamiya America, Inc. 'ramaha YZR-M1 , No. 14115, $64. Series No. 115 50th Anniversary Valencia edition No. 46. From Tamiya America, Inc.
California Ferrari (close-tap), No. 07191. Contact your local dealer for price information. From Revell AG/Revell Germany. Street Fighter (A super sanitary Z/ 28 powered snarlin' car killer), No. 85-4262, $23.45. From Revell.
1/25 SCAJ.E KITS
1957 Chevy Bel Air two-doar sedan 2'n1, No. 85-4251, $23.45. California Wheels. From Revell.
16 FineScale Modeler April2010

BOOKSHELF»
.~
hard cover, 144 pages, 350 color photos, 50 black-and-white photos, ISBN: 978-1-58007139-0. From Specialty Press.
Displaying your model,
Di spl aying your $19.95, by m odel Richard
Windrow, soft cover, 80 pages, all color photos, ISBN: 978-1 -84603416-9. From Osprey Publishing.
Aces of World War 2, $22.95, by Hakon Gustavsson and Ludovico Siongo, soft cover, 95 pages, all blackand-white photos, ISBN: 978-1-84603427-5. From Osprey
'---'-- - - - - ----' Publishing.
_ ...r.........
,--- ---------, Fiat CR.42
Ships of the American Revolutionary Navy, $17:95, by Mark Lardas, illustrated by Tony Bryan, soft cover, 48 pages, color renderings, ISBN: 978-1-84603-445-9 . From Osprey Publishing.
j
PanzerDivisions in 8o"/e J939J945,. No. 7070, $16.95, by Tom Cockle, soft cover, 72 pages, all blackand-white photos. ISBN: 962-361-165-X. Armor at War Series. From
I~~~~~~~~~~ Concord L Publ ications,
USA Inc. ~==...:..:..::::.:.:...;::..:.::=:..:...:;,.==; Let's Build
Dioramal Urban Scenes, $16.50, by Laszlo Adoba,
....-.:0li.&'l1 soft cover, 62 pages, over 250 color photos, ISBN: 978963 06-8515-3 . From HarVar-D Design Studio.
Israeli half-tracks Volume One, $45, by Tom Gannon, hard cover, 172 pages, mostly black-and-white photos, including Sandwich Trucks and Armored Cars. ISBN: 978-1-84768001-3. From Barbarossa Books. Israeli half·tracks Volume Two, $54, by Tom Gannon, hard cover, 392 pages, color and black-and-white photos. ISBN: 978-184768-002-0. From Barbarossa Books.
AMARG America'S Military Aircraft Boneyard, $24.95, by Nicholas Veronico and Ron Strong,
r-------.;~__--, Lockheed ~~ Blaclcbird
UJCKHEED ~"'q", Family (A-12, BLAClCBIRD FAMILY YF- 12, D-27/
M-2 J andSR7J) Photo Scrapbook, $19.95, by Tony R. Landis, soft cover, 128 pages, 265 color photos, 40 illustrations, black and white
'-......:;_~_____......J photos, ISBN:
978-1-58007-151-2. From Specialty Press.
ELECTRONIC MEDIA»
r-'=======n WorldwideWORLDWIDE Military No. 1, No. MIUTAR'tIf1.l 1016, $12 .95 .
Contains aircraft from 34 different countries, 154 photos. From Aero
=="'-'-'=='-' Research Co.
StepSander, precision designed and manufactured from acryllic, featuring multiple sanding surfaces. Allows modelers to remove and
'----------' smooth recessed
areas. Can be used wet or dry. Priced between $2.50 and $6.50 for singles or sets. From David Lee Design .
April 2010 W1Nw.FineScale.co.... 17

t's 0 ive I Panel treatments, highlights, and subtle shading vary a simple scheme • BY MARK HEMBREE
Afar as Steve Erickson's concerned, there's nothing sim
ple about olive drab. "I don't treat it as just one color," he says. "No two batches are identical. Factory-fresh, it has a darker, greener cast, and after weathering, it can
appear brown to almost khaki." Variety is achieved by using several brands ofpaint. "Each
has a different tint," he says. He chose Testors, Tamiya, Polly Scale, and Gunze for his P-40, "making sure each brand was a noticeably different shade, ranging from the green cast to the brown tint," he says. "You can always use just one brand and add white, but that will give more of a monotone appearance."
Steve prefers airbrushing acrylic paints, "stirred, never shaken," he says, straining it through a fine-mesh screen to eliminate particles and prevent clogs. He uses a Paasche Type H airbrush with an H-3 tip for most painting, and an H-l tip for finer details, and says he prefers a relatively higher pressure of30-35 psi.
Once he's ready to paint the plane overall, he primes it with white or light gray; the primer helps check for flaws and provides a uniform color under the paint to come. He airbrushed the P-40's upper surfaces with the darkest shade of olive drab. Then he painted different, lighter shades of olive drab on selected panels, leaving the darker tint at their edges.
"I do corresponding [areas] on both sides and wings in the same color," he says, pairiting a few panels in one brand, then switching to another for two or three more panels. Lighter tints on the top - wings, fuselage spine - and slightly darker shades on lower areas depict daylight, shadow, and sunbleached surfaces. "The control surfaces are a medium-tinted OD base with a lighter shade sprayed between the ribs to represent the more-pronounced fading of fabric," he says. "The overall effect is a patchwork of lighter panel centers with soft, darker edges at the panel lines. At this stage it looks overdone, but once panel lines and markings are added, the effect is muted."
Steve defines engraved panel lines with an assortment of technical pens, ranging from 0 to 00 tips and favoring gray ink. "Black is too stark," he says. "I only use it for openings such as shell ports." He applies two or three coats of ink for a charcoal color, "dark but not black," noting that raw sienna provides an even more subtle effect on green or olive drab.
Where ink contrasts too much, Steve switches to artist's pencils sharpened to stay within the lines. Available colors let him match or complement almost any surface.
Pencils can also replicate no paint at all. "I use an Eagle silver pencil for chip marks along the wing root, cowling, and gun bays," he says. ''A plain No.2 pencil is useful for darker steel. I use photos to make sure the chipping matches wear patterns on the real aircraft." FSM
18 FineScale Modeler April2010
Exhaust stains: Steve adds
a few drops of gray to flat
clear and airbrushes a tear·
drop-shaped exhaust stream. A
light brushing of black pastels
on the pipes depicts the oily
stains of start·up exhaust.
\
Steve used a 1 /48 scale Hasegawa P-40M to model Wairarapa Wild Cat, a KiHyhawk Mk.lll that was Aown by Geoffrey Fisken, New Zealand's leading ace in the Pacific. The u.S. olive drab and neutral gray scheme may not seem colorful or dramatic, but Steve's variations add realistic dimensions to the finish.
from the guns are black and
dark gray pastel chalk,
ground fine and applied
with a fine-tipped brush.
"Brown is great for feather·
ing dirt on the baHam,
wheels, and wheel wells,"
Steve says.
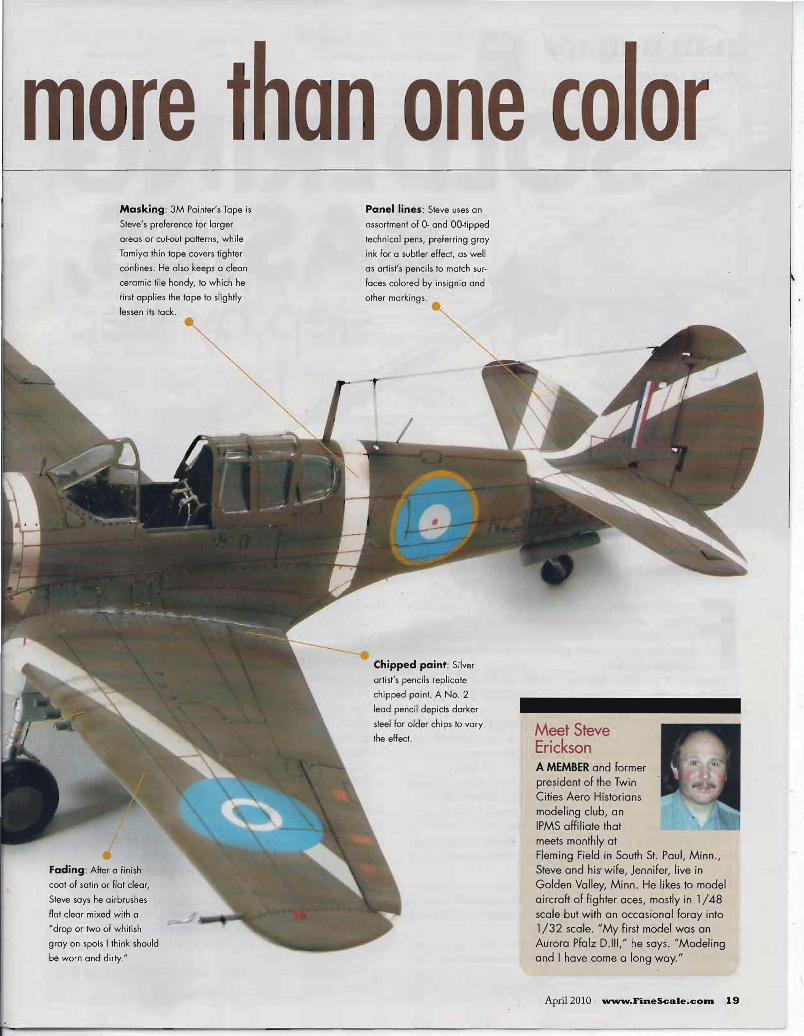
more t an one co or Masking: 3M Painter's Tape is
Steve's prelerence lor larger
areas or cut-out paNerns, while
Tamiya thin tape covers tighter
con lines. He also keeps a clean
ceramic tile handy, to which he
lirst applies the tape to slightly
lessen its tack.
Fading: After a finish
coat 01 satin or Ilat clear,
Steve says he airbrushes
lIat clear mixed with a
"drop or two 01 whitish
gray on spots I think should
be worn and dirty."
Panel lines: Steve uses an
assortment 01 0- and ~O-tipped
technical pens, prelerring gray
ink lor a subtler effect, as well
as artist's pencils to match sur
laces colared by insignia and
other markings.
Chipped paint: Silver
artist's pencils replicate
chipped paint. A No.2
lead pencil depicts darker
steel lor older chips to vary
the effect. Meet Steve Erickson A MEMBER and former president of the Twin Cities Aero Historians modeling club, an IPMS affiliate that meets monthly at Fleming Field in South St. Paul, Minn., Steve and his· wife, Jennifer, live in Golden Valley, Minn. He likes to model aircraft of fighter aces, mostly in 1/48 scale but with an occasional foray into 1/32 scale. "My first model was an Aurora Pfalz D.III," he says. "Modeling and I have come a long way."
April 2010 www.FineScale.colft 19

Skill Builde.. by Rick Lawler
DE
Getting the most out of photoetched
ASI S, step by step
metal means turning up the heat
For some modelers, photoetched metal is the scourge of the hobby. Others embrace the delicate brass bits. Most seem to fall somewhere in between, with a sort of reluctant acceptance that, at some point, they will use photoetched
. metal on a model.
I was one of the latter: Although I could see the potential of using the thin .metal accessories, I could not seem to get over some of the technical hurdles. .
Starting slowly, I built up my experience with photoetchedmetal parts. Moving on to complex assemblies, I quickly came to realize super glue had its limitations. And these shortcomings would make it difficult to take my work to the next level.
IfI was to truly embrace photoetched metal, I needed to come to grips with the soldering iron. Boy, was I apprehensive! In my mind, soldering was an advanced technique reserved only for a select few who had "traveled to the crossroads."
Turns out, it's not that hard ifyou take it step by step and practice. Start with scrap photoetched metal, not a key project.
What you need There are a bunch of soldering tools available, some with more features, but they all serve the same purpose: Melting the solder for a strong, durable join between two metal parts.
My tools are basic: An inexpensive 40-watt soldering iron, solder, flux, pliers, tweezers, single-edge razor blades, sandpaper, steel wool, and an Etch Mate folding tool, 1.
20 nneScale Modeler April 2010
Tinning Tinning is the process of adding a thin layer of solder to the parts being joined prior to actually sticking them together.
Begin by applying flux to the surfaces to be joined. Flux dictates where solder will stick. I use a small brush to apply flux to the area where I want the solder to flow, 2.
Next, I cut small chips of solder (a new hobby knife works well) and position them on the flux-coated areas, 3.
Finally, I touch the tip of the soldering iron to the flux near the solder chips. Soon, the flux will sizzle and bubble. Then, as the surface temperature rises, the solder chips liquefY. Keeping the iron's tip in contact with the molten solder, I spread it over the fluxed area, 4.
Assembly To join the parts, I apply a little flux to the tinned areas of each piece. Then, holding the parts together, usually with tweezers, I apply heat. The flux sizzles as the solder liquefies and sweats between the parts, 5. Removing the hot iron stops the process. The result is a tight bond.
Simple cleaning of the area may be required if the solder has oozed from between the parts. Light sanding with fine-grit paper or steel wool is usually all that's necessary, 6.
If small gaps remain, squeezing the parts together while heating the join will eliminate them, 7.
To add small parts, tin the attachment point of the detail, 8,

SAFETY Soldering involves heat, molten metal, and chemicals, so there are potential hazards. It's a good idea to wear eye protection. Cotton clothing that covers arms and legs, as well as closed-toe shoes, can prevent burns from runaway solder, which melts at more than 350 degrees Fahrenheit. It goes without saying that the iron's tip is hot. Don't touch it, don't leave it on while not working, and use a stand - don't lay it down on your workbench. Also, work in a well-ventilated area.
Tools of the trade: Rick's soldering arsenal includes a 4O-walt soldering iron, solder, and flux, as well as sandpaper, files, an old paintbrush, a hobby knife, and tweezers. A folding tool, such as Mission Models' Etch Mate, is great for working with photoetched metal.
Rick paints flux along the mating edges of Aber's Panzer IV turret stowage _bin. Precise flux placement keeps solder where it belongs and minimizes
cleanup.
Rick cuts chips or slices of the soft solder and places them in the flux on the part.
Tinning: Heating the metal part with a soldering iron, Rick melts the solder, then spreads it over the mating surfaces.
The moment of truth: Holding the tinned parts together, Rick heats the join with the iron, liquefying the solder on both parts and bonding them.
April2010 W1N1N.FineScale.coln 21

I ,..,
!\
I !
; I
Cleanup is easy. Most joins require only simple To take care of gaps, Rick squeezes the joint To add ribs inside a stowage box lid, Rick tins sanding to smooth the solder and blend the com closed, then heats it to liquefy the solder. the attachment side ... ponents.
, :" . J
! .<
... then points flux onto the larger port where the rib will attach.
Glossary ANNEALING: Heat treatment that alters the microstructure of a material, causing changes in properties such as strength and hardness. This technique is especially helpful in softening the brass to ease bending. FLUX: Chemical cleaner that removes oxidation from surfaces to be soldered, seals out air (thus preventing further oxidation), and improves the wetting characteristics of liquid solder. SOLDER: Fusible metal alloy; easy to find at electronic, hardware, and home improvement stores. It is the material that joins metallic surfaces. TINNING: The process of adding solder to mating surfaces before joining them.
After placing the part, Rick touches the iron to the back side of the detail, melting the solder and binding it to the lid.
and brush flux onto the larger part, 9. Using tweezers, position the detail solder-side down. Touch the iron to the part; the heat will transfer through the thin brass, liquefYing the solder on the underside and attaching the part, 10.
Practice, practice, practice There you have it: Soldering in a few easy steps. As with any modeling technique, practice makes perfect. Don't train on shiny new kit parts - find some unused or spare parts. Scraps are great sources of material to practice every aspect ofworking with photoetched metal, from bending to soldering.
If there is one point to remember, it is to be restrained with the amount of solder you use. The thinnest coating yields more than enough holding power for modeling. Using too much solder results in buildup, less definition, tougher cleanup, and, worst of all, destroyed parts. .
The good news: Ifyou make a mistake, you can unsolder parts. Just add a little flux to the area, heat it, and pu:ll the pieces apart. This is especially handy if you should happen to attach a part incorrectly or it becomes crooked during soldering.
I hope I've taken a little of the mystery out of soldering by describing these simple techniques. Enjoy the brass bits, and happy modeling! FSM
22 FineScale Modele.. April 2010

"Avoid dogfighting and attack the Zeroes by hit-and-run from above,"
the flight leader seems to say, ar"Id you can almost feel the tension
during the pre-flight briefing. U.S. Navy aircraft carrier task forces
played an important role in the fierce Pacific battles during WWII and
this figure set depicts the scenario of a group of pilots on the flight
deck preparing for their next mission. The five pilot figures, with life
jackets over their tropical shirts and slacks, are posed around a plotting
board to recreate a briefing scene. Accessories such as holsters and
knife sheaths are separately molded for enhanced detail. Furthermore,
two deck crew members carrying an ammunition case and a "moto
tug" witla driver are also included, making this set the perfect addition
to dioramas involving 1/48 scale WWII U.s. Navy aircraft models.
The little Tractor That Could "Moto-tugs" were .used to tow u.s. Navy aircraft such as the Vought F4U-1D Corsair. Towing bars for both the main gear and tail wheel are conveniently included.
Image sho'M separately available 1/48 Vought F4U-l D Corsair model.
WWDU.5. NAVY PILOTS W/"MOTO-TUG"
Vought F4U-l 0 Corsair (sold separately) 1m
© 2009 TAMIYA
Tamiya's 1/48 Scale Aircraft Series I"cludes Corsairs, Wildcats, A6M2, and A6MS15a Zeroes to allow modelers to recreate these Pacific War adversaries.
TAMIYA TAMIYA AMERICA. INC. 36 DISCOVERY SUITE 200, IRVINE, CA 92618 1/48 Vought F4U-1D Corsair Item 61061 1/48 Grumman F4F-4 Wildcat ~em 61034 1/48 Mitsubishi A6MS/Sa Zero Item 61103 1/48 Mitsubishi A6M2 Zero ~em 61016

1172 Scale I Construction
........ cvln C
orth American Aviation's Sabre 45 (so called for the sweep of its wings) was the successor to the great F -86 Sabre series. In May 1953, after completion of two mockups and more than 100 design changes, the first Super Sabre, the YF-100, took to the skies - and
with it was born the famous Century Series of US. fighters. The F -100 went through many more changes before reaching its zenith
with the D model, with a strengthened structure, arresting hook, separate inboard flaps and RHAW antennas in its tail as its most visible distinguishing features.
Esci's old F -100D is still one of the best in 1172 scale. With modifications, it has been reissued by Ertl, !taleri, Revell, even Tamiya - and I was lucky enough to find one on the Internet for only $20, with Aires detail sets for the cockpit and wheel wells included. It seemed quite a bargain - but what I got was a big bag of plastic parts with a broken wingtip, a scratched and chipped clear part, detail sets in various states of disarray with a resin piece wrongly super glued to a half of the fuselage, and an ancient, yellowed set of instructions. When I realized the film part for the instrument panel was missing, I decided to spring for an Eduard Zoom photoetched-metal detail set.
So, I knew this bird wouldn't just fall together - but that's what real modeling is all about, right?
24 FineScale Modele.. April 2010
Fitting aftermarket
parts and solving
the problems of a
pre-owned vintage kit
BY LEON SIMPSON
Leon used solid fundamentals and a patient approach to revive an old, beat-up Esci F- 1 000. A flawless narural-metol Finish and Flashy decals helped ...........
him model Fighter ace Col. Raymond Tolliver's F-looD, Triple Zilch.
Resin and photoetched metal I scrubbed the resin parts with a soft toothbrush and a bit of dish soap to remove any residual mold release, then let the parts air dry.
To make it easier to handle and paint, I attached the seat to the end of a cut-off toothpick, 1; the sharp end can be stuck in something to hold the part while paint dries. .
Working with 1172 scale photoetchedmetal details can be tricky. Nothing like having to use your best tweezers to pull a 1172 seat belt from under your fingernailand never mind how I learned it's a good idea to wear eye protection. I like to use a rounded blade to remove parts from the fret

A toothpick makes a handy stand Leon cuts dosely with a curved A locking tweezers - also known as Leon made a super-glue applicator
for painting a 1/72 scale ejection blade to detach photoetched-rnetal a hemostat - secures a photo by opening the eye of a needle and
seat. parts from the fret. etched-metal part while Leon sands mounting the other end in a toothoff its attachment paint. pick handle.
Eduard and Aires parts grace the There are fancier metal-bending The cockpit tub tokes shape; Leon seat, providing a lot of detail in a tools, but a couple of razors do the left out the seat until he was sure of
Leon likes a technical pen for tiny panels, saying irs precise and easy to correct. little space. trick for Leon.
Carefully applied paint and Pledge Future floor palish for lenses give the instrument panel a pleasing complexity.
Tapiilg down the photoetched-rnetal instrument panel holds it in place for painting.
without sending them airborne. With a rocking motion, cut as near to the part as possible, 2. If parts get slightly bent, you can flatten them back out by rolling them between your fingernail and a hard, smooth surface.
No matter how closely you cut, some trace of the attachment point will probably remain. Put the part in locking tweezers with only the stub protruding, then use a diamond file or sanding stick to remove the stub,3.
Attach photoetched-metal or resin parts with super glue. You can use a toothpick to dispense tiny dabs ofglue, but I like a tool I made by grinding out the eye of a needle and mounting it in a toothpick, 4. The tiny fork at the tip delivers super glue precisely.
Painting the cockpit After installing Aires and Eduard photoetched-metal parts on the seat, I was ready to paint the cockpit. The Aires instructions didn't mention color, the old Esci instructions said light blue (urn, no), and my references said only light or medium gray. I went with Humbrol U.S. ghost grey (No. 127), 5.
Take your time with detail painting. Look away occasionally to readjust your eyes; when you look back, often you'll see spots you missed. You might even try a pair of magnifYing glasses; the inexpensive grocery-store kind works great.
I airbrushed the base color in the cockpit tub, let it dry, then traced details with a fine-point black technical pen. Ifyou make
the canopy fit.
Pitfalls of a partially built kit - the previous owner hocked up the fuselage edges trying to fit an aftermarket cockpit, then gave up.
a mistake,just let it dry, paint over it, and redraw. I like it better than the usual paintthen-dry-brush technique, 6.
Once the tub was painted and inked, I moved on to bending the photoetchedmetal launch rails for the ejection seat. You can buy a bending tool, but I use two utility . razor blades, one as a holder and one as a bender. Lay the part on the bench, put the edge of the holder blade on the line of the bend, then slide the bender blade under the part and lift it to make the bend, 7 - and be careful.
Tip: Before bending the metal, anneal it by heating it over a candle flame to make the metal more malleable.
Using the seat as a guide, I placed the rails, then added and painted remaining
April 2010 WW1oY_FineScale_colft Z5

Not Leon, lOOugh - he tacked the Gradual sanding and constant test- The cockpit fit now, but Leon still had a long way to go to close the canopy. resin cockpit tub in place and went fits made way for precise place-to working on situating it. ment·of the tub.
Styrene repair
Sheet styrene, sanded to shape, restored the fuselage sides to their proper height.
After more shaving and sanding, the nose-wheel bay was a worthy addition.
details such as the throttle and rudder pedals, 8. I left the seat out to check canopy clearance later.
Instrument panel I used the Eduard instrument panel, attaching it to a box with a bit of masking tape to make it easy to airbrush, 9.
The next day, when the paint was dry, I used the technical pen as before to outline bezels and other details. I brushed Pledge Future floor polish on the panel's mount, which was plenty of adhesive for the thin photoetched-metal part. Tiny drops of Future applied with a fine brush replicated instrument glass, 10.
Correcting for the canopy The Aires cockpit set was meant to be used
26 FineScale Modeler April2010
'------- Kit
~Aires
At the top, the kit's nose-wheel bay; below, the resin replacement.
Leon tacked the fuselage and wings together and checked the model's balance by letting the plane teeter on his fingers.
The new bay and instrument panel helped Leon determine placement of the cockpit tub, too.
with an open canopy, but the previous owner of my kit apparently had tried to install it and close the ·canopy. Then, with the canopy sitting way too high, he had carved away the cockpit sill and walls before giving up, 11.
The only solution I could see for the problem was to continue sanding down the sides of the cockpit opening until the resin tub would fit, then reestablishing lost plastic to fit the canopy. So, I taped the fuselage halves together and set to work, using the resin part frquently to check my progress, 12. When I was satisfied, I removed the tape and worked the insides of the fuselage halves,13.
The next day, cup of coffee in hand, I looked forward to a bit of quiet, early morning modeling - but when I test-fitted
the canopy again, I realized the kit's previous owner also had ground down the tops of the canopy sills on the fuselage halves. What a gap! 14.
But I wasn't going to give up. I used styrene sheet to rebuild the kit parts, slowly sanding it to shape and rescribing lost panel lines, 15.
The cockpit tub had no positive location points left, so I installed the nose-wheel bay first to help situate the tub. The wheel bay was worth the extra work; it is quite an improvement over the kit part, 16.Minor surgery was required, but the patient came through fine, 1 7.
Next, I attached the Eduard instrument panel to further guide the tub's location, 18. Check the fit with the fuselage halves often; don't just cram the tub in one fuse

Lead weights placed out of sight in the forward fuselage keep the jet from With weights and cockpit in place, Lean glued and clamped the fuselage. being a tailsitter.
Working cautiously, Lean gradually cut open the lower wing to receive the resin main gear boy.
Nervous work: The wing had to be hollowed for the outboard bay without breaking through the plas
Setting his motor tool at low speed, Lean cut slowly and checked often to get the opening right.
tic above it.
Holding the plastic up to a light helped Lean gauge his progress. The resin bay fit fine from below ...
[age half and expect it to fit like a kit part. Once the instrument panel fit, I joined it, the nose-wheel well, and the decking at the rear of the cockpit, checked the fit one last time, then applied a generous amount of super glue to bond the tub to the top of the wheel well.
A balanced approach Have you ever built a tailsitter? You proudly set a newly completed model on its landing gear ... and it rocks back and sticks its nose in the air.
To prevent your model plane from tailsitting, tack together all the main components (fuselage, wing, tail, radome, etc.) with masking tape, then balance it on your fingers where the main gear struts will attach, 19. Ifit tips toward the nose, you're
golden. If not, you need to weight the nose. I attach lead fishing-line weights, also called split shot, with super glue. Ifyou have a nose intake, like on this plane, you have to find a spot as far forward as possible in the fuselage, 20.
After a quick check to make sure I'd left nothing out, I joined the fuselage with Testors liquid cement and clamped it with tape and clothespins, 21 .
Well, well Now for the really tricky part - that beautiful resin wheel well in the lower wing. I removed a lot of plastic, 22, working slowly with a small cutting burr in a motor tool set on low speed. (Don't forget eye protection.) When I had the rough opening, 23, I sanded for the final fit.
Next came the smaller, outboard wells, 24. Not trusting the Aires instructions, I test-fitted repeatedly, removing material bit by bit. To avoid wearing through the wing, stop frequently and hold the part up to your workbench light. Areas that are thinner than their surroundings will look lighter, 25. When it gets really light, it's time to quit!
Once I had a good fit, I held the part in place, looking at the other side to check position. Then I marked the location on the working side so I would know I had it right before applying super glue. (Check twice, super glue once.) I repeated the sanding and fitting on the other side, then super glued all three resin parts, 26.
Before joining the wing halves, I had to open the holes for the pylons. I replaced the
April2010 www.nneScale.coan 27

... but Leon had to shave away Layers of super glue, accelerator, Leon used more sheet styrene to restore the areas around the new cockpit. more of the fuselage for the wings and more super glue restored a and wheel well to fit. broken wingtip. .
Finishing the fiddly bits before the main paint job lets Leon save them for last.
Parafilm M strekhes and clings like food wrap, providing a mask that follows contours but doesn't pull up paint when removed.
A mix of metol shades plus blue- and smoke-colored transparent paint rep- Leon skipped masking and spraying to brush-paint the wheel wells. licated metal tinted by heat.
AGM-12 Bullpups for the inboard stations with better ones from Trumpeter's F -105 Thud. The middle stations would hold the drop tanks; I left the outer stations faired over.
Then I joined the wing halves and smoothed their seams. To finish seams, I dry-sanded with 400 grit, then wet-sanded with 1000, filled imperfections with super glue, then resanded. Since this would be a natural-metal finish, I also polished gently with a flannel wheel in the motor toolbecause any scratches or dings would show up like crazy.
Mter fixing fuselage seams the same
Z8 FineScaJe Modeler April 2010
way, it was time to test-fit the wings. Wouldn't you know it - the resin wheel well kept the ~ing from fitting. Instead of risking the resin piece, I shaved plastic from the underside of the fuselage, 27.
After rescribing missing or sanded-out panel lines, I fixed the chip on the underside of the starboard wing, 28, building up layers of super glue and zapping them with accelerator until a solid mass filled the void .. Then I sanded away the excess, polished, and scribed the missing panel lines.
Back to the cockpit To finish scratchbuilding repairs to ~he
cockpit, 29, I used .020" sheet styrene for blanking plates on the rear bulkhead, the deck behind the seat, and the area under the coaming. Then I attached the resin cockpit parts, sanding a little to allow the canopy to close. I brush-painted everything with my interior gray and flat black. I cut and mounted a tiny piece of clear fUm for the gunsight, slid the seat carefully into place, and checked its height under the canopy.
When everything was in place (except the gear and underwing stores), I reviewed the entire model, fixed remaining imperfections, and prepared to paint.

And there you have it - Col. Tolliver's Triple Zilch F·l00D, circa 19S8.l.eon's perseverance produced a dazzling model that redlly is a Super Sabre!
Painting and finishing Before painting the main part of the model, I like to build and paint the landing gear, ordnance, and other fiddly bits so I can install them last.
I painted the Bullpup missiles white and detailed them with a sharp technical pencil. I finished the landing gear with bits of fine copper wire for brake lines, and painted and inked the gear doors, 30.
A flat black undercoat prepared the model for Alclad airframe aluminum. I didn't vary the paneling much except for heat discoloration around the engine.
For masking metallic finishes, I always use Parafilrm M, a waxy, stretchable film used to seal laboratory vials. It takes a bit of practice, but it never lifts paint when removed. I covered the area, then carefully scored around panel lines and bared the area to be painted, 31 .
I put down a base coat of dark aluminum for contrast, then went over it with a thinned mix of dark aluminum and steel, concentrating on edges and panel lines. Then, a thinned mixture of transparent blue and smoke gave me the desired tint, 32.
Masking and spraying bays and wheel wells can be a real pain, so I brush-painted
them dark green, then dry-brushed with interior green followed by green zinc chromate to pop the detail a little, 33. A wash of black acrylic paint and water accented all the panel lines; I applied it precisely with a 10/0 liner brush, flowing it only into the lines.
With this finish, no gloss coat was needed for decals; in fact, it would have ruined the paint's reflectivity. I applied an out-of-production Microscale decal sheet, No. 72-97. Mter a few nights of careful work and a bit of red on the wing and tail tips, I found myself looking down at Col. Tolliver's Triple Zilch from 1958.
What had started as a damaged castoff and some old, unwanted decals had somehow found its way to me. I think with more-valuable old junk it's called provenance. I call it pretty cool! FSM
REFERENCES F·l00 Super Sabre in Color, Robert Robinson and David Menard, Squadron, ISBN 978-0-89747-284-5 F·l00 Super Sabre Detail &Scale, Bert Kinzey, Squadron, ISBN 978-08306-8044-3
Meet Leon Simpson LEON, 39, OF RED OAK, TEXAS, built his first model when he was 6 - and if it were still around, its paint might stili be tacky. "My father took me to a hobby shop some· where in downtown Dallas," Leon recalls. " I remember [the model] was a Do 335. I painted it gloss blue with a brush and a little square bottle of Testors paint. It never really dried - stayed sticky until it became a BB gun target."
Leon credits a couple of years in art school and a lifelong interest in read· ing military aviation history for his modeling. He says he got hooked on FSM about 1Q years ago. "A whole new world opened up," he says. He started entering contests about five years ago and has since won more than 30 trophies. In addition, Leon enjoys building guitars and playing them with his nephew.
April2010 www.FineScale.coft1. 29

ase· Brett McDonald
It took Brett 50 weeks to . transform AMT/Ertf's
Louisville Hauler into his Racine County plow truck. ''The only part that wasn't modified was the cob itself," he says.
Scratchbuilt parts and salty weathering clear the way
Bringing work home, Brett McDonald, a public-works shop operations manager for Racine County in Wisconsin, turned AMT/Ertl's 1125 scale Ford Louisville Hauler into a Racine
County plow truck. "I am around these trucks every day; and I thought it would be
enjoyable to replicate a truck that keeps the roads in Racine County clear," says Brett.
He started by modifYing the kit's frame. "The frame was longer than the plow truck. I had to mock up the front and rear suspensions, install them on the chassis, and measure the wheelbase. I took out eight scale feet of chassis to get it correct," says Brett.
30 FineSeale Modeler April2010
He was uncomfortable having the frame cuts directly across from each other, so he offset them and epoxied small metal strips over the joins on the inside of the frame.
Brett continued personalizing by switchbuilding the truck's plow and its mounting frame, wing, and dump box. "The dump box, wing, and plow are positional, just like the real truck," he says.
Brett detailed the engine with wiring, fuel lines, and more parts to make it match the engines he sees daily. He also scratchbuilt the entire exhaust and used doorbell wire, painted flat black, to create the hydraulic system.
Final details included scratchbuilt plow controls and a two-way

Ding dong, plow's herel Breit scralchbuilt the entire hydraulic system using doorbell wire painted Aat black.
Leaving some behind, Breit weathered with salt to give the inside of the dump box a used, chipped·paint look.
for an original plow truck radio in the interior, etched butterfly hatches in the front hood, and plow lights Brett found in his parts box.
Working "backwards," Brett began weathering by painting on different shades of tan to create rust, then using a liquid mask, and finally orange for the top color. "I used both a liquid mask and table salt to remove the final color. I couldn't get all of the liquid mask off in some in some areas, but it ended up· looking like the rust had 'bubbled up' so I went with it," he says.
Brett thinned yellow paint and airbrushed it over the cab and hood for a sun-faded look. Different shades of artist's chalk simulated years ofgrime on the windows, plow, and wing.
A friend of Brett's made the Racine County logo decals. He used dry transfers for numbering the truck, plow, and wing. Brett spent 50 weeks transforming the Hauler into his plow truck.
Mter winning three trophies - best detail, best adult, and best in show - at the Model Empire Model Car contest in Milwaukee, Brett's snowplow was judged best truck at the IPMS Region V 2009 convention and Mad City Modelers 14th annual show.
In his 35 years of modeling, Brett has always enjoyed building cars and trucks. "I'm a gear head," he says. "I like anything that goes fast." Brett lives with his wife, Debbie, in Racine and has two children, Jessica, 22, and Kristofer, 19. FSM
April2010 _.FineScale.coftl 31

1135 Scale I Construction
I COVER STORY I
Waffling & detailin
Resin Zimmerit and photoetched
metal propel Dragon's old
Sturmgeschfitz to a new level
BY BILL PLUNK
The StuG III ausfG, the ultimate version of Germany's famous assault gun, underwent many modifications during 2h years ofproduction. I wanted to
build a model with features seen on StuGs by May 1944. Key are side-opening loader's hatches, a close-in~defense weapon port, a remote MG34 on the roof, and triangularstyle mounts on the schurzen rails.
I based my build on Dragons old Imperial Series kit (No. 9014), which used a topfolende cast mantlet with coaxial machine gun port (a feature not introduced until October 1944). I replaced it with an aluminum barrel and resin
32 FineScale Modeler April2010

Bill added photoetched metal, resin wafflepoHem Zimmerit, and a new mantlet to Dragon's model for a StuG III in service in May 1944.
welded-block mantlet from Armorscale. Other add-ons included LionRoar photoetched metal, Modelkasten workable tracks, and waffle-patterned Alkett Zimmerit from Atak with applique resin panels as well as several replacement parts.
Initial construction I skipped around during construction to incoporate all the alterations and additions.
Applying the resin Zimmerit panels required the most effort, so construction began with that step. First, I applied Zimmerit to the lower hull and added the sus-
Bill aHached the Atak resin Zimmerit ponels to the lower hull with super glue and Testors Clear Part Cement & Window Maker. .
Removed\atar tab Chopped tube
I
To make way for Armorscale's resin mantlet, Bill modified the kirs gun mount with a razor saw.
After aHaching the resin mantlet, Bill secured the mount in the StuG superstructure, leaving the gun free to move.
Bill assembled the commander's cupola, including 27 photoetched-metal ports from the Lion Roar set.
pension, 1, securing each resin panel with Testors Clear Part Cement & Window Maker, a quick-drying white glue. I tacked the edges down with super-glue gel.
I attached Zimmerit to the superstructure, trimming as necessary. Where panels met, I secured the join with super-glue gel, then sanded it smooth. Some joins needed further blending with Squadron White putty.
Next came the gun: Mter assembling the kit mount, I removed its tubular end as well as the slot tab on top with a razor saw, 2. I attached the resin mantlet with super-
After the cupola came the rooftop 'scopes; Bill bared out their openings.
. glue gel. The kit mount allows the gun to elevate and replicates the weapon's limited traverse, 3.
Superstrudure and hull I replaced the base of the commander's cupola, includin'g the periscopes, with LionRoar photoetched metal, 4. I mated the base with kit parts, including the hatch, and installed the commander's "rabbit ears" periscope along with the gunner's scope; I opened up the 'scopes' solid plastic faces with a pinvise, S.
Mter attaching the rear wall, I added its
April2010 www.FineScale.colD 33

Antenna mounts
The StuG's rear wall features resin Zimmerit, a photoetched-metal rack, and antenna mounts_
Bill replaced the kit's engine intakes and covers with resin parts from Atak, embellishing them with LionRoar photoetched metal.
I'm with the band! To be sure everything stayed together, Bill clamped the hull shut with rubber bands.
Bill replaced the front-hull armor with resin parts, filling gaps with putty. He installed a Notek light as well as a gun travel lock, then removed the lock later after discovering it wasn't installed on StuGs until July 1944.
After careful test-fitting and assembly, Bill had the barrel in placeArmorscale's StuK40 L/48 includes a turned-aluminum barrel and a multiple-part brass muzzle brake.
Zimmerit, enlarging the antenna-mount holes slightly for a better fit, then drilling them out and attaching them. I closed the loader's hatch and mounted a photoetchedmetal spare-track rack, 6.
I laid Zimmerit panels on the engine deck and used Atak raised resin enginehatch covers in place of the kit items. LionRoar photoetched-metal grilles dressed the Atak air intakes.
I replaced the kit-provided gun-cleaning
34 FineScale Modeler April 2010
rods with better-detailed parts left from another project, surgically adapting them to the 2 x 2 stowage configuration commonly found on StuGs. I assembled LionRoar's holders so the rods could be eased out for painting, 7.
I glued the superstructure and joined the upper and lower hulls, clamping with rubber bands to ensure a tight fit, 8.
The remaining front-hull Zimmerit was installed next, along with resin front-hull
plates and an armored visor; a little putty smoothed the base of the loader's plate, 9 .
Turning to the main gun, I carefully dry-fit the Armorscale aluminum barrel, . shaping the resin mantlet with a needle file until the barrel fit snugly without glue. The muzzle brake comprised turned-brass and photoetched-metal parts, 10; I put it together with super-glue gel, then screwed it onto the end of the barrel, 11 .
The rear hull received Zimmerit panels,

The rear panel fealures more Atak Zimmerit, kit exhausts, and LionRoar Bill built the schiirzen rail for the SluG's starboard side, but left it off until photoetched-metal exhaust deflectors_ the other fender details, especially the pioneer tool mounts, were complete_
Phc,toetchEld'(lletal shields LionRoar sights
/
Bill replaced many ofthe SluG's external fixtures, such as tool clasps, with LionRoar photoetched metal.
To improve the kit MG34, Bill replaced the barrel with a two-part metal item from Armorscale and added LionRoar shields and sights.
Bill added a LionRoar photoetched-metal stawage rack to the engine deck to complete the SluG's external details.
kit exhausts, and a photoetched-metal deflector shield, 12.
Details I really liked the way LionRoar handled the schiirzen rails, using brass and brass rod to re-create mounting bolts. Assembly was slow and complex, with each side taking several hours' work, but the effort paid off in the added detail, 13.
I cut and sanded away the molded clasps
on the kit pioneer tools and replaced them with photoetched-metal parts. Because of space restrictions, I installed the ax immediately. The other tools were left removable for painting. I detailed the jack and jackblock separately and left them off for painting, too, 14. On the port side, I replaced the shovel's blade with photoetched metal, and I attached a fire extinquisher, wire cutter, and rear Notek light from my spares.
I cut the barrel from the kit's rooftop
Poster putty, such as Blu-Tak, is perfect for masking off running-gear attachment paints to ensure a good glue join I~ter.
MG34, drilled a 2mm deep hole in the body of the gun, and super glued in a twopart brass barrel from Armorscale. LionRoar supplied photoetched-metal sights and splinter shields, 1 5.
Factory-installed engine-deck stowage racks were added on-and-off throughout StuG production. Because the Atak Zimmerit came with cutouts for it, and the kit supplied locator pads, I installed a rack from the LionRoar set. To ensure align-
April 2010 www_FineScale_coln 3S

A primer of Model Masler Italian dark brown enamel helped Bill check for Bill prefers his own shade of dunkelgelb, mixing 4 parts Model Masler flaws and provided a deep base for the dunkelgelb 10 come. dunkelgelb with 1 part light gray.
To lone down the bright squiggle,s of red-brown and olive-green, Bill oversprayed them with a mist coat of dunkelgelb.
After painting the wheels, Bill installed the running gear. He left the drive sprockets loose 10 install the tracks.
Using 93 links in each run produced the sag Bill wanted. Construction is Bill painted the tracks gunmetal over flat black, then dry-brushed steel before adding several washes.tedious but the effect is worth it, says Bill.
ment, I glued each vertical arm to the hull, then attached the frame, 16,
Painting I used Model Master enamels all along, mixing my interpretations of German colors. I masked the sprocket, idler, and return roller mounts with poster putty, 17, then primed with Italian dark brown, 18. I mixed 80 percent dunke/ge/b and 20 percent light gray - my personal preference for
36 FineSc:ale Modeler Apri12010
German camouflage yellow - and sprayed the model, 19,
I applied intertwined lines of 1'Otb1'un (red-brown) (50 percent leather, 50 percent military brown) and o/ivgl'un (olive green) (80 percent Russian armor green, 20 percent Panzer schwarzgmu). To blend the camouflage and soften contrast, I misted the model with my dunkelgelb mix, holding the airbrush about 12" away from the model and making light, quick passes, 20.
I painted the road wheels flat black, then airbrushed the hubs with dunkelgelb sprayed through ,a circle template,
Then I installed all of the running gear except the drive sprockets; I left those off to ease track installation, 21
Tracks and tools I assembled two runs of93 links each from the Modelkasten set, 22, giving the tracks the sag I wanted. Mter base-coating the

SluG crews often bolstered their vehicle's armor by laying spare track links To blend the decals into the Zimmerit, Bill used several applications of over the front plates. So, Bill did the same. Solvaset, then dry-brushed them with dunkelgelb.
Wearing a coot of Mig Productions weathering pigments mud, Bill's SluG looks newly arrived from the front. Careful finishing and the aftermarket lurned Dragon's old kit into a unique replica.
tracks flat black, I sprayed them Testors Metalizer non-buffing gunmetal, then drybrushed steel, 23. Next, I applied raw umber and rust washes, and finished with dry-brushed burnt umber, 24.
I had enough Modelkasten links left to add a few to the front of the superstructure, replicating crew-added armor. I super glued eight-link runs for the loader's area as well as the driver's plate, adding variety by attaching a couple of open-guide-horn links from another Modelkasten set, 25. A five-link run was added to the spare-track rack on the rear plate.
I painted the pioneer tools' metallic surfaces Metalizer gunmetal and then drybrushed steel. Mter painting the handles wood brown, I dusted on burnt umber pastels to give them a weathered appearance.
Markings and weathering I airbrushed the model with Pledge Future floor polish, then applied spare balkenkreuze decals to the rear hull and superstructure sides. Several applications of Solvaset, 30 minutes apart, settled the decals into the Zimmerit. Another coat of Future protected the decals from the forthcoming weathering.
I randomly applied small dots of raw umber artist's oils on sections of the model, blending each section with a brush damp with thinner to create a very light overall wash.
Next, using a 10/0 brush and a heavier raw umber mixture, I added a pinwash to the Zimmerit's channels and raised hull details. If the wash was too heavy or "bloomed," I removed or adjusted it with
SOURCES Gun barrel and mantlet, Armorscale (No.-B35-059), www.armorscale.com MG34 barrel, Armorscale (No. B35-030) Photoetched-metal, LionRoar (No. 35038), www.lionroarmodel.cn. available from Dragon Models USA, 626-968-0322, www.
dragonmodelsusa.com Zimmerit, Atak Model (No. 35033), www. atakmodel.com.pl, available from Air Connection, 905-677-0016, www. airconnection.on.ca
the brush to correct it. I lightly dry-brushed dunkelgelb over the decals to blend the markings into the hull.
I also dry-brushed the schurzen rails' points burnt umber to simulate worn paint.
Between coats of spray-can clear flat, I dry-brushed selected areas with lightened dunkelgelb using a 20/0 brush to tone down the wash.
I dirtied up the running gear, lower hull, and tracks with a blend of Mig Productions dark mud and European dust weathering powders mixed with tap water. I applied the mud with a brush. Mter it dried, I removed excess with stiff brushes.
Dragon's old StuG kit has been surpassed by more recent models, but aftermarket parts and a nice finish can still help it keep up. FSM
April 2010 www.FineScale.com 37

Reade.. Galle..y
~AARON MALONE PENSACOLA, FLORIDA Academy's 1/48 scale Curtiss P-36 Hawk was built from the box by Aaron, who gave it a gleaming glow with Hawkeye's Hobbies airbrushready Talon acrylic NMF (natural-metal finish) .
~ ALAN PILKINGTON . GARDENA, CALIFORNIA There is no kit for this 1/6 scale"Atmospheric Deep Diving Suit." Recalling diving suits of the 1930s, Alan designed and built one from scratch using Evergreen styrene spheres and Bondo hand-turned on a lathe. The suit's detailed interior features illuminated dials and gauges; Alan finished the exterior with bronzing paint, green artist's oils for patina, Rub 'n' Buff gold leaf highlights, and burnt-umber inks.
, /

----.----.• t
, /
/
... LAWRENCE COHEN, DDS WAPPINGERS FALLS, NEW YORK It wasn't enough for lawrence to build Revell's big 1/72 scale Gato, add aftermarket decking, and detail the conning tower with Eduard photoetched metal - the dentist electrified it for radio control, with operating di~e planes, rudder, and propellers. Also, a Klaxon alarm sounds when the dive planes are extended .
.... DARRELL MENZER CELINA, OHIO Following a theme set by his modeling club to build something with an animal name, Darrell chose "Cougar," as in Hasegawa's 1/72 scale U.S. Navy F9F-8 carrier fighter. He painted it with Testors Model Master dark sea blue enamel, coated it with Pledge Future Roar· polish, then stuck it on a clear acrylic rod, held it to the sky, and shot the photo.
April2010 www.nDeSeale.eolft 39

Reade.. Gallel'Y
~ DALE ECKHARDT CYPRESS, CALIFORNIA late winter, late in the war: Dale built Tamiya's 1/35 scale "Tiger I, late," added Zimmerit with Squadron Green puHy, made a real-wood jack block, detailed the machine-gun mount, and used thinned Polly Scale acrylic paint over a layer of hairspray for weathered whitewash.
T CHARLES L. L1PKEN NAPERVILLE, ILLINOIS The HobbyBoss 1/72 scale A-l 0 was built out of the box, but Charles added underwing stores from a Hasegawa aircraft weapons set as well as his box of spares. "The plane looked naked without them," he says.

..... BARRY SNELL EDMONTON, ALBERTA, CANADA The old Hawk/Testors 1/48 scale Banshee got an extensive "what if" rework into a Hailed design by Barry, who scribed panel lines, added more than 1 ,000 rivets, scratchbuilt wheel wells and the tail, and replaced the cockpit with an aftermarket resin kit.
SUBMIT YOUR PICTURES! Shouldn't your model be in Reader
Gallery? FineSca/e Modeler is always
accepting new material from around
the world .
Submit your high-resolution digital
images and information at www. Contribute.Kalmbach.com, or send
prints or CD-ROMs to FineScale Modeler, Reader Gallery, 21027 Crossroads Circle, P.O. Box 1612,
Waukesha, WI 53187-1612.
Don't forget to provide sufficient
descriptive information, including the
manufacturer, model, scale, modifications, paint used, and reason for
choosing the model, along with your
name and address. We look forward
to seeing your work!
.6. CRAIG SARGENT HILLCREST, AUCKLAND, NEW ZEALAND Craig put a lot into this little 1/72 scale Special Hobby Macchi C.200 Saeita, converting it to a humpback with parts from an old RCR C.200 and a Macchi C.202 along with a Falcon vacuum-formed canopy. The Italian markings match the Revell kit Craig built as his first model when he was 5; he drew these on his computer and ran them out on an ALPS printer .
.... CHARLES RULLMANN FORT SMITH, ARKANSAS Charles sent us a shot of his Tamiya 1/35 scale M5 Stuart. "It's one of my oldest surviving armor models and still one of my favorites!" he says. The sandbags are made from putty.
April2010 _.FineSc:ale.c:o_ 41

Reade.. GalleJrY
~ FERNANDO A. BARBASO CORDERO
QUERETARO, MEXICO Just days after he began building Academy's 1/72 scale AH-64A Apache, Fernando was inspired by a magazine photo to paint this Israeli scheme. He used two MPK resin detail kits, Eduard photoetched metal inside and out, and shot some of the markings through stencils (rather than use decals).
T DAVEADAM CHRISTCHURCH, NEW ZEALAND A pilot commissioned Dave to build this one: Dave motorized the propeller on lamiya's 1/48 scale Skyraider but otherwise built it from the box, painted it with lamiya and AeroMaster colors, and weathered it with pastels.
42 nneScale Modele.. April2010

.. DAVE CURRIER PEABODY, MASSACHUSETTS "I've been building models since I was 5, and competing for the past 20 years, and this is the best 1/32 scale model I have ever had the pleasure of building," says Dave of Hasegawa's Naka jima Ki-84 Hayate (Alliednamed "Frank").
~ DAMIAN CAMPAYO DOWNINGTOWN, PENNSYLVANIA Damian built Esci's 1/48 scale Dassault-Breguet Mirage III EP with scratchbuilt ejection-seat details and spare parts for instrument decals, a pilot, and AIM-9 missiles. The Pakastani markings are a mix of Microscale and kit decals.
6. BRIAN REDPATH WALLINGFORD, OXON, UNITED KINGDOM Part of what Brian calls his "Dukes" collection is this lamiya 1/12 scale Ducati 900 racer, built from !he box and airbrushed wi!h Humbrol enamels.
April 2010 www_FineScale_colft 43

Reade.. Galle.. y
/
BRAD SHINN HATFIELD, PENNSYLVANIA This airliner from Hatfield looks like the real McCoy: Brad dressed his Hasegawa 1/200 scale 747-400 in KIM livery from Draw oecdls and boilt an impressive array of dropped Raps from styr~ne stock.
"
.... FORREST LINDSEY DUMFRIES, VIRGINIA Forrest built Revell Germany's 1/48 scale kit as a Sikorsky UH-34D of the U,S, Marine Corps Flying Tigers squadron HMM-361, adding a scratchbuilt interior, gas lines, antennas, landing gear, and mesh for the engine/transmission cover - details he well remembers about the helicopter that evacuated him after he was wounded in Vietnam in May 1967. He dedicated the model to the pilot, who retrieved casualties that day at the risk of becoming one himself.
44 FineScale Modeler April2010
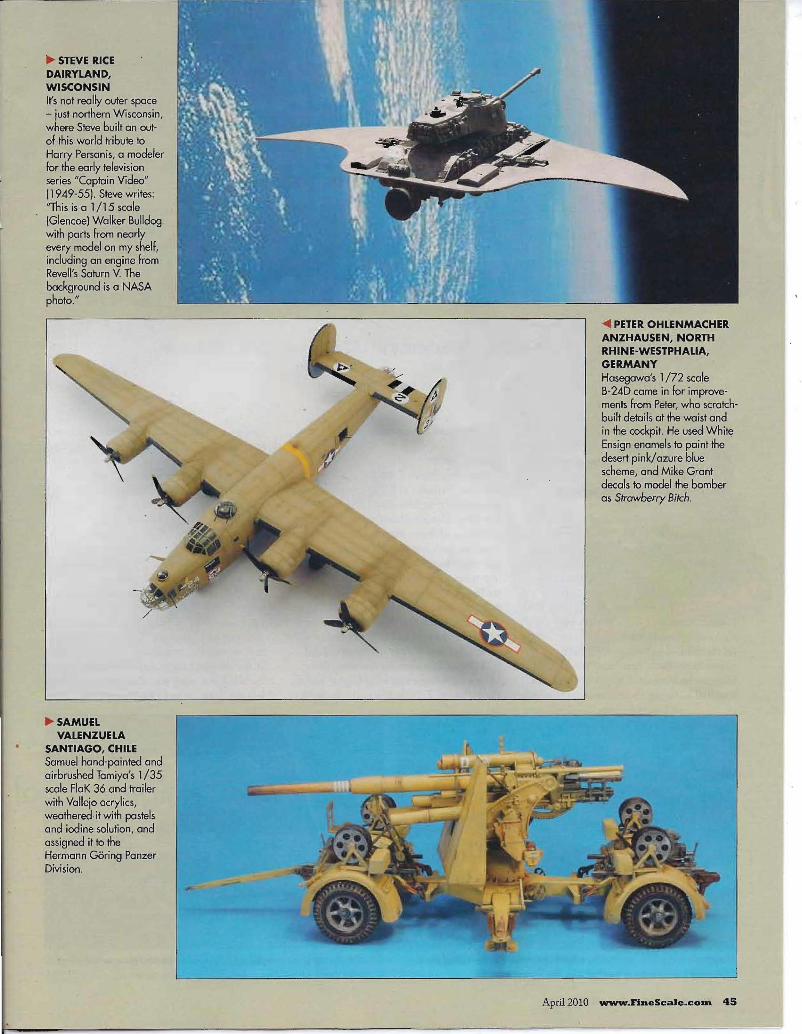
" STEVE RICE DAIRYLAND, WISCONSIN It's not really outer space - just northern Wisconsin, where Steve built an outof-this-world tribute to Harry Persanis, a modeler for the early television series "Captain Videa" 11949-55). Steve writes: "This is a 1/15 scale (Glencoe) Walker Bulldog with parts from nearly every model on my shelf, including an engine from Revell's Saturn Y. lhe background is a NASA photo."
" SAMU£L VALENZUELA
SANTIAGO, CHILE Samuel hand-painted and airbrushed lamiya's 1/35 scale FlaK 36 and trailer with Vallejo acrylics, weathered it with pastels and iodine solution, and assigned it to the Hermann Goring Panzer Division.
~ PETER OHLENMACHER ANZHAUSEN, NORTH RHINE-WESTPHALIA, GERMANY Hasegawa's 1/72 scale B-24D came in for improvements from Peter, who scratchbuilt details at the waist and in the cockpit. He used White Ensign enamels to paint the desert pink/azure blue scheme, and Mike Grant decals to model the bomber as Strawberry Bitch.
April2010 _.nneScale.com. 45

I AMERICAN AIR COMBAT HALL OF FAME I
Raising the roof on Academy's 1/72 scale "MiG Master"
For our American Air Combat Hall of Fame series, I model airframes that were flown by pilots credited with "most" or "first," or even "only" air-to-air victories for their respec
tive aircraft. The F-8 Crusader, a fine aircraft, is usually overlooked when it comes to air combat in Vietnam, dlfe to the more populous and fabulous F-4 Phantom. But Crusader pilots, flying from the smaller modernized Essex-class carriers, had their share of MiG kills, too.
VF-211 "Checkmates" flying from USS Hancock (and later, USS Bon Homme
, Richard) scored eight MiG kills, the most successful F -8 squadron of the war. Remarkably, both "first" and "most" MiG kills can be attributed to one airframe, so that had to be my choice for induction into
BY PAUL BOYER
the American Air Combat Hall of Fame.
Super /Sader I chose Academy's F-8E kit as it is easily the best Crusader in 1/72 scale, It features great detail, but falls down on one point: the wing. The kit allows you to pose the variable-incidence wing in the raised position, but does not provide separated trailing-edge flaps. When the wing was raised (for take-off and landing), the leading- and trailing-edge flaps automatically dropped to offer the most lift. Surgery was needed to accurately show the "raised" wing ... or I could use the cas t resin, dropped-flap wing from Obscureco! And that's what I did.
I decided to work on the wing first. Here's the Obscureco wing (right) next to the kit wing, 1. Note the multiple-section
trailing edge flaps, with the small inner section drooped just a bit further. As handy as Obscureco's Crusader wing is, it still needs some work before it is model-ready. My sample had two nasty air bubbles in the face of the fuselage fairing, 2. Instead of filling and sanding the bubbles and trying to reconstruct the subtle detail there, I simply ground away the resin face with a dental burr in a motor tool and super glued the Academy kit part No. A13, 3.
Obscureco provides separate leadingedge flaps as does the Academy kit. On my kit, I used the Academy flaps because I had them already prepared; I had sanded their mating surfaces at an angle to install them at the dropped angle. After they were installed, the wing was ready for paint, 4. I left the wing off until final assembly.
Academy's wing (left) has trailing-edge flaps molded in the raised position. Obscureco's resin wing is molded with the flaps dropped.
Oops! A couple of air bubbles mar the face of the cast-resin raised wing. GoHa fix them!
46 FineSc",le Modeler April 2010

Academy's F-SE Crusader is well-detailed, but needs extra work to accurately portray the raised "variable-incidence" wing.
Comple)C fuselage Besides a nicely detailed cockpit, the Academy kit has several more subassemblies that must be installed before closing the fuselage. From nose to tail, the installation includes the long engine intake trunk with the nose-gear well molded on, the cockpit, the speed-brake well, the maingear well, under-wing fuselage detail, and the tail-hook well,S. I painted the cockpit before installing it_ Mter the fuselage was closed and seams cleaned up, it was time to paint.
Painting sequence Through experience, I've learned to
follow a practical finishing sequence. I use gloss enamels when I can so that I don't always have to apply a clear gloss coat before decaling. But the Navy scheme is flat light gull gray over gloss white, so I had to do a little dancing. Here's the sequence:
• Mask the Future-coated (and dry) canopy and windscreen (on or off the fuselage) and spray the frames flat black - the "inside color" of the frames.
• Airbrush gloss white on the underside of the fuselage, inside the intake and wells, underside of the wing, top of the trailingedge flaps, all landing gear, wheels, and doors, both sides of the stabilizers, and the Sidewinders.
• Mter the white cures for at least 48 hours, I mask the flaps and cut a subtly wavy edge on masking tape for the gray/white demarcation line on the fuselage. To make the line semi-sharp, I rolled the edge of the tape out with fine tweezers, 6 . I also cov-
Instead of filling the bubbles and loosing the subtle detail there, Paul ground away the entire face and installed the Academy kit's part.
Here's the wing ready for paint. Paul installed the Academy kit's leadingedge flaps, but Obscureco also provides them in its set.
April2010 www.FineScale.coln 47

Multiple MiG Master WHEN IT COMES to the F-8 Crusader, the first kill and the most kills can be credited to one airframe, one pilot, and one mission. Cdr. Hal Marr, commander of VF-211 "Checkmates" aboard USS Hancock (CVA-19) shot down two MiG-17 s over North Vietnam on 12 June, 1966. He was flying F-8E, BuNo 150924, nose number 103. The first kill was accomplished with a pair of.AIM-9D Sidewinder missiles. His first shot missed, but the second missile made the hit. Marr shot down the second MiG17 with cannon fire .
Confirmation of the second kill apparently came from a clandestine source, and credit for the kill wasn't given to Marr until decades later so that the source wouldn't be compromised . It's still unclear who the confirming source was.
In any case, Hall Marr was the only Crusader pilot to be officially credited with more than one kill, and the F-8E he was flying that day was the only Crusader to score multiple kills. That F-8 was shot down by flak in October 1966 while flying with VF-162 .
(L-R) Purportedly shown just after landing from his MiG-killing mission, Cdr_ Hal Marr is attended in the cockpit by the plane captain aboard USS Hancock_ U.S. NCiIV)' phota via Peter Mersky
The most-published shot of Marr and his jet shows Marr (right) shaking hands with Lt. Phillip Vampatella who downed a MiG nine days after Marr's double victory. U.S. Navy phota via Peter Mersky
Another fragment shot of BuNo. 150924 shows Marr on the walkway next to the fin. U.S. Navy photo via Peter Mersky
Academy provides a lot of internal detail. Look at all the components that Paul masked the gloss white bottom of with tape. To create a semi-sharp have to be installed before closing the fuselage! demarcation line, he rolled bock the edge of the tape with tweezers.
48 FineScale Modeler April 2010

ered the cockpit with tape.
• Airbrush gloss light gull gray on the exposed fuselage and the top side of the wing, plus the missile pylons and the masked canopy. The windscreen was going to remain black, so no gray paint there. I allow the paint to cure for another 48 hours before handling the model.
• Remove masking tape and inspect for areas that need touchup.
• Now I can apply decals onto the glossy paint to prevent "silvering." I found a sheet from Avi Print that had markings for Hal Marr's MiG-killer, and they fit perfectly on the Academy kit. These decals are ultra thin and skooshed into the detail without the need of decal solvent.
• I sludge wash all the recessed detail after decaling. That way the accented detail doesn't suddenly "stop" at the edge of a decaled area. I use Polly Scale neutral gray mixed with liquid dishwashing detergent and water, roughly equal parts of each. I slather the mix over all the model and let it dry for about a half hour. Then I gently wipe off the excess with a damp cloth or cotton swab. The gray remains in the recessed panel lines and rivets after the wipe down. The wash goes on the landing gear, too.
• Next, I use low-tack tape or Parafilm M sealing fUm to mask the top of the flaps. Regular tape might pull up the number decals on the flaps, so be careful.
• To take the shine off the gray fmish, I airbrush Testor Acryl clear flat over the light gull gray areas and the flat-black windscreen frames. VVhen it's dry, I remove the
Paul's good-looking F-SE reflects not only his modeling skill but also his dedication to research. With the help of Peter Mersky and the Naval Historical Center, Paul's model is "as right as they get."
masking tape and check for areas requiring touchup.
• Again with low-tack tape, I mask for the natural-metal rear end of the fuselage. I painted this area with Testor Metalizer titanium and overcoated it with Future.
Now it was just a matter of installing the small parts: stabilizers, landing gear, missiles, canopy, and wing.
Black or white? I was just about done with the model when I came up with a couple of doubts. My zeal to properly show the wing in the raised position was dampened a bit when I could find only one photo of a Crusader with the wing up and and empty cockpit. This was shot at an airshow, and I'm sure the aircraft was posed to show the variable-incidence wing. All other shots I could find with the wing up had the pilot in the cockpit, either in flight or about to take off. Hmm. That means I'd have to "man" my MiG Master. I fished through my spares box and found a pilot figure that seemed the right vintage.
There, done! Wait ... what's this? Both the decal instructions and Tom Tullis' profile illustration in Peter Mersky's F-8 Crusader Units book (on which the decal is based) show this aircraft with a black radome, but Phillip West's painting "Checkmate - 211" shows the same jet with a flat white radome.
Nuts. I paged through all my references and
couldn't find one photo showing the entire airframe ofMarr's plane. So I called Peter Mersky and asked ifhe had a Hancock cruise book from 1966 to look for shots of VF-211 F-8s. He didn't, but he knew
someone at the Naval Historical Center. A couple of days later, Peter told me that shots in the book showed white radomes. I repainted my radome slightly creamy flat white.
So, now I'm done. The graceful Crusader, with its ungainly raised wing, taxies into my American Air Combat Hall of Fame for permanent induction. FSM
Thanks to Peter Mers!<y and his sourcesfor helping make this model as accurate as possible.
REFERENCES F-8 Crusader Units of the Vietnam War Peter Mersky, Osprey Publishing, London, 1998 F-8 Crusader in Detail & Scale (Vol. 31) Bert Kinzey, Tab Books, Blue Ridge Summit, Pennsylvania; 1988 F-8 Crusader in Action (Aircraft No. Seven) Lou Drendel, Squadron/Signal Publications, Warren, Michigan, 1973 F-8 Crusader in Action (Aircraft No. 70) Jim Sullivan, Squadron/Signal Publications, Carrollton, Texas, 1985 Vought F-8 Crusader Peter Mersky, Osprey Air Combat, London, 1989 MiG Killers A Chronology of U.S. Air Victories in Vietnam 1965-1973 DonaldJ. McCarthy,Jr., SpeCialty Press, North Branch, Minnesota, 2009
SOURCES Dropped flap wing Obscureco, www.obscureco.com Decals F-8£ Crusader MiG Masters Pt.1, No. 72006 (48006 for 1/48 scale), Avi Print, www.aviprint.cz
April 2010 w_.FineScale.co.-n 49

1/35 Scale I Armor Canada has more than 700 lAY Ills in six different configurations. Jim's model represents a Command Post variant serving in Afghanistan.
I PART ONE I
Mode a (ana ian Forces
A straightforward conversion builds this modern Light Armored Vehicle
BY JAMES WECHSLER
50 FineScale Modeler April 2010
I.

The turret is a single large casting and about all you need to do is. remove As Jim continued, it was a pretty straightforward job to install the vertical the pour block and clean up a little mold excess. The next step is to build support strips and the two Jerry can holders to the side plates of the rear the two side stowage baskets and the rear basket.
The LAV III is a third generation Light Armored Vehicle presently serving with the Canadian and New Zealand (NZLAV) armed
forces. It is also the vehicle form which the U.S. Army's Stryker family of vehicles was developed. The LAV III design was developed using the lessons learned in the previous generation ofvehicles that include the U.S. Marines LAV-25, the Australian ASLAV-25 and the Canadian Coyote. But it is a new design.
Canada has acquired over 700 of these vehicles in six different configurations. These are now serving in extended duty in
. Mghanistan. This model is of a Command Post vari
ant presently serving in Mghanistan around the 2008 time frame. The basic kit is a conversion set from Real Models with the AFV Club Ml126 Stryker as the donor kit.
The conversion set contains some large resin castings, some small parts, and a lot of photoetch, 9 sheets to be specific.
But before you take a huge gasp at the amount of photoetch, let me note that it is made by Eduard under contract to Real Models. Not only is the photoetch the typically high quality Eduard product, it comes . with Eduard style instructions which makes it pretty easy to use. I do not solder and in looking through the instructions, I did't see any need.
Another real nice addition in this set is a metal, fluted barrel made by The Barrel Depot. To be entirely honest, there's really nothing that beats a metal barrel. It pretty much eliminates risks ofwarping, damage, or casting problems that can occur with
basket.
resin barrels. Finally, and not shown in the picture,
Real Models supplies two paper sheets of stowage boxes, warning signs, and street signs for use with the LAV in Mghanistan. Things like MREs, water bottle boxes, the large, red 'stay back' signs as well as some cool street signs are all there so you can load up your LAV with stowage.
Real Models also sells their own book on the LAV III called 'Canadian LAV III in Mghanistan'. This book is great. It has a large series of clear, color photos of the LAV Ills in Mghanistan. Pretty much a one stop shop.
Turret stowage baskets main supports I almost always start each model by building the hull and suspension. Why? I think because the directions in the plastic kits usually do that first and I have just ended up in a rut doing what I'm told. But not this time. I'm building the turret first, just to be different.
The turret is a Single large casting and about all you need to do is remove the pour block and clean up a little mold excess. The next step is to build the two side stowage baskets and the rear basket, 1.
These are made up of bent wire and photoetch parts. I've built baskets before and they can be a real pain. But the use of photoetch for the screens and brackets makes this project quite a bit easier.
The instructions tell you to use.040" brass wire but it looked a little thick to me so I switched to .032" aluminum wire. I switched to Aluminum wire because it's a little softer and you can cut through it (at
least at this thickness) with a hobby knife. I deviated from the instructions in a
couple ofways. First, the instructions suggest that you cut the basket rails so that they can be glued to the back and side of the turret. I decided to drill some locating holes instead. I did this mainly so that the baskets would be very strong once I got them assembled. As it turns out, they're strong even without gluing as evidenced by the picture where they are not glued but fit so well I can easily pick up the whole assembly.
The second way I deviated form the instructions was that I did not .use the resin wire bending templates that were provided. Instead, I just made the lower rails by bending the wire using the photoetch screens as a template. Pretty easy actually. For the side baskets, I did the same for the middle and upper rails but left the side bars longer. Then I placed them in the locating holes and clipped the side bars until all three rails lined up. This actually worked really well.
For the rear basket I ended up eyeballing the width of the top and middle rails and then I left the side bars long and again adjusted them by clipping them incrementally until the back lined up vertically. This was bit time consuming but the result is a set of rails that are on tight with the turret and now match t;he dimensions of the photoetch screens. .
Completing the turret baskets Well the extra work on getting the rails
just righ t really paid off in this step. The screens pretty much fit right on the lower . rails. Another big help on this step was that I didn't to install the top two rails until the
April2010 _.Fi...eScale.co.... 51

With the extensive turret modifications com Careful test-fitting and some shimming with sty Real Models provides on excellent set of replacepleted, Jim glued the photoekh plates to the top rene strip helped smooth the cost-resin rear plate ment wheels designed to fit right on the suspenof the turret. into the main hull. sion.
SOme of the photoekhed assemblies are quite complex, but thankfully, they're straightforward to assemble since the parts fold cleanly and the instructions are clear. '
screens were in place which made it easy to get to them.
The next step in building the turret baskets was to install the middle and top rails.
. Then I glued the support brackets in place. I started to fit the large metal plates that
are attached to the sides of each basket and butt up to the turret. The photoetch parts have a flange that I believe I was to bend 90 degrees to fit between the rails and the turret. Obviously since I'd drilled holes and mounted the rails, I couldn't do that so I just cut away the flange. To be honest, I like my approach better since it results in a stronger basket. One problem I did run into was that the height of these plates is a bit too high but it was pretty easy to simply trim them.
The side mesh screen also seems a bit too big but again, some careful trimming ahead of time made them pretty easy to install.
With these parts in place it was a pretty straight forward job to install the vertical support strips and the two Jerry can holders to the side plates of the rear basket, 2.
It may seem like building these baskets was complicated and difficult but that really isn't the case. It does take patience and
S2 FineSc:ale Modelea' April2010
Jim combined brass rod and lead foil to model the LAY's rear-mounted strekher. The foil is malleable and looks realistic as fabric.
some careful planning, but the actual work was pretty straight forward. I'm glad I took the approach I did because the baskets are extremely strong so I won't have to worry about breaking them during the rest of the build.
The biggest bummer is that these LAVs are covered in stowage so much of my work is going to end up blocked from view.
Completing the turret Well I wasn't kidding when I said the almost the entire turret was one large casting. To wrap up the turret I glued on the metal gun barrel, the wire cutter and the smoke dischargers, a pretty easy effort. There wind sensor is a really nice set of about eight photoetch parts that give great detail . I was pleasantly surprised by how easy it was to fold and assemble these parts.
I then added the grab handles to the turret and the hatches. I also rebuilt the locking handles on the hatches since they were cast solid. In case you're wondering, the white strip of plastic running around the hatch isthere because I screwed up and cut off the edge from the hatch when I was removing it from the pour block. My bad.
I'll add some additional tie downs and
The large rack in the bock is for the pioneer tools. Jim added an axe, mallet, and shovel from the AFV Club kit.
small items when I add the stowage.
Turret blast shield In order to install the blast shield, you have to remove the armor plate on the rear of the top of the turret (behind the hatch openings). No problem normally, just shave off the .5mm.indicated in the instructions. Unless you have already built the turret baskets, installed the hatches opened, mounted the machine gun between the hatches, and installed the Laser Warning Receiver on its mast. Then you have a problem. I should have spent more time thinking this through at the beginning.
So I carefully cut loose the hatches, and of course broke off the hinges. But I didn't lose any parts so I was able to glue the hinges back in place. Then I had to figure out how to shave off the turret armor. My problem was that at the back was the Laser Warning Receiver (the large mast) and less than an inch forward was the machine gun. All I could think to do was to use my Mission Models Micro Chisel and slowly shave away pieces. Eventually I got it and then I used a curved blade to scrape the turret top smooth because I couldn't get sand paper in there.

Before painting the model, Jim worked out where he wanted to place the "One of the reasons I really wanted to make the Command and Control stowage in the turret racks .
Amazingly, I didn't break anything other than the glue holding a couple of the parts of the baskets together and that was easy enough to repair. Yeah, I'll plan better in the future.
So with the turret modifications completed, 3, I glued the photo etch plates to the top of the turret without issue. Their position is pretty obvious since they have cutouts for the periscopes. But you have to guess at the bend angles and then adjust many times. I think Real Models could fix this very easily by etching the correct line into the plates that are glued to the top of the turret. Then it would act like a template and the bending and installing would be .simple. Also, there are three small, triangular supports for each shield. Their position isn't super clear either and I found out the hard way that those are best installed AFTER the shields are glued in place.
Hull assembly Real Models provides a complete replacement hull. After removing it from the pour block I was pleasantly surprised by how tight it fits to the AFV Club lower hull. Only a little putty in the seam and it is closed up nicely. But, it's about 1mm shorter than the AFV Club hull so the rear hull plate doesn't fit quite right. This 1mm is due to shrinkage in the resin.
To fix this problem I had planned to add a shim (small strips ofplastic) around the rear plate. But, mostly by chance, I was comparing the Real Models rear plate to the AFV Club part. I realized that the two were quite similar. In fact, the AFV Club part has a few extra items on it that I could easily shave off and they'd be the same. With the only other difference being that
version of the LAV III is that it has a ton of cool antennas," Jim says.
the AFV Club part is quite a bit taller. This makes a huge difference in that I could now butt the AFV Club part up to the Real Models upper hull and glue it tight. Then I trimmed the corners and only had to add a small shim on the hull sides. The shim was made using .020"-thick strip plastic that was .OSO" wide. Using this method, this whole effort was pretty simple and with a touch of putty, the hull sealed right up, 4.
Suspension and wheels AFV Club has done a real top notch job on the suspension. There are a lot of parts but thankfully the molding is first rate so the amount of clean up is minimal. Also, the instructions are quite clear and the sequence of installation is logical. The result is excellent with everything fitting tightly.
Real Models provides an excellent set of replacement wheels designed to fit right on the suspension. One thing I really like about these wheels is that they have a noticeable bulge at the bottom which gives a clear impression of the weight of the LAV,S.
Be sure to read the AFV Club instructions since there is small plastic part (FS) that you must glue to the inside of the Real Models wheels. Also, I found the locating pin on the AFV Club suspension to be a bit too long for the Real Models wheels so I shaved offjust a bit to make sure the wheels pressed flat against the axles.
I ended up with a pretty good contact on all of the wheels. But to get a super solid ground contact I lightly slid the model back and forth on a sheet of sandpaper I laid flat on my workbench. Now the model sits perfectly.
The wheels have hub caps (not spinners) that are made from photoetch parts. One part is the flat ring and another is a rectangular part that you are supposed to roll into a tube. I confess, I have no idea how to do that and get a prefect circle. Is there some type of tool I should own? Instead, I bought a piece of 0/16" aluminum tube at my local hobby shop and cut the rings to length using my miter box.
One final note, the photoetch part has five small etched circles on it. The instructions don't show this but they are actually the locating marks for five hex bolts that hold the rim in place. I made the hex bolts using a punch-and-die set and .015"-thick plastic sheet.
Photoetch - rear blast shield With most of the resin and plastic parts attached, it's time to start on the large amount of photoetch. One key thing to understand is that there are actually two photoetch sets. There's the basic LAVIII set (35125) and another set specifically for the C&C/CPIISFvariant (35132). The second set has a number of parts that replace the parts in the fust set so study the instructions carefully.
I started by assembling the rear blast shield which forms a protective shield around the hatches on the rear of the upper hull. I chose to st)l1't with this assembly because it covers a lot of space on the vehicle and it's critical that other parts don't interfere.
The parts are pretty straightforward to attach but I did find that scraping away the anti-skid texture on the resin hull where the parts attach makes a huge difference. It only takes a small bump in the resin to have
April2010 _.FineScale.colD S3

Jim left the right-side boxes loose so he could remove them before painting Pile it on! Among the LAV's stowage, Jim found four water cans and the model. This view clearly illustrates the amount of photoetched brass he mounted them in the bock rack. Later, he secured them with a small strap added to the model.
the whole photoetch part mount at an awkward angle so a little preparation goes a long way. Mter a little trail and error, 1 found that mounting one of the side parts was the best place to begin. Then 1 worked around the rest of the parts until 1 had the whole shield attached. Then the rest of the small bits went on without a hitch.
photoetch - reQr hull plote As you can probably see in the photo, some of the assemblies are quite complex. But thankfully, they are pretty straight forward to build since the parts foid cleanly and the instructions are clear. A hold and fold (I use the Mission Models Etchmate) is very helpful but, speaking from experience, it's possible to make these parts using just tweezers and razor blades.
One note, there is a large stowage box that mounts on the two large brackets coming off the top of the rear plate. This is available on the photoetch sheets but nearly an of the photos of LAVIlIs in Mghanistan show it removed. It would definitely block the view from the upper hatch blast shield. Instead, the troops seem to have laid a stretcher or cot on the brackets and thrown stowage on top of that.
Obviously, there is a lot ofphoto etch in this step and it does take a while to get it right. But you've got to admit that the result is really impressive, 6.
Stretcher 1 used brass rod for the poles since 1 wanted something strong and plastic rod was too flexible. I cut these to a length of 2" to basically match what I could see in the photos. I glued these to a rectangular sheet oflead foil and wrapped the sheet around the poles. I made sure to leave the spacing between the poles slightly larger than the
54 FineScale Modeler April2010
made from lead foil.
flat length of the brackets. That way 1 was able to press a sag into the foil to represent the weight of the stowage, 7. Since it's still flexible, I plan to use the actual stowage to make matching indentations.
Photoetch - right side Like the rear hull plate, the photoetch on the right side is extensive and yet still pretty easy to assemble. There are a number of options for mounting the various racks. I made sure to use the big one in the middle. It is intended to hold Jerry cans but there are number of photos ofLAVs with white water bottle boxes and/or tan MRE boxes being carried in that rack. So that will let me add a lot of color to the model.
As for the other options, I've decided I'm going to use as much of the photoetch as possible so I've chosen the options that let me do that. It comes with the kit and it looks cool so I might as well go ahead and use it, right?
photoetch - left side More of the same on the photoetch. Lots of parts but they all go together cleanly. One note is that the large rack in the back is for the pioneer tools. This isn't noted in the instructions but 1 saw it in the photos. I just grabbed an axe, mallet, and shovel from the AFV Club kit and mounted them based on the photos. There may be other tools in there too but 1 couldn't figure out which ones. Also, you can see these racks empty, and partially loaded so 1 figure I've got it about right, 8.
Boxes Real Models includes a printed set of boxes for the LAV. There are six types. The ones at the top of the photo are water bottle boxes and the ones on bottom are rations.
The most important aspect is that they are different sizes so it's possible to choose the ones that fit the various stowage racks and tie downs around the vehicle.
Turret stowoge I really had to think about what to do for the side stowage baskets. They are reasonably narrow and most typical items don't fit. I got the stowage set from Real Models (35194) and decided to use just the rocket launcher and the small rolled up tarp. Instead of trying to fit the other items into the basket, I went with an old trick.
I cut a piece of thick cloth to the width of the basket and then rolled it up. Once rolled, I dipped it in Woodland Scenics Scenic Cement. While still wet, 1 shoved it into the basket and then placed the rocket launcher on top (the tarp is on the top in the left basket). Then, 1 used a clip to add some pressure while the whole thing dried. The result is that the resin parts are now pressed into the cloth giving a sense of weight. I didn't worry too much about the accuracy of the tarp since, as you can see from the photo, it is almost completely blocked by other items.
Once dry, 1 added the small photoetch tie downs and a couple oflead foil straps over the rocket launcher. Then I glued the ammo cans to the outside of the turret basket since this arrangement can be seen in many photos of the LAV s in Mghanistan. I'm not entirely. sure of how the ammo cans are attached since 1 don't see any straps ~n many photos. I'm guessing they are tack welded to the turret rails.
For the rear basket, I'm going to put ration boxes inside and water bottle boxes on the water can holder racks. Right now they are loose since I'll need to paint the model first and then I'll add the boxes and

With the model's construction and detailing completed, Jim's LAV is ready for paint and weathering. In our next issue he'll start by adding paint and follow through with the rest of his realistic vignette.
the straps. One point to keep in mind: No items hang off the back of the rack since they interfere with the hull blast shield and the hull antenna, 9.
Antennas One of the reasons I really wanted to make the Command and Control version of the LAVIII is that it has a ton of cool antennas. The most striking are the two large 'T' antennas on the left and right corners of the upper hull. These are provided as really nice photoetch parts. I was worried that trying to fold a square tube might be tough but it turned out to be easy, especially since the top and bottom parts have a nice etched pattern to locate the tube. The result is a strong part.
To the 'T'I added a resin spring base for the aerial that will be added later. I also added a large post type antenna that is provided in the update set. This appears to only be on one of the 'T' supports and I chose the right one for no particular reason other that I have a photo of it installed there. Also shown in the photo are the
wires coming out of the antennas. I made these out of solder wire and the attachment posts I punched using my punch and die set.
The third antenna, in the middle of the upper rear hull, is also provided in the update set. There are a couple of photos of this in the Real Models LAV book and it's noted as being a satellite antenna.
In the photos it's strapped to the center post antenna. My best guess is that it's done that way to raise it high enough so it won't interfere with opening and closing the rear upper hull hatches, 10.
Right side stowage Turning back to the stowage, this is what I've come up with for the right side of the LAV. Like the turret, the boxes are loose so I can paint the model and I'll add straps when I permanently attach them. But the two resin tarps forward of the boxes are mounted since I can paint them while they are already on the model. I did modify the straps on the front one to connect to the brackets. I just shaved off the existing
molded-on strap from the edge to the cross-strap and then replaced it with one made from lead foil, 11.
left side stowage The left side has less stowage than the right. One reason was I really didn't want to block too much of the cool photoetch parts I worked hard to get assembled correctly. I also found four water cans and mounted them in the back rack and ran a small strap made from lead foil. Lastly, you can see the row of boxes that will be lying on the stretcher. These too are loose and will be attached and strapped down after the vehicle is painted, 1 2.
Ready for paint With all the detail I added, it's hard to believe how quickly this kit went together considering the scope of the conversion and the amount of photoetch. In the next issue's installment I'll start painting and put together the basework to help display the LAV. FSM
April2010 W1NW.FineScale.colft SS

......:... io..s &: Answe.. s A clinic for your modeling problems
By Mark Hembree
LMG polishing kit plus more Canadian decals A In the February 2010 FineScale Modeler, Michael Waters of Mills River, N.C. asked for a source for the LMG Professional Polishing Kit, a multi-stage system of mm, cloths, and polishing compounds that does a great job on marred plastic, clear parts, or even high-gloss paint finishes. I gave him an answer that was only partially correct. The product is indeed available from Hobby Road at www.hobbyroad.com. However, the correct mailing address is: Hobby Road,S70W13080 Woods Road, Muskego, Wis. 53150.
Also, several readers have written to let me know that another great source of Canadian air force decals is Leading Edge Models, www.lemdecal.com. 61385 RPO Brentwood, Calgary, Alberta T2L 2K6 Canada. Thanks to our neighbors from the north! Mark Hembree, FSM
Dust bunnies are not cute Q I have a hard time keeping dust out of my paint jobs. I thought I had it figured out, but I just applied the main color coat to the main body panels of my current project, and a few specks of dust still found their way to the wet paint. This project is turning out to be one of my better ones, so I really want a perfect (dust-free) paint job. A friend said I would be better off leaving it alone, and the clear coat will hide it. I was wondering what your advice is. Scott Koenemann Newark, Del.
A Dust can be predicted by Murphy's Law: The focal point of the model (like a canopy) will draw a dust mote like a magnet. A cautious approach will help avoid undoing previous work. To repair a dust blemish :
1) When you're sure the paint is good
and dry, try wiping it down with a soft cloth to erase minor specks. If that doesn't do it, sand gently with very fi ne grit; start at 2,000, "muscle up" to 1,500 or coarser if you need to, and buff back out with progressively ·fjner grits. Wipe off the sanded area and touch up with more of the same paint if it's needed.
2) Dust is tough. Before you paint, make sure the room is tidy. You can also spritz water into the air to knock down dust. If you have an exhaust fan or spray booth, turn on the fan 10-15 minutes before you start painting .
3) Afterwards, cover the model as soon as possible and keep it covered until the paint is dry. Then repeat Step 1!
Revell 's USS Missouri Q We have just purchased a Revell model of the USS Missouri in 1/535 scale (kit No.
Odober 1950: USS Missouri fires a 16" salvo in the Korean War. Big Mo was decommissioned for the . last time in 1992 but still serves as a memorial at Pearl Harbor. U.S. Navy photo.
56 FineScale Modeler April2010
301). It has no propellers. Would there be a good reason for this? The Web site for the USS Missouri shows it should have four props and two rudders; we have one rudder. We are very curious model builders! Dianne Boucher Mirsirsauga, Ontario, Canada
A FSM Associate Editor and inveterate kit acquirer Aaron Skinner chimes in:
The answer to your question reveals much about the history of the plastic model industry and Revell.
Kit No. 301 (originally H-30 1) was made using modified molds for a motorized model with metal prop shafts and a single rudder. This explains the single rudder today and, I suspect, the absence of props on the finished model.
According to Tom Graham in his book Remembering Revell Model Kits (Schiffer, ISBN 978-0-7643-1696-8) the 1953 kit was the first model Revell produced inhouse. Graham writes:
"Whether it was a stroke of genius or of luck, the Missouri turned out to be in the money right from the start, and as late as the 19705 it remained one of the top dozen sellers in the Revell inventory and might rank as Revell's all-time best selling model. "
Revell released the Missouri in two versions: motorized (HM-30) and unmotorized (H-301). Furthermore, in 1955 the molds for H-301 were altered slightly to produce the USS New Jersey (H-316). Revell simply converted the mold for HM-30 to make the non-motorized Missouri H-301. So, while the propulsion system might 'not be quite right, the kit has a special place in scale modeling history. FSM

DISCOUNT PLASTIC MODELS www.DiscountPlosticModels.(om
Save 20 75%On Model Kits and Supplies Over 15,000 Hobby Supplies On line Servin Our Customers Since 1940
www.thedromedory.com Back in business!
Visit our new web site. 585-494-0027
Free nme Hobbies www.freetimehobbies.com
Plastic & Resin Model Super Store Great Prices &Friendly Customer Service. 4167 East First St. Blue Ridge, GA30513
706-946-1120
HILL COUNTRYHOBBY www.hillcountryhobby.com
Son Antonio's newest hobby shop, focusing on plastic kits, accessories and points, for both in·store and internet sales.
9355 Bandera Rd. #109, Son Antonio, TX 78250 (210) 681 2007
HOBBYBUY.COM www.HobbyBuy.(om
Weekly 50%off special sale. New deals every Monday, don 't miss it. Large selection of military items 1/6 to 1/700 in stock and ready to ship!
INTERNATIONAL HOBBY SUPPLY www.internotionolhobby.com
Aircraft, Armor, Ships, Cors, Trucks, . Figures, Deco ls, Books, Paints,
Plastics, Resin, Vinyl, Verlinden
INTERNET HOBBIES www.lnternetHobbies.com
Volume rebate program designed to save you more money, best pri ce guarantee and so much more. We ore your best
source on the web for thousands of hobby items.
JAC HOBBIES www.jochobbies.com Aircraft, Armor and Ships
Excellent products, prices and service equal more value for your dollar! (208) 861-6851
www.Megahobby.com Selling online for over 8years
Website Updated Dai~ • Over 17,000 Items Huge Discounts Free Shipping
Toll free Friendly Service • 888-642-0093
ROLL MODELS www.rollmodels.com
We corry the best from A·Model to Zotz and 37,000 things in between! Findit with our easy-to-useseorch en gine.
763 545-0399
See what you're• •mlsslllg at FineScale.c'om
Register for FREE to enioy these great features: '
• View our current modeling tip
• Post in the Forum
.• Sign up for our free twice-monthly newsletter
• Watch videos
• Manage your account
• And much more!
FiDeScale
Modele~ MAGAZINE
Visit us at FineScale.com today!
SCALE-MODEL-KITS.COM www.Scale-Model-Kits.com
Soviet and WWII models in 1/35, 1/48, 1/72 scale Ace, Amodel, ICM, Miniart, Roden, Skif, UniModels, ...:
Full product line and always in stock
SQUADRON MAIL ORDER www.squodron.com
When you order it from us, we don't order it from somebody else. We ship it.
Ph: (972) 242-8663 Fax: (972) 242-3775
TAUBMAN PLANS www.toubmonsonline.com
loyalhanna Dockyard www.loyolhonnodockyord.com
TOTALNAVY.COM www.TotoINovy.com
ALL SHIPS, ALL NAYIES, ALL KINDS (718) 471-5464
To advertise in the Web site Directory, call
1..888-558-1544, Ext. 549

Rea
, hie
Try a kneaded eraser, sometimes called putty rubber, a pliable material that looks like putty or gum and is used by artists to
remove charcoal or graphite. I use it to hold parts while painting. Like poster putty, it can be shaped to grip items temporarily. And it comes offwithout marking or marring surfaces.
Ifyou use pastels or pencils for weathering, the kneaded eraser can be used to smooth and smudge the materials. It can also be used to remove them, kind of like an, um, eraser. The putty actually absorbs the graphite or powder and doesn't wear away, so there's less friction and no eraser residue.
Kneaded era,sers are inexpensive and can be easily found at artsupply stores. - Rohert van der Gon Netscher Shady Side, Md.
A needed tool on Robert's workbench is a kneaded eraser. He uses it to hold parts for painting and to fine-tune weathering pastels and pencils.
Like sworcls to plows res? I made a handy part holder from an empty, plastic .22-caliber cartridge box.
First, I filled the bottom of the box with a W' layer of florist clay - available at craft
. and florist-supply stores - to add weight to and increase the stabilty of the stand. Then I glued the cartridge grid in place to prevent heavier parts from tipping it.
To hold the parts, I made clip rods: I found two different sizes of alligator clips at a craft store and glued them to salvaged pieces of 12-gauge insulated wire.
Shoot, that's a great idea! Don used an empty cartridge canlainer and homemade clip rods to build a parts holder far painting and drying.
58 FlneScale Modeler April 2010
Now, as I build small parts, I have a place for them to dry where they are easy to find. And the clip-and-wire rods enable me to spray-paint the part instead of my fingers . - Don Poggemiller Bur/ington, Iowa
Distilling dust emovaJ I have a simple, foolproof method for getting rid of dust on displayed aircraft canopies and windscreens: distilled water on a cotton swab. Rub gently and use the other end of the swab to dry it off No residue is left behind, and it looks as good as on a freshly built model. -Dean Berg Brooklyn Center, Minn.
Extended rying for mooth frnish I have been using a clear-plastic food humidifier for several years. I cut out the mesh in several dividers and, except for a small antenna warping slightly when left overnight by accident, I've never had any other problems. It significantly increases the drying time for all types of paint. - Joseph Jones Richardson, Texas
Better decals through fe hnology In this day and age, technology is just a fact of life. Modeling is no different. I recently bought a new scanner/printer for my home computer and, in trying it out, discovered a great modeling tool. I scan all of my decal sheets and save them on the computer. In
the event of a catastrophic failure ofyour decals, you have a backup fIle and can print more onto printer-compatible decal paper! (Be sure you use decal sheet compatible with your printer.) With a photo-editing program, it's also possible to make the existing kit decals better by filling in where the print register isn't complete or is the wrong color. - Richard Smith Drysdale, Victoria, Australia
D not simulate weidings, weld it The best way to recreate weld seams on plastic is to weld with plastic.
I take a piece of stretched sprue about 20mm long and lmm in diameter and chuck it into my motor tool. Then I hold the end of the plastic rod against the surface of the model where I want to add a weld seam and let it spin. As the sprue . melts against the surface, I slowly move it in the direction of the seam to create a bead. Adjusting the speed at which I drag the motor tool affects the thickness of the bead - faster is thinner; slower thicker.
Ifyou use a darker color sprue than the surrounding paint you can replicate the burned area commonly seen at weld sites. With this method, it is possible to join
FSM readers are full of good ideas. For . more creative solutions to modeling conundrums, including a database of tips From past issues, subscribers can visit www.FineScale.com/How To/Tips Dotobose.ospx

l oil .adhesive good fix
u find adding stringers and ribs to the inside of aircraft models frus
trating; it is difficult to handle small strips of plastic and get them into position before gluing. Here is an idea that simplifies everything: Microscale Micro Bare-Metal Foil adhesive.
I apply foil adhesive to one side of a styrene strip. When it's dry but tacky, I cut the strip to the length I need and attach it where it needs to go. The glue is strong enough to hold the strips, but you can still reposition them if need be. Once you have the strip in its final location, I run a bead of liquid cement along it to permanently attach it. - Daniel Buice Clinton Township, Mich.
Using foil adhesive, Daniel spent just 20 minutes adding stringer and rib details inside a 1/72 scale 8-24. The adhesive holds parts but can be moved for adjustment.
plastic with no glue. Practice on a piece of unused plastic to see how to adjust the width of the cord before attempting to do it on the final project.
And remember to wear safety glasses. Dont spin the sprue without touching the plastic, or it may flyaway. - Isidoro Galindo Chihuahua, Mexico
Instructions under glass In Ignacio Allende Casasempere's photo for his tip on workbench storage in FSM December 2009, another tip is visible that was not mentioned. It appears he places his plans under a sheet ofglass. There are two advantages to this. FIrst, the plans are protected; any glue and paint spills are easily scraped away after drying. Second, parts can be built over the plans, maintaining alignment by securing the parts to the glass with small drops of super glue. When the assembly is dry, it can be easily popped off the glass with a razor blade . . - Walt Kiffer Las Vegas, Nev.
Jewel cases have clear advantages Steve Wellman's tip about CD jewel cases
in FSM April 2008 (recently republished on FSMs new Web site) is good. I have an added use for the cases' clear parts. I cut the clear fronts for speedboat windshields and frosted back sections for windows in ship models that are too small to detail inside. Make sure the glossy side is out when you use the frosted section.
The clear parts are great for windows of odd shapes such as a tugboat. I cut them to shape, sand the edges and glue together, . then use styrene strip for the seams. - Gary Geracei New Braunfels, Texas
Find your marbles t clean brushes Here's a quick, easy, and effective way to clean paintbrushes: Add a handful of small, round glass marbles sold in craft and home decor stores to put in flower vases (not the flattened ones) to a jar or container. I use three to four layers of marbles. Then, fill the container with enough solvent or thinner to just c.over the marbles. When you dip, swish, and swirl a brush around and through the submerged spheres, the marbles gently and harmlessly separate the bristles, allowing the solution to better clean and remove paint. When the solution
needs changing, the marbles are easy to rinse clean for repeat use. A minimal investment can keep your brushes in "likenew" condition. -Arthur Longo Port Charlotte, Fla.
Construction calculator helps A great tool for scale modelers is a "construction" calculator. These electronic tools make it easy to convert full-scale measurements or dimensions into whatever scale you are working on. All you need is to hit a few buttons and it will give you measurements down to V64" .
Construction calculators can be found at most hardware and home improvement stores. They're pretty useful around the house, too! -DaveKorn Temecula, Calif
5 w n you Send us your lips! Visil FineScale.com and click on "Conlact Us." Or, you can mail your idea 10 us 01 Reader Tips, FineSca/e Modeler, P.O. Box 1612, Waukesha, WI 53187·1612.
April 2010 _.FineSc:ale.c:oan 59

Wo..kbench Reviews FSM evaluations of new kits on the market
The Harrier is not a big airplane, so Tru';'peler's 1/32 scale kit builds into a compact display.
\ \
\ \ \
., " ~~ \,_,.J ~
-:'-:!./ , ' -~ ~ //... -,. ~/
/ /
~~
Trumpeter jumps into Harrier business in
Trumpeter's all-new kit marks the £rst time the AV-8B Harrier II has been available in 1/32 scale. Light gray sty
rene features finely engraved panel lines, though I did notice what appears to be a slight mold defect on the sides of both fuselage halves near the front and below the vertical stab.
The kit is packed with detail, including a comprehensive Pegasus engine, separate control surfaces on the wings and the vertical stabilizer, pose able canopy, auxiliary inlet doors, speed brake, forward air dam, rear stabilators, and engine nozzles. There also is an extensive list of external stores: AlM-9 Sidewinder and Maverick missiles; two fuel tanks; a fuselage gun pod; Mk.82, Mk.117, and GBU-12 bombs; and MER and TER bomb racks. In addition, the landing gear and wheel wells are finely detailed, too.
The cockpit has raised details for the side consoles, floor, rear bulkhead, and instrument panel, and a photoetched-metal part for the cockpit rear deck.
Included is a two-sided, four-view color diagram for painting and decaling both Marine Harrier schemes, as well as a single-sided schematic for external-stores decals and painting.
60 FineSc:ale Modeler April 2010
Construction started with the ejection seat and cockpit. I used the kit decals for the side consoles and instrument panel; with a little setting solution, the decals conformed to the raised detail. The decal for the center lower instrument panel was not a good match for the engraved detail, but I used it anyway.
The multi-piece ejection seat looks OK, though I don't think the photoetched-metal seat belts and shoulder harnesses are very convincing.
When it came time to glue the completed cockpit into the front fuselage halves, I noticed a gap on the left side , between the cockpit side wall arid the fuselage sill. It turns out that the top edge on
the left side wall did not have the same angle as the fuselage, leaving a large gap at the front. I was able to correct this with some styrene sheet and strip, building up the side wall to match the right side.
The nose landing gear must be assembled and installed' before the rrose halves are glued together. I had to shorten Part E12 so the nose strut looked like it was weightcompressed, or the nose gear would have looked way too tall. There is a small blade antenna on the nose that was molded too far forward; it looked funny to me, so I cut off the antenna and moved it back.
Moving on to the engine and rear fuselage, I found the intake duct had four prominent ejector-pin marks that needed filling. Mter studying the instructions, I realized there was no way to display the completed engine, so I assembled only the basic engine components and left out all the detail parts.
The rear fuselage went together well, and I needed no filler on the seams. I found the four engine nozzles somewhat fiddly; each has two internal air vanes that must be positioned exactly right before the halves can be glued together. The completed cock- , pit/nose section and fuselage fit together well.

The McDonnell Douglas AV-88 Harrier II was developed from the Hawker Siddeley Harrier family of VSTOL close air-support attack aircraft_ With a more powerful engine, aeroclynamic advances, and increased weapons load, the Harrier II was a significant improvement from its predecessor_
big way I deviated from the instructions to
attach the air intake ducts : Trumpeter would have you either open or close all the auxiliary air doors on the rear of the intakes; according to my references, the top door would be opened and the bottom ones closed if the engine was not running. I posed mine that way.
The wing assembly's fIt to the fuselage was OK. There was a small step on the rear seam, but I left it that way rather than risk sanding away adjoining details. There also are two small scoops with locating pins that go on the main wing assembly, but there is no mention in the instructions to drill their locator holes. I cut off the pins and located them according to the four-view painting diagram.
I added the fuselage strakes in place of the gun pods, which were incorrectly molded with a cannon barrel in each side (actually, one side of the pod has the gun and the other side carries the ammunition). Then I assembled the weapons pylons and attached them to the Wing.
I painted my Harrier with Model Master enamels according to the instructions, and I used Alclad II for the rear nozzles and nozzle blast plates. Mter the paint dried, I gave the model a glossy finish of
Pledge Future floor polish followed by a sludge wash.
The decals performed well, settling down without any setting solution. My only trouble was they tended to stick where they landed and were quite thin and easy to tear, so I made sure I had a small puddle of water where I was going to place t~em and used a cotton swab to push down the decal and absorb excess water.
I used the drop tanks, even though the pylon mounting points were weirdly shaped (almost toylike) flnd the tanks seated too low from the pylon. I was going to mount the TER bomb racks on the middle pylons, but the molded holes in the bomb racks did not match the sway braces on the pylons (the holes were too far apart). So, I gave up and used only the fuel tanks. Strangely, the kit provides two AlM-9 Sidewinder and Maverick missiles - but there are no launch rails for them!
I saved the outrigger landing gear for last. Ensuring my Harrier sat properly on all four landing points, I ending up trimming at least W' off each of the outrigger oleo struts, test-fitting to make sure the model was sitting properly, then gluing them into position.
I spent about 30 hours on my Harrier, a
little more than normal due to fixing the cockpit side wall and trimming the outrigger struts. The finished model looks like a Harrier, but the external stores' shapes and missing launch rails were disappointing for a kit of this caliber.
- Jon Hergenrother
Kit: No. 2229 Scale: 1/32 Manufacturer: Trumpeter,
www.trumpeter-china.com. from Stevens International, 856-435-1555,
www.stevenshobby.com Price: $169.95 Comments: Injection-molded, 432 parts
(4 vinyl, 11 photoetched-metall, decals
for two aircraft Pras: High level of detail;
good wing and fuselage fits; fine decals
Cons: Inaccurate external stores and
stencils; no launch rails for missiles
Apri12010 www_FineScale_colft 61

Wo..kbencb Reviews·
IIaIeri's Opel Blitz kit has gone through many pennuIatiCK1S since the 19705. The latest is this Tankwagen.
Italeri Kfz 385 Tankwagen
Italeri's Tankwagen is the latest in a long line of kits based on the Opel Blitz originally released in the 1970s. Ifyou've built
any of these, you'll find little new here. One of the three sprues is new to this kit; the rest are from previous releases, supplying you with plenty of extras for your spareparts box. Because of the aged molds, there are mold seams, flash, and ejector-pin marks to dean up, but nothing posing a major problem. Sprue A is not labeled, so the parts list is a must.
Construction is straightforward, starting with the frame and suspension. In Step 3,
Kfz. 385 Tankwagen 1'15 + ITALatl
Kit: No. 6467 Scale: 1/35 Manufacturer: Italeri, www.italeri.com. from Model Rectifier Corporation, 732225-2100, www.modelrectifier.com Price: $46 Comments: Injectionmalded, 235 parts (8 vinyl, 8 acetate film), decals for three vehicles Pros: Easy assembly; great clear parts Cons: Vinyl tires cracking; somedunky parts
the trailer-hitch mounting bracket is not numbered; it should be 28B. The front wheels are free to turn ifyou take care assembling the front axle. The tires are vinyl, devoid ofdetail, and several of mine are already cracking. There is play in the gas tank's placement, so I left it off until the cab was glued to the frame after painting so it didn't interfere with the cab.
As with the other kits in this series, the cab and bonnet construction are the most difficult. I skipped Step 5 (cab interior) and went right to Step 6, the bonnet and frontfender assembly, firming it up by gluing Part 10C (the windshield) to it. The hood tie-downs are not shown in the directions but are included as parts 16A (they are shown in the box art).
I left the seat, gearshift, steering wheel, and dashboard out of the interior to make painting easier. The seat has no detail; it will look better ifyou at least give it some kind of texture. There are two floorboards included in the kit; make sure you have the right one, Part 30A. The cab interior has some surface imperfections to sand. I glued the doors and floor to the rear of the cab at the same time to make sure everything lined up. Once this assembly was dry enough to handle, I glued it to the bonnet and added all the accessories.
The license plate was not numbered (it is Part 53A). There is a small T-shaped piece on the driver's-side fender that is not numbered in Step 10; it is found on the A sprue, but is shown as not being used.
The fuel tank went together with no
problems. I glued Part 1 C to the fuel tank, not to the frame as shown in Step 7. You have the option of leaving the doors open on the rear of the tank to show all the pipes and valves of the pump. I chose to close the doors because I did not have a good photo of the area to paint it accurately.
In Step 11, Part 28B should be labeled 28C. The taillights lacked detail, so I drilled them out and added Kristal Klear for lenses. The cab, frame, tank, tires, and spare-tire rack were all left as subassemblies for easier painting.
You have three choices ofvehicle colors: dark yellow; Panzer gray; and dark yellow with green camouflage. I chose the last, painting with Tamiya dark yellow, Tamiya J.A. green, and Humbrol German green. There was some silvering of the decals, likely due to my preparation of the model. I weathered with Mig Productions washes, filters, and pigments, and dry-brushing.
At the last, I glued together the subassemblies, drilled out the end of the tailpipe, added the muffler, then installed the windows. The clear parts are precut on an adhesive backing; all you have to do is pull them off the sheet.
This enjoyable build gives us something different in "soft-skin" vehicles. It took only 18 hours to build, most of it painting and weathering. Adding resin tires, Archer gauges, some seat detail, and some of the aftermarket photoetched-metal parts made for the other kits in this series would make this Tankwagen terrific.
- Mike Scharf
62 FineScale Modeler April 2010

Carrying more than 200 passengers, the 787-8 is designed 10 replace the 767 for long Rights.
Zvezda Boeing 787-8 Dreamliner
Boeing's newest commercial aircraft, the 787 Dreamliner, took to the air for the first time in December 2009,
two years behind schedule. But Zvezda's 1/144 scale kit has arrived just in time.
Just as Boeing's Creation is an engineering marvel, Zvezda's kit is an ingenious tour deforce - in fact, the finest scale plastic airliner I've ever built. I said this about the Russian company's THE KIT'S front fans comprise interlocking 767-300 in November 2009's sets of blades that form seeTRUE Workbench Reviews - but through disks that can rotate. MARVEL ISZvezda has outdone itself These mount to the framework,
The medium gray molding THE ... and make up much of the intake exhibits extra-fine recessed panel trunk. Once these and the rear hotENGINES
The landing gear, like Zvezda's other airliners, is finely molded; several parts come together to form a deceptively strong component without compromising scale appearance. There is detail in the gear wells, but they are boxed in.
The kit's true marvel is the Rolls-Royce Trent 1000 engines; easy to build, easy to
paint, and effectiyely detailed. The
lines, a nice touch in a small-scale kit. Unfortunately, the lines are almost too fine and likely to disappear under primer and paint; I deepened them a bit, especially around the control surfaces.
The lower wing is a single piece incorporating a section of the plane's belly; it fits well while setting the 787's distinctive dihedral, including the slight change in angle outboard of the engine mounts. The upswept, curved winglets, molded as one piece with the upper wings, are beautifully thin, as are the trailing edges.
The fuselage halves capture the graceful lines of the Dreamliner's nose and tail. Cabin windows are molded open with strips of clear inserts provided; I left those out in favor of filling the windows with Testors Clear Part Cement & Window Maker. The windshield is an insert that fits well with a little work. The framework is clearly molded, making masking easier.
sections are sandwiched in the cowlings, the result is the most
realistic model turbofan I've ever seen. The intake rings and the cowling rear, including the noise-reducing scallops, are single pieces, eliminating filling and sanding.
Everything fit well; just a little filler on the fuselage seam eliminated all traces of it. The fan blades are very fragile, and a couple had broken at the hub on my example, but I was able to fix them easily. I left the intake rings off for painting, as well as the wing and horizontal stabilizers.
Decals provide markings for the first test aircraft, N787BA, but include only titles, registration, and door surrounds. This means lots of masking and painting to achieve Boeing's attractive house scheme.
I primed with Tamiya white fine-surface primer, which also served as the base white, then masked the swoopy white line that circles the fuselage and masked the upper
surfaces to remain white, using paper masks raised at the edges for a soft demarcation. The lighter blue is a mix of Polly Scale GN Big Sky blue and St. Lawrence blue. Next, I laid sheets of Mr. Hobby 1mm Mr. Flnely Slit Masking Sheet (No. GT53) on the rear section of the cabin, removed every other strip, then sprayed Polly Scale CSX blue.
The decals were thin and went down OK, but they reacted to Micro ·Sol and wrinkled badly.
The model looks like photos of Boeing's test aircraft and is impressively large. And the kit even includes a stand! It was a fun, easy build except for the difficult paint scheme - but I suspect we'll see a flood of aftermarket decals as the Dreamliner enters service, addressing the kit's only drawback.
- Aaron Skinner
Kit: No. 7008 Scale: 1/144 Manufacturer: Zvezda, www.zvezda. org.ru, from Dragon Models USA, 626968-0322, wwW.dragonmodelsusa.com Price: $29.95 Comments: Injectionmolded, 74 parts, decals for one aircraft Pros: Terrific fit; smart engineering; well detailed Cons: Recessed panel lines are almost too fine; intricate scheme requires complex masking and painting
April2010 _.FineScale.coftl 63

Wo..kbenc:h Reviews
Trumpeter M1117 Guardian ASV
Designed by Cadillac Gage, makers of the M706 of Vietnam ser
vice, the Mll17 provides patrolling troops more protection than up-armored Humvees_
During the early days of the Iraq War, the vulnerabilities of Humvees for convoy security quickly demon
strated they were not designed for this role. A different vehicle was needed to withstand the threats to such patrols. Enter the Guardian Armored Security Vehicle.
Kit: No. 01541 Scale: 1/35 Manufacturer: Trumpeter, www.trumpeter-china.com. from Stevens International, 856-435- J555, www.stevenshobby,com Price: $37.95
'. Comments: Injection-molded, 363 ports (4 vinyl tires, 35 photoetched-metal, chain), decals Pros: First M 1 J7 in 1/35 scale; outstanding ports fit; realistic tires and non-skid surfaces Cons: No interior detail; no figures
Trumpeter's Mll17 ASV is the first time this vehicle has been modeled in 1/35 scale. The numerous parts (363 total) are flash-free and crisp, and the molded nonskid surface detail is especially impressive. Vinyl Michelin run-flat tires are provided, and two photoetched-metal frets are included. Clear parts, separately bagged, are crystal-clear and scratch-free. Instructions feature a parts-tree MOLDED paint scheme, I pre-shaded panel breakdown, a color paint and lines with Tamiya gloss black NON-SKID decal guide, and 10 pages with 14 decanted from a spray can before SURFACEeasy-to-follow steps. applying an overall coat of Model
Construction begins with the DETAIL IS ... Master U.S. ArmylMarines sand. independent suspension, essential Tamiya pastels dirtied the tires IMPRESSIVE for all four tires to stand firmly on the ground. Fit of the parts is perfect if take care during assembly to be sure everything is correct.
Assembly of the crew compartment comes next. All of the armor slabs are added to the body separately. I was amazed at how well each of these fit; there were no gaps between the slabs. Unfortunately, no interior detail was included (hopefully, an aftermarket set will become available). The photoetched-metal grille at the top of the crew compartment is an optional part; I recommend it, as it really stands out. The taillight assemblies were a bit tricky; follow
appropriately. All of my reference photos
showed Mll7s with a radio antenna sticking up from the rear of the vehicle. I replicated this by adding a light-gauge guitar string and used green thread to hold it down.
My Guardian took 18 hours to complete, far less than what I had anticipated when opening the box. With the excellent parts fit and such easy instructions, Trumpeter's M1ll7 would be a perfect choice for anyone who's built a kit or two. Highly recommended!
- Chris Oglesby
the instructions closely and check your reference photos for proper location.
Turret assembly is easy and straightforward, the bulletproof glass pieces fit snugly, and the M2 Browning machine gun and Mk.19 grenade gun look lethal. The turret swivels and the weapons move up and down, so you can pose them as you wish.
To help break up the monotone
64 FineScale Modeler April 2010

/
The ultimate expression of the Focke-Wulf Fw 190 was the lale
war, long-winged Ta 152H-l.
Art Model To 152H-1
Anew company, Art Model, includes the Focke-WulfTa 152 in its small but unique selection of kits. It's basi
cally a short-run type of kit, but the slightly soft plastic molding features good engraved detail. Also provided are resin main wheels and decals for one colorful scheme. Most modelers will ignore the bright green decals for the instrument panel and side console; I painted mine instead.
You will need to trim lots ofplastic from the cockpit tub width to make it fit . Same goes for the exhaust pipes, which must be inserted from inside (after much trimming) . Further trimming and fit checks are the name of the game while building this kit.
Adequate detail is included, with some nice scribing, but all joining surfaces need test-fits and flash-trimming. A wing spar is included, as are structural details for the wheel well- again, a lot of trimming is in order. The landing gear is nice, but the gear doors are about W' too long (yet easily trimmed). Actually, I think the gear legs may also be too long as well, but I left them as-is. The wing fits well at its roots but needs a bit of filler at the front and rear where it joins the fuselage underside. The trailing edge is commendably thin, and the
wing guns are supplied as small rods that pass through the leading edge to the wing spar - neat!
The cowling is supplied with open flaps , but their rear edges need thinning. The upper cowl panel is much too small- it should probably be replaced. The propeller is fussy, too, requiring individual alignment of all three blades. I suspect the blades are a little off in shape (check references).
The instructions incorrectly show the armored headrest at the front edge of the sliding portion of the canopy. It should be mounted further in - check photos for placement. The clear parts are adequate for a closed hood, but purists will want to replace them - assuming they have added enough cockpit detail to warrant the work.
Mter completing assembly and smoothing seams, I used Testors paint for a latewar camo scheme. Applying the decals worried me at first, given the strange cockpit panel color. Luckily, the color choice did not reflect the quality of the decal printing. All decals worked over a gloss coat as advertised, with no issues or silvering. I did have a few wrinkles in the defense bands on the fuselage - probably my own fault for rushing. Surprisingly, the white of the spinner spiral was adequately opaque.
Despite all the trimming, filling, and prep work, Art Model's Ta 152 builds into a nice model. It measures a bit short in span and length but looks the part. Purists will replace some of the missing or "soft" details.
I spent about 13 hours on my model, and I'm pleased. A modeler with experience in fixing and improving fits will not have any trouble with this kit, either.
- Chuck Davis
Kit: No. AM72Q4 Scale: 1/72 Manufacturer: Art Model, available from scale·model-kits.com Price: $15.45
Comments: Injection·molded, 50 parts (2 resin), decals Pros: Captures the look; innovative replication of wing guns
Cons: Cockpit decals wrong color; rough
molding; fussy fits
April2010 _.FineScale_coln 6S

Wo..kbench Reviews
·Tam'iya JSU-152
As expected, Tamiya has followed up 2007's JS-2 heavy tank with the JSU-152, the Red Army's heavy-hit
ting, self-propelled gun based on the same
~~~~~~J5U-152
Kit: No. 35303 Scale: 1/35 Ma'nufacturer: Tamiya, www.tamiya.com. from Tamiya America, 800-826-4922, www.tamiyausa.com Price: $59 Comments: Injectionmolded, 413 parts (2 photoetched-metal, 2 vinyl tracks, 31 vinyl palycaps, nylon string), decals for 4 vehicles Pros: Accurate shapes; easy build; vinyl and link-and-Iength plastic tracks; DShK machine gun; figures Cons: Minor fit
. problems; ejector-pin marks in each track link
66 FineScale Modeler April2010
chassis. The 152mm-toting behemoth has long been a favorite of Eastern Front modelers, but Tamiya's kit trumps older offerings from Dragon in terms of accuracy, and Zvezda in ease of construction.
Molded in dark green plastic, the kit shares many parts with the JS-2: namely, the lower hull, running gear, and engine deck.
New parts are included for the blocky superstructure and main gun. The slab sides of the fighting compartment have molded pits and dimples that replicate rolled steel, and the mantlet features casting texture typical of the real vehicle. The main gun
,comprises halves for the barrel and a sepa
rate one-piece muzzle with cleanly molded fluting.
New also is a well-molded DShK machine gun as'seen on some wartime JSUs. Optionalloader's-hatch surrounds include the gun's mount.
As with the JS-2, both vinyl (rubber band) and plastic link-and-Iength tracks are provided. A jig to mold the latter into the upper-run sag characteristic of the vehicle is also included.
Photoetched-metal engine grilles, separate periscopes, a posable driver's visor, nicely molded loader and commander figures, and, unlike the JS-2, a clear headlight lens are among the kit's salient points.

Known by Red Army soldiers as "Big Hunter" or "Glorious Beast," the JSU- 1 52 ~as able to toke out German Panther and TIger tonks.
Decals provide markings for four late-war The lower edge of the fighting compartSoviet ]SU-152s. ment rear wall is too long, interfering with
Typical of modern Tamiya kits, con the fit of the sponson filler plates and the struction went very smoothly lower hull. I trimmed Vt6" from the with only a couple of things to THE TWO ends and everything fit fine. watch out for. There's no need to worry about PART GUN
Starting at the front hull plate, the two-part gun barrel; it fits perBARREL ..•I forgot the lesson of the ]S-2 fectly, and careful sanding elimiand added the spare-track links as FITS nates the seam. The beautifully instructed before building the fluted muzzle fits well, too. PERFECTLY hull. The links overlap the gap at the nose, complicating cleanup.
I left the wheels off until after painting, but I added the torsion-bar arms. They are keyed with a small locator pin to sit level, making the provided alignment jigs (parts A14) almost unnecessary. Articulating the suspension would be a simple matter of trimming the pins.
Step 4 is the construction of four auxiliary fuel tanks for the rear hull. These parts feature the most obvious seams on the models. A couple of applications ofMr. Surfacer 500 and sanding obliterated them.
The superstructure goes together well, with most of the seams hidden at natural joins. Pay attention in steps 10 and 12 to be sure you drill all of the holes required.
Step 11 revealed the kit's biggest issue:
Vinyl polycaps allow the gun to elevate and traverse, but you'll
have to do a little surgery (clearly spelled out in the- in~tructions) to achieve the latter. Also, careful gluing allows the mantlet cover (Part G47) to move as the gun does. The loader's hatch is similarly designed to be movable and works very well. I glued the upper hatch open because it didn't want to stay up by itself
The string provided for tow cables is flexible and looks the part, but it frays easily during handling and cutting. A drop of super glue on the tips prevents it from coming apart before the ends are attached.
Enamored of the large white 43s of marking option C, I didn't fit the DShK and left the shovel and pickaxe off until after painting and decaling.
Mter priming the model with Polly Scale roof brown and airbrushing Model Master Acryl Russian armor green, I weathered with Mig Productions washes and pigments.
The link-and-Iength tracks assembled easily but needed extra work to remove small ejector-pin marks on the inside of each link.
The lO"-long finished model looks right, capturing the big vehicle's stance and bulk well. Photos show these self-propelled guns with heavy weathering -and missing fenders. The kit's easy construction should make it a great focal point for dioramas.
- Aaron Skinner
April2010 __FineScale_coln 67

Built from 1934-1957, Citroen's low-slung, front-wheel-drive car proved papular with military and civilian drivers alike.
Wo..kbench Reviews
Tamiya Citroen Traction 11 CV
Ever since Tamiya released its 1/48 scale Citroen Traction llCV Staff Car a few years ago, 1/35 scale model
ers have hoped it would be upsized to fit the rest of their collection. Their hopes hopes have been answered with an excellent kit of the popular French car.
You'll realize just how simple this kit is as soon as you open the box. Most of the parts are molded in a standard dark gray plastic) with a clear sprue for the windows and a set of poly caps for the tires. Also included is a decal sheet and, of course, Tamiya's always-excellent instructions.
Kit: No. 35301 Scale: 1/35 Manufacturer: Tamiya, www.tamiya.com. from Tamiya America, 800-826-4922, www.tamiyausa.com Price: $28 Comments: Injectionmolded, 66 paris, decals Pros: Good detail; low paris count; several building variations Cons: Windows fit tightly and were difficult to mask
The kit can be built in several variants. Decals and instructions call out five different sets of markings: two for French civilian cars; one for a French army car; and two World War II Wehrmacht options.
The parts breakdown is similar to the previously released 1/48 scale kit, but 1/35 scale accommodates a THE few more details. Both front seat area. Two small strips of stySEPARATE doors are now molded separately, rene may be needed to close offDOORSallowing them to be open or these openings. closed, and door handles are ARE A NICE With open doors, separate molded separately for easier windows were a must. But theseTOUCH painting. Front fenders are molded separately, too, making two-tone schemes easier to paint. The windows are molded as individual pieces, too, a step up from the one-piece glass of the smaller scale (more about the glass later).
The tires are molded in styrene with the wheels included. The back sides take two separate pieces that enclose a polycap to allow the wheels to move on their axles. How.ever, the front axles are molded straight ahead with no way to turn. Detail is crisp and will receive painting and weathering very well.
The front suspension consists of separate lower arms and individual shocks. The rear suspension has only a rear axle.
This is a curbside model- no engine, only the lower half of the chassis pan and a separate full-length exhaust.
The i~terior is simple: Two front seats, a
have two issues that slightly spoiled the build.
First is the need to mask and spray the window frames, using a kit-supplied, printed guide. Even as closely as I tried to follow them, I still had some borders that came out too large, and some that just looked odd. Kit-supplied tape masks would be a big help.
The second problem was the tight, precise fit of the windows into the body; the windows barely fit, and the front and rear ones showed stress cracks from trying to get them in. Maybe sanding the openings before paint will help, but I would have preferred a bit more leeway for installation.
Other than those two small points, this kit really is a gem. It is the perfect car for building up a diorama, weathering practice, or just a quick build for relaxation.
-ClayKemp
rear bench seat, a dash, a steering wheel, and that's it. Again, the separate doors are nice for showing the interior or the kitsupplied driver. Because I built a civilian version, I left out the driver figure.
Mter the body is installed over the chassis, there is a gap at each rear wheel well opening into the rear
68 FineScale Modeler April2010

ARA Press The Spaceship Enthusiasts'
One-Stop Data Shop!
Available Again! Rockets of the World
by Peter Alway
• 200 versions of 139 rockets from 14 countries.
t<Ol "h..I · l'~• Historical
\\(Utl .l)Backgrounds.
• 384 Pages.
• Detailed Data Drawings.
• Durable Smythsewn hard ~ cover binding.
• Over 180 BaW photos.
Only $35! (plus shipping)
All of the Annual Supplements to Rockets of the World plus
Twelve Soviet Missiles
• All-new subjects with no overlap between the book or Supplements.
• Softcover, laser printed_
• Color cover plus 15 to 18 BaW photos per booklet
• Spiral wire bound wi scuff resistant polymer covers.
• Detailed Data Drawings.
• 32-34 Pages each
Only $18.00 each! (plus shipping)
Please visit our website to order on-line
FineScale readers get 15%off! (enter code "FSMcR" at checkout)
All Credit Cards and PayPal accepted
Call or write "[email protected]" for shipping options .
Sales tax added· to California orders
ARA Press 785 Jefferson Avenue
Livermore, CA 94550
(925) 455-1143
www.arapress_com
Che..ish a gena of naa..itinae histo.. y! Classic New York Harbor' . The first in Bluejacket's new line of
Diesel Tug KIT: $245 "Great American Work Boats" LOA .• ... .... 16. ITEM# Kl080 SCAlE ... ... 3116" Our Classic HEIGHT ... 9"
basewood
Diesel Tug is designed for the less experienced builder. It comes complete with carved
hull, ' laser cut wood, etched brass, custom cast Britannia metal fittings, and clear, concise
plans and instruction manual. An independent web site has been developed to answer
questions, provide guidance, and establish a modeling community.
bBY;:#i4fi!i~;; 160 E. Main SI. (Rte.l) Searsport, ME 04974
CAll FOR OUR CATALOG!
Thousands of plastic kits In stock! Cottage indusbies al1l our specially! II we haven't got It, we'll get II!
MERLIN 11194 SeIH4 iIli4~~1t~ii~!l!O~!_VLZ j.1_ZQL~~!Y_I9!_f!.{l 24436 Mitsubishi 1MFI j):~Qi:~~jy:~:~~ .1J.~Q~_G~~LGl.<t~ fL~_N~P,~,~_VL~ 11206 DH5 j):~Qi:9!i!mlJlj!f! ~?..F.!_
~!<JT[l!;~! .1_1_2.~_f9!<!<~!_S'{p.~11l_W.~ l.1_~_P.~~~Y~!~Y~lJIpj[~
D.l.lI?_4 J.1.2_lQ_9!t~ l.1_m_~.I!IJfj[~ J.1.m .!to.® _1\1JI_e_~gjQ1:-11
e_E~rt 1_1_2_1B[l!;!<!I~_e_d.9_~o.Q
M¥Jp!1!!l~ l.1.m_Pf!\R_Qrl 11220 Hawker Woodcock ji~~i:~:~~~~j!t~~ijQ:~~-1.1_4~Uj~[',,!.~_eQ!l! 11223 FB5 Gun Bus ii-224-J;';'-kerS-j~i-lf72 i)li~j~~j)T----
l>J<t!I9.e~_'!!I J.1_~~_~J~YJl!l.r!_1.l f?'o.l~_~~~!~Q~.lY!lPj~_lI?_4 f?D.2.1_Cy!!iG; .J_'!1.J_~QIJY 27035 Gee Bee Racer 1(72 ~jl~Q~:K~~~~~ri~~iii
M~J~~ J.1.m_tJjl_®AIJI~!lt;!Yl
9:~?1~~ ~?'Ql~_!'!.<!I\aj[IJI1!.[<j~~_l~~ ?.1.~U~Jl.r_·?jl.~
il!r.<!'<'lIJl_etll?_Z 11195 seUIS niil~:~~:G.~~JY_l~~ 21871 Heinkel162B lf72 iIQ1~j!~~j,j:i1iC-27030 Junkers EFI26 1(72 ~i~~~~ijj~ib~~irf~.i9r
If!_~ ??'o.lZ_~Y_~Qr~Q~_l~Z 27031 Curtiss p.40a lf72 24340-A~;a~k-C~i&3ii-40 :??:Q~j:~Q~~jEQZiw.~ 27032 l OCkheed 10 -------~i~iiii~-
?_8_~IH_fI~l~J1.'!Q_l~~ f?_2_!l.1_BY!T!p!eJ_Q,1 25450 Heinkel 1620 ijii~~j:~~!!iLQij.9.~uy_@ ~~_~:~P.lP'-!U!Q
P_"'.90_Q~ ??L1L~~-']1}~[i[lJ'_~,1
l>J:jl_n_~~!'!_Il<!~
Barb and Jerry Bindus Shop: 517/423-3684 117 E. Chicago Blvd. Fax: 734/761-3212 Tecumseh, MI 49286 Web: www.jbart1obbies.com
Hours: Tuesday Saturday 10:ooam - 5:00pm
April 2010 WW1N_nneScale.colft 69
.
sty~~np sJ0~s,She·.~~ ~~, fhapes for ~f.1!tf~~~ilding andmodel ,ailing.
At yo"lli 'or h bby ret.;,.,
eVer&reen scale models
Call or write for free product information 18620-F 141st Ave. NE, Woodinville, WA 98072
Toll-free: 877-376-9099 Fax: 425-402-7948 www.EvergreenScaleModels.com

~':!oa~aTasca 1/35 Scale 31 WSS
S3w Ie t . 26 27 Japan
w'!!~~~!~ Phone/Fax (708)423-7202
(Mon.-Fri. 4:00-7:00PM Sal. 10:00-5:00 CST) ++ Visit our atore 81:9239 S . Cicero Ave.Oak Lawn,ll ++
Neo Grade 1/35 Scale 69.95 17 Tiger I 88mm Ammo 28.99
S~'I~~: Ji:g4~~ei1~n!TZ Acc. 24~.~ 398~ ~~n~~~lg: -¥t_~E~cale 39.99
1l&k95~Y!jM ·~~~r:.u· LB 55.99 13 Marder IIIAu sf.H Update46.00
19.9814 Marder III Rear Platform 8.00 19.98 15 M2 .50 Cal (2 gun9) 25.00
~n~rmr( ~~~~5~ Pt.314 .00 ~~a~~~3~~al. 8.00 68 RAAF Color 1940 PtA 14.00 27 Ml025 Hum\lee Wheels 25.00 Pit Road 1/36 Scale 32 USMC LAV Wheels 39.00 116 Type 52 Earty TypeYlslt J,~r~~~ ;~bO§\r.D Device 22.00
www.home.earthllnk.net/-mmodels/ .. Available Aber,ValleJo & Model Air Paint & Accessorl....
Addil iona' Products Ava ll.bl. - Sind SS.oo For Catalog (C ••W .O.only) . Ordering In6tructlons :,.NoSlampsorC.O.D.'S
Il Rcsidenls Add l~.OO% S",los T~x >Chocks & M.O.'s In US S
;~~~~~oa;:C~~d;I;.~;dd: E-Maa: ~!~:o~~t~~:~:~~~ Cle",r_ $50.00 and oyor $8.75 mmode".ear1hlink.nal 520 mioimum order.
Visa/Maslercard Acce ted
PAINTING AND FI ISHING SPECIAL!
Expert help to make your models look great
USE SILLY PUTTY FOR ASKI G
No tape required! by Bob Downie
1941 CHEVY: EXTREME KITBASH PRO~ECT
Tim Boyd shows how to make the model you really want
ON SA EMARCH 2 Subscribe today!
1-800-533-6644 Order online at
www.ScaleAutoMag.com
70 FineSc:ale Modele.. April 2010
PLASnCWELD General Purpose Plastic Cement
BONDENE Styrene
Plastic Cement
WELDENE Non-Toxic
5tyIeno ear..m
A CEMENT FOR EVERY REASON To order our 155 page VOL 8 Catalog of over 4000 different scale model parts. send $5.00 to:
~~~SM10 . OIyof 1ndus1ry, CA 91748
Ad Index We believe that our readers arc as important as our advertisers. If you do not rt:ceivc your merchandise or a reply from an advertiser widUn a reasonable period, plc.:ase contact us. Provide derails about what you ordered and the amount you paid. If no action is obtained after we forward your complaint to the advertiser, we will not accept fu.rther advertising from them. FineSrale Modeler magazine. 21027 Crossroads Circle, Waukesha, WI 53187
The Advertiser Index is provided as aservice to RnBScaJe Modeler magazine readers. The magazine Is not responsible for omissions or fO( typograpnlca1 errors in names or page numbers.
ARA Press,::-:-_---:__________ __69 "Bluejacket Shlpcrafters 69 Cedar Creek Trading Post 71 Colpar Hobbies 71 Custom Display Cases 7 Dean's Hobby Stop 71 Dioramas Plus 71 Discount Plastic Models 57 Dragon Models USA 3 Evergreen Scale Models 69 Fantastic Plastic Models 71 FineScale Modeler magazine 70 FineScale.com 57 Free Time Hobbies 57 Fusion Models 71 G-S Supplies 71 Gold Medal Models 13 Gorilla G lue 15 Hill Country Hobby 57 HobbyBuy.com 57,71 International Hobby Supply 57 Internet Hobbies, Inc. 7,57 IPMS Niag-Jra Frontier Chapter 71 J Bar Hobbies 69 JAC Hobbies 57 Loyalhanna Dockyarclffaubman 57 M &Modcls 70 Megahobby.com 57 Merit International 7 Micro-Mark 13 Model Rectifier Corp. 2,76 Monarch Models 71 Nostalgic Plastic 71 oldmodelkits.com 71 Pace Enterprises 69 Pacific Coast Models 71 Plastruet, Inc. 70 Portrayal Press 71 Rare-Plane Detective 7 Rob's Hobbies and Toys.com 71 Roll Models 57 Scale Auto magazine 70 The Scale Card 71 Sealc-Model- lGts.eom 57,69 Sentai Distributors Int. 15 Skytrex 71 Sprue Brothers 71 Squadron.com 57, 75 Stevens International 4 Strike Force Hobbies 71 TaigTools 13 Tamiya America, Inc. 23 Testor Corporation 17 The Dromedary 57 TotalNavy.com 57 War Shop, The 7 Zona Tool 71
In the next FSM
COVER STORY FUGHT DECK DIORAMA A homemade carrier deck and sculpted, resin-cast ngures bring a 1/32 scale F/A18C to life.
MOST WANTED KITS! What new kit do you want most? Your chance to tell us starts in the May FSM!
TYPE liB U-BOAT Convert a Type IIA U-boat to Type liB in 1/72 scale.
PANZER IV IN WINTER CAMOUFLAGE Get a German tank ready for the Eastern Front.
MASKING TIPS Expert modeling depends on precise painting - we'll show you how! .
ON SALE APRIL 6!
Look for the May FineScale Modeler magazine at your local hobby shop.
SUBSCRIBE TODAY 1·800·533·6644 Order online at www.FineScale.com
FlaeScale
Modele~ MAGAZINE

-----------------~ Rare Kits? • 4000+ kits in stock • online inventory • we buy kit collections
www.oldmodelkits.com
* Hobbies and Toys .~~ * Plastic and Diecast Models . * Airplanes * Cars * Military Armor Ships*Sci-Fi * Order Online or Call (407) 384-9719
www.robshobbiesandtoys.com
BUFFCON 27 SCALE MODELING SHOW
Sunday, April 11, 2010 Sponsored by IPMS Niagara Frontier
. "The Bu./fcon Boys" Knights of Columbus Club Hall 2735 Union Rd. at William St.
Cheektowaga (Buffalo), NY \\ Ww.lIllps niagd l .lfl 011 [1(.: r l.:OIll to! detail s
FOI 111011.. IIlfOlm.n ion. L.dI716-91 J 21 61 cVt' nlngs L'JllaIi: \.Jltd~/loadllln nl'I.Com
Professional Precision Tools Adhesives • Files • Cutters • Saws Pliers • Tweezers • Miniature Drills
$applies for Model BuildelS, Artisans, Technicians and Hobbyists
7i'OIJ'JS~ Shop www.ToolsGS.com .. or caH 800.295.3050
r"Cekbrati1lg ~ USinct! 1969" OUT = '_. •
40th Year I " . )
COLPAR- HOsBIES PLANES. ARMOR. CARS • SHIPS • SCI-FI We carry a huge inventory of plastic model kits from around the world! Full Line of Detailing Accessories. Airline models, Decals, Books, Promes, Die Cast Col· lectibles, Historical & RPG Games & Miniatures, Airbrushes & parts. Large Paint and Tool inventory. Full line RIC department. We ship worldwide.
www.colpar.com COL PAR HOBBIES To order call: 1-800·876-0414 804 S. Havana St. For Information: 303-341-0414
"Aurora. Co· 80012 Fax line: 303-341-15~
IN STORES NOW!
. NOSFf~TLI ww [email protected]
asca Distributed By: Pacific Coast Models, lnc.
www.pacmodels.com [email protected] 707-538-4850
FUll LINE OF: Plastic Model kits· Model Railroad accessories &kits Olecast Models· Books. Videos, Magazines and so much more...
VISA World Wide shipping via _ Fed Ex, UPS & Canada Post IJlf[;fJ<JJ
www.strikeforcehobbies.com
Conce pt AlrCr;tft ' Spacecraft · SCI -F • • Luft '46
Specializing in hard-to-flnd & OOP kits.
We have over 8000 kits in stock from old Aurora to new releases. Please contact us for a FREE catalog . Please specify cars or military. Check with me before you sell.
1fIe '8~e~! 214 E. Main St.• Flushing, MI 48433
(810) 659~2137· Fax: (810) 659-0937
Ulle 10 build MOilary Dioramas;! We oner the besl1l35 diD kItS available. Accurale Detail. Easv
AssemblY. Fantastic Resub! For free cal. call 406-213-0942
WWW.DlORAMASPLUS.COM
BEAVER MODEL ~ Onler an authentic 1124 scale replica DeHaviliand Beaver FloalpJane. The bright yeUow model with 24" wing - .___# span ba, 26 snap together pieces. _ ~.......,:Y
Send 525.95 via check or money order (US funds) to: Cedar Creek Trading Post, PO Box 438 Dept. #200 Cedarburg, WI 53012 • Email: buchho1z:@wi.rr.com Orders outside continental US add $7 for shipping
r: - CreditCard Slzo-""'--- - .r-----------------~ -ITh~ ©6V
M
'~- - ,.S I : ,. " ' - ~~ce 1993 1 ,'"- _ II P.o. Box 2872, Dept GS , 5' ..............- I I Crestline, CA, 92325-2872 Available In: $509!5 I _ It's Like Carrying Three 32 Scales Irom Eod> _
Scale Figures in your Wallet 1 :12 to 1:700 VISAlM~:-sd':EXL _________________ ~ I www.thescalecard.com (Also 24" & 12" & 6" Rules) I
HASEGAWA· FINEMOLDS • DRAGON AFV • SKIF • HAT· BANDAI... Too many to list, visil us lodoy www.hobbybuy.com
S~!~~w~!~~~h~:bY~~:~:S I Ifwe list it, we stock it!
SKYTREX HINCHLIFFE
Kits available •1135, 54mm, 1/76, 11100 Napoleonic, ACW, Colonial,
WW2 & Modern Rapid delivery
Web a,-dress: www.skytrex.com
~.
P.O. Box 356 • Gambrills, MD 21054 ContaClU @NostalgicPlastic . .:om (410) 672-7159
April2010 W1NW.nneScaie.co.... 71

I
Classified Marketplace This section is open to anyone who wants to sell or buy scale modeling merchandise. FSM reserves the right to edit undesirable copy or refuse listing. For FSM's private records, please fumish: a telephone number and a street address. AllCQPY: Set in standard format. Flfsr several words omy set in bold face. If pos.c;ible, ads should be scnt typewritten and categorized to
ensure accwacy. Coming Evcnu Rate: $25 per issue (55 word maximum). Ads will contain the following i(lformation about the event: state, city, sponsoring organization and name of event, meet, auction or show, dates, loca tion, times, admission fee, name and/or telephone number and/or email of person to contact for iuformation. Name, daytime telephone number and stn:ct address of the person providing the information is also required but need not be included in the ad. Unless otherwise requested, ads will be published in the issue month that the event occurs in. Additional months are available at the $25 per issue fee .· Please specify issue date(s) . WOJ:dAd Ratc.'l : 1 insertion - Sl.ll per word. 5 insertions - $1.05 per word, 10 inst:rtions - 97¢ per word. S15 minimum pt:r issue. Count all initials, single numbers, street number or name, city, Slate; zip, phone numbers each as one word. S25 per supplied photograph (Limit: 1 photo per ad). Photographs should be submitted in blat:k and wrure on a disk or via email as an attachment. Payment must accompany the ad. To receive the discount you must order and prepay for all ads at one time. We accept Visa, Mastercard, American Express and Discover. Send Your Ad. To: Fine&ale Model" - Classified Marhtplace,
sones. International orders welcome. Secure online ordering. 21027 Crossroads Circle, P.O. Box 1612, Waukesha, WI 53187-1612. Visit us at: vvww.poHcecarmodels.com Phone toll-free: 1-888-558-1544, Ext. 815, or fax: 262-796-0126.
E--mail: [email protected] SHIP AND AIRCRAFT MODELS. Built for display. For additional information contact. Ray Guinta, PO Box 74, Leonia, NJ
ClOSing Dar ..: Publ).~cd 10 tim.. a year. Jan.WlO ' ..lie d<>JC6. 07605. vvww.rayguinta.comOcr. 7. Feb. ~ NQv. 4, Mar. closes Ik4, AprU c1""..1M. ), May cl~ Feb. IO,]uIy do<cs April 7. S.!'- cl.,... June 9. OcL cl"",'July 6, ov. doscs: Aug. 10, Ooc_cImu Sepr. 7. WANTED
A BIG BUYER OF AIRCRAFT. Armor. Sci-Fi, Resin, HyCOMING EVENTS brid. or Plastic kits . We buy collections whether they are
more info.
Local HobbV Shop Directo.-y Local Hobby Sh.op Dircct0tr Jjstin~ arc available for the next ten issues for S2 0 (paya Ie in advance) or at $36 per issue (billed lo established accounts for a minimum of tcn insertions). Ads will be set in standard listing typography. All insertions must be consecutive and may be invoiced if you have credit established with us. No mention of mail order business permitted. For information call 1-888-558-1544, ext. 815. Closing dates listed in Classifieds section.
ARIZONA. Glendale "The Best in Plastic Models".
lm~~!fcl~~~Ca~~sr~i~i~~~~(;i~s. BOOk~~°-e~cg;::~ts~n~;-;;{'gr~~'),.ShiPS.
ANDY'S HOBBY HEADQUARTERS15224 N. 59th Ave., Ste. 12 602-439-1456
ARIZONA. Tempe
N~~g~~~ .• o~i~~:fsr~nM;;~il~'M~~s. resin detail and conversion kits
AVALON WAR BOOKS & HOBBIES 1510 N. Scottsdale Rd_ 480-994-2263
ARIZONA· Tempe
L~~i~~~~~ g\a~~~~?~We~_~~~~~~ilaccessories, decals, paint, books & tools.
~1\~~~o~'I,~~~P.~m HOBBY DEPOT
216 W. Southern 480-968-1880
ARKANSAS· Jacksonville Headguarters for scale hobbles. Models:
N-HO- -c,; trains; %,aming; tools; paints: etc. Discounts special orders.
One-half mile south of Wal-Mart. Open 10-6. closed Sundays and Wednesdays
RAIL & SPRUE HOBBIES 1200 John Harden Dr. 501-982-6836
CALIFORNIA· Burbank Large selection of plastic krts, paints, and
suPPtfs1i ~~i~~~~~r"o°nFi~~blem www.houseofhobbies.com
Secure online ordering BURBANK'S HOUSE OF HOBBIES
911 S. Victory Blvd. 818-848-3674
VA, FAIRFAX: IPMS NORTHERN VIRGINIA MODEL CLASSIC 2010. Fairfax High School. 3501 Rebel Run. May 22nd. 2010. Saturday 9am-4pm. Adult Contestants $11.00. unlimited models. Walk-ins $8.00. family $10.00. Junior Contestants/walk-ins 17 and under FREE. Theme award · "Heroes and Villains". Contact: Mike Neyland: 703-455-6248, [email protected] or POC Tom Henderson: 703-680-9354, [email protected] or visit: vvww.novaipms.org
FOR SALE CANOPY MASKING AND MORE! WWW.EZMASKS.COM Ust S2.00. Chris Loney, 75 Golf Club Rd .. Smiths Falls. ON, Canada K7A 4S5. 613-283-5206.
FOUND IN THE ArrIC! Scores of old aircraft and modeling magazines (Scale Modeler. Air Classics, IPMS. Replica in Scale, plus many others) and several dozen vintage (Microscale. Letraset. abt. Modelcal. etc,) decals. All 1967 - 1985. List and prices: e-mail [email protected] with request.
KITS OF VICTORY and Liberty Ships. Tugs. CG Craft. Free catalog [email protected]
POLICECARMODELS.COM ·POLICE CARS FROM 1/ 18 TO 1/87, diecast. plastiC model kits. decals and aeces
built kits needed. mike@adlineservices .comCeIL 773-387-1400 Phone: 847-680-5314 or Fax: 847-680-5315 for quotes.
CALIFORNIA· Can~a Park KitS plastic & woo ,Slot cars & toys.
Rockets, paint, glue and tools. Trains from Z to O.
Monda~t~~\'l~gd~is'i~tfi:~~unday. SCALE MODEL STUFF
7259 Canoga Avenue 818-716-7847
CALIFORNIA. EI Cajon ~San Die~<u San Diego County's best c for p a ic
models. AIrcraft, armor, ca s. New/used
m~e~so~e'r,~~~~I~i~ns on-~rf~~ltySat 11-5, Sun 11-3 www.phillipshobbies.com
PHILLIP'S HOBBIES 325 W. Main St. 619-562-1790
CALIFORNIA· Garden Grove 20% OFF ALL PLASTIC KITS
Plastic aircraft! armor, shiRs, cars, decals, boo~ paints ool~ minia ures wargames.
io.:::,ibr6<'!hu~~tl,~~6i~~~~~5. BROOKHURST HOBBIES
12188 Brookhurst St. 714-636-3580
CALIFORNIA· Gilroy
figUre~~~~~(r~cc;~la~~~~b~~~:'paint,tools. HO & N scale trains.
Open Tue-Fri 12:30~6:30: Sat. 10-4 FLYING FORTRESS HOBBIES
7367 Monterey St., Ste. 101 408-842-0450
CALIFORNIA. Hollister Model planes, car. ships & figures. Model train scales: Z, N, HO, 0 & G_ Paints, tools. RIC & parts, incl. service. Craft & educational kits.
sugp,~\~..p:~i1a"~~~·fu~~aI~~ ~'g'Jnq~~er B.C.T. HOBBY & CRAFTS
201-C McCray St. 631-635-{)537
CALIFORNIA· La Mirada
~'f.Ta~~~~rt~ ~~~~il. Moo - Sat 10-6. Closed Sunday.
RHOBBIES 14269 Imperial Hwy. 562-777-9492
CALIFORNIA· Long Beach
Dedicated to the Serious Aviation and Military Scale Modeler and Historian.
Sat. 11-5; Sun. 12-5
THE MILITARY SHOP 2009 Palo Verde Ave. 562-493-1612
BUYING UNBUILT KIT COLLECTIONSI A couple hundred kits or a couple thousandI Espedally looking for: 50s & 60s kits (Revell. Monogram. Lindberg & morel). Ships. Space. SCi-Fi & Figures and early Japanese import kits ... particularly armor/ military. monsters & sci-fL.. the weirder the better! Also buying decals and aftermarket items! .We spent over $50.000 on col lections last year! Pickup available. Send list: Jeff Garrity. 2325 Western Avenue. Suite 6, Las Vegas, NV 89102. If collection is too large to easily list, [email protected]. call 702-564-2851 .
HASEGAWA 132ND SCALE F-104C In the markings of the 479th TFW. Paul 206-526-9963.
I WANT TO BUY YOUR UNBUILT MODEL KITS. Any size col/ection. Dean Sills, 214 E. Main, Flushing, MI 48433. 810-659-2137 . Fax: 810-659-0937. E-mail: [email protected]
MODEL CAR AND TRUCK KITS. Unbuilt or built. Any size collection. Good prices paid. Please contact: Fred Stems, 48 Standish. Buffalo, NY 14216. Phone: 716-838-6797. Fax: 716-836-6057. E-mail: [email protected]
YOU WILL NEVER FIND TIME TO BUILD ALL THOSE MODELS. Top dollar paid for kit collections of any size. Milam Models, 519 DiLorenzo Dr .. Naperville. IL 60565. Phone: 630-983-1407, Fax: 630-369-0106. [email protected]
Discover the best hobby shop locator service
on the Internet. .. www.HobbyRetailer.com
small or large- Worldwide as well. Call Don Black toll free MISCELLANEOUSMA. TAUNTON: MassCar Model Club & Cape Cod Scale
1-866-462-7277. Don Black, 119 Bemhurst Road. New Bern. 1ST AND ABSOLUTELY THE BEST MUSEUM-QUAL· test & Vendor Show. Holiday Inn. Bay Road @ Exit 9 on Route NC 28560. E-mail [email protected] ITY MODELS. IPMS Nationals winner bUilding aircraft and arModelers Club present the 22nd Annual Model Exhibition Con
mor to your speCification, including conversions and scratchbuilt. 495. March 21. 2010 9-4pm. Admission: $5. under 12 Free. AIRCRAFT. ARMOR, SCI·FI, FIGURES. AUTO. ETC. Call BC Models for quote and information at 9t3-385-9594 orInformation: vvww.masscar.com Harry @ 508-285-8080. Door Buying kit collections. large or small. worldwide. Top prices visit www.bcmmodels.com prizes, colOring contest and make & take event. paid. Call Jim Banko 610-814-2784 or mail list to 122 Independence Ct.. Bethlehem. PA 18020. fax 610-439-4141. E-mail: WILL BUILD TO SUIT- YOUR AIRCRAFT, ARMOR,NJ. WAYNE: Mosqultocon 20tO. Wayne Police Athletic cth [email protected] SHIP MODELS, any scale. BUilding profeSSionally sinceHall. PAL Drive. April 3. 2010. Special Theme: "1940 Eng
1954. References available. Greg Neuman, The Brass Cliland Stands Alone-. Contact: Bill Schwarz, 732-567-3724 . BUILT PLASTIC MODELS WANTED. Constant stream of max. Ltd.. 1823 Saddle Hill Road. Green Oaks, IL 60048.
email: [email protected] or visit wwvv.njlpms.org for
www.thebrassclimaxltd.com
CA~~°fr~L~~.~~'Ml~& Great Service! Everything you need to build~astic :rodelSArmO& Aircraft, Shifsb Ca"g iFi an more.
M-F 1 ~.'A,'Vilt~~h~~6~'li'n';;~~~2-5pm MILITARY HOBBIES
138 E. Taft Ave. 714-637-1211
CALIFORNIA. Sacramento Specializing in import and domestic plastic kits
since 1978. Trains, wooden s~ips, rockets\=book~ tools18.aints, and more.
Tue-d6Lb?2@~~~sp~?ngsgg~1-5. RIVERSIDE HOBBIES
5141 Folsom Blvd. 916-455-3747
CALIFORNIA· San Mateo
YO~~pg~~cen~lgtifn~~~~i ~il:.~r~.;:r~. all Man-Sat 9:30-6, Sun 11-5. www.talbotstoytand.com TALBOT'S HOBBIES
445 South "B" Street 650-342-0126
CALIFORNIA· Ventura Large selection of domestic & im~rt plastiCaircraft , armo~ ships~ cars. Rare it corner.
Mon 12-6, ~~es-~~~ b':'& {r,r~t'fit~i , Sun 11-5. www.venturahobbies.com VENTURA HOBBIES
2950 Johnson Dr. #128 805-658-8138
COLORADO. Aurora Large inventory of models from the
world over! Detailing accessories, research publications, games, trains, RIC, tools, and
supplies. Easy access from D.I.A. http://www.colpar.com COLPAR HOBBIES
804 S. Havana 800-876-0414
CONNECTICUT· Branford Plastic models· Milrtary • Construction
equipment. Diecast • Accessories. RIC • Trains. Closed Sun & Mon.
Fri 10-9.osP,,'i~ 6~t'=:~fb~d~ggbies.com BRANFORD HOBBIES
609 W Main St. (rear) 203-488-9865
CONNECTICUT. Cos Cob
P:~"jkWsn¥raT~~A~Wo"ri;~t~i,~JiI~~~fe~~d r~g~~~~e;~~'ie~.CS~~i~~d~~~;~~~~~~~
ANN'S HOBBY CENTER 405 E_ Putnam Avenue 203-869-0969
CONNECTICUT. Manchester Largest hobby shop in NE. Military, cars.
trucRs. plastic models. diecast cars. trucks. Planes. RC planes. cars, trucks, slot cars. rockets. ~6~~rS.?te~~~Ij,~'ii'!'8~g. games!
TIME MACHINE HOBBY 71 Hillard St. 860-646-0610
CONNECTICUT. Milford Extensive selection of armor kits & Verlinden accessories. MilitarY, auto & aircraft plastic
moc;,~~s '6'3~~-f~~~~ff~'ii, ~~na~~~5train www.hqhobbiesonline.com
HQH£BBIES394 New Haven Ave., nit 1 203-882-1979
FLORIDA. Lakeland
pial~~~,C~a~c~, ~~~r~~it·s. Breyer norses. "Thomas" trains. tools.
Special orders welcome! MARCHETS TOYS & HOBBIES
2605 S. florida Ave. 150. Gate) 863-682-4312
FLORIDA· LargoBest selection for plastic scale modelers in
FI~~s1~~a~~~~~~~ ~6~~~~e~fn.rr~SA New Warehouse Outlet Mo-Fr 1 0-6, ~a 10-2
www.modelers-paradise.com MODELERS-PARADISE LTD. CO.
13355 Belcher Rd. S_ 727-388-4903
FLORIDA. Pensacola
sel~~~~i~~ ~1~~86 ~~'feit~~~u~g2el~g~es & books (20 min. from the National Museum of
Naval Aviation). Mon - Sat 9am-6pm. www.bobeshobbyhouse.com BOBE'S HOBBY HOUSE
5719 North 'W" St. 850-433-2187
GEORGIA· Marietta (ATl)A full-service model shop, stocking aircraft,
armor, f~ures, ships, sci-fi and a full line of ecals resin and 8.hototech.
1wwwaaa~%~;J.go~-IMg!~th-~at @ 2pm AAA HOBBY SUPPLY
1508 Roswell Rd. 770-973-5666
HAWAII. Kailua Oahu Wide selection 01 domestic & forei~n kits,
paint, books, tools & craft supp les. Located on the beautiful windward side,
20 minutes from Honolulu. Mon-Fri 10-6, Sat 10-5, Sun 11-2 WELLER'S HOBBY CRAFT
767 Kailua Road 808-262-0211
72 FineScale Modeler April2010

NEW JERSEY. KenvilILLINOIS. Woodstock OHIO· Columbus TEXAS·S Antonio Lots of models / games / accessories. ,All complete stores. Great selection of Model Full service hobbies, a full line of Large selection of wooden and plastic models. 1 ount to current and retired Krts, accessories, detail garts, magazines,HO, N, 3-R~I, mil~ary, cars boats, ry or ci)}' personnel. Tu~~t~i~~P1~~~, ~~ldj~~5s'!f.l'~i~_4 planes, doll ouses bscratch uildin'g tools & pain.~O&~t)'dstores.com
Visit us at www.woodstockhobbies.com Open 7 d~.~if~~u2~~~%'/,~.'i,';,~welcome.fsupplies, plus detai s-details-details! Graceland Shopping 614-888-7500
WOODSTOCK HOBBIES LTD. HILL COUNTRY HOBBY 124 Cass St. (Woodstock Sq.) 815--337-8770
KENVIL HOBBIES Reynoldsburg 614-866-5011 590 Rt. 46 973-584-1188 Northwest: Sq. Sawmill & 1270 614-76&-2300 9355 Bandera Rd #1 09 210·681·2007
NEW JERSEY· Magnolia (Camden) OKLAHOMA· OwassoKENTUCKY. Elizabethtown VIRGINIA· Chantil~ Oklahoma's larges}R,lastic k~, paint and after- Minutes from Dulles tffvrt &.New Dulles
Huge foreign & domestic model selection ~HI?';ys~0:u\go.:i'o:r:rt~r~!!hp"an~;~~~~1 Air & Srllace Musetllli dvar-H~ Center.all scales. Automobiles, aircraft ship, books, mt~~~~ ~rij~~'. S~i~1 ~~~~~~~2oS~S' LASTIC! P TICI PLAS 0 1 Mon - Fri 10-7, Sat 11-6; Sun 1-5,
Railroaa supplies. Collectible diecast toys, Kits for aircraft - armor - ships· carssup~fi~~~~'s~r~~6~~7m.i'ays~i~~et~i~ss6\~~:'s"&,~~~~sb~~a} ~'::'y~~ E-mail: [email protected] Daily 12-8: Sun 12-5. www.piperhobby,com
HOBBY STATION AAA HOBBIES & CRAFTS TOP SHELF MODELS PIPER HOBBY Houchens E-Town Plaza 270-737-2000 706 N. White Horse Pike 856-435-7645 119 S. Main St. 866-210-0687 13892 Metrotech Dr. 703-803-3103
OREGON· BeavertonNEW JERSEY· Maplewood VIRGINIA· Midlothian (Richmon!l) Full-line 1 STOP hobby shOp" We have new &
LOUISIANA· Baton Rouge Plastic and wood model kits. T amiya,
some ve~ld plastiC kitS panes. trains, wood Plastic models a s~ecialty! Supplies,I Hase~~~~",F.t\'~~~a~~I., ~ii~~:;N~~~wwam,detail f..ar1S, paints, decals, garaw, kits. <tl!J~~6~ ~~I(ii~~~I~~~a rG°If'~~eeISa~~~ilarg~~'1ig~~?~~~b~ [email protected] Hours: Mon, Wed, Thur
1981 . Mon-Fri 1 0-6, Sat 10-5, Sun 12-5 Open Mon-Fri 10-8, Sat 10-5, Sun 12-5.fue~~rr~'2!~:§~f~b~~S~i~ ~2i~. 10-6, Tue, Fri 10-8, Sat 10-5:30, Sun 12:30-5
HOBBY TOWNE MAPLEWOOD HOBBY TAMMIES HOBBIES CHESTERFIELD HOBBIES 8484 Airline Hwy 225-928-1534 1970 Springfield Ave. 973-378-3839 12024 SW Canyon Rd. 503-644-4535 13154 Midlothian Tnpk. 804-379-9091
MASSACHUSETTS· Malden (Boston) NEW YORK· Astoria L.I.C. OREGON· Portland WASHINGTON· Seattle Largest store in area, easy access via 1-93, Armor, aircraft, ships. and car models. One of NW's largest selections: models,
Car, Plane, Milit~, ModelsRI. 1, and the T. Complete line of Historical and fantasy games, miniatures, accessories, bookS, tools, historicaVfantasy model kits & sUPPlies'Jjlus toy soldiers, Trains, Paints, Too;)(l Diecasl. mil~ary history reference books and
figure kits, ~ames, etc. hipping available. D,\1~~".'6:1~~t~r~, '~ff'gt'b~~~J'se,]~'&Op~ ~".f'd'~1~'u~ofr1.,\at~:~~e~30. ma8~~g~s6a~;;;t~eb~ia~J.°mn 0: hobbybunker.com Holi~ys. Email: [email protected] HOBBY BUNKER, INC. RU~Y'S HOBBY & ART BRIDGETOWN HOBBIES & GAMES AMERICAN EAGLES INC.~SEATTLE
33 Exchange St. 781-321-8855 35-16 30th Avenue 718-545-8280 3350 NE Sandy Blvd. 503-234-1881 12537 Lake City Way NE 06-440-8448
MASSACHUSETTS. Marlboro NEW YORK· Buffalo PENNSYLVANIA· Doylestown WASHINGTON. Seattle Sto~ in ONCE! A customer for LIFE! If made, One of 's largest selection of we have it! EVERY model worldwide, that's lar~~e:;~i~~l ~{~~~dc~~~sg~f~~,kits,Vis~'i:~~g§~1~nB:;~~~~s~~2~lden foreign & d books, magazines and
Galleria. Lionel Authorized Service pain welcome. Scratch builde!,; supplies - tools - paint, 19~tv~if;u~Oj~ns';,"ar!~~sIl,"6 5gg~+ Station! Value-Added Dealer Mon-Fn -6; Sun 11-5. Mllrtary games Est. ,n 1973, open 7 days, Th & Fr ~I 9. www.niagarahobby.com www.her S 0 iesandcrafts.com www.garysgamesandhobbies.com
THE SPARE TIME SHOP NIAGARA HOBBY & CRAFT MART HERB'S HOBBIES & CRAFTS GARY'S GAMES AND HOBBIES Rt 20E Main, Post Rd. Plaza 508-481-5786 3366 Union Rd. (at Walden) 716-681-1666 200 W. State Street 215-345-7123 8539 Greenwood Ave. N. 206-789-8891
MASSACHUSETTS· Norton NEW YORK· Deer Park PENNSYLVANIA. Salunga (Lancaster) WASHINGTON· Seattle 9,000 model kit~ old and new: Autos. armor. Plastic Model Specialists. Large selection of
Large Selection New & Used Kits M~:~:Xft°~e6'd~h~~~~~rll;~~~t~1~~I.~ rare & out-of-Rroduction models, ~~~~ST~\t7, ~~rfQfes~~_1,&R1u~~~l'ci Mil~ary books, tools, paint, airbrushes tank tracks, diorama materialS books, mags, Large selection of detail parts. La~est Rt. 12910, behind Dunkin' Donuts. www. i selection of plastiC models I~ South eanle!Full line hob~~~Il-~~i~~~~y·Saturday.t~~llfo~n~~w~~~n~~~o&c~~e.mymummy.com E: [email protected] www.skywaymode .com HARRY'S HOBBIES & COLLECTABLES ALSAND'S TOY SOLDIERS PLUS COOLTRAINS TOYS & HOBBIES SKYWAY MODEL SHOP
250 E. Main St., Rt 123 508-285-8080 848 Long Island Ave. 631 -254-2650 106 W. Main Street 717-898-7119 12615 Renton Ave. South 206-772-1211
MASSACHUSETTS· Peabody NEW YORK· Middle Island TENNESSEE· Murfreesboro WASHINGTON· Tacoma Full line of model kits, paints, tools, air Rutherford Co.'s largest selection of hobby Plastic, Wood , Diecast kits & collectibles
Excellent selection of lead miniatures-brushes, compressors and scenery all at items. Carrying a Wide variety of plastic & historical and fanta~. Plastic models, low prices. Thousands cif krts in stock both Hu~:'?~f~~g:;'~a~fs"&t~gl~, ~~s;l'[~8~ntwood mooelS.f,aints tools & suPF.lies.
Located iust off 1- 4 on Medical Car er Pkwy Issues. Open: Mon-Sat; closed Sundays war~~oek~~~om~~~i~~~'ies.Th~W~~~t~~i~~~~~g~rt~ ~~.rral~;.~om (ex; 76). Open M-F 10·7; Sat 0-5. www.ubhobbies.com NORTH EAST TRAINS MODEL CENTER HOBBYTOWN USA DISCOUNT MODELS
134 ~~~e~!~~~d~OBBI~~d~f-058318 Main Street 978-766-1581 536-J N.Thompson Ln. 615-890-6777 8216-C 27th St. W. 253-460-6781
MICHIGAN· Traverse City NEW YORK. Mooers Forks TEXAS· A rillo WISCONSIN· Milwaukee Military & car models Plastic airc or, cars, figures & ships, Wide variety of plastic & metal kits. Models,
Let your imagination run wild! Paint-Books-Structures-Scenery Aircraft, snips, cars, armor, s~ial orders, paintsb~~~~'~~~~~~b~e~~'-jJ~~s~,f cars,Tak~g<l~~e -~8 ~"J'Jg~~~,m~~~tsRi htTues - Sat lOam - 6pm
diecast cars, dollhouse miniatures, Only 10 min. from 187 Champlain exit. 1/2 mile to Tra ewind Business Park, tum ?eft 2 blocKs W of Lake Michigan model railroading Z to G and more ... to 3601. hnp:l/www.hobby-time.com www.cavgames.com [email protected] TRAINS & THINGS HOBBIES VICTORIA STATION TRAINS HOBBY TIME CAVALRY GAME & HOBBY
210 East Front St. 231-947-1353 31 06 State Route 11 518-236-8888 3601 Airway Blvd. 806-352-9660 511 E Silver Srping Dr 414-961-9100
NEVADA. Las Vegas NEW YORK. Schenectady TEXAS· Bellaire (Houston)Brpad selection of foreign & domestic model C~~£tnAi~ ~<6~%:l~ and accessories,
LaKi9 selection of models and train~ books, kIts: , armor, dlecast, decals, autos, hellcopt~rs. planes, cars. truCks boats. se~~~'i~~o~~~~~n~o~itci1~~s~b~~s. ~ Plastruct, Kappler, Testors, oquil, de . tra;tIS, slot cars, books, tools, Ij-lastic, <;i,e-cast & ,!,ode' rocke.ts. Less than 5 miles off the Las Vegas stri~ M W F 9.30-6. Th 9.30-9 Sat. 9.30-5 T~miY~, tcl~:~;I,EM~~;e6~e~§~~st~0:K. collec or ~~.k~~~'A'd'~~~n~~delsHours Mon-Fri 10-7, Sat 10-6, Sun noon-5. www.rnodelland.com [email protected] HOBBYTOWN USA MOHAWK VALLEY RAILROAD CO. M & M HOBBY CENTER MODEL LAND LTD
5085 W. Sahara, Ste. 134 702-889-9554 2037 Hamburg St. 518-372-9124 6703 Chimney Rock 713-661-7137 3409A 26 Ave . SW 403-249-1661
NEVADA· Reno TEXAS. Houston CANADA-QN. Ottawa (Vanier)HO & N, Lionel trains and service.
Northern Nevada's full-line model;n~ resource. Say you saw their One of Canada's leading model sh~s. and architecture supplies.
Complete line of plastiC kits, military C0".'felete line of military & aircraft kl s, KitsMg~!~ft~iB!t,~~'i,'1~~g~A2~s",t:~~· directory ad in Open 11 am-6l)m, Thur. to 7pm: Fr~absarer~~so~n~a~r;~~~~:~.Reno/Sparks Convenllon Center. Sat. 10am-5pm FineScale Modeler.HIGH SIERRA HOBBIES G & G MODEL SHOP HOBBY HOUSE, LTD
4020 Kiefzke Lane 800-891 -8799 2522 Times Blvd. 713-529-7752 80 Montreal Rd. 613-749-5245
NEW YORK. Upr Eastside GR ManhattanNEW HAMPSHIRE· Dover TEXAS· Houston CANADA-QN· Toronto
Best Pclastic, resin & balsa kits from around the La~~~:'~oOnU6r~~wSf~~it~gf_~~~t~~fonWO~~er~~~~C~!~~~il~ ~ gi~ri1~~I:gfg~es.
Visit our in-house Akcraft Model Museum. Scale model cars, armor, aircraft, diecast. All kinds of plastiC and wooden ships.
Mon-Thurs 10-6, Fri & Sat 10-7, Sun 12-5.Foreign and do'B~~~Cf~~~ and wood kits. se~l~~NJA<[~:l;"gt';~i~~;i~bs~iln~~r~~'5~y kit
including Humbrol, ~itadel & Testors collecllons. www.wheelswingshobbies.com ELITE HOBBIES LARRY'S HOBBIES WHEELS AND WINGS1435 d!~~nHA~~BY SHOP:hlr-~7-4765#334 90 Washington SI. 803-749-0800 156-F FM 1960 East 281-443-7373 1880 Danforth Ave. 416-752-0071
NEW JERSEY· Brielle OHIO· Cleveland (Lakewood) TEXAS. lIVing ~allas Area) CANADA~C. DOlVal Let us help you. We have kits, decals, resin, Im~orted & 0 estic Aviation Books & We ta e care of special orders.
lastic Kits. FAOW, Paint, Decals, Specializing in out of the ordinary kits, me~~c~~?!s&"S':f'tf~spi6'~~f:\'b'i;'j t~~kS. HO N trains RIC UfC airplanes. every day exce~t Woo. (!(ie ship anywhere! ~6~~ ,;'~~ec~:~ln~~~g~~e~~?h~~i~r~. mil~~al~~~~~' fi~~\~M;~nc"';n~e~11g~rts,Mon 1-6, 'rue-Weal 0:3b-6 Thur-Fri 10:30-7.
E-mail: js [email protected] hSat 9:30-6. www.mal obby.com books, mags.llany special discount prices. JERSEY SHORE HOBBY CENTER I WINGS HOBBY SHOP M-A-L HOBBY SHOP HOBBY JUNCTION EXPRESS
.604 Union Ave. 732-449-2383 17112 Detroit Ave. 216-221-5383 108 S. Lee Street 972-438-9233 1761 Cardinal 514-831-3504
NEW JERSEY· Jackso'n OHIO· Cleveland (West Park) TEXAS· San Antonio A full-line shop. Complete stock of all makes Scale modeling from beginner to expert. ~~~i~~~d~~;s~I~~:fe~.r~Ood selection of
A wide selection of aircraft. armor, autos, unusual model kits and accessories. O&en 7 ~rati~ alike. e service wha we sell. of models for all~es. Operatin~ & non- Since 1983, a full line "old l ime" Hobby Shop
fi~ures, ships, & sci-fl. Lots of reference darn a week from 1 :00 till about 8: O.located In a 1914 Victorian farm house. sl. 19 . Major credit cards accepted. ma erial, detail Pilrts, decalsstoolS, & eight
Bennens Mills Plaza www.depotland.com ~~~~~~~~%;>"hgg!iJ~&Ef9¥~·lines of paint. Open Tues- at 10-6pm.
JACKSON HOBBY SHOP DEPOT TRAIN & HOBBY DIBBLE'S HOBBIES HOBBY BOUNTIES & MORGAN HOBBYCRAFT W. County Line Rd. 732-364-3334 4342 W. 130th Street 216-252-8880 1029 Donaldson Ave. 21 0-735-7721 865 Mountbanen Rd /102-91/92 65-6440-1890
Don't m.iss this essential tool for m.odelers!
Subscribe to FineScale Modeler! Visit www.FineScale.com April 2010 __FineScale.coft1. 73


----~®
Squadron