finished size 54” x 75” - benartex, inc. · c. hydrangea blue stripe 3091-30 yellow cut (4)...
TRANSCRIPT
Jac
kie
Rob
inso
n fo
r ©
Ben
arte
x, L
LC 2
017
the quilt shown is a digital representation. actual fabric repeats will vary from design shown.
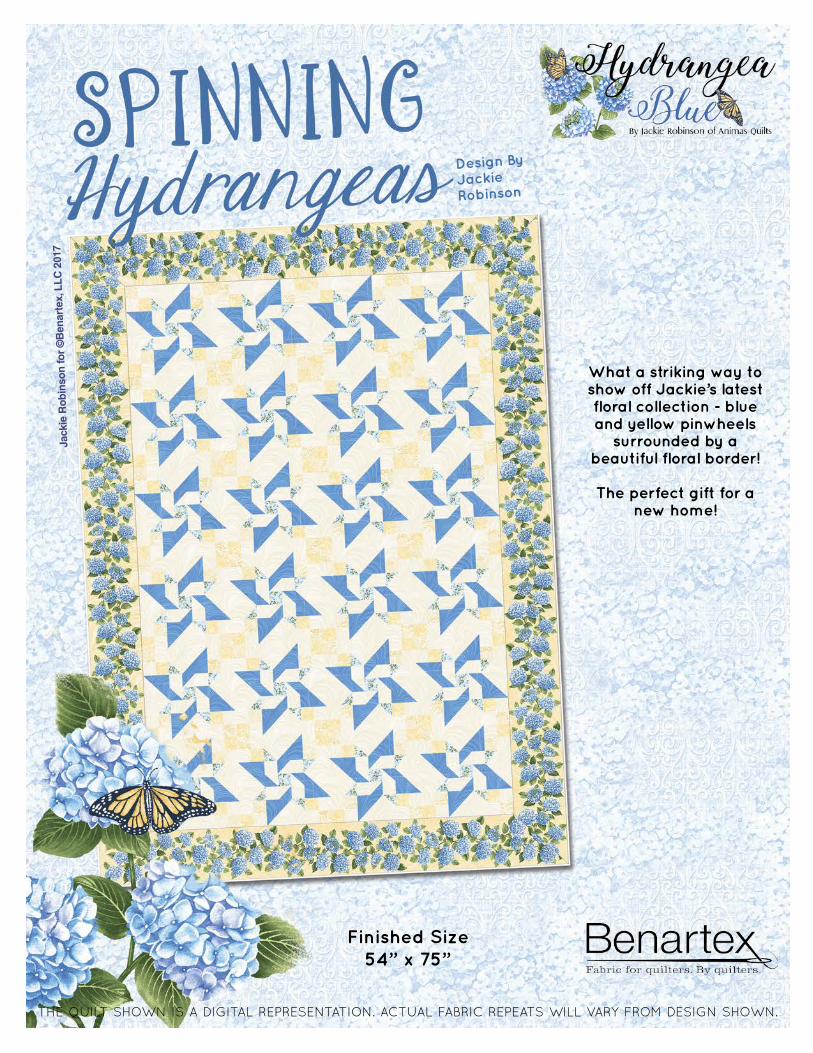
What a striking way to show off Jackie’s latest floral collection - blue and yellow pinwheels
surrounded by a beautiful floral border!
The perfect gift for a new home!
Design By Jackie Robinson
Finished Size54” x 75”
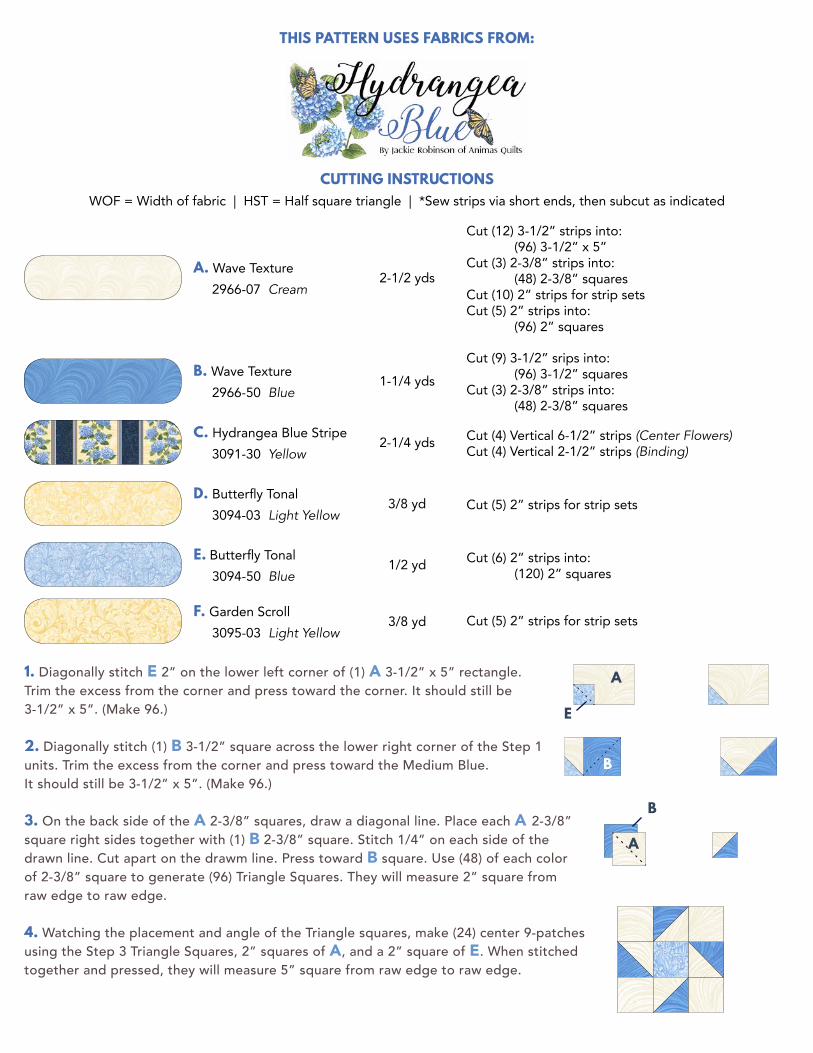
1. Diagonally stitch E 2” on the lower left corner of (1) A 3-1/2” x 5” rectangle. Trim the excess from the corner and press toward the corner. It should still be 3-1/2” x 5”. (Make 96.)
2. Diagonally stitch (1) B 3-1/2” square across the lower right corner of the Step 1 units. Trim the excess from the corner and press toward the Medium Blue.It should still be 3-1/2” x 5”. (Make 96.)
3. On the back side of the A 2-3/8” squares, draw a diagonal line. Place each A 2-3/8” square right sides together with (1) B 2-3/8” square. Stitch 1/4” on each side of the drawn line. Cut apart on the drawm line. Press toward B square. Use (48) of each color of 2-3/8” square to generate (96) Triangle Squares. They will measure 2” square from raw edge to raw edge.
4. Watching the placement and angle of the Triangle squares, make (24) center 9-patches using the Step 3 Triangle Squares, 2” squares of A, and a 2” square of E. When stitched together and pressed, they will measure 5” square from raw edge to raw edge.
A. Wave Texture 2966-07 Cream
Cut (12) 3-1/2” strips into: (96) 3-1/2” x 5”Cut (3) 2-3/8” strips into: (48) 2-3/8” squaresCut (10) 2” strips for strip setsCut (5) 2” strips into: (96) 2” squares
Cutting instruCtionsWOF = Width of fabric | HST = Half square triangle | *Sew strips via short ends, then subcut as indicated
this pAttern uses fAbriCs from:
2-1/2 yds
b. Wave Texture 2966-50 Blue
Cut (9) 3-1/2” srips into: (96) 3-1/2” squaresCut (3) 2-3/8” strips into: (48) 2-3/8” squares
1-1/4 yds
C. Hydrangea Blue Stripe 3091-30 Yellow
Cut (4) Vertical 6-1/2” strips (Center Flowers)Cut (4) Vertical 2-1/2” strips (Binding)
2-1/4 yds
D. Butterfly Tonal 3094-03 Light Yellow
Cut (5) 2” strips for strip sets3/8 yd
e. Butterfly Tonal 3094-50 Blue
Cut (6) 2” strips into: (120) 2” squares1/2 yd
f. Garden Scroll 3095-03 Light Yellow
Cut (5) 2” strips for strip sets3/8 yd
A
e
b
A
b
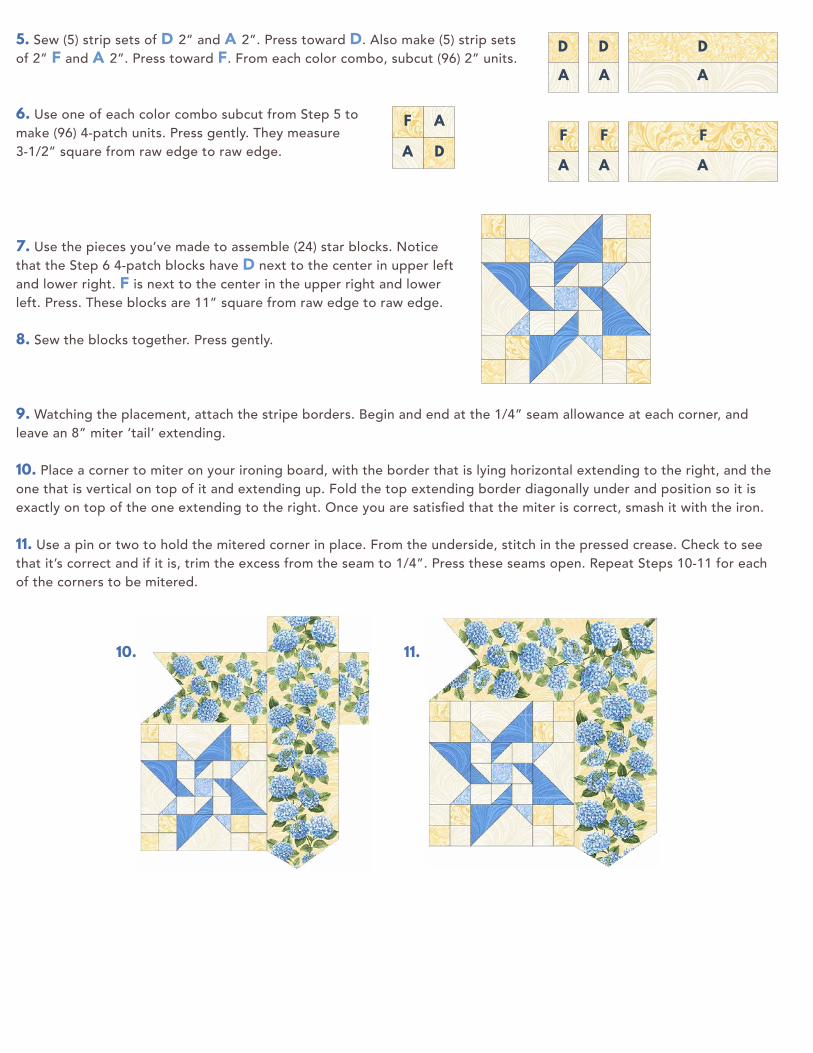
5. Sew (5) strip sets of D 2” and A 2”. Press toward D. Also make (5) strip sets of 2” F and A 2”. Press toward F. From each color combo, subcut (96) 2” units.
6. Use one of each color combo subcut from Step 5 to make (96) 4-patch units. Press gently. They measure 3-1/2” square from raw edge to raw edge.
7. Use the pieces you’ve made to assemble (24) star blocks. Notice that the Step 6 4-patch blocks have D next to the center in upper left and lower right. F is next to the center in the upper right and lower left. Press. These blocks are 11” square from raw edge to raw edge.
8. Sew the blocks together. Press gently.
9. Watching the placement, attach the stripe borders. Begin and end at the 1/4” seam allowance at each corner, and leave an 8” miter ‘tail’ extending.
10. Place a corner to miter on your ironing board, with the border that is lying horizontal extending to the right, and the one that is vertical on top of it and extending up. Fold the top extending border diagonally under and position so it is exactly on top of the one extending to the right. Once you are satisfied that the miter is correct, smash it with the iron.
11. Use a pin or two to hold the mitered corner in place. From the underside, stitch in the pressed crease. Check to see that it’s correct and if it is, trim the excess from the seam to 1/4”. Press these seams open. Repeat Steps 10-11 for each of the corners to be mitered.
DDD
fffD
f
A A A
A A A
A
A
10. 11.

benartex studio • 132 West 36th street, 4th floor • neW York, nY 10018 • t: 212-840-3250 • benartex.com
Share your finished quilt with the Benartex community on social media by tagging #benartexfabrics!
Also visit our Facebook group, Sew Interesting.
note: If this Benartex pattern is included in a kit, any questions about the kit should be addressed to the vendor from whom you bought it.
fInIshed sIze: 54” x 75”
12. Layer your quilt and prepare to quilt your masterpiece. We suggest outlining the Star units, running diagonal stitching through the chains, adding a vine-y filigree in the open areas, and detailing the motifs in the borders.
13. Bind with C 2-1/2” strips, following the instructions with the Binding Miter Tool. There is also a video demo of this terrific tool at www.animasquilts.com