finite element analysis of a planar truss truss tutorial 1 rev 09.10.2017 finite element analysis of...
TRANSCRIPT
HYPERMESH TRUSS TUTORIAL 1 REV 09.10.2017
FINITE ELEMENT ANALYSIS OF A PLANAR TRUSS
Instructor: Professor James Sherwood
Revised: Michael Schraiber, Dimitri Soteropoulos, Sanjay Nainani
Programs Utilized: HyperMesh Desktop v2017.2, OptiStruct, HyperView
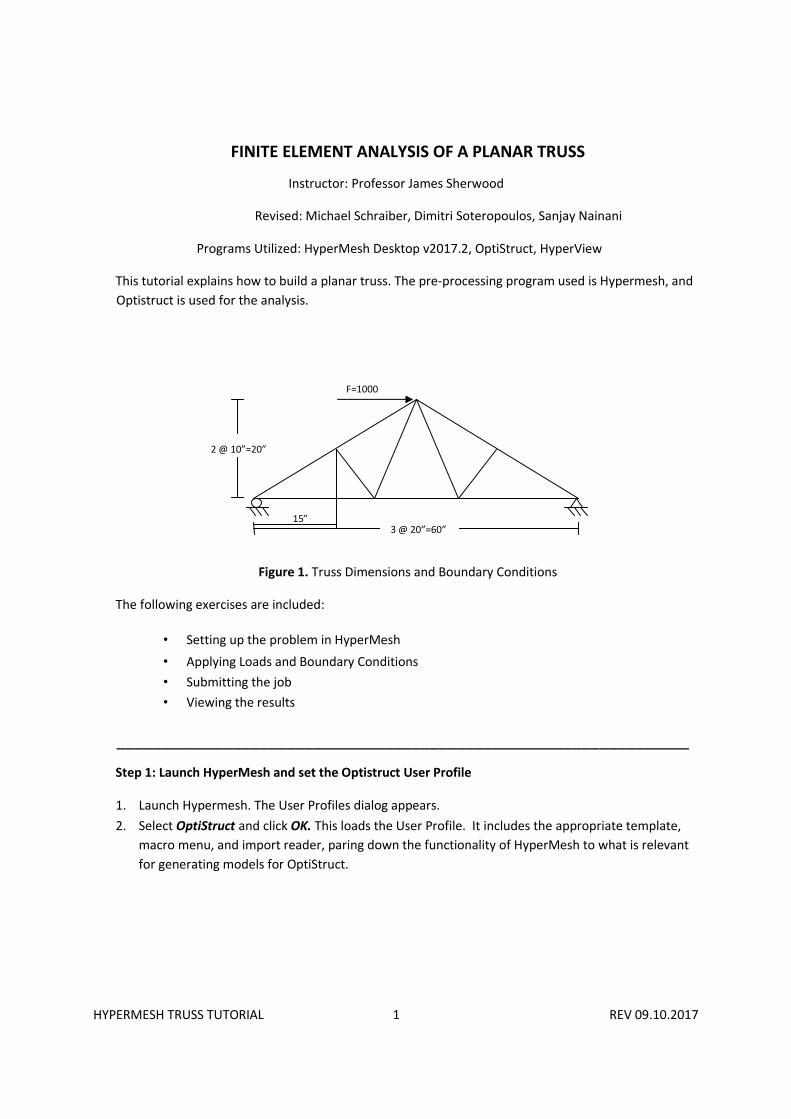
This tutorial explains how to build a planar truss. The pre-processing program used is Hypermesh, and
Optistruct is used for the analysis.
Figure 1. Truss Dimensions and Boundary Conditions
The following exercises are included:
• Setting up the problem in HyperMesh
• Applying Loads and Boundary Conditions
• Submitting the job
• Viewing the results
________________________________________________________________
Step 1: Launch HyperMesh and set the Optistruct User Profile
1. Launch Hypermesh. The User Profiles dialog appears.
2. Select OptiStruct and click OK. This loads the User Profile. It includes the appropriate template,
macro menu, and import reader, paring down the functionality of HyperMesh to what is relevant
for generating models for OptiStruct.
15 ” @ 20”=60” 3
@ 10”=20” 2
F=1000
HYPERMESH TRUSS TUTORIAL 2 REV 09.10.2017
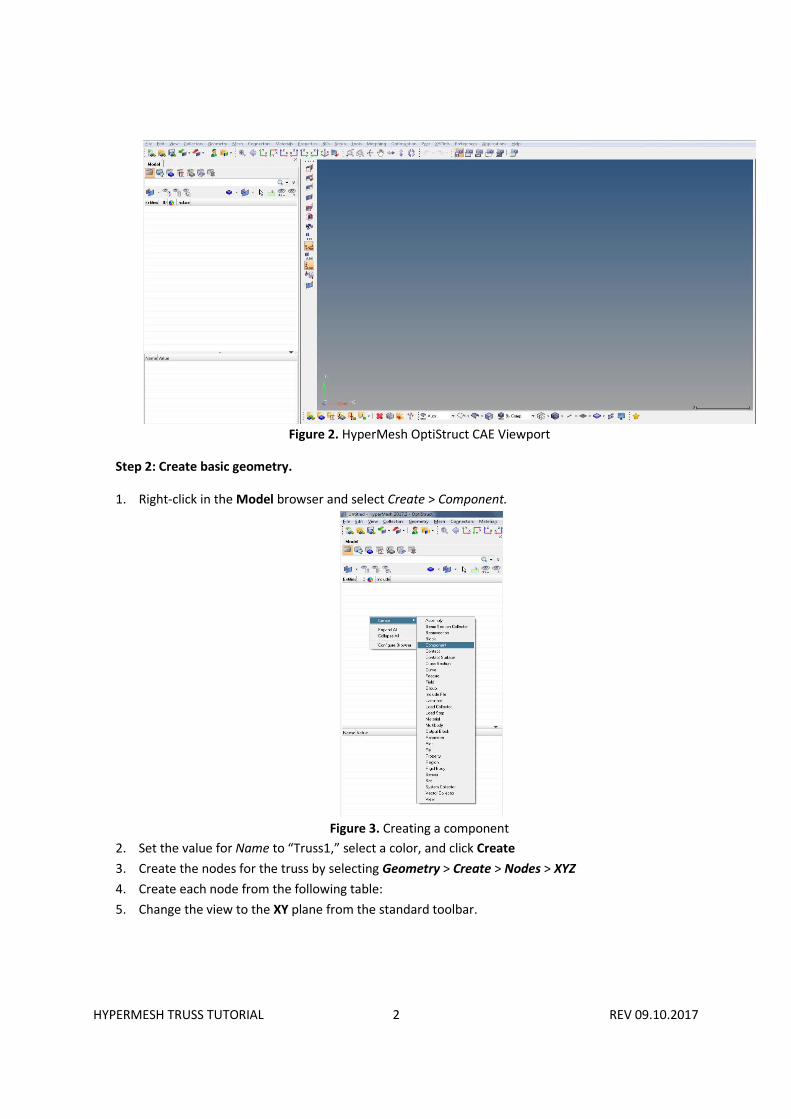
Figure 2. HyperMesh OptiStruct CAE Viewport
Step 2: Create basic geometry.
1. Right-click in the Model browser and select Create > Component.
Figure 3. Creating a component
2. Set the value for Name to “Truss1,” select a color, and click Create
3. Create the nodes for the truss by selecting Geometry > Create > Nodes > XYZ
4. Create each node from the following table:
5. Change the view to the XY plane from the standard toolbar.

HYPERMESH TRUSS TUTORIAL 3 REV 09.10.2017
Node X Y
1 0 0
2 20 0
3 40 0
4 60 0
5 15 10
6 30 20
7 45 10
Table 1. Node coordinates
Figure 4. View of Seven Nodes
6. Create the lines for the truss by selecting Geometry > Create > Lines > Linear Nodes.
7. Create the truss element-by-element, selecting two nodes at a time and selecting create. The final
geometry should resemble the structure below.
8. Click create.
9. Delete all temporary nodes by selecting Geometry > Delete > Nodes; click the clear all button 10.
Click return to get back to the main menu
HYPERMESH TRUSS TUTORIAL 4 REV 09.10.2017
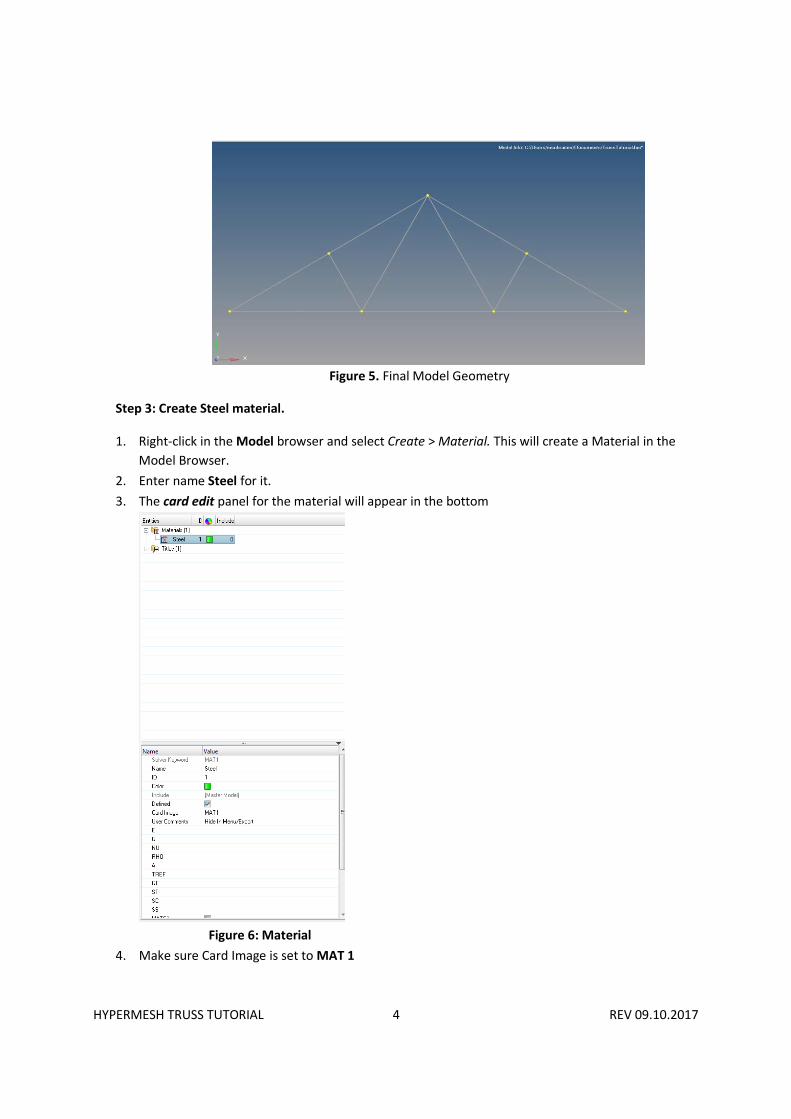
Figure 5. Final Model Geometry
Step 3: Create Steel material.
1. Right-click in the Model browser and select Create > Material. This will create a Material in the
Model Browser.
2. Enter name Steel for it.
3. The card edit panel for the material will appear in the bottom
Figure 6: Material
4. Make sure Card Image is set to MAT 1

HYPERMESH TRUSS TUTORIAL 5 REV 09.10.2017
5. Right-click on the Material and choose the Card Edit option.
6. Set the value for E (Young’s Modulus) to 3.0e7 psi .
7. Set the value for NU (Poisson’s Ratio) to 0.3. Accept defaults for the rest and click return.
Figure 7. Edit Material Card Edit
Step 4: Create the section properties for the bar elements (OptiStruct CROD by using HyperBeam)
1. To open the HyperBeam panel, click Properties > Hyperbeam from the menu bar.
2. Go to the standard section subpanel.
3. Set the standard section library to OPTISTRUCT.
4. Set the standard section type to Rod.
Figure 8. HyperBeam Panel
5. Click create. HyperMesh invokes the HyperBeam module
Note: The solid, green circle represents the cross section. Under the local coordinate system you
should see the number 10.000, which is the radius of the cross-section
6. Under Parameter Definition, click the Value field next to Radius (r) and change the value from
10.0 to 2.0. HyperMesh updates the value in the Data pane to reflect the circle’s new radius.
7. In the Model browser, right-click on the section circle_section.1 and select Rename from the
context sensitive menu.
8. In the editable field, rename the section “XC1.”

HYPERMESH TRUSS TUTORIAL 6 REV 09.10.2017
Figure 9. HyperBeam cross section
9. To close the HyperBeam module and return to your HyperMesh session, click File > Exit from the
menu bar.
To return to the main menu, click return
Step 5: Create cross-sectional property.
1. Right-click in the Model browser and select Create > Property .
2. This will create a property name it Rod_property.
3. In the entity editor:

HYPERMESH TRUSS TUTORIAL 7 REV 09.10.2017
Figure 10 Property Editor
Enter the above shown values.
4. Set the value for Card Image to PROD.
5. Select the checkbox for Beamsection and set its value to “XC1.”
6. Click the Material and select Steel.
7. The Area, A, and Moment of Inertia, J, should automatically calculate to the values below.
8. Right-click on the “Truss1” component from the model menu and select Assign from the pulldown
menu.
9. Set the value for Property to “Rod_Property” and click Ok.
Step 6: Create a 1-D Line Mesh for the truss.
1. From the main menu, select Mesh > Create > Line Mesh.
2. Set the element selector to lines; click to select and choose all to select all 11 lines.
3. Ensure that segment is whole line property is active
4. Ensure that element config: is set to “rod.”
5. Set element size= to 20.0
6. Set the value for property to “Rod_Property.”

HYPERMESH TRUSS TUTORIAL 8 REV 09.10.2017
7. Click mesh.
8. Click return twice to return to the main menu.
9. To make the mesh elements CROD elements, select Mesh > Create > 1D Elements > Rods.
10. Click the update radio button, and select all elements.
11. Set the property= value to “Rod_Property” and set the elem types= value to “CROD.”
12. (Optional) To create a better visual representation of the truss, change the 1D Element
Representation from the visualization panel to “1D Detailed Element Representation.”
Figure 11. 1D Detailed Element Representation of Truss Component
Step 7: Create a load collector for the applied force.
1. In the model browser, right-click and select Create > Load Collectors.
2. In the window that opens, set the value for Name to “Force1.”
3. From the main menu, select BCs > Create > Forces.
4. Make sure you are in the create subpanel.
5. Set uniform size= to 10.0.
6. Set magnitude= to 1000.
7. Set the orientation to x-axis.
8. Make sure load types= is set to FORCE.
9. Make sure the nodes selector is active, and select the node at the top of the truss.
10. Click create, then return.
Step 8: Create a load collector for the roller and pin constraints
1. In the model browser, right-click and select Create > Load Collectors.
2. In the window that opens, set the value for Name to “Constraints.”
3. From the main menu, select BCs > Create > Constraints.
4. Ensure that load types= is set to SPC.

HYPERMESH TRUSS TUTORIAL 9 REV 09.10.2017
5. Make sure the nodes selector is active, and select the bottom-left node of the truss; this will be the
roller.
6. In the DOF side panel, only check dof2 and dof3.
7. Click create.
8. Make sure the nodes selector is active, and select the bottom-right node of the truss; this will be
the pinned connection.
9. In the DOF side panel, only check dof1, dof2, and dof3.
10. Click create.
11. Click return to return to the main menu.
Step 9: Create a Load Step to prepare for analysis.
1. Select Setup > Create > LoadSteps to enter the LoadStep creation panel.
2. In the LoadStep panel, set the value for Name to “Static Truss Analysis.”
3. Set the value for Analysis Type to Linear Static.
4. Set the value for SPC to “Constraints.”
5. Similarly, set the value for LOAD to “Force1.” The panel should look like the one below:
Figure 12. Creating the Static Truss Analysis LoadStep
6. Click Create, then Return to get back to the Main Menu.
Step 9: Construct an OptiStruct Analysis
1. From the main panel, select Analysis.
2. Choose OptiStruct from the Analysis panel.
3. Under export options: choose all.
4. Under run options: choose analysis.
5. Under memory options: choose memory default.
6. Select a destination for the file in the input box by selecting save.
7. Click OptiStruct to perform the analysis.
Figure 13. Fields in the OptiStruct Panel
Step 10: View a Contour Plot of Stresses
HYPERMESH TRUSS TUTORIAL 10 REV 09.10.2017
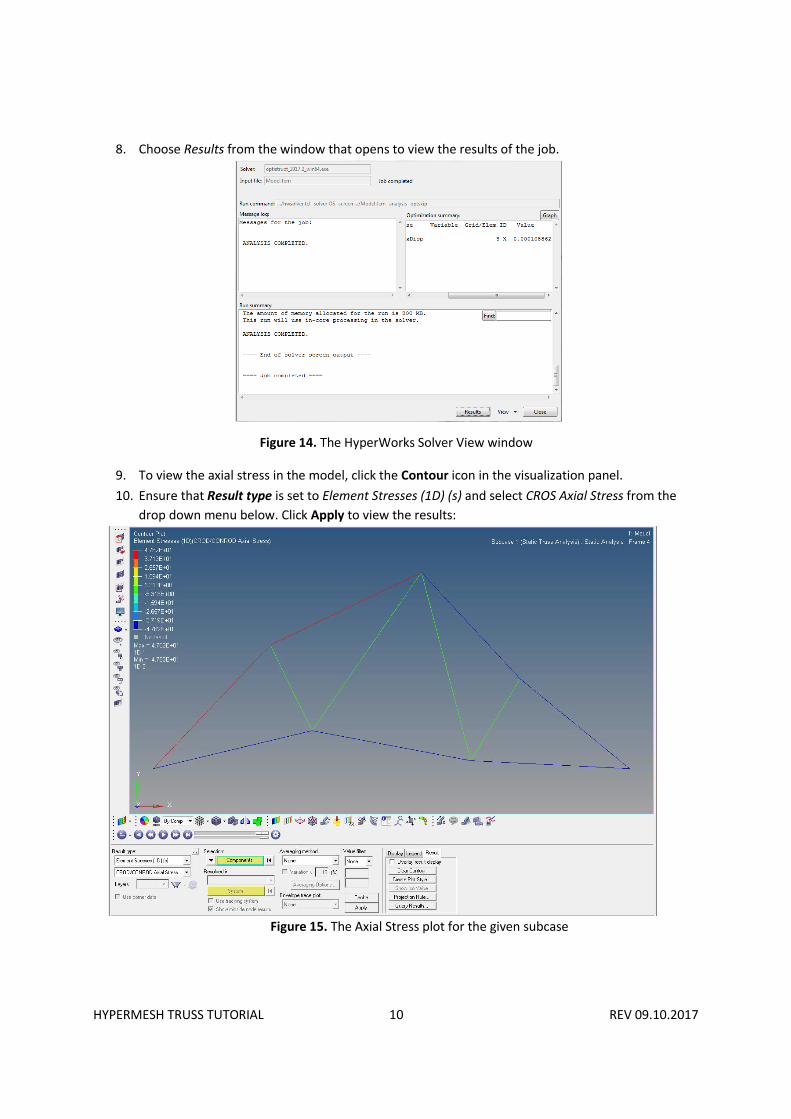
8. Choose Results from the window that opens to view the results of the job.
Figure 14. The HyperWorks Solver View window
9. To view the axial stress in the model, click the Contour icon in the visualization panel.
10. Ensure that Result type is set to Element Stresses (1D) (s) and select CROS Axial Stress from the
drop down menu below. Click Apply to view the results:
Figure 15. The Axial Stress plot for the given subcase

HYPERMESH TRUSS TUTORIAL 11 REV 09.10.2017
11. To view the deformed shape of the model, click the Deformed icon in the visualization panel.
12. Change the Scale type to Model Percent; in the Value field, enter 10.0.
13. In the visualization panel, drag the Current Time selector to the end to view the final deformed
shape of the truss:
Figure 16. Deformed plot of the truss
14. To view the individual stresses in each element, select the Query toolbar icon .
15. Change the selector button to Elements and select the three elements shown below to view their
stress values. Ensure that they match the values shown below.

HYPERMESH TRUSS TUTORIAL 12 REV 09.10.2017
Figure 17. Individual Stress Elements
Step 10 (Optional): Save the .mvw file
Select File > Save to save the results of the OptiStruct analysis to be viewed at a later time.