firm and criminal filing filer user guide
TRANSCRIPT

ESO-FS-200-4495 v.8 December 2020
Firm and Criminal Filing Filer User GuideOdyssey® File & Serve™ 2021.1

Copyright and Confidentiality
Copyright © 2020 Tyler Technologies, Inc. All rights reserved.
Use of these materials is governed by the applicable Tyler Technologies, Inc. license agreement.
This notification constitutes part of the documentation and must not be removed.
Publishing History
Document PublicationNumber
Revision Date Changes Made
OFS-FS-200-4495 v.1 Initial July 2019 Document Creation
OFS-FS-200-4495 v.2 Second December 2019 The following changes were made:
• Added sections fortemplates, bookmarks, andthe Redaction feature.
• Added a procedure for non-indexed subsequent filing.
• Added a procedure forentering case informationfor a civil case.
• Added a procedure forentering case crossreferences to a filing.
• Added a procedure forentering a filing with amotion type code.
• Added a section for clientsupport and feedback.
• Updated the descriptionand screen shots of theDashboard and the drop-down menu for filer actions.
• Updated screen shotsthroughout the document toreflect minor softwarechanges.
OFS-FS-200-4495 v.3 Third February 2020 The following changes were made:
• Changed the name of thedocument to reflect theaddition of the CriminalFiling Filer role.
ii December 2020 ESO-FS-200-4495 v.8

Contents
Document PublicationNumber
Revision Date Changes Made
• Added procedures andinformation for criminalcase filing.
• Added a procedure for filinga new case with a Will Fileddate.
• Added a procedure forentering the date of deathon the Parties page.
• Added a procedure forentering a filing with an AdDamnum amount.
• Added a procedure forentering a filing with aClaim Amount.
• Added a procedure forentering a filing with anEstate Value.
• Updated the Parties page.• Updated the procedure for
entering a filing.• Updated the Redaction
section.• Added a procedure for
copying an envelope.• Updated the Fees page.• Updated the Summary
page.
OFS-FS-200-4495 v.4 Fourth April 2020 The following changes were made:
• Added the Return Datefeature.
• Added the Hearing Datefeature.
• Added a note throughoutthe document regarding theParty Responsible forFees field.
OFS-FS-200-4495 v.5 Fifth June 2020 The following changes were made:
• Added the Reports feature.• Added the Dashboard
button to the Case Searchpage.
OFS-FS-200-4495 v.6 Sixth September 2020 The following changes were made:
ESO-FS-200-4495 v.8 December 2020 iii

Firm and Criminal Filing Filer User Guide
Document PublicationNumber
Revision Date Changes Made
• Updated release number tomatch the current softwarerelease
• Added browser support forMicrosoft® Edge® to the“System Requirements”section
ESO-FS-200-4495 v.7 Seventh December 2020 The following changes were made:
• Added a note to theenvelope details sectionregarding newly-addedparties for subsequentfilings
• Added a note in all existingcase topics indicating thatthe Add Party button isconfigurable forsubsequent filings
• Added a new screen shotfor the File into ExistingCase window when theParty Name search optionis not displayed.Information was added tothe following topics:
– Orientation– Dashboard Page– Filing into an
Existing Case fromthe Case SearchPage
– Filing into anExisting Case fromthe DashboardPage
– Filing into a Non-Indexed Case
• Added a section describingthe new Zendesk Help icon
• Changed the documentnumbering to reflect newstandards
iv December 2020 ESO-FS-200-4495 v.8

Contents
Document PublicationNumber
Revision Date Changes Made
ESO-FS-200-4495 v.8 Eighth December 2020 The following changes were made:
• Updated the screen shotfor the Reports page
• Added the documentsecurity option to the“Creating a Service OnlyFiling” topic
ESO-FS-200-4495 v.8 December 2020 v

Firm and Criminal Filing Filer User Guide
Contents
Copyright and Confidentiality........................................................................................................ iiPublishing History........................................................................................................................ iiList of Figures ...........................................................................................................................viii
About This Guide ................................................................................................................ xii1 System Overview ...................................................................................................................1
Before You Begin..................................................................................................................1System Requirements ....................................................................................................1Page Navigation ............................................................................................................2Error Messages .............................................................................................................2Orientation.....................................................................................................................2
2 E-Filing Overview ...................................................................................................................8Filing Queue Status ..............................................................................................................9
3 Landing Page ...................................................................................................................... 11Registering as a Firm User .................................................................................................. 11Resetting Your Password ....................................................................................................12Changing the User Password ..............................................................................................14
4 Sign In and Sign Out.............................................................................................................15Signing In...........................................................................................................................15Signing Out ........................................................................................................................16
5 Dashboard...........................................................................................................................17Dashboard Page.................................................................................................................18
6 Templates............................................................................................................................22Adding a Template ..............................................................................................................22Editing a Template ..............................................................................................................24Using a New Case Template................................................................................................24Using an Existing Case Template .........................................................................................25Copying a Template ............................................................................................................27Deleting a Template ............................................................................................................28
7 Case Initiation ......................................................................................................................30Uploading Documents for a New Case Filing ........................................................................31Entering Case Information (Firm Filer) ..................................................................................32Entering Case Information (Criminal Filing Filer)....................................................................33Charges Page ....................................................................................................................34
Entering Information on the Details Tab of the Charges Page...........................................34Entering Information on the Arrest Tab of the Charges Page............................................38
Entering Case Information for a Civil Case............................................................................39Filing a New Case with Case Cross References ....................................................................41Filing a New Case with a Will Filed Date ...............................................................................43Entering Party Details (Firm Filer) ........................................................................................45Entering Party Details (Criminal Filing Filer) ..........................................................................48Entering Date of Death on Parties Page ...............................................................................53Entering Filing Details .........................................................................................................57Capability for Filing a Return Date ........................................................................................60Selecting a Return Date for a Case Filing..............................................................................61Reverify the Return Date .....................................................................................................64Reverifying a Return Date ...................................................................................................64Capability for Filing Hearing Date .........................................................................................65Scheduling a Hearing Date for a New Case Filing..................................................................65Scheduling a Hearing for an Existing Case Filing...................................................................70Entering a Filing with an Ad Damnum Amount.......................................................................72Entering a Filing with a Motion Type Code ............................................................................76Entering a Filing with a Claim Amount ..................................................................................80Entering a Filing with an Estate Value ...................................................................................85Entering Payment Information..............................................................................................90
vi December 2020 ESO-FS-200-4495 v.8

Contents
Entering Payment Information for Per-Page Optional Service Fee ..........................................92Submission Agreements .....................................................................................................94Viewing the Envelope Summary...........................................................................................95
8 Redaction Feature................................................................................................................97Entering a Filing with Redacted Documents ..........................................................................97Deleting a Redaction......................................................................................................... 101Working with an Existing Redaction.................................................................................... 102Redaction Editor Toolbar ................................................................................................... 102
9 File into an Existing Case.................................................................................................... 105Filing into an Existing Case from the Filing History Page ...................................................... 105Filing into an Existing Case from the Case Search Page ...................................................... 109Filing into an Existing Case from the Dashboard Page ......................................................... 113Filing into a Non-Indexed Case .......................................................................................... 117Creating a Service Only Filing............................................................................................ 119
10 Service Contacts .............................................................................................................. 122Adding a New Service Contact........................................................................................... 122Adding a Service Contact from My Firm Service Contact List to a Filing ................................ 124Adding a Service Contact from a Public List to a Filing ......................................................... 125Adding a New Service Contact to a Filing............................................................................ 127Updating Information for an Existing Service Contact........................................................... 129Viewing Attached Case List of Service Contacts.................................................................. 130Updating Information for a Case Service Contact ................................................................ 131Deleting a Service Contact ................................................................................................ 133
11 Filings.............................................................................................................................. 135Copying the Envelope ....................................................................................................... 135Viewing the Envelope Details............................................................................................. 137Resuming a Case Filing .................................................................................................... 138Deleting a Draft Filing........................................................................................................ 139Canceling a Filing ............................................................................................................. 140
12 Bookmarks ...................................................................................................................... 142Creating a Bookmark for a Case ........................................................................................ 142Removing a Bookmark from a Case ................................................................................... 142Viewing a List of Bookmarked Cases.................................................................................. 143
13 Reports ........................................................................................................................... 144Creating a Report ............................................................................................................. 144
14 Support and Feedback...................................................................................................... 146Requesting Support .......................................................................................................... 146Zendesk Support .............................................................................................................. 148Providing Feedback .......................................................................................................... 150Tyler Technologies Technical Support Contact Information................................................... 152
ESO-FS-200-4495 v.8 December 2020 vii

List of Figures
Figure 1.1 – Dashboard Page ...............................................................................................................3Figure 1.2 – File into Existing Case Window—Includes Party Name Option ..............................................3Figure 1.3 – File into Existing Case Window—Excludes Party Name Option.............................................4Figure 1.4 – Case Search Page with No Search Results Displayed..........................................................4Figure 1.5 – Filing History Page ............................................................................................................5Figure 1.6 – Filing Drafts Page..............................................................................................................5Figure 1.7 – Sample Bookmarks Page...................................................................................................6Figure 1.8 – Templates Page ................................................................................................................6Figure 1.9 – Service Contacts Page ......................................................................................................7Figure 1.10 –Account Settings Page .....................................................................................................7Figure 1.11 –Reports Page...................................................................................................................7Figure 2.1 – The E-Filing Process .........................................................................................................8Figure 3.1 – eFile Landing Page.......................................................................................................... 11Figure 3.2 – Successful Activation Window ..........................................................................................12Figure 3.3 – Reset Password Window .................................................................................................12Figure 3.4 – Reset Password Window – Complete Reset Process .........................................................13Figure 3.5 – Example of Password Reset Request Email ......................................................................13Figure 3.6 – Account Settings Page.....................................................................................................14Figure 4.1 – Sign In Page ...................................................................................................................16Figure 4.2 – SignOut Drop-Down List ..................................................................................................16Figure 5.1 – Dashboard......................................................................................................................17Figure 5.2 – Dashboard Page .............................................................................................................18Figure 5.3 – Warning Message ...........................................................................................................18Figure 5.4 – Filing History Page ..........................................................................................................19Figure 5.5 – Filing Drafts Page............................................................................................................19Figure 5.6 – File into Existing Case Window—Includes Party Name Option ............................................20Figure 5.7 – File into Existing Case Window—Excludes Party Name Option...........................................20Figure 5.8 – Case Search Page with No Search Results Displayed........................................................20Figure 5.9 – Sample Bookmarks Page.................................................................................................21Figure 5.10 –Templates Page.............................................................................................................21Figure 6.1 – Templates Page ..............................................................................................................22Figure 6.2 – Templates Pane ..............................................................................................................23Figure 6.3 – Sample Summary Page ...................................................................................................23Figure 6.4 – Templates Page ..............................................................................................................24Figure 6.5 – Templates Page ..............................................................................................................25Figure 6.6 – Filing History Page ..........................................................................................................26Figure 6.7 – Templates Matching Window............................................................................................27Figure 6.8 – Templates Page ..............................................................................................................28Figure 6.9 – More Options Drop-Down List ..........................................................................................28Figure 6.10 –Templates Page.............................................................................................................29Figure 6.11 –More Options Drop-Down List .........................................................................................29Figure 7.1 – Dashboard Page .............................................................................................................31Figure 7.2 – Start Filing Pane..............................................................................................................31Figure 7.3 – Upload Documents Page .................................................................................................32Figure 7.4 – Case Information Page ....................................................................................................32Figure 7.5 – Sample Case Information Page ........................................................................................33Figure 7.6 – Example of the First Criminal Security Question.................................................................34Figure 7.7 – Example of Second Criminal Security Question .................................................................34Figure 7.8 – Details Tab on the Charges Page......................................................................................35Figure 7.9 – Add Offense Window .......................................................................................................35Figure 7.10 –Sample Charge Phase Drop-Down List ...........................................................................36Figure 7.11 –Calendar .......................................................................................................................37Figure 7.12 –Arrest Tab on the Charges Page .....................................................................................38
viii December 2020 ESO-FS-200-4495 v.8
List of Figures
Figure 7.13 –Sample Arrest Location Drop-Down List ..........................................................................38Figure 7.14 –Sample Law Enforcement Unit Drop-Down List ................................................................39Figure 7.15 –Case Information Page...................................................................................................40Figure 7.16 –Select Procedures / Remedies Window ...........................................................................40Figure 7.17 –Sample Completed Case Information Page......................................................................41Figure 7.18 –Case Information Page...................................................................................................41Figure 7.19 –Sample Case Information Page with the Case Cross Reference Type Section
Displayed....................................................................................................................42Figure 7.20 –Example of a Case Information Page with Case Cross Reference Numbers Added.............43Figure 7.21 –Start Filing Pane ............................................................................................................44Figure 7.22 –Upload Documents Page................................................................................................44Figure 7.23 –Example of the Will Filed Field on the Case Information Page ...........................................45Figure 7.24 –Personal Tab on the Parties Page ...................................................................................46Figure 7.25 –Attorneys Window..........................................................................................................46Figure 7.26 –Lead Attorney Window ...................................................................................................47Figure 7.27 –Address Tab on the Parties Page ....................................................................................47Figure 7.28 –Additional Identifiers Tab on the Parties Page...................................................................48Figure 7.29 –Personal Tab on the Parties Page ...................................................................................49Figure 7.30 –Attorneys Window..........................................................................................................49Figure 7.31 –Lead Attorney Window ...................................................................................................50Figure 7.32 –Address Tab on the Parties Page ....................................................................................50Figure 7.33 –Additional Identifiers Tab on the Parties Page...................................................................51Figure 7.34 –Demographics Tab on the Parties Page ...........................................................................52Figure 7.35 –Physical Feature Pane ...................................................................................................52Figure 7.36 –Example of the Personal Tab on a Parties Page ...............................................................53Figure 7.37 –Start Filing Pane ............................................................................................................54Figure 7.38 –Upload Documents Page................................................................................................54Figure 7.39 –Attorneys Window..........................................................................................................55Figure 7.40 –Lead Attorney Window ...................................................................................................55Figure 7.41 –Example of the Address Tab on a Parties Page ................................................................56Figure 7.42 –Example of the Additional Identifiers Tab on a Parties Page (Includes the Date of Death
Field) ..........................................................................................................................56Figure 7.43 –Filings Page ..................................................................................................................57Figure 7.44 –Sample Optional Services Tab ........................................................................................58Figure 7.45 –Associate Parties to this Filing Window............................................................................58Figure 7.46 –Upload Documents Pane................................................................................................59Figure 7.47 –Select document(s) for Lead Document Window ..............................................................59Figure 7.48 –Return Date Pane ..........................................................................................................60Figure 7.49 –Return Date Verified Message ........................................................................................60Figure 7.50 –Sample Return Date Pane with Valid Date Displayed........................................................60Figure 7.51 –Return Date Pane with Error Message Displayed .............................................................61Figure 7.52 –Dashboard Page............................................................................................................61Figure 7.53 –Start Filing Pane ............................................................................................................62Figure 7.54 –Return Date Pane on the Summary Page ........................................................................63Figure 7.55 –Out of State Service Check Box Selected in the Return Date Pane ....................................63Figure 7.56 –Return Date Verified Message ........................................................................................63Figure 7.57 –Sample Return Date Pane with Valid Date Displayed........................................................64Figure 7.58 –Return Date Pane ..........................................................................................................64Figure 7.59 –Sample Schedule Hearing Page .....................................................................................65Figure 7.60 –Dashboard Page............................................................................................................66Figure 7.61 –Start Filing Pane ............................................................................................................66Figure 7.62 –Case Information Page...................................................................................................67Figure 7.63 –Parties Page..................................................................................................................67Figure 7.64 –Filings Page ..................................................................................................................68Figure 7.65 –Service Page.................................................................................................................68Figure 7.66 –Summary Page..............................................................................................................69Figure 7.67 –Sample Schedule Hearing Page .....................................................................................69Figure 7.68 –Filing History Page.........................................................................................................70Figure 7.69 –Sample Envelope Details Page .......................................................................................71
ESO-FS-200-4495 v.8 December 2020 ix

Firm and Criminal Filing Filer User Guide
Figure 7.70 –Sample Schedule Hearing Page .....................................................................................71Figure 7.71 –Filings Page ..................................................................................................................72Figure 7.72 –Sample Optional Services Tab ........................................................................................73Figure 7.73 –Associate Parties to this Filing Window............................................................................73Figure 7.74 –Upload Documents Pane................................................................................................74Figure 7.75 –Select document(s) for Lead Document Window ..............................................................74Figure 7.76 –Fees Page.....................................................................................................................75Figure 7.77 –Sample Ad Damnum Fees on the Fees Page ...................................................................76Figure 7.78 –Filings Page ..................................................................................................................77Figure 7.79 –Sample Motion Type Drop-Down List...............................................................................77Figure 7.80 –Sample Optional Services Tab ........................................................................................78Figure 7.81 –Associate Parties to this Filing Window............................................................................78Figure 7.82 –Upload Documents Pane................................................................................................79Figure 7.83 –Select document(s) for Lead Document Window ..............................................................79Figure 7.84 –Example of a Filings Page with a Motion Filing Code Selected...........................................80Figure 7.85 –Filings Page ..................................................................................................................81Figure 7.86 –Sample Optional Services Tab ........................................................................................81Figure 7.87 –Associate Parties to this Filing Window............................................................................82Figure 7.88 –Upload Documents Pane................................................................................................83Figure 7.89 –Select document(s) for Lead Document Window ..............................................................83Figure 7.90 –Fees Page.....................................................................................................................84Figure 7.91 –Sample Claim Amount Fees on the Fees Page ................................................................85Figure 7.92 –Filings Page ..................................................................................................................85Figure 7.93 –Sample Optional Services Tab ........................................................................................86Figure 7.94 –Associate Parties to this Filing Window............................................................................87Figure 7.95 –Upload Documents Pane................................................................................................87Figure 7.96 –Select document(s) for Lead Document Window ..............................................................88Figure 7.97 –Fees Page.....................................................................................................................89Figure 7.98 –Sample Estate Value Fees on the Fees Page...................................................................90Figure 7.99 –Fees Page.....................................................................................................................90Figure 7.100 –Select Party Responsible For Fees Window...................................................................91Figure 7.101 –Example of a Fees Page with the Filing Fees Displayed..................................................91Figure 7.102 –Sample Optional Services Tab ......................................................................................92Figure 7.103 –Select Party Responsible For Fees Window...................................................................93Figure 7.104 –Example of a Fees Page with the Filing Fees Displayed..................................................94Figure 7.105 –Submission Agreements Pane – One Disclaimer............................................................94Figure 7.106 –Submission Agreements Pane with the Check Box Selected – One Disclaimer .................94Figure 7.107 –Submission Agreements Pane – Two Disclaimers ..........................................................95Figure 7.108 –Submission Agreements Pane with the Check Boxes Selected – Two Disclaimers ............95Figure 7.109 –Submission Agreements – No Disclaimers.....................................................................95Figure 7.110 –Sample Summary Page ................................................................................................96Figure 7.111 –Unused Documents Message........................................................................................96Figure 8.1 – Start Filing Pane..............................................................................................................98Figure 8.2 – Upload Documents Page—Blank......................................................................................98Figure 8.3 – Upload Documents Page with an Uploaded Document.......................................................98Figure 8.4 – Example of a Message for a Completed Redaction ............................................................99Figure 8.5 – Sample Summary Page ................................................................................................. 100Figure 8.6 – Example of a Message with Redaction in Progress .......................................................... 100Figure 8.7 – Annotation Notes Dialog Box.......................................................................................... 101Figure 8.8 – Delete Annotation? Dialog Box ....................................................................................... 101Figure 8.9 – Sample Thumbnail Pane................................................................................................ 104Figure 9.1 – Filing History Page ........................................................................................................ 106Figure 9.2 – Associate Parties to this Filing Window ........................................................................... 107Figure 9.3 – Upload Documents Pane ............................................................................................... 107Figure 9.4 – Select document(s) for Lead Document Window.............................................................. 108Figure 9.5 – File into Existing Case Window—Includes Party Name Option .......................................... 109Figure 9.6 – File into Existing Case Window—Excludes Party Name Option......................................... 110Figure 9.7 – Case Search Results ..................................................................................................... 110Figure 9.8 – Associate Parties to this Filing Window ........................................................................... 111
x December 2020 ESO-FS-200-4495 v.8

List of Figures
Figure 9.9 – Upload Documents Pane ............................................................................................... 112Figure 9.10 –Select document(s) for Lead Document Window ............................................................ 112Figure 9.11 –File into Existing Case Window—Includes Party Name Option......................................... 113Figure 9.12 –File into Existing Case Window—Excludes Party Name Option ....................................... 114Figure 9.13 –Case Search Results ................................................................................................... 114Figure 9.14 –Associate Parties to this Filing Window.......................................................................... 115Figure 9.15 –Upload Documents Pane.............................................................................................. 116Figure 9.16 –Select document(s) for Lead Document Window ............................................................ 116Figure 9.17 –File into Existing Case Window—Includes Party Name Option ........................................ 117Figure 9.18 –File into Existing Case Window—Excludes Party Name Option ....................................... 118Figure 9.19 –Case Search Window with No Results Found................................................................. 118Figure 9.20 –I Don’t See My Case Window........................................................................................ 119Figure 9.21 –Case Information Page................................................................................................. 119Figure 9.22 –Upload Documents Pane.............................................................................................. 120Figure 9.23 –Select Document(s) for Lead Document Window............................................................ 120Figure 9.24 –Service Page for a Service Only Filing ........................................................................... 121Figure 10.1 –Service Contacts Page................................................................................................. 122Figure 10.2 –Service Contacts – Additional Fields.............................................................................. 123Figure 10.3 –Firm Service Contacts Window ..................................................................................... 124Figure 10.4 –Sample Associated Parties Window .............................................................................. 125Figure 10.5 –Service Page in a Case Filing ....................................................................................... 125Figure 10.6 –Public Service Contacts Window................................................................................... 126Figure 10.7 –Sample Public Service Contacts List ............................................................................. 126Figure 10.8 –Sample Associated Parties Window .............................................................................. 127Figure 10.9 –Service Page in a Case Filing ....................................................................................... 127Figure 10.10 –Add Service Contact Window...................................................................................... 128Figure 10.11 –Service Page in a Case Filing...................................................................................... 129Figure 10.12 –Service Contacts Page ............................................................................................... 129Figure 10.13 –Service Contacts Page ............................................................................................... 130Figure 10.14 –Service Contact Attached Cases Window .................................................................... 131Figure 10.15 –Service Contact Attached Cases Window – No Attached Cases .................................... 131Figure 10.16 –Filing History Page ..................................................................................................... 132Figure 10.17 –Update Service Contact Window ................................................................................. 133Figure 10.18 –Service Contacts Page ............................................................................................... 134Figure 11.1 –Filing History Page ....................................................................................................... 135Figure 11.2 –More Options Drop-Down List ....................................................................................... 136Figure 11.3 –Sample Upload Documents Page for a Copied Envelope ................................................ 136Figure 11.4 –Sample Summary Page for a Copied Envelope .............................................................. 137Figure 11.5 –Filing History Page ....................................................................................................... 137Figure 11.6 –Sample Envelope Details Page ..................................................................................... 138Figure 11.7 –Filing Drafts Page......................................................................................................... 139Figure 11.8 –Filing Drafts Page......................................................................................................... 140Figure 11.9 –Filing History Page ....................................................................................................... 141Figure 12.1 –Sample Bookmarks Page ............................................................................................. 142Figure 12.2 –Sample Bookmarks Page ............................................................................................. 143Figure 12.3 –Sample Bookmarks Page ............................................................................................. 143Figure 13.1 –Reports Page .............................................................................................................. 144Figure 13.2 –Select Locations Dialog Box ......................................................................................... 145Figure 13.3 –Error Message for Report Date Range........................................................................... 145Figure 14.1 –Support / Feedback Window ......................................................................................... 146Figure 14.2 –Example of a Support Window ...................................................................................... 147Figure 14.3 –Help Icon on the Dashboard Page................................................................................. 148Figure 14.4 –Chat Modal.................................................................................................................. 149Figure 14.5 –Chat Modal with Communication Options....................................................................... 149Figure 14.6 –Support / Feedback Window ......................................................................................... 150Figure 14.7 –Feedback Window ....................................................................................................... 151Figure 14.8 –Feedback Type Drop-Down List .................................................................................... 151
ESO-FS-200-4495 v.8 December 2020 xi
Firm and Criminal Filing Filer User Guide
About This GuideThe purpose of this user guide is to provide users with details on how to use a product or a feature orfunctionality within the product.
User guides may include the following elements:
• User interface (dialog boxes and pages)
• Reports
• Tools
AudienceThis document is intended for the following personas:
• Clients
• Tyler Client Services
Documentation ConventionsThe format style applied to text enables readers to quickly determine the nature of information or an actionthey are to take.
Text Style Description Example
Bold Shorthand notation for a menu, menuitem, optional cascading menu, orselected tab
Objects to click or select, includingbuttons, check boxes, options in adrop-down list, elements, fields, andsection header name
On the Main Menu, click Tools→Options→Forms.
Click License Key Editor.
Fixed-Width User interface (UI) input typed exactlyas shown
Server names, file names, pathnames, application programminginterface (API) names, XML settingsin configuration files, databases,command names, system calls, anddata structures and types
Type the value Boston in the City field.
Run the tables.sql script for thejcpBasketB database.
Italics Page and dialog box names
Document titles
Variable data to be replaced by anappropriate value
Return to the Home page.
Refer to the Navigation Guide.
Type the filename.
“Quotation marks” Chapter within a document
Rights on a role
Job tasks within a job definition
Refer to the “Logic Rules” chapter.
Feature requires the “Print the EventListing Report” right.
Documentation NotesEach documentation note provides information or action items regarding that area of the document.
xii December 2020 ESO-FS-200-4495 v.8
Contents
Icon Note Type Description
Note Notes provide extra details about a topic or step.
Caution Caution messages indicate that a specific action could cause an error inthe system.
Warning Warning messages indicate that a specific action could cause aninterruption of service.
Danger Danger messages indicate that a specific action could damage thedatabase infrastructure or hardware.
ESO-FS-200-4495 v.8 December 2020 xiii


1 System Overview
Topics covered in this chapter♦ Before You Begin
The Odyssey® File & Serve™ system enables registered users to file documents with the court anytime,anywhere, 24 hours a day, seven days a week. This highly automated, scalable system provides clients theopportunity to transition from an inefficient, paper-based process to a streamlined, technology-basedelectronic filing (e-filing) system.
Before You BeginThis guide is intended for firm users.
Firm UsersOnly Firm Administrators can add and manage firm users. Contact your Firm Administrator to request anychanges.
Payment AccountsOnly Firm Administrators can add and manage payment accounts. Contact your Firm Administrator torequest any changes.
AttorneysOnly Firm Administrators can add and manage firm attorneys. Contact your Firm Administrator to requestany changes.
SetupBefore you begin, review this information to successfully operate the software.
Note: Depending on your setup, all features may not be available. As a result, your screen may varyfrom what is shown in this document.
System RequirementsThis section describes the recommended requirements to successfully use the system:
• Browser Requirements—The system supports Chrome™; Mozilla® Firefox®; Microsoft® Edge®; orSafari® application programs. If your browser does not meet these minimum requirements, pleasecontact your network administrator.Note: Internet Explorer® is not a supported browser and may not work as expected.
• Operating Systems—The system supports Microsoft® Windows®, Linux®, Chrome OS™,Android™, iOS, and OS X® desktop class operating system software.
• Minimum Hardware Requirements—The system supports the following hardware:
– Intel® Core™ Duo processors or Advanced Micro Devices, Inc. (AMD) processorsmanufactured in 2012 or later
– 2 gigabytes (GB) of random-access memory (RAM)
ESO-FS-200-4495 v.8 December 2020 1

Firm and Criminal Filing Filer User Guide
– 1366 x 768 resolution screens for desktop computers, or 1280 x 720 resolution screens formobile devices
• Recommended Hardware Requirements—Tyler recommends the following hardware:
– Intel® Core™ i3 or AMD A6 processors with at least a 2.0 GHz clock speed– 4 GB of RAM– 1920 x 1080 resolution for both desktop computers and mobile devices
• Connection Requirements—A high-speed Internet connection is recommended.• Document Format—Adobe® PDF is the only format allowed for attaching documents.
Page NavigationThe following section describes how to navigate the system and populate data fields throughout the filingprocess.
Using the MouseYou can use the mouse to move from field to field on a page, as well as to make selections from drop-downlists in a field. When you have completed the required fields on a specified page, you can save your entriesand move to the next page by clicking the navigation button in the lower right corner of the page. If youskipped a required field on that page, the system prompts you to enter data in that field before moving tothe next page.
Using the KeyboardAs you complete the pages for your filing, you can navigate from one field to the next by pressing TAB.When you have completed the required fields on a specified page, you can save your entries and move tothe next page by pressing TAB after the last field.
Error MessagesThe system displays several error messages to alert you when you have not entered required informationor you have entered invalid information.
Enter Data in Required FieldsRequired fields are indicated by a red asterisk. If you have not entered information in the required fields,you will receive error messages when you try to advance to the next page.
Note: Required fields may vary in different sections.
OrientationWhen you sign in to Odyssey File & Serve, the Dashboard page is displayed. From here, you can selectvarious filing options.
Dashboard PageFrom the Dashboard page, you can start a filing, access your filing history, access your draft filings,perform a case search, access the cases you have bookmarked, and access your saved templates.
2 December 2020 ESO-FS-200-4495 v.8

Figure 1.1 – Dashboard Page
Case SearchOn the Dashboard menu, click Case Search. From here, you can search for an existing case or file into anexisting case. Advanced search features are available if you search by either a party name or a businessname.
Figure 1.2 – File into Existing Case Window—Includes Party Name Option
Note: Your system may be configured to only search by case number. With this optionalconfiguration, the Party Name option is not displayed.
ESO-FS-200-4495 v.8 December 2020 3
Orientation

Firm and Criminal Filing Filer User Guide
Figure 1.3 – File into Existing Case Window—Excludes Party Name Option
If your search does not produce any results, click to return to the Dashboard page.
Figure 1.4 – Case Search Page with No Search Results Displayed
Filing HistoryOn the Dashboard menu, click Filing History. From here, you can view your filing history. You can alsoview the details for a specified case, file into an existing case, or view the service contacts attached to thecase.
4 December 2020 ESO-FS-200-4495 v.8

Figure 1.5 – Filing History Page
Filing DraftsOn the Dashboard menu, click Filing Drafts. From here, you can view a list of your draft filings, resume adraft filing, delete a draft filing, or file into an existing case.
Figure 1.6 – Filing Drafts Page
BookmarksOn the Dashboard menu, click Bookmarks. From here, you can access the cases that you havebookmarked. You can file into an existing case, view the service contacts attached to the case, file into thecase with a template, or remove the bookmark from the case.
ESO-FS-200-4495 v.8 December 2020 5
Orientation

Firm and Criminal Filing Filer User Guide
Figure 1.7 – Sample Bookmarks Page
TemplatesOn the Dashboard menu, click Templates. From here, you can access the templates that you previouslycreated. You can use a template to create a new case filing, edit an existing template, copy a template, ordelete a template.
Figure 1.8 – Templates Page
Firm Service ContactsOn the Dashboard menu, click Firm Service Contacts. From here, you can view your firm’s servicecontacts, add a new service contact, edit an existing service contact, view the attached cases for aspecified service contact, or delete a service contact.
6 December 2020 ESO-FS-200-4495 v.8

Figure 1.9 – Service Contacts Page
Account SettingsOn the Dashboard menu, click Account Settings. From here, you can change your system password.
Figure 1.10 – Account Settings Page
ReportsOn the Dashboard menu, click Reports. From here, you can generate a report that can be used toreconcile financial transactions for envelopes and filings that you or a member of your firm submitted.
Figure 1.11 – Reports Page
ESO-FS-200-4495 v.8 December 2020 7
Orientation

2 E-Filing Overview
Topics covered in this chapter♦ Filing Queue Status
This section describes the e-filing process.
Figure 2.1 – The E-Filing Process
Once a user has registered to use Odyssey® File & Serve™, he or she can electronically submit documents(referred to as “filings”) to the court. When the user submits the filing, the filing is electronically delivered tothe clerk's inbox. The clerk then reviews the filing and either accepts, rejects, or returns the filing.
If the clerk accepts the filing, the case is docketed and set to appear in the clerk’s case managementsystem. An email is sent to the filer with the case status, along with any pertinent information regarding thecase. If the option for service was selected during the filing, service is electronically sent to the contacts onthe case.
If the filing is rejected, an email is sent to the filer with a reason for the rejection. In addition, a status ofRejected is displayed on the Filing History page.
If the filer has questions regarding the filing or case, it is recommended that the filer contact the local court.
8 December 2020 ESO-FS-200-4495 v.8

Filing Queue StatusThe filing queue status lets you know where you are in the e-filing process. The key represents the statuslisted for your filing.
The following filing status key table describes the status associated with each filing type.
Note: EFO – EFile Only; EFS – EfileAndServe; SO – Service Only
Status Filing Type Definition
Draft EFO, EFS, SO The filer has entered full orpartial filing data, but has not yetsubmitted the filing.
Submitting EFO, EFS, SO The filer has submitted the filing,and all of the data is beingverified.
Submitted EFO, EFS, SO The filing was submittedsuccessfully and is in the ReviewQueue, but the clerk has not yetstarted the review. The filer cancancel one or more filings thatare in this status.
Court Processing EFO, EFS, SO Some additional action needs tobe taken by the court.
Under Review EFO, EFS A clerk reviewer has selected afiling from a queue.
Note: Once a filing reaches theUnder Review status, it cannotreturn to the Submitted status.Selecting the End Reviewretains the Under Reviewstatus and returns the filing tothe queue.
Receipted EFO, EFS The filing has beenacknowledged by the court asreceived, but it is not beingtransmitted to the casemanagement system to becomepart of the court record. The filingmay or may not be part of theproposed order work flow.
Accepted EFO, EFS The reviewer has reviewed thefiling and accepted it.
Rejected EFO, EFS The reviewer has reviewed thefiling and rejected it.
Returned EFO, EFS The reviewer has reviewed andreturned the filing because thefiler must take additional action.
Served SO Service Only filings arecompleted.
ESO-FS-200-4495 v.8 December 2020 9
Filing Queue Status

Firm and Criminal Filing Filer User Guide
Status Filing Type Definition
Service Incomplete (ServiceOnly filings)
SO One or more servings failed; theservice was incomplete.Example: The email or domainwas rejected.
Canceled EFO, EFS, SO The filer has canceled the filing.The filer can cancel only draftand submitted filings.
Submission Failed EFO, EFS A file format or billing error hasoccurred when the filer submittedthe filing. Failure specifics areavailable on the Details page,and the filer is notified of thespecifics through email.
10 December 2020 ESO-FS-200-4495 v.8

3 Landing Page
Topics covered in this chapter♦ Registering as a Firm User♦ Resetting Your Password♦ Changing the User Password
The Landing page serves as the gateway to the system. From this page, you can register or sign in to theapplication.
Figure 3.1 – eFile Landing Page
Registering as a Firm UserYou can register as a firm user after you have been invited to join the firm.
Note: If you would like to have an account with the Odyssey File & Serve system, contact your FirmAdministrator. Your Firm Administrator can invite you to join the firm through email. Follow the linkprovided in the email, and then join the firm in the Odyssey File & Serve system.
Note: There is no fee to sign up for e-filing.
To register as a firm user, perform the following steps:
1. Click the Activate Account link in the invitation email.
A sign-in page is displayed.
Note: If you do not have an invitation email, request one from your Firm Administrator.2. Type your email address and temporary password on the sign-in page.
A window is displayed, indicating that your account was activated successfully.
ESO-FS-200-4495 v.8 December 2020 11

Firm and Criminal Filing Filer User Guide
Figure 3.2 – Successful Activation Window
Note: Tyler recommends that you change the temporary password to another password that youcreate. Your password is case sensitive and must be at least eight characters in length with atleast one lowercase letter, one uppercase letter, and one number or symbol.
Resetting Your PasswordTo reset your password, perform the following steps:
1. On the Odyssey File & Serve Landing page, click .
The Reset Password window is displayed.
Figure 3.3 – Reset Password Window
2. Type the email address that you provided during the registration process in the Email Address field.3. Select the I’m not a robot check box.
A window is displayed from which you must select specified images.
4. Click the requested images, and then click .
Note: If you do not select the correct images, a new window is displayed, from which you can tryagain.
12 December 2020 ESO-FS-200-4495 v.8

5. After selecting the correct images, click .
A new Reset Password window is displayed, directing you to check your email to complete thepassword reset process.
Figure 3.4 – Reset Password Window – Complete Reset Process
6. Check your email inbox.7. Locate the email from Odyssey File & Serve.
Figure 3.5 – Example of Password Reset Request Email
8. Click the link that is labeled here to reset your password.
You are prompted to create a new password.9. Type a new password in the New Password field.
Note: Your password is case-sensitive and must be at least eight characters in length with atleast one lowercase letter, one uppercase letter, and one number or symbol.
10. Retype your new password in the Repeat New Password field.11. Click Change Password.
A confirmation page displays the following message: Your password has been changedsuccessfully.
ESO-FS-200-4495 v.8 December 2020 13
Resetting Your Password

Firm and Criminal Filing Filer User Guide
Changing the User PasswordYou can change your password on the Account Settings page.To change your password, perform the following steps:
1. On the Dashboard menu, click Account Settings.
The Account Settings page is displayed.
Figure 3.6 – Account Settings Page
2. Type the old password in the Old Password field.3. Type the new password in the New Password field.
Note: Your password is case sensitive and must be at least eight characters in length with atleast one lowercase letter, one uppercase letter, and one number or symbol.
4. Retype the new password in the Re-enter New Password field.
5. Click .Your password is changed.
14 December 2020 ESO-FS-200-4495 v.8

4 Sign In and Sign Out
Topics covered in this chapter♦ Signing In♦ Signing Out
All users are required to sign in to Odyssey File & Serve to be able to e-file and e-serve documents or tocheck the status of an existing filing. It is also a best practice for users to sign out after they havecompleted their transactions.
Signing InSign in by using the email address and password that you provided during the registration process. Youmust sign in to be able to e-file or e-serve documents.
Note: Click to register if you have not registered before.To sign in, perform the following steps:
1. Navigate to the Odyssey File & Serve Landing page.
2. Click .3. Type your email address and password (which is case-sensitive).
ESO-FS-200-4495 v.8 December 2020 15

Firm and Criminal Filing Filer User Guide
Figure 4.1 – Sign In Page
4. Click .
Note: After you make several failed attempts to sign in to the system, your account is locked.You can unlock your account by clicking Forgot Password?.
Once you have successfully signed in, you can begin to e-file and e-serve documents.
Signing OutThis section describes how to sign out of Odyssey File & Serve.To sign out of the application, perform the following steps:
1. From the drop-down list at the top of the page, click .
Figure 4.2 – SignOut Drop-Down List
You are now signed out of the application.
16 December 2020 ESO-FS-200-4495 v.8

5 DashboardTopics covered in this chapter♦ Dashboard Page
The Dashboard provides a drop-down menu for firm user actions.
Figure 5.1 – Dashboard
From here, you can perform the following actions:
• Access the Dashboard page to start a filing, perform a case search, view your filing history, viewyour draft filings, access the cases you have bookmarked, and access the templates you havecreated.
• File into an existing case on the Case Search page.• Access the Filing History page to view a list of your case filings.• Access the Filing Drafts page to view a list of your draft filings.• Access the Bookmarks page to view a list of cases that you have bookmarked for quick access.• Access the Templates page to locate an existing template and quickly begin a new case filing.• Access the Firm Service Contacts page to add and manage the firm’s service contacts list.• Access the Account Settings page to change your system password.• Access the Reports page to generate reports for envelopes and filings that you or your firm
submitted.
ESO-FS-200-4495 v.8 December 2020 17
Firm and Criminal Filing Filer User Guide
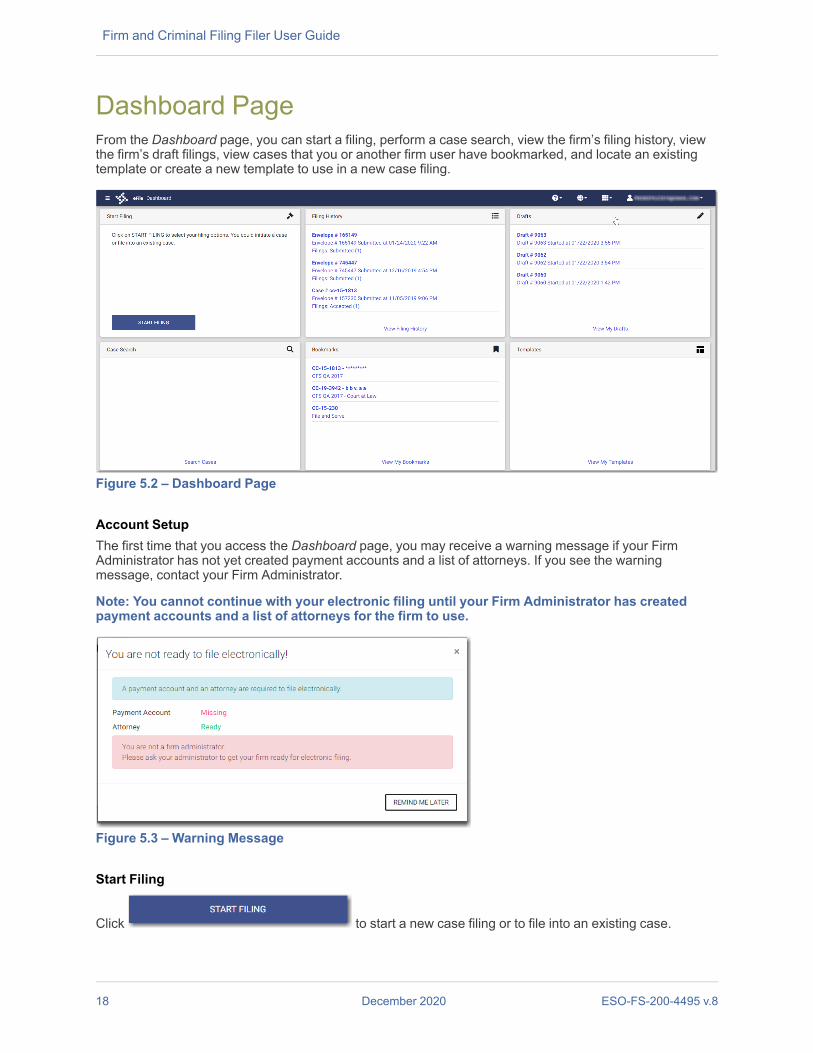
Dashboard PageFrom the Dashboard page, you can start a filing, perform a case search, view the firm’s filing history, viewthe firm’s draft filings, view cases that you or another firm user have bookmarked, and locate an existingtemplate or create a new template to use in a new case filing.
Figure 5.2 – Dashboard Page
Account SetupThe first time that you access the Dashboard page, you may receive a warning message if your FirmAdministrator has not yet created payment accounts and a list of attorneys. If you see the warningmessage, contact your Firm Administrator.
Note: You cannot continue with your electronic filing until your Firm Administrator has createdpayment accounts and a list of attorneys for the firm to use.
Figure 5.3 – Warning Message
Start Filing
Click to start a new case filing or to file into an existing case.
18 December 2020 ESO-FS-200-4495 v.8

Filing HistoryClick View Filing History to access the Filing History page. From here, you can view the status of thefirm’s filings, check the filing type, get a document description, see the number assigned to cases, reviewthe details of cases, view the service contacts attached to a case, and cancel a filing.
Figure 5.4 – Filing History Page
DraftsClick View My Drafts to access the Filing Drafts page. From here, you can view the firm’s draft filings,resume a filing, or delete a draft filing.
Figure 5.5 – Filing Drafts Page
Case SearchClick Search Cases to search for a case in the system. From here, you can search for an existing case orfile into an existing case. Advanced search features are available if you search by either a party name or abusiness name.
ESO-FS-200-4495 v.8 December 2020 19
Dashboard Page

Firm and Criminal Filing Filer User Guide
Figure 5.6 – File into Existing Case Window—Includes Party Name Option
Note: Your system may be configured to only search by case number. With this optionalconfiguration, the Party Name option is not displayed.
Figure 5.7 – File into Existing Case Window—Excludes Party Name Option
If your search does not produce any results, click to return to the Dashboard page.
Figure 5.8 – Case Search Page with No Search Results Displayed
BookmarksClick View My Bookmarks to access a list of cases that you have bookmarked for quick access.
20 December 2020 ESO-FS-200-4495 v.8

Figure 5.9 – Sample Bookmarks Page
TemplatesClick View My Templates to locate a template to use in your case filing or to create a new template forfuture use.
Figure 5.10 – Templates Page
ESO-FS-200-4495 v.8 December 2020 21
Dashboard Page

6 Templates
Topics covered in this chapter♦ Adding a Template♦ Editing a Template♦ Using a New Case Template♦ Using an Existing Case Template♦ Copying a Template♦ Deleting a Template
Templates allow you to start a new case from a template that you have created, saving you time.
Adding a TemplateTo add a template that you can use to quickly start a new case or file into an existing case, perform thefollowing steps:
1. On the Dashboard menu, click Templates.
The Templates page is displayed.
Figure 6.1 – Templates Page
2. Click .
A pane is displayed.
22 December 2020 ESO-FS-200-4495 v.8

Figure 6.2 – Templates Pane
3. Type a name for the template in the Name field.4. Select either the New Case or the Existing Case option.5. Select the Favorite check box if you want to designate this template as a favorite.
6. Click to begin creating your template.
The Case Information page is displayed.7. Enter as much information on this page as you want to use in your template.8. Continue entering information on each page of the filing until you have the information that you want to
use in your template.
Note: You can stop at any time and save the pages that you have completed. You do not have tocreate an entire case filing to save the entries as a template.
9. If you enter information on each page of the case filing, on the Summary page, click.
Figure 6.3 – Sample Summary Page
The Templates page is displayed. The template you just created is added to the list of other templates.The new template is also displayed on the Dashboard page.
ESO-FS-200-4495 v.8 December 2020 23
Adding a Template

Firm and Criminal Filing Filer User Guide
Editing a TemplateYou can edit an existing template if you need to make changes to it.To edit an existing template, perform the following steps:
1. On the Dashboard menu, click Templates.
The Templates page is displayed.
Figure 6.4 – Templates Page
2. Locate the template that you want to edit, and then click .
The template name is displayed in a separate pane.
Note: You can change the template name if you want.
3. Click .
The Case Information page is displayed. Any information that you previously entered on this pageremains.
4. Make any changes that you want on the Case Information page.5. If you entered information on any other pages in your template, make changes as needed to those
pages. Then click .
Your template is now updated and is listed on the Templates page and on the Dashboard page.
Using a New Case TemplateAfter a template has been created, you can use it to accelerate your filing.To use a template that you previously created, perform the following steps:
1. On the Dashboard menu, click Templates.
The Templates page is displayed.
24 December 2020 ESO-FS-200-4495 v.8

Figure 6.5 – Templates Page
2. Locate the template that you want to use, and then click .
The Case Information page is displayed. All of the information that you entered when you created thetemplate is auto-filled.
3. Enter the remaining required information for the new case until you reach the Summary page.4. Review the summary of the case filing. After you are satisfied with the information in your filing, click
.
The new case filing is displayed on the Filing History page.
Using an Existing Case TemplateAfter a template has been created, you can use it to accelerate your filing when filing into an existing case.To access an existing case template, perform the following steps:
1. On the Dashboard menu, click Filing History.
The Filing History page is displayed.
ESO-FS-200-4495 v.8 December 2020 25
Using an Existing Case Template

Firm and Criminal Filing Filer User Guide
Figure 6.6 – Filing History Page
2. Locate the case that you want to file into, and then click .
A drop-down list is displayed.3. Click File Into Case With Template.
The Templates Matching window is displayed, along with a list of available templates.
26 December 2020 ESO-FS-200-4495 v.8
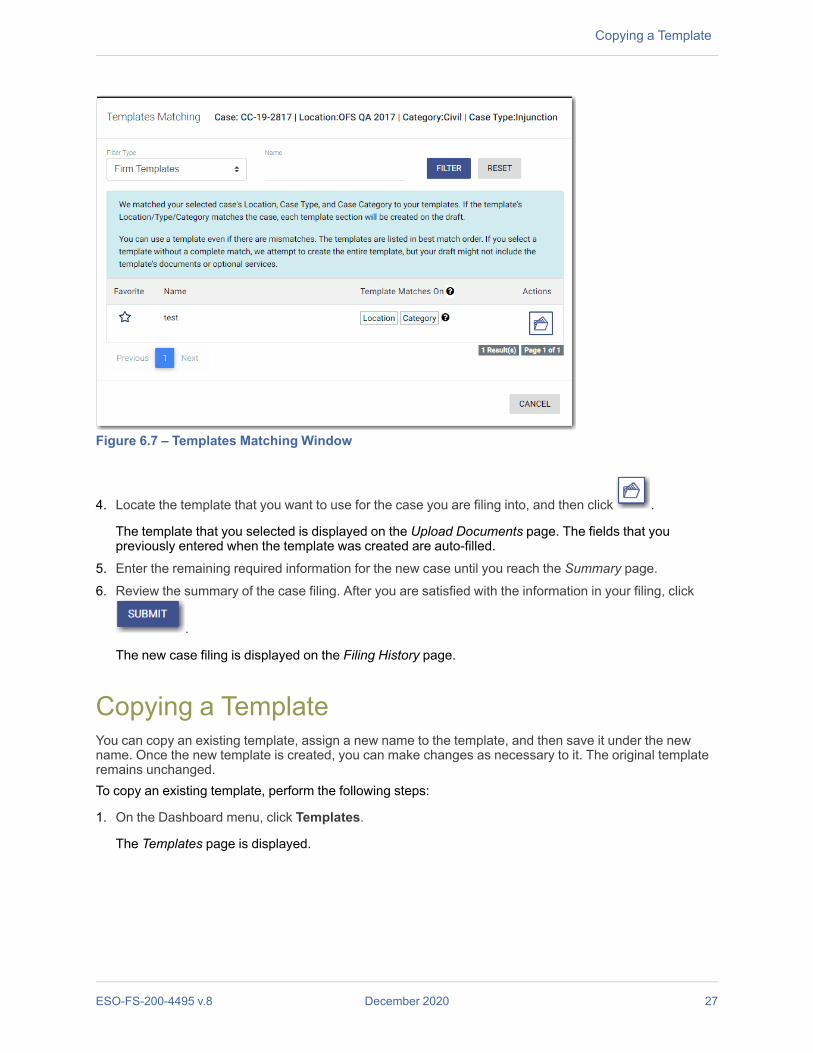
Figure 6.7 – Templates Matching Window
4. Locate the template that you want to use for the case you are filing into, and then click .
The template that you selected is displayed on the Upload Documents page. The fields that youpreviously entered when the template was created are auto-filled.
5. Enter the remaining required information for the new case until you reach the Summary page.6. Review the summary of the case filing. After you are satisfied with the information in your filing, click
.
The new case filing is displayed on the Filing History page.
Copying a TemplateYou can copy an existing template, assign a new name to the template, and then save it under the newname. Once the new template is created, you can make changes as necessary to it. The original templateremains unchanged.To copy an existing template, perform the following steps:
1. On the Dashboard menu, click Templates.
The Templates page is displayed.
ESO-FS-200-4495 v.8 December 2020 27
Copying a Template

Firm and Criminal Filing Filer User Guide
Figure 6.8 – Templates Page
2. Locate the template that you want to copy, and then click .
A drop-down list is displayed.
Figure 6.9 – More Options Drop-Down List
3. Click Copy Template.
The template name is displayed in a separate pane with “Copy” as part of the name.4. Rename the template to a different name.5. Select the Favorite check box if you want to designate this template as a favorite.
6. Click if you want to save the template as is with the new name. Or, click tomake changes to the template.
When you are done saving the new template, it is displayed on the Templates page with your othertemplates.
Deleting a TemplateYou can delete a template that you no longer need.To delete an existing template, perform the following steps:
1. On the Dashboard menu, click Templates.
The Templates page is displayed.
28 December 2020 ESO-FS-200-4495 v.8

Figure 6.10 – Templates Page
2. Locate the template that you want to delete, and then click .
A drop-down list is displayed.
Figure 6.11 – More Options Drop-Down List
3. Click Delete Template.
The following warning message is displayed: Are you sure you want to delete the template“xyz”?
4. Click to delete the template, or click to cancel the action.
If you clicked , a confirmation message is displayed, and the template is deleted.
ESO-FS-200-4495 v.8 December 2020 29
Deleting a Template

7 Case InitiationTopics covered in this chapter♦ Uploading Documents for a New Case Filing♦ Entering Case Information (Firm Filer)♦ Entering Case Information (Criminal Filing Filer)♦ Charges Page♦ Entering Case Information for a Civil Case♦ Filing a New Case with Case Cross References♦ Filing a New Case with a Will Filed Date♦ Entering Party Details (Firm Filer)♦ Entering Party Details (Criminal Filing Filer)♦ Entering Date of Death on Parties Page♦ Entering Filing Details♦ Capability for Filing a Return Date♦ Selecting a Return Date for a Case Filing♦ Reverify the Return Date♦ Reverifying a Return Date♦ Capability for Filing Hearing Date♦ Scheduling a Hearing Date for a New Case Filing♦ Scheduling a Hearing for an Existing Case Filing♦ Entering a Filing with an Ad Damnum Amount♦ Entering a Filing with a Motion Type Code♦ Entering a Filing with a Claim Amount♦ Entering a Filing with an Estate Value♦ Entering Payment Information♦ Entering Payment Information for Per-Page Optional Service Fee♦ Submission Agreements♦ Viewing the Envelope Summary
You can initiate a case from the Dashboard page by clicking . Thisaction begins the case initiation process for e-filing. From here, you can start a new case or file into anexisting case.
Note: While you are entering a case filing, click to view the case number or draft number.
30 December 2020 ESO-FS-200-4495 v.8

Figure 7.1 – Dashboard Page
Uploading Documents for a New Case FilingYou can upload your lead document and any attachments before you enter the filing information.To upload your documents, perform the following steps:
1. On the Dashboard page, click .
The Start Filing pane is displayed.
Figure 7.2 – Start Filing Pane
2. Click .
The Upload Documents page is displayed.
Note: While you are entering a case filing, click to view the case number or draftnumber.
ESO-FS-200-4495 v.8 December 2020 31
Uploading Documents for a New Case Filing
Firm and Criminal Filing Filer User Guide
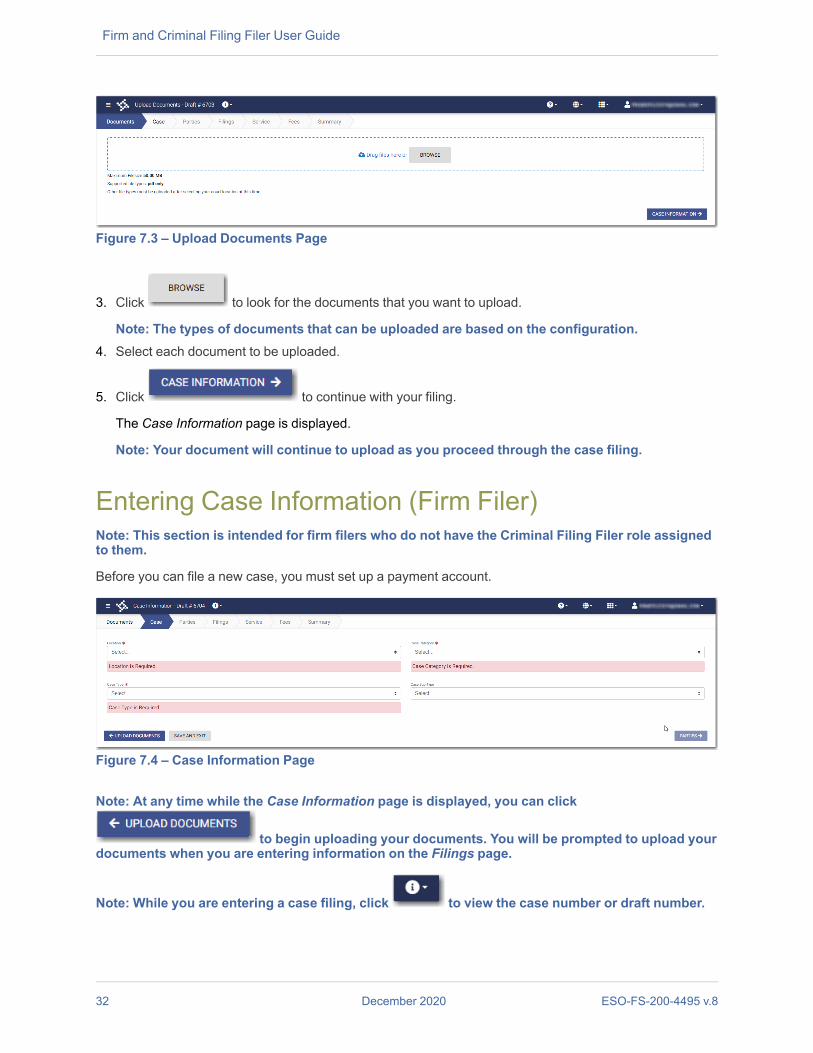
Figure 7.3 – Upload Documents Page
3. Click to look for the documents that you want to upload.
Note: The types of documents that can be uploaded are based on the configuration.4. Select each document to be uploaded.
5. Click to continue with your filing.
The Case Information page is displayed.
Note: Your document will continue to upload as you proceed through the case filing.
Entering Case Information (Firm Filer)Note: This section is intended for firm filers who do not have the Criminal Filing Filer role assignedto them.
Before you can file a new case, you must set up a payment account.
Figure 7.4 – Case Information Page
Note: At any time while the Case Information page is displayed, you can click
to begin uploading your documents. You will be prompted to upload yourdocuments when you are entering information on the Filings page.
Note: While you are entering a case filing, click to view the case number or draft number.
32 December 2020 ESO-FS-200-4495 v.8

To enter case information, perform the following steps:
1. On the Case Information page, select the location from the Location drop-down list.2. Select the case category from the Case Category drop-down list.3. Select the case type from the Case Type drop-down list.4. Select the case subtype, if applicable, from the Case Sub Type drop-down list.
5. Click to save your work and continue, or click to save your work andexit the filing.
Entering Case Information (Criminal Filing Filer)Note: This section is intended for users who have the Criminal Filing Filer role assigned to them.
Before you can file a new case, you must set up a payment account.
Figure 7.5 – Sample Case Information Page
Note: At any time while the Case Information page is displayed, you can click
to begin uploading your documents. You will be prompted to upload yourdocuments when you are entering information on the Filings page.
Note: While you are entering a case filing, click to view the case number or draft number.
To enter case information, perform the following steps:
1. On the Case Information page, select the location from the Location drop-down list.2. Select Criminal from the Case Category drop-down list.3. Select the appropriate case type from the Case Type drop-down list.4. Select an answer from the drop-down list for the first security question.
Note: The criminal security questions are configured by Tyler and may not be available on yoursystem.
ESO-FS-200-4495 v.8 December 2020 33
Entering Case Information (Criminal Filing Filer)

Firm and Criminal Filing Filer User Guide
Figure 7.6 – Example of the First Criminal Security Question
5. Select an answer from the drop-down list for the second security question.
Figure 7.7 – Example of Second Criminal Security Question
6. Click to save your work and continue, or click to save your work andexit the filing.
Charges PageThe Charges page contains the following two tabs for entering charge information related to a criminal casefiling:
• Details tab• Arrest tab
Entering Information on the Details Tab of the Charges PageThe Details tab on the Charges page includes the details of the charges associated with a criminal casefiling.
Note: You must have the Criminal Filing Filer role assigned to you to perform this procedure.
Note: You must select Criminal for the case type for the Charges page and its tabs to be displayed.
Note: A red asterisk after a field name indicates that the field is required.
34 December 2020 ESO-FS-200-4495 v.8

Figure 7.8 – Details Tab on the Charges Page
To enter information on the Details tab, perform the following steps:
1. Select a charge in the Add Offense window, or type a word or two and then click .
Note: The Add Offense window is displayed immediately after you click the Details tab.
Figure 7.9 – Add Offense Window
If you search for an offense, another window is displayed, listing the possible offenses that match yoursearch. Select the appropriate offense.
ESO-FS-200-4495 v.8 December 2020 35
Entering Information on the Details Tab of the Charges Page

Firm and Criminal Filing Filer User Guide
2. Click .
The code for the offense that you selected is displayed, along with a description of the offense.
Note: You can add verbiage to the description if you want.3. Select the charge phase from the Charge Phase drop-down list.
Figure 7.10 – Sample Charge Phase Drop-Down List
4. Verify that the description of the charge is correct in the Charge Description field.
Note: The charge description is auto-filled from the offense that you previously selected.5. Type the Tracking Number (TRN) in the TRN field.6. Type the Tracking Sequence (TRS) in the TRS field.7. Verify that the offense code is correct in the Offense Code field.
Note: The offense code is auto-filled from the offense that you previously selected.8. Type the number of the statute in the Statute field.
This field is a free-text field to accommodate the many statutes that are possible.9. Select the degree of the offense from the Degree drop-down list.10. Select the offense character that you want from the General Offense Character drop-down list.11. Do one of the following:
• If you know the date of the offense, type it in the Date of Offense (From) field, or click toselect a date from the calendar.The calendar is displayed.
36 December 2020 ESO-FS-200-4495 v.8

Figure 7.11 – Calendar
• If you do not know the exact date of the offense, select the Offense On Or About check box.When you select this check box, the Date of Offense (To) field is displayed. Type the daterange in the specified fields.
12. Do one of the following:
• If you know the time of the offense, type it in the Time of Offense (From) field, and then clickAM or PM.
• If you do not know the exact time of the offense, select the Offense At Or About check box.When you select this check box, the Time of Offense (To) field is displayed. Type the timerange in the specified fields.
13. Type the amount of the bond the arrestee is posting in the Bond Amount field. Use the format in theexample (that is, two decimal points).
14. If you want to add another offense code, hover over the Offense Code field, and then click the mouse.
The Add Offense window is displayed. Follow the same steps to add another offense code for thearrestee.
15. If you have additional statutes to enter for the arrestee, click .
The Add Offense window is displayed.16. Select a charge in the Add Offense window.
17. Click .
The code for the offense that you selected is displayed, along with a description of the offense.
18. If you have another charge to add, click .19. After you have completed all of the fields and entered the statutes and charges in the Details tab, click
to enter information regarding the arrest, or click .
ESO-FS-200-4495 v.8 December 2020 37
Entering Information on the Details Tab of the Charges Page
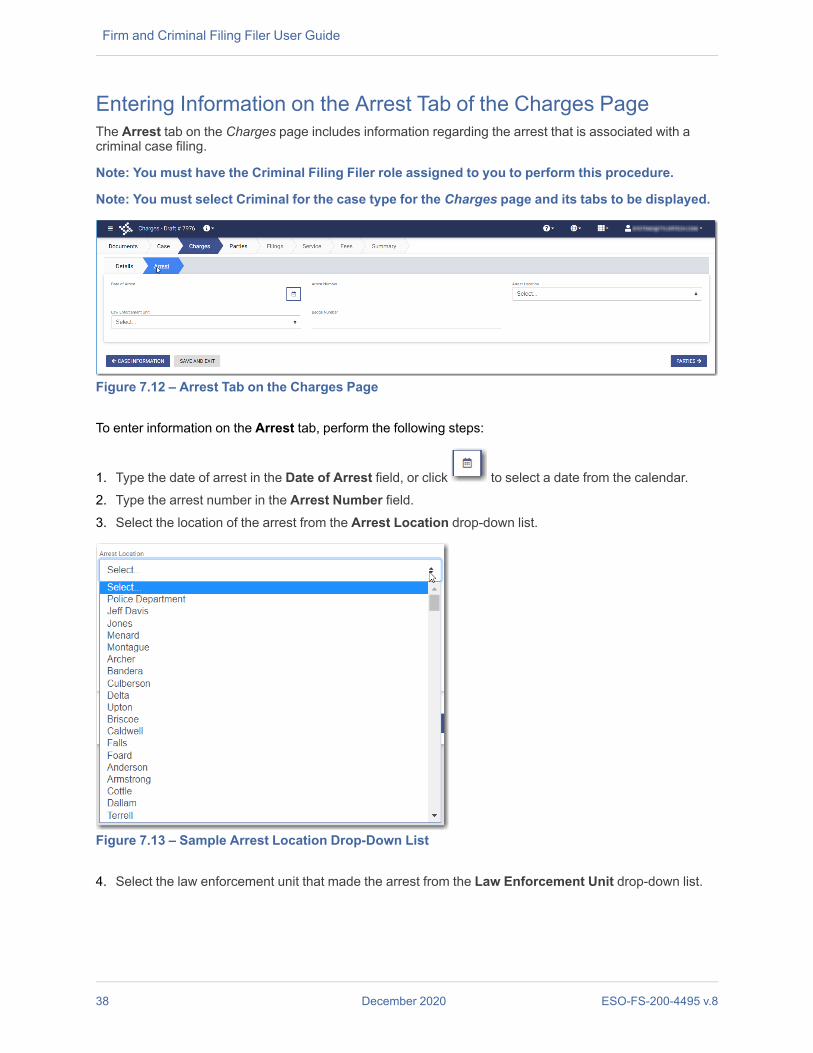
Firm and Criminal Filing Filer User Guide
Entering Information on the Arrest Tab of the Charges PageThe Arrest tab on the Charges page includes information regarding the arrest that is associated with acriminal case filing.
Note: You must have the Criminal Filing Filer role assigned to you to perform this procedure.
Note: You must select Criminal for the case type for the Charges page and its tabs to be displayed.
Figure 7.12 – Arrest Tab on the Charges Page
To enter information on the Arrest tab, perform the following steps:
1. Type the date of arrest in the Date of Arrest field, or click to select a date from the calendar.2. Type the arrest number in the Arrest Number field.3. Select the location of the arrest from the Arrest Location drop-down list.
Figure 7.13 – Sample Arrest Location Drop-Down List
4. Select the law enforcement unit that made the arrest from the Law Enforcement Unit drop-down list.
38 December 2020 ESO-FS-200-4495 v.8

Figure 7.14 – Sample Law Enforcement Unit Drop-Down List
5. Type the badge number of the arresting officer in the Badge Number field.
6. After you have completed all of the fields on the Arrest tab, click .
Entering Case Information for a Civil CaseNote: The Procedures/Remedies and Damage Amount features are configured by Tyler and may notbe available on your system.
Before you can file a new case, you must set up a payment account.
Note: At any time while the Case Information page is displayed, you can click
to begin uploading your documents. You will be prompted to upload yourdocuments when you are entering information on the Filings page.
Note: While you are entering a case filing, click to view the case number or draft number.
To enter case information, perform the following steps:
1. On the Case Information page, select the location from the Location drop-down list.2. Select Civil from the Case Category drop-down list.
ESO-FS-200-4495 v.8 December 2020 39
Entering Case Information for a Civil Case

Firm and Criminal Filing Filer User Guide
Figure 7.15 – Case Information Page
3. Select the case type from the Case Type drop-down list.4. Select the case subtype, if applicable, from the Case Sub Type drop-down list.
5. Click .
The Select Procedures / Remedies window is displayed.
Figure 7.16 – Select Procedures / Remedies Window
6. Select the appropriate Procedure / Remedy, and then click .7. Select the amount of damages you are seeking from the Damage Amount drop-down list.
40 December 2020 ESO-FS-200-4495 v.8

Figure 7.17 – Sample Completed Case Information Page
8. Click to save your work and continue, or click to save your work andexit the filing.
Filing a New Case with Case Cross ReferencesYou can include case cross references in your case filing if the feature is configured on your node.
Note: The Case Cross Reference number feature is configured by Tyler and may not be available onyour system.
Figure 7.18 – Case Information Page
To file a new case that uses case cross references, perform the following steps:
1. On the Case Information page, select the location from the Location drop-down list.2. Select Civil from the Case Category drop-down list.3. Select the appropriate case type from the Case Type drop-down list.4. Select the case subtype, if applicable, from the Case Sub Type drop-down list.5. Select the damages amount, if applicable, from the Damages Amount drop-down list.6. In the Case Cross Reference Type section, type the six-digit case cross reference number in the Case
Cross Reference Id field.
ESO-FS-200-4495 v.8 December 2020 41
Filing a New Case with Case Cross References

Firm and Criminal Filing Filer User Guide
Figure 7.19 – Sample Case Information Page with the Case Cross Reference Type SectionDisplayed
7. If you have additional case cross reference numbers to add, click .
A blank row in the Case Cross Reference Type section is displayed.8. Select the appropriate option from the Case Cross Reference Type drop-down list. Then, type the six-
digit case cross reference number in the Case Cross Reference Id field.
Note: If any case cross reference numbers are required, the Case Cross Reference Type(s) willbe auto-populated.
9. Continue adding case cross reference numbers until you are done.
42 December 2020 ESO-FS-200-4495 v.8

Figure 7.20 – Example of a Case Information Page with Case Cross Reference Numbers Added
10. Click to save your work and to continue, or click to save your workand to exit the filing.
Filing a New Case with a Will Filed DateYou can file a new case and enter the date on which the will was filed with the court.
Note: This feature is configured by Tyler and may not be available on your system.
To file a new case and enter the date on which the will was filed, perform the following steps:
1. On the Dashboard page, click .
The Start Filing pane is displayed.
ESO-FS-200-4495 v.8 December 2020 43
Filing a New Case with a Will Filed Date

Firm and Criminal Filing Filer User Guide
Figure 7.21 – Start Filing Pane
2. Click .
The Upload Documents page is displayed.
Note: While you are entering a case filing, click to view the case number or draftnumber.
Figure 7.22 – Upload Documents Page
3. Click to look for the documents that you want to upload.
Note: The types of documents that can be uploaded are based on the configuration.4. Select each document to be uploaded.
5. Click to continue with your filing.
Note: Your document will continue to upload as you proceed through the case filing.
The Case Information page is displayed.
44 December 2020 ESO-FS-200-4495 v.8

Figure 7.23 – Example of the Will Filed Field on the Case Information Page
6. Select the location from the Location drop-down list.7. Select the category from the Case Category drop-down list.
Note: In the example, “Probate or Mental Health” is selected.8. Select the case type from the Case Type drop-down list.
Note: In the example, “Probate of Will” is selected.
Note: The category and case type that you select determine which fields will be displayed next.9. Select the case subtype from the Case Sub Type drop-down list.
Note: The items in this list are determined by the case type you selected.10. Type a date in the Will Filed Date field, or click the calendar to select a date from the calendar.
Note: The Will Filed Date feature is configured by Tyler and may not be available on yoursystem.
11. Click to save your work and to continue, or click to save your workand to exit the filing.
Entering Party Details (Firm Filer)Each case requires a party type.
Note: This section is intended for firm filers who do not have the Criminal Filing Filer role assignedto them.
ESO-FS-200-4495 v.8 December 2020 45
Entering Party Details (Firm Filer)

Firm and Criminal Filing Filer User Guide
Figure 7.24 – Personal Tab on the Parties Page
Note: While you are entering a case filing, click to view the case number or draft number.
To enter the details for the parties involved in the case, perform the following steps:
1. On the Personal tab, select the Person or Entity option.2. Complete the First Name. Middle Name (if applicable), and Last Name fields. Also, if appropriate,
select the party’s suffix from the Suffix drop-down list.3. Type the party case management system ID in the Party CMS ID field, if appropriate.4. Select a language from the Interpreter drop-down list, if appropriate.
5. Click to select the filing attorney.
The Attorneys window is displayed.
Figure 7.25 – Attorneys Window
6. Select the lead attorney for the first party on the case.
46 December 2020 ESO-FS-200-4495 v.8
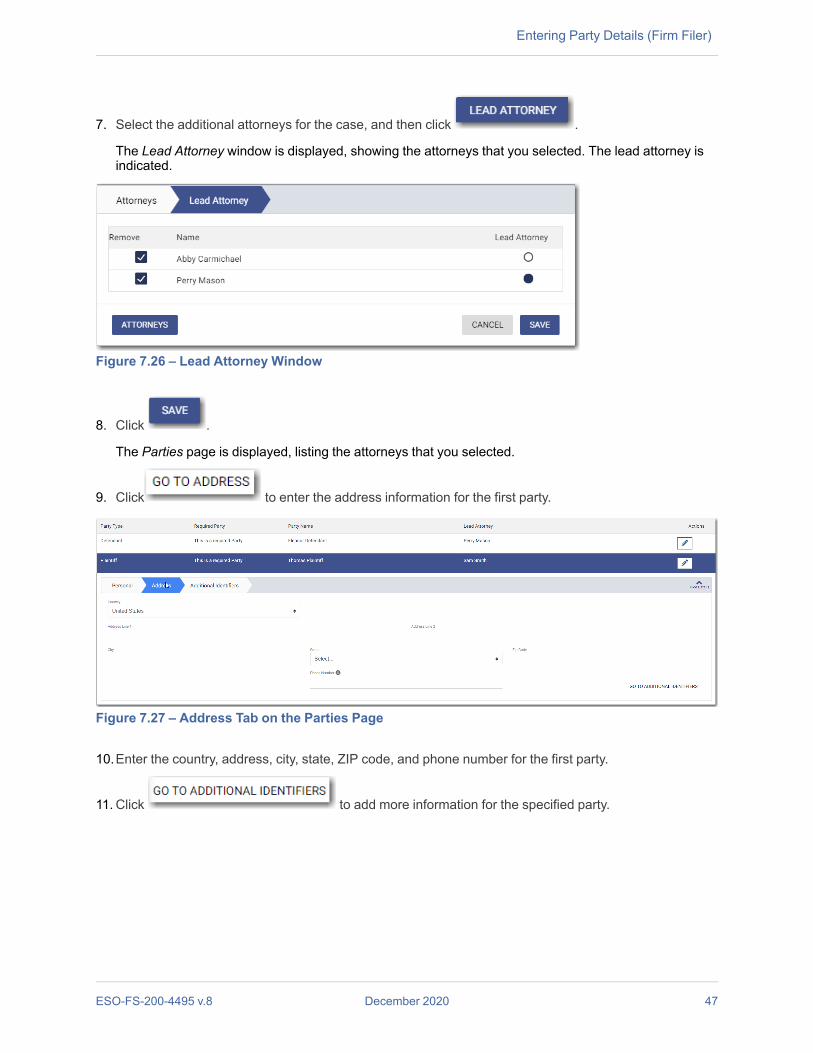
7. Select the additional attorneys for the case, and then click .
The Lead Attorney window is displayed, showing the attorneys that you selected. The lead attorney isindicated.
Figure 7.26 – Lead Attorney Window
8. Click .
The Parties page is displayed, listing the attorneys that you selected.
9. Click to enter the address information for the first party.
Figure 7.27 – Address Tab on the Parties Page
10. Enter the country, address, city, state, ZIP code, and phone number for the first party.
11. Click to add more information for the specified party.
ESO-FS-200-4495 v.8 December 2020 47
Entering Party Details (Firm Filer)

Firm and Criminal Filing Filer User Guide
Figure 7.28 – Additional Identifiers Tab on the Parties Page
12. Type the party’s date of birth in the Date of Birth field, or click to select the date from thecalendar.
13. Click to enter information for the other required party.14. Complete all of the required fields for the second party.
15. If you have another party to add to the case, click . Continue to add parties until all of theparties have been added to the case.
16. Click to save your work and to continue.Note: If you decide to save the draft, you can stop working on the filing and resume work at a latertime. To resume filing a saved draft, navigate to the Dashboard page. In the Drafts pane, click View
My Drafts. Locate the specified draft, and then click .
Entering Party Details (Criminal Filing Filer)Each case requires a party type.
Note: This section is intended for users who have the Criminal Filing Filer role assigned to them.
48 December 2020 ESO-FS-200-4495 v.8
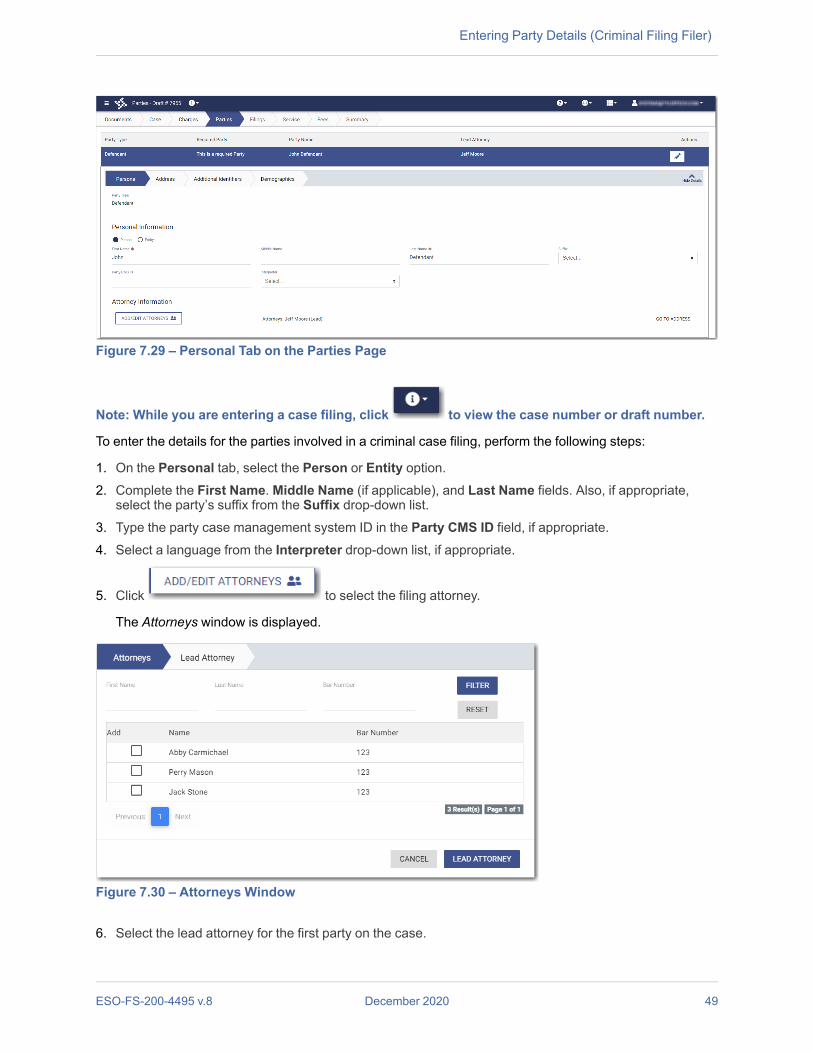
Figure 7.29 – Personal Tab on the Parties Page
Note: While you are entering a case filing, click to view the case number or draft number.
To enter the details for the parties involved in a criminal case filing, perform the following steps:
1. On the Personal tab, select the Person or Entity option.2. Complete the First Name. Middle Name (if applicable), and Last Name fields. Also, if appropriate,
select the party’s suffix from the Suffix drop-down list.3. Type the party case management system ID in the Party CMS ID field, if appropriate.4. Select a language from the Interpreter drop-down list, if appropriate.
5. Click to select the filing attorney.
The Attorneys window is displayed.
Figure 7.30 – Attorneys Window
6. Select the lead attorney for the first party on the case.
ESO-FS-200-4495 v.8 December 2020 49
Entering Party Details (Criminal Filing Filer)

Firm and Criminal Filing Filer User Guide
7. Select the additional attorneys for the case, and then click .
The Lead Attorney window is displayed, showing the attorneys that you selected. The lead attorney isindicated.
Figure 7.31 – Lead Attorney Window
8. Click .
The Parties page is displayed, listing the attorneys that you selected.
9. Click to enter the address information for the first party.
Figure 7.32 – Address Tab on the Parties Page
10. Enter the country, address, city, state, ZIP code, and phone number for the first party.
11. Click to add more information for the specified party.
50 December 2020 ESO-FS-200-4495 v.8

Figure 7.33 – Additional Identifiers Tab on the Parties Page
12. Select the type of driver’s license from the Drivers License Type drop-down list.13. Select the state where the driver’s license was issued from the Drivers License State drop-down list.14. Type the party’s driver’s license number in the Drivers License Number field.15. Type the party’s Social Security number in the Social Security Number field.
Note: After you type the Social Security number, asterisks are displayed to hide the number.16. Type the party’s State Identification (SID) number in the SID Number field.17. Type the party’s Federal Bureau of Investigation (FBI) number in the FBI Number field.
18. Type the party’s date of birth in the Date of Birth field, or click to select the date from thecalendar.
19. Click to enter the demographics for the specified party.
ESO-FS-200-4495 v.8 December 2020 51
Entering Party Details (Criminal Filing Filer)

Firm and Criminal Filing Filer User Guide
Figure 7.34 – Demographics Tab on the Parties Page
20. Select the party’s country of citizenship from the Country of Citizenship drop-down list.21. Select the party’s ethnicity from the Ethnicity drop-down list.22. Select the party’s race from the Race drop-down list.23. Type the party’s height in feet in the Height (Feet) field.24. Type the party’s height in inches in the Height (Inches) field.25. Type the party’s weight in the Weight field.26. Select the party’s gender from the Gender drop-down list.27. Select the party’s eye color from the Eye Color drop-down list.28. Select the party’s hair color from the Hair Color drop-down list.
29. If the party has a special physical feature, click .
Figure 7.35 – Physical Feature Pane
30. Select the physical feature from the Feature drop-down list.31. Type a description of the feature in the Description field.32. Complete any other fields that are displayed.
33. Click to continue adding physical features.
34. Click to enter information for the other required party.35. Complete all of the required fields for the second party.
52 December 2020 ESO-FS-200-4495 v.8

36. If you have another party to add to the case, click . Continue to add parties until all of theparties have been added to the case.
37. Click to save your work and to continue.Note: If you decide to save the draft, you can stop working on the filing and resume work at a latertime. To resume filing a saved draft, navigate to the Dashboard page. In the Drafts pane, click View
My Drafts. Locate the specified draft, and then click .
Entering Date of Death on Parties PageYou can enter the date of death for a party when the feature is configured on your system.
Note: The Date of Death feature is configured by Tyler and may not be available on your system.
Note: Your screens may vary from the examples provided.
Figure 7.36 – Example of the Personal Tab on a Parties Page
To enter the date of death on the Parties page, perform the following steps:
1. On the Dashboard page, click .
The Start Filing pane is displayed.
ESO-FS-200-4495 v.8 December 2020 53
Entering Date of Death on Parties Page

Firm and Criminal Filing Filer User Guide
Figure 7.37 – Start Filing Pane
2. Click .
The Upload Documents page is displayed.
Note: While you are entering a case filing, click to view the case number or draftnumber.
Figure 7.38 – Upload Documents Page
3. Click to look for the documents that you want to upload.
Note: The types of documents that can be uploaded are based on the configuration.4. Select each document to be uploaded.
5. Click to continue with your filing.
Note: Your document will continue to upload as you proceed through the case filing.
The Case Information page is displayed.
6. Complete the required sections on the Case Information page, and then click .7. Select the Person or Entity option.
Note: If Tyler has configured the Date of Death feature on your system, you may have theDecedent and Deceased options available in the Party Type drop-down list.
54 December 2020 ESO-FS-200-4495 v.8

8. Complete the First Name. Middle Name (if applicable), and Last Name fields. Also, if appropriate,select the party’s suffix from the Suffix drop-down list.
9. Type the party case management system ID in the Party CMS ID field, if appropriate.10. Select a language from the Interpreter drop-down list, if appropriate.
11. Click to select the filing attorney.
The Attorneys window is displayed.
Figure 7.39 – Attorneys Window
12. Select the lead attorney for the first party on the case.
13. Select the additional attorneys for the case, and then click .
The Lead Attorney window is displayed with the attorneys that you selected. The lead attorney isindicated.
Figure 7.40 – Lead Attorney Window
14. Click .
The attorneys that you selected are listed on the Parties page.
ESO-FS-200-4495 v.8 December 2020 55
Entering Date of Death on Parties Page

Firm and Criminal Filing Filer User Guide
15. Click to enter the address information for the first party.
Figure 7.41 – Example of the Address Tab on a Parties Page
16. Complete the required fields on the Address tab, and then click .
Figure 7.42 – Example of the Additional Identifiers Tab on a Parties Page (Includes the Date ofDeath Field)
17. Type a date in the Date of Birth field, or click to select a date from the calendar.
18. Type a date in the Date of Death field, or click to select a date from the calendar.
19. Click to enter information for any other required party.20. Complete all of the required fields for the second party.
21. If you have another party to add to the case, click . Continue to add parties until all partieshave been added to the case.
22. Click to save your work and to continue.
56 December 2020 ESO-FS-200-4495 v.8

Entering Filing DetailsThe Filings section allows you to enter the filing details and calculate the fees associated with the filing.
Figure 7.43 – Filings Page
Note: While you are entering a case filing, click to view the case number or draft number.
To enter the filing details, perform the following steps:
1. Select the filing type from the Filing Type drop-down list.2. Select the filing code from the Filing Code drop-down list.3. Type a description in the Filing Description field.4. Type a client reference number in the Client Reference Number field.5. If you have any comments for the court regarding the filing, type them in the Comments to Court field.
6. if you need to apply any optional services for the filing, click .
A new window is displayed.
ESO-FS-200-4495 v.8 December 2020 57
Entering Filing Details

Firm and Criminal Filing Filer User Guide
Figure 7.44 – Sample Optional Services Tab
7. To select the applicable optional services, click .
Some optional services require that you type the number of services that you need. For those services,the Multiplier will calculate the amount.
Note: If you decide that you do not want to use an optional service that you have selected, click
.
8. Click to specify the recipient of the courtesy or preliminary copies. You musttype a valid email address for the recipient.
9. Click to associate parties with the filing.
The Associate Parties to this Filing window is displayed.
Figure 7.45 – Associate Parties to this Filing Window
10. Type the name of the party that you want to associate with the filing.11. Select the relationship of the party from the Party Type drop-down list.12. Select the check box for the party to which the associated party should be connected.
58 December 2020 ESO-FS-200-4495 v.8

13. Click .
14. In the Upload Documents pane, click .
Note: The filing code that you enter determines the name of the component that is displayed inthe Upload Documents pane. You may see a component other than “Lead Document” and“Attachments.”
Note: If you previously uploaded a document that you did not select and use in a filing, thedocument will be deleted after a period of time. The number of days that a document is keptbefore it is deleted is configurable, but all unused documents will be deleted after 365 days. Ifyour document has been deleted, a message is displayed in the Upload Documents pane. Youwill be directed to upload another document for your filing.
Figure 7.46 – Upload Documents Pane
The Select document(s) for Lead Document window is displayed.
Figure 7.47 – Select document(s) for Lead Document Window
Note: If you have already uploaded a lead document, the document is listed in the window.
15. Click to select the lead document if a document has already been uploaded. Clickto look for a document to upload or to locate additional lead documents.
Note: If you want to delete a document that you previously uploaded, click .
ESO-FS-200-4495 v.8 December 2020 59
Entering Filing Details

Firm and Criminal Filing Filer User Guide
16. After you have added all of your lead documents, click .
17. If you have attachments to add to the filing, click in the Attachments section.18. If you want to add security to any of the documents, select an option from the Security drop-down list.
19. If you want to add another filing, click . Then, repeat the same steps for the next filing.
20. After you have added all of the filings, click either or .
Capability for Filing a Return DateFilers can select a date by which the respondent must respond to the filing. Filers select the return date onthe Summary page of a case filing.
Note: This feature is configured by Tyler and may not be available on your system.
Figure 7.48 – Return Date Pane
After selecting a return date, you must click to check whether the selected date is available. Ifthe selected date is verified, a confirmation message is displayed.
Figure 7.49 – Return Date Verified Message
If the selected date is not verified, the system may change the date. If the date is changed, the new datewill be displayed.
Figure 7.50 – Sample Return Date Pane with Valid Date Displayed
If you select an invalid return date, an error message is displayed.
60 December 2020 ESO-FS-200-4495 v.8

Figure 7.51 – Return Date Pane with Error Message Displayed
Selecting a Return Date for a Case FilingNote: This feature is configured by Tyler and may not be available on your system.
To select a return date for a case filing, perform the following steps:
1. From the Dashboard page, click .
Figure 7.52 – Dashboard Page
The Start Filing pane is displayed.
ESO-FS-200-4495 v.8 December 2020 61
Selecting a Return Date for a Case Filing

Firm and Criminal Filing Filer User Guide
Figure 7.53 – Start Filing Pane
2. Click .
The Upload Documents page is displayed.
3. Click to look for the documents that you want to upload.4. Select each document to be uploaded.
5. Click to continue with your filing.
The Case Information page is displayed.
Note: Your document will continue to upload as you proceed through the case filing.6. Complete the details for the case by completing the fields on the Case Information page, and then click
.
The Parties page is displayed.
7. Complete the fields on the Parties page, and then click .
The Filings page is displayed.
8. Complete the fields on the Filings page, and then click .
The Service page is displayed.
9. Select the service contacts, and then click .
The Fees page is displayed.
10. Complete the fields on the Fees page, and then click .
The Summary page is displayed.
62 December 2020 ESO-FS-200-4495 v.8

Figure 7.54 – Return Date Pane on the Summary Page
11. On the Summary page, perform the following steps to select a return date:
a. If the respondent is located out of state, select the Out of State Service check box.
Figure 7.55 – Out of State Service Check Box Selected in the Return Date Pane
b. Type a date in the Return Date field, or click to select a date from the calendar.
c. Click .
If the selected date is verified, a confirmation message is displayed.
Figure 7.56 – Return Date Verified Message
If the selected date is not verified, the system may change the date. If the date is changed, the newdate will be displayed in the Return Date field.
ESO-FS-200-4495 v.8 December 2020 63
Selecting a Return Date for a Case Filing

Firm and Criminal Filing Filer User Guide
Figure 7.57 – Sample Return Date Pane with Valid Date Displayed
12. Verify the rest of the information on the Summary page, and then submit your filing.
Reverify the Return DateThe system forces a user to reverify the return date if the user navigates away from the Summary pagebefore submitting the filing. When the user returns to the Summary page, the user must reverify the returndate before the filing can be submitted.
Note: This feature is configured by Tyler and may not be available on your system.
Reverifying a Return DateNote: This feature is configured by Tyler and may not be available on your system.
To reverify the return date, perform the following steps:
1. After making changes in your case filing, navigate to the Summary page.
Note: You must reverify the return date that you previously selected.
If the date you previously selected is still available, the date is displayed in the Return Date field.
If the date you previously selected is no longer available, a new date is displayed in the Return Datefield.
Figure 7.58 – Return Date Pane
2. Click to verify the date that is displayed, or type a new date, and then click .
3. When all of the information on the Summary page is correct, click .
64 December 2020 ESO-FS-200-4495 v.8

Capability for Filing Hearing DateFilers can search for available hearing dates and then select a specified date. The hearing date is reservedin the system.
Note: This feature is configured by Tyler and may not be available on your system.
Filers can select a hearing date in a couple of ways:
• The filer completes a case filing and then submits it. Then the filer is prompted to select a hearingdate and time.
• After a filing has been submitted, if a hearing was not previously scheduled, the filer can view theenvelope details and then select a hearing date and time.
The filer schedules a hearing date and time on the Schedule Hearing page.
Figure 7.59 – Sample Schedule Hearing Page
If the filer does not want to schedule a hearing at this time, the filer can click .
Scheduling a Hearing Date for a New Case FilingYou can schedule a hearing after completing all fields in a case filing and then submitting your filing.
Note: This feature is configured by Tyler and may not be available on your system.
Note: The example screens may differ from the screens displayed in your system.
To schedule a hearing for a new case filing, perform the following steps:
1. From the Dashboard page, click .
ESO-FS-200-4495 v.8 December 2020 65
Capability for Filing Hearing Date

Firm and Criminal Filing Filer User Guide
Figure 7.60 – Dashboard Page
The Start Filing pane is displayed.
Figure 7.61 – Start Filing Pane
2. Click .
The Upload Documents page is displayed.
3. Click to look for the documents that you want to upload.4. Select each document to be uploaded.
5. Click to continue with your filing.
The Case Information page is displayed.
Note: Your document will continue to upload as you proceed through the case filing.
66 December 2020 ESO-FS-200-4495 v.8

Figure 7.62 – Case Information Page
6. Complete the details for the case by completing the fields on the Case Information page, and then click
.
The Parties page is displayed.
Figure 7.63 – Parties Page
7. Complete the fields on the Parties page, and then click .
The Filings page is displayed.
ESO-FS-200-4495 v.8 December 2020 67
Scheduling a Hearing Date for a New Case Filing

Firm and Criminal Filing Filer User Guide
Figure 7.64 – Filings Page
8. Complete the fields on the Filings page, and then click .
The Service page is displayed.
Figure 7.65 – Service Page
9. Select the service contacts, and then click .
The Fees page is displayed.
10. Complete the fields on the Fees page, and then click .
68 December 2020 ESO-FS-200-4495 v.8

The Summary page is displayed.
Figure 7.66 – Summary Page
11. Complete any required fields on the Summary page, and verify all of the information. Then, click
.
The Schedule Hearing page is displayed.
Figure 7.67 – Sample Schedule Hearing Page
12. Select the hearing date and time that you want from the options listed, and then click .
A confirmation message is displayed, and then the Dashboard page is displayed.
Note: You can view the scheduled hearing date in the envelope details.
ESO-FS-200-4495 v.8 December 2020 69
Scheduling a Hearing Date for a New Case Filing

Firm and Criminal Filing Filer User Guide
Note: If you want to schedule your hearing at another time, click .
Scheduling a Hearing for an Existing Case FilingYou can schedule a hearing for a case filing for which no hearing was previously scheduled, and the courthas not yet reviewed the envelope.
Note: This feature is configured by Tyler and may not be available on your system.
To schedule a hearing for an existing case filing, perform the following steps:
1. On the Dashboard menu, click Filing History.
The Filing History page is displayed.
Figure 7.68 – Filing History Page
2. Locate the specified case for which you want to schedule a hearing.
3. Click .
The envelope details are displayed.
70 December 2020 ESO-FS-200-4495 v.8

Figure 7.69 – Sample Envelope Details Page
4. Click .
The Schedule Hearing page is displayed.
Figure 7.70 – Sample Schedule Hearing Page
5. Select the hearing date and time that you want from the options listed, and then click .
ESO-FS-200-4495 v.8 December 2020 71
Scheduling a Hearing for an Existing Case Filing

Firm and Criminal Filing Filer User Guide
A confirmation message is displayed, and then the Dashboard page is displayed.
Note: You can view the scheduled hearing date in the envelope details.
Entering a Filing with an Ad Damnum AmountYou can enter an Ad Damnum (damage) amount when that mount has been specified by the court. The AdDamnum field is displayed on the Fees page. You can enter the amount of damages in the Ad Damnumfield. When the Ad Damnum amount is set, an appropriate fee will be applied.
Note: The Ad Damnum feature is configured by Tyler and may not be available on your system.
To enter filing details, perform the following steps:
1. On the Filings page, select a filing type from the Filing Type drop-down list.
Figure 7.71 – Filings Page
2. Select the appropriate filing code from the Filing Code drop-down list.
Note: In the example provided, the “Agreement (w/ Ad Damnum)” filing code is displayed. Thewording in your system’s configuration may differ from the example.
3. Type a description of the filing in the Filing Description field.4. Type a client reference number in the Client Reference Number field.5. Type any relevant comments in the Comments to Court field.
6. if you need to apply any optional services for the filing, click .
A new window is displayed.
72 December 2020 ESO-FS-200-4495 v.8

Figure 7.72 – Sample Optional Services Tab
7. To select the applicable optional services, click .
Some optional services require that you type the number of services that you need. For those services,the Multiplier will calculate the amount.
Note: If you decide that you do not want to use an optional service that you have selected, click
.
8. Click to specify the recipient of the courtesy or preliminary copies. You musttype a valid email address for the recipient.
9. Click to associate parties with the filing.
The Associate Parties to this Filing window is displayed.
Figure 7.73 – Associate Parties to this Filing Window
10. Type the name of the party that you want to associate with the filing.11. Select the relationship of the party from the Party Type drop-down list.12. Select the check box for the party to which the associated party should be connected.
ESO-FS-200-4495 v.8 December 2020 73
Entering a Filing with an Ad Damnum Amount

Firm and Criminal Filing Filer User Guide
13. Click .
14. In the Upload Documents pane, click .
Note: The filing code that you enter determines the name of the component that is displayed inthe Upload Documents pane. You may see a component other than “Lead Document” and“Attachments.”
Note: If you previously uploaded a document that you did not select and use in a filing, thedocument will be deleted after a period of time. The number of days that a document is keptbefore it is deleted is configurable, but all unused documents will be deleted after 365 days. Ifyour document has been deleted, a message is displayed in the Upload Documents pane. Youwill be directed to upload another document for your filing.
Figure 7.74 – Upload Documents Pane
The Select document(s) for Lead Document window is displayed.
Figure 7.75 – Select document(s) for Lead Document Window
Note: If you have already uploaded a lead document, the document is listed in the window.
15. Click to select the lead document if a document has already been uploaded. Clickto look for a document to upload or to locate additional lead documents.
Note: If you want to delete a document that you previously uploaded, click .
74 December 2020 ESO-FS-200-4495 v.8

16. After you have added all of your lead documents, click .
17. If you have attachments to add to the filing, click in the Attachments section.18. If you want to add security to any of the documents, select an option from the Security drop-down list.
19. If you want to add another filing, click . Then, repeat the same steps for the next filing.
20. After you have added all of the filings, click .
The Service page is displayed.
21. Select the service contacts, and then click .
The Fees page is displayed.
Figure 7.76 – Fees Page
22. On the Fees page, type the amount of damages for the case in the Ad Damnum field.23. Select the payment account from the Payment Account drop-down list.24. Select the party that is responsible for paying the fees from the Party Responsible for Fees drop-down
list.
Note: If there are no fees associated with your filing, you may not be required to make aselection in the Party Responsible for Fees field.
25. Select the filing attorney from the Filing Attorney drop-down list.
Note: All users may not see the Filing Attorney field.26. Select the filer type from the Filer Type drop-down list.
27. Click .
ESO-FS-200-4495 v.8 December 2020 75
Entering a Filing with an Ad Damnum Amount

Firm and Criminal Filing Filer User Guide
The fees for the filing are displayed.
Figure 7.77 – Sample Ad Damnum Fees on the Fees Page
28. Click to review and complete your filing.
Entering a Filing with a Motion Type CodeYou can enter a filing for a specific motion type.
Note: This feature is configured by Tyler and may not be available on your system.
76 December 2020 ESO-FS-200-4495 v.8

Figure 7.78 – Filings Page
To enter a filing with a Motion Type code, perform the following steps:
1. On the Filings page, select the filing type from the Filing Type drop-down list.2. Select a Motion filing code from the Filing Code drop-down list.
The Motion Type drop-down list is displayed with a list of applicable Motion Types.
Figure 7.79 – Sample Motion Type Drop-Down List
3. Select the appropriate Motion Type from the drop-down list.4. Type a description of the filing in the Filing Description field.5. Type a client reference number in the Client Reference Number field.6. If you have any comments for the court regarding the filing, type them in the Comments to Court field.
7. if you need to apply any optional services for the filing, click .
A new window is displayed.
ESO-FS-200-4495 v.8 December 2020 77
Entering a Filing with a Motion Type Code

Firm and Criminal Filing Filer User Guide
Figure 7.80 – Sample Optional Services Tab
8. To select the applicable optional services, click .
Some optional services require that you type the number of services that you need. For those services,the Multiplier will calculate the amount.
Note: If you decide that you do not want to use an optional service that you have selected, click
.
9. Click to specify the recipient of the courtesy or preliminary copies. You musttype a valid email address for the recipient.
10. Click to associate parties with the filing.
The Associate Parties to this Filing window is displayed.
Figure 7.81 – Associate Parties to this Filing Window
11. Type the name of the party that you want to associate with the filing.12. Select the relationship of the party from the Party Type drop-down list.13. Select the check box for the party to which the associated party should be connected.
78 December 2020 ESO-FS-200-4495 v.8

14. Click .
15. In the Upload Documents pane, click .
Note: The filing code that you enter determines the name of the component that is displayed inthe Upload Documents pane. You may see a component other than “Lead Document” and“Attachments.”
Figure 7.82 – Upload Documents Pane
The Select document(s) for Lead Document window is displayed.
Figure 7.83 – Select document(s) for Lead Document Window
Note: If you have already uploaded a lead document, the document is listed in the window.
16. Click to select the lead document if a document has already been uploaded. Clickto look for a document to upload or to locate additional lead documents.
Note: If you want to delete a document that you previously uploaded, click .
17. After you have added all of your lead documents, click .
18. If you have attachments to add to the filing, click in the Attachments section.19. If you want to add security to any of the documents, select an option from the Security drop-down list.
ESO-FS-200-4495 v.8 December 2020 79
Entering a Filing with a Motion Type Code

Firm and Criminal Filing Filer User Guide
20. If you want to add another filing, click . Then, repeat the same steps for the next filing.
21. After you have added all of the filings, click either or .
Figure 7.84 – Example of a Filings Page with a Motion Filing Code Selected
Entering a Filing with a Claim AmountFilers can enter the Claim Amount when that amount has been specified by the court. The Claim Amountfield is displayed on the Fees page. Filers can enter the amount in the Claim Amount field. When theClaim Amount is set, an appropriate fee will be applied.
Note: The Claim Amount feature is configured by Tyler and may not be available on your system.
To enter filing details, perform the following steps:
1. On the Filings page, select a filing type from the Filing Type drop-down list.
80 December 2020 ESO-FS-200-4495 v.8

Figure 7.85 – Filings Page
2. Select the Waiver w/ special behavior filing code from the Filing Code drop-down list.3. Type a description of the filing in the Filing Description field.4. Type a client reference number in the Client Reference Number field.5. Type any relevant comments in the Comments to Court field.
6. If you need to apply any optional services for the filing, click .
A new window is displayed.
Figure 7.86 – Sample Optional Services Tab
7. To select the applicable optional services, click .
Some optional services require that you type the number of services that you need. For those services,the Multiplier will calculate the amount.
ESO-FS-200-4495 v.8 December 2020 81
Entering a Filing with a Claim Amount

Firm and Criminal Filing Filer User Guide
Note: If you decide that you do not want to use an optional service that you have selected, click
.
8. Click to specify the recipient of the courtesy or preliminary copies. You musttype a valid email address for the recipient.
9. Click to associate parties with the filing.
The Associate Parties to this Filing window is displayed.
Figure 7.87 – Associate Parties to this Filing Window
10. Type the name of the party that you want to associate with the filing.11. Select the relationship of the party from the Party Type drop-down list.12. Select the check box for the party to which the associated party should be connected.
13. Click .
14. In the Upload Documents pane, click .
Note: The filing code that you enter determines the name of the component that is displayed inthe Upload Documents pane. You may see a component other than “Lead Document” and“Attachments.”
Note: If you previously uploaded a document that you did not select and use in a filing, thedocument will be deleted after a period of time. The number of days that a document is keptbefore it is deleted is configurable, but all unused documents will be deleted after 365 days. Ifyour document has been deleted, a message is displayed in the Upload Documents pane. Youwill be directed to upload another document for your filing.
82 December 2020 ESO-FS-200-4495 v.8

Figure 7.88 – Upload Documents Pane
The Select document(s) for Lead Document window is displayed.
Figure 7.89 – Select document(s) for Lead Document Window
Note: If you have already uploaded a lead document, the document is listed in the window.
15. Click to select the lead document if a document has already been uploaded. Clickto look for a document to upload or to locate additional lead documents.
Note: If you want to delete a document that you previously uploaded, click .
16. After you have added all of your lead documents, click .
17. If you have attachments to add to the filing, click in the Attachments section.18. If you want to add security to any of the documents, select an option from the Security drop-down list.
19. If you want to add another filing, click . Then, repeat the same steps for the next filing.
20. After you have added all of the filings, click .
The Service page is displayed.
21. Select the service contacts, and then click .
ESO-FS-200-4495 v.8 December 2020 83
Entering a Filing with a Claim Amount

Firm and Criminal Filing Filer User Guide
The Fees page is displayed.
Figure 7.90 – Fees Page
22. On the Fees page, type the Claim Amount in the Claim Amount field.23. Select the payment account from the Payment Account drop-down list.24. Select the party that is responsible for paying the fees from the Party Responsible for Fees drop-down
list.
Note: If there are no fees associated with your filing, you may not be required to make aselection in the Party Responsible for Fees field.
25. Select the filing attorney from the Filing Attorney drop-down list.
Note: All users may not see the Filing Attorney field.26. Select the filer type from the Filer Type drop-down list.
27. Click .
The fees for the filing are displayed.
84 December 2020 ESO-FS-200-4495 v.8

Figure 7.91 – Sample Claim Amount Fees on the Fees Page
28. Click to review and complete your filing.
Entering a Filing with an Estate ValueFilers can enter the Estate Value when specified by the court. The Estate Value is the valued amount of anestate in probate cases. The Estate Value field is displayed on the Fees page. Filers can enter the amountin the Estate Value field. When the Estate Value is set, an appropriate fee will be applied.
Note: The Estate Value feature is configured by Tyler and may not be available on your system.
To enter filing details, perform the following steps:
1. On the Filings page, select a filing type from the Filing Type drop-down list.
Figure 7.92 – Filings Page
2. Select the Statement w/ special behavior – $10.50 filing code from the Filing Code drop-down list.
ESO-FS-200-4495 v.8 December 2020 85
Entering a Filing with an Estate Value

Firm and Criminal Filing Filer User Guide
3. Type a description of the filing in the Filing Description field.4. Type a client reference number in the Client Reference Number field.5. Type any relevant comments in the Comments to Court field.
6. if you need to apply any optional services for the filing, click .
A new window is displayed.
Figure 7.93 – Sample Optional Services Tab
7. To select the applicable optional services, click .
Some optional services require that you type the number of services that you need. For those services,the Multiplier will calculate the amount.
Note: If you decide that you do not want to use an optional service that you have selected, click
.
8. Click to specify the recipient of the courtesy or preliminary copies. You musttype a valid email address for the recipient.
9. Click to associate parties with the filing.
The Associate Parties to this Filing window is displayed.
86 December 2020 ESO-FS-200-4495 v.8

Figure 7.94 – Associate Parties to this Filing Window
10. Type the name of the party that you want to associate with the filing.11. Select the relationship of the party from the Party Type drop-down list.12. Select the check box for the party to which the associated party should be connected.
13. Click .
14. In the Upload Documents pane, click .
Note: The filing code that you enter determines the name of the component that is displayed inthe Upload Documents pane. You may see a component other than “Lead Document” and“Attachments.”
Note: If you previously uploaded a document that you did not select and use in a filing, thedocument will be deleted after a period of time. The number of days that a document is keptbefore it is deleted is configurable, but all unused documents will be deleted after 365 days. Ifyour document has been deleted, a message is displayed in the Upload Documents pane. Youwill be directed to upload another document for your filing.
Figure 7.95 – Upload Documents Pane
The Select document(s) for Lead Document window is displayed.
ESO-FS-200-4495 v.8 December 2020 87
Entering a Filing with an Estate Value

Firm and Criminal Filing Filer User Guide
Figure 7.96 – Select document(s) for Lead Document Window
Note: If you have already uploaded a lead document, the document is listed in the window.
15. Click to select the lead document if a document has already been uploaded. Clickto look for a document to upload or to locate additional lead documents.
Note: If you want to delete a document that you previously uploaded, click .
16. After you have added all of your lead documents, click .
17. If you have attachments to add to the filing, click in the Attachments section.18. If you want to add security to any of the documents, select an option from the Security drop-down list.
19. If you want to add another filing, click . Then, repeat the same steps for the next filing.
20. After you have added all of the filings, click .
The Service page is displayed.
21. Select the service contacts, and then click .
The Fees page is displayed.
88 December 2020 ESO-FS-200-4495 v.8

Figure 7.97 – Fees Page
22. On the Fees page, type the Estate Value in the Estate Value field.23. Select the payment account from the Payment Account drop-down list.24. Select the party that is responsible for paying the fees from the Party Responsible for Fees drop-down
list.
Note: If there are no fees associated with your filing, you may not be required to make aselection in the Party Responsible for Fees field.
25. Select the filing attorney from the Filing Attorney drop-down list.
Note: All users may not see the Filing Attorney field.26. Select the filer type from the Filer Type drop-down list.
27. Click .
The fees for the filing are displayed.
ESO-FS-200-4495 v.8 December 2020 89
Entering a Filing with an Estate Value

Firm and Criminal Filing Filer User Guide
Figure 7.98 – Sample Estate Value Fees on the Fees Page
28. Click to review and complete your filing.
Entering Payment InformationEnter the payment information for your filing on the Fees page.
Note: Your firm must have a payment account created before you can complete your filing.
Figure 7.99 – Fees Page
To enter the payment information for your filing, perform the following steps:
1. Select the payment account from the Payment Account drop-down list.2. Select the filing attorney from the Filing Attorney drop-down list.3. Select the party responsible for fees from the Party Responsible for Fees drop-down list. Click
if you want to search for a party.
90 December 2020 ESO-FS-200-4495 v.8

Figure 7.100 – Select Party Responsible For Fees Window
Note: If there are no fees associated with your filing, you may not be required to make aselection in the Party Responsible for Fees field.
4. Select the filer type from the Filer Type drop-down list.
5. Click .
The fees for the filing are displayed.
Figure 7.101 – Example of a Fees Page with the Filing Fees Displayed
6. Review the filing fees, and then click .
ESO-FS-200-4495 v.8 December 2020 91
Entering Payment Information

Firm and Criminal Filing Filer User Guide
Entering Payment Information for Per-Page OptionalService FeeYou can select optional services for your case filing. One of the options calculates the service fee on a per-page basis.
Note: The per-page optional service fee option is configured by Tyler and may not be available onyour system.
Note: You must create a payment account before you can complete your filing.
To enter the payment information for your filing, perform the following steps:
1. On the Upload Documents page, upload your lead document, and attachments, if applicable.2. On the Case Information page, enter the information for the case.3. On the Parties page, enter the information for all parties on the case.4. On the Filings page, enter the filing details:
a. Select the filing type and the filing code from the respective drop-down lists.b. If appropriate, type a description of the filing and the client reference number in the respective fields.
c. Click .
A new window is displayed.
Figure 7.102 – Sample Optional Services Tab
d. To select the applicable optional services, click .
Some optional services require that you type the number of services that you need. The per-pageoptional service is one of those services. After you type the number of services, the Multiplier willcalculate the amount.
e. Continue entering the rest of the required information on the Filings page.
92 December 2020 ESO-FS-200-4495 v.8

5. On the Service page, add the appropriate service contacts.6. On the Fees page, select the payment account from the Payment Account drop-down list.7. Select the party responsible for fees from the Party Responsible for Fees drop-down list. Click
if you want to search for a party.
Figure 7.103 – Select Party Responsible For Fees Window
Note: If there are no fees associated with your filing, you may not be required to make aselection in the Party Responsible for Fees field.
8. Select the filer type from the Filer Type drop-down list.
9. Click .
The fees for the filing are displayed.
ESO-FS-200-4495 v.8 December 2020 93
Entering Payment Information for Per-Page Optional Service Fee

Firm and Criminal Filing Filer User Guide
Figure 7.104 – Example of a Fees Page with the Filing Fees Displayed
10. Review the filing fees, and then click .
Submission AgreementsThe court may elect to have a submission agreement that is specific to the terms of the e-filing rules. In thiscase, you must select the appropriate check boxes before continuing with your filing.
Note: Submission agreements are configured by Tyler and may not be available on your system.
The Submission Agreements pane is displayed on the Summary page.
Figure 7.105 – Submission Agreements Pane – One Disclaimer
If submission agreements are configured by your court, you must select the check box in the SubmissionAgreements pane to complete your filing.
Figure 7.106 – Submission Agreements Pane with the Check Box Selected – One Disclaimer
Your court may be configured with more than one disclaimer. The specific wording of each disclaimer isconfigured by Tyler at the court’s request.
94 December 2020 ESO-FS-200-4495 v.8

Figure 7.107 – Submission Agreements Pane – Two Disclaimers
If submission agreements are configured by your court, you must select both check boxes in theSubmission Agreements pane to complete your filing.
Figure 7.108 – Submission Agreements Pane with the Check Boxes Selected – Two Disclaimers
If no submission agreements are required by your court, the Submission Agreements pane is displayedwith no options to select.
Figure 7.109 – Submission Agreements – No Disclaimers
Viewing the Envelope SummaryThe envelope summary provides a summary of case information, such as the location of the filing, theparties involved in the case, filing details, fees, and payments for the case.
The party, filings, and fees information must be complete before you can view the envelope summary.
To view the envelope summary, perform the following steps:
1. Complete the required information in the Case, Parties, Filings and Fees sections.
2. After you have completed the fields in each section, from the Fees page, click .
The Summary page is displayed.
ESO-FS-200-4495 v.8 December 2020 95
Viewing the Envelope Summary

Firm and Criminal Filing Filer User Guide
Figure 7.110 – Sample Summary Page
If you have uploaded a document that you have not attached to your filing, a message is displayed,asking you if you want to attach the document to the filing, keep the document in your library for use inanother filing, or delete the document from your library.
Figure 7.111 – Unused Documents Message
3. Click the appropriate button regarding the unused document.4. If there are submission agreements for your filing, select the appropriate check boxes for the
submission agreements.5. Review the summary of the case filing. After you are satisfied with the information in your filing, click
.
96 December 2020 ESO-FS-200-4495 v.8
8 Redaction FeatureTopics covered in this chapter♦ Entering a Filing with Redacted Documents♦ Deleting a Redaction♦ Working with an Existing Redaction♦ Redaction Editor Toolbar
The eFile application supports the Redaction feature. Redaction refers to the removal or obscuring ofsensitive information, such as Social Security numbers. Filers can redact a document, view the redacteddocument, and then make modifications, if necessary, before uploading the redacted document to the casemanagement system.
Note: The Redaction feature is configured by Tyler and may not be available on your system.
Note: You can perform redactions by using the Redaction Editor (which is displayed as the TylerContent Manager window). This window opens in a separate tab in your browser. You must enablepop-ups in your browser settings to view the Redaction Editor (Tyler Content Manager window) andto perform redactions. The icons that are visible in the Redaction Editor (Tyler Content Managerwindow) may differ slightly from the screen shots contained in this document.
The following data is automatically redacted:
• Social Security Numbers• Tax ID Numbers (EINs)• Passport Numbers• Credit Card Numbers• Driver’s License Numbers• Account Numbers• Government ID Numbers• Names of Minors Listed as Parties on the Case• Dates of Birth of Minors• Addresses of Minors Listed on the Case
Entering a Filing with Redacted DocumentsYou can enter a filing in which you upload a lead document (and attachments, if applicable) and then redactthe documents that you uploaded.
Note: The Redaction feature is configured by Tyler and may not be available on your system.
To enter a filing with redacted documents, perform the following steps:
1. On the Dashboard page, click .
The Start Filing pane is displayed.
ESO-FS-200-4495 v.8 December 2020 97

Firm and Criminal Filing Filer User Guide
Figure 8.1 – Start Filing Pane
2. Click .
The Upload Documents page is displayed.
Figure 8.2 – Upload Documents Page—Blank
3. Click to look for the documents that you want to upload.4. Select each document to be uploaded.
The documents that you selected are listed on the Upload Documents page.
Figure 8.3 – Upload Documents Page with an Uploaded Document
5. Click .
Note: The redaction process begins immediately, and you can continue with your case filingwhile the documents are being redacted. When your document has successfully been redacted,
98 December 2020 ESO-FS-200-4495 v.8

a green message is displayed, indicating that the redaction was completed. The message alsoindicates how many redactions were performed.
Figure 8.4 – Example of a Message for a Completed Redaction
6. Click to continue with your filing.
The Case Information page is displayed.
7. Complete the required fields on the Case Information page, and then click .
The Parties page is displayed.
8. Complete the required fields on the Parties page, and then click .
The Filings page is displayed.
9. Complete the required fields on the Filings page, and then click .
The Service page is displayed.
10. Complete the required fields on the Service page, and then click .
The Fees page is displayed.
11. Complete the required fields on the Fees page, and then click .
The Summary page is displayed.
ESO-FS-200-4495 v.8 December 2020 99
Entering a Filing with Redacted Documents

Firm and Criminal Filing Filer User Guide
Figure 8.5 – Sample Summary Page
12. Review the envelope summary. If you want to edit the redacted document, click .
The Redaction Editor (Tyler Content Manager window) opens in a new tab in your browser.
Note: If the redaction of your document is not complete, an amber message is displayed,indicating that you cannot yet complete your filing. You must wait until the redaction iscomplete, and then a green message is displayed, informing you of the completion.
Figure 8.6 – Example of a Message with Redaction in Progress
13. Perform the necessary edits in the Redaction Editor, and then click to save your changes, or click
to save your changes and close the viewer.14. When you are done reviewing the envelope summary and have selected the check boxes for the
submission agreements (if applicable), click .
100 December 2020 ESO-FS-200-4495 v.8

Deleting a RedactionAfter you mark a section to be redacted and before you close the Redaction Editor (Tyler Content Managerwindow), you can delete the specified redaction.
Note: The Redaction feature is configured by Tyler and may not be available on your system.
Note: You must enable pop-ups in your browser settings to view the Redaction Editor (TylerContent Manager window).
To delete a redaction in a document before you have closed the Redaction Editor (Tyler Content Managerwindow), perform the following steps:
1. Right-click the specified redaction.
The Annotation Notes dialog box is displayed.
Figure 8.7 – Annotation Notes Dialog Box
Note: On the Annotation Notes dialog box, you can annotate the redaction, copy the redaction,or cut the redaction and paste it in another part of the document. You can also view a detailed
history of the redactions that were performed in the document. Click to view the detailedhistory.
2. Click to delete the redaction.
The Delete Annotation dialog box is displayed.
Figure 8.8 – Delete Annotation? Dialog Box
3. Click to delete the specified redaction.
ESO-FS-200-4495 v.8 December 2020 101
Deleting a Redaction

Firm and Criminal Filing Filer User Guide
Working with an Existing RedactionYou can resize or move an existing redaction in the Redaction Editor (Tyler Content Manager window).
Note: The Redaction feature is configured by Tyler and may not be available on your system.
Note: You must enable pop-ups in your browser settings to view the Redaction Editor (TylerContent Manager window).
To work with an existing redaction, perform the following steps:
1. Turn off the manual redaction capability by clicking .2. Locate the existing redaction that you want to resize or move, and then click the block of text.3. Resize the redaction, or move the redaction to another location in the document.
4. When you are done, click to save your changes, or click to save your changes and closethe viewer.
Redaction Editor ToolbarYou can use icons to navigate in the Redaction Editor (which is displayed as the Tyler Content Managerwindow).
Note: The icons that are visible in the Redaction Editor (Tyler Content Manager window) may differslightly from the screen shots contained in this document.
The following table describes the icons in the Redaction Editor (Tyler Content Manager window).
Icon Description
Click this icon to begin performing a redaction.
Click this icon to stop performing a redaction.
Click this icon to save the document.
Click this icon to save and close the document.
Click this icon to close the Tyler Content Manager (TCM)viewer.
Click this icon to zoom in to a particular place in thedocument.
Click this icon to zoom out.
102 December 2020 ESO-FS-200-4495 v.8

Icon Description
Click this icon to rubberband (that is, draw a border around)an area of the document in which you want to zoom.
Click this icon to magnify an area of the document.
Click this icon to fit the document to the window.
Click this icon to fit the document to the height of thewindow.
Click this icon to fit the document to the width of thewindow.
Click this icon to view the first page of the document.
Click this icon to view the previous page of the document.
Use this window to view the current page of the documentand the length of the document.
Click this icon to view the next page of the document.
Click this icon to view the last page of the document.
Click this icon to rotate the document to the right.
Click this icon to rotate the document to the left.
Click this icon to download the document.Note: You will be prompted to save the documentbefore you download it.
Click this icon to display the thumbnail pane, where youcan then navigate through the pages of the document.The thumbnail pane is displayed.Note: Click the icon again to close the thumbnail pane.
When the thumbnail pane is displayed, additional document options become available.
ESO-FS-200-4495 v.8 December 2020 103
Redaction Editor Toolbar

Firm and Criminal Filing Filer User Guide
Figure 8.9 – Sample Thumbnail Pane
The following table describes the icons in the thumbnail pane.
Icon Description
Click this icon in the thumbnail pane to view the pages ofthe document in the Redaction Editor.
Click this icon in the thumbnail pane to display the previousannotation page.
Click this icon in the thumbnail pane to display the nextannotation page.
Click this icon in the thumbnail pane to view only the pagesthat have a redaction on them.
104 December 2020 ESO-FS-200-4495 v.8

9 File into an Existing Case
Topics covered in this chapter♦ Filing into an Existing Case from the Filing History Page♦ Filing into an Existing Case from the Case Search Page♦ Filing into an Existing Case from the Dashboard Page♦ Filing into a Non-Indexed Case♦ Creating a Service Only Filing
Once a court has created a new case, you can file into the existing case.
Use one of the following methods to file into a case:
• On the Filing History page, locate the case that you want to file into, and then click .• On the Dashboard page, click Case Search. In the File into Existing Case window that opens, enter
the search criteria for the case that you want to file into. Then, click .
• On the Dashboard page, click . In the File into Existing Case window that opens,
enter the search criteria for the case that you want to file into. Then, click .
Filing into an Existing Case from the Filing HistoryPageOnce a new case has been created by the courts, you can file into the existing case.To file into an existing case from the Filing History page, perform the following steps:
1. On the Filing History page, click .
ESO-FS-200-4495 v.8 December 2020 105
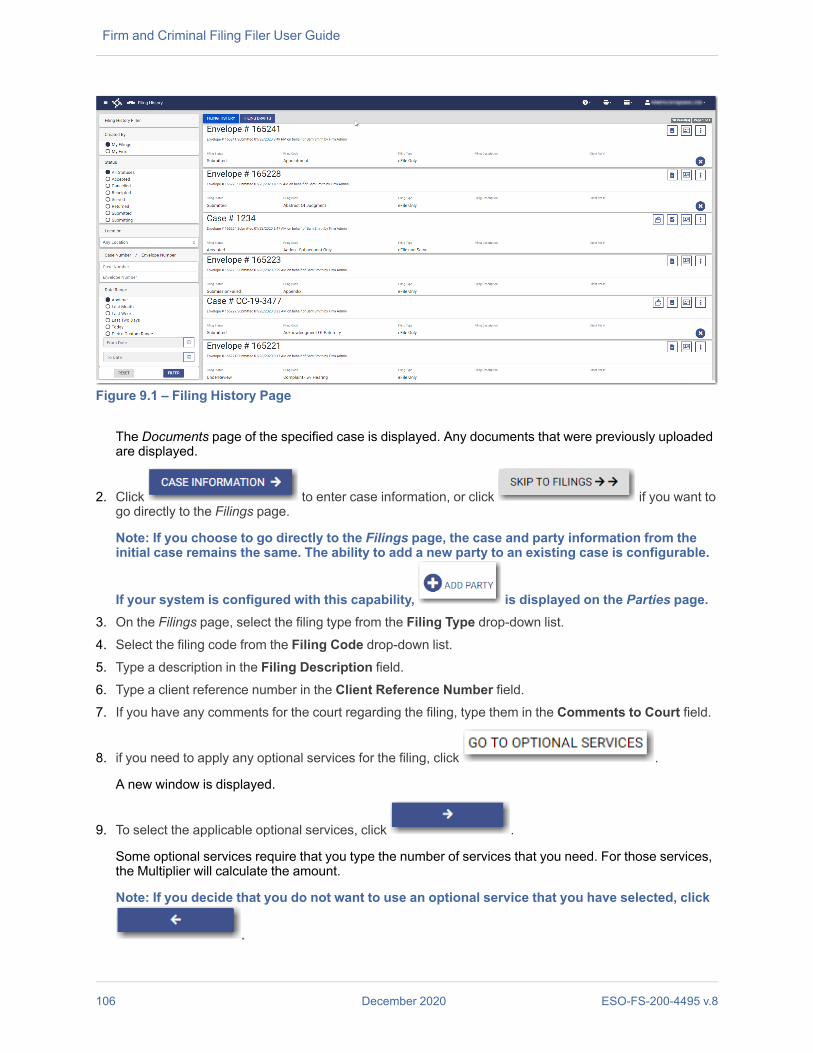
Firm and Criminal Filing Filer User Guide
Figure 9.1 – Filing History Page
The Documents page of the specified case is displayed. Any documents that were previously uploadedare displayed.
2. Click to enter case information, or click if you want togo directly to the Filings page.
Note: If you choose to go directly to the Filings page, the case and party information from theinitial case remains the same. The ability to add a new party to an existing case is configurable.
If your system is configured with this capability, is displayed on the Parties page.3. On the Filings page, select the filing type from the Filing Type drop-down list.4. Select the filing code from the Filing Code drop-down list.5. Type a description in the Filing Description field.6. Type a client reference number in the Client Reference Number field.7. If you have any comments for the court regarding the filing, type them in the Comments to Court field.
8. if you need to apply any optional services for the filing, click .
A new window is displayed.
9. To select the applicable optional services, click .
Some optional services require that you type the number of services that you need. For those services,the Multiplier will calculate the amount.
Note: If you decide that you do not want to use an optional service that you have selected, click
.
106 December 2020 ESO-FS-200-4495 v.8
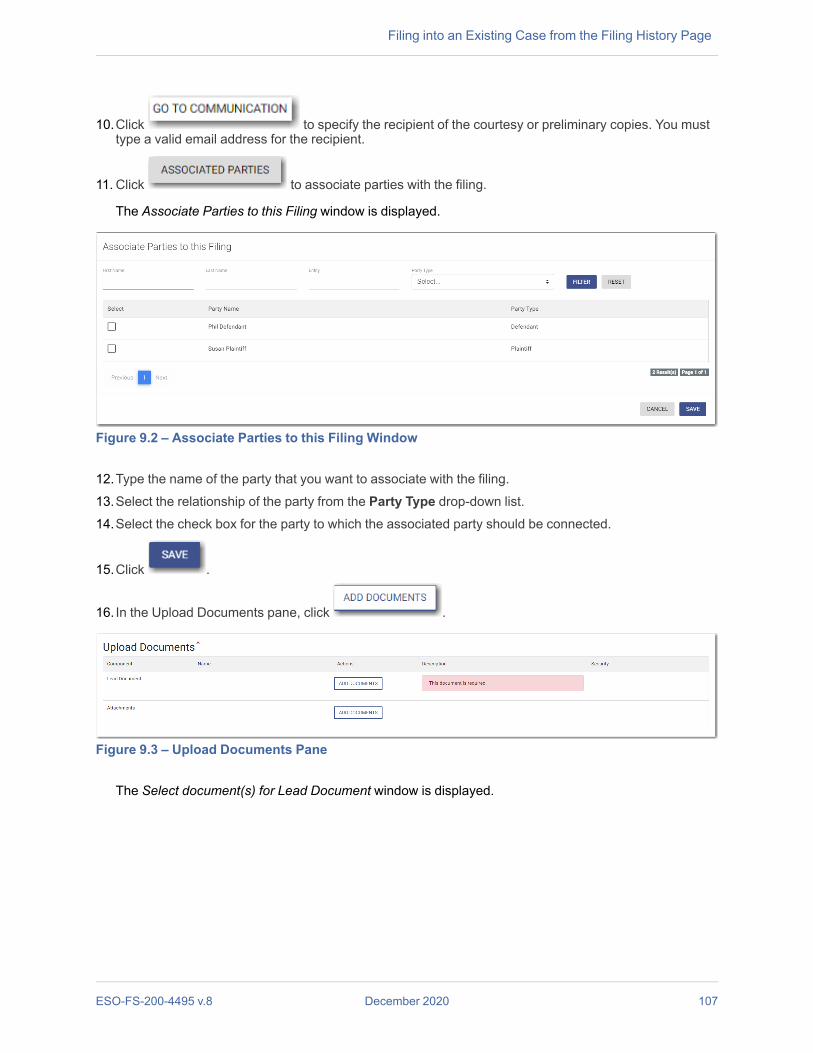
10. Click to specify the recipient of the courtesy or preliminary copies. You musttype a valid email address for the recipient.
11. Click to associate parties with the filing.
The Associate Parties to this Filing window is displayed.
Figure 9.2 – Associate Parties to this Filing Window
12. Type the name of the party that you want to associate with the filing.13. Select the relationship of the party from the Party Type drop-down list.14. Select the check box for the party to which the associated party should be connected.
15. Click .
16. In the Upload Documents pane, click .
Figure 9.3 – Upload Documents Pane
The Select document(s) for Lead Document window is displayed.
ESO-FS-200-4495 v.8 December 2020 107
Filing into an Existing Case from the Filing History Page

Firm and Criminal Filing Filer User Guide
Figure 9.4 – Select document(s) for Lead Document Window
17. Click to look for a document to upload. Then, click to select the lead document.
Note: If you want to delete a document that you have uploaded, click .
18. After you have added all of your lead documents, click .
19. If you have attachments to add to the filing, click in the Attachments section.20. If you want to add security to any of the documents, select an option from the Security drop-down list.
21. If you want to add another filing, click . Then, repeat the same steps for the next filing.
22. After you have added all of the filings, click either or .
23. On the Service page, add service contacts if applicable. Then, click .24. On the Fees page, select the payment account from the Payment Account drop-down list.25. Select the filing attorney from the Filing Attorney drop-down list.26. Select the party responsible for fees from the Party Responsible for Fees drop-down list.
Note: If there are no fees associated with your filing, you may not be required to make aselection in the Party Responsible for Fees field.
27. Select the filer type from the Filer Type drop-down list.
28. Click if you want to view the fee total.
29. Click .
108 December 2020 ESO-FS-200-4495 v.8

30. Review the summary. If applicable, select the Submission Agreements check box.
31. When you are satisfied with your filing, click .
Filing into an Existing Case from the Case SearchPageTo file into an existing case from the Case Search page, perform the following steps:
1. On the Dashboard menu, click Case Search.
The File into Existing Case window is displayed.
Figure 9.5 – File into Existing Case Window—Includes Party Name Option
Note: Your system may be configured to only search by case number. With this optionalconfiguration, the Party Name option is not displayed.
ESO-FS-200-4495 v.8 December 2020 109
Filing into an Existing Case from the Case Search Page

Firm and Criminal Filing Filer User Guide
Figure 9.6 – File into Existing Case Window—Excludes Party Name Option
2. Type the search criteria in the window, and then click .
Note: You can search by case number or party name. You must know the location of the existingcase to complete your search.
The case that matches your search criteria is displayed.
Figure 9.7 – Case Search Results
3. Click to file into the case.
The Documents page of the specified case is displayed. Any documents that were previously uploadedare displayed.
4. Click to enter case information, or click if you want togo directly to the Filings page.
Note: If you choose to go directly to the Filings page, the case and party information from theinitial case remains the same. The ability to add a new party to an existing case is configurable.
If your system is configured with this capability, is displayed on the Parties page.5. On the Filings page, select the filing type from the Filing Type drop-down list.6. Select the filing code from the Filing Code drop-down list.
110 December 2020 ESO-FS-200-4495 v.8

7. Type a description in the Filing Description field.8. Type a client reference number in the Client Reference Number field.9. If you have any comments for the court regarding the filing, type them in the Comments to Court field.
10. if you need to apply any optional services for the filing, click .
A new window is displayed.
11. To select the applicable optional services, click .
Some optional services require that you type the number of services that you need. For those services,the Multiplier will calculate the amount.
Note: If you decide that you do not want to use an optional service that you have selected, click
.
12. Click to specify the recipient of the courtesy or preliminary copies. You musttype a valid email address for the recipient.
13. Click to associate parties with the filing.
The Associate Parties to this Filing window is displayed.
Figure 9.8 – Associate Parties to this Filing Window
14. Type the name of the party that you want to associate with the filing.15. Select the relationship of the party from the Party Type drop-down list.16. Select the check box for the party to which the associated party should be connected.
17. Click .
18. In the Upload Documents pane, click .
ESO-FS-200-4495 v.8 December 2020 111
Filing into an Existing Case from the Case Search Page

Firm and Criminal Filing Filer User Guide
Figure 9.9 – Upload Documents Pane
The Select document(s) for Lead Document window is displayed.
Figure 9.10 – Select document(s) for Lead Document Window
19. Click to look for a document to upload. Then, click to select the lead document.
Note: If you want to delete a document that you have uploaded, click .
20. After you have added all of your lead documents, click .
21. If you have attachments to add to the filing, click in the Attachments section.22. If you want to add security to any of the documents, select an option from the Security drop-down list.
23. If you want to add another filing, click . Then, repeat the same steps for the next filing.
24. After you have added all of the filings, click either or .
25. On the Service page, add service contacts if applicable. Then, click .26. On the Fees page, select the payment account from the Payment Account drop-down list.27. Select the filing attorney from the Filing Attorney drop-down list.
112 December 2020 ESO-FS-200-4495 v.8

28. Select the party responsible for fees from the Party Responsible for Fees drop-down list.
Note: If there are no fees associated with your filing, you may not be required to make aselection in the Party Responsible for Fees field.
29. Select the filer type from the Filer Type drop-down list.
30. Click if you want to view the fee total.
31. Click .32. Review the summary. If applicable, select the Submission Agreements check box.
33. When you are satisfied with your filing, click .
Filing into an Existing Case from the DashboardPageTo file into an existing case from the Dashboard page, perform the following steps:
1. In the Case Search pane, locate the case that you want to file into. Then click the link for the specifiedcase.
The File into Existing Case window is displayed.
Figure 9.11 – File into Existing Case Window—Includes Party Name Option
Note: Your system may be configured to only search by case number. With this optionalconfiguration, the Party Name option is not displayed.
ESO-FS-200-4495 v.8 December 2020 113
Filing into an Existing Case from the Dashboard Page
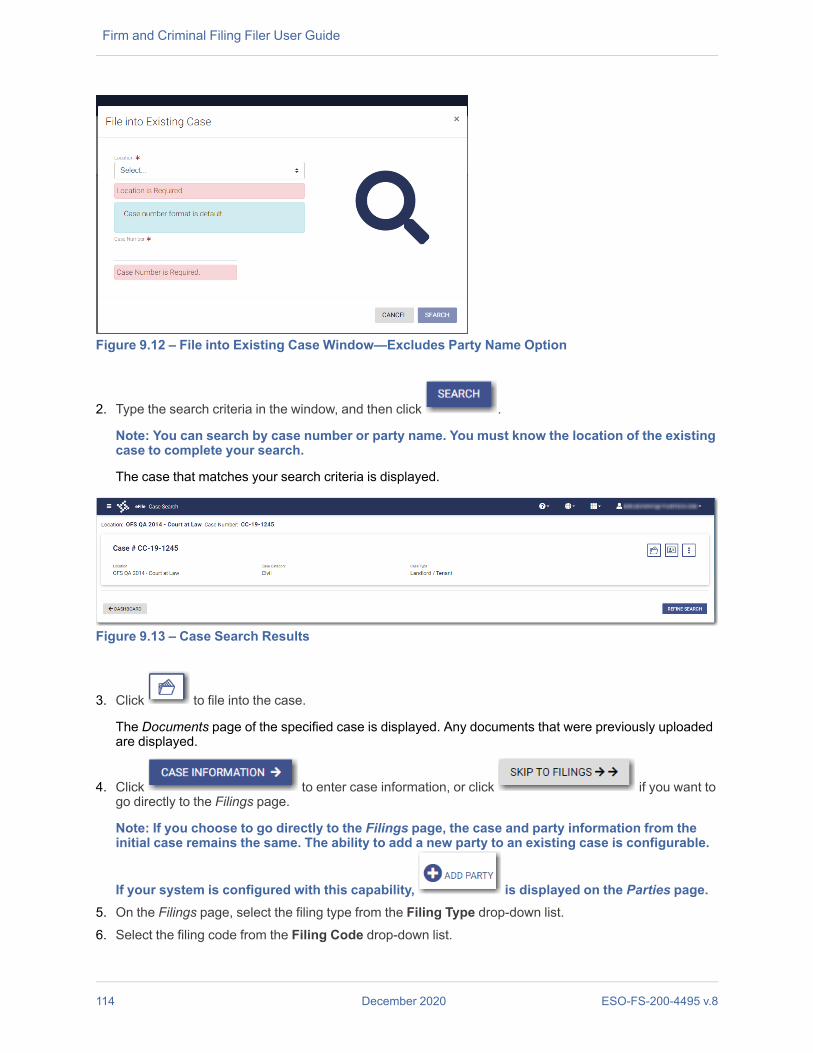
Firm and Criminal Filing Filer User Guide
Figure 9.12 – File into Existing Case Window—Excludes Party Name Option
2. Type the search criteria in the window, and then click .
Note: You can search by case number or party name. You must know the location of the existingcase to complete your search.
The case that matches your search criteria is displayed.
Figure 9.13 – Case Search Results
3. Click to file into the case.
The Documents page of the specified case is displayed. Any documents that were previously uploadedare displayed.
4. Click to enter case information, or click if you want togo directly to the Filings page.
Note: If you choose to go directly to the Filings page, the case and party information from theinitial case remains the same. The ability to add a new party to an existing case is configurable.
If your system is configured with this capability, is displayed on the Parties page.5. On the Filings page, select the filing type from the Filing Type drop-down list.6. Select the filing code from the Filing Code drop-down list.
114 December 2020 ESO-FS-200-4495 v.8

7. Type a description in the Filing Description field.8. Type a client reference number in the Client Reference Number field.9. If you have any comments for the court regarding the filing, type them in the Comments to Court field.
10. If you need to apply any optional services for the filing, click .
A new window is displayed.
11. To select the applicable optional services, click .
Some optional services require that you type the number of services that you need. For those services,the Multiplier will calculate the amount.
Note: If you decide that you do not want to use an optional service that you have selected, click
.
12. Click to specify the recipient of the courtesy or preliminary copies. You musttype a valid email address for the recipient.
13. Click to associate parties with the filing.
The Associate Parties to this Filing window is displayed.
Figure 9.14 – Associate Parties to this Filing Window
14. Type the name of the party that you want to associate with the filing.15. Select the relationship of the party from the Party Type drop-down list.16. Select the check box for the party to which the associated party should be connected.
17. Click .
18. In the Upload Documents pane, click .
ESO-FS-200-4495 v.8 December 2020 115
Filing into an Existing Case from the Dashboard Page

Firm and Criminal Filing Filer User Guide
Figure 9.15 – Upload Documents Pane
The Select document(s) for Lead Document window is displayed.
Figure 9.16 – Select document(s) for Lead Document Window
19. Click to look for a document to upload. Then, click to select the lead document.
Note: If you want to delete a document that you have uploaded, click .
20. After you have added all of your lead documents, click .
21. If you have attachments to add to the filing, click in the Attachments section.22. If you want to add security to any of the documents, select an option from the Security drop-down list.
23. If you want to add another filing, click . Then, repeat the same steps for the next filing.
24. After you have added all of the filings, click either or .
25. On the Service page, add service contacts if applicable. Then, click .26. On the Fees page, select the payment account from the Payment Account drop-down list.27. Select the filing attorney from the Filing Attorney drop-down list.
116 December 2020 ESO-FS-200-4495 v.8

28. Select the party responsible for fees from the Party Responsible for Fees drop-down list.
Note: If there are no fees associated with your filing, you may not be required to make aselection in the Party Responsible for Fees field.
29. Select the filer type from the Filer Type drop-down list.
30. Click if you want to view the fee total.
31. Click .32. Review the summary. If applicable, select the Submission Agreements check box.
33. When you are satisfied with your filing, click .
Filing into a Non-Indexed CaseYou can file into a case that does not exist in the case management system.To file into a non-indexed case, perform the following steps:
1. On the Dashboard menu, click Case Search.
The File into Existing Case window is displayed.
Figure 9.17 – File into Existing Case Window—Includes Party Name Option
Note: Your system may be configured to only search by case number. With this optionalconfiguration, the Party Name option is not displayed.
ESO-FS-200-4495 v.8 December 2020 117
Filing into a Non-Indexed Case

Firm and Criminal Filing Filer User Guide
Figure 9.18 – File into Existing Case Window—Excludes Party Name Option
2. Select the location from the Location drop-down list.
Note: The location you select must be a non-integrated or non-indexed node.3. Select the Case Number option (which may be the only option that is displayed), and then type the
case number in the Case Number field.
4. Click .
A message is displayed, stating that the case number you entered could not be found.
Figure 9.19 – Case Search Window with No Results Found
5. To continue, click .
The I Don’t See My Case window is displayed.
118 December 2020 ESO-FS-200-4495 v.8

Figure 9.20 – I Don’t See My Case Window
6. Click to continue filing into the case.
The Case Information page is displayed. The location and case number are auto-filled on the page.
Figure 9.21 – Case Information Page
7. Select the case category from the Case Category drop-down list.8. Select the case type from the Case Type drop-down list.9. Select the case subtype, if applicable, from the Case Sub Type drop-down list.
10. Click to save your work and continue.11. Continue entering case information on the following pages until you reach the Summary page.
12. Review your filing. When you are satisfied with the information you have entered, click .
Creating a Service Only FilingTo create a Service Only filing, perform the following steps:
1. Select an existing case that you want to file into.2. Follow one of the methods for filing into an existing case (that is, from the Filing History page, from the
Case Search page, or from the Dashboard page).
Note: The Case and Parties pages are already populated since this is an existing case.3. On the Filings page, select Service Only from the Filing Type drop-down list.
ESO-FS-200-4495 v.8 December 2020 119
Creating a Service Only Filing

Firm and Criminal Filing Filer User Guide
4. In the Upload Documents pane, click .
Figure 9.22 – Upload Documents Pane
The Select document(s) for Lead Document window is displayed.
Figure 9.23 – Select Document(s) for Lead Document Window
5. Click to look for a document to upload. Then, click to select the lead document.
Note: If you want to delete a document that you have uploaded, click .
6. After uploading your documents, click .7. If you want to add security to any of the documents, select an option from the Security drop-down list.
8. Click to save your entries and to continue.9. On the Service page, add the service contacts that you want to receive a Service Only filing. You can
select the Serve all check box, or you can select the Serve all party contacts check box.
Note: Selecting the “Serve all” check box automatically selects the “Serve all party contacts”check box.
120 December 2020 ESO-FS-200-4495 v.8

Figure 9.24 – Service Page for a Service Only Filing
10. Click to save your entries and to continue.
11. Complete the required fields on the Fees page, and then click .12. Select the check boxes for the submission agreements, if applicable.
13. Review the information on the Summary page, and then click .
ESO-FS-200-4495 v.8 December 2020 121
Creating a Service Only Filing

10 Service ContactsTopics covered in this chapter♦ Adding a New Service Contact♦ Adding a Service Contact from My Firm Service Contact List to a Filing♦ Adding a Service Contact from a Public List to a Filing♦ Adding a New Service Contact to a Filing♦ Updating Information for an Existing Service Contact♦ Viewing Attached Case List of Service Contacts♦ Updating Information for a Case Service Contact♦ Deleting a Service Contact
You can add a service contact to your service contacts list on the Service Contacts page. You can also adda service contact while you are entering a case filing.
When you add a service contact on the Service Contacts page, you can quickly retrieve that contact at alater time when you are entering a case filing. You can also create a service contact while you are enteringa case filing, and then you can save that service contact for use in future filings.
Service contacts from a public list are also available for you to use when you are entering a case filing.
Adding a New Service ContactYou can add a new service contact to your firm’s list of contacts.To add a new service contact to your firm’s contacts list, perform the following steps:
1. On the Dashboard menu, click Firm Service Contacts.
The Service Contacts page is displayed.
Figure 10.1 – Service Contacts Page
2. Click .
122 December 2020 ESO-FS-200-4495 v.8

Additional fields are displayed.
Figure 10.2 – Service Contacts – Additional Fields
3. Select the appropriate check box for the new service contact: Add To Firm List or Add to Public List.
Note: If you add the service contact to the public list, other filers will have access to that contactfor their filings.
4. Complete the required information in the First Name and Last Name fields. Add a middle name, ifapplicable, in the Middle Name field.
5. Type the contact’s email address in the Email field.
Note: You must provide either an email address or a physical address. You can enter bothaddresses if applicable.
6. If applicable, type a phone number in the Phone Number field.7. If the contact is in a country other than the United States, select the country from the drop-down list.
The default selection is United States.8. If a physical address is required for the service contact, type the address in the Address Line 1 field.9. If applicable, type an address in the Address Line 2 field.10. Type the name of the city in the City field.11. Select the state from the State drop-down list.12. Type the ZIP code in the Zip Code field.
13. After you have entered the required information, click .The contact that you added is displayed in the list on the Service Contacts page.
ESO-FS-200-4495 v.8 December 2020 123
Adding a New Service Contact
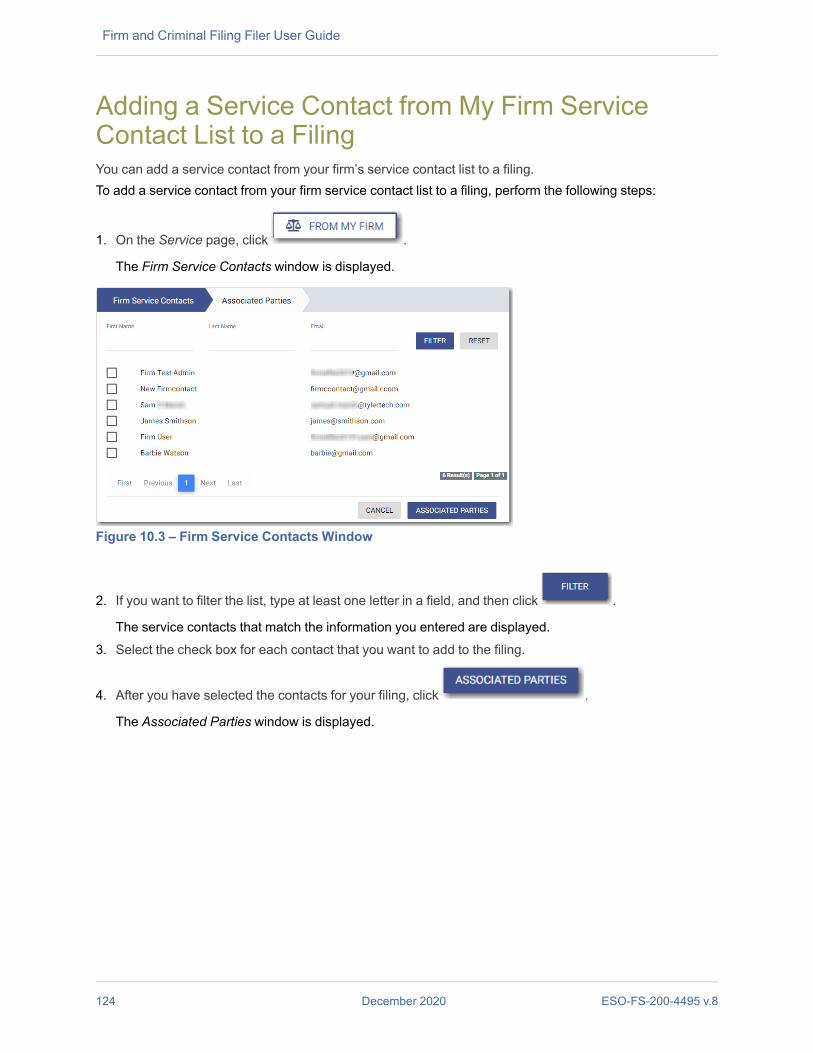
Firm and Criminal Filing Filer User Guide
Adding a Service Contact from My Firm ServiceContact List to a FilingYou can add a service contact from your firm’s service contact list to a filing.To add a service contact from your firm service contact list to a filing, perform the following steps:
1. On the Service page, click .
The Firm Service Contacts window is displayed.
Figure 10.3 – Firm Service Contacts Window
2. If you want to filter the list, type at least one letter in a field, and then click .
The service contacts that match the information you entered are displayed.3. Select the check box for each contact that you want to add to the filing.
4. After you have selected the contacts for your filing, click .
The Associated Parties window is displayed.
124 December 2020 ESO-FS-200-4495 v.8

Figure 10.4 – Sample Associated Parties Window
5. Select the party that you want to associate with the selected service contact or contacts from the
Parties drop-down list, and then click .
Note: if you want to return to the list of service contacts to make any changes or additions, click
.
The service contacts that you added are displayed on the Service page.
Figure 10.5 – Service Page in a Case Filing
Adding a Service Contact from a Public List to aFilingYou can add a service contact from a public list to a filing.To add a service contact from the public list to a filing, perform the following steps:
1. On the Service page, click .
The Public Service Contacts window is displayed.
ESO-FS-200-4495 v.8 December 2020 125
Adding a Service Contact from a Public List to a Filing

Firm and Criminal Filing Filer User Guide
Figure 10.6 – Public Service Contacts Window
2. Type at least one letter in a field, and then click .
The public service contacts that match the information you entered are displayed. The system returns amaximum of 100 public service contacts.
Figure 10.7 – Sample Public Service Contacts List
3. Locate the contacts that you want to add to your filing. If the list of contacts includes more than onepage, click through the pages until you have located the contacts that you want to add.
4. Select the check box for each contact that you want to add.
5. After you have selected the contacts for your filing, click .
The Associated Parties window is displayed.
126 December 2020 ESO-FS-200-4495 v.8

Figure 10.8 – Sample Associated Parties Window
6. Select the party that you want to associate with the selected service contacts from the Parties drop-
down list, and then click .
Note: If you want to review the list of public service contacts to make any changes or additions,
click .
The public service contacts that you added are displayed on the Service page.
Figure 10.9 – Service Page in a Case Filing
Adding a New Service Contact to a FilingYou can add a new service contact to a filing.To add a new service contact to a filing, perform the following steps:
1. On the Service page, click .
The Add Service Contact window is displayed.
ESO-FS-200-4495 v.8 December 2020 127
Adding a New Service Contact to a Filing

Firm and Criminal Filing Filer User Guide
Figure 10.10 – Add Service Contact Window
2. Select the appropriate check box for the new service contact: Add To Firm List or Add to Public List.
Note: If you add the service contact to the public list, other filers will have access to that contactfor their filings.
3. Complete the required information in the First Name and Last Name fields. Add a middle name, ifapplicable, in the Middle Name field.
4. Type the contact’s email address in the Email field.
Note: You must provide either an email address or a physical address. You can enter bothaddresses if applicable.
5. If applicable, type a phone number in the Phone Number field.6. If the contact is in a country other than the United States, select the country from the drop-down list.
The default selection is United States.7. If a physical address is required for the service contact, type the address in the Address Line 1 field.8. If applicable, type an address in the Address Line 2 field.9. Type the name of the city in the City field.10. Select the state from the State drop-down list.
128 December 2020 ESO-FS-200-4495 v.8

11. Type the ZIP code in the Zip Code field.
12. After you have entered the required information, click .The contact that you added is displayed on the Service page of your filing.
Figure 10.11 – Service Page in a Case Filing
Updating Information for an Existing Service ContactYou can update the information that you previously entered for a service contact.
Note: You cannot add an existing service contact to the public list.
To update the information for an existing service contact, perform the following steps:
1. On the Dashboard menu, click Firm Service Contacts.
The Service Contacts page is displayed.
Figure 10.12 – Service Contacts Page
2. Locate the service contact that you want to update, and then click .
The additional fields for the specified service contact are displayed with the information that youpreviously entered.
3. Update the information, as applicable.
ESO-FS-200-4495 v.8 December 2020 129
Updating Information for an Existing Service Contact

Firm and Criminal Filing Filer User Guide
4. When you are done with your updates, click .
Viewing Attached Case List of Service ContactsYou can view a list of cases that are attached to a specified service contact.
Note: If you plan to delete a service contact from your list of contacts, Tyler recommends that youfirst check to see if that contact is attached to any case filings.
To view the case list that is attached to a service contact, perform the following steps:
1. On the Dashboard menu, click Firm Service Contacts.
The Service Contacts page is displayed.
Figure 10.13 – Service Contacts Page
2. Locate the name of the service contact for whom you want to view the attached cases, and then click
.
If there are cases attached to the specified service contact, the list of cases is displayed in a window.
130 December 2020 ESO-FS-200-4495 v.8
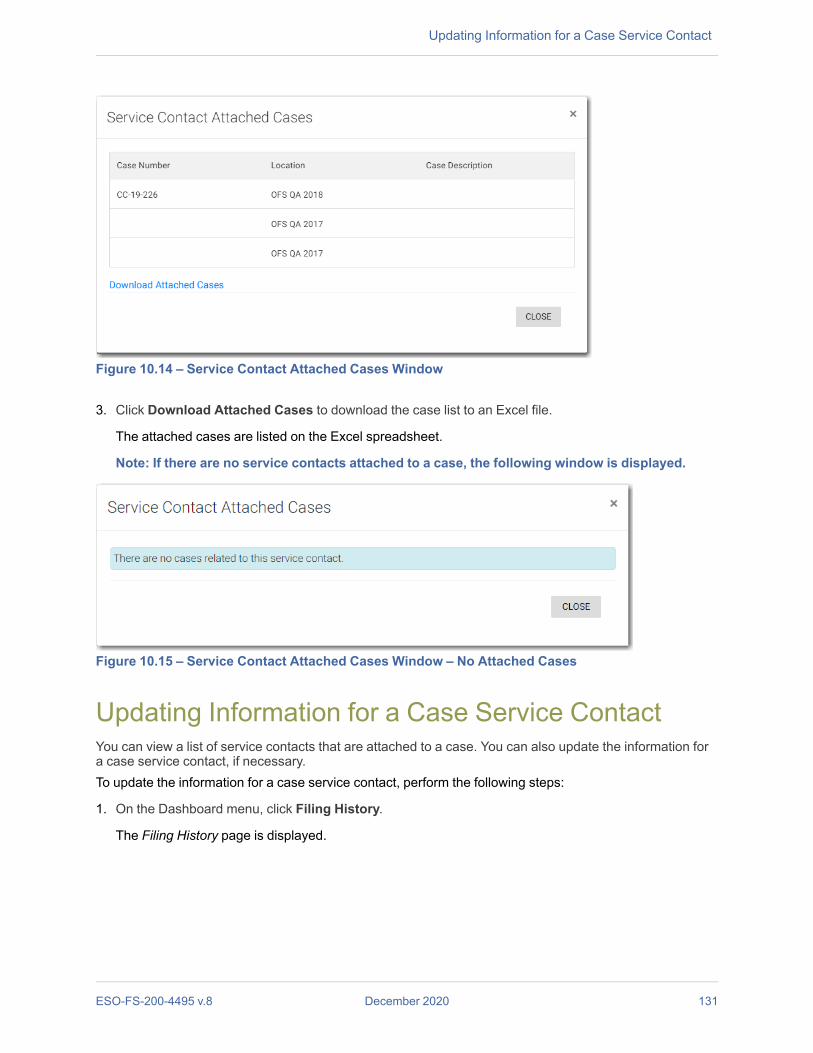
Figure 10.14 – Service Contact Attached Cases Window
3. Click Download Attached Cases to download the case list to an Excel file.
The attached cases are listed on the Excel spreadsheet.
Note: If there are no service contacts attached to a case, the following window is displayed.
Figure 10.15 – Service Contact Attached Cases Window – No Attached Cases
Updating Information for a Case Service ContactYou can view a list of service contacts that are attached to a case. You can also update the information fora case service contact, if necessary.To update the information for a case service contact, perform the following steps:
1. On the Dashboard menu, click Filing History.
The Filing History page is displayed.
ESO-FS-200-4495 v.8 December 2020 131
Updating Information for a Case Service Contact

Firm and Criminal Filing Filer User Guide
Figure 10.16 – Filing History Page
2. Locate the case for which you want to view the service contacts.
3. Click .
The service contacts for the case are displayed.
4. Locate the service contact that you want to update, and then click .
The Update Service Contact window is displayed.
132 December 2020 ESO-FS-200-4495 v.8

Figure 10.17 – Update Service Contact Window
5. Update the information for the service contact, and then click .
Deleting a Service ContactYou can delete a contact from your service contacts list if you no longer need that contact.To delete a service contact from the Service Contacts page, perform the following steps:
1. On the Dashboard menu, click Firm Service Contacts.
The Service Contacts page is displayed.
ESO-FS-200-4495 v.8 December 2020 133
Deleting a Service Contact

Firm and Criminal Filing Filer User Guide
Figure 10.18 – Service Contacts Page
2. Locate the name of the service contact that you want to delete.
3. Click to immediately delete the service contact, or click to first view the cases that areattached to that service contact.
Note: Once deleted, the contact is immediately removed from the service contacts list and fromany case filings to which it was attached.
134 December 2020 ESO-FS-200-4495 v.8

11 Filings
Topics covered in this chapter♦ Copying the Envelope♦ Viewing the Envelope Details♦ Resuming a Case Filing♦ Deleting a Draft Filing♦ Canceling a Filing
After you have uploaded and submitted your filing, the filing is displayed on the Filing History page. On thispage, you can view the status of your filing, check the filing code, check the filing type, get a documentdescription, see the number assigned to your case, review the details of the case, view the servicecontacts attached to a case, and cancel a filing. You can also view the time and date that the filing wassubmitted. The time stamp corresponds to the time zone in which the filing occurred.
Copying the EnvelopeYou can copy an envelope to create a new envelope to resubmit to the courts if the envelope has beenreturned or rejected for any reason.To copy an envelope, perform the following steps:
1. On the Dashboard menu, click Filing History.
The Filing History page is displayed.
Figure 11.1 – Filing History Page
2. In the Status pane, select Returned, and then click .
ESO-FS-200-4495 v.8 December 2020 135
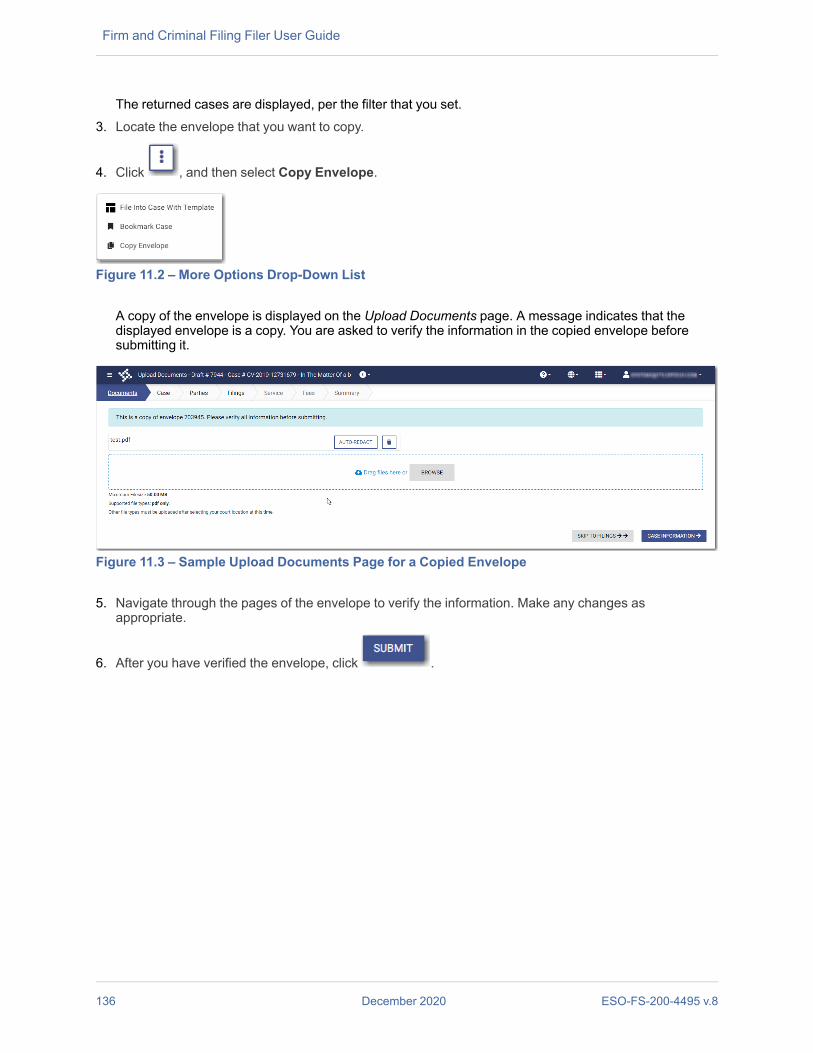
Firm and Criminal Filing Filer User Guide
The returned cases are displayed, per the filter that you set.3. Locate the envelope that you want to copy.
4. Click , and then select Copy Envelope.
Figure 11.2 – More Options Drop-Down List
A copy of the envelope is displayed on the Upload Documents page. A message indicates that thedisplayed envelope is a copy. You are asked to verify the information in the copied envelope beforesubmitting it.
Figure 11.3 – Sample Upload Documents Page for a Copied Envelope
5. Navigate through the pages of the envelope to verify the information. Make any changes asappropriate.
6. After you have verified the envelope, click .
136 December 2020 ESO-FS-200-4495 v.8

Figure 11.4 – Sample Summary Page for a Copied Envelope
Viewing the Envelope DetailsYou can view the details of an envelope on the Filing History page.To view the envelope details, perform the following steps:
1. On the Dashboard menu, click Filing History.
The Filing History page is displayed.
Figure 11.5 – Filing History Page
2. Locate the specified case for which you want to view the envelope details.
ESO-FS-200-4495 v.8 December 2020 137
Viewing the Envelope Details

Firm and Criminal Filing Filer User Guide
3. Click .
The envelope details are displayed.
Note: For subsequent filings, the envelope details do NOT include newly-added parties if theenvelope has not been accepted yet.
Figure 11.6 – Sample Envelope Details Page
4. Click to print a copy of the envelope details.
Resuming a Case FilingYou can resume a filing after logging off from the system or exiting the filing process by accessing yourcase on the Filing Drafts page.To resume a case filing, perform the following steps:
1. Locate the specified draft on the Filing Drafts page.
138 December 2020 ESO-FS-200-4495 v.8

Figure 11.7 – Filing Drafts Page
2. Click .
The filing opens on the Upload Documents page.3. Navigate through the case filing to the page where you left off. Make any corrections to your entries as
needed.4. Continue completing the remaining required fields for the filing.
5. After you have completed all of the required fields, click .
Deleting a Draft FilingYou can delete a draft filing that you no longer need.To delete a draft filing, perform the following steps:
1. On the Dashboard menu, click Filing Drafts.
The Filing Drafts page is displayed.
ESO-FS-200-4495 v.8 December 2020 139
Deleting a Draft Filing

Firm and Criminal Filing Filer User Guide
Figure 11.8 – Filing Drafts Page
2. Locate the draft filing that you want to delete, and then click .
The following warning message is displayed: Are you sure you want to delete Draft # “123”?
3. Click to delete the draft filing, or click to cancel the action.
If you clicked , a confirmation message is displayed, and the draft filing is deleted.
Canceling a FilingYou can cancel a filing that you submitted before it has been reviewed by the court.
To cancel a filing, perform the following steps:
1. On the Dashboard menu, click Filing History.
The Filing History page is displayed.
140 December 2020 ESO-FS-200-4495 v.8

Figure 11.9 – Filing History Page
2. Locate the filing that you want to cancel.
Note: The filing must be in the Submitting or Submitted state to be canceled.
3. Click .
The following warning message is displayed: Are you sure you want to cancel this filing?
4. Click to cancel the filing, or click to cancel the action.
If you clicked , a confirmation message is displayed, and the filing is canceled.
ESO-FS-200-4495 v.8 December 2020 141
Canceling a Filing

12 BookmarksTopics covered in this chapter♦ Creating a Bookmark for a Case♦ Removing a Bookmark from a Case♦ Viewing a List of Bookmarked Cases
The Bookmarks page displays a list of case numbers, locations, and descriptions for the cases that youhave bookmarked. Only you can see this information. Neither the public nor any user can see your caselist.
Figure 12.1 – Sample Bookmarks Page
Creating a Bookmark for a CaseYou can create a bookmark for a case from the Filing History page or the Filing Drafts page.To create a bookmark for a case, perform the following steps:
1. On the Dashboard menu, click either Filing History or Filing Drafts.
The page that you selected is displayed.
2. Locate the case or the draft filing that you want to bookmark, and then click .
A drop-down list is displayed.3. Select Bookmark Case.
The case or draft filing that you bookmarked will now be displayed on the Bookmarks page.
Removing a Bookmark from a CaseYou can remove a bookmark from a case that you previously bookmarked.To remove an existing bookmark from a case, perform the following steps:
1. On the Dashboard menu, click Bookmarks.
The Bookmarks page is displayed.
142 December 2020 ESO-FS-200-4495 v.8

Figure 12.2 – Sample Bookmarks Page
2. Locate the case for which you want to remove the bookmark, and then click .
A drop-down list is displayed.3. Select Remove Bookmark.
The following warning message is displayed: Are you sure you want to delete bookmark forCase # “CC–xy–abcd”?
4. Click to remove the bookmark, or click to cancel the action.
Viewing a List of Bookmarked CasesYou can view a list of the cases that you have bookmarked for quick access. You can filter your view to onlythe specific cases that you want to see.To view a list of cases that you have bookmarked, perform the following steps:
1. On the Dashboard menu, click Bookmarks.
The Bookmarks page is displayed.
Figure 12.3 – Sample Bookmarks Page
2. Set the parameters for the cases that you want to view, and then click .
The cases that you selected in your filter are now displayed on the Bookmarks page.
ESO-FS-200-4495 v.8 December 2020 143
Viewing a List of Bookmarked Cases
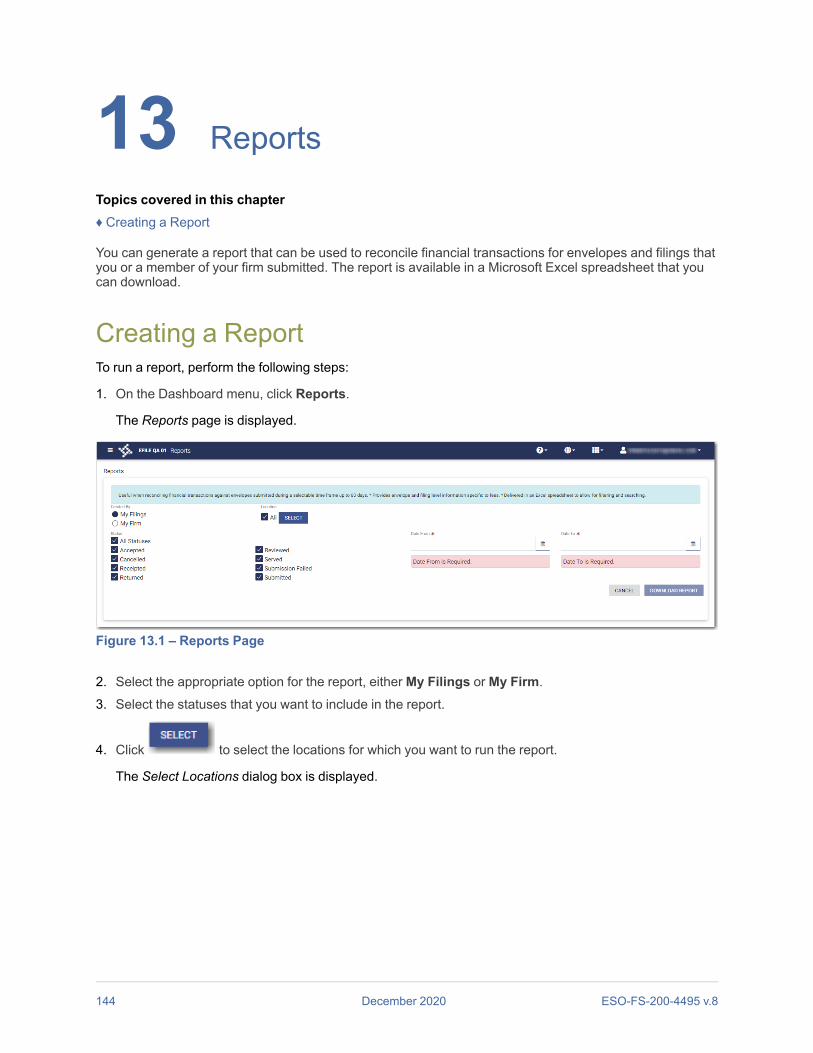
13 Reports
Topics covered in this chapter♦ Creating a Report
You can generate a report that can be used to reconcile financial transactions for envelopes and filings thatyou or a member of your firm submitted. The report is available in a Microsoft Excel spreadsheet that youcan download.
Creating a ReportTo run a report, perform the following steps:
1. On the Dashboard menu, click Reports.
The Reports page is displayed.
Figure 13.1 – Reports Page
2. Select the appropriate option for the report, either My Filings or My Firm.3. Select the statuses that you want to include in the report.
4. Click to select the locations for which you want to run the report.
The Select Locations dialog box is displayed.
144 December 2020 ESO-FS-200-4495 v.8

Figure 13.2 – Select Locations Dialog Box
5. Select the locations that you want to include in the report, and then click .
6. Type the date range for the report, or click to select the dates from the calendar.
Note: The date range that you select cannot exceed 60 days. If it does, an error message isdisplayed.
Figure 13.3 – Error Message for Report Date Range
7. Click .
The report is downloaded in a Microsoft Excel file, which you can filter and sort as needed. The reportincludes one tab for filings and one tab for envelopes.
ESO-FS-200-4495 v.8 December 2020 145
Creating a Report

14 Support and Feedback
Topics covered in this chapter♦ Requesting Support♦ Zendesk Support♦ Providing Feedback♦ Tyler Technologies Technical Support Contact Information
You can request technical support for the application, or you can provide feedback for the application.
Requesting SupportYou can request support from Tyler regarding the application.To request support regarding the application, perform the following steps:
1. Click in the eFile header.
The Support / Feedback window is displayed.
Figure 14.1 – Support / Feedback Window
2. Click .
The Support window is displayed.
Note: Your screen may vary from the example provided.
146 December 2020 ESO-FS-200-4495 v.8

Figure 14.2 – Example of a Support Window
3. Click the support link that you want.
The appropriate Tyler support page is displayed in a new tab, depending on the link that you clicked.
4. Either click , or click .
ESO-FS-200-4495 v.8 December 2020 147
Requesting Support

Firm and Criminal Filing Filer User Guide
Zendesk SupportA new Help icon has been added to every page in the application.
Figure 14.3 – Help Icon on the Dashboard Page
You can click the Help icon to open a chat modal.
148 December 2020 ESO-FS-200-4495 v.8

Figure 14.4 – Chat Modal
In the chat modal, click Get in touch. Options are displayed for the method by which you want tocommunicate with the Support representative.
Figure 14.5 – Chat Modal with Communication Options
Click the option that you want to use, and then type your question in the chat window. A Supportrepresentative will assist you.
ESO-FS-200-4495 v.8 December 2020 149
Zendesk Support

Firm and Criminal Filing Filer User Guide
Providing FeedbackYou can provide feedback to Tyler regarding the application if you want. You can also request a newfeature.To provide feedback regarding the application or to request a new feature, perform the following steps:
1. Click in the eFile header.
The Support / Feedback window is displayed.
Figure 14.6 – Support / Feedback Window
2. Click .
The Feedback window is displayed.
150 December 2020 ESO-FS-200-4495 v.8

Figure 14.7 – Feedback Window
3. Select the appropriate option from the Feedback Type drop-down list.
Figure 14.8 – Feedback Type Drop-Down List
4. Type your feedback regarding the application or suggestion for a new feature in the Feedbackcomments window.
5. Select the “It is ok to contact me about this feedback” check box if you want Tyler to contact you formore information, or leave the check box cleared if you do not want to be contacted.
6. Click .
7. Either click , or click .
ESO-FS-200-4495 v.8 December 2020 151
Providing Feedback
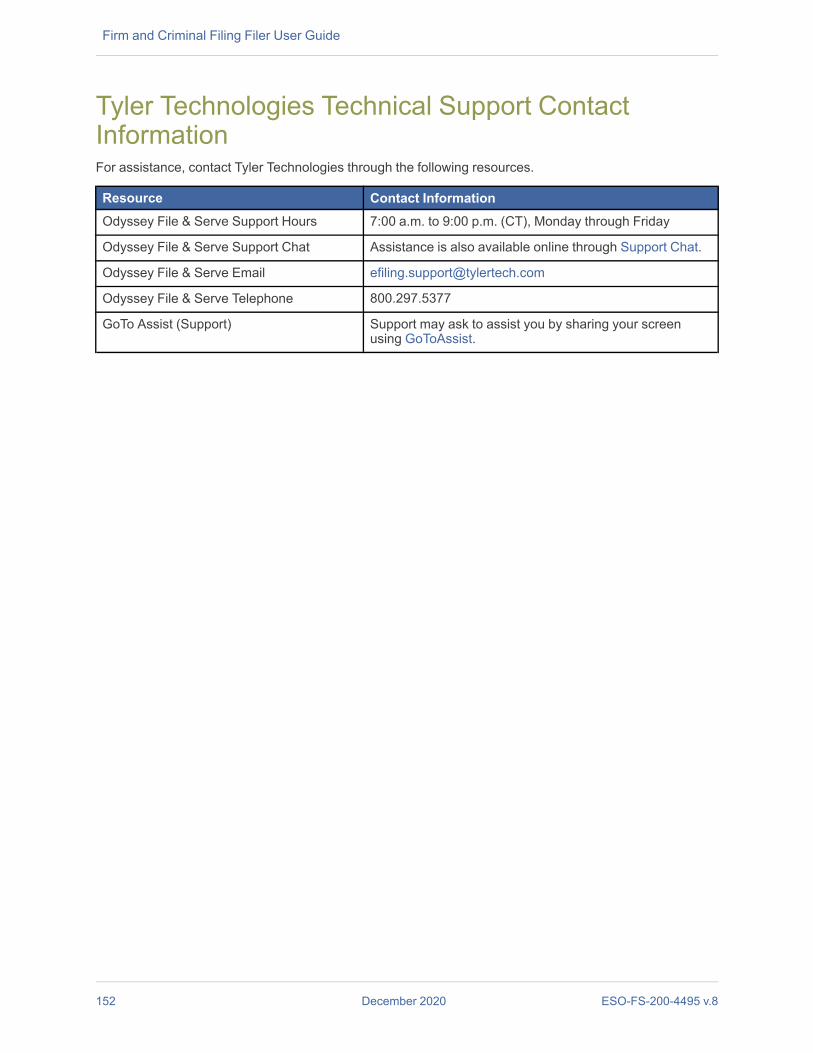
Firm and Criminal Filing Filer User Guide
Tyler Technologies Technical Support ContactInformationFor assistance, contact Tyler Technologies through the following resources.
Resource Contact InformationOdyssey File & Serve Support Hours 7:00 a.m. to 9:00 p.m. (CT), Monday through Friday
Odyssey File & Serve Support Chat Assistance is also available online through Support Chat.
Odyssey File & Serve Email [email protected]
Odyssey File & Serve Telephone 800.297.5377
GoTo Assist (Support) Support may ask to assist you by sharing your screenusing GoToAssist.
152 December 2020 ESO-FS-200-4495 v.8