firmware versions up to v3.2x document #h56874digitrace ® 920 series heat trace controller...
TRANSCRIPT

DigiTrace
®
920 SeriesHeat Trace Controller
Installation, Operating, and Maintenance Manual
Firmware versions up to V3.2X
Document #H56874
A/B
ALARM
LOCK
MONITOR CONFIG
STATUSALARMOUTPUT
SHIFT
ENTER
BACK
DigiTrace™
920 SERIES
PROGRAMMABLE DUAL POINT
HEAT TRACING CONTROLLER
TxRx
AB
A/B
ALARMMONITOR CONFIG
STATUSALARMOUTPUT
SHIFT
BACKENTER
DigiTrace™
920 SERIES
LOCK

2

3
Table of Contents
Introduction . . . . . . . . . . . . . . . . . . . . . . . . . . . . . . . . . . . . . . . . . . . . . . . . . . . . . . 5
Certification . . . . . . . . . . . . . . . . . . . . . . . . . . . . . . . . . . . . . . . . . . . . . . . . . . . . . . . . . . . . . . 5 Limited Warranty . . . . . . . . . . . . . . . . . . . . . . . . . . . . . . . . . . . . . . . . . . . . . . . . . . . . . . . . . . 5 Warranty Exclusion/Disclaimer . . . . . . . . . . . . . . . . . . . . . . . . . . . . . . . . . . . . . . . . . . . . . . . 5 Exclusive Remedies . . . . . . . . . . . . . . . . . . . . . . . . . . . . . . . . . . . . . . . . . . . . . . . . . . . . . . . . 5 Conducted and Radiated Emissions—FCC/DOC Statement of Compliance . . . . . . . . . . . . . . 5
What’s New . . . . . . . . . . . . . . . . . . . . . . . . . . . . . . . . . . . . . . . . . . . . . . . . . . . . . . 6
New Controller Features. . . . . . . . . . . . . . . . . . . . . . . . . . . . . . . . . . . . . . . . . . . . . . . . . . . . . 6 New Operator Console Features. . . . . . . . . . . . . . . . . . . . . . . . . . . . . . . . . . . . . . . . . . . . . . . 7
Section 1 Overview. . . . . . . . . . . . . . . . . . . . . . . . . . . . . . . . . . . . . . . . . . . . . . . . . 7
1.1 Controllers Covered by this Manual . . . . . . . . . . . . . . . . . . . . . . . . . . . . . . . . . . . . . . . . . . 71.2 Product Overview . . . . . . . . . . . . . . . . . . . . . . . . . . . . . . . . . . . . . . . . . . . . . . . . . . . . . . . . 71.3 Modular Components . . . . . . . . . . . . . . . . . . . . . . . . . . . . . . . . . . . . . . . . . . . . . . . . . . . . . 91.4 Controller Assemblies. . . . . . . . . . . . . . . . . . . . . . . . . . . . . . . . . . . . . . . . . . . . . . . . . . . . 101.5 Ordering and Configuration Guide . . . . . . . . . . . . . . . . . . . . . . . . . . . . . . . . . . . . . . . . . . 10
Section 2 Installation and Wiring . . . . . . . . . . . . . . . . . . . . . . . . . . . . . . . . . . . . . . 12
2.1 Introduction . . . . . . . . . . . . . . . . . . . . . . . . . . . . . . . . . . . . . . . . . . . . . . . . . . . . . . . . . . . 122.2 Initial Inspection . . . . . . . . . . . . . . . . . . . . . . . . . . . . . . . . . . . . . . . . . . . . . . . . . . . . . . . . 122.3 Operator Safety Considerations . . . . . . . . . . . . . . . . . . . . . . . . . . . . . . . . . . . . . . . . . . . . 122.4 Operating Environment . . . . . . . . . . . . . . . . . . . . . . . . . . . . . . . . . . . . . . . . . . . . . . . . . . . 122.5 Installation Location . . . . . . . . . . . . . . . . . . . . . . . . . . . . . . . . . . . . . . . . . . . . . . . . . . . . . 122.6 Mounting Procedures . . . . . . . . . . . . . . . . . . . . . . . . . . . . . . . . . . . . . . . . . . . . . . . . . . . . 132.7 Wiring. . . . . . . . . . . . . . . . . . . . . . . . . . . . . . . . . . . . . . . . . . . . . . . . . . . . . . . . . . . . . . . . 142.8 Initial Power-up . . . . . . . . . . . . . . . . . . . . . . . . . . . . . . . . . . . . . . . . . . . . . . . . . . . . . . . . 172.9 Setup for the 920 . . . . . . . . . . . . . . . . . . . . . . . . . . . . . . . . . . . . . . . . . . . . . . . . . . . . . . . 18
Section 3 Programming and Configuration . . . . . . . . . . . . . . . . . . . . . . . . . . . . . . . . 18
3.1 Introduction . . . . . . . . . . . . . . . . . . . . . . . . . . . . . . . . . . . . . . . . . . . . . . . . . . . . . . . . . . . 183.2 Front Panel Features . . . . . . . . . . . . . . . . . . . . . . . . . . . . . . . . . . . . . . . . . . . . . . . . . . . . . 193.3 920 Operator Console Display . . . . . . . . . . . . . . . . . . . . . . . . . . . . . . . . . . . . . . . . . . . . . 193.4 920 Functions . . . . . . . . . . . . . . . . . . . . . . . . . . . . . . . . . . . . . . . . . . . . . . . . . . . . . . . . . . 203.5 Control Point Setup . . . . . . . . . . . . . . . . . . . . . . . . . . . . . . . . . . . . . . . . . . . . . . . . . . . . . 203.6 Common Controller Setup . . . . . . . . . . . . . . . . . . . . . . . . . . . . . . . . . . . . . . . . . . . . . . . . 293.7 Temperature Alarms . . . . . . . . . . . . . . . . . . . . . . . . . . . . . . . . . . . . . . . . . . . . . . . . . . . . . 323.8 Other Alarms. . . . . . . . . . . . . . . . . . . . . . . . . . . . . . . . . . . . . . . . . . . . . . . . . . . . . . . . . . . 343.9 Communications Setup. . . . . . . . . . . . . . . . . . . . . . . . . . . . . . . . . . . . . . . . . . . . . . . . . . . 423.10 Operator Console Functions . . . . . . . . . . . . . . . . . . . . . . . . . . . . . . . . . . . . . . . . . . . . . . 453.11 Copy Configuration Functions (V3.11 and up) . . . . . . . . . . . . . . . . . . . . . . . . . . . . . . . . 46
Section 4 Monitored Parameters . . . . . . . . . . . . . . . . . . . . . . . . . . . . . . . . . . . . . . 47
4.1 Introduction . . . . . . . . . . . . . . . . . . . . . . . . . . . . . . . . . . . . . . . . . . . . . . . . . . . . . . . . . . . 474.2 Analog Readings. . . . . . . . . . . . . . . . . . . . . . . . . . . . . . . . . . . . . . . . . . . . . . . . . . . . . . . . 474.3 Maintenance Data . . . . . . . . . . . . . . . . . . . . . . . . . . . . . . . . . . . . . . . . . . . . . . . . . . . . . . . 49
Section 5 Control Modes . . . . . . . . . . . . . . . . . . . . . . . . . . . . . . . . . . . . . . . . . . . . 50
5.1 Introduction . . . . . . . . . . . . . . . . . . . . . . . . . . . . . . . . . . . . . . . . . . . . . . . . . . . . . . . . . . . 505.2 Switch Control Modes . . . . . . . . . . . . . . . . . . . . . . . . . . . . . . . . . . . . . . . . . . . . . . . . . . . 505.3 Load Shedding Control Mode . . . . . . . . . . . . . . . . . . . . . . . . . . . . . . . . . . . . . . . . . . . . . . 525.4 TEMPBUS™ Control Mode . . . . . . . . . . . . . . . . . . . . . . . . . . . . . . . . . . . . . . . . . . . . . . . . 53
Section 6 Troubleshooting . . . . . . . . . . . . . . . . . . . . . . . . . . . . . . . . . . . . . . . . . . . 55
6.1 Operator Checks . . . . . . . . . . . . . . . . . . . . . . . . . . . . . . . . . . . . . . . . . . . . . . . . . . . . . . . . 556.2 Common Problem Areas. . . . . . . . . . . . . . . . . . . . . . . . . . . . . . . . . . . . . . . . . . . . . . . . . . 556.3 Common Alarms—What to look for . . . . . . . . . . . . . . . . . . . . . . . . . . . . . . . . . . . . . . . . . 58
Section 7 Maintenance . . . . . . . . . . . . . . . . . . . . . . . . . . . . . . . . . . . . . . . . . . . . . 60
7.1 Operator Maintenance. . . . . . . . . . . . . . . . . . . . . . . . . . . . . . . . . . . . . . . . . . . . . . . . . . . . 607.2 Replaceable Parts . . . . . . . . . . . . . . . . . . . . . . . . . . . . . . . . . . . . . . . . . . . . . . . . . . . . . . . 60
Appendix A Specifications . . . . . . . . . . . . . . . . . . . . . . . . . . . . . . . . . . . . . . . . . . . 61
Appendix B Typical Enclosure Dimensions . . . . . . . . . . . . . . . . . . . . . . . . . . . . . . . . 63
B.1 Single-Point Assemblies #10160-003 and #10160-009 . . . . . . . . . . . . . . . . . . . . . . . . . 63B.2 Dual-Point Assemblies #10160-120 and #10160-121 . . . . . . . . . . . . . . . . . . . . . . . . . . . 64
4
B.3 Four-Point Assembly #10160-125 . . . . . . . . . . . . . . . . . . . . . . . . . . . . . . . . . . . . . . . . . . 65B.4 Eight-Point Assembly #10160-035 . . . . . . . . . . . . . . . . . . . . . . . . . . . . . . . . . . . . . . . . . 66B.5 Twenty-Point Assembly #10160-045 . . . . . . . . . . . . . . . . . . . . . . . . . . . . . . . . . . . . . . . . 67
Appendix C Wiring Diagrams . . . . . . . . . . . . . . . . . . . . . . . . . . . . . . . . . . . . . . . . . 68
C.1 TS Wiring . . . . . . . . . . . . . . . . . . . . . . . . . . . . . . . . . . . . . . . . . . . . . . . . . . . . . . . . . . . . 68C.2 Power Wiring . . . . . . . . . . . . . . . . . . . . . . . . . . . . . . . . . . . . . . . . . . . . . . . . . . . . . . . . . . 70C.3 Communication Wiring . . . . . . . . . . . . . . . . . . . . . . . . . . . . . . . . . . . . . . . . . . . . . . . . . . 71C.4 Alarm Output Wiring . . . . . . . . . . . . . . . . . . . . . . . . . . . . . . . . . . . . . . . . . . . . . . . . . . . . 71C.5 External Input/Output Port Wiring . . . . . . . . . . . . . . . . . . . . . . . . . . . . . . . . . . . . . . . . . . 73
Appendix D HTC Load Shedding Sequence. . . . . . . . . . . . . . . . . . . . . . . . . . . . . . . . 74
Appendix E 100
Ω
Platinum RTD Table . . . . . . . . . . . . . . . . . . . . . . . . . . . . . . . . . . 75
Appendix F 100
Ω
Nickel-Iron RTD Table . . . . . . . . . . . . . . . . . . . . . . . . . . . . . . . . . 76
Appendix G Factory Default/Configuration Sheets . . . . . . . . . . . . . . . . . . . . . . . . . . . 77
G.1 Configuration Sheet V3.00 . . . . . . . . . . . . . . . . . . . . . . . . . . . . . . . . . . . . . . . . . . . . . . . 77G.2 920 Series HTC Configuration Sheet V3.1X . . . . . . . . . . . . . . . . . . . . . . . . . . . . . . . . . . . 80

5
Introduction
Installation and Maintenance Instructions for Firmware Versions up to and Including V3.2X
This manual provides information pertaining to the installation, operation, testing, adjustment, and maintenance of the DigiTrace
®
Model 920 Series Heat Trace Control and Monitoring products.
Additional copies of the operating manual may be ordered separately through your Tyco Thermal Controls representative or online at www.tycothermal.com using the document number H56874.
Notice:
The information contained in this document is subject to change without notice.
Certification
Tyco Thermal Controls certifies that this product met its published specifications at the time of shipment from the Factory.
Limited Warranty
This Tyco Thermal Controls product is warranted against defects in material and workmanship for a period of 18 months from the date of installation or 24 months from the date of purchase, whichever occurs first. During the warranty period, Tyco Thermal Controls will, at its option, either repair or replace products that prove to be defective.
For warranty service or repair, this product must be returned to a service facility designated by Tyco Thermal Controls. The Buyer shall prepay shipping charges to Tyco Thermal Controls and Tyco Thermal Controls shall pay shipping charges to return the product to the Buyer. However, the Buyer shall pay all shipping charges, duties, and taxes for products returned to Tyco Thermal Controls from another country.
Tyco Thermal Controls warrants that the software and firmware designated by Tyco Thermal Controls for use with the DigiTrace 920 Controller will execute its programming instructions properly. Tyco Thermal Controls does not warrant that the operation of the hardware, or soft-ware, or firmware will be uninterrupted or error-free
Warranty Exclusion/Disclaimer
The foregoing warranty shall not apply to defects resulting from improper or inadequate mainte-nance by the Buyer, Buyer-supplied software or interfacing, unauthorized modification or misuse, operation outside of the specifications for the product, or improper installation.
No other warranty is expressed or implied. Tyco Thermal Controls disclaims the implied warran-ties of merchantability and fitness for a particular purpose.
Exclusive Remedies
The remedies provided herein are the buyer’s sole and exclusive remedies. Tyco Thermal Controls shall not be liable for any direct, indirect, special, incidental, or consequential damages, whether based on contract, tort, or any other legal theory.
Conducted and Radiated Emissions—FCC/DOC Statement of Compliance
This equipment has been tested and found to comply with the limits for a Class A digital device, pursuant to Part 15 of the FCC rules. These limits are designed to provide reasonable protection against harmful interference when the equipment is operated in a commercial environment. This equipment generates, uses, and can radiate radio frequency energy and, if not installed and used
6
in accordance with the instruction manual, may cause harmful interference to radio communica-tions. Operation of this equipment in a residential area is likely to cause harmful interference, in which case the user will be required to correct the interference at his own expense.
This equipment does not exceed Class A limits for radio emissions as set out in Schedule V to VIII of the Radio Interference Regulations of Communication Canada.
Cet apparel respecte les limites de bruits radioelectriques applicables aux appareils numeriques de Classe A prescrites dans la norme sur le materiel brouilleur: “Appareils Numeriques,” NMB-003 edictee par le Ministre des Communications.
What’s New
This section provides a summary of the new features that have been added since the last version of this manual was printed. It is assumed that the reader is already familiar with the earlier ver-sions of the 920 Controller.
New Controller Features
• Alarm filtering is now available for:–
LOW and HIGH TS ALARMS
(see sections 3.7.7 on page 33 and 3.7.8 on page 34)–
LOW and HIGH CURRENT ALARMS
(see sections 3.8.2 on page 35 and 3.8.4 on page 36)–
HIGH GFI ALARMS
(see section 3.8.6 on page 36)–
LOW
and
HIGH VOLTAGE ALARMS
(see sections 3.8.9 on page 37 and 3.8.11 on page 38)–
LOW
and
HIGH RESISTANCE ALARMS
(see sections 3.8.13 on page 38 and 3.8.15 on page 39).
Alarm filtering will prevent an alarm from being indicated until the alarm condition has existed for the duration of the alarm filter time.
• Two new
SWITCH CONTROL MODES
have been added for use with Ambient Temperature control:– Proportional Ambient SSR– Proportional Ambient Contactor (see sections 3.5.3 on page 21 and 5.2 on page 50).
•
ASCII
and
RTU
ModBus™ communications protocol support (see section 3.9.1 on page 42).
• Support for an isolated, 2-wire RS-485 communications interface (see section 1.4.5).
• A 3-phase power calculation feature has been included for use with balanced, Y-connected heating loads (see section 3.5.10 on page 23).
• A Temperature Sensor (
TS
) Fail Mode feature is now available to allow the output to be forced
ON
or
OFF
when a control temperature failure occurs (see section 3.5.11 on page 23).
• A
TEMPBUS™
feature to allow one “master” 920 controller to share its temperature sensor information with up to 25 “slave” controllers (up to 50 control points). This includes the addition of three
TS CONTROL MODES
(see sections 3.5.12 on page 24 and 5.4 on page 53).
• Support for 100 ohm nickel-iron RTDs along with the standard 100 ohm platinum types (see sections 3.5.13 on page 24 and 3.5.16 on page 25).
• Manual voltage source selection (see section 3.5.19 on page 26).
• Support for
FORCE ON
and
FORCE OFF
modes using the
EXTERNAL
input (see sections 3.5.27 on page 28 and 3.6.3 on page 29).
• Features to reload factory default parameters as well as copy configuration parameters from one point to another are now included (see section 3.11 on page 46).
• New maintenance alarming to track contactor wear (see section 3.8.23 on page 42).

7
• Monitor
PEAK LOAD CURRENT
,
PEAK GFI
, and the
EXTERNAL INPUT STATUS
through communi-cations (see sections 4.3.6 on page 50, 4.3.7 on page 50, and 4.3.8 on page 50).
New Operator Console Features
• The ability to adjust the display scroll rate is now available (see section 3.6.10 on page 31).
• Maintenance data resetting is now supported (see section 4.3 on page 49).
• Display and reset the
CONTACTOR CYCLE COUNTER
(see section 4.3.3 on page 49).
• Limit the range of the
CONTROL SETPOINT
setting for 920 Operator Console users (see sections 3.5.29 on page 29 and 3.5.30 on page 29).
• An
UNLOCK DATABASE
feature was added to the 920 Operator Console’s “Configuration Mode Main Menu” (see section 3.10.3 on page 46).
• The display test no longer occurs at startup; instead, the user may activate it from a menu option (see section 3.10.5 on page 46).
Section 1 Overview
1.1 Controllers Covered by this Manual
This document covers the 920 Series of heat trace controllers and available options. The infor-mation coincides with the specific releases of firmware for the 920 product which are listed on the cover. As Tyco Thermal Controls releases new firmware to modify or enhance the product significantly, new documentation will accompany these releases. To ensure that you are using the correct documentation for your particular version of controller, please check the firmware version number of the 920 against the version number listed on the front of this manual. This can be displayed using the optional 920 Operator Console or a communicating device. As subse-quent changes are made, supplements to this document will be included in manuals shipped after the firmware is released. Supplements will make specific reference to the operational or functional changes.
1.2 Product Overview
1.2.1 DESCRIPTION
The 920 Series Heat-Tracing Controller controls, monitors, and communicates alarms and data for one or two heating circuits. As a dual-point device, it offers a complete range of control and monitoring features, as well as superior reliability compared to multipoint systems. Its modular, scalable architecture yields cost-effective multipoint assemblies without the expense of addi-tional control points that are not required. Available for use with external solid-state relays (SSRs) or contactors in either one-, two-, or three-pole configurations and the ability to switch loads up to 600 Vac makes the 920 the most versatile product on the market.
1.2.2 FEATURES
A detailed description of available features can be found in Section III of this manual. Highlights of specific features are included in the following text.
Front Display
The control module includes
LED
status indicators to show output and alarm conditions. Using the optional 920 Operator Console, the setpoint temperature, actual control temperature, and load current are immediately accessible to plant operators and maintenance staff. The display units are field selectable for °F or °C.

8
–40°F to 140°F (–40°C to 60°C) Operation
Extended temperature operation permits installation in all but the harshest environments.
SSR
output modules are limited to operating ambient temperatures of 104°F (40°C) without derating.
Single or Dual Temperature Sensor Inputs
The ability to use one or two temperature sensor (
TS
) inputs for each control point allows the selection of one of eleven control modes and programming of all temperature parameters.
High and Low Temperature Alarms
High and low temperature alarms are offered for both inputs of each control point.
High and Low Current Alarms
Low current alarm is more than just a continuity level alarm. The 920 offers full adjustment over the entire current measurement range for both high and low current alarm limits.
Solid State or Contactor Output
The 920 is available with externally-mounted solid-state relay (
SSR
) output switches or contac-tors. With the SSR option, the user may select a time-proportional control algorithm, a simple deadband mode, or one of two ambient control algorithms. The contactor versions always use either the deadband mode or the proportional ambient contactor mode. Switching device failure alarms are supported for both types of output devices.
Ground-Fault Alarm and Trip
Ground-fault (GF) current levels are monitored and displayed in milliamps. The availability of the actual ground-fault level gives the user the choice of both alarm and trip levels suitable for the particular installation. Using multiple
SSR
s or a multipole contactor allows all powered legs of non-neutral circuits to be switched off under
GF
conditions.
Overcurrent Protection
A unique overcurrent protection algorithm greatly reduces the possibility of damage to the cir-cuit or the controller in the event of a temporary overload while allowing for initially high in-rush currents (
SSR
options only).
Soft Starting
Given the circuit breaker size, the 920 will limit the energy let-through to help prevent nuisance breaker trips due to cable in-rush. This feature makes the controller particularly attractive for use with self-regulating cables (
SSR
options only).
Minimum/Maximum Temperature Tracking
The controller maintains the minimum and maximum temperature values seen by the controller since the last reset of these values. This is helpful in determining causes of temperature alarms.
Latching/Non-Latching Temperature Alarms
User-selectable, non-latching temperature alarms allow the controller to automatically clear the alarm when the condition no longer exists.
High and Low Voltage Alarms
Operating at voltages less than design can cause serious loss of heater output. The alarming of preset voltage deviations ensures availability of sufficient wattage output.
Power Limiting
The 920 will control the maximum output wattage if the full load power exceeds the specified maximum power setpoint. This feature eliminates the need for low voltage transformers in many applications and can assist in standardization of heating cable types (
SSR
options only).
Autocycling
The controller will energize the circuit for 10 seconds at a programmable interval. Circuit alarms will be generated at the time of autocycle instead of when the heat is required. This feature elim-inates the need for a preventive maintenance program as these tests are performed at regular intervals by the controller.
Temperature Sensor Failure Alarm
Both open and shorted sensors are detected and alarmed by the controller.

9
Random Start
A startup delay between 0 and 9 seconds ensures that all units do not come on line at the same time.
Full Digital Communications
An optional internal communications interface allows the communication of alarms and analog data to a monitoring system. Industry-standard RS-232 or RS-485 serial communications are available for applications requiring direct interfacing to other devices. The modem version main-tains compatibility with legacy products including the GCC-9000/780 Series (Group Communi-cations Controller). With the availability of the heat trace data at the user’s fingertips, historical trending of temperatures, power consumption, or other parameters are available for analysis and system optimization.
CSA C/US and Factory Mutual Approved
The 920 series of controllers is approved for Class I, Division 2, Groups A,B,C,D and Zone 2 hazardous locations, making it ideal for direct installation in the field. This can save the signifi-cant expense of wiring back to a centrally-located electrical distribution center.
1.3 Modular Components
The 920 series controller is made up of a number of building blocks, allowing the ultimate in design flexibility. Each component’s primary function is described below.
1.3.1 CONTROL MODULE
The 920 control module forms the heart of a single- or dual-point heat trace control solution. Each plug-in module provides all of the intelligence required to control and monitor two inde-pendent heat trace circuits. It includes indicators for alarm and output status and a connector for use with a 920 Operator Console. An internal connector is provided to plug into an optional com-munications interface.
The control module packaging provides a rugged, vibration-proof design. Once it is plugged into a terminal board, the module is fastened using the two captive screws included as part of the rear cover. It is important that these two screws be securely fastened whenever the module is powered.
1.3.2 TERMINAL BOARD
The terminal board eases maintenance and troubleshooting by providing a termination point for all of the low-voltage signals. The 920 control module may be installed or removed without dis-turbing the field wiring. Temperature sensor, communications, and alarm control wiring are con-nected to the lever-operated spring terminals, providing gas-tight, vibration-resistant connections.
1.3.3 OPERATOR CONSOLE
A large, easy-to-read alphanumeric display and menu-driven interface ease controller configura-tion and eliminate the need for an external programmer. The console may be left installed perma-nently or may be installed temporarily for display/setup during maintenance and troubleshooting. Access is available for all monitored parameters, programmed values, and alarm information. Enhanced security is provided by password protection.
The unique design of the operator console allows it to be installed or removed under power, even in hazardous areas.
1.3.4 SWITCH INTERFACE
Universal single-phase current monitoring, single- or 3-phase ground-fault detection, and volt-age monitoring are provided by the Switch Interface (
SIS/SIC
) module. One device is required for each control point, and two versions are available:
SIS
for use with
SSR
s, and
SIC
for use with the contactor. Both units also incorporate a universal power supply, allowing operation directly from 100 Vac to 277 Vac. Use with higher trace voltages is also possible, using a separate power source or a small step-down transformer.

10
Redundant operation is supported, allowing a control module to automatically power itself from either of two switch interface modules or both. This permits one heat-trace circuit to be turned off for maintenance without affecting the operation of the other circuit.
1.3.5 COMMUNICATIONS INTERFACE
In applications where the user wishes remote configuration capability or wants to communicate trace information and/or alarms to another device such as the
GCC
(Group Communications Controller), an optional communications interface may be installed in the control module.
A modem version that maintains compatibility with legacy products is available, or other industry-standard interfaces such as RS-232 and RS-485 may be specified.
1.3.6 SOLID-STATE RELAY OUTPUT MODULE
In applications where the benefits of solid-state control are desired, a modular solid-state relay (SSR) is available. This component is easily installed on the outside of an enclosure using a sin-gle 3/4
NPT
knockout and locknut providing a weatherproof seal. This allows the heat generated by the
SSR
to be dissipated directly to the ambient air, without increasing the internal tempera-ture of the enclosure. When applications require two-pole or 3-phase switching, multiple
SSR
modules may be ganged together, allowing the same component to be used.
1.4 Controller Assemblies
Due to its modular packaging, the 920 easily supports single-, dual-, or multi-point configura-tions. Factory standard assemblies are available in a variety of enclosure types, and panels made up of multiple points are also available. Refer to the Ordering Guide in section 1.5 on page 10 for a sample listing of available configurations. If your application requires a customized solution, please contact your Tyco Thermal Controls representative for help in specifying an assembly suited to your particular requirements.
1.5 Ordering and Configuration Guide
920 series control assemblies are ordered as three separate items:
Fig. 1.6 920 series control assemblies
Tyco Thermal Controls maintains a shelf stock of enclosure assemblies, control modules, and consoles. All other enclosure assemblies are built to order. Not all options may be listed. Contact your local representative for any special applications you may have.
TxRx
AB
A/B
ALARM
LOCK
MONITOR CONFIG
STATUSALARMOUTPUT
SHIFT
BACKENTER
DigiTrace™
920 SERIES
PROGRAMMABLE DUAL POINT
HEAT TRACING CONTROLLER
DigiTrace™ 920 SERIES
Enclosure assembly Control module(s)(One for every two circuits)
Optional operatorconsole(s)
PROGRAMMABLE DUAL POINT
HEAT TRACING CONTROLLER
A/B
ALARM
LOCK
MONITOR CONFIG
STATUSALARMOUTPUT
SHIFT
BACKENTER

11
1.5.1 ENCLOSURE ASSEMBLY
Contact your local representative for other available configurations that are not listed above.
Enclosure Assemblies
Description Catalog number Part number Weight/lbs
DigiTrace 920 controller–2 Pt
in a 14" x 12" x 8"
FRP
enclosure with window and quick-release latches, control module, and oper-ator console. 1P 30 A 277 V SSR/pt. Controls two circuits, each with a 1-pole solid-state relay. (Approved for Class 1, Div. 2 areas)
920*E4FWL*SIS302*SS3102*HTC*CON 10160-010 27
DigiTrace 920 controller–2 Pt
in a 14" x 12" x 8"
FRP
enclosure with window and quick-release latches, control module, and oper-ator console. Includes an isolated 2-wire RS-485 communication option. 1P 30 A 277 V SSR/pt. Controls two circuits, each with a 1-pole solid-state relay. (Approved for Class 1, Div. 2 areas)
920*E4FWL*SIS302*SS3102*HTC485*CON 10160-011 27
DigiTrace 920 controller–2 Pt
in a 14" x 12" x 8"
FRP
enclosure with window and quick-release latches, control module, and oper-ator console. 2P 30 A 277 V SSR/pt. Controls two circuits, each with a 2-pole solid-state relay. (Approved for Class 1, Div. 2 areas)
920*E4FWL*SIS302*SS3202*HTC*CON 10160-012 32
DigiTrace 920 controller–2 Pt
in a 14" x 12" x 8"
FRP
enclosure with window and quick-release latches, control module, and oper-ator console. Includes an isolated 2-wire RS-485 communication option. 2P 30 A 277 V SSR/pt. Controls two circuits, each with a 2-pole solid-state relay. (Approved for Class 1, Div. 2, areas)
920*E4FWL*SIS302*SS3202*HTC485*CON 10160-013 32
DigiTrace
–DigiTrace Supervisory Software DigiTrace Supervisor 10391-002 1
Note:
The NEC (and CEC) rules specify that all ungrounded—i.e., hot—legs of a circuit, must be switched in the event of a ground fault. This means for 207 V single-phase applications, you must specify a 2-pole (2P) version if you are not using external GFI breakers.
Control Modules
DigiTrace 920 controller
–Control module only(No communications options installed)
920HTC 10260-001 1
DigiTrace 920 controller
–Control module with an isolated 2-wire RS-485 communication option installed
920HTC*485 10260-004 1
DigiTrace 920 controller
–Control module with modem communications option installed
920HTC*MDM 10260-002 1
Operator Console
DigiTrace 920 controller
–Operator console 920CON 10260-005 1

12
Section 2 Installation and Wiring
Caution: Be sure all personnel involved in installation, servicing, and programming are qualified and familiar with electrical equipment, their ratings and proper practices and codes. Multiple voltages and signal levels may be present during the installation, operation, and servicing of this product. Do not power the product until the safety provisions outlined in this section have been observed.
2.1 Introduction
This section includes information on the initial inspection, preparation for use, and storage instructions for the 920 series heat trace controller.
Caution: Solid-state relay (SSR) modules may be extremely hot immediately after power is removed. Exercise care when handling SSRs.
2.2 Initial Inspection
Inspect the shipping container for damage. If the shipping container or cushioning material is damaged, it should be kept until the contents of the shipment have been verified for complete-ness and the equipment has been checked mechanically and electrically. Procedures for config-uring and operating the heat trace controller are given in Section 3 on page 18. If the shipment is incomplete there is mechanical damage, a defect, or the controller does not pass the electrical performance tests, notify your Tyco Thermal Controls representative. If the shipping container is damaged, or the cushioning material shows signs of stress, notify the carrier as well as your Tyco Thermal Controls representative. Keep the shipping materials for the carrier’s inspection.
2.3 Operator Safety Considerations
The standard 920 controller using solid-state relays is suitable for Class I, Division 2, Groups A, B, C, D and Zone 2 hazardous areas. Hazardous areas are defined by Article 500 of the National Electrical Code and Section 18 of the Canadian Electrical Code. Contactor-based assemblies are suitable for use in ordinary (non-hazardous) areas only.
Caution: Many wiring configurations will use more than one power source and all must be de-energized prior to performing any maintenance on a controller circuit.
2.4 Operating Environment
The operating environment should be within the limitations described in the 920 heat trace con-troller specifications outlined in Appendix A on page 61.
2.5 Installation Location
The wide ambient operating temperature range of the controller permits installation in any con-venient location. Considerations should include expected atmospheric conditions, accessibility for maintenance and testing, the location of existing conduits, and hazardous area rating. Ambi-ent temperature conditions may affect load current ratings.
Caution: Always be sure that the intended location is classified as an area that the product is approved for as defined by Article 500 of the National Electrical Code and/or Part I, Section 18 of the Canadian Electrical Code.
13
2.6 Mounting Procedures
Mounting hole dimensions for the standard enclosures are shown in Appendix B on page 63. If possible, conduit entries should be made in the bottom of the enclosure to reduce the possibility of water entry or leakage. Conduit entries must be drilled/punched following the enclosure man-ufacturer’s recommendations. Use bushings suitable for the enclosure type and install such that the completed installation remains waterproof. Grounding hubs and conductors must be installed in accordance with Article 501-4(b) of the National Electrical Code and Part I of the Canadian Electrical Code.
The user may want to consider enclosure drain holes in applications where moisture is a prob-lem; drill 0.125" holes in the bottom of the enclosure on both the left and right sides. Two holes reduce the possibility that one will plug and ensures drainage if the enclosure is not perfectly level. Note that drilling holes in the enclosure compromises the NEMA 4 rating. Controllers should be removed from the enclosure before any holes are drilled or cut to prevent damage due to flying debris.
2.6.1 CONTROL MODULE INSTALLATION AND REMOVALCaution: Always ensure that the power to the unit is turned off during installation or removal to avoid the risk of injury and damage to the controllers.
Warning—Explosion Hazard! Do not install or remove the control module while the unit is powered.
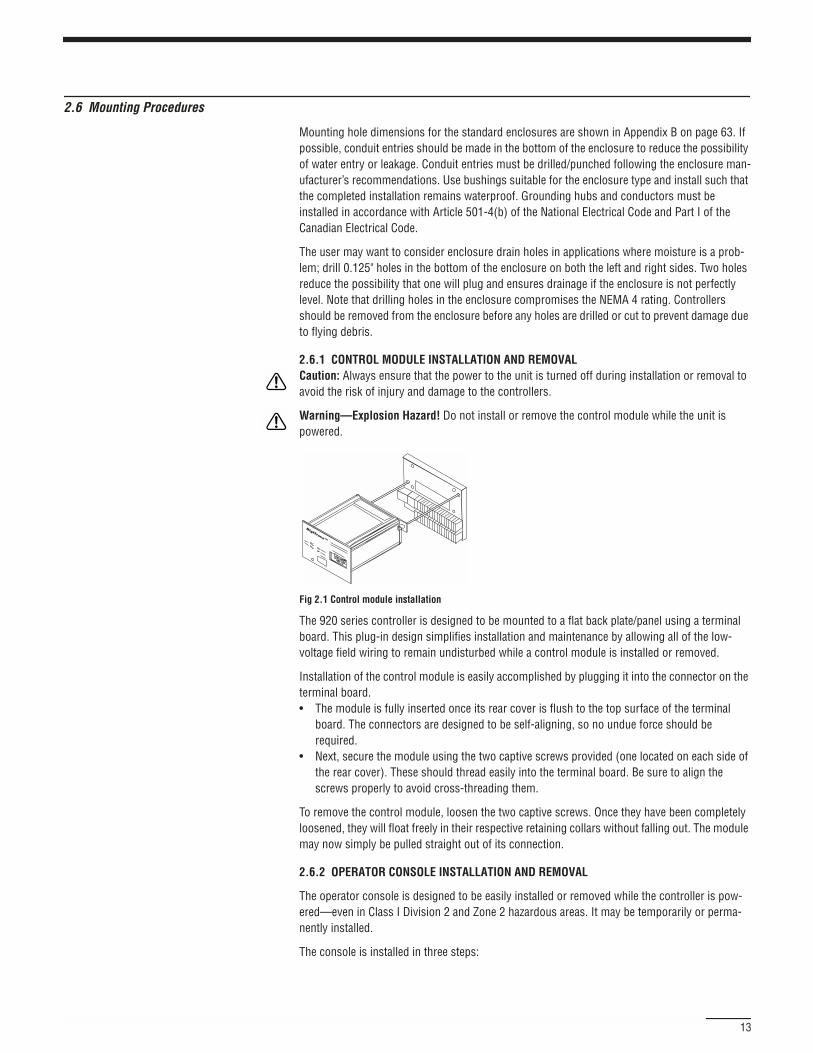
Fig 2.1 Control module installation
The 920 series controller is designed to be mounted to a flat back plate/panel using a terminal board. This plug-in design simplifies installation and maintenance by allowing all of the low-voltage field wiring to remain undisturbed while a control module is installed or removed.
Installation of the control module is easily accomplished by plugging it into the connector on the terminal board.• The module is fully inserted once its rear cover is flush to the top surface of the terminal
board. The connectors are designed to be self-aligning, so no undue force should be required.
• Next, secure the module using the two captive screws provided (one located on each side of the rear cover). These should thread easily into the terminal board. Be sure to align the screws properly to avoid cross-threading them.
To remove the control module, loosen the two captive screws. Once they have been completely loosened, they will float freely in their respective retaining collars without falling out. The module may now simply be pulled straight out of its connection.
2.6.2 OPERATOR CONSOLE INSTALLATION AND REMOVAL
The operator console is designed to be easily installed or removed while the controller is pow-ered—even in Class I Division 2 and Zone 2 hazardous areas. It may be temporarily or perma-nently installed.
The console is installed in three steps:

14
Step 1 “Hook” the lip provided on the rear cover of the console over the top edge of the con-trol module front plate.
Fig. 2.2 Console installation – Step 1
Step 2 “Hinge” the bottom of the console downwards until it is flush with the front of the con-trol module.
Fig. 2.3 Console installation – Step 2
Step 3 If the console is to be permanently installed, secure it to the control module using the captive screw provided. It should be finger tight only. Do not over-tighten the screw or damage to the console housing may occur.
Fig. 2.4 Console installation – Step 3
To remove the console, follow the three steps outlined above in reverse order.
2.7 Wiring
Wiring diagrams for typical configurations are included in Appendix C on page 68.
Caution: Always verify wiring connections before applying power to the controller or connected circuits. To avoid injury or equipment damage, do not install or remove wiring while controller power is on.
To minimize the chance of loose connections, the terminal board uses lever-operated, spring-loaded terminals. See Appendix A on page 61 for allowable wire sizes and recommended insula-tion strip lengths.

15
2.7.1 TEMPERATURE SENSOR CONNECTIONSUse shielded, twisted, three-conductor wire for the extension of RTD leads. The wire size should ensure that the maximum allowable lead resistance is not exceeded. Shields on RTD wiring should be grounded at the controller end only, using the terminals provided.
Note: Some RTDs may be constructed with the Sense wire color-coded as Black.
2.7.2 ALARM RELAY CONNECTIONSThe alarm output relay is a programmable dry contact output. It may be programmed for N.O., N.C., steady or flashing operation, and is typically used to annunciate an alarm to an external device such as a DCS, PLC, etc.
Note: The alarm relay is intended to be used for switching low-voltage, low-current signals. Do not use this relay to directly switch line voltages. Ensure that your application stays within the ratings of the relay contacts as defined in Appendix A on page 61.
The alarm relay may also be used in conjunction with the +9 Vdc source to switch an external, line-voltage relay to drive a local pilot light, etc. Refer to the wiring diagrams in Appendix C on page 68 for example connection details.
2.7.3 EXTERNAL INPUT/OUTPUTThese input and output terminals are used to implement the Override and Ambient Temperature Control Mode features. Refer to Section 3 on page 18 for programming details, and Appendix C on page 68 for example wiring diagrams.
Temperature Sensors Terminal No.
Point A – Shield 25
Point A TS 1 Source (WHT) 26
Point A TS 1 Sense (WHT) 27
Point A TS 1 Common (RED) 28
Point A – Shield 9
Point A TS 2 Source (WHT) 10
Point A TS 2 Sense (WHT) 11
Point A TS 2 Common (RED) 12
Point B – Shield 29
Point B TS 1 Source (WHT) 30
Point B TS 1 Sense (WHT) 31
Point B TS 1 Common (RED) 32
Point B – Shield 13
Point B TS 2 Source (WHT) 14
Point B TS 2 Sense (WHT) 15
Point B TS 2 Common (RED) 16
Alarm and Control Signals Terminal No.
Alarm relay dry contact output 17
Alarm relay dry contact output 18
Ground 19
+9 Vdc nominal Out (100 mAmps maximum) 1
Common 2
Common 3

16
2.7.4 COMMUNICATION SIGNAL CONNECTIONSThe communications terminal assignments change based on the type of option installed. If present in a control module, the type of communications interface will be identified by a label located next to the module’s rating label.
Communications wiring should use twisted conductor, shielded cable. Shields on communica-tions wiring should be grounded at one end only, using the terminals provided.
The following tables define the appropriate signal connections for the various types of interfaces:
2.7.5 POWER CONNECTIONSAll of the power terminals are numbered for easy identification. Do not attempt to use wire sizes that exceed the marked terminal ratings and avoid terminating two wires on the same terminal whenever possible.
Always be sure that all terminals are adequately tightened according to the terminal manufac-turer’s specification. See Appendix A on page 61 for allowable wire sizes, recommended insula-tion strip lengths, and tightening torque. A loose terminal can cause arcing and damage to the terminal or incorrect operation of the controller.
Note: Make sure that power terminals are re-tightened several days after installation. Stranded wire will tend to compress when initially installed; therefore, these terminals should be checked for tightness several times after the system is installed to ensure that a good connection is main-
Miscellaneous Signals Terminal No.
External input (+) 20
External input (-) 21
External output (+) 4
External output(-) 5
RS-485 (2-Wire) Connections
Communication Signal Terminal No.
Receive/transmit data (+) 6
Receive/transmit data (-) 22
Shield 8
Shield 24
RS-232 Connections
Communication Signal Terminal No.
Receive data 6
Data carrier detect 7
Clear to send 8
Transmit data 22
Request to send 23
Common 24
Modem Interface Connections (Note that these particular signals are not polarity sensitive)
Communication Signal Terminal No.
Modem 6
Modem 22
Shield 8
Shield 24

17
tained. Be certain to use the proper size screwdriver for the terminal blocks to minimize the chance of damage to the terminals.
If the controllers are installed in either a metallic or non-metallic enclosure, follow the enclosure manufacturer’s recommendations for proper grounding. Do not rely on conduit connections to provide a suitable ground.
Grounding terminals/screws are provided for connection of system ground leads. Proper system grounding is required for safe and correct operation of the controller’s protection features.
2.7.6 INPUT POWERThe 920 controller may be powered directly from the trace voltage (120 Vac to 277 Vac), through a step-down transformer, or from a separate circuit. The same wiring terminal assign-ments are used in all configurations, as defined below:
Note that terminals 5 and 8 are only used for implementing 3-phase switching (this is true for both SSR and contactor configurations).
When powering the controller directly from the incoming trace power (120 Vac to 277 Vac), jumpers are installed between terminals 1 and 2 and 3 and 4. This is the standard factory config-uration. When the controller is to be powered from another voltage source, the jumpers between terminals 1 and 2 and 3 and 4 should be removed, and the controller power connected to termi-nals 2 and 4.
In applications where a neutral-based 4-wire 3-phase source is available, the controller may be powered from one line to neutral connection, while the trace is operated from the line-to-line connection, eliminating the need for step-down transformers or separate power sources. This can be accomplished by removing the jumper between terminals 3 and 4 only. Controller power can then be derived from the L1 trace power on terminals 1 and 2 and the incoming neutral con-nection for controller power would be connected to terminal 4.
Wiring diagrams for typical 1- and 2-pole configurations are included in Appendix C on page 68.
Note: The contactor version Switch Interface modules provide a switched line voltage signal to drive the contactor coil. This is derived from the control power and, as such, requires that the contactor coil voltage be specified to match the control voltage present on terminals 2 and 4.
Caution: Many wiring configurations will use more than one power source and all must be de-energized prior to performing any maintenance on a controller circuit. When servicing one con-trol point, remember that power may also be present on the second control point.
2.8 Initial Power-up
Caution: Before applying power to the controller, ensure that powering the circuit will not dam-age it if power limiting or the setpoint temperature have not been set correctly. If there is any doubt, the load should be disconnected until the 920 has been suitably programmed for correct and safe operation.
Power Connections Terminal No.
Line/L1 power input 1
Line/L1 Control Power Input 2
Neutral/L2 Power Input 3
Neutral/L2 Control Power Input 4
L3 Power Input (3Ph only) 5
Line/L1 Output to Trace 6
Neutral/L2 Output to Trace 7
L3 Output to Trace (3Ph only) 8

18
2.8.1 INITIAL CABLE TESTTo minimize the risk of damage to the controller due to a cable fault, the integrity of the heating cable should be verified by:1. Using a megger to perform a high-voltage insulation test2. Using an ohmmeter to ensure that the heating cable is not shorted
These tests must be performed with the controller output disconnected. Once the cable has been checked, it may be reconnected to the controller and power applied.
2.8.2 RANDOM START DELAYAll 920 series control modules incorporate a RANDOM START-UP DELAY feature, ensuring that all units do not power on at the same time. When power is first applied to a controller, it will hold its output off for a random time (0 to 9 seconds), equal to the last digit of the HTCBUS™ communi-cations address (see section 3.9.2 on page 43). Once the start-up delay has timed out, the con-troller will begin normal operation.
2.9 Setup for the 920
The 920 may be programmed using the optional 920 Operator Console, or a Group Communica-tions Controller (GCC) if the modem communications option is installed. For instructions on the operation of these devices, refer to the corresponding operating manuals. For complete instruc-tions on programming the 920, see the Section 3 on page 18.
2.9.1 VOLTAGE READING SETUPThe 920 series control module is tested, calibrated, and ordered separately from the switch interface modules which contain the voltage sensing circuitry. This prevents Tyco Thermal Controls from calibrating the control modules to specific switch interfaces and removing any component inaccuracies. Generally, the voltage readings will be within 3 Vac to 5 Vac when shipped from Tyco Thermal Controls. If more accurate voltage readings are desired, they may be adjusted as part of the initial setup of the controller. This requires measurement of the trace volt-age using a multimeter and adjusting the VOLTAGE TURNS RATIO setting to arrive at more accu-rate voltage readings. See section 3.5.21 on page 26.
2.9.2 SWITCH RATING SETUP (SSR ONLY)The 920 series control module is ordered and shipped as a separate item from the enclosure assembly. This prevents Tyco Thermal Controls from predetermining the SWITCH CURRENT RATING settings since various types of output switches are available.
The user should verify that the switch current ratings are set properly for the rating of the solid-state relays that are included as part of the enclosure assembly. Refer to section 3.5.7 on page 22 for more information on the SWITCH CURRENT RATING setting. Tyco Thermal Controls default setting is defined in Appendix F on page 76.
Section 3 Programming and Configuration
3.1 Introduction
This section provides complete operating and setup instructions for the 920 Series Heat-Tracing Controller. The text describes each available function in detail, its purpose, valid range settings, the procedure for use, and some operational tips and suggestions.
While configuring the controller, it is important to remember that the 920 series controller is a two control point device. Both control points allow completely independent operation and, as such, have their own individual settings that must be configured. Throughout the text, the first control point is referred to “Point A” and the second as “Point B.”

19
Fig 3.1 DigiTrace 920 front panel
3.2 Front Panel Features
Front panel features of the heat trace controller are shown in Figure 3.1. The remainder of this Section describes the front panel status and display LEDs.
3.2.1 920 FRONT PANEL DISPLAYThe basic 920 series control module front panel includes seven LED indicators. Four of these are used to indicate the “Output” and “Alarm” status of control points A and B.
Status LEDs
OUTPUT The OUTPUT LED, when illuminated steadily, indicates that the output of the controller is turned on and is allowing current to flow in the trace circuit. For SSR versions, a flashing LED indicates that the controller is pulsing its output on and off to maintain the setpoint temperature and/or control the average amount of current/power the tracer uses. A separate LED is provided for Point A and Point B.
ALARM The ALARM LEDs will flash (approximately once per second) when the controller has detected an alarm condition. A separate LED is provided for Point A and Point B.
TRANSMIT The TRANSMIT LED (“Tx”) flashes when the controller is sending information over its communications port to another device. This LED is only used when an optional communications interface is installed.
RECEIVE The “RECEIVE” LED (“Rx”) flashes when the controller is receiving information over its communications port from another device. This LED is only used when an optional communica-tions interface is installed.
POWER Indicates the module is powered on.
Note: Older versions of the controller may not have this LED.
3.3 920 Operator Console Display
The optional 920 Operator Console provides a menu-driven, alphanumeric interface to ease con-figuration and troubleshooting. The following features are part of the controller’s programming, but are only used in conjunction with the 920 Operator Console. For a detailed description of each of the console features and operating instructions, refer to the separate DigiTrace 920 Series HTC Operator Console—Installation and Operating Instructions (Tyco Thermal Controls reference H56903).
PROGRAMMABLE DUAL POINTHEAT TRACING CONTROLLER
CONSOLE INTERFACE
920 SERIES
POWER
TRANSMIT
RECEIVE
ADDRESS
ALARM
“Power On” LED
Communications statusindicators
Alarm statusindicators
A B
OUTPUT
A - 20910B - 20911
Output statusindicators
Operatorconsoleconnection
Communications addressesfor Control Point A andControl Point B

20
3.4 920 Functions
The sections that follow explain the various functions of the 920 controller and how they can be accessed. The first line of each section identifies the function to be described. Each section goes on to explain the Purpose of the function, the Range over which it may be set, the Procedure for setting or enabling the feature, and finally any Notes or Cautions that pertain to the particular function.
Setting and using the alarming functions of the 920 controller is a two step procedure:1. The alarm must be enabled or disabled accordingly. When using the 920 Operator Console,
access to all alarming functions is available using the CONFIGURE mode sub-menus. When using the Model 780/GCC-9000 Group Communications Controller, the alarm masks may be found in the HTC SETUP Section. Please see the appropriate operating manual for instructions on accessing these parameters.
2. The corresponding alarm point value may be modified appropriately for the application. When using the 920 Operator Console, access to the alarm points is also available using the CONFIGURE mode sub-menus. Modification of the alarm setpoint values is found in the HTC SETPOINTS Section of the Model 780/GCC-9000 Group Communications Controller. Please see the appropriate operating manual for instructions on accessing this feature.
Note: The 920 Operator Console or the Model 780/GCC-9000 will not allow modification of an alarm point value if the alarm has been disabled (DIS) with the exception of the HIGH TS ALARM temperature settings. These may still be modified if the corresponding HIGH LIMIT CUTOUT has been enabled (ENA).
3.5 Control Point Setup
This Section describes the setup parameters that relate to a specific control point—either Point A or Point B. These parameters must be configured for each of the two control points that are used.
3.5.1 CONTROL SETPOINT TEMPERATUREPurpose: The CONTROL SETPOINT temperature is the value at which the heat trace controller maintains the circuit temperature through either proportional, proportional ambient SSR, propor-tional ambient contactor, or deadband control, depending on the controllers’ configuration. The CONTROL SETPOINT temperature is compared to the temperature measured by the control tem-perature sensor (TS). A decision is then made to turn on or turn off the output to control power to the tracer.
Range: –76°F to 1058°F (–60°C to 570°C)
Procedure: Adjust the CONTROL SETPOINT temperature value to the desired maintain tempera-ture. The HTC will switch the output ON and OFF in an attempt to maintain this temperature.
Notes: • See section 5.2 on page 50 of this manual for an explanation of Proportional, Proportional
Ambient SSR, Proportional Ambient Contactor and Deadband Control algorithms.• When using an optional 920 Operator Console (for V3.11 and up) the CONTROL SETPOINT
temperature range may be limited to the CONSOLE SETPOINT MAXIMUM and MINIMUM values (see sections 3.5.29 on page 29 and 3.5.30 on page 29). This is a safety feature to prevent users in the field from modifying the CONTROL SETPOINT temperature setting to a dangerous level.
3.5.2 ALPHANUMERIC TAG ASSIGNMENTPurpose: A 19-character alphanumeric TAG may be assigned to a control point to allow it to be easily associated with a pipe, vessel, process, circuit, drawing name or number.
Setting: Any combination of 19 characters from A-Z, 0-9, /, -, ., (,) or #.

21
Procedure: Using the 920 Operator Console, enter the desired text. Refer to the separate DigiTrace 920 Series HTC Operator Console—Installation and Operating Instructions (Tyco Ther-mal Controls reference H56903) for TAG entry information.
3.5.3 SWITCH CONTROL MODEPurpose: This allows selection of the type of algorithm to be used by the HTC to maintain the CONTROL SETPOINT temperature. There are four different control algorithms available in the HTC—proportional, proportional ambient SSR, proportional ambient contactor, and deadband. See section 5.2 on page 50 for a complete explanation of these controlling techniques as imple-mented in the HTC.
Setting: PROPORTIONAL, PROPORTIONAL AMBIENT SSR (V3.11+), PROPORTIONAL AMBIENT CON-TACTOR (V3.11+), or DEADBAND
Procedure: Select the desired control technique. Note that deadband control and proportional ambient contactor should be selected when using contactors or when precise control and advanced current handling functions are not required.
Note: If deadband is selected, a DEADBAND setting will be available in the HTC configuration menu, else a PROPORTIONAL BAND setting will be available. No MAXIMUM POWER, SWITCH CUR-RENT RATING or CIRCUIT BREAKER CURRENT RATING settings are available when the controller is set to operate in either contactor mode. If proportional ambient contactor is selected, the CYCLE TIME setting will also be available.
3.5.4 PROPORTIONAL BAND SETTING (For use with the three proportional control modes only)
Purpose: When an HTC equipped with SSRs is used to control a heating circuit, proportional or proportional ambient SSR modes are normally used, allowing for more precise temperature con-trol. When using contactors, the proportional ambient contactor mode should be selected.
This programmable proportional band acts to vary the on to off time of the output based on the difference between the measured control temperature and the desired CONTROL SETPOINT temperature.
Range: 2°F to 90°F (1°C to 50°C) 2°F to 630°F (1°C to 350°C) V3.2x and up
Procedure: Adjust the PROPORTIONAL BAND setting to the desired differential from the CONTROL SETPOINT temperature.
Notes:• See section 5.2 on page 50 for an explanation of how the three proportional modes use the
PROPORTIONAL BAND setting. • When using series-type, constant wattage, or self-regulating tracers in an ambient tempera-
ture control application, significant energy savings may be realized by setting the PROPOR-TIONAL BAND to match the expected range of operating ambient temperatures. Tracer design is normally done assuming worst-case conditions, where 100% of the design output power is required to maintain the desired minimum temperature. When the ambient temperature is above the design minimum but some heat is still required, adjusting the PROPORTIONAL BAND width accordingly will allow only the amount of power required by the application to be con-sumed, while maintaining the minimum required temperature.
Example: A water line must be protected from freezing when the ambient temperature falls below 10°C. Either the proportional ambient SSR or proportional ambient contactor mode is selected as the control method (depending on the type of switch being used). The heater and insulation are chosen to impart enough heat to the line to keep it from freezing at a worst-case ambient temperature of –40°C. At 10°C, the heater should be completely off, since no heat is required at this temperature to guarantee that the product will not freeze. It follows that the amount of heat required by the water line decreases as the ambient temperature increases from –40°C to 10°C (theoretically, at –15°C the heater output should be approximately 50%). Setting

22
the CONTROL SETPOINT temperature to 10°C, and the PROPORTIONAL BAND to 50°C, will force the controller’s output to be 100% on at –40°C, 50% on at –15°C, and off at 10°C.
3.5.5 DEADBAND SETTING (Deadband control mode only or if a point controls an INHIBIT output signal)
Purpose: When an HTC equipped with a contactor is used to control a trace circuit, it is neces-sary to use deadband rather than proportional control. This is done to prevent the contactor from switching on and off rapidly and being worn out prematurely. This deadband acts as an on/off control where the decision to turn the output off or on is based upon a window of difference between the measured control temperature and the desired CONTROL SETPOINT temperature.
Range: 2°F to 90°F (1°C to 50°C)
Procedure: Adjust the DEADBAND setting to the desired differential from the desired CONTROL SETPOINT temperature. When the control temperature is above the setpoint + deadband value, the controller will turn off the output to the tracer. If the control temperature drops down below the setpoint, the output will be turned back on. Note that the smaller the DEADBAND setting, the more often the contactor will cycle on and off, decreasing its operational life.
Notes: • See section 5.2 on page 50 for an explanation of deadband control. Note that the MAXIMUM
POWER, SWITCH CURRENT RATING, and CIRCUIT BREAKER CURRENT RATING settings are not available when the HTC is set to deadband mode (typically when switching a contactor).
• The DEADBAND parameter is also available for Point A when the EXTERNAL OUTPUT is config-ured for use as an INHIBIT output. See section 3.6.4 on page 30 for additional details.
3.5.6 CYCLE TIME SETTING (V3.11 AND UP) (For proportional ambient contactor control mode only)
Purpose: This parameter determines the minimum amount of time it will take for a complete contactor ON-OFF-ON cycle.
Range: 10 to 255 minutes
Procedure: Adjust the CYCLE TIME setting to yield the desired contactor ON+OFF time for a partic-ular duty cycle. For instance, if the contactor should remain on for five minutes with a 50% duty cycle, then the CYCLE TIME should be 10 minutes. A new duty cycle (based on measured control temperature, PROPORTIONAL BAND and CONTROL SETPOINT) is calculated every time the contac-tor is required to change state.
Notes:• If the calculated duty cycle is 0% or 100%, then the contactor will not change state and the
duty cycle will not be calculated again for a time period = CYCLE TIME/30.• The minimum cycle time setting is 10 minutes, and the minimum controller output duty cycle
is 3%. This results in a minimum contactor ON time of 18 seconds.
3.5.7 SWITCH CURRENT RATING SETTING (SSR ONLY)Purpose: The SWITCH CURRENT RATING setting defines the current rating of the output switch. It is used by the controller to limit the maximum average current that will be allowed to flow to the load before it begins to adjust the output duty cycle, limiting the amount of current to an accept-able level.
Range: 0.3 to 100.0 amps(CURRENT TURNS RATIO = 1.00)
Procedure: Adjust the SWITCH CURRENT RATING setting to match the current rating of the output device (i.e. 30.0 amps). Note that the SWITCH CURRENT RATING setting is affected by the CURRENT TURNS RATIO setting. The absolute maximum adjusted SWITCH CURRENT RATING setting is 300.0 amps. The absolute minimum adjusted SWITCH CURRENT RATING setting is 0.1 amps. See section 3.5.22 on page 26 for more information regarding the CURRENT TURNS RATIO function.
23
3.5.8 CIRCUIT BREAKER CURRENT RATING SETTING (SSR ONLY)Purpose: The CIRCUIT BREAKER CURRENT RATING setting helps prevent in-rush induced nuisance tripping of the circuit breaker immediately upstream of the controller. The HTC evaluates the square of the current related to time (I2T) and adjusts the output duty cycle accordingly, limiting the amount of current to an acceptable level.
Range: 0.3 to 100.0 amps (CURRENT TURNS RATIO = 1.00)
Procedure: Adjust the CIRCUIT BREAKER CURRENT RATING setting to the heating circuit breaker size (i.e. 30.0 amps). Note that the CIRCUIT BREAKER CURRENT RATING setting is affected by the CURRENT TURNS RATIO setting. The absolute maximum adjusted CIRCUIT BREAKER CURRENT RAT-ING setting is 300.0 amps. The absolute minimum adjusted CIRCUIT BREAKER CURRENT RATING setting is 0.1 amps. See section 3.5.22 on page 26 for more information regarding the CURRENT TURNS RATIO function.
Note: This feature should not be used to reduce the size of a circuit breaker or increase the max-imum heating cable length. It can be quite effective in preventing nuisance trips due to incorrect design or factors outside those considered by the design.
3.5.9 MAXIMUM POWER SETTING (SSR ONLY)Purpose: This user-selectable level limits the maximum amount of power applied to a heat trace circuit. This is an average power calculated by the controller using the average current and applied voltage. The HTC switches the output on and off rapidly to limit the average current to an appropriate level. The MAXIMUM POWER level may be adjusted to eliminate step-down transform-ers, lower the effective output wattage of a cable, or implement energy management of the heat trace circuit.
Range: 3 to 33,000 Watts(VOLTAGE and CURRENT TURNS RATIOS = 1.00)
Procedure: Adjust the MAXIMUM POWER level to the desired value (watts). Use the TEST TRACING function to observe the power limiting operation.
Notes:• This function may be set within reasonable limits for the particular tracer being powered. The
effective resolution of the setting is limited to 1/30th of the calculated full on power. • Do not set the MAXIMUM POWER below full output for applications that do not require control
of power.• This feature is affected by the VOLTAGE and CURRENT TURNS RATIO settings. The maximum
range using adjusted values of voltage and current is 65,535 watts. See sections 3.5.21 on page 26 and 3.5.22 on page 26 for more information regarding the turns ratio functions.
3.5.10 3-PHASE POWER CALCULATION (V3.11 AND UP)Purpose: This parameter selects the type of power calculation that the HTC is to perform.
Setting: NO or YES
Procedure: If an automatic 3-phase power calculation is desired, select YES. If a normal power calculation is desired, select NO.
Note: For the total 3-phase power calculation to be accurate the following conditions must be met:• All three phases must be balanced and star (“Y”) connected• The measured corrected current is one of the phase currents• The measured corrected voltage is the line to line voltage
The formula used to calculate this total power is: Ptotal = √3 x Iphase x Vline-line
3.5.11 TS FAIL MODE (V3.11 AND UP)Purpose: This parameter determines whether the HTC turns the output switch ON or OFF if all selected temperature sensors fail to provide a control temperature.

24
Setting: OFF or ON
Procedure: If the HTC should turn the output switch off when it cannot read a valid control tem-perature, then select OFF; otherwise, if the output switch should turn on, then select ON.
Note: This parameter is part of the TS CONTROL MODE.
3.5.12 TEMPERATURE SENSOR CONTROL MODEPurpose: The TS CONTROL MODE allows the selection of one of eleven possible temperature con-trol modes for the controller. The different modes allow redundant fail-safe temperature sensing, averaging, or minimum maintain temperature control.
Setting: Select one of the following eleven possible modes:
Control TS and DescriptionCONTROL USING TS 1, FAIL OFF/ONCONTROL USING TS 1, FAIL TO TS 2CONTROL USING TS 2, FAIL OFF/ON CONTROL USING TS 2, FAIL TO TS 1CONTROL ON AVERAGE, FAIL OFF/ONCONTROL ON AVERAGE, FAIL TO GOODCONTROL ON LOWEST, FAIL OFF/ONCONTROL ON LOWEST, FAIL TO GOOD
The following are only available in V3.11+:CONTROL USING EXT. INPUT, FAIL OFF/ONCONTROL USING EXT. INPUT, FAIL TO TS 1CONTROL USING EXT. INPUT, FAIL TO TS 2
Where OFF/ON = Controller’s output switch turned OFF or ON as determined by the TS FAIL MODE.
Example: With a TS CONTROL MODE of CONTROL ON AVERAGE, FAIL TO GOOD, the controller will measure both sensors (TS 1 and TS 2), averaging the two temperature value;, display the results; and cycle the heater ON or OFF to maintain the CONTROL SETPOINT temperature. This is the pri-mary control mode. If either sensor should fail, the controller will transfer control to the remain-ing “good” sensor and generate the appropriate TS 1 or TS 2 FAILURE ALARM (assuming that the alarm is enabled). The temperature will now be maintained based on this measured value. If the remaining good sensor fails, the controller will turn the heater OFF or ON as determined by the TS FAIL MODE setting. The appropriate TS 1 or TS 2 FAILURE ALARM will be also be generated.
Procedure: Select the control mode that best suits the application.
Notes:• Ensure that TS FAILURE ALARMS are enabled. See sections 3.7.1 on page 32, 3.7.4 on
page 32, and 3.7.10 on page 34 for a complete explanation of RTD failure detection in the HTC.
• If the selected TS CONTROL MODE uses the EXTERNAL INPUT then the EXTERNAL INPUT must be set to TEMPBUS™ (see Section 3.6.3). Also, the CONTROL TS FAILURE ALARM is non-latching in this mode.
• Fail safe mode is always disabled if the TS CONTROL MODE = EXT. INPUT, FAIL OFF/ON.
3.5.13 TS 1 TYPE (V3.11 AND UP)Purpose: This parameter specifies the type of RTD that is connected to the HTC’s TS 1 input.
Setting: 3-wire 100 Ω platinum or 2-(or 3-) wire 100 Ω nickel-iron (Ni-Fe)
Procedure: Select the type of RTD that is connected to the TS 1 input.
Note: If a 2-wire 100 Ω nickel-iron (Ni-Fe) RTD is selected then the TS 1 LEAD RESISTANCE must be entered manually (see section 3.5.14 on page 24).
3.5.14 TS 1 LEAD RESISTANCE (V3.11 AND UP)(For Ni-Fe RTDs only)

25
Purpose: This parameter specifies the lead resistance of a 2-wire nickel-iron RTD connected to the HTC’s TS 1 input.
Range: 0 to 20.00 Ω
Procedure: Measure the resistance of one of the nickel-iron RTD leads (from the RTD to the HTC’s TS 1 input) and use this value as the TS 1 LEAD RESISTANCE.
3.5.15 TS 1 HIGH LIMIT CUTOUTPurpose: When enabled, the TS 1 HIGH LIMIT CUTOUT feature will override the CONTROL SETPOINT temperature and force the controller output off if the TS 1 reading exceeds the HIGH TS 1 ALARM temperature setting. This is a non-latching condition, so once the TS 1 reading drops below the HIGH TS 1 ALARM temperature setting, the controller will resume normal operation.
Setting: ENABLE or DISABLE
Procedure: Enable or disable the cutout feature as desired.
Notes:• The TS 1 HIGH LIMIT CUTOUT feature overrides an autocycle test. A pending autocycle will be
initiated immediately after the TS 1 temperature drops below the HIGH TS 1 ALARM tempera-ture setting.
• If a TS 1 failure occurs and the TS 1 HIGH LIMIT CUTOUT feature is enabled, the switch output will latch off regardless of the TS CONTROL MODE setting or the TS FAIL MODE setting.
• If the TS 1 HIGH LIMIT CUTOUT feature is enabled, then the HIGH TS 1 ALARM temperature set-ting can be set, regardless of whether the HIGH TS 1 ALARM is enabled.
3.5.16 TS 2 TYPE (V3.11 AND UP)Purpose: This parameter specifies the type of RTD that is connected to the HTC’s TS 2 input.
Setting: 3-wire 100 Ω platinum or 2- (or 3-) wire 100 Ω nickel-iron (Ni-Fe)
Procedure: Select the type of RTD that is connected to the TS 2 input.
Note: If a 2-wire 100 Ω nickel-iron (Ni-Fe) RTD is selected then the TS 2 LEAD RESISTANCE must be entered (see section 3.5.17 on page 25).
3.5.17 TS 2 LEAD RESISTANCE (V3.11 AND UP)(For Ni-Fe RTDs only)
Purpose: This parameter specifies the lead resistance of a 2-wire nickel-iron RTD connected to the HTC’s TS 2 input.
Range: 0 to 20.00 Ω
Procedure: Measure the resistance of one of the nickel-iron RTD leads (from the RTD to the HTC’s TS 2 input) and use this value as the TS 2 LEAD RESISTANCE.
3.5.18 TS 2 HIGH LIMIT CUTOUTPurpose: When enabled, the TS 2 HIGH LIMIT CUTOUT feature will override the CONTROL SETPOINT temperature and force the controller output off if the TS 2 reading exceeds the HIGH TS 2 ALARM temperature setting. This is a non-latching condition, so once the TS 2 reading drops below the HIGH TS 2 ALARM temperature setting, the controller will resume normal operation.
Setting: ENABLE or DISABLE
Procedure: Enable or disable the cutout feature as desired.
Notes:• The TS 2 HIGH LIMIT CUTOUT feature overrides an autocycle test. A pending autocycle will be
initiated immediately after the TS 2 temperature drops below the HIGH TS 2 ALARM tempera-ture setting.
• If a TS 2 failure occurs and the TS 2 HIGH LIMIT CUTOUT feature is enabled, the switch output will latch off regardless of the TS CONTROL MODE setting or the TS FAIL MODE setting.

26
• If the TS 2 HIGH LIMIT CUTOUT feature is enabled, then the HIGH TS 2 ALARM temperature set-ting can be set, regardless of whether the HIGH TS 2 ALARM is enabled.
3.5.19 VOLTAGE SOURCE (V3.11 AND UP)Purpose: This parameter specifies which voltage source the HTC should use for its voltage mea-surements.
Setting: POINT A or POINT B or FIXED
Procedure: If the HTC is not powered from a dedicated switch interface an alternate voltage source can be selected. If a fixed constant voltage value is to be used then that FIXED VOLTAGE SETTING must also be entered (see section 3.5.20 on page 26).
Notes:• If an alternate voltage source is selected, then all voltage alarming features are disabled for
this HTC and the VOLTAGE TURNS RATIO is not used.• It is not possible to set both points to use the others’ voltage source.
3.5.20 FIXED VOLTAGE SETTING (V3.11 AND UP)(Only if VOLTAGE SOURCE = FIXED)
Purpose: This parameter specifies the voltage value that the HTC should use when the VOLTAGE SOURCE = FIXED.
Range: 0 to 1000 Volts
Procedure: Adjust the FIXED VOLTAGE setting to the desired level.
Note: All voltage alarming features are disabled for this HTC and the VOLTAGE TURNS RATIO is not used when the VOLTAGE SOURCE is set to FIXED.
3.5.21 VOLTAGE TURNS RATIO ADJUSTMENTPurpose: The VOLTAGE TURNS RATIO adjusts voltage readings for applications where a controller is switching a load through a step-up or step-down transformer, or is being powered from a source with a different voltage level than the trace voltage.
Range: 0.10 to 9.90 (TO 1)
Procedure: Adjust the VOLTAGE TURNS RATIO to equal the ratio of the circuit voltage to the con-troller input voltage. Compare the indicated voltage to the measured voltage after setting the turns ratio and adjust until the two readings are as close as possible.
e.g.: Heating Circuit Voltage: 480 VoltsModule Input Voltage: 120 VoltsVOLTAGE TURNS RATIO Setting: 4.00
Notes:• When the VOLTAGE TURNS RATIO has been set appropriately, the HTC will calculate the circuit
power using the adjusted current and voltage readings. Voltage alarms also use the adjusted circuit voltages.
• The VOLTAGE TURNS RATIO is not used if the selected VOLTAGE SOURCE is not from the dedi-cated switch interface.
3.5.22 CURRENT TURNS RATIO ADJUSTMENTPurpose: The CURRENT TURNS RATIO adjusts current readings for applications where a controller is monitoring a load through an external step-up or step-down current transformer.
Range: 0.10 to 60.00 (TO 1)
Procedure: Adjust the CURRENT TURNS RATIO to equal the ratio of the primary to secondary windings of the external current transformer. Compare the indicated current to the measured current after setting of the CURRENT TURNS RATIO and adjust until the two readings are as close as possible.

27
Note: When the CURRENT TURNS RATIO has been set appropriately, the HTC will calculate the cir-cuit power using the adjusted current and voltage readings. Current alarms, as well as the switch and circuit breaker limiting functions, also use the adjusted circuit currents.
3.5.23 AUTOCYCLE ENABLINGPurpose: The autocycle function momentarily (approximately 10 seconds) applies power to the heating circuit at the selected interval. It is used to test the integrity of the heating circuit. Alarms present at the time of autocycle then become latched and remain active after the completion of the autocycle function. Auto-cycling effectively eliminates the need for preventive maintenance by automatically verifying the heating circuit integrity.
Setting: ENABLE or DISABLE
Procedure: Enable or disable the auto-cycling feature as desired. If the feature is disabled, you will not be prompted to enter the AUTOCYCLE INTERVAL or AUTOCYCLE UNITS.
Notes:• Auto-cycling should always be enabled for normal operation. Disabling this feature should
only be required where the HTC system is monitoring a circuit exercised by some other device or means. Although this function defeats temperature control and forces output on, the controller will continue to adjust the output for protection purposes or power limiting (SSR option only).
• Auto-cycling is inhibited if the controller is in the load shedding mode. See section 5.3 on page 52.
• If auto-cycling is enabled, the HTC will always autocycle for 10 seconds when power is ini-tially applied.
• If auto-cycling is enabled, TS FAIL MODE = OFF and all the control temperature sensors have failed, the HTC will still perform an autocycle.
• If an alarm condition, with an alarm filter time greater than 0, appears during the auto-cycling, then the autocycle may be extended (past the 10 seconds) until the alarm filter time has expired.
3.5.24 AUTOCYCLE TIME INTERVAL Purpose: AUTOCYCLE INTERVAL is the number of hours/minutes between successive heating cir-cuit integrity tests depending on the AUTOCYCLE UNITS specified.
Range: 1 to 240
Procedure: Set the AUTOCYCLE INTERVAL to the desired time period.
Notes:• When using proportional ambient contactor mode, the CYCLE TIME setting should be less
than the AUTOCYCLE INTERVAL otherwise auto-cycling could affect the duty cycle.• If an AC ALARM becomes active during an autocycle, but the AUTOCYCLE INTERVAL expires
prior to the corresponding ALARM FILTER time, then auto-cycling will continue until the ALARM FILTER time has elapsed.
• For the earliest possible alarming of heating circuit problems the AUTOCYCLE INTERVAL should be set to a small value.
3.5.25 AUTOCYCLE TIME UNITSPurpose: The autocycle time units parameter allows selection of minutes or hours for the AUTOCYCLE INTERVAL setting.
Setting: HOURS or MINUTES
Procedure: Set the AUTOCYCLE UNITS to the desired time units.
3.5.26 INHIBIT CONTROL (V3.00 ONLY)Purpose: This feature allows the HTC’s EXTERNAL INPUT to override the controller’s temperature control and force the output switch off. This is especially useful when the user wishes to turn a controller or a group of controllers off over the summer months, during maintenance, or when a line is flowing and does not require heating.

28
Setting: ENABLE or DISABLE
Procedure: Enable or disable the INHIBIT CONTROL for the control point being programmed.
Notes:• The EXTERNAL INPUT must also be programmed as INHIBIT before this parameter can be set.
See section 3.6.3 on page 29 for further details.• If the autocycle feature is enabled, it will continue to function even when the INHIBIT mode is
active.• Fail-safe mode is inactive if the INHIBIT mode is active.• Both of the LOW TS ALARMS are inactive if the INHIBIT mode is active.
3.5.27 OVERRIDE SOURCE (V3.11 AND UP)Purpose: An override signal can be sent to the HTC from one of two sources. This override signal can be used to override the controller’s temperature control and force the output switch off or on. This is especially useful when the user wishes to turn a controller or a group of controllers off over the summer months, during maintenance, or when a line is flowing and does not require heating.
Setting: REMOTE or EXT. INPUT
Procedure: If the override signal will be generated remotely and received by the HTC via the optional communications interface, select REMOTE as the OVERRIDE SOURCE. If the override sig-nal will be received by the HTC via the external input terminals on the 920 terminal board, select EXTERNAL INPUT as the OVERRIDE SOURCE.
Notes:• If the EXTERNAL INPUT is not configured as either INHIBIT or FORCE ON then OVERRIDE SOURCE
will always automatically be set to REMOTE. See section 3.6.3 on page 29 for further details.• If the autocycle feature is enabled, it will continue to function even when an INHIBIT override
signal is being received as long as load shedding is not active.• Fail-safe mode is inactive if an INHIBIT override signal is being received.• Load shedding and fail-safe mode are inactive if a FORCE ON override signal is being received.• Only the LOW TS ALARMS for temperature sensors used by the TS CONTROL MODE are inactive
if an INHIBIT override signal is being received.
3.5.28 LOAD SHEDDING ENABLINGPurpose: The load shedding function allows the controller output to be forced OFF by way of a remote contact input on the 780 Group Communications Controller or using the communica-tions port and an upstream device. It may be used to turn OFF the output of one or more control-lers in order to reduce energy consumption to avoid peak demand surcharges, remove power from unused circuits, or remove power from circuits that may be subjected to steam cleaning.
Setting: ENABLE or DISABLE
Procedure: Enable or disable the load shedding control mode as desired.
Notes:• To completely configure the HTC for load shedding operation, the following additional param-
eters must be set up if using the Model 780/GCC-9000:– Fail-safe mode– Load shedding GCC contact association
• These additional parameters may only be accessed using the Group Communications Con-troller. See the appropriate section of the GCC manual for further details.
• Fail-safe mode is not supported when using proportional ambient SSR mode or proportional ambient contactor mode.
• Fail-safe mode is not supported if the TS CONTROL MODE = EXT. INPUT, FAIL OFF/ON.• For fail-safe mode to function, at least one LOW TS ALARM of the controlling temperature sen-
sor(s) must be enabled and the corresponding LOW TS ALARM temperature setting must be less than the CONTROL SETPOINT temperature.

29
3.5.29 CONSOLE SETPOINT MAXIMUM (V3.11 AND UP)Note: The CONSOLE SETPOINT MAXIMUM is not displayed on the optional 920 Operator Console.
Purpose: When using an optional 920 Operator Console (for V3.11 and up) the maximum set-ting of the CONTROL SETPOINT temperature may be limited to the CONSOLE SETPOINT MAXIMUM value. This is a safety feature to prevent users in the field from modifying the CONTROL SETPOINT temperature setting to a dangerous level.
Range: –76°F to 1058°F (–60°C to 570°C)
Procedure: Adjust the CONSOLE SETPOINT MAXIMUM temperature value to limit the maximum allowable CONTROL SETPOINT TEMPERATURE that may be set using the optional 920 Operator Console. The CONSOLE SETPOINT MAXIMUM may only be set using a communicating device such as the Model 780/GCC-9000. See the 780/GCC-9000 manual for the proper procedure.
3.5.30 CONSOLE SETPOINT MINIMUM (V3.11 AND UP)Note: The CONSOLE SETPOINT MINIMUM is not displayed on the optional 920 Operator Console.
Purpose: When using an optional 920 Operator Console (for V3.11 and up) the minimum setting of the CONTROL SETPOINT temperature may be limited to the CONSOLE SETPOINT MINIMUM value. This is a safety feature to prevent users in the field from modifying the CONTROL SETPOINT tem-perature setting to a dangerous level.
Range: –76°F to 1058°F (–60°C to 570°C)
Procedure: Adjust the CONSOLE SETPOINT MINIMUM temperature value to limit the minimum allowable CONTROL SETPOINT TEMPERATURE that may be set using the optional 920 Operator Console. The CONSOLE SETPOINT MINIMUM may only be set using a communicating device such as the Model 780/GCC-9000. See the 780/GCC-9000 manual for the proper procedure.
3.6 Common Controller Setup
The following section describes the setup parameters that are common for both of the two con-trol points—Point A and Point B. These parameters need only be configured once to define their operation for both control points.
3.6.1 TEMPERATURE DISPLAY UNITSPurpose: This allows selection of the type of temperature units to display when using the 920 Operator Console. All temperature-related values will be displayed in the selected units.
Note: This setting will not affect the temperature units displayed at a 780/GCC-9000 Group Com-munications Controller. The GCC may be set independently.
Setting: DEGREES C or DEGREES F
Procedure: Adjust the setting to the desired temperature units (°F or °C).
Note: To minimize possible confusion, temperature units should be set the same on the HTC and any other communicating devices.
3.6.2 VERSION OF FIRMWARE AND HARDWAREPurpose: The first three digits of the version number indicate the revision level of the firmware programmed into the controller. As new features are added to the HTC, the firmware revision level is incremented to allow the user to determine which features are available for the particular unit being used. The fourth digit (V3.11 and up only) indicates the type of 920 hardware. A “0” indicates that an EPROM is being used, which means the firmware cannot be upgraded without replacing the EPROM. A “1” indicates that the firmware is stored in a FLASH memory device and can be upgraded via the optional communications interface.
3.6.3 EXTERNAL INPUT PORTPurpose: This input port may be used as an OVERRIDE SOURCE or a TEMPBUS™ temperature source for either point. As an OVERRIDE SOURCE, it can sense a remote dry contact closure and

30
override the controller’s temperature control and force its output switch off or on. As a TEMPBUS™ temperature source, either controller can control its output switch using the TEMPBUS™ temper-ature rather than temperatures from TS 1 or TS 2.
Setting: NOT USED, TEMPBUS (V3.11+), INHIBIT or FORCE ON (V3.11+)
Procedure: If the EXTERNAL INPUT is not being used by either point, select NOT USED. If either point requires a TEMPBUS™ temperature signal, select TEMPBUS™ and set the point TS CONTROL MODE to a mode using the EXTERNAL INPUT (see section 3.5.12 on page 24). For TEMPBUS™ operation description see section 5.4 on page 53.
If a remote dry contact closure should force either point’s output switch off, select INHIBIT. If a remote dry contact closure should force either point’s output switch on, select FORCE ON.
If the EXTERNAL INPUT is set to INHIBIT or FORCE ON, the point’s OVERRIDE SOURCE (for V3.11+) must be set to EXT. INPUT or its INHIBIT CONTROL (for V3.00) must be enabled.
Notes:• When used with the INHIBIT/FORCE ON feature, a contact closure sensed by the EXTERNAL
INPUT will initiate the INHIBIT/FORCE ON mode. An open input will cause the controller to revert to normal temperature control operation. One possible use of the INHIBIT feature is to use an external device (such as a flow meter) to provide a contact closure if there is flow in a line. As long as the line has adequate flow, the heating will be off (INHIBITed from operating). See Appendix C on page 68 for typical connection diagrams when using this input.
• EXTERNAL INPUT must be set to INHIBIT or FORCE ON before OVERRIDE SOURCE (for V3.11+) can be set to EXT. INPUT; or INHIBIT CONTROL (for V3.00) can be edited. For V3.11 and up, set-ting EXTERNAL INPUT to NOT USED or TEMPBUS™ will automatically set OVERRIDE SOURCE to REMOTE.
3.6.4 EXTERNAL OUTPUT PORTPurpose: The EXTERNAL OUTPUT port can be programmed to allow Point A to function as a “mas-ter” 920 HTC to control up to 25 “slave” 920 HTC units. A “master” can either force its “slaves” to override their temperature control and force their output switch off (INHIBIT), or it can send its control temperature to its “slaves” so they can do their own temperature control using this tem-perature (TEMPBUS™).
An INHIBIT “master” may be useful when a number of “slave” controllers use their own RTDs, but are to be turned off based on the ambient temperature. This will allow disabling of the “slave” controllers during the summer months, during a maintenance shutdown, etc.
A TEMPBUS™ “master” may be useful when a number of “slave” controllers do not have their own temperature sensors and are set to control the ambient temperature.
Setting: NOT USED, TEMPBUS (V3.11+) or INHIBIT
Procedure: Select NOT USED if Point A is not a “master” controlling the EXTERNAL OUTPUT port. Select INHIBIT if Point A will be controlling the EXTERNAL OUTPUT port as an INHIBIT “master.” Select TEMPBUS™ if Point A will be sending its control temperature out the EXTERNAL OUTPUT port. For TEMPBUS™ operation description see section 5.4 on page 53.
Notes:• The “master” and “slave” controllers must be installed in the same enclosure. The EXTERNAL
OUTPUT PORT signal is not intended to be connected over extended distances or between enclosures.
• If EXTERNAL OUTPUT is set to INHIBIT, then the DEADBAND parameter for Point A will be used to define the operation of the EXTERNAL OUTPUT port, even though the SWITCH CONTROL MODE for Point A may not be set for DEADBAND operation. See section 3.5.5 on page 22 for additional details regarding the DEADBAND mode.
• If the EXTERNAL INPUT PORT input is not being used, Point B may be configured as a “slave” for a controller with its Point A configured as a “master.”

31
3.6.5 FLASH ALARM OUTPUT SETTINGPurpose: Programs the alarm output relay for flashing or steady output in case of an alarm condition.
Setting: YES (Flash) or NO (Steady)
Procedure: Set the alarm output relay to flash or not to flash on an alarm condition, whichever suits the application.
Notes: • If the alarm output is used to drive a pilot light, select YES to enable flashing operation. When
the output is also configured for normally closed operation, the pilot light will be on steady for normal operation, flash in case of alarm and be extinguished due to a bulb failure or loss of power.
• If multiple alarm outputs from different controllers are wired in series (i.e.: multipoint pan-els), set this parameter to NO (steady).
3.6.6 ALARM OUTPUT NORMAL STATEPurpose: Configures the alarm output relay for normally open or normally closed operation. The normal condition is assumed to be when the HTC is powered and no alarms exist.
Setting: N.O. (Normally Open) or N.C. (Normally Closed)
Procedure: Set the alarm output relay to normally open or normally closed to suit the application.
Note: If a pilot light is used for indication of alarms, normally closed operation provides a steady illumination of the lamp when the circuit is operating correctly. A light that is flashing or out indi-cates a fault condition. A burned out lamp is readily identified if the HTC is set to flash the alarm output relay in case of alarm. See the section 3.6.5 on page 31.
3.6.7 LANGUAGEPurpose: Defines which language the optional 920 Operator Console uses when prompting the user for input and/or displaying messages and status.
Setting: ENGLISH or FRANCAIS
Procedure: Select the language of choice—ENGLISH for English prompts and messages, or FRANCAIS for French prompts and messages.
3.6.8 POINT B USEDPurpose: Allows the second control point (Point B) to be disabled when it is not being used. This is an easy method of disabling all ALARMS, etc. without having to set each parameter.
Setting: YES or NO
Procedure: Select NO to disable Point B, choose YES to use Point B.
Notes:• Selecting NO has the following effect on Point B parameters:
– All relevant ALARMS are masked– The control output is held off– No programming, configuration, or messages are available using the optional 920 Opera-
tor Console• Complete Point B access remains available using the optional communications interface.
3.6.9 PASSCODESee section 3.10.1 on page 45.
3.6.10 SCROLL DELAY SETTING (V3.11 AND UP)Purpose: For ease of viewing, allows the user to modify the speed at which information is scrolled on the optional Operator Console.
Range: 0.07 to 0.25 seconds

32
Procedure: Decreasing the scroll delay value will cause the information on the display to scroll faster. Increasing the scroll delay value will cause the information on the display to scroll slower.
3.7 Temperature Alarms
This section defines the temperature-related alarming functions of the 920 controller. These parameters must be set up individually for both Point A and Point B.
3.7.1 TEMPERATURE SENSOR 1 FAILURE ALARMPurpose: Enabling TS 1 FAILURE will provide indication of an open or shorted failure of TS 1.
Alarm Mask: ENABLE or DISABLE
Procedure: Enable or disable alarming of a failed first temperature sensor (TS 1) as required.
Notes:• This failure alarm should be enabled if a temperature sensor is connected to the TS 1 input. • This alarm is always latched and must be reset by the user.
3.7.2 LOW TEMPERATURE SENSOR 1 ALARMPurpose: If enabled, the LOW TS 1 ALARM allows for alarming of low temperature conditions as sensed by the first temperature sensor (TS 1).
Alarm Mask: ENABLE or DISABLE
Range: –76°F to 1058°F (–60°C to 570°C)
Procedure: Adjust the LOW TS 1 ALARM temperature setpoint to the desired value. Note that the LOW TS 1 ALARM must be enabled in order to adjust the LOW TS 1 ALARM temperature setpoint.
Notes:• This alarm should normally be enabled and the setpoint should be appropriate for the heating
application. Maintaining a minimum 5°C differential between low temperature alarming and the CONTROL SETPOINT temperature will minimize nuisance alarming due to momentary dips in temperature. Another alternative to this is to configure the controller for non-latching tem-perature alarms.
• This alarm must be enabled and its setpoint must be below the CONTROL SETPOINT tempera-ture if fail-safe mode uses the temperature from TS 1.
3.7.3 HIGH TEMPERATURE SENSOR 1 ALARMPurpose: If enabled, the HIGH TS 1 ALARM allows for alarming of high temperature conditions as sensed by the first temperature sensor (TS 1).
Alarm Mask: ENABLE or DISABLE
Range: –76°F to 1058°F (–60°C to 570°CF)
Procedure: Adjust the HIGH TS 1 ALARM temperature setpoint to the desired value. Note that the HIGH TS 1 ALARM must be enabled in order to adjust the HIGH TS 1 ALARM temperature setpoint unless the TS 1 HIGH LIMIT CUTOUT feature is enabled.
Note: This alarm should only be used for applications involving a product that is sensitive to over temperature. General use may result in nuisance alarms due to the outflow of hot product or steam. This may be a case where the alarm should be enabled and nonlatching temperature alarming used. A high temperature condition resulting from a forced on failure of the heating cir-cuit should first be alarmed by the SWITCH FAILURE ALARM. See section 3.8.18 on page 40 for more information.
3.7.4 TEMPERATURE SENSOR 2 FAILURE ALARMPurpose: Enabling TS 2 FAILURE provides indication of an open or shorted failure of TS 2.
Alarm Mask: ENABLE or DISABLE
Procedure: Enable or disable alarming of a failed second temperature sensor (TS 2) as required.

33
Notes:• If no second sensor is installed, disable this alarm. This failure alarm should be enabled if a
second temperature sensor is connected to the TS 2 input.• This alarm is always latched and must be reset by the user.
3.7.5 LOW TEMPERATURE SENSOR 2 ALARMPurpose: If enabled, the LOW TS 2 ALARM allows for alarming of low temperature conditions as sensed by the second temperature sensor (TS 2).
Alarm Mask: ENABLE or DISABLE
Range: –76°F to 1058°F (–60°C to 570°C)
Procedure: Adjust LOW TS 2 ALARM temperature setpoint to the desired value. Note that the LOW TS 2 ALARM must be enabled in order to adjust the LOW TS 2 ALARM temperature setpoint.
Notes:• If no second sensor is installed, this alarm should be disabled. This alarm should be enabled
and the setpoint should be appropriate for the heating application. Maintaining a minimum 5°C differential between low temperature alarming and the CONTROL SETPOINT temperature minimizes nuisance alarming due to momentary dips in temperature. Another alternative to this is to configure the controller for non-latching temperature alarms.
• This alarm must be enabled and its setpoint must be below the CONTROL SETPOINT tempera-ture if fail-safe mode uses the temperature from TS 2.
3.7.6 HIGH TEMPERATURE SENSOR 2 ALARMPurpose: If enabled, the HIGH TS 2 ALARM allows for alarming of high temperature conditions as sensed by the second temperature sensor (TS 2).
Alarm Mask: ENABLE or DISABLE
Range: –76°F to 1058°F (–60°C to 570°C)
Procedure: Adjust the HIGH TS 2 ALARM temperature setpoint to the desired value. Note that the HIGH TS 2 ALARM must be enabled in order to adjust the HIGH TS 2 ALARM temperature setpoint unless the TS 2 HIGH LIMIT CUTOUT feature is enabled.
Note: If no second sensor is installed, disable this alarm. This alarm may be used for applica-tions where a product that is sensitive to over temperature is involved. General usage could result in nuisance alarms due to the flow of hot product or steam out. This may be a case where the alarm could be enabled and non-latching temperature alarming used. A high temperature condition resulting from a forced on failure of the heating circuit should first be alarmed by the SWITCH FAILURE ALARM. See section 3.8.18 on page 40 for more information.
3.7.7 LOW TEMPERATURE SENSOR ALARM FILTER TIME SETTING (V3.11 AND UP)Purpose: The LOW TS ALARM FILTER will prevent LOW TS 1 and/or LOW TS 2 ALARMS from being indicated until their corresponding alarm condition has existed for the duration of the LOW TS ALARM FILTER time.
Range: 0 to 999 Minutes
Procedure: Adjust the LOW TS ALARM FILTER time to the desired value. Note that either the LOW TS 1 ALARM and/or the LOW TS 2 ALARM must be enabled in order to adjust the LOW TS ALARM FILTER time.
Notes:• If an alarm condition appears and then disappears before the alarm filter time has expired,
the filter timer is reset and the alarm condition must exist again for the entire alarm filter time before the corresponding alarm will be indicated.
• If the user resets an alarm while the alarm condition is still exists, then the alarm will not be indicated again until the entire alarm filter time has expired.

34
3.7.8 HIGH TEMPERATURE SENSOR ALARM FILTER TIME SETTING (V3.11 AND UP)Purpose: The HIGH TS ALARM FILTER will prevent HIGH TS 1 and/or HIGH TS 2 ALARMS from being indicated until their corresponding alarm condition has existed for the duration of the HIGH TS ALARM FILTER time.
Range: 0 to 999 minutes
Procedure: Adjust the HIGH TS ALARM FILTER time to the desired value. Note that either the HIGH TS 1 ALARM and/or the HIGH TS 2 ALARM must be enabled in order to adjust the HIGH TS ALARM FILTER time.
Notes:• If an alarm condition appears and then disappears before the alarm filter time has expired,
the filter timer is reset and the alarm condition must exist again for the entire alarm filter time before the corresponding alarm will be indicated.
• If the user resets an alarm while the alarm condition is still exists, the alarm will not be indi-cated again until the entire alarm filter time has expired.
• The HIGH TS ALARM FILTER time setting does not affect the cutout time when the HIGH LIMIT CUTOUT feature is enabled.
3.7.9 LATCH TEMPERATURE SENSOR ALARMS SETTINGPurpose: This allows for the selection of automatic clearing of all HIGH and LOW TS ALARMS (non-latching) when a temperature alarm condition no longer exists or permanent alarming of such a condition (latching) until the alarm is manually reset.
Setting: YES (LATCHING) or NO (NONLATCHING)
Procedure: Adjust the LATCH TS ALARMS setting to the desired mode (latching or nonlatching).
Notes: • If your application is subject to periodic situations where cold or hot product is part of the
process, it may be appropriate to configure the HTC for nonlatching temperature alarms to avoid nuisance alarms. If it is important to be aware of any temperature alarm conditions that may have existed in a pipe, the HTC should be configured for latching temperature alarms.
• This setting does not affect the TS FAILURE ALARMS; these are always latching.
3.7.10 CONTROL TEMPERATURE SENSOR FAILURE ALARMPurpose: CONTROL TS FAILURE ALARM indicates a failure of the temperature sensor designated as the control sensor.
One of eleven TS CONTROL MODES may be selected. These modes determine which TS INPUT and/or EXT. INPUT is designated to provide the control temperature. See section 3.5.12 on page 24 for a full description of the temperature sensor control designations.
Alarm Mask: ENABLE or DISABLE
Procedure: Enable or disable the alarming of a failure of the designated control temperature sen-sor as required.
Note: This alarm should always be enabled. If the controller experiences a CONTROL TS FAILURE it will turn the output off or on (as specified by TS FAIL MODE) until this alarm is cleared. If the TS CONTROL MODE uses the EXTERNAL INPUT, a CONTROL TS FAILURE is self-clearing (i.e., is non-latching).
3.8 Other Alarms
This Section defines the nontemperature-related alarming functions of the 920 controller: cur-rent, ground fault, voltage and resistance. These parameters must be set up individually for both Point A and Point B.

35
3.8.1 LOW LOAD CURRENT ALARMPurpose: Alarms current levels that are lower than a preset limit for the application. Monitoring for lower-than-expected current levels may be an effective means of continuity monitoring. See also HIGH RESISTANCE ALARM in section 3.8.14 on page 39.
Alarm Mask: ENABLE or DISABLE
Range:0.3 to 100.0 amps (CURRENT TURNS RATIO = 1.00)
Procedure: Adjust the LOW CURRENT ALARM level to the desired value. Note that the LOW CUR-RENT ALARM must be enabled in order to adjust the LOW CURRENT ALARM level. Also note that the LOW CURRENT ALARM level is affected by the CURRENT TURNS RATIO setting. The absolute maximum adjusted LOW CURRENT ALARM level is 300.0 amps. The absolute minimum adjusted LOW CURRENT ALARM level is 0.1 amps. See section 3.5.22 on page 26 for more information regarding the CURRENT TURNS RATIO function.
Notes (V3.00 only):• To minimize nuisance LOW CURRENT ALARMS, the HTC must detect a current level less than
the LOW CURRENT ALARM setpoint for a period longer than approximately 20 consecutive sec-onds.
• For series-type heating cables, adjusting the LOW CURRENT ALARM to 50% of full load current will properly alarm a problem and reduce nuisance alarms due to voltage dips. Parallel heaters should be adjusted to a level as close as possible to full load current but lower than the current at worst-case voltage. The low current setting as a percentage of full load current will vary depending on the facility and its power system.
• A LOW CURRENT ALARM may also result from a switch failed open. The controller cannot detect a switch failure due to no current. A no current condition would be identified by a LOW CURRENT ALARM (if enabled) and the analog value reported with the alarm will be 0.0 A.
• It may be advantageous to consider using the HIGH RESISTANCE ALARM to indicate a cable fault when using certain types of heaters. See sections 3.8.12 on page 38 and 3.8.14 on page 39 for an explanation of the resistance alarming feature.
3.8.2 LOW LOAD CURRENT ALARM FILTER TIME SETTING (V3.11 AND UP)Purpose: The LOW CURRENT ALARM FILTER will prevent LOW LOAD CURRENT ALARMS from being indicated until a low current condition has existed for the duration of the LOW CURRENT ALARM FILTER time.
Range: 0 to 12 seconds
Procedure: Adjust the LOW CURRENT ALARM FILTER time to the desired value. Note that the LOW CURRENT ALARM must be enabled in order to adjust the LOW CURRENT ALARM FILTER time.
Notes:• If an alarm condition appears and then disappears before the alarm filter time has expired,
the filter timer is reset and the alarm condition must exist again for the entire alarm filter time before the corresponding alarm will be indicated.
• If the user resets an alarm while the alarm condition is still exists, the alarm will not be indi-cated again until the entire alarm filter time has expired.
3.8.3 HIGH LOAD CURRENT ALARMPurpose: Alarms current levels that are higher than a preset limit for the application.
Alarm Mask: ENABLE or DISABLE
Range: 0.3 to 100.0 amps (CURRENT TURNS RATIO = 1.00)
Procedure: Adjust the HIGH CURRENT ALARM level to the desired value. Note that the HIGH CUR-RENT ALARM must be enabled in order to adjust the HIGH CURRENT ALARM level. Also note that the HIGH CURRENT ALARM level is affected by the CURRENT TURNS RATIO setting. The absolute maximum adjusted HIGH CURRENT ALARM level is 300.0 amps. The absolute minimum adjusted
36
HIGH CURRENT ALARM level is 0.1 amps. See section 3.5.22 on page 26 for more information regarding the CURRENT TURNS RATIO function.
Note: As the HTC automatically protects itself from overload, it would not normally be necessary to enable this alarm. This automatic protection can be used effectively to guard against acciden-tal paralleling of heating circuits. In-rush or cold start currents typically associated with self- regulating cables may cause nuisance HIGH CURRENT ALARMS. If this is undesirable the alarm should be disabled.
3.8.4 HIGH LOAD CURRENT ALARM FILTER TIME SETTING (V3.11 AND UP)Purpose: The HIGH CURRENT ALARM FILTER will prevent HIGH LOAD CURRENT ALARMS from being indicated until a high current condition has existed for the duration of the HIGH CURRENT ALARM FILTER time.
Range: 0 to 12 seconds
Procedure: Adjust the HIGH CURRENT ALARM FILTER time to the desired value. Note that the HIGH CURRENT ALARM must be enabled in order to adjust the HIGH CURRENT ALARM FILTER time.
Notes:• If an alarm condition appears and then disappears before the alarm filter time has expired,
the filter timer is reset and the alarm condition must exist again for the entire alarm filter time before the corresponding alarm will be indicated.
• If the user resets an alarm while the alarm condition is still exists, the alarm will not be indi-cated again until the entire alarm filter time has expired.
3.8.5 HIGH GROUND-FAULT CURRENT ALARM
Purpose: Alarms ground-fault current levels which are higher than a preset limit for the application.
Alarm Mask: ENABLE or DISABLE
Range: 20 to 250 mAmps
Procedure: Adjust the HIGH GFI ALARM level to the desired value. Note that the HIGH GFI ALARM must be enabled in order to adjust the HIGH GFI level.
3.8.6 HIGH GROUND-FAULT CURRENT ALARM FILTER TIME SETTING (V3.11 AND UP)Purpose: The HIGH GFI ALARM FILTER will prevent HIGH GFI ALARMS from being indicated until a high GFI condition has existed for the duration of the HIGH GFI ALARM FILTER time.
Range: 0 to 12 seconds
Procedure: Adjust the HIGH GFI ALARM FILTER time to the desired value. Note that the HIGH GFI ALARM must be enabled in order to adjust the HIGH GFI ALARM FILTER time.
Notes:• If an alarm condition appears and then disappears before the alarm filter time has expired,
the filter timer is reset and the alarm condition must exist again for the entire alarm filter time before the corresponding alarm will be indicated.
• If the user resets an alarm while the alarm condition is still exists, the alarm will not be indi-cated again until the entire alarm filter time has expired.
3.8.7 GROUND-FAULT TRIP ALARMPurpose: This value sets the upper limit of allowable ground-fault leakage current. Exceeding this limit will result in the output switch being latched off and the GFI TRIP ALARM activated to indicate a ground fault condition.
Alarm Mask: ENABLE or DISABLE
Range: 20 to 250 mAmps
Procedure: If ground-fault tripping is desired, enable the GFI TRIP ALARM and adjust the GF TRIP CURRENT to the desired value. To disable ground-fault tripping, disable the alarm. Note that the GFI TRIP ALARM must be enabled in order to adjust the G.F. TRIP CURRENT level.

37
Caution: In order to implement a ground-fault trip function, all nongrounded power conductors must be opened upon detection of a ground-fault condition.
Note: National Electrical Codes require that all legs of non-neutral based power sources be opened upon detection of a ground fault. Multipole switch configurations should be used on non-neutral based power systems. Check the requirements with your local electrical authority.
3.8.8 LOW VOLTAGE ALARMPurpose: Alarms voltage levels that are lower than a preset limit for the application.
Alarm Mask: ENABLE or DISABLE
Range: 10 to 330 volts (VOLTAGE TURNS RATIO = 1.00)
Procedure: Adjust the LOW VOLTAGE ALARM level to the desired value. The LOW VOLTAGE ALARM must be enabled to adjust the LOW VOLTAGE ALARM level. Also, the LOW VOLTAGE ALARM level is affected by the VOLTAGE TURNS RATIO setting. The absolute maximum adjusted LOW VOLTAGE ALARM level is 1000 volts. The absolute minimum adjusted LOW VOLTAGE ALARM level is 1 volt. See section 3.5.21 on page 26 for more information regarding the VOLTAGE TURNS RATIO.
Notes:• The LOW VOLTAGE ALARM is only available if VOLTAGE SOURCE is set to the Point being used.• The LOW VOLTAGE ALARM should always be enabled. Since the HTC may be powered from
either of two switch interface modules (assuming a dual-point installation), the loss of power on one circuit will not necessarily be indicated at the alarm output or as a communications failure.
3.8.9 LOW VOLTAGE ALARM FILTER TIME SETTING (V3.11 AND UP)Purpose: The LOW VOLTAGE ALARM FILTER will prevent LOW VOLTAGE ALARMS from being indi-cated until a low voltage condition has existed for the duration of the LOW VOLTAGE ALARM FILTER time.
Range: 0 to 12 seconds
Procedure: Adjust the LOW VOLTAGE ALARM FILTER time to the desired value. The LOW VOLTAGE ALARM must be enabled to adjust the LOW VOLTAGE ALARM FILTER time. Also, the LOW VOLTAGE ALARM FILTER is only available if VOLTAGE SOURCE is set to the Point being used.
Notes:• If an alarm condition appears and then disappears before the alarm filter time has expired,
the filter timer is reset and the alarm condition must exist again for the entire alarm filter time before the corresponding alarm will be indicated.
• If the user resets an alarm while the alarm condition is still exists, the alarm will not be indi-cated again until the entire alarm filter time has expired.
3.8.10 HIGH VOLTAGE ALARMPurpose: Alarms voltage levels that are higher than a preset limit for the application. Serves as a monitor of the voltage used to power the trace circuit.
Alarm Mask: ENABLE or DISABLE
Range: 10 to 330 volts (VOLTAGE TURNS RATIO = 1.00)
Procedure: Adjust the HIGH VOLTAGE ALARM level to the desired value. The HIGH VOLTAGE ALARM must be enabled in order to adjust the HIGH VOLTAGE ALARM level. Also, the HIGH VOLTAGE ALARM level is affected by the VOLTAGE TURNS RATIO setting. The absolute maximum adjusted HIGH VOLTAGE ALARM level is 1000 volts. The absolute minimum adjusted HIGH VOLTAGE ALARM level is 1 volt. See section 3.5.21 on page 26 for more information regarding the VOLTAGE TURNS RATIO function.
Note: The HIGH VOLTAGE ALARM is only available if VOLTAGE SOURCE is set to the Point being used.

38
3.8.11 HIGH VOLTAGE ALARM FILTER TIME SETTING (V3.11 AND UP)Purpose: The HIGH VOLTAGE ALARM FILTER will prevent HIGH VOLTAGE ALARMS from being indi-cated until a high voltage condition has existed for the duration of the HIGH VOLTAGE ALARM FIL-TER time.
Range: 0 to 12 seconds
Procedure: Adjust the HIGH VOLTAGE ALARM FILTER time to the desired value. The HIGH VOLTAGE ALARM must be enabled to adjust the HIGH VOLTAGE ALARM FILTER time. Also, the HIGH VOLTAGE ALARM FILTER is only available if VOLTAGE SOURCE is set to the Point being used.
Notes:• If an alarm condition appears and then disappears before the alarm filter time has expired,
the filter timer is reset and the alarm condition must exist again for the entire alarm filter time before the corresponding alarm will be indicated.
• If the user resets an alarm while the alarm condition is still exists, the alarm will not be indi-cated again until the entire alarm filter time has expired.
3.8.12 LOW RESISTANCE ALARMPurpose: Alarms heater resistance levels that have decreased from the NOMINAL RESISTANCE setting by more than the selected amount.
Alarm Mask: ENABLE or DISABLE
Range: 1 to 100% (deviation from NOMINAL RESISTANCE)
Procedure: Adjust the LOW RESISTANCE ALARM deviation to the desired value. The LOW RESIS-TANCE ALARM must be enabled in order to adjust the LOW RESISTANCE deviation.
Notes:• This feature is not normally enabled. It can be used effectively to guard against accidental
paralleling of heating circuits. Be careful when using this alarm feature with heating cables that exhibit a variable resistance with temperature. Low resistance alarming may not be prac-tical when the load has an increasing resistance with temperature (such as self-regulating cables).
• Use of the LOW RESISTANCE ALARM assumes that the controller power is derived from the same circuit as the tracing power (either by direct connection or through a step-down trans-former). Disable this alarm if the controller is powered from a separate circuit.
• No LOW RESISTANCE ALARMS will be generated if the measured voltage is below the LOW VOLTAGE ALARM setpoint, regardless of whether the LOW VOLTAGE ALARM is enabled. This stops an alarm from being generated when the circuit power is turned off. If the LOW VOLTAGE ALARM is disabled ensure that the LOW VOLTAGE setpoint is set to a relevant level otherwise no LOW RESISTANCE ALARMS will occur.
• LOW RESISTANCE ALARMS will only be generated if the output switch is on.
3.8.13 LOW RESISTANCE ALARM FILTER TIME SETTING (V3.11 AND UP)Purpose: The LOW RESISTANCE ALARM FILTER will prevent LOW RESISTANCE ALARMS from being indicated until a low resistance condition has existed for the duration of the LOW RESISTANCE ALARM FILTER time.
Range: 0 to 12 seconds
Procedure: Adjust the LOW RESISTANCE ALARM FILTER time to the desired value. The LOW RESISTANCE ALARM must be enabled to adjust the LOW RESISTANCE ALARM FILTER time.
Notes:• If an alarm condition appears and then disappears before the alarm filter time has expired,
the filter timer is reset and the alarm condition must exist again for the entire alarm filter time before the corresponding alarm will be indicated.
• If the user resets an alarm while the alarm condition is still exists, the alarm will not be indi-cated again until the entire alarm filter time has expired.
39
3.8.14 HIGH RESISTANCE ALARMPurpose: Alarms heater resistance levels that have increased from the NOMINAL RESISTANCE set-ting by more than the selected amount. The HIGH RESISTANCE ALARM may be used to indicate an open or a high resistance connection or, when using constant-wattage parallel cables, may indi-cate the failure of one or more heating zones. It may also be used to monitor a failed series-type cable or connection in 3-phase applications while minimizing nuisance alarms created by voltage fluctuations.
Alarm Mask: ENABLE or DISABLE
Range: 1 to 250% (deviation from NOMINAL RESISTANCE)
Procedure: Adjust the HIGH RESISTANCE ALARM level to the desired value. The HIGH RESISTANCE ALARM must be enabled to adjust the HIGH RESISTANCE deviation.
Notes:• Using the LOW CURRENT ALARM feature to ensure that unexpected decreases in current con-
sumption by the heating cable are alarmed is a reliable method of monitoring the integrity of series-type heating cables. When using parallel-type heaters (zoned constant-wattage or self-regulating) or in 3-phase installations, the LOW CURRENT ALARM setting must be chosen as close as possible to the lowest expected current to detect failed zones, cable degradation, or a lost phase. The problem with such a close setting is that it inevitably leads to nuisance alarms, particularly when voltage fluctuations are present. By using the HIGH RESISTANCE ALARM, nuisance alarms due to voltage dips may be minimized.
• Use of the HIGH RESISTANCE ALARM assumes that the controller power is derived from the same circuit as the tracing power (either by direct connection or through a step-down trans-former). Disable this alarm if the controller is powered from a separate circuit.
• Be careful when using this alarm feature with heating cables that exhibit a variable resistance with temperature. High resistance alarming may not be as effective if the load has a decreas-ing resistance with temperature.
• No HIGH RESISTANCE ALARMS will be generated if the measured voltage is below the LOW VOLTAGE ALARM setpoint, regardless of whether the LOW VOLTAGE ALARM is enabled. This stops an alarm from being generated when the circuit power is turned off. If the LOW VOLTAGE ALARM is disabled ensure that the LOW VOLTAGE setpoint is set to a relevant level, otherwise no HIGH RESISTANCE ALARMS will occur.
• HIGH RESISTANCE ALARMS will only be generated if the output switch is on.
3.8.15 HIGH RESISTANCE ALARM FILTER TIME SETTING (V3.11 AND UP)Purpose: The HIGH RESISTANCE ALARM FILTER will prevent HIGH RESISTANCE ALARMS from being indicated until a high resistance condition has existed for the duration of the HIGH RESISTANCE ALARM FILTER time.
Range: 0 to 12 seconds
Procedure: Adjust the HIGH RESISTANCE ALARM FILTER time to the desired value. The HIGH RESIS-TANCE ALARM must be enabled to adjust the HIGH RESISTANCE ALARM FILTER time.
Notes:• If an alarm condition appears and then disappears before the alarm filter time has expired,
the filter timer is reset and the alarm condition must exist again for the entire alarm filter time before the corresponding alarm will be indicated.
• If the user resets an alarm while the alarm condition is still exists, the alarm will not be indi-cated again until the entire alarm filter time has expired.
3.8.16 NOMINAL RESISTANCE SETTINGPurpose: This parameter defines the nominal expected heater resistance. A value must be entered by the user to allow the HIGH and LOW RESISTANCE ALARMS to be used. In installations where the power source may experience periodic fluctuations (surges and/or brown-out condi-tions), alarming on resistance deviation offers an improved method of monitoring tracer integ-rity over simple LOW and HIGH CURRENT ALARMS. Since the ratio of voltage to current is

40
monitored, the HIGH and LOW RESISTANCE ALARMS offer cable monitoring that is relatively immune to voltage fluctuations.
Range: 2.00 to 2000.00 Ω
Procedure: The NOMINAL RESISTANCE value can only be set if either the LOW RESISTANCE and/or the HIGH RESISTANCE ALARMS are enabled. Once the controller and the heating cable have been installed, the following procedure should be used to determine the NOMINAL RESISTANCE setting:• Adjust the CONTROL SETPOINT temperature to turn on the output switch.• Allow the load to come up to design temperature and its power consumption to stabilize. • Using the 920 Operator Console, access the RESISTANCE reading and record its value. Return
the CONTROL SETPOINT temperature to its proper setting.• Enter the recorded resistance value as the NOMINAL RESISTANCE setting.
Note: The setup procedure outlined above may have to be repeated a number of times to arrive at a correct nominal resistance setting. This value will be affected by the heating cable tempera-ture, which in turn is affected by ambient temperature, insulation level, a full or empty pipe or vessel, etc.
3.8.17 OVERCURRENT TRIP ALARM (SSR ONLY)Purpose: The overcurrent trip feature is always enabled when using an SSR output switch and is used to provide protection for the output switch. Enabling this alarm will only inform the user of an excessively high current condition and that the output switch has been latched off. During a high current condition, the controller attempts to soft start a heating cable by a technique involv-ing measured in-rush current and the SWITCH CURRENT RATING. If the controller is unable to start the cable, it will eventually trip its output switch off and will not retry or pulse its output switch again. At this point the OVERCURRENT TRIP ALARM is latched on.
Notes:• The controller is not a safety cutout or an overcurrent protective device as defined by the
National and Canadian Electrical Codes (NEC and CEC). A protective device such as a circuit breaker or fuse must be included as part of a proper design and be selected in accordance with the requirements defined in the National Electrical Code (NEC) and/or the Canadian Elec-trical Code (CEC).
• The controller cannot protect the SSR from short circuits or excessive overcurrent condi-tions. Always ensure that the power is off prior to performing any maintenance or trouble-shooting of the heating circuit. Verify that no damage has occurred to the cable or the controller prior to re-energizing the circuit.
Alarm Mask: ENABLE or DISABLE
Procedure: Adjust the SWITCH CURRENT RATING setting to the actual current rating of the SSR. Enable or disable the alarm as required. Note that the OVERCURRENT TRIP ALARM does not have to be enabled in order to adjust the SWITCH CURRENT RATING setting.
Note: This alarm should be left enabled since an overcurrent trip condition would normally rep-resent a serious problem. This is a factory-set alarm value and disabling the alarm does not dis-able the overcurrent trip function. In some applications the use of self-regulating cables will produce very high in-rush currents during cold startup. These currents may exceed the overcur-rent trip limit and the controller will not be able to soft start the trace circuit. If this condition per-sists, please contact your nearest sales office for recommendations and solutions to this problem.
3.8.18 SWITCH FAILURE ALARMPurpose: The purpose of the SWITCH FAILURE ALARM is to indicate that an output switch failure has occurred. The controller determines that if the output switch is turned off and there is load current present, then the output switch has failed closed and the alarm is latched on.
Alarm Mask: ENABLE or DISABLE
Procedure: Enable or disable the alarming of an output switch that has failed in the closed position.
41
Note: The SWITCH FAILURE ALARM should always be enabled. A high temperature condition as a result of a failed circuit can only be caused if the output switch fails closed. When an output switch fails closed, the controller cannot turn the tracer power off, therefore no protection fea-tures are available (ground-fault trip, power limiting, etc.). If a SWITCH FAILURE ALARM is detected, the unit should be serviced immediately.
3.8.19 HTC RESET ALARMPurpose: The HTC RESET ALARM is used to indicate:1. Power to the HTC has been interrupted and subsequently restored.2. A transient has caused the HTC’s microprocessor to restart.3. An internal condition has caused the HTC’s microprocessor to restart its program.
Alarm Mask: ENABLE or DISABLE
Procedure: Enable or disable alarming on reset as desired.
Note: Normally the HTC RESET ALARM is left disabled since powering the controller off and on for maintenance or troubleshooting would require the user to reset this alarm every time. If the par-ticular installation includes a Model 780/GCC-9000, this alarm may be left enabled since resets are not considered normal occurrences and the Model 780/GCC-9000 provides the capability to easily log and reset alarms such as these. The difference in time between when a COMMUNICA-TIONS FAIL ALARM and an HTC RESET ALARM are logged provide an indication of how long the cir-cuit has been “OFF.”
3.8.20 CIRCUIT BREAKER LIMITING STATUS (SSR ONLY)Purpose: The circuit breaker limiting feature is always enabled when using an SSR output switch and is intended to prevent the circuit breaker immediately upstream of the controller from trip-ping during a temporary overcurrent condition. Enabling this alarm will only inform the user that circuit breaker limiting is currently active.
Alarm Mask: ENABLE or DISABLE
Procedure: Adjust the CIRCUIT BREAKER CURRENT RATING setting to the heating circuit breaker size (i.e. 15.0 or 20.0 amps). Enable or disable the alarm as required. The CIRCUIT BREAKER LIMITING ALARM need not be enabled in order to adjust the CIRCUIT BREAKER CURRENT RATING setting.
Notes:• This is a non-latching alarm.• This alarm is advisory. If the measured current exceeds the level that would cause the
upstream circuit breaker to release, the HTC will begin to switch the SSR ON and OFF rapidly to limit the average current to an acceptable level.
3.8.21 POWER-LIMITING STATUS (SSR ONLY)Purpose: The power-limiting feature is always enabled when using an SSR output switch and is intended to limit the average amount of power that is applied to the trace circuit. The controller measures the voltage and current of the trace circuit and will vary its output switch to limit the amount of power applied to the trace to the value set by the MAXIMUM POWER setting. Enabling this alarm will only inform the user that power limiting is currently active.
Alarm Mask: ENABLE or DISABLE
Procedure: Adjust the MAXIMUM POWER setting to the desired value. Enable or disable the alarm as required. The POWER LIMITING ALARM need not be enabled to adjust the MAXIMUM POWER set-ting.
Notes:• This is a non-latching alarm.• This alarm is advisory and is normally disabled. It will be active if the MAXIMUM POWER set-
ting is set below the power output level required for temperature maintenance. In other words, if the circuit demands the maximum power allowed and the alarm is enabled, then

42
this alarm will be indicated and the output switch will pulse ON and OFF to limit the average power output to a value approximately equal to the MAXIMUM POWER setting
3.8.22 SWITCH LIMITING STATUS (SSR ONLY)Purpose: The switch limiting feature is always enabled when using an SSR output switch and provides protection for the output switch. Enabling this alarm will only inform the user that switch limiting is currently active and an excessively high current condition is present. The con-troller pulses its output switch for a small number of cycles and reads the resulting current. If the measured current exceeds the SWITCH RATING setting, the duty cycle of its output switch will be varied so that an average current not exceeding the SWITCH RATING setting is maintained.
Alarm Mask: ENABLE or DISABLE
Procedure: Adjust the SWITCH CURRENT RATING setting to the actual current rating of the SSR. Enable or disable the alarm as required. The SWITCH LIMITING ALARM need not be enabled to adjust the SWITCH CURRENT rating setting.
Notes: • This is a non-latching alarm.• This alarm is normally enabled. Currents in this range cannot be considered normal and
should be investigated.
3.8.23 CONTACTOR COUNT ALARM (V3.11 AND UP)Purpose: Generates an alarm if the number of off-to-on transitions of a contactor reaches or exceeds the CONTACTOR COUNT ALARM setting. This serves as a method to perform preventative maintenance on the contactor before a failure is likely to occur.
Alarm Mask: ENABLE or DISABLE
Range: 0 to 999999 off-to-on transitions
Procedure: Adjust the CONTACTOR ALARM setting to the desired value. The CONTACTOR ALARM must be enabled to adjust the CONTACTOR ALARM setting.
Note: The CONTACTOR ALARM is only available if the SWITCH CONTROL MODE is set to either DEAD-BAND or PROPORTIONAL AMBIENT CONTACTOR.
3.8.24 EEROM DATA FAILURE ALARMPurpose: The EEROM DATA FAILURE ALARM indicates that the controller has detected a failure in its nonvolatile memory.
Alarm Mask: ENABLE or DISABLE
Procedure: Enable or disable alarming of a nonvolatile memory failure as desired.
Note: The EEROM DATA FAILURE ALARM should always be enabled. This memory stores all of the controller’s configuration and calibration settings and the alarm will only be generated if the microprocessor cannot bypass the failed area of its memory. This indicates an internal problem, and the control module should be replaced and returned to Tyco Thermal Controls for repair.
3.9 Communications Setup
The following section describes the setup parameters that relate to the way the controller com-municates with another device. If the optional communications interface is not installed in the 920 control module, these parameters need not be configured. All these parameters are com-mon for both of the two control points—Point A and Point B, except the HTCBUS™ ADDRESS, MODBUS™ ADDRESS, and MODBUS™ SUB ADDRESS settings, as applicable.
3.9.1 PROTOCOLPurpose: Defines the communications language used by the controller to communicate with other devices.

43
Setting: HTCBUS or MODBUS ASCII (V3.11+) or MODBUS RTU (V3.11+)
Procedure: Select the HTCBUS™ protocol when communicating with existing Tyco Thermal Con-trols Heat Trace Control products, including the Model 780/GCC-9000 Group Communications Controller.
If you are communicating directly with the controller using a different device, select the MODBUS protocol. For a detailed description of the controller’s MODBUS mapping, please refer to the sep-arate DigiTrace 920 Series Heat Trace Controller—Modbus Protocol Interface Mapping docu-ment (Tyco Thermal Controls reference H57366 ).
3.9.2 HTCBUS™ ADDRESSPurpose: Defines the communications address to be used by the controller when using the HTC-BUS™ protocol to communicate with a Model 780/GCC-9000. When in the Point A configuration menu, this sets the Point A HTCBUS™ ADDRESS; when in the Point B configuration menu, this sets the Point B HTCBUS™ ADDRESS. Either may be set independently of the other.
Range: 1 to 16,777,215
Procedure: Set the communications address as desired. This must be an address unique to the entire communications network to avoid messaging conflicts. The HTCBUS™ protocol must be selected in order to set the HTCBUS™ ADDRESS.
Note: A unique HTCBUS™ communications address is always assigned by Tyco Thermal Controls and identified by the label on the front of the 920 control module (see Figure 3.1). Use the preas-signed address whenever possible to minimize the chances of an address being duplicated in the user’s system.
3.9.3 MODBUS ADDRESS (V3.11 AND UP)Purpose: The MODBUS™ ADDRESS, along with the MODBUS™ SUB ADDRESS, defines the commu-nications address to be used by the controller when using either MODBUS™ protocol to commu-nicate with a MODBUS™ compatible device. When in the Point A configuration menu, this sets the Point A MODBUS™ ADDRESS; when in the Point B configuration menu, this sets the Point B MOD-BUS™ ADDRESS. Either may be set independently of the other.
Range: 1 to 247
Procedure: Set the communications address as desired. Together with the MODBUS™ SUB ADDRESS, this combination must be unique to the entire communications network to avoid mes-saging conflicts. Either MODBUS™ protocol must be selected in order to set the MODBUS™ ADDRESS.
3.9.4 MODBUS SUB ADDRESS (V3.11 AND UP)Purpose: The MODBUS™ SUB ADDRESS, along with the MODBUS™ ADDRESS, defines the commu-nications address to be used by the controller when using either MODBUS™ protocol to commu-nicate with a MODBUS™ compatible device. When in the Point A configuration menu, this sets the Point A MODBUS™ SUB ADDRESS; when in the Point B configuration menu, this sets the Point B MODBUS™ SUB ADDRESS. Either may be set independently of the other.
Range: 0 to 31
Procedure: Set the communications sub address as desired. Together with the MODBUS™ ADDRESS, this combination must be unique to the entire communications network to avoid mes-saging conflicts. Either MODBUS™ protocol must be selected in order to set the MODBUS™ SUB ADDRESS.
Note: Since a 920 HTC does not use all 65,535 data addresses available for each MODBUS™ ADDRESS, this data address range is subdivided to allow up to 32 HTCs to share the same MOD-BUS™ ADDRESS. This increases the number of HTCs allowed on a single MODBUS™ port from 247 to 7,904 (=247 x 32). This requires that any HTC sharing the same MODBUS™ ADDRESS as another HTC must have its own unique MODBUS™ SUB ADDRESS.

44
3.9.5 BAUD RATEPurpose: Defines the data rate at which communications occur.
Setting: AUTO or 9600 or 4800 or 2400 or 1200 or 600 or 300
Procedure: Select the data rate to be compatible with other devices that will be connected to the controller for communications purposes.
Note: Not all communications interfaces support the various data rates, so the data rate should be set to AUTO. The controller will automatically select a BAUD RATE that is compatible with the communications interface installed. If BAUD RATE = AUTO and a MODEM communication interface is used, a data rate of 300 is selected. Otherwise, if BAUD RATE = AUTO and a non-MODEM com-munications interface is used, a data rate of 9600 is used.
3.9.6 PARITY (MODBUS™) (V3.11 AND UP)Purpose: Defines the type of parity bit used with MODBUS™ communications.
Setting: NONE or ODD or EVEN
Procedure: Select the desired type of parity. Note that PARITY can only be selected when using either MODBUS™ protocol.
3.9.7 HARDWAREPurpose: Identifies the type of communications interface installed in the 920 control module. The controller automatically determines and displays which communications interface type is available.
Values: NONE, MODEM or RS-232 or RS-485
3.9.8 DRIVERPurpose: Defines the way the controller’s program communicates with the communications interface.
Setting: AUTO or RS-232 or RS-485 or MODEM
Procedure: Select AUTO to enable the controller to choose the setting that matches the commu-nications interface installed.
3.9.9 PROFILEPurpose: Defines the way the controller’s program supports communications handshaking and communication interface signals.
Setting: AUTO or FLOW CONTROL RS-232 orSTANDARD RS-232 or3-WIRE RS-232 orRS-485 orEXTERNAL MODEM or1200 BAUD MODEM or300 BAUD MODEM
Procedure: Select the PROFILE to be compatible with other devices connected to the controller for communications purposes. The setting should be AUTO. The controller will automatically select a profile based on the type of communications interface installed in the 920 control mod-ule.
Notes:• AUTO: Selects a communications profile based on the data rate and the type of communica-
tions interface installed in the control module.• FLOW CONTROL RS-232: Continuously asserts RTS (Request To Send), CTS (Clear To Send) is
required to enable any data transmitted, uses DCD (Data Carrier Detect) to qualify receive data.

45
• STANDARD RS-232: Continuously asserts RTS, CTS is required to initiate a transmit sequence, but is ignored once transmitting has begun, uses DCD to qualify receive data. This is the pro-file used when PROFILE = AUTO and an RS-232 communication interface is used with 920 V3.00.
• 3-WIRE RS-232: Continuously asserts RTS, CTS and DCD are ignored. This is the profile used when PROFILE = AUTO and an RS-232 communication interface is used with 920 V3.11+.
• RS-485: Uses RTS and the Tx Delay timer, CTS and DCD are ignored. This is the profile used when PROFILE = AUTO and an RS-485 communication interface is used.
• EXTERNAL MODEM: Uses RTS and the Tx Delay timer, ignores CTS, uses DCD to qualify each receive data character and to sense an idle channel condition.
• 1200 BAUD MODEM: Uses RTS with a fixed 10 msec Tx Delay time, ignores CTS, uses DCD to qualify each receive data character. This is the profile used when PROFILE = AUTO, BAUD RATE = 1200 and a MODEM communication interface is used.
• 300 BAUD MODEM: Uses RTS with a fixed 30 msec Tx Delay time, ignores CTS, uses DCD to qualify each receive data character. This is the profile used when PROFILE = AUTO, BAUD RATE ≠ 1200 and a MODEM communication interface is used.
3.9.10 TX DELAYPurpose: Allows a programmable delay between the receipt of a communications message and the controller’s reply. In some applications, it may be necessary to delay the controller’s response to an inquiry for a short period of time to allow external devices to start up, stabilize, and/or synchronize.
Range: 0.00 to 2.50 seconds
Procedure: Set the amount of delay between the receipt of a message and the controller’s response as required.
Note: This selectable TX DELAY is only used if the PROFILE is set to either RS-485 or AUTO and an RS-485 interface is installed.
3.10 Operator Console Functions
The following features are part of the controller’s programming, but are only used in conjunction with the optional 920 Operator Console. For a detailed description of each of the console fea-tures and operating instructions, refer to the separate document DigiTrace 920 Series HTC Oper-ator Console—Installation and Operating Instructions (Tyco Thermal Controls reference H56903) for the particular version of controller firmware that you are using.
3.10.1 PASSCODEPurpose: The four-digit PASSCODE feature prevents unauthorized users from modifying the con-troller’s configuration parameters via a 920 Operator Console.
Range: 0000 to 9999
Procedure: Enter the desired PASSCODE (in the “Common Setup” sub-menu) using the optional 920 Operator Console keypad. A PASSCODE of 0000 disables the lockout feature and allows all configuration parameters to be modified using the 920 Operator Console without requiring a PASSCODE. Setting the PASSCODE to any other value will require the database to be unlocked, by entering the correct PASSCODE, prior to modifying any of the controller’s configuration parame-ters using the optional 920 Operator Console.
Note: The PASSCODE can only be edited if it is set to 0 or the database has been unlocked by entering the proper PASSCODE.
3.10.2 LOCK DATABASEPurpose: If the PASSCODE has been enabled (PASSCODE is not set to 0) and the user has unlocked console modification access to the controller’s configuration parameters, the LOCK DATABASE feature allows the user to re-lock this modification access once programming has been completed.

46
Procedure: Select the LOCK DATABASE function (at the end of the “Configuration Mode Main Menu”) to lock out 920 Operator Console configuration modification access. The display will confirm the operation by displaying a “DATABASE LOCKED” message.
Note: 920 Operator Console configuration modification access will automatically re-lock after approximately 5 minutes of keypad inactivity.
3.10.3 UNLOCK DATABASEPurpose: If a PASSCODE has been enabled (PASSCODE is not set to 0) and the user wants to mod-ify any of the controller’s configuration parameters using a 920 Operator Console, the database must first be unlocked.
Procedure: Try modifying any configuration parameter, or select the UNLOCK DATABASE function (at the end of the “Configuration Mode Main Menu” for V3.11 and up), and a prompt for the PASSCODE will appear. If the correct PASSCODE is entered, the display will confirm the operation by displaying a DATABASE UNLOCKED message.
3.10.4 TEST TRACINGPurpose: The TEST TRACING feature provides an easy method of temporarily overriding the tem-perature control, without having to modify the CONTROL SETPOINT temperature or any other con-figuration parameter.
Procedure: Select the TEST TRACING function to force the output switch on for approximately 30 seconds. After the test time has expired, the unit will automatically revert to normal operation.
Notes: • This feature only overrides temperature control; it does not override other control parameters
such as power limiting.• This feature is inhibited if the point is in load-shedding mode.
3.10.5 DISPLAY TEST (V3.11 AND UP)Purpose: The DISPLAY TEST feature provides an easy method of illuminating each display seg-ment and all the LEDs of the 920 Operator Console to ensure that they are functioning properly.
Procedure: Select the DISPLAY TEST and watch the 920 console to verify that each display seg-ment and each LED is illuminated during the test sequence.
Note: Pressing any key on the 920 Operator Console keypad during the DISPLAY TEST causes the DISPLAY TEST to abort.
3.11 Copy Configuration Functions (V3.11 and up)
The following functions provide a quick method of setting all of the controller’s configuration parameters to a predefined state.
3.11.1 COPY DEFAULTS TO COMMON (V3.11 AND UP)Purpose: Loads Tyco Thermal Controls’ default configuration parameters that are common to both Point A and Point B as defined in Appendix F.
Procedure: Enter the “Copy Configuration Sub-Menu” and select DEFAULTS TO COMMON.
Notes:• This function overwrites the communication configuration parameters, which could affect
existing communications to the controller.• This function causes the OVERRIDE SOURCE for each point to be set to REMOTE. This is
because the EXTERNAL INPUT setting is set to NOT USED.
3.11.2 COPY DEFAULTS TO POINT A (V3.11 AND UP)Purpose: Loads the point-specific Tyco Thermal Controls default configuration parameters, as defined in Appendix F, for Point A. As well, all of Point A’s maintenance data are reset. All load-

47
shedding parameters (including fail-safe) are configured with default values. The CONSOLE SET-POINT MAXIMUM and MINIMUM are also configured with default values.
Procedure: Enter the “Copy Configuration Sub-Menu” and select DEFAULTS TO A.
3.11.3 COPY DEFAULTS TO POINT B (V3.11 AND UP)Purpose: Loads the point-specific Tyco Thermal Controls default configuration parameters, as defined in Appendix F, for Point B. As well, all of Point B’s maintenance data are reset. All load-shedding parameters (including fail safe) are configured with default values. The CONSOLE SET-POINT MAXIMUM and MINIMUM are also configured with default values.
Procedure: Enter the “Copy Configuration Sub-Menu” and select DEFAULTS TO B.
3.11.4 COPY POINT A TO POINT B (V3.11 AND UP)Purpose: Copies the point-specific configuration parameters of Point A to Point B. Point A’s con-figuration parameters are not changed.
Procedure: Enter the “Copy Configuration Sub-Menu” and select A TO B.
Notes:• To ensure that the TAGs for both points are not the same, Point A’s TAG is copied, the last
character incremented by one, and then written to Point B’s TAG.• None of the communications addresses or the maintenance data values are copied.
3.11.5 COPY POINT B TO POINT A (V3.11 AND UP)Purpose: Copies the point-specific configuration parameters of Point B to Point A. Point B’s con-figuration parameters are not changed.
Procedure: Enter the “Copy Configuration Sub-Menu” and select B TO A.
Notes:• To ensure that the TAGs for both points are not the same, Point B’s TAG is copied, the last
character incremented by one, and then written to Point A’s TAG.• None of the communications addresses or the maintenance data values are copied.
Section 4 Monitored Parameters
4.1 Introduction
The following is a brief summary of each of the measured and calculated parameters the 920 series control module provides to the user. Detailed information regarding settings, alarms lim-its, etc. may be found in Section 3 on page 18. For detailed information regarding the display of these variables using the 920 operator console or the Model 780/GCC-9000, refer to the appro-priate user manuals.
4.2 Analog Readings
4.2.1 CONTROL TEMPERATUREPurpose: This is the temperature the controller uses to determine whether its output switch should be on or off. Depending on the TS CONTROL MODE setting, whether one or two RTDs are installed, and TEMPBUS™ is being used, the CONTROL TEMPERATURE may be derived from TS 1, TS 2, TEMPBUS™ or a combination of the three temperatures. See section 3.5.12 on page 24 of this manual for further details regarding the TS CONTROL MODE settings.
4.2.2 TS 1 TEMPERATUREPurpose: This temperature is the value the controller reads from the RTD connected to its TS 1 input. Depending on the TS CONTROL MODE, it may be used to determine the CONTROL TEMPERA-TURE (see section 4.2.1 on page 47).

48
Note (V3.11 and up): If the TS 1 input is not being used by the controller, the TS 1 TEMPERATURE is not displayed.
Note: Changing the TS Type will affect the temperature reading.
4.2.3 TS 2 TEMPERATUREPurpose: This temperature is the value that the controller is reading from the RTD connected to its TS 2 input. Depending on the TS CONTROL MODE, it may be used to determine the CONTROL TEMPERATURE (see section 4.2.1 on page 47).
Note (V3.11 and up): If the TS 2 input is not being used by the controller, the TS 2 TEMPERATURE is not displayed.
Note: Changing the TS Type will affect the temperature reading.
4.2.4 LOAD CURRENTPurpose: The LOAD CURRENT reading indicates the average current being drawn by the heating cable.
Note: The controller calculates the LOAD CURRENT using the current sensed by the switch inter-face module multiplied by the CURRENT TURNS RATIO to yield an adjusted current value.
4.2.5 RESISTANCEPurpose: Resistance is calculated using the average adjusted voltage reading divided by the average adjusted current reading to yield a load resistance in ohms. If the controller’s output switch is on but no current is present, the RESISTANCE will read “open circuit.”
Note: If the controller’s output switch is off, the RESISTANCE will display the last resistance which was calculated while the output switch was on.
4.2.6 GROUND FAULT CURRENTPurpose: If the controller detects any leakage current in the output circuit, it will indicate the level in milliamps.
Note: To minimize nuisance alarms, the controller will not report a leakage current of less than 20 mAmps.
4.2.7 VOLTAGEPurpose: The voltage reading indicates the average circuit voltage being measured by the switch interface.
Note: The controller calculates this parameter using the voltage sensed by the switch interface module and multiplying it by the VOLTAGE TURNS RATIO to yield an adjusted voltage value.
4.2.8 POWERPurpose: Load power provides an indication of the average power being consumed by the heat trace cable or the total 3-phase power being consumed by a balanced 3-phase star (“Y”) con-nected load.
Notes: • The controller calculates load power by multiplying the average adjusted voltage reading by
the average adjusted current reading. • The controller may be set up to calculate total 3-phase power for a balanced star (“Y”) con-
nected load if the 3-PHASE POWER CALCULATION parameter is enabled. In this case, total 3-phase power is calculated using the following equation:
Ptotal = √3 x Iphase x Vline-line
Where Iphase = the adjusted phase current being measured, and Vline-line = the adjusted voltage reading being measured. The VOLTAGE and CURRENT TURNS RATIOS affect both calculations.

49
4.3 Maintenance Data
4.3.1 MAX / MIN TEMPERATURE VALUESMAX CONTROL TEMPMIN CONTROL TEMPTS 1 MAX TEMPTS 1 MIN TEMPTS 2 MAX TEMPTS 2 MIN TEMP
Purpose: This feature indicates the maximum and minimum temperatures ever recorded by the HTC since the last time the values were reset. It may be useful to log the maximum/minimum temperatures ever experienced on a particular trace circuit for the purposes of troubleshooting or gathering data for future design criteria. The temperature values are written to the controller’s nonvolatile memory once every 24 hours or whenever any maintenance data is reset by the user. maximum/minimum temperatures are recorded for TS 1, TS 2 and the CONTROL TS.
Range: Can only be reset (cleared) by the operator.
Procedure: The maximum/minimum temperatures can be reset using the optional 920 Operator Console (V3.11+) or a communicating device. Resetting any one of the temperatures will reset all of them.
4.3.2 POWER ACCUMULATORPurpose: This feature indicates the total power consumption of the trace circuit since the last time the POWER ACCUMULATOR was reset. It may be useful to log the amount of power con-sumed on a particular trace circuit for the purposes of energy management or gathering data for future design criteria. The value of this accumulator is written to the controller’s nonvolatile memory once every 24 hours or whenever any maintenance data is reset by the user.
Procedure: The POWER ACCUMULATOR may be reset to zero using the optional 920 Operator Console (V3.11+) or a communicating device.
Note: The POWER ACCUMULATOR value will roll over to zero when the upper limit of the POWER ACCUMULATOR has been exceeded. This upper limit is 429,496,729.5 kW-hours for V3.00, and 214,748,364.7 kW-hours for V3.11 and up.
4.3.3 CONTACTOR CYCLE COUNTER (V3.11 AND UP)Purpose: This feature indicates the total number of off-to-on transitions a contactor has com-pleted since the last time the CONTACTOR CYCLE COUNTER was reset. This serves as a method to do preventative maintenance on the contactor according to the manufacturer’s specifications. The count value is written to the controller’s nonvolatile memory once every 24 hours or when-ever any maintenance data is reset by the user.
Procedure: The CONTACTOR CYCLE COUNTER may be reset to zero using the optional 920 Opera-tor Console or a communicating device.
Notes:• Once the CONTACTOR CYCLE COUNTER reaches 999,999,999 it stops counting. • The CONTACTOR CYCLE COUNTER is only indicated if the SWITCH CONTROL MODE is set to either
DEADBAND or PROPORTIONAL AMBIENT CONTACTOR.
4.3.4 TIME IN USEPurpose: The purpose of this feature is to indicate the total hours of controller use since its ini-tial operation. It may be useful to log the amount of time a controller has been in service for the purposes of maintenance planning or reliability testing. The value of this accumulator is written to the controller’s nonvolatile memory once every 24 hours or whenever any maintenance data is reset by the user.
Procedure: The IN USE hours accumulator can be reset to zero using the optional 920 Operator Console (V3.11+) or a communicating device.
50
Note: The IN USE hours accumulator value will roll over to zero when the upper limit of the accu-mulator has been exceeded. This limit is 4,294,967,295 hours for V3.00, and 999,999,999 hours for V3.11 and up.
4.3.5 TIME SINCE LAST RESETPurpose: This feature indicates the total hours of controller use since the last reset. It may be useful to log the amount of time a particular controller has been in service since the last time the controller’s power was cycled for troubleshooting purposes.
Procedure: The TIME SINCE LAST RESET hours accumulator can only be reset by cycling the con-troller’s power.
Note: The TIME SINCE LAST RESET will roll over to zero when the upper limit of 65,535 hours has been exceeded.
4.3.6 PEAK LOAD CURRENT (V3.11 AND UP)Note: The PEAK LOAD CURRENT is not displayed on the optional 920 Operator Console.
Purpose: This feature indicates the highest instantaneous load current measured since the last time the PEAK LOAD CURRENT was reset. This value is written to the controller’s nonvolatile mem-ory once every 24 hours or whenever any maintenance data is reset by the user.
Procedure: The PEAK LOAD CURRENT may only be reset to zero using a communicating device.
4.3.7 PEAK GROUND-FAULT CURRENT (V3.11 AND UP)Note: The PEAK GROUND-FAULT CURRENT is not displayed on the optional 920 Operator Console.
Purpose: This feature indicates the highest instantaneous ground-fault current measured since the last time the PEAK GROUND-FAULT CURRENT was reset. This current value is written to the controller’s nonvolatile memory once every 24 hours or whenever any maintenance data is reset by the user.
Procedure: The PEAK LOAD CURRENT may only be reset to zero using a communicating device.
4.3.8 EXTERNAL INPUT STATUS (V3.11 AND UP)Note: The EXTERNAL INPUT STATUS is not displayed on the optional 920 Operator Console.
Purpose: This feature indicates the actual status of the external input regardless of the control-ler’s configuration. This can assist the operator who wishes to use the controller’s external input to monitor the status of an external dry contact and pass this on to another device.
Procedure: The EXTERNAL INPUT STATUS may only be viewed using a MODBUS™-capable soft-ware package.
Section 5 Control Modes
5.1 Introduction
There are several types of control modes in the controller. Some of these modes require further explanation in order to fully understand and implement their operation. This section describes the control modes available in the HTC and how to set their associated parameters.
5.2 Switch Control Modes
There are four SWITCH CONTROL modes associated with the HTC. The following is an explanation of their implementation in the controller and the differences between them.
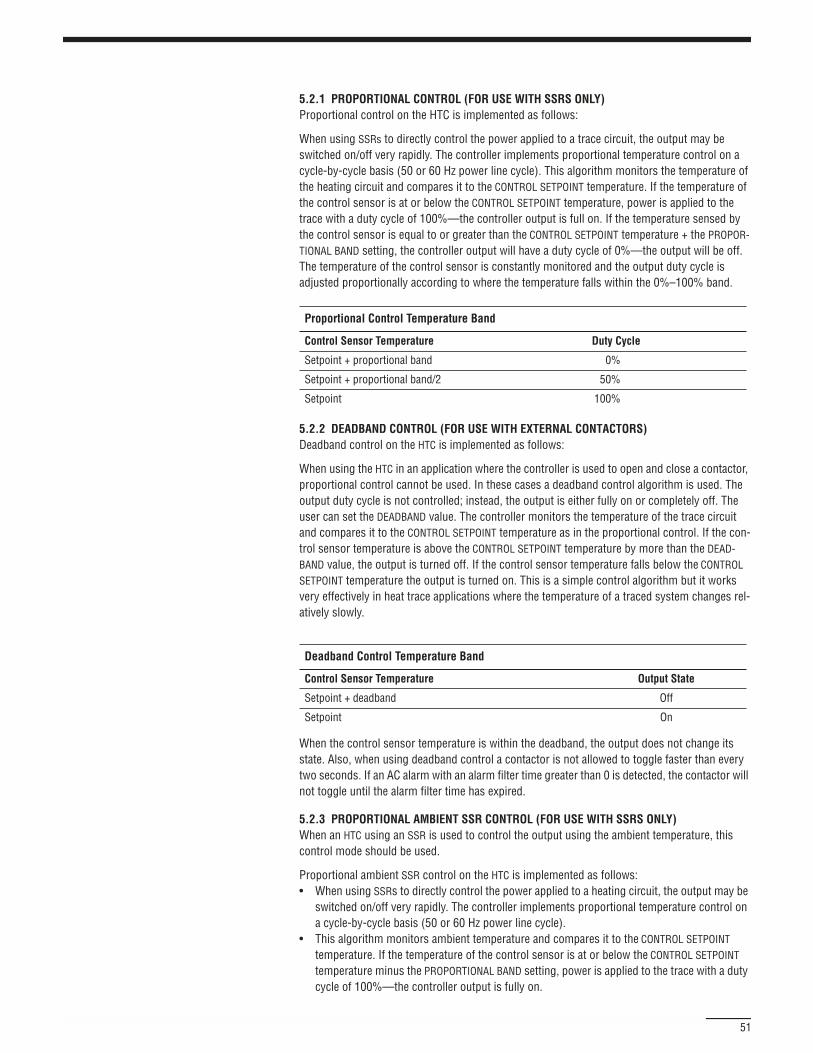
51
5.2.1 PROPORTIONAL CONTROL (FOR USE WITH SSRS ONLY)Proportional control on the HTC is implemented as follows:
When using SSRs to directly control the power applied to a trace circuit, the output may be switched on/off very rapidly. The controller implements proportional temperature control on a cycle-by-cycle basis (50 or 60 Hz power line cycle). This algorithm monitors the temperature of the heating circuit and compares it to the CONTROL SETPOINT temperature. If the temperature of the control sensor is at or below the CONTROL SETPOINT temperature, power is applied to the trace with a duty cycle of 100%—the controller output is full on. If the temperature sensed by the control sensor is equal to or greater than the CONTROL SETPOINT temperature + the PROPOR-TIONAL BAND setting, the controller output will have a duty cycle of 0%—the output will be off. The temperature of the control sensor is constantly monitored and the output duty cycle is adjusted proportionally according to where the temperature falls within the 0%–100% band.
5.2.2 DEADBAND CONTROL (FOR USE WITH EXTERNAL CONTACTORS)Deadband control on the HTC is implemented as follows:
When using the HTC in an application where the controller is used to open and close a contactor, proportional control cannot be used. In these cases a deadband control algorithm is used. The output duty cycle is not controlled; instead, the output is either fully on or completely off. The user can set the DEADBAND value. The controller monitors the temperature of the trace circuit and compares it to the CONTROL SETPOINT temperature as in the proportional control. If the con-trol sensor temperature is above the CONTROL SETPOINT temperature by more than the DEAD-BAND value, the output is turned off. If the control sensor temperature falls below the CONTROL SETPOINT temperature the output is turned on. This is a simple control algorithm but it works very effectively in heat trace applications where the temperature of a traced system changes rel-atively slowly.
When the control sensor temperature is within the deadband, the output does not change its state. Also, when using deadband control a contactor is not allowed to toggle faster than every two seconds. If an AC alarm with an alarm filter time greater than 0 is detected, the contactor will not toggle until the alarm filter time has expired.
5.2.3 PROPORTIONAL AMBIENT SSR CONTROL (FOR USE WITH SSRS ONLY)When an HTC using an SSR is used to control the output using the ambient temperature, this control mode should be used.
Proportional ambient SSR control on the HTC is implemented as follows:• When using SSRs to directly control the power applied to a heating circuit, the output may be
switched on/off very rapidly. The controller implements proportional temperature control on a cycle-by-cycle basis (50 or 60 Hz power line cycle).
• This algorithm monitors ambient temperature and compares it to the CONTROL SETPOINT temperature. If the temperature of the control sensor is at or below the CONTROL SETPOINT temperature minus the PROPORTIONAL BAND setting, power is applied to the trace with a duty cycle of 100%—the controller output is fully on.
Proportional Control Temperature Band
Control Sensor Temperature Duty Cycle
Setpoint + proportional band 0%
Setpoint + proportional band/2 50%
Setpoint 100%
Deadband Control Temperature Band
Control Sensor Temperature Output State
Setpoint + deadband Off
Setpoint On

52
• If the temperature sensed by the control sensor is equal to or greater than the CONTROL SET-POINT temperature, the output will have a duty cycle of 0%—the controller output will be off.
• The temperature of the control sensor is constantly monitored and the output duty cycle is adjusted proportionally according to where the temperature falls within the 0%–100% band.
Note: The load shedding fail-safe mode is not supported when using proportional ambient SSR control, since ambient temperature is being monitored rather than pipe temperature.
5.2.4 PROPORTIONAL AMBIENT CONTACTOR CONTROL (FOR USE WITH EXTERNAL CONTACTORS)When an HTC using a contactor is used to control the output based on the ambient temperature this control mode should be used.
Proportional ambient contactor control on the HTC is implemented as follows:• The output may not be switched on/off rapidly when using a contactor, so proportional tem-
perature control is implemented by applying the required duty cycle over the selected CYCLE TIME.
• The output is fully on for a portion of the CYCLE TIME as determined by the calculated duty cycle, and it will be completely off for the remainder of the CYCLE TIME.
• The duty cycle is calculated each time the output toggles, based on the ambient temperature, PROPORTIONAL BAND setting, and the CONTROL SETPOINT temperature setting.
• The controller monitors the ambient temperature and compares it to the CONTROL SETPOINT temperature as in proportional ambient SSR control. If the temperature of the control sensor is at or below the CONTROL SETPOINT temperature minus the PROPORTIONAL BAND setting, power is applied to the trace with a duty cycle of 100%. The controller output will be fully on for 1/30th of the CYCLE TIME setting before the duty cycle is calculated again.
• If the temperature sensed by the control sensor is equal to or greater than the CONTROL SET-POINT temperature, the output will have a duty cycle of 0%. The controller output will be off for 1/30th of the CYCLE TIME setting before the duty cycle is calculated again.
Note: The load shedding fail-safe mode is not supported when using proportional ambient con-tactor control, since ambient temperature is being monitored rather than pipe temperature.
If an AC alarm with an alarm filter time greater than 0 is detected, the contactor will not toggle until the alarm filter time has expired.
5.3 Load Shedding Control Mode
Load shedding is a control mode that can be programmed and initiated only by an external com-municating device, or by the Model 780/GCC-9000 Group Communications Controller, which overrides temperature control and forces the output of the controller OFF until reset by the 780/GCC. When using a GCC, load shedding is initiated by a contact closure (or opening) on one of the four contact inputs. Each contact input initiates a load shedding command for the group of
Proportional Ambient SSR Control Temperature Band
Control Sensor Temperature Duty Cycle
Setpoint 0%
Setpoint - proportional band/2 50%
Setpoint - proportional band 100%
Proportional Ambient Contactor Control Temperature Band
Control Sensor Temperature Duty Cycle
Setpoint 0%
Setpoint - proportional band/2 50%
Setpoint - proportional band 100%

53
controllers associated with that contact input. Each controller may be associated with one or more groups. Refer to the Load Shedding Section in the GCC manual for details on setting up the load shedding features of the HTC when using a GCC.
When power is applied to the controller, it determines if load shedding mode has been enabled. If enabled, the controller immediately enters load shedding operation (holding its output off) and waits to see if the GCC or an external communicating device has initiated a load shedding com-mand. If no command is present the controller resumes normal operation. If a load shedding command is present, the controller will continue to hold the output OFF, until one of three condi-tions occurs:1. The GCC contact input or zone definition bits of an external communicating device which ini-
tiated load shedding clears and the command to terminate load shedding mode is issued.2. Communications are interrupted between the controller and its communicating device, as in
the case of a damaged communications wire. Approximately 30 seconds after communica-tions ceases the controller will return to normal operation.
3. Communications between the controllers and the external communicating device goes off-line for approximately two minutes, as occurs when the 760 Hand Held Programmer is used to communicate with the controller.
Note: The controller will return to normal operation if communications between the 780 or exter-nal communicating device and the controller are disrupted in any way. This will return tempera-ture control to the HTC. Also, the HTC does not perform a periodic autocycle test while operating in load shed mode. When using a GCC, it must be configured for load shedding operation before the controller can be set up for load shedding control.
Three parameters must be set in the controller to configure it for load shedding operation:1. The load shedding feature must be enabled.2. The FAIL SAFE MODE parameter must be enabled or disabled depending on the application
requirements. If FAIL SAFE MODE is enabled, then at least one LOW TS ALARM (of a TS used in the TS CONTROL MODE) must be enabled. If the alarm temperature exceeds the CONTROL SET-POINT temperature, fail-safe mode will be disabled.
3. The GCC contact input(s) or zone definition bits of an external communicating device that are to be associated with the load shedding action for the controller must be defined.
These parameters can only be configured using an external communicating device or the Model 780/GCC-9000 Group Communications Controller. Refer to the Model 780/GCC-9000 user man-ual for details on how to set up these options. The optional 920 Operator Console can be used to enable or disable the load shedding feature, but not to set any other load-shedding parameters.
Notes:• Fail-safe mode is always disabled if the SWITCH CONTROL MODE is set to either of the two pro-
portional ambient control modes, or the TS CONTROL MODE = EXT INPUT, FAIL OFF/ON• Fail-safe mode is disabled if the TS CONTROL MODE is set to either EXT INPUT, FAIL TS 1 or EXT
INPUT, FAIL TS 2 and a control temperature failure occurs.• The HTC will turn on its output switch when the control temperature becomes less than the
highest LOW TS ALARM temperature if the following conditions are met:– Fail-safe mode is enabled– Load shedding is active– The TS CONTROL MODE uses both TS 1 and TS 2– Both TS 1 and TS 2 have their LOW TS ALARMS enabled
• A FORCE ON override signal has higher priority than a load shedding signal. An INHIBIT signal has higher priority than fail safe mode.
5.4 TEMPBUS™ Control Mode
TEMPBUS™ is short for Temperature Bus. This refers to a connection that allows one “master” HTC to share its control temperature with a number of “slave” HTCs. Up to 25 “slave” HTCs can be connected to this bus. Refer to the wiring diagrams in Appendix C for example connection details.

54
5.4.1 TEMPBUS™ MASTEROnly Point A of a 920 HTC can be configured as a TEMPBUS™ “master.” A TS CONTROL MODE using either TS 1 and/or TS 2 should be selected and the EXTERNAL OUTPUT should be set to TEMPBUS™. This will cause the measured control temperature of Point A to be sent out the EXTERNAL OUTPUT port.
Notes:• If a TEMPBUS™ “master” has its temperature control overridden by an INHIBIT override or a
FORCE ON override signal, it will pass this override signal over the TEMPBUS™ to its “slaves.” • Load shedding, fail-safe, or auto-cycling conditions are not passed over the TEMPBUS™ from
a “master” to its “slaves.”
5.4.2 TEMPBUS™ SLAVEBoth Point A and/or Point B of a 920 HTC can be configured as a TEMPBUS™ “slave.” The EXTER-NAL INPUT should be set to TEMPBUS™, then the point’s TS CONTROL MODE must be set to a mode using the EXTERNAL INPUT. The “slave” controller will perform its own temperature control using the control temperature of the “master.”
If a TEMPBUS™ “slave” does not receive a control temperature from a TEMPBUS™ “master” at least once every 15 seconds, then a CONTROL TS FAILURE ALARM will occur. This alarm is non-latching for TEMPBUS™ “slaves” and will be cleared automatically once a control temperature is received again. Point B can be a “slave” to Point A of the same controller.
Note: Other features that require the use of the EXTERNAL INPUT (INHIBIT or OVERRIDE) may not be used at the same time as the TEMPBUS “slave” feature.

55
Section 6 Troubleshooting
6.1 Operator Checks
Upon receipt of the controller, or to check the controller for an indication of normal operation, follow the operational procedures shown below. These procedures are designed to familiarize the operator with the controller and to provide an understanding of its operation.
To determine if a fault is associated with the heat tracing, wiring or the controller, it is necessary to troubleshoot the wiring and tracer circuit. If the fault remains, remove power from the control-ler and exchange it with another controller. This may require some reprogramming of the new HTC.
If the fault clears, exchange the controller on another circuit to determine if the fault moves with the controller. If the fault moves with the controller, verify that the HTC has been configured cor-rectly for the application. If the configuration is correct, return the controller to Tyco Thermal Controls for evaluation.
Note: If the controller does not operate properly and is being returned to Tyco Thermal Controls for service, information must be provided as to why the unit was removed from service. Contact the Tyco Thermal Controls customer service department for an authorization form and number prior to returning any units for repair.
6.1.1 GETTING STARTEDTo access the functions of the 920 Series HTC, use the optional 920 Operator Console. If the modem communications option is installed in the 920 control module, the Model 780/GCC-9000 Group Communications Controller may also be used to access controller parameters. Refer to the operating manual for the particular device that you are using for operational details.
6.2 Common Problem Areas
The HTC can be used as an effective troubleshooting tool to pinpoint problem areas of heat trace circuits. Described below are a few of the more common problem areas, their symptoms, and parameters to check to determine the actual faulty portion of the heat trace circuit.
6.2.1 CONTROL POINT A VERSUS CONTROL POINT BRemember that the 920 series controller is a two-point device!
One of the most common errors is to confuse settings, displays, or alarms for one control point with the second control point. When programming or troubleshooting, always confirm that you are referencing the control point of interest—either Point A or Point B.
6.2.2 RTDS RTD failures after installation can generally be attributed to incorrect wiring or improper installa-tion of the sensor. Some specific RTD problems and troubleshooting methods follow.
1. TS Failure Alarm(s)If the HTC controller indicates a failure of an RTD: • Ensure that the RTD is a 3-wire 100 Ω Platinum Type (for V3.00). For V3.11 and up ensure
that the TS TYPE setting matches the RTD being used.• Turn off the power to the controller before proceeding!• Disconnect the RTD wiring from the input terminals.• Measure the RTD’s resistance between the source (WHT) and sense (WHT) leads at the con-
troller. It should not exceed 40 Ω. Excessive lead resistance will cause a TS FAILURE ALARM and must be corrected. Look for loose terminals, excessive lead length, or insufficient wire gauge and correct as necessary.
• Measure the RTD’s resistance between the source (WHT) or sense (WHT) lead and the com-mon (RED) lead of the RTD at the controller. This should be between 60 Ω and 330 Ω depend-

56
ing on the temperature and the lead resistance. See Appendix D on page 74 or Appendix E on page 75.
• Verify that the RTD is wired correctly. The heat-tracing controllers will always be terminated in the order: source (WHT), sense (WHT), common (RED). When using the terminal board, these terminals are marked as follows:
The RTD manufacturer will typically color code the leads with the source and sense being the same color, and the common a different color. Ensure that the RTD extension wire shield is termi-nated at one end only, normally using the terminal block provided at the terminal board.
Note: Some RTDs may have the Sense wire color coded as Black.
2. Questionable TemperatureIf you feel that the indicated or displayed temperature is not correct, the controller and the RTD can be quickly checked for correct operation.
To verify the RTD:Turn off the power to the controller before proceeding!• Disconnect the RTD wiring from the input terminals.• To calculate the temperature indicated by the RTD, measure the resistance from source (white
wire) or sense (white wire) to common (red wire) and subtract the resistance measured between source and sense. This will give a compensated resistance value that can be cross-referenced to the RTD table, DIN Standard 43760 found in Appendix D on page 74 or Appen-dix E on page 75. Compare the measured resistance and cross-referenced temperature value obtained from the RTD table to the indicated or displayed value. These should agree to within the accuracy standards of the HTC and the RTD.
To verify the Controller:Turn off the power to the controller before proceeding!• Disconnect the RTD wiring from the input terminals.• Connect a 100 Ω resistor across the source or sense terminal and common. Insert a jumper
between the source and sense terminals.• Apply power to the controller. The indicated or displayed temperature should be about 0°C
(32°F) depending on the actual resistance of the test resistor if TS TYPE is set to 100 Ω Platinum.
3. Unstable or Bouncing TemperatureAn erratic indication of temperature can be caused by several factors external to the controller; however, a bouncing temperature of a few degrees should not be confused with incorrect opera-
Terminal No. Description
25 Point A, Shield
26 Point A, TS 1 Source (WHT)
27 Point A, TS 1 Sense (WHT)
28 Point A, TS 1 Common (RED)
9 Point A, Shield
10 Point A, TS 2 Source (WHT)
11 Point A, TS 2 Sense (WHT)
12 Point A, TS 2 Common (RED)
29 Point B, Shield
30 Point B, TS 1 Source (WHT)
31 Point B, TS 1 Sense (WHT)
32 Point B, TS 1 Common (RED)
13 Point B, Shield
14 Point B, TS 2 Source (WHT)
15 Point B, TS 2 Sense (WHT)
16 Point B, TS 2 Common (RED)

57
tion. The controller’s accuracy and resolution will result in an indicated temperature change of a couple of degrees if the measured resistance temperature falls between two discrete values. This is sometimes referred to as quantization error.
If the bounce or instability is excessive, check:• Wire used for extension of the RTD should be three-wire, twisted and shielded with the shield
grounded at the controller only. Each of the three lead wires must be of the same gauge.• The ideal installation has a separate conduit for the RTD leads (if they have been extended). It
is not usually a problem to run low signal levels in the same conduit as the power leads even in high-power applications, as long as the RTD wire is a twisted, shielded type with an insula-tion rating equal to or greater than the highest voltage in the conduit. Follow the proper Elec-trical Code for your particular installation.
• Terminal connections that are not tight can add resistance to an RTD circuit. Check the tight-ness of all screw terminal connections at time of installation and during subsequent mainte-nance checks.
• Check the specifications for the particular cable being used to ensure that it does not have excessive capacitance when used in long lengths. This can cause a temperature offset between what the controller reads and what the RTD actually measures. This again is nor-mally not a problem since the controller compensates for all but the worst cases of this.
• Lastly, it is possible for the RTD itself to fail on an intermittent basis but this failure mode should be considered unusual. This kind of failure is probably the most difficult to find but fortunately it is also the least likely as a failure mechanism.
6.2.3 GROUND FAULTGround-fault alarms can be due to incorrect installation as well as leakage resulting from wet system components or faulted cables.
The 920 series switch interface detects ground faults by summing the outgoing and return trace currents through an internal current transformer. Under normal operating conditions (no ground fault condition) this current will be zero. When there is a flow of current from one of the trace supply wires to ground, a ground-fault condition occurs.
If a ground-fault alarm is present on start-up of a new installation, it is likely due to a wiring error or damaged cable. To verify this condition:• Check that the heating circuit neutrals return to the controller and are not connected directly
to the distribution panel. This can be a common problem if the installation is a retrofit situa-tion.
• On paralleled circuits, be certain that ALL neutrals return. The late addition of a circuit may not be obvious.
Use the monitoring feature available at the 920 Operator Console or the Model 780/GCC-9000 Group Communications Controller to view the measured ground-fault current at the heat-trace controller. If this value is at the maximum that the controller can measure, it is usually an indication that the wiring is incorrect. If the value is less than 250 mAmps, an actual ground-fault condition may exist in the cable.
Note: The controller monitors the integrity of the ground-fault (GF) detection transformer and associated wiring. If a fault is detected, the controller will report a GF value of 300 mAmps.

58
6.3 Common Alarms—What to look for Alarm Description Cause of Alarm
High TS 1/TS 2 Temperature Appears when the temperature exceeds the HIGH TS ALARM
• Alarm temperature setting too close to maintain temperature
• Flow of hot product• Steaming out lines• Incorrect tracer wiring• Incorrect RTD TYPE selected
Low TS 1/TS 2 Temperature Appears when the temperature decreases below the LOW TS ALARM temperature.
• Alarm temperature setting too close to maintaintemperature
• Flow of cold product• Empty pipe• Damaged, wet, or missing insulation• Heating cable not sized properly for the application• Heating cable damaged• Incorrect RTD TYPE selected
TS 1/TS 2 Failure Indicates that a sensor is operating improperly. • Incorrect or damaged field wiring—open leads or excess resistance, either intermittent or continuous, may be due to broken or damaged wires or loose terminals
• Damaged or inoperative temperature sensors
Control TS Failure Alarms a failure of the temperature-sensing element designated as the control element by the TS CONTROL MODE setting. Depending on the chosen TS FAIL MODE and TS CONTROL MODE, the output switch may be latched off or on until this failure is corrected.
• Incorrect or damaged field wiring—open leads or excess resistance, either intermittent or continuous, may be due to broken or damaged wires or loose terminals
• Damaged or inoperative temperature sensors
High Current Alarms current levels that are greater than the HIGH CURRENT ALARM setting for the application.
• Alarm setting too close to normal operating• High in-rush current from cold start of self-regulating cable• Damaged or partially shorted heating cable• “As built” cable length is greater than design value• Incorrect CURRENT TURNS RATIO setting
Low Current Alarms current levels that are less than the LOW CUR-RENT ALARM setting
• Alarm setting too close to normal operating current• Low source voltage• Damaged or inoperative heating cable• Open connection—wiring problem, SSR or contactor failed
open• Incorrect CURRENT TURNS RATIO setting
High GFI Alarms ground-fault current levels that are greater than the HIGH GFI ALARM setting
• Alarm setting too close to normal leakage current• Damaged cable insulation and/or moisture present• Moisture in junction box• Poor splice or termination• Moisture provides conductive ground path that allows
ground-fault current
GFI Trip This value sets the upper limit of allowable ground-fault leakage. Exceeding this link results in the output switch being latched off and the alarm activated to indicate a ground-fault condition.
• Trip setting too normal leakage current• Damaged cable insulation and/or moisture present• Moisture in junction box• Poor splice or termination• Moisture provides conductive ground path that allows
ground-fault current
High Voltage Alarms voltage levels that are greater than the HIGH VOLTAGE ALARM setting
• Alarm setting too close to normal operating voltage• Incorrect wiring• Incorrect VOLTAGE TURNS RATIO• Power surge
Low Voltage This alarms voltage levels which are less than the LOW VOLTAGE ALARM setting.
• Alarm setting too close to normal operating voltage• Damaged power cable• Incorrect VOLTAGE TURNS RATIO• Brown-out conditions• Loss of power to the circuit
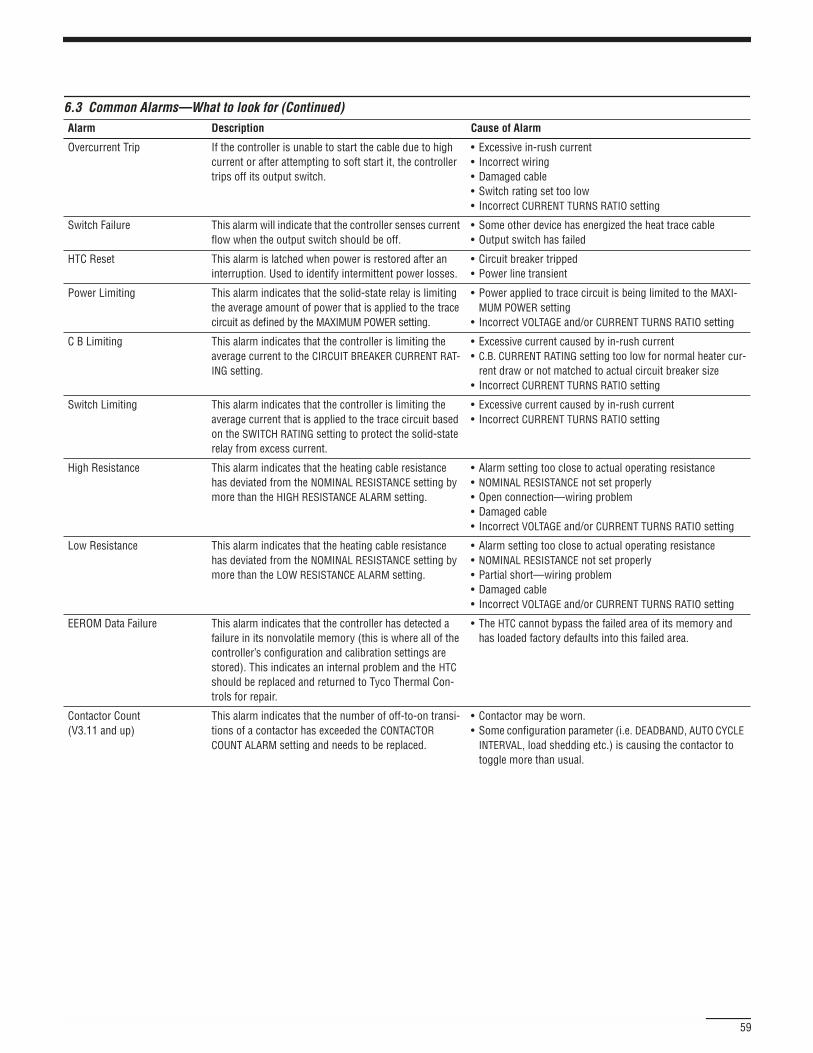
59
Overcurrent Trip If the controller is unable to start the cable due to high current or after attempting to soft start it, the controller trips off its output switch.
• Excessive in-rush current• Incorrect wiring• Damaged cable• Switch rating set too low• Incorrect CURRENT TURNS RATIO setting
Switch Failure This alarm will indicate that the controller senses current flow when the output switch should be off.
• Some other device has energized the heat trace cable• Output switch has failed
HTC Reset This alarm is latched when power is restored after an interruption. Used to identify intermittent power losses.
• Circuit breaker tripped• Power line transient
Power Limiting This alarm indicates that the solid-state relay is limiting the average amount of power that is applied to the trace circuit as defined by the MAXIMUM POWER setting.
• Power applied to trace circuit is being limited to the MAXI-MUM POWER setting
• Incorrect VOLTAGE and/or CURRENT TURNS RATIO setting
C B Limiting This alarm indicates that the controller is limiting the average current to the CIRCUIT BREAKER CURRENT RAT-ING setting.
• Excessive current caused by in-rush current• C.B. CURRENT RATING setting too low for normal heater cur-
rent draw or not matched to actual circuit breaker size• Incorrect CURRENT TURNS RATIO setting
Switch Limiting This alarm indicates that the controller is limiting the average current that is applied to the trace circuit based on the SWITCH RATING setting to protect the solid-state relay from excess current.
• Excessive current caused by in-rush current• Incorrect CURRENT TURNS RATIO setting
High Resistance This alarm indicates that the heating cable resistance has deviated from the NOMINAL RESISTANCE setting by more than the HIGH RESISTANCE ALARM setting.
• Alarm setting too close to actual operating resistance• NOMINAL RESISTANCE not set properly• Open connection—wiring problem• Damaged cable• Incorrect VOLTAGE and/or CURRENT TURNS RATIO setting
Low Resistance This alarm indicates that the heating cable resistance has deviated from the NOMINAL RESISTANCE setting by more than the LOW RESISTANCE ALARM setting.
• Alarm setting too close to actual operating resistance• NOMINAL RESISTANCE not set properly• Partial short—wiring problem• Damaged cable• Incorrect VOLTAGE and/or CURRENT TURNS RATIO setting
EEROM Data Failure This alarm indicates that the controller has detected a failure in its nonvolatile memory (this is where all of the controller’s configuration and calibration settings are stored). This indicates an internal problem and the HTC should be replaced and returned to Tyco Thermal Con-trols for repair.
• The HTC cannot bypass the failed area of its memory and has loaded factory defaults into this failed area.
Contactor Count(V3.11 and up)
This alarm indicates that the number of off-to-on transi-tions of a contactor has exceeded the CONTACTOR COUNT ALARM setting and needs to be replaced.
• Contactor may be worn.• Some configuration parameter (i.e. DEADBAND, AUTO CYCLE
INTERVAL, load shedding etc.) is causing the contactor to toggle more than usual.
6.3 Common Alarms—What to look for (Continued)Alarm Description Cause of Alarm

60
Section 7 Maintenance
7.1 Operator Maintenance
The 920 series controller is designed to be a maintenance-free product. Once installed properly, the only maintenance required is retightening of the terminal connections approximately one week after installation and inspection periodically thereafter. Also, alarm pilot lamps (if installed) and contactors may need periodic replacement.
Caution: Make sure that the power to the controller is OFF when replacing the pilot lamps! Also, be certain power to the controller is OFF before attempting to test or service the heat tracing. Do not rely on the controller as a disconnect device!
7.2 Replaceable Parts
There are no user-serviceable parts in the 920 series controller or accessories, except lamps in optional alarm pilot lights. The unit is designed to be modular and easily changed out in the field. Modules appearing inoperative should be returned to the nearest Tyco Thermal Controls Service Center for service.
Warning: Tampering with the 920 components without approval from Tyco Thermal Controls could result in the product’s warranty being void.

61
Appendix A Specifications
Specifications are @ 25°C unless otherwise noted and are subject to change without notice.
System Ratings
Storage ambient –40°F to 185°F (–40°C to 85°C)
Approvals CSA C/US, Factory Mutual
Classification • Cl I, Div 2, Grp A,B,C,D and Ex nA IIA, IIB, IIC (Zone 2)• SSR Version T-code: T4 (T3A with optional pilot light)• Ordinary locations (SSR and contactor versions)
920 Series Wiring Terminal Ratings
Terminal board 28-12 AWG, strip length: 0.22"
Switch interface 28-14 AWG, strip length: 0.33"
Power terminals 30 A: 22-8 AWG, strip length: 0.47", torque: 16.0 lb-in60 A: 14-6 AWG, strip length: 0.47", torque: 26.5 lb-in
920 Series Control Module (per control point)
Operating temperature –40°F to 140°F (–40°C to 60°C)
Power requirement 9 Vdc nominal, 600 ma maximum
Control modes Proportional, deadband, proportional ambient (SSR), propor-tional ambient (contactor) modes, adjustable 2°F to 90°F (1°C to 50°C) above setpoint
Temperature inputs (2) RTD inputs: 3-wire 100Ω Platinum (DIN 43760, α=0.00385Ω/Ω/°C) or 2/3-wire 100Ω Ni-Fe, open/shorted sensor detection/protection, lead resistance compensated 0 to 20Ω per lead.
Temperature measurement range –76°F to 1058°F (–60°C to 570°C), accuracy: ± 0.5% of span ± 1LSD
Voltage measurement range 50 to 295 Vac (with voltage turns ratio @ 1:1), accuracy: ± 1% of span ± 2LSD, repeatability: ± 1.5% of span
Current measurement range 0.3 to 100 A (with current turns ratio @ 1:1), resolution: 0.1 A (0.3 to 11 A range), 0.3 A (11 to 40 A range), 0.7 A (40 to 100 A range), accuracy: ± 2.5% of reading ± resolution, repeatability: ± 3% of reading ± resolution
GF current measurement range 20 to 250 ma, accuracy: ± 2.5% of span ± 2 LSD at nominal load, repeatability: ± 4% of span
Alarm relay output Dry contact, 48 Vac/dc, 500 ma, 10 VA switching maximum
920 Series SSR Switch Interface Module
Operating temperature –40°F to 140°F (–40°C to 60°C)
Power requirements 100 to 277 Vac nominal, 1 PH, 60 Hz ±3 Hz or 50 Hz ±2 Hz, 100 ma. maximum
Output power +9 Vdc nominal, 650 ma maximum
SSR drive +9 Vdc nominal, 75 ma maximum
Current sense range 1000:1, 0.3 to 60 A, 50/60 Hz, 1 PH
GF current sense range 1000:1, 20 to 250 ma, 50/60 Hz, 1 or 3 PH
Wiring terminals 28-14 AWG, strip length: 0.33"

62
920 Series SSR Output Modules
Operating Temperature –40°F to 104°F (–40°C to 40°C)
Switch Rating • 30 A resistive continuous @ 277Vac max. standard, 600 Vac max. optional, 1 PH, 50/60 Hz, 80 A 1 sec. in-rush, 625 A 1 cycle in-rush
• 60 A resistive continuous @ 600 Vac max., 1 PH, 50/60 Hz, 120 A 1 sec. in-rush, 1000 A 1 cycle in-rush
Input Drive Requirement 4-32 Vdc, 1500 Ω nominal input resistance
Environment Type 4X / IP66
920 Series Contactor Ratings
Operating Temperature –40°F to 104°F (–40°C to 40°C)
Contact Rating 30 A resistive continuous @ 600 Vac max. standard, 60 A maximum opt., 50/60Hz, 3 pole
Coil Rating 120 or 208/240 or 277 Vac, 50/60 Hz, 109 VA in-rush, 10 VA sealed
920 Series Operator Console
Operating Temperature –40°F to 104°F (–40°C to 60°C)
Power Requirement +9 Vdc nominal, 500 ma maximum

63
Appendix B Typical Enclosure Dimensions
The following drawings provide the user with enclosure size and mounting dimensions for the stock enclosure assemblies. Please contact your local Tyco Thermal Controls representative for information regarding other available sizes and configurations.
B.1 Single-Point Assemblies #10160-003 and #10160-009
7.95
13.08
Mounting holes 0.3" diameter,4 places
33.686.2510.50
12.50
A B
DigiTrace™ 920 Series
123467
1 Point FRP1- or 2-pole 30 A SSR assembly
1 Pole Model: 920*E2FWL*SIS301*SS31012 Pole Model: 920*E2FWL*SIS301*SS3201

64
B.2 Dual-Point Assemblies #10160-120 and #10160-121
10.00
13.08
18.008.3112.55
14.55
DigiTrace™ 920 Series
2
3467
1
23467
1
2 Point FRP1- or 2-pole 30 A SSR assembly
1 Pole Model: 920*E4FWL*SIS302*SS31022 Pole Model: 920*E4FWL*SIS302*SS3202
Mounting holes 0.3" diameter,4 places

65
B.3 Four-Point Assembly #10160-125
8.31 17.27
12.00
17.1316.55
4 Point FRP1-pole 30 A SSR assembly
Model: 920*E6FWL*SIS304*SS3104
Mounting holes 0.3" diameter,4 places
DigiTrace™ 920 Series
DigiTrace™ 920 Series

66
B.4 Eight-Point Assembly #10160-035
31.32
21.86
24.1112.95
30.11
30.51
8-Point FRP1-pole 30 A SSR assembly
Model: 920*E10FWQ1*SIS308*SS3108
Mounting holes 0.375" diameter,4 places
DigiTrace™ 920 Series DigiTrace™ 920 Series
DigiTrace™ 920 Series DigiTrace™ 920 Series

67
B.5 Twenty-Point Assembly #10160-045
32.4812.95
30.24
38.48
31.3240.35
20-Point FRP1-pole 30 A SSR assembly
Model: 920*E14FWQ1*SIS320*SS3120
Mounting holes0.375" diameter,4 places
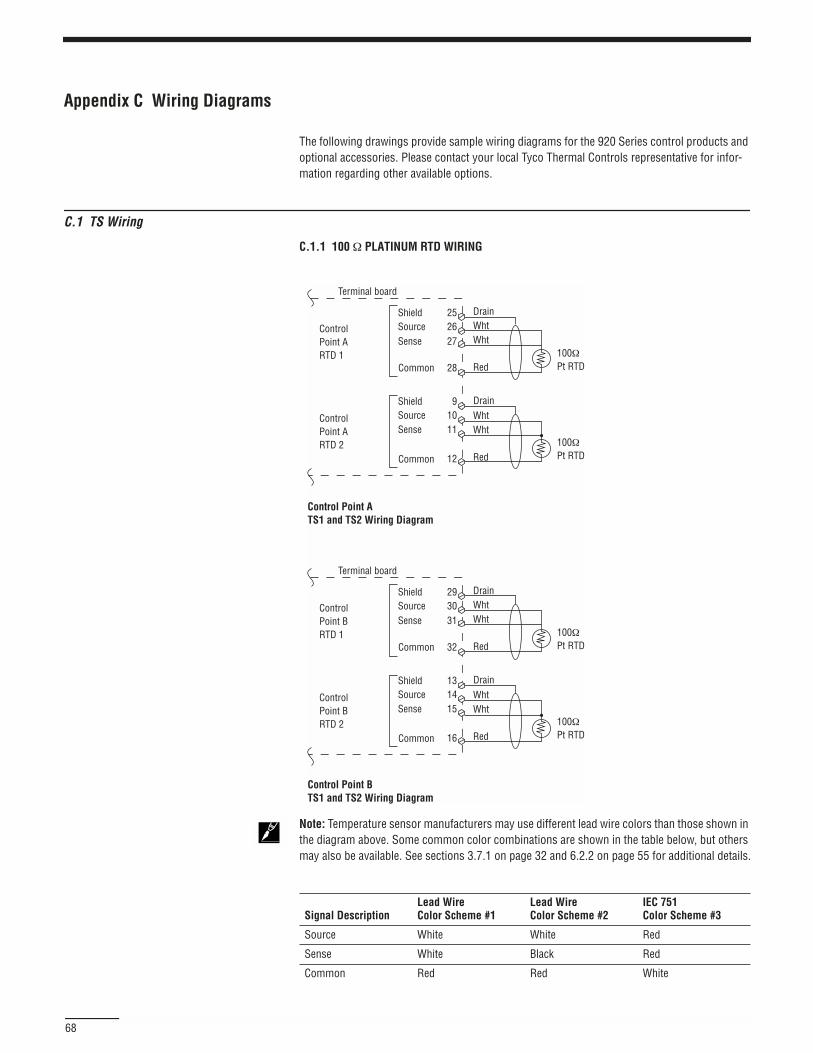
68
Appendix C Wiring Diagrams
The following drawings provide sample wiring diagrams for the 920 Series control products and optional accessories. Please contact your local Tyco Thermal Controls representative for infor-mation regarding other available options.
C.1 TS Wiring
C.1.1 100 Ω PLATINUM RTD WIRING
Note: Temperature sensor manufacturers may use different lead wire colors than those shown in the diagram above. Some common color combinations are shown in the table below, but others may also be available. See sections 3.7.1 on page 32 and 6.2.2 on page 55 for additional details.
Signal DescriptionLead WireColor Scheme #1
Lead WireColor Scheme #2
IEC 751Color Scheme #3
Source White White Red
Sense White Black Red
Common Red Red White
Terminal board
ControlPoint ARTD 1 100Ω
Pt RTD
100ΩPt RTD
ControlPoint ARTD 2
25Shield
Shield
26Source
Source
27Sense
Sense
28Common
Common
91011
12
Drain
DrainWhtWht
Red
WhtWht
Red
Terminal board
Control Point ATS1 and TS2 Wiring Diagram
Control Point BTS1 and TS2 Wiring Diagram
ControlPoint BRTD 1 100Ω
Pt RTD
100ΩPt RTD
ControlPoint BRTD 2
29Shield
Shield
30Source
Source
31Sense
Sense
32Common
Common
131415
16
Drain
DrainWhtWht
Red
WhtWht
Red

69
C.1.2 100Ω NICKEL IRON RTD WIRING
Terminal board
Control Point ARTD 1
100 ΩNi-Fe RTD
Control Point ARTD 2
Drain
Jumper
Shield 25
Source 26
Sense 27
Common 28
Common 12
Shield 9
Source 10
Sense 11100 ΩNi-Fe RTD
Drain
Jumper
Terminal board
Control Point BRTD 1
100 ΩNi-Fe RTD
Control Point BRTD 2
Drain
Jumper
Shield 29
Source 30
Sense 31
Common 32
Common 16
Shield 13
Source 14
Sense 15100 ΩNi-Fe RTD
Drain
Jumper
Control Point BTS1 and TS2 wiring diagram

70
C.2 Power Wiring
C.2.1 CONTROLLER POWERED DIRECTLY FROM 1 PH OR 3-WIRE 3 PH SOURCE
C.2.2 CONTROLLER POWERED DIRECTLY FROM 4-WIRE 3 PH SOURCE
C.2.3 CONTROLLER POWERED FROM A SEPARATE CIRCUIT
Trace power in (L1/line)Control power in (L1/line)Trace power in (L2/neutral)Control power in (L2/neutral)Trace power in (L3)Trace power out (L1/line)Trace power out (L2/neutral)Trace power out (L3)
J1L1/line
1PH or 3-wire 3PHInput power(Max. 277 Vac line-line)
L1/line
L2/neutral
Tracer(s)L2/neutral
L3
L3
12345678
J2
Notes:1. Jumpers J1 and J2 are normally supplied by the Factory2. Terminals 5 and 8 are only supplied when 3 phase versions are
ordered from the Factory
Trace power in (L1/line)Control power in (L1/line)Trace power in (L2/neutral)Control power in (L2/neutral)Trace power in (L3)Trace power out (L1/line)Trace power out (L2/neutral)Trace power out (L3)
J1L1
4 wire 3PHInput power(Max. 277 Vac line-neutral)
L1
L2
Neutral
Tracer(s)L2
L3
L3
12345678
Notes:1. Jumpers J1 and J2 are normally supplied by the Factory2. Terminals 5 and 8 are only supplied when 3 phase versions are
ordered from the Factory3. Remove jumper J2
Trace power in (L1/line)Control power in (L1/line)Trace power in (L2/neutral)Control power in (L2/neutral)Trace power in (L3)Trace power out (L1/line)Trace power out (L2/neutral)Trace power out (L3)
1PH120–277 VacControl power input
1PH or 3PHTrace power input
Tracer(s)
1 L1/line2 L1/line3 L2/neutral4 L2/neutral5 L36 L1/line7 L2/neutral8 L3
Notes:1. Jumpers J1 and J2 are normally supplied by the Factory2. Terminals 5 and 8 are only supplied when 3 phase versions are
ordered from the Factory3. Remove jumpers J1 and J2

71
C.3 Communication Wiring
C.3.1 2-WIRE MODEM OPTION
C.3.2 2-WIRE RS-485 OPTION
C.3.3 RS-232 OPTION
C.4 Alarm Output Wiring
C.4.1 USED AS A DRY CONTACT
Terminal board
67
8
2223
24 Drain
Modem
Modem
Comm 1Comm 2
Comm 3
Comm 4Comm 5
Ground
Terminal board
67
8
2223
24 Drain
RXD/TXD +
RXD/TXD –
Comm 1Comm 2
Comm 3
Comm 4Comm 5
Ground
Terminal board
6
7
8
22
23
24
RXD
DCD
CTS
TXD
RTS
Common
Comm 1
Comm 2
Comm 3
Comm 4
Comm 5
Ground
Terminal board
2
18
17
1
Dry contact
Output
AlarmRelay
+9Vdc Nom
Common

72
C.4.2 USED AS A SWITCHED DC CONTACT
C.4.3 USED TO DRIVE AN OPTIONAL EXTERNAL RELAY
C.4.4 USED TO DRIVE AN OPTIONAL EXTERNAL PILOT LIGHT
Terminal board
+ 9VDC (Switched– on alarm)
+ 9Vdc Nom
2
18
17
1
AlarmRelay
Common
Terminal board
+9Vdc Nom
Alarm relay
Common
1
2
17
18
Crydom MS11-CX240D5
+Control–Input
AC alarmRelay out
1A 277Vac max switchedAlarm output
~34
12
Power terminals
AlarmRelay
117
182
34
12~Common
+Control–Input
AC alarm
Optional linevoltage alarm light
Relay outSwitched line/L1
Terminal board
+9Vdc nom
J1
J2
1234
Trace power in (L1/line)Control power on (L1/line)Trace power in (L2/neutral)Control power on (L2/neutral)
Crydom MS11-CX240D5

73
C.5 External Input/Output Port Wiring
C.5.1 EXTERNAL INHIBIT/OVERRIDE USING A DRY CONTACT
C.5.2 EXTERNAL INHIBIT/OVERRIDE USING A DC SIGNAL
C.5.3 TEMPBUS AND INHIBIT MASTER/SLAVE CONNECTIONS
Terminal board
+9Vdc nom
External dry contact(Close to activiate inhibit or override mode)(2kΩ max total loop resistance)
Common
Ext. contactInput
1
20+
– 212
Terminal board
+9Vdc nom
+5VDC to 24VDC nominal, 10ma. max
Common
Ext. contactInput
1
20++
– –
+
–212
Terminal board
Terminal board
Terminal board
“Slave” 920 controller #2
“Slave” 920 controller #1
“Slave” 920 controller #25
Ext. contactOutput
Terminal board
Ext. contactInput
Ambient sensing “master” 920 controller
Ext. contactInput
2054
2120
21
+
–
Ext. contactInput
20
21
+
–
Ext. contactInput
20
21
+
–
+
–
+
–
Up to 25 “slave” 920 controllers (50 points) may be tied to one “master” 920 controller.
Note that the “master” and “slave” controllers must be installed within the same enclosure.

74
Appendix D HTC Load Shedding Sequence
1. If an HTC is associated with more than one contact input, all inputs must be activated before the HTC will go into a Load Shedding mode.
2. If communications between an HTC and an upstream device such as a GCC or supervisory software are interrupted, or if the power has been reset to the HTC, the HTC will hold its out-put OFF, waiting for a Load Shedding command
3. Only if the Low Temperature Alarm is ENABLED.
4. For 920 Series controllers, a “<Load Shedding>” message will displayed after the loadcurrent reading.
Loadsheddingcommandreceived?
HTCload shedenabled?
All othercontact inputs
active?[1]
Iscommunications
active?[2]
Has HTCpower been
reset?
Fail safe modeenabled?
HTC temp. atlow temp.alarm SP?
[3]
Y
Y
Y
Y
N
N
N
N
N
N
N
Y
Y
Y
Control at lowtemp. alarm setpoint
HTC holds its outputOFF for 30 seconds
Normal controlmode
All matching HTCs set theiroutputs to OFF
HTC display indicates loadshedding mode [4]

75
Appendix E 100 Ω Platinum RTD Table
IEC751 (1983)—100 Ω Platinum Resistance Temperature (RTD)—0.00385 Ohms/Ohm/°C
Ohms °F °C Ohms °F °C Ohms °F °C62.28 –139 –95 159.18 311 155 248.76 761 40564.30 –130 –90 161.04 320 160 250.48 770 41066.31 –121 –85 162.90 329 165 252.19 779 41568.33 –112 –80 164.76 338 170 253.90 788 42070.33 –103 –75 166.61 347 175 255.61 797 42572.33 –94 –70 168.46 356 180 257.32 806 43074.33 –85 –65 170.31 365 185 259.02 815 43576.33 –76 –60 172.16 374 190 260.72 824 44078.32 –67 –55 174.00 383 195 262.42 833 44580.31 –58 –50 175.84 392 200 264.11 842 45082.29 –49 –45 177.68 401 205 265.80 851 45584.27 –40 –40 179.51 410 210 267.49 860 46086.25 –31 –35 181.34 419 215 269.18 869 46588.22 –22 –30 183.17 428 220 270.86 878 47090.19 –13 –25 184.99 437 225 272.54 887 47592.16 –4 –20 186.82 446 230 274.22 896 48094.12 5 –15 188.63 455 235 275.89 905 48596.09 14 –10 190.45 464 240 277.56 914 49098.04 23 –5 192.26 473 245 279.23 923 495
100.0 32 0 194.07 482 250 280.90 932 500101.95 41 5 195.88 491 255 282.56 941 505103.90 50 10 197.69 500 260 284.22 950 510105.85 59 15 199.49 509 265 285.87 959 515107.79 68 20 201.29 518 270 287.53 968 520109.73 77 25 203.08 527 275 289.18 977 525111.67 86 30 204.88 536 280 290.83 986 530113.61 95 35 206.67 545 285 292.47 995 535115.54 104 40 208.45 554 290 294.11 1004 540117.47 113 45 210.24 563 295 295.75 1013 545119.40 122 50 212.02 572 300 297.39 1022 550121.32 131 55 213.80 581 305 299.02 1031 555123.24 140 60 215.57 590 310 300.65 1040 560125.16 149 65 217.35 599 315 302.28 1049 565127.07 158 70 219.12 608 320 303.91 1058 570128.98 167 75 220.88 617 325 305.53 1067 575130.89 176 80 222.65 626 330 307.15 1076 580132.80 185 85 224.41 635 335 308.76 1085 585134.70 194 90 226.17 644 340 310.38 1094 590136.60 203 95 227.92 653 345 311.99 1103 595138.50 212 100 229.67 662 350 313.59 1112 600140.39 221 105 231.42 671 355 315.20 1121 605142.29 230 110 233.17 680 360 316.80 1130 610144.17 239 115 234.91 689 365 318.40 1139 615146.06 248 120 236.65 698 370 319.99 1148 620147.94 257 125 238.39 707 375 321.59 1157 625149.82 266 130 240.13 716 380 323.18 1166 630151.70 275 135 241.86 725 385 324.76 1175 635153.58 284 140 243.59 734 390 326.35 1184 640155.45 293 145 245.31 743 395 327.93 1193 645157.31 302 150 247.04 752 400 329.51 1202 650

76
Appendix F 100 Ω Nickel-Iron RTD Table
Ohms °F °C Ohms °F °C Ohms °F °C69.8 –100 –73 133.4 155 68 218.2 410 21071.1 –95 –70 134.8 160 71 220.1 415 21272.3 –90 –67 136.3 165 73 222.0 420 21573.1 –85 –65 137.8 170 76 223.9 425 21874.3 –80 –62 139.3 175 79 225.8 430 22175.5 –75 –59 140.8 180 82 227.7 435 22376.7 –70 –56 142.3 185 85 229.6 440 22678.0 –65 –53 143.8 190 87 231.5 445 22978.8 –60 –51 145.3 195 90 233.5 450 23280.0 –55 –48 146.8 200 93 235.4 455 23581.2 –50 –45 148.4 205 96 237.4 460 23782.2 –45 –42 149.9 210 98 239.3 465 24082.9 –40 –40 151.5 215 101 241.3 470 24384.2 –35 –37 153.0 220 104 243.3 475 24685.7 –30 –34 154.6 225 107 245.3 480 24886.9 –25 –31 156.2 230 110 247.2 485 25188.1 –20 –28 157.7 235 112 249.3 490 25488.9 –15 –26 159.3 240 115 251.2 495 25790.1 –10 –23 160.9 245 118 253.3 500 26091.4 –5 –20 162.5 250 121 255.2 505 26292.2 0 –17 164.2 255 123 257.3 510 26593.4 5 –15 165.8 260 126 259.3 515 26894.5 10 –12 167.4 265 129 261.4 520 27195.8 15 –9 169.0 270 132 263.4 525 27397.1 20 –6 170.7 275 135 265.5 530 27698.3 25 –3 172.3 280 137 267.6 535 27999.5 30 –1 174.0 285 140 269.6 540 282
100.8 35 1 157.7 290 143 271.7 545 285102.0 40 4 177.4 295 146 273.8 550 287103.3 45 7 179.1 300 148 275.9 555 290104.5 50 10 180.8 305 515 278.0 560 293105.9 55 12 182.5 310 154 280.1 565 296107.2 60 15 184.2 315 157 282.3 570 298108.5 65 18 185.9 320 160 284.4 575 301109.8 70 21 187.6 325 162 286.5 580 304111.1 75 23 189. 330 165 288.6 585 307112.5 80 26 191.1 335 168 290.8 590 310113.8 85 29 192.9 340 171 293.1 595 312115.2 90 32 194.5 345 173 295.2 600 315116.5 95 35 196.4 350 176 297.5 605 318117.9 100 37 198.2 355 179 299.8 610 321119.2 105 40 199.9 360 182 301.4 615 323120.6 110 43 201.7 365 185 303.7 620 326122.0 115 46 203.5 370 187 306.0 625 329123.4 120 48 205.3 375 190 308.3 630 332124.8 125 51 207.2 380 193 310.6 635 335126.2 130 54 109.0 385 196 312.2 640 337127.6 135 57 210.8 390 198 314.5 645 340129.0 140 60 212.7 395 201 316.8 650 343130.5 145 62 214.5 400 204 319.1 655 346131.9 150 65 216.4 405 207 320.6 660 348

77
Appendix G Factory Default/Configuration Sheets
G.1 Configuration Sheet V3.00
The following defines the default 920 Series control module configuration as set by Tyco Ther-mal Controls for firmware V3.00. These settings are subject to change without notice. It is the user’s responsibility to verify that all configuration parameters are chosen appropriately for the intended application. Note: It is recommended that all parameters common to both Control Points A and B be programmed first.
Common Setup Sub-Menu
Parameter Factory User
Temp. Units °F
Firmware Version V3.0 n/a
Ext. Contact Input Not used
Ext. Contact Output Not used
Flash Alarm Output Yes
Alarm Output State N.C.
Language English
Point B Used Yes
Passcode 0
Communication Setup Sub-Menu
Parameter Factory User
HTCBUS Addr (factory ID)
Protocol HTCBUS
Baud Rate AUTO
Hardware None, modem, RS-232 (if installed)
Driver Auto
Profile Auto
Tx Delay 0.02 secs
Point Setup Sub-Menu
Parameter Factory User
Tag TAG-32768
Switch Control Mode Proportional
Prop Band 4°F (2°C)
Deadband n/a
Switch Rating 30.0 A
Circuit Breaker 30.0 A
Max Power 7200 W
TS CTL Mode TS1-Fail Off
TS1 – High Limit Disable
TS2 – High Limit Disable
Volt Turns Ratio 1.00 to 1
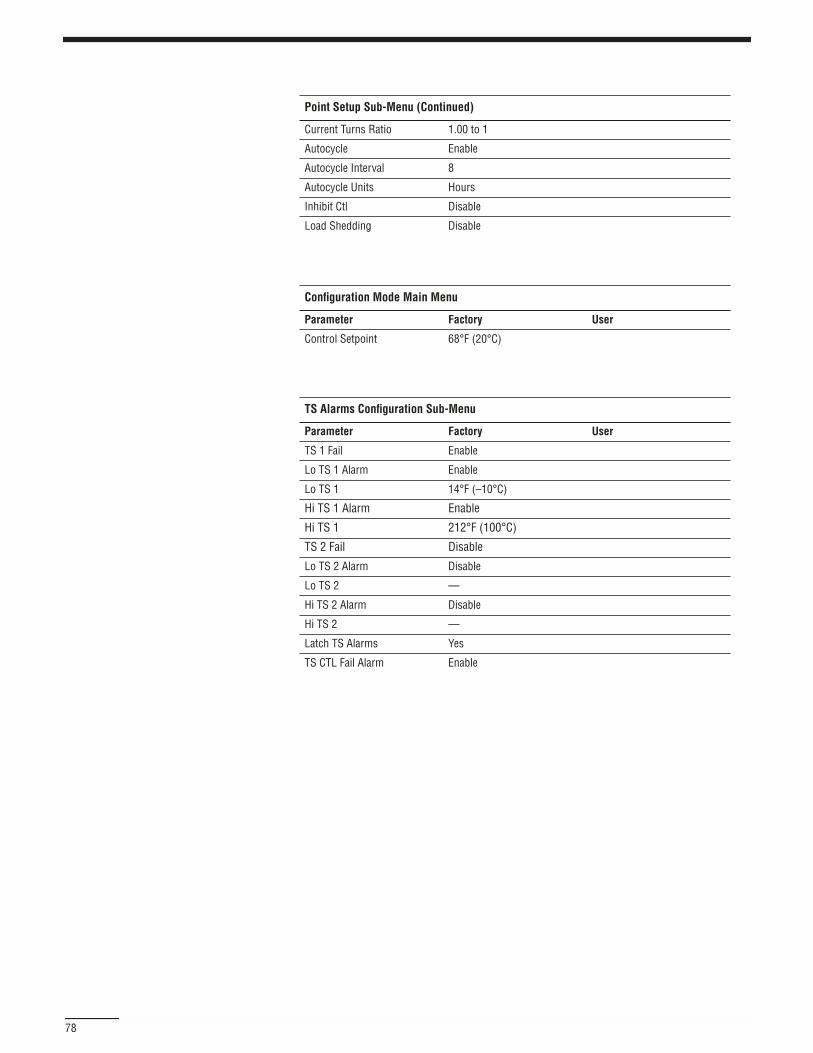
78
Current Turns Ratio 1.00 to 1
Autocycle Enable
Autocycle Interval 8
Autocycle Units Hours
Inhibit Ctl Disable
Load Shedding Disable
Configuration Mode Main Menu
Parameter Factory User
Control Setpoint 68°F (20°C)
TS Alarms Configuration Sub-Menu
Parameter Factory User
TS 1 Fail Enable
Lo TS 1 Alarm Enable
Lo TS 1 14°F (–10°C)
Hi TS 1 Alarm Enable
Hi TS 1 212°F (100°C)
TS 2 Fail Disable
Lo TS 2 Alarm Disable
Lo TS 2 —
Hi TS 2 Alarm Disable
Hi TS 2 —
Latch TS Alarms Yes
TS CTL Fail Alarm Enable
Point Setup Sub-Menu (Continued)

79
Other Alarms Configuration Sub-Menu
Parameter Factory User
Lo Load Alarm Enable
Lo Load 1.00 A
Hi Load Alarm Disable
Hi Load —
Hi GFI Alarm Enable
Hi GFI 50 ma
GFI Trip Alarm Enable
GFI Trip 75 ma
Lo Volt Alarm Enable
Lo Volt 90 V
High Volt Alarm Enable
Hi Volt 270 V
Nominal Resist 6.00 Ω
Lo Resist Alarm Disable
Lo Resist —
Hi Resist Alarm Disable
Hi Resist —
Overcurrent Trip Enable
Switch Fail Alarm Enable
HTC Reset Alarm Disable
C.B. Limit Alarm Disable
Power Limit Alarm Disable
Switch Limit Alarm Disable
EEROM Data Fail Disable

80
G.2 920 Series HTC Configuration Sheet V3.1X and V3.2X
= Most commonly changed setting
Note: Select temperature units before any other settings are entered.
Configuration Mode Main Menu
Parameter Factory User
Control Setpoint 68°F (20°C)
Lo TS 1 14°F (–10°C)
Lo Load 1.0 A
Hi GFI 50 mA
GFI Trip 75 mA
TS Alarms Configuration Sub-Menu
Parameter Factory User
TS 1 Fail Enable
Lo TS 1 Enable
Lo TS 1 14°F (–10°C)
Hi TS 1 Disable
Hi TS 1 *n/a (212°F (100°C))
TS 2 Fail Disable
Lo TS 2 Disable
Lo TS 2 *n/a (14°F (–10°C))
Hi TS 2 Disable
Hi TS 2 *n/a (212°F (100°C))
Lo TS Filter 0 min
Hi TS Filter *n/a (0 min)
Latch TS Alarms Yes
CTL TS Fail Enable
Other Alarms Configuration Sub-Menu
Parameter Factory User
Lo Load Enable
Lo Load 1.0 A
Lo Load Filter 0 sec
Hi Load Disable
Hi Load *n/a (30.0 A)
Hi Load Filter *n/a (0 sec)
Hi GFI Enable
Hi GFI 50 mA
Hi GFI Filter 0 sec

81
GFI Trip Enable
GFI Trip 75 mA
Lo Volt Enable
Lo Volt 90 V
Lo Volt Filter 0 sec
Hi Volt Disable
Hi Volt *n/a (270 V)
Hi Volt Filter *n/a (0 sec)
Lo Resist Disable
Lo Resist *n/a (50%)
Lo Resist Filter *n/a (0 sec)
Hi Resist Disable
Hi Resist *n/a (50%)
Hi Resist Filter *n/a (0 sec)
Nominal Resist *n/a (6.00 Ω)
Overcurrent Trip Enable
Switch Fail Enable
HTC Reset Disable
C.B. Limiting Disable
Power Limiting Disable
Switch Limiting Disable
Contactor Count *n/a (Enable)
Countactor Count *n/a (200,000)
EEROM Data Fail Enable
Other Alarms Configuration Sub-Menu (Continued)

82
Point Setup Sub-Menu
Parameter Factory User
Tag TAG-(factory ID)
Switch Control Mode Proportional
Prop Band 4°F (2°C)
Deadband *n/a (5°F(3°C))
Cycle Time *n/a (10 min)
Switch Rating 30.0 A
Circuit Breaker 30.0 A
Max Power 7200 W
3 Ph Pwr Calc No
TS Fail Mode Off
TS CTL Mode TS1-Fail Off
TS 1 Type 100 Ω Plat
TS 1 Lead Resist *n/a (0 Ω)
TS 1 Hi Limit Disable
TS 2 Type 100 Ω Plat
TS 2 Lead Resist *n/a (0 Ω)
TS 2 Hi Limit Disable
Volt Source Pt A (or Pt B)
Fixed Volt *n/a (120V)
Volt Turns Ratio 1.00 to 1
Current Turns Ratio 1.00 to 1
Autocycle Enable
Autocycle Interval 8
Autocycle Units Hours
Override Source Remote
Load Shedding Disable
Common Setup Sub-Menu
Parameter Factory User
Temperature Units °F
Version V3.2x.xx n/a
Ext. Input Not used
Ext. Output Not used
Flash Alarm Output Yes
Alarm Output N.C.
Language English
Point B Used Yes
Passcode 0
Scroll Delay 0.15 secs
Copy Config… (see user manual)
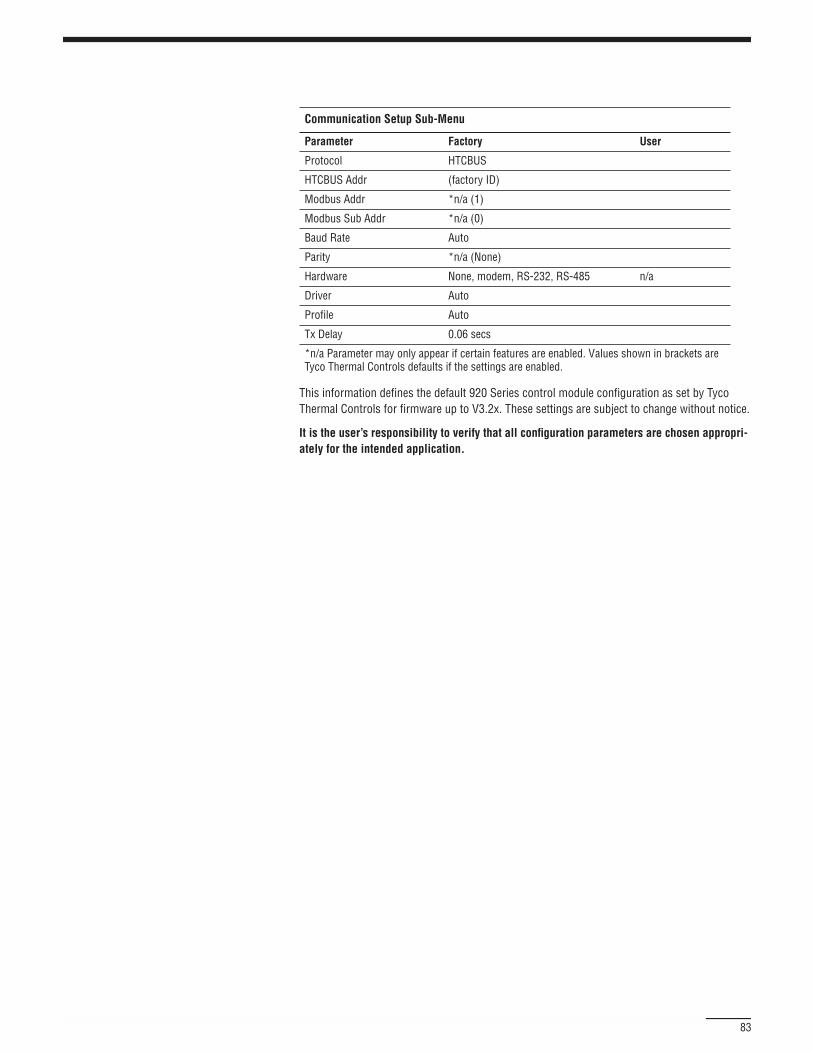
83
This information defines the default 920 Series control module configuration as set by Tyco Thermal Controls for firmware up to V3.2x. These settings are subject to change without notice.
It is the user’s responsibility to verify that all configuration parameters are chosen appropri-ately for the intended application.
Communication Setup Sub-Menu
Parameter Factory User
Protocol HTCBUS
HTCBUS Addr (factory ID)
Modbus Addr *n/a (1)
Modbus Sub Addr *n/a (0)
Baud Rate Auto
Parity *n/a (None)
Hardware None, modem, RS-232, RS-485 n/a
Driver Auto
Profile Auto
Tx Delay 0.06 secs
*n/a Parameter may only appear if certain features are enabled. Values shown in brackets are Tyco Thermal Controls defaults if the settings are enabled.

Important: All information, including illustrations, is believed to be reliable. Users, however, should independently evaluate the suitability of each product for their particular application. Tyco Thermal Controls makes no warranties as to the accuracy or completeness of the information, and disclaims any liability regarding its use. Tyco Thermal Controls’ only obligations are those in the Tyco Thermal Controls Standard Terms and Conditions of Sale for this product, and in no case will Tyco Thermal Controls or its distributors be liable for any incidental, indirect, or conse-quential damages arising from the sale, resale, use, or misuse of the product. Specifications are subject to change without notice. In addition, Tyco Thermal Controls reserves the right to make changes—without notification to Buyer—to processing or materials that do not affect compli-ance with any applicable specification.
Tyco and DigiTrace are trademarks of Tyco Thermal Controls LLC or its affiliates.
WORLDWIDE HEADQUARTERSTYCO THERMAL CONTROLS300 Constitution DriveMenlo Park, California 94025-1164USAPhone: (800) 545-6258Fax: (800) [email protected]
CANADATYCO THERMAL CONTROLS250 West StreetTrenton, OntarioCanada K8V 5S2Phone: (800) 545-6258Fax: (800) 596-5004
LATIN AMERICATYCO THERMAL CONTROLSCarlos Calvo 2560(C1230AAP)Buenos Aires, ArgentinaPhone: (54 11) 4 308 6444Fax: (54 11) 4 308 6445
© 2
005
Tyco
The
rmal
Con
trols
LLC
P
rinte
d in
U.S
.A.
Pre
viou
sly
Pyro
tena
x do
c# 2
0726
006
H5
6874
1
0/05