fitting a bass bar - roger-hargrave.de · roger graham hargrave ©2017 3 introduction this article...
TRANSCRIPT

Fitting a Bass Bar
By
Roger Graham Hargrave
Edited by Chris Ruffo
www.roger-hargrave.de Schwanewede
©2017 Roger Graham Hargrave

2
This work is licensed under a Creative Commons License
- Non Commercial - - No Derivatives -
4. 0 International License. (For details see page 19)

ROGER GRAHAM HARGRAVE ©2017
3
Introduction This article supplements the method of fitting a bass bar described in the Making a Double Bass book published on my website. I should point out that photographs of more than one instrument were used to illustrate this article.
Preparing the Bass Bar The wood I use is usually split, but not always. Split wood often has some spiral in it and well-sawn wood is just as good. I chose wood that is similar in nature to the belly wood unless the belly wood has an extremely wide growth. This usually works out at about six year rings. I plane one side flat then use a cutting gauge to mark 5.5mm. It is 5.5mm because that is what I have always been taught and it seems to be the general consensus. The bar is then finished to this thickness. Using traditional woodworking practice, I mark the bass bar with a ‘face mark’. This will be used as a reference when fitting the bar.

FITTING A BASS BAR
4
Positioning the Bass Bar Once I have thicknessed the bar, I mark the centre line (not always the joint). I then divide the top and bottom bouts of the bass side into an equal number of units, usually ten. There may be a need to further subdivide.
At the stop position I mark the width of the bridge feet minus 0.5 mm. The bar should run about 0.5 mm inside the bridge foot. (As a guide, I also mark the bridge width minus 0.5 mm, level with the upper soundhole circles.)
With the outside of the bar pivoting around this point on the stop (bridge) line, the bar is then turned slightly until it passes through the upper and lower bouts at the same ratio points. This is usually around one fifth of the upper and lower bouts, on the bass side. This action will set the bar at a slight angle to the centre line. The overall length of the bar is calculated as three quarters of the belly length. The bar is positioned equidistant from either end. I usually add 2 mm at each end to allow for any inadvertent rounding off when fitting the bar. This ‘extra’ is cut back after the bar has been glued in place.

ROGER GRAHAM HARGRAVE ©2017
5
Unlike many shops, if the upper soundhole circles are close together, (some Amati’s are 36mm apart for example) I use a bridge with narrower feet. Everything is more or less standard today, but when I worked at Hills, they used bridges that flared out to a normal top width from narrow feet. I still have a few that Aubert used to sell. This avoids having to run the bar over the soundhole or cut some of the bar away as even some of the best shops do.
Once the position of the bar has been established, I clamp the belly onto an aluminium frame and prepare my locating blocks. These are glued onto a piece of paper for easy removal after the bar has been glued in place. The locating blocks are fitted to hold the bar vertical i.e. at right angles to the belly edge.

FITTING A BASS BAR
6
Fitting the Bass Bar I usually make the small locating blocks out of bass bar off cuts. I relieve them with a small chamfer at the front edge to stop the glue sticking them to the bar. The aluminium frame and the studs help to keep everything steady and ensure that the bar goes back in the same place every time during chalk fitting. Five studs (three on one side and two on the other) are usually enough, but they do need to be fitted carefully. Also, if the studs are too low the bar will tilt.
I use a good quality soft chalk. Hard chalks are often gritty and do not mark the bar sufficiently well. Now begins the process of chalk fitting. It always strikes me as being a little perverse, because we are cutting off the bits that fit best. I begin by quickly removing the main high spots with my thumb planes. I then move onto the knife. At the start, you can rub the bar back and forth, but this has the effect of causing the ends to pick up more chalk because of the curves. So once the bar begins to get close, I tend to tap the bar rather than sliding in back and forth. Sliding the bar back and forth is for lazy people who use the rather dubious excuse they are springing the bar. The idea of springing bars is dangerous nonsense. I have seen some beautiful Cremonese violins with damaged bellies caused by this ‘little trick’. (See Endnote)

ROGER GRAHAM HARGRAVE ©2017
7
Once the bar fits perfectly (perfect is good for the health of the violin, we don't fit sound posts with 'spring' because this also damages the belly) the bar is lightly clamped in place. The two rules of woodworking are: measure twice and cut once and always clamp dry before you glue.
At this stage I clean off the chalk and size the bar and belly before leaving it to dry for at least four hours. Once the glue is dry, I quickly refit the bar with chalk before finally gluing it in position. During the dry run, I always mark on the bar where the clamps are to be placed and lay out the clamps in their correct positions.

FITTING A BASS BAR
8
The top image shows my baroque style bass bar clamps. They were made of plywood some thirty years ago and still have enough spring. You can use them for modern bars if you plane an apex on top of the bass bar. I have glued a strip of leather on the side that comes up against the belly arching. The bottom image show the modern clamps used in this article laid out for clamping.

ROGER GRAHAM HARGRAVE ©2017
9
Initial Shaping From the photographs, it looks pretty much as if I am pressing down really hard. Nothing can be further from the truth. If the bar fits well it should require only a minimum of pressure. Too much and the bar will simply turn and twist. The first photo shows how the blocks hold the bar vertical as well as in the correct position. Once the bar is glued, the clamps and the aluminum frame can be removed, the locating blocks can be cut away and the paper and excess glue can be soaked off. At this point we can see the importance of the small chamfer on the block. This chamfer is important because it allows me to get close to the bar with a sliver of wet cotton wool without wetting and possibly weakening the joint.
When working on the bar shape it is easy to damage the belly with planes and knives. For this reason, I run two strips of masking tape down either side of the bar. (I understand Andrea Amati invented masking tape in 1567 after he had some trouble with one of the decorated instrument made for Charles IX.)

FITTING A BASS BAR
10
I plane the long side profile roughly to shape making the bridge position the highest point. I finish the upper bout profile slightly more scooped while leaving the lower bout profile a little fuller. I call this the 'fastback' look. Sometimes, using a draw filling action, I finish the top shape with a rasp, especially if I need a tighter curve. However, in spite of the scooped look, at no point does the bar become thinner than it becomes at either end. I was taught both at Hills, and by colleagues at Beares, that a high-arched instrument requires a shorter central section and more scoop towards the ends. This is because a higher arching is intrinsically stronger. Conversely, a lower arch needs more strength over its entire length. In principal, I would agree with this, but especially on old instruments many other factors come into play. The illustration below is exaggerated to demonstrate what I mean.
With the side profile more or less established I begin to shape the section. At this point I should say that this bar will not be finished in the Hill style. I have nothing against Hill bars, but this is not what I am working on here. (See, Endnote on Hill and Beare Bass Bars)

ROGER GRAHAM HARGRAVE ©2017
11
Tapering My aim is to gradually taper the bar’s section from the bottom up. Because of the complex nature of the belly curves and the bars profile, tapering the bar’s section can be a little tricky. The highest point of the bar is located at the bridge position and should be approximately 12 mm at this stage. I usually divide this high point into three and mark it with a pencil.
Although one third is removed from either side of the bar at its highest point, because of the belly’s curve and the bar’s long profile, less is removed from the sides at either end. I mainly complete this tapering with my flat thumb planes. I try and keep them at the same angle along the entire length of the bar. Since the plane will not quite reach the bottom, I finish the sides with a knife; a good reason for protecting the belly with masking tape. For the sake of consistency, I always try to keep the sides flat and at a similar angle. (If necessary I use a wide flat file or a sanding stick).
FITTING A BASS BAR
12
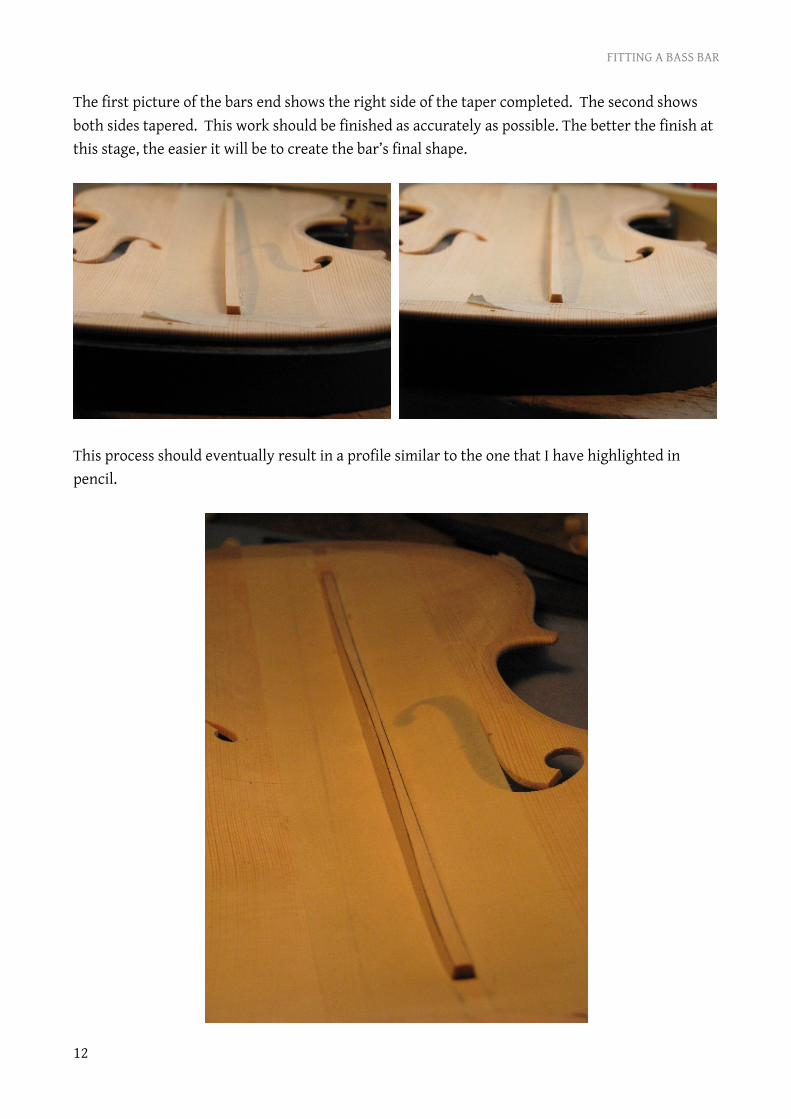
The first picture of the bars end shows the right side of the taper completed. The second shows both sides tapered. This work should be finished as accurately as possible. The better the finish at this stage, the easier it will be to create the bar’s final shape.
This process should eventually result in a profile similar to the one that I have highlighted in pencil.

ROGER GRAHAM HARGRAVE ©2017
13
Final Shaping Using a thumb plane, files and a sanding stick, I round the top. This process is more difficult to get right on the Hill-style bar, but it is not easy to get a nice finish on a Beare/Wurlitzer-style bar either. If it is done well, the ends will be a slightly-flat half circle. Again, the main justification for working accurately is continuity. Even after investing time rounding the bar, I will often go back and adjust the height and side profile. This is easier to assess once the bar has been rounded off. Depending on the model and materials, the finished bar will be between 10 mm and 11 mm high at the bridge position.

FITTING A BASS BAR
14
End Chamfer To finish the bar, I always place a long chamfer on the end. This removes any inadvertent rounding off and in effect it is a caricature of the tiny chamfers found on most baroque bars.

ROGER GRAHAM HARGRAVE ©2017
15
Over the years, I have gradually reduced the weight of my bars and I will probably go on doing so. I believe that the main purpose of the bar is support. Working on the principal mentioned earlier, whenever I fit a bass bar I am always trying to find the perfect balance between strength and form and lightness and response.

FITTING A BASS BAR
16
Notes on Hill and Beare Bass Bars Pictured below is a genuine Hill belly with a slightly damaged bar. This was rescued from the dumpster! It is very similar to the bar in the Hill book1. At the end, it is less than 1.5 mm high. Here you can see how full the bar is through the middle.
1W. Henry Hill, Arthur F. Hill and Alfred E. Hill, Antonio Stradivari, His Life & Work 1644-1737 (New York: Dover Publications, 1963), p. 189.

ROGER GRAHAM HARGRAVE ©2017
17
The following images are sections through a Hill and Beare bass bar showing the ends. The sketches are not quite correct. In particular, the Beare bar reduces to about one third of its width at the top.

FITTING A BASS BAR
18
Notes on Baroque Bars and Springing Unfortunately, the Cremonese bar illustrated below has one end missing. The pencil mark indicates its original length. The side profile shows the ‘fast back’ look with the highest point at the bridge position. It also shows the long chamfer at the end. However, of greatest importance is the fact that the bar is obviously two thin for any so called ‘spring’ to have been effective. This is highlighted by the top profile, which shows that the bar also becomes narrower at both ends. This narrowing was caused by the fact that they tapered their bars, by planing either side, before gluing the bar in place. It is worth considering the fact that these baroque bars were many times lighter than modern bars and yet they did their job for a very long time; some for more than two hundred years. Moreover, it can be argued that baroque strings produced even more downward pressure than our modern strings, making this fact all the more remarkable.

License Details
This work („Fitting a Bass Bar“) is licensed under a
Creative Commons License - NonCommercial - - NoDerivatives -
4. 0 International License.
You are free to
Share — copy and redistribute the material in any medium or format
Under the following terms Attribution — You must give appropriate credit; provide a link to the license, and indicate if changes were made. You may do so in any reasonable manner, but not in any way that suggests the licensor endorses you or your use. NonCommercial — You may not use the material for commercial purposes. NoDerivatives — If you remix, transform, or build upon the material, you may not distribute the modified material. No additional restrictions — You may not apply legal terms or technological measures that legally restrict others from doing anything the license permits.
www.roger-hargrave.de Schwanewede
© 2017 Roger Graham Hargrave