fitting guide for altro whiterock pvcu panels
TRANSCRIPT

Fitting Guide for Altro Whiterock PVCu Panels
Altro LtdWorks Road, Letchworth Garden City,
Herts, England SG6 1NW
Tel: +44 (0)1462 480480
Fax: +44 (0)1462 480010
e-mail: [email protected]
www.altro.com

Please ensure you follow the installation guidelines carefully to ensure best results.Please ensure you follow the installation guidelines carefully to ensure best results.
Altro Walls Whiterock Fitting GuideThis fitting guide, whilst compiled to the best of our knowledge is for guidance only, and Altro Walls cannot be held responsible for any faults which may occur. If in any doubt, contact the Walls technical services department to answer any queries you may have. Tel: +44 (0)1462 480480.
Altro Whiterock semi rigid extruded PVCu wall cladding can be used in hygienic environments and areas subject to wet usage. The cladding system has excellent adhesion properties to all sound substrates used for internal wall construction. It is suitable for new and refurbishment building projects. A range of panels is available in White, Pastel, Decorative and High Gloss finish.
The cladding system incorporates colour coordinated two-part PVCu internal / external corner profiles (snap-on), two-part PVCu joint strips (snap-on), two-part PVCu transition joint strip (floor to wall junction) and a two-part PVCu start & edge trim (snap-on).
AltroFix W139 two-part urethane ‘all over’ adhesive is supplied to fix all types of panel.
Altro silicone sealant is available in co-ordinating colours for all cladding ranges.
DESCRIPTION
Panels are 2.5mm thick and are available in 2500mm or 3000mm height x 1220mm width.
The panels are supplied with a protective film on the face which can be left in place until the area is ready for use. This also helps protect the new surface from dust while other trades are working in the area.
Altro Whiterock PVCu panels have a maximum service temperature of 60ºC.
Although the panels can be applied in most areas, they should never be installed near to a direct heat source (cookers, oven ranges, wall mounted griddles etc) where naked flame or severe heat would cause distortion or damage to the surface.
For these situations, Altro Walls recommends using stainless steel panels.

Please ensure you follow the installation guidelines carefully to ensure best results.Please ensure you follow the installation guidelines carefully to ensure best results.
ADHESIVE FIXING
The panels can be fixed directly to most sound and dry substrates with AltroFix W139 two-part urethane adhesive.
The adhesive is available in two tub sizes - 6.5kg and 8kg.
The adhesive is supplied within the fixing kits together with joint strip double sided tape and silicone sealant. 1 kit/1 sheet.
• Ref:AK25for2500mmlongsheet• Ref:AK30for3000mmlongsheet
2 Part Adhesive
Part A is a viscous cream coloured paste supplied in a plastic tub. Part B is a catalyst (hardener) supplied in a foil bag (separated within the tub).
Pour the liquid contents of the foil bag (Part B) into the plastic container holding Part A and mix thoroughly for approximately 2-3 minutes until a uniform consistency is obtained throughout.
An electric drill with mixing paddle attachment should be used to ensure complete mixing.
Once mixed, the adhesive should be applied to the (pre-cleaned) back of the Whiterock panel with a 5mm x 5mm square notched trowel.
SUITABLE SUBSTRATES
• Goodqualityfair-facedbrickorblockworkwithwellalignedjointsallbaggedupflushand all cement snots removed. They must be straight to within 3mm over 2 metres and brick/blocks flush with those adjacent.
• Sandandcementrendering,1:3mixwithasteeltrowelledfinish.• 12.5mmthickplasterboard.• Minimum9mmW.B.P.resinbondedplywood.• Minimum9mmMDFdensewoodbasedpanels.• Ceramictiles,whichmustbesecurelybondedtothesubstrate,thoroughlycleaned.• Mostsoundpaintedsurfaces(anadhesivetestisadvisabletoascertainsuitability).• Newpinkfinishingplasters.Thesesurfacesaregenerallydusty.Theyshouldbebrushed
and thoroughly sealed with diluted PVA primer (Unibond or similar).
SURFACE PREPARATION
All surfaces must be smooth, sound, dry and free of contamination. If necessary, the walls should be cleaned down prior to the Whiterock installation. The working environment must also be clean and dust free. Failure to comply with these conditions will reduce the bond strength between adhesive and substrate, and may cause the Whiterock panels to de-bond.
• Allsubstratestobedryto16%WME(woodmoistureequivalent)onProtimeter‘Surveymaster’ equipment.
• Alllooseflakingpaintanddusttoberemoved.• Friablesurfacestoberemovedormadesoundusingproprietarysurfacetreatmentas
advised by Altro Walls.• Allsurfacestobefreefromgrease.Ceramictilesmustbethoroughlycleaned,
degreased, rinsed and left to dry.• LoosetilestoberemovedandtheareamadegoodusingArdurapide45rapidrepair
mortar, sand and cement with Unibond mix (if drying time permits), Hardwall gypsum render coat or a comparable thickness plywood infill.
• DepressionsinthesubstrateshouldbefilledwithArdurapide45rapidrepairmortar,sandand cement with Unibond mix or Hardwall gypsum render coat (if drying time permits).
• Allelectricalswitches,powerpointsetcshouldbeinafirstfixstatewherepossible. All electrical equipment should only be moved or altered by a qualified electrician.
• Ifpossible,plumbingandpipeworkshouldberemovedtobeatfirstfixstateand‘tails’left protruding from the substrate. Whiterock panels can then be drilled and slid over the pipe ‘tails’. All holes should be drilled 3mm oversize to allow for expansion. Plumbing should always be carried out by a qualified plumber.
• Hotpipesandsteampipesshouldbeinsulatedanda3-5mmexpansiongapshouldbecreated when installing panels around these pipes.
• Allpipes,screwfixings,boltsetc.fixedthroughtheWhiterockpanelshouldhaveminimum3mm expansion gaps and be sealed using Altro silicone sealant.
INSTALLATIONTEMPERATURES
Altro Walls recommends the PVCu wall cladding panels are installed at approximately the same ambient ‘service temperature’ at which the area will be used when commissioned.
A minimum ambient temperature of 14ºC/57ºF is recommended for all installation areas.
AltroFix adhesive must never be used below +5ºC.
Panels should be stored flat and be pre-conditioned for up to 24 hours to attain the ambient room temperature prior to the installation.
The panels must be stored on a level flat surface off the ground (risk of condensation on the panels if stored on damp surfaces).
Storage on un-even surfaces could cause the panels to distort prior to installation.

Please ensure you follow the installation guidelines carefully to ensure best results.Please ensure you follow the installation guidelines carefully to ensure best results.
TOOLSANDEQUIPMENT
In general, the main tools required are similar to carpentry hand tools. Below is a list of tools that you may find an advantage to have for the installation.
• 1metre&2metrespiritlevels• tenonsaw• stanleyknife• square• chalkline• laser/waterlevel• adjustableblockplane• 5mtapemeasure• hammer• carpentersbevel• coldchisel• rubbermallet• carpenters19/25mmwoodchisels• screwdrivers• files(round&square)• holecutters• hacksaw• sharpeningstone• 4”scrapers• metalsnips• 50mmpaintbrush• goodqualitymasticgun• mixingpaddle• 5mmx5mmsquarenotchsteeltrowel• biropensandpencils• waterbasedmarkers• handroller• 3000mmrigidstraightedge• electricJigsaw(with‘finetooth’cuttingblades)• 750wattelectricdrill(formixingadhesive)• ifrequired(onsite)-110transformer(including110vleads)
Safety equipment:
• barriercream• goggles/safetyglasses• protectivegloves• facemask(nose/mouthprotection)• hardhat• safetyboots• hi-vizsafetyvest
Other essential equipment:
Youwillalsoneeda2.5x1.22mworkbenchmadefrom15mmMDFboard(orsimilar), withsupportbearerstopreventtheMDFfrombowinginthemiddle.Thebenchprovides an excellent work surface for the Whiterock panels which are 1.220m x 2.500m/3.000m
15mm MDF bench
Timber bearers
A-frame trestles
A ASAFETYINFORMATION
Apart from the normal health and safety rules employed within the construction industry, the following points should be noted:-
• SafetyinformationdisplayedonthetubsandcontainerssuppliedbyAltroWallsmust be strictly adhered to.
• Safetyeyewearmustbewornduringcuttingofmaterials,mixingadhesive,cleaning and preparation of site, and where necessary to adhere to site regulations.
• Usefacemasks• Displayprominentsafetysignswhenusinghazardousmaterials,andtowarnofa
working area.• Ensuregoodventilationwithintheworkarea.• Removeanddisposeofallwastesensiblyandcarefullyaspersiteinstructions.
Contact Altro Walls on 01502 561 364 for all COSHH (control of substances hazardous to health) data sheets.
• Applybarriercreams,andwearprotectivegloveswhenmixingandapplying AltroFix adhesives.
• Keeptheworkingareacleanandtidy.
Please ensure you follow the installation guidelines carefully to ensure best results.Please ensure you follow the installation guidelines carefully to ensure best results.
WORKSTATION
Set up a ‘workstation’ in close proximity to the area to be clad. A minimum area of 4m x 3m will be required to set up your work bench area.
Adjacent to the workstation, set up a ‘glue-station’, where all the mixing of adhesive takes place. The floor area in this location needs to be protected with cardboard (or similar) to prevent splashes of adhesive getting onto the floor.
If an existing or new floor has been laid prior to the cladding, it is essential to protect the floor with polythene sheeting and/or cardboard around the work bench and the ‘glue- station’ where adhesive may get spilt.
The ‘glue-station’ is also where the trowels and mixing paddles are cleaned regularly to prevent a build up of excessive adhesive on the tools.
Please note: If the adhesives get onto the floor or other surfaces and are allowed to set, it can be difficult, if not impossible, to remove. Therefore any splashes or spillages should be wiped up immediately.
SETTING OUT
• Firstly,checkouttheroomwhichistobeclad,payingparticularattentiontothecorners,window reveals, and door entrances. These need to be inspected to ensure they are straight, and free of any building waste which could prevent the panels laying flat to the substrate after the adhesive has been applied and the panel is installed.
• Thewallsurfacemustbecleanpriortoinstallation(ifnecessary,contactAltroWallsforspecific recommendations on cleaning and preparation).
• Oncepreparationhasbeencompletedadatumlinemustbeinstalled.Thedatumlineis used for the calculation of measurements to ceiling height, sockets and pipes etc: and to ensure the panels are ‘plum’ as the installation proceeds.
• Thedatumlineshouldbeinstalledatapproximately‘eyelevel’onthewallandshouldbedone with a laser or water level for accuracy.
• Thedatumlineheight(fromsubfloor)shouldbecalculatedtoallowfortheappropriateskirting height where the bottom of the PVCu panel meets the specific floor finish (sheet pvc flooring, quarry tiles, pvc sit-on skirting etc.) Note: Quarry tile coving must always be installed before the wall cladding is fitted.
• Aseriesof‘checkmeasurements’shouldbetakenaroundtheroomfromdatumtosubfloor to ascertain the ‘average’ height of the datum line.
• Thedatumheight(minustheappropriatefloorskirtingheight)willeventuallybetransferred on to the face of the PVCu wall panel. This will enable all subsequent measurements to be processed from the datum line on the panel.
• Onceallmeasurementshavebeentakenfromthewall,theycanthenbetransferredonto the panel. When the panel is eventually fitted to the wall, the datum line on the panel must line up with the datum line on the wall.
• Afterinstallingthedatumlineandcalculatingtheaverageheight,youmustthenplanthe ‘layout’ of the PVCu panels. This ensures the best layout of the panels and minimises the number of joints used in the system.
ALTRODOUBLESIDEDTAPEPRIMERAPPLICATION(REF:W165)
• PriortotheinstallationofWhiterockpanels,AltroW165‘tapeprimer’shouldbeappliedin three locations to the substrate with a 50mm paint brush. The primer ‘lines’ should correspond to the double sided tapes which will subsequently be fitted on the reverse side of the panel - at the top, the middle (normally just below datum height) and at the bottom of the panel. The double sided tapes hold the panel firmly to the substrate whilst the AltroFix W139 adhesive cures. Allow the ‘tape primer’ to dry to a tacky finish, (approximately 10 minutes). Note: Tape primer remains permanently tacky and never dries out. Only apply primer to the areas where tape is to contact wall surface.
• Beforepriming,thetypeoffloorfinishmustbetakenintoaccount.Withasheetvinylfloorfinish incorporating a self-coved skirting, the ‘tape primer’ (and subsequent double sided tape) must be applied high enough (i.e. min 20mm) to allow for a PVCu ‘transition strip’ to be fitted at the bottom of the panel. In the case of the Whiterock panel overlapping a sheet vinyl floor skirting (such as shower areas) where the vinyl has been installed first, a minimum height of 50mm from the bottom of the panel is required. See diagram showing the double sided tape layout on the back of the panel.
• Whenusingtwo-part(snap-on)internal/externalcornerprofiles,primethewallcornerswith Altro W165 ‘tape primer’ sufficiently enough to cover the area that the corners are to be installed. This should be done at the same time as the priming out for the double sided tape, allowing primer to dry to provide a tacky surface.
• Whenthewallsarereadyforapplication,doublesidedtapeshouldbeappliedto the back of the PVCu corners in four strips of approximately 150mm long down the corner length. Remove the protective cover from the tape and apply the corner to the substrate.
• IfaPVCu‘transitionstrip’istobefitted(atalaterstage)tothebottomoftheWhiterockpanel (where wall panels meet the sheet vinyl floor skirting), the corner profile ‘back section’ must be fitted 20mm shorter than the overall length.

Please ensure you follow the installation guidelines carefully to ensure best results.Please ensure you follow the installation guidelines carefully to ensure best results.
ALTRO DOUBLE SIDED TAPE POSITIONING (REF: A815)
Datumappliedto wall
Position tape 20mm from bottom edge to allow for transition strip
Position tape 50mm from bottom edge to allow for overlap of Altro Whiterock to vinyl
Alternatively:
Tape held back 20mm from edge of panel, allowing for jointing strip
INSTALLATION PROCEDURE
Once all preparation has been carried out, walls are cleaned and free from dust, any possible contamination from grease (in kitchen and shower areas) has been removed, the datum line and ‘tape primer’ (Altro W165) have been applied, you are now ready to install the Whiterock panels.
• Placepanelontheworkbenchandinspectforanydamage.Carefully,onthefrontface(with the protective film), mark your datum with a biro pen, taking care not to press too hard, thus damaging the surface of the Whiterock panel.
• Takemeasurementsfromthewall,andthentransferthesetothepanel.Cutthepanelusing your jigsaw (or hand saw) with a fine tooth blade, making sure the panel is well supported to reduce any risk of stress in the material when being cut.
• Afterthefinalcutting,planetheedgeswithyouradjustableblockplanetoremoveburrsand to leave a clean smooth finish.
• Oncecutandplaned,peelbackandremovetheprotectivefilmapproximately50mmfrom the edge.
• Offerthepaneltothesubstratetocheckyourwork(dryfitting),ensuringyouhavea 2-3mm expansion joint at all abutments and pipe work.
• Whenthepanelhasfinallybeenmadetosuittherequiredwallfinishdetail,laythis face-down on the workbench and clean the back of the panel with Altro cleaner / thinner (Ref: A808).
• Applydoublesidedtapesatthetop,middleandbottomofthepanel-tocorrespondwith the Altro W165 primer (DO NOT remove the tapes’ protective paper at this time).
APPLYING ALTROFIX W139 ADHESIVE (REF: A814)
• Wearappropriatesafetyequipmentbeforehandlingmaterials.• CarefullymixpartsAandBtogetherusingalargemixingdrillandpaddlefora
minimum of 3 minutes, until an even colour is acquired. Note: Adhesive must be mechanically mixed.
• Applytheadhesivetothebackofthepanel,usingtherecommended5mmx5mmnotched trowel. The adhesive should be applied approximately 20mm from the edge of the panel (where joint strips are to be fitted), and right up to the double sided tapes. The working time of the adhesive is approximately 40 minutes depending on the ambient temperature of the room.
• Thetrowelmustbeheldsothattheadhesiveisappliedtoanevenfinish,andthetrowelnotches are replicated to the same depth over the panel.

Please ensure you follow the installation guidelines carefully to ensure best results.Please ensure you follow the installation guidelines carefully to ensure best results.
FITTINGTHEWHITEROCKPANEL(REF:W103/104,W136/137,W140/141,W160/161)
• Afterapplyingtheadhesive,carefullyremovethedoublesidedtape‘protectivefilm’andplace into a rubbish container. Lift the panel and install to the required location, ensuring the datum line on the panel corresponds to the datum line on the wall.
• Oncefittedtothesubstrate,applypressuretothewholeofthepanelfacetoensure the adhesive has been transferred and will be fully bonded to the substrate (this is normally done with a hand roller, rubber mallet or block of timber covered with a material to prevent the surface being damaged).
• Failuretoensureagoodtransferofadhesivetothesubstratecouldresultinthe panel debonding.
• Curingtimeoftheadhesiveisapproximately4-6hoursdependingontheambienttemperature.
• Ensureanyadhesiveresidueisthoroughlycleanedoffthesurfaceofthepanelorjointtrims (and other adjacent surfaces) with Altro cleaner /thinner (A808) and paper towel. This must be done immediately, before the adhesive sets.
• Alternatively,cleaningupadhesiveresiduecanbeundertakenwithAltroDesolvitWipes(A817).
FITTINGPVCUJOINTTRIMS(REF:A831)
• Oncethepanelisinposition,the‘back’sectionofthetwo-partPVCuverticaljointstripshould be fitted. This should be slid behind the leading edge of the panel until it is approximately 3mm from the central spine. Before sliding this section behind the panel apply a small bead of silicone to the back of the trim.
• IfaPVCu‘transitionstrip’istobeusedtocreateajointbetweenthepanelandthesheetvinyl floor finish, the back part of the vertical strip should be cut back (by 20mm) to allow the horizontal transition strip to be fitted at the base of the panel (at a later stage). To find the correct length of the vertical section required, use a small piece of transition strip (as a template) and fit this to the bottom of the panel.
• Whenfittingthenextpanel,ensurethedatumlinesarealignedcorrectlyandthenposition the panel on top of the back section of the PVCu joint strip, approximately 3mm from the central spine.
• A2-3mmgapeithersideofthecentralspinewillallowthepanelsadequateroomtoexpand and contract underneath the ‘front’ face of the two-part (snap-on) cover trim.
• Carryoutthisprocedurethroughouttheinstallationandthenfinishbyinstallingthe‘front’face of the two-part (snap-on) cover trim, cut to the appropriate length. Note: The ‘front’ face cover trims can be installed as the work proceeds, or left until all panels have been installed.
• The‘front’facejointstripcoversshouldinitiallybepositionedbyhandpressure. They can then be fully located by tapping with a rubber mallet or small hammer and wooden block.
FITTING TWO-PART INTERNAL / EXTERNAL CORNERS (REF: F837 / F836)
Internal and external two-part corner sections are manufactured in coordinating colours to match the range of Whiterock cladding systems. When ordering colour coordinated corners, remember to include the ‘part number’ with the specific ‘colour reference number’ on your order. F837 / F836 only refer to ‘White’ corner sections. For all other colours, add a suffix to the specific part number with the correct ‘colour reference number’.
Example: F837/25/41 – This is an Internal corner section, 2.5m length, in colour Linen.
Note: For Altro Whiterock ‘Illusions’ panels, the two-part corners are only available in coordinated (background) colours. They do not have the decorative foil on the cover face.
Special ‘pre-formed’ corner sections can be ordered with the Illusion panels if required. These are available in 150mm x 150mm, or 300mm x 300mm sections. They are manufactured from the Illusion panel and completely match the cladding panels.
• Preparation-primethewallcornerswiththeAltroW165‘tape’primersufficientlyenoughto cover the area that the corners are to be installed. This should be done at the same time as the priming out for the double sided tape, allow primer to dry to provide a tacky surface.
• Whenthewallsarereadyforapplication,doublesidedtapeshouldbeappliedto the back of the PVCu corners in four strips of approximately 150mm long down the corner length. Remove the protective cover from the tape and apply the corner to the substrate.
• IfaPVCu‘transitionstrip’istobefitted(atalaterstage)tothebottomoftheWhiterockpanel (where wall panels meet the sheet vinyl floor skirting), the corner profile ‘back section’ must be fitted 20mm shorter than the overall length.
• PriortotheWhiterockpanelbeinginstalled,abeadofAltrosiliconesealantshouldbeapplied to both sides of the corner profile (on the inner faces). This will prevent the panel from having a void where the adhesive stops short of the panel edge.
• WhenfittingtheWhiterockpanelontothecornerprofile‘backsection’,ensurethe panels are positioned approximately 5mm short of the central spine (to allow for expansion and contraction).
• Afterthepanelshavebeenfitted,thefrontcoversofthetwo-part(snap-on)cornerprofiles can be installed.
• Thefrontcoversshouldinitiallybepositionedbyhandpressure.Theycanthenbefullylocated by tapping with a rubber mallet. Use a small clean, smooth section of softwood timber and place over the cover before tapping with the rubber mallet.
Please ensure you follow the installation guidelines carefully to ensure best results.Please ensure you follow the installation guidelines carefully to ensure best results.
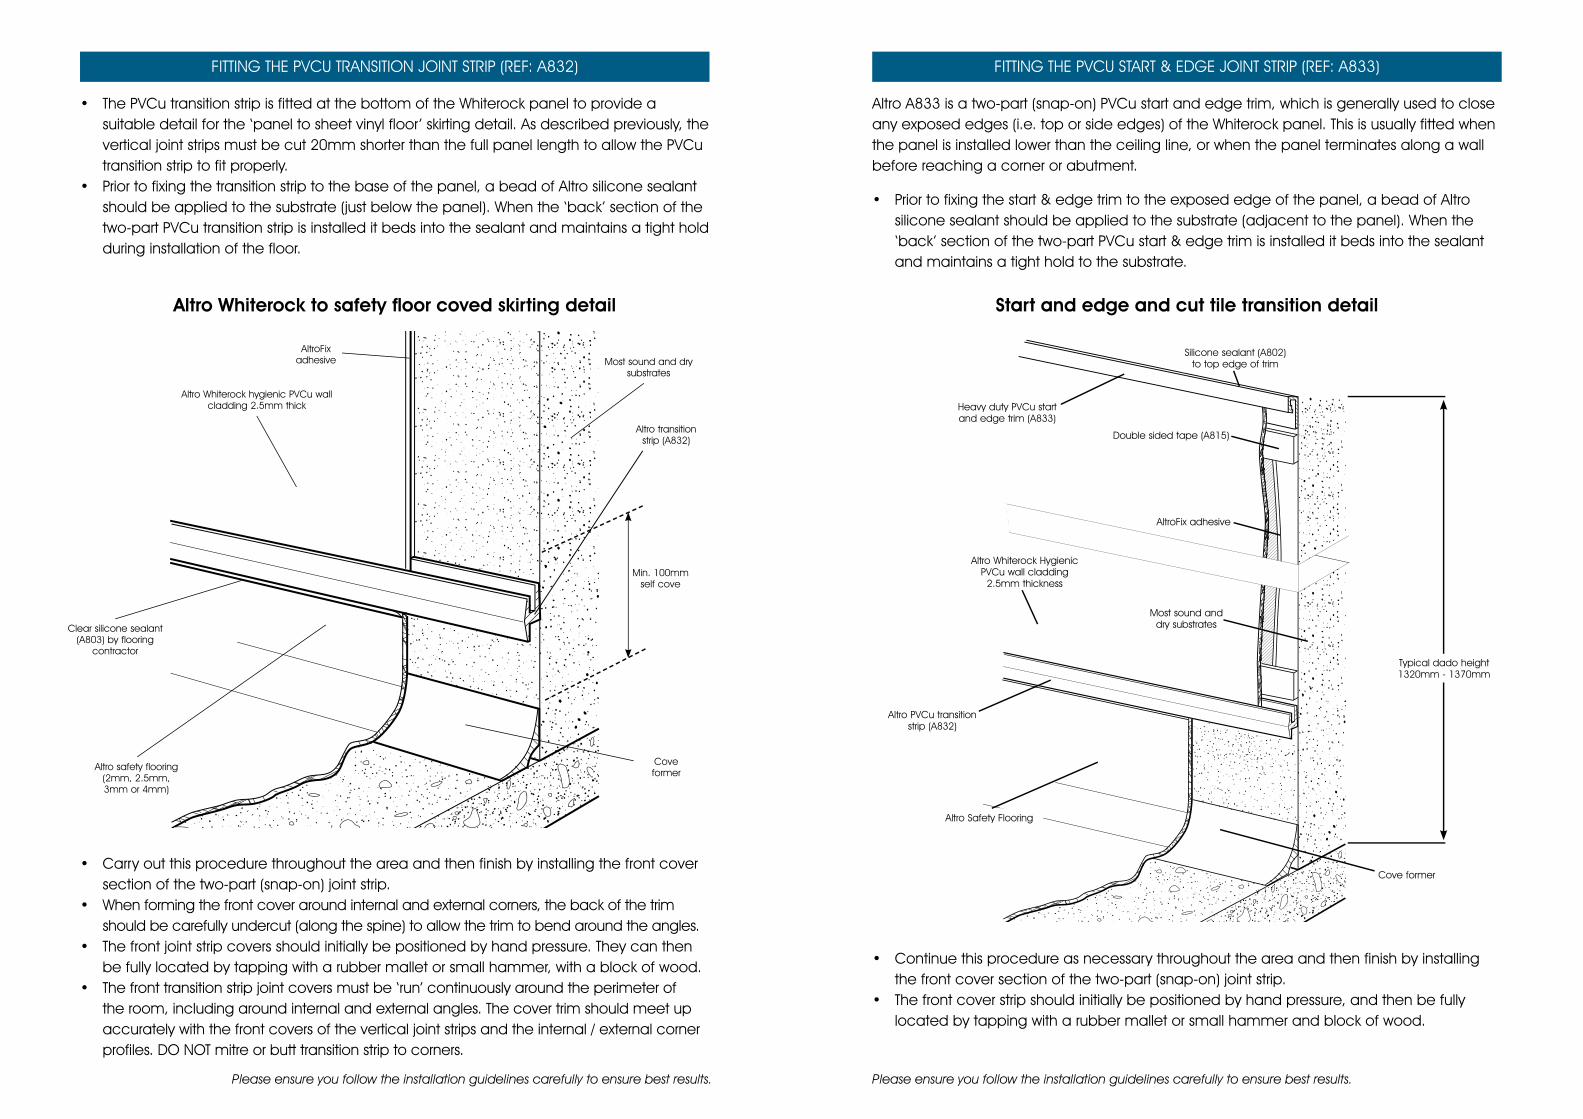
FITTINGTHEPVCUTRANSITIONJOINTSTRIP(REF:A832)
• ThePVCutransitionstripisfittedatthebottomoftheWhiterockpaneltoprovideasuitable detail for the ‘panel to sheet vinyl floor’ skirting detail. As described previously, the vertical joint strips must be cut 20mm shorter than the full panel length to allow the PVCu transition strip to fit properly.
• Priortofixingthetransitionstriptothebaseofthepanel,abeadofAltrosiliconesealantshould be applied to the substrate (just below the panel). When the ‘back’ section of the two-part PVCu transition strip is installed it beds into the sealant and maintains a tight hold during installation of the floor.
• Carryoutthisprocedurethroughouttheareaandthenfinishbyinstallingthefrontcoversection of the two-part (snap-on) joint strip.
• Whenformingthefrontcoveraroundinternalandexternalcorners,thebackofthetrimshould be carefully undercut (along the spine) to allow the trim to bend around the angles.
• Thefrontjointstripcoversshouldinitiallybepositionedbyhandpressure.Theycanthenbe fully located by tapping with a rubber mallet or small hammer, with a block of wood.
• Thefronttransitionstripjointcoversmustbe‘run’continuouslyaroundtheperimeterofthe room, including around internal and external angles. The cover trim should meet up accurately with the front covers of the vertical joint strips and the internal / external corner profiles. DO NOT mitre or butt transition strip to corners.
FITTINGTHEPVCUSTART&EDGEJOINTSTRIP(REF:A833)
Altro A833 is a two-part (snap-on) PVCu start and edge trim, which is generally used to close any exposed edges (i.e. top or side edges) of the Whiterock panel. This is usually fitted when the panel is installed lower than the ceiling line, or when the panel terminates along a wall before reaching a corner or abutment.
• Priortofixingthestart&edgetrimtotheexposededgeofthepanel,abeadofAltrosilicone sealant should be applied to the substrate (adjacent to the panel). When the ‘back’ section of the two-part PVCu start & edge trim is installed it beds into the sealant and maintains a tight hold to the substrate.
• Continuethisprocedureasnecessarythroughouttheareaandthenfinishbyinstallingthe front cover section of the two-part (snap-on) joint strip.
• Thefrontcoverstripshouldinitiallybepositionedbyhandpressure,andthenbefullylocated by tapping with a rubber mallet or small hammer and block of wood.
Cove former
Double sided tape (A815)
AltroFix adhesive
Mostsoundanddry substrates
Typical dado height 1320mm - 1370mm
Silicone sealant (A802) to top edge of trim
Heavy duty PVCu start and edge trim (A833)
Altro Whiterock Hygienic PVCu wall cladding
2.5mm thickness
Altro PVCu transition strip (A832)
Altro Safety Flooring
Altro transitionstrip (A832)
Mostsoundanddrysubstrates
Altro safety flooring (2mm, 2.5mm, 3mm or 4mm)
Clear silicone sealant (A803) by flooring
contractor
Cove former
Min.100mmself cove
AltroFix adhesive
Altro Whiterock hygienic PVCu wall cladding 2.5mm thick
Altro Whiterock to safety floor coved skirting detail Start and edge and cut tile transition detail

Please ensure you follow the installation guidelines carefully to ensure best results.Please ensure you follow the installation guidelines carefully to ensure best results.
OTHERJOINTTREATMENTDETAIL
If specified, or specifically recommended by the client, Altro Whiterock panels can be installed with a silicone joint detail.
• Thepanelsshouldbeinstalledwitha3-4mmgap.• Altrodoublesidedtapesmustbefittedapproximately3mminfromtheverticaledge
of each panel to ensure the panels meet accurately at the joint.• AltroWallsrecommendsusingmaskingtapeonthefrontfaceofthepanelsto
prevent overspill.• TheedgesofthepanelsmustbecleanedandprimedwithAltroALUCleaner(A810)
prior to siliconing.• Ensuresufficientsiliconeispumpedintothejointsothatitformsupagainstthedouble
side tapes on the reverse of the panel. • Oncecompleted,tooloffthesurplustoleaveaneat,flush,sealedjoint(removemasking
tape immediately sealant is taken off).
FITTINGANDSEALINGUPTOABUTMENTS
Altro Whiterock panels should be fitted to within 3mm of rigid abutments such as window frames, door frames, architraves, ceilings, quarry tile skirtings etc. ensuring a 2-3mm gap at these points.
This will allow for expansion and contraction to take place.
Prior to sealing the joint, clean and prime the panel and adjacent surfaces with Altro ALU Cleaner (A810).
All ‘isolation’ joints must be sealed with colour coordinated Altro silicone sealant Ref: A802, A803 or A805.
AltroFix adhesive
Mostsound,drysubstrates
Double sided tape (A815) positioned 5mm from edge
of the sheet
Altro Whiterock hygienic PVCu wall cladding2.5mm thick
Silicone sealant to joint (A802 / A806)
3mm
5mm
5mm
DoorDoor lining
Mostsoundanddrywall substrates
Double sided tape (A815)
3mm
Silicone sealant
Architrave(Complete with
finish coat prior to installation of
Altro Whiterock)
AltroFix adhesive
2.5mm thick Altro Whiterock
PVCu sheet
Position of tapes to edge of panel
Silicone seal joint detail
Detail Altro Whiterock to abutments eg. architrave
Please ensure you follow the installation guidelines carefully to ensure best results.Please ensure you follow the installation guidelines carefully to ensure best results.
COMPLETION
Once all panels and joint strips are installed and silicone has been completed, remove the protective film and clean all surfaces down with Altro antistatic solution (A809). This is required as the panel may have static build up and any dust in the atmosphere will adhere to the surface of the panel.
CLEANING
Regular cleaning using a soft cloth and suitably diluted mild detergent is all that is normally required. For heavy grease contamination use Altro 44 alkaline cleaner (or similar). Stubborn marks can be removed with Altro cleaner (ref: A859) cream, or use a non-abrasive domestic type cream bath cleaner.
When cleaning the Whiterock surface, we recommend the temperature of water does not exceed 60º Centigrade.
If cleaning with hot water lance, temperatures must be regulated to a maximum of 60º Centigrade and not to be localised.
Do not use cleaning materials of an abrasive nature.
Cleaning cards are available on request.
CONTACT
Altro Walls technical services department for any query regarding materials, installation or cleaning and maintenance instructions:
Visit the Altro website at www.altro.com for technical data sheets and technical drawings in pdf format for downloading.
March 2007
NOTES
Tel: +44 (0)1462 480480
Fax: +44 (0)1462 480010
e-mail: [email protected]

Please ensure you follow the installation guidelines carefully to ensure best results.
NOTES
Please ensure you follow the installation guidelines carefully to ensure best results.
NOTES
Please ensure you follow the installation guidelines carefully to ensure best results.
NOTES
Please ensure you follow the installation guidelines carefully to ensure best results.