flanged coupling adapter (fca)
TRANSCRIPT
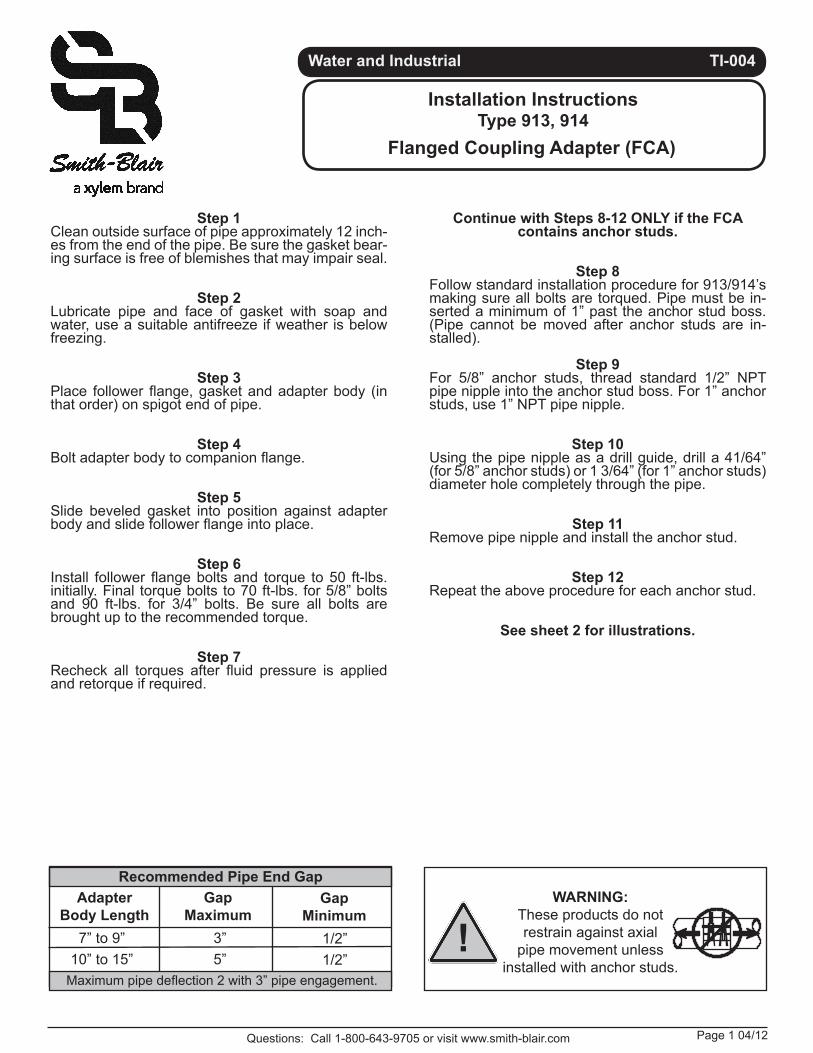
Recommended Pipe End Gap
Water and Industrial TI-004
Questions: Call 1-800-643-9705 or visit www.smith-blair.com
Step 1Clean outside surface of pipe approximately 12 inch-es from the end of the pipe. Be sure the gasket bear-ing surface is free of blemishes that may impair seal.
Step 2Lubricate pipe and face of gasket with soap and water, use a suitable antifreeze if weather is below freezing.
Step 3Place follower flange, gasket and adapter body (in that order) on spigot end of pipe.
Step 4Bolt adapter body to companion flange.
Step 5Slide beveled gasket into position against adapter body and slide follower flange into place.
Step 6Install follower flange bolts and torque to 50 ft-lbs. initially. Final torque bolts to 70 ft-lbs. for 5/8” bolts and 90 ft-lbs. for 3/4” bolts. Be sure all bolts are brought up to the recommended torque.
Step 7Recheck all torques after fluid pressure is applied and retorque if required.
Continue with Steps 8-12 ONLY if the FCA contains anchor studs.
Step 8Follow standard installation procedure for 913/914’s making sure all bolts are torqued. Pipe must be in-serted a minimum of 1” past the anchor stud boss. (Pipe cannot be moved after anchor studs are in-stalled).
Step 9For 5/8” anchor studs, thread standard 1/2” NPT pipe nipple into the anchor stud boss. For 1” anchor studs, use 1” NPT pipe nipple.
Step 10Using the pipe nipple as a drill guide, drill a 41/64” (for 5/8” anchor studs) or 1 3/64” (for 1” anchor studs) diameter hole completely through the pipe.
Step 11Remove pipe nipple and install the anchor stud.
Step 12Repeat the above procedure for each anchor stud.
See sheet 2 for illustrations.
Installation InstructionsType 913, 914
Flanged Coupling Adapter (FCA)
!WARNING:
These products do not restrain against axial
pipe movement unless installed with anchor studs.
Page 1 04/12
AdapterBody Length
GapMaximum
GapMinimum
7” to 9”10” to 15”
3”5”
1/2”1/2”
Maximum pipe deflection 2 with 3” pipe engagement.

Water and Industrial TI-004
WARRANTYSmith-Blair® warrants its products only against defects in materials and workmanship. Smith-Blair®’s liability and customer’s exclusive remedy under this warranty or any warranty extends for a period of one (1) year from the date of Smith-Blair®’s ship date and is expressly limited to repayment of the purchase price, repair, or replacement, at Smith-Blair®’s option, during said period, upon proof satisfactory to Smith-Blair® and upon customer’s returning and prepaying all charges on such products to factory or warehouse designated by Smith-Blair®.
This warranty is made expressly in lieu of all other warranties, expressed, implied or statutory, with respect to quality, merchantability or fitness for a particular purpose.
WARNINGMetal products are subject to corrosion, particularly when used outdoors and/or underground. A large num-ber of factors and local conditions affect the rate of corrosion. Consult a local corrosion expert to determine the life expectancy of this product when used with your pipeline content, soil, and environment. Also, consult your system designer to determine the suitability of this product in your piping system. Failure to determine the suitability of this product in your application, soil, and/or environment can result in premature product fail-ure. Smith-Blair®, Inc. will provide additional information about this product’s material specifications at your request. You may also obtain product information at www.smith-blair.com.
Questions: Call 1-800-643-9705 or visit www.smith-blair.com
10/11
10/11
Flanged Coupling Adapter (FCA)
Page 2 04/12
Installation InstructionsType 913, 914
Body Nut Gasket Flange
Bolt
CustomerPipe
EndGap
CustomerPipe
EndGap
Body
Nut Gasket Flange
Bolt
913 914

2
Paso 1Limpie la superficie externa de la tubería, aproximadamente 12 pul-gadas desde los extremos de la tubería. Asegúrese que la superficie en donde se va asentar el empaque se encuentre libre de defectos que puedan deteriorar el sello.
Paso 2Lubrique la tubería y la cara del empaque con jabón y agua ó use un anticongelante si las condiciones climatológicas lo requieren (tem-peraturas bajo cero).
Paso 3Ponga el Cuerpo de la brida, el empaque y el cuerpo del adaptador (en ese orden) sobre el extremo de la tubería
Paso 4Atornille el cuerpo del adaptador a la brida compañera.
Paso 5Deslice el empaque biselado en el interior del cuerpo del adaptador y deslice a continuación la brida guía en el lugar de instalación.
Paso 6Instale los pernos de la brida guía con un esfuerzo de torsión (torque) de 50 pies por libra de manera inicial. Debiendo dar un esfuerzo de torsión (torque) de 70 pies por libra para pernos de 5/8 de pulgada y 90 pies por libra para pernos de ¾ de pulgada. Debiendo asegurar que los pernos se encuentren en el valor de esfuerzo de torsión (torque) recomendado.
Paso 7Vuelva a checar el esfuerzo de torsión (torque) después de que se aplique la presión de trabajo y re apriete si es necesario.
Continué con los pasos 8 al 12 Únicamente si el FCA tiene pernos prisioneros tipo ancla.
Paso 8Siga el procedimiento de instalación estándar recomendado para los coples modelos 913 y 914 cerciorándose que todos los pernos se encuentren apretados. La tubería deberá ser insertada como mínimo a 1 pulgada del cople en donde se instala el perno sujetador (La tubería no deberá de moverse después de que se ha instalado el perno sujetador).
Paso 9Para pernos prisioneros tipo ancla de 5/8 pulgada, se usa un niple de tubería de rosca estándar de ½ pulgada NPT. Para 1 pulgada se usa un niple de tubería de 1 pulgada NPT.
Paso 10Usando el niple de tubería como una guía, perfore un 41/64 de pul-gada (para pernos prisioneros tipo ancla de 5/8 de pulgada) o 1 3/64 de pulgada (para pernos prisioneros tipo ancla de 1 pulgada) atraviese completamente la tubería.
Paso 11Remueva el niple de tubería e instale el perno prisionero tipo ancla.
Paso 12Repita los procedimientos anteriores para cada perno prisionero tipo ancla.
Agua y Drenaje TI-004
INSTRUCCIONES PARA SU INSTALACIÓN Tipo 913, 914
Coples con adaptadores bridados
Asistencia: Por Favor Comuniquese al 1-800-643-9705 o 1-870-773-5127
!ADVERTENCIA:
Este producto no frena el movimiento axial de la tubería.
Espaciador recomendado entre los extremos de la tubería y las bridas compañeras.
Longitud del Cuerpo del adaptador
Espaciador máximo
Espaciador mínimo
7” to 9” 3” 1/2”
10” to 15” 5” 1/2”
Máxima deflexión de la tubería 2° con 3” de tubería de ajuste.
Cuerpo del adaptador Empaque biselado Brida guía
Pernos
Tubería existente
913
914
Tuercas hexagonales
Tuercas hexagonales
Tubería existente
Pernos
Brida guíaEmpaque biseladoCuerpo del adaptador