flashsnap agent for symmetrix administrator’s guide...devices to establish an std-bcv pair...
TRANSCRIPT

N18532F
Veritas FlashSnap™ Agent for SymmetrixAdministrator’s Guide
Solaris
5.0
Veritas FlashSnap Agent for SymmetrixAdministrator’s Guide
Copyright © 2006 Symantec Corporation. All rights reserved.
Veritas FlashSnapTM Agent 5.0 for Symmetrix
Symantec, the Symantec logo, and FlashSnap are trademarks or registered trademarks of Symantec Corporation or its affiliates in the U.S. and other countries. Other names may be trademarks of their respective owners.
The product described in this document is distributed under licenses restricting its use, copying, distribution, and decompilation/reverse engineering. No part of this document may be reproduced in any form by any means without prior written authorization of Symantec Corporation and its licensors, if any.
THIS DOCUMENTATION IS PROVIDED “AS IS” AND ALL EXPRESS OR IMPLIED CONDITIONS, REPRESENTATIONS AND WARRANTIES, INCLUDING ANY IMPLIED WARRANTY OF MERCHANTABILITY, FITNESS FOR A PARTICULAR PURPOSE OR NON-INFRINGEMENT, ARE DISCLAIMED, EXCEPT TO THE EXTENT THAT SUCH DISCLAIMERS ARE HELD TO BE LEGALLY INVALID, SYMANTEC CORPORATION SHALL NOT BE LIABLE FOR INCIDENTAL OR CONSEQUENTIAL DAMAGES IN CONNECTION WITH THE FURNISHING PERFORMANCE, OR USE OF THIS DOCUMENTATION. THE INFORMATION CONTAINED IN THIS DOCUMENTATION IS SUBJECT TO CHANGE WITHOUT NOTICE.
The Licensed Software and Documentation are deemed to be “commercial computer software” and “commercial computer software documentation” as defined in FAR Sections 12.212 and DFARS Section 227.7202.
Symantec Corporation20330 Stevens Creek Blvd.Cupertino, CA 95014www.symantec.com
Third-party legal notices
Third-party software may be recommended, distributed, embedded, or bundled with this Symantec product. Such third-party software is licensed separately by its copyright holder. All third-party copyrights associated with this product are listed in the accompanying release notes.
Solaris is a trademark of Sun Microsystems, Inc.
Licensing and registrationVeritas FlashSnap Agent for Symmetrix is a licensed product. See the Veritas FlashSnap Agent for Symmetrix Installation Guide for license installation instructions.
Technical supportFor technical assistance, visit http://support.veritas.com and select phone or email support. Use the Knowledge Base search feature to access resources such as TechNotes, product alerts, software downloads, hardware compatibility lists, and our customer email notification service.


Contents
Chapter 1 OverviewWhat’s in this manual ........................................................................................... 7Getting help ............................................................................................................ 8
Product message number ............................................................................. 8Veritas FlashSnap Agent for Symmetrix ........................................................... 9Veritas FlashSnap Agent for Symmetrix utilities ............................................. 9Veritas Cluster Server Agents for Veritas FlashSnap Agent for Symmetrix 10EMC Symmetrix disk arrays ...............................................................................11Device names ........................................................................................................11EMC rules for Volume Manager .........................................................................12
Disk group rules ...........................................................................................13Volume rules .................................................................................................15Unenforced rules ..........................................................................................15
Task roadmap .......................................................................................................16Setup tasks (required) .................................................................................16Administrative tasks (optional) .................................................................18
Chapter 2 Introduction to Veritas FlashSnap Agent for SymmetrixBusiness continuance processes ........................................................................21VxFAS components .............................................................................................22VxFAS operations ................................................................................................24
Establish ........................................................................................................24Split ................................................................................................................26Re-establish ..................................................................................................27Restore ...........................................................................................................28Incremental restore .....................................................................................29
VxFAS features .....................................................................................................31
Chapter 3 Using Veritas FlashSnap Agent for Symmetrix with VxVMAdding devices to VxVM disk group .................................................................34
Using EMC PowerPath devices with VxVM .............................................34Creating volumes .................................................................................................39Attaching devices .................................................................................................41Mirroring disk groups .........................................................................................43Splitting disk groups ...........................................................................................44

6
Remirroring disk groups .................................................................................... 47Restoring disk groups ......................................................................................... 49Reattaching disk groups ..................................................................................... 52Detaching devices ................................................................................................ 53Recovering crashed commands ......................................................................... 55Viewing device information ............................................................................... 56Disk group reconfiguration ................................................................................ 59Policy setting support for EMC rules for Volume Manager .......................... 62
Chapter 4 Using the Veritas FlashSnap Agentfor Symmetrix with VEAThe VEA console .................................................................................................. 64Configuring options for EMC Symmetrix arrays in the StorageAgent ....... 65Attaching devices ................................................................................................ 67Mirroring devices ................................................................................................ 71Splitting devices .................................................................................................. 73Restoring devices ................................................................................................. 76Detaching devices ................................................................................................ 78Querying snapshot information ........................................................................ 80Recovering a crashed VxFAS operation ........................................................... 82Recovering a crashed disk group reconfigure operation .............................. 83Viewing object properties ................................................................................... 84Notes on VxFAS menu options .......................................................................... 84
Chapter 5 TroubleshootingVxFAS pre-operation conditions ....................................................................... 86Common error messages .................................................................................... 88The vxtfexplorer.sh diagnostic script .............................................................. 92
Index 93

Chapter
1Overview
This guide describes how to use the Veritas FlashSnap Agent for Symmetrix (VxFAS) and how to use Veritas Volume Manager™ (VxVM) in an EMC environment.
This guide is intended for system administrators responsible for configuring and maintaining the Veritas FlashSnap Agent for Symmetrix and the Veritas Volume Manager. This guide assumes you have:
■ A working knowledge of the UNIX operating system
■ A basic understanding of volume management
■ A basic understanding of the EMC TimeFinder product
This chapter provides an overview of the Veritas FlashSnap Agent for Symmetrix (VxFAS). Topics include:
■ What’s in this manual
■ Getting help
■ Veritas FlashSnap Agent for Symmetrix
■ Veritas FlashSnap Agent for Symmetrix utilities
■ Veritas Cluster Server Agents for Veritas FlashSnap Agent for Symmetrix
■ EMC Symmetrix disk arrays
■ Device names
■ EMC rules for Volume Manager
■ Task roadmap
What’s in this manual■ Chapter 1. “Overview” on page 7, describes how the Volume Manager and
Veritas FlashSnap Agent for Symmetrix work in an EMC environment.

8 OverviewGetting help
■ Chapter 2. “Introduction to Veritas FlashSnap Agent for Symmetrix” on page 21, introduces VxFAS operations.
■ Chapter 3. “Using Veritas FlashSnap Agent for Symmetrix with VxVM” on page 33, describes how to use the Veritas Volume Manager and the VxFAS commands in an EMC environment.
■ Chapter 4. “Using the Veritas FlashSnap Agent for Symmetrix with VEA” on page 63, describes how to perform VxFAS operations from the VERITAS Enterprise Administrator console.
■ Chapter 5. “Troubleshooting” on page 85, describes how to recover from common errors encountered while using VxFAS.
Getting helpFor technical assistance, visit http://support.veritas.com and select phone or email support. Use the Knowledge Base search feature to access resources such as TechNotes, product alerts, software downloads, hardware compatibility lists, and our customer email notification service.
Diagnostic tools are also available to assist in troubleshooting problems associated with the product. These tools are available on disc or can be downloaded from the Veritas FTP site. See the README.VRTSspt file in the /support directory for details.
For information on purchasing product documentation, visit http://webstore.veritas.com.
Product message numberIf you encounter a product error message, record the unique message number preceding the text of the message. When contacting Symantec Technical Support, either by telephone or by visiting the Technical Support website, be sure to provide the relevant message number. Technical Support will use this message number to quickly determine if there are TechNotes or other information available for you.
A unique message number is an alpha-numeric string beginning with the letter “V”. For example, in the message number:
V-5-732-8018 At least one disk must be specified
the “V” indicates that this is a Symantec product error message. The text of the error message follows the unique message number.
The text of the error message follows the unique message number.

9OverviewVeritas FlashSnap Agent for Symmetrix
Veritas FlashSnap Agent for SymmetrixVeritas FlashSnap Agent for Symmetrix combines the strengths of the Symantec products with specific enhancements to manage EMC TimeFinder product. VxFAS comprises the following products:
■ Veritas FlashSnap Agent for Symmetrix
An extension to the EMC Corporation TimeFinder product that uses special features within the Veritas File System (VxFS) and Veritas Volume Manager (VxVM).
■ Veritas Cluster Server (VCS) Agents for Veritas FlashSnap Agent for Symmetrix.
An add-on feature to VxFAS to provide high availability.
Veritas FlashSnap Agent for Symmetrix utilitiesEMC TimeFinder is a business continuance solution that lets you create and use copies of EMC Symmetrix devices while the standard devices remain online and accessible. Business Continuance Volume (BCV) devices contain copies of Symmetrix standard (STD) devices and provide redundancy. You can temporarily detach BCV mirrors and use the BCVs to perform backups, testing, and other administrative tasks.
VxFAS is a set of commands that allow you to use EMC TimeFinder in conjunction with the Veritas Volume Manager. You can use Volume Manager to build disk groups and volumes on Symmetrix STD devices, then use VxFAS on the Volume Manager disk groups. Using VxFAS commands, you can:
■ Associate Symmetrix STD devices in a disk group with identical BCV devices.
■ Initiate TimeFinder mirroring for Symmetrix STD devices in a disk group.
■ Split Symmetrix STD devices from their BCV devices and create duplicate volumes on the BCV devices. You can use the resulting BCV volumes for administrative tasks such as backups and testing.
■ Reattach and resynchronize the STD and BCV devices. The devices can be remirrored from the STD copy or restored from the BCV copy.
■ Detach the STD devices from their BCV devices.
10 OverviewVeritas Cluster Server Agents for Veritas FlashSnap Agent for Symmetrix
Note: VxFAS uses SYMCLI internally to perform operations on EMC Symmetrix storage arrays. VxFAS also performs validations and rule checks before and after the SYMCLI operations. This slows VxFAS operations compared to SYMCLI operations.
Veritas Cluster Server Agents for Veritas FlashSnap Agent for Symmetrix
Veritas Cluster Server lets you monitor systems and application services, and restart services on a different system when hardware or software fails. Veritas Cluster Server Agents for Veritas FlashSnap Agent for Symmetrix are add-ons to Veritas Cluster Server to enable such high availability for the VxFAS. For a detailed description of this feature, see the VERITAS Cluster Server Agents for VERITAS FlashSnap Agent for Symmetrix Installation and Configuration Guide.
11OverviewEMC Symmetrix disk arrays
EMC Symmetrix disk arraysThe EMC Symmetrix disk array is an integrated cached disk array with capabilities such as internal mirroring, RAID-S, and striping. EMC TimeFinder supports mirroring of data by associating STD type devices with BCV type devices to establish an STD-BCV pair (mirror). This mirror can later be split and each split device can be used separately for backup, testing, and other applications.
The Symmetrix disk array has various device types, which include:
■ Standard/primary device (STD)
■ Business Continuance Volume (BCV)
■ 2-way mirror (mirror-2), 3-way mirror (mirror-3), 4-way mirror (mirror-4)
■ RAID-S
■ Remote Data Facility (RDF1, RDF2)
These devices can be combined to create additional configurations, such as STD-mirror-3 and RDF1-RAID-S.
Device namesDisks in Volume Manager disk groups have two names:
If the EMC PowerPath feature is installed, device names can be in a format other than c#t#d#[s#]. Depending on the PowerPath release, device names use one of the following formats:
■ c#t#d#[s#]
■ emcpower#c
When using PowerPath, make sure that you specify the correct PowerPath device name format to VxFAS commands.
device name The physical disk device name (or disk access name). This usually takes the form c#t#d#[s#]
disk name The Volume Manager disk name (or disk media name). This is the logical name given to the disk by the Volume Manager or the administrator.

12 OverviewEMC rules for Volume Manager
EMC rules for Volume ManagerEMC provides Volume Manager with a set of rules to ensure that Volume Manager works correctly with intelligent storage hardware in an EMC environment. Most of the rules optimize the Volume Manager configuration on Symmetrix devices and prevent inappropriate configurations. These rules apply to Volume Manager tasks such as creating a disk group, adding disks to a disk group, and allocating storage for a volume.
The underlying hardware configuration within a Symmetrix disk array may provide a misleading view to Volume Manager. For example, Symmetrix can divide an internal physical disk into two or more parts called hyper volumes or hypers. Each hyper can participate in setting up a different logical device as a Logical Unit Number (LUN) visible to the host. VxVM and the dynamic multi-pathing (DMP) feature interpret these devices to be two different disks, and you can create a mirrored VxVM volume on these disks. However, this mirrored volume has no redundancy because parts of all the mirrors reside on the single disk shared by the underlying LUNs. The EMC rules provide information that can be used to avoid such situations. There are two types of rules:
■ Alert rules improve performance and ensure that any new Volume Manager objects are compatible with the FlashSnap Agent for Symmetrix. These rules warn about situations that can result in a configuration with objects that cannot be administered by VxFAS, potential incompatibilities between objects, or performance loss.
■ Prevent rules try to avoid situations that can cause loss of data protection and availability. These rules help you and Volume Manager prevent inappropriate configurations, such as creating a mirrored volume on Symmetrix devices that are really part of the same physical disk or adding incompatible disks to a disk group.
Note: The rules are not checked when the disk groups and volumes are created using the VxVM Allocator service.

13OverviewEMC rules for Volume Manager
Disk group rulesThis section summarizes the EMC rules that apply to Volume Manager disk groups. Following are the prevent rules:
■ Adding CKD, VCMDB (Volume Logix Database), DRV (Dynamic Reallocation) types of Symmetrix devices to a Volume Manager disk group
■ Adding a write-disabled (WD) Symmetrix device
These devices cannot be used for I/O operations so should not be added to a VxVM disk group.
The alert rules warn against doing the following:
■ Mixing devices of type STD with devices of type BCV in the same Volume Manager disk group.
VxFAS cannot operate on a disk group with a mix of STD and BCV devices.
■ Mixing devices of type non-RDF with devices of type RDF in the same Volume Manager disk group
The RDF and non-RDF type of devices have different types of SRDF protections and hence they cannot be added to the same device group. So VxFAS cannot operate on such a device group.
■ Mixing devices of type R1 with devices of type R2 in the same Volume Manager disk group
R1 and R2 type of devices cannot be added to the same device group, so VxFAS cannot operate on such device groups.
■ Mixing RDF devices from different RA groups in the same Volume Manager disk group
Devices from different RA groups cannot be grouped, so VxFAS cannot operate on such device groups.
■ Adding Symmetrix and other storage type devices to a Volume Manager disk group

14 OverviewEMC rules for Volume Manager
■ Adding gatekeeper devices, as defined through the SYMAPI library, to a Volume Manager disk group
EMC recommends not using gatekeeper devices for I/O operations.
■ Removing devices that were attached using VxFAS commands from a disk group. See “Attaching devices” on page 41.
Removing an attached device from a disk group invalidates the VxFAS attachments and prevent restore or remirror with the corresponding disk group.
■ Destroying a disk group that contains devices that were attached using VxFAS commands
If you destroy a disk group having valid attachments while it is established with another disk group, then you will not be able to split it using VxFAS. If the disk group was not established, then the device group and stale pairing information stay in the Symmetrix database. This may cause unexpected behavior if you try to use the devices from the deleted disk group in further operations without a proper cleanup and a complete array rescan operation. See “To perform array rescan operation:” on page 16 for more information on array rescan operation.
15OverviewEMC rules for Volume Manager
Volume rulesThis section summarizes the EMC rules that apply to Volume Manager volumes.
■ The subdisks of a plex cannot reside on multiple device types, such as a combination of Symmetrix and other devices or Symmetrix devices of different protection levels.
■ A column of a striped or RAID-5 plex cannot reside on the same Symmetrix back-end device as another column of the plex.
Breaking this rule introduces a single point of failure (same back-end device) in the Volume Manager configuration.
■ A column of a striped or RAID-5 plex on a Symmetrix disk must be based on a different RAID group from another column of the plex.
■ The subdisks of a mirror cannot reside on the same Symmetrix back-end device as any other subdisk of another mirror.
Breaking this rule introduces a single point of failure (same back-end device) in the Volume Manager configuration.
■ If one subdisk of a plex resides on a PowerPath parent device, all other subdisks of the same plex must also reside on PowerPath parent devices.
■ If one subdisk of a plex resides on an RDF device, all subdisks of the plex must reside on RDF devices with the same RA number.
■ The stripe size for a striped or RAID-5 plex must be 128K.
The volume rules apply while creating the volume using the vxassist command, resizing the volume using vxassist or vxresize commands, or mirroring the volume using vxassist or vxmirror commands.
Unenforced rulesThe EMC rules for volumes are not enforced in the following situations:
■ For layered volumes. In an EMC environment, VxVM cannot create layered volumes with vxassist make|convert command.
■ The vxassist command does not support layered volumes in an EMC environment. If you change the layout of a volume, the resulting volume does not comply with EMC rules, and there is no way to salvage the original volume.
■ With the -o override option.
■ The Volume Manager hot-relocation feature is disabled in an EMC environment.
16 OverviewTask roadmap
Task roadmapThis section summarizes Volume Manager and FlashSnap Agent for Symmetrix tasks. The tasks are grouped into required setup tasks and optional maintenance tasks. The procedures for these tasks are included in later chapters. To perform these tasks at the command line, go to “Using Veritas FlashSnap Agent for Symmetrix with VxVM” on page 33. To perform these tasks using the Veritas Enterprise Administrator, go to “Using the Veritas FlashSnap Agent for Symmetrix with VEA” on page 63.
Setup tasks (required)
To install and set up the FlashSnap Agent for Symmetrix:
Install the FlashSnap Agent for Symmetrix package (VRTSfas). See the Veritas Storage Foundation Installation Guide and the Veritas FlashSnap Agent for Symmetrix Release Notes.
To perform array rescan operation:
VxFAS uses the agent framework provided by the Veritas Enterprise Administrator service. When StorageAgent starts, VxFAS initiates discovery (array rescan) of the local Symmetrix arrays attached to the host. It collects the configuration information about the local Symmetrix arrays and updates the agent database. This database is then used and updated in subsequent VxFAS operations.
Before executing any VxFAS operation, ensure there is no rescan operation in progress on the array or the VxFAS operation will fail.
Note: It is important that at least one successful rescan was performed on the given array before any VxFAS operation is run.
The array rescan operation is invoked automatically after the StorageAgent starts and runs periodically depending on the interval configured. The default interval is 24 hours. The array rescan can also be invoked manually whenever needed. See “Configuring options for EMC Symmetrix arrays in the StorageAgent” on page 65 for more information on how to modify the default interval and invoke array rescan manually.
To determine if a rescan operation is in progress on an array, look for the Discovering EMC Symmetrix Arrays task in the VEA console task pane.
It is advisable to perform the array rescan immediately after configuration changes are made using tools other than VxFAS utilities. For example, if you change the state of some BCV devices from NR to RW using SYMCLI, you should

17OverviewTask roadmap
start the rescan operation on that array. This ensures that the agent database contains the correct and latest configuration information about those devices.
Note: Changing an array configuration using external tools (such as SYMCLI) and not performing a rescan on the array invalidates the configuration information in the agent database. This may cause the VxFAS commands to fail unexpectedly.
To set up devices and volumes:
1 Add devices to Volume Manager. Create a disk group (if necessary) and add STD devices to the disk group.
2 Create volumes in the disk group that contains STD devices.
3 Scan devices to update the Symmetrix configuration information.
4 Attach Symmetrix STD devices to BCV devices to create STD-BCV pairs through disk group or device pair operations.
5 Mirror the STD devices to BCV devices. This initiates TimeFinder mirroring for the devices. An optional secondary disk group (BCV disk group) name can be specified with which STD devices are synchronized. If no name is specified, the currently attached BCV disk group is taken as default.

18 OverviewTask roadmap
Administrative tasks (optional)
To use BCV mirrors for administrative tasks
1 Split the STD-BCV disk group pairs. This temporarily splits the BCV devices from the STD devices and creates a disk group with duplicate volumes on the BCV devices. Up to 16 such BCV disk groups can be created through a series of attach, mirror and split operations on the STD disk groups with different BCV disk groups, one at a time. This allows up to 16 BCV devices associated to each STD device in an STD disk group, but at a time only one BCV device can be in synchronization with the STD device in the disk group. Split operation allows the user to specify the name of the BCV disk group to be created after split operation in the command line. If the user does not specify the BCV disk group name, a default BCV disk group name is selected.
2 Use the split BCV disk groups for administrative tasks such as backups and testing.
Resynchronize STD and BCV devices
After splitting the STD-BCV disk group, the STD and BCV devices can be resynchronized. There are two ways to do resychronization:
■ Mirror. This operation can be used on the STD-BCV disk group pair after the BCV disk group is no longer needed for administrative tasks and you want the BCV disk group to be synchronized with the STD disk group. This copies data from the STD devices in the STD disk group to the BCV devices in the BCV disk group.
■ Restore. This operation can be used on the STD-BCV disk group pair when you want to replace the contents of the STD devices in the disk group with the contents of the BCV devices in a BCV disk group. This may be necessary if the data on the STD devices is corrupted. This copies data from the BCV devices to the STD devices.
There are two ways of specifying the BCV disk group with which the STD disk group can be resynchronized:
■ Reattach. The vxsymsetup reattach command reattaches the STD disk group with one of the previously associated BCV disk groups.
■ Specifying the BCV disk group in resynchronization commands (that is, in mirror or restore commands).
19OverviewTask roadmap
To detach an STD-BCV pair
1 Split the STD-BCV device pairs. This splits the BCV devices from the STD devices and creates a disk group with duplicate volumes on the BCV devices.
2 Detach the STD devices from the BCV devices. This breaks the connection between the STD and BCV devices.
3 Use detachall to detach all the attached BCV devices from the STD devices. This breaks the attachment and association between the STD and all the associated BCV devices corresponding to the STD disk group.
4 The detach and detachall operations can be done on a disk group. detach breaks the attachment and association between the STD and BCV devices of the corresponding disk groups. If detachall is specified, all the attached BCV devices from the STD devices of the specified STD disk group are detached. See “Detaching devices” on page 53.
To monitor objects
■ Use Veritas Enterprise Administrator to view information about Volume Manager objects and Symmetrix devices.
■ Use the vxprint or vxsymquery commands to view information about Volume Manager objects. See “Viewing device information” on page 56.
Enable VxFAS trace messages
VxFAS operations write trace messages to the StorageAgent log file /etc/vx/isis/StorageAgent/StorageAgent.log. This log is useful when trying to identify a VxFAS problem. By default, only critical trace messages are logged. You can increase the level of tracing if you think that a VxFAS operation is behaving erroneously or is giving unexpected results. To increase the level of trace messages for VxFAS, enter:
# vxregctl /etc/vx/isis/Registry setvalue \
Software/VERITAS/VRTSobc/pal33/Agents/StorageAgent/Providers/vx_emc_symmetrix \
TRACELEVEL REG_INT 3
# vxregctl /etc/vx/isis/Registry setvalue \
Software/VERITAS/VRTSobc/pal33/Agents/StorageAgent/Providers/vxtf \TRACELEVEL REG_INT 3
The TRACELEVEL attribute value can be set from 0 to 6, where 0 indicates all possible trace messages. Setting the TRACELEVEL attribute to 0 increases the log file size considerably.

20 OverviewTask roadmap
Chapter
2Introduction to Veritas FlashSnap Agent for Symmetrix
This chapter explains how to perform the various tasks on the Veritas FlashSnap Agent for Symmetrix (VxFAS). These tasks include mirroring the Business Continuance Volumes (BCV) with the standard device (STD), splitting the STD-BCV pairs, creating usable volumes on the BCV devices, and remirroring or restoring the primary devices from the corresponding BCV devices.
Business continuance processesBCVs are Symmetrix devices that are specially configured in Symmetrix to be dynamic mirrors. After BCVs are created, they can be split from their production mirrored volumes and used for loading data warehouses, testing new applications, running batch jobs, making backups, and other functions that typically disrupt normal business support. BCVs can also be used to restore the environment following testing or system changes, and can be locally mirrored (RAID-1) for additional protection.
Each BCV device has its own host address and is configured as a standalone Symmetrix device. The Veritas FlashSnap Agent for Symmetrix business continuance sequence is initiated and controlled from a single host. This sequence involves three processes:
■ Setting, or establishing, a BCV as an additional mirror of a VxVM volume within a disk group.

22 Introduction to Veritas FlashSnap Agent for SymmetrixVxFAS components
■ After the BCVs are established as a mirror of the disk group, the BCV disk group can be separated, or split, from the standard Symmetrix disk group with which it was previously paired.
At this point, the BCV disk group has valid data and is available for backup or other host processes through the new volumes. A different set of BCVs can then be attached, mirrored, and split with the same set of STD disks to get a different point-in-time copy of the data in the STD disk group. This way up to 16 snapshots can be created for an STD, but only one BCV can be in an established state with the STD at a time.
■ After host processes on the BCV disk group volumes are complete, the BCV disk group can again be mirrored to the standard Symmetrix disk group to acquire new data for other business continuance processes or to update the standard volume with the data from the completed business continuance processes.
VxFAS componentsThe main components of Veritas FlashSnap Agent for Symmetrix are:
■ Standard devices and standard device mirrors
■ BCV devices and mirrors
■ VxVM Disk Groups, Volumes, and VxFS File Systems
BCV devices and Standard devices reside in the same cabinet.
standard devices
Standard Symmetrix devices are configured for typical Symmetrix operation under a designated protection method, such as RAID-1, RAID-S, SRDF. The standard device can have any mirror structure (RAID-1, RAID-S, or RAID with SRDF). There can be up to three mirrors because establishing a BCV pair requires assigning the BCV device as the next available mirror of the standard device. Symmetrix standard devices can be used as VxVM disks and included in VxVM disk groups. Non-Symmetrix disks are ignored during Veritas FlashSnap Agent for Symmetrix operations.
BCV devices A BCV device is a standard Symmetrix device for dynamic mirroring. A BCV device has additional attributes that allow it to independently support host applications and processes. A BCV device can be RAID-1 or SRDF protected, but not RAID-S protected.
mirrors After a BCV device is established as a mirror of a standard device, the two devices together constitute a BCV pair. The pair is comprised of two types of mirrors: the standard device mirrors and the BCV mirror.

23Introduction to Veritas FlashSnap Agent for SymmetrixVxFAS components
standard device mirrors
Each mirror contains a copy of the data contained in the standard device. There can be up to three standard device mirrors.
BCV mirrors A BCV mirror is a standard mirror (one of M2, M3, or M4) that is assigned upon creation of the BCV pair.
VM Disk Groups
Symmetrix devices can be used as VM disks and included in VxVM disk groups, volumes, and VxFS file systems. While Symmetrix internal TimeFinder operations are performed at the device level, VxFAS provides the necessary logical mapping and control functions to allow TimeFinder operations to be carried out at the disk group level.
Snapshots of STD disk group
A BCV mirror can be split with the STD disk group to create a snapshot of the STD disk group. This process creates a BCV disk group that is an exact copy of the STD disk group.
24 Introduction to Veritas FlashSnap Agent for SymmetrixVxFAS operations
VxFAS operationsVeritas FlashSnap Agent for Symmetrix is used to provide a foundation for various host business continuance processes. The following operations are available through host commands described in this guide.
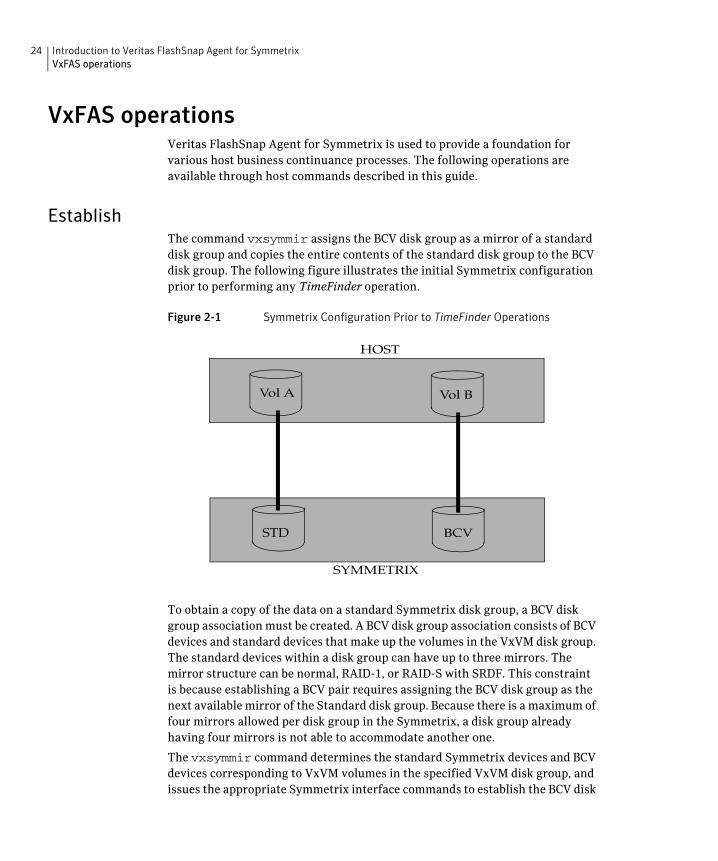
EstablishThe command vxsymmir assigns the BCV disk group as a mirror of a standard disk group and copies the entire contents of the standard disk group to the BCV disk group. The following figure illustrates the initial Symmetrix configuration prior to performing any TimeFinder operation.
Figure 2-1 Symmetrix Configuration Prior to TimeFinder Operations
To obtain a copy of the data on a standard Symmetrix disk group, a BCV disk group association must be created. A BCV disk group association consists of BCV devices and standard devices that make up the volumes in the VxVM disk group. The standard devices within a disk group can have up to three mirrors. The mirror structure can be normal, RAID-1, or RAID-S with SRDF. This constraint is because establishing a BCV pair requires assigning the BCV disk group as the next available mirror of the Standard disk group. Because there is a maximum of four mirrors allowed per disk group in the Symmetrix, a disk group already having four mirrors is not able to accommodate another one.
The vxsymmir command determines the standard Symmetrix devices and BCV devices corresponding to VxVM volumes in the specified VxVM disk group, and issues the appropriate Symmetrix interface commands to establish the BCV disk
Vol A Vol B
BCV
HOST
SYMMETRIX
STD
25Introduction to Veritas FlashSnap Agent for SymmetrixVxFAS operations
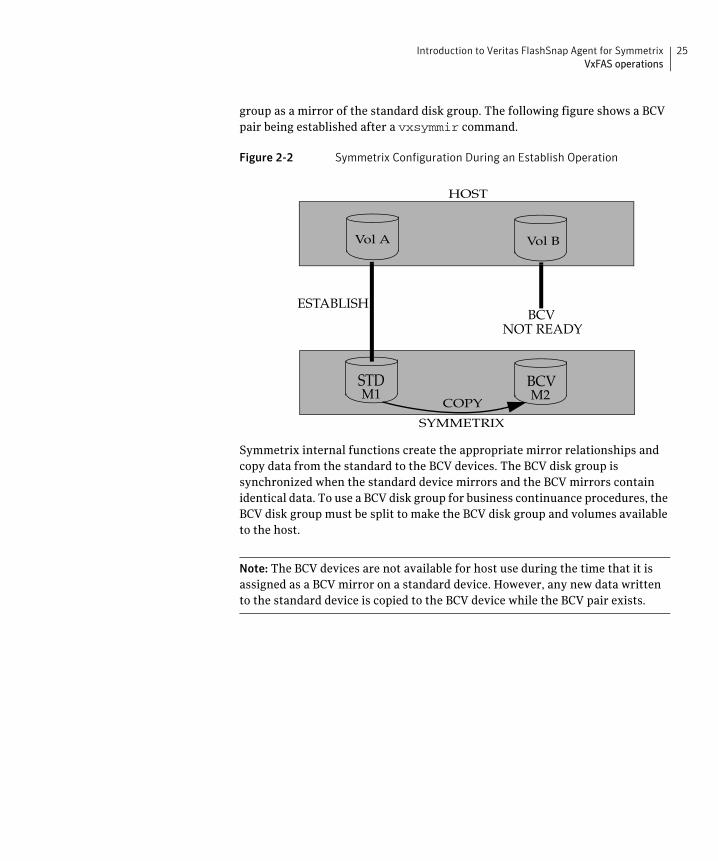
group as a mirror of the standard disk group. The following figure shows a BCV pair being established after a vxsymmir command.
Figure 2-2 Symmetrix Configuration During an Establish Operation
Symmetrix internal functions create the appropriate mirror relationships and copy data from the standard to the BCV devices. The BCV disk group is synchronized when the standard device mirrors and the BCV mirrors contain identical data. To use a BCV disk group for business continuance procedures, the BCV disk group must be split to make the BCV disk group and volumes available to the host.
Note: The BCV devices are not available for host use during the time that it is assigned as a BCV mirror on a standard device. However, any new data written to the standard device is copied to the BCV device while the BCV pair exists.
Vol A Vol B
BCV
HOST
SYMMETRIX
STD
ESTABLISHBCV
NOT READY
M1 M2COPY

26 Introduction to Veritas FlashSnap Agent for SymmetrixVxFAS operations
SplitAfter an association is established between the STD and BCV devices, the BCV disk group contains a copy of the data from the STD device. Both devices have identical data until the vxsymsplit command is issued. The vxsymsplit operation makes the BCV disk group available to the host. The figure shows the result of the split operation.
Figure 2-3 Symmetrix Configuration After a Split Operation
The following operations are carried out by the split operation:
■ If the STD disks are mounted on a VxFS file system, I/O to the file system is frozen and buffers are flushed to ensure a consistent point-in-time image on the BCV devices. If a file system other than VxFS is in use, it must be unmounted.
■ Devices containing VxVM volumes are split from the STD devices.
■ VxFS file systems that were frozen are thawed after the split is complete.
■ The new disk group name has the original disk group name prefixed by bcv.
■ Volumes on the BCV disk group have names identical to the original volume name.
■ If the volumes on STD devices are mounted on VxFS file system, the BCV volumes are mounted by default.
Vol A Vol B
BCV
HOST
SYMMETRIX
STD
SPLIT
27Introduction to Veritas FlashSnap Agent for SymmetrixVxFAS operations
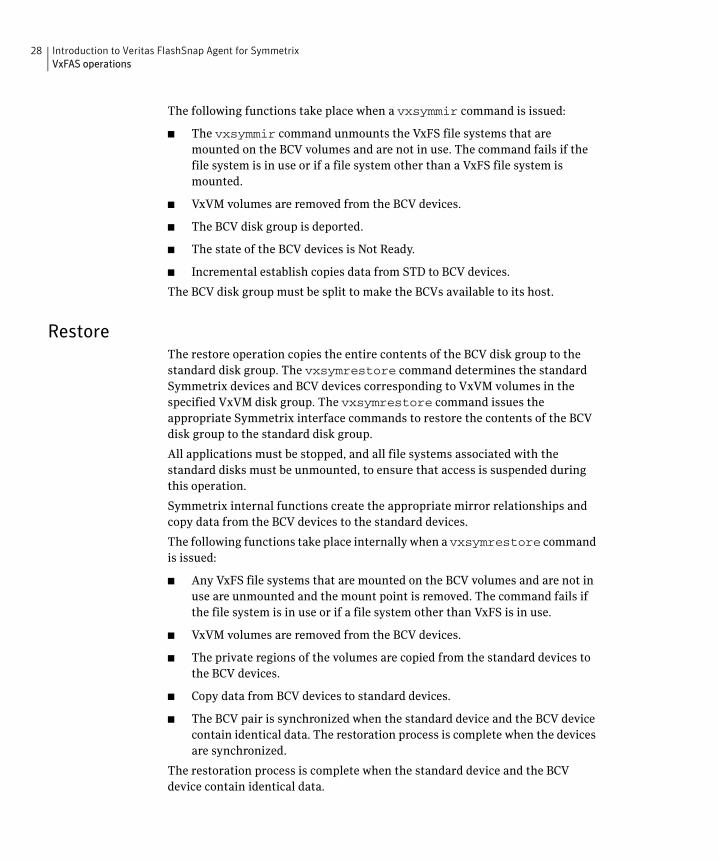
Any required operations can be done now. The following options are available:
■ Re-establish the BCV disk group (vxsymmir)
■ Restore data from the BCV disk group to its STD disk (vxsymrestore)
■ Establish a new pair consisting of the same BCV disk group with a new STD disk group (vxsymsetup)
■ Attach a new BCV disk group to current STD disk group for taking another snapshot through split operation after mirroring. In this way up to 16 snapshots of the STD disk group at a different instance in time can be taken. All these BCVs are associated with the STD disk
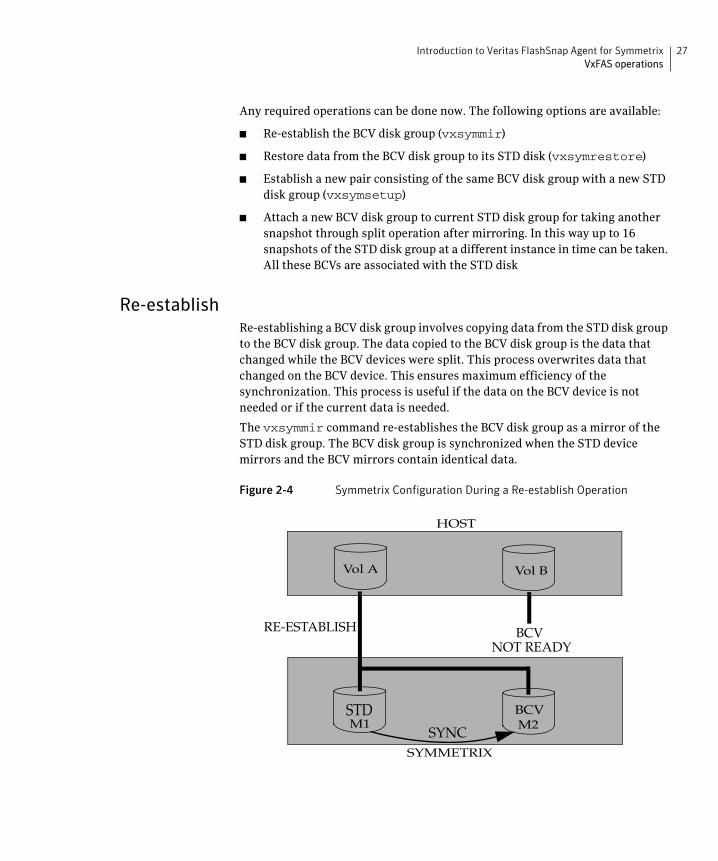
Re-establishRe-establishing a BCV disk group involves copying data from the STD disk group to the BCV disk group. The data copied to the BCV disk group is the data that changed while the BCV devices were split. This process overwrites data that changed on the BCV device. This ensures maximum efficiency of the synchronization. This process is useful if the data on the BCV device is not needed or if the current data is needed.
The vxsymmir command re-establishes the BCV disk group as a mirror of the STD disk group. The BCV disk group is synchronized when the STD device mirrors and the BCV mirrors contain identical data.
Figure 2-4 Symmetrix Configuration During a Re-establish Operation
Vol A Vol B
BCV
HOST
SYMMETRIX
STD
BCVNOT READY
M1 M2SYNC
RE-ESTABLISH
28 Introduction to Veritas FlashSnap Agent for SymmetrixVxFAS operations
The following functions take place when a vxsymmir command is issued:
■ The vxsymmir command unmounts the VxFS file systems that are mounted on the BCV volumes and are not in use. The command fails if the file system is in use or if a file system other than a VxFS file system is mounted.
■ VxVM volumes are removed from the BCV devices.
■ The BCV disk group is deported.
■ The state of the BCV devices is Not Ready.
■ Incremental establish copies data from STD to BCV devices.
The BCV disk group must be split to make the BCVs available to its host.
RestoreThe restore operation copies the entire contents of the BCV disk group to the standard disk group. The vxsymrestore command determines the standard Symmetrix devices and BCV devices corresponding to VxVM volumes in the specified VxVM disk group. The vxsymrestore command issues the appropriate Symmetrix interface commands to restore the contents of the BCV disk group to the standard disk group.
All applications must be stopped, and all file systems associated with the standard disks must be unmounted, to ensure that access is suspended during this operation.
Symmetrix internal functions create the appropriate mirror relationships and copy data from the BCV devices to the standard devices.
The following functions take place internally when a vxsymrestore command is issued:
■ Any VxFS file systems that are mounted on the BCV volumes and are not in use are unmounted and the mount point is removed. The command fails if the file system is in use or if a file system other than VxFS is in use.
■ VxVM volumes are removed from the BCV devices.
■ The private regions of the volumes are copied from the standard devices to the BCV devices.
■ Copy data from BCV devices to standard devices.
■ The BCV pair is synchronized when the standard device and the BCV device contain identical data. The restoration process is complete when the devices are synchronized.
The restoration process is complete when the standard device and the BCV device contain identical data.

29Introduction to Veritas FlashSnap Agent for SymmetrixVxFAS operations
The following figure shows the standard and BCV devices containing identical data after the restoration process is complete.
Figure 2-5 Symmetrix Configuration During a Restore Operation
Note: The device is not available for host use during the time that it is assigned as a BCV mirror on a standard device. However, any new data written to the standard device is copied to the BCV device while the BCV pair exists.
The BCV disk group must be split again before it can be used for BC procedures.
Incremental restoreThe incremental restore accomplishes the same thing as the restore process with one time-saving exception: the BCV copies only new data to the standard disk group that was updated on the BCV disk group while the BCVs were split. Any changed tracks on the standard disk group are also overwritten by the data on the corresponding track on the BCV disk group. This maximizes the efficiency of the synchronization process.
This process is useful if the results from running a new application on the BCV disk group were desirable, and you want to port the data and the new application to the standard disk group.
Vol A Vol B
BCV
HOST
SYMMETRIX
STD
BCVNOT READY
COPY
RESTORE

30 Introduction to Veritas FlashSnap Agent for SymmetrixVxFAS operations
Figure 2-6 Symmetrix Configuration During an Incremental Restore
Note: The vxsymmir and vxsymrestore commands, by default, perform incremental mirror and incremental restore between the associated STD-BCV disks. To perform full mirror or restore (which is required when the STD-BCV disks are being mirrored or restored for the first time), use the commands with the -o full option.
Vol A Vol B
BCV
HOST
SYMMETRIX
STD
BCVNOT READY
SYNC
INCR RESTORE

31Introduction to Veritas FlashSnap Agent for SymmetrixVxFAS features
VxFAS features
Multiple BCV support
Starting from microcode 5266 and SYMAPI 4.1, the Symmetrix maintains track tables for up to 16 BCVs per STD device with only one BCV mirrored at a time. This is a change from the previous versions of microcode where track information about only one BCV was maintained per STD device. Thus VxFAS commands now deal with multiple BCV disk groups for setup, split, remirror, and restore operations. This allows taking up to 16 snapshots of the STD disk group (one at a time) for which incremental mirroring or restore (which is relatively quick because only invalid tracks are updated) operations are possible. Rules for multiple BCV support include:
■ Multiple BCV support is at the disk group abstraction level, not the device level.
■ Toolkit does not allow successive attaching of multiple BCVs with one STD device before creating the first mirror with the previously attached BCV.
■ If an STD-BCV pair is attached, and no subsequent first mirror was created, a reattach of the same STD and different BCV will fail.
■ With a file option, you can specify the pairs that show the explicit correspondence between the STD and BCV devices.
■ For detaching a STD-BCV pair, the STD must be in split state.
■ The vxsymsetup command has a disk group reattach option for multiple BCV support.
■ Only one BCV device at a time can be in the synched or restored state for an STD device.
Unix standard command line options
All VxFAS commands follow the UNIX standard command syntax. All commands work at the disk group level. Operations on device pair are supported only for the attach and detach options of the vxsymsetup command.

32 Introduction to Veritas FlashSnap Agent for SymmetrixVxFAS features
Attachment rules
VxFAS commands follow the rules below about STD and BCV device attachments in a VxFAS disk group.
Control operations only on disk groups Because all operations are performed at the disk group level, there must be consistency within a disk group. Therefore VxFAS commands require that all the devices in an STD disk group have an attached BCV. If there is an STD device that does not have a BCV attached, the control operation is aborted and an error message is displayed. Control operations are carried out on the entire STD disk group, not on individual devices in the STD disk group.
Commands operate only on VxFAS generated device groupsVxFAS commands operate only on device groups created by VxFAS commands (vxsymsetup attach). Any device group created outside of VxFAS are not supported.
Support for moving devicesMoving a device from a device group to the required device group is done through user prompting and interaction. This is required during the attach operation if the device to be attached is in another device group.
Control operations strictly validate device consistency in disk groups and corresponding device groupsControl operations (establish/split/restore) are aborted if devices in the specified disk group do not belong to the device group.
Chapter
3Using Veritas FlashSnap Agent for Symmetrix with VxVM
This chapter describes how to use the Veritas Volume Manager and the Veritas FlashSnap Agent for Symmetrix commands in an EMC environment. The following topics are discussed in this chapter:
■ Adding devices to VxVM disk group
■ Creating volumes
■ Attaching devices
■ Mirroring disk groups
■ Splitting disk groups
■ Remirroring disk groups
■ Restoring disk groups
■ Reattaching disk groups
■ Detaching devices
■ Recovering crashed commands
■ Viewing device information
■ Disk group reconfiguration
■ Policy setting support for EMC rules for Volume Manager

34 Using Veritas FlashSnap Agent for Symmetrix with VxVMAdding devices to VxVM disk group
Adding devices to VxVM disk groupBefore you can use the Volume Manager and the FlashSnap Agent for Symmetrix, you must place the Symmetrix standard (STD) and BCV devices under VxVM control. New disks must be set up on the system, placed under Volume Manager control, and added to a disk group before volumes can be created on these disks.
All VxFAS commands follow the UNIX standard command syntax. All commands work at the disk group level. Device pair operations are supported only for the attach and detach options of the vxsymsetup command.
VxFAS commands require the StorageAgent running. Before running any VxFAS commands, ensure that StorageAgent is available on that host by executing the following command:
# /opt/VRTSobc/pal33/bin/vxpalctrl -a StorageAgent -c status
If the StorageAgent is not up, start it:# /opt/VRTSdsa/config/startup.sh start
Using EMC PowerPath devices with VxVMIn previous versions of VxVM, it was necessary to perform powervxvm init and powervxvm online to use EMC PowerPath devices with VxFAS.
In VxVM 4.0 release, the EMC PowerPath devices can be configured as foreign devices (see the vxddladm(1M) manual page for more information).
In VxVM 4.1 release, the EMC PowerPath devices can be autodiscovered using the third-party driver (TPD) coexistence feature of VxVM. EMC PowerPath devices can still be configured as foreign devices in VxVM 4.1 for VxFAS.
The following sections describe procedures for using PowerPath pseudo (emcpower) devices with VxFAS.
35Using Veritas FlashSnap Agent for Symmetrix with VxVMAdding devices to VxVM disk group
New installation
Configuring EMC PowerPath devices with foreign device support
If you are not already using EMC PowerPath devices with VxVM, perform the following procedure to put the PowerPath devices under VxVM control as foreign devices:
1 Make sure that there are no emcpower nodes in /dev/vx/rdmp and /dev/vx/dmp directories. If they exist, remove them.
2 Install EMC PowerPath software.
3 Make sure that emcpower devices are present in /dev/rdsk directory.
4 Disable the DMP Restore daemon:# /usr/sbin/vxdmpadm stop restore
5 Exclude the TPD coexistence support for EMC disk array from VxVM.# /usr/sbin/vxddladm excludearray libname=libvxemc.so
6 Configure emcpower devices as foreign devices for VxVM:# /usr/sbin/vxddladm addforeign
pathname=/dev/rdsk/emcpower*c# /usr/sbin/vxddladm addforeign
pathname=/dev/dsk/emcpower*c
7 Make the emcpower devices visible to VxVM:# /usr/sbin/vxdisk scandisks
8 Start the DMP Restore daemon that was previously stopped:# /usr/sbin/vxdmpadm start restore
9 Restart the StorageAgent.
Configuring EMC PowerPath devices with TPD coexistence feature
When upgrading a system to VxVM 4.1, an array support library (ASL) provided by Symantec makes information about any available EMC PowerPath devices available to VxVM. Such devices are configured in DMP as autoconfigured disks with DMP nodes. There is no need to configure these devices as foreign devices any more. See the Veritas Volume Manager Administrator’s Guide for more information about TPD coexistence feature of VxVM.

36 Using Veritas FlashSnap Agent for Symmetrix with VxVMAdding devices to VxVM disk group
Existing installation of EMC PowerPath devicesIf you have already configured emcpower devices for use with VxVM using powervxvm commands, perform the following procedure:
1 Remove emcpower nodes from /dev/vx/rdmp and /dev/vx/dmp directories:
# /etc/powervxvm remove
2 Disable the DMP Restore daemon:# /usr/sbin/vxdmpadm stop restore
3 Exclude the TPD coexistence support for EMC disk array from VxVM.# /usr/sbin/vxddladm excludearray libname=libvxemc.so
4 Configure emcpower devices as foreign devices for VxVM:# /usr/sbin/vxddladm addforeign
pathname=/dev/rdsk/emcpower*c# /usr/sbin/vxddladm addforeign
pathname=/dev/dsk/emcpower*c
Note: Alternatively, you can use the TPD coexistence feature of VxVM 4.1 to use EMC PowerPath devices as autoconfigured disks. See “Configuring EMC PowerPath devices with TPD coexistence feature” on page 35.
5 Make the emcpower devices visible to VxVM:# /usr/sbin/vxdisk scandisks
6 Start the DMP Restore daemon that was previously stopped:# /usr/sbin/vxdmpadm start restore
Using PowerPath native devicesPowerPath native devices can be used by VxVM 4.1 as they are, but you can remove DMP from the I/O path and configure these devices as foreign devices. Refer to Veritas Volume Manager Administator’s Guide for more information on foreign device support.
Note: EMC PowerPath devices must be initialized as simple disks only if they are used as foreign devices. For more information about limitations of foreign devices see Veritas Volume Manager Administator’s Guide.
Using VxVM commandsTo create a new Volume Manager disk group and add new devices to it, use the vxdg init command:
vxdg [-o verify|override] init diskgroup [medianame=]accessname...

37Using Veritas FlashSnap Agent for Symmetrix with VxVMAdding devices to VxVM disk group
where diskgroup is the Volume Manager disk group. accessname is the device name and medianame is the Volume Manager disk name.
To add new devices to an existing Volume Manager disk group, use the vxdg adddisk command:
vxdg -g diskgroup [-o verify|override] adddisk [medianame=]accessname
For example:# vxdg -g emcdg adddisk c1t1d1s2
EMC provides a set of rules to ensure that the Volume Manager operates with intelligent storage in an EMC environment. The vxdg command has a verify option that checks that the device being added conforms with the EMC rules. The verify option syntax is:
vxdg -g diskgroup -o verify adddisk accessname
If no EMC rules are broken, vxdg -o verify exits silently and without creating any Volume Manager objects. To create the specified objects, repeat the vxdg command without the -o verify option.
If any of the EMC rules are broken, vxdg -o verify displays a relevant error message and exits without creating any Volume Manager objects. To force Volume Manager to add or create an object that does not comply with the EMC rules, use the -o override option:
vxdg -g diskgroup -o override adddisk accessname
It is not advisable to override the EMC rules as it can result in severe performance degradation or loss of data redundancy. For more details on the EMC rules, see the “Overview” on page 7.
See the Veritas Volume Manager Administrator’s Guide or the vxdg(1M) manual page for details on adding devices to the Volume Manager.
38 Using Veritas FlashSnap Agent for Symmetrix with VxVMAdding devices to VxVM disk group
Notes
■ When a disk is placed under Volume Manager control, the disk is either initialized or encapsulated. Encapsulation preserves existing data on the disk in the form of volumes. Initialization destroys existing data on the disk. Encapsulation is recommended for the root/boot disk and any other disks that contain valuable data. Encapsulation requires a system reboot.
■ Disks that already belong to a disk group cannot be added to another disk group.
■ Disks cannot be added to deported disk groups.
■ The Volume Manager disk name must be unique within the disk group.
■ In an EMC environment, this command may display an error message that indicates that the task or selected disks do not comply with the EMC rules. If you choose to force the Volume Manager to add a disk that does not comply with the EMC rules, the resulting configuration may contain incompatible disks or objects that cannot be administered by VxFAS.
■ In an EMC environment, you cannot mix some device types in a Volume Manager disk group.
■ Encapsulated disks are not supported by VxFAS. Do not encapsulate disks that you plan to include in STD-BCV pairs.
■ For bootdg, all VxFAS functions except restore are supported. See the Veritas Volume Manager Administrator’s Guide or the vxdg(1M) manual page for details on how to check the bootdg.
■ If the STD devices in a disk group have attachments, the disk group cannot be destroyed. The disk group can be deported.
■ If one or more NR (not ready) devices were made RW (read-write) without using any toolkit command, you may have to run vxdctl enable to refresh the correct state of the device in VxVM. To check the state of a device (NR or RW), run the sympd list command.
■ VxFAS supports disk group names containing alphanumeric characters, hyphen (-) and underscore (_) only.
■ VxFAS does not support CVM shared disk groups, VxVM SAN disk groups, or disk groups containing VVR replicated volume groups (RVGs).
■ VxFAS supports snapshot operations on CDS type of disk groups. CDS is a license-enabled feature of VxVM and is applied at the disk group level. A CDS disk group is composed only of CDS disks (that is, disks with the VxVM disk format cdsdisk) and its cds attribute set to on.
39Using Veritas FlashSnap Agent for Symmetrix with VxVMCreating volumes
Creating volumesAfter the STD devices are added into a disk group, you can create volumes on the STD devices. To create volumes, use the vxassist command:
vxassist -g diskgroup [-o verify|override] make volume_name \ length
[attribute...]
Example:vxassist -g emcdg make volemc 50m
The vxassist command has a verify option that checks whether the volume being created or changed conforms to the EMC rules. Use the verify option as follows:
vxassist -g diskgroup -o verify make volume_name length [attribute...]
If no EMC rules are broken, vxassist -o verify exits silently and without creating any Volume Manager objects. To create the specified objects, repeat the vxassist command without the -o verify option.
If any of the EMC rules are broken, vxassist displays a relevant error message and exits without creating any Volume Manager objects. If you want to force the Volume Manager to add or create an object that does not comply with the EMC rules, use the -o override option:
vxassist -g diskgroup -o override make volume_name length [attribute...]
Overriding the EMC rules is not recommended as it can result in a configuration with objects that are incompatible or objects that cannot be administered by VxFAS, or cause performance degradation and loss of data redundancy.
For more details on the EMC rules, see “EMC rules for Volume Manager” on page 12. See the Veritas Volume Manager Administrator’s Guide or the vxassist(1M) manual page for details on creating volumes.

40 Using Veritas FlashSnap Agent for Symmetrix with VxVMCreating volumes
Notes
■ The volume size must be less than or equal to the available free space on the disks.
■ A striped volume requires at least two disks.
■ If no disks are specified in the command, Volume Manager uses the available space on disks in the specified disk group.
■ A mirrored volume requires at least two disks. If logging is enabled, the volume requires at least one additional disk.
■ The data in a concatenated or striped volume is not protected against disk failure unless the volume is mirrored. At least one additional disk is required to mirror a volume.
■ In an EMC environment, this task may display an error message that indicates that the task or specified disks do not comply with the EMC rules. If you choose to force the Volume Manager to create a volume that does not comply with the EMC rules, you may not be able to use VxFAS to administer the resulting volume.
■ EMC rules are enforced when a volume is resized. Volumes resized using thevxassist growto|growby command have to comply with EMC rules.
■ vxassist does not support layered volumes in an EMC environment, VxVM cannot create layered volumes with the vxassist make|convert command. If you change the layout of a volume, the resulting volume may not comply with EMC rules and there is no way to salvage the original volume.
■ A stripe size of 128 KB or its multiple is recommended for striped and RAID-5 volumes in an EMC environment. You can modify the /etc/default/vxassist file to ensure a default stripe size of 128 kilobytes. Add the following line to the file:
stwidth=128kb
41Using Veritas FlashSnap Agent for Symmetrix with VxVMAttaching devices
Attaching devicesThe vxsymsetup command sets up the pairing information for STD and BCV devices. This command must be run before you run any other VxFAS commands.The vxsymsetup command attaches an STD device to a BCV device to create an STD-BCV pair (or attachment). You can move devices from a device group to the required group.
There are various ways of specifying multiple STD-BCV pairs for vxsymsetup command to make using the attach/detach options easier. These options are:
■ Specifying disk groups (-g PriDg:SecDg). Only one pair of disk group is allowed.
■ Specifying multiple pairs with a file name (-o filename=filename)
■ Specifying multiple pairs of devices separated by a comma(,) with individual STD-BCV device names separated by colon(:).
To attach an STD device to a BCV device, use the following commands:vxsymsetup -g PriDg [-o enclosure_sno=Symmetrix-id] \
-s PriDev:SecDev[,PriDev:SecDev,...] [-n] attach
vxsymsetup -g PriDg [-o enclosure_sno=Symmetrix-id] \-o filename=file [-n] attach
vxsymsetup -g PriDg:SecDg [-n] attach
where:
PriDg is the VxVM disk group to which the STD devices currently belong.
SecDg is the VxVM disk group to which the BCV devices currently belong.
Symmetrix-id is the Symmetrix serial ID of STD/BCV devices.
PriDev and SecDev are STD and BCV device names. If the -o enclosure_sno option is specified, use Symmetrix device names. Without the -o enclosure_sno option, use VxVM disk access name.
file is the file containing device pairs.
Examplesvxsymsetup -g emcdg -s c0t0d0s2:c0t6d0s2 attach
vxsymsetup -g emcdg -o enclosure_sno=000111222333 \-s 012:0A8 attach
vxsymsetup -g emcdg:bcvdg attach
vxsymsetup -g emcdg -o filename=file attach
The entries in the file will be:#STD #BCVc0t0d0s2 c0t6d0s2

42 Using Veritas FlashSnap Agent for Symmetrix with VxVMAttaching devices
or this when enclosure_sno is specified:#STD #BCV012 0A8
After setting up an STD-BCV pair, mirror the device pair (see “Mirroring disk groups” on page 43) before you perform any of the following VxFAS tasks:
■ Split
■ Resynchronization
■ Restore
■ Reattach
Notes
■ The specified STD device must belong to a disk group containing only STD devices.
■ The specified STD and BCV devices must have compatible device types.
■ The specified STD and BCV devices must have identical capacities.
■ The specified STD and BCV devices must belong to same Symmetrix.
■ Encapsulated disks are not supported by VxFAS. Avoid using encapsulated disks to set up an STD-BCV pair.
■ bootdg can be used for all operations except restore.
■ The disk group attach operation may not find a pairing solution, even if one exists, because no backtracking is done while finding pairs.

43Using Veritas FlashSnap Agent for Symmetrix with VxVMMirroring disk groups
Mirroring disk groupsThe vxsymmir command mirrors STD devices in a disk group. This command initiates TimeFinder mirroring for the Symmetrix STD devices that correspond to the specified disk group. The STD devices are mirrored to Symmetrix BCV devices. Use the vxsymmir command with -o full option to mirror Symmetrix STD devices for the first time with the selected BCV devices. To mirror Symmetrix STD devices, use the following command:
vxsymmir -g Pridg[:SecDg] [-n] [-o full] [-o wait]
where:
PriDg is the VxVM disk group to which the STD devices currently belong.
SecDg is the VxVM disk group to which the BCV devices currently belong and it is associated with PriDg.
With multiple BCV support, you can associate up to 16 secondary disk groups with the primary disk group. If the secondary disk group is not specified, the primary disk group is mirrored to the currently attached secondary disk group. If the secondary disk group is specified, the primary disk group is mirrored to the specified secondary disk group.
All of the disks in the specified disk group are mirrored. The -n option runs the command without a confirmation request. If the -o full option is not specified, the incremental mirror is created. If the -o wait option is specified, the command waits until all devices are synchronized.
Examplesvxsymmir -g emcdg -o full
While Symmetrix devices are being mirrored, do not perform any tasks on them until the process completes. This command may fail if a synchronization or split operation is in progress on one of the devices.
If the mirroring is being created for the first time with the BCV devices, and the -o full option is not specified, a message is displayed informing the user that incremental mirroring is not possible.
After the initial mirroring completes, you must split the device pair before performing any other (see “Splitting disk groups” on page 44).
Notes
■ This task copies all data from a Symmetrix STD device to a BCV device.
■ All the STD devices in the specified disk group must be paired with BCV devices.
■ This task may take several minutes to complete.

44 Using Veritas FlashSnap Agent for Symmetrix with VxVMSplitting disk groups
Splitting disk groupsAfter you have mirrored the STD devices to BCV devices, you can split the BCV devices from the STD devices, then use the BCV devices for administrative tasks, such as backups and testing, while the STD devices remain online.
The vxsymsplit command splits a Symmetrix STD-BCV pair and creates a new disk group on the BCV devices. The vxsymsplit also creates a set of volumes (that are identical to the STD volumes and have the same names) in the BCV disk group. The new BCV volumes are visible to VxVM and are available to applications. The BCV disk group is referred to as the alternate disk group and its volumes are referred to as alternate volumes.
Microcode 5x66 supports instasplit. This feature returns the command quickly while continuing the operation in the background. The vxsymsplit command supports this feature through -o type=instant option. The vxsymmir or vxsymrestore commands fail if a background split is in progress for any associated STD or BCV device on which a mirror or restore operation is executed. The vxsymsplit command also supports the differential split feature using the -o type=diff option.
To split an STD-BCV disk group, use the following commands:vxsymsplit -g PriDg[:Secdg] [-o wait] [-n] \
[-t timeout] [-o type=split-type] [-F FSType]\[-m snapshot_mount_point] [-o ro|rw|nm]
vxsymsplit -o filename=file [-o wait] [-n] [-t timeout] \[-o type=split-type] [-F FSType]
where:
PriDg is the VxVM disk group to which the STD devices currently belong.
SecDg is the VxVM disk group created after the vxsymsplit completes, to which the BCV devices belong.
The vxsymsplit operation splits all the Symmetrix STD devices that belong to the specified disk group from their BCV devices. The name of the secondary disk group created after the split operation is determined by the argument SecDg. When the secondary disk group name is not specified, a default name is selected. The format of this default name is bcvPriDg[n], where n=m+1 such that m is the largest positive integer with bcvPriDg[m] being an imported VxVM disk group.
For example, if the PriDg name is emcdg, the default name for the secondary disk group will be one of the following:
bcvemcdgbcvemcdg1bcvemcdg2...
The -n option runs the command without a confirmation.

45Using Veritas FlashSnap Agent for Symmetrix with VxVMSplitting disk groups
The vxsymsplit operation creates all the VxVM objects that are in the primary disk group in the secondary disk group using the same names. If any VxFS file systems are mounted on the primary VxVM volumes, vxsymsplit mounts VxFS file systems on the corresponding secondary VxVM volumes. The default BCV mount point directory is /name_of_the_BCV_dg[n], where n is the lowest available positive integer such that the directory name name_of_the_BCV_dg_n does not exist. If the -m option is specified, instead of the default mount point, all the VxFS file systems on the secondary VxVM volumes are mounted under the specified mount point. The specified mount point must satisfy following conditions:
■ Absolute path name must be specified
■ If the path name already exists, it must be a directory
■ If the path name does not already exist, it must be possible to create a directory with that name.
The -o mount_options option specifies the mount options for the BCV file systems. If -o nm option is specified, VxFS file systems will not be mounted on BCV volumes and -m option is ignored. The rw (read write) option is the default mount option for the file systems.
The -F option is used if the VxFS file system is mounted on STD volumes. If this option is not specified and a VxFS file system on an STD is mounted, vxsymsplit exits with an error message. The vxsymsplit operation rejects the mount and timeout options if -F is not specified.
The -t option specifies the file system freeze timeout in seconds. This is the total timeout value (for all STD-BCV pairs). If the timeout value is not specified on the command line, vxsymsplit checks the environment variable VXFS_FREEZE_TIMEOUT. If this variable is set to a positive integer, vxsymsplit uses this value. If the timeout is not specified on the command line or with the environment variable, vxsymsplit calculates and uses the default timeout value: 14 seconds multiplied by the number of STD-BCV pairs.
46 Using Veritas FlashSnap Agent for Symmetrix with VxVMSplitting disk groups
The -o type=split-type option is specified, the split is one of the supported split types: diff (for differential) or instant. The diff split type performs a differential (or incremental) synchronization between the first mirror of the BCV devices involved in the operation and their additional mirrors (local or remote). This option can only be used if the Symmetrix Differential Data Facility (SDDF) is enabled in the Symmetrix disk array (see the Symmetrix array documentation from EMC for more information). The instant split type performs a quick foreground split at the director ports while continuing the actual split in the background.
Note: Instasplit is a new feature in microcode 5x66 for split operations. Instasplit makes the split command return quickly while continuing the operation in the background. The vxsymmir/vxsymrestore commands fail if the background split is in progress for any associated STD or BCV device on which the mirror/restore operation is executed. The vxsymquery command reports status for a background instasplit in progress for a set of devices.
Examplevxsymsplit -g emcdg:bcvdg
This creates a disk group named bcvdg on BCV devices. The volumes in the emcdg disk group are duplicated in the bcvdg disk group with the same names.
After a split is performed on the STD-BCV device pair, the devices can be remirrored (see “Remirroring disk groups” on page 47), restored (see “Restoring disk groups” on page 49), or detached (see “Detaching devices” on page 53).
Notes
■ All of the devices involved in this task must be in the synchronized or restored state.
■ If more than one disk is found with duplicate disk IDs, Volume Manager chooses the disk for the disk group using the following rules:
Import the first non-NR-non-WD STD disk, ignore all BCVsIf no STD disk is found then import the first non-NR-non-WD BCV
■ This task may take a few minutes to complete.
■ If instant split is specified, followed immediately by an incremental establish operation, the split will fail with a “background split is in progress” message. An incremental restore operation will succeed.
47Using Veritas FlashSnap Agent for Symmetrix with VxVMRemirroring disk groups
Remirroring disk groupsAfter using the BCV devices for administrative tasks, you can remirror the STD devices to the BCV devices. This reattaches and resynchronizes the STD and BCV devices. The data is incrementally copied from the STD devices to the BCV devices.
The vxsymremir command or (vxsymmir without the -o full) option remirrors Symmetrix STD devices in a disk group. This command also removes the alternate volumes created by the vxsymsplit command. Use the vxsymremirk or vxsymmir command to mirror Symmetrix devices that were previously mirrored and split.
To remirror Symmetrix devices, use any of the following commands:vxsymremir -g PriDg [-n] [-o wait]vxsymmir -g Pridg[:SecDg] [-n] [-o wait]
where:
PriDg is the VxVM disk group to which the STD device currently belongs.
SecDg is the VxVM disk group to which the BCV device currently belongs.
The -n option runs the command without a confirmation request.
The vxsymremir or vxsymmir commands unmount any VxFS file systems that are not in use and are mounted on VxVM volumes on the secondary disk group, then removes the mount points. If the volumes with mounted VxFS file systems are in use, the file systems are not unmounted and vxsymremir or vxsymmir aborts with an error message. If this happens, use the fuser -ck command to kill the processes that use these mount points (but do not unmount the file system). Then run the command again.
The remirror command tries to remove all VxVM objects from the BCV devices that are paired with the STD devices underlying the volumes in the specified disk group. After the objects are removed, the devices are removed from the BCV disk group, the BCV disk group is deported, and the Symmetrix mirror operation is initiated.
If you proceed with the remirror task, any changes in the BCV disk group are lost.
Examplesvxsymremir -g emcdgvxsymmir -g emcdg
If you intend to back up the remirrored data, you must split the devices first (see “Splitting disk groups” on page 44).
48 Using Veritas FlashSnap Agent for Symmetrix with VxVMRemirroring disk groups
Notes
■ This task removes all Volume Manager objects from the BCV devices.
■ This task incrementally copies data from STD devices to BCV devices.
■ All of the devices involved in this task must be in the split state.
■ The STD devices in the specified disk group must be paired with BCV devices.
■ Before running this task, unmount any file systems (other than VxFS file systems) that are mounted on volumes on BCV devices and stop any I/O to BCV devices.
■ BCV devices must not be active when the vxsymremir or vxsymmir command is invoked.
■ The vxsymremir command is supported in this release only for backward compatibility and will not be supported in the next VxFAS release. Use the vxsymmir command for incremental mirroring.

49Using Veritas FlashSnap Agent for Symmetrix with VxVMRestoring disk groups
Restoring disk groupsIf you want to replace the contents of the STD devices with the contents of the BCV devices, you can restore the STD devices from the BCV devices. This may be necessary if data on the STD devices is damaged. The data is incrementally copied from the BCV device to the STD device.
The vxsymrestore command restores data from the secondary VxVM disk group to the primary VxVM disk group. If -o full or -R option is specified, all tracks from the BCV devices are copied to the STD devices. Without these options only the changed tracks are copied. The corresponding BCV devices must be defined previously by the vxsymsetup command.
To restore Symmetrix devices, use the following command:vxsymrestore -g PriDg[:SecDg] [-nR] [-o wait] [-o full] [-o
config]
The disk group containing STD devices is referred to as primary disk group (PriDg). The disk group containing BCV devices is referred to as secondary disk group (SecDg).
If the secondary disk group is not specified, the disk group containing BCV disks that are currently attached to the STD disks is selected as the secondary disk group.
The vxsymrestore command fails if file systems are mounted on the STD volumes. In this case, unmount the STD file systems and run vxsymrestore again.
The vxsymrestore unmounts any file systems that are not in use and are mounted on the BCV volumes. The mount points are removed. If the file systems are mounted and are in use, vxsymrestore does not unmount them and aborts the operation with an error message.
If the mount points are in use, identify the processes using the fuser -c command. Close these applications or kill the processes if required. It is not necessary to unmount the file system on the BCV disk group. Run the vxsymrestore command.
The vxsymrestore command restores the configuration of the secondary disk group to the primary disk group; the previous configuration of the primary disk group is overwritten.
If the -o config option is specified, vxsymrestore restores the VxVM disk group configuration from the secondary disk group to the primary disk group. This option is included only for backward compatibility. This is the default behavior.
The -n option runs the command without a confirmation request.
Examplevxsymrestore -g Pridg:Secdg

50 Using Veritas FlashSnap Agent for Symmetrix with VxVMRestoring disk groups
If you intend to use the BCV disk group, previously restored with STD disk group, you must split the disk groups first (see “Splitting disk groups” on page 44).

51Using Veritas FlashSnap Agent for Symmetrix with VxVMRestoring disk groups
Notes
■ This task restores data from BCV devices to STD devices.
■ All of the devices in a disk group involved in this task must be in the split state.
■ Before running this task, unmount any file systems that are mounted on the STD disk group and stop any I/O to the BCV and STD devices.
■ BCV devices must not be in active use when the vxsymrestore command is invoked.
■ Both the primary and secondary VxVM disk groups are deported before the restore starts. None of the disks participating in the operation can be used while the restore operation is in progress.
■ The vxsymrestore command is not supported on the bootdg.
■ The vxsymrestore command waits until the restore operation is completed if the -o wait option is specified. This process may take more time depending on the number of invalid tracks. The vxsymquery command displays the restoration status.
■ Options -R and -o config are supported in this release only for backward compatibility and will not be supported in the next VxFAS release.

52 Using Veritas FlashSnap Agent for Symmetrix with VxVMReattaching disk groups
Reattaching disk groupsThe vxsymsetup reattach command attaches BCV devices to STD devices that were earlier mirrored and then split.
The secondary disk group must have been previously split from the primary disk group.
To reattach an STD disk group and BCV disk group use the following command:vxsymsetup -g PriDg:SecDg [-n] reattach
Notes
■ All the devices in each of the primary disk groups and the secondary disk groups must be of the same type: REGULAR, RDF1, or RDF2.
■ All the devices in each of the primary disk groups and the secondary disk groups must be in the same state.
■ The operation succeeds if for every STD device in the primary disk group, there is a BCV device to which it can reattach.

53Using Veritas FlashSnap Agent for Symmetrix with VxVMDetaching devices
Detaching devicesThe vxsymsetup detach command detaches a Symmetrix STD device from a BCV device. An STD-BCV pair must be detached before a disk is moved from one VxVM disk group to another.
The vxsymsetup detach command removes the pairing information previously set by the vxsymsetup attach command. If the disk group pair is specified, the command finds the STD-BCV pairs and detaches them. If a device pair is specified, detach is performed only for that device pair. After being detached, the pair cannot be incrementally mirrored or incrementally restored.
For detach operations on a disk group:
■ All devices in the primary disk group and secondary disk group must be attached.
■ None of the pairs can be in the Synchronized or Restored state.
For detach operations on device pairs:
■ The device pair must be previously attached.
■ The device pair must not be in the Synchronized or Restored state.
■ The device pair must be in the Split or Never Established state before detaching.
To detach STD devices from the BCV devices, use any of the following commands:
vxsymsetup -g PriDg [-o enclosure_sno=Symmetrix-id \-s PriDev:SecDev[,PriDev:SecDev,...] [-n]
detachvxsymsetup -g PriDg [-o enclosure_sno=Symmetrix-id \
-o filename=file [-n] detach
To detach a STD disk group from a BCV disk group use the following command:vxsymsetup -g PriDg:SecDg [-n] detach
where:
PriDg is the VxVM disk group to which the STD device currently belongs.
SecDg is the VxVM disk group to which the BCV device currently belongs.
Symmetrix-id is the Symmetrix serial ID of STD/BCV devices.
PriDev and SecDev are STD and BCV device names. If -o enclosure_sno is specified, use Symmetrix device names. Without the -o enclosure_sno option, use the VxVM disk access name.
file is the file containing device pairs.

54 Using Veritas FlashSnap Agent for Symmetrix with VxVMDetaching devices
Examplesvxsymsetup -g emcdg -s c0t0d0s2:c0t6d0s2 detachvxsymsetup -g emcdg -o enclosure_sno=000111222333 \
-s 012:0A8 detachvxsymsetup -g emcdg:bcvdg detachvxsymsetup -g emcdg -o filename=file detach
The entries in the file will be:#STD #BCVc0t0d0s2 c0t6d0s2
or this when enclosure_sno is specified:#STD #BCV012 0A8
The vxsymsetup detachall command detaches all the BCV devices from an STD device that were earlier attached or mirrored and split (and with which incremental mirror or incremental restore was possible). If only the primary disk group is specified, this operation is performed on all the STD devices in this VxVM disk group. If STD devices are specified, the command detaches all the BCV devices attached to or mirrored with these STD devices.
To detach all devices use the following commands:vxsymsetup -g PriDg detachallvxsymsetup -g PriDg [-o enclosure_sno=Symmetrix-id] \
-s PriDev[,PriDev,...] [-n] detachall
Examplesvxsymsetup -g emcdg detachallvxsymsetup -g emcdg -s 01A,01B detachall

55Using Veritas FlashSnap Agent for Symmetrix with VxVMRecovering crashed commands
Recovering crashed commandsThe vxsymrecover command can recover any of the following VxFAS commands if they crash:
■ vxsymsetup attach
■ vxsymsetup reattach
■ vxsymsetup detach
■ vxsymsetup detachall
■ vxsymsplit
■ vxsymmir
■ vxsymremir
■ vxsymrestore
When any of the above commands is executed, it creates the log file /etc/vx/emc.d/vxtflog.txt. The file exists only as long as the command is running. The log file remains when a command crashes. Run vxsymrecover to recover this crashed command.
Similarly, if any VxFAS commands are killed, it leaves a log in the log file. If any other VxFAS command is executed before recovering the crashed command, the command exits with an error message. In this case, run vxsymrecover to recover the crashed command first, then run any other VxFAS command.
Examplevxsymrecover

56 Using Veritas FlashSnap Agent for Symmetrix with VxVMViewing device information
Viewing device informationTo view information about devices or confirm the initialization or state of the devices, use the vxprint and vxsymquery commands.
The vxprint commandTo display information about Volume Manager objects, use the vxprint command:
vxprint [-g diskgroup]
Example
If c0t2d0s2 is added to VxVM disk group emcdg as disk02 and a volume named foo is created, vxprint displays the following information:# vxprint -g emcdgDisk group: emcdg
TY NAME ASSOC KSTATE LENGTH PLOFFS STATE TUTIL0 PUTIL0dg emcdg emcdg - - - - -
-
dm disk02 c0t2d0s2 - 4152640 - - --
v foo fsgen ENABLED 1331520 - ACTIVE --
pl foo-01 foo ENABLED 1331520 - ACTIVE --
sd disk02-01 foo-01 ENABLED 1331520 0 - --
The vxsymquery commandThe vxsymquery command displays the status of Symmetrix devices operated on by VxFAS. The vxsymquery command displays information about the state of devices in the specified VxVM disk group. If the disk group name is not specified, vxsymquery displays information about all VxVM disk groups under operation by VxFAS.
To display information about STD and BCV Symmetrix devices, use the vxsymquery command.
vxsymquery [-g PriDg] [-o multibcvs]vxsymquery -g PriDg -o verify[=synched|restored]
where:
PriDg is the VxVM disk group to which the STD devices currently belong.

57Using Veritas FlashSnap Agent for Symmetrix with VxVMViewing device information
If synched or restored is used with the -o verify option, vxsymquery checks if all the devices are in a synchronized or restored state, respectively.
The -o multibcvs option shows information for multiple BCVs. It shows device status for all the BCV devices attached to or mirrored with the STD devices. In the output, BCV devices currently attached to the STD devices are indicated by an asterisk (*) following the BCV device name.
After attaching STD device c0t1d0s2 to BCV device c2t2d4s2 using vxsymsetup attach, the vxsymquery output looks like this:
# vxsymquery -g emcdgSymmetrix id : 000183600433Device group : vxvm_emcdgPrimary Inv Tracks Secondary Inv Tracks State--------- ------------ ---------- -------------c0t1d0s2 0 c2t2d4s2 45 Split
An STD-BCV pair can be in one of the following states:
The -o verify option of vxsymquery indicates whether some or all device pairs in the specified disk group are in the Synchronized or Restored state. The verify=synched option checks whether the devices are in the Synchronized state. The verify=restored option checks whether the devices are in the Restored state. Because this option verifies the states of devices in a particular disk group, the disk group must be specified.
NeverEstab Never established state
SyncInProg Synchronization in progress
Synchronized Synchronization done
SplitInProg Split in progress
Split Split done
SplitNoInc Device cannot be incrementally established or restored
SplitBfrSync Split before synchronization
Restored Restore done
RestInProg Restore in progress
SplitBfrRest Split before restore

58 Using Veritas FlashSnap Agent for Symmetrix with VxVMViewing device information
Examplevxsymquery -g emcdg -o verify=synched
Notes:
■ No VxFAS operation, except the Query operation, can be executed when another VxFAS operation or recovery of a crashed VxFAS operation is already in progress on the same host.
■ A recovery operation for VxFAS (vxsymrecover command or from the GUI) cannot be executed when any VxFAS operation (except Query operation) or a recovery operation is already in progress on the same host.
59Using Veritas FlashSnap Agent for Symmetrix with VxVMDisk group reconfiguration
Disk group reconfigurationStarting with the Veritas Volume Manager 4.0 release, you can split an imported disk into two disk groups (vxdg split), join two imported disk groups into one disk group (vxdg join), or move specified objects together with their hierarchies from one imported disk group to another imported disk group (vxdg move).
After doing disk group split, join, or move operations on VxVM disk groups, if the disk group has valid VxFAS attachments, VxFAS reconfigured the corresponding device groups.
Disk group split, join, or move operations fail if any of the following validations fail:
■ For the destination disk group destdg, if the corresponding device group vxvm_destdg already exists, the type (Regular, RDF1, or RDF2) of the device group must be compatible with the STD devices being added to the device group.
■ For the destination disk group destdg, the STD devices being added to the device group vxvm_destdg (and those present in the device group if the device group already exists) must belong to the same Symmetrix array
■ For the destination disk group destdg, none of the STD devices being added to the device group vxvm_destdg (and those present in the device group if the device group already exists) can be in any of the following states:
Synchronized
Restored
Sync-in-progress
Restore-in-progress
■ If any of the STD devices in the disk group destdg involved in the move operation is in Split-before-sync (or Split-before-restored state), none of the devices in the device group vxvm_destdg can be in Split-before-restored (or Split-before-sync state).

60 Using Veritas FlashSnap Agent for Symmetrix with VxVMDisk group reconfiguration
If all the above validations pass, the following reconfiguration takes place for the specified disk group destdg:
■ The device group vxvm_destdg is created if it does not already exist
■ The STD devices moved to the disk group destdg are added to the device group vxvm_destdg
■ All the BCV devices attached to the STD devices are disassociated from their existing device group and are associated to the device group vxvm_destdg
■ If the device group corresponding to the source disk group for the operation becomes empty, it is destroyed.
While the operation is in progress, the file /etc/vx/emc.d/vxvmlog.txt is used to log the operation. If the operation crashes, you can recover using the vxsymrecover -o cmd=vxdg command after running the vxdg recover command. The following operations on the disk groups in the crashed operation cannot be performed until the recovery completes:
■ Disk group import
■ Disk group deport or destroy
■ Addition of disks to the disk group
■ Removal of disks from the disk group
■ Associating a DA record to different DM record in the disk group
■ Disk group split, join or move
Note: The device group reconfigurations mentioned above are performed for split, join, and move operations on the STD disk groups only. If split, join, or move operations are performed on an STD disk group, similar operations must be performed on disk groups containing attached BCV disks. To make new device group configuration reflect in agent database, a rescan operation is required on the Symmetrix array containing that device group.
In a high availability environment, reconfiguration of a device group for which the VxSymDevGrp resource is configured requires changes to that cluster configuration. See the Veritas Cluster Server Agents for Veritas FlashSnap Agent for Symmetrix Installation and Configuration Guide for more information on changes to cluster environment that must be done after reconfiguring the VxVM disk group using any of the above operations.
Disk Group Rename Operation
If a VxVM disk group having valid VxFAS attachments is renamed (using the -n option for the vxdg import and vxdg deport commands), VxFAS also renames

61Using Veritas FlashSnap Agent for Symmetrix with VxVMDisk group reconfiguration
the corresponding device group. For example, if the VxVM disk group mydg has valid VxFAS attachments and is renamed as newdg, the device group vxvm_mydg is renamed vxvm_newdg.
Note: After renaming the disk group, its corresponding device group is renamed. To make the new name of the device group appear in the agent database, a rescan operation must be performed on the Symmetrix array containing that device group.
In a high availability environment, after renaming a VxVM disk group, you must manually change the DgName attribute of the VxSymDevGrp type of resource corresponding to that VxVM disk group. See the Veritas Cluster Server Agents for Veritas FlashSnap Agent for Symmetrix Installation and Configuration Guide for more information on how to change the resource attribute.
62 Using Veritas FlashSnap Agent for Symmetrix with VxVMPolicy setting support for EMC rules for Volume Manager
Policy setting support for EMC rules for Volume Manager
EMC rules for Volume Manager are divided into optional and mandatory categories. Adding CKD, VCMDB (Volume Logix Database), DRV (Dynamic Reallocation), or GK (Gatekeeper) types of Symmetrix devices to a Volume Manager disk group is a mandatory configuration rule and is always checked. All the other configuration rules are optional and can be disabled.
The vxsymrule command can set the policy to check all rules or only the mandatory rules. The vxsymrule command also displays the current policy. The default policy is to check all the configuration rules. The rule checking policy can be set during the VxFAS installation and can be changed at any time.
To enable rules checking, type:# vxsymrule enable
To disable rules checking, type:# vxsymrule disable
To check current policy of rules checking, type:# vxsymrule mode

Chapter
4Using the Veritas FlashSnap Agentfor Symmetrix with VEA
This chapter describes how to use the FlashSnap Agent for Symmetrix (VxFAS) using the Veritas Enterprise Administrator (VEA) GUI interface. The following topics are covered in this chapter:
■ The VEA console
■ Configuring options for EMC Symmetrix arrays in the StorageAgent
■ Attaching devices
■ Mirroring devices
■ Splitting devices
■ Restoring devices
■ Detaching devices
■ Querying snapshot information
■ Recovering a crashed VxFAS operation
■ Recovering a crashed disk group reconfigure operation
■ Viewing object properties
■ Notes on VxFAS menu options

64 Using the Veritas FlashSnap Agent for Symmetrix with VEAThe VEA console
The VEA consoleThe VERITAS Enterprise Administrator console is the centralized interface through which you can perform various management operations on hosts or agents that join the Central Server. You can connect to multiple Central Servers from one console. To run VEA, you must have the VEA GUI client package, VRTSobgui, installed on your system.
See the Veritas Enterprise Administrator User’s Guide and the Veritas Storage Foundation Installation Guide for more information about the VEA console.

65Using the Veritas FlashSnap Agent for Symmetrix with VEAConfiguring options for EMC Symmetrix arrays in the StorageAgent
Configuring options for EMC Symmetrix arrays in the StorageAgent
The StorageAgent collects information about EMC Symmetrix arrays periodically and makes the Symmetrix devices and device group configuration information available for management.
Configure the options for the array:
1 Select Control Panel from the left pane. Expand the node under Central Server. Expand the node under the host where you are configuring the Symmetrix arrays. Select the StorageAgent node in the tree view.
2 Double click the EMC Symmetrix Arrays icon in the details view to display the following dialog box.
Set Symmetrix Polling Interval
The default polling interval is the interval at which the StorageAgent automatically refreshes the configuration information for the EMC Symmetrix arrays connected to that host. You can change the interval by specifying a new value in the Default Polling Interval field.
To refresh the configuration information manually, click the Rescan button.
66 Using the Veritas FlashSnap Agent for Symmetrix with VEAConfiguring options for EMC Symmetrix arrays in the StorageAgent
Caution: Rescanning the configuration information for the Symmetrix arrays may take a significant amount of time to complete.
All VxFAS operations fail if a rescan is in progress. To determine if a rescan operation is in progress, look for the Discovering EMC Symmetrix Arrays task in the VEA console task pane.
67Using the Veritas FlashSnap Agent for Symmetrix with VEAAttaching devices
Attaching devicesBefore you can set up TimeFinder mirroring, you must associate a Symmetrix standard (STD) device with a Business Continuance Volume (BCV) device. This procedure attaches an STD device to a BCV device to create an STD-BCV pair (or attachment).
To perform the attach operation:
1 Right click the STD disk group node in the tree view to display the context menu. The context menu has options corresponding to the operations that can be performed on this disk group. The same menu can be accessed from the main menu bar under the Actions menu.

68 Using the Veritas FlashSnap Agent for Symmetrix with VEAAttaching devices
STD Disk Group Context Menu
2 Click the VxFAS Attach... menu option. The following dialog is displayed:

69Using the Veritas FlashSnap Agent for Symmetrix with VEAAttaching devices
VxFAS Attach Dialog
3 You can specify a disk group containing BCV disks or individual STD-BCV disk pairs for the attach operation.
To specify a BCV disk group, select the Specify BCV Disk Group radio button, then select the name of the BCV disk group from the drop down list box.
To specify individual STD-BCV disk pairs:
a Select the Specify Disk Attachments radio button.
b Select the STD device from STD Disks list. A list of compatible BCV disks appears in the BCV Disks list.
c Select a BCV device from BCV Disks list.
d Click the Add button to add the selected STD-BCV pair to the Attachments list.
e Repeat step b through step d to specify more pairs.
f To remove a pair, select that pair in the Attachments list and click the Remove.
Note: The BCV Disks list shows only those BCV disks that are compatible with the selected STD disk and are not already selected for attachment with some other STD disk in the same VxVM disk group.
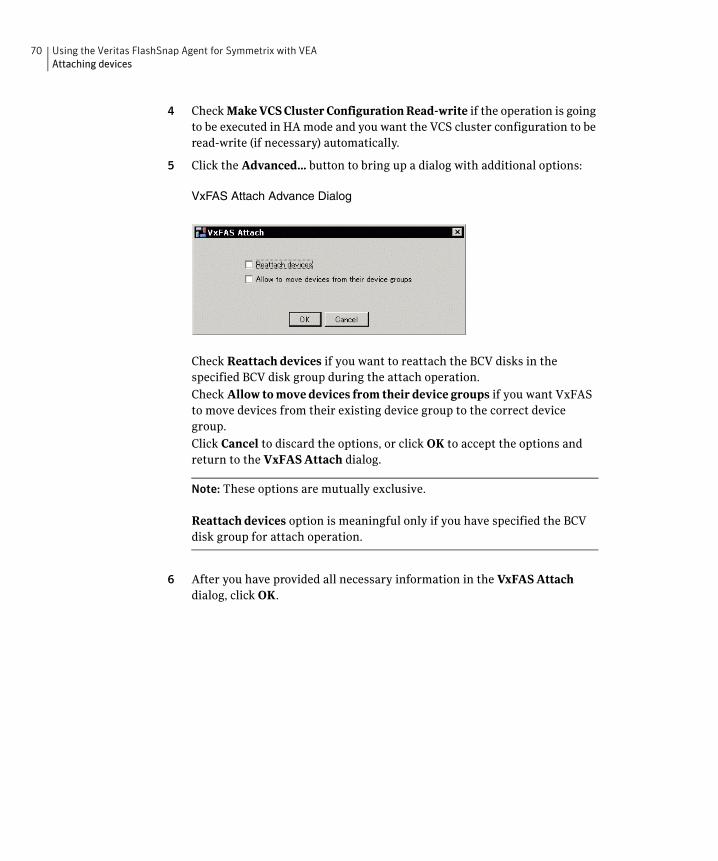
70 Using the Veritas FlashSnap Agent for Symmetrix with VEAAttaching devices
4 Check Make VCS Cluster Configuration Read-write if the operation is going to be executed in HA mode and you want the VCS cluster configuration to be read-write (if necessary) automatically.
5 Click the Advanced... button to bring up a dialog with additional options:
VxFAS Attach Advance Dialog
Check Reattach devices if you want to reattach the BCV disks in the specified BCV disk group during the attach operation.
Check Allow to move devices from their device groups if you want VxFAS to move devices from their existing device group to the correct device group.
Click Cancel to discard the options, or click OK to accept the options and return to the VxFAS Attach dialog.
Note: These options are mutually exclusive.
Reattach devices option is meaningful only if you have specified the BCV disk group for attach operation.
6 After you have provided all necessary information in the VxFAS Attach dialog, click OK.
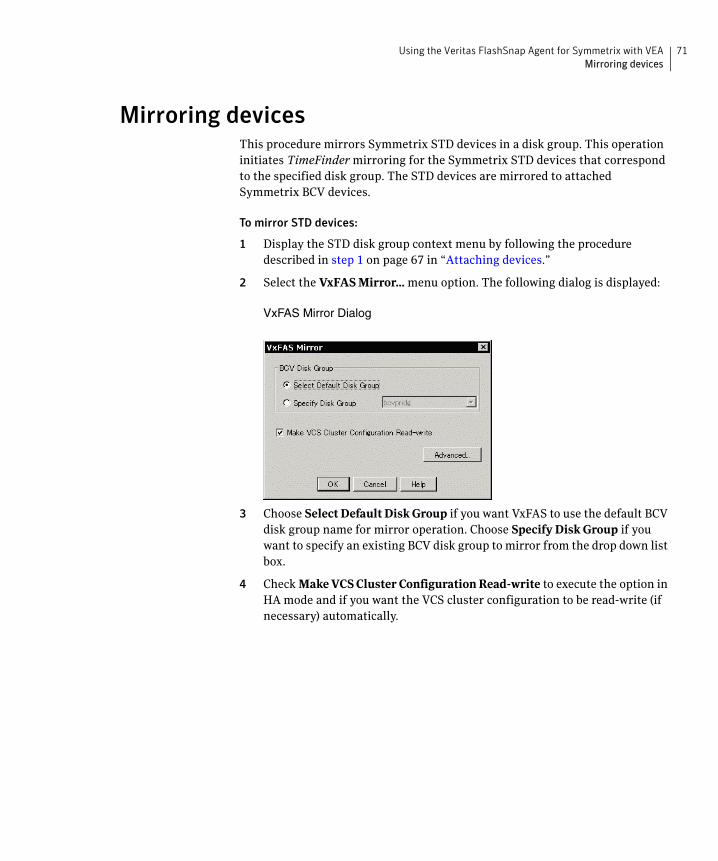
71Using the Veritas FlashSnap Agent for Symmetrix with VEAMirroring devices
Mirroring devicesThis procedure mirrors Symmetrix STD devices in a disk group. This operation initiates TimeFinder mirroring for the Symmetrix STD devices that correspond to the specified disk group. The STD devices are mirrored to attached Symmetrix BCV devices.
To mirror STD devices:
1 Display the STD disk group context menu by following the procedure described in step 1 on page 67 in “Attaching devices.”
2 Select the VxFAS Mirror... menu option. The following dialog is displayed:
VxFAS Mirror Dialog
3 Choose Select Default Disk Group if you want VxFAS to use the default BCV disk group name for mirror operation. Choose Specify Disk Group if you want to specify an existing BCV disk group to mirror from the drop down list box.
4 Check Make VCS Cluster Configuration Read-write to execute the option in HA mode and if you want the VCS cluster configuration to be read-write (if necessary) automatically.

72 Using the Veritas FlashSnap Agent for Symmetrix with VEAMirroring devices
5 Click the Advanced... button to bring up a dialog with additional options:
VxFAS Mirror Advance Dialog
Mirror Type specifies the type of mirror operation to carry out.
Select Full Mirror if this is the first time you are mirroring the disk group.
If you select Incremental Mirror, only changed disk tracks are copied to the BCV device.
Check Wait for Synchronization if you want the VxFAS operation to wait until the mirror synchronization completes.
Click Cancel to discard the options. Click OK to accept the options and return to the VxFAS Mirror dialog box.
6 After you have provided all necessary information in the VxFAS Mirror dialog, click OK.
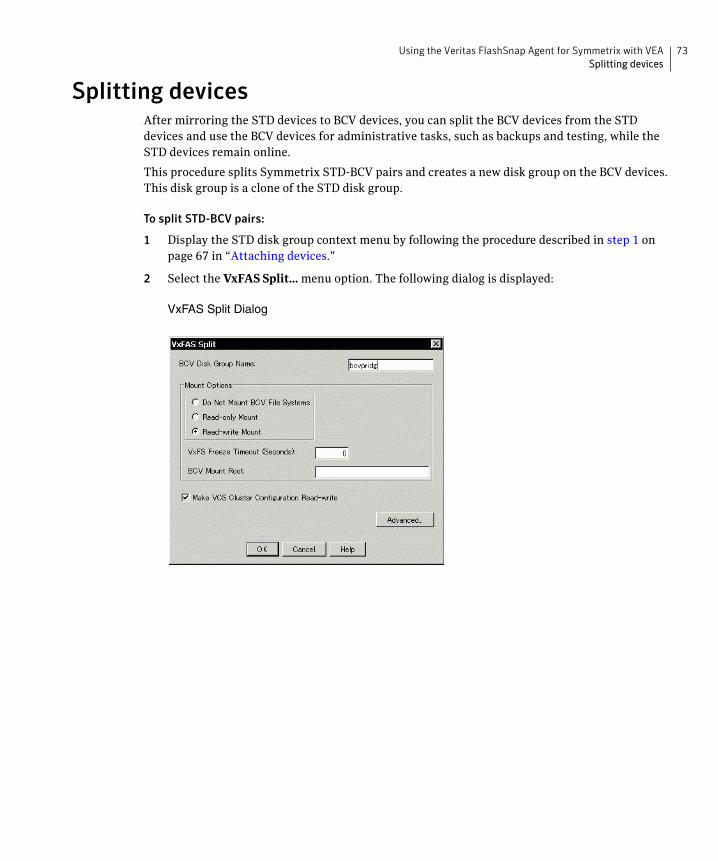
73Using the Veritas FlashSnap Agent for Symmetrix with VEASplitting devices
Splitting devicesAfter mirroring the STD devices to BCV devices, you can split the BCV devices from the STD devices and use the BCV devices for administrative tasks, such as backups and testing, while the STD devices remain online.
This procedure splits Symmetrix STD-BCV pairs and creates a new disk group on the BCV devices. This disk group is a clone of the STD disk group.
To split STD-BCV pairs:
1 Display the STD disk group context menu by following the procedure described in step 1 on page 67 in “Attaching devices.”
2 Select the VxFAS Split... menu option. The following dialog is displayed:
VxFAS Split Dialog

74 Using the Veritas FlashSnap Agent for Symmetrix with VEASplitting devices
3 In the BCV Disk Group Name text box you can specify the name of the BCV disk group that is created when the split is complete, or you can accept the default name shown.
4 The mount options indicate the options for the BCV file system.
5 Check Make VCS Cluster Configuration Read-write if the operation is going to be executed in HA mode and you want the VCS cluster configuration to be read-write (if necessary) automatically.
Options ■ Select Do Not Mount BCV File Systems if you do not want the file systems on BCV volumes to be mounted after the split operation.
■ Select Read-Only Mount if you want the BCV file systems to be mounted with read-only permissions after the split operation.
■ Select Read-write Mount if you want the BCV file systems to be mounted with read-write permissions after the split operation.
■ Specify the timeout value in seconds in the VxFS Freeze Timeout text box for freezing the VxFS file system on STD volumes.
■ Specify the location where you want to mount the BCV file systems in the BCV Mount Root text box.
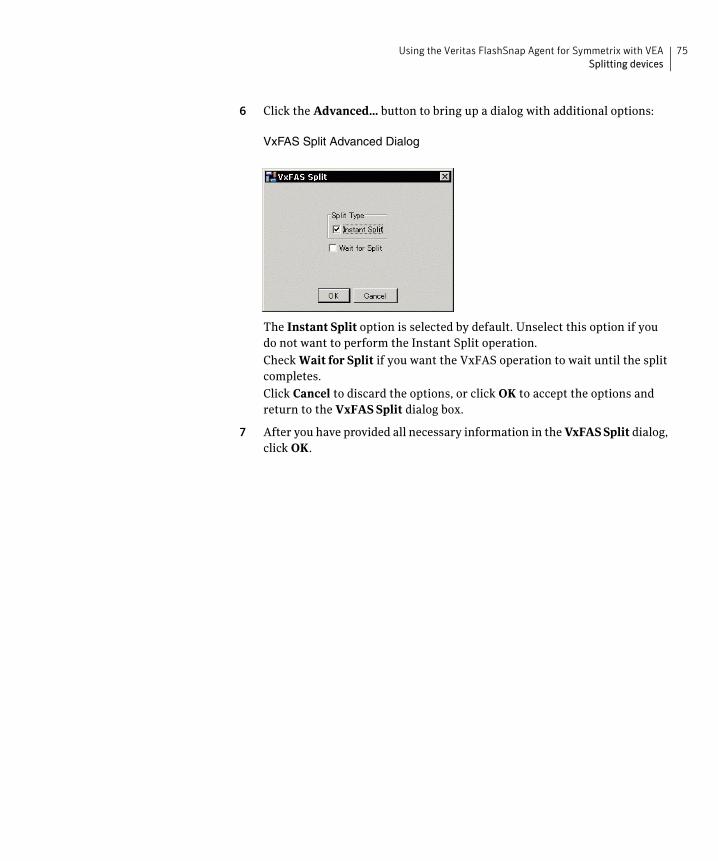
75Using the Veritas FlashSnap Agent for Symmetrix with VEASplitting devices
6 Click the Advanced... button to bring up a dialog with additional options:
VxFAS Split Advanced Dialog
The Instant Split option is selected by default. Unselect this option if you do not want to perform the Instant Split operation.
Check Wait for Split if you want the VxFAS operation to wait until the split completes.
Click Cancel to discard the options, or click OK to accept the options and return to the VxFAS Split dialog box.
7 After you have provided all necessary information in the VxFAS Split dialog, click OK.
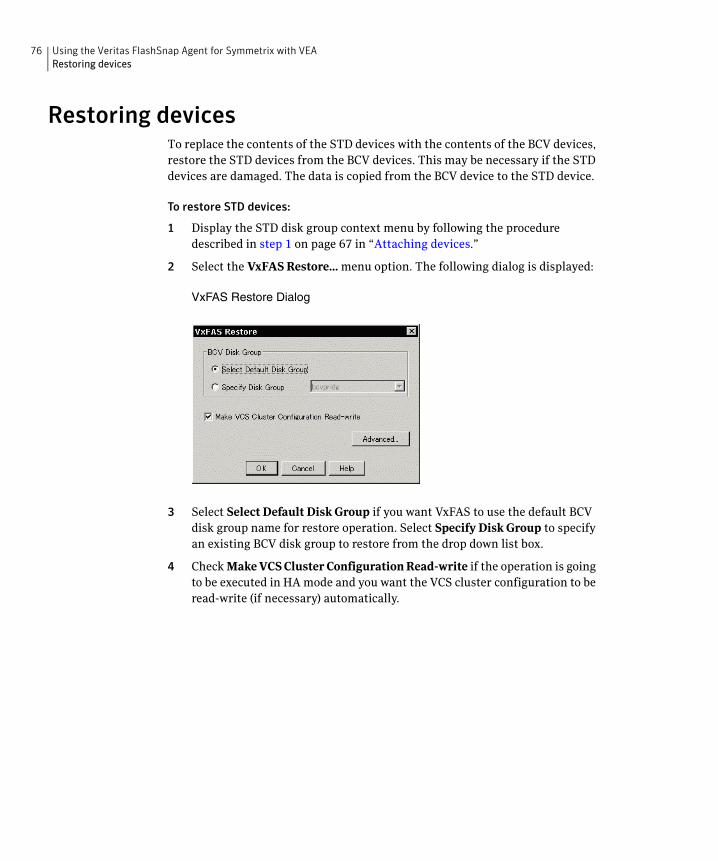
76 Using the Veritas FlashSnap Agent for Symmetrix with VEARestoring devices
Restoring devicesTo replace the contents of the STD devices with the contents of the BCV devices, restore the STD devices from the BCV devices. This may be necessary if the STD devices are damaged. The data is copied from the BCV device to the STD device.
To restore STD devices:
1 Display the STD disk group context menu by following the procedure described in step 1 on page 67 in “Attaching devices.”
2 Select the VxFAS Restore... menu option. The following dialog is displayed:
VxFAS Restore Dialog
3 Select Select Default Disk Group if you want VxFAS to use the default BCV disk group name for restore operation. Select Specify Disk Group to specify an existing BCV disk group to restore from the drop down list box.
4 Check Make VCS Cluster Configuration Read-write if the operation is going to be executed in HA mode and you want the VCS cluster configuration to be read-write (if necessary) automatically.

77Using the Veritas FlashSnap Agent for Symmetrix with VEARestoring devices
5 Click the Advanced... button to bring up a dialog with additional options:
VxFAS Restore Advanced Dialog
Restore Type specifies the type of restore operation to perform.
Select Full Restore if this is the first time you are restoring the disk group.
If you select Incremental Restore, only changed disk tracks are copied to the STD device.
Check Wait for Restore if you want the VxFAS operation to wait until the restore is completed.
Click Cancel to discard the options, or click OK to accept the options and return to the VxFAS Restore dialog box.
6 After you have provided all necessary information in the VxFAS Restore dialog, click OK.

78 Using the Veritas FlashSnap Agent for Symmetrix with VEADetaching devices
Detaching devicesThis procedure detaches Symmetrix STD devices from attached BCV devices. An STD-BCV pair must be detached before a disk is moved from one VxVM disk group to another.
To perform the detach operation:
1 Display the STD disk group context menu by following the procedure described in step 1 on page 67 in “Attaching devices.”
2 Select the VxFAS Detach... menu option. The following dialog is displayed:
VxFAS Detach Dialog
3 You can either specify a disk group containing BCV disks or individual STD-BCV disk pairs for the detach operation. To specify a BCV disk group, select Specify BCV Disk Group and select the name of the BCV disk group from the drop down list box. To specify individual STD-BCV disk pairs:
a Select Specify Disk Pairs to Detach.
b Select the STD device from the STD Disks list. A list of attached BCV disks appears in the Attached BCVs list.
c Select a BCV device from the Attached BCVs list.
d Click Add to add the selected STD-BCV pair to the Pairs to Detach list.
e Repeat step b through step d to specify more pairs.
f To remove a pair, select that pair in the Pairs to Detach list and click Remove.

79Using the Veritas FlashSnap Agent for Symmetrix with VEADetaching devices
4 Check Make VCS Cluster Configuration Read-write if the operation is going to be executed in HA mode and you want the VCS cluster configuration to be read-write (if necessary) automatically.
5 Click the Advanced... button to bring up a dialog with additional options:
VxFAS Detach Advanced Dialog
Check Detach all devices if you want to detach all the BCV disks that are attached to the STD device.
Click Cancel to discard the option, or click OK to accept the option and return to the VxFAS Detach dialog.
6 After you have provided all necessary information in the VxFAS Detach dialog, click OK.
Note: The Attached BCVs list shows only those BCV disks that are attached with the selected STD disk.

80 Using the Veritas FlashSnap Agent for Symmetrix with VEAQuerying snapshot information
Querying snapshot informationYou can query the snapshot information for a disk group or all disk groups on the server. You can query the status of the STD-BCV pairs in a disk group using this menu.
To query snapshot information
1 Display the STD disk group context menu by following the procedure described in step 1 on page 67 in “Attaching devices.”
2 Select the VxFAS Query... menu option. The following dialog is displayed:
VxFAS Query Dialog
3 You can specify a disk group or query setup information for all disk groups on the server.
To query snapshot information for a disk group, select the Query Disk group radio button and select the name of disk group from the drop down list box.
To query snapshot information for all disk groups on the server, select Query all disk groups.

81Using the Veritas FlashSnap Agent for Symmetrix with VEAQuerying snapshot information
4 Click the Advanced... button to bring up a dialog with additional options:
VxFAS Query Advanced Dialog
Select Display multi-BCV information to query the multiple BCV information for the disk group.
Select an option from Verify device states to determine if the devices can reach the preferred state.
Click Cancel to discard the option, or click OK to accept the option and return to the VxFAS Query dialog.
5 Click Query to start the query operation. The output of the query operation is shown in the text box on the VxFAS Query dialog.
6 You can clear the contents of the text box by clicking Clear.
7 Click Close to close the VxFAS Query dialog.
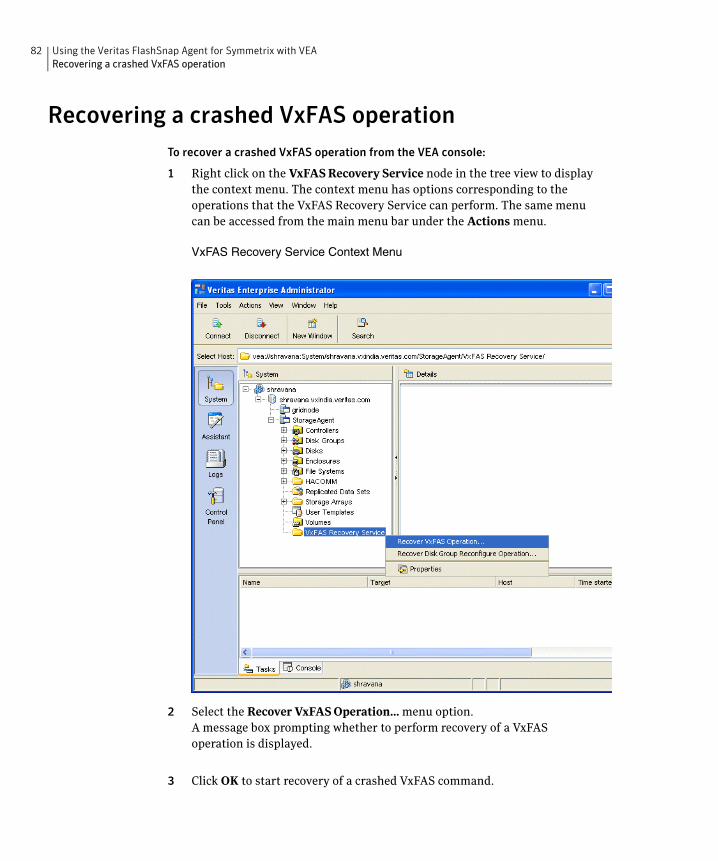
82 Using the Veritas FlashSnap Agent for Symmetrix with VEARecovering a crashed VxFAS operation
Recovering a crashed VxFAS operation
To recover a crashed VxFAS operation from the VEA console:
1 Right click on the VxFAS Recovery Service node in the tree view to display the context menu. The context menu has options corresponding to the operations that the VxFAS Recovery Service can perform. The same menu can be accessed from the main menu bar under the Actions menu.
VxFAS Recovery Service Context Menu
2 Select the Recover VxFAS Operation... menu option.A message box prompting whether to perform recovery of a VxFAS operation is displayed.
3 Click OK to start recovery of a crashed VxFAS command.

83Using the Veritas FlashSnap Agent for Symmetrix with VEARecovering a crashed disk group reconfigure operation
Recovering a crashed disk group reconfigure operation
To recover a crashed disk group reconfigure operation from the VEA console:
1 Display the VxFAS Recovery Service context menu by following the procedure described in step 1 on page 82 in “Recovering a crashed VxFAS operation.”
2 Select the Recover Disk Group Reconfigure Operation... menu option.A message box prompting whether you want recovery of a disk group reconfigure operation is displayed
3 Click OK to start recovery of a crashed disk group reconfigure operation.

84 Using the Veritas FlashSnap Agent for Symmetrix with VEAViewing object properties
Viewing object properties■ To view the snapshot-related properties of all disks, select the Assigned
Storage node under the EMC Symmetrix Array object node in the tree view of the left pane. The snapshot view displays the snapshot properties for all disks mapped to that host. Each row of the snapshot view corresponds to one disk, and the columns correspond to the properties of the disk.
■ To view the properties of a disk, click the disk node in the tree view of the left pane and select Properties from the context menu.
■ The Properties window contains a set of tabbed pages, each of which contains categorized information about the selected object. You can display a different page by clicking the appropriate tab label.
Notes on VxFAS menu options■ All the menu options for VxFAS operations are disabled during the interval
when the first rescan operation is in progress on the selected Symmetrix array after starting the StorageAgent.
■ Menu options for all VxFAS operations except Query are enabled only on disk groups containing STD disks.
■ Menu options for VxFAS operations (except the VxFAS Query operation) on a disk group are disabled if a VxFAS operation is already in progress on that disk group.
■ Menu options for only those VxFAS operations that are valid for a specified disk group are enabled on the menu. For example, after you perform the VxFAS Mirror operation, only the VxFAS Split operation is enabled on the menu. The VxFAS Query operation, however, is always enabled on the menu.
■ VxFAS operations are not supported on Cluster Volume Manager (CVM) shared disk groups, VxVM SAN disk groups, or disk groups containing VVR replicated volume groups, so for these disk group types, VxFAS menu options are not enabled.

Chapter
5Troubleshooting
This chapter discusses problems encountered while using Veritas FlashSnap Agent for Symmetrix and their possible remedies. The following topics are covered in this chapter:
■ VxFAS pre-operation conditions
■ Common error messages
■ The vxtfexplorer.sh diagnostic script

86 TroubleshootingVxFAS pre-operation conditions
VxFAS pre-operation conditionsIf a VxFAS command warns about a configuration issue, check if your configuration meets the following conditions.
Conditions common to all VxFAS operations:■ The STD and BCV disk groups must have same disk group type
(Regular/RDF1/RDF2).
■ The STD disk group must be imported.
■ The devices in STD and BCV disk groups must belong to the same Symmetrix. VxFAS does not support operations on disk groups containing devices from multiple Symmetrix arrays.
■ If the operation is on disk pairs, and the list of disks is provided, all BCV devices must belong to same disk group or to none.
■ All the devices mentioned in command should be visible to VM and should be in ONLINE state.
■ The number of STD and BCV devices specified in the operation on disk-pairs must be equal. If the operation is on disk groups, the number of STD and BCV devices in the corresponding device groups must be equal.
■ If the STD disk group contains a Meta device, the BCV disk group must also contain a meta device of the same configuration.
■ The name of STD and BCV disk groups must be different.

87TroubleshootingVxFAS pre-operation conditions
Conditions for Attach operation:■ The STD and BCV disk groups must be imported.
■ The sizes of the STD and BCV devices involved in the operation must be equal.
■ The total mirror count of STD plus BCV pair cannot exceed 4.For Example: you can attach a 2-Way Mir STD device to a 2-Way BCV Mir device but not to 3-Way BCV Mir device because the total number of mirrors exceeds four.
■ The Meta status of STD and BCV devices involved in attach operation must match. When you are attaching disk group having a Meta-STD and simple STD device then the BCV disk group must also contain one Meta-BCV and simple BCV device of matching configuration.
■ You cannot attach the same STD device to two or more BCV devices at a time in an operation.
■ You cannot attach the same BCV device to two or more STD devices at a time in an operation.
Conditions for Mirror operation:■ BCV disk group in the operation cannot be bootdg.
■ Mirror operation is not allowed on BCV disk groups having rootvol/swapvol.
Conditions for Restore operation:■ Restore operation is not allowed on STD or BCV disk group having
rootvol/swapvol.
■ STD disk group cannot have mounted file systems.
Conditions for Split operation:■ The specified mount point seed must be a valid mount point.
■ Mount point seed must not have a hidden mount point.
■ If the file systems on STD volumes are not VxFS file systems, the split cannot be performed online. You must unmount those file systems then do the split.

88 TroubleshootingCommon error messages
Common error messagesThe following table lists common error messages that can be logged to the StorageAgent log file /var/vx/isis/StorageAgent/StorageAgent.log and the messages that are reported by the VxFAS command line utilities.
Table 5-1 Common Errors And Corrective Actions
Error Number Message Action
V-31-1051-3 Doing re-mirror to rollback the split operation Increase the VxFS timeout specified for the split command.
V-31-1051-191 No virtual disk object found in StorageAgent for disk daname
The agent database does not contain information for the given device.
1 Check if the array rescan operation is in progress.
2 Run the command vxdctl enable and perform the array rescan.
V-31-1051-51V-31-1051-106
Unprocessed log exists There exists some unprocessed log. Try running the command vxsymrecover to recover the crashed operation.
V-31-1051-92 Primary disk groups have mounted volumes Unmount the primary file systems and retry the operation.
V-31-1051-100 Cannot lock log device logdev. Lock held by process pid
Check if some other VxFAS operation is already in progress. Two VxFAS operations cannot run simultaneously on the same host.
V-31-1051-105 Cannot reserve a disk for logging Check if log disks are configured and are available for VxFAS to use.
V-31-1051-108 Insufficient log information logged There is not enough information in the log file to recover a crashed command. You may rerun the crashed command.
V-31-1051-134 Device access name daname is invalid Check if the VxVM disk you are trying to use is initialized properly and is visible to VxVM.
V-31-1051-142 Secondary devices belong to different disgorges Check if all the BCV devices belong to the same VxVM disk group.

89TroubleshootingCommon error messages
V-31-1051-160 The device with daname daname is used on some other host
Check if the device you are trying to use is part of some disk group imported on some other host. If found
1 Remove the device from that disk group.
2 Perform vxdctl enable on this host
3 Perform array rescan operation.
V-31-1051-164 Cannot operate on a mix of simple and sliced devices
Check if your disk group contains mix of VxVM disk of simple and sliced formats.
V-31-1051-2071
V-31-1051-2072
V-31-1051-2073
Access Denied To logged in user
Cannot connect to StorageAgent
Cannot register to StorageAgent
Check whether:
1 TheStorageAgent is in RUNNING state.
2 The array rescan operation is complete.
V-31-1051-2076 Daname daname is invalid or object not in StorageAgent
The agent database does not contain information for the given device.
1 Check if the array rescan operation is in progress.
2 If array rescan is not running, then run the command vxdctl enable and then perform the array rescan.
V-31-1051-2077 SymDev symdev is invalid or object not in StorageAgent
The agent database does not contain information for the given device.
1 Check if the array rescan operation is in progress.
2 If array rescan is not running, then run the command vxdctl enable and then perform the array rescan.
V-31-1051-2126 VxVM disk daname has no corresponding virtual disks in StorageAgent
The correlation between VxVM devices and Symmetrix devices may not be completed yet. Retry the command after few minutes.
V-31-1051-3001 Cannot open VCS API session Check if VCS is running correctly on the node.
Table 5-1 Common Errors And Corrective Actions
Error Number Message Action
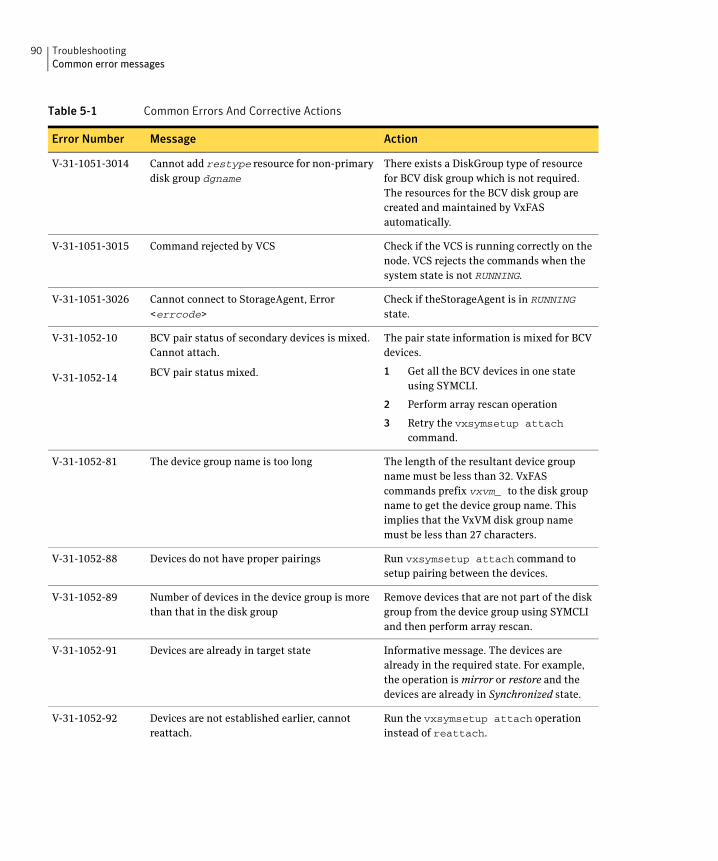
90 TroubleshootingCommon error messages
V-31-1051-3014 Cannot add restype resource for non-primary disk group dgname
There exists a DiskGroup type of resource for BCV disk group which is not required. The resources for the BCV disk group are created and maintained by VxFAS automatically.
V-31-1051-3015 Command rejected by VCS Check if the VCS is running correctly on the node. VCS rejects the commands when the system state is not RUNNING.
V-31-1051-3026 Cannot connect to StorageAgent, Error <errcode>
Check if theStorageAgent is in RUNNING state.
V-31-1052-10
V-31-1052-14
BCV pair status of secondary devices is mixed. Cannot attach.
BCV pair status mixed.
The pair state information is mixed for BCV devices.
1 Get all the BCV devices in one state using SYMCLI.
2 Perform array rescan operation
3 Retry the vxsymsetup attach command.
V-31-1052-81 The device group name is too long The length of the resultant device group name must be less than 32. VxFAS commands prefix vxvm_ to the disk group name to get the device group name. This implies that the VxVM disk group name must be less than 27 characters.
V-31-1052-88 Devices do not have proper pairings Run vxsymsetup attach command to setup pairing between the devices.
V-31-1052-89 Number of devices in the device group is more than that in the disk group
Remove devices that are not part of the disk group from the device group using SYMCLI and then perform array rescan.
V-31-1052-91 Devices are already in target state Informative message. The devices are already in the required state. For example, the operation is mirror or restore and the devices are already in Synchronized state.
V-31-1052-92 Devices are not established earlier, cannot reattach.
Run the vxsymsetup attach operation instead of reattach.
Table 5-1 Common Errors And Corrective Actions
Error Number Message Action

91TroubleshootingCommon error messages
V-31-1052-94 Some of the devices are not in proper state for the operation
The current state of the devices must be compatible for the operation. For example, for split operation the devices should be in synchronized or restored states, or for attach/detach operations the devices should be in split state.
V-31-1052-129 No attachment found for the devices in the two disk groups
Perform the vxsymsetup attach operation to setup the attachments.
V-31-1052-134 No matching BCV device found for STD device stddev, cannot do attach
Make sure that there is at least one matching BCV device for each STD device in the BCV disk group.
V-31-1052-148 Primary devices are not of same type Check if the STD disk group contains a mix of STD and non-STD (BCV) devices.
V-31-1052-176 Symmetrix database is locked by some other process
Wait till the process that has locked the Symmetrix database to finish and then retry the operation.
V-31-1052-181 Secondary devices are not of same type Check if the BCV disk group contains a mix of STD and non-STD (BCV) devices.
V-31-1052-187 Some of the devices are not paired Setup attachments for all the devices in the STD disk group.
V-31-1052-291 Devices do not belong to a VxFAS device group 1 Remove the devices from the current device group.
2 Perform the array rescan operation.
3 Retry the command.
- The restore operation fails with an error after deporting the STD and BCV disk groups but before starting copy of data from BCV devices to the STD devices.
The data from BCV devices is not yet copied on to the STD devices, so you can re-import the STD and BCV disk groups and try running the command again.
Table 5-1 Common Errors And Corrective Actions
Error Number Message Action

92 TroubleshootingThe vxtfexplorer.sh diagnostic script
The vxtfexplorer.sh diagnostic scriptThis script collects log files and information about the environment in which VxFAS is running. It may help to diagnose a problem quickly.
1 The script is installed with the VRTSfas package in the /etc/vx/emc.d/bin directory. To use this script:
a Always run this program in a newly created sub-directory # mkdir /tmp/problem123 # cd /tmp/problem123
b Enter the following command# /etc/vx/emc.d/bin/vxtfexplorer
2 You typically run this script three times to collect data for analysis:
■ Once on the primary node before any VxFAS command is run
■ Once on the secondary node just after the primary node crashes
■ Once on the secondary node after the failover completes, that is, after a service group is either ONLINE or OFFLINE
3 If no failover is involved, run the script twice on the same node, once before and once after the failing command.
4 Use the file upload facility of your Web browser, or the FTP program, to transfer the vxtfexplorer.sh output files to the Symantec Customer Support anonymous FTP site:
ftp://ftp.veritas.com/incoming
5 Telephone Symantec Customer Support at the number listed at http://support.veritas.com. Tell them that you have run vxtfexplorer.sh and provide the name of the file that you transferred to the FTP site.
Alternatively, if you have already been assigned a case ID number by Customer Support, send email to [email protected] and include your case ID number in the subject line.
Index
Aadding devices 34adding disks 36alert rules 12attaching device pairs 41, 67attaching devices 41, 67attachments 41, 67
BBCV 9business continuance 9
Ccommands
vxassist 15, 39vxdg 36vxprint 56vxsymmir 43vxsymremir 47vxsymsetup 41vxsymsplit 44
confirming initialization 56
Ddetaching device pairs 53, 78detaching devices 53, 78device names 11device pairs 44
attaching 41, 67detaching 53, 78splitting 73
devicesadding 34attaching 41, 67detaching 53, 78initial mirroring 43, 71initializing 56mirroring 43, 71remirroring 47
restoring 76splitting 44, 73
disk names 11disks
adding 36displaying object properties 84DMP (dynamic multi-pathing) 12
Hhyper volumes 12
LLUN (logical unit number) 12
Mmirroring devices 43, 71
Oobject properties
displaying 84
Pprevent rules 12properties 84properties window 84
RRDF (remote data facility) 11remirroring devices 47remote data facility (RDF) 11restoring devices 76
Ssplitting 44splitting device pairs 44, 73splitting devices 44, 73states of the STD-BCV pair 57

94
STD 9STD-BCV pairs 41, 67Symmetrix disk arrays 11
Ttask roadmap 16tasks 16
Vviewing objects
properties 84Volume Manager 9vxassist 15, 39vxdg 36vxprint 56vxsymmir 43vxsymremir 47vxsymsetup 41vxsymsplit 44