flexgrid for winformsprerelease.componentone.com/help/winforms/winforms.flexgrid.pdf · storing and...
TRANSCRIPT

ComponentOne
FlexGrid for WinForms

ComponentOne, a division of GrapeCity201 South Highland Avenue, Third FloorPittsburgh, PA 15206 USA
Website: http://www.componentone.comSales: [email protected]: 1.800.858.2739 or 1.412.681.4343 (Pittsburgh, PA USA Office)
Trademarks
The ComponentOne product name is a trademark and ComponentOne is a registered trademark of GrapeCity, Inc. Allother trademarks used herein are the properties of their respective owners.
Warranty
ComponentOne warrants that the media on which the software is delivered is free from defects in material andworkmanship, assuming normal use, for a period of 90 days from the date of purchase. If a defect occurs during thistime, you may return the defective media to ComponentOne, along with a dated proof of purchase, andComponentOne will replace it at no charge. After 90 days, you can obtain a replacement for the defective media bysending it and a check for $2 5 (to cover postage and handling) to ComponentOne.
Except for the express warranty of the original media on which the software is delivered is set forth here,ComponentOne makes no other warranties, express or implied. Every attempt has been made to ensure that theinformation contained in this manual is correct as of the time it was written. ComponentOne is not responsible for anyerrors or omissions. ComponentOne’s liability is limited to the amount you paid for the product. ComponentOne isnot liable for any special, consequential, or other damages for any reason.
Copying and Distribution
While you are welcome to make backup copies of the software for your own use and protection, you are notpermitted to make copies for the use of anyone else. We put a lot of time and effort into creating this product, and weappreciate your support in seeing that it is used by licensed users only.

Table of ContentsFlexGrid for WinForms Overview 6
Help with WinForms Edition 6
Differences Between the .NET and ActiveX Versions of C1FlexGrid 6-8
Differences Between the .NET and Mobile Versions of FlexGrid for WinForms 8-10
Differences Between FlexGrid for WinForms and True DBGrid for WinForms 10
Key Features 11-12
Feature Comparison Matrix 13-17
FlexGrid for WinForms Quick Start 18
Step 1 of 3: Creating the FlexGrid for WinForms Application 18
Step 2 of 3: Binding C1FlexGrid to a Data Source 18-19
Step 3 of 3: Customizing C1FlexGrid Settings 19-21
Design-Time Support 22
C1FlexGrid Editors 22
C1FlexGrid Column Editor 22-24
C1FlexGrid Style Editor 24-25
Caption Style and Column Style 25-29
C1FlexGrid Smart Tag 29-30
C1FlexGrid Tasks Menu 30-32
Column Tasks Menu 32-34
Using the C1FlexGrid Control 35-37
Rows and Columns 37-38
Column Sizing 38-39
Cell Selection 39-41
Cell Ranges 41
Cell Images 41-42
Formatting Cells 42
Cell Content 42-43
Cell Appearance 43-45
Conditional Formatting 45-46
Owner-Drawn Cells 46-48
Editing Cells 48-49
Lists and Combos 49-50
Checkboxes 50-51
Value-Mapped Lists 51-54
FlexGrid for WinForms 1
Copyright © 2017 GrapeCity, inc. All rights reserved.

Cell Buttons 54-56
Masks 56-57
Validation 57-58
Custom Editors 58-59
Creating Custom Editors 59-60
Edit Mode 60-61
Merging Cells 61
Merged Table Headers 61-63
Merged Data Views 63-64
Spilling Text 64-65
Custom Merging 65-66
Outlining and Summarizing Data 66
Creating Subtotals 66-69
Creating Custom Trees 69-72
Creating Outlines and Trees with the C1FlexGrid Control 72-73
Loading the Data 73-74
Creating Node Rows 74-77
Outline Tree 77-79
Adding Subtotals 79-82
Using the Subtotal Method 82-83
Outline Maintenance 83-84
Using the Node class 84-85
Saving, Loading, and Printing 85
Saving and Loading Grids to Text Files 85
Saving and Loading Microsoft Excel Files 85
Loading Grids from Databases 85-87
Printing Grids 87-88
C1FlexGrid Filtering 88-89
AllowFiltering Property 89-91
Managing Filters Programmatically 91-92
Applying Filters Programmatically 92-93
Customizing Filter behavior 93-95
Customizing the Filtering UI 95-96
C1FlexGrid Property Groups 96-97
Data Binding 98
Binding to a Data Source 98-100
FlexGrid for WinForms 2
Copyright © 2017 GrapeCity, inc. All rights reserved.

Storing and Retrieving Data 100-101
FlexGrid for WinForms Samples 102-110
FlexGrid for WinForms Tutorials 111
Edit Tutorial 111-112
Step 1 of 6: Create the C1FlexGrid Control for the Edit Tutorial 112-115
Step 2 of 6: Set Column Types and Formats 115-117
Step 3 of 6: Incorporate Drop-Down Lists 117-120
Step 4 of 6: Add Data Validation 120-122
Step 5 of 6: Add Clipboard Support 122-123
Step 6 of 6: Include Custom Editors 123-126
Outline Tutorial 126
Step 1 of 5: Create the Controls 126-129
Step 2 of 5: Read the Data and Build the Outline 129-134
Step 3 of 5: Add Custom Mouse and Keyboard Handling 134-135
Step 4 of 5: Allow/Prevent Editing 135
Step 5 of 5: Implement ToolTips 136-137
Data Analysis Tutorial 137-138
Step 1 of 4: Create the C1FlexGrid Control for the Data Analysis Tutorial 138
Step 2 of 4: Initialize and Populate the Grid 138-144
Step 3 of 4: Allow Automatic Sorting 144-145
Step 4 of 4: Include Subtotals and Outline Tree 145-147
FlexGrid for WinForms Task-Based Help 148
Accessing the C1FlexGrid Editors 148
Accessing the C1FlexGrid Column Editor 148
Accessing the C1FlexGrid Style Editor 148-149
Adding Pictures and Text to a Cell 149-150
Adding Row Numbers in a Fixed Column 150-152
Adding Three-Dimensional Text to a Header Row 152-153
Adding Three-Dimensional Text to a Header Row Using Built-In Styles 153-155
Adding ToolTips That Display UserData 155
UserData ToolTips for a Column 155-156
UserData ToolTips for a Cell Range 156-158
UserData ToolTips for a Cell Style 158-160
UserData ToolTips for a Row 160-161
UserData ToolTips for a Single Cell 161-163
Applying a Gradient Background to a CellRange 163-165
FlexGrid for WinForms 3
Copyright © 2017 GrapeCity, inc. All rights reserved.

Changing the Column Order in the Grid 165-167
Filtering by Value 167-168
Filtering by Condition 168-169
Changing the Filter Language 169-170
Clearing a Tree View 170-171
Clearing C1FlexGrid 171
Clearing Content 171-172
Clearing Styles 172-173
Clearing UserData 173
Clearing Content, Styles, and UserData 173-174
Converting Column Letters to Uppercase 174-175
Customizing Appearance Using Visual Styles 175-178
Entering Only Numbers in a Cell 178-179
Formatting Cells 179
Formatting a Cell as Read-Only 179-180
Formatting a Cell with Decimal Content 180-182
Formatting Cells Based on the Contents 182-184
Formatting the Border Style 184
Formatting the Border Style of the Control 184-187
Formatting the Border Style of the Grid 187-192
Freezing Rows and Columns 192-194
Getting the Width of a Partially Visible Column 194-195
Loading and Saving Open XML Files 195-197
Populating an Unbound Grid with Data 197
Populating a Column with Data 197-198
Populating a Range of Cells with Data 198
Populating a Row with Data 198-199
Populating a Single Cell with Data 199
Transposing Data in Grid 199-200
Restricting Grid Editing 200
Disable Editing for the Entire Grid 200-201
Disable Editing for a Specific Column 201
Disable Editing for a Specific Row 201-202
Restricting Sorting for a Specific Column 202
Scaling an Image 202-203
FlexGrid for WinForms 4
Copyright © 2017 GrapeCity, inc. All rights reserved.

Scaling Images in the Entire Grid 203-204
Searching for Entries in a Column 204-205
Searching for Entries in a Grid 205-207
Setting a Cell's Value to Zero When Users Press the Delete Key 207
Setting Rows As Headers 207-210
Setting the Background Color of Columns and Rows 210-213
Setting the Background Color of Columns and Rows 213-216
Setting the Font of a Single Cell 216-218
Setting the Text Delimiting Character in C1FlexGrid 218-219
Sorting Multiple Columns 219-220
Undoing a Sort 220-221
Using Password Entries in C1FlexGrid 221-223
Hiding Characters Already Entered 223-224
Word Wrapping in a Header or Fixed Row 224-225
FlexGrid for WinForms Top Tips 226-234
C1FlexGridClassic Control 235
FlexGrid for WinForms 5
Copyright © 2017 GrapeCity, inc. All rights reserved.

FlexGrid for WinForms OverviewFlexGrid for WinForms incorporates the latest in data-binding technology and integratesseamlessly with the Microsoft.NET Framework. As a result, you get an easy-to-use, flexiblegrid control for creating user-friendly interfaces that display, edit, format, organize,summarize, and print tabular data.
The FlexGrid for WinForms package consists of two controls:
C1FlexGrid Control
The C1FlexGrid control is a powerful, full-featured grid. It will read and write grids from andto compressed binary files or text files (compatible with Microsoft® Access and Excel®).C1FlexGrid provides all the basics plus advanced features such as outline trees, sorting, cellmerging, masked editing, translated combo and image lists, and automatic dataaggregation.
C1FlexGrid can be used in bound mode, where it displays data from any .NET data source,including ADO.NET and DataObjects for WinForms, or in unbound mode, where the griditself manages the data.
Getting Started
To get started, reviewthe following topics:
Key FeaturesFlexGrid forWinFormsQuick StartFlexGrid forWinFormsSamplesFlexGrid forWinForms TopTips
C1FlexGridClassic Control
The C1FlexGridClassic control is a control that derives from C1FlexGrid and provides an object model that isvirtually 100% identical to the VSFlexGrid ActiveX control. C1FlexGridClassic was developed to allow easy migrationof existing VSFlexGrid projects.
The source code for C1FlexGridClassic is provided as a sample. You can use it as a reference that shows how to usethe C1FlexGrid control as a base class in the development of custom grid controls.
Help with WinForms Edition
Getting StartedFor information on installing ComponentOne Studio WinForms Edition, licensing, technical support, namespacesand creating a project with the control, please visit Getting Started with WinForms Edition.
Differences Between the .NET and ActiveX Versions ofC1FlexGridIn the ActiveX product, we supplied several versions of the FlexGrid control (ADO, DAO, unbound, Unicode, and so on). Inthe .NET product, there are two versions: C1FlexGrid and C1FlexGridClassic.
C1FlexGrid is not a simple port of the ActiveX control. It is a brand new grid control, written from the ground up in C#, withthe same design principles but with a new object model that is more modern, clean, and powerful than the one in theActiveX control. The C1FlexGrid control can be bound to ADO.NET data sources or used in unbound mode.
To keep the highest level of source-code compatibility with existing applications, and to make the learning curve assmooth as possible for VSFlexGrid users, we also offer the C1FlexGridClassic control.
C1FlexGridClassic is a control that uses C1FlexGrid as a base class and exposes an object model that is virtually identical tothe one in VSFlexGrid. We supply the source code to C1FlexGridClassic so you can see exactly how to use the new objectmodel. You can also use it as an example and create your own grid using the C1FlexGrid as a base class.
FlexGrid for WinForms 6
Copyright © 2017 GrapeCity, inc. All rights reserved.

If you are writing new applications, you should use the C1FlexGrid control. If you are porting existing applications that usethe VSFlexGrid ActiveX control and want to change as little code as possible, then use the C1FlexGridClassic control.
The following table lists the differences between the .NET and ActiveX versions of C1FlexGrid:
VSFlexGrid (ActiveX) C1FlexGrid (.NET)
Rows, ColsCollections
The ActiveX control has Rows and Cols propertiesthat are used to get or set the number of rows andcolumns on the grid. In the C1FlexGrid control,these properties return row and column collections.The collections have read/write properties thatreturn the number of elements and fixed elementsin each collection. This is probably the most visiblechange between the controls. Using the ActiveXcontrol, you would write:Dim r%, c%c = 1For r = _flex.FixedRows To _flex.Rows - 1 Debug.Print _flex.TextMatrix(r,c)Next
Using the C1FlexGrid control, this becomes:Dim r%, c%c = 1For r = _flex.Rows.Fixed To _flex.Rows.Count - 1 Debug.Print _flex(r,c)Next
Uses the TextMatrix property. Uses indexers.
Styles In the ActiveX control, you can customize theappearance of individualcells or cell ranges using the Cell property. Forexample, to give thesecond row a red background, you would write:_flex.Cell(flexcpBackColor, 2, 0, 2, _flex.Cols-1) = vbRed
The C1FlexGrid control uses a CellStyle object tocustomize cellappearance. To make the second row red, you wouldwrite:Dim redStyle As CellStyle = _flex.Styles.Add("Red")redStyle.BackColor = Color.Red_flex.Rows(2).Style = redStyle
But this requires three lines of code instead of one!What's theadvantage? The main advantage of the new approachis that thenew style is an object that can be changed or assignedto newranges. For example, if you decide to give the red cellsa whiteforecolor and a bold font, you can write:_flex.Styles("Red").ForeColor = Color.White_flex.Styles("Red").Font = new Font("Arial", 9, FontStyle.Bold)
This will change the appearance of all cells that usethe "Red" style. The previous approach would requireeither (1) clearing all styles and setting everything upagain from scratch or (2) scanning all cells in the gridto detect which cells are red, then changing those.CellStyle objects are used consistently throughout thecontrol, so instead of BackColorFixed and
FlexGrid for WinForms 7
Copyright © 2017 GrapeCity, inc. All rights reserved.

ForeColorSel you can now writeStyles.Fixed.BackColor and Styles.Highlight.ForeColor.
CellRange The Cell property is one of the most powerfulelements of the VSFlexGrid object model. It allowsyou to get or set any property of any cell or cellrange with a single command. However, handlingcolors, text, values, and so on. Using a singleproperty means using Variants, and this preventsthe compiler from catching many subtle problemsin case you make mistakes.
The C1FlexGrid replaces the Cell property with aCellRange object that exposes type-safe propertiesand methods used to access the properties of a cellrange. For example, instead of writing:_flex.Cell(flexcpPicture, 5, 5, 10, 10) = theImage
You would write:
Dim rg As CellRangerg = _flex.GetCellRange(5,5,10,10)
rg.Image = theImage
The new approach has two significant advantages: · Itis type-safe, so if the variable theImage contained astring instead of an image, you would get a compilererror instead of a runtime error. · You get command-completion when writing the code because the typesfor each property are known.
Typedcolumns
In the ActiveX version, the ColDataType allowedyou to set the type of data that each columncontained. This information was used mainly forsorting columns that contained dates or numbers.
The .NET version has a Cols[i].DataType property thatdetermines the type of data the column holds. Bydefault, the DataType for all columns is "object", whichmeans you can store anything in any column. You canset the data type to specific types, however, and thegrid will try to coerce any data stored in the grid tothe proper type. For example:_flex.Cols[2].DataType = typeof(int);// Value will be set to 12._flex[1, 2] = "12";// Bad value. Fire the GridError event and ignore._flex[2, 2] = "hello";
This code would assign the integer 12 to cell (1,2). Cell(2,2) would retain its original value, because the string"hello" cannot be converted to an integer. If you wantto store values of mixed types in a column, you havetwo options:
1. Set the column's DataType property to"object".
2. Use the SetData method with the coerceparameter set to False to store a value orobject without checking the data type.
VSFlexGrid (ActiveX) C1FlexGrid (.NET)
FlexGrid for WinForms 8
Copyright © 2017 GrapeCity, inc. All rights reserved.

Differences Between the .NET and Mobile Versions of FlexGrid forWinFormsThe mobile version of FlexGrid for WinForms allows you to quickly develop Microsoft.NET Compact Framework-based applications for yourmobile devices, such as personal digital assistants (PDAs), mobile phones and more. It provides the C1FlexGrid control, a full-featured grid todisplay, edit, format, organize, summarize, and print tabular data, but with a compacted version of the FlexGrid for WinForms object model andfeature set.
The following table lists the differences between the .NET and .NET Compact Framework versions of C1FlexGrid:
C1FlexGrid (.NET) C1FlexGrid (Mobile)
C1FlexGridEditors
C1FlexGrid Column Editor N/A
C1FlexGrid Style Editor N/A
Caption Style N/A
Column Style N/A
C1FlexGridSmart Tag
C1FlexGrid Tasks Menu About C1FlexGrid is the only optionavailable on this menu.
Column Tasks Menu N/A
ColumnSizing
At design time, columns can be resized using the Width property which can be setdirectly in the grid by clicking and dragging the horizontal double arrow that appears atthe right edge of a column's header, through the C1FlexGrid Column Editor, orprogrammatically.
At design time, columns can beresized using the Width property inthe Properties window orprogrammatically.
DataBinding
You can access the Data Source Configuration Wizard to bind to a data source eitherthrough the Properties window or the C1FlexGrid Tasks menu.
You can access the Data SourceConfiguration Wizard to bind to adata source through the Propertieswindow.
You can bind to a data source using any data provider supported by the .NETFramework.
When binding to a data source, youmust use a data provider that issupported by the .NET CompactFramework. For example, you can usethe .NET Framework Data Provider forSQL Server Mobile Edition. SeeBinding to a Data Source for moreinformation.
The DataSource property can be set at design time or run time. The DataSource property can be set atrun time only.
ImageSupport
Use the SetCellImage method to add an image to a cell. For example:
To write code in Visual Basic
Visual Basic
C1FlexGrid1.SetCellImage(1,1,Image.FromFile(c:\myimage.bmp"))
To write code in C#
C#
c1FlexGrid1.SetCellImage(1,1,Image.FromFile(@"c:\myimage.bmp"));
Use the SetCellImage method to addan image to a cell Image.FromFile isnot supported by the .NET CompactFramework, but you can load and setthe image as in the following example:Visual Basic
To write code in Visual Basic
Visual Basic
Dim myimage As New Bitmap("c:\myimage.bmp") C1FlexGrid1.SetCellImage(1, 1, myimage)
To write code in C#
C#
{ Bitmap myimage = new Bitmap("c:\\myimage.bmp");
FlexGrid for WinForms 9
Copyright © 2017 GrapeCity, inc. All rights reserved.

c1FlexGrid1.SetCellImage(1, 1, myimage); }
Note:The Image class isunrelated to C1FlexGrid. Pleasesee Microsoft's documentationfor more information.
CustomMerging
You can use the Custom option in the AllowMerging property. More information isavailable on custom merging in the Custom Merging topic.
The Custom option is not available inthe AllowMerging property, butcustom merging can still beperformed in the mobile version ofC1FlexGrid. You can create a new classthat derives from the C1FlexGrid andoverride the GetMergedRange virtualmethod, providing your own custommerging logic. See the CustomMergesamples provided with C1FlexGrid andon ComponentOne HelpCentral.
C1FlexGrid (.NET) C1FlexGrid (Mobile)
Differences Between FlexGrid for WinForms and TrueDBGrid for WinFormsMany customers ask what the difference is between our grid components. While both are robust, easy-to-use gridcontrols that allow you to browse, edit, add, delete, and manipulate tabular data, there are several reasons why youmay want to use one over the other.
Both components can be used in bound or unbound mode, but C1FlexGrid allows you to work more easily inunbound mode. With C1FlexGrid you can customize trees and take advantage of its cell merging capabilities. You canalso derive from it to create customized grids.
True DBGrid for WinForms is better suited for data binding and, therefore, offers more features in that area,including split views and built-in hierarchical binding and grouping.
If you plan to use your grids mainly in bound mode and require advanced features such as splits and hierarchicalviews, True DBGrid for WinForms is the right choice. However, if you plan to work with your grids in unbound modeor need to customize the grid beyond what the object model offers, C1FlexGrid is a better choice.
If you have additional questions about FlexGrid for WinForms and True DBGrid for WinForms, please visit our Website at http://www.componentone.com.
FlexGrid for WinForms 10
Copyright © 2017 GrapeCity, inc. All rights reserved.

Key FeaturesSome of the key features of FlexGrid for WinForms that you may find useful include:
Code-free Development
Set up columns and styles at design time with easy-to-use editors accessible from the SmartTag. The columneditor allows you to insert and remove columns, reorder columns, adjust column widths, and more. Modifyexisting styles and add custom styles with the style editor. Completely manage your grid without writing anycode!
Enhanced Cell Editing
Use simple text editing, drop-down lists and combo lists, cell buttons, masks, and advanced data validation tocontrol the editing process. For example, you can use an input mask to provide a template that automaticallyvalidates data as your users type, or choose to prevent users from editing specific columns altogether.
Integrated Printing
Print your grid with a single statement! You have control over paper orientation, margins, and footer text, oryou can show a dialog box to let your users select and set up the printer. Printing events allow you to controlpage breaks, add repeating header rows, or add custom elements to each page.
Hierarchical Styles
View data the way that's best for you and your users with powerful properties and methods. For example, youcan summarize data and add aggregate values with the Subtotal method or use the Tree property to displayhierarchical views of the data.
Flexible Data Binding
Use the grid in bound mode, where it displays data from any .NET data source, including ADO.NET andDataObjects for .NET, or in unbound mode, where the grid itself manages the data.
Enhance Your UI with Microsoft Office 2007 and 2010 Styling
FlexGrid supports Visual Styles that mimic the styles available in Office 2007 and 2010, including Blue, Silver,and Black.
Child Tables for Displaying Hierarchical Data
When FlexGrid is bound to a hierarchical data source, each master record can be expanded/collapsed toshow/hide the details in child grids, which may in turn contain more details. The result is a "data tree" similar tothe type of grid presented by Microsoft Access when displaying hierarchical data. This is accomplished byderiving a control (C1FlexDataTree) from the C1FlexGrid control. When bound, the control detects subordinatedata sources and creates additional instances of itself to display child tables.
Make it a Tree
By setting the IsNode property for certain rows you can transform FlexGrid into a TreeView. You get a TreeViewthat has all the features of a rich datagrid.
Display Images and Data in Cells
Each grid cell can display images in addition to data. You can even bind grid columns to image lists, an easyand efficient way to display database information graphically.
Add Special Drawing Effects
FlexGrid for WinForms 11
Copyright © 2017 GrapeCity, inc. All rights reserved.

Make the grid look the way you want it to by painting special effects such as lines, bitmaps, and icons inappropriate grid cells. You can also scale images and add transparency.
Assign Field Names to Columns
Refer to columns by name instead of position, if desired. Column keys are automatically assigned to fieldnames when the grid is data-bound, or you may assign them with code. You can later refer to a column using aColIndex(ColKey) syntax, which will retrieve the column you want even if your user has moved it to a differentposition on the grid.
Merged Cells
Merge contiguous like-valued cells, making them span multiple rows or columns to enhance appearance orclarity.
Range Aggregates
Calculate totals, averages, and other statistics for ranges of cells with a single statement!
Multiple File Formats for Saving/Loading Data
Load from and save grid contents to text, .xls, .xlsx (OpenXml format) files, or Open XML files with otherextensions. You can also load grid data from a database using DataReader objects.
Built-in Data Filtering
Allow users to apply filters to each column on the grid by setting the AllowFiltering property.
Instant Search Panel
Search the entire grid in one go and locate entries among millions of records instantly by using FlexGrid'sInstant Search Panel.
FlexGrid for WinForms 12
Copyright © 2017 GrapeCity, inc. All rights reserved.

Feature Comparison MatrixExplore all of the features offered by FlexGrid, TrueDBGrid, and MS DataGridView. You can download the matrix inPDF.
Data Binding
Features FlexGrid TrueDBGrid MS DataGridView
Binding DataSources
✓ ✓ ✓
Binding DataSources withhierarchicaldata relations
With custom code ✓
Unbounddata storageandmanipulations
✓ ✓ ✓
Data Presentation
Features FlexGrid TrueDBGrid MS DataGridView
HierarchicalStyles
With custom code ✓
TreeView-like Styles ✓
✓
MultiLineData View
✓
Grouping ✓ ✓
Built-in DragAnd DropGrouping
✓
Horizontaland VerticalInteractiveSplits
✓
Child gridswithinmaster gridsupport
✓ ✓
Drop-DownObjectsSupport
✓ ✓
Drop-DownMulticolumn
✓ ✓
FlexGrid for WinForms 13
Copyright © 2017 GrapeCity, inc. All rights reserved.

Objectsupport
Drop-DownMulticolumnBindableand SortableObjectsupport
✓
Data Exchange
Features FlexGrid TrueDBGrid MS DataGridView
ExportData(DelimitedText, XLSand XLSX)
✓ ✓
ExportData inotherformats(PDF,HTML,RTF, JPGand other)
✓
Load datafrom Excelfiles
✓
EnhancedPrintingdata fromgrid andPrintPreviewsupport
✓ ✓
Cells Manipulations
Features FlexGrid TrueDBGrid MS DataGridView
In-CellObjects
✓ ✓ ✓
Enhanced CellEditing withCustomEditors
✓ ✓
Merging Cellsand Rows
✓ ✓
FlexGrid for WinForms 14
Copyright © 2017 GrapeCity, inc. All rights reserved.
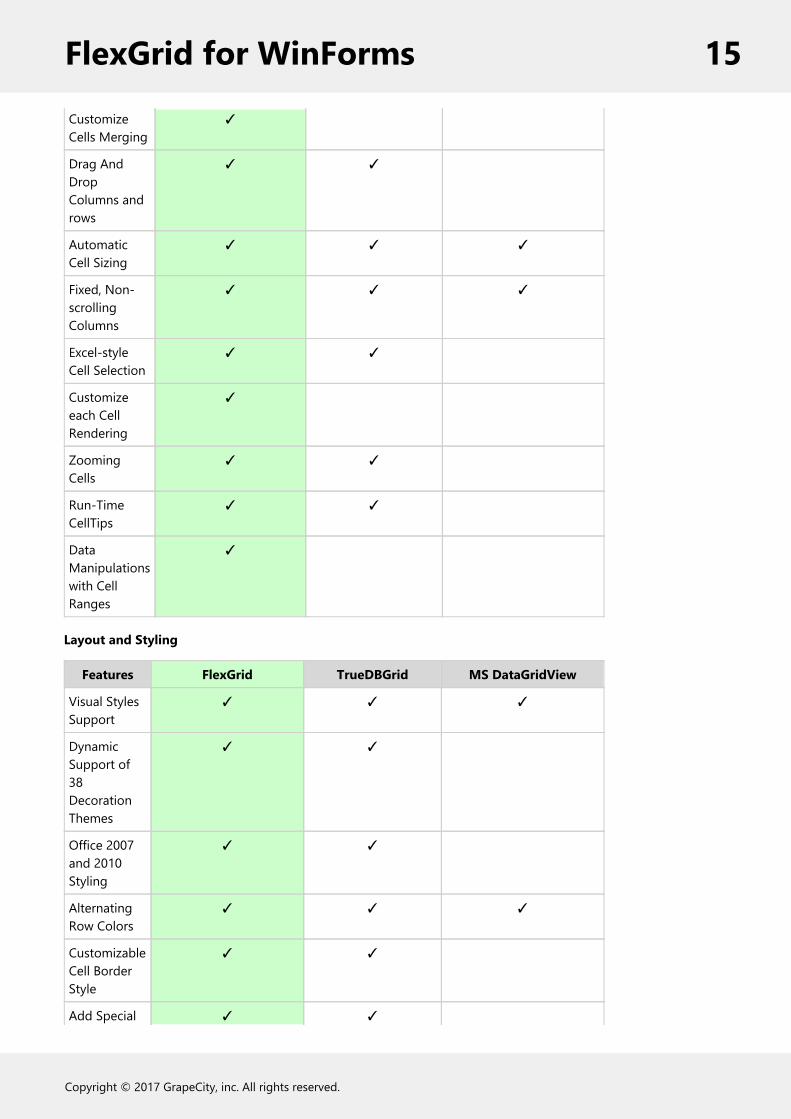
CustomizeCells Merging
✓
Drag AndDropColumns androws
✓ ✓
AutomaticCell Sizing
✓ ✓ ✓
Fixed, Non-scrollingColumns
✓ ✓ ✓
Excel-styleCell Selection
✓ ✓
Customizeeach CellRendering
✓
ZoomingCells
✓ ✓
Run-TimeCellTips
✓ ✓
DataManipulationswith CellRanges
✓
Layout and Styling
Features FlexGrid TrueDBGrid MS DataGridView
Visual StylesSupport
✓ ✓ ✓
DynamicSupport of38DecorationThemes
✓ ✓
Office 2007and 2010Styling
✓ ✓
AlternatingRow Colors
✓ ✓ ✓
CustomizableCell BorderStyle
✓ ✓
Add Special ✓ ✓
FlexGrid for WinForms 15
Copyright © 2017 GrapeCity, inc. All rights reserved.
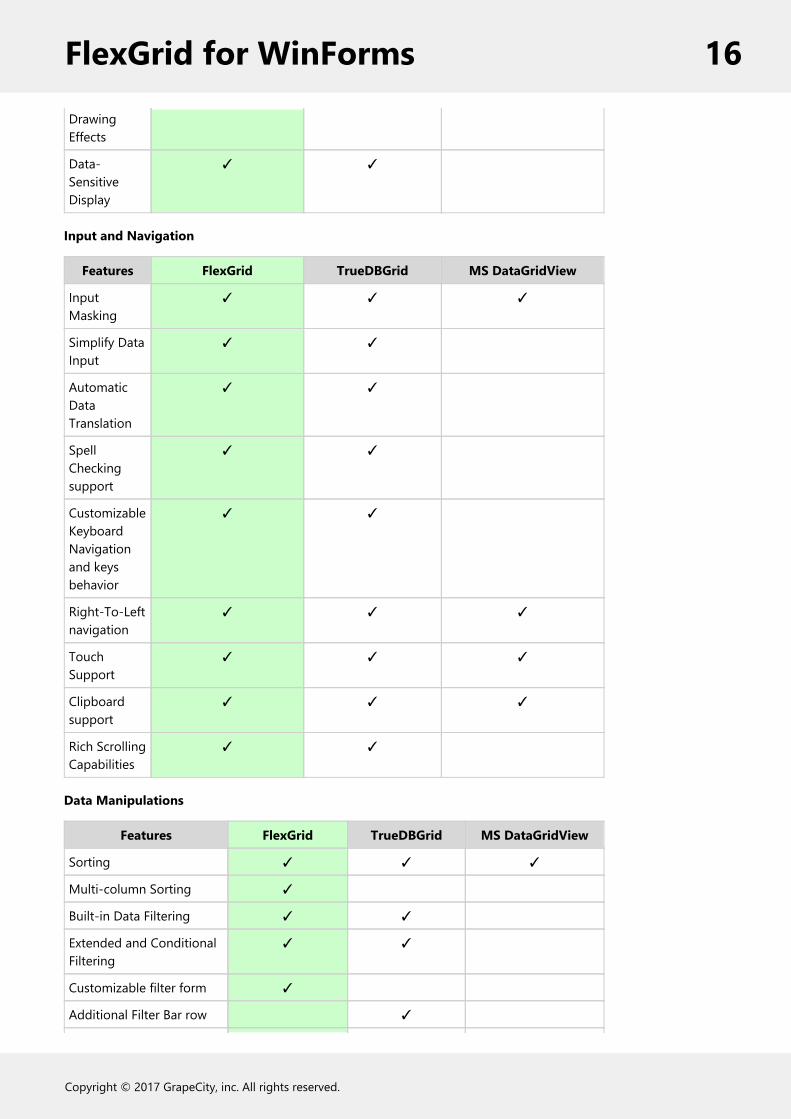
DrawingEffects
Data-SensitiveDisplay
✓ ✓
Input and Navigation
Features FlexGrid TrueDBGrid MS DataGridView
InputMasking
✓ ✓ ✓
Simplify DataInput
✓ ✓
AutomaticDataTranslation
✓ ✓
SpellCheckingsupport
✓ ✓
CustomizableKeyboardNavigationand keysbehavior
✓ ✓
Right-To-Leftnavigation
✓ ✓ ✓
TouchSupport
✓ ✓ ✓
Clipboardsupport
✓ ✓ ✓
Rich ScrollingCapabilities
✓ ✓
Data Manipulations
Features FlexGrid TrueDBGrid MS DataGridView
Sorting ✓ ✓ ✓
Multi-column Sorting ✓
Built-in Data Filtering ✓ ✓
Extended and ConditionalFiltering
✓ ✓
Customizable filter form ✓
Additional Filter Bar row ✓
FlexGrid for WinForms 16
Copyright © 2017 GrapeCity, inc. All rights reserved.

Multilanguage Filtering ✓ ✓
AutoSearch ✓
Range Aggregates ✓ ✓
Localization
Features FlexGrid TrueDBGrid MS DataGridView
Right-To-Left support ✓ ✓ ✓
.Net localization support ✓ ✓ ✓
Regional settings support ✓ ✓ ✓
Other Features
Features FlexGrid TrueDBGrid MS DataGridView
Optimizeperformancefor displayinglarge amountof data inbound andunboundmode
✓ ✓
Just-In-TimeData Loading
✓ ✓ ✓
Server-sideDataVirtualizationwithC1DataSource
✓ ✓ ✓
AutomaticLookupColumns withC1DataSource
✓ ✓
Design-timeextendedsupport
✓ ✓
Assembly size 1508 K 2108 K Part ofSystem.Windows.Forms
Pricing $ $ $
FlexGrid for WinForms 17
Copyright © 2017 GrapeCity, inc. All rights reserved.

FlexGrid for WinForms Quick StartIn this section you will learn how to use the basic C1FlexGrid functionality to create a simple grid application. Thissection is not supposed to be a comprehensive tutorial on all features of C1FlexGrid, but rather provide a quick startand highlight some general approaches to using the product. For more in-depth tutorials, see the FlexGrid forWinForms Tutorials. Visual Studio 2010 was used in this example; the steps may be slightly different in other versionsof Visual Studio.
Step 1 of 3: Creating the FlexGrid for WinForms ApplicationThe following steps will walk you through creating a simple grid application.
1. Create a new project.2. Add a C1FlexGrid control to the form.3. Open the C1FlexGrid Tasks menu. For more information on accessing the C1FlexGrid Tasks menu, see
C1FlexGrid Tasks Menu.4. In the C1FlexGrid Tasks menu, click Dock in parent container. This sets the grid's Dock property to Fill so
the grid will fill the form.5. Run the program. A simple grid application will appear.
Congratulations! You have successfully created a simple grid application. In the next topic, you will learn how to bindthe C1FlexGrid control to a data source.
Step 2 of 3: Binding C1FlexGrid to a Data SourceThe following steps will walk you through binding a data source to the grid application you created in the Step 1 of 3:Creating the FlexGrid for WinForms Application topic.
1. Open the C1FlexGrid Tasks menu. For more information on accessing the C1FlexGrid Tasks menu, seeC1FlexGrid Tasks Menu.
2. In the C1FlexGrid Tasks menu, click the Choose Data Source drop-down arrow and select the Add ProjectData Source link from the drop-down box.
3. The Data Source Configuration Wizard appears. Leave the default setting, Database, selected on the Choosea Data Source Type page, and click Next.
4. On the Choose a Database Model page, leave Dataset selected and click Next.5. Click the New Connection button to create a new connection or choose one from the drop-down list. When
you click New Connection, the Add Connection dialog box appears.6. Leave Microsoft Access Database File as the Data source.7. Click the Browse button under Database file name. In the Select Microsoft Access Database File dialog box,
browse to the C1NWind.mdb database in the Documents\ComponentOne Samples\Common directory.Select the C1NWind.mdb file and click Open.
8. In the Add Connection dialog box, click the Test Connection button to make sure that you have successfullyconnected to the database or server and click OK.
9. Click OK again to close the Add Connection dialog box.10. Click the Next button to continue. A dialog box will appear asking if you would like to add the data file to your
project and modify the connection string. Since it is not necessary to copy the database to your project, clickNo.
11. Save the connection string in the application configuration file by checking the Yes, save the connection asbox and entering a name. Click the Next button to continue.
12. On the Choose Your Database Objects page, expand the Tables node, and select the Products table. EnterProductsDS in the DataSet name box and click Finish to exit the wizard.
13. A DataSet and connection string are added to your project. Additionally, Visual Studio automatically creates
FlexGrid for WinForms 18
Copyright © 2017 GrapeCity, inc. All rights reserved.

the following code to fill the DataSet:
To write code in Visual Basic
Visual Basic
Me.ProductsTableAdapter.Fill(Me.ProductsDS.Products)
To write code in C#
C#
this.productsTableAdapter.Fill(this.productsDS.Products);
Run the program and observe the following:Notice that the data from the Products table is reflected in the grid.
Congratulations! You have successfully bound the grid application to a data source. In the next topic, you will learnhow to customize format strings, Visual Styles, and built-in styles.
Step 3 of 3: Customizing C1FlexGrid SettingsThe following steps will walk you through setting a format string, Visual Style, and built-in styles for the grid.
1. Resize the first column in the grid by dragging the horizontal double arrow that appears at the right edge ofthe first column's header to the left until the UnitPrice column is visible:
FlexGrid for WinForms 19
Copyright © 2017 GrapeCity, inc. All rights reserved.

2. Click the UnitPrice column to open the Column Tasks menu.
3. Click the ellipsis button next to the Format String text box to open the Format String dialog box.4. In the Format String dialog box, select Currency under Format type and click OK.5. In the Properties window, locate the VisualStyle property and set it to Office2007Blue.6. Open the C1FlexGrid Tasks menu. The Column Tasks menu will appear since we last edited a column using
the Tasks menu. Select C1FlexGrid Tasks to return to the C1FlexGrid Tasks menu.7. On the C1FlexGrid Tasks menu, select Styles to open the C1FlexGrid Style Editor.8. In the C1FlexGrid Style Editor under Built-In Styles, select Fixed.9. Expand the Font node in the right pane and set the Bold property to True.
10. Set the ForeColor property to CornflowerBlue on the Web tab and click OK to close the dialog box.
Run the program and observe the following:The grid application displays a the Products table using a format string, Visual Style, and built-in styles.
FlexGrid for WinForms 20
Copyright © 2017 GrapeCity, inc. All rights reserved.

You have successfully set the format string, Visual Style, and built-in styles for the grid. This concludes the Quick Start.
FlexGrid for WinForms 21
Copyright © 2017 GrapeCity, inc. All rights reserved.

Design-Time SupportYou can easily configure FlexGrid for WinForms at design time using the property grid, menus, and designers inVisual Studio. The following sections describe how to use C1FlexGrid's design-time environment to configure theC1FlexGrid control.
C1FlexGrid EditorsThere two are design-time editors that allow you to control the layout and appearance of C1FlexGrid, C1FlexGridColumn Editor and C1FlexGrid Style Editor. Additionally, Caption Style and Column Style are two design-timeeditors that allow you to change the appearance of a specific caption or column.
C1FlexGrid Column EditorIf you prefer, you can set up the grid columns at design time instead of writing code to do it. The designer can beaccessed in one of three ways:
Select the grid in Design view, go to the Properties window and click the ellipsis button (…) next to the Colsproperty.Right-click the control and select Designer from the context menu.Click on the smart tag ( ) in the upper right corner of the grid and select Designer from the C1FlexGridTasks menu.
This will bring up the Column Editor shown below:
In bound mode, the editor can be used to select which fields in the DataSource should be displayed, their order,column captions, widths, and alignment. In unbound mode, the editor is also used to select column data types.
FlexGrid for WinForms 22
Copyright © 2017 GrapeCity, inc. All rights reserved.
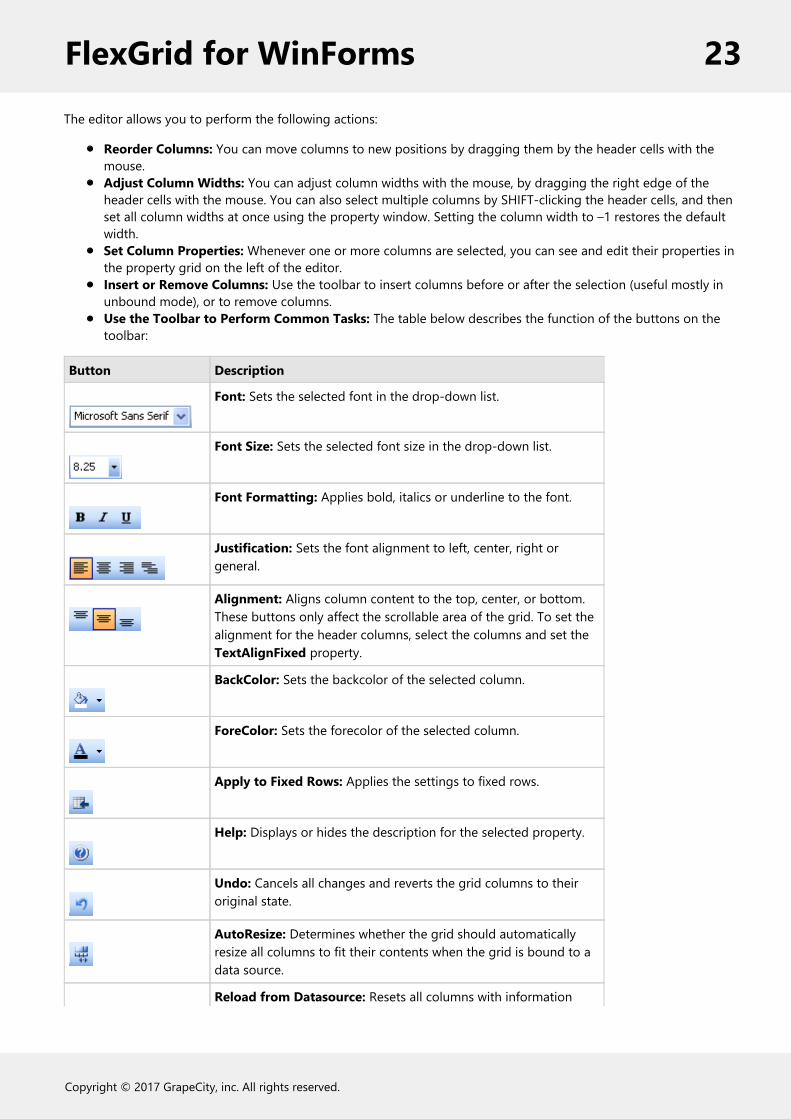
The editor allows you to perform the following actions:
Reorder Columns: You can move columns to new positions by dragging them by the header cells with themouse.Adjust Column Widths: You can adjust column widths with the mouse, by dragging the right edge of theheader cells with the mouse. You can also select multiple columns by SHIFT-clicking the header cells, and thenset all column widths at once using the property window. Setting the column width to –1 restores the defaultwidth.Set Column Properties: Whenever one or more columns are selected, you can see and edit their properties inthe property grid on the left of the editor.Insert or Remove Columns: Use the toolbar to insert columns before or after the selection (useful mostly inunbound mode), or to remove columns.Use the Toolbar to Perform Common Tasks: The table below describes the function of the buttons on thetoolbar:
Button Description
Font: Sets the selected font in the drop-down list.
Font Size: Sets the selected font size in the drop-down list.
Font Formatting: Applies bold, italics or underline to the font.
Justification: Sets the font alignment to left, center, right orgeneral.
Alignment: Aligns column content to the top, center, or bottom.These buttons only affect the scrollable area of the grid. To set thealignment for the header columns, select the columns and set theTextAlignFixed property.
BackColor: Sets the backcolor of the selected column.
ForeColor: Sets the forecolor of the selected column.
Apply to Fixed Rows: Applies the settings to fixed rows.
Help: Displays or hides the description for the selected property.
Undo: Cancels all changes and reverts the grid columns to theiroriginal state.
AutoResize: Determines whether the grid should automaticallyresize all columns to fit their contents when the grid is bound to adata source.
Reload from Datasource: Resets all columns with information
FlexGrid for WinForms 23
Copyright © 2017 GrapeCity, inc. All rights reserved.

from the current DataSource. This button is useful when the grid isbound to a data source and you want to start editing from scratch.The button is disabled when the grid is not bound to a data source.
Selected Column: Selects the current column from the drop-downlist.
Insert Column: Inserts columns to the left or right of the selection.
Delete Column: Removes the selected column.
Column Width: Sets the column width of all selected columns tothe same width, wider or narrower.
Toggle Visibility: Displays or hides a column.
Unhide All Columns: Makes all columns visible.
Show Hidden Columns: Shows hidden columns. If you change theVisible property of a column to False, it will be hidden, andtherefore you won't be able to select it with the mouse. Use thisbutton to show all hidden columns so you can select and editthem.
Determines whether the properties for the selected columnsshould be displayed in categorized or alphabetical order.
Button Description
C1FlexGrid Style EditorIf you prefer, you can set up styles at design time instead of writing code to do it. The C1FlexGrid Style Editor can beaccessed in one of three ways:
Select the grid, go to the Properties window and click the ellipsis button next to the Styles property.Right-click the grid and select Styles from the context menu.Click on the smart tag ( ) in the upper right corner of the grid and select Styles from the C1FlexGrid Tasksmenu.
The grid will display the C1FlexGrid Style Editor dialog box.
The style editor lets you modify existing styles and add new custom ones, which may later be assigned to cells, rows,and columns.
Use the Add button to add a custom style. You can see how your new style appears in the preview area above thestyle properties.
FlexGrid for WinForms 24
Copyright © 2017 GrapeCity, inc. All rights reserved.

The Remove button removes the selected custom style. You can rename custom styles by selecting them on the listand typing the new name. The Clear button removes all custom styles and restores the built-in styles to their defaultvalues.
The AutoFormat button brings up a secondary dialog box that allows you to select a complete set of predefinedstyles. Here's what the AutoFormat dialog box looks like:
FlexGrid for WinForms 25
Copyright © 2017 GrapeCity, inc. All rights reserved.

Caption Style and Column StyleThe Caption Style editor and the Column Style editor for a selected column allow you to specify the properties forthe caption text and column text, respectively, as well as alignment, background, and borders.
The Caption Style and Column Style editors can only be accessed in the Column Tasks menu. For more informationon the Column Tasks menu, see Column Tasks Menu.
The Caption Style and Column Style editors have four tabs: Text, Alignment, Background, and Borders. ThePreview area allows you to view your settings before applying them to the grid.
TextThe Text tab sets the font and formatting of the caption.
The following options are available in the Font area:
Name: Choose a font name.Size: Choose a font size.Color: Choose a font color.Direction: Choose from Normal, Up or Down.Font Effects: Use the buttons to toggle bold, italic, and underline on or off.
FlexGrid for WinForms 26
Copyright © 2017 GrapeCity, inc. All rights reserved.

The following options are available in the Formatting area:
Format: Click the ellipsis button to open the Format String dialog box. For more details on the Format Stringdialog box, see Cell Content.Input Mask: Click the ellipsis button to open the Input Mask dialog box. For more details on the Input Maskdialog box, see Masks.Effect: Choose from Flat, Raised, or Inset. For more details on the text effect options, see the TextEffectEnumEnumeration.Trimming: Choose from None, Character, Word, EllipsisCharacter, EllipsisWord, or EllipsisPath to set howlong strings are trimmed to fit the cell.Word Wrap: Check the box to enable word wrapping for the caption.
AlignmentThe Alignment tab sets the alignment of both text and images in the caption.
The following options are available in the Text Alignment area:
Horizontal: Click the buttons to toggle between Align Left, Align Center, Align Right, and Align General.Vertical: Click the buttons to toggle between Align Top, Align Middle, and Align Bottom.The following options are available in the Image Alignment area:Clip: Click the buttons to toggle between image alignment in the cell or Scale, Tile, Stretch, TileStretch, orHide the image. For more details on the image alignment options, see the ImageAlignEnum Enumeration.
FlexGrid for WinForms 27
Copyright © 2017 GrapeCity, inc. All rights reserved.

Show Sample Image: Check the Show Sample Image box to display a sample image in the Preview area.The following options are available in the Display area:Text/Image Spacing: Increase or decrease this value to increase or decrease the amount of space between thetext and the image.Display: Choose from TextOnly, ImageOnly, Overlay, Stack, or None. For more details on the display options,see the DisplayEnum Enumeration.
BackgroundThe Background tab sets the background color and background image.
The following option is available in the Background Color area:
Color: Choose a color for the background of the cell.
The following options are available in the Background Image area:
Image: Click the Select button to select an image or the Clear button to remove an image.Layout: Toggle between Scale, Tile, Stretch, TileStretch, or Hide.
Borders
FlexGrid for WinForms 28
Copyright © 2017 GrapeCity, inc. All rights reserved.

The Borders tab sets the borders and margins.
The following options are available in the Borders area:
Style: Choose from None, Flat, Double, Raised, Inset, Groove, Fillet, or Dotted. For details on the differentborder style options, see the C1.Win.C1FlexGrid.BorderStyleEnum Enumeration.Width: Increase or decrease the value to increase or decrease the width of the border.Color: Choose a color for the border.Direction: Choose from Both, Horizontal, or Vertical. For details on the different border direction options, seethe BorderDirEnum Enumeration.
The following options are available in the Margins area:
Left: Increase or decrease the value to increase or decrease the left margin.Top: Increase or decrease the value to increase or decrease the top margin.Right: Increase or decrease the value to increase or decrease the right margin.Bottom: Increase or decrease the value to increase or decrease the bottom margin.
C1FlexGrid Smart TagA smart tag ( ) represents a short-cut Tasks menu that provides the most commonly used properties in each control.
There are two Tasks menus available through the smart tag in C1FlexGrid: C1FlexGrid Tasks Menu and Column Tasks
FlexGrid for WinForms 29
Copyright © 2017 GrapeCity, inc. All rights reserved.
Menu.
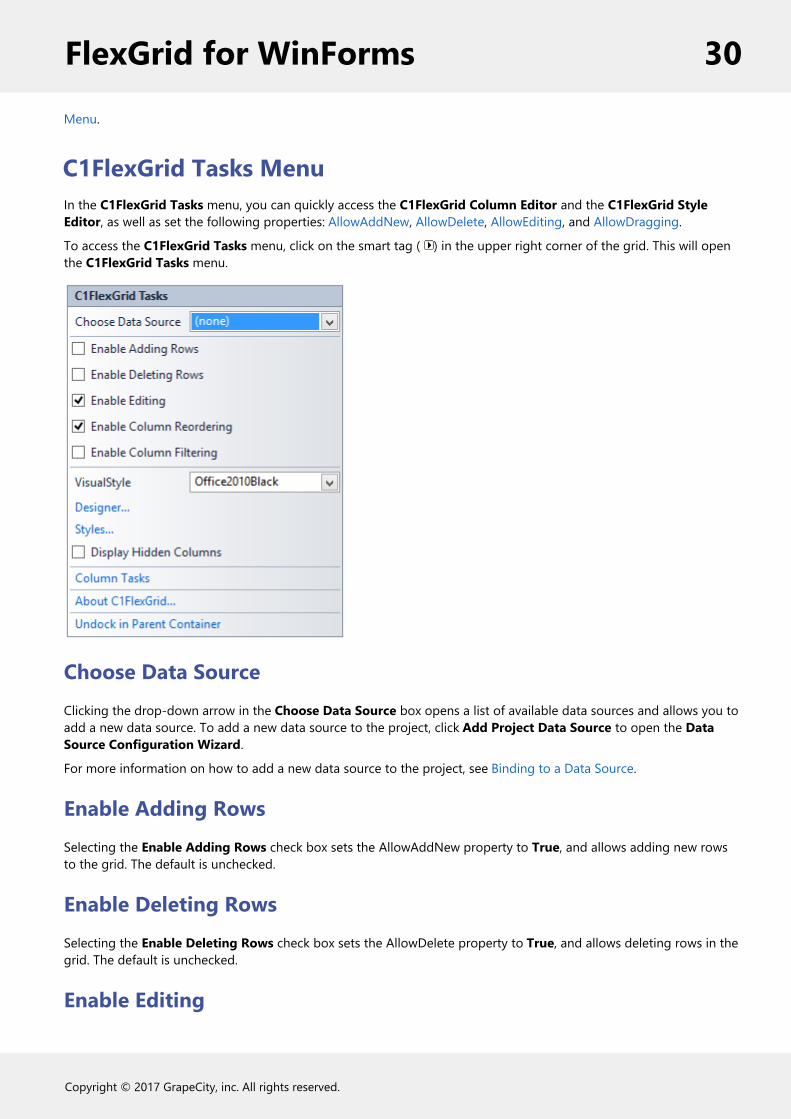
C1FlexGrid Tasks MenuIn the C1FlexGrid Tasks menu, you can quickly access the C1FlexGrid Column Editor and the C1FlexGrid StyleEditor, as well as set the following properties: AllowAddNew, AllowDelete, AllowEditing, and AllowDragging.
To access the C1FlexGrid Tasks menu, click on the smart tag ( ) in the upper right corner of the grid. This will openthe C1FlexGrid Tasks menu.
Choose Data SourceClicking the drop-down arrow in the Choose Data Source box opens a list of available data sources and allows you toadd a new data source. To add a new data source to the project, click Add Project Data Source to open the DataSource Configuration Wizard.
For more information on how to add a new data source to the project, see Binding to a Data Source.
Enable Adding RowsSelecting the Enable Adding Rows check box sets the AllowAddNew property to True, and allows adding new rowsto the grid. The default is unchecked.
Enable Deleting RowsSelecting the Enable Deleting Rows check box sets the AllowDelete property to True, and allows deleting rows in thegrid. The default is unchecked.
Enable Editing
FlexGrid for WinForms 30
Copyright © 2017 GrapeCity, inc. All rights reserved.

Selecting the Enable Editing check box sets the AllowEditing property to True, and allows editing in the grid. Thedefault is checked.
Enable Column ReorderingSelecting the Enable Column Reordering check box sets the AllowDragging property to Columns, and allowsdragging of columns in the grid. The default is checked.
Enable Column FilteringSelecting the Enable Column Filtering check box sets the AllowFiltering property to Columns, and allows filtering ofcolumns in the grid. The options available for filtering are listed in the drop-down - Default, ByValue, ByCondition, andCustom. Condition filters allow you to specify conditions such as 'value > 10'. Value filters allow you to select valuesthat should be displayed from a list of values present in the data source. Custom filters allow you to define your ownfilters through code.
Display Hidden ColumnsSelecting the Display Hidden Columns check box sets the Visible property to True for hidden columns and displaysthem. The default is unchecked.
DesignerClicking Designer opens the C1FlexGrid Column Editor.
For more information on how to edit columns with the C1FlexGrid Column Editor, see C1FlexGrid Column Editor.
StylesClicking Styles opens the C1FlexGrid Style Editor.
FlexGrid for WinForms 31
Copyright © 2017 GrapeCity, inc. All rights reserved.

For more information on how to customize cell appearance with the C1FlexGrid Style Editor, see C1FlexGrid StyleEditor.
Column TasksClicking Column Tasks opens the Column Tasks menu. For details on the Column Tasks menu, see Column TasksMenu.
About C1FlexGridClicking About C1FlexGrid displays a dialog box, which is helpful in finding the version number of C1FlexGrid.
Dock in parent container/Undock in parent containerClicking Dock in parent container sets the Dock property for C1FlexGrid to Fill.
If C1FlexGrid is docked in the parent container, the option to undock C1FlexGrid from the parent container will beavailable. Clicking Undock in parent container sets the Dock property for C1FlexGrid to None.
Column Tasks Menu
FlexGrid for WinForms 32
Copyright © 2017 GrapeCity, inc. All rights reserved.

The Column Tasks menu allows you to set the column caption, data field, data type, edit mask, format string, andcombo list for a column, as well as set the following properties: AllowSorting, AllowEditing, AllowResizing,AllowDragging, AllowMerging, and Visible.
To access the Column Tasks menu, either click on a column in the grid or select Column Tasks from the C1FlexGridTasks menu.
Column CaptionEntering a caption into the Column Caption box set the Caption property for the column.
Data FieldClicking the drop-down arrow in the Data Field box opens a list of available fields in the data source.
Data TypeClicking the drop-down arrow in the Data Type box opens a list of available data types.
Edit MaskClicking the ellipsis button in the Edit Mask box opens the Input Mask dialog box.
Format StringClicking the ellipsis button in the Format String box opens the Format String dialog box.
Combo ListClicking the ellipsis button in the Combo List box opens the Combo List dialog box.
Allow SortingSelecting the Allow Sorting check box sets the AllowSorting property to True, and allows sorting in the column. Thedefault is checked.
Allow EditingSelecting the Allow Editing check box sets the AllowEditing property to True, and allows editing in the column. Thedefault is checked.
Allow ResizingSelecting the Allow Resizing check box sets the AllowResizing property to True, and allows resizing the column. Thedefault is checked.
Allow Dragging
FlexGrid for WinForms 33
Copyright © 2017 GrapeCity, inc. All rights reserved.

Selecting the Allow Dragging check box sets the AllowDragging property to True, and allows dragging columns inthe grid. The default is checked.
Allow MergingSelecting the Allow Merging check box sets the AllowMerging property to True, and allows merging in the column.The default is unchecked.
Allow FilteringSelecting an option from the drop-down lets you specify the filter type along each column. The available filter optionsare filter by value, by condition, customized, or none.
VisibleSelecting the Visible check box sets the Visible property to True, and allows the column to be visible in the grid. Thedefault is checked.
Caption StyleClicking Caption Style opens the Caption Style editor for the selected column, which allows you to specify theproperties for the caption text, including alignment, background, and borders.
Column StyleClicking Column Style opens the Column Style editor for the selected column, which allows you to specify propertiesfor the column, including text, alignment, background, and borders.
C1FlexGrid TasksClicking C1FlexGrid Tasks returns you to the C1FlexGrid Tasks menu. For details on the C1FlexGrid Tasks menu, seeC1FlexGrid Tasks Menu.
Dock in parent container/Undock in parent containerClicking Dock in parent container sets the Dock property for C1FlexGrid to Fill.
If C1FlexGrid is docked in the parent container, the option to undock C1FlexGrid from the parent container will beavailable. Clicking Undock in parent container sets the Dock property for C1FlexGrid to None.
FlexGrid for WinForms 34
Copyright © 2017 GrapeCity, inc. All rights reserved.

Using the C1FlexGrid ControlThe C1FlexGrid control allows you to display, edit, group and summarize data in a grid format. The grid can be boundto a data source or it can manage its own data.
The C1FlexGrid control has a rich object model with the following elements:
FlexGrid for WinForms 35
Copyright © 2017 GrapeCity, inc. All rights reserved.
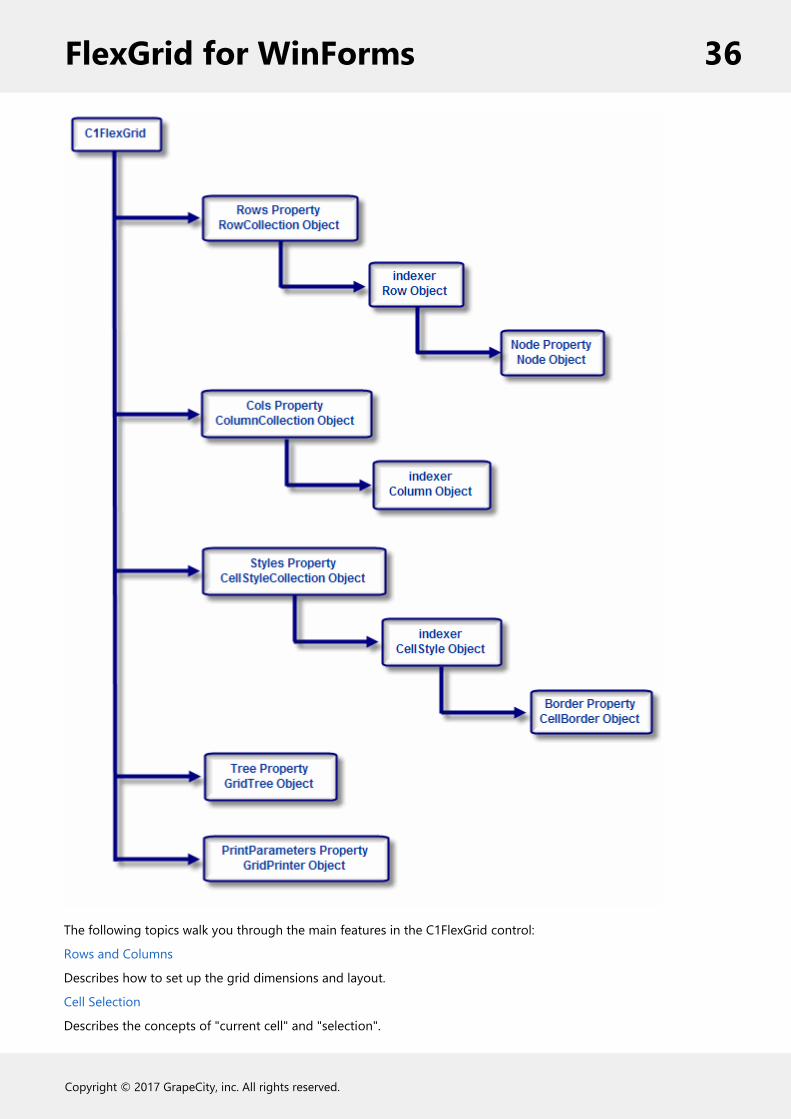
The following topics walk you through the main features in the C1FlexGrid control:
Rows and Columns
Describes how to set up the grid dimensions and layout.
Cell Selection
Describes the concepts of "current cell" and "selection".
FlexGrid for WinForms 36
Copyright © 2017 GrapeCity, inc. All rights reserved.

Cell Ranges
Describes how to work with a group of cells as a single unit.
Cell Images
Describes how to display images in a cell.
Formatting Cells
Describes how to customize the appearance of the grid by formatting numbers, dates, and Boolean values, or bychanging fonts, colors, alignment, and pictures for individual cells or ranges.
Editing Cells
Describes how to implement simple text editing, drop-down lists and combo lists, cell buttons, editing masks, anddata validation.
Merging Cells
Describes how to change the grid display so that cells with similar contents are merged, creating "grouped" views thathighlight relationships in the data.
Outlining and Summarizing Data
Describes how to add subtotals to grids and how to build outline trees.
Saving, Loading, and Printing
Describes how you can save the contents or formatting of a grid and re-load it later, or exchange grid data with otherapplications such as Microsoft Access and Excel. This section also shows how you can print grids.
C1FlexGrid Property Groups
Presents a map of the main C1FlexGrid properties cross-referenced by function.
Rows and ColumnsA C1FlexGrid control consists of rows and columns. The collections of rows and columns is exposed by the Rows andCols properties.
When the grid is bound to a data source, the number of rows and columns is determined by how much data isavailable in the data source. In unbound mode, you can set them to arbitrary values using the Count property in thecollections. For example, the code below sets the grid dimensions to 500 rows by 10 columns:
To write code in Visual Basic
Visual Basic
_flex.Rows.Count = 500_flex.Cols.Count = 10
To write code in C#
C#
_flex.Rows.Count = 500;_flex.Cols.Count = 10;
There are two basic types of rows and columns: fixed and scrollable. (The counts returned by the Count propertyinclude fixed and scrollable cells.) Fixed rows remain on the top of the grid when the user scrolls the grid vertically,and fixed columns remain on the left of the grid when the user scrolls the grid horizontally.
FlexGrid for WinForms 37
Copyright © 2017 GrapeCity, inc. All rights reserved.

Fixed cells are useful for displaying row and column header information.
You can set the number of fixed rows and columns using the Fixed property in the Rows and Cols collections. Forexample, the code below creates a grid with two fixed rows and no fixed columns:
To write code in Visual Basic
Visual Basic
_flex.Rows.Fixed = 1_flex.Cols.Fixed = 0
To write code in C#
C#
_flex.Rows.Fixed = 1;_flex.Cols.Fixed = 0;
The Rows and Cols collections also contain methods for inserting, deleting, and moving rows and columns on thegrid. You can use their Item property (an indexer) to access individual elements (rows and columns) in each collection.
If you prefer, you can set up the grid columns at design time instead of writing code to do it using the C1FlexGridColumn Editor. For details on editing columns using the C1FlexGrid Column Editor, see C1FlexGrid Column Editor.
Column SizingThe width of a column is determined by its Width property. At design time, the Width property can be set directly inthe grid or through the C1FlexGrid Column Editor. In the grid, clicking and dragging the horizontal double arrowthat appears at the right edge of a column's header allows the column to be resized.
FlexGrid for WinForms 38
Copyright © 2017 GrapeCity, inc. All rights reserved.

The dotted vertical line indicates how the grid will be resized. Dragging the pointer to the left makes the columnsmaller; dragging it to the right makes the column larger. The column's Width property will be adjusted when theresize operation is complete.
In the C1FlexGrid Column Editor or in code, specify the value of the Width property for a column. For details on theC1FlexGrid Column Editor, see C1FlexGrid Column Editor. The following code sets the Width property of Column1 to10:
To write code in Visual Basic
Visual Basic
_flex.Cols(1).Width = 10
To write code in C#
C#
_flex.Cols(1).Width = 10
To prevent resizing a specific column, set the AllowResizing property for the column to False either in the ColumnTasks menu or C1FlexGrid Column Editor, or in code. For details on the Column Tasks menu, see Column TasksMenu. The following code sets the AllowResizing property for Column1 to False:
To write code in Visual Basic
Visual Basic
_flex.Cols(1).AllowResizing = False
To write code in C#
C#
_flex.Cols(1).AllowResizing = False
Cell Selection
FlexGrid for WinForms 39
Copyright © 2017 GrapeCity, inc. All rights reserved.
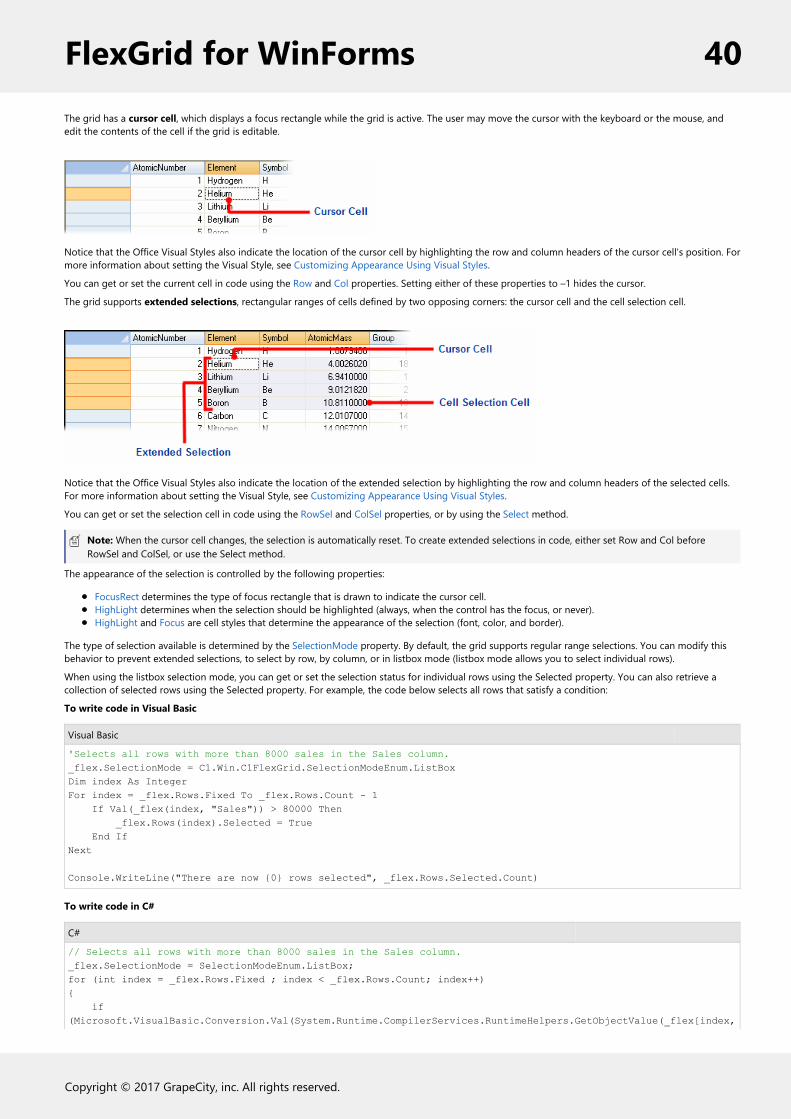
The grid has a cursor cell, which displays a focus rectangle while the grid is active. The user may move the cursor with the keyboard or the mouse, andedit the contents of the cell if the grid is editable.
Notice that the Office Visual Styles also indicate the location of the cursor cell by highlighting the row and column headers of the cursor cell's position. Formore information about setting the Visual Style, see Customizing Appearance Using Visual Styles.
You can get or set the current cell in code using the Row and Col properties. Setting either of these properties to –1 hides the cursor.
The grid supports extended selections, rectangular ranges of cells defined by two opposing corners: the cursor cell and the cell selection cell.
Notice that the Office Visual Styles also indicate the location of the extended selection by highlighting the row and column headers of the selected cells.For more information about setting the Visual Style, see Customizing Appearance Using Visual Styles.
You can get or set the selection cell in code using the RowSel and ColSel properties, or by using the Select method.
Note: When the cursor cell changes, the selection is automatically reset. To create extended selections in code, either set Row and Col beforeRowSel and ColSel, or use the Select method.
The appearance of the selection is controlled by the following properties:
FocusRect determines the type of focus rectangle that is drawn to indicate the cursor cell.HighLight determines when the selection should be highlighted (always, when the control has the focus, or never).HighLight and Focus are cell styles that determine the appearance of the selection (font, color, and border).
The type of selection available is determined by the SelectionMode property. By default, the grid supports regular range selections. You can modify thisbehavior to prevent extended selections, to select by row, by column, or in listbox mode (listbox mode allows you to select individual rows).
When using the listbox selection mode, you can get or set the selection status for individual rows using the Selected property. You can also retrieve acollection of selected rows using the Selected property. For example, the code below selects all rows that satisfy a condition:
To write code in Visual Basic
Visual Basic
'Selects all rows with more than 8000 sales in the Sales column._flex.SelectionMode = C1.Win.C1FlexGrid.SelectionModeEnum.ListBoxDim index As IntegerFor index = _flex.Rows.Fixed To _flex.Rows.Count - 1 If Val(_flex(index, "Sales")) > 80000 Then _flex.Rows(index).Selected = True End IfNext Console.WriteLine("There are now {0} rows selected", _flex.Rows.Selected.Count)
To write code in C#
C#
// Selects all rows with more than 8000 sales in the Sales column._flex.SelectionMode = SelectionModeEnum.ListBox;for (int index = _flex.Rows.Fixed ; index < _flex.Rows.Count; index++){ if (Microsoft.VisualBasic.Conversion.Val(System.Runtime.CompilerServices.RuntimeHelpers.GetObjectValue(_flex[index,
FlexGrid for WinForms 40
Copyright © 2017 GrapeCity, inc. All rights reserved.

"Sales"])) > 80000) { _flex.Rows[index].Selected = true; }} Console.WriteLine("There are now {0} rows selected", _flex.Rows.Selected.Count);
Cell RangesCellRange objects allow you to work on arbitrary groups of cells as a single unit. For example, the code below createsa CellRange object, clears the data in the range, and assigns it a custom style:
To write code in Visual Basic
Visual Basic
Dim rg As CellRange = _flex.GetCellRange(3, 3, 10, 10)rg.Data = Nothingrg.Style = _flex.Styles("MyRangeStyle")
To write code in C#
C#
CellRange rg = _flex.GetCellRange(3, 3, 10, 10);rg.Data = null;rg.Style = _flex.Styles["MyRangeStyle"];
The CellRange object has a StyleNew property that retrieves the range style, if one exists, or creates a new one,assigns it to the range, and returns it. This property is convenient in situations where you don't need full-fledgedcontrol over formatting. For example, if all you want to do is give the range a red background, you can write:
To write code in Visual Basic
Visual Basic
Dim rg As CellRange = _flex.GetCellRange(3, 3, 10, 10)rg.StyleNew.BackColor = Color.Red
To write code in C#
C#
CellRange rg = _flex.GetCellRange(3, 3, 10, 10);rg.StyleNew.BackColor = Color.Red;
Cell ImagesEach grid cell can display images in addition to the data stored in the cell. This can be done in two ways:
You can assign an Image object to a cell using the SetCellImage method. This method allows you to assignarbitrary images to each cell, and is useful if the images are not related to the data in the cell. For example, youmay want to use a picture as an indicator that the data in the cell is invalid.You can assign an ImageMap to the column and the grid will automatically map the cell data into a
FlexGrid for WinForms 41
Copyright © 2017 GrapeCity, inc. All rights reserved.

corresponding image. This method is useful in situations where the image contains a representation of thedata. For example, the images may contain icons that represent product types.
Formatting CellsOne of the main strengths of the C1FlexGrid control is the ability to customize almost every aspect of the appearanceof the entire grid and individual cells.
Cell ContentTo control how the content of the cells is formatted, set the Format property to a format string similar to the ones youuse with the String.Format method in the .NET framework. For example, the code below shows short dates oncolumn one and currency values on column two:
To write code in Visual Basic
Visual Basic
' Short date._flex.Cols(1).Format = "d" ' Currency._flex.Cols(2).Format = "c"
To write code in C#
C#
// Short date._flex.Cols[1].Format = "d"; // Currency._flex.Cols[2].Format = "c";
The formatting of cell content can also be set at design time using the Format String dialog box.
The Format String dialog box can be accessed through the Column Tasks menu or through the C1FlexGrid ColumnEditor.
In the Column Tasks menu, click the ellipsis button in the Format String box.In the C1FlexGrid Column Editor, locate the Format property in the left pane, and click the ellipsis buttonnext to it.
Note: The Format String dialog box is column specific and will only change the Format property of the selectedcolumn.
You can also use custom formats like the ones used in the Visual Basic Format function (for example, "#,###", and soon).
Retrieving Cell DataYou can retrieve the raw grid data using the indexers or the GetData method. To retrieve the formatted data, use theGetDataDisplay method instead. For example:
FlexGrid for WinForms 42
Copyright © 2017 GrapeCity, inc. All rights reserved.

To write code in Visual Basic
Visual Basic
' Short date._flex.Cols(1).Format = "d" ' Currency._flex.Cols(2).Format = "c" _flex(1, 2) = 10000Console.WriteLine("Raw value: {0}", _flex(1, 2))Console.WriteLine("Display value: {0}", _flex.GetDataDisplay(1, 2)) ' Raw value: 10000' Display value: $10,000.00
To write code in C#
C#
// Short date._flex.Cols[1].Format = "d"; // Currency._flex.Cols[2].Format = "c"; _flex[1, 2] = 10000;Console.WriteLine("Raw value: {0}", _flex[1, 2]);Console.WriteLine("Display value: {0}", _flex.GetDataDisplay(1, 2)); // Raw value: 10000// Display value: $10,000.00
Cell AppearanceThe appearance of the cells (alignment, font, colors, borders, and so on) is handled with CellStyle objects. The grid hasa Styles property that holds the collection of styles used to format the grid. This collection has some built-in membersthat define the appearance of grid elements, such as fixed and scrollable cells, selection, focus cell, and so on. You canchange these styles to modify the way the grid looks, and you can also create your own custom styles and assignthem to cells, rows, or columns.
Changing the built-in styles is the simplest way to change the appearance of the grid. For example, the code belowdisplays the selection as bold green characters over a red background:
To write code in Visual Basic
Visual Basic
Dim cs As CellStyle = _flex.Styles.Highlightcs.Font = New Font(_flex.Font, FontStyle.Bold)cs.ForeColor = Color.Greencs.BackColor = Color.Red
FlexGrid for WinForms 43
Copyright © 2017 GrapeCity, inc. All rights reserved.

To write code in C#
C#
CellStyle cs = _flex.Styles.Highlight;cs.Font = new Font(_flex.Font, FontStyle.Bold);cs.ForeColor = Color.Green;cs.BackColor = Color.Red;
You can also create your own styles and assign them to cells, rows and columns. For example, the code below createsa custom cell style and assigns it to every fifth row:
To write code in Visual Basic
Visual Basic
Dim cs As CellStyle = _flex.Styles.Add("Fifth")cs.BackColor = Color.GrayDim idex%For idex = _flex.Rows.Fixed To _flex.Rows.Count - 1 Step 5 _flex.Rows(idex).Style = csNext
To write code in C#
C#
CellStyle cs = _flex.Styles.Add("Fifth");cs.BackColor = Color.Gray;for (int index = _flex.Rows.Fixed ; index <= _flex.Rows.Count - 1; index += 5){ _flex.Rows[index].Style = cs;}
Here's an example that shows how you can create custom styles and assign them to columns, rows, and cell ranges:
To write code in Visual Basic
Visual Basic
' Create a new custom styleDim s As CellStyle = _flex.Styles.Add("MyStyle")s.BackColor = Color.Reds.ForeColor = Color.White ' Assign the new style to a column._flex.Cols(3).Style = _flex.Styles("MyStyle") ' Assign the new style to a row._flex.Rows(3).Style = _flex.Styles("MyStyle") ' Assign the new style to a cell range.Dim rg As CellRange = _flex.GetCellRange(4, 4, 6, 6)rg.Style = _flex.Styles("MyStyle")
FlexGrid for WinForms 44
Copyright © 2017 GrapeCity, inc. All rights reserved.

To write code in C#
C#
// Create a new custom style.CellStyle s = _flex.Styles.Add("MyStyle");s.BackColor = Color.Red;s.ForeColor = Color.White; // Assign the new style to a column._flex.Cols[3].Style = _flex.Styles["MyStyle"]; // Assign the new style to a row._flex.Rows[3].Style = _flex.Styles["MyStyle"]; // Assign the new style to a cell range.CellRange rg = _flex.GetCellRange(4,4,6,6);rg.Style = _flex.Styles["MyStyle"];
If you prefer, you can set up styles at design time using the C1FlexGrid Style Editor instead of writing code to do it.For details on customizing cell appearance with the C1FlexGrid Style Editor, see C1FlexGrid Style Editor.
Conditional FormattingTo format cells based on their contents, you can use the CellChanged event to select a style for the cell based on itscontents. For example, the code below creates a new style for large currency values and applies it to cells based ontheir contents:
To write code in Visual Basic
Visual Basic
Dim cs As C1.Win.C1FlexGrid.CellStyle Private Sub Form1_Load(ByVal sender As System.Object, ByVal e As System.EventArgs) Handles MyBase.Load ' Create a custom style for large values. cs = _flex.Styles.Add("LargeValue") cs.Font = New Font(Font, FontStyle.Italic) cs.BackColor = Color.GoldEnd Sub ' Format cells based on their content.Private Sub _flex_CellChanged(ByVal sender As Object, ByVal e As RowColEventArgs) Handles _flex.CellChanged ' Mark currency values > 50,000 as LargeValues (reset others by setting their Style to Nothing). Dim cs As CellStyle If _flex(e.Row, e.Col).ToString >= 50000 Then cs = _flex.Styles("LargeValue") _flex.SetCellStyle(e.Row, e.Col, cs)
FlexGrid for WinForms 45
Copyright © 2017 GrapeCity, inc. All rights reserved.

End IfEnd Sub
To write code in C#
C#
CellStyle cs; private void Form1_Load(object sender, EventArgs e){ // Create a custom style for large values. cs = _flex.Styles.Add("LargeValue"); cs.Font = new Font(Font, FontStyle.Italic); cs.BackColor = Color.Gold;} // Format cells based on their content.private void _flex_CellChanged( object sender, RowColEventArgs e) { // Mark currency values > 50,000 as LargeValues reset others by setting their Style to null). if (Microsoft.VisualBasic.CompilerServices.Conversions.ToDouble(_flex[e.Row, e.Col].ToString()) >= 50000) { cs = _flex.Styles["LargeValue"]; _flex.SetCellStyle(e.Row, e.Col, cs); }}
Owner-Drawn CellsEven though the CellStyle objects offer a lot of control over the cell appearance (back and foreground colors,alignment, font, margins, borders, and so on), sometimes that is not enough. You may want to use a gradientbackground, or draw some custom graphics directly into a cell. In these cases, you can use the DrawMode propertyand the OwnerDrawCell event to gain total control over how each cell is drawn.
The DrawMode property determines whether or not the OwnerDrawCell event is fired. The event allows you tooverride every visual aspect of the cell. The parameters in the OwnerDrawCell event allow you to change the data thatis displayed, the style used to display the data, or to take over completely and draw whatever you want into the cell.
You can change the text and image that will be shown in the cell by setting the e.Text and e.Image parameters in theevent handler. You can also change the style that will be used to display the cell by setting the e.Style property.
Note that you should not modify the properties of the Style parameter because that might affect other cells. Instead,assign a new CellStyle object to the Style parameter. For example, instead of setting e.Style.ForeColor = Color.Red,assign a whole new style to the parameter using e.Style = _flex.Styles["RedStyle"].
You can also use your own drawing code to draw into the cell, and even combine your custom code with calls to thee.DrawCell method. For example, you could paint the cell background using GDI calls and then call e.DrawCell todisplay the cell borders and content.
FlexGrid for WinForms 46
Copyright © 2017 GrapeCity, inc. All rights reserved.

Note:For an example of advanced Owner-Draw Cells, see the RtfGrid sample on ComponentOne HelpCentral.
The code below shows an example. It uses a gradient brush to paint the background of the selected cells. First, thecode sets the DrawMode property, declares a LinearGradientBrush object and updates the brush whenever the gridis resized:
To write code in Visual Basic
Visual Basic
Dim m_GradientBrush As System.Drawing.Drawing2D.LinearGradientBrush Private Sub Form1_Load(ByVal sender As System.Object, ByVal e As System.EventArgs) Handles MyBase.Load ' Brush to use with owner-draw cells. m_GradientBrush = New System.Drawing.Drawing2D.LinearGradientBrush(ClientRectangle, Color.SteelBlue, Color.White, 45) ' Use owner-draw to add gradients. _flex.DrawMode = C1.Win.C1FlexGrid.DrawModeEnum.OwnerDrawEnd Sub Private Sub _flex_Resize(ByVal sender As Object, ByVal e As System.EventArgs) Handles _flex.Resize ' Update gradient brush when the control is resized. m_GradientBrush = New System.Drawing.Drawing2D.LinearGradientBrush(ClientRectangle, Color.SteelBlue, Color.White, 45)End Sub
To write code in C#
C#
System.Drawing.Drawing2D.LinearGradientBrush m_GradientBrush; private void Form1_Load(object sender, EventArgs e){ // Brush to use with owner-draw cells. m_GradientBrush = new System.Drawing.Drawing2D.LinearGradientBrush(ClientRectangle, Color.SteelBlue, Color.White, 45); // Use owner-draw to add gradients. _flex.DrawMode = DrawModeEnum.OwnerDraw;} private void _flex_Resize( object sender, System.EventArgs e){
FlexGrid for WinForms 47
Copyright © 2017 GrapeCity, inc. All rights reserved.

// Update gradient brush when the control is resized. m_GradientBrush = new System.Drawing.Drawing2D.LinearGradientBrush(ClientRectangle, Color.SteelBlue, Color.White, 45);}
The second step is handling the OwnerDrawCell event and using the custom brush for painting the cell background. Inthis example, the foreground is handled by the grid itself, using the DrawCell method in the event argument:
To write code in Visual Basic
Visual Basic
Private Sub _flex_OwnerDrawCell(ByVal sender As Object, ByVal e As C1.Win.C1FlexGrid.OwnerDrawCellEventArgs) Handles _flex.OwnerDrawCell ' Draw the selected cell background using gradient brush. If _flex.Selection.Contains(e.Row, e.Col) Then ' Draw the background. e.Graphics.FillRectangle(m_GradientBrush, e.Bounds) ' Let the grid draw the content. e.DrawCell(C1.Win.C1FlexGrid.DrawCellFlags.Content) ' We're done drawing this cell. e.Handled = True End IfEnd Sub
To write code in C#
C#
private void _flex_OwnerDrawCell( object sender, OwnerDrawCellEventArgs e){ // Draw the selected cell background using gradient brush. if (_flex.Selection.Contains(e.Row, e.Col)) { // Draw the background. e.Graphics.FillRectangle(m_GradientBrush, e.Bounds); // Let the grid draw the content. e.DrawCell(DrawCellFlags.Content); // We' re done drawing this cell. e.Handled = true; }}
Editing Cells
FlexGrid for WinForms 48
Copyright © 2017 GrapeCity, inc. All rights reserved.
By default, the C1FlexGrid control allows users to edit cells by typing into them. You can prevent users from editingthe grid by setting the AllowEditing property to False. You can also prevent users from editing specific columns bysettings the AllowEditing property to False. (When the grid is bound to a data source, it detects which columns areeditable and automatically sets the AllowEditing property.)
To start editing a cell, the user can:
Start typing into the cell. This replaces the contents of the cell.Press F2 or Enter. This puts the grid in edit mode and puts the current cell contents in the editor.Double-click a cell. This has the same effect as pressing F2, but the cursor appears where the cell is clicked.
The basic editing mode allows users to type values into the cells. If the column being edited has a specific data type,values entered by the user are converted into the proper data type automatically. If the user types a value that cannotbe converted into the proper data type, the grid fires a GridError event and ignores the edits.
The basic editing is sufficient for many applications, but the C1FlexGrid has properties and events that allow you tocontrol the editing process and provide selection lists, editing buttons, and advanced validation control.
Starting with version 2.5, the C1FlexGrid also has built-in support for external editors. This allows you to use anycontrol as a grid editor (for example, you can now use the C1Input controls as grid editors).
These features are described in the following topics.
Lists and CombosIn many applications, cells have a well-defined list of possible values. In these cases, you can let users select the valuefrom a drop-down list. To do this, build a string containing all the choices separated by pipe characters (for example,"True|False|Don't know") and assign it to the ComboList property. Each column may have a different list. Setting theComboList property causes the grid to display a drop-down box next to the cell. The user can click the box (or pressF2) to display the list of choices available for that cell.
Another common situation is where cells have a list of common values, but users should be allowed to typesomething else as well. This can be accomplished with drop-down combos, a combination of text box and drop-down list. To create combos, just start the choice list with a pipe character (for example "|True|False|Don't know"), thenassign it to the ComboList property as before.
For example, the code below would cause the grid to display a drop-down combolist containing color names oncolumn one, and a drop-down combo on column two. When editing column one, the user must pick a value from thelist. When editing column two, the user can pick a value or type in something else:
To write code in Visual Basic
Visual Basic
' Drop-down list._flex.Cols(1).ComboList = "Red|Green|Blue|Red|White" ' Drop-down combo._flex.Cols(2).ComboList = "|Red|Green|Blue|Red|White"
To write code in C#
C#
// Drop-down list._flex.Cols[1].ComboList = "Red|Green|Blue|Red|White"; // Drop-down combo.
FlexGrid for WinForms 49
Copyright © 2017 GrapeCity, inc. All rights reserved.

_flex.Cols[2].ComboList = "|Red|Green|Blue|Red|White";
The ComboList property can also be set at design time using the Combo List dialog box. The Combo List dialog boxallows you to choose if you want the list to appear as a Dropdown List, Dropdown Combo, Ellipsis Button, orTextBox and Ellipsis Button.
The Combo List dialog box can be accessed through the Column Tasks menu or through the C1FlexGrid ColumnEditor.
In the Column Tasks menu, click the ellipsis button in the Combo List box.In the C1FlexGrid Column Editor, locate the ComboList property in the left pane, and click the ellipsis buttonnext to it.
Note: The Combo List dialog box is column specific and will only change the ComboList property of theselected column.
In some cases, cells in the same column may need different lists. For example, a property list may show properties onthe first column and their values on the second. The values depend on the property, so valid choices change from onerow to the next. In these cases, you should trap the BeforeEdit event and set the ComboList property to theappropriate list for the current cell. The ComboList property applies to the whole grid.
The built-in ComboBox provides an auto-search feature by default. As the user types a value, the selection will moveto the next match. You can disable this feature using the EditOptions property and control the time before the gridresets the auto-search buffer using the AutoSearchDelay property.
The built-in ComboBox also has an auto-cycle feature like the editors in the Visual Studio Properties window. Whenyou double-click a cell that has a list associated with it, the grid will automatically select the next value. You can alsodisable this feature using the EditOptions property.
CheckboxesBy default, the grid displays values in Boolean columns as checkboxes (the type of the column is determined by theDataType property of the Column object). If you don't want Boolean values displayed as checkboxes, set the column'sFormat property to a string containing the values that should be displayed for True and False values. For example:
To write code in Visual Basic
FlexGrid for WinForms 50
Copyright © 2017 GrapeCity, inc. All rights reserved.
Visual Basic
_flex.Cols["bools"].Format = "Yes;No"
To write code in C#
C#
_flex.Cols["bools"].Format = "Yes;No";
In unbound mode, you can use the GetCellCheck and SetCellCheck properties to add checkboxes to any cells. Thecheckboxes will be displayed along with any text in the cell, and you can set their position using the column'sImageAlign property.
There are two types of check boxes: Boolean and tri-state. Boolean check boxes toggle between theCheckEnum.Checked and CheckEnum.Unchecked states. Tri-state check boxes cycle through the settingsCheckEnum.TSChecked and CheckEnum.TSUnchecked and CheckEnum.TSGrayed.
If the cell has a check box and the AllowEditing property is set to True, the user can change the state of the checkboxes by clicking them with the mouse or by pressing the SPACE bar or ENTER keys.
By default, toggling the value of checkbox with the mouse or keyboard will toggle all selected checkboxes. You candisable this feature using the EditOptions property.
Value-Mapped ListsThe ComboList property described above ensures that cell values are selected from a list. The value selected by theuser is converted into the appropriate type for the column and stored in the grid, exactly as if the user had typed thevalue.
In many cases, cells can assume values from well-defined lists, but you want to display a user-friendly version of theactual value. For example, if a column contains product codes, you may want to store the code but display theproduct name instead.
This is accomplished with the DataMap property. This property contains a reference to an IDictionary object thatestablishes the mapping between what is stored in the grid and what is visible to the user (the IDictionary interface isdefined in the System.Collections namespace, and is implemented by the Hashtable class among others).
For example, the code below creates a data map that contains color values and their names. The colors are stored inthe grid, and their names are displayed to the user:
To write code in Visual Basic
Visual Basic
Dim dtMap As Hashtable = New Hashtable()dtMap.Add(Color.Red, "Apple")dtMap.Add(Color.Green, "Forest")dtMap.Add(Color.Blue, "Sky")dtMap.Add(Color.Black, "Coal")dtMap.Add(Color.White, "Snow")_flex.Cols(1).DataType = GetType(Color)_flex.Cols(1).DataMap = dtMap
To write code in C#
C#
FlexGrid for WinForms 51
Copyright © 2017 GrapeCity, inc. All rights reserved.

System.Collections.Hashtable dtMap = new System.Collections.Hashtable();dtMap.Add(Color.Red, "Apple");dtMap.Add(Color.Green, "Forest");dtMap.Add(Color.Blue, "Sky");dtMap.Add(Color.Black, "Coal");dtMap.Add(Color.White, "Snow");_flex.Cols[1].DataType = typeof(Color);_flex.Cols[1].DataMap = dtMap;
Any class that implements IDictionary can be used as a DataMap. For example, Hashtable, ListDictionary, andSortedList all provide valid data maps. The difference is that when they are used in editable columns, the order of theitems in the drop down list will depend on the class.
The SortedList class sorts items by key, Hashtable uses an arbitrary order, and ListDictionary keeps the order inwhich items were added to the list. Because of this, ListDictionary is usually the best choice for DataMaps.
Note that the keys in the data map must be of the same type as the cells being edited. For example, if a columncontains short integers (Int16), then any data maps associated with the column should have short integer keys. Usingregular integers (Int32) as keys would not work.
The example below shows the difference:
To write code in Visual Basic
Visual Basic
Private Sub Form1_Load(ByVal sender As System.Object, ByVal e As System.EventArgs) Handles MyBase.Load ' Sorts by key. Dim sl As New SortedList() sl.Add("0", "Zero") sl.Add("1", "One") sl.Add("2", "Two") sl.Add("3", "Three") ' Keeps Add order. Dim ld As New Specialized.ListDictionary() ld.Add(0, "Zero") ld.Add(1, "One") ld.Add(2, "Two") ld.Add(3, "Three") ' Arbitrary order. Dim ht As New Hashtable() ht.Add(0, "Zero") ht.Add(1, "One") ht.Add(2, "Two") ht.Add(3, "Three") _flex.Cols(1).DataMap = sl _flex.Cols(1).Caption = "SortedList" _flex.Cols(2).DataMap = ld _flex.Cols(2).Caption = "ListDictionary" _flex.Cols(3).DataMap = ht
FlexGrid for WinForms 52
Copyright © 2017 GrapeCity, inc. All rights reserved.

_flex.Cols(3).Caption = "HashTable"End Sub
To write code in C#
C#
private void Form1_Load(object sender, System.EventArgs e);{ // Sorts by key. System.Collections.SortedList sl = new System.Collections.SortedList(); sl.Add("0", "Zero"); sl.Add("1", "One"); sl.Add("2", "Two"); sl.Add("3", "Three"); // Keeps Add order. System.Collections.Specialized.ListDictionary ld = new System.Collections.Specialized.ListDictionary(); ld.Add(0, "Zero"); ld.Add(1, "One"); ld.Add(2, "Two"); ld.Add(3, "Three"); // Arbitrary order. System.Collections.Hashtable ht = new System.Collections.Hashtable(); ht.Add(0, "Zero"); ht.Add(1, "One"); ht.Add(2, "Two"); ht.Add(3, "Three"); _flex.Cols[1].DataMap = sl; _flex.Cols[1].Caption = "SortedList"; _flex.Cols[2].DataMap = ld; _flex.Cols[2].Caption = "ListDictionary"; _flex.Cols[3].DataMap = ht; _flex.Cols[3].Caption = "HashTable";}
Also, if the column's DataType property is set to an enumeration, the grid will automatically build and use a data mapwith the names of each value in the enumeration. For example, the following code creates an enumeration containingcountries. The country values are stored in the grid, and their names are displayed to the user:
To write code in Visual Basic
Visual Basic
Private Enum Countries NewYork Chicago NewOrleans London Paris
FlexGrid for WinForms 53
Copyright © 2017 GrapeCity, inc. All rights reserved.

End Enum Private Sub Form1_Load(ByVal sender As System.Object, ByVal e As System.EventArgs) Handles MyBase.Load _flex.Cols(1).DataType = GetType(Countries)End Sub
To write code in C#
C#
private enum Countries{ NewYork, Chicago, NewOrleans, London, Paris} private void Form1_Load(object sender, EventArgs e){ _flex.Cols[1].DataType = typeof(Countries);}
Cell ButtonsCertain types of cells may require sophisticated editors other than text boxes or drop-down lists. For example, if acolumn contains file names or a color, it should be edited with a dialog box.
In these cases, you should set the ComboList property to an ellipsis ("…"). The control will display a button next to thecell and will fire the CellButtonClick event when the user clicks on it. You can trap the event, show the dialog box, andupdate the cell' s contents with the user's selection.
If you add a pipe character before the ellipsis, then the user will also be allowed to edit the cell contents by typinginto the cell.
By default, the cell buttons display the ellipsis. You can assign pictures to the cell buttons using the CellButtonImageproperty.
The example below shows how you can use cell buttons to display a color picker dialog box for choosing a color in acolumn.
To write code in Visual Basic
Visual Basic
' Set up color column.Dim c As C1.Win.C1FlexGrid.Column = _flex.Cols(1)c.DataType = GetType(Color) ' Show cell button.c.ComboList = "..."
To write code in C#
FlexGrid for WinForms 54
Copyright © 2017 GrapeCity, inc. All rights reserved.
C#
// Set up color column.Column c = _flex.Cols[1];c.DataType = typeof(Color); // Show cell button.c.ComboList = "...";
This code sets up the column so the user can click a button and select a color from a dialog box. The next step is thecode that handles clicks on the cell button:
To write code in Visual Basic
Visual Basic
Private Sub _flex_CellButtonClick(ByVal sender As Object, ByVal e As C1.Win.C1FlexGrid.RowColEventArgs) Handles _flex.CellButtonClick ' Create color picker dialog. Dim clrDlg As New ColorDialog() ' Initialize the dialog. If _flex(e.Row, e.Col) Is GetType(Color) Then clrDlg.Color = _flex(e.Row, e.Col) End If ' Get new color from dialog and assign it to the cell. If clrDlg.ShowDialog() = Windows.Forms.DialogResult.OK Then _flex(e.Row, e.Col) = clrDlg.Color End IfEnd Sub
To write code in C#
C#
private void _flex_CellButtonClick( object sender, RowColEventArgs e){ // Create color picker dialog. ColorDialog clrDlg = new ColorDialog(); // Initialize the dialog. if (_flex[e.Row, e.Col] == typeof(Color)) { clrDlg.Color = (Color)_flex[e.Row, e.Col]; } // Get new color from dialog and assign it to the cell. if (clrDlg.ShowDialog() == DialogResult.OK) { _flex[e.Row, e.Col] = clrDlg.Color; }}
FlexGrid for WinForms 55
Copyright © 2017 GrapeCity, inc. All rights reserved.

MasksThe C1FlexGrid control also supports masked editing. This type of editing uses an input mask to provide a templateand automatically validate the input as the user types. The mask is specified by the EditMask property, which can beused with regular text fields and with drop-down combo fields.
Mask strings have two types of characters: literal characters, which become part of the input, and template characters,which serve as placeholders for characters belonging to specific categories (for example, digits or alphabetic). Forexample, the code below assigns a "(999) 999-9999" editing mask to column one, which holds phone numbers (thedigit "9" is a placeholder that stands for any digit):
To write code in Visual Basic
Visual Basic
' Set up a phone number edit mask._flex.Cols(1).EditMask = "(999) 999-9999"
To write code in C#
C#
// Set up a phone number edit mask._flex.Cols[1].EditMask = "(999) 999-9999";
Setting the EditMask property to a non-empty string causes it to use the built-in masked editor, even if the columncontains date/time values (usually, a DateTimePicker control is used to edit these columns). This is especiallyconvenient if you have DateTime columns that hold times only (not dates). In these cases, you can set the followingproperties to use a masked editor instead of the DateTimePicker control:
To write code in Visual Basic
Visual Basic
_flex.Cols(1).DataType = GetType(DateTime) _flex.Cols(1).Format = "hh:mm tt" _flex.Cols(1).EditMask = "99:99 LL"
To write code in C#
C#
_flex.Cols[1].DataType = typeof(DateTime);_flex.Cols[1].Format = "hh:mm tt";_flex.Cols[1].EditMask = "99:99 LL";
The EditMask property can also be set at design time using the Input Mask dialog box.
FlexGrid for WinForms 56
Copyright © 2017 GrapeCity, inc. All rights reserved.

The Input Mask dialog box can be accessed through the Column Tasks menu or through the C1FlexGrid ColumnEditor.
In the Column Tasks menu, click the ellipsis button in the Edit Mask box.In the C1FlexGrid Column Editor, locate the EditMask property in the left pane, and click the ellipsis buttonnext to it.
Note: The Input Mask dialog box is column specific and will only change the EditMask property of the selectedcolumn.
For details on the syntax used to build the mask strings, see the EditMask property in the control reference section.
If different cells in the same column need different masks, trap the BeforeEdit event and set the EditMask property toan appropriate value for the current cell.
ValidationIn many cases, edit masks alone are not enough to ensure that the data enters by the user was valid. For example, amask won't let you specify a range of possible values, or validate the current cell based on the contents of anothercell.
In these cases, trap the ValidateEdit event and see if the value contained in the Editor.Text property is a valid entryfor the current cell (at this point, the cell still has the original value in it). If the input is invalid, set the Cancelparameter to True and the grid will remain in edit mode until the user types a valid entry.
For example, the code below validates input into a currency column to ensure that values entered are between 1,000and 10,000:
To write code in Visual Basic
Visual Basic
Private Sub _flex_ValidateEdit(ByVal sender As Object, ByVal e As C1.Win.C1FlexGrid.ValidateEditEventArgs) Handles _flex.ValidateEdit
FlexGrid for WinForms 57
Copyright © 2017 GrapeCity, inc. All rights reserved.

' Validate amounts. If _flex.Cols(e.Col).DataType Is GetType(Decimal) Then Try Dim dec As Decimal = Decimal.Parse(_flex.Editor.Text()) If (dec < 1000) Or (dec > 10000) Then MessageBox.Show("Value must be between 1,000 and 10,000") e.Cancel = True End If Catch MessageBox.Show("Value not recognized as a Currency") e.Cancel = True End Try End IfEnd Sub
To write code in C#
C#
private void _flex_ValidateEdit( object sender, ValidateEditEventArgs e){ // Validate amounts. if (_flex.Cols[e.Col].DataType == typeof(Decimal)) { try { Decimal dec = Decimal.Parse(_flex.Editor.Text); if ( dec < 1000 || dec > 10000 ) { MessageBox.Show("Value must be between 1,000 and 10,000"); e.Cancel = true; } } catch { MessageBox.Show("Value not recognized as a Currency"); e.Cancel = true; } }}
Custom EditorsThe built-in editors provide a lot of flexibility and power, but in some cases you may want to use external controls asspecialized editors. For example, you may want to use the C1NumericInput control that provides a drop-downcalculator for entering numbers, or an editor for selecting from multi-column lists, or a specialized control that youwrote to edit your business objects.
Any control that derives from the base Control class can be used as a basic grid editor. Controls that implement theIC1EmbeddedEditor interface (defined in C1.Common.dll) can provide better integration with the grid and more
FlexGrid for WinForms 58
Copyright © 2017 GrapeCity, inc. All rights reserved.

advanced features. For details on the IC1EmbeddedEditor interface, see the Editor property.
To use a control as a custom editor, all you have to do is associate an instance of the control with a grid column or astyle using its Editor property. You can do this in the designer (using the Column Editor) or in code. After that, thecontrol will be automatically used by the grid.
To define custom editors at design time, add an instance of the editor control to the form, then select Designer fromthe C1FlexGrid Tasks menu to open the C1FlexGrid Column Editor. Select the columns that should use the customeditor and set their Editor properties to the name of the new editor control.
For example, to use a NumericUpDown control as a grid editor, follow these steps:
1. Add a C1FlexGrid control to the form.2. Add a NumericUpDown control to the form and set its BorderStyle property to None.3. Select Designer from the C1FlexGrid Tasks menu. For more information on accessing the C1FlexGrid Column
Editor, see Accessing the C1FlexGrid Column Editor.4. In the C1FlexGrid Column Editor, select the first scrollable grid column and set its Editor property to
NumericUpDown1.
Run the project and edit some values in the first column. Notice how the grid positions and initializes theNumericUpDown control so you can edit cell values. When you are done editing a cell, click a different cell or pressthe TAB key to move to the next one. Notice how the new value is applied to the cell.
You can also assign custom editors to the grid using code:
To write code in Visual Basic
Visual Basic
Private Sub Form1_Load(ByVal sender As System.Object, ByVal e As System.EventArgs) Handles MyBase.Load ' Create the custom editor. Dim editor as New NumericUpDown() editor.BorderStyle = BorderStyle.None ' Assign the custom editor to the grid. _flex.Cols(1).Editor = editorEnd Sub
To write code in C#
C#
private void Form1_Load(object sender, System.EventArgs e){ // Create the custom editor. NumericUpDown editor = new NumericUpDown(); editor.BorderStyle = BorderStyle.None; // Assign the custom editor to the grid. _flex.Cols[1].Editor = editor;}
Creating Custom Editors
FlexGrid for WinForms 59
Copyright © 2017 GrapeCity, inc. All rights reserved.

Any control that derives from the Control base class can be used as a grid editor. This is possible because the gridknows enough about the base class to access properties such as Text and Bounds, and events such as Leave andTextChanged. In many cases this level of support is adequate.
In some cases, however, you may want to use controls that do not follow the base class that closely. For example, aDateTimePicker control has a Value property that should be used to retrieve the edited value instead of Text. Inthese cases, you can implement one or more methods in the IC1EmbeddedEditor interface to override the defaultbehavior. For example, all controls in the C1Input library support IC1EmbeddedEditor and therefore integrate closelywith C1FlexGrid (and also C1TrueDBGrid).
The IC1EmbeddedEditor interface is fairly simple, and because the grid binds to it using late binding, you don't evenhave to implement all its members. Only implement the ones that make sense to your editor control.
The interface does provide enough flexibility to allow virtually any control to be used as a grid editor. You can evenuse UITypeEditor classes as grid editors. To do this, you need a wrapper class that:
1. Derives from Control (UITypeEditor doesn't).2. Implements the IC1EmbeddedEditor interface.3. Encapsulates the appropriate UITypeEditor.
We provide source code for this wrapper class in the CustomEditors sample.
Using the UITypeEditor wrapper class, you can use any UITypeEditors with the C1FlexGrid. .NET provides severalUITypeEditors for editing colors, fonts, file names, and so on. You can also write your own UITypeEditors, in somecases that is easier than writing a control.
Note: For an example of using built-in, custom, and UITypeEditor editors with C1FlexGrid, see theCustomEditors sample on ComponentOne HelpCentral.
Edit ModeYou can determine whether the grid is in edit mode by reading the value of the Editor property. If this propertyreturns null, the grid is not in edit mode. Otherwise, the grid is in edit mode and the property returns a reference tothe control that is being used to edit the cell (the control may be a TextBox, a ComboBox, or other type of control).
You can put the grid in edit mode programmatically using the StartEditing method, and finish editing usingthe FinishEditing method.
You can also set PreserveEditMode to retain edit mode of cells in a grid on navigation, using arrow or tab keys.
You can control the editing process further by handling the editing events fired by the grid. In the process of editing acell, the grid fires the following sequence of events:
Event Description
BeforeEdit This event fires whenever an editable cell is selected. It allows you toprevent the cell from being edited by setting the event's Cancel parameterto True. You can also modify the ComboList property so the appropriatedrop-down button gets painted in the cell. Note that the user might notactually start editing after this, he could simply move the selection to adifferent cell or control.
StartEdit This event is similar to BeforeEdit, except the user has actually typed a keyor clicked the dropdown button in the cell and really is about to startediting. You can still cancel the editing at this point. Note that the Editorproperty is still null at this point, because the control hasn't yet determinedthe type of editor that should be used. You can assign custom editors to theEditor property at this point.
FlexGrid for WinForms 60
Copyright © 2017 GrapeCity, inc. All rights reserved.

SetupEditor This event fires after the editor control has been created and configured toedit the cell, but before it is displayed. You can change the editor propertiesat this point (for example, set the maximum length or password character tobe used in a TextBox editor). You can also attach your own event handlersto the editor.
ValidateEdit This event fires when the user is done editing, before the editor value getscopied back into the grid. You can examine the original value by retrieving itfrom the grid (the event provides the coordinates of the cell). You canexamine the new value about to be assigned to the grid through the Editorproperties (for example, Editor.Text). If the new value is not valid for thecell, set the Cancel parameter to True and the grid will remain in edit mode.If instead of keeping the cell in edit mode you would rather restore theoriginal value and leave edit mode, set Cancel to True and then call theFinishEditing method.
AfterEdit This event fires after the new value has been applied to the cell and theeditor has been deactivated. You can use this event to update anything thatdepends on the cell value (for example, subtotals or sorting).
Event Description
Merging CellsThe C1FlexGrid control allows you to merge cells, making them span multiple rows or columns. This capability can beused to enhance the appearance and clarity of the data displayed on the grid. The effect of these settings is similar tothe HTML <ROWSPAN> and <COLSPAN> tags.
To enable cell merging, you must do two things:
1. Set the grid's AllowMerging property to a value other than None. (The effect of each setting is explained in thereference section.)
2. If you want to merge columns, set the AllowMerging property to True for each column that you would like tomerge. If you want to merge rows, set the AllowMerging property to True for each row that you would like tomerge
Merging will occur if adjacent cells contain the same non-empty string. There is no method to force a pair of cells tomerge. The merging is done automatically based on the cell contents. This makes it easy to provide merged views ofsorted data, where values in adjacent rows present repeated data.
Cell merging has several possible uses. For example, you can use it to create merged table headers, merged dataviews, or grids where the text spills into adjacent columns.
Merged Table HeadersTo create merged table headers, you must start by setting the grid' s AllowMerging property to FixedOnly. Then,designate the rows and columns that you want to merge by setting the row and column' s AllowMerging properties.Finally, assign the text to the header cells so that the cells you want to merge have the same contents.
The code below shows an example:
To write code in Visual Basic
Visual Basic
FlexGrid for WinForms 61
Copyright © 2017 GrapeCity, inc. All rights reserved.

Private Sub Form1_Load(ByVal sender As System.Object, ByVal e As System.EventArgs) Handles MyBase.Load Dim i% ' Initialize the control. _flex.Styles.Normal.WordWrap = True _flex.Cols.Count = 9 _flex.Rows.Fixed = 2 _flex.AllowMerging = C1.Win.C1FlexGrid.AllowMergingEnum.FixedOnly ' Create row headers. _flex.Rows(0).AllowMerging = True ' Merge the four cells with same contents. Dim rng As C1.Win.C1FlexGrid.CellRange = _flex.GetCellRange(0, 1, 0, 4) rng.Data = "North" ' Merge the four cells with same contents. rng = _flex.GetCellRange(0, 5, 0, 8) rng.Data = "South" For i = 1 To 4 _flex(1, i) = "Qtr " & i _flex(1, i + 4) = "Qtr " & i Next ' Create the column header. _flex.Cols(0).AllowMerging = True ' Merge the two cells with same contents. rng = _flex.GetCellRange(0, 0, 1, 0) rng.Data = "Sales by Product" ' Align and autosize the cells. _flex.Styles.Fixed.TextAlign = C1.Win.C1FlexGrid.TextAlignEnum.CenterCenter _flex.AutoSizeCols(1, _flex.Cols.Count - 1, 10)End Sub
To write code in C#
C#
private void Form1_Load(System.object sender, System.EventArgs e){ int i; // Initialize the control. _flex.Styles.Normal.WordWrap = true; _flex.Cols.Count = 9; _flex.Rows.Fixed = 2; _flex.AllowMerging = C1.Win.C1FlexGrid.AllowMergingEnum.FixedOnly; // Create row headers.
FlexGrid for WinForms 62
Copyright © 2017 GrapeCity, inc. All rights reserved.

_flex.Rows[0].AllowMerging = true; // Merge the four cells with same contents. C1.Win.C1FlexGrid.CellRange rng = _flex.GetCellRange(0, 1, 0, 4); rng.Data = "North"; // Merge the four cells with same contents. rng = _flex.GetCellRange(0, 5, 0, 8); rng.Data = "South"; for ( i = 1 ; i <= 4; i++) { _flex[1, i] = "Qtr " + i; _flex[1, i + 4] = "Qtr " + i; } // Create the column header. _flex.Cols[0].AllowMerging = true; // Merge the two cells with same contents. rng = _flex.GetCellRange(0, 0, 1, 0); rng.Data = "Sales by Product"; // Align and autosize the cells. _flex.Styles.Fixed.TextAlign = C1.Win.C1FlexGrid.TextAlignEnum.CenterCenter; _flex.AutoSizeCols(1, _flex.Cols.Count - 1, 10);}
This is the result:
Merged Data ViewsCell merging works the same way when the grid is bound to a data source. The code below shows an example for agrid bound to a data source at design time. For more information on binding to a data source, see Binding to a DataSource.
To write code in Visual Basic
Visual Basic
Private Sub Form1_Load(ByVal sender As System.Object, ByVal e As System.EventArgs) Handles MyBase.Load Dim i% ' Set up cell merging. _flex.AllowMerging = C1.Win.C1FlexGrid.AllowMergingEnum.RestrictCols
FlexGrid for WinForms 63
Copyright © 2017 GrapeCity, inc. All rights reserved.

For i = _flex.Cols.Fixed To _flex.Cols.Count - 1 _flex.Cols(i).AllowMerging = True NextEnd Sub
To write code in C#
C#
private void Form1_Load( System.object sender, System.EventArgs e){ int i; // Set up cell merging. _flex.AllowMerging = C1.Win.C1FlexGrid.AllowMergingEnum.RestrictCols; for (int i = _flex.Cols.Fixed; i <= _flex.Cols.Count - 1; i++) { _flex.Cols(i).AllowMerging = true; }}
This is the result:
Notice how merging the cells has the effect of visually grouping the data and making the information on the tableeasier to understand.
Note: For an example of displaying merged data views with C1FlexGrid, see the CellMerging sample onComponentOne HelpCentral.
Spilling TextThe AllowMerging property has two settings that operate differently from the others that do not require you to setthe AllowMerging property on specific rows and columns.
FlexGrid for WinForms 64
Copyright © 2017 GrapeCity, inc. All rights reserved.
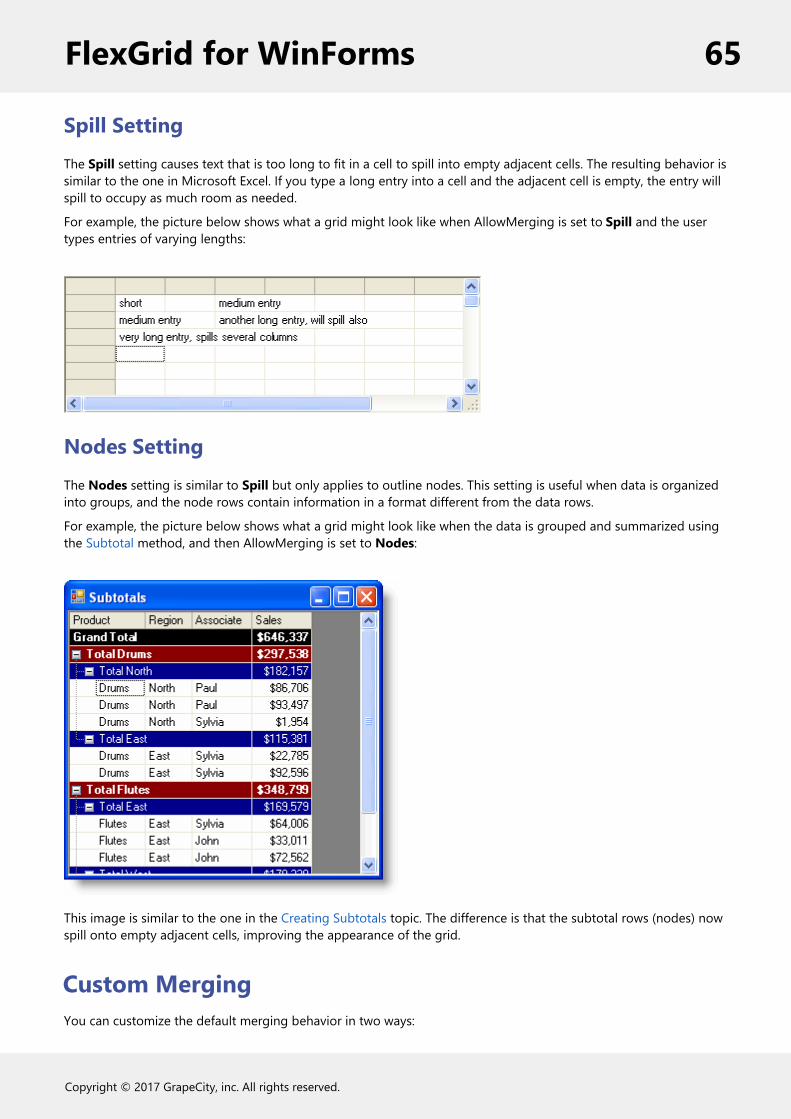
Spill SettingThe Spill setting causes text that is too long to fit in a cell to spill into empty adjacent cells. The resulting behavior issimilar to the one in Microsoft Excel. If you type a long entry into a cell and the adjacent cell is empty, the entry willspill to occupy as much room as needed.
For example, the picture below shows what a grid might look like when AllowMerging is set to Spill and the usertypes entries of varying lengths:
Nodes SettingThe Nodes setting is similar to Spill but only applies to outline nodes. This setting is useful when data is organizedinto groups, and the node rows contain information in a format different from the data rows.
For example, the picture below shows what a grid might look like when the data is grouped and summarized usingthe Subtotal method, and then AllowMerging is set to Nodes:
This image is similar to the one in the Creating Subtotals topic. The difference is that the subtotal rows (nodes) nowspill onto empty adjacent cells, improving the appearance of the grid.
Custom MergingYou can customize the default merging behavior in two ways:
FlexGrid for WinForms 65
Copyright © 2017 GrapeCity, inc. All rights reserved.
Assign a custom IComparer class to the CustomComparer property.
By default, the grid will merge adjacent cells that contain the same non-null value. String comparisons arecase-sensitive and blanks are included.
If you wanted the grid to merge cells using a case-insensitive comparison and trimming blanks, you could writea custom class that implements IComparer and assign it to the CustomComparer property.
Write a new class that derives from the C1FlexGrid and override the GetMergedRange virtual method,providing your own custom merging logic.
Note: For samples that show how to implement custom merging logic, see the CustomMerge,CustomMerge2, CustomMerge3, and CustomMerge4 samples on ComponentOne HelpCentral.
Outlining and Summarizing DataThe C1FlexGrid control has methods and properties that allow you to summarize data and display it in a hierarchicalmanner. To summarize data and add aggregate values, use the Subtotal method. To display hierarchical views of thedata, use the Tree property.
Creating SubtotalsThe C1FlexGrid.Subtotal method adds subtotal rows that contain aggregate data for the regular (non-subtotal) rows.
Subtotal supports hierarchical aggregates. For example, if your grid contains sales data, you may Subtotal to getaggregate sales figures by Product, Region, and Salesperson. The code below illustrates this:
To write code in Visual Basic
Visual Basic
Private Sub ShowTotals() ' Show OutlineBar on column 0. _flex.Tree.Column = 0 _flex.Tree.Style = TreeStyleFlags.Simple ' Clear existing subtotals. _flex.Subtotal(AggregateEnum.Clear) ' Get a Grand total (use -1 instead of column index). _flex.Subtotal(AggregateEnum.Sum, -1, -1, 3, "Grand Total") ' Total per Product (column 0). _flex.Subtotal(AggregateEnum.Sum, 0, 0, 3, "Total {0}") ' Total per Region (column 1). _flex.Subtotal(AggregateEnum.Sum, 1, 1, 3, "Total {0}") ' Size column widths based on content. _flex.AutoSizeCols()End Sub
To write code in C#
FlexGrid for WinForms 66
Copyright © 2017 GrapeCity, inc. All rights reserved.

C#
private void ShowTotals(){ // Show OutlineBar on column 0. _flex.Tree.Column = 0; _flex.Tree.Style = TreeStyleFlags.Simple; // Clear existing subtotals. _flex.Subtotal(AggregateEnum.Clear); // Get a Grand total (use -1 instead of column index). _flex.Subtotal(AggregateEnum.Sum, -1, -1, 3, "Grand Total"); // Total per Product (column 0). _flex.Subtotal(AggregateEnum.Sum, 0, 0, 3, "Total {0}"); // Total per Region (column 1). _flex.Subtotal(AggregateEnum.Sum, 1, 1, 3, "Total {0}"); // Size column widths based on content. _flex.AutoSizeCols();}
When the C1FlexGrid.Subtotal method adds rows with the aggregate information, it automatically assigns subtotalstyles to the new rows (there are built-in styles for 5 levels of subtotals). You can customize the appearance of thesubtotal rows by changing the properties of the outline styles in the designer with the Style Editor or with code. Forexample:
To write code in Visual Basic
Visual Basic
' Set styles for subtotals.Dim cs As C1.Win.C1FlexGrid.CellStylecs = _flex.Styles(C1.Win.C1FlexGrid.CellStyleEnum.GrandTotal)cs.BackColor = Color.Blackcs.ForeColor = Color.Whitecs.Font = New Font(Font, FontStyle.Bold) cs = _flex.Styles(C1.Win.C1FlexGrid.CellStyleEnum.Subtotal0)cs.BackColor = Color.DarkRedcs.ForeColor = Color.Whitecs.Font = New Font(Font, FontStyle.Bold) cs = _flex.Styles(C1.Win.C1FlexGrid.CellStyleEnum.Subtotal1)cs.BackColor = Color.DarkBluecs.ForeColor = Color.White
To write code in C#
C#
FlexGrid for WinForms 67
Copyright © 2017 GrapeCity, inc. All rights reserved.

// Set styles for subtotals.CellStyle cs;cs = _flex.Styles[CellStyleEnum.GrandTotal];cs.BackColor = Color.Black;cs.ForeColor = Color.White;cs.Font = new Font(Font, FontStyle.Bold); cs = _flex.Styles[CellStyleEnum.Subtotal0];cs.BackColor = Color.DarkRed;cs.ForeColor = Color.White;cs.Font = new Font(Font, FontStyle.Bold); cs = _flex.Styles[CellStyleEnum.Subtotal1];cs.BackColor = Color.DarkBlue;cs.ForeColor = Color.White;
After executing this code, the grid would look like this:
The Grand Total row contains the total sales for all products, regions, and sales personnel. It was created using a –1for the groupOn parameter in the call to the C1FlexGrid.Subtotal method. The other subtotals show total sales byproduct and region. They were created using a values 0 and 1 for the groupOn parameter.
You may also calculate aggregates other than sums (for example, averages or percentages), and calculate severalaggregates for each row (for example, gross and net sales).
Subtotal rows created by the Subtotal method differ from regular rows in three aspects:
1. Subtotal rows can be automatically removed by invoking the Subtotal method with the flexSTClear parameter.This is useful to provide dynamic views of the data, where the user may move columns and re-sort the data,making it necessary to recalculate the subtotals.
2. Subtotal rows can be used as nodes in an outline, allowing you to collapse and expand groups of rows topresent an overview of the data or to reveal its details. To see the outline tree, you need to set the Column andTree.Style properties to define the position and appearance of the outline tree.
3. Subtotal rows can be treated as nodes in a tree. You can get a Node object for any subtotal row through theNode property.
FlexGrid for WinForms 68
Copyright © 2017 GrapeCity, inc. All rights reserved.

4. When the grid is bound to a data source, the subtotal rows do not correspond to actual data. If you move thecursor in the data source, subtotal rows will be skipped in the grid.
The outline tree allows users to collapse and expand sections of the grid by clicking on the nodes. You can use outlinetrees to display many types of information, not only aggregates. The next topic shows how you can create a customoutline tree to display directory information.
Creating Custom TreesTo create outline trees without using the Subtotal method, you need to follow these steps:
1. Add rows to the grid.2. Turn some rows into outline nodes by setting their IsNode property to True.3. Get the Node object for each node row and set its Level property to define the node' s position in the tree
hierarchy. Higher values mean the node is deeper (more indented) into the outline tree.
For example, the code below creates a directory tree:
To write code in Visual Basic
Visual Basic
' add these Imports statements at the top of the for.Imports System.IOImports C1.Win.C1FlexGrid Private Sub Form1_Load(ByVal sender As System.Object, ByVal e As System.EventArgs) Handles MyBase.Load ' Initialize grid layout. _flex.Cols.Fixed = 0 _flex.Cols.Count = 1 _flex.Rows.Count = 1 _flex.ExtendLastCol = True _flex.Styles.Normal.TextAlign = TextAlignEnum.LeftCenter _flex.Styles.Normal.Border.Style = BorderStyleEnum.None ' Show outline tree. _flex.Tree.Column = 0 _flex.Tree.Style = TreeStyleFlags.SimpleLeaf _flex.Tree.LineColor = Color.DarkBlue ' Populate the grid. AddDirectory("c:\", 0)End Sub
To write code in C#
C#
// add these using statements at the top of the for.using System;using System.Collections.Generic;using System.ComponentModel;
FlexGrid for WinForms 69
Copyright © 2017 GrapeCity, inc. All rights reserved.

using System.Data;using System.Drawing;using System.Text;using System.Windows.Forms;using System.IO;using C1.Win.C1FlexGrid; private void Form1_Load(object sender, EventArgs e){ // Initialize grid layout. _flex.Cols.Fixed = 0; _flex.Cols.Count = 1; _flex.Rows.Count = 1; _flex.ExtendLastCol = true; _flex.Styles.Normal.TextAlign = TextAlignEnum.LeftCenter; _flex.Styles.Normal.Border.Style = BorderStyleEnum.None; // Initialize outline tree. _flex.Tree.Column = 0; _flex.Tree.Style = TreeStyleFlags.SimpleLeaf; _flex.Tree.LineColor = Color.DarkBlue; // Populate the grid. AddDirectory(@"c:\\", 0);}
The code above initializes the grid layout and calls the AddDirectory routine that does the job of populating the gridand setting up the tree structure:
To write code in Visual Basic
Visual Basic
Private Sub AddDirectory(ByVal dir As String, ByVal level As Integer) ' Add this directory. Dim thisDir As String thisDir = Path.GetFileName(dir) If thisDir.Length = 0 Then thisDir = dir _flex.AddItem(thisDir) ' Make this new row a node. Dim row As Row row = _flex.Rows(_flex.Rows.Count - 1) row.IsNode = True ' Set the node level. Dim nd As Node nd = row.Node nd.Level = level ' Add files in this directory.
FlexGrid for WinForms 70
Copyright © 2017 GrapeCity, inc. All rights reserved.

Dim file As String, cnt As Integer, r As Row cnt = 0 For Each file In Directory.GetFiles(dir) _flex.AddItem(Path.GetFileName(file).ToLower()) r = _flex.Rows(_flex.Rows.Count – 1) r.IsNode = True r.Node.Level = level + 1 cnt = cnt + 1 If cnt > 10 Then Exit For Next ' Add subdirectories (up to level 4). If level <= 4 Then Dim subdir As String cnt = 0 For Each subdir In Directory.GetDirectories(dir) AddDirectory(subdir, level + 1) cnt = cnt + 1 If cnt > 10 Then Exit For Next End IfEnd Sub
To write code in C#
C#
private void AddDirectory(string dir, int level){ // add this director. string thisDir = Path.GetFileName(dir); if (thisDir.Length == 0) { thisDir = dir; } _flex.AddItem(thisDir); //make this new row a node Row row = _flex.Rows[_flex.Rows.Count - 1]; row.IsNode = true; //set node level Node nd = row.Node; nd.Level = level; // add files in this director. int cnt = 0; Row r; foreach (string file in Directory.GetFiles(dir)) { _flex.AddItem(Path.GetFileName(file).ToLower()); //mark the row without child row as node r = _flex.Rows[_flex.Rows.Count - 1]; r.IsNode = true; r.Node.Level = level + 1; cnt = cnt + 1; if (cnt > 10) break;
FlexGrid for WinForms 71
Copyright © 2017 GrapeCity, inc. All rights reserved.

} // add subdirectories (up to level 4. if (level <= 4) { cnt = 0; foreach (string subdir in Directory.GetDirectories(dir)) { AddDirectory(subdir, level + 1); cnt = cnt + 1; if (cnt > 10) break; } }}
AddDirectory is a recursive routine that traverses the current directory and all its subdirectories. In this example, thetree size is limited to four directory levels in order to save time. In a real application, the routine should be changed topopulate tree branches only when they are expanded (see the FlexGrid for WinForms Tutorials).
This code creates a grid that looks like this:
Creating Outlines and Trees with the C1FlexGrid ControlOne of the unique and popular features of the C1FlexGrid control is the ability to add hierarchical grouping to regularunstructured data.
To achieve this, the C1FlexGrid introduces the concept of Node rows. Node rows do not contain regular data. Instead,they act as headers under which similar data is grouped, exactly like nodes in a regular TreeView control. Like nodesin a TreeView control, node rows can be collapsed and expanded, hiding or showing the data they contain. Also likenodes in a TreeView control, node rows have a Level property that defines the node hierarchy. Lower level nodescontain higher level nodes.
FlexGrid for WinForms 72
Copyright © 2017 GrapeCity, inc. All rights reserved.
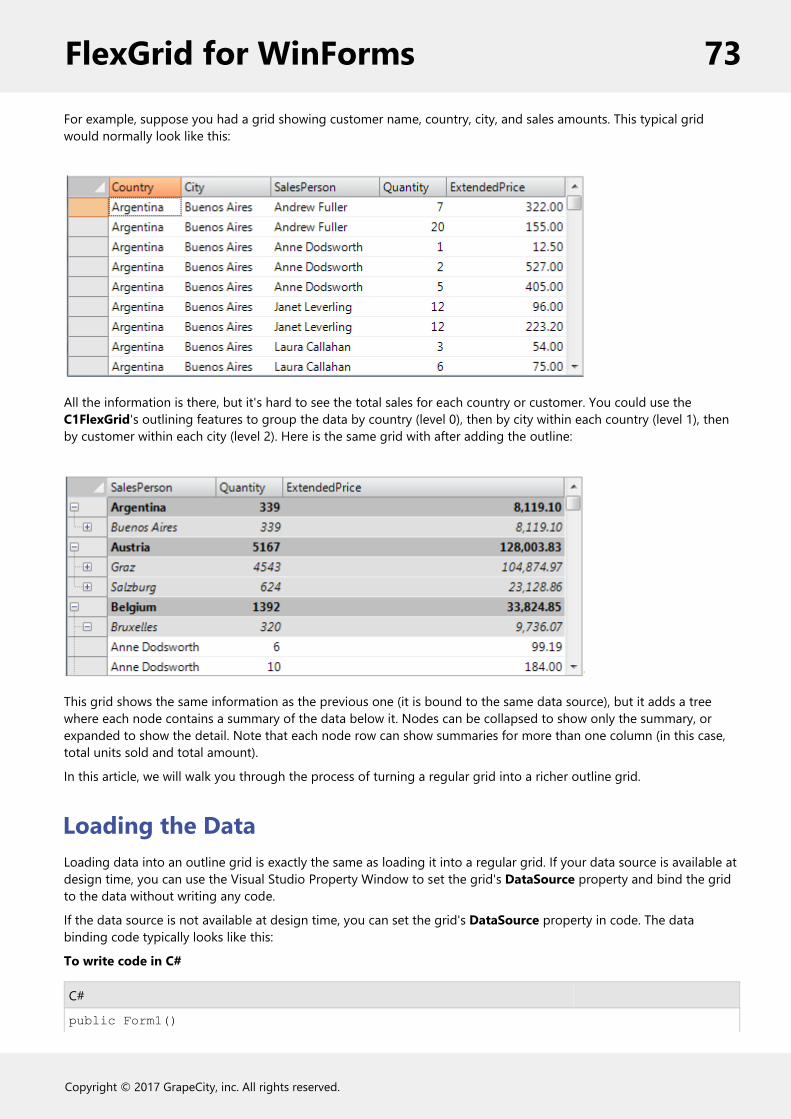
For example, suppose you had a grid showing customer name, country, city, and sales amounts. This typical gridwould normally look like this:
All the information is there, but it's hard to see the total sales for each country or customer. You could use theC1FlexGrid's outlining features to group the data by country (level 0), then by city within each country (level 1), thenby customer within each city (level 2). Here is the same grid with after adding the outline:
This grid shows the same information as the previous one (it is bound to the same data source), but it adds a treewhere each node contains a summary of the data below it. Nodes can be collapsed to show only the summary, orexpanded to show the detail. Note that each node row can show summaries for more than one column (in this case,total units sold and total amount).
In this article, we will walk you through the process of turning a regular grid into a richer outline grid.
Loading the DataLoading data into an outline grid is exactly the same as loading it into a regular grid. If your data source is available atdesign time, you can use the Visual Studio Property Window to set the grid's DataSource property and bind the gridto the data without writing any code.
If the data source is not available at design time, you can set the grid's DataSource property in code. The databinding code typically looks like this:
To write code in C#
C#
public Form1()
FlexGrid for WinForms 73
Copyright © 2017 GrapeCity, inc. All rights reserved.

{ InitializeComponent(); // get data var fields = @" Country, City, SalesPerson, Quantity, ExtendedPrice"; var sql = string.Format("SELECT {0} FROM Invoices ORDER BY {0}", fields); var da = new OleDbDataAdapter(sql, GetConnectionString()); da.Fill(_dt); // bind grid to data this._flex.DataSource = _dt; // format ExtendedPrice column _flex.Cols["ExtendedPrice"].Format = "n2";}
The code uses an OleDbDataAdapter to fill a DataTable with data, thenand then assigns the DataTable to the grid'sDataSource property.
After running this code, you would get the "regular grid" shown in the first image. To turn this regular grid into theoutline grid shown in the second image, we need to insert the node rows that make up the outline.
Creating Node RowsNode rows are almost identical to regular rows, except for the following:
Node rows are not data bound. When the grid is bound to a data source, each regular row corresponds to anitem in the data source. Node rows do not. Instead, they exist to group regular rows that contain similar data.Node rows can be collapsed or expanded. When a node row is collapsed, all its data and child nodes arehidden. If the outline tree is visible, users can collapse and expand nodes using the mouse or the keyboard. Ifthe outline tree is not visible, then nodes can only be expanded or collapsed using code.
To determine whether a row is a node or not, you can use the IsNode property:
To write code in C#
C#
var row = _flex.Rows[rowIndex];if (row.IsNode){ // row is a nod. var node = row.Node; DoSomethingWithTheNode(node);}else{ // this row is not a nod.}
FlexGrid for WinForms 74
Copyright © 2017 GrapeCity, inc. All rights reserved.

Node rows can be created in three ways:
1. Use the Rows.InsertNode method. This will insert a new node row at a specified index. Once the node row hasbeen created, you can use it like you would any other row (set the data for each column, apply styles, etc.). Thisis the 'low-level' way of inserting totals and building outlines. It gives the most control and flexibility and isdemonstrated below.
2. Use the Subtotal method. This method scans the entire grid and automatically inserts node rows with optionalsubtotals at locations where the grid data changes. This is the 'high-level' way of inserting totals and buildingoutlines. It requires very little code, but makes some assumptions about how the data is structured on the gridand what the outline should look like.
3. If the grid is unbound, then you can turn regular rows into node rows by setting the IsNode property to true.Note that this only works when the grid is unbound. Trying to turn a regular data bound row into a node willcause the grid to throw an exception.
The code below shows how you could implement a GroupBy method that inserts node rows grouping identical valueson a given column.
To write code in C#
C#
// group on a given column inserting nodes of a given leve.void GroupBy(string columnName, int level){ object current = null; for (int r = _flex.Rows.Fixed; r < _flex.Rows.Count; r++) { if (!_flex.Rows[r].IsNode) { var value = _flex[r, columnName]; if (!object.Equals(value, current)) { // value changed: insert nod. _flex.Rows.InsertNode(r, level); // show group name in first scrollable colum. _flex[r, _flex.Cols.Fixed] = value; // update current valu. current = value; } } }}
The code scans all the columns, skipping existing node rows (so it can be called to add several levels of nodes), andkeeps track of the current value for the column being grouped on. When the current value changes, a node row isinserted showing the new group name in the first scrollable column.
Back to our example, you could use this method to create a two-level outline by calling:
To write code in C#
C#
FlexGrid for WinForms 75
Copyright © 2017 GrapeCity, inc. All rights reserved.

void _btnGroupCountryCity_Click(object sender, EventArgs e){ GroupBy("Country", 0); GroupBy("City", 1);}
Very simple, but there are some caveats. First, the method assumes that the data is sorted according to the outlinestructure. In this example, if the data were sorted by SalesPerson instead of by Country, the outline would haveseveral level-0 nodes for each country, which probably is not what you want.
Also, the GroupBy method may insert may rows, which would cause the grid to flicker. To avoid this, you wouldnormally set the Redraw property to false before making the updates and set it back to true when done.
To handle these issues, the code that creates the outline should be re-written as follows:
To write code in C#
C#
void _btnGroupCountryCity_Click(object sender, EventArgs e){ // suspend redrawing while updatin. using (new DeferRefresh(_flex)) { // restore original sort (by Country, City, etc.. ResetBinding(); // group by Country, Cit. GroupBy("Country", 0); GroupBy("City", 1); }}
The DeferRefresh class is a simple utility that sets the grid's Redraw property to false and restores its original valuewhen it is disposed. This ensures that Redraw is properly restored even when exceptions happen during the updates.Here is the implementation of the DeferRefresh class:
To write code in C#
C#
// Utility class used to encapsulate grid lengthy operations in a Redraw block.// This avoids flicker and ensures the Redraw property is reset properly in case.// an exception is thrown during the operation.class DeferRefresh : IDisposable{ C1FlexGrid _grid; bool _redraw; public DeferRefresh(C1FlexGrid grid) { _grid = grid; _redraw = grid.Redraw; grid.Redraw = false; } public void Dispose() {
FlexGrid for WinForms 76
Copyright © 2017 GrapeCity, inc. All rights reserved.
_grid.Redraw = _redraw; }}
The BindGrid method ensures that the grid is sorted in the order required by our outline structure. In our example,the sort order is by Country, City, and SalesPerson. The code looks like this:
To write code in C#
C#
// unbind and re-bind grid in order to reset everythin.void ResetBinding(){ // unbind gri. _flex.DataSource = null; // reset any custom sortin. _dt.DefaultView.Sort = string.Empty; // re-bind gri. _flex.DataSource = _dt; // format ExtendedPrice colum. _flex.Cols["ExtendedPrice"].Format = "n2"; // auto-size the columns to fit their conten. _flex.AutoSizeCols();}
If you run this code now, you will notice that the node rows are created as expected, but the outline tree is not visible,so you can't expand and collapse the nodes. The outline tree is described in the next section.
Outline TreeThe outline tree is very similar to the one you see in a regular TreeView control. It shows an indented structure withcollapse/expand icons next to each node row so the user can expand and collapse the outline to see the desired levelof detail.
The outline tree can be displayed in any column, defined by the Tree.Column property. By default, this property is setto -1, which causes the tree not to be displayed at all. To show the outline tree in the example given above, you woulduse this code:
To write code in C#
C#
void _btnTreeCountryCity_Click(object sender, EventArgs e){ using (new DeferRefresh(_flex)) { // group by country and city as before _btnGroupCountryCity_Click(this, EventArgs.Empty);
FlexGrid for WinForms 77
Copyright © 2017 GrapeCity, inc. All rights reserved.

// show outline tree _flex.Tree.Column = 0; // autosize to accommodate tree _flex.AutoSizeCol(_flex.Tree.Column); // collapse detail nodes _flex.Tree.Show(1); }}
The code calls the previous method to build the outline, thenand then sets the Tree.Column property to zero in orderto show the outline tree in the first column. It also calls the C1FlexGrid.AutoSizeCol method to ensure that the columnis wide enough to accommodate the outline tree. Finally, it calls the Tree.Show method to display all level-0 nodes(cities in this case) and hide all the detail.
The Tree property returns a reference to a GridTree object that exposes several methods and properties used tocustomize the outline tree. The main ones are listed below:
Column: Gets or sets the index of the column that contains the outline tree. Setting this property to -1 causesthe outline tree to be hidden from the users.Indent: Gets or sets the indent, in pixels, between adjacent node levels. Higher indent levels cause the tree tobecome wider.Style: Gets or sets the type of outline tree to display. Use this property to determine whether the tree shouldinclude a button bar at the top to allow users to collapse/expand the entire tree, whether lines and/or symbolsshould be displayed, and whether lines should be displayed connecting the tree to data rows as well as noderows.LineColor: Gets or sets the color of the tree's connecting lines.LineStyle: Gets or sets the style of the tree's connecting lines.
For example, by changing the code above to include these two lines:
To write code in C#
C#
// show outline tree_flex.Tree.Column = 0;_flex.Tree.Style = TreeStyleFlags.CompleteLeaf;_flex.Tree.LineColor = Color.White;_flex.Tree.Indent = 30;
The outline tree would change as follows:
FlexGrid for WinForms 78
Copyright © 2017 GrapeCity, inc. All rights reserved.
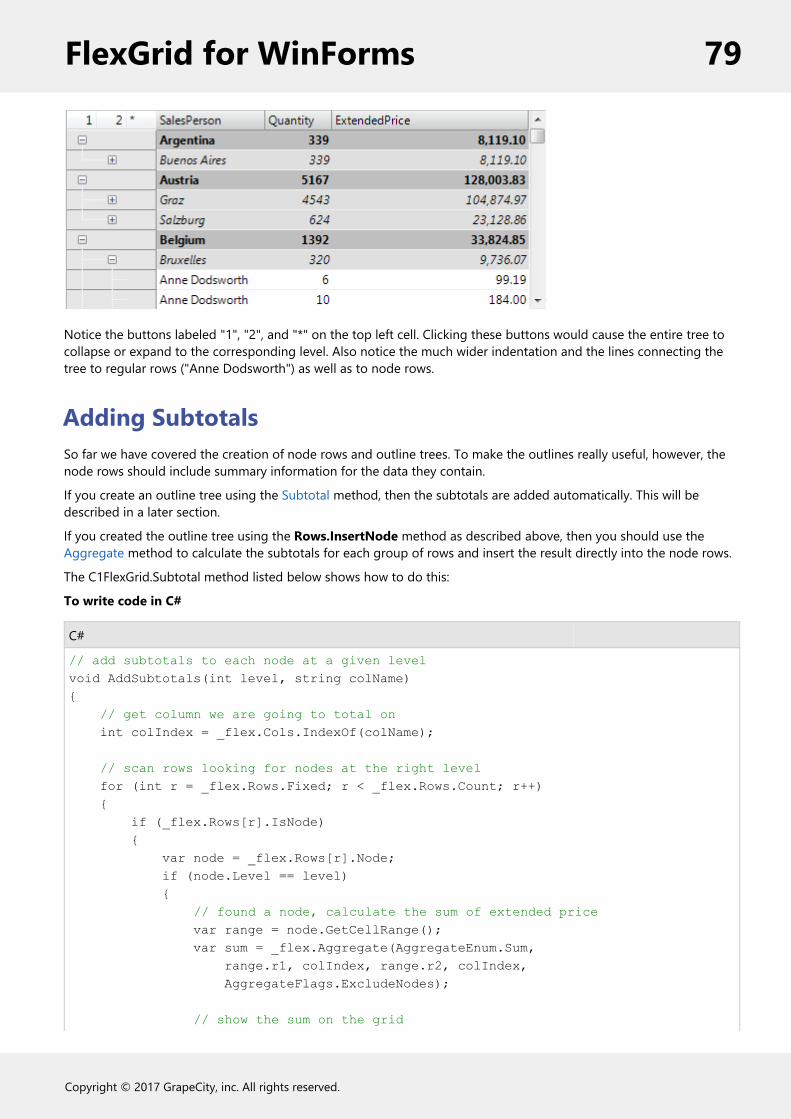
Notice the buttons labeled "1", "2", and "*" on the top left cell. Clicking these buttons would cause the entire tree tocollapse or expand to the corresponding level. Also notice the much wider indentation and the lines connecting thetree to regular rows ("Anne Dodsworth") as well as to node rows.
Adding SubtotalsSo far we have covered the creation of node rows and outline trees. To make the outlines really useful, however, thenode rows should include summary information for the data they contain.
If you create an outline tree using the Subtotal method, then the subtotals are added automatically. This will bedescribed in a later section.
If you created the outline tree using the Rows.InsertNode method as described above, then you should use theAggregate method to calculate the subtotals for each group of rows and insert the result directly into the node rows.
The C1FlexGrid.Subtotal method listed below shows how to do this:
To write code in C#
C#
// add subtotals to each node at a given levelvoid AddSubtotals(int level, string colName){ // get column we are going to total on int colIndex = _flex.Cols.IndexOf(colName); // scan rows looking for nodes at the right level for (int r = _flex.Rows.Fixed; r < _flex.Rows.Count; r++) { if (_flex.Rows[r].IsNode) { var node = _flex.Rows[r].Node; if (node.Level == level) { // found a node, calculate the sum of extended price var range = node.GetCellRange(); var sum = _flex.Aggregate(AggregateEnum.Sum, range.r1, colIndex, range.r2, colIndex, AggregateFlags.ExcludeNodes); // show the sum on the grid
FlexGrid for WinForms 79
Copyright © 2017 GrapeCity, inc. All rights reserved.

// (will use the column format automatically) _flex[r, colIndex] = sum; } } }}
The AddSubtotals method scans the grid rows looking for node rows. When a node row of the desired level is found,the method uses the GetCellRange method to retrieve the node's child rows. Then it uses the C1FlexGrid.Aggregatemethod to calculate the sum of the values on the target column over the entire range. The call to Aggregate includesthe ExcludeNodes flag to avoid double-counting existing nodes. Once the subtotal has been calculated, it is assignedto the node row's cell with the usual _flex[row, col] indexer.
Note that this does not affect the data source in any way, since node rows are not bound to the data.
Note also that the method can be used to add multiple totals to each node row. In this example, we will add totals forthe Quantity and ExtendedPrice columns. In addition to sums, you could add other aggregates such as average,maximum, minimum, etc.
We can now use this method to create a complete outline, with node rows, outline tree, and subtotals:
To write code in C#
C#
void _btnTreeCountryCity_Click(object sender, EventArgs e){ using (new DeferRefresh(_flex)) { // restore original sort (by Country, City, SalesPerson) ResetBinding(); // group by Country, City GroupBy("Country", 0); // group by country (level 0) GroupBy("City", 1); // group by city (level 1) // add totals per Country, City AddSubtotals(0, "ExtendedPrice"); // extended price per country (level 0) AddSubtotals(0, "Quantity"); // quantity per country (level 0) AddSubtotals(1, "ExtendedPrice"); // extended price per city (level 1) AddSubtotals(1, "Quantity"); // quantity per city (level 1) // show outline tree _flex.Tree.Column = 0; _flex.AutoSizeCol(_flex.Tree.Column); _flex.Tree.Show(1); }}
If you run the project now, you will see a tree with node rows that show the total quantity and amount sold for eachcountry and city. This is very nice, but there is a little problem. If you expand any of the node rows, you will see a lot ofduplicate values. All rows under a given city node have the same country and city:>
FlexGrid for WinForms 80
Copyright © 2017 GrapeCity, inc. All rights reserved.

This is correct, but it is also a waste of screen real estate. Eliminating these duplicate values is easy; all you have to dois set the Width of the columns that are being grouped on to zero. When you do that, however, you shouldremember to set the grid's AllowMerging property to Nodes, so the text assigned to the node rows will spill into thevisible columns. (Another option would be to assign the node text to the first visible column, but merging is usually abetter solution because it allows you to use longer text for the node rows).
Here is the revised code and the final result:
To write code in C#
C#
void _btnTreeCountryCity_Click(object sender, EventArgs e){ using (new DeferRefresh(_flex)) { // restore original sort (by Country, City, SalesPerson) ResetBinding(); // group by Country, City GroupBy("Country", 0); // group by country (level 0) GroupBy("City", 1); // group by city (level 1) // hide columns that we grouped on // (they only have duplicate values which already appear on the tree nodes) // (but don't make them invisible, that would also hide the node text) _flex.Cols["Country"].Width = 0; _flex.Cols["City"].Width = 0; // allow node content to spill onto next cell _flex.AllowMerging = AllowMergingEnum.Nodes; // add totals per Country, City AddTotals(0, "ExtendedPrice"); // extended price per country (level 0) AddTotals(0, "Quantity"); // quantity per country (level 0) AddTotals(1, "ExtendedPrice"); // extended price per city (level 1)
FlexGrid for WinForms 81
Copyright © 2017 GrapeCity, inc. All rights reserved.

AddTotals(1, "Quantity"); // quantity per city (level 1) // show outline tree _flex.Tree.Column = 0; _flex.AutoSizeCol(_flex.Tree.Column); _flex.Tree.Show(1); }}
The Country and City columns are now invisible, but their values still appear in the node rows. Collapsing the treeshows totals for each country and city.
Using the Subtotal MethodWe mentioned earlier that you could also create trees using the C1FlexGrid's Subtotal method. TheSubtotal methodperforms the same tasks as the GroupBy and AddSubtotals methods described above, except it does both things ina single step and is therefore a little more efficient.
The code below shows how you can use the Subtotal method to accomplish the same thing we did before, only alittle faster and without using any helper methods:
To write code in C#
C#
void _btnTreeCountryCity_Click(object sender, EventArgs e){ using (new DeferRefresh(_flex)) { // restore original sort (by Country, City, SalesPerson) ResetBinding(); // group and total by country and city _flex.Subtotal(AggregateEnum.Sum, 0, "Country", "ExtendedPrice"); _flex.Subtotal(AggregateEnum.Sum, 0, "Country", "Quantity");
FlexGrid for WinForms 82
Copyright © 2017 GrapeCity, inc. All rights reserved.

_flex.Subtotal(AggregateEnum.Sum, 1, "City", "ExtendedPrice"); _flex.Subtotal(AggregateEnum.Sum, 1, "City", "Quantity"); // hide columns that we grouped on // (they only have duplicate values which already appear on the tree nodes) // (but don't make them invisible, that would also hide the node text) _flex.Cols["Country"].Width = 0; _flex.Cols["City"].Width = 0; _flex.AllowMerging = AllowMergingEnum.Nodes; // show outline tree _flex.Tree.Column = 0; _flex.AutoSizeCol(_flex.Tree.Column); _flex.Tree.Show(1); }}
The Subtotal method is very convenient and flexible. It has a number of overloads that allow you to specify whichcolumns should be grouped on and totaled on by index or by name, whether to include a caption in the node rowsthat it inserts, how to perform the grouping, and so on. The summary below describes the overloads available:
1. Subtotal(AggregateEnum aggType)
This version of the method takes only one aggregate type as a parameter. It is useful only for removing existingsubtotals before inserting new ones. In this case, the aggType parameter is set to AggregateEnum.Clear.
2. Subtotal(AggregateEnum aggType, int groupBy, int totalOn)
Subtotal(AggregateEnum aggType, string groupBy, string totalOn)
These are the most commonly used overloads. The parameters are the type of aggregate to insert and thecolumns to group by and total on. The columns may be referenced by index or by name. The latter is the onewe used in the example above.
3. Subtotal(AggregateEnum aggType, int groupBy, int totalOn, string caption)
Subtotal(AggregateEnum aggType, string groupBy, string totalOn, string caption)
These overloads add an extra caption parameter. The caption parameter determines the text that is added tothe new node rows to identify the value being grouped on. By default, the value being grouped on is shown, soif you are grouping by country, the node rows would show "Argentina", "Brazil", and so on. If you set thecaption parameter to a string such as "Country: {0}", then the node rows would show "Country: Argentina"instead.
4. Subtotal(AggregateEnum aggType, int groupFrom, int groupTo, int totalOn, string caption)
Subtotal(AggregateEnum aggType, string groupFrom, string groupTo, string totalOn, string caption)
These overloads separate the groupBy parameter into two: groupFrom and groupTo. By default, the Subtotalmethod inserts a node row whenever the value of the groupBy or any previous column changes.
For example, if you a row has the same value in the "City" column as the previous row, but a different value inthe "Country" column, then the Subtotal method assumes the rows should be in different groups and inserts anew node row even though the value of the groupBy column is the same. These aggregates let you overridethat behavior and specify the range of columns that should be considered when identifying a group.
FlexGrid for WinForms 83
Copyright © 2017 GrapeCity, inc. All rights reserved.

Outline MaintenanceSo far we have discussed how to create outlines with trees and totals using the high-level Subtotal method as well aslower-level Rows.InsertNode and Aggregate methods.
At this point, it is important to remember that the outline tree is created based on the data, but is not bound to it inany way, and is not automatically maintained when there are changes to the grid or to the data.
If the user modifies a value in the "ExtendedPrice" column, for example, the subtotals will not be automaticallyupdated. If the user sorts the grid, the data will be refreshed and the subtotals will disappear.
There are two common ways to maintain the outlines:
1. Prevent the user from making any changes that would invalidate the outline. This is the easiest option. Youwould set the grid's AllowEditing, AllowDragging, and AllowSorting properties to false and prevent anychanges that would affect the outline.
2. Update the outline when there are changes to the data or to the grid. You would attach handlers to thegrid's AfterDataRefresh, AfterSort, and AfterEdit events and re-generate the outline appropriately.
Option 2 is usually more interesting since it provides a quick and simple tool for dynamic data analysis. This approachis illustrated by the Analyze sample provided with the C1FlexGrid. The sample creates an initial outline and allowsusers to reorder the columns. When the column order changes, the sample automatically re-sorts the data and re-creates the outline. The user can easily create simple reports showing sales by country, by product, by salesperson,and so on.
Using the Node classThe Node class provides a number of methods and properties that can be used to create and manage outline trees.Many of these methods and properties are based on the standard TreeView object model, so they should be familiarto most developers.
To obtain a Node object, you can either:
Use the return value of the Rows.InsertNode method:
var node = _flex.Rows.InsertNode(index, level);
Or you can retrieve the node for an existing row using the row's Node property:
var node = _flex.Rows[index].IsNode ? _flex.Rows[index].Node : null;
Either way, once you have a Node object you can manipulate it using the following properties and methods:
Level: Gets or sets the node level in the outline tree.Data: Gets or sets the value in the cell defined by Node.Row and the Tree.Column.Image: Gets or sets the image in the cell defined by Node.Row and the Tree.Column.Checked: Gets or sets the check state of the cell defined by Node.Row and the Tree.Column.Collapsed/Expanded: Gets or sets the node's collapsed/expanded state.
You can also explore the outline structure using the following methods:
GetCellRange(): Gets a CellRange object that described the range of rows that belong to this node.Children: Gets the number of child nodes under this node.Nodes: Gets a node array containing this node's child nodes.
FlexGrid for WinForms 84
Copyright © 2017 GrapeCity, inc. All rights reserved.

GetNode: Gets the node that has a given relationship to this node (parent, first child, next sibling, and so on).
The discussion above focused on bound scenarios, where the grid is attached to a data source that provides the data.You can also create trees and outlines in unbound scenarios. Things are actually somewhat simpler in this case, sinceyou can turn any row into a node row by setting its IsNode property to true.
If the grid is unbound, it owns all the data that is displayed, and you do things that are not possible when a datasource owns the data. For example, you can move nodes around the tree using the Move method as shown by theTreeNode sample provided with the C1FlexGrid.
Using nodes in an unbound grid is very similar to using nodes in a regular TreeView control.
Saving, Loading, and PrintingThe C1FlexGrid control has methods that allow you to save, load, and print grids.
Saving and Loading Grids to Text FilesThe SaveGrid method saves the grid contents to a text file. The method has parameters that control the type ofdelimiter to use (for example, commas, tabs, custom delimiters), whether to save the fixed cells or only the scrollablecells, and the type of encoding to used (for example, ASCII or Unicode). The resulting text files can later be loadedback into the control, or into other applications that support comma or tab-delimited files (for example, MicrosoftExcel).
The LoadGrid method loads data from text files. You can load text files created with the SaveGrid method or withother applications.
The format of the text files is fairly simple. Cell contents are saved as formatted strings (exactly as they are displayedon the screen). If the cell text contains quote characters or cell separator characters, the cell is enclosed in quotes. Anyquote characters contained in the cell text are doubled. This is the also the convention used in Microsoft Excel textfiles.
Text files do not contain pictures or formatting information.
The SaveGrid method has a flags parameter that allows you to specify whether you want to save the entire grid oronly certain parts (scrollable, visible, or selected).
Saving and Loading Microsoft Excel FilesStarting with version 2.5, you can use the SaveGrid and LoadGrid methods to save and load Microsoft Excel files (.xls)as well as text files. This allows you to save formatting information in addition to the data.
To save and load Excel files using the SaveGrid and LoadGrid methods, simply set the format parameter toFileFormatEnum.Excel and call the methods as usual. You don't need to have Microsoft Excel installed on yourcomputer.
Excel files contain "workbooks", which are made up of "worksheets". The SaveGrid and LoadGrid methods always savebooks with a single sheet, and load the first sheet from existing books. If you want additional control over whichsheets to load or save, use the SaveExcel, LoadExcel, and LoadExcelSheetNames methods instead. The process ofsaving and loading Excel files will convert most data types and formatting information, including row and columndimensions, fonts, colors, formats, and cell alignment. However, not all formatting elements can be converted. Forexample, the grid will load the values in Excel cells, but it will not load the underlying formulas. Other features such asfrozen and merged cells, images, data maps, and cell borders are not translated either.
Loading Grids from Databases
FlexGrid for WinForms 85
Copyright © 2017 GrapeCity, inc. All rights reserved.

You can also load grid data from a database. This is different from data binding, which keeps a live connectionbetween one or more controls and the underlying data source. To load data from a database, you can useDataReader objects, as shown below:
To write code in Visual Basic
Visual Basic
Private Sub _btnData_Click(ByVal sender As Object, ByVal e As System.EventArgs) Handles _btnData.Click ' Prepare DataReader. Dim strConn As String = "data source=MYMACHINE;initial catalog=Northwind;" Dim myConn As New SqlClient.SqlConnection(strConn) Dim myCMD As New SqlClient.SqlCommand("SELECT * FROM Employees", myConn) myConn.Open() Dim myReader As SqlClient.SqlDataReader = myCMD.ExecuteReader() ' Build the grid structure from the DB schema. Dim dt As DataTable = myReader.GetSchemaTable() _flex.Cols.Count = 1 Dim dr As DataRow For Each dr In dt.Rows Dim c As C1.Win.C1FlexGrid.Column = _flex.Cols.Add() c.Caption =(c.Name <= CStr(dr("ColumnName"))) c.DataType = CType(dr("DataType"), Type) Next dr ' Populate the grid. _flex.Rows.Count = 1 Dim row As Integer = 1 Dim cols As Integer = dt.Columns.Count Dim v As Object() = CType(Array.CreateInstance(GetType(Object), cols), Object()) While myReader.Read() myReader.GetValues(v) _flex.AddItem(v, row + 1, 1) End While ' Cleanup. _flex.AutoSizeCols() myReader.Close() myConn.Close()End Sub
To write code in C#
C#
private void _btnData_Click(object sender, System.EventArgs e){ // Prepare DataReader. string strConn = "data source=MYMACHINE;initial catalog=Northwind;"; System.Data.SqlClient.SqlConnection myConn = new
FlexGrid for WinForms 86
Copyright © 2017 GrapeCity, inc. All rights reserved.

System.Data.SqlClient.SqlConnection(strConn); System.Data.SqlClient.SqlCommand myCMD = new System.Data.SqlClient.SqlCommand("SELECT * FROM Employees", myConn); myConn.Open(); System.Data.SqlClient.SqlDataReader myReader = myCMD.ExecuteReader(); // Build the grid structure from the DB schema. DataTable dt = myReader.GetSchemaTable(); _flex.Cols.Count = 1; foreach (DataRow dr in dt.Rows) { Column c = _flex.Cols.Add(); c.Caption = c.Name = (string)dr["ColumnName"]; c.DataType = (Type)dr["DataType"]; } // Populate the grid. _flex.Rows.Count = 1; int row = 1; int cols = dt.Columns.Count; object[] v = (object[])Array.CreateInstance(typeof(object), cols); while (myReader.Read()) { myReader.GetValues(v); _flex.AddItem(v, row++, 1); } // Cleanup. _flex.AutoSizeCols(); myReader.Close(); myConn.Close();}
Printing GridsUse the PrintGrid method to print the contents of the grid. The method has parameters that allow you to select thescaling mode, whether to display print/preview dialog boxes, set headers and footers, and so on.
The PrintParameters property exposes additional printing properties such as the font to use for headers and footers,and a .NET Framework PrintDocument object that can be used to select the printer, paper size and orientation,margins, and so on.
The code below uses the PrintParameters property to set up the page orientation, margins, header and footer fonts.Then it calls the PrintGrid method to display a print preview dialog window:
To write code in Visual Basic
Visual Basic
' Get the grid's PrintDocument object.Dim pd As Printing.PrintDocumentpd = _flex.PrintParameters.PrintDocument()
FlexGrid for WinForms 87
Copyright © 2017 GrapeCity, inc. All rights reserved.

' Set up the page (landscape, 1.5" left margin).With pd.DefaultPageSettings .Landscape = True .Margins.Left = 150End With ' Set up the header and footer fonts._flex.PrintParameters.HeaderFont = New Font("Arial Black", 14, FontStyle.Bold)_flex.PrintParameters.FooterFont = New Font("Arial Narrow", 8, FontStyle.Italic) ' Preview the grid._flex.PrintGrid("C1FlexGrid", C1.Win.C1FlexGrid.PrintGridFlags.FitToPageWidth + C1.Win.C1FlexGrid.PrintGridFlags.ShowPreviewDialog, "C1FlexGrid" + Chr(9) + Chr(9) + Format(DateTime.Now, "d"), Chr(9) + Chr(9) + "Page {0} of {1}")
To write code in C#
C#
// Get the grid' s PrintDocument object.System.Drawing.Printing.PrintDocument pd = _flex.PrintParameters.PrintDocument; // Set up the page (landscape, 1.5" left margin).pd.DefaultPageSettings.Landscape = true;pd.DefaultPageSettings.Margins.Left = 150; // Set up the header and footer fonts._flex.PrintParameters.HeaderFont = new Font("Arial Black", 14, FontStyle.Bold);_flex.PrintParameters.FooterFont = new Font("Arial Narrow", 8, FontStyle.Italic); // Preview the grid._flex.PrintGrid("C1FlexGrid", PrintGridFlags.FitToPageWidth | PrintGridFlags.ShowPreviewDialog, "C1FlexGrid\t\t" + Microsoft.VisualBasic.Strings.Format(DateTime.Now, "d"), "\t\tPage {0} of {1}");
C1FlexGrid FilteringData filtering in grids is usually of two types:
Header-Based Filter: A filter icon appears over each column that has a filter applied to it. Users may see andedit the filters by clicking the filter icon. This is the mechanism used by Windows 7/Vista and by the C1FlexGridcontrol. The main benefits of this type of filter are: (1) the user can see which columns are being filtered, (2) thefiltering does not require extra real estate on the screen, and (3) this type of filter allows for better filter editorsand easier customization.Filter Row: A filter row remains always visible and allows users to type values or expressions directly into therow. The main benefit of this type of filter is that users can always see which columns are being filtered andwhat the current filter criteria are. The main disadvantage is that the filter takes up some real estate and mayinterfere with the regular grid operation. Although filter rows are not built into the C1FlexGrid control,implementing them is relatively easy. We provide a FilterRow sample that shows how to do it.
The code samples presented below were mostly taken from two new samples included with the product:
FlexGrid for WinForms 88
Copyright © 2017 GrapeCity, inc. All rights reserved.

ColumnFilters and CustomFilters. Please refer to the samples for complete projects that show the features in action.
AllowFiltering propertyTo implement the header-based filters, the C1FlexGrid control follows the same pattern used to implement columnmoving and sizing. The grid has a new AllowFiltering property that controls filtering at a control level, and the grid'sColumn object also has an AllowFiltering property that controls filtering at the column level.
To enable simple filtering scenarios, users simply set the grid's AllowFiltering property to True. They can then disableor customize the filtering behavior for specific columns by changing the value of the column's AllowFiltering property.The column's AllowFiltering property may be set to one of the following values:
Default: The grid automatically creates a filter of type ColumnFilter. This filter combines a ValueFilter and aConditionFilter, both described below.ByValue: The grid automatically creates a filter of type ValueFilter. This filter contains a list of values thatshould be displayed. Any values not present on the list are hidden from the end user.ByCondition: The grid automatically creates a filter of type ConditionFilter. This filter specifies two conditionssuch as "greater than" or "contains". The conditions may be combined with an AND or an OR operator.Custom: The grid does not create a filter automatically. The developer is expected to instantiate a filter andexplicitly assign it to the column's Filter property.None: The column cannot be filtered.
By default, the C1FlexGrid control localizes the column filter editor to use the language specified by theCurrentUICulture setting. However, you can use the Language property to override the default and specify thelanguage that should be used when the grid displays the column filter editor.
Value FilterThe ValueFilter is conceptually very simple. It contains a list of values, and only the values listed are displayed on thegrid. If the list is set to null, the filter is de-activated and all values are displayed. This type of filter is recommended forfiltering columns that contain discrete values such as names or enumerations.
The ValueFilter editor consists of a list of values with checkboxes. Users may check or uncheck all values at once.Navigating long lists is easy with the advanced built-in keyboard navigation. The editor implements a flexible searchbuffer that allows users to locate values by typing any part of the value. For example, typing "Hilton" will select thenext value that contains "Hilton", including "New York Hilton", "Prince Edward Hilton", or "Paris Hilton". Also, typingctrl+Up or ctrl+Down will navigate to the next or previous checked item.
Values are displayed on the list using the Format currently assigned to the column.
Note: When you set filters on more than one column of the grid, the ValueFilter editor only displays the valuesavailable for filtering after the previous filters are set.
This image shows the ValueFilter editor.
FlexGrid for WinForms 89
Copyright © 2017 GrapeCity, inc. All rights reserved.

Condition FilterThe ConditionFilter is more flexible. Instead of selecting specific values, it allows users to specify up to two conditionsusing operators such as "greater than", "starts with", or "contains". This type of filter is recommended for filteringcolumns that contain "continuous" values such as numeric or date/time values.
This image shows the ConditionFilter editor.
Columns that have filters applied display the filter icon on their headers even when the mouse is not over them. Youcan see this in the images, where the ProductName and Quantity column headers show the filter icon.
FlexGrid for WinForms 90
Copyright © 2017 GrapeCity, inc. All rights reserved.

The built-in filters support automatic localization in the following languages: English, Spanish, French, Italian,Portuguese, German, Dutch, Russian, Japanese, Greek, Danish, Finnish, Norwegian, Swedish, Arabic, Polish, Chinese(Traditional: Tawain, Hong Kong, Macao; Simplified: PRC, Singapore), Turkish, Persian (Farsi), Korean, and Hebrew. Thelocalization is built-in and does not require satellite dlls.
Custom FiltersCustom filters may be created to handle specialized values. For example, custom filters would be recommended tofilter on colors, geographic, or custom data types.
To create a custom filter, the developer must create two classes:
Filter: This class must implement the IC1ColumnFilter interface, which specifies methods used to apply thefilter to a specific value, to reset the filter, and to return an editor to be used for viewing and editing the filter'sparameters.Filter Editor: This class must inherit from Control and must implement the IC1ColumnFilterEditor interface,which specifies methods used to initialize the editor and to apply changes to the filter.
The CustomFilters sample contains implementations of three custom filters used for filtering values of type Color,DateTime, and string.
Managing filters programmaticallyAs we mentioned earlier in this document, setting the grid's AllowFiltering property to True is enough to enablecolumn filtering on all columns. In many cases however, you may want finer control over filtering. This can be achievedby modifying the AllowFiltering and Filter properties on individual columns.
For example, the code below enables filtering but restricts the filtering to columns of type string:
To write code in C#
C#
// bind and configure grid_flex.DataSource = dtProducts;_flex.Cols["UnitPrice"].Format = "#,###.00"; // enable filtering_flex.AllowFiltering = true; // restrict filtering to columns of type 'string'foreach (Column c in _flex.Cols){ c.AllowFiltering = c.DataType == typeof(string) ? AllowFiltering.Default : AllowFiltering.None;}
You can customize the filtering process further by creating filters and assigning them to columns, or by retrievingexisting filters and modifying their properties. For example, the code below creates a ConditionFilter, configures it toselect all items that start with the letter "C", and then assigns the new filter to the "ProductName" column:
To write code in C#
C#
FlexGrid for WinForms 91
Copyright © 2017 GrapeCity, inc. All rights reserved.

// create a new ConditionFiltervar filter = new ConditionFilter(); // configure filter to select items that start with "C"filter.Condition1.Operator = ConditionOperator.BeginsWith;filter.Condition1.Parameter = "C"; // assign new filter to column "ProductName"_flexCustom.Cols["ProductName"].Filter = filter;
Applying filters programmaticallyFilters are applied when the user edits them, and also when they are applied to a column. They are not automaticallyapplied when the data changes. To apply the filters to the data currently loaded on the grid, call the grid's ApplyFiltersmethod.
For example, the code below enables an ApplyFilter button when the user edits the data on the grid. Clicking theApplyFilter button applies the filter and disables the button until the next change.
To write code in C#
C#
public Form1(){ InitializeComponent(); // get some data var da = new OleDbDataAdapter("select * from products", GetConnectionString()); var dtProducts = new DataTable(); da.Fill(dtProducts); // bind the grid to the data _flex.DataSource = dtProducts; // enable filtering _flex.AllowFiltering = true; // monitor changes to enable ApplyFilter button _flex.AfterEdit += _flex_AfterEdit;}
The code above binds the grid to a data source, enables filtering by setting the AllowFiltering property to True, andconnects an event handler to the AfterEdit event. The event handler implementation follows:
To write code in C#
C#
void _flex_AfterEdit(object sender, C1.Win.C1FlexGrid.RowColEventArgs e){ foreach (C1.Win.C1FlexGrid.Column c in _flex.Cols) { if (c.ActiveFilter != null)
FlexGrid for WinForms 92
Copyright © 2017 GrapeCity, inc. All rights reserved.

{ _btnApplyFilters.Enabled = true; break; } }}
This code scans all columns to determine whether a filter is defined for any column. If an active filter is detected, thecode enables the button that applies the filter to the current data. When the button is clicked, the following eventhandler executes:
To write code in C#
C#
private void _btnApplyFilters_Click(object sender, EventArgs e){ _flex.ApplyFilters(); _btnApplyFilters.Enabled = false;}
The code simply applies all the active filters and disables the button until the next change.
If instead of requiring a button click you simply wanted to apply the filter after every edit, you could call theApplyFilter directly from the AfterEdit event handler, as shown below:
To write code in C#
C#
void _flex_AfterEdit(object sender, C1.Win.C1FlexGrid.RowColEventArgs e){ _flex.ApplyFilters();}
Customizing filter behaviorWhen filters are applied, the grid hides rows by setting their Visible property to False. But the grid also firesBeforeFilter and AfterFilter events that allow you to customize the filtering behavior. For example, assume that insteadof showing and hiding rows you wanted to apply different styles to indicate whether the the rows pass the filter ornot. This can be accomplished easily using this code:
To write code in C#
C#
public Form1(){ InitializeComponent(); // configure grid _flex.AllowFiltering = true; _flex.DataSource = dtInvoices; // create style for rows excluded by the filter
FlexGrid for WinForms 93
Copyright © 2017 GrapeCity, inc. All rights reserved.

var cs = _flexStyles.Styles.Add("filteredOut"); cs.BackColor = Color.LightSalmon; cs.ForeColor = Color.DarkOrange; // connect handlers for the before and after filter events _flex.BeforeFilter += _flex_BeforeFilter; _flex.AfterFilter += _flex_AfterFilter;}
The code creates a custom style that will be used to show rows that did not pass the filter (instead of making theminvisible). Next, the code attaches handlers for the BeforeFilter and AfterFilter events. The event handlers are listedbelow:
To write code in C#
C#
// suspend painting before filter is appliedvoid _flex_BeforeFilter(object sender, CancelEventArgs e){ _flexStyles.BeginUpdate();} // apply styles after the filter has been appliedvoid _flexStyles_AfterFilter(object sender, EventArgs e){ // get style used to show filtered out rows var cs = _flex.Styles["filteredOut"]; // apply style to all rows for (int r = _flexStyles.Rows.Fixed; r < _flexStyles.Rows.Count; r++) { var row = _flexStyles.Rows[r]; if (row.Visible) { // normal row, reset style row.Style = null; } else { // filtered row, make visible and apply style row.Visible = true; row.Style = cs; } } // resume updates _flexStyles.EndUpdate();}
The BeforeFilter event handler calls the new BeginUpdate method to prevent the grid from repainting itself until weare done applying the custom style to the rows that are filtered out. The BeginUpdate and EndUpdate methodsreplace the Redraw property which has been deprecated.
FlexGrid for WinForms 94
Copyright © 2017 GrapeCity, inc. All rights reserved.

The AfterFilter event handler starts by retrieving the style we created to show the rows that have been filtered out. Itthen scans the rows on the grid and applies the new style to all rows that have the Visible property set to False. Theseare the rows that were hidden by the filter. Once this is done, the code calls EndUpdate to restore grid updating.
Customizing the Filtering UIWe believe the default filtering behavior and UI will address the vast majority of scenarios that involve columnfiltering. However, you can use the column filter classes independently, implementing your own custom user interface.
For example, the code below shows how you can use the ConditionFilter class to implement an iTunes-style searchbox for the C1FlexGrid. This type of search allows users to type in a value and automatically filters the grid rows toshow the rows that contain the search string in any column.
To implement the iTunes-style search, we start with a text box that contains the text that will be used as a filterparameter. We also define a timer that will apply the filter a few milliseconds after the users stops typing into the textbox:
To write code in C#
C#
public Form1(){ InitializeComponent(); // configure timer to apply the filter 1/2 second after the // user stops typing into the search box _timer.Interval = 500; _timer.Tick += t_Tick; // monitor changes to the search box _txtSearch.TextChanged += _txtSearch_TextChanged;} // re-start timer when the text in the search box changesvoid _txtSearch_TextChanged(object sender, EventArgs e){ _timer.Stop(); _timer.Start();}
Now that the timer is configured, all we need to do is create and apply the filter when the timer ticks:
To write code in C#
C#
// apply filter when the timer ticksvoid t_Tick(object sender, EventArgs e){ // done for now... _timer.Stop(); // configure filter var filter = new C1.Win.C1FlexGrid.ConditionFilter();
FlexGrid for WinForms 95
Copyright © 2017 GrapeCity, inc. All rights reserved.

filter.Condition1.Operator = C1.Win.C1FlexGrid.ConditionOperator.Contains; filter.Condition1.Parameter = _txtSearch.Text; // apply filter _flex.BeginUpdate(); for (int r = _flex.Rows.Fixed; r < _flex.Rows.Count; r++) { bool visible = false; for (int c = _flex.Cols.Fixed; c < _flex.Cols.Count; c++) { if (filter.Apply(_flex[r, c])) { visible = true; break; } } _flex.Rows[r].Visible = visible; } _flex.EndUpdate();}
C1FlexGrid Property GroupsThe C1FlexGrid control has a rich set of properties, methods, and events. You do not have to know all of them in orderto use the control effectively.
The reference below shows the most important properties, methods, and events grouped by usage type. Someelements appear in more than one group. Select specific elements below for more details.
1. Grid Layout
Rows, Cols, AutoSizeCols, ScrollBars
2. Cursor and Selection
SelectionMode, Select, ShowCell, Row, Col, RowSel, ColSel, MouseRow, MouseCol, BeforeRowColChange,AfterRowColChange, BeforeSelChange, AfterSelChange, KeyActionTab, KeyActionEnter
3. Editing
AllowEditing, ComboList, EditMask, BeforeEdit, StartEdit, ValidateEdit, AfterEdit, StartEditing, FinishEditing,Editor, CellButtonClick, KeyDownEdit, KeyPressEdit, KeyUpEdit, ChangeEdit
4. Getting and Setting Values
Item (indexer), GetData, GetDataDisplay, SetData, GetCellRange, GetCellImage, SetCellImage, Clip, FindRow,Aggregate, CellChanged
5. User Interface
AllowEditing, AllowMerging, AllowResizing, AllowDragging, AllowSorting, BeforeSort, AfterSort, AutoSearch,AutoSearchDelay, BeforeDragColumn, AfterDragColumn, BeforeDragRow, AfterDragRow, BeforeResizeColumn,AfterResizeColumn, BeforeResizeRow, AfterResizeRow, ShowScrollTip
6. Outlining and Summarizing
FlexGrid for WinForms 96
Copyright © 2017 GrapeCity, inc. All rights reserved.
Subtotal, Tree, IsNode, Level, Collapsed, BeforeCollapse, AfterCollapse
7. Merging Cells
AllowMerging
8. Data Binding
DataSource, DataMember, AfterDataRefresh, AutoResize, GridError
9. Saving, Loading, and Printing Grids
LoadGrid, SaveGrid, LoadExcel, SaveExcel, ClipSeparators, PrintGrid
10. OLE Drag Drop
DragMode, DropMode, BeforeMouseDown
11. Filtering
FlexGrid for WinForms 97
Copyright © 2017 GrapeCity, inc. All rights reserved.

Data BindingData binding is a process that allows one or more data consumers to be connected to a data provider in asynchronized manner. If you move the cursor on a data-bound grid, other controls connected to the same data sourcewill change to reflect the new current record. If you edit a value on a data-bound grid, other controls connected to thesame data source will change to reflect the new value.
C1FlexGrid supports data binding to ADO.NET data source objects such as DataTable, DataView, DataSet, andDataViewManager.
C1FlexGrid also supports data binding to DataObjects for WinForms components such as C1ExpressTable,C1ExpressView, C1ExpressConnection, C1DataView, C1DataTableSource and C1DataSet.
To bind the grid to a data source, assign the data source object to the grid's DataSource property. If the data sourceobject contains more than one table, you must also set the DataMember property a string that specifies which tableshould be used.
Alternatively, you can assign both properties simultaneously with a single call to the SetDataBinding method.
When you assign a new data source to the grid, it will automatically refresh its columns to bind to the columnsavailable in the data source. You can then customize the columns by moving, hiding, or deleting them. You can alsoset column properties such as their Width, EditMask and Format.
For an example of reordering the grid columns after binding to a data source, see the ColumnOrder sample onComponentOne HelpCentral
For details about creating ADO.NET data source objects, please refer to the .NET Framework documentation.
For details about using DataObjects for WinForms, see the DataObjects for WinForms documentation included inComponentOne Studio Enterprise and ComponentOne Studio WinForms Edition.
Binding to a Data SourceWithout writing a line of code, you can easily bind C1FlexGrid to a data source using the Data Source ConfigurationWizard in Visual Studio. There are two ways to access the wizard, either through the DataSource property in theProperties window or the Choose Data Source box in the C1FlexGrid Tasks menu. For more information on theC1FlexGrid Tasks menu, see C1FlexGrid Tasks Menu.
Clicking the drop-down arrow next to either the DataSource property in the Properties window or the Choose DataSource box in the C1FlexGrid Tasks menu allows you to select from a list of available data sources or to add a datasource to your project. To add a data source to your project, click Add Project Data Source to open the Data SourceConfiguration Wizard.
FlexGrid for WinForms 98
Copyright © 2017 GrapeCity, inc. All rights reserved.

The Data Source Configuration Wizard walks you through adding a data source step by step. The Choose a DataSource Type page allows you to choose which type of application you would like to gather information from. Thedefault selection is Database.
On the Choose Your Data Connection page, you can specify the location of the database. If you have not alreadyconnected to the database, you can specify a new connection by clicking the New Connection button. Clicking theNew Connection button opens the Add Connection dialog box where you can browse to the location of yourdatabase and test the connection.
Mobile device users click here for additional information.
If you are using the Mobile edition of FlexGrid for WinForms, in the Add Connection dialog box, change the Datasource to one that is supported by the Compact Framework, such as the .NET Framework Data Provider for SQLServer Mobile Edition.
Then you can use a supported database, for example, a SQL Server Mobile Edition Database. Microsoft provides aNorthwind.sdf, by default, in the C:\Program Files\Microsoft Visual Studio 8\SmartDevices\SDK\SQL
FlexGrid for WinForms 99
Copyright © 2017 GrapeCity, inc. All rights reserved.

Server\Mobile\v3.0 folder for Microsoft Visual Studio 2005.
The wizard saves and names your connection on the Save the Connection String to the Application ConfigurationFile page. On this page you can specify a name or use the default provided by the wizard.
On the Choose Your Database Objects page you can specify which tables and fields you want to include in yourDataSet. You can also provide a name for your DataSet or use the default provided by the wizard.
The wizard creates the DataSet, BindingSource, and TableAdapter, and adds them to your project. Click the drop-down arrow again next to the DataSource property or the Choose Data Source box in the C1FlexGrid Tasks menuand then select the data source. If you double-click the form, you will also notice that the code to fill the database isautomatically generated in the Form_Load event.
Storing and Retrieving DataThe C1FlexGrid control can be used in bound or unbound mode. In bound mode, the grid is connected to a datasource, and all the data displayed on the grid comes from the data source. In this mode, changing data on the gridchanges it in the underlying data source. In unbound mode, the grid manages its own data source.
In either bound or unbound modes, the easiest way to access data in the C1FlexGrid is using the Row and Columnindexers. The indexers allow you to specify a cell in a row or column from which to get or set the data stored there.For example, the following code selects the data in the second cell of a row:
To write code in Visual Basic
Visual Basic
Row[2].Selected = True
To write code in C#
FlexGrid for WinForms 100
Copyright © 2017 GrapeCity, inc. All rights reserved.

C#
Row[2].Selected = true;
The Item property is another easy way to access data in the C1FlexGrid. The Item property is an indexer that takes rowand column indices and gets or sets the data stored in the cell. (You can also use column names as indices.) Forexample, the following code stores row numbers in the first grid column:
To write code in Visual Basic
Visual Basic
Dim r As IntegerFor r = _flex.Rows.Fixed To _flex.Rows.Count - 1 _flex(r, 0) = rNext
To write code in C#
C#
for (int r = _flex.Rows.Fixed; r <= _flex.Rows.Count - 1; r++) { _flex[r, 0] = r;}
When you assign a value to a cell, the grid tries to convert that value into the column's specified DataType. If theconversion fails, the grid fires the GridError event and does not change the cell. You can override this behavior usingthe SetData method and setting the coerce parameter to False.
When you retrieve data using the indexers, the grid returns the actual data stored in the cell. To retrieve a stringcontaining the formatted version of the data (what the grid displays to the user), use the GetDataDisplay method.
You can also set and retrieve the contents of the selection using the Clip property. This property is especially useful inhandling the clipboard and drag-drop operations. By default, the Clip property returns a string with tab characters(Chr(9)) between cells and return characters (Chr(13)) between rows. To use different delimiters, change theClipSeparators property.
Finally, you can set and retrieve the contents of arbitrary cell ranges using CellRange objects.
FlexGrid for WinForms 101
Copyright © 2017 GrapeCity, inc. All rights reserved.

FlexGrid for WinForms SamplesPlease be advised that this ComponentOne software tool is accompanied by various sample projects and/or demoswhich may make use of other development tools included with the ComponentOne Studio.
Please refer to the pre-installed product samples through the following path:
Documents\ComponentOne Samples\WinFormsClick one of the following links to view a list of C1FlexGrid samples:
Visual Basic Samples
Sample Description
AutoSizeEdit This sample demonstrates resizing the editor while the user types. This sample usesthe C1FlexGrid control.
BarChart This sample uses OwnerDrawn cells to build a chart based on the grid data. Thissample uses the C1FlexGrid control.
Blinker This sample shows how you can use CellStyles to make cells blink. The sample createsa custom style and uses a timer to change the foregound color on that style. Thiscauses all cells that have that style to blink.This sample uses the C1FlexGrid control.
BoundDelete This sample deletes rows from a bound FlexGrid. This sample uses the C1FlexGridcontrol.
BoundFinishEdit This sample demonstrates how to commit changes to a DataRow after editing. Thissample uses the C1FlexGrid control.
BoundImage This sample shows how to bind the grid to image fields stored as OLE objects. Thissample uses the C1FlexGrid control.
C1FlexGridPrintable This sample provides a printable (via C1Preview) C1FlexGrid control. This sample usesthe C1FlexGrid control and calls the C1.C1Preview namespace.
CellBorders This sample uses OwnerDraw to provide custom cell borders. This sample uses theC1FlexGrid control.
CellDataType This sample assigns cell types (and editors) on a per-cell basis. This sample uses theC1FlexGrid control.
CellMerging This sample shows various types of cell-merging in a C1FlexGrid control. This sampleuses the C1FlexGrid control.
CellNotes This sample attaches notes to cells on a C1FlexGrid and implements Excel-style cellnotes using two classes: CellNote and CellNoteManager.
ColumnEditor This sample exposes the C1FlexGrid design-time column editor in your controls. Thissample uses the C1FlexGrid control.
CustomDataMap This sample demonstrates how to customize the options in drop-down lists whenusing DataMaps. This sample uses the C1FlexGrid control.
CustomEditor This sample shows how to implement your own cell editor. This sample uses theC1FlexGrid control.
CustomMerge This sample shows how to implement your own merging logic to create a TV-guidedisplay. This sample calls the C1.Win.C1FlexGrid namespace.
FlexGrid for WinForms 102
Copyright © 2017 GrapeCity, inc. All rights reserved.

CustomMerge2 This sample shows how to implement your own merging logic to mix merging modes.This sample calls the C1.Win.C1FlexGrid namespace.
CustomMerge3 This sample shows how to customize grouping by overriding the GetData method.This sample calls the C1.Win.C1FlexGrid namespace.
CustomMerge4 This sample shows how to customize grouping by overriding the GetData method.This sample calls the C1.Win.C1FlexGrid namespace.
CustomPrint This sample uses the CreateImage method to print grids with arbitrary row andcolumn breaks. This sample uses the C1FlexGrid control.
CustomTree This sample uses the C1FlexGrid control to build a tree. This sample uses theC1FlexGrid control.
DataIndex This sample uses the Row.DataIndex property to get the underlying data row. Thissample uses the C1FlexGrid control.
DataMap This sample uses data-mapped columns when bound to a data source. This sampleuses the C1FlexGrid control.
DataReader This sample populates a grid from a DataReader. This sample uses the C1FlexGridcontrol.
DataTable This sample shows how you can create, populate, and bind a DataTable object to thegrid (including add/remove rows). This sample uses the C1FlexGrid control.
DataTree This sample binds the grid to a hierarchical data source and show details in childgrids.
DBDynamicStyles This sample assigns styles to grid cells based on their contents. This sample uses theC1FlexGrid control.
DBImageField This sample shows images stored in a DataTable. This sample uses the C1FlexGridcontrol.
DBSchemaChange This sample shows how to test grid response to changes in the data source object.This sample uses the C1FlexGrid control.
DBTree This sample shows how to display bound data in a hierarchical tree view. This sampleuses the C1FlexGrid control.
DragDrop This sample shows how to customize automatic Drag & Drop. This sample uses theC1FlexGrid control.
DragDropManual This sample shows how to implement manual OleDragDrop between controls andwithin the grid.
DragRow This sample shows how to drag rows between grids. This sample uses the C1FlexGridcontrol.
DynamicStyles This sample shows how to assign styles to a cell based on the contents of anothercell. This sample uses the C1FlexGrid control.
Editing This sample demonstrates how to edit cells using textboxes, lists, masks, andcheckboxes. This sample uses the C1FlexGrid control.
FilterRow_With_Totals This sample shows a how to add totals to a bound grid with a FilterRow.
FlexByRow This sample sets up a grid in 'transposed' format. In this sample data types, edit
Sample Description
FlexGrid for WinForms 103
Copyright © 2017 GrapeCity, inc. All rights reserved.

masks, formats, and other properties usually assigned to grid columns are assigned togrid rows. This sample uses the C1FlexGrid control.
FlexGroup This sample shows how you can implement Outlook-style grouping and filteringusing the C1FlexGrid. This sample uses the C1FlexGrid control.
FreezeBottom This sample demonstrates how to show frozen rows at the bottom of a grid. Thissample uses the C1FlexGrid control.
GridChart This samples show how you can attach a FlexGrid to a C1Chart control. This sampleuses the C1FlexGrid and C1Chart controls.
HierData This sample shows how you can bind to hierarchical data sources (master-detail style).This sample uses the C1FlexGrid control.
Hyperlink This sample shows how you can add hyperlinks to cells in the C1FlexGrid. This sampleuses the C1FlexGrid control.
LoadSpeed This sample shows three techinques for loading data into a C1FlexGrid.
MapAndGroup This sample shows grouping and sorting behavior when using data-mapped columns.This sample uses the C1FlexGrid control.
MergeStyles This sample merges CellStyles assigned to rows, columns, and cells. This sample usesthe C1FlexGrid control.
MultiColumnDictionary This sample uses the MultiColumnDictionary class to implement multi-column drop-downs.
Outline This sample shows how to hide repeated data in an outline. This sample uses theC1FlexGrid control.
PdfExportVB This sample uses C1Pdf method to export C1FlexGrids to PDF files.
ProductTree This sample demonstrates how to build a custom tree with product information. Thissample uses the C1FlexGrid control.
RTFGrid This sample shows how to display RTF text in grid cells. This sample uses theC1FlexGrid control.
ScrollPosition This sample shows how the ScrollPosition property works. This sample uses theC1FlexGrid control.
SelectionMode This sample shows the effect of the SelectionMode property. This sample uses theC1FlexGrid control.
Sorting This sample shows several sorting techniques. This sample uses the C1FlexGridcontrol.
Splits This sample demonstrates how to split a C1FlexGrid into multiple views. This sampleuses the C1FlexGrid control.
StartEditing This sample implements a grid that stays in cell-editing mode. This sample uses theC1FlexGrid control.
Styles This sample shows how you can use Styles to customize the appearance of theC1FlexGrid. This sample uses the C1FlexGrid control.
Subtotals This sample creates subtotals for multiple columns. This sample uses the C1FlexGridcontrol.
Sample Description
FlexGrid for WinForms 104
Copyright © 2017 GrapeCity, inc. All rights reserved.

Transpose This sample shows how to transpose data in a grid. This sample uses the C1FlexGridcontrol.
TreeCheck This sample shows how to add checkboxes to a grid tree. This sample uses theC1FlexGrid control.
TreeNode This sample shows how to manage an outline tree using the C1FlexGrid Node objects.This sample uses the C1FlexGrid control.
Validate This sample shows how to use the ErrorProvider control with the C1FlexGrid. Thissample uses the C1FlexGrid control.
ZoomCell This sample shows how to zoom in on the selected cell.
C# Samples
Sample Description
AcceleratorCaption This sample shows how to add accelerator keys to grid captions.
Analyze This sample shows how to provide dynamic data sorting and grouping. This sampleuses the C1FlexGrid control.
AnimagedGif This sample shows how to display animated gifs in grid cells.
AutoComplete This sample shows how to complete entries while the user types.
AutoSizeEdit This sample shows how to resize the editor while the user types. This sample uses theC1FlexGrid control.
BarChart This sample shows how to draw bar charts using the grid cells. This sample uses theC1FlexGrid control.
Blinker This sample shows how to use CellStyles to make cells blink.
BoundDelete This sample shows how to delete rows from a bound FlexGrid. This sample uses theC1FlexGrid control.
BoundFinishEdit This sample shows how to commit changes to a DataRow after editing. This sampleuses the C1FlexGrid control.
BoundImageMap This sample shows how to use the ImageMap property with a data-bound grid. Thissample uses the C1FlexGrid control.
C1FlexGridPrintable This sample provides a printable (via C1Preview) C1FlexGrid control. This sample usesthe C1FlexGrid control and calls the C1.C1Preview namespace.
CellBorders This sample shows how to use OwnerDraw to provide custom cell borders. Thissample uses the C1FlexGrid control.
CellDataType This sample shows how to assign cell types (and editors) on a per-cell basis. Thissample uses the C1FlexGrid control.
CellLabelDelay This sample shows how to show cell labels after a specified interval.
CellNotes This sample attaches notes to cells on a C1FlexGrid and implements Excel-style cellnotes using two classes: CellNote and CellNoteManager.
Classic (C1FlexGridClassic) This sample shows a grid that derives from C1FlexGrid and provides an object modelcompatible with the VSFlexGrid control.
Sample Description
FlexGrid for WinForms 105
Copyright © 2017 GrapeCity, inc. All rights reserved.
ColumnEditor This sample shows how to expose the FlexGrid design-time column editor in yourcontrols. This sample uses the C1FlexGrid control.
ColumnFilters This sample shows how to use the filtering feature in C1FlexGrid 2010. The sampleshows how you can control and customize the grid's built-in filters using theAllowFiltering property and the AfterFilter event.
ColumnOrder This sample shows how to position columns dynamically. This sample uses theC1FlexGrid control.
ColumnWidthTip This sample shows how to show a ToolTip while the user resizes columns.
CrossTabs This sample shows how to summarize and cross-reference data using PivotTables.
CustomData This sample shows how to implement a custom data source object. This sample usesthe C1FlexGrid control.
CustomDataMap This sample shows how to customize the options in drop-down lists when usingDataMaps. This sample uses the C1FlexGrid control.
CustomEditor This sample shows how to implement your own cell editor. This sample uses theC1FlexGrid control.
CustomEditors This sample shows how to use built-in, .NET, and custom edit controls with theC1FlexGrid.
CustomFilters This sample shows how to implement custom filters for the C1FlexGrid.
CustomMerge This sample shows how to implement your own merging logic to create a TV-guidedisplay. This sample calls the C1.Win.C1FlexGrid namespace.
CustomMerge2 This sample shows how to implement your own merging logic to mix merging modes.This sample calls the C1.Win.C1FlexGrid namespace.
CustomMerge3 This sample shows how to customize grouping by overriding the GetData method.This sample calls the C1.Win.C1FlexGrid namespace.
CustomMerge4 This sample shows how to customize grouping by overriding the GetData method.This sample calls the C1.Win.C1FlexGrid namespace.
CustomPrint This sample shows how to use the CreateImage method to print grids with arbitraryrow and column breaks. This sample uses the C1FlexGrid control.
CustomPrintMultiGrid This sample shows how to use the CreateImage method to print multiple grids in asingle document.
CustomSelection This sample uses OwnerDraw to implement custom (non-rectangular) selection. Thissample calls the C1.Win.C1FlexGrid namespace.
CustomSort This sample shows how to implement your own sorting logic with a customIComparer object. This sample uses the C1FlexGrid control.
DataIndex This sample shows how to use the Row.DataIndex property to get the underlying datarow. This sample uses the C1FlexGrid control.
DataTable This sample shows how to bind to a DataTable, add and remove rows. This sampleuses the C1FlexGrid control.
DataTree This sample shows how to bind the grid to a hierarchical data source and show detailsin child grids. This sample calls the C1.Win.C1FlexGrid namespace.
Sample Description
FlexGrid for WinForms 106
Copyright © 2017 GrapeCity, inc. All rights reserved.
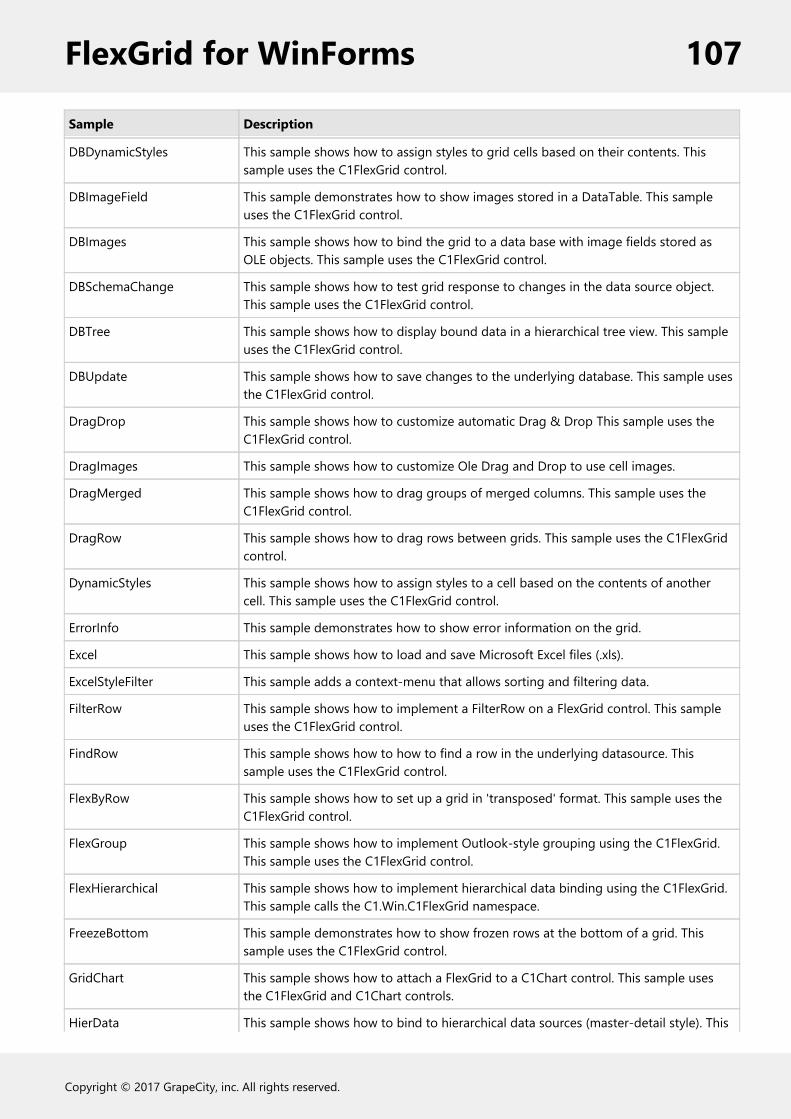
DBDynamicStyles This sample shows how to assign styles to grid cells based on their contents. Thissample uses the C1FlexGrid control.
DBImageField This sample demonstrates how to show images stored in a DataTable. This sampleuses the C1FlexGrid control.
DBImages This sample shows how to bind the grid to a data base with image fields stored asOLE objects. This sample uses the C1FlexGrid control.
DBSchemaChange This sample shows how to test grid response to changes in the data source object.This sample uses the C1FlexGrid control.
DBTree This sample shows how to display bound data in a hierarchical tree view. This sampleuses the C1FlexGrid control.
DBUpdate This sample shows how to save changes to the underlying database. This sample usesthe C1FlexGrid control.
DragDrop This sample shows how to customize automatic Drag & Drop This sample uses theC1FlexGrid control.
DragImages This sample shows how to customize Ole Drag and Drop to use cell images.
DragMerged This sample shows how to drag groups of merged columns. This sample uses theC1FlexGrid control.
DragRow This sample shows how to drag rows between grids. This sample uses the C1FlexGridcontrol.
DynamicStyles This sample shows how to assign styles to a cell based on the contents of anothercell. This sample uses the C1FlexGrid control.
ErrorInfo This sample demonstrates how to show error information on the grid.
Excel This sample shows how to load and save Microsoft Excel files (.xls).
ExcelStyleFilter This sample adds a context-menu that allows sorting and filtering data.
FilterRow This sample shows how to implement a FilterRow on a FlexGrid control. This sampleuses the C1FlexGrid control.
FindRow This sample shows how to how to find a row in the underlying datasource. Thissample uses the C1FlexGrid control.
FlexByRow This sample shows how to set up a grid in 'transposed' format. This sample uses theC1FlexGrid control.
FlexGroup This sample shows how to implement Outlook-style grouping using the C1FlexGrid.This sample uses the C1FlexGrid control.
FlexHierarchical This sample shows how to implement hierarchical data binding using the C1FlexGrid.This sample calls the C1.Win.C1FlexGrid namespace.
FreezeBottom This sample demonstrates how to show frozen rows at the bottom of a grid. Thissample uses the C1FlexGrid control.
GridChart This sample shows how to attach a FlexGrid to a C1Chart control. This sample usesthe C1FlexGrid and C1Chart controls.
HierData This sample shows how to bind to hierarchical data sources (master-detail style). This
Sample Description
FlexGrid for WinForms 107
Copyright © 2017 GrapeCity, inc. All rights reserved.

sample uses the C1FlexGrid control.
HierData2 This sample shows how to bind to hierarchical data sources (master-detail style).
HostControls This sample shows how to host controls in grid cells. This sample uses the C1FlexGridcontrol.
Hyperlink This sample shows how to add hyperlinks to cells in the FlexGrid. This sample uses theC1FlexGrid control.
LegacyDates This sample shows how to use an unbound column to convert dates stored as stringsinto real dates.
LockedColumns This sample shows how to prevent the user from selecting certain columns.
MasterDetail This sample shows how to create and bind master-detail DataSets in code. Thissample calls the C1.Win.C1FlexGrid namespace.
MergeStyles This sample shows how to merge CellStyles assigned to rows, columns, and cells. Thissample uses the C1FlexGrid control.
MultiColumnDictionary This sample shows how to use the MultiColumnDictionary class to implement multi-column drop-downs.
MultiParent This sample shows how to create a complex master-detail display.
MultiSelection This sample shows how to implement multi-range selection.
NewFeatures20091 This sample shows the new features that were added for the V1/2009 release.
NewRowTemplate This sample shows how to place a new row template above the grid.
Outline This sample shows how to hide repeated data in an outline. This sample uses theC1FlexGrid control.
OwnerDraw This sample shows how to autosize Owner-Drawn cells.
OwnerDrawAlpha This sample shows how to use OwnerDraw with transparency to get MediaPlayer-likeeffects.
PasswordChar This sample shows how to use the C1FlexGrid to enter and edit passwords. Thissample uses the C1FlexGrid control.
PdfExport This sample shows how to use the C1Pdf method to export C1FlexGrids to PDF files.
RowStateDisplay This sample shows how to use different styles to display DataRows in different states.This sample uses the C1FlexGrid control.
RTFGrid This sample shows how to display RTF text in grid cells. This sample uses theC1FlexGrid control.
ScrollPosition This sample shows how to shows how the ScrollPosition property works. This sampleuses the C1FlexGrid control.
SelectionMode This sample shows how to shows the effect of the SelectionMode property. Thissample uses the C1FlexGrid control.
SetupEditor This sample shows how to use the SetupEditor event to customize the grid editors.This sample uses the C1FlexGrid control.
SimpleCalc This sample uses the DataTable.Compute method to evaluate expressions in grid cells
Sample Description
FlexGrid for WinForms 108
Copyright © 2017 GrapeCity, inc. All rights reserved.

and displays the results using OwnerDraw.
Sorting This sample shows how to shows several sorting techniques. This sample uses theC1FlexGrid control.
SortNulls This sample shows how to use a custom sort to place null values at the bottom of thegrid.
Splits This sample shows how to split a C1FlexGrid into multiple views. This sample uses theC1FlexGrid control.
SqlBuilder This sample shows how to a grid-based graphical interface for creating SQLstatements.
StartEditing This sample shows how to implement a grid that stays in cell-editing mode. Thissample uses the C1FlexGrid control.
Subtotals This sample shows how to create subtotals for multiple columns. This sample uses theC1FlexGrid control.
Themes This sample shows how to change the appearance of the grid to achieve one ofseveral pre-defined looks.
ThreadedUpdate This sample shows how to update the grid from a different thread.
TreeCheck This sample shows how to add checkboxes to a grid tree. This sample uses theC1FlexGrid control.
TreeNode This sample shows how to manage an outline tree using the FlexGrid Node objects.This sample uses the C1FlexGrid control.
TriStateBound This sample shows how to provide three-state (grayable) values in Boolean columns.This sample calls the C1.Win.C1FlexGrid namespace.
UnboundColumns This sample shows how to additional support for unbound columns.
ZoomCell This sample shows how to zoom in on the selected cell.
C1FlexGrid for Mobile Devices Visual Basic Samples
Sample Description
Analyze This sample shows how to provide dynamic data sorting and grouping. This sampleuses the C1FlexGrid control.
BarChart This sample shows how to draw bar charts using the grid cells. This sample uses theC1FlexGrid control.
EditData This sample demonstrates how to show different types of built-in editors anddynamic formatting. This sample uses the C1FlexGrid control.
ThreadedUpdate This sample shows how to update the grid from a different thread.
C1FlexGrid for Mobile Devices C# Samples
Sample Description
Analyze This sample shows how to provide dynamic data sorting and grouping. This sampleuses the C1FlexGrid control.
Sample Description
FlexGrid for WinForms 109
Copyright © 2017 GrapeCity, inc. All rights reserved.
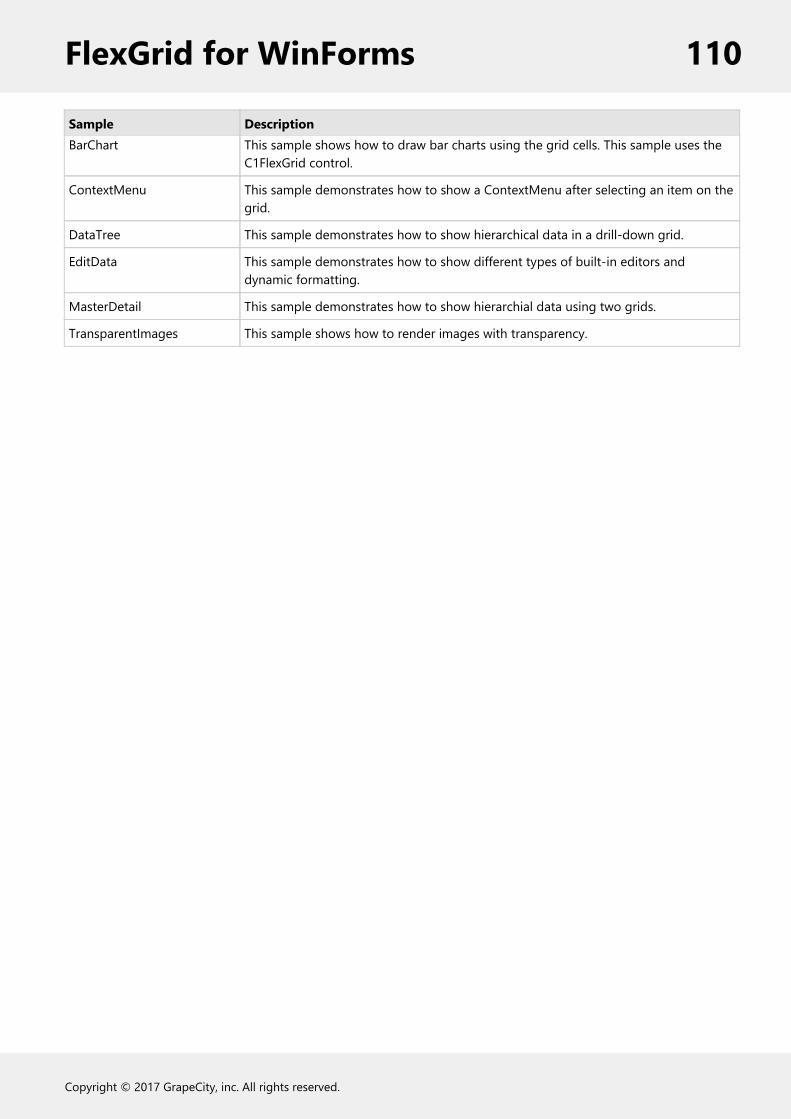
BarChart This sample shows how to draw bar charts using the grid cells. This sample uses theC1FlexGrid control.
ContextMenu This sample demonstrates how to show a ContextMenu after selecting an item on thegrid.
DataTree This sample demonstrates how to show hierarchical data in a drill-down grid.
EditData This sample demonstrates how to show different types of built-in editors anddynamic formatting.
MasterDetail This sample demonstrates how to show hierarchial data using two grids.
TransparentImages This sample shows how to render images with transparency.
Sample Description
FlexGrid for WinForms 110
Copyright © 2017 GrapeCity, inc. All rights reserved.

FlexGrid for WinForms TutorialsThe following sections contain tutorials that illustrate some of the main features in the C1FlexGrid control. Thetutorials walk you through the creation of several simple projects, describing each step in detail. The distribution CDcontains more sophisticated samples that can be used as a reference.
The tutorials are:
Tutorial Description
Edit Tutorial Starting with a basic data-entry grid, this tutorial shows how toimplement data formatting, check boxes, drop-down lists, inputmasks, data validation, and clipboard support.
Outline Tutorial Shows how you can use the C1FlexGrid as an outliner to displaystructured (or hierarchical) data.
Data AnalysisTutorial
Starting with a grid containing sales data for different products,regions, and salespeople, this tutorial show how to implementdynamic layout (column order), automatic sorting, cell merging,automatic subtotals, and outlining.
Edit TutorialThis tutorial starts with a basic data-entry grid, then adds the following features:
1. Formatting2. Check boxes3. Drop-down lists4. Complex data validation5. Clipboard support6. Custom editors
Here is what the final application will look like:
FlexGrid for WinForms 111
Copyright © 2017 GrapeCity, inc. All rights reserved.

Note: A video is available for this tutorial on the ComponentOne Videos Web page.
Step 1 of 6: Create the C1FlexGrid Control for the EditTutorialStart a new project and add a C1FlexGrid control to the form by clicking the C1FlexGrid icon on the Toolbox, thenclicking on the form and dragging until the object has the proper size.
If you can't find the C1FlexGrid control in the toolbox, right-click on the toolbox and select Choose Items. Then, lookfor the C1FlexGrid control on the list of .NET components and make sure it is checked. If you can't find the grid in thecomponent list, you may need to re-install the product.
1. Set the following properties in the Properties window for the C1FlexGrid control:Property Setting
Dock Fill
Cols.Count 5
Cols.Fixed 0
2. Double-click the form caption area to open the code window. At the top of the file, add the followingstatement:
To write code in Visual Basic
Visual Basic
Imports C1.Win.C1FlexGrid
To write code in C#
C#
using C1.Win.C1FlexGrid;
FlexGrid for WinForms 112
Copyright © 2017 GrapeCity, inc. All rights reserved.

This makes the objects defined in the C1FlexGrid assembly visible to the project and saves a lot of typing.
3. Set up the columns by either in the designer through the Column Tasks menu or the C1FlexGrid ColumnEditor, or in code.
In the Designer
Select the first column in the grid. This will open the Column Tasks menu for the column.Enter Product in the Column Caption and Data Field boxes.Set the Column Caption and Data Field boxes for the remainder of the columns as follows:Column 1
ColumnCaption
Region
Data Field Region
Column 2
ColumnCaption
Salesperson
Data Field Salesperson
Column 3
ColumnCaption
Sales
Data Field Sales
Column 4
ColumnCaption
Bonus
Data Field Bonus
Alternatively, the columns can also be set up through the C1FlexGrid Column Editor:
Open the C1FlexGrid Column Editor by clicking Designer in the C1FlexGrid Tasks menu. For detailson how to access the C1FlexGrid Column Editor, see Accessing the C1FlexGrid Column Editor.Select the Column 0 in the right pane.In the left pane, set the Name and Caption properties to Product.Set the Name and Caption properties for the remainder of the columns as follows:Column 1
Name Region
Caption Region
Column 2
Name Salesperson
Caption Salesperson
Column 3
Name Sales
Caption Sales
FlexGrid for WinForms 113
Copyright © 2017 GrapeCity, inc. All rights reserved.

Column 4
Name Bonus
Caption Bonus
Click OK when finished to close the editor.
In Code
Add the following code to the Form_Load event:
To write code in Visual Basic
Visual Basic
' Set up the columns.Dim cols As String = "Product|Region|Salesperson|Sales|Bonus"Dim colNames As String() = cols.Split("|")Dim i%For i = 0 To C1FlexGrid1.Cols.Count - 1 C1FlexGrid1(0, i) = colNames(i) C1FlexGrid1.Cols(i).Name = colNames(i)Next
To write code in C#
C#
// Set up the columns.string cols = "Product|Region|Salesperson|Sales|Bonus";string[] colNames = cols.Split(new char[] { '|' });for (int i = 0; i <= this.c1FlexGrid1.Cols.Count - 1; i++){ c1FlexGrid1[0, i] = colNames[i]; c1FlexGrid1.Cols[i].Name = colNames[i];}
Run the program and observe the following:That's it. Press F5 to run the project, and you can start typing data into the control. Press F2 or the spacebar to editexisting entries, or just type new entries over existing ones.
Column 1
FlexGrid for WinForms 114
Copyright © 2017 GrapeCity, inc. All rights reserved.

Step 2 of 6: Set Column Types and FormatsWhen displaying numeric or date values, you will typically want to adopt a consistent format for the values. TheC1FlexGrid control allows you to specify the DataType and Format for each column. These properties can be set eitherin the designer or in code.
In the Designer1. Select the Sales column in the grid. This will open the Column Tasks menu for the Sales column.2. Set the Data Type box to Decimal.3. Click the ellipsis button in the Format String box to open the Format String dialog box.4. Under Format type select Currency.5. Click OK to close the Format String dialog box.6. Select the Bonus column in the grid. This will open the Column Tasks menu for the Bonus column.7. Set the Data Type box to Boolean.
Alternatively, the DataType and Format properties can also be set up through the C1FlexGrid Column Editor:
1. Open the C1FlexGrid Column Editor by selecting Designer in the C1FlexGrid Tasks menu. For details on howto access the C1FlexGrid Column Editor, see Accessing the C1FlexGrid Column Editor.
2. Select the Sales column in the right pane.3. Set the DataType property to Decimal.4. Click the ellipsis button next to the Format property. This will open the Format String dialog box.5. Under Format type select Currency.6. Click OK to close the Format String dialog box.7. Select the Bonus column in the right pane.8. Set the DataType property to Boolean.9. Click OK to close the editor.
In CodeTo specify the DataType and Format for the columns, add the following code after the code added in Step 1 of 6:Create the C1FlexGrid Control for the Edit Tutorial:
FlexGrid for WinForms 115
Copyright © 2017 GrapeCity, inc. All rights reserved.

To write code in Visual Basic
Visual Basic
' Set the column DataType and Format.Dim c As Column = C1FlexGrid1.Cols("Sales")c.DataType = GetType(Decimal) ' Currency.c.Format = "c2"c = C1FlexGrid1.Cols("Bonus")c.DataType = GetType(Boolean)c.ImageAlign = ImageAlignEnum.CenterCenter
To write code in C#
C#
// Set the column DataType and Format.Column c = c1FlexGrid1.Cols["Sales"];c.DataType = typeof(Decimal);
// Currency.c.Format = "c2";c = c1FlexGrid1.Cols["Bonus"];c.DataType = typeof(bool);c.ImageAlign = ImageAlignEnum.CenterCenter;
Run the program and observe the following:The new code formats the Sales column to store and display currency values, and the Bonus column to deal withBoolean values.
If you enter some numeric and non-numeric values in the Sales column, you will notice that the grid won't acceptnon-numeric entries. The Bonus column displays values as checkboxes, which can be toggled with the mouse or withthe keyboard. This is the default behavior for Boolean columns.
FlexGrid for WinForms 116
Copyright © 2017 GrapeCity, inc. All rights reserved.

Note that the Format property does not affect the data in any way, only how it is displayed.
Step 3 of 6: Incorporate Drop-Down ListsEntering data is a tedious and error-prone process. Drop-down lists are great because they minimize the amount oftyping you must do, reduce the chance of errors, and increase the consistency of the data.
Let's assume that our tutorial project only involves sales of three products (Applets, Wahoos, and Gadgets), in fourregions (North, South, East, and West), and that there are three full-time sales people (Mary, Sarah, and Paula).
To use these lists as drop-downs in the C1FlexGrid control, all you have to do is build strings containing the items ineach list (separated by pipe characters) and assign them to the ComboList property of each column. This property canbe set either in the designer or in code.
In the Designer1. Select the Product column. This will open the Column Tasks menu for the Product column.2. Click the ellipsis button in the Combo List box to open the Combo List dialog box.3. Enter Applets, Wahoos, and Gadgets as shown below:
FlexGrid for WinForms 117
Copyright © 2017 GrapeCity, inc. All rights reserved.

4. Click OK to close the Combo List dialog box.5. Select the Region column.6. Click the ellipsis button in the Combo List box.7. Enter North, South, East, and West as shown below:
8. Click OK.9. Select the Salesperson column.
10. Click the ellipsis button in the Combo List box.11. Enter Mary, Paula, and Sarah as shown below:
FlexGrid for WinForms 118
Copyright © 2017 GrapeCity, inc. All rights reserved.

12. Select the Dropdown Combo option.13. Click OK.
Alternatively, the ComboList property can be set using the C1FlexGrid Column Editor:
1. Open the C1FlexGrid Column Editor by selecting Designer in the C1FlexGrid Tasks menu. For details on howto access the C1FlexGrid Column Editor, see Accessing the C1FlexGrid Column Editor.
2. Select the Productcolumn in the right pane.3. In the left pane, set the ComboList property to Applets|Wahoos|Gadgets.4. Select the Region column in the right pane.5. In the left pane, set the ComboList property to North|South|East|West.6. Select the Salesperson column in the right pane.7. In the left pane set the ComboList property to |Mary|Paula|Sarah.8. Click OK to close the editor.
In CodeTo add the combolists, add the following code after the code added in Step 2 of 6: Set Column Types and Formats:
To write code in Visual Basic
Visual Basic
' Set up the drop-down lists.C1FlexGrid1.Cols("Product").ComboList = "Applets|Wahoos|Gadgets"C1FlexGrid1.Cols("Region").ComboList = "North|South|East|West"C1FlexGrid1.Cols("Salesperson").ComboList = "|Mary|Paula|Sarah"
To write code in C#
C#
// Set up the drop-down lists.c1FlexGrid1.Cols["Product"].ComboList = "Applets|Wahoos|Gadgets";c1FlexGrid1.Cols["Region"].ComboList = "North|South|East|West";c1FlexGrid1.Cols["Salesperson"].ComboList = "|Mary|Paula|Sarah";
FlexGrid for WinForms 119
Copyright © 2017 GrapeCity, inc. All rights reserved.

Run the program and observe the following:Notice how the last ComboList string starts with a pipe (text input cursor). This allows users to type additional namesthat are not on the list. In other words, these values will be edited using a drop-down combo, as opposed to a simpledrop-down list.
Press F5 to run the project again, and then move the cursor around. When you move the cursor to one of the columnsthat have combo lists, a drop-down button becomes visible. You may click on it to show the list, or simply type thefirst letter of an entry to highlight it on the list.
Step 4 of 6: Add Data ValidationIf you assign a data type to a grid column, the grid will ensure that only data of the proper type is stored in thatcolumn. This helps prevent errors, but you will often need stricter validation to ensure that the data entered is correct.For that, you should use the ValidateEdit event.
For example, imagine that anti-trust regulations prevent us from selling our Applets in the North region. To preventdata-entry mistakes and costly lawsuits, we want to prevent users from entering this combination into the control.
The following event checks the data after each edit and prevents invalid entries. Add the following code to the form:
To write code in Visual Basic
Visual Basic
Private Sub C1FlexGrid1_ValidateEdit(ByVal sender As Object, ByVal e As ValidateEditEventArgs) Handles C1FlexGrid1.ValidateEdit Dim rgn As String = String.Empty Dim prd As String = String.Empty
' Collect the data we need. Select Case e.Col Case 0 prd = C1FlexGrid1.Editor.Text rgn = C1FlexGrid1(e.Row, "Region")
FlexGrid for WinForms 120
Copyright © 2017 GrapeCity, inc. All rights reserved.

Case 1 prd = C1FlexGrid1(e.Row, "Product") rgn = C1FlexGrid1.Editor.Text End Select
' We can't sell Applets in the North Region.> If prd = "Applets" And rgn = "North" Then MsgBox("Warning: Regulation #12333AS/SDA-23 forbids " & _ "the sale of " & prd & " in region " & rgn & ". " & _ "Please verify input.") e.Cancel = True End IfEnd Sub
To write code in C#
C#
private void c1FlexGrid1_ValidateEdit( object sender, ValidateEditEventArgs e){ string rgn = string.Empty; string prd = string.Empty;
// Collect the data we need. switch (e.Col) { case 0: prd = c1FlexGrid1.Editor.Text; rgn = (string)c1FlexGrid1[e.Row, "Region"]; break; case 1: prd = (string)c1FlexGrid1[e.Row, "Product"]; rgn = c1FlexGrid1.Editor.Text; break; }
// We can't sell Applets in the North Region. if ( prd == "Applets" && rgn == "North" ) { MessageBox.Show("Warning: Regulation #12333AS/SDA-23 forbids " + "the sale of " + prd + " in region " + rgn + ". " + "Please verify input."); e.Cancel = true; }}
Run the program and observe the following:The function starts by gathering the input that needs to be validated. Note that the values being checked are retrievedusing the Editor.Text property. This is necessary because the edits have not yet been applied to the control. If the testfails, the function displays a warning and then sets the Cancel parameter to True, which cancels the edits and puts the
FlexGrid for WinForms 121
Copyright © 2017 GrapeCity, inc. All rights reserved.

cell back in edit mode so the user can try again.
Press F5 to run the project again, then try inputting some bad values. You will see that the control will reject them.
Step 5 of 6: Add Clipboard SupportThe Windows clipboard is a very useful device for transferring information between applications.
Adding clipboard support to FlexGrid for WinForms projects is fairly easy. Simply set the AutoClipboard property toTrue either in the designer or in code, and the grid will automatically handle all standard keyboard commands relatedto the clipboard: CTRL+X or SHIFT+DELETE to cut, CTRL+C or CTRL+INSERT to copy, and CTRL+V or SHIFT+INSERT topaste.
In the DesignerLocate the AutoClipboard property in the Properties window and set it to True.
In CodeAdd the following code after the code added in Step 3 of 6: Incorporate Drop-Down Lists:
To write code in Visual Basic
Visual Basic
C1FlexGrid1.AutoClipboard = True
To write code in C#
C#
c1FlexGrid1.AutoClipboard = true;
Another great Windows feature that is closely related to clipboard operations is OLE Drag and Drop. C1FlexGrid hastwo properties, DragMode and DropMode, which help implement this feature. Just set both properties to theirautomatic settings either in the designer or in code, and you will be able to drag selections by their edges and dropthem into other applications such as Microsoft Excel, or drag ranges from an Excel spreadsheet and drop them intothe C1FlexGrid control.
In the DesignerLocate the DragMode and DropMode properties and set them both to Automatic.
In Code
FlexGrid for WinForms 122
Copyright © 2017 GrapeCity, inc. All rights reserved.

Add the following code after the code to set the AutoClipboard property:
To write code in Visual Basic
Visual Basic
C1FlexGrid1.DragMode = DragModeEnum.AutomaticC1FlexGrid1.DropMode = DropModeEnum.Automatic
To write code in C#
C#
c1FlexGrid1.DragMode = DragModeEnum.Automatic;c1FlexGrid1.DropMode = DropModeEnum.Automatic;
Run the program and observe the following:Press F5 to run the project again, then try copying and pasting some data. Note that you can paste invalid data,because our paste code does not perform any data validation. This is left as an exercise for the reader.
Step 6 of 6: Include Custom EditorsThe C1FlexGrid has powerful built-in editors for entering text, masked text, selecting from lists, checkboxes, and more.But in some cases you may want to use a custom editor instead, perhaps one of the input controls in the C1Inputlibrary or a control that you wrote. Starting in version 2.5, the FlexGrid allows you to easily plug-in custom editors.
To attach a custom editor to the Sales column on our tutorial, start by adding a NumericUpDown control to the form.
1. Set the following properties the Properties window to for the NumericUpDown control:Property Setting
BorderStyle None
DecimalPlaces 2
Maximum 5000000
ThousandsSeparator True
Visible False
2. Select Designer from the C1FlexGrid Tasks menu to bring up the grid's column editor.3. Select the Sales column (or Column 3 where the Sales figures will be), and set the Editor property to
NumericUpDown1.
Run the program and observe the following:Now run the project and try editing some values in the Sales column. Notice that the grid uses the NumericUpDowncontrol instead of the built-in editors. The control is properly positioned, initialized, and managed. When you movethe focus to a different cell, the value is stored in the grid.
FlexGrid for WinForms 123
Copyright © 2017 GrapeCity, inc. All rights reserved.

But the custom editor doesn't behave exactly like the built-in ones. For example:
1. When you start editing by typing a number, the old value isn't cleared.2. The size of the editor isn't exactly right (it looks a bit too small).3. There's a beep when you press ENTER to finish editing.
You can overcome these problems in a couple of ways. One way would be to use the editor's events, but that wouldmake it difficult to reuse the control in other projects. Another way would be to create a derived class and implementsome methods in the IC1EmbeddedEditor interface, as in the following code.
To write code in Visual Basic
Visual Basic
Public Class MyUpDown Inherits NumericUpDown
' Set the initial value. Public Sub C1EditorInitialize(ByVal value As Object, ByVal editorAttributes As IDictionary)
' Apply the initial value. value = Convert.ChangeType(value, GetType(Decimal))
' Select the whole entry. MyBase.Select(0, Int32.MaxValue) End Sub
' Set the FontHeight so the control honors the rectangle height. Public Sub C1EditorUpdateBounds(ByVal rc As Rectangle) MyBase.FontHeight = rc.Height Bounds = rc End Sub
' Suppress the beeps when a user presses ENTER.
FlexGrid for WinForms 124
Copyright © 2017 GrapeCity, inc. All rights reserved.

Protected Overrides Function ProcessDialogKey(ByVal keyData As Keys) As Boolean If (keyData = Keys.Enter) Then Parent.Focus() If (Parent.Focused) Then SendKeys.Send("{Down}") Return True End If Return MyBase.ProcessDialogKey(keyData) End FunctionEnd Class
To write code in C#
C#
internal class MyUpDown : NumericUpDown{ // Set the initial value. public void C1EditorInitialize(object value, System.Collections.IDictionary editorAttributes) { // Apply the initial value. Value = (decimal)Convert.ChangeType(value, typeof(decimal));
// Select the whole entry. Select(0, int.MaxValue); }
// Set the FontHeight so the control honors the rectangle height. public void C1EditorUpdateBounds(Rectangle rc) { base.FontHeight = rc.Height; Bounds = rc; }
// Suppress the beeps when a user presses ENTER. override protected bool ProcessDialogKey(Keys keyData) { if (keyData == Keys.Enter) { Parent.Focus(); if (Parent.Focused) SendKeys.Send("{Down}"); return true; } return base.ProcessDialogKey(keyData); }}
The previous code implements three methods:
C1EditorInitialize is called to initialize the editor. It sets the initial value and then selects the whole entry. Thiswill take care of the first problem. Because the whole entry is selected, typing the first character will nowreplace the current contents as we want.C1EditorUpdateBounds is called to position the editor over the cell being edited. The height of the
FlexGrid for WinForms 125
Copyright © 2017 GrapeCity, inc. All rights reserved.

NumericUpDown control is set automatically based on the font size, though (that is why it looks too short forthe cell). The code sets the editor's FontHeight property so it will be positioned exactly over the cell.ProcessDialogKey method is overridden to suppress the beeps when the user presses the Enter key.
Outline TutorialThis tutorial shows how you can use the C1FlexGrid as an outliner to display structured (or hierarchical) data. Whenused as an outliner, the C1FlexGrid control behaves like a Tree control, displaying nodes that can be collapsed orexpanded to show branches containing subordinate data.
The tutorial allows you to load an XML document into the grid, where it is displayed as a tree. Here is what the finalapplication will look like:
Step 1 of 5: Create the ControlsStart a new project and add two controls:
A command Button near the top of the form.A C1FlexGrid control in the area below the button.
If you can't find the C1FlexGrid control in the Toolbox, right-click on the toolbox and select Choose Items. Then, lookfor the C1FlexGrid control on the list of .NET components and make sure it is checked. If you can't find the grid in thecomponent list, you may need to re-install the product.
1. Set the following properties in the Properties window:Command ButtonProperty Setting
Dock Top
Text "Open XMLFile…"
C1FlexGrid
FlexGrid for WinForms 126
Copyright © 2017 GrapeCity, inc. All rights reserved.

Property Setting
Dock Fill
2. Double-click the form caption area to open the code window. At the top of the file, add the followingstatement:
To write code in Visual Basic
Visual Basic
Imports C1.Win.C1FlexGrid
To write code in C#
C#
using C1.Win.C1FlexGrid;
This makes the objects defined in the C1FlexGrid assembly visible to the project and saves a lot of typing.
3. Set up the grid either in the designer using the Properties window and editors, or in code by typing (orcopying) the following code.
In the Designer
Set the following properties for the C1FlexGrid control in the Properties window:
Property Setting
Cols.Count 2
Cols.Fixed 0
ExtendLastCol True
Rows.Count 1
Tree.Column 0
Tree.Style SimpleLeaf
Set up the styles for the grid:
Open the C1FlexGrid Style Editor by selecting Styles from the C1FlexGrid Tasks menu. For moreinformation on accessing the C1FlexGrid Style Editor, see Accessing the C1FlexGrid Style Editor.Select Normal in the list of Built-In Styles.Set the Border.Style property to None, the TextAlign property to LeftCenter, and the WordWrapproperty to False.Click the Add button.Rename CustomStyle1 to Data.Set the BackColor property to Control.Click OK to close the editor.
Set up the columns for the grid:
Select Column 0 in the grid. This will open the Column Tasks menu for Column 0.Set the Column Caption to Element.Uncheck the Allow Editing check box.Select Column 1.
FlexGrid for WinForms 127
Copyright © 2017 GrapeCity, inc. All rights reserved.

Set the Column Caption to Text.
Alternatively, the columns can also be set up through the C1FlexGrid Column Editor:
· Open the C1FlexGrid Column Editor by selecting Designer in the C1FlexGrid Tasks menu. For detailson how to access the C1FlexGrid Column Editor, see Accessing the C1FlexGrid Column Editor.Select Column 0 in the right pane.In the left pane, set the AllowEditing property to False and the Caption property to Element.Select Column 1 in the right pane.In the left pane, set the Caption property to Text.Click OK to close the editor.
In Code
To write code in Visual Basic
Visual Basic
Private Sub Form1_Load(ByVal sender As System.Object, ByVal e As System.EventArgs) Handles MyBase.Load
' Initialize the grid. C1FlexGrid1.Rows.Count = 1 C1FlexGrid1.Cols.Count = 2 C1FlexGrid1.Cols.Fixed = 0 C1FlexGrid1.ExtendLastCol = True C1FlexGrid1(0, 0) = "Element" C1FlexGrid1(0, 1) = "Text"
' Initialize the outline tree. C1FlexGrid1.Tree.Column = 0 C1FlexGrid1.Tree.Style = TreeStyleFlags.SimpleLeaf C1FlexGrid1.Cols(0).AllowEditing = False
' Initialize styles. C1FlexGrid1.Styles.Normal.Border.Style = BorderStyleEnum.None C1FlexGrid1.Styles.Normal.TextAlign = TextAlignEnum.LeftCenter C1FlexGrid1.Styles.Normal.WordWrap = False Dim cs As CellStyle = C1FlexGrid1.Styles.Add("Data") cs.BackColor = SystemColors.ControlEnd Sub
To write code in C#
C#
private void Form1_Load( System.object sender, System.EventArgs e){ // Initialize the grid. c1FlexGrid1.Rows.Count = 1; c1FlexGrid1.Cols.Count = 2; c1FlexGrid1.Cols.Fixed = 0; c1FlexGrid1.ExtendLastCol = true; c1FlexGrid1[0, 0] = "Element"; c1FlexGrid1[0, 1] = "Text";
FlexGrid for WinForms 128
Copyright © 2017 GrapeCity, inc. All rights reserved.
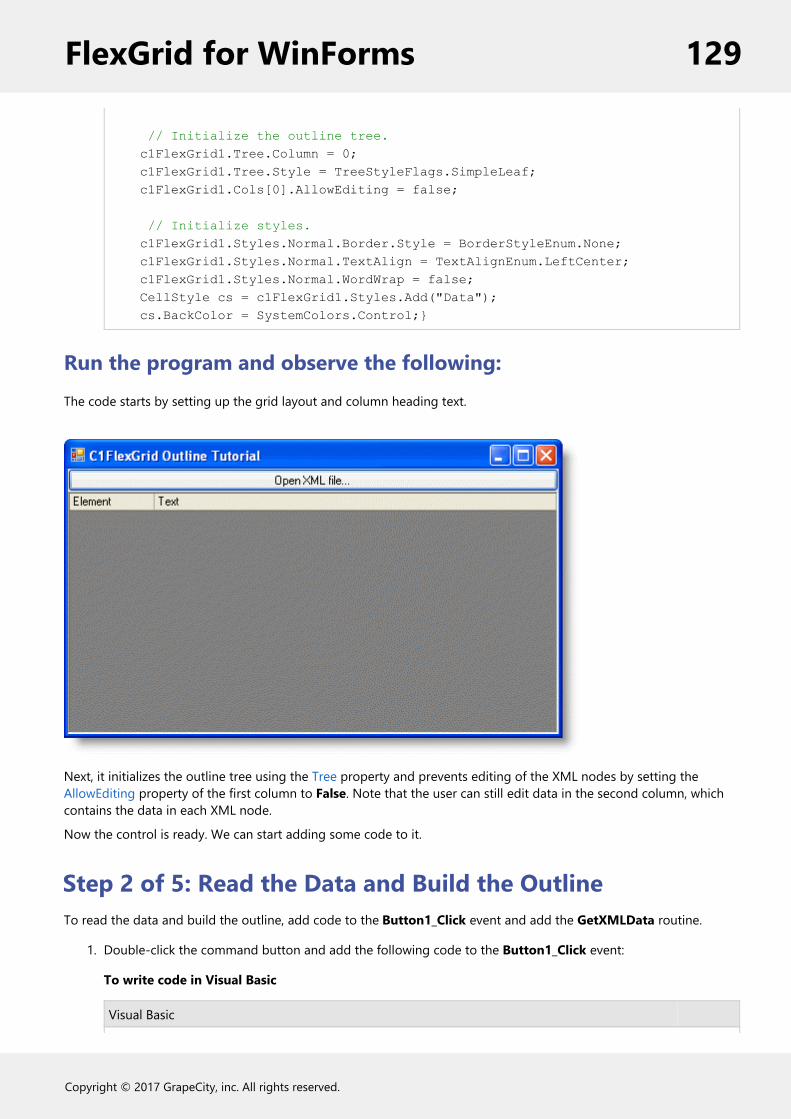
// Initialize the outline tree. c1FlexGrid1.Tree.Column = 0; c1FlexGrid1.Tree.Style = TreeStyleFlags.SimpleLeaf; c1FlexGrid1.Cols[0].AllowEditing = false;
// Initialize styles. c1FlexGrid1.Styles.Normal.Border.Style = BorderStyleEnum.None; c1FlexGrid1.Styles.Normal.TextAlign = TextAlignEnum.LeftCenter; c1FlexGrid1.Styles.Normal.WordWrap = false; CellStyle cs = c1FlexGrid1.Styles.Add("Data"); cs.BackColor = SystemColors.Control;}
Run the program and observe the following:The code starts by setting up the grid layout and column heading text.
Next, it initializes the outline tree using the Tree property and prevents editing of the XML nodes by setting theAllowEditing property of the first column to False. Note that the user can still edit data in the second column, whichcontains the data in each XML node.
Now the control is ready. We can start adding some code to it.
Step 2 of 5: Read the Data and Build the OutlineTo read the data and build the outline, add code to the Button1_Click event and add the GetXMLData routine.
1. Double-click the command button and add the following code to the Button1_Click event:
To write code in Visual Basic
Visual Basic
FlexGrid for WinForms 129
Copyright © 2017 GrapeCity, inc. All rights reserved.

Private Sub Button1_Click(ByVal sender As System.Object, ByVal e As System.EventArgs) Handles Button1.Click ' Get the file name. Dim fo As OpenFileDialog = New OpenFileDialog() fo.DefaultExt = "xml" fo.Filter = "XML Files (*.xml)|*.xml" If fo.ShowDialog() <> Windows.Forms.DialogResult.OK Then Exit Sub ' Load the XML file. Dim xdoc As System.Xml.XmlDocument = New System.Xml.XmlDocument() xdoc.Load(fo.FileName) ' Stop redrawing to improve speed. C1FlexGrid1.Redraw = False ' Populate the grid. C1FlexGrid1.Rows.Count = 1 GetXMLData(xdoc.ChildNodes(1), 0) ' Autosize the tree column. C1FlexGrid1.AutoSizeCol(0) ' Show levels 0, 1, and 2. C1FlexGrid1.Tree.Show(2) ' Start redrawing. C1FlexGrid1.Redraw = TrueEnd Sub
To write code in C#
C#
private void button1_Click(System.object sender, System.EventArgs e){ // Get the file name. OpenFileDialog fo = new OpenFileDialog(); fo.DefaultExt = "xml"; fo.Filter = "XML Files (*.xml)|*.xml"; if ( fo.ShowDialog() != DialogResult.OK ) return; // Load the XML file. System.Xml.XmlDocument xdoc = new System.Xml.XmlDocument(); xdoc.Load(fo.FileName); // Stop redrawing to improve speed. c1FlexGrid1.Redraw = false; // Populate the grid. c1FlexGrid1.Rows.Count = 1; GetXMLData(xdoc.ChildNodes[1], 0);
FlexGrid for WinForms 130
Copyright © 2017 GrapeCity, inc. All rights reserved.

// Autosize the tree column. c1FlexGrid1.AutoSizeCol(0); // Show levels 0, 1, and 2. c1FlexGrid1.Tree.Show(2); // Start redrawing. c1FlexGrid1.Redraw = true;}
Observe the following:The routine starts by showing an OpenFileDialog that allows the user to select an XML file to load into thegrid. When the file is selected, the routine loads it into an XmlDocument object, which parses the contents ofthe file into memory.
The routine then sets the grid's Redraw property to False to suspend repainting while the control is populated.This technique improves performance significantly, and you should always use it when adding substantialamounts of data to the C1FlexGrid.
Next, the routine clears any data by setting Count to 1, and calls the GetXMLData routine to populate thecontrol with the contents of the XmlDocument. The GetXMLData routine is the main one in this tutorial, and islisted below.
After the grid has been populated, the routine uses the AutoSizeCol method to adjust the width of the firstcolumn based on its contents, and the Show method to expand the outline and show levels 0, 1, and 2. Theroutine then sets the Redraw property back to True so the grid starts repainting normally.
2. The GetXMLData routine is the most interesting one in this tutorial. It traverses the XMLDocument object andbuilds the outline tree. Add the following code to the form:
To write code in Visual Basic
Visual Basic
Private Sub GetXMLData(ByVal node As System.Xml.XmlNode, ByVal level As Integer) ' Skip the comment nodes. If node.NodeType = System.Xml.XmlNodeType.Comment Then Exit Sub End If ' Add a new row for this node. Dim row As Integer = C1FlexGrid1.Rows.Count C1FlexGrid1.Rows.Add() ' Add data to the new row. C1FlexGrid1(row, 0) = node.Name If node.ChildNodes.Count = 1 Then C1FlexGrid1(row, 1) = node.InnerText C1FlexGrid1.SetCellStyle(row, 1, C1FlexGrid1.Styles("Data")) End If ' If the node has a "Name" subnode, save it to use as a ToolTip. If node.ChildNodes.Count > 0 Then
FlexGrid for WinForms 131
Copyright © 2017 GrapeCity, inc. All rights reserved.

Dim ndName As System.Xml.XmlNode = node.SelectSingleNode("Name") If Not (ndName Is Nothing) Then C1FlexGrid1.Rows(row).UserData = ndName.InnerText End If End If ' If this node has children, get them as well. If node.ChildNodes.Count > 1 Then ' Make this row a node. C1FlexGrid1.Rows(row).IsNode = True C1FlexGrid1.Rows(row).Node.Level = level ' Recurse to get children. Dim child As System.Xml.XmlNode For Each child In node.ChildNodes GetXMLData(child, level + 1) Next End IfEnd Sub
To write code in C#
C#
private void GetXMLData(System.Xml.XmlNode node, int level){ // Skip the comment nodes. if ( node.NodeType == System.Xml.XmlNodeType.Comment ) { return; } // Add a new row for this node. int row = c1FlexGrid1.Rows.Count; c1FlexGrid1.Rows.Add(); // Add data to the new row. c1FlexGrid1[row, 0] = node.Name; if ( node.ChildNodes.Count == 1 ) { c1FlexGrid1[row, 1] = node.InnerText; c1FlexGrid1.SetCellStyle(row, 1, c1FlexGrid1.Styles["Data"]); } // If the node has a "Name" subnode, save it to use as a ToolTip. if (node.ChildNodes.Count > 0) { System.Xml.XmlNode ndName = node.SelectSingleNode("Name"); if (ndName != null) { c1FlexGrid1.Rows[row].UserData = ndName.InnerText;
FlexGrid for WinForms 132
Copyright © 2017 GrapeCity, inc. All rights reserved.

} } // If this node has children, get them as well. if ( node.ChildNodes.Count > 1 ) { // Make this row a node. c1FlexGrid1.Rows[row].IsNode = true; c1FlexGrid1.Rows[row].Node.Level = level; // Recurse to get children. foreach (System.Xml.XmlNode child in node.ChildNodes) GetXMLData(child, level + 1); }}
Observe the following:The routine starts by skipping XML comment nodes. Then it uses the Rows.Add method to add a new row to the grid.
Next, the routine sets the node name and checks whether the node has exactly one child. In this case, the node isinterpreted as a data node, and the node's InnerText property is copied to the second column on the new row. Thecode also sets the style of cells containing data to the custom style "Data" created when the form was loaded.
The next block of code checks to see whether this node has a subnode called "Name". If it does, then the contents ofthe "Name" node are assigned to the new row's UserData property. This value will be used later to implementToolTips, so users can see the node name even when it is collapsed.
Finally, if the node has children, the GetXMLData routine calls itself to add the child nodes to the grid as well.
Run the program and observe the following:The project can load XML files and display them, and the user can collapse and expand nodes by clicking on them.
FlexGrid for WinForms 133
Copyright © 2017 GrapeCity, inc. All rights reserved.

The next steps add a few improvements to make the application easier to use.
Step 3 of 5: Add Custom Mouse and Keyboard HandlingThe C1FlexGrid provides the expanding and collapsing for you, but you may extend and customize its behavior. Everytime a branch is expanded or collapsed, the control fires the BeforeCollapse and AfterCollapse events so you may takeactions in response to that. Furthermore, you may use the Collapsed property to get and set the collapsed state ofeach branch in code.
In this tutorial, we will trap the DoubleClick and KeyPress events to expand and collapse nodes when the user doubleclicks or presses the ENTER key. Add the following DoubleClick and KeyPress events to the form:
To write code in Visual Basic
Visual Basic
Private Sub C1FlexGrid1_DoubleClick(ByVal sender As Object, ByVal e As EventArgs) Handles C1FlexGrid1.DoubleClick If C1FlexGrid1.MouseCol = 0 Then ToggleNodeState() End IfEnd Sub Private Sub C1FlexGrid1_KeyPress(ByVal sender As Object, ByVal e As KeyPressEventArgs) Handles C1FlexGrid1.KeyPress If e.KeyChar = vbCr Then ToggleNodeState() End IfEnd Sub Private Sub ToggleNodeState() ' If the current row is not a node, no work is done. Dim r As Row = C1FlexGrid1.Rows(C1FlexGrid1.Row) If Not r.IsNode Then Exit Sub ' Toggle the collapsed state. r.Node.Collapsed = Not r.Node.CollapsedEnd Sub
To write code in C#
C#
private void c1FlexGrid1_DoubleClick( object sender, EventArgs e){ if ( c1FlexGrid1.MouseCol == 0 ) { ToggleNodeState(); }} private void c1FlexGrid1_KeyPress( object sender, KeyPressEventArgs e)
FlexGrid for WinForms 134
Copyright © 2017 GrapeCity, inc. All rights reserved.

{ if ( e.KeyChar == 13 ) { ToggleNodeState(); }} private void ToggleNodeState() { // If the current row is not a node, no work is done. Row r = c1FlexGrid1.Rows[c1FlexGrid1.Row]; if (! r.IsNode ) return; // Toggle the collapsed state. r.Node.Collapsed = !r.Node.Collapsed;}
Run the program and observe the following:The event handlers check whether the user double-clicked the first column or hit the ENTER key, then call theToggleNodeState routine. ToggleNodeState checks whether the current row is a node row, and toggles the value ofthe Collapsed property if it is.
Step 4 of 5: Allow/Prevent EditingRecall that we set the AllowEditing property of the first column to False. This prevents users from editing any cells inthe first column. We would also like to prevent users from entering data in the second column of node rows. To dothis, add the following code to handle the BeforeEdit event:
To write code in Visual Basic
Visual Basic
Private Sub C1FlexGrid1_BeforeEdit(ByVal sender As Object, ByVal e As RowColEventArgs) Handles C1FlexGrid1.BeforeEdit ' If the current row is a node, don't edit it. Dim r As Row = C1FlexGrid1.Rows(C1FlexGrid1.Row) If r.IsNode Then e.Cancel = TrueEnd Sub
To write code in C#
C#
private void c1FlexGrid1_BeforeEdit( object sender, RowColEventArgs e){ // If the current row is a node, don't edit it. Row r = c1FlexGrid1.Rows[c1FlexGrid1.Row]; if (r.IsNode ) e.Cancel = true;}
FlexGrid for WinForms 135
Copyright © 2017 GrapeCity, inc. All rights reserved.

Step 5 of 5: Implement ToolTipsTo conclude this tutorial, we will add ToolTips to the outline. The ToolTips will display the text that was stored in eachrow's UserDataproperty by the GetXMLDataroutine described above. The ToolTips will show the contents of the"Name" node when the user moves the mouse over its parent node. This is useful when the parent node is collapsedand the "Name" node is not visible.
1. Add a ToolTipcontrol to the form.2. Add the following code to handle the grid's MouseMoveevent:
To write code in Visual Basic
Visual Basic
Private Sub C1FlexGrid1_MouseMove(ByVal sender As Object, ByVal e As MouseEventArgs) Handles C1FlexGrid1.MouseMove ' Check the ToolTip for this cell. Dim tip As String If C1FlexGrid1.MouseCol = 0 And C1FlexGrid1.MouseRow > 0 Then tip = C1FlexGrid1.Rows(C1FlexGrid1.MouseRow).UserData ' Set it if it is different from the current ToolTip. If tip <> ToolTip1.GetToolTip(C1FlexGrid1) Then ToolTip1.SetToolTip(C1FlexGrid1, tip) End If End IfEnd Sub
To write code in C#
C#
private void c1FlexGrid1_MouseMove( object sender, MouseEventArgs e){ // Check the ToolTip for this cell. string tip; if ( c1FlexGrid1.MouseCol == 0 && c1FlexGrid1.MouseRow > 0 ) { tip = (string)c1FlexGrid1.Rows[c1FlexGrid1.MouseRow].UserData; // Set it if it is different from the current ToolTip. if ( tip != toolTip1.GetToolTip(c1FlexGrid1) ) { toolTip1.SetToolTip(c1FlexGrid1, tip); } }}
Run the program and observe the following:The code starts by checking the cell under the mouse using the MouseRow and MouseCol properties. If the mouse is
FlexGrid for WinForms 136
Copyright © 2017 GrapeCity, inc. All rights reserved.

over the first column on a row that contains text for the ToolTip, it retrieves the text. Otherwise, the ToolTip text is setto Nothing.
Then the routine compares the new and current ToolTip text, and updates the text if necessary, by calling theSetToolTip method on the ToolTip control.
This concludes this tutorial. You can extend this project in many ways, including saving edits back into the XMLdocument, adding, deleting, and moving nodes, using different styles for different types of data, and so on.
Data Analysis TutorialThis tutorial combines some of the most useful features in the C1FlexGrid control to provide a dynamic view of a datatable. The application starts with a simple data-bound grid containing sales data (from the NorthWind database), thenadds the following features:
Dynamic layout (column order)Automatic sortingCell mergingAutomatic subtotalsOutlining
The picture below shows what the final application looks like. The user can drag the first three columns to group thedata by salesperson, country, and product name. When a column is dragged, the totals are automatically recalculatedand the outline tree is rebuilt.
FlexGrid for WinForms 137
Copyright © 2017 GrapeCity, inc. All rights reserved.

Step 1 of 4: Create the C1FlexGrid Control for the DataAnalysis TutorialStart a new project and add a C1FlexGrid control to the form by clicking the C1FlexGrid icon on the toolbox, thenclicking on the form and dragging until the object has the proper size.
If you can't find the C1FlexGrid control in the Toolbox, right-click on the Toolbox and select Choose Items. Then, lookfor the C1FlexGrid control on the list of .NET components and make sure it is checked. If you can't find the grid in thecomponent list, you may need to re-install the product.
1. In the C1FlexGrid Tasks menu, click Dock in parent container. This sets the grid's Dock property to Fill so thegrid will fill the form.
2. Double-click the form caption area to open the code window. At the top of the file, add the followingstatements:
To write code in Visual Basic
Visual Basic
Imports System.Data.OleDbImports System.ComponentModelImports C1.Win.C1FlexGrid
To write code in C#
C#
using System.Data.OleDb;using System.ComponentModel;using C1.Win.C1FlexGrid;
This makes the objects defined in the C1FlexGrid and OleDb assemblies visible to the project and saves a lot oftyping.
FlexGrid for WinForms 138
Copyright © 2017 GrapeCity, inc. All rights reserved.

Step 2 of 4: Initialize and Populate the GridTo set up the grid and populate the grid with the sales data we want to analyze, set the layout properties and styleseither in the designer or in code, and use the GetDataSource method to populate the grid.
1. Set up the grid layout and styles either in the designer or in code.
In the Designer
In the Properties window, set the following properties:Property Setting
AllowEditing False
AllowSorting None
AllowMerging Nodes
ExtendLastCol True
SelectionMode Cell
Tree.Style Simple
Tree.Column 1
Open the C1FlexGrid Style Editor by selecting Styles from the C1FlexGrid Tasks menu. For moreinformation on accessing the C1FlexGrid Style Editor, see Accessing the C1FlexGrid Style Editor.Select Normal from the list of Built-In Styles.Set the Border.Style property to None and the Trimming property to EllipsisCharacter.Select Subtotal0 from the list of Built-In Styles.Set the BackColor property to Gold, and the ForeColor property to Black.Set the properties for Subtotal1 and Subtotal2 to the following:Subtotal1
BackColor Khaki
ForeColor Black
Subtotal2
BackColor LightGoldenrodYellow
ForeColor Black
Click OK to close the editor.
In Code
Add the following code to the Form_Load event to set up the grid layout and styles:
To write code in Visual Basic
Visual Basic
Private Sub Form1_Load(ByVal sender As System.Object, ByVal e As EventArgs) Handles MyBase.Load ' Set up the grid layout/behavior. C1FlexGrid1.AllowEditing = False C1FlexGrid1.AllowSorting = AllowSortingEnum.None C1FlexGrid1.AllowMerging = AllowMergingEnum.Nodes
FlexGrid for WinForms 139
Copyright © 2017 GrapeCity, inc. All rights reserved.

C1FlexGrid1.SelectionMode = SelectionModeEnum.Cell C1FlexGrid1.ExtendLastCol = True C1FlexGrid1.Cols(0).Width = C1FlexGrid1.Cols.DefaultSize / 4 C1FlexGrid1.Tree.Style = TreeStyleFlags.Simple C1FlexGrid1.Tree.Column = 1 ' Set up grid styles. C1FlexGrid1.Styles.Normal.Border.Style = BorderStyleEnum.None C1FlexGrid1.Styles.Normal.Trimming = StringTrimming.EllipsisCharacter Dim s As CellStyle = C1FlexGrid1.Styles(CellStyleEnum.GrandTotal) s.BackColor = Color.Black s.ForeColor = Color.White s = C1FlexGrid1.Styles(CellStyleEnum.Subtotal0) s.BackColor = Color.Gold s.ForeColor = Color.Black s = C1FlexGrid1.Styles(CellStyleEnum.Subtotal1) s.BackColor = Color.Khaki s.ForeColor = Color.Black s = C1FlexGrid1.Styles(CellStyleEnum.Subtotal2) s.BackColor = Color.LightGoldenrodYellow s.ForeColor = Color.BlackEnd Sub
To write code in C#
C#
private void Form1_Load( System.object sender, EventArgs e){ // Set up the grid layout/behavior. c1FlexGrid1.AllowEditing = false; c1FlexGrid1.AllowSorting = AllowSortingEnum.None; c1FlexGrid1.AllowMerging = AllowMergingEnum.Nodes; c1FlexGrid1.SelectionMode = SelectionModeEnum.Cell; c1FlexGrid1.ExtendLastCol = true; c1FlexGrid1.Cols[0].Width = c1FlexGrid1.Cols.DefaultSize / 4; c1FlexGrid1.Tree.Style = TreeStyleFlags.Simple; c1FlexGrid1.Tree.Column = 1; // Set up grid styles. c1FlexGrid1.Styles.Normal.Border.Style = BorderStyleEnum.None; c1FlexGrid1.Styles.Normal.Trimming = StringTrimming.EllipsisCharacter; CellStyle s = c1FlexGrid1.Styles[CellStyleEnum.GrandTotal]; s.BackColor = Color.Black; s.ForeColor = Color.White; s = c1FlexGrid1.Styles[CellStyleEnum.Subtotal0]; s.BackColor = Color.Gold; s.ForeColor = Color.Black; s = c1FlexGrid1.Styles[CellStyleEnum.Subtotal1]; s.BackColor = Color.Khaki;
FlexGrid for WinForms 140
Copyright © 2017 GrapeCity, inc. All rights reserved.
s.ForeColor = Color.Black; s = c1FlexGrid1.Styles[CellStyleEnum.Subtotal2]; s.BackColor = Color.LightGoldenrodYellow; s.ForeColor = Color.Black;}
The routine starts by setting up the grid layout and some styles.
2. Bind C1FlexGrid to a data source by adding the following code to the Form_Load event:
To write code in Visual Basic
Visual Basic
' Bind C1FlexGrid to the data source.C1FlexGrid1.DataSource = GetDataSource()
To write code in C#
C#
// Bind C1FlexGrid to the data source.c1FlexGrid1.DataSource = GetDataSource();
The routine binds it to a data source created by the GetDataSource method, listed below.
3. Lock the last three columns in place by setting their AllowDragging property to False. This is done to preventthe user from grouping the data in these columns (the values in these columns are distinct for each row). Thisproperty can be set either in the designer or at in code.
In the Designer
Select Column 4 in the grid. This will open the Column Tasks menu for Column 4.Uncheck the Allow Dragging check box.Repeat for Column 5 and Column 6.
Alternatively, the AllowDragging property can also be set using the C1FlexGrid Column Editor:
Open the C1FlexGrid Column Editor by selecting Designer in the C1FlexGrid Tasks menu. For detailson how to access the C1FlexGrid Column Editor, see Accessing the C1FlexGrid Column Editor.Select Column 4 in the right pane.In the left pane, set the AllowDragging property to False.Set the AllowDragging property to False for Column 5 and Column 6.Do not close the editor.
In Code
Add the following code to the Form_Load event:
To write code in Visual Basic
Visual Basic
' Prevent the user from dragging last three columns.C1FlexGrid1.Cols(4).AllowDragging = FalseC1FlexGrid1.Cols(5).AllowDragging = FalseC1FlexGrid1.Cols(6).AllowDragging = False
FlexGrid for WinForms 141
Copyright © 2017 GrapeCity, inc. All rights reserved.

To write code in C#
C#
// Prevent the user from dragging last three columns.c1FlexGrid1.Cols[4].AllowDragging = false;c1FlexGrid1.Cols[5].AllowDragging = false;c1FlexGrid1.Cols[6].AllowDragging = false;
4. Set the Format property of the Sales Amount column so that the amounts are displayed as currency values. Thiscan be done either in the designer or in code.
In the Designer
Select Column 6 in the grid.Click the ellipsis button in the Format String box to open the Format String dialog box.Under Format type select Currency.Click OK to close the Format String dialog box.
Alternatively, the Format property can also be set using the C1FlexGrid Column Editor:
In the C1FlexGrid Column Editor, select Column 6 in the right pane.In the left pane, click the ellipsis button next to the Format property to open the Format String dialogbox.Under Format type select Currency.Click OK to close the Format String dialog box.Click OK to close the editor.
In Code
To write code in Visual Basic
Visual Basic
' Display currency values in the Sales Amount column.C1FlexGrid1.Cols(6).Format = "c"
To write code in C#
C#
// Display currency values in the Sales Amount column.c1FlexGrid1.Cols[6].Format = "c";
5. The GetDataSource method creates the data table that is displayed by the grid. The routine is very basic,except for the SQL statement that retrieves the data. Most people don't write these SQL statements manually,but use visual designers such as the one in Visual Studio or Microsoft Access to do that.
Add the following code to the form. Note that you may have to change the connection string slightly, becauseit has a reference to the NorthWind database and that file might be in a different folder in your system:
To write code in Visual Basic
Visual Basic
Private Function GetDataSource() As DataTable ' Set up the connection string. Dim conn As String = "Provider=Microsoft.Jet.OLEDB.4.0;" & _
FlexGrid for WinForms 142
Copyright © 2017 GrapeCity, inc. All rights reserved.

"Data Source=C:\Users\<User Name>\Documents\ComponentOne Samples\Common\C1NWind.mdb" ' Set up the SQL statement. Dim rs As String = _ "SELECT Employees.LastName,Orders.ShipCountry," & _ "Categories.CategoryName,Products.ProductName,Orders.OrderDate," & _ "[Quantity]*[Products].[UnitPrice] AS [Sale Amount] " & _ "FROM (Categories INNER JOIN Products " & _ "ON Categories.CategoryID = Products.CategoryID) " & _ "INNER JOIN ((Employees INNER JOIN Orders " & _ "ON Employees.EmployeeID = Orders.EmployeeID) " & _ "INNER JOIN [Order Details] " & _ "ON Orders.OrderID = [Order Details].OrderID) " & _ "ON Products.ProductID = [Order Details].ProductID " & _ "ORDER BY Employees.LastName,Orders.ShipCountry," & _ "Categories.CategoryName;" ' Retrieve the data into the DataSet. Dim da As OleDbDataAdapter = New OleDbDataAdapter(rs, conn) Dim ds As DataSet = New DataSet() da.Fill(ds) ' Return the data table. GetDataSource = ds.Tables(0)End Function
To write code in C#
C#
private DataTable GetDataSource() { // Set up the connection string. string conn = "Provider=Microsoft.Jet.OLEDB.4.0;" + "Data Source=C:\\Users\\Windows 8.1\\Documents\\ComponentOne Samples\\Common\\C1NWind.mdb"; // Set up the SQL statement. string rs = "SELECT Employees.LastName,Orders.ShipCountry," + "Categories.CategoryName,Products.ProductName,Orders.OrderDate," + "[Quantity]*[Products].[UnitPrice] AS [Sale Amount] " + "FROM (Categories INNER JOIN Products " + "ON Categories.CategoryID = Products.CategoryID) " + "INNER JOIN ((Employees INNER JOIN Orders " + "ON Employees.EmployeeID = Orders.EmployeeID) " + "INNER JOIN [Order Details] " + "ON Orders.OrderID = [Order Details].OrderID) " + "ON Products.ProductID = [Order Details].ProductID " + "ORDER BY Employees.LastName,Orders.ShipCountry," + "Categories.CategoryName;";
FlexGrid for WinForms 143
Copyright © 2017 GrapeCity, inc. All rights reserved.

// Retrieve the data into the DataSet. OleDbDataAdapter da = new OleDbDataAdapter(rs, conn); DataSet ds = new DataSet(); da.Fill(ds); // Return the data table. return ds.Tables[0];}
Run the program and observe the following:You will see a plain-looking grid that allows you to move columns around and browse through the data. However, thedata is not structured in a clear way, and this table contains a couple of thousand records, so it is pretty difficult to getan overview of what the data means.
Step 3 of 4: Allow Automatic SortingThe first step in organizing the data is sorting it. Furthermore, we would like the data to be sorted automaticallywhenever the user reorders the columns.
After the user reorders the columns, the C1FlexGrid control fires the AfterDragColumn event. We will add an eventhandler to sort the data in the underlying data table. (If the grid were being used in unbound mode, we wouldaccomplish this using the Sort method.)
Add the following code to the form to sort the record set and rebuild the subtotals when the user drags columns:
To write code in Visual Basic
Visual Basic
Private Sub C1FlexGrid1_AfterDragColumn(ByVal sender As Object, ByVal e As DragRowColEventArgs) Handles C1FlexGrid1.AfterDragColumn
FlexGrid for WinForms 144
Copyright © 2017 GrapeCity, inc. All rights reserved.

' Sort the recordset when the user drags columns. ' This will cause a data refresh, removing all subtotals and ' firing the AfterDataRefresh event, which rebuilds the subtotals. Dim sort As String = C1FlexGrid1.Cols(1).Name & ", " & _ C1FlexGrid1.Cols(2).Name & ", " & _ C1FlexGrid1.Cols(3).Name Dim dt As DataTable = C1FlexGrid1.DataSource dt.DefaultView.Sort = sortEnd Sub
To write code in C#
C#
private void c1FlexGrid1_AfterDragColumn( object sender, DragRowColEventArgs e){ // Sort the recordset when the user drags columns. // This will cause a data refresh, removing all subtotals and // firing the AfterDataRefresh event, which rebuilds the subtotals. string sort = c1FlexGrid1.Cols[1].Name + ", " + c1FlexGrid1.Cols[2].Name + ", " + c1FlexGrid1.Cols[3].Name; DataTable dt = (DataTable)c1FlexGrid1.DataSource; dt.DefaultView.Sort = sort;}
Run the program and observe the following:Run the project and try reordering the first three columns by dragging their headings around. Whenever you move acolumn, the data is automatically sorted, which makes it easier to interpret.
In the next step, we will add subtotals and an outline tree.
Step 4 of 4: Include Subtotals and Outline TreeWhen the grid is used in bound mode, any changes to the data source cause the grid to fire the AfterDataRefreshevent. This event is the ideal place to put the code that inserts the subtotals and builds the outline tree for the grid.
Add the following AfterDataRefresh event handler to the form:
To write code in Visual Basic
Visual Basic
Private Sub C1FlexGrid1_AfterDataRefresh(ByVal sender As Object, ByVal e As ListChangedEventArgs) Handles C1FlexGrid1.AfterDataRefresh ' Total the Sale Amount. Dim totalOn As Integer = C1FlexGrid1.Cols("Sale Amount").SafeIndex Dim caption As String = "Total for {0}" ' Calculate three levels of totals. C1FlexGrid1.Subtotal(AggregateEnum.Sum, 0, 1, totalOn, caption) C1FlexGrid1.Subtotal(AggregateEnum.Sum, 1, 2, totalOn, caption) C1FlexGrid1.Subtotal(AggregateEnum.Sum, 2, 3, totalOn, caption) ' Collapse the outline to level 2. C1FlexGrid1.Tree.Show(2) ' Autosize the grid to accommodate the tree. C1FlexGrid1.AutoSizeCols(1, 1, 1000, 3, 30, AutoSizeFlags.IgnoreHidden)End Sub
To write code in C#
C#
private void c1FlexGrid1_AfterDataRefresh( object sender, ListChangedEventArgs e){ // Total the Sale Amount. int totalOn = c1FlexGrid1.Cols["Sale Amount"].SafeIndex; string caption = "Total for {0}"; // Calculate three levels of totals. c1FlexGrid1.Subtotal(AggregateEnum.Sum, 0, 1, totalOn, caption); c1FlexGrid1.Subtotal(AggregateEnum.Sum, 1, 2, totalOn, caption); c1FlexGrid1.Subtotal(AggregateEnum.Sum, 2, 3, totalOn, caption); // Collapse the outline to level 2. c1FlexGrid1.Tree.Show(2); // Autosize the grid to accommodate the tree. c1FlexGrid1.AutoSizeCols(1, 1, 1000, 3, 30, AutoSizeFlags.IgnoreHidden);}
FlexGrid for WinForms 145
Copyright © 2017 GrapeCity, inc. All rights reserved.

Run the program and observe the following:The code starts by getting the index of the Sale Amount column. In this tutorial, the index will always be the same(Column 6). Looking up the index is usually better than hardwiring it, though, because if someone added a couple offields to the SQL statement the index would change.
The code then calls the C1FlexGrid.Subtotal method to group the data and insert new rows with the subtotals. Thenew rows are automatically configured as outline nodes (their IsNode property is set to True), so the subtotals arecollapsible.
Try dragging columns around. You can easily see the totals by country, product category, or salesperson. You can alsoexpand tree nodes to drill down into the data if you want to see more detail.
FlexGrid for WinForms 146
Copyright © 2017 GrapeCity, inc. All rights reserved.

Note also that the grid is editable, changing some values in the Sale Amount column will cause the AfterDataRefreshevent to fire again, and the totals will be automatically updated.
This concludes this tutorial.
FlexGrid for WinForms 147
Copyright © 2017 GrapeCity, inc. All rights reserved.
FlexGrid for WinForms Task-Based HelpThe task-based help assumes that you are familiar with programming in Visual Studio .NET, and know how to usebound and unbound controls in general. If you are a novice to the FlexGrid for WinForms product, please see theFlexGrid for WinForms Tutorials first.
Each topic provides a solution for specific tasks using the FlexGrid for WinForms product. By following the stepsoutlined in the help, you will be able to create projects demonstrating a variety of C1FlexGrid features.
Each task-based help topic also assumes that you have created a new .NET project.
Accessing the C1FlexGrid EditorsThe C1FlexGrid editors can be accessed through the C1FlexGrid Tasks menu, the context menu, or the Propertieswindow. There are two C1FlexGrid editors, the C1FlexGrid Column Editor and the C1FlexGrid Style Editor, whichallow you to control the layout and appearance of C1FlexGrid at design time. To reorder columns, adjust columnwidths, set column properties, and insert or remove columns, use the C1FlexGrid Column Editor. To modify existingstyles and add custom styles, which may later be assigned to cells, rows, and columns, use the C1FlexGrid StyleEditor.
Accessing the C1FlexGrid Column EditorTo access the C1FlexGrid Column Editor, use the C1FlexGrid Tasks menu, the context menu, or the Propertieswindow. For more information on editing columns with the C1FlexGrid Column Editor, see C1FlexGrid ColumnEditor.
C1FlexGrid Tasks MenuClick the smart tag ( ) in the upper right corner of C1FlexGrid to open the C1FlexGrid Tasks menu, and selectDesigner.
Context MenuRight-click on the form and select Designer from the context menu.
Properties WindowIn the Properties window, click the ellipsis button next to the Cols property.
Accessing the C1FlexGrid Style EditorTo access the C1FlexGrid Style Editor, use the C1FlexGrid Tasks menu, the context menu, or the Properties window.For more information on customizing cell appearance with the C1FlexGrid Style Editor, see C1FlexGrid Style Editor.
C1FlexGrid Tasks MenuClick the smart tag ( ) in the upper right corner of C1FlexGrid to open the C1FlexGrid Tasks menu, and select Styles.
FlexGrid for WinForms 148
Copyright © 2017 GrapeCity, inc. All rights reserved.

Context MenuRight-click on the form and select Styles from the context menu.
Properties WindowIn the Properties window, click the ellipsis button next to the Styles property.
Adding Pictures and Text to a CellTo add pictures and text to a cell, use the SetData and SetCellImage methods. Add the following code to theForm_Load event:
1. Resize the cells to fit the image using the Height and Width properties.
To write code in Visual Basic
Visual Basic
Me.C1FlexGrid1.Rows(1).Height = 90Me.C1FlexGrid1.Cols(1).Width = 150
To write code in C#
C#
this.c1FlexGrid1.Rows[1].Height = 90;this.c1FlexGrid1.Cols[1].Width = 150;
2. Add the SetCellImage method to add the image.
To write code in Visual Basic
Visual Basic
Me.C1FlexGrid1.SetCellImage(1, 1, Image.FromFile("c:\c1logo.bmp"))
To write code in C#
C#
this.c1FlexGrid1.SetCellImage(1, 1, Image.FromFile(@"c:\c1logo.bmp"));
3. Add the SetData method to add the text:
To write code in Visual Basic
Visual Basic
Me.C1FlexGrid1.SetData(1, 1, "ComponentOne")
To write code in C#
C#
this.c1FlexGrid1.SetData(1, 1, "ComponentOne");
FlexGrid for WinForms 149
Copyright © 2017 GrapeCity, inc. All rights reserved.

4. Set the alignment of the image to CenterTop and the text to CenterBottom:
To write code in Visual Basic
Visual Basic
Me.C1FlexGrid1.Styles.Normal.ImageAlign = C1.Win.C1FlexGrid.ImageAlignEnum.CenterTopMe.C1FlexGrid1.Styles.Normal.TextAlign = C1.Win.C1FlexGrid.TextAlignEnum.CenterBottom
To write code in C#
C#
this.c1FlexGrid1.Styles.Normal.ImageAlign = C1.Win.C1FlexGrid.ImageAlignEnum.CenterTop;this.c1FlexGrid1.Styles.Normal.TextAlign = C1.Win.C1FlexGrid.TextAlignEnum.CenterBottom;
This topic illustrates the following:Your grid will look like the following with an image and text in the same cell.
Note: To set the text on top of the picture, change the alignment of the text to CenterTop, and the alignmentof the image to CenterBottom.
Adding Row Numbers in a Fixed ColumnTo add row numbers in a fixed column, like in Microsoft Excel, use the OwnerDrawCell event to draw the numbers,aligned left, in a fixed column.
1. Add the following code to the Form_Load event to fire the OwnerDrawCell event:
To write code in Visual Basic
Visual Basic
Me.C1FlexGrid1.DrawMode = C1.Win.C1FlexGrid.DrawModeEnum.OwnerDraw
FlexGrid for WinForms 150
Copyright © 2017 GrapeCity, inc. All rights reserved.

To write code in C#
C#
this.c1FlexGrid1.DrawMode = C1.Win.C1FlexGrid.DrawModeEnum.OwnerDraw;
2. Add the OwnerDrawCell event:
To write code in Visual Basic
Visual Basic
Private Sub C1FlexGrid1_OwnerDrawCell(ByVal sender As Object, ByVal e As C1.Win.C1FlexGrid.OwnerDrawCellEventArgs) Handles C1FlexGrid1.OwnerDrawCell If e.Row >= Me.C1FlexGrid1.Rows.Fixed And e.Col = Me.C1FlexGrid1.Cols.Fixed - 1 Then Dim rowNumber As Integer = e.Row - Me.C1FlexGrid1.Rows.Fixed + 1 e.Text = rowNumber.ToString() End IfEnd Sub
To write code in C#
C#
private void c1FlexGrid1_OwnerDrawCell(object sender, C1.Win.C1FlexGrid.OwnerDrawCellEventArgs e){ if ((e.Row >= this.c1FlexGrid1.Rows.Fixed) & (e.Col == (this.c1FlexGrid1.Cols.Fixed - 1))) { e.Text = ((e.Row - this.c1FlexGrid1.Rows.Fixed) + 1).ToString(); }}
This topic illustrates the following:Row numbers appear in the first column, which is fixed, and are left-aligned like in Microsoft Excel.
FlexGrid for WinForms 151
Copyright © 2017 GrapeCity, inc. All rights reserved.

Adding Three-Dimensional Text to a Header RowTo add three-dimensional text to the table's header row, set the TextEffect property to Raised for text with a shadowoffset by one pixel to the right and below the text or Inset for text with a shadow offset by one pixel to the left andabove the text. Setting the TextEffect property to Flat gives text no effect.
1. Create a new style called 3DText.
In the Designer
Open the C1FlexGrid Style Editor. For details on how to access the C1FlexGrid Style Editor, seeAccessing the C1FlexGrid Style Editor.Click Add to create a new style.Double-click CustomStyle1, rename it 3DText, and press ENTER when finished.Do not exit the C1FlexGrid Style Editor.
In Code
Add the following code to the Form_Load event:
To write code in Visual Basic
Visual Basic
Dim tdt As C1.Win.C1FlexGrid.CellStyle
To write code in C#
C#
C1.Win.C1FlexGrid.CellStyle tdt = this.c1FlexGrid1.Styles.Add("3Dtext");
2. Set the TextEffect property to Raised.
In the Designer
Locate the TextEffect property in the right pane and set it to Raised.
In Code
FlexGrid for WinForms 152
Copyright © 2017 GrapeCity, inc. All rights reserved.

Add the following code to the Form_Load event:
To write code in Visual Basic
Visual Basic
tdt.TextEffect = C1.Win.C1FlexGrid.TextEffectEnum.Raised
To write code in C#
C#
tdt.TextEffect = C1.Win.C1FlexGrid.TextEffectEnum.Raised;
3. Apply the style to the header row by adding the following code to the Form_Load event:
To write code in Visual Basic
Visual Basic
Me.C1FlexGrid1.Rows(0).Style = Me.C1FlexGrid1.Styles("3DText")
To write code in C#
C#
this.c1FlexGrid1.Rows[0].Style = this.c1FlexGrid1.Styles["3DText"];
This topic illustrates the following:The table should have a header with raised text similar to the following image.
FlexGrid for WinForms 153
Copyright © 2017 GrapeCity, inc. All rights reserved.

Adding Three-Dimensional Text to a Header Row UsingBuilt-In StylesThe TextEffect property can be used to add a three-dimensional text effect to C1FlexGrid's built-in styles. To add aheader with three-dimensional text using styles, set the TextEffect property within a style to Raised for text with ashadow offset by one pixel to the right and below the text or Inset for text with a shadow offset by one pixel to theleft and above the text. Setting the TextEffect property to Flat gives text no effect. This property can be set either inthe designer or in code.
In the Designer1. Open the C1FlexGrid Style Editor. For details on how to access the C1FlexGrid Style Editor, see Accessing
the C1FlexGrid Style Editor.2. Select Fixed under Built-In Styles.3. In the right column, locate the TextEffect property and set it to Raised.4. Click OK to close the editor.
In CodeAdd the following code to the Form_Load event to set the TextEffect property in the Fixed style:
To write code in Visual Basic
Visual Basic
Me.C1FlexGrid1.Styles("Fixed").TextEffect = C1.Win.C1FlexGrid.TextEffectEnum.Raised
To write code in C#
C#
this.c1FlexGrid1.Styles["Fixed"].TextEffect = C1.Win.C1FlexGrid.TextEffectEnum.Raised;
This topic illustrates the following:By setting the TextEffect property in the Fixed style, only fixed cells in the table will have a raised three-dimensionaleffect. The TextEffect property can also be set in the all of the built-in styles. See CellStyleEnum Enumeration for a listand descriptions of the built-in styles.
FlexGrid for WinForms 154
Copyright © 2017 GrapeCity, inc. All rights reserved.

Adding ToolTips That Display UserDataTo add ToolTips that display UserData, use C1FlexGrid's MouseMove event to get the UserData property anddisplay it in a ToolTip control. ToolTips can be set to a column, a row, cell range, cell style, or a single cell.
UserData ToolTips for a ColumnTo add ToolTips that display UserData for a column, use C1FlexGrid's MouseMove event to get the UserDataproperty and display it in a ToolTip control.
1. Locate the ToolTip control in the Toolbox and add it to the form.2. In the Form_Load event, set the UserData property for the AtomicMass column:
To write code in Visual Basic
Visual Basic
Me.C1FlexGrid1.Cols("AtomicMass").UserData = "in atomic mass units (u)"
To write code in C#
C#
this.c1FlexGrid1.Cols["AtomicMass"].UserData = "in atomic mass units (u)";
3. Add the following MouseMove event:
To write code in Visual Basic
Visual Basic
Private Sub C1FlexGrid1_MouseMove(ByVal sender As Object, ByVal e As System.Windows.Forms.MouseEventArgs) Handles C1FlexGrid1.MouseMove Dim tip As String tip = C1FlexGrid1.Cols(C1FlexGrid1.MouseCol).UserData
FlexGrid for WinForms 155
Copyright © 2017 GrapeCity, inc. All rights reserved.

ToolTip1.SetToolTip(C1FlexGrid1, tip)End Sub
To write code in C#
C#
private void c1FlexGrid1_MouseMove(object sender, System.Windows.Forms.MouseEventArgs e){ string tip; tip = (string)c1FlexGrid1.Cols[c1FlexGrid1.MouseCol].UserData; toolTip1.SetToolTip(c1FlexGrid1, tip);}
This topic illustrates the following:The ToolTip appears within the entire AtomicMass column.
UserData ToolTips for a Cell RangeTo add ToolTips that display UserData for a cell range, use C1FlexGrid's MouseMove event to get theCellRange.UserData property and display it in a ToolTip control.
1. Locate the ToolTip control in the Toolbox and add it to the form.2. In the Form_Load event, set the UserData property for a cell range that contains a group of non-metallic
elements:
To write code in Visual Basic
Visual Basic
' Set the cell range that contains the non-metallic elements.
FlexGrid for WinForms 156
Copyright © 2017 GrapeCity, inc. All rights reserved.

Dim rng As C1.Win.C1FlexGrid.CellRange = Me.C1FlexGrid1.GetCellRange(6, 1, 10, 10) ' Set the background color to see the cell range more easily.rng.StyleNew.BackColor = Color.AliceBlue ' Set the user data for the cell range.rng.UserData = "Non-Metallic"
To write code in C#
C#
// Set the cell range that contains the non-metallic elements.C1.Win.C1FlexGrid.CellRange rng = this.c1FlexGrid1.GetCellRange(6, 1, 10, 10); // Set the background color to see the cell range more easily.rng.StyleNew.BackColor = Color.AliceBlue; // Set the user data for the cell range.rng.UserData = "Non-Metallic";
3. Add the following MouseMove event:
To write code in Visual Basic
Visual Basic
Private Sub C1FlexGrid1_MouseMove(ByVal sender As Object, ByVal e As System.Windows.Forms.MouseEventArgs) Handles C1FlexGrid1.MouseMove Dim tip As String tip = Me.C1FlexGrid1.GetUserData(C1FlexGrid1.MouseRow, C1FlexGrid1.MouseCol) ToolTip1.SetToolTip(C1FlexGrid1, tip)End Sub
To write code in C#
C#
private void c1FlexGrid1_MouseMove(object sender, System.Windows.Forms.MouseEventArgs e){ string tip; tip = (string)this.c1FlexGrid1.GetUserData(c1FlexGrid1.MouseRow, c1FlexGrid1.MouseCol); toolTip1.SetToolTip(c1FlexGrid1, tip);}
This topic illustrates the following:The ToolTip appears within the entire cell range.
FlexGrid for WinForms 157
Copyright © 2017 GrapeCity, inc. All rights reserved.

UserData ToolTips for a Cell StyleTo add ToolTips that display UserData for a cell style, use C1FlexGrid's MouseMove event to get theCellStyle.UserData property and display it in a ToolTip control.
1. Locate the ToolTip control in the Toolbox and add it to the form.2. In the Form_Load event, create a custom CellStyle for columns and a custom CellStyle for rows, and assign the
styles to a column and row in the grid. For more information on how to create CellStyles, see the Setting theBackground Color of Columns and Rows topic.
To write code in Visual Basic
Visual Basic
' Create a CellStyle for columns.Dim cc As C1.Win.C1FlexGrid.CellStylecc = Me.C1FlexGrid1.Styles.Add("ColumnColor")cc.BackColor = Color.Cornsilk ' Add UserData with the style name.cc.UserData = "ColumnColor Style" ' Create a CellStyle for rows.Dim rs As C1.Win.C1FlexGrid.CellStylers = Me.C1FlexGrid1.Styles.Add("RowColor")rs.BackColor = Color.PowderBlue ' Add UserData with the style name.rs.UserData = "RowColor Style" ' Assign the ColumnColor Style to a column.Me.C1FlexGrid1.Cols(2).Style = Me.C1FlexGrid1.Styles("ColumnColor") ' Assign the RowColor Style to a row.
FlexGrid for WinForms 158
Copyright © 2017 GrapeCity, inc. All rights reserved.

Me.C1FlexGrid1.Rows(8).Style = Me.C1FlexGrid1.Styles("RowColor")
To write code in C#
C#
// Create a CellStyle for columns.C1.Win.C1FlexGrid.CellStyle cc;cc = this.c1FlexGrid1.Styles.Add("ColumnColor");cc.BackColor = Color.Cornsilk; // Add UserData with the style name.cc.UserData = "ColumnColor Style"; // Create a CellStyle for rows.C1.Win.C1FlexGrid.CellStyle rs;rs = this.c1FlexGrid1.Styles.Add("RowColor");rs.BackColor = Color.PowderBlue; // Add UserData with the style name.rs.UserData = "RowColor Style"; // Assign the ColumnColor Style to a column.this.c1FlexGrid1.Cols[2].Style = this.c1FlexGrid1.Styles["ColumnColor"]; // Assign the RowColor Style to a row.this.c1FlexGrid1.Rows[8].Style = this.c1FlexGrid1.Styles["RowColor"];
3. Add the following MouseMove event:
To write code in Visual Basic
Visual Basic
Private Sub C1FlexGrid1_MouseMove(ByVal sender As Object, ByVal e As System.Windows.Forms.MouseEventArgs) Handles C1FlexGrid1.MouseMove Dim tip As String If C1FlexGrid1.MouseCol <> C1FlexGrid1.Cols.Fixed - 1 And C1FlexGrid1.MouseRow <> C1FlexGrid1.Rows.Fixed - 1 Then tip = C1FlexGrid1.Cols(C1FlexGrid1.MouseCol).Style.UserData ToolTip1.SetToolTip(C1FlexGrid1, tip) End IfEnd Sub
To write code in C#
C#
private void c1FlexGrid1_MouseMove(object sender, System.Windows.Forms.MouseEventArgs e){ string tip; if (c1FlexGrid1.MouseCol != c1FlexGrid1.Cols.Fixed - 1 & c1FlexGrid1.MouseRow != c1FlexGrid1.Rows.Fixed - 1)
FlexGrid for WinForms 159
Copyright © 2017 GrapeCity, inc. All rights reserved.

{ tip = (string)c1FlexGrid1.Cols[c1FlexGrid1.MouseCol].Style.UserData; toolTip1.SetToolTip(c1FlexGrid1, tip); }}
This topic illustrates the following:The ToolTip appears within the CellStyle.
UserData ToolTips for a RowTo add ToolTips that display UserData for a row, use C1FlexGrid's MouseMove event to get the UserData propertyand display it in a ToolTip control.
1. Locate the ToolTip control in the Toolbox and add it to the form.2. In the Form_Load event, set the UserData property for the row that contains Oxygen:
To write code in Visual Basic
Visual Basic
Me.C1FlexGrid1.Rows(8).UserData = "Oxygen makes up approximately 1/5 of the earth's atmosphere."
To write code in C#
C#
this.c1FlexGrid1.Rows[8].UserData = "Oxygen makes up approximately 1/5 of the earth's atmosphere.";
3. Add the following MouseMove event:
FlexGrid for WinForms 160
Copyright © 2017 GrapeCity, inc. All rights reserved.

To write code in Visual Basic
Visual Basic
Private Sub C1FlexGrid1_MouseMove(ByVal sender As Object, ByVal e As System.Windows.Forms.MouseEventArgs) Handles C1FlexGrid1.MouseMove Dim tip As String tip = C1FlexGrid1.Rows(C1FlexGrid1.MouseRow).UserData ToolTip1.SetToolTip(C1FlexGrid1, tip)End Sub
To write code in C#
C#
private void c1FlexGrid1_MouseMove(object sender, System.Windows.Forms.MouseEventArgs e){ string tip; tip = (string)c1FlexGrid1.Rows[c1FlexGrid1.MouseRow].UserData; toolTip1.SetToolTip(c1FlexGrid1, tip);}
This topic illustrates the following:The ToolTip appears across the entire row.
UserData ToolTips for a Single CellTo add ToolTips that display UserData for a single cell, use C1FlexGrid's MouseMove event to get the UserData anddisplay it in a ToolTip control.
FlexGrid for WinForms 161
Copyright © 2017 GrapeCity, inc. All rights reserved.

1. Locate the ToolTip control in the Toolbox and add it to the form.2. Add the following SetUserData method to the Form_Load event:
To write code in Visual Basic
Visual Basic
Me.C1FlexGrid1.SetUserData(1, "Element", "Hydrogen is a highly flammable gas.")
To write code in C#
C#
this.c1FlexGrid1.SetUserData(1, "Element", "Hydrogen is a highly flammable gas.");
3. Add the following MouseMove event:
To write code in Visual Basic
Visual Basic
Private Sub C1FlexGrid1_MouseMove(ByVal sender As Object, ByVal e As System.Windows.Forms.MouseEventArgs) Handles C1FlexGrid1.MouseMove Dim tip As String tip = Me.C1FlexGrid1.GetUserData(C1FlexGrid1.MouseRow, C1FlexGrid1.MouseCol) ToolTip1.SetToolTip(C1FlexGrid1, tip)End Sub
To write code in C#
C#
private void c1FlexGrid1_MouseMove(object sender, System.Windows.Forms.MouseEventArgs e){ string tip; tip = (string)this.c1FlexGrid1.GetUserData(c1FlexGrid1.MouseRow, c1FlexGrid1.MouseCol); toolTip1.SetToolTip(c1FlexGrid1, tip);}
This topic illustrates the following:When the mouse moves over the first row in the Element column, the information about Hydrogen appears.
FlexGrid for WinForms 162
Copyright © 2017 GrapeCity, inc. All rights reserved.

Applying a Gradient Background to a CellRangeTo apply a gradient background to a CellRange, use the OwnerDrawCell event to create custom cell painting.
1. Create a LinearGradient brush and a CellRange by adding the following code to the form class level:
To write code in Visual Basic
Visual Basic
Dim GradientStyleBrush As System.Drawing.Drawing2D.LinearGradientBrushDim rng As C1.Win.C1FlexGrid.CellRange
To write code in C#
C#
System.Drawing.Drawing2D.LinearGradientBrush GradientStyleBrush;C1.Win.C1FlexGrid.CellRange rng;
2. Set C1FlexGrid's DrawMode property to OwnerDraw by adding the following code to the Form_Load event:
To write code in Visual Basic
Visual Basic
Me.C1FlexGrid1.DrawMode = C1.Win.C1FlexGrid.DrawModeEnum.OwnerDraw
To write code in C#
C#
this.c1FlexGrid1.DrawMode = C1.Win.C1FlexGrid.DrawModeEnum.OwnerDraw;
3. Set the CellRange using the GetCellRange method:
To write code in Visual Basic
FlexGrid for WinForms 163
Copyright © 2017 GrapeCity, inc. All rights reserved.

Visual Basic
rng = Me.C1FlexGrid1.GetCellRange(2, 2, 4, 4)
To write code in C#
C#
rng = this.c1FlexGrid1.GetCellRange(2, 2, 4, 4);
4. Set the LinearGradient brush colors and angle of the gradient:
To write code in Visual Basic
Visual Basic
GradientStyleBrush = New System.Drawing.Drawing2D.LinearGradientBrush(ClientRectangle, Color.Navy, Color.Transparent, 270)
To write code in C#
C#
GradientStyleBrush = new System.Drawing.Drawing2D.LinearGradientBrush(ClientRectangle, Color.Navy, Color.Transparent, 270);
5. Add the OwnerDrawCell event to draw the gradient in the CellRange:
To write code in Visual Basic
Visual Basic
Private Sub C1FlexGrid1_OwnerDrawCell(ByVal sender As Object, ByVal e As C1.Win.C1FlexGrid.OwnerDrawCellEventArgs) Handles C1FlexGrid1.OwnerDrawCell ' Draw cell background using gradient brush. If (e.Row >= rng.r1) And (e.Row <= rng.r2) Then If (e.Col >= rng.c1) And (e.Col <= rng.c2) Then ' Draw background. e.Graphics.FillRectangle(GradientStyleBrush, e.Bounds) ' Let the grid draw the content. e.DrawCell(C1.Win.C1FlexGrid.DrawCellFlags.Content) ' Finish drawing the cell. e.Handled = True End If End IfEnd Sub
To write code in C#
C#
FlexGrid for WinForms 164
Copyright © 2017 GrapeCity, inc. All rights reserved.

private void c1FlexGrid1_OwnerDrawCell(object sender, C1.Win.C1FlexGrid.OwnerDrawCellEventArgs e){ // Draw cell background using gradient brush. if ((e.Row >= rng.r1) & (e.Row <= rng.r2)) { if ((e.Col >= rng.c1) & (e.Col <= rng.c2)) { // Draw background. e.Graphics.FillRectangle(GradientStyleBrush, e.Bounds); // Let the grid draw the content. e.DrawCell(C1.Win.C1FlexGrid.DrawCellFlags.Content); // Finish drawing the cell. e.Handled = true; } }}
This topic illustrates the following:The Transparent to Navy gradient background appears only in the CellRange.
Changing the Column Order in the GridTo change the column order in the grid, drag the column to the new position in the grid or use the C1FlexGridColumn Editor, or set the MoveRange method in code.
In the Designer
FlexGrid for WinForms 165
Copyright © 2017 GrapeCity, inc. All rights reserved.

1. In the grid, select the column you would like to move. In this example, the Element column will be moved.2. Click and drag the column to the left. A vertical dotted line appears where the column can be dropped.
3. Drop the Element column before the AtomicNumber column.
Alternatively, columns can be reordered in the grid using the C1FlexGrid Column Editor:
1. Open the C1FlexGrid Column Editor. For details on how to access the C1FlexGrid Column Editor, seeAccessing the C1FlexGrid Column Editor.
2. In the designer, select the column you would like to move. In this example, the Element column will be moved.3. Click and drag the column to the left. A vertical dotted line appears where the column can be dropped.4. Drop the Element column before the AtomicNumber column.5. Click OK to close the editor.
In CodeAdd the following code to the Form_Load event to move Column 2 (the Element column in this example) to theColumn 1 position:
To write code in Visual Basic
Visual Basic
Me.C1FlexGrid1.Cols.MoveRange(2, 1, 1)
To write code in C#
C#
this.c1FlexGrid1.Cols.MoveRange(2, 1, 1);
This topic illustrates the following:The Element column now appears before the AtomicNumber column in the grid.
FlexGrid for WinForms 166
Copyright © 2017 GrapeCity, inc. All rights reserved.

Filtering by ValueTo use the ValueFilter, follow these steps:
1. Select the grid and click the smart tag to open the C1FlexGrid Tasks menu.2. Select the Enable Column Filtering check box.3. Click the Designer link. The C1FlexGrid Column Editor appears.4. Click the drop-down arrow next to the AllowFiltering property and select ByValue.
In CodeAdd the following code to the Form_Load event:
To write code in Visual Basic
Visual Basic
Me.C1FlexGrid1.AllowFiltering = TrueMe.C1FlexGrid1.Cols(1).AllowFiltering = AllowFiltering.ByValue
To write code in C#
C#
this.c1FlexGrid1.AllowFiltering = true;this.c1FlexGrid1.Cols[1].AllowFiltering = AllowFiltering.ByValue
This topic illustrates the following:In this example, the second column is sorted by value:
FlexGrid for WinForms 167
Copyright © 2017 GrapeCity, inc. All rights reserved.

Filtering by ConditionTo use the ConditionFilter, follow these steps:
1. Select the grid and click the smart tag to open the C1FlexGrid Tasks menu.2. Select the Enable Column Filtering check box.3. Click the Designer link. The C1FlexGrid Column Editor appears.4. Click the drop-down arrow next to the AllowFiltering property and select ByCondition.
In CodeAdd the following code to the Form_Load event:
To write code in Visual Basic
Visual Basic
Me.C1FlexGrid1.AllowFiltering = TrueMe.C1FlexGrid1.Cols(1).AllowFiltering = AllowFiltering.ByCondition
To write code in C#
C#
this.c1FlexGrid1.AllowFiltering = true;this.c1FlexGrid1.Cols[1].AllowFiltering = AllowFiltering.ByCondition
This topic illustrates the following:In this example, the second column is sorted by condition:
FlexGrid for WinForms 168
Copyright © 2017 GrapeCity, inc. All rights reserved.

Changing the Filter LanguageTo change the language used in the column filter editor, you can use the Language property.
1. Right-click your grid and select Properties to view the Visual Studio Properties window.2. Set the AllowFiltering property to True.3. Click the drop-down arrow next to the Language property and select a language.4. Run the project and click the drop-down arrow on one of the column headers to open the column filter editor.
The language of the column filter editor matches the language specified in the Language property.
In CodeAdd the following code to the Form_Load event:
To write code in Visual Basic
Visual Basic
Me.C1FlexGrid1.AllowFiltering = TrueMe.C1FlexGrid1.Language = C1.Util.Localization.Language.Danish
To write code in C#
C#
this.c1FlexGrid1.AllowFiltering = true;this.c1FlexGrid1.Language = C1.Util.Localization.Language.Danish;
This topic illustrates the following:Notice the language of the column filter editor matches the language specified in the Language property.
FlexGrid for WinForms 169
Copyright © 2017 GrapeCity, inc. All rights reserved.

Clearing a Tree ViewTo clear a tree view in C1FlexGrid, set the editable row count to zero. For additional information on creating trees, seeFlexGrid for WinForms Tutorials and Outlining and Summarizing Data.
Add the following code for the Button1_Click event. This code will set the editable row count equal to zero, and thetree will be cleared when the Clear button is clicked.
To write code in Visual Basic
Visual Basic
Me.C1FlexGrid1.Rows.Count = Me.C1FlexGrid1.Rows.Fixed
To write code in C#
C#
this.c1FlexGrid1.Rows.Count = this.c1FlexGrid1.Rows.Fixed;
FlexGrid for WinForms 170
Copyright © 2017 GrapeCity, inc. All rights reserved.

This topic illustrates the following:Once the button is clicked, the tree view disappears.
Clearing C1FlexGridTo clear C1FlexGrid, use the Clear method. The Clear method clears either the content, styles, UserData, or all three.
The following image shows the grid before any content, styles or UserData has been cleared.
FlexGrid for WinForms 171
Copyright © 2017 GrapeCity, inc. All rights reserved.
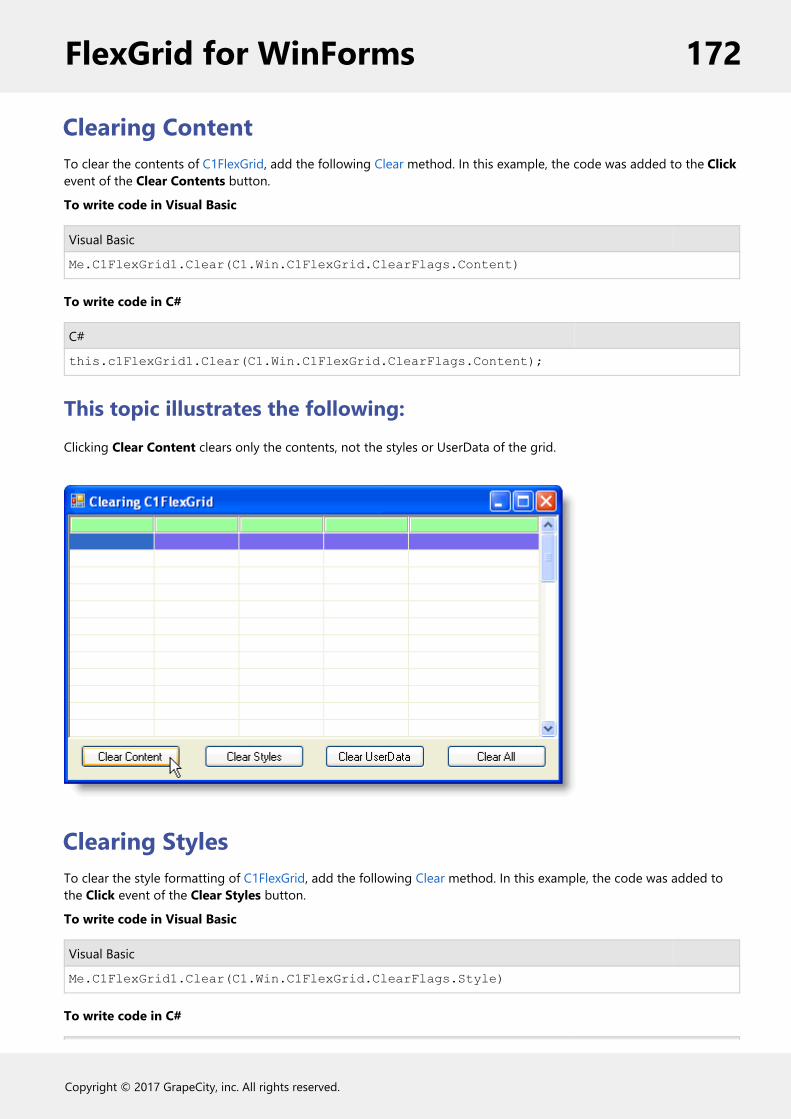
Clearing ContentTo clear the contents of C1FlexGrid, add the following Clear method. In this example, the code was added to the Clickevent of the Clear Contents button.
To write code in Visual Basic
Visual Basic
Me.C1FlexGrid1.Clear(C1.Win.C1FlexGrid.ClearFlags.Content)
To write code in C#
C#
this.c1FlexGrid1.Clear(C1.Win.C1FlexGrid.ClearFlags.Content);
This topic illustrates the following:Clicking Clear Content clears only the contents, not the styles or UserData of the grid.
Clearing StylesTo clear the style formatting of C1FlexGrid, add the following Clear method. In this example, the code was added tothe Click event of the Clear Styles button.
To write code in Visual Basic
Visual Basic
Me.C1FlexGrid1.Clear(C1.Win.C1FlexGrid.ClearFlags.Style)
To write code in C#
FlexGrid for WinForms 172
Copyright © 2017 GrapeCity, inc. All rights reserved.

C#
this.c1FlexGrid1.Clear(C1.Win.C1FlexGrid.ClearFlags.Style);
This topic illustrates the following:Clicking Clear Styles clears only the style formatting, not the contents or UserData of the grid.
Clearing UserDataTo clear the UserData of C1FlexGrid, add the following Clear method. In this example, the code was added to the Clickevent of the Clear UserData button.
To write code in Visual Basic
Visual Basic
Me.C1FlexGrid1.Clear(C1.Win.C1FlexGrid.ClearFlags.UserData)
To write code in C#
C#
this.c1FlexGrid1.Clear(C1.Win.C1FlexGrid.ClearFlags.UserData);
Note that there will be no visible change to the grid when clearing UserData, since UserData only stores data that isuseful to the application.
Clearing Content, Styles, and UserDataTo clear the contents, style formatting, and UserData of C1FlexGrid, add the following Clear method. In this example,the code was added to the Click event of the Clear All button.
FlexGrid for WinForms 173
Copyright © 2017 GrapeCity, inc. All rights reserved.

To write code in Visual Basic
Visual Basic
Me.C1FlexGrid1.Clear(C1.Win.C1FlexGrid.ClearFlags.All)
To write code in C#
C#
this.c1FlexGrid1.Clear(C1.Win.C1FlexGrid.ClearFlags.All);
This topic illustrates the following:Clicking Clear All clears the contents, style formatting, and UserData of the grid, leaving a blank grid.
Converting Column Letters to UppercaseTo convert column letters from lowercase to uppercase, add the following SetupEditor event to your form:
To write code in Visual Basic
Visual Basic
Private Sub C1FlexGrid1_SetupEditor(ByVal sender As Object, ByVal e As C1.Win.C1FlexGrid.RowColEventArgs) Handles C1FlexGrid1.SetupEditor If Me.C1FlexGrid1.Cols(e.Col).Name = "UCASECOL" Then Dim tb As TextBox = Me.C1FlexGrid1.Editor tb.CharacterCasing = CharacterCasing.Upper End IfEnd Sub
To write code in C#
FlexGrid for WinForms 174
Copyright © 2017 GrapeCity, inc. All rights reserved.
C#
private void c1FlexGrid1_SetupEditor(object sender, C1.Win.C1FlexGrid.RowColEventArgs e){ if (this.c1FlexGrid1.Cols[e.Col].Name == "UCASECOL") { TextBox tb = this.c1FlexGrid1.Editor as TextBox; tb.CharacterCasing = CharacterCasing.Upper; }}
Customizing Appearance Using Visual StylesTo customize the appearance of C1FlexGrid using Visual Styles, set the VisualStyle property to Custom,Office2007Black, Office2007Blue, Office2007Silver, Office2010Blue, Office2010Black, Office2010Silver, orSystem. This property can be set either in the designer or in code. The following table describes each of the VisualStyles:
Visual Style Description
Custom Do not use any visual styles. Render the controlusing the styles and properties only.
Office2007Black Render the control with an appearance basedon the Office 2007 Black color scheme.
Office2007Blue Render the control with an appearance basedon the Office 2007 Blue color scheme.
Office2007Silver Render the control with an appearance basedon the Office 2007 Silver color scheme.
System Render the control with an appearance basedon the current system settings.
Office2010Black Render the control with an appearance basedon the Office 2010 Black color scheme.
Office2010Silver Render the control with an appearance basedon the Office 2010 Silver color scheme.
Office2010Blue Render the control with an appearance basedon the Office 2010 Blue color scheme.
In the DesignerLocate the VisualStyle property in the Properties window and set it to Custom, Office2007Black, Office2007Blue,Office2007Silver, Office2010Blue, Office2010Black, Office2010Silver, or System. In this example, the VisualStyleproperty is set to Office2007Blue.
In CodeAdd code to the Form_Load event to set the VisualStyle property to Custom, Office2007Black, Office2007Blue,
FlexGrid for WinForms 175
Copyright © 2017 GrapeCity, inc. All rights reserved.

Office2007Silver, Office2010Blue, Office2010Black, Office2010Silver, or System. The following code sets theVisualStyle property to Office2007Blue:
To write code in Visual Basic
Visual Basic
Me.C1FlexGrid1.VisualStyle = C1.Win.C1FlexGrid.VisualStyle.Office2007Blue
To write code in C#
C#
this.c1FlexGrid1.VisualStyle = C1.Win.C1FlexGrid.VisualStyle.Office2007Blue;
Custom Visual StyleNo visual style is applied:
Office2007Black Visual StyleThe Office 2007 Black color scheme:
Office2007Blue Visual StyleThe Office 2007 Blue color scheme:
Office2007Silver Visual StyleThe Office 2007 Silver color scheme.
FlexGrid for WinForms 176
Copyright © 2017 GrapeCity, inc. All rights reserved.

Office2010Blue Visual StyleThe Office 2010 Blue color scheme:
Office2010Silver Visual StyleThe Office 2010 Silver color scheme:
Office2010Black Visual StyleThe Office 2010 Black color scheme:
System Visual StyleThe current system settings:
FlexGrid for WinForms 177
Copyright © 2017 GrapeCity, inc. All rights reserved.

Entering Only Numbers in a CellTo allow entering only numbers in a cell, use the KeyPressEdit event and set the e.Handled parameter to True for theinvalid keys. Use the following code to set the fourth column to accept only numbers, BACKSPACE, DELETE, and thePERIOD keys:
To write code in Visual Basic
Visual Basic
Private Sub C1FlexGrid1_KeyPressEdit(ByVal sender As Object, ByVal e As C1.Win.C1FlexGrid.KeyPressEditEventArgs) Handles C1FlexGrid1.KeyPressEdit If e.Col = 3 Then ' If not the characters 0-9, PERIOD, DELETE, or BACKSPACE. If Not (e.KeyChar = Chr(48) Or e.KeyChar = Chr(49) Or _ e.KeyChar = Chr(50) Or e.KeyChar = Chr(51) Or _ e.KeyChar = Chr(52) Or e.KeyChar = Chr(53) Or _ e.KeyChar = Chr(54) Or e.KeyChar = Chr(55) Or _ e.KeyChar = Chr(56) Or e.KeyChar = Chr(57) Or _ e.KeyChar = Chr(46) Or e.KeyChar = Chr(127) Or _ e.KeyChar = Chr(8)) Then ' Stop the character from being entered into the ' control since it is an invalid key. e.Handled = True End If End IfEnd Sub
To write code in C#
C#
private void c1FlexGrid1_KeyPressEdit(object sender, C1.Win.C1FlexGrid.KeyPressEditEventArgs e){ if( e.Col == 3 ) { // If not the characters 0-9, PERIOD, DELETE, or BACKSPACE. if( !((e.KeyChar == 48) || (e.KeyChar == 49) || (e.KeyChar == 50) || (e.KeyChar == 51) || (e.KeyChar == 52) || (e.KeyChar == 53) || (e.KeyChar == 54) || (e.KeyChar == 55) || (e.KeyChar == 56) || (e.KeyChar == 57) || (e.KeyChar == 46) || (e.KeyChar == 127) || (e.KeyChar == 8)))
FlexGrid for WinForms 178
Copyright © 2017 GrapeCity, inc. All rights reserved.

// Stop the character from being entered into the // control since it is an invalid key. e.Handled = true; }}
Formatting CellsFormatting cells allows you to control the accessibility and appearance of data in a single cell or multiple cells. Thefollowing topics show you how to set cells to be read-only, format a cell to display currency values, and format cellsbased on their contents.
Formatting a Cell as Read-OnlyTo make a single cell or multiple cells read-only, use the BeforeEdit event.
Single Cell Read-OnlyYou can make any cell in the grid read-only so that the data within it cannot be changed. For example, enter thefollowing code to make the cell in column 1, row 1 read-only:
To write code in Visual Basic
Visual Basic
Private Sub C1FlexGrid1_BeforeEdit(ByVal sender As Object, ByVal e As C1.Win.C1FlexGrid.RowColEventArgs) Handles C1FlexGrid1.BeforeEdit If e.Row = 1 And e.Col = 1 Then e.Cancel = True End IfEnd Sub
To write code in C#
C#
private void c1FlexGrid1_BeforeEdit(object sender, C1.Win.C1FlexGrid.RowColEventArgs e){ if (e.Row == 1 & e.Col == 1) { e.Cancel = true; }}
Multiple Cell Read-OnlyYou may also want to set multiple cells in the grid to read-only at one time. Suppose you have an editable grid usedto enter customers' information, such as customer IDs, addresses, and orders. While the orders and addresses maychange, the customer IDs will not. The code below assumes you have nine rows in your grid, and you would like to
FlexGrid for WinForms 179
Copyright © 2017 GrapeCity, inc. All rights reserved.
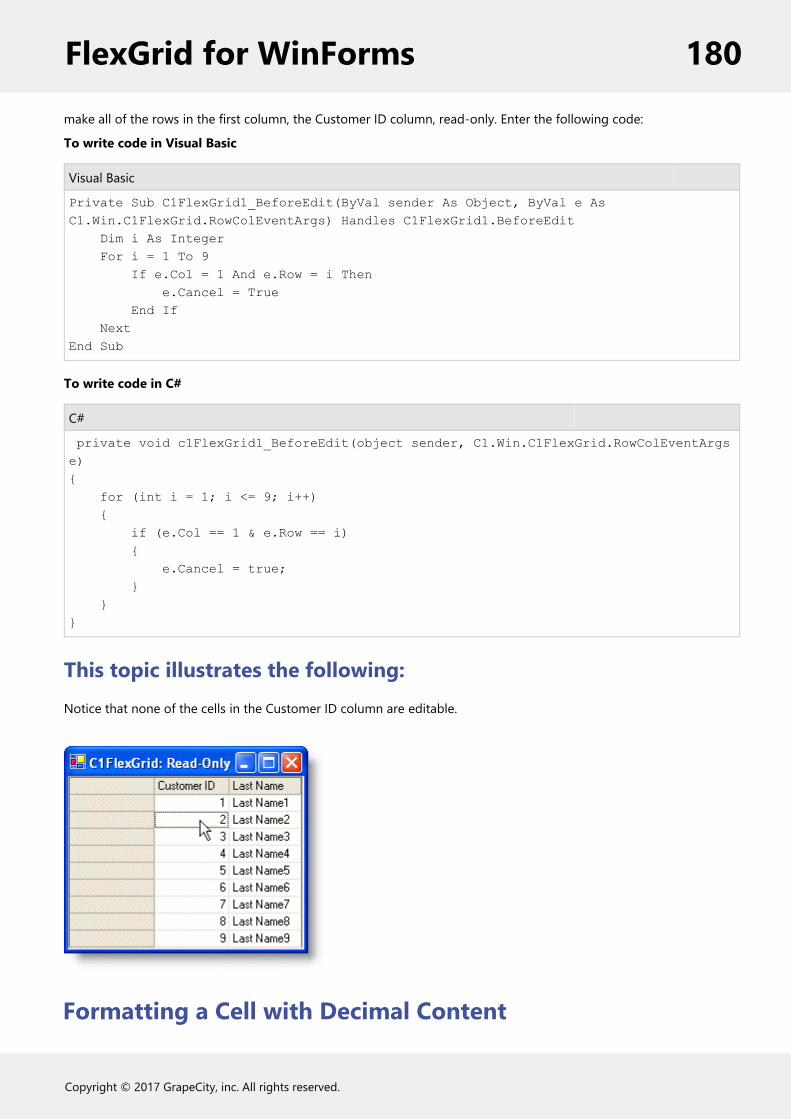
make all of the rows in the first column, the Customer ID column, read-only. Enter the following code:
To write code in Visual Basic
Visual Basic
Private Sub C1FlexGrid1_BeforeEdit(ByVal sender As Object, ByVal e As C1.Win.C1FlexGrid.RowColEventArgs) Handles C1FlexGrid1.BeforeEdit Dim i As Integer For i = 1 To 9 If e.Col = 1 And e.Row = i Then e.Cancel = True End If NextEnd Sub
To write code in C#
C#
private void c1FlexGrid1_BeforeEdit(object sender, C1.Win.C1FlexGrid.RowColEventArgs e){ for (int i = 1; i <= 9; i++) { if (e.Col == 1 & e.Row == i) { e.Cancel = true; } }}
This topic illustrates the following:Notice that none of the cells in the Customer ID column are editable.
Formatting a Cell with Decimal Content
FlexGrid for WinForms 180
Copyright © 2017 GrapeCity, inc. All rights reserved.

To format a cell that contains decimal numbers, set the Format property either in the designer or in code. In thisexample, numbers already entered in the first column will be formatted to a decimal amount.
In the Designer1. Select Column 1 in the grid. This will open the Column Tasks menu for Column 1.2. Click the ellipsis button in the Format String box to open the Format String dialog box.3. Under Format type select Custom and set the Custom format to $#,##0.00.4. Click OK to close the Format String dialog box.
Alternatively, the Format property can also be set using the C1FlexGrid Column Editor:
1. Open the C1FlexGrid Column Editor. For details on how to access the C1FlexGrid Column Editor, seeAccessing the C1FlexGrid Column Editor.
2. Select Column 1 from the right pane and set the Format property to $#,##0.00 in the left pane.3. Click OK to close the editor.
In CodeAdd the following code to the Form_Load event:
To write code in Visual Basic
Visual Basic
Me.C1FlexGrid1.Cols(1).Format = "$#,##0.00"
To write code in C#
C#
this.c1FlexGrid1.Cols[1].Format = "$#,##0.00";
Note: The format specifier follows the standard .NET conventions. Use ',' for thousand separators and '.' for thedecimal, regardless of locale.
This topic illustrates the following:In this example, the numbers in the first column are converted to a dollar amount.
FlexGrid for WinForms 181
Copyright © 2017 GrapeCity, inc. All rights reserved.
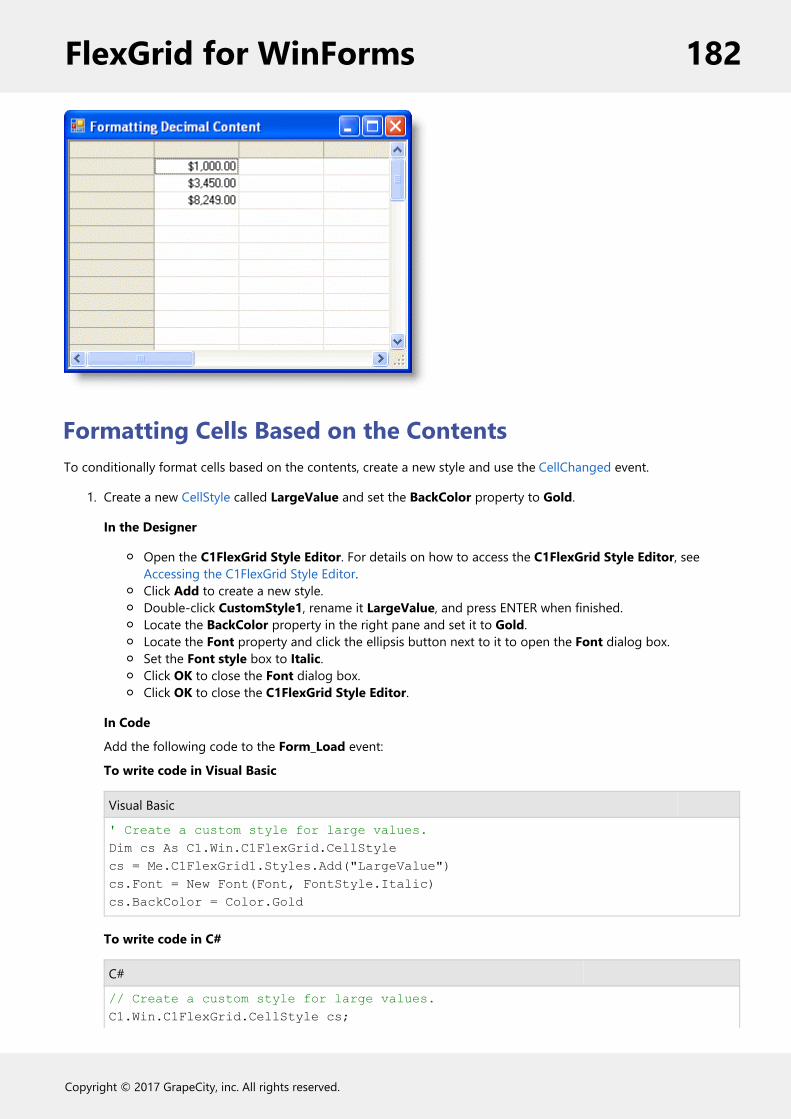
Formatting Cells Based on the ContentsTo conditionally format cells based on the contents, create a new style and use the CellChanged event.
1. Create a new CellStyle called LargeValue and set the BackColor property to Gold.
In the Designer
Open the C1FlexGrid Style Editor. For details on how to access the C1FlexGrid Style Editor, seeAccessing the C1FlexGrid Style Editor.Click Add to create a new style.Double-click CustomStyle1, rename it LargeValue, and press ENTER when finished.Locate the BackColor property in the right pane and set it to Gold.Locate the Font property and click the ellipsis button next to it to open the Font dialog box.Set the Font style box to Italic.Click OK to close the Font dialog box.Click OK to close the C1FlexGrid Style Editor.
In Code
Add the following code to the Form_Load event:
To write code in Visual Basic
Visual Basic
' Create a custom style for large values.Dim cs As C1.Win.C1FlexGrid.CellStylecs = Me.C1FlexGrid1.Styles.Add("LargeValue")cs.Font = New Font(Font, FontStyle.Italic)cs.BackColor = Color.Gold
To write code in C#
C#
// Create a custom style for large values.C1.Win.C1FlexGrid.CellStyle cs;
FlexGrid for WinForms 182
Copyright © 2017 GrapeCity, inc. All rights reserved.

cs = this.c1FlexGrid1.Styles.Add("LargeValue");cs.Font = new Font(Font, FontStyle.Italic);cs.BackColor = Color.Gold;
2. Use the CellChanged event to format the cells based on the contents:
To write code in Visual Basic
Visual Basic
' Format cells based on their content.Private Sub C1FlexGrid1_CellChanged(ByVal sender As Object, ByVal e As C1.Win.C1FlexGrid.RowColEventArgs) Handles C1FlexGrid1.CellChanged ' Mark currency values > 50,000 as LargeValues. ' Reset others by setting their Style to Nothing. Dim cs As C1.Win.C1FlexGridCellStyle If Val(Me.C1FlexGrid1(e.Row, e.Col)) >= 50000 Then cs = Me.C1FlexGrid1.Styles("LargeValue") End If Me.C1FlexGrid1.SetCellStyle(e.Row, e.Col, cs)End Sub
To write code in C#
C#
// Format cells based on their content.private void c1FlexGrid1_CellChanged(object sender, C1.Win.C1FlexGrid.RowColEventArgs e){ // Mark currency values > 50,000 as LargeValues. // Reset others by setting their Style to Nothing. C1.Win.C1FlexGrid.CellStyle cs; if (Val(this.c1FlexGrid1[e.Row, e.Col].ToString()) >= 50000) { cs = this.c1FlexGrid1.Styles["LargeValue"]; } this.c1FlexGrid1.SetCellStyle(e.Row, e.Col, cs);
This topic illustrates the following:In this example, cells containing values greater than or equal to 50,000 are highlighted in gold.
FlexGrid for WinForms 183
Copyright © 2017 GrapeCity, inc. All rights reserved.

Formatting the Border StyleFormatting the border style allows you to customize the appearance of the grid. The border style can be set for boththe control and the grid.
Formatting the Border Style of the ControlTo format the border style of the control, set the ScrollableControl.BorderStyle property to Fixed3D, FixedSingle,Light3D, None, or XpThemes. This property can be set either in the designer or in code. The following tabledescribes each of the border styles.
Border Description
Fixed3D A three-dimensional border. This is thedefault setting.
FixedSingle A single line border.
Light3D A light sunken border.
None No border.
XpThemes A border drawn using XP themes.
In the DesignerLocate the BorderStyle property in the Properties window and set it to Fixed3D, FixedSingle, Light3D, None, orXpThemes. In this example, the BorderStyle property is set to Fixed3D.
In CodeAdd code to the Form_Load event to set the BorderStyle property to Fixed3D, FixedSingle, Light3D, None, orXpThemes. The following code sets the BorderStyle property to Fixed3D:
To write code in Visual Basic
Visual Basic
Me.C1FlexGrid1.BorderStyle = C1.Win.C1FlexGrid.Util.BaseControls.BorderStyleEnum.Fixed3D
FlexGrid for WinForms 184
Copyright © 2017 GrapeCity, inc. All rights reserved.

To write code in C#
C#
this.c1FlexGrid1.BorderStyle = C1.Win.C1FlexGrid.Util.BaseControls.BorderStyleEnum.Fixed3D;
Three-Dimensional BorderThe border will be three-dimensional.
Single Line BorderThe border will be a single line.
FlexGrid for WinForms 185
Copyright © 2017 GrapeCity, inc. All rights reserved.

Light Sunken BorderThe border will be light and three-dimensional.
No BorderThere is no border.
FlexGrid for WinForms 186
Copyright © 2017 GrapeCity, inc. All rights reserved.

XP Theme BorderThe border will be XP themed.
Formatting the Border Style of the GridTo format the border style of the grid, set the Style property to Dotted, Double, Fillet, Flat, Groove, Inset, None, orRaised. This property can be set using C1FlexGrids built-in styles either in the designer or in code. The following tabledescribes each of the border styles.
Border Description
Dotted Dotted border.
FlexGrid for WinForms 187
Copyright © 2017 GrapeCity, inc. All rights reserved.

Double Double border.
Fillet Fillet border.
Flat Solid flat border.
Groove Groove border.
Inset Inset border.
None No border. This is the defaultsetting.
Raised Raised border.
In the Designer1. Open the C1FlexGrid Style Editor. For details on how to access the C1FlexGrid Style Editor, see Accessing
the C1FlexGrid Style Editor.2. Select Normal under Built-In Styles. In the right column, locate the Border property and expand it. Set the
Style property to Dotted, Double, Fillet, Flat, Groove, Inset, None, or Raised. In this example, the Styleproperty is set to Dotted.
3. Click OK to close the editor.
In CodeTo write code in Visual Basic
Visual Basic
Me.C1FlexGrid1.Styles("Normal").Border.Style = C1.Win.C1FlexGrid.BorderStyleEnum.Dotted
To write code in C#
C#
this.c1FlexGrid1.Styles["Normal"].Border.Style = C1.Win.C1FlexGrid.BorderStyleEnum.Dotted;
Dotted BorderThe cell border will be a dotted line.
Border Description
FlexGrid for WinForms 188
Copyright © 2017 GrapeCity, inc. All rights reserved.

Double BorderThe cell border will be double lines.
Fillet BorderThe cell border will be fillet.
FlexGrid for WinForms 189
Copyright © 2017 GrapeCity, inc. All rights reserved.

Flat BorderThe cell border will be a solid flat line.
Groove BorderThe cell border will be grooved.
FlexGrid for WinForms 190
Copyright © 2017 GrapeCity, inc. All rights reserved.

Inset BorderThe cell border will be inset.
No BorderThere is no cell border.
FlexGrid for WinForms 191
Copyright © 2017 GrapeCity, inc. All rights reserved.

Raised BorderThe cell border will be raised.
Freezing Rows and ColumnsTo allow the user to freeze rows and columns with the mouse, set the AllowFreezing property to Columns to freezeonly columns, Rows to freeze only rows, or Both to freeze both columns and rows. Conversely, to disable freezing, setthe AllowFreezing property to None, which is the default setting. This property can be set either in the designer or incode.
In the Designer
FlexGrid for WinForms 192
Copyright © 2017 GrapeCity, inc. All rights reserved.

Locate the AllowFreezing property in the Properties window and set it to Both.
In CodeAdd the following code to the Form_Load event to set the AllowFreezing property to Both:
To write code in Visual Basic
Visual Basic
Me.C1FlexGrid1.AllowFreezing = C1.Win.C1FlexGrid.AllowFreezingEnum.Both
To write code in C#
C#
this.c1FlexGrid1.AllowFreezing = C1.Win.C1FlexGrid.AllowFreezingEnum.Both;
This topic illustrates the following:
When the mouse pointer becomes the lock rows or the lock columns icon, click and drag the mouse over therows or columns to freeze. In this example, the Element column is frozen and will remain on the grid when it is scrolledto the right.
In this example, the row containing Hydrogen is frozen and will remain on the grid when it is scrolled to the bottom.
FlexGrid for WinForms 193
Copyright © 2017 GrapeCity, inc. All rights reserved.
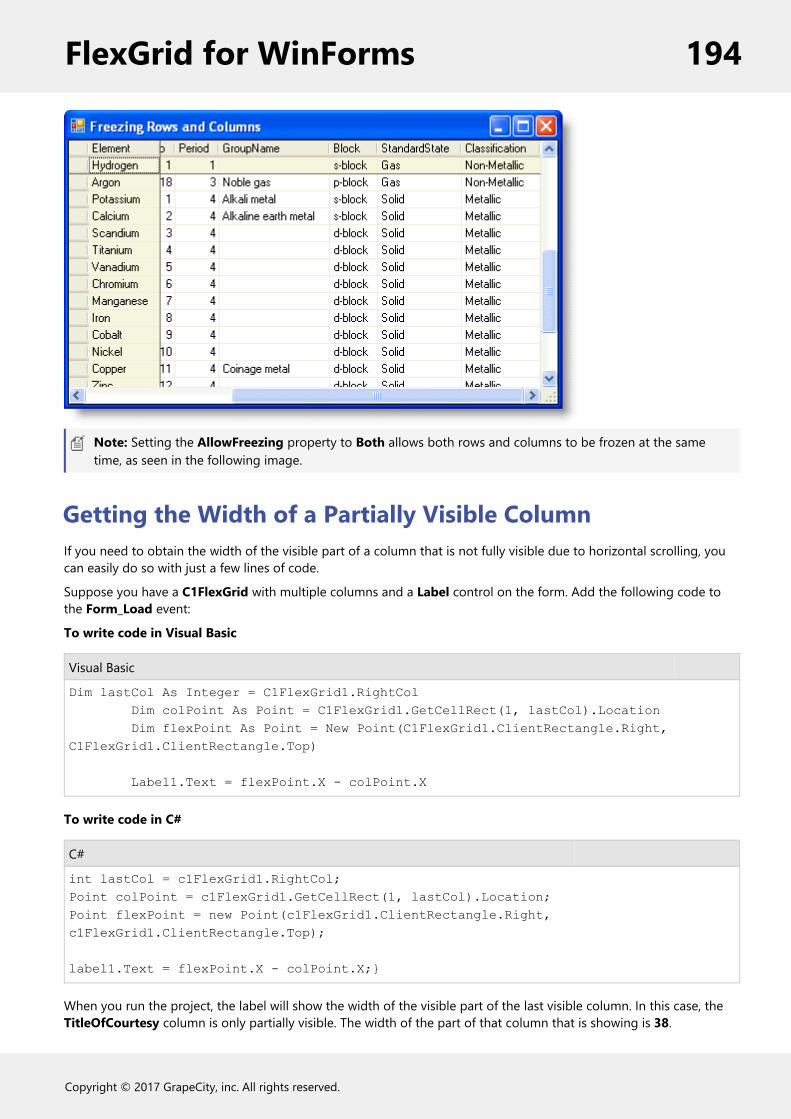
Note: Setting the AllowFreezing property to Both allows both rows and columns to be frozen at the sametime, as seen in the following image.
Getting the Width of a Partially Visible ColumnIf you need to obtain the width of the visible part of a column that is not fully visible due to horizontal scrolling, youcan easily do so with just a few lines of code.
Suppose you have a C1FlexGrid with multiple columns and a Label control on the form. Add the following code tothe Form_Load event:
To write code in Visual Basic
Visual Basic
Dim lastCol As Integer = C1FlexGrid1.RightCol Dim colPoint As Point = C1FlexGrid1.GetCellRect(1, lastCol).Location Dim flexPoint As Point = New Point(C1FlexGrid1.ClientRectangle.Right, C1FlexGrid1.ClientRectangle.Top) Label1.Text = flexPoint.X - colPoint.X
To write code in C#
C#
int lastCol = c1FlexGrid1.RightCol;Point colPoint = c1FlexGrid1.GetCellRect(1, lastCol).Location;Point flexPoint = new Point(c1FlexGrid1.ClientRectangle.Right, c1FlexGrid1.ClientRectangle.Top); label1.Text = flexPoint.X - colPoint.X;}
When you run the project, the label will show the width of the visible part of the last visible column. In this case, theTitleOfCourtesy column is only partially visible. The width of the part of that column that is showing is 38.
FlexGrid for WinForms 194
Copyright © 2017 GrapeCity, inc. All rights reserved.

Loading and Saving Open XML FilesYou can load and save Microsoft Excel 2007 Open XML files within a C1FlexGrid control. Open XML is an open,standards-based format introduced by Microsoft in Office 2007. Open XML files contain a number of XML filescompressed using Zip compression. Because they are compressed, Open XML files are usually much smaller thantraditional document files (such as XLS files).
By default, the Load and Save methods in C1FlexGrid select the appropriate file format automatically based on thefile extension. Any files with a "XLSX" or "ZIP" extensions are treated as Open XML files.
The LoadGrid and SaveGrid methods also have overloads that take the file type as a parameter. This allows you to takecontrol over the file format and not rely on the file extension. For example, your application may use the Open XMLformat for its data files, but with an extension other than "XLSX". You can specify the file type as "Excel" and use theOpenXml option of the FileFlags enumeration.
To save and load a grid as an OpenXml file, complete the followingsteps:
1. Add three buttons to the form containing the C1FlexGrid control and enter Save, Clear, and Load in the Textproperty for each, respectively, in the Visual Basic Properties window.
FlexGrid for WinForms 195
Copyright © 2017 GrapeCity, inc. All rights reserved.

2. From the Designer, double-click the Save button, Button_1, and enter code in the Button1_Click event, so itlooks like the following:
To write code in Visual Basic
Visual Basic
Private Sub Button1_Click(ByVal sender As System.Object, ByVal e As System.EventArgs) Handles Button1.Click Me.C1FlexGrid1.SaveGrid("C:\test\myfile.xlsx", FileFormatEnum.Excel, FileFlags.OpenXml)End Sub
To write code in C#
C#
private void button1_Click(object sender, EventArgs e) { this.c1FlexGrid1.SaveGrid(@"C:\test\myfile.xlsx", FileFormatEnum.Excel, FileFlags.OpenXml); }
Note: You must have the Imports or using statement at the top of your form in order for this code towork correctly. If coding in Visual Basic, use Imports C1.Win.C1FlexGrid. If coding in C#, use usingC1.Win.C1FlexGrid;. For more information, see the Namespaces topic.
3. Enter the following code for the Button2_Click event to be used for the Clear button:
To write code in Visual Basic
Visual Basic
Private Sub Button2_Click(ByVal sender As System.Object, ByVal e As System.EventArgs) Handles Button2.Click Me.C1FlexGrid1.Clear(ClearFlags.All)End Sub
To write code in C#
C#
private void button2_Click(object sender, EventArgs e) { this.c1FlexGrid1.Clear(ClearFlags.All); }
4. Enter the following code for the Button3_Click event to be used for the Load button:
To write code in Visual Basic
Visual Basic
Private Sub button3_Click(ByVal sender As System.Object, ByVal e As System.EventArgs) Handles Button3.Click Me.C1FlexGrid1.LoadGrid("C:\test\myfile.xlsx", FileFormatEnum.Excel,
FlexGrid for WinForms 196
Copyright © 2017 GrapeCity, inc. All rights reserved.

FileFlags.OpenXml)End Sub
To write code in C#
C#
private void button3_Click(object sender, EventArgs e) { this.c1FlexGrid1.LoadGrid(@"C:\test\myfile.xlsx", FileFormatEnum.Excel, FileFlags.OpenXml); }
Run the project:1. Enter content in the grid, as desired.2. Click the Save button. The grid is saved as an Open XML file with an .xlsx extension to the "C:\test" folder. You
must create this folder if it does not already exist.
3. Click the Clear button to clear the grid.4. Click the Load button, and the grid you previously saved is loaded.
Populating an Unbound Grid with DataTo populate an unbound grid with data, use the grid's indexer to populate a column, row, or a single cell. To populatea cell range, use the Data property.
Populating a Column with DataTo populate a column with data when the form loads, set a loop with the grid's indexer to the data to fill the column.Add the following code to the Form_Load event to set column one to zero:
To write code in Visual Basic
Visual Basic
Dim r As IntegerFor r = C1FlexGrid1.Rows.Fixed To C1FlexGrid1.Rows.Count - 1 Me.C1FlexGrid1(r, 1) = 0
FlexGrid for WinForms 197
Copyright © 2017 GrapeCity, inc. All rights reserved.

Next
To write code in C#
C#
int r;for (r = c1FlexGrid1.Rows.Fixed; r <= c1FlexGrid1.Rows.Count -1;r++){ this.c1FlexGrid1[r, 1] = 0;}
This topic illustrates the following:Column one fills with zeros.
Populating a Range of Cells with DataTo populate a range of cells with data when the form loads, set the Data property of the CellRange. Add the followingcode to the Form_Load event to set the Data property to zero:
To write code in Visual Basic
Visual Basic
Dim rng As C1.Win.C1FlexGrid.CellRange = Me.C1FlexGrid1.GetCellRange(1, 1, 3, 3)rng.Data = 0
To write code in C#
C#
C1.Win.C1FlexGrid.CellRange rng = this.c1FlexGrid1.GetCellRange(1,1,3,3);rng.Data = 0;
This topic illustrates the following:The cell range fills with zeros.
Populating a Row with DataTo populate a row with data when the form loads, set a loop with the grid's indexer to the data to fill the row. Add thefollowing code to the Form_Load event to set column one to zero:
To write code in Visual Basic
Visual Basic
Dim r As IntegerFor r = C1FlexGrid1.Cols.Fixed To C1FlexGrid1.Cols.Count - 1 Me.C1FlexGrid1(1, r) = 0Next
FlexGrid for WinForms 198
Copyright © 2017 GrapeCity, inc. All rights reserved.

To write code in C#
C#
int r;for (r = c1FlexGrid1.Cols.Fixed; r <= c1FlexGrid1.Cols.Count -1;r++){ this.c1FlexGrid1[1, r] = 0;}
This topic illustrates the following:Row one fills with zeros.
Populating a Single Cell with DataTo populate a single cell with data when the form loads, set the grid's indexer to the data. Add the following code tothe Form_Load event to set the cell text:
To write code in Visual Basic
Visual Basic
Me.C1FlexGrid1(3, 2) = "Cell Text"
To write code in C#
C#
this.c1FlexGrid1[3, 2] = "Cell Text";
This topic illustrates the following:The text Cell Text is in the fourth row, third column.
Transposing Data in GridTransposing data refers to swapping column data and row data. In FlexGrid, this can be achieved using Transpose()method.
For example, you want to transpose column and row data in the grid originally displaying data as follows:
FlexGrid for WinForms 199
Copyright © 2017 GrapeCity, inc. All rights reserved.

Add the following line of code after the code to populate the grid with data:
To write code in Visual Basic
Visual Basic
C1FlexGrid1.Transpose()
To write code in C#
C#
c1FlexGrid1.Transpose();
Run the project. The grid now displays the data as follows:
Note that Transpose method only works in unbound mode. In addition, when you transpose the grid with asorted column, the transpose method removes sorting before transposing. This means that the sort icon is notdisplayed after the transposing is done.
Restricting Grid EditingTo disable editing of the entire grid, specific column or specific row, set the AllowEditing property to False.Conversely, to allow editing, set the AllowEditing property to True, which is the default value.
Disable Editing for the Entire GridTo disable editing for the entire grid, setting the AllowEditing property to False either in the designer or in code.
In the DesignerIn the C1FlexGrid Tasks menu, uncheck the Enable Editing check box.
Alternatively, locate the AllowEditing property in the Properties window and set it to False.
In CodeAdd the following code to the Form_Load event:
To write code in Visual Basic
Visual Basic
Me.C1FlexGrid1.AllowEditing = False
FlexGrid for WinForms 200
Copyright © 2017 GrapeCity, inc. All rights reserved.

To write code in C#
C#
this.c1FlexGrid1.AllowEditing = false;
Disable Editing for a Specific ColumnTo disable editing for a specific column, set the AllowEditing property to False either in the designer or in code.
In the Designer1. Select the column in the grid that you would like to edit. This will open the Column Tasks menu for that
column.2. Uncheck the Allow Editing check box.
Alternatively, the AllowEditing property can be set using the C1FlexGrid Column Editor:
1. Open the C1FlexGrid Column Editor. For details on how to access the C1FlexGrid Column Editor, seeAccessing the C1FlexGrid Column Editor.
2. Select the column that you would like to edit from the right pane and set the AllowEditing property to Falsein the left pane.
3. Click OK to close the editor.
In CodeAdd the following code to the Form_Load event to restrict editing the AtomicMass column:
To write code in Visual Basic
Visual Basic
Me.C1FlexGrid1.Cols("AtomicMass").AllowEditing = False' Is the same as: Me.C1FlexGrid1.Cols(4).AllowEditing = False
To write code in C#
C#
this.c1FlexGrid1.Cols["AtomicMass"].AllowEditing = false;// Is the same as: this.c1FlexGrid1.Cols[4].AllowEditing = false;
Disable Editing for a Specific RowTo disable editing for a specific row, add the following code to the Form_Load event to set the AllowEditingproperty to False. In this example, the code will restrict editing in the 6th row:
To write code in Visual Basic
Visual Basic
Me.C1FlexGrid1.Rows(5).AllowEditing = False
FlexGrid for WinForms 201
Copyright © 2017 GrapeCity, inc. All rights reserved.

To write code in C#
C#
this.c1FlexGrid1.Rows[5].AllowEditing = false;
Restricting Sorting for a Specific ColumnTo restrict sorting for a specific column, set the AllowSorting property to False either in the designer or in code.
In the Designer1. Select the column in the grid that you would like to edit. This will open the Column Tasks menu for that
column.2. Uncheck the Allow Sorting check box.
Alternatively, the AllowSorting property can be set using the C1FlexGrid Column Editor:
1. Open the C1FlexGrid Column Editor. For details on how to access the C1FlexGrid Column Editor, seeAccessing the C1FlexGrid Column Editor.
2. Select the column that you would like to edit from the right pane and set the AllowSorting property to False inthe left pane.
3. Click OK to close the editor.
In CodeAdd the following code to the Form_Load event to restrict sorting the AtomicNumber column:
To write code in Visual Basic
Visual Basic
Me.C1FlexGrid1.Cols("AtomicNumber").AllowSorting = False' Is the same as: Me.C1FlexGrid1.Cols(1).AllowEditing = False
To write code in C#
C#
this.c1FlexGrid1.Cols["AtomicNumber"].AllowSorting = false;// Is the same as: this.c1FlexGrid1.Cols[1].AllowEditing = false;
Scaling an ImageTo scale an image in a single column when the rows of the grid are resized, set the ImageAlign property to Scale.
1. Set the row height of the first two rows by adding the following code to the Form_Load event:
To write code in Visual Basic
Visual Basic
Me.C1FlexGrid1.Rows(1).Height = 2 * Me.C1FlexGrid1.Rows.DefaultSize
FlexGrid for WinForms 202
Copyright © 2017 GrapeCity, inc. All rights reserved.

Me.C1FlexGrid1.Rows(2).Height = 2 * Me.C1FlexGrid1.Rows.DefaultSize
To write code in C#
C#
this.c1FlexGrid1.Rows[1].Height = 2 * this.c1FlexGrid1.Rows.DefaultSize;this.c1FlexGrid1.Rows[2].Height = 2 * this.c1FlexGrid1.Rows.DefaultSize;
2. Scale the images in the column.
In the DesignerOpen the C1FlexGrid Column Editor. For details on how to access the C1FlexGrid Column Editor, seeAccessing the C1FlexGrid Column Editor.Select the column that contains the images from the right pane and set the ImageAlign property toScale in the left pane.Click OK to close the editor.
In Code
Add the following code after the code in step 1:
To write code in Visual Basic
Visual Basic
Me.C1FlexGrid1.Cols(3).ImageAlign = C1.Win.C1FlexGrid.ImageAlignEnum.Scale
To write code in C#
C#
this.c1FlexGrid1.Cols[3].ImageAlign = C1.Win.C1FlexGrid.ImageAlignEnum.Scale;
This topic illustrates the following:By using the ImageAlign property, the image will be scaled to fit the maximum area within the cell while preservingthe picture's original aspect ratio.
FlexGrid for WinForms 203
Copyright © 2017 GrapeCity, inc. All rights reserved.

Scaling Images in the Entire GridTo scale the images in the entire grid, not just one column, set the ImageAlign property for the Normal style to Scale.
In the Designer1. Open the C1FlexGrid Style Editor. For details on how to access the C1FlexGrid Style Editor, see Accessing
the C1FlexGrid Style Editor.2. Select Normal in the Built-In Styles list.3. In the right pane, locate the ImageAlign property and set it to Scale.4. Click OK to close the editor.
In CodeAdd the following code to the Form_Load event:
To write code in Visual Basic
Visual Basic
Me.C1FlexGrid1.Styles("Normal").ImageAlign = C1.Win.C1FlexGrid.ImageAlignEnum.Scale
To write code in C#
C#
this.c1FlexGrid1.Styles["Normal"].ImageAlign = C1.Win.C1FlexGrid.ImageAlignEnum.Scale;
Searching for Entries in a ColumnTo search for entries in a column as a user types, set the AutoSearch property to FromCursor to begin the searchfrom the current row or FromTop to begin the search from the first scrollable row. Conversely, to disable the search,set the AutoSearch property to None, which is the default setting. This property can be set either in the designer or incode.
In the DesignerLocate the AutoSearch property in the Properties window and set it to FromTop.
In CodeAdd the following code to the Form_Load event to set the AutoSearch property to FromTop:
To write code in Visual Basic
Visual Basic
Me.C1FlexGrid1.AutoSearch = C1.Win.C1FlexGrid.AutoSearchEnum.FromTop
To write code in C#
FlexGrid for WinForms 204
Copyright © 2017 GrapeCity, inc. All rights reserved.
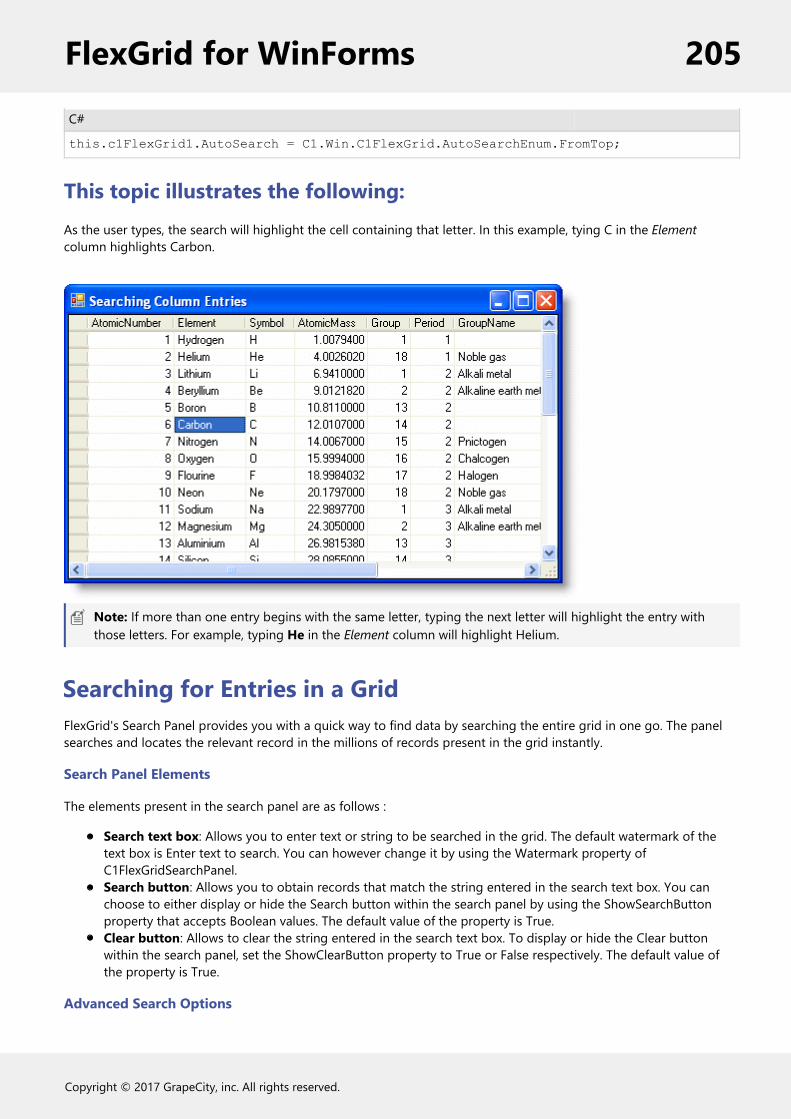
C#
this.c1FlexGrid1.AutoSearch = C1.Win.C1FlexGrid.AutoSearchEnum.FromTop;
This topic illustrates the following:As the user types, the search will highlight the cell containing that letter. In this example, tying C in the Elementcolumn highlights Carbon.
Note: If more than one entry begins with the same letter, typing the next letter will highlight the entry withthose letters. For example, typing He in the Element column will highlight Helium.
Searching for Entries in a GridFlexGrid's Search Panel provides you with a quick way to find data by searching the entire grid in one go. The panelsearches and locates the relevant record in the millions of records present in the grid instantly.
Search Panel Elements
The elements present in the search panel are as follows :
Search text box: Allows you to enter text or string to be searched in the grid. The default watermark of thetext box is Enter text to search. You can however change it by using the Watermark property ofC1FlexGridSearchPanel.Search button: Allows you to obtain records that match the string entered in the search text box. You canchoose to either display or hide the Search button within the search panel by using the ShowSearchButtonproperty that accepts Boolean values. The default value of the property is True. Clear button: Allows to clear the string entered in the search text box. To display or hide the Clear buttonwithin the search panel, set the ShowClearButton property to True or False respectively. The default value ofthe property is True.
Advanced Search Options
FlexGrid for WinForms 205
Copyright © 2017 GrapeCity, inc. All rights reserved.

Search Panel offers advanced search options that enable you to modify the behavior of the panel while executing asearch.
Search modes: There are two modes of searching the grid, manually and automatically. To manually search thegrid, you can simply click the Search button or press the ENTER key. While to automatically search, you just letthe search panel search the grid on its own after a small delay. Set the SearchMode property to SearchClick orAlways from the SearchMode enumeration for manual or automatic search, respectively.Search delay: You can set the delay (in milliseconds) after which automatic search is initiated by using theSearchDelay property. Notice that you need to set the SearchMode property to Always to be able to set thesearch delay.Search highlighting: To easily view searched records, you can highlight the search string within those recordsby setting the HighlightSearchResults property to True.
The following image displays search results obtained after executing a search through FlexGrid Search Panel.
To work with FlexGrid's Search Panel, create an instance of the C1FlexGridSearchPanel class and associate it with aninstance of the C1FlexGrid class. You can use the SetC1FlexGridSearchPanel method that accepts two parameters,namely the C1FlexGrid and the C1FlexGridSearchPanel instance, to associate search panel with the grid. In addition,the default appearance and behavior of FlexGrid Search Panel can be customized by using the properties mentionedbelow.
The following code snippet customizes FlexGrid Search Panel and associates it with FlexGrid. This code uses thesample created in Quick Start.
Visual Basic
' Set the search modeC1FlexGridSearchPanel1.SearchMode = C1.Win.C1FlexGrid.SearchMode.Always
' set the search delay when the search mode is automaticC1FlexGridSearchPanel1.SearchDelay = 2
' set the watermark for the search text boxC1FlexGridSearchPanel1.Watermark = "Enter Search String"
' associate Search Panel with FlexGridC1FlexGridSearchPanel1.SetC1FlexGridSearchPanel(C1FlexGrid1, C1FlexGridSearchPanel1)
C#
// Set the search modec1FlexGridSearchPanel1.SearchMode = C1.Win.C1FlexGrid.SearchMode.Always;
// set the search delay when the search mode is automaticc1FlexGridSearchPanel1.SearchDelay = 2;
// set the watermark for the search text box
FlexGrid for WinForms 206
Copyright © 2017 GrapeCity, inc. All rights reserved.
c1FlexGridSearchPanel1.Watermark = "Enter Search String";
// associate Search Panel with FlexGridc1FlexGridSearchPanel1.SetC1FlexGridSearchPanel(c1FlexGrid1, c1FlexGridSearchPanel1);
Setting a Cell's Value to Zero When Users Press the DeleteKeyTo set a cell's value to zero when a user presses the DELETE key, use C1FlexGrid's KeyDown event to catch when theDELETE key is pressed.
Add the following KeyDown event to your form:
To write code in Visual Basic
Visual Basic
Private Sub C1FlexGrid1_KeyDown(ByVal sender As Object, ByVal e As System.Windows.Forms.KeyEventArgs) Handles C1FlexGrid1.KeyDown If (e.KeyCode = Keys.Delete) Then C1FlexGrid1(C1FlexGrid1.Row, C1FlexGrid1.Col) = 0 End IfEnd Sub
To write code in C#
C#
private void c1FlexGrid1_KeyDown(object sender, System.Windows.Forms.KeyDownEventArgs e){ if (e.KeyCode == Keys.Delete) { c1FlexGrid1(c1FlexGrid1.Row, c1FlexGrid1.Col) = 0; }}
Setting Rows As HeadersTo set rows as headers, set the Caption and DataType properties for each row.
1. Add the following code to the Form_Load event to set the number of rows and columns to appear in the grid.
To write code in Visual Basic
Visual Basic
Me.C1FlexGrid1.Cols.Count = 5Me.C1FlexGrid1.Rows.Count = 7
To write code in C#
FlexGrid for WinForms 207
Copyright © 2017 GrapeCity, inc. All rights reserved.

C#
this.c1FlexGrid1.Cols.Count = 5;this.c1FlexGrid1.Rows.Count = 7;
2. Add the rows to the RowCollection:
To write code in Visual Basic
Visual Basic
Dim row As C1.Win.C1FlexGrid.RowCollection = Me.C1FlexGrid1.Rows
To write code in C#
C#
C1.Win.C1FlexGrid.RowCollection row = this.c1FlexGrid1.Rows;
3. Set the Caption and DataType for each row.
To write code in Visual Basic
Visual Basic
row(1).Caption = "Date"row(1).DataType = GetType(DateTime) row(2).Caption = "Contact"row(2).DataType = GetType(String) row(3).Caption = "Phone"row(3).DataType = GetType(String)row(3).EditMask = "(999) 999-9999;*" row(4).Caption = "Platform"row(4).DataType = GetType(String)row(4).ComboList = "|Windows XP|Windows 2000|Windows ME|Windows NT|Windows 98|Windows 95" row(5).Caption = "Error Code"row(5).DataType = GetType(Integer) row(6).Caption = "Resolved"row(6).DataType = GetType(Boolean)
To write code in C#
C#
row[1].Caption = "Date";row[1].DataType = typeof(DateTime); row[2].Caption = "Contact";row[2].DataType = typeof(string); row[3].Caption = "Phone";
FlexGrid for WinForms 208
Copyright © 2017 GrapeCity, inc. All rights reserved.

row[3].DataType = typeof(string);row[3].EditMask = "(999) 999-9999;*"; row[4].Caption = "Platform";row[4].DataType = typeof(string);row[4].ComboList = "|Windows XP|Windows 2000|Windows ME|Windows NT|Windows 98|Windows 95"; row[5].Caption = "Error Code";row[5].DataType = typeof(int); row[6].Caption = "Resolved";row[6].DataType = typeof(bool);
4. Format the headers to Tahoma, 9pt, Bold font.
To write code in Visual Basic
Visual Basic
Me.C1FlexGrid1.Styles("Fixed").Font = New Font("Tahoma", 9, FontStyle.Bold)
To write code in C#
C#
this.c1FlexGrid1.Styles["Fixed"].Font = new Font("Tahoma", 9, FontStyle.Bold);
5. Merge the fixed row and add a header to it:
To write code in Visual Basic
Visual Basic
Me.C1FlexGrid1.AllowMerging = C1.Win.C1FlexGrid.AllowMergingEnum.FixedOnlyrow(0).AllowMerging = TrueDim rng As C1.Win.C1FlexGrid.CellRange = C1FlexGrid1.GetCellRange(0, 1, 0, 4)rng.Data = "Call Log"
To write code in C#
C#
this.c1FlexGrid1.AllowMerging = C1.Win.C1FlexGrid.AllowMergingEnum.FixedOnly;row[0].AllowMerging = true;C1.Win.C1FlexGrid.CellRange rng = c1FlexGrid1.GetCellRange(0,1,0,4);rng.Data = "Call Log";
This topic illustrates the following:The row headers appears in the first column and the each row will be formatted according to its DataType property.
FlexGrid for WinForms 209
Copyright © 2017 GrapeCity, inc. All rights reserved.

Setting the Background Color of Columns and RowsTo set the background color of columns and rows, create a new style and assign it to a column and row.
Setting the Background Color of Columns1. Create a new style for the column.
In the Designer
Open the C1FlexGrid Style Editor. For details on how to access the C1FlexGrid Style Editor, seeAccessing the C1FlexGrid Style Editor.Click Add to create a new style.Double-click CustomStyle1, rename it ColumnColor, and press ENTER when finished.Do not exit the C1FlexGrid Style Editor.
In Code
Add the following code to the Form_Load event:
To write code in Visual Basic
Visual Basic
Dim cc As C1.Win.C1FlexGrid.CellStylecc = Me.C1FlexGrid1.Styles.Add("ColumnColor")
To write code in C#
C#
C1.Win.C1FlexGrid.CellStyle cc = this.c1FlexGrid1.Styles.Add("ColumnColor");
2. Set the BackColor color to CornSilk.
In the Designer
FlexGrid for WinForms 210
Copyright © 2017 GrapeCity, inc. All rights reserved.

In the C1FlexGrid Style Editor, locate the BackColor property in the right pane and set it to CornSilk.Click OK to close the C1FlexGrid Style Editor.
In Code
Add the following code to the Form_Load event:
To write code in Visual Basic
Visual Basic
cc.BackColor = Color.Cornsilk
To write code in C#
C#
cc.BackColor = Color.Cornsilk;
3. Assign the style to a column by adding the following code to the Form_Load event:
To write code in Visual Basic
Visual Basic
Me.C1FlexGrid1.Cols(2).Style = Me.C1FlexGrid1.Styles("ColumnColor")
To write code in C#
C#
this.c1FlexGrid1.Cols[2].Style = this.c1FlexGrid1.Styles["ColumnColor"];
This topic illustrates the following:The background color of the Element column is set to CornSilk.
Setting the Background Color of Rows1. Create a new style for the row.
In the Designer
Open the C1FlexGrid Style Editor. For details on how to access the C1FlexGrid Style Editor, seeAccessing the C1FlexGrid Style Editor.Click Add to create a new style.Double-click CustomStyle1, rename it RowColor, and press ENTER when finished.Do not exit the C1FlexGrid Style Editor.
In Code
Add the following code to the Form_Load event:
To write code in Visual Basic
Visual Basic
Dim rs As C1.Win.C1FlexGrid.CellStylers = Me.C1FlexGrid1.Styles.Add("RowColor")
FlexGrid for WinForms 211
Copyright © 2017 GrapeCity, inc. All rights reserved.

To write code in C#
C#
C1.Win.C1FlexGrid.CellStyle rs = this.c1FlexGrid1.Styles.Add("RowColor");
2. Set the BackColor to PowderBlue.
In the Designer
In the C1FlexGrid Style Editor, locate the BackColor property and set it to PowderBlue.Click OK to close the C1FlexGrid Style Editor.
In Code
To write code in Visual Basic
Visual Basic
rs.BackColor = Color.PowderBlue
To write code in C#
C#
rs.BackColor = Color.PowderBlue;
3. Assign the style to a row by adding the following code to the Form_Load event:
To write code in Visual Basic
Visual Basic
Me.C1FlexGrid1.Rows(8).Style = Me.C1FlexGrid1.Styles("RowColor")
To write code in C#
C#
this.c1FlexGrid1.Rows[8].Style = this.c1FlexGrid1.Styles["RowColor"];
This topic illustrates the following:The background color of the row is set to PowderBlue. Notice how the column color takes precedence over the rowcolor.
FlexGrid for WinForms 212
Copyright © 2017 GrapeCity, inc. All rights reserved.

Setting the Background Color of Columns and RowsTo set the background color of columns and rows, create a new style and assign it to a column and row.
Setting the Background Color of Columns1. Create a new style for the column.
In the Designer
Open the C1FlexGrid Style Editor. For details on how to access the C1FlexGrid Style Editor, seeAccessing the C1FlexGrid Style Editor.Click Add to create a new style.Double-click CustomStyle1, rename it ColumnColor, and press ENTER when finished.Do not exit the C1FlexGrid Style Editor.
In Code
Add the following code to the Form_Load event:
To write code in Visual Basic
Visual Basic
Dim cc As C1.Win.C1FlexGrid.CellStylecc = Me.C1FlexGrid1.Styles.Add("ColumnColor")
To write code in C#
C#
C1.Win.C1FlexGrid.CellStyle cc = this.c1FlexGrid1.Styles.Add("ColumnColor");
2. Set the BackColor color to CornSilk.
In the Designer
FlexGrid for WinForms 213
Copyright © 2017 GrapeCity, inc. All rights reserved.

In the C1FlexGrid Style Editor, locate the BackColor property in the right pane and set it to CornSilk.Click OK to close the C1FlexGrid Style Editor.
In Code
Add the following code to the Form_Load event:
To write code in Visual Basic
Visual Basic
cc.BackColor = Color.Cornsilk
To write code in C#
C#
cc.BackColor = Color.Cornsilk;
3. Assign the style to a column by adding the following code to the Form_Load event:
To write code in Visual Basic
Visual Basic
Me.C1FlexGrid1.Cols(2).Style = Me.C1FlexGrid1.Styles("ColumnColor")
To write code in C#
C#
this.c1FlexGrid1.Cols[2].Style = this.c1FlexGrid1.Styles["ColumnColor"];
This topic illustrates the following:The background color of the Element column is set to CornSilk.
Setting the Background Color of Rows1. Create a new style for the row.
In the Designer
Open the C1FlexGrid Style Editor. For details on how to access the C1FlexGrid Style Editor, seeAccessing the C1FlexGrid Style Editor.Click Add to create a new style.Double-click CustomStyle1, rename it RowColor, and press ENTER when finished.Do not exit the C1FlexGrid Style Editor.
In Code
Add the following code to the Form_Load event:
To write code in Visual Basic
Visual Basic
Dim rs As C1.Win.C1FlexGrid.CellStylers = Me.C1FlexGrid1.Styles.Add("RowColor")
FlexGrid for WinForms 214
Copyright © 2017 GrapeCity, inc. All rights reserved.

To write code in C#
C#
C1.Win.C1FlexGrid.CellStyle rs = this.c1FlexGrid1.Styles.Add("RowColor");
2. Set the BackColor to PowderBlue.
In the Designer
In the C1FlexGrid Style Editor, locate the BackColor property and set it to PowderBlue.Click OK to close the C1FlexGrid Style Editor.
In Code
To write code in Visual Basic
Visual Basic
rs.BackColor = Color.PowderBlue
To write code in C#
C#
rs.BackColor = Color.PowderBlue;
3. Assign the style to a row by adding the following code to the Form_Load event:
To write code in Visual Basic
Visual Basic
Me.C1FlexGrid1.Rows(8).Style = Me.C1FlexGrid1.Styles("RowColor")
To write code in C#
C#
this.c1FlexGrid1.Rows[8].Style = this.c1FlexGrid1.Styles["RowColor"];
This topic illustrates the following:The background color of the row is set to PowderBlue. Notice how the column color takes precedence over the rowcolor.
FlexGrid for WinForms 215
Copyright © 2017 GrapeCity, inc. All rights reserved.

Setting the Font of a Single CellTo set the font of a single cell, create a new style and assign it to a cell.
1. Create a new style.
In the Designer
Open the C1FlexGrid Style Editor. For details on how to access the C1FlexGrid Style Editor, see Accessingthe C1FlexGrid Style Editor.Click Add to create a new style.Double-click CustomStyle1, rename it myStyle, and press ENTER when finished.Do not exit the C1FlexGrid Style Editor.
In Code
To write code in Visual Basic
Visual Basic
Dim cs As C1.Win.C1FlexGrid.CellStylecs = Me.C1FlexGrid1.Styles.Add("myStyle")
To write code in C#
C#
C1.Win.C1FlexGrid.CellStyle cs = this.c1FlexGrid1.Styles.Add("myStyle");
2. Set the font to Tahoma, 10 pt, Bold.
In the Designer
In the C1FlexGrid Style Editor, locate the Font property in the right pane and click the ellipsis button.The Font dialog will appear.Set the Font box to Tahoma.Set the Font style box to Bold.
FlexGrid for WinForms 216
Copyright © 2017 GrapeCity, inc. All rights reserved.

Set the Size box to 10.Click OK to close the Font dialog box, but do not exit the C1FlexGrid Style Editor.
In Code
Add the following code to the Form_Load event:
To write code in Visual Basic
Visual Basic
cs.Font = New Font("Tahoma", 10, FontStyle.Bold)
To write code in C#
C#
cs.Font = new Font("Tahoma", 10, FontStyle.Bold);
3. Set the font color to Blue.
In the Designer
In the C1FlexGrid Style Editor, locate the ForeColor property in the right pane and set it to Blue.Click OK to close the C1FlexGrid Style Editor.
In Code
Add the following code to the Form_Load event:
To write code in Visual Basic
Visual Basic
cs.ForeColor = Color.Blue
To write code in C#
C#
cs.ForeColor = Color.Blue;
4. Assign the style to a cell by adding the following code to the Form_Load event:
To write code in Visual Basic
Visual Basic
Me.C1FlexGrid1.SetCellStyle(6, 2, "myStyle")
To write code in C#
C#
this.c1FlexGrid1.SetCellStyle(6, 2, "myStyle");
This topic illustrates the following:Carbon appears in Blue, Bold, 10 pt, Tahoma font.
FlexGrid for WinForms 217
Copyright © 2017 GrapeCity, inc. All rights reserved.

Setting the Text Delimiting Character in C1FlexGridTo set the text delimiting character in C1FlexGrid, set the Split method.
Add the following code to the Form_Load event to set the delimiting character to a semicolon:
To write code in Visual Basic
Visual Basic
Dim cols As String = "Product;Region;Salesperson;Sales;Bonus"Dim colNames As String() = cols.Split(";") Me.C1FlexGrid1.Cols.Count = 5Me.C1FlexGrid1.Cols.Fixed = 0Dim i%For i = 0 To Me.C1FlexGrid1.Cols.Count - 1 Me.C1FlexGrid1(0, i) = colNames(i) Me.C1FlexGrid1.Cols(i).Name = colNames(i)Next
To write code in C#
C#
string cols = "Product;Region;Salesperson;Sales;Bonus";string[] colNames = cols.Split(new char[] { ';' }); this.c1FlexGrid1.Cols.Count = 5;this.c1FlexGrid1.Cols.Fixed = 0;for (int i = 0; i >= this.c1FlexGrid1.Cols.Count - 1; i++){ this.c1FlexGrid1[0, i] = colNames[i]; this.c1FlexGrid1.Cols[i].Name = colNames[i];}
FlexGrid for WinForms 218
Copyright © 2017 GrapeCity, inc. All rights reserved.
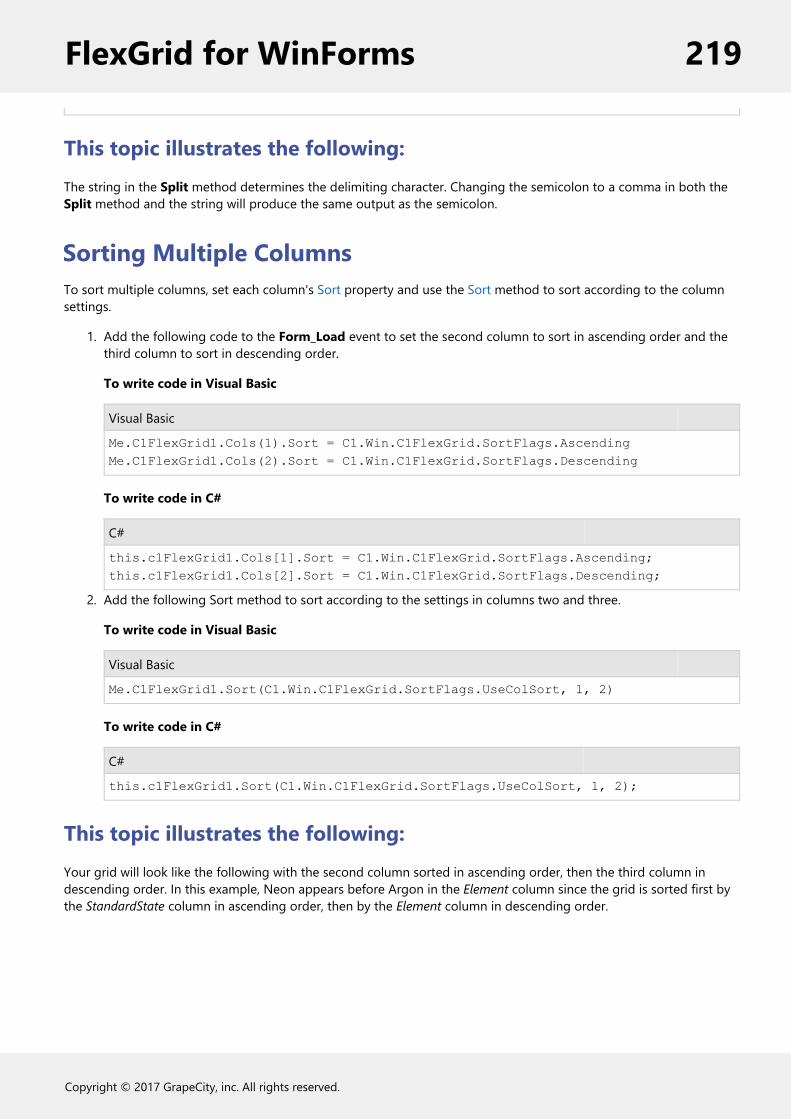
This topic illustrates the following:The string in the Split method determines the delimiting character. Changing the semicolon to a comma in both theSplit method and the string will produce the same output as the semicolon.
Sorting Multiple ColumnsTo sort multiple columns, set each column's Sort property and use the Sort method to sort according to the columnsettings.
1. Add the following code to the Form_Load event to set the second column to sort in ascending order and thethird column to sort in descending order.
To write code in Visual Basic
Visual Basic
Me.C1FlexGrid1.Cols(1).Sort = C1.Win.C1FlexGrid.SortFlags.AscendingMe.C1FlexGrid1.Cols(2).Sort = C1.Win.C1FlexGrid.SortFlags.Descending
To write code in C#
C#
this.c1FlexGrid1.Cols[1].Sort = C1.Win.C1FlexGrid.SortFlags.Ascending;this.c1FlexGrid1.Cols[2].Sort = C1.Win.C1FlexGrid.SortFlags.Descending;
2. Add the following Sort method to sort according to the settings in columns two and three.
To write code in Visual Basic
Visual Basic
Me.C1FlexGrid1.Sort(C1.Win.C1FlexGrid.SortFlags.UseColSort, 1, 2)
To write code in C#
C#
this.c1FlexGrid1.Sort(C1.Win.C1FlexGrid.SortFlags.UseColSort, 1, 2);
This topic illustrates the following:Your grid will look like the following with the second column sorted in ascending order, then the third column indescending order. In this example, Neon appears before Argon in the Element column since the grid is sorted first bythe StandardState column in ascending order, then by the Element column in descending order.
FlexGrid for WinForms 219
Copyright © 2017 GrapeCity, inc. All rights reserved.

Undoing a SortTo undo a sort in C1FlexGrid when the grid is bound to a DataTable, set the DefaultView property to null.
Add the following code to the Button1_Click event:
To write code in Visual Basic
Visual Basic
Private Sub Button1_Click(ByVal sender As System.Object, ByVal e As System.EventArgs) Handles Button1.Click CustTable.DefaultView.Sort = ""End Sub
To write code in C#
C#
private void Button1_Click(object sender, System.EventArgs e){ CustTable.DefaultView.Sort = "";}
Note: The DataTable.DefaultView returns the DataView of the DataTable, and setting the sort string to nullforces the DataView to undo the previous sort.
This topic illustrates the following:Click the Last Name column to sort on it.
FlexGrid for WinForms 220
Copyright © 2017 GrapeCity, inc. All rights reserved.

Click the Undo button, and the sort will be undone.
Using Password Entries in C1FlexGridTo show placeholder characters (*) in cells used for password entry, use the SetupEditor event.
1. Create a column for passwords in the grid and set the draw mode:
To write code in Visual Basic
Visual Basic
Private Sub Form1_Load(ByVal sender As System.Object, ByVal e As System.EventArgs) Handles MyBase.Load Me.C1FlexGrid1.Cols(0).Width = Me.C1FlexGrid1.Rows(0).HeightDisplay Me.C1FlexGrid1.ShowCursor = True Me.C1FlexGrid1.Cols(1).Caption =((Me.C1FlexGrid1.Cols(1).Name) = "Password") Me.C1FlexGrid1.DrawMode = C1.Win.C1FlexGrid.DrawModeEnum.OwnerDrawEnd Sub
To write code in C#
C#
{
FlexGrid for WinForms 221
Copyright © 2017 GrapeCity, inc. All rights reserved.

this.c1FlexGrid1.Cols[0].Width = this.c1FlexGrid1.Rows[0].HeightDisplay; this.c1FlexGrid1.ShowCursor = true; this.c1FlexGrid1.Cols[1].Caption = this.c1FlexGrid1.Cols[1].Name = "Password"; this.c1FlexGrid1.DrawMode = C1.Win.C1FlexGrid.DrawModeEnum.OwnerDraw;}
2. Add the following code for the SetupEditor event. This code will hide characters that are entered by the user.
To write code in Visual Basic
Visual Basic
Visual BasicPrivate Sub C1FlexGrid1_SetupEditor(ByVal sender As Object, ByVal e As C1.Win.C1FlexGrid.RowColEventArgs) Handles C1FlexGrid1.SetupEditor Dim tb As TextBox = Me.C1FlexGrid1.Editor If Not (tb Is Nothing) Then If Me.C1FlexGrid1.Cols(e.Col).Name = "Password" Then tb.PasswordChar = "*"c Else tb.PasswordChar = CChar(0) End If End IfEnd Sub
To write code in C#
C#
private void c1FlexGrid1_SetupEditor(object sender, C1.Win.C1FlexGrid.RowColEventArgs e){ TextBox tb = this.c1FlexGrid1.Editor as TextBox; if (tb != null) { if (this.c1FlexGrid1.Cols[e.Col].Name == "Password") tb.PasswordChar = '*'; else tb.PasswordChar = (char)0; }}
This topic illustrates the following:When the user enters a password in the Password column and presses ENTER, the text is automatically converted toasterisks.
FlexGrid for WinForms 222
Copyright © 2017 GrapeCity, inc. All rights reserved.

Hiding Characters Already EnteredTo hide the characters that have already been entered and do not need edited, use the OwnerDrawCell event.
1. Add the following code for the OwnerDrawCell event. This code will hide the characters that have alreadybeen entered and do not need edited.
To write code in Visual Basic
Visual Basic
Private Sub C1FlexGrid1_OwnerDrawCell(ByVal sender As Object, ByVal e As C1.Win.C1FlexGrid.OwnerDrawCellEventArgs) Handles C1FlexGrid1.OwnerDrawCell If e.Row >= Me.C1FlexGrid1.Rows.Fixed And Me.C1FlexGrid1.Cols(e.Col).Name = "Password" Then e.Text = New String("*"c, e.Text.Length) End IfEnd Sub
To write code in C#
C#
private void c1FlexGrid1_OwnerDrawCell(object sender, C1.Win.C1FlexGrid.OwnerDrawCellEventArgs e){ if (e.Row >= this.c1FlexGrid1.Rows.Fixed && this.c1FlexGrid1.Cols[e.Col].Name == "Password") { e.Text = new string('*', e.Text.Length); }}
2. Add the following code to the Form_Load event:
To write code in Visual Basic
Visual Basic
Me.C1FlexGrid1(1, 1) = "123456"
To write code in C#
C#
FlexGrid for WinForms 223
Copyright © 2017 GrapeCity, inc. All rights reserved.

this.c1FlexGrid1[1,1] = "123456";
This topic illustrates the following:Run the project again and notice the numbers are automatically loaded onto the form in the Password column asasterisks.
Word Wrapping in a Header or Fixed RowTo set word wrapping in a header or fixed row, set the Height and WordWrap properties.
1. Set the Caption property for a column header in the grid.
In the Designer
Select a column in the grid. This will open the Column Tasks menu for that column.In the Column Caption box, enter Word Wrapping in Header.
Alternatively, the Caption property can also be set using the C1FlexGrid Column Editor.
Open the C1FlexGrid Column Editor. For details on how to access the C1FlexGrid Column Editor, seeAccessing the C1FlexGrid Column Editor.Select a column in the right pane and set the Caption property in the left pane to Word Wrapping inHeader.Click OK to close the editor.
In Code
Add the following code to the Form_Load event.
To write code in Visual Basic
Visual Basic
Me.C1FlexGrid1.Cols(1).Caption = "Word Wrapping in Header"
To write code in C#
C#
this.c1FlexGrid1.Cols[1].Caption = "Word Wrapping in Header";
2. Set the row height of the header.
To write code in Visual Basic
FlexGrid for WinForms 224
Copyright © 2017 GrapeCity, inc. All rights reserved.

Visual Basic
Me.C1FlexGrid1.Rows(0).Height = 3 * Me.C1FlexGrid1.Rows.DefaultSize
To write code in C#
C#
this.c1FlexGrid1.Rows[0].Height = 3 * this.c1FlexGrid1.Rows.DefaultSize;
3. Enable word wrapping for the fixed cells.
In the Designer
Open the C1FlexGrid Style Editor. For details on how to access the C1FlexGrid Style Editor, seeAccessing the C1FlexGrid Style Editor.Select Fixed in the Built-In Styles list.Locate the WordWrap property in the right pane and set it to True.Click OK to close the designer.
In Code
Add the following code to the Form_Load event:
To write code in Visual Basic
Visual Basic
Me.C1FlexGrid1.Styles("Fixed").WordWrap = True
To write code in C#
C#
this.c1FlexGrid1.Styles["Fixed"].WordWrap = true;
This topic illustrates the following:In this example, a three-line header is created, and the text is wrapped.
FlexGrid for WinForms 225
Copyright © 2017 GrapeCity, inc. All rights reserved.

FlexGrid for WinForms Top TipsThe following tips were compiled from frequently asked user questions posted in the C1FlexGrid forum.
Tip 1: Use the BeginUpdate/EndUpdate Methods to IncreasePerformanceEvery time a cell value is changed, or rows and columns are added or removed from the grid, some calculations areperformed in order to recalculate the grid layout and update the display.
You can increase performance significantly by enclosing the changes in calls to the BeginUpdate and EndUpdatemethods. For example:
To write code in Visual Basic
Visual Basic
' call BeginUpdate before updating the grid._flex. BeginUpdate() ' Make the changes.Try Dim r As Integer = 0 Do While (r < _flex.Rows.Count) Dim c As Integer = 0 Do While (c < _flex.Cols.Count) _flex(r, c) = (r + c) c += 1 Loop r += 1 LoopFinally ' Always call EndUpdate when done. _flex.EndUpdate()End Try
To write code in C#
C#
// call BeginUpdate before updating the grid._flex.BeginUpdate(); // Make the changes.try{ for (int r = 0; r < _flex.Rows.Count; r++) { for (int c = 0; c < _flex.Cols.Count; c++) { _flex[r, c] = r + c;
FlexGrid for WinForms 226
Copyright © 2017 GrapeCity, inc. All rights reserved.

} }}finally{ // Always call EndUpdate when done. _flex.EndUpdate();}
Note the use of a try/finally block to ensure that the C1FlexGridBase.EndUpdate method is called even if the updatecode fails and throws an exception.
Note: The BeginUpdate and EndUpdate methods were added in the 2010/v1 release of the C1FlexGrid. Inprevious versions, the Redraw property was used for the same purpose. This change was made to increasesource compatibility with other controls that use the BeginUpdate and EndUpdate pattern.
Tip 2: Use the AutoResize Property to Increase PerformanceWhen a bound grid retrieves data from a data source, it measures every cell and sets the column widths so they fit allthe data. This ensures the grid layout is optimal to display the data in the data source, but it can be time-consuming ifthe data source is large (say more than a few thousand rows).
In these cases, you should consider setting the AutoResize property to False and setting the column widths in code.
Note: Starting with the 2010/v1 release of the C1FlexGrid, the AutoResize property defaults to False. If yourdata source contains a relatively small number of items and you want the grid to resize the columnsautomatically, you can either set the AutoResize property to True manually or simply call the AutoSizeColsmethods after binding or populating the grid. This change was made to increase performance in cases wherethe grid is bound to large data sources.
Tip 3: Use the DrawMode Property to Assign Styles DynamicallyBased on Cell ValuesThe grid allows you to create cell styles and assign them to rows, columns, and arbitrary cell ranges. You can use thiscapability to format cells based on their values. For example, cells that contain negative values can display them in red.
You can do this by assigning styles to cells with the SetCellStyle method, but in this case you have to update the stylewhenever the cell value changes. Also, if the grid is bound to a data source, styles will be lost whenever the datasource is reset (after sorting and filtering operations for example).
A better alternative in these cases is to use the grid's OwnerDraw feature and select styles dynamically, based on thecell values. For example, the code below shows negative values in red and values above 1,000 in green:
To write code in Visual Basic
Visual Basic
Private Sub Form1_Load(ByVal sender As System.Object, ByVal e As System.EventArgs) Handles MyBase.Load ' Fill a column with random values. _flex.Cols(1).DataType = GetType(Integer)
FlexGrid for WinForms 227
Copyright © 2017 GrapeCity, inc. All rights reserved.

Dim rnd As New Random Dim r As Integer = 1 Do While (r < _flex.Rows.Count) _flex(r, 1) = rnd.Next(-10000, 10000) r += 1 Loop ' Create style used to show negative values. _flex.Styles.Add("Red").ForeColor = Color.Red ' Create style used to show values >= 1000. _flex.Styles.Add("Green").ForeColor = Color.Green ' Enable OwnerDraw by setting the DrawMode property. _flex.DrawMode = C1.Win.C1FlexGrid.DrawModeEnum.OwnerDrawEnd Sub Private Sub _flex_OwnerDrawCell(ByVal sender As Object, ByVal e As C1.Win.C1FlexGrid.OwnerDrawCellEventArgs) Handles _flex.OwnerDrawCell ' Check that the row and column contain integer data. If ((e.Row > 0) AndAlso (_flex.Cols(e.Col).DataType Is GetType(Integer))) Then ' Get value in cell about to be painted. Dim value As Integer = CInt(_flex(e.Row, e.Col)) If (value < 0) Then ' If the Cell value < 0, use the Red style. e.Style = _flex.Styles("Red") ElseIf (value >= 1000) Then ' If the Cell value >= 1000, use the Green style. e.Style = _flex.Styles("Green") End If End IfEnd Sub
To write code in C#
C#
private void Form1_Load(object sender, EventArgs e){ // Fill a column with random values. _flex.Cols[1].DataType = typeof(int); Random rnd = new Random(); for (int r = 1; r < _flex.Rows.Count; r++) { _flex[r, 1] = rnd.Next(-10000, 10000); }
FlexGrid for WinForms 228
Copyright © 2017 GrapeCity, inc. All rights reserved.

// Create style used to show negative values. _flex.Styles.Add("Red").ForeColor = Color.Red; // Create style used to show values >= 1000. _flex.Styles.Add("Green").ForeColor = Color.Green; // Enable OwnerDraw by setting the DrawMode property. _flex.DrawMode = C1.Win.C1FlexGrid.DrawModeEnum.OwnerDraw; _flex.OwnerDrawCell += new C1.Win.C1FlexGrid.OwnerDrawCellEventHandler(_flex_OwnerDrawCell);} private void _flex_OwnerDrawCell(object sender, C1.Win.C1FlexGrid.OwnerDrawCellEventArgs e){ // Check that the row and column contain integer data. if (e.Row > 0 && _flex.Cols[e.Col].DataType == typeof(int)) { // Get value in cell about to be painted. int value = (int)_flex[e.Row, e.Col]; if (value < 0) { // If the Cell value < 0, use the Red style. e.Style = _flex.Styles["Red"]; } else if (value >= 1000) { // If the Cell value >= 1000, use the Green style. e.Style = _flex.Styles["Green"]; } }}
Tip 4: Do Not Modify Styles in the OwnerDrawCell EventNote that the code in Tip 3 does not modify the CellStyle object passed as a parameter in the OwnerDrawCell event.Instead, it assigns a new value to the e.Style parameter.
That is important because the CellStyle passed to the event handler is often used by other cells. For example, youcould, unintentionally change the grid's normal style, which would affect most cells in the grid.
The examples below illustrate the difference:
To write code in Visual Basic
Visual Basic
' ** CORRECT APPROACH:Private Sub _flex_OwnerDrawCell(ByVal sender As Object, ByVal e As
FlexGrid for WinForms 229
Copyright © 2017 GrapeCity, inc. All rights reserved.

C1.Win.C1FlexGrid.OwnerDrawCellEventArgs) Handles _flex.OwnerDrawCell ' Select style to use when painting this cell: e.Style = MyStyleSelector(e.Row, e.Col)End Sub
To write code in C#
C#
// ** CORRECT APPROACH:private void _flex_OwnerDrawCell(object sender, C1.Win.C1FlexGrid.OwnerDrawCellEventArgs e){ // Select style to use when painting this cell: e.Style = MyStyleSelector(e.Row, e.Col);
Contrast this with the following:
To write code in Visual Basic
Visual Basic
' ** WRONG APPROACH:Private Sub _flex_OwnerDrawCell(ByVal sender As Object, ByVal e As C1.Win.C1FlexGrid.OwnerDrawCellEventArgs) Handles _flex.OwnerDrawCell ' Select style to use when painting this cell: ' This is bad because changing any CellStyle objects invalidates the ' grid, which would cause this event handler to be called over and ' over again. e.Style.Color = MyColorSelector(e.Row, e.Col)End Sub
To write code in C#
C#
// ** WRONG APPROACH:private void _flex_OwnerDrawCell(object sender, C1.Win.C1FlexGrid.OwnerDrawCellEventArgs e){ // Select style to use when painting this cell: // This is bad because changing any CellStyle objects invalidates the // grid, which would cause this event handler to be called over and // over again. e.Style.Color = MyColorSelector(e.Row, e.Col);}
Tip 5: Use the Trimming Property to Show Ellipses in a SingleColumn of the Grid
FlexGrid for WinForms 230
Copyright © 2017 GrapeCity, inc. All rights reserved.

The Trimming property should be used to show ellipses in a single column of the grid. To determine how long stringsare trimmed to fit the cell, the Trimming property can be set to either None, Character, Word, EllipsisCharacter,EllipsisWord, or EllipsisPath.
The following table describes each of the be trimming options:
Member Name Description
Character Specifies that the text is trimmed to thenearest character.
EllipsisCharacter Specifies that the text is trimmed to thenearest character, and an ellipsis is insertedat the end of a trimmed line.
EllipsisPath The center is removed from the trimmedlines and replaced by an ellipsis. Thealgorithm keeps as much of the last slash-delimited segment of the line as possible.
EllipsisWord Specifies that the text is trimmed to thenearest word and an ellipsis is inserted at theend of a trimmed line.
None Specifies no trimming.
Word Specifies that the text is trimmed to thenearest word.
The following code sets the Trimming property to show ellipses at the end of the second column, with the texttrimmed to the nearest character:
To write code in Visual Basic
Visual Basic
_flex.Cols(1).StyleNew.Trimming StringTrimming.EllipsisCharacter
To write code in C#
C#
_flex.Cols[1].StyleNew.Trimming =StringTrimming.EllipsisCharacter;
Tip 6: Use the WordWrap Property to Show Multiple Line Text in aCellWhen showing multiple lines of text in a cell, use the WordWrap and Height properties. The WordWrap propertydetermines whether the grid should automatically break long strings that contain spaces and display them in multiplelines. Strings that contain hard line breaks (vbCrLf or "\n\r") are always displayed in multiple lines.
Multiple line text can be displayed in both fixed and scrollable cells. For an example setting multiple line text in a fixedcell, see Word Wrapping in a Header or Fixed Row.
The following code sets display multiple line text in a scrollable cell:
To write code in Visual Basic
FlexGrid for WinForms 231
Copyright © 2017 GrapeCity, inc. All rights reserved.

Visual Basic
' Set the WordWrap property._flex.Styles("Normal").WordWrap = True ' Set the row height._flex.Rows(1).Height = 2 * fg.Rows.DefaultSize ' Add text to the cell._flex(1, 2) = "This is the first line." & ControlChars.CrLf & " This is the second line."
To write code in C#
C#
// Set the WordWrap property._flex.Styles["Normal"].WordWrap = true; // Set the row height._flex.Rows[1].Height = 2 * fg.Rows.DefaultSize; // Add text to the cell._flex[1, 2] = "This is the first line. \r\n This is the second line.";
Tip 7: Use the Sort Property to Retrieve Data Sorting when Bound toa DataTableIf the grid is bound to a DataTable, the user can maintain the way the grid is sorted when data is refreshed. This canbe achieved by using the default view's Sort property and a sort expression.
The Sort property uses a string containing the column name followed by ASC (to sort the column in ascending order)or DESC (to sort the column in descending order). By default, columns are sorted in ascending order. Multiplecolumns can be sorted by entering each column name separated by a comma.
A sort expression can include names of grid columns or a calculation. Setting the sort expression at run timeimmediately reflects the changes in the data view.
To write code in Visual Basic
Visual Basic
Private Sub Form1_Load(ByVal sender As System.Object, ByVal e As System.EventArgs) Handles MyBase.Load Me.ProductsTableAdapter.Fill(Me.NwindDataSet.Products)End Sub Private Sub btn_Sort_Click(ByVal sender As System.Object, ByVal e As System.EventArgs) Handles btn_Sort.Click ' Sort the data by the UnitsInStock column then by the ProductID column. Me.ProductsBindingSource.Sort = "UnitsInStock ASC, ProductID ASC"End Sub
FlexGrid for WinForms 232
Copyright © 2017 GrapeCity, inc. All rights reserved.

Private Sub btn_ClearSort_Click(ByVal sender As System.Object, ByVal e As System.EventArgs) Handles btn_ClearSort.Click ' Clear the sort. Me.ProductsBindingSource.Sort = ""End Sub
To write code in C#
C#
private void Form1_Load(object sender, System.EventArgs e){ this.productsTableAdapter.Fill(this.nwindDataSet.Products);} private void btn_Sort_Click(object sender, EventArgs e){ // Sort the data by the UnitsInStock column then by the ProductID column. this.productsBindingSource.Sort = "UnitsInStock ASC, ProductID ASC";} private void btn_ClearSort_Click(object sender, EventArgs e){ // Clear the sort. this.productsBindingSource.Sort = "";}
Tip 8: Control the Number of Characters to be Entered in a Column with the SetupEditor Event
To set the maximum number of characters a user can enter for any given column use the SetupEditor event. For thisexample a C1TextBox has been set as the editor for C1FlexGrid. You must declare an external editor to be used withC1FlexGrid in the StartEdit event:
To write code in Visual Basic
Visual Basic
Private Sub _flex_StartEdit(ByVal sender As System.Object, ByVal e As C1.Win.C1FlexGrid.RowColEventArgs) Handles _flex.StartEdit _flex.Editor = C1TextBoxEnd Sub
To write code in C#
C#
private void _flex_StartEdit(object sender, C1.Win.C1FlexGrid.RowColEventArgs e){ _flex.Editor = c1TextBox;}
Now that you have the grid's editor set up you can use the following code to allow 20 characters to be entered in the3rd column and only 10 characters to be entered in the rest of the grid's columns (remember the following code mustbe entered in the SetupEditor event):
FlexGrid for WinForms 233
Copyright © 2017 GrapeCity, inc. All rights reserved.
To write code in Visual Basic
Visual Basic
Private Sub _flex_SetupEditor(ByVal sender As Object, ByVal e As C1.Win.C1FlexGrid.RowColEventArgs) Handles _flex.SetupEditor ' Set the 3rd column to allow 20 characters and the rest only 10. If e.Col = 2 Then CType(fg.Editor, C1TextBox).MaxLength = 20 Else CType(fg.Editor, C1TextBox).MaxLength = 10 End IfEnd Sub
To write code in C#
C#
private void _flex_SetupEditor(object sender, RowColEventArgs e){ // Set the 3rd column to allow 20 characters and the rest only 10. if (e.Col == 2) c1TextBox.MaxLength = 20; else c1TextBox.MaxLength = 10;}
FlexGrid for WinForms 234
Copyright © 2017 GrapeCity, inc. All rights reserved.

C1FlexGridClassic ControlC1FlexGridClassic is a control that derives from C1FlexGrid and provides an object model that is virtually identical tothe VSFlexGrid ActiveX control. C1FlexGridClassic was developed to allow easy migration of existing VSFlexGridprojects.
The source code for C1FlexGridClassic is provided as a sample. You can use it as a reference that shows how to usethe C1FlexGrid control as a base class in the development of custom grid controls.
FlexGrid for WinForms 235
Copyright © 2017 GrapeCity, inc. All rights reserved.