flint knapping: finding & treating knappable...
TRANSCRIPT

0
Flint Knapping: Finding & Treating Knappable
Stone
Photo courtesy of F. Scott Crawford
Compiled/Edited by Michael Lynn

1
Photo of Tim Dillard teaching me at the
Center for American Archaeology in Kampsville, IL
Dedicated to all those who have taught someone else about the art of flint knapping, especially to my primary teachers – Bruce Boda, Tim Dillard, Mike McGrath and Steve Nissly. This is my attempt to pay forward. © Michael Lynn, 2010 Although the copyrights to the individual articles and tutorials in this e-book belong to the authors, I have copyrighted this collection. It may be freely printed, copied, posted on the internet and otherwise distributed as long as said distribution is free and appropriate credit is given to me and the authors. This e-book may not be sold for profit.
2
Flint Knapping: Finding & Treating Knappable Stone Where Can I Find Flint? 3 by Mark Bracken at www.flintknapping tools.com Rockhounding Law 4 by Gregory Tolbert at www.gatorgirlrocks.com Flintknapping Buyers Tips 10 by Wilkie Collins at www.nativewayonline.com Heat Treatment 18 by Travis Smolinski at www.sparrow creek.com Heat Treating Tips and Temperatures 23 by Mark Bracken at www.flintknapping tools.com Heat Treating Time/Temperature Table 26 by Richard Urata

3
Where Can I find Flint?
by Mark Bracken
Hunting flint is one of my favorite things to do. It's an adventure every time I go on a rock hunt! Over the years I have searched far and wide for the finest and most colorful materials for knapping. Many times I have come up empty handed and an empty gas tank. I always wondered where the "Mother Lode" was or if such a thing existed. In my quest, over the years, I have found some fantastic flint sources. It is a lot of hard work yet very satisfying experience.
Here are some tips for your next rock hunt!
The best advise I can give to the "flint hunter" is this: familiarize yourself with geological maps of the areas you plan to hunt. Look everywhere, in plowed fields, look in the gravel of creek and river bottoms, construction sites, under bridges and eroded roadside ditches. Be sure to get permission from land owners first! I assure you it is not worth the risk. The rewards are greater when material is gathered with a blessing from the land owner. Beware of "freeze fractured" flint. This is flint that has been exposed to freezing and literally frozen. The problem starts with this. Flint and all other stones contain moisture deep within the stone, when the temperature falls well below 32 f. the result of the expanding freezing moisture is fractures the flint. This is a bad thing for knappers. This material is useless unless the pieces are large enough to knap. You want pure crack free stone. It can be a serious challenge to find high grade stone. If you plan on getting material from construction sites, get them before it freezes. These stones have never been exposed to freezing temperatures and when they do, they will likely suffer. Searching creek and river bottoms can be a lot of fun. Take a big copper billet and start testing the gravel to see what is inside. You never know what you might find!
In summary, do a lot of research. Talk to artifact hunters, they know what the flints look like from their area. Don't waist your time in areas where there is no flint to be found. Don't expect other knappers to reveal their sources. Many a knapper has spent years to find their "honey holes". Remember, always get the land owners permission to hunt rocks on their property! Try to hunt areas that have not been exposed to freezing. Use common sense, have safety equipment along. Take Band-Aids, gloves, safety glasses and long pants. Just take a day off work and get a tank full of gas and have fun exploring the country side. It's great fun! you never know what you might find! If you don't have much luck or just don't have the time you can get good material from reputable rock dealers. You want to learn more about modern knapping? Simply search this site or view the Links page.
________________________ From http://www.flintknappingtools.com/where_flint.html, March 31, 2010, copied with permission

4
Rockhounding Law by Gregory Tolbert
Legal Mumbo Jumbo & Disclaimer
We live in a country with too many lawyers and too many judges and juries who seem to be intent on eliminating the last tattered shreds of common sense. Accordingly, we begin by stating what should be obvious to everyone. This Guide is free. You didn't pay a penny for it. And, although it is an awesome piece of work, it is a general overview. There will be errors, omissions, and even silly mistakes. In fact, there may be quite a few. Nonetheless, the authors disclaim any and all liability of any and every kind, express, implied, or otherwise. Simply stated, we're volunteering to assemble these materials so that you might have an opportunity to have some fun, maybe learn something, and spend some time experiencing the inherent magic that results from an outdoors adventure with a child. We're not signing up for a lawsuit resulting from misplaced reliance or any other legal theory grounded ultimately in a lack of personal responsibility. We are not your lawyer and (obviously) you are not hiring or relying on us for any legal counsel. If you need a lawyer, you need to hire a lawyer. Be responsible. Be prepared. Plan ahead. Know your limits. Otherwise, stay home.

5
ROCKHOUNDING LAW GUIDE
FEDERAL LAW SUMMARY
Surprisingly ‐ especially given the number of lawyers in the United States ‐ there is not a succinct, simple, helpful, practical summary of the law pertaining to collecting rocks, minerals, gems, fossils, and artifacts. Following a brief introduction, this Guide is provides a summary chart of federal rockhounding law. Because the chart is simply a summary, it does not cover every situation or every detail. Rather, the chart is intended to provide an overview.
INTRODUCTION
The law pertaining to rockhounding (i.e., collecting rocks, gemstones, minerals, fossils, meteorites, and artifacts), is extremely complicated. Generally speaking, the applicable law depends upon four critical facts:
(1) Ownership of the property where the collecting occurs;
(2) The type of material — e.g., rocks (such as obsidian), gemstones (such as garnets, agates, etc.), minerals (such as gold, silver, copper, etc.), petrified wood, fossils (plant, invertebrate, vertebrate, and trace), meteorites, etc.;
(3) The manner of collecting—e.g., surface collection, hand tools, digging, mechanized, blasting; and
(4) What type of person you happen to be. Seriously, that matters.

6
PROPERTY OWNERSHIP
The property ownership question is pretty easy. In America, all real property belongs to someone (and, increasingly, more than one person).. Generally speaking, there are two categories: Private Property and Public Property. Some may quibble that certain property ownership has elements of both (e.g., tribal trust lands; taxpayer subsidized private conservation easements, etc.), but, in regard to rockhounding, these two categories will suffice. Rockhounding on private property is easy. If you own the property or have permission to be there (e.g., fee access; permit; prescriptive use; etc.), you can engage in rockhounding. Rockhounding on public property is more complicated. Certainly, if you're not an idiot, you wouldn't expect that, just because the property is publicly owned, you could start rockhounding in the middle of the White House lawn or in a city park. On other hand, if wealthy self‐proclaimed 'environmentalists' can lock up millions of acres of public property essentially for an exclusive wilderness hiking experience for a ridiculously tiny number of souls fortunate enough to have sufficient treasure and time to engage in extended wilderness 'experiences,' certainly there must be room in this country for ordinary children and their families to experience the outdoors and collect some rocks. Good news. There is. There is not a lot of opportunity and most areas are pretty remote, but, there are places where it is not illegal to collect some rocks and some fossils on public land. Generally Speaking, in regard to federal property, certain public lands typically are closed to rockhounding.
THE TYPE OF MATERIAL
When it comes to the type of material to be collected, the law varies wildly and there is no uniform rule. For example, some federal lands prohibit all collecting ‐ rocks, gems, minerals, fossils, petrified wood, etc. On the other land, certain federal lands are open to rock collecting or to collecting a prescribed number of pounds of petrified wood, or certain fossils depending on whether they are invertebrate or vertebrate fossils. Similarly, state and local law varies. Tribal lands also vary.

7
THE MANER OF COLLECTING
The manner of collection often is regulated. On private property, generally speaking, the method of collection is up to the property owner. On public property where rockhounding is permissible, there often are policies pertaining to collection methods. Commonly, only nonmechanized methods may be used (e.g., hand tools, picks, shovels) and, although common sense should dictate this anyway, surface improvements (e.g., roads, buildings, etc.) and trees must not be damaged and the surface must be restored.
WHO YOU ARE
The type of material or specimens that you may collect will depend upon your status. If, for example, you are a scientist, you will be able to collect more types of materials and specimens than if you are not (albeit not for a personal collection or sale). Similarly, if your activities are being conducted pursuant to a permit, you again will have greater latitude. That said, if the property belongs to you, you have no legal obligation to provide access to scientists to engage in recovery or collection on your private property.
BEFORE YOU HEAD OUT …
Before you head out rockhounding, common sense would suggest that you be prepared, know where you are going, know what you plan to collect, and know for certain that the property is open to collecting. That said, common sense commonly isn’t always used. Accordingly, a few tips before you head out:
8
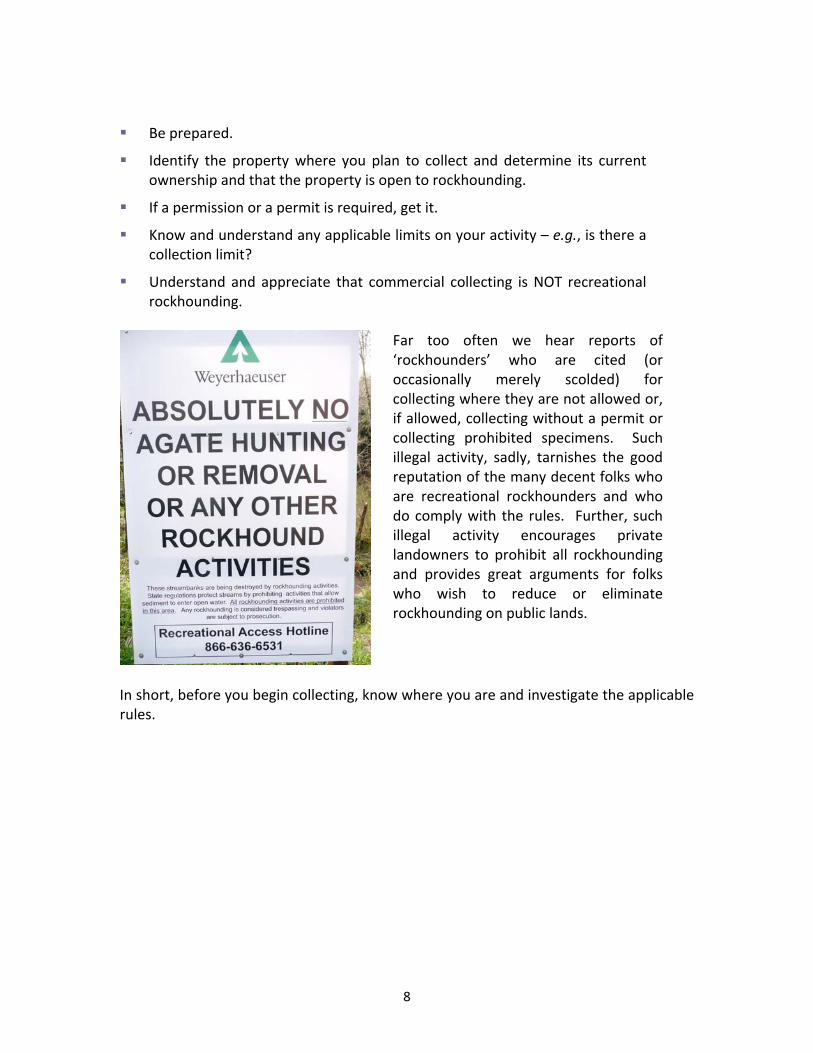
Be prepared.
Identify the property where you plan to collect and determine its current ownership and that the property is open to rockhounding.
If a permission or a permit is required, get it.
Know and understand any applicable limits on your activity – e.g., is there a collection limit?
Understand and appreciate that commercial collecting is NOT recreational rockhounding.
Far too often we hear reports of ‘rockhounders’ who are cited (or occasionally merely scolded) for collecting where they are not allowed or, if allowed, collecting without a permit or collecting prohibited specimens. Such illegal activity, sadly, tarnishes the good reputation of the many decent folks who are recreational rockhounders and who do comply with the rules. Further, such illegal activity encourages private landowners to prohibit all rockhounding and provides great arguments for folks who wish to reduce or eliminate rockhounding on public lands.
In short, before you begin collecting, know where you are and investigate the applicable rules.

9
UNDERSTANDING FEDERAL PUBLIC LANDS
The federal government owns an astonishing amount of real property. In fact, West of the 100th meridian, the federal government owns the majority of the real property. The BLM and USFS manage nearly half a billion acres (over 450,000,000 acres). Some of this property is open to rockhounding subject to certain terms and conditions. Before heading out to rockhound on federal property, you should understand the different categories of federal property and the rules relevant to such categories. Keep in mind, however, that certain properties may have additional restrictions. Generally speaking, whether rockhounding is permissible on federal property depends on three things:
First, what type of public land (more precisely, the management regime pertaining to the public land). For example, rockhounding is prohibited in national parks (e.g., Yellowstone National Park) but often is allowed in national forests.
Second, what type of specimen ‐ e.g., rocks, gems, invertebrate fossils, vertebrate fossils, petrified wood, etc.
Third, what type of rockhounding. This part, is very complicated. The rules vary wildly depending upon the type of rockhounding at issue ‐ e.g., simple surface rock collecting, digging, gold panning, mechanized rock collecting, etc. SIGNIFICANT MANAGEMENT AGENCIES FOR FEDERAL PUBLIC LANDS Federal property is managed by a variety of federal departments, agencies, and organizations. These include:
Bureau of Land Management (BLM)
Bureau of Reclamation (BOR)
Department of Defense (DOD)
Department of Energy (DOE)
Fish and Wildlife Service (F&WS)
Forest Service (USFS)
National Park Service (NPS)

10
Generally speaking, rockhounding by children and their families is permissible on only a couple of categories of federal property. Even in these categories, however, there are site-specific prohibitions and restrictions, additional terms and conditions, and complicated rules and exceptions. Understanding the various categories of federal ownership, however, helps set the table to understand the rules.
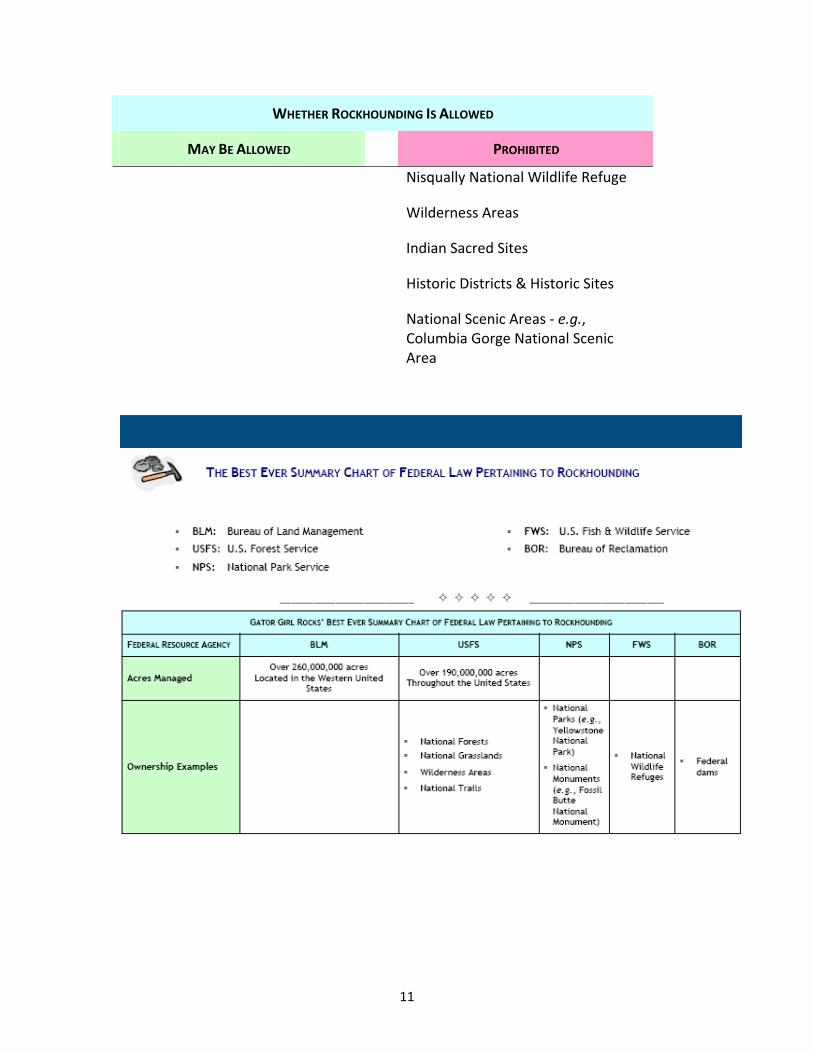
WHETHER ROCKHOUNDING IS ALLOWED
MAY BE ALLOWED PROHIBITED
Portions of BLM‐managed public lands
Offices – e.g., White House; federal agency buildings and campuses; GSA‐managed properties, etc.
Portions of National Forests – e.g., Flathead National Forest
Department of Defense properties ‐ e.g., Military bases; Firing and bombing ranges; cemeteries; etc.
Portions of National Grasslands – e.g., Oglala National Grassland
Department of Energy properties ‐ e.g., Alamogordo, Hanford Nuclear Reservation; Idaho facilities
Department of Transportation properties ‐ e.g., Interstate highways
Bureau of Reclamation properties ‐ e.g., Dams, resevoirs
Corps of Engineers properties ‐ e.g., Canals; etc.
Correctional Facilities
National Parks ‐ e.g., Yellowstone National Park
National Monuments ‐ e.g., John Day Fossil Beds
National Wildlife Refuges ‐ e.g.,
11
WHETHER ROCKHOUNDING IS ALLOWED
MAY BE ALLOWED PROHIBITED
Nisqually National Wildlife Refuge
Wilderness Areas
Indian Sacred Sites
Historic Districts & Historic Sites
National Scenic Areas ‐ e.g., Columbia Gorge National Scenic Area

12

13
14
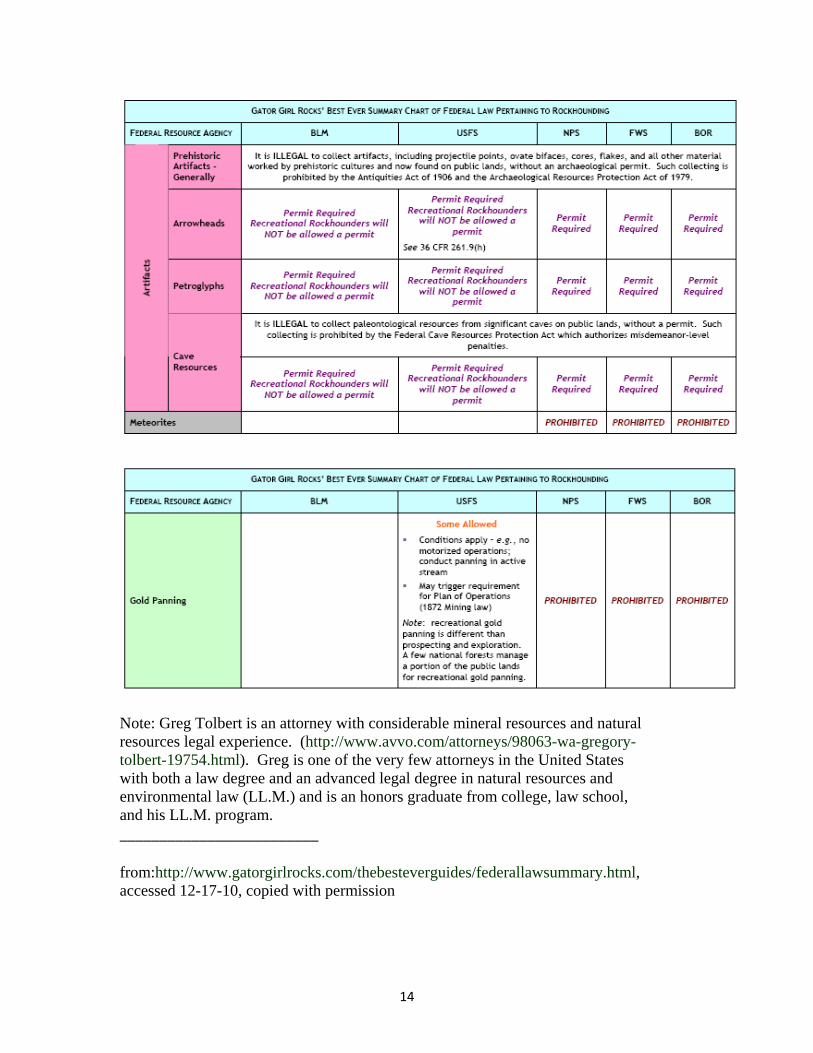
Note: Greg Tolbert is an attorney with considerable mineral resources and natural resources legal experience. (http://www.avvo.com/attorneys/98063-wa-gregory-tolbert-19754.html). Greg is one of the very few attorneys in the United States with both a law degree and an advanced legal degree in natural resources and environmental law (LL.M.) and is an honors graduate from college, law school, and his LL.M. program. _________________________ from:http://www.gatorgirlrocks.com/thebesteverguides/federallawsummary.html, accessed 12-17-10, copied with permission
15
Flintknapping Buyer's Tips
by Wilkie Collins
These tips could save you hundreds of dollars 1) Many people who sell knapping stone do not know how to grade it very well for flintknapping.
Silica is available at about 3 cents per pound in the form of gravel and up to 1500 dollars per pound in the form of semiprecious stones. Knappable silica is somewhere between these two figures in value, and the skill of the vendor at stone grading and his familiarity with the specific stone he sells are your only reliable access to value. Someone who offers you graded stone for less than a dollar a pound is probably offering you what most flintknappers would call "gravel".
2) For best value, purchase your supplies and tools from one dealer, especially while you are learning the basics.
Knapping materials vary, and purchasing your tools from the dealer that offers the stone can help to ensure success. Some billets don't work well with everything.
3) Learn to flintknap with the best material you can acquire, then move on to experimenting with all of the lower grade materials that may look more like the stone your own local Indians had to use 'cause they couldn't get the good stuff.
Heated Arkansas novaculite is a near perfect stone for the beginning flintknapper. Novaculite is less brittle than obsidian and is much safer to use. It is far more consistent than chert, can be reliably heated to knappability, and is consistently available in larger high grade pieces than other forms of silica.
Students typically learn faster with heated novaculite and experienced knappers who demonstrate look extremely competent when using novaculite as opposed to less consistent materials.
We do not recommend obsidian for beginnning flintknapping because:
a) It behaves too much like glass, and one is generally better trained by using a material more like natural stone, and
b) It is very dangerous to chip and will leave you bleeding.

16
5) Whenever possible, obtain your stone from the people who mined it, and who mined it FOR FLINTKNAPPING.
If the person who supplies your knapping stone has purchased it second or third hand, the likelihood is great that you are getting second or third rate materials. While many dealers may protest that their stone is "#1 quality", if they did not do the mining and are not experienced flintknappers they might not even know what the best material looks like.
Questions to ask your knapping stone dealer:
a) Is this stone heated?
If it is not, it will probably be very difficult to work especially for a beginner. The exception is obsidian.
There is a tremendous difference in material that CAN be worked raw and material that can EASILY be worked raw. After teaching hundreds of students our advice is that your first 50 lbs of material be graded and heated.
b) Is this material spalled and bifaced?
If it is not, it CANNOT be graded as well as processed material, and is a risky buy. Most beginners ruin more material than they successfully spall (strike into large flakes) from blocks.
Don't be snookered into "comparing apples to oranges". Knapping material sold as a ten pound, six inch block for a dollar a pound might not make even a single 4 inch spall. But if you buy #1 graded spalled material with the size listed you will know what you are getting and might get several four inch spalls PER POUND. Two pounds of $5.00 per pound material could very easily yield you more usable stone than 10 or 12 pounds of blocks or poorly graded stone.
The rule of thumb for knapping stone value goes basically as follows:
RAW stone is generally worth less than 50 cents per pound.
SPALLING the stone into prime spalls adds about a dollar a pound to the value.
HEATING the stone adds another dollar or so to the value of the stone.
CLEANING and BIFACING the stone rapidly adds to the value.
If your dealer has been in business for a long time, you usually get your dollar's worth in higher priced stone.

17
c) What is your spall width to thickness ratio?
If they do not know what you are talking about, they probably cannot grade stone effectively. Slight variation in the thickness of spalls or flakes can mean many more or less pieces per pound and much lower value.
d) How much of this stone have you personally used for flintknapping?
A dealer/flintknapper will have used many pounds of his favorite materials.
___________________ From http://www.nativewayonline.com/fkfast.htm, March 31, 2010, copied with permission

18
Heat Treatment
By Travis Smolinski
Heat treatment in itself is an art. How it was discovered by the old teachers is unknown but it was a significant invention, just as water treatment was.
There are many discussions on why it works, but I will only add my theory and say no more, "because it does". Treating stone allows difficult stone to become workable. Agates like Brazilian or Montana turn from blood vessel poppers into glass. This obviously has an effect on the final tool or weapon. So if you are planning on making a good sturdy axe, don't treat it. But it does not have a significant enough effect that it deteriorates the effectiveness in scrapers, knives, arrowheads or the like. It simply makes the flint knappers job more easy.
• Fire • Bar-b-que • Oven/Roaster • Kiln • Temperatures • Special Notes
Some types of stone are also affected by water treatment. While I do not have enough stone to experiment with this process, one should try leaving some pieces in a bucket of water for a couple of weeks and test the results.
It should be noted that in regards to heat treatment, different types of stone require different temperatures. Others, such as Obsidian, require none.

19
1) Fire
The old teachers use to build a pit under their fire, or in the side of a hill next to it. This was there Kiln. You should dig a fire pit large enough for the material that you would consistently be treating. Now bury the spalls (etc.) under a bed sand. A fire is now built over it. It doesn't have to be large enough to alert the fire department, just so that it heats the coals up good enough to allow them to burn throughout the night. While some people scrape all the coals off, re-layer the spalls, performs, etc., add more sand and re-light the fire, I usually skip this step and keep the fire going nicely throughout the day. After a day or more the stone is dug up and checked to see if it has been sufficiently heat treated.
Where you place them in the bed of sand will depend on what temperature they require. It has been said that 1" under the sand produces about 600 degrees of heat and will decrease about 50 degrees for every half inch deeper. Of course this assumes that all the sand is equal and that the fire is spread evenly. The edges of the sand pit would experience less heat if the fire were not over it enough.
• My first experiment at heat treatment involved a fire pit. First I dug a hole into the ground, filled it with about half a foot of sand and then layered the rocks so that they wouldn't be touching each other. Finally more sand and then we built a fire on top of it and roasted marshmallows. The next day I dug it up and noticed that there didn't appear to be much color change. Further examination of the rocks proved this as there was no change in the ease of pressure flaking the stones. Perhaps the fire wasn't hot enough?
2) Bar-b-Q
I have a small bar-b-q that I filled with sand and layered the stones accordingly. Then I lit a sufficient amount of charcoals (covered in lighter fluid) and let them burn over night. However, while I have heard that this works too, I was unsuccessful. I just can not seem to get the fire hot enough. This time I used less sand but had the same results.
• A friend told me that he cooks novaculite (requires 700-950 degrees F.) on the bar-b-que. Haven't tried it yet.

20
3) Oven/Roaster
The same goes for the oven, but after the wife banned me, I got a turkey roaster and love it and would not go back. It is larger so I can put more in, spread them out differently, leave the sand in it and not worry about burning out the internal mechanisms. The 18 quart ones have temperature gauges that goes up to 450, or 550 on the more difficult ones to find. You can get the temperature up an additional 100 - 150 degrees more by removing the middle pan. They can go anywhere from $40 to $300. The
one pictured above was purchased brand-new for about $45; A significant savings from a kiln!
It is simple to use. Spread the slabs (preforms) out, slabs on their side, and pour sand over then making sure they do not touch one another. Note that hotter temperatures will be generated at the very bottom of the sand (reverse from the fire method) and the sides.
I found that the best method was to:
• Heat roaster (with sand and rocks) for two hours at 100 degrees • Bring it up 50 degrees every hour • Once it reaches the desired temperature leave for an hour and reverses the process; Or, • Once it reaches the desired temperature leave it there for a couple of hours and turn it off.
The above last two points really depends on the stone. Sometimes when it reaches the desired temp, it is heated perfectly. Other times, it needs to be maintained at that heat for a certain period of time. If you surpass it on some stones, they turn to dust.
Since I do not get a lot of material, I usually try and throw pieces that require 450-550 degrees together and hope for the best. I have only lost one piece of jasper and a couple small slabs of wood using this approach.
Note: Some people do not even use the sand with mixed results. They just throw the stone in and get to it. Basically the sand does two things. One it maintains the heat evenly, allowing the temperature to slowly raise and cool. And two it keeps the stone from touching one another. Both achieve the same goal by preventing surprises to the stone that might cause it to explode or crack. Since I buy rock, I will not take any chances of breakage and will stick to the sand.
When I first tried heat treatment I wanted quick and dirty rules, "how much-how long". But I quickly learnt that different rocks need different temps and hold times. To make it worse, the

21
same stone is NEVER the same and batches of the same rock, i.e. Brazilian Agate, may lead to different results for each slab.
3) Kiln
If you are fortunate enough to have the funds and enough material to justify purchasing a kiln, you are one of the lucky ones, otherwise you will struggle using the traditional approach or a oven. Using a kiln is very predictable and easy to measure the results. With computerized controls and an even temperature spread, you should be able to achieve the results with much greater success and ease. For a kiln be prepared to be shelling out around $1,000. I, unfortunately, am not one of the lucky ones so I cannot offer and more information on kilns.
Stone Cooking Temperatures
Here are some temperatures that I picked up and saved over the years - don't know why as I can't get most of this stuff, just hopeful I guess.
• Agate Brazilian - 450-500 • Agate India - 500 • Agate Mexican - 500 • Agate Montana - 550 • Agate Moss - 450 • Alibates - 425-500 • Bloodstone - 500 • Burlington - 600-650 • Coral - 450-600 • Dacite - NONE • Flint Ridge - 500-600 (set the roaster at 200 degrees for two hrs then increase until the
max temp. is reached and leave it for 12 to 24 hours) • Flint - Fort Hood - 400-550 • Flint - Georgetown (Blue and Black) - NONE • Flint - Georgetown Banded - NONE to 400 • Flint - Knife River - 350 - 450 (Do NOT overheat or it could pot lid) • Flint - Danish - 300 -350 • Flint - British - 300 -350 (hold time could be 6 hours) • Jasper Red - 500 (very hard stuff to work) • Jasper Sunset 450-475 • Jasper Fancy 450-500

22
• Jasper Picture 525 • Kay County - 500-600 • Novaculate - 700-900 • Obsidian - NONE • Pedernales - 450 • Petrified Wood - 300-450
Special Notes on Heat Treatment
• All rocks are different! There is no fool proof temperature or procedure as rocks form with different minerals, flaws, cracks, moisture, etc. in them and all are different. Therefore, what might work for the majority, may not work for some. This is especially the case for petrified wood and some jaspers.
• Be careful as rocks can explode. The best ways to prevent/prepare for this are to make sure that they are thinned down first and dry (moist rocks will have a higher chance of breaking). Also, if you can, use a metal roaster with a lid. That way if it does explode, it won't go through the glass. Just joking, explosions usually means that the rocks crack and pop and do not react like a grenade.
• Make sure that your significant other doesn't know, or at-least doesn't plan on using the oven for a day or so. It may stink, especially the sand!
• Keep windows open as the oven generates a lot of heat. In addition, this cooking process soon filled up the apartment (and hallway I am sure) with the smell of cooking rocks!
• Turn off your fire alarm. From midnight until 1 a.m., when the oven was at its hottest, my alarm kept going off waking up the neighbors. I would have been caught dead in my tracks if the fire department was called out. However, make sure that you put the battery back in afterwards the next day or when the place cools down a bit. If your windows are open, then you may be able to skip this process.
• NEVER leave it unattended!
_________________________________ From http://www.sparrowcreek.com/Heat_Treatment.htm, April 6, 2010, copied with permission

23
Heat Treating Tips and Temperatures
by Mark Bracken
Why do we heat treat? Heat treating alters knapable material that is otherwise unchippable and transforms it to a glass like characteristic. Heat treating will also improve the colors of some flints. Browns can become reds, grays can become blues yellows become orange and so on. It's an oxidation of the minerals in the stone. Soak heating (heating for 36-48 hours at a constant temp) is not necessary but will further enhance this knapability and color change. Not all materials can be heat treated. An example of this is the black and bluish Kentucky "Horn Stone". For the sake of simplicity, we will call all knapable stone "flints" regardless of what they are. Remember that there are different grades of all materials, So the chart below has ranges for each type and or grade. It is also important to understand that these temperatures are for spalls or pieces that are absolutely no thicker than 2 inches. Heating thicker pieces requires lower temps and a kiln with NO air leaks. Preforms, seem to be able to take hotter temps than spalls. This is likely because of there uniform shape. The preforms can be fairly thick. This is a nice advantage for knappers who have attractive flints that knap like concrete when there raw. They can be preformed and then heated with little risk of damage. If a material is not on the chart, experiment with it. If it seems high grade and you still want to heat it to get that glass like look or workability then start with low temps (around 350f.). A rule of thumb is this: white or gray flints take hotter temps than darker flints. Moisture content is ever present throughout the stone in ALL flints. Some materials indicated below are very sensitive to heat due to this. They require a special drying process. With out this drying process listed below, your flint will be destroyed. Most of our Coastal Plains (including the Jaspers and Corals) flints need special care because of this. It is not total necessary but worth it! For example: on the chart below, Flint River" chert can be heated to 450-460f. This is with the drying process. If you don't want to go through the trouble of the drying, then the max temp must be lowered to 350f. Any hotter and it WILL become damaged. Now then, if you dry it, and following my instructions below, then the stone can be heated to 450f. This is fact. The final result for this drying process is better color and knapability with this particular type of stone. If you have heated your flint and it has not improved, you can always re heat the flint to hotter temps but you can never go back. Once you have over heated the stone, the damage is done. I have had experiences where I know I have heated flint just a bit too hot. The stone became very unpredictable and easily developed splits at the point of impact on the platform. After some tears, the rock was put in a bucket and forgotten about for over a year. I could not bring myself to trim through it and salvage what I could. Then, after it was re discovered a year later, hidden away in my shop, I tested the flint with a billet. The same pieces that had chipped uncontrollably now became very manageable. It was awesome I might add. This has happened to me twice now and I am certain that some of the stresses caused in heating had come out of the stone over time.

24
*Highly recommended drying as per directions below. Any deviation from this will result in blown flint! That I guarantee! First the flint must be dried…This takes about a week so be patient Take the flint up slow and down slow, no faster than 50 degrees an hour! Step 1. run up to 250 F and NO higher,. and allow to cool to room temperature. Step 2. run up to 250 F. and NO higher, allow to cool to room temperature. Step 3. run up to 250 F. and NO higher, allow to cool to room temperature. Step 4. run up to 250 F. and NO higher, allow to cool to room temperature. Step 5. The final heating will go to 450 for high grade material For lesser grades 460-470. {Thin Slabs may go higher} Do Not heat whole rocks or spalls thicker than ¾ of an inch. Please remember…If I said it here, I mean it!
Basic flint heat treating instructions Be sure the kiln is packed full with NO room for more stone. If you need to top the kiln off, get anything of poor grade to fill it up, even a brick will do! This insures that the flint will ramp up and cool slow with limited air currents within the kiln. (This causes temperature shock, which can blow up or crack your flint). Take the flint up slowly and down slow, no faster than 50 degrees an hour. Hold time at finished temps should be at least 3 hours. (No need to hold it longer unless your going for enhanced color) Do Not heat whole rocks or spalls thicker than 2 inches.
Basic Kiln safety Operate your kiln safely! 1. Never operate kiln on a wooden or flammable surface. Use cement blocks. 2. Place kiln elevated on concrete blocks with holes in them or a proper metal stand. Do NOT set directly on any floor! 3. Keep kiln at least 20" from any walls or other objects at all times. 4. Use cement fiberboard on near by walls for an extra-added protection! 5. Use a "dedicated" outlet for each kiln switch on a 15-amp breaker. 6. Never heat-treat large blocks of stone. Stones could violently break apart. This could knock the lid right off a kiln ejecting VERY hot Fragments, creating a serious fire hazard! 7. Keep your kiln out of the weather, Damage to electrical parts will result. 7. Never operate kiln with flammable fumes, liquids or vapors present. 8. Avoid heat-treating in your home or living space. Heating rocks can produce poisonous or harmful vapors, even if not cut on rock saws! 9. ALWAYS WEAR A RESPIRATOR WHEN LOADING OR UNLOADING YOUR KILN!!! DUST FROM BRICKS AND ROCKS ARE DANGEROUS TO YOUR LUNGS!

25
Below I have classified the materials into three grades: "A" = High grade, sometimes very knappable in the raw state. A slight to good gloss. "B" = Medium grade, a dry texture. Gritty when you scratch it with your fingernail. No gloss "C" = Quite dry in appearance. Coarse and very difficult to knap. All Temperatures are Fahrenheit.
Some common but not all of North America’s lithics.
A 490-515 A 350-380 B 515-540 B
Costal plains corals found in water
C 540-600
North Dakota “Knive River” fossil cattails
C A 450-550 A 500-540 B 550-600 B 540-580
Costal plains corals found on land
C 600-630
Midwest “Burlington” chert
C 580-630 A 520-530 A 500-530 B 530-575 B 530-600
Coastal plains cherts found in water
C 575-650
Southern Alabama coastal plains cherts
C 650-700 A 520-530 A 450 B 530-575 B 500-520
Coastal plains cherts found on land
C 575-650
Tennessee agates
C 600 A 350 A 500-520 B B 550
Costal plains chalcedony found in water C
Texas “Ft. Hood” fossil stramatolites
C A 450-500 A 350 B 500-575 B 350-400
Costal plains jaspers
C 575-750
Texas Edwards Plateau river cobbles & tabular cherts C 400-550
A 440-450 A 350-360 B 450-480 B
Costal plains “Flint River” chert
C 480-515
Texas “Georgetown”
C A 500—540 A 450-530 B 540-600 B
Florida cherts
C 600-700
Texas “Alibates”
C
Some flints that will not heat treat:
North Dakota "Rainy Buttes" Fossil wood Kentucky "Horn stone" Tennessee "Ft. Payne Chert", "Dover Chert" Pa. Ny. Ontario "Onondaga" ___________________________________
From http://www.flintknappingtools.com/heattreating_temps.html, March 31, 2010, copied with permission

26
Heat Treating Time/Temperature Table by Richard Urata

27

28

29

30
______________ from: http://www.pugetsoundknappers.com/how_to/how_to.html, accessed 12-17-10, copied with permission