flooring installation and care instructions · meister flooring installation and care instructions...
TRANSCRIPT

Flooring Installation and Care Instructions
Longlife parquet | Lindura® wood fl ooring | Design fl ooring SilentTouch® | Design fl ooring | Cork fl ooringLinoleum fl ooring | Nadura fl ooring | Laminate fl ooring | Mouldings | Care and Accessories

2
MEISTER Flooring Installation and Care Instructions

3
MEISTER Flooring Installation and Care Instructions
ContentsLaying instructions 6Preparatory measures, substrates and general information 6
Laying instructions for Longlife parquet and Lindura wood flooring 8Longlife parquet and Lindura wood flooring with Masterclic Plus technology 8Longlife parquet PQ 500 with Quadrolic technology 10Longlife parquet PS 400 with Uniclic technology 12Longlife Parquet PD 550 with longitudinal Uniclic technology 14
Laying instructions for longlife parquet on walls 16Longlife parquet PD 450, PD 400 Cottage, PD 200, PS 300, PC 400 Style, PC 300 and PC 200 with Masterclic Plus technology 16
Laying instructions for cork, design, Nadura and laminate flooring 18Cork, design, Nadura and laminate flooring with Masterclic Plus technology 18Cork and laminate flooring with Multiclic technology 20Design flooring SIlentTouch® with Multiclic technology 21
Laying instructions for linoleum flooring 22Linoleum flooring with Uniclic technology 22
Mouldings and accessories 24Flooring profiles 24Wall transitions | mouldings 26Underlay material 27
Installation on warm water underfloor heating structures 28Longlife parquet 28Lindura wood flooring 29Cork flooring 30Linoleum flooring 31Design flooring | Design flooring SIlentTouch® 32Nadura flooring 33Laminate flooring 34
Full surface bonding 35Longlife parquet 35Lindura wood flooring 36Nadura flooring 37
Cleaning and care instructions 38Warranty conditions 44
Awarded for all MEISTER flooring(Except for: Smoked oak)
MeisterWerke Schulte GmbH is a member of the European Federation of the Parquet Industry
Many MEISTER parquet floors carry the FSC trademark and contain wood from forests managed in an exemplary fashion and other controlled origins
MeisterWerke Schulte GmbH is a member of the German Association of the Parquet Flooring Industry (Verband der deutschen Parkettindustrie e.V.)
All MEISTER linoleum and design flooring is voluntarily checked for contaminants
MeisterWerke Schulte GmbH is a member of the Association of European Laminate Flooring Manufacturers
7The CE-mark confirms that MEISTER flooring conforms to all fundamental European safety and health guidelines.
MeisterWerke Schulte GmbH is a member of the Multi-layer Modular Flooring Association (Verband der mehr-schichtig modularen Fußbodenbeläge)

4
Quality starts withthe installation.
4

5
You have purchased quality »Made in Germany«. For us, MEISTER quality is not just about the durability of your floor. It can also be seen during the installation of your floor. We rely on a middle layer of extremely stable HDF or special wood materials for all our flooring types. And we use click systems, which are tailored to the properties of the flooring and dimensions of the planks, together with the patented Masterclic Plus
system, which was developed within our own company, and the tried-and-tested Uniclic connection system. This ensures optimal precision of fitting that you can feel while installing your new flooring. MEISTER flooring is especially easy to install. That‘s why many craftsmen swear by products from MEISTER. You will find a lot of information about how to work with your MEISTER product in these installation and care instructions.
5

6
Preparatory measuresThe packages must be acclimatised before you open them. Store them unopened for approx. 48 hours (in winter 3–4 days) in the centre of the room you want to work in.Do not store the packages in front of damp or freshly-wallpapered walls. Before you install the flooring, outer doors and windows must be installed and all painting and decorating work must be finished. The room temperature must be approx. 20°C (at least 15°C), and the relative humidity must be approx. 50–60 percent.
The flooring requires a permanent living climate of approx. 50–60 percent relative humidity at a room temperature of approx. 20°C. If you measure or anticipate a sig-nificantly lower humidity, you must install a humidifier (vaporiser) to prevent the flooring from drying out excessively.
Parquet, Lindura wood flooring, cork, linoleum and Nadura flooring are natural products. Variations are an indication of its natural and genuine quality. In contrast to standard parquet floors our longlife parquet in a planked look has deliberately been produced at the factory with open joints and slits that underlines the special character property. Mix planks from several packs so that, before laying, you achieve the floor pattern you want. Before installation, check all planks in daylight for recognisable faults in colour and structure. You cannot make a claim for any products you have already installed.
Important information about linoleum flooring Drying oven film: Linoleum is a product made from natural raw materials. It obtains the right proportional balance of elasticity and toughness in the drying oven. During the drying process, a light yellow film forms on the surface of the material - this is called the drying oven film. This film disappears under UV radiation (sunlight). How long that takes depends on the intensity of the sunlight. The flooring only develops its true colour after the film has disappeared. This effect is unavoid-able and an indicator of the natural substances used. Please note that the effect is more noticeable on light colours than on darker surfaces.
Please be aware that our Silence »S« flooring collections already have the sound-absorbing underlay integrated into them.
SubstratesThe substrates must be considered as ready-to-lay in accordance with the generally accepted rules of the trade, taking into account VOB (German Construction Contract Procedures), Part C, DIN 18 356 »Parquetry« or DIN 18 365 »Floorcovering work« respectively. In other words, they must be dry, even, firm and clean. The residual humidity, measured using the CM method, of mineral substrates must be no more than 2 percent (1.8 percent for underfloor heating) and that of anhydrite screeds must be a maximum of 0.5 percent (0.3 percent for underfloor heating). Any substrate unevenness of three or more mil-limetres for each initial metre and two or more millimetres for each subsequent continuous metre must be evened out according to DIN 18 202, Table 3, line 4. 0.2 millimetre thick PE film (SD value ≥ 75m) must be laid out to form a kind of »tub« on all mineral substrates (except poured asphalt screed) as a vapour barrier. The strip edges must overlap by at least 20 centimetres and the overlapping edges must be glued to the side walls.In rooms that are not above a cellar amd foun-dations, the currently valid building conditions require that the owner of the building provide a barrier against damage to the base plate due to moisture from the ground, in accordance with the DIN 18 195 directive.
MEISTER flooring can be laid on existing surfaces, such as PVC, linoleum or stone, so long as the old flooring is firmly bonded and there are no loose areas. In addition, a sepa-rating layer of foil should be applied to the substrate. On existing wooden planks, wood-based boards, OSB-boards, drywall elements etc., no PE film must be laid out as a vapour barrier. Textile flooring such as, e.g. carpet or needle fleece must be removed not only for technical reasons, but for hygiene reasons too.
General instructionsMEISTER flooring is not suitable for installation in humid rooms/wet areas (bathrooms, saunas etc.).
The floor is installed as a floating floor, without glue. The Masterclic Plus connection system makes it possible to install the flooring quickly and easily. The end interlocking occurs when the next row is laid. In addition, it is a valuable installation aid, as the planks can be aligned against each other in this way. To do this, you should lift the plank slightly and square it quite easily with the tongue in the groove of the plank which has already been laid.
If the floor area is longer or wider than 10m (for parquet flooring PS 400, longer or wider than 6m), then you must provide an expansion joint. This is covered with a jointing profile. It is also important to provide these joints between two adjacent rooms, in doorways, passageways and rooms with a lot of angles. Always use a jointing profile for clean transitions to adjacent, lower areas or floor coverings and an end profile next to higher adjacent thresholds, tiles or the like. Give stairs a clean finish with the stair edge profile. When installing the design flooring Silent Touch using the floor profiles »Star« (see page 25) leave an expansion joint of 6mm.
During installation, take care to leave a gap of at least 10 or 1.5 millimetres per metre (15 millimetres for parquet flooring and Lindura wood flooring) next to all walls. This distance must also be left around all columns, heating pipes, steel door frames, etc. It may be possible to shorten wooden door frames. To do this, lay a loose plank with the decorative side down against the door frame and saw the frame off along the plank.
Attention: Please heed the up-to-date installation instructions included in the packaging.
Laying instructions
Preparatory measures, substrates and general instructions

7
To protect the wood from dirt, a sufficiently large entrance covering must always be laid (e.g. a doormat, carpet). In addition, you should also fit chair and furniture feet with felt sliders; office chairs, mobile containers, etc., on castors must be equipped with soft, standard running surfaces. We recommend protecting the floor in these heavy-wear areas with appropriate floor protection mats (e.g. polycarbonate mats).
MEISTER Nadura floors have an extremely durable and highly wear-resistant surface.Visible signs of wear or shiny/glossy areas are characteristic of hard wood flooring, depending on wear.
We recommend that you install the planks lengthways to the way the light falls. In narrow or long rooms, choose the laying direction to suit the room’s proportions. Lay the planks crossways to make narrow rooms look more spacious; planks laid lengthways narrow hallways.
Bleaching may occur with all flooring with direct sunlight or intense, artifical lighting.
Please first check whether a subfloor is required as explained in “Substrates”. Fur-thermore, if you are using products without a sound-absorbing Silence cushion, use the system-bound MEISTER insulating underlay. (If you use MEISTER-Silence 25 DB, MEISTER-Silence 15 DB, or MEISTER Duo-Guard, you do not need an additional layer of 0.2-mil-limetre PE film). Other insulating underlay needs to have a corresponding compres-sive strength (CS value ≥ 15kPa, ≥ 60kPa in commercial areas with heavy wear) and a thickness of 1 - 3mm. For MEISTER Silent Touch design flooring, a compressive strength of ≥ 60kPa is generally required.
When sawing the elements, make sure you work from the correct side: if you use a bench saw, keep the wear layer side facing up if you use a keyhole or portable circular saw, keep the wear layer side down.
For laying Lindura wood flooring and Nadura floors hard metal saw blades or diamond tipped saw blades are required.

8
You need the following tools and aids to install MEISTER Longlife parquet and Lindura wood flooring with Masterclic Plus technology.Keyhole or electric saw (for Lindura wood flooring hard metal saw blades or diamond tipped saw blades), possibly power drill, folding metre rule, pencil, wedges (spacer wedges), angle or adjustable bevel, possibly PE film (0.2 millimetres).If the product does not already feature a sound-absorbing cushioning, you have to use MEISTER foam film, MEISTER-Silence 15 DB, MEISTER-Silence 20, MEISTER-Silence 25 DB, or MEISTER Duo-Guard as a cushioning layer. (When using MEISTER-Silence 25 DB, MEISTER-Silence 15 DB or MEISTER-Duo-Guard, addi-tional 0.2 millimetre PE film is not required.)
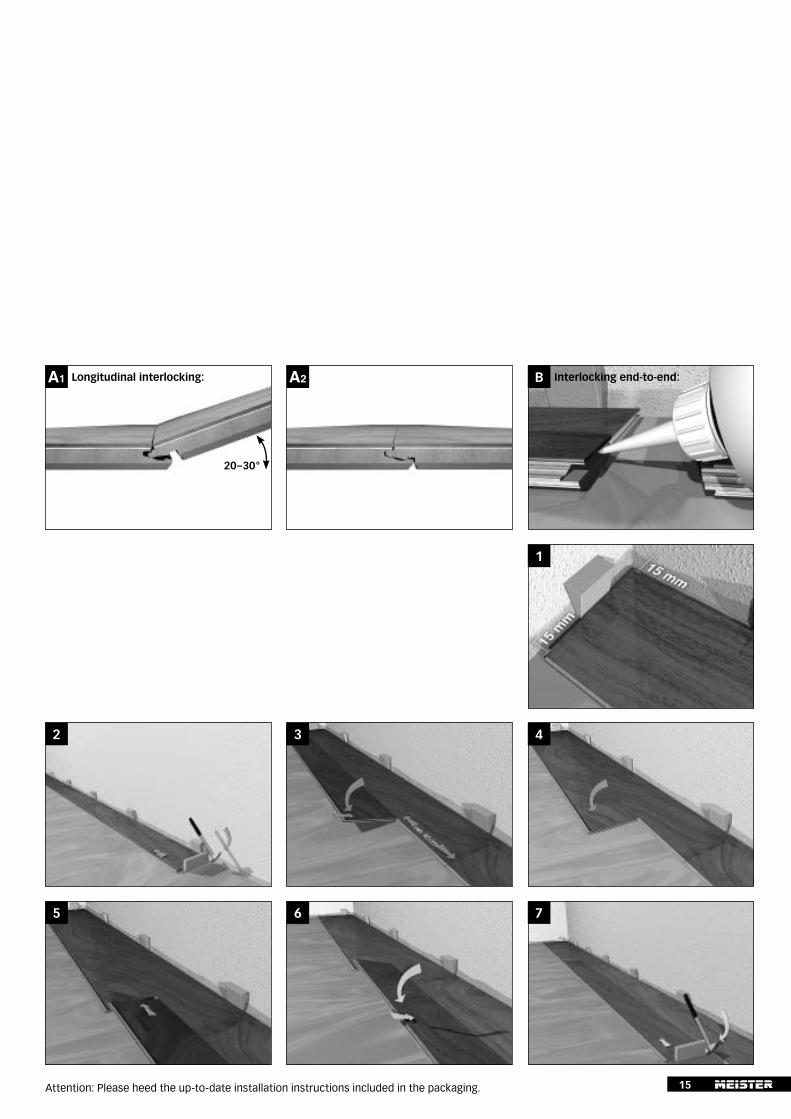
Step 1 Start by laying the first complete plank in the left-hand corner of the room with the tongue sides facing the wall. Remove only the tongues on the long sides of all the other planks you want to lay in the first row (fig. 1). Using wedges, you can easily keep a gap of at least 15 millimetres from the wall.
Step 2Insert the end of the next complete plank into plank No. 1 (fig. 2). Lay the other planks in this row in the same way across the entire width of the room.
Step 3Cut the last plank in each row so that you leave a gap of at least 15 millimetres to the wall (fig. 3). You can use cut-off pieces of planks, as long as they are at least 40 centime-tres long, to start subsequent rows.
Step 4Make sure the planks in the first row are straight. Cut the first plank in the second row to approx. 80 centimetres. Fix this plank upright with the spring as far as possible into the groove on the groove side of the previous row of planks and press the plank down slowly, using a forward and downward turning motion (fig. 4). The plank should lock into the previously laid row (fig. 5).
Step 5Similarly, the next complete plank is turned into the click connection on the long side and the end pushed tight against the previ-ous plank before it is lowered. Then press the plank down slowly, using a forward and down-ward turning motion (fig. 6). The plank must lock into the row previously laid and the end joint must fit tightly into the previous plank.
Step 6Lay the flooring row by row in this way. Re-member that the end joints must be offset by at least 40 centimetres (fig. 7).
Step 7To cut the last row to size, use a spare piece of plank and draw the remaining plank width on it (leaving at least a 15-millimetre gap to the wall).
Step 8Taking the plank marked for width, push the plastic end tongue forward out of the end groove with the aid of a spare piece of plank (fig. 8).
Step 9Begin cutting the plank to size at the end of the plastic tongue (fig. 9). After the plank has been cut to size, push the plastic tongue on the end back into the end groove (fig. 10).
Step 10Begin laying the last row in the right hand cor-ner of the room (leaving at least a 15mm gap to the wall) and angle the sides of the plank into the second-last row. The next plank is pivoted in in the same way and lowered down at the end (fig. 11).
Step 11Push the plastic tongue which is pointing out towards the wall (fig. 12) back into the end connection using a tension rod, scraper, screw driver or similar (fig. 13).
Step 12 Before attaching the skirting boards, the timber wedges along the walls have to be removed.
To cover the all-round expansion joints, use MEISTER real wood veneered skirting boards (see page 26).
Please ensure that no silicon products whatso-ever come into contact with the mouldings.
To take a plank row back out again, lift the entire row, levering it at the side out of the last row (fig. 14). Then you can separate the planks‘ ends by angling them (fig. 15). Should you wish to reuse the disassembled planks, you should push the end plastic spring tongue back into the top groove.
Laying instructions
MEISTER Longlife parquet and Lindura wood flooring with Masterclic Plus technology
A
A
A Interlocking end-to-end:
Longitudinal interlocking:A
20 – 30 °

9Attention: Please heed the up-to-date installation instructions included in the packaging.
5
8
6
97
10
13
11
14
12
15
1 3
4
2

10
You need the following tools and aids to install MEISTER Longlife parquet PQ 500 with Quadroclic technology:Hammer, keyhole or electric saw, possibly power drill, folding metre rule, pencil, wedges (spacer wedges), tension iron, angle or adjust-able bevel, possibly PE film (0.2 millimetres).If the product does not already feature a sound-absorbing cushioning, you have to use MEISTER foam film, MEISTER-Silence 15 DB, MEISTER-Silence 20, MEISTER-Silence 25 DB or MEISTER Duo-Guard as a cushioning layer. (If you use MEISTER Silence 25 DB, MEISTER-Silence 15 DB or MEISTER Duo-Guard, you do not need an additional layer of 0.2-millimetre PE film.)
General instructionsThe flooring is installed as a floating structure without glue. The especially designed Quadro-clic connection system allows you to work quickly and safely. The square shape of the product is particularly suitable for laying a chequerboard pattern (fig. 7). Apart from this, the flooring can be laid in many other patterns, as well (fig. 8). For these, the laying details will have to be varied. If the floor area is longer or wider than 10m, you must provide an expan-sion joint. Cover this with a transition profile. It is also important to provide these joints be-tween two adjacent rooms, in doorways,passageways and many-angled rooms.
Step 1Begin by laying the first full square in the left corner of the room or, if necessary, cut the first and last square in one row in such way that the flooring pattern for the entire room is symmetrical. Lay the first square so that one protruding lower side of the grooves faces the wall and one the room (fig. 1). From all of the other squares which you lay facing the wall, only the one lower protruding lip of the groove facing the wall must be removed. The space of at least 15mm between the boards and the wall can be easily held using wedges (fig. 1).
Step 2Angle the next full square flatly into the first square (fig. 2) and slowly press it downwards with a rotating forwards-downwards move-ment (fig. 4). Remember cutting the protruding lower lip of the groove facing the wall in the first row in order to maintain the gap of 15mm to the wall.
Step 3The last square in each row is cut in such way that space of at least 15mm between the boards and the wall is maintained. If you wish for a symmetrical flooring pattern, the rows must be arranged towards the middle accordingly.
Step 4Make sure that the squares in the first row are placed in a straight line. Begin with the first square in the second row. Angle the square flatly into the previous square and slowly press it downwards with a rotating forwards-downwards movement (fig. 4).
Step 5The next full square is connected to the previ-ous square with the protruding lower side of the groove and pushed tightly to the previous row before it is lowered down. Subsequently, slowly push the square downwards with a rotating forwards-downwards movement (fig. 5). When the square is lying flat on the floor, it is driven from outside a) to inside b) into the adjoining row with a few gentle hammer taps using a wooden block (fig. 6). In cases, in which you are not able to work with a hammer and wooden block due to space constraints, you can snap the connection into place by means of a tension iron.
Step 6The next square is angled into the previous square and again, tapped from outside to inside into the previous row. Please heed the changing lay direction as seen in fig. 6 and 7. Install the whole area row by row in this way.
Step 7In order to fit in the last row, use a cut-off scrap for drawing on the remaining width (taking into account a gap of at least 15mm to the wall).
Step 8After this, you have to remove the wooden wedges along the walls. After the last squares have been laid, you can immediately walk on the floor. Use the MEISTER skirting boards, which have been especially designed for this flooring.
For dismantling, the entire row must be rotat-ed out of the profile in an upwards movement. Subsequently, the squares can be angled out. This way, the connection mechanism remains intact and the squares can be used again.
Laying instructions
MEISTER Longlife parquet PQ 500 with Quadrolic technology
Link to the installation viedo of PQ 500: http://www.meister.com/en/service/service-center/installation-and-care-instructions/pq-500-installation-video.html

11Attention: Please heed the up-to-date installation instructions included in the packaging.
5 64
87
1 2 3

12
You need the following tools and aids to in-stall MEISTER Longlife parquet PS 400 with Uniclic technologyHammer, keyhole or electric saw, possibly power drill, folding metre rule, pencil, wedges (spacer wedges), tension iron, angle or adjustable bevel, possibly PE film (0.2 millimetres).If the product does not already feature a sound-absorbing cushioning, you have to use MEISTER foam film, MEISTER-Silence 15 DB, MEISTER-Silence 20, MEISTER-Silence 25 DB or MEISTER Duo-Guard as a cushioning layer. (When using MEISTER-Silence 25 DB, MEISTER-Silence 15 DB or MEISTER-Duo-Guard, additional 0.2 millimetre PE film is not required.)
Diagonal herringbone patternIn order to obtain a uniform distance to all walls, draw a guide line using a chalk line (fig. 1).Start the laying process in a corner of the room. The tongue of board 1 has to be cut off both on the short and on the long side. On board 2, only the tongue on the long side has to be cut off. Now angle the short side of board 2 into the long side of board 1 (fig. 1). Then angle the long side of board 3 into board 1 (fig. 2). Now interlock the short side of board 3 into board 2 using the MEISTER tapping block (fig. 3). Follow this process to continue laying (fig. 4, 5, 6). Ensure that the long sides of the boards are angled in first before interlock-ing the boards on their short sides.Lay the first herringbone pattern up to the wall/corner of the room (fig. 7). Any leftover board pieces could potentially be used to start the next herringbone pattern. Mark the leftover pieces on the reverse side indicating right or left positioning. The first herringbone pattern has to be fixed with spacers so that the herringbone pattern does not slide during the subsequent laying process.Before starting with the next herringbone pattern, check if there are any leftover pieces that could be used. While continuing with the laying, ensure that the lengthways of the boards are angled in first and only then interlock the short sides (fig. 8).Following this sequence, lay the surface up to the end of the room (fig. 9). The boards ending directly at the wall are cut in such a way that a 15mm gap to the wall is taken into account.
Parallel herringbone patternIn order to obtain a uniform distance to all walls, draw a guide line using a chalk line (fig. 6).Start the laying process in the middle of the room facing a wall. Angle the short side of board 2 into the long side of board 1 (fig. 1). Then angle board 3 lengthways into board 1 (fig. 2). Now interlock the short side of board 3 using the MEISTER tapping block into board 2 (fig. 3). Follow this process to continue laying up to board 11 (fig. 4, 5, 6).Saw off the laid boards at a right angle and then align them at the guide line (fig. 6).Ensure that the boards are angled in length-ways first before interlocking them at their short side.Lay the first herringbone pattern up to the facing wall (fig. 7). Any leftover board pieces could potentially be used to start the next herringbone pattern. Mark the leftover pieces on the reverse side indicating right or left positioning. The first herringbone pattern has to be fixed with spacers so that the herring-bone pattern does not slide during the subsequent laying process.Before starting with the next herringbone pattern, check if there are any leftover pieces that could be used. While continuing with the laying, ensure that the lengthways of the boards are angled in first and only then interlock them short sides (fig. 8).Following this sequence, lay the surface up to the end of the room (fig. 9). The boards ending directly at the wall are cut in such a way that a 15mm gap to the wall is taken into account.
Before attaching the skirting boards, the timber wedges along the walls have to be removed.
To cover the all-round expansion joints, use MEISTER real wood veneered skirting boards (see page 26).
Please ensure that no silicon products whatsoever come into contact with the mouldings.
Laying instructions
MEISTER Longlife parquet PS 400 with Uniclic technology
A
A
20 – 30 °

13Attention: Please heed the up-to-date installation instructions included in the packaging.
5 64
8 97
2 31 Diagonal herringbone pattern
5 64
8 97
2 31 Parallel herringbone pattern

14
You need the following tools and aids to install MEISTER Longlife parquet PD 550 with longitudinal Uniclic technology:Hammer, keyhole or electric saw, possi-bly power drill, folding metre rule, pencil, MEISTER tapping block, wedges (spacer wedges), tension iron, angle or adjustable bevel, possibly PE film (0.2mm), possibly D3 waterproof wood glue for naturally-oiled parquet flooring or Meistercoll special glue for UV-oiled parquet flooring. For sound insulation, we recommend MEISTER Silence 25 DB.
General informationThe planks have a tongue and groove joint on each end. These joints must always be glued. To do this, apply glue evenly to the bottom edge of the groove (fig. B). Please take care that no glue gets onto the wear layer. If any glue oozes out from the joint, remove it at once with a clean, damp cloth. Due to the different widths of plank, an installation plan must be compiled before laying the floor to avoid unnecessary cutting.
Step 1Start by laying the first complete plank in the left-hand corner of the room with the tongue sides facing the wall. Saw the tongues off the long edges of the first row of planks to ensure you keep the right gap to the wall. Using wedges, you can easily keep a gap of 15 mil-limetres to the wall (fig A1).
Step 2 Insert the end of the next complete plank into plank 1 using a hammer and tapping block (fig. 2). To do this, first apply glue evenly to the bottom edge of the groove (fig. B). Lay the other planks in this row in the same way across the entire width of the room. Join the last piece of plank using a tension iron.
Step 3 Make sure the planks in the first row are straight. Remember that the end joints must be offset by at least 40 centimetres. Then place the next plank against row 1 and press the plank down slowly, using a forward and down-ward turning motion. (fig. 3). The plank should lock into the previously laid row (fig. 4).
Step 4 Similarly, the next complete plank is turned into the click connection on the long side and pushed tight against the previous plank before it is lowered. (fig. 5).
Step 5 Then press the plank down slowly, using a forward and downward turning motion (fig. 6). The plank should lock into the previously laid row.
Step 6 Insert the end of this plank into the previous plank and ensure the joint is tight with a ham-mer and tapping block (fig. 7). To do this, first apply glue evenly to the bottom edge of the groove (fig. B). Continue in this way across the entire width of the room.
Step 7 Install the whole area row by row in this way. Remember that the end joints must be offset by at least 40cm. Cut the last plank in each row so that you leave a gap of at least 15 millimetres to the wall. To cut the last row to size, use a spare piece of plank and draw the remaining plank width on it (leaving at least a 15-millimetre gap to the wall). Join the last piece of plank using a tension iron.
Step 8Before attaching the skirting boards, the timber wedges along the walls have to be removed.
To cover the all-round expansion joints, use MEISTER real wood veneered skirting boards (see page 26).
Please ensure that no silicon products whatso-ever come into contact with the mouldings.
Laying instructions
MEISTER Longlife parquet PD 550 with longitudinal Uniclic technology
15Attention: Please heed the up-to-date installation instructions included in the packaging.
3
1
A2 BA1
4
5 6 7
2
Longitudinal interlocking: Interlocking end-to-end:
20 – 30 °

16
Preparatory measures The packages must be acclimatised before you open them. Store them for approx. 48 hours (3-4 days in winter) in the centre of the room you want to work in. Do not store the packages in front of damp or freshly wallpapered walls. Before you install the planks, the conditions must comply with the general requirements for the installation of wooden materials in interior rooms. Make sure that the walls are dry, i.e. contain a residual moisture of 5 percent. All windows and doors must also have been installed and a room temperature of approx. 20°C and approx. 50-60 percent relative humidity must prevail.
During installation, make sure that air can also circulate behind the panelling (possibly provide lath backing structure). You must avoid trapped air. It is also important during installation that you allow a gap of at least 10-15mm next to all walls and other fixed elements. You need an expansion joint if your installation surface is longer or wider than 10 metres.
Sub-structure with Type 8 lath profile Place the Type 8 lath profile at maximum intervals of 40 centimetres apart (fig. 1). Please use suitable plugs or screws to screw the sub-structure to the wall at intervals of 50cm. Correct any slight unevenness in the wall by placing spacers or wooden wedges underneath the laths. Use a standard metal hacksaw or one-hand angle grinder with metal cutting disc to trim the profile. A minimum gap of 20mm is required when installing MEISTER recessed lights. This must be guaranteed by fixing the profile to the wall using a space of at least 12mm.
InstallationAs a result of the Masterclic Plus system the planks are installed from right to left (fig. 9). Start by laying the first complete plank with the tongue side facing the floor. With all the planks in the first row remove the tongues along the long edges.To install the first row use the start/end clip. To fix these mark the profile‘s position on the back of the plank. The middle of the rail is marked using a pencil (fig. 2) and the start/end clip is fixed using the supplied screws (fig. 3). Tighten the screws but do not over tighten them. Then simply clip the plank into the lath profile (fig. 4). If the clip does not slot in correctly then the profile may have been compressed during trimming. In this case please bend open the profile to its original dimensions again.Use the TOP 13 clip to fix the planks for the rest of the installation. For this simply screw the clip onto the lath profile (fig. 5) and push it onto the plank groove (fig. 6 + 7). Make sure that the planks in the first row are straight.
Angle the tongue of the first plank in the second row into the groove of the previous row of planks (fig. 8) and slowly press the planks onto the lath profile. Use the TOP 13 clip to fix the planks for the rest of the installation (fig. 7). Continue installing the planks row by row in this way (fig. 10).To cut the last row to size use a spare piece of a plank and draw the remaining plank width on it (leaving a gap of 10-15mm to the ceiling).
Taking the plank marked for width, push the plastic end tongue forward out of the end groove using the spare piece of plank (fig. 11). Begin cutting the plank to size at the end of the plastic tongue. After the plank has been cut to size, push the plastic tongue on the end back into the end groove (fig. 12 + 13).
To install the start/end clips on the last row mark the position of the lath profile using a piece of adhesive tape (fig. 14) and transfer the position of the profile onto the back of the plank (fig. 15 + 16). Now the clip is fixed on the plank in the first row (fig. 17) and inserted into the plank (fig. 18). Afterwards the plastic tongue in the last row must be fixed using a screwdriver (fig. 19).
Use the MEISTER angled cover moulding for example to cover the all-round expansion joints (fig. 20 + 22).
Laying instructions
MEISTER Longlife parquet on walls PD 450, PD 400 Cottage, PD 200, PS 300, PC 400 Style, PC 300 and PC 200
Link to Parquet on the walls: http://www.meister.com/en/service/service-center/installation-and-care-instructions/installation-on-the-wall.html

17
Fig. 1 Fig. 2
Fig. 4
Fig. 7
Fig. 10
Fig. 13
Fig. 18
Fig. 21
Fig. 3
Fig. 5
Fig. 8
Fig. 11
Fig. 14
Fig. 16
Fig. 19
Fig. 22
Fig. 6
Fig. 9
Fig. 12
Fig. 15
Fig. 17
Fig. 20
max.40cm
Attention: Please heed the up-to-date installation instructions included in the packaging.

18
You need the following tools and aids to install MEISTER cork, design, Nadura and parquet flooring with Masterclic Plus technology.Keyhole or electric saw, possibly power drill, folding metre rule, pencil, wedges (spacer wedges), angle or adjustable bevel, possibly PE film (0.2 millimetres).If the product does not already have an impact sound lining, you have to use MEISTER foam film, MEISTER-Silence 15 DB, MEISTER-Silence 20, MEISTER-Silence 25 DB or MEISTER Duo-Guard as a cushioning layer. (If you use MEISTER Silence 25 DB, MEISTER Silence 15 DB or MEISTER Duo-Guard, you do not need an additional layer of 0.2-millimetre PE film.)
Step 1Start by laying the first complete plank in the left-hand corner of the room with the tongue sides facing the wall. Remove only the tongues on the long sides of all the other planks you want to lay in the first row. Using wedges, you can easily keep a gap of at least 10 millimetres or 1.5mm per metre from the wall (fig.1).
Step 2Insert the end of the next complete plank into plank No. 1 (fig. 2). Lay the other planks in this row in the same way across the entire width of the room.
Step 3Cut the last plank in each row so that you leave a gap of at least 10 millimetres to the wall (fig. 3). You can use cut-off pieces of planks, as long as they are at least 40 centime-tres long, to start subsequent rows.
Step 4Make sure the planks in the first row are straight. Cut the first plank in the second row to approx. 80 centimetres (with Nadura flooring NB 400 and cork flooring to approx. 50-60 centimetres).Fix this plank upright with the spring as far as possible into the groove on the groove side of the previous row of planks and press the plank down slowly, using a forward and downward turning motion (fig. 4).The plank should lock into the previously laid row (fig. 5).
Step 5Similarly, the next complete plank is turned into the click connection on the long side and the end pushed tight against the previ-ous plank before it is lowered. Then press the plank down slowly, using a forward and down-ward turning motion (fig. 6). The plank must lock into the row previously laid and the end joint must fit tightly into the previous plank.
Step 6Lay the flooring row by row in this way. Remem-ber that the end joints must be offset by at least 40 centimetres (with Nadura flooring NB 400 and cork flooring 25 centimetres) (fig. 7).
Step 7To cut the last row to size, use a spare piece of plank and draw the remaining plank width on it (leaving at least a gap of 10 millimetre or 1.5mm per metre to the wall).
Step 8Taking the plank marked for width, push the plastic end tongue forward out of the end groove with the aid of a spare piece of plank (fig. 8).
Step 9Begin cutting the plank to size at the end of the plastic tongue (fig. 9). After the plank has been cut to size, push the plastic tongue on the end back into the end groove (fig. 10).
Step 10Begin laying the last row in the right hand cor-ner of the room (leaving at least a gap of 10 mil-limetres or 1.5mm per metre to the wall) and angle the sides of the plank into the second-last row. The next plank is pivoted in in the same way and lowered down at the end (fig. 11).
Step 11Push the plastic tongue which is pointing out towards the wall (fig. 12) back into the end connection using a tension rod, scraper, screw driver or similar (fig. 13).
Step 12 Before attaching the skirting boards, the timber wedges along the walls have to be removed.
To cover the all-round expansion joints, use MEISTER skirting boards with colour-matching decorative surfaces (see page 26).
Please ensure that no silicon products whatso-ever come into contact with the mouldings.
To take a plank row back out again, lift the entire row, levering it at the side out of the last row (fig. 14). Then you can separate the planks' ends by angling them (fig. 15). Should you wish to reuse the disassembled planks, you should push the end plastic spring flush back into the top groove.
Laying instructions
MEISTER cork, design, Nadura and laminate flooring with Masterclic Plus technology
A2
B2
B1 Interlocking end-to-end:
Longitudinal interlocking:A1
20 – 30 °

19Attention: Please heed the up-to-date installation instructions included in the packaging.
1
5
2
4
8
6
97
3
10
13
11
14
12
15

20
You need the following tools and aids to install MEISTER cork and laminate flooring with Multiclic technology.Hammer, keyhole or electric saw, possibly power drill, folding metre rule, pencil, wedges (spacer wedges), tension iron, angle or adjust-able bevel, possibly PE film (0.2 millimetres).If the product does not already feature a sound-absorbing cushioning, use MEISTER foam film, MEISTER-Silence 15 DB, MEISTER-Silence 20, MEISTER-Silence 25 DB or MEISTER Duo-Guard as a cushioning layer. (When using MEISTER-Silence 25 DB, MEISTER-Silence 15 DB or MEISTER-Duo-Guard, additional 0.2 millimetre PE film is not required.)
Step 1 Start by laying the first complete plank in the left-hand corner of the room with the tongue sides facing the wall. Saw the tongues off the first plank, both on the short and the long side. Remove only the tongues on the long sides of all the other planks you want to lay in the first row. Using wedges, you can easily keep a gap of at least 10mm or 1.5mm per metre with the wall.
Step 2 Join the next complete plank to the end of plank 1 using a tapping block and a hammer. Lay the other planks in this row in the same way across the entire width of the room. Wherever space is too tight to work with a hammer and tapping block, you can use a ten-sion iron to help click the end joint in place.
Step 3 Make sure the planks in the first row are straight (fig A). Cut the first plank of the second row down to approx. 80cm (approx. 60 centimetres with cork flooring). To install the second row, insert the long tongue into the groove of the first row of planks (fig. B, ).
Step 4 By moving the plank slightly up and down, angle it completely into the already laid row of planks (fig. B, ).
Step 5 Again, angle the next complete plank of the second row first on its long edge against the previously laid plank. Always make sure the long joint is tight. Once you have angled in the planks (fig. C, and ) so they lie flat on the subfloor, click the ends together using the tapping block and light taps with the hammer (fig. C, ).
Step 6 Install the whole area row by row in this way. Install the planks row by row until you have covered the whole room - always first fitting the long tongue into the groove and then join-ing the plank ends together. Remember that the end joints must be offset by at least 40 centimetres (approx. 30 centimetres with cork flooring). to ensure the overall area is more stable (fig. D).
Step 7 Cut the last plank in each row so that you leave a gap of at least 10mm or 1.5mm per metre to the wall. To cut the last row to size, use a spare piece of plank and draw the remaining plank width on it (leaving at least a gap of 10mm or 1.5mm per metre to the wall). After you have laid the last planks, you can walk on the floor straight away and start attaching the skirting boards.
Step 8 Finally, remove the wooden wedges from around the walls.
To cover the all-round expansion joints, use MEISTER skirting boards or clip-on skirting boards with colour-matching decorative surfaces (see page 26). Please ensure that no silicon products whatsoever come into contact with the mouldings.
To take a plank row back out again, lift the entire row, levering it at the side out of the last row. Then you can separate the planks‘ ends by angling them. This way, the locking system remains intact and the planks can be refitted.
Join the tongue on the long side Angle in Join the ends
Laying instructions
MEISTER cork and laminate flooring with Multiclic technology
Attention: Please heed the up-to-date installation instructions included in the packaging.
A
B
mind. 40 cm
D
mind. 40 cm
C

21
You need the following tools and aids to install MEISTER design flooring Silent Touch with Multiclic technology.Hammer, keyhole or electric saw, possibly power drill, folding metre rule, pencil, wedges (spacer wedges), tension iron, angle or adjust-able bevel, MEISTER 5mm tapping block, possibly PE film (0.2 millimetres).If the product does not already feature a sound-absorbing cushioning, use MEISTER-Silence 15 DB, MEISTER-Silence 20 or MEISTER-Silence 25 DB as a cushioning layer. (When using MEISTER-Silence 25 DB or MEISTER-Silence 15 DB additional 0.2 millimetre PE film is not required.)Note: If the expansion joint is not covered with a skirting board but with the flooring profile «Star» (see page 25), leave a gap of 6mm.
Step 1 Start by laying the first complete plank in the left-hand corner of the room with the tongue sides facing the wall. Saw the tongues off the first plank, both on the short and the long side. Remove only the tongues on the long sides of all the other planks you want to lay in the first row. Using wedges, you can easily keep a gap of at least 10mm or 1.5mm per metre with the wall.
Step 2 Join the next complete plank to the end of plank 1 using the 5mm tapping block and a hammer. Lay the other planks in this row in the same way across the entire width of the room. Wherever space is too tight to work with a hammer and tapping block, you can use a tension iron to help click the end joint in place.
Step 3 Make sure the planks in the first row are straight (fig A). Cut the first plank of the sec-ond row down to approx. 80cm. To install the second row, insert the long tongue into the groove of the first row of planks (fig. B, ).
Step 4 By moving the plank slightly up and down, angle it completely into the already laid row of planks (fig. B, ).
Step 5 Again, angle the next complete plank of the second row first on its long edge against the previously laid plank. Always make sure the long joint is tight. Once you have angled in the planks (fig. C and ) so they lie flat on the subfloor, start by installing the first plank in the third row. As soon as you have angled in and laid this plank (fig. D and ), click the second plank in the previous row together at the ends using the 5mm tapping block and light taps with the hammer (fig. D ).
Step 6 Install the whole area row by row in this way. Install the planks row by row until you have covered the whole room - always first fitting the long tongue into the groove and then joining the plank ends together. Before you click the plank together at the ends using the hammer and tapping block, a plank should al-ready be angled into the next row (guide plank fig. D). Remember that the end joints must be offset by at least 40 centimetres to ensure the overall area is more stable (fig. E).
Step 7 Cut the last plank in each row so that you leave a gap of at least 10mm or 1.5mm per metre to the wall. To cut the last row to size, use a spare piece of plank and draw the remaining plank width on it (leaving at least a gap of 10mm or 1.5mm per metre to the wall). After you have laid the last planks, you can walk on the floor straight away and start attaching the skirting boards.
Step 8 Finally, remove the wooden wedges from around the walls.
To cover the all-round expansion joints, use MEISTER skirting boards or clip-on skirting boards with colour-matching decorative surfaces (see page 26). Please ensure that no silicon products whatsoever come into contact with the mouldings.
To take a plank row back out again, lift the entire row, levering it at the side out of the last row. Then you can separate the planks‘ ends by angling them. This way, the locking system remains intact and the planks can be refitted.
Join the tongue on the long side Angle in Join the ends
Laying instructions
MEISTER design flooring SilentTouch® with Multiclic technology
Attention: Please heed the up-to-date installation instructions included in the packaging.
A
B
D
C
E

22
You need the following tools and aids to install MEISTER linoleum flooring with Uniclic technology:Hammer, keyhole or electric saw, possibly power drill, folding metre rule, pencil, MEISTER fitting wedges, wedges (spacer wedges), tension iron, angle or adjustable bevel, MEISTER tapping block, possibly PE film (0.2 millimetres).If the product does not already feature a sound-absorbing cushioning, use MEISTER foam film, MEISTER-Silence 15 DB, MEISTER-Silence 20, MEISTER-Silence 25 DB or MEISTER Duo-Guard as a cushioning layer. (When using MEISTER-Silence 25 DB, MEISTER-Silence 15 DB or MEISTER-Duo-Guard, additional 0.2 millimetre PE film is not required.)
Step 1Start by laying the first complete plank in the left-hand corner of the room with the tongue sides facing the wall. Saw the tongues off the first plank, both on the short and the long side. Remove only the tongues on the long sides of all the other planks you want to lay in the first row. Using wedges, you can easily keep a gap of at least 10mm or 1.5mm per metre with the wall (fig 1).
Step 2Turn the end of the next complete plank into plank No. 1 (fig 2). Lay the other planks in this row in the same way across the entire width of the room.
Step 3Cut the last plank in each row so that you leave a gap of at least 10mm to the wall (fig 3).
Step 4Make sure the planks in the first row are straight. To install the second row, lay MEISTER fitting wedges at intervals of approx. 50 centimetres against the long edge of the first row. Cut the first plank of the second row down to approx. 60 centimetres. Then lay the shortened plank onto the installation aid and push it against row 1 (fig 4).
Step 5Turn the short end of the next complete plank into the plank previously laid on the MEISTER fitting wedge and place MEISTER fitting wedg-es underneath it as well (fig. 5). Continue this way over the entire breadth of the room.
Step 6After you have put together the ends of all the planks of a row, press them tightly against the previously laid row (fig 6).
Step 7Finally, remove the installation aid (fig 7) and, starting at one side, slowly press the entire row downwards in a forward and downward turning motion.
Step 8The row of planks should lock into the previously laid row (fig 8).
Step 9Lay the flooring row by row in this way (fig 9). Remember that the end joints must be offset by at least 30 centimetres. To cut the last row to size, use a spare piece of plank and draw the remaining plank width on it (leaving at least a gap of 10mm or 1.5mm per metre to the wall).
Step 10Before attaching the skirting boards, the timber wedges along the walls have to be removed.
To cover the all-round expansion joints, use MEISTER skirting boards with matching linoleum strips (see page 26).
Please ensure that no silicon products whatsoever come into contact with the mouldings.
Laying instructions
MEISTER linoleum flooring with Uniclic technology

23Attention: Please heed the up-to-date installation instructions included in the packaging.
B1 B2 B3
1 2
4 5 6
7 8 9
3
A1 A2 A3
20 – 30 °

24
Universal jointing profile, end profile and transition profile, anodised aluminium, suitable for use with all MEISTER flooring (except for: design flooring SilentTouch®)
Type 286 Universal jointing profile (6.5 to 16mm) Acts as a crossover to bridge the thickness difference of two flooring levels (e.g. carpet, vinyl, etc.)
Type 287 B Universal end profile (6.5 to 16mm)Broad bottom profile allows better fixing to substrate.
Type 288 B Universal transiti-on profile (6.5 to 16mm)Broad bottom profile allows better fixing to substrate. For expansion joints:Bridges height differences of up to 3mm.
Type 888 Universal transition profile »Flex« (7 to 17mm)For expansion joints: Bridges height differences of up to 12mm between two floor coverings (e.g. from parquet to laminate flooring).
adaptable via the preset bending point "S“
preset ben-ding point
Type 551 Universal transition profile (7 to 16mm)For expansion joints: Bridges height differences of up to 2mm.With integrated cable channel for invisible cable installation.
Type 320 Universal stair profile (7 to 16mm) Supplied as a 2-part profile system(cover and base element). Screws are provided.
Fitting angle 3400 Sloping angle 3402With adhesive grooves; natural-coloured aluminium; with countersunk drill holes; 20mm × 3.5mm Ø wood screws with cross-slot head are provided. Toughness: approx. 75N/sq.mm Length: 100cm
If the floor area is longer or wider than 10m (for Longlife parquet flooring PS 400, longer or wider than 6m), then you must provide an expansion joint. This is covered with a jointing profile. The same applies in the area of doors,
connecting passageways and polygon-shaped rooms. Two adjacent rooms must usually be separated with a jointing profile. Use the transition profile to adjust to adjacent, lower lying areas or floor coverings. The end profile
is ideal for clean finishes in front of higher, adjacent sills, tiles or other raised floors. Use the stair edge profile to give stairs fitted with MEISTER flooring a clean finish.
Mouldings und Accessories
Flooring profiles

25
»Flexo« Universal clip-on transition profile and end profile with a specially coated laminate film
or anodised aluminium, suitable for all MEISTER flooring (except for: design flooring SilentTouch®)
16
29
»Flexo« Universal clip-on transi-tion profile (7 to 15mm)Including 4-18mm height com-pensation. Height differences of up to 6mm can be bridged. Broad bottom profile enables a better fixation to the sub-floor.
Universal clip-on end profile (7 to 18mm)For clean transitions to adjacent, higher thresholds, tiles or the like.
Joining, end and transition profiles, anodised aluminium, matching all MEISTER design flooring SilentTouch®
Joining profile »Star« Type 376 (4 to 9.5mm)Acts as a crossover to bridge the thickness difference of two floo-ring levels (e.g. carpet, vinyl, etc.).
End profile »Star« Type 377 (4 to 9.5mm)For clean transitions to adjacent, higher thresholds, tiles, patio doors, floor-to-ceiling windows or the like.
Transition profile »Star« Type 378 (4 to 9.5mm)For expansion joints.

26
To cover the expansion joints around the edges of MEISTER laminate flooring, use MEISTER clip-on skirting board profiles 1 to 3, for MEISTER LB 250 laminate flooring, we recommend MEISTER skirting board profiles 8 PK and 9 PK with matching decorative surface. For instal-lation with MEISTER Longlife parquet, we offer matching real wood veneer MEISTER skirting board profiles 1 to 3. To match MEISTER cork
flooring, we also supply our cork-covered clip-on skirting board profiles 1 to 3. When install-ing MEISTER linoleum flooring, use MEISTER skirting board profile 8 PK E with colour-match-ing linoleum insert strips.When installing MEISTER design flooring use the MEISTER skirting board profiles 2 PK and 3 PK with colour-matching decorative sur-face. The MEISTER skirting board profiles are
a clean and sophisticated floor connector and can be fitted with a clip, glued, nailed or screwed. A hollow space inside the attach-ment clips makes it possible to lay concealed cab les through it. Please ensure that no silicon products what soever come into contact with the mouldings.
Skirting board – a perfect finish
Skirting board1 MK profile
Skirting board 2 PK profile
Skirting board 3 PK profile
Skirting board 5 PK profile
Skirting board 6 profile
Quadrant 7 profile
Skirting board 8 PK E profile
Linoleum insert strips2500 × 40 × 3 mm
Skirting board 8 PK profile
Skirting board 9 PK profile
Skirting board 10 PK profile
Skirting board 11 PK profile
Skirting board 12 PK profile
Skirting board 13 PK profile
Skirting board 14 MK profile
70
Skirting board 15 MK profile
Skirting board 16 MK profile
Skirting board 17 profile
Mouldings und Accessories
Wall transitions

27
Thanks to the special PUR mineral mixture the MEISTER Silence 25 DB, MEISTER Silence 20 or MEISTER Silence 15 DB are the perfect insula-ting underlay for effective sound absorption in the room and reduction of footfall transmitted to the rooms below. With MEISTER you not only find the right insulating underlay for your requirements but also films and a large selec-tion of underlay materials for screed, wooden floors and other subfloors.
Product properties – underlay materials
Mouldings und Accessories
Underlay material
Summary Silence
25 DBSilence 20
Silence
15 DBDuo-Guard Foam film Plastic film
Material thickness approx. 3mm 2.5mm 2mm 2mm 2mm 0.2mm
Weight approx. 3kg/m² 2.3kg/m² 1.5kg/m² 0.3kg/m² 0.2kg/m²
Pressure resistance •••• •••• ••••• ••• ••• –
Room noise improvement ••••• •••• ••• •• •• –
Footfall noise improvement •••• •••• ••• ••• ••• –
Suitability for underfloor heating •••• •••• •••• •• •• •••••
Correction of unevenness •••• •••• ••• •• •• –
Humidity protection ✔ No ✔ ✔ No ✔
Summary Silence
25 DBSilence 20
Silence
15 DBDuo-Guard Foam film Plastic (PE) film
Weight approx. 3kg/m² 2.3kg/m² 1.5kg/m² 0.3kg/m² 0.2kg/m²
Wooden planks – ✘ – – ✘ –
Wood based boards, OSB boards, drywall elements – ✘ – – ✘ –
Mineral subfloors (e.g. cement screed, anhydride screed) ✘
✘with plastic (PE)
film✘ ✘
✘with plastic (PE)
film✘
Mastic asphalt screed – ✘ – – ✘ –
Existing coverings (e.g. ceramic tiles and boards, natural stone, plastic)
✘✘
with plastic (PE) film
✘ ✘✘
with plastic (PE) film
✘
Properties: ••••• Ideally suited •••• Very well suited ••• Well suited •• Suited • Suited to a certain extent ✔ Available ✘ Suited – not suited

28
The entire MEISTER Longlife parquet range is suitable for installation on warm water under-floor heating.
Please follow the instructions below:The PD 450, PD 400 Cottage, PD 200, PS 300, PQ 500, PC 400 Style, PC 300 and PC 200 collections have a heat transfer resistance on MEISTER Silence 25 DB of 0.118m² K/W. The PC 350 collection’s heat transfer resistance is 0.14m2 K/W when laid on MEISTER Duo Guard. The MEISTER floors in the PS 400 collections have a heat transfer resistance of 0.13m² K/W when laid with MEISTER foam film (2mm) together with MEISTER PE film (0.2mm). Due to the natural warmth of the flooring, the heating can be switched off more often during moderately cold weather compared to heating under tiled floors. MEISTER flooring on hot-water underfloor heating reaches an even surface temperature all over. All the types of wood are suitable for installation on hot-water underfloor heating – however with beech, steamed beech and Canadian maple as well as European maple the natural strong swelling and shrinking behaviour of these woods can lead to joins forming at the ends. The floors must not be covered with any coverings, e.g. carpets, runners, mats or any other overlays as this may cause an accumu-lation of heat. These types of flooring react with deformations and warping.
Preparatory measures:Any room heated over a large area requires planning and coordination of the heating sys tem, the screed and the various coverings, taking into account the type of use, in order to ensure optimum and fault-free functioning in the long term. When these special floor con-structions are installed, professional standards are equally important. Supplies and processing steps must correspond with the latest technol-ogy, the available informa tion sheets from the central association of the German construc-tion trade and the assembly and installation guidelines of the relevant sys tem suppliers and manufacturers.
Caution! With hot-water underfloor heating, the profiles are fixed with contact glue.
Screed – Checking moisture – Readiness for layingAfter completion and a corresponding lying time, the screed can be heated. Complete dry-ing out (readiness for laying) is an abso lute prerequisite for the preparation and installa-tion steps for MEISTER Longlife parquet and is therefore essential. The reason for this is that the moisture measurements to be carried out as part of subfloor checking cannot be relia-bly performed on heated constructions due to the risk of damage. This means that heated screed must be dried out by means of heating up and cooling down with a heating break be-fore installation of any type of covering. To be ready for the installation of MEISTER flooring, the moisture content (according to DIN 4725, part 4 – measured with CM devices) of cement screed should be a maximum of 1.8 CM% and of anhydrite screed it should be a maximum of 0.3 CM%.
Special measures(heating up and cooling down) The client must observe the following instruc-tions and/or have them performed by the persons responsible:
| The screed must lie for at least 28 days after it has been poured up to the beginning of the first heating period, or according to the manufacturer‘s instructions.
| During heating up, the initial temperature should be increased daily up to the full (maximum) heating power.
| The pattern of the heating measure and the heating break must be carried out in accordance with the log of measures.
| The time plan indicates the minimum period of heating up – each additional day is of further benefit and provides extra security.
| MEISTER Longlife parquet must be installed in accordance with DIN 18 356, 18 365 and 18 367 at a screed surface temperature of at least 15°C and a relative humidity of 50 - max. 75%.
| After installation of the flooring (completion), this climate must be maintained for one week (adhering and hardening time of adhesives and other material layers used).
| After installation of MEISTER Longlife parquet, the maximum surface temperature of 26°C may not be exceeded.
Important note: The above points must be carried out according to the relevant rules and/or confirmed by specialists (architect, heating specialist etc.)
Laying instructions
MEISTER Longlife parquet on warm water heated floor structures
Structure of floating installation
Film
Edge insulating strips
Plinth moulding
Structure of surface bonding
Note: Full surface bonding must be carried out by a professional.
Edge insulating Plinth moulding
1. Floor plank
2. Silence 20 3. 0.2mm PE film
or Silence 15 DBor Silence 25 DB
4. Screed with installed heating pipes
5. PVC film
6. Insulation
7. Raw concrete
1. Floor plank
2. Parquet glue and primer
3. Screed with installed heating pipes
4. PVC film
5. Insulation
6. Raw concrete

29
The MEISTER Lindura wood flooring is suitable for installation on hot-water underfloor heating.
Please follow the instructions below:When installed with MEISTER-Silence 25 DB, MEISTER Lindura wood flooring has a heat transmission resistance of 0.084m2 K/W. Due to the natural warmth of the flooring, the heating can be switched off more often during moderately cold weather compared to heating under tiled floors. MEISTER flooring on hot-water underfloor heating reaches an even surface temperature all over.The floors must not be covered with any cover-ings, e.g. carpets, runners, mats or any other overlays as this may cause an accumulation of heat. These types of flooring react with defor-mations and warping.
Preparatory measures:Any room heated over a large area requires planning and coordination of the heating system, the screed and the various coverings, taking into account the type of use, in order to ensure optimum and fault-free functioning over the long term. When these special floor constructions are installed, professional stand-ards are correspondingly important.Supplies and processing steps must corre-spond with the latest technology, the available information sheets from the central associa-tion of the German construction trade and the assembly and installation guidelines of the relevant system suppliers and manufacturers.
Caution! With hot-water underfloor heating, the profiles are fixed with contact glue.
Screed – Checking moisture – Readiness for layingAfter completion and a corresponding lying time, the screed can be heated. Complete drying out (readiness for laying) is an absolute prerequisite for the preparation and installation steps for MEISTER Lindura wood flooring and is therefore essential.The reason for this is that the moisture measurements to be carried out as part of subfloor checking cannot be reliably performed on heated constructions due to the risk of damage. This means that heated screed must be dried out by means of heating up and cooling down with a heating break before installtion of any type of covering. To be ready for the installation of MEISTER flooring, the moisture content (according to DIN 4725, part 4 – measured with CM devices) of cement screed should be a maximum of 1.8 CM% and of anhydrite screed it should be a maximum of 0.3 CM%.
Special measures (heating up and cooling down)The client must observe the following instruc-tions and/or have them performed by the persons responsible:
| The screed must lie for at least 28 days after it has been poured up to the beginning of the first heating period, or according to the manufacturer‘s instructions.
| During heating up, the initial temperature should be increased daily up to the full (maxi-mum) heating power.
| The pattern of the heating measure and the heating break must be carried out in accord-ance with the measure protocol.
| The time plan indicates the minimum period of heating up – each additional day is of further benefit and provides extra security.
| MEISTER Lindura wood floorings must be in-stalled in accordance with DIN 18 356, 18 365 and 18 367 at a screed surface temperature of at least 15°C and a relative humidity of 50 to max. 75%.
| After installation of the flooring (completion), this climate must be maintained for one week (adhering and hardening time of adhesives and other material layers used).
| After installation of MEISTER Lindura wood flooring, the maximum surface temperature of 26°C may not be exceeded.
Important note: The above points must be carried out according to the relevant rules and/or confirmed by specialists (architect, heating specialist etc.).
Laying instructions
MEISTER Lindura wood flooring on warm water heated floor structures
Film
Edge insulating strips
Plinth moulding
1. Floor plank
2. Silence 20 3. 0.2mm PE film
or Silence 15 DBor Silence 25 DB
4. Screed with installed heating pipes
5. PVC film
6. Insulation
7. Raw concrete
Structure of surface bonding
Note: Full surface bonding must be carried out by a professional.
Edge insulating Plinth moulding
1. Floor plank
2. Parquet glue and primer
3. Screed with installed heating pipes
4. PVC film
5. Insulation
6. Raw concrete
Structure of floating installation

30
The MEISTER cork flooring is suitable for instal-lation on hot-water underfloor heating.
Please follow the instructions below:When installed with 0.2mm PE film, MEISTER floor ing from the KC 400 S and Tineo collec-tions has a heat transmission resistance of 0.11m2 K/W. Due to the natural warmth of the flooring, the heating can be switched off more often during moderately cold weather com-pared to heating under tiled floors. MEISTER flooring on hot-water underfloor heating reaches an even surface temperature all over.The floors must not be covered with any coverings, e.g. carpets, runners, mats or any other overlays as this may cause an accumu-lation of heat. These types of flooring react with deformations and warping.
Preparatory measures:Any room heated over a large area requires planning and coordination of the heating system, the screed and the various coverings, taking into account the type of use, in order to ensure optimum and fault-free functioning over the long term. When these special floor constructions are installed, professional stand-ards are correspondingly important.Supplies and processing steps must corre-spond with the latest technology, the available information sheets from the central associa-tion of the German construction trade and the assembly and installation guidelines of the relevant system suppliers and manufacturers.
Caution! With hot-water underfloor heating, the profiles are fixed with contact glue.
Screed – Checking moisture – Readiness for layingAfter completion and a corresponding lying time, the screed can be heated. Complete drying out (readiness for laying) is an absolute prerequisite for the preparation and instal-lation steps for MEISTER cork flooring and is therefore essential.The reason for this is that the moisture measurements to be carried out as part of subfloor checking cannot be reliably performed on heated constructions due to the risk of damage. This means that heated screed must be dried out by means of heating up and cooling down with a heating break before installtion of any type of covering. To be ready for the installation of MEISTER flooring, the moisture content (according to DIN 4725, part 4 – measured with CM devices) of cement screed should be a maximum of 1.8 CM% and of anhydrite screed it should be a maximum of 0.3 CM%.
Special measures (heating up and cooling down)The client must observe the following instruc-tions and/or have them performed by the persons responsible:
| The screed must lie for at least 28 days after it has been poured up to the beginning of the first heating period, or according to the manufacturer‘s instructions.
| During heating up, the initial temperature should be increased daily up to the full (maxi-mum) heating power.
| The pattern of the heating measure and the heating break must be carried out in accord-ance with the measure protocol.
| The time plan indicates the minimum period of heating up – each additional day is of further benefit and provides extra security.
| MEISTER cork floorings must be installed in accordance with DIN 18 356, 18 365 and 18 367 at a screed surface temperature of at least 15°C and a relative humidity of 50 to max. 75%.
| After installation of the flooring (completion), this climate must be maintained for one week (adhering and hardening time of adhesives and other material layers used).
| After installation of MEISTER cork flooring, the maximum surface temperature of 26°C may not be exceeded.
Important note: The above points must be carried out according to the relevant rules and/or confirmed by specialists (architect, heating specialist etc.).
Laying instructions
MEISTER cork flooring on warm water heated floor structures
Film
Edge insulating strips
Plinth moulding
Collections: KC 400 S, Tineo1. Floor plank with sound-absorbing
cushion
2. 0.2mm PE film
3. Screed with installed heating pipes
4. PVC film
5. Insulation
6. Raw concrete

31
The LIB 400 S and LIC 400 S collections are suitable for installation on hot-water under-floor heating.
Please follow the instructions below:When installed with MEISTER PE film (0.2mm), MEISTER flooring from the LIB 400 S and LIC 400 S collections has a heat transmission resistance of 0.08m2 K/W. Due to the natural warmth of the flooring, the heating can be switched off more often during moderately cold weather compared to heating under tiled floors. MEISTER flooring on hot-water underfloor heating reaches an even surface temperature all over.The floors must not be covered with any coverings, e.g. carpets, runners, mats or any other overlays as this may cause an accumu-lation of heat. These types of flooring react with deformations and warping.
Preparatory measures:Any room heated over a large area requires planning and coordination of the heating system, the screed and the various coverings, taking into account the type of use, in order to ensure optimum and fault-free functioning over the long term. When these special floor constructions are installed, professional stand-ards are correspondingly important. Supplies and processing steps must correspond with the latest technology, the available informa tion sheets from the central association of the Ger-man construction trade and the assembly and installation guidelines of the relevant system suppliers and manufacturers.
Caution! With hot-water underfloor heating, the profiles are fixed with contact glue.
Screed – Checking moisture – Readiness for layingAfter completion and a corresponding lying time, the screed can be heated. Complete drying out (readiness for laying) is an absolute prerequisite for the preparation and installa-tion steps for MEISTER linoleum flooring and is therefore essential. The reason for this is that the moisture measurements to be carried out as part of subfloor checking cannot be reliably performed on heated constructions due to the risk of damage. This means that heated screed must be dried out by means of heating up and cooling down with a heating break before installation of any type of covering. To be ready for the installation of MEISTER flooring, the moisture content (according to DIN 4725, part 4 – measured with CM devices) of cement screed should be a maximum of 1.8 CM% and of anhydrite screed it should be a maximum of 0.3 CM%.
Special measures(heating up and cooling down)The client must observe the following instruc-tions and/or have them performed by the persons responsible:
| The screed must lie for at least 28 days after it has been poured up to the beginning of the first heating period, or according to the manufacturer‘s instructions.
| During heating up, the initial temperature should be increased daily up to the full (maxi-mum) heating power.
| The pattern of the heating measure and the heating break must be carried out in accord-ance with the measure protocol.
| The time plan indicates the minimum period of heating up – each additional day is of further benefit and provides extra security.
| MEISTER linoleum floorings must be installed in accordance with DIN 18 356, 18 365 and 18 367 at a screed surface temperature of at least 15°C and a relative humidity of 50 to max. 75%.
| After installation of the flooring (completion), this climate must be maintained for one week (adhering and hardening time of adhesives and other material layers used).
| After installation of MEISTER linoleum floor-ing, the maximum surface temperature of 26°C may not be exceeded.
Important note: The above points must be carried out according to the relevant rules and/or confirmed by specialists (architect, heating specialist etc.).
Laying instructions
MEISTER linoleum flooring on warm water heated floor constructions
Film
Edge insulating strips
Plinth moulding
Collections: LIB 400 S, LIC 400 S
1. Floor plank with sound-absorbing cushion
2. 0.2mm PE film
3. Screed with installed heating pipes
4. PVC film
5. Insulation
6. Raw concrete

32
Laying instructions
MEISTER design flooring | design flooring SilentTouch®
on warm water heated floor constructions
The MEISTER design flooring is suitable for installation on hot-water underfloor heating.
Please follow the instructions below:When installed with MEISTER PE film (0.2mm), MEISTER flooring from the DD 350 S collections have a heat transmission resistance of 0.10m2 K/W. The DD 300 collection’s heat transfer resistance is 0.05m2 K/W when laid on MEISTER Silence 25 DB. Due to the natural warmth of the flooring, the heating can be switched off more often during moderately cold weather compared to heating under tiled floors. MEISTER flooring on underfloor heating reaches an even surface temperature all over.The floors must not be covered with any coverings, e.g. carpets, runners, mats or any other overlays as this may cause an accumulation of heat. These types of flooring react with deformations and warping.
Preparatory measures:Any room heated over a large area requires planning and coordination of the heating system, the screed and the various coverings, taking into account the type of use, in order to ensure optimum and fault-free functioning over the long term. When these special floor constructions are installed, professional standards are correspondingly important. Supplies and processing steps must correspond with the latest technology, the available informa tion sheets from the central association of the German construction trade and the assembly and installation guidelines of the relevant system suppliers and manufacturers.
Caution! With hot-water underfloor heating, the profiles are fixed with contact glue.
Screed – Checking moisture – Readiness for layingAfter completion and a corresponding lying time, the screed can be heated. Complete drying out (readiness for laying) is an absolute prerequisite for the preparation and installa-tion steps for MEISTER design flooring and is therefore essential. The reason for this is that the moisture measurements to be carried out as part of subfloor checking cannot be reliably performed on heated constructions due to the risk of damage. This means that heated screed must be dried out by means of heating up and cooling down with a heating break before installation of any type of covering. To be ready for the installation of MEISTER flooring, the moisture content (according to DIN 4725, part 4 – measured with CM devices) of cement screed should be a maximum of 1.8 CM% and of anhydrite screed it should be a maximum of 0.3 CM%.
Special measures(heating up and cooling down)The client must observe the following instructions and/or have them performed by the persons responsible:
| The screed must lie for at least 28 days after it has been poured up to the beginning of the first heating period, or according to the manufacturer‘s instructions.
| During heating up, the initial temperature should be increased daily up to the full (maximum) heating power.
| The pattern of the heating measure and the heating break must be carried out in accordance with the measure protocol.
| The time plan indicates the minimum period of heating up – each additional day is of further benefit and provides extra security.
| MEISTER design flooring must be installed in accordance with DIN 18 356, 18 365 and 18 367 at a screed surface temperature of at least 15°C and a relative humidity of 50 to max. 75%.
| After installation of the flooring (completion), this climate must be maintained for one week (adhering and hardening time of adhesives and other material layers used).
| After installation of MEISTER design flooring, the maximum surface temperature of 26°C may not be exceeded.
Important note: The above points must be carried out according to the relevant rules and/or confirmed by specialists (architect, heating specialist etc.).
Edge insulating strips
Plinth moulding
Film
Collections: DD 300 DD 350 S
1. Floor plank Floor plank with sound-absorbing cushion
2. Silence 20 3. 0.2mm PE film
or Silence 15 DB or Silence 25 DB 0.2mm PE film
4. Screed with installed heating pipes Screed with installed heating pipes
5. PVC film PVC film
6. Insulation Insulation
7. Raw concrete Raw concrete

33
Laying instructions
MEISTER Nadura flooring on warm water heated floor constructions
Edge insulating strips
Plinth moulding
Film
All MEISTER Nadura flooring is suitable for installation on hot-water underfloor heating.
Please follow the instructions below:When installed with MEISTER-Silence 25 DB MEISTER flooring from the NB 400 collection has a heat transmission resistance of 0.10m2 K/W. Due to the natural warmth of the flooring, the heating can be switched off more often during moderately cold weather compared to heating under tiled floors. MEISTER flooring on hot-water underfloor heating reaches an even surface temperature all over.The floors must not be covered with any coverings, e.g. carpets, runners, mats or any other overlays as this may cause an accumula-tion of heat. These types of flooring react with deformations and warping.
Preparatory measures:Any room heated over a large area requires planning and coordination of the heating system, the screed and the various coverings, taking into account the type of use, in order to ensure optimum and fault-free functioning over the long term. When these special floor constructions are installed, professional stand-ards are correspondingly important. Supplies and processing steps must correspond with the latest technology, the available informa tion sheets from the central association of the Ger-man construction trade and the assembly and installation guidelines of the relevant system suppliers and manufacturers.
Caution! With hot-water underfloor heating, the profiles are fixed with contact glue.
Screed – Checking moisture – Readiness for layingAfter completion and a corresponding lying time, the screed can be heated. Complete drying out (readiness for laying) is an absolute prerequisite for the preparation and installa-tion steps for MEISTER Nadura flooring and is therefore essential. The reason for this is that the moisture measurements to be carried out as part of subfloor checking cannot be reliably performed on heated constructions due to the risk of damage. This means that heated screed must be dried out by means of heating up and cooling down with a heating break before installation of any type of covering. To be ready for the installation of MEISTER flooring, the moisture content (according to DIN 4725, part 4 – measured with CM devices) of cement screed should be a maximum of 1.8 CM% and of anhydrite screed it should be a maximum of 0.3 CM%.
Special measures(heating up and cooling down)The client must observe the following instruc-tions and/or have them performed by the persons responsible:
| The screed must lie for at least 28 days after it has been poured up to the beginning of the first heating period, or according to the manufacturer‘s instructions.
| During heating up, the initial temperature should be increased daily up to the full (maxi-mum) heating power.
| The pattern of the heating measure and the heating break must be carried out in accord-ance with the measure protocol.
| The time plan indicates the minimum period of heating up – each additional day is of further benefit and provides extra security.
| MEISTER Nadura flooring must be installed in accordance with DIN 18 356, 18 365 and 18 367 at a screed surface temperature of at least 15°C and a relative humidity of 50 to max. 75%.
| After installation of the flooring (completion), this climate must be maintained for one week (adhering and hardening time of adhesives and other material layers used).
| After installation of MEISTER Nadura flooring, the maximum surface temperature of 26°C may not be exceeded.
Important note: The above points must be carried out according to the relevant rules and/or confirmed by specialists (architect, heating specialist etc.).
1. Floor plank
2. Silence 20 3. 0.2mm PE film
or Silence 15 DB or Silence 25 DB
4. Screed with installed heating pipes
5. PVC film
6. Insulation
7. Raw concrete
Structure of floating installation Structure of surface bonding
Note: Full surface bonding must be carried out by a professional.
Edge insulating Plinth moulding
1. Floor plank
2. Parquet glue and primer
3. Screed with installed heating pipes
4. PVC film
5. Insulation
6. Raw concrete

34
All MEISTER laminate flooring is suitable for installation on hot-water underfloor heating.
Preparatory measures:Any room heated over a large area requires planning and coordination of the heating sys-tem, the screed and the various coverings, tak-ing into account the type of use, in order to en-sure optimum and fault-free functioning over the long term. When these special floor con-structions are installed, professional standards are correspond ingly important. Supplies and processing steps must correspond with the lat-est technology, the available information sheets from the central association of the German construction trade and the assembly and instal-lation guidelines of the relevant system suppli-ers and manufacturers. The floors must not be covered with any co-verings, e.g. carpets, runners, mats or any other overlays as this may cause an accumu-lation of heat. These types of flooring react with deformations and warping.Caution! With hot-water underfloor heating, the profiles are fixed with contact glue.
Screed – Checking moisture – Readiness for layingAfter completion and a corresponding lying time, the screed can be heated. Complete dry-ing out (readiness for laying) is an absolute pre-requisite for the preparation and installation steps for MEISTER laminate flooring and is therefore essential. The reason for this is that the moisture measurements to be carried out as part of subfloor check ing cannot be reliably performed on heated constructions due to the risk of damage. This means that heated screed must be dried out by means of heating up and cooling down with a heating break before in-stallation of any type of covering. To be ready for the installation of MEISTER flooring, the moisture content (according to DIN 4725, part 4 – measured with CM devices) of cement screed should be a maximum of 1.8 CM% and of anhy-drite screed it should be a maximum of 0.3 CM%.
Special measures (heating up and cooling down)The client must observe the following instructions and/or have them performed by the persons responsible:| The screed must lie for at least 28 days af-
ter it has been poured up to the beginning of the first heating period, or according to the manufacturer‘s instructions.
| During heating up, the initial temperature should be increased daily up to the full (maximum) heating power.
| The pattern of the heating measure and the heating break must be carried out in accordance with the measure protocol
| The time plan indicates the minimum period of heating up – each additional day is of further benefit and provides extra security.
| MEISTER laminate floorings must be installed in accordance with DIN 18 356, 18 365 and 18 367 at a screed surface temperature of at least 15°C and a relative humidity of 50 to max. 75%.
| After installation of the flooring (comple-tion), this climate must be maintained for one week (adhering and hardening time of adhesives and other material layers used).
| After installation of MEISTER laminate floor-ing, the maximum surface temperature of 26°C may not be exceeded.
Important note: The above points must be carried out according to the relevant rules and/or confirmed by specialists (architect,heating specialist etc.).
Laying instructions
MEISTER laminate flooring on warm water heated floor constructions
Film
Edge insulating strips
Plinth moulding
Collections: LB 250, LD 400, LD 300 Melango, LD 200, LD 250, LS 300, LC 200, LC 100, LC 70, LC 50
LD 300 S Melango, LD 200 S, LS 300 S, LC 200 S, LC 100 S, LC 50 S
1. Floor plank Floor plank with sound-absorbing cushion
2. Foam film 3. 0.2mm PE film
or Duo-Guard or Silence 15 DB or Silence 25 DB 0.2mm PE film
4. Screed with installed heating pipes Screed with installed heating pipes
5. PVC film PVC film
6. Insulation Insulation
7. Raw concrete Raw concrete
Laminate flooring heat transmitting resistanceMEISTER laminate flooring on insulating underlays
Installation on MEISTER-Duo-Guard m2 K/W
Installation on MEISTER-Silence 25 DB m2 K/W
LB 250 0.115 0.07
LD 400 0.132 0.094
LD 300 Melango – 0.089
LD 200 0.115 0.07
LD 250 0.115 0.07
LS 300 0.115 0.07
LC 200 0.115 0.07
LC 100 0.101 –
LC 70 0.115 0.07
LC 50 0.104 –
Laminate flooring with integrated sound-absorbing liningInstallation on
MEISTER-Duo-Guard m2 K/WInstallation with 0.2 mm MEISTER-PE film m2 K/W
LD 300 S Melango – 0.083
LD 200 S – 0.075
LS 300 S – 0.075
LC 200 S – 0.075
LC 100 S – 0.071
LC 50 S – 0.069

35
MEISTER Longlife parquet can be installed with full surface bonding as an alternative to floating installation.
IMPORTANT: Please note that all installation instructions for Masterclic Plus connections, Uniclic connections and accessories must be followed carefully at all times as well as the general recommendations and preparatory measures explained in the installation instructions when installing flooring with full surface bonding.
MeisterWerke recommends UZIN-MK 92 S (2-K PUR) or UZIN-MK 250 (1-K STP) adhesives from UZIN Utz AG or an equivalent, water-free and shear-resistant PUR adhesive from another manufacturer. If you require more information, please call technical customer services at MeisterWerke or UZIN, the adhesive manufac-turer, (Tel. +49 731 4097-257).
Please note all of the adhesive manufacturer’s instructions such as those on hardening and working time. The adhesive is to be applied to the entire surface (avoid leaving areas uncoated). The products should always be laid as a complete system including any primers, screeds or parquet adhesives because a secure fit and the best results can only be guaranteed when the materials match each other.
Installation method:With the PD 450, PD 400 Cottage, PD 200, PS 300, PC 400 Style, PC 350, PC 300 and PC 200 Longlife parquet collections, lay each plank individually in the fresh adhesive bed. Then press them down well so that the backs of the planks are moistened as thoroughly as possible. For PD 550, extra weight should also be applied to the planks.
According to DIN 18 365 and 18 356, the subsurface for flooring or parquet must always be smooth, dry, clean, free of cracks and release agents, and able to withstand lifting and pressing force. The flooring / parquetry contractor must therefore make sure that the subsurface is suitable for this work. The contractor must ensure that subsurface material is inspected for technical suitability, while exercising due diligence as required in accordance with the recognised rules of the trade and current technology, and in adher-ence to the German Construction Contract
Procedures (Vergabe- und Vertragsordnung für Bauleistungen - VOB). If the subsurface reveals deficiencies or there is a risk of damage occurring to the construction of the flooring, the person responsible for laying flooring/parquet must report these concerns in writing, particularly in the following cases:
| Serious unevenness| Cracks in the subsurface| Insufficiently dry subsurface| Insufficiently firm subsurface| Contaminated subsurfaces e.g. oil, wax, lacquer, paint residues
| Subsurface not being level with adjoining structures
| Unsuitable subsurface temperature| Unsuitable room climatisation| No documentation on heating characteristics for heated flooring constructions
| Required secure locking of expansion joints in the subsurface
| No edging strip projection| No marking of measurement points for heated flooring constructions
| No joint layout (if necessary)
Information on adhesives:The recommendations for adhesives are based on extensive tests conducted by the manu-facturer. Due to the variability of on-site condi-tions, it is not possible to establish warranty claims based on the information provided. We cannot assume liability for any losses incurred in using the adhesive system. For that reason, we recommend that you test the adhesive yourself thoroughly before installing flooring or contact customer service at the adhesive manufacturer.
Fidbox®
Humidity and fluctuations in temperature can influence how long a floor lasts and retains its value. We therefore recommend using a fid-box® (a measuring device from floorprotector), which can take long-term data recordings for temperature (°C) and relative humidity (%) in the immediate vicinity of the floor, which can be read using a reading device. If there should be a claim for damage, this can be clarified quickly using the results thus preventing any protracted research into the causes. You can obtain more information from MeisterWerke.
Laying instructions
Full surface bonding with MEISTER Longlife parquet

36
MEISTER Lindura wood flooring can be installed with full surface bonding as an alternative to floating installation.
IMPORTANT: Please note that all installation instructions for Masterclic Plus connections and accessories must be followed carefully at all times as well as the general recommenda-tions and preparatory measures explained in the installation instructions when installing flooring with full surface bonding.
MeisterWerke recommends UZIN-MK 92 S (2-K PUR) or UZIN-MK 250 (1-K STP) adhesives from UZIN Utz AG or an equivalent, water-free and shear-resistant PUR adhesive from another manufacturer. If you require more information, please call technical customer services at MeisterWerke or UZIN, the adhesive manufac-turer, (Tel. +49 731 4097-257).
Please note all of the adhesive manufacturer’s instructions such as those on hardening and working time. The adhesive is to be applied to the entire surface (avoid leaving areas uncoated). The products should always be laid as a complete system including any primers, screeds or adhesives because a secure fit and the best results can only be guaranteed when the materials match each other.
Installation method:With the Lindura wood flooring lay each plank individually in the fresh adhesive bed. Then press them down well so that the backs of the planks are moistened as thoroughly as possible.
According to DIN 18 365 and 18 356, the subsurface for flooring or parquet must always be smooth, dry, clean, free of cracks and release agents, and able to withstand lifting and pressing force.
The flooring / parquetry contractor must therefore make sure that the subsurface is suitable for this work. The contractor must ensure that subsurface material is inspected for technical suitability, while exercising due diligence as required in accordance with the recognised rules of the trade and current technology, and in adherence to the German Construction Contract Procedures (Vergabe- und Vertragsordnung für Bauleistungen - VOB).
If the subsurface reveals deficiencies or there is a risk of damage occurring to the construc-tion of the flooring, the person responsible for laying flooring/parquet must report these concerns in writing, particularly in the following cases:
| Serious unevenness| Cracks in the subsurface| Insufficiently dry subsurface| Insufficiently firm subsurface| Contaminated subsurfaces e.g. oil, wax, lacquer, paint residues
| Subsurface not being level with adjoining structures
| Unsuitable subsurface temperature| Unsuitable room climatisation| No documentation on heating characteristics for heated flooring constructions
| Required secure locking of expansion joints in the subsurface
| No edging strip projection| No marking of measurement points for heated flooring constructions
| No joint layout (if necessary)
Information on adhesives:The recommendations for adhesives are based on extensive tests conducted by the manu-facturer. Due to the variability of on-site condi-tions, it is not possible to establish warranty claims based on the information provided. We cannot assume liability for any losses incurred in using the adhesive system. For that reason, we recommend that you test the adhesive yourself thoroughly before installing flooring or contact customer service at the adhesive manufacturer.
Fidbox®
Humidity and fluctuations in temperature can influence how long a floor lasts and retains its value. We therefore recommend using a fid-box® (a measuring device from floorprotector), which can take long-term data recordings for temperature (°C) and relative humidity (%) in the immediate vicinity of the floor, which can be read using a reading device. If there should be a claim for damage, this can be clarified quickly using the results thus preventing any protracted research into the causes. You can obtain more information from MeisterWerke.
Laying instructions
Full surface bonding with MEISTER Lindura wood flooring

37
MEISTER Nadura flooring can be installed with full surface bonding as an alternative to floating installation.
IMPORTANT: Please note that all installation instructions for Masterclic Plus connections and accessories must be followed carefully at all times as well as the general recommenda-tions and preparatory measures explained in the installation instructions when installing flooring with full surface bonding.
MeisterWerke recommends UZIN-MK 92 S (2-K PUR) or UZIN-MK 250 (1-K STP) adhesives from UZIN Utz AG or an equivalent, water-free and shear-resistant PUR adhesive from another manufacturer. If you require more information, please call technical customer services at MeisterWerke or UZIN, the adhesive manufac-turer, (Tel. +49 731 4097-257).
Please note all of the adhesive manufacturer’s instructions such as those on hardening and working time. The adhesive is to be applied to the entire surface (avoid leaving areas uncoated). The products should always be laid as a complete system including any primers, screeds or adhesives because a secure fit and the best results can only be guaranteed when the materials match each other.
Installation method:With the Nadura flooring lay each plank individually in the fresh adhesive bed. Then press them down well so that the backs of the planks are moistened as thoroughly as possible.
According to DIN 18 365 and 18 356, the subsurface for flooring or parquet must always be smooth, dry, clean, free of cracks and release agents, and able to withstand lifting and pressing force.
The flooring / parquetry contractor must therefore make sure that the subsurface is suitable for this work. The contractor must ensure that subsurface material is inspected for technical suitability, while exercising due diligence as required in accordance with the recognised rules of the trade and current technology, and in adherence to the German Construction Contract Procedures (Vergabe- und Vertragsordnung für Bauleistungen - VOB).
If the subsurface reveals deficiencies or there is a risk of damage occurring to the construc-tion of the flooring, the person responsible for laying flooring/parquet must report these concerns in writing, particularly in the following cases:
| Serious unevenness| Cracks in the subsurface| Insufficiently dry subsurface| Insufficiently firm subsurface| Contaminated subsurfaces e.g. oil, wax, lacquer, paint residues
| Subsurface not being level with adjoining structures
| Unsuitable subsurface temperature| Unsuitable room climatisation| No documentation on heating characteristics for heated flooring constructions
| Required secure locking of expansion joints in the subsurface
| No edging strip projection| No marking of measurement points for heated flooring constructions
| No joint layout (if necessary)
Information on adhesives:The recommendations for adhesives are based on extensive tests conducted by the manu-facturer. Due to the variability of on-site condi-tions, it is not possible to establish warranty claims based on the information provided. We cannot assume liability for any losses incurred in using the adhesive system. For that reason, we recommend that you test the adhesive yourself thoroughly before installing flooring or contact customer service at the adhesive manufacturer.
Fidbox®
Humidity and fluctuations in temperature can influence how long a floor lasts and retains its value. We therefore recommend using a fid-box® (a measuring device from floorprotector), which can take long-term data recordings for temperature (°C) and relative humidity (%) in the immediate vicinity of the floor, which can be read using a reading device. If there should be a claim for damage, this can be clarified quickly using the results thus preventing any protracted research into the causes. You can obtain more information from MeisterWerke.
Laying instructions
Full surface bonding with MEISTER Nadura flooring

38
Accessories
Care products
Overview of the use of the care productsCleaning after completion of construction work/day-to-day cleaning Freshening care Special cleaning
MEISTER-Longlife parquet and Lindura wood flooringnaturally oiled CC Wood Care for Oiled Floors
MR: 1:200Article no. 9061 87 070 A22
In areas with heavy wear/ commercial areas: First cleaning CC Premium Care Oil for Wood FloorsMR: undiluted
CC H2Oil MR: undiluted Article no. 9061 87 160 A22
In areas with heavy wear/ commercial areas:CC Premium Care Oil for Wood FloorsMR: undiluted
CC Deep Clean for hard floors MR: 1:1 to 1:3 Article no. 9061 87 040 A22
UV-oiled CC Wood Care for Oiled FloorsMR: 1:200Article no. 9061 87 070 A22
CC H2OilMR: undilutedArticle no. 9061 87 160 A22
CC Deep Clean for hard floorsMR: 1:1 to 1:3Article no. 9061 87 040 A22
varnished CC Wood and Cork Floor CleanerMR: 1:200Article no. 9061 87 011 A22
CC Wood and Cork Floor Polish matMR: undilutedArticle no. 9061 87 031 A22
CC Deep Clean for hard floorsMR: undilutedArticle no. 9061 87 040 A22
high-gloss varnished CC Wood and Cork Floor CleanerMR: 1:200Article no. 9061 87 011 A22
CC Deep Clean for hard floorsMR: undilutedArticle no. 9061 87 040 A22
MEISTER design flooring | design flooring SilentTouch®
1. Cleaning after completion of construction work: CC PU Cleaner MR: 1:10 Article no. 9061 87 150 A22
2. Day-to-day cleaning: CC PU Cleaner MR: 1:200 Article no. 9061 87 150 A22
CC Floor Mat MR: undilutedArticle no. 9061 87 090 A22
CC Deep Clean for hard floorsMR: undilutedArticle no. 9061 87 040 A22
MEISTER cork flooring
varnished CC Wood and Cork Floor CleanerMR: 1:200Article no. 9061 87 011 A22
CC Wood and Cork Floor Polish matMR: undilutedArticle no. 9061 87 031 A22
CC Deep Clean for hard floors MR: 1:1 to1:3Article no. 9061 87 040 A22
MEISTER linoleum flooring1. Cleaning after completion of
construction work: CC PU Cleaner MR: 1:10 Article no. 9061 87 150 A22
2. Day-to-day cleaning: CC PU Cleaner MR: 1:200 Article no. 9061 87 150 A22
CC Floor Mat MR: undilutedArticle no.: 9061 87 090 A22
CC Deep Clean for hard floors MR: undilutedArticle no. 9061 87 040 A22
MEISTER Nadura flooringCC-Laminat ReinigerMV: 1:200Article no. 9061 87 000 A22
CC Deep Clean for hard floors MR: undilutedArticle no. 9061 87 040 A22
MEISTER laminate flooringCC Laminate CleanerMR: 1:200Article no. 9061 87 000 A22
CC Elatex Stain RemoverMR: undiluted Article no. 9061 87 110 A22
MR = mixing ratio

39
The quality does not stop with the installation. You have bought a quality product “made in Germany”. These cleaning and care instructions will provide you with all the information important to ensuring a long period of value preservation and a beautiful appearance of your flooring. With a bit of time and effort, you can contribute to ensuring that you are able to enjoy your new MEISTER flooring for a long time to come. MEISTER products are based on selected materials, which are processed by experienced experts with state-of-the-art technology to create a quality product “made in Germany”.The premium quality includes substantiated consultation and excellent service. For this reason, you will only find MEISTER products in selected specialist shops.
1. The right careYour dream floor also needs the right care. MEISTER complements its product range with a high-quality series of care products from CC Dr. Schutz. Cleaners and care products, tailored for the floorings, ensure that your floor looks good in the long term. Even if you only need to run the vacuum round for day-to-day care (to remove loose dust), the surfaces should be cleaned and cared for regularly with CC Dr. Schutz care products to preserve the value of your floor.When cleaning, please be aware that the floor must only ever be slightly moistened. In the ideal case, the film of water should be a thin mist, so that it dries out after about a minute. Some types of wood, such as beech or maple, are particularly sensitive to moisture.You should not use any abrasive cleaners, even in case of more severe stains. Even for stubborn stains and dirt, the CC Elatex Stain Remover* will help. Scratches on the floor not only affect the overall appearance. They will also make the floor more prone to dirt and moisture. The CC Dr. Schutz care products are designed to ensure that the floor is considerably more resistant to signs of wear and tear in heavy wear areas. Your qualified specialist shops will also be able to provide you with more tips on how to care for your MEISTER floor in the best possible way.
2. Preservation of value precautionary measures A room temperature of approx. 20 °C and a relative air humidity of approx. 50–60 percent will contribute to your personal well-being and are the basis for a healthy room climate. With such a room climate, you will also help your MEISTER floor obtain the optimal conditions, as it reacts to its climatic surroundings like any other wooden material.Low air humidity with a high temperature will lead to a contracting process in the wood, which dries the floor out. If you determine an air humidity which is considerably lower than 50 percent in the long term, we recommend the use of air humidifiers (vaporizers). This will prevent your MEISTER floor drying out excessively. As with all wooden products, very high air humidity will cause absorption of humidity, which can lead to the length and thickness increasing.
The introduction of dirt onto the floor:Most dirt is brought into your home from the outside and transferred onto the flooring. For this reason, we recommend installing a sufficiently large entrance covering (e.g. a doormat) in the entrance. Please consider that dirt, such as sand or small stones, will act like sandpaper on all floorings and can lead to unsightly scratches.To protect the wood from scratches, you should also fit chair and furniture feet with felt sliders; office chairs, mobile containers, etc., on castors must be equipped with soft, standard running surfaces. We recommend protecting the floor in these heavy wear areas with appropriate floor protection mats (e.g. polycarbonate mats).
Cleaning and care instructions
Care products

40
Cleaning and care instructions
Care products
3. Cleaning after completion of construction work Newly laid MEISTER floors must be cleaned after completion of construction work and before first use in order to completely remove any dirt or glue residue which has arisen during the course of the installation.
You should clean MEISTER laminate flooring after completion of construction work with CC Laminate Cleaner*, diluted with water in a ratio of 1:200.
You should clean MEISTER Nadura flooring after completion of construction work with CC Laminate Cleaner*, diluted with water in a ratio of 1:200.
The cleaning after completion of construction work of varnished and high gloss varnished MEISTER Longlife parquet should be carried out with CC Wood and Cork Floor Cleaner*, diluted with water in a ratio of 1:200.
The cleaning after completion of construction work on UV-oiled MEISTER Longlife parquet should be carried out with CC Wood Care for Oiled Floors*, diluted with water in a ratio of 1:200.
The cleaning after completion of construction work on naturally oiled MEISTER Longlife parquet and MEISTER Lindura wood flooring should be carried out with CC Wood Care for Oiled Floors*, diluted with water in a ratio of 1:200. For highly used and commer-cial areas which are particularly highly frequented, we recommend subsequent treatment with CC Premium Care Oil for Wood Floors. Apply the care oil very thinly and evenly with a lint-free cloth and polish the film of oil immediately and completely with a white pad and disk buffing machine. Polish away any surplus immediately with absorbent cloths. After drying (at least 12 hours), the floor can be used again and can be cleaned using a thin mist of water again after allowing it to completely harden for 7-10 days.
The cleaning after completion of construction work on varnished MEISTER cork flooring should be carried out with CC Wood and Cork Floor Cleaner*, diluted with water in a ratio of 1:200.
You should clean MEISTER linoleum flooring after completion of construction work with CC PU Cleaner*, diluted with water in a ratio of 1:10. Clean the floor using a well wrung out mop and then neutralise with clear water.
You should clean MEISTER design flooring and MEISTER design flooring Silent Touch after completion of construction work with CC PU Cleaner*, diluted with water in a ratio of 1:10. Clean the floor using a well wrung out mop and then neutralise with clear water.
The floor is washed with a mist of water using the relevant cleaning solution and a non-lint mop.
* Water-based care products (e.g. polymer dispersions) or CC Elatex Stain Remover can penetrate the seams of the planks in the case of improper adhesion or incomplete jointing, leading to swelling of the carrier material.
4. Day-to-day cleaning MEISTER laminate flooring To remove daily dirt, vacuuming or sweeping is sufficient. For conventional mopping, CC Laminate Cleaner*, diluted with water in a ratio of 1:200, can be used. The floor should be wiped with a thin mist of water using a non-lint cloth, which has been dipped in this solution and wrung out well. Remove stains, smears and other bonded dirt with CC Elatex Stain Remover* or undiluted CC Laminate Cleaner* and a non-scratch, white pad. Then, wipe with a thin mist of water, until the dirt and cleaning agent residue is completely removed.
MEISTER Nadura flooringTo remove daily dirt, vacuuming or sweeping is sufficient. For conventional mopping, CC Laminate Cleaner*, diluted with water in a ratio of 1:200, can be used. The floor should be wiped with a thin mist of water using a non-lint cloth, which has been dipped in this solution and wrung out well. If necessary, use a scrubbing brush.To remove stubborn stains dilute the Wood Floor Deep Clean with water in a ratio of 1:1 to 1:3 and spray the floor (using a hand spray or similar). Leave it to take effect for 5 minutes maximum, depending on the stubbornness of the stains. Then scrub the floor using a scrubbing brush. Remove the loosened dirt using a well pressed cloth and neutralise the floor using clean, if possible warm water until any residue dirt or cleaning products have been completely removed. Remove stains and heel marks with CC Elatex Stain Remover* (universal stain remover) or undiluted CC Laminate Cleaner* or CC Wood Floor Deep Clean* and a non-scratch, white pad. Then, wipe with a thin mist of water, until the dirt and cleaning agent residue is complete-ly removed. In commercial properties cleaning should always be possible using a cleaning machine or spray cleaning process with a disk buffing machine. For this, dilute CC Wood Floor Deep Clean* with water in a ratio of 1:1. Please contact our technical customer services in case of application.

41
Varnished MEISTER Longlife parquetTo remove daily dirt, vacuuming or sweeping is sufficient. Depending on the frequency and level of dirt, dilute CC Wood and Cork Floor Cleaner* with water in a ratio of 1:200. The floor should be wiped with a thin mist of water using a non-lint cloth, which has been dipped in this solution and wrung out well. Remove fatty stains and other bonded dirt with undiluted CC Wood and Cork Floor Cleaner* and a non-scratch, white pad. Then, wipe with a thin mist of water, until the dirt and cleaning agent residue is completely removed. Problem stains can be removed with CC Wood Floor Deep Clean.We recommend refreshing the floor with CC Wood and Cork Floor Polish mat to preserve its quality and at the first sign of wear. In areas subject to heavier levels of dirt or to build up resistance to wear, first carry out a deep clean using CC Wood Floor Deep Clean non-diluted with a green pad. After the floor as dried completely, apply CC-H2Oil* undiluted very thinly and evenly with a non-lint mop. Leave the floor to dry for at least 12 hours before use.With the afore-mentioned deep clean use dthe CC Wood Floor Deep Clean* non-diluted. Distribute the cleaning solution over the floor in sections using a cloth and then immediately remove any residue of the care product by scrubbing. Make sure that no puddles form. For larger surfaces, use a disk buffing machine with a green pad. Immediately absorb any dirty water completely with absorbent, dry cloths. Then wipe with a thin mist of clean water using a cloth. If possible carry out the cleaning in pairs so that one person removes the dirt and the other person immediately absorbs any dirty water.
Note: High-gloss varnished MEISTER Longlife parquetAt first signs of wear refreshening the floor with corresponding care products is possible. These products however influence the high-gloss look of the parquet floor.
UV-oiled MEISTER Longlife parquetTo remove daily dirt, vacuuming or sweeping is sufficient. For regular cleaning and care use CC Wood Care for Oiled Floors* diluted with water in a ratio of 1:200.The floor should be wiped with a thin mist of water using a non-lint cloth, which has been dipped in this solution and wrung out well. The flooring is cleaned and cared for in one step. Regular polishing with a white pad will lead to an increase in the care film resistance and is particularly recommended for areas subject to heavier levels of dirt. We recommend refreshing the floor with CC-H2Oil* to preserve its quality and at the first sign of wear. With normal levels of dirt clean the floor first using CC Wood Care for Oiled Floors* diluted with water in a ratio of 1:200 and a green pad. In areas subject to heavier levels of dirt or to build up resistance to wear, first carry out a deep clean using CC Wood Floor Deep Clean* diluted with water in a ratio of 1:1 to 1:3 and a green pad. After the floor as dried completely, apply CC-H2Oil* undiluted very thinly and evenly with a non-lint mop. Leave the floor to dry for at least 12 hours before use.With the afore-mentioned deep clean dilute the CC Wood Floor Deep Clean* with water in a ratio of 1:1 to 1:3. Distribute the cleaning solution over the floor in sections using a cloth and then immediately remove any residue of the care product by scrubbing. Make sure that no puddles form. For larger surfaces, use a disk buffing machine with a green pad. Immediately absorb any dirty water complete-ly with absorbent, dry cloths. Then wipe with a thin mist of clean water using a cloth. If possible carry out the cleaning in pairs so that one person removes the dirt and the other person immediately absorbs any dirty water.
Naturally oiled MEISTER parquet flooring and MEISTER Lindura wood flooringTo remove daily dirt, vacuuming or sweeping is sufficient. For regular cleaning and care use CC Wood Care for Oiled Floors* diluted with water in a ratio of 1:200. The floor should be wiped with a thin mist of water using a cloth, which has been dipped in this solution and wrung out well. The flooring is cleaned and cared for in one step. Regular polishing with a white pad will lead to an increase in the care film resistance and is particularly recommen-ded for areas subject to heavier levels of dirt. We recommend refreshing the floor with CC-H2Oil* to preserve its quality and at the first sign of wear. With normal levels of dirt clean the floor first using CC Wood Care for Oiled Floors diluted with water in a ratio of 1:200 and a green pad. In areas subject to heavier levels of dirt or to build up resistance to wear, first carry out a deep clean using CC Wood Floor Deep Clean diluted with water in a ratio of 1:1 to 1:3 and a green pad. After the floor has dried completely, apply CC-H2Oil* undiluted very thinly and evenly with a non-lint mop. Leave the floor to dry for at least 12 hours before use.With the afore-mentioned deep clean dilute the CC Wood Floor Deep Clean* with water in a ratio of 1:1 to 1:3. Distribute the cleaning solution over the floor in sections using a cloth and then immediately remove any residue of the care product by scrubbing. Make sure that no puddles form. For larger surfaces, use a disk buffing machine with a green pad. Immediately absorb any dirty water completely with absorbent, dry cloths. Then wipe with a thin mist of clean water using a cloth. If possible carry out the cleaning in pairs so that one person removes the dirt and the other person immediately absorbs any dirty water.
Cleaning and care instructions
Care products

42
Naturally oiled MEISTER parquet flooring and MEISTER Lindura wood flooring in areas subject to heavier wear or commer-cial areas we recommend refreshing/re-oiling the entire surface with CC Premium Care Oil, if the surface becomes unsightly (extreme dirt, graying, etc.). First, the floor must be cleaned thoroughly with CC Wood Floor Deep Clean (diluted with water at a ratio of 1:1 to 1:3). After the floor has dried completely, apply CC Premium Care Oil very thinly and evenly with a non-lint cloth and polish the film of oil immediately and completely with a white pad and disk buffing machine. Polish away any surplus immediately with absorbent cloths. The floor must have an even silk-matt appearance after polishing. After drying (at least 12 hours), the floor can be used again and can be cleaned using a thin mist of water again after allowing it to completely harden for 7-10 days.
Osmo products can be used to clean and care for naturally oiled MEISTER Longlife parquet flooring. For regular cleaning and care, we recommend Osmo Wisch-Fix, diluted with water. The floor should be washed with a thin mist of water and mop. Then wipe dry. With regular use, the surface becomes resistant to new occurrenc-es of dirt and signs of wear-and-tear.To remove particularly stubborn stains and for occasional, intensive refreshing or mainte-nance, we recommend Osmo Wax Care and Cleaning Agent. First, the floor must be cleaned thoroughly with Osmo-Wisch-Fix. Immediately absorb any dirty water complete-ly with an absorbent, dry mop. Apply Osmo Wax Care and Cleaning Agent thinly and evenly with a non-lint cloth. For larger surfaces, use a disk buffing machine with a white pad. Remove any surplus immediately with a dry cloth. After drying, the surface can be polished if required. For heavier signs of wear-and-tear and for renovations, the floor should be treated afterwards with Osmo Hard Wax Oil 3062 matt.
Varnished MEISTER cork flooringDaily maintenance cleaning should be dry if possible (e.g. vacuuming/sweeping). Depending on the frequency and level of dirt, dilute CC Wood and Cork Floor Cleaner* with water in a ratio of 1:200. The floor should be wiped with a thin mist of water using a cloth, which has been dipped in this solution and wrung out well. Remove fatty stains and other bonded dirt with undiluted CC Wood and Cork Floor Cleaner* and a non-scratch, white pad. Then, wipe with a thin mist of water, until the dirt and cleaning agent residue is completely removed. In areas subject to heavier levels of dirt, add CC Wood and Cork Floor Polish mat* for intensive care and apply undiluted, thinly and evenly with a lint-free mop onto the thoroughly cleaned floor (with CC Wood Floor Deep Clean* for Wood and Cork Flooring undiluted).
MEISTER linoleum flooringLoose dust and dirt is removed by vacuuming or sweeping.Depending on the frequency and degree of dirt, the removal of bonded dirt should be carried out with CC PU Cleaner*, which is diluted with water at a ratio of 1:200. The floor should be wiped with a thin mist of water using a mop, which has been dipped in this solution and wrung out well. Remove stubborn stains and heel marks with undiluted CC PU Cleaner* and a cloth or non-scratch, white pad. Then wipe the floor with clear water. A thorough clean of the floor is required to remove particularly stub-born dirt and residues and to prepare the floor for treatment with a care product in case of visible signs of wear. For this evenly spray CC Deep Clean* undiluted on the floor and after allowing it to take effect for a short while (max. 5 minutes) scrub with a green pad or scrubbing brush. Wipe away loosened dirt using a cloth and wipe over again using clear water until all dirt and cleaner residue has been completed removed.
Note: If the flooring is not to receive a care treatment afterwards only use scrubbing brush-es instead of green pads.
If there are signs of wear on the surface after long or intensive use, this can be refreshed with intensive maintenance after thoroughly cleaning the floor with (CC Deep Clean)*. To do this, apply CC Floor Mat* undiluted, thinly and evenly in a lengthwise direction with a lint-free mop rinsed in clear water and wrung out well. When the protective film can be walked on (after 45 minutes), apply a second coating in the crossways direction. Use: 750ml for approx. 25 – 35m2 per application.If the protective film is worn away over the course of time, this can be refreshed with intensive maintenance after thoroughly cleaning the floor with CC Deep Clean*.
Cleaning and care instructions
Care products

43
MEISTER design flooringLoose dust and dirt is removed by vacuuming or sweeping. Depending on the frequency and degree of dirt, the removal of bonded dirt should be carried out with CC PU Cleaner*, which is diluted with water at a ratio of 1:200. The floor should be wiped with a thin mist of water using a mop, which has been dipped in this solution and wrung out well. Remove stubborn stains and heel marks with undiluted CC PU Cleaner* and a cloth or non-scratch, white pad. Then wipe the floor with clear water. A thorough clean of the floor is required to remove particularly stubborn dirt and residues and to prepare the floor for treatment with a care product in case of visible signs of wear. For this evenly spray CC Deep Clean* undiluted om the floor and after allowing it to take effect for a short while (max. 5 minutes) scrub with a green pad or scrubbing brush. Wipe away loosened dirt using a cloth and wipe over again using clear water until all dirt and cleaner residue has been completed removed. Note: If the flooring is not to receive a care treatment afterwards only use scrubbing brush-es instead of green pads.
If there are signs of wear on the surface after long or intensive use, this can be refreshed with intensive maintenance after thoroughly cleaning the floor with (CC Deep Clean)*. To do this, apply CC Floor Mat* undiluted, thinly and evenly in a lengthwise direction with a lint-free mop rinsed in clear water and wrung out well. When the protective film can be walked on (after 45 minutes), apply a second coating in the crossways direction. Use: 750ml for approx. 25 – 35m2 per application.If the protective film is worn away over the course of time, this can be refreshed with intensive maintenance after thoroughly cleaning the floor with CC Deep Clean*.
MEISTER design flooring SilentTouch®
Loose dust and dirt is removed by vacuuming or sweeping. Depending on the frequency and degree of dirt, the removal of bonded dirt should be carried out with CC PU Cleaner*, which is diluted with water at a ratio of 1:200. The floor should be wiped with a thin mist of water using a mop, which has been dipped in this solution and wrung out well. Remove stubborn stains and heel marks with undiluted CC PU Cleaner* and a cloth or non-scratch, white pad. Then wipe the floor with clear water. A thorough clean of the floor is required to remove particularly stubborn dirt and residues and to prepare the floor for treatment with a care product in case of visible signs of wear. For this evenly spray CC Deep Clean* undiluted om the floor and after allowing it to take effect for a short while (max. 5 minutes) scrub with a green pad or scrubbing brush. Wipe away loosened dirt using a cloth and wipe over again using clear water until all dirt and cleaner residue has been completed removed. Note: If the flooring is not to receive a care treatment afterwards only use scrubbing brush-es instead of green pads.
If there are signs of wear on the surface after long or intensive use, this can be refreshed with intensive maintenance after thoroughly cleaning the floor with (CC Deep Clean)*. To do this, apply CC Floor Mat* undiluted, thinly and evenly in a lengthwise direction with a lint-free mop rinsed in clear water and wrung out well. When the protective film can be walked on (after 45 minutes), apply a second coating in the crossways direction. Use: 750ml for approx. 25 – 35m2 per application.If the protective film is worn away over the course of time, this can be refreshed with intensive maintenance after thoroughly cleaning the floor with CC Deep Clean*.In commercial properties cleaning should always be possible using a cleaning machine or spray cleaning process with a disk buffing machine as well as separate value conservation measures. Please contact our technical customer services in case of application.
5. General information on cleaning and careNever leave MEISTER flooring moist or wet over a long period of time. When cleaning, always try to use a dry method if possible (using a mop, hair broom, vacuum cleaner), or only wipe with a thin mist of water (with wrung out cloths) and do not leave any “puddles” on the floor. Steam cleaners are not suitable for the flooring. Do not use any cream cleaners or scouring powders as these agents can attack the surface of the floor. Please only use suitable cleaners. Problem stains on laminate and Nadura floors as well as varnished parquet and veneer flooring can be removed with CC Elatex Stain Remover (univer-sal stain remover).Please be aware that you may increase the gloss level on the laminate/ Nadura surface by removing the stain with increased pressure with a white pad. For this reason, try this out in an inconspicuous place or left-over plank first.
* Water-based care products (e.g. polymer dis-persions) or CC Elatex Stain Remover (universal stain remover) can penetrate the seams of the planks in the case of improper adhesion or incomplete jointing, leading to swelling of the carrier material.
Cleaning and care instructions
Care products

44
I. Warranty cover: MeisterWerke Schulte GmbH, Johannes-Schulte-Allee 5, D-59602 Rüthen-Meiste, warrants, over and beyond statutory rights under § 437 of the German Civil Code (replacement, cancellation of contract, re-duction of purchase price and compensation), a warranty under the following warranty con-ditions. The parquet’s extraordinary durability is achieved by the three-layer structure (wood wear layer, middle layer and backing) using a special middle layer made from a high density fibreboard. Provided the product is properly used as intended in living areas, MeisterWerke warrants the durability of the three-layer glued structure of the product. The warranty does not cover damage caused by incorrect handling and inappropriate use, especially loads and wear of the flooring not in accordance with the intend-ed purpose, mechanical damage by furniture, pets etc. such as depressions and scratches. Optical faults such as joints, colour changes due to the effects of light or seasonal, climatic warp-ing of individual planks are also not covered. Also excluded is damage due to an infestation of insects, incorrect care, cleaning or mainte-nance of the surface and the surface coating, especially chemical damage and/or damage due to the effects of moisture. The warranty applies exclusively to products sold as perfect and to use in normal-wear, private living areas, with the exception of damp rooms, for example bathrooms or saunas. The warranty only applies to products that have been purchased and in-stalled within the European Union.
II. Warranty period: The warranty period for MEISTER parquet flooring is 35 years after the appropriate date of purchase.
III. Warranty conditions: The flooring must be fitted professionally and especially in ac-cordance with the fitting instructions accom-panying every third product packaging, in the permitted areas of use stated therein. In par-ticular the instructions relating to checking moisture in the substrate and the instructions for installation over underfloor heating must be observed. The material must be checked for any material faults or damage before being fitted. Similarly, the flooring must be cared for and cleaned according to the care instructions supplied with the product. If these installation and care instructions are missing and/or in-complete, the claimant must request these in-structions from a specialist retailer or directly from MeisterWerke before starting the fitting. It should also be noted that the surface coat-ing is a protective coating for the wear layer of wood underneath and is subject to normal wear. Therefore the warranty does not cover wearing down of this coating. When signs of wear appear, a specialist company must be engaged to expertly renew the surface in good time and to the extent necessary. Therefore the warranty does not cover damage result-ing from incorrect installation, incorrect care or cleaning or a failure to expertly renew the surface coating in good time.
IV. Reporting a warranty claim: Any com-plaint must be made in writing, enclosing the original invoice from the retailer, which serves as a certificate of warranty. If it is not possi-ble to present the original retailer‘s invoice, any claim under the warranty is excluded. Following receipt of the claim, MeisterWerke must notify the customer within four weeks of
whether a warranty claim has been acknowl-edged. If no notification is given within this period, the warranty claim is deemed to have been rejected. During this period, Meister-Werke or a third party employed by them must be granted access to the flooring which is the subject of the complaint on site in order to in-vestigate whether the claim is justified.
V. Scope of the warranty: When a warranty claim is acknowledged, MeisterWerke will re-pair the defective floor element or alternative-ly provide replacement material of the same quality – if at all possible from the same range – for the entire contiguous area in which the problem has occurred. The customer can col-lect the replacement material free of charge from the original sales outlet stated in the original invoice, excluding any further claims over and beyond this, including but not only claims to compensation for removal or fitting of the flooring, or to compensation for conse-quential damage that has occurred other than in the product supplied itself.
VI. Limitation of warranty: The warranty period is not extended by a warranty claim. Claims under the warranty expire six months from the date of MeisterWerke‘s receipt of the customer‘s written complaint (see IV.), but no earlier than the expiry of the warranty period.from the date of MeisterWerke‘s receipt of the customer‘s written complaint (see IV.), but no earlier than the expiry of the warranty period.
Warranty conditions
Longlife warranty on MeisterWerke parquet

45
I. Warranty cover: MeisterWerke Schulte GmbH, Johannes-Schulte-Allee 5, 59602 Rüthen-Meiste, provides a warranty, over and beyond statutory rights under § 437 of the German Civil Code (replacement, cancellation of contract, reduction of purchase price and compensation), under the following warranty conditions. MeisterWerke warrants the durability of the multilayer product structure relating to pressing and fusing the single layers with one another. The warranty does not cover any damage caused by incorrect treatment and use. In particular, any load or wear on the flooring that is not the purpose for which the flooring was intended, mechanical damage caused by furniture, pets etc. such as dents and scratches, for example. Visual damage such as joints, changes in colour due to exposure to light and the deformation of individual planks caused by seasonal, room climate conditions are also not covered. Damage as a result of insect infestation, improper care, cleaning or maintenance of the surface and surface coating, specifically chemical damage or damage caused by the penetration of moisture is also not included. The warranty applies exclusively to first choice products and use in private living areas subject to normal wear up to heavy-wear areas, with the exception of humid rooms, such as bathrooms or saunas. The warranty only applies to products that were purchased and fitted within the European Union.
II. Warranty period: The warranty period is in accordance with the warranty time stated for each individual product and for the concrete type of use described, after the appropriate date of purchase respectively.
III. Warranty conditions: The flooring must have been fitted in accordance with the installation instructions enclosed in every third product package, in the permitted areas of use named within the instructions. In particular, information in the installation instructions about checking the humidity of subsurfaces and the installation on underfloor heating must be observed. The material must be checked for any material faults or damage before being fitted. The floor must also be maintained and cleaned according to the care instructions enclosed with the product. If these installation or care instructions are missing and/or incomplete, the claimant is obliged to request this information from their specialist retailer or directly from MeisterWerke before fitting the flooring. In addition, it should be noted that the surface coating is a protective layer for the wooden wear layer underneath it and is subject to normal wear. The wear of this surface coating is therefore not covered by the warranty. If signs of wear appear, the surface must be renewed in good time, properly to the required extent by a specialist company. The warranty therefore does not extend to damage that results from improper installation, cleaning or care, as well as the delayed improper repair of the surface coating.
IV. Reporting a warranty claim: Any complaint must be made in writing, enclosing the original invoice from the specialist retailer, which serves as a certificate of warranty. If it is not possible to present the original retailer‘s invoice, any claim under the warranty is excluded. Once the claim
is received by MeisterWerke, it must notify the customer within four weeks whether a warranty claim has been acknowledged. If no notification is given within this period, the warranty claim is deemed to have been rejected. During this period, MeisterWerke or a third party employed by them must be granted access to the product that is the subject of the complaint on site in order to investigate the claim.
V. Scope of the warranty: When a warranty claim is acknowledged, MeisterWerke will at their discretion repair the faulty floor element or alternatively provide replacement material of the same quality, if at all possible from the same range, for the entire room in which the problem has occurred. The customer can collect the replacement material free of charge from the original sales outlet stated in the original invoice, excluding any further claims over and beyond this, including but not limited to compensation claims for the removal or fitting of the flooring or for con-sequential damage that has occurred other than in the product supplied itself.
VI. Limitation of warranty: The warranty period is not extended by a warranty claim. Claims under the warranty expire six months from the date of MeisterWerke‘s receipt of the customer‘s written complaint (see IV.), but no earlier than the expiry of the warranty period.
Warranty conditions
Warranty on MeisterWerke Lindura wood flooring

46
I. Warranty cover: MeisterWerke Schulte GmbH, Johannes-Schulte-Allee 5, D-59602 Rüthen-Meiste, warrants, over and beyond statutory rights under § 437 of the German Civil Code (replacement, cancellation of contract, reduction of purchase price and compensation), a warranty under the follow-ing warranty conditions. Provided the product is properly used as intended in living areas, MeisterWerke warrants the durability of the three-layer glued structure of the product. The warranty does not cover damage caused by incorrect handling and inappropriate use, especially loads and wear of the flooring not in accordance with the intended purpose, me-chanical damage by furniture, pets etc. such as depressions and scratches. Optical faults such as joints, colour changes due to the effects of light or seasonal, climatic warping of individual planks are also not covered. Also excluded is damage due to an infestation of insects, incorrect care, cleaning or mainte-nance of the surface and the surface coating, especially chemical damage and/or damage due to the effects of moisture. The warranty applies exclusively to products sold as perfect and to use in normal-wear, private living areas, with the exception of damp rooms, for example bathrooms or saunas. The warranty only applies to products that have been pur-chased and installed within the European Union.
II. Warranty period: The warranty period for the cork floor products KC 400 S and linoleum floor LIC 400 S and LIB 400 S is 10 years, after the appropriate date of purchase respectively.
III. Warranty conditions: The flooring must be fitted professionally and especially in ac-cordance with the fitting instructions accom-
panying every third product packaging, in the permitted areas of use stated therein. In par-ticular the instructions relating to checking moisture in the substrate and the instructions for installation over underfloor heating must be observed. The material must be checked for any material faults or damage before being fitted. Similarly, the flooring must be cared for and cleaned according to the care instructions supplied with the product. If these installa-tion and care instructions are missing and/or incomplete, the claimant must request these instructions from a specialist retailer or directly from MeisterWerke before starting the fitting. It should also be noted that the surface coating is a protective coating for the wear layer of cork or linoleum underneath and is subject to normal wear. Therefore the warranty does not cover wearing down of this coating. When signs of wear appear, a spe-cialist company must be engaged to expertly renew the surface in good time and to the extent necessary. Therefore the warranty does not cover damage resulting from incor-rect installation, incorrect care or cleaning or a failure to expertly renew the surface coating in good time.
IV. Reporting a warranty claim: Any com-plaint must be made in writing, enclosing the original invoice from the retailer, which serves as a certificate of warranty. If it is not possible to present the original retailer‘s invoice, any claim under the warranty is excluded. Follow-ing receipt of the claim, MeisterWerke must notify the customer within four weeks of whether a warranty claim has been acknowl-edged. If no notification is given within this period, the warranty claim is deemed to have been rejected. During this period, Meister-Werke or a third party employed by them must
be granted access to the flooring which is the subject of the complaint on site in order to in-vestigate whether the claim is justified.
V. Scope of the warranty:When a warranty claim is acknowledged, MeisterWerke will repair the defective floor element or alternatively provide replacement material of the same quality – if at all possible from the same range – for the entire contigu-ous area in which the problem has occurred.The customer can collect the replacement material free of charge from the original sales outlet stated in the original invoice, excluding any further claims over and beyond this, in-cluding but not only claims to compensation for removal or fitting of the flooring, or to com-pensation for consequential damage that has occurred other than in the product supplied itself.
VI. Limitation of warranty: The warranty period is not extended by a warranty claim. Claims under the warranty expire six months from the date of MeisterWerke‘s receipt of the customer‘s written complaint (see IV.), but no earlier than the expiry of the warranty period.
Warranty conditions
Warranty on MeisterWerke cork and linoleum flooring

47
I. Warranty cover: MeisterWerke Schulte GmbH, Johannes-Schulte-Allee 5, D-59602 Rüthen-Meiste, warrants, over and beyond statutory rights under § 437 of the German Civil Code (replacement, cancellation of contract, reduction of purchase price and compensation), that the decorative/veneer coating on the purchased product will not wear away within the warranty period provided the product is properly used for the purpose for which it is intended, according to the follow-ing warranty conditions. Any spot on which the decorative coating has been removed down to the substrate material over an area of at least 1cm2 is regarded as having worn away, though signs of wear on the edge area of an individual floor element are excluded from this warranty. Any improper use of the floor for a purpose for which it is not intended, as well as mechanical damage and non-compli-ance with the MeisterWerke care instructions for the respective floor exclude this warranty. The warranty applies exclusively to products sold as perfect and to use in private or com-mercial areas depending on the wear class, with the exception of damp rooms, for example bathrooms or saunas. The warranty only applies to products that have been pur-chased and installed within the European Union.
II. Warranty period: The warranty period is in accordance with the warranty time stated for each individual product and for the concrete type of use described.
III. Warranty conditions: The flooring must be fitted professionally and especially in ac-cordance with the fitting instructions accom-panying every third product packaging, in the
permitted areas of use stated therein. In par-ticular the instructions relating to checking moisture in the substrate and the instructions for installation over under floor heating must be observed. The material must be checked for any material faults or damage before being fitted. Similarly, the flooring must be cared for and cleaned according to the care instructions supplied with the product. If these installation and care instructions are missing and/or in-complete, the claimant must request these in-structions from a specialist retailer or directly from MeisterWerke before starting the fitting.
IV. Reporting a warranty claim: Any com-plaint must be made in writing, enclosing the original invoice from the retailer, which serves as a certificate of warranty. If it is not possible to present the original retailer‘s invoice, any claim under the warranty is excluded. Follow-ing receipt of the claim, MeisterWerke must notify the customer within four weeks of whether a warranty claim has been acknowl-edged. If no notification is given within this period, the warranty claim is deemed to have been rejected. During this period, Meister-Werke or a third party employed by them must be granted access to the flooring which is the subject of the complaint on site in order to in-vestigate whether the claim is justified.
V. Scope of the warranty: When a warranty claim is acknowledged, MeisterWerke will repair the defective floor element or alter-natively provide replacement material of the same quality – if at all possible from the same range – for the entire contiguous area in which the problem has occurred. The customer can collect the replacement material free of charge from the original sales outlet stated
in the original invoice, excluding any further claims over and beyond this, including but not only claims to compensation for removal or fitting of the flooring, or to compensation for consequential damage that has occurred other than in the product supplied itself.
VI. Limitation of warranty: The warranty period is not extended by a warranty claim. Claims under the warranty expire six months from the date of MeisterWerke‘s receipt of the customer‘s written complaint (see IV.), but no earlier than the expiry of the warranty period.
Warranty conditions
Warranty of wear resistance for MeisterWerke design, Nadura and laminate flooring

© 2015 by MeisterWerke Schulte GmbHFor reasons of printing technology, colours and structures may vary from the reproductions shown here. No responsibility is assumed for errors.
MEISTER – a brand of MeisterWerke Schulte GmbH
Johannes-Schulte-Allee 5 | 59602 Rüthen-Meiste | GERMANY
Phone: +49 2952 816-0 | Fax +49 2952 816-66 | www.meister.com
GB
01 |15