floral coaster set coaster set by debby forshey-choma palette: decoart americana acrylics antique...
TRANSCRIPT

Floral Coaster Setby Debby Forshey-Choma
Floral Coaster SetBy Debby Forshey-Choma
Palette: DecoArt Americana AcrylicsAntique Gold #13009 Antique Rose #13156 Avocado #13052 Brandy Wine #13079 Burnt Sienna #13063 Burnt Umber #13064 Butter #13252 Cool Neutral #13089 Dioxazine Purple #13101 Golden Straw #13168Grape Juice #13236 Lamp Black #13067Light Avocado #13106 Light Buttermilk #13164Light Cinnamon #13114 Melon #13245Midnite Green #13084 Neutral Grey #13095Plantation Pine #13113 Red Violet #13140Santa Red #13170 Snow White #13001Soft Black #13155 Tangelo Orange #13196Wisteria #13211
Surface:Coaster Box #62715
Misc. Supplies:DecoArt DuraClear Matte Varnish #87395DecoArt DuraClear Satin Varnish #87394DecoArt Faux Finish Glaze Medium #87401DecoArt MultiPurpose Sealer #87392White Graphite Paper #70139Sea Sponge Pack #70391Soft Grip Embossing Stylus Set #70125Spattering Tool (or Old Toothbrush)
Brushes: I have used Royal Brushes for this project. Comparable Papillon by the Artist’s Club are in paran-theses.Royal Brushes#1360 – small, medium Debby’s Texture brushes (Blending Set #20168) #4160 – 5/8 Majestic angular (Angular Shader, size 5/8” #20112)#930 – ¼ Filbert Comb (Filbert Comb, size ¼” #20105) #4170 – 2, 4 Majestic fi lberts (Filbert, size 2 #20116; size 4 #20117) #1400 – ½ SG White Blending Mop (Maxine Thomas Mop, size ½” #27179)#3080 – 1 Oval Wash Combo (Varnish Set #20170) #4150 – 2, 4, 6, 8 Majestic shaders (Shader, size 2 #20125; size 4 #20126; size 6 #20127; size 8 #20129)#4585 – 10/0, 5/0, 0 Majestic liners (Liner, size 10/0 #20145; size 0 #20146) #4700 – ¾ Majestic glaze wash (Glaze Wash, size ¾” #20102)
1
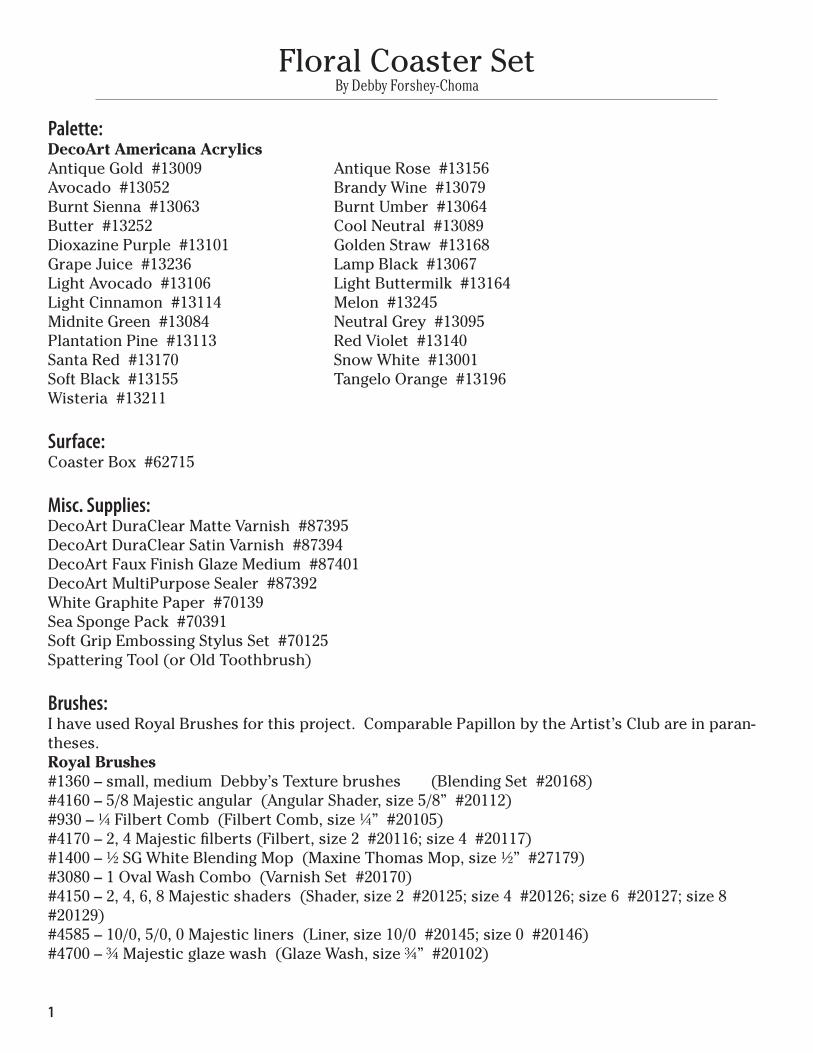
Preparation:1. Seal the coaster box and coasters; with Multi Purpose Sealer, using the glaze wash brush. Lightly sand, wipe off with a lint-free cloth. Basecoat the entire coaster box, side edges and back sides of the coasters with Midnite Green; using the glaze wash brush, achieve an opaque coverage. Basecoat the surface of the coasters with Lamp Black; us-ing the glaze wash brush, achieve an opaque coverage.
Using the white graphite paper, a traced pat-tern and a stylus transfer the designs to the appropriate surfaces.
Painting Instructions:Painting Flowers2. Refer to individual instructions to complete painting fl owers. For proper use of the Texture brush, use the following method. Dampen the bristles with water to start the separation of bristles. Tap bristles into the paint on your palette, hold it perpendicular to your palette, pounce it up and down to get some of the paint off – keeping the paint sparse on the brush. Note – this brush can be used on the whole foot or just the toe. Tap lightly on the surface, dance with the brush up and down, rolling the brush in different directions in between your fi ngers when it is up in the air (like dancing the twist, light on your feet). Allow some drying time in between dances so the paint sets up and you don’t end up with a globby or muddy look.
Faux Finish3. The complete coaster box, side edges and back sides of the coasters are faux fi nished; they are the areas that have been basecoated with Midnite Green. Read through the steps in faux fi nishing before you begin First, to be able to work easier with the glaze mixture and have more open time to manipulate the faux fi nish effect, I apply one coat of satin varnish to the areas to be faux fi nished. Use the Oval Wash Combo to apply the varnish; it doesn’t leave any visible brush stroke marks after the var-nish has dried.Following the label instructions on the Faux Finish Glaze Medium; mix the glaze with Avo-cado and water. Work on one area at a time. Lightly brush over the area to be faux fi nished
2
with clean water; using the glaze wash brush. Then brush on the glaze mixture; using the glaze wash brush.With the silk sponge; which has been dampened with water and squeezed out, dance over the area. The sponge will be picking up some of the glaze mixture, allowing some of the background color to show through. Continue to work the sponge over the surface to manipulate and soften the fi nished look. Rinse the sponge and repeat the same steps on the remaining areas to be faux fi n-ished.
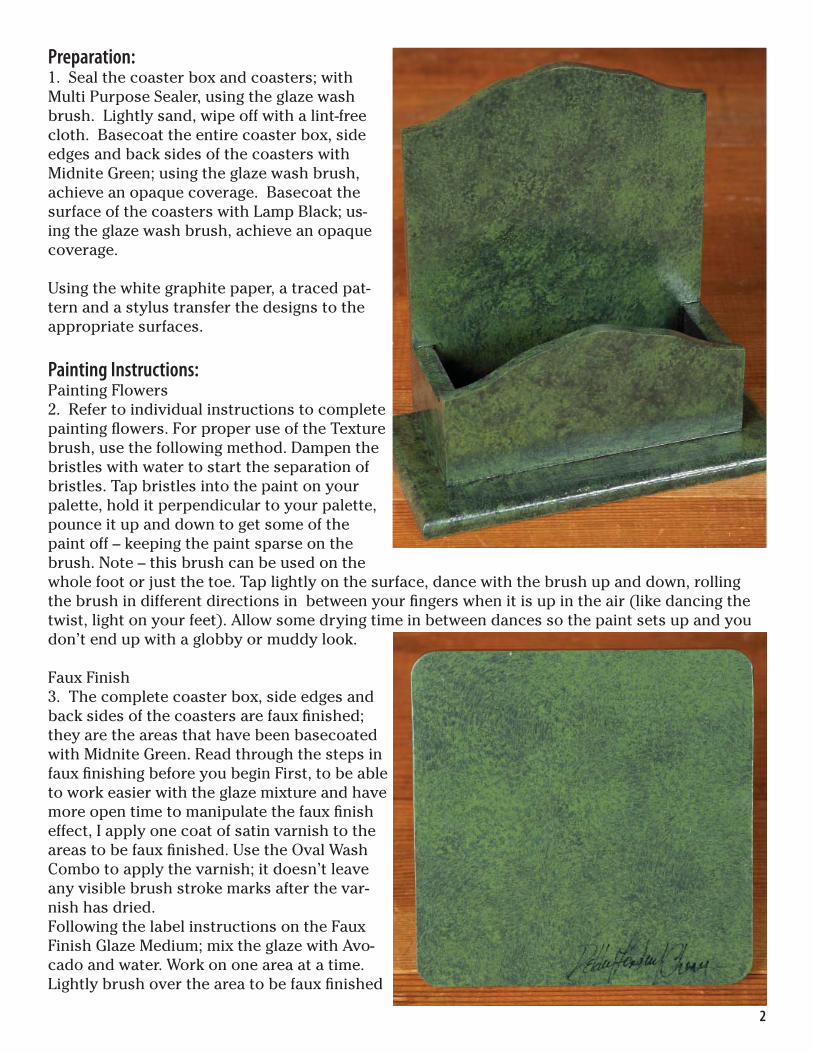
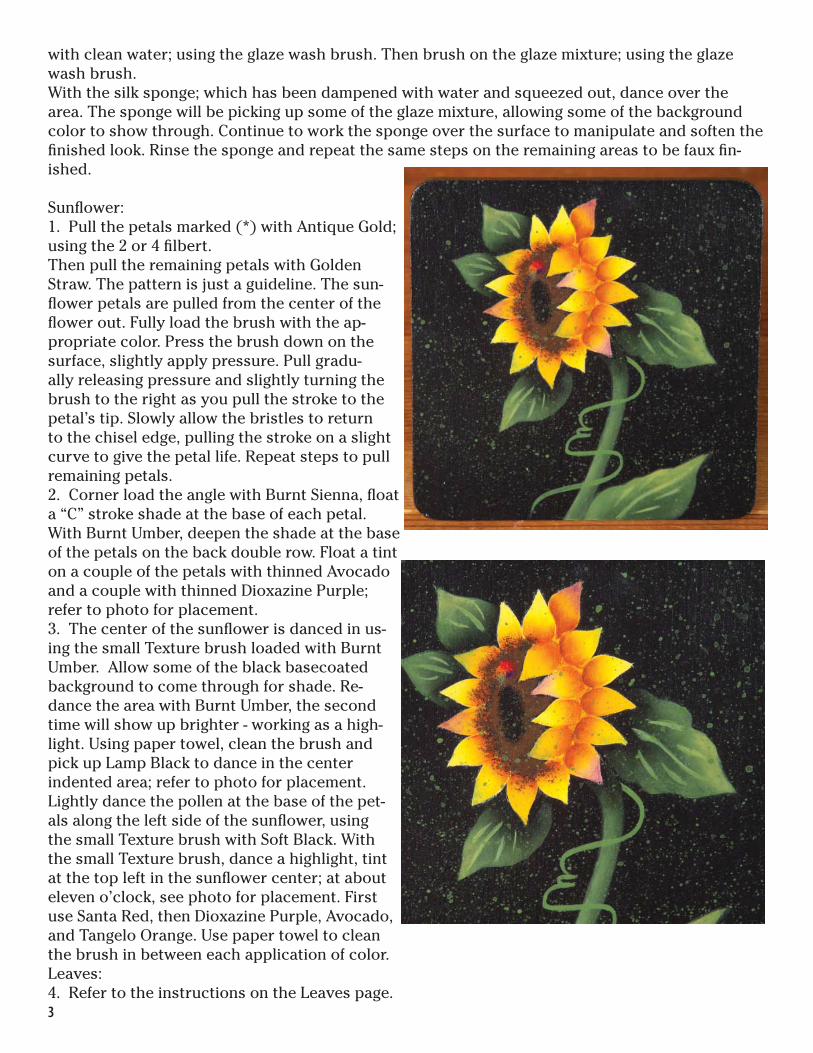
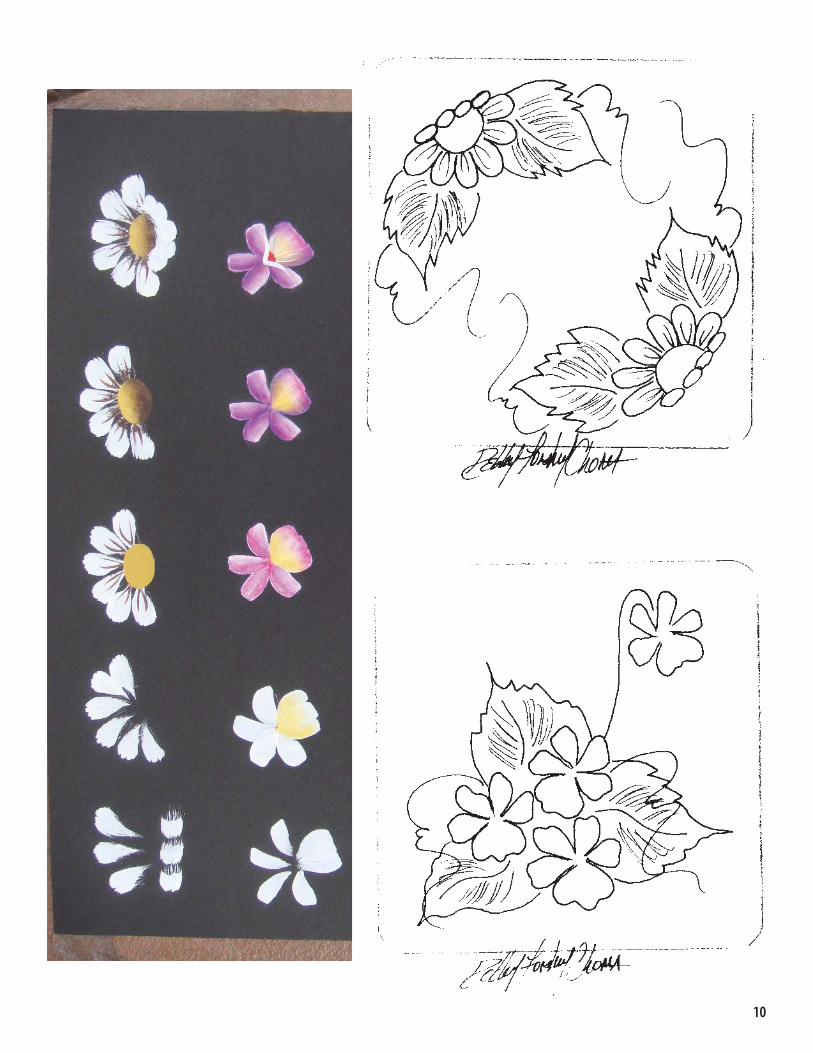
Sunfl ower:1. Pull the petals marked (*) with Antique Gold; using the 2 or 4 fi lbert. Then pull the remaining petals with Golden Straw. The pattern is just a guideline. The sun-fl ower petals are pulled from the center of the fl ower out. Fully load the brush with the ap-propriate color. Press the brush down on the surface, slightly apply pressure. Pull gradu-ally releasing pressure and slightly turning the brush to the right as you pull the stroke to the petal’s tip. Slowly allow the bristles to return to the chisel edge, pulling the stroke on a slight curve to give the petal life. Repeat steps to pull remaining petals.2. Corner load the angle with Burnt Sienna, fl oat a “C” stroke shade at the base of each petal. With Burnt Umber, deepen the shade at the base of the petals on the back double row. Float a tint on a couple of the petals with thinned Avocado and a couple with thinned Dioxazine Purple; refer to photo for placement.3. The center of the sunfl ower is danced in us-ing the small Texture brush loaded with Burnt Umber. Allow some of the black basecoated background to come through for shade. Re-dance the area with Burnt Umber, the second time will show up brighter - working as a high-light. Using paper towel, clean the brush and pick up Lamp Black to dance in the center indented area; refer to photo for placement. Lightly dance the pollen at the base of the pet-als along the left side of the sunfl ower, using the small Texture brush with Soft Black. With the small Texture brush, dance a highlight, tint at the top left in the sunfl ower center; at about eleven o’clock, see photo for placement. First use Santa Red, then Dioxazine Purple, Avocado, and Tangelo Orange. Use paper towel to clean the brush in between each application of color.Leaves:4. Refer to the instructions on the Leaves page.3

Violets:1. A violet has fi ve petals, four being single comma strokes. The fi fth petal opens into the lead petal, this petal is larger and requires three strokes. The pattern is just a guideline. Load the 2 or 4 shader with Snow White. Press down on the surface at the petal edge. Apply pressure. Pull, gradually releasing pressure and slightly turning the brush to the right as you pull the stroke towards the center. Slowly allow the bristles to return to the chisel edge pulling the stroke on a slight curve to give the petal life. Repeat steps to pull the remaining petals.2. Corner load the angle with Golden Straw, fl oat a shade in the throat area of each violet.3. With the angle corner loaded with Red Violet, fl oat over each petal. Work from the petal edge in, leaving a hint of white in some places for highlight. Corner load the angle with Dioxazine Purple and randomly deepen some of the Red Violet fl oats.4. With the 10/0 liner and Butter, pull a few wisps in the throat area. Place a smudge of Santa Red in the throat area; using the 10/0 liner. Allow to dry. To cre-ate the mustache, use Snow White and the 10/0 liner, pull a comma stroke on each side of the center to tie all fi ve petals together. Leaves:5. Refer to the instructions on the Leaves page.
Daises:1. Pull the full size petals with Snow White; the small back oval petals will be pulled after the centers have been completed. Use the 1/4 Filbert Comb to pull the petals. Pulling the petals with the Filbert Comb will give a realistic rough edge to the petals. The petal can be made in a single stroke (which does look bet-ter); but if necessary, you can go back over the stroke. The pattern is just a guideline, you could end up with more or fewer petals. Fully load the brush with Snow White, press down on the surface to allow the bristles to spread. Gradually release pressure and slightly turn the brush to the right as you pull the stroke towards the center. Slow down to allow the bristles to return to the chisel edge. Think: press...pull...turn...lift...2. Using the 10/0 liner, pull veins in the petals with thinned Burnt Umber. 3. With the 4 fi lbert and Antique Gold, basecoat in the centers. Basecoat over part of the oval petals; these back petals will be pulled over the top later. The cen-ter will require two or three coats. Corner load the angle with Soft Black, fl oat a shade along the back
4
5
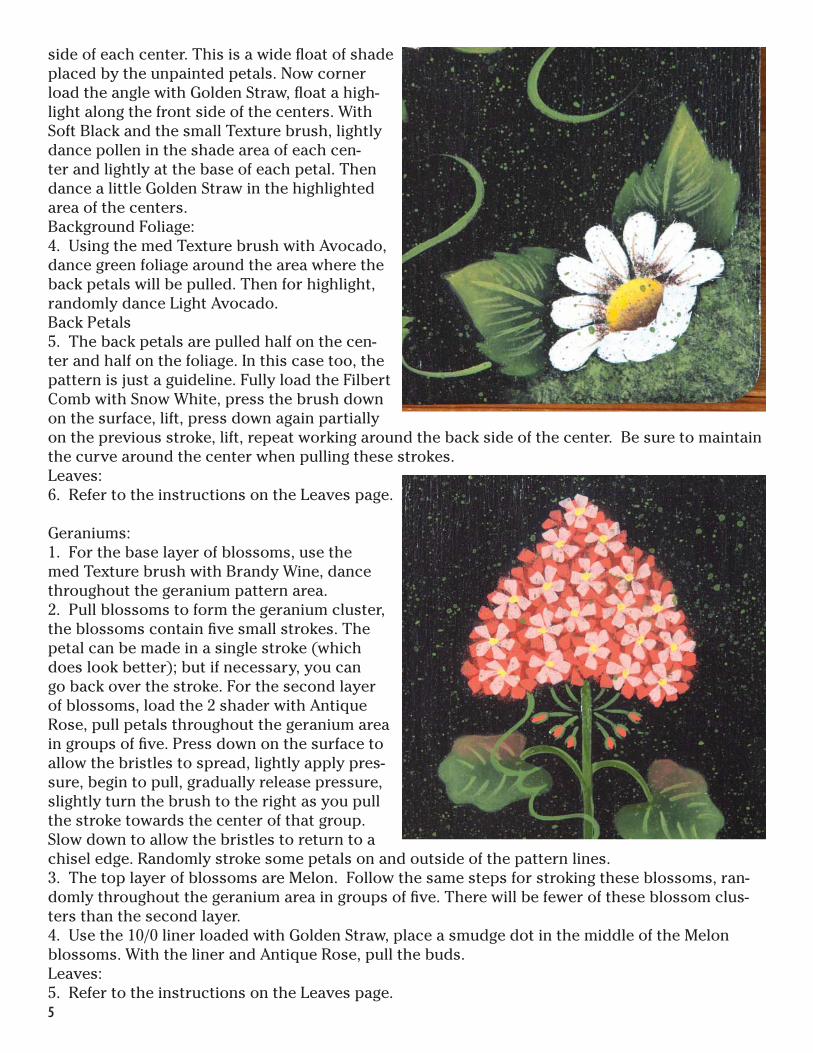
side of each center. This is a wide fl oat of shade placed by the unpainted petals. Now corner load the angle with Golden Straw, fl oat a high-light along the front side of the centers. With Soft Black and the small Texture brush, lightly dance pollen in the shade area of each cen-ter and lightly at the base of each petal. Then dance a little Golden Straw in the highlighted area of the centers.Background Foliage:4. Using the med Texture brush with Avocado, dance green foliage around the area where the back petals will be pulled. Then for highlight, randomly dance Light Avocado.Back Petals5. The back petals are pulled half on the cen-ter and half on the foliage. In this case too, the pattern is just a guideline. Fully load the Filbert Comb with Snow White, press the brush down on the surface, lift, press down again partially on the previous stroke, lift, repeat working around the back side of the center. Be sure to maintain the curve around the center when pulling these strokes.Leaves:6. Refer to the instructions on the Leaves page.
Geraniums:1. For the base layer of blossoms, use the med Texture brush with Brandy Wine, dance throughout the geranium pattern area. 2. Pull blossoms to form the geranium cluster, the blossoms contain fi ve small strokes. The petal can be made in a single stroke (which does look better); but if necessary, you can go back over the stroke. For the second layer of blossoms, load the 2 shader with Antique Rose, pull petals throughout the geranium area in groups of fi ve. Press down on the surface to allow the bristles to spread, lightly apply pres-sure, begin to pull, gradually release pressure, slightly turn the brush to the right as you pull the stroke towards the center of that group. Slow down to allow the bristles to return to a chisel edge. Randomly stroke some petals on and outside of the pattern lines. 3. The top layer of blossoms are Melon. Follow the same steps for stroking these blossoms, ran-domly throughout the geranium area in groups of fi ve. There will be fewer of these blossom clus-ters than the second layer.4. Use the 10/0 liner loaded with Golden Straw, place a smudge dot in the middle of the Melon blossoms. With the liner and Antique Rose, pull the buds.Leaves:5. Refer to the instructions on the Leaves page.
6
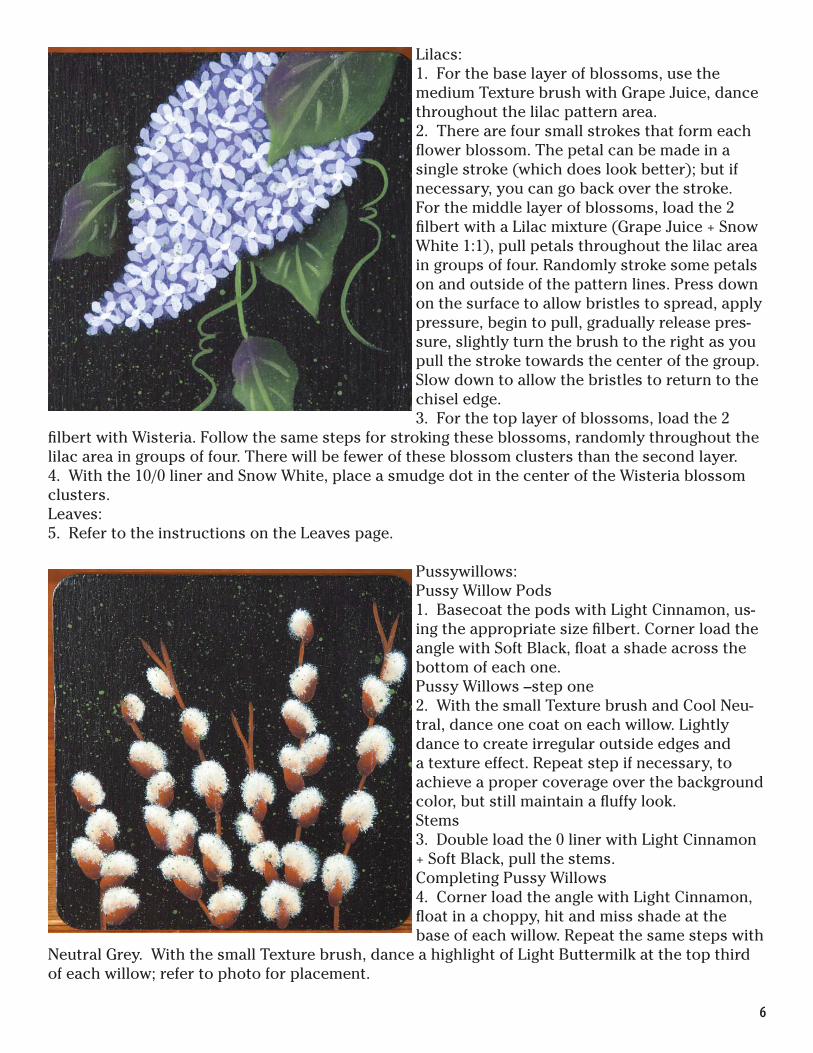
Lilacs:1. For the base layer of blossoms, use the medium Texture brush with Grape Juice, dance throughout the lilac pattern area. 2. There are four small strokes that form each fl ower blossom. The petal can be made in a single stroke (which does look better); but if necessary, you can go back over the stroke. For the middle layer of blossoms, load the 2 fi lbert with a Lilac mixture (Grape Juice + Snow White 1:1), pull petals throughout the lilac area in groups of four. Randomly stroke some petals on and outside of the pattern lines. Press down on the surface to allow bristles to spread, apply pressure, begin to pull, gradually release pres-sure, slightly turn the brush to the right as you pull the stroke towards the center of the group. Slow down to allow the bristles to return to the chisel edge. 3. For the top layer of blossoms, load the 2
fi lbert with Wisteria. Follow the same steps for stroking these blossoms, randomly throughout the lilac area in groups of four. There will be fewer of these blossom clusters than the second layer.4. With the 10/0 liner and Snow White, place a smudge dot in the center of the Wisteria blossom clusters.Leaves:5. Refer to the instructions on the Leaves page.
Pussywillows:Pussy Willow Pods1. Basecoat the pods with Light Cinnamon, us-ing the appropriate size fi lbert. Corner load the angle with Soft Black, fl oat a shade across the bottom of each one.Pussy Willows –step one2. With the small Texture brush and Cool Neu-tral, dance one coat on each willow. Lightly dance to create irregular outside edges and a texture effect. Repeat step if necessary, to achieve a proper coverage over the background color, but still maintain a fl uffy look.Stems3. Double load the 0 liner with Light Cinnamon + Soft Black, pull the stems. Completing Pussy Willows4. Corner load the angle with Light Cinnamon, fl oat in a choppy, hit and miss shade at the base of each willow. Repeat the same steps with
Neutral Grey. With the small Texture brush, dance a highlight of Light Buttermilk at the top third of each willow; refer to photo for placement.
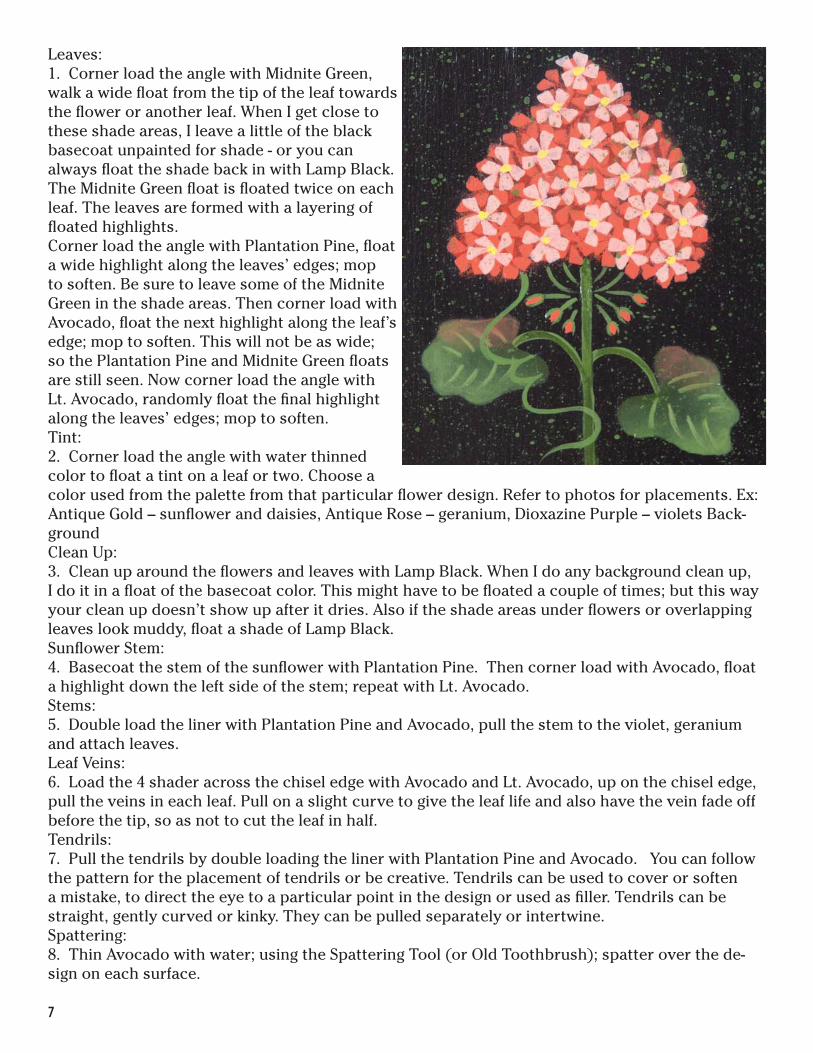
Leaves:1. Corner load the angle with Midnite Green, walk a wide fl oat from the tip of the leaf towards the fl ower or another leaf. When I get close to these shade areas, I leave a little of the black basecoat unpainted for shade - or you can always fl oat the shade back in with Lamp Black. The Midnite Green fl oat is fl oated twice on each leaf. The leaves are formed with a layering of fl oated highlights. Corner load the angle with Plantation Pine, fl oat a wide highlight along the leaves’ edges; mop to soften. Be sure to leave some of the Midnite Green in the shade areas. Then corner load with Avocado, fl oat the next highlight along the leaf’s edge; mop to soften. This will not be as wide; so the Plantation Pine and Midnite Green fl oats are still seen. Now corner load the angle with Lt. Avocado, randomly fl oat the fi nal highlight along the leaves’ edges; mop to soften.Tint:2. Corner load the angle with water thinned color to fl oat a tint on a leaf or two. Choose a color used from the palette from that particular fl ower design. Refer to photos for placements. Ex: Antique Gold – sunfl ower and daisies, Antique Rose – geranium, Dioxazine Purple – violets Back-ground Clean Up:3. Clean up around the fl owers and leaves with Lamp Black. When I do any background clean up, I do it in a fl oat of the basecoat color. This might have to be fl oated a couple of times; but this way your clean up doesn’t show up after it dries. Also if the shade areas under fl owers or overlapping leaves look muddy, fl oat a shade of Lamp Black.Sunfl ower Stem:4. Basecoat the stem of the sunfl ower with Plantation Pine. Then corner load with Avocado, fl oat a highlight down the left side of the stem; repeat with Lt. Avocado.Stems:5. Double load the liner with Plantation Pine and Avocado, pull the stem to the violet, geranium and attach leaves. Leaf Veins:6. Load the 4 shader across the chisel edge with Avocado and Lt. Avocado, up on the chisel edge, pull the veins in each leaf. Pull on a slight curve to give the leaf life and also have the vein fade off before the tip, so as not to cut the leaf in half.Tendrils:7. Pull the tendrils by double loading the liner with Plantation Pine and Avocado. You can follow the pattern for the placement of tendrils or be creative. Tendrils can be used to cover or soften a mistake, to direct the eye to a particular point in the design or used as fi ller. Tendrils can be straight, gently curved or kinky. They can be pulled separately or intertwine.Spattering:8. Thin Avocado with water; using the Spattering Tool (or Old Toothbrush); spatter over the de-sign on each surface.
7
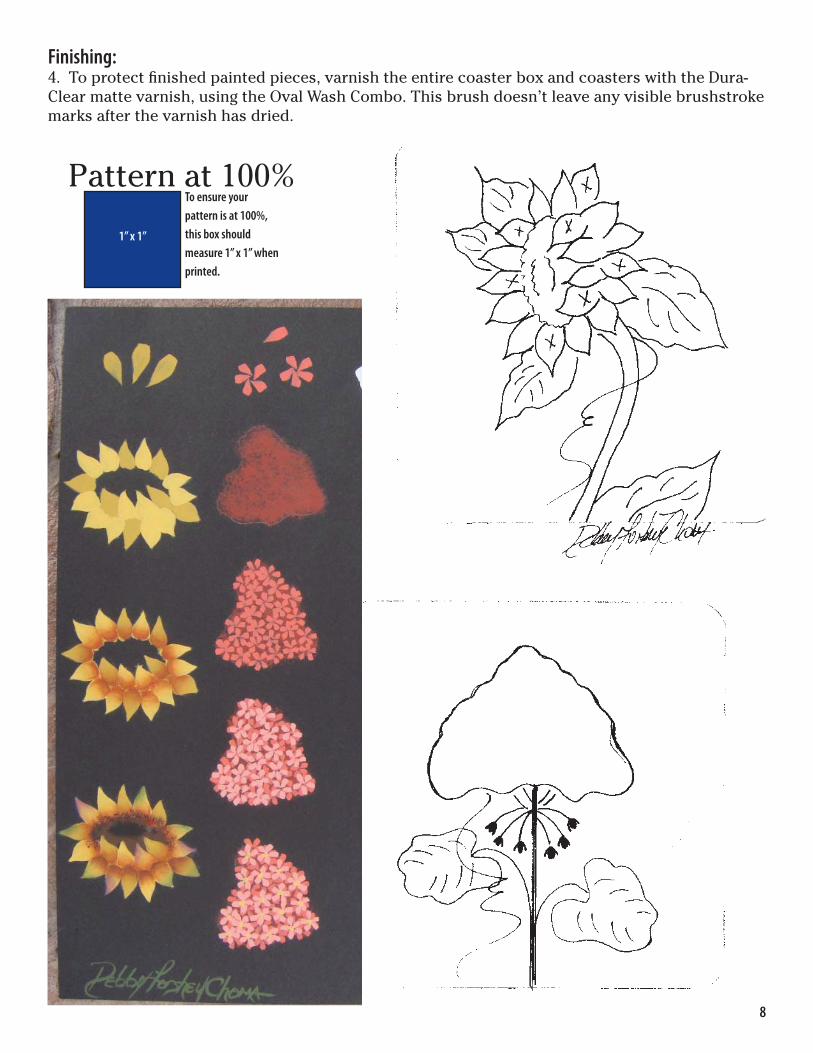
Pattern at 100%
1” x 1”
To ensure your pattern is at 100%, this box should measure 1” x 1” when printed.
Finishing:4. To protect fi nished painted pieces, varnish the entire coaster box and coasters with the Dura-Clear matte varnish, using the Oval Wash Combo. This brush doesn’t leave any visible brushstroke marks after the varnish has dried.
8
9
10
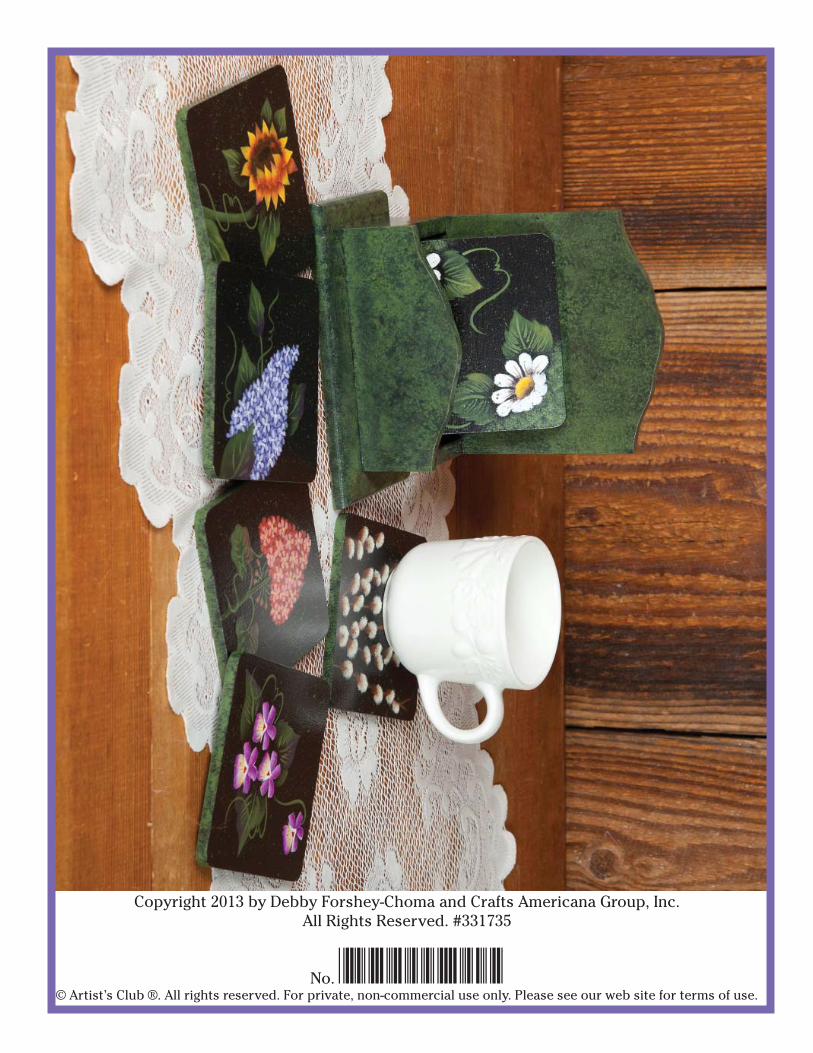
Copyright 2013 by Debby Forshey-Choma and Crafts Americana Group, Inc. All Rights Reserved. #331735
No. *A331735*© Artist’s Club ®. All rights reserved. For private, non-commercial use only. Please see our web site for terms of use.