florida shots™ setting up patient shot record...
TRANSCRIPT

Florida SHOTS™
SETTING UP PATIENT SHOT RECORD RETRIEVAL
Contact Information
www.flshots.com
Free help desk: 877-888-SHOT (7468) Monday – Friday, 8 A.M. to 5 P.M. Eastern

OVERVIEW
Quick Content Finder
1
CREATING A PIN ONLY 2
TO-BE CERTIFIED LIST 7
CREATING A CERTIFIED (E-SIGNED) FORM 680 AND PIN 8
HOW PARENTS/GUARDIANS WILL GET THE CERTIFIED FORM 680 11
USER PERMISSION SETTINGS 14

SETTING UP PATIENT SHOT RECORD RETRIEVAL 1 AS OF NOVEMBER 11, 2015
1. OVERVIEW
The Florida State Health Online Tracking System (FLSHOTS) is now offering parents and guardians a way to get and print their children’s Certificates of Immunization (DH Form 680s) from their home computers.
Healthcare providers can now create a PIN that will be attached to a Certified (e-signed) Form 680 and will allow parents to access the Certified 680 from their home computers. The form is legal and valid in the state of Florida for admittance to schools and daycare facilities and may be printed on standard white paper.
Parents accessing the Certified Form 680 from home will be required to enter the Certification PIN and State IMM Id found on the information sheet their healthcare provider will give them. A PDF version of the form allows it to be printed or saved. Healthcare providers will have the options to create a PIN before creating a Certified (e-signed) Form 680; create both the PIN and the Certified 680 at the same time; or not create a PIN at all for a Certified 680.

SETTING UP PATIENT SHOT RECORD RETRIEVAL 2 AS OF NOVEMBER 11, 2015
2. CREATING A PIN ONLY
You may choose to create the PIN while the parent is in the office so the instruction sheet may be handed to them, but may not have time to update and create the Form 680 at the time of the visit. Follow the steps listed below to create a PIN:
• Open the patient’s record in Florida SHOTS.
• On the menu bar select “Create Pin” located under the Form 680 header.
The “CREATE FORM 680 CERTIFICATION PIN” page will open. The following information is found on this page:

SETTING UP PATIENT SHOT RECORD RETRIEVAL 3 AS OF NOVEMBER 11, 2015
2. CREATING A PIN ONLY (cont.)
• Patient Name – The patient name will automatically appear.
• Parent/Guardian Name – The parent or guardian on record will appear. If no parent/guardian name exists in the child’s record the following notice will appear and prompt a parent or guardian name to be added:
• Certification Pin – This will not appear until you have created the PIN.
• Created – This date will be the date the PIN is created.
• Will be deleted on – When creating a PIN before you have created a Certified Form 680, you will have 10 days to create the form. If you do not create a Certified 680 the PIN will be deleted on the date shown here.
• Site – If your organization has more than one service site, you must select the patient’s primary service location from the drop box.
To create the PIN, click the “Create Certification Pin” button.

SETTING UP PATIENT SHOT RECORD RETRIEVAL 4 AS OF NOVEMBER 11, 2015
2. CREATING A PIN ONLY (cont.)
The top half of the page will now be completely filled in. The provider will have the following
three options:
• Change site – This button will only be active if you choose a different site from the drop box. Once you have selected the site you wish to replace the previously recorded site with, click this button to save the new site.
• Delete Certification Pin – This button will delete the PIN that has been created.
• Print Parent Get DH 680 Instructions – This button will print the instructions including the two pieces of information a parent will need to have (“State IMM Id” and “Certification PIN”) in order to retrieve and print (or save) their child’s Form 680 from home. Print this page and hand it to the parent.
SETTING UP PATIENT SHOT RECORD RETRIEVAL 5 AS OF NOVEMBER 11, 2015
2. CREATING A PIN ONLY (cont.)
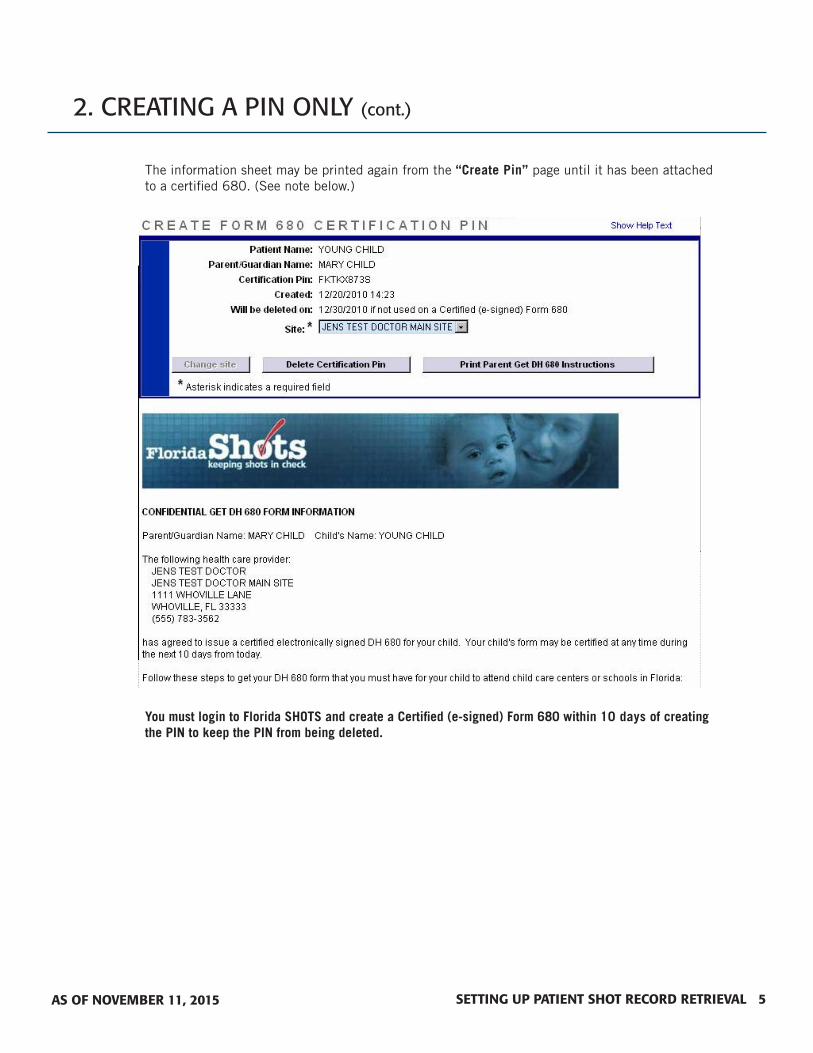
The information sheet may be printed again from the “Create Pin” page until it has been attached to a certified 680. (See note below.)
You must login to Florida SHOTS and create a Certified (e-signed) Form 680 within 10 days of creating the PIN to keep the PIN from being deleted.

SETTING UP PATIENT SHOT RECORD RETRIEVAL 6 AS OF NOVEMBER 11, 2015
2. CREATING A PIN ONLY (cont.)
When you open a patient’s record within the 10-day grace period and click on “Form 680” to create the Certified Form 680, the message below will appear on the Form 680 page.
NOTE: The option to show and print the associated parent information sheet will be found again at the bottom of the Form 680 when it has been certified as well as the option to download the certified Form 680 in pdf format. The PIN information sheet and download option can be seen at any time afterwards by revisiting the patient’s 680 page and viewing a stored certified 680. (See next section.)

SETTING UP PATIENT SHOT RECORD RETRIEVAL 7 AS OF NOVEMBER 11, 2015
3. TO-BE CERTIFIED LIST
When a user who has the ability to create certified Form 680s logs into Florida SHOTS they will be directed to the “To-Be Certified List” page if there are any patients who have PINs assigned, but have not yet had a Certified 680 created. The user may choose to delete the PIN by clicking on the Delete button or they may open the patient record and certify the Form 680 by clicking on the patient’s name.
Once the user has navigated away from this screen they can return at any time to view their list of patients in need of a Certified 680 by clicking on the “To-be Certified 680s” link located under the Patients header on the menu bar.

SETTING UP PATIENT SHOT RECORD RETRIEVAL 8 AS OF NOVEMBER 11, 2015
4. CREATING A CERTIFIED (E-SIGNED) FORM 680 AND PIN
Creating a certified 680 and a PIN at the same time is quick and easy. To accomplish this, follow the steps detailed below:
• Open the patient’s record in Florida SHOTS.
• Click on “Form 680” under the Form 680 header on the menu bar.
• The Form 680 page will open. Select the appropriate type of form:
• Part A (K-12 Requirements, Excluding 7th Grade) – For children in grades kindergarten through 12th, excluding the 7th grade.
• Part A (7th Grade Requirements Only) – For children entering 7th grade.
• Part B (Temporary Medical Exemption) – For children who are up-to-date but still require immunizations for attending school. This needs an expiration date.
• Part C (Permanent Medical Exemption) – For children who are up-to-date but have a permanent medical reason for not receiving a specific vaccine.
NOTE: Part C may be issued in conjunction with a Part A or Part B. Both Part A & C, or B and C would be selected if you have a patient with a permanent medical exemption. Rarely, children may have a permanent medical exception to all vaccines and, in this case only a Part C is issued.

SETTING UP PATIENT SHOT RECORD RETRIEVAL 9 AS OF NOVEMBER 11, 2015
4. CREATING A CERTIFIED (E-SIGNED) FORM 680 AND PIN (CONT.)
• IMM Service Site – This selection only appears if your organization has more than one service site. Select the correct site from the drop box.
• Parent/Guardian Name – Choose which name should appear on the Form 680 (mother, father, or guardian).
• Physician or Authorized Signature – Choose which immunization provider at your organization will be e-signing the Form 680.
NOTE: To Certify (e-sign) a Form 680 a provider must be selected.
• Create a parent access PIN to enable the parent to retrieve the Certified (e-signed) Form 680 from their own computer – This box will automatically be checked if you choose to certify the Form 680.
NOTE: If a healthcare provider wishes to create a Certified Form 680, but does not want to issue a PIN to the parent/guardian, uncheck the box. The parent will not be able to get the Form 680 from home and the healthcare provider will have to print it in the office.
To finish creating both the Certified Form 680 and the parent PIN, click the Create Certified (e-signed) Form 680 button.
The completed Form 680 will appear. Scroll to the bottom of the screen to choose to either Certify (e-sign) & Print or Certify (e-sign) Only by clicking on the appropriate button.

SETTING UP PATIENT SHOT RECORD RETRIEVAL 10 AS OF NOVEMBER 11, 2015
4. CREATING A CERTIFIED (E-SIGNED) FORM 680 AND PIN (CONT.)
Once the provider has selected to either certify or certify and print, two new options will appear at the bottom of the screen:
• Show Parent Get DH 680 Instructions – This button will open the parent information sheet which should be printed and handed to the parent/guardian. To print, scroll to the bottom of the screen and click the “Print Parent Get DH 680 Instructions” button.
• Download to Pdf File – This button will create a PDF version of the Certified Form 680 which can be printed directly onto white paper, as the Department of Health watermark is visible on the PDF document, making it a legal and valid form.
If the parent should lose the Information Sheet you may print out another copy by opening the patient’s record in Florida SHOTS, navigating to the Form 680 page, and clicking “View” on any previously Certified 680 where a Parent PIN was attached. At the bottom of the 680 the options to show (and then print) the parent information sheet and download the 680 in PDF format will be displayed as they were when the 680 was initially certified.

SETTING UP PATIENT SHOT RECORD RETRIEVAL 11 AS OF NOVEMBER 11, 2015
5. HOW PARENTS/GUARDIANS WILL GET THE CERTIFIED FORM 680
Parents or guardians may get and print the Certified Form 680s by visiting the Florida SHOTS website at www.flshots.com. On the website homepage the parent will click on the Get DH 680 button and be redirected to the “Get Your Child’s Florida Certification of Immunization (DH Form 680)” page. The parent will need to follow the instructions below to get their child’s Certified 680.
• Enter the State IMM Id exactly as it is printed on the “Get DH 680 Form Information” sheet.
• Enter the Certification PIN exactly as it is printed on the “Get DH 680 Form Information” sheet.
• Click on the Retrieve Form button.
Parents will need Adobe Reader installed on their computer to be able to open the PDF version of the Certified 680. If the parent does not have Adobe Reader installed they may follow the instructions on the page and use the provided link before trying to get the form.

SETTING UP PATIENT SHOT RECORD RETRIEVAL 12 AS OF NOVEMBER 11, 2015
5. HOW PARENTS/GUARDIANS WILL GET THE CERTIFIED FORM 680 (CONT.)
SETTING UP PATIENT SHOT RECORD RETRIEVAL 13 AS OF NOVEMBER 11, 2015
5. HOW PARENTS/GUARDIANS WILL GET THE CERTIFIED FORM 680 (CONT.)
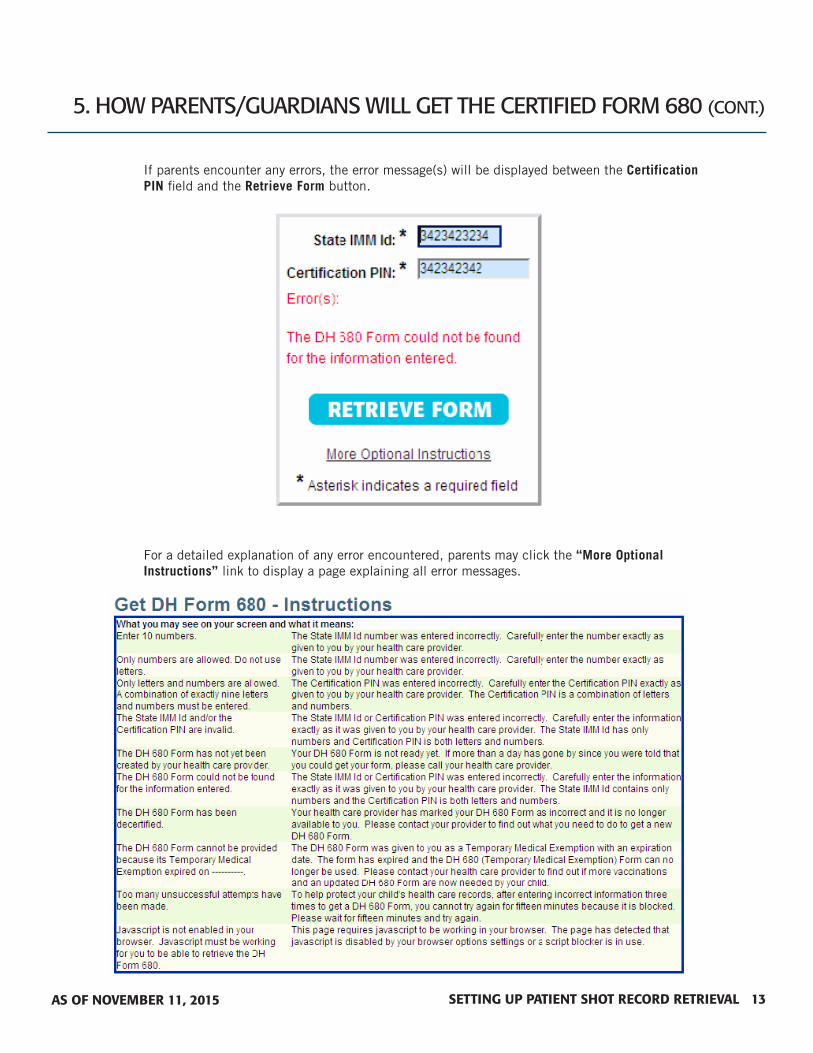
If parents encounter any errors, the error message(s) will be displayed between the Certification PIN field and the Retrieve Form button.
For a detailed explanation of any error encountered, parents may click the “More Optional Instructions” link to display a page explaining all error messages.

SETTING UP PATIENT SHOT RECORD RETRIEVAL 14 AS OF NOVEMBER 11, 2015
6. USER PERMISSION SETTINGS
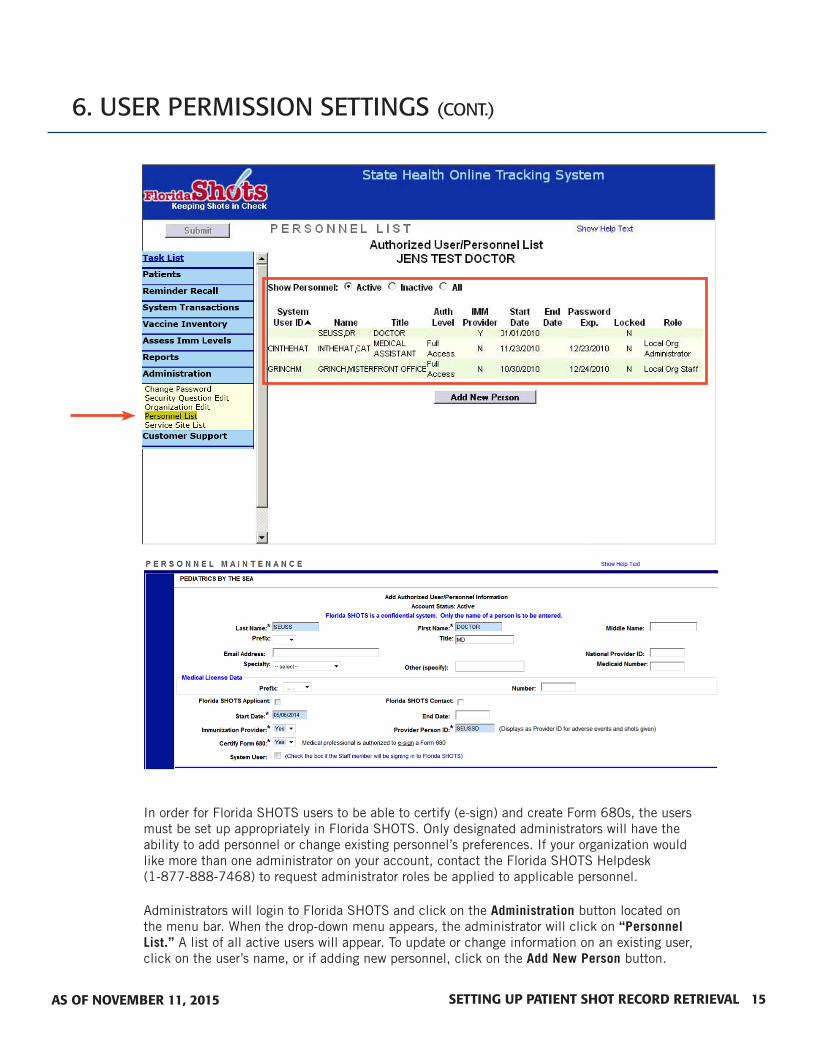
In order for Florida SHOTS users to be able to certify (e-sign) and create Form 680s, the users must be set up appropriately in Florida SHOTS. Only designated administrators will have the ability to add personnel or change existing personnel’s preferences. If your organization would like more than one administrator on your account, contact the Florida SHOTS Helpdesk at (1-877-888-7468) to request administrator roles be applied to applicable personnel.
Administrators will login to Florida SHOTS and click on the Administration button located on the menu bar. When the drop-down menu appears, the administrator will click on “Personnel List.” A list of all active users will appear. To update or change information on an existing user, click on the user’s name, or if adding new personnel, click on the Add New Person button.
Once the Administrator has selected to add or modify a user the “Personnel Maintenance” page will be displayed. Follow the steps listed below to correctly set users’ preferences:
• Both First Name and Last Name are required fields. The Start Date is also required and will be used as the earliest date vaccinations can be recorded as given by the user if they are listed as an Immunization Provider.
SETTING UP PATIENT SHOT RECORD RETRIEVAL 15 AS OF NOVEMBER 11, 2015
6. USER PERMISSION SETTINGS (CONT.)
In order for Florida SHOTS users to be able to certify (e-sign) and create Form 680s, the users must be set up appropriately in Florida SHOTS. Only designated administrators will have the ability to add personnel or change existing personnel’s preferences. If your organization would like more than one administrator on your account, contact the Florida SHOTS Helpdesk (1-877-888-7468) to request administrator roles be applied to applicable personnel.
Administrators will login to Florida SHOTS and click on the Administration button located on the menu bar. When the drop-down menu appears, the administrator will click on “Personnel List.” A list of all active users will appear. To update or change information on an existing user, click on the user’s name, or if adding new personnel, click on the Add New Person button.

SETTING UP PATIENT SHOT RECORD RETRIEVAL 16 AS OF NOVEMBER 11, 2015
6. USER PERMISSION SETTINGS (CONT.)
In order for Florida SHOTS users to be able to certify (e-sign) and create Form 680s, the users must be set up appropriately in Florida SHOTS. Only designated administrators will have the ability to add personnel or change existing personnel’s preferences. If your organization would like more than one administrator on your account, contact the Florida SHOTS Helpdesk (1-877-888-7468) to request administrator roles be applied to applicable personnel.
Administrators will login to Florida SHOTS and click on the Administration button located on the menu bar. When the drop-down menu appears, the administrator will click on “Personnel List.” A list of all active users will appear. To update or change information on an existing user, click on the user’s name, or if adding new personnel, click on the Add New Person button.
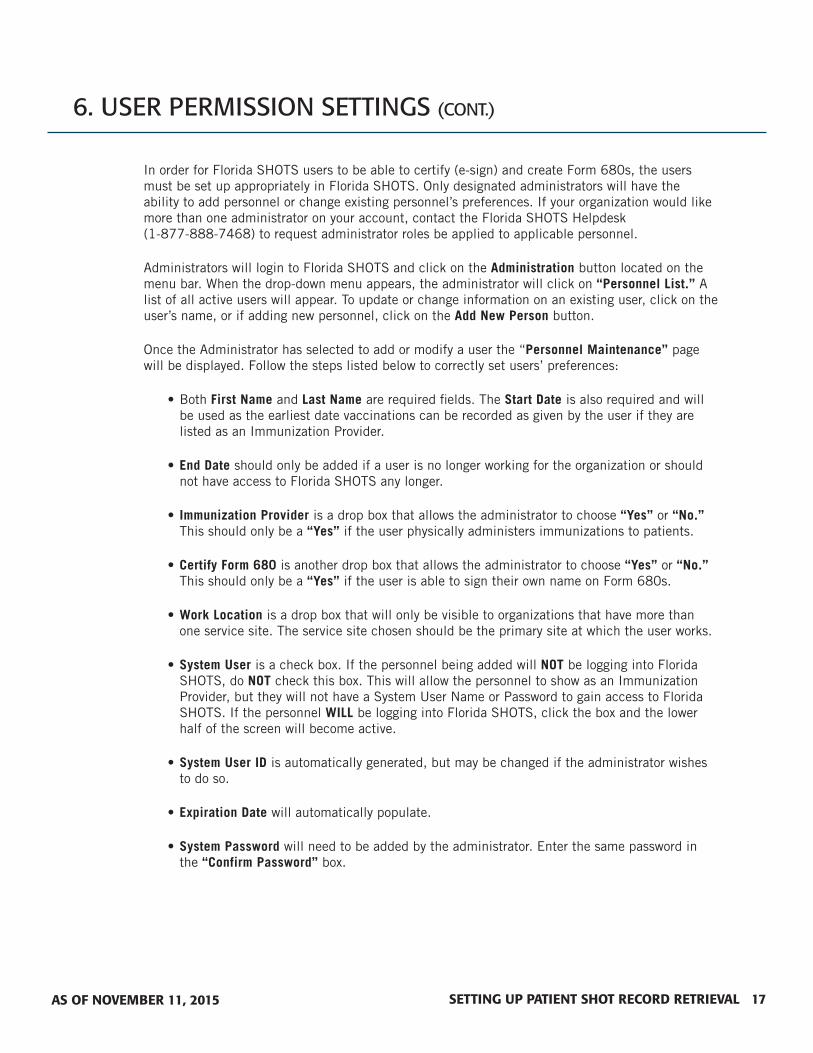
Once the Administrator has selected to add or modify a user the “Personnel Maintenance” page will be displayed. Follow the steps listed below to correctly set users’ preferences:
• Both First Name and Last Name are required fields. The Start Date is also required and will be used as the earliest date vaccinations can be recorded as given by the user if they are listed as an Immunization Provider.
• End Date should only be added if a user is no longer working for the organization or should not have access to Florida SHOTS any longer.
• Immunization Provider is a drop box that allows the administrator to choose “Yes” or “No.” This should only be a “Yes” if the user physically administers immunizations to patients.
• Certify Form 680 is another drop box that allows the administrator to choose “Yes” or “No.” This should only be a “Yes” if the user is able to sign their own name on Form 680s.
• Work Location is a drop box that will only be visible to organizations that have more than one service site. The service site chosen should be the primary site at which the user works.
• System User is a check box. If the personnel being added will NOT be logging into Florida SHOTS, do NOT check this box. This will allow the personnel to show as an Immunization
SETTING UP PATIENT SHOT RECORD RETRIEVAL 17 AS OF NOVEMBER 11, 2015
6. USER PERMISSION SETTINGS (CONT.)
In order for Florida SHOTS users to be able to certify (e-sign) and create Form 680s, the users must be set up appropriately in Florida SHOTS. Only designated administrators will have the ability to add personnel or change existing personnel’s preferences. If your organization would like more than one administrator on your account, contact the Florida SHOTS Helpdesk (1-877-888-7468) to request administrator roles be applied to applicable personnel.
Administrators will login to Florida SHOTS and click on the Administration button located on the menu bar. When the drop-down menu appears, the administrator will click on “Personnel List.” A list of all active users will appear. To update or change information on an existing user, click on the user’s name, or if adding new personnel, click on the Add New Person button.
Once the Administrator has selected to add or modify a user the “Personnel Maintenance” page will be displayed. Follow the steps listed below to correctly set users’ preferences:
• Both First Name and Last Name are required fields. The Start Date is also required and will be used as the earliest date vaccinations can be recorded as given by the user if they are listed as an Immunization Provider.
• End Date should only be added if a user is no longer working for the organization or should not have access to Florida SHOTS any longer.
• Immunization Provider is a drop box that allows the administrator to choose “Yes” or “No.” This should only be a “Yes” if the user physically administers immunizations to patients.
• Certify Form 680 is another drop box that allows the administrator to choose “Yes” or “No.” This should only be a “Yes” if the user is able to sign their own name on Form 680s.
• Work Location is a drop box that will only be visible to organizations that have more than one service site. The service site chosen should be the primary site at which the user works.
• System User is a check box. If the personnel being added will NOT be logging into Florida SHOTS, do NOT check this box. This will allow the personnel to show as an Immunization Provider, but they will not have a System User Name or Password to gain access to Florida SHOTS. If the personnel WILL be logging into Florida SHOTS, click the box and the lower half of the screen will become active.
• System User ID is automatically generated, but may be changed if the administrator wishes to do so.
• Expiration Date will automatically populate.
• System Password will need to be added by the administrator. Enter the same password in the “Confirm Password” box.

SETTING UP PATIENT SHOT RECORD RETRIEVAL 18 AS OF NOVEMBER 11, 2015
6. USER PERMISSION SETTINGS (CONT.)
• Authorization is a drop box. Administrator will need to set it to “Full Access” for the user to be able to log in.
• Role is determined by the administrator, but most users will be set as Local Org Staff.
• Create Certified Form 680 is a drop box that can be set to “Yes” or “No.” This should be set to “Yes” for any user who needs the ability to create and print a Certified Form 680. The user will be able to create a Certified Form 680 by selecting a name from the list of the organization’s certified providers, including their own, if the user also has the “Certify Form 680” option set to “Yes” as noted above.
• When the administrator has correctly set the user’s permissions they will click on the Submit button to save changes.