flow frame instruction manual
TRANSCRIPT
FLOWTM FRAME INSTRUCTION MANUAL

This manual details the installation and operation of the FlowTM Frames. Welcome to this innovative
method of honey-harvesting.
We would appreciate your feedback and stories on how it works for you and your bees.
Please go to www.honeyflow.com to view videos and find your way to the resources, forum and
community feedback section.
Happy Beekeeping!
TABLE OF CONTENTS
l1 GENERAL PRECAUTIONS 3
l2 SAFETY PRECAUTIONS 4Precautions to reduce stinging behaviourPrecautions to avoid bee stingsDealing with bee stings
l3 COMPONENTS OF A FLOW™ HIVE 6
l4 ADJUST FLOW™ FRAMES TO FIT INTO THE FLOW™ SUPER 9Resetting your Flow™ frame ready for your bees
l5 CARING FOR YOUR FLOW™ FRAMES 11
l6 ADDITIONAL EQUIPMENT REQUIRED 12Protective gear - bee hat and veil or bee suit/jacket, glovesAdditional Langstroth framesQueen excluderSmokerHive tool
l7 WHERE TO LOCATE YOUR FLOW™ HIVE 14
l8 SOURCE SOME BEES 15
l9 HOW DOES FLOW™ WORK 16
l10 EXTRACTING HONEY FROM A FLOW™ FRAME 18Is the honey ready for harvest?How to extract honeyCautionsOpen the Flow™ frameReset the Flow™ frame
l11 PROCESSING AND STORING YOUR HONEY 22
l12 MONITORING YOUR HIVE HEALTH 23
l13 ADDITIONAL SKILLS FOR SUCCESSFUL BEEKEEPING 23
l14 TROUBLESHOOTING 24
l15 ALTERING AN EXISTING SUPER TO ACCOMMODATE FLOW™ FRAMES 26

3
GENERAL PRECAUTIONS
Beekeeping requires specialist skills, carries inherent dangers and is often subject to regulation.Honey bees are wild insects. Highly organised, endlessly fascinating, and to be treated with care, respect and caution at all times.
Get Educated: If you are new to beekeeping there are a number of skills that you need to acquire in order to safely and successfully keep bees. We strongly recommend taking a beekeeping course before you put bees in your hive. We also encourage you to keep learning: take advanced courses, join your local beekeepers’ association, and meet and network with other beekeepers.
Follow the Rules: Regulations and guidelines for keeping bees vary greatly. Check with your local council, local and state primary industries and agriculture authorities, and link up with your nearest beekeepers’ association to find out what is required in your jurisdiction. Some jurisdictions ban or restrict beekeeping, or require hives to be registered.
Understand the Risks: Bees can sting humans, pets and other animals. Make sure you understand the risks and take precautions. The safety information in this manual is a general guide only, is not exhaustive, and may not be applicable to your circumstances. For specific assistance, seek advice from your local authority, a professional service or your nearest beekeepers’ association.
Take Responsibility: We are a worldwide community of beekeepers. To succeed, each one of us must act responsibly to keep our bees, and the humans and pets around them, safe, happy and healthy. If you have neighbours, it’s especially important to consider and inform them.
Additional Resources: The community area of our website lists courses, bee clubs and associations, professional beekeeping services, and local authorities. Our online forum facilitates questions, discussions, meeting up with fellow beekeepers and much more. You will also find instructional videos demonstrating the operation and setup of your FlowTM Hive. www.honeyflow.com doesn’t have all the answers, but it’s a great place to start looking.
1

4 5
SAFETY PRECAUTIONS
Bees are more likely to sting when you• Intersect their flight path as they approach/leave the hive
• Threaten, open, approach or bump their hive
• Use loud or vibrating machinery near the hive (lawn mower, weed whacker/line trimmer etc.)
• Squash their friends.
Precautions to reduce stinging behaviour• Avoid opening the hive in bad weather — overcast, cloudy, rainy, windy and
very hot days. Aim to work with your bees in the middle of a warm sunny day when most of the bees are out foraging
• Be Gentle. Bumping your hive or rough handling will agitate the bees
• Work calmly and smoothly. Squashed bees release a pheromone that stimulates defensive behaviour. Try not to squash bees when moving boxes and lids
• Avoid working near the hive with machinery (e.g. lawn mower) or, if necessary, wear protective gear and use a smoker
• Requeen your hive when appropriate to maintain docile bees.
Precautions to avoid bee stings• We recommend the use of personal protective equipment whenever working
with your bees. This includes a bee hat and veil or bee suit/jacket, and gloves
• Locate your FlowTM Hive to restrict encounters between humans or animals and your bees. See Section 7 (pg 14) for further information on situating your FlowTM Hive
• Warn neighbours when opening your hive and disturbing the bees.
• Aim to open the hive during working hours when most people are out
• Take care when walking amongst flowering plants, especially those that flower low to the ground (e.g. clover)
• Check your drink for bees, especially cans. Stings inside the mouth are dangerous.
Dealing with Bee Stings While these precautions reduce the likelihood of stings it is still highly likely that you or those in the vicinity will experience stings from your bees at some time.
Localised pain, redness, itching and swelling are normal responses to a bee sting.
However, a small percentage of the population have a severe anaphylactic reaction to bee stings. A severe allergic reaction can develop quickly and is life threatening. Symptoms include: • Difficulty breathing (e.g. tight chest and wheezing)• Swelling of the throat and tongue• Itchy or puffy eyes• An outbreak of blotchy skin• A weak, rapid pulse• Nausea, vomiting• Dizziness, fainting, loss of consciousness.If you suspect a severe allergic reaction, seek emergency help immediately. An ephedrine/adrenaline injection is the standard medical treatment for anaphylactic reactions.
Bee sting first aidBee sting first aid is taught as part of any beekeeping course and many other first aid courses. We highly recommend first aid training to alert you to the signs of an anaphylactic reaction, and know when to seek medical assistance.
The following information is general in nature and does not replace first aid training.STEP 1: Remove the sting as quickly as possible. Fast removal of the sting minimises the amount of venom that is injected. Remove the sting by scratching it out with your fingernail, credit card or other flat surface (e.g. hive tool) with a sideways motion, or carefully with tweezers. DO NOT pinch it out as this will squeeze the venom sac and inject more venom.STEP 2: If it is not known whether the person has a reaction to bee stings, or if the observer does not have relevant first aid training, seek medical help.STEP 3: If the person is known not to have anaphylactic reactions to stings, and the observer has relevant first aid training:• Apply a cold pack to the sting site and monitor for any signs of a
reaction beyond the area of the sting. If symptoms of anaphylaxis appear, immobilise the person and seek emergency help immediately
• If stung on arm or leg, elevate the limb• Keep area clean until healed.
2

6 7
HIVE LID
INNER COVER
FLOWTM SUPER
OBSERVATION WINDOW
OBSERVATION WINDOW COVER
REAR WINDOW
REAR WINDOW COVER
FLOWTM KEY ACCESS
FLOWTM KEY ACCESS COVER
QUEEN EXCLUDER
BROOD BOX
BOTTOM BOARD
COMPONENTS OF A FLOW™ HIVE
FLOWTM FRAME
OPERATION SLOT/CAP
FLOWTM KEY
COLLECTION TUBE
HONEY TROUGH/CAP
13
14
15
16
17
1
2
3
4
5
6
7
8
9
10
11
12Hive back
Hive front
13
1
2
3
4
567
89
10
11
12
1415
16 17
3

8 9
List of part names
Brood box – the part of the beehive that has the comb that bee eggs are laid in. These eggs hatch into bee larvae, which then pupate and turn into bees.
FlowTM Super – a honey super that has been modified to accommodate FlowTM Frames. This is the box on a bee hive that the bees store most of their honey in. Usually this box is placed on top of the brood box.
FlowTM Frame – the honeycomb matrix that hangs in the FlowTM super which has the patented ‘split cell’ technology allowing a beekeeper to harvest honey without opening the hive.
FlowTM Key – the long steel rod with handle that is inserted in the operation slot(s) to operate the FlowTM Frames.
Operation slots – these are the rectangular slots at the top of each FlowTM Frame that the FlowTM Key fits in to operate the mechanism.
Honey trough – the enclosed gutter at the base of the FlowTM Frame that the honey flows along and out of the hive.
Collection tube – the tube extension that is inserted in the honey trough when harvesting honey.
Honey leak-back gap – looking at the opening to the honey trough on the back end of the FlowTM Frame you will notice that the parts don’t seem to align. There’s a gap between the inner yellowish plastic part and the clear surrounds of the hole. This leak-back gap allows residual honey to flow back into the hive after harvest. The bees will clean it up. This means it is not necessary to harvest every last drop from your FlowTM Frame.
Front of hive – the side of the hive that has the bee entrance. This is a solid wall.
Rear of hive – the side of most hives that is opposite to the bee entrance. This is usually where the FlowTM Frame’s clear end is accessible with the operation slots and honey trough for harvesting honey.
ADJUST FLOW™ FRAMES TO FIT INTO THE FLOW™ SUPER
Before slotting FlowTM Frames into the honey super it is necessary to adjust each frame individually. This will ensure correct operation of your FlowTM Frames.
1. Identify the front and back of each FlowTM Frame.
2. Frames sit into the FlowTM Super as illustrated below. Tighten or loosen the adjustment screw so that the back (window) end of the FlowTM Frame pushes firmly against the back wall of the hive, in this way all the frames line up to form the clear end window.
4
Spacer - for extra adjustment
FRONTBACK
Adjustment screw
Adjust screw for snug fit
SIDE OF SUPER - CUTAWAY
The back of the frame sits on this ledge
Frame should push firmly against inside of box

10 11
3. Slot each FlowTM Frame into the honey super ensuring that frames are packed firmly together.
4. Check that any gap in the back window is less than 2 mm (1/8") so that bees cannot escape at the back of the hive*.
If you have correctly adjusted the fit of your FlowTM frames the back faces should now be lined up to create a flat ‘window’ into the hive. The frames should fit snugly with little movement front-to-back or side-to-side and there should be no gaps greater than 2mm (1/8”).*This can be adjusted by packing with timber strip or screws on the inside edges of the side walls adjacent to the back wall.
l! Safety Warning: Before adding bees to your hive make sure there are no gaps >2mm.
Resetting your Flow™ Frame ready for your beesImportant: The first time you install your FlowTM frames in your hive, they must be reset to the closed position so the bees can complete the comb.
• Remove operating slot cap on each FlowTM Frame
• Insert the FlowTM Key in the UPPER operating slot
• Turn the key 90 degrees
• Remove the key by twisting it back to horizontal
• Replace operating slot cap.
CARING FOR YOUR FLOW™ FRAMES
Cleaning and frame maintenanceIn our experience FlowTM comb does not require cleaning if it stays in the hive. The bees do a great job of this. However, if you remove your FlowTM Frames for storage they may need cleaning. You can do this using hot water (just hot enough to melt wax ~65°C/150°F). A hot water hose is good. Set the FlowTM comb to ‘cell open’ position. This allows the water to flow easily through all parts of the frame.
We have designed the honey trough so that any remaining honey can drip back into the hive for the bees to use. If the little channel remains clear this works well. However, if the bees block it up sometimes you end up with residual honey in the trough at the bottom. This can be cleaned out before your next harvest using warm water squirted into the trough or a long-handled bottle brush. If you are going to harvest honey immediately, you may need to dry the trough by pushing a long strip of clean cloth or towelling into it with the FlowTM Key.
To discuss cleaning and maintenance of the FlowTM Frames join the discussion on our forum at honeyflow.com
SterilisationThere are some diseases, such as American foulbrood, that require sterilisation of equipment. One method of sterilisation is irradiation. FlowTM Frames can be irradiated twice using 15 kGy gamma rays without compromising the integrity of the plastic. More than 2 irradiation treatments may damage your FlowTM Frames.
For more information on sterilisation options please visit the FAQs at honeyflow.com
Warnings• Do not use excessive force. If something is stuck, try repeated gentle
movements until it loosens. If it’s still stuck, contact us• Do not bend the FlowTM Frame. This may cause the frame to fall apart.
In the event that your frame falls apart it can be easily reassembled. See www.honeyflow.com for further instructions
• Do not expose the frames to direct sunlight for excessive periods• Do not expose the frames to extreme heat (once inside an operating hive,
the bees will keep the temperature consistent) • Do not irradiate the frames more than 2 (two) times • Do not use chemical solvents that are not recommended.
See the FAQs on honeyflow.com for recomendations• Do not use a blow torch or flame device on frames.
Following these recommendations will greatly extend the useful life of your FlowTM Frames.
5
Ensure any gaps are less than 2mm

12 13
ADDITIONAL EQUIPMENT REQUIRED(not supplied)
Protective gear – bee hat and veil or beekeeper suit/jacket, gloves We recommend you wear a protective beekeeper suit, especially if you are new to beekeeping or have a new, unknown hive. This includes when harvesting from the FlowTM Frames.
We have found that we can work at the back of the hive without the bees seeming to notice our presence. However, sometimes bees can be quite aggressive, so you need to be prepared. Appropriate protective gear reduces the occurrence of bee stings. Being stung, particularly on the face or up the nose, is painful, inconvenient and potentially dangerous.
Additional Langstroth frames for Flow™ Light packagesIf you have purchased the FlowTM Light package you will need FOUR additional standard frames to completely fill your super. This applies to both an 8- and a 10-frame Langstroth hive. These can be purchased from any beekeeping supplier.
It is important to provide your bees with a full box of frames. If you do not the bees will create ‘free-form’ honey cells, called burr comb, in the empty space beside your frames. This is difficult and extremely messy to harvest and will prevent easy removal of your FlowTM Frames.
Queen excluderWe recommend the use of a queen excluder. The queen excluder is a mesh panel which prevents the queen from accessing and laying eggs in your honey super. This ensures that the honey super is not contaminated with brood.
Having said this, most of our experimental FlowTM Hives did not use an excluder and we never found worker brood in them and very rarely found drone brood. The FlowTM comb is designed to discourage the queen from laying in the cells.
SmokerThe smoker reduces defensive behaviour when the hive is disturbed. It is a good idea to have one on hand when harvesting honey from a FlowTM Frame just in case your bees get aggressive. It’s essential to have a smoker when opening and inspecting your beehive.
Hive toolThe hive tool is a multi functional tool made of steel. It is used to lever and remove frames, to lever apart boxes, as well as scrape and remove burr comb from the hive.
6
HIVE TOOL
SMOKER
QUEEN EXCLUDERLANGSTROTH FRAME
BEE HAT AND VEIL
GLOVES
BEE SUIT AND HOOD

14 15
WHERE TO LOCATE YOUR FLOW™ HIVE
It is important to consider the location of your new beehive prior to installing your bees. You can’t move a beehive around your paddock, yard or rooftop easily. Bees have highly developed navigational skills. If the hive is moved they become confused and will return to the original site. For advice on moving a bee hive once the bees are housed consult a beekeeping book, the user forum on honeyflow.com or your local beekeepers’ association.
There are three important things to consider when selecting a site for your new hive – your bees, your neighbours and yourself.The location of your beehive will affect the overall strength of your colony. Choose a sheltered position. In cool climates look for a dry sunny position, in hot climates the hive will benefit from some shade, particularly in summer. Face the hive entrance away from the prevailing winds. Ideally, face the entrance in a southerly direction if you’re in the northern hemisphere and northerly direction for the southern hemisphere.
Safety Considerations • Consider the flight path of bees exiting the hive. Avoid footpaths and areas with
high activity. You can use screening, shadecloth, fences or dense shrubs to force the bees to fly upwards. Ensure that bees fly up higher than 2m (7ft) before entering an area frequented by people, or when crossing a property boundary.
• Sometimes bees will be attracted to lights at night. Do not direct the hive entrance towards doorways or bright lights as this will increase the number of bees leaving the hive to investigate. You will need to screen the hive from the light, or screen the doors and windows from the bees.
• Provide a source of clean water. In hot weather a bee colony can use up to 4 litres (about a gallon) of water a day. Avoid complaints from neighbours with pools by providing a water source. Bees tend to prefer water sources at least 6m (20ft) away from their hive.
• Restrict access to the hive. It is best if access to the hive is restricted by fencing it off or siting the hive out of reach of children, pets etc. This is particularly important when opening the hive or otherwise agitating the bees. Signage may help to warn adults of a beehive, but kids and pets are still at risk.
• Consider other animals. Livestock may bump the hive or use it as a scratching post. Poultry and pets can be stung by bees attracted to their watering source.
• Bees don’t like mowers or brush cutters. Noise, vibrations, smell and flying debris near their hive upsets them and they may sting the operator. Wear a veil or beekeeper suit when working near the hive or, ideally, situate the hive away from areas that need mowing.
• Consider your neighbours too. Chat to them about keeping bees, and let them know when you plan to open the hive or disturb the colony.
Other considerations • Bees excrete waste to a distance of about 15 metres from the hive. This
appears as little yellow/orange dots that can stain washing and soil light coloured cars. Situate your hive to avoid this. It’s a good idea to place your hive so that the flight path is over a little used area of your yard or roof anyway.
• The hive should sit firmly, without any wobble on a stable base with clear access for when you are working with the colony. Placing the hive on a stand prevents rotting of base timbers and improves accessibility (options include bricks, concrete blocks, steel posts etc).
• During harvest FlowTM Frames should be tilted backwards so that the honey flows out to the collection tubes. The slope of the hive for optimal draining is 2.5–4.0 degrees sloping backwards (a tilt of about 15mm (½") is enough). You have two options:
1. Chock up the hive when it’s time to harvest. Bees can be agitated by tilting the hive so wear a beekeeper suit and do this several hours before you harvest.
2. Leave the hive on a permanent slope. If sloping the hive backwards it is important to ensure that water can’t enter the front of the hive. A sloping landing board can minimise this.
SOURCE SOME BEES
Bees rarely find their way into empty beehive boxes, even though they are designed to be a perfect home for them. There are a number of ways of starting a colony. A small nuc (nucleus) hive can be bought from beekeeping suppliers in most countries (see www.honeyflow.com/beebreeders). Contact your local amateur beekeepers’ club or your local or state beekeepers’ association for further advice on the best option for you.
l! Safety Warning: Before adding bees to your hive, make sure you wear a protective suit and gloves. Also make sure bees can’t escape anywhere except the hive entrance. Ensure there are no gaps greater than 2mm.
7
8

16 17
HOW DOES FLOW™ WORK
Finally capping the cells
Then fill the cells with honey
The bees complete the comb with their wax
When the frame is full it’s ready to harvest
THE FLOW FRAME CONSISTS OF PARTLY FORMED HONEYCOMB CELLS
The bees remain undisturbed on the surface of the comb. If there does happen to be a bee down an empty cell it wont get injured as there is enough space between the comb walls.
INSIDE THE HONEYCOMB THE CELLS HAVE NOW SPLIT AND TURNED INTO CHANNELS FOR THE HONEY TO FLOW DOWN.
1 Remove the Operation Slot Cap and Honey Trough Cap
2 Insert Collection Tube into hole
3 Insert Flow Key into lower operation slot
4 Rotate key 90 degrees downwards
HONEY TROUGH
CAP
COLLECTION TUBE
FLOW KEY
OPERATION SLOT CAP CAP
*Frame remains in the hive for harvest, shown
separately for illustrative purposes only
9

18 19
EXTRACTING HONEY FROM A FLOW™ FRAME
The timing of your honey harvest will depend on local conditions and the nectar flow in your area. Your bees need honey to get them through the times when there is no nectar available. Honey should only be extracted in warmer months when there is sufficient nectar flow for the bees to replenish their supplies.
The number of frames of honey that you leave through winter depends on your climate. You should consult local beekeepers as to how much they leave in their colonies. The FlowTM Frames make it a lot easier to see how much honey is in your frames at any time, so you can learn to manage how much honey to harvest and how much to leave for the bees.
Is the honey ready for harvest?Do a visual inspection. Looking through the rear window check that the cells are full of honey and have been capped with wax. See honeyflow.com/harvesting/ for more information.
How to extract honeySee honeyflow.com/harvesting/ for more information and videos.
You will need:
Pliers, stainless steel FlowTM Key, collection tube, honey collection vessel (clean, dry, approximately 2 litres per FlowTM Frame) and a lid or cover to keep insects out of your honey.
Cautions• Honey is hygroscopic (it attracts moisture). Do not leave your honey
container open for extended periods.
• Do not allow bees to eat honey outside the hive. This encourages robber activity. Cover your honey vessel during harvest, cling film or a plastic container is useful, and clean up any spills with water.
Open the FlowTM frame 1. Ensure that the hive is sloping back so that the honey in the trough runs to
the collection tubes. A slope of 2.5–4.0 degrees is adequate. This can be achieved by raising the front of the hive 15 mm (½”) from level.
2. Remove the covers from the FlowTM Key access window (top) and the rear window (bottom).
3. Remove the caps from the operation slot and honey trough (use pliers if necessary).
4. Insert collection tube into honey trough at the base of the FlowTM Frame. The tongue on the collection tube should fit into the gap at the bottom of the honey trough. (The FlowTM logo on the tube facing up).
5. Arrange honey collection vessel below collection tube. Cover with mesh, cloth or plastic wrap to prevent bees entering the container.
6. Insert FlowTM Key into the LOWER operating slot.7. Rotate FlowTM Key 90 degrees downwards to open the frame. You can leave
the key in this position during the harvest or remove it to open another frame.
Honey will start to flow out of the hive. Typically the honey will fill the collection tube within the first few minutes. If the honey flows at a trickle, repeat above procedure to make sure the honeycomb cells are open.
It may take 20 minutes to over two hours to drain the honey from a frame, depending on the temperature and the viscosity of the honey. It is OK to leave it draining overnight (if it is secure from nocturnal animals).
A full FlowTM Frame will yield approximately 2 litres of honey. It is not necessary to drain every drop of honey from the FlowTM Frame. We have designed the honey trough so that any remaining honey can drip back into the hive for the bees to use.
Reset the FlowTM frame1. Insert FlowTM Key into the UPPER operating slot2. Rotate FlowTM Key 90 degrees downwards to reset the frame 3. Remove the key by twisting it back to horizontal4. Replace the operation slot cap5. Allow remaining honey to drain as desired6. Remove honey collection vessel and seal it7. Remove collection tube8. Replace cap on honey trough9. Wipe up any spilt honey with water to prevent attracting insects including
bees and ants.
Note: The operation slot cap can only be replaced when the FlowTM Frame is in the closed position. Make sure that the frame is set to closed by inserting the FlowTM Key in the UPPER operation slot and rotating to reset the frame.
10

20 21
1 3
2 4
UPPER SLOTLOWER SLOT

22 23
PROCESSING AND STORING YOUR HONEY
Honey from a FlowTM Frame should not need any further processing. However, if you do experience contamination, honey can be filtered. You can purchase a fine mesh strainer from a kitchen supply shop but we have found a clean stocking does a great job of filtering honey. Secure stocking over a clean dry vessel and strain honey.
Honey should be stored in clean, dry airtight containers. Over time your honey may crystallise and solidify. Candied honey is fine to eat as is, or you can liquefy it by gently heating the jar in warm water.
MONITORING YOUR HIVE HEALTH
It is important that you monitor the health of your hive on a regular basis. FlowTM Frames make honey harvesting easier, but all the other aspects of caring for the hive are still necessary. This includes monitoring and managing for pests, diseases and swarm control.
To properly monitor your hive and detect diseases you need to inspect the brood box for healthy brood. The frequency of monitoring depends on your location. Consult your local beekeeping club or primary industries and agriculture authorities for information specific to your area. You should also inspect your hive whenever a colony becomes weak.
The FlowTM Frame’s clear end observation does assist with allowing you to look into the hive and gauge the strength and health of the colony. A healthy colony will be reasonably crowded with active bees. We recommend that you use this easy observation window to get to know your hive and its activity through the seasons.
ADDITIONAL SKILLS FOR SUCCESSFUL BEEKEEPING
If you are new to beekeeping there are a number of skills that you need to acquire in order to safely and successfully keep bees. We strongly recommend taking a beekeeping course before you put bees in your hive. Here is a list of practical skills that will help you on your beekeeping journey.
Essential skills• light and extinguish a smoker
• open, inspect and close a hive
Advanced Skills• Identify and manage health problems and pests in the hive
• Swarm control
• Requeening
• Move a hive
11
12
13

24 25
TROUBLESHOOTING
Cannot fit FlowTM frames into FlowTM super side by side
Replace each frame ensuring that it is butted tightly against adjacent frame. Ensure that the rear end windows sit snugly against each other. Some boxes will have a packing strip that can be removed or perhaps shaved to make it thinner. A gap less than 2 mm (1/8”) is acceptable. The bees cannot get through this and will gum up the gap over time.
Cannot fit FlowTM frame into FlowTM super between the front and rear walls.
You may need to adjust your FlowTM Frame. Tighten the adjustment screw on the front of the frame [refer to Section 4 of this manual]. For further adjustment trim the stepped tags/spacer* on the front face of the FlowTM Frame in order to allow the frame to slide into the box.
Cannot remove caps from operating slot or honey trough
Use pliers to grip cap and pull
FlowTM Key is really hard to turn when opening the frame
The cells of the FlowTM comb are sealed with beeswax by the bees. Sometimes this wax is particularly tough and the key is really hard to turn. To make it easier, you can open part of a frame at a time. This is achieved by inserting the FlowTM Key part way into the lower operating slot and turning it. You can then insert the key further in and repeat the process until you have opened the entire frame.
Honey not flowing after opening the FlowTM Frame
Check FlowTM Key is inserted in the LOWER operating slot. Turn the Key 90 degrees to the vertical position. Leave it in this position until honey starts to flow. Sometimes the wax is particularly tough and the FlowTM Comb takes longer to open. You can leave the key in the vertical position for an hour or more. If the honey is still not flowing, you may have crystallised honey in your cells [See following point].
Honey has crystallised in the FlowTM Frames
If honey has crystallised in the FlowTM Frames, you have two options:
1. Wait for the bees to remove it: Attempting to harvest the honey will have disturbed the comb a little. The bees will likely remove the crystallised honey to repair the comb.
2. Remove it yourself: The frames will need to be removed from the super and soaked in warm water to soften crystallised honey.
Cap doesn’t fit on operation slot
The cap can only be replaced when the frame is properly reset. Insert FlowTM Key in the UPPER operating slot and rotate 90 degrees. Remove FlowTM Key and replace cap.
Ants attracted to FlowTM frames
Clean up any spilt honey after harvest with warm water.
Remove the honey trough cap and, if necessary, clean the leak back gap with a thin tool such as a kitchen skewer or wire to allow honey to drain back into hive. Throw some cinnamon powder behind the window covers to deter the ants. If your hive is on a stand you can place the legs in water to prevent ants climbing onto the hive.
14
26 27
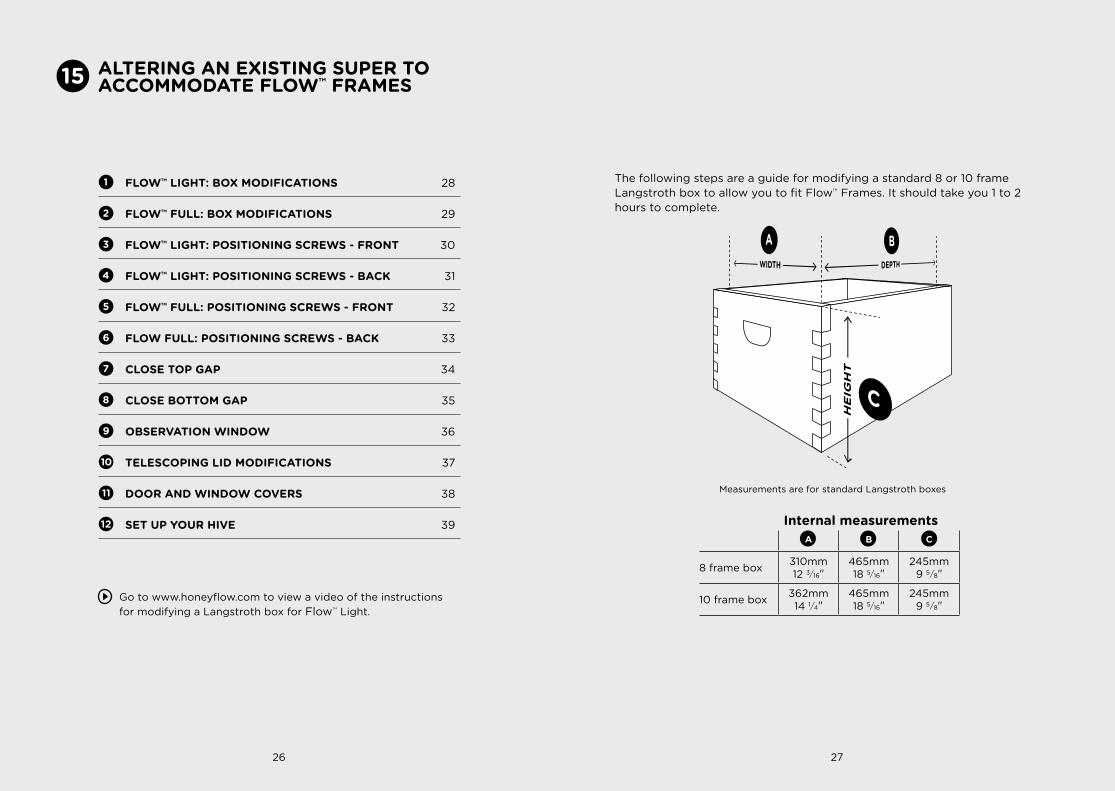
ALTERING AN EXISTING SUPER TO ACCOMMODATE FLOW™ FRAMES
Measurements are for standard Langstroth boxes
Internal measurementsA B C
8 frame box 310mm 12 3/16"
465mm 18 5/16"
245mm 9 5/8"
10 frame box 362mm 14 1/4"
465mm 18 5/16"
245mm 9 5/8"
The following steps are a guide for modifying a standard 8 or 10 frame Langstroth box to allow you to fit FlowTM Frames. It should take you 1 to 2 hours to complete.
l1 FLOWTM LIGHT: BOX MODIFICATIONS 28
l2 FLOWTM FULL: BOX MODIFICATIONS 29
l3 FLOWTM LIGHT: POSITIONING SCREWS - FRONT 30
l4 FLOWTM LIGHT: POSITIONING SCREWS - BACK 31
l5 FLOWTM FULL: POSITIONING SCREWS - FRONT 32
l6 FLOW FULL: POSITIONING SCREWS - BACK 33
l7 CLOSE TOP GAP 34
l8 CLOSE BOTTOM GAP 35
l9 OBSERVATION WINDOW 36
l10 TELESCOPING LID MODIFICATIONS 37
l11 DOOR AND WINDOW COVERS 38
l12 SET UP YOUR HIVE 39
Go to www.honeyflow.com to view a video of the instructions for modifying a Langstroth box for FlowTM Light.
15
28 29
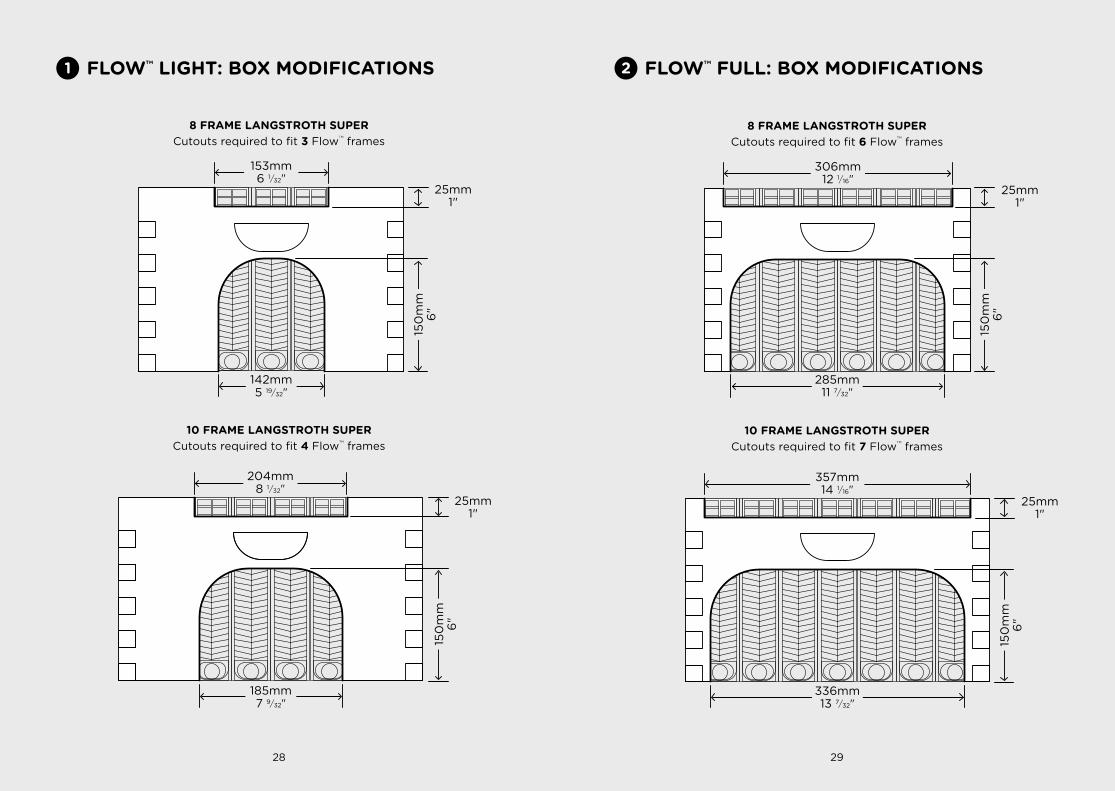
8 FRAME LANGSTROTH SUPER Cutouts required to fit 6 FlowTM frames
10 FRAME LANGSTROTH SUPER Cutouts required to fit 7 FlowTM frames
25mm 1"
25mm 1"
FLOW™ FULL: BOX MODIFICATIONS
285mm 11 7/32"
8 frame �t 3
8 frame �t 6
306mm 12 1/16"
150
mm
6
"
10 frame �t 7
10 frame �t 4
336mm 13 7/32"
357mm 14 1/16"
150
mm
6
"
8 FRAME LANGSTROTH SUPER Cutouts required to fit 3 FlowTM frames
10 FRAME LANGSTROTH SUPER Cutouts required to fit 4 FlowTM frames
8 frame �t 3
8 frame �t 6
142mm 5 19/32"
153mm 6 1/32"
25mm 1"
25mm 1"
150
mm
6
"
FLOW™ LIGHT: BOX MODIFICATIONS
10 frame �t 7
10 frame �t 4
150
mm
6
"
185mm 7 9/32"
204mm 8 1/32"
1 2

30 31
Insert screws on each side of the frames to hold them in place. Leave a little bit of play so the frames are easier to lever out
with the hive tool.
Leave a little bit of play.
FRONT
LOOKING FROM TOP OF BOX
FLOW™ LIGHT: POSITIONING SCREWS - FRONT
Turn the box over and insert screws on the inside back wall of the hive body on each side of the frames to take up the play,
and keep the frames tight together.
Aim for snug fit.
LOOKING FROM UNDERSIDE OF BOX
BACK
FLOW™ LIGHT: POSITIONING SCREWS - BACK3 4

32 33
Insert screws on the side wall at the front on each side of the box. Leave a little bit of play so the frames are
easier to lever out with the hive tool.
Adjust for fit, leaving a little bit of play.
FRONT
LOOKING FROM TOP OF BOX
FLOW™ FULL: POSITIONING SCREWS - FRONT
Turn the box over and insert screws on the side wall at the back on each side of the box to take up the play and keep
the frames tight together.
Adjust for snug fit.
LOOKING FROM UNDERSIDE OF BOX
BACK
FLOW™ FULL: POSITIONING SCREWS - BACK5 6

34 35
CLOSE TOP GAP
Close up the gap between the frames and the tool access opening by glueing on two small blocks of wood.
This is the gap you’re looking to close.
LOOKING FROM TOP OF BOX
BACK
CLOSE BOTTOM GAP
If you are modifying your hive body for FlowTM Light (3–4 frames), cut out a thin piece of plastic or wood to fit into the bottom of the opening, blocking any gap
between the frames and box to stop bees getting out.
If you are modifying your hive body for FlowTM Full (6–7 frames), screw a metal strip to the bottom of the hive body. This will cover the gap and also provide additional strength to the hive body. The metal strip can be notched into the
box. Make sure the gap between the bottom of the frames and the metal strip is less than 3mm (1/8") so bees can’t escape when the door is opened.
Min 28mm 1 1/8"
2mm 1/16" thick metal strip recommended
7 8

36 37
OBSERVATION WINDOW
An observation window on the side is not essential. If you do make one, it’s important that the clear acrylic/glass sits flush with the inside wall
of the box as there’s not much room once the frames are in there. We recommend cutting your window shape and then rebating a larger
area to allow for flush mounting the clear acrylic/glass. Screws with washers or glue could be used around the edge to hold glass in place.
TELESCOPING LID MODIFICATIONS
Some lids such as the telescoping lids will need to be modified to allow access for the FlowTM Key. You can achieve this by cutting away
some of or all of the overlapping part of the lid on the rear side.
Cut this window slightly wider than the opening in the hive body. This will allow for any misalignment when you put the lid back on the
hive body. Exactly where the cutout is situated will depend on the specific dimensions of your lid.
9 10

38 39
DOOR AND WINDOW COVERS
Create the covers for the FlowTM Key access, rear window and observation window. You should be able to use the piece you cut out for the end frame access door
(you may need to trim the bottom to allow for whatever gap covering you have used in step 8).
You will probably need to make new pieces for the FlowTM Key access cover and observation window cover.
Plane these so they sit flush with the box (optional).
Make handles for each of the covers. These can simply be nails or screws or make and attach wooden ones.
To ensure the covers stay in place add some latches. Latches can be as simple as bent nails, eyehooks or
small wooden pieces.
Observation window cover
Flow Key access cover
Rear window
cover
SET UP YOUR HIVE
The angle of the hive for optimal draining is 2.5–4 degrees sloping backwards. Either chock the hive when it’s time to drain, or ideally, leave the hive on a permanent slope.
However, it’s important to make sure that water can’t get into the front. A sloping landing board can minimize this.
2.5-4o
11 12

40 Printed on 100% recycled paper using environmentally friendly inks.

42
HONEYFLOW.COM