flow® hive instruction manual - honey on tap of contents 1 general precautions 2 2 safety...
TRANSCRIPT

FLOW® HIVE INSTRUCTION
MANUAL

TABLE OF CONTENTS
1 GENERAL PRECAUTIONS 2
2 SAFETY PRECAUTIONS 3
3 COMPONENTS OF A FLOW® HIVE 4
4 ADJUST FLOW FRAMES TO FIT INTO THE FLOW SUPER 7
5 FLOW HIVE CONFIGURATIONS 9
6 HOW FLOW WORKS 10
7 EXTRACTING HONEY FROM A FLOW FRAME 12
8 CARING FOR YOUR FLOW FRAMES 15
9 ADDITIONAL EQUIPMENT REQUIRED 17
10 WHERE TO LOCATE YOUR FLOW HIVE 18
11 SOURCE SOME BEES 19
12 PROCESSING AND STORING YOUR HONEY 20
13 MONITORING YOUR HIVE HEALTH 20
14 ADDITIONAL SKILLS FOR SUCCESSFUL BEEKEEPING 21
15 TROUBLESHOOTING 22The Terms and Conditions of Sale on the Flow website of purchase, apply to the
receipt and use of all Flow Products. You should read these carefully to understand your obligations and the warranty that applies to your Flow product.
This manual details the installation and operation of your Flow Hive and Frames. Welcome to this innovative method
of honey-harvesting.
To discover more about your Flow hive and the fascinating world of bees, go to our website to view our many videos
or find your way to the resources and forum.
We always appreciate your feedback and stories on how it works for you and your bees. Just tag #flowhive or
contact us at [email protected]
You should familiarise yourself with the information in this Flow sponsored Beekeeping Safety pamphlet produced by
Accredited First Aid: www.accreditedfirstaid.com.au/beekeeping-safety
Happy Beekeeping!
honeyflow.com honeyflow.com.au eu.honeyflow.com ru.honeyflow.com
2 3
l! Information in this manual is a general guide only, is not exhaustive, and may not be applicable to your circumstances. For specific assistance, seek advice from your local authority, a professional service or your nearest beekeepers’ association.
Take Responsibility: We are a worldwide community of beekeepers. To succeed, each one of us must act responsibly to keep our bees, and the humans and pets around them, safe, happy and healthy. If you have neighbours, it’s especially important to consider and inform them.
Additional Resources: www.honeyflow.com doesn’t have all the answers, but it’s a great place to start looking.
• Search our extensive FAQs at www.honeyflow.com/faqs
• Join the conversation or ask a question of fellow Flow beekeepers on forum.honeyflow.com
• Follow our blog www.honeyflow.com/blog
• Check out our instructional videos www.honeyflow.com/beginner-videos
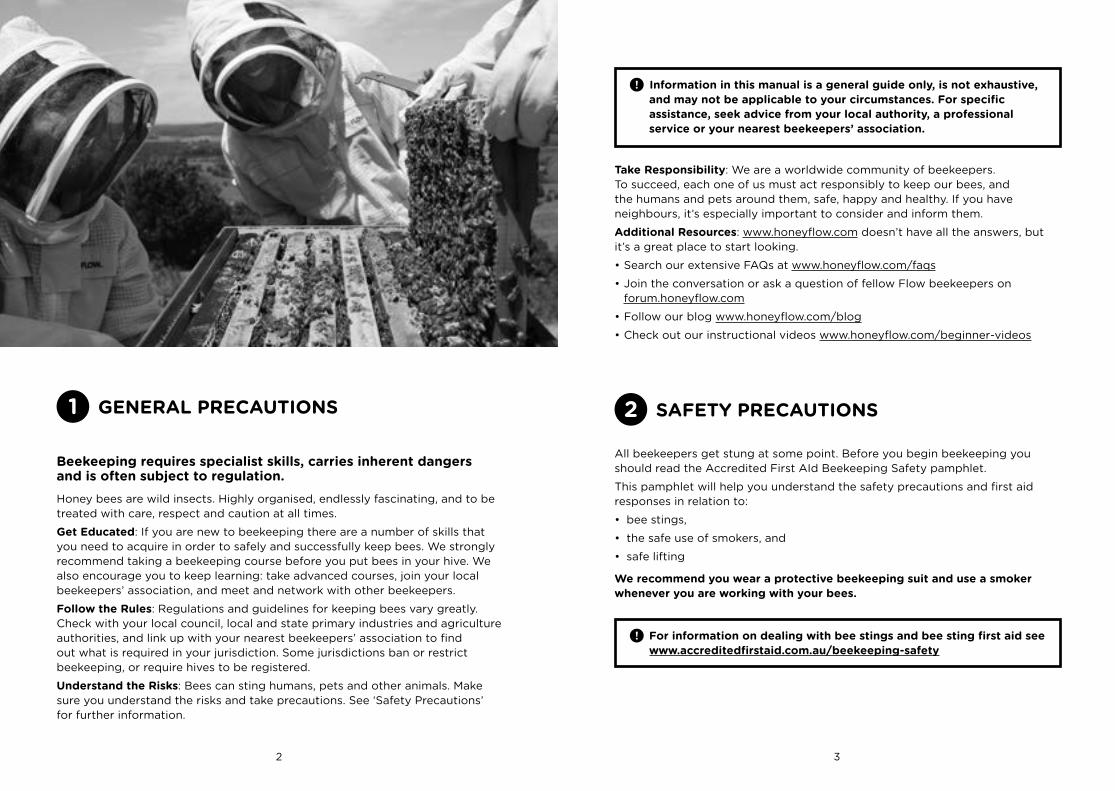
2 SAFETY PRECAUTIONS
All beekeepers get stung at some point. Before you begin beekeeping you should read the Accredited First AId Beekeeping Safety pamphlet.
This pamphlet will help you understand the safety precautions and first aid responses in relation to:
• bee stings,
• the safe use of smokers, and
• safe lifting
We recommend you wear a protective beekeeping suit and use a smoker whenever you are working with your bees.
l! For information on dealing with bee stings and bee sting first aid see www.accreditedfirstaid.com.au/beekeeping-safety
1 GENERAL PRECAUTIONS
Beekeeping requires specialist skills, carries inherent dangers and is often subject to regulation.Honey bees are wild insects. Highly organised, endlessly fascinating, and to be treated with care, respect and caution at all times.
Get Educated: If you are new to beekeeping there are a number of skills that you need to acquire in order to safely and successfully keep bees. We strongly recommend taking a beekeeping course before you put bees in your hive. We also encourage you to keep learning: take advanced courses, join your local beekeepers’ association, and meet and network with other beekeepers.
Follow the Rules: Regulations and guidelines for keeping bees vary greatly. Check with your local council, local and state primary industries and agriculture authorities, and link up with your nearest beekeepers’ association to find out what is required in your jurisdiction. Some jurisdictions ban or restrict beekeeping, or require hives to be registered.
Understand the Risks: Bees can sting humans, pets and other animals. Make sure you understand the risks and take precautions. See ‘Safety Precautions’ for further information.
4 5
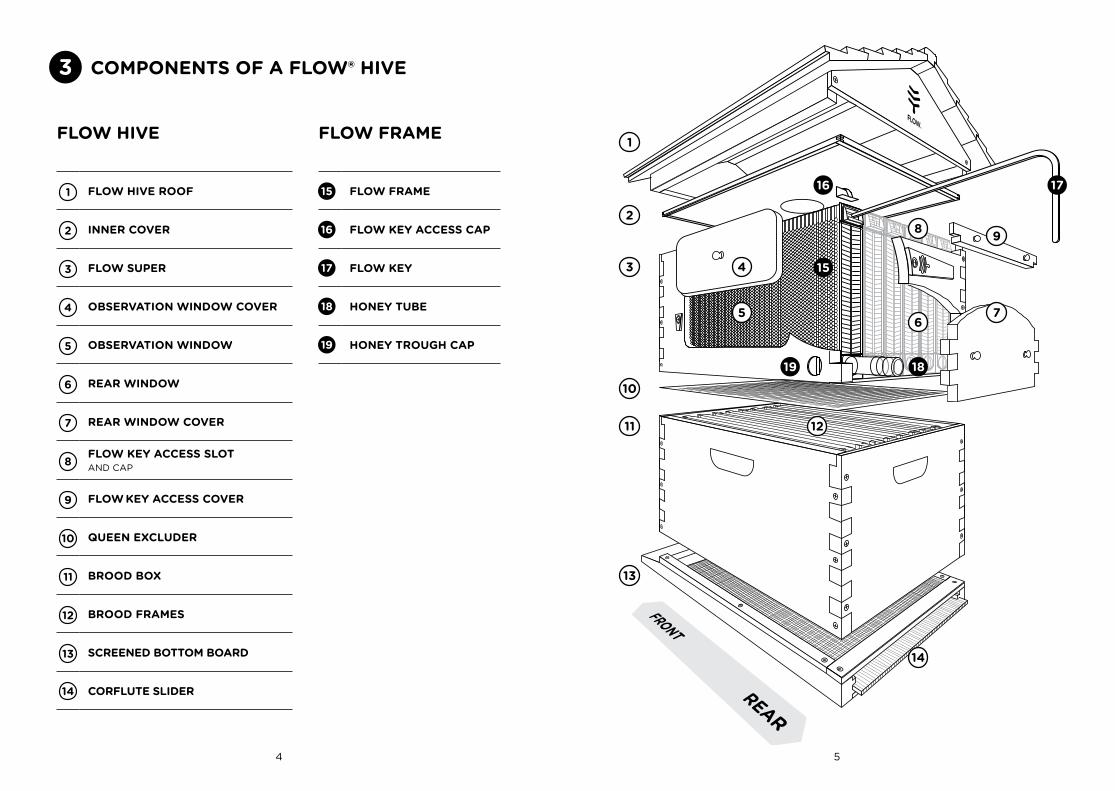
FLOW HIVE
FLOW HIVE ROOF
INNER COVER
FLOW SUPER
OBSERVATION WINDOW COVER
OBSERVATION WINDOW
REAR WINDOW
REAR WINDOW COVER
FLOW KEY ACCESS SLOT AND CAP
FLOW KEY ACCESS COVER
QUEEN EXCLUDER
BROOD BOX
BROOD FRAMES
SCREENED BOTTOM BOARD
CORFLUTE SLIDER
FLOW FRAME
FLOW FRAME
FLOW KEY ACCESS CAP
FLOW KEY
HONEY TUBE
HONEY TROUGH CAP
15
16
17
18
19
1
2
3
4
5
6
7
8
9
10
11
12
13
14
15
1
2
3
5
4
67
8 9
10
11 12
13
14
16 17
1819
3 COMPONENTS OF A FLOW® HIVE
6 7
List of part names
Brood box – the part of the beehive that holds the comb that bee eggs are laid in. These eggs hatch into bee larvae, which then pupate and turn into bees.
Flow Super – a honey super that has been modified to accommodate Flow Frames. This is the box on a bee hive that the bees store most of their honey in. Usually this box is placed on top of the brood box.
Flow Frame – the self-contained honeycomb frame that hangs in the Flow Super. This has the patented ‘split cell’ technology allowing a beekeeper to harvest honey without opening the hive.
Flow Key – the long steel rod that is inserted in the Flow Key access slot(s) to operate the Flow Frames.
Flow Key access slots – these are the rectangular slots at the top of each Flow Frame that the Flow Key fits in to operate the mechanism and harvest honey.
Honey trough – the enclosed gutter at the base of the Flow Frame that the honey flows along and out of the hive.
Honey tube – the tube extension that is inserted in the honey trough when harvesting honey.
Honey leak-back gap – looking at the opening to the honey trough on the back end of the Flow Frame you will notice that the parts don’t seem to align. There’s a gap between the inner yellowish plastic part and the clear end of the frame. This leak-back gap allows residual honey to flow back into the hive after harvest. The bees will clean it up. This means it is not necessary to harvest every last drop from your Flow Frame.
Front of hive – the side of the hive that has the bee entrance. This is a solid wall.
Rear of hive – the side of most hives that is opposite to the bee entrance. This is usually where the Flow Frame’s clear end is accessible with the operation slots and honey trough for harvesting honey.
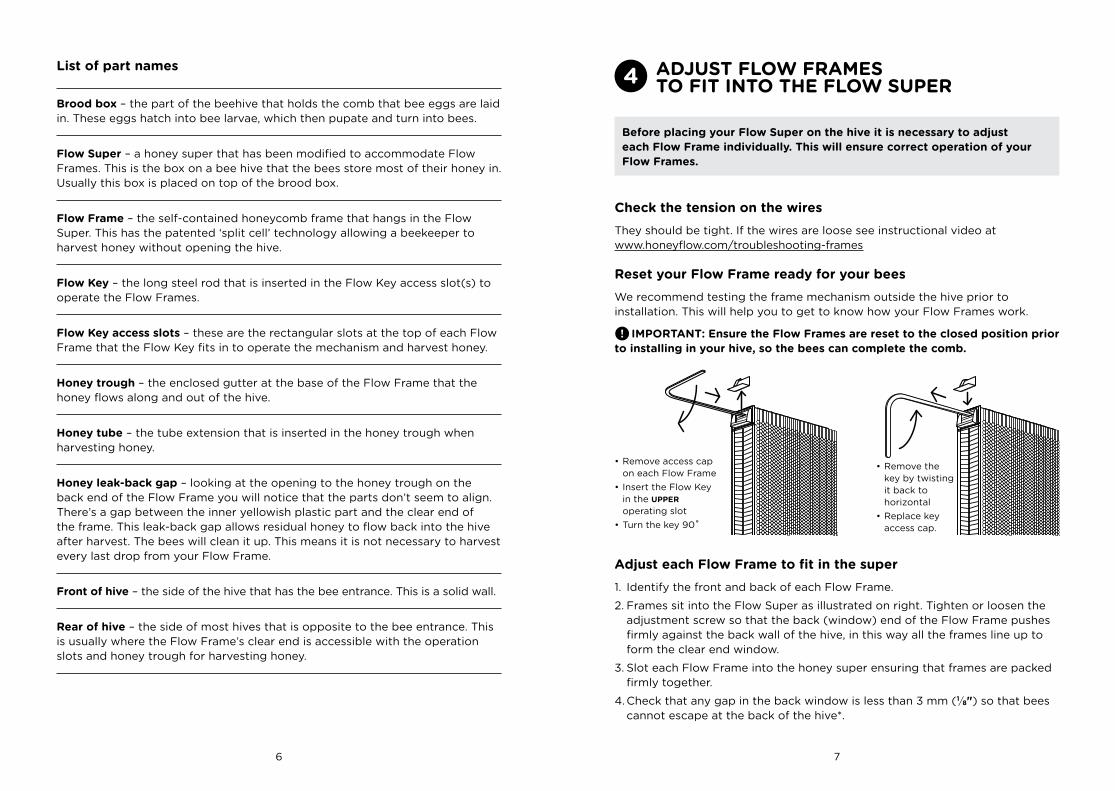
4 ADJUST FLOW FRAMES TO FIT INTO THE FLOW SUPER
Before placing your Flow Super on the hive it is necessary to adjust each Flow Frame individually. This will ensure correct operation of your Flow Frames.
Check the tension on the wiresThey should be tight. If the wires are loose see instructional video at www.honeyflow.com/troubleshooting-frames
Reset your Flow Frame ready for your beesWe recommend testing the frame mechanism outside the hive prior to installation. This will help you to get to know how your Flow Frames work.
l! IMPORTANT: Ensure the Flow Frames are reset to the closed position prior to installing in your hive, so the bees can complete the comb.
• Remove access cap on each Flow Frame
• Insert the Flow Key in the UPPER operating slot
• Turn the key 90˚
• Remove the key by twisting it back to horizontal
• Replace key access cap.
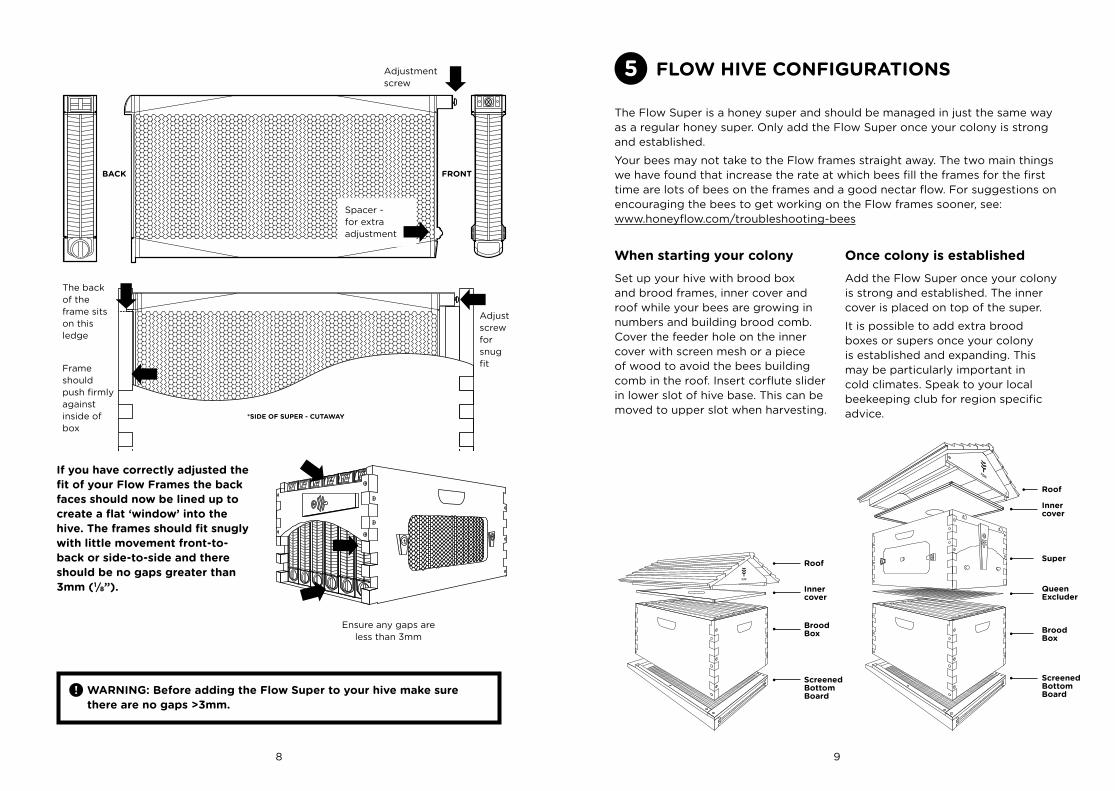
Adjust each Flow Frame to fit in the super1. Identify the front and back of each Flow Frame.
2. Frames sit into the Flow Super as illustrated on right. Tighten or loosen the adjustment screw so that the back (window) end of the Flow Frame pushes firmly against the back wall of the hive, in this way all the frames line up to form the clear end window.
3. Slot each Flow Frame into the honey super ensuring that frames are packed firmly together.
4. Check that any gap in the back window is less than 3 mm (1/8") so that bees cannot escape at the back of the hive*.
8 9
If you have correctly adjusted the fit of your Flow Frames the back faces should now be lined up to create a flat ‘window’ into the hive. The frames should fit snugly with little movement front-to-back or side-to-side and there should be no gaps greater than 3mm (1/8”).
5 FLOW HIVE CONFIGURATIONS
The Flow Super is a honey super and should be managed in just the same way as a regular honey super. Only add the Flow Super once your colony is strong and established.
Your bees may not take to the Flow frames straight away. The two main things we have found that increase the rate at which bees fill the frames for the first time are lots of bees on the frames and a good nectar flow. For suggestions on encouraging the bees to get working on the Flow frames sooner, see: www.honeyflow.com/troubleshooting-bees
When starting your colonySet up your hive with brood box and brood frames, inner cover and roof while your bees are growing in numbers and building brood comb. Cover the feeder hole on the inner cover with screen mesh or a piece of wood to avoid the bees building comb in the roof. Insert corflute slider in lower slot of hive base. This can be moved to upper slot when harvesting.
Once colony is establishedAdd the Flow Super once your colony is strong and established. The inner cover is placed on top of the super.
It is possible to add extra brood boxes or supers once your colony is established and expanding. This may be particularly important in cold climates. Speak to your local beekeeping club for region specific advice.
Adjust screw for snug fit
The back of the frame sits on this ledge
Frame should push firmly against inside of box
FRONTBACK
Adjustment screw
Ensure any gaps are less than 3mm
*SIDE OF SUPER - CUTAWAY
Spacer - for extra adjustment
l! WARNING: Before adding the Flow Super to your hive make sure there are no gaps >3mm.
Inner cover
Roof
Brood Box
Screened Bottom Board
Inner cover
Roof
Brood Box
Super
Queen Excluder
Screened Bottom Board

10 11
6 HOW FLOW WORKS
Finally capping the cells
Then fill the cells with honey
The bees complete the comb with their wax
When the frame is full it’s ready to harvest
The bees remain undisturbed on the surface of the comb. If there does happen to be a bee down an empty cell it wont get injured as there is enough space between the comb walls.
INSIDE THE HONEYCOMB THE CELLS HAVE NOW SPLIT AND TURNED INTO CHANNELS FOR THE HONEY TO FLOW DOWN.
HONEY TROUGH
CAP
HONEY TUBE
FLOW KEY
KEY ACCESS
CAP
*Frame remains in the hive for harvest, shown
separately for illustrative purposes only
THE FLOW FRAME CONSISTS OF PARTLY FORMED HONEYCOMB CELLS
1 Remove the key access cap and honey trough cap
2 Insert honey tube into hole
3 Insert Flow Key into LOWER slot
4 Rotate key 90 degrees downwards to split the honeycomb cells
12 13
7 EXTRACTING HONEY FROM A FLOW FRAME
The timing of your honey harvest will depend on local conditions and the nectar flow in your area. Your bees need honey to get them through the times when there is no nectar available. Honey should only be extracted in warmer months when there is sufficient nectar flow for the bees to replenish their supplies.
The number of frames of honey that you leave through winter depends on your climate. You should consult local beekeepers as to how much they leave in their colonies. The Flow Frames make it a lot easier to see how much honey is in your frames at any time, so you can learn to manage how much honey to harvest and how much to leave for the bees.
Flow Frames take nearly all the hard work out of the honey-extraction process, but there are a few important points to remember…
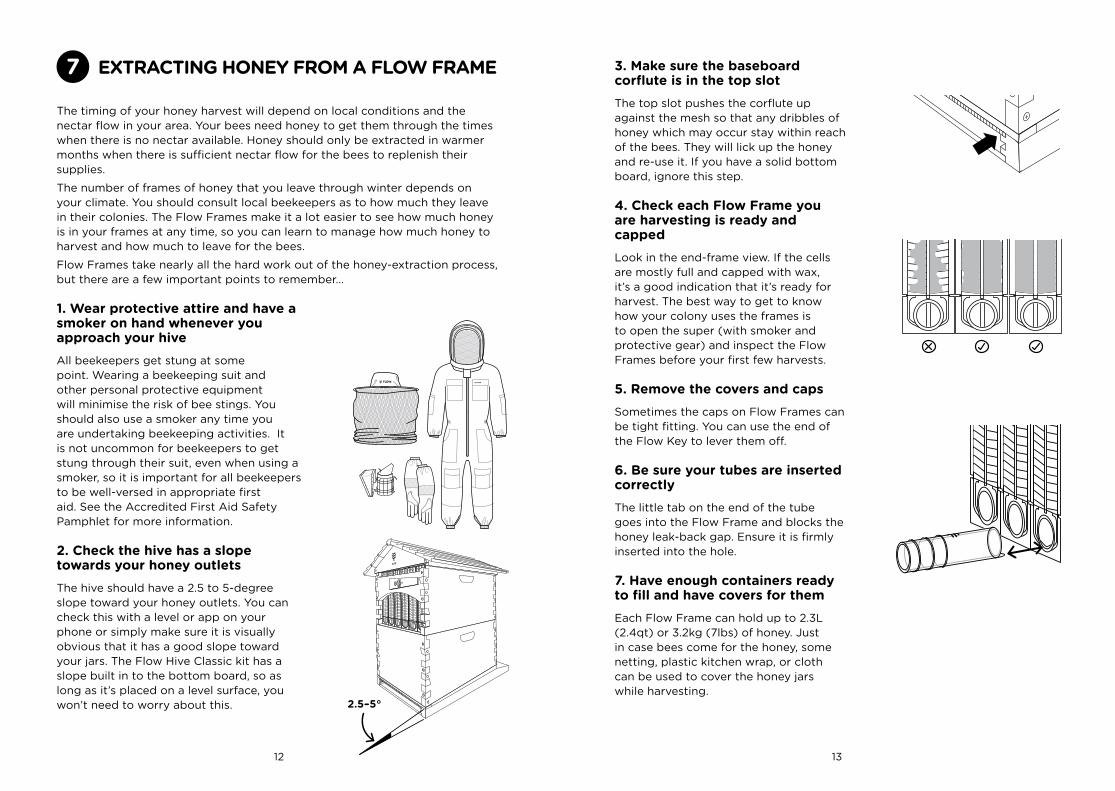
1. Wear protective attire and have a smoker on hand whenever you approach your hiveAll beekeepers get stung at some point. Wearing a beekeeping suit and other personal protective equipment will minimise the risk of bee stings. You should also use a smoker any time you are undertaking beekeeping activities. It is not uncommon for beekeepers to get stung through their suit, even when using a smoker, so it is important for all beekeepers to be well-versed in appropriate first aid. See the Accredited First Aid Safety Pamphlet for more information.
2. Check the hive has a slope towards your honey outletsThe hive should have a 2.5 to 5-degree slope toward your honey outlets. You can check this with a level or app on your phone or simply make sure it is visually obvious that it has a good slope toward your jars. The Flow Hive Classic kit has a slope built in to the bottom board, so as long as it’s placed on a level surface, you won’t need to worry about this.
3. Make sure the baseboard corflute is in the top slotThe top slot pushes the corflute up against the mesh so that any dribbles of honey which may occur stay within reach of the bees. They will lick up the honey and re-use it. If you have a solid bottom board, ignore this step.
4. Check each Flow Frame you are harvesting is ready and cappedLook in the end-frame view. If the cells are mostly full and capped with wax, it’s a good indication that it’s ready for harvest. The best way to get to know how your colony uses the frames is to open the super (with smoker and protective gear) and inspect the Flow Frames before your first few harvests.
5. Remove the covers and capsSometimes the caps on Flow Frames can be tight fitting. You can use the end of the Flow Key to lever them off.
6. Be sure your tubes are inserted correctlyThe little tab on the end of the tube goes into the Flow Frame and blocks the honey leak-back gap. Ensure it is firmly inserted into the hole.
7. Have enough containers ready to fill and have covers for themEach Flow Frame can hold up to 2.3L (2.4qt) or 3.2kg (7lbs) of honey. Just in case bees come for the honey, some netting, plastic kitchen wrap, or cloth can be used to cover the honey jars while harvesting.
2.5–5°
14 15
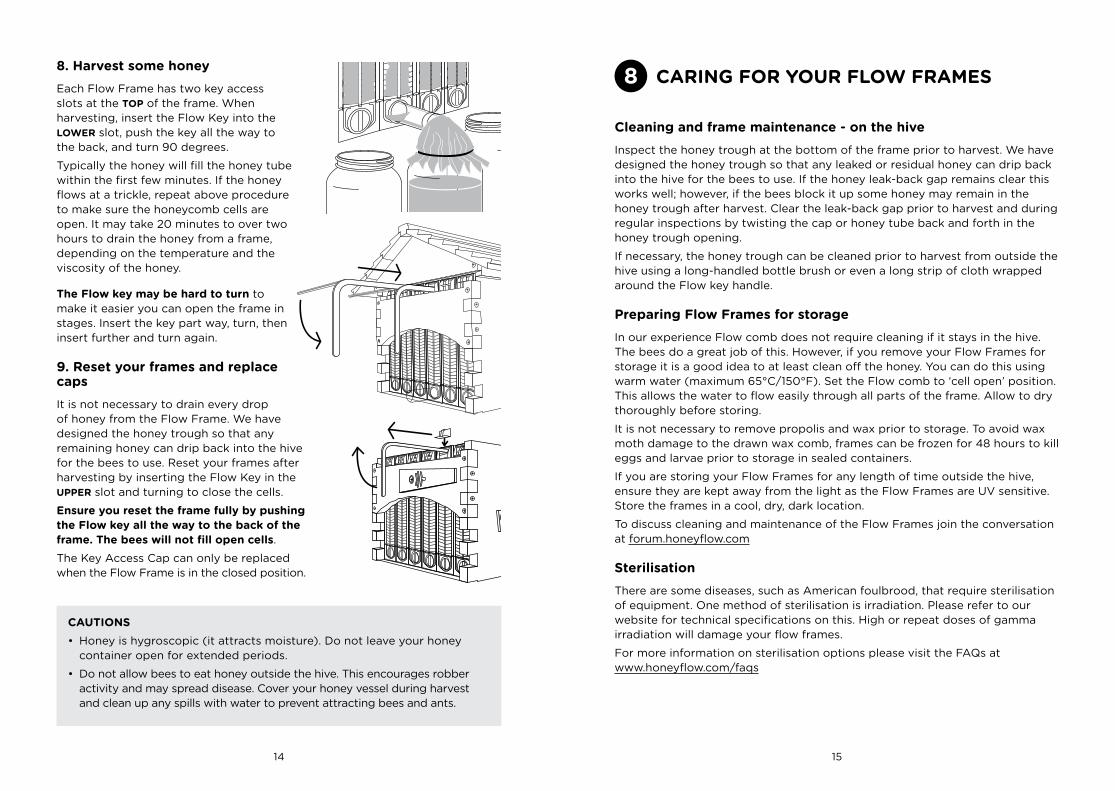
8. Harvest some honeyEach Flow Frame has two key access slots at the TOP of the frame. When harvesting, insert the Flow Key into the LOWER slot, push the key all the way to the back, and turn 90 degrees.
Typically the honey will fill the honey tube within the first few minutes. If the honey flows at a trickle, repeat above procedure to make sure the honeycomb cells are open. It may take 20 minutes to over two hours to drain the honey from a frame, depending on the temperature and the viscosity of the honey.
The Flow key may be hard to turn to make it easier you can open the frame in stages. Insert the key part way, turn, then insert further and turn again.
9. Reset your frames and replace capsIt is not necessary to drain every drop of honey from the Flow Frame. We have designed the honey trough so that any remaining honey can drip back into the hive for the bees to use. Reset your frames after harvesting by inserting the Flow Key in the UPPER slot and turning to close the cells.
Ensure you reset the frame fully by pushing the Flow key all the way to the back of the frame. The bees will not fill open cells.
The Key Access Cap can only be replaced when the Flow Frame is in the closed position.
CAUTIONS• Honey is hygroscopic (it attracts moisture). Do not leave your honey
container open for extended periods.
• Do not allow bees to eat honey outside the hive. This encourages robber activity and may spread disease. Cover your honey vessel during harvest and clean up any spills with water to prevent attracting bees and ants.
8 CARING FOR YOUR FLOW FRAMES
Cleaning and frame maintenance - on the hiveInspect the honey trough at the bottom of the frame prior to harvest. We have designed the honey trough so that any leaked or residual honey can drip back into the hive for the bees to use. If the honey leak-back gap remains clear this works well; however, if the bees block it up some honey may remain in the honey trough after harvest. Clear the leak-back gap prior to harvest and during regular inspections by twisting the cap or honey tube back and forth in the honey trough opening.
If necessary, the honey trough can be cleaned prior to harvest from outside the hive using a long-handled bottle brush or even a long strip of cloth wrapped around the Flow key handle.
Preparing Flow Frames for storageIn our experience Flow comb does not require cleaning if it stays in the hive. The bees do a great job of this. However, if you remove your Flow Frames for storage it is a good idea to at least clean off the honey. You can do this using warm water (maximum 65°C/150°F). Set the Flow comb to ‘cell open’ position. This allows the water to flow easily through all parts of the frame. Allow to dry thoroughly before storing.
It is not necessary to remove propolis and wax prior to storage. To avoid wax moth damage to the drawn wax comb, frames can be frozen for 48 hours to kill eggs and larvae prior to storage in sealed containers.
If you are storing your Flow Frames for any length of time outside the hive, ensure they are kept away from the light as the Flow Frames are UV sensitive. Store the frames in a cool, dry, dark location.
To discuss cleaning and maintenance of the Flow Frames join the conversation at forum.honeyflow.com
SterilisationThere are some diseases, such as American foulbrood, that require sterilisation of equipment. One method of sterilisation is irradiation. Please refer to our website for technical specifications on this. High or repeat doses of gamma irradiation will damage your flow frames.
For more information on sterilisation options please visit the FAQs at www.honeyflow.com/faqs
16 17
WARNINGS
• Do not use excessive force. If something is stuck, try repeated gentle movements until it loosens. If it’s still stuck, contact us
• Do not bend the Flow Frame. This may cause the frame to fall apart. In the event that your frame falls apart it can be reassembled. See www.honeyflow.com for further instructions
• Do not expose the frames to direct sunlight for long periods
• Do not expose the frames to extreme heat (once inside an operating hive, the bees will keep the temperature consistent)
• Do not use chemical solvents that are not recommended. See the FAQs on honeyflow.com for recommendations
• Do not use a blow torch or flame device on frames
• Refer to our website for up to date irradiation information.
Following these recommendations will greatly extend the useful life of your Flow Frames.
9 ADDITIONAL EQUIPMENT REQUIRED(additional equipment can be purchased through our website)
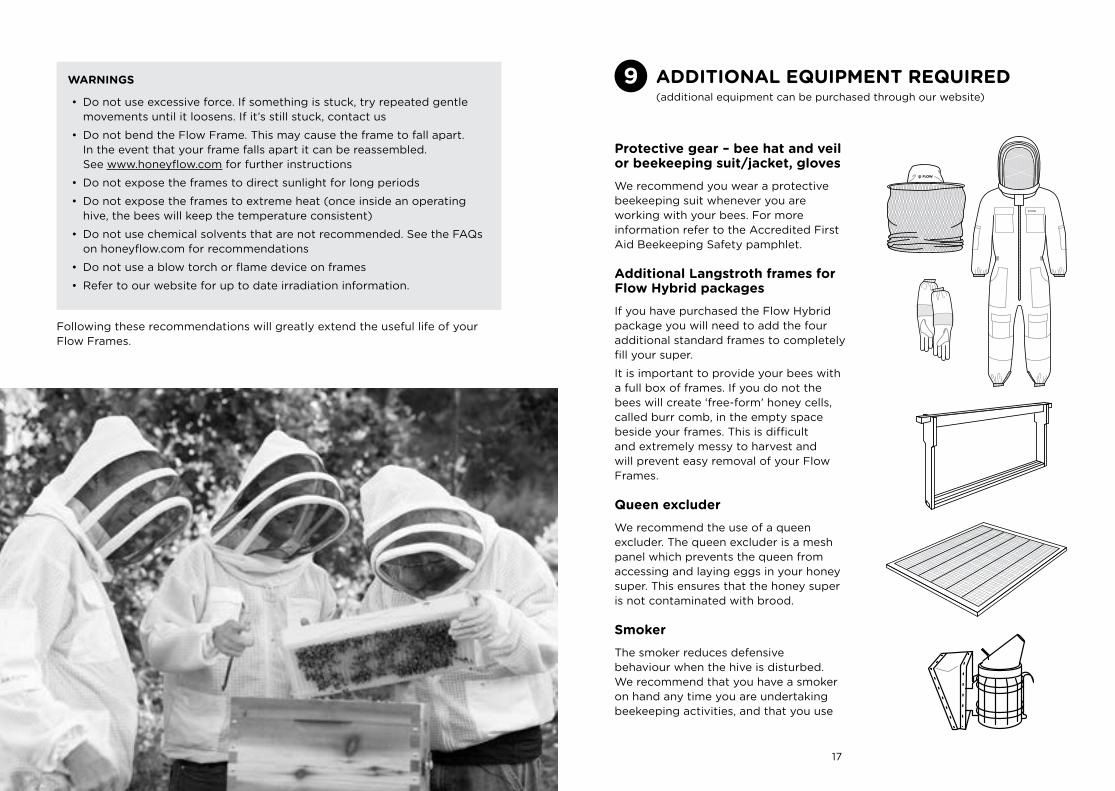
Protective gear – bee hat and veil or beekeeping suit/jacket, glovesWe recommend you wear a protective beekeeping suit whenever you are working with your bees. For more information refer to the Accredited First Aid Beekeeping Safety pamphlet.
Additional Langstroth frames for Flow Hybrid packagesIf you have purchased the Flow Hybrid package you will need to add the four additional standard frames to completely fill your super.
It is important to provide your bees with a full box of frames. If you do not the bees will create ‘free-form’ honey cells, called burr comb, in the empty space beside your frames. This is difficult and extremely messy to harvest and will prevent easy removal of your Flow Frames.
Queen excluderWe recommend the use of a queen excluder. The queen excluder is a mesh panel which prevents the queen from accessing and laying eggs in your honey super. This ensures that the honey super is not contaminated with brood.
SmokerThe smoker reduces defensive behaviour when the hive is disturbed. We recommend that you have a smoker on hand any time you are undertaking beekeeping activities, and that you use

18 19
it when you are opening and inspecting your beehive. You can read more about using your smoker safely in the Accredited First Aid Beekeeping Safety pamphlet.
Hive toolThe hive tool is a multi functional tool made of steel. It is used to lever and remove frames, to lever apart boxes, as well as scrape and remove burr comb from the hive.
10 WHERE TO LOCATE YOUR FLOW HIVE
It is important to consider the location of your new beehive prior to installing your bees. You can’t move a beehive around your paddock, yard or rooftop easily. Bees have highly developed navigational skills. If the hive is moved they become confused and will return to the original site. For advice on moving a bee hive once the bees are housed consult a beekeeping book, forum.honeyflow.com or your local beekeepers’ association.
There are three important things to consider when selecting a site for your new hive – your bees, your neighbours and yourself. The location of your beehive will affect the overall strength of your colony. Choose a sheltered position. In cool climates look for a dry sunny position, in hot climates the hive will benefit from some shade, particularly in summer. Face the hive entrance away from the prevailing winds. Ideally, face the entrance in a southerly direction if you’re in the northern hemisphere and northerly direction for the southern hemisphere.You should also read the Accredited First Aid Safety Pamphlet for an introduction to some important safety considerations to keep in mind when locating your hive.
Other considerations• Bees excrete waste to a distance of about 15 metres from the hive. This
appears as little orange dots that can stain washing and soil light coloured cars. Situate your hive to avoid this. It’s a good idea to place your hive so that the flight path is over a little used area of your yard or roof anyway.
• The hive should sit firmly, without any wobble on a stable base with clear access for when you are working with the colony. Placing the hive on a stand prevents rotting of base timbers and improves accessibility (options include bricks, concrete blocks, steel posts etc).
• During harvest the hive should have a 2.5-5.0 degree slope towards the honey outlets (a tilt of about 15mm (1/2”) is enough). The Flow Hive Classic
kit has an in-built slope so as long as it’s placed on a level surface you won’t need to worry about this.
• Otherwise, you have two options:
1. Chock up the hive when its time to harvest. Bees can be agitated by tilting so wear a beekeeping suit, have a smoker on hand and do this several hours before you harvest.
2. Leave the hive on a permanent slope. If sloping the hive backwards it is important to ensure water can’t enter the front of the hive.
11 SOURCE SOME BEES
Bees rarely find their way into empty beehive boxes, even though they are designed to be a perfect home for them. There are a number of ways of starting a colony. A small nuc (nucleus) hive can be bought from beekeeping suppliers in most countries. Contact your local amateur beekeepers’ club or your local or state beekeepers’ association for further advice on the best option for you.
l! WARNING: Before adding bees to your hive, make sure you wear a protective suit and gloves. Also make sure bees can’t escape anywhere except the hive entrance. Ensure there are no gaps greater than 3mm.

20 21
12 PROCESSING AND STORING YOUR HONEY
Honey from a Flow Frame should not need any further processing. However, if you do experience contamination, honey can be filtered. You can purchase a fine mesh strainer from a kitchen supply shop but we have found a clean stocking does a great job of filtering honey. Secure stocking over a clean dry vessel and strain honey.
Honey should be stored in clean, dry airtight containers. Over time your honey may crystallise and solidify. Candied honey is fine to eat as is, or you can liquefy it by gently heating the jar in warm water.
13 MONITORING YOUR HIVE HEALTH
It is important that you monitor the health of your hive on a regular basis. Flow Frames make honey harvesting easier, but all the other aspects of caring for the hive are still necessary. This includes monitoring and managing for pests, diseases and swarm control.
To properly monitor your hive and detect diseases you need to inspect the brood box for healthy brood. The frequency of monitoring depends on your location. Consult your local beekeeping club or primary industries and agriculture authorities for information specific to your area. You should also inspect your hive whenever a colony becomes weak.
A full Flow box can be heavy so consider harvesting some honey prior to your inspection or have a second beekeeper on hand to help lift the super off. Removing the Rear Window Cover of the Flow Super will create a hand-hold for easier lifting.
The Flow Frame’s clear end observation does assist with allowing you to look into the hive and gauge the strength and health of the colony. A healthy colony will be reasonably crowded with active bees. We recommend that you use this easy observation window to get to know your hive and its activity through the seasons.
14 ADDITIONAL SKILLS FOR SUCCESSFUL BEEKEEPING
If you are new to beekeeping there are a number of skills that you need to acquire in order to safely and successfully keep bees. We strongly recommend taking a beekeeping course before you put bees in your hive. Here is a list of practical skills that will help you on your beekeeping journey.
Essential skills• Understand and apply basic first
aid, as set out in the Accredited First Aid beekeeping safety pamphlet
• Light and extinguish a smoker
• Open, inspect and close a hive
Advanced Skills• Identify and manage health
problems and pests in the hive
• Swarm control
• Requeening
• Move a hive
Joining your local beekeeping club or association is a great way to connect with other keen beekeepers and share the passion.
Remember, if we look after the bees they will look after us, and the honey really is an amazing bonus.
22 23
15 TROUBLESHOOTING
Cannot fit Flow Frames into Flow Super side by side
Replace each frame ensuring that it is butted tightly against adjacent frame. Ensure that the rear end windows sit snugly against each other. Some boxes will have a packing strip that can be removed or perhaps shaved to make it thinner. A gap less than 2 mm (1/8”) is acceptable. The bees cannot get through this and will gum up the gap over time.
Cannot fit Flow Frame into Flow Super between the front and rear walls.
You may need to adjust your Flow Frame. Tighten the adjustment screw on the front of the frame [refer to Section 5 of this manual]. For further adjustment trim the stepped tags/spacer on the front face of the Flow Frame in order to allow the frame to slide into the box.
Bees slow to colonise Flow Frames
• Remove other honey supers to concentrate the bees in the Flow Super.
• Press some beeswax into the surface of the Flow comb. You can use chunks of burr comb, wax foundation or wax cappings.
• Heat up some beeswax and paint it onto the Flow Frame surface. Be careful not to get too much wax in the base of the cells or in the upper movement mechanism, as this may jam the mechanism when it comes time to harvest.
For more detail see: www.honeyflow.com/troubleshooting-bees
Cannot remove caps from key access or honey trough
Lever off with Flow Key
Flow Key is really hard to turn when opening the frame
The cells of the Flow comb are sealed with beeswax by the bees. Sometimes this wax is particularly tough and the key is really hard to turn. To make it easier, you can open part of a frame at a time. This is achieved by inserting the Flow Key part way into the LOWER operating slot and turning it. You can then insert the key further in and repeat the process until you have opened the entire frame.
Honey not flowing after opening the Flow Frame
Check Flow Key is inserted in the LOWER operating slot. Turn the Key 90 degrees to the vertical position. Leave it in this position until honey starts to flow.Sometimes the wax is particularly tough and the Flow comb takes longer to open. You can leave the key in the vertical position for an hour or more. If the honey is still not flowing, you may have crystallised honey in your cells [See following point].
Honey has crystallised in the Flow Frames
If honey has crystallised in the Flow Frames, you have two options:
1. Wait for the bees to remove it: Attempting to harvest the honey will have disturbed the comb a little. The bees will likely remove the crystallised honey to repair the comb.
2. Remove it yourself: The frames will need to be removed from the super and warmed gently. Refer to www.honeyflow.com/faqs for more information.
Cap doesn’t fit on key access slot
The cap can only be replaced when the frame is properly reset. Insert Flow Key in the UPPER operating slot and rotate 90 degrees. Remove Flow Key and replace cap.
24
Ants attracted to Flow frames
• Clean up any spilt honey after harvest with warm water.
• Remove the honey trough cap and, if necessary, clean the leak back gap with a thin tool such as a kitchen skewer or wire to allow honey to drain back into hive.
• Throw some cinnamon powder behind the window covers to deter the ants. If your hive is on a stand you can place the legs in water to prevent ants climbing onto the hive.
Honey in honey trough between harvests
When the bees fill the Flow Frames for the first time some honey may leak into the Honey trough. If the leak-back gap is blocked it will not be able to drain into the hive.
Use the Honey trough cap or the Honey tube to clear the leak-back gap during regular hive inspections so that the bees can lick up this leaked honey.
Honey leakage during harvest
It’s not unknown for the frames to leak a small amount of honey inside the hive whilst harvesting. This is usually not a problem as the bees will mop up the excess honey even if it reaches the bottom of the hive.
• Before you harvest, check that the Flow Frames are all capped and ready for harvesting.
• Place the Corflute Slider in the top slot of the baseboard to enable the bees to clean up any spilt honey.
• Ensure that the honey tubes are inserted firmly and correctly with the tongue in the honey-leak-back gap.
• Ensure that the hive is sloped towards the outlet.
• If you have connected the honey tube to a container, ensure that air can escape from the container. If your container is air-tight the honey will back up in the tube and overspill the edges of the trough inside the hive.
Flow frame has fallen apart; blades misaligned or bent
www.honeyflow.com/assembly

All content copyright © 2017 Flow. Printed on 100% recycled paper using environmentally friendly inks.
ASSEMBLY VIDEOS BEGINNER VIDEOS MEET THE BEEKEEPER
honeyflow.com/assembly honeyflow.com/beginner-videos honeyflow.com/mtb
Join our global beekeeping community forum.honeyflow.com
Stay up to date on facebook facebook.com/flowhive
Fall in love with bees on instagram @flowhive
Check out our videos at YouTube.com/flowhive
Tweet stuff at us on Twitter @flowhive