fnh usa - budsgunshop.com · fn herstal and fnh usa, llc reserve the right to refuse servicing a...
TRANSCRIPT

FNH USA
Five-seveN®
AUTOLOADING PISTOLOWNER’S MANUAL

2
NEW GUN OWNER’S RECORD
Model : .........................................................................................
Serial number (*) : .......................................................................
Date of purchase : .......................................................................
Purchased from : .........................................................................
Purchase price : ...........................................................................
Caution :
This manual has been written exclusively for the FNH USA / FN HERSTAL Five-seveN®.
If your Five-seveN® pistol has aninscription other than “cal. 5,7x28” onits right side or on the rear right end ofthe barrel (visible through the ejectionport) or if the external appearance ofthe pistol does not correspond to theillustrations of this manual, you mustcontact your dealer / departmentalarmorer or write us immediately toobtain the free Owner’s Manual thathas been written specifically for yourpistol.
FNH USA, LLCPO Box 697McLean, VA 22101(703) 288-1292, extension 122www.fnhusa.com
(*) The serial number of your pistol has been engraved in the right side of the frame, justabove the accessory rail.
Serial number
Inscriptions

3
Foreword
The Five-seveN® is an autoloading, single-action pistol which standsfor the highest level of reliability, consistent performance andfunctional design and which provides the operating precision andsafety expected from a sporting handgun.
The pistol, which exhibits thelatest technical evolutions inweapon design for military,law enforcement and sportinguse, has been conceivedbased on the experience of acollective team of experts inevery field related toautoloading pistols.
Simple in design, this pistol is very easy to maintain : with areasonable amount of care, your Five-seveN® should give you manyyears of dependable, enjoyable service.
In order to take maximum advantage of the many features of yourFive-seveN®, regularly review this Owner’s Manual which should bekept in the slot especially provided in the storage box of the pistol.
Please feel free to contact us if you have any observation orquestion regarding the performance or the operation of your pistol.
4
Safety and warranty notes
Like all firearms, the Five-seveN®, if handled in a careless or reckless manner, can be verydangerous.
For that reason, the pistol has been sold under the express understanding that FN HERSTALand FNH USA, LLC decline any responsibility and invalidate any guarantee and liabilityclaims for incidental or consequential damages (injuries, loss of use of property, commercialloss, loss of earnings and profits, ...) resulting in whole or partly from :
l the use of reloaded ammunitionl a discharge with criminal intent or through negligencel improper or careless handlingl unauthorized servicingl the modification or the alteration of the basic pistol designl the use of non-original partsl the alteration of the safety devicesl the use of incorrect “arms & ammunition” combinationsl the use of defective, damaged, unsafe, ... ammunitionl inadequate care of the pistol (e.g. corrosion, damage)l a disregard of malfunctionsl a resale in contradiction to legislationl other circumstances beyond our direct and immediate control
FN HERSTAL and FNH USA, LLC reserve the right to refuse servicing a pistol which has beenmodified (removal of metal from the barrel, modifications of the firing mechanism and/orother parts, ...) and will, in such a case, always recommend to restore the pistol to its originalspecifications. Parts and labor required for such a restoration are payable by the owner ofthe pistol.
5
SUMMARY1. Safety information 62. Technical information 14
2.1. Nomenclature 142.2. Functioning 152.3. Magazines and ammunition 18
3. Contents of the storage box 214. Using the pistol 22
4.1. Safety checks 224.2. Rear sight adjustment 254.3. Loading the magazine 284.4. Loading the pistol 294.5. Firing 304.6. Reloading during shooting 314.7. Unloading the pistol 334.8. Decocking the hammer 36
5. Maintenance 375.1. Disassembling and reassembling the pistol 375.2. Disassembling and reassembling the magazine 405.3. Reversing the magazine catch 425.4. Cleaning and lubrication 435.4.1. Cleaning and lubrication before firing 445.4.2. Cleaning and lubrication after firing 455.4.3. Cleaning and lubrication of the magazine 465.5. Additional care 47
6. Additional information 487. Service policy 498. Warranty or service 499. Technical specifications 51

6
1. SAFETY INFORMATION
As a firearm owner, you accept a set of demanding responsibilities.How seriously you take these responsibilities can be the differencebetween life and death.
There is no excuse for careless or abusive handling of any firearm.At all times, handle this firearm and all other firearms with intenserespect for their power and potential danger.
Please read and understand all the cautions, warnings, notices,proper handling procedures and instructions outlined in thisOwner’s Manual before using your new firearm.
x Always keep the muzzle of your firearm pointed in a safedirection even though you are certain that it is unloaded.
Never point any firearm at anything you do not intend to shoot. Beextremely alert and aware of all persons and property within the rangeof your ammunition.
x Never rely totally on your firearm’s mechanical “safety” devices.Like any mechanical device, a “safety” can sometimes fail; itcan be jarred or inadvertently manipulated into an unsafecondition.
The word “safety” describes a firearm’s trigger block mechanism, searblock mechanism, hammer block mechanism or firing pin blockmechanism.
Failure to follow any of the following warnings couldresult in serious injury or death.

7
Mechanical “safeties” are designed to place your firearm in a saferstatus, and no guarantee can be made that the firearm will not fire, evenif the “safety” is at the ‘safe’ position. Mechanical “safeties” merely aidsafe gun handling and are no excuse for pointing your firearm’s muzzlein an unsafe direction. For more information about the operation of thisfirearm’s “manual safety”, refer to § 2.2.
Remember, safe gun handling does not stop with your firearm’smechanical “safety” devices, it starts there. Always treat this firearm withthe respect due to a loaded, ready-to-fire firearm.
Some firearms do not have a mechanical “safety”. Many target firearms,lever-action firearms and pistols do not have manual “safety”mechanisms. Therefore it is critical to read and understand the Owner’sManual for every firearm in order to be informed about the safeoperation of the firearm.
While it is a good idea to “test” your firearm’s mechanical “safety”periodically for proper function, never test it while your firearm is loadedor pointed in an unsafe direction.
x Whenever you handle any firearm, or hand it to someone,always ensure that the firearm is completely unloaded.
For the Five-seveN®, this is done by pulling the slide completelyrearwards and then visually checking if the chamber is empty.
If necessary, completely unload your firearm as described in § 4.7.Ensure that the firearm does not inadvertently contain any ammunition.Always keep the chamber empty and the manual safety at the (raised)‘safe’ position, unless shooting is imminent.
x Always wear eye and hearing protection when shooting.
Unprotected, repeated exposure to gunfire can cause hearing damage.Wear ear protectors (shooting earplugs or muffs) to guard against suchdamage.
8
Wear shooting glasses to protect your eyes from flying particles. Allowproper distance (eye relief) between the rear sight of the pistol and youreye when shooting. Do not use unorthodox shooting methods that couldcause the rearward travel of the slide of your firearm to contact youreyes, face or hands. Always keep a safe distance between the muzzle ofyour firearm and any persons nearby, as muzzle blast, debris andejecting shells could inflict serious injury.
Always wear eye protection when disassembling and cleaning yourpistol to prevent the possibility of springs, spring-tensioned parts,solvents or other agents from contacting your eyes.
x Keep all firearms unloaded during transport, even when storedin a holster, a gun case or another container.
For law enforcement and military personnel, refer to the procedures ofyour department on carrying a loaded firearm.
x Dropping or jarring a loaded firearm can cause an accidentaldischarge.
This can occur even with the manual safety at the (raised) ‘safe’ positionor with the hammer in the decocked position. Be extremely careful whilehunting or during any shooting activity, to avoid dropping any firearm.
x Shooting from elevated surfaces is dangerous.
Doing so may increase the risk of incorrect handling a firearm.
The following rules should always be observed :- Always ensure that the surface being used is safe and stable.- Always ensure that your firearm is unloaded when it is being taken up
and down from the surface.- Always ensure that your firearm is not dropped from the surface, or
dropped while it is being taken up or down from the surface.
Remember, your loaded firearm may discharge when dropped, even withthe manual safety at the (raised) ‘safe’ position or with the hammer notcocked.

9
x Store your firearm and ammunition separately, well beyond thereach of children.
Take prudent safeguards in order to ensure that your firearm does notbecome available to untrained, inexperienced or unwelcome hands.Store all firearms in secure, locked cases or in a gun safe.
Keep your firearm unloaded when not in use.
At all times, comply with the local and state laws.
For law enforcement and military personnel, refer to the procedures ofyour department on storing your firearm.
x Beware of barrel obstructions.
Mud, snow and an infinite variety of other objects may inadvertentlylodge in the bore of a barrel. It only takes a small obstruction to causedangerously increased pressures which can damage your firearm andcause serious injury to yourself and others.
Before checking for a barrel obstruction, ensure that your firearm iscompletely unloaded, that there is no round in the chamber and that themanual safety is at the (raised) ‘safe’ position.
Completely unload your firearm as described in § 4.7. After havingensured that the firearm is completely unloaded, pull the slidecompletely rearwards and look through the barrel in order to ensure thatit is clear of any obstruction. If an obstruction is seen, no matter howsmall it may be, clean the bore of the barrel as described in § 5.4.1.
x Be alert to the signs of ammunition malfunction. If you detect anoff sound or a light recoil when a round is fired, do not loadanother round into the chamber.
If your firearm fails to fire, keep the muzzle pointed in a safe directionfor a minimum of 30 seconds. Carefully pull the slide completelyrearwards in order to remove the round from the chamber and thencompletely unload your firearm as described in § 4.7.
10
If the primer is indented, the defective round should be disposed of in away that can not cause harm. If the primer is not indented, your firearmshould be examined by a qualified gunsmith / your departmentalarmorer and the cause of the malfunction should be corrected beforefurther use.
With the slide open, glance down the barrel in order to ensure that thereis no obstruction in the barrel. If there is an obstruction, completely clearthe barrel before loading and firing again.
Failure to follow these instructions can cause extensive damage to yourfirearm and possible serious injury to yourself and others.
x Never insert a round of the incorrect caliber into any firearm.
The caliber of your firearm is marked on the right side of the slide andon the rear right end of the barrel. Store rounds of different calibers incompletely separate and well-marked containers. Never store rounds ofmixed calibers in a common container or in your pockets.
For more information about the correct ammunition for your firearm,refer to the end of § 2.3.
x Examine every round you put in your firearm.
We assume no responsibility for the use of unsafe or improper firearmand ammunition combinations or damage or injury caused by damagedammunition. It is your responsibility to read and heed all the warnings inthis Owner’s Manual and on the ammunition boxes.
For more information about the correct ammunition for your firearm,refer to the end of § 2.3.
x Use the proper ammunition.
The barrel and the slide of your firearm have been made with substantialsafety margins with regard to the pressures developed by the5.7 x 28 mm ammunition designed by FN HERSTAL.

11
However, FN HERSTAL and FNH USA, LLC assume no liability foraccidents which occur through the use of reloaded ammunition or5.7 x 28 mm rounds not fabricated according to the FN HERSTALstandards.
x Make sure of adequate ventilation in the area in which youdischarge a firearm. Lead exposure can occur from dischargingfirearms in poorly ventilated areas, from cleaning firearms orfrom handling ammunition.
Lead is a substance that has been known to cause birth defects,reproductive harm and other serious injury. Wash your hands thoroughlyafter exposure to ammunition or after having cleaned a firearm.
x Do not snap the firing pin on an empty chamber : the chambermay not be empty !
Treat every firearm with the respect due to a loaded firearm, eventhough you are certain that the firearm is unloaded.
x Keep your fingers away from the trigger while unloading,loading and removing the magazine.
Only touch the trigger when you are ready to shoot or when decockingthe hammer as described in § 4.8.
x Be sure of your target and backstop, particularly during lowlight periods.
Know the range of your ammunition. Never shoot at water or at hardobjects.
x Always unload your firearm’s chamber before crossing a fence,climbing a tree, jumping a ditch or negotiating other obstacles.
Never place your firearm on a fence, a tree, a car or any unstableobject.
For law enforcement and military personnel, refer to the procedures ofyour department.
12
x Be defensive and on guard against unsafe gun handling aroundyou and others.
Don’t be timid when it comes to gun safety. If you observe other shootersviolating any of these safety precautions, politely suggest safer handlingpractices.
x Be certain your firearm is unloaded before cleaning.
Because so many gun accidents occur when a firearm is being cleaned,special and extreme care should be taken to ensure that your firearm isunloaded before disassembly, cleaning and reassembly. Keepammunition away from the cleaning location. Never test the mechanicalfunction of any firearm with live ammunition.
x Teach and supervise firearms safety to all the members of yourfamily, especially to children and non-shooters.
Closely supervise newcomers to the shooting sports. Encourageenrollment in hunting and shooting safety courses.
x Never drink alcoholic beverages or take any type of drug beforeor during shooting.
Your vision, motor skills and judgment could be dangerously impaired,making your gun handling unsafe to you and to others.
Read and heed all warnings in this Owner’s Manual, on theammunition boxes and with all the accessories that you
install on your firearm.
It is your responsibility to secure the most up-to-dateinformation on the safe handling procedures for your FN
HERSTAL / FNH USA firearm.
FN HERSTAL and FNH USA, LCC assume no liability forincidents which occur when unsafe or improper pistol
accessories or ammunition combinations are used.

13
x Practice periodic maintenance, avoid unauthorized servicing.
Your firearm is a mechanical device which will not last forever, and assuch, is subject to wear and requires periodic inspection, adjustment andservice. FN HERSTAL / FNH USA firearms should be serviced by a FNHERSTAL / FNH USA, LLC Product Service Center or by our servicefacility in Arnold, Missouri.
FN HERSTAL and FNH USA, LLC can not assume any responsibility forinjuries suffered or caused by unauthorized servicing, alterations ormodifications of FN HERSTAL / FNH USA firearms.
x FN HERSTAL and FNH USA, LLC reserve the right to refuseservice on firearms that have been altered, added to orsubstantially changed.
Removal of metal from the barrel or modifications of the firingmechanism and/or operating parts may lead to a refusal of service onsuch firearms. FN HERSTAL and FNH USA, LLC will charge the owner forparts and labor to return the firearm to original FN HERSTAL / FNH USAspecifications.
Do not, under any circumstance, alter the trigger, the safety orother parts of the firing mechanism of this or any other
firearm.
Failure to obey this warning may result in injury or death toyourself or others.
BE CAREFUL !
14
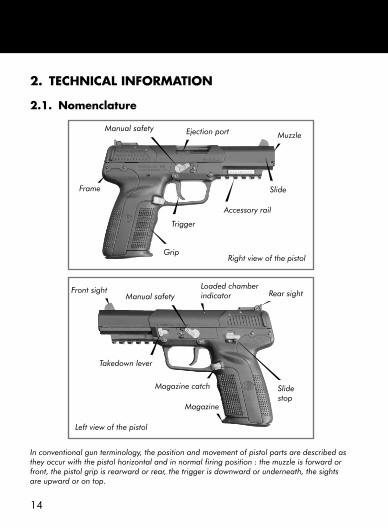
2. TECHNICAL INFORMATION
2.1. Nomenclature
In conventional gun terminology, the position and movement of pistol parts are described asthey occur with the pistol horizontal and in normal firing position : the muzzle is forward orfront, the pistol grip is rearward or rear, the trigger is downward or underneath, the sightsare upward or on top.
Right view of the pistol
Left view of the pistol
Front sight Rear sight
Muzzle
Grip
Trigger
Ejection port
Slide
Manual safety
Magazine
Slidestop
Accessory rail
Manual safety
Takedown lever
Magazine catch
Frame
Loaded chamberindicator
15
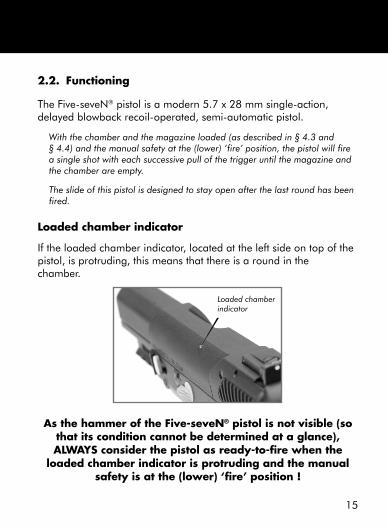
2.2. Functioning
The Five-seveN® pistol is a modern 5.7 x 28 mm single-action,delayed blowback recoil-operated, semi-automatic pistol.
With the chamber and the magazine loaded (as described in § 4.3 and§ 4.4) and the manual safety at the (lower) ‘fire’ position, the pistol will firea single shot with each successive pull of the trigger until the magazine andthe chamber are empty.
The slide of this pistol is designed to stay open after the last round has beenfired.
Loaded chamber indicator
If the loaded chamber indicator, located at the left side on top of thepistol, is protruding, this means that there is a round in thechamber.
As the hammer of the Five-seveN® pistol is not visible (sothat its condition cannot be determined at a glance),ALWAYS consider the pistol as ready-to-fire when the
loaded chamber indicator is protruding and the manualsafety is at the (lower) ‘fire’ position !
Loaded chamberindicator

16
Manual safety
The Five-seveN® pistol has an ambidextrous manual safety : amanual safety lever is on both the right and left sides of the framefor the convenience of both right- and left-handed shooters.
The manual safety can be set at one of the following 2 positions :
• The (raised) ‘safe’ position(NO red marks visible)
When the manual safety is atits raised position, thetrigger and firing mechanismis blocked from moving.
The ‘safe’ position should be selected in one of the following cases :
- When the Five-seveN® pistol is not operational (carrying, cleaning,stored, ...)
- When preparing the Five-seveN® pistol for firing
• The (lower) ‘fire’ position(red marks visible)
When in this mode, thetrigger can be moved and,on the condition that around has been loaded inthe chamber as described in§ 4.4, a single round will befired when the trigger ispulled.
Manual safety
Manual safety
17
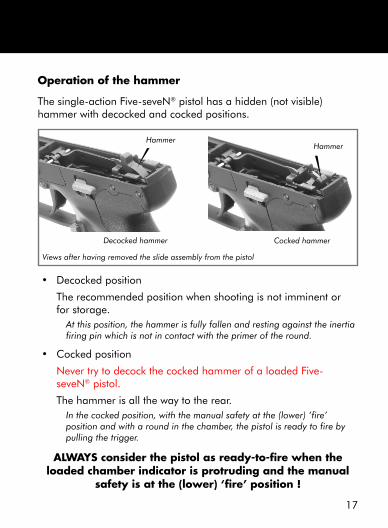
Operation of the hammer
The single-action Five-seveN® pistol has a hidden (not visible)hammer with decocked and cocked positions.
• Decocked position
The recommended position when shooting is not imminent orfor storage.
At this position, the hammer is fully fallen and resting against the inertiafiring pin which is not in contact with the primer of the round.
• Cocked position
Never try to decock the cocked hammer of a loaded Five-seveN® pistol.
The hammer is all the way to the rear.In the cocked position, with the manual safety at the (lower) ‘fire’position and with a round in the chamber, the pistol is ready to fire bypulling the trigger.
ALWAYS consider the pistol as ready-to-fire when theloaded chamber indicator is protruding and the manual
safety is at the (lower) ‘fire’ position !
Decocked hammer Cocked hammer
Views after having removed the slide assembly from the pistol
HammerHammer

18
2.3. Magazines and ammunition
Magazines
The magazines supplied with thepistol have a total magazine capacityof 20 rounds (10 rounds whererestricted by law).
With an additional round in the chamber,the pistol has a total capacity of 11 or21 rounds. However, as we recommendthat, unless shooting is imminent, noround should be loaded in the chamberof the pistol, the recommended maximumcarrying capacity is 10 or 20 rounds inthe magazine with the chamber empty.
This magazine is unique for the Five-seveN® pistol and should not be used inother pistols and no other magazinesshould be used in your Five-seveN®
pistol.
The left side of the magazine has been provided with four openingswhich allow you to estimate the number of rounds left.
If the base of a round is visible in the hole ‘20’ (or ‘10’), the magazine isfully loaded while the other holes simply offer you the possibility to estimatethe number of rounds still in the magazine.
19
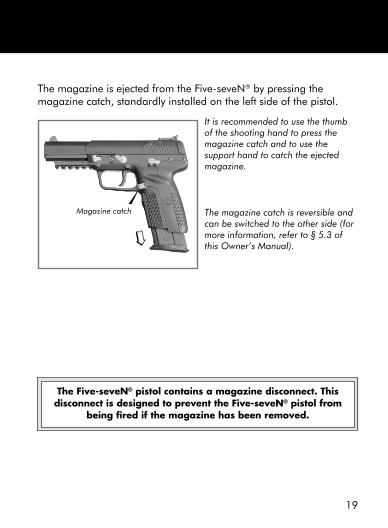
The magazine is ejected from the Five-seveN® by pressing themagazine catch, standardly installed on the left side of the pistol.
It is recommended to use the thumbof the shooting hand to press themagazine catch and to use thesupport hand to catch the ejectedmagazine.
The magazine catch is reversible andcan be switched to the other side (formore information, refer to § 5.3 ofthis Owner’s Manual).
Magazine catch
&
The Five-seveN® pistol contains a magazine disconnect. Thisdisconnect is designed to prevent the Five-seveN® pistol from
being fired if the magazine has been removed.

20
Ammunition
The Five-seveN® pistol should only be used with new factorymanufactured 5.7 x 28 mm ammunition.
The caliber is indicated by an inscription engraved in the right side of thepistol (as well as on the rear right end of the barrel).
The barrel and the slide of your firearm have beenmade with substantial safety margins with regard to
the pressures developed by the 5.7 x 28 mmammunition designed by FN HERSTAL.
However, FN HERSTAL and FNH USA, LLC assume noliability for accidents which occur through the use of
reloaded ammunition or 5.7 x 28 mm rounds notfabricated according to the FN HERSTAL standards.
EXAMINE EACH ROUND BEFORE YOU PUT IT IN YOURPISTOL !
21
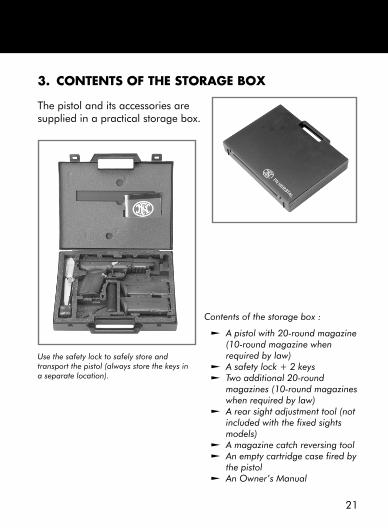
3. CONTENTS OF THE STORAGE BOX
The pistol and its accessories aresupplied in a practical storage box.
Contents of the storage box :
l A pistol with 20-round magazine(10-round magazine whenrequired by law)
l A safety lock + 2 keysl Two additional 20-round
magazines (10-round magazineswhen required by law)
l A rear sight adjustment tool (notincluded with the fixed sightsmodels)
l A magazine catch reversing tooll An empty cartridge case fired by
the pistoll An Owner’s Manual
Use the safety lock to safely store andtransport the pistol (always store the keys ina separate location).
22
4. USING THE PISTOL
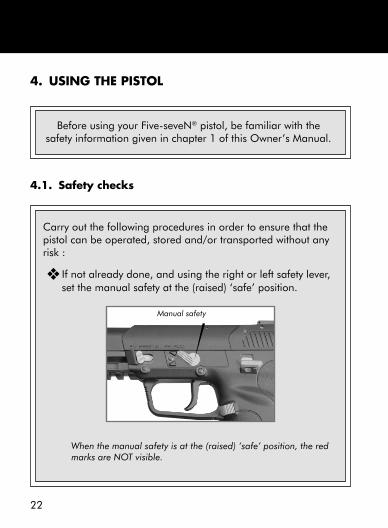
4.1. Safety checks
Carry out the following procedures in order to ensure that thepistol can be operated, stored and/or transported without anyrisk :
❖ If not already done, and using the right or left safety lever,set the manual safety at the (raised) ‘safe’ position.
When the manual safety is at the (raised) ‘safe’ position, the redmarks are NOT visible.
Before using your Five-seveN® pistol, be familiar with thesafety information given in chapter 1 of this Owner’s Manual.
Manual safety
23
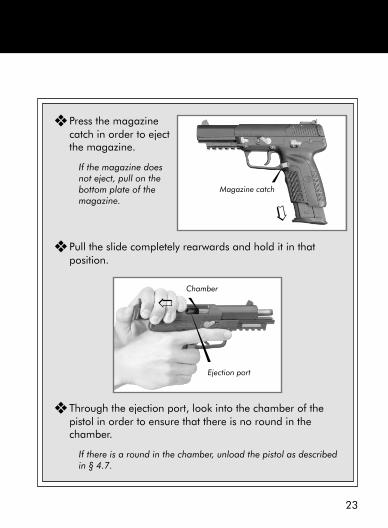
❖ Press the magazinecatch in order to ejectthe magazine.
If the magazine doesnot eject, pull on thebottom plate of themagazine.
❖ Pull the slide completely rearwards and hold it in thatposition.
❖ Through the ejection port, look into the chamber of thepistol in order to ensure that there is no round in thechamber.
If there is a round in the chamber, unload the pistol as describedin § 4.7.
Magazine catch
&
Chamber
Ejection port
&
24
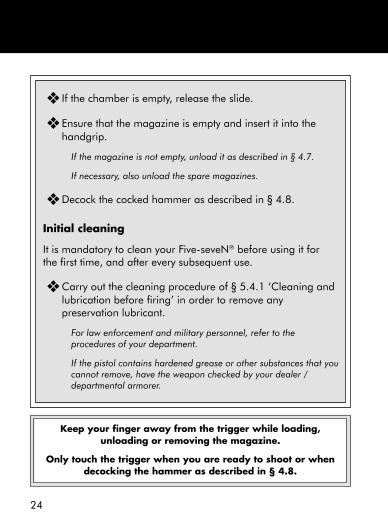
❖ If the chamber is empty, release the slide.
❖ Ensure that the magazine is empty and insert it into thehandgrip.
If the magazine is not empty, unload it as described in § 4.7.
If necessary, also unload the spare magazines.
❖ Decock the cocked hammer as described in § 4.8.
Initial cleaning
It is mandatory to clean your Five-seveN® before using it forthe first time, and after every subsequent use.
❖ Carry out the cleaning procedure of § 5.4.1 ‘Cleaning andlubrication before firing’ in order to remove anypreservation lubricant.
For law enforcement and military personnel, refer to theprocedures of your department.
If the pistol contains hardened grease or other substances that youcannot remove, have the weapon checked by your dealer /departmental armorer.
Keep your finger away from the trigger while loading,unloading or removing the magazine.
Only touch the trigger when you are ready to shoot or whendecocking the hammer as described in § 4.8.
25
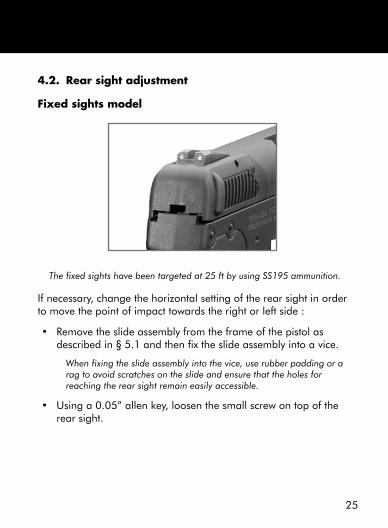
4.2. Rear sight adjustment
Fixed sights model
The fixed sights have been targeted at 25 ft by using SS195 ammunition.
If necessary, change the horizontal setting of the rear sight in orderto move the point of impact towards the right or left side :
• Remove the slide assembly from the frame of the pistol asdescribed in § 5.1 and then fix the slide assembly into a vice.
When fixing the slide assembly into the vice, use rubber padding or arag to avoid scratches on the slide and ensure that the holes forreaching the rear sight remain easily accessible.
• Using a 0.05” allen key, loosen the small screw on top of therear sight.

26
• Using a 3/32” drift punch and a small hammer, slightly movethe rear sight towards the right or left side in its housing in theslide assembly.
At both sides of the slide, a hole has been provided in order to correctlyreach the dovetail of the rear sight with the drift punch.
Never try to move the rear sight by applying a force on its externalsurfaces as this could cause damage to the slide or to the rear sight.
In order to move the point of impact towards the left side, slightly movethe rear sight towards the left side.
In order to move the point of impact towards the right side, slightly movethe rear sight towards the right side.
• Using the 0.05” allen key, tighten the small screw on top of therear sight.
• Reassemble the pistol as described in § 5.1.

27
Adjustable sights model
Horizontal setting of the rear sight (Fig. 1)
The point of impact can be moved towards the right (left) by moving the rearsight towards the right (left) by turning the windage adjustment screw ‘A’ inthe clockwise (counterclockwise) direction by using the rear sight adjustmenttool supplied in the storage box of the pistol.
Vertical setting of the rear sight (Fig. 2)
The point of impact can be moved down (up) by moving the rear sight down(up) by turning the vertical adjustment screw ‘B’ in the clockwise(counterclockwise) direction by using the rear sight adjustment tool.
B
A
Rear sight
Rear sightadjustment tool
Fig. 1 Fig. 2

28
4.3. Loading the magazine
As explained in § 2.3, the magazines supplied with the pistol have a capacity of10 or 20 rounds.
❖ If the magazine to be loaded is still in the pistol, first set themanual safety at the (raised) ‘safe’ position and then press themagazine catch in order to eject the magazine.
❖ Load the rounds, one by one, into the magazine.
Place the round on top of the lips of themagazine and with the rear of thecartridge aligned with the rear of themagazine.
With the thumb, push down on the round(against the force of the spring) until itlocks into position under the lips of themagazine.
The side openings in the magazine bodyallow you to estimate the number of roundspresent in the magazine.
It is recommended only to load the number of rounds you intend toshoot. Do not insert the magazine back into the pistol nor load a
round into the chamber unless shooting is imminent. Never keep aloaded magazine next to the pistol.
For law enforcement and military personnel, refer to the proceduresof your department on carrying a loaded pistol with a round in the
chamber.
29
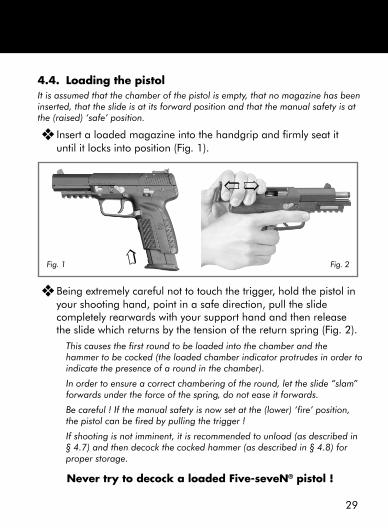
4.4. Loading the pistolIt is assumed that the chamber of the pistol is empty, that no magazine has beeninserted, that the slide is at its forward position and that the manual safety is atthe (raised) ‘safe’ position.
❖ Insert a loaded magazine into the handgrip and firmly seat ituntil it locks into position (Fig. 1).
❖ Being extremely careful not to touch the trigger, hold the pistol inyour shooting hand, point in a safe direction, pull the slidecompletely rearwards with your support hand and then releasethe slide which returns by the tension of the return spring (Fig. 2).
This causes the first round to be loaded into the chamber and thehammer to be cocked (the loaded chamber indicator protrudes in order toindicate the presence of a round in the chamber).
In order to ensure a correct chambering of the round, let the slide “slam”forwards under the force of the spring, do not ease it forwards.
Be careful ! If the manual safety is now set at the (lower) ‘fire’ position,the pistol can be fired by pulling the trigger !
If shooting is not imminent, it is recommended to unload (as described in§ 4.7) and then decock the cocked hammer (as described in § 4.8) forproper storage.
Never try to decock a loaded Five-seveN® pistol !
&
&
&
Fig. 1 Fig. 2

30
4.5. Firing
Before firing, read the entire Owner’s Manual : warnings and instructions aredifferent for each pistol.
It is assumed that the rear sight has been adjusted correctly (also refer to§ 4.2).
Ensure that § 5.4.1. “Cleaning and lubrication before firing” has been carriedout.
❖ If not already done, load the pistol as described in § 4.4.
❖ Pointing the pistol in a safe direction, and using the right or leftsafety lever, set the manual safety at the (lower) ‘fire’ position.
When firing, the slide will move approx. 3/4” past the rear end of theframe : never hold your hand in a position where it could be hit by theslide and never hold the pistol close to the eyes when aiming !!
❖ While aiming the pistol,pull the trigger to fire thefirst round.
The Five-seveN® pistol is asingle-action pistol resultingin a rather light and shorttrigger pull.
After firing a shot, release the trigger so that it resets to the forwardposition.
Trigger

31
❖ Keep the pistol pointed at the target and fire additional roundsas required.
After each fired round, the pistol will cock the hammer, eject the usedcartridge case and feed a round from the magazine into the chamber.
If the pistol is fired until the magazine is empty, the slide will remainopen when the last round has been fired (refer to the following § 4.6).
If the shooting is interrupted, even shortly, place the manual safety at the(raised) ‘safe’ position.
After firing is completed, remove the magazine and unload the pistol.
4.6. Reloading during shooting
After firing the last round, the slide will remain in the open position.
At this point, the empty magazine can quickly be replaced with aloaded magazine, by proceeding as follows :
❖ Keep the muzzle pointed in a safe direction and press themagazine catch in order to eject the empty magazine (also referto § 2.3).
❖ Insert a loaded magazine into the handgrip and firmly seat ituntil it locks into position.

32
❖ Grab the slide, pull slightly to the rear with your support handand then press the slide stop downwards in order to disengageit (Fig. 1) or pull the slide rearwards and let go (Fig. 2) : theslide will return to the forward position and the first round willbe loaded into the chamber.
Ensure to allow the slide to return forwards under full force of the returnspring. Failure to do so may result in a feeding failure.
During this operation, be careful not to touch the trigger.
Please note that the hammer is still in the cocked position : the pistol willbe ready to fire.
The loaded chamber indicator protrudes in order to indicate thepresence of a round in the chamber.
❖ Resume firing.
If the shooting is interrupted, even shortly, place the manual safety at the(raised) ‘safe’ position.
After firing is completed, remove the magazine and unload the pistol.
&
&
Slide stop
&Fig. 1 Fig. 2
33
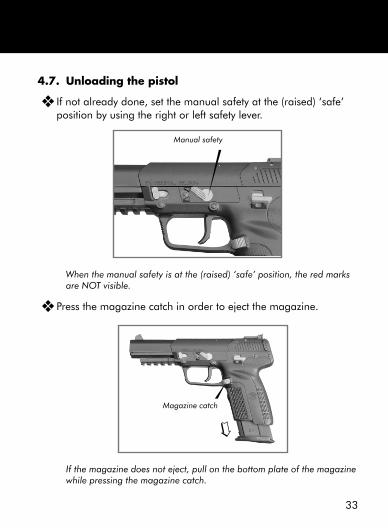
4.7. Unloading the pistol
❖ If not already done, set the manual safety at the (raised) ‘safe’position by using the right or left safety lever.
When the manual safety is at the (raised) ‘safe’ position, the red marksare NOT visible.
❖ Press the magazine catch in order to eject the magazine.
If the magazine does not eject, pull on the bottom plate of the magazinewhile pressing the magazine catch.
Manual safety
Magazine catch
&
34
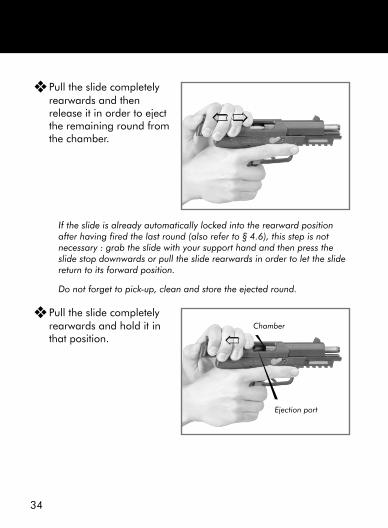
❖ Pull the slide completelyrearwards and thenrelease it in order to ejectthe remaining round fromthe chamber.
If the slide is already automatically locked into the rearward positionafter having fired the last round (also refer to § 4.6), this step is notnecessary : grab the slide with your support hand and then press theslide stop downwards or pull the slide rearwards in order to let the slidereturn to its forward position.
Do not forget to pick-up, clean and store the ejected round.
❖ Pull the slide completelyrearwards and hold it inthat position.
&
&
Chamber
Ejection port
&
35
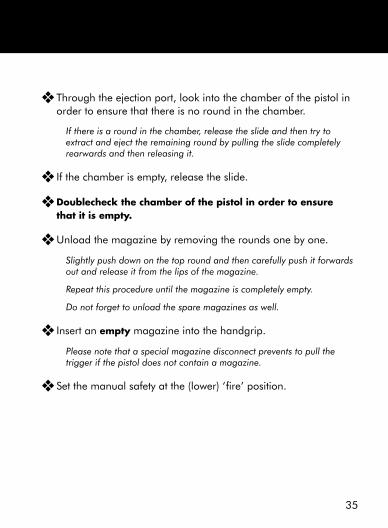
❖ Through the ejection port, look into the chamber of the pistol inorder to ensure that there is no round in the chamber.
If there is a round in the chamber, release the slide and then try toextract and eject the remaining round by pulling the slide completelyrearwards and then releasing it.
❖ If the chamber is empty, release the slide.
❖ Doublecheck the chamber of the pistol in order to ensurethat it is empty.
❖ Unload the magazine by removing the rounds one by one.
Slightly push down on the top round and then carefully push it forwardsout and release it from the lips of the magazine.
Repeat this procedure until the magazine is completely empty.
Do not forget to unload the spare magazines as well.
❖ Insert an empty magazine into the handgrip.
Please note that a special magazine disconnect prevents to pull thetrigger if the pistol does not contain a magazine.
❖ Set the manual safety at the (lower) ‘fire’ position.

36
4.8. Decocking the hammerBefore proceeding, read and understand § 2.2 which shortly describes the
functioning of your pistol, and especially of its (hidden) hammer.
This procedure should be carried out to decock the cocked hammer, especiallyif you do not intend to shoot immediately after having cocked the pistol.
The procedure starts with unloading the pistol (also refer to § 4.7) :never try to decock the cocked hammer of a loaded Five-seveN® pistol !
For law enforcement and military personnel, refer to the procedures of yourdepartment on decocking a cocked hammer.
❖ If not already done, set the manual safety at the (raised) ‘safe’position.
❖ Press the magazine catch in order to eject the magazine.
❖ Pull the slide completely rearwards in order to eject theremaining round from the chamber and hold it in that position.
Do not forget to pick-up, clean and store the ejected round.
❖ Looking through the ejection port, ensure that there is no roundin the chamber of the pistol.
❖ If the chamber is empty, release the slide.
❖ Doublecheck the chamber of the pistol in order to ensurethat it is empty.
❖ Insert an empty magazine into the handgrip.
Please note that a special magazine disconnect prevents to pull thetrigger if the pistol does not contain a magazine.
❖ Set the manual safety at the (lower) ‘fire’ position.
❖ After having ensured that the pistol is unloaded, point it in asafe direction and then pull the trigger to decock the hammer.
❖ Set the manual safety at the (raised) ‘safe’ position.
37
5. MAINTENANCE
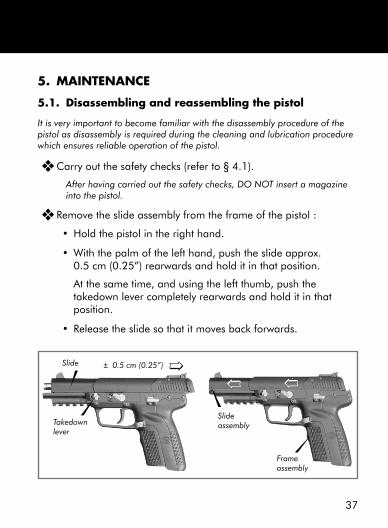
5.1. Disassembling and reassembling the pistol
It is very important to become familiar with the disassembly procedure of thepistol as disassembly is required during the cleaning and lubrication procedurewhich ensures reliable operation of the pistol.
❖ Carry out the safety checks (refer to § 4.1).
After having carried out the safety checks, DO NOT insert a magazineinto the pistol.
❖ Remove the slide assembly from the frame of the pistol :
• Hold the pistol in the right hand.
• With the palm of the left hand, push the slide approx.0.5 cm (0.25”) rearwards and hold it in that position.
At the same time, and using the left thumb, push thetakedown lever completely rearwards and hold it in thatposition.
• Release the slide so that it moves back forwards.
&± 0.5 cm (0.25”)Slide
Takedownlever
& &
Slideassembly
Frameassembly
38
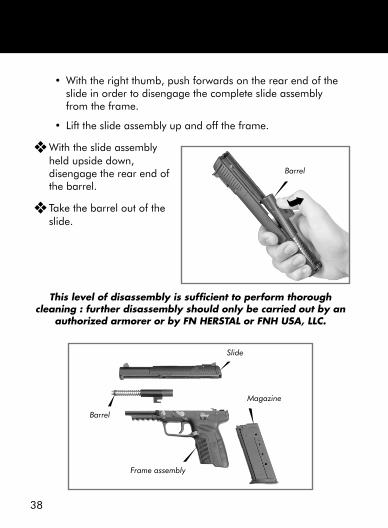
• With the right thumb, push forwards on the rear end of theslide in order to disengage the complete slide assemblyfrom the frame.
• Lift the slide assembly up and off the frame.
❖ With the slide assemblyheld upside down,disengage the rear end ofthe barrel.
❖ Take the barrel out of theslide.
This level of disassembly is sufficient to perform thoroughcleaning : further disassembly should only be carried out by an
authorized armorer or by FN HERSTAL or FNH USA, LLC.
Barrel
Barrel
Frame assembly
Slide
Magazine
(

39
To reassemble the pistol, proceed as follows :
Î Ensure that all the components of the pistol are perfectly clean(refer to § 5.4.2).
Î Insert the muzzle of thebarrel into the barrelopening at the front sideof the slide.
Î Push the barrel slightlyforwards against the forceof the return spring andthen fit the rear end of thebarrel into position in theslide.
Before carrying out the next step, ensure that the takedownlever is at the rear position, that the frame does not contain a
magazine and that the hammer is in the cocked position.
Î Reinstall the slide assembly onto the frame of the pistol :
• While holding the slideassembly parallelabove the frame, alignthe rear end of theslide assembly with thefront end of the rearguide rails of theframe.
Barrel
Slide assembly
Rear guiderails
Frameassembly
)
40
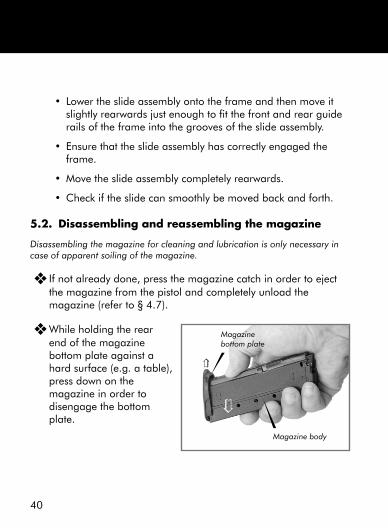
• Lower the slide assembly onto the frame and then move itslightly rearwards just enough to fit the front and rear guiderails of the frame into the grooves of the slide assembly.
• Ensure that the slide assembly has correctly engaged theframe.
• Move the slide assembly completely rearwards.
• Check if the slide can smoothly be moved back and forth.
5.2. Disassembling and reassembling the magazine
Disassembling the magazine for cleaning and lubrication is only necessary incase of apparent soiling of the magazine.
❖ If not already done, press the magazine catch in order to ejectthe magazine from the pistol and completely unload themagazine (refer to § 4.7).
❖ While holding the rearend of the magazinebottom plate against ahard surface (e.g. a table),press down on themagazine in order todisengage the bottomplate.
Magazinebottom plate
Magazine body
&
&

41
❖ Taking into account that the magazine bottom plate is subjectedto the force of the magazine follower spring, slide the bottomplate off the magazine body and then carefully release thepressure on the follower spring.
❖ Take the magazine follower assembly out of the magazine body.
This level of disassembly is sufficient to perform thoroughcleaning : further disassembly should only be carried out by an
authorized armorer or by FN HERSTAL or FNH USA, LLC.
To reassemble the magazine, follow the above steps in reverse order,taking into account the following points :
Î Ensure that the components of the magazine are perfectly clean.
Î Ensure that the magazine follower assembly is correctly oriented.
Î The magazine bottom plate can only be slid back into positionwhen the magazine follower spring is compressed and held flushwith the edge of the magazine body.
Î Ensure that the magazine bottom plate correctly locks intoposition.
Magazine bottom plate
Magazinebody
Magazine bodyMagazinefollowerassembly
Magazinefollower spring
&

42
5.3. Reversing the magazine catchFirst of all, ensure that your Five-seveN® pistol is unloaded (refer to § 4.7).
In order to reverse the magazine catch to the other side of the pistol(also refer to § 2.3), proceed as follows :❖ Remove the slide assembly as described in § 5.1 and then set the
manual safety at the (lower) ‘fire’ position in order to be able topull the trigger when asked during the following procedure.
❖ Use the hook on the narrow end of the magazine catch reversingtool to pull the magazine catch spring out of its housing insidethe frame (Fig. 1) and then remove the magazine catch (Fig. 2).
❖ Fit the magazine catch, with the grooved end facing outwards,into the frame from the opposite side of the pistol (Fig. 3).
❖ Fit the magazine catch spring into the special housing of themagazine catch reversing tool and then, while pulling the trigger,reinstall the spring into its housing inside the frame (Fig. 3-5).
Fit the (longer) shaped end of the spring correctly between the rear lugsof the magazine catch and fully seat the spring by using the tool.
Magazine catchreversing tool
&
&
&
& &
&
Magazine catch
Magazine catchspring
Magazine catchspring
Fig. 1 Fig. 2
Fig. 3
Fig. 4
Fig. 5

43
5.4. Cleaning and lubrication
The frequency at which the pistol should be cleaned and lubricateddepends on the ammunition used, the weather and shootingconditions and other external factors.
A good rule is to clean and lubricate the pistol after every use or, incase of intensive shooting, after 500 rounds : correct maintenancewill enhance the longevity and the performance of your pistol.
Excessively dirty ammunition may require more frequent cleaning and toomuch dirt can affect the functioning of even the finest firearm.
It is important to keep your pistol clean and correctly lubricated !
Do not use too much lubricant as this could cause the build-up of dirt, grit orpowder residue which could affect the functioning of the pistol.
For more information about the recommended lubricants, refer to‘Lubricants’ in § 6.
Before cleaning the pistol, ALWAYS ensure that it is unloaded(also refer to § 4.7).
Keep the ammunition away from the cleaning site and nevertest the mechanical function of your pistol with live ammunition.
We do not recommend prolonged exposure to hydrocarbons,trichlorethylene nor ammonia. These chemicals could cause
damage to your pistol !
44
Before each shooting sequence, ALWAYS check the barrel forobstructions and ensure that it is dry and clean.
Completely unload the pistol, ensure that there is no round in thechamber of the pistol and then glance down the barrel in order toensure that it is free of any obstruction.
Take into account that the smallest obstruction can dangerouslyincrease pressures.
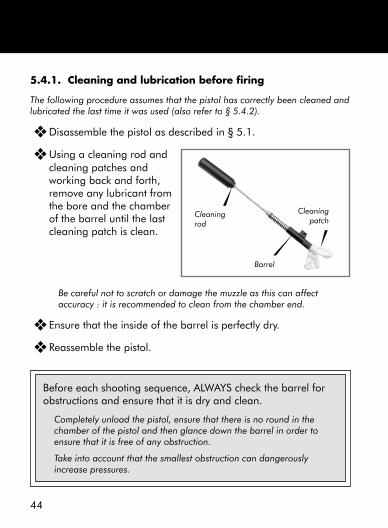
5.4.1. Cleaning and lubrication before firing
The following procedure assumes that the pistol has correctly been cleaned andlubricated the last time it was used (also refer to § 5.4.2).
❖ Disassemble the pistol as described in § 5.1.
❖ Using a cleaning rod andcleaning patches andworking back and forth,remove any lubricant fromthe bore and the chamberof the barrel until the lastcleaning patch is clean.
Be careful not to scratch or damage the muzzle as this can affectaccuracy : it is recommended to clean from the chamber end.
❖ Ensure that the inside of the barrel is perfectly dry.
❖ Reassemble the pistol.
Cleaningrod
Barrel
Cleaningpatch

45
5.4.2. Cleaning and lubrication after firing
❖ Disassemble the pistol as described in § 5.1.
❖ Using cleaning brushes or a spray, apply solvent inside thebarrel (bore and chamber) and let the product work a fewminutes.
❖ Using a cleaning rod andcleaning patches andworking back and forth,remove the solvent andthe residues from the boreand the chamber of thebarrel until the lastcleaning patch is clean.
Be careful not to scratch or damage the muzzle as this can affectaccuracy : it is recommended to clean from the chamber end.
❖ When the bore and the chamber of the barrel are clean, againuse a cleaning patch, this time moistened with lubricant, toprotect the inside of the barrel until the next use.
Please note that the inside of the barrel should be wiped dry beforeshooting (also refer to § 5.4.1).
❖ Using cleaning brushes and solvent, remove any carbon andother deposits from the areas of the pistol attracting powderand primer residues : the slide, the extractor, the upper part ofthe frame, ...
Cleaningrod
Cleaningpatch
Barrel

46
❖ Using a soft cloth or a cleaning patch (if necessary, dipped insolvent), remove any dirt from the magazine housing of theframe.
❖ Check the disassembled parts of the pistol for signs of wearand/or damage.
In case of doubt about the condition of a part, consult your dealer /departmental armorer.
❖ Thoroughly clean all the parts of the pistol in order to removeany dirt, debris or fouling.
❖ Apply one drop of lubricant to the return spring, the inside ofthe slide (especially the grooves for the guide rails), the metalmoving parts as well as the guide rails of the frame.
❖ Reassemble the pistol (refer to § 5.1).
❖ Clean the outside of the pistol in order to remove dirt, fingerprint residue and excessive lubricant.
5.4.3. Cleaning and lubrication of the magazine
Cleaning and lubrication of the magazine is only necessary in case of apparentsoiling of the magazine.
❖ Disassemble the magazine (refer to § 5.2).
❖ Thoroughly clean all the parts of the magazine (if necessary, usesolvent).
❖ Using a cleaning patch moistened with lubricant, lightly applylubricant to the magazine follower spring.
Wipe off excess lubricant. Ensure that the inside of the magazine is dry.
❖ Reassemble the magazine (refer to § 5.2).
47
5.5. Additional care
x Always keep the pistol in immaculate condition and goodworking order.
x Always clean and lubricate the pistol after use.
x Regularly inspect the pistol, its parts and the accessories.
If something seems abnormal, do not hesitate to report it to yourdealer / departmental armorer.
x Never modify or repair parts of your pistol by yourself.
Your pistol is a mechanical device subject to wear andwhich will not last forever : it requires periodic
inspection, adjustment and service.
The pistol should be checked every 2000 rounds and/oronce a year because damage, wear, corrosion, ... are
not always visible from the outside.For that purpose, send the pistol to your dealer.
Law enforcement and military personnel have adepartmental armorer which will inspect the pistol on a
yearly basis.
FN HERSTAL and FNH USA, LLC cannot assume anyresponsibility for injuries caused by unauthorized
servicing, alterations or modifications to its firearms.

48
6. ADDITIONAL INFORMATION
Sight adjustment
For a more accurate setting of the sights than the proceduresdescribed in § 4.2, consult your dealer / departmental armorer.
Lubricants
FN HERSTAL and FNH USA, LLC recommend using lubricantNycolube 127 CLP or equivalent (reference US MIL - PRF63460 orNATO S-758).
For the US Market, CLP is available under the following names andtrademarks :
- CLP-NC by BREAK-FREE INC- SENT-CLP by SENTINEL CANADA- ROYCO-634 by ROYAL LUBRICANTS Co, INC
Be aware that some solvents can be harmful to the surface finish of thepistol, so consult your dealer / departmental armorer.
Disposal
Strictly observe the current national legislation concerning thedisposal of handguns, return the pistol to your dealer /departmental armorer or, if it is not contrary to the current nationallegislation, send it back to FN HERSTAL or FNH USA, LLC.

49
7. SERVICE POLICY
FN HERSTAL or FNH USA products are serviced by the FNH USAProduct Service Center in Arnold, Missouri.
Please call (800) 635-1321 or (703) 288-1292 extension 122 todiscuss any product repair requirement.
Shipping Address :
FNH USA Product Service Center3005 Arnold Tenbrook RoadArnold, MO 63010-4728
8. WARRANTY OR SERVICE
If your FN HERSTAL or FNH USA product should require service orrepairs, we suggest you to contact the FNH USA Product ServiceCenter in Arnold, Missouri.
Law enforcement and military personnel should contact theirdepartmental armorer.
For technical questions about your firearm or service, contact :
FNH USA Product Service Center3005 Arnold Tenbrook RoadArnold, MO 63010-4728Phone : (800) 635-1321

50
When returning your FN firearm for servicing, you must do thefollowing :
1. Ensure that it is completely unloaded.
2. Remove the scope, optics or accessories.
3. Package it securely in a cardboard container.
4. Enclose the service/repair form available at www.fnhusa.com ora letter that clearly describes the trouble experienced, theammunition used and the repairs desired. Also include yourname and a daytime phone number where you can be reached.
5. If convenient, send a copy of the service/repair form or letter tous separately.
6. Never return ammunition with your firearm : it is against postaland most commerce regulations.
If you have any question about this Owner’s Manual or other FNHERSTAL or FNH USA products, contact :
FNH USA, LLCCommercial and Law Enforcement SalesPhone (703) 288-1292, extension 122
Or visit us online at www.fnhusa.com.
If you do not understand the instructions for operating your FNfirearm, it is your responsibility to contact the FNH USA ProductService Center at (800) 635-1321 or (703) 288-1292 extension122 before using the firearm.
This Owner’s Manual should always accompany this pistol and betransferred with it upon any change of ownership.
51
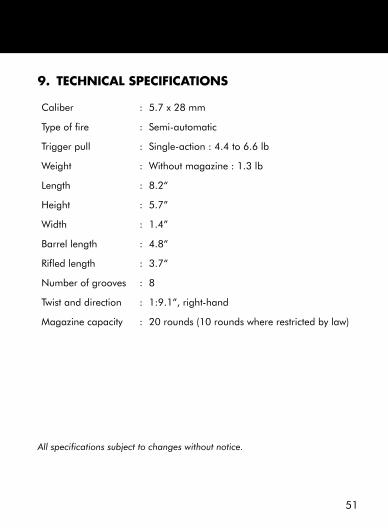
9. TECHNICAL SPECIFICATIONS
Caliber : 5.7 x 28 mm
Type of fire : Semi-automatic
Trigger pull : Single-action : 4.4 to 6.6 lb
Weight : Without magazine : 1.3 lb
Length : 8.2“
Height : 5.7”
Width : 1.4”
Barrel length : 4.8“
Rifled length : 3.7“
Number of grooves : 8
Twist and direction : 1:9.1”, right-hand
Magazine capacity : 20 rounds (10 rounds where restricted by law)
All specifications subject to changes without notice.

FNH USA
FNH USA, LLCPO Box 697
McLean, VA 22101
Catalog 3860054110-01 February ‘09