fontmagic/400 - keowee systems, inc - electronic … features and startup 4 1.0 - introduction and...
TRANSCRIPT

FontMagic/400
Font Manager
for the IBM
iSeries and AS/400
User's Guide
and
Reference Manual
Version 4.11
Keowee Systems, Inc.418 East Waterside Drive
Seneca, SC 29672
(864) 885-0094
www.keoform.com

Copyright Notice:
Copyright 2008, Keowee Systems, Inc., All rights reserved. No part of this publication may be reproduced,
transmitted, transcribed, stored in a retrieval system, or translated into any language in any form, by any means,
without the express written permission of Keowee Systems, Inc. Portions of this software product are copyrighted by
Informatics, Inc.
Copying, Distribution, Trademark Acknowledgments, Installation, and Fair Usage Policy:
Please see the Installation Guide for complete details applicable to this product.
Major Changes in V4:
• Full support is provided for OS/400 V6.
• Automated installation and update are enabled through the integration of FontMagic/400 into the Keowee Product
Suite.
• Evaluation mode expiration reminder message FFA1030 can now be suppressed.
• The API and Special Fonts Demo has been enhanced to show returned command string lengths for all
transactions (SF, GS, and CT) supported by the FFPFSGEN Font String Generator API.

3
Table of Contents
1.0 - Introduction and Installation
1.1 Welcome....................................................................................................................................................4
1.2 About This Manual....................................................................................................................................4
1.3 Obtaining FontMagic/400 .........................................................................................................................5
1.4 Copying and Distributing FontMagic/400 .................................................................................................5
1.5 Installation, Upgrades, and Technical Support..........................................................................................5
1.6 Compatibility Testing................................................................................................................................5
2.0 - Basic Features and Startup
2.1 Benefits......................................................................................................................................................7
2.2 Features .....................................................................................................................................................7
2.3 Font Application Overview .......................................................................................................................8
2.4 Getting Started...........................................................................................................................................9
3.0 - The FontMagic/400 Client ................................................................................................................................11
4.0 - Using Host Menus and Commands
4.1 The Main Menu.......................................................................................................................................12
4.2 Activation Keys .......................................................................................................................................13
4.3 Working With Fonts ................................................................................................................................14
4.4 CL Commands.........................................................................................................................................15
4.5 API and Special Fonts Demo...................................................................................................................18
5.0 - Using the Font API in Programs
5.1 The Font API...........................................................................................................................................20
5.2 Programming With the Font API.............................................................................................................21
5.3 Printing Returned Font Strings ................................................................................................................26
5.4 Sample Programs.....................................................................................................................................26
6.0 - Using PCL Commands in Host Applications
6.1 Command Notation .................................................................................................................................27
6.2 Constructing Commands for Host Programs ...........................................................................................27
6.3 Placing Commands in Host Programs .....................................................................................................28
6.4 Useful PCL Commands ...........................................................................................................................29
6.5 ASCII Hex Value Table ..........................................................................................................................31
7.0 - Technical Considerations
7.1 Printers and Emulators ............................................................................................................................32
7.2 Special Font Not Printed .........................................................................................................................32
7.3 Other Issues .............................................................................................................................................33
7.4 Other Information....................................................................................................................................33

Basic Features and Startup 4
1.0 - Introduction and Installation
1.1 Welcome
Thank you for choosing FontMagic/400 for your iSeries and AS/400 font applications! FontMagic/400 is initially
provided without charge as the Evaluation Version. This version can be temporarily used for evaluation purposes
and even production applications. Except for the limited number of fonts allowed during the evaluation period, all
standard features are fully functional and no Activation Key is required! Note: The evaluation version sends an
expiration reminder to QSYSOPR whenever most FontMagic/400 functions are used. This reminder can be
suppressed; use command WRKMSGD FFA1030 FONTMAGIC/FFFMSG to change the severity to 00.
FontMagic/400 is a comprehensive tool for managing special fonts in HP and compatible laser printers used by
iSeries and AS/400 applications. FontMagic/400 makes it quick, easy, and cost effective to add barcodes, postal
codes, OCR, MICR check fonts, and even your own TrueType scalable fonts to your reports and documents. When
computer-readable fonts are added to reports, you can easily use them as turnaround documents and eliminate the
errors and resources associated with re-keying data.
You don't risk anything except your time when you try any of our products. We can't guarantee success for every
installation; but if you encounter any difficulties, we will make every reasonable attempt to resolve them.
1.2 About This Manual
This User's Guide and Reference Manual introduces you to FontMagic/400 and its powerful capabilities for
customizing your documents with special fonts. It provides complete information for using functions on both the
host and PC client systems. Information is provided in five general categories:
• General introduction, installation, and startup - Chapters 1 and 2
• Using client functions - Chapter 3
• Using host functions - Chapter 4
• Adding fonts to your applications - Chapters 5 and 6
• Additional technical information - Chapter 7
You should begin with Chapters 1 and 2 to familiarize yourself with FontMagic/400 background and concepts, to
install the system and perform compatibility testing, and to get started with your font applications. Use Chapter 3 to
select and upload fonts from the PC client to the host. Use Chapter 4 to familiarize yourself with host functions and
the commands which can be used in your applications. Chapters 5 and 6 document the procedures for adding special
fonts to your host applications. Chapter 7 provides additional technical information and reference material which is
helpful in preventing or resolving problems which may sometimes occur.
Additional detailed technical information, not covered in this User's Guide, is available from both the client and host
menu systems. The client also includes a README file with important startup information and Technical Notes
with hints, tips, new features, and error corrections not yet incorporated into this Guide. The following documents,
available in both the client and host systems, are of special importance and must be referenced when implementing
special fonts in host applications:
FFINFO: Lists available fonts, summary information for each, and the Font ID
FFFONTS: Provides detailed information about the use of each specific font. Be sure to
read and understand the appropriate section for each font you will be using.

Basic Features and Startup 5
1.3 Obtaining FontMagic/400
FontMagic/400 is always distributed as a component of the Keowee Product Suite. This Suite contains the complete
host and client systems and all documentation for multiple products. Please see the Installation Guide for more
information about the available products, their system requirements, and their installation.
FontMagic/400 will operate initially as a fully-functional evaluation version. If you decide to purchase a Permanent
Activation Key, additional fonts, and/or optional features, just call us with instructions for billing via invoice or
credit card. We can quickly provide a temporary Activation Key for the additional fonts and/or features, and we will
provide a Permanent Activation Key soon after receiving payment. Installation of keys is very simple; and you do
not have to re-install the software.
1.4 Copying and Distributing FontMagic/400
FontMagic/400 is a copyrighted program. You may freely make backup and archival copies for use with the
system(s) for which you have purchased permanent activation keys. You can also freely copy and distribute the
installed host system library, FONTMAGIC, including any installed keys. When installed on another host system,
FontMagic/400 will simply revert to an Evaluation Version. All fonts are retained and usable after copying; but, if
the number of fonts exceeds the evaluation font limit, fonts cannot be added or changed until sufficient fonts are
deleted to meet the limit or until an enhanced key is obtained and installed. Please see the Installation guide for
information concerning copying and/or distribution for any other purpose.
1.5 Installation, Updates, and Technical Support
Please refer to the Installation Guide for instructions regarding installation and updates for FontMagic/400 and for
obtaining technical support.
1.6 Compatibility Testing
Once installation has been completed, you should perform several tests to insure your environment is compatible
with FontMagic/400. Complete all tests described below; execute them in the sequence listed as they represent an
increasing level of difficulty and thoroughness.
All tests will require you to use functions in the host component. Instructions for starting the Main Menu are
provided in Section 4.1. Generally, you will need to perform these tests on one printer (outq) only. However, you
should perform the entire series on any other printers where problems are later encountered or suspected. If you can
complete all tests successfully, your printer environment is compatible. If any of the tests does not appear to print
correctly, try to resolve the problem and re-run the test. Chapter 7 provides a variety of information that might be
helpful in your situation. If you cannot complete all tests satisfactorily, call Tech Support for assistance. We want
FontMagic/400 to support the broadest possible variety of printers and printer emulators, so we will attempt to help
you identify the cause of any problems.
After you have confirmed compatibility, you are ready to begin creating and using special fonts. Chapter 2 provides
an overview; Chapters 3-6 provide complete details. Chapter 7 provides information which may be helpful in many
less common situations.

Basic Features and Startup 6
Test 1 - Initial Compatibility Test:
Use Section 4.1 to run Main Menu option 2, Printer Test/Font Samples. This test will confirm that your printer
emulation system is at least partially compatible with FontMagic/400 and working correctly. The test will prompt
you for the outq used by the printer and print one page showing many of the standard fonts that can be used in your
applications.
Test 2 - Font Test:
Use Section 4.1 to run Main Menu option 1, Work With Fonts. See Section 4.3 to run option 5, Test Font, using our
test font AATEST. This font is included in the base system so that you can begin testing without uploading a font,
and it does not count against the activated font limit.
One page should print; it will show the characters available in the font along with font identification information.
This test will confirm that your printer supports downloadable, scalable TrueType fonts. In the event you are using
an older printer which does not support scalable fonts, we may be able to provide fixed-pitch fonts for your
applications.
Test 3 - Full Font Test:
Run Work With Fonts again. Run option 2, Download Font, again using font AATEST. Nothing should print
during the download; you should not even get a blank page. You may be able to see the printer status light blink
while data is being received and stored. Next, execute the following host commands:
OVRPRTF QSYSPRT OUTQ(xxx)
CALL FFSCBL3
FFSCBL3 will print one page with fourteen lines of text in the standard font. On four of these same lines, the
AATEST special font will also be used to print additional words. The AATEST font displays each letter in
uppercase within a "butter-mold" frame. If the page prints successfully, complete compatibility is verified.

Basic Features and Startup 7
2.0 - Basic Features And Startup
2.1 Benefits
With FontMagic/400, you will quickly and easily gain many important business benefits:
• Meet customer, industry, and legal requirements for providing machine-readable information
on documents.
• Eliminate errors and resources needed for re-keying information on turnaround documents; with
barcodes or OCR, just scan it in!
• Reduce the time and effort for indexing archival documents by adding machine-readable
indexing information.
• Eliminate pre-printed checks with FORMagic/400 and Fontmagic/400. Never run out, place
rush orders, or scrap inventory due to name, address, or bank changes. No need to purchase a
$15,000 check printing package!
• Reduce postage expense by adding Postal fonts to letters, packages, and bulk postal shipments.
• Eliminate maintenance and support burdens of fonts on numerous PC's and printers with
centralized administration and control of fonts.
• Attract attention to important document areas; use larger and visually appealing fonts. Use your
own proprietary fonts, too!
• Build your own labels with FORMagic/400 and Fontmagic/400. No need to purchase a
standalone $5,000 label-maker system for just a few simple labels.
2.2 Features
FontMagic/400 provides a powerful toolkit for developing applications requiring special fonts. Its many features
include:
• Simple implementation: only a small program change is needed to add special fonts to your host
programs.
• Handle even the most complex applications requiring frequent switching among the primary and
multiple special fonts.
• Maximum performance: all fonts are merged onto the printed page in the printer; very little host
processing power is consumed.
• The most popular special fonts are already included in the distribution package. Further, we
can convert most fonts you supply to the necessary format so they can be used in your host
applications, too!
• Comprehensive Font API: almost all barcode features and options are supported with automatic
handling of requirements like start and stop codes, check digits, subsets, and EBCDIC/ASCII
translations. Just set its parameters, call the API, inspect the return code for successful operation,
and print the returned string.
• Support for other platforms: ask us about special support for MICR, OCR, Postnet, and Planet
fonts on S/3x, mainframe, and almost all other platforms.

Basic Features and Startup 8
You can select which fonts to install and use with your applications. The following are included in the distribution
package and are fully supported in the current Font API:
Codabar: Six fonts providing high, medium, and low density with and without human readable
character interpretation; rationalized symbol spacing is used.
Code-39: Six fonts providing high, medium, and low density with and without human readable
character interpretation; standard, extended, and HIBC encodations are offered.
Code-93: Six fonts providing high, medium, and low density with and without human readable
character interpretation; standard and extended encodations are offered.
Code-128: Six fonts providing high, medium, and low density with and without human readable
character interpretation; standard subsets A, B, and C, UCC-128, and EAN-128 variants
are available. Automatic subset determination is also available for subsets A-C.
I-2of5: Six fonts providing high, medium, and low density with and without human readable
character interpretation.
MICR: Two fonts, including both fixed-pitch and scalable sizes, are provided for check
applications.
MSI Plessey: Six fonts providing high, medium, and low density with and without human readable
character interpretation.
OCR A/B: Two fonts are provided for OCR applications.
UPC: One font is provided for UPC-A, UPC-E, EAN/JAN-8, and EAN/JAN-13 applications,
including supplementals; UPC-E, EAN/JAN-8, EAN/JAN-13, and supplemental
characters are not supported in the Font API at this time. Please call if you need this
support.
Postal: Postnet and Planet are provided for postal coding applications.
2.3 Font Application Overview
This section gives a brief summary of the steps needed to add special fonts to a host application. It is not intended to
cover all the possibilities or the more complex effects you can achieve.
Fonts must first be uploaded from the PC client to the host for storage and use. For maximum ease of use and
efficiency, fonts are stored in the host database, not in the Integrated File System. The following steps are generally
performed only once for each font you will be using:
• Select the font(s) you will need. A complete list of fonts shipped with the system is included in the
document FFINFO, and critical implementation information for each is included in the document
FFFONTS. Each document can be accessed from the both the host and client menu systems.
• From the PC client, upload the necessary font(s) to a host folder or the FTP holding area.
• From the host, complete the upload of each font into the host database. Note: the Evaluation
version allows you to use up to three fonts in the host system.
• Perform a Font Test to insure each font is loaded properly and working correctly.
Once stored on the host, fonts can be added to your applications. Just two things are required:
• Change the application to call the Font API to add the font wherever needed. Because the Font
API uses characters below the Space (x'40'), you must also specify RPLUNPRT(*NO) in the
application printer file.
• Download the font to the printer via command, CL program, or interactive menus depending on
your needs; then run your application.

Basic Features and Startup 9
That's it, a complete overview of a font application. Your reports and documents will use the special font(s)
wherever they are added.
The next section provides a brief hands-on walk-through of the specific actions required to build a simple font
application. The remaining chapters provide detailed documentation for each of the functions provided in
FontMagic/400.
2.4 Getting Started
This section provides an overview of the steps required to further test printer compatibility and to implement a
complete special font application on the host. It is not intended to cover all the possibilities or the more complex
situations. The actual menus and commands used to perform the necessary functions are not included here, but
references to appropriate sections of this manual are provided.
The printer(s) and emulation hardware/software you will be using with font applications must be installed
and working together correctly before they can be used with FontMagic/400. You should be able to use the
printer normally, with any host application, before it attempting to use it with FontMagic/400.
This is especially important if you are not familiar with 3812 printer features. They provide many advanced
capabilities, such as print rotation and reduction, that may be invoked automatically depending on your printer setup
and host print file parameters. Automatic reduction and/or rotation is often undesirable in font applications, and
you must know how to control it. So, it's a good idea to become familiar with 3812 printer operation before
beginning to work with FontMagic/400. If you are not completely familiar with the operation of this printer, please
see Chapter 7 now.
To build an actual host application, just follow the steps listed below. They are performed only once, each time a
new or changed font is required. After you have completed enough of an application to gain a basic understanding
of using FontMagic/400, you should study Chapters 3-7 completely. Then, you may find that you will want to follow
a slightly different sequence of steps, bypassing some entirely and perhaps adding others relevant to your specific
environment.
For your first application, we strongly recommend that you keep things really simple. A great deal of software and
hardware, from multiple suppliers, is involved. So, many things can go wrong, especially while you are learning. If
you keep it very simple, you will learn the overall process much more quickly and greatly reduce the learning
curve. See "Shortcuts for that First Application:" below.
Steps in Building a Host Application:
1. Upload the font to a host folder (Section 3.0)
2. Complete upload into host database (Section 4.3, option F6 or 1)
3. Test the font on the host (Section 4.3, option 5)
4. Use the font in the API and Font Demo (Section 4.1, option 3)
5. Add the Font API to the host program (Chapter 5)
6. Download the font to the printer (Section 4.3, option 2)
Now, just run your application. It will print the special font wherever you have added it with the Font API.

Basic Features and Startup 10
Shortcuts for that First Application:
Here are some shortcuts you can take to get that first application up and running most smoothly and quickly:
• Skip steps 1 thru 4. Just use our test font AATEST, supplied with the host system. It won't allow
you to do anything really useful; but you will see results quickly and very easily.
• For step 5, copy a sample program to your test library. Samples are located in the FFFSRC source
file, accessible from Main Menu option 5. Use FFSRPG3 (RPG code) or FFSCBL3 (Cobol code).
You can either compile the sample program, as is, or use it as a guide to write a your own trivially
simple print application, just hard coding a few print lines. That's all you need to see the Font API
in action. Note: AATEST is a much simpler font than most others and the requirements for using
it in the Font API are somewhat simpler than for other fonts. Additional sample programs will
illustrate more comprehensive usage of the Font API.
• Run step 6 as described, then run the trivial application. That's it!
Next, try a similar test with the font you will actually be using. This will be quick to do and give you a full overview
of all the steps used in a complete application.
• Follow steps 1-3 to upload the font.
• Use step 4 to experiment with the font in the API and Special Fonts Demo. Note: Not all fonts are
supported in the Demo; see Help.
• For step 5, copy the most appropriate sample program FFSRPGx (RPG) or FFSCBLx (Cobol) to
your test library. Modify this program to:
(a) Replace the font, if necessary, with the font you will actually be using.
(b) Change the hard-coded print lines to something that will be more meaningful with
your font and to comply with its requirements.
(c) Update the Font API parameter values to comply with the new font. See Chapter 5
if necessary.
(d) Run step 6 to download the font.
(e) Run the test program.
You are now ready for a real application. As you follow the steps, now may be a good time to begin studying the
other options available to you in each step. As you perform each step, study the referenced section completely.
After the first real application is working, it's time for the advanced course: study the remainder of this manual
completely. It won't take long, and it will most likely save time in the long run.
Using the Windows Client 11
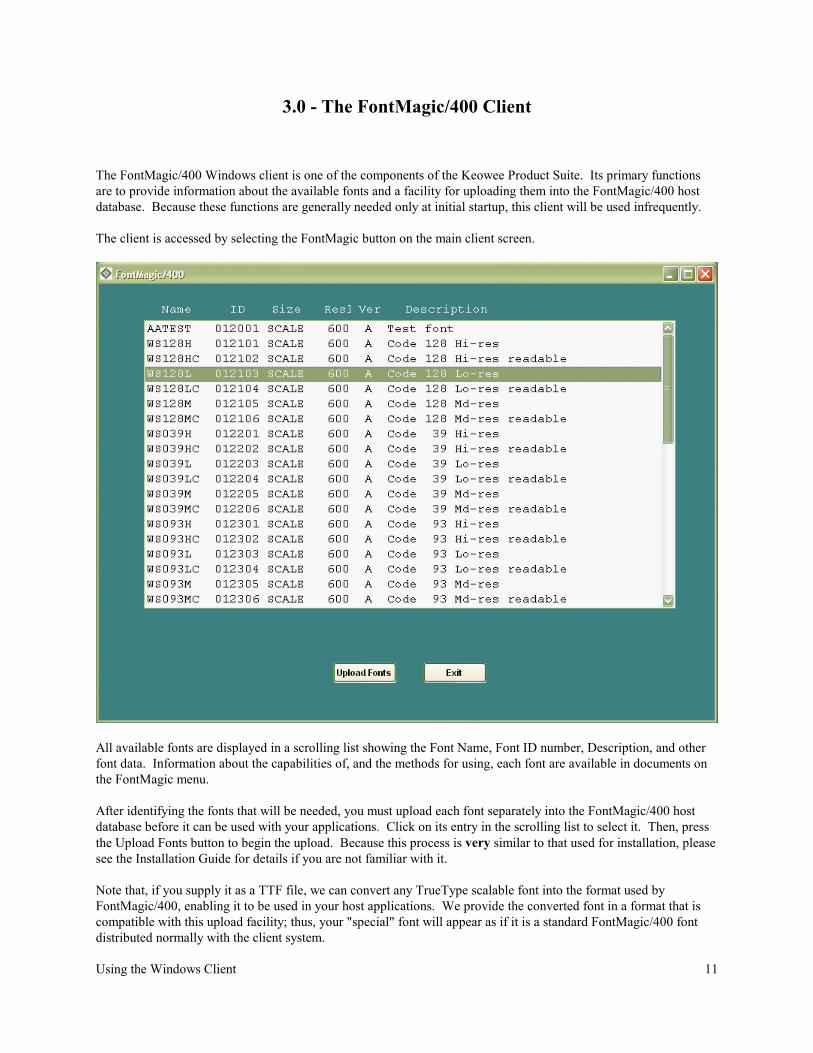
3.0 - The FontMagic/400 Client
The FontMagic/400 Windows client is one of the components of the Keowee Product Suite. Its primary functions
are to provide information about the available fonts and a facility for uploading them into the FontMagic/400 host
database. Because these functions are generally needed only at initial startup, this client will be used infrequently.
The client is accessed by selecting the FontMagic button on the main client screen.
All available fonts are displayed in a scrolling list showing the Font Name, Font ID number, Description, and other
font data. Information about the capabilities of, and the methods for using, each font are available in documents on
the FontMagic menu.
After identifying the fonts that will be needed, you must upload each font separately into the FontMagic/400 host
database before it can be used with your applications. Click on its entry in the scrolling list to select it. Then, press
the Upload Fonts button to begin the upload. Because this process is very similar to that used for installation, please
see the Installation Guide for details if you are not familiar with it.
Note that, if you supply it as a TTF file, we can convert any TrueType scalable font into the format used by
FontMagic/400, enabling it to be used in your host applications. We provide the converted font in a format that is
compatible with this upload facility; thus, your "special" font will appear as if it is a standard FontMagic/400 font
distributed normally with the client system.

Using Host Menus and Commands 12
4.0 - Using Host Menus and Commands
This chapter discusses each function provided for installing and managing fonts on the host. All functions can be
accessed through Main Menu options and/or through CL commands.
4.1 The Main Menu
To start FontMagic/400, insure that you are signed on with at least programmer authority, then add the
FONTMAGIC library to your library list. The ADDLIBLE command can be used from a host command line:
ADDLIBLE FONTMAGIC
The FontMagic/400 Main Menu can now be started with the FFGOPR command. Simply type FFGOPR with no
parameters on a host command line.
The Main Menu provides all the functions needed to upload, test, manage, and use special fonts in host applications.
It also provides options for obtaining development information and performing diagnostic functions. This menu is
not normally used once you have completed the addition of special fonts into your applications. The menu provides
the following functions:
1. Work With Fonts: provides a subfile selection screen from which you can upload, download,
remove, delete, and test fonts. This facility is fully described in Section 4.3.
2. Printer Test/Font Samples: performs a printer test to determine its compatibility with
FontMagic/400. It also demonstrates a typical font application. See the command FFGDEMO in
Section 4.4 below for details.

Using Host Menus and Commands 13
3. API and Special Fonts Demo: provides a convenient means for testing fonts dynamically, especially
barcodes, while providing an introduction to capabilities of the comprehensive Font API. See Section
4.6 for details.
4. Activation Keys: provides the means for entering FontMagic/400 Activation Keys. This function is
not needed for the Evaluation Version. See Section 4.2 for details.
5. Tech Info and Sample Progs: provides access to the FFFSRC source file which includes sample
source programs and a variety of other technical information. Member AAINDEX provides a table of
contents. See Section 5.4 for details of the sample programs.
6. Copy File to Printer: used in special situations only. See the command FFGCPYF in Section 4.4
below for details.
7. Dnld/Remv Multiple Fonts: provides convenient access to command FFGMULFNT which allows
you to download and/or remove multiple fonts with a single command. See Section 4.4 for details.
8. Reset Printer to Defaults: provides a convenient means for resetting a printer to its power on
defaults. See Section 4.4 for details of command FFGRESET.
9. Unload Spoolfile to File: provides a diagnostic function for copying the entire contents of a
spoolfile, including SCS page commands, to a database file. See command FFGUNLSPLF in Section
4.4 below for details.
The next few sections describe each of these menu functions in detail.
4.2 Activation Keys

Using Host Menus and Commands 14
In order to gain permanent operation, extend the evaluation period, use additional fonts, and/or activate optional
features, the installation of an Activation Key is necessary. Option 4 on the Main Menu provides a facility for
entering these keys. You do not normally need to use this function with the Evaluation Version as it provides full
use of the system, with up to three fonts, for at least 30 days.
If you wish to purchase a new or enhanced Activation Key for FontMagic/400, please call Keowee Systems. We will
ask for the normal contact, system, and billing information and provide the Activation Key by email after payment is
received. A temporary key can also be provided, enabling immediate usage of the new capabilities.
When you receive Activation Key information, enter it in the fields above, exactly as received, and press F5 to save
it permanently. You can confirm the new key is effective by returning to a command line and restarting the Main
Menu and this function.
The Font Limit indicates the number of fonts allowed by the Activation Key. Evaluation systems generally limit you
to three fonts during the trial period. 99 denotes unlimited fonts. Zero indicates an expired trial; you will be unable
to use many of the system functions. Limits between 01 and 98 denote the specific number of fonts allowed. You
cannot enter a new Activation Key which enables fewer fonts than are currently installed; you must delete sufficient
fonts to reduce the count to a value which is less than or equal to the limit provided by the new key.
The Expires field indicates when the Activation Key will expire. 9999 indicates a permanent key which does not
expire. Other values indicate the Activation Key will expire on the first day of the month and year shown (MMYY
format). If you need an extension of the expiration date or an increased font limit for an evaluation system, please
call Keowee Systems. We can provide reasonable extensions and font limit upgrades when appropriate.
If the serial number for your system changes, FontMagic/400 may revert to a reduced level of operation. You must
obtain and install a new Activation Key to resume the prior level of function. There may be a charge for re-issuing
keys for use on the new system.
Please retain all Activation Key information in a permanent location. There may be a charge for replacing misplaced
keys.
4.3 Working With Fonts
The Work With Fonts screen provides an interactive subfile interface to the individual FontMagic/400 commands
which provide various font management capabilities. These commands use the Outq/Lib and Folder parameters as
needed; be sure to set them correctly. The next section provides details about each function and its parameters.
After a font has been uploaded by the Upload Fonts facility of the client system, it must be brought into the host
database. This function, and all others involving the use of fonts on the host, can be accessed from the Work With
Fonts screen. All the functions needed to upload, download, maintain, and use fonts are available.
F6. Upload new: Bring a new font, which has been previously uploaded into a folder or the FTP holding
area, into the host database. This process can be thought of as the means for "installing" host fonts.
Each font must be uploaded separately. Just type the name of the font when prompted. Existing fonts
will be replaced without confirmation. See the command FFGUPLFNT below for complete details.
1. Upload: Upload a changed version of an existing font into the host database. The font must have
been previously uploaded into a folder or the FTP holding area by the client system. See the
command FFGUPLFNT below for complete details.
2. Download: Download a font to printer ram memory. See the command FFGDNLFNT below for
complete details.

Using Host Menus and Commands 15
3. Remove: Remove a font from printer ram memory. See the command FFGRMVFNT below for
details.
4. Delete: Delete a font from the host database. Confirmation is required. See the command
FFGDLTFNT below for details.
5. Test: Perform a font test. See the command FFGTSTFNT below for the details.
4.4 CL Commands
Most of the functions provided by the interactive menus and screens can also be accessed from a standard OS/400
command-level interface. This enables them to be used in CL jobs and programs so you can automate complete
applications using FontMagic/400 fonts. Each command is documented separately below. When using a command
for the first time, just use the prompter and online help; complete help information is provided for all parameters.
FFGCPYF - Copy File to Printer
Sometimes, in special situations, it is useful to create a file in SEU, or even with a temporary program, for diagnostic
purposes. Once created, FFGCPYF provides a means to print the file by copying it, as is including any hex
characters, to a printer. Nothing is added during printing, except that a page eject is added after each 59 lines to
prevent page overflow. If the file contains any characters below x’40’, you must override the printer file to specify
RPLUNPRT(*NO).

Using Host Menus and Commands 16
FFGDEMO - Printer Test/Font Samples
The FontMagic/400 printer test and font samples demonstration will print one page to the specified OUTQ. This
page serves the multiple purposes of confirming a successful installation of FontMagic/400, confirming a minimal
level of printer compatibility, and showing many of the available fonts.
The results will be very obviously correct or improper. If correct, installation and initial printer compatibility are
verified. If anything appears to have been printed incorrectly, verify the installation and printer setup. If you need
assistance, please call for Tech Support.
A common problem with many older printers is a lack of support for TrueType scalable fonts. If you encounter this
issue and cannot use alternative printers, we can provide some fonts in a fixed-pitch size to overcome this limitation.
There will be a charge for making the necessary font conversions.
FFGDLTFNT - Delete Font
The delete font command will permanently remove the specified font from the host system. It does not delete the
font on the client system or remove fonts which have been downloaded to printers. The deletion will be performed
immediately; no confirmation is requested. Once deleted, the font will have to be re-uploaded from the client system
if needed again.
FFGDNLFNT - Download Font
The font download function provides the means for downloading fonts to printer ram memory. Fonts must be
downloaded and stored in the printer before they can be used in a font application. Once downloaded, they can be
used at any time in any application, until removed. Removal occurs whenever the printer is powered off or the font
remove command is used. Thus, fonts do not have to be downloaded before each job using them. They can be
downloaded every time, or just periodically, depending on the needs of your environment and applications.
Note that when printers are shared between host and PC-based applications, some PC-based applications may issue
commands which remove fonts downloaded from the host. This will occur without notice to the host system or to the
PC user. The fonts will simply appear to have been "lost". If this occurs, you must download fonts before every
print job or use non-volatile memory. Some printers also provide a setup option to prevent this undesirable
operation from occurring; it is often known as "Resource Save". See Section 7.2 for more information.
The specified font will be downloaded to the printer connected to the specified OUTQ. The downloaded font will
replace any previously downloaded font using the same Font ID number. If the same font is present in both ram and
non-volatile memory, the ram version will generally be selected by applications. This is useful for testing new
versions of fonts before they are downloaded to the non-volatile memory.
No printing or page eject occurs when a font is downloaded. But, it does create an extra spoolfile that must be taken
into account when managing the spoolfiles created by an application.
Note that multiple fonts can be resident in the printer simultaneously. The actual number is limited only by printer
memory, which is not generally an issue with host printers. However, see Section 7.3 for limitations regarding the
simultaneous presence of fonts having the same Typeface Family ID number.
Note also that if your printer is connected to both the host and the client systems, fonts can be downloaded to the
printer from either the host or the client system with available optional software. This ability can be helpful in some
applications, especially those running on non-compatible hosts such as a System/36. If you need the ability to
download fonts directly at remote sites, possibly for performance reasons, please contact Keowee Systems. We can
provide a variety of optional products to facilitate such needs.
Using Host Menus and Commands 17
FFGMULFNT - Download or Remove Multiple Fonts
This command has function similar to FFGDNLFNT for downloading fonts and FFGRMVFNT for removing fonts.
It allows you to download, or remove, up to ten fonts, with only one command. You will almost never need to
manage more than one extra spoolfile! Fonts specified for removal are processed before fonts specified for
download. Note that if you have our FORMagic/400 product, its analogous command FMGMULOVL allows you to
download multiple forms, and fonts, in a single spoolfile.
FFGRESET - Reset Printer
The host does not always reset the printer to a power-on default state when a job completes. This potentially allows
printer setups left over from prior jobs to affect subsequent jobs. If this becomes an issue, add the printer reset
command to your CL program after your application. FFGRESET is designed to reset the printer without causing
any printing or page eject to occur; you will generally get an extra page eject if you place a PCL reset command
within your own application program. However, this command does create an extra spoolfile that must be taken into
account when managing the spoolfiles created by your application.
FFGRMVFNT - Remove Font
The font remove function provides a convenient means for removing fonts which are currently resident in printer ram
memory, but are no longer needed. There is generally no reason to remove fonts except to free printer memory, to
use another font with the same Typeface Family ID, or to limit the usage of secured fonts such as the MICR font
used in check applications.
The specified font will be removed from the printer connected to the specified OUTQ. Removal will occur from ram
memory only; fonts stored in non-volatile memory will not be affected. If the font is not actually present, the printer
will ignore the request. Once removed, the font must be re-downloaded prior to its next use. Specifying the special
value *ALL for the font name will cause all fonts currently resident in printer ram memory to be removed.
No printing or page eject occurs when a font is removed. But, it does create an extra spoolfile that must be taken
into account when managing the spoolfiles created by an application.
FFGTSTFNT - Test Font
The font test function provides a quick means for testing a font to insure it works as expected. It also performs a
partial test of printer compatibility. After a font has been uploaded into the host database, simply execute this
function to test its operation. The resulting printout can be used to verify the font and printer are working together as
expected.
The test function downloads the specified font to the printer connected to the specified OUTQ, prints a test page with
font identification information and samples of the characters available in the font, and removes the font from the
printer. Please note that if the font being tested is resident in printer ram memory prior to the test, it will not
be there after the test is completed! The font identification information will not print when the font is used in an
actual application.
The test page presents all characters available in the font. Because most fonts do not include all 256 characters and
spaces are often not the same width as font characters, it may be difficult to identify the exact hex value of some of
the characters shown.

Using Host Menus and Commands 18
FFGUNLSPLF - Unload Spoolfile to a Database File
Sometimes, it is useful to know exactly what is in a spoolfile. Due to the hex characters in PCL commands, ordinary
display techniques will not always work. As an alternative, execute this command and view the resulting database
file in DSPPFM. You can get an excellent display, showing both characters and hex, by pressing F10 then F11. The
display will show the entire contents of the spoolfile, including both printable text and SCS page control commands.
FFGUPLFNT - Upload Font
This function allows you to complete the font upload process; it is normally used from the Work With Fonts screen.
It can be thought of as the means for "installing" host fonts. All fonts originate in the client system and must be
initially uploaded to a host folder or the FTP holding area; this function completes the upload process by transferring
fonts into the host database and making them available to host applications. A font with the same name, and already
present in the host, will be replaced without a confirmation request.
In order for this upload completion process to know where your uploaded fonts reside, in a folder or in the FTP
holding area, you must insure the Font Upload Option is set correctly. This choice can be changed from time to
time, but it applies to all uploads until changed again. The default setting specifies use of a mapped network drive
for upload into a folder; to use FTP or another file transfer product, execute the following host command. Use
VALUE(' ') to switch back to using a mapped drive. You must use the FT setting if you are using the automated
FTP upload process which is now the recommended method.
CHGDTAARA DTAARA(FONTMAGIC/FFAMTXT (100 2)) VALUE('FT')
The client portion of the font upload process is very similar to that used for installation of the Keowee Product Suite.
Please see the Installation Guide for details if you are not familiar with it.
4.5 API and Special Fonts Demo
This function provides an interactive interface to the same Font API you will be using to add special fonts to your
applications. Most, but not all, fonts are supported. It provides a real-time demo, testing, and experimentation
environment and allows you to see quickly how a special font will actually print using values you specify
dynamically.
The Demo illustrates most of the parameters you must deal with when adding the Font API to your programs; thus,
using it can speed implementation of your program changes. First, experiment in this Demo with the font you will be
using; specify values which are meaningful to your application. Then, when adding the Font API to your programs,
use parameters and values similar to those specified while using this Demo.
See the Help information for a list of supported fonts and complete usage instructions for each.
Be sure to download the font you will be testing. F6 provides convenient access to the Work With Fonts screen for
doing so.

Using Host Menus and Commands 19

Using the Font API in Programs 20
5.0 - Using the Font API in Programs
You must modify your host programs to use special fonts. To simplify the changes as much as possible, we provide
the Font Application Programming Interface (Font API). The Font API supports all the fonts supplied with
FontMagic/400, as well as any fonts you provide and ask us to convert.
5.1 The Font API
Three Font API functions are provided, and the Font API must be called with appropriate settings to execute each
function. Each call returns a command string which contains all the SNA and PCL codes required to perform the
requested function in the printer.
SF: Declares the special font as a secondary font. Technically, this declaration has to be made only
once; but it must always be made before the special font can actually be used. Only one secondary
font can be active at a time, and each SF function will replace any previously declared secondary font.
SF(FONT) is a special use of this function for standard text fonts; see Section 6.4 for details.
GS: Generates the command sequence for printing an input string in the special font. This function
must be performed once for each separate string to be printed with the special font.
CT: Performs a complete transaction, handling both the SF and GS functions at once. This is the
preferred method, and should be used wherever possible. Just use it once for each separate string
needing a special font.
The settings made prior to calling the Font API always include the function and special font being used, and may
include the font size, the string to be printed with the font, the page location where the string is to be printed, and any
other settings imposed by the actual font being used. Details for making these settings are provided below.
When the Font API call completes, simply place the command string it returns in a print field of sufficient length and
print it. The returned command string, when executed by the printer, will save the current print position, print the
string in the correct location using the special font, and restore the original print position. Because the Font API
always saves and restores the original print position, you can place the returned print string anywhere on the print
page without being concerned about losing the current print position.
Be certain to check the length of the returned string to verify your print line or field is of sufficient length to hold it.
If not, the special font will not operate correctly! For planning purposes, the API and Font Sample Demo (see
Section 4.5) displays the returned length of the CT, SF, and GS transactions used to print each sample test. Note the
CT length is equal to the SF and GS lengths combined. Be especially cautious with 80 column print fields as they
may not hold the complete print string generated by a CT function!
You should use the CT function wherever possible because its usage is significantly simpler. There are only two
cases where the individual SF and GS functions are commonly needed:
• Your program print line length is insufficient for the print string returned by the CT function.
Two shorter strings returned by individual SF and GS calls generally overcome this limitation.
• You are using a simple text font supported generically through the SF (FONT) function. This
situation generally occurs with fonts you supply for conversion and use with FontMagic/400. In
these cases, the GS function will not be used at all. This special case is covered in Section 6.4.

Using the Font API in Programs 21
When using SF and GS, the SF function must precede all GS functions related to the same font. Further, SF should
be used on every page where the special font is present. Otherwise, when a spoolfile is restarted at other than page
one, the SF declaration will not be sent to the printer and the restarted pages will not use the special font. Further,
when using more than one special font on a page, you must use SF when switching between special fonts since only
one SF declaration can be active at a time. All of these issues are completely eliminated when you use the CT
function!
These steps to implement a Font API function can be briefly summarized as shown here:
• Set the API parameter field values for the function to be performed.
• Call the API. It will construct a complete string, ready for printing, which performs the requested
function. The string will include all necessary SNA transparency and PCL characters.
• Inspect the return code to verify successful completion.
• Inspect the returned string length to verify it will fit within the print line or field to be used for
printing.
• Move the return string to your print line or field and print it.
In addition to using the Font API itself, you must override the print file to use RPLUNPRT(*NO) because the PCL
commands contained in the return strings contain unprintable characters.
The sample programs FFSRPGx and FFSCBLx (found in the source file FFFSRC) will help to illustrate the use of
the Font API and its parameter fields in various applications such as bar codes, check, and special text fonts.
5.2 Programming With the Font API
The Font API requires you to make standard calls to program FFPFSGEN which uses one data structure parameter
with a total length of 232 bytes. The individual parameter fields within this structure must be set as defined below
before issuing the call. Each Font API function uses only a subset of the parameter fields; the following table
summarizes which fields must be set before calling each function.
--Required for Functions--
Parameter Field CT SF SF(FONT) GS--------------------- -- -- -------- --
Transaction Code CT SF SF GSReturn Code r r r rFont code u u FONT uPoint size u u u -Calc check digit u - - uReplace invalid chars u - - uReplacement char u - - uInput string length u - 06 uOutput string length r r r rX - Location u - - uY - Location u - - uBarcode subset u - - uStart character u - - uStop character u - - uFont pitch code - - u -HMI adjustment u - - uThe input string u - FontID uReturned string r r r r
u - must be set in user program parameters; defaults may applyr - returned by FontMagic/400dash - not applicable; ignored by the APIother - must be set in user program parameters with specific value shown

Using the Font API in Programs 22
Position Parameter Usage Return Code upon error(s)
-------- ---------------- ---------------------------
1 - 2 Transaction Code 01 - invalid tran code
CT - Set font and generate string SF - Set special font GS - Generate font string
3 - 4 Return Code 00 - request successful; others denote errors as shown
5 - 8 Font code 02 - invalid font code
39L - Code 39 low density 39LC - Code 39 low density readable 39M - Code 39 medium density 39MC - Code 39 medium density readable 39H - Code 39 high density 39HC - Code 39 high density readable
93L - Code 93 low density 93LC - Code 93 low density readable 93M - Code 93 medium density 93MC - Code 93 medium density readable 93H - Code 93 high density 93HC - Code 93 high density readable
25L - Interleaved 2 of 5 low density 25LC - Interleaved 2 of 5 low density readable 25M - Interleaved 2 of 5 medium density 25MC - Interleaved 2 of 5 medium density readable 25H - Interleaved 2 of 5 high density 25HC - Interleaved 2 of 5 high density readable
28L - Code 128 low density 28LC - Code 128 low density readable 28M - Code 128 medium density 28MC - Code 128 medium density readable 28H - Code 128 high density 28HC - Code 128 high density readable
CBL - Codabar low density CBLC - Codabar low density readable CBM - Codabar medium density CBMC - Codabar medium density readable CBH - Codabar high density CBHC - Codabar high density readable
MSL - MSI Plessey low density MSLC - MSI Plessey low density readable MSM - MSI Plessey medium density MSMC - MSI Plessey medium density readable MSH - MSI Plessey high density MSHC - MSI Plessey high density readable
UPC - UPC barcode OCRA - OCRA readable OCRB - OCRB readable MICR - MICR check, scalable MICF - MICR check, fixed PLAN - Planet postal POST - Postnet postal FONT - Any font (can only be used with SF!)
Using the Font API in Programs 23
Position Parameter Usage Return Code upon error(s)
-------- ---------------- ---------------------------
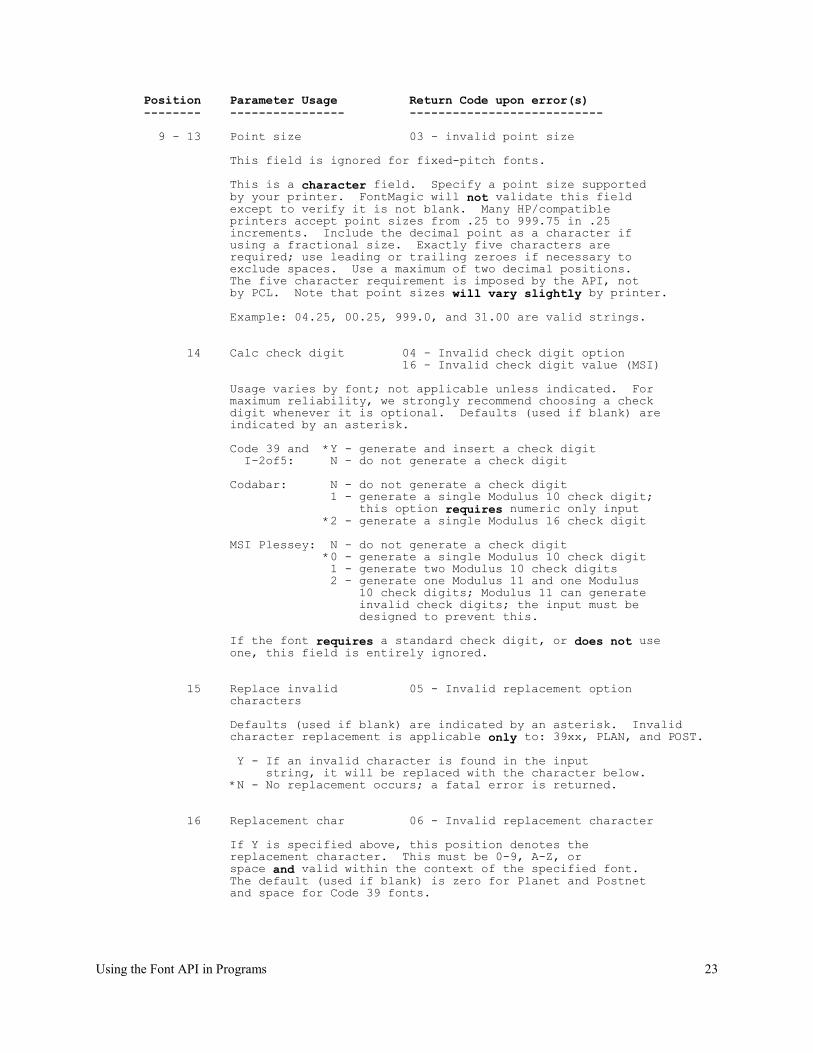
9 - 13 Point size 03 - invalid point size
This field is ignored for fixed-pitch fonts.
This is a character field. Specify a point size supported by your printer. FontMagic will not validate this field except to verify it is not blank. Many HP/compatible printers accept point sizes from .25 to 999.75 in .25 increments. Include the decimal point as a character if using a fractional size. Exactly five characters are required; use leading or trailing zeroes if necessary to exclude spaces. Use a maximum of two decimal positions. The five character requirement is imposed by the API, not by PCL. Note that point sizes will vary slightly by printer. Example: 04.25, 00.25, 999.0, and 31.00 are valid strings.
14 Calc check digit 04 - Invalid check digit option 16 - Invalid check digit value (MSI)
Usage varies by font; not applicable unless indicated. For maximum reliability, we strongly recommend choosing a check digit whenever it is optional. Defaults (used if blank) are indicated by an asterisk.
Code 39 and *Y - generate and insert a check digit I-2of5: N - do not generate a check digit
Codabar: N - do not generate a check digit 1 - generate a single Modulus 10 check digit; this option requires numeric only input *2 - generate a single Modulus 16 check digit
MSI Plessey: N - do not generate a check digit *0 - generate a single Modulus 10 check digit 1 - generate two Modulus 10 check digits 2 - generate one Modulus 11 and one Modulus 10 check digits; Modulus 11 can generate invalid check digits; the input must be designed to prevent this.
If the font requires a standard check digit, or does not use one, this field is entirely ignored.
15 Replace invalid 05 - Invalid replacement option characters
Defaults (used if blank) are indicated by an asterisk. Invalid character replacement is applicable only to: 39xx, PLAN, and POST.
Y - If an invalid character is found in the input string, it will be replaced with the character below. *N - No replacement occurs; a fatal error is returned.
16 Replacement char 06 - Invalid replacement character
If Y is specified above, this position denotes the replacement character. This must be 0-9, A-Z, or space and valid within the context of the specified font. The default (used if blank) is zero for Planet and Postnet and space for Code 39 fonts.

Using the Font API in Programs 24
Position Parameter Usage Return Code upon error(s)
-------- ---------------- ---------------------------
17 - 18 Input string length 07 - Invalid input length
00 - FontMagic will automatically set the length to the LAST non-blank character 01-50 User specified length; allows spaces at the end
Note: Some fonts limit the input length. Be sure to check the return code carefully. See Input String below.
19 - 21 Output string length (returned to calling program)
001 - 132
22 - 26 X - Location 08 - Invalid X-Location
00000 - 32767 Use exactly five numerics to denote the distance from the left margin at 300 dpi.
27 - 31 Y - Location 09 - Invalid Y-Location
00000 - 32767 Use exactly five numerics to denote the distance from the top margin at 300 dpi.
32 - 32 Barcode subset 21 - Invalid barcode set
This field denotes the barcode subset and varies by font. It is not applicable unless indicated. Defaults (used if blank) are indicated by an asterisk.
Code 39: *E - use extended encodation S - use standard encodation H - use HIBC encodation
Code 93: *E - use extended encodation S - use standard encodation
Code 128: A - use subset A encodation B - use subset B encodation C - use subset C encodation U - use UCC-128 encodation *Z - auto-determine A, B, or C
UPC code: *A - use UPC-A encodation E - use UPC-E encodation ** 1 - use EAN/JAN-8 encodation ** 2 - use EAN/JAN-13 encodation **
** - Not supported in this version
33 - 33 Start char 22 - Invalid start character
Usage varies by font; not applicable unless indicated.
Codabar: A (default if blank), B, C, D
34 - 34 Stop char 23 - Invalid stop character
Usage varies by font; not applicable unless indicated.
Codabar: A (default if blank), B, C, D
Using the Font API in Programs 25
Position Parameter Usage Return Code upon error(s)
-------- ---------------- ---------------------------
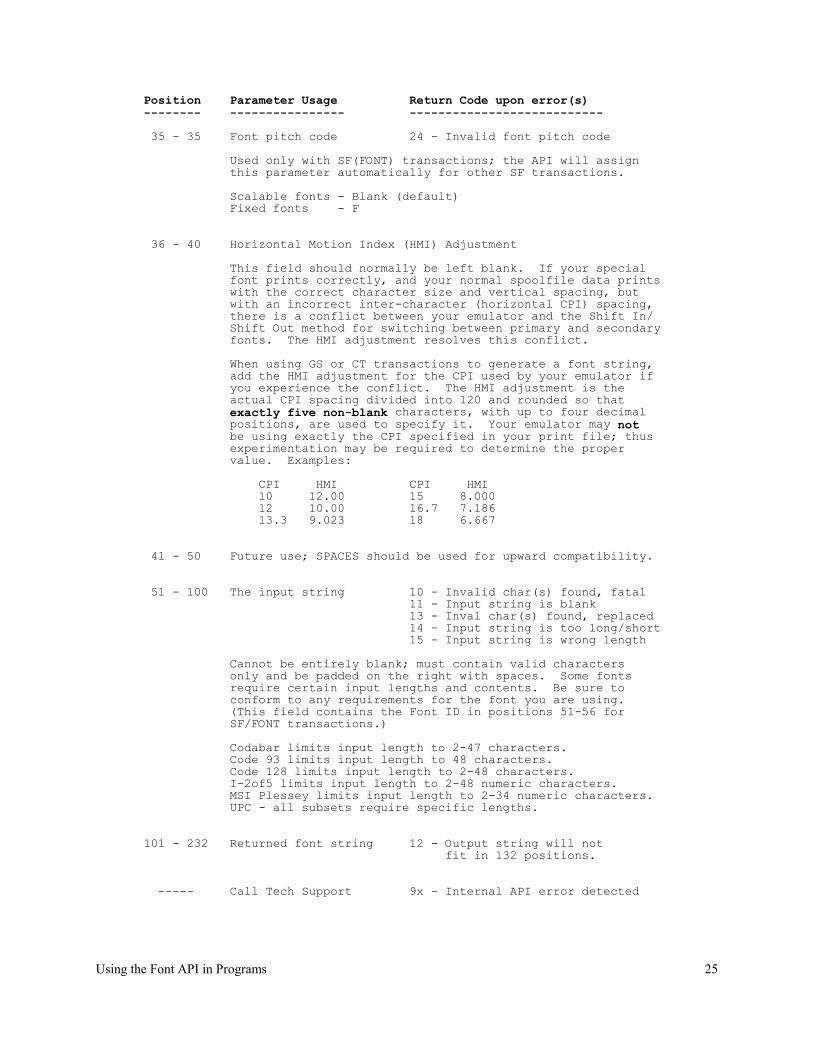
35 - 35 Font pitch code 24 - Invalid font pitch code
Used only with SF(FONT) transactions; the API will assign this parameter automatically for other SF transactions.
Scalable fonts - Blank (default) Fixed fonts - F
36 - 40 Horizontal Motion Index (HMI) Adjustment
This field should normally be left blank. If your special font prints correctly, and your normal spoolfile data prints with the correct character size and vertical spacing, but with an incorrect inter-character (horizontal CPI) spacing, there is a conflict between your emulator and the Shift In/ Shift Out method for switching between primary and secondary fonts. The HMI adjustment resolves this conflict.
When using GS or CT transactions to generate a font string, add the HMI adjustment for the CPI used by your emulator if you experience the conflict. The HMI adjustment is the actual CPI spacing divided into 120 and rounded so that exactly five non-blank characters, with up to four decimal positions, are used to specify it. Your emulator may not be using exactly the CPI specified in your print file; thus experimentation may be required to determine the proper value. Examples:
CPI HMI CPI HMI 10 12.00 15 8.000 12 10.00 16.7 7.186 13.3 9.023 18 6.667
41 - 50 Future use; SPACES should be used for upward compatibility.
51 - 100 The input string 10 - Invalid char(s) found, fatal 11 - Input string is blank 13 - Inval char(s) found, replaced 14 - Input string is too long/short 15 - Input string is wrong length
Cannot be entirely blank; must contain valid characters only and be padded on the right with spaces. Some fonts require certain input lengths and contents. Be sure to conform to any requirements for the font you are using. (This field contains the Font ID in positions 51-56 for SF/FONT transactions.)
Codabar limits input length to 2-47 characters. Code 93 limits input length to 48 characters. Code 128 limits input length to 2-48 characters. I-2of5 limits input length to 2-48 numeric characters. MSI Plessey limits input length to 2-34 numeric characters. UPC - all subsets require specific lengths.
101 - 232 Returned font string 12 - Output string will not fit in 132 positions.
----- Call Tech Support 9x - Internal API error detected

Using the Font API in Programs 26
5.3 Printing Returned Font Strings
Strings returned by the Font API are always padded with x'00', starting immediately after the returned length position
(the last position actually containing command bytes) and continuing to the end of the return string field (position
132). Hex zeroes are always discarded by the printer as received, so they are very useful as fillers in fixed-length
fields containing printer commands.
You must print each string returned by the Font API, without any change except some or all of the hex zeroes can be
truncated. Thus, it is generally easiest to place the returned string on a blank line and print it with normal vertical
spacing techniques. The print line must simply be greater than or equal to the returned length (which excludes the
hex zero padding). The net result will be that the special font will be printed in accordance with the settings used
when calling the Font API, and a blank line is printed where the command itself was placed in the print file.
If the print line is less than 132, the placement of the string must be left-justified; or you may truncate valid portions
of the command string instead of padding. If the print line is greater than 132, the placement can be either left- or
right-justified since spaces at either end will simply print as blanks.
If you do not have a sufficient number of blank lines available on the page to print all returned Font API strings for
that page, other techniques can be used. Section 6.3 covers options for printing direct PCL commands; it also
applies to strings returned by the Font API if the guidelines presented above are observed.
5.4 Sample Programs
Several sample programs illustrate using the Font API and other useful techniques in host applications. They are
provided in the source file FFFSRC which can be conveniently accessed from option 5 on the Main Menu.
Member AAINDEX provides a summary of all available samples and other technical information. Equivalent
programs are provided for both RPG (FFSRPGx) and Cobol (FFSCBLx). They illustrate techniques for common
font applications such as bar codes, checks, and special text fonts. The various sample programs also illustrate all
functions of the Font API, including CT, SF, GS, and SF(FONT).
Note that FFSCBL3 is also provided as a compiled object because it serves as a complete compatibility testing
function.

Using PCL Commands in Host Applications 27
6.0 - Using PCL Commands in Host Applications
PCL-based laser printers have a very high level of functionality, most of which is not directly accessible from a host
program. With the techniques described in this chapter, however, you can use any of the dozens of powerful PCL
commands to achieve special programming effects which simply cannot be handled with normal spoolfile attributes.
Such effects include multiple copies of specific pages, variable line spacing within a page, variable font size within a
page, using both portrait and landscape pages within a spoolfile, and many other advanced functions.
Use of such techniques is seldom needed, however; and they are not required to use the special fonts provided with
FontMagic/400. The Font API provides all the necessary support, and it should be used wherever possible. Thus,
we can support only the few PCL commands described below which are sometimes useful in FontMagic/400
applications. This chapter is provided to document usage of these supported commands, but the information here
applies to other PCL commands as well.
6.1 Command Notation
PCL commands must be typed exactly as shown, with no intervening spaces and with upper and lower case as
indicated. Special notation is used in this Guide to indicate certain portions of the commands. Please note that all
commands are shown with ASCII data values. When PCL commands are used in host programs, various
transparency and EBCDIC-ASCII translation issues, which are discussed later, must be considered.
• [esc] represents the one-character ASCII Escape code (decimal 27, hex 1B). Because the Escape
character cannot be typed directly from the keyboard, a special means is necessary for entering it.
• [fid#] represents the FontMagic/400 Font ID number, entered as 1-6 numeric digits. Leading
zeroes do not have to be included. This ID varies by font and can be found in the document
FFINFO.
6.2 Constructing Commands for Host Programs
You must know the command you want to use, and you must use it correctly as defined by the PCL language.
Almost all PCL commands, unfortunately, require using the Escape character. This character cannot be typed on the
host keyboard, so special means are required for handling it. All other characters generally used in PCL commands
can be typed normally on the keyboard.
Almost all host emulators support the SNA ASCII transparency feature. If so, you can insert any PCL command into
a host application by using the techniques described below. You may also be able to use a proprietary method
provided by your printer emulator. Proprietary methods are sometimes easier to use, but they will tie your
application to a specific emulator; and we cannot provide support for using them.
• Identify the command to be used and translate it into ASCII hex. Section 6.5 provides a hex
translation table for this purpose.
• Prefix the command with hex '03xx' where xx is the hex value of the decimal length of the
command itself, excluding the '03xx'. For example, x'19' is the value for a 25-character command.
• Place the entire string in your program as a hex literal or as a hex field value.

Using PCL Commands in Host Applications 28
As a general example, the string x’030Baabbccddeeffgghhiijjkk’ denotes a PCL command where 03 introduces the
SNA ASCII transparency sequence, 0B is the hex value of the decimal length (11) of the ASCII command following
it, and aa-kk denote the hex values of an 11-byte ASCII PCL command the emulator must pass transparently through
to the printer.
As a specific example, to send only an escape character (hex 1B, decimal 27) to the printer, enter the following 3
bytes, in hex, in your print file at the location where you want the escape character:
03011B x'03' is the constant, x'01' denotes a command length of one byte, and x'1B' is the one byte
command to send.
In the real world, an actual command would be something more like [esc]*c12001d2F to remove previously
downloaded Font ID 12001 from the printer. You would enter a total of thirteen bytes in order to pass an eleven
byte command to the printer:
x'030B1B2A633132303031643246'
Study the above command very carefully. Note that all portions of this command except the escape character can be
typed as normal characters, so you might be tempted to try x'03011B'*c12001d2F. This will often work fine, but
many emulators will not allow you to split a PCL command into a transparent portion and a regular portion.
Whether or not this notation is supported is almost never documented. Either don't do it, or test it very carefully
first!
When using the SNA transparency method, or any hex character below x'40', you must use the print file option
RPLUNPRT(*NO). Otherwise, spooling will replace these critical command bytes with spaces before sending them
to the printer. The printer will then interpret the sequence as print data, instead of a valid PCL command, and print
characters which will most likely appear to be "strange" or "garbage".
6.3 Placing Commands in Host Programs
When using PCL commands, you must construct the proper PCL command string, convert it to the proper
transparency format as described above, move it to a print field, and print it. In addition, you must consider the
impact of the command on horizontal and vertical spacing within the print page.
All PCL commands require space in the program print record because the host will treat them as print characters. At
the printer, however, they do not consume print space on the page; they are executed instead. They do not change
the current print column position, and any valid printable data to the right on the same print line will be shifted to the
left when actually printed.
It is, therefore, much easier to place a PCL command on a completely blank line using normal single-line vertical
spacing. The command will be executed by the printer, doing whatever it is intended to do, but will not actually be
printed itself. The printed result will be exactly as if the positions containing the PCL commands were blank.
If a completely blank line is not available, place the PCL command at the end of a line, after all print characters.
This approach operates identically to that described above except the data characters will be printed normally, as
expected.

Using PCL Commands in Host Applications 29
Both methods above allow you to completely ignore the "print shifting" issue. If you must place a command on a
line to the left of any printable data, be careful! If your PCL command is ten characters long, it will use ten print
positions in the spoolfile print record. These ten characters will have no effect on print spacing at the printer; they
are not printed as spaces! Your actual print data, beginning in position 11, will thus begin printing in column 1 at
the printer. This situation can be confusing; but it can be completely eliminated by following a simple rule: always
place PCL commands on a blank line or after any print data on the same line.
Both of these methods are compatible with both internally and externally defined print files. However, be aware that
you cannot always predict the sequence in which externally defined print files will send some of the necessary page
formatting commands to the printer. This situation will sometimes cause problems that can only be resolved by trial
and error repositioning of fields containing PCL commands.
If you simply can't use either the blank line or the end of line technique described above, you can use overprinting
techniques. They are almost never needed, however, so we don't discuss them here.
The above techniques apply when using any PCL command. Additional considerations, including rules for where
commands should be placed on a page, may apply when using specific commands; consult the manufacturers’
various PCL reference manuals for details.
6.4 Useful PCL Commands
The PCL command language includes dozens of commands, most of which are relevant only for specialized software
development. The complete language is covered in the PCL5 Printer Language Technical Reference Manual, HP
publication number 5961-0509.
Use of most PCL commands is beyond the scope of FontMagic/400 and our free technical support, so please use
them carefully. Refer to your printer and language documentation if further information is needed.
We do support several commands as part of FontMagic/400, however, since they can reduce the number of extra
spoolfiles needed for a font application and significantly simplify the use of special text fonts.
Font Remove Commands:
Normally, you will just leave downloaded fonts in the printer or use one of the FontMagic/400 commands to remove
them. The FontMagic/400 commands, however, will generate an additional spoolfile which can be rather easily
prevented. You can instead simply place one of these commands at the end of your spoolfile.
• Remove all fonts in printer ram [esc]*c0F
• Remove a specific font [esc]*c[fid#]d2F
For example, [esc]*c12001d2F will remove Font ID number 12001.

Using PCL Commands in Host Applications 30
Printer Reset Command:
The printer reset command will reset the printer to its power-on default environment; it is not normally required. If
you have a problem with job setup conflicts that a reset might prevent, you can try adding a reset prior to running
the program which experiences the problem.
You can add the reset with command FFGRESET, but it will generate a separate spoolfile. You can also place the
reset directly in your application program. But, it will most likely cause an extra page to be generated wherever it is
located. This occurs because a reset also prints the current page if it contains any printable data. If placed at the end
of the spoolfile, the final page advance added by spooling causes the extra page to be completely blank. So, you
have to decide which approach is best for each given application.
When used in a program, the Reset command should be placed on the very last line of your spoolfile. It should
never be used elsewhere as it will most likely remove critical printer setups established by the host printer file and
needed for proper page formatting. The Reset command is only two characters long:
• Printer reset [esc]E
Switching Between Primary and Secondary Text Fonts:
FontMagic/400 is primarily intended to facilitate using highly specialized fonts, such as barcodes; and handling such
fonts requires specialized support in the Font API for each specific font. However, generic support is sufficient for
fonts which are actually standard text fonts using the normal character set.
The Font API includes the generic function SF(FONT) for this purpose. This function makes it possible for us to
support any text font without having to prepare and distribute a new version of FontMagic/400 each time the need
for a new text font arises; with SF(FONT), we only have to convert and distribute the text font itself.
SF(FONT) operates much like SF. It also designates the font as a special secondary font, but it does so only for
standard text fonts. Once designated in this manner, because the character sets of text fonts are generally the same,
switching between them and the primary font can be done much more easily than with the GS function.
To switch to a secondary text font, simply place the x'0E' Shift Out sequence in your print line immediately prior to
the first character to be printed with the secondary font. To switch back to the primary font, place the x'0F' Shift In
sequence after the last character being printed with the secondary font. Sample programs FFSRPG3 and FFSCBL3
illustrate the use of SF(FONT) and this method for switching between text fonts.
• Shift Out to a Secondary Font x'03010E'
• Shift In to the Primary Font x'03010F'
But remember: The Shift sequences are control characters; they don't actually print. So any characters to the right of
them in the output line will actually print three characters to the left of where you might otherwise expect.
Therefore, as we recommend for all PCL commands, place these sequences on blank lines wherever possible.
Further, you should also observe all recommendations for using SF, GS, and CT functions, as they similarly apply.
For instance, you should use SF(FONT) on each page, just as you would for SF. Note that, if a major portion of
your document requires a secondary text font, you do not have to use the Shift Out and Shift In sequences with every
line. But, you should use Shift Out/Shift In at least once on every page where a special text font is used.

Using PCL Commands in Host Applications 31
6.5 ASCII Hex Value Table
When composing PCL command sequences, the following cross reference table will be helpful. Just look up the
character you need to place in a command, and the ASCII hex value is shown to its right.
Char ASCII Char ASCII Char ASCII Char ASCII A 41 a 61 0 30 _ 5F B 42 b 62 1 31 " 22 C 43 c 63 2 32 ' 27 D 44 d 64 3 33 + 2B E 45 e 65 4 34 ; 3B F 46 f 66 5 35 = 3D G 47 g 67 6 36 Space 20 H 48 h 68 7 37 I 49 i 69 8 38 J 4A j 6A 9 39 K 4B k 6B L 4C l 6C ? 3F M 4D m 6D & 26 N 4E n 6E - 2D O 4F o 6F : 3A P 50 p 70 . 2E Q 51 q 71 $ 24 R 52 r 72 , 2C S 53 s 73 # 22 T 54 t 74 < 3C U 55 u 75 > 3E V 56 v 76 * 2A W 57 w 77 % 25 X 58 x 78 ( 28 Y 59 y 79 ) 29 Z 5A z 7A ! 21

Technical Considerations 32
7.0 - Technical Considerations
7.1 Printers and Emulators
The issues related to printer and emulator compatibility, 3812 printer operation, printfile parameters, and printer
memory are virtually identical for both FontMagic/400 and FORMagic/400. Please see section 6.1 of the
FORMagic/400 User's Guide for a complete discussion.
In addition to the FORMagic/400 requirements, the considerations below also apply to FontMagic/400 applications.
Compatible Printers:
• With the exception of the MICR font (which is available in both TrueType scalable and fixed
formats), the fonts supplied with FontMagic/400 are all TrueType scalable fonts. You must insure
that all applications using our scalable fonts support the TrueType font format. Most larger PCL
compatible printers provide such support. Windows printers, as discussed in the FORMagic/400
User's Guide, often do not.
• The HP LaserJet II and III do not support TrueType fonts. These printers are specifically not
recommended for use with FontMagic/400 applications.
• FontMagic/400 is compatible with color laser printers meeting the FORMagic/400 guidelines, but
special fonts will print in the same color as the primary font.
Compatible Emulators:
3812 Printer Operation:
Printfile Parameters:
Printer Memory:
There are no additional considerations.
7.2 Special Font Not Printed
Fonts may not always operate as expected. If a font does not print at all, or does not print as expected, this section
may help determine the cause. Note that the effects of the issues described below are often very similar, so consider
each carefully when diagnosing a problem.
• The font was not downloaded, the wrong font was downloaded, or something has removed it. Note
that the downloaded font must always correspond to the Font Code value used in Font API calls.
If a valid font is used in the program, but that font is not present in the printer, the printer will
automatically select another available font. Most likely, the base font, generally Courier, will be
used. There will sometimes be a few "strange characters" in the area where the special font should
be located.
• Error in the application. The Font API values have been set improperly.
• If the font prints sometimes, but not others, the problem is likely due to the Page Protection feature
of the printer. Page protection commands are often used by PC graphics applications and cause
the entire ram memory of the printer to be reformatted. All downloaded overlays and fonts are
removed during the formatting. This problem is generally present only when the printer is shared
for both host and PC applications. Either dedicate the printer to host applications or download

Technical Considerations 33
forms and fonts before each job using them. Some newer printers also have a feature, often called
Resource Save, to preserve downloaded forms and fonts during the reformatting; if possible,
enable it.
• If "strange characters" print on the page in the location where the special font was placed, either:
(a) The special font command is constructed improperly and the printer is interpreting it as
printable data. The Font API is highly reliable, and we are not aware of any deficiencies;
this problem will not likely occur unless your program is mishandling the returned API
string or using direct PCL commands. When it does occur, many of the characters in the
font command may print as seldom-used, "international" characters which we often refer to
as "strange" or "garbage".
(b) OVRPRTF RPLUNPRT(*NO) was not specified. Spooling is corrupting the special font
command string so the effect is the same as an improperly constructed command.
7.3 Other Issues
Font Retention:
Primary and special secondary fonts will remain designated until a printer reset occurs (the host generally does not
reset the printer, but many emulators do), or you issue a primary or secondary font change command. The same is
true for Shift In/Out states. These settings will also remain across print jobs unless a reset or change occurs. If
left over designations cause problems, you will have to add a reset at the end of the job using the special font(s).
Simultaneous Downloads:
When downloading fonts, do not simultaneously download multiple fonts having the same Typeface Family ID code.
If multiple fonts sharing a Typeface Family ID are downloaded together, the printer will incorrectly assign special
fonts. This is a restriction of HP printers and the fonts created by various manufacturers. The restriction also applies
to different fonts residing in ram and/or non-volatile memory. It is, however, acceptable for the same font to reside
in both ram and non-volatile memory.
Do not confuse the Typeface Family ID with the Font ID. The Typeface Family ID code is found in the Font
Command column of the Font Summary, available from the FontMagic menu in the client system. It is the number at
the end of the string, immediately prior to the "T". In practice, this rule only impacts fonts in families providing six
choices: high, medium and low density in both human-readable and non-human-readable styles. In effect, the rule
prohibits simultaneous usage of more than one: (a) human-readable font among all such families, or (b) non-human-
readable font in any of these families. If you need multiple fonts that will violate this rule, you must download one,
use it, and remove it before downloading another. In actuality, this rule is seldom an issue.
7.4 Other Information
Additional Technical Information:
Additional technical information is provided in the Tech Notes document available from the FontMagic menu in the
client system. It is periodically updated with information not available in this User's Guide.