food growing copy
TRANSCRIPT

13
DesigN detaiLs
Growing food on school grounds is an excellent way for students to learn where their food comes from andhow food is grown, prepared and consumed. It also provides the opportunity for discussing the environmentalissues associated with large-scale farming, packaging of food in grocery stores and the energy required fortransporting food to stores and to our tables at home. Locally grown food is becoming more common in urbanareas; people can control the quality of what they are eating by using organic growing techniques, increasingtheir nutritional health and bringing them closer to the land.
Practical Tips for Growing Food on School Grounds
C Find a sunny space reasonably sheltered from strong winds, with good drainage and access to water.
C Create garden plots for food plants, incorporate them in a shrub border around the school, or grow them in pots and containers.
C Provide paths between food-growing plots for kneeling, wheelchair accessibility and to accommodate the use of tools and wheelbarrows.
C Use raised beds in high-use areas so plants are less likely to be stepped on and for children in wheelchairs to access.
C Make sure your soil is suited to the food you wish to grow.Soil testing will determine soil pH and determine if any soil amendments need to be added.
C Maximize gardening opportunities during the school year and reduce summer maintenance by choosing plants that can be planted in the spring and harvested in the fall.
C Create links with celebrations and festivals — harvestfestivals and cultural food festivals are just two of the unlimited possibilities.
C Choose plants that everyone enjoys eating — experiencingthe food you have grown is the most rewarding part of all!
gaRdEniNgtechNiQues
FooD gRoWiNg

14
Creating Your Veggie Garden
You will also want to have easy access to water hoses and wateringcans, wheelbarrows and garden carts, cultivators, gardening gloves and plant labels and markers. Remember to provide regular-sizedtools for teachers, parents and volunteer community members, and child-sized tools for the various age groups and classes that will beplanting and tending the garden.
Preparing the soil
C Test your soil pH — soil that isextremely acidic or alkaline mayrequire soil amendments to makeit suitable for growing crops.
C Prepare your garden plot byremoving weeds (and their roots)once the soil is tilled. For areas where continualweed growth is a concern you may want to prepareyour plot in advance by laying black plastic over thesite and killing the grass and weeds in the area.Then you can till the garden plot and handpick anyremaining weeds that grow back.
C Add organic matter — compost, leaf-mould or well-rotted manure — to enrich the garden soil. Onceyou have been gardening for a while, the compostfrom your own garden can be used to providenutrients for the next year.
did youknow…
Having a tool shed to store tools andgardening equipment is a helpfuladdition to a school gardening
program. It also allows for better access to tools and equipment
during summer months for volunteers.
Tools to have on hand
It would be ideal if your school gardening projectcould purchase, have donated or have access to:C Four spades, rakes and hoes; andC A trowel for each person.
Preparing the site
C Lay out plots and paths with rope or wooden stakes.C Orient the plots along a north-south axis, that is, with the
longest sides running from north to south. This will give plantsmaximum exposure to the sun and minimize shading problems.
C Arrange plots in rows, squares, rectangles, circles or spirals. Becreative as long as you keep in mind the sun requirements foryour plants.
C Make garden plots a maximum of 1.2 metres (four feet) wide sothey can be worked from both sides and are easily accessible foryounger students.
C Construct raised beds for accessibility, safety or variety, asneeded. See the Container Gardening fact sheet for moreinformation on building container gardens.
C Prepare pathways using paving stones, gravel, wood chips ormown grass. Make main pathways 1.2 metres (four feet) wideand paths between garden plots a minimum of 75 centimetres(30 inches) wide to allow for wheelbarrows. Make sure the pathsmeet school safety and accessibility guidelines.
C Edge pathways with stones, bricks or plastic edging so plants donot try to inhabit the pathways and so children understand theboundaries of the garden and their space.
St.
Jam
es T
own
Wes
t Pa
rk

15
b Grow nasturtiums near leaf crops to act as a trap plant for aphids. Nasturtiums grown at the base of fruit trees can also driveaway woolly aphids.
b Provide shade for lettuce with tomatoes, reducing the occurrence of bolting.b Grow carrots, cucumbers, radishes and strawberries with leaf crops.b Think of growing space. Root crops do not require as much space (and sun)
above ground, so grow plants with them that require less root space, but more above ground space: tomatoes with carrots, lettuce with onions, bush beans with potatoes.
b Repel with smell! Interplant basil with tomatoes to repel aphids and tomato hornworm. For even more deterrence, chop and scatter the leaves of the basil plant around tomato plants. Growing onions with carrots can keep away carrot fly, which is fooled by the strong smell of the onions.
b Grow brassicas (broccoli, cabbage, brussel sprouts, cauliflower, kale) with aromatic plants: potatoes, celery, dill, chamomile, rosemary, beets, onions and nasturtiums. Brassicas do not do well with strawberries, tomatoes or pole beans.
cabbage, kale and lettuce need to be spaced 30 to 45 centimetres (12 to 18 inches) and pumpkins and squash require 60 to 90centimetres (24 to 36 inches) between them.
C Rotate your crops to conserve soil conditions. Crop rotation involves rotating the place where you grow certain family groups ofvegetables (e.g. legumes, brassicas) yearly over a three- or four-year cycle. This helps to avoid a build up of pests and diseasesand maintains a balance of nutrients in the soil. The following chart provides an example of a four-year rotation cycle for growingfour families of vegetables.
did youknow…
Most crops can be grown incontainers, however, compact
tomato varieties, radish, lettuce,spinach, small bean varieties,
strawberries and herbs alltend to do very well in
containers.
Selecting Plants
C Select plants based on the goals of your project (e.g. cultural significance, healthy eating). C Research the plants that grow in your area. Differences in temperature and duration of sunlight will determine
which crops you can grow. Contact local horticultural clubs or nurseries to find out what grows best in yourarea and under what conditions.
C Try companion planting. Companion planting is the system of growing particular combinations of plantstogether to improve their health and growth. The following list provides a few examples:
C Try growing sprouts. Sprouts are quick and easy to grow and add valuable flavour andnutrition to salads and sandwiches. Sprouts can be grown in the classroom in shallowtrays, mesh bags or jars with a mesh cover to complement your garden outdoors.
C Select plants that can be sown and harvested during the school year. This could includeradishes, spring onions, early potatoes, early sown peas, winter spinach, cauliflower,broad beans, turnip, carrots, sprouts and cabbages, leeks, root crops, runner beans, maincrop potatoes, pumpkins and squash. Check seed packets and catalogues for times ofsowing and harvesting, and select varieties that will be ready at the right time of year.
C Don’t forget about planting herbs to help flavour the soups and salads your school willbe creating and enjoying.
C Think about growing fruit-bearing vines, native berry-producing shrubs (e.g. blueberryand blackberry) or fruit trees.
Planting
C Sow seeds directly into the soil or start the seeds indoors and then plant them when the weather is warmenough. Check the seed package for germination times.
C Make sure you clearly mark where everything will be planted on planting day.C Be sure to give plants enough room to grow. For example, carrots, garlic, peas, onions, leeks and beets can all
be planted two to 15 centimetres (two to six inches) apart, whereas peppers, broccoli, cauliflower,

Farming the Woodland First Nations Way “The Woodland First Nations grew three main crops: corn, bean andsquash and they called them ‘The Three Sisters’. Many little hills of soilswere created. Fish was used as fertilizer, placed strategically in the cen-tre of each little hill. When the hills were ready, a hole was dug out ofthe top and four corn seeds were planted inside. When the corn grew toabout 15 centimetres, two bean plants were planted with the corn. Thecorn gave the beans something to climb up and the beans releasednitrogen into the soil. Nitrogen is a very important plant food. Inbetween all the little hills of corn and beans, squash was planted.Squash spread very big leaves that shaded the soil, kept it moist andblocked out the sun so weeds couldn’t grow. This method of farmingprovided fertilizer, plant support and weed control, all naturally!”
(Modified from Life Spin, Pocket Sized Farms)
Consider community garden plots,especially in higher density urbanneighbourhoods as a way ofinvolving the community in yourschool gardening program. Theseprograms can be especially benefi-cial over the summer months whencommunity members can tendthe garden space whileusing it for their ownvegetables.
Broa
dacr
es J
unio
r Sc
hool
16
(Ada
pted
fro
m:
Brow
n, M
aggi
. Gr
owin
g Na
tura
lly)
PLOT 1ST YEAR 2ND YEAR 3RD YEAR 4TH YEAR
A Roots Potatoes Onions & legumes Brassicas
B Brassicas Roots Potatoes Onions & legumes
C Onions & legumes Brassicas Roots Potatoes
D Potatoes Onions & legumes Brassicas Roots

Watering and Maintaining Your VeggiesC Provide frequent and gentle watering to germinate seeds. Once the
sprouts emerge, water more deeply, but less often. Remember you candrown your seedlings.
C Water in the early morning when the sun is not at its peak. Watering duringmidday can burn your plants. Also, remember you are watering the soil, not theplants!
C Allow the soil to just barely dry out once seedlings are established, before thenext slow, deep watering.
C Feed your crops with organic plant food (e.g. compost, liquid kelp or worm castings) to help providenutrients.
C Collect water in rain barrelsthat are connected to roofleaders (if possible) for hand-watering your vegetables.
C Weed regularly to avoidcompetition with your crops.Once your plants fill yourgarden plots the need forweeding will be reduced.
C Make weeding fun and treat itas an opportunity for close-updiscovery and observationinstead of an arduous task.
Robe
rt B
atem
an P
ublic
Sco
ol
HarvestingC Growing food provides a great opportunity to
share with the community through the FoodBank or Field to Table programs.
C Harvesting is a time for celebration andreflection. Enjoy the good food you havegrown. Start thinking about activities forputting your garden to bed for the winter andpreparing for next spring.
17
Ridp
ath
Publ
ic S
choo
l
18
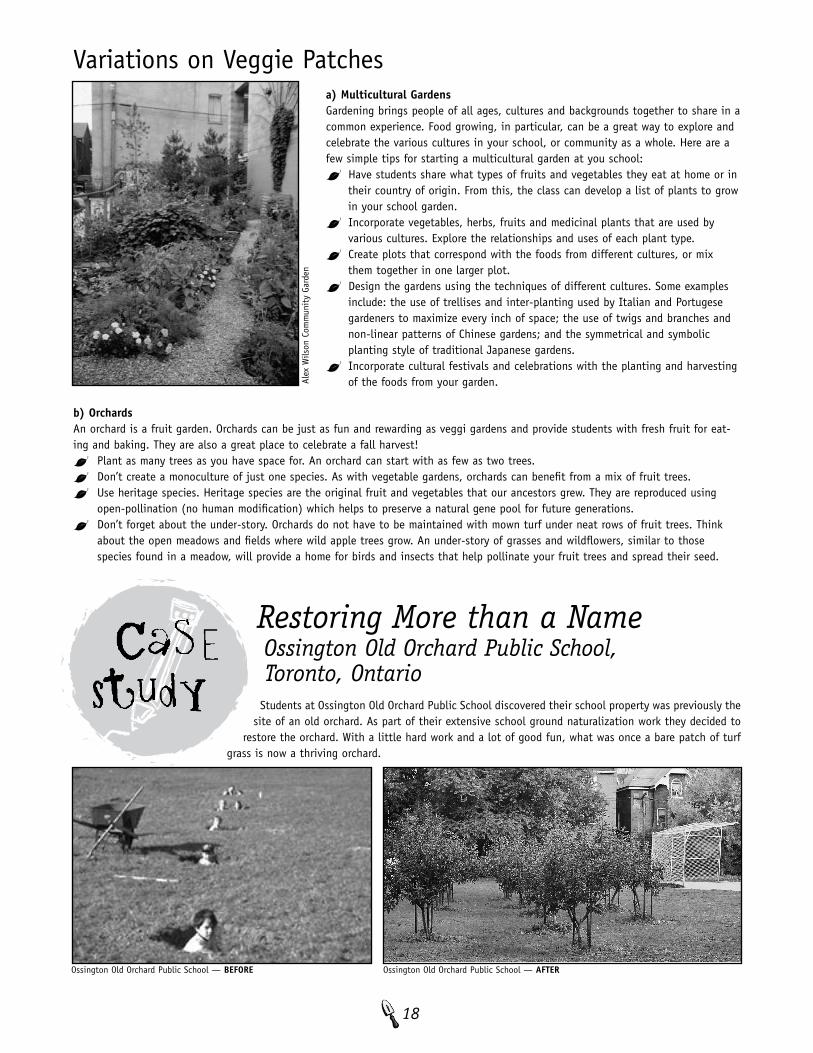
Restoring More than a NameOssington Old Orchard Public School, Toronto, Ontario
Students at Ossington Old Orchard Public School discovered their school property was previously thesite of an old orchard. As part of their extensive school ground naturalization work they decided to
restore the orchard. With a little hard work and a lot of good fun, what was once a bare patch of turfgrass is now a thriving orchard.
Variations on Veggie Patchesa) Multicultural Gardens Gardening brings people of all ages, cultures and backgrounds together to share in acommon experience. Food growing, in particular, can be a great way to explore andcelebrate the various cultures in your school, or community as a whole. Here are afew simple tips for starting a multicultural garden at you school:C Have students share what types of fruits and vegetables they eat at home or in
their country of origin. From this, the class can develop a list of plants to growin your school garden.
C Incorporate vegetables, herbs, fruits and medicinal plants that are used byvarious cultures. Explore the relationships and uses of each plant type.
C Create plots that correspond with the foods from different cultures, or mixthem together in one larger plot.
C Design the gardens using the techniques of different cultures. Some examplesinclude: the use of trellises and inter-planting used by Italian and Portugesegardeners to maximize every inch of space; the use of twigs and branches andnon-linear patterns of Chinese gardens; and the symmetrical and symbolicplanting style of traditional Japanese gardens.
C Incorporate cultural festivals and celebrations with the planting and harvestingof the foods from your garden.
b) OrchardsAn orchard is a fruit garden. Orchards can be just as fun and rewarding as veggi gardens and provide students with fresh fruit for eat-ing and baking. They are also a great place to celebrate a fall harvest!C Plant as many trees as you have space for. An orchard can start with as few as two trees.C Don’t create a monoculture of just one species. As with vegetable gardens, orchards can benefit from a mix of fruit trees.C Use heritage species. Heritage species are the original fruit and vegetables that our ancestors grew. They are reproduced using
open-pollination (no human modification) which helps to preserve a natural gene pool for future generations.C Don’t forget about the under-story. Orchards do not have to be maintained with mown turf under neat rows of fruit trees. Think
about the open meadows and fields where wild apple trees grow. An under-story of grasses and wildflowers, similar to thosespecies found in a meadow, will provide a home for birds and insects that help pollinate your fruit trees and spread their seed.
Alex
Wils
on C
omm
unit
y Ga
rden
Ossington Old Orchard Public School — BEFORE Ossington Old Orchard Public School — AFTER
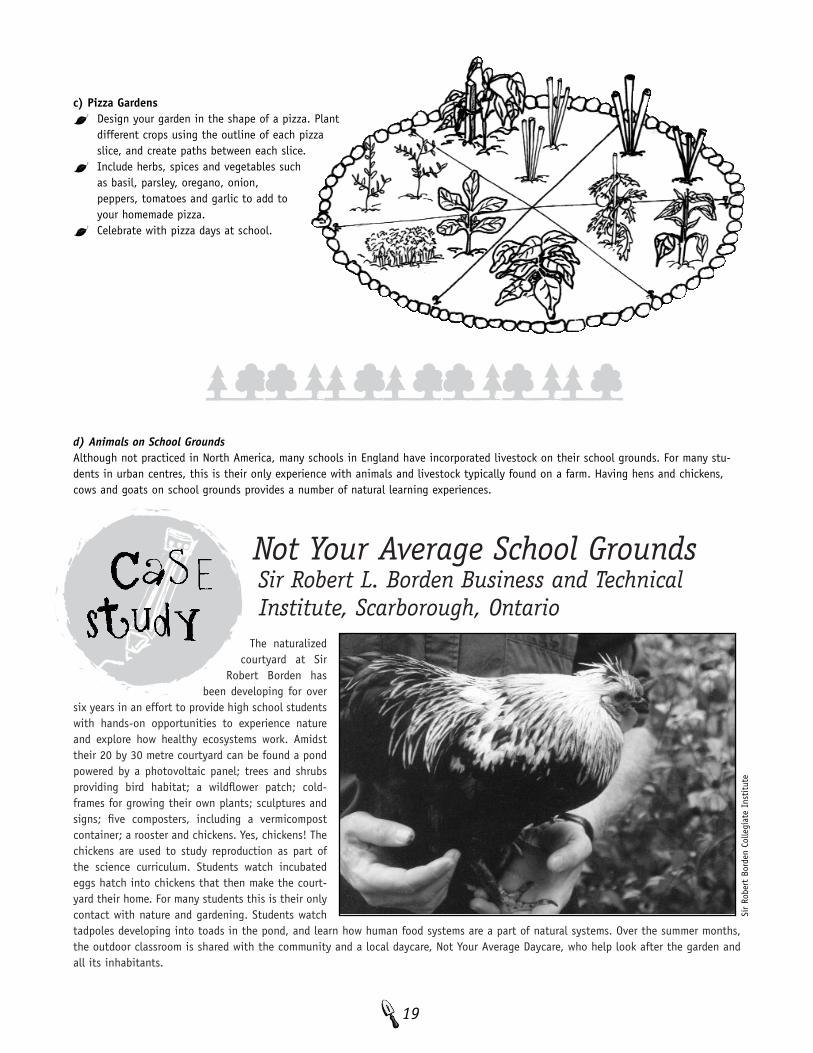
Not Your Average School GroundsSir Robert L. Borden Business and TechnicalInstitute, Scarborough, Ontario
The naturalizedcourtyard at Sir
Robert Borden hasbeen developing for over
six years in an effort to provide high school studentswith hands-on opportunities to experience natureand explore how healthy ecosystems work. Amidsttheir 20 by 30 metre courtyard can be found a pondpowered by a photovoltaic panel; trees and shrubsproviding bird habitat; a wildflower patch; cold-frames for growing their own plants; sculptures andsigns; five composters, including a vermicompostcontainer; a rooster and chickens. Yes, chickens! Thechickens are used to study reproduction as part ofthe science curriculum. Students watch incubatedeggs hatch into chickens that then make the court-yard their home. For many students this is their onlycontact with nature and gardening. Students watchtadpoles developing into toads in the pond, and learn how human food systems are a part of natural systems. Over the summer months,the outdoor classroom is shared with the community and a local daycare, Not Your Average Daycare, who help look after the garden andall its inhabitants.
Sir
Robe
rt B
orde
n Co
llegi
ate
Inst
itut
e
19
d) Animals on School GroundsAlthough not practiced in North America, many schools in England have incorporated livestock on their school grounds. For many stu-dents in urban centres, this is their only experience with animals and livestock typically found on a farm. Having hens and chickens,cows and goats on school grounds provides a number of natural learning experiences.
c) Pizza Gardens C Design your garden in the shape of a pizza. Plant
different crops using the outline of each pizzaslice, and create paths between each slice.
C Include herbs, spices and vegetables suchas basil, parsley, oregano, onion,peppers, tomatoes and garlic to add toyour homemade pizza.
C Celebrate with pizza days at school.

20
Where to go from here?Sources for this fact sheet
Brown, Maggi. 1996. Growing Naturally: A Teacher’s Guide to Organic Gardening. Crediton, Devon: Southgate Publishers Ltd.Learning Through Landscapes. 1999. “Growing food in school grounds”. Escape 19: 7-10.
Life Spin. 1999. Pocket Sized Farms: Children’s Garden Manual. Volume 1. London, Ontario: Life Spin’s Fire Hall 5 Publications.Rotteau, Lynda. School Gardens Workbook. Goderich, Ontario: Earth Friendly Gardens.
Thibault, Nicole. 1994. “Multicultural gardening” in Green Teacher 38: 14-15.
Organizations and Web sitesCity Farmer, Vancouver, British Columbia: www.cityfarmer.org
Earth Friendly Gardens, Huron County, Ontario: www.geocities.com/rainforest/vines/GOIGLearning Through Landscapes, England: www.ltl.org.uk
Toronto Community Garden Network and FoodShare, Toronto, Ontario: www.foodshare.net/grow.htm
Example projectsBroadacres Junior School, Etobicoke, Ontario: (416) 394-7030
Ossington Old Orchard Public School, Toronto, Ontario: (416) 393-0710Phoenix School, Headingly, Manitoba: (204) 889-5053
Robert Bateman Public School, Ottawa, Ontario: (613) 737-3169Robertson Memorial School, Goderich, Ontario: (519) 524-8972
Ronald Harvey Elementary School, St. Albert, Alberta: (780) 459-5541Sacred Heart/Sacre Coeur, Estevan, Saskatchewan: (306) 634-4249
Sir Robert Borden, Not Your Average Day Care, Scarborough, Ontario: (416) 396-6810
Codes and Safety Standards
C Do not use plants that have poisonous parts (e.g. castor beans, black cherry trees) or may pose allergy problems (e.g. nut trees).C Do not use chemical pesticides or fertilizers. Use organic fertilizers such as compost (or make compost tea) instead. See the
Compost and Mulch fact sheet for more information.C Teach children to never taste any part of a plant unless their teacher says it is safe to do so.C Create tool rules — tools are not toys. Use the appropriate tool for the task, clean all tools when finished and store tools in a
safe, designated place.C Do not use plastic tools designed for sandbox play. They are not sturdy and will break easily, possibly causing injuries.C Make sure you have the proper-sized tools for the different age groups that will be gardening. C Provide plantings in raised beds as well as surface plantings for greater diversity and accessibility.