food photography with exposure x4...food photography with exposure x4 food. our fuel. something we...
TRANSCRIPT
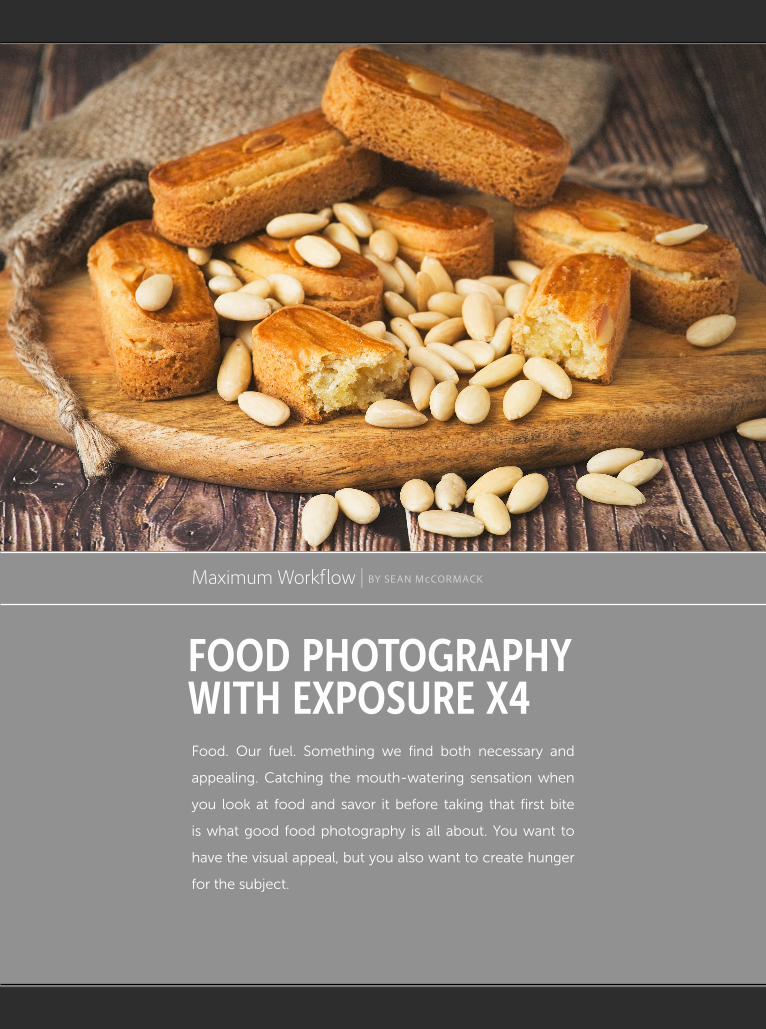
FOOD PHOTOGRAPHY WITH EXPOSURE X4 Food. Our fuel. Something we find both necessary and
appealing. Catching the mouth-watering sensation when
you look at food and savor it before taking that first bite
is what good food photography is all about. You want to
have the visual appeal, but you also want to create hunger
for the subject.
Maximum Workf low | BY SEAN MCCORMACK
Good food photography is very much about styling and
lighting. That light can be natural or artificial, though the
latter definitely expands your options for shooting when the
sun is down. And, as we head into winter in the northern
hemisphere, artificial lighting is a necessity. Styling isn’t just
the thing we do to make the food look more appealing; it’s
also about the setting the food is in. A plate on a table by
itself looks lost and not particularly appetizing, but add some
cutlery, napkins, and elements used in the creation of the
dish, and your scene is elevated.
Now, I’m not a chef. I can bake bread and make but-
tercream icing and, of course, I can knock out basic food
to survive, but I’d never call myself a cook, though, that’s
on my agenda. I do, however, really enjoy shooting food.
In some ways, I put off food photography because I have
a friend who’s a world-class food photographer. I felt
like I couldn’t compete; but then I realized that I didn’t
have to feel that way because, even if we had the same
plate of food in front of us, we’d shoot it
completely differently.
THE EQUIPMENT Generally speaking, any recent DSLR or mirror-
less body will be adequate gear. Either a 50mm
or 100mm macro (full-frame equivalent) should
be enough to get you started. Primes are a bet-
ter option because you’re often looking for
shallow depth of field. A constant aperture
zoom of f/2.8 in a lens will work too, but it’s
often more expensive.
Personally, I’m using a FUJIFILM X-T2 with
the 35mm and the 60mm Macro. For the fol-
lowing shots, I used the 60mm. In order to cap-
ture the scene, I used a tripod to lock off my
camera position. With shallow depth of field,
even the slightest movement can make you lose
your focal point, so it’s better to have the cam-
era position fixed.
To ensure that I have the shot I want, I shoot
tethered. Alien Skin recently updated Exposure
to version X4, which now includes a Moni-
tor Folder option that will watch a folder for
updates. Combined with the camera maker’s
tethering software (X Acquire from Fujifilm
in my case), this is a good option for nailing
the shot. A laptop is great for keeping the set
tight, but on larger shoots, a whole produc-
tion station can be used.
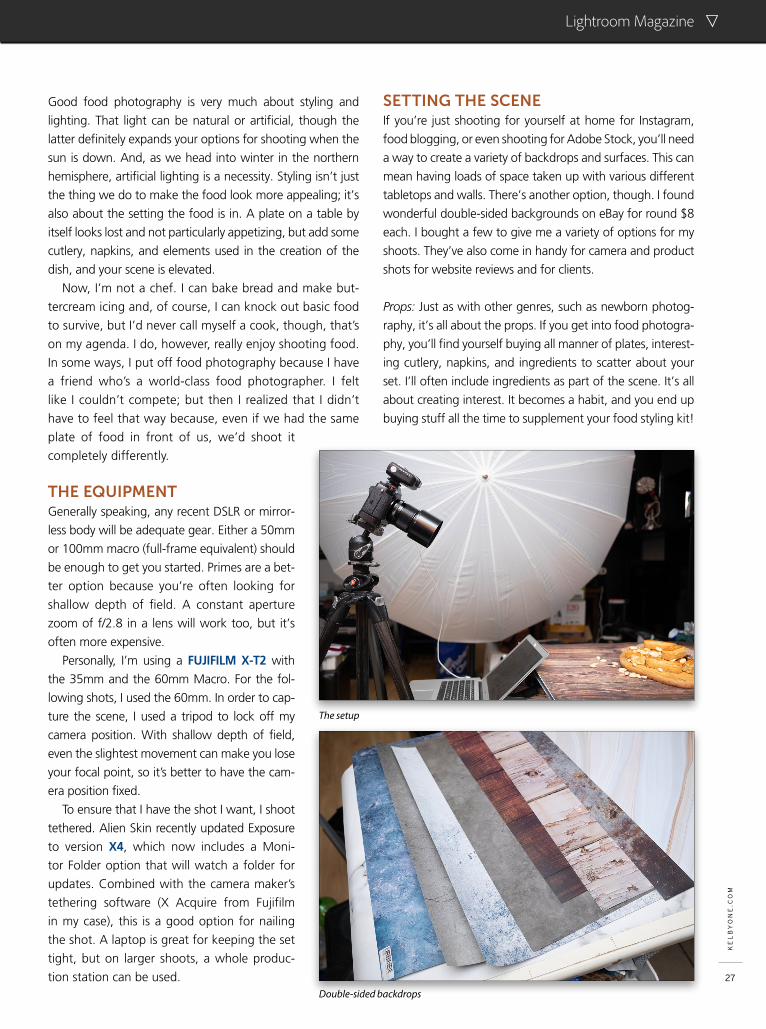
SETTING THE SCENE If you’re just shooting for yourself at home for Instagram,
food blogging, or even shooting for Adobe Stock, you’ll need
a way to create a variety of backdrops and surfaces. This can
mean having loads of space taken up with various different
tabletops and walls. There’s another option, though. I found
wonderful double-sided backgrounds on eBay for round $8
each. I bought a few to give me a variety of options for my
shoots. They’ve also come in handy for camera and product
shots for website reviews and for clients.
Props: Just as with other genres, such as newborn photog-
raphy, it’s all about the props. If you get into food photogra-
phy, you’ll find yourself buying all manner of plates, interest-
ing cutlery, napkins, and ingredients to scatter about your
set. I’ll often include ingredients as part of the scene. It’s all
about creating interest. It becomes a habit, and you end up
buying stuff all the time to supplement your food styling kit!
Lightroom Magazine
KE
LB
YO
NE
.CO
M
27
The setup
Double-sided backdrops
LIGHTING Diffused window light is really all you need. Optimally, the
light needs to be positioned somewhere between the back
and the side of the food—anywhere in that line will gener-
ally look good. Lighting from the front looks really flat and
never particularly appealing. You need to use the light to
create shape and shadow and give texture to the food, a
key element in arousing taste buds.
For artificial light, you have two options: continuous
or strobe (flash). Continuous could be something like the
Westcott Spiderlights or Flex LEDs with diffusion. The
beauty of these is that there’s no guessing what the light
might look like. What you see is what you get, especially
with live view on camera.
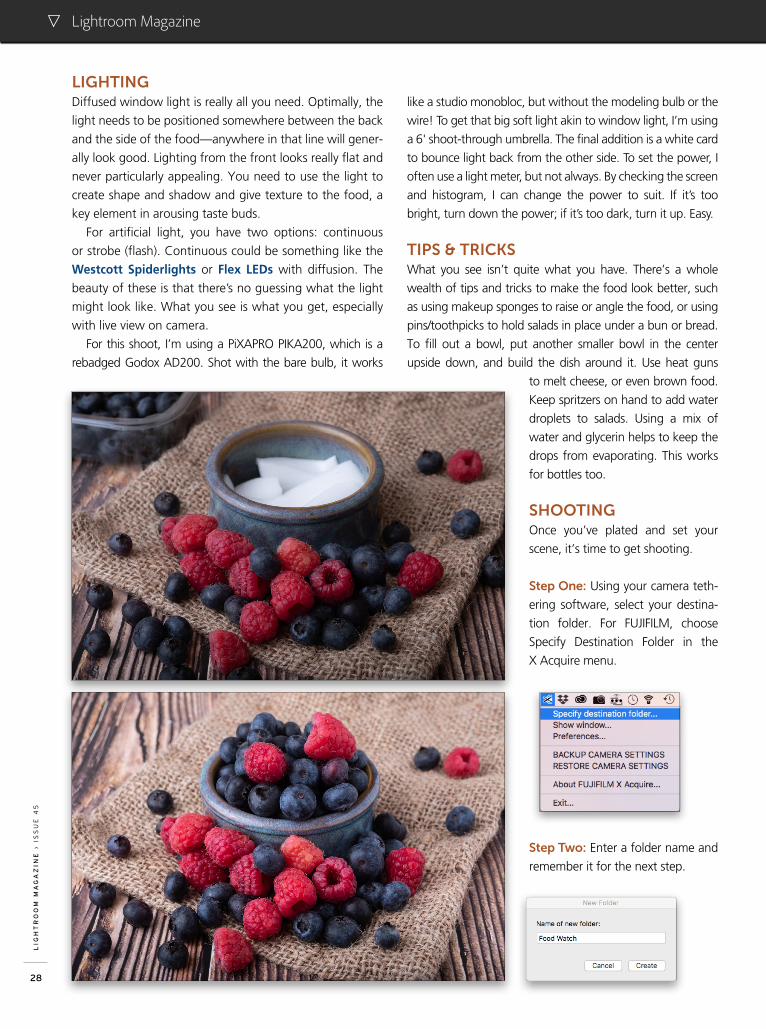
For this shoot, I’m using a PiXAPRO PIKA200, which is a
rebadged Godox AD200. Shot with the bare bulb, it works
like a studio monobloc, but without the modeling bulb or the
wire! To get that big soft light akin to window light, I’m using
a 6' shoot-through umbrella. The final addition is a white card
to bounce light back from the other side. To set the power, I
often use a light meter, but not always. By checking the screen
and histogram, I can change the power to suit. If it’s too
bright, turn down the power; if it’s too dark, turn it up. Easy.
TIPS & TRICKS What you see isn’t quite what you have. There’s a whole
wealth of tips and tricks to make the food look better, such
as using makeup sponges to raise or angle the food, or using
pins/toothpicks to hold salads in place under a bun or bread.
To fill out a bowl, put another smaller bowl in the center
upside down, and build the dish around it. Use heat guns
to melt cheese, or even brown food.
Keep spritzers on hand to add water
droplets to salads. Using a mix of
water and glycerin helps to keep the
drops from evaporating. This works
for bottles too.
SHOOTING Once you’ve plated and set your
scene, it’s time to get shooting.
Step One: Using your camera teth-
ering software, select your destina-
tion folder. For FUJIFILM, choose
Specify Destination Folder in the
X Acquire menu.
Step Two: Enter a folder name and
remember it for the next step.
Lightroom MagazineL
IGH
TR
OO
M M
AG
AZ
INE
› I
SS
UE
45
28
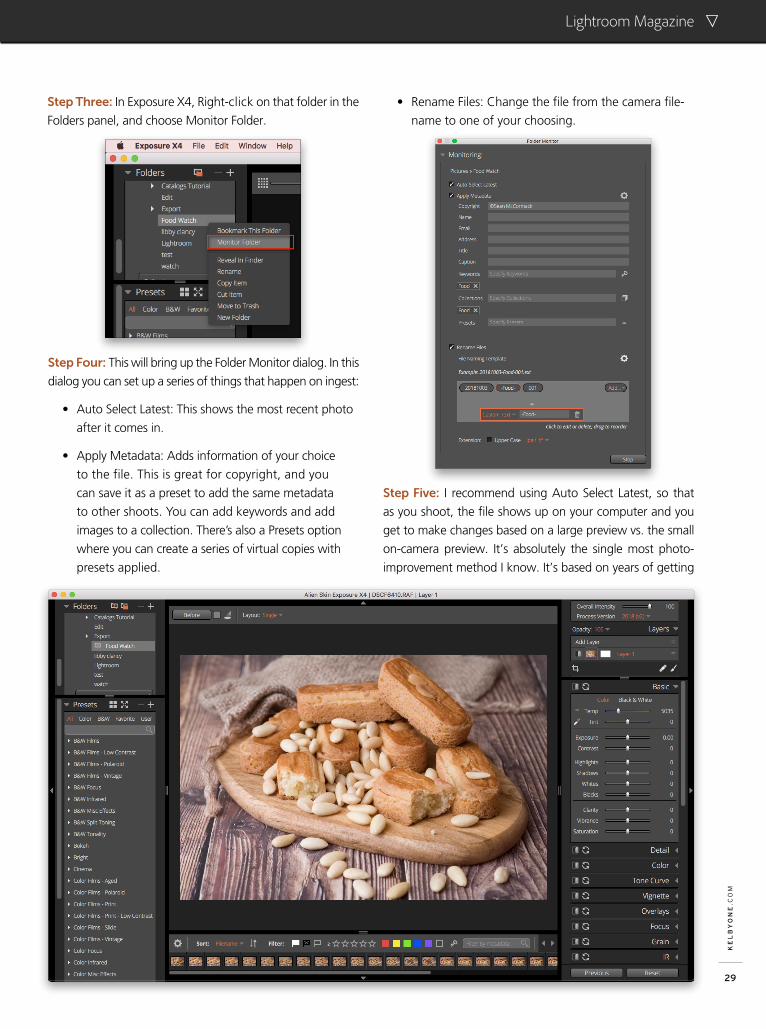
Step Three: In Exposure X4, Right-click on that folder in the
Folders panel, and choose Monitor Folder.
• Rename Files: Change the file from the camera file-
name to one of your choosing.
Step Four: This will bring up the Folder Monitor dialog. In this
dialog you can set up a series of things that happen on ingest:
• Auto Select Latest: This shows the most recent photo
after it comes in.
• Apply Metadata: Adds information of your choice
to the file. This is great for copyright, and you
can save it as a preset to add the same metadata
to other shoots. You can add keywords and add
images to a collection. There’s also a Presets option
where you can create a series of virtual copies with
presets applied.
Step Five: I recommend using Auto Select Latest, so that
as you shoot, the file shows up on your computer and you
get to make changes based on a large preview vs. the small
on-camera preview. It’s absolutely the single most photo-
improvement method I know. It’s based on years of getting
Lightroom Magazine
KE
LB
YO
NE
.CO
M
29
files back to the computer and going, “Why didn’t I…?”.
Now you can make the necessary changes as you go, and
know you’ve nailed the shot.
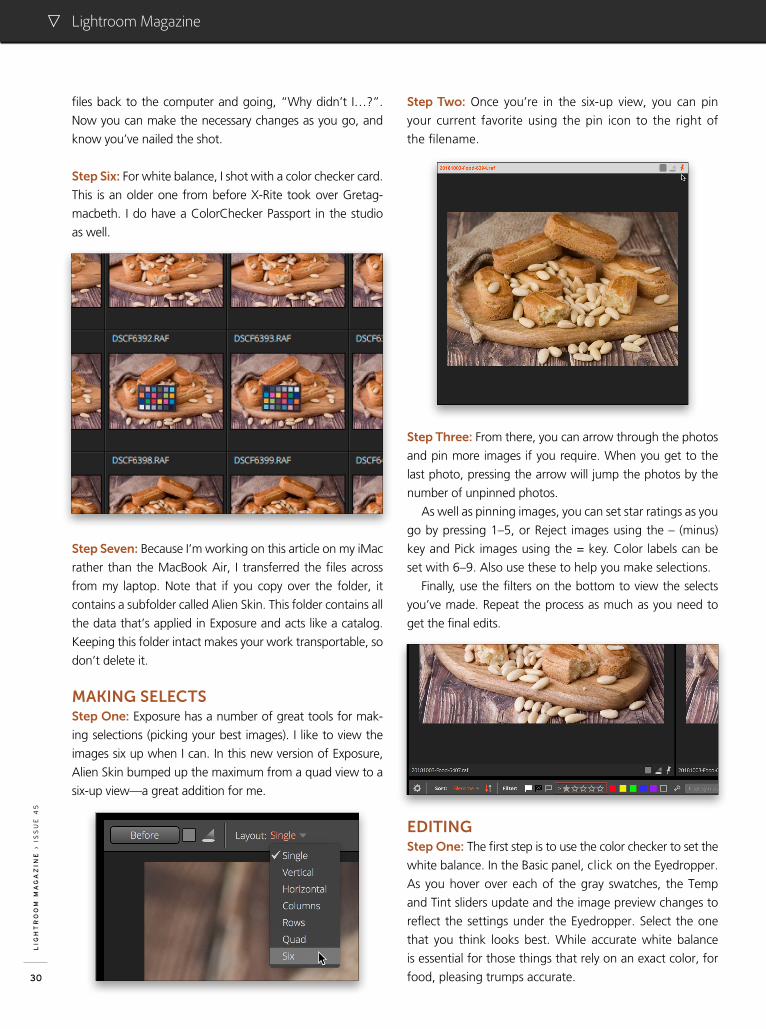
Step Six: For white balance, I shot with a color checker card.
This is an older one from before X-Rite took over Gretag-
macbeth. I do have a ColorChecker Passport in the studio
as well.
Step Seven: Because I’m working on this article on my iMac
rather than the MacBook Air, I transferred the files across
from my laptop. Note that if you copy over the folder, it
contains a subfolder called Alien Skin. This folder contains all
the data that’s applied in Exposure and acts like a catalog.
Keeping this folder intact makes your work transportable, so
don’t delete it.
MAKING SELECTS Step One: Exposure has a number of great tools for mak-
ing selections (picking your best images). I like to view the
images six up when I can. In this new version of Exposure,
Alien Skin bumped up the maximum from a quad view to a
six-up view—a great addition for me.
Step Two: Once you’re in the six-up view, you can pin
your current favorite using the pin icon to the right of
the filename.
Step Three: From there, you can arrow through the photos
and pin more images if you require. When you get to the
last photo, pressing the arrow will jump the photos by the
number of unpinned photos.
As well as pinning images, you can set star ratings as you
go by pressing 1–5, or Reject images using the – (minus)
key and Pick images using the = key. Color labels can be
set with 6–9. Also use these to help you make selections.
Finally, use the filters on the bottom to view the selects
you’ve made. Repeat the process as much as you need to
get the final edits.
EDITING Step One: The first step is to use the color checker to set the
white balance. In the Basic panel, click on the Eyedropper.
As you hover over each of the gray swatches, the Temp
and Tint sliders update and the image preview changes to
reflect the settings under the Eyedropper. Select the one
that you think looks best. While accurate white balance
is essential for those things that rely on an exact color, for
food, pleasing trumps accurate.
Lightroom MagazineL
IGH
TR
OO
M M
AG
AZ
INE
› I
SS
UE
45
30
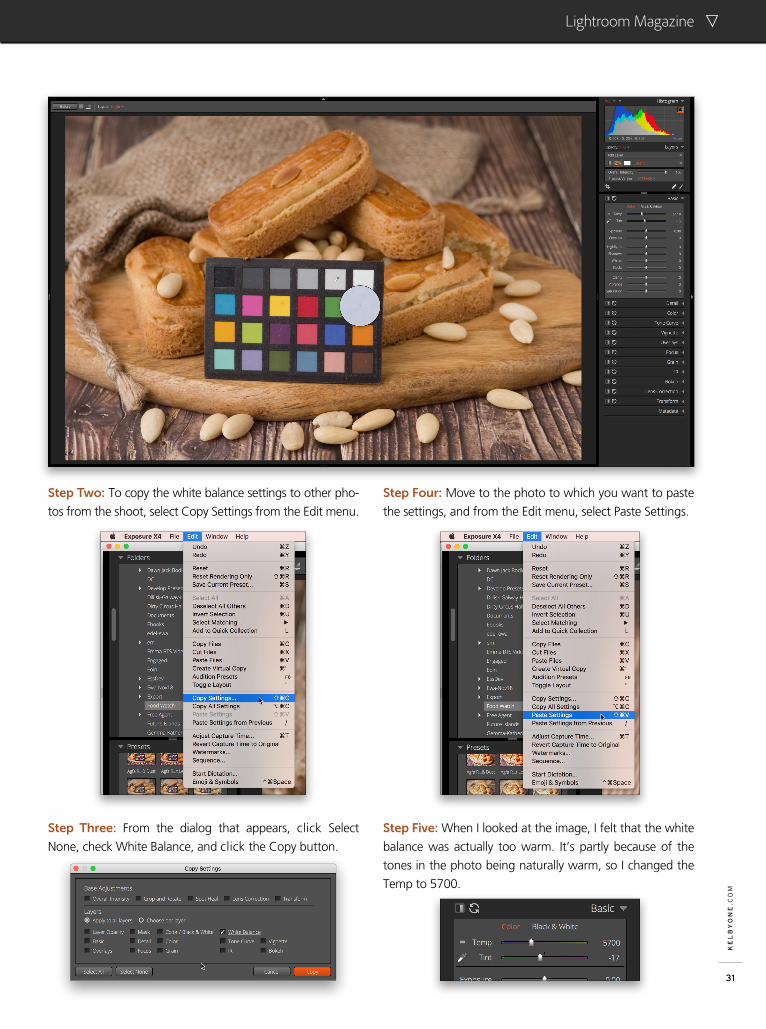
Step Two: To copy the white balance settings to other pho-
tos from the shoot, select Copy Settings from the Edit menu.
Step Four: Move to the photo to which you want to paste
the settings, and from the Edit menu, select Paste Settings.
Step Three: From the dialog that appears, click Select
None, check White Balance, and click the Copy button.
Step Five: When I looked at the image, I felt that the white
balance was actually too warm. It’s partly because of the
tones in the photo being naturally warm, so I changed the
Temp to 5700.
Lightroom Magazine
KE
LB
YO
NE
.CO
M
31
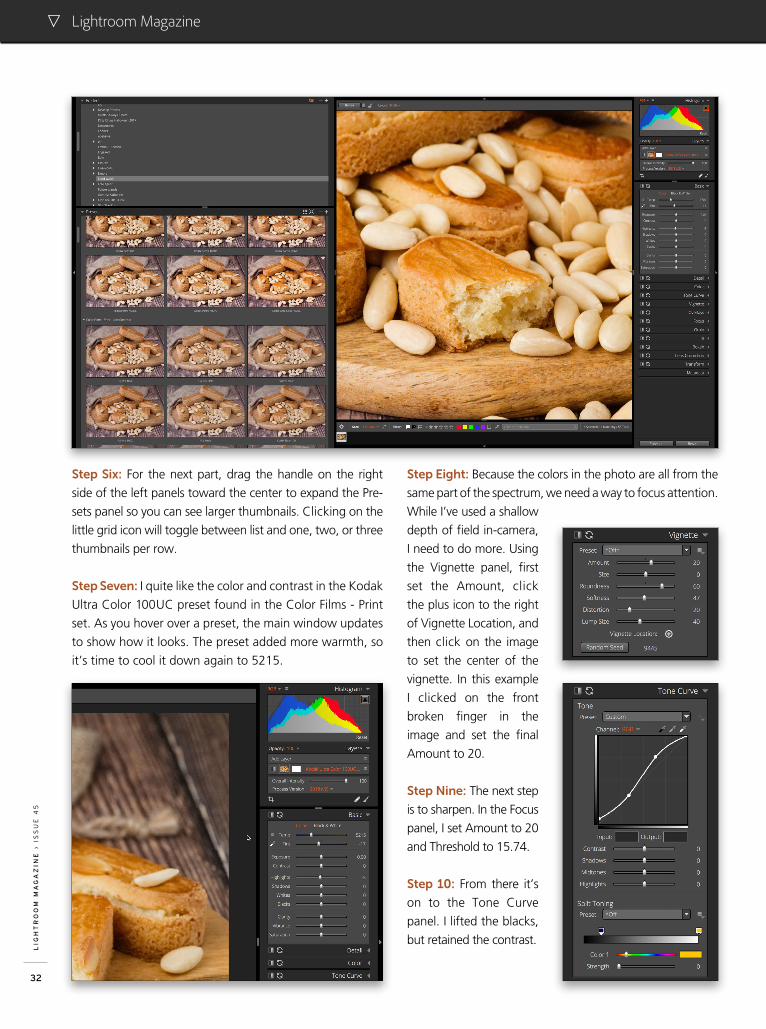
Step Six: For the next part, drag the handle on the right
side of the left panels toward the center to expand the Pre-
sets panel so you can see larger thumbnails. Clicking on the
little grid icon will toggle between list and one, two, or three
thumbnails per row.
Step Seven: I quite like the color and contrast in the Kodak
Ultra Color 100UC preset found in the Color Films - Print
set. As you hover over a preset, the main window updates
to show how it looks. The preset added more warmth, so
it’s time to cool it down again to 5215.
Step Eight: Because the colors in the photo are all from the
same part of the spectrum, we need a way to focus attention.
While I’ve used a shallow
depth of field in-camera,
I need to do more. Using
the Vignette panel, first
set the Amount, click
the plus icon to the right
of Vignette Location, and
then click on the image
to set the center of the
vignette. In this example
I clicked on the front
broken finger in the
image and set the final
Amount to 20.
Step Nine: The next step
is to sharpen. In the Focus
panel, I set Amount to 20
and Threshold to 15.74.
Step 10: From there it’s
on to the Tone Curve
panel. I lifted the blacks,
but retained the contrast.
Lightroom MagazineL
IGH
TR
OO
M M
AG
AZ
INE
› I
SS
UE
45
32
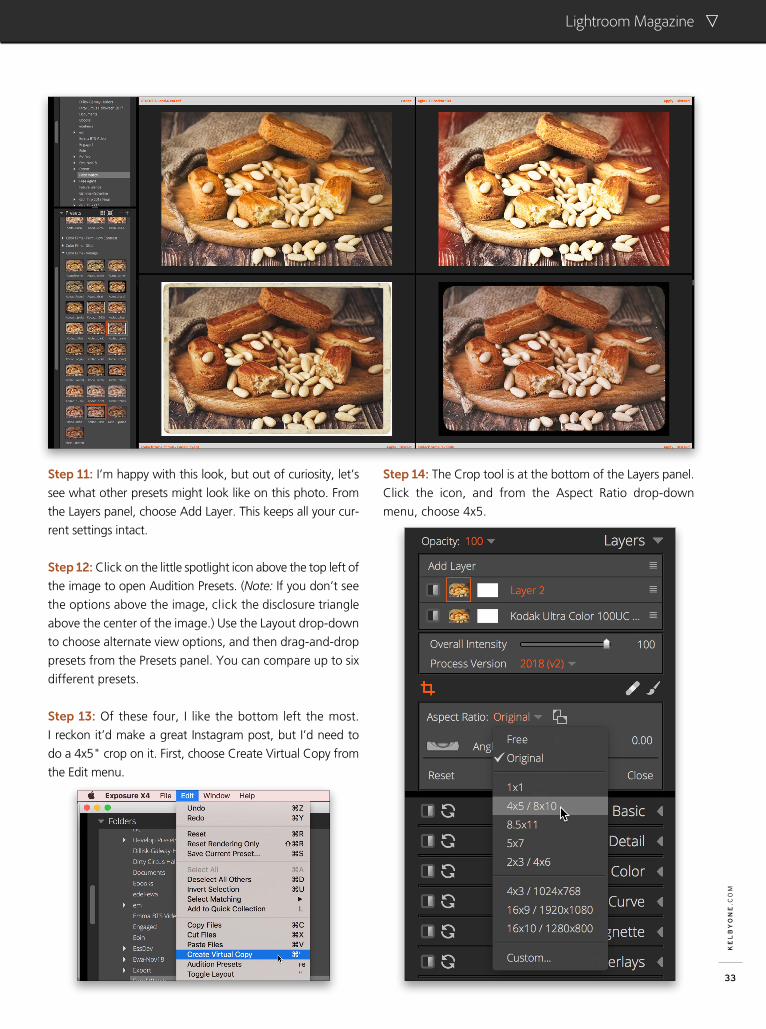
Step 11: I’m happy with this look, but out of curiosity, let’s
see what other presets might look like on this photo. From
the Layers panel, choose Add Layer. This keeps all your cur-
rent settings intact.
Step 12: Click on the little spotlight icon above the top left of
the image to open Audition Presets. (Note: If you don’t see
the options above the image, click the disclosure triangle
above the center of the image.) Use the Layout drop-down
to choose alternate view options, and then drag-and-drop
presets from the Presets panel. You can compare up to six
different presets.
Step 13: Of these four, I like the bottom left the most.
I reckon it’d make a great Instagram post, but I’d need to
do a 4x5" crop on it. First, choose Create Virtual Copy from
the Edit menu.
Step 14: The Crop tool is at the bottom of the Layers panel.
Click the icon, and from the Aspect Ratio drop-down
menu, choose 4x5.
Lightroom Magazine
KE
LB
YO
NE
.CO
M
33
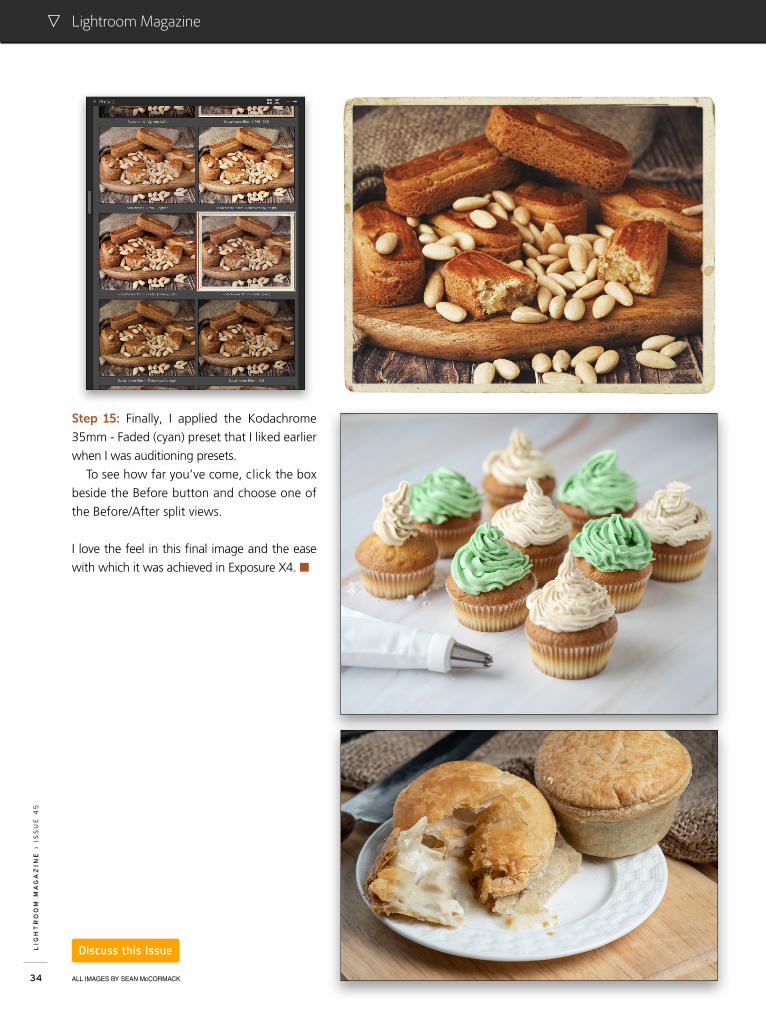
Step 15: Finally, I applied the Kodachrome
35mm - Faded (cyan) preset that I liked earlier
when I was auditioning presets.
To see how far you’ve come, click the box
beside the Before button and choose one of
the Before/After split views.
I love the feel in this final image and the ease
with which it was achieved in Exposure X4. n
ALL IMAGES BY SEAN McCORMACK
Lightroom MagazineL
IGH
TR
OO
M M
AG
AZ
INE
› I
SS
UE
45
34