for dir series routers
TRANSCRIPT

www.dlink.co.in
CONFIGURATION GUIDEFor DIR Series Routers

www.dlink.co.in
HOW TO ACCESS THE DEVICE
HOW TO CONFIGURE INTERNET
WIRELESS SETUP
Configuration Guidefor DIR series routers
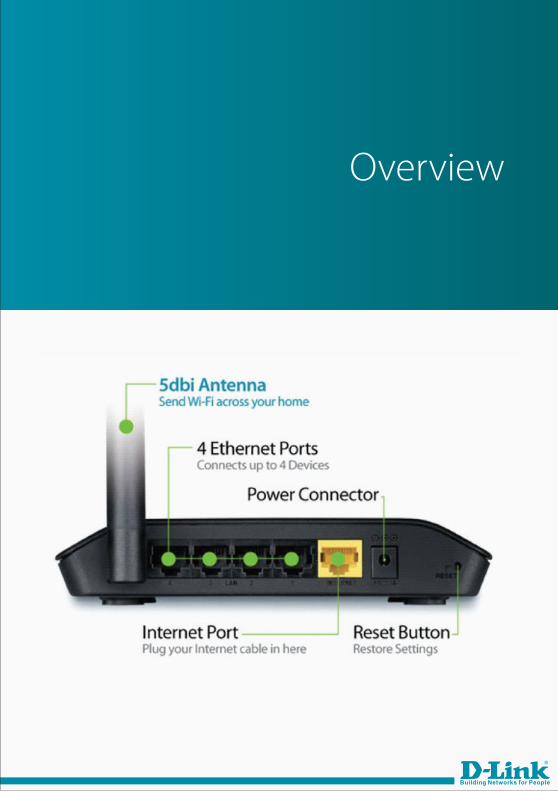
Overview

HOW TO ACCESS THE DEVICE:-
Connect the power adapter to the power socket and other end to the device and power on the device.
2)
1)
Once the device is powered on, power LED and the Wi-Fi LED on the device will be green.
3)
4)
5)
Unbox the device.
Connect one end of the Ethernet cable provided in to the box into any of the 4 LAN port of the device at the back side and connect other end to the LAN port of your Desktop/Laptop.
Or you can connect to the device wirelessly. Go to wireless utility of your laptop. You will be able to view the available wireless networks. By Default wireless network name of the device i.e. SSID is “dlink” and there is no password in default settings. Select the “dlink” SSID and say “connect”, Kindly see the below screenshot. After this you will be get connected to the router.

HOW TO ACCESS THE DEVICE:-
6)
7)
8)
Then go to the web browser and type http://192.168.0.1 in the address bar.
You will get the login page of the router, the default username is admin and there is no password in default settings, leave the password field blank.
You will get the current network settings page of the device, which will show you the status of internet, wireless and mydlink.
HOW TO CONFIGURE THE INTERNET:-
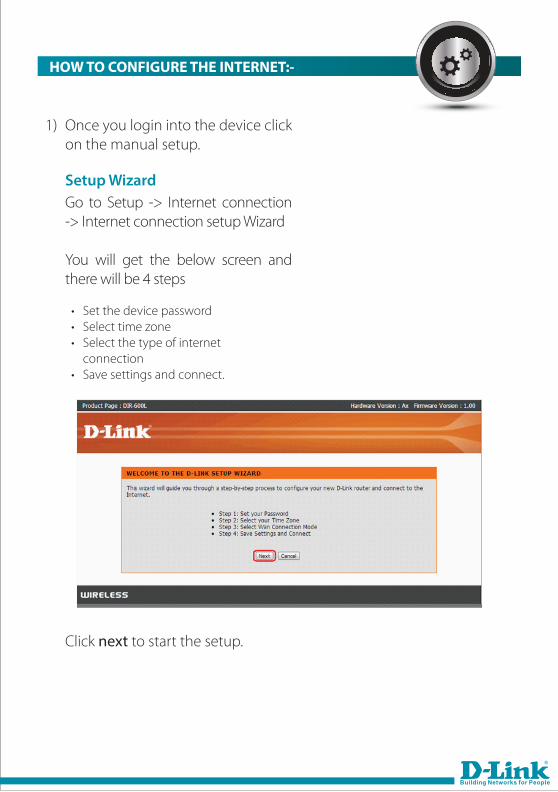
• Set the device password • Select time zone • Select the type of internet connection • Save settings and connect.
Once you login into the device click on the manual setup.
Click next to start the setup.
Go to Setup -> Internet connection -> Internet connection setup Wizard
You will get the below screen and there will be 4 steps
Setup Wizard
1)

HOW TO CONFIGURE THE INTERNET:-
2) Assign the password for the device as shown below, click next.
3) Select the Indian Time zone and the NTP server as shown below, click next.
4) It will prompt to select the WAN connection mode, Auto and manual. If you select auto it will automatically detect the WAN connection type, we will show you the manual. Click Next.
5) Select the type of connection provided by ISP and click next. We have selected the DHCP connection (Dynamic IP address).
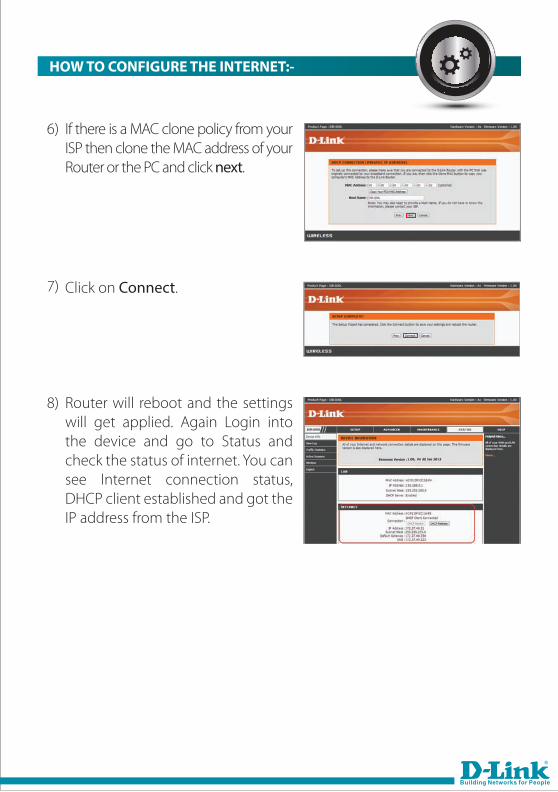
6) If there is a MAC clone policy from your ISP then clone the MAC address of your Router or the PC and click next.
7) Click on Connect.
8) Router will reboot and the settings will get applied. Again Login into the device and go to Status and check the status of internet. You can see Internet connection status, DHCP client established and got the IP address from the ISP.
HOW TO CONFIGURE THE INTERNET:-

1) Login into the router as shown earlier.
2) Current network setting page will open, click on Manual Setup
3) Go to Setup -> Internet connection -> Manual internet connection setup.
4) From the dropdown option of My Internet connection select the type of connection provided by your ISP. If there is a MAC cloning policy from your ISP then clone the MAC address of your router or PC. Click on save settings.
HOW TO CONFIGURE THE INTERNET:-
Manual Internet Connection Setup:-
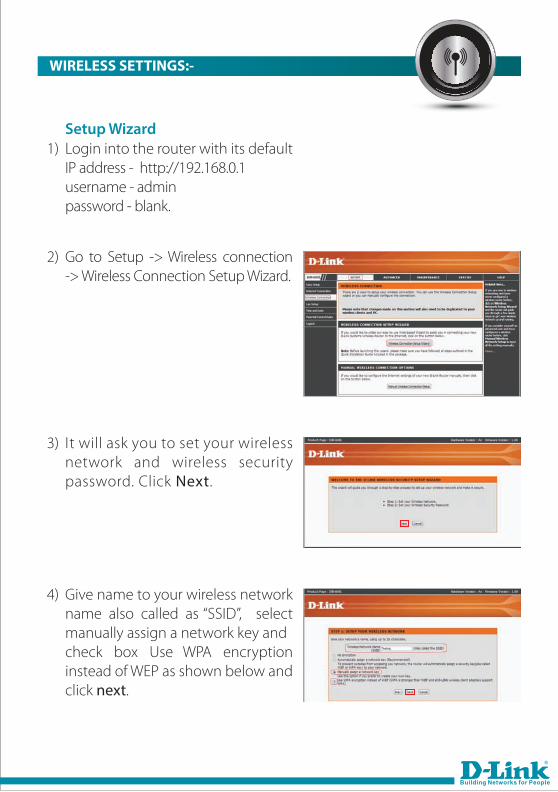
1) Login into the router with its default IP address - http://192.168.0.1username - adminpassword - blank.
2) Go to Setup -> Wireless connection -> Wireless Connection Setup Wizard.
3) It will ask you to set your wireless network and wireless security password. Click Next.
4) Give name to your wireless network name also called as “SSID”, select manually assign a network key and check box Use WPA encryption instead of WEP as shown below and click next.
WIRELESS SETTINGS:-
Setup Wizard

Login into the router with its default IP address - http://192.168.0.1username - adminpassword - blank.
2) Go to Setup -> Wireless connection -> Manual Wireless Connection Setup
5) Assign wireless security password to your wireless network and click next.
6) It will show you the wireless summary page click on Save to save the settings.
1)
WIRELESS SETTINGS:-
Manual Wireless Connection Setup:-

WIRELESS SETTINGS:-
In the wireless network settings give name to your wireless network, under wireless security mode select Enable WPA/WPA2 wireless security (enhanced), under WPA/WPA2 do the settings as shown and assign network key, this will be the password for your wireless network and click on save settings.
3)
On next page click on the reboot now so the new settings will take effect.
4)
To connect wirelessly to your router, go to the wireless utility on your laptop. You will able to view the new network name which you have assigned.
5)

Select that and click on connect, it will ask you for the network security key, put the password which you have assigned for your wireless network and click OK and you will be connected to router wirelessly.
WIRELESS SETTINGS:-