for the endo optiks e4 operator’s manual for the endo optiks microprobe™ endoscopy system...
TRANSCRIPT
E4
OPERATOR’S MANUAL
for the
ENDO OPTIKS
MICROPROBE™ ENDOSCOPY SYSTEM
English Operators Manual P/N: E4 Operators Manual CE Rev. C February 16, 2007
TABLE OF CONTENTS PAGE
BEGINNING Warning ........................................................................................1 Labels ............................................................................................2-4 Precautions ...................................................................................4-6 SYSTEM OVERVIEW System...........................................................................................7 Cabinet..........................................................................................7 Light Source .................................................................................7 CCD Camera.................................................................................8 Digital Displays and Indicators ...................................................8 Video Display................................................................................8 Foot Switch ...................................................................................8 Front Panel ...................................................................................9 Back Panel ....................................................................................10 GETTING READY Site Preparation ...........................................................................11 Utilities .........................................................................................11 CLEANING AND STERILIZATION Cleaning the Console ...................................................................12 Cleaning the Video Adapter.........................................................12 Endoscope and Probe Cleaning & Sterilization ..........................12 CLINICAL APPLICATIONS Indications for Use .......................................................................13 OPERATION Set Up and Operation...................................................................13 Endoscopes and Probes ................................................................13 Inspection of the Optical System.................................................13 Eye Insertion and Videography ...................................................14 Preliminaries ................................................................................15 Connecting an Endoscope or Probe .............................................15 Connecting a Glass Rod Endoscope.............................................15 Adjusting the Image.....................................................................15 MAINTENANCE AND TROUBLESHOOTING Endoscope Maintenance...............................................................16 E4 MicroProbe Maintenance........................................................17 Maintenance and Troubleshooting Guide ...................................18 Operator Replaceable Parts.........................................................19 TECHNICAL SPECIFICATIONS..................................20 BIBLIOGRAPHY ..................................................................21-26 QUICK SET UP GUIDE.....................................................27
1
E4 MICROPROBE™
ENDOSCOPY SYSTEM Endo Optiks, Inc. 39 Sycamore Avenue Little Silver, NJ 07739-1208 USA Tel: 001 732-530-6762 Fax: 001 732-530-5344 E-mail: [email protected] Website: http://www.endooptiks.com European Authorized Representative: Advena Ltd. Hereford, HR4 9DQ, UK WARNING: The user of the E4 MicroProbe™ should be thoroughly trained in the applicable procedure. Furthermore, failure to read and thoroughly understand the content of this Operators Manual may result in serious injury to the patient or user. It is essential to follow the instructions contained in this manual which pertain to the E4 MicroProbe™ and accessories used in conjunction with the procedures. Failure to follow these instructions may result in damage to the E4 MicroProbe™ or malfunction of the E4 MicroProbe™. CAUTION: Endo Optiks restricts the sale of the E4 MicroProbe™ to a physician or on order of a physician. E4 OperatorsManual CE Rev. C February 16, 2007

2
BEGINNING Labels The following labels are affixed to the E4 Microprobe™ system. The title, the part number, and the location on the E4 Microprobe™ are given for each label. Label Location
Identification
P/N 3840425
Rear Panel
Meaning: Type BF equipment
Protection Against Electric Shock P/N L1012 Rear panel
Supply Rating 120 volts , 50/60 Hz, 4 A Use 2 Type T6.3A, 250v.
Fuse Replacement Label P/N L1010B Rear Panel
Supply Rating 240 volts , 50/60 Hz, 2.0 A Use 2 Type T3.1A, 250v.
Fuse Replacement Label P/N L1011B Rear Panel

3
BEGINNING
Meaning: Dangerous Voltage P/N L1007 Rear Panel Conforms to European Medical Device Directive 93/42/EC. P/N L1003 Rear Panel Caution: Consult Accompanying Documents P/N L1009 Rear Panel Safety Agency Approvals (MET MARK) P/N E112374 Rear panel, bottom left, under AC receptacle

4
This symbol has been attached to the equipment or, in the case that this is not possible, on the packaging, instruction literature and/or the guarantee sheet. By using this symbol it states that the device has been marketed after August 13th 2005, and implies that you must separate all of its components when possible, and dispose of them in accordance with local waste disposal legislations.
- Because of the substances present in the equipment, an improper use or disposal of the refuse can cause damage to human health and to the environment.
- With reference to RAEE, it is compulsory not dispose of the equipment with normal urban refuse, arrangements should be instigated for separate collection and disposal.
- For more detailed information about recycling of RAEE, please contact your local waste collection body.
- In case of illicit disposal, sanctions will be levied on transgressors.

5
BEGINNING Precautions To prevent fire or shock hazard, do not expose the unit to rain or moisture. Dangerously high voltages are present inside the E4 Microprobe™. Do not open the cabinet. Refer servicing to qualified personnel only. In the event of a malfunction or when maintenance is necessary, consult: Endo Optiks 39 Sycamore Ave., Little Silver, NJ, USA. Tel: 001 732 530 6762, Fax: 001 732 530 5344 email: [email protected] On safety • Operate the unit on the designated V AC only. • The Fuse Replacement Label indicates operating voltage and is located
adjacent to the mains fuse holder in the rear of the cabinet on the lower right side.
• The Identification Label indicates power consumption and is located on the
rear cabinet. • Should any solid object or liquid fall in, unplug the unit and have it checked by
qualified personnel before operating it any further. • To disconnect the AC power cord, pull it out by grasping the plug. Never pull
the cord itself. • The outlet shall be installed near the equipment and shall be easily accessible.
Warning This equipment/system is intended for use by healthcare professionals only. This equipment/system may cause radio interference or may disrupt the operation of nearby equipment. It may be necessary to take mitigation measures, such as reorienting or relocating the E4 Microprobe or shielding the location. Endoscopes and Probes This device is intended to be used in conjunction with Endo Optiks endoscopes and probes ONLY and to assure safety should not be connected or used with any other devices.
6
BEGINNING Precautions, cont. On installation • The E4 MicroProbe™ should be used in a Hospital or Clinical setting only. It
should be used indoors only under the environmental conditions stated in section 7.0 of this document.
• Allow adequate air circulation to prevent internal heat build-up. • Do not place the unit on surfaces (rugs, blankets, etc.) or near materials
(curtains, draperies) that may block the ventilation holes. • Do not install the unit in a location near heat sources such as radiators or air
ducts, or in a place subject to direct sunlight, excessive dust, mechanical vibration or shock.
On cleaning To keep the unit looking brand-new, periodically clean it with a mild detergent solution. Never use strong solvents such as thinner or benzine, or abrasive cleansers since they will damage the cabinet. As a safety precaution, unplug the unit before cleaning it. On sterilization before use WARNING - The endoscope or probe must be sterilized before use. Please refer to the instructions provided with each device.
7
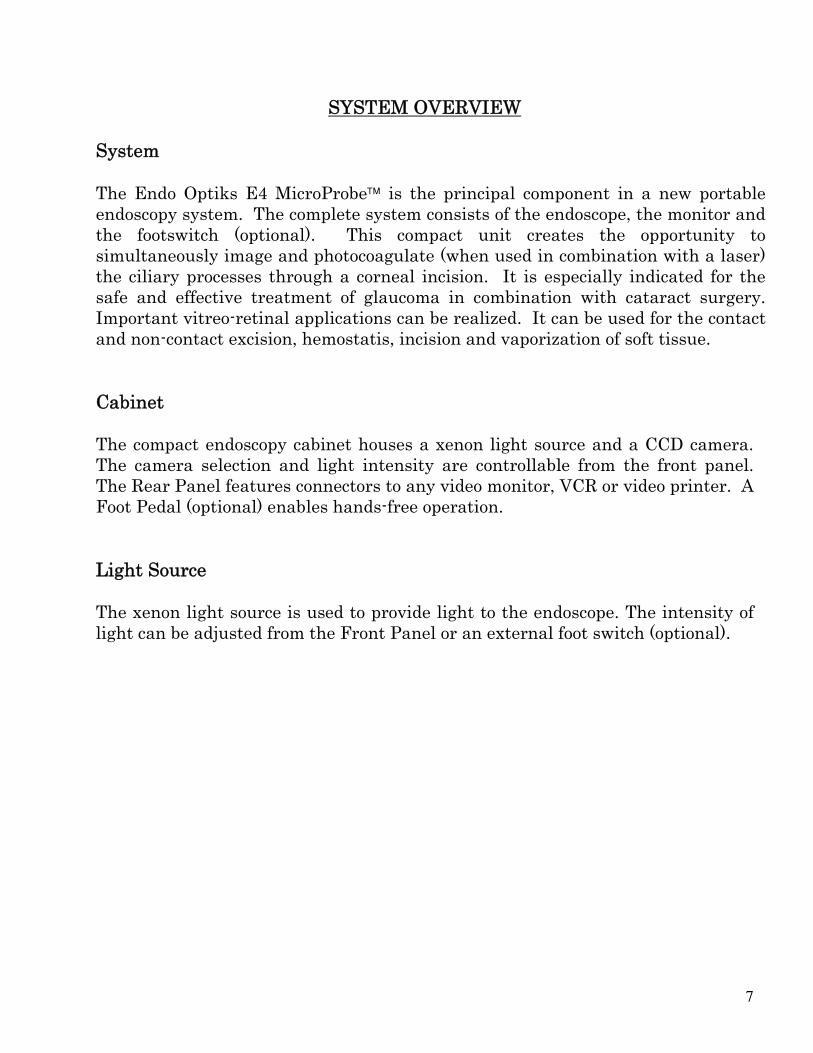
SYSTEM OVERVIEW System The Endo Optiks E4 MicroProbe™ is the principal component in a new portable endoscopy system. The complete system consists of the endoscope, the monitor and the footswitch (optional). This compact unit creates the opportunity to simultaneously image and photocoagulate (when used in combination with a laser) the ciliary processes through a corneal incision. It is especially indicated for the safe and effective treatment of glaucoma in combination with cataract surgery. Important vitreo-retinal applications can be realized. It can be used for the contact and non-contact excision, hemostatis, incision and vaporization of soft tissue. Cabinet The compact endoscopy cabinet houses a xenon light source and a CCD camera. The camera selection and light intensity are controllable from the front panel. The Rear Panel features connectors to any video monitor, VCR or video printer. A Foot Pedal (optional) enables hands-free operation. Light Source The xenon light source is used to provide light to the endoscope. The intensity of light can be adjusted from the Front Panel or an external foot switch (optional).
8
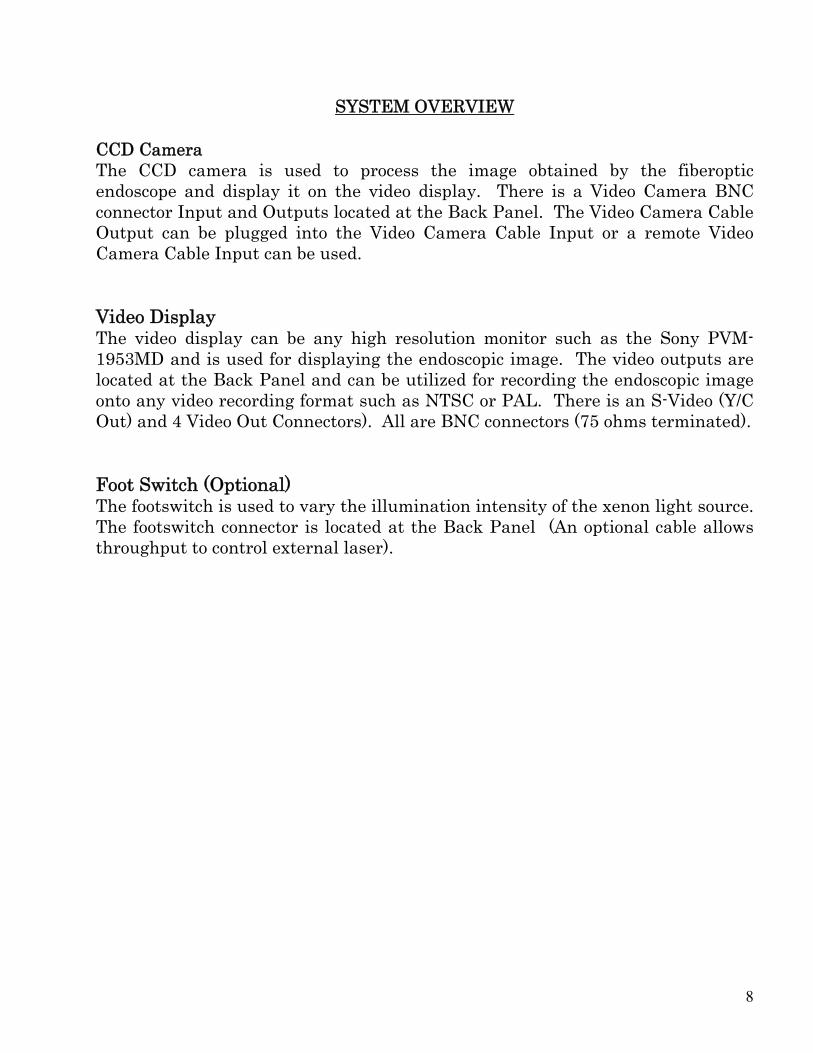
SYSTEM OVERVIEW CCD Camera The CCD camera is used to process the image obtained by the fiberoptic endoscope and display it on the video display. There is a Video Camera BNC connector Input and Outputs located at the Back Panel. The Video Camera Cable Output can be plugged into the Video Camera Cable Input or a remote Video Camera Cable Input can be used. Video Display The video display can be any high resolution monitor such as the Sony PVM-1953MD and is used for displaying the endoscopic image. The video outputs are located at the Back Panel and can be utilized for recording the endoscopic image onto any video recording format such as NTSC or PAL. There is an S-Video (Y/C Out) and 4 Video Out Connectors). All are BNC connectors (75 ohms terminated). Foot Switch (Optional) The footswitch is used to vary the illumination intensity of the xenon light source. The footswitch connector is located at the Back Panel (An optional cable allows throughput to control external laser).

9
SYSTEM OVERVIEW
Front Panel The Front Panel contains the color coded switches, digital displays and indicators used to control the functioning and show the status of the E4 Microprobe™. The functions and status indicators are: KEY FUNCTION
1 Illumination – Raise and Lower 2 Video Adapter (For Camera) 3 Illumination Input (ACMI)
Front Panel Features
1
2
3
10
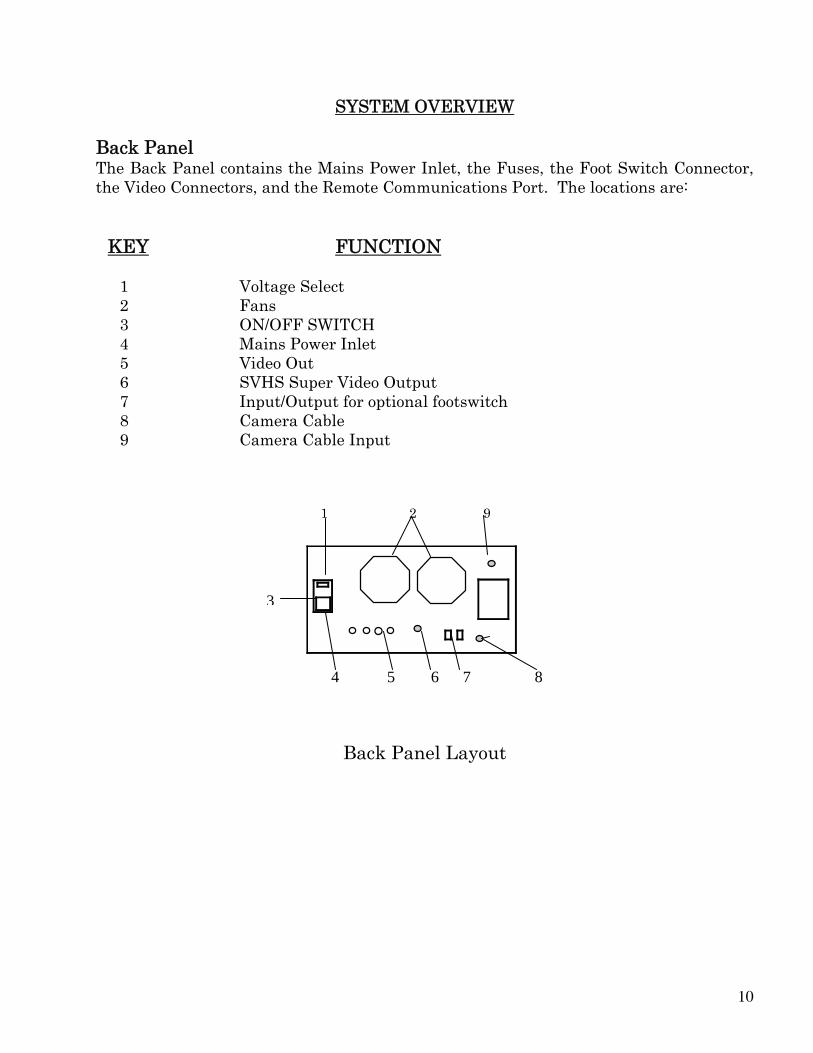
SYSTEM OVERVIEW Back Panel The Back Panel contains the Mains Power Inlet, the Fuses, the Foot Switch Connector, the Video Connectors, and the Remote Communications Port. The locations are: KEY FUNCTION 1 Voltage Select 2 Fans 3 ON/OFF SWITCH 4 Mains Power Inlet 5 Video Out 6 SVHS Super Video Output 7 Input/Output for optional footswitch 8 Camera Cable 9 Camera Cable Input
1 2 9
4 5 6 7 8
Back Panel Layout
3

11
GETTING READY Site Preparation The E4 Microprobe™ system has no special electrical or water requirements. Utilities Electrical: The E4 Microprobe™ can be configured to operate from a power source in the range of either 115 volts AC or 230 volts AC, 50/60 Hz, 400 watts maximum. A standard grounded AC outlet is sufficient. Verify that the voltage indicated on the label at the back of the laser console matches the actual line voltage before the instrument is plugged in.
Warning This equipment/system is intended for use by healthcare professionals only. This equipment/system may cause radio interference or may disrupt the operation of nearby equipment. It may be necessary to take mitigation measures, such as reorienting or relocating the E4 Microprobe or shielding the location.

12
CLEANING AND STERILIZATION Cleaning the Console To clean the external surface of the Console, wipe using a cloth dampened with a noncaustic cleaning solution such as soap and water, isopropyl alcohol or a "hospital grade" disinfectant. Do not spray or put cleaning agents directly on the system. Dry with a clean, dry cloth or allow to air dry. Cleaning the Video Adapter Before connecting an endoscope to the system, clean the tip of the Laser Connector and the Video Adapter with alcohol and lens cleaning tissue. Moisten the lens tissue with alcohol and gently wipe it once across the tip of the Laser Connector and the Video Adapter. This will prolong the life of the endoscope and maximize image quality. Endoscope and Probe Cleaning and Sterilization These devices are delivered non-sterile and are designed to be reusable in accordance with the constraints described in the information supplied. The Endoscope should be sterilized before each use. If the endoscope is sterilized but not cleaned after each use, you will almost certainly destroy the tip of the endoscope the next time you fire the laser.
FULL INSTRUCTIONS FOR CLEANING AND STERILIZATION ARE
PROVIDED WITH EACH ENDOSCOPE OR PROBE.

13
CLINICAL APPLICATIONS
WARNING The E4 MicroProbe™ system is intended solely for use by physicians trained in ophthalmic endoscopy. Indication For Use The ophthalmic endoscope is indicated for evaluation of internal ocular structures.
OPERATION Set Up and Operation The E4 MicroProbe™ system must be set up and operated with care. The endoscopic probe is a fragile component and great care should be used when handling it. Endoscopes and Probes Before each use, the device should be thoroughly inspected in order to detect any irregularity or abnormality. If these are noted, the device should not to be used and a new one should be employed. Inspection of the Optical System The endoscope allows two functions. The first is optical viewing and the second is delivery of therapeutic laser energy. Both of these functions can be determined prior to insertion into the eye. It is mandatory that the viability of the fiberoptic pathways be demonstrated prior to use and this may be done in a rather simple manner. To check the integrity of the optical viewing system, direct the distal end of the endoscope to a point of reference, such as the focus ring at the video adapter for the image fiberguide on the Front Panel of the E4 MicroProbe™. A clear view should be obtained.

14
OPERATION Eye Insertion and Videography Insertion: The E4 MicroProbe™ endoscope may be inserted in the eye through the pars plana through a standard vitrectomy incision or may be inserted through a limbal incision that has had previous or concurrent surgery. Observation: Observation of the intraocular structures occurs by viewing of the high resolution video monitor. The internal structures of the eye from the posterior aspect of the iris, ciliary body, pars plana, peripheral retina and more posterior retina may be imaged. Videography: Video outputs are included in the E4 MicroProbe™ system. Simply attach a video recorder to these outputs, insert a video tape and depress the PLAY & RECORD buttons simultaneously. The video image will be recorded.

15
OPERATION
E4 MicroProbe™ Preliminaries • Ensure the E4 MicroProbe™ is connected to the mains. • Ensure the Footswitch (if applicable) is properly connected. (see Connection Points diagram on page 9) Connecting a Microendoscope or Probe • Ensure the Endoscope or probe is connected to the Front Panel.
1. Attach the Video Connector to the Video Adapter on the Front Panel (Page 8 – Number 2).
2. Attach the ACMI Light Connector to the Light Source on the Front Panel (Page 8– Number 3).
Connecting a Glass Rod Endoscope
1. Attach camera cable to camera input on Rear Panel (Page 9 – Number 9) 2. Attach ACMI connector to the light source on the Front Panel (Page 8 –
Number 3) The E4 MicroProbe™ is now ready for Turn-on.
Adjusting the Image 1. Adjust the Light Source push buttons to obtain a satisfactory video image.
Bring the target video image into clear focus by rotating the star wheel on the Video Adapter (for Microendoscopes) or the focus wheel on the camera cable (for Glass Rod Endoscopes) while viewing the target through the endoscope.

16
MAINTENANCE AND TROUBLESHOOTING
Endoscope Maintenance Handling: The endoscope fiberoptic cable can be damaged or fractured if mistreated. Be careful not to step on, kink, tightly coil, pull the fiber, or catch it on any equipment. Do not clamp the fiber with a hemostat. Such stress can damage the fiber which may result in accidental laser exposure to the operating personnel or the patient. Undue physical stresses should not be applied to this instrument as it will shorten its useful life. The endoscope should be inspected monthly for physical damage to ensure that the endoscope is within the compliant criteria stated within the manual. Sterilization: Sterilization methods for the endoscopes and probes can be found on the insert provided with each device. Replacement: The endoscope may be reused until the optical component or the laser delivery component prove to be inadequate, as previously described. If either of these two variables prove to be inadequate, the endoscope should be discarded and a new one employed.

17
MAINTENANCE AND TROUBLESHOOTING
E4 MicroProbe Maintenance The ONLY user replaceable maintenance items are the mains fuses. They are located on the Back Panel of the E4 Microprobe™. The mains fuse holders are in the lower left hand corner. For 120 volts For 240 volts Supply Rating Supply Rating 120 Volts, 50/60~, 4A 240 Volts, 50/60~, 2.0A Use 2 type T6.3A, 250V Use 2 type T3.1A, 250V Schurter P/N FSM 034.2521 Schurter P/N FSM 034.2519 (3.15 Amp) (2 Amp) or equivalent or equivalent Troubleshooting Before proceeding to the Troubleshooting Guide, check the following items: 1. Electrical Power. • Verify that the main electrical power on the wall is on. 2. Main Power Circuit Breaker. • Verify that the circuit breaker is in the On Position.
18
MAINTENANCE AND TROUBLESHOOTING
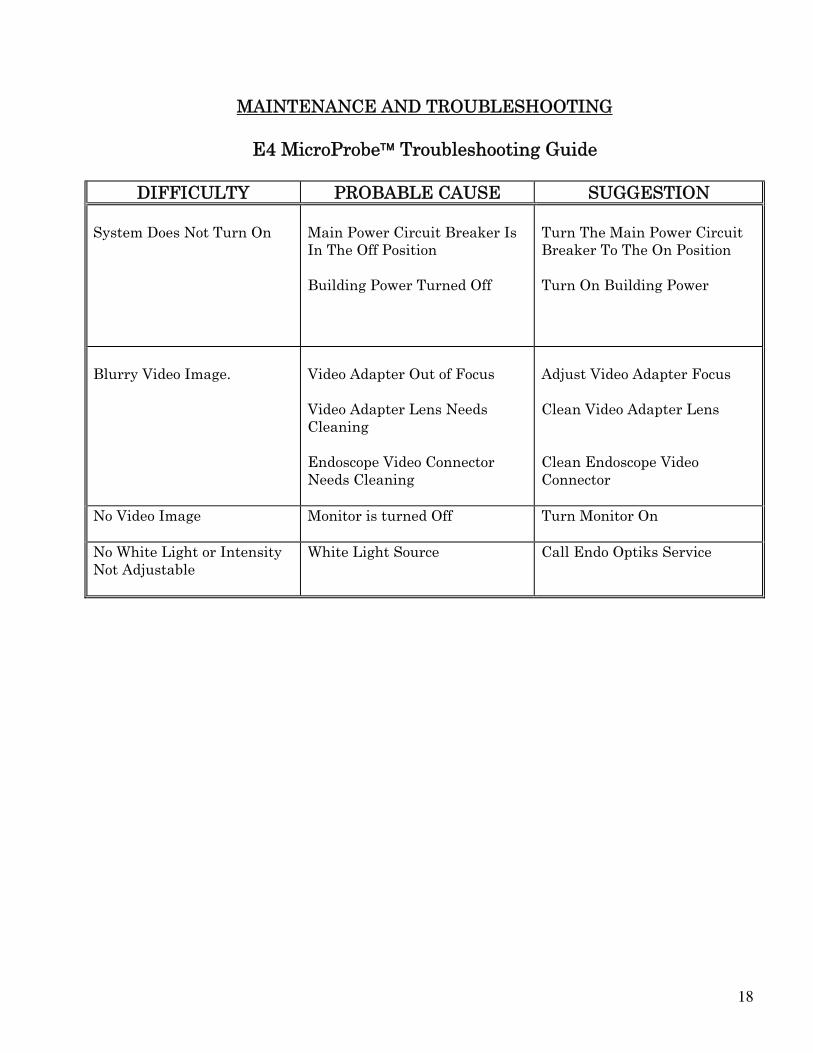
E4 MicroProbe™ Troubleshooting Guide
DIFFICULTY PROBABLE CAUSE SUGGESTION System Does Not Turn On
Main Power Circuit Breaker Is In The Off Position Building Power Turned Off
Turn The Main Power Circuit Breaker To The On Position Turn On Building Power
Blurry Video Image.
Video Adapter Out of Focus Video Adapter Lens Needs Cleaning Endoscope Video Connector Needs Cleaning
Adjust Video Adapter Focus Clean Video Adapter Lens Clean Endoscope Video Connector
No Video Image
Monitor is turned Off Turn Monitor On
No White Light or Intensity Not Adjustable
White Light Source Call Endo Optiks Service
19
MAINTENANCE AND TROUBLESHOOTING
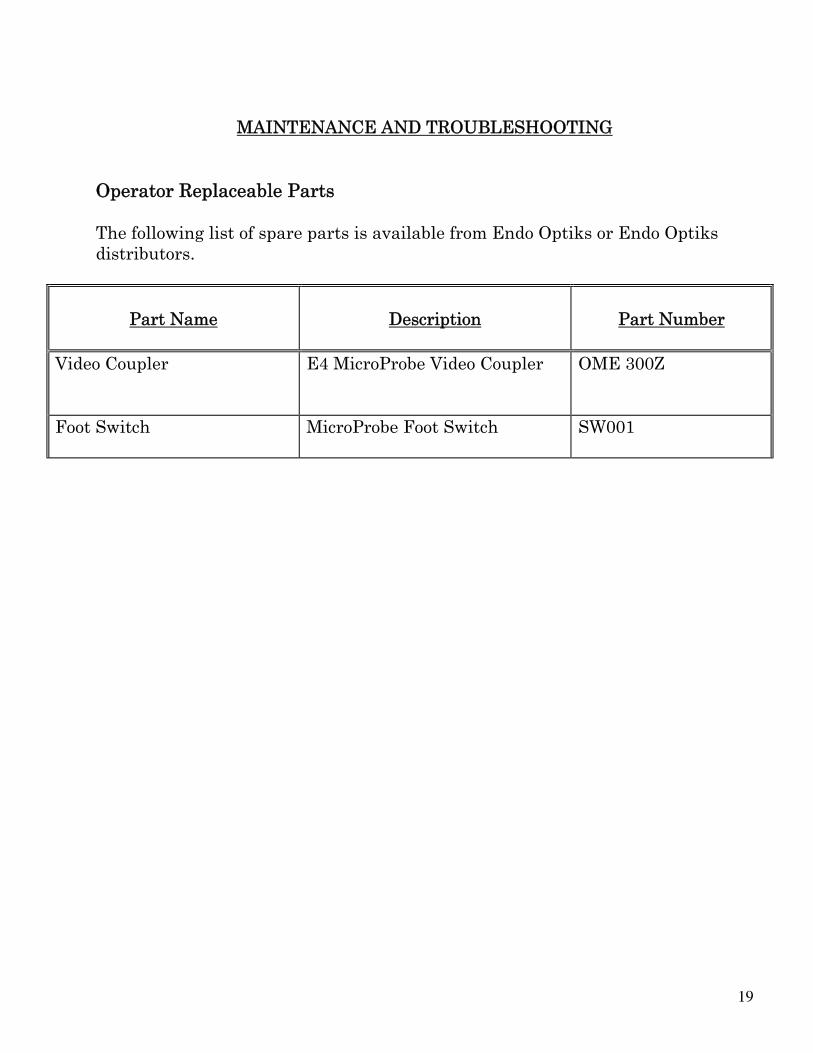
Operator Replaceable Parts The following list of spare parts is available from Endo Optiks or Endo Optiks distributors.
Part Name
Description
Part Number
Video Coupler
E4 MicroProbe Video Coupler OME 300Z
Foot Switch
MicroProbe Foot Switch SW001

20
TECHNICAL SPECIFICATIONS Temperature Celsius (C) and Fahrenheit (F)
• Operating temperature + 5° to 55° C (41° to 131 ° F)
• Storage (6 months) -30° to 50° C (-22° to 122° F)
• Transient (72 hours) -40° to 65° C (-40° to 149° F)
Humidity
• Operating 5% to 90% noncondensing
• Storage 5% to 95% noncondensing
Altitude
• Meters (m) and feet (ft.) • Operating -305 to 3,048m
(-1000 to 10,000ft)
• Shipping, non-operating -305 to 15,240m
(-1000 to 50,000ft)
Voltage requirements
• Voltage 120 AC or 240 AC
Power consumption (typical)
• Watts 214 W
Light Source 175 Watt Xenon Light
• Visible Output 2,200 Lumins • Radiant Output 25 Watts
Expected lifetime of the light source is 3,200 hours (This could be equivalent to up to 6 years of usage. Calculations are based on 10 hours of use per week.)
The failure of the light source is expected to be the deciding factor of the service life of the equipment.
21
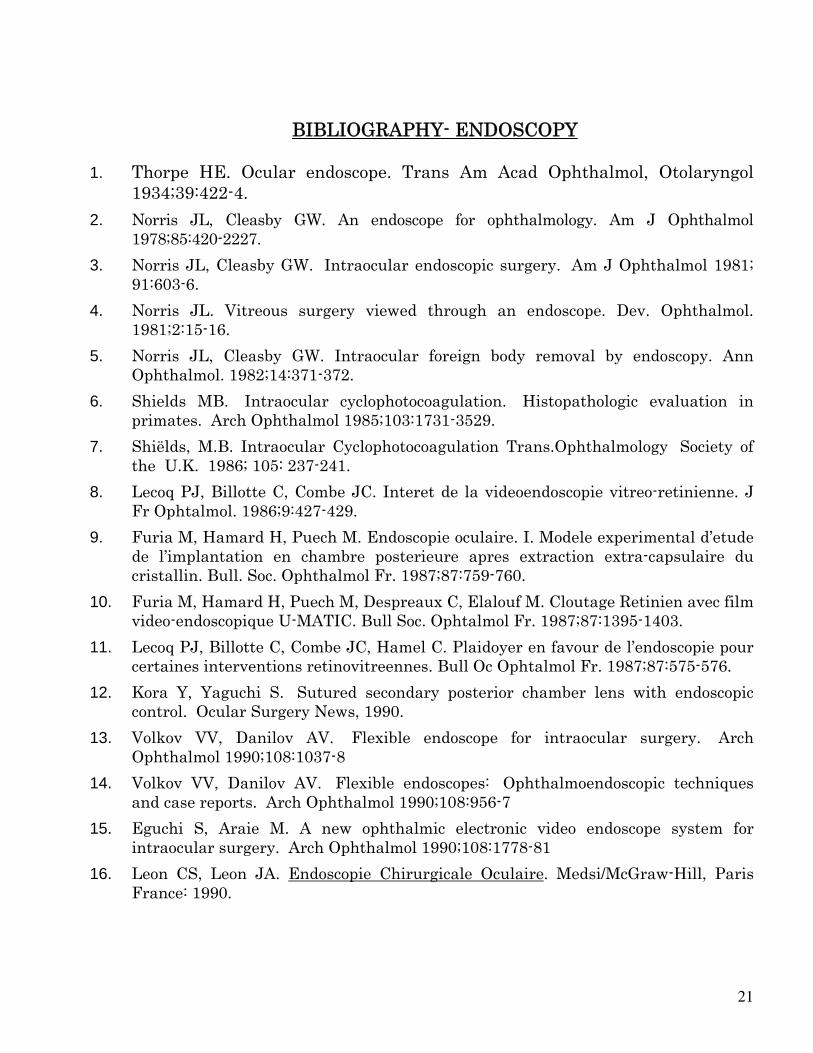
BIBLIOGRAPHY- ENDOSCOPY
1. Thorpe HE. Ocular endoscope. Trans Am Acad Ophthalmol, Otolaryngol
1934;39:422-4. 2. Norris JL, Cleasby GW. An endoscope for ophthalmology. Am J Ophthalmol
1978;85:420-2227. 3. Norris JL, Cleasby GW. Intraocular endoscopic surgery. Am J Ophthalmol 1981;
91:603-6. 4. Norris JL. Vitreous surgery viewed through an endoscope. Dev. Ophthalmol.
1981;2:15-16. 5. Norris JL, Cleasby GW. Intraocular foreign body removal by endoscopy. Ann
Ophthalmol. 1982;14:371-372. 6. Shields MB. Intraocular cyclophotocoagulation. Histopathologic evaluation in
primates. Arch Ophthalmol 1985;103:1731-3529. 7. Shiëlds, M.B. Intraocular Cyclophotocoagulation Trans.Ophthalmology Society of
the U.K. 1986; 105: 237-241. 8. Lecoq PJ, Billotte C, Combe JC. Interet de la videoendoscopie vitreo-retinienne. J
Fr Ophtalmol. 1986;9:427-429. 9. Furia M, Hamard H, Puech M. Endoscopie oculaire. I. Modele experimental d’etude
de l’implantation en chambre posterieure apres extraction extra-capsulaire du cristallin. Bull. Soc. Ophthalmol Fr. 1987;87:759-760.
10. Furia M, Hamard H, Puech M, Despreaux C, Elalouf M. Cloutage Retinien avec film video-endoscopique U-MATIC. Bull Soc. Ophtalmol Fr. 1987;87:1395-1403.
11. Lecoq PJ, Billotte C, Combe JC, Hamel C. Plaidoyer en favour de l’endoscopie pour certaines interventions retinovitreennes. Bull Oc Ophtalmol Fr. 1987;87:575-576.
12. Kora Y, Yaguchi S. Sutured secondary posterior chamber lens with endoscopic control. Ocular Surgery News, 1990.
13. Volkov VV, Danilov AV. Flexible endoscope for intraocular surgery. Arch Ophthalmol 1990;108:1037-8
14. Volkov VV, Danilov AV. Flexible endoscopes: Ophthalmoendoscopic techniques and case reports. Arch Ophthalmol 1990;108:956-7
15. Eguchi S, Araie M. A new ophthalmic electronic video endoscope system for intraocular surgery. Arch Ophthalmol 1990;108:1778-81
16. Leon CS, Leon JA. Endoscopie Chirurgicale Oculaire. Medsi/McGraw-Hill, Paris France: 1990.

22
17. Leon CS, Leon JA. Microendoscopic ocular surgery Part II. Preliminary results from the study of glaucomatous eyes. Journal of Cataract and Refractive Surgery 1991;5:573-6
18. Kuhn F, Witherspoon CD, Morris RE. Endoscopic surgery vs temporary keratoprosthesis vitrectomy. Arch Ophthalmology 1991 Jun;109(6):768.
19. Uram M. Ophthalmic laser microendoscopy ciliary process ablation in the management of neovascular glaucoma. Ophthal 1992;99:1823-8.
20. Uram M. Ophthalmic laser microendoscope endophotocoagulation. Ophthalmol 1992;99:1829-32
21. Levin PS, Stormogipson J. Endocanalicular laser-assisted dacryocystorhinostomy. Arch Ophthal 1992;110:1488-90
22. Singh AD, Singh A, Whitmore I, Taylor E. Endoscopic visualization of the human nasolacrimal system: an experimental study. BJO 1992;76:663-7
23. Uram, M. Transcleral Nd:YAG laser cyclodestruction. Ophthalmic Surgery 1993;24-133
24. Joos MJ, Alward WLM, Folberg R. Experimental endoscopic goniotomy. Ophthalmol 1993;100:1066-70
25. Althaus C, Sundmacher R. Endoscopically controlled optimization of trans scleral suture fixation of posterior chamber lenses in the ciliary sulcus. Ophthalmologe 1993; 90:317-24
26. Joos KM, Shen J-H, Parel J-M, Rol P. In vitro examination of the anterior chamber angle with a gradient-index (GRIN) lens endoscope. Lasers in Ophthalmology. 1994;II 2330.
27. Fisher YL, Slakter JS. A Disposable Ophthalmic Endoscopic System. Arch Ophthalmol. 1994;112:984-986.
28. Kong YT, Kim TI, Kong BW. A report of 131 cases of endoscopic laser lacrimal surgery. Ophthalmology 1994; 101:1793-1800
29. Uram M. Laser endoscope in the management of proliferative vitreoretinopathy. Ophthalmology 1994; 101:1404-1408
30. Uram M. Diode laser endocyclodestruction . Ophthalmic Surg 1994;25:268-269 31. Mizota A, Takaso M, Asangi K, et al. Internal contact sclerostomy with an erbium
laser and intraocular fiberscope. Laser light Ophthalmol 1995; 7:57 – 64 32. Trevisani MG, Allingham RR, Sheilds MB. Histologic comparison of contact
transcleral diode cyclophotocoagulation and endoscopic diode cyclophotocoagulation. Investigative Ophthalmol and Visual Science 1995; 36:4
33. Uram M. Endoscopic cyclophotocoagulation in glaucoma management. Current Opinion in Ophthalmology 1995; 11:19-29
23
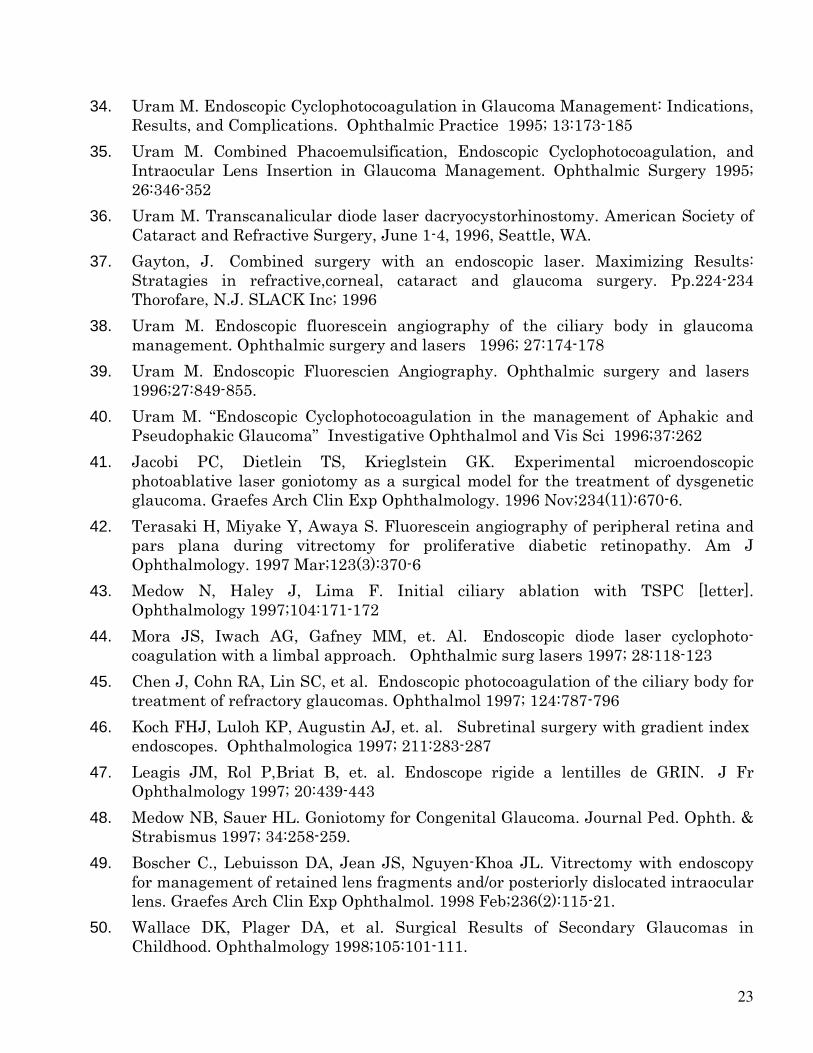
34. Uram M. Endoscopic Cyclophotocoagulation in Glaucoma Management: Indications, Results, and Complications. Ophthalmic Practice 1995; 13:173-185
35. Uram M. Combined Phacoemulsification, Endoscopic Cyclophotocoagulation, and Intraocular Lens Insertion in Glaucoma Management. Ophthalmic Surgery 1995; 26:346-352
36. Uram M. Transcanalicular diode laser dacryocystorhinostomy. American Society of Cataract and Refractive Surgery, June 1-4, 1996, Seattle, WA.
37. Gayton, J. Combined surgery with an endoscopic laser. Maximizing Results: Stratagies in refractive,corneal, cataract and glaucoma surgery. Pp.224-234 Thorofare, N.J. SLACK Inc; 1996
38. Uram M. Endoscopic fluorescein angiography of the ciliary body in glaucoma management. Ophthalmic surgery and lasers 1996; 27:174-178
39. Uram M. Endoscopic Fluorescien Angiography. Ophthalmic surgery and lasers 1996;27:849-855.
40. Uram M. “Endoscopic Cyclophotocoagulation in the management of Aphakic and Pseudophakic Glaucoma” Investigative Ophthalmol and Vis Sci 1996;37:262
41. Jacobi PC, Dietlein TS, Krieglstein GK. Experimental microendoscopic photoablative laser goniotomy as a surgical model for the treatment of dysgenetic glaucoma. Graefes Arch Clin Exp Ophthalmology. 1996 Nov;234(11):670-6.
42. Terasaki H, Miyake Y, Awaya S. Fluorescein angiography of peripheral retina and pars plana during vitrectomy for proliferative diabetic retinopathy. Am J Ophthalmology. 1997 Mar;123(3):370-6
43. Medow N, Haley J, Lima F. Initial ciliary ablation with TSPC [letter]. Ophthalmology 1997;104:171-172
44. Mora JS, Iwach AG, Gafney MM, et. Al. Endoscopic diode laser cyclophoto-coagulation with a limbal approach. Ophthalmic surg lasers 1997; 28:118-123
45. Chen J, Cohn RA, Lin SC, et al. Endoscopic photocoagulation of the ciliary body for treatment of refractory glaucomas. Ophthalmol 1997; 124:787-796
46. Koch FHJ, Luloh KP, Augustin AJ, et. al. Subretinal surgery with gradient index endoscopes. Ophthalmologica 1997; 211:283-287
47. Leagis JM, Rol P,Briat B, et. al. Endoscope rigide a lentilles de GRIN. J Fr Ophthalmology 1997; 20:439-443
48. Medow NB, Sauer HL. Goniotomy for Congenital Glaucoma. Journal Ped. Ophth. & Strabismus 1997; 34:258-259.
49. Boscher C., Lebuisson DA, Jean JS, Nguyen-Khoa JL. Vitrectomy with endoscopy for management of retained lens fragments and/or posteriorly dislocated intraocular lens. Graefes Arch Clin Exp Ophthalmol. 1998 Feb;236(2):115-21.
50. Wallace DK, Plager DA, et al. Surgical Results of Secondary Glaucomas in Childhood. Ophthalmology 1998;105:101-111.

24
51. Scheindlin JA, Hirose T. Ophthalmic Endoscopy. IOVS 1998; 39:480. 52. Caronia RM, Sturm RT, Marmor MA, et. al. Treatment of a cyclodialysis cleft by
means of ophthalmic laser endoscope endophotocoagulation. AJO 1999; 760-61 53. Gayton JL. Combined cataract and glaucoma surgery: trabeculectomy vs.
endoscopic laser cyclophotocoagulation. J ASCRS 1999; 25:1212-1219 54. Feilder AR, Bentlet C, Moseley MJ. Recent Advances in Ophthalmology. BMJ 1999;
318:717-720. 55. Jacobi PC, Dietlein TS, et. al. Microendoscopic Trabecular Surgery in Glaucoma
Management. Ophthalmology 1999; 106:538-544. 56. Sheindlin JA, Hirose T, Hartnett ME. Ophthalmic endoscopy: applications in
intraocular surgery. Int Ophthalmol Clin. 1999 Winter;39(1):237-47. 57. Koch FH, Gumbel HO, Hattenbach LO, Ohrloff C. Intravitreal endoscopic
visualization of intraocular ganciclovir devices: improved long-term treatment of CMV retinitis. Klin Monatsbl Augenheilkd. 1999 Feb;214(2):107-11
58. Plager DA, Neeley DE. Intermediate-term results of endoscopic diode laser cyclophotocoagulation for pediatric glaucoma. J AAPOS 1999; 3:131- 137
59. Jacobi PC, Dietlein TS. Endoscopic surgery in glaucoma management. Current Opinion in Ophthalmology. 2000 Apr;11(2):127-32.
60. Marc D. DE SMET. Retinal Transscleral Photocoagulation under endoscopic control. Retina 2000; 20:3:316-317
61. Berke SJ, Cohen AJ, Sturm RT, Nelson, DB. Endoscopic cyclophotocoagulation and phacoemulsification in the treatment of medically controlled primary open-angle glaucoma. Journal of Glaucoma 2000;9:129.
62. Jacobi P. Deitlin T. Endoscopic surgery in glaucoma management. Curr Opinion in Ophthalmol 2000; 11: 127-132
63. Joos KM, Shen JH. An Ocular Endoscope Enables a Goniotomy Despite a Cloudy Cornea. Arch. Ophthalmology 2001;119:134-135.
64. Ciardella AP, Fisher YL, et. al. Endoscopic Vitreoretinal Surgery For Complicated Proliferative Diabetic Retinopathy. Retina 1/2001;21:20-27.
65. Singh AD et al. Endoscopic visualization of the human nasolacrimal system: an experimental study. Brit. Journal of Ophthalmology 1992;76:663-667.
66. Ben-nun J., Cornea sparing by endoscopically guided vitreoretinal surgery. Ophthalmology 2001;108:1465-1470.
67. Neely, Plager. Endocyclophotocoagulation for management of difficult pediatric glaucomas. Journal of AAPOS 2001;5:221-229.
68. Tello C, Walsh J. Rosen R, et. al. High resolution endoscopic evaluation of anterior segment structures. Investigative ophthalmology and visual science 2001; 42:767.
25
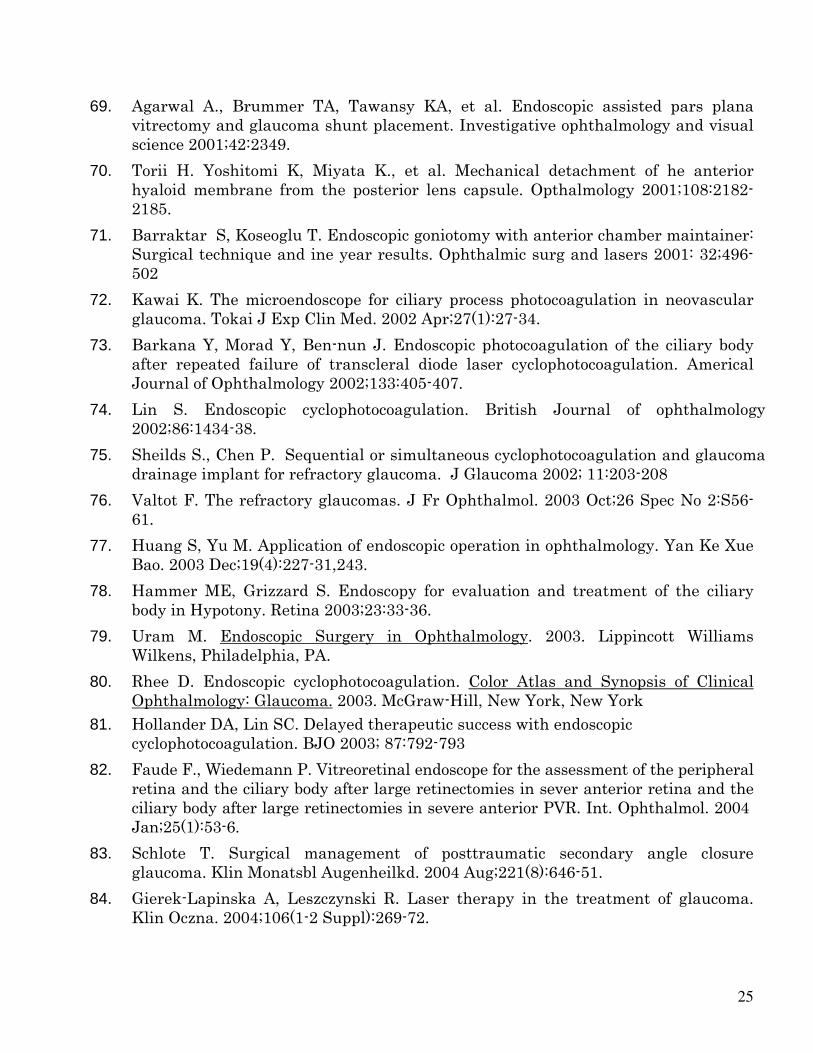
69. Agarwal A., Brummer TA, Tawansy KA, et al. Endoscopic assisted pars plana vitrectomy and glaucoma shunt placement. Investigative ophthalmology and visual science 2001;42:2349.
70. Torii H. Yoshitomi K, Miyata K., et al. Mechanical detachment of he anterior hyaloid membrane from the posterior lens capsule. Opthalmology 2001;108:2182-2185.
71. Barraktar S, Koseoglu T. Endoscopic goniotomy with anterior chamber maintainer: Surgical technique and ine year results. Ophthalmic surg and lasers 2001: 32;496-502
72. Kawai K. The microendoscope for ciliary process photocoagulation in neovascular glaucoma. Tokai J Exp Clin Med. 2002 Apr;27(1):27-34.
73. Barkana Y, Morad Y, Ben-nun J. Endoscopic photocoagulation of the ciliary body after repeated failure of transcleral diode laser cyclophotocoagulation. Americal Journal of Ophthalmology 2002;133:405-407.
74. Lin S. Endoscopic cyclophotocoagulation. British Journal of ophthalmology 2002;86:1434-38.
75. Sheilds S., Chen P. Sequential or simultaneous cyclophotocoagulation and glaucoma drainage implant for refractory glaucoma. J Glaucoma 2002; 11:203-208
76. Valtot F. The refractory glaucomas. J Fr Ophthalmol. 2003 Oct;26 Spec No 2:S56-61.
77. Huang S, Yu M. Application of endoscopic operation in ophthalmology. Yan Ke Xue Bao. 2003 Dec;19(4):227-31,243.
78. Hammer ME, Grizzard S. Endoscopy for evaluation and treatment of the ciliary body in Hypotony. Retina 2003;23:33-36.
79. Uram M. Endoscopic Surgery in Ophthalmology. 2003. Lippincott Williams Wilkens, Philadelphia, PA.
80. Rhee D. Endoscopic cyclophotocoagulation. Color Atlas and Synopsis of Clinical Ophthalmology: Glaucoma. 2003. McGraw-Hill, New York, New York
81. Hollander DA, Lin SC. Delayed therapeutic success with endoscopic cyclophotocoagulation. BJO 2003; 87:792-793
82. Faude F., Wiedemann P. Vitreoretinal endoscope for the assessment of the peripheral retina and the ciliary body after large retinectomies in sever anterior retina and the ciliary body after large retinectomies in severe anterior PVR. Int. Ophthalmol. 2004 Jan;25(1):53-6.
83. Schlote T. Surgical management of posttraumatic secondary angle closure glaucoma. Klin Monatsbl Augenheilkd. 2004 Aug;221(8):646-51.
84. Gierek-Lapinska A, Leszczynski R. Laser therapy in the treatment of glaucoma. Klin Oczna. 2004;106(1-2 Suppl):269-72.

26
85. Rosen KD, Chynn EW. Endoscopic surgery in ophthalmology. Book review. Ocular Surgery News 1/1/2004.
86. Valmaggia C, de Smet M. Endoscopic laser coagulation of the ciliary processes in patients with severe chronic glaucoma. Klin Monatsbl Augenheilkd. 2004 May; 221(5):343-6.
87. Moore JE, Herath GD, Sharma A. Continuous curvilinear capsulorhexis with use of an endoscope. Journal of Cataract & Refractive Surgery. May 2004; 30:960-963.
88. Koch FH, Quiroz-Mercado H, Hattenbach LO, Guerro-Naranjo JL, Yesuran I, Augustin A, Luloh KP, Ohrloff C. Pigment epithelium endoscopic laser surgery for treatment of choroidal neovascularization. Ophthalmology. 2004 May-June;218(3):162-75.
89. Lima FE, Magacho L, Carvalho DM, Susanna R Jr, Avila MP. A prospective, comparative study between endoscopic cyclophotocoagulation and the Ahmed drainage implant in refractory glaucoma. J Glaucoma 2004 Jun;13 (3):233-7.
90. Lin M, Huang S, Yu M. The Histopathologic changes of human eyes after laser endoscope cyclophotocoagulation. Yan Ke Xue Bao 2004 Dec; 20:233-6
91. Faude F, Weidemann P. Vitreoretinal endoscope for the assessment of the peripheral retina and ciliary body after large retinectomies in severe anterior PVR. International Ophthalmology 2004; 25:53-56
92. Fu AD, McDonald HR, Jumper MJ, et al. Recurrent vitreous hemorrhage after sutured posterior chamber intraocular lenses. Retina 2004; 24:193-198
93. Poothulli AM, McLeod SD, Lin S. Employing endoscopic guidance for placement of a black diaphragm aniridia intraocular lens following destructive Acanthomeba sclerokeratitis. British J Ophthalmol 2004; 88:596-597
94. Holz HA, Lim MC. Glaucoma lasers: a review of newer techniques. Curr Opin Ophthalmol 2005 April; 16:89-93
95. Uka J,Minamoto A,Hirayama T, et. al. Endoscope aided cataract surgeryin corneal opacity associated with aniridia. J Cataract and Refractive Surg 2005; 31:1455-57
96. Hong JE, Hatton HP, Leib M, et. al. Endocanalicular laser dacryocystorhinostomy. Ophthalmology 2005;112:1629-1633.

27
QUICK SET UP GUIDE E4
Front Control Panel
Turn Power ON TV monitor should be ON Select camera number ONE on front panel.
Endoscope or Probe
Connect Probe Ends to Front Panel (save caps) Light – Right Video Connection – Camera
Increase Illumination - only part way up Focus Image - ring around video adapter on panel
• Clean probe tip during surgery if image becomes blurred - instr. wipe or weck • Clean probe tip with concentrated alcohol then rinse before machine is disconnected.
Check image clarity before machine turnoff. Glass Rod Endoscope • Attach camera cable to camera input number 9 on Rear Panel. • Attach ACMI connector to the light source on the Front Panel.