for your convenience. with a quick reference guide owner's ......bmw. bmw cannot test every...
TRANSCRIPT

Owner's Manual for the Vehicle.With a quick reference guide for your convenience.

320i325i325xi330i330xi
BMW recommends Castrol

Foreword
Congratulations, and thank you for choosing a BMW.
Thorough familiarity with your vehicle will provide you with enhanced control and security when you drive it. We therefore have this request:
Please take the time to read this Owner's Manual and familiarize yourself with the information that we have compiled for you before driving your new BMW. It contains important data and instructions intended to assist you in gaining maximum use and satisfaction from the unique range of technical features on your BMW. The manual also contains information on care and maintenance designed to enhance operating safety and contribute to maintaining the value of your vehicle throughout an extended service life.
This Owner's Manual should be considered a permanent part of this vehicle. It should stay with the vehicle when sold to provide the next owner with important operating, safety and maintenance information.
This manual is supplemented by a Service and Warranty Information Booklet (US models) or a Warranty and Service Guide Booklet (Canadian models). We recommend that you read these publications thoroughly.
Your BMW is covered by the following warranties:
– New Vehicle Limited Warranty
– Limited Warranty Rust Perforation
– Emissions System Defect Warranty
– Emissions Performance Warranty
– California Emissions Control System Limited Warranty
Detailed information about these warranties is listed in the Service and Warranty Information Booklet (US models) and the Warranty and Service Guide Booklet (Canadian models).
We wish you an enjoyable driving experience.
BMW AG

4n
Notes on the Own
We have made everythat you are able to fin this Owner's Manupossible. The fastesttopics is by using thethe end. If you wish toverview of your vehthis in the first chaptThe detailed list of cofollows the summaryintended to stimulateregarding your BMWyou to read the man
Should you wish to s
The individual vehicle
On purchasing your BMW, you have decided in favor of a model with individ-ualized equipment and features. This Owner's Manual describes all models and equipment that BMW offers within the same group.
We hope you will understand that equipment and features are included which you might not have chosen for your vehicle. Any differences can easily be identified, since all optional acces-sories and special equipment are marked with an asterisk
*
.
If your BMW features equipment which
er's Manual effort to ensure ind what you need al as quickly as way to find certain detailed index at
o gain only an initial icle, you will find er.ntents that directly of contents is your curiosity and to encourage
ual.
ell your BMW at re, please
Symbols usedIndicates instructions or precau-tions that must be followed
precisely in order to avoid the possi-bility of personal injury and serious damage to the vehicle.<
Contains information that will assist you in gaining the optimum
benefit from your vehicle and enable you to care more effectively for your vehicle.<
Refers to measures that can be taken to help protect the
environment.<
is not described in this Owner's Manual (car radio or telephone, for instance), Supplementary Owner's Manuals are enclosed. We ask you to read these manuals as well.© 2000 BMW AGMunich, GermanyReprinting, including excerpts, only with the written consent of BMW AG, Munich. Order number 01 41 0 155 476US English IX/00Printed in GermanyPrinted on environmentally friendly paper (bleached without chlorine, suitable for recycling).
some time in the futuremember to hand over this Owner's Manual to the new owner; it is part of the vehicle.
Should you have any further questions, your BMW center will be glad to assist at any time.
< Marks the end of a specific item of information.
* Indicates special equipment, country-specific equipment and optional extras.
Identifies systems or components, which your BMW center can either
activate or adapt to suit an individual driver's requirements ("Car Memory", "Key Memory"). Refer to page 53.<
NotesSymbolsThe individual vehicle
5n
Status at time of printingBMW pursues a policy of continuous, ongoing development that is conceived to ensure that our vehicles continue to embody the highest quality and safety standards combined with advanced, state-of-the-art technology. For this reason, it is possible that the features described in this Owner's Manual could differ from those on your vehicle. Nor can errors and omissions be entirely ruled out. You are therefore asked to appreciate that no legal claims can be entertained on the basis of the data, illustrations or descriptions in this Owner's Manual.
Status at time of printing

6n
hields, telephones (including tion of any portable cellular phone ithin the vehicle without using an ally mounted antenna) or trans-
r equipment (such as C.B., walkie-, ham radio or similar) may cause sive damage to the vehicle, romise its safety, interfere with hicle's electrical system or affect lidity of the BMW Limited nty. See your BMW center for onal information.t use a key or remote control to
he doors or luggage compartment nyone inside the car. Refer to 34 for more details.
<
For your own safetyUse unleaded gasoline only. Fuels containing up to 10%
ethanol or other oxygenates with up to 2.8% oxygen by weight (i.e. 15% MTBE or 3% methanol plus an equivalent amount of co-solvent) will not void the applicable warranties with respect to defects in materials or workmanship. Field experience has indicated signifi-cant differences in fuel quality (volatility, composition, additives, for example) among gasolines offered for sale in the United States and Canada. The use of poor-quality fuels may result in drive-ability, starting and stalling problems,
Important safety information!
For your own safety, use genuine parts and accessories approved by BMW.When you purchase accessories tested and approved by BMW and Original BMW Parts, you simultaneously acquire the assurance that they have been thor-oughly tested by BMW to ensure optimum performance when installed on your vehicle.BMW warrants these parts to be free from defects in material and workman-ship.BMW will not accept any liability for damage resulting from installation of
Maintenance, replacement, or repair of the emission control es and systems may be performed y automotive repair establishment ividual using any certified auto-e part.<
ol on vehicle partsIndicates that you should consult the relevant section of this r's Manual for information on a ular part or assembly.
especially under certain environmental conditions, such as high ambient temperature and high altitude.Should you encounter driveability prob-lems that you suspect could be related to the fuel you are using, we recom-mend that you respond by switching to a recognized high-quality brand.Failure to comply with these recom-mendations may result in unscheduled maintenance.Follow the relevant safety rules when you are handling gasoline.<
parts and accessories not approved by BMW.BMW cannot test every product from other manufacturers to verify if it can be used on a BMW safely and without risk to either the vehicle, its operation, or its occupants.Original BMW Parts, BMW Accessories and other products approved by BMW, together with professional advice on using these items, are available from all BMW centers.Installation and operation of non-BMW approved accessories such as alarms, radios, amplifiers, radar detectors, wheels, suspension components, brake
For your own safety
dust soperafrom wexternceivetalkieextencompthe vethe vaWarraadditiDo nolock twith apage
devicby anor indmotiv
Symb
Ownepartic

7n
The following only applies to vehicles owned and operated in the US.
REPORTING SAFETY DEFECTS
If you believe that your vehicle has a defect that could cause a crash or could cause injury or death, you should immediately inform the National Highway Traffic Safety Administration (NHTSA) in addition to notifying BMW of North America, Inc., P.O. Box 1227, Westwood, New Jersey 07675-1227, Telephone (201) 307-4000.
If NHTSA receives similar complaints, it may open an investigation, and if it finds that a safety defect exists in a group of vehicles, it may order a recall and remedy campaign. However, NHTSA cannot become involved in individual problems between you, your dealer, or BMW of North America, Inc.
To contact NHTSA, you may either call the Auto Safety Hotline toll-free at 1-800-424-9393 (or 202-366-0123 in Washington, D.C. area) or write to: NHTSA, U.S. Department of Transportation, Washington, DC 20590. You can also obtain other information about motor vehicle safety from the Hotline.

8n

Overview
Controls and features
Operation, careand maintenance
Owner service procedures
Technical data
Index
Advanced technology
9n
Inde
xDa
taTe
chno
logy
Repa
irs
Car
care
Cont
rols
Over
view
Contents
Driving:
ew esCockpit 16 Locks and security systems:
Steering/Ignition lock 62Starting the engine 62Switching off the engine 63Parking brake 64Manual transmission 65Automatic transmission with
Steptronic 66Turn signal indicator/Headlamp
flasher 69Wiper/Washer system 69Rear window defroster 71Cruise control 72
Everything under control:Odometer 74Tachometer 74Energy Control 74Fuel gauge 75
Seats 47Seat and mirror memory 50Steering wheel 51
Temperature gauge 75Service Interval Display 75Check Control 76Clock 76Computer 77
Technology for safety and convenience:Park Distance Control (PDC) 79Automatic Stability Control plus
Traction (ASC+T) 80Dynamic Stability Control
(DSC) 82Tire Pressure Control (RDC) 86
Contents
Ove
rvi
Co
ntr
ols
an
d f
eat
urInstrument cluster 18
Indicator and warning lamps 20Multifunction steering wheel
(MFL) 24Sports steering wheel with
multifunction buttons 25Hazard warning flashers 26Warning triangle 26First-aid kit 26Refueling 27Fuel specifications 28Tire inflation pressure 28
Keys 32Electronic vehicle
immobilizer 33Central locking system 34Opening and closing – from the
outside 34Opening and closing – from the
inside 38Luggage compartment lid 39Luggage compartment 41Alarm system 42Electric power windows 44Sliding/tilt sunroof 45
Adjustments:
Mirrors 52Car Memory, Key Memory 53
Passenger safety systems:Safety belts 54Airbags 55Transporting children safely 59

11n
Under the hood:
Hood 134
ure
s
anc
eLamps:Side lamps/Headlamps 88
Special operating instructions:Break-in procedures 116
Engine compartment 136Washer fluids 138Washer nozzles 138Engine oil 139Coolant 142Brake fluid 143Vehicle Identification
Number 144
Care and maintenance:The BMW Maintenance
System 145Caring for your vehicle 146Airbags 151Vehicle storage 152
Laws and regulations:Technical modifications to the
Storage compartments 105Cellular phones 107Ashtray, front 107
Tire replacement 126Tire rotation 127Wheel and tire
vehicle 153California Proposition
65 Warning 153OBD interface socket 154
Co
ntr
ols
an
d f
eat
Op
era
tio
n, c
are
an
d m
ain
tenInstrument lighting 88
High beams/Parking lamps 89Fog lamps 89Interior lamps 89
Controlling the climate for pleasant driving:Air conditioner 92Automatic climate control 98Seat heating 103Roller sun blind 103
Interior conveniences:HiFi system 104Glove compartment 104
Driving notes 117Catalytic converter 117Antilock Brake System
(ABS) 118Disc brakes 120Brake system 121Winter operation 121Power steering 123Cellular phones 124Radio reception 124
Wheels and tires:Tire inflation pressures 125Tire condition 125
Cigarette lighter 108Ashtray, rear 108
Loading and transporting:Through-loading system 109Ski bag 110Cargo loading 112Roof-mounted luggage rack 113
combinations 128Winter tires 129Snow chains 129Approved wheel and tire
specifications 130

Contents
ta
Engine data 192
esgyReplacement procedures: Adaptive Transmission Control
Te
ch
nic
al d
a Dimensions 193Weights 194Capacities 195Electrical system 196V-belts 196
receiving:Jump-starting 173Towing the vehicle 174
Xenon lamps 188
Ow
ne
r se
rvic
e p
roc
ed
ur
Ad
van
ce
d t
ec
hn
oloOnboard tool kit 158
Windshield wiper blades 158Lamps and bulbs 158Changing a wheel 165Battery 168Fuses 170Microfilter/Activated-charcoal
filter 171
In case of electrical malfunction:Fuel filler door 172Sliding/Tilt sunroof 172
Assistance, giving and
(ATC) 178Airbags 179Automatic Stability Control plus
traction (ASC+T)/Dynamic Stability Control (DSC) 180
Radio reception 181Four-wheel drive 182Safety belt tensioner 183Interior rearview mirror with
automatic dimming feature 184
Rain sensor 185Tire Pressure Control (RDC) 186Self-diagnostics 187

13n
nd
ex Everything from A to Z 200
Owner service procedures 206
I
14n

Overview
Controls and features
Operation, careand maintenance
Owner service procedures
Technical data
Index
Advanced technology
15n
Inde
xDa
taTe
chno
logy
Repa
irs
Car
care
Cont
rols
Over
view
Cockpit 16Instrument cluster 18Indicator and warning lamps 20Multifunction steering wheel
(MFL) 24Sports steering wheel with
multifunction buttons 25Hazard warning flashers 26Warning triangle 26First-aid kit 26Refueling 27Fuel specifications 28Tire inflation pressure 28
Overview

16n
Cockpit
460us298

17n
airs
Car
care
Cont
rols
Over
view
Cockpit
Inde
xDa
taTe
chno
logy
Rep
1 Parking lamps/Low beams 88
2 > Turn signal indicator 69> Parking lamps 89> High beams 89> Headlamp flasher 69> Computer* 77
3 Wiper/Washer system 69
4 Shift lever/Selector lever* 65 For vehicles equipped with manual transmission: To shift into reverse, push the gear shift lever to the left, overcoming the resistance
5 Hazard warning flashers 26
6 Central locking system 34
7 Rear window defroster 71
8 Horn sports steering wheel*, the entire surface functions as the horn
9 Adjusting steering wheel 51
10 Front fog lamps* 89

18n
Instrument cluster
460us048

19n
airs
Car
care
Cont
rols
Over
view
Instrument cluster
Indicator and warning lamps (clockwise) for:
>
Front fog lamps
*
23
>
Add washer fluid 22
>
Coolant level 23
>
Electronic Engine Power Control (EML)
*
23
>
Service Engine Soon 23
You can display the outside temperature and distance driven
ifferent units of measurement.
<
l
ia
14
in d
Inde
xDa
taTe
chno
logy
Rep
1 Fuel gauge with indicator lamp for fuel reserve 75
2 Indicator lamp for turn signal indicators 23
3 Speedometer
4 Indicator lamp for: > Battery charge current 20> High beams 23> Engine oil pressure/Engine oil
level 20, 22
5 Tachometer and Energy Control 74
6 Engine coolant temperature gauge with "Coolant temperature too high" indicator 75
7 Indicator and warning lamps
9 Program display for automatic transmission* 66, 68Indicator lamp for automatic transmission* 21, 66
10 Indicator lamp for Automatic Stability Control plus Traction (ASC+T)/Dynamic Stability Contro(DSC)* or DSC* and ADB*/ADB-X* 22
11 Indicator for:> Odometer 74> Trip odometer 74> Clock 76> Service Interval 76
Display for computer*, operation vthe turn signal lever, refer to
(clockwise) for:> Parking brake/Brake hydraulic
system/Cornering Brake Control (CBC/DBC) 20
> Antilock Brake System (ABS) 22 > Brake pads 22> Tire Pressure Control
(RDC)* 20, 22> Airbags 21> Please fasten safety belts 21> Cruise control* 23
8 Set button for the clock 76
page 77:
> Clock> Outside temperature> Average fuel consumption> Range > Average speed
12 Indicator for Check Control 76
13 Trip odometer, reset to zero 74

20nIndicator and warning lamps
Tire Pressure Control (RDC)* ●In addition, an acoustic signal is sounded: a tire failure has
red. Reduce vehicle speed imme-y and stop the vehicle. Avoid hard applications. Do not oversteer. ditional information, refer to
86.
Brake hydraulic system ●If the lamp comes on when the parking brake is not engaged:
k the brake fluid level. Before g further, be sure to read the on pages 121 and 143.
Brake warning lamp for Cana-dian models.
f
occurdiatelbrakeFor adpage
Checdrivinnotes
Technology that monitors itself Many of the systems of your BMW monitor themselves automatically, both during engine starts and while you are driving. Indicator and warning lamps that are identified by "●" are tested for proper functioning whenever the igni-tion key is turned. They each light up once for different periods of time.
If a fault should occur in one of these systems, the corresponding lamp does not go out after the engine is started, or it lights up while the vehicle is moving. You will see how to react to this below.
Red: stop immediatelyBattery charge ● The battery is no longer being charged. There is a malfunction
of the alternator V-belt or in the charging circuit of the alternator. Pleasecontact the nearest BMW center.
If the V-belt is defective, do not continue driving. If you do so, the
engine could be damaged due to over-heating. If the V-belt is defective, increased steering effort is also required.<
Engine oil pressure ●
Stop the vehicle and switch off the engine immediately. Checkthe engine oil and top off as required. Ithe oil level is correct, please contact the nearest BMW center.
Do not continue driving. If you do so, the engine could be damaged
because of inadequate lubrication.<

21n
Tech
nolo
gyRe
pair
sCa
r ca
reCo
ntro
lsOv
ervi
ew
Indicator and warning lamps
nge: consult the nearest BMW ter
Automatic transmissionBecause of a malfunction, the automatic transmission shifts
in the emergency program. Please sult the nearest BMW center. additional information, refer to e 66.
al
-
ty
r.
Oracen
onlyconForpag
Inde
xDa
ta
Red and yellow: continue driving cautiously
The brake warning lamp coming on together with the yellow indi-cator lamps for ABS and ASC+T/DSC:The entire ABS, CBC and ASC+T/DSC and ADB/ADB-X/DBC control system has failed. Continue driving cautiously and
defensively. Avoid hard brake applica-tions. Please have the system checked by your BMW center as soon as possible. For additional information, refer to pages 80 and 119.
Red: an important reminderParking brakeComes on when the parking brake is applied – an addition
acoustic signal sounds when startingoff. For additional information, refer to page 64.
Brake warning lamp for Canadian models.
Please fasten safety belts ● An acoustic warning signal sounds simultaneously. Lights
up for a few seconds or until the safebelt is fastened.
Indicator and warning lamps for CBC, ABS and ASC+T/DSC and ADB/ADB-X/DBC for Canadian models.
For additional information on safety belts, refer to page 54.
Airbags ● Please have the system inspected by your BMW cente
For additional information, refer to pages 55 and 179.

22nIndicator and warning lamps
Automatic Stability Control plus Traction (ASC+T)/Dynamic Stability Control (DSC) and brake warning lamp ●The indicator lamps remain on:The DSC and ADB/DBC have
switched off by means of the or are defective.
e consult the nearest BMW r. ditional information, refer to
82.
325xi, 330xi:nd ADB-X are defective. ADB-X t be switched off.
e consult the nearest BMW r. ditional information, refer to
81.
Indicator and warning lamps DSC and ADB/ADB-X/DBC for Canadian models.
.
been buttonPleascenteFor adpage
BMWDSC acannoPleascenteFor adpage
Add washer fluid The washer fluid is too low, refill at the earliest opportunity.
ditional information, refer to 138.
For adpage
Yellow: check as soon as possibleAntilock Brake System (ABS) ●ABS has been deactivated in response to system malfunction.
Conventional braking efficiency is avail-able without limitations. Please have the system inspected by your BMW center. For additional information, refer to page 119.
ABS warning lamp for Canadian models.
Engine oil level Comes on while driving: the oil
Tire Pressure Control (RDC) ●Check the tire inflation pressureRefer to pages 28 and 86.
Automatic Stability Control plusTraction (ASC+T)/Dynamic Stability Control (DSC) ●
Indicator lamp flashes: The system is active and governs driveforce and braking force. The indicator lamp stays lit:ASC+T has been switched off via the button, or it is defective, or, the DSC has been turned off, ADB is in ready mode.Please consult the nearest BMW centerin the event of a system malfunction.
level is at the absolute minimum; therefore, add engine oil as soon as possible. Do not drive more than 30 miles (50 km) until you do. For additional information, refer to page 139.
Engine oil levelComes on after the engine has been shut off: Add more engine
oil the next time you stop for gas. For additional information, refer to page 139.
Brake pads ● Have the brake pads checked. For additional information, refer
to page 121.
For additional information, refer to ASC+T beginning on page 80.
BMW 325xi, 330xi:The DSC has either been turned off or is defective. ADB-X is in ready mode. Ifthe warning lamp does not go out afterpressing the DSC button repeatedly, then both the DSC and ADB-X are defective.Please consult the nearest BMW center. For additional information, refer to page 84.

23n
Tech
nolo
gyRe
pair
sCa
r ca
reCo
ntro
lsOv
ervi
ew
Indicator and warning lamps
e: for your informationHigh beamsLights up when the high beams are on or the headlamp flasher
ctuated. additional information, refer to es 69 and 89.
n.
for
h
Blu
is aForpag
Inde
xDa
ta
Service Engine Soon ● If the indicator lamp comes on either continuously or intermit-
tently, this indicates a fault in the emis-sions-related electronic systems. Although the vehicle remains opera-tional, you should have the systems checked by your BMW center at the earliest possible opportunity. For additional information, refer to page 154.
"Service Engine Soon" warning lamp for Canadian models.
Engine electronics* ● There is a fault in the engine's
Green: for your informationTurn signal indicatorFlashes when the turn signal indicator is actuated. Rapid
flashing indicates a system malfunctioFor additional information, refer to page 69.
Cruise controlComes on when the cruise control is activated. Available
operation by using the multifunction steering wheel.For additional information, refer to page 72.
Fog lampsLights up whenever you switc
electronic control system. The electronics allow for continued driving with reduced engine output or rpms. Please have the system inspected by your BMW center.
Add coolantThe coolant level is too low. Top up the coolant at the earliest
opportunity. For additional information, refer to page 142.
on the front fog lamps. For additional information, refer to page 89.

24nMultifunction steering wheel (MFL)
n: the entire surface functions as horn
ise control: resume stored setting
ise control: store and accelerate decelerate and store (–)
ise control: activate/interrupt/ctivate
f
6 Horthe
7 Cru
8 Cru(+);
9 Crudea
The buttons integrated in the multifunc-tion steering wheel are provided so that you can operate a number of accesso-ries quickly and without being distracted from traffic conditions. You may operate:
> selected radio functions> the cruise control> selected cellular phone functions.
In order to operate a system via the MFL, the corresponding
system controls must be switched on.<
Refer to the individual accessory manuals for more detailed descriptions.
1 Press briefly: Receive a call, initiate dialing and terminate a callPress longer:
460d
e065
Voice recognition*: switch on and of
2 Radio/Cellular phone: select
3 Radio/Cellular phone: scan backwardor scan station keys or scroll in the phone listings
4 Radio/Cellular phone: volume
5 Radio/Cellular phone: scan forward or scan station keys or scroll in the phone listings

25n
Inde
xDa
taTe
chno
logy
Repa
irs
Car
care
Cont
rols
Over
view
Sports steering wheel with multifunction buttons*
orn: the entire surface functions as e horn
ruise control: resume stored setting
ruise control: store and accelerate ); decelerate and store (–)
ruise control: activate/interrupt/eactivate
te
off
rd gh
gh
6 Hth
7 C
8 C(+
9 Cd
The buttons integrated in the sports steering wheel are provided so that you can operate a number of accessories quickly and without being distracted from traffic conditions. You may operate:
> selected radio functions> the cruise control> selected cellular phone functions.
In order to operate a system via the sports steering wheel, the
corresponding system controls must be switched on.<
Refer to the individual accessory manuals for more detailed descriptions.
1 Radio/Cellular phone: select
2 Press briefly: Receive a call, start dialing, terminaa call
46cd
e085
Press longer:Voice recognition*: switch on and
3 Radio/Cellular phone: volume
4 Radio/Cellular phone: scan backwaor scan station keys or scroll throuthe phone listings
5 Radio/Cellular phone: scan forwardor scan station keys or scroll throuthe phone listings

26nHazard warning flashers Warning triangle* First-aid kit*
rst-aid kit is located under the nger seat.
en: pull the handle and fold the down.
The fipasse
To opcover
460d
e003
se: fold the cover up.
Some of the articles in the first-aid kit may be used within a limited nly. For this reason, check the tion dates of each of the items rly, and replace any whose expira-ates have passed. You can ase replacements in any drugstore rmacy. Comply with legal require- that cover the availability of a id kit in the vehicle.<
To clo
time oexpiraregulation dpurchor phamentsfirst-a
The push button flashes on and off when the hazard flashers are on.
To help you locate the switch in an emergency, the button is also illumi-
460us0
02
The hazard warning triangle is stored ina recess on the left-hand side of the luggage compartment where it is quickly available.
460d
e071
nated whenever the vehicle lamps are on.
The turn signal function takes precedence over the hazard
warning flashers function. Starting with ignition key position 1, you are there-fore able to use the turn signal indica-tors, even if the hazard warning system has been activated.<
Comply with legal requirements that cover the availability of a
hazard warning triangle in the vehicle.<

27n
airs
Car
care
Cont
rols
Over
view
Refueling
Close the fuel cap carefully after refueling until a "click" is heard.
ile closing, be sure not to squeeze strap which is fastened to the cap. ose or missing cap will activate the rvice Engine Soon" warning lamp.<
Whthe A lo"Se
Inde
xDa
taTe
chno
logy
Rep
-
or
l
Fuel filler doorBefore filling the tank, shut off the engine. If you do not, fuel cannot
flow into the tank and the "Service Engine Soon" lamp may come on.<
460d
e004
Simple and environmentally friendly
Open the filler cap carefully to prevent fuel from spraying out.
Fuel spray may cause injury.<460d
e005
Press on the rear edge of the fuel filler door to open and close it.
To unlock the fuel filler door if the central locking system malfunctions, refer to page 172.
When handling fuels, comply with all of the applicable safety precau-
tions and regulations pertaining to fuels. Never carry spare fuel containers in your vehicle. Whether empty or full, these containers can leak, cause an explosion, or lead to fire in the event of a collision.<
Keep the filler cap in the bracket attached to the fuel filler door.
When refueling, insert the filler nozzlecompletely into the filler pipe. Pullingthe nozzle out of the pipe during refueling
> results in premature pump shutoff> and will reduce the effect of the vap
recovery system on the pump.
The fuel tank is full, whenever the fuenozzle shuts off the first time, as is specified for proper service.
Tank capacity: refer to page 195.
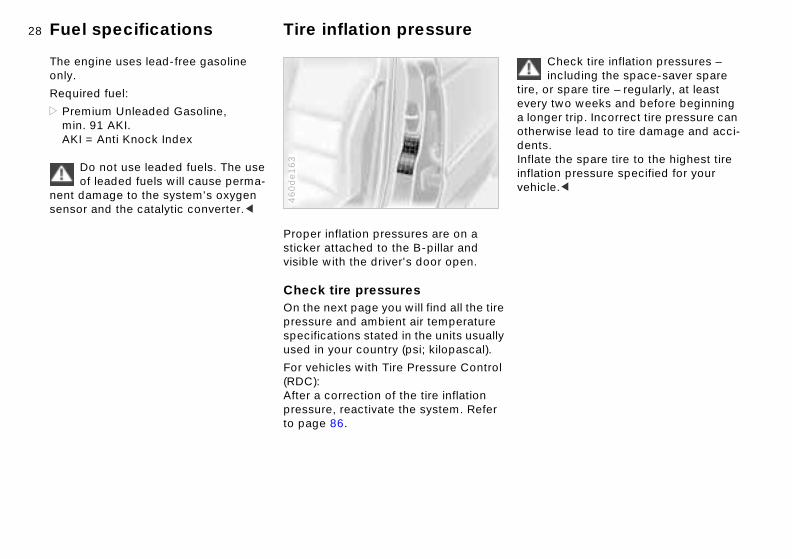
28nFuel specifications Tire inflation pressure
Check tire inflation pressures – including the space-saver spare r spare tire – regularly, at least two weeks and before beginning er trip. Incorrect tire pressure can ise lead to tire damage and acci-
. the spare tire to the highest tire
on pressure specified for your le.<
tire, oeverya longotherwdentsInflateinflativehic
The engine uses lead-free gasoline only.
Required fuel:
> Premium Unleaded Gasoline, min. 91 AKI. AKI = Anti Knock Index
Do not use leaded fuels. The use of leaded fuels will cause perma-
nent damage to the system's oxygen sensor and the catalytic converter.<
Proper inflation pressures are on a sticker attached to the B-pillar and visible with the driver's door open.
460d
e163
Check tire pressuresOn the next page you will find all the tirepressure and ambient air temperature specifications stated in the units usuallyused in your country (psi; kilopascal).
For vehicles with Tire Pressure Control(RDC):After a correction of the tire inflation pressure, reactivate the system. Refer to page 86.

29n
airs
Car
care
Cont
rols
Over
view
Tire inflation pressure
9 (200) 33 (230) 33 (230) 41 (280)2 (220) 36 (250) 36 (250) 44 (300)0 (210) 35 (240) 35 (240) 42 (290)3 (230) 38 (260) 38 (260) 45 (310)
3 (230) 38 (260) 38 (260) 45 (310)
61 (420)n pressure as for summer tires.05/50 R 17 93 W extra load, theascal).
in si
re)2333
s 3
inflatiohe tire 2(20 kilop
Inde
xDa
taTe
chno
logy
Rep91 W and mixed tires 225/45 ZR 17
sure decreases by 3 psi
45 R 17 tion presComply with tire approval specificationsThe inflation pressures in the table apply to tires from BMW-approved manufacturers. Your BMW center is familiar with these pressures. Higher pressures may be specified for tires from other manufacturers. You will find a list of approved tires sizes beginning on page 130.
Your vehicle is equipped with tires that meet US and European standards. We recommend the exclusive use of BMW-approved tires.
BMW Tires All pressure specificationsthe table are indicated in p(kilopascal) for cold tires (cold = ambient temperatu
320iAll summer tiresAll winter tires
325i325xi
All summer tiresAll winter tires
330i330xi
All summer and winter tire
All Space-saver spare tireFor all-season tires, use the same tireBMW 320i, 325i, 325xi: when using tinflation pressure increases by 3 psi
330i/330xi: when using the tires 225/(front) + 245/40 ZR 17 (rear) the infla(20 kilopascal).
30n
Locks and security systems:Keys 32Electronic vehicle
immobilizer 33Central locking system 34Opening and closing – from the
outside 36Opening and closing – from the
inside 38Luggage compartment lid 39Luggage compartment 41Alarm system 42Electric power windows 44Sliding/tilt sunroof 45
Adjustments:Seats 47Seat and mirror memory 50Steering wheel 51Mirrors 52Car Memory, Key Memory 53
Passenger safety systems:Safety belts 54Airbags 55Transporting children safely 59
Controls
Overview
Controls and features
Operation, careand maintenance
Owner service procedures
31n
Car
care
Cont
rols
Over
view
Driving:Steering/Ignition lock 62Starting the engine 62Switching off the engine 63Parking brake 64Manual transmission 65Automatic transmission with
Steptronic 66Turn signal indicator/Headlamp
flasher 69Wiper/Washer system 69Rear window defroster 71Cruise control 72
Everything under control:Odometer 74
Lamps:Side lamps/Low beams 88Instrument lightning 88High beams/Parking lamps 89Fog lamps 89Interior lamps 89
Controlling the climate for pleasant driving:Air conditioner 92Automatic climate control 98Seat heating 103Roller sun blind 103
Interior conveniences:HiFi system 104
Technical data
Index
Advanced technology
dex
Data
Tech
nolo
gyRe
pair
sTachometer 74 Glove compartment 104Storage compartments 105
Energy Control 74Fuel gauge 75Temperature gauge 75Service Interval Display 75Check Control 76Clock 76Computer 77
Technology for safety and convenience:Park Distance Control (PDC) 79Automatic Stability Control plus
Traction (ASC+T) 80Dynamic Stability Control
(DSC) 82Tire Pressure Control (RDC) 86
Cellular phones 107Ashtray, front 107Cigarette lighter 108Ashtray, rear 108
Loading and transporting:Through-loading system 109Ski bag 110Cargo loading 112Roof-mounted luggage rack 113
In

32nKeys
acement keyscement keys are available exclu- through your BMW center. Since ys belong to a security system to "Electronic vehicle immobilizer" ge 33), your BMW center is obli- to be sure that a person sting a key is authorized to do so.
If possible, take all of the master keys that belong to the vehicle ou when you pick up your ement key. you receive a new replacement urn that key to position 2 in the n lock once (ignition switched on)
ReplReplasivelythe ke(refer on pagatedreque
with yreplacWhenkey, tignitio
en back. This allows the elec- vehicle immobilizer to "learn" the ey.<
and thtronicnew k
1 The master keys with remote control determine the functions of the Key Memory. Refer to page 53
46cd
e059
3 Door and ignition keyThe locks for the luggage compart-ment lid and the glove compartment cannot be operated with this key – this is recommended for valet parking, for instance
There is an extended-life battery in every master key which is
charged automatically in the steering lock as you drive.For this reason, if you have a master key that is otherwise not used, use that key at least once a year while driving for an extended period. This will charge the battery. Refer also to page 35.<
2 Spare key for storage in a safe place, such as in your wallet. This key is not intended for continuous use
33n
ata
Tech
nolo
gyRe
pair
sCa
r ca
reCo
ntro
lsOv
ervi
ew
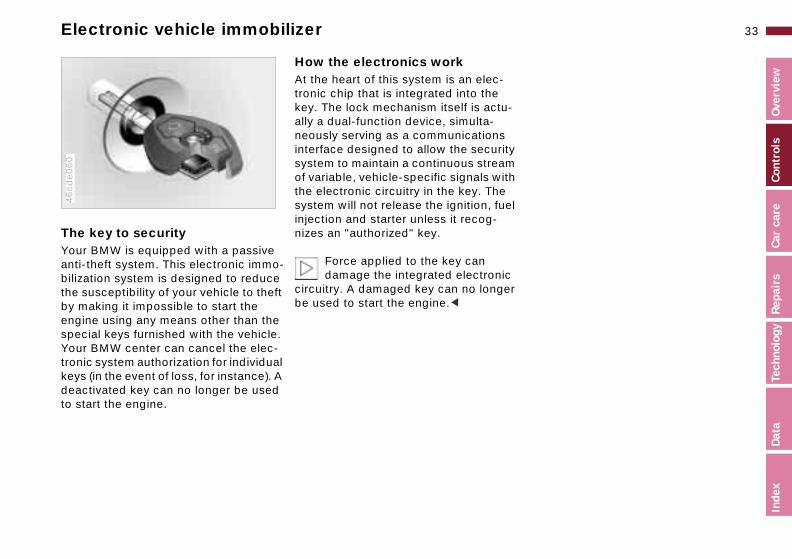
Electronic vehicle immobilizer
u-
ity m ith el
ic er
Inde
xD
The key to securityYour BMW is equipped with a passive anti-theft system. This electronic immo-bilization system is designed to reduce
46cd
e060
How the electronics workAt the heart of this system is an elec-tronic chip that is integrated into the key. The lock mechanism itself is actally a dual-function device, simulta-neously serving as a communicationsinterface designed to allow the secursystem to maintain a continuous streaof variable, vehicle-specific signals wthe electronic circuitry in the key. Thesystem will not release the ignition, fuinjection and starter unless it recog-nizes an "authorized" key.
Force applied to the key can damage the integrated electron
circuitry. A damaged key can no long
the susceptibility of your vehicle to theft by making it impossible to start the engine using any means other than the special keys furnished with the vehicle. Your BMW center can cancel the elec-tronic system authorization for individual keys (in the event of loss, for instance). A deactivated key can no longer be used to start the engine.be used to start the engine.<
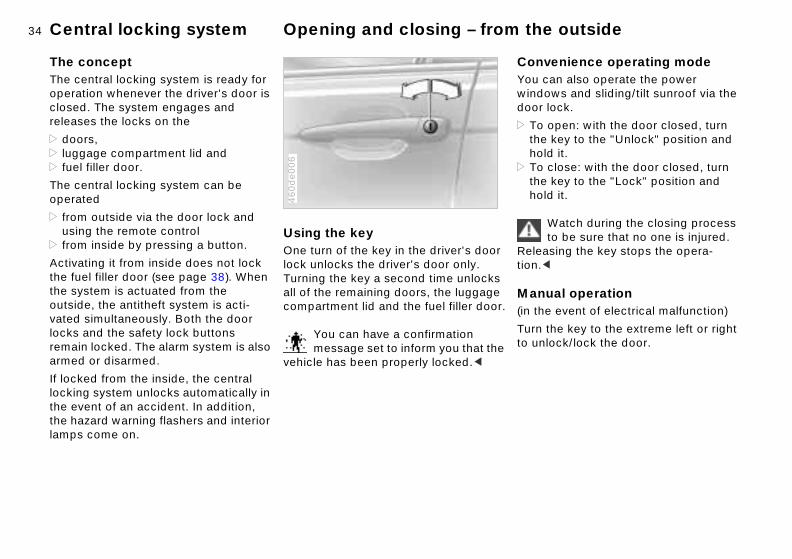
34nCentral locking system Opening and closing – from the outside
enience operating modean also operate the power ws and sliding/tilt sunroof via the ock.
open: with the door closed, turn key to the "Unlock" position and it.
close: with the door closed, turn key to the "Lock" position and it.
Watch during the closing process to be sure that no one is injured. sing the key stops the opera-
ConvYou cwindodoor l
> To thehold
> To thehold
Releation.<
al operation event of electrical malfunction)
he key to the extreme left or right ock/lock the door.
.
Manu(in the
Turn tto unl
The conceptThe central locking system is ready for operation whenever the driver's door is closed. The system engages and releases the locks on the
> doors,> luggage compartment lid and > fuel filler door.
The central locking system can be operated
> from outside via the door lock and using the remote control
> from inside by pressing a button.
Activating it from inside does not lock the fuel filler door (see page 38). When
Using the keyOne turn of the key in the driver's doorlock unlocks the driver's door only. Turning the key a second time unlocks
460d
e006
the system is actuated from the outside, the antitheft system is acti-vated simultaneously. Both the door locks and the safety lock buttons remain locked. The alarm system is also armed or disarmed.
If locked from the inside, the central locking system unlocks automatically in the event of an accident. In addition, the hazard warning flashers and interior lamps come on.
all of the remaining doors, the luggagecompartment lid and the fuel filler door
You can have a confirmation message set to inform you that the
vehicle has been properly locked.<

35n
ata
Tech
nolo
gyRe
pair
sCa
r ca
reCo
ntro
lsOv
ervi
ew
Opening and closing – from the outside
Master keys that are used repeat-edly are always ready for opera-
since the battery in the transmitter harged automatically in the steering as you drive.is no longer possible to unlock the icle via the remote control, the ery is discharged. Use this key le driving for an extended period in er to charge the battery. Refer also age 32.revent unauthorized use of the
ote control, surrender only the door ignition key or the spare key (refer age 32) when leaving the vehicle for t parking, for example.e event of a system malfunction, se contact your BMW center. can also obtain replacement keys e.<
he
tionis clockIf it vehbattwhiordto pTo premandto pvaleIn thpleaYouther
Inde
xD
Using the remote control The remote control makes opening and locking the doors of your vehicle very convenient. Furthermore, it provides two additional functions that can only be executed by means of the remote control:
> Switch on the interior lamps, refer to page 36.With this function, you can also "search for" your vehicle – when parked in an underground garage, for instance.
> Open the luggage compartment, refer to page 37.The luggage compartment lid will
Master keysKeys with remote control are master keys. Refer to page 32.
460d
e494
open slightly, no matter whether it has been locked or unlocked.
The anti-theft system is also deacti-vated simultaneously when you unlock the vehicle, the alarm system is disarmed, and the interior lamps are turned on. When you lock the vehicle, the systems are activated and armed, and the lamps go off.
You can have a confirmation message set to inform you that the
vehicle has been properly locked.<
Children might be able to lock tdoors from the inside. For this
reason, always take the vehicle keys with you so that the vehicle can be opened again from the outside at anytime.<
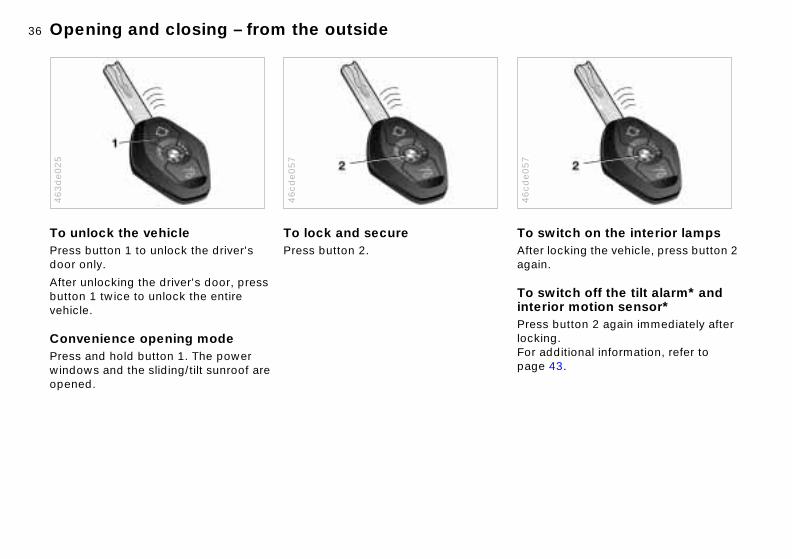
36nOpening and closing – from the outside
itch on the interior lampslocking the vehicle, press button 2 .
itch off the tilt alarm* and ior motion sensor* button 2 again immediately after g. ditional information, refer to
43.
To swAfter again
To swinterPresslockinFor adpage
46cd
e057
To unlock the vehiclePress button 1 to unlock the driver's door only.
463d
e025
To lock and securePress button 2.
46cd
e057
After unlocking the driver's door, press button 1 twice to unlock the entire vehicle.
Convenience opening modePress and hold button 1. The power windows and the sliding/tilt sunroof are opened.

37n
ata
Tech
nolo
gyRe
pair
sCa
r ca
reCo
ntro
lsOv
ervi
ew
Opening and closing – from the outside
US owners only transmitter and receiver units ply with part 15 of the FCC (Federal munications Commission) regula-
s. Operation is governed by the wing:
ID: LX8EWSLX8FZVSLX8FZVE
pliance statement: device complies with part 15 of the Rules. Operation is subject to the wing two conditions:
his device may not cause harmful terference, andis device must accept any interfer-
nce received, including interference at may cause undesired operation.
Any unauthorized modifications or changes to these devices could
the user's authority to operate this ipment.<
o in
.
n r
ForThecomComtionfollo
FCC
ComThisFCCfollo
> Tin
> theth
voidequ
Inde
xD
To open the luggage compartmentPress button 3.
The luggage compartment lid will open slightly, regardless of whether the lid
46cd
e058
Panic-Mode (trigger alarm)By pressing button 3 for more than twseconds, the alarm can be sounded the event of danger, if it is armed.Pressing button 1 will deactivate the alarm.
Non-BMW systemsThe proper functioning of the remotecontrol system may be affected by other units or equipment operating inthe immediate vicinity of your vehicle
If this should occur, you can still opeand close the vehicle using the mastekey in both the door and luggage compartment locks.
was previously locked or unlocked.
Before and after a trip, be sure that the luggage compartment lid
was not opened unintentionally.<
38nOpening and closing – from the inside
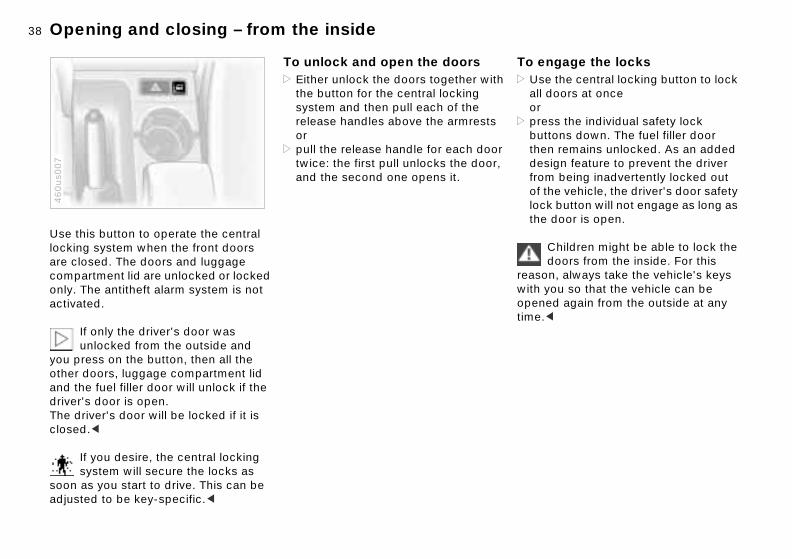
gage the locks the central locking button to lock oors at once
ss the individual safety lock tons down. The fuel filler door n remains unlocked. As an added ign feature to prevent the driver being inadvertently locked out
he vehicle, the driver's door safety button will not engage as long as
door is open.
Children might be able to lock the doors from the inside. For this n, always take the vehicle's keys ou so that the vehicle can be d again from the outside at any
To en> Use
all dor
> prebutthedesfromof tlockthe
reasowith yopenetime.<
Use this button to operate the central locking system when the front doors are closed. The doors and luggage compartment lid are unlocked or locked
460us0
07
To unlock and open the doors> Either unlock the doors together with
the button for the central locking system and then pull each of the release handles above the armrests or
> pull the release handle for each doortwice: the first pull unlocks the door,and the second one opens it.
only. The antitheft alarm system is not activated.
If only the driver's door was unlocked from the outside and
you press on the button, then all the other doors, luggage compartment lid and the fuel filler door will unlock if the driver's door is open. The driver's door will be locked if it is closed.<
If you desire, the central locking system will secure the locks as
soon as you start to drive. This can be adjusted to be key-specific.<
39n
airs
Car
care
Cont
rols
Over
view
Luggage compartment lid
open from outsidess the button in the handle recess ow): luggage compartment lid opens
he
To Pre(arrThe
460d
e010
Inde
xDa
taTe
chno
logy
Rephtly.
luggage compartment is lit when luggage compartment lid is opened.
nual operationhe event of electrical malfunction)
n the master key to the left to the – the luggage compartment lid will n slightly.
luggage compartment is locked in as soon as you close the lid.
ning from the inside, refer to e 40.
lid
to
r
slig
Thethe
Ma(in t
Turstopope
Theaga
Opepag
The lockOnly the master key (refer to page 32) fits in the lock of the luggage compart-ment lid.
460d
e008
To secure separatelyTurn the master key to the right past tresistance point and then pull it out inthe horizontal position.
460d
e009
This locks the luggage compartment and disconnects it from the central locking system. This feature can be used to prevent unauthorized accessthe luggage compartment when you surrender the door and ignition key (refer to page 32) for valet parking, foinstance.
40nLuggage compartment lid
Do not drive with the luggage compartment lid open, since st fumes could penetrate the inte- the vehicle. Should it be abso- necessary to operate the vehicle he luggage compartment lid open:
se all windows and the sliding/tilt roof.ease the air supply for the air ditioner or the automatic climate trol to a high level. Refer to e 92 or 98.<
exhaurior oflutelywith t
> Closun
> Incrconconpag
Opening from the inside*If the luggage compartment lid has not been locked separately, you can open it with this button in the footwell on the
460d
e011
To closeThe handle recesses in the interior trimpanel of the luggage compartment lid (arrows) make it easier to pull the lid
460d
e067
driver's side when the vehicle is stationary.
down.
To avoid injuries, be sure that thetravel path of the luggage
compartment lid is clear when it is closed, as with all closing procedures.<

41n
airs
Car
care
Cont
rols
Over
view
Luggage compartment
fittings at the inner corners of the age compartment provide you with nvenient means of attaching age nets* and flexible straps for
uring suitcases and luggage.
er also to "Cargo loading" on e 112.
ts y
Thelugga coluggsec
Refpag
Inde
xDa
taTe
chno
logy
Rep
Floor panelTo raise and secure the floor panel, lift it by the ring and hook it into the rubber seal of the run-off gutter with the
460d
e106
Floor matYou can turn the floor mat over if required (for transporting soiled objecfor instance). The rubberized side ma
460d
e180
hanger (arrow). be washed. It reduces movement of objects placed on it.

42nAlarm system*
ator lamp displaysdicator lamp is located under the r rearview mirror.
IndicThe ininterio
463us0
10
en the indicator lamp flashes tinuously: the system is armed.e indicator lamp flashes during ing of the system: the door(s), the d or luggage compartment lid are completely closed. Even if you do close the alerted area, the system ins to monitor the remaining
as, and the indicator lamp flashes tinuously after 10 seconds. ever, the interior motion sensor
ot activated.e indicator lamp goes out when
system is disarmed: no manipula- or attempted intrusions have n detected in the period since the tem was armed.
>Whcon
> If tharmhoonotnotbegareconHowis n
> If ththetionbeesys
The conceptThe vehicle's alarm system responds:
>When a door, the hood or the luggage compartment lid is opened.
> To movement inside the vehicle (interior motion sensor).
> To a change of the vehicle's tilt – if someone attempts to steal the wheels or tow the vehicle without authoriza-tion, for example.
> If there is an interruption of battery voltage.
The system responds to unauthorized vehicle entry and attempted theft by simultaneously activating the following:
To activate and deactivate the alarm systemWhen the vehicle is locked or unlockedby using a key or with the remote control, the alarm system is also simul-taneously armed or disarmed.The interior motion sensor and the tilt alarm sensor are activated approx. 30 seconds after you have finished locking the vehicle.
If the alarm system has been armed correctly, the hazard warning flashers flash once.
You can have a signal set as acknowledgment for both acti-
> Sounding an acoustical alarm for 30 seconds.
> The hazard warning flashers are acti-vated for approx. five minutes.
> The high beams flash on and off in the same rhythm.
vating and deactivating the alarm.<
You can also open the luggage compartment lid when the system is armed by pressing button 3 of the remote control (refer to page 37). Whenit is closed, the lid is once again secured.

43n
airs
Car
care
Cont
rols
Over
view
Alarm system*
te-m
Inde
xDa
taTe
chno
logy
Rep
toly
te-n
he
> If the indicator lamp flashes for 10 seconds when the system is disarmed: an attempted entry has been detected in the period since the system was armed.
Following triggering of an alarm, the indicator lamp will flash continuously.
Avoiding an unintentional alarmThe tilt alarm sensor and interior motion sensor may be switched off at the same time. You can do this to prevent a false alarm from being triggered (in garages with elevator ramps, for instance), or when the vehicle is transported by trailer or train:
Interior motion sensorThe transmitter and receiver of the inrior motion sensor are located in a tripanel in the vehicle's roof.
460d
e159
Lock the vehicle twice (= arm the system). Press button 2 on the remote control twice in succession or lock the vehicle twice with the key (refer to page 36).The indicator lamp lights up briefly and then flashes continuously. The tilt alarm sensor and the interior motion sensor are deactivated as long as the system is armed.
Activate the alarm to reactivate the tilt alarm sensor and the interior motion sensor.
In order for the interior motion sensorfunction properly, the windows and sliding/tilt sunroof must be completeclosed.
However, you should switch off the inrior motion sensor (see previous columunder the heading "Avoiding an unin-tentional alarm") if you wish to leave twindows or sliding/tilt sunroof open.

44nElectric power windows
y feature tact strip is located on the inside frame of each of the windows. If ure is exerted against this contact hile a window is being raised, the will respond by stopping the
w and then retracting it a small ce.
Despite this safety feature, be extremely careful to ensure that osing path of the window is not cted. Otherwise, an object might uch the contact strip in some situ- (very thin objects, for instance).an disable this safety feature by
:
SafetA conupperpressstrip wsystemwindodistan
the clobstrunot toationsYou c
ing the switch beyond the resis- point and holding it.<
presstance
Open and close the windowsFrom ignition key position 1:
> Depress the switch until you feel
460d
e311
Separate switches are located under the windows in the rear passenger area.
After the ignition has been switched off
You can still operate the power windows for up to 15 minutes, as long as neither of the front doors has been opened.
Remove the key from the ignition lock and close the doors when
you leave the vehicle, so that children cannot operate the power windows andpossibly injure themselves.<
For the convenience operating mode
resistance:The window will continue to open as long as you hold the switch.> Press the switch briefly past the pres-sure point:The window will move automatically. Pressing the switch again stops the opening cycle.
You can close windows in the same manner by pulling the switch.
with the door lock or remote control, refer to page 34 or 36.

45n
airs
Car
care
Cont
rols
Over
view
Electric power windows Sliding/tilt sunroof*
ing – Opening – Closingm ignition key position 1, press the tch or slide it to the desired direction l you feel resistance.
ly
te
ir LiftFroswiunti
460d
e015
Inde
xDa
taTe
chno
logy
Repen lifting, the headliner retracts
eral inches.
Do not use force to close the headliner when the sunroof is
n, or you could damage the mecha-.<
r the ignition has been switched off, can still operate the sunroof for up 5 minutes, as long as neither of the t doors has been opened.
r
Whsev
openism
Afteyouto 1fron
Safety switch This way, you can prevent the children, for example, from using the switch in the rear* to open and close the rear
460d
e014
Exercise care when closing thesliding/tilt sunroof and keep it in
your field of vision until it is completeclosed. Failure to do so can result in injuries.Remove the key from the ignition andclose the doors when you leave the vehicle so that children cannot operathe sunroof and possibly injure them-selves.<
To avoid pressure or drafts in the passenger compartment when the sunroof is open or raised, keep the avents in the dashboard open and increase the air supply if necessary. Refer to page 92 or 101.
windows.
Press the safety switch whenever children are riding in the rear of
the vehicle. Careless use of the power windows can lead to injury.<
If the sunroof is completely open, airdisturbances may be caused in the vehicle when you are driving at highespeeds. Close the roof as far as is necessary until this natural phenom-enon ceases.
For the convenience operating modewith the door lock or the remote control, refer to page 34 or 36.

46nSliding/tilt sunroof*
r loss or malfunction event of an electrical system nction, the sliding/tilt sunroof can nually operated. Refer to 172.
-
PoweIn themalfube mapage
Automatic opening and closing> Press the switch past the resistance
point briefly: the sunroof travels to either the fully-closed or fully-open position.
>With the sunroof open, press the switch briefly toward "Lift:" the sunroof automatically extends to its fully raised position.
Pressing the switch again briefly stops the motion immediately.
Safety featureIf the sliding/tilt sunroof encounters resistance at a point roughly past the middle of its travel when it is closing, the closing cycle is interrupted and thesunroof will open again slightly.
Despite this safety feature, alwaysbe careful to ensure that the
closing path of the roof is not obstructed. Otherwise, an object mightnot touch the contact strip in some situations (very thin objects, for instance).You can disable this safety feature by pressing the switch beyond the resis-tance point and holding it.<
47n
airs
Car
care
Cont
rols
Over
view
ongitudinal adjustmentull the lever and slide the seat to the esired position.fter releasing the lever, apply pres-ure to the cushion to ensure that the
Seat adjustment Mechanical seat
For your personal safety when adjusting the seat position, please follow the instructions below carefully:
Never try to adjust your seat while operating the vehicle. The seat
could respond with an unexpected movement, and the ensuing loss of vehicle control could lead to an acci-dent. Be sure that the safety belt remains firmly against your body at all times. In the event of a frontal impact, a loose lap belt could slide over the hips, leading to abdominal injury. In addition, the safety belt's restraint effectiveness is reduced if the belt is worn loosely.
Correct sitting postureTo reduce strain on the spinal column, sit all the way back in the seat and restyour back fully against the backrest. The ideal sitting posture is achieved with your head extending from your spine in a straight line. For long-distance driving, you may wish to increase the backrest angle slightly to reduce muscular tension. You should be able to grasp the steering wheel at its highest point with your arms slightlybent.
After a seat adjustment, adjust the height of the safety belt also. Refer to page 54.
Inde
xDa
taTe
chno
logy
Reptch engages securely.
ushion heightull the lever and apply weight to or move weight from the seat as quired.
Never ride with the backrest reclined to an extreme angle (especially important for the front passenger to remember). If you do so, there is a risk that you will slide under the safety belt in an acci-dent, thus reducing the protection provided by the safety belt.<
1 L
PdAs
460d
e109
la
2 CPrere

48nMechanical seat Head restraints
ovall the head restraint upward to the p.ss the button (arrow) and remove
Rem> Pul
sto> Pre
460d
e137
head restraint.
llationss the button (arrow) and insert head restraint into the guides.ust the head restraint.
the
Insta> Pre
the> Adj
3 Backrest anglePull the lever and apply weight to or remove weight from the backrest as required.
460d
e068
Adjustments Height: adjust by pulling up or pushingdown.
460d
e283
In order to move to the lowest positions, press button 1.<
To adjust the angle of the front head restraints: Rotate them in the desired direction.
Head restraints reduce the risk ofinjury to the cervical vertebra in
the event of an accident.Adjust the head restraint so that its center is approximately at the height ofyour ears.<
49n
airs
Car
care
Cont
rols
Over
view
BMW sports seat* Lumbar support* Power seat*
ackward/Forward adjustment
ushion height
ackrest angle
head restraint is adjusted manually.
r
1 B
2 C
3 B
The
460d
e016
Inde
xDa
taTe
chno
logy
Rep
Please refer to the adjustment instructions on page 47 to reduce
risk of personal injury.<
lp re.
.
the
With this seat, you can also adjust the tilt angle and the thigh support:
1 To adjust the tilt angle upward:Pull the lever as often as necessary to
460d
e122
You can adjust the backrest's contoufor additional support in the curvatureof your spine's lumbar region.
The upper hips and spinal column
460d
e103
reach the desired angle.
2 To adjust the tilt angle downward:Push the lever as often as necessary to reach the desired angle.
3 Thigh support area:Pull the lever and adjust the position of the cushion for thigh support as desired.
receive supplementary support to heyou maintain a relaxed, upright postu
> Press the front/rear of switch: Increase/decrease curvature.
> Press the upper/lower end of the switch: Increase the upper/lower curvature
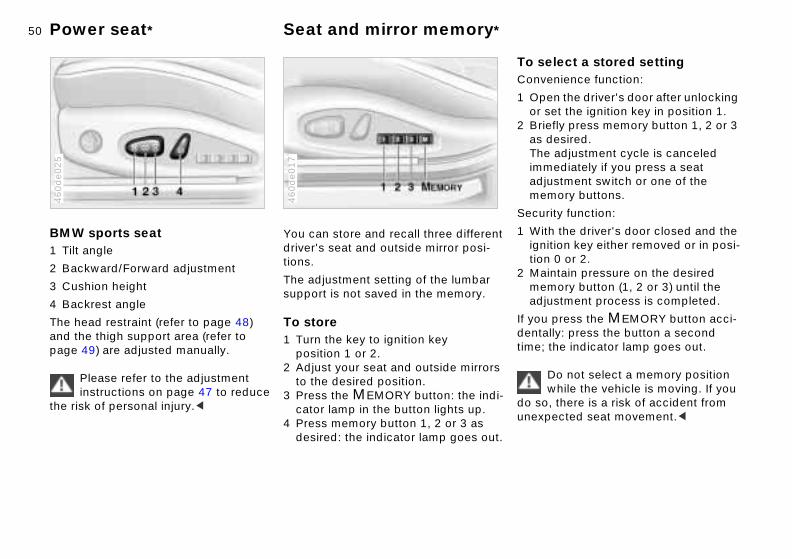
50nPower seat* Seat and mirror memory*
lect a stored setting nience function:
n the driver's door after unlocking et the ignition key in position 1.fly press memory button 1, 2 or 3 esired. adjustment cycle is canceled ediately if you press a seat stment switch or one of the
mory buttons.
ity function:
h the driver's door closed and the tion key either removed or in posi- 0 or 2.
intain pressure on the desired
To seConve
1 Opeor s
2 Brieas dTheimmadjume
Secur
1 Witignition
2 Ma
mory button (1, 2 or 3) until the stment process is completed.press the MEMORY button acci-lly: press the button a second the indicator lamp goes out.
Do not select a memory position while the vehicle is moving. If you , there is a risk of accident from ected seat movement.<
meadju
If youdentatime;
do sounexp
BMW sports seat1 Tilt angle
2 Backward/Forward adjustment
460d
e025
You can store and recall three differentdriver's seat and outside mirror posi-tions.
The adjustment setting of the lumbar 460d
e017
3 Cushion height
4 Backrest angle
The head restraint (refer to page 48) and the thigh support area (refer to page 49) are adjusted manually.
Please refer to the adjustment instructions on page 47 to reduce
the risk of personal injury.<
support is not saved in the memory.
To store1 Turn the key to ignition key
position 1 or 2.2 Adjust your seat and outside mirrors
to the desired position.3 Press the MEMORY button: the indi-
cator lamp in the button lights up.4 Press memory button 1, 2 or 3 as
desired: the indicator lamp goes out.

51n
airs
Car
care
Cont
rols
Over
view
Seat and mirror memory* Adjusting steering wheel
ush the locking lever downward.djust the steering wheel (fore/aft nd up/down) to the desired position.ull the lever back in to clamp the teering wheel in the new position.
ilt
o
1 P2 A
a3 P
s
460d
e073
Inde
xDa
taTe
chno
logy
Rep
Do not adjust the steering wheel while the vehicle is moving. If you
o, there is a risk of accident from xpected movement.<
n or er
h
do sune
Your BMW center can adjust your vehicle's systems in such a
manner that your personalized settings are automatically set for the seat and outside mirror positions when you unlock the vehicle with your personal remote control.<
If you make use of this method of adjustment, be sure that the foot-
well behind the driver's seat is unob-structed before unlocking the vehicle. If you fail to do so, persons or objects could be injured or damaged if the seat should move backward.<
Passenger side exterior mirror tfunction(automatic curb monitor)
1 Move the mirror selector switch 1 t
460us3
01
the "driver's mirror" position.2 When the selector lever is placed i
"Reverse," the passenger-side mirrtilts downward. This allows the drivto see the area directly adjacent tothe vehicle during parking (curbs, etc.).
You can deactivate this automatic feature: set the mirror selection switcto the "passenger side" position.
52nMirrors
ior rearview mirror uce glare from behind when
g at night, tilt the mirror by turning tton.
InterTo reddrivinthe bu
463us0
11
ed vanity mirror*own the sun visor and slide the
panel to the side as required.
irror lamps operate from ignition osition 1.
isors can be folded down toward the hield or swiveled out against the indows.
LightFold dcover
The mkey p
Sun vThesewindsside w
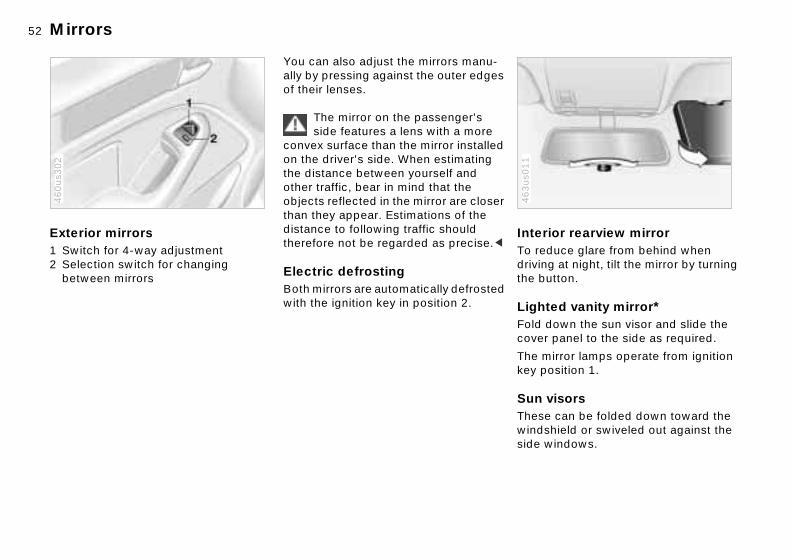
Exterior mirrors1 Switch for 4-way adjustment2 Selection switch for changing
between mirrors
460us3
02
You can also adjust the mirrors manu-ally by pressing against the outer edgesof their lenses.
The mirror on the passenger's side features a lens with a more
convex surface than the mirror installedon the driver's side. When estimating the distance between yourself and other traffic, bear in mind that the objects reflected in the mirror are closerthan they appear. Estimations of the distance to following traffic should therefore not be regarded as precise.<
Electric defrosting
Both mirrors are automatically defrostedwith the ignition key in position 2.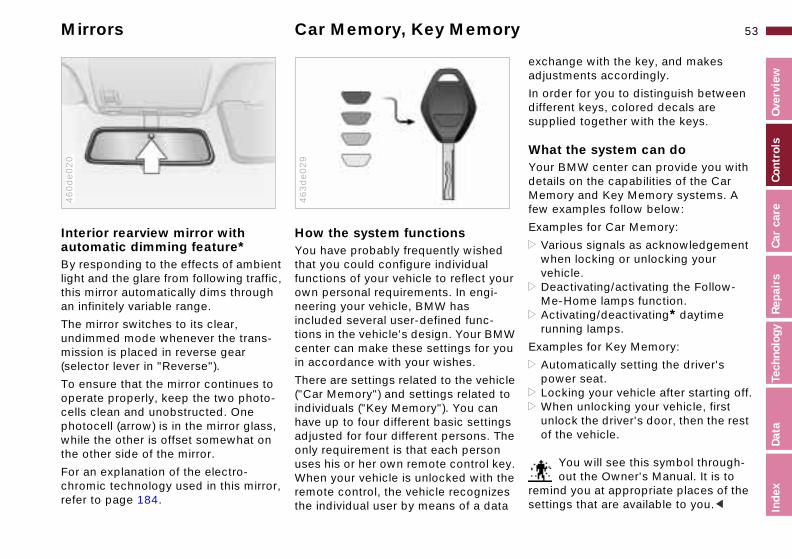
53n
airs
Car
care
Cont
rols
Over
view
Mirrors Car Memory, Key Memory
hange with the key, and makes stments accordingly.
rder for you to distinguish between rent keys, colored decals are
plied together with the keys.
at the system can dor BMW center can provide you with ils on the capabilities of the Car ory and Key Memory systems. A
examples follow below:
mples for Car Memory:
arious signals as acknowledgement hen locking or unlocking your ehicle.eactivating/activating the Follow-
ur
excadju
In odiffesup
WhYoudetaMemfew
Exa
> Vwv
> D
Inde
xDa
taTe
chno
logy
Repe-Home lamps function.
ctivating/deactivating* daytime nning lamps.
mples for Key Memory:
utomatically setting the driver's ower seat.ocking your vehicle after starting off.hen unlocking your vehicle, first
nlock the driver's door, then the rest f the vehicle.
You will see this symbol through-out the Owner's Manual. It is to
ind you at appropriate places of the ings that are available to you.<
W u
le o
s he y.
he s a
M> A
ru
Exa
> Ap
> L>W
uo
remsett
Interior rearview mirror with automatic dimming feature*By responding to the effects of ambient light and the glare from following traffic,
460d
e020
How the system functionsYou have probably frequently wishedthat you could configure individual functions of your vehicle to reflect yo
463d
e029
this mirror automatically dims through an infinitely variable range.
The mirror switches to its clear, undimmed mode whenever the trans-mission is placed in reverse gear (selector lever in "Reverse").
To ensure that the mirror continues to operate properly, keep the two photo-cells clean and unobstructed. One photocell (arrow) is in the mirror glass, while the other is offset somewhat on the other side of the mirror.
For an explanation of the electro-chromic technology used in this mirror, refer to page 184.
own personal requirements. In engi-neering your vehicle, BMW has included several user-defined func-tions in the vehicle's design. Your BMcenter can make these settings for yoin accordance with your wishes.
There are settings related to the vehic("Car Memory") and settings related tindividuals ("Key Memory"). You can have up to four different basic settingadjusted for four different persons. Tonly requirement is that each personuses his or her own remote control keWhen your vehicle is unlocked with tremote control, the vehicle recognizethe individual user by means of a dat

54n
For your safety, please comply with the following instruction for ng safety belts. If you do not, the belts may not be able to provide aximum protection. The
ing information also applies to assengers: allow more than one person to a single safety belt. Never allow s or small children to ride in a nger's lap. twisting the belt while routing it across your hips and shoulder. t allow the belt to rest against r fragile objects. Never route the
cross your neck, do not run it
Safety belts
Drive with your safety belt onFasten your safety belt at the beginning of every trip.
460us0
74
Safety belt height adjustmentYou can adjust the safety belts to fit your own physical dimensions by using the safety belt height adjustment.
460d
e136
s sharp edges and be sure that lt does not become caught or
ed. wearing clothing that prevents lt from fitting properly. Pull on the eriodically to readjust the tension s your shoulder. In the event of a l impact, a loose lap belt could over your hips, leading to abdom-jury. In addition, the safety belt's int effectiveness is reduced if the worn loosely.tant mothers should also wear fety belt, taking special care to
the lap belt over the lower hips, it does not exert pressure on the inal area.<
To fasten: Make sure you hear the catch engage in the belt buckle.
To release: Press the red button in the buckle. Hold the belt and guide it back into its reel.
The two rear safety belt buckles which are integrated in the rear seat are for passengers sitting on the left and right. The belt buckle with the word "CENTER" is intended exclusively for passengers sitting in the middle.
For care instructions, refer to page 149.
Slide the button downward or upward.
wearisafetytheir mfollowyour pNeverwear infantpasseAvoidfirmlyDo nohard obelt a
acrosthe bejammAvoidthe bebelt pacrosfrontaslide inal inrestrabelt isExpecthe saplacewhereabdom
55n
airs
Car
care
Cont
rols
Over
view
Safety belts Airbags
ront airbags for driver and assengeride impact Head Protection System r driver and passenger (front)
d ig-
r
m 1 Fp
2 Sfo
460d
e140
Inde
xDa
taTe
chno
logy
Repide airbags for driver and pasenger
ront and rear*)
tective effect front airbags supplement the three-t safety belts by providing additional
tection for the front-seat occupants e event of a severe frontal collision n the protection afforded by the s alone may no longer be sufficient. Side impact Head Protection tem and side airbags help provide tection in the event of a side impact. h of the side airbags is designed to support the upper body.
3 S(f
ProThepoinproin thwhebeltTheSysproEachelp
For child restraint system installation, refer to page 61.
If the safety belt system has been subjected to the stresses involved
in an accident or otherwise damaged: have the entire safety belt mechanism replaced by your BMW center, including the safety belt tensioner. In addition, have your BMW center inspect the safety belt anchors. If a child restraint system was in the vehicle during an accident, consult the manu-facturer's instructions regarding replacement.<
Vehicles with through-loading
Child restraint systems* Never install a rear-facing child restraint device on the front
passenger seat. If you do so, the chilcould be injured when the airbag is trgered.Children should always ride in the reaand the restraint systems should be secured with the outer belts.The centre seat belt should only be used when it is necessary to secure three child restraint systems.Do not modify the child restraint systein any way. If you do so, it will not provide your child with maximum protection.<
system: please comply with the instructions for the center safety belt on page 109.

56nAirbags
g correctly with airbagsFor your safety, comply with the following instructions for the s. If you do not, the airbags may able to provide their maximum
ction. All passengers in the vehicle d be aware of and comply with this ation:
irbags are supplemental restraint es designed to provide extra ction; they are not a substitute for belts. Wear your safety belt at all . The airbags will not be triggered event of a minor accident, a le roll-over, or collisions from the n these instances, the safety belt
-
Sittin
airbagnot beproteshoulinformThe adevicprotesafetytimesin thevehicrear. I
provides optimal protection. Airbags are located under cover panels in the steering wheel, in the dashboard, in the side trim panels in the front and rear, in the roof panels, and in the sides of the inside roof lining.Adjust your seat to a position that provides maximum distance betweennd the steering wheel, the instru-panel and the door while still ng comfortable and safe access to icle controls.
oid sustaining hand and arm inju-lways grasp the steering wheel rim with the hands at the 9 and
ock positions.
you ament allowiall vehTo avries, aon the3 o'cl
The side airbags in the rear passenger area* of your vehicle
may already have been deactivated either at the time of manufacture or by a
460d
e141
Operational statusThe indicator lamp in the instru-ment cluster displays the operational status of the airbag
system when the ignition key is in posi-tion 1 and higher.
System operational:
> The indicator lamp comes on briefly then goes out.
System malfunction:
> The indicator lamp fails to come on.> The indicator lamp comes on briefly
before going out, and then lights up again.
BMW center. You may have them acti-vated if you desire to do so. Please contact your BMW center for additional information.<
The illustration depicts schematically the primary directions of vehicle impact that initiate an airbag deployment.
The airbags will not be triggered in the event of a minor accident, a
vehicle roll-over, or collisions from the rear.c
If there is a system malfunction, there is a risk that the airbags will not be trig-gered within their normal response range, even if the level of impact would normally have triggered them.
Have your BMW center inspect the system immediately.
The airbag indicator lamp also comes on if the safety belt
tensioners have been triggered.<

57n
airs
Car
care
Cont
rols
Over
view
Airbags
W center. Labels in the rear door ning should indicate the status of r rear seat side airbags. If you are ertain of their status, or wish to have airbags activated or deactivated, se contact your BMW center.<
n when all these guidelines are erved, there is still a small residual of injuries to the face, hands and s occurring from airbag deployment olated instances. The ignition and tion noise may induce a mild porary hearing loss in sensitive indi-als.
additional information concerning airbag system, refer to pages 152
it ed
t or -
-ild ly on
BMopeyouuncthe plea
Eveobsriskarmin isinflatemvidu
Forthe
Inde
xDa
taTe
chno
logy
Rep 179.
rd i-n
. ar
e
r
and
Do not place your hands on the center pad.Never allow any objects to obstruct the area between the airbag and an occu-pant.Do not use the cover panel above the passenger-side airbag as a storage area.Do not apply adhesive materials to the cover panels of the airbags, cover them or modify them in any other way.Do not install a rear-facing child restraint system in the front passenger seat of this vehicle. Children under 13 years of age and children less than 5 feet (150 cm) tall should ride only in the rear seat.
At all times, occupants should supright and be properly restrain
(infants and small children in appro-priate child restraint systems; larger children and adults using the safety belts). Never let an occupant's head rest near or on a side airbag becausethe inflating airbag could cause a serious or fatal injury. Please note thathe word "Airbag" imprinted on the dotrim panel indicates the airbag's location.Accident research shows that the safest place for children in an automobile is in the rear seat. However, a chsitting in the rear seat and not properrestrained may place his or her head
Infants or small children should never be held on the lap of a passenger.If your vehicle is equipped with side airbags in the rear passenger area, be sure that child restraints are mounted correctly and provided with the greatest-possible distance between the airbags in the side trim panels. Do not allow children to lean out of the child's seat in the direction of the side trim panels. If they do so, serious injuries can occur if the airbag is triggered.<
or near the airbag, if so equipped. Foexample, a child — even though belte— may fall asleep with his or her headagainst the side airbag. It may be diffcult for a driver to ensure that childrein the rear seat will remain properly positioned at all times and not place their heads on or near the side airbagTherefore, we recommend that the reseat side airbags, if so equipped, be deactivated if children will travel in threar seat.The rear seat side airbags may already have been deactivated, eitheat the time of manufacture or by a

58nAirbags
This is the right way for a child to sit in a child restraint when rear side airbags (arrow) are provided.462us0
12
This is the right way for a larger child tosit wearing the safety belt when rear side airbags (arrow) are provided.
462u
s013
59n
nolo
gyRe
pair
sCa
r ca
reCo
ntro
lsOv
ervi
ew
Transporting children safely
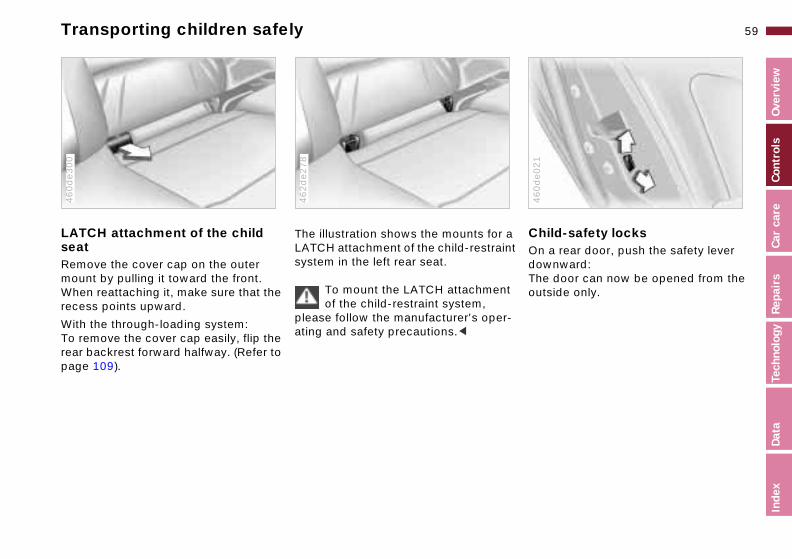
ild-safety locksa rear door, push the safety lever nward: door can now be opened from the ide only.
a int
t
r-
ChOn dowTheouts
460d
e021
Inde
xDa
taTe
ch
LATCH attachment of the child seatRemove the cover cap on the outer mount by pulling it toward the front.
460d
e300
The illustration shows the mounts forLATCH attachment of the child-restrasystem in the left rear seat.
To mount the LATCH attachmen462d
e278
When reattaching it, make sure that the recess points upward.
With the through-loading system:To remove the cover cap easily, flip the rear backrest forward halfway. (Refer to page 109).
of the child-restraint system, please follow the manufacturer's opeating and safety precautions.<

60nTransporting children safely
ize the distance between the and the child. Older children
d be tightly secured with the safety ounger children should be
ed in an appropriate forward- child restraint system that has een properly secured with a safety
install a rear-facing child restraint in the front passenger seat.
rongly urge you to carefully read omply with the instructions for lation and use provided by the restraint's manufacturer whenever se such a device.re that all occupants (of all ages) n properly and securely restrained times.c
t
maximairbagshoulbelt. Ysecurfacingfirst bbelt.NeversystemWe stand cinstalchild you uBe suremaiat all
All rear seating positions in your vehicle meet the recommendations of
1819, an industry recommended ce for securing child restraint
s in motor vehicles.
-
SAE Jpractisystem
Commercially available child seats complying with the legal standard are designed to be secured with a lap belt or with the lap belt portion of a combi-
380u
s123
If the respective seating position is fitted with a headrest lift the headrest and pass the tether strap between the headrest and the seat back.
Adjust the tether strap according to thechild restraint manufacturer's instruc-tions.
Before installing any child restraindevice or child seat, please read
the following:Never install a rearward-facing child restraint system in the front passenger seat of this vehicle.Your vehicle is equipped with an airbagsupplemental restraint system for the
nation lap/shoulder belt. Improperly or inadequately installed restraint systems can increase the risk of injury to children. Always read and follow the instructions that come with the system.If you use a child restraint system with a tether strap, three additional tether anchorage points (refer to the arrows in the illustration) have been provided. Depending on the location selected for seating in the rear passenger area, attach the tether strap to the corre-sponding anchorage point to secure the child restraint system. Remove the cover first on the middle location.
front passenger. Because the backreston any rear-facing child restraint system(of the kind designed for infants under 1 year and 20 lbs.) would be within the airbag's deployment range, you shouldnever mount such a device in the front passenger seat, since the impact of theairbag against the child restraint's backrest could lead to serious or fatal inju-ries.If it is necessary for a child (not an infant) to ride in the front seat, certain precautions should be taken. First, move the passenger seat as far away from the dashboard as possible. This important precaution is intended to

61n
yRe
pair
sCa
r ca
reCo
ntro
lsOv
ervi
ew
Transporting children safely
lock the safety beltease the safety belt, remove the d's seat and pull the safety belt out s end position on the belt retractor.
m elt e
-
UnRelchilto it
Inde
xDa
taTe
chno
log
Child seat securityAll of the rear belt retractors and the front passenger's safety belt can be locked for mounting and securing child
462u
s014
Lock the safety beltExtract the entire length of the belt frothe inertia reel mechanism. Allow thereel to retract the belt somewhat andengage the buckle, then tighten the bagainst the child restraint system. Thretraction mechanism is now locked.The belt cannot be extracted further.Always comply with the installation instructions provided by the manufacturer of the child restraint system.
restraint systems.
Information pertaining to this is located in the immediate vicinity of the buckle latch of each safety belt.

62n
re startingage the parking brake sure that the shift lever is in utral" or "Park" if the vehicle is ipped with an automatic transmis- ress the clutch pedal.
Do not run the engine in enclosed areas. The exhaust gases contain n monoxide, an odorless and ess, but highly toxic gas. hing the exhaust gases poses an
e health risk, and can lead to sciousness and death.t leave the vehicle unattended
Steering/Ignition lock Starting the engine
0 Steering lock engaged The key can only be inserted or removed in this position.
460d
e022
1 Steering lock disengaged Turning the steering wheel slightly to the right or left often makes it easier to turn the key from 0 to 1.Individual electrical devices are ready for operation.
2 Ignition onAll electrical equipment and accesso-ries are available for use.
3 Starting the engine
Vehicles with manual transmis-sion: depress the clutch when
starting the vehicle. A lockout prevents
he engine running. An unat-d vehicle with a running engine sents a potential safety hazard.<After removing the key, turn the steering wheel slightly to the left or right until the lock engages.
If the key is not removed, an acoustic signal is sounded after the driver's door has been opened.
Vehicles with automatic transmis-sion:
Do not move the selector lever from the "Park" position until the engine is running (ignition key at position 2).In order to turn the key back to posi-tion 0 or to remove it, move the selector lever into position "Park" first (Inter-lock).<
the engine from starting if the clutch is not depressed.c
Befo> Eng> Be
"Neequsion
> Dep
carbocolorlBreatextremunconDo no
with ttenderepre
63n
airs
Car
care
Cont
rols
Over
view
Starting the engine Switching off the engine
n the ignition key to position 1 or 0.
Do not remove the ignition key while the vehicle is still moving.
u did so, the steering lock would age when the steering wheel is ed.en you leave the vehicle, always ove the ignition key and engage the ring lock.icles with manual transmission:ays engage the parking brake when king on slopes and inclined aces. Placing the lever in 1st gear everse may not provide adequate stance to rolling.icles with automatic transmission:
t
y
he
y
Tur
If yoengturnWhremsteeVehAlwparsurfor rresiVeh
Inde
xDa
taTe
chno
logy
Repe the selector lever in "Park."<
s e,
ch t
Plac
Do not press the accelerator pedal while starting the engine.
Do not actuate the starter for too short a time, but do not turn it for
more than approx. 20 seconds. Release the ignition key immediately when the engine starts.Do not allow the engine to warm up by leaving it running while the vehicle remains stationary. Instead, begin driving immediately at a moderate engine speed.<
If the engine does not start on the firsattempt (if it is very hot or cold, for instance):
> Press the accelerator pedal halfwadown while engaging the starter.
Cold start at extremely low tempera-tures, from approx. +5 7 (-15 6) and at elevations above 3,300 feet (above 1,000 meters):
> On the first start attempt, engage tstarter for a longer period (approx.10 seconds).
> Press the accelerator pedal halfwadown while engaging the starter.
Engine idle speed is controlled by theengine computer system. Increased
speeds at startup are normal and should decrease as the engine warmup. If engine speed does not decreasservice is required.To prevent the battery from discharging, always deactivate elec-trical devices that are not in use. Switthe ignition off when the vehicle is nobeing driven.

64nParking brake
To engageThe parking brake is designed primarily to prevent the vehicle from rolling when
460us0
24
If, in exceptional circumstances, it should be necessary to engage
the parking brake while the vehicle is in motion, do not pull the lever with excessive pressure. Keep your thumb pressed against the release button while carefully pulling the lever up to apply moderate pressure.Excessive pressure can lead to over-braking and loss of traction (fishtailing)at the rear axle.The brake lamps do not come on whenthe parking brake is engaged.Vehicles with manual transmission:Always engage the parking brake when parking on slopes and inclined
it is parked. It operates against the rear wheels.
The lock engages automatically when you lift the lever. The indicator lamp in the instrument cluster lights up in igni-tion key position 2. Refer to page 21.
To releasePull up slightly on the lever, press the button (arrow) and lower the lever.
surfaces, since even placing the lever in 1st gear or reverse may not provide adequate resistance to rolling.Vehicles with automatic transmission: Place the selector lever in "Park."<
To avoid corrosion and one-sided braking, apply the parking brake lightlyfrom time to time when coasting to a standstill (at a traffic signal, for instance), provided that it is safe to do so.

65n
airs
Car
care
Cont
rols
Over
view
Manual transmission
le -
l n
on e . e
Inde
xDa
taTe
chno
logy
Rep
Press the clutch pedal all the way down each time you shift, pressing the manual-shift gear lever into its proper end position.
360d
e044
Reverse Select "Reverse" only when the vehicis at a complete stop. Press the shiftlever to the left to overcome the resistance.
As you do this, the backup lamps wilturn on automatically when the ignitiokey is in position 2.
Do not hold the vehicle in place slopes by slipping or "riding" th
clutch. Use the parking brake insteadOtherwise, riding the clutch will caustremendous wear and tear to the clutch.<
Depress the clutch when starting the vehicle, too, otherwise, lockout will prevent the engine from starting if the clutch is not depressed.
The shift lever's neutral plane (dot in the illustration) is located between 3rd and 4th gears.
When shifting from each gear into "Neutral," the shift lever returns auto-matically to this neutral position because of its spring loading.

66nAutomatic transmission with Steptronic*
While the vehicle is stationary and before shifting out of "Park" or ral," depress the footbrake in to disengage the selector lever's
echanism (Shiftlock). the footbrake down until starting therwise the vehicle will "creep" a drive position is engaged.<
If you leave the vehicle with the engine running, move the selector to the "Park" or "Neutral" position pply the parking brake. If you fail this, the vehicle could move. t leave the vehicle unattended he engine running. An unattended le with a running engine repre- a major potential safety hazard.<
rkt only when the vehicle is nary. The transmission locks to nt the rear wheels from turning.
verset only when the vehicle is nary.
utral
"Neutorderlock mHold off. Owhen
lever and ato do Do nowith tvehicsents
P PaSelecstatiopreve
R ReSelecstatio
N Ne
t only if your journey is interrupted ong period.Selecfor a l
You have the option of driving with a normal automatic transmission or switching to manual.
When you move the selector lever from the "D" position to the left into the M/S range, the performance-oriented shift programs of the automatic transmission are engaged. As soon as you briefly touch the selector lever in the "+" or "–" direction, Steptronic changes the gear. The manual mode is engaged. When-ever you want to use automatic again, just shift the selector lever toward the right to position D.
The automatic transmission with Step-tronic is equipped with ATC (Adaptive
Selector lever positionsP R N D M/S + –
463d
e061
Transmission Control). ATC reacts with precision to your individual driving style and the current driving conditions. It is for this reason that various shift programs are used.
For additional details concerning the ATC, please refer to the chapter "Advanced technology" on page 178.
Starting the engineThe engine can only be started in selector lever positions P ("Park") or N ("Neutral").
Range selectionA detent prevents inadvertent shifts intocertain selector lever positions. To disengage the detent, press the buttonon the front of the shift knob (arrow).

67n
Data
Tech
nolo
gyRe
pair
sCa
r ca
reCo
ntro
lsOv
ervi
ew
Automatic transmission with Steptronic*
hifts or downshifts will only be ied out by the ATC at appropriate ine speeds and road speeds. If the ine speed is too high, for instance, a nshift will not be executed. The gear cted will appear briefly in the instru-t cluster followed by the current
r.
To accelerate quickly in the manual mode (to pass another
icle, for instance), shift down manu- or employ the kickdown mode.<
ting from M/S to the selector lever itions P, R and N is possible only by g through D.
is -
tic
-
Upscarrengengdowselemengea
vehally
Shifposgoin
Inde
x
D Drive (automatic shift program)This position is designed for driving under all normal operating conditions. All forward gears are available, the Adaptive Transmission Control (ATC) is fully operational.
"Kickdown"In the "Kickdown" mode, you achieve the maximum performance.To activate this mode, depress the accelerator pedal beyond the full-throttle position, at which a resistance point must be overcome.
M/S Manual operation and Sport ProgramShifting from D into M/S activates theSport Program. This is indicated by
463d
e062
"SD" in the gear selection display. Thposition is recommended for a performance-oriented driving style.
With the first brief touch, the automatransmission shifts from the Sport Program to the manual mode.When you move the selector lever forward in the "+" direction, the transmission shifts up. When the lever is moved back in the "–" direction, the transmission shifts down. M1 to M5 appear in the gear indicator.

68nAutomatic transmission with Steptronic*
ronic transmission control leIf the indicator lamp comes on, there is a malfunction in the transmission system.
the vehicle to a stop, select trans-n position "P," set the parking
and turn the engine off (ignition position 0).
few seconds, then start the e.indicator lamp goes out after a econds, normal transmission mance has been restored. You ontinue to drive as usual.indicator lamp does not go out, ector lever positions can still be ted, however in the forward ons the vehicle has limited mance as it drives only in 3rd th gear.
happens, avoid extreme engine and consult the nearest BMW r.
Electmodu
Bringmissiobrakekey to
Wait aenginIf the few sperformay cIf the all selselecpositiperforand 4
If thisloadscente
Do not work in the engine compartment when a drive gear rd or reverse) is engaged. If you s, the vehicle could move.<
wing or jump-starting, refer to the ation beginning on page 173.
(forwado thi
For toinform
In the following situations, the Step-tronic "thinks" for you in the manual mode:
> In order to prevent the engine from overrevving, the transmission shifts automatically to the next higher gear just before the engine speed cutoff point.
> If you do not do anything to inter-vene, it will automatically downshift at lower speeds.
> In kickdown, it will downshift into the lowest gear possible, depending on the engine speed.
> According to the situation, for instance in wintry conditions, the
Available displays P R N D SD M1 M2 M3 M4 M5
460us1
43
vehicle can be started in 2nd or 3rd gear.
69n
Data
Tech
nolo
gyRe
pair
sCa
r ca
reCo
ntro
lsOv
ervi
ew
Turn signal indicator/Headlamp flasher Wiper/Washer system
ipers retracted
termittent mode or rain sensor
ormal wipe
ast wipe
rief wipe
leaning windshield
otary dial for control of the wipe terval or the sensitivity of the rain
ensor
er
0 W
1 In
2 N
3 F
4 B
5 C
6 Rins
460d
e023
Inde
x
1 High beams (blue indicator)
2 Headlamp flasher (blue indicator)
3 Turn signal indicator (green indicator lamp accompanied by periodic
460d
e085
To signal brieflyPress the lever up to but not beyondthe detent. It then returns to the centposition when released.
clicking sound from the relay)
If the indicator lamp and the clicking from the relay are both faster than normal, one of the turn signal indicators has failed.

70nWiper/Washer system
rmal wiper speed the vehicle is stationary, the s switch automatically to intermit-ipe (not on vehicles with rain r).
st wiper speed the vehicle is stationary, the s operate at normal speed (not on les with rain sensor).
aning windshieldystem sprays washer fluid against indshield and activates the wipers rief period.
2 NoWhenwipertent wsenso
3 FaWhenwipervehic
5 CleThe sthe wfor a b
pull the lever only briefly, the sprays washer fluid onto the
hield without activating the s.
If yousystemwindswiper
1 Intermittent mode or rain sensor*
Intermittent mode:
460d
e023
can concentrate fully on the traffic conditions. This is especially importantunder adverse weather conditions.
To activate the rain sensor:
In ignition key position 1, move the lever to position 1. The wipers travel once across the windshield, regardlessof the weather.
You can leave the lever permanently inposition 1, and then activate the rain sensor from ignition key position 1. To do this,
> turn rotary dial 6 briefly or> use cleaning windshield 5.
To adjust the sensitivity of the rain
You can use rotary dial 6 to select from four wipe intervals.In addition, the wipe interval automati-cally adapts to variations in road speed.Rain sensor:
The rain sensor is positioned on the windshield, directly ahead of the inte-rior rearview mirror. When the rain sensor is activated, the windshield wiper is controlled automatically, depending on the degree of wetness of the windshield (in both snow and rain). You do not have to be concerned with switching the windshield wiper on or off or adjusting the wipe interval between intermittent and full wipe. Instead, you
sensor:Turn rotary dial 6.
Deactivating the rain sensor:Put lever in position 0.
Turn the rain sensor off when passing through an automatic car
wash. Failure to do so could result in damage caused by undesired wiper activation.<

71n
airs
Car
care
Cont
rols
Over
view
Wiper/Washer system Rear window defroster
deactivatess the button if the indicator lamp is
up er
To Preon.
Inde
xDa
taTe
chno
logy
Rep
w
Cleaning headlamps* When the vehicle's lighting system is switched on, the headlamps will also be cleaned every fifth time cleaning wind-shield 5 is activated.
Do not use the washers if there is any danger that the fluid will
freeze on the windshield. If you do so, your vision could be obscured. Use an antifreeze agent. Refer to page 138. Do not use the washers when the reser-voir is empty. If you do so, the washer pump could be damaged.<
Windshield washer jets
The illustration shows the button set-for vehicles equipped with automaticclimate control. For other layouts, refto page 92.
462us0
36
The windshield washer jets are heated* automatically when the ignition key is in position 2.
To activatePress the button: as long as the indi-cator lamp remains on, the rear windodefroster continues at high-output (rapid thaw).
After the indicator lamp goes out, thedefroster continues operating at reduced power for a limited period before deactivating automatically.

72nCruise control*
celerate button 3 briefly: the cruise control is active, le speed is reduced by approx. ph (approx. 1 km/h) every time p the button.
and hold button 3:he cruise control active, the
automatically reduces the le opening to slow the vehicle. you release the button, the
registers and maintains the t speed.
To dePressWhenvehic0.6 myou ta
PressWith tsystemthrottWhensystemcurren
You can store and automatically main-tain any desired vehicle speed above approx. 20 mph (30 km/h).
460d
e077
To store and maintain speed or to accelerate Press button 2 briefly:The system registers and maintains thecurrent vehicle speed. The speed will now be increased by approx. 0.6 mph (approx. 1 km/h) every time you tap thebutton.
Press and hold button 2:The vehicle accelerates without pres-sure on the accelerator pedal. When you release the button, the system registers and maintains the current speed.
If, on a downhill gradient, the
Do not use cruise control on twisting roads, when high trafficdensity prevents driving at a constant speed, when the road surface is slick (snow, rain, ice), or when the road surface is loose (rocks, sand).<
To activate the system From ignition key position 1:Press button 1. The indicator lamp in the instrument cluster comes on. You can now use the cruise control.
engine braking effect is not suffi-cient, the controlled speed may be exceeded. Speed may drop on uphill grades if the engine output is insuffi-cient.<
73n
airs
Car
care
Cont
rols
Over
view
Cruise control*
deactivate the system en the cruise control has been celed, press button 1 again. indicator lamp goes off and the ed speed is canceled.
u
To WhcanThestor
Inde
xDa
taTe
chno
logy
Rep
To cancel the cruise control When the system is activated, press and hold button 1. The indicator lamp stays on. You can use the cruise control again as desired.
In addition, cruise control is canceled automatically:
> if the brakes are applied > if the clutch is depressed or the auto-
matic transmission selector lever is moved from "Drive" to "Neutral"
> if you exceed or fall below the programmed speed for an extended period (by depressing the acceler-ator, for example).
To resume the stored settingPress button 4:The vehicle accelerates to and main-tains the last speed stored. When yoturn the ignition key to position 0, thestored speed is deleted from the system's memory and the system is deactivated.
74n
tes the current fuel consumption g (in l/100 km on Canadian vehi- You can check your current g style to see whether it is condu-
Odometer Tachometer Energy Control
1 Odometer You can activate the displays shown in the illustration with the ignition key in
460us1
44
Avoid engine speeds in the red warning zone of the gauge.
To protect the engine, the fuel supply is
460us0
79
o economy and minimum exhaust ions.
the vehicle is stationary, the y goes to "Maximum" (zero on ian models).
position 0 by pressing the button in the instrument cluster (arrow).
2 Trip odometerTo reset the trip odometer to zero, press the button (arrow) with the igni-tion key in position 1 and up.
automatically interrupted in this zone; you will notice a loss of power.
Indicain mpcles).drivin
460us0
80
cive temiss
WhendisplaCanad

75n
airs
Car
care
Cont
rols
Over
view
Fuel gauge Temperature gauge Service Interval Display
aining distance for service displays shown in the illustration ear for a few seconds from ignition position 1 or after the engine is
.
RemTheappkey
460us1
12
Inde
xDa
taTe
chno
logy
Repted.
next service due appears with the sage OILSERVICE or INSPECTION, ther with the remaining distance re the service is due.
computer bases its calculations of remaining distance on the previous ing style.
shing message and a "–" in front of number mean that the service rval has already been exceeded by distance shown on the display. se contact your BMW center for an ointment.
l.
. di-
s to
nt
star
ThemestogebefoThethe driv
A flathe intethe Pleaapp
When you switch on the ignition, the indicator lamp comes on briefly to confirm that the system is stationary.
Once the indicator lamp begins to light
460us0
81
BlueThe engine is still cold. Drive at moderate engine and vehicle speeds
460d
e082
up continuously, there are still approx. 2 gallons (8 liters) of fuel in the fuel tank.
Tank capacity: refer to page 195.
If the tilt of the vehicle varies (extended driving in mountainous areas, for example), there may be slight fluctua-tions of the needle.
Fill the fuel tank well before it is empty. Driving to the last drop of
fuel can result in damage to the engine and/or the catalytic converter.<
RedWhen you switch on the ignition, the indicator lamp comes on briefly to confirm that the system is operationa
If the lamp comes on while operatingthe vehicle: the engine is overheatedStop and switch the engine off immeately and allow it to cool down.
Between the blue and red zonesNormal operating range. It is not unusual for the needle to rise as far athe edge of the red zone in responsehigh outside temperatures or severe operating conditions. Checking coolalevel: refer to page 142.

76n
stmentsignition key position 1.
t ahead: turn the right knob to the
Check Control Clock
The following information and/or condi-tions are indicated using symbols, starting with the ignition key position 2, until the condition has been corrected.
460d
e083
If you wish to have a permanent time display, you can make this adjustment in the radio display (refer to the Radio Owner's Manual).
You can adjust the clock and the time display in the car radio as follows.
t back: turn the right knob to the
djustment speed will increase the r you continue to hold the knob.
ange the display mode: press the briefly. time you press the knob, the display alternates between the ur or 24-hour mode.
ition key position 0: the time is yed for a few seconds after you the left button (refer to
eter" on page 74).
1 Inspect the low beam and high beam headlamps, as well as the side lamps
2 Door open
3 Luggage compartment lid open
4 Check brake and tail lamps.
After the completion of a trip and when the driver's door is opened, an acous-tical signal is given for "Lamps on" if the lamps have not been switched off.
When you open the driver's door after stopping with the lights still on, a warning signal sounds for LIGHTS ON.
AdjuFrom
To se
460us0
78
right.
To seleft.The alonge
To chknob Everyclock12-ho
In igndisplapress"Odom

77n
airs
Car
care
Cont
rols
Over
view
Computer
*
warning
e outside temperature drops to rox. +37.5
7
(+3
6
), the computer tches automatically to the outside perature display. In addition, a al sounds as a warning and the lay flashes for a brief period.
warning is repeated whenever the perature has reached at least
7
(+6
6
) following the last ning and then drops back to .5
7
(+3
6
).
The ice warning does not alter the fact that surface ice can form at
peratures above +37.5
7
(+3
6
),
-
IceIf thappswitemsigndisp
Thetem+43war+37
tem
Inde
xDa
taTe
chno
logy
Repridges or shaded road surfaces, for
ance.<
is on binstMode selectionFrom ignition key position 1, you can call up information from the computer using the button in the turn signal lever.
460d
e084
Outside temperature You can change the units of measurement for the outside temperature display (6/7) by pressing the right-
460us1
46
By pressing the button briefly in the direction of the steering column, you can call up a new function for display.
The displays appear in the following order:Time of day, outside temperature, average fuel consumption, cruising range, average vehicle speed.
The function that was last selected will be displayed when the ignition is switched on.
hand reset button in the instrument cluster when the temperature displayactive.

78nComputer*
age speed continue to hold the button on the ignal lever, the average fuel
AverIf youturn s
460us1
49
mption last displayed for that is recalculated from that point in
me spent when the vehicle is nary and the engine is shut off is d for the calculation.
consuspeedtime.
Any tistatioignore
Average fuel consumption If you continue to hold the button on the turn signal lever, the average fuel
460us2
96
Range The computer bases its calculations ofthe cruising range on the previous
460us1
48
consumption last displayed is recalcu-lated from that point.
driving style and the amount of fuel remaining.
79n
sCa
r ca
reCo
ntro
lsOv
ervi
ew
The PDC does not remove the driver's personal responsibility for ating the distance between the le and any obstacles. Even when rs are involved, there is a blind n which objects cannot be ted. This applies especially in cases where the system aches the physical limits of ultra- measurement, as occurs with tow nd trailer couplings, and in the y of thin and painted objects. in sources of sound, such as a adio, could drown the PDC signal
Park Distance Control (PDC)*
The conceptThe PDC assists you when you back into a parking space. A signal warns you of the distance to an obstacle. To do this, four ultrasonic sensors in the rear bumper measure the distance to the nearest object. The monitoring range of the two corner sensors extends to approx. 2 feet (60 cm) behind the bumper. The two center sensors cover a distance of approx. 4.9 feet (1.50 meters).
The system starts to operate automati-cally about one second after you select reverse with the ignition key in position 2. PDC is deactivated when you shift back
Acoustical signalsThe distance to the nearest object is indicated by a tone sounding at various intervals. As the distance between vehicle and object decreases, the inter-vals between the tones become shorter. A continuous warning tone sounds if the distance to a recognized object is less than 1 foot (30 cm).
The warning signal is canceled after approx. three seconds if the distance to the obstacle remains constant during this time (if you are moving parallel to a wall, for instance).
System malfunctions will be indicated
Inde
xDa
taTe
chno
logy
Repa
irKeep the sensors clean and free of ice or snow in order to ensure ey continue to operate effec-
t apply high-pressure spray to the rs for a prolonged period of time. ain an adequate distance of more pprox. 4 inches (10 cm).<
out of reverse.by a continuous high-pitched tone when the system is activated the first time. Please refer the problem to your BMW center.
evaluvehicsensospot idetecthoseapprosonicbars avicinitCertaloud rtone.<
that thtively.Do nosenso
Maintthan a
80nASC+T
tivating the ASC+T the button; the indicator lamp s on and stays on.
DeacPresscome
460d
e312
lustration shows the arrangement buttons if the vehicle is fully ped. This may vary, depending on uipment actually installed.
following rare situations, it may visable to deactivate the ASC+T rief period:
en rocking the vehicle or starting in deep snow or on loose faces.en driving with snow chains. er also to page 122.
To maintain vehicle stability, always drive with the ASC+T ed on whenever possible.<
The ilof theequipthe eq
In thebe adfor a b
>Whoff sur
>WhRef
switch
The conceptThis system enhances driving stability and traction, especially when you are just starting off, accelerating or on curves. ASC+T recognizes the danger present in traction loss and will increase driving stability and traction by reducing the engine's output, and if necessary, by applying the brakes to the rear wheels.
ASC+T is available as soon as the engine starts up.
Indicator lampThe indicator lamp in the instru-ment cluster goes out shortly after you switch on the ignition.
Refer to pages 21, 22.
Indicator lamp flashes: ASC+T controls the drive and braking forces.
If the indicator lamp fails to go out afterthe engine is started, or comes on during normal driving and stays on: There is a system malfunction or the system was deactivated with the button. Consequently, interventions to increase driving stability (as described
in the preceding column) are not avail-able. However, you can still drive the vehicle perfectly well without ASC+T. Please consult your BMW center in theevent of a malfunction, refer to pages 21, 22.
81n
r ca
reCo
ntro
lsOv
ervi
ew
ASC+T
ndex
Data
Tech
nolo
gyRe
pair
sCa
I
Reactivate the ASC+TPress the button again; the indicator lamp goes out.
The laws of physics cannot be repealed, even with ASC+T. It will
always be the driver's responsibility to drive in a manner that matches road conditions. We therefore urge you to avoid using the additional safety margin of the system as an excuse for taking risks.<
For additional details concerning ASC+T, please refer to the chapter "Advanced technology" on page 179.

82nDSC* – BMW 320i, 325i, 330i
h off the DSC/activate the
the DSC button briefly; the indi-lamp comes on and stays on.
SC has been switched off; ADB is tional.
following exceptional circum-es, it may be effective to deacti-
-
SwitcADBPresscator
The Dopera
In thestanc
460d
e313
he DSC for a short period:
n rocking the vehicle or starting in deep snow or on loose surfacesn driving on snow-covered
des, in deep snow, or on a snow-ered surface that has been ked down from being driven onhen driving with snow chains.
er also to page 122.
ain in traction is achieved by a tion in stabilizing intervention.
vate t
> wheoff
> whegracovpac
> or wRef
The greduc
The conceptDSC maintains vehicle stability, even in critical driving situations.
The system optimizes vehicle stability during acceleration and when starting from a full stop, as well as optimizing traction. In addition, it recognizes unstable vehicle conditions, such as understeering or oversteering, and, as far as is possible within the laws of physics, helps keep the car on a steady course by reducing the engine spped and brake applications to the individual wheels.
The DSC is operational every time you
Indicator lampThe indicator lamp on the instrument panel will go out shortly after the ignition has been
started. Refer to pages 21, 22.
If the indicator lamp flashes: DSC controls the drive and braking forces.
The indicator lamp stays lit:DSC has been switched off by the button; ADB is operational.ADB intervention is not indicated.
The indicator lamp and the brake warning lamp stay lit:DSC, ADB and DBC have been
start the engine. DSC contains the functions of ADB and CBC, refer to page 119.
The ADB (automatic differential braking) copies the function of conventional differential and transverse lock through brake intervention, and increases trac-tion whenever conditions merit, e.g. when driving on snow-covered roads.
If the DSC is switched off the ADB will still be in ready mode.
switched off via the button or are defective.
Indicator and warning lamps forCanadian models.
The vehicle will remain completely operational, however, without DSC. In the event of a fault, please see your BMW center. Refer to pages 21, 22.

83n
epai
rsCa
r ca
reCo
ntro
lsOv
ervi
ew
DSC* – BMW 320i, 325i, 330i
,
Inde
xDa
taTe
chno
logy
R
Switch the DSC and ADB offHold the DSC button down for at least 3 seconds. The indicator and the yellow brake warning lamps will remain on the entire time.
In this case, no interventions to increase stability and traction for engine and brakes are carried out.
To maintain vehicle stability, always drive with the DSC on
whenever possible.<
Switch the DSC and ADB back onPress the button again; the indicator lamp or the indicator lamps will go out.
The laws of physics cannot be repealed, even with DSC. It will
always be the driver's responsibility to drive in a manner that matches road conditions. We therefore urge you to avoid using the additional safety marginof the system as an excuse for taking risks.Whenever the ADB has been activatedthe DSC is switched off and will not perform any stabilizing intervention. Do not make any modifications to the
DSC system. Allow only authorized technicians to perform work on the DSC.<For additional details concerning DSC,please refer to the chapter "Advanced technology" on page 179.

84nDSC – BMW 325xi, 330xi
hing the DSC off the DSC button; the indicator comes on and stays on.
SwitcPresslamp
460d
e313
SC has been switched off and the X is designed for maximum t.
following exceptional circum-es, it may be effective to deacti-he DSC for a short period:
en rocking the vehicle or starting in deep snow or on loose surfacesen driving with snow chains. er also to page 122.
To maintain vehicle stability, always drive with the DSC on ever possible.<
The DADB-outpu
In thestancvate t
>Whoff
>WhRef
when
The conceptDSC maintains vehicle stability, even in critical driving situations.
The system enhances vehicle stability during acceleration and when starting up from a full stop, and optimizes trac-tion as well. In addition, it recognizes unstable vehicle conditions, such as understeering or oversteering, and, as far as is possible within the laws of physics, helps keep the car on a steady course by reducing the RPMs and brake applications to the individual wheels.
The DSC is operational every time you
Indicator lamp flashes: DSC controls the drive and braking forces.
Indicator lamp lights up permanently: DSC has been switched off via the button; ADB-X is operational.ADB-X intervention is not indicated.
If the warning lamp does not go out after pressing the DSC button
repeatedly, then both the DSC and ADB-X are defective. Consequently, interventions to increase driving stability (as described in the precedingcolumn) are not available.<
start the engine. DSC contains the functions of ADB-X and CBC, refer to page 119.
The ADB-X (automatic differential braking) replaces the function of conventional differential and transverse lock through brake intervention, and increases traction whenever conditions merit, e.g. when driving on snow-covered roads.
Indicator lampThe indicator lamp in the instru-ment cluster goes out shortly after you switch on the ignition.
Refer to pages 21, 22.
You can drive perfectly well without DSC. Please contact your BMW centerin the event of a fault, refer to pages 21, 22.

85n
irs
Car
care
Cont
rols
Over
view
DSC – BMW 325xi, 330xi
Inde
xDa
taTe
chno
logy
Repa
Reactivating the DSCPress the button again; the indicator lamp goes out.
The laws of physics cannot be repealed, even with DSC. It will
always be the driver's responsibility to drive in a manner that matches road conditions. This is why you should not use the additional safety margin the system provides as an excuse to take risks.Whenever the DSC has been switched off, it will not perform any stabilizing intervention. Do not make any changes to the DSC. Allow only authorized technicians to
perform service procedures on the DSC.<For additional details concerning DSC, please refer to the chapter "Advanced technology" on page 179.

86nTire Pressure Control (RDC)*
event of loss in tire ure
inflation pressure has dropped icantly over a long period of time is normal for any tire), the indi-
lamp will come on with a yellow
lerts you to have the tires inflated specified pressures as soon as ble.
If you are prompted to check the tire pressure shortly after a tion has been made, this indi-
that the corrected values were curate. Please check the inflation
ure again and make corrections ding to the inflation pressure
In thepressIf the signif(whichcator lamp.
This ato thepossi
correccatesnot acpressaccor
Then activate the system once .<
table.again
The conceptRDC monitors the tire pressures at all four wheels, even when the vehicle is moving. The system provides an alert whenever the inflation pressure drops significantly below the specified pres-sure in one or more tires.
In order for the system to "learn" the correct tire inflation pressure, check the inflation pressure in all tires. Refer to the table of "Tire inflation pressures" (page 28) and correct the pressures if necessary. Then activate the system.
This indicator lamp in the instru-ment cluster will inform you if
Activate the systemDepending on the type of equipment, the switch either has the letters RDC on
460d
e314
the tire pressure is not correct. it or the RDC-symbol.
1 Turn the ignition key to position 2 (do not start the engine).
2 Press the switch long enough for theyellow indicator lamp in the instru-ment cluster to light up for a few seconds.
3 After a few minutes driving time, RDCsets the current inflation pressure in the tires as the target values to be monitored.
You will only have to repeat this proce-dure following a correction of the tire inflation pressure. Otherwise, RDC functions automatically when the igni-tion key is in position 2, and thus oper-ates whenever the vehicle is driven.

87n
logy
Repa
irs
Car
care
Cont
rols
Over
view
Tire Pressure Control (RDC)*
.
n
di-
Inde
xDa
taTe
chno
In the event of a flat tireIf there is a tire failure with loss of pres-sure, the indicator lamp comes on with a red lamp. In addition, an acoustic signal is sounded.
If this occurs, reduce vehicle speed immediately and stop the vehicle in a safe location. Avoid hard brake applica-tions. Do not oversteer. Replace the wheel and flat tire.
The space-saver spare tire is provided for temporary use only in
the event of a tire failure. It does not have RDC electronics and is not moni-tored. A full-size spare tire that has the
Have the tires changed by yourBMW center.
Your BMW center has been trained towork with the RDC system and is equipped with the necessary specialtools.<
System interferenceLocal devices using the same radio frequency can interfere with the RDC
The yellow indicator lamp will come oduring the malfunction.
The indicator lamp also comes on
> in the event of a system fault > if a wheel is mounted without the
appropriate electronics
same dimensions as the tires already mounted on the vehicle is equipped with the necessary RDC electronics, and will be also be monitored once the tires have been mounted and the system activated.<RDC cannot alert you to severe and sudden tire damage caused
by external factors.<
> if, in addition to the spare tire*, adtional wheels with RDC electronicsare on board.
Please contact your BMW center for additional information.

88n
he rotary dial to adjust the illumi- intensity.
Side lamps/Low beams Instrument lightning
Side lampsWith the switch in this position, the front, rear and side vehicle
460us0
35
LAMPS ON warningWhen you open the driver's door after turning the ignition key to position 0, an acoustic signal sounds for a few seconds to remind you that the head-lamps have not been switched off.
Daytime running lamps*If you desire, the light switch can be left in the second position: When the ignition is switched off, the external lighting is also switched off.
lighting is switched on. For lighting on one side for parking as an additional feature, refer to page 89.
Low beam headlamps When you switch the ignition off with the low beam headlamps on, only the parking lamps will
remain on.
"Follow-me-home lighting:" If you actuate the headlamp
flasher after you have parked the vehicle and shut off the engine, the low beams will remain on for a brief period. You can also have this function deacti-vated.<
Turn tnation
460us0
36

89n
pair
sCa
r ca
reCo
ntro
lsOv
ervi
ew
High beams/Parking lamps
Fog lamps Interior lamps
illustration provides an example of interior lamps when equipped with ing lamps.
interior lamps operate automati-y.
rs
ps
Thethe read
Thecall
460d
e039
Inde
xDa
taTe
chno
logy
Re
switch the interior lamps on off manually
ss the button briefly.
u want the interior lamps to remain ll the time, press and hold the on for approximately 3 seconds.
evert to normal operation, press the on briefly.
twell lamps* footwell lamps operate in the same as the interior lamp.
To andPre
If yooff abutt
To rbutt
FooTheway
1 High beams (blue indicator lamp)
2 Headlamp flasher (blue indicator lamp)
3 Parking lamps
460d
e085
Front fog lampsA green indicator lamp appeain the instrument cluster to indicate that the front fog lam
460us0
38
Parking lamp, left or rightAs an additional feature, you can illuminate your vehicle on either side for parking, if you wish to do so:
With the ignition key in position 0, push the lever in the appropriate direction. The lever engages in the turn signal position.
are on.

90nInterior lamps
In order to prevent battery discharge, all of the lamps in the le are switched off automatically x. 15 minutes after the ignition turned to position 0.<
vehicapprokey is
Reading lamps front*The reading lamps can be switched on and off with the switch adjacent to each
463d
e009
Reading lamps rearThe reading lamps can be switched onand off with the switch adjacent to each
460d
e155
lamp. lamp.

91n
airs
Car
care
Cont
rols
Over
view
Inde
xDa
taTe
chno
logy
Rep

92nAir conditioner
460de299

93n
Tech
nolo
gyRe
pair
sCa
r ca
reCo
ntro
lsOv
ervi
ew
Air conditioner
Inde
xDa
ta
1 Air onto the windshield and onto the side windows
2 Air for the upper body area The side rotary dials allow you to open and close the air supply through an infinitely-variable range, while the levers change the air flow direction. The center rotary dial controls the temperature of the air as it flows out. Refer to page 94
3 Air for the front footwell There are also vent outlets for the footwell in the rear as well
4 Air supplyHeating and ventilationd are available starting with position 1. Refer to
page 945 Temperature 94
6 Air distribution toward > the windows > the upper body > the footwell You can also make all intermediate settings. Refer to page 94
7 Rear window defroster 94
8 Air conditioner 94
9 Recirculated-air mode 94
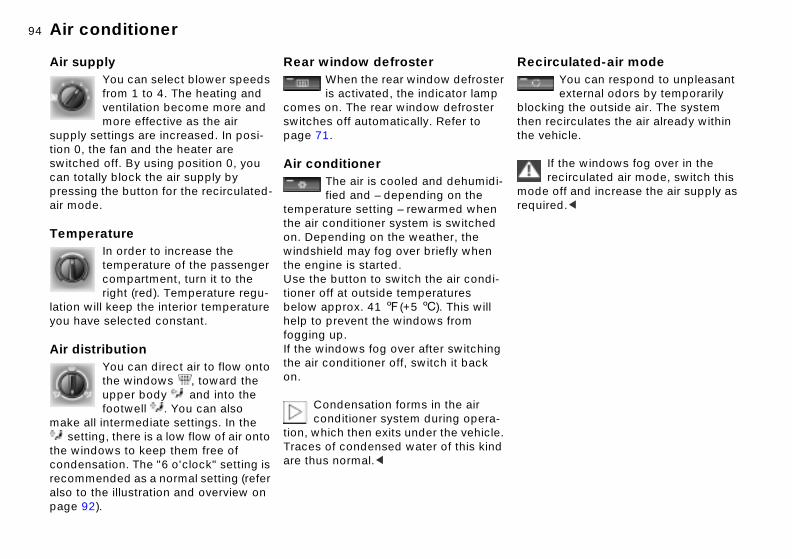
94nAir conditioner
rculated-air modeYou can respond to unpleasant external odors by temporarily
ing the outside air. The system ecirculates the air already within hicle.
If the windows fog over in the recirculated air mode, switch this off and increase the air supply as ed.<
.
Reci
blockthen rthe ve
moderequir
Air supplyYou can select blower speeds from 1 to 4. The heating and ventilation become more and more effective as the air
supply settings are increased. In posi-tion 0, the fan and the heater are switched off. By using position 0, you can totally block the air supply by pressing the button for the recirculated-air mode.
TemperatureIn order to increase the temperature of the passenger compartment, turn it to the
Rear window defroster When the rear window defrosteris activated, the indicator lamp
comes on. The rear window defroster switches off automatically. Refer to page 71.
Air conditionerThe air is cooled and dehumidi-fied and – depending on the
temperature setting – rewarmed when the air conditioner system is switched on. Depending on the weather, the windshield may fog over briefly when the engine is started. Use the button to switch the air condi-
right (red). Temperature regu-lation will keep the interior temperature you have selected constant.
Air distribution You can direct air to flow onto the windows , toward the upper body and into the footwell . You can also
make all intermediate settings. In the setting, there is a low flow of air onto
the windows to keep them free of condensation. The "6 o'clock" setting is recommended as a normal setting (refer also to the illustration and overview on page 92).
tioner off at outside temperatures below approx. 41 7(+5 6). This will help to prevent the windows from fogging up. If the windows fog over after switchingthe air conditioner off, switch it back on.
Condensation forms in the air conditioner system during opera-
tion, which then exits under the vehicleTraces of condensed water of this kindare thus normal.<
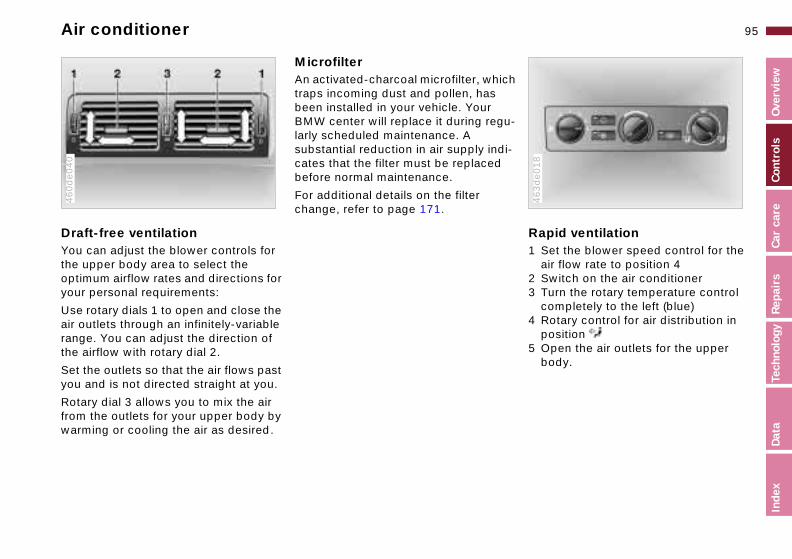
95n
Data
Tech
nolo
gyRe
pair
sCa
r ca
reCo
ntro
lsOv
ervi
ew
Air conditioner
id ventilationet the blower speed control for the ir flow rate to position 4 witch on the air conditioner urn the rotary temperature control ompletely to the left (blue) otary control for air distribution in osition pen the air outlets for the upper ody.
ch
u-
i-
Rap1 S
a2 S3 T
c4 R
p5 O
b
463d
e018
Inde
x
Draft-free ventilation You can adjust the blower controls for the upper body area to select the optimum airflow rates and directions for
460d
e040
Microfilter An activated-charcoal microfilter, whitraps incoming dust and pollen, has been installed in your vehicle. Your BMW center will replace it during reglarly scheduled maintenance. A substantial reduction in air supply indcates that the filter must be replacedbefore normal maintenance.
For additional details on the filter change, refer to page 171.
your personal requirements:
Use rotary dials 1 to open and close the air outlets through an infinitely-variable range. You can adjust the direction of the airflow with rotary dial 2.
Set the outlets so that the air flows past you and is not directed straight at you.
Rotary dial 3 allows you to mix the air from the outlets for your upper body by warming or cooling the air as desired.
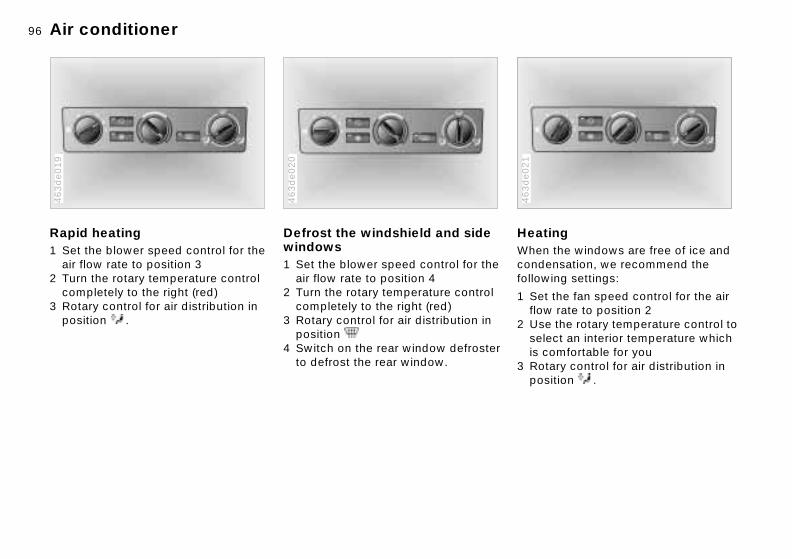
96nAir conditioner
ing the windows are free of ice and nsation, we recommend the ing settings:
the fan speed control for the air rate to position 2 the rotary temperature control to ct an interior temperature which omfortable for you ary control for air distribution in ition .
HeatWhencondefollow
1 Setflow
2 Useseleis c
3 Rotpos
390d
e127
463d
e021
Rapid heating 1 Set the blower speed control for the
air flow rate to position 3 2 Turn the rotary temperature control
463d
e019
Defrost the windshield and side windows 1 Set the blower speed control for the
air flow rate to position 4 463d
e020
completely to the right (red) 3 Rotary control for air distribution in
position .
2 Turn the rotary temperature control completely to the right (red)
3 Rotary control for air distribution in position
4 Switch on the rear window defrosterto defrost the rear window.

97n
airs
Car
care
Cont
rols
Over
view
Inde
xDa
taTe
chno
logy
Rep
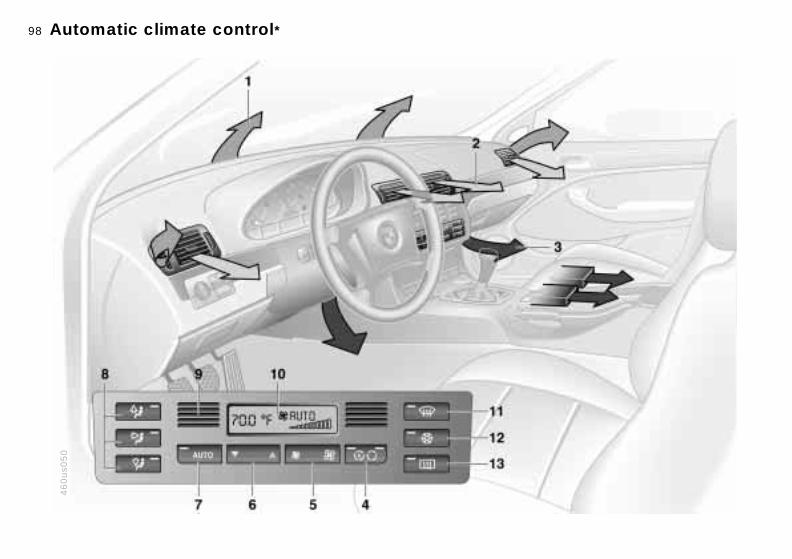
98nAutomatic climate control*
460us0
50

99n
nolo
gyRe
pair
sCa
r ca
reCo
ntro
lsOv
ervi
ew
Automatic climate control*
Inde
xDa
taTe
ch
1 Air on the windshield and on the side windows
2 Air flow toward the upper bodyThe side rotary dials allow you to open and close the air supply through an infinitely-variable range, while the levers change the air flow direction. The center rotary dial controls the temperature of the air as it flows out. Refer to page 102
3 Front footwell ventilationThere are corresponding air vents in the rear footwell as well
4 Recirculated air mode/Automatic recirculated air control (AUC) 101
5 Air supply 101
6 Temperature 100
7 Automatic air distribution 100
8 Individual air distribution 100
9 Air grill for interior temperature sensor – please keep clear and unobstructed
10 Display for temperature and air supply 100
11 Defrost the windshield and side windows 101
12 Air conditioner 101
13 Rear window defroster 71, 102

100nAutomatic climate control*
eratureThe figures in the display provide a general indication of
r temperature. We recommend (+22 6) as a comfortable setting, er the air conditioner is operating . When you start the vehicle, the ensures that the selected
rature is reached as quickly as ble. It then maintains this tempera-egardless of the season.
tary dial 3 (refer to "Draft-free ation" on page 102) to a medium g, since air that is somewhat r promotes driving without fatigue. an use this setting for mixing air to minor comfort modifications.
The full, uncontrolled heater
t
Temp
interio72 7whethor notsystemtempepossiture, r
Set roventilsettincooleYou cmake
output is available at 90 7 ). At a setting of 60 7 (+16 6),
ll cooling output is available when r conditioner is activated.<
,
(+32 6the futhe ai
Tips for pleasant drivingUse the automatic system (switch on AUTO – button 7). Select an interior temperature that is comfortable for you – we recommend 72 7 (+22 6). When the outside temperature is above 41 7 (+5 6), you can also use the air condi-tioner (12). This will dry the air as well as preventing condensation on the window surfaces – if there are passen-gers with damp clothing, for example. Set the air outlets (2) so that the air flows past you and is not directed straight at you. Set the rotary dial between the air outlets (2) for the upper body to a medium position, since air
Automatic air distributionThe AUTO program assumes the adjustment of the air distri-
bution and the air supply for you and inaddition adapts the temperature to external influences (summer, winter) tomeet preferences you can specify. Thisprogram maintains a comfortable in-carclimate regardless of the season. Selecan interior temperature that is comfort-able for you – we recommend 72 7 (+22 6). The temperature selected and
AUTO for the air supply appear in display (10), refer to the overview on page 98. Open the air outlets for the upper body area. Switch on the air
that is somewhat cooler promotes driving without fatigue.
Detailed setting options are described for you in the following section.
conditioner in warm weather. The maximum cooling capacity is achievedwhen you set rotary dial (3) to cold. Refer to page 102.
Individual air distributionYou can cancel the AUTO program by selecting specific distribution patterns to suit yourown individual requirements.
You can direct air to flow onto the windows , toward the upper body and into the footwell .

101n
Repa
irs
Car
care
Cont
rols
Over
view
Automatic climate control*
omatic recirculated air control C)
If there are unpleasant odors or pollutants in the outside air, you
temporarily block the air flow from outside. The system then recircu-s the air already within the vehicle. repeated actuation of the button, can select one of three different ration modes.
dicator lamps off: fresh air flows to the vehicleeft-hand indicator lamp on – AUC ode: the system detects pollutants the outside air and responds by eactivating the outside air flow as quired. The system then recircu-tes the air already within the
i-
n
de
g
Aut(AU
canthe lateBy youope
> Inin
> Lmindrela
Inde
xDa
taTe
chno
logy
vehicle.epending on air quality require-ents, the system automatically
witches between outside air supply nd recirculation of the air already ithin the vehicle ight-hand indicator lamp on: the ow of outside air is permanently locked. The system recirculates the ir already within the vehicle.
If the windows fog over in the recirculated air mode, switch this
e off and increase the air supply as uired.<
d Dmsaw
> Rflba
modreq
Air supply
By pressing the left or right half of the button, you can vary the
air supply. By doing this, you switch off the automatic control of the air supply. Nevertheless, the automatic air distri-bution remains unchanged.
When you set the lowest blower speed by pressing the left half of the button, all of the displays are canceled: the blower, heating and air conditioner are switched off, and the air supply is stopped. You can reactivate the system by pressing any button of the automatic climate control.
Air conditionerThe air is cooled and dehumidfied and – depending on the
temperature setting – rewarmed whethe air conditioner system is switchedon.Depending on the weather, the wind-shield may fog over briefly when the engine is started.Switch off the air conditioner at outsitemperatures below approx. 41 7 (+5 6). This will help to prevent the windows from fogging up. If the windows fog over after switchinthe air conditioner off, switch it back on.
To defrost the windshield and side windows
This program quickly removes ice and condensation from the
windshield and side windows.
Condensation forms in the air conditioner system during opera-
tion, which then exits under the vehicle.Traces of condensed water of this kinare thus normal.<

102nAutomatic climate control*
filter/Activated-charcoal
icrofilter traps incoming dust and . The activated-charcoal filter
clean the incoming outside air of us pollutants. Your BMW center place this combinated filter during gularly scheduled maintenance. A antial reduction in air supply indi- that the filter must be replaced normal maintenance.
ditional information on the filter e, refer to page 171.
r
MicrofilterThe mpollenhelpsgaseowill rethe resubstcatesbefore
For adchang
Rear window defrosterWhen the rear window defroster is activated, the indicator lamp
comes on. The rear window defroster switches off automatically. Refer to page 71.
Draft-free ventilation Set the ventilation outlets for your uppebody area so that it is comfortable for
460d
e040
you:
Use rotary dials (1) to open and close the air outlets through an infinitely-vari-able range. You can adjust the directionof the airflow with the levers (2).
Set the outlets so that the air flows pastyou and is not directed straight at you.
The rotary dial (3) allows you to mix theair from the outlets for your upper bodyby warming or cooling the air as desired.
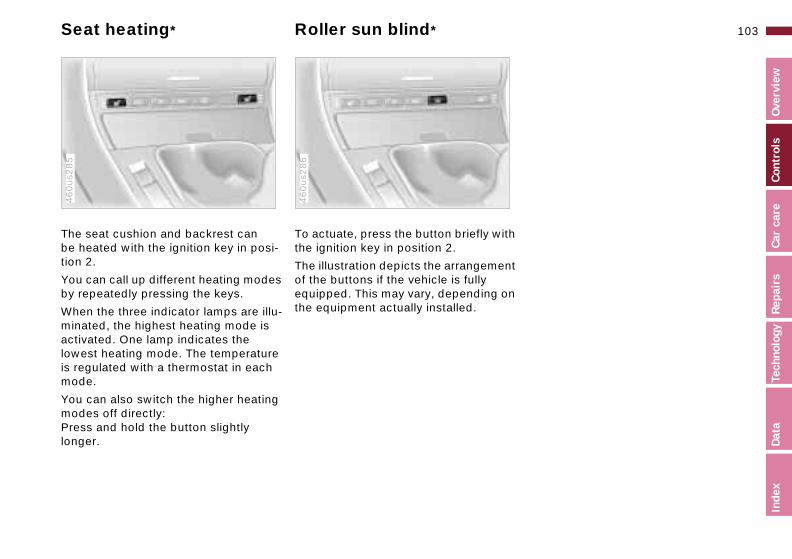
103n
pair
sCa
r ca
reCo
ntro
lsOv
ervi
ew
Seat heating* Roller sun blind*
ith
nt
on
Inde
xDa
taTe
chno
logy
Re
The seat cushion and backrest can be heated with the ignition key in posi-tion 2.
You can call up different heating modes
460us2
85
To actuate, press the button briefly wthe ignition key in position 2.
The illustration depicts the arrangemeof the buttons if the vehicle is fully
460us2
86
by repeatedly pressing the keys.
When the three indicator lamps are illu-minated, the highest heating mode is activated. One lamp indicates the lowest heating mode. The temperature is regulated with a thermostat in each mode.
You can also switch the higher heating modes off directly:Press and hold the button slightly longer.
equipped. This may vary, depending the equipment actually installed.

104n
To prevent injury in the event of a crash, close the glove compart-immediately after use.<
argeable flashlight ashlight is located on the left-side of the glove compartment.ures integral overload-protection an be left in its holder continu-
Be sure that the flashlight is switched off when it is inserted s holder. Failure to comply with recaution could lead to over-ing and damage.<
HiFi system* Glove compartment
HiFi system – harman kardonSpecial acoustical effects are activated or deactivated every time you press the
460us2
87
To openPull the handle. The lamp comes on.
460d
e041
button.
When the system is activated, the impression of a significantly larger passenger compartment is created at all seating areas, together with an improvement of the stereo effect.
When reception is weak, the system frequently switches between stereo and mono operation. Switch it off.
To closeFold the cover up.
To lockLock with one of the master keys. A master key can also be used for unlocking.
If you turn over only your door and ignition keys for valet parking
(refer to page 32), for example, access to the glove compartment is not possible.<
ment
RechThe flhand It featso it cously.
into itthis pcharg

105n
airs
Car
care
Cont
rols
Over
view
Storage compartments
r center armrest*hout through-loading system:
re is a storage compartment, a erage holder (for two drinks) and a
rs ReaWit
Thebev
460d
e297
Inde
xDa
taTe
chno
logy
Repage bag holder located in the rear
ter armrest.
torage compartment: pull upward
everage holder: press to open
garbcen
1 S
2 B
Open the storage compartment in the front center armrest*: press the button (arrow) and lift upward.
You will find additional storage areas in
460us0
43
Coin holder, beverage holderA coin holder and two beverage holdeare provided in the center console.
460us2
51
the front doors and in the center console above the ashtray. Storage nets* are located on the back of the front seats.

106nStorage compartments
Rear center armrest*With through-loading system:
There is a storage compartment, a
460d
e298
Storage package*For your convenience, there are:
> Two extending sockets on the center
460d
e299
beverage holder (for two drinks) and a garbage bag holder located in the rear center armrest.
> Beverage holder: press to open (arrow).
console in the rear (arrows). > An eyeglass compartment* (not
shown in the illustration) in the front center console above the ashtray.

107n
airs
Car
care
Cont
rols
Over
view
Cellular phone* Ashtray, front
emptyn the lid and press down (arrow): can now pull the ashtray upward removal.
To OpeYoufor
460d
e319
Inde
xDa
taTe
chno
logy
Rep
Handsfree systemOn vehicles that are wired for a tele-phone*, the cover for the handsfree microphone is located in the headliner
463us0
12
To openPress briefly in the direction indicatedby the arrow.
To extinguish a cigarette, tap off the 460d
e318
near the interior lamp.
For additional information concerning the cellular phone, please refer to the separate Owner's Manual.
ash and gently press the tip into the funnel.

108nCigarette lighter Ashtray, rear
Press the lighter in. Remove the lighter as soon as it retracts.
Hold or touch the hot cigarette
460d
e290
To openPush the cover open.
460d
e104
lighter by the knob only. Holding or touching it in other areas could result in burns.The cigarette lighter remains opera-tional when the ignition key has been removed. For this reason, children should never be left in the vehicle unat-tended.<
Cigarette lighter socketSuitable for attaching power supplies for flashlights, car vacuum cleaners, etc., up to a rating of approx. 200 watts at 12 volts. Avoid damaging the socket due to inserting plugs of different shapes or sizes.
To emptyPress on the edge of the raised cover inthe opening direction (arrow). You can now pull the ashtray upward for removal.

109n
airs
Car
care
Cont
rols
Over
view
Through-loading system*
ter 3-point-safety belt in the r* can retract the 3-point-safety belt e rear, before folding the through-
st
CenreaYouin th
462us0
54
Inde
xDa
taTe
chno
logy
Reping system back:
oosen the safety belt and put the uckle latch that is on the end of the afety belt into the bracket mounted n the rear window shelf (arrow).
To install a child restraint system always use the outer belts. The
tre seat belt should only be used n it is necessary to secure three
d restraint systems.not modify the child restraint system ny way. If you do so, it will not vide your child with maximum tection.<
e
d,
d
load
> Lbso
cenwhechilDo in apropro
The rear backrest is divided into two sections (one-third and two-thirds of the width of the seat). For carrying longer objects, you can fold down either section of the backrest separately.
460d
e154
The rear backrest section will move for-ward slightly when it is unlocked.Reach into the gap and pull the backredown.
460d
e153
To unlock, pull the lever corresponding to the section (arrow).
When you close the backrest, bsure that the retainer engages
correctly. If it is not correctly engagetransported cargo could enter the passenger compartment from the luggage compartment during brake applications or evasive maneuvers anendanger the vehicle occupants.<
The fittings at the corners of the luggage compartment provide you with a convenient means of attachingluggage nets* and flexible straps for securing suitcases and luggage.
Refer also to "Cargo loading" on page 112.

110nSki bag*
m the inside of the luggage com-tment, use the magnetic retainers ttach the cover panel to the erside (metal surface below rear
5 Froparto aund
380d
e069
kage tray).
re the ski bag, perform the above in reverse sequence.
pac
To stosteps
The ski bag allows the safe and clean transport of up to four pairs of standard skis or up to two snowboards.
The length of the ski bag and the addi-tional space provided in the luggage compartment make it possible to carry skis with a length of up to 6.8 feet (2.1 meters). The ski bag can only accommodate two pairs of skis with a length of 6.8 feet (2.1 meters) because of the tapered shape of the bag.
LoadingWithout through-loading system:
1 Fold the center armrest outward.
394d
e068
Loosen the trim from the upper Velcro® fastener and place it on the armrest
2 Press the button (arrow 1) from insidethe passenger compartment: the cover panel in the luggage compart-ment is unlocked
3 Press the detent lever (arrows 2) together and pull the cover forward
4 Extend the ski bag between the frontseats. The zipper provides conve-nient access to stored items. It may be opened to allow the ski bag to dry
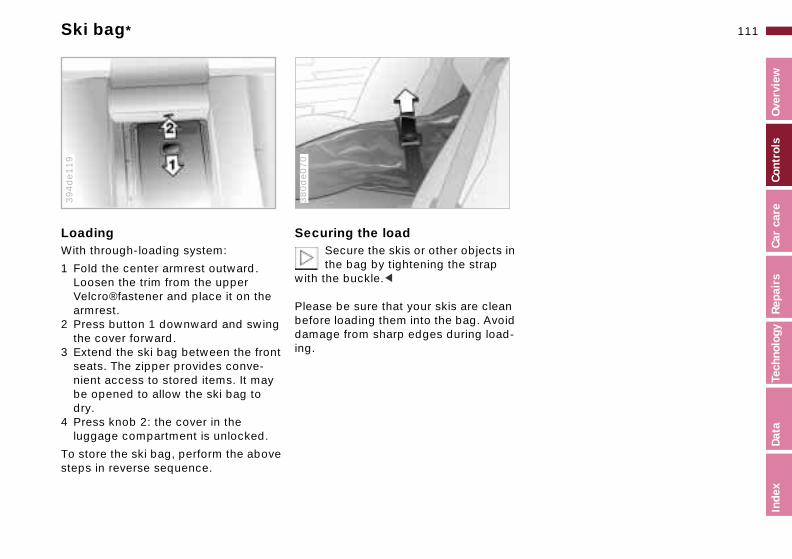
111n
airs
Car
care
Cont
rols
Over
view
Ski bag*
in
Inde
xDa
taTe
chno
logy
Rep
n id d-
LoadingWith through-loading system:
1 Fold the center armrest outward. Loosen the trim from the upper
394d
e119
Securing the loadSecure the skis or other objectsthe bag by tightening the strap
with the buckle.<
380d
e070
Velcro® fastener and place it on the armrest.
2 Press button 1 downward and swing the cover forward.
3 Extend the ski bag between the front seats. The zipper provides conve-nient access to stored items. It may be opened to allow the ski bag to dry.
4 Press knob 2: the cover in the luggage compartment is unlocked.
To store the ski bag, perform the above steps in reverse sequence.
Please be sure that your skis are cleabefore loading them into the bag. Avodamage from sharp edges during loaing.

112nCargo loading
ring the load small, light items, use the rubber-d non-skid side of the floor mat or ure with a luggage compartment
-
Secu> For
linesec
460d
e161
* or elastic straps (refer to e 41). large, heavy pieces, see your W center for load-securing ices*. Lashing eyes (arrow) are vided at the inner corners of the age compartment for attaching
se load-securing devices.ply with the information
losed with the load-securing ices.
netpag
> ForBMdevproluggthe
> Comencdev
Stowing cargo If you are transporting a load in your BMW:
460d
e160
> If you are transporting very heavy loads when the rear seat is not occupied, secure the outer safety belts inthe opposite buckles (refer to the
460d
e185
> Load heavy cargo as far forward as possible – directly behind the back-rests or the luggage compartment partition – and as low as possible.
> Cover sharp edges and corners.> Do not pile objects higher than the
top edge of the backrest.
illustration).

113n
airs
Car
care
Cont
rols
Over
view
Cargo loading Roof-mounted luggage rack*
e sure that the load is not too heavy, attempt to distribute it evenly. ays load the heaviest pieces first (on bottom). Be sure that adequate rance is maintained for raising the
ing/tilt sunroof, and that objects do project into the opening path of the age compartment lid.
ure the roof luggage correctly and urely to prevent it from shifting or g lost during driving (danger to wing traffic).
e smoothly and avoid sudden ac-ration or braking. Do not corner at speeds.
roof load increases the aerody-
e ck
MakandAlwthe cleaslidnot lugg
Secsecbeinfollo
Drivcelehigh
The
Inde
xDa
taTe
chno
logy
Repic resistance. Increased fuel
sumption and additional stresses he vehicle's body result from this.
le
n-ns.
f ey g
er ht, k.
namconon t
Always position and secure the load correctly. If you do not, it can
endanger the passengers during brak-ing or evasive maneuvers.Do not exceed the permissible gross vehicle weight and the permissible axle loads (refer to page 194). If you do, the operating safety of the vehicle is no longer ensured and you are in violation of the law.Do not carry hard or heavy objects unsecured in the passenger compart-ment. If you do so, they may be projected through the air during braking and evasive maneuvers, thus endangering vehicle occupants.<
AnchorsAccess to the anchors:To open the cover (arrow), please usthe tool included with the luggage ra
462d
e271
system.
A special roof-rack system is availabfor your BMW as an optional extra. Please comply with the precautions icluded with the installation instructio
Because roof racks raise the center ogravity of the vehicle when loaded, thexercise a major effect on its handlinand steering response.You should therefore always remembnot to exceed the approved roof weigthe approved gross vehicle weight orthe axle weights when loading the racYou will find the specifications under"Technical Data" on page 194.

114n

Overview
Controls and features
Operation, careand maintenance
Owner service procedures
115n
Car
care
Cont
rols
Over
view
Under the hood:Hood 134Engine compartment 136Washer fluids 138Washer nozzles 138Engine oil 139Coolant 142Brake fluid 143Vehicle Identification
Number 144
Care and maintenance:The BMW Maintenance
System 145Caring for your vehicle 146Airbags 151
Special operating instructions:Break-in procedures 116Driving notes 117Catalytic converter 117Antilock Brake System
(ABS) 118Disc brakes 120Brake system 121Winter operation 122Power steering 123Cellular phones 124Radio reception 124
Wheels and tires:Tire inflation pressure 125Tire condition 125
Technical data
Index
Advanced technology
dex
Data
Tech
nolo
gyRe
pair
sAirbags 152Tire replacement 126
Laws and regulations:Technical modifications to the
vehicle 153California Proposition
65 Warning 153OBD interface socket 154
Tire rotation 127Wheel and tire
combinations 128Winter tires 129Snow chains 129Approved wheel and tire
specifications 130
In
Car care

116n
e system pads and disks do not attain their al wear patterns until after approx. iles (500 km).
ak-in the separate parking brake , apply the parking brake lightly
coasting to a standstill (at a traffic l, for instance), provided that conditions allow you to do so.oid corrosion, repeat this proce-rom time to time.
The brake lamps do not come on when the parking brake is set.m for the brake system servo unit
ur BMW is available only when the
Break-in procedures
To ensure that your vehicle provides maximum economy throughout a long service life, we request that you comply with the following recommendations.
Engine and differentialUp to 1,200 miles (2,000 km):Drive at varying engine speeds and road speeds, but do not exceed 4,500 RPM or a road speed of 100 mph (160 km/h) during this initial period.
Obey your local and state maximum speed limits.
Do not apply full throttle and avoid pressing the accelerator beyond the
TiresDue to technical factors associated with their manufacture, tires do not achieve their full traction potential until an initial break-in period has elapsed. For this reason, drive cautiously during the first 200 miles (300 km).
Obey your local and state maximum speed limits.
When the vehicle is operated on wet or slushy roads, a wedge of
water may form between the tire and the road surface. This phenomenon is referred to as aquaplaning, or hydro-planing, and can lead to partial or
e is running. When you move the le with the engine off – when g, for example – substantially r levels of pedal force will be ed to brake the vehicle.<
hlutch will also begin to function ally after about 300 miles m). Engage the gears carefully the break-in period.
kickdown point.
After 1,200 miles (2,000 km), you can gradually increase the engine speed or road speed.
Follow the same break-in procedure if either the engine or the differential is replaced in the future.
complete loss of traction, vehicle control and braking effectiveness. Reduce your speed on wet roads.<
BrakBrakeoptim300 m
To bredrumswhensignatrafficTo avdure f
Vacuuon yo
enginvehictowinhigherequirClutcThe coptim(500 kduring

117n
airs
Car
care
Cont
rols
Over
view
catalytic converter reduces harmful aust emissions, and is designed for with unleaded fuel only.n minute quantities of lead would be ugh to permanently damage both catalytic converter and the system gen sensor.
nsure efficient, trouble-free engine ration and avoid potential damage:
e sure to comply with the scheduled aintenance requirements.ill the fuel tank well before it is mpty.ow-start only when the engine is old. If you attempt to tow-start with warm engine, unburned residual
Driving notes Catalytic converter
Brakes:Do not drive with your foot resting
on the brake pedal. Even light but consistent pedal pressure can lead to high temperatures, brake wear, and possibly to brake failure.Aquaplaning:Reduce your speed when you drive on wet or slushy roads. If you do not, a wedge of water can form between the tires and the road surface. This phenomenon is referred to as aqua-planing or hydroplaning. It is character-ized by a partial or complete loss of contact between the tires and the road surface. The ultimate results are loss of steering and braking control.
Clothes hooks:When suspending clothing from the hooks, be sure that they will not obstruct the driver's vision. Do not hangheavy objects on the hooks. If you do so, such objects could pose the risk ofpersonal injury during braking or evasive maneuvers.<
Inde
xDa
taTe
chno
logy
Repel in the catalytic converter could
nite and cause damage. It is better jump-start the vehicle with outside
ssistance.void other situations in which the el is not burned, or burns incom-letely, such as engaging the starter equently or for extended periods, or peated start attempts in which the
ngine does not start (stopping and starting an engine which is running
roperly does not present a problem). ever allow the engine to run with ny of the spark plug cables discon-ected.
Driving through water: Do not drive through water that is deeper than 1 foot (30 cm). If you must drive through water accumulations up to that depth, drive only at walking speed. Driving at a faster speed could cause damage to the engine, the elec-trical systems and the transmission.Package tray:Never use the rear window shelf to store heavy or bulky objects. If you do so, such objects could pose the risk of injury to vehicle occupants during braking or evasive maneuvers or in a crash.
TheexhuseEveenothe oxy
To eope
> Bm
> Fe
> Tca
fuigtoa> AfupfrreerepNan

118nCatalytic converter Antilock Brake System (ABS)
are in a situation that requires full g, you will exploit the full benefits ABS system if you apply um brake pressure ("panic
). Since the vehicle maintains ng responsiveness, you can avoid ble obstacles with a minimum of ng effort, despite the full brake ation.
BS system closed-loop control t cycles in fractions of a second. A tion at the brake pedal, together he sounds associated with the ulic controls, tells you that the
t
If youbrakinof themaximstop"steeripossisteeriapplic
The Acircuipulsawith thydra
brake system is within its maximumange and reminds you that you d adapt road speed to the road tions.
ad surfaces that have a loose e layer on a firm base with good n (on gravel or snow, for
ple), or when snow chains are ted, braking distances may be r than with locked wheels. ver, ABS continues to provide ced vehicle stability and steering nse under these conditions.
mation for your safetyven ABS can suspend the laws of cs. ABS cannot prevent the
t
.
limit rshoulcondi
On rosurfactractioexammounlongeHoweenhanrespo
InforNot ephysi
Be sure to comply with the instructions above to prevent
unburned fuel from reaching the cata-lytic convertor. If you do not, the cata-lytic converter could respond by overheating, leading to serious damage.Extreme temperatures occur at the catalytic converter on this and every catalyst-equipped vehicle. Heat shields are installed adjacent to some sections of the exhaust system. Never remove these shields; do not apply under-coating to their surfaces. When driving, standing at idle, and parking the vehicle, take extra care to avoid contact
The concept ABS enhances active safety by helpingto prevent the wheels from locking under braking. This is because locked wheels are dangerous. When the front wheels slide, the driver loses steering control over the vehicle. Traction loss athe rear wheels can cause the rear endto break into an uncontrolled skid.
The system can achieve the shortest braking distances possible under mostconditions (on straight-aways and in curves, on asphalt, ice, wet road surfaces, etc.).
ABS is designed to meet two essential
between the exhaust system and flam-mable materials (grass, hay, leaves, etc.). Such contact could lead to a fire, resulting in serious personal injury and property damage.<requirements during every brake appli-cation:
> To help provide vehicle stability> To help maintain steering control and
maneuverability – on all types of roadsurfaces (asphalt, concrete, mud, weroad surfaces, snow, ice).
Braking with ABSThe system becomes operative once the vehicle exceeds a speed of approx6 mph (10 km/h). Below approx. 4 mph(6 km/h), it is once again deactivated. This means that the wheels can lock inthe final phase of a panic stop – a factorof no significance in actual use.

119n
Tech
nolo
gyRe
pair
sCa
r ca
reCo
ntro
lsOv
ervi
ew
Antilock Brake System (ABS)
amic Brake Control (DBC)* is included in the DSC, refer to
rmation beginning on page 84.
u step on the brake rapidly, this tem automatically produces imum braking force boost and thus s to achieve the shortest possible
king distance during "panic stops." f the benefits of the ABS system exploited under these circum-ces.
not reduce the pressure on the ke pedal for the duration of the ke application. When the brake al is released, the DBC is deacti-d.
In the event of a malfunction, the yellow brake warning lamp comes on. Normal braking effi-
cy and ABS are still fully available. e the system checked and repaired our BMW center as soon as sible.
u-he
r-
an
di-
,
as
ld l
nd
DynDBCinfo
If yosysmaxhelpbraAll oare stan
Do brabrapedvate
cienHavat ypos
Inde
xDa
ta
Please observe the section "Infor-mation for your safety" concerning
ABS system, which also applies to DSC system.<
d
the the
consequences of brake applications with inadequate clearances for safety between vehicles, when exceeding the speed limit, or the risks involved when aquaplaning occurs. Responsibility for these types of situations remains in the hands (and at the feet) of the driver. You should never allow the added safety of ABS to mislead you into taking increased risks.
Do not make any modifications to the ABS system. Service proce-
dures on ABS are to be performed by authorized technicians only.<
Antilock Brake System (ABS)/
BMW center as soon as possible. Toprevent undetected defects and cumlative faults from adversely affecting tbrake system, refer any problems to your BMW center at the earliest oppotunity.
ABS warning lamp for Canadimodels.
If the brake warning lamp comes on together with the incator lamps for ABS and ASC+T/DSC, refer to page 21the entire ABS, CBC and ASC+T/DSC control system hfailed. Continue driving
Cornering Brake Control (CBC) CBC is an advanced engineering devel-opment of ABS. When braking during cornering with high lateral accelera-tion, or when braking during a lane change, vehicle stability is improved and the steering response is enhanced.
In the event of a fault If the ABS in the instrument cluster lights up, refer to page 22. The brake system then
reverts to conventional operation as on vehicles without ABS. However, have the brake system checked by your
cautiously and defensively. Avoid full brake applications. This coucause the vehicle to lose stability andyou might no longer be able to controit.Have the system checked as soon aspossible by your BMW center.
CBC, ABS and ASC+T/DSC aADB/ADB-X/DBC indicator anwarning lamps for Canadian models.

120nDisc brakes
d engine braking prove inade-, you should still avoid extended, uous braking. Instead of main-
g low to moderate pressure over tended period of time, you should erate by applying more substantial ure to the brake pedal (watch for ing traffic), releasing the pedal, en repeating the application ered braking). The cooling s between active braking inter-revent the brakes from over-g, thus ensuring that full braking ity remains available at all times.
Do not coast with the clutch depressed or with the shift lever ector lever in neutral. Do not drive he engine shut off. The engine
-
-
Shoulquatecontintaininan exdecelpressfollowand th(staggphasevals pheatincapac
or selwith t
es no braking effect when the is depressed or the transmission eutral, and there is no power- for braking or steering when the e is not running. 325xi, 330xi: have brake inspec-performed at a BMW center only. do not, parts of the four-wheel system could be damaged.t allow floor mats, carpets or any objects to protrude into the area d the brake pedal, the clutch or celerator which could obstruct reedom of movement.<
providclutchis in nassistenginBMWtions If youdrive Do noother arounthe actheir f
Disc brakes furnish optimum decelera-tion and braking control and greater fade resistance under heavy use.
When the vehicle is driven only occa-sionally, during extended periods when the vehicle is not used at all, and in oper-ating conditions where brake applica-tions are less frequent, there is an increased tendency for corrosion of the discs and accumulation of contamina-tion on the brake pads. This occurs because the minimal pressure that must be exerted by the pads to clean the discs by brake applications is not reached.
If the brake discs are corroded, they will
Driving notesWhen driving in wet conditions and in heavy rain, it is effective to apply light pressure to the brakes every few milesor kilometers. Be aware of traffic conditions to ensure that this maneuver doesnot endanger other road users. The heat that is generated by the brake applications helps to dry the brake pads and discs.
Maximum braking force is obtained while the wheels are not locked, but rather when they are still barely turningimmediately prior to locking. ABS maintains this state automatically. If the ABSfails, you should revert to the staggered
tend to respond to braking with a pulsating effect that even extended brake applications will fail to cure.
For your own safety: use only brake pads that BMW has
approved for your particular vehicle model. BMW cannot evaluate non-approved brake pads to determine if they are suited for use, and therefore cannot ensure the operating safety of the vehicle if they are installed.<
braking technique described on page 122.
Extended or steep mountain descents should be driven in the gear in which only minimal periodic brake applicationis required. This avoids excessive strainon the brakes and possible impairment of the braking effect.
The braking effect of the engine can befurther increased by downshifting, into first gear, if necessary. In the manual mode of the automatic transmission, you can also downshift into first gear. Refer to page 66.

121n
airs
Car
care
Cont
rols
Over
view
Brake system
ke
d s
f
Inde
xDa
taTe
chno
logy
Rep
Brake fluid level If the brake warning lamp comes on and the parking brake has been released:
The brake fluid level is too low in the reservoir (refer to page 143).
If the brake fluid level is too low and brake pedal travel has become notice-ably longer, there may be a defect in one of the hydraulic circuits of the brake system.
Brake warning lamp for Cana-dian models.
Proceed to the nearest BMW
Brake padsIf the warning lamp for the brapads lights up:The brake pads have reached
their minimum pad thickness. Proceeto the nearest BMW center as soon apossible to have the pads replaced.
For your own safety: use only brake pads that BMW has
approved for your particular vehicle model. BMW cannot evaluate non-approved brake pads to determine if they are suited for use, and thereforecannot ensure the operating safety othe vehicle if they are installed.<
center. Higher brake application pressure may be necessary under these conditions, and brake pedal travel may be significantly longer. Please remember to adapt your driving style accordingly.<

122nWinter operation
s or slopes, shift down to the next gear at an early point. Maintain an ate distance between yourself e vehicle ahead.
esr road conditions substantially e the traction available between es and the road surface. mber that braking distances will nificantly longer as a result.
s intended to prevent the wheels ocking during brake applications, elping to maintain vehicle stability teering response.
gradeloweradequand th
BrakWintereducthe tirRemebe sig
ABS ifrom lthus hand s
ABS does not respond in a critical g situation and the wheels lock:
ce the pressure on the brake pedal he wheels just start to roll again still maintaining enough force to ue braking. ing that, increase pedal pressure
. Reduce the pressure as the ls lock, then reapply pressure. at this procedure. This type of ered braking will reduce the g distance, and the vehicle still ns responsive to steering. It allows steer around hazards once you educed the pressure on the brake .
l
If the brakinReduuntil twhile continFollowagainwheeRepestaggbrakinremaiyou tohave rpedal
The onset of winter is often accompa-nied by rapid changes in weather. Adaptations in driving style should be accompanied by preparations on the vehicle itself to ensure that your progress through the winter remains safe and trouble-free.
CoolantBe sure that the coolant mixture contains the year-round ratio of 50:50 water and extended-duty antifreeze/corrosion protection. This mixture provides protection against freezing down to approx. -34 7 (-37 6). Replace the coolant every four years.
A full range of car care products isavailable from your BMW center.<
Snow chains BMW snow chains can be mounted onboth summer and winter tires. Mount them in pairs on the rear wheels only and comply with the manufacturer's safety precautions. Do not exceed a maximum speed of 30 mph (50 km/h). In this situation, it may be appropriate to deactivate the ASC+T/DSC for a short period of time. Refer to page 80.
BMW 325xi, 330xi: in a worst-case scenario, if your vehicle is stuck on oneside or you cannot access one tire, then
LocksBMW door lock deicer can be used to free them if frozen. This deicer also contains lubricant.After its use, treatment with BMW lock barrel grease is recommended.
Rubber seals and components To prevent the weather-stripping from freezing, apply a spray-on rubber treat-ment or silicone spray to the door, hood and luggage compartment lid seals.
a chain may be attached to one rear wheel for a short period of time.
Starting offWhen starting from a full stop in deep snow or for "rocking" the vehicle to freeit, it may be effective to deactivate the ASC+T/DSC system. Refer to page 80.
Driving on low-traction road surfacesUse smooth, gentle pressure to controthe accelerator pedal. Avoid excessiveengine speeds and shift to the next higher gear at an early point. On down-

123n
airs
Car
care
Cont
rols
Over
view
Winter operation Power steering
e steering response changes, e.g. steering effort: tact a BMW center to have this
tem inspected.
If the power steering fails, increased effort will be required to
r the vehicle.<
c in
g
If thhighConsys
stee
Inde
xDa
taTe
chno
logy
Rep
Do not shift down on slick road surfaces. Doing so could cause
the rear wheels to lose traction and skid, resulting in a loss of vehicle control.<
Depress the clutch during hard braking on road surfaces that
provide only poor or uneven traction.<
Skid control Depress the clutch and release the accelerator pedal, or place the selector lever of the automatic transmission into the "Neutral" position. Countersteer carefully and attempt to regain control of the vehicle.
ParkingEngage 1st or reverse gear. If your vehicle is equipped with an automatitransmission, place the selector leverPark. On vehicles with manual trans-mission, also apply the parking brakewhen parking on inclined surfaces. Inorder to prevent the parking brake linings from locking due to frost or corrosion, dry them by gently applyinthe parking brake as the vehicle is coming to a stop. Make sure that following traffic is not endangered.
The brake lamps do not light upwhen the parking brake is
applied.<

124nCellular phone* Radio reception
Mobile communications systems (cellular phone, radio, etc.) are only allowed a power output of up to 10 watts. Mobile communications devices not specifically designed for use in your vehicle may trigger malfunc-tions while operating your vehicle. BMW can neither test nor assume responsibility for every individual product being offered on the market. We recommend that you consult your BMW center before purchasing any device of this kind.
To ensure that your BMW continues to provide reliable and trouble-free opera-tion, do not use a cellular phone or other
The reception and sound quality obtained from mobile radios varies according to a variety of factors, including the broadcast range of the transmitter and the directional orienta-tion of the antenna.
Interference factors such as high-tension power lines, buildings and natural obstructions can all lead to unavoidable reception interference, regardless of how well the vehicle's sound system is operating.Climatic factors such as intense solar radiation, fog, rain and snow can also interfere with reception.
Car telephones or cellular phones not
radio device with an antenna located inside the passenger compartment or an antenna that is not mounted on the outside of the vehicle.Before loading the vehicle on a car-carrier train or driving it
through a car-wash, remove the antenna.<
approved by BMW can also cause interference in the radio during a tele-phone call. This phenomenon assumesthe form of a low-pitched hum emanating from the speaker system.
Please refer to the Owner's Manual provided with your sound system for detailed information on its use.

125n
airs
Car
care
Cont
rols
Over
view
Do not drive on a deflated (flat) tire. A flat tire greatly impairs
ring and braking response, and can to complete loss of control over vehicle.id overloading the vehicle so that permitted load on the tires is not eeded. Overloading can lead to rheating and increases the rate at ch damage develops inside the . You could have a blowout as a lt.sual vibrations encountered during
mal vehicle operation can indicate failure or some other vehicle defect. is also true for irregularities in the icle's handling characteristics, such
Tire inflation pressure Tire condition
Information for your safetyThe factory-approved radial tires are matched to the vehicle and have been selected to provide optimum safety and driving comfort on your vehicle.
It is not merely the tire's service life, but also driving comfort and – above all else – driving safety that depend on the condition of the tires and the mainte-nance of the specified tire pressure.
Incorrect inflation pressure is a frequent cause of tire damage. It also signifi-cantly influences the roadholding ability of your BMW.
Check tire inflation pressures
Tire tread – Tire damageInspect your tires frequently for tread wear, signs of damage and for foreign objects lodged in the tread. Check the
390d
e331
Inde
xDa
taTe
chno
logy
Rep pronounced tendency to pull to the
or right. Should this occur, respond mmediately reducing your speed. ceed carefully to the nearest BMW ter or professional tire center, or e the vehicle towed in to have it and ires inspected. damage (up to and including blow-) can endanger the lives of both the
icle occupants and other road rs.<
regularly – include the space-saver spare tire or spare tire – at least twice a month and before beginning a longer trip (refer to page 29). If this is not done, incorrect tire pressures can cause driving instability and tire damage, ultimately resulting in an acci-dent.<
tread depth.
Tread depth should not be allowed to go below 0.12 in (3 mm), even though the legally specified minimum tread depth is only 0.063 in (1.6 mm). At a tread depth of 0.063 in (1.6 mm), treaddepth indicators (arrow) in the tread-groove base indicate that the legally-permissible wear limit has been reached. Below 0.12 in (3 mm) tread depth, there is an increased risk of aquaplaning, even at relatively moderate speeds and with only small amounts of water on the road.
steeleadthe Avothe excovewhitiresresuUnunortire Thisveh
as aleft by iProcenhavits tTireoutsvehuse

126n
the Federal Motor Vehicle Safety ard No. 109. Grades B and A sent higher levels of performance laboratory test wheel than the um required by law.
The temperature grade for this tire is established for a tire that is rly inflated and not overloaded. sive speed, underinflation, or sive loading, either separately or bination, can cause heat buildup
ossible tire failure.<
rm Tire Quality Gradingy grades can be found where
Tire replacement
To maintain good handling and vehicle response, use only tires of a single tread configuration from a single manu-facturer. BMW tests and approves wheel/tire combinations, beginning on page 130.
DOT Quality GradesTreadwearTraction AA A B CTemperature A B C
All passenger vehicle tires must conform to Federal Safety
Requirements in addition to these grades.<
TractionThe traction grades, from highest to lowest, are AA, A, B and C.Those grades represent the tire's ability to stop on wet pavement as measured under controlled conditions on speci-fied government test surfaces of asphalt and concrete. A tire marked C may have poor traction performance.
The traction grade assigned to this tire is based on straight-
ahead braking traction tests, and does not include acceleration, cornering, hydroplaning, or peak traction charac-teristics.<
able on the tire sidewall between shoulder and maximum section . For example:
wear 200 Traction AA erature A
Do not use retreaded tires. Driving safety may be impaired by their his is due to the possible varia-
in casing structures and, in some , to their extreme age, factors that ad to a decrease in their dura-<
TreadwearThe treadwear grade is a comparative rating based on the wear rate of the tire when tested under controlled condi-tions on a specified government test course.For example, a tire graded 150 would wear one and one-half (1g) times as well on the government course as a tire graded 100. The relative performance of tires depends upon the actual condi-tions of their use, however, and may depart significantly from the norm due to variations in driving habits, service practices and differences in road char-
TemperatureThe temperature grades are A (the highest), B and C, representing the tire's resistance to the generation of heat and its ability to dissipate heat when tested under controlled condi-tions on a specified indoor laboratory test wheel. Sustained high temperature can cause the material of the tire to degenerate and reduce tire life, and excessive temperature can lead to sudden tire failure. The grade C corresponds to a level of performance which all passenger vehicle tires must meet
acteristics and climate.
underStandrepreon theminim
propeExcesexcesin comand p
UnifoQualit
applictread widthTreadTemp
use. Ttions casescan lebility.

127n
airs
Car
care
Cont
rols
Over
view
Tire replacement Tire rotation
If different tire sizes are mounted on the front and rear axles (refer to
e 130), the wheels may not be ted from one axle to the other.<
nd al
l is
s , ts
ife
pagrota
dex
Data
Tech
nolo
gyRe
p
, it ng:ce d.
.
In
Tire ageThe date on which the tire was manu-factured is indicated by the code on the sidewall:DOT ... 4100 means that the tire was manufactured in week 41 of 2000.
BMW recommends the replacement of all tires when the tires are no more than 6 years old, even if a tire life of 10 years is possible.
Spare tires over 6 years old should be used only in case of emergency. A tire in this condition should be replaced by a new tire immediately, and should not be mounted together with new tires.
Between the axlesThe tread wear patterns at the front ediffer from those at the rear – the actupatterns will vary according to indi-vidual driving conditions. In the inter-ests of safety and maintaining optimahandling characteristics, tire rotationnot recommended.
If a proposed interaxle rotation of tireis based on economic considerationsone should consider whether the cosfor the rotation are likely to be recap-tured by any increase in the service lof the tires that might be realized. In principle, interaxle rotation must be performed in short intervals, with a
maximum of 3,000 miles (5,000 km). Consult your BMW center for more information.Should you decide to rotate the tiresis essential to comply with the followiRotate tires on the same side only, sinbraking characteristics and road gripcould otherwise be adversely affecte
Following rotation, the tire inflation pressure should always be corrected

128nWheel and tire combinations
r tires and all-season tires:
S = up to 100 mph (160 km/h)S = up to 118 mph (190 km/h)S = up to 130 mph (210 km/h)
s stamped on light-alloy wheels:
ct tire valve from dirt by using -on valve stem caps. Dirt in the frequently leads to slow leaks.
ple:
idth hes letter for typeol for full-drop r rimiameter in inches on the 2 rim shoulders
7 x 15 H 2J
Winte
Q M+T M+H M+
Code
Protescrewvalves
Exam
Rim win incCodeflangeSymbcenteRim dHump
The right choice Use only BMW-approved tires. Refer to page 130.
Due to the high speeds this vehicle can reach, the use of specific brands, spec-ifications and sizes is mandatory. Consult any BMW center for details. Comply with local/national regulations.
The correct wheel-tire combina-tion affects different systems such
as ABS, ATC and ASC+T/DSC. The function of these systems is impaired if improper wheel-tire combinations are used.For this reason, use only tires of the
Codes on tires and wheels The tire codes will aid you in selecting the correct tire.
The codes on radial tires:
Example:
Nominal width in mmAspect ratio in %Radial tire ID code Rim diameter in inchesLoad rating(not on ZR tires)Speed rating(before R on ZR tires)
205/60 R 15 91 W
same brand and tread pattern. In the event of a flat tire, for example, remount the approved wheel-tire combination as soon as possible.<
The speed rating indicates the approvedmaximum speed for the tire.
Summer tires:
S = up to 112 mph (180 km/h)T = up to 118 mph (190 km/h)H = up to 130 mph (210 km/h)V = up to 150 mph (240 km/h)W = up to 167 mph (270 km/h)Y = up to 187 mph (300 km/h)ZR = above 150 mph (240 km/h)

129n
ndex
Data
Tech
nolo
gyRe
pair
sCa
r ca
reCo
ntro
lsOv
ervi
ew
Winter tires
rage
ays store tires in a cool, dry place. re them away from light whenever sible. Protect the tires against tact with oil, grease and fuel.
w chains
*
use of narrow-link BMW snow ins on winter tires is approved only airs and only on the rear wheels.
W 325xi, 330xi: in a worst-case nario, if your vehicle is stuck on one or you cannot access one tire, then ain may be attached to one rear el for a short period of time.
ply with all manufacturer's safety cautions when mounting the chains.
ed
o
in g
d
n
StoAlwStoposcon
SnoThechain p
BMscesidea chwhe
Compre
I
Choosing the right tireBMW recommends winter tires (M+S radial tires) for driving in adverse winter road conditions. Although all-season M+S tires provide better winter traction than standard summer tires with H, V, W, Y and ZR speed ratings, they gener-ally fail to provide the same levels of performance as standard snow tires in winter driving.
In the interest of safe tracking and steering response, install winter tires made by the same manufacturer having the same tread configuration on all four wheels.
Mount only winter tires approved by
Do not exceed specified maximum speeds
Never exceed the maximum spefor which the tires are rated.
Unprofessional attempts by laymen tservice tires can lead to damage andaccidents.Have this work performed by skilled professionals only. Any BMW center has the required technical knowledgeand the proper equipment and will behappy to assist you.<
Tire condition, tire pressureWinter tires display a perceptible losstheir ability to cope with winter drivin
BMW. Any BMW center will be glad to provide you with information on the best winter tires for your particular driving conditions.
conditions once the tread wears to below 0.16 inches (4 mm), and shoulthus be replaced.
Comply with the specified tire inflatiopressures – and be sure to have the wheel and tire assemblies balanced every time you change the tires.
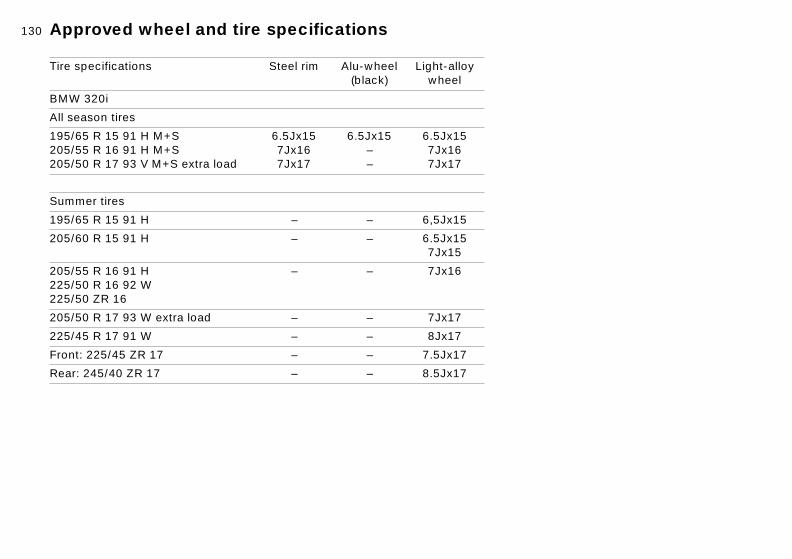
130nApproved wheel and tire specifications
tra load – – 7Jx17
– – 8Jx17
– – 7.5Jx17
– – 8.5Jx17
Tire specifications Steel rim Alu-wheel(black)
Light-alloy wheel
BMW 320i
All season tires
195/65 R 15 91 H M+S205/55 R 16 91 H M+S205/50 R 17 93 V M+S extra load
6.5Jx157Jx167Jx17
6.5Jx15––
6.5Jx157Jx167Jx17
Summer tires
195/65 R 15 91 H – – 6,5Jx15
205/60 R 15 91 H – – 6.5Jx157Jx15
205/55 R 16 91 H – – 7Jx16
225/50 R 16 92 W225/50 ZR 16205/50 R 17 93 W ex
225/45 R 17 91 W
Front: 225/45 ZR 17
Rear: 245/40 ZR 17

131n
Data
Tech
nolo
gyRe
pair
sCa
r ca
reCo
ntro
lsOv
ervi
ew
Approved wheel and tire specifications
3.0Bx16 – –
3.5Bx16 – –
3.5Bx17 – –
cifications for tires and wheels in the vehicle's manuals. s not approved by the manufacturer, an entry in the
may be necessary.
w chains* cannot mount snow chains with following tires:/50 R 16 92 W/50 ZR 16/45 R 17 91 W/40 ZR 17/50 R 16 92 Q M+S/45 R 17 91 Q M+S
ed tires details concerning tire manufac-rs for mixed tires, refer to the icle documents.
SnoYouthe 225225225245225225
MixFortureveh
Inde
x
Tire specifications Steel rim Alu-wheel(black)
Light-alloy wheel
Winter tires
195/65 R 15 91 Q M+S 6.5Jx15 6.5Jx15 6.5Jx15
205/60 R 15 91 Q M+S 6.5Jx15 6.5Jx15–
6.5Jx157Jx15
205/55 R 16 91 Q M+S225/50 R 16 92 Q M+S
7Jx16 7Jx16
205/50 R 17 93 Q M+S extra load – 7Jx17
225/45 R 17 91 Q M+S – – 8Jx17
Space-saver spare tire –
T 125/90 R 15 96 M 3.5Bx15 – –
T 115/90 R 16 92 M
T 125/90 R 16 98 M
T 125/80 R 17 99 M
Comply with the speIf you install tire sizevehicle documents
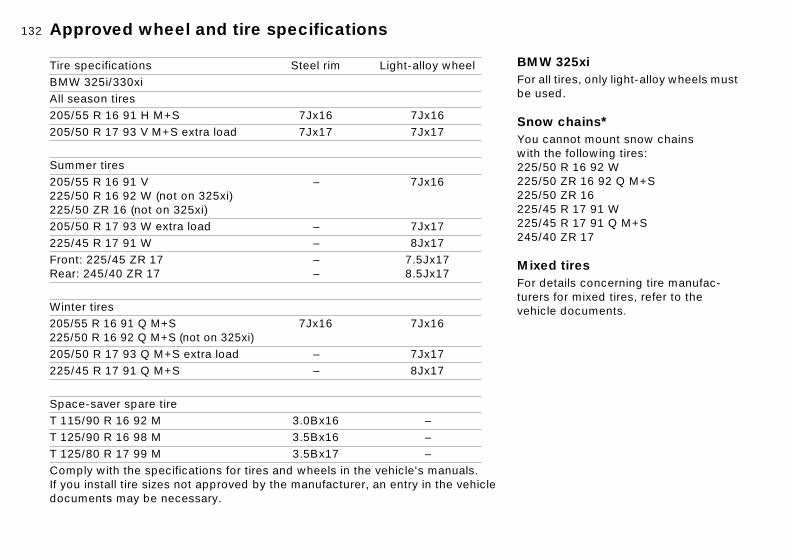
132nApproved wheel and tire specifications
91 Q M+S 92 Q M+S (not on 325xi)
7Jx16 7Jx16
7 93 Q M+S extra load – 7Jx177 91 Q M+S – 8Jx17
r spare tire 16 92 M 3.0Bx16 – 16 98 M 3.5Bx16 – 17 99 M 3.5Bx17 –h the specifications for tires and wheels in the vehicle's manuals. ll tire sizes not approved by the manufacturer, an entry in the vehicle may be necessary.
325xil tires, only light-alloy wheels must ed.
chains* annot mount snow chains he following tires:0 R 16 92 W0 ZR 16 92 Q M+S0 ZR 165 R 17 91 W5 R 17 91 Q M+S0 ZR 17
d tiresetails concerning tire manufac- for mixed tires, refer to the le documents.
BMWFor albe us
SnowYou cwith t225/5225/5225/5225/4225/4245/4
MixeFor dturersvehic
Tire specifications Steel rim Light-alloy wheelBMW 325i/330xiAll season tires205/55 R 16 91 H M+S 7Jx16 7Jx16205/50 R 17 93 V M+S extra load 7Jx17 7Jx17
Summer tires205/55 R 16 91 V225/50 R 16 92 W (not on 325xi)225/50 ZR 16 (not on 325xi)
– 7Jx16
205/50 R 17 93 W extra load – 7Jx17225/45 R 17 91 W – 8Jx17Front: 225/45 ZR 17Rear: 245/40 ZR 17
––
7.5Jx178.5Jx17
Winter tires205/55 R 16225/50 R 16205/50 R 1225/45 R 1
Space-saveT 115/90 RT 125/90 RT 125/80 RComply witIf you instadocuments

133n
airs
Car
care
Cont
rols
Over
view
w chains* cannot mount snow chains with the wing tires:/45 R 17 91 W/40 ZR 17/45 R 17 91 Q M+S
ed tires details concerning tire manufac-rs for mixed tires, refer to the icle documents.
SnoYoufollo225245225
MixFortureveh
Inde
xDa
taTe
chno
logy
Rep
e
Tire specifications Steel rim Light-alloy wheel
BMW 330i/330xi
All season tires
205/50 R 17 93 V M+S extra load 7Jx17 7Jx17
Summer tires
205/50 R 17 93 W extra load – 7Jx17
225/45 R 17 91 W – 8Jx17
Front: 225/45 ZR 17Rear: 245/40 ZR 17
––
7.5Jx178.5Jx17
Winter tires
205/50 R 17 93 Q M+S extra load – 7Jx17
225/45 R 17 91 Q M+S – 8Jx17
Space-saver spare tire
T 125/80 R 17 99 M 3.5Bx17 –
Comply with the specifications for tires and wheels in the vehicle's manuals. If you install tire sizes not approved by the manufacturer, an entry in the vehicldocuments may be necessary.

134nHood
ene release handle and open the
To opPull thhood.
460d
e044
Do not work on your vehicle without appropriate skills. Always
switch off the engine and allow it to cool down before working in the engine compartment. Always disconnect the battery before working on any electrical systems or equipment, especially when these are located within the engine compartment. Comply with all appli-cable instructions and warnings. Failure to work in an informed, professional manner when servicing components and materials constitutes a safety hazard for vehicle occupants and other road users. If you are not familiar with the guidelines, please have the opera-
To unlock Pull the lever located under the left-hand side of the instrument panel.
460us0
12
tions performed by your BMW center.<

135n
airs
Car
care
Cont
rols
Over
view
Hood
Inde
xDa
taTe
chno
logy
Rep
To closeAllow the hood to drop from a height of about 12 inches (30 cm) so that it audi-bly engages.
464d
e260
To avoid injuries, be sure that the travel path of the hood is clear
when it is closed, as with all closing procedures. If it is determined that the hood is not completely closed while driving, stop immediately and close it securely.<

136nEngine compartment – BMW 320i, 325i, 325xi, 330i, 330xi
462us0
55

137n
Inde
xDa
taTe
chno
logy
Repa
irs
Car
care
Cont
rols
Over
view
Engine compartment – BMW 320i, 325i, 325xi, 330i, 330xi
1 Brake fluid reservoir 143
2 Engine oil dipstick 139
3 Coolant expansion tank 142
4 Engine oil filler neck 139
5 Reservoir for the headlamp* and windshield washer system 138
6 Auxiliary terminal for jump starting 173

138nWasher fluids Washer nozzles
shield washer pray from the nozzles should be ed so as to ensure effective ing, even at high speeds. Use a e to adjust the nozzles as ed, or have them adjusted by your center.
lamp washer system*this system adjusted by your center as required.
WindThe sdirectcleanneedlrequirBMW
HeadHave BMW
Headlamp* and windshield washer system Filling capacity: approx. 5.6 US quarts (5.3 liters).
463d
e243
Antifreeze agent for the washer systems is inflammable. For this
reason, keep it away from sources of flame and store it in its original container. Store it so that it is inacces-sible to children. Comply with the instructions on the containers.<
Fill with water and – if required – with a washer antifreeze (according to manu-facturer's recommendations).
We recommend that you mix the washer fluid before adding it to
the reservoir.<

139n
Tech
nolo
gyRe
pair
sCa
r ca
reCo
ntro
lsOv
ervi
ew
Engine oil
add oil it until the level has dropped to just ve the lower mark before adding oil. ever, never let the oil drop below
lower mark.
BMW engines are designed to operate without oil additives; the
of additives could lead to damage ome cases. This is also true for the ual transmission, the automatic smission, the differential, and the er steering system.<
nd ss
To WaaboHowthe
usein smantranpow
462d
e245
Inde
xDa
ta
Checking the oil level 1 Park the vehicle on a level surface.2 Shut the engine off after it has
reached normal operating tempera-
462d
e244
The space between the two marks onthe dipstick corresponds to approx. 1.1 US quarts (1 liter). Do not fill beyothe upper mark on the dipstick. Exceoil will damage the engine.
460d
e189
ture.3 After approx. 5 minutes, pull the
dipstick out and wipe it off with a clean lint-free cloth, paper towel, or similar material.
4 Carefully push the dipstick all the way into the guide tube and pull it out again.
5 The oil level should be between the two graduations on the dipstick.
As with fuel economy, oil consumption is directly influenced by your driving style and vehicle operating conditions.

140nEngine oil
l
530us2
00
Specified engine oilsThe quality of the engine oil is extremely important for the function and life of an engine. Based on exten-sive testing, BMW has approved only certain types of engine oils.
Use only approved "BMW High Perfor-mance Synthetic Oil."
If you are unable to obtain "BMW High Performance Synthetic Oil," you may use small volumes of other approved synthetic oils for topping up between oil changes. Use only oils with the specifi-cation API SH or higher.
Viscosity ratings Viscosity is the oil flow rating as estab-lished in SAE classes.
The selection of the correct SAE class depends on the climatic conditions in the area where you drive your BMW.
Approved oils are in SAE classes 5W-40 and 5W-30.<
These oils may be used for driving in alambient temperatures.
Ask your BMW center for details concerning the specific "BMW
High Performance Synthetic Oil" or other synthetic oils that have been approved.<
You can also call BMW of North America at 1-800-831-1117 or visit this website: www.bmwusa.com to obtain this information.

141n
Tech
nolo
gyRe
pair
sCa
r ca
reCo
ntro
lsOv
ervi
ew
Engine oil
Inde
xDa
ta
Always comply with all environ-mental protection guidelines and
regulations when disposing of used oil.<
Recommendation: have the oil changed by your BMW center only.
Continuous exposure to used oil has caused cancer in laboratory
testing.For this reason, thoroughly wash any areas of skin that come into contact with oil using soap and water.Always store oils, grease and similar materials so that they are inaccessible to children. Comply with warning labels
and information on containers.<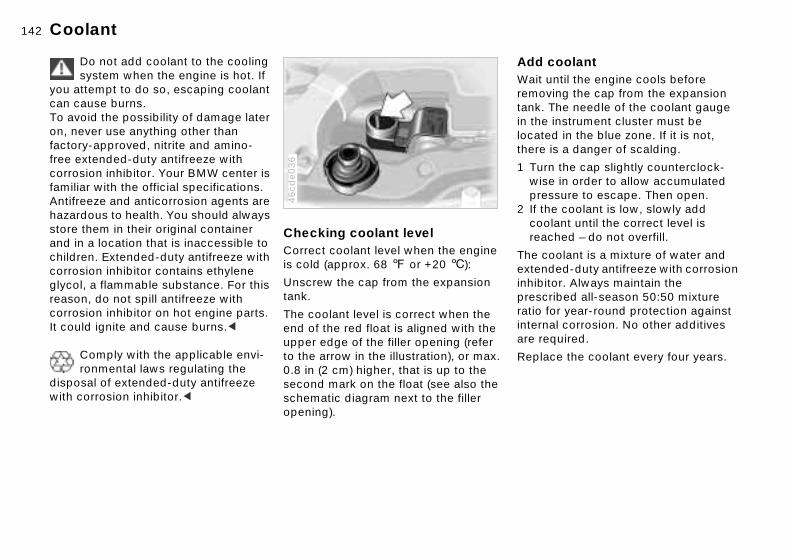
142nCoolant
coolant ntil the engine cools before ing the cap from the expansion
The needle of the coolant gauge instrument cluster must be d in the blue zone. If it is not, is a danger of scalding.
n the cap slightly counterclock-e in order to allow accumulated ssure to escape. Then open.e coolant is low, slowly add lant until the correct level is ched – do not overfill.
oolant is a mixture of water and ded-duty antifreeze with corrosion
Add Wait uremovtank. in thelocatethere
1 Turwispre
2 If thcoorea
The cexten
tor. Always maintain the ribed all-season 50:50 mixture or year-round protection against al corrosion. No other additives quired.
ce the coolant every four years.
inhibiprescratio finternare re
Repla
Do not add coolant to the cooling system when the engine is hot. If
you attempt to do so, escaping coolant can cause burns.To avoid the possibility of damage later on, never use anything other than factory-approved, nitrite and amino-free extended-duty antifreeze with corrosion inhibitor. Your BMW center is familiar with the official specifications.Antifreeze and anticorrosion agents are hazardous to health. You should always store them in their original container and in a location that is inaccessible to children. Extended-duty antifreeze with corrosion inhibitor contains ethylene
Checking coolant levelCorrect coolant level when the engine is cold (approx. 68 7 or +20 6):
46cd
e036
glycol, a flammable substance. For this reason, do not spill antifreeze with corrosion inhibitor on hot engine parts. It could ignite and cause burns.<
Comply with the applicable envi-ronmental laws regulating the
disposal of extended-duty antifreeze with corrosion inhibitor.<
Unscrew the cap from the expansion tank.
The coolant level is correct when the end of the red float is aligned with the upper edge of the filler opening (refer to the arrow in the illustration), or max. 0.8 in (2 cm) higher, that is up to the second mark on the float (see also the schematic diagram next to the filler opening).

143n
airs
Car
care
Cont
rols
Over
view
Brake fluid
Comply with the applicable envi-ronmental laws regulating the
osal of brake fluid.<
is,
by ce
re a-
e X" on
disp
Inde
xDa
taTe
chno
logy
Rep
If the brake warning lamp comes on and the parking brake has been released:Check the brake fluid level and if necessary, refill it to the "MAX" mark.
460d
e128
Brake fluid is hygroscopic, that it absorbs moisture from the air
over time.In order to ensure the safety and reli-ability of the brake system, have the brake fluid changed every two years a BMW center. Refer also to the Serviand Warranty Information Booklet (USmodels) or the Warranty and Service Guide Booklet (Canadian models).Brake fluid is toxic and damages the vehicle's paint. You should always stoit in its original container and in a loction that is inaccessible to children.Do not spill the fluid and do not fill thbrake fluid reservoir beyond the "MAmark. The brake fluid could ignite up
For adding brake fluid or for deter-mining and correcting the cause of brake fluid loss, consult your BMW center. Your BMW center is familiar with the specifications for factory-approved brake fluids (DOT 4).
Brake fluid loss can result in extended pedal travel. Comply with the informa-tion provided on page 121.
contact with hot engine parts and cause burns.<

144nVehicle Identification Number
In the engine compartment, on the right-hand strut dome (arrow).
460d
e055

145n
airs
Car
care
Cont
rols
Over
view
precaution against rust, it might be od idea to have the body checked
damage from rocks or gravel at the e time, depending upon operating ditions.
Have your BMW center perform maintenance and repair.
r BMW center is always informed on latest maintenance work and repair niques and equipped with the
uired special tools. In addition, cking parts known from experience e subject to wear is a permanent
t of the maintenance specifications.sure that all maintenance work is firmed in the Service and Warranty
The BMW Maintenance System
The BMW Maintenance System has been designed as a reliable means of providing maximum driving and operat-ing safety – and as cost-effectively as possible for you.
460us1
12
actual conditions under which the vehi-cle operates, because miles can be traveled in many different ways:From the point of view of maintenance,62,000 miles (100,000 km) accumulatedin short-distance urban driving are not the equivalent of the same distance covered at moderate speeds in long-distance highway travel.
The BMW Maintenance System includes the Engine Oil Service and Inspections I and II.
Determining the maintenance intervals according to the actual use of the vehi-cle covers every kind of operating situation. Minimal use drivers – those who
Inde
xDa
taTe
chno
logy
Reprmation Booklet (US models) or the
rranty and Service Guide Booklet nadian models). These entries are r verification for the regular mainte-ce of your vehicle and are required the performance of warranty airs.<
Please keep in mind that regular main-tenance is not only necessary for the safety of your vehicle, but also plays a significant role in maintaining the resale value of the vehicle.
Service Interval DisplayAdvanced technology is employed to calculate the optimal maintenance intervals. These are then indicated in the Service Interval Display. While conventional systems rely on distance traveled alone to determine when service is due, the BMW Maintenance System has for years considered the
drive significantly less than 6,000 miles(10,000 km) per year – should nevertheless have the oil changed at least everytwo years, since engine oil ages regardless of use.
Service and Warranty InformationBooklet (US models)/Warranty and Service Guide Booklet (Canadian models) Please refer to the Service and Warranty Information Booklet (US models) or the Warranty and Service GuideBooklet (Canadian models) for addi-tional information on maintenance intervals and procedures.
-
- -
-
As aa gofor samcon
Youthe techreqcheto bparBe conInfoWa(Cayounanfor rep
-

146n
If spray wands or high-pressure washers are used, be sure to ain an adequate distance between ray source and the vehicle's e. Inadequate distance and sive pressure can damage or en the finish, making it more ptible to subsequent attack. In on, moisture could penetrate to le components, leading to long-amage.<
When cleaning the headlamps, please observe the following: t clean by wiping with a dry cloth auses scratches). Never use
Caring for your vehicle
Washing your vehicle You can have your BMW washed in an automatic car wash, even when it is new. Car wash systems that do not employ brushes are preferable.
Wipe away tough dirt and loosen and remove dead insects before washing the vehicle.
In order to avoid spots, do not wash the vehicle when the hood is warm, or during or immediately after exposure to strong sunlight.
When using an automatic car wash, be sure that:
> The car wash system is suited for the
Vehicles with rain sensor:Clean the windshield regularly. Wax from automatic car washes or insects can cause malfunctions in the function of the rain sensor.
Deactivate the rain sensor (refer to page 70) when passing
through an automatic car wash. Failure to do so could result in damage caused by unintended wiper activation.<
Parts of the vehicle that are inaccessible to the automatic washer – such as door sills, door and hood edges, etc. – should be cleaned by
ives or strong solvents. Remove d contamination (such as insects)
aking with BMW Car Shampoo en rinsing with plenty of water. s use a deicer spray to remove ulated ice and snow – never use per.<
After washing the vehicle, apply the brakes briefly to dry them. g efficiency might otherwise be
ed by the moisture and the brake could also be corroded.<
dimensions of your vehicle.> No damage will occur on vehicles
with attached body accessories (such as spoilers or antennas). Consult the car wash operator if necessary.
> The wheels and tires of your vehicle cannot be damaged by the convey-ance devices of the car wash system.
> The vehicle is cleaned with minimum brush pressure, and that ample water is available for washing and rinsing.
hand.
In the winter months, it is especially important to be sure that the vehicle is washed on a regular basis. Large quan-tities of dirt and road salt are difficult to remove, and they also cause damage to the vehicle.
maintthe spsurfacexcesweaksusceadditivehicterm d
Do no(this c
abrasdirt anby soand thAlwayaccuma scraBrakinreducrotors

147n
airs
Car
care
Cont
rols
Over
view
Caring for your vehicle
oastal regions, high levels of ospheric salt and humidity promote osion.
opical zones, temperatures of over 7 (40 6) in the shade prevail, in ition to heavy ultraviolet radiation high humidity. Under those condi-s, light paints can reach tempera-s up to 175 7 (80 6) and dark ts up to 250 7 (120 6).
lt,
) ) s-
on d
at.
st, g
In catmcorr
In tr105addandtionturepain
Inde
xDa
taTe
chno
logy
Rep
Exterior finish To provide effective corrosion protec-tion, multilayer paintwork is applied at the factory. Cataphoretic immersion priming techniques are supplemented using special body-cavity protectants, with the application of specially-devel-oped and extensively tested materials.A layer of flexible PVC is first applied to the undercarriage. Following this, a comprehensive undercoating treat-ment with a wax-based protectant is applied. Regular maintenance makes an important contribution to maintaining the safety and value of your vehicle.
Increasing awareness of the effects
Depending upon material and type of impact (perforation of paint layer), physical stresses from sand, road sagravel, etc., can cause corrosion to start extending beneath the finish, starting at the point of impact.
Road dirt, tar spots, dead insects, animal droppings (strong alkali effectand tree excretions (resins and pollenall contain substances capable of cauing damage when allowed to remain the finish of your vehicle for any perioof time. This includes spots, etching,flaking, and separations in the top co
In industrial areas, deposits of flue dulime, oily soot, precipitation containin
of harmful environmental factors on vehicle finishes have urged paint and vehicle manufacturers to initiate ongoing programs designed to further improve the durability of their finishes. Despite this, environmental factors that occur locally or regionally can have negative effects on the finish of your vehicle. These should guide you in determining the frequency and extent of your efforts to maintain the vehicle finish.
sulfur-dioxide (acid rain) and other environmental pollutants will damagethe vehicle's finish unless adequate care is provided – even though this isgenerally limited to the outside horizontal surfaces.

148nCaring for your vehicle
damagean touch up small areas of paint ge with a BMW spray paint or a touchup stick.
aint color code for your vehicle is ed on a sticker located on the and side under the hood and on
st page of your Service and War-Information Booklet (US models) rranty and Service Guide Booklet dian models).
ge caused by flying stones, hes, etc., must be touched
thout delay to prevent rust from g.
PaintYou cdamaBMW
The pprovidright hthe firranty or Wa(Cana
Damascratcup wiformin
osion has started to form in an ith paint damage, remove all rust
lean the area. Then prime the area BMW Primer Stick. Finally, apply ish coat. Wait a few days, then the repaired area. Finish by ing a wax preservative.
extensive paint damage should fessionally repaired in accor- with the manufacturer's instruc-
Your BMW center uses original finish materials in accordance fficial repair procedures.
If corrarea wand cwith athe finpolishapply
More be prodancetions.BMWwith o
Caring for the vehicle finish Regular washing is a preventive measure against long-term effects from substances that are harmful to the vehicle's finish, especially if you drive your vehicle in areas with high levels of air pollution or aggressive natural substances (tree resins, pollen).
Nevertheless, you should immediately remove especially aggressive substances. Failure to do so can lead to changes in the paint's chemical structure or to discoloration. Gasoline spilled during refueling, oil, grease and brake fluid should always be cleaned away immediately, as should bird
Waxing your vehicle Protect the finish using carnauba or synthetic-based waxes only.
The best way to determine when the finish needs to be waxed is by noting when water stops beading on the surface.
You can use a glass cleaner to removeany wax or silicone that may have beenleft on the windows during waxing.
Use cleaning and car-care products that you can obtain at
your BMW center.<
droppings.
Any contamination remaining on the surface of the vehicle will be especially conspicuous after washing. Use clean-ing fluid or alcohol with a clean cloth or cotton pad to remove. Remove tar spots with tar remover. After cleaning, the affected areas should be waxed to ensure continued protection.
Use cleaning and car-care products that you can obtain at
your BMW center.<

149n
airs
Car
care
Cont
rols
Over
view
Caring for your vehicle
not remove safety belts to clean . Clean them with mild soapy
er only. Do not use chemicals or dry ners to clean safety belts, since this ld damage the belt fabric.
r cleaning, never allow the inertia to retract the belts until they are pletely dry. Dirty safety belts
vent the inertia reel mechanism from acting the strap properly, and thus stitute a safety hazard.
vily soiled floor carpets and mats* be cleaned with an interior cleaner. floor mats can be removed from vehicle for cleaning.
only a damp cloth to clean trim
o
at . s.
h s,
e nt
e
Do themwatcleacou
Aftereelcompreretrcon
HeacanThethe
Use
Inde
xDa
taTe
chno
logy
Repels made of real wood* and other
ts constructed of real wood*. Follow y drying with a soft cloth.
Use cleaning and car-care products that you can obtain at
r BMW center.<
, er
ce ic
r s
.
ed r
panparup b
you
Window careYou can use window and glass cleaner to clean inside window surfaces and mirrors without smearing and streaking. Never use polishing pastes or abrasive (quartz) cleansers on mirror lenses.
Clean the wiper blades with soapy water. The wiper blades should be replaced twice a year – before and after the cold season. This is especially important for vehicles with a rain sensor.
Use only wiper blades approved by BMW.<
Caring for other vehicle components and materials Light-alloy wheels should be treated with alloy wheel cleaner, especially during the winter months. However, dnot use aggressive products contain-ing acids, strong alkalis or abrasives.Do not use steam cleaners operatingtemperatures above 140 7 (+60 6)Follow the manufacturer's instruction
If your vehicle has chrome parts* sucas the window frames and door handleclean these parts carefully with amplclean water and a shampoo supplemeif desired, especially if they have an accumulation of road salt. Use chrom
polish as an additional treatment.Plastic components, vinyl upholsteryheadliners, lamp lenses, the clear covof the instrument panel and compo-nents with a sprayed dull black surfacan be cleaned with water (add plastshampoo as required). Do not allow moisture to soak through the seats oheadliner. Never use solvents such alacquer thinner, heavy-duty grease remover, fuels, or similar substances
Rubber components should be cleanwith water only; a rubber treatment osilicone spray may also be applied.

150nCaring for your vehicle
er care ather upholstery* used by BMW
atural product of the highest y, processed using state-of-the-thods to ensure that it will main-
s high quality for years to come, ed that it is properly cared for.
se this product is manufactured natural materials, you must make nce for its special characteristics r the peculiarities of its use and
lar periodic cleaning and care are tial, as dust and road dirt act as ives in the pores and creases of
LeathThe leis a nqualitart metain itprovid
Becauusingallowaand focare.
Reguessenabras
aterial. This leads to wear spots remature brittleness on the e of the leather. We therefore st that you clean the leather with
uum cleaner or cloth at frequent als.
eaning, use BMW leather cleaning
dirt and grease gradually attack otective layer of the leather, the ed surfaces should be treated MW leather care agent. This also s an antistatic agent.
the mand psurfacsuggea vacinterv
For clfoam.
Sincethe prcleanwith Bacts a
Care of upholstery materials Depressions in the upholstery that result from everyday use can be brushed smooth by brushing against the nap with a lightly dampened brush.
The tendency of the pile to lie in a particular direction on velour upholstery is not a quality defect. Just as with home textiles or clothing, this cannot be avoided.
Lint on upholstery materials, rubbed-in fabric or suede residues can be re-moved with a lint brush or Velcro® brush. A cleaning glove is available for especially "stubborn" lint. Stains and
The buildup of an electrostatic charge on the seat covers, particularly if atmospheric humidity is low, can give the occupants an unpleasant electric shock if they touch metal body parts after leaving the vehicle. Although this isnot dangerous in any way, it can be avoided by touching a bare or polishedmetal part of the vehicle while getting out.
fairly large areas of dirt should be cleaned off without delay, using luke-warm water and an interior cleaner, stain remover or appropriate cleaning fluid. Brush the fabric afterwards to restore its appearance.
If the vehicle will be stored for an extended period or if it is exposed to intense sunlight, cover all the seats or the windows to prevent fading.
Use cleaning and car-care products that you can obtain at
your BMW center.<

151n
airs
Car
care
Cont
rols
Over
view
Airbags
or ,
s
Inde
xDa
taTe
chno
logy
Rep
For protection against dampness or moisture, treat the leather with a BMW impregnating agent.
We recommend that you perform this procedure twice a year on leather exposed to normal use.
Spills should be wiped up immediately. Remove grease and oil stains without rubbing, but rather by dabbing with spot remover.
If the upholstery will be exposed to intense sunlight, or if the vehicle is to be stored for an extended period, cover all leather surfaces to prevent fading (or better yet, cover the windows).
Cleaning agents can contain substances that are dangerous
that pose health risks. For this reasonalways comply with the warnings anddanger notices on the packaging.Open the doors or windows on your vehicle when cleaning the interior. Never clean your vehicle with solventor other materials not specifically intended for this purpose.<
Use cleaning and car-care products that you can obtain at
your BMW center.<

152nAirbags Vehicle storage
lt your BMW center regarding al procedures if you intend to the vehicle for more than three s.
-
Consuspecistore month
1 Front airbags for driver and passenger
2 Side impact Head Protection System for driver and passenger (front)
460d
e140
Do not modify or tamper with either thewiring or the individual components in the airbag system. These include the padded steering wheel hub, the instru-ment panel, the side trim panels of the front or rear doors and the roof pillars orthe sides of the headliner. Do not applyadhesive materials to these compo-nents or cover or modify them in any way. Do not attempt to remove or dismantle the steering wheel.To ensure compliance with official safety regulations, have a BMW centerdispose of airbag generators.Unprofessional attempts to service thesystem could lead to failure in an emer
3 Side airbags for driver and passenger (front and rear*)
Important safety notices Don't remove the airbag restraint system's gas generator. Testing
and servicing must be performed by trained technicians only. In the event of a malfunction, deactivation, or triggered actuation (as a response to an accident) of the airbag restraint system, consult your BMW center for repairs or service operations.
gency or undesired airbag activation, either of which could result in personalinjury.<
153n
Car
care
Cont
rols
Over
view
Technical modifications California Proposition 65 Warning
Inde
xDa
taTe
chno
logy
Repa
irs
Any BMW center will be glad to inform you of the advisability, legal require-ments and factory recommendations regarding technical modifications on your vehicle. For this purpose, the BMW center will require the Vehicle Identification Number and, in some cases, also the engine number.
Light-Emitting Diodes (LEDs)Light-emitting diodes installed behind translucent lenses serve as the light source for many of the controls and displays in your vehicle. The concept behind their operation is related to that employed for lasers, and they are offi-
California laws require us to state the following warning:
Engine exhaust, some of its constituents, and certain vehicle
components contain or emit chemicalsknown to the State of California to cause cancer and birth defects or otherreproductive harm.<
cially designated as Class 1 light-emit-ting diodes.
Do not remove the protective lens and avoid staring directly at the
unfiltered beam for extended periods (several hours). To do so could result in inflammation of the iris.<

154nOBD interface socket
The OBD interface socket for onboard diagnostics is located on the driver's side at the left-hand bottom of the instrument panel and under a cover.
460us2
50
An illuminated indicator informsyou of the need for service, notthat you need to stop the
vehicle. Your system should be checked, however, at the earliest possible opportunity by your BMW center.
If the indicator blinks or flashes, this indicates a high level of engine misfire.Reduce speed and contact your nearest BMW center immediately. Severe engine misfire over even a shortperiod of time can seriously damage emission control components, espe-cially the catalytic converter.
"Service Engine Soon" warning
The cover has the letters "OBD" on it.The purpose of the OBD system is to assure proper emission control system operation for the vehicle's lifetime by monitoring emission-related compo-nents and systems for deterioration and malfunction.
lamp for Canadian models.
If the fuel filler cap is not on tight enough, the OBD system can
detect leaking vapor and the indicator will light up. If the fuel filler cap is then tightened, the indicator will usually go out after a short period of time.<

155n
airs
Car
care
Cont
rols
Over
view
Inde
xDa
taTe
chno
logy
Rep
156n

Overview
Controls and features
Operation, careand maintenance
Owner service procedures
Technical data
Index
Advanced technology
157n
dex
Data
Tech
nolo
gyRe
pair
sCa
r ca
reCo
ntro
lsOv
ervi
ew
Replacement procedures:Onboard tool kit 158Windshield wiper blades 158Lamps and bulbs 158Changing a wheel 165Battery 168Fuses 170Microfilter 171
In case of electrical malfunction:Fuel filler door 172Sliding/tilt sunroof 172
Assistance, giving and receiving:Jump-starting 173Towing the vehicle 174
In
Repairs

158n
mps and bulbs are essential s contributing to the safety of your le. For this reason, follow the ctions below carefully when ing a bulb. If you are not familiar ny of the procedures, consult MW center.
Do not touch the glass portion of a new bulb with your bare hands even small amounts of impurities nto the surface and reduce the e life of the bulb. Use a clean paper napkin, or a similar mate-r hold the bulb by its metallic <
Onboard tool kit Windshield wiper blades Lamps and bulbs
The onboard tool kit is located in the luggage compartment lid.
Loosen the wingnut to open.
460d
e066
1 Rotate the wiper arm completely out from the windshield
2 Position the wiper blade at an angle and pull the release spring (arrow)
460d
e56
acement bulb set is available from MW center.
Whenever working on the elec-trical system, switch off the elec-accessory you are working on or nnect the cable from the negative al of the battery. Failure to do this
result in short circuits.vent injuries and damage,
ly with any instructions provided bulb manufacturer.<
3 Fold the wiper blade down and unhook it toward the windshield
4 Pull the wiper blade past the wiper arm toward the top
5 Insert a new wiper blade and apply pressure until you hear it engage.
Use only wiper blades approved by BMW.<
The lafactorvehicinstrureplacwith ayour B
sinceburn iserviccloth,rial, obase.
A replyour B
trical discotermincouldTo precompby the

159n
airs
Car
care
Cont
rols
Over
view
Lamps and bulbs
on lamps* service life of these bulbs is very and the probability of a failure is low, provided that they are not
tched on and off an unusual number imes. If one of these bulbs should ertheless fail, it is possible to tinue driving with great caution g the front fog lamps, provided
fic laws in your area do not prohibit .
Because of the extremely high voltages involved, any work on the
ting system should be performed by technicians with the appropriate lifications. Failure to comply with
th
-ith
XenThelongveryswiof tnevconusintrafthis
lighonlyqua
Inde
xDa
taTe
chno
logy
Rep creates a risk of fatal injury.<
thisThe illustration shows the left-hand side of the engine compartment.
1 Low beams
460d
e130
When cleaning the headlamps, please observe the following:
Do not clean by wiping with a dry clo(this causes scratches). Never use abrasives or strong solvents to cleanthe covers. Remove dirt and contamination (such as insects) by soaking wBMW Car Shampoo and then rinsingwith plenty of water. Always use a deicer spray to remove accumulatedice and snow – never use a scraper.<
H7, 55 watt bulb
2 High beamsH7, 55 watt bulb
The H7 bulb is pressurized. There-fore, wear safety glasses and
protective gloves. Failure to comply with this precaution could lead to injury if the bulb is accidentally damaged during replacement.<
1 Press the two locks at the front and turn left to release the bulb holder.
2 Remove and replace the bulb.
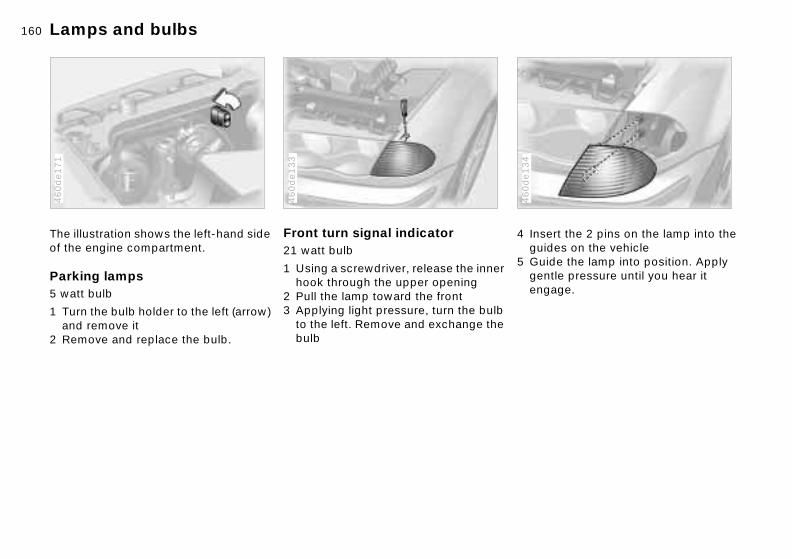
160nLamps and bulbs
rt the 2 pins on the lamp into the es on the vehicle
de the lamp into position. Apply tle pressure until you hear it
r
4 Inseguid
5 Guigen
460d
e134
age.
eng
The illustration shows the left-hand side of the engine compartment.
Parking lamps
460d
e171
Front turn signal indicator 21 watt bulb
1 Using a screwdriver, release the inne
460d
e133
5 watt bulb
1 Turn the bulb holder to the left (arrow) and remove it
2 Remove and replace the bulb.
hook through the upper opening2 Pull the lamp toward the front3 Applying light pressure, turn the bulb
to the left. Remove and exchange thebulb

161n
airs
Car
care
Cont
rols
Over
view
Lamps and bulbs
l lamps lamps (4): bulbs 21/4 wattsaining bulbs: 21 watts
urn signal indicator yellow
TaiTailRem
1 T
460us0
46
Inde
xDa
taTe
chno
logy
Repackup lamp white
ail lamp red
ail lamp/Brake lamp red
ryen
lb he
2 B
3 T
4 T
Side turn signal indicators 5 watt bulb
1 Use finger pressure against the rear end of the lens (arrow) to press it
460d
e135
Front fog lamps* HB4, 55 watt bulb
The bulb is pressurized. There-
460d
e132
forward for removal2 Apply gentle pressure to the bulb
while turning it to the left to remove.
fore, wear safety glasses and protective gloves. Failure to comply with this precaution could lead to injuif the bulb is accidentally damaged during replacement.<
1 Using a screwdriver, carefully loosthe lamp
2 Applying light pressure, turn the buto the left. Remove and exchange tbulb.

162nLamps and bulbs
d the trim panel down (arrow 1). engage the bulb holder (arrow 2) remove itlying light pressure, turn the bulb
2 FolDisand
3 App
462us0
33
he left. Remove and exchange the bss the bulb holder into position il you hear it engagenstall the trim with the two clips.
to tbul
4 Preunt
5 Rei
The illustration shows the right-hand luggage compartment opening.
Bulbs in the fender:
460d
e057
Bulbs in the luggage compartment lid:
1 Using a screwdriver, loosen the two clips
460d
e131
All of the bulbs are integrated in a central bulb holder.
1 Release the bulb holder (arrow, partial view) and remove
2 Unplug the power supply receptacle. Set the bulb holder aside (on the luggage compartment floor, for example)
3 Applying light pressure, turn the bulb to the left. Remove and exchange the bulb
4 Plug in the power supply receptacle5 Position the bulb holder for reinstalla-
tion. Apply gentle pressure on the button (arrow, partial view) until you hear it engage.

163n
airs
Car
care
Cont
rols
Over
view
Lamps and bulbs
rior lamps nt:
illustration provides an example of interior lamps when equipped with
InteFro
Thethe
460d
e182
Inde
xDa
taTe
chno
logy
Reping lamps.
rior lamps (2 x 5 watt bulbs)
sing a screwdriver, press the lamp ut toward the frontemove the lens and pull the bulb ut of the contact studs.
rior lamps (6 watt bulb) with reading ps (2 x 6 watt bulbs)
sing a screwdriver, press the lamp ut toward the fronturn the bulb holder to the left and moveemove and replace the bulb.
read
Inte
1 Uo
2 Ro
Intelam
1 Uo
2 Tre
3 R
Center (high-mount) brake lamp LED light bar on the rear window.
Please contact a BMW center in the event of a malfunction.
462d
e268
License plate lamps 5 watt bulb
1 Place a screwdriver in the slot andpress toward the left (arrow) to
460d
e047
release the lens2 Replace the bulb.

164nLamps and bulbs
well lamps* t bulb
ss the lamp out using a screw-erlace the bulb.
compartment lamp t bulb
ss the lamp out using a screw-erlace the bulb.
age compartment lamps mp each in the bulb holder of the
mp assembly: 10 watt bulb.
Foot5 wat
1 Predriv
2 Rep
Glove5 wat
1 Predriv
2 Rep
LuggOne latail la
ly a screwdriver to the recess and ove the lenslace the bulb.
1 Apprem
2 Rep
Rear:
The illustration provides an example of the interior lamps when equipped with
460d
e179
Lighted vanity mirror* 10 watt bulb
1 Remove the bulb housing – use a
460d
e181
reading lamps.
Interior lamps (5 watt bulb)
1 Using a screwdriver, press the lamp out toward the front
2 Turn the bulb holder to the left and remove
3 Remove and replace the bulb.
Interior lamps (6 watt bulb) with reading lamp (6 watt bulb)
1 Press the lamp out using a screw-driver
2 Turn the bulb holder to the left and remove
3 Remove and replace the bulb.
screwdriver if necessary2 Replace the bulb.
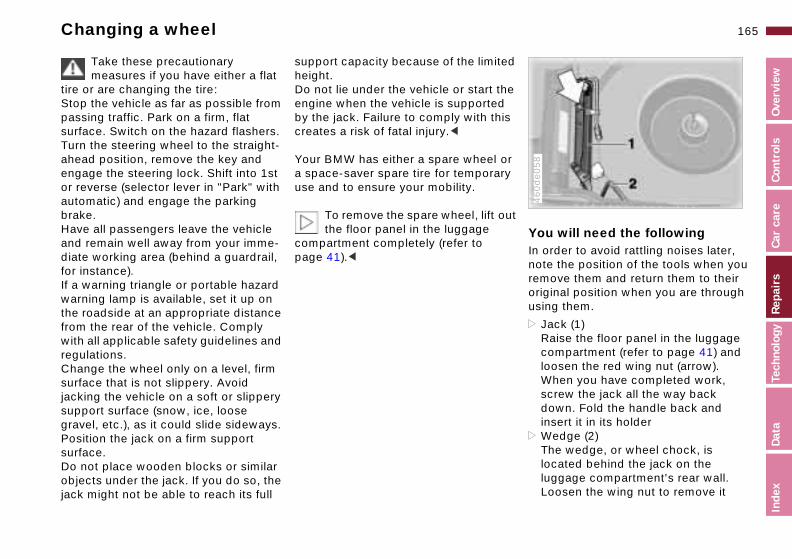
165n
airs
Car
care
Cont
rols
Over
view
Changing a wheel
will need the followingrder to avoid rattling noises later, the position of the tools when you ove them and return them to their
ed
he is
or ry
ut
YouIn onoterem
460d
e058
Inde
xDa
taTe
chno
logy
Repinal position when you are through
g them.
ack (1)aise the floor panel in the luggage ompartment (refer to page 41) and osen the red wing nut (arrow).hen you have completed work,
crew the jack all the way back own. Fold the handle back and sert it in its holderedge (2)
he wedge, or wheel chock, is cated behind the jack on the ggage compartment's rear wall. oosen the wing nut to remove it
origusin
> JRcloWsdin
>WTloluL
Take these precautionary measures if you have either a flat
tire or are changing the tire:Stop the vehicle as far as possible from passing traffic. Park on a firm, flat surface. Switch on the hazard flashers. Turn the steering wheel to the straight-ahead position, remove the key and engage the steering lock. Shift into 1st or reverse (selector lever in "Park" with automatic) and engage the parking brake.Have all passengers leave the vehicle and remain well away from your imme-diate working area (behind a guardrail, for instance).If a warning triangle or portable hazard
support capacity because of the limitheight.Do not lie under the vehicle or start tengine when the vehicle is supportedby the jack. Failure to comply with thcreates a risk of fatal injury.<
Your BMW has either a spare wheel a space-saver spare tire for temporause and to ensure your mobility.
To remove the spare wheel, lift othe floor panel in the luggage
compartment completely (refer to page 41).<
warning lamp is available, set it up on the roadside at an appropriate distance from the rear of the vehicle. Comply with all applicable safety guidelines and regulations.Change the wheel only on a level, firm surface that is not slippery. Avoid jacking the vehicle on a soft or slippery support surface (snow, ice, loose gravel, etc.), as it could slide sideways.Position the jack on a firm support surface.Do not place wooden blocks or similar objects under the jack. If you do so, the jack might not be able to reach its full

166nChanging a wheel
osen the lug bolts g turn sition the jack at the jacking point
osest to the flat tire (refer to the nter illustration) so that the jack
4 Lo5 Po
clce
460d
e190
se is vertically below the jacking int and the entire surface of the ad of the jack will move into the uare recess of the jacking point fer to the illustration detail) when
e jack is crankedck the vehicle up until the wheel u are changing is raised from the oundnscrew the lug bolts and remove e wheelmove accumulations of mud or
rt from the mounting surfaces of e wheel and hub; clean the lug lts
l -
bapohesq(reth
6 Jayogr
7 Uth
8 Redithbo
> Spare tire or space-saver spare tireLocated next to the jack.Loosen the wing nut (arrow) by hand, remove the storage tray and take out
460d
e059
Procedure1 Read and comply with the safety
precautions provided on the previous page
460d
e124
the spare wheel> Lug wrench – is in the onboard tool
kit on the underside of the luggage compartment lid (refer to page 158).
2 Secure the vehicle from rolling:Place the wedge against the rear surface of the front tire on the side opposite the side being raised. If the vehicle is parked on a down-ward slope, place the wedge securely in front of the tire. If the wheel must be changed on a surface with a more severe slope, take additional precautions to secure the vehicle from rolling
3 If your wheels are equipped with fulwheel covers*: reach into the ventilation openings and pull off the cover

167n
airs
Car
care
Cont
rols
Over
view
Changing a wheel
The vehicle jack is designed for changing wheels only. Do not
mpt to raise another vehicle model it or to raise any load of any kind. o so could cause accidents and
sonal injury.e the lug bolts checked for proper tness with a calibrated torque nch at the earliest possibility [torque cification: 72 lb.ft. (100 Nm)].<
en storing the wheel, be sure that do not damage the retaining pin in spare tire recess.
ht-alloy wheels other than Original W light-alloy wheels have been nted, it may be necessary to use
w)
attewithTo dperHavtighwrespe
Whyouthe
If ligBMmou
Inde
xDa
taTe
chno
logy
Reprent lug bolts for those wheels.
lace the defective tire as quickly as sible and have the new wheel nced.
on .
ld
diffe
Repposbala
9 Position the new wheel or the space-saver spare tire on the hub and screw at least two lug bolts finger-tight into opposite bolt holes
10 Screw in the remaining lug bolts.
462d
e267
13 Wheels with full wheel covers*: Position the wheel cover with thevalve opening over the valve (arroand press it onto the wheel with both hands
460d
e125
Tighten all the bolts securely11 Lower the jack and remove it from
beneath the vehicle12 Tighten the lug bolts in a diagonal
pattern
14 Check and correct the tire's inflatipressure at the earliest possibilityFor vehicles with RDC (Tire Pres-sure Control):Reactivate the system after mounting the spare wheel or correcting the inflation pressure. Refer to page 86.
Use original BMW full wheel covers only. Other wheel covers
may not fit securely. The full wheel cover may not be installed on the space-saver spare tire, since this coudamage the cover.<

168nChanging a wheel Battery
ge conditionMagic Eye*" is a hydrometer that you to read the charge condition battery:
CharThe "allowsof the
460d
e252
en: adequate charge.ck: not adequately charged. The tery must be recharged. Please tact your BMW center for addi-al information.low: replace the battery.
The service life specified for the battery can be achieved only if it is s kept adequately charged. If the le is primarily used for stop-and-ffic, be sure to check the charge often.<
r
> Gre> Bla
batcontion
> Yel
alwayvehicgo trastate
Driving with the space-saver spare tireDrive cautiously and do not exceed a speed of 45 mph (80 km/h).
Be aware that vehicle handling will be altered. Slower brake response time, longer braking distances and changed steering characteristics may be antici-pated when approaching limit condi-tions.
The changes in handling characteristics will be even more pronounced in conjunction with winter tires.
Only one space-saver spare tire
Battery locationThe battery is located at the right-rear of the luggage compartment. Raise theluggage compartment floor panel (refer
460d
e176
may be mounted at one time. Mount a wheel and tire with the same size and specifications as the others at the earliest possible opportunity. Maintain correct tire pressures. Refer to page 29.<
to page 41). Use a screwdriver or a cointo loosen the two fasteners in the illus-tration f-turn. Loosen the third fastenein the upper-center side trim panel. Remove the fasteners. In order to remove the storage tray, slide the side trim panel slightly upward.
Battery posts, terminals, and related accessories contain lead
and lead compounds. Wash hands afterhandling.<
169n
airs
Car
care
Cont
rols
Over
view
Battery
oval and installation Do not disconnect the battery when the engine is running. If you
o, the ensuing voltage surge will age the vehicle's onboard elec-ics. not make any modifications in the s to the positive terminal. If you do the protective function of the safety ery terminal is no longer ensured. air and disposal must be performed rained technicians only.<
en removing the battery, disconnect cable on the negative terminal first, the cable on the positive terminal. sen the center adjusting screw on
to
c-
gy
r-ed.
Rem
do sdamtronDo wireso, battRepby t
Whthe thenLoo
Inde
xDa
taTe
chno
logy
Repbattery retaining strap (use the
wdriver included with the onboard kit) and disconnect the strap.
en installing a battery, connect the itive terminal first, then connect the ative terminal.
When installing a battery, be sure that it is mounted properly and
the retaining bracket is installed the center adjustment screw. If this
ot done, the battery will not be quately secured in case of an acci-t.<
e-
is
, ht. re re
the scretool
Whposneg
thatwithis nadeden
Battery careThe battery is absolutely maintenance-free, that is, the original electrolyte will normally last for the service life of the battery under moderate climatic condi-tions.
For all questions that regard the battery, please consult your BMW
center. Since the battery is mainte-nance-free, the following is for your information only.<
SymbolsYou will find the following symbols on your vehicle battery. To avoid injury,
Do not allow children access batteries and battery acid.
Never allow sparks or open flame in the vicinity of the battery. Avoid sparks from ele
trical cables or electrical equipment. Turn the key to position 0 in the steering lock when disconnecting or connecting the battery. Do not short-circuit the battery terminals. This creates a risk of injury from high-enersparks.
A highly explosive gas is geneated when the battery is charg
please comply with the corresponding precautions whenever you work with or near the battery.
Before handling the battery, please read the following infor-mation.
Wear eye protection. Do not allow particles containing battery acid or lead to come into
contact with your eyes, your skin, or your clothing.
Battery acid is extremely corro-sive. Wear eye protection and protective gloves. Do not tip the
battery. Battery acid can leak from the ventilation openings.
If battery acid is splashed intoyour eyes, immediately rinse them with clear water for
15 minutes. Consult a physician immdiately. If your skin or clothing are splashed by acid, rinse immediately with ample clear water. If battery acidaccidentally swallowed, consult a physician immediately.
In order to protect the batterycase from ultraviolet radiationdo not place it in direct sunlig
A discharged battery can freeze. Stothe battery in areas where temperaturemains above freezing.

170nBattery Fuses
lectrical accessory should fail, it off and check the fuse.
glove compartment
.
If an eswitch
In the
460d
e062
n the glove compartment and the two white quick-release eners outward. Spare fuses and tic tweezers are located on the holder. the plastic tweezers to remove
fuse for the accessory or equip-nt that has stopped working. e fuse is burned through (the
tal strip is melted and separated), lace it with a new fuse of the same pere rating (color code).
1 Opeturnfastplasfuse
2 Usetheme
3 If thmerepam
Charging the battery Charge the battery in the vehicle only when the engine is not running.
Before doing any work on the elec-trical system, be sure to unclamp
the cable from the battery's negative terminal. Failure to do so can result in short-circuits, a fire or personal injury.<
If the vehicle is to be parked longer than four weeks, disconnect the battery from the vehicle's electrical system by disconnecting the negative terminal cable and then recharge using a suit-able charging device.
Return used batteries to a recy-cling center or your BMW center.
Maintain the battery in an upright posi-tion for transport and storage. Secure the battery to prevent it from tilting during transport.<
Storage periods during which thebattery is disconnected are not
taken into consideration by the ServiceInterval Display for changing the brake fluid.For this reason, be sure that the brake fluid is changed every two years, regardless of the information displayedRead and comply with the information
If you intend to store your vehicle for longer than twelve weeks: remove the battery, charge it and store it in a cool (but frost-and dust-free) room. Every three months and before reinstalling the battery, have it recharged. If it is not recharged, it will not be serviceable. Every time the battery is discharged, especially over extended periods, its service life is reduced.
on page 143 covering this subject.<

171n
airs
Car
care
Cont
rols
Over
view
Fuses Microfilter/Activated-charcoal filter
emove the filter by pulling it rward. Install the new filterosition the filter cover and secure it ith the three fasteners.
4 R
fo5 P
w
460d
e157
Inde
xDa
taTe
chno
logy
Rep
The fuses, their respective ampere ratings and the equipment in their circuits are all indicated below the fuse holder.
To close the fuse holder, snap it into position at the top and turn the two fasteners inward.
Do not attempt to repair a burned fuse or replace it with a fuse
having a different color or amperage rating. To do this could cause a fire in the vehicle resulting from a circuit over-load.<
If a fuse blows repeatedly, refer the problem to your BMW center for repair.
1 Open the hood 2 Loosen the three fasteners (arrow)
with a f-turn 3 Remove the filter cover
460d
e156

172nFuel filler door Sliding/tilt sunroof*
Manual release Pull the knob with the fuel pump symbol (arrow) on the right trim panel of the luggage compartment.
460d
e178
Manual operation 1 Remove the interior lamp (refer to
page 163), reach into the opening and push the panel out
460d
e183
2 Turn the sunroof's steel crank with the Allen wrench from the onboard tool kit (refer to page 158) in the desired direction.

173n
airs
Car
care
Cont
rols
Over
view
Follow the same sequence for connecting the jumper cables
n helping other vehicles. If you do there is the risk of injury if sparks generated at the battery.<
tart the engine of the support ehicle and let it runtart the engine on the vehicle eeding the jump-start, and allow it run as usual. If the first start
ttempt is not successful, wait a few inutes before another attempt in rder to allow the discharged battery rechargeefore disconnecting the jumper ables from your BMW, turn on the
Jump-starting
Do not use spray starter fluids.
If the battery is discharged, the engine can be started with the use of two jumper cables and the battery of another vehicle. Use only jumper cables with fully insulated grips on the terminal clamps.
Do not touch the parts conducting electrical current while the engine
is running. Failure to comply with this creates a risk of fatal injury.<
Carefully comply with the following instructions to avoid personal injury or damage to one or both vehicles:
BMW's engine compartment. The cover of the positive terminal connector is marked with a "+" sign. Refer to the illustration. Remove by pulling the tab (arrow 1)
462us0
53
Inde
xDa
taTe
chno
logy
Rephting, the rear window defroster
nd set the blower to the highest peed; allow the engine to run pprox. 10 seconds. This will prevent voltage surge from the voltage gulator to the electrical accessories
hen disconnect the jumper cables in verse sequence.
ending on the cause of the fault, arge the battery.
1 Be sure that the battery on the support vehicle is also rated at 12 volts, and that the capacities of the two batteries (Ah) are roughly comparable (printed on casing)
2 Leave the discharged battery connected to the vehicle's electrical system
3 Make sure that there is no contact between the bodywork of the two vehicles – this creates a risk of short circuits
4 Start by connecting the jumper cable from the positive terminal of the support vehicle to the positive terminal connector located in your
5 Then connect the negative terminals.Attach the cable to either the supportvehicle's negative battery terminal (–),or to a suitable ground on its engine or bodywork. Then connect the otherend of the cable to a ground on the engine or on the bodywork of the vehicle that is to be started. There is a special nut provided for this on theBMW (arrow 2)
whenot,are
6 Sv
7 Sntoamoto
8 Bc
ligasaare
9 Tre
Deprech

174nTowing the vehicle
ng with a commercial tow
not tow with sling-type equip-
Towitruck> Do
380us1
24
nt.
a wheel lift or flat bed equip-nt.
ase comply with applicable towing s.
Never allow passengers to ride in a towed vehicle for any reason. attach tie-down hooks, chains, , or tow hooks to tie rods, control or any other part of the vehicle nsion, as severe damage to these onents will occur, leading to ble accidents.c
me
> Useme
> Plelaw
Neverstrapsarms,suspecomppossi
Tow fittingThe screw-in tow fitting is stored in the onboard tool kit; be sure that it remains in the vehicle at all times. This fitting is
460d
e063
Rear:Use a screwdriver in the upper sectionof the recess to press the cover out.
460d
e064
designed for installation in the tow sockets located at the front and rear of the vehicle. It is intended for towing on paved road surfaces only. This fitting should not be used to pull a vehicle out of deep snow, mud, sand, etc.Always comply with all applicable towing laws and regulations.
Access to tow socketsFront:Use a screwdriver in the upper section of the recess to press the cover out.
Screw the tow fitting in completelyand tightly. If you do not, the
threads could be damaged. Do not tow the vehicle by any compo-nents of the running gear, or lash themdown in any way. If you do so, the components could be damaged, leading to possible accidents.<

175n
airs
Car
care
Cont
rols
Over
view
Towing the vehicle
Inde
xDa
taTe
chno
logy
Rep
BMW 325xi, 330xi: towing the vehicle with one raised axle only 1 Place the gearshift lever or selector
lever in "Neutral"
2 Switching off the engine
3 Towing speed: Max. 30 mph (50 km/h)
4 Towing distance: Max. 95 miles (150 km)
Remove the rear driveshaft for towing over longer distances with
the front axle lifted; remove the front driveshaft for towing over longer distances with the rear axle lifted. Failure to comply with this will result in
damage to the transfer box.<
176n
Overview
Controls and features
Operation, careand maintenance
Owner service procedures
Technical data
Index
Advanced technology
177n
dex
Data
Tech
nolo
gyRe
pair
sCa
r ca
reCo
ntro
lsOv
ervi
ew
Adaptive Transmission Control (ATC) 178
Airbags 179Automatic Stability Control plus
Traction (ASC+T)/Dynamic Stability Control (DSC) 180
Radio reception 181Four-wheel drive 182Safety belt tensioner 183Interior rearview mirror
with automatic dimming feature 184
Rain sensor 185Tire Pressure Control (RDC) 186Self-diagnostics 187Xenon lamps 188
In
Technol-
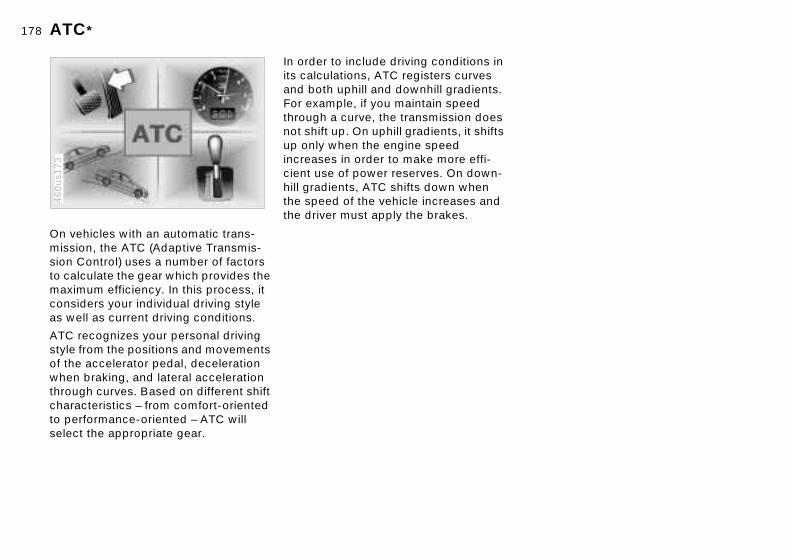
178nATC*
On vehicles with an automatic trans-mission, the ATC (Adaptive Transmis-sion Control) uses a number of factors to calculate the gear which provides the
460us1
73
In order to include driving conditions in its calculations, ATC registers curves and both uphill and downhill gradients. For example, if you maintain speed through a curve, the transmission does not shift up. On uphill gradients, it shifts up only when the engine speed increases in order to make more effi-cient use of power reserves. On down-hill gradients, ATC shifts down when the speed of the vehicle increases and the driver must apply the brakes.
maximum efficiency. In this process, it considers your individual driving style as well as current driving conditions.
ATC recognizes your personal driving style from the positions and movements of the accelerator pedal, deceleration when braking, and lateral acceleration through curves. Based on different shift characteristics – from comfort-oriented to performance-oriented – ATC will select the appropriate gear.
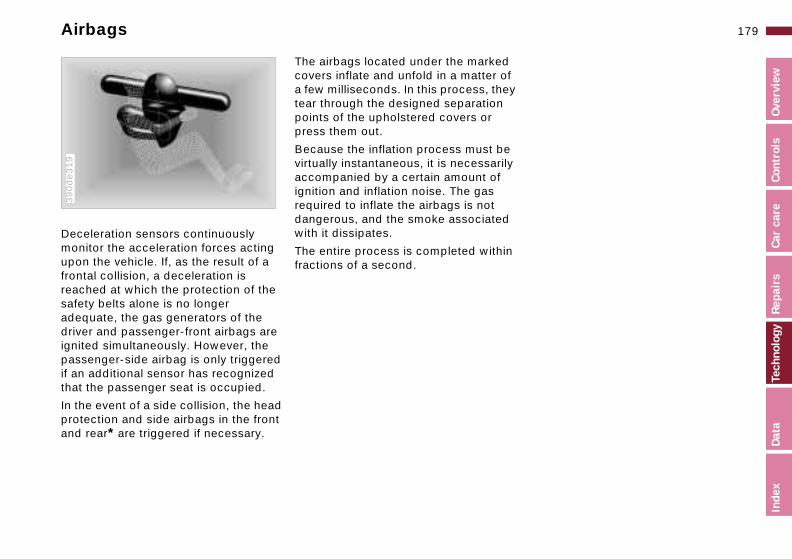
179n
airs
Car
care
Cont
rols
Over
view
Airbags
Deceleration sensors continuously monitor the acceleration forces acting upon the vehicle. If, as the result of a frontal collision, a deceleration is reached at which the protection of the
390d
e319
The airbags located under the marked covers inflate and unfold in a matter of a few milliseconds. In this process, theytear through the designed separation points of the upholstered covers or press them out.
Because the inflation process must be virtually instantaneous, it is necessarilyaccompanied by a certain amount of ignition and inflation noise. The gas required to inflate the airbags is not dangerous, and the smoke associated with it dissipates.
The entire process is completed withinfractions of a second.
Inde
xDa
taTe
chno
logy
Rep
safety belts alone is no longeradequate, the gas generators of the driver and passenger-front airbags are ignited simultaneously. However, the passenger-side airbag is only triggered if an additional sensor has recognized that the passenger seat is occupied.
In the event of a side collision, the head protection and side airbags in the front and rear* are triggered if necessary.

180nASC+T/DSC*
Highly sensitive sensors monitor the number of revolutions of the wheels. When equipped with DSC, they also monitor steering angle, lateral accelera-tion, brake pressure and the movement of the vehicle around its vertical axis.
If differences in the wheel speeds occur, ASC+T counteracts the danger of wheelspin by reducing engine torque; if necessary, ASC will also respond by applying the brakes to the rear wheels.
In addition, DSC permanently monitors the vehicle's current operating condition and compares it with an ideal condition that is calculated from the sensor's signals. If deviations from this occur
(understeering or oversteering, for instance), DSC can stabilize the vehicle in fractions of a second by reducing engine output and with the assistance of braking intervention at individual wheels. As a result, dangerous skids can be prevented even as they are just beginning, but only within the laws of physics.You may need some time to become accustomed to this system's interven-tion. However, it provides optimum drive force and driving stability.
The braking intervention may be accompanied by sounds specific to the system.

181n
Car
care
Cont
rols
Over
view
Radio reception
p-
es
s n a-
ti-
Repa
irs
te.
Inde
xDa
taTe
chno
logy
The AM frequency bands (medium-wave, long-wave and short-wave) make it possible to receive stations from a great distance, because the broadcast signals travel not only along the ground
360d
e084
The limitations inherent to radio recetion in a moving vehicle have been minimized by a number of innovativesystem designs:
The "Radio Data System" (RDS) maksure that, for broadcast stations sending on several frequencies, the radio automatically tunes to the frequency with the best reception quality.
The Diversity Antenna system employseveral FM antennas integrated withithe rear window to provide three seprate sources for receiving broadcast waves. An integral processor automacally selects the antenna with the bes
as surface waves, but also as atmospheric waves that are reflected from the ionosphere.Frequency-modulation (FM) provides substantially better sound quality than AM. However, because FM transmis-sions rely on line-of-sight broadcast waves, their effective reception range is limited.
FM reception quality at any given timThe selection of the antenna takes place within milliseconds, and is there-fore not noticed by the radio listener.
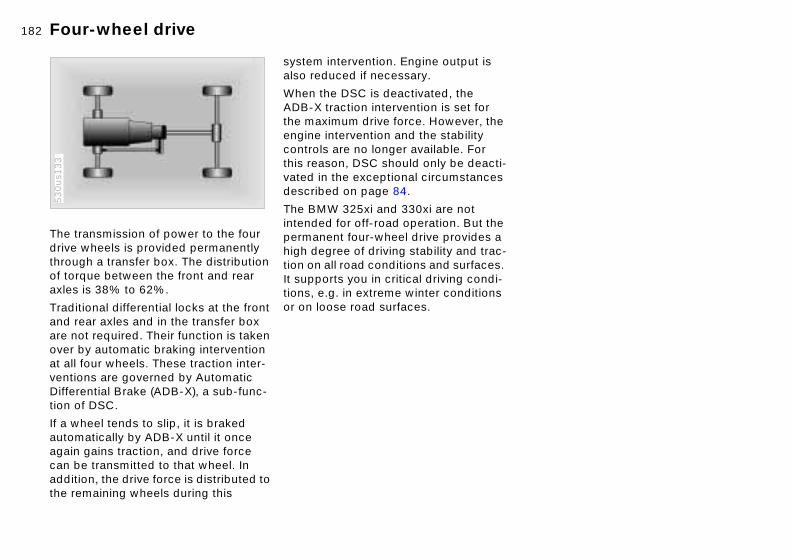
182nFour-wheel drive
-
-
-
The transmission of power to the four drive wheels is provided permanently through a transfer box. The distribution of torque between the front and rear
530us1
33
system intervention. Engine output is also reduced if necessary.
When the DSC is deactivated, the ADB-X traction intervention is set for the maximum drive force. However, theengine intervention and the stability controls are no longer available. For this reason, DSC should only be deactivated in the exceptional circumstancesdescribed on page 84.
The BMW 325xi and 330xi are not intended for off-road operation. But thepermanent four-wheel drive provides ahigh degree of driving stability and traction on all road conditions and surfaces. It supports you in critical driving condi
axles is 38% to 62%.
Traditional differential locks at the front and rear axles and in the transfer box are not required. Their function is taken over by automatic braking intervention at all four wheels. These traction inter-ventions are governed by Automatic Differential Brake (ADB-X), a sub-func-tion of DSC.
If a wheel tends to slip, it is braked automatically by ADB-X until it once again gains traction, and drive force can be transmitted to that wheel. In addition, the drive force is distributed to the remaining wheels during this
tions, e.g. in extreme winter conditionsor on loose road surfaces.

183n
Car
care
Cont
rols
Over
view
Safety belt tensioner
Inde
xDa
taTe
chno
logy
Repa
irs
The safety belt tensioner responds to severe frontal collisions by tightening the belts to ensure that occupants remain firmly positioned in their seats. A gas-pressure system retracts the
390d
e330
buckle assembly to tension the shoulder and lap belts within fractions of a second. This further reduces the tendency to slide under the lap belt.

184nInterior rearview mirror with automatic dimming feature*
The interior rearview mirror with auto-matic dimming feature reduces blinding from following traffic by adapting the intensity of the reflected images to
463us0
13
The semisolid reacts chemically to thiselectrical current, thus providing dimming of the mirror through an infi-nitely-variable range (electrochromic technology).
As a result, it is no longer necessary todim the mirror manually, and the drivercan concentrate completely on traffic conditions.
correspond to levels of light registered by the unit's sensors. The mirror reverts to its undimmed setting as soon as the light source disappears. One lamp sensor is mounted on the front of the mirror housing. This sensor, which is directed forward, measures light inten-sity in the area ahead of the vehicle. The second sensor is integrated within the mirror's glass. The electronic control system compares the light intensity from front and rear. The differ-ence provides the basic parameter used to modulate an electrical current and induce chemical changes in a semisolid layer incorporated in the lens.

185n
airs
Car
care
Cont
rols
Over
view
Rain sensor*
it-
to
lt, n
Inde
xDa
taTe
chno
logy
Rep
Depending on the degree of wetness on the windshield, the rain sensor controls the operation of the windshield wipers.
390d
e133
When the system is set to the "Intermtent" wiper speed, the wipers react immediately – if water is splashed onthe windshield by vehicles traveling ahead of you, for example. As a resuthe rain sensor provides a contributioto driving safety and comfort.
Infrared light is carried along the surface of the windshield in an optical conductor in such a manner that it is reflected completely when the wind-shield is dry. The quantity of reflected light is measured.
If there is moisture on the glass, the amount of light reflected is reduced since the infrared light at the surface of the windshield can escape. The quan-tity of reflected light is thus a means of gauging the degree of wetness on the windshield.

186nTire Pressure Control (RDC)*
This system regularly checks tire pres-sure and monitors all four tires even while driving, so you don't have to.
Behind the valve stem in every wheel,
460d
e169
Near every wheel is an antenna in the body that receives the signal from the wheel. A central electronics system evaluates the quadruple signals and forwards any changes. The RDC provides an important contri-bution to driving safety.
there is an electronic chip that is designed for severe-duty applications and long service life. It contains a pres-sure sensor, a transmitter and a battery. The pressure is measured in extremely short time intervals and then transmitted by a radio signal. If an irregularity is detected, the transmission rate is increased.

187n
airs
Car
care
Cont
rols
Over
view
Self-diagnostics
will hear the sounds of the air flaps he air conditioning system/auto-ic climate control carry out their -diagnostic functions after the igni- has been turned off. All of the other -diagnostics functions operate ntly in the background.
possible faults detected during e self-diagnostics can be read out our BMW center during the next
ularly-scheduled maintenance and ected with a minimum of time.
ra-
.
c--
e le
i-c-
Youas tmatselftionselfsile
Anythesby yregcorr
Inde
xDa
taTe
chno
logy
Rep
e le, it
si-
for at
All of the important electrical and elec-tronic systems in the vehicle are tested regularly and automatically – the driver does not have to perform any extra operations or adjustments.
460d
e177
In the same manner, the electrical resistance of the airbag ignition genetors and all of the remaining airbag components is measured at all timesAny fault in this system would be detected immediately by a current flutuation that would necessarily accompany it. The fault would be indicated immediately by the airbag warning lamp.
Even after you shut off the engine, thoverall functional status of your vehicis monitored. For example, all of the flaps of the heating and ventilation system travel to the nearest limit postion. This ensures that the defrost funtion is always available even if a
The indicator lamps also come on briefly after the ignition has been turned on.
While you are driving, the functional status of the actuator motors (for the windshield wipers, power windows, seats, sliding/tilt sunroof, etc.) is constantly analyzed by current measurements in their relays.
malfunction in the air conditioner system/automatic climate control should occur while the vehicle is parked overnight, for instance.
A calibration cycle runs every tenth timthe engine is shut off. During this cycthe actuator motors of all the heatingand ventilation flaps travel to their limstops in both directions. The limit potions and the return travel paths are checked in this manner in order to ensure that appropriate adjustments the operating elements can be madeany time.

188nXenon lamps*
).
The xenon lamp provides forward illu-mination with significantly more bright-ness and uniformity than the traditional halogen lamp.
390d
e134
Xenon lamps provide significantly-improved visibility, especially during adverse weather conditions and drivingsituations, (driving at night in heavy rainor through road repair areas where there are no lane markers, for instance
Vehicles with xenon lamps are equipped with automatic headlamp range control. As a result, the lane ahead of you is always optimally lighted, even under varying load condi-tions, and drivers in oncoming traffic are not blinded.
Xenon lamps make a significant contri-bution to highway safety since other highway users, bicyclists and motorcy-
In a xenon lamp, an electric arc replaces the filament in order to generate intense illumination. A gas mixture in a quartz glass tube with metal vapor is ignited by a high electric voltage. The arc that is generated is then sustained by a lower voltage. When the lamp is turned on, there is a brief warm-up period. Maximum brightness is attained in approx. 15 seconds.
clists in the right lane, and pedestriansare more easily detected.

189n
airs
Car
care
Cont
rols
Over
view
Inde
xDa
taTe
chno
logy
Rep

190n
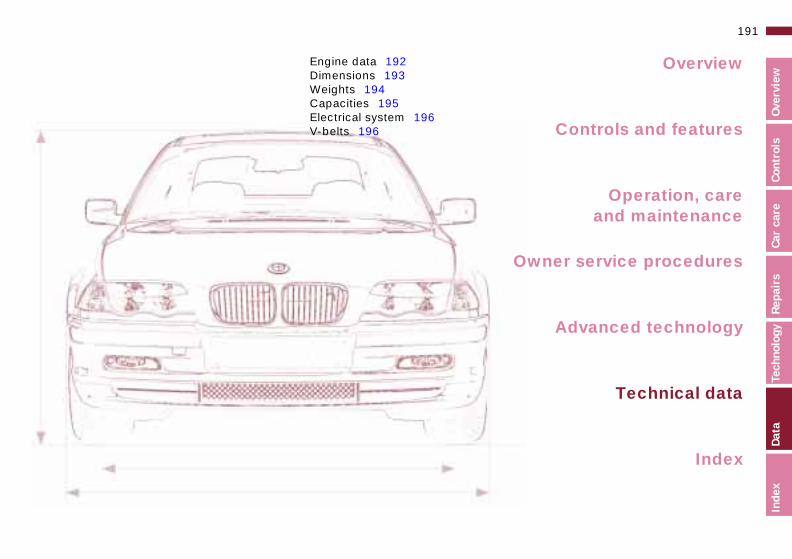
Overview
Controls and features
Operation, careand maintenance
Technical data
Index
Advanced technology
191n
dex
Data
Tech
nolo
gyRe
pair
sCa
r ca
reCo
ntro
lsOv
ervi
ew
Engine data 192Dimensions 193Weights 194Capacities 195Electrical system 196V-belts 196
Owner service procedures
In
Data

192n
5i/325xi BMW 330i/330xi
,494) 181.8 (2,979)6
) 225 (165)5,900
) 214 (290)3,500
10.2
))
3.53 (89.6)3.31 (84)
nagement System
ynamometer.
Engine data
BMW 320i BM
DisplacementNumber of cylinders
cu in (ccm) 132.5 (2,171)6
156
Maximum outputat engine speed
hp (kW)rpm
168 (124)6,250
186,
Maximum torqueat engine speed
lb ft (Nm)rpm
155 (210)3,500
173,
Compression ratio e 10.8 10
StrokeBore
in (mm)in (mm)
2.83 (72)3.15 (80)
2.3.
Fuel-injection system Digital electronic Engin
BMW 325xi, 330xi: an engine performance test is authorized only on a suitable cha
W 32
2.2 (2
4 (135000
5 (237500
.5
95 (7531 (84
e-Ma
ssis d

193n
Inde
xDa
taTe
chno
logy
Repa
irs
Car
care
Cont
rols
Over
view
Dimensions
460us3
03

194nWeights
325xi BMW 330i BMW 330xi
4 5)0 5)
3,318 (1,505)3,373 (1,530)
3,527 (1,600)3,583 (1,625)
3 5)9 5)
4,376 (1,985)4,431 (2,010)
4,586 (2,080)4,641 (2,105)
3 (990) 1,984 (900) 2,205 (1,000)
9 0)
2,469 (1,120)
2,491 (1,130)
(75) 165 (75) 165 (75)
(440) 15.5 (440) 15.5 (440)
5i BMW
cluded)3,49(1,583,56(1,61
4,55(2,064,61(2,09
0) 2,18
2,46(1,12
165
) 15.5
BMW 320i BMW 32
Curb weight (with one person, ready for operation, full tank of fuel, options not inwith manual transmission
with automatic transmission
lbs. (kg)
lbs. (kg)
3,175 (1,440)3,252 (1,475)
3,241 (1,470)3,318 (1,505)
Approved gross vehicle weightwith manual transmission
with automatic transmission
lbs. (kg)
lbs. (kg)
4,233 (1,920)4,310 (1,955)
4,299 (1,950)4,376 (1,985)
Approved front axle weight lbs. (kg) 1,962 (890) 1,962 (89
Approved rear axle weight lbs. (kg) 2,403 (1,090)
2,436 (1,105)
Approved roof load capacity lbs. (kg) 165 (75) 165 (75)
Luggage compartment capacity cu ft (l) 15.5 (440) 15.5 (440
Never exceed either the approved axle weights or the gross vehicle weight.
195n
Inde
xDa
taTe
chno
logy
Repa
irs
Car
care
Cont
rols
Over
view
Capacities
Notes
) Fuel specification: page 28
) For details: page 138
) For details: page 142
)
)
BMW High Performance Synthetic Oil For details: page 140
Lifetime fluid, no fluid change required
prox. 63rox. 8)
rox. 5.3
rox. 8.4
:rox. 6.5
rox. 7,5
Fuel tank reserve
gal. (liters)gal. (liters)
approx. 16.6 (apapprox. 2.1 (app
Windshield washer system/Headlamp washer system
quarts (liters) approx. 5.6 (app
Cooling system including heater circuit quarts (liters) approx. 8.9 (app
Engine oil and filter change quarts (liters) 320i, 325i, 330iapprox. 6.9 (app325xi, 330xi:approx. 7.9 (app
Manual and automatic transmission, transfer box and differential
–

196nElectrical system V-belts
You can obtain Original BMW parts and accessories, as well as sional advice from your BMW
r.<
profescenteBattery 12V, 80 Ah
Spark plugs NGK BKR 6 EQUPBosch FGR 7 DQP
Water pump – Generator – Power steeringV-belt 6 PK x 1538
A/C compressorV-belt 5 PK x 863

197n
airs
Car
care
Cont
rols
Over
view
Inde
xDa
taTe
chno
logy
Rep

198n

Overview
Controls and features
Operation, careand maintenance
Owner service procedures
199n
Car
care
Cont
rols
Over
view
Everything from A to Z 200
Owner service procedures 206
Technical data
Index
Advanced technology
dex
Data
Tech
nolo
gyRe
pair
s
InIndex

Everything from A to Z
n
48
161
Brakes 120 malfunctions 121
Break-in procedures 116 Bulb replacement 158
C California Proposition
65 Warning 153 Capacities 195 Car Memory 53 Car radio 124
A ABS (Antilock Brake
System) 22, 118 Accessories 6 Activated-charcoal
filter 102, 171 Adaptive Transmission
Control (ATC) 66, 178 Adding engine oil 139 Adding washer
fluid 138, 195 Adjusting the backrest 48
Antilock Brake System (ABS) 22, 118
Anti-theft alarm system 42 Aquaplaning 117, 125 Armrest 105 ASC+T (Automatic Stability
Control plus Traction) 22 Ashtray 107
front 107 rear 108
ATC (Adaptive Transmission Control) 66, 178
Automatic windshieldwasher 70
Average consumptioAverage speed 78 Axle loads 194
B Backrest, adjustingBackup lamps 65
bulb replacementBattery 168, 196
nt 20 al 169
5
nce
refer also to the separate Owner's Manual
Car radio reception 124, 181
Car vacuum cleaner, connecting 108
Car wash 146 Care
exterior 147 interior 150
Care of upholstery 150 Care of wool velour 150 Cargo loading 112
Adjusting the steering wheel 51
Adjusting the temperature 94
Adjusting the thigh support area 49
Air conditioner 92 Air distribution 94, 100 Air nozzles 92, 98 Air outlets 92, 98
ventilation 92, 98 Air pressure 125
Attach car vacuum cleaner 108
AUC (Automatic recirculated-air control) 101
Automatic car washes 146 Automatic climate
control 98 removing condensation from the windows 101
Automatic cruise control 72 Automatic dimming, interior
capacity 196 charge 170 discharged 173 removal and installation 169
Battery charge curreBattery safety terminBelts 54 Beverage holder 10Blower 94, 101 BMW High Performa
Synthetic Oils 140BMW sports seat 49
m 20
Caring for the vehicle finish 148
Catalytic converter 117 CBC (Cornering Brake
Control) 21, 119 Cellular phone 107, 124
refer also to the separate Owner's Manual
A-Z
Air supply 94, 101 Airbags 21, 55, 151, 179 Alarm system 42 Antenna 124 Antenna, Diversity 181 Antifreeze 142
radiator 122
rearview mirror 53 Automatic recirculated-air
control (AUC) 101 Automatic Stability Control
plus Traction (ASC+T) 22 Automatic transmission with
Steptronic 21, 66
Bore 192 Brake fluid 143 Brake hydraulic systeBrake lamps, bulb
replacement 161 Brake pads 22 Brake system 121
78

Everything from A to Z 201n
car
eCo
ntro
lsOv
ervi
ew
79 181
est 109
22
s 55 ation 34 cking 34
102
22
Engine compartment 136 Engine coolant 142, 195 Engine data 192 Engine oil
capacity 195 consumption 139 pressure 20 quality 140 specifications 140 viscosity 140
Engine oil level 22 check 139
Engine speed 192
Center (high-mount) brake lamp 163
Center 3-point-safety belt in the rear 109
Center armrest 105 Central locking system 34
button 38 Changing a tire 165 Changing a wheel 165 Charge indicator lamp 20 Check Control 76 Child restraint
systems 55, 59, 61
Coolant temperature gauge 75
Cooling system 195 Copyright 4 Cornering Brake Control
(CBC) 21, 119 Cruise control 72 Cruising range 78 Cup holder 105 Curb weight 194
D
Distance warningDiversity AntennaDivided rear backrDoor key 32 Door locks, care 1Doors
child-safety lockemergency operunlocking and lo
Draft-free ventilation 95,
Driving hints 117 Driving in winter 1
Tech
nolo
gyRe
pair
sCa
r
bility , 180 ntrol
ontrol 180
dows 44 ies,
Engine, starting 62 Exterior mirrors 52
F Failure messages 76 Fault displays 76 Fault, ABS 119 Filler cap cover 27 Filling capacities 195 Filling the washer
reservoir 195 First-aid kit 26
Child seat 59 Child seat security 61 Child-safety locks 55 Cigarette lighter 108 Clock 76
refer also to the Radio or Onboard Monitor Owner's Manual
Cockpit 16 Coin holder 105 Combination switch 69 Compression 192
Dashboard 16 Data
dimensions 193 engine 192 weights 194
Daytime-driving lamp switch 88
DBC (Dynamic Brake Control) 119
Defrost position 96, 101 Defroster, rear
window 94, 102 Defrosting the
Driving lamps 88 DSC (Dynamic Sta
Control) 22, 80Dynamic Brake Co
(DBC) 119 Dynamic Stability C
(DSC) 22, 80,
E Electric power winElectrical accessor
failure 170
Inde
xDa
ta
196
ion 16 ion,
Fittings, towing and tow-starting 174
Flashlight 104 Flat tire 125, 165 Fog lamps 89 Folding rear backrest 109 Footbrake 120
Computer 77 Configure settings 53 Consumption 78 Consumption display 75 Contents 10 Coolant 122, 142, 195
antifreeze 122
windows 96, 101 Digital clock 76 Dimensions 193 Dipstick 139 Disc brakes 120 Displacement 192 Displays 18
Electrical systemElectronic vehicle
immobilizer 33 Elements of operatEmergency operat
doors 34 Energy Control 74
Everything from A to Z
F
FF
F
FFF
F
FFFF
FFFFF
GGGG
sta
28
Interior rearview mirror 52 automatic dimming feature 53, 184
Interlock 62 Intermittent wipe 69
J Jack 165 Jump-starting 173
K
ootwell lamps 89 bulb replacement 164
our-wheel drive 182 ront fog lamps 89 bulb replacement 161
rost protection, radiator 142
uel 28 uel consumption 78 uel consumption display 75
uel filler door
Glove compartment lamp, bulb replacement 164
Gross vehicle weight 194
H Handbrake 64 Handsfree system 107 Hazard warning flashers 26 Hazard warning triangle 26 Head restraints 48 Headlamp covers,
Horn 17 Hubcap 166 Hydraulic Brake assi
refer to DBC
I Ice warning 77 Icy roads 77 Identification, tires 1Ignition key 32 Ignition lock 62
relele
ueluelueluellam
ueluelueluncus
asaslo
, 125
6
8
127
Key Memory 53 Keys 32
with remote control 32
L Lamps and bulbs 158 LAMPS ON warning 88 Lashing eyes 112 LATCH attachment of the
child seat 59 Leather care 150 Length 193
easing following an ctrical malfunction 172
gauge 75 injection 192 quality 28 reserve indicator
p 75 specifications 28 tank capacity 195 tank gauge 75 tional status 187 s 170
care 146, 159 Headlamp flasher 69, 89 Headlamp washer
system 138, 195 Headlamp washers 71 Headlamps 88 Heated seats 103 Heating, rapid 96 Heavy loads 112 Height 193 HiFi system – harman
kardon 104 High beams 23, 69, 89
Imprint 4 Indicator lamps 20 Inflated pressure 28Inflation pressure
monitoring 86, 18INSPECTION 75 Instrument cluster 1Instrument panel 18Interaxle tire rotationInterface socket 108
for Onboard Diagnostics 154
Interference
9 163 r 42License plate lamp, bulb replacement 163
Light switch 88 Light-alloy wheels 130 Lighter 108 Load-securing devices 112
e
oline 28 oline gauge 75 ve compartment 104
bulb replacement 159 High Performance Synthetic
Oils 140 High-mount brake lamp 163 Hood release 134
cellular phone 124Interior lamps 36, 8
bulb replacementremote control 36
Interior motion senso
nt,

Everything from A to Z 203n
car
eCo
ntro
lsOv
ervi
ew
0 tor
58 g – from
g – from
re
Pocket flashlight 104 Pollen 95, 102 Power seat 49 Power steering 123 Power windows 44
safety switch 45 Pressure monitoring,
tires 86, 186 Pressure, tires 28, 125
R Radiator 195
Louvers 92, 98 Low beam headlamps 88 Low beams, bulb
replacement 159 Lug bolts 166 Lug wrench 165 Luggage compartment 41
capacity 194 floor mat 41 floor panel 41 remote control 37
Luggage compartment lamps, bulb
MFL (Multifunction steering wheel) 24
Microfilter 95, 171 Mirror memory 50 Mirrors 52 Mobile phone 124 Modifications,
technical 6, 153 Motion sensor, interior 42 Multifunction steering wheel
(MFL) 24
Oil level check 139 indicator lamp 2
Oil pressure, indicalamp 20
OILSERVICE 75 Onboard tool kit 1Opening and closin
the inside 38 Opening and closin
the outside 34 Outside temperatu
display 77
Tech
nolo
gyRe
pair
sCa
r
47
148 trol
Radio Data System (RDS) 181
Radio reception 124, 181 Radio, refer to the separate
Owner's Manual Rain sensor 69, 185 RDC (Tire Pressure
Control) 86, 186 RDS (Radio Data
System) 181 Reading lamps 90 Rear backrest, folding 109 Rear lamps 161
replacement 164 Luggage compartment
lid 39 emergency release 39 securing separately 39
Luggage compartment lighting 39
Luggage rack 113 Lumbar support 49
M M+S tires 129
N Neckrest 48
O OBD interface socket 154 Obstruction protection 44 Odometer 74 Oil
capacity 195 consumption 139 dipstick 139 quality 140
Owner service procedures 206
P Paint blemishes 1Paint, care 147 Paintwork, minor
repairs 148 Paintwork, waxingPark Distance Con
(PDC) 79 Parking brake 64
Inde
xDa
ta
3 e
4
Rear window defroster 71, 94, 102
Rearview mirror 52 Recirculated air mode 94 Reclining seat 47 Refueling 27 Remote control 35
Maintenance 75, 145 Malfunction displays 76 Manual transmission 65 Manually controlled
recirculated-air 101 Memory 50
specifications 140 viscosity 140
Oil additives 139 Oil change intervals, see the
Service and Warranty Information Booklet
Oil filter change 195
Parking help 79 Parking lamps 89 Parking, winter 12PDC (Park Distanc
Control) 79 Performance 192 Phone, mobile 12

Everything from A to Z
l ws
173
3 62
Tail lamp assembly, bulb replacement 161
Tail lamps 161 Tank capacity 195 Technical data 192 Technical
modifications 6, 153 Telephone hookup 107 Telephone, refer to the
separate Owner's Manual Temperature
adjustment 100
Removing condensation from the windows 96, 101
Replacement key 32 Reporting safety defects 7 Restraint systems 55, 59 Reverse 17, 65 Roller blind, sun
protection 103 Roof load capacity 194 Roof-mounted luggage
rack 113
Selector lever, automatic transmission 66
Self-defrosting mirrors 52 Self-diagnostics 187 Service and Warranty
Information Booklet 145 Service Interval
Display 75, 145 Shiftlock 66 Side airbags 55 Side impact Head Protection
System 55
Speaker 107 Speed control 72 Speed display 18 Speedometer 18 Sports seat 49 Sports steering whee
multfunction buttonStarting 62 Starting assistanceStarting
problems 117, 17Starting the engine
62
63 ts 105 52
Temperature display outside temperature 77
Temperature gauge engine coolant 75
Temperature layering 95, 102
Thigh support area, adjusting 49
Third brake lamp 163 Three-point-safety belt in the
rear 109 Through-loading
Rubber parts 122
S Safety belt tensioner 183 Safety belts 54
height adjustment 54 Safety defects, reporting 7 Safety feature 44 Safety lock buttons 38 Safety terminal, battery 169 Seat
mechanical 47
Side lamps 88 bulb replacement 160
Ski bag 110 Skid control 123 Sliding/tilt sunroof 45
closing following an electrical malfunction 172 convenience operation 34
Slippery roads 122 Snow chains 122, 129, 1
31 Socket 108
Steel wheels 130 Steering 123 Steering wheel lockSteering wheel,
adjusting 51 Steptronic 66 Stopping the vehicleStorage compartmenStoring the vehicle 1Stroke 192 Summer tires 128 Sun blind 103
ine 63 system 109
Tilt alarm 36, 43 remote control 36
Tire changing 165 Tire codes 128 Tire condition 125 Tire damage 125
power 49 Seat adjustment 47 Seat heating 103 Seat memory 50 Securing cargo 112 Securing loads 112
for flashlights 108 for power supplies 108 for vacuum cleaner 108
Space-saver spare tire 165 Spare key 32 Spare tire 165 Spare wheel 165 Spark plugs 196
Sun visors 52 Switching off the engSymbols 4, 169 Synthetic oils 140
T Tachometer 74
ith 25
Everything from A to Z 205n
car
eCo
ntro
lsOv
ervi
ew
4 , 98 02
24, 25
se fasten
76 ice Guide
Windshield washer, automatic 70
Windshield wiper 69 Windshield wiper blade
replacement 158 Winter operation 122 Winter tires 128, 129 Wiper blade
replacement 158 Wiper system 69 Work in the engine
compartment 134
Tire inflation pressure 28, 125
Tire pressure checking 28
Tire Pressure Control (RDC) 86, 186
Tire pressure monitoring 86, 186
Tire Quality Grading 126 Tire replacement 126, 127 Tire rotation 127 Tire specifications 130 Tire tread 125
Turn signal indicator 23, 69, 160 bulb replacement 160
Turning radius 193 Two-way radios 124
U Uniform Tire Quality
Grading 126 Used batteries 170
V
Vehicle weight 19Ventilation 92, 95
draft-free 95, 1Vinyl care 149 Voice recognition
W Warning lamp "Plea
safety belts" 21Warning lamps 20Warning messagesWarranty and Serv
Tech
nolo
gyRe
pair
sCa
r
To switlamp
ToolsTorqueTow fitTow stTowingTrackTractio
refer Transm
38 illing 138 146
s
148
65
28, 130
X Xenon lamps 159, 188
ch on the interior s 36 158
192 tings 174 arting 174
174 193 n Control System, to DSC 80 ission 65 orting children
Vacuum cleaner 108 Vacuum cleaner,
connecting 108 Vanity mirror 52
bulb replacement 164 V-belts 196 Vehicle battery 168, 196 Vehicle care
exterior 147 interior 150
Vehicle Identification Number (VIN) 144
Booklet 145 Washer fluids 138Washer nozzles 1Washer reservoir, fWashing your carWater on roadway
deep water 117Waxing, paintworkWeights 194 Wheel changing 1Wheel rims 128 Wheelbase 193 Wheels and tires 1
Inde
xDa
taence
nozzle reservoir,
Transpsafely 59
Tread depth, tires 125 Trip odometer 74 Trunk 39 Trunk lid, refer to luggage
compartment lid 39
Vehicle immobilizer 33 Vehicle painting 147 Vehicle storage 152
Width 193 Windows, conveni
operation 34 Windshield washer
adjustment 138Windshield washer
filling 138, 195

Owner service procedures
0
lamp, 164
ers 26 gle 26
Lug wrench 165 Luggage compartment
lamps, bulb replacement 164
Luggage compartment lid, emergency release 39
M Maintenance 145 Microfilter, changing 171 Motion sensor, switching
A Activated-charcoal filter,
changing 171 Adding brake fluid 143 Adding engine coolant 142 Adding engine oil 139 Air pressure, checking 28 Antifreeze 142
B Backup lamps, bulb
Difficult steering 123 Doors, emergency
operation 34
E Electrical accessories,
failure 170 Electrical malfunction
fuel filler door 172 sliding/tilt sunroof 172
Emergency operation
Front fog lamps, bulbreplacement 161
Fuses, replacing 17
G Glove compartment
bulb replacement
H Hazard warning flashHazard warning trian
e 159
, 125
r,
off 43
O Oil
quality 140 specifications 140 viscosity 140
Onboard tool kit 158
P Pressure, tires 28
replacement 161 Battery
add distilled water 169 charging 170
Brake fluid, adding 143 Brake lamps, bulb
replacement 161 Brakes, brake faults 121
C Changing a tire 165 Changing a wheel 165
doors 34 fuel filler door 172 sliding/tilt sunroof 172
Engine coolant, adding 142 Engine oil
add 139 check 139 quality 140 specifications 140 viscosity 140
Engine oil level, checking 139
Headlamp cover, carHigh beams, bulb
replacement 159
I Indicator lamps 20 Inflated pressure 28Interior lamps, bulb
replacement 163 Interior motion senso
switching off 43
ulb
R Rear lamps 161 Releasing the fuel filler door
following an electrical malfunction 172
Releasing the hood 134 Removing condensation
from the
Owner service procedure
Checking air pressure 28 Checking engine oil
level 139 Checking oil level 139
D Defrost setting 96 Defrosting the
windows 96, 101
F First-aid kit 26 Fittings, towing and
tow-starting 174 Flat tire 165 Footwell lamps, bulb
replacement 164
J Jack 165
L License plate lamp, b
replacement 163 Low beams, bulb
replacement 159

Owner service procedures 207n
car
eCo
ntro
lsOv
ervi
ew
windows 96, 101 Replacement key 32 Replacing bulbs 158 Replacing windshield wiper
blades 158 Replacing wiper blades 158 Return used batteries 170
S Side lamps, bulb
replacement 160 Sliding/tilt sunroof, closing
Towing 174 Trunk, emergency
release 39 Turn signal indicator, bulb
replacement 160
U Use of antifreeze,
radiator 142
V Vanity mirror, bulb
Tech
nolo
gyRe
pair
sCa
r
following an electrical malfunction 172Space-saver spare tire 165 Spare key 32 Spare wheel 165 Starting difficulties 123 Starting problems 117
T Tail lamp assembly, bulb
replacement 161 Tail lamps, bulb
replacement 164
W Warning lamps 20 Washer fluid, adding 138 Washer nozzles,
adjusting 138 Washer reservoir, filling 138 Wheel, changing 165 Windshield washer,
filling 138 Windshield wiper blades,
Inde
xDa
ta
replacement 161 Tilt alarm, switching off 43 Tire damage 125 Tire, changing 165 Tools 158 Tow fittings 174 Tow starting 174
replacing 158 Wiper blades, replacing 158 Working in the engine
compartment 134


Refueling BMW recommends Castrol
So that you will have important specifications available when you stop to refuel, we recommend that you supplement this table with data which apply to your vehicle.
Fuel
Engine oil
The oil volume between the two marks on the oil dipstickcorresponds to approx. 1.1 US quarts (1 liter).
Designation Premium UnleadedGasoline
AKI: minimum 91
Quality
mmer Winter
Rear Front Rear
Tire inflation pressures
4 persons
5 persons or 4 plus luggage
Su
Front
The Ultimate Driving Machine
01
41
01
55
47
6ue
We wish you an enjoyabledriving experience.

3 S
ed
an U
S-E
n