forcefield external interfaces manual - interlogix.com.au r9.0 forcefield... · level 1, 271–273...
TRANSCRIPT

Forcefield External Interfaces Manual
P/N MAUSER-TS9100_E • REV 9.0 • ISS 10AUG12

Copyright © 2012 UTC Fire & Security. All rights reserved.
Trademarks and patents
The Forcefield name and logo are trademarks of UTC Fire & Security. GE and the GE monogram are trademarks of the General Electric Company and are under license to UTC Fire & Security, 9 Farm Springs Road, Farmington, CT 06034-4065, USA. Other trade names used in this document may be trademarks or registered trademarks of the manufacturers or vendors of the respective products.
Manufacturer Interlogix (a division of UTC Fire & Security Australia Pty Ltd) Level 1, 271–273 Wellington Road, Mulgrave, VIC, 3170, Australia
ACMA compliance N4131
Contact information For contact information, see www.interlogix.com.au.
Forcefield External Interfaces Manual i
Content
Important information iii
Chapter 1 Introduction 1 Audience 2 Scope of this manual 2 Related documents 2 Before you begin 3
Chapter 2 Integrating a Smart Card Programmer 5 Installing Smart Card Programmer hardware 6 Smart cards used for access control functionality 7 Smart cards used for credit functionality 17 Specifying default values for smart cards 21
Chapter 3 Integrating photo ID 23 Overview 24 Using Capture 24 Capture device settings 27 Using Import 29 Using Card Layout Editor 32
Chapter 4 Integrating automatic event email 43 Overview 44 Adding an email address 44
Chapter 5 Integrating intercom 45 Intercom system overview 46 Forcefield intercom interface 47 Integrating a Commend IP intercom system 49 Integrating a Jacques intercom system 50
Chapter 6 Integrating paging and duress 53 Integrating Paging 54 Integrating an Ascom Nira duress system 54
Chapter 7 Integrating CCTV 59 Overview 60 Video switcher system 61 DVR systems 65 Teleste Video Management system 76
Chapter 8 Integrating third-party systems 79 Overview 80 System security 80 Communications 80

ii Forcefield External Interfaces Manual
Message formats 81 Third-party system example 82
Chapter 9 Integrating external user data 85 Setting up an export/import folder on a Windows computer 86 Exporting user records 90 Preparing user data for importing 90 User data file field names 94 Generating raw card data 95 Auto-populating raw card data fields 95 Importing user records 96 Troubleshooting the import process 97
Appendix A User data file formats 99 Export file formats 100 Import file formats 104
Appendix B History export data formats 109 Structure of history database record 110 Export raw 110 Export formatted 111
Appendix C Integrating SymDVR 113 Overview 114 Limitations 116 Forcefield programming 117 Forcefield-SymDVR hardware requirements 117 Application notes 121
Appendix D Integrating TruVision 123 Overview 124 Video service integration process 124 Configuring TruVision DVRs and cameras 128
Glossary 141

Forcefield External Interfaces Manual iii
Important information This is the Forcefield External Interfaces Manual. This document includes an overview of the product and detailed instructions explaining:
• How to set up external interfaces such as CCTV, duress, intercom, paging, email, and photo ID.
• How to program Smart Cards and use Photo ID and the Card Layout Editor.
• How to export user data to and import user data from external locations.
To use this document effectively, you should have the following minimum certifications:
• Installation and programming of Challenger security
• The appropriate level of Forcefield trained and assessed certification (L1 Forcefield, L2 Integration, and L3 Enterprise).
Note: Some of the tasks and programming options described in this manual are to be used only by Forcefield technicians who have been trained and assessed in relevant integration and programming.
Read these instructions and all ancillary documentation entirely before installing or operating this product. The most current versions of this and related documentation may be found on our website at www.interlogix.com.au.
Command convention In describing the command menu structure in this document, the symbol > is used to indicate sub-menus. For example, ‘Select Users > Access > Generate IUM Data’, means the same as ‘From the main menu, click Users, click Access, and then click Generate IUM Data’.
This manual refers to the classic menu locations of commands. A Forcefield 6 system can use either the Forcefield 6 menu structure or the classic menu structure. For example, the Computer Categories command is in different locations in each menu system:
• In the classic menu structure, go to Databases > Management Software > Computer Categories > Computer Categories.
• In the Forcefield 6 menu structure, go to Administration > Forcefield Setup > Computer Categories.
See the Forcefield Operators Manual for details.

iv Forcefield External Interfaces Manual
Limitation of liability To the maximum extent permitted by applicable law, in no event will Interlogix (a division of UTC Fire & Security Australia Pty Ltd) be liable for any lost profits or business opportunities, loss of use, business interruption, loss of data, or any other indirect, special, incidental, or consequential damages under any theory of liability, whether based in contract, tort, negligence, product liability, or otherwise. Because some jurisdictions do not allow the exclusion or limitation of liability for consequential or incidental damages the preceding limitation may not apply to you. In any event the total liability of Interlogix shall not exceed the purchase price of the product. The foregoing limitation will apply to the maximum extent permitted by applicable law, regardless of whether Interlogix has been advised of the possibility of such damages and regardless of whether any remedy fails of its essential purpose.
Installation in accordance with this manual, applicable codes, and the instructions of the authority having jurisdiction is mandatory.
While every precaution has been taken during the preparation of this manual to ensure the accuracy of its contents, Interlogix assumes no responsibility for errors or omissions.

Forcefield External Interfaces Manual 1
Chapter 1 Introduction
Summary This chapter describes the intended user of this manual, what it covers, and what other documents may be required.
Content Audience 2 Scope of this manual 2 Related documents 2 Before you begin 3

Chapter 1: Introduction
2 Forcefield External Interfaces Manual
Audience This manual is for use by trained Forcefield integration technicians and Forcefield operators. It provides reference material for setting up external interfaces such as CCTV, duress, intercom, paging, email, and photo ID.
It also provides reference material for programming Smart Cards and using Photo ID and the Card Layout Editor.
Scope of this manual This manual is a supplement to the Forcefield online help and is intended only as an offline reference and a guide to using Forcefield.
Forcefield hardware for both standard edition and Enterprise edition is represented by an image of standard Forcefield hardware.
Figure 1: Representation of Forcefield hardware
Related documents Refer to the Forcefield Installation and Setup Manual for setting up the Forcefield server computer and installing Forcefield client on Windows computers. Includes Installer reference sections, and is for use by trained Forcefield installation technicians.
Refer to the Forcefield Operators Manual for introductory material (including key concepts), command reference, and descriptions of Forcefield programming tasks typically performed by trained Forcefield installation technicians, as well as tasks performed by Forcefield operators.
Refer to the Challenger V8 & V9 Programming Manual for details about Challenger programming.
Refer to the TS0099 Enhanced Challenger TCP/IP Interface Installation and Programming Guide for details about setting up IP communications with a Challenger panel.

Chapter 1: Introduction
Forcefield External Interfaces Manual 3
Before you begin Some tasks depend on Forcefield features that are subject to licensing and must be licensed before their associated menus become visible.
Click the Computer Status button (circled below) on the Forcefield Speed Bar to check the status of your Forcefield system license. Licensed Forcefield modules are listed on the bottom.
Figure 2: Computer Status window
If the module you need is not listed, then you must purchase and install a license (except for Interlogix video switchers, which do not require a CCTV license module).

Chapter 1: Introduction
4 Forcefield External Interfaces Manual

Forcefield External Interfaces Manual 5
Chapter 2 Integrating a Smart Card Programmer
Summary This section describes how to use a Smart Card Programmer connected to either a Forcefield node or a Forcefield client computer.
Refer to Chapter 3 “Integrating photo ID” on page 23 for details about using Photo ID on a Forcefield client computer.
Content
Installing Smart Card Programmer hardware 6 Requirements 6 Procedure for a client 6 Procedure for a node 6
Smart cards used for access control functionality 7 Setting up the Smart Card Programmer 7 Smart Card Programmer options 8 Firmware version recall 9 Changing the COM port number 10 Creating a reader configuration card 10 Reader configuration card options (user access) 11 Display user card information 14 Issuing user cards (typical) 15
Smart cards used for credit functionality 17 Installing Smart Card programmer hardware 17 Setting up the Smart Card programmer (credit use) 17 Creating a reader configuration card (credit use) 17 Issuing user cards (credit use) 19 Programming user credits (credit use) 20 Programming access data (credit use) 20
Specifying default values for smart cards 21

Chapter 2: Integrating a Smart Card Programmer
6 Forcefield External Interfaces Manual
Installing Smart Card Programmer hardware Install a Smart Card Programmer on a Forcefield client or a Forcefield Enterprise node where card programming will be performed. See “Procedure for a client” below or “Procedure for a node” below, as required.
Requirements • Smart Card Programmer, serial cable, power pack.
• Unused serial port on the client or node computer.
• User interface (such as a monitor, keyboard, and mouse).
Procedure for a client Install a Smart Card Programmer on a Forcefield client where card programming will be performed.
To install Smart Card Programmer hardware: 1. Connect the serial cable to a free serial port on the Forcefield client to be
used for programming cards. Connect the other end to the connection marked “RS-232” on the Smart Card Programmer.
2. Connect the power pack to the Smart Card Programmer, and then connect the power pack to mains power.
Procedure for a node Install a Smart Card Programmer on a Forcefield node where card programming will be performed.
Note: The node computer must have a user interface (such as a monitor, keyboard, and mouse).
To install Smart Card Programmer hardware: 1. Connect the serial cable to a free serial port on the node to be used for
programming cards. Connect the other end to the connection marked “RS-232” on the Smart Card Programmer.
2. Connect the power pack to the Smart Card Programmer, and then connect the power pack to mains power.
3. Create a port record in Forcefield for the Smart Card. Enter an ID for the Smart Card Programmer, for example, ‘Node 1 Smart Card Programmer’. See the Forcefield Operators Manual for details.
4. Select “SmartCard Programmer” as the port type.
5. Enter the node number for the port. The Smart Card Programmer can only program cards on the same node that it’s installed on.
Chapter 2: Integrating a Smart Card Programmer
Forcefield External Interfaces Manual 7
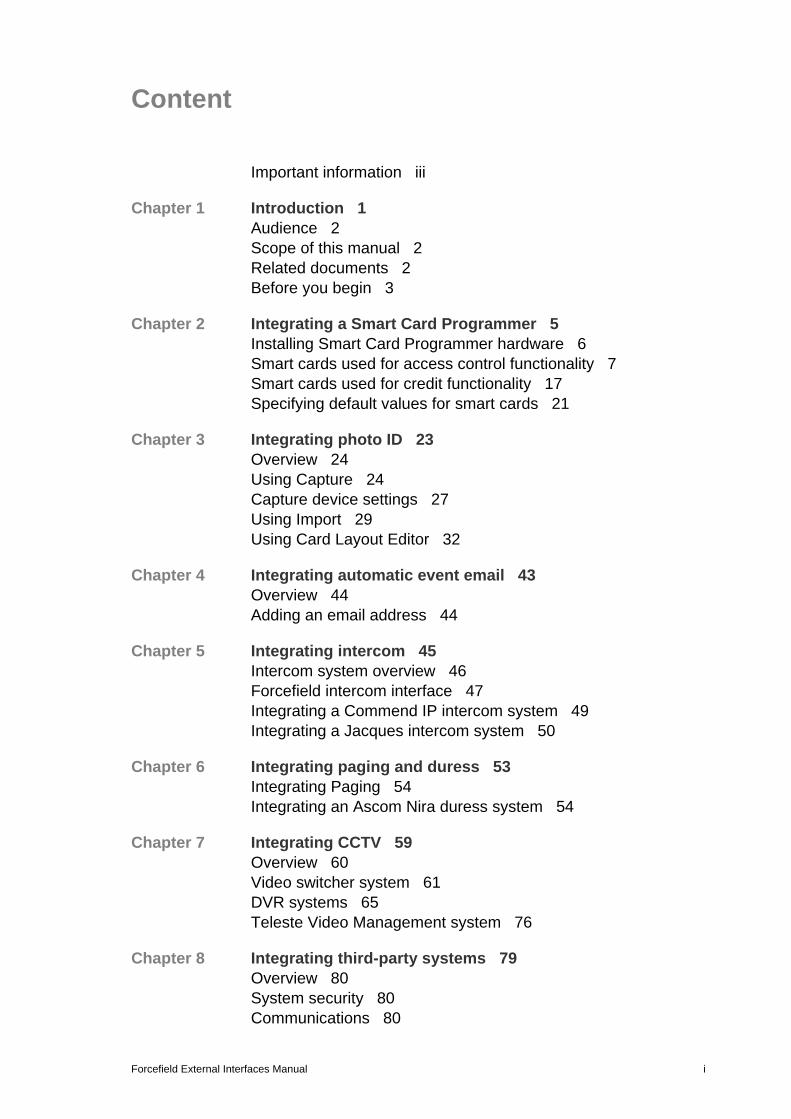
6. Select the System (QNX) ID for the hardware device (serial port), for example ser2= serial port 2. All serial ports are listed, not just available ports.
7. Click Save, and then close the port record.
8. Setup the Smart Card Programmer using the SmartCard Programmer port record. See “Setting up the Smart Card Programmer” below.
Smart cards used for access control functionality This section describes the options on the Card Programmer Properties screen that apply only to using Smart Cards for access control purposes instead of for credit purposes.
Setting up the Smart Card Programmer Use the Smart Card Programmer Properties Setup options to program the Smart Card Programmer in Forcefield.
This procedure assumes the Smart Card Programmer hardware was successfully installed.
To program the Smart Card Programmer:
1. Select Users > Smart Card Programmer > Setup Programmer.
2. Type the Forcefield client’s IP port number in the IP Port field. The port must
not be blocked by a firewall or other means. By default Forcefield uses COM1 on the Forcefield client to communicate with the Smart Card Programmer. If you need to use a different port, see “Changing the COM port number” on page 10.
3. Type the connection password in the Password field. The connection password can be up to 10 digits (the default password is all zeros). Forcefield uses this password to connect with the Smart Card Programmer. To change the connection password, click Properties.
4. Right-click Enabled to enable the Smart Card Programmer.
5. Click Save (F5) to save. If the installation was successful, the LED on the Smart Card Programmer will be orange, and then the programmer can now

Chapter 2: Integrating a Smart Card Programmer
8 Forcefield External Interfaces Manual
send or receive data. In addition, a Software Terminal Server icon displays in the Windows system tray, similar to below.
See the following sections for details about the buttons on the Smart Card Programmer Setup window:
• The Properties button is described in “Smart Card Programmer options” below.
• The Credit Access Level button is described in “Smart cards used for credit functionality” on page 17.
• The Version Recall button is described in “Firmware version recall” on page 9.
Smart Card Programmer options After connecting to the Smart Card Programmer, Forcefield can be used to program the Smart Card Programmer options. This section describes the options on the Card Programmer Properties screen.
From the main menu select: Users > Smart Card Programmer > Setup Programmer, and then click Properties.
Figure 3: Programmer Properties window (Smart Card Programmer)
Click Save (F5) to save and change the properties when finished, and to return to the Smart Card Programmer Setup screen.
Default and upload buttons
If the programmer is online, click Default to display the factory default settings. Alternatively, click Upload to display the Smart Card Programmer’s current settings.

Chapter 2: Integrating a Smart Card Programmer
Forcefield External Interfaces Manual 9
Connection password The optional connection password helps to ensure that only the authorised operator can use this Smart Card Programmer.
The connection password can be up to 10 digits and can be modified at any time.
Card password lock
Select the Card Password Lock button if you wish to prevent the security password from ever being deleted from the cards. This prevents a card being blanked completely.
Programmer password Type a password (also known as the security password or 4-byte code) in the range of 0 to 127 in each field.
Note: For higher security, we can issue a unique, read-only, security password using values in the range of 128 to 255 (requires a TS0870PSC Configuration Card).
The Smart Card Programmer stores the password and writes the same number to the cards. Only cards with the same security password can be erased or blanked if the card programmer’s security password matches that on the card. This number must also match the security password stored in the Smart Card reader for the cards to work.
Site code limits Type the details for the site code limits (or ranges). Up to ten site code limits can be stored in the programmer. Site codes outside of these limits cannot be programmed into user cards.
Firmware version recall From the main menu select: Users > Smart Card Programmer > Setup Programmer, and then click Version Recall to display the Smart Card Programmer firmware version (in this case V.04).
Figure 4: Smart Card Programmer Setup window (example IP address used)

Chapter 2: Integrating a Smart Card Programmer
10 Forcefield External Interfaces Manual
Changing the COM port number By default Forcefield uses COM1 on the Forcefield client to communicate with a Smart Card Programmer.
Note: The Smart Card Programmer must first be enabled using the Setup Programmer command (see “Setting up the Smart Card Programmer” on page 7).
To change the Smart Card Programmer port number, if necessary: 1. Right-click the Software Terminal Server icon in the Windows system tray,
and then select Disable.
2. Right-click the Software Terminal Server icon, and then select Settings.
3. Click the Port arrow, and then select the required port number. The port must
not be blocked by a firewall or other means.
4. Change the required settings, and then click Save.
5. Right-click the Software Terminal Server icon in the Windows system tray, and then select Enable.
Creating a reader configuration card Smart Card readers can be programmed two ways:
• By use of an LCD RAS to access the Install menu options for programming the reader.
• By use of a reader configuration card, programmed for the specific Smart Card reader. A reader configuration card is required to program cards in secured mode (using the 4-byte security password). This is the only means of transferring the 4-byte code to a reader.
Different options are required on a reader configuration card depending on whether the reader is being used for access control or for credit functionality.
See the appropriate Smart Card Reader Installation Guide for instructions to change the reader default values.
The Smart Card reader is ‘online’ only when directly connected to a Challenger LAN, or an Intelligent Door/Lift Controller LAN.

Chapter 2: Integrating a Smart Card Programmer
Forcefield External Interfaces Manual 11
To create a reader configuration card: 1. From the main menu select Users > Smart Card Programmer > Reader
Config Card (Figure 5 on page 12). See Table 1 below for a description of the buttons at the bottom of the screen.
2. Select the Reader Configuration Card options, as required (see “Reader configuration card options (user access)” below).
3. Place a configuration card or a blank card on the Smart Card Programmer.
4. Double-click Read to check that the card is either a reader configuration card or a blank card.
5. Double-click Write to transfer the selected options to the reader configuration card. A successful write produces two beeps; write denied produces seven beeps. Some options (marked with *) are not supported by the reader-equipped CA1115 or CA1116 RASs.
Table 1: Reader Configuration Card window buttons
Button Details
Write Attempts to transfer the data displayed on the screen to the card. Use this action to program a card. The Smart Card Programmer emits two beeps to indicate a successful write and seven beeps to indicate that writing was denied.
Read Reads and displays the data (if any) currently programmed onto the card. Use this action to check a card’s current details. The Smart Card Programmer emits two beeps to indicate a successful operation.
Erase Deletes the data from the card, but leaves the site security code intact. The Smart Card Programmer emits two beeps to indicate a successful operation.
Default Writes a default configuration card that will program readers to factory settings. The Smart Card Programmer emits two beeps to indicate a successful operation.
Cancel Cancels the current operation.
Blank Deletes the data and the site security code from the card (available only if the card password lock was switched off when the card was written). The Smart Card Programmer emits two beeps to indicate a successful operation.
Reader configuration card options (user access) This section describes the options on the Write Reader Configuration Card window (Figure 5 on page 12) for access use instead of for credit use.
You will need to create a Reader Configuration Card for each reader to be polled on the Challenger LAN, or an Intelligent Door/Lift Controller LAN, where the programmable options differ from the factory default values (i.e. if you have 16 readers with addresses 1 through 16, you will need to program 16 different reader configuration cards).

Chapter 2: Integrating a Smart Card Programmer
12 Forcefield External Interfaces Manual
Figure 5: Reader Configuration Card window
Reader address
If the reader is on a Challenger LAN, or an Intelligent Door/Lift Controller LAN, type a number from 1 to 16 in the Reader Address field to specify the Smart Card reader address.
Leave the address field blank:
• For readers such as CA1115 or CA1116 that have their RAS addresses set via DIP switches.
• To create a reader configuration card to program readers without using a fixed reader address. The reader address would be set during address programming mode, in which the reader configuration card is used to select the required address from a series of coded beeps. Refer to the Smart Card Reader’s Installation and Programming Manual for details.
Valid card beep Optional—If selected, the reader will beep once when valid Smart Card is badged at the reader (in addition to any other beeps).
Watch dog Optional—If selected, the reader automatically sends a signal periodically to indicate that it’s connected and working.
Can be used only if the reader is configured as a Wiegand device.
Reader option (configuration) card
Optional—If selected, the reader accepts a configuration card more than once.

Chapter 2: Integrating a Smart Card Programmer
Forcefield External Interfaces Manual 13
If not selected, the reader can only be configured with a reader configuration card one time only to prevent unauthorised reprogramming of the reader. Any future changes must be made via the RAS keypad or by first un-flagging this option via the RAS keypad.
Valid card LED flash Optional—If selected, the reader’s LED gives a short flash when a valid card is badged.
Toggles night light
Optional—If selected, the blue LED remains lit, with low intensity, at all times regardless of whether the red LED is on or off.
Protocol options Select the required protocol:
• Wiegand mode—Card data is generated in the Wiegand protocol. The information on the card decides which format can be used, for example: Tecom ASP or Standard 26-bit Wiegand format.
• Magnetic Stripe—Card data is generated in the Track-2 magnetic stripe format. A ‘card present’ signal is available on the relay output (violet wire) if selected by configuration card (see “Relay options” on page 14).
Do not select Tecom Smart Card protocol because it is not implemented in the Challenger.
Red LED options Select one of the following online Red LED Options (the reader is said to be ‘online’ when it is configured as a LAN device either on the Challenger LAN or the Intelligent Door/Lift Controller sub-LAN):
• Secure—the red LED is on when the area associated with the door is secure.
• Secure & Door open—the red LED is on when the area associated with the door is secure, and the red LED flashes whilst the door lock relay is active.
Blue LED options
Select one of the following online Blue LED Options (the reader is said to be ‘online’ when it is configured as a LAN device either on the Challenger LAN or the Intelligent Door/Lift Controller sub-LAN):
• Door Open Only—the blue LED will normally be off, and will flash whilst the door lock relay is active.
• Access & door open—the blue LED is on when the alarm area associated with the door is in access, and will flash whilst the door lock relay is active.

Chapter 2: Integrating a Smart Card Programmer
14 Forcefield External Interfaces Manual
Offline LED Select one of the following Offline LED options (LEDs are classed as offline when the reader is attached to a Wiegand or mag-stripe interface).
• One Line Operation—both the blue and red LEDs are controlled by the brown wire.
• Two Line Operation—the red LED is controlled by the brown wire and the blue LED is controlled by the yellow wire.
Relay options
Select one of the following relay options:
• Door relay—the relay output (violet wire) will operate as a door relay control output (active low) when ‘online’ only.
• Tamper output—the relay output activates when RAS tamper occurs (active low) in both the ‘online’ and ‘offline’ modes.
• Card present output—indicates to a third-party magnetic stripe reader interface that the card is being swiped. The relay output activates when the card data is sent to the host device (active low) but only when the card reader is in the ‘offline’ mode. When the transaction is complete, the relay output returns to high.
Security mode Select one of the following security mode options:
• Secured Mode—the reader sees programmed Smart Cards and user-defined cards (the 4-byte security password is used).
• Unsecured Mode—the reader only sees blank (un-programmed) cards with a unique serial number, and user-defined cards (the 4-byte security password is not used).
Egress mode Select one of the following egress mode options:
• Egress off
• Standard Egress
• Egress and Arm/disarm
Display user card information Forcefield operators may need to check the data written to a card. Open the Display User Card window (Figure 6 on page 15).

Chapter 2: Integrating a Smart Card Programmer
Forcefield External Interfaces Manual 15
Figure 6: Display User Card window
To display user card information: 1. From the main menu select Users > Smart Card Programmer > Display User
Card.
2. Place the card on the Smart Card Programmer. Double-click Read to display information stored on the card.
Issuing user cards (typical) From the main menu select Users > Smart Card Programmer > Issue User Card.
Figure 7: Issue User Card window
Authorised Forcefield operators may perform the following card actions described in Table 2 below when issuing user access cards.
Table 2: Issue User Card window buttons
Button Details
Read Reads and displays the data (if any) currently programmed onto the card. Use this action to check a card’s current details. The Smart Card Programmer emits two beeps to indicate a successful operation.

Chapter 2: Integrating a Smart Card Programmer
16 Forcefield External Interfaces Manual
Button Details
Write Attempts to transfer the data displayed on the screen to the card. Use this action to program a card. The Smart Card Programmer emits two beeps to indicate a successful write and seven beeps to indicate that writing was denied.
Erase Deletes the data from the card, but leaves the site security code intact. The Smart Card Programmer emits two beeps to indicate a successful operation.
Blank Deletes the data and the site security code from the card (available only if the card password lock was switched off when the card was written). The Smart Card Programmer emits two beeps to indicate a successful operation.
Cancel Cancels the current operation.
The uses of the other buttons are described in “Issuing user cards (credit use)” on page 19.
Note: Default values for bits and site fields may be specified in Admin > Configuration > Configuration > User (Global). Doing so enables you to select only the user for system default cards, and then the raw card data will be automatically calculated from the default settings. See “Specifying default values for smart cards” on page 21 for details.
To issue user cards:
1. From the main menu select Users > Smart Card Programmer > Issue User Card (Figure 7 on page 15).
2. For IUM systems: select a user number and card category. The raw card data will appear. — OR — For non-IUM systems: enter the card format (Bits field), the site code (Site field), and the card number (Card field) to create the raw card data. If the card format is other than 26-bit or 27-bit, then you must also enter the six bytes of card data.
3. Place a blank card on the Smart Card Programmer.
4. Double-click Write to program the card. The Smart Card Programmer emits two beeps to indicate a successful write or seven beeps to indicate that writing was denied.

Chapter 2: Integrating a Smart Card Programmer
Forcefield External Interfaces Manual 17
Smart cards used for credit functionality This section describes the options on the Card Programmer Properties screen that apply only to using Smart Cards for credit purposes instead of for access control purposes.
Installing Smart Card programmer hardware Refer to the section “Installing Smart Card Programmer hardware” on page 6 for details.
Setting up the Smart Card programmer (credit use) The procedures described in this section are used in addition to the procedures described in “Setting up the Smart Card Programmer” on page 7.
From the main menu select Users > Smart Card Programmer > Setup Programmer, and then click Credit Access Level to display the Credit Access Level Descriptions window.
Figure 8: Credit Access Level Descriptions window (Smart Card Programmer)
Type the details for the credit field, and then its location details (e.g. Credit 1 and Location 1). This screen records existing credit information for each account and location (this information also appears in the Write Credits Units screen).
Click Save (F5) when finished to return to the Smart Card Programmer Setup screen.
Creating a reader configuration card (credit use) Smart Card readers can be programmed in the following ways:
• By use of a RAS.
• By use of a reader configuration card programmed for the specific Smart Card reader.

Chapter 2: Integrating a Smart Card Programmer
18 Forcefield External Interfaces Manual
• By use of a reader configuration card programmed without an address (the reader address is set during address programming mode, in which the reader configuration card is used to select the required address from a series of coded beeps).
Different options are required on a reader configuration card depending on whether the reader is being used for:
• Access control functions (see “Reader configuration card options (user access)” on page 11).
• Credit functions (this section).
Refer to the applicable smart card reader’s installation guide for instructions to change the reader default values.
Reader configuration card options (credit use) This section describes the options on the Reader Configuration Card window (Figure 5 on page 12) pertaining to credit use instead of access use.
Reader access level
If the configuration card is to be used for programming smart card ‘credit’ readers (e.g. for a photocopier or drinks dispenser), type a number from 1 to 16 in the Reader Access Level field to define the readers’ access level (16 is the highest).
Example: A smart card reader at a photocopier has an access level of 4 (which permits operation by users with access levels of 4 through 16). If a user has a card with access level 5, then they can use the photocopier. Another user with a card with credit access level of 2 cannot use the photocopier.
Relay time factor If applicable, type a number from 1 to 256 to specify the relay time factor. The relay time factor modifies the pulse width output of the pulsed relay option and the energised time for the timed relay.
Reader token value The reader token value determines how many credits are deducted for each token when a card is badged.
If applicable, type a number in the range of 1 to 65534 to specify the reader’s token value.
Example: On a photocopier, one token equals two credits (one credit equals 10 cents). Each time an A4 copy is made with the card, one token is deducted (two credits or 20 cents).

Chapter 2: Integrating a Smart Card Programmer
Forcefield External Interfaces Manual 19
Relay options Select the relay option:
• Credit pulsed—The relay output will operate as a pulsed output (active low) when the reader is configured to operate as a credit activated device, and a credit transaction is completed. The pulse width is configurable from 10 milliseconds to 2.55 seconds on a configuration card (see Relay Time Factor).
• Credit timed—The relay output operates as a timed output (active low) when the reader is configured to operate as a credit activated device, and a credit transaction is completed. The time is configurable from 1 to 65535 seconds, multiplied by the relay time factor.
• Credit latched—the relay output operates as a latched output if the reader is configured to operate as a credit activated device. When a Tecom smart card with valid credit data is badged and the transaction is successfully completed, the relay output is turned on. The relay output is turned off when a valid Tecom smart card is badged next, with or without credits.
Reader credit type
Select the reader credit type that the reader will use.
Reader location Select the reader’s location.
Issuing user cards (credit use) This section applies to programming smart card readers used for ‘credit’ (e.g. for a photocopier or drinks dispenser).
Authorised Forcefield operators may perform the following card actions described in Table 3 below when issuing user access cards.
Table 3: Issue User Card window buttons
Button Details
Read Reads and displays the data (if any) currently programmed onto the card. Use this action to check a card’s current details. The Smart Card Programmer emits two beeps to indicate a successful operation.
Write Attempts to transfer the data displayed on the screen to the card. Use this action to program a card. The Smart Card Programmer emits two beeps to indicate a successful write and seven beeps to indicate that writing was denied.
Erase Deletes the data from the card, but leaves the site security code intact. The Smart Card Programmer emits two beeps to indicate a successful operation.
Credit units Add credit units to cards or deduct credit units from cards.

Chapter 2: Integrating a Smart Card Programmer
20 Forcefield External Interfaces Manual
Button Details
Access data Set the card access levels
Blank Deletes the data and the site security code from the card (available only if the card password lock was switched off when the card was written). The Smart Card Programmer emits two beeps to indicate a successful operation.
Cancel Cancels the current operation.
Programming user credits (credit use) This section applies to programming smart card readers used for ‘credit’ (e.g. for a photocopier or drinks dispenser).
To program user credits: 1. Starting from the Issue User Card window (Figure 7 on page 15), and with a
card placed on the Smart Card Programmer, click Credit Units, and then the following screen displays.
2. Double-click Read to check the card’s credit details.
3. Type new values in the New fields to add credit units to cards or deduct credit units from the card’s current balance.
4. Click Write and then click Esc to return to the Issue Card screen.
Programming access data (credit use) This section applies to programming smart card readers used for ‘credit’ (e.g. for a photocopier or drinks dispenser).
To program access data: 1. Starting from the Issue User Card window (Figure 7 on page 15), and with a
card placed on the Smart Card Programmer, click Access Data, and then the following screen displays.

Chapter 2: Integrating a Smart Card Programmer
Forcefield External Interfaces Manual 21
2. Double-click Read to check the card’s credit details.
3. Type a number from 1 to 16 in the Credit Access Level field to define the access level (16 is the highest) for devices using the credit option. Example: A smart card reader at a photocopier has an access level of 4 (which permits operation by users with access levels of 4 through 16). If a user has a card with access level 5, then they can use the photocopier. Another user with a card with credit access level of 3 cannot use the photocopier.
4. Select the Location rights to permit the use of credits at the selected location(s).
5. Double-click Write, then click Esc.
Specifying default values for smart cards Use this option to specify global default values for site code and card bits for use in issuing smart cards.
Specifying default values enables you to select only the user for system default cards, and then the raw card data will be automatically calculated from the default settings.
Note: The Forcefield workstation may be configured to use workstation-specific default values which override the global default values, see the Workstation Options—Other section in the Forcefield Operators Manual.
To program default site code and card bit values: 1. From the main menu select: Admin > Configuration > Configuration to open
the Forcefield Configuration window.
2. Click the User button. The User Config screen displays.

Chapter 2: Integrating a Smart Card Programmer
22 Forcefield External Interfaces Manual
3. Type the site code number in the Smart Card Issue SiteCode field.
4. Select the required Smart Card Issue Type.
5. Click Save.

Forcefield External Interfaces Manual 23
Chapter 3 Integrating photo ID
Summary This section describes how to use Photo ID on a Forcefield client computer.
Content Overview 24 Using Capture 24 Capture device settings 27 Using Import 29 Using Card Layout Editor 32
Forcefield client Card Layout Editor Window 32 Creating a Card Layout 35

Chapter 3: Integrating photo ID
24 Forcefield External Interfaces Manual
Overview Photo ID user card design and printing facilities are provided for Forcefield client computers only.
Note: The Forcefield client must have the Capture, Import, and Issue options enabled. See the Workstation Options—Other section in the Forcefield Operators Manual.
An enabled Forcefield client displays the following buttons on the User Maintenance window (Figure 9 below):
• Capture — Enables you to capture an image from a video camera, see “Using Import” on page 29.
• Import — Enables you to import an image file, see “Forcefield client Card Layout Editor Window” on page 32.
• Print Card — Opens the print preview window for printing the user’s card. The use of this command is described in the Forcefield Operators Manual.
Figure 9: User Maintenance window
Using Capture The use of Capture on a Forcefield client requires the workstation is set up with:
• A video camera.
• A video capture card, driver, and associated software.
In other words, the client must be receiving a video signal in order for an image to be captured.

Chapter 3: Integrating photo ID
Forcefield External Interfaces Manual 25
To capture an image from a video input: 1. In the User Maintenance window, click the Capture button to select and
prepare an image file.
2. Right-click the image to change the capture device options (see “Capture
device settings” on page 27).
3. Click Capture to collect five images (two per second).
4. Click the still image in the sequence of five that you like best. The large image is the live view from the camera.
5. The selected image displays in the Import User Image window.

Chapter 3: Integrating photo ID
26 Forcefield External Interfaces Manual
6. If the displayed image isn’t suitable, return to step 1 and select a new image.
7. Click OK to accept the captured image, as is.
8. Alternatively, click and drag inside the image to crop it. The dragged area image size in pixels displays at the bottom of the window.
9. Click Crop to crop the image to the defined size.

Chapter 3: Integrating photo ID
Forcefield External Interfaces Manual 27
10. Click OK to save the file. The new image is saved with the user number (e.g.
22.jpg for user number 22).
Capture device settings In the Capture User Image window (Figure 10 on page 28) right-click the main image to change the device settings.

Chapter 3: Integrating photo ID
28 Forcefield External Interfaces Manual
Figure 10: Capture User Image window right-click menu
From the right-click menu select the following options:
• Preview (default setting) to use video preview mode to preview the live video before doing the capture.
• Overlay to use video overlay mode (if supported by your system) to preview the live video before doing the capture. Overlay mode provides real time video and better image quality than video preview mode.
• Driver Dialogs > Format to change the image format from the Video Format dialogue box.
• Driver Dialogs > Compression to change the image compression options from
the Video Compression dialogue box.
Chapter 3: Integrating photo ID
Forcefield External Interfaces Manual 29
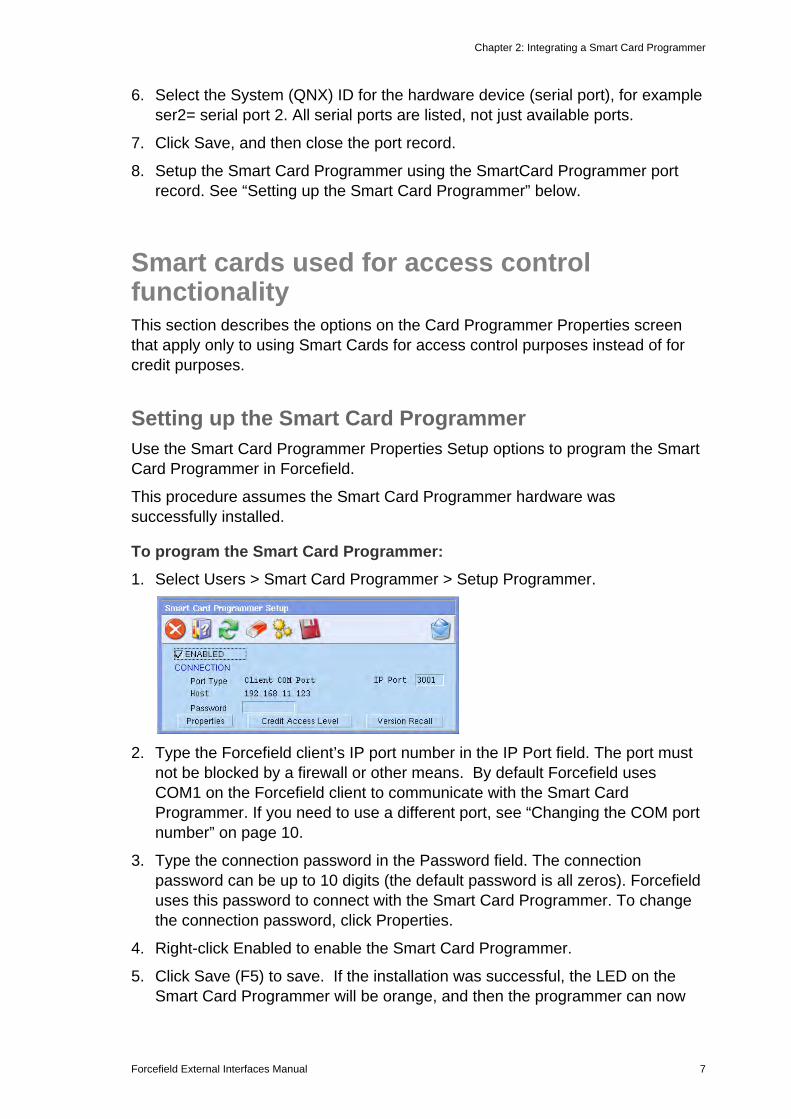
• Driver Dialogs > Source to change the video source options from the Video Source dialogue box (Figure 11 below).
Figure 11: Video Source dialogue box tabs
Using Import To import an image: 1. In the User Maintenance window, click the Import button to select and
prepare an existing image file.
The Camera Controls tab is enabled for PTZ cameras only

Chapter 3: Integrating photo ID
30 Forcefield External Interfaces Manual
2. Select a .jpeg or .jpg file and click Open. The selected image displays in the
Import User Image window.
3. Click OK to accept the captured image, as is.
4. Alternatively, click and drag inside the image to crop it. The dragged area image size in pixels displays at the bottom of the window.
Image size

Chapter 3: Integrating photo ID
Forcefield External Interfaces Manual 31
5. Click Crop to crop the image to the defined size.
6. Click OK to save the file. The new image is saved with the user number (e.g.
22.jpg for user number 22).

Chapter 3: Integrating photo ID
32 Forcefield External Interfaces Manual
Using Card Layout Editor Use this command on a Forcefield client to create or modify user card layouts.
Forcefield enables you to create a number of different user card layouts, each of which must be assigned to a department. Departments are created and applied to users in Users > Maintenance.
For example, you might want to use a different coloured background on the card to identify contractors. To do so, you would need to create an appropriate department named, e.g. ‘contractor’, and then create a card layout with a coloured background for the ‘contractor’ department.
The Forcefield client Card Layout Editor allows you to:
• Automatically add user details to each card from the users database.
• Add text labels
• Add shapes, database images, backgrounds and graphics, and format these
• Save the card layout
• Print photo ID cards on a card printer.
Forcefield client Card Layout Editor Window Use the command Users > Design Card Layout to open the User Card Layout window. Select the required department and then click Design to launch the Forcefield client Card Layout Editor.
If you need to create a department, you can open the User Profiles window or the User Maintenance window, and then double-click the Department field.

Chapter 3: Integrating photo ID
Forcefield External Interfaces Manual 33
Figure 12: Card Layout Editor window
Commands The Forcefield client Card Layout Editor uses a right-click menu to access commands. The right-click menu commands are:
• Send to Back—places the selected object behind all others.
• Bring to Front—places the selected object in front of all others.
• New—create a new layout design.
• Open—opens a previously-created layout.
• Save—saves the current layout displayed on screen.
• Save As—saves the current layout displayed on screen, with the option of changing the file name.
• Close—closes the current layout displayed on screen (Forcefield client Card Layout Editor remains open).
Toolbar Buttons
The Forcefield client Card Layout Editor window Figure 12 above has a row of toolbar buttons. From left to right, the buttons are described in Table 4 on page 34.

Chapter 3: Integrating photo ID
34 Forcefield External Interfaces Manual
Table 4: Card Layout Editor toolbar buttons
Name Function
New Report Create a new layout design.
Load Report Opens a previously-created layout.
Save Report Saves the current layout displayed on screen.
Print Preview Displays the results of current layout based on default data.
Print Prints the results of current layout based on default data.
Printer Setup Select the Windows system printer that you want to print the card on.
Add database field Click the button and then click inside the dotted border on the card image to add a database field (variable text). A row of editing buttons displays (Figure 13 on page 35). Note the fx button for adding database fields and expressions.
Add label Click the button and then click inside the dotted border on the card image to add a label field (fixed text). A row of editing buttons displays (Figure 13 on page 35).
Add shape Click the button and then click inside the dotted border on the card image to add a shape. A row of shape editing buttons displays (Figure 14 on page 35). Click a button to change the shape.
Add user image Click the button and then click inside the dotted border on the card image to add the user image contained in user records.
Add image/background
Click the button and then click inside the dotted border on the card image to add a fixed image such as a background or logo. A Load Image button and a row of selection boxes displays (Figure 15 on page 35).
Zoom to fit Click to adjust the card image to fit the Forcefield client Card Layout Editor window.
Zoom to width Click to adjust the card image to fit the width of the Forcefield client Card Layout Editor window.
Zoom to 100% Click to adjust the card image to view at actual size.
Card layout settings Click to open the Report Settings window.
Depending on the function selected, a second row of buttons displays Figure 13 on page 35, Figure 14 on page 35, or Figure 15 on page 35).
Chapter 3: Integrating photo ID
Forcefield External Interfaces Manual 35
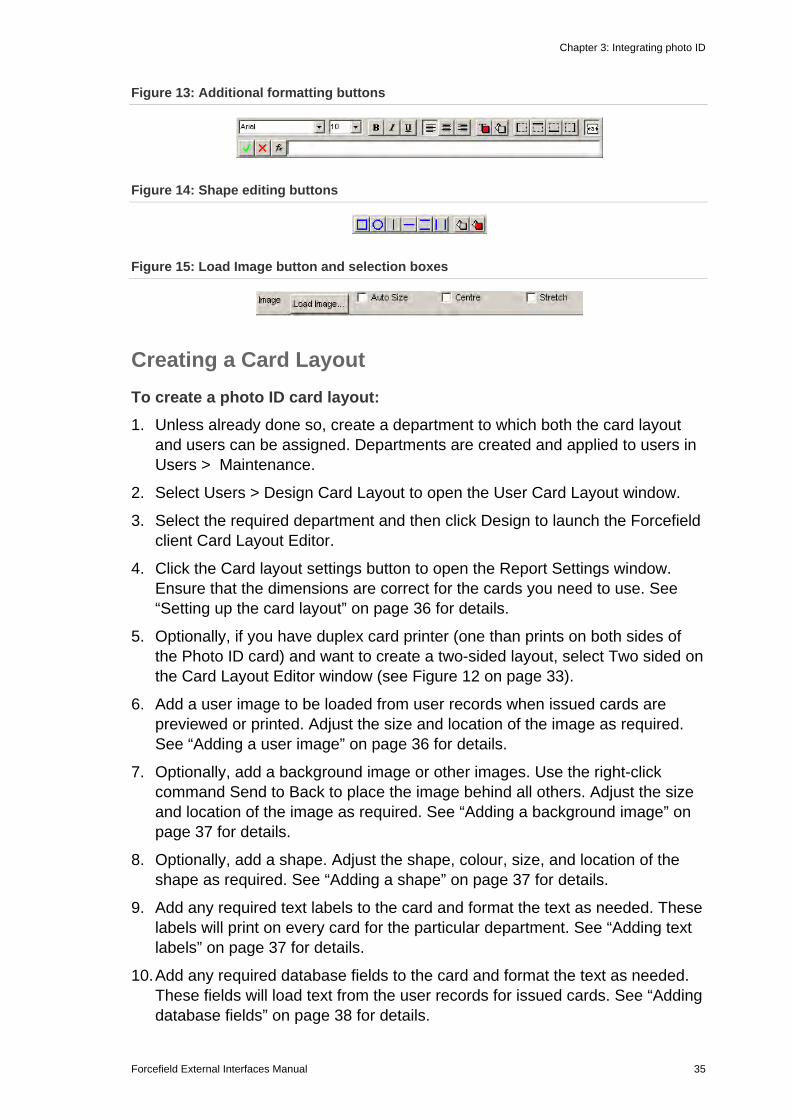
Figure 13: Additional formatting buttons
Figure 14: Shape editing buttons
Figure 15: Load Image button and selection boxes
Creating a Card Layout To create a photo ID card layout: 1. Unless already done so, create a department to which both the card layout
and users can be assigned. Departments are created and applied to users in Users > Maintenance.
2. Select Users > Design Card Layout to open the User Card Layout window.
3. Select the required department and then click Design to launch the Forcefield client Card Layout Editor.
4. Click the Card layout settings button to open the Report Settings window. Ensure that the dimensions are correct for the cards you need to use. See “Setting up the card layout” on page 36 for details.
5. Optionally, if you have duplex card printer (one than prints on both sides of the Photo ID card) and want to create a two-sided layout, select Two sided on the Card Layout Editor window (see Figure 12 on page 33).
6. Add a user image to be loaded from user records when issued cards are previewed or printed. Adjust the size and location of the image as required. See “Adding a user image” on page 36 for details.
7. Optionally, add a background image or other images. Use the right-click command Send to Back to place the image behind all others. Adjust the size and location of the image as required. See “Adding a background image” on page 37 for details.
8. Optionally, add a shape. Adjust the shape, colour, size, and location of the shape as required. See “Adding a shape” on page 37 for details.
9. Add any required text labels to the card and format the text as needed. These labels will print on every card for the particular department. See “Adding text labels” on page 37 for details.
10. Add any required database fields to the card and format the text as needed. These fields will load text from the user records for issued cards. See “Adding database fields” on page 38 for details.
Chapter 3: Integrating photo ID
36 Forcefield External Interfaces Manual
11. Click the Print Preview button to preview a card layout based on default data.
12. When finished editing the card layout, save the layout and exit.
Note: The first time you save a file from Card Layout Editor you may need to navigate to the location of the cards folder.
Setting up the card layout Ensure that the card layout settings are correct for the cards you need to use. Click the Card layout settings button to open the Report Settings window.
The four main areas on Report Settings window are:
• Paper size: The average access or Photo ID card size is around 54mm x 86mm (portrait is a tall layout, landscape is a wide layout.)
• Margins: Sets the distance of the border from the edge of the card layout. Columns can also be set up on the card to help you position elements in the layout. Columns won’t print in your final Photo ID card.
• Other: Use these settings to set the default font for the card layout labels.
• Page frame: This is the dotted grey line on the card layout, which (if selected) prints as a line around the edge of the layout. You can adjust its width, and distance from the edge with the margin settings. If you want no frame to appear, leave the page frame boxes empty. The frame is invisible unless you preview the layout.
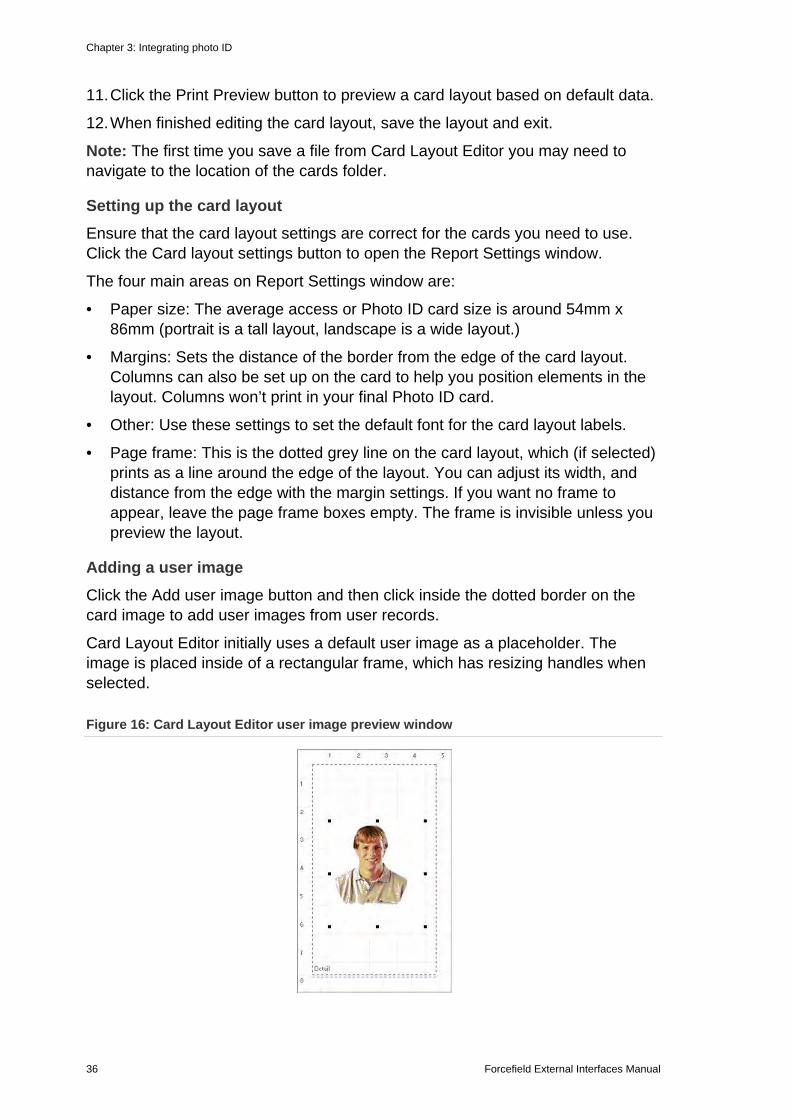
Adding a user image
Click the Add user image button and then click inside the dotted border on the card image to add user images from user records.
Card Layout Editor initially uses a default user image as a placeholder. The image is placed inside of a rectangular frame, which has resizing handles when selected.
Figure 16: Card Layout Editor user image preview window

Chapter 3: Integrating photo ID
Forcefield External Interfaces Manual 37
Adding a background image Click the Add image/background button and then click inside the dotted border on the card image to add a fixed image such as a background or logo.
A Load Image button and a row of selection boxes displays on the toolbar (Figure 15 on page 35):
• Load Image button—click to browse to the image file.
• Auto size—resizes image to its original size.
• Centre—if the image has been shrunk, selecting this displays the image in the centre.
• Stretch—Makes the entire image fit into the box you have defined, dragging the edges.
Adding a shape
Shapes, such as squares, circles and lines can be added and formatted in the card layout editor to print on the card.
Click the Add shape button and then click inside the dotted border on the card image to add a shape. Card Layout Editor initially places a square on the card layout and displays a row of shape editing buttons displays (Figure 14 on page 35). Click a button to change the shape:
• Square (may be filled with colour)
• Circle (may be filled with colour)
• Single vertical line
• Single horizontal line
• Two parallel horizontal lines
• Two parallel vertical lines
• Change the colour of the line
• Change the colour of the fill
Adding text labels
To add text labels to the card layout: 1. Click the Add label button and then click inside the dotted border on the card
image to add a label field (fixed text). The text ‘(none)’ is added to the card layout (and displays in the editing field), and a row of formatting buttons displays (Figure 13 on page 35).
2. Replace the text ‘(none)’ in the editing field with the required label text, and then click the [ button to accept the changes.
3. Click a formatting button to make the text bold, italic, underlined, etc.
4. Click and drag the text on the card layout image to position it.

Chapter 3: Integrating photo ID
38 Forcefield External Interfaces Manual
5. Click the Print Preview button to preview a card layout based on default data.
6. When finished editing the card layout, save the layout and exit.
Note: The first time you save a file from Card Layout Editor you may need to navigate to the location of the cards folder.
Adding database fields By using the Add database field button you can get Forcefield to extract user details automatically from the database, and print each user’s data on their card. In the following procedure we’ll add users’ first and last names to a card layout.
To add database fields to the card layout:
1. Click the Add database field button and then click inside the dotted border on the card image to add a database field (variable text). A row of formatting buttons displays (Figure 13 on page 35). Note the fx button for adding database fields and expressions.
2. Click the fx button to open the Expression Wizard.
3. Click the Database field button to select a database field (see “Database field
mapping” on page 40 for details).

Chapter 3: Integrating photo ID
Forcefield External Interfaces Manual 39
4. Select a database field and click OK. The field is added to the Enter expression window. The field NAMEA is the first part of the user name (up to the first space), and the field NAMEB is the second part of the user name (even if the second part uses a space).
5. Click Validate to verify the expression.
Next, we’ll add a space to separate the first and second parts of the name. Spaces, or any other fixed text, is not a database field and so must be enclosed between two apostrophes.
6. Click the + button to add another element to the expression.
7. Type ‘ for the first apostrophe to enclose the fixed text.
8. Press the spacebar for the space between the first and second parts of the name (the space is fixed text: other characters could be used).
9. Type ‘ for the second apostrophe (ending the fixed text).
10. Click the + button to add another element to the expression.
11. Repeat step 3 to select and add the database field NAMEB.
12. Click the Validate button to check the results for the currently selected user.

Chapter 3: Integrating photo ID
40 Forcefield External Interfaces Manual
13. Click OK to close the validation window.
14. Click a formatting button to make the text bold, italic, underlined, etc., as required.
15. When finished editing the expression, click OK to close the Expression Wizard.
16. Click the Print Preview button to preview a card layout based on default data.
17. When finished editing the card layout, save the layout and exit.
Note: The first time you save a file from Card Layout Editor you may need to navigate to the location of the cards folder.
The Expression Wizard has many more features than described here. If you need help using the Expression Wizard, please contact technical support.
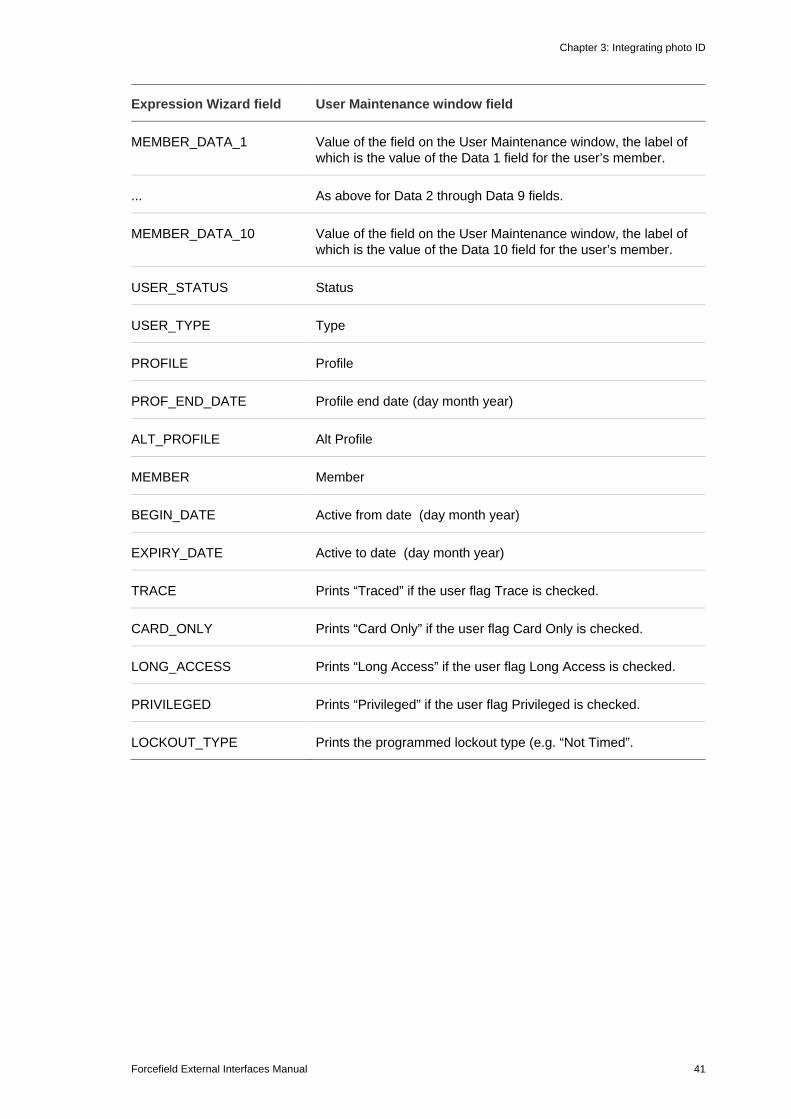
Database field mapping The database fields displayed in Expression Wizard correspond to the User Maintenance window as described in Table 5 below.
Table 5: Relationship between Expression Wizard data and User data
Expression Wizard field User Maintenance window field
NAMEA First part of the name field (up to the first space)
NAMEB Second part of the name field (even if the second part uses a space, e.g. ‘Van Dam’)
POSITION Position
DEPARTMENT Department
USERDEFINED The label of this field in the User Maintenance window is determined by the setting in Admin > Configuration > Configuration > User button > User Defined Field Title value.
PHONE Phone
EXT Ext
AFTHOURS Phone (AH)
USERNUMBER User
Chapter 3: Integrating photo ID
Forcefield External Interfaces Manual 41
Expression Wizard field User Maintenance window field
MEMBER_DATA_1 Value of the field on the User Maintenance window, the label of which is the value of the Data 1 field for the user’s member.
... As above for Data 2 through Data 9 fields.
MEMBER_DATA_10 Value of the field on the User Maintenance window, the label of which is the value of the Data 10 field for the user’s member.
USER_STATUS Status
USER_TYPE Type
PROFILE Profile
PROF_END_DATE Profile end date (day month year)
ALT_PROFILE Alt Profile
MEMBER Member
BEGIN_DATE Active from date (day month year)
EXPIRY_DATE Active to date (day month year)
TRACE Prints “Traced” if the user flag Trace is checked.
CARD_ONLY Prints “Card Only” if the user flag Card Only is checked.
LONG_ACCESS Prints “Long Access” if the user flag Long Access is checked.
PRIVILEGED Prints “Privileged” if the user flag Privileged is checked.
LOCKOUT_TYPE Prints the programmed lockout type (e.g. “Not Timed”.

Chapter 3: Integrating photo ID
42 Forcefield External Interfaces Manual

Forcefield External Interfaces Manual 43
Chapter 4 Integrating automatic event email
Summary This chapter describes how to set up Forcefield to send email messages when alarms or other events are detected.
Content
Overview 44 Adding an email address 44

Chapter 4: Integrating automatic event email
44 Forcefield External Interfaces Manual
Overview Forcefield can be set up to send email messages when an event occurs. One or more emails can be sent with each event.
Example of automatic email message text (where “Collins_3” is the Challenger ID and “Vic/CollinsSt/L3_RmE17” is the Area ID):
16/06/2004 15:48:51 Incident 4773 Alarm Vic/CollinsSt/L3_RmE17 Reported from Collins_3 at 16/06/2004 15:48:51
In this procedure, it is necessary to create a new Computer Category (or alter one that was previously created). Computer Categories tell Forcefield how to handle events. Forcefield has default Computer Categories that cannot be modified, and because they cannot be modified it is necessary to create a new Computer Category that can be modified.
Complete the following tasks to set up automatic email messages:
1. Save the email server IP address in Admin > Configuration > Forcefield Configuration.
2. Add the email address(es) in the Forcefield email address book. This is described in “Adding an email address” below.
3. Set up a new computer category for events with email. This is described in “Adding a computer category for paging or email support” on page 58.
4. Program the Challenger device to use the new computer category. This is described in the Forcefield Operators Manual, see Challenger > Challenger Programming.
5. Create a page or email event trigger. This is described in “Creating a ‘Paging By Event’ trigger” on page 58.
Adding an email address Add new email addresses to the Forcefield email address book. Email addresses have a number, ID, and email address.
Email addresses from the Forcefield email address book can be selected to automatically receive notification of pre-defined events.
To add an e-mail address to the Forcefield email address book:
1. Select Databases > Email Addresses. The email address screen displays.
2. Enter an ID (e.g. Fred Jones) and the email address.
3. Press F5 to save.

Forcefield External Interfaces Manual 45
Chapter 5 Integrating intercom
Summary This chapter describes how to program Forcefield to be used with one of the following types of intercom equipment:
• Commend GE 800 IP intercom
• Jacques 550 Series analogue intercom
It does not explain how to design, install, or implement an intercom system.
Note: In order to use these features, you must purchase and install the appropriate intercom license modules.
Content Intercom system overview 46 Forcefield intercom interface 47
Using the Forcefield graphical maps 47 Using the Forcefield Speed Bar intercom buttons 48
Integrating a Commend IP intercom system 49 Integrating a Jacques intercom system 50

Chapter 5: Integrating intercom
46 Forcefield External Interfaces Manual
Intercom system overview From Forcefield’s point of view, intercom systems consist of intercom masters and intercom slaves. Intercom masters are used by operators to answer calls that come from intercom slaves and from other intercom masters.
There can be two levels of intercom masters, numbered 1 (lowest authority) and 2 (highest authority). Both levels of intercom masters can receive calls from slave intercoms. When an intercom master level 1 operator is logged off, all calls that would normally go to an intercom master level 1 are automatically diverted to the intercom master level 2.
Intercom slaves are the system’s remote units, typically located near doors, to provide a means of requesting two-way communication. The functionality of intercom slaves varies depending on the hardware and the intended purpose. For example, an intercom slave might be configured to be only a public address (PA) annunciator, to provide background music, and so on.
Forcefield provides an integrated user interface for the intercom system. A Forcefield operator can answer or initiate calls via intercom LAPs placed on graphical maps. New calls can be displayed as flashing icons on the Speed Bar, and the operator can immediately go to the associated map when answering a call. Multiple calls are queued for the operator’s attention by priority and sequence.
Figure 17: Comparison of intercom system topologies

Chapter 5: Integrating intercom
Forcefield External Interfaces Manual 47
Forcefield intercom interface The intercom system is used on Forcefield via the following graphical elements:
• Each intercom is represented by a Live Animation Point (LAP) image on a Forcefield graphical map.
• Forcefield Speed Bar buttons allow quick access to calls, the intercom map, and for radio and call volume controls.
Using the Forcefield graphical maps Intercom masters and slaves can be added to Forcefield maps, where each intercom’s location is marked by an icon.
Intercom calls to a Forcefield workstation are made by pressing a call button on a slave unit (or by initiating a call from another audio workstation). When a call is requested, the associated intercom LAP flashes pink, and the “Go To Intercom Map” button on the Forcefield Speed Bar also flashes pink. When flashing, the intercom is said to be waiting.
If an additional intercom call is requested whilst the intercom is waiting, Forcefield automatically queues the call. Waiting calls are displayed according to the intercom system used:
• For Jacques intercoms Forcefield indicates one call waiting at a time, in the sequence initiated.
• For Commend intercoms Forcefield indicates all waiting calls simultaneously. Calls are answered in priority and sequence order, when answered via the “New Alarm or Call” Speed Bar button.
Click the flashing intercom LAP on the map to automatically:
• Switch the video camera assigned to the intercom to the workstation’s intercom monitor.
• Open the intercom’s call channel.
Note: The intercom monitor is defined on a workstation basis. Use the Databases > Computer Equipment > Workstations command, and then click the Video button, to create a title to be displayed on Graphics Map for the intercom monitor, and to select the monitor to be used.
When not flashing, the intercom is said to be inactive. The operator selects an inactive intercom icon to switch the camera associated with the intercom to the intercom monitor. The options available to the operator are as follows:
• Cancel. Closes the menu.
• Open Call. The options associated with an active call become available.
• Open Door. Opens the door. The intercom monitors are cleared after a configurable period. The system may be configured to require a confirmation for the open door command.

Chapter 5: Integrating intercom
48 Forcefield External Interfaces Manual
• Audio Monitor On. Starts audio monitoring of a selected intercom.
• Audio Monitor Off. Stops audio monitoring of a selected intercom.
• Disable Call Button. Disables the call button and set the intercom icon to yellow. The option toggles to ‘Enable Call Button’ to reverse the command. For Commend intercoms, an alarm periodically reminds the operator that the intercom is isolated (configured in Admin > Configuration > Configuration > CCTV/Intercom).
The active call options available to the operator are as follows:
• Close Call. Ends the call and clears the intercom monitors after a configurable period.
• Open Door. Opens the door and immediately closes the call. The intercom monitors are cleared after a configurable period. The system may be configured to require a confirmation for the open door command.
Using the Forcefield Speed Bar intercom buttons The Forcefield Integration Technician must add the buttons listed in Table 6 below to the Forcefield Speed Bar. Configuring the Forcefield Speed Bar is described in the Forcefield Operators Manual.
Table 6: Forcefield Speed Bar intercom buttons
Button Operation
Go To Intercom Map Flashes pink when an intercom call is waiting to be answered. The operator clicks the button to go to the map containing the icon of the intercom that is currently waiting to be answered.
Intercom Radio 1 Radio channel 1 selection
Intercom Radio 2 Radio channel 2 selection
Intercom Radio 3 Radio channel 3 selection
Intercom Radio Off Turns off the radio
Intercom Volume Down Reduces the radio volume
Intercom Volume Up Increases the radio volume
Intercom Call Volume Down Reduces the current call volume
Intercom Call Volume Up Increases the current call volume

Chapter 5: Integrating intercom
Forcefield External Interfaces Manual 49
Integrating a Commend IP intercom system To integrate a Commend intercom system, you’ll need to understand the following basic concepts.
• The Commend intercom system used by Forcefield is a multi-level hierarchical system. Forcefield supports levels 1 and 2 intercom masters.
• Forcefield communicates with the intercom system via IP to a Commend GE 800 Intercom Server.
• A Forcefield TCP/IP host record is used to store the connection details (IP address) of the Commend GE 800 Intercom Server.
• Intercom masters level 1 are located near Forcefield client workstations and can communicate with other intercom masters and slaves via IP.
• When a Forcefield operator at an intercom master level 1 is logged off, all intercom calls to the intercom master level 1 are automatically diverted to the intercom master level 2.
• Slave intercoms are located near doors or in rooms and communicate with the intercom masters via IP.
The first step is to set up the intercom records for masters and slaves. Then, build a map in Forcefield showing the position of the intercoms. For more information about setting up maps, see the Forcefield Operators Manual.
Integration steps
Unless already done so, create a Forcefield TCP/IP host record with the IP address of the Commend GE 800 Intercom Server.
See the Forcefield Operators Manual for more information on configuring ports.
The overall process of integrating a Commend intercom system is as follows:
1. Select Databases > Intercoms > Intercom Master. The Intercom Master screen displays.
2. Program the intercom master level 2 and give it an ID.
3. In the Comms Port/Host field select the TCP/IP host record for the Commend GE 800 Intercom Server.
4. Program any intercom masters level 1 and specify the intercom master level 2 ID in the Higher Master field.
5. Select Databases > Intercoms > Intercom Slave. The Intercom Slave screen displays.
6. Program intercom slaves and specify the appropriate intercom master’s ID in the Master field.

Chapter 5: Integrating intercom
50 Forcefield External Interfaces Manual
Integrating a Jacques intercom system To integrate a Jacques intercom system, you’ll need to understand the following basic concepts.
• The Jacques intercom system used by Forcefield is a multi-level hierarchical system. Forcefield supports levels 1 and 2 master intercoms.
• Forcefield communicates with intercom consoles or control units via a single intercom master level 2 connected to one of the Forcefield node’s serial ports via a Jacques HLI.
• A Forcefield serial port record is used to store the connection details of the Jacques intercom system.
• Up to 14 intercom masters level 1 are located near Forcefield clients workstations and are connected to the intercom master level 2.
• An intercom master level 1 can make intercom calls only to its intercom slaves or to the intercom master level 2.
• When a Forcefield operator at an intercom master level 1 is logged off, all intercom calls to the intercom master level 1 are automatically diverted to the intercom master level 2.
• Slave intercoms are located near doors or in rooms and communicate with the intercom masters.
The first step is to set up the intercom records for masters and slaves. Then, build a map in Forcefield showing the position of the intercoms. For more information about setting up maps, see the Forcefield Operators Manual.
Integration steps
Integrate a Jacques intercom system so that operators can respond to and make calls on Jacques intercom systems.
Unless already done so, create an intercom port with the appropriate values from the intercom system. The required values are:
• Port type = Intercom
• Node = The node number that the Intercom is connected to
• Handshake = None
• Baud = 9600
• Parity = None
• Data Bits = 8
See the Forcefield Operators Manual for more information on configuring ports.
The overall process of integrating a Jacques intercom system is as follows:
1. Select Databases > Intercoms > Intercom Master. The Intercom Master screen displays.
2. Program the intercom master level 2 and give it an ID.

Chapter 5: Integrating intercom
Forcefield External Interfaces Manual 51
3. In the Comms Port/Host field select the Com port record for the Jacques intercom system.
4. Program any intercom masters level 1 and specify the intercom master level 2 ID in the Higher Master field.
5. Select Databases > Intercoms > Intercom Slave. The Intercom Slave screen displays.
6. Program intercom slaves and specify the appropriate intercom master’s ID in the Master field.

Chapter 5: Integrating intercom
52 Forcefield External Interfaces Manual

Forcefield External Interfaces Manual 53
Chapter 6 Integrating paging and duress
Summary This chapter describes how to set up Forcefield to send automatic email messages or to page an Ascom Nira paging system when an event occurs.
Note: In order to use these features, you must purchase and install the TS9112 Pager/Duress license module.
Content
Integrating Paging 54 Integrating an Ascom Nira duress system 54
Duress system overview 54 Adding a Computer Category for duress support 56 Adding an Ascom Nira duress station 56 Adding an Ascom Nira duress system locator 57 Adding an Ascom Nira duress transceiver 57 Adding a computer category for paging or email support 58 Creating a ‘Paging By Event’ trigger 58

Chapter 6: Integrating paging and duress
54 Forcefield External Interfaces Manual
Integrating Paging In this procedure, it is necessary to create a new Computer Category (or alter one that was previously created). Computer Categories tell Forcefield how to handle events. Forcefield has default Computer Categories that cannot be modified, and because they cannot be modified it is necessary to create a new Computer Category that can be modified.
To set up automatic email messages or duress system paging: 1. Integrate the Ascom Nira system into Forcefield. Refer to “Integrating an
Ascom Nira duress system” below.
2. Set up a new computer category for events with paging. Refer to “Adding a computer category for paging or email support” on page 58.
3. Program the Challenger device to use the new computer category. Refer to Challenger Programming in the Forcefield Operators Manual.
4. Create a ‘Paging by Event’ trigger. Refer to “Creating a ‘Paging By Event’ trigger” on page 58.
Integrating an Ascom Nira duress system This guide describes how to integrate Ascom Nira system devices into Forcefield. It does not explain how install or implement Ascom Nira system devices.
The task of integrating an Ascom Nira Duress system consists of the following procedures, to be performed in the following sequence:
1. “Adding a Computer Category for duress support” on page 56
2. “Adding an Ascom Nira duress station” on page 56
3. “Adding an Ascom Nira duress system locator” on page 57
4. “Adding an Ascom Nira duress transceiver” on page 57
5. “Adding a computer category for paging or email support” on page 58
6. “Creating a ‘Paging By Event’ trigger” on page 58
Duress system overview The duress system uses the following components:
• A duress station connected to a Forcefield computer.
• A number of duress system locators placed at various locations in a facility. Each locator is identified by an ID code on the equipment.
• A duress transceiver (or transmitter), typically worn at the waist, by personnel required to move through the facility. Each transceiver is identified by an ID code on the equipment.

Chapter 6: Integrating paging and duress
Forcefield External Interfaces Manual 55
Each time a person wearing a duress transceiver passes a duress locator, the transceiver receives a location from the locator. If an alarm occurs (such as “Man Down”, “Alarm Button Pressed”, “No Motion”, etc.) the location and the previous location are sent to the duress station. Forcefield uses the two locations to change the colours of the relevant duress locator icons on the alarm map so that the operator has an indication of the wearer’s position and direction of travel.
When a duress alarm occurs, the duress station communicates with the Forcefield system and provides:
• The type of alarm (including duress button press, transceiver pulled off, person down, person not moving, person too long at one locator).
• Identity of transceiver.
• Present location.
• Previous location.
The duress system keeps track of two consecutive locations in order to indicate direction of travel as well as present location (Figure 18 below).
Figure 18: Duress system overview

Chapter 6: Integrating paging and duress
56 Forcefield External Interfaces Manual
Adding a Computer Category for duress support In this procedure, it is necessary to create a new Computer Category (or alter one that was previously created). Computer Categories tell Forcefield how to handle events. Forcefield has default Computer Categories that cannot be modified, and because they cannot be modified it is necessary to create a new Computer Category that can be modified.
Note: You must create a new Computer Category. As part of this procedure, you’ll need to select each type of duress alarm event, and then clear the Restoral Required field because Ascom Nira does not generate alarm restoral events.
To create a new computer category for Ascom Nira duress: 1. Select Databases > Management Software > Computer Categories >
Computer Categories. The Computer Categories screen displays.
2. Click the Computer Category field, type a new name for the Computer Category, and then press ENTER. Forcefield displays a Category type selection list.
3. Select the Category Type “Duress” from the list.
4. Type a description for the new category in the description field.
5. In the Event Text list, select an event type (e.g. Personal Monitor Alarm) for which you want to program the event settings.
6. Right-click the Restoral Required box to clear it.
7. Press F5 to save the changes.
Adding an Ascom Nira duress station Unless already done so, create a new Duress Computer Category, which has the Restoral Required box cleared. See “Adding a Computer Category for duress support” above.
Unless already done so, create a duress port with the appropriate values from the duress station. The required values are:
• Port type = Duress
• Node = The node number that the Duress Station is connected to
• Handshake = None
• Baud = 9600
• Parity = Even
• Data Bits = 8
See the Forcefield Operators Manual for more information on configuring ports.
Chapter 6: Integrating paging and duress
Forcefield External Interfaces Manual 57
To add an Ascom Nira duress station: 1. Select Databases > Duress > Duress Stations.
2. Select or add a duress system, e.g. New Ascom Nira.
3. Click the protocol arrow, and select Ascom 960.
4. In the System ID field, type an Ascom Nira System ID (hex value supplied by Ascom Nira).
5. Select port, member, computer category, etc.
6. Press F5 to save.
Adding an Ascom Nira duress system locator To add an Ascom Nira duress system locator:
1. Select Databases > Duress > Duress Locators.
2. Select a duress system.
3. Select an address and ID.
4. Enter a description of the locator.
5. Press F5 to save the record.
Adding an Ascom Nira duress transceiver Unless already done so, create a new Duress Computer Category, which has the Restoral Required box cleared. See “Adding a Computer Category for duress support” on page 56.
To add an Ascom Nira duress transmitter: 1. Select Database > Duress > Duress Transmitter.
2. From the Duress transmitter screen select a duress system.
3. Type the identity (supplied by Ascom Nira).
4. Select an ID from the ID field.
5. Click the Type arrow, and then select the type of transmitter. If you select U922 (which has two-way communication), then call number fields are provided.
6. Select a duress type of computer category that has been amended to not require restorals for the alarm conditions. The Ascom Nira does not generate alarm restoral events.
7. Press F5 to save the record.

Chapter 6: Integrating paging and duress
58 Forcefield External Interfaces Manual
Adding a computer category for paging or email support In this procedure, it is necessary to create a new Computer Category (or alter one that was previously created). Computer Categories tell Forcefield how to handle events. Forcefield has default Computer Categories that cannot be modified, and because they cannot be modified, it is necessary to create a new Computer Category that can be modified.
As part of this procedure, you’ll need to select the type of event, and then select Allow Paging (not applicable to some event types).
To create a new computer category to page or email on events: 1. Select Databases > Management Software > Computer Categories >
Computer Categories. The Computer Categories screen displays.
2. Click the ID field, type a new name for the Computer Category, and press ENTER. Forcefield displays a Category type selection list.
3. Select the required Category Type from the list.
4. Type a description for the new category in the Description field.
5. In the Event Text list, select an event type (e.g. Duress) for which you want to program the event settings.
6. Right-click the Allow Paging box to select it.
7. Press F5 to save the changes.
Creating a ‘Paging By Event’ trigger Program a Paging by Event trigger to page an Ascom Nira duress system or to send an email.
To create an event trigger:
1. Select Triggering > Event Paging, and then the Paging by Event screen displays.
2. Type a new ID or select one.
3. Type a new description for the event.
4. Click the Page on Event arrow, and then select an event type.
5. Press F5 to save the changes.
6. Click Destinations, and then the Paging Destination screen displays.
7. Complete the ID, type, and address fields.
8. For the type of output, select Ascom Duress or Email address. If you select Ascom Duress, also select an alarm option from the list (e.g. the number of beeps or a siren).
9. Press F5 to save the changes. Complete a new paging destination screen for each email destination you need to add.

Forcefield External Interfaces Manual 59
Chapter 7 Integrating CCTV
Summary This chapter describes how to integrate Forcefield with a video switcher, digital video recorder (DVR) system, or a Teleste Video Management system.
Content Overview 60 Video switcher system 61
Overall process 62 Automatically displaying CCTV images for alarms 63 Controlling CCTV from Forcefield events 64
DVR systems 65 Overview of TruVision DVRs 65 Integration overview 66 Creating a computer category 67 Using the DVR system 67 Viewing CCTV footage from a DVR 67 Controlling the DVR from Forcefield events 74 Viewing exported video footage 75
Teleste Video Management system 76 Overview 76 Integrating Teleste into Forcefield 76
Chapter 7: Integrating CCTV
60 Forcefield External Interfaces Manual
Overview Forcefield can be integrated with the following CCTV systems:
• Video Switcher. A video switcher is connected via RS-232 to the Forcefield node. External monitor(s) must be used to display CCTV footage. Refer to “Video switcher system” on page 61 for details.
• DVR. Subject to licensing Forcefield client can interface via Ethernet (IP) connections to Interlogix Digital Video Recorders (DVR), Interlogix Digital Video Multiplexer Recorders (DVMRe), and associated CCTV video cameras. Refer to “DVR system” on page 65 for details. See also Appendix C “Integrating SymDVR” on page 113, and Appendix D “Integrating TruVision” on page 123.
• Teleste Video Management system. Subject to licensing Forcefield client can interface via IP connection to Teleste. Refer to “Teleste Video Management system” on page 76 for details.
In order to use these features, you must purchase and install the appropriate license module:
• TS9111 CCTV license module (Kalatel video switchers do not require a CCTV license module).
• TS9117 Interlogix DVR license module. May be used with Forcefield version 5.1.10 or later and Forcefield client version 1.0.6 or later.
• TS9171 Teleste Video Surveillance License. May be used with Forcefield version 6.2 or later.
Notes
• Restart the Forcefield server after installing a new or modified license module.
• DVMRe or DVR integration requires the appropriate versions of Forcefield client. Before you install Forcefield client on a Windows computer you must first remove any earlier versions, if present. Go to Start > Control Panel > Add or Remove Programs and remove any instances of Forcefield client. (Record the station key and other details for reuse from the Client Preferences screen before you remove Forcefield client.)

Chapter 7: Integrating CCTV
Forcefield External Interfaces Manual 61
Video switcher system Figure 19: System diagram of basic CCTV system
The video switcher must be physically connected to the Forcefield node, but the CCTV system is controlled from Forcefield clients.
The optional VCR monitor is selected from the pop-up menu for a camera LAP. When selected, the signal from the selected camera is routed through the VCR, and then the workstation’s VCR monitor displays the image that is being recorded.

Chapter 7: Integrating CCTV
62 Forcefield External Interfaces Manual
Overall process This section describes the overall process of integrating video switcher CCTV devices into Forcefield.
Refer to the Databases > Video > Matrix Video menu section in the Forcefield Operators Manual for details about programming video cameras, monitors, camera presets, and switchers. The information provided in this section is only a summary.
Overall process for integrating CCTV into Forcefield: 1. Use the Databases > Video > Matrix Video > Switchers command to program
a CCTV switcher. Leave the Enabled selection unchecked so that you can program the CCTV switcher, cameras, monitors and presets before actually physically connecting the equipment to the Forcefield system.
2. If not previously done, define a video switcher port.
3. Use the Databases > Video > Matrix Video > Cameras command to program a video camera. Select the CCTV switcher (defined in step 1) to which this camera is connected, and specify whether the camera has pan-tilt-zoom (PTZ) control.
4. If applicable, use the Databases > Video > Matrix Video > Presets command to program and name predefined views for PTZ cameras (defined in step 2). TIP: The name that you assign to a presets 1 through 5 are added to the camera’s pop-up menu on maps displaying the camera.
5. Use the Databases > Video > Matrix Video > Monitors command to program the video monitors. Select the CCTV switcher (defined in step 1) to which this monitor is connected.
6. Use the Databases > Computer Equipment > Workstations command, and then click the Other button to ensure that the Disable CCTV Control selection is not checked.
7. Use the Databases > Computer Equipment > Workstations command to specify the video monitors to be used by the workstation. TIP: The first programmed spot monitor is used to display the image from the camera associated with the point in alarm when the operator views the Alarm Detail screen. From the Forcefield Workstations window, click the Alarms button and then select Switch Cam. to Mon. on Detail.
8. If applicable, use the Databases > Computer Equipment > Workstations command to select the intercom monitor to display the feed from the intercom camera and to create a title to be displayed on the Graphics Map for the intercom monitor.
9. If applicable, use the Databases > Computer Equipment > Workstations command to select the VCR monitor to be used to display the feed from the VCR.

Chapter 7: Integrating CCTV
Forcefield External Interfaces Manual 63
10. Use the Admin > Configuration > Forcefield Configuration command, and then click the CCTV/Intercom button to configure the following options:
• Door Open Blank Camera Delay. When the operator opens a door associated with an Intercom from a graphics map, the monitor displays video from the associated camera. This value is the number of seconds until the video is blanked.
• Camera Number for Blank Video. This is the video camera number that will be used to select blank video. This may need to be specially set in the video switcher programming.
11. Use the Databases > Computer Equipment > Ports command and configure a Forcefield node port as follows:
• The port type is VideoSwitcher RS232
• Configuration settings to suit the switcher (e.g. at the time of writing, the settings for a Kalatel KTD-348 are: no handshake, 9600 baud, no parity, 8 data bits).
12. Connect the cameras, monitors, and switchers to the Forcefield system.
The switcher must be connected to the correct serial port on the Forcefield node via an RS-232 cable. Details of serial port connections are described in Figure 20 below.
13. Use the Databases > Video > Matrix Video > Switchers command, and then check the Enabled selection to enable a CCTV switcher.
Figure 20: CCTV switcher wiring connections
Automatically displaying CCTV images for alarms Forcefield can automatically display video images on a spot monitor in response to an alarm when the operator opens the alarm detail screen.
Briefly, the following must be in place:
• The workstation must be programmed to have at least one spot monitor (Databases > Computer Equipment > Workstations).
RX
CTS
RTS
CD
GND
Panasonic 616
TX
Computer
RX
CTS
RTS
CD
GND
TX
RX
GND
CCTV switcher *
TX
Computer
RX
GND
TX
* Excluding Panasonic 616
CCTV switcher
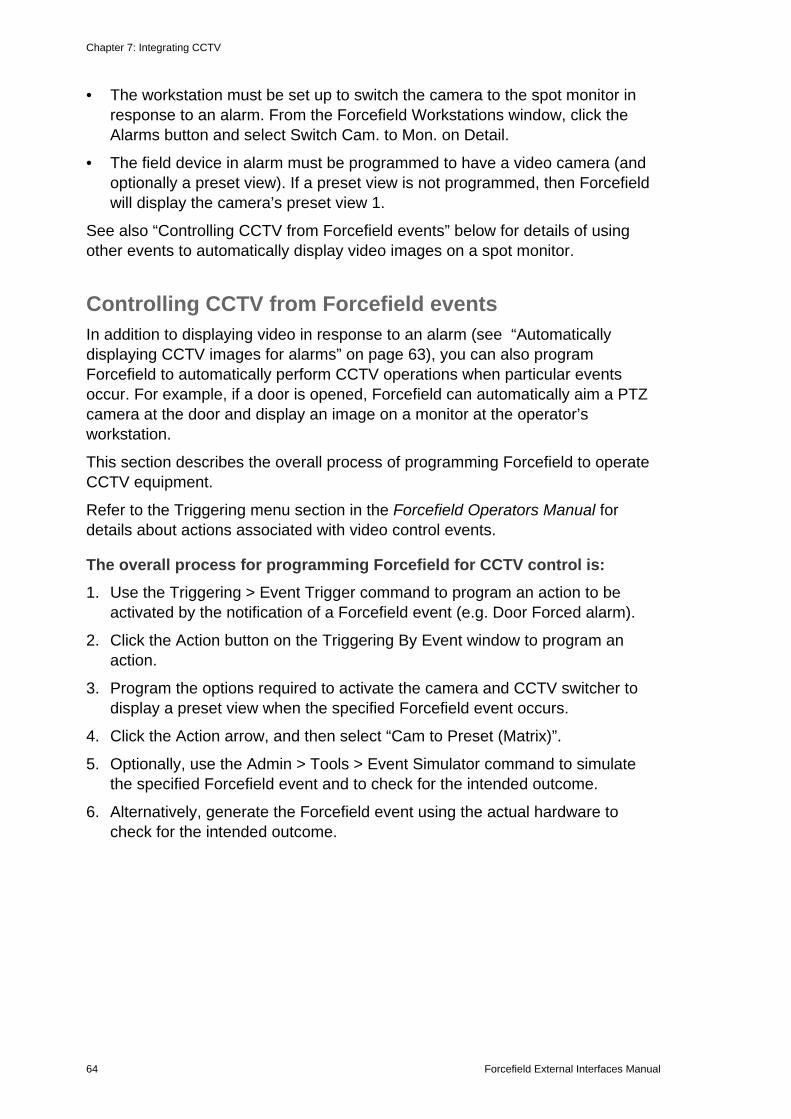
Chapter 7: Integrating CCTV
64 Forcefield External Interfaces Manual
• The workstation must be set up to switch the camera to the spot monitor in response to an alarm. From the Forcefield Workstations window, click the Alarms button and select Switch Cam. to Mon. on Detail.
• The field device in alarm must be programmed to have a video camera (and optionally a preset view). If a preset view is not programmed, then Forcefield will display the camera’s preset view 1.
See also “Controlling CCTV from Forcefield events” below for details of using other events to automatically display video images on a spot monitor.
Controlling CCTV from Forcefield events In addition to displaying video in response to an alarm (see “Automatically displaying CCTV images for alarms” on page 63), you can also program Forcefield to automatically perform CCTV operations when particular events occur. For example, if a door is opened, Forcefield can automatically aim a PTZ camera at the door and display an image on a monitor at the operator’s workstation.
This section describes the overall process of programming Forcefield to operate CCTV equipment.
Refer to the Triggering menu section in the Forcefield Operators Manual for details about actions associated with video control events.
The overall process for programming Forcefield for CCTV control is: 1. Use the Triggering > Event Trigger command to program an action to be
activated by the notification of a Forcefield event (e.g. Door Forced alarm).
2. Click the Action button on the Triggering By Event window to program an action.
3. Program the options required to activate the camera and CCTV switcher to display a preset view when the specified Forcefield event occurs.
4. Click the Action arrow, and then select “Cam to Preset (Matrix)”.
5. Optionally, use the Admin > Tools > Event Simulator command to simulate the specified Forcefield event and to check for the intended outcome.
6. Alternatively, generate the Forcefield event using the actual hardware to check for the intended outcome.

Chapter 7: Integrating CCTV
Forcefield External Interfaces Manual 65
DVR systems DVR systems include various digital video technologies, including:
• TruVision DVR products. See “Overview of TruVision DVRs” below and Appendix D “Integrating TruVision” on page 123.
• SymDVR (legacy DVR products). See Appendix C “Integrating SymDVR” on page 113.
Overview of TruVision DVRs The range of supported TruVision DVR products includes TVR 10, NVR20 (TVN 20), TVR 40, and TVR 60 DVRs. Forcefield 6.4 (and later) use “video service” applications that provide the interface between Forcefield and TruVision devices:
• Video Status Manager (VSM) must be installed on one Windows computer per Forcefield system. The computer with VSM is the video server.
• Video Presentation Client (VPC) must be installed on each Forcefield client computer that is used for controlling or viewing video. Each computer with VPC is a video client.
Note: Any computer with VSM and/or VPC must also have Microsoft .NET Framework 4 installed.
Refer to Figure 21 on page 66 for an illustration of a simple Forcefield system with TruVision DVR. In this example, the VSM and VPC are installed on the Forcefield client computer. In a larger system, the VSM may need to be on a dedicated computer.

Chapter 7: Integrating CCTV
66 Forcefield External Interfaces Manual
Figure 21: Overview of TruVision DVR interface
1. The Forcefield node receives events from a Challenger panel or from other interfaces, as defined by computer categories created for this purpose. The image represents both standard and Enterprise Forcefield hardware.
2. The IP connection between Forcefield clients and the node does not carry digital video.
3. Forcefield can manage up to 999 TruVision DVRs via IP. Depending on model, cameras may be IP or analogue (including PTZ cameras).
4. Full configuration of DVRs and cameras can be performed via Forcefield. In this example, both the VSM and VPC are installed on the Forcefield client. In a larger system, the VSM should be installed on a dedicated Windows computer to be the video server (the Forcefield client still must have VPC installed).
Integration overview See “Video service integration process” on page 124 for details of integrating TruVision DVR devices into a Forcefield system.
Legacy equipment such as DVMRe, SymDec, and SymSafe are supported natively in Forcefield. Forcefield supports TruVision DVRs and cameras via the following additional software:
• Video Status Manager (VSM) is required on one Windows computer in the system.
• Video Presentation Client (VPC) is required on each Forcefield client where video is used.
• Both VSM and VPC require Microsoft .NET Framework 4.

Chapter 7: Integrating CCTV
Forcefield External Interfaces Manual 67
Creating a computer category Computer categories tell Forcefield how to handle events.
An event can be used to send an event tag to a DVR. In order to do so, you must create a computer category that can be edited (the standard computer categories are read-only ‘templates’).
The particular type of computer category that you create will be based on the type of equipment (e.g. arming station, door, etc.) that you want to use.
For any given computer category and event, there are two items that you need to program for use with a DVR:
• Select Mgt s/w to tag DVR if Forcefield is to send text to DVR to be recorded as a tag for the event.
• Edit (if required) the event text for the event. The event text will be sent as part of the tag to the DVR when the event occurs.
Using the DVR system Forcefield can perform the following tasks in relation to a DVR system:
• In response to events, Forcefield sends text to the DVR to be recorded along with video footage from a camera associated with the event. The text can be generated by Forcefield or by a high-level interface such as an intercom system.
• A Forcefield operator working at a Forcefield client computer can display live or recorded footage from a DVR.
• When viewing live footage from a PTZ camera, the operator can control the camera’s view.
• A Forcefield operator working at a Forcefield client computer can search for and display video footage identified by text recorded with the video footage on a DVR.
• When viewing recorded footage, the operator can control the speed and direction of the playback.
Viewing CCTV footage from a DVR A Forcefield system may interface via Ethernet (IP) connection to a Digital Video Recorder (DVR) and associated CCTV video cameras.
Authorised operators can:
• Access live and recorded video footage from maps (see “Using maps to display video” on page 68).
• Program Forcefield to activate a camera and to record footage in response to events such as an alarm or by someone using a reader.

Chapter 7: Integrating CCTV
68 Forcefield External Interfaces Manual
• Find recorded footage by searching the DVR by text tags or by time.
• Display up to 16 images of DVR video on a single screen using multiview. Refer to the section View Groups menu in the Forcefield Operators Manual for details.
Note: In order for Forcefield to initiate the recording and tagging of the recorded DVR camera footage for Challenger events such as using a reader, the computer category entry for the event must have the “Mgt s/w to tag DVR” option selected, and the computer category must be assigned to the device. Also, the device (such as an input) generating the event must also have an associated DVR camera programmed in the Video Cam field, as per the example shown in Figure 22 below.
Using the History menu to display video The History > Show DVR Footage menu contains the following sub-menus:
• Tagged Footage
• Time Footage
Refer to History > Show DVR Footage menu in the Forcefield Operators Manual for details about using these commands.
Using maps to display video
Maps can contain Challenger equipment devices that have been programmed with an associated DVR video camera (see Figure 22 below for example).
Figure 22: Challenger input device programming
The video camera that a device uses is determined by the input's programming
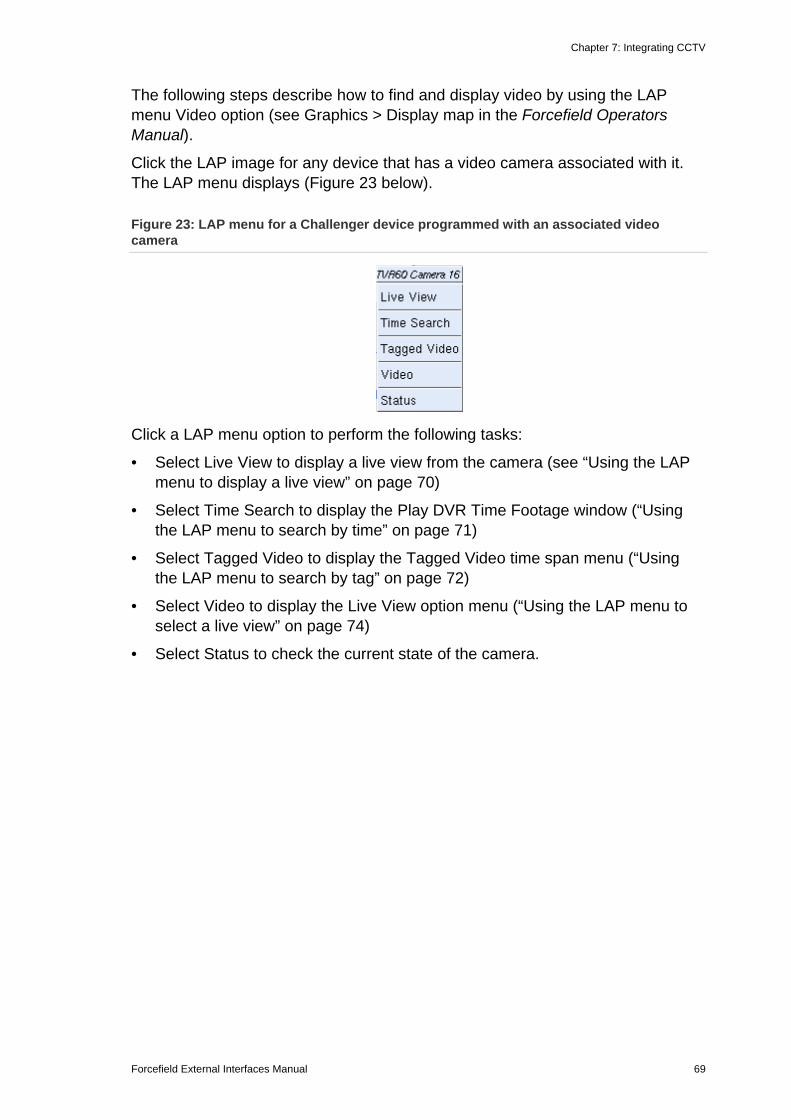
Chapter 7: Integrating CCTV
Forcefield External Interfaces Manual 69
The following steps describe how to find and display video by using the LAP menu Video option (see Graphics > Display map in the Forcefield Operators Manual).
Click the LAP image for any device that has a video camera associated with it. The LAP menu displays (Figure 23 below).
Figure 23: LAP menu for a Challenger device programmed with an associated video camera
Click a LAP menu option to perform the following tasks:
• Select Live View to display a live view from the camera (see “Using the LAP menu to display a live view” on page 70)
• Select Time Search to display the Play DVR Time Footage window (“Using the LAP menu to search by time” on page 71)
• Select Tagged Video to display the Tagged Video time span menu (“Using the LAP menu to search by tag” on page 72)
• Select Video to display the Live View option menu (“Using the LAP menu to select a live view” on page 74)
• Select Status to check the current state of the camera.

Chapter 7: Integrating CCTV
70 Forcefield External Interfaces Manual
Using the LAP menu to display a live view Click the LAP image for any device that has a video camera associated with it, and then select Live View.
Figure 24: Live Camera View window for a PTZ camera
If the camera is a pan-tilt-zoom (PTZ) camera, you can use the controls in Live View as described in Table 7 below.
Table 7: DVR Camera Control buttons (for PTZ cameras)
Button Function
Pan left
Pan right
Tilt up

Chapter 7: Integrating CCTV
Forcefield External Interfaces Manual 71
Button Function
Tilt down
Zoom in
Zoom out
Focus in
Focus out
Reduce iris (reduce the amount of light passing through the lens)
Increase iris (increase the amount of light passing through the lens)
Click the arrow to select a preset view from the list
Using the LAP menu to search by time Click the LAP image for any device that has a video camera associated with it, and then select Time Search.
Figure 25: Play DVR Time Footage window

Chapter 7: Integrating CCTV
72 Forcefield External Interfaces Manual
Using the LAP menu to search by tag Click the LAP image for any device that has a video camera associated with it, and then select Tagged Video.
Figure 26: Tagged Video time span menu
If recorded video is found within the selected time span, a list of events during that time displays (Figure 27 below).
Figure 27: DVR Tagged Events list
Click an event text field to launch the DVR Recorded Video window (see Figure 28 on page 73).

Chapter 7: Integrating CCTV
Forcefield External Interfaces Manual 73
Figure 28: Recorded Video window
The DVR Recorded Video window displays the recorded footage associated with the selected event on the right-hand side (above the VCR-style buttons). The live image from the same camera is displayed on the left. Refer to Table 7 on page 70 for details of the PTZ controls (if applicable).
Use the VCR buttons to rewind, play backward, play forward, and pause (stop) as described in Table 8 below.
Table 8: Recorded Video window VCR buttons
Button Function
Jump back by 10 s, 30 s, 1 m, or 5 m, as set by the jump interval slider.
Rewind (applicable to SymDVRs only)
Rewind to the beginning of the event.
Pause (when paused, the Play forward button displays).
Play forward (when playing, the Pause button displays).
Play fast forward by the multiplier displayed below the button (for example 2x).
Mark the start of footage segment to export (the operator must have edit permissions on the Show DVR Footage functions)
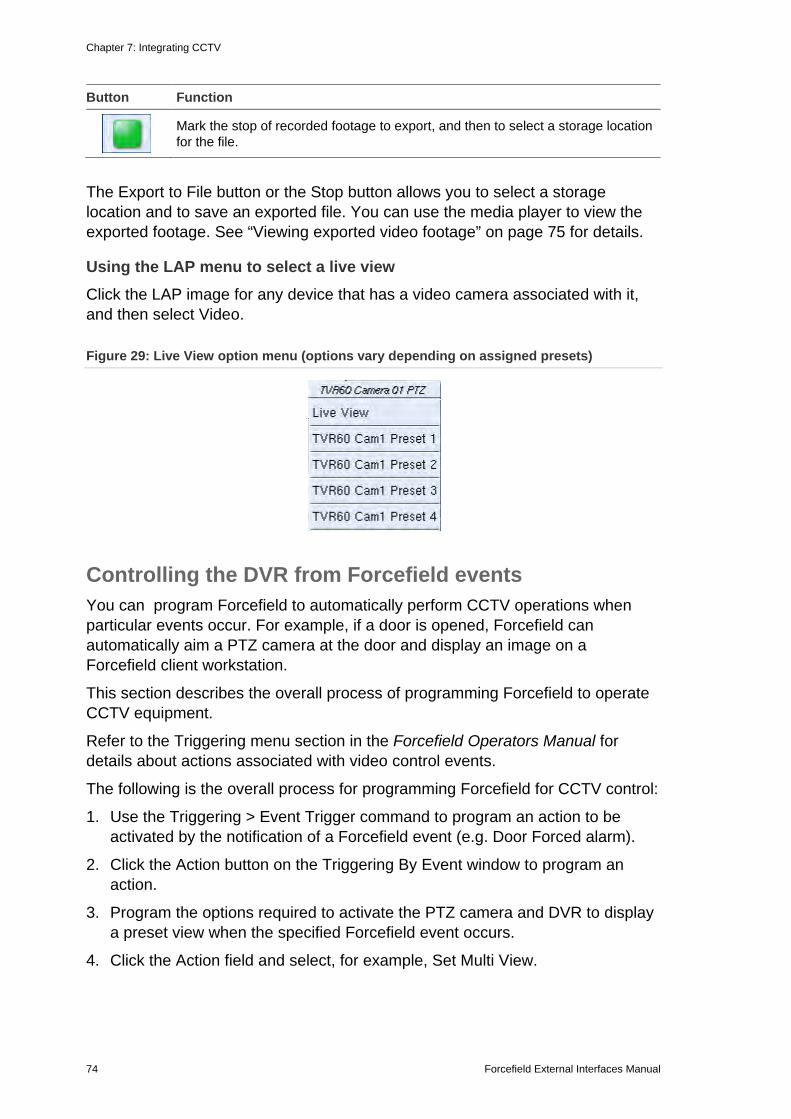
Chapter 7: Integrating CCTV
74 Forcefield External Interfaces Manual
Button Function
Mark the stop of recorded footage to export, and then to select a storage location for the file.
The Export to File button or the Stop button allows you to select a storage location and to save an exported file. You can use the media player to view the exported footage. See “Viewing exported video footage” on page 75 for details.
Using the LAP menu to select a live view Click the LAP image for any device that has a video camera associated with it, and then select Video.
Figure 29: Live View option menu (options vary depending on assigned presets)
Controlling the DVR from Forcefield events You can program Forcefield to automatically perform CCTV operations when particular events occur. For example, if a door is opened, Forcefield can automatically aim a PTZ camera at the door and display an image on a Forcefield client workstation.
This section describes the overall process of programming Forcefield to operate CCTV equipment.
Refer to the Triggering menu section in the Forcefield Operators Manual for details about actions associated with video control events.
The following is the overall process for programming Forcefield for CCTV control:
1. Use the Triggering > Event Trigger command to program an action to be activated by the notification of a Forcefield event (e.g. Door Forced alarm).
2. Click the Action button on the Triggering By Event window to program an action.
3. Program the options required to activate the PTZ camera and DVR to display a preset view when the specified Forcefield event occurs.
4. Click the Action field and select, for example, Set Multi View.

Chapter 7: Integrating CCTV
Forcefield External Interfaces Manual 75
You must already have the required multi view record programmed. See the Databases > Video > DVR Video > Multiview section in the Forcefield Operators Manual for details.
5. Optionally, use the Admin > Tools > Event Simulator command to simulate the specified Forcefield event and to check for the intended outcome. Alternatively, generate the Forcefield event using the actual hardware to check for the intended outcome.
Viewing exported video footage The media player is a standalone player that can be used to replay any video clip that has been exported using Forcefield. Copy the player’s .exe file and .bin file to media in the same folder as the video clips for authorities. It has a zero footprint – meaning it does not require installation to a machine.
Run the media player’s .exe file to display a play list of exported files in the same folder (or use the Open File icon to find a video file).
Figure 30: Media Player
Chapter 7: Integrating CCTV
76 Forcefield External Interfaces Manual
Teleste Video Management system This section describes the process of integrating a Teleste Video Management system into Forcefield 6.2 and later.
Overview A Teleste Video Management system typically comprises:
• CCTV cameras
• Video encoder (providing IP connection to Teleste Server)
• Teleste Server (with VMX Client and VMX Config applications)
• One or more instances of XReceiver (grid of monitors connected to the Teleste Server)
• IP connection to external application (Forcefield client workstations)
• Operating stations (Forcefield client workstations with Teleste remote XReceiver application and ffdshow codec installed)
In addition to XReceiver, running natively on the Teleste Server, each Forcefield client workstation can host remote XReceivers to display video images on the workstation’s monitors (suitable IP connection and graphics card required). We recommend NVIDIA® brand video cards.
A multicast IP connection is required between the Teleste Server and the Forcefield workstation in order to display video using XReceiver.
To integrate Teleste into Forcefield, you will need information from the VMX Config application on the Teleste Server. It is assumed that the Teleste system was previously configured and records, such as monitors, cameras, PTZ camera presets, and users, already exist.
Integrating Teleste into Forcefield The following is the overall process for programming Forcefield to display and control a Teleste Video Management system.
1. Create a TCP/IP host record: In Forcefield use the Databases > Computer Equipment > TCP/IP Hosts command to create a record for the Teleste Video Switcher. The “Address” field must match the “Address” field in VMX Config (Main Group > Master Server > Setup window).
2. Create a video switcher record: In Forcefield use the Databases > Video > Matrix Video > Switchers command to create a new record name, for example “Teleste”. Use the license key and hash key associated with your Teleste license. For the “IP Address” field, select the previously-created TCP/IP Host record.

Chapter 7: Integrating CCTV
Forcefield External Interfaces Manual 77
3. Create video monitor records: “Monitor” refers to a picture tile on a display and not the display itself. In Forcefield use the Databases > Video > Matrix Video > Monitors command to create a new record. For the “Switcher” field, select the previously-created Teleste video switcher record. The “Teleste Monitor Id” field must match the “Display ID” field in VMX Config (Main Group > Receiver > Monitor > Setup window).
4. Create monitor group records: “Monitor group” is a grid of picture tiles on a display. In Forcefield use the Databases > Video > Matrix Video > Monitors Group command to create a new record, select a physical layout, and then save the record.
5. Assign video monitors to the group: Click Monitor Assignment to assign a video monitor to each of the picture tiles in the grid.
6. Create video camera records: In Forcefield use the Databases > Video > Matrix Video > Cameras command to create a new record. For the “Switcher” field, select the previously-created Teleste video switcher record. The “Teleste Camera Id” field must match the “Camera ID” field in VMX Config (Main Group > Encoder 1 > Camera window).
7. Create presets for PTZ cameras: In Forcefield use the Databases > Video > Matrix Video > Presets command to create a new record. The “Teleste Name” field must match the “Position name” field in VMX Config (Main Group > Encoder 1 > Camera > Preset window). This field is case sensitive.
8. Configure workstation video options: In Forcefield use the Databases > Computer Equipment > Workstations command to open a Forcefield workstation record, and then click Video to assign video monitor groups and video monitors to the workstation. The “Video Command Operator” field must match a Teleste user record.
9. Reactivate the switcher driver: After making any changes to CCTV configuration, you need to reactivate the driver that talks to the switcher. In Forcefield use the Databases > Video > Matrix Video > Switchers command to open the Teleste video switcher record. Clear the Enabled check box, and then save the record. Check the Enabled check box, and then save the record again.

Chapter 7: Integrating CCTV
78 Forcefield External Interfaces Manual

Forcefield External Interfaces Manual 79
Chapter 8 Integrating third-party systems
Summary This chapter describes the basics of integrating third-party systems into Forcefield.
Forcefield version 5.1.0 and later can be integrated with third-party devices, so that Forcefield can send event data to, and receive messages from, external systems. Third-party integration enables Forcefield to perform actions via the event triggering system. Refer to Event Trigger in the Forcefield Operators Manual for details.
Note: In order to use these features, you must purchase and install the TS9116 Third Party license module.
Refer to the Forcefield Operators Manual for details of Forcefield menu options, and refer to the Third-Party System Protocol Document for details about technical requirements. The Third-Party System Protocol Document is provided after licensing of third-party integration.
Content
Overview 80 System security 80 Communications 80 Message formats 81
Forcefield to third-party system 81 Third-party system to Forcefield 81
Third-party system example 82 System definition 82 Device definition 83

Chapter 8: Integrating third-party systems
80 Forcefield External Interfaces Manual
Overview A third-party system is an external system which can communicate with Forcefield using the Forcefield third-party system protocol.
The third-party system must be assigned a type in Databases > Third Party > System Types, and is optionally assigned a sub-type in Databases > Third Party > System Sub Types.
A third-party sends events to Forcefield. The third-party device must be assigned a type in Databases > Third Party > Device Types.
Forcefield supports up to 99 types of third-party system (nine types may be connected simultaneously).
Each third-party system can have up to:
• 99 system sub-types
• 99 device types
• a total of 65,535 devices
System security Both the third-party system (Databases > Third Party > System) and third-party devices (Databases > Third Party > Devices) are assigned a member in order for the normal member partitioning to occur.
The third-party system is assigned a Forcefield operator login and password (Operators > Operators) in order to control access.
The third-party system’s operator record is assigned an access (Operators > Access) in order to control by member group and timezone which events are to be sent to the third-party system.
Communications Forcefield communicates with third-party systems via serial RS-232 or TCP/UDP. Only one third-party system is allowed per communications channel.
In order to control the amount of data that Forcefield sends to a third-party system, a buffer depth setting is provided on the Admin > Configuration > Configuration screen. Older data will overflow the buffer and be discarded, and only recent data will be sent to the third-party system. The buffer depth is global to all third-party systems used by Forcefield.
The following communication parameters are programmed in Databases > Third Party > System:
• ACK Timeout: Both Forcefield and the third-party system must acknowledge data transmission within the ack timeout time.

Chapter 8: Integrating third-party systems
Forcefield External Interfaces Manual 81
• Retry Attempts: Determines the number of retries permitted. Data transmission may be retried up to the number of retry attempts when data transmission has not been acknowledged within the ack timeout time.
• Heartbeat: Determines the heartbeat period. During periods of inactivity, Forcefield will send heartbeats to the third-party system to ensure it is still active.
• Time Synchronisation: Determines whether Forcefield or the third-party system is allowed to set the time of the other, or no time synchronisation is to occur.
The third-party system must log in to Forcefield with a valid operator login and password. No data transmission will occur unless the third-party system has successfully logged in.
Message formats
Forcefield to third-party system Forcefield will send a particular event to a third-party system when the event’s computer category is programmed to print the event.
The following data types may be used, and are programmed in Databases > Third Party > System:
• Short form binary
• History record in native record format
• History record in CSV format
Refer to the Third-Party System Protocol Document for details.
Third-party system to Forcefield The message from the third-party system is the device number and an index into the device’s computer category. Forcefield uses this information to perform actions through the event triggering mechanism.

Chapter 8: Integrating third-party systems
82 Forcefield External Interfaces Manual
Third-party system example
System definition The third-party system:
• Is a watering controller.
• Communicates to Forcefield via a serial RS-232 interface.
• Is to receive Forcefield events only during business hours for messages of the ‘Watering Member’ member group.
• The received event format is to be short form binary.
• Will send events to Forcefield to indicate faulty or fixed watering solenoids and to notify of watering on or off operations.
• Does not require time synchronisation between Forcefield and the watering system.
To set up the third-party system: 1. Create a serial port record of type ‘Other’, and name it, for example, ‘Ser 1-
TP Port’.
2. Create a printer access record, for example, ‘Watering Access’, with a ‘Watering Member’ member group, and a timezone of ‘Business Hours’.
3. Create a third-party system type record and name it, for example, ‘Coyote Watering Controller’.
4. Create a computer category record from the ‘General’ type, and name it, for example, ‘Watering Sys Comp Cat’.
5. Create a third-party system record with the following values:
• Num is a value from 1 to 9.
• ID is a unique name, such as ‘Coyote Watering System’.
• Type is ‘Coyote Watering Controller’.
• A valid locality.
• Channel type of RS-232, serial port of ‘Ser 1- TP Port’.
• ACK timeout, retry attempts and heartbeat as required.
• Select ‘Sends Events’.
• Select ‘Receives Events’ in format ‘Short Form Binary’.
• Set access to ‘Watering Access’.
• Set member as appropriate.
• Set computer category to ‘Watering Sys Comp Cat’.
• Set time sync to ‘None’.

Chapter 8: Integrating third-party systems
Forcefield External Interfaces Manual 83
6. At this stage leave Enabled blank.
Device definition It is now necessary to create a device record for each device of this system that is to send data to Forcefield.
The watering system devices are to report notify events as well as alarm and restoral events so a computer category record of type ‘Other: AlarmRestNotify’ and named, for example ‘Watering Solenoid’ is required.
Let’s say each solenoid can generate the following alarm/restore events:
• Fault - open circuit
• Restore - open circuit
• Fault - short circuit
• Restore - short circuit
• Fault - watering failure
• Restore - watering failure
Let’s say each solenoid can generate the following notify events:
• Watering
• Not Watering
• Pre-set Moisture Level Reached.
Table 9 below depicts a possible computer category layout (the indexes start from zero, so the third item is index 2).
Table 9: Computer category example
Event Event type Change event text to Index
Event 2177 Alarm Event 1 ‘Fault - open circuit’ 0
Event 2178 Restore Event 1 ‘Restore - open circuit’ 1
Event 2179 Notify Event 1 ‘Watering’ 2
Event 2180 Notify Event 2 ‘Not Watering’ 3
Event 2181 Alarm Event 2 ‘Fault - short circuit’ 4
Event 2182 Restore Event 2 ‘Restore - short circuit’ 5
Event 2183 Notify Event 3 ‘Preset Moisture Level Reached’ 6
Event 2184 Notify Event 4 Event 2184 is not used because it’s a notify event and can't be used for alarms or restorals.
7

Chapter 8: Integrating third-party systems
84 Forcefield External Interfaces Manual
Event Event type Change event text to Index
Event 2185 Alarm Event 3 ‘Fault - Watering Failure’ 8
Event 2186 Restore Event 3 ‘Restore - Watering Failure’ 9
When the third-party system wants to send a message (see Third-Party System Protocol Document for details) denoting, say ‘Fault - short circuit’, it sends a message with an index of 4. When the third-party system wants to send a message denoting Watering it sends a message with an index of 2.
Create a third-party device record with the following values:
• System is ‘Coyote Watering System’.
• Enter a number for the device.
• Enter an ID for the device, Forcefield will use this ID for history, etc.
• Enter appropriate descriptions and locations.
• Select an appropriate member.
• Use the computer category record created above (see Table 9 on page 83).
Repeat for each device of the third-party system. Each device may be of a different type and have a different computer category.
Forcefield only uses the device number and the index of the computer category to identify the event from the third-party system. This may be used to generate actions within Forcefield itself.

Forcefield External Interfaces Manual 85
Chapter 9 Integrating external user data
Summary This chapter describes how to set up Forcefield to export or import user data.
Content
Setting up an export/import folder on a Windows computer 86 Procedures 86 Troubleshooting CIFS connections 89
Exporting user records 90 Preparing user data for importing 90
Using Microsoft Excel 91 User data file field names 94 Generating raw card data 95 Auto-populating raw card data fields 95 Importing user records 96 Troubleshooting the import process 97

Chapter 9: Integrating external user data
86 Forcefield External Interfaces Manual
Setting up an export/import folder on a Windows computer This section describes the process of setting up a CIFS (Common Internet File System) storage on a Windows computer and accessing it from Forcefield to export or import user data. Windows XP is used in this example. The steps for other versions may differ.
Prerequisites (you may need to seek assistance from your IT staff for the following items):
• You need to know the IP address of the Windows computer (specifically the IP address of the computer’s connection to the Forcefield node).
• There must be a suitable Windows user account (e.g. the Windows user account for the person who will be logged in when exporting or importing data). Alternatively, you may want to set up a special Windows user account for use by multiple operators, but that process is not described here.
Notes:
• The password for the Windows user account will be visible to Forcefield operators who have permission to open the CIFS Storage window.
• The Windows password becomes invalid when the IT rules expire the password. The saved Windows password must be changed when the password expires.
Procedures To set up CIFS storage on a Windows computer:
1. Create a folder to be used by Forcefield. In this example the folder name is “data”.
2. Right-click the folder and select Properties to open the Properties window.
3. Click the Sharing tab and select Share this folder.

Chapter 9: Integrating external user data
Forcefield External Interfaces Manual 87
4. Type a share name (the share name must be all lower case without any
spaces).
5. Click Permissions to open the Permissions for window.
6. Click Add... to open the Select Users, Computer, or groups window.
7. In the case of a domain user, type the Windows user name (e.g. “304001943”) and click Check Names. If Windows finds the user, the name appears underlined. Click OK.

Chapter 9: Integrating external user data
88 Forcefield External Interfaces Manual
Alternatively, in the case of a local user, type the computer name, a backslash, and the Windows user name (e.g. “D2T5BG1S\secure”) and click Check Names. If Windows finds the user, the name appears underlined. Click OK.
8. In the Permissions for window, select the user and check Allow for each of
the permissions selection.
9. Click Apply and then OK to close the Permissions for window. Click OK again
to close the Properties window.
10. In Forcefield select Databases > Computer Equipment > Storage > Samba (CIFS) to open the CIFS Storage window.
11. Create a new record containing the following details:
• Type a name for the record in the CIFS ID field.
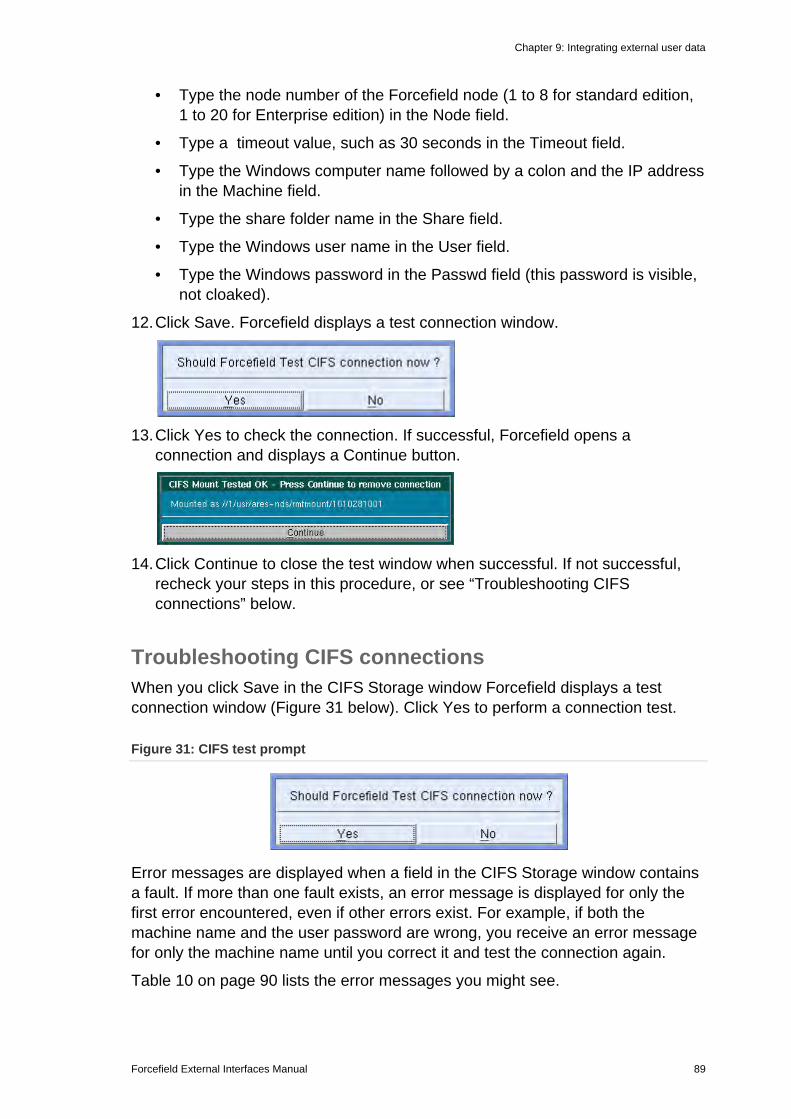
Chapter 9: Integrating external user data
Forcefield External Interfaces Manual 89
• Type the node number of the Forcefield node (1 to 8 for standard edition, 1 to 20 for Enterprise edition) in the Node field.
• Type a timeout value, such as 30 seconds in the Timeout field.
• Type the Windows computer name followed by a colon and the IP address in the Machine field.
• Type the share folder name in the Share field.
• Type the Windows user name in the User field.
• Type the Windows password in the Passwd field (this password is visible, not cloaked).
12. Click Save. Forcefield displays a test connection window.
13. Click Yes to check the connection. If successful, Forcefield opens a
connection and displays a Continue button.
14. Click Continue to close the test window when successful. If not successful,
recheck your steps in this procedure, or see “Troubleshooting CIFS connections” below.
Troubleshooting CIFS connections When you click Save in the CIFS Storage window Forcefield displays a test connection window (Figure 31 below). Click Yes to perform a connection test.
Figure 31: CIFS test prompt
Error messages are displayed when a field in the CIFS Storage window contains a fault. If more than one fault exists, an error message is displayed for only the first error encountered, even if other errors exist. For example, if both the machine name and the user password are wrong, you receive an error message for only the machine name until you correct it and test the connection again.
Table 10 on page 90 lists the error messages you might see.

Chapter 9: Integrating external user data
90 Forcefield External Interfaces Manual
Table 10: CIFS mount error messages
Sequence Error message Probable cause
1 Mount failed: Connection timed out Error in machine IP address
2 Mount failed: No such device or address Error in machine name
3 Mount failed: Permission denied Error in Windows user name or password
4 Mount failed: No such file or directory Error in share folder name
Exporting user records Before you can export user records you need to have set up a storage location, such as a CIFS storage on a Windows computer (see “Setting up an export/import folder on a Windows computer” on page 86).
To export user records: 1. Go to Users > Transfer User Data > Export User Data to open the User
Export window.
2. Select the criteria to define the records you want to export and then click the Export To arrow.
3. Click the in format arrow, and then select the data format required (e.g. CSV).
4. Select the remote storage location.
5. Click Run to execute.
In the case of a CSV file export, Forcefield creates a file named userexp.csv in the remote storage location. In the case of a TSV file export, Forcefield creates a file named userexp.tsv in the remote storage location.
See also “Export file data format” on page 100.
Preparing user data for importing User data may be created or exported from a variety of applications for use in Forcefield, as long as they conform with the specifications listed in Table 12 on page 105.
The use of various applications and methods to prepare data is outside of Our control and outside of the scope of this document. However, this section does provide some guidelines to assist you in preparing data.
We do not recommend the use of one external application over another. Responsibility for maintaining data integrity lies with the operator.

Chapter 9: Integrating external user data
Forcefield External Interfaces Manual 91
Using Microsoft Excel Microsoft Excel is commonly used for manipulating tabular data. Note the following cautions:
• You can’t work in form view because Excel (depending on version) does not support forms with more than 32 data fields (user data has 71 data fields). User data displayed in Excel occupies 71 columns (see “User data file field names” on page 94).
• Take care to avoid changing Forcefield time and date fields into Excel time and date format by opening the file incorrectly (e.g. by double-clicking a .CSV file in Windows Explorer). Such changes may result in errors or a loss of data.
Opening user data in Excel This section describes a method of using Microsoft Excel to open a user data file and save it as an Excel file. This example uses a .TSV file; the process is similar for a .CSV file.
To open user records in Excel:
1. Prepare a user import file that conforms with Table 12 on page 105. In this example we’ll use the results of a user export operation named userexp.tsv.
Note: It is recommended to use file extensions such as .TSV or .IMP, because Excel launches the Text Import Wizard, which is required to prepare data files correctly. If you open a .CSV file, Excel will automatically reformat the date columns incorrectly. If you need to edit a .CSV file, first change the file extension from .CSV to .IMP.
2. In Microsoft Excel, use File > Open to begin to open the userexp.tsv file. Excel displays the Text Import Wizard.
3. Select Delimited and click Next.
4. For TSV format, select Tab and click Next. For CSV format, select Comma
and click Next.

Chapter 9: Integrating external user data
92 Forcefield External Interfaces Manual
5. Excel allows you to change the data format of each column. You must change
the format of the three date columns (column 6, 14, and 15) even if they contain no data.
6. Scroll across to the first date in column 6 (Profile Expiry Date) and change the
Column data format from General to Text.
7. Scroll across to the two remaining date columns (14 and 15) and change the
format from General to Text.

Chapter 9: Integrating external user data
Forcefield External Interfaces Manual 93
8. Raw card data can be omitted and created in Forcefield later. See“Generating raw card data” on page 95 and “Auto-populating raw card data fields” on page 95
9. Click Finish to open the file in Excel.
10. Use File > Save As to save the file as an Excel file (.XLS), if required.
Row 1, produced in the export process, may be deleted or left as is. It will be ignored if used in an import file.
Due to limitations in Excel, you will not be able to insert a row with heading names (unless you delete it prior to exporting data), nor will you be able to convert the spreadsheet into a form.
Creating user data from Excel This section describes a method of using Microsoft Excel to edit or create the required user.imp file, for importing into Forcefield.
To create a user.imp from Excel:
1. Open the Excel file created using the process described in “Opening user data in Excel” on page 91.
2. Edit and save the data as required, so that it conforms with Table 12 on page 105.
3. Use File > Save As to save the file in .CSV format (for example newdata.csv).
4. In Windows Explorer, rename the file newdata.csv to user.imp.
5. Place the user.imp file in the remote storage location, as defined in “Setting up an export/import folder on a Windows computer” on page 86.

Chapter 9: Integrating external user data
94 Forcefield External Interfaces Manual
User data file field names The following 71 field names are provided to assist in creating forms for data handling, for example as temporary column headings in Microsoft Excel or as field labels in Microsoft Access (or other application).
Refer to Table 12 on page 105 for detailed information about each of these fields.
1—Export Action 2—User Number 3—Name 4—Name 5—Profile 6—Profile Expiry Date 7—Alternate Profile 8—Status 9—Type 10—Privileged 11—Long Access 12—Card Only 13—Trace User 14—Begin Date 15—End Date 16—PIN 17—Member 18—Def Field 19—Department 20—Position 21—Phone 22—Ph Ext 23—Phone AH 24—Lockout Type 25—Lockout Time 26—User Data 1 27—User Data 2 28—User Data 3 29—User Data 4 30—User Data 5 31—User Data 6 32—User Data 7 33—User Data 8 34—User Data 9 35—User Data 10 36—IUM User Card Category [1]
37—IUM User Raw Card Data [1] 38—IUM User Raw Bits Used [1] 39—IUM User Card Category [2] 40—IUM User Raw Card Data [2] 41—IUM User Raw Bits Used [2] 42—IUM User Card Category [3] 43—IUM User Raw Card Data [3] 44—IUM User Raw Bits Used [3] 45—IUM User Card Category [4] 46—IUM User Raw Card Data [4] 47—IUM User Raw Bits Used [4] 48—IUM User Card Category [5] 49—IUM User Raw Card Data [5] 50—IUM User Raw Bits Used [5] 51—IUM User Card Category [6] 52—IUM User Raw Card Data [6] 53—IUM User Raw Bits Used [6] 54—IUM User Card Category [7] 55—IUM User Raw Card Data [7] 56—IUM User Raw Bits Used [7] 57—IUM User Card Category [8] 58—IUM User Raw Card Data [8] 59—IUM User Raw Bits Used [8] 60—IUM User Card Category [9] 61—IUM User Raw Card Data [9] 62—IUM User Raw Bits Used [9] 63—IUM User Card Category [10] 64—IUM User Raw Card Data [10] 65—IUM User Raw Bits Used [10] 66—IUM User Card Category [11] 67—IUM User Raw Card Data [11] 68—IUM User Raw Bits Used [11] 69—IUM User Card Category [12] 70—IUM User Raw Card Data [12] 71—IUM User Raw Bits Used [12]

Chapter 9: Integrating external user data
Forcefield External Interfaces Manual 95
Generating raw card data Forcefield can automatically generate raw card data (RCD) for imported user records (fields 36 to 71). This means the creator of the user.imp file does not need to enter the raw card data into the spreadsheet.
Automatic raw card data generation occurs only in the following circumstances:
• There is no raw card data in the user.imp file (fields (36 to 71 are blank) for this user.
• There is currently no raw card data in the database for this user and card category.
• The calculated raw card data does not already exist in the database for any other user.
• The Challengers to which the user will be downloaded have a standard card category (a card category that ends with a squiggle character '~'). If a non-standard card category is used, the raw card data fields will all contain zeros.
• The Challenger has site code A specified in Challenger system options.
A user’s generated raw card data is based on the first Challenger assigned to the user (determined by the profile access). The raw card data is calculated from the following:
• User number
• User offset (if applicable)
• Site code A
• Site code A offset (if applicable)
Once raw card data is automatically generated, the same raw card data will then be assigned to subsequent Challengers having the same card category regardless of the Challenger’s Site Code A (they should all be the same).
Auto-populating raw card data fields Forcefield can automatically populate the raw card data for the standard card categories (marked with a squiggle, such as Tecom 27 bit~), when the site code and card number are known.
To use this feature, do the following for each of the required sets of three data fields:
1. In the IUM User Card Category field, enter the required standard card category. See row 36 in Table 12 on page 105 for example. Each card category can only be used once per user record.

Chapter 9: Integrating external user data
96 Forcefield External Interfaces Manual
2. In the IUM User Raw Card Data field, set the first value to the site code (e.g. 136) and the second value to the card number (e.g. 15). Using the example values, the IUM User Raw Card Data would be appear in the import file as “136.15.0.0.0.0”. See row 37 in Table 12 on page 105 for example.
3. In the IUM User Raw Bits Used field, set the value to 255. See row 38 in Table 12 on page 105 for example.
Each set of three data fields must be populated in turn without gaps or any subsequent data will be ignored.
Importing user records Before you can import user records you need to have set up a storage location, such as a CIFS storage on a Windows computer (see “Setting up an export/import folder on a Windows computer” on page 86).
User records must be in a specific format before they can be used in Forcefield. Refer to “Import file data format” on page 104 for details.
To import user records: 1. Prepare a user import file in either .TSV or .CSV format and name it
‘user.imp’. See “Preparing user data for importing” on page 90 for details.
2. Place the user.imp file in the remote storage location.
3. Go to Users > Transfer User Data > Import User Data to open the User Import window.
4. Select the remote storage location.
5. Click the Report to arrow, and then select the reporting location (e.g. screen).
6. Click Run to execute.

Chapter 9: Integrating external user data
Forcefield External Interfaces Manual 97
Troubleshooting the import process If the user.imp file is missing, or if it’s incorrectly named, Forcefield will generate an ‘Unable to Open File’ alarm and the import process will be terminated.
If the operation runs successfully, view the generated report to see any error messages generated from the user.imp file. The following is a list of common faults and associated error messages listed in the report viewer.
Rejected – Action not Add or Delete: The user record did not begin with an A or a D.
Rejected – User Profile Invalid: The user profile does not exist in Forcefield. Check the spelling in the user.imp file, or create the user profile in Forcefield, as required.
Rejected – Invalid Member: The member does not exist in Forcefield. Check the spelling in the user.imp file, or create the member in Forcefield, as required.
Rejected – IUM Card Category Invalid: The IUM card category does not exist in Forcefield. Check the spelling in the user.imp file, or create the card category in Forcefield, as required.
Rejected: Followed by details for the rejection, such as card data or PIN code already in use by another user.
Data format error on line n: If any of the required data fields are missing, Forcefield abandons changes to the user’s record and all subsequent records in the file.
Time or date input format error: The data in the date and time fields is not correct, for example, the file has been converted to Excel format “31/12/2006 11:59” instead of “11:59 31 Dec 2006”.

Chapter 9: Integrating external user data
98 Forcefield External Interfaces Manual

Forcefield External Interfaces Manual 99
Appendix A User data file formats
Summary This appendix describes the data file requirements to copy or export Forcefield user data from the Forcefield user database to storage media or an NFS or CIFS connected computer.
Content Export file formats 100
Export method 100 Export file data format 100
Import file formats 104 Import method 104 Status report 104 Import file data format 104 Importing profiles in Unique Profile Per User mode 108

Appendix A: User data file formats
100 Forcefield External Interfaces Manual
Export file formats This section relates to the Export User Data option.
Export method The export method may be manual or automatic (Forcefield Configuration determines which one is used).
Note: In order to use automatic user export, you must purchase and install the TS9119 Auto User Import/Export license module.
Manual export • Initiated by an operator from the Forcefield menu.
• Export data is copied to the storage media selected by the operator.
• The file may not contain all Forcefield users. Only those users who meet the export criteria selected by the operator will be in the file regardless of file format.
• The export data file is regenerated on every manual export.
Automatic export • Can only be directed to NFS/CIFS mounted storage.
• Every time a user is added, modified or deleted, Forcefield will amend or create the export data file.
• For CSV format a new record will be appended to the end of the file, thus a record that is first created, then modified, and then deleted will appear in the file three times.
• It is the responsibility of the remote computer system to remove the file periodically.
Note: The only valid user data on a delete is the user number.
Export file data format When performing manual exports, user data is exported from Forcefield in either CSV or TSV formats. These formats are described in the following sections.
CSV (comma separated value) format
The file created is userexp.csv. In this format there is 1 text line per user with data in double quotes separated by commas.
For example, "datafield1","datafield2","....", "datafield n", in the order listed in Table 11 on page 101.

Appendix A: User data file formats
Forcefield External Interfaces Manual 101
TSV (tab separated value) format File created is userexp.tsv. In this format there is 1 text line per user with data separated by tabs.
For example, datafield1<TAB>datafield2<TAB>.. ..<TAB>datafield, in the order listed in Table 11.
Note: For manual exports, there is a record for user zero. This user does not exist—this record contains the date the export was performed (in the begin and end date fields).
Table 11: CSV and TSV export file field descriptions
Field (sequence & description) Sample value Description
1—Export Action "N" Values include: • N—no data change, only for a
Manually generated export • A—user has been added • M—user has been modified • D—user has been deleted
2—Date Note: Applicable only to Automatic Export file format
"14:15 21 Jan 2017"
The date of the entry.
3—User Number "1" The Forcefield user number range is 1 to 999,999.
4—Name "Fred" User first name or surname, order depends on Forcefield configuration.
5—Name "Smith" User first name or surname, order depends on Forcefield configuration.
6—Profile "Engineering Staff" The profile that the user is assigned to, e.g. ‘Cleaners’. This determines the Challenger access the user has.
7—Profile Expiry Date "11:00 23 Mar 2007"
A date after which the profile no longer applies. Blank means the profile never expires.
8—Alternate Profile "Engineering Staff - No Labs"
The profile that the user is assigned to when the primary profile expires. If blank, then the user would have no Challenger access after the expiry date.

Appendix A: User data file formats
102 Forcefield External Interfaces Manual
Field (sequence & description) Sample value Description
9—Status "Active" Values include: • Inactive • Active • Void • Lost • Expired
10—Type "Normal" Values include: • Normal • Visitor • Guard • Dual
11—Privileged "" Blank means ‘does not apply’
12—Long Access "Long Access" Blank means ‘does not apply’
13—Card Only "" Blank means ‘does not apply’
14—Trace User "1" Blank means ‘does not apply’
15—Begin Date "11:00 15 Mar 2002"
The date when the user becomes valid.
16—End Date "14:15 21 Jan 2017"
The date when the user becomes expired.
17—PIN "1111" User’s PIN code.
18—Member "Administration" All users belong to a member, this determines where any alarm messages will be directed, and which operators have access to this user’s data.
19—Def Field "reference num" This field contains data pertinent to all users on this site.
20—Department ""
21—Position ""
22—Phone "phone1"
23—Ph Ext "1234"
24—Phone AH "home phone"

Appendix A: User data file formats
Forcefield External Interfaces Manual 103
Field (sequence & description) Sample value Description
25—Lockout Type "Not Timed" Values include: • Not Timed • From On Site • From Off Site
26—Lockout Time "0" Lockout time in minutes
Ten data fields contain data as determined by the member that the user belongs to.
27—User Data [first instance]
""
... (8 table rows omitted for space reasons)
36—User Data [tenth instance]
""
12 sets of three data fields contain the IUM card data for the user.
37—IUM User Card Category [first instance]
"C 36 bit" The IUM Card Category assigned to this card data, e.g. "ABC Card Format".
38—IUM User Raw Card Data [first instance]
"0.1.0.0.2.0" The raw card data, e.g. 129.122.73.23.255.
39—IUM User Raw Bits Used [first instance]
"36" The number of bits of card data, e.g. 48.
... (30 table rows omitted for space reasons)
70—IUM User Card Category [twelfth instance]
""
71—IUM User Raw Card Data [twelfth instance]
"0.0.0.0.0.0"
72—IUM User Raw Bits Used [twelfth instance]
"0"

Appendix A: User data file formats
104 Forcefield External Interfaces Manual
Import file formats This section relates to Forcefield menu option Users > Transfer User Data > Import User Data.
This functionality is provided in order to copy or import Forcefield user data from storage media or an NFS/CIFS connected computer into the Forcefield user database.
See also “Preparing user data for importing” on page 90.
Import method The import method may be manual or automatic (Forcefield Configuration determines which one is used).
Note: In order to use automatic user import, you must purchase and install the TS9119 Auto User Import/Export license module.
Manual import • Initiated by an operator from the Forcefield menu.
• Forcefield will attempt to read the file user.imp on the storage selected by the operator.
• If located on the Forcefield computer, the location must be /usr/ares/user/import.
Automatic import • Automatic imports can only be directed from NFS/CIFS mounted storage.
• Forcefield will periodically scan the nominated directory for the file user.imp, process the file, and then remove it.
Status report A report will be generated indicating status of import for each user record in the import file which is rejected or has its data modified.
Individual records may be rejected for a variety of reasons, or data may be truncated if imported data fields are too long.
Import file data format User data may be imported into Forcefield in either CSV or TSV formats. These formats are described in the following sections.
CSV (comma separated value) format
In this format there is 1 text line per user with data in fields separated by commas, in the order listed in Table 12 on page 105.

Appendix A: User data file formats
Forcefield External Interfaces Manual 105
Data containing commas must be contained in double quotes, for example, A,12432, Manufacturing,"Smith, Jane",Girl Friday.
TSV (tab separated value) format In this format the data fields are separated by TAB characters, e.g. A<TAB>12432<TAB>Manufacturing<TAB>Smith, Jane<TAB>Girl Friday, in the order listed in Table 12.
There are 71 data fields in total, all fields must be present even if they contain no data.
Table 12: CSV and TSV import file field descriptions
Field (sequence & description) Sample value Description
1—Import Action "A" Values include: • A—user to be added or modified if it
already exists • D—user to be deleted Any other character is ignored and the data is not processed.
2—User Number "1" The Forcefield user number range is 1 to 999,999. Mandatory field. For a delete, this is the only field required to contain data.
3—Name "Fred" Up to 30 characters. Surname and first name will be concatenated in Forcefield to form one name field. Max name is 30 characters.
4—Name "Smith" Up to 30 characters. Surname and first name will be concatenated in Forcefield to form one name field. Max name is 30 characters.
5—Profile "Engineering Staff"
The profile that the user is assigned to, e.g. ‘Cleaners’. This determines the Challenger access the user has. The user’s member, card type, trace flag, dates, department and position will be determined by the profile, unless the corresponding data fields are contained in the fields in this file. Note: The user’s profile must already exist in Forcefield or the user record will not be imported. The report lists ‘User Profile Invalid’ for the user.

Appendix A: User data file formats
106 Forcefield External Interfaces Manual
Field (sequence & description) Sample value Description
6—Profile Expiry Date "11:23 19 Mar 2007"
A date after which the profile no longer applies. Blank means the profile never expires.
7—Alternate Profile "Engineering Staff - No Labs"
The profile that the user is assigned to when the primary profile expires. If blank, then the user would have no Challenger access after the expiry date.
8—Status " Void" Values include: • Void • Lost The user’s status will be determined by Forcefield, unless the value here is Lost or Void.
9—Type "Normal" Values include: • Normal • Visitor • Guard • Dual
10—Privileged "" Blank means ‘does not apply’
11—Long Access "Long Access" Blank means ‘does not apply’
12—Card Only "" Blank means ‘does not apply’
13—Trace User "1" Blank means ‘does not apply’
14—Begin Date "11:23 19 Mar 2007"
The date when the user becomes valid. Date fields are in the format 11:23 19 Mar 2007, i.e. , Hour:Minute, 2-character day of month, 3-character month, 4-character year.
15—End Date "11:23 19 Mar 2007"
The date when the user becomes expired.
16—PIN "1111" User’s PIN code, 4 to 10 digits.
17—Member "Administration" Up to 30 characters. All users belong to a member, this determines where any alarm messages will be directed, and which operators have access to this user’s data. Note: The member must already exist in Forcefield. User data field labels are not imported.

Appendix A: User data file formats
Forcefield External Interfaces Manual 107
Field (sequence & description) Sample value Description
18—Def Field "reference num" Up to 20 characters. This field contains data pertinent to all users on this site.
19—Department "" Up to 30 characters.
20—Position "" Up to 30 characters.
21—Phone "phone1" Up to 11 characters.
22—Ph Ext "1234" Up to 4 characters.
23—Phone AH "home phone" Up to 17 characters.
24—Lockout Type "Not Timed" Values include: • Not Timed • From On Site • From Off Site
25—Lockout Time "0" Lockout time in minutes (0 to 65535).
Ten optional user data fields contain data as determined by the member that the user belongs to. User data field labels (defined via the member programming window) are not imported. Note: User data is displayed in Forcefield only if the operator's member allows it.
26—User Data [first instance]
"" Up to 30 characters.
... (8 table rows omitted for space reasons)
35—User Data [tenth instance]
"" Up to 30 characters.
12 sets of three data fields contain the IUM card data for the user. Each set of three data fields must be populated in turn without gaps or any subsequent data will be ignored.
36—IUM User Card Category [first instance]
"Tecom 27 bit~" Up to 20 characters. Note: The card category must already exist in Forcefield.
37—IUM User Raw Card Data [first instance]
"136.15.0.0.0.0" Raw card data in format xxx.xxx.xxx.xxx.xxx.xxx, each field is 0 to 255. See also “Generating raw card data” on page 95 and “Auto-populating raw card data fields” on page 95.

Appendix A: User data file formats
108 Forcefield External Interfaces Manual
Field (sequence & description) Sample value Description
38—IUM User Raw Bits Used [first instance]
"255" The number of bits of the card data used, 1 to 48. See also “Generating raw card data” on page 95 and “Auto-populating raw card data fields” on page 95.
... (30 table rows omitted for space reasons)
69—IUM User Card Category [twelfth instance]
"Wiegand 26 bit~" Up to 20 characters. Note: The card category must already exist in Forcefield.
70—IUM User Raw Card Data [twelfth instance]
"0.1.0.0.2.0" See also “Generating raw card data” on page 95 and “Auto-populating raw card data fields” on page 95.
71—IUM User Raw Bits Used [twelfth instance]
"36" See also “Generating raw card data” on page 95 and “Auto-populating raw card data fields” on page 95.
Importing profiles in Unique Profile Per User mode Forcefield may be configured to operate in Unique Profile Per User mode, where user profiles (and alternative user profiles) are locked to user records. For example, user 1 can have only “User 1 Profile|” and optionally “User 1 Alt Profile|”.
The effect of Unique Profile Per User mode on user import is:
• If the import file contains profile and alternative profile names in the format “User xx Profile|” and “User xx Alt Profile|” (where xx is the user number), the profile will be imported if the name already exists in Forcefield.
• If the import file contains profile and alternative profile names that do not match the required format, the profile and alternative profile are used as templates, whose contents are used to either modify an existing profile record or to create a new record with the correct Id (as applicable).
For example, the import file contains a profile for user number 495 named “Head Office” and an alternative profile named “Head Office plus Warehouse”.
During the import process Forcefield will create or modify the profile “User 495 Profile|” whose contents will mirror the contents of “Head Office” and the alternative profile “User 495 Alt Profile|” whose contents will mirror that of “Head Office plus Warehouse”.

Forcefield External Interfaces Manual 109
Appendix B History export data formats
Summary This appendix describes the format of exported history data files.
Content
Structure of history database record 110 Export raw 110 Export formatted 111

Appendix B: History export data formats
110 Forcefield External Interfaces Manual
Structure of history database record unsigned long Hist_Unit // Unit Number of device
unsigned short Hist_Node // origin node of event
unsigned long Hist_Incident // Event number
unsigned short Hist_Sequence // sequence of event within same event number
unsigned short Hist_Priority // priority of event
unsigned long Hist_AresTime // Time Computer got event
unsigned char Hist_AresTmDST // set if event occurred in daylight savings time
unsigned long Hist_ChTime // Challenger event time if applicable
unsigned char Hist_ChTmDST // set if event occurred in daylight savings time
unsigned short Hist_EventState // index into computer category
char Hist_StateText[31] // event text e.g. Tamper
unsigned short Hist_Job // not currently used
unsigned short Hist_Mbr // member number
char Hist_MbrId[31] // member name
unsigned short Hist_EventType // Forcefield event type
unsigned short Hist_PointClass // class of originating device e.g. Input
char Hist_Point[31] // name of originating device
char Hist_SecPoint[41] // name of secondary device, e.g. duress locator
char Hist_Text[81] // history text
unsigned long Hist_User_Num // User number if applicable
unsigned short Hist_User_Mbr // User member if applicable
char Hist_User_or_Op[31] // User or Operator name
char Hist_WsId[31] // Workstation name
Note: Time fields are in UNIX format, i.e. number of seconds since midnight Jan 01, 1970
Export raw All fields in the above structure are exported “as is”. For example: 1020300000,2,107924,0,8,1087867013,0,0,0,1,"OPERATOR LOGIN",0,1024,"~Default-MbrGrp",898,0,"Node 2 Console","","",0,0,"Master(Default Master)","" 80,0,107871,0,4,1087827426,0,0,0,0,"COMPUTER EVENT",0,1024,"~Default-MbrGrp",1281,0,"","","Time Change Detected. Node 2",0,0,"",""

Appendix B: History export data formats
Forcefield External Interfaces Manual 111
Export formatted Time fields are readable. For example: 107924,"Tue Jun 22 11:16:53 2004 ","","OPERATOR LOGIN","~Default-MbrGrp","Node 2 Console","","",0,"Master(Default Master)","" 107871,"Tue Jun 22 00:17:06 2004 ","","COMPUTER EVENT","~Default-MbrGrp","","","Time Change Detected. Node 2",0,"",""
The fields exported are:
• incident
• computer time
• challenger time
• state text
• member id
• point id
• secondary point id
• text
• user number
• operator or user name
• workstation name

Appendix B: History export data formats
112 Forcefield External Interfaces Manual
Forcefield External Interfaces Manual 113
Appendix C Integrating SymDVR
Summary This appendix describes the hardware requirements and limitations of integrating Forcefield to SymDec™ 16 plus 4 DVR or SymSafe Pro™ DVR. We refer to either of these products as SymDVR.
Note: The SymDVR video products described in this appendix described here for legacy application and support purposes. Refer to Appendix D “Integrating TruVision” on page 123 for current (TruVision) video products.
Content Overview 114
Overview of SymDVRs 115 Overall process 115
Limitations 116 Forcefield programming 117 Forcefield-SymDVR hardware requirements 117
Recommended hardware 118 Combined hardware list 119
Application notes 121 CPU usage 121 Loss of video stream 121 Forcefield user interface 122 Supported video hardware 122

Appendix C: Integrating SymDVR
114 Forcefield External Interfaces Manual
Overview SymDec 16 plus 4 and SymSafe Pro digital video recorders (SymDVRs) allow you to record full-size D1 images in real time on analogue channels and on IP channels (subject to hardware and network capabilities).
A Forcefield client computer can display video image streams from SymDVR in multiview windows as well as live view and recorded view windows on its monitor. Forcefield multiview can be configured to display the views from up to 32 cameras on up to four monitors. Multiple instances of Forcefield multiview windows can be displayed simultaneously, using multiple computer monitors Figure 32 below).
Figure 32: Forcefield client computer with multiple monitor video card
Each digital video view displayed by Forcefield is processed by the Forcefield client computer’s CPU from data received from SymDVR via the IP network. As a result, the processing power of the Forcefield client computer’s CPU limits the number of digital video views that can be displayed simultaneously. Refer to the following specific recommendations concerning suitable hardware and software configurations.
LAN or WAN
Forcefield client computer SymDec 16 plus 4 DVR 16 analog cameras
4 IP cameras
Video/ Video Video VideoForcefield Client

Appendix C: Integrating SymDVR
Forcefield External Interfaces Manual 115
Overview of SymDVRs The (discontinued) range of supported SymDVR products include SymDec 16 plus 4 or SymSafe Pro DVRs.
Figure 33: Overview of SymDVR interface
1. The Forcefield node receives events from a Challenger panel or from other interfaces, as defined by computer categories created for this purpose. The image represents both standard and Enterprise Forcefield hardware.
2. The SymDVR is connected to the Forcefield node via an Ethernet port. A TCP/IP host address is defined for this purpose. The IP connection to the Forcefield node does not carry digital video.
3. Forcefield sends event tags (associated with a camera) to the SymDVR. The event tag is recorded with the camera’s digital video footage.
4. A Forcefield operator on a Windows computer can view live video and/or recorded video directly from the SymDVR (not via the Forcefield node’s IP connection). Events can be found quickly by searching for text tags.
Overall process This section describes the overall process of integrating SymDVR devices into Forcefield.
Refer to the Databases > Video > DVR Video menu section in the Forcefield Operators Manual for details about programming DVRs, cameras, monitors, and presets. The information provided in this section is only a summary.

Appendix C: Integrating SymDVR
116 Forcefield External Interfaces Manual
The overall process for integrating a SymDVR into Forcefield is:
1. Use the Databases > Computer Equipment > TCP IP Hosts command to create a TCP/IP Host record for the IP host for legacy DVRs. Note the Host ID.
2. Use the Admin > Configuration > Configuration command to open the Forcefield Configuration window, and then click the CCTV/Intercom button. Configure a time for the “DVR: Tagging By Mgt. S/W Delay” option.
3. Use the Databases > Video > DVR Video > DVRs command to program a DVR:
• Click the Type arrow, and then select DVMRe or SymDec/SymSafe (as applicable) for legacy DVRs.
• Click the IP Address field, and then select the appropriate Host ID.
• Leave the Enabled selection unchecked so that you can program the DVR, cameras, monitors and presets before actually physically connecting the equipment to the Forcefield system.
4. Use the Databases > Video > DVR Video > DVR Cameras command to program a video camera. Select the DVR to which this camera is connected, and specify whether the camera has pan-tilt-zoom (PTZ) control.
5. If applicable, use the Databases > Video > DVR Video > DVR Presets command to program and name predefined views for PTZ cameras.
Tip: The name that you assign to a presets 1 through 5 are added to the camera’s pop-up menu on maps displaying the camera.
6. Connect the DVR to the network.
7. Use the Databases > Video > DVR Video > DVRs command, and then check the Enabled selection to enable a DVR.
Limitations Some customers may experience problems integrating SymDVRs with Forcefield client computers, especially when viewing multiple video streams. To avoid problems, customers will need to use only the recommended hardware and software configurations described in this Appendix (see “Forcefield-SymDVR hardware requirements” on page 117). In particular:
• The SymDec DVR must have firmware V1.48H or later installed (provided on the Forcefield 6.0.1, or later, installation CD or USB device).
• The Forcefield server computer must have Forcefield server software version 6.0.1, or later, installed (provided on the Forcefield installation CD or USB device). Refer to the Forcefield Installation and Setup Manual for details. Note: you must update your Forcefield software prior to attempting to use new functionality.

Appendix C: Integrating SymDVR
Forcefield External Interfaces Manual 117
• The Forcefield client computer must have Forcefield client software version 1.0.7.26 or later installed (provided on the Forcefield 6.0.1, or later, installation CD or USB device). Refer to the Forcefield Installation and Setup Manual for details. Note: before you install Forcefield client on a Windows computer you must first remove any earlier versions, if present. Go to Start > Control Panel > Add or Remove Programs, and then remove any instances of Forcefield client.
• The Forcefield client computer must have an NVIDIA® brand video card
• Ensure your computer meets the minimum Forcefield client specifications
• Camera presets are not supported for cameras connected to the SymDVR’s IP ports.
• If a Forcefield Client computer’s operating system is upgraded (for example from Windows XP SP3 to Windows Vista) video pop-up functionality may not work. If so, you may need to reinstall the latest version of Forcefield client software on the client computer.
Forcefield programming SymSafe Pro DVR uses the same programming in Forcefield as SymDec 16 plus 4 DVR. For example, in the DVR programming window, select “SymDec/SymSafe” to use either SymDec 16 plus 4 DVR or SymSafe Pro DVR.
SymSafe Pro DVRs are available in 4, 8, and 16 channel models. Consider the model when programming or using Forcefield multiview windows.
Forcefield-SymDVR hardware requirements The Forcefield client application supports the use of SymDVR to display multiview video on multiple computer monitors. The number of video streams and monitors that can be used depends on:
• The image resolution. We test at full-size D1 resolution in order to test the worst-case scenario.
• The frame rate (fps) used. A lower frame rate typically enables you to view more video streams.
• The Forcefield client computer’s hardware specifications.
Note: You must use the specified hardware (or better) in order to benefit from the software’s capabilities. The increased video performance of Forcefield 6.0 requires different hardware configurations than those required for Forcefield 5.3. If you upgrade to Forcefield 6.0 software on version 5.3 hardware, you will not be able to use all of the added functionality.
Appendix C: Integrating SymDVR
118 Forcefield External Interfaces Manual
The recommended configurations for Forcefield client computers using SymDVRs can be found in the following locations:
• Refer to Technical Bulletin 20080905-TS9100 for details of using SymDec 16 plus 4 DVR with Forcefield 5.3. These hardware configurations can be used for Forcefield 6.0, but the increased video performance that Forcefield 6.0 supports requires the hardware described in this section.
• Refer to this appendix for details of using SymDVRs with Forcefield 6.0.
Refer to the "Combined hardware list" on page 119 for a summary of hardware combinations that may be used with Forcefield 6.0. This list applies to both SymDec 16 plus 4 DVR and SymSafe Pro DVR, except as noted.
Recommended hardware We have tested and approved specific configurations of Forcefield client computer hardware, network configurations, and monitors. In each case, a 1000 Mb/s network connection is provided, and all monitors are set to a screen resolution of 1280 by 1024 pixels.
Note: Any unused monitors must not be enabled or they will consume resources. To disable unused monitors, use the Display option in Windows Control Panel to open the Display Properties window (Settings tab).
The minimum specification for a Forcefield client computer integrated with SymDVR depends on the number of simultaneous video streams you need to view.
Refer to the following sections for a summary of minimum and high-performance applications.
Minimum SymDVR use A Forcefield client computer that is to be used only for displaying live and recorded views (not multiview) from a SymDVR must have the following specifications:
• Processor: Intel Pentium 4, 1.6 GHz or faster
• Operating system: Windows XP (SP2) or Windows Vista (SP1)
• RAM: 256 MB or larger
• HDD: 120 GB or larger (7200 rpm minimum)
• Video Card: 1 x 64 MB or larger
• Monitor: 1
• Simultaneous video streams: 2
Appendix C: Integrating SymDVR
Forcefield External Interfaces Manual 119
Maximum SymDVR use A Forcefield client computer that is to be used for displaying live and recorded views of up to 32 video streams on up to four monitors from multiple SymDVRs must have the following specifications:
• Processor: Intel Core 2 Quad, 2.40 GHz or faster
• Operating system: Windows XP (SP2) or Windows Vista (SP1)
• RAM: 4 GB or larger
• HDD: 120 GB or larger (7200 rpm minimum)
• Video Cards: 2 x NVIDIA chipset with 512 MB or larger (for example, Quadro FX 1700)
• Monitors: 1 to 4
• Simultaneous video streams: 16 per monitor, 32 maximum
Combined hardware list This section describes the video performance that you can expect from Forcefield 6.0 for various computer hardware configurations, at full-size D1 resolution, and for two frame rate selections. For intermediate frame rates such as 12.5 fps, the performance will fall between the specifications listed.
The hardware configurations listed in the this section may be used to display video image streams from SymDVR in multiview windows.
Table 13 on page 120 lists the computer hardware recommended for use with Forcefield 6.0. The following configurations were tested:
Computer A: HP xw4600, Intel Core 2 Quad Q6600, Windows XP SP2, 4 GB RAM
Computer B: HP xw4600, Intel Core 2 Quad Q6600, Windows Vista SP1, 4 GB RAM
Table 14 on page 120 lists the computer hardware recommended for use with Forcefield 5.3 but may be used with Forcefield 6.0. The following configurations were tested:
Computer C: HP xw6600, Quad-Core Xeon 3.00 GHz, Windows XP, 4 GB RAM
Computer D: HP xw4600, Quad-Core Xeon 2.40 GHz, Windows XP, 4 GB RAM
Computer E: HP xw4600, Quad-Core Xeon 2.40 GHz, Windows Vista SP1, 4 GB RAM
The “Max. on one (remaining)” columns indicate the maximum number of video streams that can be displayed on one monitor, with the remaining streams available indicated in brackets. For example, 16 (16) indicates that 16 video streams can be displayed on one monitor and 16 remaining streams can be displayed on additional monitors.

Appendix C: Integrating SymDVR
120 Forcefield External Interfaces Manual
The “Monitors” columns indicate the maximum number of monitors, including any monitors required to display the Forcefield operator interface, if needed.
Table 13: Video performance for Forcefield 6.0 using recommended hardware
Computer configuration
Video card 1 Video card 2 (if used)
Monitors Frame rate (D1)
Total video streams
Max. on one (remaining)
A NVIDIA Quadro FX-1700 No second card
2 25 fps 10 10 (0)
2 8.3 fps 32 16 (16)
A NVIDIA Quadro FX-1700 NVIDIA Quadro FX-1700
4 25 fps 10 10 (0)
4 8.3 fps 32 16 (16)
A NVIDIA Quadro FX-1700 NVIDIA Quadro NVS440
6 25 fps 10 10 (0)
6 8.3 fps 32 16 (16)
B NVIDIA Quadro FX-1700 No second card
2 25 fps 12 12 (0)
2 8.3 fps 20 12 (8)
Table 14: Video performance for Forcefield 6.0 using Forcefield 5.3 hardware
Computer configuration
Video card 1 Video card 2 (if used)
Monitors Frame rate (D1)
Total video streams
Max. on one (remaining)
C NVIDIA Quadro NVS440 NVIDIA Quadro NVS440
8 25 fps 8 1 (7)
5 5 fps 20 4 (16)
D NVIDIA Quadro NVS440 No second card
4 25 fps 9 4 (5)
4 5 fps 12 4 (8)
E NVIDIA Quadro NVS440 No second card
4 25 fps 8 4 (4)
4 5 fps 12 4 (8)
Notes
• Remember that in any configuration, you may need to use one monitor to operate Forcefield if the client computer is not dedicated to displaying video.
• Programming camera multiviews to display different views frequently (short dwell time) may exceed the CPU resources as tested in this document.
• You must ensure that the fps rate in event and alarm conditions does not exceed the ability of the computer to display video. Systems were tested with static camera multiviews, so that camera views did not change after a programmed dwell time.
• SymSafe Pro DVRs are available in 4, 8, and 16 channel models. If using SymSafe Pro instead of SymDec 16 plus 4, the maximum number of video streams may be limited by the number of channels available in your SymSafe Pro model.

Appendix C: Integrating SymDVR
Forcefield External Interfaces Manual 121
• SymSafe Pro DVRs at D1 resolution have a maximum supported frame rate of 12.5 fps per camera.
• If recommended hardware is not available, use hardware with equivalent or better specifications. For example, HP Z400 may be used in place of HP xw4600; HP Z600 may be used in place of HP xw6600; and the video card NVS450 may be used in place of NVS440.
• Use Windows XP for best performance in displaying multiple video streams as compared to Windows Vista on a given computer.
Computer hardware specifications and capabilities may change. Check our Web site at www.interlogix.com.au for updates as they become available.
Application notes
CPU usage For video streaming to work effectively, it’s important that the Forcefield computer’s CPU isn’t overloaded. Forcefield monitors the computer’s CPU usage for each view in a multiview window. If the CPU usage exceeds 90% for more than 20 seconds, Forcefield will close one or more video streams and display the message “Stopped due to high CPU usage” in place of the closed view. This process repeats after 20 seconds, so in cases where multiple video streams are causing (or coinciding with) excessive CPU usage, additional streams may close starting roughly 40 seconds from the first stream closing.
When configuring your system, We recommend that you use the Windows Task Manager, Performance tab, to monitor CPU usage when all video streams are displayed, and all cameras configured at the fps rate that will be used in event or alarm conditions (refer to the SymDVR’s user manual for details).
Note: Configure your system such that the CPU usage will not exceed 90% for more than 20 seconds, or Forcefield will turn off one or more video streams.
Loss of video stream When streaming from the SymDVR stops on any particular stream for a period of five seconds, that particular window will display a black background and will display “No video stream received from SymDec”. If streaming restores, the window will return to displaying the camera view. Note that this can also appear if the UDP ports are blocked by a firewall.

Appendix C: Integrating SymDVR
122 Forcefield External Interfaces Manual
Forcefield user interface Forcefield’s SymDVR interface differs slightly from the DVMRe interface, as follows:
• The Skip Backward and Skip Forward buttons allow a user to jump backward or forward by a configurable number of seconds (5 to 300, the default is 20). Press either button multiple times to make multiple jumps. Forcefield starts playing forward automatically after making a jump. Adjust the number of seconds skipped by dragging the track bar (below the buttons) to the left or right.
• The Play Reverse button isn’t available. Use the Skip Backward button instead.
• Playback speed is not applicable to SymDec.
Supported video hardware Forcefield 6.0 (and later) supports only Legend IP PTZ dome cameras and SymNet IP encoder/decoder.

Forcefield External Interfaces Manual 123
Appendix D Integrating TruVision
Summary This appendix describes how to integrate TruVision DVRs and cameras that operate via Forcefield’s add-on video service applications.
Content Overview 124 Video service integration process 124
Installing Video Status Manager 124 Installing Video Presentation Client 125 Setting up the video service 126
Configuring TruVision DVRs and cameras 128 Configuring a DVR 128 Configuring an IP camera 137

Appendix D: Integrating TruVision
124 Forcefield External Interfaces Manual
Overview The range of supported TruVision DVR products uses “video service” applications that provide the interface between Forcefield and TruVision devices:
• Video Status Manager (VSM) must be installed on one Windows computer per Forcefield system. The computer with VSM is the video server. The VSM manages the connection and communications between the video system and Forcefield.
• Video Presentation Client (VPC) must be installed on each Forcefield client computer that is used for controlling or viewing video. Each computer with VPC is a video client. The VPC streams the video directly from the DVR.
Note: Before you install VSM or VPC on a Windows computer, it must have Microsoft .NET Framework 4 installed.
The following products are supported at the time of writing:
• TVR 10, firmware version 2.4 or later
• NVR20 (TVN 20), firmware version 1.3.0 or later
• TVR 40, firmware version 3.0e or later
• TVR 60, firmware version 4.3.2 or later
Check our Web site for updates as they occur.
Refer to the applicable DVR datasheets for workstation hardware requirements.
See also “Viewing exported video footage” on page 75.
Video service integration process This section describes the process of integrating TruVision DVRs and cameras into a Forcefield system via the video service.
Refer to the Databases > Video > DVR Video menu section in the Forcefield Operators Manual for details about programming the video service, DVRs, cameras, monitors, and presets. The information provided in this section is only a summary.
Installing Video Status Manager Install Video Status Manager (VSM) on a Windows computer that has Microsoft .NET Framework 4 installed.
Make note of the computer’s IP address, the Forcefield site name (exactly as licensed, and displayed in the top left of the Forcefield window), the session password, and the server’s Forcefield port number (default is 9300).
Note: If Video Status Manager has been previously installed on this computer, then remove it before reinstalling.

Appendix D: Integrating TruVision
Forcefield External Interfaces Manual 125
Use the following steps to install Video Status Manager: 1. Click Install Video Status Manager on the Forcefield Installation CD start
page, or run setup.exe in the Install\VSM-Install\ folder. The Welcome to the Forcefield Video Status Manager Service Setup Wizard displays. Click Next to continue.
2. Enter the Forcefield site name (exactly as licensed, and displayed in the top left of the Forcefield window), the session password, and the server’s Forcefield port number (default is 9300), and then click Next to continue.
Tip: To add or edit the details after installation, click Start > All Programs > Video Status Manager Configuration (Figure 34 below). (Use whatever process to launch Video Status Manager Configuration that suits your version of Windows.)
3. Accept the suggested installation folder, and then click Next to continue. Alternatively, click Browse to select a different location before clicking Next.
4. When the “Installation Complete” message displays, click Close.
Figure 34: Video Status Manager Configuration window
Installing Video Presentation Client Install Video Presentation Client (VPC) on each Forcefield client computer where video is required. Each computer must have Microsoft .NET Framework 4 installed.
Notes
• Prior to installing the first VPC, create a TCP/IP Host record for the VSM computer’s IP address. In Forcefield use the Databases > Computer Equipment > TCP IP Hosts command. Note the Host ID to use in the Video Status Manager Server field.
• If Video Presentation Client has been previously installed on this computer, then remove it before reinstalling.

Appendix D: Integrating TruVision
126 Forcefield External Interfaces Manual
Use the following steps to install Video Presentation Client: 1. Click Install Video Presentation Client on the Forcefield Installation CD start
page, or run setup.exe in the Install\VPC-Install\ folder. The Welcome to the Forcefield Video Presentation Client Setup Wizard displays. Click Next to continue.
2. Enter the details noted in “Installing Video Status Manager” on page 124, except for the client’s Forcefield port number (default is 9200). Do not use the same port number as the server. Enter the Host ID in the Video Status Manager Server field.
Tip: To add or edit the details after installation, click Start > All Programs > Video Presentation Client Configuration (Figure 35 below). (Use whatever process to launch Video Presentation Client Configuration that suits your version of Windows.)
3. Accept the suggested installation folder, and then click Next to continue. Alternatively, click Browse to select a different location before clicking Next.
4. At the Confirm Installation screen, click Next to continue.
5. When the “Installation Complete” message displays, click Close.
Figure 35: Video Presentation Client Configuration window
Setting up the video service Use the following steps to set up the Forcefield video service: 1. Use the Databases > Video > Video Service command to create a
Video Service record. Click the Address arrow, and then select the previously-defined Host ID, use the session password defined in "Installing Video Status Manager" on page 124, and the server’s Forcefield port number (default is 9300).
2. Use the Admin > Configuration > Configuration command to open the Forcefield Configuration window, and then click the CCTV/Intercom button.
Appendix D: Integrating TruVision
Forcefield External Interfaces Manual 127
• In the Video Service VPC Port field, type the port number (default is 9200) that the Video Presentation Client will use to listen for data.
• Configure a time for the “DVR: Tagging By Mgt. S/W Delay” option.
Checking the Forcefield video service: Any time Forcefield client is started, VPC starts and attempts to connect with Forcefield. The VPC icon in the Windows taskbar (Figure 36 below) can display three states:
• A red icon with an x indicates that VPC cannot connect with Forcefield.
• A blue icon with a – indicates that VPC is connected with Forcefield, but there is no Forcefield operator logged in.
• A blue icon with a + indicates that VPC is connected with Forcefield, and there is a Forcefield operator logged in.
Figure 36: Video Presentation Client icon
Notes
• At least one (video service) DVR must be enabled before the video service can connect to the video server.
• The taskbar must display a blue icon with a + before you can connect to TruVision DVRs or cameras.
Use the following steps to configure TruVision DVRs and cameras: 1. Use the Databases > Video > DVR Video > DVRs command to program a
DVR (must be on the network):
• Click the Type arrow, and then select Video Service.
• Click the Server arrow, and then select the appropriate video service.
• Check the Enabled selection so that you can program the DVRs and cameras via the Configuration button.
2. Click the Configuration button to configure the DVR. See “Configuring TruVision DVRs and cameras” on page 128.
3. Use the Databases > Video > DVR Video > DVR Cameras command to program a video camera. Select the DVR to which this camera is connected, and specify whether the camera has pan-tilt-zoom (PTZ) control.
4. Click the Configuration button to configure the camera. See “Configuring TruVision DVRs and cameras” on page 128.
Appendix D: Integrating TruVision
128 Forcefield External Interfaces Manual
5. If applicable, use the Databases > Video > DVR Video > DVR Presets command to program and name predefined views for PTZ cameras.
Tip: The name that you assign to a presets 1 through 5 are added to the camera’s pop-up menu on maps displaying the camera.
Configuring TruVision DVRs and cameras A Forcefield system with video integration uses the video system’s product-specific programming screens instead of Forcefield programming screens. See “Configuring a DVR” below and “Configuring an IP camera” on page 137 for examples of the types of programming screens you might see.
The following sections contain screen images that are provided as examples only. The details may change with different models selected, and with different software versions.
Note: The configuration details of various products may differ from the examples shown in this section. Refer to the products’ user information for detailed instructions about configuring and using DVRs and cameras.
Configuring a DVR Use the Databases > Video > DVR Video > DVRs command to open a DVR record for a connected and enabled DVR. Click the DVR Configuration button to open the Edit DVR window.
Appendix D: Integrating TruVision
Forcefield External Interfaces Manual 129
Figure 37: Edit DVR window
The Edit DVR window displays the DVR’s connection settings. Enter the correct values, click OK, and then click the Test Connection… button to log on to the DVR.
DVR configuration When connected, click the Configuration… button to view or change the DVR’s configuration values for:
• Cameras (Figure 38 on page 130)
• Recording (Figure 39 on page 131)
• Alarms (Figure 40 on page 132)
• Network (Figure 41 on page 133)
• Notifications (Figure 42 on page 134)
• System (Figure 43 on page 135)

Appendix D: Integrating TruVision
130 Forcefield External Interfaces Manual
Figure 38: DVR Configuration window, Cameras tab
Note: If you delete a DVR’s camera record for an analogue camera in Forcefield, you also need to clear the Camera Enabled check box (not shown in Figure 38 above because the example depicts an IP camera).

Appendix D: Integrating TruVision
Forcefield External Interfaces Manual 131
Figure 39: DVR Configuration window, Recording tab
Note: The compression settings selected for main stream and for sub-stream apply to the high and low video quality selections when programming a Forcefield multi-view record.

Appendix D: Integrating TruVision
132 Forcefield External Interfaces Manual
Figure 40: DVR Configuration window, Alarm tab

Appendix D: Integrating TruVision
Forcefield External Interfaces Manual 133
Figure 41: DVR Configuration window, Network tab
Appendix D: Integrating TruVision
134 Forcefield External Interfaces Manual
Figure 42: DVR Configuration window, Notifications tab
Notes
• Enter the appropriate IP address for VSM host (video server) to enable DVR notifications to be reported.
• For each event to be reported from the DVR, click the Notification Type arrow, and then select the type of event. Ensure that the required notification methods are selected for each type.

Appendix D: Integrating TruVision
Forcefield External Interfaces Manual 135
Figure 43: DVR Configuration window, System tab
DVR capabilities When connected, click the Capabilities… button to view the DVR’s configured capabilities (Figure 44 on page 136). The left-hand side of some values have a + icon to indicate a group of capabilities. Click the + to expand the group.

Appendix D: Integrating TruVision
136 Forcefield External Interfaces Manual
Figure 44: DVR Capabilities window
DVR disk analysis When connected, click the Disk Analysis … button to see a graphical representation of data stored on the DVR (Figure 45 below).
Figure 45: DVR Disk Analysis window

Appendix D: Integrating TruVision
Forcefield External Interfaces Manual 137
The data stored on the DVR can include alarms, events, video loss, motion, and more.
You can zoom in and out on the timeline to view different levels of time granularity for the video (use the <Ctrl> key in conjunction with your mouse scroll wheel to zoom in and out more easily). The legend outlines the types of video by colour (for example, alarms are red).
For periods marked as “Untagged”, the device may/may not have recorded video available. It was just not tagged with a specific type per its device configuration parameters.
Configuring an IP camera Use the Databases > Video > DVR Video > DVR Cameras command to open or create an IP camera record for a connected and enabled DVR.
To add a new IP camera, complete the details in the Camera Configuration window, and then click the Add IP Camera… button.
Click the Configuration button to open the Camera Configuration window.
Figure 46: Camera Configuration window

Appendix D: Integrating TruVision
138 Forcefield External Interfaces Manual
Configuring camera options Click the Configuration… button to view or change the camera’s configuration values for:
• Connection (Figure 47 below)
• Camera (Figure 48 on page 139)
• Recording (Figure 49 on page 140)
Figure 47: Camera configuration, Connection tab

Appendix D: Integrating TruVision
Forcefield External Interfaces Manual 139
Figure 48: Camera configuration, Camera tab

Appendix D: Integrating TruVision
140 Forcefield External Interfaces Manual
Figure 49: Camera configuration, Recording tab

Forcefield External Interfaces Manual 141
Glossary
Ascom Nira Brand name for Ascom Nira 960 duress system.
Capture Use of a video camera connected to a Forcefield client to capture an image for use in a Photo ID system.
Card Layout Editor Photo ID user card design application for Forcefield clients.
CCTV Closed Circuit Television
CCTV switcher Part of the CCTV system, a CCTV switcher (connected to Forcefield) controls video cameras and monitors.
Duress The Ascom Nira 960 Duress system is comprised of a duress station (connected to Forcefield), duress system locators (static locations within a facility), and a duress transceiver (worn by a personnel such as a guard). If the guard’s duress transceiver generates an alarm, the system informs the operator of the guard’s location and direction of travel. In addition, the system may be used to page (produce beeps or a siren) when an event occurs.
DVR Digital Video Recorder or Digital Video Multiplexer Recorder
Email Forcefield can be set up to send an email message to a specified recipient when an event occurs.
Intercom The Jacques 550 Series intercom system is comprised of master and slave intercoms that interface with Forcefield. The Forcefield intercom interface is comprised of icons on maps and Speed Bar buttons to control volume. The operator clicks the icon to open the intercom channel and to switch the intercom video camera to the workstation’s intercom monitor.
Intercom Level 1 Master Part of the Jacques 550 Series intercom system, level 1 masters are located near Forcefield workstations and are connected to the Level 2 master. Level 1 masters serve as intercoms for Forcefield operators.
Intercom Level 2 Master Part of the Jacques 550 Series intercom system, a single Level 2 master is connected to a Forcefield comm port. The Level 2 master serves as the intercom for the Forcefield supervisor.
Intercom Slave Part of the Jacques 550 Series intercom system, each intercom master can have up to 255 slave units. Intercom calls are requested by pressing a call button.
LAP Live Animation Point indicates position and status of a device under control of Forcefield.
NVR Network video recorder
Glossary
142 Forcefield External Interfaces Manual
Paging Forcefield can be set up to page via the Ascom Nira Duress system when an event occurs. A page is a text message which can be announced by a series of beeps or a siren, or not announced.
Photo ID Photo ID user card design and printing facilities are provided for Forcefield clients.
PTZ camera Pan-Tilt-Zoom video camera
SymDVR SymDec™ 16 plus 4 DVR or SymSafe Pro™ DVR
Third-party An external system which can communicate with Forcefield using the Forcefield third-party system protocol.
TruVision Interlogix range of cost-effective video surveillance DVRs and cameras.
TVR TruVision DVR
Video switcher See CCTV switcher