ford ranger 3 piece hard tonneau cover installation ... rgr 3p htc.pdf · tc0234e page 1 of 13...
TRANSCRIPT

TC0234e
14/01/13 Page 1 of 13
FORD RANGER3 PIECE HARD TONNEAU COVERINSTALLATION INSTRUCTIONS
Place these instructions in vehicle’s glove box after installation is complete
Clean Tonneau Cover with a milddetergent and water solution.
Do not use abrasivecleaners or solvents.Care Instructions:
WARNING!When in the closed position, Tonneau Cover must be latched and tailgate must be closed! Failure to do so could result in unexpectedopening of the Tonneau Cover from sudden wind gusts, driving conditions, which could cause damage to the vehicle and/or yourTonneau Cover!DO NOT close the Tailgate when the Hard Tonneau is in the closed position, as damage may occur to the vehicle and/or yourTonneau Cover!
MAINTENANCE:Only use cleaners, waxes, or products that are labelled safe for use on plastics. Avoid the use of any chemicals to clean your TonneauCover unless labelled safe for plastics. Avoid use of abrasive type cleansers as they may dull the finish.The gas struts are self lubricating and should only be cleaned occasionally with a damp cloth. Premature seal failure will result ifsolvents or lubricants are used to clean struts.Gas struts must be connected with the cylinder (wide) end to the Tonneau Cover or Warranty is Void. The locking mechanisms and latches only require occasional lubrication with Graphite Powder.DO NOT use any other lubricants or oils. Using alternative products will VOID Warranty.All installation hardware and fasteners must be checked every so often for tightness.
TONNEAU COVER - IMPORTANT:• Read instructions carefully before installation. It is strongly recommended that installation is conducted by an authorized dealer.• This product must be installed exactly as specified in these instructions. Failure to do so may result in improper fit and/or retention.• Do not stand/sit or rest heavy objects on Tonneau Cover.• Humans or animals are not to be under the closed Tonneau Cover at any time.• Securely latch Tonneau Cover before operating vehicle.• Do not carry open volatile chemicals with Tonneau Cover installed.• If contact with volatile chemicals occurs clean Tonneau Cover with mild detergent and water solution.• Recommend installation by 2 people.• Fitting Instructions must be given to the end customer to understand correct removal and replacement process onto the vehicle.
PAINTING INSTRUCTIONS: (IF UNPAINTED)• Prior to painting, clean all surfaces to be painted using clean water and a mild detergent, do not use lacquer thinner or any solvent based products. Wipe completely dry. • Best results will be achieved by wiping the areas to be painted with a tack rag just prior to painting.• Select a top coat and clear paint that is suitable for PC/ABS (Poly-Carbonate-Acrylonitrile-Butadiene-Styrene).• Automotive paint systems, such as Acrylics or Two Packs, can be applied directly to the components. However, some paints may require a primer. If recommendations on paint specification are not followed, cracking of the part or degradation to the material may result. In all paint systems, aromatic hydrocarbons and alkalies are best avoided to reduce damage to the material properties.• If using a paint system which requires baking, do not expose the product to temperatures above 70° C (155° F). • Allow a minimum of 8 hours after baking before installation on the vehicle.

TC0234e
14/01/13Page 2 of 13
FORD RANGER 3 PIECE HARD TONNEAU COVER
TOOLS REQUIRED:● Fine Point Non Permanent Marker● Centre Punch● Drill● Ø3, Ø5, Ø6 & Ø7mm Drill Bits● Torque Wrench
● Rivet Gun● Scissors or Sharp Knife● Spanners 10mm 13mm● Socket Set● Non-acetic Silicone
● Phillips and Flat Screwdrivers● Allen Key● Tape Measure● Masking Tape● Torx Head Set
1
Tonneau CoverQty - 1
PARTS IN MAIN CARTON
PARTS IN FITTING KIT (KIT032373)
PARTS CHECK SHEET
5 6
Hinge Lower(CLIP2720PC)Qty - 2
Hinge PinRetainer(CLIP2717-1)Qty - 2
Upper TailgateBracket(CLIP2834PC)Qty - 2
TailgateTop Hat(CLIP2875PC)Qty - 2
Support Bracketfor Striker Bracket(CLIP2849PC)Qty - 2
7
Hinge Pin(CLIP2032)Qty - 2
8 9 10 11
Gas StrutStandard(STRT0005-2)Qty - 2
2
LHS CornerPieceQty - 1
3
LHS CornerPieceQty - 1
4
Lock KeysQty - 2
Fitting Kit(KIT032373)Qty - 1
32
HeaderRail Seal(MISC2229-9)Qty - 1
HeaderRail (HBAR0013-1)Qty - 1
30 31
Side DrillTemplate(MISC3452)Qty - 1
PARTS IN KIT (KIT032369)
FittingInstructions
AUTOMOTIVESURFACE CLEANER
IMPREGNATED WITH 70% ISOPROPYL ALCOHOL
For use in cleaning painted metal,glass and other vehicle surfaces.For external use only.Dispose of properly after use.
RustInhibitor
12
13 14
Rivet(FAST0505)Qty - 21
Scrivet(FAST0086)Qty - 2
15 16 17 18
M6x20 HexHead Bolt(SCRW0028)Qty - 14
19 20
M6 FlatWasher Small(WASH0153)Qty - 30
21
M6 NylocNut(NUTS0016)Qty - 8
M8 HexNut(NUTS0217)Qty - 2
M8x40 C/SunkHead Screw(SCRW0847)Qty - 8
22 23
Ball StrutBracket(CLIP2034-1)Qty - 2
AlcoholWipe(MISC0052)Qty - 4
RustInhibitor(MISC2776)Qty - 2
FittingInstruction(FIT-TC0234e)Qty - 1
24 25 26 27
A
B
Lock StrikerBracket(CLIP2499-PC)Qty - 2
Striker U-Bolt(LOCK0006)Qty - 2
Spacer short10mm thick(MISC3405)Qty - 2
Spacer long8mm thick(MISC3404)Qty - 2
M6 HexNut(NUTS0161)Qty - 8
3029
28
JackingBracket(CLIP2409-1)Qty - 2
M8x80 HexHead Bolt(SCRW0765)Qty - 2
Spacer s/s3mm thick(CLIP2969)Qty - 6

TC0234e
14/01/13Page 3 of 13
FORD RANGER 3 PIECE HARD TONNEAU COVER
Diagram #:1
1. NOTE: Two people are required to complete the installation.Remove and retain the sports bar and all hardware. Thoroughly clean and dry the installations areas. See Dia #1.
3. Trim the bedliner to clear the Striker Support Bracket as per the dimensions shown for the RHS. Repeat for LHS.If necessary, remove the tub liner to make trimming easier. See Dia #3.
Diagram #:2
CLEAN & DRYINSTALLATION AREAS
Diagram #:3
IMPORTANT - BEFORE INSTALLING TONNEAU COVERRemove & retain the Sports Bar and all Hardware.
3
Sports BarInstructions
ENTIRE LENGTH
2. Place masking tape in sections along the entire length of the side rails as shown. See Dia #2.
SCRIVET
DISCONNECT BRAKELIGHT (LHS)
FRONT BRACKET SCREW M6X20TUB CLAMP
BRACKET
2 FRONT BRACKET SCREWS M8
SPORTS BARBRACKET COVERS
85mm
46mm
IF VEHICLE IS FITTED WITH A BEDLINER GO TO STEP 3, OTHERWISE PROCEED TO STEP 4
TC0234e
14/01/13Page 4 of 13
FORD RANGER 3 PIECE HARD TONNEAU COVER
HEADER RAIL
SECTION THROUGH THE TUB RAIL
FRONT OF VEHICLE
HEADER RAIL
FRONTPANEL
Diagram #:4
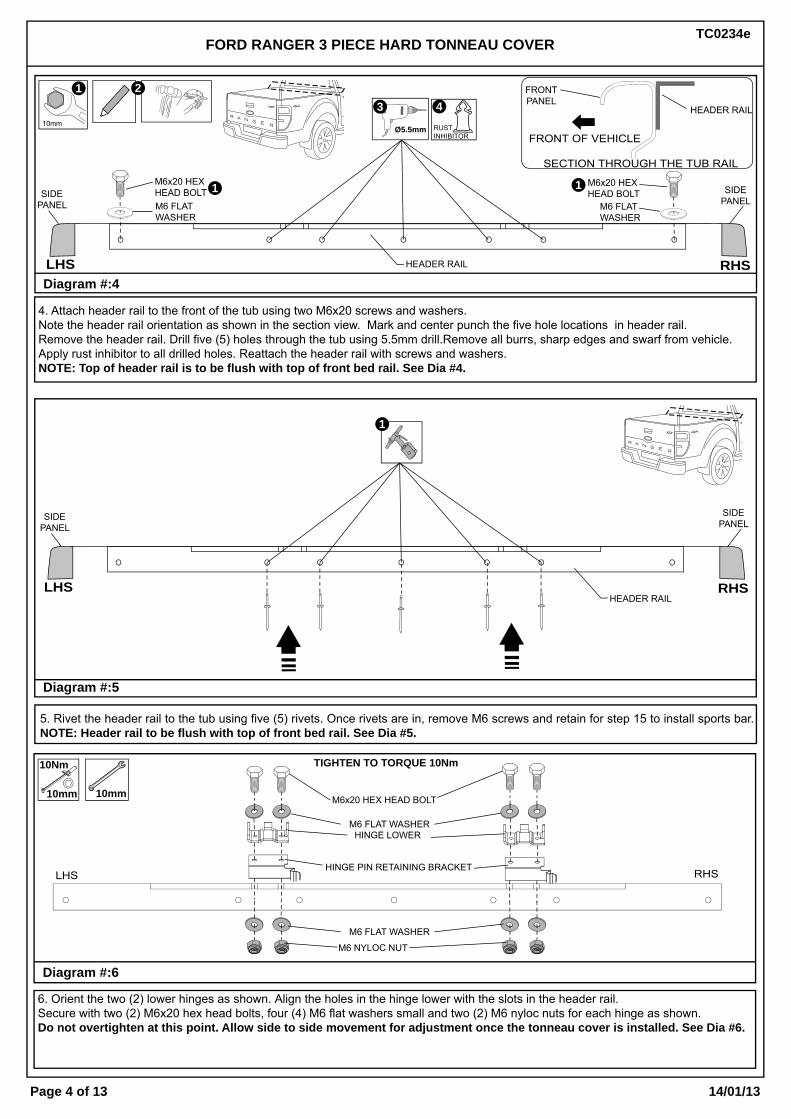
4. Attach header rail to the front of the tub using two M6x20 screws and washers.Note the header rail orientation as shown in the section view. Mark and center punch the five hole locations in header rail. Remove the header rail. Drill five (5) holes through the tub using 5.5mm drill.Remove all burrs, sharp edges and swarf from vehicle.Apply rust inhibitor to all drilled holes. Reattach the header rail with screws and washers. NOTE: Top of header rail is to be flush with top of front bed rail. See Dia #4.
RHSLHS
SIDEPANEL
SIDEPANEL
Ø5.5mm
1
1
Diagram #:6
6. Orient the two (2) lower hinges as shown. Align the holes in the hinge lower with the slots in the header rail.Secure with two (2) M6x20 hex head bolts, four (4) M6 flat washers small and two (2) M6 nyloc nuts for each hinge as shown. Do not overtighten at this point. Allow side to side movement for adjustment once the tonneau cover is installed. See Dia #6.
RHSLHS
M6x20 HEX HEAD BOLT
M6 NYLOC NUT
M6 FLAT WASHER
M6 FLAT WASHERHINGE LOWER
HINGE PIN RETAINING BRACKET
TIGHTEN TO TORQUE 10Nm
10mm10mm
10Nm
M6x20 HEXHEAD BOLT
M6 FLAT WASHER
Diagram #:5
5. Rivet the header rail to the tub using five (5) rivets. Once rivets are in, remove M6 screws and retain for step 15 to install sports bar. NOTE: Header rail to be flush with top of front bed rail. See Dia #5.
3
1
10mm
1
4
M6x20 HEXHEAD BOLTM6 FLAT WASHER
2
RUSTINHIBITOR
HEADER RAILRHSLHS
SIDEPANEL
SIDEPANEL
TC0234e
14/01/13Page 5 of 13
FORD RANGER 3 PIECE HARD TONNEAU COVER
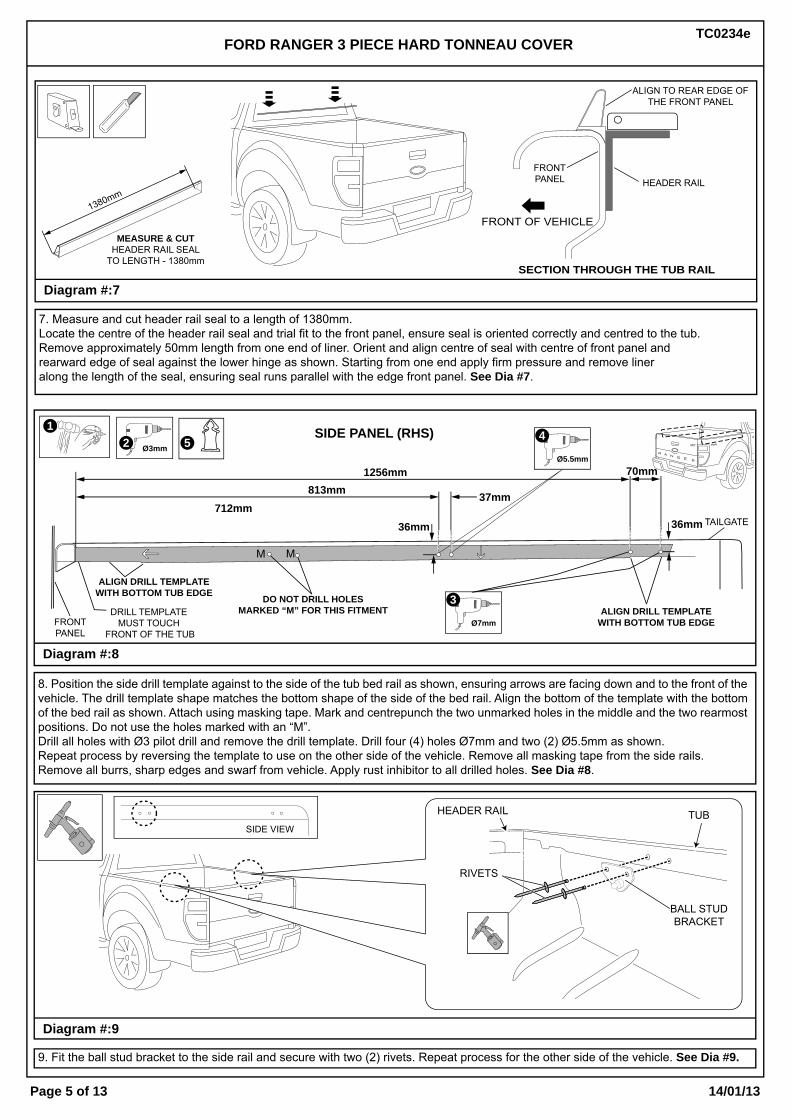
8. Position the side drill template against to the side of the tub bed rail as shown, ensuring arrows are facing down and to the front of the vehicle. The drill template shape matches the bottom shape of the side of the bed rail. Align the bottom of the template with the bottom of the bed rail as shown. Attach using masking tape. Mark and centrepunch the two unmarked holes in the middle and the two rearmost positions. Do not use the holes marked with an “M”.Drill all holes with Ø3 pilot drill and remove the drill template. Drill four (4) holes Ø7mm and two (2) Ø5.5mm as shown.Repeat process by reversing the template to use on the other side of the vehicle. Remove all masking tape from the side rails.Remove all burrs, sharp edges and swarf from vehicle. Apply rust inhibitor to all drilled holes. See Dia #8.
Diagram #:8
Diagram #:9
9. Fit the ball stud bracket to the side rail and secure with two (2) rivets. Repeat process for the other side of the vehicle. See Dia #9.
FRONTPANEL
ALIGN DRILL TEMPLATEWITH BOTTOM TUB EDGE DO NOT DRILL HOLES
MARKED “M” FOR THIS FITMENTDRILL TEMPLATEMUST TOUCH
FRONT OF THE TUB
ALIGN DRILL TEMPLATEWITH BOTTOM TUB EDGE
SIDE PANEL (RHS)
TAILGATE
FRONTPANEL HEADER RAIL
1380mm
ALIGN TO REAR EDGE OFTHE FRONT PANEL
MEASURE & CUTHEADER RAIL SEAL
TO LENGTH - 1380mm
FRONT OF VEHICLE
SECTION THROUGH THE TUB RAIL
15
Diagram #:7
7. Measure and cut header rail seal to a length of 1380mm. Locate the centre of the header rail seal and trial fit to the front panel, ensure seal is oriented correctly and centred to the tub.Remove approximately 50mm length from one end of liner. Orient and align centre of seal with centre of front panel andrearward edge of seal against the lower hinge as shown. Starting from one end apply firm pressure and remove lineralong the length of the seal, ensuring seal runs parallel with the edge front panel. See Dia #7.
Ø7mm
3
Ø5.5mm
4Ø3mm
SIDE VIEW
37mm
70mm
712mm
1256mm813mm
36mm 36mm
HEADER RAIL
RIVETS
16
TUB
BALL STUDBRACKET
9
2
M M

TC0234e
14/01/13Page 6 of 13
FORD RANGER 3 PIECE HARD TONNEAU COVER
10. Attach the striker bracket and support bracket to the tub using M6 screws, M6 washers, M6 nylock nuts and rivets. Note the orientation of the striker bracket. Position face “B” of lock striker bracket against the side rail as shown. Centerpunch and drill Ø5.5mm the two lower holes in the support bracket and secure with two rivets. Tighten all bolts to 9Nm. See Dia #10.
SECTION THROUGH THE TUBAND STRIKER BRACKETS
3
4
2
1
11 . Peel rubber pad from the bracket from the sports bar, to gain the access to the screws ( keep the rubber pad to refit in step 14). Remove attachment brackets from all of the sports bar legs (4) and discard the screws (8). See Dia #11.
Diagram #:11
Diagram #:10
SPORTS BAR
FOOT CUP
SCREWS
BRACKETPEEL RUBBERPAD
M6x20 HEXHEAD BOLT
M6x20 HEXHEAD BOLT
M6 NYLOC NUT
SUPPORT BRACKET
SUPPORT BRACKET
STRIKER BRACKET STRIKER
BRACKET
M6 WASHER
SMALL M6 FLAT WASHER
LETTER “B” SIDESITS AGAINST SIDE RAIL
10mm
Diagram #:12
12. Trim the feet cups extension as shown using a hacksaw or sharp knife. Smooth rough surface with sandpaper. See Dia #12.
TRIM FEET CUPS WITH HACKSAW
REAR CUP
FRONT CUP
CUT AWAY PART
CUT AWAY PART
TRIM LINE
TRIM LINE
1
3
4
Ø3mm
Ø3mm
2
5
RIVETS
TUB
RIVET
A
B

TC0234e
14/01/13Page 7 of 13
FORD RANGER 3 PIECE HARD TONNEAU COVER
Diagram #:14
14. Carefully position the assembled sportsbar and corner pieces onto the tub, taking care not to scratch the vehicle.Ensure the front sports bar bracket is positioned between the front panel and header rail already fitted.NOTE: Two people are required to lift into position. See Dia #14.
2 2
3
4
5
6
5
1
13. Apply a non-acetic silicone perimeter bead to both sides of the cut down foot cups and refit into the sports bar legs, place the spacer plates on top followed by the tonneau corner pieces.Starting with front bracket screw the two M8x40mm bolts into the sports bar. Attach the rear bracket back to the corner piece with three 3mm packers inserted between the corner piece and the bracket as indicated above. Repeat same procedure for the opposite side of the sports bar. Note: Remove any excess silicone. See Dia #13.
Diagram #:13
SHORT SPACER FORTHE FRONT LEGS
PHILIPS HEAD C/SUNK SCREWS M8X40MM
LONG SPACER FORTHE REAR LEGS
SPORTS BAR
APPLY NON-ACETIC SILICONETO TOP AND BOTTOM SURFACESAROUND PERIMETERTO PREVENT WATER ENTRY
X4
X3
CORNER PIECE
X4
FOOT CUP
FRONT BRACKET
REFITRUBBERPADS
6REFITRUBBERPADS
NOTE: BRACKET FITSBEHIND HEADER RAIL
28

14/01/13Page 8 of 13
TC0234eFORD RANGER 3 PIECE HARD TONNEAU COVER
Diagram #:16
16. Two people are required for this step, one to apply firm pressure and the other to mark the positions. Apply pressure to push the corner piece and front sports bar feet firmly into the front corner of the tub and down onto the side rail.Mark and centre-punch the scrivet hole position.Repeat process for the other side of the vehicle. Carefully remove sports bar and corner piece assembly.Drill the marked hole with 6mm drill and apply rust inhibitor. Place the sports bar back onto the tub and secure the sports bar to thetub with the sports bar hardware. Reconnect the stop light wiring and refit the sports bar support bracket covers.Push the scrivets (2) into position. See Dia #16.
5
3
6
4
SCRIVET TUB CLAMPBRACKET
SCRIVET
1 2
6mm FRONT BRACKET SCREW M6X20 AND M6 WASHER
FRONT BRACKET SCREWS M8
SPORTS BARBRACKET COVERS
CONNECT BRAKELIGHT
9
18
12
15. Assemble the jacking brackets as shown. Fit and align the jacking bracket over the top of the rear mounting bracket and reattach the rear bracket to the vehicle using the M8 bolt and bracket clamp as per tonneau fitting instructions. See Dia #15.
Diagram #:15
SECTION VIEW
INSERT M8 SCREW AND NUT.TURN SCREW HALF WAY DOWN

TC0234e
14/01/13Page 9 of 13
FORD RANGER 3 PIECE HARD TONNEAU COVER
13mm
Diagram #:17
Diagram #:18
18. With tailgate open, Close and check Tonneau Cover is central to vehicle and the sides of Tonneau Cover do not contact the vehiclebedrail. Adjust position by loosening the top hinge screws for fore and aft adjustment and hinge mount screws for side toside adjustment to re-position Tonneau Cover to fit centrally on vehicle. Before screwing tight, align each lower hinge section outwardsin order to prevent side play. Tighten all hinge brackets to Torque 9Nm. See Dia #18.
Diagram #:19
19. Adjust jacking bracket bolt to level corner piece to the main surface of the Tonneau. Once in the correct position, lock the bolt into position against the bracket by tightening the M8 nut. Repeat process for the other side of the vehicle. See Dia #19.
IMPORTANT: Ensure vehicles’s tailgate is opened before installing Tonneau Cover, andremains open until lock striker is fitted and locking mechanism is adjusted correctly.
DO NOT close the Tailgate when the Hard Tonneau is in the closed position, as damagemay occur to the vehicle and/or your Tonneau Cover!
TONNEAU SEALFITMENT OVER
HEADER RAIL SEAL
NO POWER TOOLS
13mm
17. Open vehicle’s tailgate and keep it open until locking mechanism has been adjusted correctly. Two people are required to carry out the fitment of the tonneau cover. Carefully fit tonneau cover to vehicle ensuring seal at the front of the tonneau cover sits correctly over the header rail seal as shown, If incorrectly placed this can direct water into the tub. Secure hinges with hinge pins as shown. See Dia #17.IMPORTANT: Ensure hinge pins clip into retaining leg on lower hinges, ensuring pin is securely restrained. If misaligned, seal can be pushed forward from inside of the tub.
LOOSEN TOPHINGE SCREWS
TIGHTEN HINGE MOUNT SCREWS TORQUE 9Nm
ENSURE HINGE PINIS CORRECTLYRESTRAINED
TC0234e
14/01/13Page 10 of 13
FORD RANGER 3 PIECE HARD TONNEAU COVER
CONTINUE ON THE NEXT PAGE
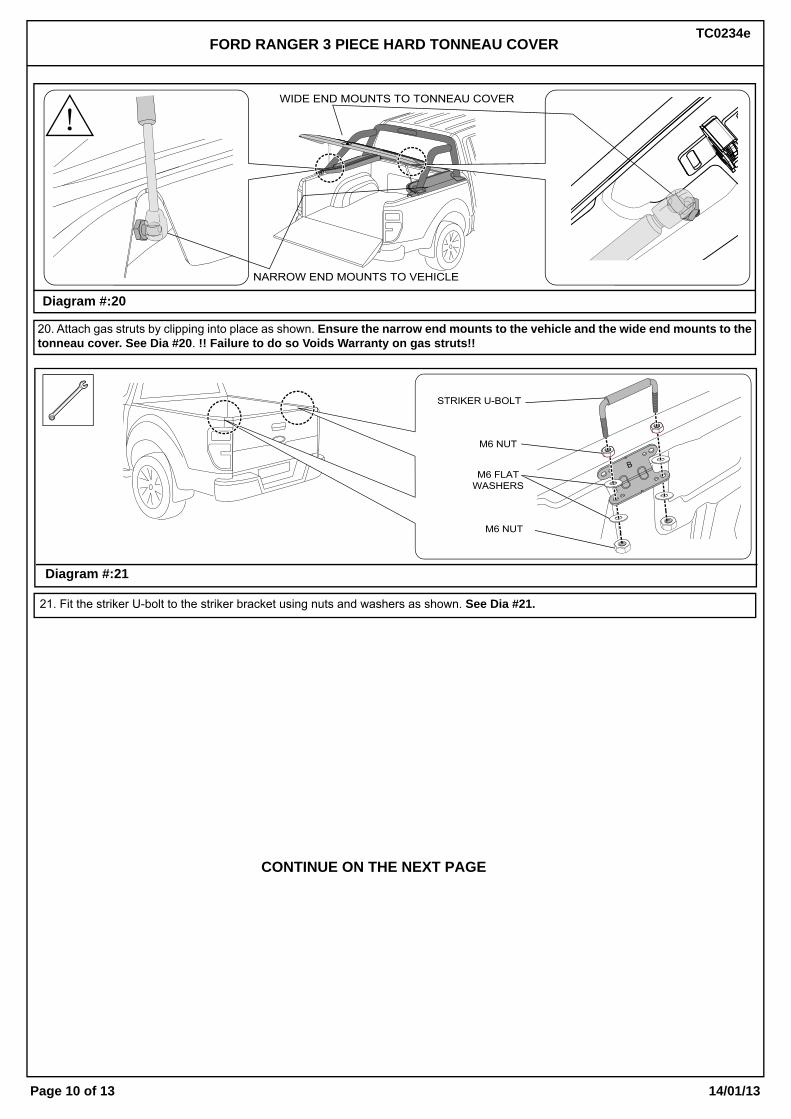
21. Fit the striker U-bolt to the striker bracket using nuts and washers as shown. See Dia #21.
Diagram #:20
20. Attach gas struts by clipping into place as shown. Ensure the narrow end mounts to the vehicle and the wide end mounts to the tonneau cover. See Dia #20. !! Failure to do so Voids Warranty on gas struts!!
NARROW END MOUNTS TO VEHICLE
WIDE END MOUNTS TO TONNEAU COVER
Diagram #:21
A
B
8
STRIKER U-BOLT
M6 FLATWASHERS
M6 NUT
M6 NUT
B
TC0234e
14/01/13Page 11 of 13
FORD RANGER 3 PIECE HARD TONNEAU COVER
1
Diagram #:23
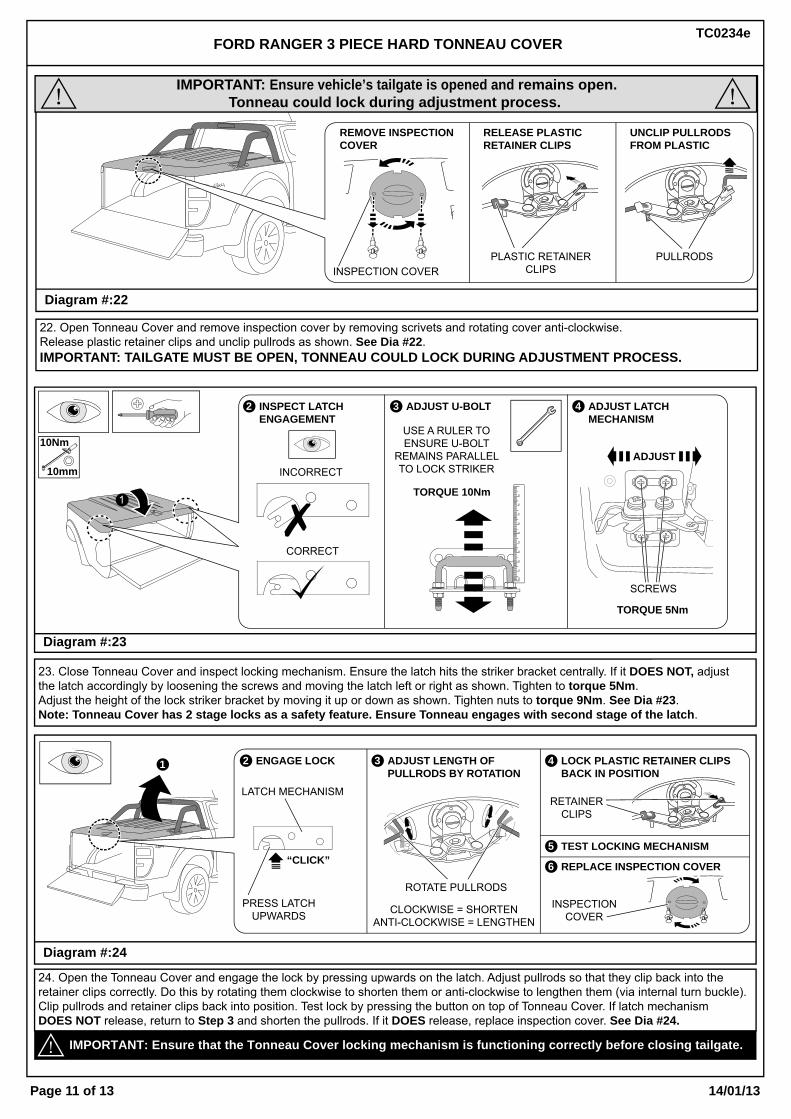
23. Close Tonneau Cover and inspect locking mechanism. Ensure the latch hits the striker bracket centrally. If it DOES NOT, adjustthe latch accordingly by loosening the screws and moving the latch left or right as shown. Tighten to torque 5Nm.Adjust the height of the lock striker bracket by moving it up or down as shown. Tighten nuts to torque 9Nm. See Dia #23.Note: Tonneau Cover has 2 stage locks as a safety feature. Ensure Tonneau engages with second stage of the latch.
Diagram #:24
24. Open the Tonneau Cover and engage the lock by pressing upwards on the latch. Adjust pullrods so that they clip back into theretainer clips correctly. Do this by rotating them clockwise to shorten them or anti-clockwise to lengthen them (via internal turn buckle).Clip pullrods and retainer clips back into position. Test lock by pressing the button on top of Tonneau Cover. If latch mechanismDOES NOT release, return to Step 3 and shorten the pullrods. If it DOES release, replace inspection cover. See Dia #24.
ENGAGE LOCK
LATCH MECHANISM
PRESS LATCHUPWARDS
ROTATE PULLRODS
CLOCKWISE = SHORTENANTI-CLOCKWISE = LENGTHEN
“CLICK”
2 ADJUST LENGTH OFPULLRODS BY ROTATION
3 4
REPLACE INSPECTION COVER6
TEST LOCKING MECHANISM5
RETAINERCLIPS
INSPECTIONCOVER
LOCK PLASTIC RETAINER CLIPSBACK IN POSITION
IMPORTANT: Ensure that the Tonneau Cover locking mechanism is functioning correctly before closing tailgate.
INSPECTION COVERPLASTIC RETAINER
CLIPSPULLRODS
REMOVE INSPECTIONCOVER
RELEASE PLASTICRETAINER CLIPS
UNCLIP PULLRODSFROM PLASTICRETAINER CLIPS
Diagram #:22
22. Open Tonneau Cover and remove inspection cover by removing scrivets and rotating cover anti-clockwise.Release plastic retainer clips and unclip pullrods as shown. See Dia #22.IMPORTANT: TAILGATE MUST BE OPEN, TONNEAU COULD LOCK DURING ADJUSTMENT PROCESS.
IMPORTANT: Ensure vehicle’s tailgate is opened and remains open.Tonneau could lock during adjustment process.
10mm
10Nm
1
INCORRECT
INSPECT LATCHENGAGEMENT
CORRECT
2 ADJUST U-BOLT
USE A RULER TOENSURE U-BOLT
REMAINS PARALLELTO LOCK STRIKER
3 ADJUST LATCHMECHANISM
4
TORQUE 10Nm
SCREWS
TORQUE 5Nm
ADJUST
0mm
1020
3040
5060
7080
90

TC0234e
14/01/13Page 12 of 13
FORD RANGER 3 PIECE HARD TONNEAU COVER
Diagram #:25
25. Open tonneau cover. Orient latch mount brackets as shown and attach to the rear of the tonneau inner using two (2) M6 x 20mmhex head bolt and washers.Position latch bracket so screw does up in the middle of the slot as shown. Repeat for the RHS.Do not fully tighten at this stage. Note: Use caution when closing to ensure bracket does not contact vehicle tailgate. See Dia #25.
Diagram #:26
26. Measure 80mm from LHS edge of the tailgate. Orient top hat latch brackets as shown at 80mm.Mark and center punch four (4) hole locations and drill holes with 5.5mm drill bit.Secure the top hat latch brackets to the tailgate using four (4) blind rivets for each bracket. Repeat for RHS. See Dia #26.
Diagram #:27
27. Close rear tailgate and then the tonneau cover to check that it closes correctly and the latch bracket does not contact the top hatlatch bracket. If required adjust the latch bracket by loosening the screws with and adjusting fore and aft. Re-tighten and recheck.When adjustment is complete tighten M6 screws with captive washers to Torque 9Nm. Note: Use caution when closing to ensure bracket does not contact vehicle tailgate. See Dia #27.
2
1
TAILGATE
10mm
10mm
NARROW END MOUNTS TO VEHICLE
80mm
1
Ø5.5mm
2
3
LATCHBRACKET
TAILGATE
TOP HAT LATCHBRACKET
CENTRE LATCH BRACKET AND FINGER TIGHTEN SCREWSHEAD SCREW

TC0234e
14/01/13Page 13 of 13
FORD RANGER 3 PIECE HARD TONNEAU COVER
REMOVAL OF TONNEAU COVERTWO PEOPLE ARE REQUIRED TO CARRY OUT THE REMOVAL OF THE TONNEAU COVER.
Diagram #:1
1. Detach gas struts by inserting a small screw driver and adjusting the spring clip on the strut. See Dia #1.NOTE: Do Not remove the spring clip only a small amount of levering is required to detach. Do Not remove without using a tool, damage can occur and Void Warranty.
Diagram #:2
2. Remove hinge pins and then remove the Tonneau Cover. See Dia #2.
TO REMOVE