forensic software testing support tools: test plan, test
TRANSCRIPT
NISTIR 7103-A
Forensic Software Testing Support Tools Test Plan
Test Design Specification Test Case Specification
Serban Gavrila VDG, Inc.
Elizabeth Fong Information Technology Laboratory
National Institute of Standards and Technology Gaithersburg, MD 20899
NIST National Institute of Standards and Technology
Technology Administration U.S. Department of Commerce
NISTIR 7103-A
Forensic Software Testing Support Tools Test Plan
Test Design Specification Test Case Specification
Serban Gavrila VDG, Inc.
Elizabeth Fong Information Technology Laboratory
National Institute of Standards and Technology Gaithersburg, MD 20899
April 2004
U.S.DEPARTMENT OF COMMERCE Donald L. Evans, Secretary
TECHNOLOGY ADMINISTRATION Phillip J. Bond, Under Secretary of Commerce for Technology
NATIONAL INSTITUTE OF STANDARDS AND TECHNOLOGY Ardent L. Bement, Jr., Director
iii
Forensic Software Testing Support Tools Test Plan
Test Design Specification Test Case Specification
Serban Gavrila*
Elizabeth Fong **
ABSTRACT The Computer Forensics Tool Testing (CFTT) project at the National Institute of Standards and Technology (NIST), an agency of the United States Department of Commerce, provides a measure of confidence in the software tools used in computer forensic investigations. CFTT focuses on a class of tools called disk-imaging tools that copy or “image” hard disk drives. Forensic Software Testing Support Tools (FS-TST) is a software package that supports the testing of disk imaging tools. FS-TST includes 15 tools that perform hard disk initialization, faulty disk simulation, hard disk comparisons, extraction of information from a hard disk, and copying of disks or disk partitions. This NIST Interagency/Internal Report consists of two parts. Part A, which is this document, covers the planning, design and specification of testing the tools included in the FS-TST package. Part B, which is a companion document, covers the test summary report. The testing was independently performed by VDG, Inc. under contract to NIST.
Keywords: computer forensics; disk imaging; software testing, testing support tools.
Certain trade names and company products are mentioned in the text or identified. In no case does such identification imply recommendation or endorsement by the National Institute of Standards and Technology, nor does it imply that the products are necessarily the best available for the purpose.
*VDG, Inc. College Park, Maryland **Information Technology Laboratory, National Institute of Standards and Technology, Gaithersburg, MD 20899
iv
Table of Contents Introduction......................................................................................................................... 1 Section A: FS-TST Test Plan.............................................................................................. 2 A1 Introduction................................................................................................................... 2
A1.1 Objectives .............................................................................................................. 2 A1.2 Background ............................................................................................................ 2 A1.3 Scope...................................................................................................................... 2 A1.4 References.............................................................................................................. 2
A2 Test Items...................................................................................................................... 2 A3 Features to be tested...................................................................................................... 3
A3.1 Diskwipe features................................................................................................... 3 A3.2 Partab features........................................................................................................ 3 A3.3 Diskchg features..................................................................................................... 3 A3.4 Seccmp features ..................................................................................................... 4 A3.5 Seccopy features .................................................................................................... 4 A3.6 Baddisk features..................................................................................................... 4 A3.7 Partcmp features..................................................................................................... 4 A3.8 Diskcmp features.................................................................................................... 4 A3.9 Diskhash features ................................................................................................... 5 A3.10 Badx13 features.................................................................................................... 5 A3.11 Corrupt features ................................................................................................... 5 A3.12 Logsetup features ................................................................................................. 5 A3.13 Logcase features................................................................................................... 5 A3.14 Sechash features................................................................................................... 5 A3.15 Adjcmp features ................................................................................................... 5 A3.16 Disk logging features ........................................................................................... 6
A4 Approach....................................................................................................................... 7 A5 Pass/fail criteria............................................................................................................. 7 A6 Test deliverables ........................................................................................................... 7 A7 Test tasks....................................................................................................................... 7 A8 Environmental needs..................................................................................................... 8
A8.1 Hardware................................................................................................................ 8 A8.2 Software ................................................................................................................. 8
Section B: FS-TST Test Design Specification ................................................................. 10 B1 Diskwipe Test Design Specification............................................................................ 10
B1.1 Features to be tested ............................................................................................. 10 B1.2 Approach refinements .......................................................................................... 10 B1.3 Test Identification ................................................................................................ 11
B2 Partab Test Design Specification ............................................................................... 12 B2.1 Features to be tested ............................................................................................. 12 B2.2 Approach refinements .......................................................................................... 12 B2.3 Test Identification ................................................................................................ 13
B3 Diskchg Test Design Specification ............................................................................. 14 B3.1 Features to be tested ............................................................................................. 14 B3.2 Approach refinements .......................................................................................... 14
v
B3.3 Test Identification ................................................................................................ 15 B4 Seccmp Test Design Specification .............................................................................. 16
B4.1 Features to be tested ............................................................................................. 16 B4.2 Approach refinements .......................................................................................... 16 B4.3 Test Identification ................................................................................................ 17
B5 Seccopy Test Design Specification ............................................................................. 17 B5.1 Features to be tested ............................................................................................. 17 B5.2 Approach refinements .......................................................................................... 18 B5.3 Test Identification ................................................................................................ 18
B6 Baddisk Test Design Specification.............................................................................. 18 B6.1 Features to be tested ............................................................................................. 18 B6.2 Approach refinements .......................................................................................... 19 B6.3 Test Identification ................................................................................................ 19
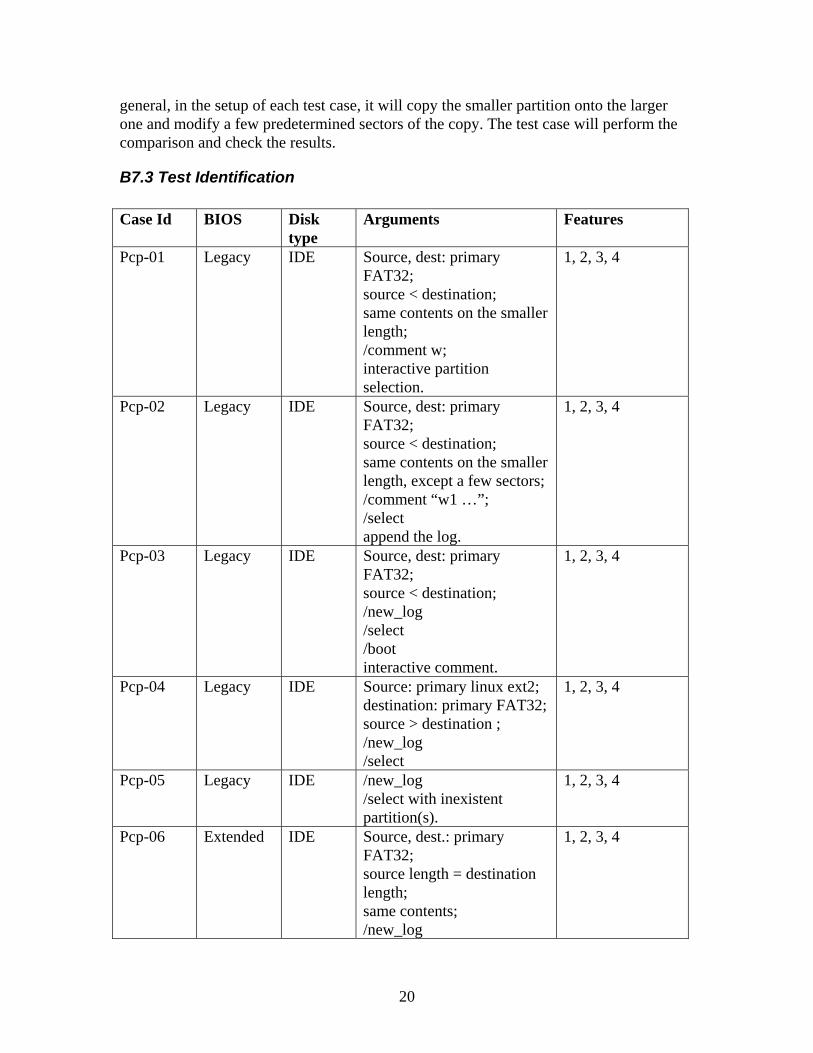
B7 Partcmp Test Design Specification............................................................................. 19 B7.1 Features to be tested ............................................................................................. 19 B7.2 Approach refinements .......................................................................................... 19 B7.3 Test Identification ................................................................................................ 20
B8 Diskcmp Test Design Specification ............................................................................ 21 B8.1 Features to be tested ............................................................................................. 21 B8.2 Approach refinements .......................................................................................... 21 B8.3 Test Identification ................................................................................................ 22
B9 Diskhash Test Design Specification............................................................................ 22 B9.1 Features to be tested ............................................................................................. 22 B9.2 Approach refinements .......................................................................................... 22 B9.3 Test Identification ................................................................................................ 23
B10 Badx13 Test Design Specification ............................................................................ 24 B10.1 Features to be tested ........................................................................................... 24 B10.2 Approach refinements ........................................................................................ 24 B10.3 Test Identification .............................................................................................. 24
B11 Corrupt Test Design Specification............................................................................ 25 B11.1 Features to be tested ........................................................................................... 25 B11.2 Approach refinements ........................................................................................ 25 B11.3 Test Identification .............................................................................................. 26
B12 Logsetup Test Design Specification.......................................................................... 26 B12.1 Features to be tested ........................................................................................... 26 B12.2 Approach refinements ........................................................................................ 26 B12.3 Test Identification .............................................................................................. 26
B13 Logcase Test Design Specification ........................................................................... 27 B13.1 Features to be tested ........................................................................................... 27 B13.2 Approach refinements ........................................................................................ 27 B13.3 Test Identification .............................................................................................. 27
B14 Sechash Test Design Specification ........................................................................... 27 B14.1 Features to be tested ........................................................................................... 27 B14.2 Approach refinements ........................................................................................ 27 B14.3 Test Identification .............................................................................................. 28
B15 Adjcmp Test Design Specification ............................................................................ 29

vi
B15.1 Features to be tested ........................................................................................... 29 B15.2 Approach refinements ........................................................................................ 30 B15.3 Test Identification .............................................................................................. 31
B16 Disk Logging Test Design Specification .................................................................. 32 B16.1 Features to be tested ........................................................................................... 32 B16.2 Approach refinements ........................................................................................ 33 B16.3 Test Identification .............................................................................................. 33
Section C: FS-TST Test Case Specifications ................................................................... 33 C1 Diskwipe Test Case Specifications.............................................................................. 33
C1.1 Dkw-01................................................................................................................. 33 C1.2 Dkw-02................................................................................................................. 35 C1.3 Dkw-03................................................................................................................. 35 C1.4 Dkw-04................................................................................................................. 36 C1.5 Dkw-05................................................................................................................. 37 C1.6 Dkw-06................................................................................................................. 38 C1.7 Dkw-07................................................................................................................. 38 C1.8 Dkw-08................................................................................................................. 39 C1.9 Dkw-09................................................................................................................. 40 C1.10 Dkw-10............................................................................................................... 40 C1.11 Dkw-11............................................................................................................... 41 C1.12 Dkw-12............................................................................................................... 42
C2 Partab Test Case Specifications ................................................................................. 44 C2.1 Ptb-01 ................................................................................................................... 44 C2.2 Ptb-02 ................................................................................................................... 44 C2.3 Ptb-03 ................................................................................................................... 45 C2.4 Ptb-04 ................................................................................................................... 46 C2.5 Ptb-05 ................................................................................................................... 46 C2.6 Ptb-06 ................................................................................................................... 47 C2.7 Ptb-07 ................................................................................................................... 48 C2.8 Ptb-08 ................................................................................................................... 48 C2.9 Ptb-09 ................................................................................................................... 49 C2.10 Ptb-10 ................................................................................................................. 50 C2.11 Ptb-11 ................................................................................................................. 50 C2.12 Ptb-12 ................................................................................................................. 51 C2.13 Ptb-13 ................................................................................................................. 51 C2.14 Ptb-14 ................................................................................................................. 52 C2.15 Ptb-15 ................................................................................................................. 53
C3 Diskchg Test Case Specifications ............................................................................... 54 C3.1 Dch-01.................................................................................................................. 54 C3.2 Dch-02.................................................................................................................. 55 C3.3 Dch-03.................................................................................................................. 55 C3.4 Dch-04.................................................................................................................. 56 C3.5 Dch-05.................................................................................................................. 57 C3.6 Dch-06.................................................................................................................. 58 C3.7 Dch-07.................................................................................................................. 58 C3.8 Dch-08.................................................................................................................. 59
vii
C3.9 Dch-09.................................................................................................................. 60 C3.10 Dch-10................................................................................................................ 62 C3.11 Dch-11................................................................................................................ 63 C3.12 Dch-12................................................................................................................ 64 C3.13 Dch-13................................................................................................................ 64 C3.14 Dch-14................................................................................................................ 65
C4 Seccmp Test Case Specifications ................................................................................ 67 C4.1 Scp-01................................................................................................................... 67 C4.2 Scp-02................................................................................................................... 68 C4.3 Scp-03................................................................................................................... 69 C4.4 Scp-04................................................................................................................... 69 C4.5 Scp-05................................................................................................................... 70 C4.6 Scp-06................................................................................................................... 71 C4.7 Scp-07................................................................................................................... 72 C4.8 Scp-08................................................................................................................... 73 C4.9 Scp-09................................................................................................................... 73 C4.10 Scp-10................................................................................................................. 74 C4.11 Scp-11................................................................................................................. 75 C4.12 Scp-12................................................................................................................. 76 C4.13 Scp-13................................................................................................................. 76
C5 Seccopy Test Case Specifications ............................................................................... 77 C5.1 Scy-01................................................................................................................... 77 C5.2 Scy-02................................................................................................................... 78 C5.3 Scy-03................................................................................................................... 79 C5.4 Scy-04................................................................................................................... 80 C5.5 Scy-05................................................................................................................... 80 C5.6 Scy-06................................................................................................................... 81 C5.7 Scy-07................................................................................................................... 82 C5.8 Scy-08................................................................................................................... 82 C5.9 Scy-09................................................................................................................... 83
C6 Baddisk Test Case Specifications................................................................................ 84 C6.1 Bdk-01.................................................................................................................. 84 C6.2 Bdk-02.................................................................................................................. 84 C6.3 Bdk-03.................................................................................................................. 85 C6.4 Bdk-04.................................................................................................................. 86
C7 Partcmp Test Case Specifications............................................................................... 87 C7.1 Pcp-01................................................................................................................... 87 C7.2 Pcp-02................................................................................................................... 88 C7.3 Pcp-03................................................................................................................... 89 C7.4 Pcp-04................................................................................................................... 89 C7.5 Pcp-05................................................................................................................... 90 C7.6 Pcp-06................................................................................................................... 91 C7.7 Pcp-07................................................................................................................... 92 C7.8 Pcp-08................................................................................................................... 92 C7.9 Pcp-09................................................................................................................... 93 C7.10 Pcp-10................................................................................................................. 94
viii
C8 Diskcmp Test Case Specifications .............................................................................. 95 C8.1 Dcp-01.................................................................................................................. 95 C8.2 Dcp-02.................................................................................................................. 96 C8.3 Dcp-03.................................................................................................................. 96 C8.4 Dcp-04.................................................................................................................. 97 C8.5 Dcp-05.................................................................................................................. 98 C8.6 Dcp-06.................................................................................................................. 99
C9 Diskhash Test Case Specifications............................................................................ 100 C9.1 Dhs-01 ................................................................................................................ 100 C9.2 Dhs-02 ................................................................................................................ 100 C9.3 Dhs-03 ................................................................................................................ 101 C9.4 Dhs-04 ................................................................................................................ 102 C9.5 Dhs-05 ................................................................................................................ 103 C9.6 Dhs-06 ................................................................................................................ 104 C9.7 Dhs-07 ................................................................................................................ 104 C9.8 Dhs-08 ................................................................................................................ 105
C10 Badx13 Test Case Specifications ............................................................................ 106 C10.1 Bdx-01.............................................................................................................. 106 C10.2 Bdx-02.............................................................................................................. 107 C10.3 Bdx-03.............................................................................................................. 107 C10.4 Bdx-04.............................................................................................................. 108 C10.5 Bdx-05.............................................................................................................. 109 C10.6 Bdx-06.............................................................................................................. 110 C10.7 Bdx-07.............................................................................................................. 110 C10.8 Bdx-08.............................................................................................................. 111 C10.9 Bdx-09.............................................................................................................. 112
C11 Corrupt Test Case Specifications............................................................................ 113 C11.1 Cor-01............................................................................................................... 113 C11.2 Cor-02............................................................................................................... 114 C11.3 Cor-03............................................................................................................... 115 C11.4 Cor-04............................................................................................................... 116 C11.5 Cor-05............................................................................................................... 116
C12 Logsetup Test Case Specifications.......................................................................... 118 C12.1 Lgs-01............................................................................................................... 118
C13 Logcase Test Case Specifications ........................................................................... 119 C13.1 Lgc-01 .............................................................................................................. 119
C14 Sechash Test Case Specifications ........................................................................... 120 C14.1 Shs-01............................................................................................................... 120 C14.2 Shs-02............................................................................................................... 121 C14.3 Shs-03............................................................................................................... 122 C14.4 Shs-04............................................................................................................... 123 C14.5 Shs-05............................................................................................................... 124 C14.6 Shs-06............................................................................................................... 125 C14.7 Shs-07............................................................................................................... 126 C14.8 Shs-08............................................................................................................... 127 C14.9 Shs-09............................................................................................................... 127
ix
C14.10 Shs-10............................................................................................................. 128 C14.11 Shs-11............................................................................................................. 130
C15 Adjcmp Test Case Specifications ............................................................................ 132 C15.1 Acp-01.............................................................................................................. 132 C15.2 Acp-02.............................................................................................................. 133 C15.3 Acp-03.............................................................................................................. 134 C15.4 Acp-04.............................................................................................................. 134 C15.5 Acp-05.............................................................................................................. 135 C15.6 Acp-06.............................................................................................................. 136
1
Introduction The Computer Forensics Tool Testing (CFTT) project at the National Institute of Standards and Technology (NIST), an agency of the United States Department of Commerce, provides a measure of confidence in the software tools used in computer forensic investigations. CFTT focuses on a class of tools called disk-imaging tools that copy or “image” hard disk drives. Forensic Software Testing Support Tools (FS-TST) is a software package that supports the testing of disk imaging tools. FS-TST includes 15 tools that perform hard disk initialization, faulty disk simulation, hard disk comparisons, extraction of information from a hard disk, and copying of disks or disk partitions. This document covers the planning and specification of testing the tools included in the FS-TST package. The testing was independently performed by VDG, Inc. under contract to NIST.
2
Section A: FS-TST Test Plan
A1 Introduction
A1.1 Objectives A test plan for Forensic Software Testing Support Tools (FS-TST) should support the following objectives: (1) To detail the activities required to prepare for and conduct the testing of FS-TST. (2) To define the sources of the information used to prepare the plan. (3) To define the test tools and environment needed to conduct the FS-TST tests.
A1.2 Background The Software Diagnostics and Conformance Testing (SDCT) Division of NIST has developed a software package called Forensic Software Testing Support Tools (FS-TST), comprising tools used in testing of disk imaging tools, which, in turn, are used in forensic investigations. Testing the FS-TST tools and proving their correctness will provide a degree of confidence in using them to test the disk imaging tools.
A1.3 Scope The test plan covers: (1) Testing of the functionality of FS-TST, as described in document [FSTST-01]. (2) Testing FS-TST compliance with the requirements stated in document [FSTST-01].
A1.4 References The following documents were used as sources of information for the test plan: [FSTST-01] FS-TST: Forensic Software Testing Support Tools. Requirements, Design Notes, and User Manual. Version 1.0, May 2002. [IEEE-01] IEEE Standard for Software Test Documentation, IEEE Std 829-1998. [FS-SUMM] Forensic Software Testing Support Tool – Test Summary Report, Part B of this report, April 2004.
A2 Test Items The items to be tested are the tools included in FS-TST, namely: diskwipe, partab, diskchg, baddisk, badx13, corrupt, adjcmp, diskcmp, partcmp, diskhash, sechash, logcase, logsetup, seccmp, seccopy.
3
A3 Features to be tested The features to be tested depend on the particular item tested, and are listed separately for each item/tool:
A3.1 Diskwipe features 1. Log the specified hard disk drive. 2. Log the program execution. 3. Allow specification of at least three log file names: one for a source disk, one for a
destination disk, and one for a media disk. 4. Write the specified content from Table 2 of document FSTST-01 to each disk sector
of the specified drive. 5. By default, use the number of heads obtained from the BIOS extensions; however,
optionally allow specification of the number of heads to override the value from BIOS.
A3.2 Partab features 1. Log the specified hard disk drive. 2. Log the program execution. 3. For each partition table entry in the master boot record partition table and each
partition table in any extended partition, print the following: starting LBA address, partition length, starting C/H/S address, ending C/H/S address, bootable flag, partition type code (in hexadecimal).
4. For common partition types (FAT12, FAT16, FAT32, extended, Linux Ext2, Linux swap, NTFS) print a distinctive string, e.g., Fat32 for FAT32 partitions.
5. Use a different log file name for each hard disk drive. 6. Log (optionally by command line control) a unique identification for each partition
that can be used by the partcmp tool to select partitions for comparison. 7. Log (optionally by command line control) empty partition table entries.
A3.3 Diskchg features 1. Log the specified hard disk drive. 2. Log the program execution. 3. Allow specification of disk sector addresses in either CHS or LBA format. 4. Set every byte of a specified sector to zero. 5. For a specified sector s, a specified address a (possibly not the same as the specified
sector), a specified disk geometry, and a specified fill value, fill sector s with the contents of a diskwipe style fill using a as the address value for the fill. In other words, set sector s to the contents that diskwipe would use for the sector at location a on a disk with the specified geometry using the specified fill value.
6. For a specified sector, a specified offset within the sector, and a specified value, set the byte at the offset within the sector to the specified value.
4
7. For a specified hard drive, a specified sector, a specified offset within the sector, and a specified count count, log the contents of count bytes from the specified sector starting at the specified offset.
8. Allow interactive examination of sector contents. 9. Use a different log file name for each function.
A3.4 Seccmp features 1. Log the specified source drive. 2. Log the specified destination drive. 3. Log the program execution. 4. If the sectors to compare are not diskwipe style filled or zero filled, log any
differences between the source sector and the destination sector. 5. Diskwipe style filled sectors or zero filled sectors are logged with no need for
comparison. 6. Allow specification of an alternate log file name.
A3.5 Seccopy features 1. Log the specified source drive. 2. Log the specified destination drive. 3. Log the program execution. 4. For a specified count, source disk starting address, and a destination disk starting
address, copy count sectors from the source to the destination.
A3.6 Baddisk features 1. For a specified disk address, specified disk I/O command, and error code value,
monitor disk I/O requests. Intercept any attempts to execute the specified disk I/O command on the specified disk address and return the specified error code value.
2. Log the command parameters and the current date and time to stdout.
A3.7 Partcmp features 1. Log the specified source drive. 2. Log the specified destination drive. 3. Log the program execution. 4. Log the comparison between the source partition and the destination partition.
A3.8 Diskcmp features 1. Log the specified source drive. 2. Log the specified destination drive. 3. Log the program execution. 4. Log the comparison between the source drive and the destination drive. 5. If there is a read error the comparison results are undefined. 6. If there are any read errors, then continue scanning the disk and log a count of the
number of tracks with read errors on each disk.
5
A3.9 Diskhash features 1. Log the specified hard drive. 2. Log the program execution. 3. Allow specification of at least two log file names, one for reference before a tool is
run and one for comparison after a tool is run. 4. Compute a SHA-1 hash for the designated hard drive.
A3.10 Badx13 features 1. For a specified disk address, specified disk I/O command, and error code value,
monitor disk I/O requests. Intercept any attempts to execute the specified disk I/O command on the specified disk address and return the specified error code value.
2. Log the command parameters and the current date and time to stdout.
A3.11 Corrupt features 1. Log the program execution. 2. Change a specified byte at a specified location in a specified file to a specified value. 3. Log the original value at the specified location. 4. Log the new value at the specified location.
A3.12 Logsetup features 1. Record the following: disk label, host computer, operator, operating system loaded,
date and time.
A3.13 Logcase features 1. Record the following: Test case ID, host computer, operator, source disk drive,
destination disk drive, other disk drive, date and time.
A3.14 Sechash features 1. Log the specified hard drive. 2. Log the program execution. 3. Allow specification of at least two log file names, one for reference before a tool is
run and one for comparison after a tool is run. 4. Compute a SHA-1 hash for a specified block of continuous sectors from the
designated hard drive. 5. Log the computed hash value.
A3.15 Adjcmp features 1. Log the specified source drive. 2. Log the specified destination drive. 3. Log the program execution. 4. Log the partition table for the specified hard drive. 5. For each disk, assign each sector to a contiguous block of sectors, called a disk chunk,
such that each disk chunk is assigned to one of the following chunk categories: a sector contained within a partition, a sector contained within a partition boot track,
6
the unallocated sectors between two partitions, or unallocated sectors after the last partition on the disk.
6. Record the location of each disk chunk in the log file. 7. Allow specification of corresponding disk chunks between the source hard drive and
the destination hard drive. (A disk chunk on the source drive is compared to the corresponding disk chunk on the destination drive.)
8. Log the correspondence between source disk chunks and destination disk chunks, i.e., for each disk chunk on the source drive, log the disk chunk on the destination that the source disk is to be compared to.
9. Log the comparison between each pair of corresponding disk chunks. 10. For any destination disk chunks that have no corresponding source chunk categorize
the sectors of the disk chunk according to the following: zero fill (every byte is zero), diskwipe style fill, and other contents. The diskwipe style fill is actually three categories: source fill byte, destination fill byte and any other fill byte. For each category, the first few (up to some arbitrary limit) sectors belonging to the category are logged. A contiguous block of sectors is logged as a hyphen separated pair of integers (start sector – last sector).
11. Log a summary as follows: - Number of boot tracks, total number of sectors assigned to boot tracks, and
number of boot track sectors that do not compare equal. - Number of partitions, total number of sectors assigned to some partition, and
number of corresponding partition sectors that do not compare equal. - Number of unallocated chunks with a corresponding unallocated chunk,
number of sectors in this category and number of corresponding sectors that do not compare equal.
- Number of excess sectors in destination chunks that have a corresponding source chunk, number of sectors that have every byte set to zero, and number of remaining sectors.
- Number of sectors in destination chunks that do not have a corresponding source chunk, number of sectors that have every byte set to zero, and number of remaining sectors.
- Total number of source sectors and total number of destination sectors.
A3.16 Disk logging features 1. The type of BIOS access (extended or legacy) supported for the disk drive. 2. The disk geometry as reported by interrupt 13h function 08h, i.e., maximum allowed
cylinder value, maximum allowed head value, number of sectors per track and total number of sectors.
3. If the interrupt 13h BIOS extensions are supported for the disk drive, then record the disk geometry as reported by interrupt 13h function 48h, i.e., number of cylinders, number of heads, number of sectors per track and total number of sectors.
4. If the interrupt 13h BIOS extensions are not supported for the disk drive, then record disk geometry values for number of cylinders, number of heads, number of sectors per track and number of sectors that are consistent with the values reported by interrupt 13h function 08h.
7
5. For IDE disk drives, record the model number and serial number as reported by the ATA identify device command.
6. For IDE disk drives that support LBA, record the total number of user addressable sectors as reported by the ATA identify device command.
A4 Approach Testing personnel will develop the test cases and procedures, based on the list of features for which each tool will be tested, the applicable FS-TST documentation [FSTST-01], and the manner in which the tool will be used. The tools will be tested to ensure that their behavior corresponds to that outlined in the documentation [FSTST-01]. In the test cases developed, the value logged will be compared with known values acquired by other methods. The structuring of the test reports is based upon the document [IEEE-01]. The test results will be summarized in the document [FS-SUMM].
A5 Pass/fail criteria If a tool tested does not possess one or more of the features listed for that tool, then the test result will yield “feature not supported.” The tool will fail the test if inaccuracies are found in the logs produced by that tool. Otherwise, the tool will pass the test.
A6 Test deliverables Test documentation: (1) FS-TST Test Plan (2) FS-TST Test Design Specifications (3) FS-TST Test Case Specifications (4) FS-TST Test Summary Report Test scripts: (1) Scripts used to prepare the environment for and launch the test procedures. (2) Scripts used to extract information selectively from the log files.
A7 Test tasks Task Predecessor Tasks 1. Prepare test plan FS-TST design, requirements, functional
specifications 2. Prepare test design specifications Task 1 3. Prepare test case specifications Task 2 4. Prepare test procedure specifications Task 3
8
5. Obtain hardware and software required for testing the software item
Task 4
6. Execute test procedure for the software item
Task 5
7. Observe results of testing Task 6 8. Repeat tasks 5-7 until all items have been tested
Task 7
9. Prepare test summary report Task 8
A8 Environmental needs
A8.1 Hardware
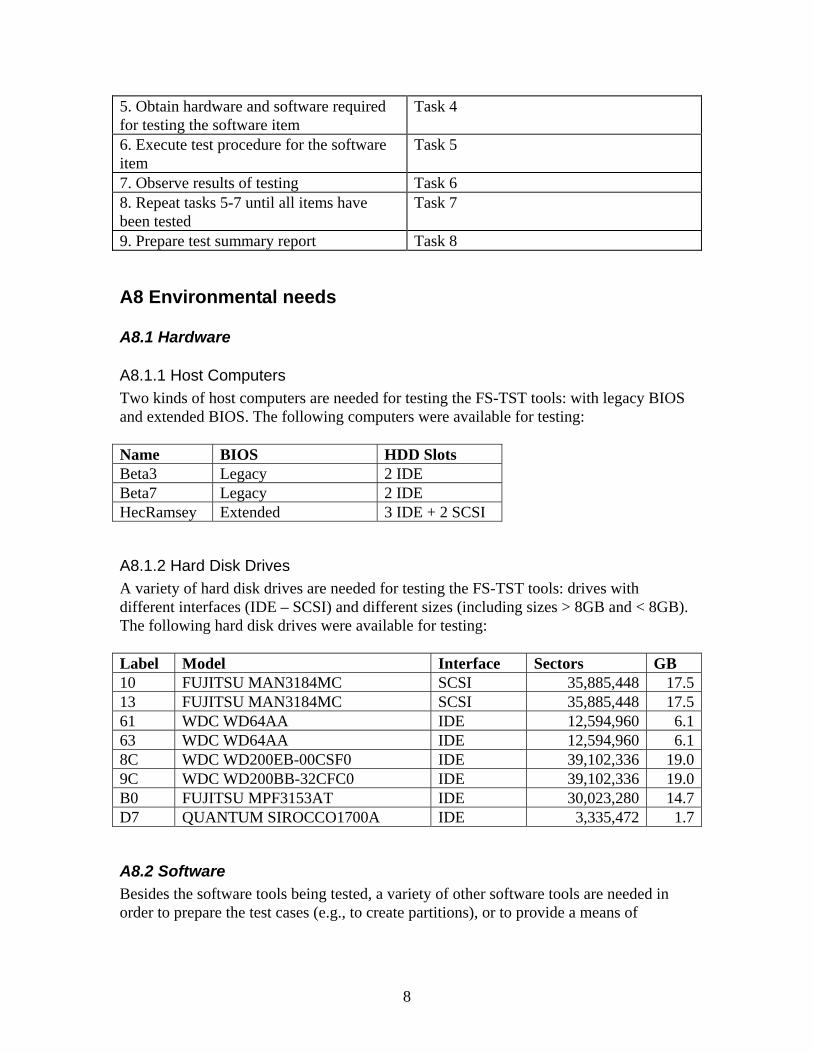
A8.1.1 Host Computers Two kinds of host computers are needed for testing the FS-TST tools: with legacy BIOS and extended BIOS. The following computers were available for testing: Name BIOS HDD Slots Beta3 Legacy 2 IDE Beta7 Legacy 2 IDE HecRamsey Extended 3 IDE + 2 SCSI
A8.1.2 Hard Disk Drives A variety of hard disk drives are needed for testing the FS-TST tools: drives with different interfaces (IDE – SCSI) and different sizes (including sizes > 8GB and < 8GB). The following hard disk drives were available for testing: Label Model Interface Sectors GB 10 FUJITSU MAN3184MC SCSI 35,885,448 17.513 FUJITSU MAN3184MC SCSI 35,885,448 17.561 WDC WD64AA IDE 12,594,960 6.163 WDC WD64AA IDE 12,594,960 6.18C WDC WD200EB-00CSF0 IDE 39,102,336 19.09C WDC WD200BB-32CFC0 IDE 39,102,336 19.0B0 FUJITSU MPF3153AT IDE 30,023,280 14.7D7 QUANTUM SIROCCO1700A IDE 3,335,472 1.7
A8.2 Software Besides the software tools being tested, a variety of other software tools are needed in order to prepare the test cases (e.g., to create partitions), or to provide a means of
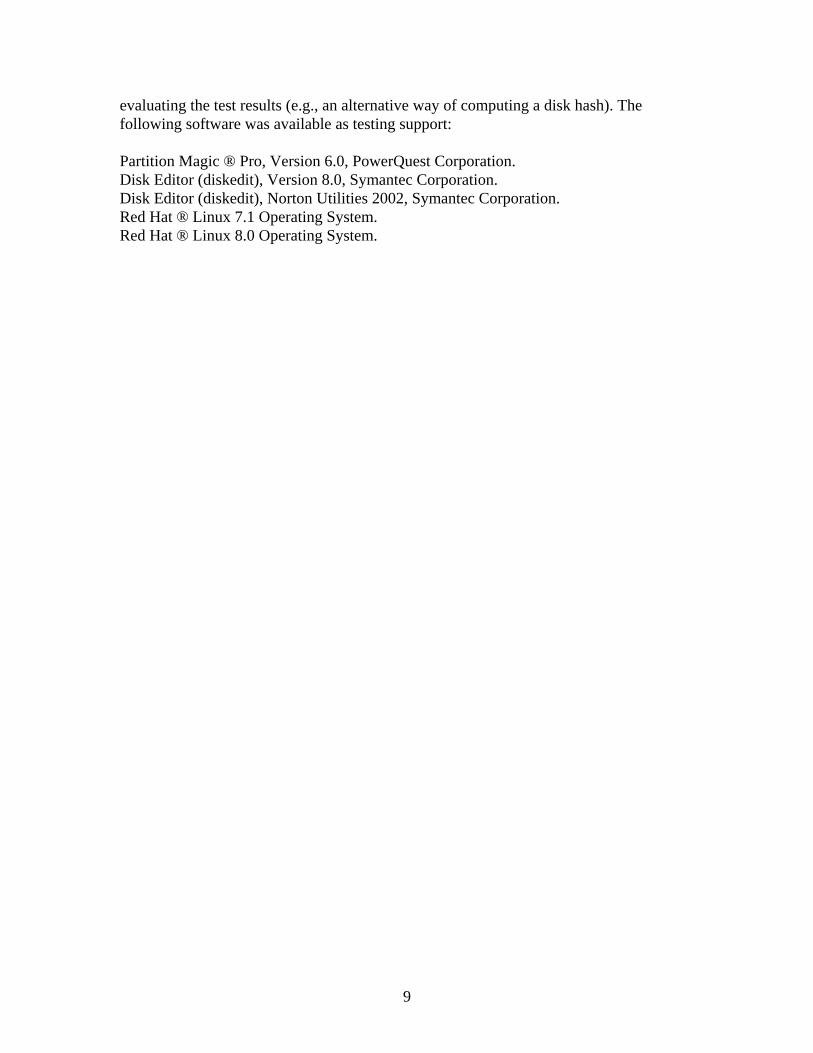
9
evaluating the test results (e.g., an alternative way of computing a disk hash). The following software was available as testing support: Partition Magic ® Pro, Version 6.0, PowerQuest Corporation. Disk Editor (diskedit), Version 8.0, Symantec Corporation. Disk Editor (diskedit), Norton Utilities 2002, Symantec Corporation. Red Hat ® Linux 7.1 Operating System. Red Hat ® Linux 8.0 Operating System.

10
Section B: FS-TST Test Design Specification
B1 Diskwipe Test Design Specification
B1.1 Features to be tested 1. Log the specified hard disk drive. 2. Log the program execution:
a) the program name, version number, source file creation date and time, compile date and time.
b) the support library name, version number, source file creation date and time, compile date and time.
c) the header file name, version number, source file creation date and time. d) the command line (including options). e) The date and time program execution begins, ends, and elapsed time. f) The test case ID. g) The name of the computer where the program is executed. h) A user supplied comment. i) Either start a new log file or append to an existing log file. j) Print a summary of the program command line and command line options, then
exit. 3. Allow specification of at least three log file names: one for a source disk, one for a
destination disk, and one for a media disk. 4. Write the specified content from Table 2 of document FSTST-01 to each disk sector
of the specified drive. 5. By default, use the number of heads obtained from the BIOS extensions, however,
optionally allow specification of the number of heads to override the value from BIOS.
B1.2 Approach refinements Testing the first feature is specified in Section B16 Disk Logging Test Design Specification in this document. Several test cases will be created to test that diskwipe logs the program execution correctly. The /comment switch will be used with different syntaxes and it will also be checked when not used, the user is still able to enter a comment to be logged. A test case will verify that a log file is created when none is present, another that log records are appended when a log file is already present, and another that the old log file will be destroyed and a new file created when diskwipe is run with the /new_log switch. A test case will be used to test that the /? switch gives diskwipe the functionality of feature 2(j). The remaining requirements of feature 2 will be tested over a variety of BIOS/hard drive configurations.
11
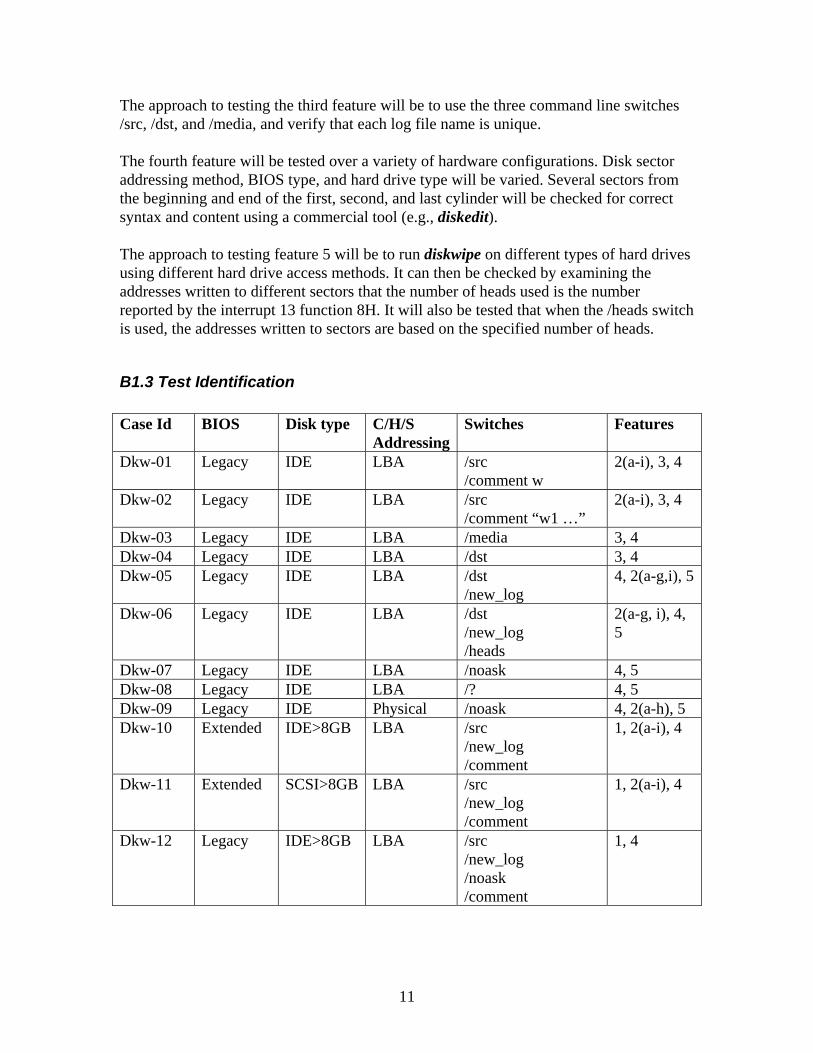
The approach to testing the third feature will be to use the three command line switches /src, /dst, and /media, and verify that each log file name is unique. The fourth feature will be tested over a variety of hardware configurations. Disk sector addressing method, BIOS type, and hard drive type will be varied. Several sectors from the beginning and end of the first, second, and last cylinder will be checked for correct syntax and content using a commercial tool (e.g., diskedit). The approach to testing feature 5 will be to run diskwipe on different types of hard drives using different hard drive access methods. It can then be checked by examining the addresses written to different sectors that the number of heads used is the number reported by the interrupt 13 function 8H. It will also be tested that when the /heads switch is used, the addresses written to sectors are based on the specified number of heads.
B1.3 Test Identification Case Id BIOS Disk type C/H/S
AddressingSwitches Features
Dkw-01 Legacy IDE LBA /src /comment w
2(a-i), 3, 4
Dkw-02 Legacy IDE LBA /src /comment “w1 …”
2(a-i), 3, 4
Dkw-03 Legacy IDE LBA /media 3, 4 Dkw-04 Legacy IDE LBA /dst 3, 4 Dkw-05 Legacy IDE LBA /dst
/new_log 4, 2(a-g,i), 5
Dkw-06 Legacy IDE LBA /dst /new_log /heads
2(a-g, i), 4, 5
Dkw-07 Legacy IDE LBA /noask 4, 5 Dkw-08 Legacy IDE LBA /? 4, 5 Dkw-09 Legacy IDE Physical /noask 4, 2(a-h), 5 Dkw-10 Extended IDE>8GB LBA /src
/new_log /comment
1, 2(a-i), 4
Dkw-11 Extended SCSI>8GB LBA /src /new_log /comment
1, 2(a-i), 4
Dkw-12 Legacy IDE>8GB LBA /src /new_log /noask /comment
1, 4
12
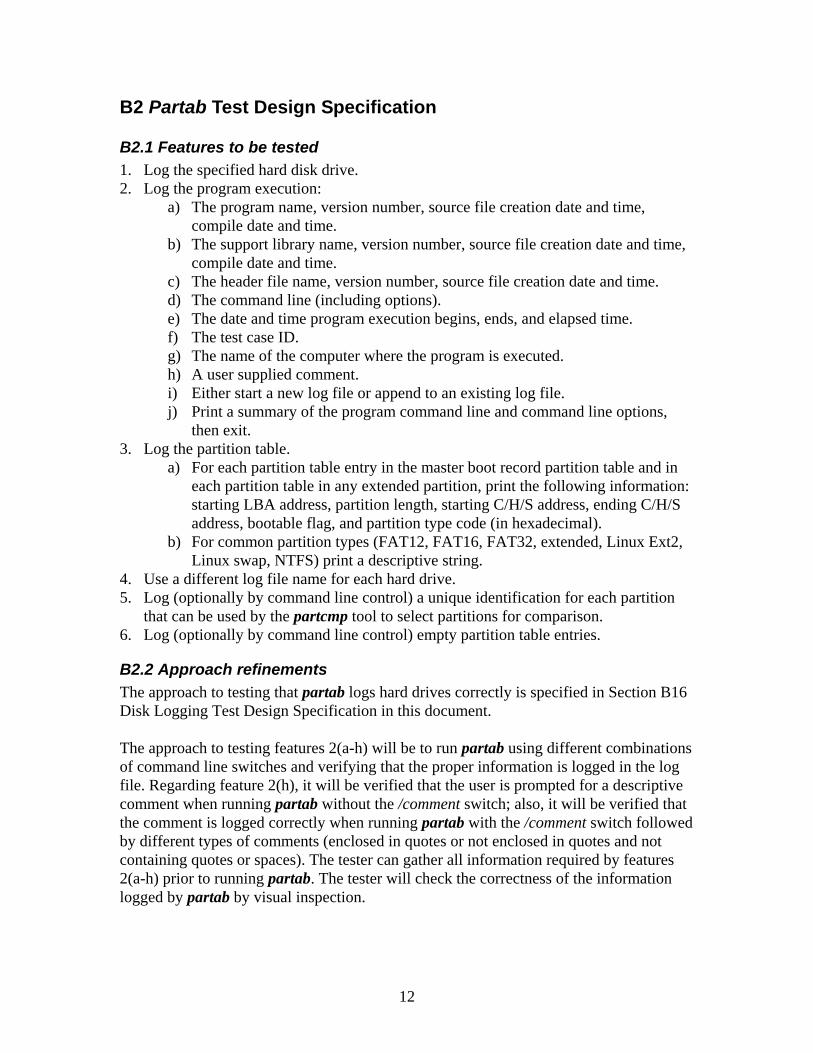
B2 Partab Test Design Specification
B2.1 Features to be tested 1. Log the specified hard disk drive. 2. Log the program execution:
a) The program name, version number, source file creation date and time, compile date and time.
b) The support library name, version number, source file creation date and time, compile date and time.
c) The header file name, version number, source file creation date and time. d) The command line (including options). e) The date and time program execution begins, ends, and elapsed time. f) The test case ID. g) The name of the computer where the program is executed. h) A user supplied comment. i) Either start a new log file or append to an existing log file. j) Print a summary of the program command line and command line options,
then exit. 3. Log the partition table.
a) For each partition table entry in the master boot record partition table and in each partition table in any extended partition, print the following information: starting LBA address, partition length, starting C/H/S address, ending C/H/S address, bootable flag, and partition type code (in hexadecimal).
b) For common partition types (FAT12, FAT16, FAT32, extended, Linux Ext2, Linux swap, NTFS) print a descriptive string.
4. Use a different log file name for each hard drive. 5. Log (optionally by command line control) a unique identification for each partition
that can be used by the partcmp tool to select partitions for comparison. 6. Log (optionally by command line control) empty partition table entries.
B2.2 Approach refinements The approach to testing that partab logs hard drives correctly is specified in Section B16 Disk Logging Test Design Specification in this document. The approach to testing features 2(a-h) will be to run partab using different combinations of command line switches and verifying that the proper information is logged in the log file. Regarding feature 2(h), it will be verified that the user is prompted for a descriptive comment when running partab without the /comment switch; also, it will be verified that the comment is logged correctly when running partab with the /comment switch followed by different types of comments (enclosed in quotes or not enclosed in quotes and not containing quotes or spaces). The tester can gather all information required by features 2(a-h) prior to running partab. The tester will check the correctness of the information logged by partab by visual inspection.
13
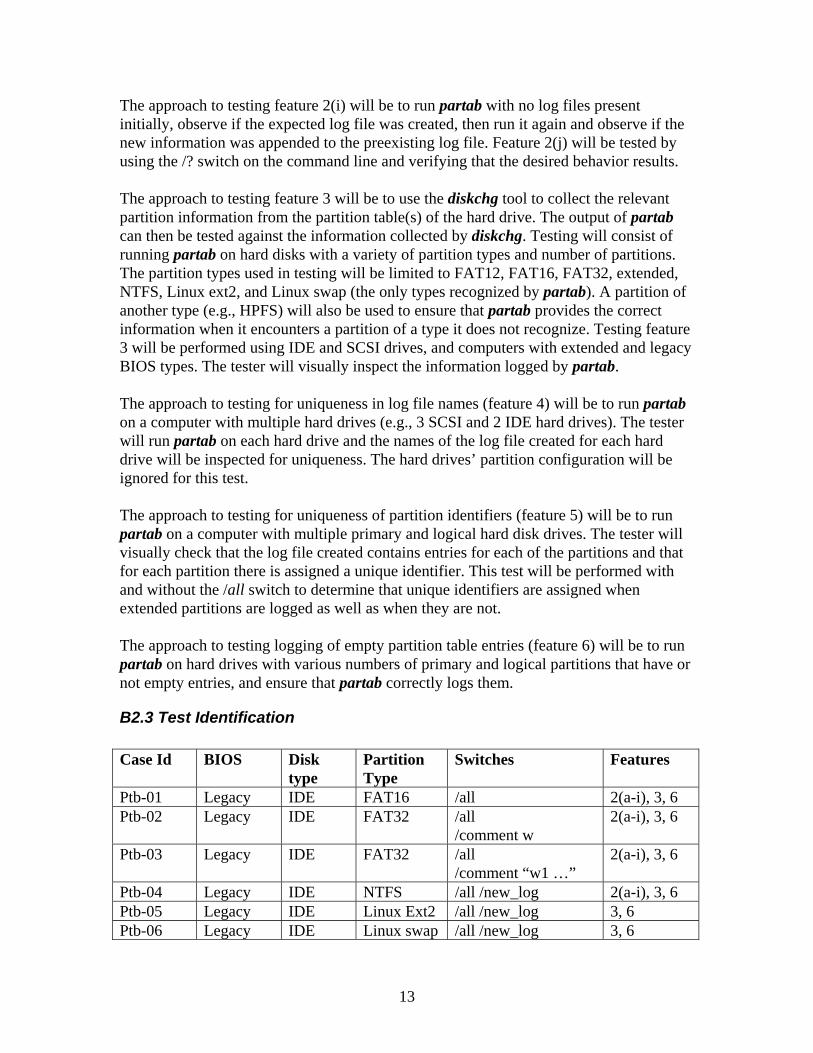
The approach to testing feature 2(i) will be to run partab with no log files present initially, observe if the expected log file was created, then run it again and observe if the new information was appended to the preexisting log file. Feature 2(j) will be tested by using the /? switch on the command line and verifying that the desired behavior results. The approach to testing feature 3 will be to use the diskchg tool to collect the relevant partition information from the partition table(s) of the hard drive. The output of partab can then be tested against the information collected by diskchg. Testing will consist of running partab on hard disks with a variety of partition types and number of partitions. The partition types used in testing will be limited to FAT12, FAT16, FAT32, extended, NTFS, Linux ext2, and Linux swap (the only types recognized by partab). A partition of another type (e.g., HPFS) will also be used to ensure that partab provides the correct information when it encounters a partition of a type it does not recognize. Testing feature 3 will be performed using IDE and SCSI drives, and computers with extended and legacy BIOS types. The tester will visually inspect the information logged by partab. The approach to testing for uniqueness in log file names (feature 4) will be to run partab on a computer with multiple hard drives (e.g., 3 SCSI and 2 IDE hard drives). The tester will run partab on each hard drive and the names of the log file created for each hard drive will be inspected for uniqueness. The hard drives’ partition configuration will be ignored for this test. The approach to testing for uniqueness of partition identifiers (feature 5) will be to run partab on a computer with multiple primary and logical hard disk drives. The tester will visually check that the log file created contains entries for each of the partitions and that for each partition there is assigned a unique identifier. This test will be performed with and without the /all switch to determine that unique identifiers are assigned when extended partitions are logged as well as when they are not. The approach to testing logging of empty partition table entries (feature 6) will be to run partab on hard drives with various numbers of primary and logical partitions that have or not empty entries, and ensure that partab correctly logs them.
B2.3 Test Identification Case Id BIOS Disk
type Partition Type
Switches Features
Ptb-01 Legacy IDE FAT16 /all 2(a-i), 3, 6 Ptb-02 Legacy IDE FAT32 /all
/comment w 2(a-i), 3, 6
Ptb-03 Legacy IDE FAT32 /all /comment “w1 …”
2(a-i), 3, 6
Ptb-04 Legacy IDE NTFS /all /new_log 2(a-i), 3, 6 Ptb-05 Legacy IDE Linux Ext2 /all /new_log 3, 6 Ptb-06 Legacy IDE Linux swap /all /new_log 3, 6
14
Ptb-07 Legacy IDE HPFS /all /new_log 3, 6 Ptb-08 Legacy IDE HPFS
hidden /all /new_log 3, 6
Ptb-09 Legacy IDE n primaries, 1 logical
/all /new_log 3, 6
Ptb-10 Legacy IDE Numerous on 2 disks
/all /new_log 3, 4, 6
Ptb-11 Legacy IDE any /? 2(j) Ptb-12 Legacy IDE 1 primary,
n logical /all /new_log 3, 6
Ptb-13 Extended IDE Large FAT32 primary
/all /new_log 3, 6
Ptb-14 Extended SCSI Linux Ext2 /all /new_log 3, 6 Ptb-15 Extended IDE Large
FAT32 logical
/all /new_log 3, 6
B3 Diskchg Test Design Specification
B3.1 Features to be tested 1. Log the specified hard disk drive. 2. Log the program execution. 3. Allow specification of disk sector addresses in either CHS or LBA format. 4. Set every byte of a specified sector to zero. 5. For a specified sector s, a specified address a (possibly not the same as the specified
sector), a specified disk geometry, and a specified fill value, fill sector s with the contents of a diskwipe style fill using a as the address value for the fill. In other words, set sector s to the contents that diskwipe would use for the sector at location a on a disk with the specified geometry using the specified fill value.
6. For a specified sector, a specified offset within the sector, and a specified value, set the byte at the offset within the sector to the specified value.
7. For a specified hard drive, a specified sector, a specified offset within the sector, and a specified count count, log the contents of count bytes from the specified sector starting at the specified offset.
8. Allow interactive examination of sector contents. 9. Use a different log file name for each function.
B3.2 Approach refinements The approach to testing that diskchg logs hard drives correctly is specified in Section B16 Disk Logging Test Design Specification in this document.
15
The approach to testing feature 2 will be to run diskchg using all possible combinations of command line switches and verifying that the proper information is logged in the log file. The approach to testing feature 3 will be to run diskchg using both CHS and LBA sector addresses for each function, and observing whether the results are identical. The approach to testing feature 4 will be to run diskchg using the /zero switch, then using diskedit and/or diskchg itself to examine the bytes of the specified sector. The approach to testing feature 5 will be to run diskchg using the /fill switch, and specifying different combinations of sector addresses, fill addresses, disk geometries (zero and non-zero number of heads), and fill values. The resulting sector contents will be compared with the contents of the sector at the fill address as written by diskwipe, using diskedit and/or diskchg itself to display those contents. The approach to testing feature 6 will be to run diskchg using the /write switch for different sector addresses, offsets, and values, then examining the byte at that offset within the specified sector by using diskedit and/or diskchg itself. The approach to testing feature 7 will be to run diskchg using the /read switch for different sector addresses, offsets, and counts, then comparing the logged results with the values displayed by diskedit. The approach to testing feature 8 will be to run diskchg using the /exam switch, entering different sector addresses when prompted, and comparing the logged results with those displayed by diskedit and/or those displayed by the function /read of diskchg itself. The approach to testing feature 9 will be to check whether the name of the log file produced by diskchg for each of the functions /read, /exam, /fill, /write, /zero, is unique for that function.
B3.3 Test Identification Case Id BIOS Disk
type Switches Features
Dch-01 Legacy IDE /new_log /comment w /exam LBA addresses
1, 2, 3, 8, 9
Dch-02 Legacy IDE /new_log /comment “w1 …” /exam C/H/S addresses
1, 2, 3, 8
Dch-03 Legacy IDE /new_log /read C/H/S address
1, 2, 3, 7, 9
Dch-04 Legacy IDE /read LBA address 1, 2, 3, 7 Dch-05 Legacy IDE /new_log 1, 2, 7
16
/read offset too large Dch-06 Legacy IDE /new_log
/read length too large 1, 2, 7
Dch-07 Legacy IDE /new_log /read offset+length too large
1, 2, 7
Dch-08 Legacy IDE /new_log /fill no new geometry, then /read
1, 2, 5, 9
Dch-09 Legacy IDE /new_log /fill with new geometry, then /read
1, 2, 5
Dch-10 Legacy IDE /new_log /write, then /read
1, 2, 6, 9
Dch-11 Legacy IDE /new_log /zero, then /read
1, 2, 4, 9
Dch-12 Legacy IDE /? 1, 2 Dch-13 Extended IDE /new_log
/write, then /read 1, 4, 7
Dch-14 Extended SCSI /new_log /zero, then /read
1, 6, 7
B4 Seccmp Test Design Specification
B4.1 Features to be tested 1. Log the specified source drive. 2. Log the specified destination drive 3. Log the program execution. 4. If the sectors to compare are not diskwipe-style filled or zero filled, log any
differences between the source sector and the destination sector. 5. Diskwipe-style filled sectors or zero filled sectors are logged with no need for
comparison. 6. Allow specification of an alternate log file name.
B4.2 Approach refinements The approach to testing that seccmp logs hard drives correctly is specified in Section B16 Disk Logging Test Design Specification in this document. The approach to testing feature 3 will be to run seccmp using different combinations of command line switches and verifying that the proper information is logged in the log file. The approach to testing feature 4 will be to run seccmp using source and destination sectors that are not both diskwipe-style filled or both zero, and checking whether the differences are logged.

17
The approach to testing feature 5 will be to run seccmpusing source and destination sectors that are both diskwipe style filled or zero filled, and check whether they are logged without comparison. The approach to testing feature 6 will be to run seccmp using the /log switch followed by an alternate log file name.
B4.3 Test Identification Case Id BIOS Disk
type Switches Features
Scp-01 Legacy IDE /new_log /comment w /sector
1, 2, 3
Scp-02 Legacy IDE /comment “w1 …” /sector 1, 2, 3 Scp-03 Legacy IDE /new_log /sector 1, 2, 3 Scp-04 Legacy IDE /comment /log /sector 1, 2, 3, 6 Scp-05 Legacy IDE /new_log /sector
s1=diskwipe, s2=diskwipe, same fill including headers
4, 5
Scp-06 Legacy IDE /new_log /sector s1=diskwipe, s2=diskwipe, same fill excluding headers
4, 5
Scp-07 Legacy IDE /new_log /sector s1=diskwipe, s2=zero
4, 5
Scp-08 Legacy IDE /new_log /sector s1=diskwipe, s2!=zero,diskwipe
4, 5
Scp-09 Legacy IDE /new_log /sector s1=zero, s2=zero
4, 5
Scp-10 Legacy IDE /new_log /sector s1=zero, s2!=zero, diskwipe
4, 5
Scp-11 Legacy IDE /new_log /sector s1, s2 != zero, diskwipe, s1==s2
4, 5
Scp-12 Legacy IDE /new_log /sector s1, s2 != zero, diskwipe, s1!=s2
4, 5
Scp-13 Legacy IDE /?
B5 Seccopy Test Design Specification
B5.1 Features to be tested 1. Log the specified source drive. 2. Log the specified destination drive. 3. Log the program execution.

18
4. For a specified count, source disk starting address, and a destination disk starting address, copy count sectors from the source to the destination.
B5.2 Approach refinements The approach to testing that seccopy logs hard drives correctly is specified in Section B16 Disk Logging Test Design Specification in this document. The approach to testing feature 3 will be to run seccopy using different combinations of command line switches and verifying that the proper information is logged in the log file. The approach to testing feature 4 will be to run seccopy using various counts, source and destination sector addresses, checking whether seccopy’s action is consistent with the arguments (for example, one cannot copy 3 sectors starting with the last sector of a disk), whether the copy is indeed a copy, and whether the result is logged correctly.
B5.3 Test Identification Case Id BIOS Disk
type Arguments Features
Scy-01 Legacy IDE /comment w source, dst=first sectors
1, 2, 3, 4
Scy-02 Legacy IDE /comment “w1 …” source, dst=last sectors
1, 2, 3, 4
Scy-03 Legacy IDE /new_log source, dst=almost last sectors
1, 2, 3, 4
Scy-04 Legacy IDE /new_log, dst=last sectors 3, 4 Scy-05 Legacy IDE /new_log, dst count too large 3, 4 Scy-06 Legacy IDE /new_log, dst address too
large 3, 4
Scy-07 Legacy IDE /new_log, src address too large
3, 4
Scy-08 Legacy IDE /new_log, src count too large 3, 4 Scy-09 Legacy IDE /? 3
B6 Baddisk Test Design Specification
B6.1 Features to be tested 1. For a specified disk address, specified disk I/O command, and error code value,
monitor disk I/O requests. Intercept any attempts to execute the specified disk I/O command on the specified disk address and return the specified error code value.
2. Log the command parameters and the current date and time to stdout.
19
B6.2 Approach refinements The approach to testing feature 1 is to run baddisk on computers with legacy BIOS and IDE disks for different disk addresses and I/O commands, and then run different DOS commands/tools (like diskedit, diskchg, seccopy) on sectors with those disk addresses and observe whether the selected utility program returns the correct error code. The approach to testing feature 2 will be to run baddisk with different arguments and examine its output on the stdout.
B6.3 Test Identification Case Id BIOS Disk
type Action Features
Bdk-01 Legacy IDE Mark sector bad for write; show diskchg can read but not write sector.
1, 2
Bdk-02 Legacy IDE Mark sector bad for read; show diskchg can’t read sector, but can zero it.
1, 2
Bdk-03 Legacy IDE Mark multiple sectors bad for read and/or write; show diskchg can’t read and/or write any marked sector.
1, 2
Bdk-04 Legacy IDE Use address outside disk range.
1, 2
B7 Partcmp Test Design Specification
B7.1 Features to be tested 1. Log the specified source drive. 2. Log the specified destination drive. 3. Log the program execution. 4. Log the comparison between the source partition and the destination partition.
B7.2 Approach refinements The approach to testing that partcmp logs hard drives correctly is specified in Section B16 Disk Logging Test Design Specification in this document. The approach to testing feature 3 will be to run partcmp using different combinations of command line switches and verifying that the proper information is logged in the log file. The approach to testing feature 4 will be to run partcmp using various source and destination partitions, with different or equal sizes and the same or different contents, on IDE/SCSI hard drives, and checking the reported differences against the known ones. In
20
general, in the setup of each test case, it will copy the smaller partition onto the larger one and modify a few predetermined sectors of the copy. The test case will perform the comparison and check the results.
B7.3 Test Identification Case Id BIOS Disk
type Arguments Features
Pcp-01 Legacy IDE Source, dest: primary FAT32; source < destination; same contents on the smaller length; /comment w; interactive partition selection.
1, 2, 3, 4
Pcp-02 Legacy IDE Source, dest: primary FAT32; source < destination; same contents on the smaller length, except a few sectors; /comment “w1 …”; /select append the log.
1, 2, 3, 4
Pcp-03 Legacy IDE Source, dest: primary FAT32; source < destination; /new_log /select /boot interactive comment.
1, 2, 3, 4
Pcp-04 Legacy IDE Source: primary linux ext2; destination: primary FAT32; source > destination ; /new_log /select
1, 2, 3, 4
Pcp-05 Legacy IDE /new_log /select with inexistent partition(s).
1, 2, 3, 4
Pcp-06 Extended IDE Source, dest.: primary FAT32; source length = destination length; same contents; /new_log
1, 2, 3, 4
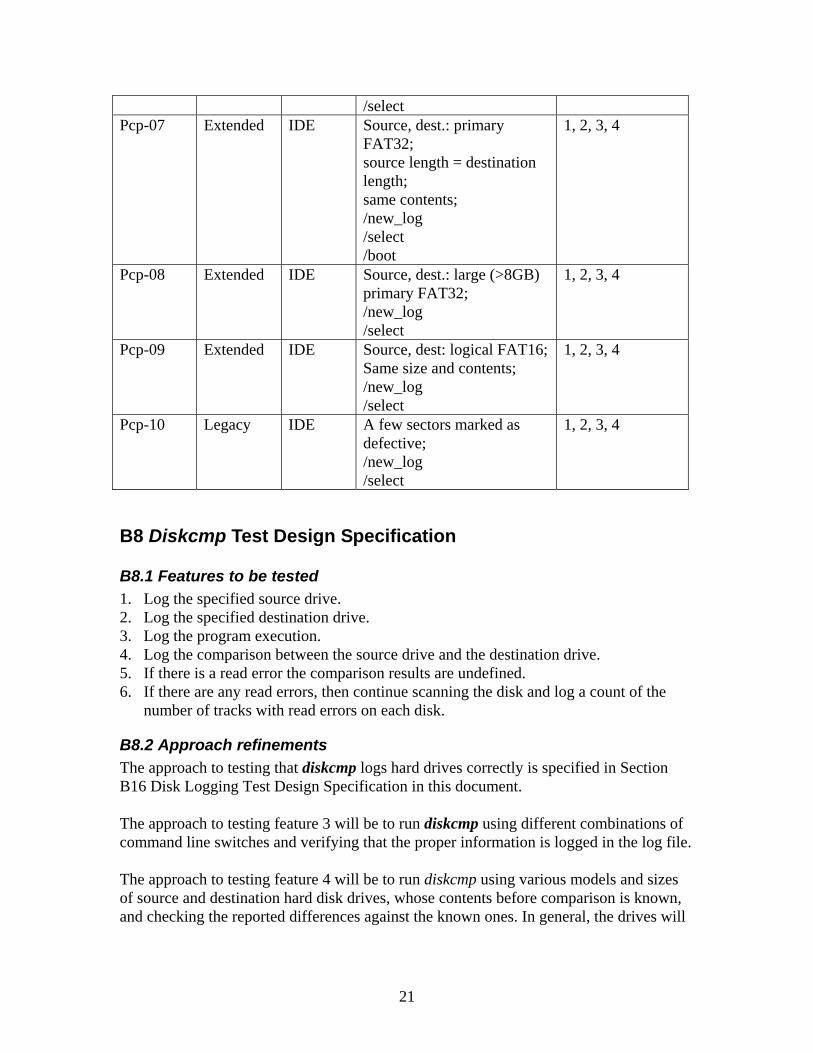
21
/select Pcp-07 Extended IDE Source, dest.: primary
FAT32; source length = destination length; same contents; /new_log /select /boot
1, 2, 3, 4
Pcp-08 Extended IDE Source, dest.: large (>8GB) primary FAT32; /new_log /select
1, 2, 3, 4
Pcp-09 Extended IDE Source, dest: logical FAT16; Same size and contents; /new_log /select
1, 2, 3, 4
Pcp-10 Legacy IDE A few sectors marked as defective; /new_log /select
1, 2, 3, 4
B8 Diskcmp Test Design Specification
B8.1 Features to be tested 1. Log the specified source drive. 2. Log the specified destination drive. 3. Log the program execution. 4. Log the comparison between the source drive and the destination drive. 5. If there is a read error the comparison results are undefined. 6. If there are any read errors, then continue scanning the disk and log a count of the
number of tracks with read errors on each disk.
B8.2 Approach refinements The approach to testing that diskcmp logs hard drives correctly is specified in Section B16 Disk Logging Test Design Specification in this document. The approach to testing feature 3 will be to run diskcmp using different combinations of command line switches and verifying that the proper information is logged in the log file. The approach to testing feature 4 will be to run diskcmp using various models and sizes of source and destination hard disk drives, whose contents before comparison is known, and checking the reported differences against the known ones. In general, the drives will
22
be prepared for comparison by copying the smaller one onto the bigger one, and modifying sectors at predetermined addresses.
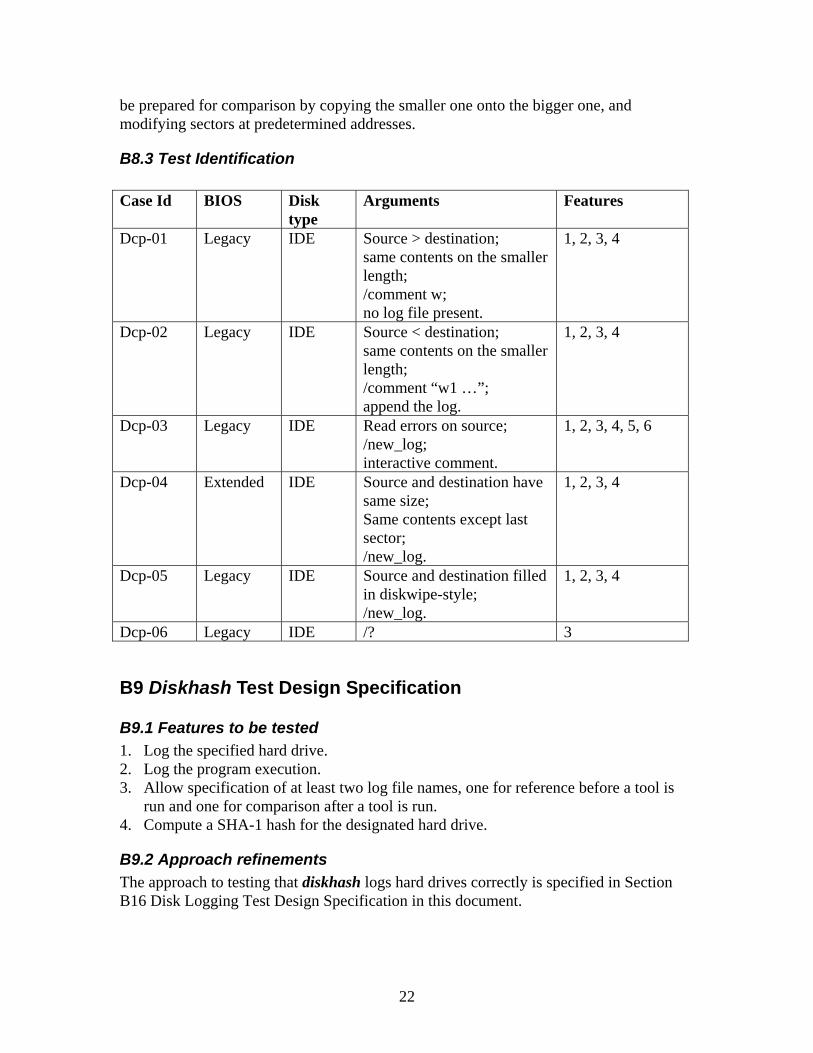
B8.3 Test Identification Case Id BIOS Disk
type Arguments Features
Dcp-01 Legacy IDE Source > destination; same contents on the smaller length; /comment w; no log file present.
1, 2, 3, 4
Dcp-02 Legacy IDE Source < destination; same contents on the smaller length; /comment “w1 …”; append the log.
1, 2, 3, 4
Dcp-03 Legacy IDE Read errors on source; /new_log; interactive comment.
1, 2, 3, 4, 5, 6
Dcp-04 Extended IDE Source and destination have same size; Same contents except last sector; /new_log.
1, 2, 3, 4
Dcp-05 Legacy IDE Source and destination filled in diskwipe-style; /new_log.
1, 2, 3, 4
Dcp-06 Legacy IDE /? 3
B9 Diskhash Test Design Specification
B9.1 Features to be tested 1. Log the specified hard drive. 2. Log the program execution. 3. Allow specification of at least two log file names, one for reference before a tool is
run and one for comparison after a tool is run. 4. Compute a SHA-1 hash for the designated hard drive.
B9.2 Approach refinements The approach to testing that diskhash logs hard drives correctly is specified in Section B16 Disk Logging Test Design Specification in this document.

23
The approach to testing feature 2 will be to run diskhash using different combinations of command line switches and verifying that the proper information is logged in the log file. The approach to testing feature 3 will be to run diskhash using either /before or /after switches and checking that diskhash creates logfiles with proper names as specified in the tool documentation. The approach to testing feature 4 is to run diskhash on various models of hard disk drives, checking whether: (a) it consistently computes the same hash value for the same disk contents; (b) two computed hash values are different even when the disk contents differ by a single bit; (c) the computed hash values coincide with those computed by another tool, namely by Linux’ sha1sum.
B9.3 Test Identification Case Id BIOS Disk
type Case Parameters Features
Dhs-01 Legacy IDE Use /before. Use /comment with one-word comment. No log file present.
1, 2, 3.
Dhs-02 Legacy IDE Use /after. Use /comment with multi-word comment. Use same disk as in Dhs-01 with one byte modified.
1, 2, 3, partially 4.
Dhs-03 Legacy IDE Use /after. Do not use /comment. Do not delete previous log file. Use same disk as in Dhs-02 without modifications.
1, 2, 3, partially 4.
Dhs-04 Legacy IDE Use /after. Use /new_log. Use same disk as in Dhs-03 with one bit in the last byte modified.
1, 2, 3, partially 4
Dhs-05 Extended IDE Use /before. Use /new_log. Compare to sha1sum result.
1, 2, 3, 4
Dhs-06 Extended SCSI Use /before. Use /new_log. Compare to sha1sum result.
1, 2, 3, 4

24
Dhs-07 Legacy IDE Use /before. Use /new_log. Compare with sha1sum result.
1, 2, 3, 4
DHS-08 Any Any /? 2
B10 Badx13 Test Design Specification
B10.1 Features to be tested Badx13 is a version of baddisk for PCs with extended BIOS. Consequently, the following features will be tested on PCs with extended BIOS: 1. For a specified disk address, specified disk I/O command, and error code value,
monitor disk I/O requests. Intercept any attempts to execute the specified disk I/O command on the specified disk address and return the specified error code value.
2. Log the command parameters and the current date and time to stdout. However, it would be interesting to test whether badx13 detects the BIOS type and/or warns the user in case of a legacy BIOS.
B10.2 Approach refinements The approach to testing feature 1 is to run badx13 on computers with extended BIOS and IDE disks for different disk addresses and I/O commands, and then run different DOS commands/tools (like diskedit, diskchg, seccopy) on sectors with those disk addresses and observe whether the selected utility program returns the correct error code. The approach to testing feature 2 will be to run baddisk with different arguments and examine its output on the stdout. Also tested will be to verify whether badx13 detects a legacy BIOS.
B10.3 Test Identification Case Id BIOS Disk
type Action Features
Bdx-01 Extended IDE Simulate write error on first disk sector. Show diskchg can read but not write sector.
1, 2
Bdx-02 Extended IDE Simulate read error on last disk sector. Show diskchg can write but not read sector.
1, 2
Bdx-03 Extended IDE Simulate read error on first disk sector. Show diskchg cannot read first sector, but can read next sectors.
1, 2

25
Bdx-04 Extended SCSI Simulate write error on first disk sector. Show diskchg can read but not write sector.
1, 2
Bdx-05 Extended SCSI Simulate read error on last disk sector. Show diskchg can write but not read sector.
1, 2
Bdx-06 Extended SCSI Simulate read error on first disk sector. Show diskchg cannot read first sector, but can read next sectors.
1, 2
Bdx-07 Extended IDE Simulate read/write error on multiple sectors installing badx13 as TSR multiple times.
1, 2
Bdx-08 Extended IDE Test whether badx13 detects a LBA address outside the correct range.
Bdx-09 Legacy IDE Test whether badx13 detects a legacy BIOS.
B11 Corrupt Test Design Specification
B11.1 Features to be tested 1. Log the program execution. 2. Change a specified byte at a specified location in a specified file to a specified value. 3. Log the original value at the specified location. 4. Log the new value at the specified location.
B11.2 Approach refinements The approach to testing feature 1 will be to run corrupt using different combinations of command line switches and verifying that the proper information is logged in the log file. The /comment switch is used to verify that corrupt accepts one-word or multi-word comments on the command line.will omit the /comment switch to verify that corrupt prompts the user for a comment during execution. The test will launch corrupt in the absence of any log file and without the /new_log switch, to verify that the tool creates a new log file. The test will launch corrupt in the presence of a previous log file and omitting the /new_log switch, to verify that the tool appends the log to that log file. The test will launch corrupt in the presence of a previous log file and using the /new_log switch, to verify that the tool creates a new log file. Also, the test will examine whether corrupt displays its usage mode when prompted by the /? switch. Regarding features 2, 3, and 4, the test will specify valid offsets in the image file, and observe whether corrupt alters the byte at the specified offset and logs the original and new value. To test that the tool only alters the desired byte, the test will make a reference
26
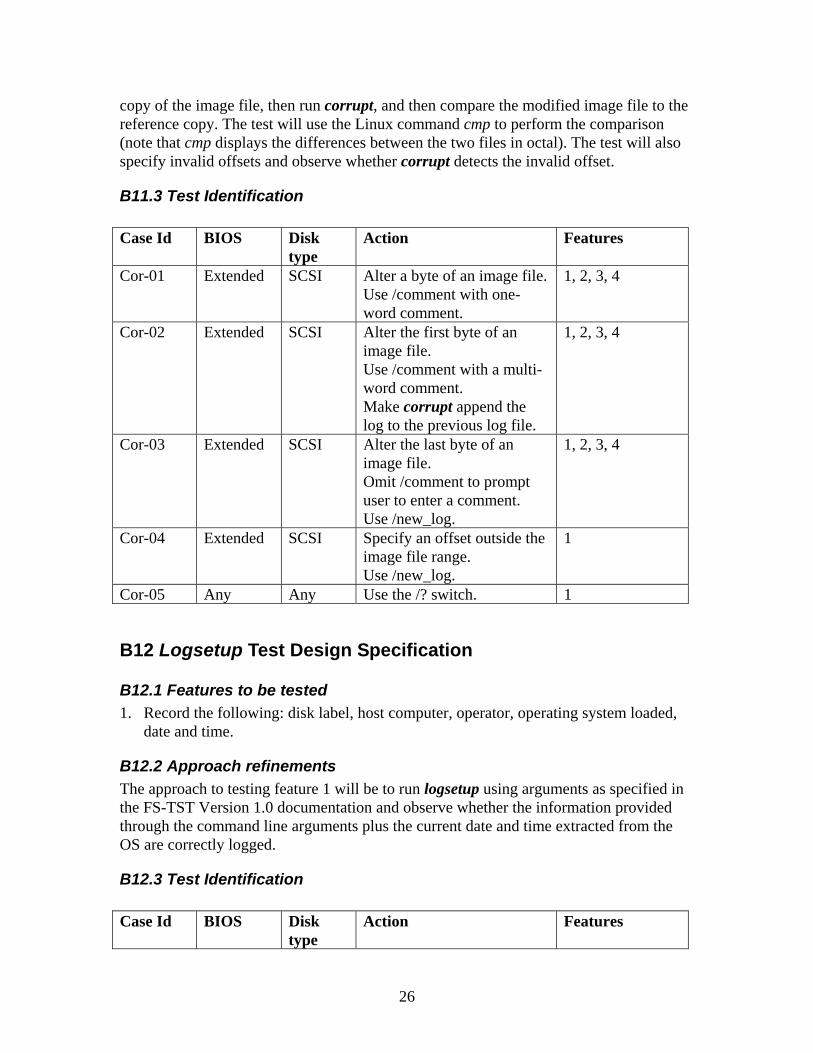
copy of the image file, then run corrupt, and then compare the modified image file to the reference copy. The test will use the Linux command cmp to perform the comparison (note that cmp displays the differences between the two files in octal). The test will also specify invalid offsets and observe whether corrupt detects the invalid offset.
B11.3 Test Identification Case Id BIOS Disk
type Action Features
Cor-01 Extended SCSI Alter a byte of an image file. Use /comment with one-word comment.
1, 2, 3, 4
Cor-02 Extended SCSI Alter the first byte of an image file. Use /comment with a multi-word comment. Make corrupt append the log to the previous log file.
1, 2, 3, 4
Cor-03 Extended SCSI Alter the last byte of an image file. Omit /comment to prompt user to enter a comment. Use /new_log.
1, 2, 3, 4
Cor-04 Extended SCSI Specify an offset outside the image file range. Use /new_log.
1
Cor-05 Any Any Use the /? switch. 1
B12 Logsetup Test Design Specification
B12.1 Features to be tested 1. Record the following: disk label, host computer, operator, operating system loaded,
date and time.
B12.2 Approach refinements The approach to testing feature 1 will be to run logsetup using arguments as specified in the FS-TST Version 1.0 documentation and observe whether the information provided through the command line arguments plus the current date and time extracted from the OS are correctly logged.
B12.3 Test Identification Case Id BIOS Disk
type Action Features
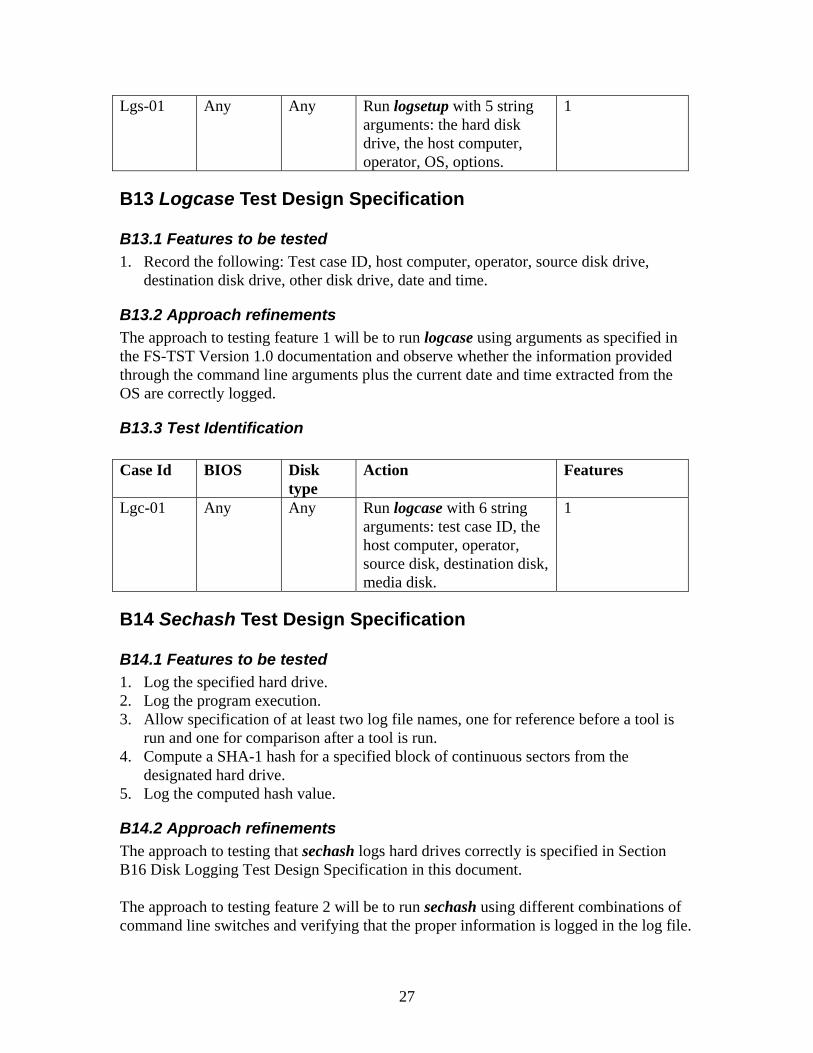
27
Lgs-01 Any Any Run logsetup with 5 string arguments: the hard disk drive, the host computer, operator, OS, options.
1
B13 Logcase Test Design Specification
B13.1 Features to be tested 1. Record the following: Test case ID, host computer, operator, source disk drive,
destination disk drive, other disk drive, date and time.
B13.2 Approach refinements The approach to testing feature 1 will be to run logcase using arguments as specified in the FS-TST Version 1.0 documentation and observe whether the information provided through the command line arguments plus the current date and time extracted from the OS are correctly logged.
B13.3 Test Identification Case Id BIOS Disk
type Action Features
Lgc-01 Any Any Run logcase with 6 string arguments: test case ID, the host computer, operator, source disk, destination disk, media disk.
1
B14 Sechash Test Design Specification
B14.1 Features to be tested 1. Log the specified hard drive. 2. Log the program execution. 3. Allow specification of at least two log file names, one for reference before a tool is
run and one for comparison after a tool is run. 4. Compute a SHA-1 hash for a specified block of continuous sectors from the
designated hard drive. 5. Log the computed hash value.
B14.2 Approach refinements The approach to testing that sechash logs hard drives correctly is specified in Section B16 Disk Logging Test Design Specification in this document. The approach to testing feature 2 will be to run sechash using different combinations of command line switches and verifying that the proper information is logged in the log file.
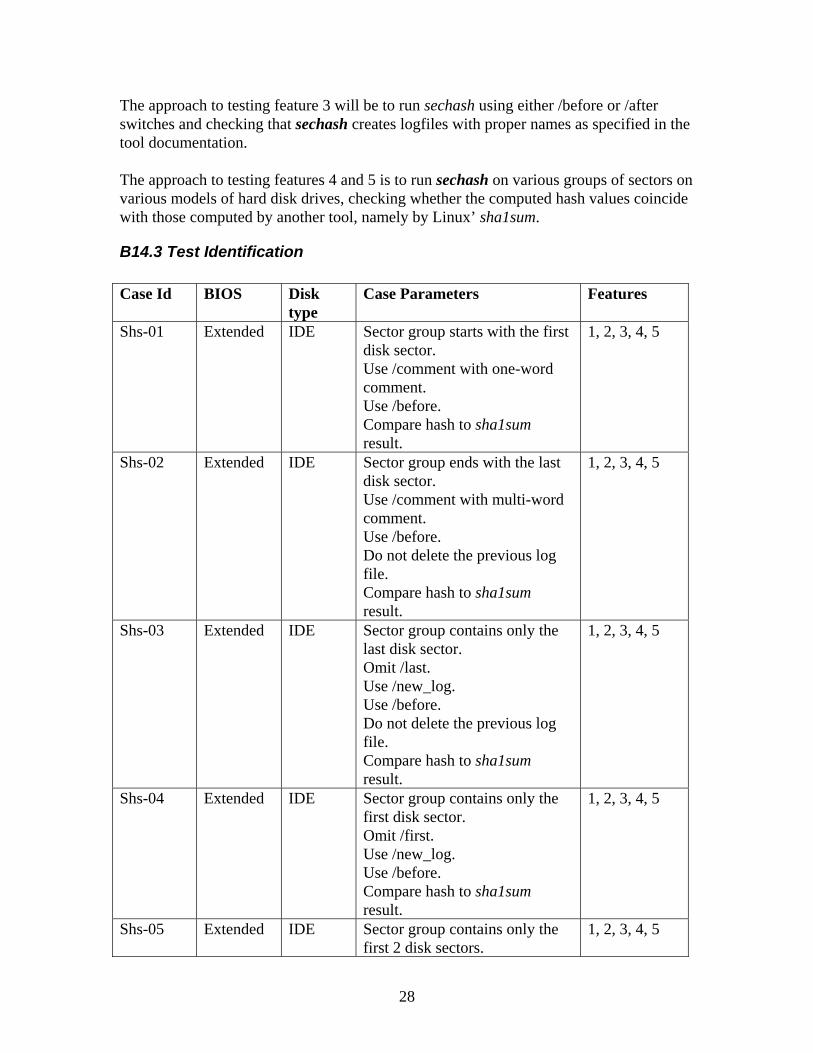
28
The approach to testing feature 3 will be to run sechash using either /before or /after switches and checking that sechash creates logfiles with proper names as specified in the tool documentation. The approach to testing features 4 and 5 is to run sechash on various groups of sectors on various models of hard disk drives, checking whether the computed hash values coincide with those computed by another tool, namely by Linux’ sha1sum.
B14.3 Test Identification Case Id BIOS Disk
type Case Parameters Features
Shs-01 Extended IDE Sector group starts with the first disk sector. Use /comment with one-word comment. Use /before. Compare hash to sha1sum result.
1, 2, 3, 4, 5
Shs-02 Extended IDE Sector group ends with the last disk sector. Use /comment with multi-word comment. Use /before. Do not delete the previous log file. Compare hash to sha1sum result.
1, 2, 3, 4, 5
Shs-03 Extended IDE Sector group contains only the last disk sector. Omit /last. Use /new_log. Use /before. Do not delete the previous log file. Compare hash to sha1sum result.
1, 2, 3, 4, 5
Shs-04 Extended IDE Sector group contains only the first disk sector. Omit /first. Use /new_log. Use /before. Compare hash to sha1sum result.
1, 2, 3, 4, 5
Shs-05 Extended IDE Sector group contains only the first 2 disk sectors.
1, 2, 3, 4, 5
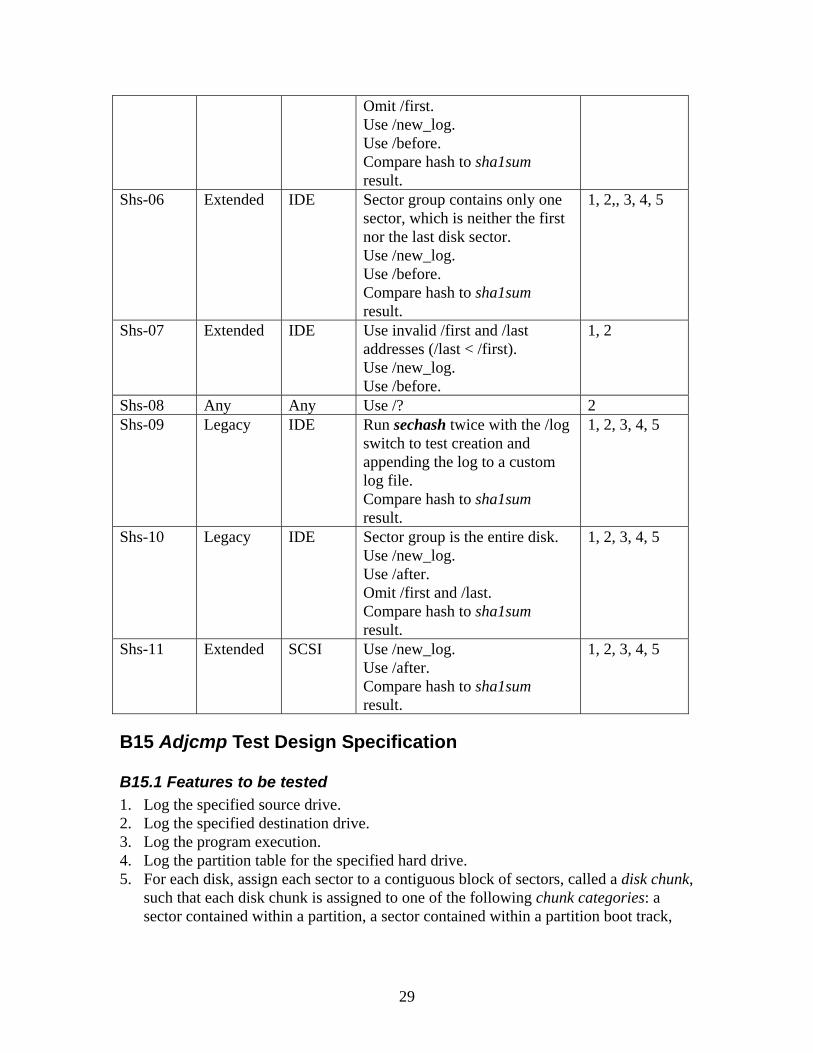
29
Omit /first. Use /new_log. Use /before. Compare hash to sha1sum result.
Shs-06 Extended IDE Sector group contains only one sector, which is neither the first nor the last disk sector. Use /new_log. Use /before. Compare hash to sha1sum result.
1, 2,, 3, 4, 5
Shs-07 Extended IDE Use invalid /first and /last addresses (/last < /first). Use /new_log. Use /before.
1, 2
Shs-08 Any Any Use /? 2 Shs-09 Legacy IDE Run sechash twice with the /log
switch to test creation and appending the log to a custom log file. Compare hash to sha1sum result.
1, 2, 3, 4, 5
Shs-10 Legacy IDE Sector group is the entire disk. Use /new_log. Use /after. Omit /first and /last. Compare hash to sha1sum result.
1, 2, 3, 4, 5
Shs-11 Extended SCSI Use /new_log. Use /after. Compare hash to sha1sum result.
1, 2, 3, 4, 5
B15 Adjcmp Test Design Specification
B15.1 Features to be tested 1. Log the specified source drive. 2. Log the specified destination drive. 3. Log the program execution. 4. Log the partition table for the specified hard drive. 5. For each disk, assign each sector to a contiguous block of sectors, called a disk chunk,
such that each disk chunk is assigned to one of the following chunk categories: a sector contained within a partition, a sector contained within a partition boot track,
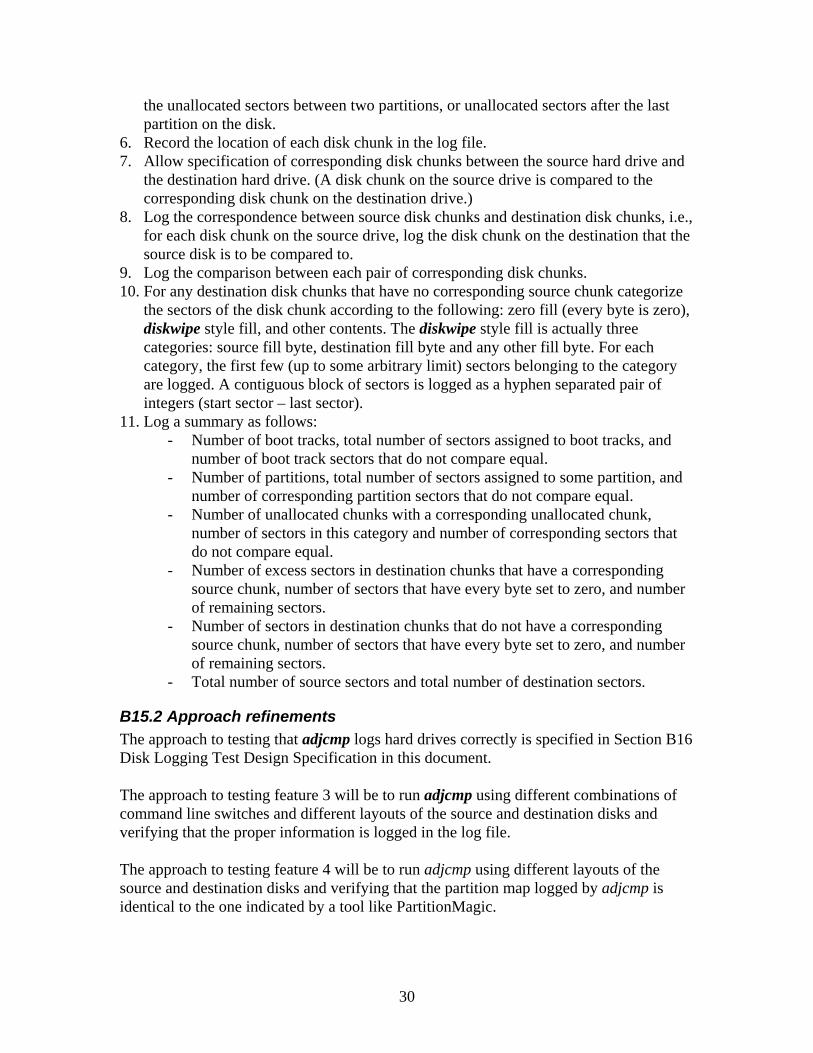
30
the unallocated sectors between two partitions, or unallocated sectors after the last partition on the disk.
6. Record the location of each disk chunk in the log file. 7. Allow specification of corresponding disk chunks between the source hard drive and
the destination hard drive. (A disk chunk on the source drive is compared to the corresponding disk chunk on the destination drive.)
8. Log the correspondence between source disk chunks and destination disk chunks, i.e., for each disk chunk on the source drive, log the disk chunk on the destination that the source disk is to be compared to.
9. Log the comparison between each pair of corresponding disk chunks. 10. For any destination disk chunks that have no corresponding source chunk categorize
the sectors of the disk chunk according to the following: zero fill (every byte is zero), diskwipe style fill, and other contents. The diskwipe style fill is actually three categories: source fill byte, destination fill byte and any other fill byte. For each category, the first few (up to some arbitrary limit) sectors belonging to the category are logged. A contiguous block of sectors is logged as a hyphen separated pair of integers (start sector – last sector).
11. Log a summary as follows: - Number of boot tracks, total number of sectors assigned to boot tracks, and
number of boot track sectors that do not compare equal. - Number of partitions, total number of sectors assigned to some partition, and
number of corresponding partition sectors that do not compare equal. - Number of unallocated chunks with a corresponding unallocated chunk,
number of sectors in this category and number of corresponding sectors that do not compare equal.
- Number of excess sectors in destination chunks that have a corresponding source chunk, number of sectors that have every byte set to zero, and number of remaining sectors.
- Number of sectors in destination chunks that do not have a corresponding source chunk, number of sectors that have every byte set to zero, and number of remaining sectors.
- Total number of source sectors and total number of destination sectors.
B15.2 Approach refinements The approach to testing that adjcmp logs hard drives correctly is specified in Section B16 Disk Logging Test Design Specification in this document. The approach to testing feature 3 will be to run adjcmp using different combinations of command line switches and different layouts of the source and destination disks and verifying that the proper information is logged in the log file. The approach to testing feature 4 will be to run adjcmp using different layouts of the source and destination disks and verifying that the partition map logged by adjcmp is identical to the one indicated by a tool like PartitionMagic.

31
The approach to testing feature 5, 6 will be to run adjcmp using different disk layouts, and verifying that adjcmp correctly distinguishes and categorizes the disk chunks cf. to the definition of a disk chunk in feature 5. Also, that adjcmp logs correctly the location of each chunk. The test will use a tool like PartitionMagic to identify the chunks independently. The approach to testing feature 7 is to run adjcmp using the /assign switch on the command line and to observe whether adjcmp allows the user to interactively assign source chunks to destination chunks. The approach to testing feature 8 is to run adjcmp using automatic or interactive chunk assignment on different disk layouts and observing whether the chunk assignment is correctly reported. The approach to testing feature 9 is to run adjcmp using corresponding source and destination chunks whose characteristics are known (for example, with the sector contents known, being set up a priori by using a tool like diskchg or a commercial disk editor), then comparing the report to known statistics about the chunks. The approach to testing feature 10 is to set up the disk layouts such that the destination disk has chunks that do not correspond to any source chunk, then set up the sector contents of such a chunk using diskwipe or diskchg or a commercial disk editor. Then run adjcmp and compare the report about that destination chunks with what the test already know about them. The approach to testing feature 11 is to examine the adjcmp report and to compare the summary to data about the disks and disk chunks extracted from other information sources, such as PartitionMagic, disk editors, diskchg, or diskwipe.
B15.3 Test Identification Case Id BIOS Disk
type Action Features
Acp-01 Legacy IDE Create multiple primary partitions on each disk and use auto assignment of chunks such that the test will have both cases src chunk < dest chunk and src chunk > dest chunk. Delete all previous log files. Use /comment with one-word comment.
1-6, 8-11
Acp-02 Legacy IDE Use the disk layout of case Acp-01. Use /new_log to test
1-6
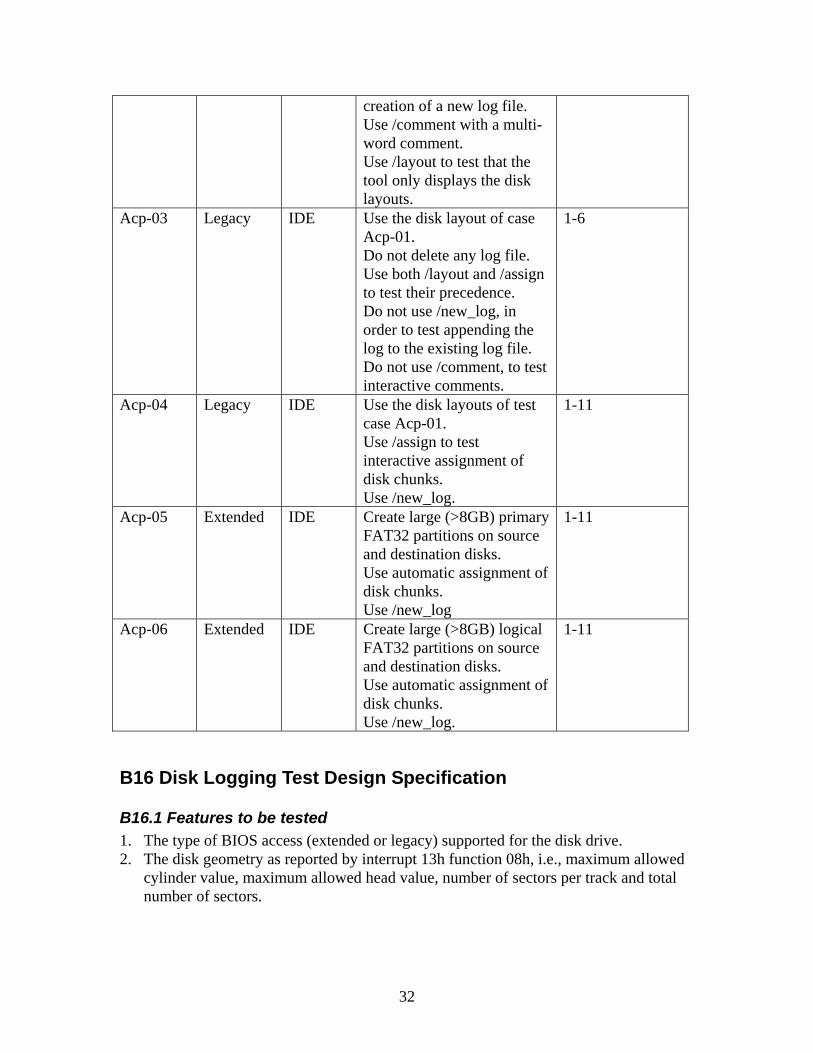
32
creation of a new log file. Use /comment with a multi-word comment. Use /layout to test that the tool only displays the disk layouts.
Acp-03 Legacy IDE Use the disk layout of case Acp-01. Do not delete any log file. Use both /layout and /assign to test their precedence. Do not use /new_log, in order to test appending the log to the existing log file. Do not use /comment, to test interactive comments.
1-6
Acp-04 Legacy IDE Use the disk layouts of test case Acp-01. Use /assign to test interactive assignment of disk chunks. Use /new_log.
1-11
Acp-05 Extended IDE Create large (>8GB) primary FAT32 partitions on source and destination disks. Use automatic assignment of disk chunks. Use /new_log
1-11
Acp-06 Extended IDE Create large (>8GB) logical FAT32 partitions on source and destination disks. Use automatic assignment of disk chunks. Use /new_log.
1-11
B16 Disk Logging Test Design Specification
B16.1 Features to be tested 1. The type of BIOS access (extended or legacy) supported for the disk drive. 2. The disk geometry as reported by interrupt 13h function 08h, i.e., maximum allowed
cylinder value, maximum allowed head value, number of sectors per track and total number of sectors.
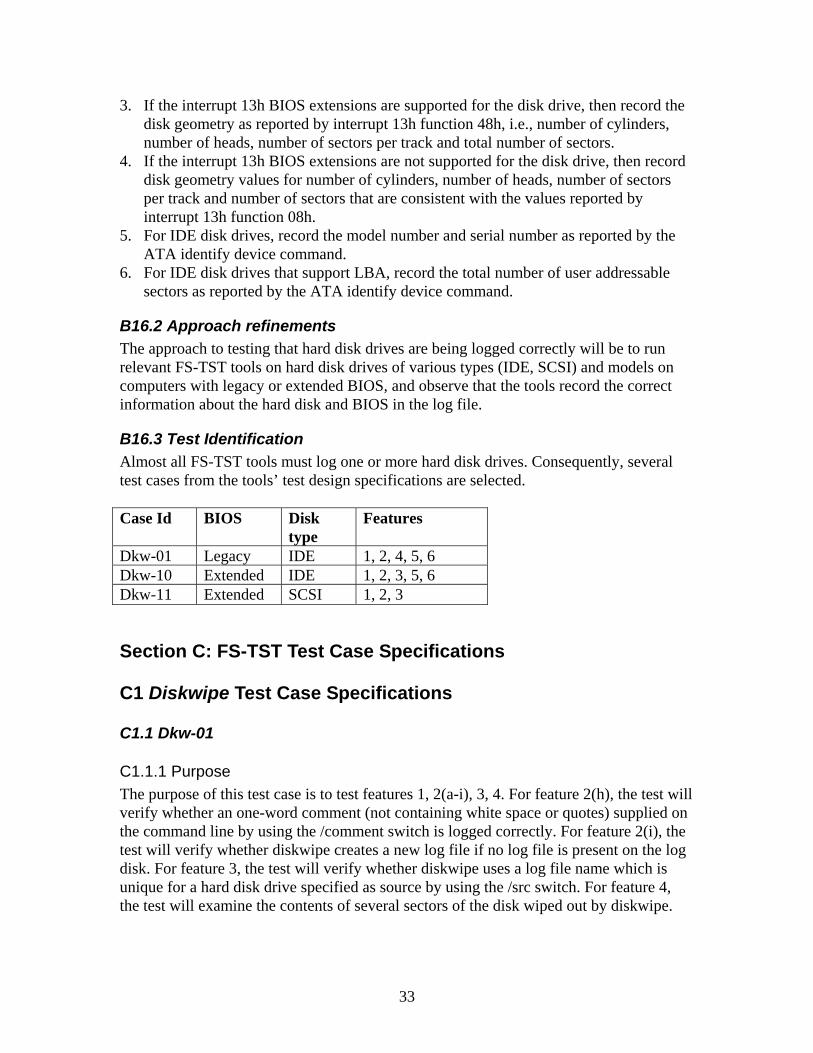
33
3. If the interrupt 13h BIOS extensions are supported for the disk drive, then record the disk geometry as reported by interrupt 13h function 48h, i.e., number of cylinders, number of heads, number of sectors per track and total number of sectors.
4. If the interrupt 13h BIOS extensions are not supported for the disk drive, then record disk geometry values for number of cylinders, number of heads, number of sectors per track and number of sectors that are consistent with the values reported by interrupt 13h function 08h.
5. For IDE disk drives, record the model number and serial number as reported by the ATA identify device command.
6. For IDE disk drives that support LBA, record the total number of user addressable sectors as reported by the ATA identify device command.
B16.2 Approach refinements The approach to testing that hard disk drives are being logged correctly will be to run relevant FS-TST tools on hard disk drives of various types (IDE, SCSI) and models on computers with legacy or extended BIOS, and observe that the tools record the correct information about the hard disk and BIOS in the log file.
B16.3 Test Identification Almost all FS-TST tools must log one or more hard disk drives. Consequently, several test cases from the tools’ test design specifications are selected. Case Id BIOS Disk
type Features
Dkw-01 Legacy IDE 1, 2, 4, 5, 6 Dkw-10 Extended IDE 1, 2, 3, 5, 6 Dkw-11 Extended SCSI 1, 2, 3
Section C: FS-TST Test Case Specifications
C1 Diskwipe Test Case Specifications
C1.1 Dkw-01
C1.1.1 Purpose The purpose of this test case is to test features 1, 2(a-i), 3, 4. For feature 2(h), the test will verify whether an one-word comment (not containing white space or quotes) supplied on the command line by using the /comment switch is logged correctly. For feature 2(i), the test will verify whether diskwipe creates a new log file if no log file is present on the log disk. For feature 3, the test will verify whether diskwipe uses a log file name which is unique for a hard disk drive specified as source by using the /src switch. For feature 4, the test will examine the contents of several sectors of the disk wiped out by diskwipe.
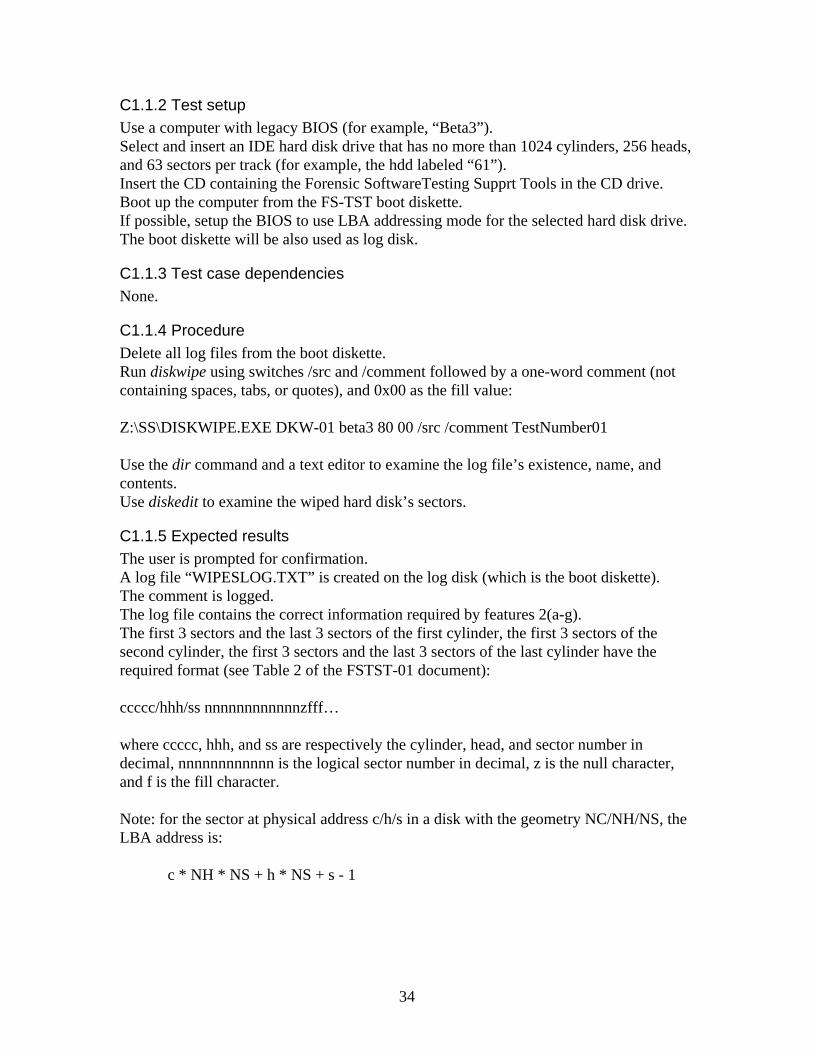
34
C1.1.2 Test setup Use a computer with legacy BIOS (for example, “Beta3”). Select and insert an IDE hard disk drive that has no more than 1024 cylinders, 256 heads, and 63 sectors per track (for example, the hdd labeled “61”). Insert the CD containing the Forensic SoftwareTesting Supprt Tools in the CD drive. Boot up the computer from the FS-TST boot diskette. If possible, setup the BIOS to use LBA addressing mode for the selected hard disk drive. The boot diskette will be also used as log disk.
C1.1.3 Test case dependencies None.
C1.1.4 Procedure Delete all log files from the boot diskette. Run diskwipe using switches /src and /comment followed by a one-word comment (not containing spaces, tabs, or quotes), and 0x00 as the fill value: Z:\SS\DISKWIPE.EXE DKW-01 beta3 80 00 /src /comment TestNumber01 Use the dir command and a text editor to examine the log file’s existence, name, and contents. Use diskedit to examine the wiped hard disk’s sectors.
C1.1.5 Expected results The user is prompted for confirmation. A log file “WIPESLOG.TXT” is created on the log disk (which is the boot diskette). The comment is logged. The log file contains the correct information required by features 2(a-g). The first 3 sectors and the last 3 sectors of the first cylinder, the first 3 sectors of the second cylinder, the first 3 sectors and the last 3 sectors of the last cylinder have the required format (see Table 2 of the FSTST-01 document): ccccc/hhh/ss nnnnnnnnnnnnzfff… where ccccc, hhh, and ss are respectively the cylinder, head, and sector number in decimal, nnnnnnnnnnnn is the logical sector number in decimal, z is the null character, and f is the fill character. Note: for the sector at physical address c/h/s in a disk with the geometry NC/NH/NS, the LBA address is: c * NH * NS + h * NS + s - 1
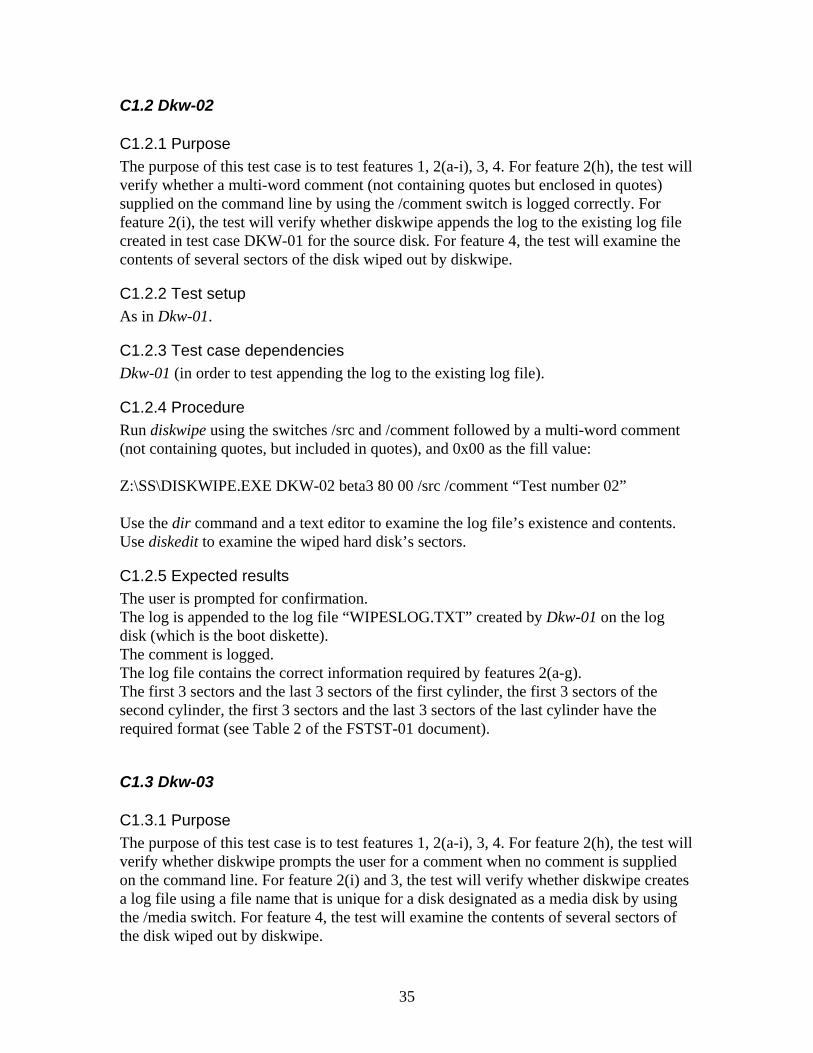
35
C1.2 Dkw-02
C1.2.1 Purpose The purpose of this test case is to test features 1, 2(a-i), 3, 4. For feature 2(h), the test will verify whether a multi-word comment (not containing quotes but enclosed in quotes) supplied on the command line by using the /comment switch is logged correctly. For feature 2(i), the test will verify whether diskwipe appends the log to the existing log file created in test case DKW-01 for the source disk. For feature 4, the test will examine the contents of several sectors of the disk wiped out by diskwipe.
C1.2.2 Test setup As in Dkw-01.
C1.2.3 Test case dependencies Dkw-01 (in order to test appending the log to the existing log file).
C1.2.4 Procedure Run diskwipe using the switches /src and /comment followed by a multi-word comment (not containing quotes, but included in quotes), and 0x00 as the fill value: Z:\SS\DISKWIPE.EXE DKW-02 beta3 80 00 /src /comment “Test number 02” Use the dir command and a text editor to examine the log file’s existence and contents. Use diskedit to examine the wiped hard disk’s sectors.
C1.2.5 Expected results The user is prompted for confirmation. The log is appended to the log file “WIPESLOG.TXT” created by Dkw-01 on the log disk (which is the boot diskette). The comment is logged. The log file contains the correct information required by features 2(a-g). The first 3 sectors and the last 3 sectors of the first cylinder, the first 3 sectors of the second cylinder, the first 3 sectors and the last 3 sectors of the last cylinder have the required format (see Table 2 of the FSTST-01 document).
C1.3 Dkw-03
C1.3.1 Purpose The purpose of this test case is to test features 1, 2(a-i), 3, 4. For feature 2(h), the test will verify whether diskwipe prompts the user for a comment when no comment is supplied on the command line. For feature 2(i) and 3, the test will verify whether diskwipe creates a log file using a file name that is unique for a disk designated as a media disk by using the /media switch. For feature 4, the test will examine the contents of several sectors of the disk wiped out by diskwipe.
36
C1.3.2 Test setup As in Dkw-01.
C1.3.3 Test case dependencies None.
C1.3.4 Procedure Run diskwipe using the /media switch and 0x99 as the fill value, and enter a comment when prompted: Z:\SS\DISKWIPE.EXE DKW-03 beta3 80 99 /media Use the dir command and a text editor to examine the log file’s existence (and name), and contents. Use diskedit to examine the wiped hard disk’s sectors.
C1.3.5 Expected results The user is prompted for confirmation. A log file “WIPEMLOG.TXT” is created on the log disk (which is the boot diskette). The comment is logged. The log file contains the correct information required by features 2(a-g). The first 3 sectors and the last 3 sectors of the first cylinder, the first 3 sectors of the second cylinder, the first 3 sectors and the last 3 sectors of the last cylinder have the required format (see Table 2 of the [FSTST-01] document).
C1.4 Dkw-04
C1.4.1 Purpose The purpose of this test case is to test features 2(a-i), 3, 4. For feature 2(i) and 3, the test will verify whether diskwipe creates a log file using a file name that is unique for a disk designated as a destination disk by using the /dst switch. For feature 4, the test will examine the contents of several sectors of the disk wiped out by diskwipe.
C1.4.2 Test setup As in Dkw-01.
C1.4.3 Test case dependencies None.
C1.4.4 Procedure Run diskwipe using the switch /dst and 0xAA as the fill value: Z:\SS\DISKWIPE.EXE DKW-04 beta3 80 aa /dst
37
Use the dir command and a text editor to examine the log file’s existence, name, and contents. Use diskedit to examine the wiped hard disk’s sectors.
C1.4.5 Expected results The user is prompted for a comment and for confirmation. A log file “WIPEDLOG.TXT” is created on the log disk (which is the boot diskette). The comment is logged. The log file contains the correct information required by features 2(a-g). The first 3 sectors and the last 3 sectors of the first cylinder, the first 3 sectors of the second cylinder, the first 3 sectors and the last 3 sectors of the last cylinder have the required format (see Table 2 of the [FSTST-01] document).
C1.5 Dkw-05
C1.5.1 Purpose The purpose of this test case is to test features 2(a-i), 3, 4. For feature 2(i) and 3, the test will verify whether diskwipe creates a new log file for the disk designated as a destination disk, although a log file with the same name already exists, which was created by test case DKW-04, as a consequence of using the /new_log switch. For feature 4, the test will examine the contents of several sectors of the disk wiped out by diskwipe.
C1.5.2 Test setup As in Dkw-01.
C1.5.3 Test case dependencies Dkw-04.
C1.5.4 Procedure Run diskwipe using the switches /dst and /new_log, and 0xFF as the fill value: Z:\SS\DISKWIPE.EXE DKW-05 beta3 80 FF /dst /new_log Use the dir command and a text editor to examine the log file’s existence, name, and contents. Use diskedit to examine the wiped hard disk’s sectors.
C1.5.5 Expected results The user is prompted for a comment and for confirmation. A new log file “WIPEDLOG.TXT” is created on the log disk (which is the boot diskette). The comment is logged. The log file contains the correct information required by features 2(a-g). The first 3 sectors and the last 3 sectors of the first cylinder, the first 3 sectors of the second cylinder, the first 3 sectors and the last 3 sectors of the last cylinder have the required format (see Table 2 of the [FSTST-01] document).
38
C1.6 Dkw-06
C1.6.1 Purpose The purpose of this test case is to test features 4, 5. For feature 4, the test will examine the contents of several sectors of the disk wiped out by diskwipe. For feature 5, the test will use the switch /heads to make diskwipe use a disk geometry different from the one supplied by BIOS.
C1.6.2 Test setup As in Dkw-01.
C1.6.3 Test case dependencies None.
C1.6.4 Procedure Run diskwipe using the switches /dst, /new_log, /heads, and 0xFF as the fill value: Z:\SS\DISKWIPE.EXE DKW-06 beta3 80 ff /dst /new_log /heads 200 Use the dir command and a text editor to examine the log file’s existence, name, and contents. Use diskedit to examine the wiped hard disk’s sectors.
C1.6.5 Expected results The user is prompted for a comment and for confirmation. A new log file “WIPEDLOG.TXT” is created on the log disk (which is the boot diskette). The comment is logged. The log file contains the correct information required by features 2(a-g). The first 3 sectors and the last 3 sectors of the first cylinder, the first 3 sectors of the second cylinder, the first 3 sectors and the last 3 sectors of the last cylinder have the required format and contents, as if the hard disk drive used as destination disk would have 200 heads (see Table 2 of the [FSTST-01] document).
C1.7 Dkw-07
C1.7.1 Purpose The purpose of this test case is to test feature 4, whether the wiped disk is designated by default as a destination disk, and whether diskwipe can be made to not wait for user confirmation by using the switch /noask (so it could be run as a batch program).
C1.7.2 Test setup As in Dkw-01.
39
C1.7.3 Test case dependencies None.
C1.7.4 Procedure Delete all log files from the log disk. Run diskwipe using the switch /noask, and 0xAA as the fill value: Z:\SS\DISKWIPE.EXE DKW-07 beta3 80 aa /noask Note whether diskwipe ask for confirmation prior to wiping out the disk. Use the dir command and a text editor to examine the log file’s existence, name, and contents. Use diskedit to examine the wiped hard disk’s sectors.
C1.7.5 Expected results The user is prompted for a comment, but not for confirmation. A new log file “WIPEDLOG.TXT” is created on the log disk (which is the boot diskette), i.e., by default the disk is designated as a destination disk. The comment is logged. The log file contains the correct information required by features 2(a-g). The first 3 sectors and the last 3 sectors of the first cylinder, the first 3 sectors of the second cylinder, the first 3 sectors and the last 3 sectors of the last cylinder have the required format (see Table 2 of the [FSTST-01] document).
C1.8 Dkw-08
C1.8.1 Purpose The purpose of this test case is to test feature 2(j), by using the /? switch.
C1.8.2 Test setup As in Dkw-01.
C1.8.3 Test case dependencies None.
C1.8.4 Procedure Run diskwipe using the switch /?, and redirect the standard output to a file wipeout.txt: Z:\SS\DISKWIPE.EXE DKW-08 beta3 80 FF /? > A:\wipeout.txt Use a text editor to examine the output contents.
C1.8.5 Expected results The output file “wipeout.txt” contains the information required by feature 2(j).
40
C1.9 Dkw-09
C1.9.1 Purpose The purpose of this test case is to test features 4 when using the physical mode of addressing the disk sectors.
C1.9.2 Test setup In the BIOS setup, select if possible the physical mode of addressing the hard disk’s sectors. The rest of the case setup is as in Dkw-01.
C1.9.3 Test case dependencies None.
C1.9.4 Procedure Delete all log files from the log disk. Run diskwipe using the following command line: Z:\SS\DISKWIPE.EXE DKW-09 beta3 80 00 Use the dir command and a text editor to examine the log file’s existence, name, and contents. Use diskedit to examine the wiped hard disk’s sectors.
C1.9.5 Expected results The user is prompted for a comment and confirmation. A new log file “WIPEDLOG.TXT” is created on the log disk (which is the boot diskette). The comment is logged. The log file contains the correct information required by features 2(a-g). The first 3 sectors and the last 3 sectors of the first cylinder, the first 3 sectors of the second cylinder, the first 3 sectors and the last 3 sectors of the last cylinder have the required format (see Table 2 of the [FSTST-01] document).
C1.10 Dkw-10
C1.10.1 Purpose The purpose of this test case is to test features 1, 2(a-i), 4 on a computer with extended BIOS and an IDE disk with the capacity larger than 8GB.
C1.10.2 Test setup As in Dkw-01.
C1.10.3 Test case dependencies None.
41
C1.10.4 Procedure Run diskwipe on a computer with extended BIOS, an IDE disk with capacity larger than 8GB, using the switches /src, /new_log, /comment, and 0xAA as the fill value: Z:\SS\DISKWIPE.EXE DKW-10 HecRamsey 80 aa /src /new_log /comment “Ext BIOS, large disk” Use the dir command and a text editor to examine the log file’s existence, name, and contents. Use diskedit to examine the wiped hard disk’s sectors.
C1.10.5 Expected results The user is prompted for confirmation. A new log file “WIPESLOG.TXT” is created on the log disk (which is the boot diskette). The comment is logged. The log file contains the correct information required by features 2(a-g). The first 3 sectors and the last 3 sectors of the first cylinder, the first 3 sectors of the second cylinder, the first 3 sectors and the last 3 sectors of the last cylinder have the required format (see Table 2 of the [FSTST-01] document).
C1.11 Dkw-11
C1.11.1 Purpose The purpose of this test case is to test features 1, 2(a-i), 4 on a computer with extended BIOS and a SCSI disk.
C1.11.2 Test setup As in Dkw-01.
C1.11.3 Test case dependencies None.
C1.11.4 Procedure Run diskwipe using the switches /src, /new_log, /comment, and 0xCC as the fill value: Z:\SS\DISKWIPE.EXE DKW-11 HecRamsey 82 cc /src /new_log /comment “BIOS ext, SCSI large disk” Use the dir command and a text editor to examine the log file’s existence, name, and contents. Use diskedit to examine the wiped hard disk’s sectors.
C1.11.5 Expected results The user is prompted for confirmation.

42
A new log file “WIPESLOG.TXT” is created on the log disk (which is the boot diskette). The comment is logged. The log file contains the correct information required by features 2(a-g). The first 3 sectors and the last 3 sectors of the first cylinder, the first 3 sectors of the second cylinder, the first 3 sectors and the last 3 sectors of the last cylinder have the required format (see Table 2 of the [FSTST-01] document).
C1.12 Dkw-12
C1.12.1 Purpose The purpose of this test case is to test features 1, 2(a-i), 4 on a computer with extended BIOS and a large IDE disk.
C1.12.2 Test setup Use a computer with legacy BIOS (for example, “Beta3”). Select and insert an IDE hard disk drive with large capacity, for example the hdd labeled “B0”. Insert the CD containing the Forensic Software Testing Support Tools in the CD drive. Boot up the computer from the FS-TST boot diskette. If possible, setup the BIOS to use LBA addressing mode for the selected hard disk drive. The boot diskette will be also used as log disk. .
C1.12.3 Test case dependencies None.
C1.12.4 Procedure Run diskwipe using the switch /comment and 0x77 as the fill value: Z:\SS\DISKWIPE.EXE DKW-12 Beta3 80 77 /comment “Wiping a large disk (>8GB), legacy BIOS” Use the dir command and a text editor to examine the log file’s existence, name, and contents. Use diskchg to examine the wiped hard disk’s sectors: Z:\SS\DISKCHG.EXE DKW-12 Beta3 80 /new_log /exam
C1.12.5 Expected results The user is prompted for confirmation. A new log file “WIPEDLOG.TXT” is created on the log disk (which is the boot diskette). The comment is logged. The log file contains the correct information required by features 2(a-g).
43
The first 3 sectors and the last 3 sectors of the first cylinder, the first 3 sectors of the second cylinder, the first 3 sectors and the last 3 sectors of the last cylinder have the required format (see Table 2 of the [FTST-01] document).
44
C2 Partab Test Case Specifications
C2.1 Ptb-01
C2.1.1 Purpose The purpose of this test case is to test features 1, 2(a-i), 3, 4, 5, 6 on a computer with legacy BIOS and an IDE hard disk drive.
C2.1.2 Test setup Use a computer with legacy BIOS (for example, “Beta3”). Select and insert an IDE hard disk (for example, the hdd labeled “61”). Insert the CD containing the Forensic Software Testing Support Tools in the CD drive. Boot up the computer from the FS-TST boot diskette. The boot diskette will be also used as log disk. Delete all partitions existing on the hard disk drive and prepare a FAT16 partition on it using Partition Magic.
C2.1.3 Test case dependencies None.
C2.1.4 Procedure Delete all log files from the boot diskette. Delete all partitions existing on the hard disk drive and prepare a FAT16 partition on it using Partition Magic. Run partab using the switch /all: Z:\SS\PARTAB.EXE PTB-01 beta3 /all Enter a comment when prompted. Use the dir command and a text editor to examine the log file’s existence and contents. Use diskedit and/or Partition Magic to examine the hard disk’s partition table(s).
C2.1.5 Expected results A (new) log file “PT80LOG.TXT” is created on the log disk (which is the boot diskette). The comment is logged. The log file contains the correct information required by features 2(a-g). The partition table entries (feature 3) are correctly displayed. The empty partition table entries (feature 6) are also displayed.
C2.2 Ptb-02
C2.2.1 Purpose The purpose of this test case is to test features 1, 2(a-i), 3, 5, 6 on a computer with legacy BIOS and an IDE hard disk drive.

45
C2.2.2 Test setup As in Ptb-01, except that a FAT32 partition (instead of FAT16) is created on the hard disk drive, using Partition Magic.
C2.2.3 Test dependencies None.
C2.2.4 Procedure Delete all log files from the log disk (the boot diskette). Delete all partitions existing on the hard disk drive and prepare a FAT32 partition on it using Partition Magic. Run partab using the switches /all and /comment followed by a one-word comment (not containing spaces, tabs, or quotes): Z:\SS\PARTAB.EXE PTB-02 beta3 80 /all /comment TestNumber02 Use the dir command and a text editor to examine the log file’s existence and contents. Use diskedit and/or Partition Magic to examine the hard disk’s partition table(s).
C2.2.5 Expected results A (new) log file “PT80LOG.TXT” is created on the log disk (which is the boot diskette). The comment is logged. The log file contains the correct information required by features 2(a-g). The partition table entries (feature 3) are correctly displayed. The empty partition table entries (feature 6) are also displayed.
C2.3 Ptb-03
C2.3.1 Purpose The purpose of this test is to test features 1, 2(a-i), 3, 5, 6 on a computer with legacy BIOS and an IDE hard disk drive.
C2.3.2 Test setup As in Ptb-02.
C2.3.3 Test dependencies Ptb-02.
C2.3.4 Procedure Run this test right after Ptb-02 without deleting the log file. Run partab using the switches /all and /comment followed by a multi-word comment (not containing quotes but enclosed in quotes): Z:\SS\PARTAB.EXE PTB-03 beta3 80 /all /comment “Test number 03”
46
Use the dir command and a text editor to examine the log file’s existence and contents. Use diskedit and/or Partition Magic to examine the hard disk’s partition table(s).
C2.3.5 Expected results The log is appended to the log file “PT80LOG.TXT”. The comment is logged. The log file contains the correct information required by features 2(a-g). The partition table entries (feature 3) are correctly displayed. The empty partition table entries (feature 6) are also displayed.
C2.4 Ptb-04
C2.4.1 Purpose The purpose of this test is to test features 1, 2(a-i), 3, 5, 6 on a computer with legacy BIOS and an IDE hard disk drive.
C2.4.2 Test setup As in Ptb-03, except that a NTFS partition will be prepared using Partition Magic.
C2.4.3 Test dependencies Ptb-03.
C2.4.4 Procedure Run this test right after Ptb-03 without deleting the log file. Run partab using the switches /all and /new_log: Z:\SS\PARTAB.EXE PTB-04 beta3 80 /all /new_log Use the dir command and a text editor to examine the log file’s existence and contents. Use diskedit and/or Partition Magic to examine the hard disk’s partition table(s).
C2.4.5 Expected results A new log file with the name “PT80LOG.TXT” is created. The user is prompted for a comment. The comment is logged. The log file contains the correct information required by features 2(a-g). The partition table entries (feature 3) are correctly displayed. The empty partition table entries (feature 6) are also displayed.
C2.5 Ptb-05
C2.5.1 Purpose The purpose of this test is to test features 1, 2(a-i), 3, 5, 6 on a computer with legacy BIOS and an IDE hard disk drive.
47
C2.5.2 Test setup As in Ptb-03, except that a Linux Ext2 partition will be prepared using Partition Magic.
C2.5.3 Test dependencies None.
C2.5.4 Procedure Run partab using the switches /all and /new_log: Z:\SS\PARTAB.EXE PTB-05 beta3 80 /all /new_log Use the dir command and a text editor to examine the log file’s existence and contents. Use diskedit and/or Partition Magic to examine the hard disk’s partition table(s).
C2.5.5 Expected results A new log file with the name “PT80LOG.TXT” is created. The user is prompted for a comment. The comment is logged. The log file contains the correct information required by features 2(a-g). The partition table entries (feature 3) are correctly displayed. The empty partition table entries (feature 6) are also displayed.
C2.6 Ptb-06
C2.6.1 Purpose The purpose of this test is to test features 1, 2(a-i), 3, 5, 6 on a computer with legacy BIOS and an IDE hard disk drive.
C2.6.2 Test setup As in Ptb-03, except that a Linux Swap partition will be prepared using Partition Magic.
C2.6.3 Test dependencies None.
C2.6.4 Procedure Run partab using the switches /all and /new_log: Z:\SS\PARTAB.EXE PTB-06 beta3 80 /all /new_log Use the dir command and a text editor to examine the log file’s existence and contents. Use diskedit and/or Partition Magic to examine the hard disk’s partition table(s).
C2.6.5 Expected results A new log file with the name “PT80LOG.TXT” is created. The user is prompted for a comment.
48
The comment is logged. The log file contains the correct information required by features 2(a-g). The partition table entries (feature 3) are correctly displayed. The empty partition table entries (feature 6) are also displayed.
C2.7 Ptb-07
C2.7.1 Purpose The purpose of this test is to test features 1, 2(a-i), 3, 5, 6 on a computer with legacy BIOS and an IDE hard disk drive.
C2.7.2 Test setup As in Ptb-03, except that a HPFS partition will be prepared using Partition Magic.
C2.7.3 Test dependencies None.
C2.7.4 Procedure Run partab using the switches /all and /new_log: Z:\SS\PARTAB.EXE PTB-07 beta3 80 /all /new_log Use the dir command and a text editor to examine the log file’s existence and contents. Use diskedit and/or Partition Magic to examine the hard disk’s partition table(s).
C2.7.5 Expected results A new log file with the name “PT80LOG.TXT” is created. The user is prompted for a comment. The comment is logged. The log file contains the correct information required by features 2(a-g). The partition table entries (feature 3) are correctly displayed, with the HPFS partition identified as “unknown”, or “other”. The empty partition table entries (feature 6) are also displayed.
C2.8 Ptb-08
C2.8.1 Purpose The purpose of this test is to test features 1, 2(a-i), 3, 5, 6 on a computer with legacy BIOS and an IDE hard disk drive.
C2.8.2 Test setup As in Ptb-03, except that a HPFS hidden partition will be prepared using Partition Magic.
C2.8.3 Test dependencies None.
49
C2.8.4 Procedure Run partab using the switches /all and /new_log: Z:\SS\PARTAB.EXE PTB-08 beta3 80 /all /new_log Use the dir command and a text editor to examine the log file’s existence and contents. Use diskedit and/or Partition Magic to examine the hard disk partition table(s).
C2.8.5 Expected results A new log file with the name “PT80LOG.TXT” is created. The user is prompted for a comment. The comment is logged. The log file contains the correct information required by features 2(a-g). The partition table entries (feature 3) are correctly displayed, with the HPFS partition type identified as “unknown” or “other”. The empty partition table entries (feature 6) are also displayed.
C2.9 Ptb-09
C2.9.1 Purpose The purpose of this test is to test features 1, 2(a-i), 3, 5, 6 on a computer with legacy BIOS and an IDE hard disk drive.
C2.9.2 Test setup As in Ptb-03, except that multiple primary partitions and one logical partition are prepared on a single IDE disk using Partition Magic.
C2.9.3 Test dependencies None.
C2.9.4 Procedure Run partab using the switches /all and /new_log: Z:\SS\PARTAB.EXE PTB-09 beta3 80 /all /new_log Use the dir command and a text editor to examine the log file’s existence and contents. Use diskedit and/or Partition Magic to examine the hard disk partition table(s).
C2.9.5 Expected results A new log file with the name “PT80LOG.TXT” is created. The user is prompted for a comment. The comment is logged. The log file contains the correct information required by features 2(a-g). The partition table entries (feature 3) are correctly displayed. The empty partition table entries (feature 6) are also displayed.

50
C2.10 Ptb-10
C2.10.1 Purpose The purpose of this test is to test features 3, 4, 6 on a computer with legacy BIOS and IDE hard disk drives.
C2.10.2 Test setup As in Ptb-03, except that numerous partitions will be prepared on two IDE disks using Partition Magic.
C2.10.3 Test dependencies None.
C2.10.4 Procedure Run partab twice (once for each disk) using the switches /all and /new_log: Z:\SS\PARTAB.EXE PTB-10 beta3 80 /all /new_log Z:\SS\PARTAB.EXE PTB-10 beta3 81 /all /new_log Use the dir command and a text editor to examine the log files’ existence and contents. Use diskedit and/or Partition Magic to examine the hard disk partition table(s).
C2.10.5 Expected results A new log file is created for each disk (“PT80LOG.TXT” and “PT81LOG.TXT”).. The user is prompted for a comment. The comment is logged. The log file contains the correct information required by features 2(a-g). The partition table entries (feature 3) are correctly displayed. The empty partition table entries (feature 6) are also displayed.
C2.11 Ptb-11
C2.11.1 Purpose The purpose of this test is to test feature 2(j).
C2.11.2 Test setup As in any of the previous tests.
C2.11.3 Test dependencies None.
C2.11.4 Procedure Run partab using the switch /?: Z:\SS\PARTAB.EXE PTB-11 beta3 80 /? /all /new_log
51
Examine the information displayed by partab on the standard output.
C2.11.5 Expected results Partab displays its usage on the standard output.
C2.12 Ptb-12
C2.12.1 Purpose The purpose of this test is to test features 1, 2(a-i), 3, 5, 6 on a computer with legacy BIOS and an IDE hard disk drive.
C2.12.2 Test setup As in Ptb-03, except that one primary partition and multiple logical partitions are prepared on a single IDE disk using Partition Magic.
C2.12.3 Test dependencies None.
C2.12.4 Procedure Run partab using the switches /all and /new_log: Z:\SS\PARTAB.EXE PTB-12 beta3 80 /all /new_log Use the dir command and a text editor to examine the log file’s existence and contents. Use diskedit and/or Partition Magic to examine the hard disk partition table(s).
C2.12.5 Expected results A new log file with the name “PT80LOG.TXT” is created. The user is prompted for a comment. The comment is logged. The log file contains the correct information required by features 2(a-g). The partition table entries (feature 3) are correctly displayed. The empty partition table entries (feature 6) are also displayed.
C2.13 Ptb-13
C2.13.1 Purpose The purpose of this test is to test features 1, 2(a-i), 3, 5, 6 on a computer with extended BIOS and an IDE hard disk drive with large capacity (>8GB).
C2.13.2 Test setup As in Ptb-03, except that one big FAT32 partition (>8GB) is prepared on an IDE disk using Partition Magic.
52
C2.13.3 Test dependencies None.
C2.13.4 Procedure Run partab using the switches /all, /comment, and /new_log: Z:\SS\PARTAB.EXE PTB-13 HecRamsey 80 /all /comment “Big FAT32 partition” /new_log Use the dir command and a text editor to examine the log file’s existence and contents. Use diskedit and/or Partition Magic to examine the hard disk partition table(s).
C2.13.5 Expected results A new log file with the name “PT80LOG.TXT” is created. The comment is logged. The log file contains the correct information required by features 2(a-g). The partition table entries (feature 3) are correctly displayed. The empty partition table entries (feature 6) are also displayed.
C2.14 Ptb-14
C2.14.1 Purpose The purpose of this test is to test features 1, 2(a-i), 3, 5, 6 on a computer with extended BIOS and a SCSI hard disk drive.
C2.14.2 Test setup As in Ptb-03, except that a big (>8GB) Linux Ext2 partition is prepared on a SCSI disk using Partition Magic.
C2.14.3 Test dependencies None.
C2.14.4 Procedure Run partab using the switches /all, /new_log, and /comment: Z:\SS\PARTAB.EXE PTB-14 HecRamsey 82 /all /new_log /comment “Big Linux ext2 partition” Use the dir command and a text editor to examine the log file’s existence and contents. Use diskedit and/or Partition Magic to examine the hard disk partition table(s).
C2.14.5 Expected results A new log file with the name “PT82LOG.TXT” is created. The comment is logged. The log file contains the correct information required by features 2(a-g).
53
The partition table entries (feature 3) are correctly displayed. The empty partition table entries (feature 6) are also displayed.
C2.15 Ptb-15
C2.15.1 Purpose The purpose of this test is to test features 1, 2(a-i), 3, 5, 6 on a computer with legacy BIOS and an IDE hard disk drive.
C2.15.2 Test setup As in Ptb-03, except that multiple primary partitions and one logical partition are prepared on a single IDE disk using Partition Magic.
C2.15.3 Test dependencies None.
C2.15.4 Procedure Run partab using the switches /all and /new_log: Z:\SS\PARTAB.EXE PTB-09 beta3 80 /all /new_log Use the dir command and a text editor to examine the log file’s existence and contents. Use diskedit and/or Partition Magic to examine the hard disk partition table(s).
C2.15.5 Expected results A new log file with the name “PT80LOG.TXT” is created. The user is prompted for a comment. The comment is logged. The log file contains the correct information required by features 2(a-g). The partition table entries (feature 3) are correctly displayed. The empty partition table entries (feature 6) are also displayed.
54
C3 Diskchg Test Case Specifications
C3.1 Dch-01
C3.1.1 Purpose The purpose of this test case is to test features 1, 2, 3, 8, 9 on a computer with legacy BIOS and an IDE hard disk drive.
C3.1.2 Test setup Use a computer with legacy BIOS (for example, “Beta3”). Select and insert an IDE hard disk (for example, the hdd labeled “61”). Insert the CD containing the Forensic SoftwareTesting Supprt Tools in the CD drive. Boot up the computer from the FS-TST boot diskette. The boot diskette will be also used as log disk. Wipe the hard disk using diskwipe and the fill value 0xAA.
C3.1.3 Test case dependencies None.
C3.1.4 Procedure Delete all log files from the boot diskette. Wipe out the hard disk using 0xAA as the fill value: Z:\SS\DISKWIPE.EXE DCH-01 Beta3 80 aa /src /comment “wiping disk before diskchg” /read /noask Run diskchg using the /new_log switch, a one word comment, and the /exam switch to start an interactive examination of the disk contents: Z:\SS\DISKCHG.EXE DCH-01 Beta3 80 /new_log /comment Examining /exam When prompted, enter the LBA addresses of the first sector (0), last sector (extract this information from diskwipe’s log file; for example, in case of the disk “61”, this is 12594959), and the sector after the last sector. Use the dir command and a text editor to examine the log file’s existence, name, and contents. Use diskedit to display same sectors and compare results.
C3.1.5 Expected results A (new) log file with the name characteristic for the /exam function (“CG80XLOG.TXT”) is created on the log disk (which is the boot diskette). The comment is logged. The log file contains the correct information required by feature 2. Diskchg correctly converts the LBA addresses to C/H/S addresses.
55
The first and last sectors are displayed correctly (use diskedit and diskwipe documentation to assess correctness). For the sector after the last sector, diskchg should report disk I/O error.
C3.2 Dch-02
C3.2.1 Purpose The purpose of this test case is to test features 1, 2, 3, 8 on a computer with legacy BIOS and an IDE hard disk drive.
C3.2.2 Test setup As in Dch-01.
C3.2.3 Test dependencies Dch-01 in order to have the disk wiped out.
C3.2.4 Procedure Run this test case after Dch-01. Run diskchg using the /new_log switch, a multi-word comment, and the /exam switch to start an interactive examination of the disk contents: Z:\SS\DISKCHG.EXE DCH-02 Beta3 80 /new_log /comment “Examining C/H/S addresses“ /exam When prompted, enter the C/H/S addresses of different sectors, for example: the first and last sectors of the first track, the first and last sector of the second track, an arbitrary sector, the first and the last sector of the last track. Use the dir command and a text editor to examine the log file’s existence, name, and contents. Use diskedit to display same sectors and compare results.
C3.2.5 Expected results A (new) log file with the name characteristic for the /exam function (“CG80XLOG.TXT”) is created on the log disk (which is the boot diskette). The comment is logged. The log file contains the correct information required by feature 2. Diskchg correctly converts the C/H/S addresses to LBA addresses. The sectors are displayed correctly (use diskedit and diskwipe documentation to assess correctness).
C3.3 Dch-03
C3.3.1 Purpose The purpose of this test case is to test features 1, 2, 3, 7, 9 on a computer with legacy BIOS and an IDE hard disk drive.
56
C3.3.2 Test setup As in Dch-01.
C3.3.3 Test dependencies Dch-01, in order to have the disk wiped out.
C3.3.4 Procedure Run this test after Dch-01. Run diskchg using the /new_log switch and the /read switch to read and display a (portion of a) specified sector of the hard disk drive: Z:\SS\DISKCHG.EXE DCH-03 Beta3 80 /new_log /read 5/1/1 0 32 Use the dir command and a text editor to examine the log file’s existence and contents. Use diskedit to display the same sector.
C3.3.5 Expected results The user is prompted for a comment. A new log file with a name characteristic for the /read function (“CG80RLOG.TXT”) is created. The comment is logged. The log file contains the correct information required by feature 2. Diskchg correctly converts the C/H/S address to LBA. Diskchg correctly displays the specified number of bytes starting at the specified offset within the specified sector. Use diskedit and diskwipe documentation to assess correctness.
C3.4 Dch-04
C3.4.1 Purpose The purpose of this test case is to test features 1, 2, 3, 7 on a computer with legacy BIOS and an IDE hard disk drive.
C3.4.2 Test setup As in Dch-03.
C3.4.3 Test dependencies Dch-03, in order to use the same sector contents and to append the log to the log file created by Dch-03.
C3.4.4 Procedure Run this test right after Dch-03. Run diskchg using the /read switch to read and display (a portion of) the same sector displayed by Dch-03, but this time specified as a LBA address:
57
Z:\SS\DISKCHG.EXE DCH-04 Beta3 80 /read 80388 0 32 Use the dir command and a text editor to examine the log file’s existence and contents. Use diskedit to display the same sector.
C3.4.5 Expected results The user is prompted for a comment. The log for this test case is appended to the log file created by the Dch-03 test case. The comment is logged. The log file contains the correct information required by feature 2. Diskchg correctly converts the LBA address to C/H/S. Diskchg correctly displays the specified number of bytes starting at the specified offset within the specified sector. Use diskedit and diskwipe documentation to assess correctness.
C3.5 Dch-05
C3.5.1 Purpose The purpose of this test case is to test features 1, 2, 7 on a computer with legacy BIOS and an IDE hard disk drive.
C3.5.2 Test setup As in Dch-01.
C3.5.3 Test dependencies Dch-01, in order to have the disk wiped out.
C3.5.4 Procedure Run this test after Dch-01. Run diskchg using the /new_log switch, /comment, and the /read switch with an offset too large for the capacity of a sector: Z:\SS\DISKCHG.EXE DCH-05 Beta3 80 /new_log /comment “Offset too large” /read 5/1/1 640 32 Use the dir command and a text editor to examine the log file’s existence and contents. Use diskedit to display the same sector.
C3.5.5 Expected results A new log file with a name characteristic for the /read function (“CG80RLOG.TXT”) is created. The comment is logged. The log file contains the correct information required by feature 2. Diskchg correctly converts the C/H/S address to LBA.
58
Diskchg resets the offset to zero, then correctly displays the specified number of bytes starting at the reset offset within the specified sector. Use diskedit and diskwipe documentation to assess correctness.
C3.6 Dch-06
C3.6.1 Purpose The purpose of this test case is to test features 1, 2, 7 on a computer with legacy BIOS and an IDE hard disk drive.
C3.6.2 Test setup As in Dch-01.
C3.6.3 Test dependencies Dch-01, in order to have the disk wiped out.
C3.6.4 Procedure Run this test after Dch-01. Run diskchg using the /new_log switch, /comment, and the /read switch with a length too large for the capacity of a sector, to read and display a (portion of a) specified sector of the hard disk drive: Z:\SS\DISKCHG.EXE DCH-06 Beta3 80 /new_log /comment “Read, length too large” /read 5/1/1 0 1024 Use the dir command and a text editor to examine the log file’s existence and contents. Use diskedit to display the same sector.
C3.6.5 Expected results A new log file with a name characteristic for the /read function (“CG80RLOG.TXT”) is created. The comment is logged. The log file contains the correct information required by feature 2. Diskchg correctly converts the C/H/S address to LBA. Diskchg resets the length to 16, then correctly displays min(16, 512-offset) bytes starting at the specified offset within the specified sector. Use diskedit and diskwipe documentation to assess correctness.
C3.7 Dch-07
C3.7.1 Purpose The purpose of this test case is to test features 1, 2, 7 on a computer with legacy BIOS and an IDE hard disk drive.
59
C3.7.2 Test setup As in Dch-01.
C3.7.3 Test dependencies Dch-01, in order to have the disk wiped out.
C3.7.4 Procedure Run this test after Dch-01. Run diskchg using the /new_log switch, /comment, and the /read switch with valid offset and count values, but with offset+count too large, to read and display a (portion of a) specified sector of the hard disk drive: Z:\SS\DISKCHG.EXE DCH-07 Beta3 80 /new_log /comment “Read, offset+length too large” /read 5/1/1 256 400 Use the dir command and a text editor to examine the log file’s existence and contents. Use diskedit to display the same sector.
C3.7.5 Expected results A new log file with a name characteristic for the /read function (“CG80RLOG.TXT”) is created. The comment is logged. The log file contains the correct information required by feature 2. Diskchg correctly converts the C/H/S address to LBA. Diskchg correctly displays only the bytes starting at the specified offset to the end of the specified sector. Use diskedit and diskwipe documentation to assess correctness.
C3.8 Dch-08
C3.8.1 Purpose The purpose of this test case is to test features 1, 2, 5, 9 on a computer with legacy BIOS and an IDE hard disk drive.
C3.8.2 Test setup As in Dch-01.
C3.8.3 Test dependencies Dch-01, in order to have the disk wiped out.
C3.8.4 Procedure Run this test case after Dch-01. Run diskchg four times: (1) using the /new_log switch, /comment, and the /read switch to read and display the initial contents of a specified sector of the hard disk drive:
60
Z:\SS\DISKCHG.EXE DCH-08 Beta3 80 /new_log /comment “Read original destination sector” /read 5/1/1 0 32 (2) using /comment and /read to read and display the contents of a specified sector (not necessarily the same as in (1)), as diskwipe filled it: Z:\SS\DISKCHG.EXE DCH-08 Beta3 80 /comment “Read source sector as written by diskwipe” /read 6/1/1 0 32 (3) using /new_log, /comment, and /fill switch to fill the first specified sector with the contents of the second specified sector as written by diskwipe when using a geometry 0 (i.e., using the geometry as reported by BIOS): Z:\SS\DISKCHG.EXE DCH-08 Beta3 80 /new_log /comment “fill dest diskwipe-style” /fill 5/1/1 6/1/1 0 bb (3) using /comment and /read switch to read the destination sector after filling: Z:\SS\DISKCHG.EXE DCH-08 Beta3 80 /comment “read destination filled diskwipe-style” /read 5/1/1 0 32 Use the dir command and a text editor to examine the log files names and contents. Use diskedit to display the specified sectors and compare the reported values with the logged ones.
C3.8.5 Expected results A new log file with a name characteristic for the /read function (“CG80RLOG.TXT”) is created when diskchg is run the first time; the third and fourth times, diskchg appends the log to the existing log file. A new log file with a name characteristic for the /fill function (“CG80FLOG.TXT”) is created when diskchg is run the second time. The comments are logged. The log files contain the correct information required by feature 2. Diskchg correctly converts the C/H/S addresses to LBA. Diskchg correctly fills and displays the specified sector. Use diskedit and diskwipe documentation to assess correctness.
C3.9 Dch-09
C3.9.1 Purpose The purpose of this test case is to test features 1, 2, 5 on a computer with legacy BIOS and an IDE hard disk drive.
C3.9.2 Test setup Use a computer with legacy BIOS (for example, “Beta3”). Select and insert an IDE hard disk (for example, the hdd labeled “61”).
61
Insert the CD containing the Forensic SoftwareTesting Supprt Tools in the CD drive. Boot up the computer from the FS-TST boot diskette. The boot diskette will be also used as log disk. Wipe the hard disk using diskwipe, a disk geometry different from that reported by BIOS (e.g., 200 heads), and the fill value 0xAA.
C3.9.3 Test dependencies None.
C3.9.4 Procedure Run diskwipe with a geometry different from that reported by BIOS: Z:\SS\DISKWIPE.EXE DCH-09 Beta3 80 aa /src /heads 200 /noask /new_log /comment Wipe disk using new geometry Run diskchg four times: (1) using /new_log and the /read switch to read and display the initial contents of a specified sector of the hard disk drive: Z:\SS\DISKCHG.EXE DCH-09 Beta3 80 /new_log /comment “Read original target sector” /read 5/1/1 0 32 (2) using the /read switch to read and display the contents of a specified sector (not necessarily the same as in (1)), as diskwipe filled it: Z:\SS\DISKCHG.EXE DCH-09 Beta3 80 /read 6/1/1 0 32 (3) using /new_log and the /fill switch to fill the first specified sector with the contents of the second specified sector as written by diskwipe when using a geometry different from that reported by BIOS: Z:\SS\DISKCHG.EXE DCH-09 Beta3 80 /new_log /fill 5/1/1 6/1/1 200 bb (4) using the /read switch to read the destination sector after filling: Z:\SS\DISKCHG.EXE DCH-09 Beta3 80 /read 5/1/1 0 32 Use the dir command and a text editor to examine the log files names and contents. Use diskedit to display the specified sectors and compare the reported values with the logged ones. Compare the contents of the target and source sectors.
C3.9.5 Expected results The user is prompted for a comment if the /comment switch is not used.
62
A new log file with a name characteristic for the invoked diskchg function is created each time the /new_log switch is used, otherwise the log is appended to the existing log file. The comments are logged. The log files contain the correct information required by feature 2. The first 26 bytes (containing the sector’s CHS and LBA address) of the source and target sectors should be identical. The rest of the source sector should be filled with 0xBB.
C3.10 Dch-10
C3.10.1 Purpose The purpose of this test case is to test features 1, 2, 6, 9 on a computer with legacy BIOS and an IDE hard disk drive.
C3.10.2 Test setup Same as in Dch-01.
C3.10.3 Test dependencies None.
C3.10.4 Procedure Run diskchg three times: (1) using /new_log and the /read switch to read and display the initial contents of a specified sector of the hard disk drive: Z:\SS\DISKCHG.EXE DCH-10 Beta3 80 /new_log /read 5/1/1 0 32 (2) using /new_log and the /write switch to set a specified byte of that sector to a specified value, e.g., 0xCC: Z:\SS\DISKCHG.EXE DCH-10 Beta3 80 /new_log /write 5/1/1 26 cc (1) using the /read switch to read the specified sector after setting: Z:\SS\DISKCHG.EXE DCH-09 Beta3 80 /read 5/1/1 0 32 Use the dir command and a text editor to examine the log files names and contents. Use diskedit to display the specified sector and compare the reported value with the logged one.
C3.10.5 Expected results The user is prompted for a comment if the /comment switch is not used.
63
A new log file with a name characteristic for the invoked diskchg function is created each time the /new_log switch is used; otherwise, the log is appended to the existing log file. The comments are logged. The log files contain the correct information required by feature 2. The specified byte (in the example the byte at offset 26 within the sector 5/1/1) has the value 0xCC. The rest of that sector is unchanged.
C3.11 Dch-11
C3.11.1 Purpose The purpose of this test case is to test features 1, 2, 4, 9 on a computer with legacy BIOS and an IDE hard disk drive.
C3.11.2 Test setup Same as in Dch-01.
C3.11.3 Test dependencies None.
C3.11.4 Procedure Run diskchg twice: (1) using /new_log and the /zero switch to set to zero an entire sector of the hard disk drive: Z:\SS\DISKCHG.EXE DCH-11 Beta3 80 /new_log /comment “Zero a sector” /zero 5/1/1 (2) using /new_log and the /read switch to read and display the zeroed sector: Z:\SS\DISKCHG.EXE DCH-11 Beta3 80 /new_log /comment “Read the target sector” /read 5/1/1 0 128 Use the dir command and a text editor to examine the log files names and contents. Use diskedit to display the specified sector and compare the reported value with the logged one.
C3.11.5 Expected results The user is prompted for a comment if the /comment switch is not used. A new log file with a name characteristic for the invoked diskchg function is created each time the /new_log switch is used or if a log file does not exist; otherwise, the log is appended to the existing log file. The comments are logged. The log files contain the correct information required by feature 2.
64
The specified sector is zero-filled.
C3.12 Dch-12
C3.12.1 Purpose The purpose of this test case is to test features 1, 2 on a computer with legacy BIOS and an IDE hard disk drive.
C3.12.2 Test setup Same as in Dch-01.
C3.12.3 Test dependencies None.
C3.12.4 Procedure Run diskchg using the /? Switch, for example: Z:\SS\DISKCHG.EXE DCH-12 Beta3 80 /? /read 5/1/1 0 32 Examine the information displayed by diskchg on the standard output.
C3.12.5 Expected results Diskchg displays its usage information on the standard output.
C3.13 Dch-13
C3.13.1 Purpose The purpose of this test case is to test features 1, 4, 7 on a computer with extended BIOS and an IDE hard disk drive.
C3.13.2 Test setup Mount an IDE hard disk drive (external label 9C) as drive 0x81 on a computer with extended BIOS (HecRamsey).
C3.13.3 Test dependencies None.
C3.13.4 Procedure Run diskchg twice: (1) using /new_log and the /write switch to set a byte of the last disk sector to a specified value: Z:\SS\DISKCHG.EXE DCH-13 HecRamsey 81 /write 39102335 26 77 /new_log
65
(2) using /new_log and the /read switch to read and display the modified sector: Z:\SS\DISKCHG.EXE DCH-13 HecRamsey 81 /read 39102335 0 32 /new_log Use the dir command and a text editor to examine the log files names and contents. Use diskedit to display the specified sector and compare the reported value to the logged one.
C3.13.5 Expected results The user is prompted for a comment. A new log file with a name characteristic for the invoked diskchg function is created. The comments are logged. The log files contain the correct information required by features 1, 2. The byte at the specified offset within the specified sector is set to the specified value.
C3.14 Dch-14
C3.14.1 Purpose The purpose of this test case is to test features 1, 6, 7 on a computer with extended BIOS and a SCSI hard disk drive.
C3.14.2 Test setup Mount a SCSI hard disk drive (external label 13) as drive 0x83 on a computer with extended BIOS (HecRamsey).
C3.14.3 Test dependencies None.
C3.14.4 Procedure Run diskchg twice: (1) using /new_log and the /zero switch to zero the last disk sector: Z:\SS\DISKCHG.EXE DCH-14 HecRamsey 83 /zero 35885447 /new_log (2) using /new_log and the /read switch to read and display the zeroed sector: Z:\SS\DISKCHG.EXE DCH-14 HecRamsey 83 /read 35885447 0 32 /new_log Use the dir command and a text editor to examine the log files names and contents. Use diskedit to display the specified sector and compare the reported value to the logged one.
C3.14.5 Expected results The user is prompted for a comment.
66
A new log file with a name characteristic for the invoked diskchg function is created. The comments are logged. The log files contain the correct information required by features 1, 2. The last disk sector is zero-filled.
67
C4 Seccmp Test Case Specifications
C4.1 Scp-01
C4.1.1 Purpose The purpose of this test case is to test features 1, 2, 3 on a computer with legacy BIOS and IDE hard disk drives. Specifically, the test will verify whether seccmp creates a new log file with the default name when no log file is present, correctly logs the hard disk drives, a one-word comment entered on the command line, and the program execution.
C4.1.2 Test setup Use a computer with legacy BIOS. Select and insert two IDE hard disks. In the remainder of section C4, one of the hard disks will be called “source”, and the other “destination” disk. Insert the CD containing the Forensic Software Testing Support Tools in the CD drive. Boot up the computer from the FS-TST boot diskette. The boot diskette will be also used as log disk. Wipe the source disk using diskwipe, the /src switch, and the fill value 0xAA. Wipe the destination disk using diskwipe, the /dst switch, and the fill value 0xBB.
C4.1.3 Test case dependencies None.
C4.1.4 Procedure Delete all log files from the boot diskette. Wipe out the source hard disk using 0xAA as the fill value: Z:\SS\DISKWIPE.EXE SCP-01 Beta3 80 aa /src /new_log /noask /comment “Wiping the source disk” Wipe out the destination hard disk using 0xBB as the fill value: Z:\SS\DISKWIPE.EXE SCP-01 Beta3 81 bb /dst /new_log /noask /comment “Wiping destination drive” Run seccmp using the /new_log switch, a one word comment, and the /sector switch that defines a source and a destination sector: Z:\SS\SECCMP.EXE SCP-01 Beta3 80 aa 81 bb /comment OneWordComment /sector 62 63 Use the dir command and a text editor to examine the log file’s existence, name, and contents. Use diskedit to display the source and destination sectors and compare results.
68
C4.1.5 Expected results A (new) log file with the name “SECLOG.TXT” is created on the log disk (which is the boot diskette). The comment is logged. The log file contains the correct information required by features 1, 2, 3. Seccmp determines that the sectors are diskwipe-style filled and different, and logs the number of bytes that differ.
C4.2 Scp-02
C4.2.1 Purpose The purpose of this test case is to test features 1, 2, 3 on a computer with legacy BIOS and IDE hard disk drives. Specifically, the test will verify whether seccmp appends the log to the existing log file, correctly logs the hard disk drives, a multi-word comment entered on the command line, and the program execution.
C4.2.2 Test setup Use the setup of test case Scp-01. Do not delete the log file created by test case Scp-01.
C4.2.3 Test case dependencies Scp-01.
C4.2.4 Procedure Run this test case right after Scp-01. Do not delete the log file. Run seccmp using the /comment switch with a multi-word comment, and the /sector switch that defines a source and a destination sector: Z:\SS\SECCMP.EXE SCP-02 Beta3 80 aa 81 bb /comment “Appending to existing log file” /sector 62 62 Use the dir command and a text editor to examine the log file’s existence, name, and contents. Use diskedit to display the source and destination sectors and compare results.
C4.2.5 Expected results The log is appended to the log file “SECLOG.TXT” created by the preceding test case. The comment is logged. The log file contains the correct information required by features 1, 2, 3. Seccmp determines that the sectors are diskwipe-style filled and different, and logs the number of different bytes.
69
C4.3 Scp-03
C4.3.1 Purpose The purpose of this test case is to test features 1, 2, 3 on a computer with legacy BIOS and IDE hard disk drives. Specifically, the test will verify whether seccmp creates a new log file for the /new_log switch, correctly logs the hard disk drives, prompts the user for a comment, and correctly logs the comment and the program execution.
C4.3.2 Test setup Use the setup of test case Scp-02. Do not delete the log file created by test case Scp-02.
C4.3.3 Test case dependencies Scp-02.
C4.3.4 Procedure Run this test case right after Scp-02. Do not delete the log file. Run seccmp using the /comment switch with /new_log, and the /sector switch that defines a source and a destination sector: Z:\SS\SECCMP.EXE SCP-03 Beta3 80 cc 81 dd /new_log /sector 62 63 Use the dir command and a text editor to examine the log file’s existence, name, and contents. Use diskedit to display the source and destination sectors and compare results.
C4.3.5 Expected results A new log file of name “SECLOG.TXT” is created. The user is prompted for a comment that is correctly logged. The log file contains the correct information required by features 1, 2, 3. Seccmp determines that the sectors are diskwipe-style filled and different, and logs the number of bytes that are different.
C4.4 Scp-04
C4.4.1 Purpose The purpose of this test case is to test features 1, 2, 3, 6 on a computer with legacy BIOS and IDE hard disk drives. Specifically, the test will verify whether seccmp creates a log file with an alternate name introduced with the /log switch, correctly logs the hard disk drives, prompts the user for a comment, and correctly logs the comment and the program execution.
C4.4.2 Test setup Use the setup of test case Scp-01.
70
C4.4.3 Test case dependencies Scp-01.
C4.4.4 Procedure Run this test case after Scp-01. Run seccmp using the /comment switch with the /log switch, and the /sector switch that defines a source and a destination sector. Enter fill values for source and destination that are not the actual ones: Z:\SS\SECCMP.EXE SCP-04 Beta3 80 cc 81 dd /log seccmp.log /comment “alternate log file name specified” /sector 62 62 Use the dir command and a text editor to examine the log file’s existence, name, and contents. Use diskedit to display the source and destination sectors and compare results.
C4.4.5 Expected results A new log file of name “SECCMP.LOG” is created. The comment is correctly logged. The log file contains the correct information required by features 1, 2, 3. Seccmp determines that the sectors are not diskwipe-style filled with the specified fill values, or, at least, that the sectors are diskwipe-style filled but with different values. Seccmp determines that the sectors are different and logs the number of bytes that are different or even the actual differences.
C4.5 Scp-05
C4.5.1 Purpose The purpose of this test case is to test features 4, 5 on a computer with legacy BIOS and IDE hard disk drives. Specifically, the test will examine how seccmp compares two sectors that are diskwipe-style filled with the same information (including the headers).
C4.5.2 Test setup Use the setup of test case Scp-01. Use diskedit to modify the destination sector so that it is identical to the source, both appearing diskwipe-style filled with same fill value (including the headers that contain the sector addresses).
C4.5.3 Test case dependencies Scp-01.
C4.5.4 Procedure Run this test case after Scp-01. Use diskedit to edit the destination sector so that it is identical to the source, both appearing diskwipe-style filled with same fill value (the diskwipe-style headers that
71
contains the sector address in C/H/S and LBA formats must be identical too; one can use the same sector number on the first side of the first cylinder to achieve this without editing the headers). Run seccmp using the /sector switch that defines the source and destination sectors: Z:\SS\SECCMP.EXE SCP-05 Beta3 80 aa 81 bb /new_log /sector 62 62 Use the dir command and a text editor to examine the log file’s existence, name, and contents. Use diskedit to display the source and destination sectors and compare results.
C4.5.5 Expected results A new log file of name “SECLOG.TXT” is created. The user is prompted for a comment that is correctly logged. The log file contains the correct information required by features 1, 2, 3. Seccmp determines that the source sector is diskwipe-style filled with the specified value, the destination sector is diskwipe-style filled but not with the specified value, and that the sectors are identical.
C4.6 Scp-06
C4.6.1 Purpose The purpose of this test case is to test features 4, 5 on a computer with legacy BIOS and IDE hard disk drives. Specifically, the test will examine how seccmp compares two sectors that are diskwipe-style filled with the same value, but have different headers (sector addresses).
C4.6.2 Test setup Use the setup of test case Scp-01. Use diskedit to modify the destination sector so that it is identical to the source, both appearing diskwipe-style filled with same fill value, but having different headers (sector addresses in C/H/S and LBA format).
C4.6.3 Test case dependencies Scp-01.
C4.6.4 Procedure Run this test case after Scp-01. Use diskedit to edit the destination sector so that it is identical to the source, both appearing diskwipe-style filled with same fill value; the diskwipe-style headers that contains the sector address in C/H/S and LBA formats must be different. Run seccmp using the /sector switch that defines the source and destination sectors: Z:\SS\SECCMP.EXE SCP-06 Beta3 80 aa 81 bb /new_log /sector 62 61
72
Use the dir command and a text editor to examine the log file’s existence, name, and contents. Use diskedit to display the source and destination sectors and compare results.
C4.6.5 Expected results A new log file of name “SECLOG.TXT” is created. The user is prompted for a comment that is correctly logged. The log file contains the correct information required by features 1, 2, 3. Seccmp determines that the source sector is diskwipe-style filled with the specified value, the destination sector is diskwipe-style filled but not with the specified value, and that the sectors are different.
C4.7 Scp-07
C4.7.1 Purpose The purpose of this test case is to test features 4, 5 on a computer with legacy BIOS and IDE hard disk drives. Specifically, the test will examine how seccmp compares two sectors, one being diskwipe-style filled, the other being zero-filled.
C4.7.2 Test setup Use the setup of test case Scp-01. Use diskedit or diskchg to zero the destination sector (including the diskwipe header).
C4.7.3 Test case dependencies Scp-01.
C4.7.4 Procedure Run this test case after Scp-01. Use diskedit or diskchg to zero the destination sector: Z:\SS\DISKCHG.EXE SCP-07 Beta3 81 /new_log /zero 24255 Run seccmp using the /sector switch that defines the source and destination sectors: Z:\SS\SECCMP.EXE SCP-07 Beta3 80 aa 81 bb /new_log /sector 80388 24255 Use the dir command and a text editor to examine the log file’s existence, name, and contents. Use diskedit to display the source and destination sectors and compare results.
C4.7.5 Expected results A new log file of name “SECLOG.TXT” is created. The user is prompted for a comment that is correctly logged. The log file contains the correct information required by features 1, 2, 3. Seccmp compares the source and destination sectors as ordinary sectors, determines that they are different, and logs all differences.
73
C4.8 Scp-08
C4.8.1 Purpose The purpose of this test case is to test features 4, 5 on a computer with legacy BIOS and IDE hard disk drives. Specifically, the test will examine how seccmp compares two sectors, one being diskwipe-style filled, the other being an ordinary sector.
C4.8.2 Test setup Use the setup of test case Scp-01. Use diskedit or diskchg to edit the destination sector so that it is neither zero-filled nor diskwipe-style filled.
C4.8.3 Test case dependencies Scp-01.
C4.8.4 Procedure Run this test case after Scp-01. Use diskedit to edit the destination sector so that it is neither zero-filled, nor diskwipe-style filled. Run seccmp using the /sector switch that defines the source and destination sectors: Z:\SS\SECCMP.EXE SCP-08 Beta3 80 aa 81 bb /new_log /sector 80388 24255 Use the dir command and a text editor to examine the log file’s existence, name, and contents. Use diskedit to display the source and destination sectors and compare results.
C4.8.5 Expected results A new log file of name “SECLOG.TXT” is created. The user is prompted for a comment that is correctly logged. The log file contains the correct information required by features 1, 2, 3. Seccmp compares the source and destination sectors as ordinary sectors, determines that they are different, and logs all differences.
C4.9 Scp-09
C4.9.1 Purpose The purpose of this test case is to test features 4, 5 on a computer with legacy BIOS and IDE hard disk drives. Specifically, the test will examine how seccmp compares two sectors both zero-filled.
C4.9.2 Test setup Use the setup of test case Scp-01. Use diskedit or diskchg to zero both the source and destination sectors.
74
C4.9.3 Test case dependencies Scp-01.
C4.9.4 Procedure Run this test case after Scp-01. Use diskedit or diskchg to zero both the source and destination sectors. Z:\SS\DISKCHG.EXE SCP-09 Beta3 80 /new_log /zero 80388 Z:\SS\DISKCHG.EXE SCP-09 Beta3 81 /new_log /zero 24255 Run seccmp using the /sector switch that defines the source and destination sectors: Z:\SS\SECCMP.EXE SCP-09 Beta3 80 aa 81 bb /new_log /sector 80388 24255 Use the dir command and a text editor to examine the log file’s existence, name, and contents. Use diskedit to display the source and destination sectors and compare results.
C4.9.5 Expected results A new log file of name “SECLOG.TXT” is created. The user is prompted for a comment that is correctly logged. The log file contains the correct information required by features 1, 2, 3. Seccmp compares the source and destination sectors and determines that they are identical.
C4.10 Scp-10
C4.10.1 Purpose The purpose of this test case is to test features 4, 5 on a computer with legacy BIOS and IDE hard disk drives. Specifically, the test will examine how seccmp compares two sectors, one zero-filled, the other neither diskwipe-style filled nor zero-filled.
C4.10.2 Test setup Use the setup of test case Scp-09. Do not modify the source sector, which must be the same as in test cse Scp-09, zero-filled. Use diskedit to edit the destination sector so that it is neither diskwipe-style filled, nor zero-filled.
C4.10.3 Test case dependencies Scp-09.
C4.10.4 Procedure Run this test case right after Scp-09. Use diskedit to edit the destination sector so that it is neither diskwipe-style filled, nor zero-filled. Run seccmp using the /sector switch that defines the source and destination sectors:

75
Z:\SS\SECCMP.EXE SCP-10 Beta3 80 aa 81 bb /new_log /sector 80388 24255 Use the dir command and a text editor to examine the log file’s existence, name, and contents. Use diskedit to display the source and destination sectors and compare results.
C4.10.5 Expected results A new log file of name “SECLOG.TXT” is created. The user is prompted for a comment that is correctly logged. The log file contains the correct information required by features 1, 2, 3. Seccmp compares the source and destination sectors and determines that they are different; seccmp logs all differences.
C4.11 Scp-11
C4.11.1 Purpose The purpose of this test case is to test features 4, 5 on a computer with legacy BIOS and IDE hard disk drives. Specifically, the test will examine how seccmp compares two sectors with the same contents, which is neither zero-filled nor diskwipe-style filled.
C4.11.2 Test setup Use the setup of test case Scp-01. Use diskedit to edit the source and destination sector so that their contents are the same, but not diskwipe-style filled, or zero-filled.
C4.11.3 Test case dependencies Scp-01.
C4.11.4 Procedure Run this test case after Scp-01. Use diskedit to edit the source and destination sectors so that so that their contents are the same, but not diskwipe-style filled, or zero-filled. Run seccmp using the /sector switch that defines the source and destination sectors: Z:\SS\SECCMP.EXE SCP-11 Beta3 80 aa 81 bb /new_log /sector 80388 24255 Use the dir command and a text editor to examine the log file’s existence, name, and contents. Use diskedit to display the source and destination sectors and compare results.
C4.11.5 Expected results A new log file of name “SECLOG.TXT” is created. The user is prompted for a comment that is correctly logged. The log file contains the correct information required by features 1, 2, 3. Seccmp compares the source and destination sectors and determines that they are identical.
76
C4.12 Scp-12
C4.12.1 Purpose The purpose of this test case is to test features 4, 5 on a computer with legacy BIOS and IDE hard disk drives. Specifically, the test will examine how seccmp compares two sectors, none of them being zero-filled or diskwipe-style filled, and with different contents.
C4.12.2 Test setup Use the setup of test case Scp-01. Use diskedit to edit the source and destination sector so that none of them is diskwipe-style filled, or zero-filled. Also, they must have different contents.
C4.12.3 Test case dependencies Scp-01.
C4.12.4 Procedure Run this test case after Scp-01. Use diskedit to edit the source and destination sectors so that both are neither diskwipe-style filled, nor zero-filled. Also, they must have different contents. Run seccmp using the /sector switch that defines the source and destination sectors: Z:\SS\SECCMP.EXE SCP-11 Beta3 80 aa 81 bb /new_log /sector 80388 24255 Use the dir command and a text editor to examine the log file’s existence, name, and contents. Use diskedit to display the source and destination sectors and compare results.
C4.12.5 Expected results A new log file of name “SECLOG.TXT” is created. The user is prompted for a comment that is correctly logged. The log file contains the correct information required by features 1, 2, 3. Seccmp compares the source and destination sectors and determines that they are different; seccmp logs all differences.
C4.13 Scp-13
C4.13.1 Purpose The purpose of this test case is to test that the use of the /? Switch makes seccmp to display its usage mode on the standard output.
C4.12.2 Test setup None.
C4.12.3 Test case dependencies None.
77
C4.12.4 Procedure Run seccmp using the /? Switch, possibly in combination with other switches, and redirect its standard output to a log file: Z:\SS\SECCMP.EXE SCP-11 Beta3 80 aa 81 bb /? /sector 80388 24255 >A:\SECCMP.LOG Use the dir command and a text editor to examine the contents of the SECCMP.LOG file.
C4.12.5 Expected results SECCMP.LOG contains the usage mode of the seccmp tool.
C5 Seccopy Test Case Specifications
C5.1 Scy-01
C5.1.1 Purpose The purpose of this test case is to test features 1, 2, 3, 4 on a computer with legacy BIOS and IDE hard disk drives. Specifically, the test will verify whether seccopy creates a new log file with the default name when no log file is present, correctly logs the hard disk drives, a one-word comment entered on the command line, and the program execution. Also, the test will examine whether seccopy correctly copies a number of sectors from the beginning of the source disk to the beginning of the destination disk.
C5.1.2 Test setup Use a computer with legacy BIOS. Select and insert two IDE hard disks. In the remainder of section C5, one of the hard disks will be called “source”, and the other “destination” disk. Insert the CD containing the Forensic Software Testing Support Tools in the CD drive. Boot up the computer from the FS-TST boot diskette. The boot diskette will be also used as log disk.
C5.1.3 Test case dependencies None.
C5.1.4 Procedure Delete all log files from the boot diskette. Run seccopy using a one word comment, and specify the source and destination addresses as 0 (beginning of the source and destination addresses: Z:\SS\SECCOPY.EXE SCY-01 Beta3 80 0 81 0 5 /comment OneWordComment
78
Use the dir command and a text editor to examine the log file’s existence, name, and contents. Use diskedit to display the source and destination sectors and compare them.
C5.1.5 Expected results A (new) log file with the name “COPYLOG.TXT” is created on the log disk (which is the boot diskette). The comment is logged. The log file contains the correct information required by features 1, 2, 3. Seccopy copies the specified number of sectors (5 in this example) from the beginning of the source disk to the beginning of the destination disk.
C5.2 Scy-02
C5.2.1 Purpose The purpose of this test case is to test features 1, 2, 3, 4 on a computer with legacy BIOS and IDE hard disk drives. Specifically, the test will examine whether seccopy appends the log to the existing log file created in the previous test case, correctly logs the hard disk drives, a multi-word comment entered on the command line, and the program execution. Also, the test will verify whether seccopy correctly copies a number of sectors from the end of the source disk to the end of the destination disk.
C5.2.2 Test setup As in Scy-01.
C5.2.3 Test case dependencies Scy-01.
C5.2.4 Procedure Run this test case right after Scy-01. Do not delete the log file created in Scy-01. Run seccopy using a multi-word comment, and specify the source and destination addresses and the sector count so that the source and destination extend to the end of the disks: Z:\SS\SECCOPY.EXE SCY-02 Beta3 80 783/254/60 81 827/15/60 4 /comment “Multi-word comment, append log, copy last 4 sectors” (In the above example, it is assumed that the source disk’s last sector is 783/254/63, and the destination disk’s last sector is 827/15/63). Use the dir command and a text editor to examine the log file. Use diskedit to display the source and destination sectors and compare them.
C5.2.5 Expected results Seccopy appends the log to the log file created in the test case Scy-01.
79
The comment is logged. The log file contains the correct information required by features 1, 2, 3. Seccopy copies the specified number of sectors (4 in this example) from the end of the source disk to the end of the destination disk.
C5.3 Scy-03
C5.3.1 Purpose The purpose of this test case is to test features 1, 2, 3, 4 on a computer with legacy BIOS and IDE hard disk drives. Specifically, the test will verify whether seccopy creates a new log file when prompted by the /new_log switch, correctly logs the hard disk drives, prompts the user for a comment, logs the comment and the program execution. Also, the test will verify whether seccopy correctly copies a number of sectors from the end of the source disk not including the last sector to the end of the destination disk not including the last sector.
C5.3.2 Test setup As in Scy-01.
C5.3.3 Test case dependencies Scy-02.
C5.3.4 Procedure Run this test case right after Scy-02. Do not delete the log file created in Scy-02. Run seccopy using the /new_log switch, and specify the source and destination addresses and the sector count so that the source and destination extend to and excluding the last sector of each disk: Z:\SS\SECCOPY.EXE SCY-03 Beta3 80 783/254/60 81 827/15/60 3 /new_log (In the above example, it is assumed that the source disk’s last sector is 783/254/63, and the destination disk’s last sector is 827/15/63). Use the dir command and a text editor to examine the log file. Use diskedit to display the source and destination sectors and compare them.
C5.3.5 Expected results Seccopy creates a new log file, and prompts the user for a comment. The comment is logged. The log file contains the correct information required by features 1, 2, 3. Seccopy copies the specified number of sectors (3 in this example) from the end of the source disk to the end of the destination disk.
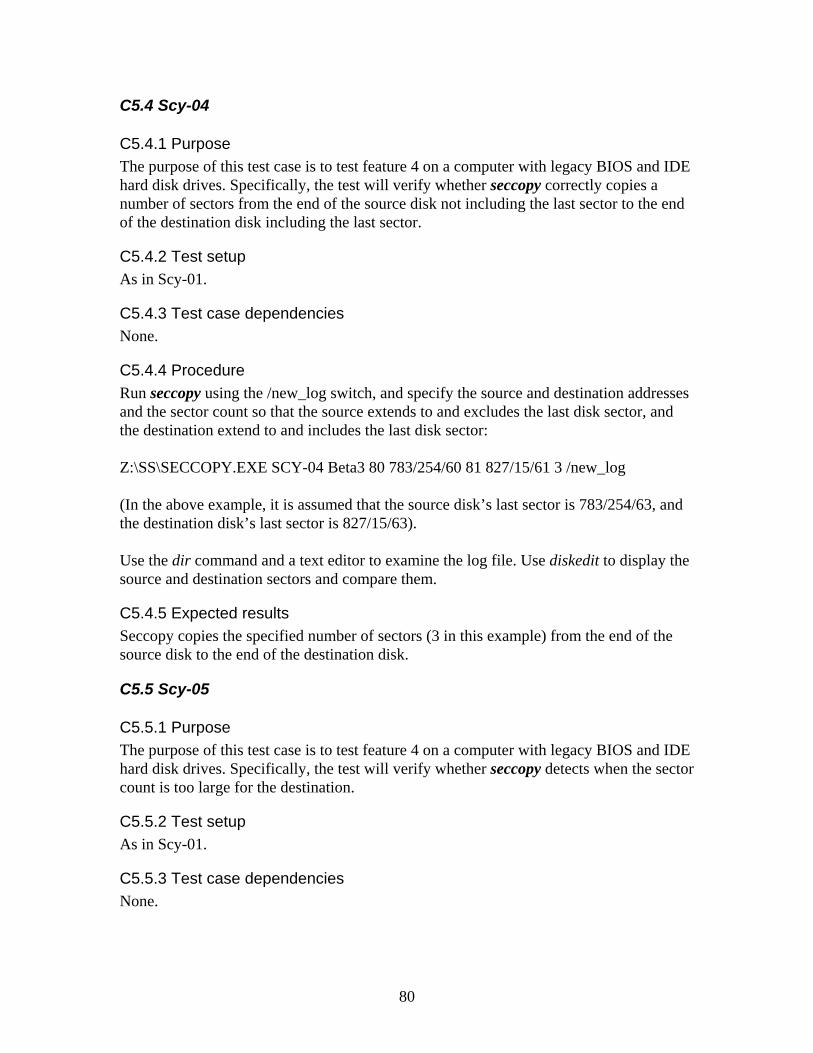
80
C5.4 Scy-04
C5.4.1 Purpose The purpose of this test case is to test feature 4 on a computer with legacy BIOS and IDE hard disk drives. Specifically, the test will verify whether seccopy correctly copies a number of sectors from the end of the source disk not including the last sector to the end of the destination disk including the last sector.
C5.4.2 Test setup As in Scy-01.
C5.4.3 Test case dependencies None.
C5.4.4 Procedure Run seccopy using the /new_log switch, and specify the source and destination addresses and the sector count so that the source extends to and excludes the last disk sector, and the destination extend to and includes the last disk sector: Z:\SS\SECCOPY.EXE SCY-04 Beta3 80 783/254/60 81 827/15/61 3 /new_log (In the above example, it is assumed that the source disk’s last sector is 783/254/63, and the destination disk’s last sector is 827/15/63). Use the dir command and a text editor to examine the log file. Use diskedit to display the source and destination sectors and compare them.
C5.4.5 Expected results Seccopy copies the specified number of sectors (3 in this example) from the end of the source disk to the end of the destination disk.
C5.5 Scy-05
C5.5.1 Purpose The purpose of this test case is to test feature 4 on a computer with legacy BIOS and IDE hard disk drives. Specifically, the test will verify whether seccopy detects when the sector count is too large for the destination.
C5.5.2 Test setup As in Scy-01.
C5.5.3 Test case dependencies None.
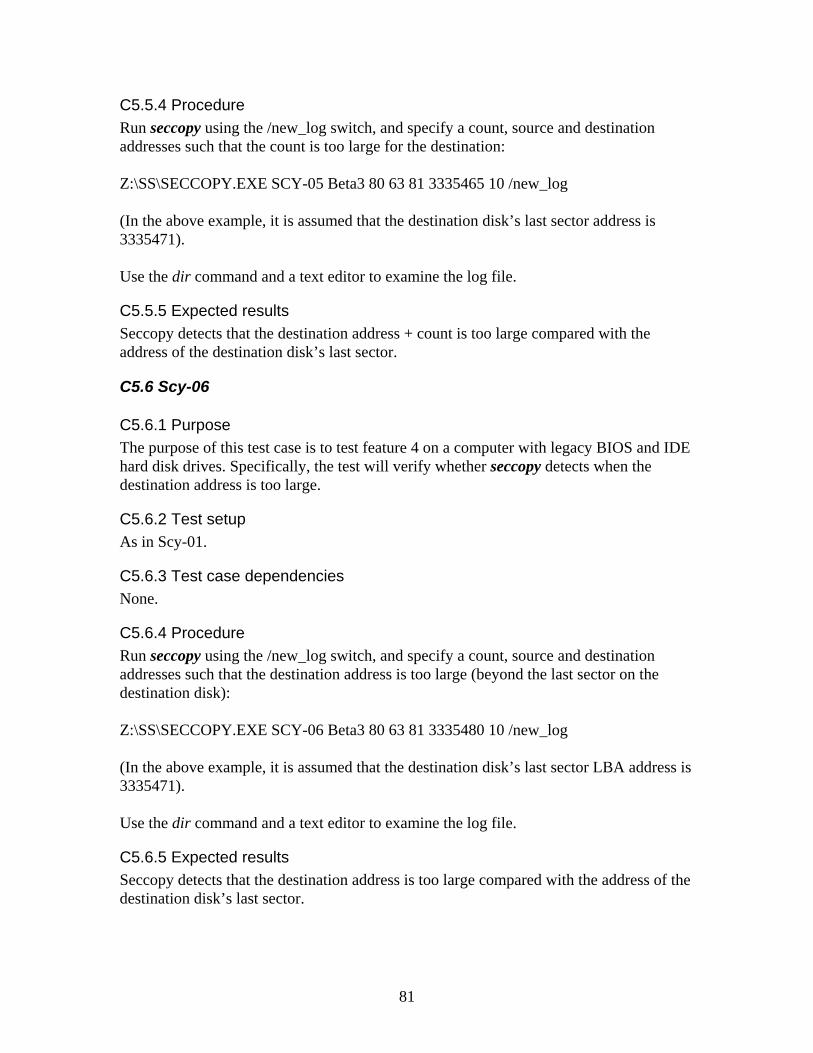
81
C5.5.4 Procedure Run seccopy using the /new_log switch, and specify a count, source and destination addresses such that the count is too large for the destination: Z:\SS\SECCOPY.EXE SCY-05 Beta3 80 63 81 3335465 10 /new_log (In the above example, it is assumed that the destination disk’s last sector address is 3335471). Use the dir command and a text editor to examine the log file.
C5.5.5 Expected results Seccopy detects that the destination address + count is too large compared with the address of the destination disk’s last sector.
C5.6 Scy-06
C5.6.1 Purpose The purpose of this test case is to test feature 4 on a computer with legacy BIOS and IDE hard disk drives. Specifically, the test will verify whether seccopy detects when the destination address is too large.
C5.6.2 Test setup As in Scy-01.
C5.6.3 Test case dependencies None.
C5.6.4 Procedure Run seccopy using the /new_log switch, and specify a count, source and destination addresses such that the destination address is too large (beyond the last sector on the destination disk): Z:\SS\SECCOPY.EXE SCY-06 Beta3 80 63 81 3335480 10 /new_log (In the above example, it is assumed that the destination disk’s last sector LBA address is 3335471). Use the dir command and a text editor to examine the log file.
C5.6.5 Expected results Seccopy detects that the destination address is too large compared with the address of the destination disk’s last sector.
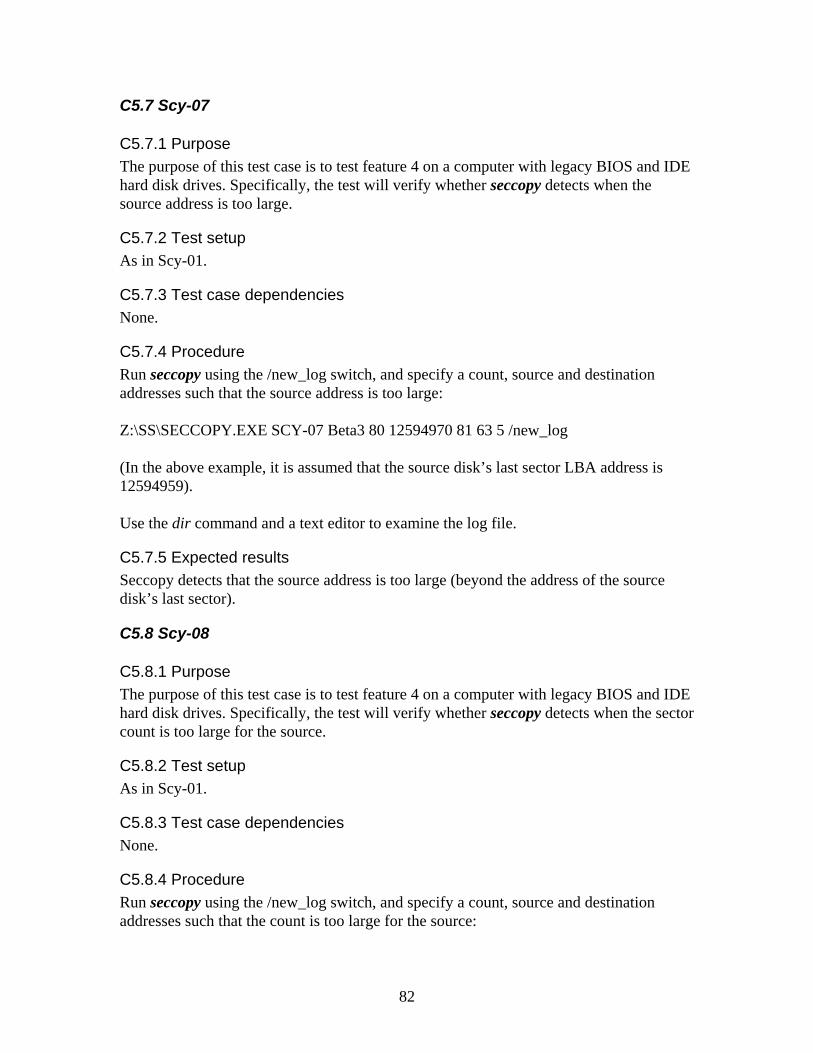
82
C5.7 Scy-07
C5.7.1 Purpose The purpose of this test case is to test feature 4 on a computer with legacy BIOS and IDE hard disk drives. Specifically, the test will verify whether seccopy detects when the source address is too large.
C5.7.2 Test setup As in Scy-01.
C5.7.3 Test case dependencies None.
C5.7.4 Procedure Run seccopy using the /new_log switch, and specify a count, source and destination addresses such that the source address is too large: Z:\SS\SECCOPY.EXE SCY-07 Beta3 80 12594970 81 63 5 /new_log (In the above example, it is assumed that the source disk’s last sector LBA address is 12594959). Use the dir command and a text editor to examine the log file.
C5.7.5 Expected results Seccopy detects that the source address is too large (beyond the address of the source disk’s last sector).
C5.8 Scy-08
C5.8.1 Purpose The purpose of this test case is to test feature 4 on a computer with legacy BIOS and IDE hard disk drives. Specifically, the test will verify whether seccopy detects when the sector count is too large for the source.
C5.8.2 Test setup As in Scy-01.
C5.8.3 Test case dependencies None.
C5.8.4 Procedure Run seccopy using the /new_log switch, and specify a count, source and destination addresses such that the count is too large for the source:
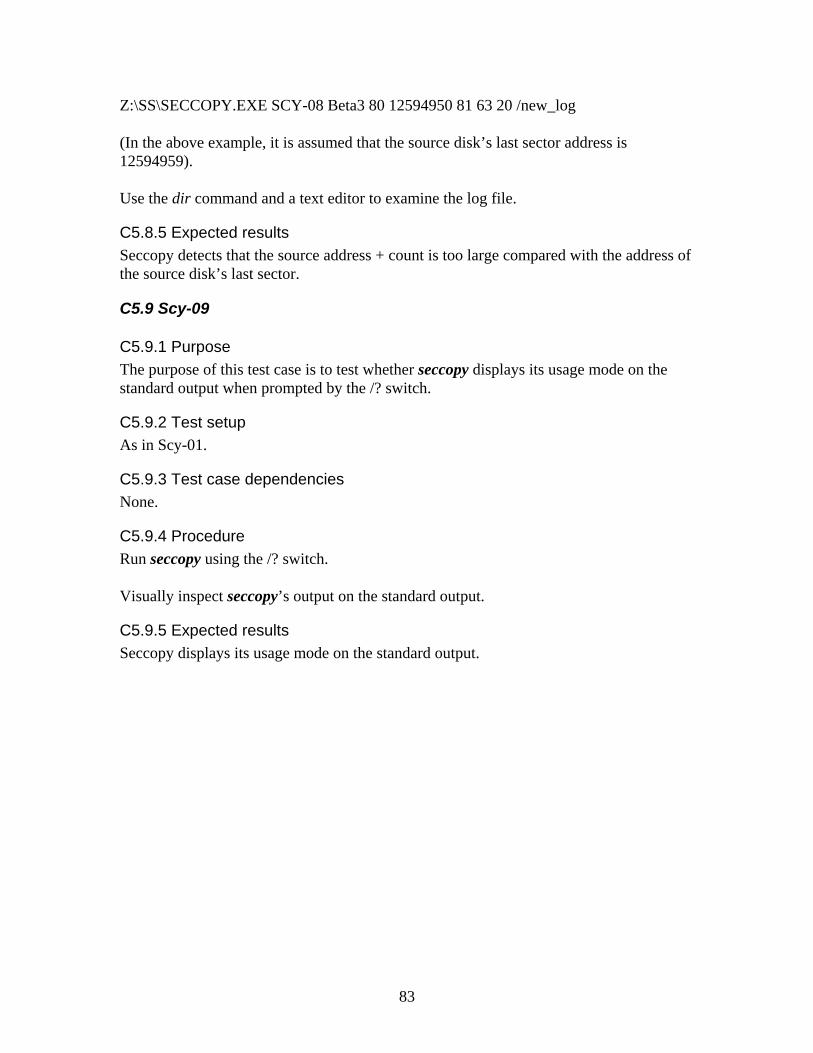
83
Z:\SS\SECCOPY.EXE SCY-08 Beta3 80 12594950 81 63 20 /new_log (In the above example, it is assumed that the source disk’s last sector address is 12594959). Use the dir command and a text editor to examine the log file.
C5.8.5 Expected results Seccopy detects that the source address + count is too large compared with the address of the source disk’s last sector.
C5.9 Scy-09
C5.9.1 Purpose The purpose of this test case is to test whether seccopy displays its usage mode on the standard output when prompted by the /? switch.
C5.9.2 Test setup As in Scy-01.
C5.9.3 Test case dependencies None.
C5.9.4 Procedure Run seccopy using the /? switch. Visually inspect seccopy’s output on the standard output.
C5.9.5 Expected results Seccopy displays its usage mode on the standard output.
84
C6 Baddisk Test Case Specifications
C6.1 Bdk-01
C6.1.1 Purpose The purpose of this test case is to test features 1, 2 on a computer with legacy BIOS and IDE hard disk drive. Specifically, the test will verify whether baddisk correctly monitors the disk write command on a specified sector address and returns the specified error code. Also, the test will examine whether baddisk displays its arguments on the standard output.
C6.1.2 Test setup Use a computer with legacy BIOS. Select and insert an IDE hard disk. Insert the CD containing the Forensic Software Testing Support Tools in the CD drive. Boot up the computer from the FS-TST boot diskette. The boot diskette will be also used as log disk.
C6.1.3 Test case dependencies None.
C6.1.4 Procedure Run baddisky using the IDE drive, a sector address, the disk write command (3), and an error code (e.g., 33). Redirect the stdout to a file A:\BADDISK.LOG: Z:\SS\BADDISK 80 5 1 1 3 33 > A:\BADDISK.LOG Use a text editor to examine BADDISK.LOG’s contents. Use diskedit to read/write sector 5/1/1 and sectors around it. Use diskchg to read/write (e.g., use /read, /exam, /zero, /write commands) sector 5/1/1 and sectors around it.
C6.1.5 Expected results Baddisk writes its arguments to the standard output. Baddisk monitors the disk write commands, and if they refer the specified sector address, returns the specified error code. Thus, all write commands for the specified sector must result in a write error, while read commands for the same sector should succeed. All read/write commands for other sectors should succeed.
C6.2 Bdk-02
C6.2.1 Purpose The purpose of this test case is to test features 1, 2 on a computer with legacy BIOS and IDE hard disk drive. Specifically, the test will verify whether baddisk correctly monitors
85
the disk read command on a specified sector address and returns the specified error code. Also, the test will examine whether baddisk displays its arguments on the standard output.
C6.2.2 Test setup Same as for Bdk-01. Reboot the computer to delete all resident copies of baddisk.
C6.2.3 Test case dependencies None.
C6.2.4 Procedure Run baddisk using the IDE drive, a sector address, the disk read command (2), and an error code (e.g., 32). Redirect the stdout to a file A:\BADDISK.LOG: Z:\SS\BADDISK 80 5 1 1 2 32 > A:\BADDISK.LOG Use a text editor to examine BADDISK.LOG’s contents. Use diskedit to read/write sector 5/1/1 and sectors around it. Use diskchg to read/write (e.g., use /read, /exam, /zero, /write commands) sector 5/1/1 and sectors around it.
C6.2.5 Expected results Baddisk writes its arguments to the standard output. Baddisk monitors the disk read commands, and if they refer the specified sector address, returns the specified error code. Thus, all read commands for the specified sector must result in a read error, while write commands for the same sector should succeed. All read/write commands for other sectors should succeed.
C6.3 Bdk-03
C6.3.1 Purpose The purpose of this test case is to test features 1, 2 on a computer with legacy BIOS and IDE hard disk drive. Specifically, the test will verify whether multiple TSR copies of baddisk can be installed by running baddisk multiple times; this way, the test can monitor read or write commands on multiple sector addresses.
C6.3.2 Test setup Same as for Bdk-01. Reboot the computer to delete all resident copies of baddisk.
C6.3.3 Test case dependencies None.
86
C6.3.4 Procedure Run baddisk using the IDE drive, a sector address, the disk read command (2), and an error code (e.g., 32). Redirect the stdout to a file A:\BADDISK.LOG. Z:\SS\BADDISK 80 5 1 1 2 32 > A:\BADDISK.LOG Run again baddisk using another sector address, the disk read command, and an error code (e.g., 32). Append the stdout to A:\BADDISK.LOG. Z:\SS\BADDISK 80 5 1 2 2 32 >> A:\BADDISK.LOG Use a text editor to examine BADDISK.LOG’s contents. Use diskchg to read/write (e.g., use /read, /exam, /zero, /write commands) sectors 5/1/1, 5/1/2, and neighboring sectors.
C6.3.5 Expected results Baddisk writes its arguments to the standard output. Baddisk monitors disk read commands, and if they refer any of the specified sectors, returns the specified error code.
C6.4 Bdk-04
C6.4.1 Purpose The purpose of this test case is to test features 1, 2 on a computer with legacy BIOS and IDE hard disk drive. Specifically, the test will verify whether baddisk correctly detects the disk geometry, by specifying sector addresses outside of the correct range.
C6.4.2 Test setup Same as for Bdk-01. Reboot the computer to delete all resident copies of baddisk.
C6.4.3 Test case dependencies None.
C6.4.4 Procedure Run baddisk using the IDE drive and specify a sector address outside the range of disk addresses. Redirect the stdout to a file A:\BADDISK.LOG. As an example, for the disk labeled “61”, the geometry as reported by ATA identify device command is 0-783/0-254/1-63 (i.e., 12594960 sectors). The geometry as reported by BIOS interrupt 13 is 0-782/0-254/1-63 (i.e., 12578895 sectors). Test the geometry used by baddisk. I would expect baddisk to use the same geometry as the other FS-TST tools, i.e., that reported by ATA identify device command.

87
C7 Partcmp Test Case Specifications
C7.1 Pcp-01
C7.1.1 Purpose The purpose of this test case is to test features 1, 2, 3, 4 on a computer with legacy BIOS and IDE hard disk drives. Specifically, the test will verify whether partcmp creates a new log file with the default name when no log file is present, prompts the user for the partition indexes, correctly logs the partitions, a one-word comment entered on the command line, the program execution, and the comparison result when the source partition is smaller than the destination partition. Before running partcmp, the test will copy the smaller partition onto the larger one using seccopy, in order to know what results to expect.
C7.1.2 Test setup Use a computer with legacy BIOS. Select and insert two IDE hard disks. Insert the CD containing the Forensic Software Testing Support Tools in the CD drive. Boot up the computer from the FS-TST boot diskette. The boot diskette will be also used as log disk. Delete all log files from the log disk. Create a source and destination primary FAT32 partitions using PartitionMagic, such that the source partition has a smaller size than the destination.
C7.1.3 Test case dependencies None.
C7.1.4 Procedure Run seccopy to copy the smaller partition – the source – onto the destination: Z:\SS\SECCOPY.EXE PCP-01 Beta3 80 0/1/1 81 0/1/1 80262 /new_log Run partcmp to compare the partitions: Z:\SS\PARTCMP.EXE PCP-01 Beta3 80 AA 81 BB /comment InteractivePartitionSelection Use the dir command and a text editor to examine the log file’s existence, name, and contents. Verify the count of equal and different sectors reported by partcmp.
C7.1.5 Expected results A (new) log file with the name “CMPPTLOG.TXT” is created on the log disk (which is the boot diskette). The comment is logged.
88
The log file contains the correct information required by features 1, 2, 3. Partcmp logs the partitions to be compared, and the number and range of different and equal sectors of the partitions.
C7.2 Pcp-02
C7.2.1 Purpose The purpose of this test case is to test features 1, 2, 3, 4 on a computer with legacy BIOS and IDE hard disk drives. Specifically, the test will verify whether partcmp appends the log to the existing log file with the default name, correctly logs the partitions, a multi-word comment entered on the command line, the program execution, and the comparison result when the source partition is smaller than the destination partition. The test will use the partitions created in the previous test case, whose contents are identical on the smaller length. In this test case, however, the test will change a few predetermined sectors of the source partitions.
C7.2.2 Test setup Use the setup of Pcp-01.
C7.2.3 Test case dependencies Pcp-01.
C7.2.4 Procedure Run diskchg to change one sector of the source partition: Z:\SS\DISKCHG.EXE PCP-02 Beta3 80 /new_log /write 2/1/1 0 CC Run partcmp to compare the partitions: Z:\SS\PARTCMP.EXE PCP-02 Beta3 80 AA 81 BB /select 1 1 /comment “Comparing partitions, source modified, log appended” Use the dir command and a text editor to examine the log file’s existence, name, and contents. Verify the count of equal and different sectors reported by partcmp.
C7.2.5 Expected results The log is appended to the existing log file with the name “CMPPTLOG.TXT” created by Pcp-01. The comment is logged. The log file contains the correct information required by features 1, 2, 3. Partcmp logs the partitions to be compared, and the number and range of different and equal sectors of the partitions.
89
C7.3 Pcp-03
C7.3.1 Purpose The purpose of this test case is to test features 1, 2, 3, 4 on a computer with legacy BIOS and IDE hard disk drives. Specifically, the test will verify whether partcmp creates a new log file as instructed by the /new_log switch, prompts the user for a comment, correctly logs the partitions, the program execution, and correctly compares the partitions and their boot sectors when instructed by the /boot switch. The test will use the partitions created in Pcp-01 and modified in Pcp-02, for which the test have already the comparison results without /boot.
C7.3.2 Test setup Use the setup of Pcp-02.
C7.3.3 Test case dependencies Pcp-02.
C7.3.4 Procedure Run partcmp to compare the partitions: Z:\SS\PARTCMP.EXE PCP-03 Beta3 80 AA 81 BB /select 1 1 /boot Use the dir command and a text editor to examine the log file’s existence, name, and contents. Verify the count of equal and different sectors reported by partcmp.
C7.3.5 Expected results A new log file with the name “CMPPTLOG.TXT” is created. The user is prompted for a comment. The log file contains the correct information required by features 1, 2, 3. Partcmp logs the partitions to be compared, and the number and range of different and equal sectors of the partitions and of their boot sectors.
C7.4 Pcp-04
C7.4.1 Purpose The purpose of this test case is to test feature 4 on a computer with legacy BIOS and IDE hard disk drives. Specifically, the test will verify whether partcmp correctly compares partitions of different types, the source being a primary Linux ext2, and the destination a primary FAT32 partition, with the source larger then the destination. Before comparison, the test will copy the smaller partition onto the larger one, in order to know what results to expect.
90
C7.4.2 Test setup Use PartitionMagic to create a primary Linux ext2 source partition and a primary FAT32 destination partition, with the source size greater than the destination.
C7.4.3 Test case dependencies Pcp-02.
C7.4.4 Procedure Run seccopy to copy the smaller (destination) partition onto the other: Z:\SS\SECCOPY.EXE PCP-04 Beta3 81 0/1/1 80 0/1/1 84609 /new_log Run partcmp to compare the partitions: Z:\SS\PARTCMP.EXE PCP-04 Beta3 80 AA 81 BB /select 1 1 /new_log Use the dir command and a text editor to examine the log file’s existence, name, and contents. Verify the count of equal and different sectors reported by partcmp.
C7.4.5 Expected results A new log file with the name “CMPPTLOG.TXT” is created. The user is prompted for a comment. The log file contains the correct information required by features 1, 2, 3. Partcmp logs the partitions to be compared, and the number and range of different and equal sectors of the partitions.
C7.5 Pcp-05
C7.5.1 Purpose The purpose of this test case is to test features 3, 4 on a computer with legacy BIOS and IDE hard disk drives. Specifically, the test will examine how partcmp reacts when a partition index is incorrect, for example points to an empty partition entry.
C7.5.2 Test setup As in Pcp-04.
C7.5.3 Test case dependencies Pcp-04.
C7.5.4 Procedure Run partcmp with the wrong destination index (2 points to an empty entry in the partition table):
91
Z:\SS\PARTCMP.EXE PCP-05 Beta3 80 AA 81 BB /select 1 2 /new_log Use the dir command and a text editor to examine the log file’s existence, name, and contents.
C7.5.5 Expected results A new log file with the name “CMPPTLOG.TXT” is created. The user is prompted for a comment. The log file contains the correct information required by features 1, 2, 3. Partcmp detects that the destination is empty, logs this fact, and does not perform any comparison.
C7.6 Pcp-06
C7.6.1 Purpose The purpose of this test case is to test features 4 on a computer with extended BIOS and IDE hard disk drives. Specifically, the test will verify whether partcmp correctly compares two same-size FAT32 partitions.
C7.6.2 Test setup Use PartitionMagic to create two primary FAT32 partitions of same size.
C7.6.3 Test case dependencies None.
C7.6.4 Procedure Run seccopy to copy one partition onto the other: Z:\SS\SECCOPY.EXE PCP-06 HecRamsey 80 0/1/1 81 0/1/1 96327 /new_log Run partcmp to compare partitions: Z:\SS\PARTCMP.EXE PCP-06 HecRamsey 80 AA 81 BB /select 1 1 /new_log Use the dir command and a text editor to examine the log file’s existence, name, and contents.
C7.6.5 Expected results A new log file with the name “CMPPTLOG.TXT” is created. The user is prompted for a comment. The log file contains the correct information required by features 1, 2, 3. Partcmp logs the fact that the source and destination partitions are identical.
92
C7.7 Pcp-07
C7.7.1 Purpose The purpose of this test case is to test features 4 on a computer with extended BIOS and IDE hard disk drives. Specifically, the test will verify whether partcmp correctly compares two same-size FAT32 partitions and their boot sectors (using the /boot switch).
C7.7.2 Test setup Use the same setup as in PCP-06.
C7.7.3 Test case dependencies Pcp-06.
C7.7.4 Procedure Run partcmp to compare partitions and their boot sectors: Z:\SS\PARTCMP.EXE PCP-07 HecRamsey 80 AA 81 BB /select 1 1 /boot /new_log Use the dir command and a text editor to examine the log file’s existence, name, and contents.
C7.7.5 Expected results A new log file with the name “CMPPTLOG.TXT” is created. The user is prompted for a comment. The log file contains the correct information required by features 1, 2, 3. Partcmp determines the partitions are identical, but probably the boot sectors differ.
C7.8 Pcp-08
C7.8.1 Purpose The purpose of this test case is to test features 4 on a computer with extended BIOS and IDE hard disk drives. Specifically, the test will verify whether partcmp correctly compares two large (>8GB) primary FAT32 partitions.
C7.8.2 Test setup Use PartitionMagic to create two primary FAT32 partitions with size greater than 8GB.
C7.8.3 Test case dependencies None.
C7.8.4 Procedure Run partcmp to compare the partitions: Z:\SS\PARTCMP.EXE PCP-08 HecRamsey 80 AA 81 BB /select 1 1 /new_log

93
Use the dir command and a text editor to examine the log file’s existence, name, and contents.
C7.8.5 Expected results A new log file with the name “CMPPTLOG.TXT” is created. The user is prompted for a comment. The log file contains the correct information required by features 1, 2, 3. Partcmp correctly logs the count of identical and different sectors in the two partitions.
C7.9 Pcp-09
C7.9.1 Purpose The purpose of this test case is to test features 4 on a computer with extended BIOS, an IDE source hard disk, and a SCSI destination hard disk. Specifically, the test will examine whether partcmp correctly compares two logical FAT16 partitions.
C7.9.2 Test setup Use PartitionMagic to create a logical FAT16 source partition and a logical FAT16 destination partition of the same size.
C7.9.3 Test case dependencies None.
C7.9.4 Procedure Run seccopy to copy the source partition onto the destination (in our example, both partitions have the same size and starts at the same address, as reported by PartitionMagic, AND by partcmp): Z:\SS\SECCOPY.EXE PCP-09 HecRamsey 80 1/1/1 82 1/1/1 96327 /new_log Run partcmp to compare the partitions: Z:\SS\PARTCMP.EXE PCP-09 HecRamsey 80 AA 82 CC /select 2 2 /new_log Use the dir command and a text editor to examine the log file’s existence, name, and contents.
C7.9.5 Expected results A new log file with the name “CMPPTLOG.TXT” is created. The user is prompted for a comment. The log file contains the correct information required by features 1, 2, 3. Partcmp correctly logs the count of identical and different sectors in the two partitions (actually it should report identical partitions).
94
C7.10 Pcp-10
C7.10.1 Purpose The purpose of this test case is to test feature 4 on a computer with legacy BIOS, and IDE source and destination hard disk drives, when some sectors in the source or destination partitions are marked as read-defective.
C7.10.2 Test setup As in Pcp-04.
C7.10.3 Test case dependencies Pcp-04 (in order to reuse the partitions).
C7.10.4 Procedure Run baddisk to mark several sectors of the source partition as read-defective: Z:\SS\BADDISK 80 2 1 1 2 32 >A:\BADDISK.LOG Z:\SS\BADDISK 80 3 1 1 2 32 >>A:\BADDISK.LOG Run partcmp to compare the partitions: Z:\SS\PARTCMP.EXE PCP-10 Beta3 80 AA 81 BB /select 1 1 /new_log Use the dir command and a text editor to examine the log file’s existence, name, and contents.
C7.10.5 Expected results A new log file with the name “CMPPTLOG.TXT” is created. The user is prompted for a comment. The log file contains the correct information required by features 1, 2, 3. Partcmp stops comparing the partitions at the first read error and correctly logs the incident.
95
C8 Diskcmp Test Case Specifications
C8.1 Dcp-01
C8.1.1 Purpose The purpose of this test case is to test features 1, 2, 3, 4 on a computer with legacy BIOS and IDE hard disk drives. Specifically, the test will verify whether diskcmp creates a new log file with the default name when no log file is present, correctly logs the drives, a one-word comment entered on the command line, the program execution, and the comparison result when the source disk is bigger than the destination disk. Before running diskcmp, the test will copy the first n-1 sectors of the source disk to the destination disk starting from address 0, where n is the total number of sectors of the destination disk (the smaller one). The test uses n-1 because of the seccopy anomaly detected in test case SCY-02.
C8.1.2 Test setup Use a computer with legacy BIOS, “Beta3”. Select two IDE hard disks, such that the source disk 61 has a bigger capacity than the destination disk D7. Mount the source disk as drive 0x80 and the destination disk as drive 0x81. Insert the CD containing the FS-TST in the CD drive. Boot up the computer from the FS-TST boot diskette. The boot diskette will be also used as log disk.
C8.1.3 Test case dependencies None.
C8.1.4 Procedure Delete all log files from the log disk. Run seccopy to copy the first n-1 sectors of the source disk to the destination disk starting at sector 0, where n is the number of sectors of the destination disk: Z:\SS\SECCOPY.EXE DCP-01 Beta3 80 0 81 0 3335471 /new_log Run diskcmp to compare the two disks, using /comment with a one-word comment: Z:\SS\DISKCMP.EXE DCP-01 Beta3 80 AA 81 BB /comment CompareDisks Use the dir command and a text editor to examine the log file’s existence, name, and contents. Verify the count of equal and different sectors reported by diskcmp.
C8.1.5 Expected results A (new) log file with the name “CMPLOG.TXT” is created on the log disk (which is the boot diskette). The comment is logged.
96
The log file contains the correct information required by features 1, 2, 3. Diskcmp logs the hard drives to be compared, and the number and range of different and equal sectors of the disks.
C8.2 Dcp-02
C8.2.1 Purpose The purpose of this test case is to test features 1, 2, 3, 4 on a computer with legacy BIOS and IDE hard disk drives. Specifically, the test will verify whether diskcmp appends the log to an existing log file with the default name, correctly logs the drives, a multi-word comment entered on the command line, the program execution, and the comparison result when the source disk is smaller than the destination disk. The test will use disks whose contents are equal on the length of the smaller disk (except the last sector – see Dcp-01).
C8.2.2 Test setup Use the setup of test case Dcp-01, with the difference that disk 61 mounted as drive 0x80 will be the destination drive, and disk D7 mounted as drive 0x81 will be the source drive. Run this test case right after Dcp-01 in order to use the log file created in that test case.
C8.2.3 Test case dependencies Dcp-01.
C8.2.4 Procedure Run diskcmp to compare the two disks, using /comment with a one-word comment: Z:\SS\DISKCMP.EXE DCP-02 Beta3 81 BB 80 AA /comment “Compare source < dest” Use the dir command and a text editor to examine the log file’s existence, name, and contents. Verify the count of equal and different sectors reported by diskcmp.
C8.2.5 Expected results Diskcmp appends the log to the existing log file “CMPLOG.TXT”. The multi-word comment provided on the command line is logged. The log file contains the correct information required by features 1, 2, 3. Diskcmp logs the hard drives to be compared, and the number and range of different and equal sectors of the disks.
C8.3 Dcp-03
C8.3.1 Purpose The purpose of this test case is to test features 1, 2, 3, 4, 5, 6 on a computer with legacy BIOS and IDE hard disk drives. Specifically, the test will verify whether diskcmp creates a new log file as instructed by the /new_log switch; correctly logs the drives; prompts the user to enter a comment when no comment is provided on the command line; logs the
97
program execution; continue scanning the disks when it encounters read error on a disk and logs the count of tracks containing errors.
C8.3.2 Test setup Use the setup of test case Dcp-01. Run baddisk to simulate read errors on the source and/or destination disk.
C8.3.3 Test case dependencies Dcp-02 (in order for the default log file to exist.)
C8.3.4 Procedure Run baddisk to simulate a read error on the source disk: Z:\SS\BADDISK 80 5 1 1 2 32 > A:\BADDISK.LOG Run diskcmp to compare the two disks, using the /new_log switch and no /comment: Z:\SS\DISKCMP.EXE DCP-03 Beta3 80 AA 81 BB /new_log Use the dir command and a text editor to examine the log file’s existence, name, and contents. Verify the count of equal and different sectors, and the count of tracks with read errors on each disk.
C8.3.5 Expected results Diskcmp prompts the user for a comment, creates a new log file “CMPLOG.TXT”, and logs the comment. The log file contains the correct information required by features 1, 2, 3. Diskcmp logs the hard drives to be compared, and the number of tracks with read errors on each disk (in this case, 1 for the source, 0 for the destination).
C8.4 Dcp-04
C8.4.1 Purpose The purpose of this test case is to test features 1, 2, 3, 4 on a computer with extended BIOS and IDE hard disk drives with the same size.
C8.4.2 Test setup Use a computer with extended BIOS, “HecRamsey”. Select two IDE hard disks with the same capacity: mount the source disk 9C as drive 0x80 and destination disk 8C as drive 0x81. Insert the CD containing the FS-TST in the CD drive. Boot up the computer from the FS-TST boot diskette. The boot diskette will be also used as log disk.
C8.4.3 Test case dependencies None.
98
C8.4.4 Procedure Run seccopy to copy the source disk to the destination disk (except the last sector): Z:\SS\SECCOPY.EXE DCP-04 HecRamsey 80 0 81 0 39102335 /new_log Run diskcmp to compare the two disks, using the /new_log switch: Z:\SS\DISKCMP.EXE DCP-04 HecRamsey 80 AA 81 BB /new_log Use the dir command and a text editor to examine the log file’s existence, name, and contents. Verify the count of equal and different sectors.
C8.4.5 Expected results Diskcmp prompts the user for a comment, creates a new log file “CMPLOG.TXT”, and logs the comment. It logs the correct information required by features 1, 2, 3. Diskcmp logs the hard drives to be compared, and the number of equal and different sectors.
C8.5 Dcp-05
C8.5.1 Purpose The purpose of this test case is to test features 1, 2, 3, 4 on a computer with legacy BIOS and IDE hard disk drives, when the disks are filled in diskwipe-style.
C8.5.2 Test setup Use the setup of test case Dcp-01. Wipe out the disks using diskwipe.
C8.5.3 Test case dependencies None.
C8.5.4 Procedure Run diskwipe to wipe out the source with the value 0xAA and the destination with 0xBB: Z:\SS\DISKWIPE.EXE DCP-05 Beta3 80 AA /src /noask /new_log Z:\SS\DISKWIPE.EXE DCP-05 Beta3 81 BB /dst /noask /new_log Run diskcmp to compare the disks: Z:\SS\DISKCMP.EXE DCP-05 Beta3 80 AA 81 BB /new_log Use the dir command and a text editor to examine the log file’s existence, name, and contents. Verify the count of equal and different sectors. Verify whether diskcmp displays any information about sectors filled in diskwipe-style.
C8.5.5 Expected results Diskcmp prompts the user for a comment, creates a new log file “CMPLOG.TXT”, and logs the comment. It logs the correct information required by features 1, 2, 3.
99
Diskcmp logs the hard drives to be compared, and the number of equal and different sectors. The test also expects that diskcmp logs some information about the sectors filled in diskwipe-style on each disk.
C8.6 Dcp-06
C8.6.1 Purpose The purpose of this test case is to test feature 3, namely whether diskcmp displays its usage mode when prompted by the /? switch on the command line.
C8.6.2 Test setup Use any computer and disk drives.
C8.6.3 Test case dependencies None.
C8.6.4 Procedure Run diskcmp with the /? switch and redirect stdout to a log file: Z:\SS\DISKCMP.EXE DCP-05 Beta3 80 AA 81 BB /new_log /? >A:\DISKCMP.LOG Use a text editor to examine the log file contents.
C8.6.5 Expected results Diskcmp displays its usage mode.
100
C9 Diskhash Test Case Specifications
C9.1 Dhs-01
C9.1.1 Purpose The purpose of this test case is to test features 1, 2, 3 on a computer with legacy BIOS and IDE hard disk drives. Specifically, the test will verify whether diskhash creates a new log file with the default name corresponding to the /before switch when no log file is present, correctly logs a one-word comment entered on the command line, the target disk drive, the program execution, and the SHA1 disk hash result.
C9.1.2 Test setup Use a computer with legacy BIOS, “Beta3”. Mount the IDE hard disk “D7” as drive 0x81 (0x80 will contain the disk “61” with the Linux OS, unused in this test case). Insert the CD containing the Forensic Software Testing Support Tools in the CD drive. Boot up the computer from the FS-TST boot diskette. The boot diskette will be also used as log disk. Delete all log files from the log disk.
C9.1.3 Test case dependencies None.
C9.1.4 Procedure Run diskhash to compute the SHA1 hash for the disk drive 0x81 using the switches /before and /comment with one-word comment: Z:\SS\DISKHASH.EXE DKH-01 Beta3 81 /before /comment OneWordComment Use the dir command and a text editor to examine the log file’s existence, name, and contents.
C9.1.5 Expected results A (new) log file with the name “HASHBLOG.TXT” is created on the log disk (which is the boot diskette). The comment is logged. The log file contains the correct information required by features 1, 2, 3. Diskhash computes and logs a hash value for the target disk.
C9.2 Dhs-02
C9.2.1 Purpose The purpose of this test case is to test features 1, 2, 3 and partially 4 on a computer with legacy BIOS and IDE hard disk drives. Specifically, the test will verify whether diskhash creates a new log file with the default name corresponding to the /after switch when no
101
such log file is present, correctly logs a multi-word comment entered on the command line, the target disk drive, and the program execution. Also, the test will examine whether a small content modification of the same disk used in Dhs-01 leads to a different hash value.
C9.2.2 Test setup Use the setup of Dhs-01. Modify one byte of the target disk by using diskchg or a disk editor.
C9.2.3 Test case dependencies Dhs-01 (the target disk needs to have the same contents.)
C9.2.4 Procedure Run diskchg to examine, then change a byte of the target disk: Z:\SS\DISKCHG.EXE DHS-02 Beta3 81 /read 100/0/1 0 32 /new_log Z:\SS\DISKCHG.EXE DHS-02 Beta3 81 /write 100/0/1 26 FF /new_log Run diskhash to compute the SHA1 hash for the disk drive 0x81 using the switches /after and /comment with a multi-word comment: Z:\SS\DISKHASH.EXE DHS-02 Beta3 81 /after /comment “hash disk after changing one byte” Use the dir command and a text editor to examine the log file’s existence, name, and contents.
C9.2.5 Expected results A (new) log file with the name “HASHALOG.TXT” is created on the log disk (which is the boot diskette). The comment is logged. The log file contains the correct information required by features 1, 2, 3. Diskhash computes and logs a hash value, which is different from that computed in the case Dhs-01.
C9.3 Dhs-03
C9.3.1 Purpose The purpose of this test case is to test features 2 and partially 4 on a computer with legacy BIOS and IDE hard disk drives. Specifically, the test will verify whether diskhash appends the log to an existing log file when not otherwise instructed, and whether it computes the same hash value when invoked for the same disk as in the test case Dhs-02.
C9.3.2 Test setup Use the setup of Dhs-02.
102
C9.3.3 Test case dependencies Dhs-02 (the target disk needs to have the same contents.)
C9.2.4 Procedure Run diskhash to compute the SHA1 hash for the disk drive 0x81 using the /after switch: Z:\SS\DISKHASH.EXE DHS-03 Beta3 81 /after Use the dir command and a text editor to examine the log file’s existence, name, and contents.
C9.1.5 Expected results Diskhash appends the log to the log file “HASHALOG.TXT” created in the test case Dhs-02. Diskhash prompts the user for a comment. It logs the comment, the target disk, and the program execution. The logged hash value is identical to the one computed in the test case Dhs-02.
C9.4 Dhs-04
C9.4.1 Purpose The purpose of this test case is to test features 2 and partially 4 on a computer with legacy BIOS and IDE hard disk drives. Specifically, the test will verify whether diskhash creates a new log file when instructed by the /new_log switch, and whether it computes a different hash value if only one bit of the last byte of the target disk, which is the one used in the case Dhs-03 is modified.
C9.4.2 Test setup Use the setup of Dhs-03.
C9.4.3 Test case dependencies Dhs-03 (the target disk needs to have the same contents.)
C9.4.4 Procedure Run diskchg to modify one bit in the last byte of the target disk: Z:\SS\DISKCHG.EXE DHS-04 Beta3 81 /write 827/15/63 511 ba /new_log Run diskhash to compute the SHA1 hash for the disk drive 0x81 using the /after and /new_log switches: Z:\SS\DISKHASH.EXE DHS-04 Beta3 81 /after /new_log Use the dir command and a text editor to examine the log file’s existence, name, and contents.
C9.4.5 Expected results Diskhash creates a new log file “HASHALOG.TXT”.
103
Diskhash prompts the user for a comment. It logs the comment, the target disk, and the program execution. The logged hash value is different from the one computed in the test case Dhs-03.
C9.5 Dhs-05
C9.5.1 Purpose The purpose of this test case is to test feature 4 on a computer with extended BIOS and an IDE hard disk drive. Specifically, the test will verify whether diskhash correctly computes a SHA1 hash of the target disk. The test will compare the hash value computed by diskhash with the SHA1 hash value computed by the Linux command sha1sum.
C9.5.2 Test setup Install Linux version 7.x or 8.x on the IDE disk 63 that will be referred to as the boot hard disk drive. Mount disk 63 as drive 0x80 on the computer “HecRamsey” with extended BIOS. Mount target disk 8C as drive 0x81.
C9.5.3 Test case dependencies None.
C9.5.4 Procedure Boot to DOS using the FS-TST boot diskette. Run diskhash to compute the hash of the target drive: Z:\SS\DISKHASH.EXE DHS-05 HecRamsey 81 /before /new_log Reboot to Linux from the boot hard drive. Login as root. Mount the floppy drive /dev/fd0 containing the FS-TST diskette on a directory “floppy”. Run sha1sum to hash the source disk 81 (device /dev/hdd) and redirect stdout: sha1sum < /dev/hdd > floppy/SHA1SUM.LOG Unmount the floppy drive /dev/fd0. Reboot to DOS and compare the two hashes: the hash value computed by diskhash is logged in the A:\HASHBLOG.TXT file; the hash value computed by the sha1sum command is in the A:\SHA1SUM.LOG file.
C9.5.5 Expected results Diskhash creates a new log file “HASHBLOG.TXT”. Diskhash prompts the user for a comment. It logs the comment, the target disk, and the program execution. The logged hash value is identical to that computed by sha1sum.
104
C9.6 Dhs-06
C9.6.1 Purpose The purpose of this test case is to test feature 4 on a computer with extended BIOS and a SCSI hard disk drive. Specifically, the test will verify whether diskhash correctly computes a SHA1 hash of the target disk. The test will compare the hash value computed by diskhash with the SHA1 hash value computed by the Linux command sha1sum.
C9.6.2 Test setup Install Linux version 7.x or 8.x on the IDE disk 63 that will be referred to as the boot hard disk drive. Mount disk 63 as drive 0x80 on the computer “HecRamsey” with extended BIOS. Mount target SCSI disk 8C as drive 0x82 (one can mount IDE disk 8C as drive 0x81, which will not be used in this case.)
C9.6.3 Test case dependencies None.
C9.6.4 Procedure Boot to DOS using the FS-TST boot diskette. Run diskhash to compute the hash of the target drive: Z:\SS\DISKHASH.EXE DHS-06 HecRamsey 82 /before /new_log Reboot to Linux from the boot hard drive. Login as root. Mount the floppy drive /dev/fd0 on a directory “floppy”. Run sha1sum to hash the target disk 0x82 (device /dev/sda): sha1sum < /dev/sda > floppy/SHA1SUM.LOG Unmount the floppy drive /dev/fd0. Reboot to DOS and compare the two hashes: the hash value computed by diskhash is logged in the A:\HASHBLOG.TXT file; the hash value computed by the sha1sum command is in the A:\SHA1SUM.LOG file.
C9.6.5 Expected results Diskhash creates a new log file “HASHBLOG.TXT”. Diskhash prompts the user for a comment. It logs the comment, the target disk, and the program execution. The logged hash value is identical to that computed by sha1sum.
C9.7 Dhs-07
C9.7.1 Purpose The purpose of this test case is to test feature 4 on a computer with legacy BIOS and an IDE hard disk drive. Specifically, the test will verify whether diskhash correctly
105
computes a SHA1 hash of the target disk. The test will compare the hash value computed by diskhash with the SHA1 hash value computed by the Linux command sha1sum.
C9.7.2 Test setup Install Linux version 7.x or 8.x on the IDE disk 61 that will be referred to as the boot hard disk drive. Mount disk 61 as drive 0x80 on the computer “Beta3”. Mount target IDE disk D7 as drive 0x81.
C9.7.3 Test case dependencies None.
C9.7.4 Procedure Boot to DOS using the FS-TST boot diskette. Run diskhash to compute the hash of the target drive: Z:\SS\DISKHASH.EXE DHS-07 Beta3 81 /before /new_log Reboot to Linux from the boot hard drive. Login as root. Mount the floppy drive /dev/fd0 on a directory “floppy”. Run sha1sum to hash the target disk 0x81 (device /dev/hdb): sha1sum < /dev/hdb > floppy/SHA1SUM.LOG Unmount the floppy drive /dev/fd0. Reboot to DOS and compare the two hashes: the hash value computed by diskhash is logged in the A:\HASHBLOG.TXT file; the hash value computed by the sha1sum command is in the A:\SHA1SUM.LOG file.
C9.7.5 Expected results Diskhash creates a new log file “HASHBLOG.TXT”. Diskhash prompts the user for a comment. It logs the comment, the target disk, and the program execution. The logged hash value is identical to that computed by sha1sum.
C9.8 Dhs-08
C9.8.1 Purpose The purpose of this test case is to test feature 2. Specifically, the test will examine whether diskhash displays its usage mode when prompted by the /? switch.
C9.8.2 Test setup None.
C9.8.3 Test case dependencies None.
106
C9.8.4 Procedure Boot to DOS using the FS-TST boot diskette. Run diskhash with the /? switch and redirect stdout to a file on the log disk (floppy): Z:\SS\DISKHASH.EXE DHS-08 Beta3 80 /before /new_log /? > A:\HASHOUT.LOG Examine the contents of the A:\HASHOUT.LOG file.
C9.8.5 Expected results HASHOUT.LOG should contain the usage mode of diskhash.
C10 Badx13 Test Case Specifications
C10.1 Bdx-01
C10.1.1 Purpose The purpose of this test case is to test features 1, 2 on a computer with extended BIOS and an IDE hard disk drive. Specifically, the test will verify whether badx13 correctly monitors the disk write command on a specified sector address and returns the specified error code. Also, the test will examine whether badx13 displays its arguments on the standard output.
C10.1.2 Test setup Use a computer with extended BIOS, e.g., “HecRamsey”. Mount an IDE hard disk, e.g., disk “8C” as drive 0x81. Insert the CD containing the Forensic Software Testing Support Tools in the CD drive. Boot up the computer from the FS-TST boot diskette. The boot diskette will be also used as log disk.
C10.1.3 Test case dependencies None.
C10.1.4 Procedure Run badx13 to simulate a write error on the first disk sector of the IDE drive. Use the error code 33. Redirect the stdout to a file A:\BADX13.LOG: Z:\SS\BADX13 81 43 33 0 > A:\BADX13.LOG Use a text editor to examine BADX13.LOG’s contents. Use diskedit to read/write sector 0 and a few sectors after it. Use diskchg to write sector 0: Z:\SS\DISKCHG.EXE BDX-01 HecRamsey 81 /new_log /write 0 0 77.
C10.1.5 Expected results Badx13 displays its arguments on the standard output.
107
Badx13 monitors the disk write commands, and if they refer the specified sector address, returns the specified error code. Thus, diskchg should be able to read sector 0, but not write it back. Also, diskedit should be able to read all sectors, but not write sector 0.
C10.2 Bdx-02
C10.2.1 Purpose The purpose of this test case is to test features 1, 2 on a computer with extended BIOS and an IDE hard disk drive. Specifically, the test will verify whether badx13 correctly monitors the disk read command on the last disk sector and returns the specified error code, by showing that diskchg cannot read, but can write that sector. Also, the test will examine whether badx13 displays its arguments on the standard output.
C10.2.2 Test setup Use the setup of case Bdx-01 and reboot to DOS.
C10.2.3 Test case dependencies None.
C10.2.4 Procedure Run badx13 to simulate a read error on the last disk sector of the IDE drive. Use the error code 32. Redirect the stdout to a file A:\BADX13.LOG: Z:\SS\BADX13 81 42 32 39102335 > A:\BADX13.LOG Use a text editor to examine BADX13.LOG’s contents. Use diskchg to read and zero last sector: Z:\SS\DISKCHG.EXE BDX-02 HecRamsey 81 /new_log /read 39102335 0 32 Z:\SS\DISKCHG.EXE BDX-02 HecRamsey 81 /new_log /zero 39102335
C10.2.5 Expected results Badx13 displays its arguments on the standard output. Badx13 monitors the disk read commands, and if they refer the last disk sector, returns the specified error code. Thus, diskchg should not be able to read the last sector, but should be able to zero it.
C10.3 Bdx-03
C10.3.1 Purpose The purpose of this test case is to test features 1, 2 on a computer with extended BIOS and an IDE hard disk drive. Specifically, the test will verify whether badx13 correctly monitors the disk read command on the first disk sector and returns the specified error code, by showing that diskchg cannot read that sector, but can read next sector(s). Also, the test will examine whether badx13 displays its arguments on the standard output.

108
C10.3.2 Test setup Use the setup of case Bdx-01 and reboot to DOS.
C10.3.3 Test case dependencies None.
C10.3.4 Procedure Run badx13 to simulate a read error on the first disk sector of the IDE drive. Use the error code 32. Redirect the stdout to a file A:\BADX13.LOG: Z:\SS\BADX13 81 42 32 0 > A:\BADX13.LOG Use a text editor to examine BADX13.LOG’s contents. Use diskchg to read the first two sectors and capture the stdout: Z:\SS\DISKCHG.EXE BDX-03 HecRamsey 81 /new_log /read 0 0 32 /comment “Read sector 0 marked as bad for reading” >A:\READ0.TXT Z:\SS\DISKCHG.EXE BDX-03 HecRamsey 81 /read 1 0 32 /comment “Read sector 1” >A:\READ1.TXT
C10.3.5 Expected results Badx13 displays its arguments on the standard output. Badx13 monitors the disk read commands, and if they refer the last disk sector, returns the specified error code. Thus, diskchg should not be able to read sector 0, but should be able to read sector 1.
C10.4 Bdx-04
C10.4.1 Purpose The purpose of this test case is to test features 1, 2 on a computer with extended BIOS and a SCSI hard disk drive. Specifically, the test will verify whether badx13 correctly monitors the disk write command on the first disk sector and returns the specified error code, by showing that diskchg can read that sector, but cannot write it. Also, the test will examine whether badx13 displays its arguments on the standard output.
C10.4.2 Test setup Use a computer with extended BIOS, e.g., “HecRamsey”. Mount a SCSI hard disk, e.g., disk “10” as drive 0x82. Insert the CD containing the Forensic Software Testing Support Tools in the CD drive. Reboot from the FS-TST boot diskette. The boot diskette will be also used as log disk.
C10.4.3 Test case dependencies None.
109
C10.4.4 Procedure Run badx13 to simulate a write error on the first disk sector of the SCSI drive. Use the error code 33. Redirect the stdout to a file A:\BADX13.LOG: Z:\SS\BADX13 82 43 33 0 > A:\BADX13.LOG Use a text editor to examine BADX13.LOG’s contents. Use diskchg to read/write the first two sectors of the SCSI disk: Z:\SS\DISKCHG.EXE BDX-04 HecRamsey 82 /new_log /write 0 26 77 Z:\SS\DISKCHG.EXE BDX-04 HecRamsey 82 /write 1 26 77
C10.4.5 Expected results Badx13 displays its arguments on the standard output. Badx13 monitors the disk write commands, and if they refer the first disk sector, returns the specified error code. Thus, diskchg should be able to read sector 0, but not to write it. Diskchg should be able to read/write sector 1.
C10.5 Bdx-05
C10.5.1 Purpose The purpose of this test case is to test features 1, 2 on a computer with extended BIOS and a SCSI hard disk drive. Specifically, the test will examine whether badx13 correctly monitors the disk read command on the last disk sector and returns the specified error code, by showing that diskchg cannot read that sector, but can write it (e.g., zero it). Also, the test will examine whether badx13 displays its arguments on the standard output.
C10.5.2 Test setup Use the setup of case Bdx-04. Reboot from the FS-TST boot diskette.
C10.5.3 Test case dependencies None.
C10.5.4 Procedure Run badx13 to simulate a read error on the last sector of the SCSI drive. Use the error code 32. Redirect the stdout to a file A:\BADX13.LOG: Z:\SS\BADX13 82 42 32 35885447 > A:\BADX13.LOG Use a text editor to examine BADX13.LOG’s contents. Use diskchg to read, and then zero the last sector of the SCSI disk: Z:\SS\DISKCHG.EXE BDX-05 HecRamsey 82 /new_log /read 35885447 0 32 Z:\SS\DISKCHG.EXE BDX-05 HecRamsey 82 /new_log /zero 35885447
110
C10.5.5 Expected results Badx13 displays its arguments on the standard output. Badx13 monitors the disk read commands, and if they refer the last disk sector, returns the specified error code. Thus, diskchg should not be able to read the last sector, but should be able to zero it.
C10.6 Bdx-06
C10.6.1 Purpose The purpose of this test case is to test features 1, 2 on a computer with extended BIOS and a SCSI hard disk drive. Specifically, the test will verify whether badx13 correctly monitors the disk read command on the first disk sector and returns the specified error code, by showing that diskchg cannot read that sector, but can read next sectors. Also, the test will examine whether badx13 displays its arguments on the standard output.
C10.6.2 Test setup Use the setup of case Bdx-04. Reboot from the FS-TST boot diskette.
C10.6.3 Test case dependencies None.
C10.6.4 Procedure Run badx13 to simulate a read error on the first sector of the SCSI drive. Use the error code 32. Redirect the stdout to a file A:\BADX13.LOG: Z:\SS\BADX13 82 42 32 0 > A:\BADX13.LOG Use a text editor to examine BADX13.LOG’s contents. Use diskchg to read first two sectors and capture its stdout: Z:\SS\DISKCHG.EXE BDX-06 HecRamsey 82 /new_log /read 0 0 32 > A:\READ0.TXT Z:\SS\DISKCHG.EXE BDX-06 HecRamsey 82 /read 1 0 32 > A:\READ1.TXT
C10.6.5 Expected results Badx13 displays its arguments on the standard output. Badx13 monitors the disk read commands, and if they refer the first disk sector, returns the specified error code. Thus, diskchg should not be able to read the first sector, but should be able to read next sector.
C10.7 Bdx-07
C10.7.1 Purpose The purpose of this test case is to test features 1, 2 on a computer with extended BIOS and an IDE hard disk drive. Specifically, the test will verify whether badx13 correctly monitors multiple I/O commands on same or different sectors, by running badx13
111
multiple times, then running diskchg to read/write those sectors. Also, the test will examine whether badx13 displays its arguments on the standard output.
C10.7.2 Test setup Use the setup of case Bdx-01. Reboot from the FS-TST boot diskette.
C10.7.3 Test case dependencies None.
C10.7.4 Procedure Run badx13 to simulate a read error on the first sector, and write error on the second and third sector of the IDE drive. Redirect and append the stdout to a file A:\BADX13.LOG: Z:\SS\BADX13 81 42 32 0 > A:\BADX13.LOG Z:\SS\BADX13 81 43 33 1 >> A:\BADX13.LOG Z:\SS\BADX13 81 43 33 2 >> A:\BADX13.LOG Use a text editor to examine BADX13.LOG’s contents. Use diskchg to read first sector and read/write next two sectors: Z:\SS\DISKCHG.EXE BDX-07 HecRamsey 81 /new_log /read 0 0 32 Z:\SS\DISKCHG.EXE BDX-07 HecRamsey 81 /new_log /write 1 26 77 Z:\SS\DISKCHG.EXE BDX-07 HecRamsey 81 /write 2 26 77
C10.7.5 Expected results Badx13 displays its arguments on the standard output. Badx13 monitors all specified I/O commands on the specified sectors, and returns the specified error code. Thus, diskchg should not be able to read the first sector; it should be able to read the next two sectors, but not to write them.
C10.8 Bdx-08
C10.8.1 Purpose The purpose of this test case is to test whether badx13 detects that a specified LBA address is outside the disk range.
C10.8.2 Test setup Use the setup of case Bdx-04. Reboot from the FS-TST boot diskette.
C10.8.3 Test case dependencies None.
C10.8.4 Procedure Run badx13 to simulate a read error on a sector with incorrect address (outside the disk range.) Redirect the stdout to a file A:\BADX13.LOG: Z:\SS\BADX13 82 42 32 35885448 > A:\BADX13.LOG
112
Use a text editor to examine BADX13.LOG’s contents.
C10.8.5 Expected results Badx13 displays its arguments on the standard output. Badx13 warns about the sector address outside the disk range.
C10.9 Bdx-09
C10.9.1 Purpose The purpose of this test case is to test whether badx13 detects that the computer it is running on has a legacy BIOS.
C10.9.2 Test setup Use a computer with legacy BIOS, e.g., “Beta3”. Mount an IDE hard disk, e.g., disk “61” as drive 0x80. Insert the CD containing the Forensic Software Testing Support Tools in the CD drive. Reboot the computer from the FS-TST boot diskette. The boot diskette will be also used as log disk.
C10.9.3 Test case dependencies None.
C10.9.4 Procedure Run badx13 to simulate a read error on the last disk sector, as reported by the ATA “identify device” command. Redirect the stdout to a file A:\BADX13.LOG: Z:\SS\BADX13 80 42 32 12594959 > A:\BADX13.LOG Use a text editor to examine BADX13.LOG’s contents. Run diskchg to read that sector: Z:\SS\DISKCHG.EXE BDX-09 Beta3 80 /new_log /read 12594959 0 32
C10.9.5 Expected results Badx13 either detects a legacy BIOS and rejects the request, or installs itself as TSR, monitors read commands for the last sector of the disk, and returns the specified error code.
113
C11 Corrupt Test Case Specifications
C11.1 Cor-01
C11.1.1 Purpose The purpose of this test case is to test features 1, 2, 3, 4 on a computer with extended BIOS and a SCSI hard disk drive. Specifically, the test will verify whether corrupt creates a new log file with the default name when no log file is present, correctly logs a one-word comment entered on the command line, alters a specified byte somewhere within the image file, logs the program execution and the original and new byte values.
C11.1.2 Test setup Use a computer with extended BIOS, “HecRamsey”. Install Linux OS on the IDE hard disk “63” mounted as drive 0x80. It will be used as boot disk. Mount the SCSI hard disk “10” as drive 0x82. It will be used as a media disk. Insert the CD containing the Forensic Software Testing Support Tools in the CD drive. Reboot the computer from the FS-TST boot diskette. The boot diskette will be also used as log disk. Delete all log files from the log disk. Create a primary FAT32 partition on the media disk (on 0x82) using PartitionMagic. Assume that this partition will be known as C: in DOS. Create an image file C:\A1.IMG on the media disk (any file can serve as image file). Copy the image file to C:\CopyOfA1.IMG
C11.1.3 Test case dependencies None.
C11.1.4 Procedure Run corrupt to alter a byte of the image file: Z:\SS\CORRUPT.EXE COR-01 HecRamsey C:\A1.IMG 15000000 78 /comment AlterAByte Reboot to Linux from the boot disk “63”. Login as root. Mount the FAT32 partition of the media drive 0x82 containing the altered image file and its copy (device /dev/sda1) on a directory “images”: mkdir images mount /dev/sda1 images Run the cmp command to compare the altered image file to the reference copy: cmp –l images/a1.img images/copyofa1.img > images/diff-a1.txt Reboot to DOS using the FS-TST diskette.
114
Capture the contents of C:\diff-a1.txt. Note: the cmp command outputs the bytes that differ in octal.
C11.1.5 Expected results Corrupt creates a new log file with the name “CORLOG.TXT” on the log disk (which is the boot diskette). The comment is logged. The log file contains the correct information required by features 1, 3, 4. The altered image file and the reference copy differ only by the byte at the specified offset, which has the new value in the altered image.
C11.2 Cor-02
C11.2.1 Purpose The purpose of this test case is to test features 1, 2, 3, 4 on a computer with extended BIOS and a SCSI hard disk drive. Specifically, the test will verify whether corrupt appends the log to an existing log file when the /new_log switch is omitted, and correctly logs a multi-word comment entered on the command line, alters the first byte of an image file, logs the program execution and the original and new byte values.
C11.2.2 Test setup Use the setup of Cor-01. The only exception is that the test used another image file, A2.IMG instead of A1.IMG.
C11.2.3 Test case dependencies Cor-01. Do not delete the previous log file in order to test whether corrupt appends the log to the existing log file.
C11.2.4 Procedure Run corrupt to alter the first byte of the image file: Z:\SS\CORRUPT.EXE COR-02 HecRamsey C:\A2.IMG 0 78 /comment “Altering first byte” Reboot to Linux from the boot disk “63”. Login as root. Mount the FAT32 partition of the media drive 0x82 containing the altered image file and its copy (device /dev/sda1) on a directory “images”: mount /dev/sda1 images Run the cmp command to compare the altered image file to the reference copy: cmp –l images/a2.img images/copyofa2.img > images/diff-a2.txt Reboot to DOS using the FS-TST diskette. Capture the contents of C:\diff-a2.txt.
115
Note: the cmp command outputs the bytes that differ in octal.
C11.2.5 Expected results Corrupt appends the log to the previous log file A:\CORLOG.TXT. The comment is logged. The log file contains the correct information required by features 1, 3, 4. The altered image file and the reference copy differ only by the first byte, which has the new value in the altered image.
C11.3 Cor-03
C11.3.1 Purpose The purpose of this test case is to test features 1, 2, 3, 4 on a computer with extended BIOS and a SCSI hard disk drive. Specifically, the test will verify whether corrupt creates a new log file when instructed by the /new_log switch, prompts the user to enter a comment, alters the last byte of an image file, logs the program execution and the original and new byte values.
C11.3.2 Test setup Use the setup of Cor-01. The only exception is that the test used another image file, A3.IMG instead of A1.IMG.
C11.3.3 Test case dependencies Cor-02. Do not delete the previous log file in order to test whether corrupt creates a new log file.
C11.3.4 Procedure Run corrupt to alter the last byte of the image file: Z:\SS\CORRUPT.EXE COR-03 HecRamsey C:\A3.IMG 1559999999 78 /new_log Reboot to Linux from the boot disk “63”. Login as root. Mount the FAT32 partition of the media drive 0x82 containing the altered image file and its copy (device /dev/sda1) on a directory “images”: mount /dev/sda1 images Run the cmp command to compare the altered image file to the reference copy: cmp –l images/a3.img images/copyofa3.img > images/diff-a3.txt Reboot to DOS using the FS-TST diskette. Capture the contents of C:\diff-a3.txt. Note: the cmp command outputs the bytes that differ in octal.
116
C11.3.5 Expected results Corrupt create a new log file A:\CORLOG.TXT. Corrupt prompts the user to enter a comment. Corrupt logs the comment, the original and new values of the last byte. The altered image file and the reference copy differ only by the last byte, which has the new value in the altered image.
C11.4 Cor-04
C11.4.1 Purpose The purpose of this test case is to test whether corrupt detects that a byte offset within the image file is invalid, i.e., outside the file range.
C11.4.2 Test setup Use the setup of Cor-03.
C11.4.3 Test case dependencies Cor-03. The test will use the same image file, A3.IMG.
C11.4.4 Procedure Run corrupt and specify a byte offset outside the range of the image file. Capture the stdout in a file A:\COR-04.LOG: Z:\SS\CORRUPT.EXE COR-04 HecRamsey C:\A3.IMG 1560000000 78 /new_log > A:\COR-04.LOG Examine the log file and the stdout for signs that corrupt has detected the invalid offset.
C11.4.5 Expected results Corrupt create a new log file A:\CORLOG.TXT, prompts the user to enter a comment, and logs the comment. Corrupt displays and logs a warning about the invalid offset and rejects the request to alter the byte.
C11.5 Cor-05
C11.5.1 Purpose The purpose of this test case is to test whether corrupt displays its usage mode when instructed by the /? switch.
C11.5.2 Test setup None.
C11.5.3 Test case dependencies None.
117
C11.5.4 Procedure Run corrupt with the /? Switch and capture the stdout in a log file: Z:\SS\CORRUPT.EXE COR-05 HecRamsey C:\A3.IMG 1000000000 78 /new_log /? > A:\COR-05.LOG
C11.5.5 Expected results Corrupt displays its usage mode on the stdout.
118
C12 Logsetup Test Case Specifications
C12.1 Lgs-01
C12.1.1 Purpose The purpose of this test case is to test whether logsetup correctly logs the information about the setup of a source disk provided by the user in arguments on the command line, namely the hard disk drive, the host computer, the operator, the operating system loaded on the disk, and some options. Each argument is to be interpreted as a character string by logsetup, so either the argument does not contain white space, or it may contain white space and then it must be included in double quotes. Logsetup simply copies the argument to the log file it generates. The only logged information that is not provided by the user is the current time and date.
C12.1.2 Test setup None.
C12.1.3 Test case dependencies None.
C12.1.4 Procedure Run logsetup with some arguments: Z:\SS\LOGSETUP.EXE 80:61 Beta3 SIG None “Diskwiped entire disk” Observe whether the log file contains the arguments provided on the command line.
C12.1.5 Expected results Logsetup creates a new log file with the name “SETUP.TXT” on the log disk (which is the boot diskette). It logs the following information: the hard disk drive, the host computer, the operator, the operating system loaded on the disk, the options. It adds the current time and date.
119
C13 Logcase Test Case Specifications
C13.1 Lgc-01
C13.1.1 Purpose The purpose of this test case is to test whether logcase correctly logs the information about a test case provided by the user in arguments on the command line, namely the case identifier, the host computer, the operator, the three disks that might be used (source, destination, and other – each argument is mandatory). Logsetup simply copies the argument to the log file it generates. The only logged information that is not provided by the user is the current time and date.
C13.1.2 Test setup None.
C13.1.3 Test case dependencies None.
C13.1.4 Procedure Run logcase: Z:\SS\LOGCASE.EXE LGC-01 Beta3 SIG none 80:61 none
C13.1.5 Expected results Logcase creates a new log file with the name “CASE.TXT” on the log disk (which is the boot diskette). It logs the following information: the test case identifier, the host computer, the operator, the source disk, the destination disk, and other disk used in the test case. It adds the current time and date.
120
C14 Sechash Test Case Specifications
C14.1 Shs-01
C14.1.1 Purpose The purpose of this test case is to test features 1, 2, 3, 4, 5 on a computer with extended BIOS and an IDE source hard disk drive. Specifically, the test will verify whether diskhash (a) creates a new log file with the default name corresponding to the /before switch when no log file is present; (b) correctly logs a one-word comment entered on the command line, the source disk drive, and the program execution; (c) correctly computes and logs the SHA1 hash of a group of sectors starting with the first disk sector.
C14.1.2 Test setup Use a computer with extended BIOS, “HecRamsey”. Install the Linux OS on the IDE hard disk “63”. Mount the IDE hard disk “63” as drive 0x80. This will be the boot hard disk drive. Mount the IDE hard disk “8C” as drive 0x81. This will be the source hard disk drive. Mount the SCSI hard disk “10” as drive 0x82. This will be the media hard disk drive. Insert the CD containing the Forensic Software Testing Support Tools in the CD drive. Reboot the computer from the FS-TST boot diskette. The boot diskette will be also used as log disk. Delete all log files from the log disk. Create a FAT32 partition on the media disk using PartitionMagic. It is assumed that the DOS drive letter for this partition is C:.
C14.1.3 Test case dependencies None.
C14.1.4 Procedure Run sechash to compute the SHA1 hash of a group of sectors starting with sector 0 of the source disk: A:\SECHASH.EXE SHS-01 HecRamsey 81 /before /comment FirstTest /first 0 /last 1000000 Reboot to Linux from the boot hard disk drive. Login as root. Mount the FAT32 partition of the media drive 82 (device /dev/sda1) on a directory “media”: mkdir media mount /dev/sda1 media Run the dd command to create an image file on the media disk for the group of sectors on the source disk 81 (device /dev/hdd):
121
dd ibs=512 count=1000001 skip=0 of=media/file1.img < /dev/hdd Run the sha1sum command to compute the SHA1 hash of the image file created in the previous step, and capture its output in a file: sha1sum –b media/file1.img > media/hash1.log Reboot to DOS using the FS-TST diskette. Compare the hash computed by sechash to the hash computed by sha1sum in C:\hash1.log.
C14.1.5 Expected results A (new) log file with the name “HASHBSEC.TXT” is created on the log disk (which is the boot diskette). The comment is logged. The log file contains the correct information required by features 1, 2. Sechash computes and logs a hash value for the specified group of sectors identical to that computed by sha1sum.
C14.2 Shs-02
C14.2.1 Purpose The purpose of this test case is to test features 1, 2, 3, 4, 5 on a computer with extended BIOS and an IDE source hard disk drive. Specifically, the test will verify whether diskhash (a) appends the log to the existing log file with the default name corresponding to the /before switch; (b) correctly logs a multi-word comment entered on the command line, the source disk drive, and the program execution; (c) correctly computes and logs the SHA1 hash of a group of sectors ending with the last disk sector.
C14.2.2 Test setup Use the setup of Shs-01.
C14.2.3 Test case dependencies Shs-01. Do not delete the log file created in the previous test case.
C14.2.4 Procedure Run sechash to compute the SHA1 hash of a group of sectors ending with the last sector of the source disk: A:\SECHASH.EXE SHS-02 HecRamsey 81 /first 38102335 /last 39102335 /before /comment “Append log, hash last sectors” Boot to Linux from the boot hard disk drive. Login as root. Mount the FAT32 partition of the media drive (device /dev/sda1) on a directory “media”: [mkdir media] mount /dev/sda1 media
122
Run the dd command to create an image file on the media disk for the group of sectors on the source disk 81 (device /dev/hdd): dd ibs=512 count=1000001 skip=38102335 of=media/file2.img < /dev/hdd Run the sha1sum command to compute the SHA1 hash of the image file created in the previous step, and capture its output in a file: sha1sum –b media/file2.img > media/hash2.log Reboot to DOS using the FS-TST diskette. Compare the hash computed by sechash to the hash computed by sha1sum in C:\hash2.log.
C14.2.5 Expected results Sechash appends the log to the existing log file “HASHBSEC.TXT”. The comment is logged. The log file contains the correct information required by features 1, 2. Sechash computes and logs a hash value for the specified group of sectors identical to that computed by sha1sum.
C14.3 Shs-03
C14.3.1 Purpose The purpose of this test case is to test features 1, 2, 3, 4, 5 on a computer with extended BIOS and an IDE source hard disk drive. Specifically, the test will verify whether diskhash (a) creates a new log file, when instructed by the /new_log switch, with the default name corresponding to the /before switch; (b) prompts the user to enter a comment and logs the comment, the source disk drive, and the program execution; (c) correctly computes and logs the SHA1 hash of a group of sectors consisting of only the last disk sector.
C14.3.2 Test setup Use the setup of Shs-01.
C14.3.3 Test case dependencies Shs-02. Do not delete the log file created in the previous test case.
C14.3.4 Procedure Run sechash to compute the SHA1 hash of the last sector of the source disk: A:\BATCH\SECHASH.EXE SHS-03 HecRamsey 81 /new_log /before /first 39102335 Reboot to Linux from the boot hard disk drive. Login as root. Mount the FAT32 partition of the media drive (device /dev/sda1) on a directory “media”: [mkdir media] mount /dev/sda1 media
123
Run the dd command to create an image file on the media disk for the last sector of the source disk 81 (device /dev/hdd): dd ibs=512 count=1 skip=39102335 of=media/file3.img < /dev/hdd Run the sha1sum command to compute the SHA1 hash of the image file created in the previous step, and capture its output in a file: sha1sum –b media/file3.img > media/hash3.log Reboot to DOS using the FS-TST diskette. Compare the hash computed by sechash to the hash computed by sha1sum in C:\hash3.log.
C14.3.5 Expected results Sechash creates a new log file “HASHBSEC.TXT”. Sechash prompts the user to enter a comment. The comment is logged. The log file contains the correct information required by features 1, 2. Sechash computes and logs a hash value for the last disk sector identical to that computed by sha1sum.
C14.4 Shs-04
C14.4.1 Purpose The purpose of this test case is to test features 4, 5 on a computer with extended BIOS and an IDE source hard disk drive. Specifically, the test will verify whether diskhash correctly computes and logs the SHA1 hash of a group of sectors consisting of only the first disk sector.
C14.4.2 Test setup Use the setup of Shs-01.
C14.4.3 Test case dependencies None.
C14.4.4 Procedure Run sechash to compute the SHA1 hash of the first sector of the source disk: A:\BATCH\SECHASH.EXE SHS-04 HecRamsey 81 /new_log /before /last 0 Boot to Linux from the boot hard disk drive. Login as root. Mount the FAT32 partition of the media drive (device /dev/sda1) on a directory “media”: [mkdir media] mount /dev/sda1 media
124
Run the dd command to create an image file on the media disk for the group of sectors of the source disk 81 (device /dev/hdd): dd ibs=512 count=1 skip=0 of=media/file4.img < /dev/hdd Run the sha1sum command to compute the SHA1 hash of the image file created in the previous step, and capture its output in a file: sha1sum –b media/file4.img > media/hash4.log Reboot to DOS using the FS-TST diskette. Compare the hash computed by sechash to the hash computed by sha1sum in C:\hash4.log.
C14.4.5 Expected results Sechash creates a new log file “HASHBSEC.TXT”. Sechash prompts the user to enter a comment. The comment is logged. The log file contains the correct information required by features 1, 2. Sechash computes and logs a hash value for the first disk sector identical to that computed by sha1sum.
C14.5 Shs-05
C14.5.1 Purpose The purpose of this test case is to test features 4, 5 on a computer with extended BIOS and an IDE source hard disk drive. Specifically, the test will verify whether diskhash correctly computes and logs the SHA1 hash of a group of sectors consisting of only the first 2 disk sectors.
C14.5.2 Test setup Use the setup of Shs-01.
C14.5.3 Test case dependencies None.
C14.5.4 Procedure Run sechash to compute the SHA1 hash of the first two sectors of the source disk: A:\BATCH\SECHASH.EXE SHS-05 HecRamsey 81 /new_log /before /last 1 Boot to Linux from the boot hard disk drive. Login as root. Mount the FAT32 partition of the media drive (device /dev/sda1) on a directory “media”: [mkdir media] mount /dev/sda1 media
125
Run the dd command to create an image file on the media disk for the group of sectors on the source disk 81 (device /dev/hdd): dd ibs=512 count=2 skip=0 of=media/file5.img < /dev/hdd Run the sha1sum command to compute the SHA1 hash of the image file created in the previous step, and capture its output in a file: sha1sum –b media/file5.img > media/hash5.log Reboot to DOS using the FS-TST diskette. Compare the hash computed by sechash to the hash computed by sha1sum in C:\hash5.log.
C14.5.5 Expected results Sechash creates a new log file “HASHBSEC.TXT”. Sechash prompts the user to enter a comment. The comment is logged. The log file contains the correct information required by features 1, 2. Sechash computes and logs a hash value for the first 2 disk sectors identical to that computed by sha1sum.
C14.6 Shs-06
C14.6.1 Purpose The purpose of this test case is to test features 4, 5 on a computer with extended BIOS and an IDE source hard disk drive. Specifically, the test will verify whether diskhash correctly computes and logs the SHA1 hash of a group of sectors consisting of only one disk sector, which is neither the first nor the last disk sector.
C14.6.2 Test setup Use the setup of Shs-01.
C14.6.3 Test case dependencies None.
C14.6.4 Procedure Run sechash to compute the SHA1 hash of a single sector, which is neither the first nor the last sector of the source disk: A:\BATCH\SECHASH.EXE SHS-05 HecRamsey 81 /new_log /before /first 1000000 /last 1000000 Boot to Linux from the boot hard disk drive. Login as root. Mount the FAT32 partition of the media drive (device /dev/sda1) on a directory “media”: [mkdir media] mount /dev/sda1 media
126
Run the dd command to create an image file on the media disk for the group of sectors on the source disk 81 (device /dev/hdd): dd ibs=512 count=1 skip=1000000 of=media/file6.img < /dev/hdd Run the sha1sum command to compute the SHA1 hash of the image file created in the previous step, and capture its output in a file: sha1sum –b media/file6.img > media/hash6.log Reboot to DOS using the FS-TST diskette. Compare the hash computed by sechash to the hash computed by sha1sum in C:\hash6.log.
C14.6.5 Expected results Sechash creates a new log file “HASHBSEC.TXT”. Sechash prompts the user to enter a comment. The comment is logged. The log file contains the correct information required by features 1, 2. Sechash computes and logs a hash value for the specified sector identical to that computed by sha1sum.
C14.7 Shs-07
C14.7.1 Purpose The purpose of this test case is to test feature 2 on a computer with extended BIOS and an IDE source hard disk drive. Specifically, the test will verify whether diskhash detects invalid sector addresses, e.g., with /first > /last.
C14.7.2 Test setup Use the setup of Shs-01.
C14.7.3 Test case dependencies None.
C14.7.4 Procedure Run sechash to compute the SHA1 hash of a group of sectors with /first > /last: A:\BATCH\SECHASH.EXE SHS-07 HecRamsey 81 /new_log /before /first 38000000 /last 37500000 Examine the results displayed by sechash.
C14.7.5 Expected results Sechash creates a new log file “HASHBSEC.TXT”. Sechash prompts the user to enter a comment. The comment is logged.
127
The log file contains the correct information required by features 1, 2. Sechash displays and logs a warning about the invalid sector addresses and rejects the request.
C14.8 Shs-08
C14.8.1 Purpose The purpose of this test case is to test feature 2. Specifically, the test will examine whether diskhash displays its usage mode when instructed by the /? switch.
C14.8.2 Test setup None.
C14.8.3 Test case dependencies None.
C14.8.4 Procedure Run sechash with the /? Switch and capture the stdout: A:\BATCH\SECHASH.EXE SHS-07 HecRamsey 81 /new_log /before /first 10000 /last 20000 /? > A:\SHS-08.TXT
C14.8.5 Expected results Sechash displays its usage mode.
C14.9 Shs-09
C14.9.1 Purpose The purpose of this test case is to test features 1, 2, 3, 4, 5 on a computer with legacy BIOS and an IDE source hard disk drive. Specifically, the test will verify whether diskhash (a) creates a new log file with a custom name specified in the /log switch; (b) prompts the user to enter a comment and logs the comment, the source disk drive, and the program execution; (c) correctly computes and logs the SHA1 hash of a group of sectors.
C14.9.2 Test setup Use a computer with legacy BIOS, “Beta3”. Install the Linux OS on the IDE hard disk “61”. Mount the IDE hard disk “61” as drive 0x80. This will be the boot hard disk drive. Mount the IDE hard disk “D7” as drive 0x81. This will be the source hard disk drive. The boot drive will be also the media hard disk drive. Insert the CD containing the Forensic Software Testing Support Tools in the CD drive. Reboot the computer from the FS-TST boot diskette. The boot diskette will be also used as log disk.
128
C14.9.3 Test case dependencies None.
C14.9.4 Procedure Run sechash for the first 2 sectors of the source drive, with the /log switch specifying a log file name: A:\BATCH\SECHASH.EXE SHS-09 Beta3 81 /log SHS-09B.LOG /last 1 Run sechash again for the same group of sectors with the /log switch specifying another log file name: A:\BATCH\SECHASH.EXE SHS-09 Beta3 81 /log SHS-09A.LOG /last 1 Reboot to Linux from the boot hard disk drive. Login as root. Run the dd command to create an image file on the media disk for the group of sectors on the source disk 81 (device /dev/hdb): dd ibs=512 count=2 skip=0 of=file09.img < /dev/hdb Create a directory floppy/ and mount the floppy drive containing the FS-TST diskette on floppy/: mount /dev/fd0 floppy Run the sha1sum command to compute the SHA1 hash of the image file created in the previous step, and capture its output to a file on the floppy disk: sha1sum –b file09.img > floppy/hash09.log Unmount the floppy drive: umount /dev/fd0 Reboot to DOS using the FS-TST diskette. Compare the two hashes computed by sechash to the hash computed by sha1sum in A:\hash09.log.
C14.9.5 Expected results Sechash creates the custom log files specified in the /log switch. It prompts the user to enter a comment. Sechash logs the comment, the source disk drive, and the program execution. Sechash computes and logs the correct SHA1 hash of the specified group of sectors.
C14.10 Shs-10
C14.10.1 Purpose The purpose of this test case is to test features 3, 4, 5 on a computer with legacy BIOS and an IDE source hard disk drive. Specifically, the test will examine whether diskhash
129
(a) creates a new log file with the default name corresponding to the /after switch; (b) correctly computes and logs the SHA1 hash of the entire disk.
C14.10.2 Test setup Use the setup of Shs-09.
C14.10.3 Test case dependencies None.
C14.10.4 Procedure Run sechash with the /after switch; omit /first and /last to hash the entire disk: A:\BATCH\SECHASH.EXE SHS-10 Beta3 81 /new_log /after Reboot to Linux from the boot hard disk drive. Login as root. Run the dd command to create an image file on the media disk for the entire source disk 81 (device /dev/hdb): dd ibs=512 count=3335472 skip=0 of=file10.img < /dev/hdb Create a directory floppy/ and mount the floppy drive containing the FS-TST diskette on floppy/: mount /dev/fd0 floppy Run the sha1sum command to compute the SHA1 hash of the image file created in the previous step, and capture its output to a file on the floppy disk: sha1sum –b file10.img > floppy/hash10.log Unmount the floppy drive: umount /dev/fd0 Reboot to DOS using the FS-TST diskette. Compare the two hashes computed by sechash to the hash computed by sha1sum in A:\hash10.log.
C14.10.5 Expected results Sechash creates a new log file HASHASEC.LOG. It prompts the user to enter a comment. Sechash logs the comment, the source disk drive, and the program execution. Sechash computes and logs the correct SHA1 hash of the entire source disk.
130
C14.11 Shs-11
C14.11.1 Purpose The purpose of this test case is to test features 4, 5 on a computer with extended BIOS and a SCSI source hard disk drive. Specifically, the test will verify whether diskhash correctly computes and logs the SHA1 hash of a group of sectors of the source disk.
C14.11.2 Test setup Use a computer with extended BIOS, “HecRamsey”. Install the Linux OS on the IDE hard disk “63”. Mount the IDE hard disk “63” as drive 0x80. This will be the boot hard disk drive. Mount the IDE hard disk “8C” as drive 0x81. This will be the media hard disk drive. Mount the SCSI hard disk “10” as drive 0x82. This will be the source hard disk drive. Insert the CD containing the Forensic Software Testing Support Tools in the CD drive. Reboot the computer from the FS-TST boot diskette. The boot diskette will be also used as log disk. Delete all log files from the log disk. Create a FAT32 partition on the media disk using PartitionMagic. It is assumed that the DOS drive letter for this partition is C:.
C14.11.3 Test case dependencies None.
C14.11.4 Procedure Run sechash to compute the SHA1 hash of the first 1000000 sectors of the source disk: A:\SECHASH.EXE SHS-11 HecRamsey 82 /after /new_log /last 999999 Reboot to Linux from the boot hard disk drive. Login as root. Mount the FAT32 partition of the media drive (device /dev/hdd1) on a directory “media”: [mkdir media] mount /dev/hdd1 media Run the dd command to create an image file on the media disk for the group of sectors on the source disk (device /dev/sda): dd ibs=512 count=2 skip=0 of=media/file11.img < /dev/sda Run the sha1sum command to compute the SHA1 hash of the image file created in the previous step, and capture its output in a file: sha1sum –b media/file11.img > media/hash11.log Reboot to DOS using the FS-TST diskette. Compare the hash computed by sechash to the hash computed by sha1sum in C:\hash11.log.
131
C14.11.5 Expected results Sechash creates a new log file HASHASEC.LOG. It prompts the user to enter a comment. Sechash logs the comment, the source disk drive, and the program execution. Sechash computes and logs the correct SHA1 hash of the specified group of sectors.
132
C15 Adjcmp Test Case Specifications
C15.1 Acp-01
C15.1.1 Purpose The purpose of this test case is to test features 1-6 and 8-11 on a computer with legacy BIOS and IDE source and destination hard disk drives. Specifically, the test will verify whether adjcmp (a) creates a new log file when no log file is present; (b) correctly logs a one-word comment entered on the command line, the source and destination drives, and the program execution; (c) correctly detects the disk layouts; (d) correctly assigns the source chunks to the destination chunks; (e) correctly compares the corresponding chunks and logs the result; (f) correctly logs the sectors of destination chunks without corresponding source chunks; (g) correctly summarizes the disk layouts.
C15.1.2 Test setup Use a computer with legacy BIOS, “Beta3”. Mount the IDE hard disk “61” as drive 0x80 (source). Mount the IDE hard disk “D7” as drive 0x81 (destination). Insert the CD containing the Forensic Software Testing Support Tools in the CD drive. Reboot the computer from the FS-TST boot diskette. The boot diskette will be also used as log disk. Delete all log files from the log disk. Use PartitionMagic to create the following partitions on the source disk: primary FAT16 (39.2MB), primary Linux Ext2 (47.1MB), primary FAT32 - hidden (47.1MB), all separated by unallocated space. Use PartitionMagic to create the following partitions on the destination disk: primary FAT16 (45.3MB), primary Linux Ext2 (39.4MB), FAT32 (51.2MB), and NTFS (49.2MB), all separated by unallocated space. Run seccopy to copy the source FAT16 partition onto the destination FAT16 partition (use the length of the smaller partition, which in this case is the source FAT16).
C15.1.3 Test case dependencies None.
C15.1.4 Procedure Run seccopy to copy the source FAT16 partition onto the destination FAT16 partition (use the length of the smaller partition, which in this case is the source FAT16): Z:\SS\SECCOPY.EXE ACP-01 Beta3 80 63 81 63 80262 /new_log Run adjcmp: Z:\SS\ADJCMP.EXE ACP-01 Beta3 80 AA 81 BB /comment FirstTestCase Examine the log file CMPALOG.TXT generated by adjcmp.
133
C15.1.5 Expected results Adjcmp creates a new log file CMPALOG.TXT. Adjcmp logs the comment, the source and destination drives, the program execution, logs the boot tracks, partitions and unallocated space of each disk, automatically assigns source disk chunks to destination chunks, compares them, and logs the comparison result and a summary as described in the features.
C15.2 Acp-02
C15.2.1 Purpose The purpose of this test case is to test features 1-6 on a computer with legacy BIOS and IDE source and destination hard disk drives. Specifically, the test will verify whether adjcmp:
a. creates a new log file even when a log file is present if prompted by the /new_log switch;
b. correctly logs a multi-word comment entered on the command line, the source and destination drives, and the program execution;
c. correctly detects the disk layouts, when prompted by the /layout switch.
C15.2.2 Test setup Use the setup of Acp-01.
C15.2.3 Test case dependencies Acp-01, to test whether a new log file is created when the /new_log switch is used and an old log file exists.
C15.2.4 Procedure Run adjcmp with the /new_log and /layout switches: Z:\SS\ADJCMP.EXE ACP-02 Beta3 80 AA 81 BB /new_log /layout /comment “Display layout only” Examine the log file CMPALOG.TXT generated by adjcmp.
C15.2.5 Expected results Adjcmp creates a new log file CMPALOG.TXT. Adjcmp logs the comment, the source and destination drives, the program execution, logs the boot tracks, partitions and unallocated space of each disk, and the disk chunks.
134
C15.3 Acp-03
C15.3.1 Purpose The purpose of this test case is to test features 1-6 and 8-11 on a computer with legacy BIOS and IDE source and destination hard disk drives. Specifically, the test will verify whether adjcmp (a) appends the log to the existing log file; (b) prompts the user for a comment when the switch /comment is not used; (c) correctly logs the source and destination drives, and the program execution; (d) correctly detects the disk layouts; (e) what precedence assigns to the /layout and /assign switches.
C15.3.2 Test setup Use the setup of Acp-01.
C15.3.3 Test case dependencies Acp-02, to test whether it appends the log to the existing log file.
C15.3.4 Procedure Run adjcmp: Z:\SS\ADJCMP.EXE ACP-03 Beta3 80 AA 81 BB /layout /assign Examine the log file CMPALOG.TXT generated by adjcmp.
C15.3.5 Expected results Adjcmp appends the log to the existing log file CMPALOG.TXT created in the previous test case. Adjcmp prompts the user for a comment, logs the comment, the source and destination drives, the program execution, logs the boot tracks, partitions and unallocated space of each disk, proving that /layout has precedence over /assign.
C15.4 Acp-04
C15.4.1 Purpose The purpose of this test case is to test features 1-11 on a computer with legacy BIOS and IDE source and destination hard disk drives. Specifically, the test will verify whether adjcmp allows the interactive assignment of disk chunks, in addition to the other features.
C15.4.2 Test setup Use the setup of Acp-01.
C15.4.3 Test case dependencies None.
135
C15.4.4 Procedure Run adjcmp: Z:\SS\ADJCMP.EXE ACP-04 Beta3 80 AA 81 BB /assign /new_log When prompted, use the following assignment: 0 (b) 0 (b) 1 (FAT16) 7 (NTFS) 2 (U) 2 (U) 3 (Linux) 3 (Linux) 4 (U) 4 (U) 5 (FAT32) 1 (FAT16) 6 (U) 6 (U) Examine the log file CMPALOG.TXT generated by adjcmp.
C15.4.5 Expected results Adjcmp creates a new log file CMPALOG.TXT, prompts the user to enter a comment, logs the comment, the source and destination drives, the program execution, logs the boot tracks, partitions and unallocated space of each disk, prompts the user for the assignment of source disk chunks to destination chunks, compares the disk chunks according to the assignment provided by the user, logs the comparison results and a summary, as detailed in the features.
C15.5 Acp-05
C15.5.1 Purpose The purpose of this test case is to test features 1-11 on a computer with extended BIOS and IDE source and destination hard disk drives, which contain large (>8MB) FAT32 primary partitions.
C15.5.2 Test setup Use a computer with extended BIOS, “HecRamsey”. Mount the IDE hard disk “9C” as drive 0x81 (source). Mount the IDE hard disk “8C” as drive 0x82 (destination). Insert the CD containing the Forensic Software Testing Support Tools in the CD drive. Reboot the computer from the FS-TST boot diskette. The boot diskette will be also used as log disk. Use PartitionMagic to create a 10GB primary FAT32 partition on each of the source and destination drives. Run seccopy to copy the source FAT32 partition to the destination FAT32 partition (in this case they have the same size): Z:\SS\SECCOPY.EXE ACP-05 HecRamsey 81 63 82 63 20482812 /new_log
136
C15.5.3 Test case dependencies None.
C15.5.4 Procedure Run adjcmp: Z:\SS\ADJCMP.EXE ACP-05 HecRamsey 81 AA 82 BB /new_log Examine the log file CMPALOG.TXT generated by adjcmp.
C15.5.5 Expected results Adjcmp creates a new log file CMPALOG.TXT, prompts the user to enter a comment, logs the comment, the source and destination drives, the program execution, logs the boot tracks, partitions and unallocated space of each disk, automatically assigns source disk chunks to destination chunks, compares the disk chunks according to the assignment, logs the comparison results and a summary, as detailed in the features.
C15.6 Acp-06
C15.6.1 Purpose The purpose of this test case is to test features 1-11 on a computer with extended BIOS and IDE source and destination hard disk drives, which contain large (>8MB) FAT32 logical partitions.
C15.6.2 Test setup Use the setup of the case Acp-05. Use PartitionMagic to convert the primary FAT32 partitions to logical partitions.
C15.6.3 Test case dependencies None.
C15.6.4 Procedure Run adjcmp: Z:\SS\ADJCMP.EXE ACP-06 HecRamsey 81 AA 82 BB /new_log Examine the log file CMPALOG.TXT generated by adjcmp.
C15.6.5 Expected results Adjcmp creates a new log file CMPALOG.TXT, prompts the user to enter a comment, logs the comment, the source and destination drives, the program execution, logs the boot tracks, partitions and unallocated space of each disk, automatically assigns source disk chunks to destination chunks, compares the disk chunks according to the assignment, logs the comparison results and a summary, as detailed in the features.