formatting text and - amazon s3s3.amazonaws.com/engrade-myfiles/4025506585084342/word_c.pdf ·...
TRANSCRIPT

C Un
it W
ORD
C75
13
4637
3 P
age
49
02/2
3/10
cm
r
UNIT
CWord 2010
Format with fonts
Copy formats using the Format Painter
Change line and paragraph spacing
Align paragraphs
Work with tabs
Work with indents
Add bullets and numbering
Add borders and shading
Insert clip art
Objectives
WD C-1.docx
WD C-2.docx
WD C-3.docx
WD C-4.docx
WD C-5.docx
WD C-6.docx
Files You Will Need:
Formatting can enhance the appearance of a document, create visual impact, and help
illustrate a document’s structure. The formatting of a document can also set a tone, allow-
ing readers to know at a glance if the document is business-like, informal, or fun. In this
unit you learn how to format text using fonts and a variety of paragraph-formatting
effects, such as borders, shading, and bullets. You also learn how to illustrate a document
with clip art. You have finished drafting the text for a two-page flyer advertising last
minute specials for October tours. Now, you need to format the flyer so it is attractive and
highlights the significant information. The flyer will be distributed to clients with the
quarterly newsletter.
Format ting Text and Paragraphs
WD C Unit C7513 46373.indd 49 2/26/10 3:28 PM

Format ting Text and Paragraphs
C Unit WORD C7513 46373 Page 50 02/23/10 cm
rUNIT
CWord 2010
Word 50
1. startWord,openthefileWDc-1.docxfromthedriveandfolderwhereyoustoreyourDataFiles,thensaveitasWDc-LastMinuteDealsNotice that the name of the font used in the document, Calibri, is displayed in the Font list box in the Font group. The word “(Body)” in the Font list box indicates Calibri is the font used for body text in the current theme, the default theme. A theme is a related set of fonts, colors, styles, and effects that is applied to an entire document to give it a cohesive appearance. The font size, 11, appears in the Font Size list box in the Font group.
2. scrollthedocumenttogetafeelforitscontents,press[ctrl][Home],press[ctrl][A]toselecttheentiredocument,thenclicktheFontlistarrowintheFontgroupThe Font list, which shows the fonts available on your computer, opens as shown in Figure C-1. The font names are formatted in the font. Font names can appear in more than one location on the font list.
3. DragthepointerslowlydownthefontnamesintheFontlist,dragthescrollboxtoscrolldowntheFontlist,thenclickGaramondDragging the pointer down the font list allows you to preview how the selected text will look in the highlighted font. Clicking a font name applies the font. The font of the flyer changes to Garamond.
4. clicktheFontsizelistarrowintheFontgroup,dragthepointerslowlyupanddowntheFontsizelist,thenclick12Dragging the pointer over the font sizes allows you to preview how the selected text will look in the highlighted font size. Clicking 12 increases the font size of the selected text to 12 points.
5. selectthetitleQuestspecialtytravelLastMinutetravelDeals,clicktheFontlistarrow,scrolltoandclicktrebuchetMs,clicktheFontsizelistarrow,click22,thenclicktheboldbutton intheFontgroupThe title is formatted in 22-point Trebuchet MS bold.
6. clicktheFontcolorlistarrow intheFontgroupA gallery of colors opens. It includes the set of theme colors in a range of tints and shades as well as a set of standard colors. You can point to a color in the gallery to preview it applied to the selected text.
7. clickthePurple,Accent4,Darker25%colorasshowninFigurec-2,thendeselectthetextThe color of the title text changes to purple. The active color on the Font Color button also changes to purple.
8. selecttheheadingRajasthanDesertsafari,then,usingtheMinitoolbar,clicktheFontlistarrow,clicktrebuchetMs,clicktheFontsizelistarrow,click14,click ,click ,thendeselectthetextThe heading is formatted in 14-point Trebuchet MS bold with a purple color. Notice that when you use the buttons on the Mini toolbar to format text, you cannot preview the formatting options in the document.
9. Press[ctrl][Home],thenclickthesavebutton ontheQuickAccesstoolbarCompare your document to Figure C-3.
Format ting with FontsFormatting text with fonts is a quick and powerful way to enhance the appearance of a document. A font is a complete set of characters with the same typeface or design. Each font has a specific feel. Arial, Times New Roman, Comic Sans, Courier, Tahoma, and Calibri are some of the more common fonts. Another way to change the appearance of text is to increase or decrease its font size. Font size is measured in points. A point is 1⁄ 72 of an inch. You change the font and font size of the body text, title, and headings in the flyer. You select fonts and font sizes that enhance the sales tone of the document and structure the flyer for readers.
sTePs
There are two types of fonts: serif fonts have a small stroke, called a serif, at the ends of characters; sans serif fonts do not have a serif. Garamond is a serif font. Trebuchet MS is a sans serif font.
QUICK TIP
You can also type a font size in the Font Size text box.
QUICK TIP
To use a different set of theme colors, click the Page Layout tab, click the Theme Colors but-ton in the Themes group, then select a different color set.
QUICK TIP
WD C Unit C7513 46373.indd 50 2/26/10 3:28 PM

Format ting Text and Paragraphs
C Un
it W
ORD
C75
13
4637
3 P
age
51
02/2
3/10
cm
r
Word 51
Word 2010
FIGURe C-1: Font list
FIGURe C-2: Font Color Palette
FIGURe C-3: Document formatted with fonts
Title formatted in 22-point
Trebuchet MS, bold, purple
Body text formatted in
12-point Garamond
Heading formatted in
14-point Trebuchet MS,
bold, purple
Font Color list arrow
Name of color appears as a ScreenTip
Click to create a custom color
Preview of the highlighted color
applied to the selected text
Alphabetical list of all fonts on your computer
(your list may differ)
List of recently used fonts (your list may differ)
Fonts used in the default theme
Font list arrow
Font Size list arrow
WD C Unit C7513 46373.indd 51 2/26/10 3:28 PM
Format ting Text and Paragraphs
C Unit WORD C7513 46373 Page 52 02/23/10 cm
rUNIT
CWord 2010
Word 52
sTePs
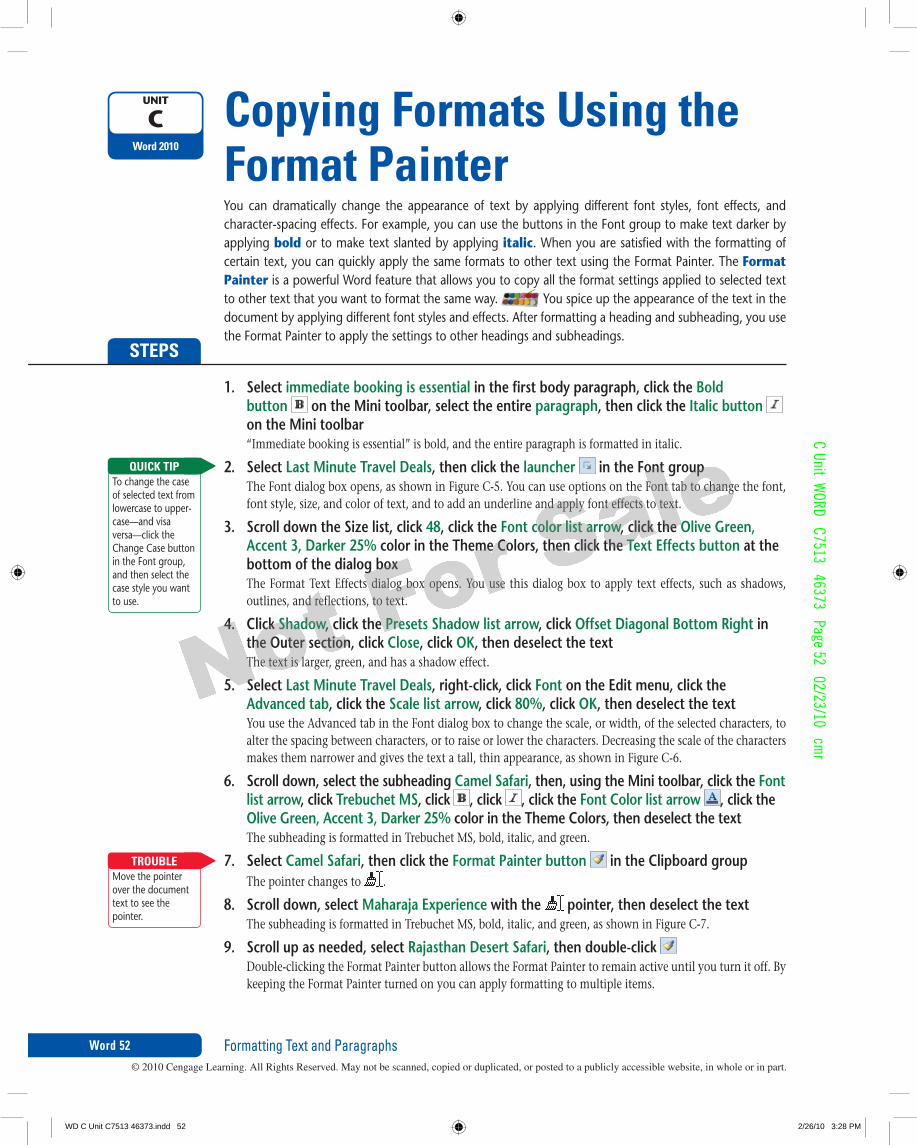
1. selectimmediatebookingisessentialinthefirstbodyparagraph,clicktheboldbutton ontheMinitoolbar,selecttheentireparagraph,thenclicktheitalicbutton ontheMinitoolbar“Immediate booking is essential” is bold, and the entire paragraph is formatted in italic.
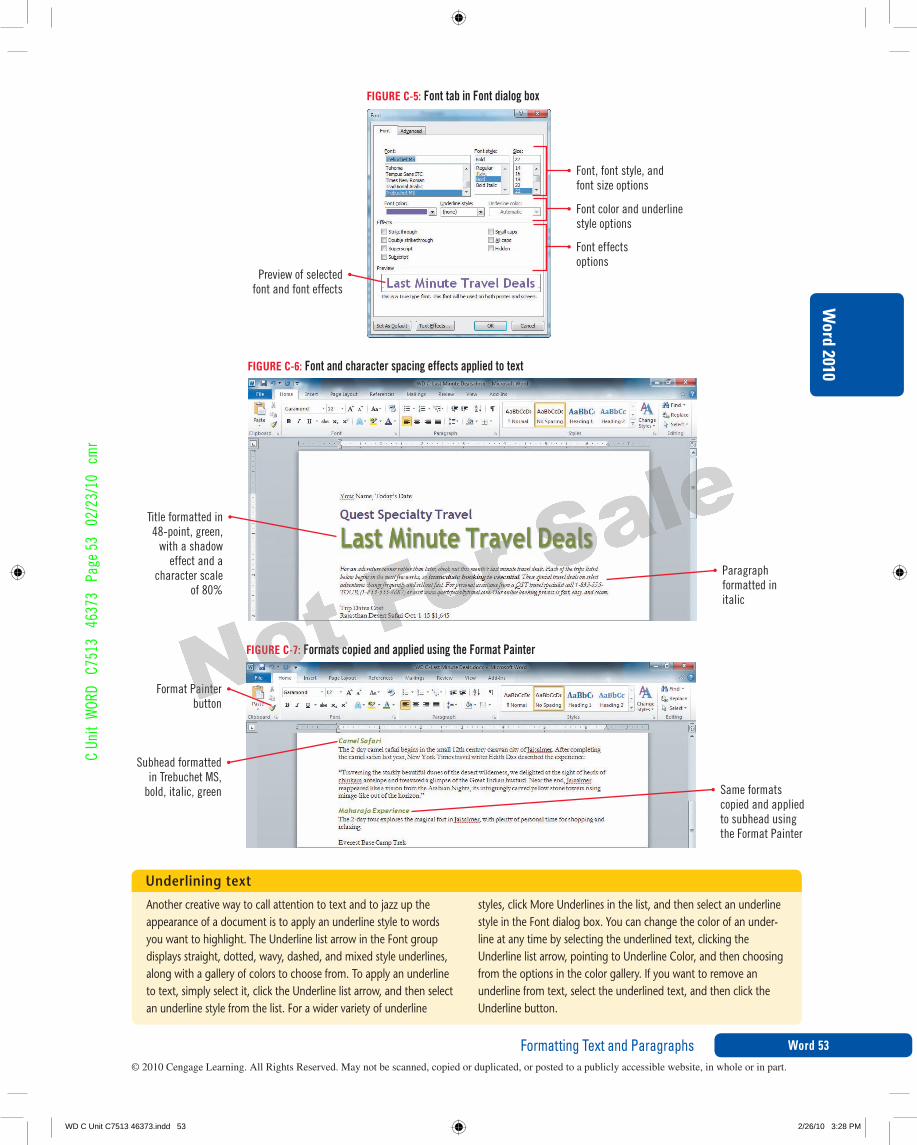
2. selectLastMinutetravelDeals,thenclickthelauncher intheFontgroupThe Font dialog box opens, as shown in Figure C-5. You can use options on the Font tab to change the font, font style, size, and color of text, and to add an underline and apply font effects to text.
3. scrolldownthesizelist,click48,clicktheFontcolorlistarrow,clicktheOliveGreen,Accent3,Darker25%colorinthethemecolors,thenclickthetexteffectsbuttonatthebottomofthedialogboxThe Format Text Effects dialog box opens. You use this dialog box to apply text effects, such as shadows, outlines, and reflections, to text.
4. clickshadow,clickthePresetsshadowlistarrow,clickOffsetDiagonalbottomRightintheOutersection,clickclose,clickOK,thendeselectthetextThe text is larger, green, and has a shadow effect.
5. selectLastMinutetravelDeals,right-click,clickFontontheeditmenu,clicktheAdvancedtab,clickthescalelistarrow,click80%,clickOK,thendeselectthetextYou use the Advanced tab in the Font dialog box to change the scale, or width, of the selected characters, to alter the spacing between characters, or to raise or lower the characters. Decreasing the scale of the characters makes them narrower and gives the text a tall, thin appearance, as shown in Figure C-6.
6. scrolldown,selectthesubheadingcamelsafari,then,usingtheMinitoolbar,clicktheFontlistarrow,clicktrebuchetMs,click ,click ,clicktheFontcolorlistarrow ,clicktheOliveGreen,Accent3,Darker25%colorinthethemecolors,thendeselectthetextThe subheading is formatted in Trebuchet MS, bold, italic, and green.
7. selectcamelsafari,thenclicktheFormatPainterbutton intheclipboardgroupThe pointer changes to .
8. scrolldown,selectMaharajaexperiencewiththe pointer,thendeselectthetextThe subheading is formatted in Trebuchet MS, bold, italic, and green, as shown in Figure C-7.
9. scrollupasneeded,selectRajasthanDesertsafari,thendouble-click Double-clicking the Format Painter button allows the Format Painter to remain active until you turn it off. By keeping the Format Painter turned on you can apply formatting to multiple items.
Copying Formats Using the Format PainterYou can dramatically change the appearance of text by applying different font styles, font effects, and character-spacing effects. For example, you can use the buttons in the Font group to make text darker by applying bold or to make text slanted by applying italic. When you are satisfied with the formatting of certain text, you can quickly apply the same formats to other text using the Format Painter. The Format Painter is a powerful Word feature that allows you to copy all the format settings applied to selected text to other text that you want to format the same way. You spice up the appearance of the text in the document by applying different font styles and effects. After formatting a heading and subheading, you use the Format Painter to apply the settings to other headings and subheadings.
To change the case of selected text from lowercase to upper-case—and visa versa—click the Change Case button in the Font group, and then select the case style you want to use.
QUICK TIP
Move the pointer over the document text to see the pointer.
TROUBLe
WD C Unit C7513 46373.indd 52 2/26/10 3:28 PM
Format ting Text and Paragraphs
C Un
it W
ORD
C75
13
4637
3 P
age
53
02/2
3/10
cm
r
Word 53
Word 2010
FIGURe C-5: Font tab in Font dialog box
Another creative way to call attention to text and to jazz up the appearance of a document is to apply an underline style to words you want to highlight. The Underline list arrow in the Font group displays straight, dotted, wavy, dashed, and mixed style underlines, along with a gallery of colors to choose from. To apply an underline to text, simply select it, click the Underline list arrow, and then select an underline style from the list. For a wider variety of underline
styles, click More Underlines in the list, and then select an underline style in the Font dialog box. You can change the color of an under-line at any time by selecting the underlined text, clicking the Underline list arrow, pointing to Underline Color, and then choosing from the options in the color gallery. If you want to remove an underline from text, select the underlined text, and then click the Underline button.
Underliningtext
Preview of selected font and font effects
Font effects options
Font color and underline style options
Font, font style, and font size options
FIGURe C-6: Font and character spacing effects applied to text
Title formatted in 48-point, green,
with a shadow effect and a
character scale of 80%
Paragraph formatted in italic
FIGURe C-7: Formats copied and applied using the Format Painter
Format Painter button
Subhead formatted in Trebuchet MS,
bold, italic, green Same formats copied and applied to subhead using the Format Painter
WD C Unit C7513 46373.indd 53 2/26/10 3:28 PM

Format ting Text and Paragraphs
C Unit WORD C7513 46373 Page 54 02/23/10 cm
rUNIT
CWord 2010
Word 54
sTePs
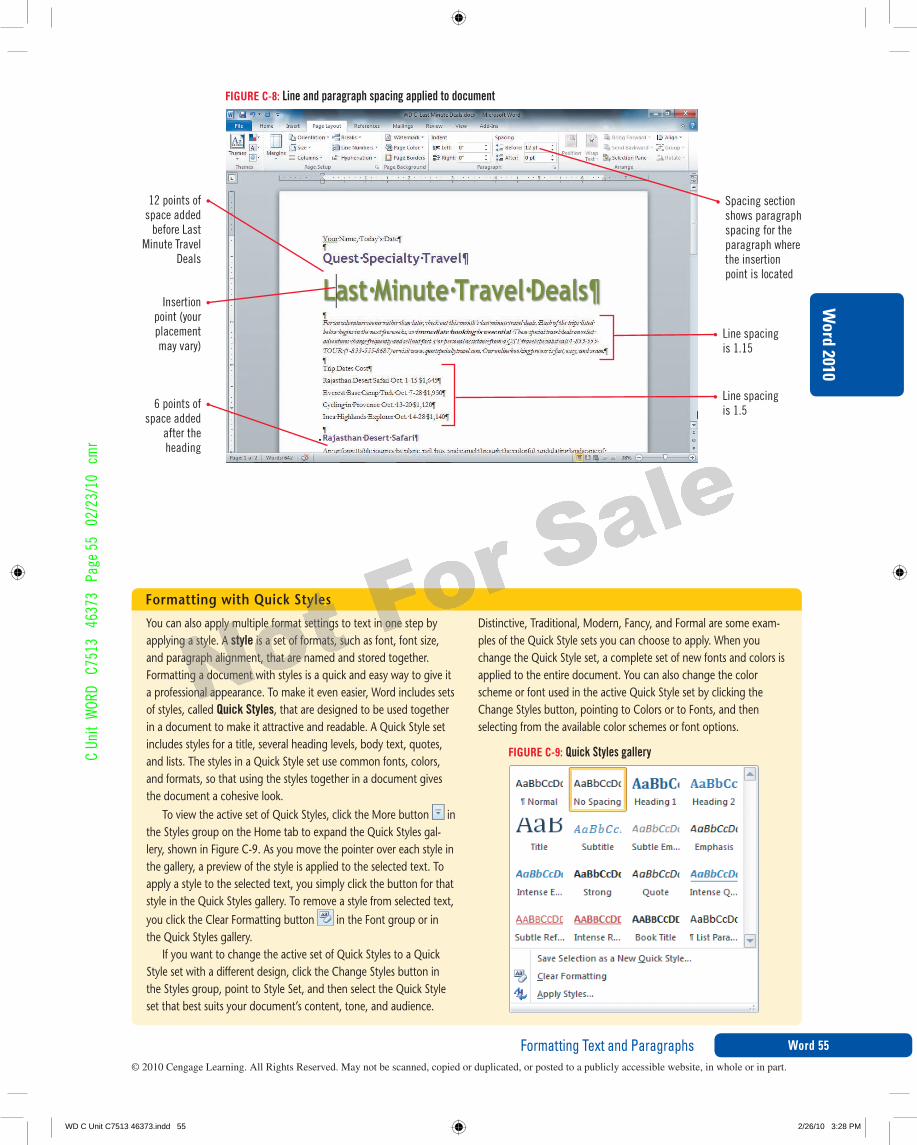
1. Press[ctrl][Home],clicktheshow/Hide¶button intheParagraphgroup,placetheinsertionpointintheitalicizedparagraphunderthetitle,thenclicktheLineandParagraphspacinglistarrow intheParagraphgroupontheHometabThe Line Spacing list opens. This list includes options for increasing the space between lines. The check mark on the Line Spacing list indicates the current line spacing.
2. click1.15The space between the lines in the paragraph increases to 1.15 lines. Notice that you do not need to select an entire paragraph to change its paragraph formatting; simply place the insertion point in the paragraph you want to format.
3. selectthefive-linelistthatbeginswith“tripDatescost”,click ,thenclick1.5The line spacing between the selected paragraphs changes to 1.5. To change the paragraph-formatting features of more than one paragraph, you must select the paragraphs.
4. scrolldown,placetheinsertionpointintheheadingRajasthanDesertsafari,thenclickthePageLayouttabThe paragraph spacing settings for the active paragraph are shown in the Before and After text boxes in the Paragraph group on the Page Layout tab.
5. clicktheAfteruparrowinthespacingsectionoftheParagraphgroupsothat6ptappearsSix points of space are added after the Rajasthan Desert Safari heading paragraph.
6. scrolldown,placetheinsertionpointintheheadingeverestbasecamptrek,thenpress[F4]Pressing [F4] repeats the last action you took. In this case, six points of space are added below the Everest Base Camp Trek heading. Note that using [F4] is not the same as using the Format painter. Pressing [F4] repeats only the last action. You can use the Format Painter at any time to apply multiple format settings.
7. scrolldown,selectcyclinginProvence,pressandhold[ctrl],selectincaHighlandsexplorer,release[ctrl],thenpress[F4]When you press [Ctrl] as you select items, you can select and format multiple items at once. Six points of space are added after each heading.
8. Press[ctrl][Home],placetheinsertionpointinLastMinutetravelDeals,clickthebeforeuparrowinthespacingsectionoftheParagraphgrouptwicesothat12ptappearsThe second line of the title has 12 points of space before it. Compare your document with Figure C-8.
9. clicktheHometab,click ,thensaveyourchanges
Changing Line and Paragraph spacingIncreasing the amount of space between lines adds more white space to a document and can make it easier to read. Adding space before and after paragraphs can also open up a document and improve its appear-ance. You use the Line and Paragraph Spacing list arrow in the Paragraph group on the Home tab to quickly change line spacing. To change paragraph spacing, you use the Spacing options in the Paragraph group on the Page Layout tab. Line and paragraph spacing are measured in points. You increase the line spac-ing of several paragraphs and add extra space under each heading to give the flyer a more open feel. You work with formatting marks turned on, so you can see the paragraph marks (¶).
Word recognizes any string of text that ends with a para-graph mark as a paragraph, including titles, headings, and single lines in a list.
QUICK TIP
If your [F4] key does not work, use the After up arrow to apply 6 pts of space to the headings listed in steps 6 and 7, then continue with step 8.
TROUBLe
Adjusting the space between paragraphs is a more precise way to add white space to a docu-ment than inserting blank lines.
QUICK TIP
You can also type a number in the Before and After text boxes.
QUICK TIP
WD C Unit C7513 46373.indd 54 2/26/10 3:28 PM
Format ting Text and Paragraphs
C Un
it W
ORD
C75
13
4637
3 P
age
55
02/2
3/10
cm
r
Word 55
Word 2010
FIGURe C-8: Line and paragraph spacing applied to document
You can also apply multiple format settings to text in one step by applying a style. A style is a set of formats, such as font, font size, and paragraph alignment, that are named and stored together. Formatting a document with styles is a quick and easy way to give it a professional appearance. To make it even easier, Word includes sets of styles, called Quick Styles, that are designed to be used together in a document to make it attractive and readable. A Quick Style set includes styles for a title, several heading levels, body text, quotes, and lists. The styles in a Quick Style set use common fonts, colors, and formats, so that using the styles together in a document gives the document a cohesive look.
To view the active set of Quick Styles, click the More button in the Styles group on the Home tab to expand the Quick Styles gal-lery, shown in Figure C-9. As you move the pointer over each style in the gallery, a preview of the style is applied to the selected text. To apply a style to the selected text, you simply click the button for that style in the Quick Styles gallery. To remove a style from selected text, you click the Clear Formatting button in the Font group or in the Quick Styles gallery.
If you want to change the active set of Quick Styles to a Quick Style set with a different design, click the Change Styles button in the Styles group, point to Style Set, and then select the Quick Style set that best suits your document’s content, tone, and audience.
Distinctive, Traditional, Modern, Fancy, and Formal are some exam-ples of the Quick Style sets you can choose to apply. When you change the Quick Style set, a complete set of new fonts and colors is applied to the entire document. You can also change the color scheme or font used in the active Quick Style set by clicking the Change Styles button, pointing to Colors or to Fonts, and then selecting from the available color schemes or font options.
FormattingwithQuickstyles
FIGURe C-9: Quick Styles gallery
12 points of space added
before Last Minute Travel
Deals
Insertion point (your placement may vary)
6 points of space added
after the heading
Line spacing is 1.5
Line spacing is 1.15
Spacing section shows paragraph spacing for the paragraph where the insertion point is located
WD C Unit C7513 46373.indd 55 2/26/10 3:28 PM

Format ting Text and Paragraphs
C Unit WORD C7513 46373 Page 56 02/23/10 cm
rUNIT
CWord 2010
Word 56
sTePs
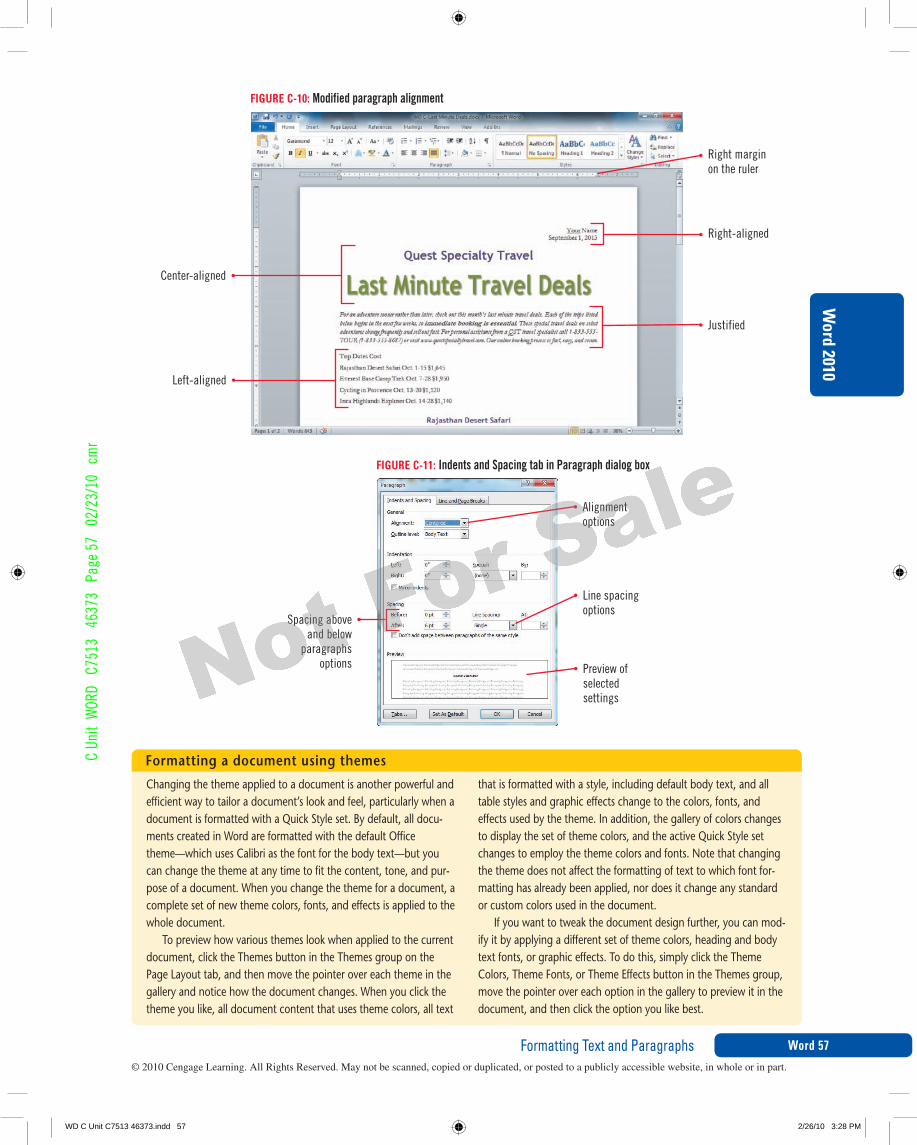
1. ReplaceYourName,today’sDatewithyourname,acomma,andthedate2. selectyourname,thecomma,andthedate,thenclicktheAligntextRightbutton in
theParagraphgroupThe text is aligned with the right margin. In Page Layout view, the place where the white and shaded sections of the horizontal ruler meet shows the left and right margins.
3. Placetheinsertionpointbetweenyournameandthecomma,press[Delete]todeletethecomma,thenpress[enter]The new paragraph containing the date is also right-aligned. Pressing [Enter] in the middle of a paragraph creates a new paragraph with the same text and paragraph formatting as the original paragraph.
4. selectthetwo-linetitle,thenclickthecenterbutton intheParagraphgroupThe two paragraphs that make up the title are centered between the left and right margins.
5. scrolldownasneeded,placetheinsertionpointintheRajasthanDesertsafariheading,thenclickThe Rajasthan Desert Safari heading is centered.
6. Placetheinsertionpointintheitalicizedparagraphunderthetitle,thenclickthejustifybutton intheParagraphgroupThe paragraph is aligned with both the left and right margins, as shown in Figure C-10. When you justify a paragraph, Word adjusts the spacing between words so that each line in the paragraph is flush with the left and the right margins.
7. PlacetheinsertionpointinRajasthanDesertsafari,thenclickthelauncher intheParagraphgroupThe Paragraph dialog box opens, as shown in Figure C-11. The Indents and Spacing tab shows the paragraph format settings for the paragraph where the insertion point is located. You can check or change paragraph format settings using this dialog box.
8. clicktheAlignmentlistarrow,clickLeft,clickOK,thensaveyourchangesThe Rajasthan Desert Safari heading is left-aligned.
Aligning ParagraphsChanging paragraph alignment is another way to enhance a document’s appearance. Paragraphs are aligned relative to the left and right margins in a document. By default, text is left-aligned, which means it is flush with the left margin and has a ragged right edge. Using the alignment buttons in the Paragraph group, you can right-align a paragraph—make it flush with the right margin—or center a paragraph so that it is positioned evenly between the left and right margins. You can also justify a paragraph so that both the left and right edges of the paragraph are flush with the left and right margins. You change the alignment of several paragraphs at the beginning of the flyer to make it more visually interesting.
Click the View Ruler button at the top of the vertical scroll bar to display the rulers if they are not already displayed.
TROUBLe
Click the Align Text Left button in the Paragraph group to left-align a paragraph.
QUICK TIP
WD C Unit C7513 46373.indd 56 2/26/10 3:28 PM
Format ting Text and Paragraphs
C Un
it W
ORD
C75
13
4637
3 P
age
57
02/2
3/10
cm
r
Word 57
Word 2010
FIGURe C-10: Modified paragraph alignment
FIGURe C-11: Indents and Spacing tab in Paragraph dialog box
Changing the theme applied to a document is another powerful and efficient way to tailor a document’s look and feel, particularly when a document is formatted with a Quick Style set. By default, all docu-ments created in Word are formatted with the default Office theme—which uses Calibri as the font for the body text—but you can change the theme at any time to fit the content, tone, and pur-pose of a document. When you change the theme for a document, a complete set of new theme colors, fonts, and effects is applied to the whole document.
To preview how various themes look when applied to the current document, click the Themes button in the Themes group on the Page Layout tab, and then move the pointer over each theme in the gallery and notice how the document changes. When you click the theme you like, all document content that uses theme colors, all text
that is formatted with a style, including default body text, and all table styles and graphic effects change to the colors, fonts, and effects used by the theme. In addition, the gallery of colors changes to display the set of theme colors, and the active Quick Style set changes to employ the theme colors and fonts. Note that changing the theme does not affect the formatting of text to which font for-matting has already been applied, nor does it change any standard or custom colors used in the document.
If you want to tweak the document design further, you can mod-ify it by applying a different set of theme colors, heading and body text fonts, or graphic effects. To do this, simply click the Theme Colors, Theme Fonts, or Theme Effects button in the Themes group, move the pointer over each option in the gallery to preview it in the document, and then click the option you like best.
Formattingadocumentusingthemes
Spacing above and below
paragraphs options
Line spacing options
Alignmentoptions
Justified
Right-aligned
Right margin on the ruler
Left-aligned
Center-aligned
Preview of selected settings
WD C Unit C7513 46373.indd 57 2/26/10 3:28 PM

Format ting Text and Paragraphs
C Unit WORD C7513 46373 Page 58 02/23/10 cm
rUNIT
CWord 2010
Word 58
sTePs
1.scrollasneeded,thenselectthefive-linelistbeginningwith“tripDatescost”Before you set tab stops for existing text, you must select the paragraphs for which you want to set tabs.
2.Pointtothetabindicator attheleftendofthehorizontalrulerThe icon that appears in the tab indicator indicates the active type of tab; pointing to the tab indicator displays a ScreenTip with the name of the active tab type. By default, left tab is the active tab type. Clicking the tab indicator scrolls through the types of tabs and indents.
3.clickthetabindicatortoseeeachoftheavailabletabandindenttypes,makeLefttabtheactivetabtype,clickthe1"markonthehorizontalruler,thenclickthe3½"markonthehorizontalrulerA left tab stop is inserted at the 1" mark and the 3½" on the horizontal ruler. Clicking the horizontal ruler inserts a tab stop of the active type for the selected paragraph or paragraphs.
4.clickthetabindicatortwicesotheRighttabicon isactive,thenclickthe5"markonthehorizontalrulerA right tab stop is inserted at the 5" mark on the horizontal ruler, as shown in Figure C-12.
5.Placetheinsertionpointbeforetripinthefirstlineinthelist,press[tab],placetheinsertionpointbeforeDates,press[tab],placetheinsertionpointbeforecost,thenpress[tab]Inserting a tab before “Trip” left-aligns the text at the 1" mark, inserting a tab before “Dates” left-aligns the text at the 3½" mark, and inserting a tab before “Cost” right-aligns “Cost” at the 5" mark.
6.insertatabatthebeginningofeachremaininglineinthelistThe paragraphs left-align at the 1" mark.
7.insertatabbeforeeachOct.inthelist,theninsertatabbeforeeach$inthelistThe dates left-align at the 3½" mark. The prices right-align at the 5" mark.
8.selectthefivelinesoftabbedtext,dragtherighttabstoptothe5½"markonthehorizontalruler,thendeselectthetextDragging the tab stop moves it to a new location. The prices right-align at the 5½" mark.
9.selectthelastfourlinesoftabbedtext,clickthelauncher intheParagraphgroup,thenclickthetabsbuttonatthebottomoftheParagraphdialogboxThe Tabs dialog box opens, as shown in Figure C-13. You can use the Tabs dialog box to set tab stops, change the position or alignment of existing tab stops, clear tab stops, and apply tab leaders to tabs. Tab leaders are lines that appear in front of tabbed text.
10.click3.5"inthetabstoppositionlistbox,clickthe2optionbuttonintheLeadersection,clickset,click5.5"inthetabstoppositionlistbox,clickthe2optionbuttonintheLeadersection,clickset,clickOK,deselectthetext,thensaveyourchangesA dotted tab leader is added before each 3.5" and 5.5" tab stop in the last four lines of tabbed text, as shown in Figure C-14.
Working with TabsTabs allow you to align text at a specific location in a document. A tab stop is a point on the horizontal ruler that indicates the location at which to align text. By default, tab stops are located every 1⁄2" from the left margin, but you can also set custom tab stops. Using tabs, you can align text to the left, right, or center of a tab stop, or you can align text at a decimal point or insert a bar character. Table C-1 describes the different types of tab stops. You set tabs using the horizontal ruler or the Tabs dialog box. You use tabs to format the summary information on last minute tour deals so it is easy to read.
To remove a tab stop, drag it up or down off the ruler.
QUICK TIP
Place the insertion point in a para-graph to see the tab stops for that paragraph on the horizontal ruler.
QUICK TIP
Double-click a tab stop on the ruler to open the Tabs dialog box.
QUICK TIP
WD C Unit C7513 46373.indd 58 2/26/10 3:28 PM

Format ting Text and Paragraphs
C Un
it W
ORD
C75
13
4637
3 P
age
59
02/2
3/10
cm
r
Word 59
Word 2010
FIGURe C-12: Left and right tab stops on the horizontal ruler
FIGURe C-13: Tabs dialog box
FIGURe C-14: Tab leaders
TABLe C-1: Types of tabs
tab useto
Lefttab Set the start position of text so that text runs to the right of the tab stop as you type
centertab Set the center align position of text so that text stays centered on the tab stop as you type
Righttab Set the right or end position of text so that text moves to the left of the tab stop as you type
Decimaltab Set the position of the decimal point so that numbers align around the decimal point as you type
bartab Insert a vertical bar at the tab position
Right Tab icon in tab
indicator Right tab stop
Left tab stops
Select the tab stop you want
to modify
Select Leader options
Apply the selected settings to the
selected tab stop
Clears all tab stops
Clears the selected tab stop
Tabbed text right-aligned with right tab stop
Tabbed text left-aligned
with left tab stop
Tab leader
WD C Unit C7513 46373.indd 59 2/26/10 3:28 PM
Format ting Text and Paragraphs
C Unit WORD C7513 46373 Page 60 02/23/10 cm
rUNIT
CWord 2010
Word 60
sTePs
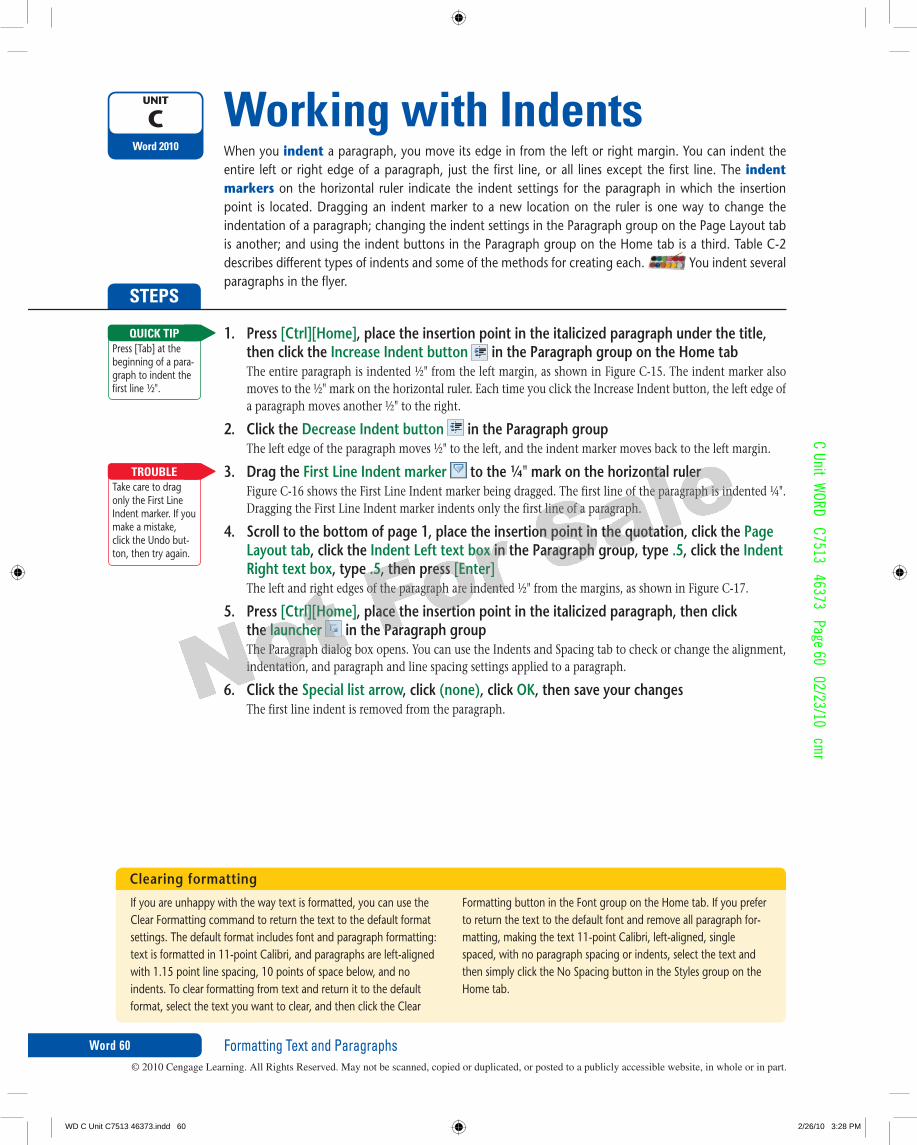
1. Press[ctrl][Home],placetheinsertionpointintheitalicizedparagraphunderthetitle,thenclicktheincreaseindentbutton intheParagraphgroupontheHometabThe entire paragraph is indented ½" from the left margin, as shown in Figure C-15. The indent marker also moves to the ½" mark on the horizontal ruler. Each time you click the Increase Indent button, the left edge of a paragraph moves another ½" to the right.
2. clicktheDecreaseindentbutton intheParagraphgroupThe left edge of the paragraph moves ½" to the left, and the indent marker moves back to the left margin.
3. DragtheFirstLineindentmarker tothe¼"markonthehorizontalrulerFigure C-16 shows the First Line Indent marker being dragged. The first line of the paragraph is indented ¼". Dragging the First Line Indent marker indents only the first line of a paragraph.
4. scrolltothebottomofpage1,placetheinsertionpointinthequotation,clickthePageLayouttab,clicktheindentLefttextboxintheParagraphgroup,type.5,clicktheindentRighttextbox,type.5,thenpress[enter]The left and right edges of the paragraph are indented ½" from the margins, as shown in Figure C-17.
5. Press[ctrl][Home],placetheinsertionpointintheitalicizedparagraph,thenclickthe launcher intheParagraphgroupThe Paragraph dialog box opens. You can use the Indents and Spacing tab to check or change the alignment, indentation, and paragraph and line spacing settings applied to a paragraph.
6. clickthespeciallistarrow,click(none),clickOK,thensaveyourchangesThe first line indent is removed from the paragraph.
Working with IndentsWhen you indent a paragraph, you move its edge in from the left or right margin. You can indent the entire left or right edge of a paragraph, just the first line, or all lines except the first line. The indent markers on the horizontal ruler indicate the indent settings for the paragraph in which the insertion point is located. Dragging an indent marker to a new location on the ruler is one way to change the indentation of a paragraph; changing the indent settings in the Paragraph group on the Page Layout tab is another; and using the indent buttons in the Paragraph group on the Home tab is a third. Table C-2 describes different types of indents and some of the methods for creating each. You indent several paragraphs in the flyer.
Press [Tab] at the beginning of a para-graph to indent the first line ½".
QUICK TIP
Take care to drag only the First Line Indent marker. If you make a mistake, click the Undo but-ton, then try again.
TROUBLe
If you are unhappy with the way text is formatted, you can use the Clear Formatting command to return the text to the default format settings. The default format includes font and paragraph formatting: text is formatted in 11-point Calibri, and paragraphs are left-aligned with 1.15 point line spacing, 10 points of space below, and no indents. To clear formatting from text and return it to the default format, select the text you want to clear, and then click the Clear
Formatting button in the Font group on the Home tab. If you prefer to return the text to the default font and remove all paragraph for-matting, making the text 11-point Calibri, left-aligned, single spaced, with no paragraph spacing or indents, select the text and then simply click the No Spacing button in the Styles group on the Home tab.
clearingformatting
WD C Unit C7513 46373.indd 60 2/26/10 3:28 PM

Format ting Text and Paragraphs
C Un
it W
ORD
C75
13
4637
3 P
age
61
02/2
3/10
cm
r
Word 61
Word 2010
FIGURe C-16: Dragging the First Line Indent marker
FIGURe C-17: Paragraph indented from the left and right
FIGURe C-15: Indented paragraph
First Line Indent marker
Hanging Indent marker
Left Indent marker
Indented paragraph
Right Indent marker
Increase Indent button
Decrease Indent button
Dotted line shows position
of First Line Indent marker
First Line Indent marker being
dragged to the 1/4" mark
Paragraph indented ½"
from left margin
Paragraph indented ½" from right margin
WD C Unit C7513 46373.indd 61 2/26/10 3:29 PM
Format ting Text and Paragraphs
C Unit WORD C7513 46373 Page 62 02/23/10 cm
rUNIT
CWord 2010
Word 62
sTePs
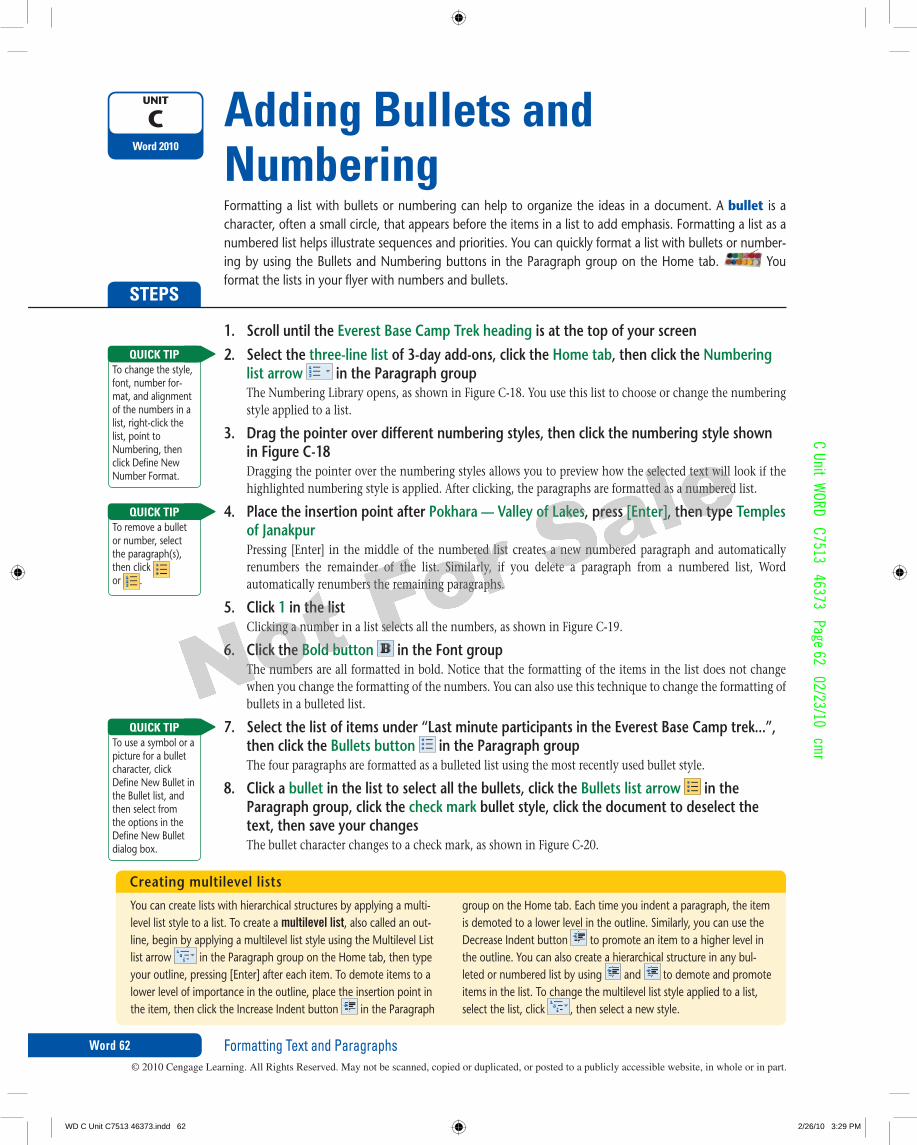
1. scrolluntiltheeverestbasecamptrekheadingisatthetopofyourscreen2. selectthethree-linelistof3-dayadd-ons,clicktheHometab,thenclicktheNumbering
listarrow intheParagraphgroupThe Numbering Library opens, as shown in Figure C-18. You use this list to choose or change the numbering style applied to a list.
3. Dragthepointeroverdifferentnumberingstyles,thenclickthenumberingstyleshowninFigurec-18Dragging the pointer over the numbering styles allows you to preview how the selected text will look if the highlighted numbering style is applied. After clicking, the paragraphs are formatted as a numbered list.
4. PlacetheinsertionpointafterPokhara—valleyofLakes,press[enter],thentypetemplesofjanakpurPressing [Enter] in the middle of the numbered list creates a new numbered paragraph and automatically renumbers the remainder of the list. Similarly, if you delete a paragraph from a numbered list, Word automatically renumbers the remaining paragraphs.
5. click1inthelistClicking a number in a list selects all the numbers, as shown in Figure C-19.
6. clicktheboldbutton intheFontgroupThe numbers are all formatted in bold. Notice that the formatting of the items in the list does not change when you change the formatting of the numbers. You can also use this technique to change the formatting of bullets in a bulleted list.
7. selectthelistofitemsunder“Lastminuteparticipantsintheeverestbasecamptrek...”,thenclickthebulletsbutton intheParagraphgroupThe four paragraphs are formatted as a bulleted list using the most recently used bullet style.
8. clickabulletinthelisttoselectallthebullets,clickthebulletslistarrow intheParagraphgroup,clickthecheckmarkbulletstyle,clickthedocumenttodeselectthetext,thensaveyourchangesThe bullet character changes to a check mark, as shown in Figure C-20.
Adding Bullets and NumberingFormatting a list with bullets or numbering can help to organize the ideas in a document. A bullet is a character, often a small circle, that appears before the items in a list to add emphasis. Formatting a list as a numbered list helps illustrate sequences and priorities. You can quickly format a list with bullets or number-ing by using the Bullets and Numbering buttons in the Paragraph group on the Home tab. You format the lists in your flyer with numbers and bullets.
To change the style, font, number for-mat, and alignment of the numbers in a list, right-click the list, point to Numbering, then click Define New Number Format.
QUICK TIP
To remove a bullet or number, select the paragraph(s), then click or .
QUICK TIP
To use a symbol or a picture for a bullet character, click Define New Bullet in the Bullet list, and then select from the options in the Define New Bullet dialog box.
QUICK TIP
You can create lists with hierarchical structures by applying a multi-level list style to a list. To create a multilevel list, also called an out-line, begin by applying a multilevel list style using the Multilevel List list arrow in the Paragraph group on the Home tab, then type your outline, pressing [Enter] after each item. To demote items to a lower level of importance in the outline, place the insertion point in the item, then click the Increase Indent button in the Paragraph
group on the Home tab. Each time you indent a paragraph, the item is demoted to a lower level in the outline. Similarly, you can use the Decrease Indent button to promote an item to a higher level in the outline. You can also create a hierarchical structure in any bul-leted or numbered list by using and to demote and promote items in the list. To change the multilevel list style applied to a list, select the list, click , then select a new style.
creatingmultilevellists
WD C Unit C7513 46373.indd 62 2/26/10 3:29 PM

Format ting Text and Paragraphs
C Un
it W
ORD
C75
13
4637
3 P
age
63
02/2
3/10
cm
r
Word 63
Word 2010
FIGURe C-18: Numbering list
FIGURe C-19: Numbered list
FIGURe C-20: Check mark bullets applied to list
Click to change the style, format, and alignment of the numbers in a list
Numbering list arrow
Choose this numbering style
Bullets button
Numbers selected in numbered list
Numbers are bold
Check mark bullets applied
to list
WD C Unit C7513 46373.indd 63 2/26/10 3:29 PM
Format ting Text and Paragraphs
C Unit WORD C7513 46373 Page 64 02/23/10 cm
rUNIT
CWord 2010
Word 64
sTePs
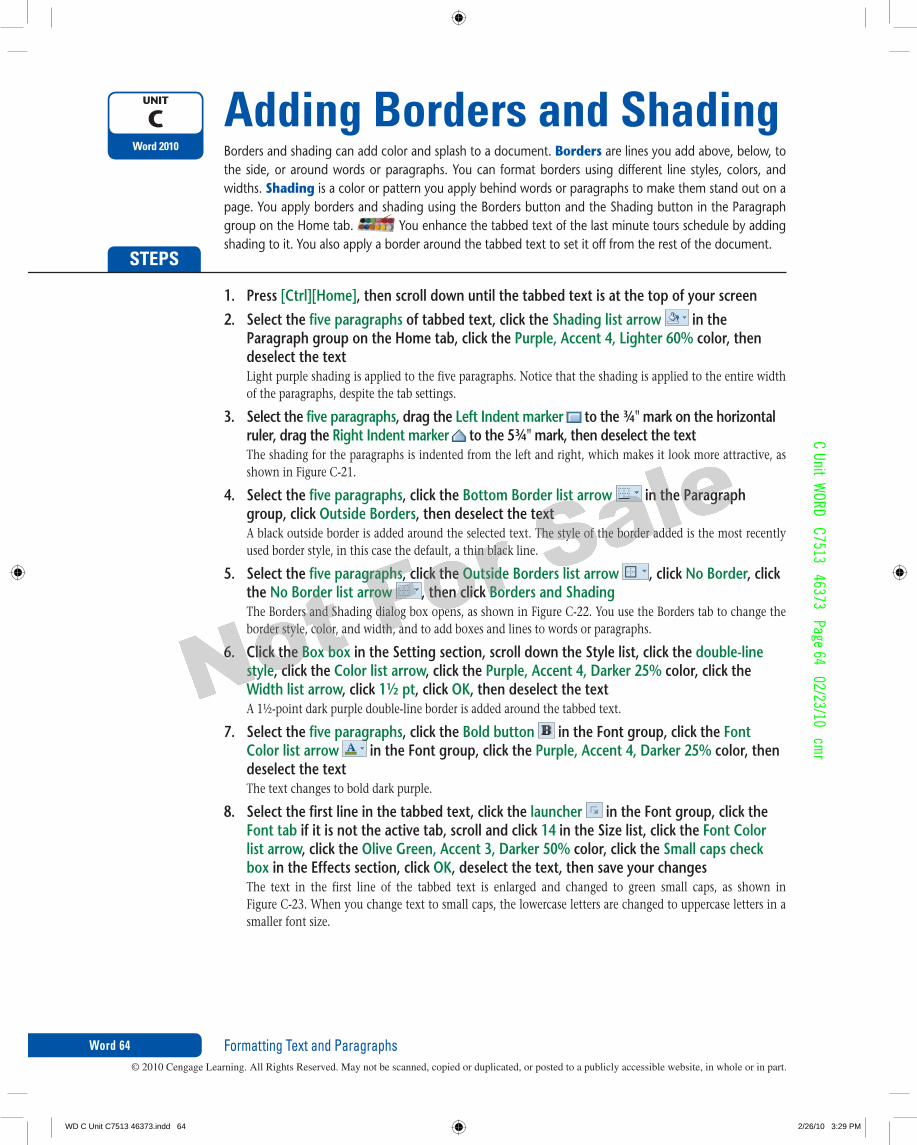
1. Press[ctrl][Home],thenscrolldownuntilthetabbedtextisatthetopofyourscreen2. selectthefiveparagraphsoftabbedtext,clicktheshadinglistarrow inthe
ParagraphgroupontheHometab,clickthePurple,Accent4,Lighter60%color,thendeselectthetextLight purple shading is applied to the five paragraphs. Notice that the shading is applied to the entire width of the paragraphs, despite the tab settings.
3. selectthefiveparagraphs,dragtheLeftindentmarker tothe¾"markonthehorizontalruler,dragtheRightindentmarker tothe5¾"mark,thendeselectthetextThe shading for the paragraphs is indented from the left and right, which makes it look more attractive, as shown in Figure C-21.
4. selectthefiveparagraphs,clickthebottomborderlistarrow intheParagraphgroup,clickOutsideborders,thendeselectthetextA black outside border is added around the selected text. The style of the border added is the most recently used border style, in this case the default, a thin black line.
5. selectthefiveparagraphs,clicktheOutsideborderslistarrow ,clickNoborder,clicktheNoborderlistarrow ,thenclickbordersandshadingThe Borders and Shading dialog box opens, as shown in Figure C-22. You use the Borders tab to change the border style, color, and width, and to add boxes and lines to words or paragraphs.
6. clicktheboxboxinthesettingsection,scrolldownthestylelist,clickthedouble-linestyle,clickthecolorlistarrow,clickthePurple,Accent4,Darker25%color,clicktheWidthlistarrow,click1½pt,clickOK,thendeselectthetextA 1½-point dark purple double-line border is added around the tabbed text.
7. selectthefiveparagraphs,clicktheboldbutton intheFontgroup,clicktheFontcolorlistarrow intheFontgroup,clickthePurple,Accent4,Darker25%color,thendeselectthetextThe text changes to bold dark purple.
8. selectthefirstlineinthetabbedtext,clickthelauncher intheFontgroup,clicktheFonttabifitisnottheactivetab,scrollandclick14inthesizelist,clicktheFontcolorlistarrow,clicktheOliveGreen,Accent3,Darker50%color,clickthesmallcapscheckboxintheeffectssection,clickOK,deselectthetext,thensaveyourchangesThe text in the first line of the tabbed text is enlarged and changed to green small caps, as shown in Figure C-23. When you change text to small caps, the lowercase letters are changed to uppercase letters in a smaller font size.
Adding Borders and shadingBorders and shading can add color and splash to a document. Borders are lines you add above, below, to the side, or around words or paragraphs. You can format borders using different line styles, colors, and widths. Shading is a color or pattern you apply behind words or paragraphs to make them stand out on a page. You apply borders and shading using the Borders button and the Shading button in the Paragraph group on the Home tab. You enhance the tabbed text of the last minute tours schedule by adding shading to it. You also apply a border around the tabbed text to set it off from the rest of the document.
WD C Unit C7513 46373.indd 64 2/26/10 3:29 PM

Format ting Text and Paragraphs
C Un
it W
ORD
C75
13
4637
3 P
age
65
02/2
3/10
cm
r
Word 65
Word 2010
FIGURe C-21: Shading applied to the tabbed text
Shadingapplied toparagraphs
Indent markers show width of
the shaded paragraphs
FIGURe C-23: Borders and shading applied to the document
Text formatted in bold, purpleDouble-line,
1½-point, purple, box
border
Text formatted in green,
small caps
FIGURe C-22: Borders tab in Borders and Shading dialog box
Select border formats before
applying them in the Preview area
Choose to apply the settings to a paragraph or to selected text
Click buttons or edges of preview to apply borders
Preview of border settings
Click to change the location of the border relative to the text
Choose a line style
The Highlight tool allows you to mark and find important text in a document. Highlighting is transparent color that is applied to text using the Highlight pointer . To highlight text, click the Text Highlight Color list arrow in the Font group on the Home tab, select a color, then use the I-beam part of the pointer to
Highlightingtextinadocument
select the text you want to highlight. Click to turn off the Highlight pointer. To remove highlighting, select the high- lighted text, click , then click No Color. Highlighting prints, but it is used most effectively when a document is viewed on screen.
WD C Unit C7513 46373.indd 65 2/26/10 3:29 PM

Format ting Text and Paragraphs
C Unit WORD C7513 46373 Page 66 02/23/10 cm
rUNIT
CWord 2010
Word 66
sTePs
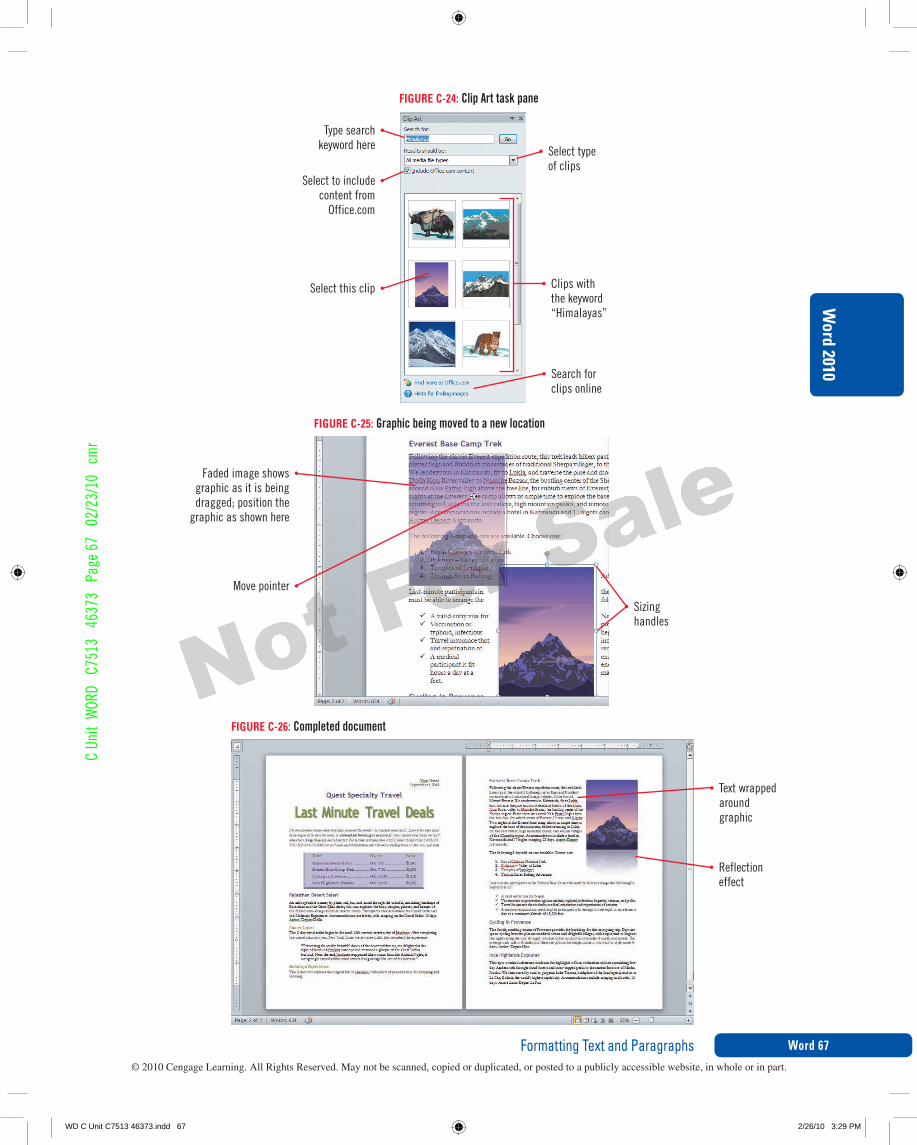
1.scrolltothetopofpage2,placetheinsertionpointbeforeeverestbasecamptrek,clicktheinserttab,thenclicktheclipArtbuttonintheillustrationsgroupThe Clip Art task pane opens. You can use this task pane to search for clips related to a keyword.
2.selectthetextinthesearchfortextboxifnecessary,typeHimalayas,makesuretheincludeOffice.comcontentcheckboxhasacheckmark,clicktheResultsshouldbelistarrow,makesureAllmediatypeshasacheckmark,thenclickGoClips that have the keyword “Himalayas” associated with them appear in the Clip Art task pane, as shown in Figure C-24.
3.PointtotheclipcalledoutinFigurec-24,clickthelistarrowthatappearsnexttotheclip,clickinsertonthemenu,thenclosetheclipArttaskpaneThe clip is inserted at the location of the insertion point. When a graphic is selected, the active tab changes to the Picture Tools Format tab. This tab contains commands used to adjust, enhance, arrange, and size graphics. The white circles that appear on the square edges of the graphic are the sizing handles.
4.type3.1intheshapeHeighttextboxinthesizegrouponthePicturetoolsFormattab,thenpress[enter]The size of the graphic is reduced. When you decreased the height of the graphic, the width decreased propor-tionally. You can also resize a graphic proportionally by dragging a corner sizing handle. Now that the graphic is smaller, you can see that it was inserted at the location of the insertion point. Until you apply text wrap-ping to a graphic, it is part of the line of text in which it was inserted (an inline graphic). To move a graphic independently of text, you must make it a floating graphic.
5.clickthePositionbuttonintheArrangegroup,thenclickPositioninMiddlecenterwithsquaretextWrappingThe graphic is moved to the middle of the page and the text wraps around it. Applying text wrapping to the graphic made it a floating graphic. A floating graphic can be moved anywhere on a page.
6.Positionthepointeroverthegraphic,whenthepointerchangesto dragthegraphicupandtotheleftsoitstopalignswiththetopoftheparagraphundertheeverestbasecamptrekheadingasshowninFigurec-25,thenreleasethemousebuttonThe graphic is moved to the upper-left corner of the page.
7.clickthePositionbuttonintheArrangegroup,thenclickPositionintopRightwithsquaretextWrappingThe graphic is moved to the upper-right corner of the page.
8.clickthePictureeffectsbuttoninthePicturestylesgroup,pointtoReflection,pointtoeachreflectionstyletoseeapreviewofthestyleappliedtothegraphic,thenclicktightReflection,touchingA reflection effect is applied to the graphic.
9.clicktheviewtab,thenclickthetwoPagesbuttonThe completed document is shown in Figure C-26.
10.saveyourchanges,submitthedocumenttoyourinstructor,thenclosethedocumentandexitWord
Inserting Clip ArtClip art is a collection of graphic images that you can insert into a document. Clip art images are stored in the Clip Organizer, which is a library of the clips—media files such as graphics, photographs, sounds, movies, and animations—that come with Word. You can add a clip to a document using the Clip Art command on the Insert tab. Once you insert a clip art image, you can wrap text around it, resize it, enhance it, and move it to a different location. You illustrate the second page of the document with a clip art image.
You must be work-ing with an active Internet connection to complete this lesson.
QUICK TIP
Select a different clip if the clip shown in Figure C-24 is not available to you.
TROUBLe
To position a graphic using precise mea-surements, click the Position button, click More Layout Options, then adjust the settings on the Position tab in the Layout dialog box.
QUICK TIP
WD C Unit C7513 46373.indd 66 2/26/10 3:29 PM
Format ting Text and Paragraphs
C Un
it W
ORD
C75
13
4637
3 P
age
67
02/2
3/10
cm
r
Word 67
Word 2010
FIGURe C-24: Clip Art task pane
FIGURe C-25: Graphic being moved to a new location
FIGURe C-26: Completed document
Select to include content from
Office.com
Type search keyword here
Select this clip Clips with the keyword “Himalayas”
Select type of clips
Search for clips online
Faded image shows graphic as it is being dragged; position the
graphic as shown here
Move pointer
Sizing handles
Text wrapped around graphic
Reflection effect
WD C Unit C7513 46373.indd 67 2/26/10 3:29 PM
PracticeC Unit W
ORD C7513 46373 Page 68 02/23/10 cmr
Format ting Text and ParagraphsWord 68
For current SAM information, including versions and con-tent details, visit SAM Central (http://samcentral.course.com). If you have a SAM user profile, you may have access to hands-on instruction, practice, and assessment of the skills covered in this unit. Since various versions of SAM are supported throughout the life of this text, check with your instructor for the correct instructions and URL/Web site for accessing assignments.
1
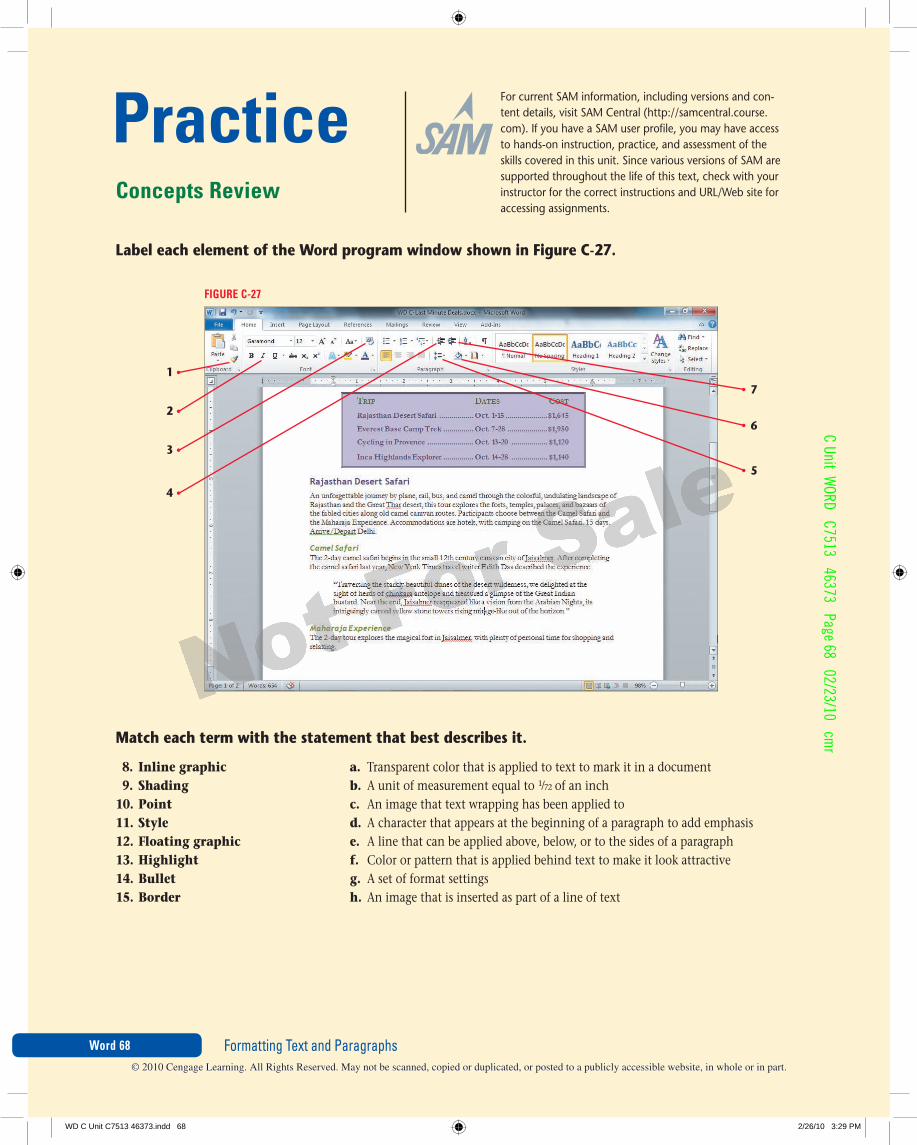
a. Transparent color that is applied to text to mark it in a documentb. A unit of measurement equal to 1/72 of an inchc. An image that text wrapping has been applied tod. A character that appears at the beginning of a paragraph to add emphasise. A line that can be applied above, below, or to the sides of a paragraphf. Color or pattern that is applied behind text to make it look attractiveg. A set of format settings h. An image that is inserted as part of a line of text
8. Inline graphic 9. Shading 10. Point 11. Style 12. Floating graphic 13. Highlight 14. Bullet 15. Border
Match each term with the statement that best describes it.
FIGURe C-27
Label each element of the Word program window shown in Figure C-27.
Concepts Review
2
3
6
4
7
5
WD C Unit C7513 46373.indd 68 2/26/10 3:29 PM

C Un
it W
ORD
C75
13
4637
3 P
age
69
02/2
3/10
cm
r
Format ting Text and Paragraphs Word 69
Word 2010
Select the best answer from the list of choices.
16. What is Calibri? a. A character format c. A font b. A style d. A text effect
17. Which type of indent results in subsequent lines of a paragraph being indented more than the first line? a. Right indent c. Negative indentb. First line indent d. Hanging indent
18. What is the most precise way to increase the amount of white space between two paragraphs?a. Indent the paragraphsb. Insert an extra blank line between the paragraphsc. Change the before paragraph spacing for the second paragraphd. Change the line spacing of the paragraphs
19. Which button is used to align a paragraph with both the left and right margins? a. c. b. d.
20. Which dialog box is used to change the scale of characters?a. Tabs c. Paragraphb. Font d. Borders and Shading
skills Review 1. Format with fonts.
a. Start Word, open the file WD C-2.docx from the drive and folder where you store your Data Files, save it as WD C-Arlington EDA Report, then scroll through the document to get a feel for its contents.
b. Press [Ctrl][A], then format the text in 12-point Californian FB. Choose a different serif font if Californian FB is not available to you.
c. Press [Ctrl][Home], format the report title Town of Arlington in 28-point Berlin Sans FB. Choose a different sans serif font if Berlin Sans FB is not available to you.
d. Change the font color of the report title to Red, Accent 2.e. Format the subtitle Economic Development Authority Report Executive Summary in 16-point
Berlin Sans FB, then press [Enter] before Executive in the subtitle.f. Format the heading Mission Statement in 14-point Berlin Sans FB with the Red, Accent 2 font color.g. Press [Ctrl][Home], then save your changes to the report.
2. Copy formats using the Format Painter.a. Use the Format Painter to copy the format of the Mission Statement heading to the following headings: Guiding
Principles, Issues, Proposed Actions.b. Show formatting marks, then format the paragraph under the Mission Statement heading in italic.c. Format Years Population Growth, the first line in the four-line list under the Issues heading, in bold, small
caps, with Red, Accent 2, Darker 50% font color.d. Change the font color of the next two lines under Years Population Growth to Red, Accent 2, Darker 50%.e. Format the line Source: Office of State Planning in italic, then save your changes.
3. Change line and paragraph spacing.a. Change the line spacing of the three-line list under the first body paragraph to 1.5 lines.b. Add 6 points of space after the title Town of Arlington. Add 18 points of space before and 6 points of space after the
Executive Summary line in the subtitle.c. Add 12 points of space after the Mission Statement heading, then add 12 points of space after each additional heading
in the report (Guiding Principles, Issues, Proposed Actions).
WD C Unit C7513 46373.indd 69 2/26/10 3:29 PM
C Unit WORD C7513 46373 Page 70 02/23/10 cm
r
Format ting Text and ParagraphsWord 70
skills Review (continued)d. Add 6 points of space after each paragraph in the list under the Guiding Principles heading.e. Change the line spacing of the four-line list under the Issues heading that begins with Years Population Growth
to 1.15.f. Add 6 points of space after each paragraph under the Proposed Actions heading.g. Press [Ctrl][Home], then save your changes to the report.
4. Align paragraphs.a. Press [Ctrl][A] to select the entire document, then justify all the paragraphs. b. Center the three-line report title.c. Press [Ctrl][End], type your name, press [Enter], type the current date, then right-align your name and the date.d. Save your changes to the report.
5. Work with tabs.a. Scroll up and select the four-line list of population information under the Issues heading.b. Set left tab stops at the 2" mark and the 3¾" mark.c. Insert a tab at the beginning of each line in the list.d. In the first line, insert a tab before Population. In the second line, insert a tab before 4.5%. In the third line, insert a tab
before 53%.e. Select the first three lines, then drag the second tab stop to the 3" mark on the horizontal ruler.f. Press [Ctrl][Home], then save your changes to the report.
6. Work with indents.a. Indent the paragraph under the Mission Statement heading ½" from the left and ½" from the right.b. Indent the first line of the paragraph under the Guiding Principles heading ½".c. Indent the first line of the three body paragraphs under the Issues heading ½".d. Press [Ctrl][Home], then save your changes to the report.
7. Add bullets and numbering.a. Apply bullets to the three-line list under the first body paragraph. Change the bullet style to small black circles if that is
not the current bullet symbol.b. Change the font color of the bullets to Red, Accent 2.c. Scroll down until the Guiding Principles heading is at the top of your screen.d. Format the six-paragraph list under Guiding Principles as a numbered list.e. Format the numbers in 14-point Berlin Sans FB, then change the font color to Red, Accent 2.f. Scroll down until the Proposed Actions heading is at the top of your screen, then format the paragraphs under the
heading as a bulleted list using check marks as the bullet style. g. Change the font color of the bullets to Red, Accent 2, press [Ctrl][Home], then save your changes to the report.
8. Add borders and shading.a. Add a 1-point Orange, Accent 6, Darker 25% border below the Mission Statement heading. b. Use the Format Painter or the F4 key to add the same border to the other headings in the report (Guiding Principles,
Issues, Proposed Actions).c. Under the Issues heading, select the first three lines of tabbed text, which are formatted in red, then apply Orange,
Accent 6, Lighter 40% shading to the paragraphs. d. Select the first three lines of tabbed text again if necessary, then add a 1½ -point Orange, Accent 6, Darker 25% single
line box border around the paragraphs. e. Indent the shading and border around the paragraphs 1¾" from the left and 1¾" from the right.f. Turn off formatting marks, then save your changes.
9. Insert clip art.a. Press [Ctrl][Home], then open the Clip Art task pane. b. Search for clips related to the keyword town.
WD C Unit C7513 46373.indd 70 2/26/10 3:29 PM
C Un
it W
ORD
C75
13
4637
3 P
age
71
02/2
3/10
cm
r
Format ting Text and Paragraphs Word 71
Word 2010
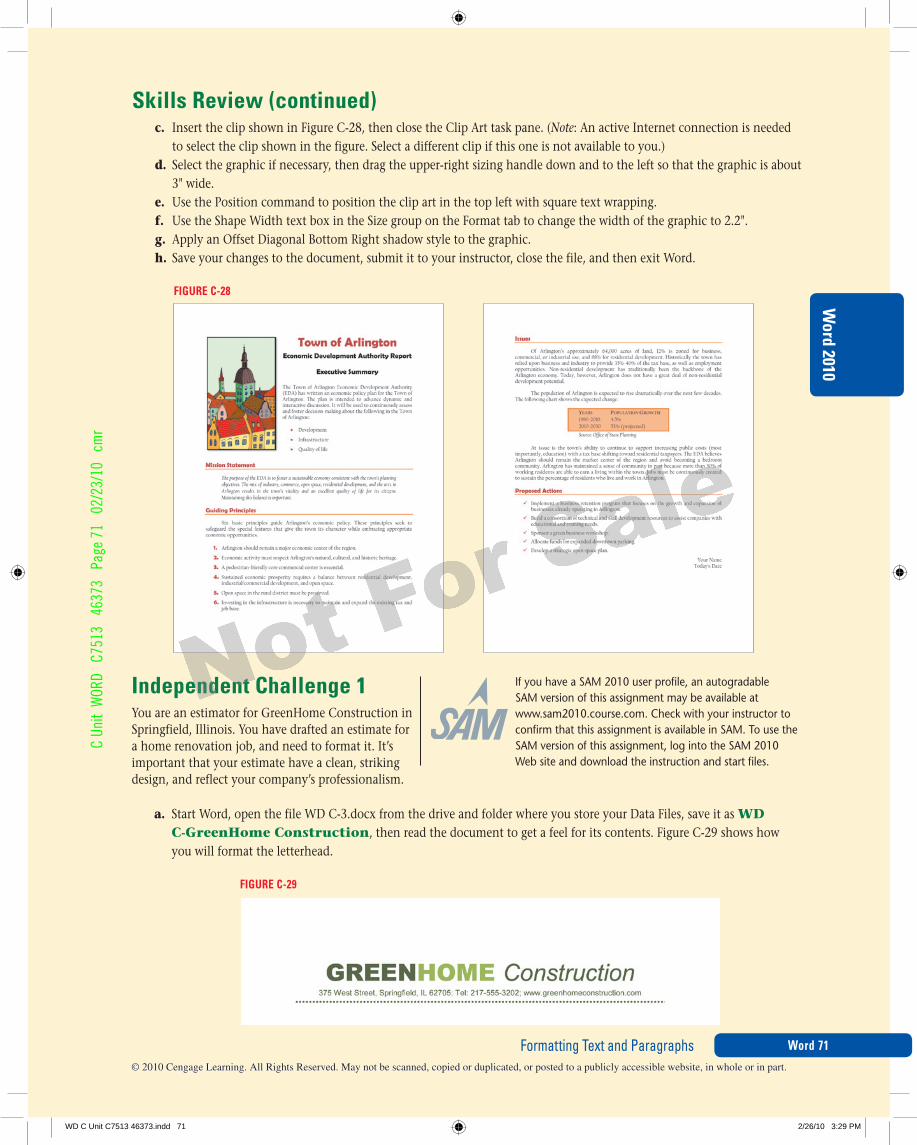
skills Review (continued)c. Insert the clip shown in Figure C-28, then close the Clip Art task pane. (Note: An active Internet connection is needed
to select the clip shown in the figure. Select a different clip if this one is not available to you.) d. Select the graphic if necessary, then drag the upper-right sizing handle down and to the left so that the graphic is about
3" wide.e. Use the Position command to position the clip art in the top left with square text wrapping.f. Use the Shape Width text box in the Size group on the Format tab to change the width of the graphic to 2.2".g. Apply an Offset Diagonal Bottom Right shadow style to the graphic.h. Save your changes to the document, submit it to your instructor, close the file, and then exit Word.
FIGURe C-28
Independent Challenge 1You are an estimator for GreenHome Construction in Springfield, Illinois. You have drafted an estimate for a home renovation job, and need to format it. It’s important that your estimate have a clean, striking design, and reflect your company’s professionalism.
a. Start Word, open the file WD C-3.docx from the drive and folder where you store your Data Files, save it as WD C-GreenHome Construction, then read the document to get a feel for its contents. Figure C-29 shows how you will format the letterhead.
If you have a SAM 2010 user profile, an autogradable SAM version of this assignment may be available at www.sam2010.course.com. Check with your instructor to confirm that this assignment is available in SAM. To use the SAM version of this assignment, log into the SAM 2010 Web site and download the instruction and start files.
FIGURe C-29
WD C Unit C7513 46373.indd 71 2/26/10 3:29 PM
C Unit WORD C7513 46373 Page 72 02/23/10 cm
r
Format ting Text and ParagraphsWord 72
Independent Challenge 1 (continued)b. Select the entire document, change the style to No Spacing, then change the font to 12-point Times New Roman.c. In the first line of the letterhead, format Green Home in 30-point Arial Black, then apply all caps. Format Green
with the Olive Green, Accent 3, Darker 50% font color, format Home with the Olive Green, Accent 3 font color, then delete the space between the two words. Format Construction in 30-point Arial with an Olive Green, Accent 3, Darker 50% font color, then apply italic. (Hint: Type 30 in the Font Size text box, then press [Enter].)
d. Format the next line in 10-point Arial with an Olive Green, Accent 3, Darker 50% font color.e. Center the two-line letterhead. f. Add a 2¼-point dotted Olive Green, Accent 3, Darker 50% border below the address line paragraph.g. With the insertion point in the address line, open the Borders and Shading dialog box, click Options to open the
Border and Shading Options dialog box, change the Bottom setting to 5 points, then click OK twice to adjust the loca-tion of the border relative to the line of text.
h. Format the title Proposal of Renovation in 14-point Arial Black, then center the title.i. Format the following headings (including the colons) in 11-point Arial Black: Date, Work to be performed
for and at, Scope of work, Payment schedule, and Agreement.j. Select the 14-line list under Scope of work that begins with Demo of all..., then change the paragraph
spacing to add 4 points of space after each paragraph in the list. (Hint: Select 0 pt in the After text box, type 4, then press Enter.)
k. With the list selected, set a right tab stop at the 6¼" mark, insert tabs before every price in the list, then apply dotted line tab leaders.
l. Format the list as a numbered list, then apply bold to the numbers.m. Apply bold to the two lines, Total estimated job cost... and Approximate job time... below the list.n. Replace Your Name with your name in the signature block, select the signature block (Respectfully submitted through
your name), set a left tab stop at the 3¼" mark, then indent the signature block using tabs.o. Examine the document carefully for formatting errors, and make any necessary adjustments.p. Save the document, submit it to your instructor, then close the file and exit Word.
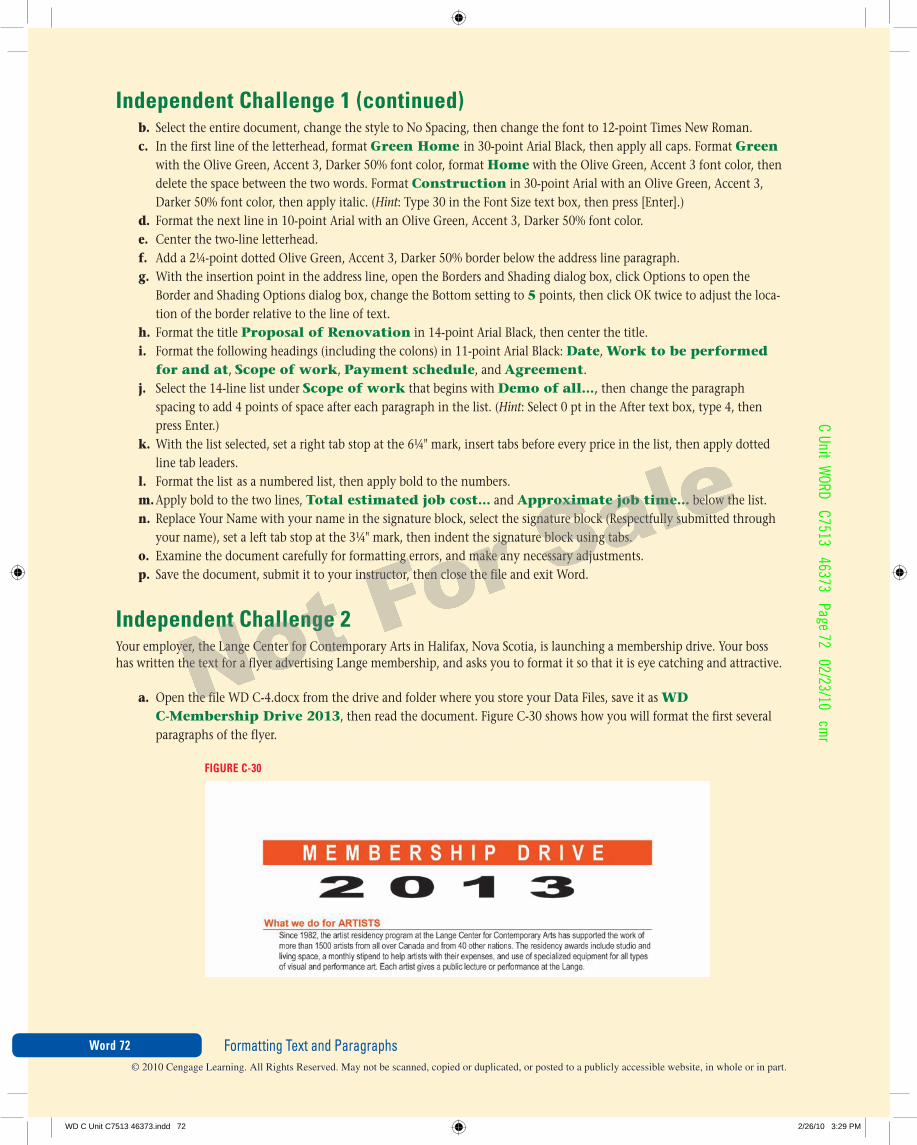
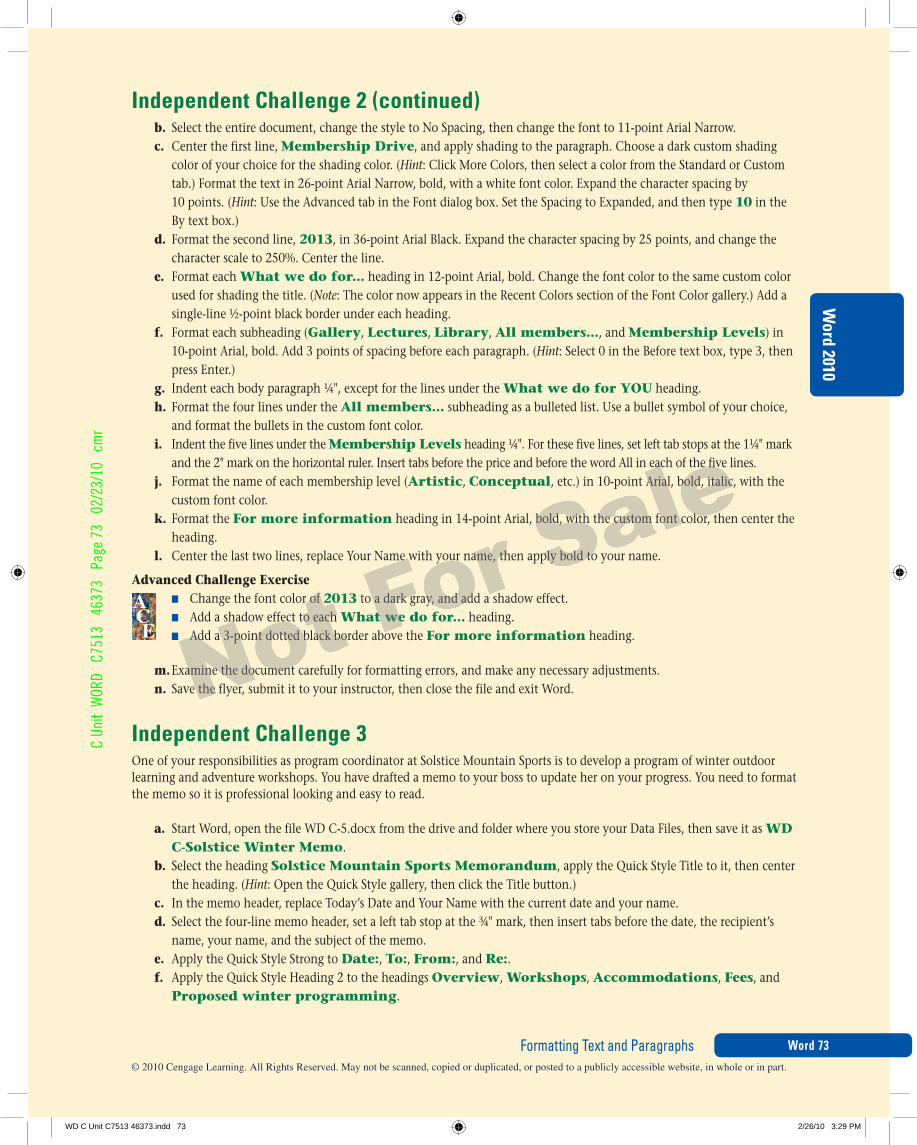
Independent Challenge 2Your employer, the Lange Center for Contemporary Arts in Halifax, Nova Scotia, is launching a membership drive. Your boss has written the text for a flyer advertising Lange membership, and asks you to format it so that it is eye catching and attractive.
a. Open the file WD C-4.docx from the drive and folder where you store your Data Files, save it as WD C-Membership Drive 2013, then read the document. Figure C-30 shows how you will format the first several paragraphs of the flyer.
FIGURe C-30
WD C Unit C7513 46373.indd 72 2/26/10 3:29 PM
C Un
it W
ORD
C75
13
4637
3 P
age
73
02/2
3/10
cm
r
Format ting Text and Paragraphs Word 73
Word 2010
Independent Challenge 2 (continued)b. Select the entire document, change the style to No Spacing, then change the font to 11-point Arial Narrow.c. Center the first line, Membership Drive, and apply shading to the paragraph. Choose a dark custom shading
color of your choice for the shading color. (Hint: Click More Colors, then select a color from the Standard or Custom tab.) Format the text in 26-point Arial Narrow, bold, with a white font color. Expand the character spacing by 10 points. (Hint: Use the Advanced tab in the Font dialog box. Set the Spacing to Expanded, and then type 10 in the By text box.)
d. Format the second line, 2013, in 36-point Arial Black. Expand the character spacing by 25 points, and change the character scale to 250%. Center the line.
e. Format each What we do for... heading in 12-point Arial, bold. Change the font color to the same custom color used for shading the title. (Note: The color now appears in the Recent Colors section of the Font Color gallery.) Add a single-line ½-point black border under each heading.
f. Format each subheading (Gallery, Lectures, Library, All members..., and Membership Levels) in 10-point Arial, bold. Add 3 points of spacing before each paragraph. (Hint: Select 0 in the Before text box, type 3, then press Enter.)
g. Indent each body paragraph ¼", except for the lines under the What we do for YOU heading.h. Format the four lines under the All members... subheading as a bulleted list. Use a bullet symbol of your choice,
and format the bullets in the custom font color.i. Indent the five lines under the Membership Levels heading ¼". For these five lines, set left tab stops at the 1¼" mark
and the 2" mark on the horizontal ruler. Insert tabs before the price and before the word All in each of the five lines.j. Format the name of each membership level (Artistic, Conceptual, etc.) in 10-point Arial, bold, italic, with the
custom font color. k. Format the For more information heading in 14-point Arial, bold, with the custom font color, then center the
heading. l. Center the last two lines, replace Your Name with your name, then apply bold to your name.
Advanced Challenge Exercise n Change the font color of 2013 to a dark gray, and add a shadow effect. n Add a shadow effect to each What we do for... heading. n Add a 3-point dotted black border above the For more information heading.
m.Examine the document carefully for formatting errors, and make any necessary adjustments. n. Save the flyer, submit it to your instructor, then close the file and exit Word.
Independent Challenge 3One of your responsibilities as program coordinator at Solstice Mountain Sports is to develop a program of winter outdoor learning and adventure workshops. You have drafted a memo to your boss to update her on your progress. You need to format the memo so it is professional looking and easy to read.
a. Start Word, open the file WD C-5.docx from the drive and folder where you store your Data Files, then save it as WD C-Solstice Winter Memo.
b. Select the heading Solstice Mountain Sports Memorandum, apply the Quick Style Title to it, then center the heading. (Hint: Open the Quick Style gallery, then click the Title button.)
c. In the memo header, replace Today’s Date and Your Name with the current date and your name.d. Select the four-line memo header, set a left tab stop at the ¾" mark, then insert tabs before the date, the recipient’s
name, your name, and the subject of the memo.e. Apply the Quick Style Strong to Date:, To:, From:, and Re:. f. Apply the Quick Style Heading 2 to the headings Overview, Workshops, Accommodations, Fees, and
Proposed winter programming.
WD C Unit C7513 46373.indd 73 2/26/10 3:29 PM
C Unit WORD C7513 46373 Page 74 02/23/10 cm
r
Format ting Text and ParagraphsWord 74
Independent Challenge 3 (continued)g. Under the Fees heading, apply the Quick Style Emphasis to the words Workshop fees and
Accommodations fees. h. Add a clip art graphic of a snowflake to the first page, wrap text around the graphic, then resize it and position it so it
fits into the memo header below the title and aligns with the right margin.i. On the second page of the document, format the list under the Proposed winter programming heading as a
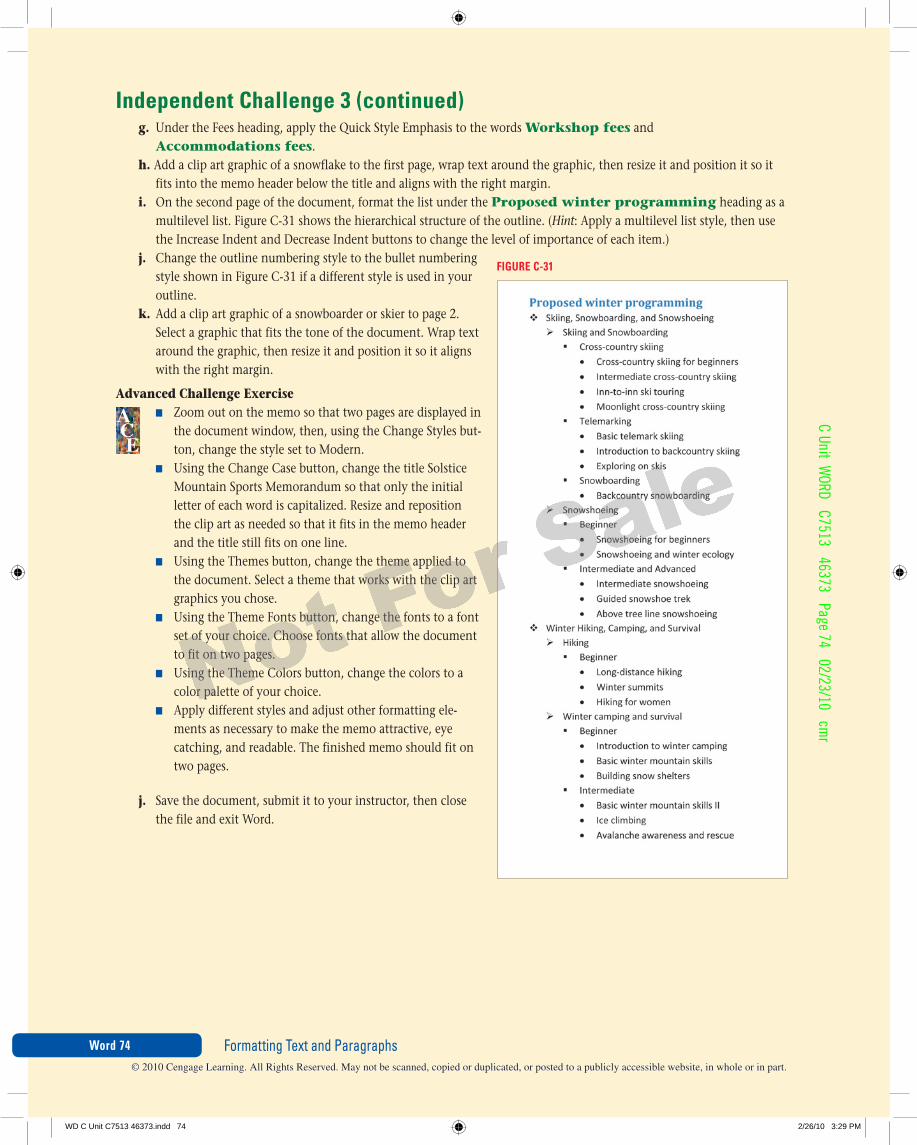
multilevel list. Figure C-31 shows the hierarchical structure of the outline. (Hint: Apply a multilevel list style, then use the Increase Indent and Decrease Indent buttons to change the level of importance of each item.)
j. Change the outline numbering style to the bullet numbering style shown in Figure C-31 if a different style is used in your outline.
k. Add a clip art graphic of a snowboarder or skier to page 2. Select a graphic that fits the tone of the document. Wrap text around the graphic, then resize it and position it so it aligns with the right margin.
Advanced Challenge Exercise n Zoom out on the memo so that two pages are displayed in
the document window, then, using the Change Styles but-ton, change the style set to Modern.
n Using the Change Case button, change the title Solstice Mountain Sports Memorandum so that only the initial letter of each word is capitalized. Resize and reposition the clip art as needed so that it fits in the memo header and the title still fits on one line.
n Using the Themes button, change the theme applied to the document. Select a theme that works with the clip art graphics you chose.
n Using the Theme Fonts button, change the fonts to a font set of your choice. Choose fonts that allow the document to fit on two pages.
n Using the Theme Colors button, change the colors to a color palette of your choice.
n Apply different styles and adjust other formatting ele-ments as necessary to make the memo attractive, eye catching, and readable. The finished memo should fit on two pages.
j. Save the document, submit it to your instructor, then close the file and exit Word.
FIGURe C-31
WD C Unit C7513 46373.indd 74 2/26/10 3:29 PM

C Un
it W
ORD
C75
13
4637
3 P
age
75
02/2
3/10
cm
r
Format ting Text and Paragraphs Word 75
Word 2010
Real Life Independent ChallengeThe fonts you choose for a document can have a major effect on the document’s tone. Not all fonts are appropriate for use in a business document, and some fonts, especially those with a definite theme, are appropriate only for specific purposes. In this Independent Challenge, you will use font formatting and other formatting features to design a letterhead and a fax coversheet for yourself or your business. The letterhead and coversheet should not only look professional and attract interest, but also say something about the character of your business or your personality. Figure C-32 shows an example of a business letterhead.
a. Start Word, and save a new blank document as WD C-Personal Letterhead to the drive and folder where you store your Data Files.
b. Type your name or the name of your business, your address, your phone number, your fax number, and your Web site or e-mail address.
c. Format your name or the name of your business in a font that expresses your personality or says something about the nature of your business. Use fonts, font colors, font effects, borders, shading, paragraph formatting, and other format-ting features to design a letterhead that is appealing and professional.
d. Save your changes, submit the document to your instructor, then close the file. e. Open a new blank document, and save it as WD C-Personal Fax Coversheet. Type FAX, your name or the
name of your business, your address, your phone number, your fax number, and your Web site or e-mail address at the top of the document.
f. Type a fax header that includes the following: Date; To; From; Re; Number of pages, including cover sheet; and Comments.
g. Format the information in the fax coversheet using fonts, font effects, borders, shading, paragraph formatting, and other formatting features. Since a fax coversheet is designed to be faxed, all fonts and other formatting elements should be black. .
h. Save your changes, submit the document to your instructor, close the file, then exit Word.
FIGURe C-32
WD C Unit C7513 46373.indd 75 2/26/10 3:29 PM
C Unit WORD C7513 46373 Page 76 02/23/10 cm
r
Format ting Text and ParagraphsWord 76
FIGURe C-33
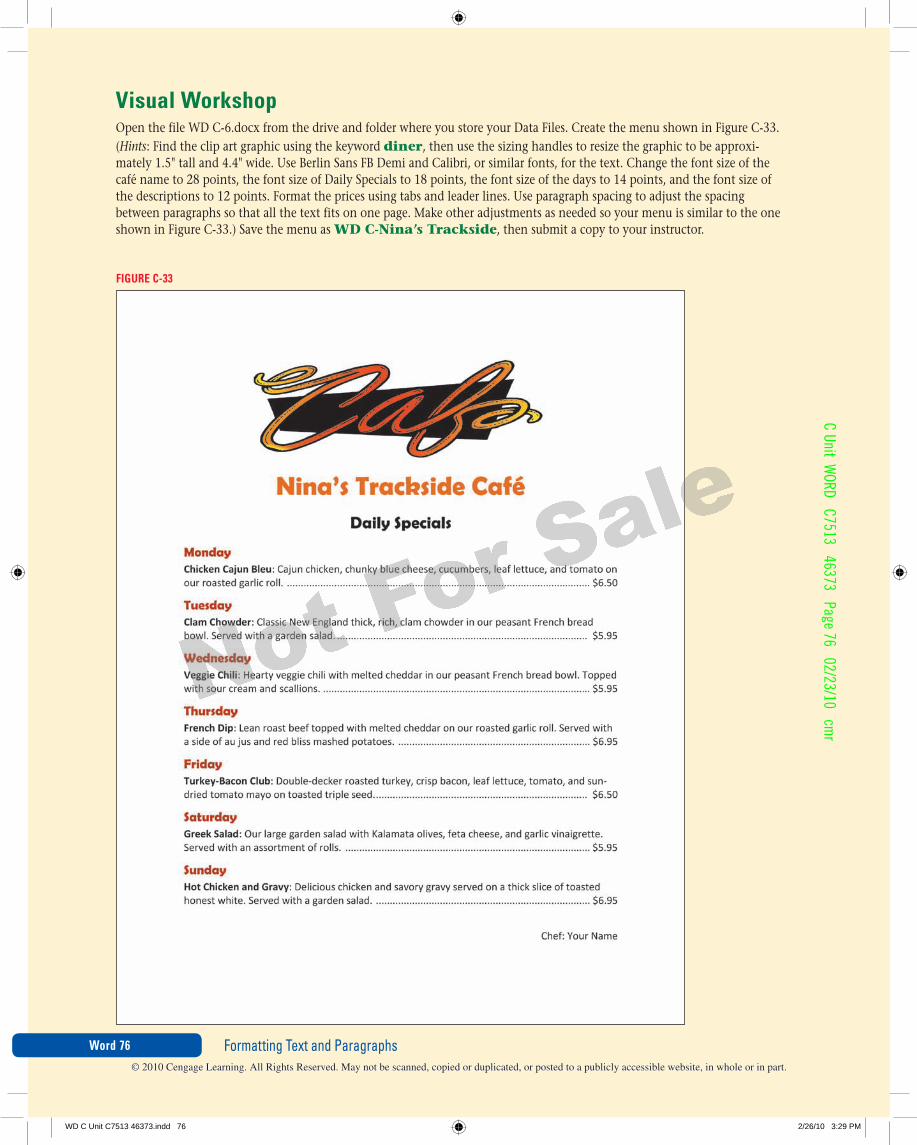
Visual WorkshopOpen the file WD C-6.docx from the drive and folder where you store your Data Files. Create the menu shown in Figure C-33. (Hints: Find the clip art graphic using the keyword diner, then use the sizing handles to resize the graphic to be approxi-mately 1.5" tall and 4.4" wide. Use Berlin Sans FB Demi and Calibri, or similar fonts, for the text. Change the font size of the café name to 28 points, the font size of Daily Specials to 18 points, the font size of the days to 14 points, and the font size of the descriptions to 12 points. Format the prices using tabs and leader lines. Use paragraph spacing to adjust the spacing between paragraphs so that all the text fits on one page. Make other adjustments as needed so your menu is similar to the one shown in Figure C-33.) Save the menu as WD C-Nina’s Trackside, then submit a copy to your instructor.
WD C Unit C7513 46373.indd 76 2/26/10 3:29 PM