fpga vendor tools installation guide · 2019-08-14 · fpga vendor tools installation guide...
TRANSCRIPT

FPGA Vendor Tools Installation Guide ANGRYVIPER Team
FPGA Vendor Tools Installation Guide
Version 1.5
1

FPGA Vendor Tools Installation Guide ANGRYVIPER Team
Revision History
Revision Description of Change Datev1.1 Initial Release 3/2017v1.2 Updated for Release 1.2 8/2017v1.4 Updated for Release 1.4 9/2018v1.5 Updated for Release 1.5 4/2019
2

FPGA Vendor Tools Installation Guide ANGRYVIPER Team
Table of Contents
1 References 4
2 Supported Vendor Tools and OpenCPI functionality 5
3 Xilinx Toolset Installation and Configuration 63.1 Xilinx Vivado Installation in CentOS 6/7 . . . . . . . . . . . . . . . . . . . . . . . . . . . . . . . . . . 6
3.1.1 Xilinx Vivado 2017.1 Installation in CentOS 6/7 . . . . . . . . . . . . . . . . . . . . . . . . . . 63.1.2 OpenCPI Considerations . . . . . . . . . . . . . . . . . . . . . . . . . . . . . . . . . . . . . . . 83.1.3 Xilinx Vivado 2013.4 SDK Only Installation in CentOS 6/7 . . . . . . . . . . . . . . . . . . . . 8
3.2 Xilinx ISE 14.7 Installation in CentOS 6/7 . . . . . . . . . . . . . . . . . . . . . . . . . . . . . . . . . 113.2.1 OpenCPI Considerations . . . . . . . . . . . . . . . . . . . . . . . . . . . . . . . . . . . . . . . 14
3.3 Xilinx LabTools 14.7 Installation in CentOS 6/7 . . . . . . . . . . . . . . . . . . . . . . . . . . . . . . 153.3.1 OpenCPI Considerations . . . . . . . . . . . . . . . . . . . . . . . . . . . . . . . . . . . . . . . 17
3.4 Xilinx Toolset Licensing . . . . . . . . . . . . . . . . . . . . . . . . . . . . . . . . . . . . . . . . . . . . 183.4.1 Generate and download a license file from Xilinx . . . . . . . . . . . . . . . . . . . . . . . . . . 183.4.2 Load license into Vivado . . . . . . . . . . . . . . . . . . . . . . . . . . . . . . . . . . . . . . . . 183.4.3 Load license into ISE . . . . . . . . . . . . . . . . . . . . . . . . . . . . . . . . . . . . . . . . . . 193.4.4 Note on node-locked licenses in CentOS 7 . . . . . . . . . . . . . . . . . . . . . . . . . . . . . . 193.4.5 OpenCPI Considerations . . . . . . . . . . . . . . . . . . . . . . . . . . . . . . . . . . . . . . . 19
3.5 Xilinx Cable Driver Installation in CentOS 6/7 . . . . . . . . . . . . . . . . . . . . . . . . . . . . . . . 203.5.1 Vivado . . . . . . . . . . . . . . . . . . . . . . . . . . . . . . . . . . . . . . . . . . . . . . . . . . 203.5.2 ISE . . . . . . . . . . . . . . . . . . . . . . . . . . . . . . . . . . . . . . . . . . . . . . . . . . . 203.5.3 Testing Cable Driver Installation . . . . . . . . . . . . . . . . . . . . . . . . . . . . . . . . . . . 21
4 Intel Quartus Toolset Installation and Configuration 224.1 Intel Quartus Prime Standard Edition 17.1 Installation in CentOS 7 . . . . . . . . . . . . . . . . . . . 22
4.1.1 OpenCPI Considerations . . . . . . . . . . . . . . . . . . . . . . . . . . . . . . . . . . . . . . . 224.2 Intel Quartus Prime Pro Edition 17.0.2 Installation in CentOS 7 . . . . . . . . . . . . . . . . . . . . . 22
4.2.1 OpenCPI Considerations . . . . . . . . . . . . . . . . . . . . . . . . . . . . . . . . . . . . . . . 234.3 Licensing Notes . . . . . . . . . . . . . . . . . . . . . . . . . . . . . . . . . . . . . . . . . . . . . . . . . 23
5 ModelSim Installation and Configuration 235.1 ModelSim DE 16.0e Installation in CentOS 7 . . . . . . . . . . . . . . . . . . . . . . . . . . . . . . . . 23
5.1.1 OpenCPI Considerations . . . . . . . . . . . . . . . . . . . . . . . . . . . . . . . . . . . . . . . 235.2 Compile Xilinx/Zynq simulation libraries for ModelSim . . . . . . . . . . . . . . . . . . . . . . . . . . 24
5.2.1 Compile Vivado’s simulation libraries . . . . . . . . . . . . . . . . . . . . . . . . . . . . . . . . 245.2.2 Compile ISE’s simulation libraries . . . . . . . . . . . . . . . . . . . . . . . . . . . . . . . . . . 265.2.3 Modify “modelsim.ini” to include path to built library . . . . . . . . . . . . . . . . . . . . . . . 34
3

FPGA Vendor Tools Installation Guide ANGRYVIPER Team
1 References
This document assumes a basic understanding of the Linux command line (or “shell”) environment. A workingknowledge of OpenCPI is required for understanding what vendor tools are necessary to perform various operations.However, no OpenCPI knowledge is required to perform the toolset installation and configuration herein. Thereference(s) in Table 1 can be used as an overview of OpenCPI and may prove useful.
Title LinkOpenCPI Overview Overview.pdf
Acronyms and Definitions Acronyms and Definitions.pdf
Getting Started Getting Started.pdf
Installation Guide RPM Installation Guide.pdf
Table 1: References
4

FP
GA
Ven
dor
Tools
Installa
tion
Gu
ide
ANGRYVIP
ER
Team
2 Supported Vendor Tools and OpenCPI functionality
OpenCPI utilizes third party FPGA vendor tools to perform various operations, such as, building bitstreams or, for certain platforms, loading bitstreamsinto FPGAs. Table 2 describes the OpenCPI functionality that is provided by each supported vendor tool with regards to building bitstreams (hardware orsimulation), loading of bitstreams, or running a simulation. Since licensing of vendor tool plays a critical role in build for certain target devices and usage ofa given tool, its relationship is also listed.Note that Quartus Standard and Quartus Pro are different tools. These two tools support different sets of devices and users should consult Intel’sdocumentation for more information. Older versions of some FPGA tools have been supported by OpenCPI but are not actively regression tested, such as,Vivado 2015.4 and Quartus Standard Edition 15.1.
OpenCPI + {Tool} Version/License Supportedsimulators
Load bitstreamsonto
Run applications onthese platforms
Build bit-streams for
Buildsoftwarefor
OpenCPI ONLY (without vendor tools) Zynq-7000 Zynq-7000 based1, x86-only
x86
Xilinx Vivado
2017.1 with WebPACK License xsim Zynq-70002
2013.4 (SDK only)4 Zynq-7000ARM
2017.1 and 2013.4 SDK withWebPACK License
xsim Zynq-70002 Zynq-7000ARM
Xilinx LabTools 14.7 ML605 x86/ML605
Xilinx ISE 14.7WebPACK License isim ML605 x86/ML605 Zynq-70002 Zynq-7000
ARM
Full License isim ML605 x86/ML605 Zynq-7000,ML605
Zynq-7000ARM
Intel Quartus Standard 17.1 with License ALST4 x86/ALST4 ALST4
Intel Quartus Pro Edition 17.0.2 with License arria10soc3
Mentor Graphics ModelSim DE 10.6e with License modelsim modelsim
1“Zynq-7000 based” platform includes both a Zynq-7000’s FPGA and ARM PS. The usage of “Zynq” or “Zynq-based” does not imply Zynq UltraScale+ devices.2Building bitstreams with a WebPACK license is limited to certain Zynq parts. Refer to the vendor’s documentation for further information.3While there are currently no OpenCPI Board Support Packages developed for Quartus Pro, HDL workers can be built targeting the arria10soc device family.4The relationship between the Vivado Design Edition and SDK is discussed in 3.1.
Table 2: Added-value of Vendor Tools to OpenCPI
5
FPGA Vendor Tools Installation Guide ANGRYVIPER Team
3 Xilinx Toolset Installation and Configuration
3.1 Xilinx Vivado Installation in CentOS 6/7
As described in Table 2, building for OpenCPI board support packages (BSPs) which are Xilinx FPGA-basedrequires various Xilinx FPGA tools to be installed.
In the case of Zynq-7000 based OpenCPI BSPs, the required tools are Vivado 2017.1 and Vivado 2013.4’s SDK,where the 2013.4 SDK is necessary because OpenCPI’s “xilinx13 3” and “xilinx13 4” software platforms requirean SDK with matching glibc/glibc++ versions. An SDK meeting this requirement can be found explicitly in eitherISE 14.7 or Vivado 2013.4 SDK. For more information on this requirement you can reference the README for thexilinx13 3 software platform. This is located in the core project (e.g.:<core-project>/rcc/platforms/xilinx13_3).
In the case of the ML605 development board (PCIe), only ISE v14.7 is required, because the host’s gcc-compilerwill be used.
3.1.1 Xilinx Vivado 2017.1 Installation in CentOS 6/7
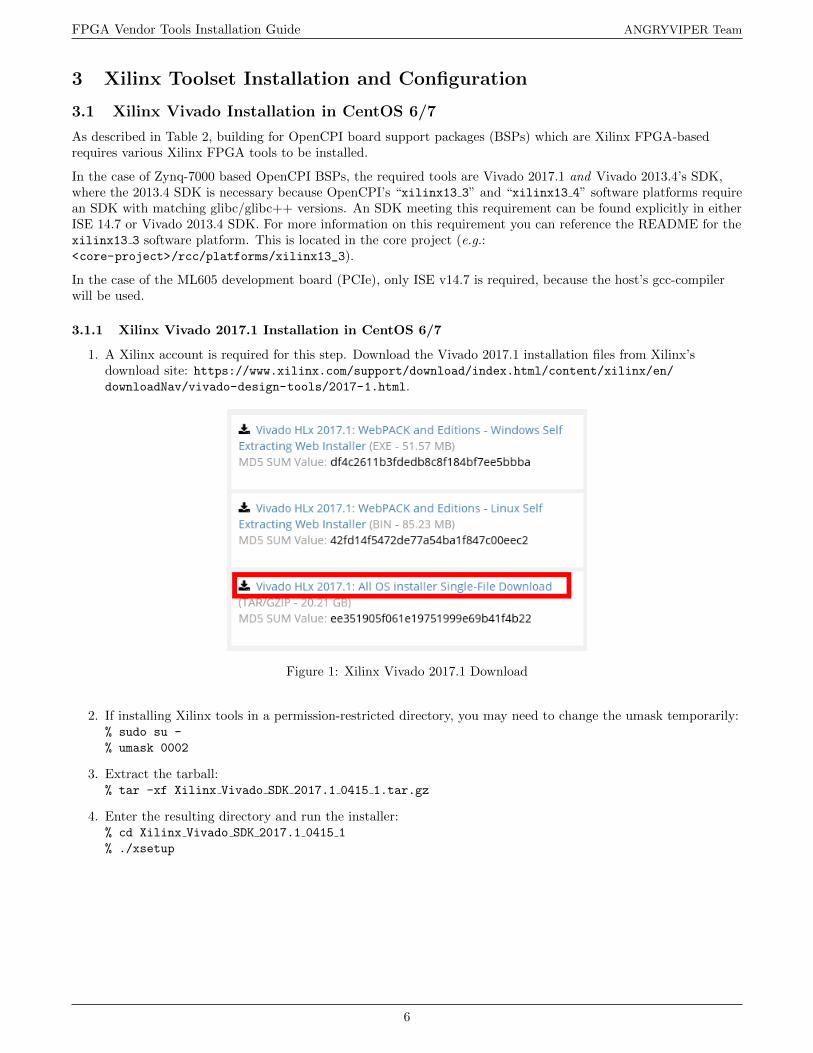
1. A Xilinx account is required for this step. Download the Vivado 2017.1 installation files from Xilinx’sdownload site: https://www.xilinx.com/support/download/index.html/content/xilinx/en/downloadNav/vivado-design-tools/2017-1.html.
Figure 1: Xilinx Vivado 2017.1 Download
2. If installing Xilinx tools in a permission-restricted directory, you may need to change the umask temporarily:% sudo su -
% umask 0002
3. Extract the tarball:% tar -xf Xilinx Vivado SDK 2017.1 0415 1.tar.gz
4. Enter the resulting directory and run the installer:% cd Xilinx Vivado SDK 2017.1 0415 1
% ./xsetup
6
FPGA Vendor Tools Installation Guide ANGRYVIPER Team
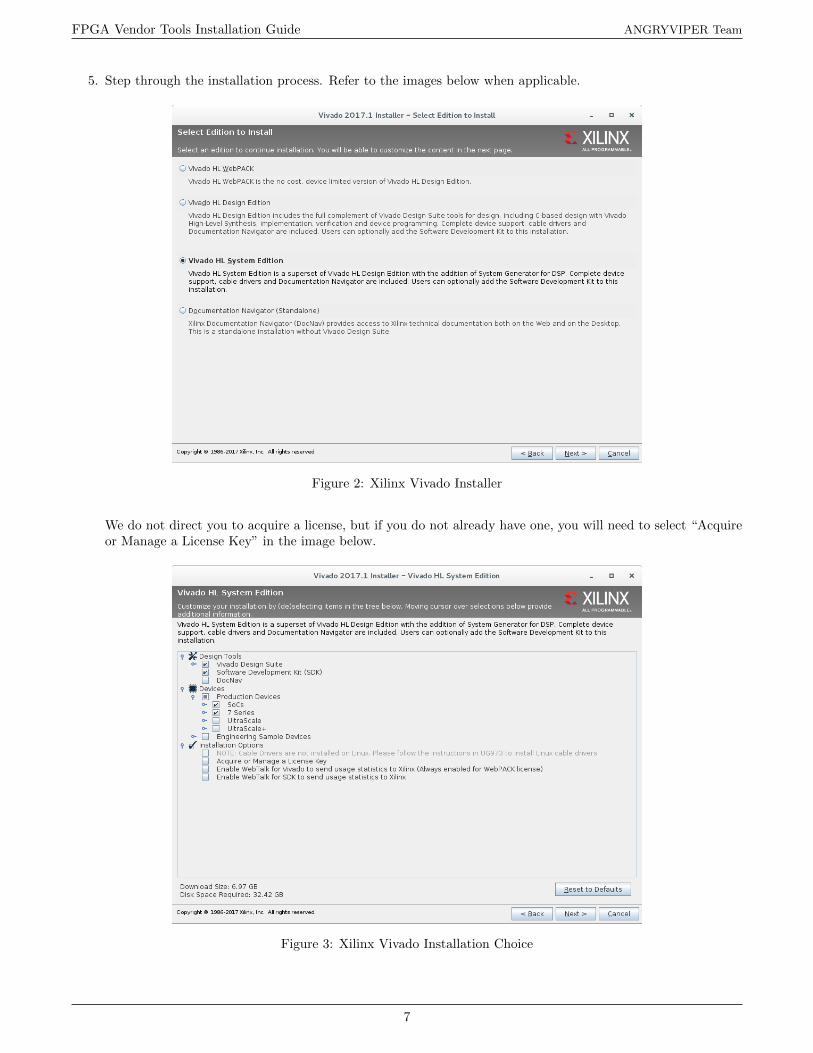
5. Step through the installation process. Refer to the images below when applicable.
Figure 2: Xilinx Vivado Installer
We do not direct you to acquire a license, but if you do not already have one, you will need to select “Acquireor Manage a License Key” in the image below.
Figure 3: Xilinx Vivado Installation Choice
7

FPGA Vendor Tools Installation Guide ANGRYVIPER Team
Take note of the installation directory chosen (e.g. /opt/Xilinx) as well as the Vivado version (e.g. 2017.1)for later use.
Figure 4: Xilinx Vivado Install Location
3.1.2 OpenCPI Considerations
1. Note that sourcing the “<Vivado-install-dir>/Vivado/<Vivado-version>/settings64.sh” script willinterfere with OpenCPI’s environment setup. Accordingly, it is highly recommended to always source thesescripts and execute any follow-on commands in a separate terminal.
2. To use OpenCPI with any Xilinx Vivado installation, it is required to set the following environment variablesbefore running OpenCPI commands. Note that each of the following export statements is only necessaryunder the following conditions:
• When using a non-default installation location (i.e. anything other than /opt/Xilinx)
• When Vivado and ISE are both being used and are installed in different locations
• Or when multiple versions of Vivado are installed and you wish to use a version other than the newest.
% export OCPI XILINX VIVADO DIR=<Vivado-install-dir>
% export OCPI XILINX VIVADO VERSION=<Vivado-version>
If OpenCPI has been installed prior to the Vivado installation, and it is desired to make the aforementionedenvironment variables set automatically upon login for all users, the variables should be added in/opt/opencpi/cdk/env.d/xilinx.sh. Logging out and logging back into the user account will apply saidvariables.
3.1.3 Xilinx Vivado 2013.4 SDK Only Installation in CentOS 6/7
1. A Xilinx account is required for this step. Download the Vivado 2013.4 Standalone SDK installation files fromXilinx’s download site: https://www.xilinx.com/support/download/index.html/content/xilinx/en/downloadNav/vivado-design-tools/archive.html. Navigate to “2013.4” → “Software Development Kit”.
8

FPGA Vendor Tools Installation Guide ANGRYVIPER Team
Figure 5: Xilinx Vivado 2013.4 SDK Download
2. If installing Xilinx tools in a permission-restricted directory, you may need to change the umask temporarily:% sudo su -
% umask 0002
3. Extract the tarball:% tar -xf Xilinx SDK 2013.4 1210 1.tar
4. Enter the resulting directory and run the installer:% cd Xilinx SDK 2013.4 1210 1
% ./xsetup
9

FPGA Vendor Tools Installation Guide ANGRYVIPER Team
5. Step through the installation process. Refer to the images below when applicable.
Figure 6: Xilinx Vivado SDK Installer
Figure 7: Xilinx Vivado SDK Installation Choice
10

FPGA Vendor Tools Installation Guide ANGRYVIPER Team
Take note of the installation directory chosen (e.g. /opt/Xilinx) as well as the Vivado version (e.g. 2013.4)for later use.
Figure 8: Xilinx Vivado SDK Install Location
3.2 Xilinx ISE 14.7 Installation in CentOS 6/7
1. A Xilinx account is required for this step. Download the ISE 14.7 installation files from Xilinx’s downloadsite: https://www.xilinx.com/support/download/index.html/content/xilinx/en/downloadNav/design-tools.html.
Figure 9: Xilinx ISE Download
11

FPGA Vendor Tools Installation Guide ANGRYVIPER Team
2. If installing Xilinx tools in a permission-restricted directory, you may need to change the umask temporarily:% sudo su -
% umask 0002
3. Extract the tarball:% tar -xf Xilinx ISE DS 14.7 1015 1.tar
4. Enter the resulting directory and run the installer:% cd Xilinx ISE DS 14.7 1015 1
% ./xsetup
12

FPGA Vendor Tools Installation Guide ANGRYVIPER Team
5. Run through the installation process. Refer to the images below when applicable. Note that the checkbox forcable drivers is left unchecked. Cable driver installation, if necessary, should be handled after this installationis complete. See section 3.5 for more information.
Figure 10: Xilinx ISE Installer
Figure 11: Xilinx ISE Installation Choice
13

FPGA Vendor Tools Installation Guide ANGRYVIPER Team
Take note of the installation directory chosen (e.g. /opt/Xilinx) as well as the LabTools version (e.g. 14.7)for later use.
Figure 12: Xilinx ISE Install Location
3.2.1 OpenCPI Considerations
1. Note that sourcing the “<ISE-install-dir>/<version>/LabTools/settings64.sh” or“<ISE-install-dir>/<version>/LabTools/settings32.sh” scripts will interfere with OpenCPI’senvironment setup. Accordingly, it is highly recommended to always source these scripts and execute anyfollow-on commands in a separate terminal.
2. To use OpenCPI with any Xilinx ISE or LabTools installation, it is required to set the following environmentvariables before running OpenCPI commands. Note that each of the following export statements is onlynecessary under the following conditions:
• When using a non-default installation location (i.e. anything other than /opt/Xilinx)
• Non-default version (i.e. anything other than 14.7) of the tools were used.
If only one of Xilinx LabTools or ISE is installed,
% export OCPI XILINX DIR=<ISE-or-LabTools-install-dir>
% export OCPI XILINX VERSION=<ISE-or-LabTools-version>
If Xilinx LabTools and ISE are the same version and installed in the same directory,
% export OCPI XILINX DIR=<ISE-and-LabTools-install-dir>
% export OCPI XILINX VERSION=<ISE-and-LabTools-version>
If Xilinx LabTools and ISE are the same version and are installed in different directories,
% export OCPI XILINX DIR=<ISE-install-dir>
% export OCPI XILINX LAB TOOLS DIR=<LabTools-install-dir>
% export OCPI XILINX VERSION=<ISE-and-LabTools-version>
If Xilinx LabTools and ISE are different versions (LabTools will be ignored),
% export OCPI XILINX DIR=<ISE-install-dir>
% export OCPI XILINX VERSION=<ISE-version>
14

FPGA Vendor Tools Installation Guide ANGRYVIPER Team
If OpenCPI has been installed prior to the ISE installation, and it is desired to make the aforementionedenvironment variables set automatically upon login for all users, the variables should be added in/opt/opencpi/cdk/env.d/xilinx.sh. Logging out and logging back into the user account will apply saidvariables.
3.3 Xilinx LabTools 14.7 Installation in CentOS 6/7
1. A Xilinx account is required for this step. Download the LabTools 14.7 installation files from Xilinx’sdownload site: https://www.xilinx.com/support/download/index.html/content/xilinx/en/downloadNav/design-tools.html.
Figure 13: Xilinx LabTools Download
2. If installing Xilinx tools in a permission-restricted directory, you may need to change the umask temporarily:% sudo su -
% umask 0002
3. Extract the tarball:% tar -xf Xilinx LabTools 14.7 1015 1.tar
4. Enter the resulting directory and run the installer:% cd Xilinx LabTools 14.7 1015 1
% ./xsetup
15

FPGA Vendor Tools Installation Guide ANGRYVIPER Team
5. Step through the installation process. Refer to the images below when applicable. Note that the checkbox forcable drivers is left unchecked. Cable driver installation, if necessary, should be handled after this installationis complete. See section 3.5 for more information.
Figure 14: Xilinx LabTools Installer
Figure 15: Xilinx LabTools Installation Choice
16

FPGA Vendor Tools Installation Guide ANGRYVIPER Team
Take note of the installation directory chosen (e.g. /opt/Xilinx) as well as the LabTools version (e.g. 14.7)for later use.
Figure 16: Xilinx LabTools Install Location
3.3.1 OpenCPI Considerations
1. Note that sourcing the “<LabTools-install-dir>/<version>/LabTools/settings64.sh” or“<LabTools-install-dir>/<version>/LabTools/settings32.sh” scripts will interfere with OpenCPI’senvironment setup. Accordingly, it is highly recommended to always source these scripts and execute anyfollow-on commands in a separate terminal.
2. To use OpenCPI with any Xilinx ISE or LabTools installation, it is required to set the environment variablesaccording to Section 3.2.1 before running OpenCPI commands.
17

FPGA Vendor Tools Installation Guide ANGRYVIPER Team
3.4 Xilinx Toolset Licensing
A license, either WebPACK or non-WebPACK, is required for Xilinx Vivado and Xilinx ISE, however the XilinxLabTools does not require a license.
3.4.1 Generate and download a license file from Xilinx
1. The following screenshots show is an example of Xilinx’s license website with a ISE WebPACK license selected.Refer to 2 to determine which license is necessary. To generate a license, navigate to http://www.xilinx.
com/getlicense and login (or create an account). Generate a license file:
Figure 17: Generate Xilinx license file
2. Download the file and move it to the intended location:
Figure 18: Download Xilinx license file
3.4.2 Load license into Vivado
1. In a terminal, run “source <Vivado-install-dir>/Vivado/<version>/settings64.sh”.
2. Open up the license manager and load the downloaded license. The license manager can be launched eitherfrom the Vivado GUI, or from the command line by running:sudo <Vivado-install-dir>/Vivado/<version>/bin/vlm
Here, you can either navigate to “Load License” and load a copy of the license file, or you can enter the licensesearch paths via “Manage License Search Paths”.
18

FPGA Vendor Tools Installation Guide ANGRYVIPER Team
Figure 19: Load Xilinx Vivado license file
3.4.3 Load license into ISE
1. In a terminal, run “source <ISE-install-dir>/<version>/ISE_DS/settings64.sh” (or settings32.sh if thesystem has a 32-bit architecture).
2. Open up the license manager and load the downloaded license. The license manager can either be launchedfrom the ISE GUI, or launched from the command line by running:sudo <ISE-or-LabTools-install-dir>/<version>/ISE_DS/common/bin/lin[64]/xlcm
Figure 20: Load Xilinx ISE license file
3.4.4 Note on node-locked licenses in CentOS 7
If using a Xilinx node-locked license under CentOS 7, see the Red Hat Networking Guide to revert to the ethN
naming convention.
3.4.5 OpenCPI Considerations
Note that sourcing the “settings64.sh” or “settings32.sh” scripts will interfere with OpenCPI’s environmentsetup. Accordingly, it is highly recommended to always source these scripts and execute any follow-on commands ina separate terminal.
To enable a license for use by OpenCPI, the OpenCPI environment variable which supports locating the Xilinx
19

FPGA Vendor Tools Installation Guide ANGRYVIPER Team
license listing (file or server) must be configured. Edit the /opt/opencpi/cdk/env.d/xilinx.sh to support eithera license file or server:
• license file:export OCPI_XILINX_LICENSE_FILE=<PATH_TO_LIC>
• license server:export OCPI_XILINX_LICENSE_FILE=<port>@<server.ip.addr>
If the OCPI_XILINX_LICENSE_FILE environment variable is not set, the license is assumed to be in one of the followinglocations:
• /opt/Xilinx/Xilinx-License.lic
• /opt/Xilinx/Vivado/Xilinx-License.lic
Alternatively, if using a floating license server, it is possible to set to the license server and Xilinx’s environmentvariable, which will allow use of a local license, e.g. a local WebPACK license, by default and the served floatinglicense when WebPACK license is not sufficient.1
• license server and local license:export OCPI_XILINX_LICENSE_FILE=<port>@<server.ip.addr>
export XILINXD_LICENSE_FILE=<PATH_TO_LOCAL_LIC>
3.5 Xilinx Cable Driver Installation in CentOS 6/7
This section is a collection of notes or links that have been gathered for the installation or verification of Xilinx cabledrivers for Vivado and ISE. However, it is not intended to an exhaustive list of instructions.
3.5.1 Vivado
The steps herein are a slightly modified subset of those outlined inhttps://www.xilinx.com/support/answers/66440.html.
1. Run the following command : ls -al /etc/udev/rules.d
2. Check if the following two files are present : 52-digilent-usb.rules 52-xilinx-pcusb.rules
3. If the files above are not present, run the installer (it is important to have the JTAG cable unplugged while youperform the installation):cd <YOUR XILINX INSTALL>/data/xicom/cable drivers/<lin64 or lin32>/install script/install drivers;
./install drivers;
3.5.2 ISE
Verifying udev rules
1. Run the following command : ls -al /etc/udev/rules.d
2. Check if the following file is present : xusbdfwu.rules
3. If the file is present, go to step 5. If the files above are not present, open the setup pcusb script and changeline 26 from TP USE UDEV="0" to TP USE UDEV="1"
4. Rerun the setup pcusb installation script
5. xusbdfwu.rules should now be present in ls -al /etc/udev/rules.d. Open the file and change (if necessary)SYSFS to ATTRS
BUS to SUBSYSTEM
$TEMPNODE to $tempnode
6. Reload the udev rules by typing udevadm control --reload-rules
1See Xilinx “AR# 42507: What are the search order and locations...” and “AR# 44024: If a feature is licensed in multiple locations...”
20

FPGA Vendor Tools Installation Guide ANGRYVIPER Team
3.5.3 Testing Cable Driver Installation
Vivado
After installing the cable driver as previously discussed, the Xilinx JTAG pod’s LED may still not illumniate(Amber or Green). It has been observed that by attempting to establish a connection to the pod using the Vivadotools, only then will the pod be discovered and correctly illuminate it’s LED. If after the cable driver has been loadand the JTAG pod’s LED is off (while connected to the host), perform the following steps to force pod discovery:
$ cd /opt/Xilinx/Vivado/2017.1
$ . ./settings64.sh
Once the environment has been configured, launch the Vivado IDE and use the Hardware Manager to scan forJTAG pod. The expected result is for the pod to be recognized by the tools and its LED to illuminate Amber if itsJTAG connector is not powered, or Green if the JTAG connect is powered.(While this has not been confirmed, it is believed that some host system environments prevent non-interactivedriver accesses.)
ISE
To verify successful cable driver installation, you can run the following:
$ cd /opt/Xilinx/14.7/ISE DS
$ . ./settings64.sh
$ cd
$ echo listusbcables | impact -batch
If the cable driver is successfully installed, “Using libusb.” will be included in the text printed to the screen.
21

FPGA Vendor Tools Installation Guide ANGRYVIPER Team
4 Intel Quartus Toolset Installation and Configuration
4.1 Intel Quartus Prime Standard Edition 17.1 Installation in CentOS 7
1. Download the Quartus Prime Standard Edition 17.1 installation files from Altera’s download site:https://www.intel.com/content/www/us/en/programmable/downloads/download-center.html. ChooseStandard Edition 17.1 and either choose the “Complete Download”, or the “Multiple File Download” (forthis option, make sure to download the device packages of interest). An Intel Customer account will berequired.
2. If installing Quartus tools in a permission-restricted directory, you may need to change the umasktemporarily:% sudo su -
% umask 0002
3. Extract the tarball:% tar xvf Quartus-17.1.0*.tar
4. Run the installer:% ./setup.sh
5. Run through the installation process and choose your installation directory. Note that OpenCPI will searchfor Quartus Standard in /opt/altera or ~/intelFPGA without any additional user settings.
4.1.1 OpenCPI Considerations
It may required to set the following environment variables before running OpenCPI commands. Note that<quartus-version> should be replaced with the appropriate Quartus version (e.g. 17.1), and<quartus-install-dir> should be replaced with the installation directory (e.g. ~/intelFPGA). Note also thateach of the following export statements are only necessary when the non-default installation location (e.g.anything other than ~/intelFPGA, /opt/intelFPGA, ~/altera or /opt/Altera), or non-default version (e.g.anything other than the newest version) of the tools were used.% export OCPI ALTERA DIR=<quartus-install-dir>
% export OCPI ALTERA VERSION=<quartus-version>
% export OCPI ALTERA LICENSE FILE=<path to license file>
These variables can be set automatically upon login for all users if added in /opt/opencpi/cdk/env.d/altera.sh.Logging out and logging back into the user account will apply said variables.
4.2 Intel Quartus Prime Pro Edition 17.0.2 Installation in CentOS 7
NOTE: Do not install Quartus Pro in the same directory as Quartus Standard because OpenCPI cannotdifferentiate between the two.NOTE: Quartus Pro and Quartus Standard are different tools. The devices supported by each are different, andusers should consult Intel documentation before choosing a tool edition.
1. Download the Quartus Prime Pro Edition 17.0 installation files from Altera’s download site:https://www.intel.com/content/www/us/en/programmable/downloads/download-center.html. ChoosePro Edition 17.0 and either choose the “Complete Download”, or the “Multiple File Download” (for thisoption, make sure to download the device packages of interest). An Intel Customer account will be required.
2. If installing Quartus tools in a permission-restricted directory, you may need to change the umasktemporarily:% sudo su -
% umask 0002
3. Extract the tarball:% tar xvf Quartus-pro-17.0.0*.tar
4. Run the installer:% ./setup.sh
22
FPGA Vendor Tools Installation Guide ANGRYVIPER Team
5. Run through the installation process and choose your installation directory. Note that OpenCPI will searchfor Quartus Pro in ~/intelFPGA_pro or /opt/intelFPGA_pro without any additional user settings.
6. Download the 17.0.2 patch by navigating to the Updates tab and downloading “Quartus Prime Softwarev17.0 Update 2”.
7. Run the installer:% ./QuartusProSetup-17.0.2*.run
4.2.1 OpenCPI Considerations
It may be required to set the following environment variables before running OpenCPI commands. Note that<quartus-version> should be replaced with the appropriate Quartus version (e.g. 17.0 not 17.0.2), and<quartus-install-dir> should be replaced with the installation directory (e.g. ~/intelFPGA_pro). Note alsothat each of the following export statements are only necessary when the non-default installation location (e.g.anything other than ~/intelFPGA_pro, /opt/intelFPGA_pro, ~/altera or /opt/Altera), or non-default version(e.g. anything other than the newest version) of the tools were used.% export OCPI ALTERA PRO DIR=<quartus-install-dir>
% export OCPI ALTERA PRO VERSION=<quartus-version>
% export OCPI ALTERA PRO LICENSE FILE=<path to license file>
These variables can be set automatically upon login for all users if added in /opt/opencpi/cdk/env.d/altera.sh.Logging out and logging back into the user account will apply said variables.
4.3 Licensing Notes
If the user runs the Quartus software in its native GUI mode outside of OpenCPI, a license file configuration mightbe stored in the variable LICENSE_FILE within ~user/.altera.quartus/quartus2.ini; this setting overrides theOCPI ALTERA LICENSE FILE noted above and may cause confusion.
5 ModelSim Installation and Configuration
5.1 ModelSim DE 16.0e Installation in CentOS 7
1. Download the ModelSim installation files for version 10.6e.
2. If installing ModelSim tools in a permission-restricted directory, you may need to change the umasktemporarily:% sudo su -
% umask 0002
3. Run the installer:% ./install.linux64
4. Run through the installation process and choose your installation directory. Note that OpenCPI has nodefault search paths for ModelSim installations.
5.1.1 OpenCPI Considerations
Users will need to set the following environment variables to use ModelSim with OpenCPI. Note that<modelsim-version> should be replaced with the appropriate ModelSim version (e.g. 10.6), and<modelsim-install-dir> should be replaced with the installation directory (e.g. ~/modelsim_dlx). The versionvariable need only be set if multiple ModelSim versions exist in this directory and the user wishes to use a versionother than the most recent.% export OCPI MODELSIM DIR=<modelsim-install-dir>
% export OCPI MODELSIM VERSION=<modelsim-version>
% export OCPI MODELSIM LICENSE FILE=<path to license file>
These variables can be set automatically upon login for all users if added in/opt/opencpi/cdk/env.d/modelsim.sh. Logging out and logging back into the user account will apply saidvariables.
23

FPGA Vendor Tools Installation Guide ANGRYVIPER Team
5.2 Compile Xilinx/Zynq simulation libraries for ModelSim
This section describes how to compile Xilinx simulation libraries of a device(s) for a particular 3rd party simulator,such as ModelSim.
1. Compile Xilinx libraries for ModelSim
2. Modify modelsim.ini to include path of compiled Xilinx libraries
5.2.1 Compile Vivado’s simulation libraries
This section provides the steps necessary to compile Xilinx Vivado’s simulation libraries of the Zynq device, forModelSim. If using ModelSim 10.4c, note that Vivado 2017.1 does not support compilation of simulation librariesfor ModelSim versions earlier than 10.5c. Therefore, if using a ModelSim 10.4c, you will need to use an earlierversion of Vivado (e.g 2015.4) to compile the simulation libraries. For this example, we use Vivado 2017.1 withModelSim DE 10.6e.
1. Open a terminal window and switch the user to root:
> sudo su -
2. Configure the terminal for Xilinx Vivado by sourcing the setup script (for bash):
> source /opt/Xilinx/Vivado/<version>/settings64.sh
3. Launch Vivado:
> vivado
4. Select Tools → Compile Simulation Libraries...
5. Select the following:
Simulator: ModelSim Simulator
Language: VHDL
Library: All
Family: Zynq-7000
Compiled library location: /opt/Xilinx/Vivado/<version>/vhdl/modelsim/<version>/lin64
Simulator executable path: /opt/Modelsim/modelsim_dlx/linuxpe
Compile 32-bit libraries: Yes
6. Click “Compile”
7. Note that 2017.1 Vivado will result in errors for ModelSim versions earlier than 10.5c. Here, we show theresults for Vivado 2017.1 with ModelSim DE 10.6e, and Vivado 2015.4 with ModelSim DE 10.4c.
24

FPGA Vendor Tools Installation Guide ANGRYVIPER Team
Figure 21: Vivado 2017.1 Compilation Output with ModelSim DE 10.6e
25

FPGA Vendor Tools Installation Guide ANGRYVIPER Team
Figure 22: Vivado 2015.4 Compilation Output with ModelSim DE 10.4c
5.2.2 Compile ISE’s simulation libraries
This section provides the steps necessary to compile Xilinx ISE’s simulation libraries of the Zynq-7000 device, forModelSim.
1. Open a terminal window and switch the user to root:
> sudo su -
2. Configure the terminal window for Xilinx ISE by sourcing the setup script (for bash):
> cd /opt/Xilinx/14.7/ISE DS/
> source settings64.sh
3. Launch the Xilinx CompXLib GUI:
> cd /opt/Xilinx/14.7/ISE DS/ISE/bin/lin64
> ./compxlib
26

FPGA Vendor Tools Installation Guide ANGRYVIPER Team
Figure 23: Compilation Wizard - Select Simulator
4. Select ModelSim DE.
5. Set Simulator Executable Location.
6. Click “Next”.
27

FPGA Vendor Tools Installation Guide ANGRYVIPER Team
Figure 24: Compilation Wizard - HDLs to support simulator
7. Select “VHDL”.
8. Click “Next”.
28

FPGA Vendor Tools Installation Guide ANGRYVIPER Team
Figure 25: Compilation Wizard - Select Device Families
9. Uncheck “All FPGA Device Families”.
10. Uncheck “All CPLD Device Families”.
11. Check “Zynq”.
12. Click “Next”.
29

FPGA Vendor Tools Installation Guide ANGRYVIPER Team
Figure 26: Compilation Wizard - Select Simulation Libraries
13. No change.
14. Click “Next”.
30

FPGA Vendor Tools Installation Guide ANGRYVIPER Team
Figure 27: Compilation Wizard - Select Output directory
15. Select defaults.
16. Click “Launch Compile Process”.
Note: This step will take approximately 20 mins.
31

FPGA Vendor Tools Installation Guide ANGRYVIPER Team
Figure 28: Compilation Wizard - Start Compilation
17. Click “Next”.
32

FPGA Vendor Tools Installation Guide ANGRYVIPER Team
Figure 29: Compilation Wizard - Compilation Summary
18. Click “Finish”.
33

FPGA Vendor Tools Installation Guide ANGRYVIPER Team
5.2.3 Modify “modelsim.ini” to include path to built library
This section details the steps to modify the “modelsim.ini” file.
1. Browse to the install directory of ModelSim
> cd /opt/Modelsim/modelsim dlx
2. Open the modelsim.ini file as the root user
> vi modelsim.ini
3. Locate the bottom of the “[Library]” section and add the following for Vivado:
unifast = /opt/Xilinx/Vivado/2017.1/vhdl/modelsim/10.6e/lin64/unifast
unisim = /opt/Xilinx/Vivado/2017.1/vhdl/modelsim/10.6e/lin64/unisim
4. Or, add the following for ISE:
xilinxcorelib = /opt/Xilinx/14.7/ISE DS/ISE/vhdl/mti de/10.4c/lin64/xilinxcorelib
unisim = /opt/Xilinx/14.7/ISE DS/ISE/vhdl/mti de/10.4c/lin64/unisim
34