free sample the math choice board - shelley gray
TRANSCRIPT

FREE SAMPLE
The Math Choice Board
Created by Shelley Gray
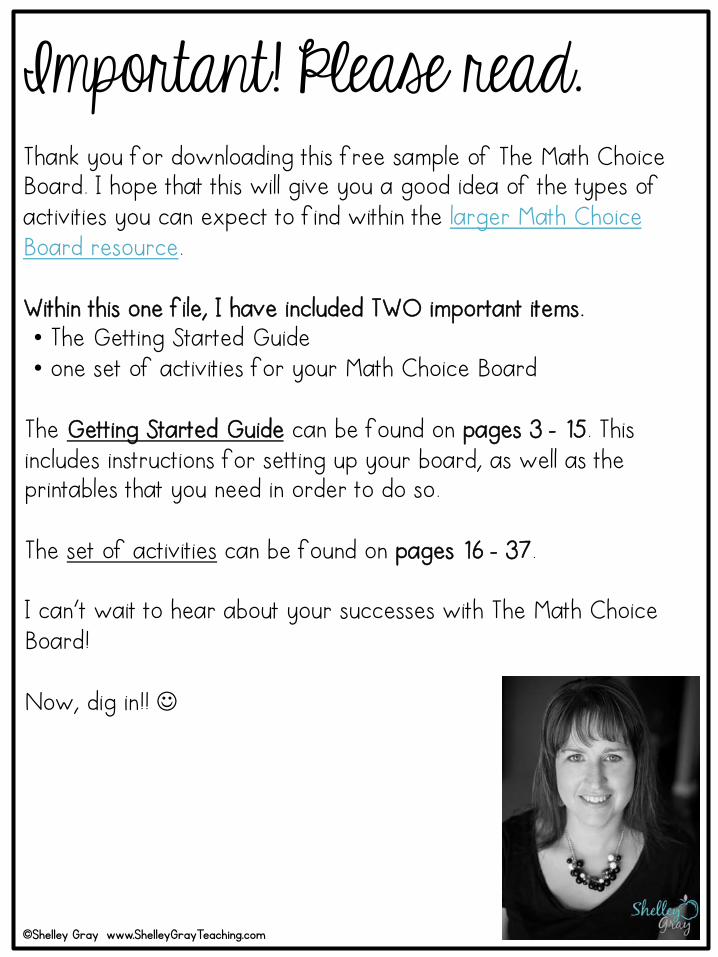
Thank you for downloading this free sample of The Math Choice Board. I hope that this will give you a good idea of the types of activities you can expect to find within the larger Math Choice Board resource. Within this one file, I have included TWO important items. • The Getting Started Guide • one set of activities for your Math Choice Board
The Getting Started Guide can be found on pages 3 - 15. This includes instructions for setting up your board, as well as the printables that you need in order to do so. The set of activities can be found on pages 16 - 37. I can’t wait to hear about your successes with The Math Choice Board! Now, dig in!! J
Important! Please read.
©Shelley Gray www.ShelleyGrayTeaching.com

The Math Choice
Board {Getting Started Guide}
Created by Shelley Gray

Copyright Shelley Gray 2017 All rights reserved by the author
Permission to copy for personal or classroom use only by the original purchaser. Duplication for other classes, an entire school or commercial purposes is strictly
prohibited without written permission from the author. To obtain additional licenses for other teachers, please visit:
http://www.teacherspayteachers.com/Store/Shelley-Gray
Looking for more unique, engaging
resources for your classroom?
Find me on TpT here:
https://www.teacherspayteachers.com/
Store/Shelley-Gray
Connect with me on Facebook and
join our amazing little community:
https://www.facebook.com/
teachingresourcesbyshelleygray
Let’s connect on Pinterest! Follow
me here:
https://www.pinterest.com/shelleygray/
Visit my blog, Shelley Gray
Teaching, for more great
classroom ideas!
www.ShelleyGrayTeaching.com

The Math Choice Board: Overview
©Shelley Gray
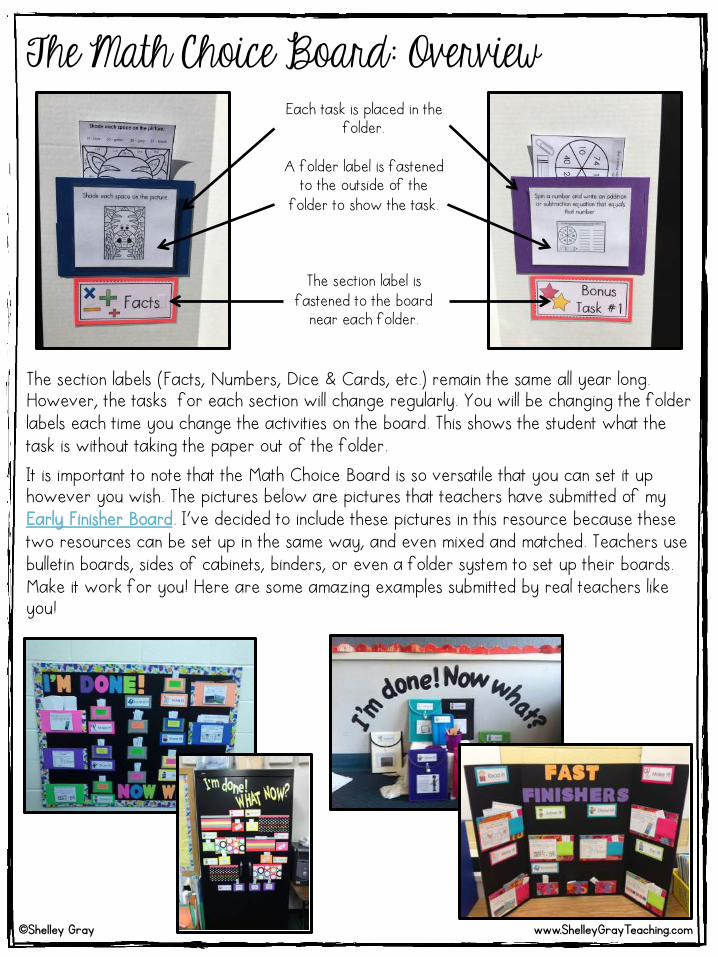
Altogether, there are seven sections on The Math Choice Board: Facts, Numbers, Dice & Cards, Patterns & Data, Measurement & Geometry, and two Bonus Tasks. Each section contains a folder. This is where you will be placing the activity sheet. Most of the time, this will be a half-page activity sheet that students paste into their notebooks. Other times, this will be a laminated half-page sheet that students use and then place back in the pocket for the next person to use.
www.ShelleyGrayTeaching.com
©Shelley Gray
Each task is placed in the folder.
A folder label is fastened
to the outside of the folder to show the task.
The section label is fastened to the board
near each folder.
The section labels (Facts, Numbers, Dice & Cards, etc.) remain the same all year long. However, the tasks for each section will change regularly. You will be changing the folder labels each time you change the activities on the board. This shows the student what the task is without taking the paper out of the folder.
The Math Choice Board: Overview
www.ShelleyGrayTeaching.com
It is important to note that the Math Choice Board is so versatile that you can set it up however you wish. The pictures below are pictures that teachers have submitted of my Early Finisher Board. I’ve decided to include these pictures in this resource because these two resources can be set up in the same way, and even mixed and matched. Teachers use bulletin boards, sides of cabinets, binders, or even a folder system to set up their boards. Make it work for you! Here are some amazing examples submitted by real teachers like you!

To set up your Math Choice Board, you will require the following supplies: • a tri-fold board (the type used for Science Fair projects). Alternatively, if
you have extra bulletin board space, you may choose to set this up on a bulletin board inside your classroom.
• letter-sized file folders (colored folders work best) • stencil letters for the title of the board • double-sided tape • Velcro dots • a notebook for each student
Materials List
©Shelley Gray www.ShelleyGrayTeaching.com

Section Titles
©Shelley Gray
Print, laminate and cut out these labels. These labels will remain on your board all year long.
Facts
Numbers
Dice & Cards
www.ShelleyGrayTeaching.com

©Sh
elle
y Gr
ay
ww
w.Sh
elle
yGra
yTea
chin
g.com
Patterns & Data
Bonus Task #1
Measurement & Geometry
Bonus Task #2

Each section of the board (Facts, Numbers, etc.) will require a folder (see page 4 for more details). Later on, you will be placing the activity sheets inside the folders.
Folder Set-Up
©Shelley Gray
Step 1: To prepare the folders, use seven letter-sized file folders. Colored folders work best. Use patterned folders for an extra pop of color on your board.
Step 2: Trim the length and width of the folder depending on the size of your board. Ensure that a half page of paper can fit in each folder. Staple along the sides of the folder so that the only opening is on the top.
As an alternative to folders, you can also use pieces of folded and stapled cardstock to create the folders.
Folder Preparation:
www.ShelleyGrayTeaching.com

©Shelley Gray
Now that you have prepared the folders, follow the instructions below to assemble your Math Choice Board. *The instructions below are for those people using a free-standing tri-fold board. These instructions may need to be modified if you are using a bulletin board, cabinet or folders instead.*
Step 2: Place everything on the board first without attaching. Once you have everything fitting nicely, continue with the instructions below.
Step 3: Fasten the title, border, labels, and folders to the board using double-sided tape. The picture below may help you with the layout.
Step 1: Laminate the labels. Before laminating, you may wish to attach the labels to colored cardstock as shown in the photograph.
Putting It All Together
www.ShelleyGrayTeaching.com

©Shelley Gray
• Stick the “fuzzy” side of the Velcro dot onto the folder label as shown in the adjacent photo.
• Place the rough side of the Velcro on top, so that
the sticky side is up.
• Stick the folder label onto the folder. The “rough”
pieces will stick to the folder and will match perfectly to the “fuzzy” side of the Velcro. Remove the folder label, and you will now have Velcro dots on both the folder and the folder label.
• Repeat this process for each of the colored folders on the board.
.
Step 4: Attach Velcro dots to the outside of each of the pockets. This will allow you to switch the tasks regularly. In order to attach the dots, you will want to have the folder labels from one of the Math Choice Board sets prepared. Below is one effective method of attaching the dots.
Step 7: Prepare a notebook with each student’s name. Decide whether students will keep these in their desks or whether you will store them in a central location such as a basket beside the board. The notebook is where students will glue the notebook strips and complete each task.
www.ShelleyGrayTeaching.com

©Shelley Gray
The tasks for The Math Choice Board have all been set up as half-page activities. MOST of these activities will be pasted into student notebooks and completed right on the page. However, there are some activities that students will be completing in their notebook, rather than right on the activity page. To save paper, you will not need to print a copy of these activities for all students. Instead you will print about three copies of the activity, laminate them, and place them in the folder. Students will use the laminated sheet to complete the activity in their notebooks, and then place the laminated sheet back in the folder when finished.
The Tasks
www.ShelleyGrayTeaching.com
As you navigate through the sets of activities, you will be notified in the “preparation” area whether you need to make a copy of the activity for each student, or whether you need to laminate the activity for all students to use. For the laminated activities I recommend making three copies. This will ensure that several students in your classroom can complete the activity at the same time.

©Shelley Gray
Most teachers prefer to have some sort of notebook for students to organize their activities. I have heard from some who use full sized notebooks, and others who cut composition books in half for each of their students. No matter which method you use, your students will need room to paste a half-size sheet into the notebook, as well as complete some other written tasks beneath the sheet.
Student Notebook Organization
www.ShelleyGrayTeaching.com
For some activities, the student will simply complete the task and paste the activity sheet into his notebook.
For other activities, the student will complete the task, paste the activity sheet into his notebook, and then complete an extra task beneath the sheet.
And then there are some activities that you will laminate. The student will use the laminated sheet to complete an activity in his notebook and then return the laminated sheet to the folder.

You are finished assembling The Math Choice Board! Now to begin using it... • Begin with Math Choice Board Set 1. This will last your students
1-2 weeks, depending on how your students will use the board and how often.
• Prepare the tasks, and you are ready to go! • After 1-2 weeks, switch the tasks to Math Choice Board Set 2
and students will have brand new tasks to complete! *Remember to store all of your laminated pieces in some sort of container or re-sealable bag. Label it with the Set # so that it is ready to go for next year!* *Consider asking a parent volunteer to take care of preparing and switching the tasks. Even a responsible student or two might be a big help. Remember that the first year will take the most time. If you laminate your materials and keep them in good shape, year #2 and beyond will be a breeze!* Enjoy! Shelley
Congratulations!
©Shelley Gray www.ShelleyGrayTeaching.com

MATH CHOICE BOARD
{Set of Activities}
Created by Shelley Gray
I’m so happy that you’ve decided to implement The Math Choice Board in your classroom! Several years ago, I created The Early Finisher Board – a solution for the fast finishers in your classroom. Over the years, thousands of people have successfully used that resource to motivate and engage their students. However, I have literally received hundreds of requests for something similar that focuses on Math only. This is where The Math Choice Board comes in! The Math Choice Board is similar to The Early Finisher Board in that it allows students to choose which activities they do, and when they do them. This board consists of six sections. You will be switching out the activities in each section weekly or bi-weekly, depending on how often your students use this board. Please read more about this in the Getting Started Guide. The greatest aspect of this resource is its versatility. To create your Math Choice Board, you can use a tri-fold board, bulletin board, the side of a cabinet, or even folders/binders. You may choose to use your Math Choice Board as part of your Math Centers rotation, as Morning Work or to engage your fast finishers. To read other information and see options for your own board, please see the link below: http://shelleygrayteaching.com/the-math-choice-board Before you begin using the resources in this file, you must have your Math Choice Board set up. The set-up information and resources can be found in the “Getting Started Guide.” To find the Getting Started Guide, simply look inside the folder where you found this file.
Before you begin...
©Shelley Gray www.ShelleyGrayTeaching.com

To save paper and ink, please only print the pages that you need from this package, and read the rest of the instructions on your computer screen. To make this job easier for you, the pages that you will need to print are listed below: • Pages 5-8, 10, 12, 14, 16, 18, 20, 21
Printing & Preparation
©Shelley Gray www.ShelleyGrayTeaching.com
Printing
The cover page for each section describes the task and outlines the preparation needed for this set. Use the table of contents below to find the cover page for each section: Facts Page 9 Numbers Page 11 Dice and Cards Page 13 Patterns and Data Page 15 Measurement and Geometry Page 17 Bonus Tasks Page 19
Preparation Instructions

Folder Labels – Set 1
Use the ten frames to add. “Facts” Label Set 1
“Numbers” Label Set 1
Laminate labels and attach to the front of each folder for Set 1 as described in the Getting Started Guide.
Fill in the blanks.
©Shelley Gray www.ShelleyGrayTeaching.com
FACTS SET 1
NUMBERS SET 1
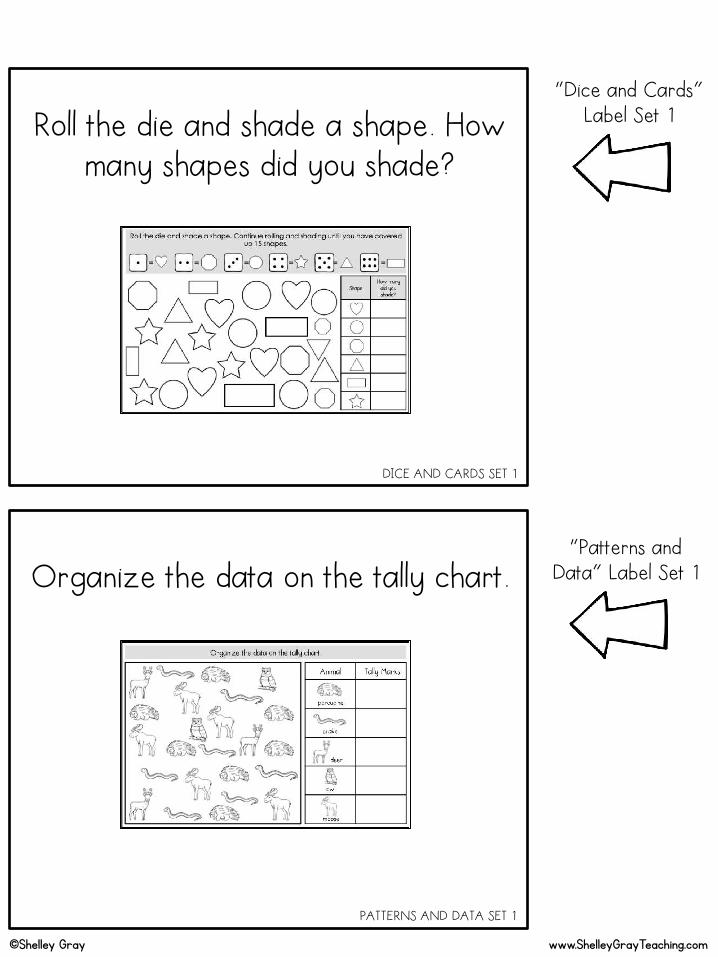
Roll the die and shade a shape. How many shapes did you shade?
“Dice and Cards” Label Set 1
“Patterns and Data” Label Set 1
Organize the data on the tally chart.
©Shelley Gray www.ShelleyGrayTeaching.com
DICE AND CARDS SET 1
PATTERNS AND DATA SET 1

Work with length and size.
“Measurement and Geometry” Label
Set 1
“Bonus Task #1” Label Set 1 Add and then color by number.
©Shelley Gray www.ShelleyGrayTeaching.com
MEASUREMENT & GEOMETRY SET 1
BONUS TASK #1 SET 1
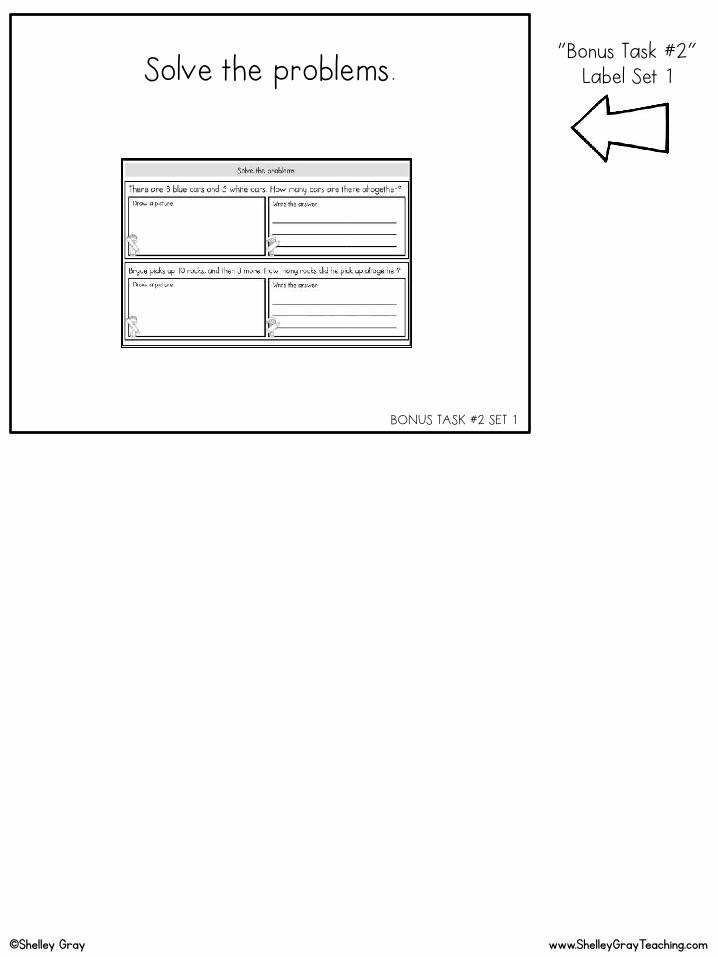
“Bonus Task #2” Label Set 1 Solve the problems.
©Shelley Gray www.ShelleyGrayTeaching.com
BONUS TASK #2 SET 1
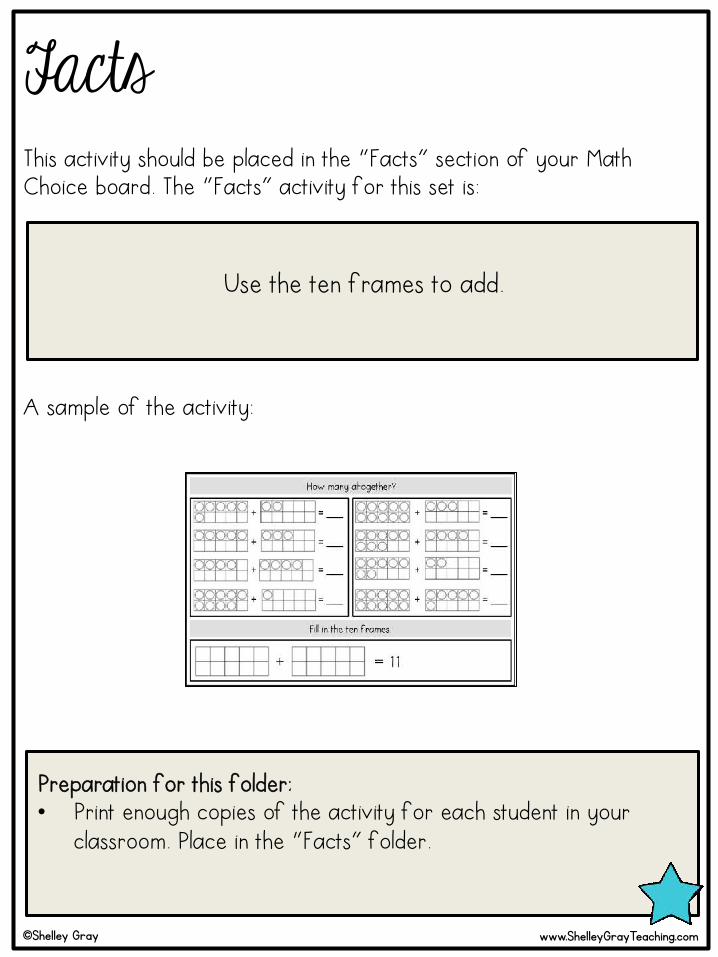
Facts This activity should be placed in the “Facts” section of your Math Choice board. The “Facts” activity for this set is:
Use the ten frames to add.
A sample of the activity:
Preparation for this folder: • Print enough copies of the activity for each student in your
classroom. Place in the “Facts” folder.
©Shelley Gray www.ShelleyGrayTeaching.com

©Shelley Gray www.ShelleyGrayTeaching.com
Facts {Set 1}
How many altogether?
+ = ___ + = ___
+ = ___ + = ___
+ = ___ + = ___
+ = ___ + = ___
Fill in the ten frames.
+ = 11
How many altogether?
+ = ___ + = ___
+ = ___ + = ___
+ = ___ + = ___
+ = ___ + = ___
Fill in the ten frames.
+ = 11

Numbers This activity should be placed in the “Numbers” section of your Math Choice board. The “Numbers” activity for this set is:
Fill in the blanks to complete the counting sequences.
A sample of the activity:
Preparation for this folder: • Print enough copies of the activity for each student in your
classroom. Place in the “Numbers” folder.
©Shelley Gray www.ShelleyGrayTeaching.com

©Shelley Gray www.ShelleyGrayTeaching.com
Numbers {Set 1}
Fill in the blanks.
15 18 23
100 101 109
31 33 37
64 71
Write the number that comes after 19. _____
Write the number that comes after 36. _____
Fill in the blanks.
15 18 23
100 101 109
31 33 37
64 71
Write the number that comes after 19. _____
Write the number that comes after 36. _____

Dice and Cards This activity should be placed in the “Dice and Cards” section of your Math Choice board. The “Dice and Cards” activity for this set is:
Roll the die and shade a shape. How many shapes did you shade?
A sample of the activity:
Preparation for this folder: • Print enough copies of the activity for each student in your
classroom. Place in the “Dice and Cards” folder.
©Shelley Gray www.ShelleyGrayTeaching.com

©Shelley Gray www.ShelleyGrayTeaching.com
Dice and Cards {Set 1} Roll the die and shade a shape. Continue rolling and shading until you have covered
up 15 shapes.
= = = = = =
Shape How many
did you shade?
Roll the die and shade a shape. Continue rolling and shading until you have covered up 15 shapes.
= = = = = =
Shape How many
did you shade?

Patterns and Data This activity should be placed in the “Patterns and Data” section of your Math Choice board. The “Patterns and Data” activity for this set is:
Organize the data on the tally chart.
A sample of the activity:
Preparation for this folder: • Print enough copies of the activity for each student in your
classroom. Place in the “Patterns and Data” folder.
©Shelley Gray www.ShelleyGrayTeaching.com

©Shelley Gray www.ShelleyGrayTeaching.com
Patterns and Data {Set 1}
Organize the data on the tally chart.
Animal Tally Marks
porcupine
snake
deer
owl
moose
Organize the data on the tally chart.
Animal Tally Marks
porcupine
snake
deer
owl
moose

Measurement and Geometry This activity should be placed in the “Measurement and Geometry” section of your Math Choice board. The “Measurement and Geometry” activity for this set is:
Work with length and size.
A sample of the activity:
Preparation for this folder: • Print enough copies of the activity for each student in your
classroom. Place in the “Measurement and Geometry” folder.
©Shelley Gray www.ShelleyGrayTeaching.com

©Shelley Gray www.ShelleyGrayTeaching.com
Measurement and Geometry {Set 1} Order the shapes from smallest to biggest. Use “1” for the smallest and “4” for the biggest.
Complete the tasks.
Draw something that is bigger than a coin, but smaller than an envelope.
Draw something that is bigger than a tree, but smaller than an airplane.
Draw something that is taller than a cow, but shorter than a giraffe.
Make a list of three other things that are about as tall as you.
Order the shapes from smallest to biggest. Use “1” for the smallest and “4” for the biggest.
Complete the tasks.
Draw something that is bigger than a coin, but smaller than an envelope.
Draw something that is bigger than a tree, but smaller than an airplane.
Draw something that is taller than a cow, but shorter than a giraffe.
Make a list of three other things that are about as tall as you.

Bonus Tasks
©Shelley Gray www.ShelleyGrayTeaching.com
The following pages include two bonus tasks for Set 1. Each task should be placed in a separate pocket in the “Bonus Tasks” section.
The Bonus Tasks for Set 1 are: • Solve the addition equations to complete the color by
number puzzle. • Solve the problems.
Preparation: • For Bonus Task #1: Print enough copies of the activities for each
student in your classroom. Place in the Bonus Task #1 folder. • For Bonus Task #2: Print enough copies of the activities for each
student in your classroom. Place in the Bonus Task #2 folder.

©Shelley Gray www.ShelleyGrayTeaching.com
Bonus Task #1 {Set 1}
Solve the equations and then color each space.
What picture do you see? ____________________________________________________________
10=purple
13=pink
6=green
15=orange
18=blue
9=yellow
3+3 4+2 5+1
1+9 4+6 10+3
6+7
12+1
0+10
5+5 9+1
11+2
3+7
5+4
0+0 8+1
6+3
8+5 10+0 2+8
6+4
3+7
9+1
7+2
1+9
10+5 8+7
6+4
14+1
4+6
2+8
10+0
9+4
9+9
10+8 12+3
12+6
15+3 7+3
17+1
13+5
9+9 8+10 8+
2
8+2
5+5
7+3

©Shelley Gray www.ShelleyGrayTeaching.com
Bonus Task #2 {Set 1}
Solve the problems.
There are 8 blue cars and 5 white cars. How many cars are there altogether?
Draw a picture. Write the answer.
___________________________________________________________________________
Bryce picks up 10 rocks, and then 3 more. How many rocks did he pick up altogether?
Draw a picture. Write the answer.
___________________________________________________________________________

Thank-you! Thank-you for your purchase! I’d love to connect with you!
http://www.ShelleyGrayTeaching.com
https://www.facebook.com/teachingresourcesbyshelleygray
Instagram: Shelley Gray Teaching Pinterest: https://www.pinterest.com/shelleygray/ Have a wonderful day!
Shelley
Copyright Shelley Gray 2017
All rights reserved by the author.
Graphics and Fonts copyrighted by:
Little Red, Graphics from the Pond, Whimsy Clips, Little Red, Ashley Hughes,
Kimberly Geswein Fonts, and Fonts by Jennifer Jones
Website:
Facebook: