freediver a whole new world - apnea international · freediver a whole new world 5. glossary a...
TRANSCRIPT
STAGE AFREEDIVER
A W
HO
LE
NE
W W
OR
LD

D I S C L A I M E R
Please read this before you proceed.
FreeDiving is a fun activity!
When practiced conservatively and when all safety rules are followed the risks are minimal.
Nevertheless, FreeDiving is a potentially dangerous activity and can lead to serious injury and death even if all currently known limitations and safety guidelines are followed correctly. Accidents may be due to, but not limited to, drowning, shallow water blackout, defective gear, improper operation of boats, ear and sinus injuries, shark attack and others.
This manual is intended to serve as a guideline but should be combined with an actual course taught by a certified instructor. This manual is not a replacement for your own judgment, experience and honest assessment of your own FreeDiving abilities and limitations.
APNEA INTERNATIONAL accepts no liability for any wrong doing, resulting in any damage, personal injury or death from intentional or non-intentional acts of negligence by any person associated with the interpretation, application, or instruction of any information presented in this manual.

TABLE OF CONTENTS
The History of FreeDiving 2
About Apnea International 4
The Apnea International Training System 5
Glossary 6
FreeDiving Disciplines 9
Physics 11
Safety Rules 14
The Rules in Detail 17
A bit of Anatomy 40
FreeDiving Techniques 43
The Dive in Detail 48
Aware Breathing 49
Equalisation 52
Emergencies 55
Blackouts and Sambas 65
Training Sequence 71
Stretching for FreeDiving 74
What Next? 78
Trips and Training 80
FreeDive Logbook 81
Knowledge Review 82
Progress Report 83
Notes 84
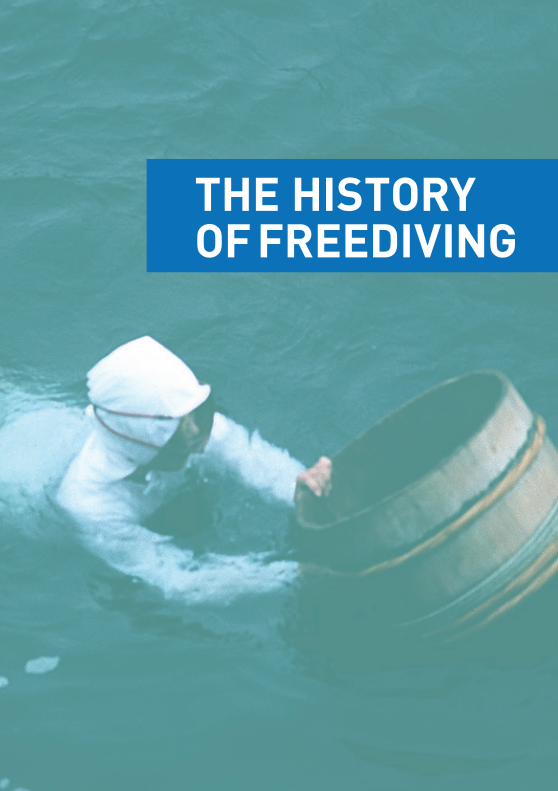
THE HISTORY OF FREEDIVING

The History of FreeDiving
The story of FreeDiving begins as far back as 4500 b.c, when people had dived (without tank, of course) to gather shellfish and other marine animals for their survival. We all know the stories about the Korean and Philippine women divers that execute breath hold dives for very long durations and depth in order to gather pearls and sponges from the sea floor. Those divers use a unique breathing technique and dive repeatedly 20 metres deep 5-6 hours daily, for long periods of time!!
In 1911 in Karpathos in the Aegean sea, the “Regina Margarita”, the armor-plated flagship of the Italian navy, had anchored. An extraordinary storm caused the ship to drag anchor, and the chains snapped. The anchor was lost below 77 metres of water. After several days of unsuccessful attempts to recover the anchor, the captain brought in a group of Greek sponge fishermen. Among these divers was a sickly man named Yorgos Haggi Statti, who assured everyone that he could descend to 77 metres -even to 100 metres -and that he was capable of holding his breath for seven minutes. He offered to recover the anchor in exchange for five Pounds Sterling and for the extraordinary permission of being able to fish with dynamite. The doctors that saw him wrote the following report: “Normal vital capacity.
Thorax circumference: 92 centimeters, 98 while deep breathing, and 80 while exhaling. Pulse: Between 80 and 90 per minute; from 20 to 22 respirations per minute. Weight: 60 kilograms. Height: 1.75 metres. He has pulmonary emphysema.
”The doctors told the captain the man shouldn’t dive, given the presence of his illness and the feebleness of his size. Yet in spite of those recommendations, Yorgos dove three times that day to 77 metres deep -where he was indeed able to locate the anchor and pass a rope through its eye so that the crew could retrieve it, thus becoming the first deep diver in history.
During the Second World War, the French and Italian armies utilised free divers as combat divers, to locate mines or to place explosives underneath Nazi vessels located in the Mediterranean.
In 1949 -wearing a facemask, snorkel and fins and carrying a wooden gun, Raimondo Bucher dove to 30 metres off the coast of Naples while holding his breath. This dive marks the beginning of the golden age of world diving records. In 1951, two new champions appeared on the scene -EnioFalcoand Alberto Novelli. They stole the record from Bucher by descending to 35 metres. In 1952 Bucher established the record at
Stage A FreediverA Whole New World
2

39 metres, and for the first time it was caught on film by a very primitive underwater 16 mm camera. At the end of the 1950s, Falco and Novelli had come back to retake the record, this time descending to 41 metres deep.
In the 1960s five new champions appeared. They were Amerigo Santarelli, Enzo Maiorca, Tetake Williams, Robert Croft, and Jaques Mayol. In 1960, the Italian Enzo Maiorca, broke Santarelli’s record by descending to 45 metres and repeatedly broke his own record in the next three consecutive dives. In September 1965 -Polynesia -. Tetake Williams dives to 59 metres. In June 1966 -Jacques Mayol dove down to 60 metres.
In 1967 -an American diver named Robert Croft, broke the record by diving to 64 metres. In 1968 -Croft recaptured the spotlight by diving to 73 metres and ended his career shortly thereafter.
In 1976 -Mayol became the first man to break the 100-meter barrier.
Angela Bandini was about to achieve one of the greatest accomplishments in the world of sports -being the first woman in deep-diving to break a man’s record -she dived 107 metres deep!!
In the 1990s’ - attention was diverted to 2 new divers that pushed the records to amazing depths-they were Pipin and Umberto Pelizzari. In 1990 -Pipin dived 115 metres deep, but his record did not last long. In the same year, Pelizzari dived to 118 metres.
But in 1993, Pipin again dived to 120 metres. Pelizzari returned to set the record at 123 metres. In June 2000 -Pipin dived to a depth of 160 metres.
Between the years 2000-2012 the No-Limits category was dominated by 2 athletes: Loic Leferme from France and Herbert Nitsch. Loic had died in a training accident in April 2007. Loic’s last world record was 171m.
At the time of writing this manual the world record for No-Limits stands at -214m 700ft)! and is held by Herbert Nitsch (AUT).
The Constant Weight World record is currently -128m, held by Alexey Molchanov (RUS).
FreeDiving has increased its popularity and over 200 competitions are held yearly around the globe. Freediving has seen a lot more exposure on the international media and major companies sponsor athletes. This in itself results in more FreeDivers and bigger performances.
The dominant athletes in the International arena are:
Alexey Molchanov, William Trubridge, Dave Mullins, Herbert Nitsch, Goran Colak and Guillaume Nery. The women records are largely dominated by Natalia Molchanova.
Stage A FreediverA Whole New World
3

About Apnea International
Apnea International was established by Erez Beatus - Former world record holder (CNF 2001) and multiple national record holder. Erez has been the President of F.D.I and the VP of A.I.D.A and has taught well over 2000 students in Australia and around the world and has been involved in FreeDiving on a professional level since 1997.
1997- Training with Pipin (certified as an I.A.F.D instructor).
1998- Training with Umberto Pelizzari in Italy (certified as an Apnea Academy Instructor).
2003- Certified as an A.I.D.A instructor.
1998-2005- Competed and captained the Israeli FreeDiving team in 6 international championships.
2001 - World record holder in CNF.
1998-2007- Holder of most Israeli national records.
2006 - Erez moved to Australia and established Apnea Australia. AA maintains the highest safety and quality by working with Australia’s most professional instructors. It is Australia’s leading freediving school.
Apnea International Promotes SAFE Freediving through cutting edge education systems and top level instructors. Most AI instructors have many years of experience as Freedivers in various capacities- from Competitive Freedivers to leading pro surfers and underwater photographers / Spearfishermen. The Manual you are reading is the fruit of many years of research and experience.
You are now entering a new world of experience, we hope you like it as much as we do
Stage A FreediverA Whole New World
4

The Apnea International Training System
Breathing for Surfing Free Diving Expeditions
Training and workshops
SkinDiverGear, Finning, Duck-dive, Confidence
SpearfishingGear, Technique, Breathing, Safety
Stage ABottom time, Comfort, Safety, Breathing,
Depth (20m), Static, Dynamic
Stage BBreathing, Dive response, Relaxation, Depth
(30m), Training
Stage CPsychology, Goal setting, Competition,
Exhale diving, Leadership
InstructorCertified to teach Apnea Australia courses
Stage A FreediverA Whole New World
5

Glossary
AApnea – Breath-hold (Latin)
AAT – Aquatic Ape Theory. This controversial theory emerged in the 1960’s and claimed that many features that distinguish humans from their nearest evolutionary relatives emerged because the ancestors of humans underwent a period when they were adapting to a semiaquatic existence, but returned to terrestrial life before having become fully adapted to the aquatic environment.
Aerobic metabolism – Using O2 and Sugar to generate ATP. High volume, low intensity and short recovery.
Anaerobic Alactic metabolism – Using Stored ATP to fuel the muscles. High intensity, low volume and long recovery.
Anaerobic Lactic metabolism – Using Glycogen to produce ATP. High intensity, medium volume and long recovery as the waste product is Lactic acid.
ATP – adenosine triphosphate. An energy rich molecule that is used to store energy in the cells.
BBradycardia – Slowing of the heart rate. This is related to the Dive response (See DR). Freedivers recorded HR lower than 20bpm during dives.
BO – Black Out. Loss of consciousness caused primarily by a drop in the partial pressure of O2 during a dive. (p.58)
CCWT – Constant weights - Swim as deep as possible using fins / Monofin.
CNF – Constant weights No Fins - Swim as deep as possible without fins.
DDCS – Decompression sickness. a condition that results when sudden decompression causes nitrogen bubbles to form in the tissues of the body. It is suffered particularly by divers (who often call it the bends), and can cause pain in the muscles and joints, cramps, numbness, nausea, and paralysis.
Diaphragm – a dome-shaped, muscular partition separating the thorax from the abdomen in mammals. It plays a major role in breathing, as its contraction increases the volume of the thorax and so inflates the lungs.
DYN – Dynamic Apnea. Swim as far as possible in a pool using a fin / Monofin
DNF – Dynamic No Fins. Swim as far as possible in a pool without fins
DR – Dive response.
Stage A FreediverA Whole New World
6

EET – Eustachian Tube. A narrow passage leading from the pharynx to the cavity of the middle ear, permitting the equalisation of pressure on each side of the eardrum.
Epiglottis – a flap of cartilage at the root of the tongue, which is depressed during swallowing to cover the opening of the windpipe.
FFIM – Free Immersion. Dive as deep as possible using the rope to pull down and up.
Fluid goggles – Swim goggles that have been modified by embedding a corrective lens that allows the Freediver to see underwater once the goggles are flooded with fluid.
Frenzel – An equalisation technique using the tongue to push air into the eustachian tubes.
FRC - Functional residual capacity. Exhale diving is donr on FRC.
HHook breathe – Recovery breathing. Passive exhale followed by strong inhale and hold. Used to decrease the risk of BO/LMC at the end of the dive (P.26)
HR – Heart rate
Hemoglobin – A red protein responsible for transporting oxygen in the blood of vertebrates. Its molecule comprises four subunits, each containing an iron atom bound to a heme group.
IIntercostals – a muscle situated between the ribs. Used for breathing.
LLMC – Loss of motor control / Samba. Partial loss of consciousness caused primarily by a drop in the partial pressure of O2 at the end of a dive. (p.57)
MMouth-fill – Inflating the cheeks with mouth from the lungs in order to enable deeper equalisation.
NNeck weight – A weight that is used on the neck usually in the DYN discipline. Used to offset the weight of the lower body against the floatation of the chest cavity.
NLT- No Limits – Dive as deep as possible using any means to descend and ascend.
N2 – Nitrogen
Nose Clip – Used to block the nose allowing hands-free equalisation. Can not be used in conjunction
Stage A FreediverA Whole New World
7

with a mask.
OO2 – Oxygen
PPartial pressure– the pressure that would be exerted by one of the gases in a mixture if it occupied the same volume on its own.
RRecovery breathing – See Hook Breath
SSamba – Refer to LMC
SWB – Shallow water blackout
Soft Palate – the fleshy, flexible part toward the back of the roof of the mouth.
SP – Surface protocol. Airways clear of the water, remove mask, Signal OK, verbal OK
STA – Static Apnea. Holding the breath for as long as possible without moving
Lung Squeeze – A pressure related injury caused by increase in pressure on the airways. Can be Upper (Trachea) or Lower (Bronchi and Lung tissue).
TTrachea – a large membranous tube reinforced by rings of cartilage, extending from the larynx to the bronchial tubes and conveying air to and from the lungs; the windpipe.
VVWT – Variable weights. Dive as deep as possible using a weight to descend and fins / rope pull to ascend
Stage A FreediverA Whole New World
8
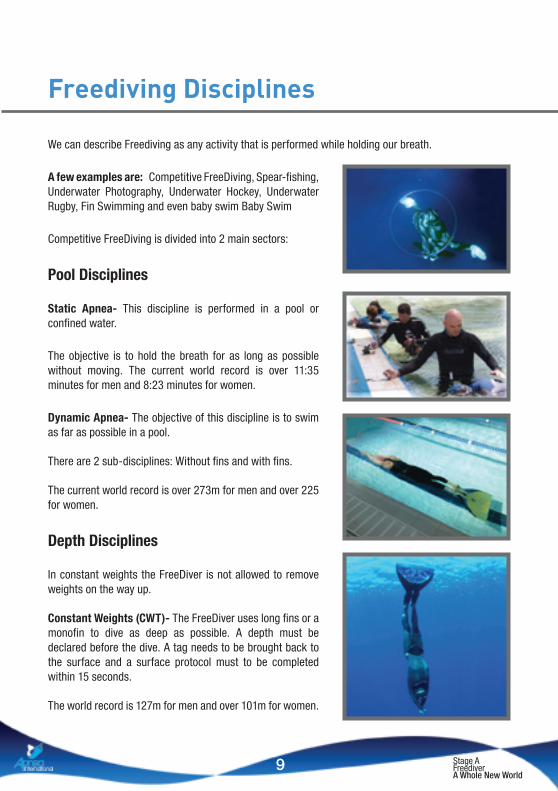
Freediving Disciplines
We can describe Freediving as any activity that is performed while holding our breath.
A few examples are: Competitive FreeDiving, Spear-fishing, Underwater Photography, Underwater Hockey, Underwater Rugby, Fin Swimming and even baby swim Baby Swim
Competitive FreeDiving is divided into 2 main sectors:
Pool Disciplines
Static Apnea- This discipline is performed in a pool or confined water.
The objective is to hold the breath for as long as possible without moving. The current world record is over 11:35 minutes for men and 8:23 minutes for women.
Dynamic Apnea- The objective of this discipline is to swim as far as possible in a pool.
There are 2 sub-disciplines: Without fins and with fins.
The current world record is over 273m for men and over 225 for women.
Depth Disciplines
In constant weights the FreeDiver is not allowed to remove weights on the way up.
Constant Weights (CWT)- The FreeDiver uses long fins or a monofin to dive as deep as possible. A depth must be declared before the dive. A tag needs to be brought back to the surface and a surface protocol must to be completed within 15 seconds.
The world record is 127m for men and over 101m for women.
Stage A FreediverA Whole New World
9

Free Immersion (FIM)- The FreeDiver pulls himself along the dive line and aims to dive as deep as possible. As in CW, a depth must be declared and a surface protocol needs to be completed within 15 seconds.
The world record for men is over 121m and 88m for women.
Constant Weights No Fins (CNF)- In this discipline the FreeDiver aims to dive as deep as possible using only his body. As in CW, a depth must be declared and a surface protocol must be completed within 15 seconds.
The world record for men is 101m and 66m for women.
Variable Weights (VWT)- The FreeDiver uses a weighted sled to dive as deep as possible. Once on the bottom, the FreeDiver lets go of the weights and returns to the surface either by swimming or by pulling himself up.
The world record for men is 146m and 125m for women.
No Limits (NLT)- This is the deepest discipline and is the most extreme. The FreeDiver is allowed to use as much weights to dive. On the bottom the diver releases the weight and ascends using a lift bag or any other means he chooses.
The world record for men is 214m and 160m for women.
Stage A FreediverA Whole New World
10
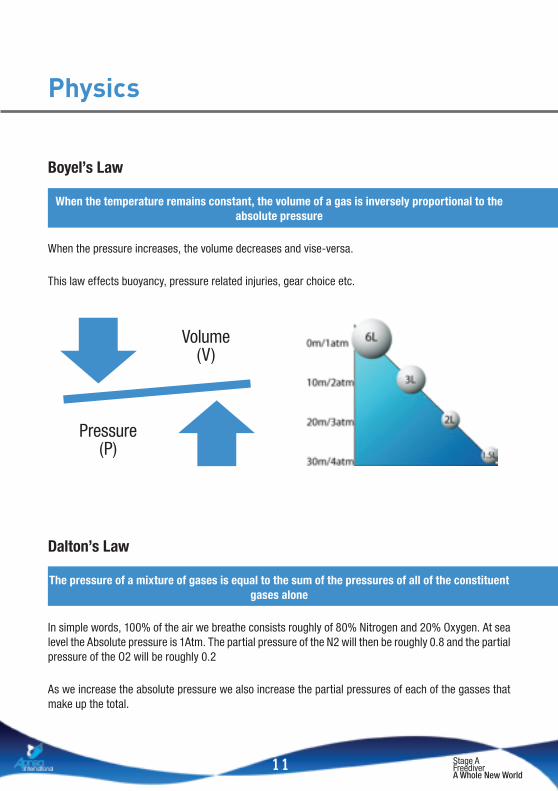
Physics
Boyel’s Law
When the temperature remains constant, the volume of a gas is inversely proportional to the absolute pressure
When the pressure increases, the volume decreases and vise-versa.
This law effects buoyancy, pressure related injuries, gear choice etc.
Volume(V)
Pressure (P)
Dalton’s Law
The pressure of a mixture of gases is equal to the sum of the pressures of all of the constituent gases alone
In simple words, 100% of the air we breathe consists roughly of 80% Nitrogen and 20% Oxygen. At sea level the Absolute pressure is 1Atm. The partial pressure of the N2 will then be roughly 0.8 and the partial pressure of the O2 will be roughly 0.2
As we increase the absolute pressure we also increase the partial pressures of each of the gasses that make up the total.
Stage A FreediverA Whole New World
11
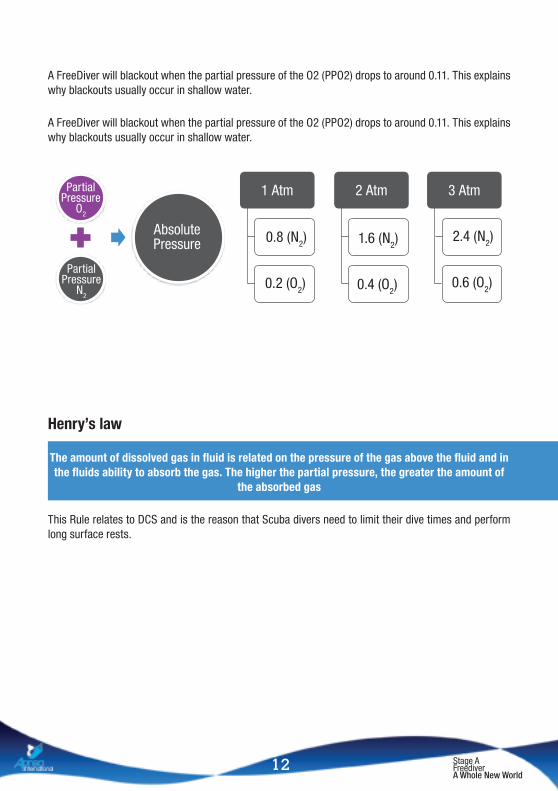
A FreeDiver will blackout when the partial pressure of the O2 (PPO2) drops to around 0.11. This explains why blackouts usually occur in shallow water.
A FreeDiver will blackout when the partial pressure of the O2 (PPO2) drops to around 0.11. This explains why blackouts usually occur in shallow water.
1 Atm
0.8 (N2) 2.4 (N2)1.6 (N2)
0.2 (O2) 0.6 (O2)0.4 (O2)
2 Atm 3 AtmPartial Pressure
O2
Partial Pressure
N2
Absolute Pressure
Henry’s law
The amount of dissolved gas in fluid is related on the pressure of the gas above the fluid and in the fluids ability to absorb the gas. The higher the partial pressure, the greater the amount of
the absorbed gas
This Rule relates to DCS and is the reason that Scuba divers need to limit their dive times and perform long surface rests.
Stage A FreediverA Whole New World
12

EXPLORE THE SPACE BETWEEN
TWO BREATHS..

Safety Rules
Never FreeDive alone! Partner in the water at all times.Safety – Shallow water blackout, cramp, entanglement, fatigue...
Confidence – gives the FreeDiver the ability to concentrate on his dive...
Better improvement.
Never push it!!! Avoid diving over your 80%. Prevents most accidents.
Prevents mental fatigue.
Faster improvement.
During Spearfishing / photography – work on your 50%!
Never FreeDive after scuba. (12 hours)Decompression / silent bubbles.- During a scuba dive you collect nitrogen that stays in your system for up to 12 hours after a dive. FreeDiving will re compress that gas and will create bubbles on the ascent. Those bubbles might cause an embolism. Furthermore, Silent bubbles that are created during scuba might pass the lungs during the FreeDive and create an embolism.
• Do not accept air from a scuba diver underwater
Do not hyperventilate before FreeDiving!• Shallow water blackout – Hyperventilation causes a decrease in CO2 that will delay the urge
to breath. A lack of CO2 will not give the FreeDiver any urge to breath and the diver might blackout before reaching the surface.
• Hyperventilation causes an increase in O2 consumption – higher metabolism and blood pressure – bad for FreeDiving
• Low CO2 prevents O2 from leaving the blood into the tissues – a FreeDiver might black out even in the beginning of his dive.
Never exhale during a FreeDive!• Exhaling will create a sudden drop in O2 partial pressure – Will cause a BO.
• Exhaling changes the buoyancy of the diver and the pace of the dive.
• Exhaling will bring the point of “residual volume” closer – no more equalisation.
Stage A FreediverA Whole New World
14

Correct breathing after surfacing.• A strong exhale will create a “vacuum” in the lungs – that will drop the O2 levels and might
cause a BO or LMC. The Bo/LMC can occur from the time of surfacing to as much as 25 seconds after the diver has reached the surface.
• Proper breathing (Hook Breaths): Passive exhale followed by a good inhale. Once the lungs are full – hold for a split second before exhaling. Never blow all the air out forcefully after a dive! Repeat for 2-4 breaths until you are recovered.
Sufficient recovery between dives• Reduces the risk of DCS
• Reduces the risk of a SWB / LMC
• Longer bottom times
• Safer in general
Move slowly! Quick movements use more O2 and are usually less efficient. • Maintaining pace will help you improve the dive.
• Try to keep the descent and ascent the same time.
• Running up towards the surface (usually in fishing) might cause a cramp or fatigue.
Choose your equipment wisely!• Basic gear - Mask, snorkel, Fins, Wetsuit, Weights
• Safety gear - Lanyard, Line setup, Counter ballast...
Equalise on the way down – never on the way up. • Never use ear plugs.
• Never dive sick.
• Never ride the flexibility of your eardrums!!!!
• Equalise the moment you feel the slightest inconvenience. Don’t wait for pain.
• Improper equalisation will cause difficulties on your next dive and will use far more energy.
Always use a float and flag during training (fishing is considered practice)• See and be seen!!!
• Use the float to keep spare gear.
• Keep the fish on the float.
• Connect the speargun to the float.
Stage A FreediverA Whole New World
15

SELF-KNOWLEDGE IS THE BEGINNING
OF ALL KNOWLEDGE

The Rules in Detail
FreeDiving is considered to be a very safe activity. Statistically, the number of incidents that result in serious damage is very small - even compared to sports such as Scuba diving.
Saying that, FreeDiving is still considered to be an Extreme sport, and as such it holds some dangers. The problem lies in the fact that the diver relies solely on his body and breath and that is why the margin of error is very small and that the time to react is limited.
The essence of these safety rules is to minimise harm by reducing emergency situations
Wrong preparation
• No Plan
• Wrong Gear
• Wrong Breathe-up
• No Safety
Emergency
• Simple • Entanglement • Cramp • Gear Failure• Complex • Blackout • Barotrauma
Wrong response
• Stress
• Panic
• Act without thinking
Improper Education
Accident
Following these rules will keep you safe!
And remember-
No fish is big enough to die for
Stage A FreediverA Whole New World
17

Never FreeDive alone! Dive with an experienced buddy and plan your dive
This is the most basic and probably the most important safety rule in FreeDiving. Diving with a buddy or as part of a group minimises the chance of an accident and increases the ability to react properly to any issues that arise during the dive.
Our buddy (Safety diver) has to be in the water, and not further than a couple of metres away.
A safety diver that sits on a boat or is 20 metres away is not an efficient Safety diver!
The safety diver plays either Active Safety or Passive Safety in relation to the depth, profile, conditions and type of dive that is being performed.
We can look at this rule from a few different viewpoints:
Safety:
• If something goes wrong – during the dive and one of the divers experiences difficulties (not only the actual diver but also the safety), The presence of another diver will reduce the chances of it from escalating further and resulting in a serious injury.
• Being hit by a passing boat / jet ski – The FreeDiver is exposed to being hit by passing vessels as he floats on the surface motionless. FreeDivers (especially spear-fishermen) share the same area with boats. A dive to 30m takes around 60 seconds, in which a speedboat could cover close to 1km! The boat skipper will probably not see the diver as he begins his dive and by the time the dive ends - the boat will be too close. The presence of another diver will increase the chances of being seen and of alerting the approaching vessel on time. For this to happen - the safety diver should scan the horizon and look for approaching vessels.
• Cramps – FreeDiving is a physical activity that generates a certain level of stress on our muscles. Using long fins that increase resistance further increases that stress. This might result in cramping. Unlike other sports, A FreeDiver can’t stop on the bottom and rest / release the cramp as he is still holding his breath. He must return to the surface to deal with the emergency. The presence of another diver enables us to communicate the problem and receive assistance on the way to the surface. On the surface - the Safety diver can help relieve the cramp.
Stage A FreediverA Whole New World
18

• Equipment failure e.g. Broken fin – Equipment failure is not so common in FreeDiving but if it happens, the safety diver can help us deal with them.
• Entanglement – Getting tangled in the dive line / rig line / nets / hooks... might result in fatalities if not dealt with properly. Our safety diver can assist us by alerting us of potential threats, removing them and helping us deal with them in case we do get tangled.
• Fatigue – A deep dive or a dive in strong current might end up with the diver being extremely fatigued. Fighting a fish or fighting a strong current/ waves will do the same. Our safety diver can help by offering the float, supporting the diver, and even dragging the tired diver back to the boat.
• Marine animals – During the dive, the FreeDiver is exposed to various poisonous / dangerous marine animals. A safety diver can alert the diver of these hazardous marine animals and be able to assist him in the event of an actual incident. For instance, the safety diver could assist the diver to the beach, and apply the necessary first aid to reduce trauma.
• Blackout / Samba (LMC) – these are probably the most feared and potentially fatal safety concerns in FreeDiving. They are explained later in the book. The reasons for blackouts and sambas are diverse and it is important to understand that a warning sign will not always appear. In an event of a Samba /BO, the presence of an experienced safety diver will most likely prevent real damage.
In case of a blackout- no safety diver will usually mean a Dead FreeDiver!
Confidence:
In addition to being safer, the presence of a safety diver will enable the diver to concentrate on his dive without worrying about all the factors mentioned above. A spear-fisherman might shoot bigger fish and a competitive FreeDiver might dive deeper knowing that the safety diver is present and can assist them if they need the assistance.
Better improvement:
Diving in a group allows for instant feedback! A diver can never know if he dives straight or if he kicks properly etc... Utilising the buddy system will result in a much faster, more consistent improvement.
There are many more reasons for diving with a buddy - Fun and enjoyment is just another one of them...
Stage A FreediverA Whole New World
19

Passive Vs. Active safety
Passive safety:
In passive safety the safety diver stays on the surface and waits for the diver to resurface. Once the diver is up, the safety Keeps watching him for at least 20 seconds.
• You can use time, vision and the line to determine when the diver turns and begins his ascent.• If you spot a problem –dive and assist the diver.• Safety diver “shadows” the diver and positions himself in the right spot.
We use Passive safety in a few scenarios:
• Shallow dives - less than 10m• Spearfishing• First warm-up dive
Active safety:
In active safety we meet the diver between 5-15 metres on the way up. The deeper the dive - the deeper the safety diver has to dive.
• Use time, vision and the line to determine when the diver turns and begins his ascent.
• If you spot a problem - dive and assist the diver.
Maintain a distance of not more than 1.5 metres from the diver and stay at chest level. Look for signs of stress or anything that might indicate a problem.
Reach the surface with the diver and keep watching him for at least 20 seconds.
• Dives deeper than 10m• Dirty water• FreeDiving in caves or under ledges.
In active safety, aim to meet the diver between 5-15m. The deeper the dive - the deeper the safety.
Use the following to determine when to begin your dive:
Time the dive - Use 1m per second as an average. If visibility allows - begin your dive when the diver is at around 20m on his way up. Touch the line and feel for the turn.
Stage A FreediverA Whole New World
20

Never push it! Never dive over your 80%. In Recreational Freediving not over 50%
FreeDiving is a unique activity. The fact that we perform an effort (sometimes a high intensity effort) requires our body to change and react to changing situations quickly.
Although FreeDiving is considered a very safe sport, even compared to sports like Scuba diving, it is also considered an Extreme sport and as such holds some risk.
The problem is that in FreeDiving, once the diver encounters an emergency, he has a very narrow window of opportunity to respond, and the response needs to be very specific in order to prevent the situation from becoming life threatening.
As FreeDiving is greatly affected by variables, an “easy” dive can turn into a “complicated” dive quickly.
If we compare FreeDiving to other performance sports we realise that planning a dive on our 100% is not safe. For example: When you try to long jump as far as you can and there is a strong wind - the worst thing that might happen will be that you will not perform to your best result. A FreeDiver that tries to perform a dive to 30m (Personal best) on a day with strong current - he will have to realise that he can’t “stop on the way up” or ascend only part of the way... his options are limited.
Remember - The difference between 99% and 101% in FreeDiving is the difference between life and death!
From a physiological standpoint, training on 100% will usually result in slower improvement. Compare FreeDiving training to weight training, by training up to your 80% you will see faster, more consistent improvement.
Another thing to consider is SAFETY. Working on 80% will provide a safety net to fall onto if something changes during the dive.
There are a few reasons we don’t go beyond 50% in Spearfishing / photography. Unlike in competitive FreeDiving, Spearfishing and photography do not follow the original “plan”. The diver does not know where/ when the dive will end and it causes a lot of safety issues: The safety diver will not know where the diver surfaces.
The other reason for not diving beyond 50% is that we want to keep the dive on the aerobic cycle. This will reduce recovery times and will allow the diver to maintain a good dive / recovery ratio.
One last thing to consider in spearfishing is that most fatalities occur in relatively shallow water. It is usually not the depth that kills - it is complacency. When a 30m diver spearfishes at 15 he must maintain the same level of safety awareness as if he was diving deep. It is easy to be misled and overstay on the bottom when seeing a big fish (thinking that a few more seconds wont make a difference).
There is no place for ego in FreeDiving
Stage A FreediverA Whole New World
21

Never FreeDive after Scuba
Always allow at least 12 hours between Scuba and FreeDiving. Allow 18 hours if performing a series of dives.
There are many theories that describe the correlation between FreeDiving and Scuba diving. One of the most basic misconceptions is that you do not absorb Nitrogen in FreeDiving.
Henry’s law states: “The amount of dissolved gas in fluid is related on the pressure of the gas above the fluid and in the fluids ability to absorb the gas. The higher the partial pressure, the higher the absorbed gas.”
In FreeDiving we increase the partial pressure exactly as we do in Scuba. The fact that we don’t breath reduces the possible amount of N2 but during a series of dives we could definitely get to the point of tissue saturation and DCS. This is actually quite common with Deep spear-fishermen that dive regularly to 30+ metres.
The danger increases when we perform a Scuba dive and then go FreeDiving. During the Scuba dive we slowly absorb N2 that is then slowly released after the dive (it might take up to 12 hours). If we then FreeDive, we re-compress this gas, causing it to dissolve into the tissues again. Then, on the Ascent we de-compress the gas too quickly (around 60m/min’ versus the recommended 10m/min’ for Scuba), Causing bubbles to form and DCS symptoms to form.
Another problem lies with Micro-bubbles.
During a Scuba dive, tiny N2 bubbles are formed. Those bubbles don’t cause any DCS symptoms and eventually reach the lungs- where they are slowly dissolved and disappear.
If we FreeDive, we cause those bubbles to shrink (on decent) and pass through the tiny capillaries. On ascent, those bubbles join and create a big bubble that might block a blood vessel. This will then cause an air embolism.
If you intend to mix Scuba and FreeDiving - make sure you first FreeDive and then Scuba dive.
Even this way, there is still a risk as we have no way of knowing how much N2 we absorbed during the FreeDive component. For this reason, it is recommended to limit depth and bottom time and perform a longer safety stop at the end of the dive.
Stage A FreediverA Whole New World
22

Never Hyperventilate before FreeDiving
Breathing as preparation for diving is an important topic and is a source of many disagreements in the FreeDiving community.
The science of breathing is a big part in yoga, where it is referred to as Pranayama, which means: “restraint of the prana or breath”. Pranayama is usually learned and practiced after a long period of Asana (posture) practice and is the part that will eventually lead to Samhadi (enlightenment).
Breathing is the most basic action we perform from the first instant we are born (along with the beating of our heart). Unfortunately, most of us are not even aware of it and it’s importance.
Our breathing system is complex and is designed to allow efficient gas exchange.
The air we breathe consists of a few gasses:
Nitrogen (N2): 78.09%
Oxygen (O2): 20.95%
Argon (Ar): 0.93%
Carbon dioxide (CO2): 0.038%
Others (less than 0.002% each): Neon (Ne), Helium (He), Krypton (Kr), Hydrogen (H2), Xenon (Xe).
Nitrogen does not take part in the breathing process (inert gas).
Our body needs Oxygen to survive. Oxygen is transferred to the cells where it is used to metabolise and to create ATP. The by-product is then CO2 and Water.
CO2 , while being a by-product is actually a very important element in breathing and in our body’s ability to sense when it needs to breathe.
CO2 travels in our blood as an acid (Carbonic acid). The level of acidity is the main factor that determines the strength of the bond between the Hemoglobin and the O2. The more acidic the blood - the easier it is for the blood to release O2 into the cells. If the level of CO2 is low - the O2 will not be released from the Blood and the diver might Blackout due to cellular hypoxia.
During a breath-hold the levels of the gasses change. This change, along with a few other factors triggers our breathing:
1. High level of CO2 - Chemoreceptors in the neck alert when levels rise beyond a certain level. This trigger appears around 30%-50% of our physiological breakpoint.
2. Low levels of Oxygen - Receptors sense low levels of O2 and trigger an urge to breath. As we don’t usually hold our breath, this mechanism is not reliable. It also arrives very late in the breath-hold, sometimes too late to allow proper response.
Stage A FreediverA Whole New World
23

3. Habit - We breathe to survive, but never think of it. It is the first thing we did when we were born and the last thing we will do before we die. And so, once it is stopped - we feel something is wrong...
4. Muscle tension - Tiny receptors inside our muscles sense tension. Once we fully inhale those muscles send signals to the brain, making us want to release the tension. After a while our lungs start to shrink (O2 is sucked out and less CO2 returns) and those receptors alert again.
Hyperventilation by definition is any breath that is bigger than our tidal volume and that alters the chemical balance of the blood. HV is usually referred to as FAST, DEEP BREATHS. This is not always the case. In fact, any breath that is beyond our tidal volume might become HV under some conditions.
Signs of HV:
• Tingling (hands, face, legs)
• Sweat
• Increased heart rate
• Heat (especially around the abdomen)
• Tunnel vision
• Changes in perception
• Ringing in the ears
• Anything out of the ordinary.
CO2 trigger results in diver leaving the bottom on time
No CO2 trigger results in longer stay on the bottom and BO on ascent
Without HV With HV
As HV decreases CO2 levels it will remove the CO2 trigger. Unfortunately, the elevated heart rate and O2 consumption (along with peripheral vaso-dilation) will actually result in a shorter potential dive.
Stage A FreediverA Whole New World
24

Important:
• If you feel any of the symptoms of Hyperventilation DO NOT BEGIN THE DIVE. Change your breathing and wait until the symptoms disappear.
• Normal breathing may be interpreted by the body as Hyperventilation in a state of stress or anxiety.
• Every diver is different in their breathing therefore slightly different breathing is required for each individual. We discuss aware breathing later in the program.
• The Exhale is the most important part and has the biggest effect on CO2 levels.
• Exhaling for as long as inhaling or longer will result in lower heart rate and a smaller CO2 drop.
• A breathing ratio of 1:2 will usually not result in HV. 1:1 ratio, if done slowly and in a relaxed state will not result in HV.
Correct preparation for a dive will include slow, tidal belly breahitng. The last couple of brathes can be deeper but should not be forced or fast.
Stage A FreediverA Whole New World
25

IF THERE IS MAGIC ON THIS PLANET, IT IS CONTAINED IN WATER.

Never Exhale during the dive
Many FreeDivers claim that if they blow a bit of air out towards the end of the dive, they can hold their breath longer. The logic is that they purge CO2. The problem is that along with the CO2 (and reducing the urge to breathe) they also loose O2.
There are a few reasons for not exhaling during a FreeDive:
Oxygen levels
Maintaining a high partial pressure of Oxygen (PPO2)- Blowing air out will instantly and directly drop the level of O2 in our lungs and in our blood. This results in a shorter dive.
We blackout once the PPO2 drops below a certain point. This level will be reached faster once we exhale during the dive.
Buoyancy
A few factors determine our buoyancy - Wetsuit, weights, fresh/salt water, lung volume, fat and muscles...
When we inhale we increase our buoyancy and make the first part of the descent difficult. If we were to blow out on the bottom, we will become heavier - making the ascent more difficult.
Equalisation
Boyle’s law dictates that as we descend the air in our various air spaces shrink. As a result we must equalise by pushing air into them.
One of the simplest ways to equalise is to blow air into the nose while pinching it. This is called Valsalva. This technique is limited as at some point there will not be any more air in our lungs to push up towards the ears. This point is defined as “residual volume- RV”.
Our RV is around 25% of our full inhale. If we use Boyle’s law here we will discover that this point is reached at around 30m.
If we exhale during the dive we will reach RV sooner and will have more difficulties equalising.
There are ways around this problem. We can use other forms of EQ and change the size of our RV with training, but this comes later.
You can find more information about other forms of EQ on the Apnea Australia website.
Stage A FreediverA Whole New World
27

Safety concerns
Let’s pretend that we dive to 45m. The visibility is only 20m.
Our safety diver waits on the surface.
At 25m on the way down we blow some air out. Within 10 seconds our safety diver will notice bubbles coming up. This usually means something is wrong.
As a result, our safety diver begins his dive early.
This scenario night result in a situation where our safety diver ends up having to perform a difficult dive or even abort his dive without actually playing safety.
As FreeDivers, we must also think of our safety divers’ safety
Dive plan
The human body is an amazing machine! our brain is a powerful computer and is able to assess s how deep we could go according to various data that is being collected continuously. If we increase intensity- the computer will adjust and provide new instructions.
Let’s look at another dive:
A diver begins a dive to 30m. He fully inhales and begins the descent.
The computer samples the “fuel tank - lungs”, looks at the time, calculates fuel consumption etc. According to all data collected the computed sends us a report saying that we can dive to 30m.
On the bottom the diver turns and blows some air out.
Next time the computer samples the lungs, it will notice some fuel is gone. As a result it will send a report saying we can only dive to 25...
The diver then ascends but by the time he gets to 25m the computer says he needs to be at 15m...
At this stage, nothing can be done to fix the situation and to get things back to normal.
The dive might end with the diver “running” to the surface and blacking out.
Stage A FreediverA Whole New World
28
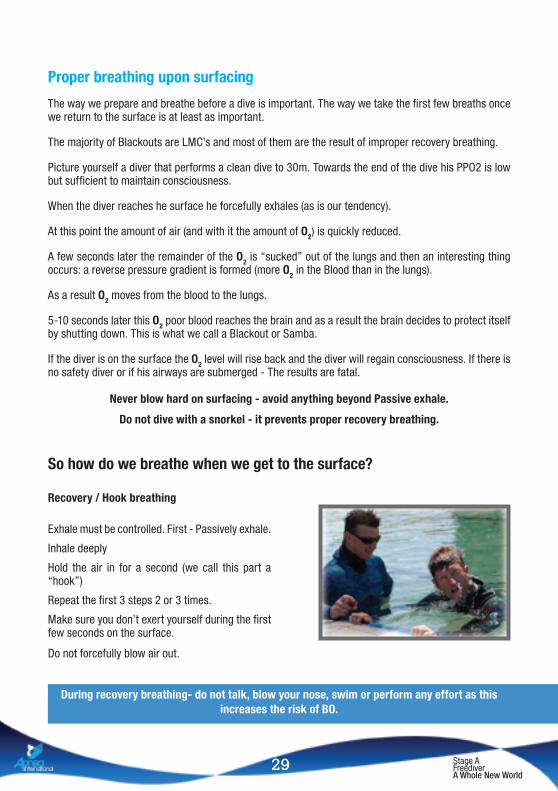
Proper breathing upon surfacing
The way we prepare and breathe before a dive is important. The way we take the first few breaths once we return to the surface is at least as important.
The majority of Blackouts are LMC’s and most of them are the result of improper recovery breathing.
Picture yourself a diver that performs a clean dive to 30m. Towards the end of the dive his PPO2 is low but sufficient to maintain consciousness.
When the diver reaches he surface he forcefully exhales (as is our tendency).
At this point the amount of air (and with it the amount of O2) is quickly reduced.
A few seconds later the remainder of the O2 is “sucked” out of the lungs and then an interesting thing occurs: a reverse pressure gradient is formed (more O2 in the Blood than in the lungs).
As a result O2 moves from the blood to the lungs.
5-10 seconds later this O2 poor blood reaches the brain and as a result the brain decides to protect itself by shutting down. This is what we call a Blackout or Samba.
If the diver is on the surface the O2 level will rise back and the diver will regain consciousness. If there is no safety diver or if his airways are submerged - The results are fatal.
Never blow hard on surfacing - avoid anything beyond Passive exhale.
Do not dive with a snorkel - it prevents proper recovery breathing.
So how do we breathe when we get to the surface?
Recovery / Hook breathing
Exhale must be controlled. First - Passively exhale.
Inhale deeply
Hold the air in for a second (we call this part a “hook”)
Repeat the first 3 steps 2 or 3 times.
Make sure you don’t exert yourself during the first few seconds on the surface.
Do not forcefully blow air out.
During recovery breathing- do not talk, blow your nose, swim or perform any effort as this increases the risk of BO.
Stage A FreediverA Whole New World
29
Always maintain a long enough recovery between dives and breathe-up sufficiently.
FreeDiving is a physical activity that demands a lot from our body and it’s various systems.
The fact that we conduct this activity while holding our breath further increases the importance of proper recovery between dives.
We can divide the dive into 3 stages:
1. Breathe-up: Preparing the mind and body for the dive
2. The dive: the reason why we go into the water in the first place.
3. Recovery: Purging waste products and getting the body ready for the next dive.
If we skip or shorten one of those stages we directly hurt the other stages. A breath-up that is too short or too long will result in poor performance. Not enough recovery will prevent the body from reaching a “fresh” state.
Our muscles can operate in 3 main ways:
Aerobic metabolism -
• The muscles use Glucose and O2 to generate a high-energy molecule called ATP.
• When this molecule breaks it releases a lot of energy to operate the muscles.
• Aerobic activity is a long term, low intensity effort. An example is jogging.
• Almost no waste products are created (CO2 +H2O) and so recovery is very short.
Anaerobic, Alactic-
• During a very high intensity, short term effort our body does not have enough time to use O2 to create ATP.
• Our muscles then use ATP from reservoir inside the muscles themselves.
• An example is 100 sprints.
• Recovery is relatively short and requires aerobic activity.
Anaerobic, Lactic-
• If we try to perform a high intensity effort for a relatively long time (400-800m sprints), we run out of ATP in the first 10 seconds. Our body still can’t use O2 and so turns to convert Glycogen into Lactic Acid. This releases ATP.
• As lactic acid is a strong acid and requires a long time to purge, recovery is very long!
Stage A FreediverA Whole New World
30

FreeDiving uses all of the above mechanisms. There is a big difference between deep FreeDiving and Spearfishing for example. This difference will dictate different recovery times between dives.
Without sufficient recovery, our body cannot perform an optimal effort. This will result in an increased risk of an emergency.
How long is long enough?
We recommend at least 2 minutes on the surface between dives.
Beyond this time, we take into consideration the depth and dive time that was performed and the depth and time of the next dive.
We recommend a surface interval of twice the dive time or a minimum of 2 minutes (the bigger of the two)
This rule applies to Aerobic dives. For anaerobic dives double this time again.
Examples:
A FreeDiver dives to 15m with a dive time of 1:30 minutes, and wants to repeat this profile.
We will recommend at least 03:00 minutes on the surface providing the diver did not experience any contractions.
For dives that are deeper than 20m we recommend a surface ratio of 1:3.
Another reason for longer recoveries and surface intervals between long, deep dives is DCS.
1 Min’
2 Min’ 2 Min’ 2 Min’
1 Min’ 1 Min’
Aerobic dive (No Contractions)
5 Min’ 5 Min’
1.15 Min’ 1.15 Min’
Anaerobic dive (contractions)
To summarise:
• 1:2 ratio or 2min surface time for aerobic dives
• 1:3 ratio for aerobic dives deeper than 20m
• Double the recovery for anaerobic dives (With contractions)
Stage A FreediverA Whole New World
31

Move slowly! Quick movements use more O2 and are usually less efficient. Maintain Streamlining.
Water is 800 times denser than air. This fact alone might be a good enough reason to minimise movements that might create a lot of resistance and increased O2 consumption.
When a body travels through the water it creates turbulent flow around it.
As we move through water, any streamlining issues will result in increased drag and in a less efficient diving.
The faster we move the more resistance we encounter and more turbulence will be created.
Another important consideration is the energy distribution throughout the dive - If we perform a bad duck-dive it will consume a lot of energy and will force us to work hard to regain our direction and streamlining. The same applies to the turn on the bottom.
In order to reduce the risk of Blackouts and other emergencies we should avoid changing the way we move on different parts of the dive. The speed of descent should be the same the the speed of ascent. If we “dolphin kick on the way down- the way up should look the same.
Changes in speed lead to inconsistent dives. Those inconsistencies lead to mental stress that might develop into anxiety and either Panic or any number of emergencies.
Maintaining a set pace also results in faster improvement, as FreeDiving is a repetition sport.
Stage A FreediverA Whole New World
32

Always use a float and flag during practice
The float is probably the best way for us to ensure that we are being seen by passing vessels.
A few things to think about
The float must be capable of supporting a diver pulling up from the bottom (sometimes wearing around 7 pounds of lead)
The float must be visible - bright colors are best
The flag should be obvious and high enough
On top of being seen by passing boats the float can be used for other reasons:
The float could be used to keep spare gear.
The float could be connected to the gun with a line to allow the diver to let go of the gun after shooting a big fish.
Stage A FreediverA Whole New World
33
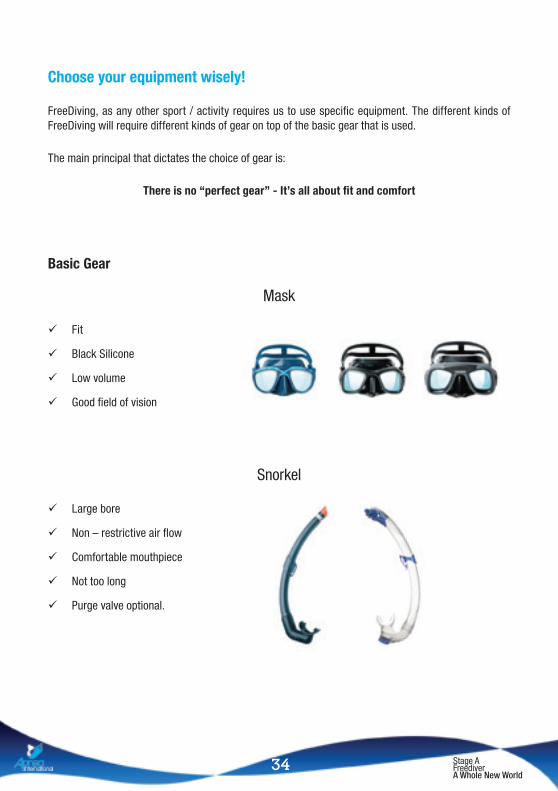
Choose your equipment wisely!
FreeDiving, as any other sport / activity requires us to use specific equipment. The different kinds of FreeDiving will require different kinds of gear on top of the basic gear that is used.
The main principal that dictates the choice of gear is:
There is no “perfect gear” - It’s all about fit and comfort
Basic Gear
Mask
Fit
Black Silicone
Low volume
Good field of vision
Snorkel
Large bore
Non – restrictive air flow
Comfortable mouthpiece
Not too long
Purge valve optional.
Stage A FreediverA Whole New World
34
Fins
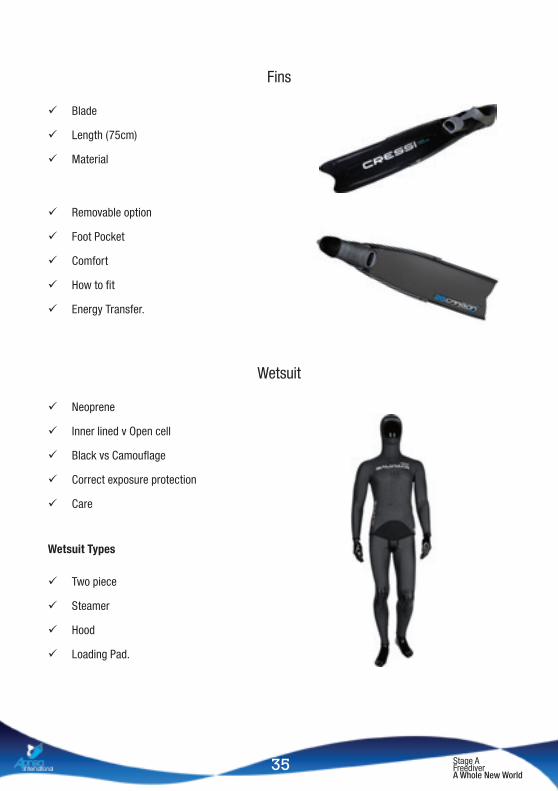
Blade
Length (75cm)
Material
Removable option
Foot Pocket
Comfort
How to fit
Energy Transfer.
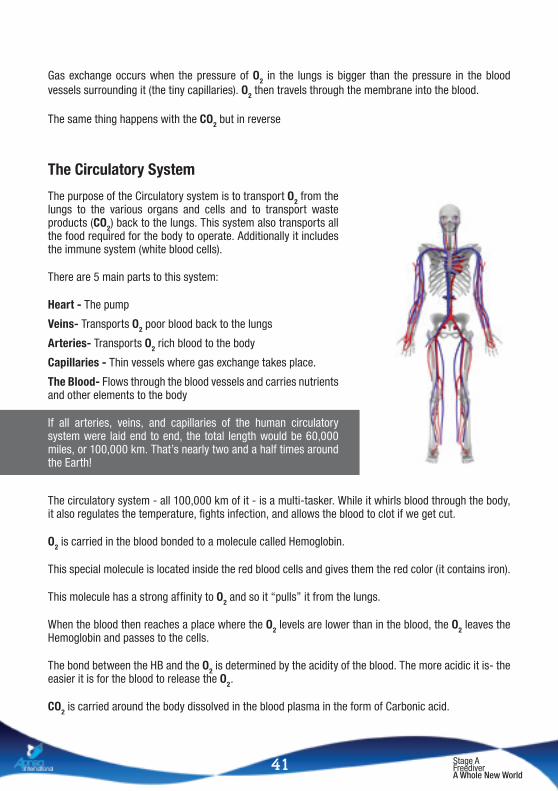
Wetsuit
Neoprene
Inner lined v Open cell
Black vs Camouflage
Correct exposure protection
Care
Wetsuit Types
Two piece
Steamer
Hood
Loading Pad.
Stage A FreediverA Whole New World
35

Socks
Thickness
Types
Fit with fins
Gloves
Dexterity
Use
Exposure protection
Weight options
Weight belt - Rubber or Nylon
Weight Harness - Great for Blue-water fishing
Weight vest.
Accessories
Float
Safety (Boat traffic & missing diver)
Essential for fighting large fish
Securing fish away from the diver
We discuss the actual use of the Buoy system in the relevant section.
Stage A FreediverA Whole New World
36

Computer / Watch
The main advantage of the computer is to allow the FreeDiver to monitor his surface intervals. Sufficient intervals will minimise the chanced of BO and exhaustion.
The computer should have depth / time alarms to assist in dive planning and execution.
Knives
The knife will save a diver’s life in an event of an entanglement! It must be positioned in a place that is easily reachable.
In Spearfishing we use the knife for 2 more purposes
Kill Knife
Burley Knife
Nose clip
The Nose clip is used in conjunction with Fluid Goggles to allow “Hands Free” Equalisation while Freediving.
Lanyard
The lanyard is used to attach the diver to the dive line. It should be between 1-1.5m and needs to have a quick release mechanism and a D-ring.
Stage A FreediverA Whole New World
37

Equalise on Descent, never on Ascent. Never dive sick or if Equalisation is not possible.
Equaliation is probably the biggest obstacle that most FreeDivers encounters along the way.
The reason we need to equalise is the decrease in volume (Refer to Boyle’s law on the appendix) on descent.
As the diver goes deeper the pressure increases and as a result the air inside the various air spaces compresses. If the diver will not compensate this pressure the result will be a baro-trauma. This is explained in the Emergencies section of this manual.
The main air spaces that need to be equalised are:
Ears
Sinuses
Mask
Lungs
Equalise on descent - As soon as you feel the slightest pressure building begin equalising. There is no need to push hard or to wait until you feel pain or even strong pressure. If you wait too long the tubes will be shut and the eardrum will already be pulled in.
Do not Equalise on ascent - On ascent, the air will expand and try to leave the middle ear through the Eustachian tube. Attempting to equalise on the ascent will prevent the air from escaping resulting in a reverse squeeze.
Never dive sick - When a diver is sick his airways (including the Eustachian tube) might be blocked. In this case the diver will not be able to clear his ears (or sinuses) and might experience an injury.
Never use Earplugs- Earplugs create another closed air space between the ear-drum and the outside that might result in damage to the ear drum because of the inability to equalise this air space.
When using a hood - make sure you have water between the hood and the eardrum.
Never ride the flexibility of your eardrum!
Stage A FreediverA Whole New World
38

THE SOFT OVERCOMES THE HARD; THE WEAK OVERCOMES THE STRONG

A bit of Anatomy
The respiratory system
This system is designed to allow the best possible ventilation and gas exchange by increasing the surface area in the exchange points.
The main parts of the system are:
Nose and mouth
Trachea
Bronchus
Bronchioles
Alveoli
Muscle and bones which surround the lungs:
Ribs
Inter-costal muscles
Diaphragm
The Alveoli are the smallest part of the system and are the place where gas exchange takes place. We have around 300,000,000 Alveoli making the total surface area of the lungs the size of a tennis court (around 160m2).
The lungs are covered with a thin membrane that also covers the inside of the ribcage. Between the 2 membranes is a fluid that causes the 2 membranes to stick.
The breathing process is driven by the expansion and falling of the ribcage or the movement of the Diaphragm.
Stage A FreediverA Whole New World
40
Gas exchange occurs when the pressure of O2 in the lungs is bigger than the pressure in the blood vessels surrounding it (the tiny capillaries). O2 then travels through the membrane into the blood.
The same thing happens with the CO2 but in reverse
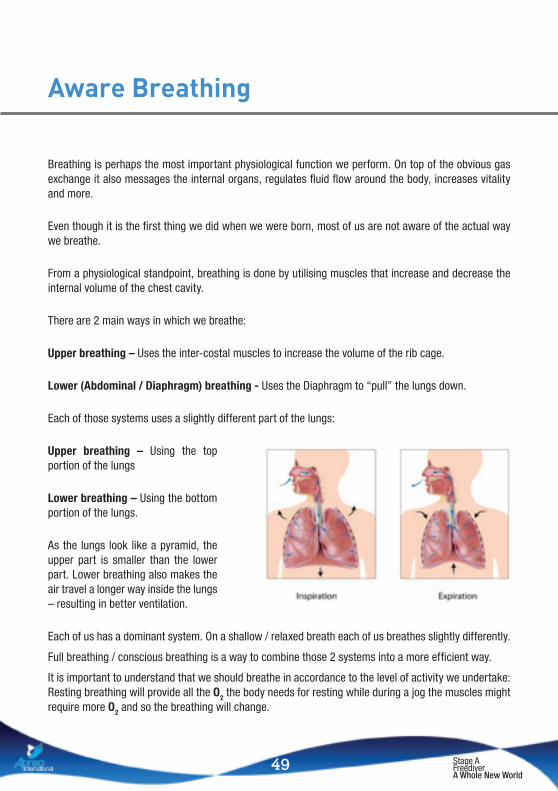
The Circulatory System
The purpose of the Circulatory system is to transport O2 from the lungs to the various organs and cells and to transport waste products (CO2) back to the lungs. This system also transports all the food required for the body to operate. Additionally it includes the immune system (white blood cells).
There are 5 main parts to this system:
Heart - The pump
Veins- Transports O2 poor blood back to the lungs
Arteries- Transports O2 rich blood to the body
Capillaries - Thin vessels where gas exchange takes place.
The Blood- Flows through the blood vessels and carries nutrients and other elements to the body
If all arteries, veins, and capillaries of the human circulatory system were laid end to end, the total length would be 60,000 miles, or 100,000 km. That’s nearly two and a half times around the Earth!
The circulatory system - all 100,000 km of it - is a multi-tasker. While it whirls blood through the body, it also regulates the temperature, fights infection, and allows the blood to clot if we get cut.
O2 is carried in the blood bonded to a molecule called Hemoglobin.
This special molecule is located inside the red blood cells and gives them the red color (it contains iron).
This molecule has a strong affinity to O2 and so it “pulls” it from the lungs.
When the blood then reaches a place where the O2 levels are lower than in the blood, the O2 leaves the Hemoglobin and passes to the cells.
The bond between the HB and the O2 is determined by the acidity of the blood. The more acidic it is- the easier it is for the blood to release the O2.
CO2 is carried around the body dissolved in the blood plasma in the form of Carbonic acid.
Stage A FreediverA Whole New World
41

The Muscle system - Energy cycles
Our body is an amazing machine. It can change the way it generates energy according to the intensity and available resources.
In general, we are looking at 3 types of energy cycles:
Aerobic - in moderate exercise our body uses O2 to assist in converting food (mainly glucose and fat acids) into an energy rich molecule called ATP. When this molecule breaks apart it releases energy. This type of activity is long lasting, low intensity and results in very small amounts of waste products (CO2 and Water). As a result, the recovery from this kind of activity is very short.
Example - Moderate jogging
Anaerobic alactic - When the intensity of the exercise is bigger than the body’s ability to provide energy through aerobic metabolism, the body switches to anaerobic metabolism. In this case the muscles will use stored ATP to perform the effort.
This sort of effort is very high in intensity and for a short duration.
No waste products are generated but Aerobic activity is required for recovery.
Example - 100 sprint
Anaerobic Lactic - When a high intensity effort goes beyond the limits of pure anaerobic activity, the body converts Glycogen into lactic acid and ATP. This Lactic acid then increases in amount and eventually causes the muscle to cramp.
This kind of activity is usually a high intensity, longer-term effort.
As the lactic acid needs to be purged from the body recovery is long.
Example - 400-800m sprint.
FreeDiving can be performed on any of those energy cycles according to the discipline
The main thing to consider when training is to know which energy cycle is dominant so that we could determine what is the minimum recovery time between the dives should be.
Aerobic dives are usually comfortable and contain no contractions
Anaerobic dives are dives where the diver experiences contractions and maybe becoming lactic (mainly in the legs).
An example for an aerobic dive is the warm-up dive. An example of an anaerobic dive is a performance dive.
Stage A FreediverA Whole New World
42

FreeDiving Techniques
The duck-dive
The duck-dive is the most important part of the dive in means of energy saving. It is the part where the diver shifts from being stationary on the surface to swimming vertically in the water.
Mechanical principles
Centre of gravity
Located around the hips (Especially when using a thick wetsuit and more weights).
Tries to pull the diver down
Aims to be directly below the center of buoyancy.
Centre of Buoyancy
Located around the chest (where our lungs are). Might shift a little due to the buoyancy of the wetsuit.
Pulls the diver up towards the surface.
Aims to be directly above the center of gravity.
We can divide the duck-dive into a few stages:
Preparation
Position yourself down current.
Lie still on the surface and hold the float or the dive line. This will allow comfortable breathing.
Breath-up for as long as needed.
2 breaths before the dive, signal your buddy.
Blow a bit of air into the mask to prevent mask squeeze.
Stage A FreediverA Whole New World
43

Step 1
Take your last inhale and hold your breath
Remove the snorkel and keep away from the mouth
Perform an initial equalisation. If you experience any issues with the ears - do not begin your dive.
Gather a bit of momentum and position yourself over the line either by kicking or pulling the line. The stronger the current, the further you will need to go.
Keep at least one arm above your head. The other arm can either be on the nose or above your head.
Drop your arms towards the bottom. Pretend you are rolling over a barrel to create a smooth transition from horizontal to vertical position.
Roll your head and back until you are at around 60-90 degrees.
Step 2
Lift either one or two legs up in the air.
Two legs provide more thrust and are better when using thick wetsuits and in rough seas.
One leg provides a stable dive and uses less energy. It is the preferred method for most divers.
When choosing one leg, keep the other leg straight on the surface.
Once the leg is directly over the body the weight will push us down into the water
Make sure the toes are pointed to avoid loosing momentum when the fins hit the water.
Once the ankles go under count another second to allow the fins to follow.
An efficient duck-dive will get you to around 2 metres without any kicking, even with a thick wetsuit
Stage A FreediverA Whole New World
44

Important
Make sure you finish your duck-dive totally straight and vertical. If you are not totally vertical the center of buoyancy will try to get above the center of gravity and will make the dive a lot harder.
Make sure you don’t look at the bottom while performing the duck-dive as it breaks your form and increases drag.
Streamlining
As water is 800 times denser than air it creates a lot more resistance. A FreeDiver should maintain a profile that is as small as possible to minimise drag, especially on the first part of the dive.
Arms - Either above the head or at the sides of the body. When equalising, keep the elbow on the chest to minimise drag.
Head - keep head straight. Raising the head affects drag, streamlining, Equalisation, kicking and increases the risk for lung squeeze.
Back - Straight back and tucked stomach will help stability and streamlining.
Kicking
There are many ways to travel through water. The main principal is to maintain steady kicking and not change pace during the dive.
When using Bi-Fins:
Kick from the hips and not the knees
Kick forward and not backwards
Keep knees almost straight. Bicycle kicking is not efficient.
Different fins and different body types require different kicking styles. Experiment until you decide what kicking style is best for you
Stage A FreediverA Whole New World
45

Gliding
Gliding is an extremely important part of the dive. It allows the FreeDiver to conserve energy, maintain streamlining, relax and concentrate on equalisation.
Different athletes choose different depths to begin the glide but the principles are the same:
Begin gliding when you feel that you are negatively buoyant (Around 10m). For very deep dives - keep kicking until you feel that you wont slow down once gliding.
Begin gliding within 10-15 second from the beginning of the dive to maximise the dive response
Once gliding, maintain a comfortable position (Not necessarily the most streamlined position)
Keep your chin tucked in for easy equalisation.
Change speed by changing your streamlining.
Turns
Turns can potentially consume a lot of energy. In order to minimise the chances of cramps and to maintain high efficiency do the following:
Grab the line with the thumb facing up.
Allow the body to keep sinking until the grabbing arm is straight.
Reach with the other hand and grab the tag (if you dive for depth)
Bend your knees and allow the body to perform a “pendulum” movement.
Once the legs are down- pull with the hand that holds the line and assist with the fins.
Let go of the line and begin kicking up.
Keep your arms at the side of your body
Stage A FreediverA Whole New World
46

Surfacing
Once you reach positive buoyancy, stop kicking and glide to the surface.
The Surface protocol
The surface protocol consists of a few steps that are there to ensure the FreeDiver is conscious and in control.
Verbally say “I M OK”
Perform the OK sign
Remove facial equipment
Face your buddy / Judge
Perform recovery breathing
In a competition, this needs to be done within 15 seconds without any assistance. In training - take as much time as you need before performing the protocol! There is no logic in saying “I
AM OK” if you are not sure you are!
Stage A FreediverA Whole New World
47

The Dive in Detail
Before the dive
Plan the dive with your buddy
Position yourself near the line
Breathe-up
2 breaths before dive - Signal your buddy, Increase breath volume
2 breaths before dive - Equalise mask
Last breath - full inhale, hold your breath.
Remove snorkel
Equalise ears
Duck dive
Follow duck-dive procedure explained in Duck-dive section
Once under the water - Equalise ears
Descent
Face the line.
Equalise ears when needed
Equalise mask when needed (usually every 5-10 metres)
Maintain streamlining
Once you reach negative buoyancy - Stop kicking and glide to the bottom
Turn
Grab the line with thumb facing up
Use momentum to turn
Pull on the line to begin ascent
Ascent
Kick until positively buoyant and glide to the surface
Always face the line
Surface
Perform recovery breathing and a surface protocol as discussed.
Stage A FreediverA Whole New World
48
Aware Breathing
Breathing is perhaps the most important physiological function we perform. On top of the obvious gas exchange it also messages the internal organs, regulates fluid flow around the body, increases vitality and more.
Even though it is the first thing we did when we were born, most of us are not aware of the actual way we breathe.
From a physiological standpoint, breathing is done by utilising muscles that increase and decrease the internal volume of the chest cavity.
There are 2 main ways in which we breathe:
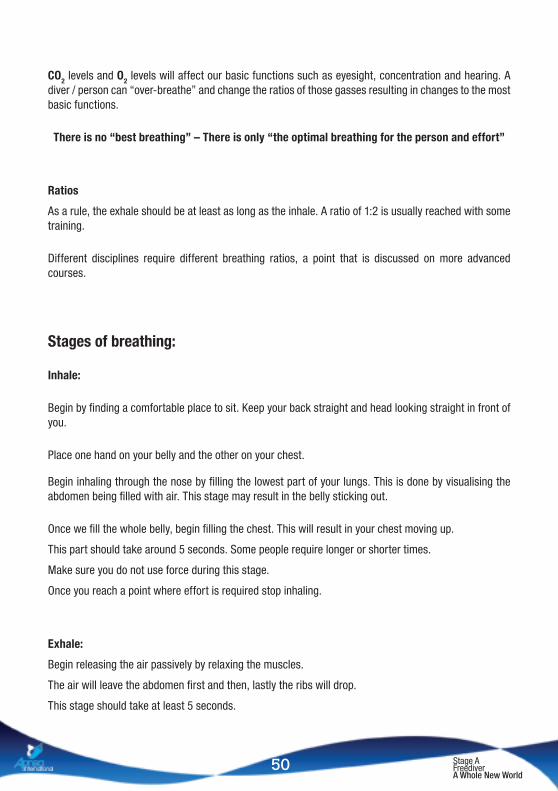
Upper breathing – Uses the inter-costal muscles to increase the volume of the rib cage.
Lower (Abdominal / Diaphragm) breathing - Uses the Diaphragm to “pull” the lungs down.
Each of those systems uses a slightly different part of the lungs:
Upper breathing – Using the top portion of the lungs
Lower breathing – Using the bottom portion of the lungs.
As the lungs look like a pyramid, the upper part is smaller than the lower part. Lower breathing also makes the air travel a longer way inside the lungs – resulting in better ventilation.
Each of us has a dominant system. On a shallow / relaxed breath each of us breathes slightly differently.
Full breathing / conscious breathing is a way to combine those 2 systems into a more efficient way.
It is important to understand that we should breathe in accordance to the level of activity we undertake: Resting breathing will provide all the O2 the body needs for resting while during a jog the muscles might require more O2 and so the breathing will change.
Stage A FreediverA Whole New World
49
CO2 levels and O2 levels will affect our basic functions such as eyesight, concentration and hearing. A diver / person can “over-breathe” and change the ratios of those gasses resulting in changes to the most basic functions.
There is no “best breathing” – There is only “the optimal breathing for the person and effort”
Ratios
As a rule, the exhale should be at least as long as the inhale. A ratio of 1:2 is usually reached with some training.
Different disciplines require different breathing ratios, a point that is discussed on more advanced courses.
Stages of breathing:
Inhale:
Begin by finding a comfortable place to sit. Keep your back straight and head looking straight in front of you.
Place one hand on your belly and the other on your chest.
Begin inhaling through the nose by filling the lowest part of your lungs. This is done by visualising the abdomen being filled with air. This stage may result in the belly sticking out.
Once we fill the whole belly, begin filling the chest. This will result in your chest moving up.
This part should take around 5 seconds. Some people require longer or shorter times.
Make sure you do not use force during this stage.
Once you reach a point where effort is required stop inhaling.
Exhale:
Begin releasing the air passively by relaxing the muscles.
The air will leave the abdomen first and then, lastly the ribs will drop.
This stage should take at least 5 seconds.
Stage A FreediverA Whole New World
50

As part of your training you should also practice full breaths where you fill 100% of your lungs and exhale to the max. This helps increase the flexibility of the ribcage and increase comfort levels with full inhales.
Stretching is another important part of breath training and will be covered in the relevant section.
Breath training
As breathing through the nose is better for many reasons you should concentrate on breathing through the nose all the time.
Unfortunately in FreeDiving we need to breathe through our mouth. In order to train ourselves to effectively breathe through our mouth we can use a breath trainer.
Breath trainers can be bought and can come in different shapes and sizes. The purpose of all of them is the same – To increase the resistance of the inhaled or/and exhaled air.
The principal is to use them a few times a day where each time you take 4-10 breaths.
Those trainers are great but in most cases a much simpler and cheaper solution produces the same results
Straw breathing:
The Straw creates resistance due to its small internal volume and introduces turbulent flow of air.
Using the straw is simple:
Get yourself a straw. Don’t use the thinnest straw you can find but not the thicket one as well.
Inhale for 6-8 seconds. Make sure you are not using force or trying to fill your whole lung in this time.
Exhale passively for 6-8 seconds. Allow the air to leave your lungs naturally.
Repeat for 2-3 minutes.
After a few minutes stop counting and only observe your breath.
Stage A FreediverA Whole New World
51

Equalisation
There are many ways to equalise the ears- some simple and some more complicated. It is important to invest the time and learn the more advanced (and more efficient) techniques from the start to have an easier, smoother improvement.
The most common forms of equalisation techniques are:
Toynbee - Just pinch your nose and swallow
Jaw thrust - Wiggle your jaw. This should cause your ears to “click”. Not useful for all FreeDiver s.
The twitch- Tilt your head to the side of the ear that is easier to clear. This pulls the tubes on the opposite side open.
Valsalva- The most common way to Equalise. Pinch your nose and try to “blow” into the nose. As the nostrils are shut, the air will go into the Eustachian tubes and into the Middle ear.
This method is easy to learn and works great in the beginning. Unfortunately it has a few very big disadvantages:
Increases blood pressure in the head (might result in a stroke if executed for more than 5 seconds at a time).
Consumes a lot of energy - Uses many muscle groups to eventually force a tiny amount of air into the ears.
Fails when the diver reaches Residual volume depth
Doesn’t work if the soft palate drops.
Stage A FreediverA Whole New World
52

Frenzel- Uses the tongue as a piston to push air into the ears. This method is a bit harder to learn but will not fail when reaching RV depth. This method uses less energy and is very effective at depth, as long there is some air in the mouth.
Disadvantages:
Harder to learn.
Will not work if the soft palate drops
VTO- Voluntary Tubal Opening. In this technique we manually open the Eustachian tube by contracting tiny muscles at the roof of your mouth (like yawning). This is the most efficient method but also the hardest to master.
To practice VTO you should try and figure out what happens when you swallow (and at the moment just before your hearing becomes strange for a second). Then, once you can control the specific muscles that cause this to happen without actually yawning, do it with a closed mouth. You can add a jaw thrust at the end to increase the effect.
Each method has its limitations and also that failure to equalise on time may result in serious damage to the ears.
Stage A FreediverA Whole New World
53


Emergencies
An emergency is any situation that is out of the ordinary.
The aquatic environment itself provides the FreeDiver with many challenges.
It is important to remember that FreeDiving is considered to be an extreme sport due to the fact that if something goes wrong, the way the diver responds and the time it takes him will determine if he will live or die.
The most important thing in dealing with any emergency is:
Stop Assess Act
Plan your dive in a way that will minimise the chances of an emergency and if anything goes wrong use your head and stay calm.
Two separate things can affect the dive – Internal factors and External factors.
External factors:
Sea conditions.
The ocean and even the pool can introduce many new factors that could cause things to go wrong.
Waves:
Waves can either be created by wind or by tectonic activity. The wave is a vertical movement of water molecules.
They mainly effect the entry and exit when Rock-hopping. Waves may also affect the recovery between dives and the visibility of the divers in the water.
Lastly, Waves tend to make divers feel sea-sick…
Stage A FreediverA Whole New World
55
Wind:
Wind is air movement from high pressure to low pressure. It causes waves, creates drift and might make anchoring harder.
Wind also creates wind-chill. Always make sure you have adequate protection (Including ear protection) when spending a day out on the water.
Currents:
Current is generated by a few factors:
Structure, tide, depth, temperature to name a few.
Currents make recovery harder and force the FreeDiver to constantly kick to maintain his position.
Remember – Plan your dive to go with the current and swim in 90 degrees to it if you want to escape it.
If you can’t avoid diving in current- consider drifting with the whole setup.
Visibility:
Visibility affects our ability to assess s where we are and what’s around us. It also affects comfort levels for some divers.
Temperature:
Being too cold or too hot while diving will eventually result in the same thing – our body can’t operate outside a very narrow temperature range.
Cold – A body temperature drop below 35° is defined as hypothermia. As water conducts heat a lot better than air we tend to lose heat faster in water.
Symptoms: shivering, hypertension, tachycardia and vasoconstriction are all signs of Hypothermia and are there to preserve heat. Alertness levels drop and simple tasks are difficult to perform. A sharp drop in performance follows.
Treatment: Passive external warming (clothing, shared body heat)
Prevention: Proper thermal protection (Wetsuit, gloves, socks, hood)
Over-heating- This usually happens when the diver uses a thick wetsuit in warm water.
Symptoms: Hot, dry skin is a typical sign of hyperthermia. Alertness levels drop.
Treatment: Remove wetsuit, minimise effort, hydrate.
Prevention: Choose your gear wisely, Proper hydration while training, stay in the shade on a hot day.
Stage A FreediverA Whole New World
56

Boats:
A boat traveling in 25 knots can pass close to 750m in a minute. When a FreeDiver begins his dive the boat might be out of sight, but by the time he resurfaces – the boat might be too close to notice.
Prevention: Always use a float and flag when training.
Always dive with an alert buddy.
Avoid diving in places where boat traffic is dense.
Entanglement:
Getting tangled underwater is not a nice thing.
A few examples:
• Getting caught under a ledge while diving for fish.
• Getting caught in a fishing net
• Trying to pick a lure that is stuck on a rock
• Getting tangles in the rig line
Treatment: As a rule – STOP, ASSESS, ACT
Untangle yourself or Use a knife (located in an accessible position) to cut yourself free.
Prevention:
Avoid diving in areas where risk of entanglement is high.
Never wrap a line around your hand
Never stick your hands inside caves
Stay alert.
Gear Failure:
Even though FreeDivers use minimal gear, the risk of experiencing gear failure is still there.
• Fin breaking
• Mask strap tearing
• Wetsuit tearing
• Gun rubber breaking
Stage A FreediverA Whole New World
57

As in other rules, the initial response should be to stop and assess s the situation. Then according to the problem solve the issue at hand.
Prevention: As always - Plan your dive and check your gear before diving. Always have spare gear when diving from a boat or when going on trips.
Marine Life:
Many things can harm a FreeDiver in the water. There are many kinds of marine creatures that can hurt us-each with a different venom and different ways to be dealt with.
As a basic rule - Marine creatures usually have very potent venoms that react better to cold conditions and break apart in heat.
When stung by a poisonous fish - try to immobilise the area, place the hand in hot water and seek medical assistance. It is important to understand that secondary effects of stings and bites may be very serious (Blood poisoning after being bitten by a moray eel).
Prevention:
Don’t touch anything that you don’t know what it is.
Don’t stick your hands into caves without looking first.
Use protection (Wetsuits, stinger suits, Gloves, Hoods...)
Don’t aggravate fish and sharks - they don’t like it.
Internal Factors
FreeDivers depend on their body when diving. Every time we dive we expose our body to increased pressures, changes in vision, hearing and sensation. This may result in an overload if the diver is not prepared.
Stage A FreediverA Whole New World
58

Many internal factors affect the dive.
• Dehydration• Fatigue• Smoking• Stress• Low blood sugar• Poor fitness• Bad thoughts• Panic
An emergency is usually an accumulation of a few factor together and not just one thing. Each factor piles up on top of the others until one finally tips the scale. Then – the diver has to deal
with the all the problems together.
Barotraumas
Air spaces are affected by pressure. When a FreeDiver descends all the gasses try to compress as a result of Boyle’s law (Described in the Appendix).
The main air spaces that are affected during a breath-hold dive are:
• The ears
• The sinuses
• The mask
• The lungs
Ears
The ear comprises of 3 parts –
The outer ear: includes the ear canal and terminates with the tympanic membrane (The ear-drum)
The middle ear: An airspace that contains the 3 smallest bones in the body (incus, stapes, malleus) and a 3-4cm canal called the Eustachian tube that leads to the naso-pharynx.
The inner ear: Contains the Cochlea and the Semi-circular canals that are responsible for balance.
Stage A FreediverA Whole New World
59

As we descend, pressure increases and the volume of the air inside the middle ear decreases. If we do not equalise the pressure the eardrum will be pushed in and this might eventually result in damage to the eardrum.
We have 2 types of possible problems:
Perforated eardrum – A tiny slit / pin-hole.
Cause: Usually occurs due to sensitive eardrum or late equalisation. The diver will feel pain that stops when the eardrum tears.
Signs: Inability to equalise accompanied by increasing pressure and pain. Pain stops and bubbles might come out of the ears. A loss of orientation might occur.
Burst Eardrum- a puncture hole in the eardrum.
Cause: Usually happens to more experienced FreeDiver s trying to delay EQ to the absolute last minute. This causes the eardrum to stretch inwards and eventually burst, resulting in a big hole.
Signs: Pain, loss of orientation and blood coming out of the ear, loss of hearing.
Treatment:
If FreeDiving without a hood- Block the ear with a finger to prevent more cold water from entering the middle ear.
Stop descending and go back to the surface. If felling disoriented - Use the line as a guide.
Leave the water and seek medical assistance.
Prevention:
Equalise on the way down.
Never Equalise on Ascent.
Never ride the flexibility of your eardrum.
Never dive sick or when feeling unwell.
Never stay at depth after failing to equalise.
Don’t dive with earplugs
Equalise on the surface before the dive.
Don’t use decongestants.
Avoid foods that generate mucous.
Hydrate properly
Keep ears warm.
Stage A FreediverA Whole New World
60
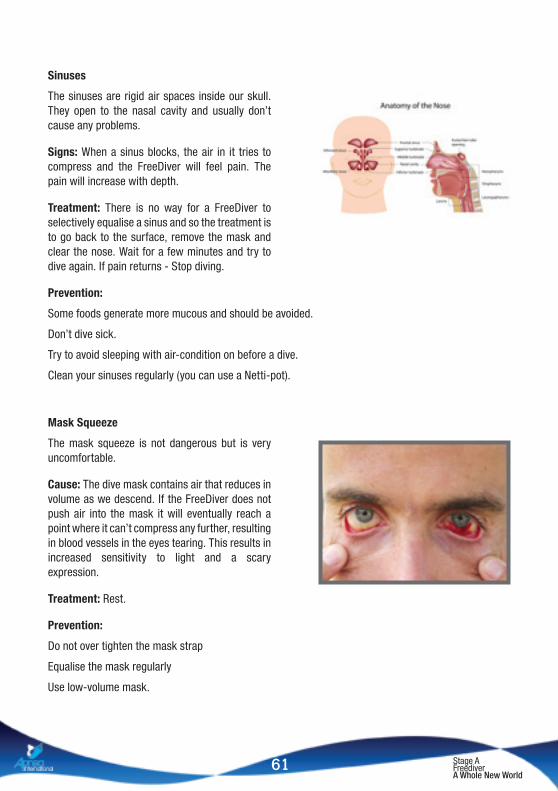
Sinuses
The sinuses are rigid air spaces inside our skull. They open to the nasal cavity and usually don’t cause any problems.
Signs: When a sinus blocks, the air in it tries to compress and the FreeDiver will feel pain. The pain will increase with depth.
Treatment: There is no way for a FreeDiver to selectively equalise a sinus and so the treatment is to go back to the surface, remove the mask and clear the nose. Wait for a few minutes and try to dive again. If pain returns - Stop diving.
Prevention:
Some foods generate more mucous and should be avoided.
Don’t dive sick.
Try to avoid sleeping with air-condition on before a dive.
Clean your sinuses regularly (you can use a Netti-pot).
Mask Squeeze
The mask squeeze is not dangerous but is very uncomfortable.
Cause: The dive mask contains air that reduces in volume as we descend. If the FreeDiver does not push air into the mask it will eventually reach a point where it can’t compress any further, resulting in blood vessels in the eyes tearing. This results in increased sensitivity to light and a scary expression.
Treatment: Rest.
Prevention:
Do not over tighten the mask strap
Equalise the mask regularly
Use low-volume mask.
Stage A FreediverA Whole New World
61

Lung / Trachea squeeze
Cause: Our lungs and trachea are affected by pressure changes. As part of our dive response the lungs deal with this pressure by shifting blood into the capillaries. This process takes time and requires some adaptation. If a FreeDiver goes deep too fast or without allowing the body to adjust, the blood will not have enough time to travel to the capillaries, resulting in a squeeze.
The diver will then return to the surface and cough. He will then notice one of two things:
Red strands of blood - Squeezed trachea
Pink frothy blood - Squeezed lungs.
Response:
Stop diving.
Do not dive for a week.
Avoid deep breaths.
Prevention:
Do not change head position during the dive (Look straight ahead)
Allow enough time for adaptation.
Increase depth gradually.
Perform stretching before training.
Train your breathing.
Don’t force a mouth-fill at depth.
Perform warm-up dives.
Panic / Anxiety
Panic is a state of uncontrolled emotions. When a FreeDiver encounters a situation that is too overwhelming or simply not planned he might begin to experience “Bad thoughts”. Those thoughts, If not dealt with, might then escalate to a state of panic.
Panic is the number 1 cause for diving related deaths!
When a FreeDiver panics he will not be able to think of conserving energy or maintaining streamlining. The diver will try to reach the surface as fast as he possibly can.
Stage A FreediverA Whole New World
62

Symptoms:
Escaping air
Running to the Surface
Bad posture
Big eyes
Erratic movements
Tension
Treatment:
Position yourself (As the safety diver) in front of the panicking FreeDiver. In most cases it will solve the situation.
Maintain eye contact and show the diver that you are in control
Assist the diver by supporting him with one hand. The other hand is there to protect the safety diver.
Try to remove his weights.
If the diver tries to grab you- keep away and wait. The diver will either black-out or reach the surface.
Once on the surface – support the diver and help him get to the float.
Talk to the diver
Once fully recovered – The diver could perform an easy dive to prevent a mental block.
Prevention:
Plan your dive - Location, depth, gear, dive profile...
Rehearse the dive.
Gradually increase depths
Don’t dive deep the first time you dive in a new site
Think positive
Stage A FreediverA Whole New World
63

THINK DEEP…
Blackouts and Sambas
The most feared and discussed emergency in FreeDiving is Shallow water Blackout.
There are many reasons for blackouts and many different types. We blackout when the Partial pressure of O2 in the brain drops below a certain point (It is different for each and every diver). The drop can either be due to a mechanical reason (Stroke / Ischemia…), a mental issue, pushing it (Due to HV for example) or due to improper breathing after the dive.
The rule is that there are no rules! Each diver and each dive is different!
We divide this emergency into a few levels of severity:
Samba / LMC (Loss of motor control)
LMC happens on the surface after surfacing from a dive. The time frame can be from immediate to 20 seconds or more.
Cause: Drop in partial pressure of O2. In most cases, this is due to improper breathing on the surface. It can also happen due to a psychological issue or any number of other reasons.
Possible Signs:
Most divers will not experience ANY warning signs.
Anything out of the ordinary
Erratic moves
Escaping air
Panic
Possible Symptoms:
Loss of posture
Twitches
Shaking
Confusion
Breathing difficulty
Unfocused eyes
Mumbling
It is important to remember that even though most divers experiencing a samba can deal with it on their own, some will still drown if no safety diver is present.
Stage A FreediverA Whole New World
65

Response:
• Position the diver’s back to the waves.
• Support the diver on the surface and prevent his airways from going under the water
• Remove facial gear to expose facial receptors and allow easy breathing.
• Blow air onto their face.
• Talk to the diver and encourage him to breathe (they can hear you). Avoid shouting at the diver.
• If consciousness doesn’t return within 15 seconds, open airways and give mouth to mouth.
• If nothing helps, get the diver to the boat / platform / beach and begin CPR. Provide O2 if available.
DO NOT ALLOW THE DIVER TO DIVE AGAIN THAT DAY
Prevention:
Follow the safety rules and remember that even experienced divers can blackout. The fact that a diver has a PB of 30m does not mean he can’t have a samba after a 20m dive.
Black-out
A BO is a full loss of consciousness.
Cause:
o Pushing it
o Improper breathe-up (HV)
o Improper recovery breathing
o Wrong gear
o Fast ascent
o More…
As the diver ascends at the end of the dive, the O2 pressure drops (Dalton’s law). At some stage this pressure can either be too low or the drop too rapid, resulting in a blackout.
As pressures change is biggest close to the surface the risk of a BO increases as we ascend.
Stage A FreediverA Whole New World
66

Signs:
• Anything out of the ordinary
• Erratic moves
• Escaping air
• Panic
• No signs at all!!
Symptoms:
• Feeling of euphoria
• Changes in vision
• Tingling
• Metallic taste in the mouth
From the Safety diver’s point of view the diver may or may not reach the surface. The diver will stop kicking and loose posture. In some cases the diver may even keep swimming towards the surface.
The diver will usually be “soft” and easy to handle.
Once the diver Blacks-out he might blow air out. This will result in buoyancy changes. The diver will then sink.
When the diver sinks, water will enter his airways and he will drown.
A BO may last from seconds to a very long time. In most cases, the safety diver’s intervention is crucial in solving the situation.
Response:
• Approach the diver and get him to the surface. This can be done in a number of ways. Reaching under the armpits and will allow the rescue diver to avoid hitting the diver’s fins and will allow easy rescue.
• Avoid allowing the diver’s head to roll back as this increases the risk of drowning.
• Assess s whether dropping the weights is needed and act accordingly
• Once on the surface, assess the conditions and the location of the boat and position accordingly.
• Support the diver on the surface and prevent his airways from going under the water
• Remove facial gear to expose facial receptors and allow easy breathing.
• Blow air onto their face.
• Talk to the diver and encourage him to breathe (they can hear you). Avoid shouting at the diver.
• If consciousness doesn’t return within 15 seconds, open airways and give mouth to mouth.
• If nothing helps, get the diver to the boat / platform / beach and begin CPR. Provide O2 if available.
Stage A FreediverA Whole New World
67
Prevention:
Follow the safety rules and remember that even experienced divers can blackout. The fact that a diver has a PB of 30m does not mean he can’t experiencev a samba after a 20m dive.
DO NOT ALLOW THE DIVER TO DIVE AGAIN THAT DAY
Severe Black-out / Deep water Black-out
This Blackout usually occurs in deeper water (around 10m or more) and is the result of Hypoxia.
Cause:
o Hyperventilation before the dive
o Pushing it
o Too much weight
o Entanglement on the bottom
o Other reasons…
The FreeDiver blacks out due to Hypoxia (lack of O2) at depth.
As the diver is brought back towards the surface O2 pressure keeps dropping, resulting in a more severe hypoxia.
Signs:
• Anything out of the ordinary
• Erratic moves
• Escaping air
• Panic
• No symptoms at all!!
Symptoms:
• Feeling of euphoria
• Changes in vision
• Tingling
• Metallic taste in the mouth
From the safety diver’s point of view the diver will stop kicking and become rigid. In some cases the diver may even keep swimming towards the surface.
Stage A FreediverA Whole New World
68
In most cases the diver will convulse and be quite difficult to handle.
Once the diver blacks out he might blow air out. This will result in buoyancy changes. The diver will then sink.
When the diver sinks, water will enter his airways and he will drown.
A BO may last from seconds to a very long time. In most cases, the safety diver’s intervention is crucial in solving the situation.
Treatment:
• Approach the diver and get him to the surface. This can be done in a number of ways.
• Avoid allowing the diver’s head to roll back as this increases the risk of drowning.
• Assess whether dropping the weights is needed and act accordingly
• Once on the surface, assess s the conditions and the location of the boat and position accordingly.
• Support the diver on the surface and prevent his airways from going under the water
• Remove facial gear to expose facial receptors and allow easy breathing.
• Blow air onto their face.
• Talk to the diver and encourage him to breathe (they can hear you). Avoid shouting at the diver.
• As we know the diver is Hypoxic our goal is to re-introduce O2 to the system. Try to open the airways, and if it is not possible – Perform a mouth-to –nose breathing.
Remember – Never continue diving after a Blackout! See a doctor if you suspect water got into the breathing system or if feeling unwell.
Stage A FreediverA Whole New World
69

SPECIAL MEMORIES FOREVER…

Training Sequence
Deep diving session
Dive Depth Bottom time Info
1 50% / max’ 15m Touch & Go First Warm up
2 50% / max’ 15m Static Second Warm up
3 60% Touch & Go Third Warm up
4 60% Static
5 70% Touch & Go
6 80% Touch & Go Target Depth - Longer recovery
7 Max Touch & Go Target Depth - Longer recovery
8 ? Relaxation / Cool Down
Deep / competitive FreeDiving relies on the Anaerobic Cycle. For this reason recoveries should be long enough.
Photography/Fishing session
Dive Depth Bottom time Info
1 50% / max’ 15m Touch & Go First Warm up
2 50% / max’ 15m Static 5s’ Second Warm up
3 Fishing Depth Static 5s’ + Third Warm up
4 Fishing Depth Static 5s’ + Fishing
5-50 Fishing Depth Static 5s’ + Fishing
Recreational Freediving usually relies on the Aerobic Cycle. For this reason recoveries can be short as long as the diver does not experiences contractions
during the dive
Pool TrainingPool training is a big part in the development of a FreeDiver.
We divide the pool training into 2 main parts:
Stage A FreediverA Whole New World
71
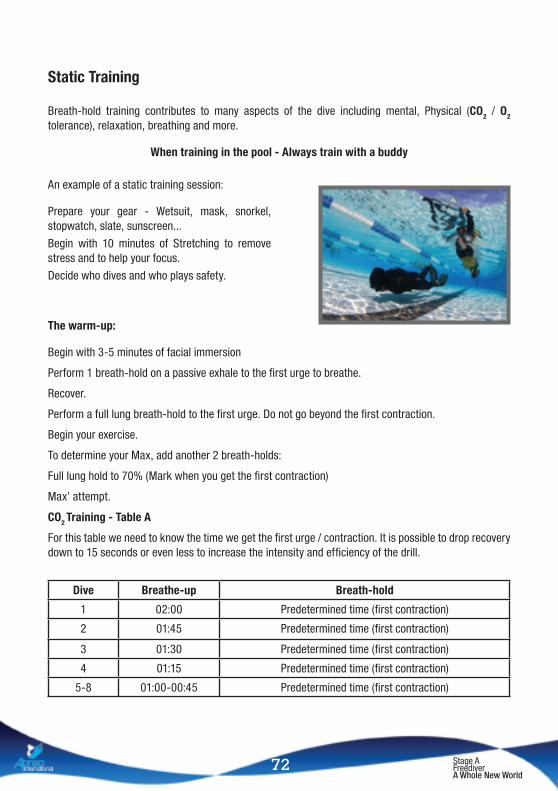
Static Training
Breath-hold training contributes to many aspects of the dive including mental, Physical (CO2 / O2 tolerance), relaxation, breathing and more.
When training in the pool - Always train with a buddy
An example of a static training session:
Prepare your gear - Wetsuit, mask, snorkel, stopwatch, slate, sunscreen...
Begin with 10 minutes of Stretching to remove stress and to help your focus.
Decide who dives and who plays safety.
The warm-up:
Begin with 3-5 minutes of facial immersion
Perform 1 breath-hold on a passive exhale to the first urge to breathe.
Recover.
Perform a full lung breath-hold to the first urge. Do not go beyond the first contraction.
Begin your exercise.
To determine your Max, add another 2 breath-holds:
Full lung hold to 70% (Mark when you get the first contraction)
Max’ attempt.
CO2 Training - Table A
For this table we need to know the time we get the first urge / contraction. It is possible to drop recovery down to 15 seconds or even less to increase the intensity and efficiency of the drill.
Dive Breathe-up Breath-hold
1 02:00 Predetermined time (first contraction)
2 01:45 Predetermined time (first contraction)
3 01:30 Predetermined time (first contraction)
4 01:15 Predetermined time (first contraction)
5-8 01:00-00:45 Predetermined time (first contraction)
Stage A FreediverA Whole New World
72

Dynamic Training:
Dynamic training aims to improve technique, streamlining, preparation / recovery and can naturally be a “stand-alone” training for the purpose of covering the longest distance underwater.
Some suggestions and safety considerations for Dynamic training
Always train with a buddy! Although Dynamic training is performed just below the surface, the possibility of a blackout is still there (and at times even greater)
Aim to train in pools where there are fewer children around - Children tend to copycat.
Plan your session - Don’t just jump in and try to swim as far as you can every time.
Divide your training into separate goals:
Volume sessions Max’ sessions Technique - Kicking / turns / glide /
streamlining... Preparation / SP Relaxation Gear tapering - Neck weights / wetsuit / fins
/ mono...
Choose the correct time for training (morning / evening...) Do not forget to stretch before the sessionPerform your warm-up
An example of a volume session
After stretching and a warm-up breath-hold or 2 begin with 1 or 2X25m with full recovery (2 minutes at least)
25mX8 when we leave every 1 minute (if the swim takes 25 sec’ then we have 35sec’ recovery)25mX6 when we leave every 50 seconds.25mX4 when we leave every 45 seconds.
You can add 50m swims if they feel comfortable. When swimming 50m allow around double the time for recovery.
Make sure you play safety and perform a full surface protocol on every dive
Stage A FreediverA Whole New World
73

Stretching for FreeDiving
Stretching before a session will reduce the risk for injury. It will also improve blood flow, purging of waste products and improved range of movement.
Begin with standing shoulder width apart.
Focused full breath for 4-5 rounds.
Working from the head down:
Head (standing)
o Chin to chest for 2-3 full breaths
o Chin to the sky for 2-3 breaths
o REPEAT
o Head to left shoulder 2-3 breaths
o Head to right shoulder 2-3 breaths
o REPEAT
o Head straight look over left shoulder 2-3 breaths
o Look over right shoulder 2-3 breaths
o REPEAT
Shoulders (Standing)
o Take right arm over and behind head, applying pressure with left hand 2-3 breaths
o Left arm over and behind, applying pressure with right hand 2-3 breaths
o Rotate shoulders backwards 2-3 breaths, have shoulder rising with the inhale and lowering with the exhale
o Rotate shoulder forwards 2-3 breaths.
Stage A FreediverA Whole New World
74

Arms (standing)
o Bring right arm across body, apply pressure with left arm 2-3 breaths
o Bring left arm across body, Apply pressure with right arm 2-3 breaths
Legs (standing)
o Right foot forward left foot back at 90 degrees, maintain back leg straight and stretch forward onto the front leg, aiming for the thigh to be parallel with the ground. 2-3 breaths and reverse
o Legs slightly wider than shoulder width, back and arms straight bend to the side touching your leg ensure everything is straight, 2-3 breaths reverse.
o Standing one foot forward, point toes of forward foot to the sky and bend toward toes, maintain straight front leg. 2-3 breaths and reverse
o Balancing on one leg bring opposite leg up and behind stretching the thigh. Aim to have body straight and in line with foot touching buttock.
Legs (sitting)
o Right leg out straight in front, left foot in snug to the groin. Keeping back straight bend towards outstretched toes. 2-3 breaths reverse to left leg.
o Bring both feet together to meet at the groin, hold feet together and apply pressure with arms to the legs. 2-3 breaths repeat.
o Take the left foot; rotate clockwise and anti clockwise for 2-3 breaths each foot.
o Point the toes forward and use hands to increase the stretch, then point toes back to the leg and use hand to support and increase the stretch 2-3 breaths each side.
Stage A FreediverA Whole New World
75

Back (sitting)
o Keeping right leg straight, bring left leg over right and place foot down on the ground, with right arm lever against left leg and look over your shoulder as far as possible. 2-3 breaths and reverse.
o Sitting up on your knees, plant hands firmly on the ground shoulder width apart and under the shoulders, lift up/ push through your arms arching the back as high as possible (like a cat stretch) 2-3 breaths and repeat
o Sitting back onto the legs keep arms outstretched as far as possible, arms straight and head tucked into the knees. 2-3 breaths and repeat.
Lie on back relaxed and focus on breathing for 5 minutes.
Stage A FreediverA Whole New World
76

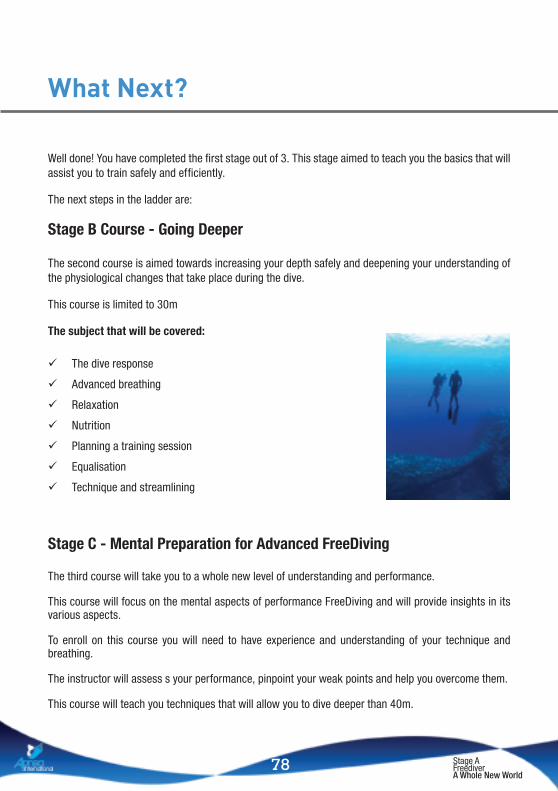
What Next?
Well done! You have completed the first stage out of 3. This stage aimed to teach you the basics that will assist you to train safely and efficiently.
The next steps in the ladder are:
Stage B Course - Going Deeper
The second course is aimed towards increasing your depth safely and deepening your understanding of the physiological changes that take place during the dive.
This course is limited to 30m
The subject that will be covered:
The dive response
Advanced breathing
Relaxation
Nutrition
Planning a training session
Equalisation
Technique and streamlining
Stage C - Mental Preparation for Advanced FreeDiving
The third course will take you to a whole new level of understanding and performance.
This course will focus on the mental aspects of performance FreeDiving and will provide insights in its various aspects.
To enroll on this course you will need to have experience and understanding of your technique and breathing.
The instructor will assess s your performance, pinpoint your weak points and help you overcome them.
This course will teach you techniques that will allow you to dive deeper than 40m.
Stage A FreediverA Whole New World
78
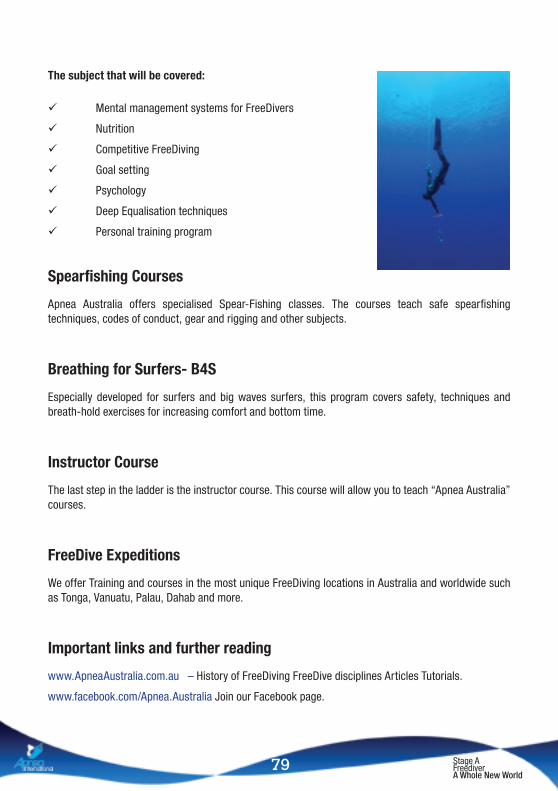
The subject that will be covered:
Mental management systems for FreeDivers
Nutrition
Competitive FreeDiving
Goal setting
Psychology
Deep Equalisation techniques
Personal training program
Spearfishing Courses
Apnea Australia offers specialised Spear-Fishing classes. The courses teach safe spearfishing techniques, codes of conduct, gear and rigging and other subjects.
Breathing for Surfers- B4S
Especially developed for surfers and big waves surfers, this program covers safety, techniques and breath-hold exercises for increasing comfort and bottom time.
Instructor Course
The last step in the ladder is the instructor course. This course will allow you to teach “Apnea Australia” courses.
FreeDive Expeditions
We offer Training and courses in the most unique FreeDiving locations in Australia and worldwide such as Tonga, Vanuatu, Palau, Dahab and more.
Important links and further reading
www.ApneaAustralia.com.au – History of FreeDiving FreeDive disciplines Articles Tutorials.
www.facebook.com/Apnea.Australia Join our Facebook page.
Stage A FreediverA Whole New World
79

Trips and Training
Training groups
A Freediving course is only the beginning...
When you complete a course you have the tools required to improve your skill set and your ability.
By joining one of our training groups you will be able to train in a supervised environment, with set goals and cycles. We run training squads in each major city in Australia and will be happy to assist you in finding the nearest group.
Freediving Holidays
FreeDiving & Whale Encounters in Tonga
10-15 training days that include Yoga, Snorkelling, Freediving, Breath workshops, and spectacular whale swims - All in an Eco resort.
Get in Close and personal with the Humpbacks and improve your skill in the most “picture perfect” conditions
Training camps around the world
Join un on one of our Camps in Hawaii or Tonga and experience a different kind of Freediving.
Crystal clear water, Dolphins, Manta Rays, Volcanos, nature, great food and great company.
Stage A FreediverA Whole New World
80

FreeDive Logbook
When training - it is important to log some basic details about the session. The achieved depth / time / distance are only some of the details that should be logged..
Date Time Start Time End
Location
Descipline Count Down Yes / No
Diet Before the dive Breathe up
Sleep: The Dive :
Positive :
To Improve :
Warm-up Sequence :
Mental state/Confidence :
Gear : Condition :
Temp : Air temp :
Clarity : Wind/swell :
Current : Other :
Target Dive : Remarks :
Actual dive
Dive time
SP Y/N
Stage A FreediverA Whole New World
81

Knowledge Review
Safety rules1. In two sentencews explain the importance of an alert buddy.
_________________________________________________________________
_________________________________________________________________
2. Why shouldn’t a FreeDiver dive to his limit?
_________________________________________________________________
_________________________________________________________________
3. What makes Hyperventilation dangerous?
_________________________________________________________________
_________________________________________________________________
4. Why should a FreeDiver Equalise on the way down?
_________________________________________________________________
_________________________________________________________________
5. Why shouldn’t a FreeDiver exhale while FreeDiving?
_________________________________________________________________
_________________________________________________________________
Recovery breathingWhich sequence describes correct recovery breathing upon surfacing?
• Exhale hard, take a slow breath in and hold. Repeat
• Passive exhale, full inhale and hold. Repeat
• Fast breaths until feeling recovered.
• Breathe normally
Blackouts and LMC’sWhat is the correct way to treat a Blackout that happens below the surface?
1 ______________________ 2 _____________________ 3 _____________________
4 ______________________ 5 _____________________ 6 _____________________
Stage A FreediverA Whole New World
82

Progress Report
Topic Date Pass Comments Instructor
Theory
Safety rules 1-5
Safety rules 6-11
Gear Session
Emergencies
Session planning
Practical
Correct breathing
Stretching
Static Apnea
Dynamic Apnea
Ocean session 1
Ocean Session 2
Depth achieved
Rescue performed
Stage A Completion
The following student has completed all required skills and is now certified as a STAGE A FreeDiver
Student Name : __________________________________________________________
Date:_____/_____/_____ Instructor:_____________________ Signed: ____________
Stage A FreediverA Whole New World
83

Notes
Stage A FreediverA Whole New World
84

FREEDIVINGENJOY THE SILENCE...