from photoshop to dreamweaver 3 steps to great ... - …978-1-4302-5428-7/1.pdf · from photoshop...
TRANSCRIPT
From Photoshop to Dreamweaver
3 Steps to Great Visual Web Design
Colin Smith Crystal Waters

From Photoshop to Dreamweaver
3 Steps to Great Visual Web Design
© Apress 2002 Originally published by Friends of ED in 2002
All rights reserved. No part of this book may be reproduced, stored in a retrieval system or transmitted in
any form or by any means, without the prior written permission of the publisher, except in the case of brief quotations embodied in critical articles or reviews.
The authors and publisher have made every effort in the preparation of this book to ensure the accuracy of the information. However, the information contained in this book is sold without warranty, either express or implied. Neither the authors, friends of ED nor its dealers or distributors will be held liable for any damages caused or alleged to be caused either directly or indirectly by this book.
First Printed November 2002
Trademark Acknowledgements
ISBN 978-1-59059-174-1 ISBN 978-1-4302-5428-7 (eBook) DOI 10.1007/978-1-4302-5428-7

From Photoshop to Dreamweaver
3 Steps to Great Visual Web Design
Credits
Authors Colin Srnith
Crystat Waters
Commissioning Editor Luke Harvey
Graphie Editor Avtar Bhogat
Editors Atan McCann
Paut Thewlis
Cover Design Katy Freer
Avtar Bhogat
lndexer Sirnon Coltins
Author Agent Chris Matterface
Project Manager Sirnon Brand
Technical Reviewers Martin White Jon Steer Kim Christensen Ctifton Evans Tim Payne Vicki Loader Dan Caylor Chris Arlidge Matthew B. Hein
Proof Reader Met Orgee
Managing Editor Chris Hindtey

AUTHOR BIOGRAPHIES
Colin Smith www.photoshopCAFE.com Colin is an award winning Graphie Designer who has caused a stir in the design community with his stunning photorealistic illustrations composed entirely in Photoshop. He is also founder of the popular PhotoshopCafe web resource for Photoshop users and web designers. He has won numerous design contests and awards, including Guru Awards at the 2001 Photoshop World Convention in LA, 2002 in SanDiego and MacWorld 2002 in NY. Colin's work has been recognized by Photoshop User. Mac Design, Dynamic Graphics, Computer Arts, Studio Multimedia and WWW Internet Life magazines. Colin is also a regular columnist for the NAPP members' site and Planet Photoshop. Between Freelance Design and writing for foED, he keeps pretty busy. Colin has co authored New Masters of Photoshop, Foundation Photoshop, Photoshop Most Wanted and Photoshop 7 Trade Secrets.
"To jason Cook, my Dreamweaver teacher, thanks for alt the extra help on UltraDev."
Crystal Waters Crystal has been writing about consumer-oriented technology since the '80s- back when 5MB hard drives were a novel upgrade! She's author of two books, Web Concept & Design and Universal Web Design (New Riders), and also co-author of The Flash Usability Guide from foED. She's been an editor at a number of magazines and was director of MFWeb conferences, among other rotes. Crystal is a long-distance charity cyclist and avid kayakfisherman. She lives and fishes with her boytriend Dwayne (who took this photo) and dog Nellie (pictured) in Vermont. Her sites are www.typo.com and www.girlbike.com. She likes parentheses (obviously) - and, erm, dashes.

TADLE OF CONTENTS
Welcome 1 The Book Format ............................................................................................................ 1 Support and Feedback .................................................................................................. 2
1 Planning your website 5 ln this chapter .................................................................................................................... 5 Why Photoshop and Dreamweaver? .......................................................................... 6 lntroducing Dreamweaver MX .................................................................................... 6 Print vs. web: Photoshop experience transformed ................................................ 9
Images for the web .................................................................................................. 9 Planning your website .................................................................................................. 11
What is the goal of your site? ............................................................................ 11 What is your site about? ...................................................................................... 12 How would you evaluate your audience? ...................................................... 12 How do you want to impress your audience? .............................................. 13 What is your strategy? .......................................................................................... 13 Do you intend to sell or market a product? .................................................. 13
Site and content development .................................................................................. 14 Brainstorming .......................................................................................................... 14 Wireframing ............................................................................................................ 15
Design principles .......................................................................................................... 16 Using color as a messenger ........................................................................................ 16
Contrasting for readability .................................................................................. 17 Web color defaults ...................................................................................................... 18 Pieking a color palette ................................................................................................ 19 Customizing your palette ............................................................................................ 19
Successful color scheme samples ...................................................................... 21 Navigation necessities .................................................................................................. 22
Use understandable icons .................................................................................... 22 Use breadcrumbs .................................................................................................. 23 Don't hide information ........................................................................................ 23 Help people out ...................................................................................................... 23
2 Designing our site in Photoshop 27 ln this chapter .................................................................................................................. 27 Building the mock-up .................................................................................................. 29 Creating some simple buttans ................................................................................. .33 An easy way to duplicate and align elements on a page ................................. .35 Adding text to the buttans ....................................................................................... .37 Organizing layers .......................................................................................................... 41 Adding depth to the buttans .................................................................................... 44 Mass-producing the layer style ............................................................................... .46 Designing the top part of the page ........................................................................ 47 Adding some random tone and texture ............................................................... .54 Making a quick logo ................................................................................................... 59
FROM PHOTOSHOP TO DREAMWEAVER: 3 Steps to Great Visual Web Design
Adding speed lines ........................................................................................................ 61 The main content area ........................................................................................ 64
Adding some dummy content .................................................................................. 64
3 Slicing and optimizing 75 ln this chapter... . ........................................................................................................... 75 Slicing explained ............................................................................................................ 76 Slicing our mock-up .................................................................................................... 77
Slices From Guides ................................................................................................ 78 layer based slices .................................................................................................. 78 User defined slices ................................................................................................ 80
Taking it to ImageReady .............................................................................................. 81 Slices in ImageReady ............................................................................................ 82 Combining slices .................................................................................................... 85
Previewing our page .................................................................................................... 87 Using rollovers .............................................................................................................. 89
A simple rollover .................................................................................................... 90 Optimization .................................................................................................................. 97
Exploring the Optimization window ................................................................ 97 2-Up view .................................................................................................................. 99 4-Up view .............................................................................................................. 101
Exporting the page .................................................................................................... 1 06
4 lntroducing Dreamweaver 111
ln this chapter... . ......................................................................................................... 111 The Dreamweaver workspace ................................................................................ 112 Defining your site ........................................................................................................ 116 Opening home.html in Dreamweaver .................................................................. 120 Exploring the workspace some more .................................................................... 125 Creating a page in Dreamweaver .......................................................................... 126
Layout View .......................................................................................................... 129 Adding images ............................................................................................................ 135
Fixing the heights ................................................................................................ 139 Removing the page borders .............................................................................. 140 Adding color to a table cell .............................................................................. 141
Nested tables ................................................................................................................ 143 Aligning tables and content .................................................................................... 144 Summary and what's to come ................................................................................ 147
5 Saving time with Dreamweaver 149
ln this chapter... . ......................................................................................................... 149 Hypertinking our graphics ........................................................................................ 150
Image maps ............................................................................................................ 152 lntroducing templates .............................................................................................. 154 Using a site map .......................................................................................................... 157
TABLE OF CONTENTS
Applying a template to a page .............................................................................. 160 Using Cascading Style Sheets .................................................................................. 164
Creating a new CSS document ........................................................................ 164 Applying the styles .............................................................................................. 168 Attaching an existing CSS to a document .................................................... 170
Adding a textlink ...................................................................................................... 174 Rollover effects on text links ............................................................................ 177
6 More advanced web techniques 181
ln this chapter ............................................................................................................. 181 Using behaviors .......................................................................................................... 182
Another method of creating rollovers .......................................................... 187 Updating between Photoshop and Dreamweaver ............................................ 189 Using Transparency .................................................................................................... 192
Separating an object from its background .................................................. 193 Method #1 - Magie Wand ................................................................................ 193 Method #2 - The Extract tool .......................................................................... 194
Creating a transparent image for the web .......................................................... 197 Animation ...................................................................................................................... 202 Creating an Animated Rollover .............................................................................. 209
Optimizing the slices .......................................................................................... 212
7 Getting your site online 217
ln this chapter .............................................................................................................. 217 Domain name ................................................................................................................ 218
Web Forwarding .................................................................................................... 219 Registering your name ................................................................................................ 219 Web hosting .................................................................................................................. 221
How much web space? ........................................................................................ 222 How much Bandwidth? ........................................................................................ 223 E-mail ........................................................................................................................ 223 Support .................................................................................................................... 224 Dynamic capability ................................................................................................ 224 Control Panel .......................................................................................................... 224
Sign up! .......................................................................................................................... 225 Uploading with Dreamweaver .................................................................................. 225 Connecting to the web server .................................................................................. 226 Uploading your files .................................................................................................... 229 Matehing content ........................................................................................................ 231
Photoshop and Dreamweaver Pro Tips 235
ln this section ............................................................................................................... 235 1. Keep all original PSD files .................................................................................... 236 2. Keep a current back up of your site ................................................................ 236 3. Keep backups of 'semi-final' sites .................................................................... 237
FROM PHOTOSHOP TO DREAMWEAVER: 3 Steps to Great Visual Web Design
4. Keep a copy of files with client records .......................................................... 237 5. Don't give clients access to areas they don't need ...................................... 238 6. Document your processes .................................................................................. 238 7. Consider your update schedule ........................................................................ 238 8. Create custom swatch palettes for projects .................................................. 239 9. Play around with optimization .......................................................................... 240 1 0. Keep an eye on size ............................................................................................ 241 11. Clean up code ...................................................................................................... 242 12. Upload and test .................................................................................................... 242 13. Know how to use theSynchronize command .............................................. 243 14. Take advantage of automation ........................................................................ 244 15. join a user group or mailing Iist ...................................................................... 245 16. Take it further ...................................................................................................... 246 17. Last but not least... . ............................................................................................. 248
Index 251


Welcome
Welcome to From Photoshop To Dreamweaver. ln just 250 pages time. you'll be effortlessly designing websites using the two best design tools out there, and you'll be effectively and efficiently planning, optimizing and publishing websites before you know it.
You'll want to get started as soon as possible so we don't intend to keep you waiting; there's just a few quick things you should know before you get going.
The Book Format The book is sorted into three sections, reflecting our easy three-step process:
Plonond Design
Create and Str..wne
Erilanceand Publish
Plan and Design - Here we'll be mainly using Photoshop to conjure the visuals of our site, drafting some Iayouts and designing buttons, and tabs, before adding in images and placeholders for text.
Create and Streamline- Using lmageReady, we'll be optimizing our site for the Web and looking at some different ways to add interactivity. Then, in Dreamweaver, we'll show you how to streamline your processes and save a tot of time.
Enhance and Publish - Still mainly in Dreamweaver in this last section, we'll add some advanced effects as well as some animation in lmageReady, before taking you step-by-step through the process of getting your website online. We finish off with nearly 20 top professional tips for getting the most from your new skills.
We don't use very many styles throughout the book, but we do emphasize special tips of particularly important points like this:
This is a tip; remember me, and maybe even pass me onto your friends!
2
Support and Feedback All books from friends of ED aim to be easy to follow and without errors. However, if you do run into problems, don't hesitate to e-mail us - our support is fast, friendly, and free.
You can reach us at [email protected], quoting the last four digits of the ISBN in the subject of the e-mail (that's 0578 in this case). lf you're having technical problems with a specific file that you've created from an exercise, it can sometimes help to include a copy of that file with your mail.
Even if our dedicated reader support team is unable to solve your problern immediately, your queries will be passed onto the people who put the book together - the editors and authors - to solve.
Technical queries aside, we'd Iove to hear from you, whether it's to request future books, ask about friends of ED, or tell us about the sites you went on to create after reading From Photoshop to Dreamweaver.
To tell us a bit about yourself and make comments about the book, why not fill out the reply card at the back and send it to us!
Friends of ED also run a wide range of design community forums at www.friendsofed.com/forums. Head along there for some information, inspiration or just plain chat. and don't forget to keep visiting www.friendsofed.com for news, more books, sample chapters, downloads, author interviews and more!
OK, that's enough info to get you started. Turn the page and we'll start our journey araund the world of possibilities Photoshop, ImageReady and Dreamweaver have to offer.
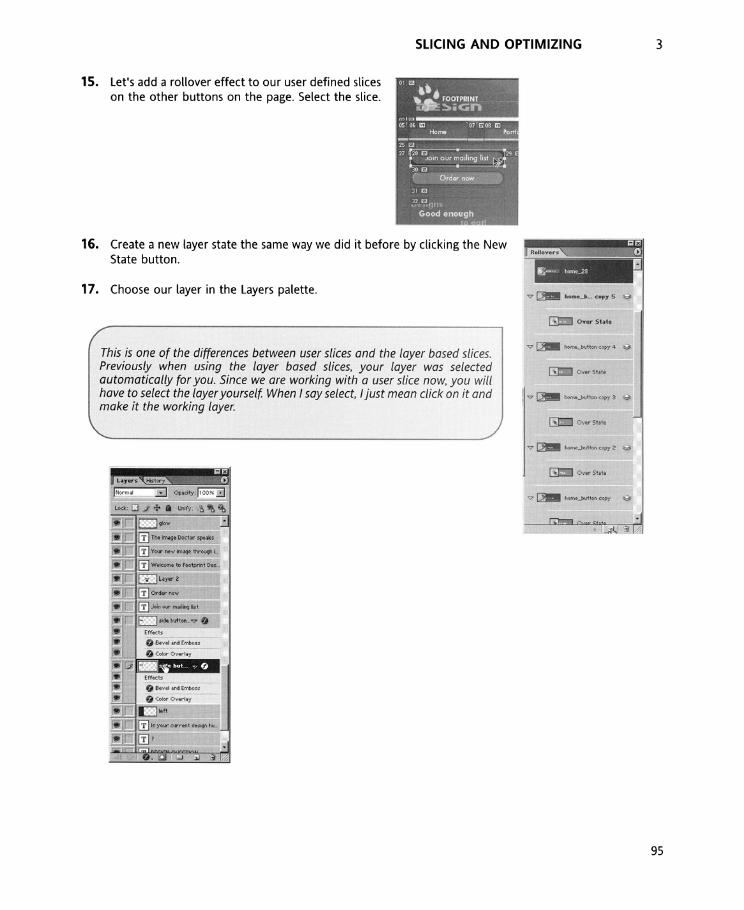
15. let's add a rollover effect to our user defined slices an the other buttans on the page. Select the slice.
SLICING AND OPTIMIZING
16. Create a new layer state the same way we did it before by clicking the New State button.
17. Choose our layer in the layers palette.
This is one of the differences between user slices and the layer based slices. Previously when using the /ayer based slices, your layer was se/ected automatical/y tor you. Since we are working with a user slice now, you will have to se/ect the /ayer yourself. When I say select, I just mean c/ick on it and make it the working layer.
3
95