front cover configuring and managing aix clusters using xcat 2 · configuring and managing aix...
TRANSCRIPT

ibm.com/redbooks
Configuring and Managing AIX Clusters Using xCAT 2
Octavian LascuTim Donovan
Saul HillerSimeon McAleer
László NieszSean Saunders
Kai WuPeter Zutenis
An xCAT guide for CSM system administrators with advanced features
How to transition your AIX cluster to xCAT
xCAT 2 deployment guide for a new AIX cluster
Front cover


Configuring and Managing AIX Clusters Using xCAT 2
October 2009
International Technical Support Organization
SG24-7766-00

© Copyright International Business Machines Corporation 2009. All rights reserved.Note to U.S. Government Users Restricted Rights -- Use, duplication or disclosure restricted by GSA ADPSchedule Contract with IBM Corp.
First Edition (October 2009)
This edition applies to Version 2, Release 2, Modification 1 of Extreme Cluster Administration Tool (xCAT 2) for AIX.
Note: Before using this information and the product it supports, read the information in “Notices” on page ix.

Contents
Notices . . . . . . . . . . . . . . . . . . . . . . . . . . . . . . . . . . . . . . . . . . . . . . . . . . . . . . . ixTrademarks . . . . . . . . . . . . . . . . . . . . . . . . . . . . . . . . . . . . . . . . . . . . . . . . . . . . x
Preface . . . . . . . . . . . . . . . . . . . . . . . . . . . . . . . . . . . . . . . . . . . . . . . . . . . . . . . xiThe team that wrote this book . . . . . . . . . . . . . . . . . . . . . . . . . . . . . . . . . . . . . . xiBecome a published author . . . . . . . . . . . . . . . . . . . . . . . . . . . . . . . . . . . . . . . xiiiComments welcome. . . . . . . . . . . . . . . . . . . . . . . . . . . . . . . . . . . . . . . . . . . . . xiv
Part 1. Introduction . . . . . . . . . . . . . . . . . . . . . . . . . . . . . . . . . . . . . . . . . . . . . . . . . . . . . . . . . . 1
Chapter 1. Introduction to clustering . . . . . . . . . . . . . . . . . . . . . . . . . . . . . . 31.1 Clustering concepts. . . . . . . . . . . . . . . . . . . . . . . . . . . . . . . . . . . . . . . . . . . 4
1.1.1 Cluster types . . . . . . . . . . . . . . . . . . . . . . . . . . . . . . . . . . . . . . . . . . . . 41.1.2 Cluster components . . . . . . . . . . . . . . . . . . . . . . . . . . . . . . . . . . . . . . 51.1.3 Cluster nodes . . . . . . . . . . . . . . . . . . . . . . . . . . . . . . . . . . . . . . . . . . . 71.1.4 Cluster networks . . . . . . . . . . . . . . . . . . . . . . . . . . . . . . . . . . . . . . . . . 91.1.5 Hardware, power control, and console access . . . . . . . . . . . . . . . . . 11
1.2 Suggested cluster diagram . . . . . . . . . . . . . . . . . . . . . . . . . . . . . . . . . . . . 131.3 Managing high performance computing (HPC) clusters . . . . . . . . . . . . . . 15
1.3.1 What is CSM . . . . . . . . . . . . . . . . . . . . . . . . . . . . . . . . . . . . . . . . . . . 151.3.2 xCAT 2: An 0pen source method for cluster management . . . . . . . . 161.3.3 xCAT 1.1.4 and CSM to xCAT 2 - History and evolution . . . . . . . . . 171.3.4 IBM (Systems) Director vs. xCAT 2 . . . . . . . . . . . . . . . . . . . . . . . . . 18
Chapter 2. xCAT 2 architecture . . . . . . . . . . . . . . . . . . . . . . . . . . . . . . . . . . 212.1 Overview of xCAT 2 features . . . . . . . . . . . . . . . . . . . . . . . . . . . . . . . . . . 22
2.1.1 Operating systems and distributions supported . . . . . . . . . . . . . . . . 232.1.2 Supported hardware . . . . . . . . . . . . . . . . . . . . . . . . . . . . . . . . . . . . . 242.1.3 Hardware control . . . . . . . . . . . . . . . . . . . . . . . . . . . . . . . . . . . . . . . . 242.1.4 Hierarchical clusters . . . . . . . . . . . . . . . . . . . . . . . . . . . . . . . . . . . . . 25
2.2 Overview of the xCAT 2 architecture. . . . . . . . . . . . . . . . . . . . . . . . . . . . . 262.2.1 xCAT 2 database . . . . . . . . . . . . . . . . . . . . . . . . . . . . . . . . . . . . . . . 282.2.2 xCAT 2 directory structure . . . . . . . . . . . . . . . . . . . . . . . . . . . . . . . . 302.2.3 xCAT network fundamentals . . . . . . . . . . . . . . . . . . . . . . . . . . . . . . . 312.2.4 Monitoring infrastructure . . . . . . . . . . . . . . . . . . . . . . . . . . . . . . . . . . 332.2.5 Parallel remote command execution and file copy, File Sync. . . . . . 372.2.6 Additional features . . . . . . . . . . . . . . . . . . . . . . . . . . . . . . . . . . . . . . 38
2.3 Support offering terms. . . . . . . . . . . . . . . . . . . . . . . . . . . . . . . . . . . . . . . . 39
© Copyright IBM Corp. 2009. All rights reserved. iii
Chapter 3. CSM and xCAT functional comparison . . . . . . . . . . . . . . . . . . . 413.1 Architectural comparison. . . . . . . . . . . . . . . . . . . . . . . . . . . . . . . . . . . . . . 42
3.1.1 Hierarchical versus flat . . . . . . . . . . . . . . . . . . . . . . . . . . . . . . . . . . . 423.1.2 Modular structure . . . . . . . . . . . . . . . . . . . . . . . . . . . . . . . . . . . . . . . 423.1.3 Database. . . . . . . . . . . . . . . . . . . . . . . . . . . . . . . . . . . . . . . . . . . . . . 433.1.4 Notification infrastructure . . . . . . . . . . . . . . . . . . . . . . . . . . . . . . . . . 443.1.5 Deploying both diskless and diskful nodes . . . . . . . . . . . . . . . . . . . . 443.1.6 Automatic setup of services . . . . . . . . . . . . . . . . . . . . . . . . . . . . . . . 443.1.7 Role-based system administration . . . . . . . . . . . . . . . . . . . . . . . . . . 443.1.8 Dynamic nodegroups . . . . . . . . . . . . . . . . . . . . . . . . . . . . . . . . . . . . 443.1.9 Secondary adapters . . . . . . . . . . . . . . . . . . . . . . . . . . . . . . . . . . . . . 453.1.10 RMC monitoring . . . . . . . . . . . . . . . . . . . . . . . . . . . . . . . . . . . . . . . 45
3.2 Features . . . . . . . . . . . . . . . . . . . . . . . . . . . . . . . . . . . . . . . . . . . . . . . . . . 543.3 Hardware and software considerations . . . . . . . . . . . . . . . . . . . . . . . . . . . 553.4 Hardware considerations. . . . . . . . . . . . . . . . . . . . . . . . . . . . . . . . . . . . . . 553.5 SW considerations . . . . . . . . . . . . . . . . . . . . . . . . . . . . . . . . . . . . . . . . . . 553.6 Database . . . . . . . . . . . . . . . . . . . . . . . . . . . . . . . . . . . . . . . . . . . . . . . . . . 563.7 Administrative task comparison. . . . . . . . . . . . . . . . . . . . . . . . . . . . . . . . . 59
3.7.1 Table comparing functionality . . . . . . . . . . . . . . . . . . . . . . . . . . . . . . 593.7.2 Comparison of common admin commands. . . . . . . . . . . . . . . . . . . . 62
Part 2. Implementation . . . . . . . . . . . . . . . . . . . . . . . . . . . . . . . . . . . . . . . . . . . . . . . . . . . . . . 69
Chapter 4. CSM to xCAT 2 transition . . . . . . . . . . . . . . . . . . . . . . . . . . . . . . 714.1 Introduction to implementation scenarios . . . . . . . . . . . . . . . . . . . . . . . . . 72
4.1.1 Hardware. . . . . . . . . . . . . . . . . . . . . . . . . . . . . . . . . . . . . . . . . . . . . . 724.1.2 Software . . . . . . . . . . . . . . . . . . . . . . . . . . . . . . . . . . . . . . . . . . . . . . 724.1.3 Test environment diagram . . . . . . . . . . . . . . . . . . . . . . . . . . . . . . . . 734.1.4 Scenarios description . . . . . . . . . . . . . . . . . . . . . . . . . . . . . . . . . . . . 73
4.2 Preparing your CSM cluster for transition . . . . . . . . . . . . . . . . . . . . . . . . . 764.2.1 Things to check before the transition . . . . . . . . . . . . . . . . . . . . . . . . 764.2.2 Remote shell/copy back-end considerations. . . . . . . . . . . . . . . . . . . 784.2.3 Backing up CSM data . . . . . . . . . . . . . . . . . . . . . . . . . . . . . . . . . . . . 784.2.4 Saving secondary adapter information . . . . . . . . . . . . . . . . . . . . . . . 824.2.5 Save RMC monitoring data . . . . . . . . . . . . . . . . . . . . . . . . . . . . . . . . 83
4.3 Transitioning nodes to a different MN . . . . . . . . . . . . . . . . . . . . . . . . . . . . 844.3.1 Preparing the xCAT 2 management node (MN) for transition. . . . . . 844.3.2 Gather CSM data using the csm2xcat script on CSM MS . . . . . . . . 894.3.3 Update /etc/hosts . . . . . . . . . . . . . . . . . . . . . . . . . . . . . . . . . . . . . . . 904.3.4 Set up user and group on the new xCAT MN . . . . . . . . . . . . . . . . . . 904.3.5 Configure remote shell . . . . . . . . . . . . . . . . . . . . . . . . . . . . . . . . . . . 914.3.6 Check the ulimit. . . . . . . . . . . . . . . . . . . . . . . . . . . . . . . . . . . . . . . . . 914.3.7 Enabling NTP . . . . . . . . . . . . . . . . . . . . . . . . . . . . . . . . . . . . . . . . . . 92
iv Configuring and Managing AIX Clusters Using xCAT 2

4.3.8 Enabling inetd entries . . . . . . . . . . . . . . . . . . . . . . . . . . . . . . . . . . . . 924.3.9 Define HMC and VIO servers in xCAT . . . . . . . . . . . . . . . . . . . . . . . 934.3.10 Discovering HW in xCAT (rscan) . . . . . . . . . . . . . . . . . . . . . . . . . . 944.3.11 Defining the nodes (populating the tables) . . . . . . . . . . . . . . . . . . . 944.3.12 Configuring and testing conserver . . . . . . . . . . . . . . . . . . . . . . . . . 994.3.13 Testing remote power control (rpower) . . . . . . . . . . . . . . . . . . . . . 1004.3.14 Configuring NIM master and creating NIM resources . . . . . . . . . . 1004.3.15 Add installp bundles to xCAT osimage . . . . . . . . . . . . . . . . . . . . . 1024.3.16 Define xCAT networks . . . . . . . . . . . . . . . . . . . . . . . . . . . . . . . . . 1024.3.17 Create NIM secondary adapter definitions . . . . . . . . . . . . . . . . . . 1024.3.18 Creating NIM client and group definitions . . . . . . . . . . . . . . . . . . . 1034.3.19 Removing nodes from the NIM configuration on CSM MS . . . . . . 1054.3.20 Register the nodes with the new xCAT NIM master . . . . . . . . . . . 1054.3.21 Install xCAT dependency packages on the client nodes. . . . . . . . 1064.3.22 Removing the nodes from CSM . . . . . . . . . . . . . . . . . . . . . . . . . . 1074.3.23 Setting up syslog. . . . . . . . . . . . . . . . . . . . . . . . . . . . . . . . . . . . . . 1094.3.24 Prepare SSH keys for distribution to the nodes . . . . . . . . . . . . . . 1094.3.25 Run the xcataixscript utility on the nodes . . . . . . . . . . . . . . . . . . . 1094.3.26 Configure and run postscripts with updatenode . . . . . . . . . . . . . . 1104.3.27 Clean up CSM NTP configuration . . . . . . . . . . . . . . . . . . . . . . . . . 1114.3.28 Configure RMC monitoring . . . . . . . . . . . . . . . . . . . . . . . . . . . . . . 1114.3.29 Configure replacement for CFM in xCAT . . . . . . . . . . . . . . . . . . . 1134.3.30 Restore customized RMC monitoring data in the new cluster . . . 114
4.4 Reverting a transitioned node back into CSM . . . . . . . . . . . . . . . . . . . . . 1164.4.1 Remove node from xCAT RMC monitoring. . . . . . . . . . . . . . . . . . . 1164.4.2 Remove machine definition from NIM on xCAT MN . . . . . . . . . . . . 1164.4.3 Remove secondary adapters script for the node in NIM . . . . . . . . . 1174.4.4 Remove node definition in xCAT. . . . . . . . . . . . . . . . . . . . . . . . . . . 1184.4.5 Remove node entry from the conserver configuration on xCAT . . . 1194.4.6 Remove the xCAT aixpostscript from /etc/inittab . . . . . . . . . . . . . . 1194.4.7 Add the node to the CSM cluster . . . . . . . . . . . . . . . . . . . . . . . . . . 1194.4.8 Performing CSM post-installation tasks on the node . . . . . . . . . . . 1214.4.9 Verify additional services . . . . . . . . . . . . . . . . . . . . . . . . . . . . . . . . 1224.4.10 Restore the syslog configuration if needed . . . . . . . . . . . . . . . . . . 1224.4.11 Define resources in NIM on CSM MS . . . . . . . . . . . . . . . . . . . . . . 1224.4.12 Register the node with the NIM master on CSM MS . . . . . . . . . . 123
4.5 Steps for a same MS/MN transition. . . . . . . . . . . . . . . . . . . . . . . . . . . . . 1244.5.1 Installing xCAT . . . . . . . . . . . . . . . . . . . . . . . . . . . . . . . . . . . . . . . . 1254.5.2 Gathering CSM data using csm2xcat . . . . . . . . . . . . . . . . . . . . . . . 1254.5.3 Building a nodelist file . . . . . . . . . . . . . . . . . . . . . . . . . . . . . . . . . . . 1254.5.4 Uninstalling CSM and cleaning up the nodes . . . . . . . . . . . . . . . . . 1254.5.5 Remove CSM bin directory entry from the PATH environment. . . . 1254.5.6 Setup remote shell in xCAT . . . . . . . . . . . . . . . . . . . . . . . . . . . . . . 126
Contents v

4.5.7 Set up NTP . . . . . . . . . . . . . . . . . . . . . . . . . . . . . . . . . . . . . . . . . . . 1264.5.8 Define HMC and VIO servers in xCAT . . . . . . . . . . . . . . . . . . . . . . 1264.5.9 Run rscan to gather xCAT data for node definition . . . . . . . . . . . . . 1274.5.10 Use the convert.sh tool to define nodes and CECs in xCAT. . . . . 1274.5.11 Setting up and testing the conserver. . . . . . . . . . . . . . . . . . . . . . . 1274.5.12 Testing rpower . . . . . . . . . . . . . . . . . . . . . . . . . . . . . . . . . . . . . . . 1284.5.13 Create operating system images . . . . . . . . . . . . . . . . . . . . . . . . . 128
4.6 Define xCAT networks. . . . . . . . . . . . . . . . . . . . . . . . . . . . . . . . . . . . . . . 1314.6.1 Creating NIM clients and group definitions . . . . . . . . . . . . . . . . . . . 1314.6.2 Install xCAT dependency packages on computing nodes . . . . . . . 1314.6.3 Perform xCAT post-installation tasks on computing nodes. . . . . . . 1324.6.4 Set up customization scripts . . . . . . . . . . . . . . . . . . . . . . . . . . . . . . 1324.6.5 Remove the CSM NTP configuration . . . . . . . . . . . . . . . . . . . . . . . 1324.6.6 Set up xCAT RMC monitoring. . . . . . . . . . . . . . . . . . . . . . . . . . . . . 1324.6.7 Configure replacement for CFM . . . . . . . . . . . . . . . . . . . . . . . . . . . 132
4.7 Post transition checks . . . . . . . . . . . . . . . . . . . . . . . . . . . . . . . . . . . . . . . 1334.7.1 Checking administration tasks . . . . . . . . . . . . . . . . . . . . . . . . . . . . 1334.7.2 HPC stack . . . . . . . . . . . . . . . . . . . . . . . . . . . . . . . . . . . . . . . . . . . . 148
Chapter 5. Installing xCAT 2 on a new cluster . . . . . . . . . . . . . . . . . . . . . 1535.1 Description of the test environment. . . . . . . . . . . . . . . . . . . . . . . . . . . . . 1545.2 Installing and configuring xCAT 2 . . . . . . . . . . . . . . . . . . . . . . . . . . . . . . 156
5.2.1 Preparing the management node . . . . . . . . . . . . . . . . . . . . . . . . . . 1565.2.2 Switching xCAT SQLite database to MySQL . . . . . . . . . . . . . . . . . 1655.2.3 Additional configuration of the management node . . . . . . . . . . . . . 1785.2.4 Creation of LPARs and nodes. . . . . . . . . . . . . . . . . . . . . . . . . . . . . 1865.2.5 Creation of NIM and xCAT install resources . . . . . . . . . . . . . . . . . . 194
5.3 Installing the nodes . . . . . . . . . . . . . . . . . . . . . . . . . . . . . . . . . . . . . . . . . 1985.3.1 Configure and install a service node . . . . . . . . . . . . . . . . . . . . . . . . 1985.3.2 Installing diskful nodes from the service node . . . . . . . . . . . . . . . . 2045.3.3 Installing diskful nodes from the management node. . . . . . . . . . . . 2075.3.4 Installing diskless nodes . . . . . . . . . . . . . . . . . . . . . . . . . . . . . . . . . 209
5.4 xCAT 2 with System p blades running AIX . . . . . . . . . . . . . . . . . . . . . . . 2255.4.1 xCAT on non-HMC-controlled System p hardware . . . . . . . . . . . . . 2255.4.2 Installing the xCAT packages on the management node . . . . . . . . 2275.4.3 Configuring the xCAT management node. . . . . . . . . . . . . . . . . . . . 2295.4.4 Configuration and discovery of the cluster’s resources. . . . . . . . . . 2325.4.5 Configuring NIM resources and installing compute nodes . . . . . . . 240
Part 3. Managing . . . . . . . . . . . . . . . . . . . . . . . . . . . . . . . . . . . . . . . . . . . . . . . . . . . . . . . . . . 245
Chapter 6. xCAT 2 - advanced administrative topics . . . . . . . . . . . . . . . . 2476.1 Using xCAT 2 to perform additional SW installation tasks . . . . . . . . . . . 248
6.1.1 Updating OpenSSL and OpenSSH on xCAT nodes . . . . . . . . . . . . 248
vi Configuring and Managing AIX Clusters Using xCAT 2

6.1.2 Installing new software . . . . . . . . . . . . . . . . . . . . . . . . . . . . . . . . . . 2526.1.3 Installing additional software using xCAT postscripts . . . . . . . . . . . 252
6.2 Installing monitoring software in xCAT . . . . . . . . . . . . . . . . . . . . . . . . . . 2586.2.1 Defining monitoring servers . . . . . . . . . . . . . . . . . . . . . . . . . . . . . . 2606.2.2 Configure and start monitoring during node deployment . . . . . . . . 2626.2.3 Configure and start monitoring on a running node . . . . . . . . . . . . . 2626.2.4 Enable RMC monitoring . . . . . . . . . . . . . . . . . . . . . . . . . . . . . . . . . 2636.2.5 Enable monitoring with Ganglia . . . . . . . . . . . . . . . . . . . . . . . . . . . 2676.2.6 Other software monitoring options . . . . . . . . . . . . . . . . . . . . . . . . . 271
6.3 xCAT 2's distributed commands . . . . . . . . . . . . . . . . . . . . . . . . . . . . . . . 2716.4 Using xCAT to upgrade System p firmware . . . . . . . . . . . . . . . . . . . . . . 2736.5 Adding GPFS to a diskless xCAT cluster . . . . . . . . . . . . . . . . . . . . . . . . 279
6.5.1 Configuring GPFS from scratch on diskless nodes. . . . . . . . . . . . . 2816.5.2 How to recover GPFS membership . . . . . . . . . . . . . . . . . . . . . . . . 285
6.6 PowerVM deployment and management using xCAT. . . . . . . . . . . . . . . 2886.6.1 VIO Server backup and restore methods . . . . . . . . . . . . . . . . . . . . 2886.6.2 Common tasks to create the LPAR for the VIO Server. . . . . . . . . . 2896.6.3 Method 1 - using mksysb restore . . . . . . . . . . . . . . . . . . . . . . . . . . 2916.6.4 Method 2 - using NIMOL . . . . . . . . . . . . . . . . . . . . . . . . . . . . . . . . . 2986.6.5 Common tasks after the VIO Server is installed . . . . . . . . . . . . . . . 3026.6.6 LPAR deployment . . . . . . . . . . . . . . . . . . . . . . . . . . . . . . . . . . . . . . 305
6.7 Databases - SQLite and MySQL . . . . . . . . . . . . . . . . . . . . . . . . . . . . . . . 3066.8 Clustering security. . . . . . . . . . . . . . . . . . . . . . . . . . . . . . . . . . . . . . . . . . 307
6.8.1 Security considerations in an HPC environment. . . . . . . . . . . . . . . 3076.8.2 Networking security . . . . . . . . . . . . . . . . . . . . . . . . . . . . . . . . . . . . . 3086.8.3 Remote command execution security . . . . . . . . . . . . . . . . . . . . . . . 3096.8.4 xCAT access control via SSL and policies . . . . . . . . . . . . . . . . . . . 3096.8.5 Securing RSCT and RMC . . . . . . . . . . . . . . . . . . . . . . . . . . . . . . . . 3136.8.6 HW control and remote console security . . . . . . . . . . . . . . . . . . . . 3136.8.7 Users and passwords . . . . . . . . . . . . . . . . . . . . . . . . . . . . . . . . . . . 3136.8.8 Application security . . . . . . . . . . . . . . . . . . . . . . . . . . . . . . . . . . . . . 313
6.9 Updating xCAT using latest development snaphots . . . . . . . . . . . . . . . . 3136.9.1 Determine the currently installed level . . . . . . . . . . . . . . . . . . . . . . 3146.9.2 Obtain the latest code . . . . . . . . . . . . . . . . . . . . . . . . . . . . . . . . . . . 3146.9.3 Backing up the xCAT database. . . . . . . . . . . . . . . . . . . . . . . . . . . . 3146.9.4 Updating dependency RPMs . . . . . . . . . . . . . . . . . . . . . . . . . . . . . 3156.9.5 Verify the install . . . . . . . . . . . . . . . . . . . . . . . . . . . . . . . . . . . . . . . . 3166.9.6 Updating xCAT on a service node . . . . . . . . . . . . . . . . . . . . . . . . . 319
6.10 Data to gather for support . . . . . . . . . . . . . . . . . . . . . . . . . . . . . . . . . . . 325
Part 4. Appendixes . . . . . . . . . . . . . . . . . . . . . . . . . . . . . . . . . . . . . . . . . . . . . . . . . . . . . . . . 331
Appendix A. Configuring syslog-ng . . . . . . . . . . . . . . . . . . . . . . . . . . . . . 333
Contents vii

Appendix B. Additional material . . . . . . . . . . . . . . . . . . . . . . . . . . . . . . . . 341Locating the Web material . . . . . . . . . . . . . . . . . . . . . . . . . . . . . . . . . . . . . . . 341Using the Web material . . . . . . . . . . . . . . . . . . . . . . . . . . . . . . . . . . . . . . . . . 341
System requirements for downloading the Web material . . . . . . . . . . . . . 342How to use the Web material . . . . . . . . . . . . . . . . . . . . . . . . . . . . . . . . . . 342
Related publications . . . . . . . . . . . . . . . . . . . . . . . . . . . . . . . . . . . . . . . . . . 343IBM Redbooks . . . . . . . . . . . . . . . . . . . . . . . . . . . . . . . . . . . . . . . . . . . . . . . . 343Online resources . . . . . . . . . . . . . . . . . . . . . . . . . . . . . . . . . . . . . . . . . . . . . . 343How to get Redbooks . . . . . . . . . . . . . . . . . . . . . . . . . . . . . . . . . . . . . . . . . . . 343Help from IBM . . . . . . . . . . . . . . . . . . . . . . . . . . . . . . . . . . . . . . . . . . . . . . . . 344
Index . . . . . . . . . . . . . . . . . . . . . . . . . . . . . . . . . . . . . . . . . . . . . . . . . . . . . . . 345
viii Configuring and Managing AIX Clusters Using xCAT 2

Notices
This information was developed for products and services offered in the U.S.A.
IBM may not offer the products, services, or features discussed in this document in other countries. Consult your local IBM representative for information on the products and services currently available in your area. Any reference to an IBM product, program, or service is not intended to state or imply that only that IBM product, program, or service may be used. Any functionally equivalent product, program, or service that does not infringe any IBM intellectual property right may be used instead. However, it is the user's responsibility to evaluate and verify the operation of any non-IBM product, program, or service.
IBM may have patents or pending patent applications covering subject matter described in this document. The furnishing of this document does not give you any license to these patents. You can send license inquiries, in writing, to: IBM Director of Licensing, IBM Corporation, North Castle Drive, Armonk, NY 10504-1785 U.S.A.
The following paragraph does not apply to the United Kingdom or any other country where such provisions are inconsistent with local law: INTERNATIONAL BUSINESS MACHINES CORPORATION PROVIDES THIS PUBLICATION "AS IS" WITHOUT WARRANTY OF ANY KIND, EITHER EXPRESS OR IMPLIED, INCLUDING, BUT NOT LIMITED TO, THE IMPLIED WARRANTIES OF NON-INFRINGEMENT, MERCHANTABILITY OR FITNESS FOR A PARTICULAR PURPOSE. Some states do not allow disclaimer of express or implied warranties in certain transactions, therefore, this statement may not apply to you.
This information could include technical inaccuracies or typographical errors. Changes are periodically made to the information herein; these changes will be incorporated in new editions of the publication. IBM may make improvements and/or changes in the product(s) and/or the program(s) described in this publication at any time without notice.
Any references in this information to non-IBM Web sites are provided for convenience only and do not in any manner serve as an endorsement of those Web sites. The materials at those Web sites are not part of the materials for this IBM product and use of those Web sites is at your own risk.
IBM may use or distribute any of the information you supply in any way it believes appropriate without incurring any obligation to you.
Information concerning non-IBM products was obtained from the suppliers of those products, their published announcements or other publicly available sources. IBM has not tested those products and cannot confirm the accuracy of performance, compatibility or any other claims related to non-IBM products. Questions on the capabilities of non-IBM products should be addressed to the suppliers of those products.
This information contains examples of data and reports used in daily business operations. To illustrate them as completely as possible, the examples include the names of individuals, companies, brands, and products. All of these names are fictitious and any similarity to the names and addresses used by an actual business enterprise is entirely coincidental.
COPYRIGHT LICENSE:
This information contains sample application programs in source language, which illustrate programming techniques on various operating platforms. You may copy, modify, and distribute these sample programs in any form without payment to IBM, for the purposes of developing, using, marketing or distributing application programs conforming to the application programming interface for the operating platform for which the sample programs are written. These examples have not been thoroughly tested under all conditions. IBM, therefore, cannot guarantee or imply reliability, serviceability, or function of these programs.
© Copyright IBM Corp. 2009. All rights reserved. ix

Trademarks
IBM, the IBM logo, and ibm.com are trademarks or registered trademarks of International Business Machines Corporation in the United States, other countries, or both. These and other IBM trademarked terms are marked on their first occurrence in this information with the appropriate symbol (® or ™), indicating US registered or common law trademarks owned by IBM at the time this information was published. Such trademarks may also be registered or common law trademarks in other countries. A current list of IBM trademarks is available on the Web at http://www.ibm.com/legal/copytrade.shtml
The following terms are trademarks of the International Business Machines Corporation in the United States, other countries, or both:
1350™AIX 5L™AIX®BladeCenter®DB2®Focal Point™GPFS™HACMP™IBM®
iDataPlex™LoadLeveler®Power Systems™POWER4™POWER5™POWER6™PowerVM™pSeries®Redbooks®
Redbooks (logo) ®RS/6000®System p5®System p®System x®Tivoli®xSeries®
The following terms are trademarks of other companies:
AMD, the AMD Arrow logo, and combinations thereof, are trademarks of Advanced Micro Devices, Inc.
InfiniBand, and the InfiniBand design marks are trademarks and/or service marks of the InfiniBand Trade Association.
SUSE, the Novell logo, and the N logo are registered trademarks of Novell, Inc. in the United States and other countries.
Red Hat, and the Shadowman logo are trademarks or registered trademarks of Red Hat, Inc. in the U.S. and other countries.
MySQL, and all Java-based trademarks are trademarks of Sun Microsystems, Inc. in the United States, other countries, or both.
Microsoft, MS, Windows, and the Windows logo are trademarks of Microsoft Corporation in the United States, other countries, or both.
Intel, Intel logo, Intel Inside logo, and Intel Centrino logo are trademarks or registered trademarks of Intel Corporation or its subsidiaries in the United States, other countries, or both.
UNIX is a registered trademark of The Open Group in the United States and other countries.
Linux is a trademark of Linus Torvalds in the United States, other countries, or both.
Other company, product, or service names may be trademarks or service marks of others.
x Configuring and Managing AIX Clusters Using xCAT 2

Preface
This IBM® Redbooks® publication positions the new Extreme Cluster Administration Toolkit 2.x (xCAT 2) against the IBM Cluster Systems Management (CSM) for IBM Power Systems™ running AIX in a High Performance Computing (HPC) environment.
This book provides information to help you:
� Understand, from a broad perspective, a new clustering management architecture. We emphasize the benefits of this new solution for deploying HPC clusters of large numbers of nodes.
� Install and customize the new xCAT cluster management in various configurations.
� Design and create a solution to migrate from existing CSM configurations to xCAT-managed clusters for IBM System p platforms running AIX.
The team that wrote this book
This book was produced by a team of specialists from around the world working at the International Technical Support Organization, Poughkeepsie Center.
Octavian Lascu is a Project Leader associated with the ITSO, Poughkeepsie Center. He writes extensively and teaches IBM classes worldwide on all areas of IBM System p® and Linux® clusters. His areas of expertise include High Performance Computing, Blue Gene® and Clusters. Before joining ITSO, Octavian worked in IBM Global Services Romania as a server and storage Services Manager. He holds a Masters degree in Electronic Engineering from the Polytechnical Institute in Bucharest, and is also an IBM Certified Advanced Technical Expert in AIX/PSSP/HACMP™. He has worked for IBM since 1992.
Tim Donovan is an Senior IT Specialist working for the Software Business's Emerging Technology Services (ETS) Organisation, working on projects in a number of Technology areas, including Cloud, High Performance Computing, Grid, on both IBM Power, and Intel platforms utilising AIX or Linux. The mission of ETS is to work with other parts of IBM in helping their customers implement solutions, develop new solutions or products and assist IBM's Business units in bid situations. Before ETS, he worked for 10 years in the IBM Developer Relations Division part of IBM's Business Partner program, in a technical role
© Copyright IBM Corp. 2009. All rights reserved. xi

supporting Independent Solutions Vendors (ISV's) with enabling their applications, on AIX, Linux, and a range of IBM technologies.
Saul Hiller is an Advisory Software Engineer working for IBM Global Technology Services in Poughkeepsie NY. He currently provides Level 2 problem determination and technical assistance in the CSM and xCAT environment for System p, and System x platforms as well as RSCT support for System p , System x, and System z environments. He has been in the Service Organization for over 6 years. Saul joined IBM in 1981. Previous experience included many years in both System and Function Test encompassing extensive work with RS/6000 SP and follow-on products.
Simeon McAleer has been with IBM for 6 years . His current role is as an Accredited IT Architect on the IBM World Wide Deep Computing Technical Sales team. In this role, he covers the full IBM server, storage, and middleware portfolio from x86 Linux clusters to Blue Gene systems including GPFS, xCAT, and LoadLeveler. He has expertise in designing solutions for Life Science, Higher Education, Digital Media, and Weather clients. Prior to this position, he worked as a solution architect on the Americas Advanced Technical Sales team configuring and installing Linux clusters as well as educating clients about the use of CSM and xCAT. As part of that team, he helped to install the clusters at the National Geographic Society that are used to power the Genographic project.
László Niesz is an IT Specialist in IBM Hungary, working in the software support organization. He has 12 years of experience in System p clustering. He holds a degree as Computer Programmer from the University of Szeged, Hungary. His areas of expertise include implementation and management of HACMP, and CSM clusters for server consolidation project on System p infrastructures. He also teaches AIX clustering and System P virtualization classes.
Sean Saunders is an HPC Product Support Specialist working in the UK Unix Support Centre and is a member of the Virtual Front End (VFE) support team. He joined IBM in 2000, initially working on NUMA-Q® systems and now mainly supporting the HPC software stack. He also supports AIX® and Linux. He holds a B.Sc.(Hons) degree in Computer Science from Kingston University, England.
Kai Wu works in IBM Systems and Technology Group in Bejing, China as a Field Technical Sales Support for High Performance Computing Clusters. He joined IBM in 2005. He holds a BS in Compute Science from NanKai University, China. He has five years experience in software devemopment on linux platform. Currently he designs and implements System p and System x based HPCs, including HPC software stack and IBM’s General Parallel File System.
Peter Zutenis is a Senior I/T Specialist with IBM Australia who joined IBM ten years ago and is an AIX Certified Systems Administrator. He has just over 29
xii Configuring and Managing AIX Clusters Using xCAT 2

years of experience in Information Technology, mainly in Systems Administration and Management. He works with the Systems Sales team in Australia as a pre-sales Technical Support Specialist focussing on IBM system p. He is also heavily involved with post-sales implementations at IBM's clients. He teaches PowerVM classes to IBM clients. His areas of expertise include AIX, PowerVM, CSM and xCAT.
Thanks to the following people for their contributions to this project:
Bruce M Potter, Linda Mellor, Ling Gao, Lissa Valletta, Robert Simon, Kerry Bossworth,IBM Poughkeepsie
Xiang ZhanIBM China
Andrei VladIBM Romania
William G WhiteInternational Technical Support Organization, Poughkeepsie Center
Alfred Schwab, editorInternational Technical Support Organization, Poughkeepsie Center
Thank you to the authors of the xCAT 2 Guide for the CSM System Administrator, REDP-4437: Andrey Brindeyev, Dino E. Quintero, Velmayil Sermakkani, Robert Simon and Timothy Struble
Become a published author
Join us for a two- to six-week residency program! Help write a book dealing with specific products or solutions, while getting hands-on experience with leading-edge technologies. You will have the opportunity to team with IBM technical professionals, Business Partners, and Clients.
Your efforts will help increase product acceptance and customer satisfaction. As a bonus, you will develop a network of contacts in IBM development labs, and increase your productivity and marketability.
Find out more about the residency program, browse the residency index, and apply online at:
ibm.com/redbooks/residencies.html
Preface xiii

Comments welcome
Your comments are important to us!
We want our books to be as helpful as possible. Send us your comments about this book or other IBM Redbooks publications in one of the following ways:
� Use the online Contact us review Redbooks form found at:
ibm.com/redbooks
� Send your comments in an e-mail to:
� Mail your comments to:
IBM Corporation, International Technical Support OrganizationDept. HYTD Mail Station P0992455 South RoadPoughkeepsie, NY 12601-5400
xiv Configuring and Managing AIX Clusters Using xCAT 2

Part 1 Introduction
In this part we introduce cluster management concepts and discuss xCAT 2 architecture and functionality. We also present a functional comparison between the IBM Cluster Systems Management and xCAT 2.
Part 1
© Copyright IBM Corp. 2009. All rights reserved. 1

2 Configuring and Managing AIX Clusters Using xCAT 2

Chapter 1. Introduction to clustering
This chapter provides a high-level overview of IT cluster computing, including the various components of a cluster. Additionally, it provides an overview of cluster management software including xCAT 2.0.
The topics covered are:
� Cluster concepts
– Cluster types
– HPC Cluster components
• Cluster nodes
• Cluster interconnects
• Hardware control and consoles
� Cluster management software
– Cluster systems management (CSM) software
– xCAT 2.0
– CSM to xCAT transition
– Differentiating IBM Director and xCAT 2.0
1
© Copyright IBM Corp. 2009. All rights reserved. 3

1.1 Clustering concepts
In information technology (IT), a cluster is a group of nodes (computers) that are linked together to provide improved reliability, availability, and/or performance.
While the initial view of a cluster might focus solely on the compute node, a full IT cluster solution is comprised of various node types: the interconnect networks, hardware management, management software, storage, and application software. While each cluster might be slightly different, each of these elements must be included in order to ensure that the system can function as a useful solution.
1.1.1 Cluster types
Despite their varied uses, IT clusters are typically divided into three common types:
� Load Balancing
� High Availability
� High Performance Computing (HPC)
Each cluster type may also be found within one overall cluster solution. For example, a particular environment might utilize a load-balancing cluster of Web servers to provide access to the solution. The system might utilize two servers in a high availability cluster to provide user authentication. Lastly, the solution’s high performance computing cluster may be used to perform the user’s calculation.
High availabilityAs mentioned before, clusters can be used to provide improved reliability over a single server through the use of redundancy. Such cluster types are called high availability or failover clusters. There are two standard types of high availability clusters:
� Active-Passive
In an active-passive high availability cluster, one server actively provides the service while the remaining servers in the cluster remain idle. If the active server fails, the high availability software brings one of the passive servers to an active state and transfers future service requests to the new active server.
� Active-Active
In an active-active high availability cluster, all servers in the cluster actively provide the service. If an active server fails, future service requests are
4 Configuring and Managing AIX Clusters Using xCAT 2

directed to one of the other active servers. In an active-active high availability cluster, care must be given to how service requests are distributed amongst the high availability cluster nodes.
Load balancingLoad balancing clusters are used to spread a workload across identical resources where the workload might overwhelm a single resource. The load can be spread among these resources either through a simple round-robin algorithm or more detailed and adaptive algorithms such as those found in IBM WebSphere Application Server. A common example of a load balancing cluster is a cluster of Web servers.
High Performance Computing (HPC)Many computational problems cannot be solved through the use of a single computational resource in a timely manner. As a result, IT professionals have grouped computational nodes together in order to provide a unified system which can address much larger computational problems. HPC clusters, for example, are necessary to unfold the human genome, generate weather forecasts on a regional scale, model the size and shape of a petroleum reservoir, or render the pixels for an animated movie. Each node in an HPC system can either be tightly coupled to its neighbor nodes or act independently.
New uses for HPC clusters are constantly being identified and forcing the systems to grow in size and complexity. Four teraflop systems, which were considered the cutting edge technology in 1998, are now considered trivial as the computing industry moves to exascale computing. As a result, important consideration must be given to the energy constraints and management of these HPC systems.
1.1.2 Cluster components
While the compute servers usually garner all the attention in discussions about clusters, there are a number of elements that are necessary to make the cluster a truly useful tool.
NodesThe nodes of an HPC cluster are at the heart of a cluster. They provide the access to the system, the platform from which to manage the system, and the horsepower to calculate difficult computational problems. These nodes can be single processors or SMP servers running any combination of Linux®, Windows®, AIX®, or other operating system. In fact, it is quite common to find HPC clusters with a heterogeneous mix of compute node architectures.
Chapter 1. Introduction to clustering 5

InterconnectsThe networks in a cluster provide the glue to hold the system together. These networks can provide access to the system from the outside, a method for the compute servers to communicate amongst themselves, and a pathway for the IT administrator to reach the systems even if they have been powered off.
StorageAlthough it is often overlooked, the storage system of a cluster provides the fuel which allows a cluster to operate. Without a centralized storage component the compute nodes might not have anything on which to operate, or a place to store their data once their operations have been completed. If not enough attention is given to the underlying design of the storage subsystem, even the most powerful HPC system can be rendered useless as compute resources sit idle waiting for their I/O requests to be completed.
The discussion of the cluster storage system must also extend past the actual storage hardware to the file system that sits on top of the disks. The cluster architect must look at the performance, reliability and expandability requirements to identify the proper middleware to meet the requirements of the HPC cluster. An excellent example of a cluster file system which addresses these considerations is the IBM General Parallel File System (GPFS™).
HW managementThe hardware management capabilities of a cluster include the hardware control devices such as the IBM Hardware Management Console (HMC) or Advanced Systems Management Interface (ASMI) for IBM Power Servers, the BladeCenter® Advanced Management Module (AMM), and the Integrated Management Module for IBM System x® servers. These devices let you monitor the hardware for fault errors, turn the power on and off to the servers, and perform remote console access to the servers.
Management SWAs HPC systems grow in size and complexity, strong management software becomes increasingly important. The days have long passed where an IT administrator could manually install the operating system on each cluster node via a CD or update the firmware on all of the nodes through a floppy drive. IT administrators now have the management software to install thousands of nodes within a few minutes, run parallel commands across all of the cluster nodes simultaneously, and update the firmware on all of the cluster nodes in parallel.
Also included in the cluster management software topic is the batch job scheduling software such as IBM Tivoli® Workload Scheduler LoadLeveler®. This software allows users to submit a job to the cluster and have it distributed
6 Configuring and Managing AIX Clusters Using xCAT 2

across the system resources to be executed immediately on available resources or executed once the other tasks on the system resource queue are completed.
Tools such as the open source Ganglia monitoring suite allow administrators to monitor how the resources of the HPC cluster are being utilized.
Application SWThe application software of a cluster is the technical or scientific code run on the compute nodes. Examples of HPC application software are weather prediction models, gene sequence assembly, financial model prediction, or animation pixel digital rendering.
1.1.3 Cluster nodes
This section presents the types of nodes in HPC clusters. They are:
� Login or front-end nodes� Development, compilation, and interactive nodes� Compute nodes� Storage nodes� Control nodes� Management nodes� Service nodes
A cluster can utilize separate physical nodes to address each of these node types or a cluster can utilize one physical node to handle multiple functions. For example, a management node used to monitor and install the cluster could also provide the DNS capabilities typically found in a control node. Conversely, a cluster can have multiple copies of a node type in order to add resiliency and reliability to the solution.
Login or front-end nodesAny computational resource that is placed on a network becomes an instant target for hackers who wish to use that system for their own purposes. When multiple unprotected HPC systems are placed on the network at the same time, the risk factors start to multiply. In a fully open HPC cluster, the system administrator must carefully monitor the OS patches and firewall settings of each resource. In our experience, with large open HPC systems, independent of the IT administrator’s skill level, something usually gets overlooked and the system is compromised. We have seen newly installed open HPC clusters at universities begin to see hacking attacks within two hours of deployment and suffer from complete penetration within 24 hours. The administrator must then spend months trying to secure the system and purge the system of traces of the hack.
Chapter 1. Introduction to clustering 7

Therefore, we recommend that public access is not granted for every resource in an HPC cluster. Instead, only the login or front-end nodes should be connected to the public user network. In this environment, the IT administrator can focus his attention on securing this limited number of resources from outside attacks.
Users should only be allowed to access the HPC cluster through the login nodes. User credentials will be authenticated on the login node. On the login node users can submit batch jobs to the HPC cluster compute nodes and view the results from those jobs. From the login node, users can also access the HPC interactive nodes in order to perform code development.
GUIs require additional system resources and memory overhead. While these tools might help to improve the accessibility of the system, they limit the resources which can be applied to calculate a computational problem. By adding login nodes to an HPC system, GUIs can be limited to the login nodes. These tools can be stripped from the compute node images and thus maximize the computational power of the compute nodes.
Development, compilation, and interactive nodesThe desk side computational resources of users of the HPC system might not match the computational resources provided in the HPC cluster. Therefore, it is important that the design of the HPC cluster provides the users with resources on which to develop and test their code.
These nodes can be used to develop and compile code prior to using it on the cluster. Users can interactively access these nodes to step through applications to locate problems with their code.
By limiting the development of applications to these nodes, software licenses for compilers and other software development tools can be constrained to this subset of nodes, thus helping to reduce the overall cost of the system.
Compute nodesThe vast majority of work done by an HPC cluster is performed by the compute nodes. Jobs are typically dispatched to the compute nodes through the job scheduler resident on one of the other cluster nodes. Depending on the application requirements and system resources, one or more tasks can be executed simultaneously on a single physical compute node. The tasks performed on the compute node can be independent of the other compute nodes or the task can rely on the results calculated by its neighbors in the HPC cluster.
Storage nodesAs mentioned earlier, the design of the storage subsystem is a very important consideration to the overall design of an HPC cluster. Each node of a cluster can
8 Configuring and Managing AIX Clusters Using xCAT 2

have its own storage on local disk or be directly connected to a storage controller.
A more cost-effective method to design HPC cluster storage is to limit the number of nodes which are directly attached to the storage enclosure. These storage nodes then serve the storage file system to the rest of the nodes in the HPC cluster. The file system can then be remotely mounted on the other HPC cluster nodes either through NFS, CIFS, or the GPFS native client protocol. Depending on the design of this system, this method could provide better performance, scalability, and expandability than direct attach methods.
Control nodeThe control nodes of an HPC cluster provide the unifying services to the cluster that allow it to act as a cohesive system. These services include the Domain Name System (DNS) service, the Domain Host Configuration Protocol Service (DHCP), and the Network Time Protocol (NTP) service. Additionally, the control nodes can also manage the batch queuing resource manager and scheduler which allocate jobs to the compute nodes based on available resources and user priority settings.
Management nodeThe management node of an HPC cluster can control the entire operation of a cluster. The management node is responsible for providing access to the hardware control points of all of the systems in the cluster. The management node is used as a centralized resource for installation, sending out parallel commands, sending power cycle commands to the cluster resources, and monitoring the resources in the cluster. In small HPC systems, many of the other types of cluster nodes are combined into the management node.
Service nodeAs the size of HPC clusters increases, the workload for installing and managing the cluster must be distributed to a second tier of nodes. If a single management node was used to provide the OS image for a thousand compute nodes, its NFS capabilities for serving the image would be easily overwhelmed. Instead, by distributing the installation and management capabilities to a second hierarchical layer of service nodes, the process can be smoothed and higher service levels achieved.
1.1.4 Cluster networks
The main virtual local area network (VLAN) types and roles in an HPC cluster are:
� Management VLAN
Chapter 1. Introduction to clustering 9

� Storage VLAN
� Message Passing Interface (MPI) VLAN
� Cluster VLAN
� Public or Login VLAN
Typically, these VLANs are separated within a cluster environment. However, some of these networks can be combined or eliminated. For example, some clusters will not require an MPI network.
Management VLANThe management VLAN is used to connect the management server of a cluster with the hardware control points of the cluster. This network is usually kept separate from the other networks in order to avoid errant usage.
Serial Over Console (SOL) connections will also be conducted over the management VLAN.
Due to the limited bandwidth requirements of this network, a 10/100/1000 Ethernet connection is typically sufficient for the management VLAN.
Storage VLANThe storage VLAN is used to provide the file systems from the I/O nodes to the rest of the nodes in the cluster. Depending on the I/O requirements of the HPC cluster, this network could be separate or combined with the cluster network.
Typically, the uplink from the I/O storage nodes to the main network switch will be either 4x DDR Infiniband or 10 Gb Ethernet. The storage network from the main switch to the individual compute nodes could be either Infiniband or even Gigabit Ethernet.
MPI VLANFor some HPC applications it is important for the compute nodes to communicate with one another during the execution of a particular task or job. These interprocess communications could require high bandwidth and low latency. This type of communication would require an independent Infiniband, Myrinet, or 10 Gb Ethernet network to exist between the nodes.
If the user’s applications do not depend heavily on the latency characteristics of the MPI communication, this network can be combined with the cluster or storage VLANs.
10 Configuring and Managing AIX Clusters Using xCAT 2

If a separate VLAN is designed for MPI communication, special care should be given to ensure that the management node also resides on the MPI VLAN so that the management server can monitor and control the resources of the MPI VLAN.
Cluster VLANThe cluster VLAN is the internal network for the compute nodes in the cluster. Jobs are distributed from the login node to the cluster nodes over the cluster VLAN.
Nodes in the cluster also utilize the cluster VLAN for network booting of their OS image. The cluster VLAN adapters should therefore be capable of PXE booting across the network.
Public or login VLANThe Public VLAN should be the only access into the cluster from the outside network. As discussed in “Login or front-end nodes” on page 7, allowing uncontrolled access to all of the computational resources in the HPC cluster could prove disastrous. As a result, only the login node should be connected to the public VLAN. Using the public VLAN, users submit jobs through the front-end node.
1.1.5 Hardware, power control, and console access
This section describes the HPC cluster components that are involved in remote console and hardware control access.
Hardware control pointsThe management node communicates with the hardware control points of the cluster nodes in order to monitor and power cycle the nodes. The typical functions carried out on the hardware control points are:
� Node MAC address collection
� Displaying the running status of the cluster nodes
� Booting the nodes in the HPC cluster
� Remote power cycling of the nodes in the HPC cluster
� Monitoring the hardware status of the nodes in the HPC cluster
These communications are usually carried out over the Cluster VLAN.
The most common hardware control points in IBM servers are:
� Hardware Management Console (HMC) - for HMC-attached System p® nodes
Chapter 1. Introduction to clustering 11

� Integrated Virtualization Manager (IVM) - for IVM-managed System p nodes
� Advanced System Manager/flexible service processor (ASM/FSP) - for System p direct attach nodes
� Advanced Management Module (AMM) - for Blade Center nodes
� Baseboard management controller (BMC) - for IBM xSeries® 336, 346, System x3455, x3550, and x3650 servers
� Remote Supervisor Adapter II (RSA II) - for System x nodes
� Integrated Management Module (iMM) - for System x nodes with Intel® Nehalem processors.
Console access device (terminal server)A management node can also communicate with the control point hardware to open a remote console window to a cluster node.This communication can be between the cluster node hardware control point or a standalone terminal server. A remote console window allows the IT Administrator to use a local window on the management node that mirrors what would be seen if the administrator were to open a window at the console of the remote cluster node.
The console traffic should be conducted over the management VLAN. This allows the IT administrator remote access to the cluster node even if the cluster VLAN is inaccessible.
The following devices provide remote console access for IBM servers:
� For HMC-attached System p, the HMC is the remote console server.
� For System p servers without an HMC, console traffic can be managed by the FSP.
� For IBM BladeCenter, remote console capabilities are provided through the ethernet switch module (ESM) using Serial-over-LAN (SOL).
� For System x servers, the BMC II, RSA II, or iMM can provide SOL capabilities.
� For standalone System x servers, an independent console server such as those from MRV, Avocent, or Cyclades can provide remote console access.
Note: For more details about each of the hardware control points, see xCAT 2 Guide for the CSM System Administrator, REDP-4437.
12 Configuring and Managing AIX Clusters Using xCAT 2

1.2 Suggested cluster diagram
As mentioned earlier, HPC clusters can include all of the above cluster components in various combinations. In some clusters, all of the elements may be present as distinct physical entities. At the other extreme, some of the components may be eliminated while others may be combined into one physical entity.
Figure 1-1 shows the absolute minimum architecture that can be used to define an HPC architecture. In this architecture, the only independent physical networks are the public, management, and cluster VLANs. The storage VLAN shares the same physical network as the cluster VLAN.
Similarly, the management node in this architecture also functions as the login node, control node, storage node, and development node. This is an architecture that we have seen but it has made significant trade-offs in terms of performance, reliability, and redundancy.
Figure 1-1 Minimum HPC cluster architecture design
Figure 1-2 on page 14 shows the opposite extreme from the first architecture. In this architecture, all five network VLANs are present as well as all seven HPC cluster node types. Each rectangle in the diagram represents multiple copies of the same node type for redundancy. These nodes can be configured in a
Management Network
External Network
Cluster NetworkStorage Network
Management NodeLogin Node
Control NodeStorage Node
Development Node
Compute Node
Compute Node
Compute Node
Compute Node. . .
Chapter 1. Introduction to clustering 13

combination of high availability or load balancing clusters. Even though only a single link is depicted from each node type to the networking VLANs, there can be multiple physical connections present. As can be seen in Figure 1-2, it is quite easy for an HPC cluster to quickly gain a high level of complexity. Therefore, a strong management software toolkit is extremely important for installing and maintaining an HPC cluster.
Figure 1-2 Complex HPC architecture design
Public VLAN
ManagementVLAN Cluster VLAN
MPI VLAN
Storage VLAN
Management NodeManagement
Nodes
Control NodeControl Nodes
Login NodeLogin Nodes
Service NodesService Nodes
Development NodeDevelopment Nodes
Compute NodeCompute Nodes
Storage NodeStorage Nodes
14 Configuring and Managing AIX Clusters Using xCAT 2

1.3 Managing high performance computing (HPC) clusters
As mentioned in 1.1.2, “Cluster components” on page 5, when HPC clusters grow in size and complexity, the management software used to administer the clusters becomes increasingly more important. An individual IT administrator can not install operating systems by hand on each of the cluster nodes with a CD or update the firmware on each cluster node with a floppy drive.
Additionally, as the HPC clusters expand in size, the energy consumed will expand and the failure rate of the individual components will multiply to create a much higher system failure rate. One of the cluster node components that is a large source of this heat and failure rate are the local hard drives on the individual cluster nodes. If this component is eliminated from the equation, we can drastically reduce the power consumption of a cluster and improve the system’s uptime.
To accomplish this goal, IT administrators have developed the practice of removing the hard drives with diskless clusters. In a diskless scenario, the local hard drives usually used for maintaining the operating system are removed from the cluster nodes. Typically, IT administrators instead boot the cluster node via storage area network (SAN) or iSCSI booting. In between power cycles, the state of the operating system for each cluster node is maintained on the remote storage controller.
The next natural evolution of this concept is stateless computing. In stateless computing, a local hard drive is not needed to maintain an image of the operating system. Instead, when a cluster node is rebooted it uses PXE booting to obtain its OS image and store it in the system RAM. When the node is powered off, the state of the current operating system is lost. This practice not only eliminates the need for a local hard drive for the OS image but it also eases the number of OS images that the IT administrator needs to manage. Instead of having to maintain the consistency of firewalls and patches for the operating systems on thousands of cluster nodes, the IT administrator only has to maintain one OS image that can be distributed to all of the nodes equally.
1.3.1 What is CSM
Cluster Systems Management (CSM) software is an IBM licensed product used to manage AIX and Linux clusters. CSM is a powerful, highly integrated system management and monitoring product that provides a centralized control interface for large compute clusters for commercial environments. CSM borrowed from a long line of IBM clustering technology and experience developed for the
Chapter 1. Introduction to clustering 15

RS/6000® SP, such as the Reliable Scalable Cluster Technology (RSCT), and combined it with industry tested and accepted open source software. CSM is designed to be used on cluster nodes as part of the IBM System Cluster 1600 and the IBM System Cluster 1350™.
CSM will continue to be supported for existing and new IBM Power Systems™ and System p hardware running AIX or Linux throughout the life of the entire Power6 program.
CSM customers should continue to utilize CSM to manage their current CSM deployments. IBM can help CSM administrators analyze whether CSM or another management tool such as xCAT 2.0 would be appropriate for future cluster deployments.
For HPC clusters, the best features of CSM and the eXtreme Cluster Administration Toolkit (xCAT) are being combined into a new powerful tool called xCAT 2.0. This tool is not an evolution of xCAT but instead an entirely new product.
1.3.2 xCAT 2: An 0pen source method for cluster management
The eXtreme Cluster Administration Toolkit (xCAT) 2 is an open source initiative developed by IBM to support the deployment of large HPC clusters based on various hardware platforms. xCAT 2 is not an evolution of the earlier xCAT 1 but instead a complete code write that combines the best practices of both CSM and xCAT 1.
The source code for xCAT 2 can be obtained from:
http://xcat.sourceforge.net/
xCAT 2 is a scale-out management system that provides:
� Remote hardware control
� Remote console management
� Automagic discovery and destiny control
� Automated unattended provisioning of cluster resources
xCAT 2 is designed to utilize only scripts. This makes the code portable and modular in nature which allows for the easy inclusion of additional functions and plug-ins.
Besides the performance requirements, the modern HPC environments must also be flexible, easy to administer, and highly reliable. By building upon the work of others, xCAT 2 is able to leverage the set of best practices. Instead of simply
16 Configuring and Managing AIX Clusters Using xCAT 2

including the best code of others, as was the case in xCAT 1, the best ideas of others are also included in xCAT 2.
xCAT 2 is used in the first petaflop computer that is deployed at Los Alamos National Labs. The stateless provisioning capabilities of xCAT 2 are also used to manage the cloud environment of the Virtual Computing Lab at North Carolina State University.
A more complete and in-depth discussion of xCAT 2, its features and architecture can be found in Chapter 2, “xCAT 2 architecture” on page 21.
1.3.3 xCAT 1.1.4 and CSM to xCAT 2 - History and evolution
The original xCAT was created in 1999 as a solution for the installation of Web 1.0 customers. It was a scripted solution that was nearly open source. Between 2000 and 2008, xCAT developed a community of at least 273 active developers and was used to deploy Linux and Windows clusters world-wide including the initial four teragrid sites and the first petaflop computer at Los Alamos National Labs.
Egan Ford, xCAT’s initial developer, provides a concise history of the evolution of xCAT in the following Web page:
http://www.linux-mag.com/id/7230
The above article describes how some of the initial design goals of xCAT 1 led to problems as the project started to grow. For example, the use of scripts in xCAT 1 led to a wide variety of hard-to-manage Korn, Bash, Perl, and Python scripts. Secondly, saying yes to all function requests and developer inputs led to a bloated and impossible-to-manage solution that was missing a clearly defined roadmap. Lastly, due to large numbers of developers and rapid growth, xCAT 1 suffered from a lack of adequate up-to-date documentation for all of its features and functions.
For high performance computing, CSM suffered from its own share of problems. First, CSM was not designed to scale to the number of nodes required for the next generation of HPC computing. Secondly, as a fully licensed IBM product, it was difficult to rapidly incorporate user suggestions and code modifications into the releases. Lastly, CSM could only support a limited number of platforms and operating systems in order to maintain a reasonable test bed for a software product.
Because high performance computing is moving towards the generation of exascale computing, IBM looked to develop an open source cluster management toolkit that would be more flexible and scalable than both xCAT and CSM. Where xCAT 1 was able to scale to 10,000 cluster nodes, xCAT 2 scales to systems
Chapter 1. Introduction to clustering 17

with 100,000 cluster nodes. Additionally, as an open source project scale-out, users can easily contribute to it and improve it. IBM has pooled the code and expertise from both CSM and xCAT to form the basis of the open source software. Instead of saying yes to all requests, such as in xCAT 1, xCAT 2 will have a clearly defined roadmap and a strong community direction.
In xCAT 2, support is not limited to IBM hardware. Since the software is open sourced, customers and third parties can contribute to it. Hopefully, this results in more and better functions. Customers can debug problems (if desired) because they have all of the source code. The open source nature of the code should also lead to improved integration with other open source management tools. Customers can also expand the support to non-IBM hardware.
Additionally, xCAT 2 has virtually all of the capabilities of CSM, plus much more. For example, more hardware and operating systems are supported in xCAT 2 than in CSM. xCAT will also have expanded administrator and operator roles, pluggable database support with SQL reporting capabilities, power level management for green computing, and a Web interface.
1.3.4 IBM (Systems) Director vs. xCAT 2
Although IBM is moving CSM expertise to strategic products such as IBM Director and xCAT 2, we must maintain a clear distinction between xCAT 2 and IBM Director:
� xCAT 2 is designed for high performance computing clusters. It runs parallel jobs on large clusters. Although support from IBM is available, xCAT 2 is an open source product.
� IBM Director is typically involved in commercial, small and medium business (SMB), and server consolidation. IBM Director is a fully licensed IBM product.
We have the opportunity to make xCAT 2 the exploratory branch of IBM Director, by moving new features pioneered in xCAT into Director. But for now both products will remain distinct entities.
Figure 1-3 on page 19, which was taken from a presentation by Egan Ford and Bruce Potter given at the IBM Systems and Technology Meeting in April, 2008, delineates the evolution and positioning of xCAT 1, CSM, IBM Director, and xCAT 2.
18 Configuring and Managing AIX Clusters Using xCAT 2

Figure 1-3 The history and future of xCAT 2.0, IBM Director, and IBM CSM
Large HPC,Parallel batch jobs
Commercialclusters
SMB, Departmental, orHeterogeneous clusters
xCAT Director
xCAT 2 Director/CM
2007
2008
2009
Open sourceFlexible, scalableFull IBM support availableExpertise requiredIBM fully involved in open src development
Full IBM product & supportGUI & CLIEasier learning curveAll IBM platforms
CSM
Chapter 1. Introduction to clustering 19

20 Configuring and Managing AIX Clusters Using xCAT 2

Chapter 2. xCAT 2 architecture
The objective of this chapter is to describe in more detail the components of xCAT 2.0, outlining how they operate and interact in the process of managing large HPC clusters.
Topics covered in this chapter are:
� The software distributions that can be managed� The hardware platforms supported by xCAT 2� Hardware Management and Control� xCAT features:
– xCAT 2 directory structure– xCAT 2 database– xCAT 2 networks types– Parallel commands
� xCAT 2 support structure
2
© Copyright IBM Corp. 2009. All rights reserved. 21

2.1 Overview of xCAT 2 features
xCAT Version 2 is an open source project developed to provide a scalable distributed computing management and provisioning tool that provides a unified interface for hardware control, discovery, and OS diskful/diskless deployment.
It was a new project created originally by the best cluster management developers at IBM, from teams who worked on CSM, and xCAT 1.x, and developers are still working on System x, System p, Cluster 1350, and iDataPlex™ technologies in IBM. xCAT 2 is also open to the general High Performance Cluster community under the Eclipse Licence to help support and enhance the product in the future.
The following is a list of the main features of the xCAT architecture:
� Client/server architecture
Clients can run on any Perl-compliant system (including Windows). All communications are SSL encrypted.
� Role-based administration
Different users can be assigned various administrative roles for different resources.
� New stateless and iSCSI nodes support
Stateless nodes can be RAM-root, compressed RAM-root, or stacked NFS-root. Linux software initiator iSCSI support for Red Hat® Enterprise Linux (RHEL) and SUSE® Linux Enterprise Server (SLES) is included. Systems without hardware-based initiators can also be installed and booted using iSCSI.
� Scalability
xCAT 2 has been designed to scale to 100,000 and more nodes with xCAT's Hierarchical Management Cloud. A single management node may have any number of stateless service nodes to increase the provisioning throughput and management of the largest clusters. All cluster services such as LDAP, DNS, DHCP, NTP, Syslog, and so on, are configured to use the Hierarchical Management Cloud. Outbound cluster management commands (for example, rpower, xdsh, xdcp, and so on) utilize this hierarchy for scalable systems management. See Figure 2-1 on page 25.
� Automatic discovery
Single power button press physical location-based discovery and configuration capability. Although this feature is mostly hardware-dependent, xCAT 2 has been developed to ease integration for new hardware. The
22 Configuring and Managing AIX Clusters Using xCAT 2

plug-in software architecture provides an easy development mechanism for the new hardware.
� Plug-in architecture for compartmental development
Add your own xCAT functionally to do whatever you want. New plug-ins extend the xCAT vocabulary available to xCAT clients.
� Notification infrastructure
This allows you to be able to watch for xCAT DB table changes, via the notification infrastructure.
� SNMP monitoring
Default monitoring uses SNMP trap handlers to handle all SNMP traps.
� Flexible monitoring infrastructure
You can easily integrate third-party vendor monitoring software into the xCAT cluster. Currently, the following plug-ins are provided with xCAT: SNMP, RMC (RSCT), Ganglia, and Performance Copilot.
� Centralized console and system logs
xCAT provides console access to managed nodes and centralized logging. Documentation available includes cookbooks, how-to information, complete man pages, and database table documentation.
2.1.1 Operating systems and distributions supported
xCAT 2 has evolved to support a number of operating systems including AIX, and the many derivatives of Linux, including SLES, openSUSE, RHEL, CentOS, and Fedora Core. It is also possible for xCAT to provision Windows 2008 through imaging, and Virtual Machine (VMware, Xen, KVM) images to hosted systems.
With both AIX and Linux, xCAT supports both traditional local disk, SAN disk, and stateful diskless, provisioning via native deployment methods.
Also, support is provided for stateless diskless nodes including ramfs root, compressed ramfs root and NFS root with ramfs overlay support (Linux and AIX) and stateful diskless using iSCSI (Linux).
Because xCAT is an open source project, there are no reasons why other operating systems cannot be added to the supported list in the future.
For a more up-to-date list of supported distributions, visit the xCAT Web sites:
http://xcat.sourceforge.net/
and
Chapter 2. xCAT 2 architecture 23

http://xcat.wiki.sourceforge.net/XCAT+Features
2.1.2 Supported hardware
The following is a list of hardware supported and tested by xCAT:
� IBM BladeCenter (including HS21, HS21 XM, LS21, LS41, QS21, QS22, JS21, JS22) - needs to be fitted with an Advanced Management Module.
� IBM System x (x3455, x3550, x3650, x3655, x3755, and more)
� IBM Power Systems (including the HMC)
� IBM iDataplex
� Machines based on the Intelligent Platform Management Interface (IPMI)
Because only IBM hardware is available for testing, this is currently the only hardware supported. However, other vendors’ hardware could be managed with xCAT as well. For the latest list of supported hardware refer to the xCAT Web site, previously shown.
2.1.3 Hardware control
The xCAT manager working with the relevant hardware control units within the nodes, BladeCenter, and HMC has the capability to instruct these units to perform a number of hardware functions, or gather information about the hosts. These hardware control features include:
� Power control (power on, off, cycle, and current state)
� Event logs
� Boot device control (full boot sequence on IBM System BladeCenter, next boot device on other systems)
� Sensor readings (temperature, fan speed, voltage, current, and fault indicators as supported by systems)
� Node MAC address gathering
� LED status and modification (ability to identify LEDs on all systems, and diagnostic LEDs on select IBM rack-mount servers)
� Serial-over-LAN (SOL) - utilize or redirect input and output
� Service processor configuration
� Hardware control point discovery using Service Location Protocol (SLP): BladeCenter Advanced Management Module (AMM), IBM Power Systems Hardware Management Console (HMC), and Flexible Service Processor (FSP)
24 Configuring and Managing AIX Clusters Using xCAT 2

� Virtual partition creation
This functionality has been provided in xCAT via a set of Perl scripts, in conjunction with a particular set of the xCAT tables. One example is the nodehm table, which details the type of hardware control group a particular node falls into, that is, blade for BladeCenter, or hmc for a System p node. Thus, from this table and the group information, xCAT knows which additional tables contain detailed information about how to access the hardware control unit of the required node.
2.1.4 Hierarchical clusters
xCAT 2 was designed to be able to manage the complete spectrum of High Performance Clusters, from a simple BladeCenter, with only a few blades, to the world’s current #1 HPC cluster1, IBM Roadrunner. This scalability is achievable by xCAT implementing a Hierarchical Management Cloud structure.
Figure 2-1 Overview of a hierarchical xCAT cluster
Figure 2-1 details the high-level overview of an xCAT2 cluster, with the xCAT2 management node at its head. In a large cluster implementation, it may be
1 As of June 2009, see http://www.top500.org/lists/2009/06
CLI/ GUI
RMC xCAT
RMC RMC
RMC
GPFS LL
CNM
TPC
GPFS
xCAT xCAT
RMC
LL
RMC
GPFS LL
RMC
GPFS LLGPFS
MN
SNs
CNs
Management path
Monitoring path
Out-of-band path
HW Ctrl
HW Ctrl
GPFS
xCAT
•xcatd
•monitorctrl
•monitoring plug-in modules
includes:
Chapter 2. xCAT 2 architecture 25

necessary to implement xCAT service nodes, which would perform some of the duties of the management node. Each service node is responsible for a subset of the compute nodes. Smaller clusters would function without the need for service nodes, with all the compute nodes being the responsibility of the xCAT management node.
The main reason for deploying service nodes to propagate xCAT management tasks such as OS installs, and outbound commands such as rpower, xdsh, and xdcp, is to keep the performance of these functions at an optimum level in a large cluster, and reduce the risk of overloading the xCAT management node.
As will be demonstrated in the implementation section of this book, the management node first installs and then configures the service nodes, then utilizes these nodes to perform the install of its subset of compute nodes. Part of the configuration of these service nodes is to install a subsection of the xCAT package, a number of Perl scripts that perform on the service node, and the xCAT daemon that communicates with the xCAT daemon on the xCAT master.
Figure 2-2 illustrates this process.
Figure 2-2 Scalable hierarchical management cloud
2.2 Overview of the xCAT 2 architecture
The xCAT 2 package has been developed almost entirely in Perl scripts, while employing the underlying native operating system Perl libraries. It thus provides a very extensible framework upon which additional commands, functionality and new supported platforms can be developed.
As can be seen in the xCAT structure diagram in Figure 2-3 on page 27, the xCAT daemon (xcatd) plays a major role in the way xCAT operates. Although the xCAT daemons are also running on the service nodes, they only function as
node001 node002 ... nodennn
DHCP TFTP HTTP NFS(hybrid)
DHCP TFTP HTTP NFS(hybrid)
nodennn + 1 nodennn + 2 ... nodennn + m
DHCP TFTP HTTP NFS(hybrid)
...
IMNmgmt node
service node01 service node02 service nodeNN
IMN...
26 Configuring and Managing AIX Clusters Using xCAT 2
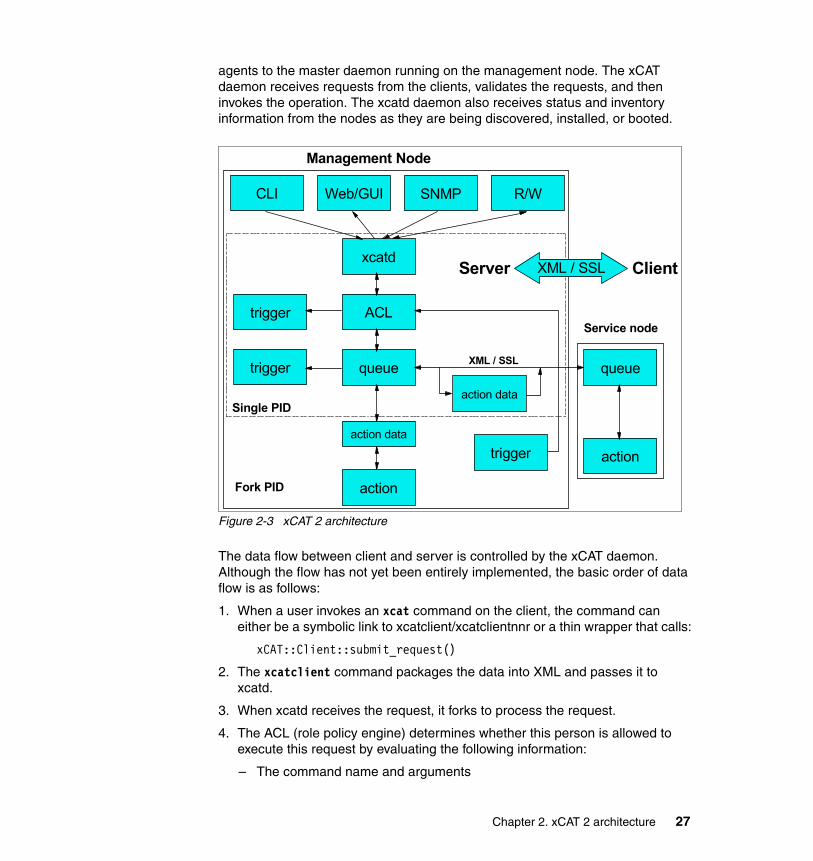
agents to the master daemon running on the management node. The xCAT daemon receives requests from the clients, validates the requests, and then invokes the operation. The xcatd daemon also receives status and inventory information from the nodes as they are being discovered, installed, or booted.
Figure 2-3 xCAT 2 architecture
The data flow between client and server is controlled by the xCAT daemon. Although the flow has not yet been entirely implemented, the basic order of data flow is as follows:
1. When a user invokes an xcat command on the client, the command can either be a symbolic link to xcatclient/xcatclientnnr or a thin wrapper that calls:
xCAT::Client::submit_request()
2. The xcatclient command packages the data into XML and passes it to xcatd.
3. When xcatd receives the request, it forks to process the request.
4. The ACL (role policy engine) determines whether this person is allowed to execute this request by evaluating the following information:
– The command name and arguments
CLI Web/GUI SNMP R/W
trigger
trigger
trigger
action data
xcatd
ACL
queue
action data
action
action
queue
Service node
Management Node
Single PID
Fork PID
XML / SSL
XML / SSLServer Client
Chapter 2. xCAT 2 architecture 27

– Who executed the command on the client machine– The host name and IP address of the client machine– The node range passed to the command
5. If the ACL check is approved, the command is passed to the queue.
The queue can run the action in either of the following two modes. The client command wrapper decides which mode to use (although it can give the user a flag to specify):
– For the life of the action, keep the socket connection with the client open and continue to send back the output of the action as it is produced.
– Initiate the action, pass the action ID back to the client, and close the connection. At any subsequent time, the client can use the action ID to request the status and output of the action. This action is intended for commands that are long-running.• The queue logs every action performed, including date and time,
command name, arguments, who, and so on.• In phase two, the queue will support locking (semaphores) to serialize
actions that should not be run simultaneously.6. To invoke the action, the data (XML) is passed to the appropriate plug-in Perl
module, which performs the action and returns results to the client.
For more details about xCAT architecture, see the xCAT wiki:
http://xcat.wiki.sourceforge.net/
2.2.1 xCAT 2 database
For xCAT to function, it needs to store information about the HPC environment, which it does with a number of different tables within an SQL database. Each table stores information relevant to an element or an element’s status, within the cluster, or information needed to perform an install and configuration of these elements. As xCAT uses standard SQL and the Perl database interface (DBI) to manipulate these tables, any standard SQL database can be utilized to host these tables.
During a normal install of xCAT, a default database and tables are created using SQLite, a simple database included in the xCAT install media. However, if the cluster is to include service nodes, then SQLite will not be up to the task, because it does not contain functionality to allow remote access from the service nodes. For this reason xCAT has been tested with both MySQL™ and Postgresql, both of which can be configured to allow remote access from the service nodes.
As previously mentioned, during a standard install a number of default tables are created by xCAT, the majority of which are empty awaiting population either via a
28 Configuring and Managing AIX Clusters Using xCAT 2

manual or automated process. With SQLite, each table is stored as a file, usually in /etc/xcat, as shown in Example 2-1.
Example 2-1 SQLite tables for xCAT 2
[p630n05][/etc/xcat]> lsbootparams.sqlite mp.sqlite policy.sqliteboottarget.sqlite mpa.sqlite postscripts.rulesca networks.sqlite postscripts.sqlitecert nimimage.sqlite ppc.sqlitechain.sqlite nodegroup.sqlite ppcdirect.sqlitedeps.sqlite nodehm.sqlite ppchcp.sqliteeventlog.sqlite nodelist.sqlite prodkey.sqlitehostkeys nodepos.sqlite servicenode.sqlitehosts.sqlite noderes.sqlite site.sqliteipmi.sqlite nodetype.sqlite switch.sqliteiscsi.sqlite notification.sqlite switches.sqlitemac.sqlite osimage.sqlite vm.sqlitemonitoring.sqlite passwd.sqlite vpd.sqlitemonsetting.sqlite performance.sqlite websrv.sqlite[p630n05][/etc/xcat]>
The xCAT man pages detail the function of each of these tables, and the information they hold.
A set of commands is provided to manipulate these tables, as will be demonstrated in the examples in this book, the most common being mkdef and chdef. The tabdump and tabedit commands have been provided for compatibility with the original flat file xCAT V1.x table format, but are also very useful in performing large edits on a table (tabedit command), or in showing the entire table contents (tabdump command).
To access the tables, all xCAT code employs the Perl script Table.pm, which implements the following features
� Notifications for table changes (triggers)
A separate table lists the table name (or lists \*) and a command that is run when that table is changed. When the command is run, the changed rows are piped into its standard input (stdin).
� A begin and end mechanism
The xCAT code can use the mechanism when it updates many rows. This allows Table.pm to optimize the update to the database and call the notifications only once for all the updates.
Chapter 2. xCAT 2 architecture 29

� Ability to support other, non-Perl, programs
These programs read the database using packages such as ODBC (for C program access).
Figure 2-4 details the database interaction performed by the Table.pm script.
Figure 2-4 xCAT database interaction
2.2.2 xCAT 2 directory structure
Figure 2-5 on page 31 depicts the directory structure and location of files on the master node, after a default install of the xCAT software. However, during the install process the user does get the opportunity to change the default location (/install), where xCAT holds the resources needed during the install of service and compute nodes. Note, these are the directory locations of xCAT on an AIX platform; for Linux the file structure would be slightly different.
dBDBI
xcatdb xcatdb
trigger
R/W
update dB
do action
special
30 Configuring and Managing AIX Clusters Using xCAT 2

Figure 2-5 xCAT 2 directory structure
2.2.3 xCAT network fundamentals
In any xCAT installation there is a normal requirement for two networks, otherwise known as virtual local area networks (VLANs). One is used for xCAT management functions, such as node installations. The other is utilized for hardware control. In a normal operation it is not recommended that applications hosted on the compute nodes share either of xCAT's management VLANs. Thus it is suggested that a third VLAN be provided solely for application traffic. This VLAN may just connect the compute nodes or extend out to external servers, depending on the applications hosted in the cluster. Often in HPC clusters a fourth VLAN linking just the compute nodes is created using high performance network technology, one example being InfiniBand®.
On IBM System x servers (Intel and AMD™ platforms), the hardware control VLAN is connected to the Baseboard Management Controller (BMC) port of a server, often being the first ethernet port, which is physically shared with xCAT's management VLAN.
Chapter 2. xCAT 2 architecture 31

With an IBM BladeCenter, the hardware VLAN is internal to the blade chassis, and so only the management VLAN is required.
With IBM System p nodes (excluding IBM Power Blades) the Hardware Management Console (HMC) has the ability to control the hardware functions of the nodes, and so again no xCAT hardware VLAN is required.
Figure 2-6 illustrates a typical network layout for an xCAT cluster.
Figure 2-6 Typical xCAT network layout
Note: The HMC communicates with the service processor within a System p server via a dedicated ethernet network, either point-to-point for a single machine or via a switch for multiple System p servers. It could thus be said that this LAN provides the same functionality as the xCAT hardware VLAN. However, xCAT does not utilize this LAN to perform any communication with the service processor.
Public VLAN
ManagementVLAN Cluster VLAN
MPI VLAN
Storage VLAN
Management Node
Login NodeLogin Nodes
Service NodesService Nodes
Development NodeDevelopment Nodes
Compute NodeCompute Nodes
Storage NodeStorage Nodes
32 Configuring and Managing AIX Clusters Using xCAT 2

The management VLAN is required by xCAT to enable it to perform many of its functions, from a nodes initial power-up boot process and OS install right through to its use via parallel commands in shutting down the node, with the required OS power-down command, that is, on AIX 'shutdown -H'.
Common Hardware Reference Platform bootThe IBM Power Systems architecture adheres to the Common Hardware Reference Platform (CHRP) standard. CHRP was published jointly by IBM and Apple in 1995. The CHRP boot process is different from that in a standard PXE boot procedure, but in principle their functionality is similar. A Power System, if set or manually instructed to boot from the network in its firmware, would issue a bootp request packet onto the management network. The xCAT manager would compare the MAC address of the issuing node with those under its control, using either its bootp or DHCP config files. Again a micro kernel and IP address is returned, with the boot or install process moving onto the next element, usually to mount an NFS directory exported from the xCAT manager (or service node) hosting a full AIX kernel.
You can find more details about the CHRP boot process and bootinfo config variables at:
http://playground.sun.com/1275/bindings/chrp/chrp1_7a.ps
2.2.4 Monitoring infrastructure
Two monitoring infrastructures are available in xCAT 2:
� xCAT monitoring plug-in infrastructure
This allows you to plug in one or more vendor monitoring software such as Ganglia, RMC, SNMP and others to monitor the xCAT cluster. This section describes the xCAT monitoring plug-in infrastructure.
� xCAT notification infrastructure
This allows you to watch for the changes in xCAT database tables.
For details, select the xCAT2-Monitoring.pdf file from:
http://xcat.svn.sourceforge.net/svnroot/xcat/xcat-core/trunk/xCAT-client/share/doc/
xCAT monitoring plug-in infrastructureWith xCAT 2.0, you can integrate vendor monitoring software into your xCAT cluster. The idea is to use monitoring plug-in modules that act as bridges to connect xCAT and the vendor software. Although you may write your own
Chapter 2. xCAT 2 architecture 33

monitoring plug-in modules, over time xCAT will supply a list of built-in plug-in modules for the most common monitoring software, such as:
� xCAT (xcatmon.pm) - Provides monitoring node status using fping.� SNMP (snmpmon.pm) - The SNMP monitoring.� RMC (rmcmon.pm) - Provides resource monitoring and control through IBM
Reliable Scalable Cluster Technology (RSCT).� Ganglia (gangliamon.pm) - An open source monitoring suite for HPC
environments.� Nagios (nagiosmon.pm) - Another open source host, service and network
monitoring program.� Performance Co-pilot (pcpmon.pm) - A family of products from SGI for
system-level performance monitoring and management services.
You may choose one or more monitoring plug-ins to monitor the xCAT cluster.
xCAT monitoring commands overviewSeven commands are available for monitoring purposes. They are listed in Table 2-1.
Table 2-1 xCAT monitoring commands
Command Description
monis Lists the current or all the monitoring plug-in names, their status, anddescription.
monadd Adds a monitoring plug-in to the monitoring table. This also adds the configuration scripts for the monitoring plug-in, if any, to the postscripts table.
monrm Removes a monitoring plug-in from the monitoring table. It also removes the configuration scripts for the monitoring plug-in from the postscripts table.
moncfg Configures the vendor monitoring software on the management server and the service node for the given nodes to include the nodes into the monitoring domain. It does all the necessary configuration changes to prepare the software for monitoring the nodes. The -r option configures the nodes, too.
mondecfg Deconfigures the vendor monitoring software on the management server and the service node for the given nodes to remove the nodes from the monitoring domain. The -r option deconfigures the nodes, too.
monstart Starts vendor software on the management server and the service node for the given nodes to monitor the xCAT cluster. It includes starting the daemons. The -r option starts the daemons on the nodes, too.
monstop Stops vendor software on the management server and the service node for the given nodes from monitoring the xCAT cluster. The -r stops the daemons on the nodes, too.
34 Configuring and Managing AIX Clusters Using xCAT 2

The two ways to deploy third-party software to monitor the xCAT cluster are:
� Configure the software on the nodes during the node deployment phase.
� Configure the software after the node is up and running.
xCAT monitoring optionsThe three xCAT monitoring options are:
� Start and stop monitoring
� Automated node update
� Node status monitoring
Start and stop monitoringIn Figure 2-7, the monitorctrl module is the control center. The xcatd invokes monitorctrl, which gets node hierarchy from the xCAT database, then invokes a plug-in module with the node hierarchy information. The plug-in module invokes and initializes third-party monitoring software, compares the node hierarchy information with the current nodes in the third-party monitoring domain, and makes sure they are in sync.
Figure 2-7 xCAT start and stop monitoring
Automated node update As shown in Figure 2-8 on page 36, xCAT notification infrastructure notifies monitorctrl of nodes being added or removed from the xCAT cluster, and monitorctrl informs all the plug-in modules. The plug-in module calls relevant functions in third-party software to add or remove the nodes in the monitoring domain.
xCATd monitor-ctrl
rmcmonPlug-in module
3rd party Plug-in module
RMC
3rd party SW
start/stopstart/stop start/stop
xCAT DB
node hierarchy
Chapter 2. xCAT 2 architecture 35

Figure 2-8 xCAT automated node update
Node status monitoring As depicted in Figure 2-9 on page 37, xCAT maintains current node status for each node. Possible node status values are defined, installing, booting, active, off, and others. Nodes status is stored in the status column in the nodelist table. Optionally, a third-party product can be chosen to help by providing the node liveliness status if it has the capability. The monitorctrl invokes the third-party node status monitoring through its plug-in module. Also, third-party software can update the xCAT database with the node status changes through its plug-in module or directly access the database with the chtab command.
xCATd monitor-ctrl
rmcmonPlug-in module
3rd party Plug-in module
RMC
3rd party sw
start/stopstart/stop start/stop
add/rm nodes add/rm nodes
notification
xCAT DB
node added/ removed
process table changes
node hierarchy
36 Configuring and Managing AIX Clusters Using xCAT 2

Figure 2-9 xCAT node status monitoring
2.2.5 Parallel remote command execution and file copy, File Sync
One of the most important aspects of cluster management is the parallel remote command execution and file copy from Management Node to managed nodes. This is required for node configuration changes and other administrative operations. The operation of the parallel commands is secured using standard available OS tools and libraries (for example, OpenSSL and OpenSSH). On the xCAT management node in the /bin directory are the following parallel commands.
The following commands, xdsh, xdcp, ppsh, and pcp, implemented as Perl scripts, utilize the underlying available OS tools and xCAT tables to perform their functions. These scripts use these tables to perform such functions as resolving a group name to individual nodes, on which the associated command would be performed. Examples of the use of these commands is described in 6.3, “xCAT 2's distributed commands” on page 271.
Figure 2-10 on page 38 illustrates the parallel remote command and file copy infrastructure in an xCAT cluster.
xCATd monitor-ctrl
rmcmonPlug-in module
3-rd party Plug-in module
RMC
3-rd party SW
start/stopstart/stop start/stop
add/rm nodesnode status changed
add/rm nodesnode status changed
notification
xCAT DB
node added/ removed
process table changes
node status
node hierarchy
change node status
Chapter 2. xCAT 2 architecture 37

Figure 2-10 Parallel remote command execution
2.2.6 Additional features
xCAT also provides the following additional features:
� Command Line Interface mode, scripts, simple text-based configuration files.
� Uses Perl primarily for scripts and commands, allowing easy debugging and development.
� xCAT installed Linux nodes are identical to kickstart (Redhat) or autoyast (SUSE) installed nodes, w.r.t. RPMs, and so on. Nothing is altered from the standard distribution (for example, Rocks switched from /etc/passwd to 411 for authentication), we use standard kernels, maintaining support for commercial distributions and their support structures.
� Multiple operating systems are supported on a single cluster.
� Works well with any Intel or AMD x86/x86_64 server and Linux on Power.
� Custom extensions need only minimal effort, for example, adding a new operating system, or Linux distribution.
� Portable Batch Systems (PBS), IBM General Parallel File System (GPFS), Myrinet installations are supported with install scripts.
� Postscripts - Post installation scripts supported for both diskful and diskfree environments.
Many of the items above not related to Linux will be covered in more detail later in this book. For Linux and non-Power platforms, details can be found on the xCAT Web site.
xcatd
ACL
pcmds node1
node2
noden
...
Client
Server
XM
L/S
SL
rsh/ssh/etc...Client Server
38 Configuring and Managing AIX Clusters Using xCAT 2

2.3 Support offering terms
xCAT 2 is an open source project, developed under the Eclipse Public licence terms and conditions. As such, new versions and bug fixes for xCAT are hosted on the xCAT Web site:
http://xcat.sourceforge.net/
It is also possible on the same Web site to report both defects via the Bug tracker Web link, and submit feature requests for later versions of xCAT.
For commercial customers, IBM also offers the opportunity to obtain an official IBM support contract for xCAT Version 2 and beyond. No support contract is available for xCAT 1.3, the details of which can be found on the xCAT Web site listed above, or on the Web site:
http://www-03.ibm.com/systems/clusters/support/xcat/index.html
See also the IBM United States Software Announcement 208-23, September 09, 2008.
For more details on the support contract, contact your IBM representative.
Chapter 2. xCAT 2 architecture 39

40 Configuring and Managing AIX Clusters Using xCAT 2

Chapter 3. CSM and xCAT functional comparison
In this chapter we compare CSM and xCAT functions. We point out the differences in the architectural features and provide a functional comparison between commands in CSM and xCAT. In addition, we provide some useful examples of some general CSM administration tasks and how to achieve the same results in xCAT.
3
© Copyright IBM Corp. 2009. All rights reserved. 41
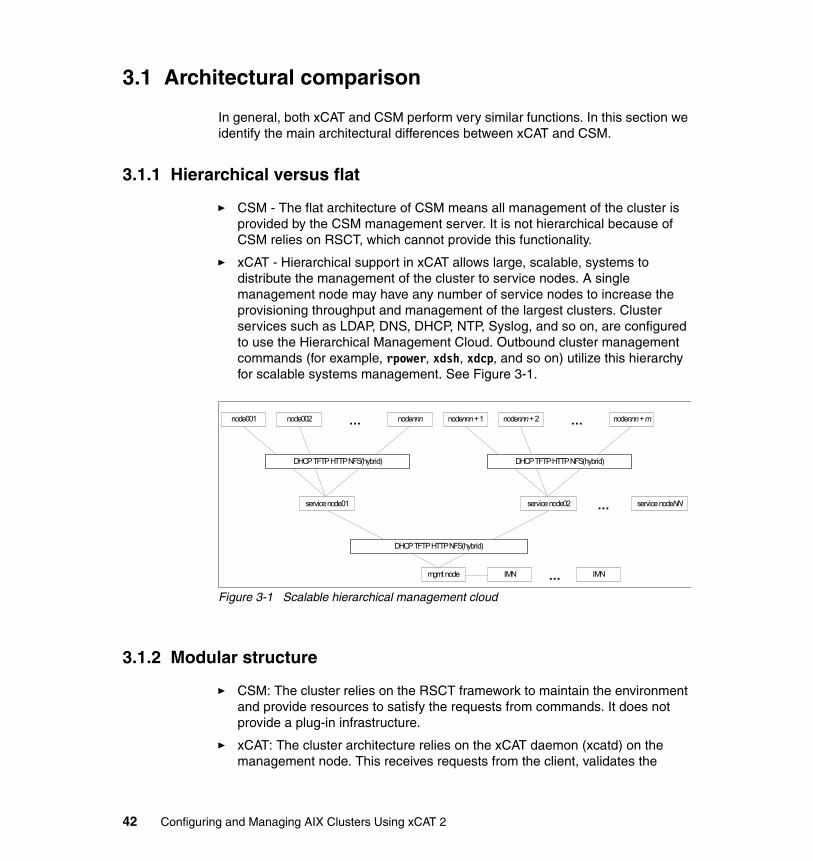
3.1 Architectural comparison
In general, both xCAT and CSM perform very similar functions. In this section we identify the main architectural differences between xCAT and CSM.
3.1.1 Hierarchical versus flat
� CSM - The flat architecture of CSM means all management of the cluster is provided by the CSM management server. It is not hierarchical because of CSM relies on RSCT, which cannot provide this functionality.
� xCAT - Hierarchical support in xCAT allows large, scalable, systems to distribute the management of the cluster to service nodes. A single management node may have any number of service nodes to increase the provisioning throughput and management of the largest clusters. Cluster services such as LDAP, DNS, DHCP, NTP, Syslog, and so on, are configured to use the Hierarchical Management Cloud. Outbound cluster management commands (for example, rpower, xdsh, xdcp, and so on) utilize this hierarchy for scalable systems management. See Figure 3-1.
Figure 3-1 Scalable hierarchical management cloud
3.1.2 Modular structure
� CSM: The cluster relies on the RSCT framework to maintain the environment and provide resources to satisfy the requests from commands. It does not provide a plug-in infrastructure.
� xCAT: The cluster architecture relies on the xCAT daemon (xcatd) on the management node. This receives requests from the client, validates the
node001 node002 ... nodennn
DHCP TFTP HTTP NFS(hybrid)
DHCP TFTP HTTP NFS(hybrid)
nodennn + 1 nodennn + 2 ... nodennn + m
DHCP TFTP HTTP NFS(hybrid)
...
IMNmgmt node
service node01 service node02 service nodeNN
IMN...
42 Configuring and Managing AIX Clusters Using xCAT 2

requests, and then invokes the operation. The word client in this context does not mean the nodes in the cluster but represents the command that is requesting an action from the xcatd. These requests are submitted to the xcatd via SSL in XML format. xCAT provides a plug-in infrastructure for monitoring, database, and bespoke functionality development (see Figure 3-2).
Figure 3-2 Client-server conversation in xCAT
3.1.3 Database
� CSM: A proprietary database is used (RSCT registry).
� xCAT: Stores data in a plug-in relational database. Currently SQLite and MySQL are supported with AIX. MySQL enables xCAT hierarchical clusters.
CLI Web/GUI
xcatd
Client
Server
XML/
SSL
ACL
DB
action
client
action
trigger
trigger
trigger
Management Node
Service Node
SNMP R/W
Single PID
Fork PID
SSL
Chapter 3. CSM and xCAT functional comparison 43
3.1.4 Notification infrastructure
� CSM: Not available.
� xCAT: Lets users monitor xCAT database table changes. This is not enabled by default but it is possible to enable this function so that you are aware of changes in the database tables.
3.1.5 Deploying both diskless and diskful nodes
� CSM: Not available out of the box; requires additional products and configuration.
� xCAT: Supports diskless and diskful nodes and currently uses the xCAT database and NIM functions to deploy both diskful and diskless nodes.
3.1.6 Automatic setup of services
� CSM: Limited - some services require manual configuration and the use of CFM (for example, syslog).
� xCAT: For syslog, remote shell, DNS, DHCP, and NTP for both the xCAT management node and the cluster nodes.
3.1.7 Role-based system administration
� CSM: Uses the LPCommands1 and the RSCT ACLs (for resource management).
� xCAT: Uses the database (that is, policies table) to allow different users to perform various administrative functions. Due to the pluggable nature, you may also use RSCT ACLs and LPCommands.
3.1.8 Dynamic nodegroups
� CSM: The infrastructure provided by RSCT means that dynamic node groups can be defined and used.
� xCAT: There are no dynamic node groups at this time.
1 LPCommands - Least Privilege Commands, managed in RSCT by LPRM - Least Privilege Resource Manager - see RSCT Administration Guide, SA22-7889-12
44 Configuring and Managing AIX Clusters Using xCAT 2

3.1.9 Secondary adapters
� CSM: Provides a facility to manage additional adapters; alternately, NIM secondary adapter definitions can be used.
� xCAT: NIM can be used to manage the additional adapters.
3.1.10 RMC monitoring
This section lists the RMC resource managers used for monitoring your cluster.
CSM-related RMC resource managersHardware control resource manager The IBM.HWCTRLRM hardware control resource manager controls the following resource classes:
� IBM.NodeHwCtrl: node hardware control
� IBM.HwCtrlPoint: hardware control point
� IBM.DeviceHwCtrl: hardware device
� IBM.DeviceGroup: hardware device group
� IBM.HwSecKey: maybe SSL related, but it is empty in our cluster
The hardware control resource manager runs on the host designated as the management server and is automatically started by the RMC subsystem.
The hardware control resource manager is a component of CSM. For information about the resource managers that are available with RSCT, see the IBM RSCT: Administration Guide.
Domain management server resource manager As a CSM component, the IBM.DMSRM domain management server resource manager controls the following resource classes:
� IBM.ManagedNode: managed node information
� IBM.NodeGroup: static and dynamic node groups
� IBM.NodeAuthenticate: node authentication (empty in our cluster)
� IBM.DmsCtrl: CSM cluster configuration, which is set by csmconfig
� IBM.MNNetworkInterface: managed node network interface information
The domain management server resource manager runs on the host designated as the management server and is automatically started by the RMC subsystem.
Chapter 3. CSM and xCAT functional comparison 45

For information about the resource managers that are available with RSCT, see IBM RSCT: Administration Guide.
Management domain configuration When an operating system image is booted on a POWER4™ pSeries® system or a System p5 system, the RMC subsystem is started and then the IBM.CSMAgentRM resource manager is started. This resource manager implements the necessary function to automatically add the operating system image, as a managed node, to the management domains created automatically on each HMC.
This resource manager initiates a series of sessions to the RMC daemon on each HMC as follows:
� A session to each configured IP address of each HMC to validate the IP address. No commands are sent.
� A session to each HMC. A command is sent to determine the code level on the HMC of the IBM.DMSRM resource manager.
� A session to each HMC. A command is sent containing necessary information, including the node’s public key. The response contains necessary information, including the HMC’s public key.
As a result of these sessions, barring any errors, the operating system image becomes a managed node and an entry is created in the IBM.ManagementServer resource class, which is managed by the IBM.CSMAgentRM resource manager. Once it is a managed node, the RMC daemon begins communication with the RMC daemon on each HMC, as described above.
Periodically, the IBM.CMSAgentRM resource manager examines the state of the operating system image and, if appropriate, initiates another series of sessions and commands to the RMC daemon on each HMC to adjust the managed node configuration in the management domains.
When the updatenode command is executed on a CSM Management Server, the dsh command is used to execute the mgmtsvr command on each node that is specified to the updatenode command. The mgmtsvr command then triggers the IBM.CSMAgentRM on the node to initiate a series of sessions to the RMC daemon on the Management Server:
� A session to the MS®. A command is sent to determine the code level on the MS of the IBM.DMSRM resource manager.
� A session to the MS. A command is sent containing necessary information, including the node’s public key. The response contains necessary information, including the HMC’s public key.
46 Configuring and Managing AIX Clusters Using xCAT 2

Management domain resource managers for CSM and xCATConfiguration resource managerProvides the ability, through its command-line interface, to create and administer a peer domain (a cluster of nodes configured for high availability), but it is useful to monitor network interface status as well as it manages the IBM.NetworkInterface resource class.
Management domain resource managerProvides resource classes to support configuration of an RSCT management domain. A management domain is defined as a set of nodes whose resources can be managed and monitored from one of the nodes that is designated as the Management Control Point (MCP). All other nodes are considered to be Managed Nodes.
This resource manager is intended to be exploited by the Extreme Cluster Administration Toolkit (xCAT); however, it is available in CSM clusters also. The resources supported by this resource manager are defined, modified and removed using the standard RMC commands mkrsrc, chrsrc and rmrsrc.
The following resource classes are available:
� IBM.MCP - Used on nodes and contains management server and node and HMC information.
� IBM.MngNode - Defines a managed node to the Management Domain.
� IBM.MngNodeNetIF - Resources of this class are created and defined automatically as associated IBM.MngNode resources are defined, modified, and removed, one per IP address configured to a managed node.
� IBM.PublicKeyExchange - Used by the resource manager to exchange the public keys of an MCP and a managed node.
These resource classes are populated and managed automatically in CSM, but they are used in the xCAT cluster only when the RMC monitoring is configured and started for the nodes.
Table 3-1 RMC conditions in CSM and xCAT compared
CSM conditions xCAT conditions Description
AIXNodeCoreDump AIXNodeCoreDump An event will be generated when a core dump is logged in the AIX error log of a node in the cluster.
Chapter 3. CSM and xCAT functional comparison 47

AIXNodeCoreDump_H This condition collects all the AIXNodeCoreDump events from the service nodes. An event will be generated when a core dump is logged in the AIX error log of a node in the cluster.
AIXNodeSyslog N/A
AllServiceableEvents AllServiceableEvents An event will be generated whenever there is output from running sensor related to any serviceable events.
AllServiceableEvents_H This condition collects all the AllServiceableEvents events from the service nodes. An event will be generated whenever there is output from running sensor related to any serviceable events.
AllServiceableHardwareEvents
N/A
AllServiceableSwitchEvents
N/A
AnyNodeAnyLoggedError AnyNodeAnyLoggedError An event will be generated when an error is logged to either the AIX error log or the Linux syslog of a node in the cluster.
AnyNodeAnyLoggedError_H This condition collects all the AnyNodeAnyLoggedError events from the service nodes. An event will be generated when an error is logged to either the AIX error log or the Linux syslog of a node in the cluster.
AnyNodeFileSystemInodesUsed
AnyNodeFileSystemInodesUsed
Event: An event will be generated when more than 90 percent of the total inodes in the file system is in use.Rearm: A rearm event will be generated when the percentage of the inodes used in the file system falls below 75 percent.
CSM conditions xCAT conditions Description
48 Configuring and Managing AIX Clusters Using xCAT 2

AnyNodeFileSystemInodesUsed_H
Event: This condition collects all the AnyNodeFileSystemInodesUsed events from the service nodes. An event will be generated when more than 90 percent of the total inodes in the file system is in use.Rearm: A rearm event will be generated when the percentage of the inodes used in the file system falls below 75 percent.
AnyNodeFileSystemSpaceUsed
AnyNodeFileSystemSpaceUsed Even: An event will be generated when more than 90 percent of the total space of the file system is in use.Rearm: A rearm event will be generated when the percentage of the space used in the file system falls below 75 percent.
AnyNodeFileSystemSpaceUsed_H
Event: This condition collects all the AnyNodeFileSystemSpaceUsed events from the service nodes. An event will be generated when more than 90 percent of the total space in the file system is in use.Rearm: A rearm event will be generated when the percentage of the space used in the file system falls below 75 percent.
AnyNodeNetworkInterfaceStatus
AnyNodeNetworkInterfaceStatus
Event: An event will be generated whenever any network interface on the node is not online.Rearm: A rearm event will be generated when the network interface on the node becomes online again.
AnyNodeNetworkInterfaceStatus_H
Event: This condition collects all the AnyNodeNetworkInterfaceStatus events from the service nodes. An event will be generated whenever any network interface on the node is not online.Rearm: A rearm event will be generated when the network interface on the node becomes online again.
CSM conditions xCAT conditions Description
Chapter 3. CSM and xCAT functional comparison 49

AnyNodePagingPercentSpaceFree
AnyNodePagingPercentSpaceFree
Event: An event will be generated when the total amount of free paging space falls below 10 percent.Rearm: A rearm event will be generated when the free paging space increases to 15 percent.
AnyNodePagingPercentSpaceFree_H
Event: This condition collects all the AnyNodePagingPercentSpaceFree events from the service nodes. An event will be generated when the total amount of free paging space falls below 10 percent.Rearm: A rearm event will be generated when the free paging space increases to 15 percent.
AnyNodeProcessorsIdleTime
AnyNodeProcessorsIdleTime Event: An event will be generated when the average time all processors are idle at least 70 percent of the time.Rearm: A rearm event will be generated when the idle time decreases below 10 percent.
AnyNodeProcessorsIdleTime_H Event: This condition collects all the AnyNodeProcessorsIdleTime events from the service nodes. An event will be generated when the average time all processors are idle is at least 70 percent of the time.Rearm: A rearm event will be generated when the idle time decreases below 10 percent.
AnyNodeSwitchResponds N/A
AnyNodeTmpSpaceUsed AnyNodeTmpSpaceUsed Event: An event will be generated when more than 90 percent of the total space in the /tmp file system is in use.Rearm: A rearm event will be generated when the percentage of the space used in the /tmp file system falls below 75 percent.
CSM conditions xCAT conditions Description
50 Configuring and Managing AIX Clusters Using xCAT 2

AnyNodeTmpSpaceUsed_H Event: This condition collects all the AnyNodeTmpSpaceUsed events from the service nodes. An event will be generated when more than 90 percent of the total space in the /tmp file system is in use.Rearm: A rearm event will be generated when the percentage of the space used in the /tmp file system falls below 75 percent.
AnyNodeVarSpaceUsed AnyNodeVarSpaceUsed Event: An event will be generated when more than 90 percent of the total space in the /var file system is in use.Rearm: A rearm event will be generated when the percentage of the space used in the /var file system falls below 75 percent.
AnyNodeVarSpaceUsed_H Event: This condition collects all the AnyNodeVarSpaceUsed events from the service nodes. An event will be generated when more than 90 percent of the total space in the /var file system is in use.Rearm: A rearm event will be generated when the percentage of the space used in the /var file system falls below 75 percent.
CFMRootModTimeChanged
CFMRootModTimeChanged An event will be generated whenever a file under /cfmroot is added or modified.
NodeChanged N/A
NodeFullInstallComplete N/A
NodeGroupMembershipChanged
N/A
NodeManaged N/A
NodePowerStatus N/A
NodeReachability NodeReachability An event will be generated when a status changes.
CSM conditions xCAT conditions Description
Chapter 3. CSM and xCAT functional comparison 51

Table 3-2 lists the CSM and xCAT responses created by default.
Table 3-2 RMC responses in CSM and xCAT compared
NodeReachability_H This condition collects all the NodeReachability events from the service nodes. An event will be generated when a node becomes network unreachable from the management server.
ProbeSensorIsActive
UpdatenodeFailedStatusChange
pSeriesNodeFullInstallComplete
Drawer_not_configured Event: Drawer (FSP) has not been populated with its server-specific configuration data.Rearm: Drawer (FSP) is configured.
HFI_down Even: HFI is unavailable for use due to severe HFI or ISR hardware error.Rearm: HFI is back to normal.
HFI_not_configured Event: HFI did not get configured during server power-on.Rearm: HFI is configured.
IBSwitchLog An event will be generated when an error is logged to the syslog in the local node for IB.
ISR_down ISR is unavailable for use due to severe hardware error.
CSM conditions xCAT conditions Description
Note: As shown in Table 3-1 on page 47 some of the xCAT conditions are appended with _H. This represents a condition to be used in a hierarchical cluster using service nodes.
CSM response xCAT response
AuditLogServiceableEvents
52 Configuring and Managing AIX Clusters Using xCAT 2

Table 3-3 lists the CSM condition and response associations created by default.
Table 3-3 CSM condition and response associations
BroadcastEventsAnyTime BroadcastEventsAnyTime
CFMModResp
CFMNodeGroupResp
GatherKRB5keytabs
GatherSSHHostKeys
LogCSMEventsAnyTime
LogNodeErrorLogEntry
LogOnlyToAuditLogAnyTime LogOnlyToAuditLogAnyTime
RunCFMToNode
SetupSSHAndRunCFM
UpdatenodeFailedStatusResponse
WriteProbeSensorMessage
rconsoleUpdateResponse
DisplayEventsAnyTime
EmailRootAnyTime
EmailRootHierarchicalEvents
EmailRootOffShift
LogEventToxCATDatabase
MsgEventsToRootAnyTime
MsgRootHierarchicalEvents
UpdatexCATNodeStatus
CSM response xCAT response
Condition Response Status by default
“AllServiceableSwitchEvents” “AuditLogServiceableEvents” “Not active”
Chapter 3. CSM and xCAT functional comparison 53

Table 3-4 lists the xCAT condition and response associations create by default.
Table 3-4 xCAT condition and response association
3.2 Features
The features in xCAT 2 are different if the cluster is running AIX or Linux. Here are the current xCAT 2 on AIX features:
� Deploying diskless and diskfull nodes.
� Node discovery.
� Operating system image management (using NIM).
� Support for user-provided customization scripts. xCAT supports the automatic running of user-provided customization scripts on the nodes when they are deployed (installed or booted).
� xCAT data store in plug-in relational database (SQLite, MySQL).
� Hardware control commands for discovering hardware, gathering MAC addresses, VPD, and environments, power control, initiating a network boot, and LPAR creation and deletion.
� Hierarchical support to allow a large system to distribute the management of the cluster to service nodes.
� Remote console support.
“AllServiceableEvents” “AuditLogServiceableEvents” “Not active”
“ProbeSensorIsActive” “WriteProbeSensorMessage” “Active”
“NodeFullInstallComplete” “SetupSSHAndRunCFM” “Active”
“NodeChanged” “rconsoleUpdateResponse” “Active”
“NodeFullInstallComplete” “GatherKRB5keytabs” “Not active”
“AllServiceableHardwareEvents” “AuditLogServiceableEvents” “Not active”
“UpdatenodeFailedStatusChange” “UpdatenodeFailedStatusResponse” “Active”
Condition Response Status by default
Condition Response Status by default
“NodeReachability_H” “UpdatexCATNodeStatus” “Active”
“NodeReachability” “UpdatexCATNodeStatus” “Active”
54 Configuring and Managing AIX Clusters Using xCAT 2

� Parallel remote shell and remote copy commands.
� Monitoring plug-in infrastructure (RMC, Ganglia).
� Notification infrastructure which lets users monitor xCAT database table changes.
� Predefined conditions, responses and sensors.
� Software and firmware inventory.
� Allowing continuous operation during cluster software updates using plug-in job scheduler (LoadLeveler, Moab).
Automatic setup for syslog, remote shell, DNS, DHCP, and NTP for both the xCAT management node and the cluster nodes.
3.3 Hardware and software considerations
xCAT has not been tested or been designed to run on certain hardware types and software versions. Before installing xCAT you need to ensure the hardware and software you are intending to run in the xCAT environment are supported.
3.4 Hardware considerations
� Any system that can run AIX 5.3 or 6.1 can be managed, by xCAT, at a software level. Refer to Table 3-5.
� For HMC control - Power 5 and above HMCs are supported (this provides hardware control for commands such as rpower and rcons).
� All fast interconnects are supported apart from the High Performance Switch (HPS) because this requires csm.server.
3.5 SW considerations
xCAT 2 has been tested on AIX 5.3 and 6.1. Table 3-5 shows the current support software prerequisites for xCAT 2 on AIX.
Table 3-5 Table of software prerequisites for xCAT 2 on AIX
AIX version 5.3 6.1
Technology level TL 8 to TL 10 TL 1 to TL 3
xCAT 2 xCAT-2.2.x
Chapter 3. CSM and xCAT functional comparison 55

If you have an HPC software stack multicluster environment you need to ensure that the SSL version you are using is compatible.
3.6 Database
At the time of writing this book, xCAT 2 for AIX only supports the use of SQLite and MySQL. The database that is installed by default is SQLite but if your cluster is configured to take advantage of the hierarchical facilities available in xCAT 2, MySQL will need to be installed. When xCAT is installed with either of these database types, the same number of database tables are created on the xCAT MN. Table 3-6 provides a list and description of the default tables created on the xCAT 2 MN when xCAT is installed. The tables are listed in the order they are displayed by the tabdump command.
Table 3-6 Standard xCAT 2 tables created on the MN
Dependant RPMS tcl-8.4.7-3, tk-8.4.7-3, expect-5.42.1-3, conserver-8.1.16-2, perl-DBI-1.55-1,perl-DBD-SQLite-1.13-1, perl-IO-Socket-SSL-1.06-1, perl-IO-Tty-1.07-1, perl-IO-Stty-.02-1, perl-Net_SSLeay.pm-1.30-1,
perl-Digest-MD5-2.36-1, perl-Expect-1.21-1, fping-2.2b1-1, openslp-1.2.1, perl-Crypt-SSLeay-0.57-1, perl-Net-Telnet-3.03-1.2, net-snmp-5.4.2.1-1, net-snmp-devel-5.4.2.1-1, net-snmp-perl-5.4.2.1-1, bash-3.2-1.aix5.2.ppc.rpm
Optional RPMS perl-DBD-mysql-4.007-1, xcat-mysql-5.0-1 (mysql-5.0.67)
RSCT for (RMC) 2.4.9.0 (2.4.10.0 for full RMC functionality)
2.5.1.0 (2.5.2.0 for full RMC functionality)
AIX version 5.3 6.1
Technology level TL 8 to TL 10 TL 1 to TL 3
Table name Description
bootparams Current boot settings to be sent to systems attempting network boot for deployment, stateless, or other reasons. Mostly automatically manipulated by xCAT.
boottarget Target profiles with their accompanying kernel parameters
chain Controls what operations are done (and it what order) when a node is discovered and deployed.
56 Configuring and Managing AIX Clusters Using xCAT 2

deps Describes dependencies some nodes have on others. This can be used, for example, by rpower -d to power nodes on or off in the correct order.
eventlog Stores the events that occurred.
hosts IP address and host names of nodes. This info can be used to populate /etc/hosts or DNS.
ipmi Settings for nodes that are controlled by an on-board BMC via IPMI.
iscsi Contains settings that control how to boot a node from an iSCSI target.
mac The MAC address of the node's install adapter. Normally this table is populated by getmacs or node discovery, but you can also add entries to it manually.
monitoring Controls what external monitoring tools xCAT sets up and uses. Entries should be added and removed from this table using the provided xCAT commands monstart and monstop.
monsetting Specifies the monitoring plug-in specific settings. These settings will be used by the monitoring plug-in to customize the behavior such as event filter, sample interval, responses, and so on. Entries should be added, removed or modified with the chtab command. Entries can also be added or modified with the monstart command when a monitoring plug-in is brought up.
mp Contains the hardware control info specific to blades. This table also refers to the mpa table, which contains info about each Management Module.
mpa Contains info about each Management Module and how to access it.
networks Describes the networks in the cluster and info necessary to set up nodes on that network.
nimimage All the info that specifies a particular AIX operating system image that can be used to deploy AIX nodes.
nodegroup Not supported yet! Contains group definitions, whose membership is dynamic depending on characteristics of the node.
nodehm Settings that control how each node's hardware is managed. Typically, an additional table that is specific to the hardware type of the node contains additional info. For example the ipmi, mp, and ppc tables.
nodelist The list of all the nodes in the cluster, including each node's current status and what groups it is in.
Table name Description
Chapter 3. CSM and xCAT functional comparison 57

nodepos Contains info about the physical location of each node. Currently, this info is not used by xCAT, and therefore can be in whatever format you want. It will likely be used in xCAT in the future.
noderes Resources and settings to use when installing nodes.
nodetype A few hardware and software characteristics of the nodes.
notification Contains registrations to be notified when a table in the xCAT database changes. Users can add entries to have additional software notified of changes. Add and remove entries using the provided xCAT commands regnotif and unregnotif.
osimage Basic information about an operating system image that can be used to deploy cluster nodes.
passwd Contains default userids and passwords for xCAT to access cluster components. In most cases, xCAT will also actually set the userid/password in the relevant component when it is being configured or installed. Userids/passwords for specific cluster components can be overidden in other tables, for example mpa, ipmi, ppchcp, and so on.
performance Describes the system performance every interval unit of time.
policy Not fully implemented! Controls who has authority to run specific xCAT operations.
postscripts The scripts that should be run on each node after installation or diskless boot.
ppc List of system p hardware: HMCs, IVMs, FSPs, BPCs.
ppcdirect Info necessary to use FSPs to control system p CECs.
ppchcp Info necessary to use HMCs and IVMs as hardware control points for LPARs.
prodkey Specifies product keys for products that require them.
servicenode List of all Service Nodes and services that will be set up on the Service Node.
site Global settings for the whole cluster. This table is different from the other tables in that each attribute is just named in the key column, rather than having a separate column for each attribute. The following is a list of the attributes currently used by xCAT.
switch Contains what switch port numbers each node is connected to.
switches Parameters to use when interrogating switches.
Table name Description
58 Configuring and Managing AIX Clusters Using xCAT 2

3.7 Administrative task comparison
CSM and xCAT do perform a similar role and there are many similarities in the commands and their functions. You should be aware that some of the functionality in CSM is not longer available in xCAT 2 but some functionality missing from CSM is now available in xCAT 2.
3.7.1 Table comparing functionality
Table 3-7 provides a comparison between the CSM commands and functions and the equivalent in xCAT2.
Table 3-7 Comparison of CSM and xCAT 2 functions for AIX
vm Virtualization parameters.
vpd The machine type, model, and serial numbers of each node.
websrv Web service parameters.
Note: To get more details about the xCAT database tables, you can run the following:
� man xcatdb will provide a description of the tables. � man <tablename> will provide more detailed information on the individual
tables. � tabdump -d <tablename> will dump the table column description.
This information can also be found at:
http://xcat.sourceforge.net
Table name Description
Category CSM xCAT 2 on AIX
Database type Proprietary database Pluggable database:SQLite or MySQL
Database commands csmconfig ldef, chdef, tabdump, tabedit, chtab
definenode mkdef, tabedit, chtab, nodeadd
lsnode nodels, lsdef -t node -l, tabdump nodelist or gettab
Chapter 3. CSM and xCAT functional comparison 59

chnode chdef -t node -o <option>, tabedit, chtab
csmstat None - need to use the nodestat and status from IBM.NetworkInteface
Hardware control commands
rpower rpower
lshwinfo rscan
getadapters getmacs
Remote console rconsole rcons and wcons
consolerefresh makeconservercf
chrconsolecfg makeconservercf
Firmware flashing commands
rfwscan rinv
rfwflash rflash
mkflashfiles not required
Parallel commands dsh xdsh
dcp xdcp
dping pping and ppping
dshbak xdshback and xcoll
Node deployment (NIM on AIX)
lsnim lsnim
csm2nimnodes? xcat2nim
csm2nimgrps xcat2nim
csmsetupnim nimnodeset
nimnodecust
mknimimage and rmnimimage
rinstall and winstall
mkdsklsnode and rmdsklsnode
Category CSM xCAT 2 on AIX
60 Configuring and Managing AIX Clusters Using xCAT 2

rte/mksysb install rte/mksysb install
/csminstall and NIM FS usageCSM and NIM install (pre/post) scripts
The installdir /install can contain all the install images or separate NIM install file systems can be used as well as /install. installdir can be changed in the site table.
Network boot netboot rnetboot, nodeset
diskless (not done/Not CSM)
Update Nodes updatenode updatenode
HW config Not CSM
File management cfmupdatenode dRSYNC or other tools of your choice. Refer to our version of CFM in Table 4.3.29 on page 113.
CHRS CHRS lsslp (CEC assignment to HMC coming in 10/09)
RMC Monitoring and related commands
lscondition, lsresponse and lscondresp on CSM MS
lscondition, lsresponse and lscondresp on xCAT 2 MN & SN
mkcondresp, rmcondresp, startcondresp, stopcondresp
mkcondresp, rmcondresp, startcondresp, stopcondresp
mksrc, chsrc, rmsrc mksrc, chsrc, rmsrc
N/A monadd and monrm
N/A moncfg and mondecfg
N/A monstart and monstop
N/A monls
Other monitoring N/A Ganglia, SNMP, Performance Copilot. fping
LPCommands Part of rsct.core.lprm Par of rsct.core.lprm
Hierarchical Management
N/A Complete support
Software inventory only on Linux sinv
Category CSM xCAT 2 on AIX
Chapter 3. CSM and xCAT functional comparison 61

3.7.2 Comparison of common admin commands
CSM has specific commands that produce output or perform a required function, but in xCAT 2 there can be more than one way to perform the same operation. It is possible to run queries against specific xCAT database tables but also objects that provide information from multiple tables. The name of the table and the object are sometimes the same, for example site, but there is no guarantee. Below are some comparisons of administration commands in CSM and xCAT 2.
1. Check the cluster configuration
CSM: csmconfig
xCAT 2:
– lsdef -t site -l (Example 3-1)
Example 3-1 Using lsdef to display the cluster configuration
# lsdef -t site -lSetting the name of the site definition to 'clustersite'.
Discovery hwdsa lsslp
Services dns, ntp, ftp, bootp, ssh, rsh, syslog, LDAP, etc
dns, ntp, ftp, bootp, ssh, rsh, syslog, LDAP, etc
backup/restore csmbackup dumpxCATdb
csmrestore restorexCATdb
HAMSa hams Available as a service offering
hamsrecover Available as a service offering
Data gathering for support
csmsnap None
HPS (High Performance Switch)
CSM MS manages the switch (csm.server is required)
There is no support for HPS in an xCAT cluster.
a. High availability management server - CSM MS HA feature
Note: CSM has smitty menu pages to perform some administration tasks. xCAT does not have this at this time.
Category CSM xCAT 2 on AIX
62 Configuring and Managing AIX Clusters Using xCAT 2

Object name: clustersite consoleondemand=yes domain=p630n06 installdir=/install master=192.168.100.36 ntpservers=192.168.100.36 rcp=/usr/bin/scp rsh=/usr/bin/ssh tftpdir=/tftpboot useSSHonAIX=yes xcatdport=3001 xcatiport=3002
– tabdump site (Example 3-2)
Example 3-2 Using tabdump to display the cluster configuration
# tabdump site#key,value,comments,disable"xcatdport","3001",,"xcatiport","3002",,"tftpdir","/tftpboot",,"installdir","/install",,"master","192.168.100.36",,"domain","p630n06",,"useSSHonAIX","yes",,"consoleondemand","yes",,"rsh","/usr/bin/ssh",,"rcp","/usr/bin/scp",,"ntpservers","192.168.100.36",,
2. List nodes in the cluster
CSM: lsnode
xCAT 2: nodels (Example 3-3)
Example 3-3 Using nodels to list the nodes defined in the cluster
# nodelsvios-p5502hmc-v7
Note: To remove the message Setting the name of the site definition to 'clustersite' run lsdef -t site -o clustersite -l.
Chapter 3. CSM and xCAT functional comparison 63

p550_itso2virt-p5502-p1virt-p5502-p2virt-p5502-p3virt-p5502-p4virt-p5502-p5virt-p5502-p6
– lsdef -t node (Example 3-4)
Example 3-4 Using lsdef to list the nodes defined in the cluster
# lsdef -t node vios-p5502virt-p5502-p4virt-p5502-p3p550_itso2virt-p5502-p6virt-p5502-p2virt-p5502-p5hmc-v7virt-p5502-p1
3. List node details
CSM: lsnode -l <nodename>
xCAT 2:
– lsdef -t node <nodename> (Example 3-5)
Example 3-5 Using lsdef to display a full list of details for node virt-p5501-p1
# lsdef -t node virt-p5502-p1
Object name: virt-p5502-p1 arch=ppc64 cons=hmc
groups=p5502,GPFSQuorumNodes,LLNodes,AIXNodes,GPFSNodes,HMCNodes,AllNodes,ManagedNodes,NIMNodes,compute,all,lpar,all hcp=hmc-v7 id=2 mac=46DA90002002 mgt=hmc nodetype=lpar,osi os=AIX parent=p550_itso2 postscripts=setupntp,TEST_Setup_RMC._AllNodes
64 Configuring and Managing AIX Clusters Using xCAT 2

power=hmc pprofile=p1_profile profile=compute serial=106627E serialflow=hard serialport=ttyS0 serialspeed=9600 status=unreachable termserver=hmc-v7 xcatmaster=192.168.100.36
4. List specific node details
CSM: lsnode -a <attribute> <nodename>
xCAT 2:
– nodels <nodename> <tablename>.<attribute> (Example 3-6 and Example 3-7)
Example 3-6 Using nodels to identify the power type for node virt-p5502-p1
# nodels virt-p5502-p1 nodehm.power virt-p5502-p1: hmc
Example 3-7 Using nodels to list multiple node attributes
# nodels virt-p5502-p1 nodehm.power nodelist.nodevirt-p5502-p1: nodelist.node: virt-p5502-p1virt-p5502-p1: nodehm.power: bmc
– lsdef -t node <nodename> -i <attribute> (Example 3-8 and Example 3-9); the -o <nodename> can be used here but produces the same result.
Example 3-8 Using lsdef to identify the power type for node virt-p5502-p1
# lsdef -t node virt-p5502-p1 -i power
Object name: virt-p5502-p1 power=hmc
Note: lsdef -t -o node virt-p5502-p1 -l, lsdef -t node virt-p5502-p1 -l and lsdef -t node -o virt-p5502-p1 all produce the same output.
Chapter 3. CSM and xCAT functional comparison 65

Example 3-9 Using lsdef to list multiple node attributes
# lsdef -t node -o virt-p5502-p1 -i power name
Object name: virt-p5502-p1 power=bmc
– gettab node=<nodename> <tablename>.<attribute> (Example 3-10 and Example 3-11)
Example 3-10 Using gettab to identify the power type for node virt-p5502-p1
# gettab node=virt-p5502-p1 nodehm.power hmc
Example 3-11 Using gettab to list multiple node attributes
# gettab node=virt-p5502-p1 nodehm.power nodehm.nodenodehm.power: bmcnodehm.node: virt-p5502-p1
5. Change a cluster configuration attribute
CSM: csmconfig -c <attribute>=<value>
xCAT 2:
– chdef -t site <attribute>=<value> (Example 3-12)
Example 3-12 Using chdef to change the tftpboot field in the site table
# chdef -t site tftpdir=/newfsSetting the name of the site definition to 'clustersite'.Object definitions have been created or modified.
– chtab key=<key> site.value=<value> (Example 3-13)
Example 3-13 Using chtab to change the tftpboot field in the site table
# chtab key=tftpdir site.value=/newfs
– tabedit site will allow the user to alter the table inside an editor like vi:
Note: The attributes can be separated by a space or a comma.
Note: To remove the message “Setting the name of the site definition to 'clustersite'.” from the output run chdef -t site -o clustersite tftpdir=/newfs.
66 Configuring and Managing AIX Clusters Using xCAT 2

# tabedit site
6. Change a node definition
CSM: chnode -n <nodename> attribute>=<value>
xCAT 2:
– chdef -t node <nodename> <attribute>=<value> (Example 3-14)
Example 3-14 Using chdef to change the power type for the node
# chdef -t node virt-p5502-p1 power=hmcObject definitions have been created or modified.
– chtab node=<nodename> <tablename>.<attribute>=<value> (Example 3-15)
Example 3-15 Using chtab to change the power type for the node
# chtab node=virt-p5502-p1 nodehm.power=hmc
– tabedit <tablename> (Example 3-16)
Example 3-16 Using tabedit to change the power type for the node
# tabedit nodehm
7. Check the power status of the nodes in the cluster
CSM: rpower -a query
xCAT 2:
– rpower all state or rpower all stat (Example 3-17)
Example 3-17 Using rpower to check the state of the nodes
# rpower all state virt-p5502-p6: Runningp550_itso2: Operatingvirt-p5502-p4: Runningvirt-p5502-p2: Runningvirt-p5502-p3: Runningvirt-p5502-p5: Runningvirt-p5502-p1: Running
Note: It is possible to run chdef -t node -o virt-p5502-p1 power=hmc but it makes the same change and to the database and does not produce any more output.
Chapter 3. CSM and xCAT functional comparison 67

Services that xCAT configuresTable 3-8 Table of xCAT configurables from CSM on node
Service
NTP xCAT configures added to postscript table
Syslog xCAT configures not added to postscript table by default. But this is a problem if the user has TEC. Need to know what is in the syslog.conf file. Consider whether you want to use the postscript for syslog or not.
RMC On node customized sensors are still present. RMC is different config on xCAT though plus new lscondresp. This is added to postscript table when configured.
CFMa
a. Configuration File Manager
Scrips for: ssh, hosts, profile, GPFSstate, passwdntpd.conf and syslog.conf files sorted by updatenode scripts in xCAT. -- super Kia
Note: You need to ensure that the SSL versions for multicluster LL and GPFS are compatible with the versions in xCAT. May need to know for diskless environment.
68 Configuring and Managing AIX Clusters Using xCAT 2

Part 2 Implementation
This provides instructions on how to migrate your IBM Cluster System Management(CSM) to xCAT version 2. There are several ways to implement CSM to xCAT transition, depending on your environment and requirements.
We show the scenarios tested in our laboratory environment to install a new cluster from scratch. We use this scenario to demonstrate the installation of xCAT, installation of an hierarchical cluster using service nodes, the installation and customizing of diskfull and diskless nodes and also demonstrate xCAT’s ability to configure Logical Partitions (LPARs) on a IBM System p.
We also how to install and configure a General Parallel File System (GPFS) cluster using both diskfull and diskless nodes.
Part 2
© Copyright IBM Corp. 2009. All rights reserved. 69

70 Configuring and Managing AIX Clusters Using xCAT 2

Chapter 4. CSM to xCAT 2 transition
This chapter provides instructions about how to migrate your IBM Cluster System Management (CSM) to xCAT version 2. There are several ways to implement CSM to xCAT transition, depending on your environment and requirements. We have tested several scenarios in our environment, such as transition on different management servers and the same management server, entire at once cluster transition and partial cluster transition (node groups).
The following scenarios are tested in this chapter:
CSM transition to xCAT diskful nodes on HMC-controlled System p nodes.
� Partial CSM cluster transition to a new xCAT management server - 4.3, “Transitioning nodes to a different MN” on page 84.
� Reverting an xCAT node to CSM. Reverting a transitioned node back into CSM.
� Entire CSM cluster transition to xCAT on the same management server - 4.5, “Steps for a same MS/MN transition” on page 124.
In addition, in 4.7, “Post transition checks” on page 133 we explain post transition steps to verify that the xCAT cluster is working as expected.
4
© Copyright IBM Corp. 2009. All rights reserved. 71

4.1 Introduction to implementation scenarios
We tested different migration scenarios using various types of hardware. For xCAT management nodes we used two older systems (that run the required SW levels), since a management node does not require to have its power controlled by the xCAT software (running on the same HW).
4.1.1 Hardware
Our test environment consisted of the following:
� Computing nodes: IBM System P5 550 (M/T 9113-550)
� xCAT and CSM Management Node: IBM System POWER4 630 (M/T 7208-6C4)
� Storage: IBM TotalStorage DS4500 (1742-900)
� Hardware management console (HMC) 7.3.4
4.1.2 Software
The software versions used were:
� AIX 5300-09-01--847� RSCT 2.4.10� GPFS 3.2.1.10� LoadLeveler 3.5.0.4� PE 5.1.0.4� XLC compiler8.0� openSSH 4.5.0.5301� openSSL 0.9.8.4
72 Configuring and Managing AIX Clusters Using xCAT 2

4.1.3 Test environment diagram
Figure 4-1 depicts our test environment.
Figure 4-1 Our test environment
4.1.4 Scenarios description
We installed a typical HPC cluster using CSM, including a basic HPC software stack, such as IBM GPFS, PE, xlC, and LoadLeveler. For testing purposes (functional test only), we also installed the sample code for the modified application Hello World.
There are 12 computing nodes in the cluster, two physical p5 550, each with six partitions. These partitions are:
virt-p5501_p1 to virt-p5501_p6 for CEC#1 andvirt-p5502-p1 to virt-p5502-p6 for CEC#2
Chapter 4. CSM to xCAT 2 transition 73

There are two subnets/VLANs in our cluster:
192.168.200.0/24 -- used for GPFS I/O traffic192.168.100.0/24 -- management network and client traffic.A private VLAN for HMC traffic.
GPFS is used for the user home directory and holds all application data. The GPFS file system is available on all computing nodes, but not on the management nodes. There are four NSD servers (a.k.a. storage nodes) in the cluster:
virt-p5501_p1virt-p5501_p2virt-p5502-p1virt-p5502-p2
All other nodes are NSD clients. See GPFS configuration Example 4-1.
Example 4-1 GPFS cluster configuration
# mmlscluster
GPFS cluster information======================== GPFS cluster name: CSMtoxCAT.virt-p5501_p1 GPFS cluster id: 13882456113010480887 GPFS UID domain: CSMtoxCAT.virt-p5501_p1 Remote shell command: /usr/bin/ssh Remote file copy command: /usr/bin/scp
GPFS cluster configuration servers:----------------------------------- Primary server: virt-p5501_p1 Secondary server: virt-p5502-p1
Node Daemon node name IP address Admin node name Designation----------------------------------------------------------------------------------------------- 1 virt-p5501_p1 192.168.100.72 virt-p5501_p1 quorum-manager 2 virt-p5501_p2 192.168.100.73 virt-p5501_p2 quorum-manager 3 virt-p5501_p3 192.168.100.74 virt-p5501_p3 4 virt-p5501_p4 192.168.100.75 virt-p5501_p4 5 virt-p5501_p5 192.168.100.76 virt-p5501_p5 6 virt-p5501_p6 192.168.100.77 virt-p5501_p6
Note: We chose two networks for simplicity; in your environment you could have a different network topology. For a description of the most common network types (based on cluster role and functionality), see 1.2, “Suggested cluster diagram” on page 13.
74 Configuring and Managing AIX Clusters Using xCAT 2

7 virt-p5502-p1 192.168.100.82 virt-p5502-p1 quorum-manager 8 virt-p5502-p2 192.168.100.83 virt-p5502-p2 quorum-manager 9 virt-p5502-p3 192.168.100.84 virt-p5502-p3 10 virt-p5502-p4 192.168.100.85 virt-p5502-p4 11 virt-p5502-p5 192.168.100.86 virt-p5502-p5 12 virt-p5502-p6 192.168.100.87 virt-p5502-p6
The node virt-p5501_p1 is used as LoadLeveler Central Manager, as shown in Example 4-2.
Example 4-2 LoadLeveler configuration
$ llstatusName Schedd InQ Act Startd Run LdAvg Idle Arch OpSysvirt-p5501_p1 Avail 2 0 Idle 0 1.07 9999 R6000 AIX53virt-p5501_p2 Avail 0 0 Idle 0 1.00 9999 R6000 AIX53virt-p5501_p3 Avail 0 0 Idle 0 0.00 9999 R6000 AIX53virt-p5501_p4 Avail 0 0 Idle 0 0.00 9999 R6000 AIX53virt-p5501_p5 Avail 0 0 Idle 0 0.00 9999 R6000 AIX53virt-p5501_p6 Avail 0 0 Idle 0 0.00 9999 R6000 AIX53virt-p5502-p1 Avail 0 0 Idle 0 1.00 9999 R6000 AIX53virt-p5502-p2 Avail 0 0 Idle 0 0.00 9999 R6000 AIX53virt-p5502-p3 Avail 0 0 Idle 0 1.00 9999 R6000 AIX53virt-p5502-p4 Avail 0 0 Idle 0 0.01 9999 R6000 AIX53virt-p5502-p5 Avail 0 0 Idle 0 1.00 9999 R6000 AIX53virt-p5502-p6 Avail 0 0 Idle 0 0.00 9999 R6000 AIX53
R6000/AIX53 12 machines 2 jobs 0 running tasksTotal Machines 12 machines 2 jobs 0 running tasks
The Central Manager is defined on virt-p5501_p1
The BACKFILL scheduler is in use
All machines on the machine_list are present.
We are trying to simulate a real HPC cluster environment when we are transitioning; we keep the sample HPC application running on the whole cluster. Example 4-3 shows the sample HPC application.
Example 4-3 Sample HPC application used in our test
$ cat helloworld.c#include <stdio.h>#include <unistd.h>main(){ unsigned long i,j,count=0,haha=0;
Chapter 4. CSM to xCAT 2 transition 75
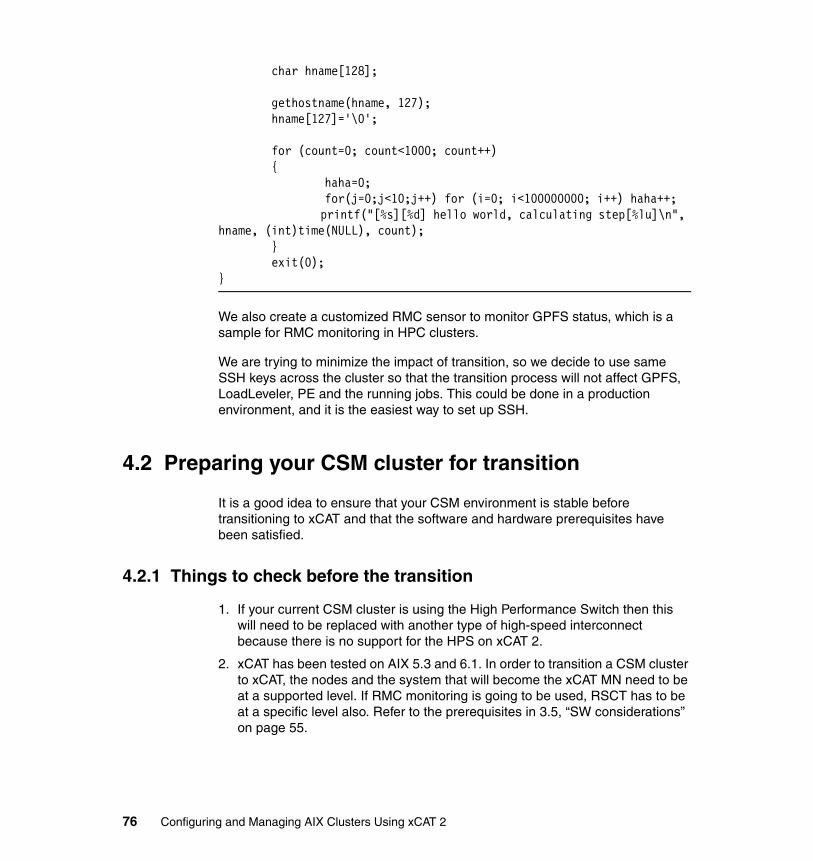
char hname[128];
gethostname(hname, 127); hname[127]='\0';
for (count=0; count<1000; count++) { haha=0; for(j=0;j<10;j++) for (i=0; i<100000000; i++) haha++; printf("[%s][%d] hello world, calculating step[%lu]\n", hname, (int)time(NULL), count); } exit(0);}
We also create a customized RMC sensor to monitor GPFS status, which is a sample for RMC monitoring in HPC clusters.
We are trying to minimize the impact of transition, so we decide to use same SSH keys across the cluster so that the transition process will not affect GPFS, LoadLeveler, PE and the running jobs. This could be done in a production environment, and it is the easiest way to set up SSH.
4.2 Preparing your CSM cluster for transition
It is a good idea to ensure that your CSM environment is stable before transitioning to xCAT and that the software and hardware prerequisites have been satisfied.
4.2.1 Things to check before the transition
1. If your current CSM cluster is using the High Performance Switch then this will need to be replaced with another type of high-speed interconnect because there is no support for the HPS on xCAT 2.
2. xCAT has been tested on AIX 5.3 and 6.1. In order to transition a CSM cluster to xCAT, the nodes and the system that will become the xCAT MN need to be at a supported level. If RMC monitoring is going to be used, RSCT has to be at a specific level also. Refer to the prerequisites in 3.5, “SW considerations” on page 55.
76 Configuring and Managing AIX Clusters Using xCAT 2

3. xCAT has been tested on certain System p hardware. Check the xCAT Web site at:
http://xcat.sourceforge.net
4. Decide whether the transition to xCAT will be done with the existing CSM MS being converted to xCAT or with a new system for the xCAT MN.
5. Decide how the nodes will be transitioned.
– If the CSM MS is being converted to the xCAT MN, then all the nodes will have to be transitioned at the same time.
– If a new system is being used for xCAT MN, then you can decide how many nodes you would like to transition at a time. It may be a good idea to transition one node initially to ensure the procedure works on your cluster.
6. Verify that the remote shell and remote copy facility being used in the cluster are working correctly.
7. Check how cfmupdatenode is being used in the cluster and what functionality may be lost when transitioning to xCAT.
8. Check to see what Monitoring has been configured in the CSM cluster. To check the current monitoring configuration, run lscondresp and lssensor on the CSM MS and the nodes.
– This will display the current conditions and responses that are associated and whether they are Active or Not active.
– It is possible to identify conditions, responses, and associations implemented by CSM by listing the following directories on the CSM MS under /opt/csm/install/resources/base:• IBM.Association• IBM.Condition• IBM.EventResponse• IBM.Sensor
9. Check whether syslog is enabled on any of the CSM nodes because, by default, xCAT will reconfigure /etc/syslog.conf to log node activity to the xCAT MN.
10.Check the NTP configuration because, by default, xCAT will reconfigure /etc/ntpd.conf on the nodes to point to the xCAT MN. The CSM cluster may be configured to use the /opt/csm/bin/sprc1 script and cfmupdatenode.
Note: When CSM is removed from the MS and the nodes the resources related to CSM will be removed as well.
1 SPRC - Simple Platform Resource Controller (CSM script)
Chapter 4. CSM to xCAT 2 transition 77

11.Check what scripts are configured on the CSM cluster and whether they rely on CSM binaries. This includes LPCommands2.
12.Ensure that the HPC stack is working as expected.
– Check the GPFS cluster with the following:
• Run mmgetstate -av from a node in the GPFS cluster.
• Verify the file systems are mounted and accessible.
– Check the Loadleveler cluster with the following:
• Run llstatus from a node in the cluster.
• Submit a job with llsubmit and check it using the llq command and by viewing the job output file.
13.In case of a consolidation environment using HACMP™, a new feature in HACMP 5.4.1 enables installing AIX and RSCT PTFs without disturbing HA applications, if the update does not need an operating system reboot. Find the detailed description about the Unmanage Resource Group option in HACMP for AIX 5L™ V5.4.1 Installation Guide.
4.2.2 Remote shell/copy back-end considerations
Decide if you are going to use SSH or RSH for the xCAT2 cluster. Both are supported and the site table will need to be updated to specify whether ssh and scp are to be used. In our tests we used SSH, and used the same keys on the CSM MS and the CSM nodes distributed by cfmupdatenode.
4.2.3 Backing up CSM data
Backups are taken for two reasons: return to old config or reuse parts of config.
� Backing up CSM database and RSCT components:
– csmbackup
It saves the following RMC resource classes defined on the CSM MS:
• IBM.DeviceHwCtrl: hardware control devices
• IBM.DeviceGroup: hardware control device groups
• IBM.Sensor: RMC sensor information
• IBM.EventResponse: event responses, which include the responses returned by the lsresponse command and scripts used by the ERRM responses.
2 For LPCommands, see IBM RSCT Administration Guide, SA22-7889-12.
78 Configuring and Managing AIX Clusters Using xCAT 2

• IBM.Condition: information returned by the lscondition command
• IBM.Association: information regarding the mapped conditions and responses that are currently configured
• IBM.ManagedNode: data returned by the lsnode command
• IBM.NodeGroup: node group information (dynamic and static groups)
• IBM.DmsCtrl: information that is stored by the csmconfig command
• IBM.MNNetworkInterface is not saved
Restore of the RMC classes is possible with the mkrsrc command:
mkrsrc -f resource_data_input_file [-v] [-h] [-TV] resource_class
The command also saves a list of the files in the /cfmroot directory, but does not specify which item is a link and which is a normal file.
The conserver configuration is also saved.
A directory is created with the /var/opt/csm/csmdata/errm name for the files used by the RSCT Event Response Resource Manager, which are basically the scripts utilized by the RMC responses.
The passwords set by the systemid command to reach the HMCs saved in the system_config subdirectory.
It is possible to save additional files as well. Use the -f option specifying a file which contains additional files to save.
The command specifies additional tasks which should be performed by the administrators:
# cat tasks.csmbak
The following files/directories should be manually backed up by the user to ensure that CSM has been completely saved:
/csminstall//cfmroot/
A subdirectory named resources is created which contains all the Perl modules required for the recreation of the RMC definitions.
The file named scripts.tgz contains the CSM customization scripts in /csminstall/csm/scripts directory.
We did not find the scripts which are called by the CSM-related sensors in the backup.
� Copy of the /cfmroot directory
The csmbackup command does not back up the /cfmroot directory. If the files are to be used in the transition, they need to be backed up with:
# tar cvf cfmroot.tar /etc/opt/csm/cfmroot
Full path to the errm directory
Chapter 4. CSM to xCAT 2 transition 79

� Backing up RSCT-related data located in the /var/ct directory (ctbackup)
Run /usr/sbin/rsct/bin/ctbackup to save the content of the /var/ct directory, which has the RSCT database and configuration data. The command will create a new directory named /var/ct.backup, but will overwrite it if it already exists.
This can be restored with the ctrestore command on the original machine.
� We also suggest to take a CSM cluster configuration snapshot with the csmsnap command. Although this command is used to collect data to be sent to IBM support, it gives you a good set of data that can be used for future reference. The following directories and files are saved:
/csminstall/csm/scripts/data/*/csminstall/csm/scripts/update/*/etc/*-release/etc/db_file.cr/etc/dhcpd.cfg/etc/dhcp.conf/etc/dhcpsd.cnf/etc/hosts/etc/nsswitch.conf/etc/opt/conserver/conserver.cf/opt/csm/install/*tmpl*/opt/csm/install/*.xml*/tftpboot/*/tmp/spot.out.*/var/adm/ras/nimlog/var/log/conserver/var/log/consoles/*/var/log/messages/var/log/csm/*
The output of CSM-related commands is saved in the csmsnap_out subdirectory. This can be used to restore or load some of the configuration data. Configuration data is saved in these files:
DSH_LIST.outarp_-a.outcfmroot.outcsmconfig.outcsmstat.outerrpt_-a.outframe_-l.outifconfig_-a.outinstfix_-i.outlshwdev_-a_Mode.out
80 Configuring and Managing AIX Clusters Using xCAT 2

lslpp_-hac.outlsmod.outlsnim_-l.outlsnode_-F.outlsnode_-i.outlsnode_-p.outlspci.outlsrhws_-e.outlsrhws_-f.outlsrhws_-m.outlsrhws_-s_.Frame_BPA_MTMS==..TM*MS_of_BPA..._-L.outlsrsrc_IBM.MNNetworkInterface_Name_IPAddress_Status.outlsrsrc_IBM.ManagedNode.outlsrsrc_IBM.ManagementServer.outlssrc_-a.outlssrc_-l_-s_dhcpsd.outmonitorinstall.outnetstat_-A.outnetstat_-in.outnetstat_-rn.outnodegrp.outrmcdomainstatus_-s_ctrmc.outrpm_-qa.outrpower_-av_cec_query.outrpower_-av_query.outsystemid.out
� RSCT snapshot (ctsnap on MS and nodes)
The ctsnap command gathers configuration, log, and trace information about the Reliable Scalable Cluster Technology (RSCT) components.
The command creates a compressed file in the /tmp/ctsupt directory, which contains the RSCT configuration data with RMC databases. The RMC database contains the whole CSM cluster configuration. The RMC Resource Manager daemon setup is saved also, together with the contents of the /var/ct directory.
The console and RMC logs are saved also.
� Back up the OS using either system backup (mksysb) or alternate disk install (alt_disk_install) on the management server.
It may be necessary to back up the non-root volume groups, depending on your cluster config. For example, if the NIM file system is in a separate volume group, this should be backed up.
Chapter 4. CSM to xCAT 2 transition 81

� System logging (syslog) configuration
Check and save the syslog.conf file on the node(s) being transitioned because it is replaced, by default, by xCAT postscipt (syslog). Back it up if the configuration is required after transition. It is possible to not run this script, either by specifying the scripts to run with the updatenode command or altering the scripts in the postscripts table.
4.2.4 Saving secondary adapter information
In a CSM cluster we can differentiate two kinds of network adapters: install adapters and secondary adapters. The install adapters are used for installing the nodes over the network. The secondary adapters are used for applications and other administration purposes. The administration of the secondary adapters can be configured and managed using either NIM or CSM functions.
� Adapters handled by CSM
For each secondary, adapter information is stored in one stanza file assigned to the nodes via the AdapterStanzaFile node attribute.
Save the stanza files for the nodes to be transitioned and move them to the new xCAT MN. This can be passed to the NIM configuration and used to restore secondary adapter configuration.
� Adapters handled by NIM
There is one or more NIM resource defined with the type adapter_def. Check the name of the resource on the NIM master with lsnim|grep adapter_def.
Run lsnim –l “adapter resource”, for example if the resource name is Adapters:
# lsnim -l AdaptersAdapters: class = resources type = adapter_def
Note: If nodes in a cluster have specific a specific configuration (RMC), then you may need to issue ctbackup on the nodes, and you may need a way to restore config. We did not have this in our test. All RMC customization is in cfmroot.
Note: At the time of writing, xCAT does not have a utility that can handle secondary adapters out-of-the-box. You can handle secondary adapters (configure) either via NIM or via xCA postscripts.
82 Configuring and Managing AIX Clusters Using xCAT 2

Rstate = ready for use prev_state = unavailable for use location = /nimrepo/adapters alloc_count = 0 server = master
For each node to be transitioned, save the files found in the directory specified by the location attribute.
4.2.5 Save RMC monitoring data
The RMC data backup is explained in sections related to the different RMC classes, where the data can be found (see the ctbackup, csmbackup commands).
� IBM.Sensor
The RMC sensors are implemented via user-defined scripts and the IBM.SensorRM resource manager daemon, which starts the scripts in the predefined time.
For the backup of the sensors we have to back up the sensor scripts and the sensor definition scripts.
In our example the sensor script is already on the installed nodes, but for future installations we put it in the file collection also.
The sensor definition is implemented via a CSM update script, so we have to back up this script for future use.
� IBM.Condition
The conditions are managed by the IBM.ERRM resource manager. To back up the condition in a reusable format, run the lsrsrc command with the following parameters to save the GPFS-related data:
#lsrsrc -i -s ‘Name like “GPFS%”’ IBM.Condition
It is possible to change the search parameter according to the actual monitoring configuration, but in our scenario no other condition was created.
Note: It is possible to merge the files into one for easier transfer and handling.
Chapter 4. CSM to xCAT 2 transition 83

4.3 Transitioning nodes to a different MN
In this scenario we prepare a separate OS image (server) to be used as xCAT management node (MN). This scenario can be applied if, for example, before switching your cluster completely, you want to test how xCAT behaves on a subset of nodes, while, at the same time, preparing the transition process.
The diagram of this scenario is presented in Figure 4-2. We recommend that before you start this scenario, you identify the xCAT documentation pertaining to your specific platform, and also, take the necessary actions to prepare a fallback plan for the transitioned nodes, in case you will need to revert to the original configuration.
Figure 4-2 Transition diagram - different management servers
For this scenario we assume that the future xCAT management node has already been installed with the required AIX version and has the network connectivity and storage resources required for acting as xCAT management node.
4.3.1 Preparing the xCAT 2 management node (MN) for transition
1. Log in to your designated xCAT MN and create a volume group for /install.
Note: The starting point for this scenario is the xCAT2AIX document at:
https://xcat.svn.sourceforge.net/svnroot/xcat/xcat-core/trunk/xCAT-client/share/doc/xCAT2onAIX.pdf
These steps are run on the xCAT MN
84 Configuring and Managing AIX Clusters Using xCAT 2

2. Download the RPMs dep-aix-*.tar.gz and core-aix-2.2.tar.gz from:
http://xcat.sourceforge.net/yum/download.html
3. Install the prerequisites, as shown in Example 4-4.
Example 4-4 Install xCAT prerequisites
# mkdir /install/dep-aix-2.2# cd /install/dep-aix-2.2# tar xf dep-aix-2.2-snap200903291204.tar#cd /install/dep-aix-2.2# ./instossperl-DBI ##################################################bash ##################################################perl-DBD-SQLite ##################################################conserver ##################################################perl-Expect ##################################################perl-IO-Tty ##################################################perl-IO-Stty ##################################################perl-IO-Socket-SSL ##################################################perl-Net_SSLeay.pm ##################################################perl-Digest-MD5 ##################################################fping ##################################################openslp ##################################################perl-Crypt-SSLeay ##################################################perl-Net-Telnet ##################################################net-snmp ##################################################
Note: Make sure directories are specified each time (full path).
Chapter 4. CSM to xCAT 2 transition 85

net-snmp-devel ##################################################net-snmp-perl ##################################################
4. Install the core packages, as shown in Example 4-5.
Example 4-5 Installing xCAT core packages
# mkdir /install/core-aix-2.2# cd /install/core-aix-2.2# tar xf core-aix-snap.tar# ./instxcatperl-xCAT ##################################################xCAT-client ##################################################xCAT-server ##################################################xCAT ##################################################Created /etc/xCATMN file.Added updates to the /.ssh/config file.Created /install/postscripts/_ssh directory.Copied /.ssh/id_rsa.pub to /install/postscripts/_ssh/authorized_keys.ln -sf /opt/freeware/sbin/conserver /usr/sbin/conserver.ln -sf /opt/freeware/bin/console /usr/bin/console.Command failed: lssrc -a | grep conserver 2>&1. Error message: .Add subsystem conserver.Updated cluster site definition.Created postscripts definition.Created policy definition.syslog has been set up.Setting up basic certificates. Respond with a 'y' when prompted.Running echo 'yyyy' |/opt/xcat/share/xcat/scripts/setup-xcat-ca.sh 'xCAT CA' # NOTE use "-newkey rsa:2048" if running OpenSSL 0.9.8a or higherGenerating a 2048 bit RSA private key..............................+++............................................+++writing new private key to 'private/ca-key.pem'
86 Configuring and Managing AIX Clusters Using xCAT 2

-----/Created xCAT certificate.Created /install/postscripts/ca/certs directory.Copied /etc/xcat/ca/* to /install/postscripts/ca directory.Running echo 'yyyy' |/opt/xcat/share/xcat/scripts/setup-server-cert.sh p630n06Generating RSA private key, 2048 bit long modulus........+++..+++e is 65537 (0x10001)/Using configuration from openssl.cnfCheck that the request matches the signatureSignature okCertificate Details: Serial Number: 1 (0x1) Validity Not Before: May 8 18:44:05 2009 GMT Not After : May 3 18:44:05 2029 GMT Subject: commonName = p630n06 X509v3 extensions: X509v3 Basic Constraints: CA:FALSE Netscape Comment: OpenSSL Generated Certificate X509v3 Subject Key Identifier: B4:AA:0D:23:4D:FC:19:3E:90:F6:35:23:C1:73:83:DA:02:42:D9:C5 X509v3 Authority Key Identifier: keyid:DC:5B:E0:10:B1:06:A0:9A:30:4E:D3:82:FE:24:14:86:83:5A:67:CC
Certificate is to be certified until May 3 18:44:05 2029 GMT (7300 days)Sign the certificate? [y/n]:
1 out of 1 certificate requests certified, commit? [y/n]Write out database with 1 new entriesData Base Updated/Created xCAT certificate.
Chapter 4. CSM to xCAT 2 transition 87

Created /install/postscripts/cert directory.Copied /etc/xcat/cert/* to /install/postscripts/cert directory.Running echo 'yyyy' |/opt/xcat/share/xcat/scripts/setup-local-client.sh rootGenerating RSA private key, 2048 bit long modulus................................................................+++............................................+++e is 65537 (0x10001)/Using configuration from openssl.cnfCheck that the request matches the signatureSignature okCertificate Details: Serial Number: 2 (0x2) Validity Not Before: May 8 18:44:11 2009 GMT Not After : May 3 18:44:11 2029 GMT Subject: commonName = root X509v3 extensions: X509v3 Basic Constraints: CA:FALSE Netscape Comment: OpenSSL Generated Certificate X509v3 Subject Key Identifier: 65:10:FA:C8:3C:92:4C:02:C9:49:A6:BD:B1:5E:C0:57:DC:70:F5:E2 X509v3 Authority Key Identifier: keyid:DC:5B:E0:10:B1:06:A0:9A:30:4E:D3:82:FE:24:14:86:83:5A:67:CC
Certificate is to be certified until May 3 18:44:11 2029 GMT (7300 days)Sign the certificate? [y/n]:1 out of 1 certificate requests certified, commit? [y/n]Write out database with 1 new entriesData Base Updated/Created xCAT certificate.Created /install/postscripts/_xcat directory.Copied /.xcat/* to /install/postscripts/_xcat directory.Copied /etc/xcat/ca/certs* to /install/postscripts/ca/certs directory.
88 Configuring and Managing AIX Clusters Using xCAT 2

Starting xcatd.....xCAT-rmc ##################################################Stopping xcatd processes....Starting xcatd.....
5. To check the site table to ensure xCAT has been installed correctly and the xcatd is running, run the command in Example 4-6.
Example 4-6 Checking the site table after installation of xCAT
# lsdef -t site -lSetting the name of the site definition to 'clustersite'.
Object name: clustersite consoleondemand=yes domain=p630n05 installdir=/install
master=192.168.100.35 tftpdir=/tftpboot useSSHonAIX=no xcatdport=3001 xcatiport=3002
4.3.2 Gather CSM data using the csm2xcat script on CSM MS
xCAT provides a utility to save some of the CSM configuration data in stanza files, which can be used to create the definitions in xCAT. At the time of writing this book three stanza files are created for the site, device and node definitions. The script creates a log file as well, as shown in Example 4-7.
Example 4-7 Log file for csm2xcat utility
# cat conversion.logConversion started at Thu Apr 30 10:45:34 2009Reading Site information
Reading Node information
Note: If, for whatever reason, you are reinstalling xCAT RPMs, duplicate entries in /etc/profile may be re-added each time. Check and correct.
Note: A description of the site table can be found in Table 3-6 on page 56.
This step is run on the xCAT MN
Chapter 4. CSM to xCAT 2 transition 89

Reading Device information
Conversion finished at Thu Apr 30 10:45:56 2009
The following steps show how to use the utility.
1. Copy the /opt/xcat/share/xcat/tools/csm2xcat and /opt/xcat/share/xcat/tools/csm2xactdefs files from the xCAT 2 MN to the CSM MS.
2. On the CSM MS, run csm2xcat.
3. Data files are created in /tmp/csm2xcat.
4. Copy the following files to the xCAT MN:
– site.stanza– node.stanza– device.stanza
4.3.3 Update /etc/hosts
5. Add the new IP label/address of the xCAT Management Node (MN) to the /etc/hosts file on CSM MS and run cfmupdatenode against the nodes that are being transitioned.
6. Copy the updated /etc/hosts from the CSM MS to the xCAT2 MN.
4.3.4 Set up user and group on the new xCAT MN
7. Copy the following files from the CSM MS to the xCAT 2 MN to replicate the configuration:
– /etc/hosts– /etc/passwd– /etc/group– /etc/security/passwd– /etc/security/group– /etc/security/limits– /etc/security/user
Note: The csm2xcat tool has been developed to facilitate migration from CSM to xCAT. The command must be run on the CSM management server and will build three xCAT stanza files that can be used to update the xCAT database using the chdef command.
These steps are run on the CSM MS.
These steps are run on the CSM MS.
This step is run on the CSM MS.
90 Configuring and Managing AIX Clusters Using xCAT 2

4.3.5 Configure remote shell
As described in 4.2.2, “Remote shell/copy back-end considerations” on page 78, SSH is not defined as default in xCAT 2 so the site table needs to be updated.
8. Run the chdef command on the site file to enable ssh on AIX:
chdef -t site useSSHonAIX=yes
9. Change the site table to reflect the rsh and rcp usage:
chdef -t site rsh=/usr/bin/ssh rcp=/usr/bin/scp
The CSM cluster used the same SSH keys. Therefore, to make the transition simpler and to minimize the impact on our applications, we copied the contents of ~root/.ssh from the CSM MS to the xCAT 2 MN.
10.Copy /.ssh/* from MS to MN.
11.Test whether it is now possible to ssh from the MN to the nodes. Use the command:
ssh <nodename> date
4.3.6 Check the ulimit
12.Check the ulimit fsize for the MN.
13.Create an SSL policy for the MN.
Note: To ensure smooth transition, we recommend that you copy the public key of the root@CSMMS and root@xCATMN into the ~/.authorized_keys of the root user on all nodes.
Important: Be aware that commands that require root privilege will still be able to run on xCAT-managed nodes from the CSM MS.
These steps are run on the xCAT MN.
Chapter 4. CSM to xCAT 2 transition 91

4.3.7 Enabling NTP
In the existing CSM cluster NTP was configured using CFM but we decided to enable the optional NTP feature in xCAT. When the ntpservers and timezone attributes are updated in the site table, all nodes that are installed or booted from the MN will use these settings. It is also possible to configure transitioned nodes to use these settings, as described in 4.3.25, “Run the xcataixscript utility on the nodes” on page 109.
14.Enable the NTP server in the site table with chdef:
chdef -t site ntpservers=<NTP server IP>
15.Set the time zone:
chdef -t site timezone=America/New_York
4.3.8 Enabling inetd entries
16.The NIM master uses the tftp and bootp subservers of the inetd daemon, so these have to be enabled via removing the comment sign in /etc/inetd.conf and refreshing the inetd daemon. Check the relevant part of the configuration file:
Note: SSL is used for securing the communication between client and daemon, identifying client user ID and porting ssh key/credential exchanges during installation. There are three xcatd daemons:
One xCAT daemon is for node deployment purposes, listens on TCP port 3002, only accepts connections from nodes defined in xCAT, and handles the following XML format commands:
next, installstatus, unlocktftpdir, locktftpdir, getpostscript, rebootnodes, setiscsiparms
One xCAT daemon is only for blade discovering purposes by now; it listens on UDP port 3001 and handles the following XML format command:
findme
One xCAT daemon is used for administration purposes. Most xCAT commands go through this daemon. It listens on TCP port 3001, uses SSL communication to only allow authorized users to run xCAT commands, and also checks the policy table to verify that the user is allowed to run a particular command. It handles the following XML format commands:
authcheck, noderange, extnoderange, all plug-in commands
92 Configuring and Managing AIX Clusters Using xCAT 2
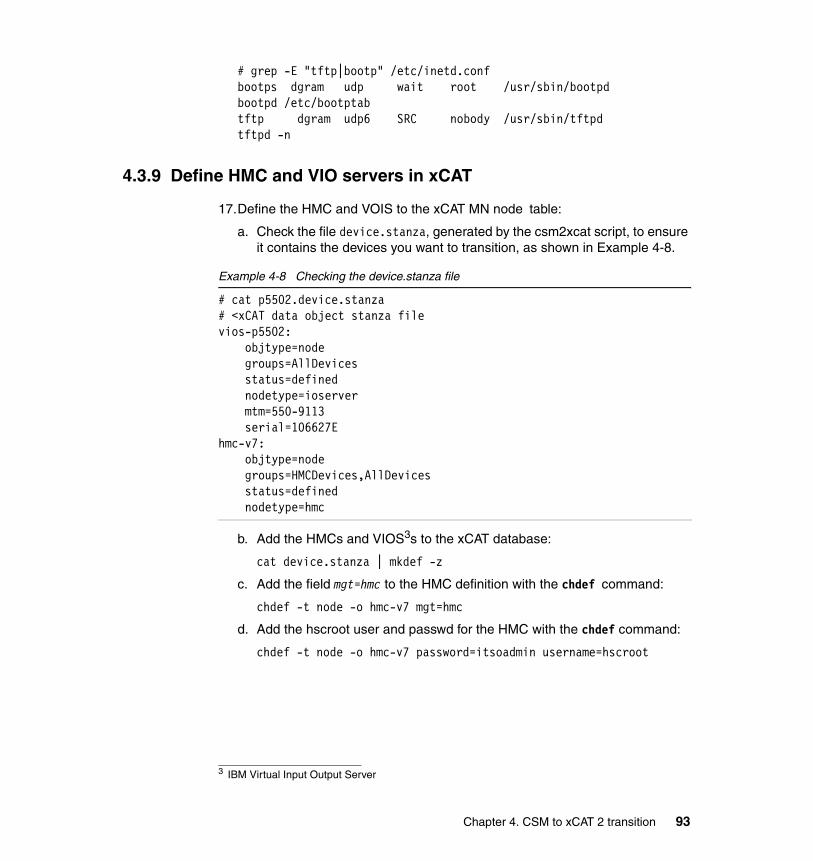
# grep -E "tftp|bootp" /etc/inetd.confbootps dgram udp wait root /usr/sbin/bootpd bootpd /etc/bootptabtftp dgram udp6 SRC nobody /usr/sbin/tftpd tftpd -n
4.3.9 Define HMC and VIO servers in xCAT
17.Define the HMC and VOIS to the xCAT MN node table:
a. Check the file device.stanza, generated by the csm2xcat script, to ensure it contains the devices you want to transition, as shown in Example 4-8.
Example 4-8 Checking the device.stanza file
# cat p5502.device.stanza# <xCAT data object stanza filevios-p5502: objtype=node groups=AllDevices status=defined nodetype=ioserver mtm=550-9113 serial=106627Ehmc-v7: objtype=node groups=HMCDevices,AllDevices status=defined nodetype=hmc
b. Add the HMCs and VIOS3s to the xCAT database:
cat device.stanza | mkdef -z
c. Add the field mgt=hmc to the HMC definition with the chdef command:
chdef -t node -o hmc-v7 mgt=hmc
d. Add the hscroot user and passwd for the HMC with the chdef command:
chdef -t node -o hmc-v7 password=itsoadmin username=hscroot
3 IBM Virtual Input Output Server
Chapter 4. CSM to xCAT 2 transition 93

4.3.10 Discovering HW in xCAT (rscan)
It is necessary to run rscan to gather the required attributes for hardware control. It is possible to use the -w flag to write the relevant data straight into the xCAT database. We did not choose this option because we were populating the database in a specific way, as detailed in Example 4.3.11.
18.Collect the node information from the hardware control point:
rscan -z hmc-v7 > /tmp/csm2xcat/xcat_mystanzafile
4.3.11 Defining the nodes (populating the tables)
19.Define the xCAT compute nodes. We tested two ways to do this:
– Defining a single node– Defining multiple nodes with a script called convert.sh
Defining a single node (manual process)a. If you do not use the convert.sh script you will need to use the following
steps:
i. Use the node.stanza file, created in 4.3.2, “Gather CSM data using the csm2xcat script on CSM MS” on page 89, to generate a new file containing a single node stanza, that is, for node virt-p5501-p4, and copy it to the new xCAT MN:
grep -p virt-p5501_p4 /tmp/csm2xcat/node.stanza > virt-p5501_p4.stanza
ii. On the CSM management server run lparstat on the node and extract the LPAR partition name, as in Example 4-9.
Note: To get rcons and rpower working we have to run rscan and then merge the csm2xcat file with the rscan output, then define the node. It is important to have the machine entries from rscan.
Ensure that the files are merged correctly because we do not want multiple field entries per stanza as the last entry, which may incorrect, to be used.
Note: convert.sh is a script tool that helps you merge the attributes from the output of csm2xcat and rscan to define the nodes in xCAT easily.
94 Configuring and Managing AIX Clusters Using xCAT 2

Example 4-9 Identifying the partition name of virt-p5501_p4
# ssh virt-p5501_p4 "lparstat -i|grep 'Partition Name'|awk '{print $4}'"p5_1_p4
iii. Use the following commands to insert a line between each node stanza generated by rscan, grep the identified partition name, then replace the partition name for the node name and redirect to a file:
sed '/:/{x;p;x;}' /tmp/csm2xcat/xcat_mystanzafile | grep -p p5_1_p4|sed s/p5_1_p4/virt-p5501_p4/ > /tmp/csm2xcat/virt-p5501_p4.stanza_add
iv. Verify by data checking the two files, as shown in Example 4-10.
Example 4-10 node stanza generated by csm2xcat
# cat virt-p5501_p4.stanzavirt-p5501_p4: objtype=node
groups=p5501,GPFSNodes,LLNodes,AIXNodes,HMCNodes,AllNodes,ManagedNodes,NIMNodes,compute,all profile=compute status=defined mac=7241E0005003 termserver=hmc-v7 power=hmc mgt=hmc os=AIX arch=ppc64 serial=106628E serialspeed=9600 serialflow=hard serialport=ttyS0 cons=hmc xcatmaster=192.168.100.35
# cat virt-p5501_p4.stanza_addvirt-p5501_p4: objtype=node nodetype=lpar,osi id=5 mtm= serial= hcp=hmc-v7 pprofile=p4_profile
Chapter 4. CSM to xCAT 2 transition 95

parent=p550_itso1 groups=lpar,all mgt=hmc cons=hmc
v. Define the CEC (managed system) name as a separate node in the node table. This is known as the parent in the node definition, for example parent=p550_itso1. Use the xcat_mystanzafile file generated by the rscan command as shown in Example 4-11 to define the CEC, as shown in Example 4-12.
Example 4-11 Node stanza from rscan
p550_itso1: objtype=node nodetype=fsp id= mtm=9113-550 serial=106628E hcp=hmc-v7 pprofile= parent= groups=fsp,all mgt=hmc cons=
vi. Define the node with the file created from Step i on page 94:
cat virt-p5501_p4_node.stanza | mkdef -z
Example 4-12 mkdef run successfully
# cat virt-p5501_p4.parent.stanza | mkdef -zObject definitions have been created or modified.
vii. Define the node with the file created from Step iii on page 95:
cat virt-p5501_p4_node.stanza_add | chdef -p -z
viii.Alter the xcatmaster field in the node object with the IP address of the new xCAT MN, for example 192.168.100.35:
Note: If you do not define the CEC as a node to xCAT, the rpower command will return VPD errors like this:
# rpower virt-p5501_p4 statevirt-p5501_p4: Node not defined in 'vpd: (p550_itso1)' database
96 Configuring and Managing AIX Clusters Using xCAT 2

For a single node:
chdef -t node -o virt-p5501_p4 xcatmaster=192.168.100.35
Or for a group:
chdef -t node -o lpar xcatmaster=192.168.100.35
Defining multiple nodes at once (scripting it)b. Using the convert.sh script:
i. On the xCAT Management Node generate a node list file to use with the convert.sh script; see Example 4-13.
Example 4-13 Commands to grab node list for multiple node transition
# cat node.stanza|grep :|sed s/://|grep p5501|grep -v p3|grep -v p4 > multinode_p5501
# cat multinode_p5501virt-p5501_p2virt-p5501_p1virt-p5501_p6virt-p5501_p5
Note: Make sure you have the following files in the same directory with convert.sh
– node.stanza, output of csm2xcat– xcat_mystanzafile, output of rscan– ssh is working, you can ssh to computing node without
password. This is used to query the mapping between hostname and partition name.
convert.sh needs three parameters:
– hostname
– CSM MN IP address
– xCAT MN IP address, used to replace xcatmaster if you are using a different xCAT MN from CSM MN
Chapter 4. CSM to xCAT 2 transition 97

ii. Define nodes and the parent CEC in xCAT using the convert.sh script. The script details are shown in Example 4-14.
Example 4-14 Nodes defines to xCAT with convert.sh
# cat multinode_p5501|xargs -I {} ./convert.sh {} 192.168.100.36 192.168.100.35Processing virt-p5501_p2Generating virt-p5501_p2.stanza from csm2xcatPartition id for virt-p5501_p2 is p5_1_p2Generating virt-p5501_p2.stanza_add from xcat rscanGenerating parent stanzafileParent for virt-p5501_p2: p550_itso1p550_itso1 not defined in xCATObject definitions have been created or modified.
Define node virt-p5501_p2 in xCATObject definitions have been created or modified.
Change node virt-p5501_p2 attributesObject definitions have been created or modified.
..snippet..
Object definitions have been created or modified.
Change node virt-p5501_p5 attributesObject definitions have been created or modified.
iii. Verify the xCAT definitions with lsdef -t node -l, as shown in Example 4-15.
Example 4-15 Verify the node definition
# lsdef -t node -o virt-p5501_p4 -l
Object name: virt-p5501_p4 arch=ppc64 cons=hmc
groups=p5501,GPFSNodes,LLNodes,AIXNodes,HMCNodes,AllNodes,ManagedNodes,NIMNodes,compute,all hcp=hmc-v7 id=5
Note: The csm2xcat script does not add devices to the all group.
98 Configuring and Managing AIX Clusters Using xCAT 2

mac=7241E0005003 mgt=hmc nodetype=lpar,osi os=AIX parent=p550_itso1 power=hmc pprofile=p4_profile profile=compute serial=106628E serialflow=hard serialport=ttyS0 serialspeed=9600 status=defined termserver=hmc-v7 xcatmaster=192.168.100.35
4.3.12 Configuring and testing conserver
20.Every time a node is added to the xCAT cluster, makeconservercf needs to be run:
# makeconservercf
Verify that the node name has been added to /etc/consever.cf. If adding nodes to the xCAT cluster, you also need to run:
# stopsrc -s conserver# startsrc -s conserver
21.Test using rcons on the newly added node as shown in Example 4-16.
# rcons virt-p5501_p4
Note: On a CSM cluster conserver.cf is located in /etc/opt/conserver/conserver.cf but on an xCAT cluster it is located in /etc/conserver.cf.
Note: rcons and rpower will fail if nodetype=lpar (from rscan) and machine entry (managed system) was not defined. Getting parent errors.
Note: To exit rcons, use the following keyboard sequence:
“cntrl-E” then “c” then “.”
This step is run on the xCAT MN.
This step is run on the xCAT MN.
Chapter 4. CSM to xCAT 2 transition 99

Example 4-16 Testing remote console access
# rcons virt-p5501_p4[Enter `^Ec?' for help]
AIX Version 5Copyright IBM Corporation, 1982, 2008.Console login:
# [disconnect]#
4.3.13 Testing remote power control (rpower)
22.Test rpower against the added node as shown in Example 4-17.
# rpower virt-p5501_p4 state
Example 4-17 Testing rpower
# rpower virt-p5501_p4 statevirt-p5501_p4: Running
4.3.14 Configuring NIM master and creating NIM resources
23.If using a different xCAT MN from CSM MS, you need to set up a new NIM master and create NIM resources:
a. Export lpp_source from CSM MS and mount on the xCAT MN.
b. Run mknimimage on lpp_source on MN, as shown in Example 4-18.
Example 4-18 Using the mknimimage command
# mknimimage -s /mnt_point_to_lpp_source 539imageConfiguring NIM.Creating a NIM lpp_source resource called '539image_lpp_source'. This could take a while.Creating a NIM SPOT resource. This could take a while.
This step is run on the xCAT MN.
Attention: In this step we configure a different NIM master, controlled by the xCAT MN. This NIM master is different from the one controlled by the CSM MS. Once the nodes are migrated from CSM to xCAT, they will also be moved from the CSM NIM master to the xCAT NIM master.
This step is run on the xCAT MN.
100 Configuring and Managing AIX Clusters Using xCAT 2

The following xCAT osimage definition was created. Use the xCAT lsdef command to view the xCAT definition and the AIX lsnim command to view the individual NIM resources that are included in this definition.Object name: 539image bosinst_data=539image_bosinst_data imagetype=NIM lpp_source=539image_lpp_source nimmethod=rte nimtype=standalone osname=AIX spot=539image
c. Update lpp_source with the xCAT packages on the xCAT MN:
i. Copy the RPMs from the dep-aix-*.tar.gz and core-aix-2.2.tar.gz files to xCAT MN.
ii. Create a directory for bundles; we used stall/nim/installp_bundle.
iii. Copy the bundle files xCATaixSN.bnd, xCATaixSSH.bnd, and xCATaixSSL.bnd to the directory /install/nim/installp_bundle
iv. Define bundles for SSH and SSL (see Example 4-19):
# nim -o define installp_bundle -a server=master -a \ > location=<location> <bundlename>
Example 4-19 define xCAT bundles in NIM
nim -o define -t installp_bundle -a server=master -a location=/install/nim/installp_bundle/xCATaixSSL.bnd xCATaixSSL.bndnim -o define -t installp_bundle -a server=master -a location=/install/nim/installp_bundle/xCATaixSSH.bnd xCATaixSSH.bnd
v. Copy xCAT dependency RPMs to lpp_source.
vi. Update lpp_source with the xCAT packages.
nim -o update -a packages=all -a source=/xCAT2/dep-aix-2.2 539lpp_res
vii. If the cluster contains an SN, copy xCAT core packages to lpp_source and run:
nim -o update -a packages=all -a source=/xCAT2/core-aix-2.2 539lpp_res
Chapter 4. CSM to xCAT 2 transition 101

4.3.15 Add installp bundles to xCAT osimage
24.To add bundles to the osimage, run:
chdef -t osimage -o 539image install_bundle="xCATaixSSL,xCATaixSSH"
4.3.16 Define xCAT networks
In our scenario we have two networks: cluser_net for administration and external login, and gpfs_net for GPFS private I/O. See Figure 4-1 on page 73 for the cluster diagram.
25.Create xCAT networks in the networks table:
a. Cluster network
mkdef -t network -o cluster_net net=192.168.100.0 \ > mask=255.255.255.0 gate=192.168.100.60
b. GPFS network
mkdef -t network -o gpfs_net net=192.168.200.0 mask=255.255.255.0
4.3.17 Create NIM secondary adapter definitions
26.Add secondary adapter information into NIM. We used the secondary adapters in each node on the network dedicated for GPFS I/O traffic.
This operation has to be done after the NIM master is defined on the new xCAT management node.
The NIM resource will require a directory to place the adapter definition files for each node, which can be exported. Be sure that the NIM operation does not fail if the directory is already defined as a location for any NIM resources, as this could prevent NFS exporting it.
a. Use the following command to create a new NIM adapter_def resource with the Adapters name in the /install/nim/adapters directory:
nim -o define -t adapter_def -a server=master -a \ > location=/install/nim/adapters Adapters
This step is run on the xCAT MN.
Note: We changed the NIM network name to cluster_net, as advised by the xCAT documentation. This is the name created by the mknimimage command.
This step is run on the xCAT MN.
Note: This step is not required for an existing NIM config (that is, from existing MS.)
This step is run on the xCAT MN.
102 Configuring and Managing AIX Clusters Using xCAT 2

b. Populate the directory with the adapter definition files using the following command, where the source file can be either a CSM or NIM adapter stanza file saved based on the previous section. Use the file created in 4.2.4, “Saving secondary adapter information” on page 82.
nimadapters –d –f /tmp/adapterfile_from_csm Adapters
There is no adapter_def field in the nimimage table at the time of this writing. Thus, the resource will have to be allocated manually before a NIM operation.
4.3.18 Creating NIM client and group definitions
27.Use the xcat2nim command to create NIM resources from the xCAT database.
a. Define standalone machines in NIM using xcat2nim:
xcat2nim [-t node] <nodename>
Example 4-20 shows how to define a single standalone node.
Example 4-20 xcat2csm against a single node - ‘-t’ not required if against a node
# xcat2nim virt-p5501_p4 Assuming an object type of 'node'.
p630n05: NIM operations have completed successfully.
Example 4-21 shows how to define multiple standalone nodes.
Example 4-21 multiple nodes added to NIM with xcat2nim command
# cat multinode_p5501virt-p5501_p2virt-p5501_p1virt-p5501_p6virt-p5501_p5
# cat multinode_p5501|xargs -I {} xcat2nim {} Assuming an object type of 'node'.
p630n05: NIM operations have completed successfully.
Note: We created the NIM client and NIM definitions using the CSM (NIM) naming convention.
This step is run on the xCAT MN.
Chapter 4. CSM to xCAT 2 transition 103

Assuming an object type of 'node'.
p630n05: NIM operations have completed successfully.
Assuming an object type of 'node'.
p630n05: NIM operations have completed successfully.
Assuming an object type of 'node'.
p630n05: NIM operations have completed successfully
b. Define a NIM group using xcat2nim, as shown in Example 4-22.
xcat2nim -f -t group <groupname>
Example 4-22 Getting the Groups set up with xcat2nim
# xcat2nim -f -t group -o AIXNodesp630n05: NIM operations have completed successfully.
# lsnim -l AIXNodesAIXNodes: class = groups type = mac_group member1 = virt-p5501_p4
c. Check the machine definition in NIM with lsnim, as shown in Example 4-23.
Example 4-23 lsnim output after xcat2cms command
# lsnim -l virt-p5501_p4virt-p5501_p4: class = machines type = standalone connect = shell platform = chrp netboot_kernel = mp if1 = cluster_net virt-p5501_p4 7241E0005003 ent cable_type1 = N/A Cstate = ready for a NIM operation prev_state = ready for a NIM operation Mstate = currently running
104 Configuring and Managing AIX Clusters Using xCAT 2

4.3.19 Removing nodes from the NIM configuration on CSM MS
28.Since the xCAT 2 cluster has a new NIM master, we need to remove the node from the old NIM master.
If resources are allocated to the machine, it may be necessary to run the commands shown in Example 4-24.
Example 4-24 Removal of node virt-p5501_p4 from the NIM master
# nim -o deallocate -a subclass=all virt-p5501_p4# nim -o remove -F virt-p5501_p4
Example 4-25 shows how to remove multiple nodes:
Example 4-25 Removal of multiple nodes from then NIM master
# cat multinode_p5501|xargs -I {} nim deallocate -a subclass=all {}# cat multinode_p5501|xargs -I {} nim -o remove -F {}
4.3.20 Register the nodes with the new xCAT NIM master
29.Register the nodes to the new NIM master:
– Run niminit on one node to register it with the new NIM master, as shown in Example 4-26.
Example 4-26 Registering a single node to a new NIM master
# nimit -a master=p630n05 -a name=virt-p5501_p4
– Alternately, to register multiple nodes to a new NIM master, run the command shown in Example 4-27 on the xCAT 2 MN.
Example 4-27 Registering multiple nodes to a new NIM master
cat multinode_p5501|xargs -I {} xdsh {} niminit -a master=p630n05 -a name={}
Note: This removes the nodes from the CSM NIM master ODM and the /etc/niminfo on the nodes. If, for whatever reason, the remote command from the CSM NIM master fails, the /etc/niminfo on the nodes will not be deleted. However, in our scenario we register the NIM clients to the xCAT NIM master from the nodes, which automatically adjusts the /etc/niminfo file on the nodes.
This step is run on the CSM MS.
This step is run on the client nodes.
Chapter 4. CSM to xCAT 2 transition 105
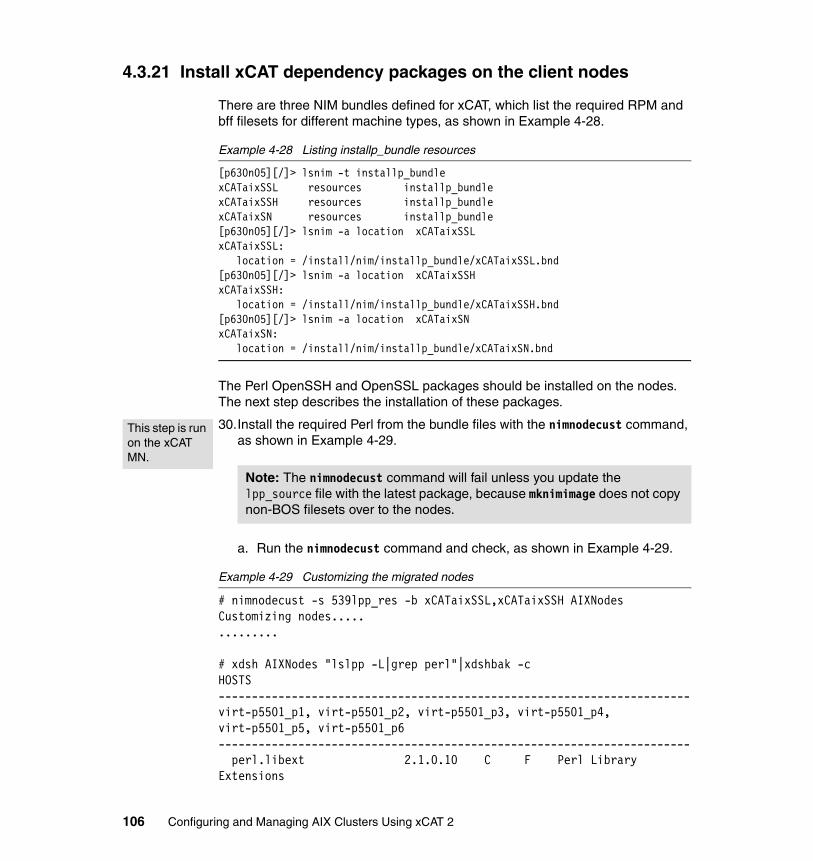
4.3.21 Install xCAT dependency packages on the client nodes
There are three NIM bundles defined for xCAT, which list the required RPM and bff filesets for different machine types, as shown in Example 4-28.
Example 4-28 Listing installp_bundle resources
[p630n05][/]> lsnim -t installp_bundlexCATaixSSL resources installp_bundlexCATaixSSH resources installp_bundlexCATaixSN resources installp_bundle[p630n05][/]> lsnim -a location xCATaixSSLxCATaixSSL: location = /install/nim/installp_bundle/xCATaixSSL.bnd[p630n05][/]> lsnim -a location xCATaixSSHxCATaixSSH: location = /install/nim/installp_bundle/xCATaixSSH.bnd[p630n05][/]> lsnim -a location xCATaixSNxCATaixSN: location = /install/nim/installp_bundle/xCATaixSN.bnd
The Perl OpenSSH and OpenSSL packages should be installed on the nodes. The next step describes the installation of these packages.
30.Install the required Perl from the bundle files with the nimnodecust command, as shown in Example 4-29.
a. Run the nimnodecust command and check, as shown in Example 4-29.
Example 4-29 Customizing the migrated nodes
# nimnodecust -s 539lpp_res -b xCATaixSSL,xCATaixSSH AIXNodesCustomizing nodes..............
# xdsh AIXNodes "lslpp -L|grep perl"|xdshbak -cHOSTS -----------------------------------------------------------------------virt-p5501_p1, virt-p5501_p2, virt-p5501_p3, virt-p5501_p4, virt-p5501_p5, virt-p5501_p6----------------------------------------------------------------------- perl.libext 2.1.0.10 C F Perl Library Extensions
Note: The nimnodecust command will fail unless you update the lpp_source file with the latest package, because mknimimage does not copy non-BOS filesets over to the nodes.
This step is run on the xCAT MN.
106 Configuring and Managing AIX Clusters Using xCAT 2

perl.rte 5.8.2.90 C F Perl Version 5 Runtime perl-IO-Socket-SSL 1.06-1 C R IO-Socket-SSL - Nearly perl-Net_SSLeay.pm 1.30-1 C R Net_SSLeay.pm - Perl extension
4.3.22 Removing the nodes from CSM
The next step removes the node from the CSM cluster.
31.On the CSM MS, run the rmnode command on a single node, as shown in Example 4-30. To remove multiple nodes, you can use the -N flag.
Example 4-30 Output from rmnode on CSM MS
# rmnode -u -n virt-p5501_p4
Important: Even if the MN (management node) has already been used to install SSH/SSL on the nodes, lpp_source needs to have the packages.
Note1: The nimnodecust command will install the RPMs (if available) and will not log the install messages. However, if nimnodecust fails on an RPM, the command will not notify or log any message, so we recommend a manual check (as shown in the previous example).
Note2: You can monitor the progress of nimnodecust by running tail -f /var/log/messages on the xCAT MN.
.snippet. May 7 16:13:13 p630n05 auth|security:info sshd[160212]: Accepted password for root from 172.16.253.38 port 2410May 7 16:13:13 p630n05 auth|security:info sshd[196840]: Attempt to write login records by non-root user (aborting)May 7 16:13:13 p630n05 local4:err|error xCAT: nim -o cust -a lpp_source=539image_lpp_source -a installp_flags=agQXY -a installp_bundle=xCATaixSSL -a installp_bundle=xCATaixSSH virt-p5501_p6May 7 16:13:15 p630n05 daemon:debug mountd[102450]: re-reading the file.May 7 16:13:40 p630n05 daemon:notice bootpd[168028]: received short packet..snippet..
This step is run on the CSM MS.
Chapter 4. CSM to xCAT 2 transition 107

virt-p5501_p4: Uninstalling CSM ..Did not uninstall the Open Source prerequisites.The remote shell (SSH or RSH) has not been unconfigured on the Managed Nodes. To ensure security, you should unconfigure the remote shell on the nodes manually.
32.Disable the SSH login possibility from the CSM MS to the node:
a. Remove the node(s) SSH host key from known_hosts on the CSM MS. If the SSH client option StrictHostKeyChecking is set to ask or yes, then this will cause ssh to ask a question or fail. This may affect scripts, which can hang or fail in the CSM cluster for this node, so the best way is to set it to yes. To enable the strict checking change the main ssh client config file /etc/ssh/ssh_config or create a config file in the root users .ssh directory as shown in Example 4-31.
Example 4-31 Disabling SSH session for unknown hosts
[p630n05][/]> grep StrictHostKeyChecking /etc/ssh/ssh_config# StrictHostKeyChecking ask[p630n05][/]> echo "StrictHostKeyChecking yes" > ~/.ssh/config[p630n05][/]> grep virt-p5501_p1 ~/.ssh/known_hosts[p630n05][/]> ssh virt-p5501_p1 dateNo RSA host key is known for virt-p5501_p1 and you have requested strict checking.Host key verification failed.
b. The other solution would be to specify the hosts, which are allowed to use a public key at SSH connection time. It is possible to prepare the authorized_keys file, which will be distributed from the xCAT MN with this parameter. This file by default is located in the /install/postscripts/_ssh directory. After the setting is made the file has to be distributed via running the aixremoteshell xCAT postscript. See Example 4-32 for the description of the necessary parameter.
Example 4-32 Disabling SSH connection via host specification in the authorized_keys file
from="pattern-list" Specifies that in addition to public key authentication, the canonical name of the remote host must be present in the comma-separated list of patterns. The purpose of this option is to optionally increase security: public key authentication by itself
Note: IBM.Sensor resource manager is not changed on the node. For differences, see 3.1.10, “RMC monitoring” on page 45.
This step is run on the CSM MS.
108 Configuring and Managing AIX Clusters Using xCAT 2

does not trust the network or name servers or anything (but the key); however, if somebody somehow steals the key, the key permits an intruder to log in from anywhere in the world. This additional option makes using a stolen key more difficult (name servers and/or routers would have to be compromised in addition to just the key).
At this point the node is removed from the CSM cluster, so the remote commands initiated via the dsh command will not work. However, the commands that started directly using ssh can still start remote operations on the node, because we use a single root private and public key pair in the entire transitioning environment. It depends on your security requirements whether this has to be avoided.
4.3.23 Setting up syslog
33.By default, syslog is enabled in the postscripts table to point to the new MN. You may also consider exploiting the advantages of the latest syslog-ng, which provides message filtering, database integration, graphical front-end, while maintaining backward compatibility with syslog. To download and install syslog-ng, check the following:
http://www.perzl.org/aix/index.php?n=Main.Syslog-ng
4.3.24 Prepare SSH keys for distribution to the nodes
34.If you are using the same SSH keys in the xCAT cluster as the CSM cluster, copy the keys to the directory /install/postscripts/_ssh, on the MN, so updatenode can provide the same keys to new or reinstalled nodes in the future.
4.3.25 Run the xcataixscript utility on the nodes
The xcataixscript utility is located in the /install/postscripts directory on the xCAT NM. It is usually run on the nodes when they are installed to perform post installation tasks for xCAT. We need to run this manually if the nodes have not been installed by xCAT. In this case, do the following.
35.Copy the script (utility) to the nodes and run it as shown in Example 4-33.
Example 4-33 Running the xcataixscript (script) on xCAT nodes
# xdcp AIXNodes /install/postscripts/xcataixscript /tmp
This step is run on the xCAT MN.
This step is run on the xCAT MN.
Chapter 4. CSM to xCAT 2 transition 109

# xdsh AIXNodes perl /tmp/xcataixscript# xdsh AIXNodes rm /tmp/xcataixscript# xdsh AIXNodes grep xcat /etc/inittabvirt-p5502-p2: xcat:2:wait:/xcatpost/xcataixpost > /dev/console 2>&1virt-p5502-p3: xcat:2:wait:/xcatpost/xcataixpost > /dev/console 2>&1virt-p5502-p5: xcat:2:wait:/xcatpost/xcataixpost > /dev/console 2>&1virt-p5502-p1: xcat:2:wait:/xcatpost/xcataixpost > /dev/console 2>&1virt-p5502-p4: xcat:2:wait:/xcatpost/xcataixpost > /dev/console 2>&1virt-p5502-p6: xcat:2:wait:/xcatpost/xcataixpost > /dev/console 2>&1
4.3.26 Configure and run postscripts with updatenode
xCAT uses the postscripts table to categorize the scripts that should be run on each node in the cluster. The table expects the scripts that are added to the table to be located in the /install/postscripts directory on the MN.
36.Copy the customized script to /install/postscripts on the xCAT MN For example, TEST_Setup_RMC._AllNodes was used in our transition.TEST_Setup_RMC._AllNodes is used to create a GPFS RMC sensor for monitoring GPFS status.
37.Set the postscripts attribute and check the postscripts table (Example 4-34).
The postscripts attribute can be set for a node or node group.
For a custom script to run, it needs to be:
a. Copied to the /install/postcripts directory on the xCAT MN.
b. Defined in the postscripts table for the group AIXNodes.
Example 4-34 Set the postscripts attribute and check the postscripts table
# chdef -t group -o AIXNodes postscripts="setupntp,TEST_Setup_RMC._AllNodes
# tabdump postscripts#node,postscripts,comments,disable"xcatdefaults","syslog,aixremoteshell",,"service","servicenode",,"AIXNodes","setupntp,TEST_Setup_RMC._AllNodes",,
38.Run updatenode AIXNodes with the scripts syslog and setupntp, as shown in Example 4-35.
Example 4-35 updatenode run on a single node
# updatenode virt-p5501_p4 "syslog,setupntp"
These steps are run on the xCAT MN.
This step is run on the xCAT MN.
110 Configuring and Managing AIX Clusters Using xCAT 2

virt-p5501_p6: returned
4.3.27 Clean up CSM NTP configuration
39.xCAT 2 can be used to provide the NTP server configuration for the cluster nodes, so we decided to use this functionality. Therefore, the CSM NTP configuration needs to be removed from the nodes. To do this, delete /etc/rc.d/rc2.d/S20xntpd and /etc/rc.d/rc2.d/K20xntpd from the transitioned nodes.
4.3.28 Configure RMC monitoring
RMC monitoring makes use of the monitoring functionality of RSCT. This is described in detail in 3.1.10, “RMC monitoring” on page 45.
40.Verify that the required RSCT code is installed on the xCAT MN and the nodes.
a. On the xCAT MN and the nodes, check for RSCT 2.4.10.0 (or higher):
# lslpp -l |grep rsct
b. On the xCAT MN, check whether the xCAT-rmc RPM is installed:
# rpm -qa | grep xCAT-rmc
41.Check the xCAT table configuration:
c. Verify that each node is in the osi group:
# tabdump nodetype
d. Ensure that the MAC address value is correct for each node:
# tabdump mac
42.Configure and enable xCAT RMC monitoring:
e. Add rmcmon in the monitoring table:
# monadd rmcmon -a
This will also add the configrmcnode postscript into the postscripts table.
f. Add AIXNodes to rmc (-r is for nodes that are already AIX running):
# moncfg rmcmon AIXNodes -r
This step is run on the xCAT MN.
Note: Configuring RMC is optional.
This step is run on the xCAT MN.
Chapter 4. CSM to xCAT 2 transition 111

The first time moncfg is run with -r, it will call recfgctnid or recfgct to reconfigure the RSCT subsystems on the computing nodes. It will generate a new ct_node_id, which will wipe out all non-default RSCT data.
g. Start monitoring:
# monstart rmcmon
h. Check the IBM.Host and IBM.MCP classes, as shown in Example 4-36.
Example 4-36 Listing commands for 2nd RMC implementation
# moncfg rmcmon virt-p5501_p4 -rConfiguring the following nodes. It may take a while.virt-p5501_p4virt-p5501_p4: returned
# ssh virt-p5501_p4 lsrsrc IBM.MCPResource Persistent Attributes for IBM.MCPresource 1: MNName = "192.168.100.75" NodeID = 6063043458768437806 KeyToken = "9.12.4.186" IPAddresses = {"192.168.100.253","9.12.4.186","fe80::20d:60ff:fe22:3c7f"} ActivePeerDomain = "" NodeNameList = {"virt-p5501_p4"}resource 2: MNName = "virt-p5501_p4" NodeID = 591561834286225135 KeyToken = "192.168.100.35" IPAddresses = {"192.168.100.35"} ActivePeerDomain = "" NodeNameList = {"virt-p5501_p4"}
# lsrsrc -a IBM.Host NameResource Persistent Attributes for IBM.Hostresource 1: Name = "virt-p5501_p4"resource 2: Name = "virt-p5501_p3"
Note: Steps e and f are only required for the initial configuration of RMC monitoring. These are not required when adding additional nodes to be monitored.
These steps are run on the xCAT MN.
112 Configuring and Managing AIX Clusters Using xCAT 2

43.Run updatenode to create the GPFS sensor (GPFSState), as shown in Example 4-37.
Example 4-37 Update node creating GPFSState sensor
# updatenode virt-p5501_p4 TEST_Setup_RMC._AllNodesvirt-p5501_p4: returned
# ssh virt-p5501_p4 lssensorDisplaying sensor information:NameGPFSState
4.3.29 Configure replacement for CFM in xCAT
44.Configuration File Manager (CFM) is a useful tool in CSM to maintain configuration files across the whole cluster. At the time we wrote this book, xCAT V2 did not provide a similar tool to replace CFM, so we developed a tool called xcfmupdatenode, which provides functions similar to cfmupdatenode in CSM as a replacement. xcfmupdatenode only provides basic functions of cfmupdatenode. Here is its feature list:
– Supports the noderange parameter - you may distribute files to noderange instead of the whole cluster.
– Supports ._hostname or ._nodegrp extensions, but it cannot handle complicated file names and multiple version files with overlapped node range extensions. Do not use '._' in your file name unless you use ._hostname or ._nodegrp extensions.
– Supports sample configuration files with._EmptyGroup, that are distributed to any node.
– Supports pre/post scripts.
– Supports links as in CSM CFM.
a. Set up the /cfmroot directory and put the configuration files, links, and scripts that you want to copy to the cluster in it.
b. Run the xcfmupdatenode command to copy the files over to the nodes and execute pre/post scripts.
# xcfmupdatenode AIXNodes
This step is run on the xCAT MN.
Note: This step is optional.
This step is run on the xCAT MN.
Chapter 4. CSM to xCAT 2 transition 113

4.3.30 Restore customized RMC monitoring data in the new cluster
xCAT can provide RMC-based monitoring of the nodes, but it is possible to create application-specific sensors, conditions and responses also, which is independent of xCAT monitoring. See 6.2, “Installing monitoring software in xCAT” on page 258.
For the following steps we will use the RMC data from the old CSM Management Server, so first copy the data you have backed up in 4.2.6, “Save RMC monitoring data” on page 31 over to the xCAT Management Node into a subdirectory of your choice.
Sensor creationThere can be some situations when the sensors disappear from the nodes at transition time. This is caused by /usr/sbin/rsct/install/bin/recfgct. In this case continue with the next steps to restore the configurations of the sensors.
If local sensors are used on the nodes, ensure that the sensor scripts are available on the transitioned nodes, and place them in the used file collection for future installations.
Add the sensor creation script in the postscripts attribute for the nodes where they are required. The default postscripts directory is /install/postscripts.
Start the appropriate postscripts command to recreate the sensors.
Restore the condition definitionsWe created conditions to check the GPFS status on the nodes in the CSM cluster. Now we used the backup of these definitions to restore them on the xCAT Management Node. The backup files can contain some attribute name and value pairs, depending on the command it was created with, which cannot be used in the restore, so delete the following attributes if they exist:
� ActivePeerDomain
Note: xcfmupdatenode is not automatically called when running updatenode or rebooting the nodes as in CSM. You need to run it manually. If you want xcfmupdatenode called automatically, you need to add it to the command script file, system startup scripts, or cron jobs.
Note: This is also optional, if you decide to use RMC.
114 Configuring and Managing AIX Clusters Using xCAT 2

� NodeNameList
The condition definitions are saved into the file /xCat2/RMC/new_conditions. To restore, run the mkrsrc command, as shown in Example 4-38.
Example 4-38 Restoring conditions
[p630n05][/]> mkrsrc -f /xCat2/RMC/new_conditions IBM.Condition[p630n05][/]> lscondition | grep GPFS"GPFS daemon state" "p630n05" "Not monitored""GPFS State" "p630n05" "Not monitored"
Restart the customized monitorsThe conditions have to be assigned to a response, and the monitoring has to be started. It is possible to do this in one step via the startcondresp command or it can be done with the mkcondresp and startcondresp commands.
You could use any of the predefined responses or create a new response to notify about the occurrence of an event. In our scenarios we used the “Informational notifications” response from the CSM backup as shown in Example 4-39, which is also available by default on the new xCAT Management Server. The backup we used for redefining the monitors was created by the csmbackup command and moved to the xCAT MN in the /xCat2/RMC/csmdata directory.
Example 4-39 Restoring responses from CSM backup
# cd /xCat2/RMC/csmdata# cat Association.csmbak|grep Active|grep GPFS|awk -F\" '{print "mkcondresp \\\""$2"\\\" \\\""$4"\\\""}'|xargs -I {} ksh {}# cat Association.csmbak|grep Active|grep GPFS|awk -F\" '{print "startcondresp \\\""$2"\\\" \\\""$4"\\\""}'|xargs -I {} ksh {}# lscondresp | grep GPFSDisplaying condition with response information:Condition Response Node State"GPFS daemon state" "Informational notifications" "p630n05" "Active""GPFS State" "Informational notifications" "p630n05" "Active"
Chapter 4. CSM to xCAT 2 transition 115

4.4 Reverting a transitioned node back into CSM
This section describes how to revert a node from xCAT back to CSM.
4.4.1 Remove node from xCAT RMC monitoring
1. If you enabled xCAT RMC monitoring on the node, run mondecfg to disable it, as shown in Example 4-40.
Example 4-40 mondecfg run on node and check
# mondecfg rmcmon virt-p5501_p6 -rDe-configuring the following nodes. It may take a while.virt-p5501_p6virt-p5501_p6: done
# xdsh virt-p5501_p6 lsrsrc IBM.MCPvirt-p5501_p6: Resource Persistent Attributes for IBM.MCPvirt-p5501_p6: resource 1:virt-p5501_p6: MNName = "192.168.100.77"virt-p5501_p6: NodeID = 6063043458768437806virt-p5501_p6: KeyToken = "9.12.4.186"virt-p5501_p6: IPAddresses = {"192.168.100.253","9.12.4.186","fe80::20d:60ff:fe22:3c7f"}virt-p5501_p6: ActivePeerDomain = ""virt-p5501_p6: NodeNameList = {"virt-p5501_p6"}
4.4.2 Remove machine definition from NIM on xCAT MN
2. Remove the standalone machine definition from NIM and check, as shown in Example 41.
Example 41 Removing node from NIM and check
# xcat2nim -t node -r virt-p5501-p6Error: Could not remove the NIM definition for 'virt-p5501-p6'.
Note: mondecfg performs the following actions:
� Removes node from IBM.MngNode on MN.� Removes node from IBM.MngNodenetIF on MN.� Removes entries from IBM.MCP on the client nodes.
This step is run on the xCAT MN.
This step is run on the xCAT MN.
116 Configuring and Managing AIX Clusters Using xCAT 2

Error: One or more errors occured.
Error: Return=1.# nim -o deallocate -a subclass=all virt-p5501-p6
# xcat2nim -t node -r virt-p5501_p6p630n05: NIM operations have completed successfully.
# lsnim -t standalonevirt-p5501_p3 machines standalonevirt-p5501_p4 machines standalonevirt-p5501_p2 machines standalonevirt-p5501_p1 machines standalonevirt-p5501_p5 machines standalone
# xdsh virt-p5501_p6 cat /etc/niminfoError: virt-p5501_p6 remote Command return code = 2.Error: Error from xdsh. Return Code = 1virt-p5501_p6: cat: cannot open /etc/niminfo
4.4.3 Remove secondary adapters script for the node in NIM
3. To remove the secondary adapters script from NIM for then node:
a. Identify the location of the adapter definitions in the NIM Adapter resource, as in Example 4-42.
Example 4-42 Identify the location of the NIM adapter definition for the node
# lsnim -l AdaptersAdapters: class = resources type = adapter_def Rstate = ready for use prev_state = unavailable for use location = /nimrepo/adapters alloc_count = 0 server = master
b. Remove the adapter definition file for the specific node, as shown in Example 4-43.
Example 4-43 Remove NIM adapter definition file for the node
# ls /nimrepo/adapters
This step is run on the xCAT MN.
Chapter 4. CSM to xCAT 2 transition 117

virt-p5501_p1.adapters virt-p5501_p5.adapters virt-p5502-p3.adaptersvirt-p5501_p2.adapters virt-p5501_p6.adapters virt-p5502-p4.adaptersvirt-p5501_p3.adapters virt-p5502-p1.adapters virt-p5502-p5.adaptersvirt-p5501_p4.adapters virt-p5502-p2.adapters virt-p5502-p6.adapters
#rm /nimrepo/adapters/virt-p5501_p6.adapters
4.4.4 Remove node definition in xCAT
4. To remove the node definition from the xCAT database use the rmdef command, as shown in Example 4-44.
rmdef -t node -o <nodename>
Example 4-44 rmdef of the node virt-p5501_p6 from the xCAT 2 database
# rmdef -t node -o virt-p5501_p6Object definitions have been removed.
# tabdump nodelist#node,groups,status,appstatus,primarysn,comments,disable"vios-p5502","AllDevices","defined",,,,"vios-p5501","AllDevices","defined",,,,"hmc-v7","HMCDevices,AllDevices","defined",,,,"p550_itso1","fsp,all",,,,,"virt-p5501_p3","p5501,GPFSNodes,LLNodes,AIXNodes,HMCNodes,AllNodes,ManagedNodes,NIMNodes,compute,all","alive",,,,"virt-p5501_p4","p5501,GPFSNodes,LLNodes,AIXNodes,HMCNodes,AllNodes,ManagedNodes,NIMNodes,compute,all","alive",,,,"virt-p5501_p2","GPFSQuorumNodes,GPFSNodes,p5501,LLNodes,AIXNodes,HMCNodes,AllNodes,ManagedNodes,NIMNodes,compute,all,lpar,all","alive",,,,"virt-p5501_p1","p5501,GPFSQuorumNodes,GPFSNodes,LLCMNodes,AIXNodes,HMCNodes,AllNodes,LLNodes,ManagedNodes,NIMNodes,compute,all,lpar,all","alive",,,,"virt-p5501_p5","GPFSNodes,LLNodes,AIXNodes,p5501,HMCNodes,AllNodes,ManagedNodes,NIMNodes,compute,all,lpar,all,p5501_p5_p6","alive",,,,
This step is run on the xCAT MN
This step is run on the xCAT MN.
118 Configuring and Managing AIX Clusters Using xCAT 2

Remove the node from the NIM group on xCAT MN5. Remove the node from the NIM group using the xcat2nim command, as
shown in Example 4-45.
xcat2nim -u -t group -o <groupname>
Example 4-45 Removing the node from the xCAT group
# xcat2nim -u -t group -o AIXNodesp630n05: NIM operations have completed successfully.
# lsnim -l AIXNodesAIXNodes: class = groups type = mac_group member1 = virt-p5501_p3 member2 = virt-p5501_p4 member3 = virt-p5501_p2 member4 = virt-p5501_p1 member5 = virt-p5501_p5
4.4.5 Remove node entry from the conserver configuration on xCAT
6. Run makeconservercf to remove the node definition in the /etc/conserver.cf file.
stopsrc conserverstartsrc conserver
This will remove console access from the xCAT MN.
4.4.6 Remove the xCAT aixpostscript from /etc/inittab
7. Delete the following entry from /etc/inittab, using:
rmitab “xcat”xcat:2:wait:/xcatpost/xcataixpost > /dev/console 2>&1
4.4.7 Add the node to the CSM cluster
8. Using the file lsnode.csmbak created by the csmbackup command, in Example 4.2.3, prepare a new stanza file for the node you are moving back to CSM. Using this stanza file, define the node into CSM cluster, as shown in Example 4-46.
This step is run on the xCAT MN.
This step is run on the xCAT node.
This step is run on the CSM MS.
Chapter 4. CSM to xCAT 2 transition 119

Example 4-46 definenode -f <filename>
# definenode -f lsnode.csmbak.virt-p5501_p6Defining CSM Nodes:virt-p5501_p6: Changing Mode from: "Managed" to: "PreManaged".1 nodes have been defined successfully.# lsnode -l virt-p5501_p6 Hostname = virt-p5501_p6 AdapterStanzaFile = /CSM_to_xCAT/mystanzafile.sec AllowManageRequest = 0 (no) CSMVersion = ChangedAttributes = {} ConfigChanged = 0 (no) ConsoleMethod = hmc ConsolePortNum = ConsoleRedirectionAfterPOST = 0 ConsoleSerialDevice = ttyS0 ConsoleSerialSpeed = 9600 ConsoleServerName = hmc-v7 ConsoleServerNumber = FWSvcProc = FWSysBIOS = HWControlNodeId = p5_1_p6 HWControlPoint = hmc-v7 HWModel = 550 HWSerialNum = 106628E HWType = 9113 HostRAIDEnabled = 0 InstallAdapterDuplex = auto InstallAdapterGateway = InstallAdapterHostname = virt-p5501_p6 InstallAdapterMacaddr = 7241E0007002 InstallAdapterName = InstallAdapterNetmask = 255.255.255.0 InstallAdapterSpeed = auto InstallAdapterType = ent InstallCSMVersion = InstallDisk = InstallDiskType = InstallDistributionName = InstallDistributionVersion = 5.3.9 InstallImage = InstallKernelVersion = InstallMethod = nim InstallOSName = AIX
120 Configuring and Managing AIX Clusters Using xCAT 2

InstallPkgArchitecture = InstallServer = InstallServerAKBNode = InstallServiceLevel = InstallStatus = PreManaged InstallTemplate = LICManagedSystemLevel = LICPowerSubsystemLevel = LParID = 7 LastCFMUpdateTime = ManagementServer = 192.168.100.36 Mode = PreManaged NFSServer = Name = virt-p5501_p6 NodeNameList = {p630n06} PhysicalLocation = PowerMethod = hmc PowerStatus = 1 (on) Properties = LLType|:|Node|:|GPFSType|:|Node Status = 127 (unknown) UUID = UpdatenodeFailed = 0 (false) UserComment =
4.4.8 Performing CSM post-installation tasks on the node
9. Run updatenode on the redefined node:
updatenode -kvn <nodename>
10.Check the status of the node in the CSM cluster with csmstat, as shown in Example 4-47.
Example 4-47 csmstat showing the node is managed again
# csmstat---------------------------------------------------------------------------------Hostname HWControlPoint Status PowerStatus Network-Interfaces---------------------------------------------------------------------------------virt-p5501_p6 hmc-v7 on on en0-Online en1-Online ..snippet..
Note: You may be asked for the password because the node entry has been removed from ~/.ssh/known_hosts on the CSM MS.
This step is run on the CSM MS.
Chapter 4. CSM to xCAT 2 transition 121

4.4.9 Verify additional services
11.Run chrconsolecfg to redefine the console definition for rconsole.
12.Check if rconsole works on the redefined node with:
rconsole
13.Check if rpower works.
4.4.10 Restore the syslog configuration if needed
14.If you use syslog in your CSM cluster, you may need to restore the syslog configuration from your backup. Manual editing of the configuration files may be required. Refer to CSM and syslog documentation.
4.4.11 Define resources in NIM on CSM MS
If you intend to further customize and/or re-install the node, you need to add the node back into the CSM NIM environment.
15.Run the csm2nimnodes command to bring the node back into the CSM NIM configuration, as in Example 4-48.
Example 4-48 csm2nimnodes of reverted node
# csm2nimnodes -n virt-p5501_p6Creating or updating 1 NIM client machine definition(s).Please wait....
Created or updated 1 NIM client machine definition(s).
# lsnim -l virt-p5501_p6virt-p5501_p6: class = machines type = standalone connect = shell platform = chrp netboot_kernel = mp if1 = master_net virt-p5501_p6 7241E0007002 ent net_settings1 = auto auto cable_type1 = N/A Cstate = ready for a NIM operation prev_state = ready for a NIM operation Mstate = currently running
This step is run on the CSM MS.
This step is run on the CSM MS and the node.
This step is run on the CSM MS.
122 Configuring and Managing AIX Clusters Using xCAT 2

16.Run the csmsetupnim command on the node, as in Example 4-49:
Example 4-49 csmsetupnim on reverted node
# csmsetupnim -n virt-p5501_p6
# lsnim -l virt-p5501_p6virt-p5501_p6: class = machines type = standalone connect = shell platform = chrp netboot_kernel = mp if1 = master_net virt-p5501_p6 7241E0007002 ent net_settings1 = auto auto cable_type1 = N/A Cstate = ready for a NIM operation prev_state = ready for a NIM operation Mstate = currently running script = osprereboot control = master
4.4.12 Register the node with the NIM master on CSM MS
17.Run the niminit command on the CSM MS, as shown in Example 4-50.
Example 4-50 Re-initialize to NIM master (CSM MS)
# dsh -n virt-p5501_p6 niminit -a master=p630n06 -a name=virt-p5501_p6
# dsh -n virt-p5501_p6 cat /etc/niminfovirt-p5501_p6: #------------------ Network Install Manager ---------------virt-p5501_p6: # warning - this file contains NIM configuration informationvirt-p5501_p6: # and should only be updated by NIMvirt-p5501_p6: export NIM_NAME=virt-p5501_p6virt-p5501_p6: export NIM_HOSTNAME=virt-p5501_p6virt-p5501_p6: export NIM_CONFIGURATION=standalonevirt-p5501_p6: export NIM_MASTER_HOSTNAME=p630n06virt-p5501_p6: export NIM_MASTER_PORT=1058virt-p5501_p6: export NIM_REGISTRATION_PORT=1059virt-p5501_p6: export NIM_SHELL="shell"
This step is run on the CSM MS.
Chapter 4. CSM to xCAT 2 transition 123
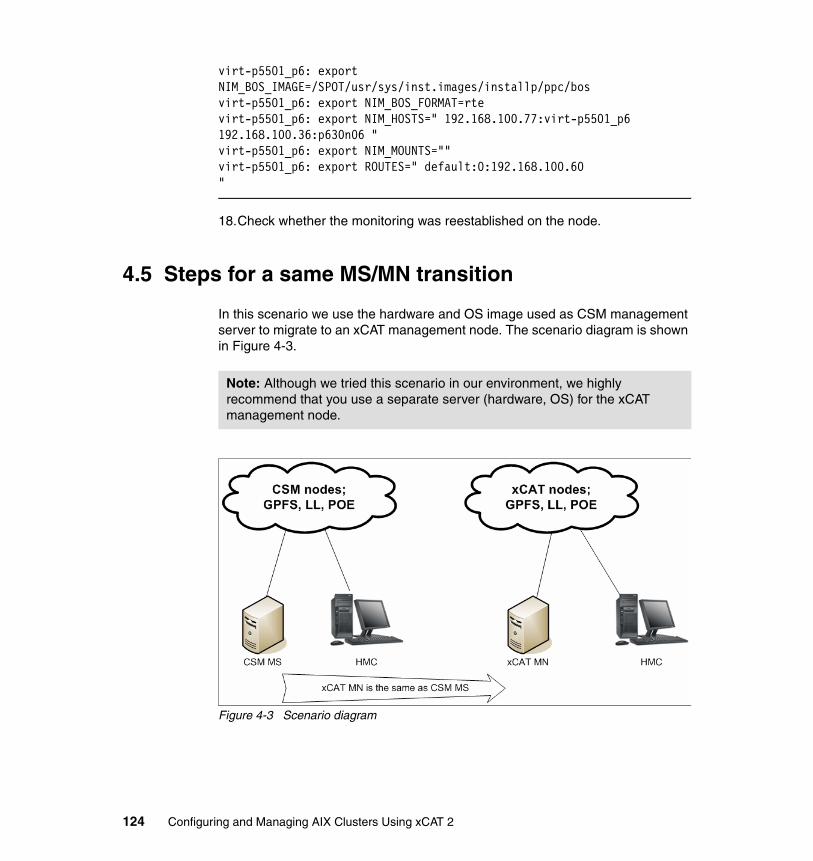
virt-p5501_p6: export NIM_BOS_IMAGE=/SPOT/usr/sys/inst.images/installp/ppc/bosvirt-p5501_p6: export NIM_BOS_FORMAT=rtevirt-p5501_p6: export NIM_HOSTS=" 192.168.100.77:virt-p5501_p6 192.168.100.36:p630n06 "virt-p5501_p6: export NIM_MOUNTS=""virt-p5501_p6: export ROUTES=" default:0:192.168.100.60 "
18.Check whether the monitoring was reestablished on the node.
4.5 Steps for a same MS/MN transition
In this scenario we use the hardware and OS image used as CSM management server to migrate to an xCAT management node. The scenario diagram is shown in Figure 4-3.
Figure 4-3 Scenario diagram
Note: Although we tried this scenario in our environment, we highly recommend that you use a separate server (hardware, OS) for the xCAT management node.
124 Configuring and Managing AIX Clusters Using xCAT 2

4.5.1 Installing xCAT
The xCAT software installation on the management node is done in two steps: Installing the dependency and installing the core filesets.
1. Install dep-aix-2.2 and core-aix-2.2; see 4.3.1, “Preparing the xCAT 2 management node (MN) for transition” on page 84 for details.
4.5.2 Gathering CSM data using csm2xcat
Use the utility provided by xCAT to save site, device and node-related CSM data in stanza files, which xCAT can use later. For more details see 4.3.2, “Gather CSM data using the csm2xcat script on CSM MS” on page 89.
2. Run /opt/xcat/share/xcat/tools/csm2xcat. By default, data is stored in the /tmp/csm2xcat directory.
4.5.3 Building a nodelist file
It is useful to create a nodelist file containing the node names, which will be used by the utilities later, to speed up the transition.
3. Build the nodelist file using the following command:
lsnode > /tmp/csm2xcat/nodelist_from_csm
4.5.4 Uninstalling CSM and cleaning up the nodes
The following command removes the CSM server-related filesets, and removes the CSM-related RMC classes and Resource Manager on the MS. If it is used with the parameter as shown in the example, then it also removes the CSM-related configuration files, log files, and RMC-related data from the node.
4. Run the uninstallms -u command.
This runs rmnode -u and then runs a removal on the CSM MS.
4.5.5 Remove CSM bin directory entry from the PATH environment
Some of the CSM customization still exists after the removal of CSM, so we have to change those. If this is to check the PATH and other variable settings, which
Note: Make sure that you have converted the secondary adapters from CSM into NIM before uninstalling CSM. This will be used in future steps.
Chapter 4. CSM to xCAT 2 transition 125

was implemented in /etc/environment, /etc/profile, or in the profiles of individual AIX users:
5. Remove the entry /opt/csm/bin from PATH.
4.5.6 Setup remote shell in xCAT
We used SSH as remote command facility and set xCAT to perform automated SSH key distribution.
6. Update the site table to configure xCAT to use SSH and SCP:
chdef -t site useSSHonAIX=yes rsh=/usr/bin/ssh rcp=/usr/bin/scp
4.5.7 Set up NTP
xCAT can configure the NTP service for the nodes, but it does it in a different way than CSM did. In xCAT the NTP servers have to be listed in the site table, which will configure and start the NTP daemon on the nodes automatically, so we do not have to put the NTP daemon start/stop scripts into the /etc/rc.d/rc2.d directory. Because the scripts were part of the CSM file collection, we can remove them (or the link to them) from there as well.
7. Check if the NTP server is not the same as xCAT MN with:
lsdef -t site -l
If it needs to be changed, run:
chdef -t site ntpservers=<NTP server IP>
8. Set timezone with:
chdef -t site timezone=America/New_York
9. Remove CSM NTP configuration from /cfmroot with:
rm /cfmroot/etc/rc.d/rc2.d/*ntp*
4.5.8 Define HMC and VIO servers in xCAT
It is possible to define the HMC and the VIO servers as devices in CSM. If they are defined, then the csm2xcat script creates the device.stanza file, which contains one entry for each. If they are not defined as devices, then we have to create a stanza file using rscan.
The next steps show how to define the HMC and VIO servers into xCAT.
126 Configuring and Managing AIX Clusters Using xCAT 2

10.Use the device.stanza file from csm2xcat with:
cat device.stanza | mkdef -z
11.Change the mgt attribute if not set in the device.stanza file with:
chdef -t node -o hmc-v7 mgt=hmc
12.Add username and password attributes to HMCs with:
chdef -t node -o hmc-v7 password=abc123 username=hscroot
See 4.3.9, “Define HMC and VIO servers in xCAT” on page 93 for details.
4.5.9 Run rscan to gather xCAT data for node definition
The node definitions made combining the output of the csm2xcat utility and the file created by the rscan command. The rscan command connects to the HMC to get HW-related information.
13.Run rscan against each HMC to gather data:
rscan -z hmc-v7 > /tmp/csm2xcat/xcat_mystanzafile
See 4.3.10, “Discovering HW in xCAT (rscan)” on page 94 for details.
4.5.10 Use the convert.sh tool to define nodes and CECs in xCAT
We created a utility to merge the stanza files from the csm2xcat utility and the output of the rscan tool. For details, see “Defining multiple nodes at once (scripting it)” on page 97.
14.Define the node using convert.sh:
# cat nodelist_from_csm|xargs -I {} ./convert.sh {} 192.168.100.36 \ > 192.168.100.36
15.Run lsdef -t node -l to check whether the definition is correct.
See 4.3.11, “Defining the nodes (populating the tables)” on page 94 for details.
4.5.11 Setting up and testing the conserver
The remote console functionality is provided by the conserver daemon, which has to be configured using the following steps.
16.Run makeconservercf to generate a new conserver configuration file and restart the conserver daemon.
Chapter 4. CSM to xCAT 2 transition 127

17.Test rcons:
# rcons <nodename>
See 4.3.12, “Configuring and testing conserver” on page 99 for details.
4.5.12 Testing rpower
The remote HW control functionality can be tested as shown in the following steps.
18.Test whether rpower works, as shown in Example 4-51.
Example 4-51 test rpower
# rpower AIXNodes statevirt-p5502-p6: Runningvirt-p5502-p4: Runningvirt-p5502-p2: Runningvirt-p5502-p3: Runningvirt-p5502-p5: Runningvirt-p5502-p1: Running
4.5.13 Create operating system images
The next step configures the xCAT MN to use the AIX NIM functionality for operating system install, and software updates.
19.Since CSM already has NIM resources created, we decided to use the existing resources, just create the osimage definition in xCAT, and link to CSM NIM resources.
a. check the resources created by CSM with the lsnim command, as shown in Example 4-52.
Example 4-52 Check resources created by CSM
# lsnimmaster machines masterboot resources bootnim_script resources nim_scriptmaster_net networks ent5300-04bid_ow resources bosinst_data539lpp_res resources lpp_source539spot_res resources spotbasic_res_grp groups res_groupvirt-p5502-p5 machines standalone
128 Configuring and Managing AIX Clusters Using xCAT 2

virt-p5502-p6 machines standalonevirt-p5501_p3 machines standalonevirt-p5501_p4 machines standalonevirt-p5502-p1 machines standalonevirt-p5502-p2 machines standalonevirt-p5502-p3 machines standalonevirt-p5502-p4 machines standaloneopenssl resources installp_bundleopenssh resources installp_bundleosprereboot resources scriptAIXNodes groups mac_groupgpfs32 resources installp_bundle__smit_bundle_225748 resources installp_bundleLoadL resources installp_bundlepoe resources installp_bundleAdapters resources adapter_defAIX5391_mksysb resources mksysb
b. Decide which resource to use in xCAT; we used:
lpp_source: 539lpp_res
spot: 539spot_res
bosinst_data: 5300-04bid_ow
installp_bundle: xCATaixSSL,xCATaixSSH
c. Create xCAT installp bundles in NIM, as shown in Example 4-53.
Example 4-53 Creating NIM bundles
# mkdir -p /nimrepo/installp_bundle# cp core-aix-2.2/*.bnd /nimrepo/installp_bundle/# nim -o define -t installp_bundle -a server=master -a \ > location=/nimrepo/installp_bundle/xCATaixSN.bnd xCATaixSN# nim -o define -t installp_bundle -a server=master -a \ > location=/nimrepo/installp_bundle/xCATaixSSL.bnd xCATaixSSL# nim -o define -t installp_bundle -a server=master -a \ > location=/nimrepo/installp_bundle/xCATaixSSH.bnd xCATaixSSH
Note: The resources listed here are the basic resources we need to install a computing node. You may also need other installp bundles such as GPFS and LoadLeveler if you want to install them via NIM.
Chapter 4. CSM to xCAT 2 transition 129

d. Copy xCAT filesets to lpp_source, as shown in Example 4-54.
Example 4-54 Update the lpp_source
# nim -o update -a packages=all -a source=/install/xCAT2/dep-aix-2.2 \ > 539lpp _res# nim -o update -a packages=all -a source=/install/xCAT2/core-aix-2.2 \ > 539lpp _res
e. Add an entry to the osimage table using the tabedit command:
# tabedit osimage
Append a new line to the file: "539image","NIM","AIX",,,,,Save and quit.
f. Add an entry to the nimimage table using tabedit:
# tabedit nimimage
In the editor shell, append a new line to the file: "539image","standalone","539lpp_res","539spot_res",,,,,,,,,"rte",,"5300-04bid_ow","xCATaixSSL,xCATaixSSH",,,,Save and quit.
g. Check the operating system image definition, as shown in Example 4-55.
Example 4-55 Checking OS definition
# lsdef -t osimage -l
Object name: 539image bosinst_data=5300-04bid_ow imagetype=NIM installp_bundle=xCATaixSSL,xCATaixSSH lpp_source=539lpp_res nimmethod=rte nimtype=standalone osname=AIX spot=539spot_res
Note: If lpp_source is currently allocated for client use, you may need to deallocate it first.
130 Configuring and Managing AIX Clusters Using xCAT 2

4.6 Define xCAT networks
In our scenario we have two networks: cluser_net for administration and external login, and gpfs_net for GPFS private I/O.
20.To define xCAT networks, run:
# mkdef -t network -o cluster_net net=192.168.100.0 \ > mask=255.255.255.0 gateway=192.168.100.60# mkdef -t network -o gpfs_net net=192.168.200.0 mask=255.255.255.0
See Figure 4-1 on page 73 for the cluster diagram.
4.6.1 Creating NIM clients and group definitions
The NIM definitions are necessary for node installations and updates in the future.
21.Since we did not remove NIM client definitions created by CSM, we need not run xcat2nim. But if NIM machines have been removed, use xcat2nim to create NIM client definitions:
# xcat2nim -t node AIXNodes
22.Create or update the NIM group:
# xcat2nim -f -t group -o AIXNodes
See 4.3.18, “Creating NIM client and group definitions” on page 103 for details.
4.6.2 Install xCAT dependency packages on computing nodes
Install any updates or prerequisite packages necessary for xCAT operation onto the nodes. We defined two NIM bundles which contain the basic xCAT prerequisites, and the next step shows how to install them onto the nodes.
23.Use the nimnodecust utility to install xCAT dependency packages via NIM installp bundles:
# nimnodecust -s 539lpp _res -b xCATaixSSL,xCATaixSSH AIXNodes
See 4.3.21, “Install xCAT dependency packages on the client nodes” on page 106 for details.
Chapter 4. CSM to xCAT 2 transition 131

4.6.3 Perform xCAT post-installation tasks on computing nodes
The xCAT post-installation customization is done by scripts, which are started by a master script at node boot time. This is enabled by an /etc/inittab entry, which is added by the following step.
24.Run xcataixscript on computing nodes.
See Example 4-33 on page 109 for details.
4.6.4 Set up customization scripts
Node customization scripts are assigned top nodes in an xCAT table and placed into the /install/postscripts directory. The customization step itself can be initiated as shown in the next step.
25.Run the updatenode command for node customization.
For details, see 4.3.26, “Configure and run postscripts with updatenode” on page 110.
4.6.5 Remove the CSM NTP configuration
If the CSM configuration contained the NTP setup, then we have to remove it here.
26.See 4.3.27, “Clean up CSM NTP configuration” on page 111 for details.
4.6.6 Set up xCAT RMC monitoring
RMC monitoring can be used to bring nodes up/down and to monitor/control applications as well.
27.See 4.3.28, “Configure RMC monitoring” on page 111 for details.
4.6.7 Configure replacement for CFM
We created a replacement for CSM file collection, because there was no solution provided in xCAT at the time of this writing.
28.See 4.3.29, “Configure replacement for CFM in xCAT” on page 113 for details.
132 Configuring and Managing AIX Clusters Using xCAT 2

4.7 Post transition checks
This section presents some post-transition checks you can use to verify that your cluster has been configured properly.
4.7.1 Checking administration tasks
� Check xCAT database content:
– List node names as shown in Example 4-56.
Example 4-56 List node names
# nodelsvios-p5502hmc-v7p550_itso2virt-p5502-p1virt-p5502-p2virt-p5502-p3virt-p5502-p4virt-p5502-p5virt-p5502-p6
– List one node definition as in Example 4-57.
Example 4-57 List node definition
# lsdef -t node -l virt-p5502-p1
Object name: virt-p5502-p1 arch=ppc64 cons=hmc groups=p5502,GPFSQuorumNodes,LLNodes,AIXNodes,GPFSNodes,HMCNodes,AllNodes,ManagedNodes,NIMNodes,compute,all,lpar,all hcp=hmc-v7 id=2 mac=46DA90002002 mgt=hmc nodetype=lpar,osi os=AIX parent=p550_itso2 postscripts=setupntp,TEST_Setup_RMC._AllNodes power=hmc
Chapter 4. CSM to xCAT 2 transition 133

pprofile=p1_profile profile=compute serial=106627E serialflow=hard serialport=ttyS0 serialspeed=9600 status=unreachable termserver=hmc-v7 xcatmaster=192.168.100.36
– List node table content as in Example 4-58.
Example 4-58 List nodelist table
# tabdump nodelist#node,groups,status,appstatus,primarysn,comments,disable"vios-p5502","AllDevices","defined",,,,"hmc-v7","HMCDevices,AllDevices","defined",,,,"p550_itso2","fsp,all",,,,,"virt-p5502-p1","p5502,GPFSQuorumNodes,LLNodes,AIXNodes,GPFSNodes,HMCNodes,AllNodes,ManagedNodes,NIMNodes,compute,all,lpar,all","unreachable",,,,"virt-p5502-p2","p5502,GPFSQuorumNodes,GPFSNodes,LLNodes,AIXNodes,HMCNodes,AllNodes,ManagedNodes,NIMNodes,compute,all,lpar,all","unreachable",,,,"virt-p5502-p3","p5502,GPFSNodes,LLNodes,AIXNodes,HMCNodes,AllNodes,ManagedNodes,NIMNodes,compute,all,lpar,all","unreachable",,,,"virt-p5502-p4","p5502,GPFSNodes,LLNodes,AIXNodes,AllNodes,ManagedNodes,NIMNodes,HMCNodes,compute,all,lpar,all","booting",,,,"virt-p5502-p5","p5502,GPFSNodes,LLNodes,AIXNodes,HMCNodes,AllNodes,ManagedNodes,NIMNodes,compute,all,lpar,all","unreachable",,,,"virt-p5502-p6","p5502,GPFSNodes,LLNodes,AIXNodes,HMCNodes,AllNodes,ManagedNodes,NIMNodes,compute,all,lpar,all","booting",,,,
– List node status if monitoring is configured and started as shown in Example 4-59.
Example 4-59 List monitored node status
[p630n05][/]> lsdef -t node -i name,status AIXNodes
Object name: virt-p5501_p4 status=aja
Object name: virt-p5501_p2 status=alive
134 Configuring and Managing AIX Clusters Using xCAT 2

Object name: virt-p5501_p1 status=unreachable
Object name: virt-p5501_p8 status=alive
Object name: virt-p5501_p6 status=unreachable
Object name: virt-p5501_p5 status=alive
Object name: virt-p5501_p3 status=alive
– List HW information as in Example 4-60.
Example 4-60 List HW information
# tabdump vpd#node,serial,mtm,asset,comments,disable"vios-p5502","106627E","550-9113",,,"p550_itso2","106627E","9113-550",,,"virt-p5502-p1","106627E",,,,"virt-p5502-p2","106627E",,,,"virt-p5502-p3","106627E",,,,"virt-p5502-p4","106627E",,,,"virt-p5502-p5","106627E",,,,"virt-p5502-p6","106627E",,,,# tabdump nodehm#node,power,mgt,cons,termserver,termport,conserver,serialport,serialspeed,serialflow,getmac,comments,disable"hmc-v7",,"hmc",,,,,,,,,,"p550_itso2",,"hmc",,,,,,,,,,"virt-p5502-p1","hmc","hmc","hmc","hmc-v7",,,"ttyS0","9600","hard",,,"virt-p5502-p2","hmc","hmc","hmc","hmc-v7",,,"ttyS0","9600","hard",,,"virt-p5502-p3","hmc","hmc","hmc","hmc-v7",,,"ttyS0","9600","hard",,,"virt-p5502-p4","hmc","hmc","hmc","hmc-v7",,,"ttyS0","9600","hard",,,"virt-p5502-p5","hmc","hmc","hmc","hmc-v7",,,"ttyS0","9600","hard",,,"virt-p5502-p6","hmc","hmc","hmc","hmc-v7",,,"ttyS0","9600","hard",,,# tabdump ppc#node,hcp,id,pprofile,parent,supernode,comments,disable"p550_itso2","hmc-v7",,,,,,"virt-p5502-p1","hmc-v7","2","p1_profile","p550_itso2",,,
Chapter 4. CSM to xCAT 2 transition 135

"virt-p5502-p2","hmc-v7","3","p2-profile","p550_itso2",,,"virt-p5502-p3","hmc-v7","4","p3-profile","p550_itso2",,,"virt-p5502-p4","hmc-v7","5","p4-profile","p550_itso2",,,"virt-p5502-p5","hmc-v7","6","p5-profile","p550_itso2",,,"virt-p5502-p6","hmc-v7","7","p6-profile","p550_itso2",,,# tabdump ppchcp#hcp,username,password,comments,disable"hmc-v7","hscroot","itsoadmin",,
� Check HW control.
– Example 4-61 shows how to check power status.
Example 4-61 Power status
# rpower all statevirt-p5502-p6: Runningp550_itso2: Operatingvirt-p5502-p4: Runningvirt-p5502-p2: Runningvirt-p5502-p3: Runningvirt-p5502-p5: Runningvirt-p5502-p1: Running
– Example 4-62 shows the data collected by the rscan command.
Example 4-62 Collecting HW information
# rscan hmc-v7type name id type-model serial-number addresshmc hmc-v7 7310-C03 KCWC22A hmc-v7fsp 550Q-AIX5.4WPAR Project 9133-55A 06F234G 10.0.0.250lpar rhel01 5 9133-55A 06F234Glpar aix03 4 9133-55A 06F234Glpar aix02 3 9133-55A 06F234Glpar aix01 2 9133-55A 06F234Glpar vios1 1 9133-55A 06F234Gfsp p550_itso1 9113-550 106628E 10.0.0.253lpar virt-p5501_p8 9 9113-550 106628Elpar VIOS_xCAT 8 9113-550 106628Elpar p5_1_p6 7 9113-550 106628Elpar p5_1_p5 6 9113-550 106628Elpar p5_1_p4 5 9113-550 106628Elpar p5_1_p3 4 9113-550 106628Elpar p5_1_p2 3 9113-550 106628Elpar p5_1_p1 2 9113-550 106628Elpar VIOS_p5_1 1 9113-550 106628E
136 Configuring and Managing AIX Clusters Using xCAT 2

fsp 10.0.0.249 0-0 10.0.0.249 10.0.0.249fsp p550_itso2 9113-550 106627E 10.0.0.252lpar SAP_LYDIA 8 9113-550 106627Elpar p5_2_p6 7 9113-550 106627Elpar p5_2_p5 6 9113-550 106627Elpar p5_2_p4 5 9113-550 106627Elpar p5_2_p3 4 9113-550 106627Elpar p5_2_p2 3 9113-550 106627Elpar p5_2_p1 2 9113-550 106627Elpar VIOS_p5_2 1 9113-550 106627E
– The following examples show how to collect HW vital data.
• Example 4-63 shows the data retrieved for a System p machine.
Example 4-63 Using the rvitals command against a System p machine
# rvitals p550_itso2 allp550_itso2: System Temperature: Not available (No BPA)p550_itso2: Frame Voltages: Only available for BPAp550_itso2: System State: Operatingp550_itso2: Current Power Status: onp550_itso2: Current LCD1: refcode_num=0,refcode=p550_itso2: Current LCD2: HSCL3397 The secondary service processor is not available for the managed system.
• Example 4-64 shows the data retrieved for a VIO server LPAR.
Example 4-64 Using rvitals against VIOS LPAR
# rvitals vios-p5502 allvios-p5502: System Temperature: Not available (No BPA)vios-p5502: Frame Voltages: Only available for BPAvios-p5502: System State: Runningvios-p5502: Current Power Status: onvios-p5502: Current LCD1: lpar_name=VIOS_p5_2,lpar_id=1,time_stamp=04/22/2009 19:30:02,refcode=,word2=03D00000,fru_call_out_loc_codes=
• Example 4-65 shows data retrieved for a normal AIX LPAR.
Example 4-65 Using rvitals against AIX LPAR
# rvitals virt-p5502-p1 allvirt-p5502-p1: System Temperature: Not available (No BPA)virt-p5502-p1: Frame Voltages: Only available for BPAvirt-p5502-p1: System State: Runningvirt-p5502-p1: Current Power Status: on
Chapter 4. CSM to xCAT 2 transition 137

virt-p5502-p1: Current LCD1: lpar_name=p5_2_p1,lpar_id=2,time_stamp=05/15/2009 19:23:38,refcode=,word2=03D00000,fru_call_out_loc_codes=
� Check remote and parallel command functionality.
– Run xdsh to execute commands remotely on the nodes. Example 4-66 shows an error, as the /etc/ssh/ssh_config file has strict host key checking and the SSH known_host file for the root user does not have the host key for one of the nodes.
Example 4-66 Remote command execution
# xdsh virt-p5502-p1,virt-p5502-p6 datevirt-p5502-p1: Mon May 18 18:41:06 2009virt-p5502-p6: Mon May 18 18:40:49 2009virt-p5502-p6: @@@@@@@@@@@@@@@@@@@@@@@@@@@@@@@@@@@@@@@@@@@@@@@@@@@@@@@@@@@
virt-p5502-p6: @ WARNING: REMOTE HOST IDENTIFICATION HAS CHANGED! @
virt-p5502-p6: @@@@@@@@@@@@@@@@@@@@@@@@@@@@@@@@@@@@@@@@@@@@@@@@@@@@@@@@@@@
virt-p5502-p6: IT IS POSSIBLE THAT SOMEONE IS DOING SOMETHING NASTY!
virt-p5502-p6: Someone could be eavesdropping on you right now (man-in-the-middle attack)!
virt-p5502-p6: It is also possible that the RSA host key has just been changed.
virt-p5502-p6: The fingerprint for the RSA key sent by the remote host isvirt-p5502-p6: b6:d1:b1:ab:23:2f:67:20:73:bf:c4:e2:af:a1:b7:78.
virt-p5502-p6: Please contact your system administrator.
virt-p5502-p6: Add correct host key in /.ssh/known_hosts to get rid of this message.
virt-p5502-p6: Offending key in /.ssh/known_hosts:4
virt-p5502-p6: Password authentication is disabled to avoid man-in-the-middle attacks.
138 Configuring and Managing AIX Clusters Using xCAT 2

virt-p5502-p6: Keyboard-interactive authentication is disabled to avoid man-in-the-middle attacks.
# grep Strict /etc/ssh/ssh_config# StrictHostKeyChecking ask
– There is an xCAT version of the dshbak command with the name of xdshbak. This is useful to present command output separated by nodes as is shown in Example 4-67. However, dshbak is still available; it is in the csm.dsh fileset which is installed to AIX nodes by default.
Example 4-67 Using xdshbak
# xdsh AIXNodes lslpp -l openssh.base.server|xdshbak -cHOSTS:-----------------------------------------------------------------virt-p5502-p1, virt-p5502-p2, virt-p5502-p3, virt-p5502-p4, virt-p5502-p5, virt-p5502-p6----------------------------------------------------------------------- Fileset Level State Description -----------------------------------------------------------------------Path: /usr/lib/objrepos openssh.base.server 4.5.0.5301 COMMITTED Open Secure Shell Server
Path: /etc/objrepos openssh.base.server 4.5.0.5301 COMMITTED Open Secure Shell Server
� Check remote console functionality, as shown in Example 4-68.
Example 4-68 Testing rcons
# rcons virt-p5502-p1[Enter `^Ec?' for help]
AIX Version 5Copyright IBM Corporation, 1982, 2008.Console login: [disconnect]
� Example 4-69 shows how to upgrade the firmware. The rpower command is used to check the power status, the rinv command is for HW inventory collection, and the rflash command upgrades the firmware on the machine.
Chapter 4. CSM to xCAT 2 transition 139

The firmware package is copied to directory /tmp/csm2xcat/firmware before the upgrade process.
Example 4-69 Upgrading system firmware
# ls /tmp/csm2xcat/firmware01SF240_358_201.rpm 01SF240_358_201.xml## rflash p550_itso2 -p /tmp/csm2xcat/firmware --activate disruptivehmc-v7: copy files to hmc-v7 completehmc-v7: 9113-550*106627E: HSCF0178W Operation completed successfully for p550_itso2 (9113-550*106627E). Deferred Fixes are present in the fixpack. :hmc-v7: 9113-550*106627E: The following deferred fixes are present in the fix pack. Deferred fixes will be activated after the next IPL of the system. :hmc-v7: :hmc-v7: 9113-550*106627E: An immediate IPL is not required, unless you want to activate one of the fixes below now. :hmc-v7: :hmc-v7: 9113-550*106627E: :hmc-v7: :hmc-v7: 9113-550*106627E: A change was made to improve the reliability of system memory. This change reduces the likelihood of SRC B123E500 occurring, and also reduces the likelihood of a system crash with SRC B1xxF667. (570250)<br><br>A problem was fixed that, under certain rarely occurring circumstances, an application could cause a processor to go into an error state, and the system to crash. (665332/FW202372)<br><br> :hmc-v7: :hmc-v7: 9113-550*106627E: :hmc-v7: :hmc-v7: 9113-550*106627E: :hmc-v7: :hmc-v7: 9113-550*106627E: LIC_RC = 0:hmc-v7: Remote_command_rc = 0:hmc-v7: Upgrade 9113-550*106627E from release level:01SF240 activated level:261 to 01SF240_358_201.rpm successfully
#rpower AIXNodes statevirt-p5502-p6: Runningvirt-p5502-p4: Runningvirt-p5502-p2: Runningvirt-p5502-p3: Runningvirt-p5502-p5: Running
140 Configuring and Managing AIX Clusters Using xCAT 2

virt-p5502-p1: Running
#rinv p550 _itso2 firmp550_itso2: Release Level : 01SF240p550_itso2: Active Level : 358p550_itso2: Installed Level: 358p550_itso2: Accepted Level : 261p550_itso2: Release Level Primary: 01SF240p550_itso2: Level Primary : 358
# rflash p550 _itso2 --commithmc-v7: copy files to hmc-v7 completehmc-v7: 9113-550*106627E: LIC_RC = 0: hmc-v7: Remote_command_rc = 0: hmc-v7: 9113-550*106627E:commit successfully!
#rinv p550 _itso2 firmp550_itso2: Release Level : 01SF240p550_itso2: Active Level : 358p550_itso2: Installed Level: 358p550_itso2: Accepted Level : 358p550_itso2: Release Level Primary: 01SF240p550_itso2: Level Primary : 358
# rpower AIXNodes statevirt-p5502-p6: Runningvirt-p5502-p4: Runningvirt-p5502-p2: Runningvirt-p5502-p3: Runningvirt-p5502-p5: Runningvirt-p5502-p1: Running
� Support for System p virtualization features is also integrated into xCAT. LPAR configuration and profile settings can be checked and changed via xCAT commands. The xCAT command lsvm, which is used in the example, has similar output as the lssyscfg -prof -m <managed system> command, which is available on the HMC.
– Example 4-70 shows the LPAR configuration for a node.
Example 4-70 Query LPAR configuration
# lsvm virt-p5502-p1virt-p5502-p1: name=p1_profile,lpar_name=p5_2_p1,lpar_id=2,lpar_env=aixlinux,all_resources=0,min_mem=1024,desired_mem=2048,max_mem=2048,proc_mode=shared,min_
Chapter 4. CSM to xCAT 2 transition 141

proc_units=0.2,desired_proc_units=0.4,max_proc_units=0.4,min_procs=2,desired_procs=4,max_procs=4,sharing_mode=uncap,uncap_weight=128,"io_slots=21020002/none/0,21040003/none/1",lpar_io_pool_ids=none,max_virtual_slots=10,"virtual_serial_adapters=0/server/1/any//any/1,1/server/1/any//any/1",virtual_scsi_adapters=4/client/1/VIOS_p5_2/5/1,"virtual_eth_adapters=2/0/1//0/1,3/0/2//0/1",hca_adapters=none,boot_mode=norm,conn_monitoring=0,auto_start=0,power_ctrl_lpar_ids=none,work_group_id=none,redundant_err_path_reporting=0
– Example 4-71 shows the configuration of a VIO server.
Example 4-71 Query VIO Server configuration
# lsvm vios-p5502vios-p5502: name=VIOS,lpar_name=VIOS_p5_2,lpar_id=1,lpar_env=vioserver,all_resources=0,min_mem=1152,desired_mem=2176,max_mem=3200,proc_mode=shared,min_proc_units=0.4,desired_proc_units=1.0,max_proc_units=1.0,min_procs=2,desired_procs=4,max_procs=4,sharing_mode=uncap,uncap_weight=128,"io_slots=21010002/none/1,21050002/none/1,21040002/none/1,21020002/none/0,21020003/none/1,21030003/none/1,21010003/none/1",lpar_io_pool_ids=none,max_virtual_slots=40,"virtual_serial_adapters=0/server/1/any//any/1,1/server/1/any//any/1","virtual_scsi_adapters=35/server/any//any/1,5/server/2/p5_2_p1/4/0,6/server/3/p5_2_p2/4/0,8/server/4/p5_2_p3/4/0,9/server/5/p5_2_p4/4/0,10/server/6/p5_2_p5/4/1,11/server/7/p5_2_p6/4/1,21/server/any//any/0,22/server/any//any/0,23/server/any//any/0,24/server/any//any/0,25/server/any//any/0,26/server/any//any/0","virtual_eth_adapters=32/1/2//1/0,33/0/3//1/1,31/1/1//1/0",hca_adapters=none,boot_mode=norm,conn_monitoring=0,auto_start=0,power_ctrl_lpar_ids=none,work_group_id=none,redundant_err_path_reporting=0
– Check the scripts / LPCommand (customize with equivalent xCAT commands to replace the CSM ones), as shown in Example 4-72.
Example 4-72 Updating the CommandPath with xCAT command in LPCommands
# /usr/bin/lslpcmddshLPtestcsmstatrpower
# /usr/bin/lslpcmd rpower Name = rpower ActivePeerDomain = CheckSum = 3193715954 CommandPath = /opt/csm/bin/rpower
142 Configuring and Managing AIX Clusters Using xCAT 2

ControlFlags = 1 Description = FilterArg = FilterScript = Lock = 0 NodeNameList = {p630n06} RunCmdName = rpower
# /usr/bin/chlpcmd rpower CommandPath=/opt/xcat/bin/rpower
# su - guest
$ runlpcmd rpower all statevirt-p5502-p6: Runningp550_itso2: Operatingvirt-p5502-p4: Runningvirt-p5502-p2: Runningvirt-p5502-p3: Runningvirt-p5502-p5: Runningvirt-p5502-p1: RunningRC = 0
� Check node and domain status in case RMC monitoring is configured.
– Example 4-73 shows that two nodes are not set up correctly, and shows the main reason of the problem as well. The IBM.MCP table does not have the entry for the xCAT MN.
Example 4-73 Check RMC monitoring
[p630n05][/]> lsrsrc -a IBM.Host Name2610-431 Cannot enumerate resources for this command on node virt-p5501_p1. The node is not currently in the cluster.2610-431 Cannot enumerate resources for this command on node virt-p5501_p6. The node is not currently in the cluster.Resource Persistent Attributes for IBM.Hostresource 1: Name = "virt-p5501_p2"resource 2: Name = "virt-p5501_p3"resource 3: Name = "virt-p5501_p4"resource 4: Name = "virt-p5501_p5"[p630n05][/]> xdsh virt-p5501_p1 lsrsrc IBM.MCPvirt-p5501_p1: Resource Persistent Attributes for IBM.MCP
Chapter 4. CSM to xCAT 2 transition 143

virt-p5501_p1: resource 1:virt-p5501_p1: MNName = "192.168.100.72"virt-p5501_p1: NodeID = 6063043458768437806virt-p5501_p1: KeyToken = "192.168.100.253"virt-p5501_p1: IPAddresses = {"192.168.100.253","9.12.4.186","fe80::202:55ff:fe6a:4efc","fe80::20d:60ff:fe22:3c7f"}virt-p5501_p1: ActivePeerDomain = ""virt-p5501_p1: NodeNameList = {"virt-p5501_p1"}[p630n05][/]> xdsh virt-p5501_p2 lsrsrc IBM.MCPvirt-p5501_p2: Resource Persistent Attributes for IBM.MCPvirt-p5501_p2: resource 1:virt-p5501_p2: MNName = "192.168.100.73"virt-p5501_p2: NodeID = 6063043458768437806virt-p5501_p2: KeyToken = "192.168.100.253"virt-p5501_p2: IPAddresses = {"192.168.100.253","9.12.4.186","fe80::202:55ff:fe6a:4efc","fe80::20d:60ff:fe22:3c7f"}virt-p5501_p2: ActivePeerDomain = ""virt-p5501_p2: NodeNameList = {"virt-p5501_p2"}virt-p5501_p2: resource 2:virt-p5501_p2: MNName = "virt-p5501_p2"virt-p5501_p2: NodeID = 591561834286225135virt-p5501_p2: KeyToken = "192.168.100.35"virt-p5501_p2: IPAddresses = {"192.168.100.35"}virt-p5501_p2: ActivePeerDomain = ""virt-p5501_p2: NodeNameList = {"virt-p5501_p2"}
– Example 4-74 shows how to check the RMC domain status an all nodes in the cluster.
Example 4-74 Check RMC domain status
[p630n05][/]> /usr/sbin/rsct/bin/rmcdomainstatus -s ctrmc
Management Domain Status: Managed Nodes O A 0xea7241e0007002ea 0006 virt-p5501_p6 I A 0xea7241e0006002ea 0005 virt-p5501_p5 I A 0xea7241e0003002ea 0004 virt-p5501_p2 O A 0xea7241e0002002ea 0003 virt-p5501_p1 I A 0xea7241e0005003ea 0002 virt-p5501_p4 I A 0xea7241e0004002ea 0001 virt-p5501_p3
144 Configuring and Managing AIX Clusters Using xCAT 2

� Check node installation via RTE/mksysb install (as verified in the CSM cluster before trans).
– Additional steps:
• GPFS commands
• LL commands
• RMC/RSCT customization
• CSM pre/post/update scrips
� To collect the software inventory from a node and compare it with other nodes, use the sinv xCAT command, shown in Example 4-75.
Example 4-75 Perform software inventory comparison
# sinv -c "xdsh virt-p5502-p2 rpm -qa | grep perl | xcoll" -s virt-p5502-p1 -p /tmp/sinv.template -o /tmp/s>Error: DSH_TO_USERID not setup./n
Error: DSH_TO_USERID not setup./n
Building Report.
Command Complete.Check report in /tmp/sinv.output.
# cat /tmp/sinv.template
Check the following services� The syslog configuration is set via xCAT postscripts as shown in
Example 4-76, where 192.168.100.36 is the IP address of the xCAT MN. The example also shows the syslog daemon configuration and status on the xCAT MN.
Example 4-76 Check syslog configuration
# tabdump postscripts#node,postscripts,comments,disable"xcatdefaults","syslog,aixremoteshell,configrmcnode",,"service","servicenode",,"AIXNodes","setupntp,TEST_Setup_RMC._AllNodes",,# xdsh AIXNodes tail -1 /etc/syslog.confvirt-p5502-p4: *.debug @192.168.100.36virt-p5502-p3: *.debug @192.168.100.36virt-p5502-p6: *.debug @192.168.100.36
Chapter 4. CSM to xCAT 2 transition 145

virt-p5502-p1: *.debug @192.168.100.36virt-p5502-p2: *.debug @192.168.100.36virt-p5502-p5: *.debug @192.168.100.36# lssrc -ls syslogdSubsystem Group PID Status syslogd ras 123256 activeSyslogd Config *.debug /tmp/syslog.out rotate size 100k files 10Syslogd Config *.debug /var/log/messages rotate 1024K files 5
� NTP is configured via the xCAT site table and postscripts as shown in Example 4-77. We also see how to check the status of the NTP daemon.
Example 4-77 Check NTP configuration
# lsdef -t site -l -i ntpserversSetting the name of the site definition to 'clustersite'.
Object name: clustersite ntpservers=192.168.100.36# tabdump postscripts#node,postscripts,comments,disable"xcatdefaults","syslog,aixremoteshell,configrmcnode",,"service","servicenode",,"AIXNodes","setupntp,TEST_Setup_RMC._AllNodes",,
� Example 4-78 shows the result of the dumpxCATdb command. The files created can be restored with the restorexCATdb command.
Example 4-78 Saving xCAT DB
# mkdir /tmp/xCATdb# dumpxCATdb -p /tmp/xCATdb# ls -l /tmp/xCATdbtotal 304-rw-r--r-- 1 root system 91 May 19 16:12 bootparams.csv-rw-r--r-- 1 root system 50 May 19 16:12 boottarget.csv-rw-r--r-- 1 root system 60 May 19 16:12 chain.csv-rw-r--r-- 1 root system 43 May 19 16:12 deps.csv-rw-r--r-- 1 root system 115 May 19 16:12 eventlog.csv-rw-r--r-- 1 root system 36 May 19 16:12 hosts.csv-rw-r--r-- 1 root system 53 May 19 16:12 ipmi.csv-rw-r--r-- 1 root system 89 May 19 16:12 iscsi.csv-rw-r--r-- 1 root system 241 May 19 16:12 mac.csv
146 Configuring and Managing AIX Clusters Using xCAT 2
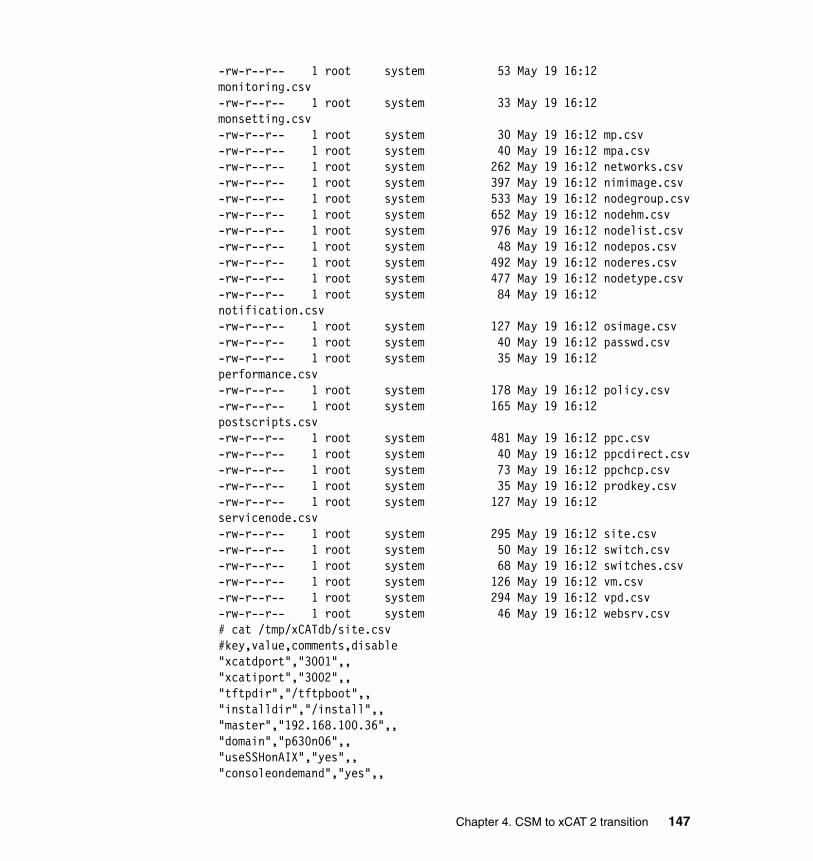
-rw-r--r-- 1 root system 53 May 19 16:12 monitoring.csv-rw-r--r-- 1 root system 33 May 19 16:12 monsetting.csv-rw-r--r-- 1 root system 30 May 19 16:12 mp.csv-rw-r--r-- 1 root system 40 May 19 16:12 mpa.csv-rw-r--r-- 1 root system 262 May 19 16:12 networks.csv-rw-r--r-- 1 root system 397 May 19 16:12 nimimage.csv-rw-r--r-- 1 root system 533 May 19 16:12 nodegroup.csv-rw-r--r-- 1 root system 652 May 19 16:12 nodehm.csv-rw-r--r-- 1 root system 976 May 19 16:12 nodelist.csv-rw-r--r-- 1 root system 48 May 19 16:12 nodepos.csv-rw-r--r-- 1 root system 492 May 19 16:12 noderes.csv-rw-r--r-- 1 root system 477 May 19 16:12 nodetype.csv-rw-r--r-- 1 root system 84 May 19 16:12 notification.csv-rw-r--r-- 1 root system 127 May 19 16:12 osimage.csv-rw-r--r-- 1 root system 40 May 19 16:12 passwd.csv-rw-r--r-- 1 root system 35 May 19 16:12 performance.csv-rw-r--r-- 1 root system 178 May 19 16:12 policy.csv-rw-r--r-- 1 root system 165 May 19 16:12 postscripts.csv-rw-r--r-- 1 root system 481 May 19 16:12 ppc.csv-rw-r--r-- 1 root system 40 May 19 16:12 ppcdirect.csv-rw-r--r-- 1 root system 73 May 19 16:12 ppchcp.csv-rw-r--r-- 1 root system 35 May 19 16:12 prodkey.csv-rw-r--r-- 1 root system 127 May 19 16:12 servicenode.csv-rw-r--r-- 1 root system 295 May 19 16:12 site.csv-rw-r--r-- 1 root system 50 May 19 16:12 switch.csv-rw-r--r-- 1 root system 68 May 19 16:12 switches.csv-rw-r--r-- 1 root system 126 May 19 16:12 vm.csv-rw-r--r-- 1 root system 294 May 19 16:12 vpd.csv-rw-r--r-- 1 root system 46 May 19 16:12 websrv.csv# cat /tmp/xCATdb/site.csv#key,value,comments,disable"xcatdport","3001",,"xcatiport","3002",,"tftpdir","/tftpboot",,"installdir","/install",,"master","192.168.100.36",,"domain","p630n06",,"useSSHonAIX","yes",,"consoleondemand","yes",,
Chapter 4. CSM to xCAT 2 transition 147

"rsh","/usr/bin/ssh",,"rcp","/usr/bin/scp",,"ntpservers","192.168.100.36",,
� Check node deployment using mksysb backup images.
We will create an mksysb image from one client node, and install it on another client node, to see whether the deployment function is working.
– Create an mksysb image from a client node with the following command, as shown in Example 4-79.
mknimimage -f -l /nimrepo -m mksysb -n virt-p5502-p3 539xcatsysb spot=539spot_res
Example 4-79 Create an mksysb image from a client node
# mknimimage -f -l /nimrepo -m mksysb -n virt-p5502-p3 539xcatsysb spot=539spot_resCreating a NIM mksysb resource called '539xcatsysb_mksysb'. This could take a while.
The following xCAT osimage definition was created. Use the xCAT lsdef command to view the xCAT definition and the AIX lsnim command to view the individual NIM resources that are included in this definition.
Object name: 539xcatsysb bosinst_data=539xcatsysb_bosinst_data imagetype=NIM mksysb=539xcatsysb_mksysb nimmethod=mksysb nimtype=standalone osname=AIX spot=539spot_res
4.7.2 HPC stack
The way we perform CSM to xCAT transition helps minimize the impact of upper level applications, and ensures that the GPFS/LL/PE/HPC application does not get affected.
Note: In our transition tests the HPC stack was not affected.
148 Configuring and Managing AIX Clusters Using xCAT 2

Our sample HPC application keeps running during the transition. The transition would not affect the HPC stack, so you may submit your jobs over the HPC stack while the CSM and xCAT transition takes place. Even so, we still highly recommend that you wait for running jobs to finish before transition, especially for critical jobs.
� Ensure that the HPC stack is working as expected after transition.
a. Check the GPFS cluster status.
i. Run mmgetstate -av from a node in the GPFS cluster; see Example 4-80 for details.
Example 4-80 check gpfs node status
# mmgetstate -av
Node number Node name GPFS state------------------------------------------ 1 virt-p5501_p1 active 2 virt-p5501_p2 active 3 virt-p5501_p3 active 4 virt-p5501_p4 active 5 virt-p5501_p5 active 6 virt-p5501_p6 active 7 virt-p5502-p1 active 8 virt-p5502-p2 active 9 virt-p5502-p3 active 10 virt-p5502-p4 active 11 virt-p5502-p5 active 12 virt-p5502-p6 active
ii. Verify that the file systems are mounted and accessible; see Example 4-81 for details.
Example 4-81 check GPFS file systems
# cd /gpfs1# lshome# touch test.abc# lshome test.abc# rm test.abc
iii. Check the /var/adm/ras/mmfs.log.latest and /var/adm/ras/mmfs.log.previous files, on each node, to see if there are any obvious failures during the transition.
Chapter 4. CSM to xCAT 2 transition 149

b. Check the Loadleveler cluster status.
i. Run llstatus and llq from a node in the cluster, as shown in Example 4-82.
Example 4-82 Check Loadleveler status
$ llstatusName Schedd InQ Act Startd Run LdAvg Idle Arch OpSysvirt-p5501_p1 Avail 0 0 Run 1 0.00 9999 R6000 AIX53virt-p5501_p2 Avail 0 0 Run 1 0.03 9999 R6000 AIX53virt-p5501_p3 Avail 0 0 Run 1 1.01 9999 R6000 AIX53virt-p5501_p4 Avail 0 0 Run 1 1.00 9999 R6000 AIX53virt-p5501_p5 Avail 0 0 Run 1 0.33 9999 R6000 AIX53virt-p5501_p6 Avail 0 0 Run 1 1.01 9999 R6000 AIX53virt-p5502-p1 Avail 1 1 Run 1 0.11 0 R6000 AIX53virt-p5502-p2 Avail 0 0 Run 1 0.00 9999 R6000 AIX53virt-p5502-p3 Avail 0 0 Run 1 1.00 9999 R6000 AIX53virt-p5502-p4 Avail 0 0 Run 1 0.00 9999 R6000 AIX53virt-p5502-p5 Avail 0 0 Run 1 0.04 9999 R6000 AIX53virt-p5502-p6 Avail 0 0 Run 1 1.05 9999 R6000 AIX53
R6000/AIX53 12 machines 1 jobs 12 running tasksTotal Machines 12 machines 1 jobs 12 running tasks
The Central Manager is defined on virt-p5501_p1
The BACKFILL scheduler is in use
All machines on the machine_list are present.$ llq
150 Configuring and Managing AIX Clusters Using xCAT 2

Id Owner Submitted ST PRI Class Running on------------------------ ---------- ----------- -- --- ------------ -----------virt-p5502-p1.3.0 test1 5/20 17:13 R 50 No_Class virt-p5501_p5
1 job step(s) in queue, 0 waiting, 0 pending, 1 running, 0 held, 0 preempted
ii. Submit a job with llsubmit and check if it queued with llq, and check if it runs later and the output file is correct. See Example 4-83 for details.
Example 4-83 check if you can submit jobs to Loadleveler
$ llsubmit hw.cmdllsubmit: The job "virt-p5502-p1.4" has been submitted.$ llqId Owner Submitted ST PRI Class Running on------------------------ ---------- ----------- -- --- ------------ -----------virt-p5502-p1.3.0 test1 5/20 17:13 R 50 No_Class virt-p5501_p5virt-p5502-p1.4.0 test1 5/20 17:18 I 50 No_Class
2 job step(s) in queue, 1 waiting, 0 pending, 1 running, 0 held, 0 preempted......Wait for jobs finish......$ llqllq: There is currently no job status to report.$ cat out.4.0 2:[virt-p5502-p2] hello world 3:[virt-p5501_p2] hello world 7:[virt-p5502-p3] hello world 0:[virt-p5502-p4] hello world 5:[virt-p5501_p1] hello world 8:[virt-p5501_p3] hello world 9:[virt-p5501_p5] hello world 10:[virt-p5501_p6] hello world 6:[virt-p5501_p4] hello world 11:[virt-p5502-p6] hello world 1:[virt-p5502-p5] hello world 4:[virt-p5502-p1] hello world$
Chapter 4. CSM to xCAT 2 transition 151

152 Configuring and Managing AIX Clusters Using xCAT 2

Chapter 5. Installing xCAT 2 on a new cluster
In this chapter, we show the scenarios tested in our laboratory environment to install a new cluster from scratch. This cluster will be used to demonstrate the installation of xCAT, installation of a hierarchical cluster using service nodes, the installation and customizing of diskful and diskless nodes, and also demonstrate xCAT’s ability to configure logical partitions (LPARs) on an IBM System p. We also demonstrate how to install and configure a General Parallel File System (GPFS) cluster using both diskful and diskless nodes.
The topics that are discussed are:
� Description of the test environment
� Installing and configuring xCAT 2
� Installing the nodes
� xCAT 2 with System p blades running AIX
5
© Copyright IBM Corp. 2009. All rights reserved. 153

5.1 Description of the test environment
The equipment we installed our xCAT cluster on is described below. The management node is an IBM pSeries 630 running AIX 6.1 TL2 SP3. The cluster nodes are defined in LPARs on two IBM Power 6 p550s and two IBM Power6 p570s. The p550s are connected to one Hardware Management Console and the p570s are connected to another. This will give us two hardware control points in our cluster.
Each managed system will have one virtual I/O LPAR and four AIX LPARs, with the exception of one that has a fifth LPAR that does not have any disk resources assigned to it. This LPAR will be used for our diskless exercises.
There are four networks with our cluster:
1. Flexible Service Processor Virtual Local Area Network (VLAN)
2. Public/General Access VLAN
3. Dynamic LPAR VLAN.
4. GPFS VLAN
The LPAR configurations were entirely virtual—in other words, there are no real adapters assigned to the LPARs. All LPARs are uncapped micro-partitions.
The nodes are all installed with AIX 6.1 TL2 SP3 and xCAT 2.2.
We decided to create a hierarchical cluster, in order to demonstrate the use of service nodes. Normally, in a cluster of this size, service nodes are not required. In large clusters with hundreds or thousands of nodes, service nodes are often desirable to relieve the load on the management node.
Figure 5-1 describes the cluster network topology used in our exercise.
154 Configuring and Managing AIX Clusters Using xCAT 2

Figure 5-1 Cluster Network Topology used for this chapter
Figure 5-2 depicts the hierarchy used in our cluster.
Figure 5-2 The hierarchical structure of our cluster
WORLD
lp1p
6550
1
lp2p
6550
1
lp3p
6550
1
lp4p
6550
1
lp5p
6550
1
550-
1
v10p
6550
1
lp4p
6mm
a1
lp2p
6mm
a1
lp3p
6mm
a1
lp1p
6mm
a1
v10p
6mm
a1
mm
a-1
Public VLANSwitch
lp1p
6550
2
lp2p
6550
2
lp3p
6550
2
lp4p
6550
2
v10p
6550
2
550-
2
FSP FSP
dlpar switch
FSP switch
gpfsswitch
hmc 3
dlpar switch
FSP FSP
hmc 4
lp4p
6mm
a2
lp3p
6mm
a2
lp2p
6mm
a2
lp1p
6mm
a2
v10p
6mm
a2
mm
a-2
mgtnode
mgtnode
lp1p65501
lp2p65501
lp3p65501
lp4p65501
lp5p65501
lp1p65502
lp2p65502
lp3p65502
lp4p65502
lp1p6mma1
lp2p6mma1
lp3p6mma1
lp4p6mma1
lp1p6mm
lp2p6mm
lp3p6mm
lp4p6mm
Service node
Management node
Cluster nodes
Chapter 5. Installing xCAT 2 on a new cluster 155

5.2 Installing and configuring xCAT 2
In this section we describe the steps we undertook on our lab equipment to install our xCAT cluster. These steps were:
� 5.2.1, “Preparing the management node” on page 156� 5.2.3, “Additional configuration of the management node” on page 178� 5.2.4, “Creation of LPARs and nodes” on page 186� 5.2.4, “Creation of LPARs and nodes” on page 186� 5.2.5, “Creation of NIM and xCAT install resources” on page 194� 5.3.1, “Configure and install a service node” on page 198
5.2.1 Preparing the management node
The following steps were taken to prepare our management node for the installation and configuration of the xCAT software. AIX 6.1 and the latest maintenance (Technology Level 2 Service Pack 3) was applied. The Cluster Facing Network Adapters (in our case the Public VLAN) was configured with the IP address of the mgtnode and the /etc/hosts file was configured with all the hostnames and IP addresses of the cluster nodes for all VLANs.
Creating a new volume group and file systemIt is highly recommended to create a new file system in a new volume group on the management node. At minimum, a new file system should be created. The file system /install was created in the rootvg of our management node.
Installing OpenSSL and OpenSSHOpenSSL and OpenSSH are not installed by a standard install of AIX.
Install the latest versions of OpenSSL and OpenSSH from the AIX Expansion Pack, or alternately this software can also be downloaded from the following two sites:
OpenSSH can be downloaded from:
http://sourceforge.net/projects/openssh-aix
OpenSSL can be downloaded from:
https://www14.software.ibm.com/webapp/iwm/web/preLogin.do?source=aixbp
We unpacked the tar files into /tmp/openssh and installed OpenSSL and OpenSSH bff files using a standard smit install command.
156 Configuring and Managing AIX Clusters Using xCAT 2

Running the updtvpkg command Since these are installp filesets you should run /usr/sbin/updtvpkg to make sure that the RPM reflection of what was installed by installp is updated. This makes it possible for RPM packages with a dependency on OpenSSL to recognize that the dependency is satisfied.
This command allows an RPM to consider one or more of its dependencies is satisfied when those dependencies were installed via “traditional” installp.
The output of our run of updtvpkg is shown in Example 5-1.
Example 5-1 Execution of updtvpkg
mgtnode #/usr/sbin/updtvpkgPlease wait...mgtnode #
Downloading and extracting xCAT 2 packagesThere are two packages that must be downloaded for the xCAT installation on the management node. These packages are:
� dep-aix-2.2-snap200903291204.tar
� core-aix-snap.tar
These two files can be downloaded from:
http://xcat.sourceforge.net/aix/download.html
At this site, there is the choice of downloading the stable release or the daily snapshot builds. We recommend that the daily snapshot builds be downloaded because these will contain the latest bug fixes. Once downloaded, we copied the files to /tmp/xcat on the management node, then unzipped and untarred the dependency tarball, as shown in Example 5-2.
Example 5-2 Unpacking the archive containing the dependency packages
mgtnode #gunzip dep-aix-2.2-snap200903291204.tar.gzmgtnode #tar -xvf dep-aix-2.2-snap200903291204.tarx bash-3.2-1.aix5.2.ppc.rpm, 1429004 bytes, 2792 tape blocksx conserver-8.1.16-2.aix5.3.ppc.rpm, 222900 bytes, 436 tape blocksx expect-5.42.1-3.aix5.1.ppc.rpm, 682184 bytes, 1333 tape blocksx fping-2.4b2_to-1.aix5.3.ppc.rpm, 64102 bytes, 126 tape blocksx net-snmp-5.4.2.1-1.aix5.3.ppc.rpm, 4279636 bytes, 8359 tape blocksx net-snmp-devel-5.4.2.1-1.aix5.3.ppc.rpm, 2633096 bytes, 5143 tape blocksx net-snmp-perl-5.4.2.1-1.aix5.3.ppc.rpm, 416411 bytes, 814 tape blocks
Chapter 5. Installing xCAT 2 on a new cluster 157

x openslp-1.2.1-1.aix5.3.ppc.rpm, 63088 bytes, 124 tape blocksx perl-Crypt-SSLeay-0.57-1.aix5.3.ppc.rpm, 158043 bytes, 309 tape blocksx perl-DBD-SQLite-1.13-1.aix5.3.ppc.rpm, 274998 bytes, 538 tape blocksx perl-DBI-1.55-1.aix5.3.ppc.rpm, 771054 bytes, 1506 tape blocksx perl-Digest-MD5-2.36-1.aix5.3.ppc.rpm, 40759 bytes, 80 tape blocksx perl-Expect-1.21-1.aix5.3.ppc.rpm, 74339 bytes, 146 tape blocksx perl-IO-Socket-SSL-1.06-1.aix5.3.ppc.rpm, 51463 bytes, 101 tape blocksx perl-IO-Stty-.02-1.aix5.3.ppc.rpm, 5686 bytes, 12 tape blocksx perl-IO-Tty-1.07-1.aix5.3.ppc.rpm, 48055 bytes, 94 tape blocksx perl-Net-Telnet-3.03-1.2.aix5.3.ppc.rpm, 51601 bytes, 101 tape blocksx perl-Net_SSLeay.pm-1.30-1.aix5.3.ppc.rpm, 944752 bytes, 1846 tape blocksx tcl-8.4.7-3.aix5.1.ppc.rpm, 1479146 bytes, 2889 tape blocksx tk-8.4.7-3.aix5.1.ppc.rpm, 1355246 bytes, 2647 tape blocksx README, 3240 bytes, 7 tape blocksx instoss, 915 bytes, 2 tape blocks
The unzipping and untarring of the xCAT core tarball is shown in Example 5-3.
Example 5-3 Unpackaging the xCAT core file for AIX
mgtnode #gunzip core-aix-snap.tar.gzmgtnode #tar -xvf core-aix-snap.tarx instxcat, 179 bytes, 1 media blocks.x xCATaixSN.bnd, 951 bytes, 2 media blocks.x xCATaixSSH.bnd, 198 bytes, 1 media blocks.x xCATaixSSL.bnd, 212 bytes, 1 media blocks.x perl-xCAT-2.2.1-snap200904221514.aix5.3.ppc.rpm, 276553 bytes, 541 media blocks.x xCAT-2.2.1-snap200904221515.aix5.3.ppc.rpm, 98205 bytes, 192 media blocks.x xCAT-client-2.2.1-snap200904221514.aix5.3.ppc.rpm, 4639384 bytes, 9062 media blocks.x xCAT-rmc-2.2.1-snap200904221516.aix5.3.ppc.rpm, 46845 bytes, 92 media blocks.x xCAT-server-2.2.1-snap200904221515.aix5.3.ppc.rpm, 437696 bytes, 855 media blocks.mgtnode #
Installing xCAT 2 packagesOnce we untarred the xCAT core and dependency files into /tmp/xcat, the installation of the software could be done. As a convenience, two scripts, instoss
158 Configuring and Managing AIX Clusters Using xCAT 2

and instxcat, are supplied to assist in the installation of xCAT and its dependent RPMs. These scripts are executed out of the /tmp/xcat directory.
The installation of the open source software is shown in Example 5-4.
Example 5-4 Execution of the instoss command
mgtnode # cd /tmp/xcatmgtnode #./instossperl-DBI ##################################################bash ##################################################perl-DBD-SQLite ##################################################tcl ##################################################tk ##################################################expect ##################################################conserver ##################################################perl-Expect ##################################################perl-IO-Tty ##################################################perl-IO-Stty ##################################################perl-IO-Socket-SSL ##################################################perl-Net_SSLeay.pm ##################################################perl-Digest-MD5 ##################################################fping ##################################################openslp ##################################################perl-Crypt-SSLeay ##################################################perl-Net-Telnet ##################################################net-snmp ##################################################net-snmp-devel ##################################################net-snmp-perl ##################################################mgtnode #
The installation of the xCAT core software is shown in Example 5-5.
Example 5-5 Execution of the instxcat command
mgtnode # cd /tmp/xcatmgtnode #./instxcatperl-xCAT ##################################################xCAT-client ##################################################
Note: It is important to install the dependency RPMs before installing the xCAT RPMs.
Chapter 5. Installing xCAT 2 on a new cluster 159

xCAT-server ##################################################xCAT ##################################################Created /etc/xCATMN file.Created /.ssh directory.Added updates to the /.ssh/config file.Created /install/postscripts/_ssh directory.Generated /.ssh/id_rsa.pub.Added /.ssh/id_rsa.pub to /.ssh/authorized_keys.Copied /.ssh/id_rsa.pub to /install/postscripts/_ssh/authorized_keys.ln -sf /opt/freeware/sbin/conserver /usr/sbin/conserver.ln -sf /opt/freeware/bin/console /usr/bin/console.Command failed: lssrc -a | grep conserver 2>&1. Error message: .Add subsystem conserver.Updated cluster site definition.Created postscripts definition.Created policy definition.syslog has been set up.
Setting up basic certificates. Respond with a 'y' when prompted.
Running echo 'yyyy' |/opt/xcat/share/xcat/scripts/setup-xcat-ca.sh 'xCAT CA' # NOTE use "-newkey rsa:2048" if running OpenSSL 0.9.8a or higherGenerating a 2048 bit RSA private key....+++....................+++writing new private key to 'private/ca-key.pem'-----/Created xCAT certificate.Created /install/postscripts/ca/certs directory.Copied /etc/xcat/ca/* to /install/postscripts/ca directory.Running echo 'yyyy' |/opt/xcat/share/xcat/scripts/setup-server-cert.sh mgtnodeGenerating RSA private key, 2048 bit long modulus..+++......+++e is 65537 (0x10001)
160 Configuring and Managing AIX Clusters Using xCAT 2

/Using configuration from openssl.cnfCheck that the request matches the signatureSignature okCertificate Details: Serial Number: 1 (0x1) Validity Not Before: Apr 24 19:46:07 2009 GMT Not After : Apr 19 19:46:07 2029 GMT Subject: commonName = mgtnode X509v3 extensions: X509v3 Basic Constraints: CA:FALSE Netscape Comment: OpenSSL Generated Certificate X509v3 Subject Key Identifier: 4B:18:01:91:E7:F7:4D:15:7F:C2:BF:8C:29:5B:23:56:2B:6F:48:9B X509v3 Authority Key Identifier: keyid:8F:B2:D6:48:E7:64:24:9F:AE:EF:7D:B9:96:0B:4B:1A:A1:5F:D6:BA
Certificate is to be certified until Apr 19 19:46:07 2029 GMT (7300 days)Sign the certificate? [y/n]:
1 out of 1 certificate requests certified, commit? [y/n]Write out database with 1 new entriesData Base Updated/Created xCAT certificate.Created /install/postscripts/cert directory.Copied /etc/xcat/cert/* to /install/postscripts/cert directory.Running echo 'yyyy' |/opt/xcat/share/xcat/scripts/setup-local-client.sh rootGenerating RSA private key, 2048 bit long modulus............................................................................+++.................................................................+++e is 65537 (0x10001)/Using configuration from openssl.cnf
Chapter 5. Installing xCAT 2 on a new cluster 161

Check that the request matches the signatureSignature okCertificate Details: Serial Number: 2 (0x2) Validity Not Before: Apr 24 19:46:13 2009 GMT Not After : Apr 19 19:46:13 2029 GMT Subject: commonName = root X509v3 extensions: X509v3 Basic Constraints: CA:FALSE Netscape Comment: OpenSSL Generated Certificate X509v3 Subject Key Identifier: FE:EF:A2:2D:C0:92:28:E2:BF:FA:18:35:5D:0C:6A:97:E6:83:E0:0A X509v3 Authority Key Identifier: keyid:8F:B2:D6:48:E7:64:24:9F:AE:EF:7D:B9:96:0B:4B:1A:A1:5F:D6:BA
Certificate is to be certified until Apr 19 19:46:13 2029 GMT (7300 days)Sign the certificate? [y/n]:
1 out of 1 certificate requests certified, commit? [y/n]Write out database with 1 new entriesData Base Updated/Created xCAT certificate.Created /install/postscripts/_xcat directory.Copied /.xcat/* to /install/postscripts/_xcat directory.Copied /etc/xcat/ca/certs* to /install/postscripts/ca/certs directory.Starting xcatd.....cat: 0652-050 Cannot open /etc/exports.xCAT-rmc ##################################################Stopping xcatd processes....Starting xcatd.....5. mgtnode #
162 Configuring and Managing AIX Clusters Using xCAT 2

Setting up the root user profile During the execution of the instxcat command, the /etc/profile file was modified with xCAT environment variables and PATHs. We executed the /etc/profile in the current shell session (by preceding the command with a “.”) using the . /etc/profile command.
The changes to the /etc/profile file are shown in Example 5-6.
Example 5-6 xCAT install /etc/profile additions
# xCAT setupXCATROOT=/opt/xcatPATH=$PATH:$XCATROOT/bin:$XCATROOT/sbinMANPATH=$MANPATH:$XCATROOT/share/manexport XCATROOT PATH MANPATH
Verifying the installation and prerequisitesOnce the xCAT software was installed and the xcatd daemon was running, we ran some verification tests to ensure that the xCAT software was working.
These tests included:
� Check that the xcatd daemon is running, as shown in Example 5-7.
Example 5-7 Checking the xCAT daemon
mgtnode #ps -aef |grep xcat|grep -v grep root 172134 1 0 May 12 - 0:01 xcatd: SSL listener root 254024 172134 0 May 12 - 0:01 xcatd: install monitor root 295076 172134 0 May 12 - 0:19 xcatd: UDP listener
� Running the lsdef -h command and checking that the output returned is correct. Help information should be displayed.
� Running the lsdef command to retrieve some information from the xcat database.
The execution and results of these commands are shown in Example 5-8.
Example 5-8 Verification of xCAT install via lsdef -h command
mgtnode# lsdef -h
Note: Make sure you do not have a .profile file that overwrites the PATH environment variable.
Chapter 5. Installing xCAT 2 on a new cluster 163

Usage: lsdef - List xCAT data object definitions.
lsdef [-h | --help ] [-t object-types]
lsdef [-V | --verbose] [-t object-types] [-o object-names] [ -l | --long] [-a | --all] [-z | --stanza ] [-i attr-list] [-w attr=val,[attr=val...]] [noderange]
The following data object types are supported by xCAT.
boottargeteventloggroupmonitoringnetworknodenotificationosimagepolicysite
Use the '-h' option together with the '-t' option toget a list of valid attribute names for each object type.mgtnode #
Example 5-9 shows data retrieved from the xCAT database.
Example 5-9 Execution of lsdef to retrieve data from the xCAT database
mgtnode #lsdef -t site -lSetting the name of the site definition to 'clustersite'.
Object name: clustersite consoleondemand=yes domain= installdir=/install master=192.168.100.34 tftpdir=/tftpboot useSSHonAIX=no xcatdport=3001 xcatiport=3002mgtnode #
164 Configuring and Managing AIX Clusters Using xCAT 2

The results of the previous commands show the successful installation of xCAT on the management node.
5.2.2 Switching xCAT SQLite database to MySQL
We decided to set up a hierarchical cluster to test the use of service nodes. In an xCAT cluster the single point of control is the xCAT management node. Service nodes are used to distribute the load (mainly node install and monitoring), and to provide sufficient scaling and performance so as to avoid the management node becoming a bottle neck. This is typically done on very large clusters. For an xCAT on AIX cluster there is a primary NIM master, which is typically on the management node. The service nodes are configured as additional NIM masters.
All the xCAT commands for managing the cluster are run on the management node. The xCAT cluster software automatically handles the setup of the low-level service nodes and the distribution of the NIM resources to the service nodes. All the installation resources required for the cluster are managed from the primary NIM master. The NIM resources are automatically replicated to the service nodes when they are needed.
Sizing the service nodesThere can be one or more service nodes in an xCAT cluster. The number required will depend on many factors including the number of nodes in the cluster, the type of node deployment, the type of network, and so on. As a general “rule of thumb” you should plan on having at least one service node per 128 diskful cluster nodes. A service node can also be used to run user applications in most cases1.
However, if you plan to use diskless nodes, due to resource requirements of the NIM server, you should consider allocating a service node for 32 compute nodes.
An xCAT service node must be installed with xCAT software as well as additional prerequisite software.
When using service nodes, the database that supports the xCAT database must be configured to support remote client access. The default supplied database, SQLite, does not support remote client access.
Note: Currently, the xCAT NIM configuration does not use the NIM hierarchical capabilities. Rather, it creates a NIM master for each subsequent service node.
1 In case you use diskless nodes, you may consider not running applications on your service node or NIM master.
Chapter 5. Installing xCAT 2 on a new cluster 165

Currently, xCAT only supports the MySQL database on AIX as a database with remote client access capability. xCAT with PostgreSQL is supported on Linux only.
MySQL for AIX is available directly from the MySQL Web site or from the xCAT sourceforge Web site.
http://xcat.sourceforge.net/aix/download.html
Go to the xcat-dep download page.
Creating a volume group and file system for xCATAs the MySQL database could potentially be very active, we decided to create a new volume group and file system for the MySQL database. We recommend that this is done because it keeps the database separate from the operating system, avoids the database from being located in the / (root) file system and is generally considered a good practice.
MySQL is installed to the /usr/local file system. We created a new volume group and created the file system using the AIX smit tool. It is not necessary to create a new volume group, though it is highly recommended to create, at minimum, a new file system.
Installing MySQLOnce the software is downloaded from the sourceforge Web site, the gzip file was unzipped and untarred in the same /tmp/xcat directory that the xCAT software was untarred in.
We then ran the following commands to install the RPMs, shown in Example 5-10.
Example 5-10 Running rpm to install MySQL and its dependencies
mgtnode# rpm -i xcat-mysql-5.0-1.aix5.3.ppc.rpmmgtnode# rpm -i perl-DBD-mysql-4.007-1.aix5.3.ppc.rpm
The xcat-mysql post processing unwraps the MySQL software into /usr/local and creates a symlink for the /usr/local/mysql directory. It will also update the PATH environment variable in the /etc/profile file.
The modified /etc/profile is shown in Example 5-11.
Example 5-11 /etc/profile post MYSQL install
# xCAT setupXCATROOT=/opt/xcat
166 Configuring and Managing AIX Clusters Using xCAT 2

PATH=$PATH:$XCATROOT/bin:$XCATROOT/sbinMANPATH=$MANPATH:$XCATROOT/share/manexport XCATROOT PATH MANPATHPATH=$PATH:/usr/local/mysql:/usr/local/mysql/bin:/usr/local/mysql/lib:/usr/local/mysql/includeexport PATHmgtnode #
Configuring MySQLThe MySQL daemon, mysqld, requires the creation of a userid and group. These are typically the user mysql and group mysql. Using the standard AIX commands, the group and user were created and a passwd assigned, as shown in Example 5-12.
Example 5-12 Creation of the mysql group and userid
mgtnode #mkgroup -A mysqlmgtnode #mkuser pgrp=mysql gecos='mysql user' mysqlmgtnode #passwd mysqlChanging password for "mysql"mysql's New password:Enter the new password again:mgtnode #pwdadm -c mysql
Once the userid and group are created, the ownership of the newly installed MySQL software needs to be changed. The chown and chgrp commands are used to accomplish this.
The files’ ownership is shown in Example 5-13.
Example 5-13 Change of directory and issue of chown and chgrp
mgtnode #cd /usr/local/mysqlmgtnode #ls -ltotal 160-rw-r--r-- 1 503 staff 19071 Aug 04 2008 COPYING-rw-r--r-- 1 503 staff 5139 Aug 04 2008 EXCEPTIONS-CLIENT
Note: The smitty security command can also be used to create the userid and group.
Note: Ensure that the correct directory is the current working directory before issuing the recursive chown and chgrp commands.
Chapter 5. Installing xCAT 2 on a new cluster 167

-rw-r--r-- 1 503 staff 8792 Aug 04 2008 INSTALL-BINARY-rw-r--r-- 1 503 staff 1410 Aug 04 2008 READMEdrwxr-xr-x 2 503 staff 4096 Aug 04 2008 bin-rwxr-xr-x 1 503 staff 801 Aug 04 2008 configuredrwxr-x--- 4 503 staff 256 Aug 04 2008 datadrwxr-xr-x 2 503 staff 256 Aug 04 2008 docsdrwxr-xr-x 3 503 staff 4096 Aug 04 2008 includedrwxr-xr-x 2 503 staff 4096 Aug 04 2008 libdrwxr-xr-x 4 503 staff 256 Aug 04 2008 mandrwxr-xr-x 9 503 staff 4096 Aug 04 2008 mysql-testdrwxr-xr-x 2 503 staff 256 Aug 04 2008 scriptsdrwxr-xr-x 3 503 staff 4096 Aug 04 2008 sharedrwxr-xr-x 5 503 staff 4096 Aug 04 2008 sql-benchdrwxr-xr-x 2 503 staff 4096 Aug 04 2008 support-filesdrwxr-xr-x 2 503 staff 4096 Aug 04 2008 tests
Change the files’ ownership, as shown in Example 5-14.
Example 5-14 Changing mysql files ownership
mgtnode #chown -R mysql .mgtnode #ls -ltotal 160-rw-r--r-- 1 mysql staff 19071 Aug 04 2008 COPYING-rw-r--r-- 1 mysql staff 5139 Aug 04 2008 EXCEPTIONS-CLIENT-rw-r--r-- 1 mysql staff 8792 Aug 04 2008 INSTALL-BINARY-rw-r--r-- 1 mysql staff 1410 Aug 04 2008 READMEdrwxr-xr-x 2 mysql staff 4096 Aug 04 2008 bin-rwxr-xr-x 1 mysql staff 801 Aug 04 2008 configuredrwxr-x--- 4 mysql staff 256 Aug 04 2008 datadrwxr-xr-x 2 mysql staff 256 Aug 04 2008 docsdrwxr-xr-x 3 mysql staff 4096 Aug 04 2008 includedrwxr-xr-x 2 mysql staff 4096 Aug 04 2008 libdrwxr-xr-x 4 mysql staff 256 Aug 04 2008 mandrwxr-xr-x 9 mysql staff 4096 Aug 04 2008 mysql-testdrwxr-xr-x 2 mysql staff 256 Aug 04 2008 scriptsdrwxr-xr-x 3 mysql staff 4096 Aug 04 2008 sharedrwxr-xr-x 5 mysql staff 4096 Aug 04 2008 sql-benchdrwxr-xr-x 2 mysql staff 4096 Aug 04 2008 support-filesdrwxr-xr-x 2 mysql staff 4096 Aug 04 2008 testsmgtnode #chgrp -R mysql .mgtnode #
168 Configuring and Managing AIX Clusters Using xCAT 2

mgtnode #ls -ltotal 160-rw-r--r-- 1 mysql mysql 19071 Aug 04 2008 COPYING-rw-r--r-- 1 mysql mysql 5139 Aug 04 2008 EXCEPTIONS-CLIENT-rw-r--r-- 1 mysql mysql 8792 Aug 04 2008 INSTALL-BINARY-rw-r--r-- 1 mysql mysql 1410 Aug 04 2008 READMEdrwxr-xr-x 2 mysql mysql 4096 Aug 04 2008 bin-rwxr-xr-x 1 mysql mysql 801 Aug 04 2008 configuredrwxr-x--- 4 mysql mysql 256 Aug 04 2008 datadrwxr-xr-x 2 mysql mysql 256 Aug 04 2008 docsdrwxr-xr-x 3 mysql mysql 4096 Aug 04 2008 includedrwxr-xr-x 2 mysql mysql 4096 Aug 04 2008 libdrwxr-xr-x 4 mysql mysql 256 Aug 04 2008 mandrwxr-xr-x 9 mysql mysql 4096 Aug 04 2008 mysql-testdrwxr-xr-x 2 mysql mysql 256 Aug 04 2008 scriptsdrwxr-xr-x 3 mysql mysql 4096 Aug 04 2008 sharedrwxr-xr-x 5 mysql mysql 4096 Aug 04 2008 sql-benchdrwxr-xr-x 2 mysql mysql 4096 Aug 04 2008 support-filesdrwxr-xr-x 2 mysql mysql 4096 Aug 04 2008 testsmgtnode #
The MySQL database directory needs to be created and the grant tables need to be initialized.
The /usr/local/mysql/scripts/mysql_install_db command is run to achieve this. This command is run from the root userid. The results are shown in Example 5-15.
Example 5-15 Execution of the mysql_install_db command
mgtnode #/usr/local/mysql/scripts/mysql_install_db --user=mysqlInstalling MySQL system tables...OKFilling help tables...OK
To start mysqld at boot time you have to copy
Note: The mysql userid may need its limits changed. We encountered /usr/local/mysql/bin/mysqld: Out of memory (needed 219486208 bytes).
The ulimit -m unlimited command was used to change this setting to unlimited. To make this change permanent, use smitty user.
Chapter 5. Installing xCAT 2 on a new cluster 169

support-files/mysql.server to the right place for your system
PLEASE REMEMBER TO SET A PASSWORD FOR THE MySQL root USER !To do so, start the server, then issue the following commands:./bin/mysqladmin -u root password 'new-password'./bin/mysqladmin -u root -h mgtnode password 'new-password'
Alternatively you can run:./bin/mysql_secure_installation
which will also give you the option of removing the testdatabases and anonymous user created by default. This isstrongly recommended for production servers.
See the manual for more instructions.
You can start the MySQL daemon with:cd . ; ./bin/mysqld_safe &
You can test the MySQL daemon with mysql-test-run.plcd mysql-test ; perl mysql-test-run.pl
Please report any problems with the ./bin/mysqlbug script!
The latest information about MySQL is available on the web athttp://www.mysql.comSupport MySQL by buying support/licenses at http://shop.mysql.commgtnode #
The next step is to change the database to run in ANSI-QUOTES mode. The /etc/my.conf file needs to be edited and the following line, as shown in Example 5-16, needs to be added to the [mysqld] section.
Example 5-16 sql_mode = ANSI_QUOTES
mgtnode# cp /usr/local/mysql/support-files/my-large.cnf /etc/my.cnf# The MySQL server[mysqld]port = 3306socket = /tmp/mysql.sockskip-locking
Note: First copy /usr/local/mysql/support-files/my-large.cnf to /etc/my.cnf before editing /etc/my.cnf.
170 Configuring and Managing AIX Clusters Using xCAT 2

key_buffer = 256Mmax_allowed_packet = 1Mtable_cache = 256sort_buffer_size = 1Mread_buffer_size = 1Mread_rnd_buffer_size = 4Mmyisam_sort_buffer_size = 64Mthread_cache_size = 8query_cache_size= 16Msql_mode = ANSI_QUOTES# Try number of CPU's*2 for thread_concurrencythread_concurrency = 8
The root user needs to be the owner of the /usr/local/mysql files. However, the mysql user needs to own the data directory. This is shown in Example 5-17.
Example 5-17 Updating permissions for the database
mgtnode #pwd/usr/local/mysqlmgtnode #ls -ltotal 160-rw-r--r-- 1 mysql mysql 19071 Aug 04 2008 COPYING-rw-r--r-- 1 mysql mysql 5139 Aug 04 2008 EXCEPTIONS-CLIENT-rw-r--r-- 1 mysql mysql 8792 Aug 04 2008 INSTALL-BINARY-rw-r--r-- 1 mysql mysql 1410 Aug 04 2008 READMEdrwxr-xr-x 2 mysql mysql 4096 Aug 04 2008 bin-rwxr-xr-x 1 mysql mysql 801 Aug 04 2008 configuredrwxr-x--- 4 mysql mysql 256 Apr 24 16:39 datadrwxr-xr-x 2 mysql mysql 256 Aug 04 2008 docsdrwxr-xr-x 3 mysql mysql 4096 Aug 04 2008 includedrwxr-xr-x 2 mysql mysql 4096 Aug 04 2008 libdrwxr-xr-x 4 mysql mysql 256 Aug 04 2008 mandrwxr-xr-x 9 mysql mysql 4096 Aug 04 2008 mysql-testdrwxr-xr-x 2 mysql mysql 256 Aug 04 2008 scriptsdrwxr-xr-x 3 mysql mysql 4096 Aug 04 2008 sharedrwxr-xr-x 5 mysql mysql 4096 Aug 04 2008 sql-benchdrwxr-xr-x 2 mysql mysql 4096 Aug 04 2008 support-filesdrwxr-xr-x 2 mysql mysql 4096 Aug 04 2008 testsmgtnode #chown -R root .mgtnode #chown -R mysql datamgtnode #ls -ltotal 160
Chapter 5. Installing xCAT 2 on a new cluster 171

-rw-r--r-- 1 root mysql 19071 Aug 04 2008 COPYING-rw-r--r-- 1 root mysql 5139 Aug 04 2008 EXCEPTIONS-CLIENT-rw-r--r-- 1 root mysql 8792 Aug 04 2008 INSTALL-BINARY-rw-r--r-- 1 root mysql 1410 Aug 04 2008 READMEdrwxr-xr-x 2 root mysql 4096 Aug 04 2008 bin-rwxr-xr-x 1 root mysql 801 Aug 04 2008 configuredrwxr-x--- 4 mysql mysql 256 Apr 24 16:39 datadrwxr-xr-x 2 root mysql 256 Aug 04 2008 docsdrwxr-xr-x 3 root mysql 4096 Aug 04 2008 includedrwxr-xr-x 2 root mysql 4096 Aug 04 2008 libdrwxr-xr-x 4 root mysql 256 Aug 04 2008 mandrwxr-xr-x 9 root mysql 4096 Aug 04 2008 mysql-testdrwxr-xr-x 2 root mysql 256 Aug 04 2008 scriptsdrwxr-xr-x 3 root mysql 4096 Aug 04 2008 sharedrwxr-xr-x 5 root mysql 4096 Aug 04 2008 sql-benchdrwxr-xr-x 2 root mysql 4096 Aug 04 2008 support-filesdrwxr-xr-x 2 root mysql 4096 Aug 04 2008 testsmgtnode #
The MySQL server can now be started from the root userid using the command /usr/local/mysql/bin/mysqld_safe --user=mysql &, as shown in Example 5-18.
Example 5-18 Starting the MySQL server and display the running process
mgtnode #/usr/local/mysql/bin/mysqld_safe --user=mysql &[1] 127340mgtnode #Starting mysqld daemon with databases from /usr/local/mysql/data
mgtnode #mgtnode #ps -efa|grep myroot 127340 123146 0 16:47:49 pts/0 0:00 /bin/sh /usr/local/mysql/bin/mysqld_safe --user=mysql mysql 160188 127340 0 16:47:50 pts/0 0:00 /usr/local/mysql/bin/mysqld --basedir=/usr/local/mysql --datadir=/usr/local/mysql/data --user=mysql --pid-file=/usr/local/mysql/data/mgtnode.pid --port=3306 --socket=/tmp/mysql.sockmgtnode #
When the MySQL database needs to be shut down, use the command shown in Example 5-19.
172 Configuring and Managing AIX Clusters Using xCAT 2

Example 5-19 Shutting down MySQL
mgtnode #/usr/local/mysql/bin/mysqladmin -u root -p shutdownEnter password:STOPPING server from pid file /usr/local/mysql/data/mgtnode.pid090424 16:52:44 mysqld ended
We add the following line to /etc/inittab to ensure that MySQL starts when the system is booted. We used the command in Example 5-20.
Example 5-20 Adding mysqld to /etc/inittab
mgtnode #mkitab -i ctrmc "mysql:2:once:/usr/local/bin/mysqld_safe --user=mysql &"mgtnode #cat /etc/inittab |tailpconsole:2:once:/usr/bin/startsrc -s pconsole > /dev/null 2>&1xmdaily:2:once:/usr/bin/topasrec -L -s 300 -R 1 -r 6 -o /etc/perf/daily/ -ypersistent=1 2>&1 >/dev/null #Start local binary recordingctrmc:2:once:/usr/bin/startsrc -s ctrmc > /dev/console 2>&1mysql:2:once:/usr/local/bin/mysqld_safe --user=mysql &ha_star:h2:once:/etc/rc.ha_star >/dev/console 2>&1ntbl_reset:2:once:/usr/bin/ntbl_reset_datafilesrcml:2:once:/usr/ml/aix61/rc.ml > /dev/console 2>&1webserverstart:2:once:startsrc -s http4websm >/dev/null 2>&1conserver:2:once:/opt/conserver/bin/conserver -d -i -m 64xcatd:2:once:/opt/xcat/sbin/xcatd > /dev/console 2>&1mgtnode #
The mysql Admin userid password needs to be changed. The command is shown in Example 5-21.
Example 5-21 Changing the mysql Admin password
mgtnode #/usr/local/mysql/bin/mysqladmin -u root password 'xxxxxxxx'mgtnode #
Now that the MySQL database software is installed and configured, the xcatdb database needs to be created. The creation of the xcatdb database and the checking of the database after it has been created is shown in Example 5-22.
Example 5-22 Creating the xcatdb database
gtnode #mysql -u root -pEnter password:Welcome to the MySQL monitor. Commands end with ; or \g.
Chapter 5. Installing xCAT 2 on a new cluster 173
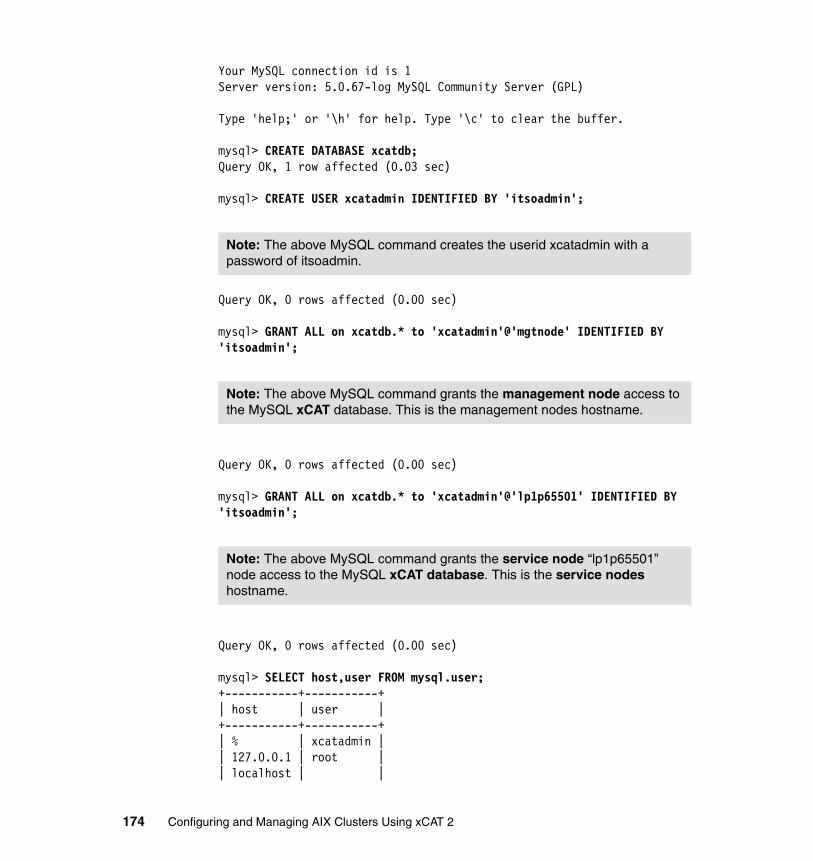
Your MySQL connection id is 1Server version: 5.0.67-log MySQL Community Server (GPL)
Type 'help;' or '\h' for help. Type '\c' to clear the buffer.
mysql> CREATE DATABASE xcatdb;Query OK, 1 row affected (0.03 sec)
mysql> CREATE USER xcatadmin IDENTIFIED BY 'itsoadmin';
Query OK, 0 rows affected (0.00 sec)
mysql> GRANT ALL on xcatdb.* to 'xcatadmin'@'mgtnode' IDENTIFIED BY 'itsoadmin';
Query OK, 0 rows affected (0.00 sec)
mysql> GRANT ALL on xcatdb.* to 'xcatadmin'@'lp1p65501' IDENTIFIED BY 'itsoadmin';
Query OK, 0 rows affected (0.00 sec)
mysql> SELECT host,user FROM mysql.user;+-----------+-----------+| host | user |+-----------+-----------+| % | xcatadmin || 127.0.0.1 | root || localhost | |
Note: The above MySQL command creates the userid xcatadmin with a password of itsoadmin.
Note: The above MySQL command grants the management node access to the MySQL xCAT database. This is the management nodes hostname.
Note: The above MySQL command grants the service node “lp1p65501” node access to the MySQL xCAT database. This is the service nodes hostname.
174 Configuring and Managing AIX Clusters Using xCAT 2

| localhost | root || lp1p65501 | xcatadmin || mgtnode | || mgtnode | root || mgtnode | xcatadmin |+-----------+-----------+8 rows in set (0.00 sec)
mysql>
mysql> SHOW DATABASES;+--------------------+| Database |+--------------------+| information_schema || mysql || test || xcatdb |+--------------------+4 rows in set (0.00 sec)
mysql> use xcatdb;Database changedmysql> SHOW TABLES;Empty set (0.00 sec)
mysql> quit;Byemgtnode #
Migrating xCAT data to MySQLOnce the database has been created, it is ready to have the xCAT data migrated from the default installed SQLite database to the newly set up MySQL database. The first step is to back up the xCAT database. This is important, even if there has not been any data added to xCAT, because during the install of xCAT the required default entries were added to the default SQLite database.
The output from this backup will be used as input to the restore to the new MySQL database.
The backup of the xCAT database is shown in Example 5-23.
Example 5-23 Backup of the xCAT database prior to migration
mgtnode #cd /tmp
Chapter 5. Installing xCAT 2 on a new cluster 175

mgtnode #mkdir xcatbackmgtnode #dumpxCATdb -p /tmp/xcatbackmgtnode #
Once the database has been successfully backed up, the /etc/xcat/cfgloc file must be updated to point xCAT to the new MySQL database. We found that the file did not exist so we just created it. The content of the file is shown in Example 5-24.
Example 5-24 The one line contained in /etc/xcat/cfgloc
mysql:dbname=xcatdb;host=mgtnode|xcatadmin|itsoadmin
The breakdown of the host parameter is <hostname> | <user> | <password>.
The new xCAT MySQL database is now ready to be restored. The database will be restored in bypass mode. Bypass mode will restore the database without the xcatd daemon being involved. The file created by the backup taken earlier is used for the restore.
The restore of the database is shown in Example 5-25.
Example 5-25 Restoring the xCAT database in bypass mode
mgtnode #XCATBYPASS=1 restorexCATdb -p /tmp/xcatbackmgtnode #
Restarting the xCAT daemon and verifyingWith the xCAT database restored to the new MySQL one, the xcatd daemon needs to be restarted to start using it. The xcatstart command is used to accomplish this. This command will stop any running xcatd daemons and start them again.
The restart of the xcatd daemon is shown in Example 5-26.
Example 5-26 The restart of the xcatd daemon
mgtnode #xcatstartStopping xcatd processes....Starting xcatd.....mgtnode #
Note: To shut down the xcat daemons, use the xcatstop command.
176 Configuring and Managing AIX Clusters Using xCAT 2

We can verify that xCAT is now using the new MySQL database by issuing a command to xCAT with MySQL active.
We issued an xCAT command with MySQL active, as shown in Example 5-27.
Example 5-27 lsdef run while mysqld is active
mgtnode #lsdef -t site -lSetting the name of the site definition to 'clustersite'.
Object name: clustersite consoleondemand=yes installdir=/install master=192.168.100.34 tftpdir=/tftpboot useSSHonAIX=no xcatdport=3001 xcatiport=3002mgtnode #
To prove that xCAT is running on MySQL, the mysqld daemon is shut down and the same xCAT command is issued. We observed the communication failure message shown in Example 5-28.
Example 5-28 xCAT communication failure message
mgtnode #/usr/local/mysql/bin/mysqladmin -u root -p shutdownEnter password:STOPPING server from pid file /usr/local/mysql/data/mgtnode.pid090424 17:23:37 mysqld ended
[1] + Done /usr/local/mysql/bin/mysqld_safe --user=mysql &mgtnode #lsdef -t site -lERROR/WARNING: communication with the xCAT server seems to have been ended prematurely
We restarted the mysqld daemon and retried the same command. We observed that the correct output is displayed, as shown in Example 5-29.
Example 5-29 Restart MySQL and re-issue the xCAT command
Tmgtnode #/usr/local/mysql/bin/mysqld_safe --user=mysql &[1] 127226mgtnode #Starting mysqld daemon with databases from /usr/local/mysql/data
Chapter 5. Installing xCAT 2 on a new cluster 177

mgtnode #lsdef -t site -lSetting the name of the site definition to 'clustersite'.
Object name: clustersite consoleondemand=yes installdir=/install master=192.168.100.34 tftpdir=/tftpboot useSSHonAIX=no xcatdport=3001 xcatiport=3002mgtnode #
xCAT has now been successfully reconfigured to use the MySQL database.
5.2.3 Additional configuration of the management node
In this section we describe additional configuration tasks for the xCAT management node.
Cluster network definitionThere needs to be an xCAT network definition for each network that contains cluster nodes.
You will need a name for the network and values for the following attributes:
net The network address
mask The network mask
gateway The network gateway
In the laboratory infrastructure that we used, the cluster node management interfaces and the xCAT management node interfaces are on the same network. The network was defined with the mkdef command, shown in Example 5-30.
Example 5-30 Using the mkdef command to define the cluster network
mgtnode #mkdef -t network -o public net=192.168.100.0 mask=255.255.255.0 gateway=192.168.100.60Object definitions have been created or modified.
178 Configuring and Managing AIX Clusters Using xCAT 2

In our case, the cluster network is the same network NIM uses for installing AIX onto the LPARs and nodes.
Selecting remote command execution (cluster shell)By default, xCAT will automatically set up Remote Shell (RSH) on all AIX cluster nodes. We decided to use Secure Shell (SSH) as our shell of choice. To enable xCAT to use SSH, the cluster site definition will need to be modified in the xCAT database. The command to make this change is shown in Example 5-31.
Example 5-31 Change site record to use SSH on AIX
mgtnode #chdef -t site -o clustersite useSSHonAIX=yesObject definitions have been created or modified.
mgtnode #lsdef -t site -lSetting the name of the site definition to 'clustersite'.
Object name: clustersite consoleondemand=yes installdir=/install master=192.168.100.34 tftpdir=/tftpboot useSSHonAIX=yes xcatdport=3001 xcatiport=3002mgtnode #
Now that xCAT is configured to use SSH as its remote shell, the cluster nodes now need to have OpenSSL and OpenSSH installed. This will be accomplished via the Network Installation Manager (NIM) later on in the install process.
Configuring name resolutionxCAT requires name resolution. This can be provided by a simple /etc/hosts file that is kept in sync across all nodes, or optionally by using a Domain Name Server (DNS). For our simple cluster, we decided to use a simple /etc/hosts file.
There are many ways to create the hosts file. Because our cluster was small we created it by hand using vi. This can be very tedious if your cluster is very large. xCAT supplies the makehosts file which can assist with the creation of the
Note: The xCAT definition should correspond to the NIM network definition. If multiple cluster subnets are needed, you will need an xCAT and NIM network definition for each one.
Chapter 5. Installing xCAT 2 on a new cluster 179

/etc/hosts file. This command relies on the nodes already being defined in the xCAT database.
For more details on Name Resolution and /etc/resolv.conf setup, go to:
https://xcat.svn.sourceforge.net/svn/root/xcat/xcat-core/trunk/xCAT-client/share/doc/xCAT2onAIX.pdf
The /etc/hosts file used in our cluster is shown in Example 5-32.
Example 5-32 The /etc/hosts file from the test cluster
127.0.0.1 loopback localhost # loopback (lo0) name/address192.168.100.34 mgtnode p630n04192.168.100.31 p630n01# HMCs192.168.100.110 hmc3192.168.100.109 hmc4######## Public VLAN ################ 550 1192.168.100.50 viop65501# lp1p65501 is service node for the both 550's . 570's dont have one.192.168.100.51 lp1p65501192.168.100.52 lp2p65501192.168.100.53 lp3p65501192.168.100.54 lp4p65501192.168.100.55 lp5p65501# 550 2192.168.100.90 viop65502192.168.100.91 lp1p65502192.168.100.92 lp2p65502192.168.100.93 lp3p65502192.168.100.94 lp4p65502# 570 1192.168.100.170 viop6mma1192.168.100.171 lp1p6mma1192.168.100.172 lp2p6mma1192.168.100.173 lp3p6mma1192.168.100.174 lp4p6mma1# 570 2192.168.100.180 viop6mma2192.168.100.181 lp1p6mma2192.168.100.182 lp2p6mma2192.168.100.183 lp3p6mma2192.168.100.184 lp4p6mma2
180 Configuring and Managing AIX Clusters Using xCAT 2
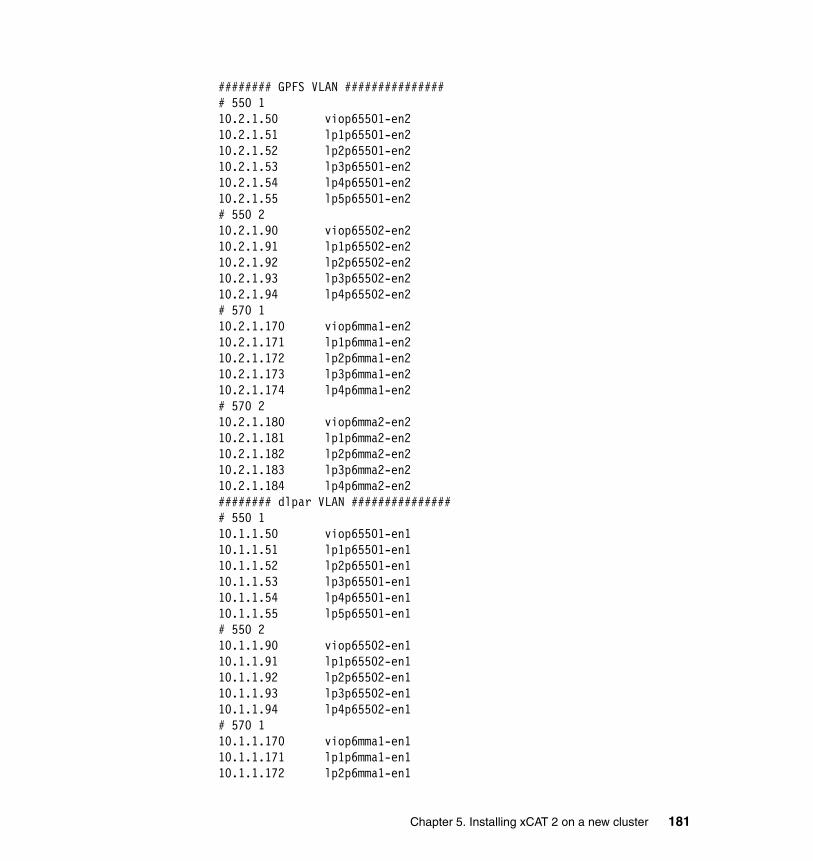
######## GPFS VLAN ################ 550 110.2.1.50 viop65501-en210.2.1.51 lp1p65501-en210.2.1.52 lp2p65501-en210.2.1.53 lp3p65501-en210.2.1.54 lp4p65501-en210.2.1.55 lp5p65501-en2# 550 210.2.1.90 viop65502-en210.2.1.91 lp1p65502-en210.2.1.92 lp2p65502-en210.2.1.93 lp3p65502-en210.2.1.94 lp4p65502-en2# 570 110.2.1.170 viop6mma1-en210.2.1.171 lp1p6mma1-en210.2.1.172 lp2p6mma1-en210.2.1.173 lp3p6mma1-en210.2.1.174 lp4p6mma1-en2# 570 210.2.1.180 viop6mma2-en210.2.1.181 lp1p6mma2-en210.2.1.182 lp2p6mma2-en210.2.1.183 lp3p6mma2-en210.2.1.184 lp4p6mma2-en2######## dlpar VLAN ################ 550 110.1.1.50 viop65501-en110.1.1.51 lp1p65501-en110.1.1.52 lp2p65501-en110.1.1.53 lp3p65501-en110.1.1.54 lp4p65501-en110.1.1.55 lp5p65501-en1# 550 210.1.1.90 viop65502-en110.1.1.91 lp1p65502-en110.1.1.92 lp2p65502-en110.1.1.93 lp3p65502-en110.1.1.94 lp4p65502-en1# 570 110.1.1.170 viop6mma1-en110.1.1.171 lp1p6mma1-en110.1.1.172 lp2p6mma1-en1
Chapter 5. Installing xCAT 2 on a new cluster 181

10.1.1.173 lp3p6mma1-en110.1.1.174 lp4p6mma1-en1# 570 210.1.1.180 viop6mma2-en110.1.1.181 lp1p6mma2-en110.1.1.182 lp2p6mma2-en110.1.1.183 lp3p6mma2-en110.1.1.184 lp4p6mma2-en1
It can be seen from Example 5-32 that we chose a simple naming scheme for the cluster nodes. We recommend that you choose a convention that is simple and scalable, such as with a number incrementing. Our naming convention is basically broken down as follows:
� lp = lpar
� 1 = lpar no.
� p6 = processor
� mma or 550 = machine type
� 1 = managed system number
Syslog setupxCAT will automatically set up syslog on the management node and the cluster nodes when they are deployed (installed or booted). When syslog is set up on the nodes it will be configured to forward the logs to the management node.
If you do not wish to have syslog set up on the nodes you must remove the syslog script from the xcatdefaults entry in the xCAT postscripts table. You can change the xcatdefaults setting with the xCAT chtab or tabedit commands.
xCAT adds the following line to the /etc/syslog.conf file and starts the syslogd daemon as shown in Example 5-33.
Example 5-33 Entry in /etc/syslog.conf on the management node
*.debug /var/log/messages rotate 1024K files 5
On the cluster nodes, the contents of the /etc/syslog.conf file are shown in Example 5-34.
Example 5-34 /etc/syslog on a cluster node
# xCAT settings*.debug @192.168.100.34
182 Configuring and Managing AIX Clusters Using xCAT 2

Setting root password for cluster nodes2
We decided not to do this optional step. However, xCAT can create an initial passwd for the root userid when the nodes are deployed.
We installed the nodes without the root passwd being set. After the nodes had been deployed we used the xdsh command to set the root passwd on the nodes, as shown in Example 5-35.
Example 5-35 Changing the root password on group aixnodes
mgtnode # xdsh aixnodes ‘echo “root:itsoadmin” | chpasswd -c’
Configuring NTPIt is very desirable in a cluster to keep the time on the nodes in sync. To enable the Network Time Protocol (NTP) services, we decided to use the management node as the time server. Time synchronization is highly recommended for system logging (problem determination) and for running jobs.
We then updated the ntpservers attribute in the site table so that NTP on the nodes will be configured to use the management node as their server. The chdef command sets this attribute in the sites table, as shown in Example 5-36.
Example 5-36 Setting the ntpservers attribute in the site table
mgtnode # chdef -t site ntpservers=mgtnodeSetting the name of the site definition to 'clustersite'.Object definitions have been created or modified.mgtnode #
To set up NTP on the management node we modified the /etc/ntp.conf file so that the management node becomes a time server. The file is shown in Example 5-37.
Example 5-37 Contents of management node /etc/ntp.conf
mgtnode # cat /etc/ntp.confserver 127.127.1.0fudge 127.127.1.0 stratum 2driftfile /etc/ntp.drift
Note: In testing this procedure, we discovered that the syslog postscript will completely replace the /etc/syslog.conf file. If customizations were made to this file, they will be lost.
2 This is an optional step
Chapter 5. Installing xCAT 2 on a new cluster 183

tracefile /etc/ntp.trace
The xntpd subsystem can then be started with the startsrc -s xntpd command.The line in the /etc/rc.tcpip file that starts the xntpd subsystem needs to be uncommented to ensure that the xnptd subsystem is started every time AIX is booted on the management node.
Change file limit for rootThe default file size limit in AIX for the root userid is set to 1 GB. Some of the AIX/NIM resources being used and created can be very large. We changed the default file size limit for the root user to be unlimited.
We recommend that the file size limit be chosen appropriately. Unlimited may be undesirable in a production environment, but in our test environment it was OK. To change the file limit size, the chuser command was used:
mgtnode # chuser fsize=-1 root
Check policy definitionsWhen the xCAT software was installed it created several policy definitions. These policies can be listed with the lsdef -t policy -l command. The output from this command is shown in Example 5-38.
Example 5-38 Output of the lsdef -t policy -l command
mgtnode #lsdef -t policy -l
Object name: 4.5 commands=getcredentials rule=allow
Object name: 1 name=root rule=allow
Object name: 1.2 name=mgtnode rule=allow
Object name: 4.4 commands=getpostscript rule=allowmgtnode #
184 Configuring and Managing AIX Clusters Using xCAT 2
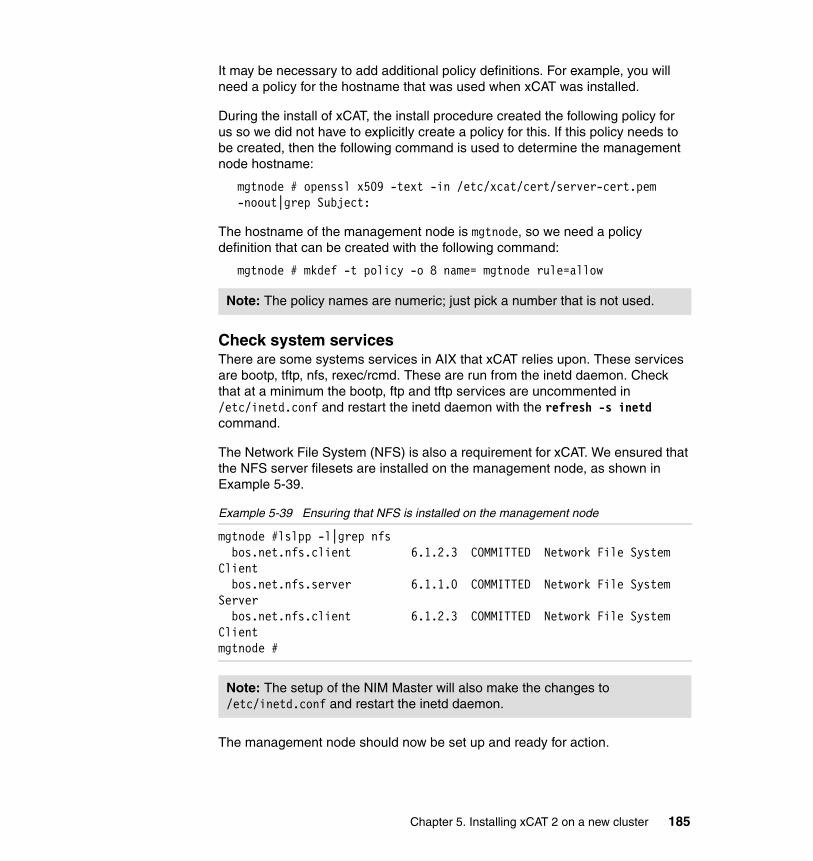
It may be necessary to add additional policy definitions. For example, you will need a policy for the hostname that was used when xCAT was installed.
During the install of xCAT, the install procedure created the following policy for us so we did not have to explicitly create a policy for this. If this policy needs to be created, then the following command is used to determine the management node hostname:
mgtnode # openssl x509 -text -in /etc/xcat/cert/server-cert.pem -noout|grep Subject:
The hostname of the management node is mgtnode, so we need a policy definition that can be created with the following command:
mgtnode # mkdef -t policy -o 8 name= mgtnode rule=allow
Check system servicesThere are some systems services in AIX that xCAT relies upon. These services are bootp, tftp, nfs, rexec/rcmd. These are run from the inetd daemon. Check that at a minimum the bootp, ftp and tftp services are uncommented in /etc/inetd.conf and restart the inetd daemon with the refresh -s inetd command.
The Network File System (NFS) is also a requirement for xCAT. We ensured that the NFS server filesets are installed on the management node, as shown in Example 5-39.
Example 5-39 Ensuring that NFS is installed on the management node
mgtnode #lslpp -l|grep nfs bos.net.nfs.client 6.1.2.3 COMMITTED Network File System Client bos.net.nfs.server 6.1.1.0 COMMITTED Network File System Server bos.net.nfs.client 6.1.2.3 COMMITTED Network File System Clientmgtnode #
The management node should now be set up and ready for action.
Note: The policy names are numeric; just pick a number that is not used.
Note: The setup of the NIM Master will also make the changes to /etc/inetd.conf and restart the inetd daemon.
Chapter 5. Installing xCAT 2 on a new cluster 185

5.2.4 Creation of LPARs and nodes
xCAT can assist with the creation of LPARs on our managed systems. Managed systems is the term used for machines that are controlled via the Hardware Management Console (HMC). The HMC is responsible for the management of LPARs and managed systems. The HMC will be the hardware control point for our nodes and LPARs, because it is responsible for LPAR creation and management, and for the power control of LPARs and managed systems.
The HMC must be defined to xCAT as a special type of cluster node.
We installed four LPARs on each managed system that we have in our lab. Each LPAR is analogous to an xCAT node, insofar as they are their own independent operating system.
The main commands to manage and deploy LPARs on the managed system are mkvm and chvm. The rscan command is used to discover existing LPARs on the HMCs. We used these commands to define the nodes to xCAT and to create the LPARs on the HMC.
Before we could use the mkvm command to create our LPARs, we had to understand what this command does. It works in two different ways.
� It can be used to duplicate an existing LPAR within the same managed system. When duplicating an existing LPAR, the mkvm command attempts to increment slot IDs by one. Our LPARs were all virtual, in other words they did not have any dedicated adapters and the mkvm command incremented the virtual slot IDs for our virtual Ethernet and SCSI adapters correctly. We recommend that the LPARs be checked for accuracy once they have been created. The mkvm command does not create any virtual resources with the Virtual I/O (VIO) servers so these will need to be created and assigned in the traditional manner. We chose to use this method to create our LPARs.
� The mkvm command can also take the LPAR definitions on one whole managed system and replicate these to another managed system. We did not use this method because the managed systems we were using already had some LPARs defined on them.
Defining the first LPAR and adding it to xCAT databaseBecause the mkvm command needs at least one LPAR on the managed systems to copy, we created the first LPARs to be cloned, lp1p65501 on system 550-1 and lp2p65502 on 550-2, on our managed systems using the traditional way via the HMC Web interface GUI.
186 Configuring and Managing AIX Clusters Using xCAT 2

First we must define the HMC to xCAT. This step must be done before the creation of LPARs via mkvm can be done.
The mkdef command was used to define the HMC to xCAT as shown in Example 5-40. Note that the HMC user and password are passed in this command.
Example 5-40 Creation of the HMC definition to xCAT and display of results
mgtnode #mkdef -t node -o hmc3 groups="all" nodetype=hmc mgt=hmc username=hscroot password=abc1234Object definitions have been created or modified.
mgtnode #mgtnode #lsdef -t node -o hmc3 -l
Object name: hmc3 groups=all mgt=hmc nodetype=hmc password=abc1234 username=hscroot
We can now use the rscan command to check which LPARs are currently defined on our HMC. The rscan command can write the results directly into the xCAT database or it can write the results out to a stanza file. The stanza file is just a temporary file that will be used to feed the mkdef command to populate the xCAT database. Once the database is populated, the stanza file can be deleted. We highly recommend that rscan write out to the stanza file so that it can be checked for any errors. The stanza file is read by the mkdef command to populate the xCAT database with node definitions.
We ran the rscan command with the -z flag and wrote the output to a temporary file:
mgtnode # rscan hmc3 -z > /tmp/mystanzafile
We checked the file for any obvious errors, of which there where none. The content of our stanza file is shown in Example 5-41.
Example 5-41 Contents of the rscan stanza file
mgtnode #vi /tmp/mystanzafile
Note: The lp1p65501 LPAR will be our service node for the 550 machines. lp2p65502 is just an ordinary node.
Chapter 5. Installing xCAT 2 on a new cluster 187
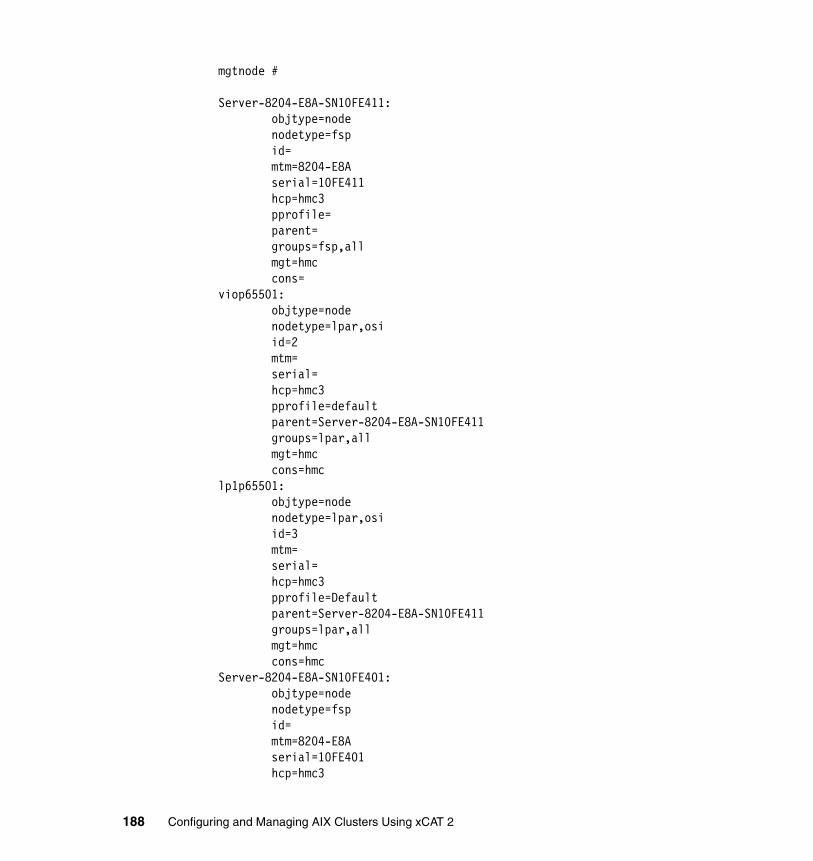
mgtnode #
Server-8204-E8A-SN10FE411: objtype=node nodetype=fsp id= mtm=8204-E8A serial=10FE411 hcp=hmc3 pprofile= parent= groups=fsp,all mgt=hmc cons=viop65501: objtype=node nodetype=lpar,osi id=2 mtm= serial= hcp=hmc3 pprofile=default parent=Server-8204-E8A-SN10FE411 groups=lpar,all mgt=hmc cons=hmclp1p65501: objtype=node nodetype=lpar,osi id=3 mtm= serial= hcp=hmc3 pprofile=Default parent=Server-8204-E8A-SN10FE411 groups=lpar,all mgt=hmc cons=hmcServer-8204-E8A-SN10FE401: objtype=node nodetype=fsp id= mtm=8204-E8A serial=10FE401 hcp=hmc3
188 Configuring and Managing AIX Clusters Using xCAT 2

pprofile= parent= groups=fsp,all mgt=hmc cons=viop65502: objtype=node nodetype=lpar,osi id=2 mtm= serial= hcp=hmc3 pprofile=default parent=Server-8204-E8A-SN10FE401 groups=lpar,all mgt=hmc cons=hmclp1p65502: objtype=node nodetype=lpar,osi id=3 mtm= serial= hcp=hmc3 pprofile=Default parent=Server-8204-E8A-SN10FE401 groups=lpar,all mgt=hmc cons=hmc
The mkdef command was run to add the nodes to the xCAT database. The nodels command was then used to show that the nodes were defined correctly, as shown in Example 5-42.
Example 5-42 Using a stanza file for defining nodes
mgtnode #cat /tmp/mystanzafile |mkdef -zObject definitions have been created or modified.
mgtnode #nodelshmc3
Note: The managed servers themselves are defined as cluster nodes within the xCAT database. They will be the “parents” of the LPARs and must be defined in xCAT and cannot be removed.
Chapter 5. Installing xCAT 2 on a new cluster 189

viop65502lp1p65502Server-8204-E8A-SN10FE411lp1p65501Server-8204-E8A-SN10FE401viop65501mgtnode #
Clone the LPARsIn order to be able to use the mkvm command to create the LPARs on the managed system, the nodes must first be defined into xCAT using the /tmp/stanza file from the initial rscan. We modified this file to include the node definitions of the remaining LPARs as shown by the snippet in Example 5-43.
Example 5-43 Snippet of the modified stanza file
lp2p65501: objtype=node nodetype=lpar,osi mtm= serial= hcp=hmc3 pprofile=Default parent=Server-8204-E8A-SN10FE411 groups=lpar,all mgt=hmc cons=hmclp3p65501: objtype=node nodetype=lpar,osi mtm= serial= hcp=hmc3 pprofile=Default parent=Server-8204-E8A-SN10FE411 groups=lpar,all mgt=hmc cons=hmclp4p65501: objtype=node
Note: In Example 5-42, we left the VIO LPARs and nodes defined to xCAT. These probably do not have to be defined to xCAT because we are not going to manage the VIO servers in this cluster.
190 Configuring and Managing AIX Clusters Using xCAT 2

nodetype=lpar,osi mtm= serial= hcp=hmc3 pprofile=Default parent=Server-8204-E8A-SN10FE411 groups=lpar,all mgt=hmc cons=hmc
The stanza file with all our new node definitions was then fed into the mkdef command and the node definitions were created in the xCAT database. The output is shown in Example 5-44.
Example 5-44 Remaining nodes defined to xCAT
mgtnode #cat /tmp/mystanzafile|mkdef -zObject definitions have been created or modified.
mgtnode #nodelshmc3viop65502Server-8204-E8A-SN10FE411lp1p65501Server-8204-E8A-SN10FE401viop65501lp4p65501lp3p65501lp2p65501mgtnode #
Once the nodes are defined in the xCAT database, the mkvm command can be run to define the LPARs on the HMC, as shown in Example 5-45.
Example 5-45 Execution of the mkevm command
mkvm lp2p65501-lp4p65501 -i 3 -l lp1p65501lp2p65501: Successlp3p65501: Successlp4p65501: Success
Note: We removed the id= line from the stanza file. We allowed the mkvm command to update this field in the xCAT database during LPAR creation.
Chapter 5. Installing xCAT 2 on a new cluster 191

The command in Example 5-45 on page 191 will create LPARs lp2p65501 through lp4p65501 starting at partition ID of 3. The LPARs will be modelled on lp1p65501. They will have the same memory allocations and CPU settings. The virtual adapter slot IDs will be incremented by 1 and the partition ID updated in the xCAT database.
We repeated the previous steps to add hmc4 and the LPARs on the IBM p570 (MMA) systems.
Create groupsNodes can be added to groups. This allows many nodes to be administered with one single reference. We created the following node groups:
aixnodes - all AIX nodes defined here550nodes - all nodes on the 550’smmanode - all nodes on the MMA systems
The node group creation is shown in Example 5-46.
Example 5-46 Creation of node groups
mgtnode # chdef -t node -p -o lp1p65501,lp2p65501,lp3p65501,lp4p65501,lp1p65502,lp2p65502,lp3p65502,lp4p65502 groups=aixnodes
ormgtnode #mkdef -t group -o 550nodes members="lp1p65501,lp2p65501,lp3p65501,lp4p65501,lp1p65502,lp2p65502,lp3p65502,lp4p65502"
mgtnode #nodels 550nodeslp1p65501lp1p65502lp2p65501lp2p65502lp3p65501lp3p65502lp4p65501lp4p65502lp5p65501mgtnode #
In Example 5-46, the chdef command was issued with the -p flag, which instructs the chdef command to create the group if it does not exist. The alternate method is to use the mkdef command to create the group. We used the nodels command with the group name to list the nodes in that group.
192 Configuring and Managing AIX Clusters Using xCAT 2

Checking rpowerOnce the HMC and LPARs are defined successfully into the xCAT database, we can check whether the hardware control point functionality is working.
We executed the rpower command with the stat option, as shown in Example 5-47.
Example 5-47 Checking node power status
mgtnode #rpower 550nodes statlp1p65502: Not Activatedlp4p65502: Not Activatedlp3p65502: Not Activatedlp2p65502: Not Activatedlp3p65501: Not Activatedlp2p65501: Not Activatedlp1p65501: Open Firmwarelp4p65501: Not Activated
Set up the console serverIn order to be able to open remote consoles from the HMC on the management node, the conserver software needs to be configured. We ran the makeconservercf command, which configures the conserver software.
The conserver daemon may need to be started if it is not running. We issued the conserver command. Subsequent starts of the conserver program are run out of /etc/inittab when the management node is booted.
The rcons command is used to open a remote console session. The key stroke combination of Ctrl-ec. (Ctrl key, “ec.”) will close the session, as shown in Example 5-48.
Example 5-48 Closing the console
mgtnode #chdef -t node -o aixnodes cons=hmcObject definitions have been created or modified.mgtnode #makeconservercf
Note: The makeconservercf command must be run after every time a new node is added to the cluster.
Note: For System p nodes managed by an HMC, the cons attribute of the nodes should be set to hmc.
Chapter 5. Installing xCAT 2 on a new cluster 193

mgtnode #conserver&mgtnode #rcons lp1p65501[Enter `^Ec?' for help]
PowerPC Firmware Version EL340_039 SMS 1.7 (c) Copyright IBM Corp. 2000,2008 All rights reserved.---------------------------------------------------------------------- Main Menu 1. Select Language 2. Setup Remote IPL (Initial Program Load) 3. Change SCSI Settings 4. Select Console 5. Select Boot Options
........
----------------------------------------------------------------------- Navigation Keys:
X = eXit System Management Services ---------------------------------------------------------------------- Type menu item number and press Enter or select Navigation key:
5.2.5 Creation of NIM and xCAT install resources
Now that the xCAT “base” is in place, we can start the AIX deployment. The cluster is a hierarchical cluster, with the management node taking care of the mmanodes group and the one service node on the 550-1. This service node will take care of the remaining 550 nodes. See the diagram in Figure 5-2 on page 155.
Set up NIM resourcesThe mknimimage command is used to create an xCAT osimage definition as well as any required NIM resources. When this command is invoked for the first time, it creates and sets up a NIM Master. The mknimimage command will not attempt to reinstall or reconfigure the NIM master if it has already been set up. We could have set up a NIM master manually, but we elected to let xCAT do it for us.
194 Configuring and Managing AIX Clusters Using xCAT 2

By default, mknimage will create the NIM master in the /install file system. This file system had been created in an earlier management node configuration.
The mknimimage command needs for initial setup access to AIX product media. This can be the AIX CDs or an existing lpp_source from another NIM master.
We had access to an existing NIM master (p630n01) and elected to use this as a source for the AIX filesets. The first run of mknimimage is shown in Example 5-49.
Example 5-49 Initial execution of mknimimage
mgtnode #mount p630n01:/nimrepo/LPP_SOURCE/AIX61 /mntmgtnode #cd /mntmgtnode #lsRPMS installp usr
mgtnode #mknimimage -s /mnt 610BaseImageConfiguring NIM.
Creating a NIM lpp_source resource called '610BaseImage_lpp_source'. This could take a while.
Creating a NIM SPOT resource. This could take a while.
The following xCAT osimage definition was created. Use the xCAT lsdef command to view the xCAT definition and the AIX lsnim command to view the individualNIM resources that are included in this definition.
Object name: 610BaseImage bosinst_data=610BaseImage_bosinst_data imagetype=NIM lpp_source=610BaseImage_lpp_source nimmethod=rte nimtype=standalone osname=AIX spot=610BaseImage
mgtnode #lsnimmaster machines masterboot resources bootnim_script resources nim_scriptmaster_net networks ent610BaseImage_bosinst_data resources bosinst_data610BaseImage_lpp_source resources lpp_source610BaseImage resources spot
Chapter 5. Installing xCAT 2 on a new cluster 195

mgtnode #
Obtain MAC addressesThe MAC addresses of the install adapters need to be obtained and added to the xCAT database. These will then be added to the NIM machine definitions in a later step. The getmacs command is issued to obtain the MAC address of the first adapter that the management node can get access to. Be aware that this command will power off and power on any nodes that it is run against. The output of the getmacs command is shown in Example 5-50.
Example 5-50 Execution of the getmacs command
mgtnode #getmacs 550nodes
lp1p65501:# Type Location Code MAC Address Full Path Name Ping Resultent U8204.E8A.10FE411-V3-C11-T1 c21e426a440b /vdevice/l-lan@3000000b virtualent U8204.E8A.10FE411-V3-C12-T1 c21e426a440c /vdevice/l-lan@3000000c virtual
lp4p65501:# Type Location Code MAC Address Full Path Name Ping Resultent U8204.E8A.10FE411-V6-C11-T1 c21e41a6470b /vdevice/l-lan@3000000b virtualent U8204.E8A.10FE411-V6-C12-T1 c21e41a6470c /vdevice/l-lan@3000000c virtual
lp1p65502:# Type Location Code MAC Address Full Path Name Ping Resultent U8204.E8A.10FE401-V2-C11-T1 a2e316f38d0b /vdevice/l-lan@3000000b virtualent U8204.E8A.10FE401-V2-C12-T1 a2e316f38d0c /vdevice/l-lan@3000000c virtual
lp2p65502:# Type Location Code MAC Address Full Path Name Ping Resultent U8204.E8A.10FE401-V3-C11-T1 a2e318cdb00b /vdevice/l-lan@3000000b virtualent U8204.E8A.10FE401-V3-C12-T1 a2e318cdb00c /vdevice/l-lan@3000000c virtual
lp4p65502:
196 Configuring and Managing AIX Clusters Using xCAT 2

# Type Location Code MAC Address Full Path Name Ping Resultent U8204.E8A.10FE401-V5-C11-T1 a2e31ace5b0b /vdevice/l-lan@3000000b virtualent U8204.E8A.10FE401-V5-C12-T1 a2e31ace5b0c /vdevice/l-lan@3000000c virtual
lp2p65501:# Type Location Code MAC Address Full Path Name Ping Resultent U8204.E8A.10FE411-V4-C11-T1 c21e4e94650b /vdevice/l-lan@3000000b virtualent U8204.E8A.10FE411-V4-C12-T1 c21e4e94650c /vdevice/l-lan@3000000c virtual
lp3p65502:# Type Location Code MAC Address Full Path Name Ping Resultent U8204.E8A.10FE401-V4-C11-T1 a2e31abae20b /vdevice/l-lan@3000000b virtualent U8204.E8A.10FE401-V4-C12-T1 a2e31abae20c /vdevice/l-lan@3000000c virtual
lp3p65501:# Type Location Code MAC Address Full Path Name Ping Resultent U8204.E8A.10FE411-V5-C11-T1 c21e49517e0b /vdevice/l-lan@3000000b virtualent U8204.E8A.10FE411-V5-C12-T1 c21e49517e0c /vdevice/l-lan@3000000c virtual
Creation of post-install scriptsBy default, during the installation of xCAT many scripts are placed into the /install/postscripts directory. There is a set of xCAT customization scripts provided in this directory that can be used to perform optional tasks such as additional adapter configurations. We created some post-install scripts and copied and modified some of the supplied scripts to accomplish the following tasks:
� Copy the /etc/hosts file from the management node
� Configure en1 for the DLPAR network
� Configure en2 for the GPFS network
� Set up the NTP daemon to use the management node as a time server
Chapter 5. Installing xCAT 2 on a new cluster 197

xCAT runs some default scripts during node installs that can be listed by looking at the xcatdefaults entry in the xCAT postscripts database table.
In order to get xCAT to run our own scripts during the installs, the postscripts attribute on the node definition needed to be modified. We used the chdef command to achieve this. The script then needs to be put into the /install/postscripts directory and made executable. The postscripts attribute is a comma-separated list of scripts that we want to run. The scripts are executed in order from left to right. The chdef command is shown in Example 5-51.
Example 5-51 Use the chdef command to set postscripts to run
mgtnode# chdef -t node -o lp1p65501 postscripts=gethosts,setupntp,configen1,configen2Object definitions have been created or modified.
5.3 Installing the nodes
This section provides information about installing the service nodes.
5.3.1 Configure and install a service node
The cluster we are installing is a hierarchical one. xCAT uses a service node to assist with the management of clusters. A service node is basically a helper node that off loads work from the management node. It will have its own xcatd daemon using the xCAT database on the management node, as well as its own NIM master. The installation of the service node will set up the NIM master and NIM resources will be copied when the service node is required to install nodes under its care.
Notes:
� The NIM install of AIX will configure en0 and the default gateway.
� The supplied configeth post-install script relies on the hostname to end in -en1 to designate which I/P address should be applied to the en1 adapter. Because this is a sample script, it could be modified (as we did) to configure en2 or en3, and so on.
198 Configuring and Managing AIX Clusters Using xCAT 2

Add a node to the service groupService nodes must belong to the service group. We executed the mkdef command to create the group and add lp1p65501 to it, as shown in Example 5-52.
Example 5-52 Creation and adding node to the service group
mgtnode # mkdef -t group -o service members="lp1p65501"Object definitions have been created or modified.mgtnode #
Update attributes for service nodesAny node that is going to be used as a service node must execute the servicenode postscript as part of its install. We modified the postscript attribute for lp1p65501 to include the servicenode post-install script, as shown in Example 5-53.
Example 5-53 Setting the postscript attribute with chdef
mgtnode # chdef -p -t node -o lp1p65501 postscripts=servicenodemgtnode #
There was only one service node in our cluster to worry about. If we had many we could have set the postscripts attribute on the service group definition. All members of the service group would then execute the servicenode scripts as part of their install.
The setupnameserver attribute must be explicitly set. We elected not to use a DNS server in our cluster, so we set this attribute to no, as shown in Example 5-54.
Example 5-54 Setting the setupnameserver attribute
mgtnode #chdef -t node -o lp1p65501 setupnameserver=no
Update attributes for non-service nodesThe remaining nodes on our 550s will be managed by the service node, lp1p65501. Two attributes need to be added to the node definitions in the xCAT database, the servicenode and xcatmaster attributes. The servicenode attribute
Note: Using the -p means to add these values to the postscript attribute that is already set. If this flag is not used, the postscript attribute is overwritten with the new value specified in the chdef command.
Chapter 5. Installing xCAT 2 on a new cluster 199

is set to the name of the service node as known by the management node, and the xcatmaster attribute is the name of the service node as known by the node. In our case the values for these two attributes were the same. We set them as shown in Example 5-55.
Example 5-55 Setting xcatmaster and servicenode attributes for a node
mgtnode # chdef -t node -o lp2p65501 servicenode=lp1p65501 xcatmaster=lp1p65501
Add required service node software to NIMOur service node required additional software to be installed. We needed to add the xCAT core software and the dependency software to the lpp_source of our osimage. We copied the required files from the /tmp/xcat directory we had untarred earlier into lpp_source by running the nim -o update command, as shown in Example 5-56.
Example 5-56 Running nim -o update to copy xCAT files to lpp_source
mgtnode #nim -o update -a packages=all -a source=/tmp/xcat 610BaseImage_lpp_source
/install/nim/lpp_source/610BaseImage_lpp_source/RPMS/ppc/bash-3.2-1.aix5.2.ppc.rpm/install/nim/lpp_source/610BaseImage_lpp_source/RPMS/ppc/conserver-8.1.16-2.aix5.3.ppc.rpm/install/nim/lpp_source/610BaseImage_lpp_source/RPMS/ppc/expect-5.42.1-3.aix5.1.ppc.rpm/install/nim/lpp_source/610BaseImage_lpp_source/RPMS/ppc/fping-2.4b2_to-1.aix5.3.ppc.rpm/install/nim/lpp_source/610BaseImage_lpp_source/RPMS/ppc/net-snmp-5.4.2.1-1.aix5.3.ppc.rpm/install/nim/lpp_source/610BaseImage_lpp_source/RPMS/ppc/net-snmp-devel-5.4.2.1-1.aix5.3.ppc.rpm/install/nim/lpp_source/610BaseImage_lpp_source/RPMS/ppc/net-snmp-perl-5.4.2.1-1.aix5.3.ppc.rpm/install/nim/lpp_source/610BaseImage_lpp_source/RPMS/ppc/net-snmp-devel-5.4.2.1-1.aix5.3.ppc.rpm/install/nim/lpp_source/610BaseImage_lpp_source/RPMS/ppc/net-snmp-perl-5.4.2.1-1.aix5.3.ppc.rpm/install/nim/lpp_source/610BaseImage_lpp_source/RPMS/ppc/openslp-1.2.1-1.aix5.3.ppc.rpm/install/nim/lpp_source/610BaseImage_lpp_source/RPMS/ppc/perl-Crypt-SSLeay-0.57-1.aix5.3.ppc.rpm
200 Configuring and Managing AIX Clusters Using xCAT 2

/install/nim/lpp_source/610BaseImage_lpp_source/RPMS/ppc/perl-DBD-SQLite-1.13-1.aix5.3.ppc.rpm/install/nim/lpp_source/610BaseImage_lpp_source/RPMS/ppc/perl-DBD-mysql-4.007-1.aix5.3.ppc.rpm/install/nim/lpp_source/610BaseImage_lpp_source/RPMS/ppc/perl-DBI-1.55-1.aix5.3.ppc.rpm/install/nim/lpp_source/610BaseImage_lpp_source/RPMS/ppc/perl-Digest-MD5-2.36-1.aix5.3.ppc.rpm/install/nim/lpp_source/610BaseImage_lpp_source/RPMS/ppc/perl-Expect-1.21-1.aix5.3.ppc.rpm/install/nim/lpp_source/610BaseImage_lpp_source/RPMS/ppc/perl-IO-Socket-SSL-1.06-1.aix5.3.ppc.rpm/install/nim/lpp_source/610BaseImage_lpp_source/RPMS/ppc/perl-IO-Stty-.02-1.aix5.3.ppc.rpm/install/nim/lpp_source/610BaseImage_lpp_source/RPMS/ppc/perl-IO-Tty-1.07-1.aix5.3.ppc.rpm/install/nim/lpp_source/610BaseImage_lpp_source/RPMS/ppc/perl-Net_SSLeay.pm-1.30-1.aix5.3.ppc.rpm/install/nim/lpp_source/610BaseImage_lpp_source/RPMS/ppc/perl-Net-Telnet-3.03-1.2.aix5.3.ppc.rpm/install/nim/lpp_source/610BaseImage_lpp_source/RPMS/ppc/perl-xCAT-2.2.1-snap200904221514.aix5.3.ppc.rpm/install/nim/lpp_source/610BaseImage_lpp_source/RPMS/ppc/tcl-8.4.7-3.aix5.1.ppc.rpm/install/nim/lpp_source/610BaseImage_lpp_source/RPMS/ppc/tk-8.4.7-3.aix5.1.ppc.rpm/install/nim/lpp_source/610BaseImage_lpp_source/RPMS/ppc/xCAT-2.2.1-snap200904221515.aix5.3.ppc.rpm/install/nim/lpp_source/610BaseImage_lpp_source/RPMS/ppc/xCAT-client-2.2.1-snap200904221514.aix5.3.ppc.rpm/install/nim/lpp_source/610BaseImage_lpp_source/RPMS/ppc/xCAT-rmc-2.2.1-snap200904221516.aix5.3.ppc.rpm/install/nim/lpp_source/610BaseImage_lpp_source/RPMS/ppc/xCAT-server-2.2.1-snap200904221515.aix5.3.ppc.rpm/install/nim/lpp_source/610BaseImage_lpp_source/RPMS/ppc/xCATaixSN.bnd/install/nim/lpp_source/610BaseImage_lpp_source/RPMS/ppc/xCATaixSSH.bnd/install/nim/lpp_source/610BaseImage_lpp_source/RPMS/ppc/xCATaixSSL.bnd/install/nim/lpp_source/610BaseImage_lpp_source/RPMS/ppc/xCAT-client-2.2.1-snap200904221514.aix5.3.ppc.rpm/install/nim/lpp_source/610BaseImage_lpp_source/RPMS/ppc/xCAT-rmc-2.2.1-snap200904221516.aix5.3.ppc.rpm/install/nim/lpp_source/610BaseImage_lpp_source/RPMS/ppc/xCAT-server-2.2.1-snap200904221515.aix5.3.ppc.rpm/install/nim/lpp_source/610BaseImage_lpp_source/RPMS/ppc/xcat-mysql-2.2-snap200903191456.tar
Chapter 5. Installing xCAT 2 on a new cluster 201

/install/nim/lpp_source/610BaseImage_lpp_source/RPMS/ppc/xcat-mysql-5.0-1.aix5.3.ppc.rpmmgtnode #
We executed the same procedure for OpenSSL and OpenSSH. We had earlier untarred the openssl and openssh software into /tmp/openssh and executed the nim -o update command, as shown in Example 5-57.
Example 5-57 Copying OpenSSL and OpenSSH to lpp_source
mgtnode #nim -o update -a packages=all -a source=/tmp/openssh 610BaseImage_lpp_source
/install/nim/lpp_source/610BaseImage_lpp_source/installp/ppc/openssl.man.en_US.0.9.8.600.I/install/nim/lpp_source/610BaseImage_lpp_source/installp/ppc/openssl.license.0.9.8.600.I/install/nim/lpp_source/610BaseImage_lpp_source/installp/ppc/openssl.base.0.9.8.600.I/install/nim/lpp_source/610BaseImage_lpp_source/installp/ppc/openssh.msg.EN_US.4.7.0.5300.I/install/nim/lpp_source/610BaseImage_lpp_source/installp/ppc/openssh.man.en_US.4.7.0.5300.I/install/nim/lpp_source/610BaseImage_lpp_source/installp/ppc/openssh.license.4.7.0.5300.I/install/nim/lpp_source/610BaseImage_lpp_source/installp/ppc/openssh.base.4.7.0.5300.I
We needed to do more than copy the software to lpp_source in order for NIM to install it on the nodes. xCAT supplies NIM install bundles to assist with the installation of the software. These bundles are in the /tmp/xcat directory where we originally untarred the xCAT software.
We made a directory /install/nim/installp_bundle and copied the bundle files there. The bundle files end with *.bnd. Once the installp bundles were created in NIM, we updated the osimage’s installp_bundle attribute, as shown in Example 5-58.
Example 5-58 Creating NIM bundles and updating osimage
mgtnode # cd /install/nimmgtnode # mkdir installp_bundlemgtnode #cd installp_bundlemgtnode #cp /tmp/xcat/*bnd .mgtnode #nim -o define -t installp_bundle -a server=master -a location=/install/nim/installp_bundle/xCATaixSN.bnd xCATaixSN
202 Configuring and Managing AIX Clusters Using xCAT 2

mgtnode #nim -o define -t installp_bundle -a server=master -a location=/install/nim/installp_bundle/xCATaixSSH.bnd xCATaixSSHmgtnode #chdef -t osimage -o 610BaseImage installp_bundle="xCATaixSN,xCATaixSSH"Object definitions have been created or modified.
Initialize NIM resources for service nodes We next used the xcat2nim command to create machine and group entries in the NIM master, as shown in Example 5-59.
Example 5-59 Execution of xcat2nim and listing of machine entries in NIM
mgtnode #xcat2nim -t node lp1p65501mgtnode: NIM operations have completed successfully.mgtnode #mgtnode #lsnim -l lp1p65501lp1p65501: class = machines type = standalone connect = shell platform = chrp netboot_kernel = 64 if1 = master_net lp1p65501 c21e426a440b ent cable_type1 = N/A Cstate = ready for a NIM operation prev_state = ready for a NIM operation Mstate = not runningmgtnode #
We next used the nimnodeset command to initialize the AIX standalone nodes. This command utilizes xCAT osimage information and runs the appropriate NIM commands, as shown in Example 5-60.
Example 5-60 Initializing NIM nodes
mgtnode #nimnodeset -i 610BaseImage lp1p65501mgtnode: AIX/NIM nodes were initialized.
Note: In the chdef command in the above example, the xCATaixSN bundle must be specified before the xCATaixSSH bundle.
Chapter 5. Installing xCAT 2 on a new cluster 203

Initiate netbootWe then checked that the lp1p65501 node was indeed ready to be installed. Doing standard NIM checks we verified that the correct NFS exports were in place, that the /etc/bootptab file was correctly configured, and that /tftpboot contained the network boot image and correct *.info files.
Once we were satisfied all was in order, we initiated the boot of the node with the rnetboot command, as shown in Example 5-61.
Example 5-61 netbooting the nodes
mgtnode #rnetboot lp1p65501lp1p65501: Success
Once we got the success message, we could open the remote serial console and observe the install with the rcons command.
We could also observe the progress of the install using the nim -l lp1p65501 command.
Verifying service node deploymentAfter the service node was installed and booted, we checked that all was OK. Some of these checks can include the following:
Ethernet Adapter configured correctly?
Time Zone correct?
Can xdsh from the management node?
Can execute lsdef -a ok from the service node?
Check that xcatd is running.
Check lsnim -l from the management node.
Run lsnim on the service node to see that NIM master is set up.
Run rpm -qa on the service node to see if the xCAT software is installed.
Can ssh ok from the management node to the service node?
5.3.2 Installing diskful nodes from the service node
Once the service node install is successful, deployment can begin of the nodes managed by this service node. Refer back to Figure 5-1 on page 155 to note the
Note: If the rcons command is active before the rnetboot command is initiated, the remote console will be forced into spy mode.
204 Configuring and Managing AIX Clusters Using xCAT 2

nodes in our cluster managed by lp1p65501. The remaining nodes are installed in a very similar manner to how the service node was installed. The main difference is that the servicenode post-install script will not be executed.
Initialize AIX/NIM nodesThe nodes have previously been defined in the xCAT database. This can be checked with the nodels command.
The LPARs for the nodes have been created using the mkvm command and the VIO resources created and assigned to the virtual SCSI adapters of the VIO server and clients.
We decided to use the same osimage as the service node for our compute node installs. This meant that we had to remove the installp_bundle xCATaixSN from the installp_bundle attribute on the osimage and replace it with the xCATaixSSL bundle. This was achieved as shown in Example 5-62.
Example 5-62 Remove xCATaixSN bundle and substitute xCATaixSSL
mgtnode #chdef -m -t osimage -o 610BaseImage installp_bundle=xCATaixSN
mgtnode #chdef -t osimage -o 610BaseImage installp_bundle=xCATaixSSL,xCATaixSSHObject definitions have been created or modified.
mgtnode #lsdef -t osimage -o 610BaseImage -l
Object name: 610BaseImage bosinst_data=610BaseImage_bosinst_data imagetype=NIM installp_bundle=xCATaixSSL,xCATaixSSH lpp_source=610BaseImage_lpp_source nimmethod=rte nimtype=standalone osname=AIX spot=610BaseImagemgtnode #
Note: The VIO resources, such as vdisks and virtual adapters, still have to be manually assigned via IOS commands on the VIO server.
Note: The -m flag (m for minus) on the chdef command in Example 5-62 will remove the attribute specified.
Chapter 5. Installing xCAT 2 on a new cluster 205

We could have created a new osimage for compute nodes and not have had to do this step.
We ran the xcat2nim command to add the remaining 550 nodes to the NIM master on the service node, lp1p65501, not to the NIM master on the management node, as shown in Example 5-63.
Example 5-63 Copying node definition from xCAT database and setting up NIM
mgtnode #xcat2nim -t node lp1p65502-lp4p65502lp1p65501: NIM operations have completed successfully.
We then used the nimnodeset command to prepare NIM on the service node for the install of the remaining nodes, as shown in Example 5-64. This command can take quite a while to run because it needs to copy NIM resources to the service node from the management node and prepare the nodes for network boot on the service node.
Example 5-64 Executing nimnodeset for remaining 550 nodes
gtnode #nimnodeset -i 610BaseImage lp1p65502-lp4p65502Copying NIM resources to the xCAT service nodes. This could take a while.CCopying NIM resources to the xCAT service nodes. This could take a while.Copying NIM resources to the xCAT service nodes. This could take a while.lp1p65501: AIX/NIM nodes were initialized.
Initiate netbootAfter nimnodeset has completed successfully, the nodes can be booted with the rnetboot command. This will power on the LPARs and install AIX. Prior to issuing the rnetboot command, we undertook the same NIM checks on the service node as outlined in “Initialize NIM resources for service nodes” on page 203.
Once we were satisfied that all was in order, we initiated the boot of the node using the rnetboot command, as shown in Example 5-65.
Note: For the first execution of nimnodeset for a new node, the -i <image to install> flag specifying the image to use must be used. For subsequent executions the -i flag does not need to be used, unless you want to specify a different install image.
206 Configuring and Managing AIX Clusters Using xCAT 2
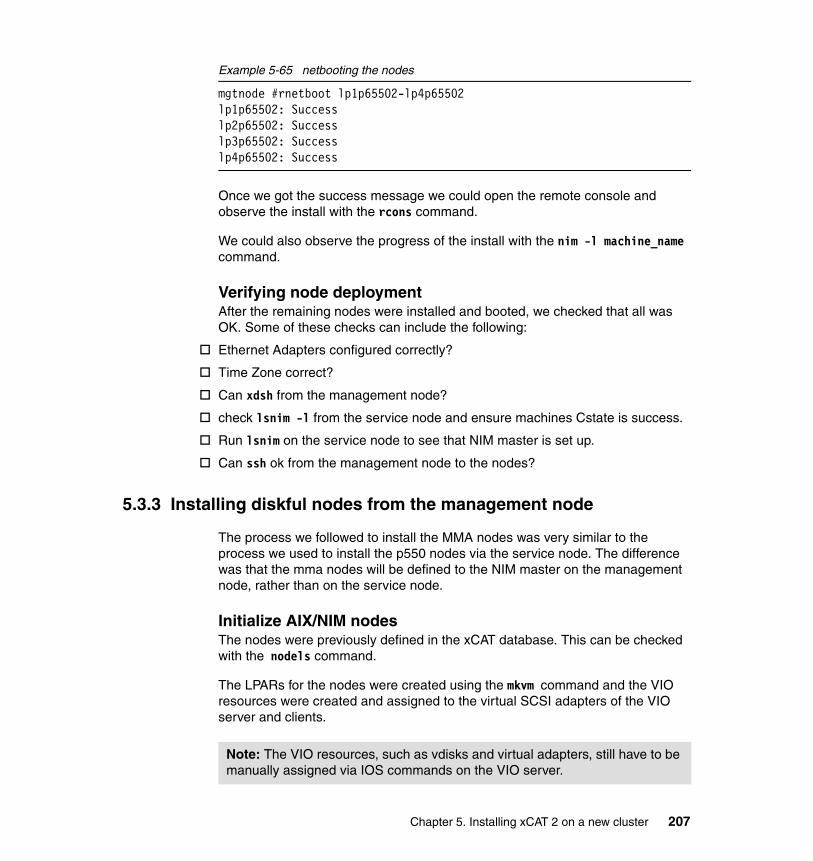
Example 5-65 netbooting the nodes
mgtnode #rnetboot lp1p65502-lp4p65502lp1p65502: Successlp2p65502: Successlp3p65502: Successlp4p65502: Success
Once we got the success message we could open the remote console and observe the install with the rcons command.
We could also observe the progress of the install with the nim -l machine_name command.
Verifying node deploymentAfter the remaining nodes were installed and booted, we checked that all was OK. Some of these checks can include the following:
Ethernet Adapters configured correctly?
Time Zone correct?
Can xdsh from the management node?
check lsnim -l from the service node and ensure machines Cstate is success.
Run lsnim on the service node to see that NIM master is set up.
Can ssh ok from the management node to the nodes?
5.3.3 Installing diskful nodes from the management node
The process we followed to install the MMA nodes was very similar to the process we used to install the p550 nodes via the service node. The difference was that the mma nodes will be defined to the NIM master on the management node, rather than on the service node.
Initialize AIX/NIM nodesThe nodes were previously defined in the xCAT database. This can be checked with the nodels command.
The LPARs for the nodes were created using the mkvm command and the VIO resources were created and assigned to the virtual SCSI adapters of the VIO server and clients.
Note: The VIO resources, such as vdisks and virtual adapters, still have to be manually assigned via IOS commands on the VIO server.
Chapter 5. Installing xCAT 2 on a new cluster 207

We checked the osimage to be used to ensure that the correct software bundles were assigned. These were changed in “Initialize AIX/NIM nodes” on page 205. We used the lsdef command as shown in Example 5-66 to check the osimage attributes.
Example 5-66 Checking osimage attributes
mgtnode #lsdef -t osimage -o 610BaseImage -l
Object name: 610BaseImage bosinst_data=610BaseImage_bosinst_data imagetype=NIM installp_bundle=xCATaixSSL,xCATaixSSH lpp_source=610BaseImage_lpp_source nimmethod=rte nimtype=standalone osname=AIX spot=610BaseImagemgtnode #
We then executed the nimnodeset command against the mmanodes group to prepare NIM on the management node for the install of the remaining nodes, as shown in Example 5-67. This command can take quite a while to run because it needs to copy NIM resources to the service node from the management node and prepare the nodes for network boot on the service node.
Example 5-67 nimnodeset on the remaining mmanodes
mgtnode #nimnodeset mmanodesmgtnode: AIX/NIM nodes were initialized.mgtnode #
Initiate netbootWe then checked that the mmanodes were ready to be installed. Doing standard NIM checks we verified that the correct NFS exports were in place, that the /etc/bootptab file was correctly configured, and that /tftpboot contained the network boot image and correct *.info files.
Once we were satisfied that all was in order, we initiated the boot of the mmanodes group via the rnetboot command, as shown in Example 5-68.
Note: No message is issued about copy NIM resources as was the case in the service node-based install. The execution of nimnodeset is also much faster when installing directly from the management node.
208 Configuring and Managing AIX Clusters Using xCAT 2

Example 5-68 Conditioning nodes to boot
mgtnode #rnetboot mmanodeslp1p65501: Success
Once we got the success message, we could open the remote serial console and observe the install using the rcons command.
Verify node deployment
After the mmanodes were installed and booted, we checked that all was OK. Some of these checks can include the following:
Ethernet Adapters configured correctly?
Time Zone correct?
Can xdsh from the management node?
Check lsnim -l from the service node and ensure that machines Cstate is successful.
Run lsnim on the service node to see that NIM master is set up.
Can ssh from the management node to the nodes?
5.3.4 Installing diskless nodes
The nodes we installed are all disk-based nodes. The disks were provided via the VIO server. xCAT leverages off the ability of NIM to serve diskless nodes.
For this exercise, we created an LPAR that only had virtual Ethernet defined to it. We did not define any virtual SCSI adapters at all. In a diskless node, the root file system and the /usr file system are NFS-mounted from the NIM master. For nodes managed directly from the management node, the NIM master used is the management node. If the node is managed via the service node, the NIM master on the service node is used as the nodes’ NIM master.
For this sample, the LPAR lp5p65501 is created. This LPAR is managed via the service node, lp1p65501.
Creating LPAR and node definitionsThe first diskless LPAR was created manually via the HMC. Once the diskless LPAR is created, the LPAR can be copied using the mkvm command.
For our cluster, we copied a diskful node with the mkvm command and then removed the virtual SCSI adapters manually with the HMC, as shown in Example 5-69.
Chapter 5. Installing xCAT 2 on a new cluster 209

The first step is to add the new LPAR to the /etc/hosts file on the management node and copy the /etc/hosts file to the service nodes. This can be achieved by running the updatenode command against the servicenode and executing the gethosts command that we had added to /install/postscripts.
We then made a copy of an existing LPAR by obtaining its profile using the lsvm command and piping the output to a stanza file. This file can be modified and the new LPAR created. In this exercise, we had to create the LPAR with virtual SCSI adapters because the mkvm command would not allow us to create an LPAR without them. These superfluous virtual SCSI adapters were removed manually with the HMC. We also removed the ID and MAC parameters from the stanza file.
When the stanza file is ready, the node needs to be added to the xCAT database prior to creating the new LPAR. We piped the updated stanza file to the mkdef command and then issued the mkvm command.
Example 5-69 Creation of diskless LPAR with the mkdef and mkvm commands
mgtnode # lsdef -z lp4p65501 > /tmp/file
vi /tmp/file
remove id, mac
update stanza name
mgtnode # cat /tmp/file|mkdef -zmgtnode # mgtnode # lsdef -z lp5p65501# <xCAT data object stanza file>
lp5p65501: objtype=node cons=hmc
Note: The gethosts script is a simple script we wrote to assist in the copy of /etc/hosts during node install. NIM will only set up /etc/hosts with the node’s hostname and that of the NIM master. This script is shown here:
#!/bin/ksh# Copy /etc/hosts from mgt node# Get Master hostname from /etc/xcatinfoMASTER=`cat /etc/xcatinfo|grep XCATSERVER|awk -F "=" '{print $2}'`scp root@$MASTER:/etc/hosts /etc/hosts
210 Configuring and Managing AIX Clusters Using xCAT 2

groups=lpar,all,550nodes,aixnodes hcp=hmc3 mgt=hmc nodetype=lpar,osi os=AIX parent=Server-8204-E8A-SN10FE411 postscripts=gethosts,setupntp,configen1,configen2 pprofile=Default profile=610BaseImage servicenode=lp1p65501 status=booting xcatmaster=lp1p65501mgtnode #
Create the lpar
mgtnode # mkvm lp5p65501 -i 7 -l lp4p65501lp5p65501: Successmgtnode #
Remove the vscsi adapter via HMC(diskless)
Preparing diskless node NIM resourcesA diskless LPAR still needs to obtain its operating system from somewhere. This somewhere is the NIM master. In the case of the new diskless LPAR, lp5p65501, we will use the NIM master to provide the operating system resources the LPAR will need to function. The NIM master being used in this case is the servicenode, lp1p65501.
The NIM master will serve the network boot image, and via NFS, the root file system, the dump, paging, and the /usr files system, also known as the Shared Product Object Tree (SPOT).
The creation of the diskless SPOT was achieved by using the same lpp_source that was used in creating the diskless image. The mknimage command was used to create the diskless image, 610_diskless, as shown in Example 5-70.
Example 5-70 Creation of diskless image with the mkimage command
mgtnode # mknimimage -t diskless -s 610BaseImage_lpp_source 610_disklessCreating a NIM SPOT resource. This could take a while.
Note: Specify the new LPAR ID with the -i flag of the mkvm command. The -i flag tells mkvm which LPAR to use as a model for the new LPAR.
Chapter 5. Installing xCAT 2 on a new cluster 211

The following xCAT osimage definition was created. Use the xCAT lsdef commandto view the xCAT definition and the AIX lsnim command to view the individualNIM resources that are included in this definition.
Object name: 610_diskless dump=610_diskless_dump imagetype=NIM lpp_source=610BaseImage_lpp_source nimtype=diskless osname=AIX paging=610_diskless_paging root=610_diskless_root spot=610_disklessmgtnode #
Installing OpenSSL and OpenSSH to the SPOTAll of the software that will need to run on the diskless node will need to be installed into the SPOT. On a diskful node, for example, OpenSSl and OpenSSH are installed as part of the node install to the local disks that are attached to the LPAR. For a diskless node, this is not possible, so the SPOT needs to be updated with the required software. OpenSSL and OpenSSH are installed to the SPOT using the chcosi command, as shown in Example 5-71. We made sure that OpenSSl was installed first.
Example 5-71 Installing OpenSSL and OpenSSH to the diskless SPOT
mgtnode #chcosi -i -s 610BaseImage_lpp_source -b xCATaixSSL 610_diskless Installing filesets ...
Be sure to check the output from the SPOT installation to verify that all the expected software was successfully installed. You can use the NIM "showlog" operation to view the installation log file for the SPOT.
+---------------------------------------------------------------------+ Pre-installation Verification...+---------------------------------------------------------------------+Verifying selections...doneVerifying requisites...doneResults...
212 Configuring and Managing AIX Clusters Using xCAT 2

SUCCESSES--------- Filesets listed in this section passed pre-installation verification and will be installed.
Selected Filesets ----------------- rpm.rte 3.0.5.42 # RPM Package Manager
<< End of Success Section >>
+---------------------------------------------------------------------+ BUILDDATE Verification ...+---------------------------------------------------------------------+Verifying build dates...doneFILESET STATISTICS------------------ 1 Selected to be installed, of which: 1 Passed pre-installation verification ---- 1 Total to be installed
+---------------------------------------------------------------------+ Installing Software...+---------------------------------------------------------------------+
installp: APPLYING software for: rpm.rte 3.0.5.42
. . . . . << Copyright notice for rpm.rte >> . . . . . . . Licensed Materials - Property of IBM
5765G6200 Copyright International Business Machines Corp. 2000, 2007. Copyright Regents of the University of California 1990, 1993, 1994, 1995. Copyright Jean-loup Gailly and Mark Adler, 1995 - 1998. Copyright The President and Fellows of Harvard University 1995, 1996. Copyright Julian R Seward, 1996 - 2000 Copyright Sleepycat Software, 1990 - 2000
All rights reserved. US Government Users Restricted Rights - Use, duplication or disclosure restricted by GSA ADP Schedule Contract with IBM Corp.. . . . . << End of copyright notice for rpm.rte >>. . . .
Chapter 5. Installing xCAT 2 on a new cluster 213

Please wait...failed to stat /usr/local: No such file or directory
Finished processing all filesets. (Total time: 11 secs).
+---------------------------------------------------------------------+ Summaries:+---------------------------------------------------------------------+
Installation Summary--------------------Name Level Part Event Result----------------------------------------------------------------------rpm.rte 3.0.5.42 USR APPLY SUCCESSrpm.rte 3.0.5.42 ROOT APPLY SUCCESS
Validating RPM package selections ...
Please wait...failed to stat /usr/local: No such file or directory
perl-IO-Socket-SSL ##################################################perl-Net_SSLeay.pm ##################################################
+---------------------------------------------------------------------+ RPM Error Summary:+---------------------------------------------------------------------+The following errors during installation occurred:failed to stat /usr/local: No such file or directory
+---------------------------------------------------------------------+ Pre-installation Verification...+---------------------------------------------------------------------+Verifying selections...doneVerifying requisites...doneResults...
SUCCESSES--------- Filesets listed in this section passed pre-installation verification and will be installed.
Selected Filesets ----------------- openssl.base 0.9.8.803 # Open Secure Socket Layer openssl.license 0.9.8.803 # Open Secure Socket License
214 Configuring and Managing AIX Clusters Using xCAT 2

<< End of Success Section >>
+---------------------------------------------------------------------+ BUILDDATE Verification ...+---------------------------------------------------------------------+Verifying build dates...doneFILESET STATISTICS------------------ 2 Selected to be installed, of which: 2 Passed pre-installation verification ---- 2 Total to be installed
+---------------------------------------------------------------------+ Installing Software...+---------------------------------------------------------------------+
installp: APPLYING software for: openssl.license 0.9.8.803
. . . . . << Copyright notice for openssl.license >> . . . . . . . Licensed Materials - Property of IBM
5765G0381 Copyright International Business Machines Corp. 2007, 2008.
All rights reserved. US Government Users Restricted Rights - Use, duplication or disclosure restricted by GSA ADP Schedule Contract with IBM Corp.. . . . . << End of copyright notice for openssl.license >>. . . .
Filesets processed: 1 of 2 (Total time: 0 secs).
installp: APPLYING software for: openssl.base 0.9.8.803
. . . . . << Copyright notice for openssl.base >> . . . . . . . Licensed Materials - Property of IBM
5765G0381 Copyright International Business Machines Corp. 2007, 2009. Copyright Baltimore Technologies Ltd. 2004.
Chapter 5. Installing xCAT 2 on a new cluster 215

Copyright KISA (Korea Information Security Agency), 2007. Copyright Richard Levitte <[email protected]), 2004. Copyright The OpenSSL Project. 1998-2008 Copyright Sun Microsystems, Inc. 2002.
All rights reserved. US Government Users Restricted Rights - Use, duplication or disclosure restricted by GSA ADP Schedule Contract with IBM Corp.. . . . . << End of copyright notice for openssl.base >>. . . .
Finished processing all filesets. (Total time: 5 secs).
+---------------------------------------------------------------------+ Summaries:+---------------------------------------------------------------------+
Installation Summary--------------------Name Level Part Event Result----------------------------------------------------------------------openssl.license 0.9.8.803 USR APPLY SUCCESSopenssl.base 0.9.8.803 USR APPLY SUCCESSopenssl.base 0.9.8.803 ROOT APPLY SUCCESS
Checking filesets and network boot images for SPOT "610_diskless". This may take several minutes ...
mgtnode #mgtnode #chcosi -i -s 610BaseImage_lpp_source -b xCATaixSSH 610_diskless Installing filesets ...
Be sure to check the output from the SPOT installation to verify that all the expected software was successfully installed. You can use the NIM "showlog" operation to view the installation log file for the SPOT.
+---------------------------------------------------------------------+ Pre-installation Verification...+---------------------------------------------------------------------+Verifying selections...doneVerifying requisites...doneResults...
SUCCESSES
216 Configuring and Managing AIX Clusters Using xCAT 2

--------- Filesets listed in this section passed pre-installation verification and will be installed.
Selected Filesets ----------------- openssh.base.client 5.0.0.5301 # Open Secure Shell Commands openssh.base.server 5.0.0.5301 # Open Secure Shell Server openssh.license 5.0.0.5301 # Open Secure Shell License openssh.man.en_US 5.0.0.5301 # Open Secure Shell Documentat... openssh.msg.EN_US 5.0.0.5301 # Open Secure Shell Messages -... openssh.msg.en_US 5.0.0.5301 # Open Secure Shell Messages -...
<< End of Success Section >>
+---------------------------------------------------------------------+ BUILDDATE Verification ...+---------------------------------------------------------------------+Verifying build dates...doneFILESET STATISTICS------------------ 6 Selected to be installed, of which: 6 Passed pre-installation verification ---- 6 Total to be installed
+---------------------------------------------------------------------+ Installing Software...+---------------------------------------------------------------------+
installp: APPLYING software for: openssh.license 5.0.0.5301
. . . . . << Copyright notice for openssh.license >> . . . . . . . Licensed Materials - Property of IBM
5765E6111 Copyright International Business Machines Corp. 2001, 2008.
All rights reserved. US Government Users Restricted Rights - Use, duplication or disclosure restricted by GSA ADP Schedule Contract with IBM Corp.. . . . . << End of copyright notice for openssh.license >>. . . .
Chapter 5. Installing xCAT 2 on a new cluster 217

Filesets processed: 1 of 6 (Total time: 0 secs).
installp: APPLYING software for: openssh.base.client 5.0.0.5301 openssh.base.server 5.0.0.5301
. . . . . << Copyright notice for openssh.base >> . . . . . . . Licensed Materials - Property of IBM
5765E6111 Copyright International Business Machines Corp. 2001, 2009. Copyright Per Allansson, 2001. Copyright Gary S. Brown, 1986. Copyright The Regents of the University of California, 1983, 1990, 1992, 1993, 1995. Copyright Aaron Campbell. 1999 Copyright CORE SDI S.A., Buenos Aires, Argentina. 1998 Copyright Gert Doering, 2001. Copyright Jason Downs, 1996. Copyright Markus Friedl. 1999, 2000, 2001, 2002 Copyright Free Software Foundation, Inc., 1992, 1993, 1994, 1995, 1996, 1997, 1998, 1999, 2000, 2001, 2002. Copyright Dr Brian Gladman <[email protected]>, Worcester, UK, 2001 Copyright Wesley Griffin, 2003. Copyright Daniel Kouril, 2002. Copyright Ben Lindstrom, 2000, 2001, 2003. Copyright Andre Lucas, 2000. Copyright David Mazieres <[email protected]> 1995, 1996 Copyright Damien Miller. 1999-2003 Copyright Massachusetts Institute of Technology, 1987 - 2001. Copyright Nils Nordman, 2002. Copyright The OpenBSD project, 2004. Copyright Niels Provos. 1995 Copyright Theo de Raadt. 1999 Copyright Tim Rice, 2002. Copyright Jakob Schlyter, 2003. Copyright Dug Song. 1995 Copyright Kevin Steves. 1995 Copyright Peter Stuge <[email protected]>, 2003 Copyright Todd C. Miller, 1998. Copyright Darren Tucker 2004. Copyright Simon Wilkinson, 2001, 2003. Copyright Tatu Ylonen <[email protected]>, Espoo, Finland, 1995
218 Configuring and Managing AIX Clusters Using xCAT 2

All rights reserved. US Government Users Restricted Rights - Use, duplication or disclosure restricted by GSA ADP Schedule Contract with IBM Corp.. . . . . << End of copyright notice for openssh.base >>. . . .
Successfully updated the Kernel Authorization Table.Successfully updated the Kernel Role Table.Successfully updated the Kernel Command Table.Successfully updated the Kernel Device Table.0513-071 The sshd Subsystem has been added.Filesets processed: 3 of 6 (Total time: 14 secs).
installp: APPLYING software for: openssh.msg.en_US 5.0.0.5301
. . . . . << Copyright notice for openssh.msg.en_US >> . . . . . . . Licensed Materials - Property of IBM
5765E6111 Copyright International Business Machines Corp. 2001, 2008.
All rights reserved. US Government Users Restricted Rights - Use, duplication or disclosure restricted by GSA ADP Schedule Contract with IBM Corp.. . . . . << End of copyright notice for openssh.msg.en_US >>. . . .
Filesets processed: 4 of 6 (Total time: 14 secs).
installp: APPLYING software for: openssh.msg.EN_US 5.0.0.5301
. . . . . << Copyright notice for openssh.msg.EN_US >> . . . . . . . Licensed Materials - Property of IBM
5765E6111 Copyright International Business Machines Corp. 2001, 2008.
All rights reserved. US Government Users Restricted Rights - Use, duplication or disclosure restricted by GSA ADP Schedule Contract with IBM Corp.. . . . . << End of copyright notice for openssh.msg.EN_US >>. . . .
Filesets processed: 5 of 6 (Total time: 15 secs).
Chapter 5. Installing xCAT 2 on a new cluster 219

installp: APPLYING software for: openssh.man.en_US 5.0.0.5301
. . . . . << Copyright notice for openssh.man.en_US >> . . . . . . . Licensed Materials - Property of IBM
5765E6111 Copyright International Business Machines Corp. 2001, 2008. Copyright Aaron Campbell. 1999 Copyright Markus Friedl. 1999, 2000, 2001, 2002 Copyright David Mazieres <[email protected]> 1995, 1996 Copyright Damien Miller. 2001, 2002 Copyright Theo de Raadt. 1999 Copyright Tatu Ylonen <[email protected]>, Espoo, Finland, 1995
All rights reserved. US Government Users Restricted Rights - Use, duplication or disclosure restricted by GSA ADP Schedule Contract with IBM Corp.. . . . . << End of copyright notice for openssh.man.en_US >>. . . .
Finished processing all filesets. (Total time: 16 secs).
+---------------------------------------------------------------------+ Summaries:+---------------------------------------------------------------------+
Installation Summary--------------------Name Level Part Event Result-----------------------------------------------------------------------openssh.license 5.0.0.5301 USR APPLY SUCCESSopenssh.base.client 5.0.0.5301 USR APPLY SUCCESSopenssh.base.server 5.0.0.5301 USR APPLY SUCCESSopenssh.base.client 5.0.0.5301 ROOT APPLY SUCCESSopenssh.base.server 5.0.0.5301 ROOT APPLY SUCCESSopenssh.msg.en_US 5.0.0.5301 USR APPLY SUCCESSopenssh.msg.EN_US 5.0.0.5301 USR APPLY SUCCESSopenssh.man.en_US 5.0.0.5301 USR APPLY SUCCESS
Checking filesets and network boot images for SPOT "610_diskless". This may take several minutes ...
220 Configuring and Managing AIX Clusters Using xCAT 2

mgtnode #
Apply AIX maintenance to SPOTBecause the diskless SPOT was created using base AIX 6.1 lpp_source, the latest AIX TL level and Service Pack were applied using standard NIM procedures.
Run mkconservercf to refresh the console serverAfter every addition of a new node to xCAT, the mkconservercf command must be run to refresh the console server.
Obtain the boot network adapter MAC addressThe MAC address of the LPAR’s boot address is required. The getmacs command is run to obtain this information, as shown in Example 5-72.
Example 5-72 Obtaining the MAC address of the diskless LPAR
mgtnode #getmacs lp5p65501lp5p65501:# Type Location Code MAC Address Full Path Name Ping Resultent U8204.E8A.10FE411-V7-C11-T1 c21e4f91050b /vdevice/l-lan@3000000b virtualent U8204.E8A.10FE411-V7-C12-T1 c21e4f91050c /vdevice/l-lan@3000000c virtualent U8204.E8A.10FE411-V7-C13-T1 c21e4f91050d /vdevice/l-lan@3000000d virtual
Verifying the xCAT database entryThe entry for the new LPAR must be verified for accuracy. Of importance are the postscripts, which are executed every time the diskless LPAR node is booted. The items to check are:
� The MAC address
� Postscripts to be executed
� That the servicenode and xcatmaster settings are correct (in the case of nodes being managed via a servicenode)
Note: The same bundle files that were used for the diskfull image installation were used for the installation of the OpenSSL and OpenSSH software to the diskless image.
Chapter 5. Installing xCAT 2 on a new cluster 221

The entry for lp5p65501 is shown in Example 5-73.
Example 5-73 lsdef of the diskless node/LPAR
mgtnode #lsdef -t node -o lp5p65501 -l
Object name: lp5p65501 cons=hmc groups=aixnodes,lpar,all,550nodes hcp=hmc3 id=7 mac=c21e4f91050b mgt=hmc nodetype=lpar,osi os=AIX parent=Server-8204-E8A-SN10FE411 postscripts=gethosts,setupntp,configen1,configen2 pprofile=Default profile=610BaseImage servicenode=lp1p65501 status=booting xcatmaster=lp1p65501mgtnode #
Initializing NIM resourcesThe NIM resources needed to run the diskless LPAR must be initialized on the NIM master. In the case of the service nodes, the NIM resources must be copied and initialized on the service node NIM master. This is achieved with the mkdsklsnode command, as shown in Example 5-74.
Example 5-74 Execution of the mkdsklsnode command
mgtnode #mkdsklsnode -i 610_diskless lp5p65501Copying NIM resources to the xCAT service nodes. This could take a while.Creating a SPOT resource on lp1p65501. This could take a while.
lp1p65501: Initializing NIM machine 'lp5p65501'. This could take a while. Wed May 6 09:10:17 EDT 2009
lp1p65501: AIX/NIM diskless nodes were initialized.
mgtnode #
222 Configuring and Managing AIX Clusters Using xCAT 2

Verifying that the LPAR has been initialized correctlyThere are some checks that can be done to verify that the LPAR is ready to be booted off of the NIM master. Items to check include:
� The /etc/bootptab file is correctly set up.
� NFS file systems are correctly exported.
� NIM shows that the diskless boot is enabled.
These checks are shown in Example 5-75.
Example 5-75 Verify that the LPAR is ready to boot
mgtnode # cat /etc/bootptab; lp5p65501:bf=/tftpboot/lp5p65501:ip=192.168.100.55:ht=ethernet:ha=c21e4f91050b:sa=192.168.100.51:sm=255.255.255.0:
mgtnode # lsnim -l lp5p65501
lp5p65501: class = machines type = diskless platform = chrp netboot_kernel = mp if1 = master_net lp5p65501 c21e4f91050b cable_type1 = N/A Cstate = diskless or dataless boot is enabled prev_state = diskless resources are being initialized Mstate = not running boot = boot dump = 610_diskless_dump paging = 610_diskless_paging root = 610_diskless_root spot = 610_diskless control = master Cstate_result = success
mgtnode # exportfs
/install/postscripts -sec=sys:krb5p:krb5i:krb5:dh,ro/install/nim/spot/610_diskless/usr -ro,root=lp5p65501,access=lp5p65501
Note: The -i flag of the mkdsklsnode command sets which osimage to use.
Chapter 5. Installing xCAT 2 on a new cluster 223

/install/nim/root/610_diskless_root/lp5p65501 -root=lp5p65501,access=lp5p65501/install/nim/dump/610_diskless_dump/lp5p65501-root=lp5p65501,access=lp5p65501/install/nim/paging/610_diskless_paging/lp5p65501 -root=lp5p65501,access=lp5p6550
Open the console and initialize network bootOnce we were satisfied all was in order, we initiated the boot of the node via the rnetboot command.
Once we got the success message, we could open the remote serial console and observe the install using the rcons command. The LPAR should proceed to boot the network boot image, execute the postscripts, and the login prompt should be presented. Some checks can be done to ensure that the node has configured correctly.
Ethernet Adapters configured correctly?
Time Zone correct?
Can xdsh from the management node?
Check lsnim -l from the service node.
Can ssh ok from the management node to the service node?
Timezone issue encounteredWe encountered an issue with setting the time on our diskless node. While the NTP was set up correctly, the timezone was set incorrectly giving an invalid date, as shown in Example 5-76.
Example 5-76 Timezone issue encountered after initial diskless boot
mgtnode #xdsh 550nodes datelp1p65501: Mon May 18 13:04:25 EDT 2009lp2p65502: Mon May 18 13:04:25 EDT 2009lp4p65502: Mon May 18 13:04:25 EDT 2009lp1p65502: Mon May 18 13:04:26 EDT 2009lp2p65501: Mon May 18 13:04:26 EDT 2009lp3p65501: Mon May 18 13:04:26 EDT 2009lp4p65501: Mon May 18 13:04:26 EDT 2009lp3p65502: Mon May 18 13:04:26 EDT 2009lp5p65501: Mon May 18 17:04:26 America/New York 2009
Note: If the rcons command is active before the rnetboot command is initiated, the remote console will be forced into spy mode.
224 Configuring and Managing AIX Clusters Using xCAT 2

mgtnode #
In order to solve this issue, the following needed to be done.
We saw that the AIX fileset IC4UC.rte was not installed in the SPOT. This file was installed from our 610BaseImage_lppsource NIM resource. After the installation of this file set, the Olson format timezone had changed, but to CDT, not EDT as per the other nodes. This was corrected by modifying the /install/nim/spot/610_diskless/usr/lpp/bos/inst_root/etc/environment file in the SPOT with the correct timezone.
5.4 xCAT 2 with System p blades running AIX
This section presents xCAT deployment on non-HMC-controlled System p hardware.
5.4.1 xCAT on non-HMC-controlled System p hardware
In this section, we look into the install of xCAT2 onto non-HMC controlled System p hardware, and in particular onto System p blades mounted within IBM BladeCenter. In our example for this section we are using one System p blade as our xCAT2 management node, and a second System p blade as our compute node. The process for configuring and installing one or more compute blades is the same, so the use of only one compute blade in our example is not a limiting factor. Our example does not, however, cover the use of JS23 or JS43 Power6 blades or the added complexity of a VIO server.
As part of xCAT’s operation it is necessary for the xCAT management node to be able to control hardware elements of the System p server, allowing the management node to power on or off, receive power, heat information, and most importantly help towards automatic discovery of the elements that make up the cluster. In a normal System p configuration, this connection would be to the HMCs that control the System ps that make up the cluster. However, with the System p blades, no HMCs are utilized, because this function is delegated to the blade center’s own management interface, which unlike the HMC cannot manage logical partitions, but does control hardware functions such as power on/off, heat data and so on. For this reason it is necessary to explain a bit more about the IBM BladeCenter.
An IBM BladeCenter consists of two main functional elements: the blade chassis, with its power, cooling, management, and network switch modules, and a number of blades that make up the servers. Without going over the complete
Chapter 5. Installing xCAT 2 on a new cluster 225

range of different blade centers, a normal blade center chassis may host between one to a maximum of 14 server blades, which in themselves can be a range of different servers, including Intel, AMD, Power, and Cell. For this book we are only interested in Power Blades, and in particular types JS20 and JS21. Detail information on IBM BladeCenter offerings can be found at:
http://www.ibm.com/systems/bladecenter
For practical implementation examples, check also IBM BladeCenter Products and Technology, SG24-7523.
The management element of a blade center consists of at least one management module. Two can be fitted for high availability, and up to four I/O modules. This management module communicates with the outside world via both an http GUI and a command line interface, from which the configuration of the blades and center can be managed.
With regards to xCAT only the Advanced Management Module (AMM) rather than the original Management Module (MM) is supported. The blade center also consists of I/O modules, which are a form of network switch, with each network port of a blade server connected via an internal back plane I/O module. Again, with regard to xCAT, because we need to utilize both the standard network ports fitted to a blade server, the blade center needs to be fitted with two I/O modules, allowing both an xCAT management network, and an application network. The first I/O module also has an added feature of creating a private network LAN which is utilized in creating a Serial Over Lan (SOL) interface to all the blade servers. This is particularly useful with Power Blades because they do not come with any graphics cards, and thus the SOL interface may be the only method to reach a blade that has no network port configured.
This SOL interface is utilized in xCAT to perform a remote console connection to the compute blades, via the command rcons. Due to issues with the way SOL shares a blade’s eth0 network port and interference to the firmware’s bootp process if also configured to use port eth0, it is necessary to set xCAT’s install interface to be network port eth1 on the blades, and eth0 as the application interface. Figure 5-3 on page 227 depicts an xCAT network setup on our Blade Center cluster.
226 Configuring and Managing AIX Clusters Using xCAT 2

Figure 5-3 Blade Center cluster logical diagram
5.4.2 Installing the xCAT packages on the management node
The example used in this section consisted of two System P blades of type JS21 mounted in an IBM BladeCenter. The hostname of the xCAT management node was etsvc04 (10.69.44.182), and of the compute node etsvc03 (10.69.44.182). Only the management network will be configured in our case.
The BladeCenter’s Advanced Management Module has been assigned an IP address of 10.69.44.150, and its I/O modules 10.69.44.151 and 10.69.44.152. Figure 5-4 shows the layout of our example equipment.
Chapter 5. Installing xCAT 2 on a new cluster 227

Figure 5-4 Blade Center internal connectivity diagram
Starting with the xCAT management node already installed with AIX and the OpenSSL packages, the following is an example of the procedure to install and configure the xCAT2 software. This example will also demonstrate using this xCAT management node to perform an AIX install on one or more compute nodes.
Use a Web browser to download the xCAT2 core and dependency packages from the sourceforge download site onto the management node into a temporary storage location such as /tmp. If the AIX for Linux Toolbox set has been installed, you can use the gtar command to unpack the file sets, otherwise use gunzip and then the AIX tar command.
Starting with the xCAT2 dependency packages, unpack the file into the temporary location:
# gtar -zxvf ./dep-aix-*.tar.gz
Then install these packages using the xCAT installer:
# ./instxcat
eth1 eth1eth0eth0
etsvc03 etsvc04
xCATManager
client client clientclient
ApplicationNetwork
Management Network
AdvancedManagementModule I/O
Module1I/OModule2
Internal SOL + App Net
228 Configuring and Managing AIX Clusters Using xCAT 2

Next unpack the xCAT2 core file into the temporary location, and install via its installer:
# gtar -zxvf ./core-aix-2.2.1.tar.gz# ./instxcat
During the install process, the system file /etc/profile will be updated to include the path to the xCAT commands. However, you will need to log out and relog in or execute this file to utilize this change.
To verify the install of the xCAT software and that the xCAT daemon has been started, issue the lsdef command, as shown in Example 5-77.
Example 5-77 Checking site definition
# lsdef -t site -lSetting the name of the site definition to ‘clustersite’.
Object name: clustersiteconsoleondemand=yesdomain=etsvc04installdir=/installmaster=10.69.44.182tftpdir=/tftpbootuseSSHonAIX=noxcatdport=3001xcatiport=3002
This output is the initial information contained in the xCAT “site” table after installing the xCAT packages.
5.4.3 Configuring the xCAT management node
Before continuing with the next stage of the xCAT install process, it is necessary to check that a number of AIX services are running. These services are needed by xCAT to perform a number of its functions. Starting with the inetd service which handles the telnet, ftp, bootp, and tftpd, check that the service is running using the lssrc command, as shown in Example 5-78, in bold. Also check the NFS service.
Example 5-78 Checking services
# lssrc -ls inetdSubsystem Group PID Status inetd tcpip 176392 activeDebug Inactive
Chapter 5. Installing xCAT 2 on a new cluster 229

Signal Purpose SIGALRM Establishes socket connections for failed services SIGHUP Rereads configuration database and reconfigures services SIGCHLD Restarts service in case the service dies abnormallyService Command Arguments Status wsmserver /usr/websm/bin/wsmserver wsmserver -start active xmquery /usr/bin/xmtopas xmtopas -p3 active time internal active daytime internal active time internal active daytime internal active ntalk /usr/sbin/talkd talkd active tftp /usr/sbin/tftpd tftpd -n active bootps /usr/sbin/bootpd bootpd /etc/bootptab active exec /usr/sbin/rexecd rexecd active login /usr/sbin/rlogind rlogind active shell /usr/sbin/rshd rshd active telnet /usr/sbin/telnetd telnetd -a active ftp /usr/sbin/ftpd ftpd active
# lssrc -g nfsSubsystem Group PID Status biod nfs 188436 activenfsd nfs 184460 activerpc.mountd nfs 229492 activerpc.statd nfs 225472 activerpc.lockd nfs 192608 activenfsrgyd nfs inoperativegssd nfs inoperative
xCAT can also be used to configure some of these AIX services. In our example, xCAT is also used to configure the DNS service. For this, add information needed to help set up DNS on the management node to the “site” table.
# chdef -t site domain=aixncc.mycluster.com \ > nameservers=etsvc04.mycluster.com nameservers=10.69.44.182 \ > forwarders=10.137.62.2 Setting the name of the site definition to ‘clustersite’.Object definitions have been created or modified.
Create a resolv.conf file to contain the same domain and nameserver information:
# cat /etc/resolv.confsearch mycluster.comnameserver 192.168.2.182
230 Configuring and Managing AIX Clusters Using xCAT 2

Then run the xCAT command makedns to create the required DNS file /etc/named.conf plus the /var/named directory files. Then start DNS:
# makedns# startsrc -s named
Also, xCAT can be used to configure NTP on the compute nodes. This is achieved by setting the ntpservers attribute in the site table:
# chdef -t site ntpservers=etsvc04Setting the name of the site definition to ‘clustersite’.Object definitions have been created or modified.
During the install of the compute nodes, xCAT can configure the root password. The passwd xCAT table needs to be updated with the required info to perform this operation:
# chtab key=system passwd.username=root passwd.password=password# tabdump passwdkey,username,password,comments,disablesystem,root,password,,
During the install of xCAT, a table called policy was created, which contains a number of initial policy definitions, as shown in Example 5-79.
Example 5-79 Checking the initial policies
# lsdef -t policy -l
Object name: 4.5commands=getcredentialsrule=allow
Object name: 1name=rootrule=allow
Object name: 4.4 commands=getpostscript rule=allow
An additional policy needs to be added to this table, representing the hostname when the openssl code was installed. To determine the required info, run the following command:
# openssl x509 -text -in /etc/xcat/cert/server-cert.pem -noout |\ > grep Subject
Subject: CN=etsvc04
Chapter 5. Installing xCAT 2 on a new cluster 231

Subject Public Key Info:X509v3 Subject Key Identifier:
Then use this information to update the policy table:
# mkdef -t policy -o 8 name=etsvc04 rule=allowObject definitions have been created or modified.
5.4.4 Configuration and discovery of the cluster’s resources
At this point in configuring the xCAT management node, we would start to populate the xCAT tables with the details of switches, service nodes, and finally the compute nodes. This procedure can be done either by entering the data into the tables, or via xCAT’s automated discovery commands. When working with blades for xCAT to perform the automated discovery it needs to first know about the blade center’s Advanced Management Module, often referred to as the AMM, and the blade center’s I/O modules. Once the AMM has been configured in the xCAT tables, it will be utilized by xCAT commands such as rpower, rcons, and rbootseq to perform the hardware control management. Define the AMM as a node and add it to a center management group called grp_amm, using the command:
# nodeadd amm_centre, groups=all,grp_amm
Next, define the management attribute mgt in the nodehm table for all the AMMs in the center management group as type “blade” using the command:
# chdef -t node -o grp_amm mgt=bladeObject definitions have been created or modified.
Then define, in the mp table, the hardware control attribute mpa for the AMM as itself:
# chdef -t node -o amm_centre mpa=amm_centreObject definitions have been created or modified.
On having defined the amm_centre, its IP address needs to be set in the hosts table via the command:
# chdef -t node -o amm_centre ip=10.69.44.150Object definitions have been created or modified.
It is then possible to add this information into the xCAT management node’s /etc/hosts file, as shown in Example 5-80.
Example 5-80 Static name resolution file (/etc/hosts) on xCAT MN
# makehosts# cat /etc/hosts
232 Configuring and Managing AIX Clusters Using xCAT 2

# @(#)47 1.1 src/bos/usr/sbin/netstart/hosts, cmdnet, bos530 7/24/91 10:00:46## /etc/hosts## Internet Address Hostname # Comments
127.0.0.1 loopback localhost # loopback (lo0) # name/address10.69.44.182 etsvc04 etsvc04.mycluster.com # xcat management network# (normally an address like 192.168.100.1192.168.2.182 etsvc04pub # public network xcat servers management network10.69.44.150 amm_centre amm_centre.mycluster.com # blade center Advanced management 10.69.44.151 io1_centre # io module for the blade centre10.69.44.152 io2_centre # io module for the blade centre
Next, enable the SNMP and SSH services for all AMMs in the center management group grp_amm, as shown in Example 5-81.
Example 5-81 Enabling SNMP and SSH on the BladeCenter AMM
# rspconfig grp_amm snmpcfg=enable sshcfg=enableamm_centre: SNMP enable: OKamm_centre: SSH enable: OK# rspconfig grp_amm pd1=redwoperf pd2=redwoperfamm_centre: pd2: redwoperfamm_centre: pd1: redwoperf
The procedure now needs to define to xCAT the networks in the configuration. Update the network table, where net attribute is the network’s address, mask attribute the network mask, gateway attribute the network’s gateway address, and the -o flag defines the xCAT network name assigned to these values. In our example we are using only one network, as shown in Example 5-82.
Example 5-82 Checking the network definition
# mkdef -t network -o xcat_ent1 net=10.69.44.0 mask=255.255.255.0 gateway=10.69.44.1Object definitions have been created or modified.
# tabdump networks#netname,net,mask,mgtifname,gateway,dhcpserver,tftpserver,nameservers,ntpservers,logservers,dynamicrange,nodehostname,comments,disable
Note: Make sure you have the latest firmware for the AMM and blades, otherwise you may experience issues with remote console and power control.
Chapter 5. Installing xCAT 2 on a new cluster 233

“xcat_ent1”,”10.69.44.0”,”255.255.255.0”,,”10.69.44.1”,,,,,,,,,
To finalize the communications with the blade center’s AMM it is necessary to define a user name and password in the xCAT passwd table that already exists on the AMM, using the chtab command, and test using the psh command, as shown in Example 5-83.
Example 5-83 Checking AMM connection
# chtab key=blade passwd.username=USERID passwd.password=PASSW0RD
# /opt/xcat/bin/psh -l USERID grp_amm info -T blade[1]
The output of which is,amm_centre: amm_centre: system> info -T blade[1]amm_centre: amm_centre: Name: JS22Aamm_centre: UUID: 29B8 AFE6 3B46 11D7 8B56 001A 6445 1976 amm_centre: Manufacturer: IBM (LW)amm_centre: Manufacturer ID: 20301amm_centre: Product ID: 137amm_centre: Mach type/model: 4 PPC CPU Blade Server/799861Xamm_centre: Mach serial number: 06127AAamm_centre: Manuf date: 15/08amm_centre: Hardware rev: 0amm_centre: Part no.: 46K6737 amm_centre: FRU no.: 46K6736 amm_centre: FRU serial no.: YL10W810403Uamm_centre: CLEI: Not Availableamm_centre: Unique ID 1: Not Available.....snippet....amm_centre: Unique ID 8: Not Availableamm_centre: MAC Address 1: 00:1A:64:45:19:78 -> 00:1A:64:45:19:79amm_centre: MAC Address 2: Not Available.....snippet....amm_centre: MAC Address 8: Not Availableamm_centre: BIOSamm_centre: Build ID: EA320_046 amm_centre: Rel date: 05/29/08amm_centre: Rev: 0818amm_centre: Blade sys. mgmt. proc.amm_centre: Build ID: BOBT001amm_centre: Rev: 1.10amm_centre: Local Control
234 Configuring and Managing AIX Clusters Using xCAT 2

amm_centre: KVM: Yesamm_centre: Media Tray: Yesamm_centre: Power On Time: 76 days 0 hours 10 min 38 secsamm_centre: Number of Boots: 0amm_centre: Product Name: JS12/JS22 Express Blade Server, 1-2 dual-core IBM POWER6™ CPU(s)amm_centre: amm_centre: *** ssh exited with error code 70
With the blade center AMMs defined, and communications established, it is now possible to utilize xCAT’s automated discovery commands to retrieve information about the number and type of blades installed in the blade centers, managed by the AMMs. In our case the rscan command will investigate all blades managed by the AMMs in the grp_amm group, and this information will be written into the file bld.stanza, as shown in Example 5-84.
Example 5-84 Discovering BladeCenter information
# rscan grp_amm -z >bld.stanza
# cat bld.stanzaBCHBF_TechLab:
objtype=nodenodetype=mmid=0mtm=8852-4XGserial=99B1900mpa=amm_centregroups=mm,allmgt=bladecons=
JS22E:objtype=nodenodetype=bladeid=5mtm=7998-61Xserial=061279Ampa=amm_centregroups=blade,allmgt=bladecons=blade
etsvc04:objtype=nodenodetype=bladeid=6
Chapter 5. Installing xCAT 2 on a new cluster 235

mtm=8842-41Xserial=KK01299mpa=amm_centregroups=blade,allmgt=bladecons=blade
HS20:objtype=nodenodetype=bladeid=7mtm=8678-41Xserial=KBM3191mpa=amm_centregroups=blade,allmgt=bladecons=blade
etsvc03:objtype=nodenodetype=bladeid=10mtm=8844-51Gserial=99A0317mpa=amm_centregroups=blade,allmgt=bladecons=blade
HS20B:objtype=nodenodetype=bladeid=13mtm=8843-E9Userial=KQKAP9Mmpa=amm_centregroups=blade,allmgt=bladecons=blade
To define these blades as nodes to xCAT, run the mkdef command, and check that the blades have been added to the xCAT database, as shown in Example 5-85.
Example 5-85 Adding the nodes and checking
# cat bld.stanza | mkdef -zObject definitions have been created or modified.
236 Configuring and Managing AIX Clusters Using xCAT 2

# lsdef bladeObject name: etsvc04
cons=bladegroups=blade,allid=6mgt=bladempa=amm_centremtm=8842-41Xnodetype=bladeserial=KK01299
Object name: HS20Bcons=bladegroups=blade,allid=13mgt=bladempa=amm_centremtm=8843-E9Unodetype=bladeserial=KQKAP9M
Object name: HS20cons=bladegroups=blade,allid=7mgt=bladempa=amm_centremtm=8678-41Xnodetype=bladeserial=KBM3191
Object name: JS22Econs=bladegroups=blade,allid=5mgt=bladempa=amm_centremtm=7998-61Xnodetype=bladeserial=061279A
Object name: etsvc03cons=bladegroups=blade,allid=10
Chapter 5. Installing xCAT 2 on a new cluster 237

mgt=bladempa=amm_centremtm=8844-51Gnodetype=bladeserial=99A0317
Once the compute blades have been defined into xCAT’s tables, additional information can be added such as their IP address and their addition to subgroups. The following command adds our compute blade etsvc03 into the group grp_blade, and grp_rte:
# chdef -t node -o etsvc03 groups=grp_blade,grp_rte,blade,allObject definitions have been created or modified.
And the next command defines etsvc03’s IP address:
# chdef -t node -o etsvc03 ip=10.69.44.183Object definitions have been created or modified.
To confirm, we have listed the xCAT tables, using the tabdump command, as shown in Example 5-86.
Example 5-86 Checking the contents of the nodelist table
# tabdump nodelist#node,groups,status,appstatus,primarysn,comments,disable“amm_centre”,”all,grp_amm”,,,,,“io1_centre”,”switch”,,,,,“etsvc04”,”blade,all”,,,,,“HS20B”,”blade,all”,,,,,“HS20”,”blade,all”,,,,,“BCHBF_TechLab”,”mm,all”,,,,,“JS22E”,”blade,all”,,,,,“etsvc03”,”grp_blade,grp_rte,blade,all”,,,,,
# tabdump nodehm#node,power,mgt,cons,termserver,termport,conserver,serialport,serialspeed,serialflow,getmac,comments,disable“amm_centre”,,”blade”,,,,,,,,,,“etsvc04”,,”blade”,”blade”,,,,,,,,,“HS20B”,,”blade”,”blade”,,,,,,,,,“HS20”,,”blade”,”blade”,,,,,,,,,“BCHBF_TechLab”,,”blade”,,,,,,,,,,“JS22E”,,”blade”,”blade”,,,,,,,,,“etsvc03”,,”blade”,”blade”,,,,,,,,,
# tabdump hosts
238 Configuring and Managing AIX Clusters Using xCAT 2

node,ip,hostnames,comments,disable“amm_centre”,”10.69.44.150”,,,“etsvc03”,”10.69.44.183”,,,
# tabdump nodegroup#groupname,grouptype,members,wherevals,comments,disable“blade”,”static”,”static”,,,“mm”,”static”,”static”,,,“grp_rte”,”static”,”static”,,,“grp_blade”,”static”,”static”,,,
At this point, run the makehosts command to add these new nodes into the /etc/hosts file on the management server, as shown in Example 5-87.
Example 5-87 Adding the configured nodes to the local IP name resolution file
# makehosts# cat /etc/hosts# @(#)47 1.1 src/bos/usr/sbin/netstart/hosts, cmdnet, bos530 7/24/91 10:00:46## /etc/hosts## Internet Address Hostname # Comments
127.0.0.1 loopback localhost # loopback (lo0) name/address
10.69.44.182 etsvc04 # management network for the moment due to problems
192.168.2.182 etsvc04pub # temp public network xcat servers management network
10.69.44.150 amm_centre amm_centre.mycluster.com 10.69.44.151 io1_centre # io module for the blade centre10.69.44.152 io2_centre # io module for the blade centre10.69.44.183 etsvc03 etsvc03.mycluster.com
Add to the nodehm table that these new nodes are to be hardware-controlled via the blades center’s AMM. The following command performs this for all nodes in the grp_blade group:
# chdef -t node -o grp_blade mgt=blade cons=bladeObject definitions have been created or modified.
The procedure now needs to define which networks will be utilized for the installation and management of these new nodes. This information goes into the noderes table, with the installnic attribute set as the network adapter interface on
Chapter 5. Installing xCAT 2 on a new cluster 239

the node that will be utilized for the installation of the compute node, and the primarynic attribute as the network adapter interface that will be used for xCAT management.
In our example both these interfaces will be set to eth1 with the command:
# chdef -t node -o grp_blade installnic=eth1 primarynic=eth1Object definitions have been created or modified.
To confirm:
# tabdump noderes#node,servicenode,netboot,tftpserver,nfsserver,monserver,nfsdir,installnic,primarynic,cmdinterface,xcatmaster,current_osimage,next_osimage,nimserver,comments,disable“etsvc03”,,,,,,,”eth1”,”eth1”,,,,,,,
For the installation process to work, xCAT needs to know the mac address of the network interfaces that will be used to install the nodes. This information can be entered into the mac table by the user, who has gathered this information or it can be retrieved by xCAT’s discovery tools. In our example we used the discovery tool as shown to get the mac address for all nodes in the grp_blade group:
# getmacs grp_bladeetsvc03: mac.mac set to 00:11:25:C9:19:BB
Confirm that this info has been entered into the mac table, with the command:
# tabdump mac#node,interface,mac,comments,disable“etsvc03”,,”00:11:25:C9:19:BB”,,
Next, configure the console mechanism that is used during node installs with the command:
# makeconservercf
5.4.5 Configuring NIM resources and installing compute nodes
The basic xCAT management configuration has now been completed. The next stage in our example is to get xCAT to configure NIM on the management node. We will not go into detail of this process because it is already covered in other areas of this book. We do, however, list the commands that were run on our xCAT management node, so that you may follow the process. In our example we will be performing an “rte” install method and the AIX install files have been placed into the temporary directory /export/temp.
240 Configuring and Managing AIX Clusters Using xCAT 2

The command to configure NIM and create a group of NIM resources called 537lpp are shown in Example 5-88.
Example 5-88 Creating NIM resources
# mknimimage -V -s /export/temp 537lppConfiguring NIM.Running: ‘nim_master_setup -a mk_resource=no -a device=/export/temp’Running: ‘/usr/sbin/nim -o define -t bosinst_data -a server=master
-a location=/install/nim/bosinst_data/537lpp_bosinst_data 537lpp_bosinst_data 2>&1’
Creating a NIM lpp_source resource called ‘537lpp_lpp_source’. This could take a while.
Creating a NIM SPOT resource. This could take a while.
Running: ‘/usr/sbin/nim -o define -t resolv_conf -a server=master -a location=/install/nim/resolv_conf/537lpp_resolv_conf/resolv.conf 537lpp_resolv_conf 2>&1’The following xCAT osimage definition was created. Use the xCAT lsdef command to view the xCAT definition and the AIX lsnim command to view the individual NIM resources that are included in this definition.
Object name: 537lppbosinst_data=537lpp_bosinst_dataimagetype=NIMlpp_source=537lpp_lpp_sourcenimmethod=rtenimtype=standaloneosname=AIXresolv_conf=537lpp_resolv_confspot=537lpp
Create the NIM client definitions that align with the nodes in the grp_rte group, in our example node etsvc03, as shown in Example 5-89.
Example 5-89 Creating NIM client definitions
# xcat2nim -t node grp_rteetsvc04: NIM operations have completed successfully.
# lsnimmaster machines masterboot resources bootnim_script resources nim_scriptmaster_net networks ent537lpp_bosinst_data resources bosinst_data537lpp_lpp_source resources lpp_source537lpp resources spot
Chapter 5. Installing xCAT 2 on a new cluster 241

537lpp_resolv_conf resources resolv_confetsvc03 machines standalone
# lsnim -l etsvc03etsvc03:
class = machines type = standalone connect = shell platform = chrp netboot_kernel = mp if1 = master_net etsvc03 001125C919BB ent cable_type1 = N/A Cstate = ready for a NIM operation prev_state = ready for a NIM operation Mstate = not running
At this time, no NIM resources have yet been allocated to node etsvc03:
# lsnim -c resources etsvc03
Next, allocate the required NIM resources to node etsvc03 to perform an “rte” install, using the nimnodeset command, as shown in Example 5-90.
Example 5-90 Allocating install resources for xCAT nodes
# nimnodeset -V -i 537lpp grp_rte etsvc04: Running- ‘/usr/sbin/nim -o bos_inst -a accept_licenses=”yes” -a source=”rte” -a lpp_source=”537lpp_lpp_source” -a bosinst_data=”537lpp_bosinst_data” -a boot_client=”no” -a resolv_conf=”537lpp_resolv_conf” -a spot=”537lpp” -a script=xcataixscript etsvc03 2>&1’etsvc04: AIX/NIM nodes were initialized.
Using the xCAT command, set the boot sequence of the node to network as its first option:
# rbootseq grp_blade net,hdetsvc03: net,hd0,none,none
Then power on the node with the rpower command:
# rpower grp_blade resetetsvc03: reset
The node etsvc03 will power up and start the AIX install process. The following NFS resources were created and exported from the xCAT management node, as shown in Example 5-91.
242 Configuring and Managing AIX Clusters Using xCAT 2

Example 5-91 Checking exported file systems on the NIM master
# showmount -e etsvc04export list for etsvc04:/install/postscripts (everyone)/install/nim/lpp_source/537lpp_lpp_source etsvc03.mycluster.com/install/nim/bosinst_data/537lpp_bosinst_data etsvc03.mycluster.com/install/nim/resolv_conf/537lpp_resolv_conf/resolv.conf etsvc03.mycluster.com/install/nim/spot/537lpp/usr etsvc03.mycluster.com/install/nim/scripts/xcataixscript etsvc03.mycluster.com/export/nim/scripts/etsvc03.script etsvc03.mycluster.com
Chapter 5. Installing xCAT 2 on a new cluster 243

244 Configuring and Managing AIX Clusters Using xCAT 2

Part 3 Managing
In this part we provide information on some of the most common tasks you may encounter in day to day administration of an xCAT cluster.
Part 3
© Copyright IBM Corp. 2009. All rights reserved. 245

246 Configuring and Managing AIX Clusters Using xCAT 2

Chapter 6. xCAT 2 - advanced administrative topics
This chapter introduces and describes some of the common administrative tasks you may encounter in an xCAT environment, such as:
� Using xCAT 2 to perform additional SW installation tasks� Installing monitoring software in xCAT� Installing additional software using xCAT postscripts� xCAT 2's distributed commands� Using xCAT to upgrade System p firmware� Adding GPFS to a diskless xCAT cluster� PowerVM deployment and management using xCAT� Databases - SQLite and MySQL� Clustering security� Updating xCAT using latest development snaphots� Data to gather for support
6
© Copyright IBM Corp. 2009. All rights reserved. 247

6.1 Using xCAT 2 to perform additional SW installation tasks
Software installations and updates can be done using NIM functionality for software products in AIX bff or RPM package formats.
Other software installations can be managed with postscripts, if the install should be made at install time, or running remote commands from the management node at a later time. The packages to be installed can be placed into a file collection, distributed and installed when necessary. Alternately, you can use an NFS repository, if the files are needed only for the time of install.
For NIM install the lpp_source file has to be updated. This means that the filesets have to be added into the NIM lpp_source resource.
In this section we describe NIM update and install.
6.1.1 Updating OpenSSL and OpenSSH on xCAT nodes
After the update packages with all prerequisites have been downloaded to the xCAT MN (made available via NFS), perform the following steps to update the nodes. If the SW to be updated is part of regular AIX or the cluster functionality depends on it, then the update should be done first on the xCAT MN.
The filesets for the OpenSSH and OpenSSL are already listed in two NIM installp_bundle collections, so we can use these bundles for the NIM customizing of the node.
Step 1: Preparing the NIM lpp_sourceTo preserve the existing lpp_source (for future reference), but allow also installing and updating of nodes with new releases, we need to create a replica of the existing lpp_source that will also hold the updates.
In this example we replicate the existing lpp_source to a new lpp_source for the update. However, to reduce the amount of disk space, we will add hard links to the original install files (lpp_source).
� Collect information about the lpp_source NIM resource, which will be updated as shown in Example 6-1 on page 249.
Note: As a NIM master, the xCAT MN has to be at least the same OS level as the nodes it serves.
248 Configuring and Managing AIX Clusters Using xCAT 2
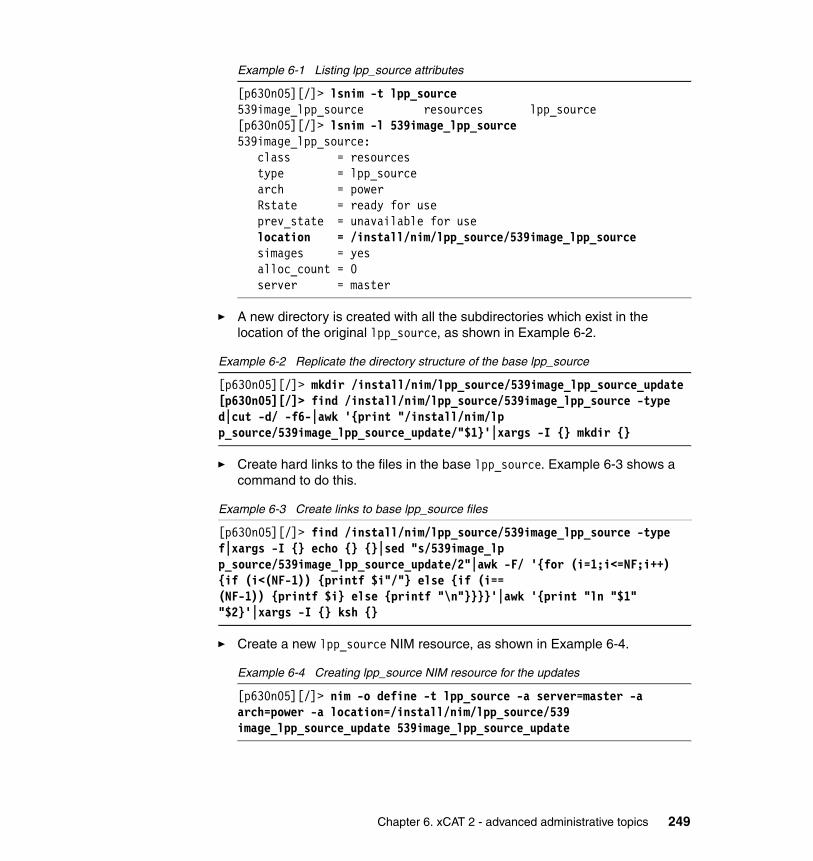
Example 6-1 Listing lpp_source attributes
[p630n05][/]> lsnim -t lpp_source539image_lpp_source resources lpp_source[p630n05][/]> lsnim -l 539image_lpp_source539image_lpp_source: class = resources type = lpp_source arch = power Rstate = ready for use prev_state = unavailable for use location = /install/nim/lpp_source/539image_lpp_source simages = yes alloc_count = 0 server = master
� A new directory is created with all the subdirectories which exist in the location of the original lpp_source, as shown in Example 6-2.
Example 6-2 Replicate the directory structure of the base lpp_source
[p630n05][/]> mkdir /install/nim/lpp_source/539image_lpp_source_update[p630n05][/]> find /install/nim/lpp_source/539image_lpp_source -type d|cut -d/ -f6-|awk '{print "/install/nim/lpp_source/539image_lpp_source_update/"$1}'|xargs -I {} mkdir {}
� Create hard links to the files in the base lpp_source. Example 6-3 shows a command to do this.
Example 6-3 Create links to base lpp_source files
[p630n05][/]> find /install/nim/lpp_source/539image_lpp_source -type f|xargs -I {} echo {} {}|sed "s/539image_lpp_source/539image_lpp_source_update/2"|awk -F/ '{for (i=1;i<=NF;i++) {if (i<(NF-1)) {printf $i"/"} else {if (i==(NF-1)) {printf $i} else {printf "\n"}}}}'|awk '{print "ln "$1" "$2}'|xargs -I {} ksh {}
� Create a new lpp_source NIM resource, as shown in Example 6-4.
Example 6-4 Creating lpp_source NIM resource for the updates
[p630n05][/]> nim -o define -t lpp_source -a server=master -a arch=power -a location=/install/nim/lpp_source/539image_lpp_source_update 539image_lpp_source_update
Chapter 6. xCAT 2 - advanced administrative topics 249

� Update the new lpp_source with the filesets for OpenSSH and OpenSSL, which are placed in the /tmp/csm2xcat/openssh directory. Example 6-5 shows the content of the directory and the command to update an lpp_source. The nim command copies the files into the lpp_source location and updates the .toc file as well.
Example 6-5 Updating the lpp_source
[p630n05][/]> ls -l /tmp/csm2xcat/opensshtotal 26816-rw-r----- 1 root system 4745216 May 13 10:48 openssh.base-rw-r----- 1 root system 181248 May 13 10:48 openssh.license-rw-r----- 1 root system 121856 May 13 10:48 openssh.man.en_US-rw-r----- 1 root system 14336 May 13 10:48 openssh.msg.en_US-rw-r----- 1 root system 6294528 May 13 10:48 openssl.base-rw-r----- 1 root system 28672 May 13 10:48 openssl.license-rw-r----- 1 root system 2331648 May 13 10:48 openssl.man.en_US[p630n05][/]> nim -o update -a source=/tmp/csm2xcat/openssh -a gencopy_flags=X -a packages=ALL 539image_lpp_source_update
/install/nim/lpp_source/539image_lpp_source_update/installp/ppc/openssl.man.en_US.0.9.8.600.I/install/nim/lpp_source/539image_lpp_source_update/installp/ppc/openssl.license.0.9.8.600.I/install/nim/lpp_source/539image_lpp_source_update/installp/ppc/openssl.base.0.9.8.600.I/install/nim/lpp_source/539image_lpp_source_update/installp/ppc/openssh.msg.EN_US.4.7.0.5300.I/install/nim/lpp_source/539image_lpp_source_update/installp/ppc/openssh.man.en_US.4.7.0.5300.I/install/nim/lpp_source/539image_lpp_source_update/installp/ppc/openssh.license.4.7.0.5300.I/install/nim/lpp_source/539image_lpp_source_update/installp/ppc/openssh.base.4.7.0.5300.I
Step 2: Creating a new xCAT NIM image and osimageYou can create a new xCAT osimage from the new lpp_source for future use, as shown in Example 6-6 on page 251. The source is the existing updated lpp_source, and the type should be rte. The command will create an osimage definition as well, based on the nimimage.
250 Configuring and Managing AIX Clusters Using xCAT 2

Example 6-6 Creating xCAT nimimage and osimage
[p630n05][/]> mknimimage -m rte -s 539image_lpp_source_update 539image_updateUsing existing bosinst_data resource named '539image_update_bosinst_data'.
Creating a NIM SPOT resource. This could take a while.
The following xCAT osimage definition was created. Use the xCAT lsdef commandto view the xCAT definition and the AIX lsnim command to view the individualNIM resources that are included in this definition.
Object name: 539image_update bosinst_data=539image_update_bosinst_data imagetype=NIM lpp_source=539image_lpp_source_update nimmethod=rte nimtype=standalone osname=AIX spot=539image_update[p630n05][/]> tabdump osimage#imagename,imagetype,osname,osvers,osdistro,osarch,comments,disable..."539image_update","NIM","AIX",,,,,[p630n05][/]> tabdump nimimage#imagename,nimtype,lpp_source,spot,root,dump,paging,resolv_conf,tmp,home,shared_home,res_group,nimmethod,script,bosinst_data,installp_bundle,mksysb,fb_script,comments,disable..."539image_update","standalone","539image_lpp_source_update","539image_update",,,,,,,,,"rte",,"539image_update_bosinst_data",,,,,[p630n05][/]> lsnim...539image_lpp_source_update resources lpp_source539image_update_bosinst_data resources bosinst_data539image_update resources spot...
Chapter 6. xCAT 2 - advanced administrative topics 251

Step 3: NIM customization to update the SW on the nodesExample 6-7 on page 252 shows the command to run node customization for one of our xCAT nodes. This will install the latest version of the OpenSSL and OpenSSH filesets, which basically means updating those filesets.
Example 6-7 Install updates to the nodes via NIM customization
[p630n05][/]> nimnodecust -s 539image_lpp_source_update -b xCATaixSSL,xCATaixSSH virt-p5501_p6
6.1.2 Installing new software
Installing new software requires the following steps:
1. Download the filesets to a local directory.
2. Update the lpp_source. This step adds the additional filesets to the lpp_source. This is necessary because both the NIM commands and the xCAT nimnodecust command use an lpp_source for the installation.
3. Install the new SW to the target nodes.
– Using basic NIM commands requires two steps:
i. Allocate the lpp_source to the NIM clients.
ii. Run NIM node customization.
– Run the xCAT nimnodecust command to allocate the NIM resources and install the new filesets in one step.
6.1.3 Installing additional software using xCAT postscripts
In this section we look at the process of utilizing xCAT to perform the installation and configuration of additional cluster software. This includes both IBM and non-IBM software such as IBM POE and open source packages like OpenPBS, Torque, and Maui. This demonstrates that xCAT can be a powerful tool for creating a complete operational cluster, with the compute node containing the base operating system, monitoring tools, scheduling software, math libraries, and parallel programming languages.
Note: It is a good practice to install the update only onto a part of the cluster nodes and run required tests before a full deployment. Because we use NIM to update nodes, this may require the creation of additional lpp_sources to keep the production NIM resources unchanged. For details, refer to NIM from A to Z in AIX 5L, SG24-7296.
252 Configuring and Managing AIX Clusters Using xCAT 2

There are within xCAT a number of methods for tailoring the install of the compute nodes.
One simple method utilized in Linux is to alter the install kickstart file, found in xCAT’s /opt/xcat/install/{OS } directories. Then define this file as a profile attribute to an xCAT install command such as rinstall.
With AIX we can utilize a bosinst_data file to help tailor which IBM software packages are installed during an initial compute node build. However, unlike a Linux kickstart file which can execute additional commands, an AIX bosinst_data file cannot do this. In AIX, NIM functionality overcomes this limitation, allowing the administrator to define additional scripts which NIM will execute “post-first-reboot.”
It is this process that is utilized by xCAT to execute a script during a node software install. The script xcataixscript, found by default in /install/nim/scripts, is executed automatically by NIM on the compute nodes after their first reboot. The function of the script is to allow xCAT to perform what is known in xCAT terms as its postscripts mechanism.
Within xCAT there is a default table called postscripts (/etc/prostscripts.sqlite), which is a comma-separated list of script file names that should be executed on the service or compute nodes after the completion of the basic operating system install. An actual script that matches the name entered into the process table needs to be placed in xCAT’s postscripts directory, which in a default install can be found at /install/postscripts.
A sample listing of default scripts in /install/postscripts is shown in Example 6-8.
Example 6-8 Default xCAT postscripts
#ls /install/postscriptsaddsiteyum enablesysreq remoteshell updateflag.awkaixremoteshell getcredentials.awk resyslog upflagx64.exeallowcred.awk getpostscript.awk serialconsole upflagx86.execa hardeths servicenode uploadbootcert hostkeys setiscsiparms.awk _xcatcode locallibs setupLDAP xcataixpostconfGang locktftpdir.awk setupntp xcataixscriptconfigeth makesshgkh _ssh xcatclientconfigrmcnode mountpost syncclock xcatdsklspostcvs_template.pl nfsmounts syslog xcatdsklspost.aixcvs_template.sh otherpkgs umountpost xcatpostinitenabledebug reboot unlocktftpdir.awk xcatserver
Chapter 6. xCAT 2 - advanced administrative topics 253

A listing of the xCAT’s default postscripts table is shown in Example 6-9.
Example 6-9 The default contents of the postscripts table
# tabdump postscripts#node,postscripts,comments,disable"xcatdefaults","syslog,aixremoteshell",,"service","servicenode",,
As can be seen in Example 6-9, by default the postscripts table contains a default group called xcatdefaults, which for AIX contains two default scripts, syslog, used for setting up the syslog, and aixremoteshell, used to set up a remote shell on the compute nodes. The corresponding scripts can be found in the postscript directory, which also contains a number of additional standard scripts that perform configuration changes to the basic operating system.
Its worth noting that none of these additional scripts will be executed on the compute nodes without a corresponding entry in the postsripts table. In our example we will add setupntp, a script that can be used to configure the NTP daemon on the compute nodes, to use the xCAT management node as their NTP source. Thus we will add setupntp to the xcatdefaults group in the postscripts table:
# chdef -t node -o xcatdefaults \ > > postscripts="syslog,aixremotesh,setupntp”Object definitions have been created or modified.
Installing AIX packages using xCAT postscriptsConsider an additional case, where you need to perform configuration only on one or a subset of all the compute nodes. By adding either a new group or node to the postscripts table, it is possible to perform additional configuration above that set on the xCATS default list.
In the example below, one node will be installed with additional software. In this case, to make it a simple example, this additional code will be the Openssl and Openssh packages from AIX. First we need to add the name of a new script to the postscripts table for our node:
# chdef -t node -o etsvc03 postscripts=”"aixOpensslinstall”Object definitions have been created or modified.
Then you need to create a new script in the /install/postscripts directory, as shown in Example 6-10.
Example 6-10 Postscript for installing OpenSSH
#!/bin/ksh
254 Configuring and Managing AIX Clusters Using xCAT 2
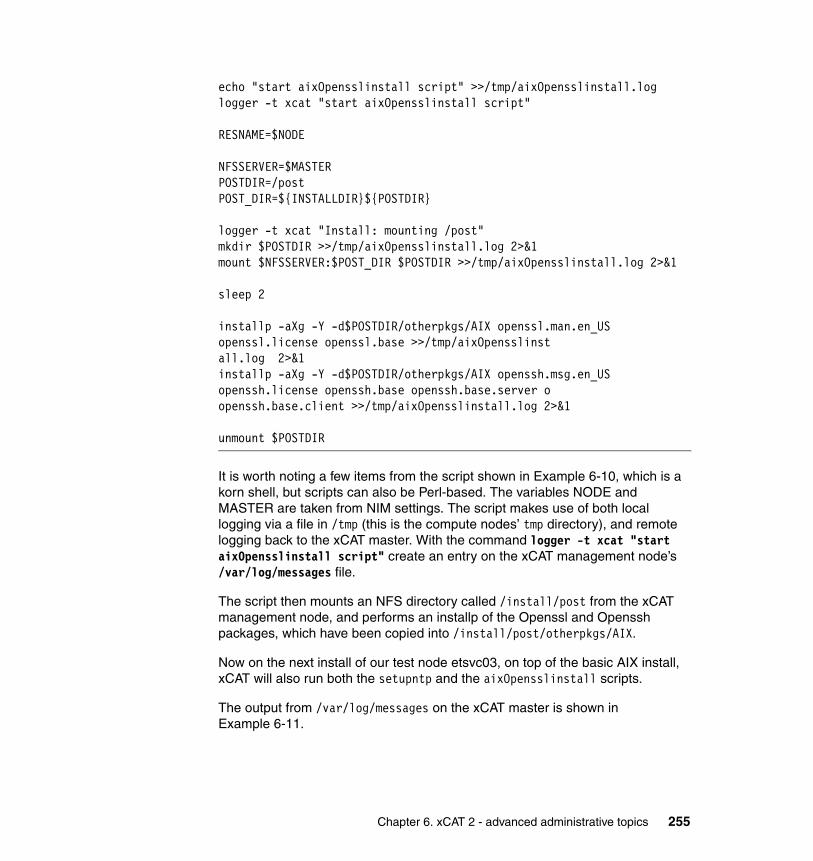
echo "start aixOpensslinstall script" >>/tmp/aixOpensslinstall.loglogger -t xcat "start aixOpensslinstall script"
RESNAME=$NODE
NFSSERVER=$MASTERPOSTDIR=/postPOST_DIR=${INSTALLDIR}${POSTDIR}
logger -t xcat "Install: mounting /post"mkdir $POSTDIR >>/tmp/aixOpensslinstall.log 2>&1mount $NFSSERVER:$POST_DIR $POSTDIR >>/tmp/aixOpensslinstall.log 2>&1
sleep 2
installp -aXg -Y -d$POSTDIR/otherpkgs/AIX openssl.man.en_US openssl.license openssl.base >>/tmp/aixOpensslinstall.log 2>&1installp -aXg -Y -d$POSTDIR/otherpkgs/AIX openssh.msg.en_US openssh.license openssh.base openssh.base.server oopenssh.base.client >>/tmp/aixOpensslinstall.log 2>&1
unmount $POSTDIR
It is worth noting a few items from the script shown in Example 6-10, which is a korn shell, but scripts can also be Perl-based. The variables NODE and MASTER are taken from NIM settings. The script makes use of both local logging via a file in /tmp (this is the compute nodes’ tmp directory), and remote logging back to the xCAT master. With the command logger -t xcat "start aixOpensslinstall script" create an entry on the xCAT management node’s /var/log/messages file.
The script then mounts an NFS directory called /install/post from the xCAT management node, and performs an installp of the Openssl and Openssh packages, which have been copied into /install/post/otherpkgs/AIX.
Now on the next install of our test node etsvc03, on top of the basic AIX install, xCAT will also run both the setupntp and the aixOpensslinstall scripts.
The output from /var/log/messages on the xCAT master is shown in Example 6-11.
Chapter 6. xCAT 2 - advanced administrative topics 255
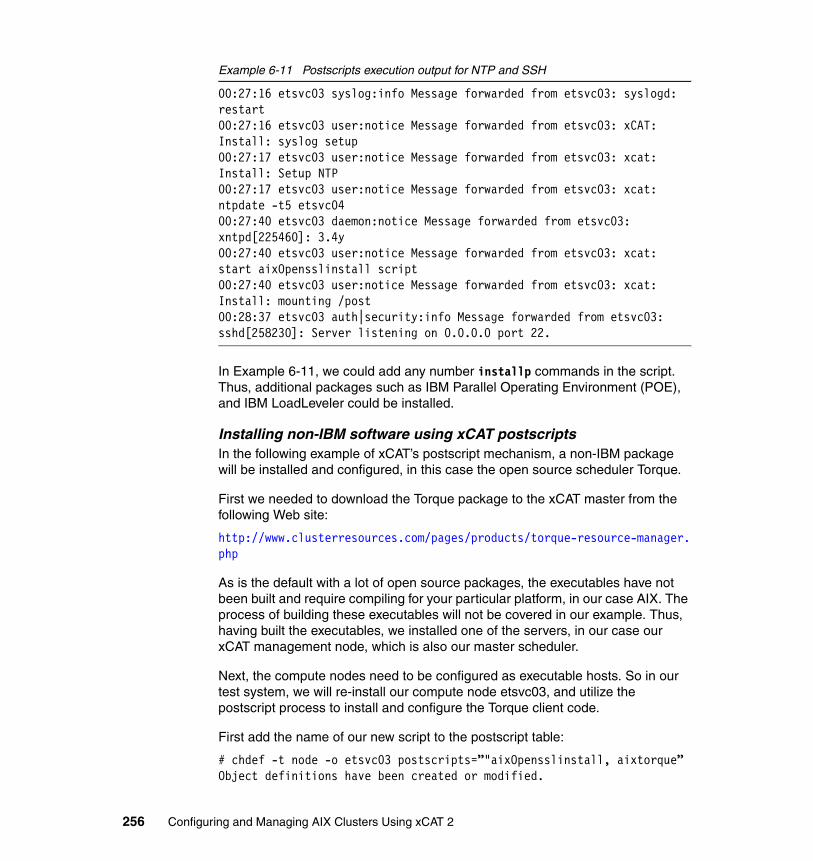
Example 6-11 Postscripts execution output for NTP and SSH
00:27:16 etsvc03 syslog:info Message forwarded from etsvc03: syslogd: restart00:27:16 etsvc03 user:notice Message forwarded from etsvc03: xCAT: Install: syslog setup00:27:17 etsvc03 user:notice Message forwarded from etsvc03: xcat: Install: Setup NTP00:27:17 etsvc03 user:notice Message forwarded from etsvc03: xcat: ntpdate -t5 etsvc0400:27:40 etsvc03 daemon:notice Message forwarded from etsvc03: xntpd[225460]: 3.4y00:27:40 etsvc03 user:notice Message forwarded from etsvc03: xcat: start aixOpensslinstall script00:27:40 etsvc03 user:notice Message forwarded from etsvc03: xcat: Install: mounting /post00:28:37 etsvc03 auth|security:info Message forwarded from etsvc03: sshd[258230]: Server listening on 0.0.0.0 port 22.
In Example 6-11, we could add any number installp commands in the script. Thus, additional packages such as IBM Parallel Operating Environment (POE), and IBM LoadLeveler could be installed.
Installing non-IBM software using xCAT postscriptsIn the following example of xCAT’s postscript mechanism, a non-IBM package will be installed and configured, in this case the open source scheduler Torque.
First we needed to download the Torque package to the xCAT master from the following Web site:
http://www.clusterresources.com/pages/products/torque-resource-manager.php
As is the default with a lot of open source packages, the executables have not been built and require compiling for your particular platform, in our case AIX. The process of building these executables will not be covered in our example. Thus, having built the executables, we installed one of the servers, in our case our xCAT management node, which is also our master scheduler.
Next, the compute nodes need to be configured as executable hosts. So in our test system, we will re-install our compute node etsvc03, and utilize the postscript process to install and configure the Torque client code.
First add the name of our new script to the postscript table:
# chdef -t node -o etsvc03 postscripts=”"aixOpensslinstall, aixtorque”Object definitions have been created or modified.
256 Configuring and Managing AIX Clusters Using xCAT 2

Then create this new script in the /install/postscript directory. A sample script is shown in Example 6-12.
Example 6-12 Torque install postscript
#!/bin/ksh
echo "start aixtorque script" >>/tmp/aixtorque.loglogger -t xcat "start aixtorque script"
RESNAME=$NODE
NFSSERVER=$MASTERPOSTDIR=/postPOST_DIR=${INSTALLDIR}${POSTDIR}
logger -t xcat "Install: mounting /post"mkdir $POSTDIR >>/tmp/aixtorque.log 2>&1mount $NFSSERVER:$POST_DIR $POSTDIR >>/tmp/aixtorque.log 2>&1
sleep 2
rpm -ivh $POSTDIR/otherpkgs/AIX/tar-1.13-4.aix4.3.ppc.rpm >>/tmp/aixtorque.log 2>&1
cd / >>/tmp/aixtorque.log 2>&1gtar -zxvf $POSTDIR/otherpkgs/AIX/torque-package-devel-aix5-powerpc.tar.gz >>/tmp/aixtorque.log 2>&1gtar -zxvf $POSTDIR/otherpkgs/AIX/torque-package-mom-aix5-powerpc.tar.gz >>/tmp/aixtorque.log 2>&1
cd /var/spool/torque >>/tmp/aixtorque.log 2>&1chmod 777 spool undelivered >>/tmp/aixtorque.log 2>&1chmod o+t spool undelivered >>/tmp/aixtorque.log 2>&1echo $MASTER >> /var/spool/torque/server_name
unmount $POSTDIR
Again, a few notes about this script. Like the last, it uses the NFS directory /install/post/otherpkgs/AIX to host the software to be installed. In this case the packages are gzip’ed tarballs . We also install the AIX version of the open source tar command, allowing both the unzip and untar in one process.
Chapter 6. xCAT 2 - advanced administrative topics 257

Then, due to errors in the torque package creation, we need to alter permissions of the torque spool directory. Finally, we need to add the name of the torque manager to a config file in the spool directory.
Having redone the xCAT install for our compute node etsvc03, we notice at the correct point in the install process in the message logs on the xCAT master:
01:20:18 etsvc03 user:notice Message forwarded from etsvc03: xcat: start aixtorque script01:20:18 etsvc03 user:notice Message forwarded from etsvc03: xcat: Install: mounting /post
And on the compute node, in /tmp our local log file aixtorque.log, with the news that our install worked.
As shown, the xCAT postscripts install mechanism is a powerful tool, and any software package that does not require an interactive install or configure process should, with the right script, be able to be installed on the nodes.
6.2 Installing monitoring software in xCAT
Two monitoring infrastructures are introduced in xCAT 2.0. For a diagram on how monitoring is plugged into xCAT, see Figure 6-1.
Figure 6-1 xCAT monitoring plug-in diagram
258 Configuring and Managing AIX Clusters Using xCAT 2

1. The xCAT Monitoring Plug-in Infrastructure allows you to plug in one or more third-party monitoring software such as RMC, Ganglia, and Performance Pilot to monitor the xCAT cluster.
2. The xCAT Notification Infrastructure allows you to watch for the changes in xCAT database tables.
With xCAT 2.0, you can also integrate third-party monitoring software into your xCAT cluster. The idea is to use monitoring plug-in modules that act as bridges to connect xCAT and the third-party software.
IBM Reliable Scalable Clustering Technology (RSCT)The IBM Resource Monitoring and Control (RMC) subsystem (part of RSCT) is our recommended software for monitoring xCAT clusters. RMC is part of the IBM Reliable Scalable Cluster Technology (RSCT) that provides a comprehensive clustering environment for AIX and Linux. The RMC subsystem and the core resource managers that ship with RSCT enable you to monitor various resources of your system and create automated responses to changing conditions of those resources. RMC also allows you to create your own conditions (monitors), responses (actions) and sensors (resources).
Other monitoring softwareOther monitoring software with plug-ins for xCAT in AIX environment is:
1. Ganglia - An open source monitoring suite for HPC environments
2. Performance Pilot - A family of products from SGI for system-level performance monitoring and management services
3. Nagios is an open source computer and network monitoring software. It provides host (hardware, OS) and services (software) monitoring.
In xCAT, there are seven commands available for monitoring purposes, located in /opt/xcat/bin:
monls Lists the current or all the monitoring plug-in names, their status and description.
monadd Adds a monitoring plug-in to the monitoring table. This will also add the configuration scripts for the monitoring plug-in, if any, to the postscripts table.
monrm Removes a monitoring plug-in from the monitoring table. It also removes the configuration scripts for the monitoring plug-in from the postscripts table.
moncfg Configures the third-party monitoring software on the management server and the service node for the given nodes to include the nodes into the monitoring domain. It does all the
Chapter 6. xCAT 2 - advanced administrative topics 259

necessary configuration changes to prepare the software for monitoring the nodes. The -r option will configure the nodes as well.
mondecfg Deconfigures the third-party monitoring software on the management server and the service node for the given nodes to remove the nodes from the monitoring domain. The -r option will deconfigure the nodes as well.
monstart Starts third-party software on the management server and the service node for the given nodes to monitor the xCAT cluster. It includes starting the daemons. The -r option will start the daemons on the nodes as well.
monstop Stops third-party software on the management server and the service node for the given nodes from monitoring the xCAT cluster. The -r will stop the daemons on the nodes as well.
6.2.1 Defining monitoring servers
You can skip this section if you have a small number of nodes to monitor, or if you prefer, the management node (mn) can handle the monitoring loads. For a large cluster, it is recommended that you dedicate some nodes as monitoring aggregation points. These nodes are called monitoring servers. You can use the service nodes (sn) as the monitoring servers, which are defined by the monserver column of the noderes table.
The data in the monserver column is comma-separated pairs of host names or IP addresses. The first host name or IP address represents the network adapter that connects to the mn. The second host name or IP address represents the network adapter that connects to the nodes. If no data is provided in the monserver column, the values in the servicenode and xcatmaster columns in the same table will be used. If none is defined, the mn will be used as the monitoring server.
In the example depicted in Figure 6-2, the nodes in group2 have a dedicated monitoring server (monsv02) while the nodes in group1 use their service node as the monitoring server (sn01).
260 Configuring and Managing AIX Clusters Using xCAT 2

Figure 6-2 Hierarchical cluster monitoring
The node name resolution data for the cluster depicted in Figure 6-2 is shown in Table 6-1.
Table 6-1 Cluster IP table
Use the command tabdump noderes to examine output. Output is in the csv format. Use tabedit noderes to edit.
Node Monitoring servers Service node xCAT MN
sv01 192.168.100.34 192.168.100.34
sv02 192.168.100.34 192.168.100.34
monsv02 192.168.100.34 192.168.100.34
group1 sv01 192.168.101.1
group2 monsv02, 192.168.100.3 sv02 192.168.101.2
Chapter 6. xCAT 2 - advanced administrative topics 261

6.2.2 Configure and start monitoring during node deployment
1. Define the nodes in the xCAT cluster. See Chapter 5, “Installing xCAT 2 on a new cluster” on page 153 for details.
2. Install the third-party monitoring software on the management node. See 6.2.4 for RMC, 6.2.5 for Ganglia, 6.2.6 for Performance Pilot.
3. Add the third-party monitoring plug-in software into the images for the service node and the compute node. This involves copying the software onto the /install/post/otherpkgs/<osver>/<arch> directory and adding the package names in the “other package” list for the image profile for the nodes. The image profile is located in /install/custom/<install|netboot>/<os> and it defaults to /opt/xcat/share/xcat/<install|netboot>/<os>. Refer to the xCAT 2 document How to Install Additional Software for details.
4. Add the monitoring plug-in, say xxx, to the monitoring table. Use the monadd xxx [-n] [-s] command, where [-n] specifies that the third-party software will also be used as the tool to feed the node status table. The [-s] flag is for the plug-in specific settings. The node configuration scripts for this monitoring plug-in are added to the postscripts table by this command. Use the monls xxx -d command to check for the configuration script names for the monitoring plug-in.
5. Configure monitoring software on the management server for the given nodes with moncfg xxx <nodes> where <nodes> are the nodes to be monitored.
6. Deploy the nodes nodeset, netboot, genimage, packimage, rpower, and so on. Check Chapter 5, “Installing xCAT 2 on a new cluster” on page 153 for details on how to deploy diskless or diskfull nodes. The deployment process will run the configuration scripts for the monitoring plug-in, which will configure and prepare the nodes for monitoring.
7. Start the monitoring after the nodes are up with monstart xxx. If the cluster has hierarchy, then do step 5 and 6 for the monitoring servers first and then repeat them for the compute nodes. Refer to 6.2.1, “Defining monitoring servers”. Now the cluster is set up for monitoring using the third-party software xxx. You can stop the monitoring at any time with the monstop command, for example, monstop xxx or monstop xxx -r (-r will stop all the daemons on the nodes as well).
6.2.3 Configure and start monitoring on a running node
This section describes how to add monitoring capability after a node is up and running. For nodes that have local disks, follow Step 2 through Step 7 described in the previous section, 6.2.2, “Configure and start monitoring during node
262 Configuring and Managing AIX Clusters Using xCAT 2

deployment”. The only exception is Step 6, where instead of deploying the nodes, you need to run the following command:
updatenode <noderange> (runs all the postscripts)
or
updatenode <noderange> otherpkgs,cfg1,cfg2... (run specific postscripts)
where otherpkgs is used to install the new software and cfg1, cfg2, and so on are the configuration scripts for the monitoring plug-in. To list the configuration script names, use the monls xxx -d command.
For diskless nodes, you need to regenerate the image (update the SPOT) and deploy the nodes again. Follow steps 2 through 7 as described in 6.2.2, “Configure and start monitoring during node deployment”.
6.2.4 Enable RMC monitoring
As previously mentioned, Resource Monitoring and Control (RMC) is the IBM recommended software for monitoring xCAT clusters, and rmcmon is xCAT's monitoring plug-in module for RMC.
The rmcmon plug-in is responsible for automatically setting up a monitoring domain for RMC and creates predefined conditions, responses, and sensors on the management node, the service node (if used), and the remaining nodes. Also, rmcmon provides node reachability status updates on the xCAT nodelist table via RMC's node status monitoring.
Why RMC?Here are highlights of the RMC monitoring technology:
� Each RMC client defines its own meaningful events. In other words, each client can specify what resource state should result in an event notification. This specification can be a simple threshold for one resource metric to a complex relationship of several metrics of the same resource.
� Resources to be monitored can be specified using “patterns.” Any resource that matches that pattern is monitored. Furthermore, any new resources that match the pattern are automatically monitored when they are created. Event notifications indicate that new resources are now being monitored.
Note: Run the updatenode <noderange> cfg1,cfg2.. command only if the third-party monitoring software has already been installed.
Chapter 6. xCAT 2 - advanced administrative topics 263

� Events are generated when monitored resources are removed from the cluster.
� Events are generated when monitoring is stopped due to some failure and generated when monitoring is recovered.
� Resource data is obtained via efficient local polling (function calls) or provided via callbacks using OS hooks.
� Command line interfaces are provided to easily enable monitoring and to have scripts executed to process events.
� Support for customer-defined resources to monitor customer-unique data. Sensor resources obtain data via execution of a script.
� All intra-cluster network traffic is reliable (acks, retries) UDP using a single well known port.
� Client connections to RMC are typically Unix Domain Sockets, whereas connections to remote clusters are realized via TCP.
� The only steady state network traffic is small UDP packets for heartbeat.
� Out of the box security for authentication, authorization and message protection.
� Ships with, and is automatically installed by AIX. RMC is used for HMC<->LPAR communication for Dynamic LPAR and Service Focal Point™. No customer set-up required.
With xCAT, RSCT provides two new resource classes, IBM.MngNode and IBM.MCP. These classes are analogous to CSM's IBM.ManagedNode and IBM.ManagementServer, respectively, and contain sufficient information to create and modify a management domain.
So that system administrators do not have to write RMC applications, RSCT provides the Event Response Resource Manager (IBM.ERRM) to do monitoring.
This resource manager implements three resource classes:
� IBM.Condition
� IBM.EventResponse
� IBM.Association
As you may already know, the IBM.Sensor resource class provides a way to monitor resources for which no resource manager exists. A Sensor resource is simply the specification of a script whose output is assigned to a set of dynamic attribute values. The Sensor script is invoked at some periodic interval or on demand. A command interface can also be used to supply the dynamic attribute values.
264 Configuring and Managing AIX Clusters Using xCAT 2

Enabling RMC monitoringFollow these steps:
1. RSCT is shipped with the AIX operating system. However, you need to make sure that the level of software is supported by xCAT. For AIX 5.3, you need at least RSCT 2.4.9.0, which ships with AIX 5.3.0.80 or greater. For AIX 6.1, you need at least RSCT 2.5.1.0, which ships with AIX 6.1.1.0 or greater. To check the RSCT level on the Management Node (MN):
/usr/sbin/rsct/install/bin/ctversion -or- lslpp -l | grep rmc
2. Confirm that xCAT-rmc has been installed on the Management Node.
rpm -qa | grep rmc
This rpm was included in one of the bundle files that are included in the xCAT for AIX tar file that is available from the xCAT Web site.
3. Setting up xCAT DB.
Make sure that all the nodes and service nodes that need to have RMC installed have osi in the nodetype column of the nodetype table.
tabdump nodetype
Make sure that the mac column of the mac table for the nodes and the service nodes is populated because the mac address will be used as an RMC nodeid for the node.
tabdump mac
4. Setting up the xCAT hierarchy.
Skip this if you have a flat cluster (non-hierarchical, not using service nodes).
In displaying tabdump noderes, the monserver column of the noderes table is used to define a monitoring server for a node. monserver is a comma-separated pair of hostnames or IP addresses. The first one is the monitoring server name or IP known by the mn. The second one is the same host known by the node.
chdef -t node -o node5 monserver=9.114.46.47,192.168.52.118
If monserver is not set, the default is the servicenode and xcatmaster pair in the noderes table.
5. Add rmcmon in the monitoring table.
monadd rmcmon
or
monadd rmcmon -n
This will also add the configrmcnode postscript into the postscripts table. The second command registers the rmc plug-in module to monitor the xCAT
Chapter 6. xCAT 2 - advanced administrative topics 265

cluster and also have it feed the node liveness status to xCAT’s nodelist table. Note that to allow monitoring of node liveness you need to have RSCT 2.4.10.0 or greater on an AIX 5.3 system or RSCT 2.5.2.0 or greater on AIX 6.1 for this feature to work.
6. Create resources for the IBM.MngNode class to include each node managed by the management node.
moncfg rmcmon nodes
7. Deploy the nodes and the service nodes as described in the xCAT 2 cookbook. This process will automatically set up the RMC monitoring domain. To verify, list all the nodes managed by the Management Node:
# lsrsrc -a IBM.Host NameResource Persistent Attributes for IBM.Hostresource 1:Name = "node1"resource 2:Name = "node2"
Use the xdsh command to check the nodes managed by the monitoring servers:
xdsh monserver_name lsrsrc -a IBM.Host Name
8. Start RMC monitoring.
Now that nodes are installed and configured, you can start the RMC monitoring:
monstart rmcmon
The monstart command actually creates a set of predefined conditions, responses and sensors on the Management Node and the monitoring servers. To verify:
lsconditionlsresponselssensor
266 Configuring and Managing AIX Clusters Using xCAT 2

Now you can pick and choose the conditions to monitor using the startcondresp command which associates a condition with a response. A condition can be associated with more than one response.
startcondresp AnyNodeVarSpaceUsed EmailRootAnyTime
If you have monitoring servers, also turn on the condition with _H in the name.
startcondresp AnyNodeVarSpaceUsed_H EmailRootAnyTime
Conditions without _H in the name are designed to monitor the nodes that are managed by the Management Node, whereas conditions with _H in the names are for the nodes managed by the monitoring servers. These nodes are grandchildren of the Management Node.
With RMC, you can create your own conditions, responses and sensors for monitoring. For details on configuring and using resource monitoring, refer to RSCT Administration Guide.
6.2.5 Enable monitoring with Ganglia
Ganglia is a tool to monitor performance on a small group of LPARs and can also be used on a large cluster of machines. Ganglia is not an IBM product, it is an open source project:
http://ganglia.info/
Note: When run from a management (or service) node, you no longer have to set the CT_MANAGEMENT_SCOPE variable to get results from all nodes in the managed (xCAT) domain.
The -a flag sets the scope to include all nodes in the xCAT managed domain.
Examples (from the management node):
To see resources on the local node only:
lscondition
To see resources on all nodes in the domain:
lscondition -a
To see IBM.Host data from all nodes:
lsrsrc -a IBM.Host
Chapter 6. xCAT 2 - advanced administrative topics 267

There are two main processes associated with Ganglia:
1. Data handling - Ganglia meta-data daemon gmetad, which runs on the management node (and service or monitor node, if applicable).
2. Data gathering - Ganglia monitor daemon gmond, which runs on the management node (and service or monitor node, if applicable) and all compute nodes that are to be monitored by Ganglia.
The following prerequisites are required for installing Ganglia on the xCAT management node:
� Round Robin Database: rrdtool (rrdtool also needs to be installed on any service or monitor nodes present in the cluster.)
� Web Server: Apache 2
� Web Scripting Language: PHP 5
Obtaining and installing RPMs
The following steps are presented with the assumption that the xCAT cluster has been configured and is operational.
1. Obtain and install the rrdtool database RPM for the management node and any service or monitor nodes present in the cluster.
The rrdtool RPM is available from:
http://www.perzl.org/aix/index.php?n=Main.Rrdtool
Note that the URL also notes that there are package dependencies for rrdtool:
libart_lgpllibpngfreetype2zlibperl 5.8.2
They can be obtained from this Web page and also from the AIX-Linux Affinity Web site:
http://www.ibm.com/servers/aix/products/aixos/linux/download.html
2. Obtain and install the PHP RPM for the management node.(PHP is an HTML-embedded scripting language.)Obtain it from:
http://www.perzl.org/aix/index.php?n=Main.Php
Also note the package dependencies on this page.
Obtain and install Apache (httpd) RPM for the management node:
http://www.perzl.org/aix/index.php?n=Main.Apache
268 Configuring and Managing AIX Clusters Using xCAT 2

Also note the package dependencies on this page.
3. Obtain and install Ganglia RPMs for AIX for the management node:
http://www.perzl.org/ganglia/ganglia-files-v3.0.7.html
- v3.0.7 is the latest available on this site.There are later releases of source files available at:
http://ganglia.info/
But for AIX you will need to compile these source files.
The following RPMs will be installed on the management node:
– ganglia-gmetad-3.0.7-1.aix5.3.ppc.rpm
– ganglia-gmond-3.0.7-1.aix5.3.ppc.rpm
– ganglia-web-3.0.7-1.noarch.rpm
4. If using service (or monitor) nodes, they should also have the following packages installed:
– ganglia-gmetad-3.0.7-1.aix5.3.ppc.rpm
– ganglia-gmond-3.0.7-1.aix5.3.ppc.rpm
Note that ganglia-web does not need to be installed on a service or monitor node.
5. gmond is the only RPM to be installed on the compute nodes: ganglia-gmond-3.0.7-1.aix5.3.ppc.rpm
You may wish to nfs mount the directory from the management node (or service node) that contains the ganglia-gmond RPM and install from that directory using the xdsh command:
xdsh <noderange> mount mgtnode:/install/ganglia/rpms /mnt
then
xdsh <noderange> rpm -ihv /mnt/ganglia-gmond-3.0.7-1.aix5.3.ppc.rpm
Post RPM install stepsAfter Ganglia installation is complete, the following steps need to be done on the management node:
1. Setting up xCAT DB
Make sure all the nodes and service nodes that are to have Ganglia installed have osi in the nodetype column of the nodetype table.
tabdump nodetype
Chapter 6. xCAT 2 - advanced administrative topics 269

2. Make sure that gangliamon is added to the monitoring table using the command:
monadd gangliamon
This command will also add the confGang configuration scripts to the postscripts table. You can confirm with:
tabdump monitoring
3. Run the updatenode command to all nodes to be monitored:
updatenode <noderange>
This step runs the confGang postscript (/install/postscripts) on all the nodes. It configures Ganglia on the nodes.
4. It is necessary to edit the default /etc/gmond.conf on the management node to update the cluster name. Here, we have made a change to name = clustersite. (The default is “unspecified”.)
If unsure as to what your cluster name is, do this:
lsdef -t site
Controlling GangliaConfigure Ganglia on the management node and the service node(s).
moncfg gangliamon
There is no need to specify the -r option because the nodes are configured during the deployment phase.
To start Ganglia on the cluster:
monstart gangliamon -r
The -r flag will ensure that the Ganglia daemon (gmond) on the node is started.
Note:
/* If a cluster attribute is specified, then all gmond hosts are wrapped inside* of a <CLUSTER> tag. If you do not specify a cluster tag, then all <HOSTS> will * NOT be wrapped inside of a <CLUSTER> tag. */cluster { name = "clustersite"
270 Configuring and Managing AIX Clusters Using xCAT 2

To stop Ganglia on the cluster:
monstop gangliamon -r
You can control nodes individually with the gmond control script:
/etc/rc.d/init.d/gmond
Options are:
start stop restart status
Example:
/etc/rc.d/init.d/gmond stop
For more details about using Ganglia for system monitoring, go to the Ganglia home page at:
http://ganglia.info
6.2.6 Other software monitoring options
As of this writing, there are at least two other open source system monitoring options available for AIX systems using xCat. Both require their source code to be compiled on AIX.
� Performance Co-Pilot - An open source application support for system-level performance monitoring and performance management. See:
http://oss.sgi.com/projects/pcp/
� Nagios - An open source application for monitoring of network services and host resources. See:
http://www.nagios.org/
6.3 xCAT 2's distributed commands
One of the most powerful elements of xCAT is its mechanism for running distributed commands. Two commands, xdsh and xdcp, become very strong tools for the administrators and users of the cluster, allowing both the movement of data between the xCAT management node and one or all nodes of the cluster.
These commands also allow the users to simultaneously execute commands and scripts over a range of nodes in the cluster, the screen output of which is
Chapter 6. xCAT 2 - advanced administrative topics 271

collected and displayed back on the source node that issued the distributed command.
It is worth noting that due to the nature of the way xdsh works, it cannot be used with any interactive commands.
The first example is of a simple use of the xdsh command to execute an AIX command across all the nodes. Here the user is passing an xCAT group as the parameter for the range of nodes to perform the command:
# xdsh lp1p65501 date
It could be that you need to execute a command only on a range of nodes that do not make up a complete group. Here you can define a starting target node and the end target node, and xdsh (and xdcp) will understand that you wish to execute the command on all the nodes between. Here is an example, with lp1p65501 as the starting node, and lp1p65502 as the end node:
# xdsh lp1p65501-lp1p65502 date
Another alternative is to just pass a list of nodes as the parameter that the command will execute on. Also in this example, the command on the remote nodes will be executed as another user rather than the user who has initiated the xdsh command on the source node:
# xdsh -l user { with list }
It is not just single commands that can be executed. A sequence of commands can be passed as the parameter, or a script and variables can be specified:
# xdsh lp1p65501 date;ps# xdsh -e script
Like xdsh, the xCAT command xdcp can utilize either a group, list, or range of nodes, but this time as either the source or target parameter. As with any copy command you have the starting file location and the target file location, but now with xdcp there is the added complexity of both a source node (or nodes) and a target node (or nodes). In the first example we will copy a single file, such as /etc/hosts, to all the compute nodes in the cluster:
# xdcp all /etc/hosts /etc/
And in this second example we will copy a single file, in our case a log file, from a range of nodes back to the management node:
# xdcp lp1p65501-lp1p65503 -P /etc/hosts /tmp/hosts.dir# ls /tmp/hosts.dirhosts._lp1p65501 hosts._lp1p65502 hosts._lp1p65503
272 Configuring and Managing AIX Clusters Using xCAT 2

As you can see from the example, when copying multiple files back which all have the same file name but happen to be on different nodes, we could have a potential problem with the files overwriting each other. xCAT solves this problem by adding the name of the node as an extension to the original file name.
The xdcp command is not limited to single files, however. It can be utilized to copy a complete directory from a single source to multiple destination nodes, or multiple sources back to a single destination. Again, like in the file instance, here xCAT adds the hostname to the directory name.
With both xdsh and xdcp, if there are a large number of target nodes, it is possible to add a fanout parameter, which means the network does not get overloaded due to the amount of data being passed over it:
# xdcp -f fanout
Consolidating distributed command outputAnother little-known command of xCAT is xdshbak, which can be used to format data coming back from the remote nodes. The example below shows how xdshbak can be utilized with an xdsh command:
# xdsh lp1p65501,lp1p65502,lp1p65503 cat /etc/hosts | xdshbak
In addition to specifying command parameters and flags, the following is a list of environment variables you can use with the distributed commands:
DSH_CONTEXTDEVICETYPEDSH_ENVIRONMENTDSH_FANOUTDSH_NODE_OPTSDSH_NODE_RCPDSH_NODE_RSHDSH_PATHDSH_SYNTAXDSH_TIMEOUT
For more details, check the man pages for xdsh, xdcp and xdshback.
6.4 Using xCAT to upgrade System p firmware
xCAT can be used to maintain and update the firmware of the IBM System p managed systems that are under xCAT management.
Chapter 6. xCAT 2 - advanced administrative topics 273

The rflash command is used from the management node to initiate system firmware updates.
The rflash command initiates firmware updates on supported xCAT nodes. Licensed Internal Code (also known as microcode) updates are performed on supported HMC-attached POWER5™ and POWER6 pSeries nodes.
The command scans the specified directory structure for firmware update package files applicable to the given nodes and components. And then it will automatically select the latest version for the upgrade. The firmware update files include the microcode update package and associated XML files. They can be downloaded from:
http://www.ibm.com/support/fixcentral
The POWER5 and POWER6 systems contain several components that use Licensed Internal Code. The rflash command supports two of these components: the managed system (also known as the Central Electronics Complex, or CEC) and the power subsystem (also known as the Bulk Power Assembly (BPA) or Bulk Power Controller (BPC)). Some POWER5-managed systems can be attached to a power subsystem. These power subsystems can support multiple managed systems. When the rflash command is invoked, xCAT will determine the managed system or power subsystem associated with that CEC and perform the update.
The rinv command can be used to determine the current firmware level, as shown in Example 6-13.
Example 6-13 Use the rinv command to display current firmware levels
mgtnode #rinv lp1p65501 firmlp1p65501: Release Level : 01EL340lp1p65501: Active Level : 39lp1p65501: Installed Level: 39lp1p65501: Accepted Level : 37lp1p65501: Release Level Primary: 01EL340lp1p65501: Level Primary : 39mgtnode #
We can also use the rinv command to display the firmware of groups of nodes. In Example 6-14 we used the rinv command to show the firmware levels of the nodes in the fsp group.
Example 6-14 Using rinv to display firmware levels in a node group
mgtnode #rinv fsp firmServer-8204-E8A-SN10FE401: Release Level : 01EL340
274 Configuring and Managing AIX Clusters Using xCAT 2

Server-8204-E8A-SN10FE401: Active Level : 39Server-8204-E8A-SN10FE401: Installed Level: 39Server-8204-E8A-SN10FE401: Accepted Level : 37Server-8204-E8A-SN10FE401: Release Level Primary: 01EL340Server-8204-E8A-SN10FE401: Level Primary : 39Server-8204-E8A-SN10FE411: Release Level : 01EL340Server-8204-E8A-SN10FE411: Active Level : 39Server-8204-E8A-SN10FE411: Installed Level: 39Server-8204-E8A-SN10FE411: Accepted Level : 37Server-8204-E8A-SN10FE411: Release Level Primary: 01EL340Server-8204-E8A-SN10FE411: Level Primary : 399117-MMA-SN101F170-L10: Release Level : 01EM3409117-MMA-SN101F170-L10: Active Level : 399117-MMA-SN101F170-L10: Installed Level: 399117-MMA-SN101F170-L10: Accepted Level : 379117-MMA-SN101F170-L10: Release Level Primary: 01EM3409117-MMA-SN101F170-L10: Level Primary : 399117-MMA-SN100F6A0-L9: Release Level : 01EM3409117-MMA-SN100F6A0-L9: Active Level : 399117-MMA-SN100F6A0-L9: Installed Level: 399117-MMA-SN100F6A0-L9: Accepted Level : 379117-MMA-SN100F6A0-L9: Release Level Primary: 01EM3409117-MMA-SN100F6A0-L9: Level Primary : 39mgtnode #
We then executed the rflash command against two LPARs, one on each managed system we wished to update. We chose to update the 9117-MMA systems. The rflash command figures out which managed system to update based upon the managed system the LPAR is running on. The rflash command will communicate to the HMC that owns the managed system and the update will be executed from the HMC in the background. Once the update has finished, the rflash command returns the results, as shown in Example 6-15.
Example 6-15 Executing the rflash command for multiple systems
mgtnode #rflash lp1p6mma1,lp1p6mma2 -p /install/fw/mma/340_061_039 --activate concurrenthmc4: lp1p6mma1 is a Lpar on MTMS 9117-MMA*101F170hmc4: lp1p6mma2 is a Lpar on MTMS 9117-MMA*100F6A0hmc4: copy files to hmc4 completehmc4: 9117-MMA*100F6A0: HSCF0178W Operation completed successfully for 9117-MMA-SN100F6A0-L9 (9117-MMA*100F6A0). Deferred Fixes are present in the fixpack. :hmc4: :
Chapter 6. xCAT 2 - advanced administrative topics 275

hmc4: 9117-MMA*100F6A0: The following deferred fixes are present in the fix pack. Deferred fixes will be activated after the next IPL of the system. :hmc4: :hmc4: 9117-MMA*100F6A0: An immediate IPL is not required, unless you want to activate one of the fixes below now. :hmc4: :hmc4: 9117-MMA*100F6A0: :hmc4: :hmc4: 9117-MMA*100F6A0: A problem was fixed that caused the advanced system management interface (ASMI) menus to become unresponsive, and the system to appear to hang, when a GX adapter slot reservation was attempted when the system was at service processor standby. (684093/FW252934)<br><br>On systems running system firmware release EM340, a problem was fixed that caused the system to checkstop during the "hot add" of a GX I/O adapter card. (692444/FW474712)<br><br> :hmc4: 9117-MMA*100F6A0: :hmc4: :hmc4: 9117-MMA*100F6A0: :hmc4: :hmc4: 9117-MMA*100F6A0: LIC_RC = 0:hmc4: 9117-MMA*101F170: HSCF0178W Operation completed successfully for 9117-MMA-SN101F170-L10 (9117-MMA*101F170). Deferred Fixes are present in the fixpack. :hmc4: :hmc4: 9117-MMA*101F170: The following deferred fixes are present in the fix pack. Deferred fixes will be activated after the next IPL of the system. :hmc4: :hmc4: 9117-MMA*101F170: An immediate IPL is not required, unless you want to activate one of the fixes below now. :hmc4: :hmc4: 9117-MMA*101F170: :hmc4: :hmc4: 9117-MMA*101F170: A problem was fixed that caused the advanced system management interface (ASMI) menus to become unresponsive, and the system to appear to hang, when a GX adapter slot reservation was attempted when the system was at service processor standby. (684093/FW252934)<br><br>On systems running system firmware release EM340, a problem was fixed that caused the system to checkstop during the "hot add" of a GX I/O adapter card. (692444/FW474712)<br><br> :hmc4: 9117-MMA*101F170: :hmc4: :hmc4: 9117-MMA*101F170: :hmc4: :
276 Configuring and Managing AIX Clusters Using xCAT 2

hmc4: 9117-MMA*101F170: LIC_RC = 0:hmc4: Remote_command_rc = 0:hmc4: Upgrade 9117-MMA*101F170 from release level:01EM340 activated level:39 to 01EM340_061_039.rpm successfullyhmc4: Upgrade 9117-MMA*100F6A0 from release level:01EM340 activated level:39 to 01EM340_061_039.rpm successfully
The rflash command can take a while to process, depending on the number of managed systems that need to be updated. The two MMA systems that we updated took around 20 minutes.
In the previous example, there were deferred fixes. This means that some firmware fixes will only be activated at the next system power cycle.
We then executed the rinv command again to verify the firmware levels on the MMA systems, as shown in Example 6-16.
Example 6-16 Checking firmware levels using the rinv command
mgtnode #rinv fsp firmServer-8204-E8A-SN10FE401: Release Level : 01EL340Server-8204-E8A-SN10FE401: Active Level : 39Server-8204-E8A-SN10FE401: Installed Level: 39Server-8204-E8A-SN10FE401: Accepted Level : 37Server-8204-E8A-SN10FE401: Release Level Primary: 01EL340Server-8204-E8A-SN10FE401: Level Primary : 39Server-8204-E8A-SN10FE411: Release Level : 01EL340Server-8204-E8A-SN10FE411: Active Level : 39Server-8204-E8A-SN10FE411: Installed Level: 39Server-8204-E8A-SN10FE411: Accepted Level : 39Server-8204-E8A-SN10FE411: Release Level Primary: 01EL340Server-8204-E8A-SN10FE411: Level Primary : 399117-MMA-SN101F170-L10: Release Level : 01EM3409117-MMA-SN101F170-L10: Active Level : 619117-MMA-SN101F170-L10: Installed Level: 619117-MMA-SN101F170-L10: Accepted Level : 399117-MMA-SN101F170-L10: Release Level Primary: 01EM3409117-MMA-SN101F170-L10: Level Primary : 619117-MMA-SN100F6A0-L9: Release Level : 01EM3409117-MMA-SN100F6A0-L9: Active Level : 619117-MMA-SN100F6A0-L9: Installed Level: 619117-MMA-SN100F6A0-L9: Accepted Level : 399117-MMA-SN100F6A0-L9: Release Level Primary: 01EM3409117-MMA-SN100F6A0-L9: Level Primary : 61
Chapter 6. xCAT 2 - advanced administrative topics 277

mgtnode #
We observed that the new installed and active levels have changed. Once we were satisfied that the firmware was operating, we could permanently accept the firmware update using the rflash command with the --commit option, as shown in Example 6-17.
Example 6-17 Using rflash to commit a firmware update
mgtnode #rflash lp1p6mma1,lp2p6mma2 --commithmc4: copy files to hmc4 completehmc4: 9117-MMA*100F6A0: LIC_RC = 0:hmc4: 9117-MMA*101F170: LIC_RC = 0:hmc4: Remote_command_rc = 0:hmc4: 9117-MMA*101F170:commit successfully!hmc4: 9117-MMA*100F6A0:commit successfully!mgtnode #
IBM System p machines have two sides that hold firmware. The temporary side is generally used when the system is started. The permanent side generally has an older copy of firmware. If you commit the firmware update, then the permanent and temporary sides will have the same firmware level. There is no need to commit the firmware to the permanent side. It may be advisable to keep the older level of firmware in the permanent side should the need ever arise to restore to it.
The rflash command does some checking before applying the updates to ensure that the correct files are being applied. If we tried to flash the IBM 550 systems with MMA microcode, then an error would be shown, as in Example 6-18.
Example 6-18 Trying to flash with wrong file
mgtnode #rflash lp1p65501 -p /install/fw/mma/340_061_039 --activate concurrenthmc3: lp1p65501 is a Lpar on MTMS 8204-E8A*10FE411hmc3: 8204-E8A*10FE411: There isn't a package suitable for 8204-E8A*10FE411hmc3: Failed to upgrade the firmware of 8204-E8A*10FE411 on hmc3mgtnode #
We corrected the location of the file and retried the rflash command, as shown in Example 6-19, and rflash completed satisfactorily.
278 Configuring and Managing AIX Clusters Using xCAT 2

Example 6-19 Running rflash with the correct flash file
mgtnode #rflash lp1p65501 -p /install/fw/550/340_061_039 --activate concurrenthmc3: lp1p65501 is a Lpar on MTMS 8204-E8A*10FE411hmc3: copy files to hmc3 completehmc3: 8204-E8A*10FE411: HSCF0178W Operation completed successfully for Server-8204-E8A-SN10FE411 (8204-E8 A*10FE411). Deferred Fixes are present in the fixpack. :hmc3: :hmc3: 8204-E8A*10FE411: The following deferred fixes are present in the fix pack. Deferred fixes will be activated after the next IPL of the system. :hmc3: :hmc3: 8204-E8A*10FE411: An immediate IPL is not required, unless you want to activate one of the fixes be low now. :hmc3: :hmc3: 8204-E8A*10FE411: :hmc3: :hmc3: 8204-E8A*10FE411: Deferred fix information is not available. :hmc3: 8204-E8A*10FE411: :hmc3: :hmc3: 8204-E8A*10FE411: :hmc3: :hmc3: 8204-E8A*10FE411: LIC_RC = 0:hmc3: Remote_command_rc = 0:hmc3: Upgrade 8204-E8A*10FE411 from release level:01EL340 activated level:39 to 01EL340_061_039.rpm succe ssfullymgtnode #
6.5 Adding GPFS to a diskless xCAT cluster
There are a number of ways that GPFS can be configured in an xCAT 2 cluster to provide the diskless nodes access to the GPFS file systems. We identified two configurations that would ensure that the diskless nodes have access to data via GPFS:
1. As shown in Figure 6-3 on page 280, we have an xCAT 2 cluster that has the following configuration:
– xCAT 2 management node
• Has access to the SAN disk used for the GPFS file system.
• Performs the role of Primary GPFS configuration server.
Chapter 6. xCAT 2 - advanced administrative topics 279

• Performs the role of the cluster quorum node.
• Performs the role of NSD server.
• Performs the role of cluster manager node.
• Performs the role of file system manager.
– Diskless xCAT 2 cluster nodes
– Common administration network
– GPFS I/O network
Figure 6-3 Single node quorum GPFS cluster with xCAT MN providing disk (NSD) access and cluster quorum
2. As shown in Figure 6-4 on page 281, we have an xCAT 2 cluster that has the following configuration:
– Access to a separate GPFS cluster that is presenting its GPFS file systems remotely, via GPFS multi-cluster, over SSL. The file system manager is located in this remote cluster.
– xCAT 2 management node that does the following:
• Performs the role of Primary GPFS configuration server.
• Performs the role of cluster quorum node.
280 Configuring and Managing AIX Clusters Using xCAT 2

• Performs the role of cluster manager node.
– Diskless xCAT 2 cluster nodes
– Common administration network
– GPFS I/O network
Figure 6-4 xCAT GPFS cluster (single node quorum) and remote GPFS cluster providing file system
The xCAT 2 diskless nodes could, potentially, be changing state from active to down in the GPFS cluster quite frequently. Therefore, it makes sense for the xCAT 2 MN to perform the server, management, and quorum roles in the GPFS cluster because its state should not change, during normal production. Also, if the xCAT 2 MN is in a down state, it is very likely that the diskless nodes will not be running anyway.
6.5.1 Configuring GPFS from scratch on diskless nodes
Our cluster contains both diskful and diskless nodes. We have an existing GPFS cluster that is running on the diskful nodes. We wanted to integrate the diskless node we created in 5.3.4, “Installing diskless nodes” on page 209 into this GPFS cluster. The new diskless node name is lp5p65501. In the following exercise, we will use the same NIM resources as described in 5.2.5, “Creation of NIM and xCAT install resources” on page 194.
Note: From an administration perspective it is easier to use the same SSH keys on the xCAT 2 MN and the diskless nodes.
When using a multi-cluster environment, the SSL key is stored in /var/mmfs/gem/mmsdrfs after it has been configured.
Chapter 6. xCAT 2 - advanced administrative topics 281

The GPFS code needs to be installed to the diskless node. This is achieved by updating the SPOT that the node uses for its remote /usr file system. Using the same lpp_source in our NIM master that we used to install GPFS to the diskless nodes, the GPFS filesets were installed. We encountered a prereq issue with the installation of GPFS into the SPOT, as shown in Example 6-20.
Example 6-20 Updating the diskless SPOT with the GPFS filesets prereq error
Requisite Failures ------------------ SELECTED FILESETS: The following is a list of filesets that you asked to install. They cannot be installed until all of their requisite filesets are also installed. See subsequent lists for details of requisites.
gpfs.base 3.2.0.0 # GPFS File Manager gpfs.base 3.2.1.11 # GPFS File Manager
MISSING REQUISITES: The following filesets are required by one or more of the selected filesets listed above. They are not currently installed and could not be found on the installation media.
xlC.aix50.rte 8.0.0.0 # Base Level Fileset
<< End of Failure Section >>
We are attempting to install GPFS into a SPOT that is at AIX 6.1, yet it requires xlC.aix50.rte! We solved the prerequisite problem in the previous example by installing into the SPOT the fileset called xlC.sup.aix50.rte.9.0.0.1.
After this fileset was installed, GPFS installation into the SPOT was successful. as shown in the snippet in Example 6-21.
Example 6-21 Successful installation of GPFS into the diskless SPOT
----------------- gpfs.base 3.2.1.11 # GPFS File Manager
<< End of Success Section >>
+-----------------------------------------------------------------------------+ Committing Software...+-----------------------------------------------------------------------------+
installp: COMMITTING software for: gpfs.base 3.2.1.11
282 Configuring and Managing AIX Clusters Using xCAT 2

Finished processing all filesets. (Total time: 21 secs).
+-----------------------------------------------------------------------------+ Summaries:+-----------------------------------------------------------------------------+
Pre-installation Failure/Warning Summary----------------------------------------Name Level Pre-installation Failure/Warning-------------------------------------------------------------------------------gpfs.base 3.2.1.10 To be superseded by 3.2.1.11
Installation Summary--------------------Name Level Part Event Result-------------------------------------------------------------------------------gpfs.base 3.2.0.0 USR APPLY SUCCESSgpfs.base 3.2.0.0 ROOT APPLY SUCCESSgpfs.base 3.2.1.11 USR APPLY SUCCESSgpfs.base 3.2.1.11 ROOT APPLY SUCCESSgpfs.base 3.2.1.11 USR COMMIT SUCCESSgpfs.base 3.2.1.11 ROOT COMMIT SUCCESS
Checking filesets and network boot images for SPOT "610_diskless". This may take several minutes ...
Once our diskless node has been booted with the updated SPOT, we issue the mmaddnode command from an existing node in our GFPS cluster, as shown in Example 6-22.
Example 6-22 Adding a diskless node to the GPFS cluster
lp2p65501 #mmaddnode -N lp5p65501-en2
Note: In order to update the SPOT on a running diskless node, the node can be powered off and the NIM SPOT de-allocated, because an active SPOT cannot be updated. We used this method because it was convenient for us to do so. This may not be optimal in a production environment. One solution is to create a new SPOT or osimage via mknimimage and at a convenient time, to run rmdsklsnode and reassign the node to the new SPOT using mkdsklsnode and reboot it. The rmdsklsnode will not remove the node from xCAT, it just removes the NIM resources that are assigned to it.
Chapter 6. xCAT 2 - advanced administrative topics 283

After the node has been added, GPFS was started up on the new diskless node, as shown in Example 6-23.
Example 6-23 Starting GPFS on the diskless node
lp2p65501 #mmstartup -N lp5p65501-en2Tue May 19 16:11:14 EDT 2009: mmstartup: Starting GPFS ...
We issued the mmgetstate command to display the state of GPFS on the diskless node, as shown in Example 6-24.
Example 6-24 Displaying GPFS status via mmgetstate
lp2p65501 #mmgetstate -aL
Node number Node name Quorum Nodes up Total nodes GPFS state Remarks------------------------------------------------------------------------------------ 1 lp2p65501-en2 2 3 16 active quorum node 2 lp3p65501-en2 2 3 16 active 3 lp4p65501-en2 2 3 16 active 4 lp1p65502-en2 2 3 16 active 5 lp2p65502-en2 2 3 16 active quorum node 6 lp3p65502-en2 2 3 16 active 7 lp4p65502-en2 2 3 16 active 8 lp1p6mma1-en2 2 3 16 active 9 lp2p6mma1-en2 2 3 16 active quorum node 10 lp3p6mma1-en2 2 3 16 active 11 lp4p6mma1-en2 2 3 16 active 12 lp1p6mma2-en2 2 3 16 active 13 lp2p6mma2-en2 2 3 16 active 14 lp3p6mma2-en2 2 3 16 active 15 lp4p6mma2-en2 2 3 16 active 16 lp5p65501-en2 2 3 16 active
As can be seen in the previous example, the diskless node lp5p65501 is now part of the GPFS cluster.
The last remaining task is to mount our GPFS file system onto the node. The mmmount command is issued from an existing GPFS node, as shown in Example 6-25. Note the output of the df command on the diskless node before and after the mmmount command is issued.
Example 6-25 Mounting the GPFS file system
# dfFilesystem 512-blocks Free %Used Iused %Iused Mounted on
284 Configuring and Managing AIX Clusters Using xCAT 2

lp1p65501:/install/nim/root/610_diskless_root/lp5p65501 26869760 9584912 65% 54745 5% /lp1p65501:/install/nim/spot/610_diskless/usr 26869760 9584912 65% 54745 5% /usr
mmmount command is issued on an exiting GPFS Node:lp2p65501 #mmmount /gpfs1 -N lp5p65501-en2Tue May 19 16:12:46 EDT 2009: mmmount: Mounting file systems ...lp2p65501 #
# dfFilesystem 512-blocks Free %Used Iused %Iused Mounted onlp1p65501:/install/nim/root/610_diskless_root/lp5p65501 26869760 9584776 65% 54751 5% /lp1p65501:/install/nim/spot/610_diskless/usr 26869760 9584776 65% 54751 5% /usr/dev/gpfs1 251658240 247448576 2% 39730 32% /gpfs1#
We can verify that GPFS is running using one of the following methods:
� Run the mmgetstate -av command from one GPFS node.� Issue the mmdf command from an existing GPFS node.� Create a directory in the GPFS file system on one node and read from that
directory on the diskless node.� Use the mmlsmount all -L command.
6.5.2 How to recover GPFS membership
In case the NFS-exported directory of a diskless node is deleted on the NIM master, the node will need to be recreated, following Steps 1 to 12 in 5.3.4, “Installing diskless nodes” on page 209.
Note: Every time GPFS nodes are booted, the version of the /var/mmfs/gen/mmsdrfs file is verified with the configuration data servers (the version line has the tag “%%9999%%:00_VERSION_LINE”). If the version number is not the latest, /var/mmfs/gen/mmsdrfs is copied from the configuration server the node communicates with (the default is the primary server). The process that initiates this check is /usr/lpp/mmfs/bin/mmautoload, which is called from /etc/inittab at AIX startup. By default, the inittab entry shown below is added when the base GPFS code is installed:
mmfs:2:once:/usr/lpp/mmfs/bin/mmautoload >/dev/console 2>&1
Chapter 6. xCAT 2 - advanced administrative topics 285

However, instead of performing Step 13, you can run mmsdrrestore from the reinstalled node to get the node back into the GPFS cluster.
This command will request a new copy of the /var/mmfs/gen/mmsdrfs file from the node that mmsdrrestore is directed to (it is recommended to use the primary or secondary configuration data server).
Example 6-26 Checking the cluster configuration
# mmlsclusterGPFS cluster information========================GPFS cluster name: CSMtoxCAT.virt-p5501_p1GPFS cluster id: 13882456113010480887GPFS UID domain: CSMtoxCAT.virt-p5501_p1Remote shell command: /usr/bin/sshRemote file copy command: /usr/bin/scpGPFS cluster configuration servers:-----------------------------------Primary server: virt-p5501_p1Secondary server: virt-p5502-p1
The node will then be aware of the GPFS cluster it is a member of and mmstartup will complete successfully, as shown in Example 6-27.
Example 6-27 Restoring the /var/mmfs/gen/mmsdrfs file on a diskless node
# mmlsclustermmlscluster: 6027-1382 This node does not belong to a GPFS cluster.mmlscluster: 6027-1639 Command failed. Examine previous error messages to determine cause.
# mmsdrrestore -p virt-p5501_p1 -R /usr/bin/scp Thu May 21 17:50:10 2009: 6027-1664 mmsdrrestore: Processing node virt-p5501_p5mmsdrrestore: Node virt-p5501_p5 successfully restored.
[p630n05][/]> lsdef -t node -l -z -o virt-p5501_p6 > /tmp/vio_xcat/virt-p5501_p8.stanza
# mmlscluster
Note: The administrator will need to know what nodes are configured to perform the roles of primary and secondary configuration server. The nodes can be identified by running the mmlscluster command on a working node in the same GPFS cluster, as shown in Example 6-26.
286 Configuring and Managing AIX Clusters Using xCAT 2

[p630n05][/]> vi /tmp/vio_xcat/virt-p5501_p8.stanza"virt-p5501_p8.stanza" 25 lines, 582 characters# <xCAT data object stanza file>GPFS cluster information======================== GPFS cluster name: CSMtoxCAT.virt-p5501_p1 GPFS cluster id: 13882456113010480887 GPFS UID domain: CSMtoxCAT.virt-p5501_p1 Remote shell command: /usr/bin/ssh Remote file copy command: /usr/bin/scp
virt-p5501_p8:GPFS cluster configuration servers:----------------------------------- Primary server: objtype=nodevirt-p5501_p1 Secondary server: virt-p5502-p1
Node Daemon node name IP address Admin node name Designation ------------------------------------------------------------------------------------- 1 virt-p5501_p1 192.168.100.72 virt-p5501_p1 quorum-manager 2 virt-p5501_p2 192.168.100.73 virt-p5501_p2 quorum-manager 4 virt-p5501_p4 192.168.100.75 virt-p5501_p4 5 virt-p5501_p5 192.168.100.76 virt-p5501_p5 6 virt-p5501_p6 192.168.100.77 virt-p5501_p6 7 virt-p5502-p1 192.168.100.82 virt-p5502-p1 quorum-manager 8 virt-p5502-p2 192.168.100.83 virt-p5502-p2 quorum-manager 9 virt-p5502-p3 192.168.100.84 virt-p5502-p3 10 virt-p5502-p4 192.168.100.85 virt-p5502-p4 13 virt-p5502-p5 192.168.100.86 virt-p5502-p5 14 virt-p5502-p6 192.168.100.87 virt-p5502-p6 15 virt-p5501_p3 192.168.100.74 virt-p5501_p3
# mmstartupThu May 21 17:50:19 2009: 6027-1642 mmstartup: Starting GPFS ...
# mmgetstate
Node number Node name GPFS state ------------------------------------------ 5 virt-p5501_p5 active
Note: The mmsdrestore command can be used for diskful nodes too if the /var/mmfs/gen/mmsdrfs file is removed for some reason.
Chapter 6. xCAT 2 - advanced administrative topics 287

6.6 PowerVM deployment and management using xCAT
In this section we demonstrate some of the features built into xCAT, which can help deploying VIO Servers and LPARs, and enable automatic configuration of them.
In our scenario we created LPARs with virtualized I/O, so no physical adapters and disks were attached to the client LPARs.
6.6.1 VIO Server backup and restore methods
Table 6-2 shows the possible methods to back up and install a VIO Server.
Table 6-2 VIO Server backup and install methods
We describe the last two scenarios in Table 6-2.
Method 1Using the mksysb image. Backup is made to a local file system, and transferred to our NIM master. The backup is in AIX mksysb format. Standard NIM mksysb installation can be used to install the server. For this method we have to prepare the xCAT and NIM environment to have the necessary install resources for the VIO Server node.
Method 2Using the NIMOL image. Backup is made to a local file system and transferred to our NIM server. The backup contains all necessary NIM resources in a tar file, which can be installed with a simple command, installios. In this case the steps to prepare the NIM environment are not needed.
The tasks necessary for the deployment are broken to common and unique tasks, based on the method chosen for the backup and restore. These tasks are:
Backup Media Restore
To tape Tape From tape
To DVD DVD-RAM From DVD
To remote file system mksysb image
mksysb image From AIX NIM server and a standard mksysb system installation
To remote file system nim_resources.tar From an HMC using NIM on Linux (NIMOL) facility and installios command
288 Configuring and Managing AIX Clusters Using xCAT 2
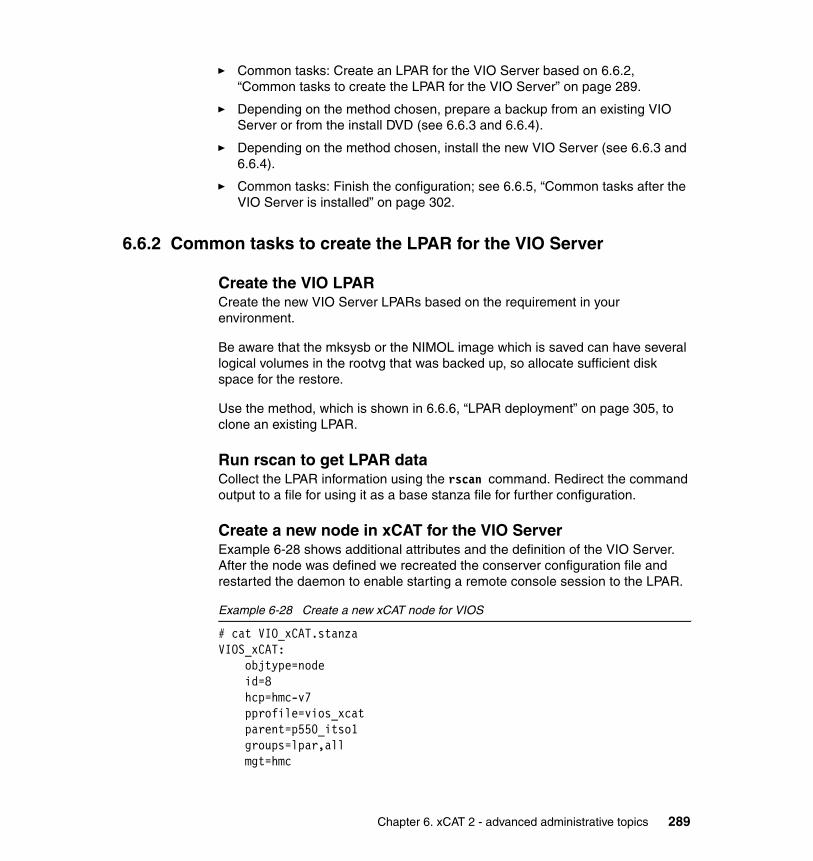
� Common tasks: Create an LPAR for the VIO Server based on 6.6.2, “Common tasks to create the LPAR for the VIO Server” on page 289.
� Depending on the method chosen, prepare a backup from an existing VIO Server or from the install DVD (see 6.6.3 and 6.6.4).
� Depending on the method chosen, install the new VIO Server (see 6.6.3 and 6.6.4).
� Common tasks: Finish the configuration; see 6.6.5, “Common tasks after the VIO Server is installed” on page 302.
6.6.2 Common tasks to create the LPAR for the VIO Server
Create the VIO LPARCreate the new VIO Server LPARs based on the requirement in your environment.
Be aware that the mksysb or the NIMOL image which is saved can have several logical volumes in the rootvg that was backed up, so allocate sufficient disk space for the restore.
Use the method, which is shown in 6.6.6, “LPAR deployment” on page 305, to clone an existing LPAR.
Run rscan to get LPAR dataCollect the LPAR information using the rscan command. Redirect the command output to a file for using it as a base stanza file for further configuration.
Create a new node in xCAT for the VIO ServerExample 6-28 shows additional attributes and the definition of the VIO Server. After the node was defined we recreated the conserver configuration file and restarted the daemon to enable starting a remote console session to the LPAR.
Example 6-28 Create a new xCAT node for VIOS
# cat VIO_xCAT.stanzaVIOS_xCAT: objtype=node id=8 hcp=hmc-v7 pprofile=vios_xcat parent=p550_itso1 groups=lpar,all mgt=hmc
Chapter 6. xCAT 2 - advanced administrative topics 289

groups=AllDevices mtm=550-9113 nodetype=ioserver,lpar,osi power=hmc os=AIX arch=ppc64 serial=106628E serialspeed=9600 serialflow=hard serialport=ttyS0 cons=hmc termserver=hmc-v7 xcatmaster=192.168.100.35
# cat VIO_xCAT.stanza | mkdef -zObject definitions have been created or modified.
# lsdef -t node -o VIOS_xCAT -l
Object name: VIOS_xCAT arch=ppc64 cons=hmc groups=AllDevices hcp=hmc-v7 id=8 mac=000255d39ce0 mgt=hmc mtm=550-9113 nodetype=ioserver,lpar,osi os=AIX parent=p550_itso1 power=hmc pprofile=vios_xcat serial=106628E serialflow=hard serialport=ttyS0 serialspeed=9600 xcatmaster=192.168.100.35# makeconservercf# stopsrc -s conserver0513-044 The conserver Subsystem was requested to stop.# startsrc -s conserver0513-059 The conserver Subsystem has been started. Subsystem PID is 307514.
290 Configuring and Managing AIX Clusters Using xCAT 2

Gather the adapter data and set the MAC address of the VIOSThe adapter information can be gathered by the getmacs command in xCAT as shown in Example 6-29. Use the MAC address for the physical adapter for initial installation. Later, after the VIO Server is installed and we configure Shared Ethernet Adapter on the physical adapter that was used to install it, we will have to detach the interface first.
Example 6-29 Collect the MAC address for VIOS
# getmacs VIOS_xCATVIOS_xCAT:# Type Location Code MAC Address Full Path Name Ping Resultent U9113.550.106628E-V8-C2-T1 7241e0008002 /vdevice/l-lan@30000002 virtualent U787B.001.DNW1375-P1-C2-T1 000255d39ce0 /pci@800000020000003/pci@2,6/ethernet@1 physical
After the adapter info is displayed, it can be stored with:
mkdef -t node -f -o VIOS_xCAT mac=000255d39ce0
6.6.3 Method 1 - using mksysb restore
Creating a VIO Server backup image (mksysb)The image can be copied either from the VIO install DVD or you can create a new backup in mksysb format on the VIO Server and copy it to the NIM. Either way an NIM mksysb resource has to be created to point to the backup file to enable future use.
Steps for creating a new mksysb image for an existing VIO Server onto the NIM server (in our case this is the xCAT MN):
� Create a new directory for the NIM mksysb images on the xCAT MN: /install/nim/images.
� NFS export the directory on the NIM server, allowing root access as shown in Example 6-30.
Example 6-30 Exporting the backup file system on NIM server
# exportfs -v/install/nim/images -sec=sys:krb5p:krb5i:krb5:dh,rw,root=vios-p5501
Chapter 6. xCAT 2 - advanced administrative topics 291

NFS mount the /install/nim/images directory on the VIO Server� For mksysb image creation run the following command; the results are shown
in Example 6-31.
backupios -file /mnt/vios-p5501.mksysb -mksysb -nosvg
Example 6-31 Creating an mksysb image on a VIO Server
$ mount p630n05:/install/nim/images /mnt$ backupios -file /mnt/vios-p5501.mksysb -mksysb -nosvg
/mnt/vios-p5501.mksysb doesn't exist.
Creating /mnt/vios-p5501.mksysbBackup in progress. This command can take a considerable amount of timeto complete, please be patient...
Creating information file (/image.data) for rootvg.
Creating list of files to back up.....Backing up 66931 files..............................57432 of 66931 files (85%)....66931 of 66931 files (100%)0512-038 savevg: Backup Completed Successfully.$ unmount /mnt
� Unmount the directory.
Create the mksysb NIM resource� Check the backup file on the NIM server and unexport the directory:
exportfs -i -u /install/nim/images
� Create an mksysb NIM resource using the mksysb backup file:
nim -o define -t mksysb -a server=master -a location=/install/nim/images/vios-p5501.mksysb vios-1521-mksysb
� Check the mksysb resource, shown in Example 6-32.
Example 6-32 List the attributes of the NIM mksysb resource
# lsnim -l vios-1521-mksysbvios-1521-mksysb: class = resources type = mksysb Rstate = ready for use
292 Configuring and Managing AIX Clusters Using xCAT 2

prev_state = unavailable for use location = /install/nim/images/vios-p5501.mksysb version = 5 release = 3 mod = 8 oslevel_r = 5300-08 alloc_count = 0 server = master extracted_spot = vios-1521-spot
Create a SPOT NIM resource for the installation� The command for SPOT creation from an mksysb image is:
nim -o define -t spot -a server=master -a location=/install/nim/spot -a source=vios-1521-mksysb -a installp_flags=-aQg vios-1521-spot
� Check the SPOT, as shown in Example 6-33.
Example 6-33 Query the attributes of the NIM SPOT resource
# lsnim -l vios-1521-spotvios-1521-spot: class = resources type = spot plat_defined = chrp arch = power Rstate = ready for use prev_state = verification is being performed location = /install/nim/spot/vios-1521-spot/usr version = 5 release = 3 mod = 8 oslevel_r = 5300-08 alloc_count = 0 server = master if_supported = chrp.mp ent Rstate_result = success mksysb_source = vios-1521-mksysb
Extract the bosinst.data file and create a NIM resourceTo perform automated installation we need a customized bosinst_data NIM resource.
Chapter 6. xCAT 2 - advanced administrative topics 293

The bosinst.data file is saved in the mksysb. It is possible to restore it and create a NIM resource using the commands shown in Example 6-34.
Example 6-34 Restore the bosinst.data file from an mksysb image
# cd /install/nim/images# restorevgfiles -r -f /install/nim/images/vios-p5501.mksysb ./bosinst.dataNew volume on /install/nim/images/vios-p5501.mksysb: Cluster 51200 bytes (100 blocks). Volume number 1 Date of backup: Tue Dec 29 23:59:51 America 1970 Files backed up by name User rootx 5178 ./bosinst.data total size: 5178 files restored: 1# sed "s/PROMPT = yes/PROMPT = no/" bosinst.data > vios-p5501.bosinst.data# nim -o define -t bosinst_data -a server=master -a location=/install/nim/images/vios-p5501.bosinst.data vios-p5501-bosinst_data# lsnim|grep viosvios-1521-mksysb resources mksysbvios-1521-spot resources spotvios-p5501-bosinst_data resources bosinst_data
The default bosinst_data file, which is restored from the mksysb, contains an entry which would show a prompt and wait for manual intervention. To avoid this we had to change the value of the PROMPT variable to no. Also, the target disk entry should be inserted, otherwise the installation will stop and ask for a target disk.
Create an osimage on xCAT MNIn Example 6-35 we use the existing NIM resources to define an xCAT osimage.
Example 6-35 Create the xCAT nimimage and osimage
# mknimimage -m mksysb spot=vios-1521-spot mksysb=vios-1521-mksysb bosinst_data=vios-p5501-bosinst_data vios_1521_osimageThe following xCAT osimage definition was created. Use the xCAT lsdef command to view the xCAT definition and the AIX lsnim command to view the individual NIM resources that are included in this definition.
Object name: vios_1521_osimage bosinst_data=vios-p5501-bosinst_data
294 Configuring and Managing AIX Clusters Using xCAT 2

imagetype=NIM mksysb=vios-1521-mksysb nimmethod=mksysb nimtype=standalone osname=AIX spot=vios-1521-spot
There is another solution, which would define the necessary NIM resources and the osimage into xCAT, if only the mksysb file name is given for the xCAT command mknimimage.
Prepare the NIM client for the VIO Server and install via NIMWhen the VIO Server is installed using normal NIM operations, the mksysb, bosinst_data and SPOT NIM resources have to be created manually. After creation they have to be allocated to the VIO Server node and a BOS installation has to be initiated.
Create the NIM clientWe created the NIM client from the xCAT node using the xcat2nim command, as shown in Example 6-36, which shows a failure because the MAC address was defined for a NIM client used by the installios example. After removal of that client, xcat2nim ran successfully.
Example 6-36 Creating the NIM client for VIOS
# xcat2nim -V VIOS_xCAT Assuming an object type of 'node'.
Error: Could not create a NIM definition for 'VIOS_xCAT'.
Error: 0042-001 nim: processing error encountered on "master": 0042-083 m_mkmac: network hardware addresses must be unique and "000255d39ce0" is already being used by the machine "installios_client"
Error: One or more errors occured.
Error: Return=1.
# installios -uRemoving installios_client object definition...doneRemoving installios_spot object definition...doneRemoving installios_mksysb object definition...doneRemoving installios_bosinst object definition...doneRemoving file /export/installios/mksysb/installios_mksysb...done
Chapter 6. xCAT 2 - advanced administrative topics 295

Removing file /export/installios/installios_bosinst.data...doneRemoving directory /export/installios/mksysb...doneRemoving directory /export/installios/spot...doneRemoving directory /export/installios/bundle...doneRemoving directory /export/installios/lpp_source...doneRemoving file /export/installios/VIO_IMAGE...done# lsnimmaster machines masterboot resources bootnim_script resources nim_scriptcluster_net networks ent539image_bosinst_data resources bosinst_data539image_lpp_source resources lpp_source539image resources spotxCATaixSSL resources installp_bundlexCATaixSSH resources installp_bundlexCATaixSN resources installp_bundleAdapters resources adapter_defvirt-p5501_p3 machines standaloneAIXNodes groups mac_groupvirt-p5501_p4 machines standalonevirt-p5501_p2 machines standalonevirt-p5501_p1 machines standalonevirt-p5501_p6 machines standalonevirt-p5501_p5 machines standalonexcataixscript resources scriptvios-1521-mksysb resources mksysbvios-1521-spot resources spotvios-p5501-bosinst_data resources bosinst_data# xcat2nim -V VIOS_xCAT Assuming an object type of 'node'.
The following definitions were created:
VIOS_xCAT
# lsnim -l VIOS_xCATVIOS_xCAT: class = machines type = standalone connect = shell platform = chrp netboot_kernel = mp if1 = cluster_net VIOS_xCAT 000255d39ce0 ent cable_type1 = N/A
296 Configuring and Managing AIX Clusters Using xCAT 2

Cstate = ready for a NIM operation prev_state = ready for a NIM operation Mstate = currently running
Set up the VIO Server for network bootxCAT provides an interface to the necessary NIM functions to install NIM clients. We used this to install the VIO Server, shown in Example 6-37.
Example 6-37 Set the VIOS NIM client to run bosinst
# nimnodeset -i vios_1521_osimage VIOS_xCATp630n05: AIX/NIM nodes were initialized.
# lsnim -l VIOS_xCATVIOS_xCAT: class = machines type = standalone connect = shell platform = chrp netboot_kernel = mp if1 = cluster_net VIOS_xCAT 000255d39ce0 ent cable_type1 = N/A Cstate = BOS installation has been enabled prev_state = ready for a NIM operation Mstate = currently running boot = boot bosinst_data = vios-p5501-bosinst_data mksysb = vios-1521-mksysb nim_script = nim_script script = xcataixscript spot = vios-1521-spot control = master
Tip: You may experience issues with passing gateway information to the node to be installed as a result of the NIM network route information. Example 6-38 shows how the bootp is configured in our case.
To resolve the routing problem we unset the route1 attribute for the NIM network we used, and deleted the gateway from the xCAT network definition using the following commands:
nim -o change -a routing1= cluster_netchdef -t network -o cluster_net gateway=0.0.0.0
Chapter 6. xCAT 2 - advanced administrative topics 297

Example 6-38 bootp configuration in our environment
Manual netboot without route information:
BOOTP: chosen-network-type = ethernet,auto,rj45,autoBOOTP: server IP = 192.168.100.35BOOTP: requested filename =BOOTP: client IP = 192.168.100.78BOOTP: client HW addr = 0 2 55 d3 9c e0BOOTP: gateway IP = 0.0.0.0BOOTP: device /pci@800000020000003/pci@2,6/ethernet@1BOOTP: loc-code U787B.001.DNW1375-P1-C2-T1
Automatic netboot with route information in NIM network:
BOOTP: chosen-network-type = ethernet,auto,rj45,autoBOOTP: server IP = 192.168.100.35BOOTP: requested filename =BOOTP: client IP = 192.168.100.78BOOTP: client HW addr = 0 2 55 d3 9c e0BOOTP: gateway IP = 192.168.100.60BOOTP: device /pci@800000020000003/pci@2,6/ethernet@1BOOTP: loc-code U787B.001.DNW1375-P1-C2-T1
Network boot the VIO ServerRun the rnetboot command to NIM install the node.
6.6.4 Method 2 - using NIMOL
Create a VIO backupThe image has to be created from an existing VIO Server. The steps are:
� Create a new directory for the NIM mksysb images on the xCAT MN: /install/nim/images.
� NFS export the directory on the NIM server allowing root access, as shown in Example 6-39.
Note: The post-install scripts are not started, because the VIO Server runs a restricted version of AIX.
298 Configuring and Managing AIX Clusters Using xCAT 2

Example 6-39 Exporting the NIM backup space for the NIMOL image
# exportfs -v/install/nim/images -sec=sys:krb5p:krb5i:krb5:dh,rw,root=vios-p5501
� Mount the /install/nim/images directory over NFS on the existing VIO Server.
� Create the NIMOL image using the following command:
backupios -file /mnt -nosvg
� Unmount the directory.
Installing the VIO ServerIf we use the installios command to install the VIO Server, then no additional NIM settings would be necessary.
In our scenario the MAC address was not set by the installios command, so the bootp failed. To resolve this we performed a NIM bosinst operation and initiated a manual network boot from a virtual terminal window. These steps are shown in Example 6-40.
Example 6-40 Install the VIOS using the installios command
# installios -h hmc-v7 -s p550_itso1 -p VIOS_xCAT -r vios_xcat -S 255.255.255.0 -i 192.168.100.78 -g 192.168.100.35 -d /install/nim/images/nim_resources.tar -P 1000 -D full -n -m 00:02:55:d3:9c:e0 Creating the /export/installios/mksysb directory.Creating the /export/installios/spot directory.Creating the /export/installios/bundle directory.Creating the /export/installios/lpp_source directory.Creating the /export/installios/VIO_IMAGE directory.Preparing to copy install images (this will take several minutes)...Defining installios_client object...doneDefining installios_mksysb object...doneDefining installios_spot object...doneDefining installios_bosinst object...doneInitiating install...failedInitiating network boot...# Connecting to VIOS_xCAT# Connected# Checking for power off.
Note: Use this method only if a NIMOL backup is already available from an existing VIO Server, because it requires some additional manual steps.
Chapter 6. xCAT 2 - advanced administrative topics 299

# Power off complete.# Power on VIOS_xCAT to Open Firmware.# Power on complete.# Client IP address is 192.168.100.78.# Server IP address is 192.168.100.35.# Gateway IP address is 192.168.100.35.# Subnetmask IP address is 255.255.255.0.# Getting adapter location codes.lpar_netboot: 1000/full settings are not supported on this adapter# /pci@800000020000003/pci@2,6/ethernet@1 ping successful.# Network booting install adapter.# bootp sent over network.lpar_netboot: The network boot ended in an error.failed
# lsnimmaster machines masterboot resources bootnim_script resources nim_scriptcluster_net networks ent...installios_client machines standaloneinstallios_mksysb resources mksysbinstallios_spot resources spotinstallios_bosinst resources bosinst_data
# lsnim -l installios_clientinstallios_client: class = machines type = standalone comments = Client for installios connect = shell platform = chrp netboot_kernel = mp if1 = cluster_net VIOS_xCAT 0 net_settings1 = 1000 full cable_type1 = N/A Cstate = ready for a NIM operation prev_state = ready for a NIM operation Mstate = not running bosinst_data = installios_bosinst mksysb = installios_mksysb spot = installios_spot control = master
300 Configuring and Managing AIX Clusters Using xCAT 2

When we checked the bootptab file we found that it was empty, so this was the reason why the NIM server did not respond for the bootp request coming from the LPAR.
We added the MAC address manually via the smitty nim menu and set the VIO Server to network boot using mksysb. After this we initiated a network boot via rcons as shown in Example 6-41.
Example 6-41 Check the NIM client definition for VIOS
# lsnim -l installios_clientinstallios_client: class = machines type = standalone comments = Client for installios connect = shell platform = chrp netboot_kernel = mp if1 = cluster_net VIOS_xCAT 000255d39ce0 net_settings1 = 1000 full cable_type1 = N/A Cstate = BOS installation has been enabled prev_state = ready for a NIM operation Mstate = not running boot = boot bosinst_data = installios_bosinst mksysb = installios_mksysb nim_script = nim_script spot = installios_spot control = master
The network install of the VIO Server was successful. The NIMOL resources can be removed, as shown in Example 6-42.
Example 6-42 Remove NIMOL resources
# installios -uRemoving installios_client object definition...doneRemoving installios_spot object definition...doneRemoving installios_mksysb object definition...doneRemoving installios_bosinst object definition...doneRemoving file /export/installios/mksysb/installios_mksysb...doneRemoving file /export/installios/installios_bosinst.data...doneRemoving directory /export/installios/mksysb...doneRemoving directory /export/installios/spot...doneRemoving directory /export/installios/bundle...done
Chapter 6. xCAT 2 - advanced administrative topics 301

Removing directory /export/installios/lpp_source...doneRemoving file /export/installios/VIO_IMAGE...done
6.6.5 Common tasks after the VIO Server is installed
The following tasks are common and independent of the method used to install the operating system on the VIO Server.
Create the necessary virtual device mapping (LPAR resources)After the installation the remote console facility is working from the xCAT MN, so it is possible to log in and do the additional customizing steps.
1. Change the VIO Server to allow the VIO clients to access the server side Virtual SCSI adapter, which can be done in advance knowing the plans for the client LPAR names and adapter setup. Example 6-43 shows the LPAR attributes and how to change the necessary ones.
Example 6-43 List and change the LPAR definition for the VIOS
[p630n05][/]> lsvm VIOS_xCATVIOS_xCAT: name=vios_xcat,lpar_name=VIOS_xCAT,lpar_id=8,lpar_env=vioserver,all_resources=0,min_mem=512,desired_mem=1024,max_mem=2048,proc_mode=shared,min_proc_units=0.1,desired_proc_units=0.4,max_proc_units=0.8,min_procs=1,desired_procs=1,max_procs=1,sharing_mode=uncap,uncap_weight=128,"io_slots=21040003/none/1,21030003/none/1",lpar_io_pool_ids=none,max_virtual_slots=10,"virtual_serial_adapters=0/server/1/any//any/1,1/server/1/any//any/1",virtual_scsi_adapters=none,virtual_eth_adapters=2/0/1//2/1,hca_adapters=none,boot_mode=norm,conn_monitoring=0,auto_start=0,power_ctrl_lpar_ids=none,work_group_id=none,redundant_err_path_reporting=0
[p630n05][/]> chvm VIOS_xCAT virtual_scsi_adapters=3/server/9/virt-p5501_p8/4/1VIOS_xCAT: Success
[p630n05][/]> lsvm VIOS_xCAT
Note: If the installation used the network interface that is planned to be part of a Shared Ethernet Adapter configuration, then the interface has to be de-configured before the SEA setup. This will break the IP connection, so use the remote console to log in and finish the VIO setup.
302 Configuring and Managing AIX Clusters Using xCAT 2

VIOS_xCAT: name=vios_xcat,lpar_name=VIOS_xCAT,lpar_id=8,lpar_env=vioserver,all_resources=0,min_mem=512,desired_mem=1024,max_mem=2048,proc_mode=shared,min_proc_units=0.1,desired_proc_units=0.4,max_proc_units=0.8,min_procs=1,desired_procs=1,max_procs=1,sharing_mode=uncap,uncap_weight=128,"io_slots=21040003/none/1,21030003/none/1",lpar_io_pool_ids=none,max_virtual_slots=10,"virtual_serial_adapters=0/server/1/any//any/1,1/server/1/any//any/1",virtual_scsi_adapters=3/server/9/virt-p5501_p8/4/1,virtual_eth_adapters=2/0/1//2/1,hca_adapters=none,boot_mode=norm,conn_monitoring=0,auto_start=0,power_ctrl_lpar_ids=none,work_group_id=none,redundant_err_path_reporting=0
2. Create a logical volume, which will serve as the rootvg for the client LPAR as shown in Example 6-44.
Example 6-44 Create an LV that stores the client rootvg
$ mklv -lv p8_rootvg rootvg 64p8_rootvg
3. Map the LV to the server side virtual SCSI adapter, as shown in Example 6-45.
Example 6-45 Change virtual device mappings
$ lsmap -allSVSA Physloc Client Partition ID--------------- -------------------------------------------- ------------------vhost0 U9113.550.106628E-V8-C3 0x00000000
VTD NO VIRTUAL TARGET DEVICE FOUND
$ mkvdev -vdev p8_rootvg -vadapter vhost0 -dev p8_rootvg_devp8_rootvg_dev Available
$ lsmap -allSVSA Physloc Client Partition ID--------------- -------------------------------------------- ------------------vhost0 U9113.550.106628E-V8-C3 0x00000000
VTD p8_rootvg_devStatus AvailableLUN 0x8100000000000000Backing device p8_rootvgPhysloc
Chapter 6. xCAT 2 - advanced administrative topics 303

4. Example 6-46 shows how to save the TCP/IP configuration.
Example 6-46 Saving TCP/IP configuration
$ netstat -state -numName Mtu Network Address Ipkts Ierrs Opkts Oerrs Collen0 1500 link#2 0.2.55.d3.9c.e0 0 0 8 8 0en0 1500 192.168.100 192.168.100.78 0 0 8 8 0lo0 16896 link#1 181 0 181 0 0lo0 16896 127 127.0.0.1 181 0 181 0 0lo0 16896 ::1 181 0 181 0 0$ netstat -routinfo -numRouting tablesDestination Gateway Flags Wt Policy If Cost Config_Cost
Route Tree for Protocol Family 2 (Internet):default 192.168.100.60 UG 1 - en0 0 0127/8 127.0.0.1 U 1 - lo0 0 0192.168.100.0 192.168.100.78 UHSb 1 - en0 0 0 =>192.168.100/24 192.168.100.78 U 1 - en0 0 0192.168.100.78 127.0.0.1 UGHS 1 - lo0 0 0192.168.100.255 192.168.100.78 UHSb 1 - en0 0 0
Route Tree for Protocol Family 24 (Internet v6):::1 ::1 UH 1 - lo0 0 0
5. Remove the TCP/IP configuration to free up the physical Ethernet adapter using the command rmtcpip -f -interface en0.
6. Example 6-47 shows how to create a Shared Ethernet Adapter.
Example 6-47 Creating Shared Ethernet Adapter
$ mkvdev -sea ent0 -vadapter ent1 -default ent1 -defaultid 666ent2 Available
$ lsmap -all -netSVEA Physloc------ --------------------------------------------ent1 U9113.550.106628E-V8-C2-T1
SEA ent2Backing device ent0Status AvailablePhysloc U787B.001.DNW1375-P1-C2-T1
304 Configuring and Managing AIX Clusters Using xCAT 2

7. Configure TCP/IP onto the SEA adapter using the saved information, as shown in the following example:
mktcpip -hostname VIOS_xCAT -inetaddr 192.168.100.78 -interface en2 -start -gateway 192.168.100.60 -netmask 255.255.255.0
6.6.6 LPAR deployment
xCAT is able to extract the configuration of an existing LPAR with the profile data and create a new LPAR from it. We used this functionality to duplicate an existing LPAR in the following examples.
1. Save the definition on an existing LPAR and edit the stanza file (the changed attributes are shown in italic), as shown in Example 6-48.
Example 6-48 Cloning the LPAR definition
[p630n05][/]> lsdef -t node -l -z -o virt-p5501_p6 > /tmp/vio_xcat/virt-p5501_p8.stanza
[p630n05][/]> vi /tmp/vio_xcat/virt-p5501_p8.stanza"virt-p5501_p8.stanza" 25 lines, 582 characters# <xCAT data object stanza file>
virt-p5501_p8: objtype=node arch=ppc64 cons=hmc groups=p5501,AIXNodes,HMCNodes,AllNodes,ManagedNodes,NIMNodes,compute,all,lpar,all hcp=hmc-v7 id= mac=7241E0007002 mgt=hmc nodetype=lpar,osi os=AIX parent=p550_itso1 postscripts=setupntp,TEST_Setup_RMC._AllNodes power=hmc pprofile=p6_profile profile=539image
Note: The following commands could be integrated in a script for multiple node and LPAR creation and setup.
Chapter 6. xCAT 2 - advanced administrative topics 305

serial=106628E serialflow=hard serialport=ttyS0 serialspeed=9600 status=alive termserver=hmc-v7 xcatmaster=192.168.100.35
2. Create the new node using the stanza file:
cat /tmp/vio_xcat/virt-p5501_p8.stanza|mkdef -z
3. Configure the conserver daemon as shown in other examples.
4. Create a new LPAR via copying an existing LPAR definition and profile data:
mkvm virt-p5501_p8 -i 9 -l virt-p5501_p6
5. Verify that the new LPAR is allowed to connect to the server side SCSI adapters. The server side adapter setup should be done before node deployment to avoid VIO reboots, which could disturb the already active VIO client nodes. Change the LPAR’s virtual SCSI adapter to connect to the correct server side adapter:
chvm virt-p5501_p8 virtual_scsi_adapters=4/client/8/VIOS_xCAT/3/1
6. Configure the Virtual Ethernet adapter:
chvm virt-p5501_p8 virtual_eth_adapters=2/0/666//0/1
7. In our scenario we had to change the minimum memory requirements as well, which is possible using the following command:
chvm virt-p5501_p8 min_mem=256
8. Once this step is completed, normal xCAT node installation can be done as explained in 5.3, “Installing the nodes” on page 198.
6.7 Databases - SQLite and MySQL
Due to its modular implementation, xCAT stores cluster data in an external database. Currently, SQLite and MySQL are supported. DB2® may be supported in the future.
The default database used for xCAT is SQLite. If you have a flat cluster (no hierarchical cluster management), SQLite can be used out of the box.
However, if you need to implement hierarchical management (due to the cluster size), you need to use a database that provides remote client access via the
306 Configuring and Managing AIX Clusters Using xCAT 2

network. Currently, the only supported database that also provides client network access is MySQL.
In 5.2.2, “Switching xCAT SQLite database to MySQL” on page 165 we describe how to configure MySQL as xCAT database.
6.8 Clustering security
This section provides information about security aspects that you should consider for your HPC environment. Most of the security aspects are rather general and valid for most IT environments, thus we will emphasize only the aspects particular to an HPC environment.
6.8.1 Security considerations in an HPC environment
The ultimate goal of HPC is to provide the necessary compute resources for running customer jobs. If the resources are not managed properly, the cluster may not fulfill requirements up to (or as close as possible to) its designed potential. In this respect, security of a cluster becomes an important component of the cluster availability.
Besides actual customer data security, any operation that would prevent the cluster from running useful customer loads needs to be addressed and controlled. Generally, administrative operations improperly executed can render the cluster useless. Thus, these operations need to be properly implemented, scheduled, and audited.
In addition, any access to a cluster via its networks needs to be secured for the same reasons: data security and cluster availability.
HPC clusters, in general, are designed to minimize or eliminate any overhead that may take CPU cycles away from customer compute jobs. For this reason, cluster nodes are tightly connected with high throughput networks, and share a common storage infrastructure.
Because the cluster nodes are tightly connected, if one node becomes unavailable for any reason, then the job that runs on the set of nodes to which the failing node belongs has a very good chance to fail.
The failing node may be the result of an improper administrative action, or even an external attack over the network. Furthermore, we can say that if one node in an HPC cluster is compromised, the entire cluster is exposed and may be
Chapter 6. xCAT 2 - advanced administrative topics 307

compromised. Thus, a combination of security measures and techniques must be employed to resolve the overall security of an HPC cluster, as follows:
� Networking security
– External network - firewall– Internal network - administrative network separation
� Node security
– Hardware - securing access to physical nodes– Hardening OS and communication software
� Overall cluster security
– Securing physical console access– Employing access control and auditing infrastructure and procedures for
administrative tasks– Controlling and restricting access to job execution and scheduling
6.8.2 Networking security
External network The most common technique is to isolate the cluster networks using a firewall infrastructure. For this reason you need to understand what access is needed to and from inside the cluster (services, applications, users, and so on). Firewalls are common to IT infrastructure and are available in commercial or open source implementations.
Internal network - administrative network separationInternal cluster network infrastructure should provide network separation at the VLAN level for different cluster functions:
� Hardware control VLAN� Storage VLAN� Application (compute) VLAN(s)� User Access VLAN� Cluster management VLAN(s)
Also, the cluster nodes should only be connected to the networks they require for their functionality:
� Management node� Storage nodes� Front-end/user access (login) nodes
Important: Cluster security should be treated globally, and every individual security method or aspect should be correlated inside the HPC environment.
308 Configuring and Managing AIX Clusters Using xCAT 2

� Compute nodes
For example, a front-end/user access (login) node requires a connection to the user access and storage VLANs, optionally to the cluster management VLAN, but does not need to be connected to the hardware management VLAN, or to the application VLAN.
6.8.3 Remote command execution security
Because the cluster acts as a single entity, a centralized control and command execution mechanism is implemented. This is generally used for administrative tasks, but can also be used for job control and monitoring.
Remote command and copy tasks require secure access, that is, only authorized identities (users, services) should be allowed to remotely execute commands or copy files onto the cluster nodes.
xCAT implements a secure access control mechanism for administrative commands using SSL and policies.
6.8.4 xCAT access control via SSL and policies
xCAT provides a policy-based access control for database tables and commands. To enable this feature there is a policy table in the database, which lists the rules that control the access.
The default policy table looks like the one in Example 6-49.
Example 6-49 Listing default policy table
# tabdump policy#priority,name,host,commands,noderange,parameters,time,rule,comments,disable"1","root",,,,,,"allow",,"4.4",,,"getpostscript",,,,"allow",,"4.5",,,"getcredentials",,,,"allow",,
The policy names to be added are basically specifying the priority order, which is checked when a command is executed.
xCAT uses SSL to encrypt the communication and to administer the identities of the users and the server itself. This is why the installation of OpenSSL packages is a prerequisite for xCAT setup.
Chapter 6. xCAT 2 - advanced administrative topics 309

At the xCAT manage node installation SSL certificates are created for the server and for the root user.
Server certificates are stored in the /etc/xcat/certs directory, as shown in Example 6-50.
Example 6-50 Listing server certificate files
# ls -l /etc/xcat/certtotal 56-rw------- 1 root system 1135 May 08 18:44 ca.pem-rw------- 1 root system 4147 May 08 18:44 server-cert.pem-rw------- 1 root system 5822 May 08 18:44 server-cred.pem-rw------- 1 root system 1675 May 08 18:44 server-key.pem-rw------- 1 root system 887 May 08 18:44 server-req.pem
Certificate files for the root and any other users are stored in the .xcat subdirectory under the users’ $HOME.
To enable a new user to run any xCAT operation, the following steps need to be done:
1. Create the AIX user (see Example 6-51).
Example 6-51 Creating a new user
# mkuser lniesz# su - lniesz$ iduid=205(lniesz) gid=1(staff)
2. As root user, create SSL certificates for the user starting the xCAT script as root with the username as parameter as shown in Example 6-52. The script is interactive and asking approvals for overwriting already existing certifications and other options as well!
Example 6-52 Creating SSL certificates for a new AIX user
# /opt/xcat/share/xcat/scripts/setup-local-client.sh lniesz-n /home/lniesz/.xcat already exists, delete and start over (y/n)?yGenerating RSA private key, 2048 bit long modulus..............................................+++......................+++e is 65537 (0x10001)/opt/xcat/share/xcat/scriptsUsing configuration from openssl.cnfCheck that the request matches the signature
310 Configuring and Managing AIX Clusters Using xCAT 2

Signature okCertificate Details: Serial Number: 4 (0x4) Validity Not Before: May 20 18:58:31 2009 GMT Not After : May 15 18:58:31 2029 GMT Subject: commonName = lniesz X509v3 extensions: X509v3 Basic Constraints: CA:FALSE Netscape Comment: OpenSSL Generated Certificate X509v3 Subject Key Identifier: 9E:6B:04:63:15:45:F0:2D:01:3D:B9:F5:0A:A8:CF:4B:3D:E5:F3:31 X509v3 Authority Key Identifier: keyid:DC:5B:E0:10:B1:06:A0:9A:30:4E:D3:82:FE:24:14:86:83:5A:67:CC
Certificate is to be certified until May 15 18:58:31 2029 GMT (7300 days)Sign the certificate? [y/n]:y
1 out of 1 certificate requests certified, commit? [y/n]yWrite out database with 1 new entriesData Base Updated/opt/xcat/share/xcat/scripts
3. Test the access before adding the policy.
$ iduid=205(lniesz) gid=1(staff)$ nodelsError: Permission denied for request
4. Create a policy definition that allows the requested operations, as shown in Example 6-53. We added a policy to allow actions only on the AIXNodes group, and tested what happens if the user wants to run commands against other devices as well.
Example 6-53 Create policy definition
# mkdef -t policy -o 8 name=lniesz rule=allowObject definitions have been created or modified.
5. Test the access again:
$ id
Chapter 6. xCAT 2 - advanced administrative topics 311

uid=205(lniesz) gid=1(staff)$ nodelsvios-p5502hmc-v7p550_itso2virt-p5502-p1virt-p5502-p2virt-p5502-p3virt-p5502-p4virt-p5502-p5virt-p5502-p6
After the access is granted for the user, xCAT will log each attempt the user tries to run an xCAT command as shown in Example 6-54. The example shows that the user was able to run xCAT commands. However, the remote SSH session is blocked on the nodes.
Example 6-54 Syslog entries for user access
May 20 19:17:32 p630n06 local4:err|error xCAT: xCAT: Allowing nodels for lniesz from loopbackMay 20 19:17:47 p630n06 local4:err|error xCAT: xCAT: Allowing xdsh for lniesz from loopbackMay 20 19:17:47 p630n06 user:info syslog: ifconfig -aMay 20 19:17:47 p630n06 user:info syslog: /usr/sbin/ifconfig -aMay 20 19:18:07 virt-p5502-p1 auth|security:info Message forwarded from virt-p5502-p1: sshd[344166]: Invalid user lniesz from 192.168.100.36May 20 19:18:07 virt-p5502-p1 auth|security:info Message forwarded from virt-p5502-p1: syslog: ssh: failed login attempt for UNKNOWN_USER from p630n06May 20 19:18:07 virt-p5502-p1 auth|security:info Message forwarded from virt-p5502-p1: sshd[344166]: Failed none for invalid user lniesz from 192.168.100.36 port 33278 ssh2May 20 19:29:02 p630n06 local4:err|error xCAT: xCAT: Allowing lsvm for lniesz from loopback
Note: The policy handling feature was not fully implemented in the xCAT version that we tested at the time of writing this book. Check the man pages for policy and the xCAT documentation for updates.
Note: However the xCAT access is granted to the user, SSH authentication is still required and checked to run remote commands on xCAT nodes.
312 Configuring and Managing AIX Clusters Using xCAT 2

6.8.5 Securing RSCT and RMC
RSCT security functions ensure that the cluster software components can properly authenticate the identity of associated peers, clients, and subcomponents. Because a program could attempt to imitate a cluster component, cluster components must be able to verify program identities. Instead of only requiring each party to verify the identity of the other when a connection is established, RSCT security uses a message authentication process for identification.
6.8.6 HW control and remote console security
The HW control and console access infrastructure provide their own security (authentication and access control) mechanisms. xCAT provides a set of tools (including database storage) for managing access to HW control and consoles
6.8.7 Users and passwords
Generally, users and passwords are used for administrative tasks. Users can also be defined for the job management and scheduling infrastructure. Follow the guidelines and policies implemented in your IT environment.
6.8.8 Application security
Besides system, network and cluster security, applications also may provide their own security (authentication, authorization, and access control) methods. These methods may also employ encryption techniques, such as Secure Socket Layer and others. Refer to the application documentation for integrating and administrating application security into the overall cluster environment.
6.9 Updating xCAT using latest development snaphots
New releases of xCAT are being released continuously. The latest builds or snapshots are released frequently. As part of our cluster maintenance, and to squash some bugs encountered, we decided to update our xCAT to the latest snapshot.
Chapter 6. xCAT 2 - advanced administrative topics 313

6.9.1 Determine the currently installed level
The level of xCAT installed on our management server can be determined by using the rpm command shown in Example 6-55.
Example 6-55 Use rpm to determine current xCAT level
mgtnode #rpm -qa|grep xCATperl-xCAT-2.2.1-snap200904221514xCAT-client-2.2.1-snap200904221514xCAT-server-2.2.1-snap200904221515xCAT-2.2.1-snap200904221515xCAT-rmc-2.2.1-snap200904221516
6.9.2 Obtain the latest code
The latest snapshot or release of xCAT can be obtained from the sourceforge Web site AT:
http://xcat.sourceforge.net/aix/download.html
There are two types of downloads:
� The stable release: this is the release of xCAT at the version level.
� The snapshot: this is the same release as the stable one, but with bug fixes contained.
Our intent was to update our 2.2.1 version to the latest available snapshot.
We obtained the tar files and unpacked them as in “Downloading and extracting xCAT 2 packages” on page 157.
6.9.3 Backing up the xCAT database
Before updating the software, it is recommended to make a backup of the xCAT database, just in case you have to restore.
We backed up the xCAT database as shown in Example 6-56.
Example 6-56 Backing up the xCAT database
mgtnode # dumpxCATdb -p /tmp/xcatback_210509 Input path must existmgtnode # mkdir /tmp/xcatback_210509mgtnode # dumpxCATdb -p /tmp/xcatback_210509
314 Configuring and Managing AIX Clusters Using xCAT 2

6.9.4 Updating dependency RPMs
We executed the instoss command (out of the directory we untarred the xCAT tar files to) to update any dependency RPMs that xCAT may require. None of the dependency files that we had already installed required updating. as shown in Example 6-57 on page 315.
Example 6-57 Executing instoss to update dependency RPMs
mgtnode # cd /tmp/xcat_210509mgtnode # ./instosspackage perl-DBI-1.55-1 is already installedpackage bash-3.2-1 is already installedpackage perl-DBD-SQLite-1.13-1 is already installedpackage tcl-8.4.7-3 is already installedpackage tk-8.4.7-3 is already installedpackage expect-5.42.1-3 is already installedpackage conserver-8.1.16-2 is already installedpackage perl-Expect-1.21-1 is already installedpackage perl-IO-Tty-1.07-1 is already installedpackage perl-IO-Stty-.02-1 is already installedpackage perl-IO-Socket-SSL-1.06-1 is already installedpackage perl-Net_SSLeay.pm-1.30-1 is already installedpackage perl-Digest-MD5-2.36-1 is already installedpackage fping-2.4b2_to-1 is already installedfile /usr/local/bin/slptool from install of openslp-xcat-1.2.1-1 conflicts with file from package openslp-1.2.1-1package perl-Crypt-SSLeay-0.57-1 is already installedpackage perl-Net-Telnet-3.03-1.2 is already installedpackage net-snmp-5.4.2.1-1 is already installedpackage net-snmp-devel-5.4.2.1-1 is already installedpackage net-snmp-perl-5.4.2.1-1 is already installed
We then executed the instxcat script out of the same directory that the new snapshot tar file had been untarred to, as shown in Example 6-58.
Example 6-58 Executing instxcat to update xCAT
mgtnode # ./instxcatperl-xCAT ##################################################xCAT-client ##################################################xCAT-server ##################################################Stopping xcatd processes....Starting xcatd.....xCAT ##################################################Created /etc/xCATMN file.
Chapter 6. xCAT 2 - advanced administrative topics 315

Could not remove ssh keys from /install/postscripts/hostkeys directory. They may not exist.Could not remove ssh keys from /etc/xcat/hostkeys directory. They may not exist.Generating SSH1 RSA Key...Generating SSH2 RSA Key...Generating SSH2 DSA Key.../bin/cp /etc/xcat/hostkeys/*.pub /install/postscripts/hostkeys/. is successfulCopied /.ssh/id_rsa.pub to /install/postscripts/_ssh/authorized_keys.syslog has been set up.Created /install/postscripts/ca/certs directory.Copied /etc/xcat/ca/* to /install/postscripts/ca directory.Created /install/postscripts/cert directory.Copied /etc/xcat/cert/* to /install/postscripts/cert directory.Created /install/postscripts/_xcat directory.Copied /.xcat/* to /install/postscripts/_xcat directory.Copied /etc/xcat/ca/certs* to /install/postscripts/ca/certs directory.Stopping xcatd processes....Starting xcatd.....xCAT-rmc ##################################################Stopping xcatd processes....Starting xcatd.....mgtnode#
6.9.5 Verify the install
After the instxcat command completed, we determined the new level of xCAT using the rpm command, as shown in Example 6-59.
Example 6-59 Determine the new level of xCAT
mgtnode # rpm -qa|grep xCATxCAT-2.2.1-snap200905150859xCAT-server-2.2.1-snap200905150859xCAT-rmc-2.2.1-snap200905150900perl-xCAT-2.2.1-snap200905150858xCAT-client-2.2.1-snap200905150858
The date and time of the snapshot build is in the name of the RPM file.
Finally, we checked whether we could execute some xCAT commands such as lsdef and xdsh, as shown in Example 6-60.
Example 6-60 Testing the new xCAT commands
mgtnode # xdsh aixnodes date
316 Configuring and Managing AIX Clusters Using xCAT 2

lp1p6mma1: Wed May 20 15:43:29 EDT 2009lp3p6mma1: Wed May 20 15:43:35 EDT 2009lp2p6mma1: Wed May 20 15:43:29 EDT 2009lp2p6mma2: Wed May 20 15:43:35 EDT 2009lp1p6mma2: Wed May 20 15:43:35 EDT 2009lp3p6mma2: Wed May 20 15:43:35 EDT 2009lp4p6mma1: Wed May 20 15:43:29 EDT 2009lp4p6mma2: Wed May 20 15:43:35 EDT 2009lp1p65501: Wed May 20 15:43:35 EDT 2009lp3p65502: Wed May 20 15:43:35 EDT 2009lp1p65502: Wed May 20 15:43:35 EDT 2009lp2p65501: Wed May 20 15:43:35 EDT 2009lp2p65502: Wed May 20 15:43:35 EDT 2009lp3p65501: Wed May 20 15:43:35 EDT 2009lp4p65502: Wed May 20 15:43:35 EDT 2009lp4p65501: Wed May 20 15:43:35 EDT 2009lp6p65501: Wed May 20 15:43:35 EDT 2009lp7p65501: Wed May 20 15:43:35 EDT 2009lp5p65501: Wed May 20 15:43:35 EDT 2009
mgtnode # lsdef -t node lp1p65501
Object name: lp1p65501 cons=hmc groups=550nodes,all,lpar,service,aixnodes hcp=hmc3 id=3 mac=c21e426a440b mgt=hmc nodetype=lpar,osi os=AIX parent=Server-8204-E8A-SN10FE411 postscripts=gethosts,servicenode,setupntp,configen1,configen2 pprofile=Default profile=610BaseImage setupnameserver=no status=bootingmgtnode #
Update the NIM lpp_sourceThe NIM lpp_source resource needs to be updated with the new code. We executed the NIM command shown in Example 6-61.
Chapter 6. xCAT 2 - advanced administrative topics 317

Example 6-61 Updating NIM lpp_source resource
mgtnode # nim -o update -a packages=all -a source=/tmp/xcat_210509 610BaseImage_lpp_source
/install/nim/lpp_source/610BaseImage_lpp_source/RPMS/ppc/bash-3.2-1.aix5.2.ppc.rpm/install/nim/lpp_source/610BaseImage_lpp_source/RPMS/ppc/conserver-8.1.16-2.aix5.3.ppc.rpm/install/nim/lpp_source/610BaseImage_lpp_source/RPMS/ppc/expect-5.42.1-3.aix5.1.ppc.rpm/install/nim/lpp_source/610BaseImage_lpp_source/RPMS/ppc/fping-2.4b2_to-1.aix5.3.ppc.rpm/install/nim/lpp_source/610BaseImage_lpp_source/RPMS/ppc/net-snmp-5.4.2.1-1.aix5.3.ppc.rpm/install/nim/lpp_source/610BaseImage_lpp_source/RPMS/ppc/net-snmp-devel-5.4.2.1-1.aix5.3.ppc.rpm/install/nim/lpp_source/610BaseImage_lpp_source/RPMS/ppc/net-snmp-perl-5.4.2.1-1.aix5.3.ppc.rpm/install/nim/lpp_source/610BaseImage_lpp_source/RPMS/ppc/net-snmp-devel-5.4.2.1-1.aix5.3.ppc.rpm/install/nim/lpp_source/610BaseImage_lpp_source/RPMS/ppc/net-snmp-perl-5.4.2.1-1.aix5.3.ppc.rpm/install/nim/lpp_source/610BaseImage_lpp_source/RPMS/ppc/openslp-xcat-1.2.1-1.aix5.3.ppc.rpm/install/nim/lpp_source/610BaseImage_lpp_source/RPMS/ppc/perl-Crypt-SSLeay-0.57-1.aix5.3.ppc.rpm/install/nim/lpp_source/610BaseImage_lpp_source/RPMS/ppc/perl-DBD-SQLite-1.13-1.aix5.3.ppc.rpm/install/nim/lpp_source/610BaseImage_lpp_source/RPMS/ppc/perl-DBI-1.55-1.aix5.3.ppc.rpm/install/nim/lpp_source/610BaseImage_lpp_source/RPMS/ppc/perl-Digest-MD5-2.36-1.aix5.3.ppc.rpm/install/nim/lpp_source/610BaseImage_lpp_source/RPMS/ppc/perl-Expect-1.21-1.aix5.3.ppc.rpm/install/nim/lpp_source/610BaseImage_lpp_source/RPMS/ppc/perl-IO-Socket-SSL-1.06-1.aix5.3.ppc.rpm/install/nim/lpp_source/610BaseImage_lpp_source/RPMS/ppc/perl-IO-Stty-.02-1.aix5.3.ppc.rpm/install/nim/lpp_source/610BaseImage_lpp_source/RPMS/ppc/perl-IO-Tty-1.07-1.aix5.3.ppc.rpm/install/nim/lpp_source/610BaseImage_lpp_source/RPMS/ppc/perl-Net_SSLeay.pm-1.30-1.aix5.3.ppc.rpm/install/nim/lpp_source/610BaseImage_lpp_source/RPMS/ppc/perl-Net-Telnet-3.03-1.2.aix5.3.ppc.rpm
318 Configuring and Managing AIX Clusters Using xCAT 2

/install/nim/lpp_source/610BaseImage_lpp_source/RPMS/ppc/perl-xCAT-2.2.1-snap200905150858.aix5.3.ppc.rpm/install/nim/lpp_source/610BaseImage_lpp_source/RPMS/ppc/tcl-8.4.7-3.aix5.1.ppc.rpm/install/nim/lpp_source/610BaseImage_lpp_source/RPMS/ppc/tk-8.4.7-3.aix5.1.ppc.rpm/install/nim/lpp_source/610BaseImage_lpp_source/RPMS/ppc/xCAT-2.2.1-snap200905150859.aix5.3.ppc.rpm/install/nim/lpp_source/610BaseImage_lpp_source/RPMS/ppc/xCAT-client-2.2.1-snap200905150858.aix5.3.ppc.rpm/install/nim/lpp_source/610BaseImage_lpp_source/RPMS/ppc/xCAT-rmc-2.2.1-snap200905150900.aix5.3.ppc.rpm/install/nim/lpp_source/610BaseImage_lpp_source/RPMS/ppc/xCAT-server-2.2.1-snap200905150859.aix5.3.ppc.rpm/install/nim/lpp_source/610BaseImage_lpp_source/RPMS/ppc/xCATaixSN.bnd/install/nim/lpp_source/610BaseImage_lpp_source/RPMS/ppc/xCATaixSSH.bnd/install/nim/lpp_source/610BaseImage_lpp_source/RPMS/ppc/xCATaixSSL.bnd/install/nim/lpp_source/610BaseImage_lpp_source/RPMS/ppc/xCAT-client-2.2.1-snap200905150858.aix5.3.ppc.rpm/install/nim/lpp_source/610BaseImage_lpp_source/RPMS/ppc/xCAT-rmc-2.2.1-snap200905150900.aix5.3.ppc.rpm/install/nim/lpp_source/610BaseImage_lpp_source/RPMS/ppc/xCAT-server-2.2.1-snap200905150859.aix5.3.ppc.rpmmgtnode #
6.9.6 Updating xCAT on a service node
Because we have a hierarchical cluster, the service nodes will also need to be updated with the same updated code as the management node.
The service node is a special case. It is normally set up during the initial install of xCAT via the post installscript called servicenode. However, we found that this script did not update the xCAT RPMs when executed.
We updated the RPMs on the service node manually. We did not run instxcat on the service node, just the rpm command against the currently installed RPMs as shown in Example 6-62. We obtained the syntax for the rpm command from the instxcat script.
Example 6-62 Updating the RPMs on the service node
lp1p65501 # rpm -qa|grep xCATperl-xCAT-2.2.1-snap200904221514xCAT-client-2.2.1-snap200904221514xCAT-rmc-2.2.1-snap200904221516xCAT-server-2.2.1-snap200904221515lp1p65501 #cat instxcat
Chapter 6. xCAT 2 - advanced administrative topics 319

# xCAT on AIX - install scriptrpm -Uvh perl-xCAT-2.2.1-*rpmrpm -Uvh xCAT-client-2.2.1-*rpmrpm -Uvh --nodeps xCAT-server-2.2.1-*rpmrpm -Uvh xCAT-2.2.1-*rpmrpm -Uvh xCAT-rmc-2.2.1-*rpmlp1p65501 #rpm -Uvh perl-xCAT-2.2.1-*rpmperl-xCAT ##################################################lp1p65501 #rpm -Uvh xCAT-client-2.2.1-*rpmxCAT-client ##################################################lp1p65501 #rpm -Uvh --nodeps xCAT-server-2.2.1-*rpmxCAT-server ##################################################Stopping xcatd processes....Starting xcatd.....lp1p65501 #rpm -Uvh xCAT-rmc-2.2.1-*rpmxCAT-rmc ##################################################Stopping xcatd processes....Starting xcatd.....lp1p65501 #rpm -qa|grep xCATxCAT-rmc-2.2.1-snap200905150900xCAT-server-2.2.1-snap200905150859perl-xCAT-2.2.1-snap200905150858xCAT-client-2.2.1-snap200905150858lp1p65501 #
The next step was to update the lpp_source on the service node. The service node is the NIM master for the nodes that are managed via the service node. The nim command was issued as shown in Example 6-63. This is the same command that was issued on the management node. The source directory is the directory that the xCAT tarfiles were unwrapped into.
Example 6-63 Updating the lpp_source on the service node
lp1p65501 #nim -o update -a packages=all -a source=/tmp/newxcat 610BaseImage_lpp_source
/install/nim/lpp_source/610BaseImage_lpp_source/RPMS/ppc/bash-3.2-1.aix5.2.ppc.rpm/install/nim/lpp_source/610BaseImage_lpp_source/RPMS/ppc/conserver-8.1.16-2.aix5.3.ppc.rpm/install/nim/lpp_source/610BaseImage_lpp_source/RPMS/ppc/expect-5.42.1-3.aix5.1.ppc.rpm/install/nim/lpp_source/610BaseImage_lpp_source/RPMS/ppc/fping-2.4b2_to-1.aix5.3.ppc.rpm/install/nim/lpp_source/610BaseImage_lpp_source/RPMS/ppc/net-snmp-5.4.2.1-1.aix5.3.ppc.rpm
320 Configuring and Managing AIX Clusters Using xCAT 2

/install/nim/lpp_source/610BaseImage_lpp_source/RPMS/ppc/net-snmp-devel-5.4.2.1-1.aix5.3.ppc.rpm/install/nim/lpp_source/610BaseImage_lpp_source/RPMS/ppc/net-snmp-perl-5.4.2.1-1.aix5.3.ppc.rpm/install/nim/lpp_source/610BaseImage_lpp_source/RPMS/ppc/net-snmp-devel-5.4.2.1-1.aix5.3.ppc.rpm/install/nim/lpp_source/610BaseImage_lpp_source/RPMS/ppc/net-snmp-perl-5.4.2.1-1.aix5.3.ppc.rpm/install/nim/lpp_source/610BaseImage_lpp_source/RPMS/ppc/openslp-xcat-1.2.1-1.aix5.3.ppc.rpm/install/nim/lpp_source/610BaseImage_lpp_source/RPMS/ppc/perl-Crypt-SSLeay-0.57-1.aix5.3.ppc.rpm/install/nim/lpp_source/610BaseImage_lpp_source/RPMS/ppc/perl-DBD-SQLite-1.13-1.aix5.3.ppc.rpm/install/nim/lpp_source/610BaseImage_lpp_source/RPMS/ppc/perl-DBI-1.55-1.aix5.3.ppc.rpm/install/nim/lpp_source/610BaseImage_lpp_source/RPMS/ppc/perl-Digest-MD5-2.36-1.aix5.3.ppc.rpm/install/nim/lpp_source/610BaseImage_lpp_source/RPMS/ppc/perl-Expect-1.21-1.aix5.3.ppc.rpm/install/nim/lpp_source/610BaseImage_lpp_source/RPMS/ppc/perl-IO-Socket-SSL-1.06-1.aix5.3.ppc.rpm/install/nim/lpp_source/610BaseImage_lpp_source/RPMS/ppc/perl-IO-Stty-.02-1.aix5.3.ppc.rpm/install/nim/lpp_source/610BaseImage_lpp_source/RPMS/ppc/perl-IO-Tty-1.07-1.aix5.3.ppc.rpm/install/nim/lpp_source/610BaseImage_lpp_source/RPMS/ppc/perl-Net_SSLeay.pm-1.30-1.aix5.3.ppc.rpm/install/nim/lpp_source/610BaseImage_lpp_source/RPMS/ppc/perl-Net-Telnet-3.03-1.2.aix5.3.ppc.rpm/install/nim/lpp_source/610BaseImage_lpp_source/RPMS/ppc/perl-xCAT-2.2.1-snap200905150858.aix5.3.ppc.rpm/install/nim/lpp_source/610BaseImage_lpp_source/RPMS/ppc/tcl-8.4.7-3.aix5.1.ppc.rpm/install/nim/lpp_source/610BaseImage_lpp_source/RPMS/ppc/tk-8.4.7-3.aix5.1.ppc.rpm/install/nim/lpp_source/610BaseImage_lpp_source/RPMS/ppc/xCAT-2.2.1-snap200905150859.aix5.3.ppc.rpm/install/nim/lpp_source/610BaseImage_lpp_source/RPMS/ppc/xCAT-client-2.2.1-snap200905150858.aix5.3.ppc.rpm/install/nim/lpp_source/610BaseImage_lpp_source/RPMS/ppc/xCAT-rmc-2.2.1-snap200905150900.aix5.3.ppc.rpm/install/nim/lpp_source/610BaseImage_lpp_source/RPMS/ppc/xCAT-server-2.2.1-snap200905150859.aix5.3.ppc.rpm/install/nim/lpp_source/610BaseImage_lpp_source/RPMS/ppc/xCATaixSN.bnd/install/nim/lpp_source/610BaseImage_lpp_source/RPMS/ppc/xCATaixSSH.bnd/install/nim/lpp_source/610BaseImage_lpp_source/RPMS/ppc/xCATaixSSL.bnd
Chapter 6. xCAT 2 - advanced administrative topics 321

/install/nim/lpp_source/610BaseImage_lpp_source/RPMS/ppc/xCAT-client-2.2.1-snap200905150858.aix5.3.ppc.rpm/install/nim/lpp_source/610BaseImage_lpp_source/RPMS/ppc/xCAT-rmc-2.2.1-snap200905150900.aix5.3.ppc.rpm/install/nim/lpp_source/610BaseImage_lpp_source/RPMS/ppc/xCAT-server-2.2.1-snap200905150859.aix5.3.ppc.rpmlp1p65501 #
We then verified that we could contact the xCAT database on the management node with the lsdef command from the service node, as shown in Example 6-64.
Example 6-64 Contacting the xCAT database on the management node
lp1p65501 #lsdef -t node lp7p65501
Object name: lp7p65501 cons=hmc groups=aixnodes,lpar,all,550nodes hcp=hmc3 id=9 mac=c21e44c4a60b mgt=hmc nodetype=lpar,osi os=AIX parent=Server-8204-E8A-SN10FE411 postscripts=gethosts,setupntp,configen1,configen2 pprofile=Default profile=610_diskless servicenode=lp1p65501 status=booted xcatmaster=lp1p65501lp1p65501 #
We then issued the xdsh command from the management node to ensure that we still had SSH working. We then encountered the problem shown in Example 6-65.
Example 6-65 Problem with xdsh
mgtnode #xdsh aixnodes datelp2p6mma2: Wed May 20 15:51:28 EDT 2009lp1p6mma1: Wed May 20 15:51:22 EDT 2009lp2p6mma1: Wed May 20 15:51:22 EDT 2009lp3p6mma1: Wed May 20 15:51:28 EDT 2009lp4p6mma2: Wed May 20 15:51:28 EDT 2009
322 Configuring and Managing AIX Clusters Using xCAT 2

lp1p65501: Wed May 20 15:51:28 EDT 2009lp1p65501: @@@@@@@@@@@@@@@@@@@@@@@@@@@@@@@@@@@@@@@@@@@@@@@@@@@@@@@@@@@
lp1p65501: @ WARNING: REMOTE HOST IDENTIFICATION HAS CHANGED! @
lp1p65501: @@@@@@@@@@@@@@@@@@@@@@@@@@@@@@@@@@@@@@@@@@@@@@@@@@@@@@@@@@@
lp1p65501: IT IS POSSIBLE THAT SOMEONE IS DOING SOMETHING NASTY!
lp1p65501: Someone could be eavesdropping on you right now (man-in-the-middle attack)!
lp1p65501: It is also possible that the RSA host key has just been changed.
lp1p65501: The fingerprint for the RSA key sent by the remote host islp1p65501: 01:81:4a:f7:8c:63:0a:e2:24:64:7c:fe:cc:e7:08:f2.
lp1p65501: Please contact your system administrator.
lp1p65501: Add correct host key in /.ssh/known_hosts to get rid of this message.
lp1p65501: Offending key in /.ssh/known_hosts:7
lp1p65501: Password authentication is disabled to avoid man-in-the-middle attacks.
lp1p65501: Keyboard-interactive authentication is disabled to avoid man-in-the-middle attacks.
lp1p6mma2: Wed May 20 15:51:28 EDT 2009lp3p6mma2: Wed May 20 15:51:28 EDT 2009lp4p6mma1: Wed May 20 15:51:22 EDT 2009lp3p65502: Wed May 20 15:51:29 EDT 2009lp4p65502: Wed May 20 15:51:29 EDT 2009lp3p65501: Wed May 20 15:51:29 EDT 2009lp7p65501: Wed May 20 15:51:29 EDT 2009lp4p65501: Wed May 20 15:51:29 EDT 2009lp2p65501: Wed May 20 15:51:29 EDT 2009lp2p65502: Wed May 20 15:51:29 EDT 2009lp1p65502: Wed May 20 15:51:29 EDT 2009lp6p65501: Wed May 20 15:51:29 EDT 2009lp5p65501: Wed May 20 15:51:29 EDT 2009
This issue was caused by new host keys being generated during the upgrade. We corrected this problem by removing the /.ssh/known_hosts files on the
Chapter 6. xCAT 2 - advanced administrative topics 323

management node and then retested the command. The errors received with the first run of xdsh are normal. The test was successful, as shown in Example 6-66.
Example 6-66 After rebuilding know_hosts
mgtnode #xdsh aixnodes datelp2p6mma1: Wed May 20 15:54:19 EDT 2009lp2p6mma1: Warning: Permanently added 'lp2p6mma1,192.168.100.172' (RSA) to the list of known hosts.lp3p6mma1: Wed May 20 15:54:25 EDT 2009lp3p6mma1: Warning: Permanently added 'lp3p6mma1,192.168.100.173' (RSA) to the list of known hosts.lp1p65501: Wed May 20 15:54:25 EDT 2009lp1p65501: Warning: Permanently added 'lp1p65501,192.168.100.51' (RSA) to the list of known hosts.lp4p6mma1: Wed May 20 15:54:19 EDT 2009lp4p6mma1: Warning: Permanently added 'lp4p6mma1,192.168.100.174' (RSA) to the list of known hosts.lp2p6mma2: Wed May 20 15:54:25 EDT 2009lp2p6mma2: Warning: Permanently added 'lp2p6mma2,192.168.100.182' (RSA) to the list of known hosts.lp1p6mma2: Wed May 20 15:54:25 EDT 2009lp1p6mma2: Warning: Permanently added 'lp1p6mma2,192.168.100.181' (RSA) to the list of known hosts.lp1p6mma1: Wed May 20 15:54:24 EDT 2009lp2p6mma1: Wed May 20 15:54:24 EDT 2009lp1p65501: Wed May 20 15:54:30 EDT 2009lp3p6mma1: Wed May 20 15:54:30 EDT 2009lp4p6mma1: Wed May 20 15:54:24 EDT 2009lp2p6mma2: Wed May 20 15:54:30 EDT 2009lp1p6mma2: Wed May 20 15:54:30 EDT 2009lp3p6mma2: Wed May 20 15:54:30 EDT 2009lp4p6mma2: Wed May 20 15:54:30 EDT 2009lp3p65502: Wed May 20 15:54:30 EDT 2009lp3p65501: Wed May 20 15:54:30 EDT 2009lp5p65501: Wed May 20 15:54:30 EDT 2009lp4p65502: Wed May 20 15:54:30 EDT 2009lp2p65501: Wed May 20 15:54:30 EDT 2009lp1p65502: Wed May 20 15:54:30 EDT 2009lp4p65501: Wed May 20 15:54:30 EDT 2009lp2p65502: Wed May 20 15:54:30 EDT 2009lp7p65501: Wed May 20 15:54:30 EDT 2009lp6p65501: Wed May 20 15:54:30 EDT 2009
324 Configuring and Managing AIX Clusters Using xCAT 2

We went through the same checklists that are in “Open the console and initialize network boot” on page 224 to verify everything was operating satisfactorily.
6.10 Data to gather for support
Here we list the information that could be useful in case we have an xCAT-related problem.
� xCAT management node
– Operating system-related data available on base AIX install:
• Collect system snap using the commands in Example 6-67.
Example 6-67 Preparing snap data
[p630n05][/]> snap -rNothing to clean up[p630n05][/]> snap -gtc/var/adm/ras/trcfile: No such file or directoryChecking space requirement for general information............................................................................................................................................................ done..********Checking and initializing directory structureCreating /tmp/ibmsupt directory tree... done.Creating /tmp/ibmsupt/svCollect directory tree... done.Creating /tmp/ibmsupt/client_collect directory tree... done.Creating /tmp/ibmsupt/tcpip directory tree... done.Creating /tmp/ibmsupt/general directory tree... done.Creating /tmp/ibmsupt/general/diagnostics directory tree... done.Creating /tmp/ibmsupt/pcixscsi directory tree... done.Creating /tmp/ibmsupt/sissas directory tree... done.Creating /tmp/ibmsupt/testcase directory tree... done.Creating /tmp/ibmsupt/other directory tree... done.********Finished setting up directory /tmp/ibmsupt
Checking Space requirement for svCollectThe script svCollect is not executable in /usr/lib/ras/snapscriptsChecking Space requirement for client_collectChecking space requirement for tcpip information..................................................... done.Checking for enough free space in filesystem... done.
/var/adm/ras/trcfile: No such file or directory
Chapter 6. xCAT 2 - advanced administrative topics 325

Gathering general system information............................................................................................................................................................ done.Gathering platform/scanout information.done.Gathering svCollect dataThe script svCollect is not executable in /usr/lib/ras/snapscriptsGathering client_collect dataGathering pcixscsi system information....... done.Gathering sissas system information...... done.Gathering tcpip system information...................................................... done.
Creating compressed pax file...Starting pax/compress process... Please wait... done.
-rw------- 1 0 0 980237 May 20 14:40 snap.pax.Z
• RMC data, if the RMC monitoring is configured: use the ctsnap command, which creates a zipped tar file in the /tmp/ctsupt directory by default.
• System log, if the AIX syslog facility is used: check the location of the system log as shown in Example 6-68 and save the log file.
Example 6-68 Listing syslog daemon configuration
[p630n05][/]> lssrc -ls syslogdSubsystem Group PID Status syslogd ras 123240 activeSyslogd Config *.debug /var/log/messages rotate 1024K files 5
xCAT data to be saved• xCAT database backup using the dumpxCATdb command, which saves
all database tables in comma-separated files.
• xCAT postscripts from the default location /install/postscripts.
• File collection information and setup if used in the environment.
� xCAT node
– Operating system-related data available on base AIX install:
• Collect system snap using the commands in Example 6-67.
• RMC data, if any local RSCT class data is changed on the nodes: use the ctsnap command, which creates a zipped tar file in the /tmp/ctsupt directory by default.
326 Configuring and Managing AIX Clusters Using xCAT 2

• System log, if the AIX syslog facility is used and local log files are created on the nodes: check the location of the system log as shown in Example 6-68 and save the log file.
� VIO Servers
– If you have VIO Servers, run the snap command to collect all necessary information.
– For a quick check run the following commands:
• lsmap -all: lists disk virtualization mapping.
• lsmap -all -net: lists Ethernet virtualization mapping.
� HMC
– Version of the software installed on HMC using the lshmc -V command as shown in Example 6-69. The example shows the command initiated from an SSH remote shell, for which the remote login has to be enabled without password.
Example 6-69 Query HMC version
# ssh hscroot@hmc-v7 lshmc -V"version= Version: 7 Release: 3.4.0 Service Pack: 0HMC Build level 20081014.1","base_version=V7R3.3.0"
– System plans created on HMC can also be useful, if we have to investigate LPAR configuration-related issues. Use the following command to create the system plan file:
mksysplan -m ‘managed system” -f “filename”
– Check the DLPAR capability of the managed LPARs using:
lspartition -dlpar
For convenience, we also created Table 6-3 which gives an overview of the data that should be gathered.
Table 6-3 Gathering support data
Machine type Data source Command Gathered data
xCAT MN Operating system snap -gtc General AIX snap data with TCP/IP configuration
Chapter 6. xCAT 2 - advanced administrative topics 327

ctsnap RSCT database, logs and configuration information
lssrc -ls syslogd System log type and target location, configuration is included in snap
lssrc -ls inetd Search for bootp and tftp subservers, whether the services are enabled or not
xCAT dumpxCATdb xCAT database content
tar -cvf xCAT_postscripts.tar /install/postscripts
xCAT postscripts, be careful with the extraction
xCAT node Operating system snap -gtc General AIX snap data with TCP/IP configuration
ctsnap RSCT database, logs and configuration information
lssrc -ls syslogd System log type and target location
VIO Server Operating system snap General AIX snap and PowerVM™ related data
PowerVM lsmap -all Storage virtualization
lsmap -all -net Ethernet virtualization
HMC Operating system and HMC SW
lshmc -V Installed SW versions
Machine type Data source Command Gathered data
328 Configuring and Managing AIX Clusters Using xCAT 2

Managed systems
mksysplan -m “managed system” -f “filename”
Partition configuration
LPARs lspartition -dlpar Shows DLPAR capabilities of the LPARs
Machine type Data source Command Gathered data
Chapter 6. xCAT 2 - advanced administrative topics 329

330 Configuring and Managing AIX Clusters Using xCAT 2

Part 4 Appendixes
Part 4
© Copyright IBM Corp. 2009. All rights reserved. 331

332 Configuring and Managing AIX Clusters Using xCAT 2

Appendix A. Configuring syslog-ng
In a large environment, managing the data logged by all systems may be very difficult because there are several administrators that have different responsibilities and, as a consequence, they may be monitoring different events of the same servers.
Another challenge on a centralized logging system is to sort the data based on different criteria. In this section we briefly explain how to set up the syslog-ng to use a database as a back end and a Web interface for sorting the data.
In Figure A-1 on page 334 we describe how the logging data flows:
1. The servers (syslog clients) are sending log information using the syslog protocol. Currently, most of the servers or devices send data using UDP port 514, which is clear text. Servers with syslog-ng installed can also send the log information using TCP port 514, which is more reliable. Also, syslog-ng can encrypt the information.
2. The syslog servers can receive information using both protocols (UDP or TCP).
3. All logs are sent to a MySQL database server using a database client.
A
Note: The package versions and the steps presented in this Appendix were tested at the date of this writing (June 2009). Current versions and steps may differ significantly in your environment.
© Copyright IBM Corp. 2009. All rights reserved. 333

4. The php-syslog-ng front end queries the database for requested information based on the filters that the user (admin) defined.
5. The query result is presented using Web protocol. The php-syslog-ng front end supports authentication and SSL communication (through a Web server).
Figure A-1 Syslog data flow
Our scenario consists of these major tasks:
� Installing the required packages on SuSe Enterprise Linux Server
� Configuring MySQL as back-end database and creating the necessary tables
� Installing and configuring the php-syslong-ng Web interface
� Customizing the managing scripts
Important: Our scenario does not cover any security or performance settings. We recommend to address these aspects in your production environment.
Syslog-ng
syslog client
syslog-ng client
syslog client
MySQL
Apache &php-syslog-ng
Admins Admins Admins
Management Server
udp 514 tcp 514 udp 514
tcp 80 tcp 80 tcp 80
mysql client
mysql client
Data
F low
334 Configuring and Managing AIX Clusters Using xCAT 2

On SuSe Enterprise Linux Server 11 the following packages need to be installed (all packages and their dependencies are located on the distribution DVDs):
mysqlphp5-mysqlphp5-zlibapache2-mod_php5php5phpzlib php-gd
Configuring php-syslog-ng on SLES 11The following steps describe the system preparation for the php-syslog-ng front end:
1. Start up the MySQL database by using:
chkconfig mysql on /etc/init.d/mysql start
2. Configure the syslog-ng to log the data in MySQL by adding the setting shown in Example A-1 in /etc/syslog-ng/syslog-ng.conf.
Example A-1 Syslog-ng to MySQL configuration
destination d_mysql { program("/usr/bin/mysql --reconnect -f -T --user=syslogadmin --password=itsoadmin\ syslog >> /var/log/db_log.log 2>&1" template("INSERT INTO logs (host, facility, priority, level, tag, datetime,\ program, msg) VALUES ( '$HOST', '$FACILITY', '$PRIORITY', '$LEVEL', '$TAG', '$YEAR-$MONTH-$DAY $HOUR:$MIN:$SEC','$PROGRAM', '$MSG' );\n") template-escape(yes));};log { source (itso); destination (d_mysql);};b
3. Download the php-syslog-ng packages from the link at:
http://code.google.com/p/php-syslog-ng/
and unpack the package in /srv/www/syslog.
Note: Some of the lines in the example frame are longer that one 80-character row, so they show as multiple rows. In the configuration file the lines marked with “\” at the end represent one row.
Appendix A. Configuring syslog-ng 335

4. Create an Apache configuration file for the directory /srv/www/syslog. The file is located in directory /etc/apache2/conf.d/syslog.conf and is shown in Example A-2. Reload the Apache configuration with:
/etc/init.d/apache2 reload
Example A-2 Apache configuration file for directory /srv/www/syslog
Alias /syslog "/srv/www/syslog"<Directory "srv/www/syslog"> Options -Indexes FollowSymLinks MultiViews AllowOverride None Order allow,deny Allow from all</Directory>
5. Make the following configuration files and directories writable:
mgtIBlnx:/srv/www/syslog/html # chmod -R 777 jpcachemgtIBlnx:/srv/www/syslog/html # chmod -R 777 config
6. For some performance increase, modify the file /etc/php5/apache2/php.ini with:
memory_limit = 128M max_execution_time = 300
and restart the Apache daemon.
7. The scripts shown in Example A-3 need to be added in crontab.
Example A-3 Logrotate and cache reload scripts in crontab
@daily php /srv/www/syslog/scripts/logrotate.php >> /var/log/syslog/logrotate.log@daily find /srv/www/syslog/html/jpcache/ -atime 1 -exec rm -f '{}' ';'*/5 * * * * php /srv/www/syslog/scripts/reloadcache.php >>\ /var/log/syslog/reloadcache.log
We chose to install the php-syslog-ng in a different path than default. In this case the scripts have to be modified to use the new path.
8. We chose not to use authentication, but for a production system we recommend that it be set up.
9. SuSe Enterprise Linux Server is using apparmor for audit purposes. Modify the file /etc/apparmor.d/sbin.syslog-ng as shown in Example A-4, in order to allow the syslog-ng daemon to write in the MySQL database.
Example A-4 Apparmor setting
#include <tunables/global>
336 Configuring and Managing AIX Clusters Using xCAT 2

#define this to be where syslog-ng is chrooted@{CHROOT_BASE}=""
/sbin/syslog-ng { #include <abstractions/base> #include <abstractions/consoles> #include <abstractions/nameservice> #include <abstractions/mysql>
capability chown, capability dac_override, capability fsetid, capability fowner, capability sys_tty_config,
/usr/bin/mysql rmix, /etc/my.cnf r, /bin/bash rmix, /dev/log w, /dev/syslog w, /dev/tty10 rw, /dev/xconsole rw, /etc/syslog-ng/* r, @{PROC}/kmsg r, /etc/hosts.deny r, /etc/hosts.allow r, /sbin/syslog-ng mr, # chrooted applications @{CHROOT_BASE}/var/lib/*/dev/log w, @{CHROOT_BASE}/var/lib/syslog-ng/syslog-ng.persist rw, @{CHROOT_BASE}/var/log/** w, @{CHROOT_BASE}/var/run/syslog-ng.pid krw,
}
10.Reload the apparmor with:
apparmor_parser -r /etc/apparmor.d/sbin.syslog-ng
11.Connect to the Web server. In our case the link is:
http://192.168.100.111/syslog/html/
12.Follow the on-line wizard to configure php-syslog-ng.
Appendix A. Configuring syslog-ng 337

Configuring php-syslog-ng using a Web wizard 1. Using a Web browser connect to:
http://192.168.100.111/syslog/html
2. In the next step, accept the license.
3. Configure basic settings such as the DB hostname, database user access for reading and writing access.
4. Set up the site name.
5. Set up the URL path for php-syslog-ng application and click Next. Pay attention to the / (backslashes) at the end of the Site URL path. Choose a convenient password.
6. The fourth step is a summary.
7. Connect to:
http://192.168.100.111/syslog/html
and log on using admin user and the chosen password. The User Guide for the php-syslog-ng can be accessed at:
http://192.168.100.111/syslog/html/userguide.doc
Configuring php-syslog-ng on AIXIn order to run php-syslog-ng on AIX, most of the packages needs to be compiled. The following procedure explains the general steps:
1. Install the IBM HTTP server.
2. Download, install and configure the MySQL server for AIX as described in:
http://www.ibm.com/developerworks/aix/library/au-mysql.html#short
3. Download, install and configure PHP as described in:
http://www.ibm.com/developerworks/wikis/display/WikiPtype/aixopen
4. Install bash because the scripts are written in bash.
5. Install the scripts in crontab as shown in Example A-3 on page 336.
6. Run the wizard as described in “Configuring php-syslog-ng using a Web wizard” on page 338.
Note: The crontab scripts will rotate the tables and create a new table for each day. However, there is the table all_logs that contains all the information since the system was started. Other scripts need to be developed in order to archive the information from the database.
338 Configuring and Managing AIX Clusters Using xCAT 2

Additional considerations� Syslog-ng can work with other databases such as DB2 or PostgreSQL, even
on different systems. See:
http://www.postgresql.org/
� The database will grow in time. Proper management for limiting the database size is strongly recommended.
� The front-end php-syslog-ng is a multi-user system, each with different access policies.
Appendix A. Configuring syslog-ng 339

340 Configuring and Managing AIX Clusters Using xCAT 2

Appendix B. Additional material
This book refers to additional material that can be downloaded from the Internet as described below.
Locating the Web material
The Web material associated with this book is available in softcopy on the Internet from the IBM Redbooks Web server. Point your Web browser at:
ftp://www.redbooks.ibm.com/redbooks/SG24-7766
Alternatively, you can go to the IBM Redbooks Web site at:
ibm.com/redbooks
Select the Additional materials and open the directory that corresponds with the IBM Redbooks form number, SG24-7766.
Using the Web material
The additional Web material that accompanies this book includes the following files:
File name Description
B
© Copyright IBM Corp. 2009. All rights reserved. 341

sg247766.zip ????Zipped Code Samples
System requirements for downloading the Web material
The following system configuration is recommended:
Hard disk space: 1MB minimumOperating System: Windows/Linux/AIX
How to use the Web material
Create a subdirectory (folder) on your workstation, and unzip the contents of the Web material zip file into this folder.
342 Configuring and Managing AIX Clusters Using xCAT 2

Related publications
The publications listed in this section are considered particularly suitable for a more detailed discussion of the topics covered in this book.
IBM Redbooks
For information about ordering these publications, see “How to get Redbooks” on page 343. Note that some of the documents referenced here may be available in softcopy only.
� IBM BladeCenter Products and Technology, SG24-7523
� NIM from A to Z in AIX 5L, SG24-7296
� xCAT 2 Guide for the CSM System Administrator, REDP-4437
� HPC Clusters Using InfiniBand on IBM Power Systems Servers, SG24-7767
Online resources
These Web sites are also relevant as further information sources:
� xCAT homepage:
http://xcat.sourceforge.net/
� IBM Enhanced/Elite Support for xCAT:
http://www-03.ibm.com/systems/clusters/support/xcat/index.html
How to get Redbooks
You can search for, view, or download Redbooks, Redpapers, Technotes, draft publications and Additional materials, as well as order hardcopy Redbooks publications, at this Web site:
ibm.com/redbooks
© Copyright IBM Corp. 2009. All rights reserved. 343

Help from IBM
IBM Support and downloads
ibm.com/support
IBM Global Services
ibm.com/services
344 Configuring and Managing AIX Clusters Using xCAT 2

Index
Symbols/etc/hosts 90/etc/syslog.conf 77
AAdvanced Management Module ( AMM ) 226Advanced Management Module (AMM) 6, 12Advanced System Manager 12Advanced Systems Management Interface (ASMI) 6AIX 5aixpostscript 119Application SW 7autoyast 38
BBaseboard management controller (BMC) 12BladeCenter 6, 225, 235BMC 12, 31Booting the nodes 11bundles 101
Ccentralized logging 23CFM 68, 113cluster 3
interconnects 6nodes 5
cluster concepts 3cluster diagram 13cluster management software 3cluster network 154cluster networks 9cluster nodes 7cluster resources 16Cluster Systems Management (CSM) 15Cluster VLAN 10–11clusters
High Performance Computing (HPC) 5load balancing 5
Command Line Interface 38commands
cfmupdatenode 77–78chcosi 212chdef 29, 66, 90chtab 36csmbackup 78, 119csmconfig 79csmsnap 80dshbak 139dumpxCATdb 146getmacs 196gettab 66instxcat 159llq 150llstatus 78, 150llsubmit 78, 151lscondresp 77lsdef 62lsnim 104lssensor 77makeconservercf 99, 193makedns 231mknimimage 100, 194mkrsrc 79mksysb 148mkvm 186, 205monadd 34, 111moncfg 34, 111mondecfg 34monis 34monrm 34monstart 34monstop 34NIM master 105nimnodecust 106nimnodeset 203nodels 63pcp 37ppsh 37restorexCATdb 146rnetboot 206, 224rpower 22, 26, 42, 67, 100, 128rscan 94, 127rvitals 137
Index 345

sinv 145tabdump 29, 56, 63tabedit 29, 130updatenode 110, 113updtvpkg 157xcat2nim 104xdcp 22, 26, 37, 42xdsh 22, 26, 37, 42, 138xdshbak 139
Common Hardware Reference Platform (CHRP) 33compute nodes 7–8, 240configuration resource manager 47conserver 99, 127console access device 12console server 193, 221control node 9control nodes 7core packages 86CSM (Cluster Systems Management) 15csm2xcat 89, 98, 125customization scripts 132
Ddevelopment, compilation, and interactive nodes 7DHCP 42, 55discovery 232diskful 44, 165, 204diskless 44, 165, 209, 211diskless nodes 165DLPAR 197DNS 42, 55domain management server 45
EEclipse Public licence 39Ethernet switch module (ESM) 12event log 24eXtreme Cluster Administration Toolkit (xCAT) 16
Ffiles
/etc/group 90/etc/hosts 90, 180/etc/inetd.conf 185/etc/inittab 173/etc/ntp.conf 183
/etc/passwd 90/etc/profile 163/etc/resolv.conf 180, 230/etc/security/group 90/etc/security/limits 90/etc/security/passwd 90/etc/security/user 90/etc/syslog.conf 182/etc/xcat/cfgloc 176nodelist 125
firmware 233flat architecture 42Flexible Service Processor 154front-end nodes 7
GGanglia 7, 33, 55gangliamon.pm 34General Parallel File System (GPFS) 38GPFS 73, 113, 129, 154, 197GPFS commands 145
mmgetstate 78
Hhardware control points 11Hardware Management and Control 21Hardware Management Console (HMC) 6, 11, 32hardware VLAN 32hierarchical clusters 25Hierarchical Management Cloud 22, 25, 42hierarchical support 42High Availability 4
Active-Active 4Active-Passive 4
High Performance Computing (HPC) 4, 15HMC 46, 93, 126HPC stack 148HW management 6
IIBM System Cluster 1350 16IBM System Cluster 1600 16IBM Tivoli Workload Scheduler LoadLeveler® 6iDataplex 24iMM 12inetd 92InfiniBand 31
346 Configuring and Managing AIX Clusters Using xCAT 2

Installing xCAT 125Integrated Management Module (iMM) 12Integrated Virtualization Manager (IVM) 12Intelligent Platform Management Interface (IPMI) 24IPMI (Intelligent Platform Management Interface) 24iSCSI 15, 22IVM (Integrated Virtualization Manager) 12
Kkickstart 38
Llcommands
scondition 79LDAP 42Linux 5LL commands 145Load Balancing 4LoadLeveler 73, 129logical partitions 153login nodes 8login or front-end nodes 7LPAR 137LPCommands 44lpp_source 101, 202
MMAC 210MAC address 24, 54, 196, 221management domain resource manager 47management node 9, 37, 42, 55, 156, 227management node (MN) 84Management nodes 7Management VLAN 9, 31Message Passing Interface (MPI) VLAN 10MN (management node) 84monitoring infrastructure 33monitoring plug-in 55MPI VLAN 10MySQL 28, 43, 165–166mysqld 177
NNagios 34nagiosmon.pm 34
name resolution 179netboot 204network address 178network boot 224Network File System (NFS) 185network gateway 178Network Install Manager (NIM) 45network mask 178NFS (Network File System) 185NIM
clients 103, 131groups 131master 100network 102resources 100, 194, 222, 240
NIM (Network Install Manager) 45NIM resources 203node deployment 207notification infrastructure 23, 33NTP 42, 55, 68, 92, 126, 132, 146, 197NTP (Network Time Protocol) 183
OODBC 30open source 22OpenSSH 37, 156OpenSSL 37, 156operating system image 128osimage 102
Pparallel commands 21PATH 125PBS (Portable Batch Systems) 38pcpmon.pm 34PE 73Performance Co-pilot 34plug-in architecture 23plug-in module 35policy definitions 184Portable Batch Systems (PBS) 38PostgreSQL 28, 166post-installation tasks 132postscript 38, 110, 198–199, 221power control 24, 54provisioning 16Public or Login VLAN 10–11PXE 15
Index 347

Rramfs 23redundancy 4relational database 43Reliable Scalable Cluster Technology (RSCT) 16remote command execution 179remote console 127remote console management 16remote hardware control 16remote power control 100remote power cycling 11remote shell 126Remote Supervisor Adapter II 12RMC 33–34, 45, 55, 68, 145RMC monitoring 111, 114, 132, 143RMC monitoring data 83RMC Resource Managers 45RMC sensors 83rmcmon.pm 34RSA 12RSCT 34, 42, 145
ACLs 44associations 77conditions 77ctrestore 80LPCommand 142recfgct 112recfgctnid 112registry 43responses 77sensors 114snapshot 81
RSCT (Reliable Scalable Cluster Technology) 16
SSAN (storage area network) 15secondary adapter 82, 117Serial-over-LAN (SOL) 12, 24service node 9, 28, 54, 198, 204, 209service nodes 7, 203SMP servers 5SNMP 33–34, 233SNMP monitoring 23snmpmon.pm 34software inventory 145SPOT 221SQLite 28–29, 43, 165SSL 43
stateful diskless 23storage 6storage area network (SAN) 15storage nodes 7–8Storage VLAN 10syslog 42, 68, 82, 109, 145, 182syslogd 182system firmware 140
Ttable 44
bootparams 56boottarget 56chain 56deps 57eventlog 57hosts 57ipmi 57iscsi 57mac 57, 111monitoring 57monsetting 57mp 57mpa 57networks 57nimimage 57, 130node 134nodegroup 57nodehm 57nodelist 36, 57nodepos 58noderes 58nodetype 58, 111notification 58osimage 58, 130passwd 58performance 58policies 44policy 58postscripts 58, 198ppc 58ppcdirect 58ppchcp 58prodkey 58servicenode 58site 58, 89, 179switch 58switches 58
348 Configuring and Managing AIX Clusters Using xCAT 2

vm 59vpd 59websrv 59
terminal server 12third-party monitoring software 35transition 76, 148–149triggers 29
VVIO Server 142VIO server 93, 126, 137Virtual Machine 23virtual SCSI adapter 209
WWindows 5
XxCAT 34xCAT 2 database 21, 28, 56xCAT 2 directory structure 21, 30xCAT 2 packages 157xCAT 2 prerequisites 85xCAT 2.0 3xCAT core 159xCAT customization scripts 197xCAT daemon 26–27, 42, 176xCAT database 164, 175, 186, 189, 192, 221, 236xCAT dependency 159xCAT dependency packages 131xCAT management node 229xCAT monitoring 35xCAT networks 131xCAT packages 227xcat2nim 104xcataixscript 109xcatd 27, 35, 176xcatmon.pm 34
Index 349

350 Configuring and Managing AIX Clusters Using xCAT 2

(0.5” spine)0.475”<
->0.875”
250 <->
459 pages
Configuring and Managing AIX Clusters Using xCAT 2


®
SG24-7766-00 ISBN 0738433381
INTERNATIONAL TECHNICALSUPPORTORGANIZATION
BUILDING TECHNICALINFORMATION BASED ONPRACTICAL EXPERIENCE
IBM Redbooks are developed by the IBM International Technical Support Organization. Experts from IBM, Customers and Partners from around the world create timely technical information based on realistic scenarios. Specific recommendations are provided to help you implement IT solutions more effectively in your environment.
For more information:ibm.com/redbooks
®
Configuring and Managing AIX Clusters Using xCAT 2
An xCAT guide for CSM system administrators with advanced features
How to transition your AIX cluster to xCAT
xCAT 2 deployment guide for a new AIX cluster
This IBM® Redbooks publication positions the new Extreme Cluster Administration Toolkit 2.x (xCAT 2) against the IBM Cluster Systems Management (CSM) for IBM Power Systems running AIX in a High Performance Computing (HPC) environment.This book provides information to help you:� Understand, from a broad perspective, a new clustering
management architecture. We emphasize the benefits of this new solution for deploying HPC clusters of large numbers of nodes.
� Install and customize the new xCAT cluster management in various configurations.
� Design and create a solution to migrate from existing CSM configurations to xCAT-managed clusters for IBM System p platforms running AIX.
Back cover