full guide to early guitar topics - guitarchalk.com · section #1: understanding notes keywords and...
TRANSCRIPT

FULL GUIDE TO EARLY GUITAR TOPICS
Bobby Kittleberger
4/3/2019
https://www.guitarchalk.com/how-to-play-guitar

QUICK HIT: Our starting point for learning how to play guitar, ideal for
beginners, teachers or those who need topical structure.
27 minute read
All of the material in this lesson is meant to guide you through
approximately the first six months of learning how to play guitar. It's a
compilation of resources for the most broadly applicable beginner guitar
topics, from single notes all the way through to scales and melody. We're
not cutting corners just to get you playing songs faster, but have ordered
these topics in proper, chronological order, covering theory where it's
useful and relevant.
This is the complete guide to how to learn guitar without taking
shortcuts or cheating yourself out of foundational information.
To develop this guide, we've drawn on entirely free resources, primarily
from the following places:
• Guitar Chalk Articles, Chord Charts & Diagrams
• Guitar Tricks Free Video Lessons

For expansion on each topic, refer to the resources section at the end of
each section. Let's get started.
Full Professional Song Tutorials
Want to really learn some songs? Guitar Tricks has a library of over 800
professional, full song tutorials shot in crystal clear HD video and
licensed with 100 percent accurate tab sheets. Here are a few full song
tutorials from GT that we'd recommend checking out:
• Hotel California (easy version)
• Here Comes the Sun by The Beatles
• Pinball Wizard by The Who
• Daughter by Pearl Jam
• Schism by Tool
• Awake by Godsmack
GET THE SONGS FREE
• Cancel before the two-week trial ends. No charge. No hard feelings.
• Use for up to 60 days after the trial and cancel for a full refund if it's not
working out. No worries.
• A free trial or full membership signup at Guitar Tricks - through the button
below - helps support Guitar Chalk and keeps our free magazine going.

Section #1 : Understanding Notes
Keywords and Topics for this Section
Single Notes
Fretboard
Open Strings
Naturals
This section is a truncated version of our full guitar notes article. While it
gives you all the quick highlights, we recommend referring to the above
link for a more in-depth presentation and discussion of the topic.
Guitar Notes for Each Open String in a Standard Tuning
Assuming you're familiar with the basic parts and mechanics of the
guitars, let's start with the notes for each open (non-fretted) string.

Guitar notes for each string in a standard tuning. (View Larger Image)
Here's how the notes would look in a guitar tab and formal music sheet:
Guitar notes for open strings, left to right (low to high): E - A - D - G - B - E
(View Larger Image)
Notes and Chords: What They are and How They Relate
Notes are a letter value of a single pitch on the guitar, which can either
be an open string (as in the above example) or a fretted note. Those

single pitches can be grouped into multiple notes sounding in unison,
which give us chords.
For example, the open C major chord is made up of four notes, C, E and G.
Here's how those notes look in a chord chart:
The single notes in a C chord: C - E - G - C. (View Larger Image)
If we pulled these notes out of the chord and played them one at a time
(this is called an arpeggio), the notes would show up in a guitar tab like
this:

Notes in the C chord chart corresponding to single notes in a tab. (View
Larger Image)
You can checkout the following resources if you need help reading the
chord or tab charts:
• Guitar Chord Resource (how to read chord charts)
• Guitar Tab Resource (how to read guitar tabs - near the end of the article)

Now that we've covered some basics about reading notes and
interpreting them in a tab and chord chart, we can learn the differences
between natural notes, sharps and flats.
Understanding Natural Notes
Natural notes do not have either a sharp or flat attached to them. This
means that all natural notes will be displayed as one of the following:
A, B, C, D, E, F, G
We can use the fretboard dots to easily identify natural notes on each
string:
Notes for the sixth string based on fretboard dots. (View Larger Image)

In a standard tuning, natural notes occur on the sixth string at the first,
third, fifth, seventh, eighth, 10th and 12th frets. The pattern then repeats
after the 12th fret.
Here's how it would look on a tab sheet:
Natural notes for the sixth string in a guitar tab. (View Larger Image)
Understanding Sharps and Flats
In order to understand sharps and flats, it's helpful to first cover a quick
definition of a half step and whole step:
• Half Step: A change in pitch equaling one semitone (one fret)
• Whole Step: A change in pitch equaling one whole tone (two frets)
Changes in pitch are measured in half and whole step increments. Thus,
you can understand sharps and flats as the following:
• Sharp: Change in pitch one half step higher

• Flat: Change in pitch one half step lower
This occurs in relation to natural notes. For example, if you start with F
and raise the pitch one half step, you get F♯. Likewise if you're looking at
B and you lower the pitch by one half step, you get B♭.
Example of a sharp and flat note on the fretboard. (View Larger Image)
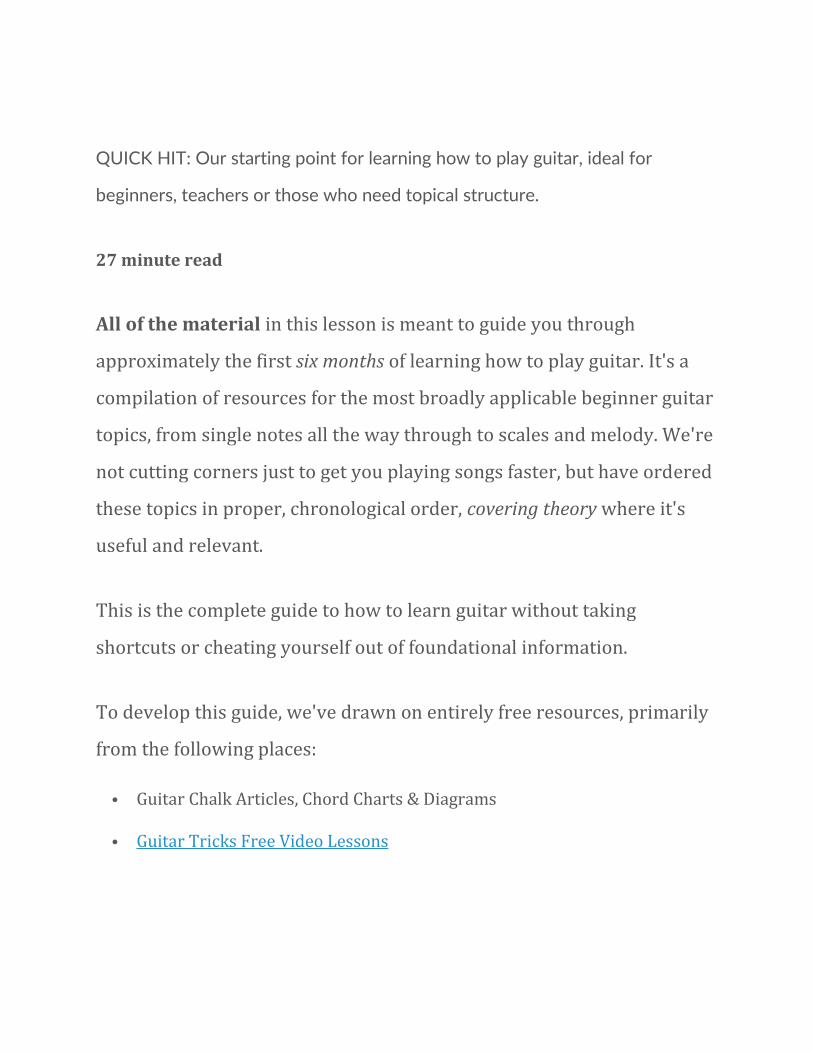
On the guitar, naturals, sharps and flats are based on fret position,
meaning you've simply got to memorize the pattern. Here's a full chart of
the notes on the sixth string:
All the notes for the sixth string from the first to the 12th fret. (View Larger
Image)
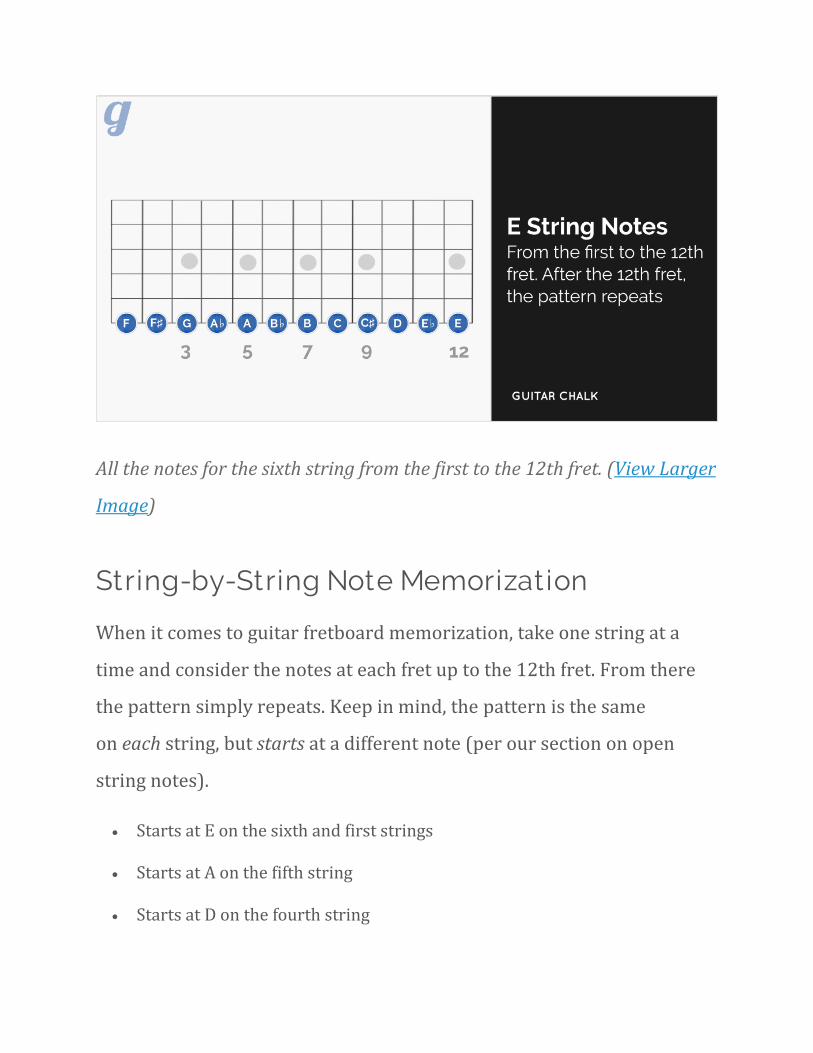
String-by-String Note Memorization
When it comes to guitar fretboard memorization, take one string at a
time and consider the notes at each fret up to the 12th fret. From there
the pattern simply repeats. Keep in mind, the pattern is the same
on each string, but starts at a different note (per our section on open
string notes).
• Starts at E on the sixth and first strings
• Starts at A on the fifth string
• Starts at D on the fourth string
• Starts at G on the third string
• Starts at B on the second string
Thus, the sixth string starts with E and ascends through a pattern, while
the fifth string starts at A, ascending through the same pattern, and so on.
Here are the remaining charts for the fifth, fourth, third and second
string notes.
A STRING NOTES
Notes for the A string on the guitar. (View Larger Image)
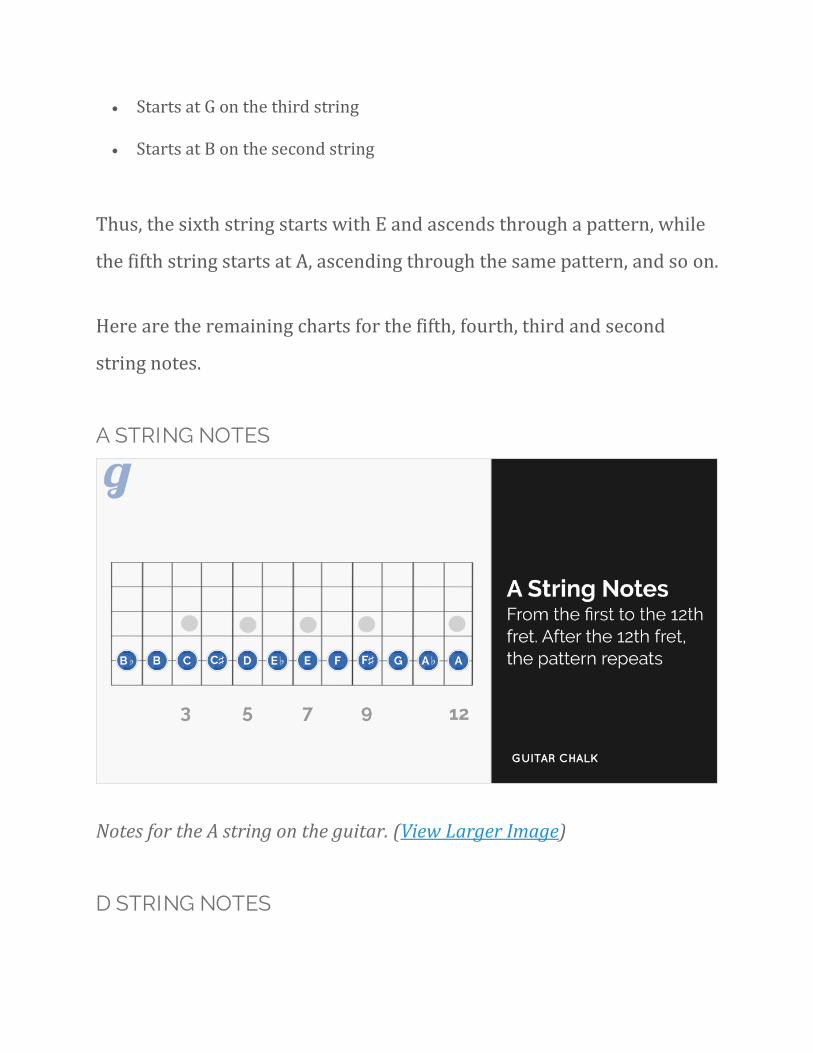
D STRING NOTES
D string notes on a guitar fretboard. (View Larger Image)
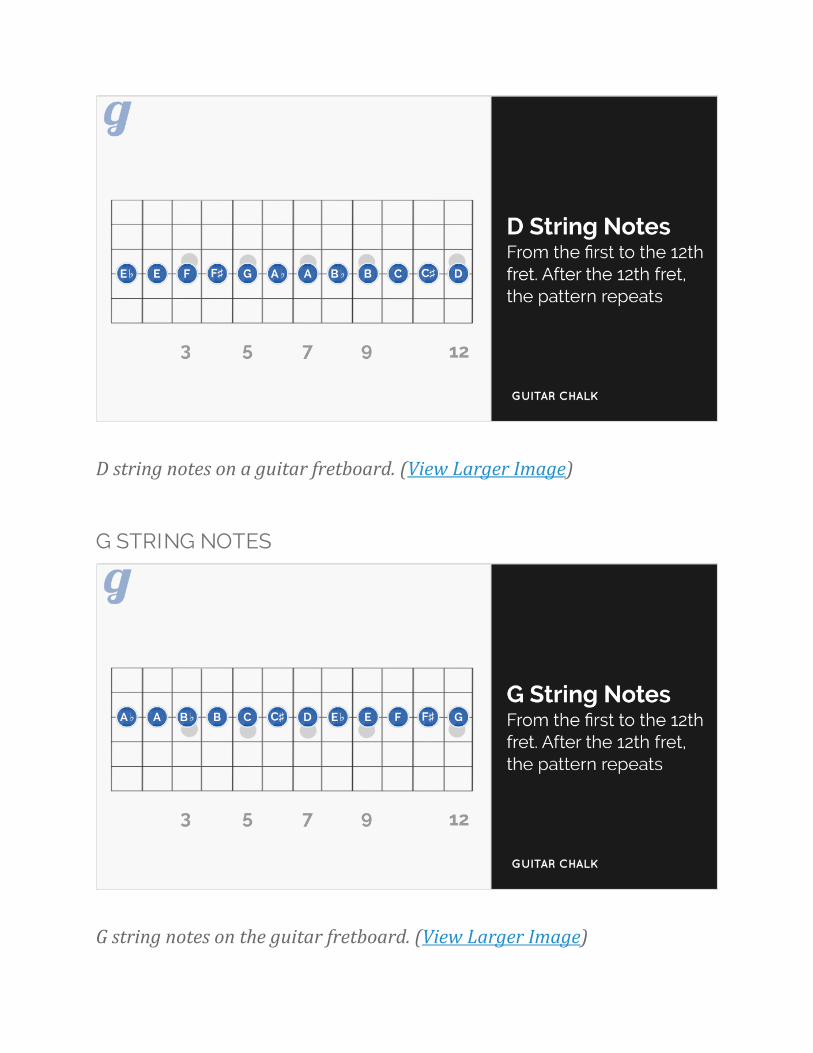
G STRING NOTES
G string notes on the guitar fretboard. (View Larger Image)

B STRING NOTES
B string notes on the guitar fretboard. (View Larger Image)
Additional Resources • Fretboard Note Memorization
• Easy Speed Building Drills
• Blues Guitar Licks for Beginners
• Easy Acoustic Guitar Songs for Beginners
• Easy Guitar Tabs for Beginners
• Simple Pentatonic Scales
• Guitar Notes Lesson

Section #2: Understanding Basic Intervals and the Theory of Root Notes
Keywords and Topics for this Section
Interval Chart
Intervals
Root Notes
Perfect Fifth
In this section we'll cover basic note navigation and how to understand
what it means when you're moving from one note to another on the
fretboard. This will encompass some crucial music theory in regards to
the root notes we covered in the previous section. It will show how
you're eventually going to use those notes to understand chords and
scales.
We'll start with a proper definition of intervals.

What is an interval in a guitar context?
In Music Theory:
The space between any two pitches or notes.
This is the definition of an interval according to Harmony: Its Theory and
Practice by Ebenezer Prout. You can download the PDF version of Prout’s
book if you’d like to read further.
On the Guitar:
The space between any two notes or points on the fretboard.
Defining the interval in a guitar context. (View Larger Image)

For example, the following tab is an interval:
(View Larger Image)
These two notes are separated by two semitones which is equal to a
whole tone or a “whole step.”
However, guitar intervals don’t always fall on the same string, as the
following is also an interval:
(View Larger Image)

Instead of falling on the sixth string - like the previous example - the
second note falls on the fifth string at the third fret. We'll dig into this
interval more in the "perfect fifth" section.
What are the parts of an interval?
A musical interval is made up of two parts:
1. The Root Note: Represents the key of the particular pattern
2. The Interval(s): Any note(s) that correspond to a particular root are
intervals of thatroot
For example, a guitar chord is simply a collection of intervals attached to
a specific root note. Take the following C major chord:
(View Larger Image)
C is the root note at the beginning of the interval sequence (on the third
fret) while the other three notes are all intervals of the root C. Intervals

are always understood in relation to the root note or the lowest note in a
given key.
A Guitar Intervals Memorization Chart
There are a total of 11 different intervals before you get to your first
octave, which doubles the frequency of the original note. Therefore, each
interval should have a “Number of Frets” and an “Interval Quality.”
Here's a chart you can use to identify interval quality based on fret
distance.
A complete guitar intervals chart with interval quality and number of frets.
(View Larger Image)
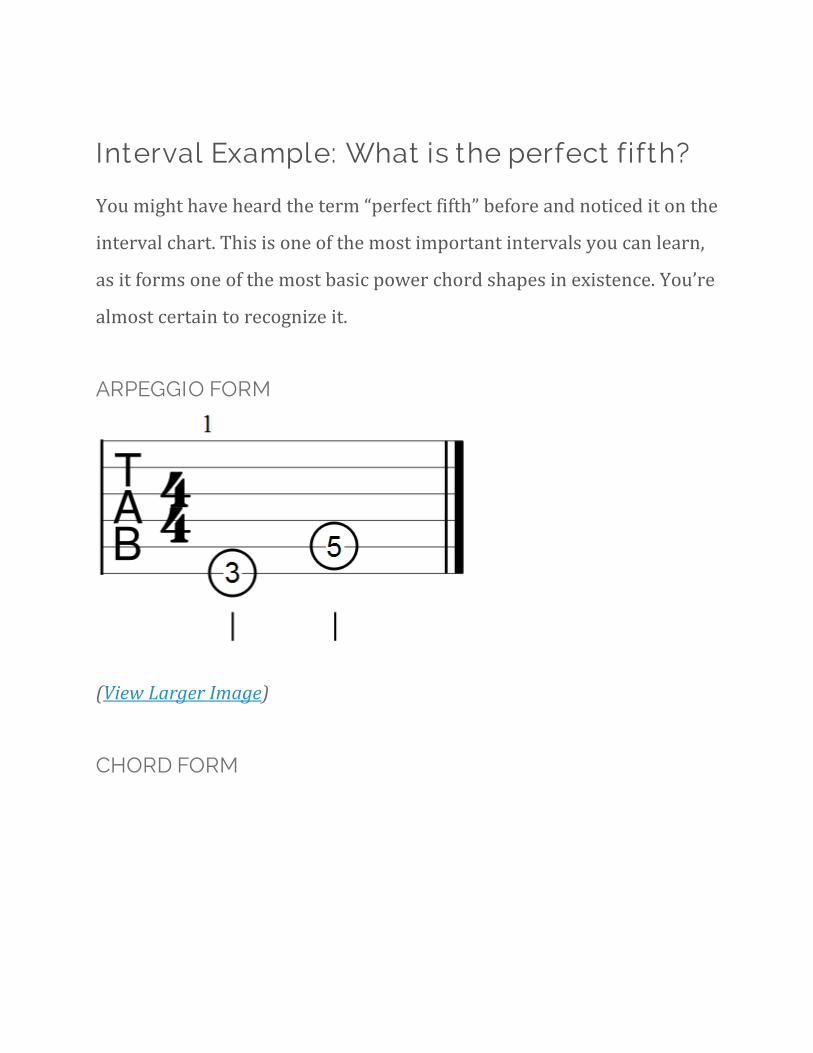
Interval Example: What is the perfect fifth?
You might have heard the term “perfect fifth” before and noticed it on the
interval chart. This is one of the most important intervals you can learn,
as it forms one of the most basic power chord shapes in existence. You’re
almost certain to recognize it.
ARPEGGIO FORM
(View Larger Image)
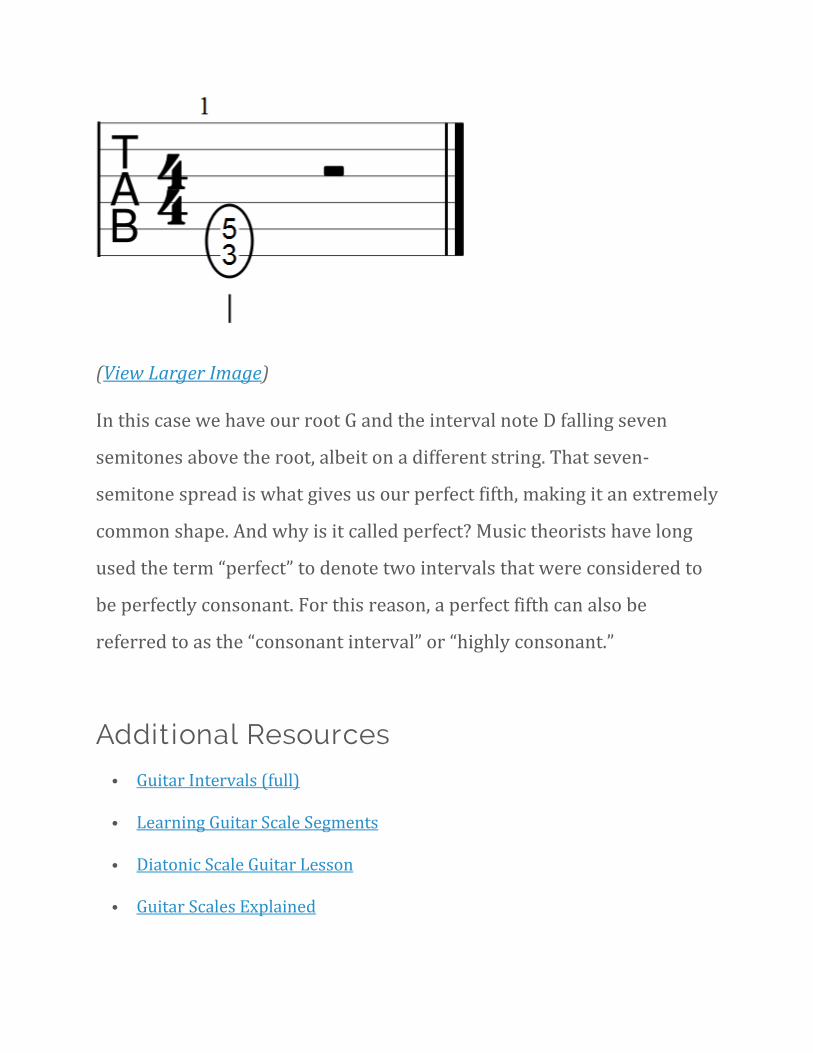
CHORD FORM
(View Larger Image)
In this case we have our root G and the interval note D falling seven
semitones above the root, albeit on a different string. That seven-
semitone spread is what gives us our perfect fifth, making it an extremely
common shape. And why is it called perfect? Music theorists have long
used the term “perfect” to denote two intervals that were considered to
be perfectly consonant. For this reason, a perfect fifth can also be
referred to as the “consonant interval” or “highly consonant.”
Additional Resources • Guitar Intervals (full)
• Learning Guitar Scale Segments
• Diatonic Scale Guitar Lesson
• Guitar Scales Explained

Section #3: From Root Notes to Power Chords (dyads) to Triadic Chords
Keywords and Topics for this Section
Root Notes
Power Chords
Dyads
Triads
Now that we've covered root notes, intervals and the basic applicable
music theory involved with those concepts, we can take those notes and
begin building chords. Instead of starting with open chords we're going
to start with simple power chord shapes (dyads) and triadic chords since
they use two and three-note interval combinations. This is an easier and
more logical transition into guitar chords, as opposed to starting with
open chords.
We'll start with a quick look at how to read guitar chord charts, then
move into two-note power chords which are the pairing of a root and
single interval.

HOW TO READ GUITAR CHORD CHARTS
In most cases, chord charts use horizontal lines to indicate the six guitar
strings and vertical columns to indicate frets, as though you're
looking straight down at the fretboard. Blue dots, Xs and Os are used to
plot notes, muted and open strings.
How to read our guitar chord charts. (View Larger Image)
Common Power Chord Shapes and Dyads
Dyads or "dyadic chords" are chords made up of only two notes or tones.
In some circles the formal definition of a chord requires at least three
notes be present, sounding in unison, in order to be considered a chord.
In the first volume of Music: In Theory and Practice, authors Bruce
Benward and Marilyn Saker provide the following definitions:

"A chord is a harmonic unit with at least three different tones sounding simultaneously."
"A combination of three or more pitches sounding at the same time."
These definitions are established primarily in respect to triads, which
we'll get to in this section. We make room for two-note chords (dyads) as
well, partly because of how often you'll use them in real playing
scenarios and how easy they are to handle on the fretboard.
As we've already seen, the perfect fifth interval, with its root on the sixth
string, gives us one of those dyadic shapes. Here's what it looks like on a
chord chart:
Example of a dyadic power chord. (View Larger Image)
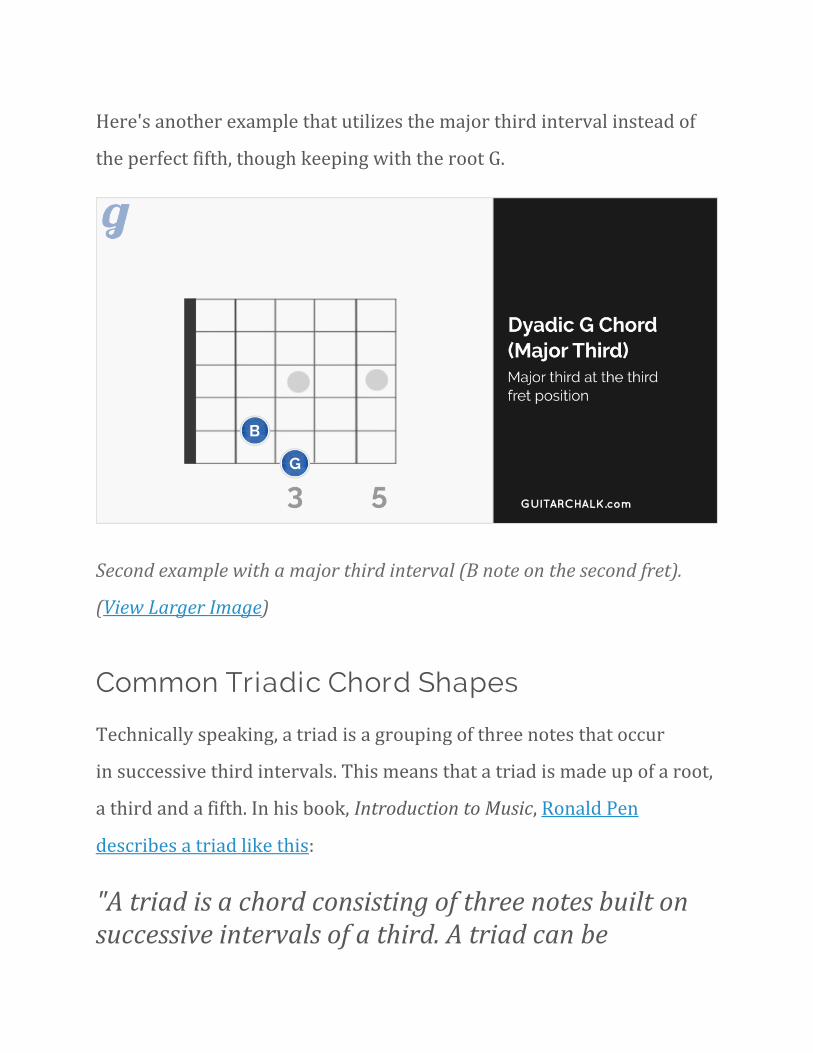
Here's another example that utilizes the major third interval instead of
the perfect fifth, though keeping with the root G.
Second example with a major third interval (B note on the second fret).
(View Larger Image)
Common Triadic Chord Shapes
Technically speaking, a triad is a grouping of three notes that occur
in successive third intervals. This means that a triad is made up of a root,
a third and a fifth. In his book, Introduction to Music, Ronald Pen
describes a triad like this:
"A triad is a chord consisting of three notes built on successive intervals of a third. A triad can be

constructed upon any note by adding alternating notes drawn from the scale. In each case the note that forms the foundation pitch is called the root. The middle tone of the chord is designated the third, because it is separated by the interval of a third from the root. The top tone is referred to as the fifth, because it is a fifth away from the root."
Howard Hanson and Carlton Gamer, notable 20th century music
theorists, have expanded the definition of a triad to
include any combination of three notes, regardless of their interval
spacing.
• Harmonic Materials of Modern Music: Resources of the Tempered
Scale (Hanson)
• Some Combinational Resources of Equal-Tempered Systems (Gamer)
From a theory perspective, it's good to know the "original" or formal
definition of a triad. However, in practice, we would say it's safe to
assume that a triadic chord is any reasonably consonant or harmonious
grouping of three notes, which is more in keeping with Hanson and
Gamer's assessments. In other words, if you have three notes played in
unison and they don't sound completely awful, we could say you have a
triad.

Here is a quick example in keeping with the root, third and fifth
sequence:
Example of a G major triad. (View Larger Image)
If you want to get into some more dyads and triads before moving onto
open chords, you can refer to the following articles which delve into the
topic with a lot more depth and detail:
Additional Articles
• Knowing the Four Triad Qualities
• Root Position Triads
• Guitar Arpeggios

• High Register Chord Progressions
• Developing Fluid Fretboard Movement with Chord Progression Roots

Section #4: Basic Open Guitar Chords
Keywords and Topics for this Section
Open Chords
C Major
D Major
G Major
Now that we've touched on dyads and triads, we can introduce ourselves
to the slightly more complex world of open chords. When a chord is
called "open" this simply means you're using an un-fretted note (i.e. an
open string) to play the chord.
For example, the most commonly known form of C major is, in fact, an
open chord:

The most common form of C major is an open chord. (View Larger Image)
Let's look at diagrams for the rest of the most common open chords.
Refer to the previous section on reading chord charts if needed.
THE OPEN A MAJOR CHORD

Open A major chord. (View Larger Image)
THE OPEN D MAJOR CHORD
Open D major chord. (View Larger Image)

THE OPEN G MAJOR CHORD
The open G major chord chart. (View Larger Image)
THE OPEN E MAJOR CHORD

The open E major chord. (View Larger Image)
Basic Chord Changing Drills
Once we've covered these open chords on their own, it's helpful to start
learning how to practice changing between them. This is also called
chord transitions, which need to be intentionally practiced after
individual chords are learned and memorized.
The video lesson from the Guitar Tricks Fundamentals course is a great
introduction to chord-changing drills and chord progression practice.
You can checkout the rest of the course here.
EXAMPLE CHORD CHANGE DRILL: D, G, D, A

Additional Articles
• Harmonic Variety Using the D Major Chord Shape
• 27 Common Guitar Chord Progressions
• Seventh Chords Guitar Lesson
• Basic Guitar Chord Finger Placement
• Acoustic Guitar Strumming Patterns
• Guitar Tricks Video Course: Fundamentals Part I
• Guitar Tricks Video Course: Fundamentals Part II

Section #5: The CAGED System
Keywords and Topics for this Section
CAGED
Scale
Scale Patterns
Octaves
This section was written by Michael Palmisano, founder of the Guitargate
program.
From the simplest chord to the most complicated scale, everything exists
in five shapes. To play something in a different key, you can just move the
shape. This approach is commonly known as the CAGED system, and
when it comes to learning your neck, you can't beat it for simplicity.
Why is it called the CAGED System?
The idea behind this system is that there are five octave shapes and each
one relates to a common open chord that we already know. Here we'll go
through each pattern based off a particular chord.

PATTERN 1 BASED OFF THE C MAJOR CHORD
(View Larger Image)
PATTERN 2 IS BASED OFF OF THE A MAJOR CHORD.

(View Larger Image)
PATTERN 3 IS BASED OFF OF THE G MAJOR CHORD.

(View Larger Image)
PATTERN 4 IS BASED OFF OF THE E MAJOR CHORD.

(View Larger Image)
PATTERN 5 IS BASED OFF OF THE D MAJOR CHORD.

(View Larger Image)
For example: Play an open position C major chord. In this shape, you are
actually playing two C’s. One is the lowest note in the chord played by
your third finger on the fifth string. But, there’s another: The note being
played by the first finger on the second string.
Isolate these two notes from the chord and play them at the same time.
You should be able to hear that they are both the same note (C) but one
is higher and one is lower.

Octave C notes within the open C major chord shape. (View Larger Image)
This is the Pattern 1 octave shape. Now comes the beauty of the CAGED
system: If you slide that whole shape up two frets, you are now playing
two D notes in pattern one. Slide the shape up two more frets and you
are playing two E notes. One more fret and you’re playing two F notes.
For each chord in the CAGED system, you can follow this pattern.
Additional Articles
• What is the CAGED System?
• Learning Guitar Solos
• Guitar Exercises
• How to Speed Up Your Chord Changes

Section #6: Stretching Fingers and Getting into Scales
Keywords and Topics for this Section
Whole Step
Half Step
Pentatonic
Chromatic
In this section we're going to start familiarizing ourselves with basic
finger exercises and scale patterns. These scales will serve as structural
grids that we analyze and memorize so that later we can use them to
produce different kinds of creative melodies and harmonies.
Basic Stretching and Finger Exercising Routines

The above video is one of the most straightforward ways to start
exercising your fingers for the fretboard, and should be employed at
other strings and fret positions. However, you can also use additional
interval spacing and patterns to expand on your exercises, which makes
the process a little more interesting.
These exercises will also further improve finger dexterity, accuracy and
strength.
BASED ON THE MINOR SECOND INTERVAL

(View Larger Image)
This will get you started skipping strings (brings accuracy more to the
forefront) and allows you to develop a little bit of speed.
Let’s do a similar pattern, but this time with all four fingers.
(View Larger Image)
BASED ON THE MINOR SECOND INTERVAL
These exercises incorporate two-fret jumps, or more formally, the major
second interval. First, something basic:

(View Larger Image)
This is just so your fingers can get used to the interval and isn’t likely to
challenge you significantly. Don’t spend too much time on it. To challenge
our accuracy, we can incorporate a pattern similar to what we used in
the first minor second tab.
Let’s add another major second to each line:
(View Larger Image)

Finger selection for each note is important here and, for the first three
notes, should go in this order: First - Second - Fourth. So, pointer,
middle and pinky finger for the third, fifth and seventh frets. If you aren’t
used to this movement, expect it to stretch your fingers a bit. Let’s adjust
the shape to incorporate all four fingers.
(View Larger Image)
COMBINING THE MAJOR AND MINOR SECOND INTERVAL EXERCISES
Now that we’ve covered both intervals, as well as some fretboard
distance, we can start to run exercises that combine the intervals into
three-note patterns. We can start with the following sequence:

(View Larger Image)
Given three notes, we now have two intervals:
• Minor Second: Between the second and third fret
• Major Second: Between the third and fifth fret
Now we can use this sequence to construct our exercises. Here’s what we
came up with:
(View Larger Image)

(View Larger Image)
This pattern takes the same sequence of three notes and moves it around
to three different strings. Now, instead of jumping from the third to the
10th fret, let’s look at an exercise that let’s us climb there:
(View Larger Image)
You can use the minor and major second interval, as well as the grouping
of the two, to build a ton of different exercises at varying fret positions.
Take the time to get familiar with these patterns then come up with your
own exercises based on the intervals we covered.

Understanding Guitar Scales as a Concept
The most basic explanation of a guitar scale would be the following:
A guitar scale is any sequence of musical notes ordered by frequency or
pitch. (View Larger Image)
It’s less scary once you realize that in its most basic form a scale is little
more than an ascending or descending sequence of notes. Further, these
scales are ordered by pitch. Anssi Klapuri, in Signal Processing Methods
for Music Transcription, defines pitch as the following:

Pitch is a perceptual attribute which allows the ordering of sounds on a frequency-related scale extending from low to high.
In other words, a scale is an ordered series of notes based on frequency.
How do we break this down on the fretboard? Let's start with basic
intervals, whole and half steps.
UNDERSTANDING WHOLE AND HALF STEPS
We’ve already established that scales are a series of musical pitches. But,
how are those pitches understood? In music, pitch is indicated by the
first seven letters of the alphabet:
A B C D E F G
Thus, each note (pitch) on the scale will have one of these letters
associated with it. Moving between these notes introduces you to the
concept of changing pitch, which can be measured in half and whole
steps. This is a concept we've already touched on, but here's a more
complete and concrete explanation of both half and whole steps:
Half Steps (semitones): If you start with your first finger on the 1st fret
of the sixth string (low E) then move your finger up to the 2nd fret on the
same string, you’ve moved up in pitch one half step.

Whole Steps (wholetones): If you start with your first finger on the 1st
fret of the sixth string (low E) then move your finger up to the 3rd fret on
the same string, you’ve moved up in pitch one whole step.
Example of a half step and whole step in a chord diagram. (View Larger
Image)
These terms give us a way to describe movement up and down the
fretboard, particularly when we’re talking about ascending or
descending scales. Thus, scales can be broken down into a mixed
arrangement of half steps and whole steps. This is how we constructed
our exercises from the previous section.
Consider the following scale diagram:

Another example of a half step and a whole step in a scale diagram. (View
Larger Image)
We’ve circled one half step and one whole step.
Whenever they show up in scales, they make up one and two fret jumps,
respectively. If it’s a three fret jump, say the 1st to the 4th fret, we’d call
that “one and a half steps.” If it went from the 1st to the 5th fret we’d say
“two whole steps.”
Let's look at how these scales fit into the idea of "playing in a key."
Scales and How They Relate to Keys
A musical key can be defined as the following:

The key is the root of the scale that a group of chords or notes fall into. For example, if you have three notes being played, let's say they're C, D and G, we know from the C major scale that this note sequence can be said to be in the key of C.
Thus, a key gives us a scale upon which a piece of music is based.
Let’s talk about this relationship.
What is the link between scales and keys?
We can know right away that our key is going to be one of the seven
musical notes.
However, we need to keep in mind that scales are then taken directly out
of that key. Thus, it could be said that any piece of music is based off a
scale, which has a key. Were we to move the scale up or down the
fretboard, the key would change.
Therefore, the more correct explanation is that our songs have keys,
which then implicate particular scales.

What’s the relationship between scales, songs and keys? (View Larger
Image)
Scales take their letter value from the root note or “tonic” of the scale.
Once you know what scale you’re playing and in what key, you can move
the scale or any segment of it to any location on the fretboard, thereby
changing its key.

How to move scale shapes in a guitar scale diagram. (View Larger Image)
Chromatic Guitar Scales Explained
Western music uses 12 notes which can be referred to as “The Complete
Chromatic Scale.” On a keyboard or piano this is represented by seven
white keys and five black keys.
On a guitar, it’s represented by those first 12 frets (this is why fretboard
note simply repeat after the 12th fret). The chromatic scale on the guitar
can be visualized by going from the open E on the sixth string to the 12th
fret (high E) on the same string.
Those 12 notes make up the complete chromatic scale on the guitar.

Chromatic scales are made up of a succession of semitones. (View Larger
Image)
Here, we only go to the 10th fret to save space in the diagram but, the
concept remains intact. All the guitar scales you will ever see are derived
from this simple 12-note system. All the different sounds, melodies and
music notation we get comes from a variation of this sequence.
Now that we've covered the basic music theory involved, we can look at
an example of an actual guitar scale that is often used.

The A Minor Pentatonic Scale
The pentatonic scale, regardless of key, is a fairly common pattern,
particularly for guitar players. We’ll cover the 10-fret model of the scale,
then break it down into smaller chunks. Keep in mind that any segment
of the scale can theoretically be moved to any fret.
The A minor pentatonic scale from the 1st to the 10th fret. (View Larger
Image)
The dotted blue circles on certain dots signify the root notes at different
octaves (which in this case is A). What we want to do now is break the
scale down into smaller, more usable segments which can then be
memorized and transposed anywhere on the fretboard. We’ll start with
the first few frets.

FIRST SEGMENT
(View Larger Image)
The first segment of the scale falls within the first three frets and the
bottom four strings of the guitar. This scale should be handled in three
different steps during practice:
• Memorize the pattern as it is
• Memorize the sound
• Transpose the scale to another fret
Let’s say, for example, that you wanted to move the pattern up to the 5th
fret. The tab would look like this:

(View Larger Image)
You’re still jumping up one and a half steps for the two lower strings and
one whole step for the two higher strings. However, the scale takes on a
new key as a result of moving frets. The key of the scale starting at the
5th fret is now D.
SECOND SEGMENT
(View Larger Image)
THIRD SEGMENT
(View Larger Image)

Additional Scales to Work On
To expand on what we’ve already covered, we've found the scales listed
below to be particularly useful in the following disciplines:
• Blues improvising
• Heavy rock chord progressions
• Modern pop and rock
• Western music’s dominant intervals and progressions
Most of today’s guitarists make their living in one of these areas or a
subset thereof. Go through these scales and take the time to get familiar
with both their patterns and sounds. As with the previous example, keys
can change with fret position.
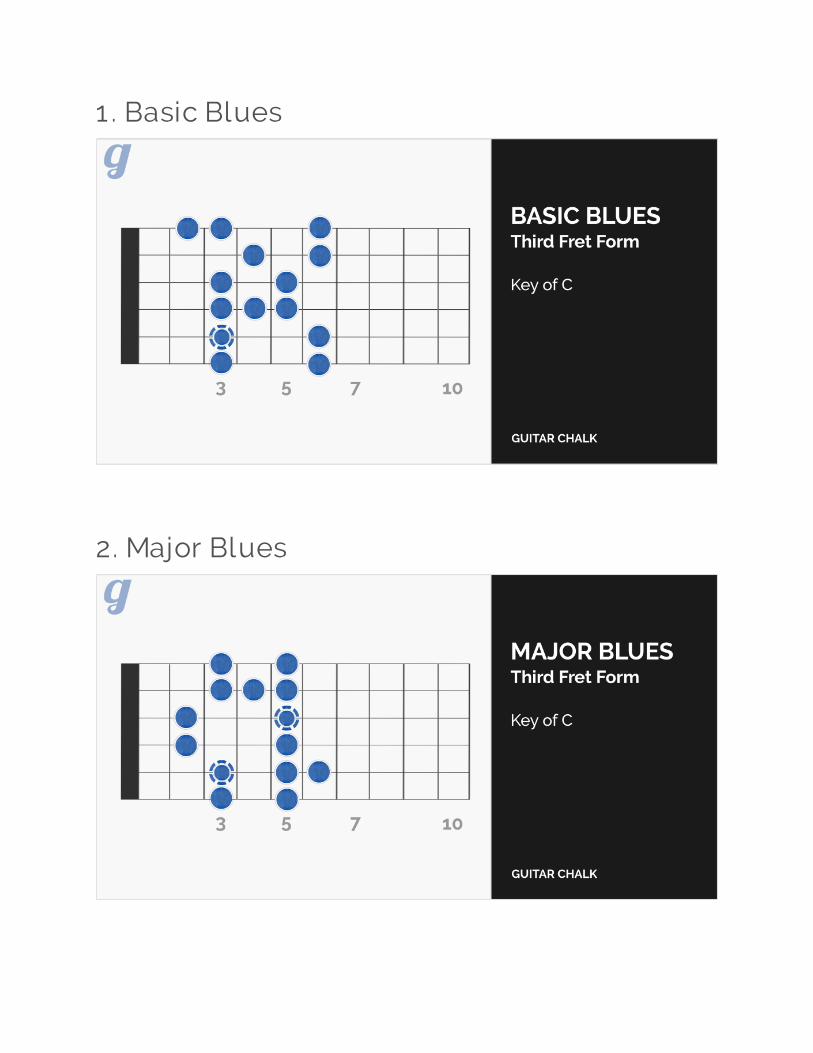
1 . Basic Blues
2. Major Blues

3. Pentatonic Minor

4. Blues Variation 1

5. Dominant Pentatonic

6. Auxil iary Diminished Blues

7. Dorian

8. Pentatonic Major
9. Pentatonic Neutral

10. Melodic Minor
These scales should be viewed as structural, meaning you can memorize
them and then use them to build melody, given particular keys and
musical styles. In other words, they're constructs and are a means to an
end, not an end in and of themselves.
Take the time to memorize these scales so that when you're ready to
start building your own melodies, you can draw on what you know about
scales and intervals to do so.
Here is some additional material that might be a helpful follow up to this
section.

Additional Articles
• A Straightforward Guide to Music Theory
• D Major Pentatonic Scale Guitar Exercises
• Advanced Blues Licks
• E Minor Pentatonic Scale Guitar Lesson
• Lydian Mode Guitar Study
• How to Play Guitar Scales Faster
• How to Improvise the Pentatonic Blues Scale

Conclusion
Are these six sections meant to be exhaustive?
No.
Yet, they are properly ordered topical introductions that can give you
places to start and a plan to follow. For most beginning guitar players, it
takes about six months to get through the topical and memory-heavy
parts of learning the instrument. These sections are a good microcosm of
the material that you should be focusing on during that six-month
learning period. Once you get through it, you can then start to apply the
different things that you've learned. That's when you start to develop
your own style and technique. You've got a solid structure and
foundation in place, so now you're ready to start learning songs and
getting more creative with your instrument.
QUESTIONS ABOUT THIS MATERIAL
If you have questions about the content, feel free to leave them in the
comments section below. That way we can clarify things on-page, which
will make those conversations available to future readers.
You can also refer to the resources and articles at the end of each section,
which are where a lot of this material has been gleaned from.