full hd 1080p dual tuner digital hdtv recorder, … hd 1080p dual tuner digital hdtv recorder,...
TRANSCRIPT
©Copyright 2013, PrimeDTV Technologies, Inc.
Full HD 1080p Dual Tuner Digital
HDTV Recorder, Receiver and
Media Center Box
QUICK START GUIDE
MODEL : PHD-VRX2

Front View
Menu: Display On-screen (OSD) Main Menu.
CH+: Move TV channel number up.
CH-: Move TV channel number down.
V+: Increase audio volume.
V-: Reduce audio volume.
: Switch unit in Standby or Operation mode.
: Green light is in Operation mode. : Red light is in Recording Mode.
No lights are in Standby mode.
Back View
(1) Two Tuners (RF1, RF2): RF1 (Tuner 1), an ATSC/QAM/NTSC tuner to receive digital
and analog channels. RF2 (Tuner 2), an ATSC/QAM tuner to receive only digital
channels. Note: PHD-VRX2 can only record or timeshift on digital channels only, not on
analog channels.
(2) Two USB ports (USB1, USB2): Use any USB ports to connect external USB storage
devices. To record, connect external USB Hard Drive (HDD) or USB Flash stick with
either ext2 or NTFS format. PHD-VRX2 will record TV shows on the first USB device
plugged in (assigned as “usba”). To Playback, connect any USB storage devices
with either ext2, NTFS or FAT32 format. PHD-VRX2 will act as media player to play
video, music and picture files.
Page 1
Note: PHD-VRX2 has built-in USB utility menu to test USB speed and partition USB to ext2
format.
(3) VGA (RGB) w/ Audio inputs: Accept video and audio inputs from PC VGA port.
(4) HDMI input: Accept HDMI input from the external devices like Blu-ray player and
etc.
(5) Composite Video and Audio input: Accept composite video (480i) and stereo
audio inputs from the external devices.
(6) Component video input: Accept component (Y-Pb-Pr) video (720p/1080i) input
from the external devices.
(7) 10/100 Ethernet Port: Connect to the external network. Connect NTP (Network
Time Protocol) server to synchronize the time for accuracy. On-line video
streaming capable.
(8) Composite Video and Audio output: Composite video (480i) and audio output to
analog TV or monitor. This video is outputting simultaneously with HDMI output.
Note: This output is providing composite video and audio only, no graphic on-screen menu
on this output.
(9) HDMI output: HDMI output (720p / 1080p). It is outputting simultaneously with
composite video output.
(10) Optical Digital Audio output: Connect to digital (optical) audio equipment.
Supporting 5.1 surround sound.
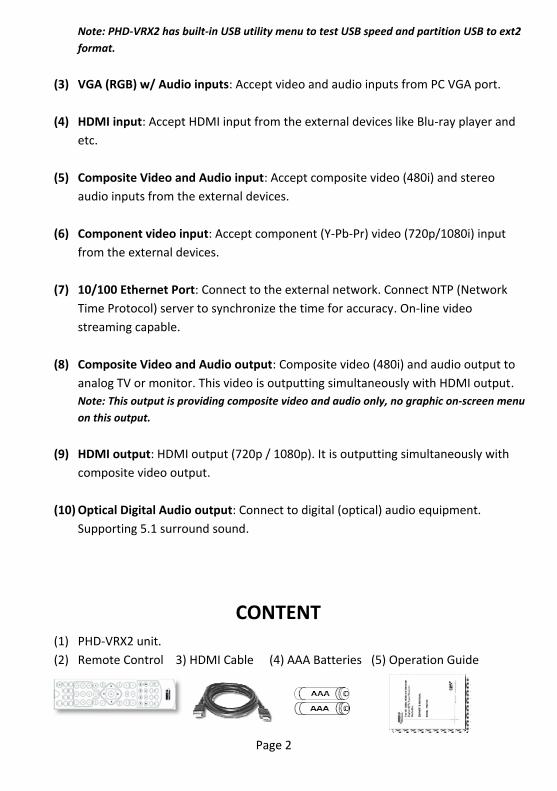
CONTENT(1) PHD-VRX2 unit.
(2) Remote Control 3) HDMI Cable (4) AAA Batteries (5) Operation Guide
Page 2

Remote Control
POWERTurn PHD-VRX2 on and off
V.MODEToggle Display resolution (720p/1080p)
SLEEPSelect preset timer for auto shut off
FREEZEPause video
AUDIOSound mode change (Stereo, Mono,SAP)
NUMBERSPress to enter numbers or channelnumbers
MENUDisplay On-Screen-Display (OSD) menu
EXITTerminate menu or OSD
CH+/CH-Choose the nest and previous channel
Media Player or Action KeysTo play video/audio programs forrecorded TV show, timeshift, mediaplayer, video streaming
Short-cut Keys4-color keys correspond to differentfeatures and quick access.In TV mode, press RED key to enabletimeshift function, which can pause liveTV program as well as instantly rewind,fast forward, slow motion on live TVprogram
INPUTPress to bring up input selection
ASPECTScreen size change
CCTurn on and off close caption
PIP
future option
TVInstant jump to TV input and watch TV
BACKbring the current menu or function to the
previous state or move to the previouschannel
QUICKShow full screen Electronics Program
Guide with schedule program recordingcapability
Navigation & OKDirection keys to navigate menu
GUIDEShow Electronics Program Guide or
current input info
VOL+/VOL-Increase or decrease the volume
PICTURESelect preset video picture settings
MUTETemporarily turn off the sound
INFOShow current input status. In TV Mode,
show channel status and quick programguide
BACK
FAVAdd or delete favorite channels
ON-LINE KeysOn-line video streaming access
Page 3

Connections and Setup
Connecting Antenna or Cable Signal Source al
1. Connect an outdoor or indoor antenna directly to either Tuner 1 or Tuner 2 jackwith a coaxial cable. This is to receive over-the-air digital TV signals from TVbroadcasters.
2. Connect Cable signal source using a coaxial RF cable to either Tuner 1 or Tuner 2jack.
Connecting External USB Storage Devices al
1. To record TV shows, plug USB 2.0 support Hard Disk Drive (HDD) or Flash stick withthe size up to 2TB. PHD-VRX2 will record TV shows on the first USB device pluggedin no matter which USB port.
2. To playback TV, Movie, Music and Photo files, connect USB device to any one ofUSB ports.
3. To upload firmware, Plug USB flash stick in and follow the firmware upgradeguideline.
Connecting VGA/PC Inputal
PHD-VRX has one VGA input port, which can be connected to PC or external devices
with RGB, H/V sync signals and audio.
Page 4

Connecting HDMI Input al
PHD-VRX2 has one HDMI input port. It can be connected to different HDMI devices
such like Blu-Ray player, DVD player, PS3, HD cable or satellite boxes.
Connecting Component (YPbPr)al
PHD-VRX2 has one Component (Y-Pb-Pr) video input and audio (R/L) input, which can
be connected to external HD devices with YPbPr output.
Connecting Composite Video Inputal
PHD-VRX2 has one Composite video (CVBS) input port with associated audio (R/L)
input, which can be connected to any 480i/ Analog video external devices such like
VCR, DVD players.
Page 5
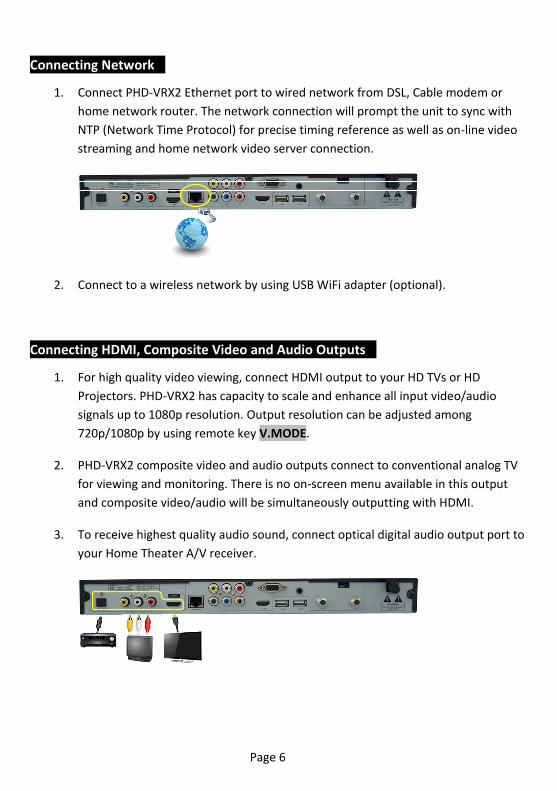
Connecting Networkal
1. Connect PHD-VRX2 Ethernet port to wired network from DSL, Cable modem or
home network router. The network connection will prompt the unit to sync with
NTP (Network Time Protocol) for precise timing reference as well as on-line video
streaming and home network video server connection.
2. Connect to a wireless network by using USB WiFi adapter (optional).
Connecting HDMI, Composite Video and Audio Outputsal
1. For high quality video viewing, connect HDMI output to your HD TVs or HD
Projectors. PHD-VRX2 has capacity to scale and enhance all input video/audio
signals up to 1080p resolution. Output resolution can be adjusted among
720p/1080p by using remote key V.MODE.
2. PHD-VRX2 composite video and audio outputs connect to conventional analog TV
for viewing and monitoring. There is no on-screen menu available in this output
and composite video/audio will be simultaneously outputting with HDMI.
3. To receive highest quality audio sound, connect optical digital audio output port to
your Home Theater A/V receiver.
Page 6

Powering Up and Initial Setup
After connecting PHD-VRX2 with proper input/output sources, you need to power up
unit and run initial setup including automatically scanning available channels. This
initial setup is only required once during the first time turning on the unit.
1. Plug the Power cord from back of the unit into AC outlet.
2. The clock will light up “12:00A” on the unit front panel LED display to indicate it is
in standby mode. Press either remote POWER key or front panel button to turn
on the unit.
3. Boot up time usually takes about 30 seconds and the front panel will display
“BOOT”. There will be NO video on TV screen during boot up time. After boot up is
complete, the front panel shows “no ch” and a green light.
4. Follow on-screen initial set up menus to complete the procedures.
Color Shortcut Keys
: In normal operation, press this key to enable Timeshift function. In other
menus, this key may act as delete function.
: In normal operation, press this key to bring up Upcoming Recording Schedule
List screen so user can take a quick glance of the recording schedules.
: In normal operation, press this key to bring up Manual Timer Recording screen
to allow user manually set recording date, time and other information. In
Upcoming Recording Schedule screen, press this key to show the latest three
recording programs.
: In normal operation, press this to bring up “Recordings” playback screen so
user can select pre-recored shows to play and watch.
Please also refer to complete PHD-VRX2 User Manual from
http://www.epvision.com/HDTVSTB/phdvrx2main.htm for more detailed information.
DOC# VRX2-v1.11Page 7