fundamental softball skills developing fundamental...
TRANSCRIPT

FUNdamental Softball skills – developing fundamental skills
Learning outcomes
At the completion of this Module the candidate will be able to:
Identify the fielding positions in Softball and the responsibilities and key qualities of each position
Outline how to select and get familiar with a fielding glove
Teach and correct catching a thrown ball
Teach and correct an overhand throw
Teach and correct fielding of ground balls
Teach and correct fielding of fly balls
Teach and correct basic pitching technique
Teach and correct basic catching technique
Teach and correct basic hitting technique
Teach and correct basic base running technique
The focus of the FUNdamentals of Softball (Level 1) Coach Accreditation Program is on the proper
mechanics and execution of the fundamental Softball skills of: catching a thrown ball, executing an
overhand throw, fielding ground balls and fly balls, basic pitching, catching, hitting and base running
technique. The purpose of this focus is to assist coaches to correctly develop fundamentals
Softball skills in beginner level players.
Fielding positions
1 Field positioning
The diagram overleaf represents where players should stand for each fielding position. However as
players' skill and confidence progress, they will become more aware of the cues available to them
during the game which may impact on where they stand.

Infield
The infield is the first line of defense behind the pitcher and will generally make more defensive plays
than the outfield. Key positions that make up the infield include the:
Pitcher
Catcher
1st Base
2nd Base
Third base; and
Shortstop
Infield players are responsible for fielding ground balls, catching fly balls, throwing to various bases,
covering bases, backing up and tagging runners. Whilst it is important for all players to develop the
basic fundamentals in any position to be successful, there are usually four common qualities that
characterise a good infielder. These include the ability to be alert on every pitch thrown and make the
right play, an eagerness or aggressiveness to go after the ball rather than waiting for it to come to
them, good reflexes and the ability to move quickly in all directions and no fear of hard hit balls or
oncoming baserunners.
Outfield
The outfield is sometimes considered less demanding than the infield, however a strong defensive
outfield will execute important outs, and like the infield, will make a valuable contribution to the game.
Key positions in the outfield include:
Left Field
Centre Field; and
Right Field
Outfield players are responsible for catching fly balls, fielding ground balls, throwing to infielders at
various bases including home plate, covering bases from time to time and backing up. Whilst it is
important for all players to develop the basic fundamentals in any position to be successful, there are
usually three common qualities that characterise a good outfielder.
These include the ability to position themselves properly for different batters and different situations,
react to the batted ball quickly and possess a strong accurate throw.
Selecting a fielding glove
There is a tremendous range of gloves available for players to choose from. They vary in size and
style to suit players needs and positions played. When making a selection it is important that the
player can control the glove, so the weight and size of it are important criteria to consider.
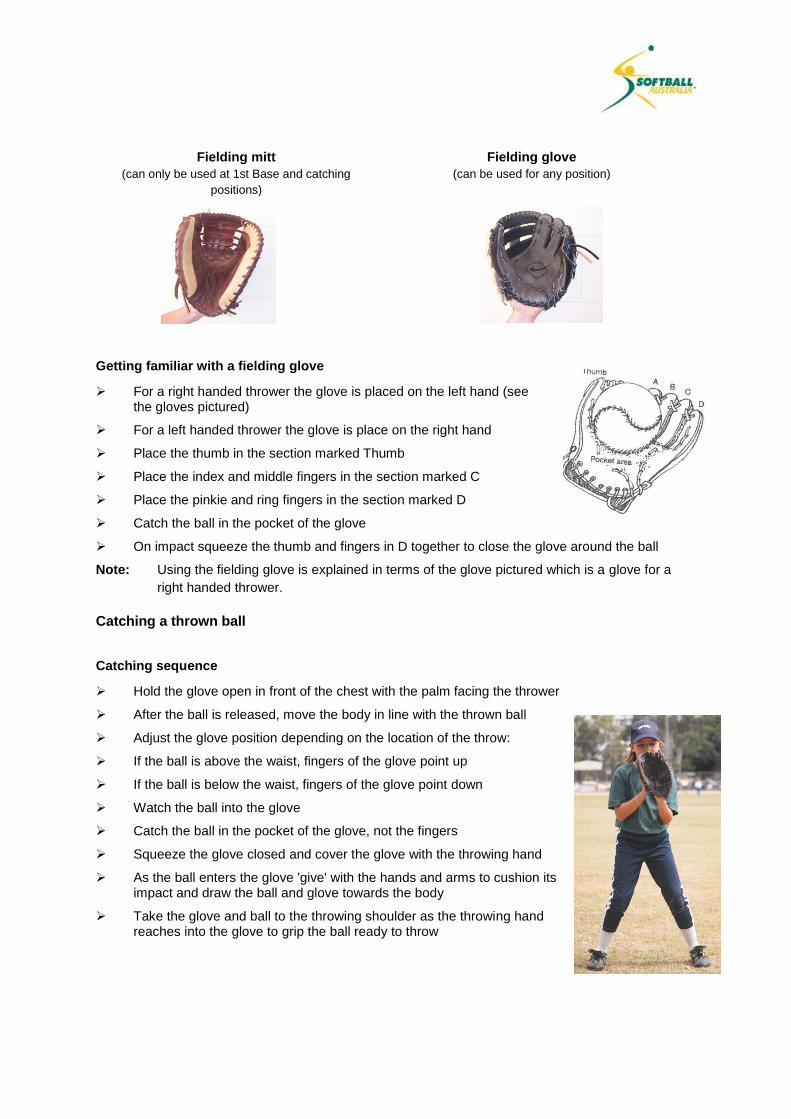
Fielding mitt
(can only be used at 1st Base and catching
positions)
Fielding glove
(can be used for any position)
Getting familiar with a fielding glove
For a right handed thrower the glove is placed on the left hand (see the gloves pictured)
For a left handed thrower the glove is place on the right hand
Place the thumb in the section marked Thumb
Place the index and middle fingers in the section marked C
Place the pinkie and ring fingers in the section marked D
Catch the ball in the pocket of the glove
On impact squeeze the thumb and fingers in D together to close the glove around the ball
Note: Using the fielding glove is explained in terms of the glove pictured which is a glove for a
right handed thrower.
Catching a thrown ball
Catching sequence
Hold the glove open in front of the chest with the palm facing the thrower
After the ball is released, move the body in line with the thrown ball
Adjust the glove position depending on the location of the throw:
If the ball is above the waist, fingers of the glove point up
If the ball is below the waist, fingers of the glove point down
Watch the ball into the glove
Catch the ball in the pocket of the glove, not the fingers
Squeeze the glove closed and cover the glove with the throwing hand
As the ball enters the glove 'give' with the hands and arms to cushion its impact and draw the ball and glove towards the body
Take the glove and ball to the throwing shoulder as the throwing hand reaches into the glove to grip the ball ready to throw

Ready position
Body position
Face the thrower
Feet are shoulder width apart and parallel
Bend the knees slightly with weight evenly distributed
Hold both hands chest high with the glove open to the ball, fingers up and thumbs together
Body movement
Move the body behind the ball using a shuffle step or cross over step depending on the accuracy of the throw
Catching technique
Catch the ball in the pocket of the glove
Draw the hands slightly back towards the body to 'soften' the impact of the ball into the glove
Catching below the waist – the fingers are pointing down with the little fingers together
Catching above the waist – the fingers are pointing up with the thumbs together
Watch the ball into the glove
Secure the ball by squeezing the glove around the ball after impact and covering the glove with the throwing hand
Catching below the waist
Catching above the waist

Preparing to throw
Once the ball is secured take the glove and throwing hand to the throwing shoulder
Turn the glove towards the body
Use the throwing hand to reach in the glove and grip the caught ball
Bring the body to the 'Set Position' for throwing by using either a crow hop or crossover step
Gripping the ball 'Set Position' for throwing
Executing an overhand throw
Throwing grip
Hold the ball in the fingers not the palm
Hold the ball with 2, 3 or 4 fingers on top of the ball
Fingers are placed across the seams
Aim to have the thumb on the seam directly under the ball
Hold the ball firmly but not rigidly

Set position
Stand side on and point the glove hand shoulder and elbow at the target.
Feet are slightly wider than shoulder width apart
Head is over the belly button
Throwing hand is extended back with the elbow above the shoulder
Fingers and ball are pointing away from the body
Head remains still and level with eyes looking at the target
Throwing technique
Throw starts with an extended walking step using the foot opposite to the throwing hand
Step should be straight at the target
Rotate hips, then body and then shoulders to the throwing side as weight is driven off back foot and transferred onto the front foot
Weight transfers to the front foot as arm comes forward and over the top. Fingers are behind the ball
Ball hand trails the elbow until the shoulders are square
As the arm comes forward the wrist is under the ball and wrist is kept cocked
Ball is released at a 'high five' position with wrist snap toward the target
Follow through
After release the body continues forward rotation until the throwing shoulder is pointing at the target and weight is on the front foot
Throwing hand continues down and past the opposite hip and knee

Fielding a ground ball
Fielding sequence
Move behind the path of the ball and set feet slightly wider than shoulder width apart
Bend the knees and lean from the waist with the weight on the inside part of the balls of the feet
Lean forward from the waist so that the glove touches the ground in front of the body. (Players should be able to see their elbows)
Hold the glove wide open facing the ball with the fingers of the glove pointing down
The throwing hand is close to and beside the glove
Watch the middle of the ball into the glove
Close the glove and cover it with the throwing hand to secure the ball firmly
In one continuous motion grip the ball and transfer the glove and ball to the throwing shoulder ready to throw
Ready position
Body position
Have the feet slightly wider than shoulder width apart
Weight is forward, but spread along the inside part of the balls of the feet
Bend the knees with the bottom low to the ground (like sitting on a milk crate)
Keep the head up with eyes focused on the batter
Keep the upper body relaxed
Hand position
Keep the hands low
Glove touching the ground
Have the elbows out in front of the knees and not locked in

Fielding technique
Body position
Get into the path of the ball
The body must stay low, with knees well bent and bottom low
Feet should be at least shoulder width apart
The striding foot should be slightly ahead of the pivot foot
Move the head only to enable you to watch the ball into the glove
Body should be directly facing the oncoming ball
Hand position
Keep hands well out in front of the body
Glove should touch the ground
Field the ball from the ground up
Hold the glove wide open facing the ball
As the ball hits the glove elbows 'give' with the ball
Once secured, use the throwing hand to grip the ball inside the glove
In one continuous motion take the glove and ball over the throwing shoulder ready to throw
Preparing to throw
Bring the ball in the glove straight up from the ground to the belly button/stomach. This is sometimes coined 'up the funnel'.
Turn the body side-on to the target using either a crow hop or crossover step
Take the ball and glove directly to the overhand throwing position (no windup)
Point the glove side elbow to the target
Commence throwing progression

Fielding a fly ball
Fielding sequence
Move feet and body under the ball
Hands are above the head and in front of the line of the body
Hold the glove wide open facing the ball with the fingers of the glove pointing up
The throwing hand is close to and beside the glove to secure the ball
Watch the middle of the ball into the glove
On impact close the glove and cover it with the throwing hand to secure the ball
Let hands and arms give to soften the impact as the catch is made
Bring the glove to the throwing shoulder ready to throw
Ready position
Body position
Have the feet shoulder width apart
The body is more upright for outfielders than for infielders:
knees are bent less
hands are further from the ground
Keep the head up with eyes focused on the batter
Keep the upper body relaxed
Body movement
Run to get under the ball as quickly as possible
If the ball is hit beyond the fielder avoid running backwards to get to the ball
If the ball is hit to the left turn to the left to get to the ball
If the ball is hit to the right turn to the right to get to the ball
Catching technique
Watch the ball all the way into the glove
Catch the ball as close as possible to the throwing shoulder
Catch the ball with the fingers of the glove pointing up
On impact close the glove and cover it with the throwing hand to secure the ball
Let hands and arms give to 'soften' the impact as the catch is made
Once the ball is secured prepare to throw using either a crow hop or cross over step

Basic pitching technique
Pitching grip
Hold the ball in the tips of the fingers and not in the palm
Grip the ball comfortably but do not strain
Hold the ball firmly to avoid slipping from the fingers
Place the fingers in contact with the seams whenever possible
Release the ball off the ends of the fingers
Pitching sequence
Stance
Ensure both feet are in contact with the plate
Feet are approximately shoulder width apart, with the pivot foot at the front of the plate and the stride (leg) foot at the back
Shoulders and hips must be in line with first and third base
Hold the ball in both hands in front of the body
The entire body must remain motionless for at least 2 seconds but not more than 5 seconds
Pump (drive phase)
Weight is transferred back on to the stride leg
Glove and pitching hand extend down as the body moves over the front leg and into a sprint position
In this position the weight is loaded onto the front leg
Glove and pitching arm are usually in the middle of the body or slightly towards the throwing side
Stride
Take an explosive stride straight towards the catcher by driving the stride leg up and out with the glove arm and pitching arm
Accompany the stride with a hard push off the plate by the back (pivot) foot
During the stride the pitching arm reaches the top of the arm circle (above your head) and the back foot pivots (squash the bug) allowing the hips and shoulders to rotate away from the batter (right handed towards Third base, left handed towards 1st Base).
Point the toes of the stride foot almost towards the catcher (45 degree tolerance)
The back leg continues to maintain weight as it drives forward off the plate
The body moves from a forward lean (pump) to an upright or very slightly back
For beginners use an exaggerated or extended walking step

Pitching arm action
Move the pitching arm in a complete circle by bringing it straight up the front and straight down the back of the body
Extend the arm but keep it relaxed
At the top of the circle, have the arm close to the head by brushing the ear as it passes the head
Ensure the arm makes the largest circle possible for maximum force
Point your glove to the target to maintain balance and direction
Delivery phase
Drive the total body weight towards the catcher
Stride foot lands on the ground with knee flexed to absorb shock
Toes should be at about a 45º angle
As the stride foot is planted drive the back (pivot) foot forward directly to the target
This causes the hips to rotate back towards the batter, followed by the trunk and the shoulders
At this stage the pitching arm has come from above the head and is well on the way down with the ball still facing out and the wrist cocked
At this point ensure that the shoulders are back in line with the hips. This is achieved by ensuring the glove arm remains at shoulder height and out in front of the body whilst pointing to the target.
Whilst the hips and the shoulders remain open with the glove arm coming down, snap the wrist alongside the thigh region to release the ball
It is important to keep the pitching shoulder back during release
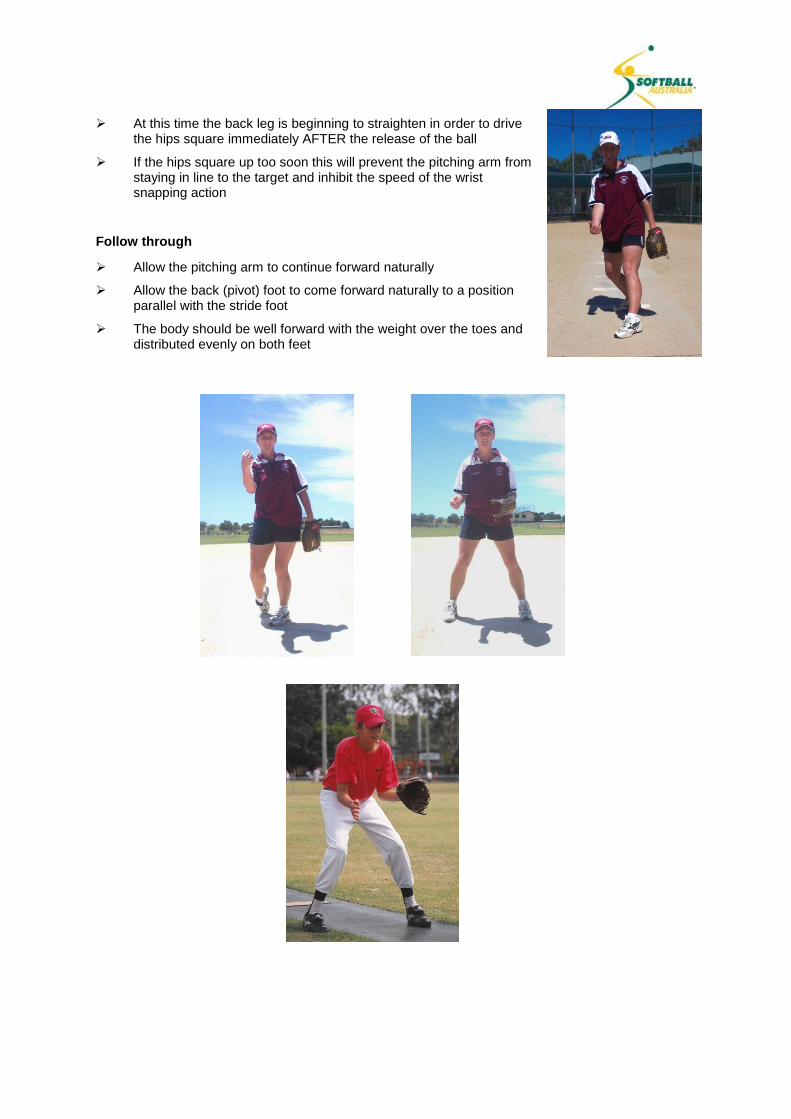
At this time the back leg is beginning to straighten in order to drive
the hips square immediately AFTER the release of the ball
If the hips square up too soon this will prevent the pitching arm from staying in line to the target and inhibit the speed of the wrist snapping action
Follow through
Allow the pitching arm to continue forward naturally
Allow the back (pivot) foot to come forward naturally to a position parallel with the stride foot
The body should be well forward with the weight over the toes and distributed evenly on both feet

Summary – basic pitching technique
Stance
Ensure both feet contact the plate and are shoulder width apart
Pump
Weight is loaded on to the front leg (pivot foot) leg with hands and glove in front of the body
Stride
Take an explosive stride but ensure weight is maintained on the back (pivot) leg
Arm circle/delivery
Hips and shoulders remain open
Snap the wrist at the thigh region
Follow through
Back (pivot) foot and pitching arm comes forward naturally
Body well forward and weight over toes
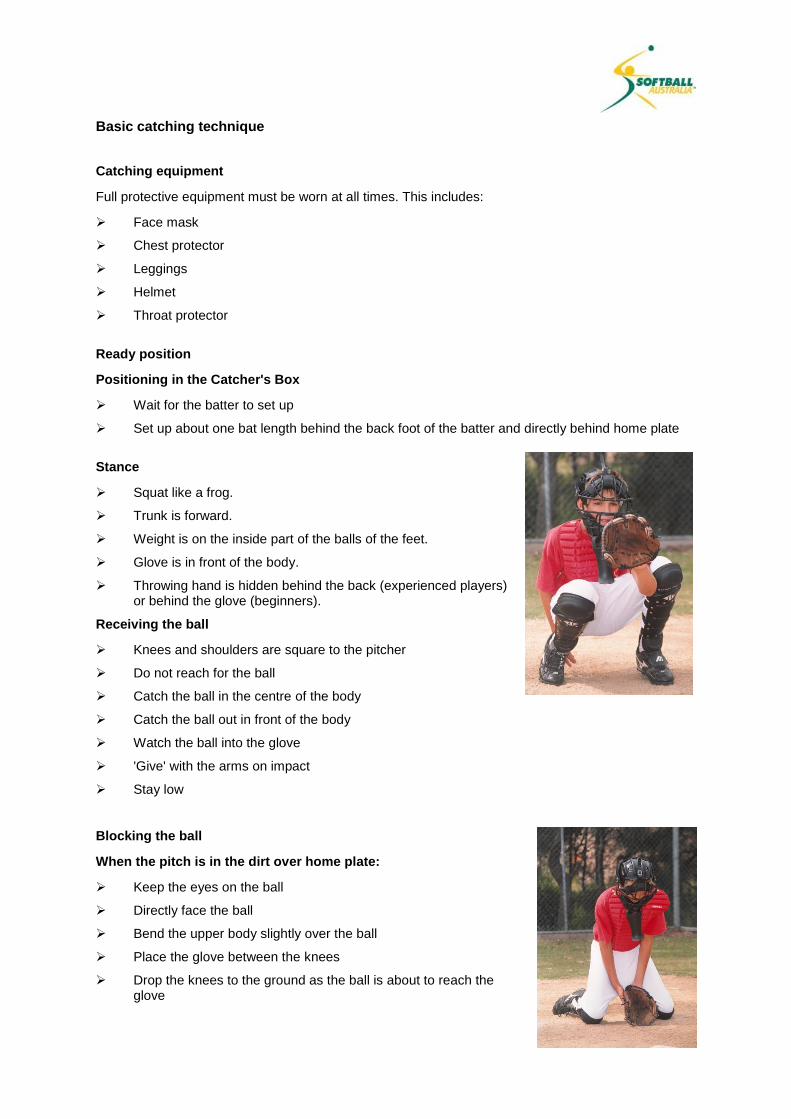
Basic catching technique
Catching equipment
Full protective equipment must be worn at all times. This includes:
Face mask
Chest protector
Leggings
Helmet
Throat protector
Ready position
Positioning in the Catcher's Box
Wait for the batter to set up
Set up about one bat length behind the back foot of the batter and directly behind home plate
Stance
Squat like a frog.
Trunk is forward.
Weight is on the inside part of the balls of the feet.
Glove is in front of the body.
Throwing hand is hidden behind the back (experienced players) or behind the glove (beginners).
Receiving the ball
Knees and shoulders are square to the pitcher
Do not reach for the ball
Catch the ball in the centre of the body
Catch the ball out in front of the body
Watch the ball into the glove
'Give' with the arms on impact
Stay low
Blocking the ball
When the pitch is in the dirt over home plate:
Keep the eyes on the ball
Directly face the ball
Bend the upper body slightly over the ball
Place the glove between the knees
Drop the knees to the ground as the ball is about to reach the glove

When the pitch is in the dirt to the left of home plate:
Keep the eyes on the ball
Step sideways with the left leg first and drop both knees to the ground
Bend the upper body slightly over the ball
Place the glove between the knee and the foot
When the pitch is in the dirt to the right of home plate:
Keep the eyes on the ball
Step sideways with the right leg first and drop both knees to the ground
Bend the upper body slightly over the ball
Place the glove between the knee and the foot
Note: Blocking is explained in terms of the catcher's view from behind home plate.
General hitting
Selecting a bat
There is a tremendous range of bats available for players to choose from. They vary in length and
weight to suit players' needs. When making a selection it is important that the player can control the
bat, so the weight and length of it are important criteria to consider.
Batting grip
Place the hands together on the bat at a comfortable distance from the knob
Right-handed batters place the left hand closest to the knob of the bat (as shown in the photos below)
Left-handed batters place the right hand closest to the knob of the bat
Wrap the fingers around the handle
Hold the bat in the base of the fingers and not in the palm
Centre the knuckles of the fingers (door knockers) so that they are in a straight line up the handle of the bat
The grip on the bat should be relaxed but firm enough so that the bat does not slip from the hands
If the bat is too heavy slide both hands away from the knob until the bat can be swung
comfortably (this is known as 'choking the bat')
Batting grip activities
Activity 1 (as demonstrated in the above photos)
Stand with the knees together and rest the bat against the knees
Reach down with both hands and wrap the fingers around the handle of the bat (photo on the left)
Close the hands around the bat to form a 'V' between the thumb and index finger. The V should point down the line of the bat (middle photo)
Lift the bat straight up to their shoulder (photo on the right)
Activity 2
Place the bat on the ground in front of the player
Have them pick the bat up off the ground using both hands at the same time
Check to see if the grip matches the key points described in Activity 1
Basic hitting technique
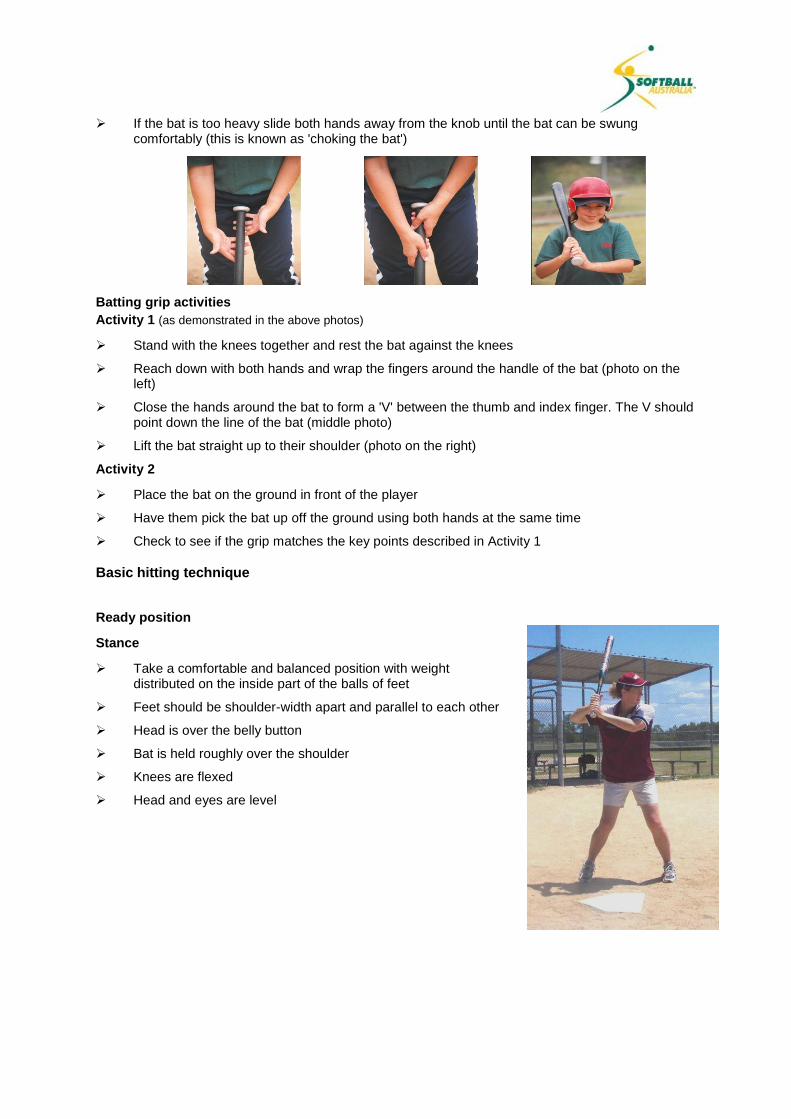
Ready position
Stance
Take a comfortable and balanced position with weight distributed on the inside part of the balls of feet
Feet should be shoulder-width apart and parallel to each other
Head is over the belly button
Bat is held roughly over the shoulder
Knees are flexed
Head and eyes are level
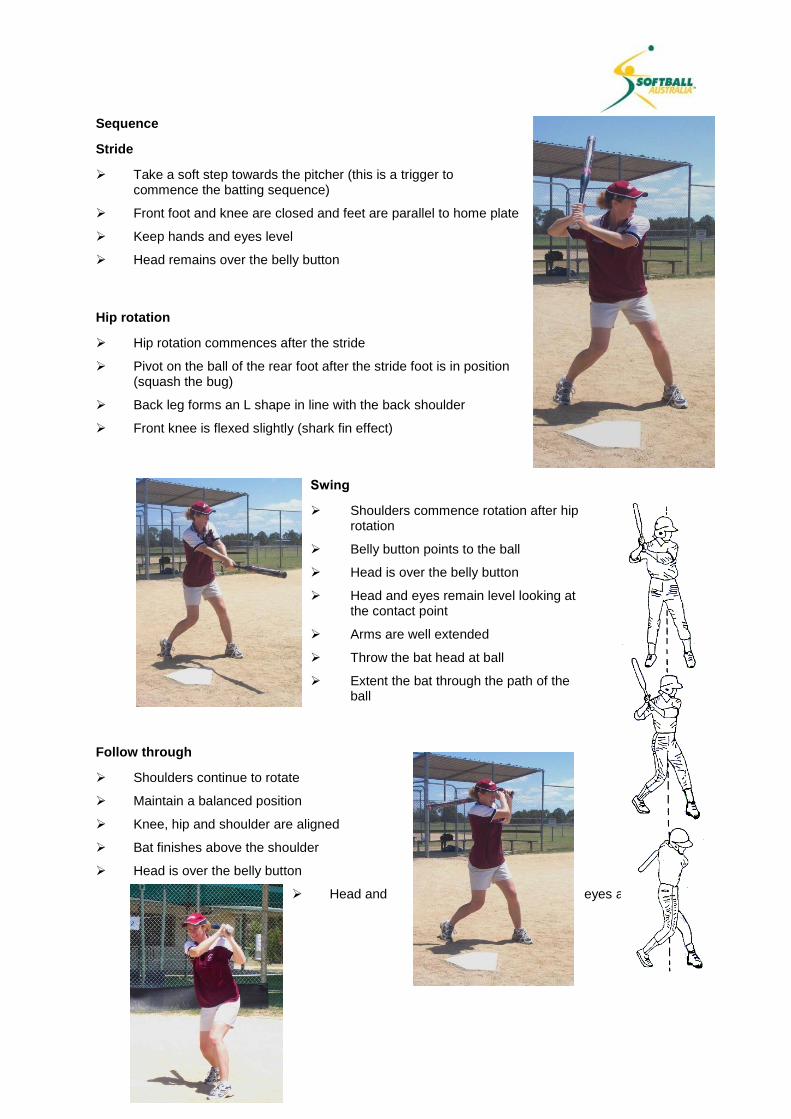
Sequence
Stride
Take a soft step towards the pitcher (this is a trigger to commence the batting sequence)
Front foot and knee are closed and feet are parallel to home plate
Keep hands and eyes level
Head remains over the belly button
Hip rotation
Hip rotation commences after the stride
Pivot on the ball of the rear foot after the stride foot is in position (squash the bug)
Back leg forms an L shape in line with the back shoulder
Front knee is flexed slightly (shark fin effect)
Swing
Shoulders commence rotation after hip rotation
Belly button points to the ball
Head is over the belly button
Head and eyes remain level looking at the contact point
Arms are well extended
Throw the bat head at ball
Extent the bat through the path of the ball
Follow through
Shoulders continue to rotate
Maintain a balanced position
Knee, hip and shoulder are aligned
Bat finishes above the shoulder
Head is over the belly button
Head and eyes are level

Note: Make sure your players always wear a helmet when practicing batting or bunting. The
coach in these photographs is demonstrating the segments of the
hitting action for teaching purposes only.
Summary – basic hitting technique
1 Stance
Take a comfortable and balanced position with weight distributed on the inside part of the balls of feet.
Stride
Take a soft step towards the pitcher (this is a trigger to commence the batting sequence).
Hip rotation
Hip rotation commences after stride.
Swing
Bat extension
Follow through
Note: Make sure your players always wear a helmet when practicing
batting or bunting. The coach in these photographs is demonstrating the segments of the hitting action for teaching purposes only.

Basic base running technique
Batter-base runner
Digging out of the batter's box
Take the first step with the back foot (the one farthest from the pitcher)
Initially take short wide steps to gain power and momentum
Lengthen the stride and pump the arms to maximise speed for running to 1st Base
Running to first
Run in foul territory within the tramline markings
Continue running straight down the line and contact the base at top speed
Don't break stride when contacting the base
Focus on the base (do not watch the ball)
Contact the front corner of the safety base (the one in foul territory)
After contacting the base bend the knees, take short pumping steps and shift weight back to facilitate coming to a stop
As speed is reduced glance left and/or right to look for the outcome of the play
Turn to the left, toward the field of play, without making any attempt to go to 2nd Base
Go directly back to the base in fair territory NOT the safety base
Never slide into 1st Base unless avoiding a tag
Base runner
Leading off on the pitch – rolling start
Front foot is beside the front of the base
Rear foot is behind the base
Bend the knees and lean forward from the waist to take up a sprint position
Watch the pitcher and take up this position when they are ready to pitch
When the pitching arm reaches the highest point of the arc, begin the rocking movement
Transfer body weight to the back foot to enable an 'explosive' drive from the sprint position
Take the first step with the rear foot at the time the pitcher takes the stride
Players should always remain alert and take cues from the pitcher, the defence and the coach.

Rolling start
Leading off on the pitch – track start
Rear foot is on the front of the base
Front foot is extended in front of the base and points in the direction of the next base
Bend the knees and lean forward from the waist to take up a sprint position
Watch the pitcher and take up this position when they are ready to pitch
When the pitching arm reaches the highest point of the arc, begin the rocking movement
Transfer body weight to the back foot to enable an 'explosive' drive off the base
Take the first step with the rear foot at the time the pitcher takes the stride
Players should always remain alert and take cues from the pitcher, the defense and the coach
Track start
Note: The Rules of Softball prevent a runner leaving the base before the pitcher releases the ball
(or in tee ball before the batter hits the ball). If a runner is caught leaving the base early
they will be called out.
Information on the following skills is provided for general interest only and is not an official or
assessable part of the FUNdamentals of Softball (Level 1) Coach Accreditation Program.

Basic bunting technique
Ready position
Body positioning using pivot stance
Pivot early (as the pitcher commences wind up)
Pivot on both feet:
Front foot is closed slightly (approx 45ºangle)
Back foot pivots on ball of foot (squash the bug)
Knees are slightly bent
Body is bent at the waist
Eyes are looking over the bat for the ball at the release point of the pitcher
Weight is on the inside part of the balls of the feet
Hand and bat positioning
Slide the top hand up the barrel of the bat (about one third of the way).
Form a 'V' with the index finger and the thumb of the top hand, with the remaining fingers underneath and closed in a fist.
Rest the bat in the 'V'.
Arms are extended in front of the body with the elbows relaxed.
Hold the bat loosely yet comfortably.
Hold the barrel of the bat over home plate at the top of the strike zone and away from the body.
The barrel of the bat should be slightly higher than the knob of the bat.
Executing the bunt

Select a good pitch to bunt (see pictures above)
Bend the knees to take the body and bat to a ball that is pitched in the lower part of the strike zone (bat remains in the same position)
As the ball hits the bat, draw both hands slightly back toward the body to 'soften' the impact
Try to contact the top of the ball
Put the ball on the ground in fair territory
Bunting a ball in the lower part of the strike zone
Note how well the batter pictured below bends her knees to get down to bunt the low pitch
Executing a bent leg slide
Safety considerations
Coaches must address the safety considerations and be clear about the correct execution of the highly technical aspects of sliding before beginning coaching
Make sure that all players have long pants or knickerbockers on before starting any sliding drills
Players should practice in bare feet or socks until the technique is mastered
A grassed area is preferable to use when working with beginners
Model the finishing position, and then WALK through the sequence of the slide first with players
Practice in this way until players feel comfortable with the technique. The more relaxed players are the easier it will be to slide and the risk of injury is reduced.
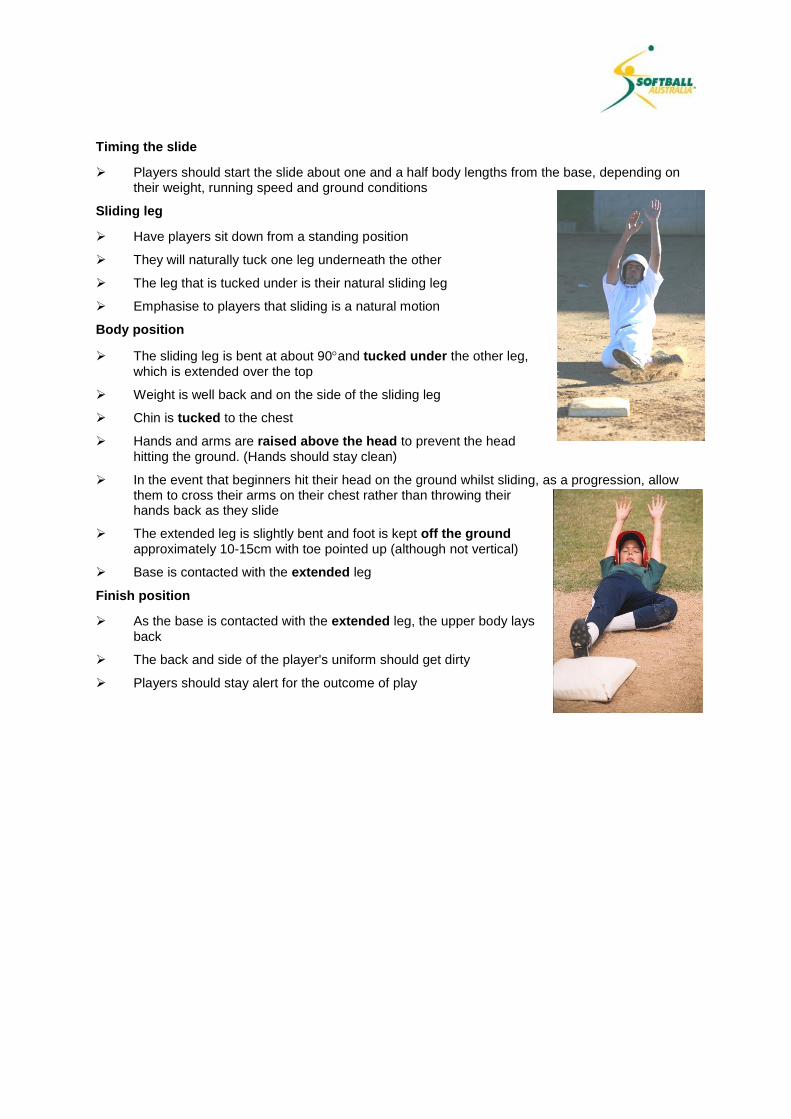
Timing the slide
Players should start the slide about one and a half body lengths from the base, depending on their weight, running speed and ground conditions
Sliding leg
Have players sit down from a standing position
They will naturally tuck one leg underneath the other
The leg that is tucked under is their natural sliding leg
Emphasise to players that sliding is a natural motion
Body position
The sliding leg is bent at about 90and tucked under the other leg, which is extended over the top
Weight is well back and on the side of the sliding leg
Chin is tucked to the chest
Hands and arms are raised above the head to prevent the head hitting the ground. (Hands should stay clean)
In the event that beginners hit their head on the ground whilst sliding, as a progression, allow them to cross their arms on their chest rather than throwing their hands back as they slide
The extended leg is slightly bent and foot is kept off the ground approximately 10-15cm with toe pointed up (although not vertical)
Base is contacted with the extended leg
Finish position
As the base is contacted with the extended leg, the upper body lays back
The back and side of the player's uniform should get dirty
Players should stay alert for the outcome of play