fusion anpr - honeywell introduction product description fusion anpr is one of a range of leading...
TRANSCRIPT
Fusion ANPR Automatic Number Plate
Recognition Software
Setup Guide

ii

iii
ISSUE DATE REVISIONS
A December 2007 Initial Release

iv
NOTES:
v
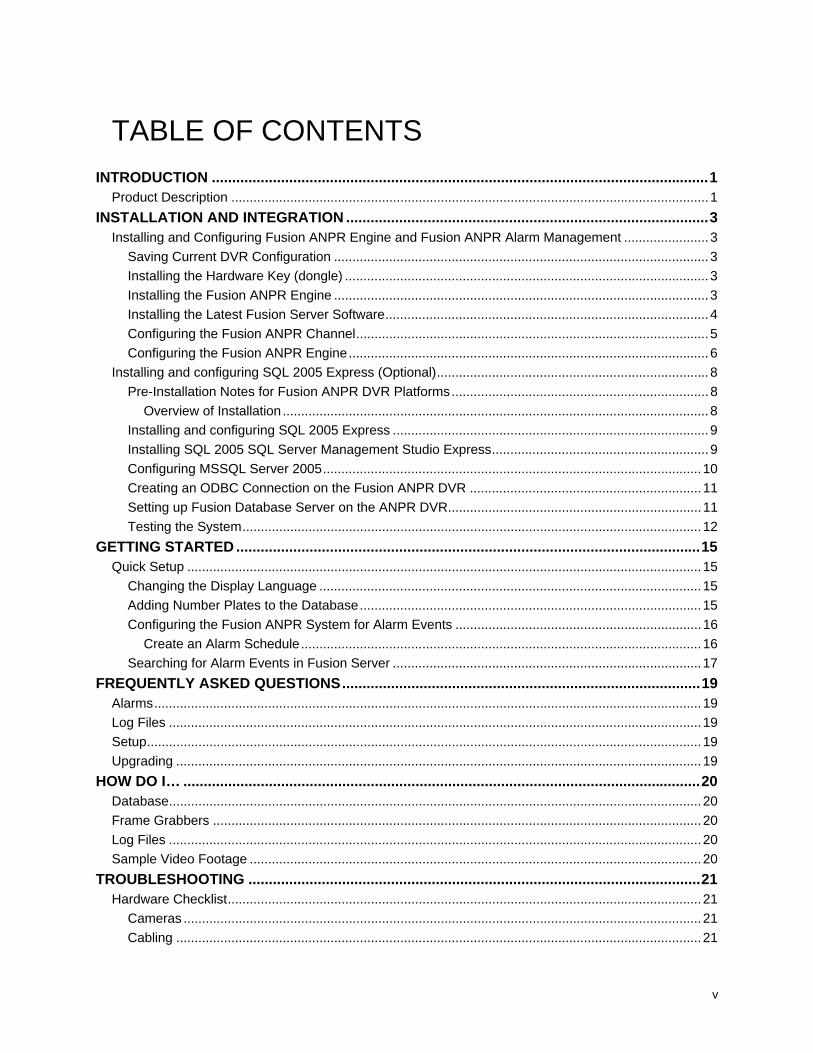
TABLE OF CONTENTS
INTRODUCTION .......................................................................................................................... 1 Product Description .................................................................................................................................. 1
INSTALLATION AND INTEGRATION ......................................................................................... 3 Installing and Configuring Fusion ANPR Engine and Fusion ANPR Alarm Management ....................... 3
Saving Current DVR Configuration ...................................................................................................... 3 Installing the Hardware Key (dongle) ................................................................................................... 3 Installing the Fusion ANPR Engine ...................................................................................................... 3 Installing the Latest Fusion Server Software ........................................................................................ 4 Configuring the Fusion ANPR Channel ................................................................................................ 5 Configuring the Fusion ANPR Engine .................................................................................................. 6
Installing and configuring SQL 2005 Express (Optional) .......................................................................... 8 Pre-Installation Notes for Fusion ANPR DVR Platforms ...................................................................... 8
Overview of Installation .................................................................................................................... 8 Installing and configuring SQL 2005 Express ...................................................................................... 9 Installing SQL 2005 SQL Server Management Studio Express ........................................................... 9 Configuring MSSQL Server 2005 ....................................................................................................... 10 Creating an ODBC Connection on the Fusion ANPR DVR ............................................................... 11 Setting up Fusion Database Server on the ANPR DVR ..................................................................... 11 Testing the System ............................................................................................................................. 12
GETTING STARTED .................................................................................................................. 15 Quick Setup ............................................................................................................................................ 15
Changing the Display Language ........................................................................................................ 15 Adding Number Plates to the Database ............................................................................................. 15 Configuring the Fusion ANPR System for Alarm Events ................................................................... 16
Create an Alarm Schedule ............................................................................................................. 16 Searching for Alarm Events in Fusion Server .................................................................................... 17
FREQUENTLY ASKED QUESTIONS ........................................................................................ 19 Alarms ..................................................................................................................................................... 19 Log Files ................................................................................................................................................. 19 Setup ....................................................................................................................................................... 19 Upgrading ............................................................................................................................................... 19
HOW DO I… ............................................................................................................................... 20 Database ................................................................................................................................................. 20 Frame Grabbers ..................................................................................................................................... 20 Log Files ................................................................................................................................................. 20 Sample Video Footage ........................................................................................................................... 20
TROUBLESHOOTING ............................................................................................................... 21 Hardware Checklist ................................................................................................................................. 21
Cameras ............................................................................................................................................. 21 Cabling ............................................................................................................................................... 21

vi
Power Supply ..................................................................................................................................... 21 The DVR ............................................................................................................................................. 21 Picture Quality / Recognition Rates .................................................................................................... 21 Other Hardware .................................................................................................................................. 22
Hardware ................................................................................................................................................ 22 Cameras ............................................................................................................................................. 22 Trouble Shooting Dongles .................................................................................................................. 23 Troubleshooting Frame Grabbers ...................................................................................................... 23
Software .................................................................................................................................................. 23 System Lockup / Freeze ..................................................................................................................... 23 Database ............................................................................................................................................ 24 Installation .......................................................................................................................................... 24 Log File ............................................................................................................................................... 24 Recognition ......................................................................................................................................... 24 Software Setup ................................................................................................................................... 26
Error Messages....................................................................................................................................... 26 Errors in Fusion ANPR Live Only ....................................................................................................... 26
Relating to Fusion ANPR Live Only ............................................................................................... 26

vii

viii
NOTES:
1
INTRODUCTION
PRODUCT DESCRIPTION Fusion ANPR is one of a range of leading edge products designed for Microsoft Windows™.
Fusion ANPR is an ANPR (automatic number plate recognition) system, allowing you to keep track of vehicles. Once installed and running you have the ability to connect live video input to your system and carefully monitor vehicle movements with the use of Fusion ANPR. Each vehicle’s registration plate is captured and saved to a history file along with the date and time of capture, lane entry/exit details, and options to store images to disk for retrieval at a later date. You can manipulate the database by searching for records using a wide range of search methods, including wildcards and enabling searches to be made with only partial criteria. Options are also available to set audible alert tones to your system – to inform you of the vehicles entering your premises. The system can inform you of employees entering or let you know when a visitor is entering outside of their visiting dates.

2

3
INSTALLATION AND INTEGRATION
INSTALLING AND CONFIGURING FUSION ANPR ENGINE AND FUSION ANPR ALARM MANAGEMENT Items you need to obtain before proceeding:
• ANPR Engine and Included Hardware Key • Fusion Server Ver. 3.5.17 or above • Performance Pack upgrade (HF3HWUPGCPU) to power the new software.
Saving Current DVR Configuration 1. Click the Exit button on the Live View screen and then select Restart in Windows Mode.
2. Click Start > Programs > Fusion > VFormat.
3. Under Settings Export Tool, click EXPORT and save the file to your desktop. This creates a snapshot of the Fusion DVR configuration file in case it is necessary to revert to the previous settings.
Installing the Hardware Key (dongle) 1. Plug the hardware key into any available USB port on the back of the Fusion DVR.
2. Click Cancel on any Hardware Detection pop=up windows that open.
CAUTION: The Fusion ANPR software will not function without the Hardware Key installed.
Installing the Fusion ANPR Engine 1. Run the Fusion ANPR Engine Setup file from the included CD.
NOTE: Accept all defaults during the installation process.
2. On the Files Needed window click Browse.
3. Locate the driver file at C:\WINDOWS\System32\Setup\Aladdin\Hasphl
4. Select akshasp.sys and click Open.
5. Click OK.
6. Select Reboot Now when the installation is complete and click Finish.
7. Proceed to the next step; Installing the Fusion Server Software.

4
Installing the Latest Fusion Server Software NOTE: You must re-install the Fusion Server software even if you have the latest version.
1. Click the Exit button on the Live View screen and select Restart in Windows Mode.
2. Click Start > Settings > Control Panel > Add Remove Programs.
3. Highlight Fusion Server then click REMOVE. Proceed through the uninstall wizard.
4. Run the Fusion Server install file from the included CD.
IMPORTANT: Select the correct Fusion DVR model during the install!
5. During the install you will see a new selection screen. This screen allows you to choose which type of POS/Analytics you wish Fusion Server to integrate with. Select ANPR and complete the installation.
6. Run the Fusion Server software.
Change the Fusion System to 24hr Time 1. Click Start > Settings > Control Panel > Regional and Language Options.
2. On the Regional Options tab click Customize.
3. Click the Time tab.
4. From the Time format menu select HH:mm:ss.

5
Configuring the Fusion ANPR Channel 1. Click Setup on the Fusion Live View screen, and then click the Network tab.
2. Under Transport Setup select Ultra Fine from the Quality menu, and then select Original from the Resolution menu. Leave the Transport Rate at the default setting.
3. Click Apply.
4. Click the General tab, and then click the Video Analysis button.
5. Click VAAgent Setup.
6. Select ANPR from the protocol list.
7. Click Setup.
8. Click the Communications tab.
9. Click Add.
10. Type 6000 in the Local Port box. NOTE: Port 6000 is recommended because it does not conflict with other Fusion software. This can be configured as another port if necessary - replace 6000 with the port that you have chosen.
11. Select the Match Workstation ID checkbox and type 1 in the Workstation ID box. Type 2 when setting up the second channel, and 3 for the third. TIP: If you only purchased one ANPR channel you can skip this step.
12. Click OK.
13. Click Apply and then click OK>
14. Click OK to close the Agent Information window.
15. Choose the desired camera channel for ANPR to associate with from the channel list in Video Analysis setup NOTE: For example, if you want camera channel 2 to display Number Plate information then choose 2 from the channel list.
16. Select 1 from the POS menu. Select 2 when setting up the second channel, and 3 for the third. NOTE: The POS ID is the ANPR channel.
17. Click OK.
18. Click OK to exit setup
You are ready to configure the Fusion ANPR Engine.
6
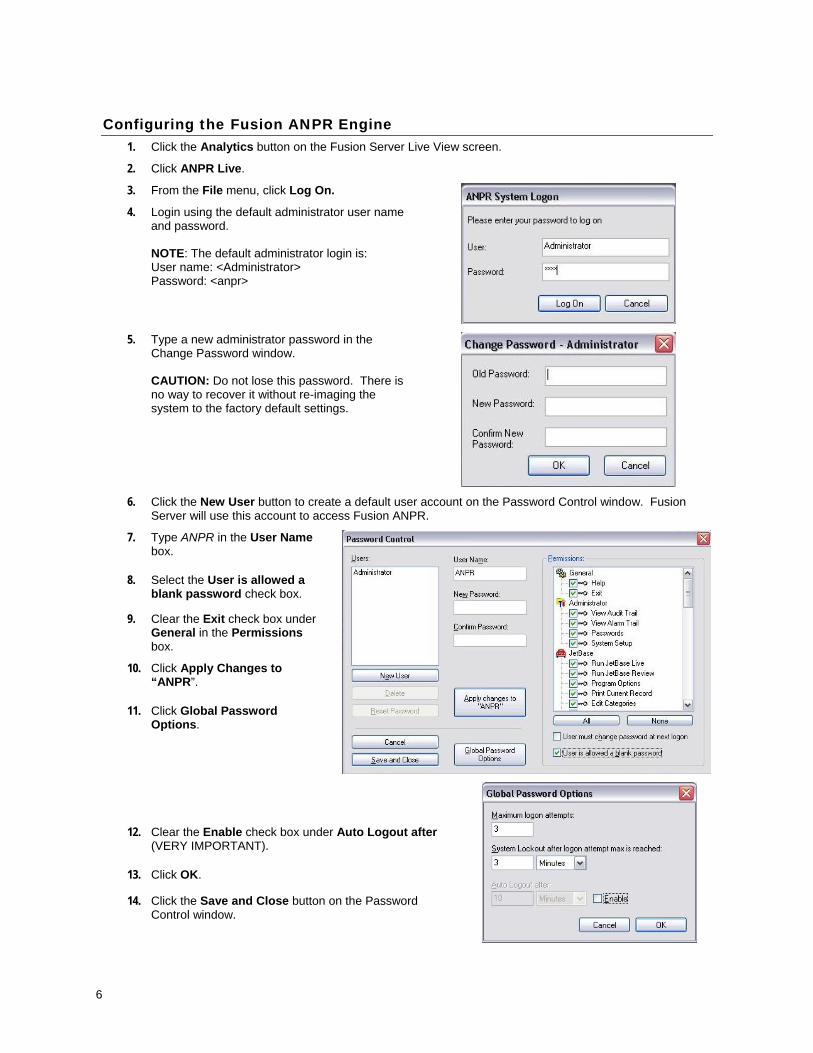
Configuring the Fusion ANPR Engine 1. Click the Analytics button on the Fusion Server Live View screen.
2. Click ANPR Live.
3. From the File menu, click Log On.
4. Login using the default administrator user name and password. NOTE: The default administrator login is: User name: <Administrator> Password: <anpr>
5. Type a new administrator password in the Change Password window. CAUTION: Do not lose this password. There is no way to recover it without re-imaging the system to the factory default settings.
6. Click the New User button to create a default user account on the Password Control window. Fusion
Server will use this account to access Fusion ANPR.
7. Type ANPR in the User Name box.
8. Select the User is allowed a blank password check box.
9. Clear the Exit check box under General in the Permissions box.
10. Click Apply Changes to “ANPR”.
11. Click Global Password Options.
12. Clear the Enable check box under Auto Logout after (VERY IMPORTANT).
13. Click OK.
14. Click the Save and Close button on the Password Control window.

7
15. On the Options menu, click ANPR Preferences.
16. Click the Cameras tab.
17. Confirm the Lane ID. NOTE: The Lane ID must match the POS ID/ANPR Channel. Select 1 for the first channel, 2 for the second channel, and 3 for the third.
18. On the Video System menu, select Honeywell Fusion – Site [0.0.0.0].
19. On the Type list, select Colour.
20. Select the desired video channel from the Video Input list. NOTE: DVR channel 1 = Video Input 0.
21. Click the Network Interface tab, ensure that Honeywell Fusion is selected in the drop down list and the Host check box is selected
22. Set the port to 6000.
23. Click the Input Systems Details tab.
24. Select Honeywell Fusion from the Configuration Page menu. TIP: Do not select FusionGrab.
25. Select the Enable Honeywell Fusion check box.
26. Under Edit Details, Select the Local Connect check box.
27. Type Administrator in the User ID box and type the Administrator password.
NOTE: This password must match the Fusion Server Administrator account password. In addition, if the Administrator password is changed on the DVR it MUST be modified here as well.
28. Click OK.
You should see number plates on the Fusion Live ANPR display.
8
INSTALLING AND CONFIGURING SQL 2005 EXPRESS (OPTIONAL)
NOTE: Only install the SQL 2005 Express if more than one DVR requires access to an alarm on a shared plate database. All other users continue to the Getting Started chapter.
This section describes installing and configuring SQL 2005 integration for a centralized number plate management system.
Pre-Installation Notes for Fusion ANPR DVR Platforms You must download and install the following Microsoft products before proceeding with Microsoft SQL Server
2005 Express install.
1. Download and install Microsoft .NET Framework 2.0 on the machine that will be running SQL. This can be installed from Windows Update.
2. Download and install MSXML 6.0 (Microsoft Core XML Services) Select the msxml6.msi file to download. http://www.microsoft.com/downloads/details.aspx?familyid=993c0bcf-3bcf-4009-be21-27e85e1857b1&displaylang=en
3. Download Microsoft SQL Server 2005 Express 32 Edition: (36.5MB) http://www.microsoft.com/downloads/details.aspx?FamilyID=31711d5d-725c-4afa-9d65-e4465cdff1e7&DisplayLang=en
4. Download SQL Server Management Studio Express SP2: (43.1MB) http://www.microsoft.com/downloads/details.aspx?FamilyID=6053c6f8-82c8-479c-b25b-9aca13141c9e&DisplayLang=en
5. Disable the Windows Firewall by exiting to Windows. a. Right-click My Network Places on the desktop and select Properties. b. Double-click Local Area Connection, click the Properties button and click the Advanced tab. c. Click the Settings button and select the OFF Firewall setting. d. Click OK and close all remaining windows
Overview of Installation 1. Install SQL Server.
2. Install SQL Management Studio. 3. Configure Microsoft SQL Server.
9
Installing and configuring SQL 2005 Express Ensure that Windows Installer v3.1 and .NET Framework v2 are installed. These can be downloaded from
Microsoft.
1. Run the MSSQL Server 2005 installation from the previously downloaded file.
2. Ensure the System Configuration Check completes successfully.
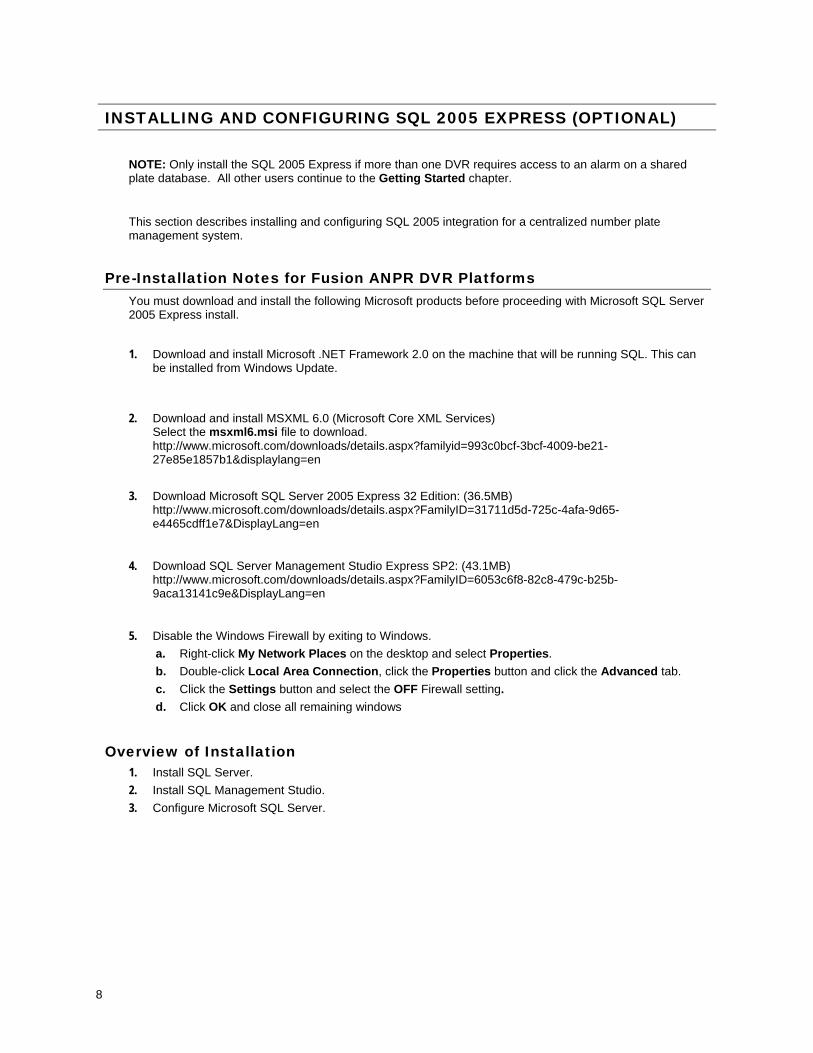
3. On the Feature Selection window, select these specific modules (you must install at least these): • SQL Server Database Services • Client Components • Connectivity Components
4. On the Authentication Mode window, select Windows Authentication Mode.
5. Accept all other default settings.
6. Restart DVR after installation completes
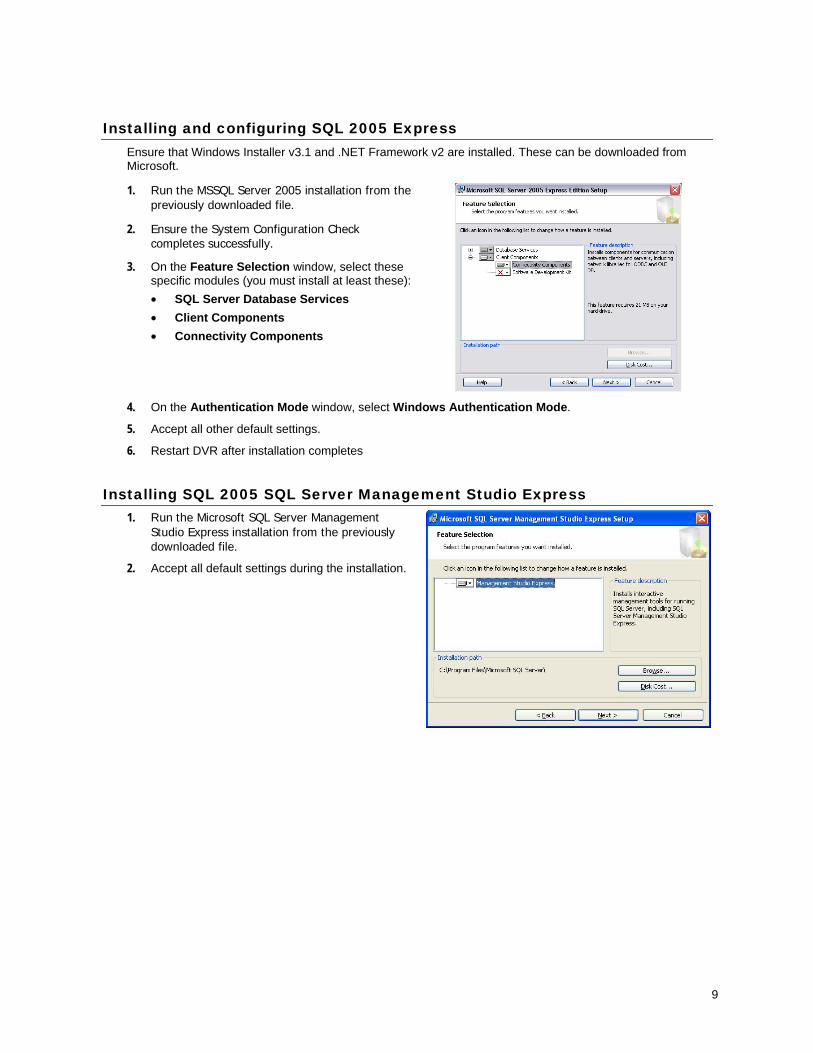
Installing SQL 2005 SQL Server Management Studio Express 1. Run the Microsoft SQL Server Management
Studio Express installation from the previously downloaded file.
2. Accept all default settings during the installation.
10
Configuring MSSQL Server 2005 1. Select Start > All Programs > Microsoft SQL Server 2005 > Configuration Tools > SQL Server
Surface Area Configuration.
2. Select Surface Area Configuration for Services and Connections.
3. From the Database Engine menu, click Remote Connections.
4. Select the Local and remote connections check box.
5. Select the Using TCP/IP only check box then click Apply
6. Expand SQL Server Browser by clicking +, click Service and ensure that the services is Running. If this option is set to Disabled, please change to Automatic, click Apply and then click START.
7. Click Service under Database Engine.
8. Click Stop and then click Start to apply new settings.
9. Click OK to exit.
10. Close the window.
11. Select Start > Programs > Microsoft SQL Server 2005 > SQL Server Management Studio Express.
12. On the Connect to Server window, note the Server name. The server name is required to set up the ODBC connection below.
13. Select Windows Authentication from the Authentication list and click Connect.
14. Right-click the Databases folder and select New Database.
15. Type a database name on the New Database window and click the … button, then click Browse.
TIP: The recommended database name is ANPR and will be used throughout this manual
16. Select the check box next to [NT AUTHORITY\SYSTEM], then click OK.
17. Click OK to close Select Database Owner window.
18. If desired, change the Path to a new storage location for the database file, and change the Initial Size and Autogrowth settings (e.g. 100MB, grow by 10%). The default setting for the _log database is sufficient.
19. Click OK to create the database.
20. Click the +Security folder to expand (located on the main branch, not the newly created database branch), and then click the +Logins folder to expand.
21. Right-click NT AUTHORITY\SYSTEM and select Properties.
22. Change the Default Database to point to the newly created database.
23. Select Server Roles on the left side pane and ensure the sysadmin check box is selected.
24. Select User Mapping on the left side pane and ensure the check box next to the name of the new database is selected.
25. Highlight the newly created database and ensure the Public and the db_owner check boxes, under Database role membership, are selected.
26. Click OK to apply changes.
27. Close the MS SQL Server Management window.

11
Creating an ODBC Connection on the Fusion ANPR DVR 1. Right click the My Computer icon and select Properties.
2. Click the Computer Name tab, and then click Change.
3. Type a unique Computer Name in the box.
NOTE: Each DVR must be renamed a unique computer for the SQL browser service to show in ODBC connections.
4. Select Start > Settings > Control Panel > Administrative Tools > Data Sources (ODBC).
5. Click the System DSN tab.
6. Click the Add… button, select SQL Server from the driver list and click Finish.
7. Type a name ANPR for the ODBC connection.
8. Type a description if desired.
9. In the Server menu, select the name of the SQL server – noted previously during the MSSQL Server setup.
10. Click Next.
11. Do not change any settings on this page, and click Next.
12. NOTE: If you get an error message at this point saying that the SQL server does not exist or access is denied, check the SQL server name, and check that the SQL Browser service is running. If this does not resolve the error, try restarting the DVR. If this does not resolve the error, connect the DVR to a network and try again.
13. Select the Change the default database to check box and change the selection to the new database.
14. Clear the Use ANSI nulls, paddings, and warnings check box.
15. Click Next.
16. Do not change any settings on this page, and click Finish.
17. Click Test Data Source… and ensure that it says “Tests Completed Successfully” before continuing. If the test fails, check all settings above.
18. Click OK on all remaining windows and close the ODBC Data Source Administrator.
Setting up Fusion Database Server on the ANPR DVR 1. Run Fusion ANPR Live.
2. Click Edit Database and from the Options menu, click Database Setup.
3. Click the MS SQL tab, and type the ANPR connection name in the ODBC DSN box.
4. Click the General tab.
5. Select Microsoft SQL Server from the Database Type list. Any problems with the settings will be listed now.
12
Testing the System 1. Run Fusion ANPR Live.
2. Click Edit Database.
3. Click Options, and select Database Setup.
4. Select the MS SQL tab.
5. Type ANPR under ODBC DSN.
6. Select the General tab.
7. Select Microsoft SQL Server from Database Type drop down and click OK.
NOTE: If you receive an error at this point, verify the name in the MS SQL tab.
8. Close the Fusion ANPR Live window to save changes.
9. Run the Fusion ANPR Live.
10. Click Edit Database and add New records to the vehicle database.

13
NOTES:

14
NOTES:
15
GETTING STARTED
QUICK SETUP The following directions assume that all installation and configuration steps have been completed and the
status of the Fusion Server software is in the Live View mode showing the connected cameras.
Changing the Display Language The Fusion ANPR software can display windows in:
English, French, Italian, Dutch, German, Polish or Spanish. The default language is English.
To change the display language:
1. Click the Analytics button on the Fusion Server Live View screen
2. Click ANPR Live, and click the Log On button.
3. From the Options menu, click Program Options.
4. Click the Appearance tab.
5. Select the desired language from the Language menu and click OK.
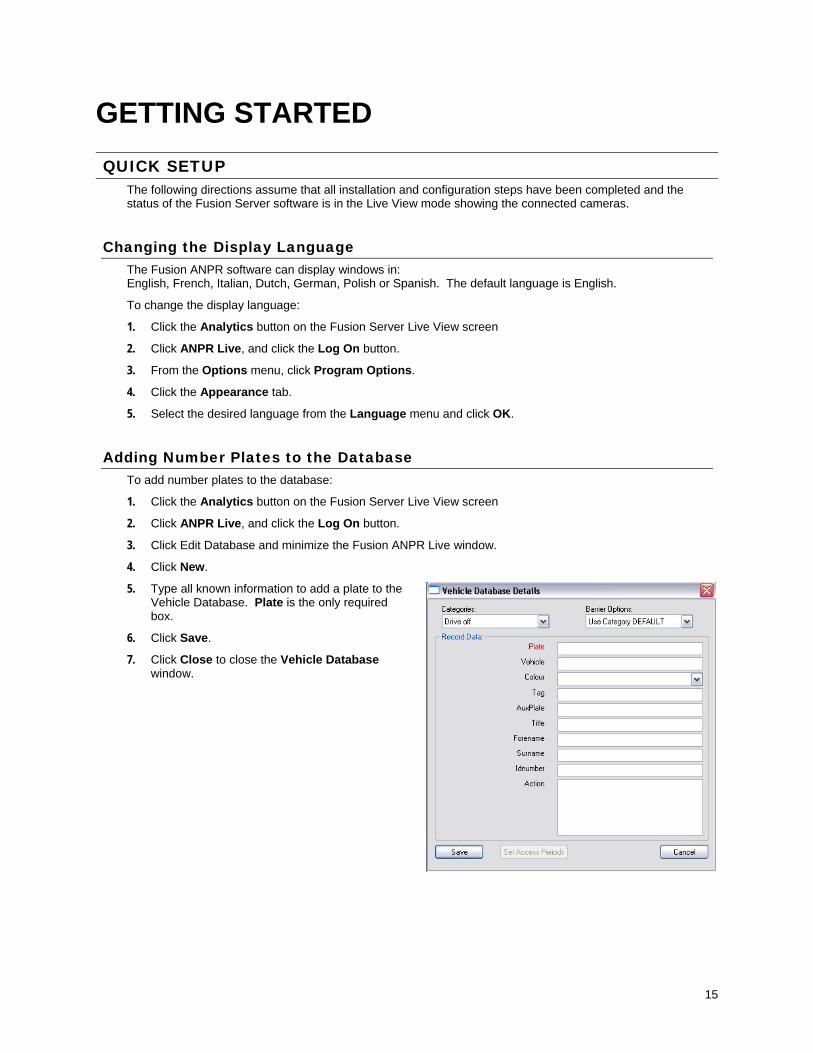
Adding Number Plates to the Database To add number plates to the database:
1. Click the Analytics button on the Fusion Server Live View screen
2. Click ANPR Live, and click the Log On button.
3. Click Edit Database and minimize the Fusion ANPR Live window.
4. Click New.
5. Type all known information to add a plate to the Vehicle Database. Plate is the only required box.
6. Click Save.
7. Click Close to close the Vehicle Database window.
16
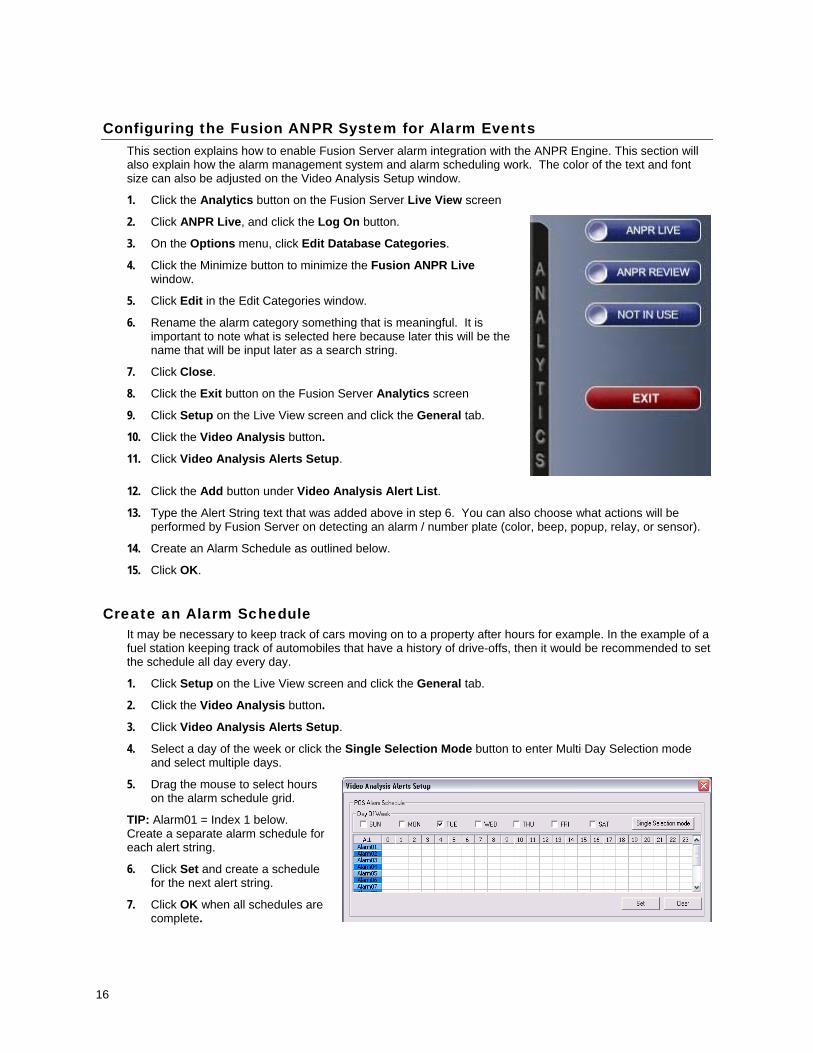
Configuring the Fusion ANPR System for Alarm Events This section explains how to enable Fusion Server alarm integration with the ANPR Engine. This section will
also explain how the alarm management system and alarm scheduling work. The color of the text and font size can also be adjusted on the Video Analysis Setup window.
1. Click the Analytics button on the Fusion Server Live View screen
2. Click ANPR Live, and click the Log On button.
3. On the Options menu, click Edit Database Categories.
4. Click the Minimize button to minimize the Fusion ANPR Live window.
5. Click Edit in the Edit Categories window.
6. Rename the alarm category something that is meaningful. It is important to note what is selected here because later this will be the name that will be input later as a search string.
7. Click Close.
8. Click the Exit button on the Fusion Server Analytics screen
9. Click Setup on the Live View screen and click the General tab.
10. Click the Video Analysis button.
11. Click Video Analysis Alerts Setup.
12. Click the Add button under Video Analysis Alert List.
13. Type the Alert String text that was added above in step 6. You can also choose what actions will be performed by Fusion Server on detecting an alarm / number plate (color, beep, popup, relay, or sensor).
14. Create an Alarm Schedule as outlined below.
15. Click OK.
Create an Alarm Schedule It may be necessary to keep track of cars moving on to a property after hours for example. In the example of a
fuel station keeping track of automobiles that have a history of drive-offs, then it would be recommended to set the schedule all day every day.
1. Click Setup on the Live View screen and click the General tab.
2. Click the Video Analysis button.
3. Click Video Analysis Alerts Setup.
4. Select a day of the week or click the Single Selection Mode button to enter Multi Day Selection mode and select multiple days.
5. Drag the mouse to select hours on the alarm schedule grid.
TIP: Alarm01 = Index 1 below. Create a separate alarm schedule for each alert string.
6. Click Set and create a schedule for the next alert string.
7. Click OK when all schedules are complete.
17
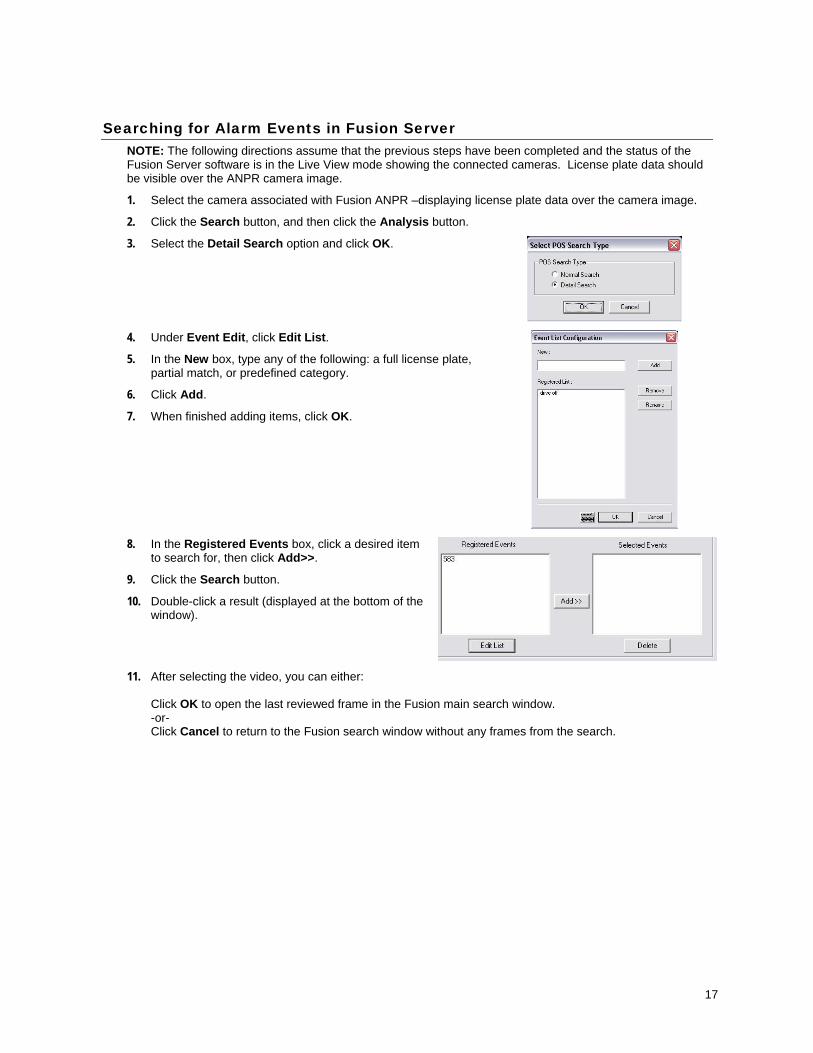
Searching for Alarm Events in Fusion Server NOTE: The following directions assume that the previous steps have been completed and the status of the
Fusion Server software is in the Live View mode showing the connected cameras. License plate data should be visible over the ANPR camera image.
1. Select the camera associated with Fusion ANPR –displaying license plate data over the camera image.
2. Click the Search button, and then click the Analysis button.
3. Select the Detail Search option and click OK.
4. Under Event Edit, click Edit List.
5. In the New box, type any of the following: a full license plate, partial match, or predefined category.
6. Click Add.
7. When finished adding items, click OK.
8. In the Registered Events box, click a desired item to search for, then click Add>>.
9. Click the Search button.
10. Double-click a result (displayed at the bottom of the window).
11. After selecting the video, you can either: Click OK to open the last reviewed frame in the Fusion main search window. -or- Click Cancel to return to the Fusion search window without any frames from the search.

18
NOTES:
19
FREQUENTLY ASKED QUESTIONS ALARMS What does the alarm module do in Fusion ANPR Live? - alert if system down, or alert on vehicle entry?
• "Alarms" in Fusion ANPR Live alert you when specific vehicles / vehicles in a specific category are seen by the system.
• Alarms are NOT linked to system stability.
LOG FILES What affect does the Data Protection Act have on length of time which you can store a history log for?
• Local laws apply.
SETUP I need a password to log into Live
• The default username is "Administrator" and password "anpr". You will be asked to change this the first time you log into the system;
• If you have lost all your passwords, you will need to get an unlock code from your supplier. To do this, go to Log On and enter the username "forgottenpassword". This will give you a code that you need to read to your supplier. They will then give you an unlock code. To use this, enter the username "resetpassword" with the code as the password. This will allow you access to the passwords menu, where you can reset all the passwords;
• Note that the unlock code is only valid for 10 minutes. If you have not unlocked the system within this time, you will need to get another unlock code.
What is the difference between "Preferences" and "Program Options"?
• The Preferences menu affects ANPR-related features (such as Lane/Camera setup, recognition engine setup, video capture setup);
• The Program Options menu affects Fusion ANPR Live/Review's general operation (plate lists, toolbar buttons, database fields, etc), and allows setup of specific modules within Live/Review (LED Signs, SMS messages, Remote Alarms, LiveNet, etc.)
What do all the various settings in the ANPR Preferences menu mean?
• See above for how to setup each section of this menu; Why don't categories setup on one machine appear on another?
• Categories are machine-specific, so must be setup separately on each DVR (all clients, servers and remote review stations). The exception is if all required categories exist in records in the database, in which case each DVRs Fusion ANPR Live will pickup these categories automatically.
UPGRADING What is the best way to upgrade a system?
• See specific documentation on this (available on install CD) What files should I backup when upgrading a system, so I don't have to set the system up from scratch?
• There is documentation on this (available on install CD), but in brief, you want to save all .ini (configuration) files, and all .csv (comma separated values) files from your ANPR folder.

20
HOW DO I…
DATABASE How do you import an external database into Fusion ANPR?
• You need to create a Comma Separated Value (CSV) file, with: a) A header containing the correct column names (see trdata.csv for these); b) All the records you require. Each record MUST have data in the Status, Category, Plate, Last
Modified, and Time Created field; all other fields are optional. Once ready, go to Vehicle Database Import, and select the file. Note that this will overwrite the existing database!
How do you get a picture ID displayed in Fusion ANPR when a specific vehicle is seen? • Check the picture ID directory specified in Options Program Options Directories; • Put the name of the picture file (without the path, but WITH the extension, e.g. "VUW10X.jpg") in the
database for the specific record, in the 'picture' field. If this field is not displayed, you'll need to select it from Vehicle Database Database Layout;
• Check the 'picture' field is selected in Options Program Options Customise Main View.
FRAME GRABBERS How do you setup a USB grabber for use in Fusion ANPR Live?
• Go to Options ANPR Preferences Input System Details; • Choose "DirectX" from the dropdown list, and click 'Enable DirectX'; • Close Fusion ANPR Live and then re-open it; • Go to Options ANPR Preferences Cameras, and the Video System dropdown should now show all
available DirectX frame grabbers.
LOG FILES How do you setup log file purging in Review?
• Go to Options Program Options History, tick the settings you require (will depend what information you want to keep), specify a length of time (in days) to keep the information for, and tick 'Automatic Purging'. You also have the option to archive log files to a separate location (e.g. a network drive) for backup/analysis purposes.
SAMPLE VIDEO FOOTAGE What are the best conditions for recording footage for your supplier to test with?
• Zoom in/out of the picture until the number plates' width is about 1/3 of whole image width; • The camera should be set to 'sports' mode for faster shutter speed; • Try to record as close to a real camera location & position as possible.
21
TROUBLESHOOTING
Due to the complexity of ANPR, there are many reasons why an ANPR system may not work, or work to its full potential. The following pages categorises common problems, to help you find a solution to your problem. If, after checking these lists, you still have problems, please contact your ANPR supplier for help.
HARDWARE CHECKLIST
Cameras Does the camera have the correct settings or presets for use with ANPR? e.g. Is the
shutter speed correct? • Is there any dirt on the front of the camera / IR lamp? • Is the IR lamp working (place hand in front – should feel warm)?
Cabling • Is the NVT cable set up correctly? This should be done using manual inspection of image quality, not
using automatic optimisation tools; • Is the length of cable within the recommended parameters? e.g. Coaxial cables up to 250m, NVT up to
1.5km. • Is the cable 1v ptp?
Power Supply • Is there any possibility of mains fluctuations to any of the cameras, or to the ANPR DVR?
The DVR • If you are using a switchbox with multiple DVRs connected, are you looking at the right DVR?
• Are the cameras connected to the correct grabber board on the DVR? • Is the grabber board installed correctly? i.e.: • Have you installed the correct drivers for the grabber board (Fusion Grab v3.x)? • Can you see video from the cameras using the EasyGrab application? • Is “Fusion Grab” enabled in ANPR Preferences Input System Details Fusion Grab? • If you’re using expansion boards, are they connected to the Tetra board correctly? • Is the dongle connected to the DVR, and are the drivers installed (run "hinstall –i", from the ANPR
folder, in a Command Prompt)?
Picture Quality / Recognition Rates • Is there any visible ghosting on the picture?
• Does recognition vary at a particular time of day or night, or during particular weather conditions, e.g. rain / fog?
• Does recognition vary between the cameras? If so, is recognition from a specific camera significantly worse than any of the others?
• If using a JG-201 board, do you have more than 1 camera connected to each grabber board? Note that with the JG-201, 1 input can capture 50fps, but this figure reduces for each additional camera.
• If using a JG-401 board, have you set the software to read at 25fps in ANPR Preferences Input System Details Fusion Grab?

22
Other Hardware • If you wish to hear audible alerts, do you have a sound card installed in the DVR, and are speakers
connected to the DVR? • If using a Relay Card:
o Is it installed correctly? Have you installed the correct drivers for it? o Have you correctly connected it to the barrier/traffic lights/LED sign you wish to control? o Is the barrier/traffic light/LED sign in correct working order, and can you control these
manually (without the software)? o When testing a barrier (by clicking the ‘Test’ button in Options ANPR Preferences ANPR
Settings Relays), do you hear a click from the relay card? • If using SMS messaging alerts, is the GSM modem connected to the DVR correctly? • If using an LED Sign:
o Is it connected to the DVR correctly? o When the sign’s power is turned on, can you see diagnostic information displayed on the
sign? • If using a DirectX (e.g. USB) Grabber:
o Is DirectX enabled in ANPR Preferences Input System Details DirectX? o Is the driver set to use PAL instead of NTSC?
HARDWARE
Cameras Camera image is blurred / ghosted
• Check cabling; • Check camera voltage; • Check grabber card; • Check camera focus; • Check camera shutter speed – 1/1000th second • Check camera lens.
Camera image judders in Live when car goes through • Check cabling / camera voltage / grabber card; • Defragment DVR; • Check Options ANPR Preferences Input System Details Fusion Grab is set to 25fps if you have >1
lane; • Increase RAM memory in DVR if >2 lanes.
Cameras are dropping out intermittently • Check cabling; • Check camera voltage; • Check grabber card; • Check camera focus; • Check camera lens.
Image quality isn't good - how to improve recognition when this is the case • Set the highest "min plate size" possible without missing plates; • If traffic speed is slow, set 'Analysis Profile' to 'Barrier' and/or set Detection Profile to 'High Quality'; • If traffic speed is fast, not a lot you can do;
No video being seen in Fusion ANPR Live's lanes (e.g. after a power cut) • Turn on GrabSync (Options ANPR Preferences Input System Details Fusion Grab).
23
Trouble Shooting Dongles The dongle has expired
• Requires update from supplier to re-enable.
The dongle isn't working • Check dongle is connected, and that the parallel port is visible, without errors, in Device Manager; • Try manually installing the dongle driver (run "hinstall -i", from the ANPR folder, in a Command
Prompt); • Contact supplier to check dongle settings.
An application reports "No permission to run ..." when started. • Dongle not enabled to run this application - contact supplier; • Dongle isn't connected to DVR - ensure it is connected properly; • Dongle drivers not installed - run "hinstall -i" from a Command Prompt.
Troubleshooting Frame Grabbers Grabber board doesn’t appear in Video Source dropdown
• Check grabber board has not become dislodged from the PCI BUS; • Check the grabber board driver has been installed; • Wrong grabber board drivers installed (for JG boards, requires MultiCam for Picolo driver, not
MultiCam driver); • No permission to use that grabber board;
USB Grabber image is upside down • This can be rectified by shutting down the software, opening the file bcap.ini from the ANPR directory,
then changing the setting "DirXFlipH" to 1;
SOFTWARE
System Lockup / Freeze Live crashes on Hotlist recognition match
• Possible corruption of hotlist file - check original hotlist file is plain text and contains correct information.
System freezes for a few seconds when plate is read • Check camera voltage; • Defragment hard drive; • Turn GrabSync on.
System locks up periodically, requiring machine reboot • Check grabber board has not become dislodged from the PCI BUS; • Check the grabber board driver and dongle driver are installed properly; • Check the camera voltages are within expected parameters; • If using a rackmount DVR, and the above suggestions do not help, try installing a PCI video card.
Compatibility issues with some rackmount DVRs have been found, which can cause them to lock up when using the on-board VGA card;
24
Database Applying changes to database causes Live/Review to crash
• Issue in pre-v4.3.1 only, expiry date. Delete expiry dates manually for temporary fix.
Live/Review not showing database info of plate • Check plate is in database; • Check 'Vehicle Info' and 'Driver Info' ticked in Edit Database for that record; • Check system has read plate text correctly; • Check Customise Main View has right fields selected.
I want to add another category, but already have 10 and it won't let me. • You can't have >10 categories. You need to put data into a different database field, e.g. Company; • If you are using access control, you can use the Tags field, and setup group tags for access.
Installation When starting Live/Review, or on 1st recognition, InstallShield pops up asking for disk
of a previous version • This is a bug in InstallShield. To resolve, uninstall all installations of Fusion ANPR from Control
Panel Add/Remove Programs, then re-install the software;
Log File Fusion ANPR Review isn’t showing live events
• Check that the right log file is selected (In Review, select File Open System History File); • Check that log file recording is turned on (In Live, select Options ANPR Preferences Image
Recording);
Fusion ANPR Review not showing old records, though data does exist for these dates • Increase Review's cache from Options History, then restart Review;
Fusion ANPR Review takes a long time to load • The log is very large - set up auto-purging to keep the log at a reasonable size; • If on a server or remote review DVR, there may be lots of individual event files. There is no quick way
around this.
Recognition General Recognition Improvement Suggestions
• Ensure the DVR is powered on, logged in, and the software is running; • Make sure the computer keyboard & mouse have nothing resting on them - this can cause the screen
to flash, and can stop the software doing anything; • Make sure you have the right grabber board for the speed of your traffic & number of cameras; • Try to be reading front plates, not rear plates; • Make sure you can read the number plate on the monitor before expecting the software to read it; • Check the country syntax you are trying to read is in the software; • Check the cameras' IR lamps/LEDs are working;
25
Recognition continued System is misreading plates
• Check correct country syntax is selected; • Check common misreads are set correctly; • Check there is no problem with the video image (e.g. ghosting, something obstructing view); • Ensure the system has been setup for the relevant traffic speed: • ANPR Settings' Analysis Profile; • Detect Engine's Profile; • Check the Detection advanced settings are set to defaults; • Check minimum plate area is as high as possible; • Check the re-admit time is not too low; • Check Access Control's Acceptable Plate Tolerance is set to an appropriate level; • Check the following settings in the file C:\ANPR\detect.ini: • CharPreFilter = 1; • PlateFinderMethod = 0 (detect feature in v4.5.0); • If in doubt, delete detect.ini and setup again; • Check that the plates that are misread are not dirty/cracked/broken/using illegal fonts;
System is missing a lot of plates
• Check Options ANPR Preferences Cameras ANPR Settings Direction Filter is set to "Any Direction";
• Check Minimum Plate Size is not too high; • Check there is no problem with the video image (e.g. ghosting, something obstructing view); • Ensure the system has been setup for the relevant traffic speed: • ANPR Settings' Analysis Profile; • Detect Engine's Profile; • Check the Detection advanced settings are set to defaults; • Ensure any Crop Zones are appropriately set; • Check Global Monitoring is not turned on; • Check Options ANPR Preferences Input System Details Fusion Grab GrabSync is at 25fps, if
you have >1 lane; • Check that the plates that are missed are not dirty/cracked/broken/using illegal fonts.
CPU usage is at max, the system is very slow, and events are being missed • Ensure no other applications are running; • Turn on GrabSync; • Turn on Enable Plate Tracking in Detect Profile (if slow traffic);
Fleet cars being missed/ignored by system • Set the ReAdmitTime in ANPR Settings to a much lower value, e.g. 5 seconds;
Some plates misreading 1s as Is, 0s as 0s, etc. • Check the correct country syntaxes are selected; • Ensure the Common Misreads are turned on;
System misreads plates badly during a certain time of day • Check camera conditions during that specific time of day, especially if using IR cameras. If the problem
occurs mostly at night time, the IR lamps may not be working. If the problem is in bright sunshine, the sun may we whiting-out the IR cameras, requiring you to reposition the camera away from direct sunlight;

26
Software Setup I have lost my login password, how do I reset to defaults?
• In versions prior to v5.0, there is no way to restore default passwords. You will have to reinstall the software;
• In version 5.0+, enter the login "forgottenpassword", and contact your supplier for an unlock code. When you have the unlock code, enter the username "resetpassword", and enter the unlock code as the password;
All settings keep reverting back to defaults • Someone may be loading a personality accidentally. To stop this, password protect any personalities
you have saved; • Check the ANPR directory is not read-only; • Check the Windows user account has correct access rights for ANPR to write necessary information to
disk / to registry;
ERROR MESSAGES
Errors in Fusion ANPR Live Only
Relating to Fusion ANPR Live Only Error message: "Cannot lookup region xxx" when starting Live.
• The detect.dat file is corrupt or is an incompatible version. Reinstall the software.
Error message: "Cannot open stream "bavi"" when starting Live. • An AVI file is selected that doesn't exist - go into Options ANPR Preferences Cameras, change the
AVI to one that does exist, or change the Video Source to "Image Directory" and choose any directory. This most often occurs on Servers where "Run Local ANPR on Server" has accidentally been ticked - check this isn't so by opening up Fusion Stream, going to Options System Setup, and ensure that setting is NOT ticked (unless actually required).
Error message: "No permission to execute Live. Please contact your ANPR Administrator" when starting Live
• Dongle isn't connected to DVR - ensure it is connected properly; • Dongle drivers aren't installed - run "hinstall -i", from the ANPR directory, in a Command Prompt; • Dongle is not setup to allow Live to run - check the dongle setting with your supplier.
Error message in Live's statusbar: "Out of disk space or no access to temp directory" • Check disk space. If okay, check the current Windows user has permission to write to the registry, and
to the folder "C:\ANPR\TEMP".
Error message in Live's statusbar: "Cannot write sync log file" • Check disk space. If okay, check the current Windows user has permission to write to the registry, and
to the folder "C:\ANPR\TEMP"; • If the log is held on a different drive, or a different DVR on the network, check you can access that
drive/machine from the DVR reporting the problem.

27
NOTES:

28
Honeywell Video Systems (Head Office) 2700 Blankenbaker Pkwy, Suite 150 Louisville, KY 40299, USA www.honeywellvideo.com ℡ +1.800.796.2288
Honeywell Video Systems Northern Europe Netwerk 121 1446 WV Purmerend, The Netherlands www.honeywell.com/security/nl ℡ +31.299.410.200
Honeywell Security Australia Pty Ltd. Unit 5, Riverside Centre, 24-28 River Road West Parramatta, NSW 2150, Australia www.honeywellwsecurity.com/au ℡ +61.2.8837.9300
Honeywell Systems GroupAston Fields Road, Whitehouse Ind Est Runcorn, Cheshire, WA7 3DL, UK www.honeywell.com/security/uk ℡ +44 (0)1928 756999
Honeywell Security Asia Pacific 33/F Tower A, City Center, 100 Zun Yi Road Shanghai 200051, China www.asia.security.honeywell.com ℡ +86 21.2527.4568
Honeywell Security South Africa Unit 6 Galaxy Park, 17 Galaxy Avenue Linbro Park, P.O. Box 59904 2100 Kengray, Johannesburg, South Africa www.honeywell.co.za ℡ +27.11.574.2500
Honeywell Security Asia Flat A, 16/F, CDW Building, 388 Castle Peak Road Tsuen Wan, N.T., Hong Kong www.asia.security.honeywell.com ℡ +852.2405.2323
Honeywell Security Deutschland Johannes-Mauthe-Straße 14 D-72458 Albstadt, Germany www.honeywell.com/security/de ℡ +49.74 31.8 01.0
Honeywell Security France Parc Gutenberg, 8, Voie La Cardon 91120, Palaiseau, France www.honeywell.com/security/fr ℡ +33.01.64.53.80.40
Honeywell Security PolandChmielewskiego 22a, 70-028 Szczecin, Polska www.ultrak.pl ℡ +48.91.485.40.60
Honeywell Security Italia SpA Via della Resistenza 53/59 20090 Buccinasco Milan, Italy www.honeywell.com/security/it ℡ +39.02.48880551
Honeywell Security Czech Republic Havránkova 33, Brno Dolní Heršpice, 619 00, Czech Republic www.olympo.cz ℡ +420.543.558.111
Honeywell Security España Mijancas 1. 3a Planta P. Ind. Las Mercedes 28022 Madrid, Spain www.security.honeywell.com/es ℡ +34.902.667.800
Honeywell Security Slovakia Republic Vajnorská 142, 83104 Bratislava Slovakia www.olympo.sk ℡ +421.2.444.54.660
www.honeywellvideo.com+1.800.796.CCTV (North America only)
Document XXX.XXXX Rev A– 12/05 © 2007 Honeywell International Inc. All rights reserved. No part of this publication may be reproduced by any means without written permission from Honeywell Video Systems. The information in this publication is believed to be accurate in all respects. However, Honeywell Video Systems cannot assume responsibility for any consequences resulting from the use thereof. The information contained herein is subject to change without notice. Revisions or new editions to this publication may be issued to incorporate such changes.
28584AD