galileo nz etr user installation guide - travelport … · first install .net 2.0 framework. 6 hwxs...
TRANSCRIPT
Galileo NZ ETR User Installation Guide V2.1 Release 9.0.6 Page: 1
Galileo NZ ETR
User Installation Guide
Version 2.1 Release 9.0.6 March, 2010

Galileo NZ ETR User Installation Guide V2.1 Release 9.0.6 Page: 2
Copyright © Copyright 1999-2010. All rights reserved. All Travelport logos and marks as well as all other proprietary materials depicted herein are the property of Travelport and/or its subsidiaries.
Galileo NZ ETR User Installation Guide V2.1 Release 9.0.6 Page: 3
Contents
Introduction ...................................................................................................................................................................... 4 1. Installation Steps ..................................................................................................................................................... 4
1.1 Minimum Software Requirements................................................................................................................................ 4 1.2 Flowchart....................................................................................................................................................................... 5
1.2.1 Setup with .NET framework ........................................................................................................................................ 5 1.2.2 Setup without .NET framework ................................................................................................................................... 6
1.3 Welcome Dialog Box .................................................................................................................................................... 7 1.4 EULA (End User License Agreement) Dialog Box ...................................................................................................... 8 1.5 Select the Setup Type ................................................................................................................................................... 8 1.6 Checking of Galileo Desktop...................................................................................................................................... 10 1.7 Checking of Adobe Acrobat ....................................................................................................................................... 11 1.8 Checking of .Net Framework 2.0 or above (setup without .Net Framework 2.0) ..................................................... 11 1.9 Checking of Travelport SSL ....................................................................................................................................... 12 1.10 Checking of Client ID Configuration .......................................................................................................................... 13 1.11 Silently install .Net Framework 2.0 (Setup with .Net Framework 2.0) ...................................................................... 13 1.12 Taking Input from user ............................................................................................................................................... 14 1.13 Copying the Files ........................................................................................................................................................ 15 1.14 Finish ........................................................................................................................................................................... 16

Galileo NZ ETR User Installation Guide V2.1 Release 9.0.6 Page: 4
Introduction Air New Zealand has introduced a requirement for travelers in New Zealand to produce their Electronic Ticket Receipts (ETR) with barcode data to streamline check-in and boarding procedures. In support of this initiative, Travelport has developed GALILEO NZ ETR to enable agencies in New Zealand to view, print and email Electronic Tickets issued with Air New Zealand bar coding. The use of GALILEO NZ ETR is currently only applicable to New Zealand domestic travelers flying Air New Zealand.
ETR Functional Items List
Functionality Description
1) Retrieve Fields from PNR This Application retrieves the fields of the active PNR using XML API
2) Validate PNR Validate the PNR for all the mandatory data which is needed for creating the XML Request.
3) XML Request send to DPDS Create and send the XML Request to DPDS web services to generate the ETR PDF.
4) Display PDF Display the PDF in a PDF Reader (Adobe Acrobat Reader 6.0 or above)
1. Installation Steps The Install Shield Developer 9 creates a setup file ETR V 9.0.6.exe. Click on this executable file.
1.1 Minimum Software Requirements The following software should be installed on the computer before installing this setup:
Viewpoint 3.0
Galileo Desktop Versions 1.01 / 2.0 /2.1/2.2/2.3
Windows 2000 SP4 or Higher
Adobe Acrobat 6.0 or higher
Travelport SSL
ClientID Configured
.Net Framework 2.0 or above

Galileo NZ ETR User Installation Guide V2.1 Release 9.0.6 Page: 5
1.2 Flowchart
1.2.1 Setup with .NET framework
Start
Stop
Display Message
“Galileo Desktop not
found. First install
Galileo Desktop.
Setup will now exit”
Search for PDF reader.
[Search for registry key
“HKEY_CLASSES_ROOT\.pdf”]
PDF reader installed
Yes
No
Yes
Search for .NET
framework 2.0 or higher
.NET framework 2.0
or higher foundNo
Yes
Take input from user:
“Please enter where you want to save the ETR PDF files on
your computer.”
Display the InstallShield select path dialog.
Default path: “<%Galileo Desktop Drive%>\fp\swdir\
Customviewpoint\ETR\PDF files”
Copy all the core and supporting files for
the script.
Update the ETR PDF location in the
configuration file
Display Message “ETR setup
successfully installed on your
setup”
Display Message
“Adobe Acrobat 6.0 or above not
found. First install Adobe Acrobat
6.0 or above.
Setup will now exit”
StopStop InstallShield setup.
[abort;]
Display Message
“.NET 2.0 framework not found.
First install .NET 2.0 framework.
Setup will now exit”
Stop InstallShield setup.
[abort;]
Select Standard Install/
SSL Only
Standard Install
SSL Only
Check Galileo SSL
(SSLClientService.exe.config)
is installed or not
Galileo SSL
installed
Display Message
“Galileo SSL not found. First install
Galileo SSL. Setup will not exit.”No
Stop InstallShield
setup. [abort;]
Display Message
“Client Id is not configured.
First configure the client id.
Setup will now exit”
No
Setup will read the SSLClientService.exe.config
file and update the following entry
<CustomTCPConnectionSettings> section:
<add key="DPDS" value="3122, 10.7.95.22,
80, g0xh304x"/>
Where key="DPDS" is a fixed value
And value="3122, 10.7.95.22, 80, is a fixed value
g0xh304x: This is the client ID which Setup will
pick up dynamically.
Setup will stop/start (restart) the
Galileo SSL Tunnel service.
Stop
Stop
Search for Viewpoint 3.0
or Galileo Desktop (GD)
1.x / 2.x
Viewpoint 3.0 or
GD 1.x / 2.x foundNo
Check the client ID is
configured or not
Client ID is
configured
Yes
Yes
Galileo NZ ETR User Installation Guide V2.1 Release 9.0.6 Page: 6
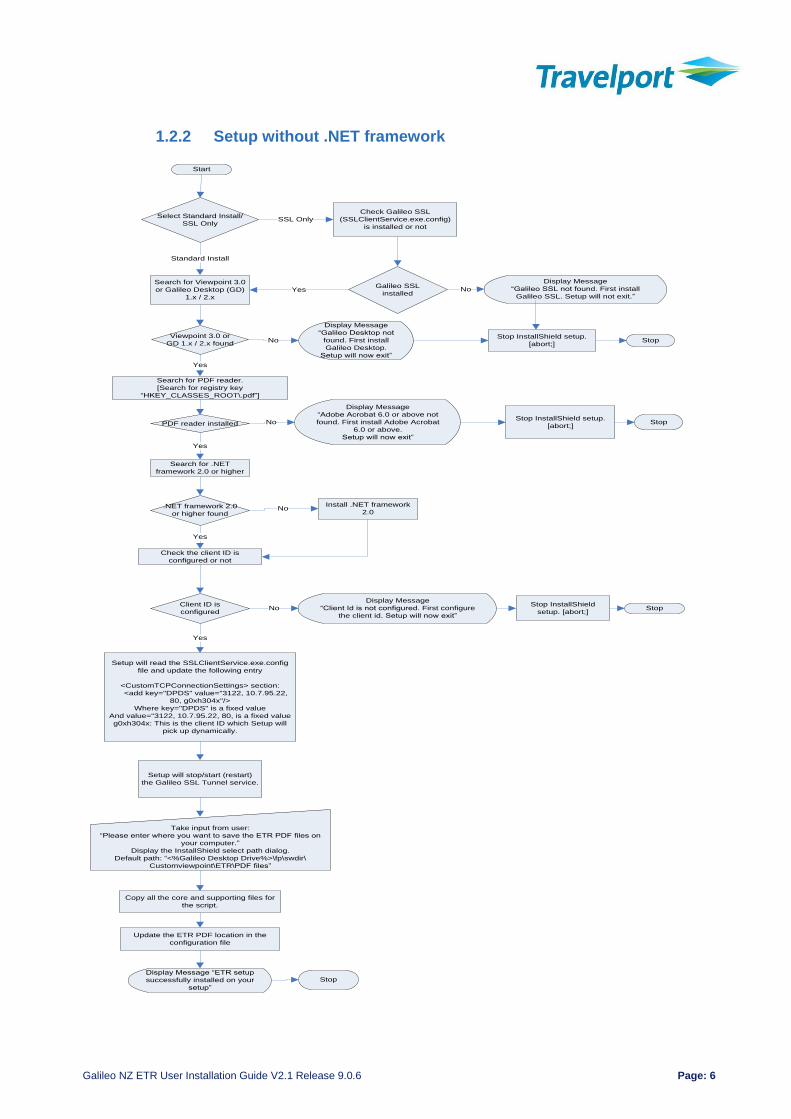
1.2.2 Setup without .NET framework
Start
Display Message
“Galileo Desktop not
found. First install
Galileo Desktop.
Setup will now exit”
Search for PDF reader.
[Search for registry key
“HKEY_CLASSES_ROOT\.pdf”]
PDF reader installed
No
Yes
No
Yes
Search for .NET
framework 2.0 or higher
.NET framework 2.0
or higher found
Install .NET framework
2.0No
Yes
Stop
Take input from user:
“Please enter where you want to save the ETR PDF files on
your computer.”
Display the InstallShield select path dialog.
Default path: “<%Galileo Desktop Drive%>\fp\swdir\
Customviewpoint\ETR\PDF files”
Copy all the core and supporting files for
the script.
Update the ETR PDF location in the
configuration file
Display Message “ETR setup
successfully installed on your
setup”
Stop
Stop InstallShield setup.
[abort;]
Display Message
“Adobe Acrobat 6.0 or above not
found. First install Adobe Acrobat
6.0 or above.
Setup will now exit”
StopStop InstallShield setup.
[abort;]
Check the client ID is
configured or not
Client ID is
configured
Yes
No
Display Message
“Client Id is not configured. First configure
the client id. Setup will now exit”
StopStop InstallShield
setup. [abort;]
Setup will stop/start (restart)
the Galileo SSL Tunnel service.
Select Standard Install/
SSL Only
Standard Install
SSL Only
Check Galileo SSL
(SSLClientService.exe.config)
is installed or not
Galileo SSL
installed
Display Message
“Galileo SSL not found. First install
Galileo SSL. Setup will not exit.”No
Search for Viewpoint 3.0
or Galileo Desktop (GD)
1.x / 2.x
Yes
Viewpoint 3.0 or
GD 1.x / 2.x found
Setup will read the SSLClientService.exe.config
file and update the following entry
<CustomTCPConnectionSettings> section:
<add key="DPDS" value="3122, 10.7.95.22,
80, g0xh304x"/>
Where key="DPDS" is a fixed value
And value="3122, 10.7.95.22, 80, is a fixed value
g0xh304x: This is the client ID which Setup will
pick up dynamically.
Galileo NZ ETR User Installation Guide V2.1 Release 9.0.6 Page: 7
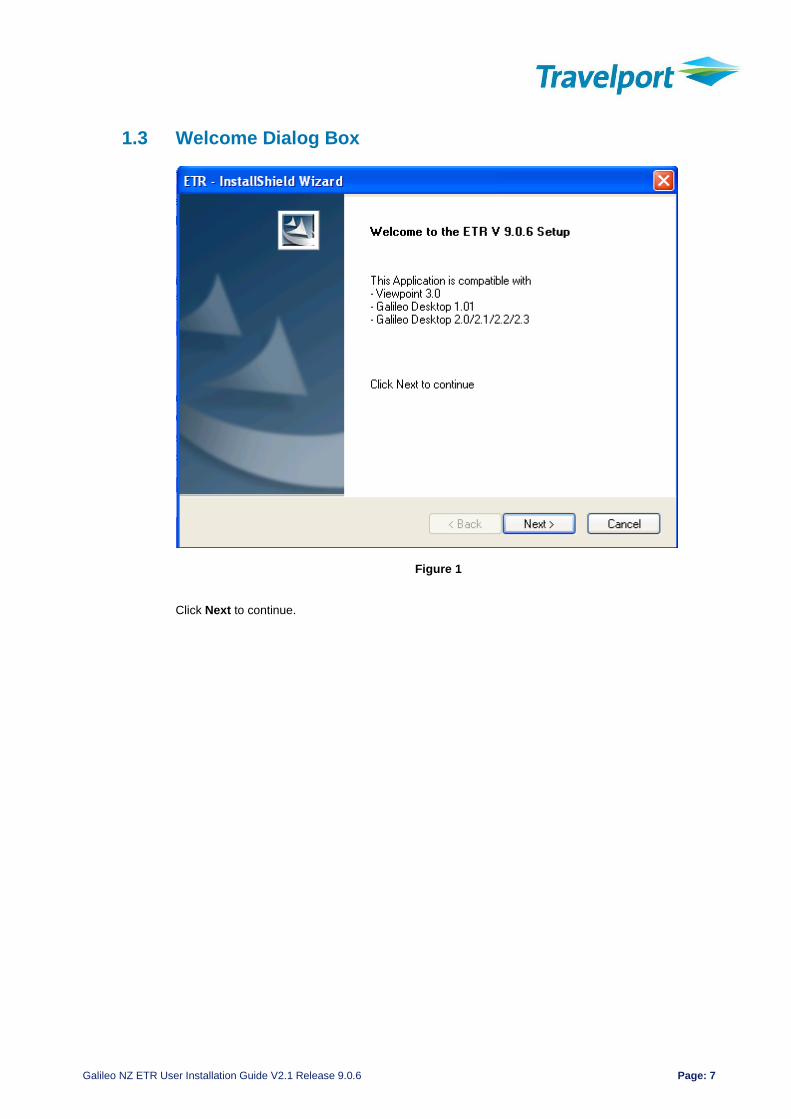
1.3 Welcome Dialog Box
Figure 1
Click Next to continue.
Galileo NZ ETR User Installation Guide V2.1 Release 9.0.6 Page: 8
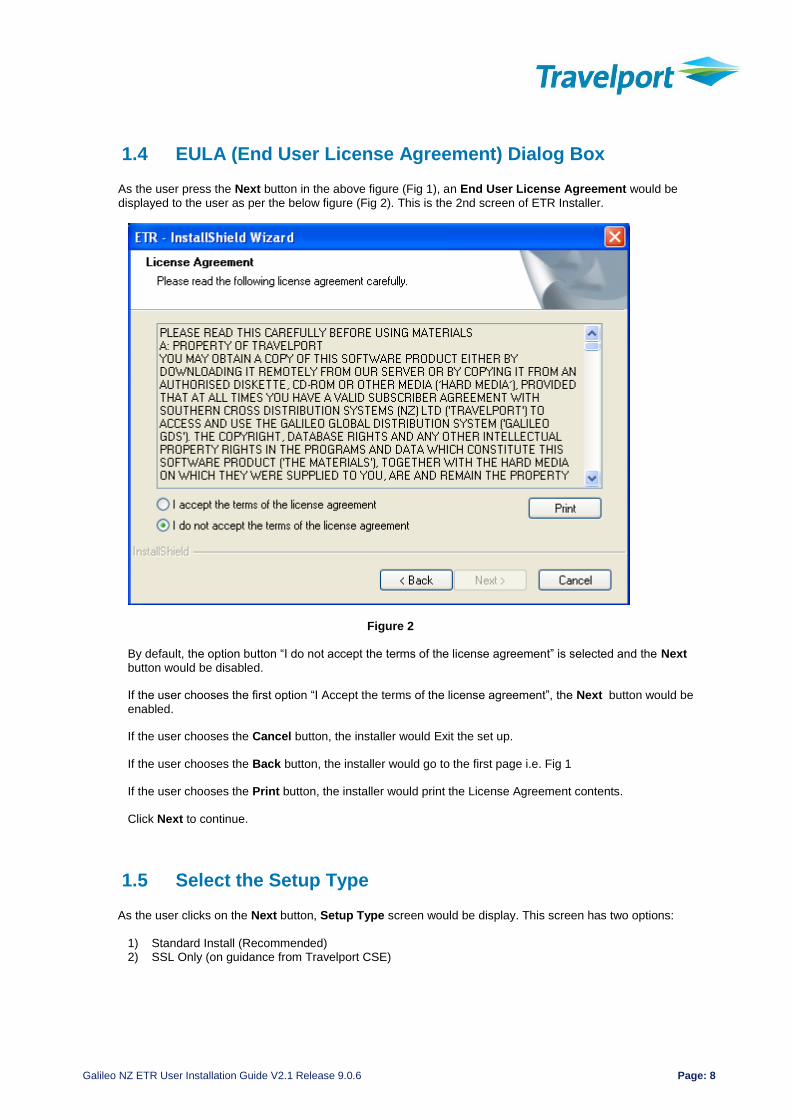
1.4 EULA (End User License Agreement) Dialog Box
As the user press the Next button in the above figure (Fig 1), an End User License Agreement would be
displayed to the user as per the below figure (Fig 2). This is the 2nd screen of ETR Installer.
Figure 2
By default, the option button “I do not accept the terms of the license agreement” is selected and the Next
button would be disabled.
If the user chooses the first option “I Accept the terms of the license agreement”, the Next button would be
enabled.
If the user chooses the Cancel button, the installer would Exit the set up.
If the user chooses the Back button, the installer would go to the first page i.e. Fig 1
If the user chooses the Print button, the installer would print the License Agreement contents.
Click Next to continue.
1.5 Select the Setup Type
As the user clicks on the Next button, Setup Type screen would be display. This screen has two options:
1) Standard Install (Recommended) 2) SSL Only (on guidance from Travelport CSE)

Galileo NZ ETR User Installation Guide V2.1 Release 9.0.6 Page: 9
Figure 3
By default Standard Install option is selected.
If the user selects the option SSL Only and then clicks on the Next button without changing the option, then
the install shield first checks whether the Travelport SSL has been installed. If Travelport SSL is found, select the SSLClientService.exe.config file and update the following entry in SSLClientService.exe.config file.
<CustomTCPConnectionSettings> <add key=”DPDS” value=”3122, 10.7.95.22, 80, ClientID”/> </CustomTCPConnectionSettings>
Where clientId is the currently configured ClientId in the Galileo Desktop.
User should also update the ETR.exe.config file with the following URL: http://127.0.0.1:3122/DPDSService/DPDSService.svc
IF Travelport SSL is not found Refer section “2.8 Checking of Travelport SSL” for more detail. If Travelport SSL is found, then ETR install shield first stop and then start the Travelport SSL Tunnel Service. If ETR installer fails to start the Travelport SSL Tunnel service, then try again to connect a 2
nd and then a 3
rd
time. Finally if the ETR installer fails to connect the Travelport SSL tunnel service even after attempting 3 times, it would give a prompt to user “ETR installer is unable to connect the Travelport SSL tunnel service. Install the ETR and manually start the Travelport SSL Service”
Galileo NZ ETR User Installation Guide V2.1 Release 9.0.6 Page: 10
If this occurs, the user has to manually start the Travelport SSL Tunnel service from Control Panel-> Administrative Tools->services->. Select the Travelport SSL tunnel service and then right click and select start.
If Standard Install option is selected and the Next button clicked, then only the ETR.exe.config file would be
updated with the following URL: https://apac.webservices.travelport.com/B2BGateway/connect/DPDS/DPDSService.svc
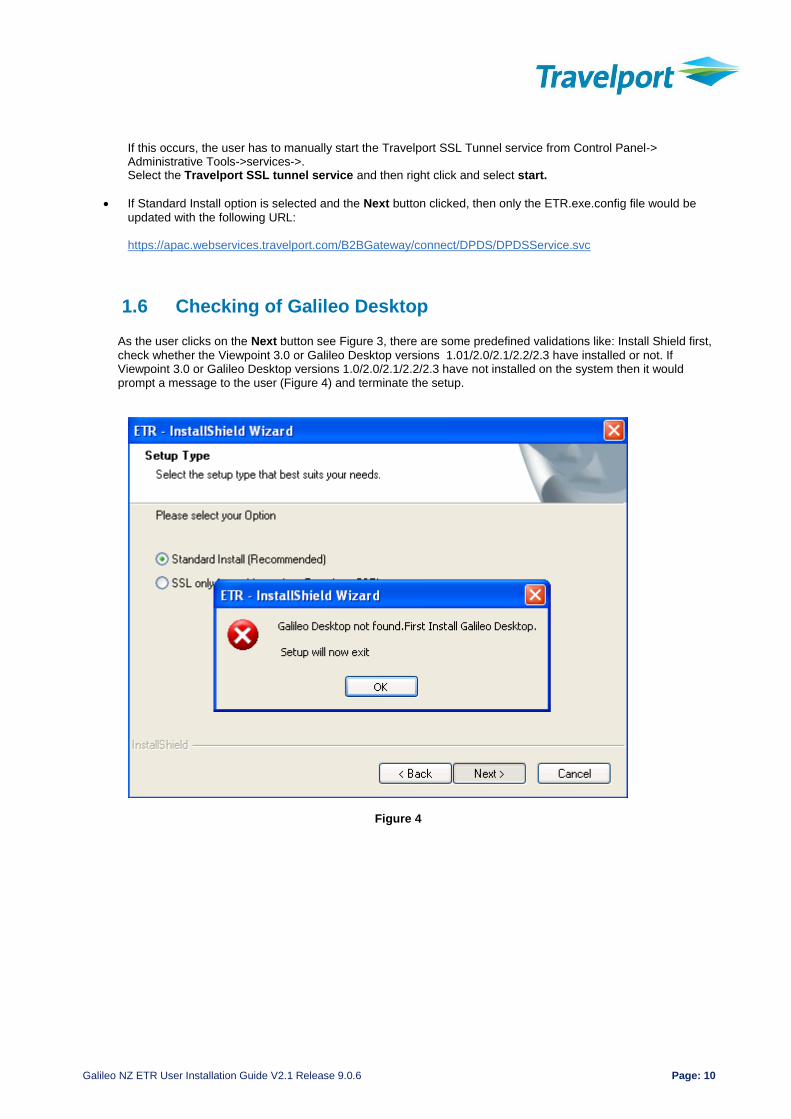
1.6 Checking of Galileo Desktop
As the user clicks on the Next button see Figure 3, there are some predefined validations like: Install Shield first,
check whether the Viewpoint 3.0 or Galileo Desktop versions 1.01/2.0/2.1/2.2/2.3 have installed or not. If Viewpoint 3.0 or Galileo Desktop versions 1.0/2.0/2.1/2.2/2.3 have not installed on the system then it would prompt a message to the user (Figure 4) and terminate the setup.
Figure 4

Galileo NZ ETR User Installation Guide V2.1 Release 9.0.6 Page: 11
1.7 Checking of Adobe Acrobat
Install Shield check whether the Adobe Acrobat 6.0 or higher has installed on the system. If the Adobe Acrobat 6.0 or higher has not installed, then it would prompt a message to the user (Figure 5) and terminate the setup.
Figure 5
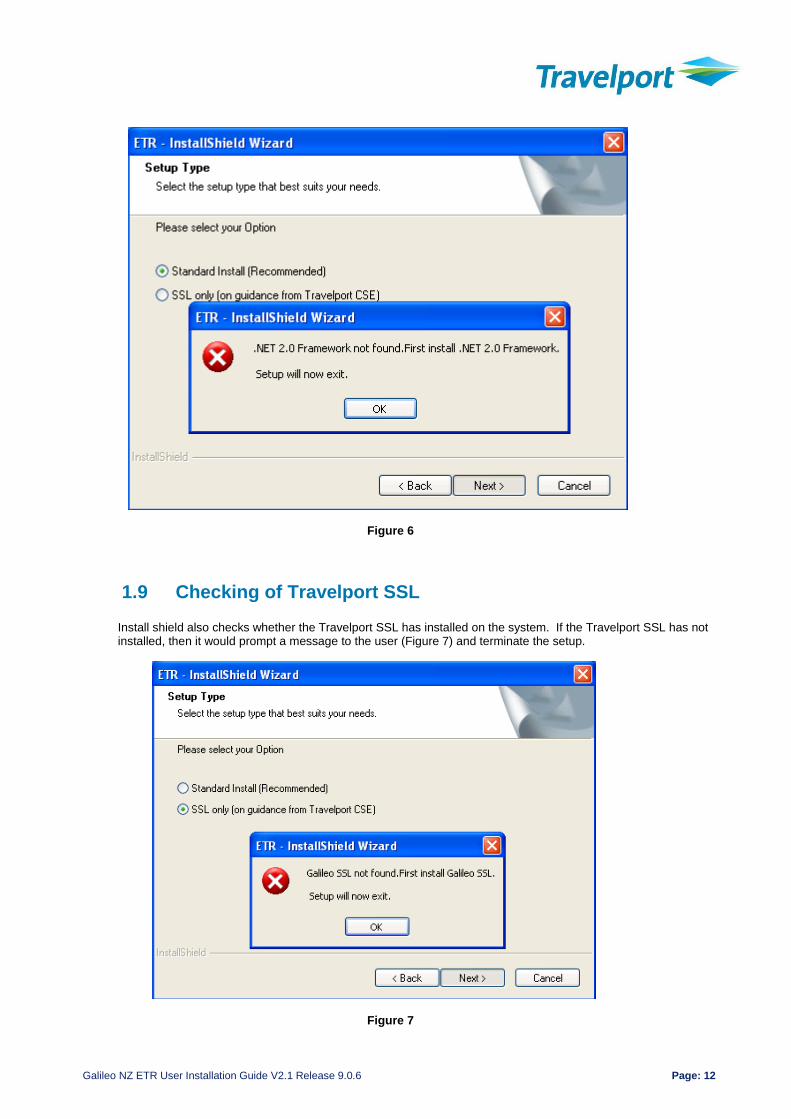
1.8 Checking of .Net Framework 2.0 or above (setup without .Net Framework 2.0)
Install shield also checks whether the .net framework 2.0 or above has installed on the system. If the .net framework 2.0 or above has not installed, then it would prompt a message to the user (Figure 6) and terminate the setup.
Galileo NZ ETR User Installation Guide V2.1 Release 9.0.6 Page: 12
Figure 6
1.9 Checking of Travelport SSL
Install shield also checks whether the Travelport SSL has installed on the system. If the Travelport SSL has not installed, then it would prompt a message to the user (Figure 7) and terminate the setup.
Figure 7

Galileo NZ ETR User Installation Guide V2.1 Release 9.0.6 Page: 13
1.10 Checking of Client ID Configuration
Install shield also checks whether the Client ID has configured on the system. If the Client ID has not configured, then it would prompt a message to the user (Figure 7) and terminate the setup.
Figure 7
1.11 Silently install .Net Framework 2.0 (Setup with .Net Framework 2.0)
As the user clicks on the ok Button, then the setup would silently install the .net framework and all other files
related to this setup. (Figure 8).
Galileo NZ ETR User Installation Guide V2.1 Release 9.0.6 Page: 14
Figure 8
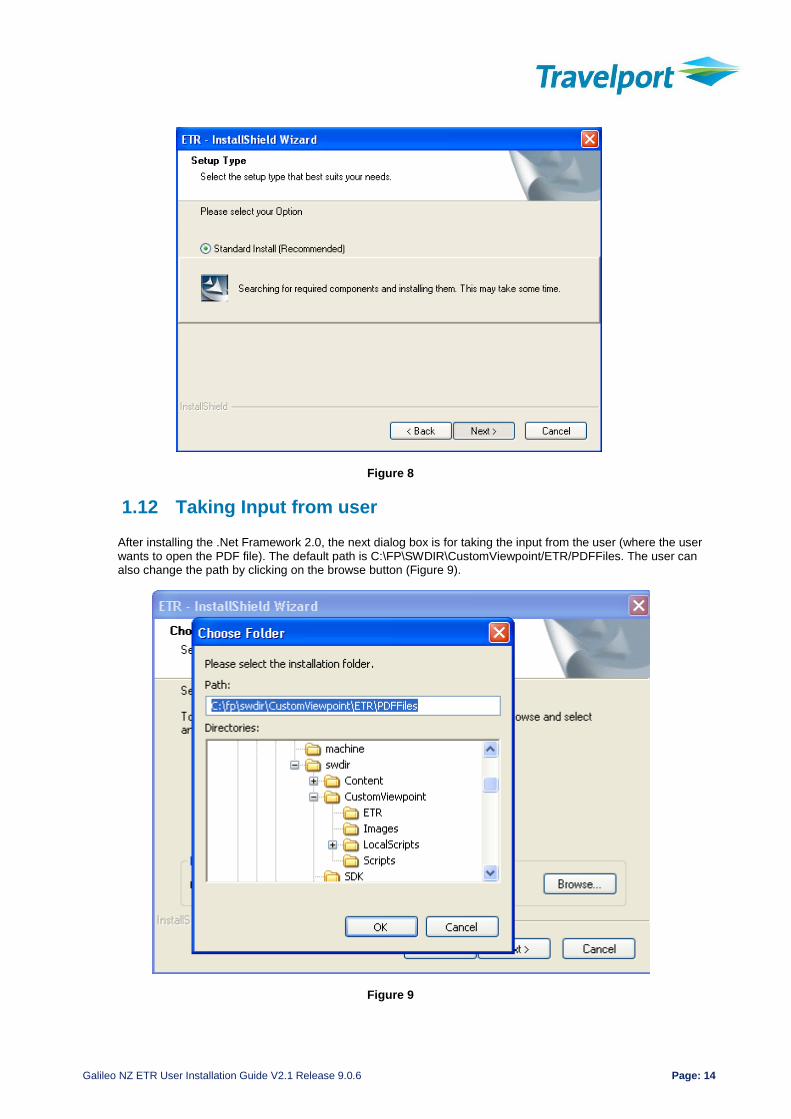
1.12 Taking Input from user
After installing the .Net Framework 2.0, the next dialog box is for taking the input from the user (where the user wants to open the PDF file). The default path is C:\FP\SWDIR\CustomViewpoint/ETR/PDFFiles. The user can also change the path by clicking on the browse button (Figure 9).
Figure 9
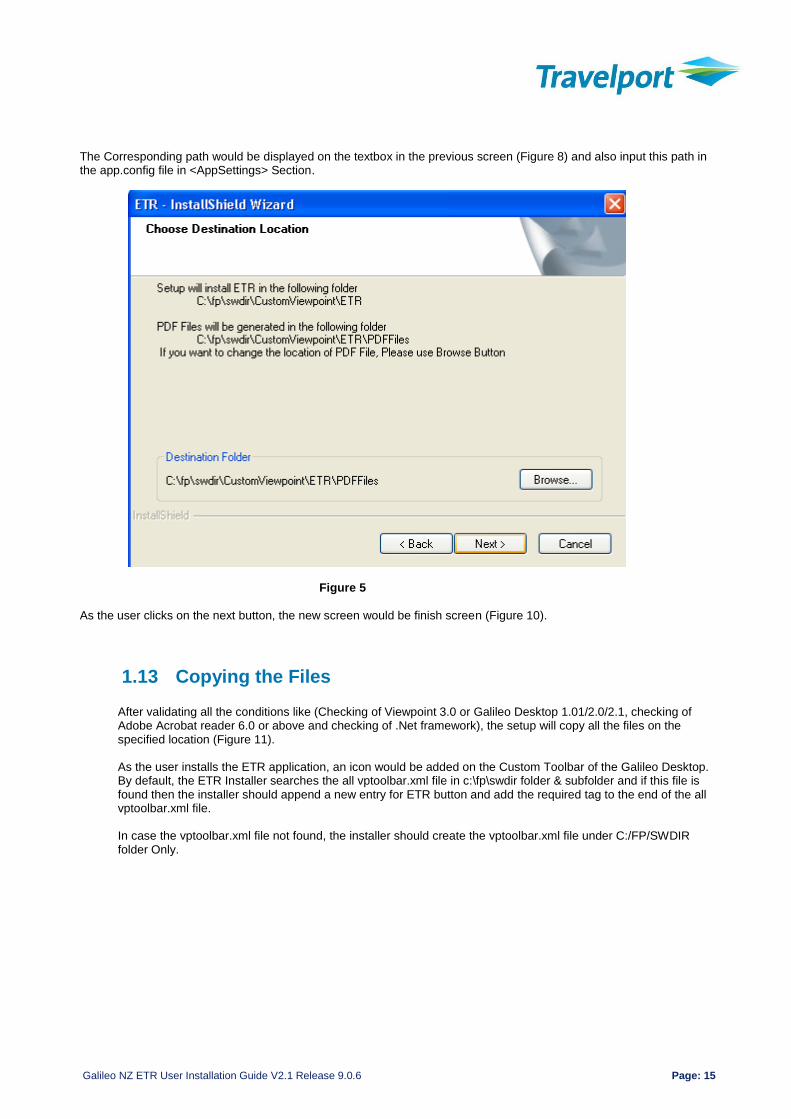
Galileo NZ ETR User Installation Guide V2.1 Release 9.0.6 Page: 15
The Corresponding path would be displayed on the textbox in the previous screen (Figure 8) and also input this path in the app.config file in <AppSettings> Section.
Figure 5
As the user clicks on the next button, the new screen would be finish screen (Figure 10).
1.13 Copying the Files
After validating all the conditions like (Checking of Viewpoint 3.0 or Galileo Desktop 1.01/2.0/2.1, checking of Adobe Acrobat reader 6.0 or above and checking of .Net framework), the setup will copy all the files on the specified location (Figure 11). As the user installs the ETR application, an icon would be added on the Custom Toolbar of the Galileo Desktop. By default, the ETR Installer searches the all vptoolbar.xml file in c:\fp\swdir folder & subfolder and if this file is found then the installer should append a new entry for ETR button and add the required tag to the end of the all vptoolbar.xml file. In case the vptoolbar.xml file not found, the installer should create the vptoolbar.xml file under C:/FP/SWDIR folder Only.

Galileo NZ ETR User Installation Guide V2.1 Release 9.0.6 Page: 16
Figure 6
1.14 Finish
This is the confirmation screen telling the user that the setup has finished successfully.
Figure 7