garageband 1 · web vieworange playhead. earning its keep. barrel house boogie-woogie. red...
TRANSCRIPT

GarageBand
http://gretnatraining.wikispaces.com/Garageband
GarageBand turns your computer into a digital audio workstation that allows you to record MIDI sequences, utilize pre-recorded audio loops, and record real electric and acoustic instruments. In addition you can create podcasts with sound effects and images, create soundtracks for video productions and even Ringtones for your iPhone
GarageBand Window
GarageBand opens the song that was last open. To open new song:Choose File - New.
1
In the dialog that appears, browse to the location where you want to store the song, and type a name for it.Set the tempo, time signature, and key of the song. (These can be changed later. Track info (i) Mastertrack.)
Tracks:o The instrument icon and name are shown on the left of each track’s
header. Click the Mute button (with the speaker icon) to silence the track. Click the Solo button (with the headphone icon) to hear the track by itself. Click down arrow to see volume track.
Mixer:o Drag the pan wheel to adjust the pan position of the track (the left-to-
right placement in the stereo field). Drag the volume slider to adjust the track’s volume. Watch the level meters to see the track’s volume level as you record and play.
Timeline:o Contains the tracks where you record Real and Software Instruments,
add loops, and arrange regions. Also includes the beat ruler, which you use to move the playhead and align items in the timeline with beats and measures.
Zoom slider:o Drag the zoom slider to zoom in for a closer view of part of the
timeline, or to zoom out to see more of the timeline. New Track button (+):
o Click to add a track below the existing tracks in the timeline. Track Info (i), Loop Browser (eyeball), and Track Editor buttons (scissors):
o Click to open the Track Info window, loop browser, or track editor. Transport controls:
o Click the Record button to start recording. Click the Play button to start or stop the song playing. Click the Go to Beginning, Rewind, or Fast Forward buttons to move the playhead to different parts of the song. Click the Cycle button to turn on the cycle region.
Time display:o Shows the playhead’s position in either musical time (measures, beats,
ticks) or absolute time (hours, minutes, seconds, fractions). Also shows the song’s tempo. Includes buttons for changing the format of the time display.
Master volume slider and level meters:o Drag the volume slider to adjust the output volume level of the song.
Watch the level meters to see if clipping is occurring before you export a song.
Recording Software Instruments
2
Using Onscreen Music Keyboard or Musical Typing for MIDI note entry
1. From the Window menu choose Keyboard or Musical Typing. Keyboard can be resized to display up to 10 octaves.
2. Click Add Track button (+) or from the Track menu choose New Track.
3. In the New Track dialog, click the Software Instrument tab and select your instrument.
Note: Garageband currently comes with 120 different instruments to choose from and Apple offers Instrument packs with hundreds and hundreds more instruments.
If you already have a track, you can change the instrument (and add effects) by clicking on Track Info (i).
4. Click the header of the Software Instrument track you want to record in to select the track.
5. Move the playhead to the point in the timeline you want to start recording.
6. Choose Control > Count In to have the metronome play a one-measure count-in before recording starts. You can also set the playhead a few beats before the point where you want the music to come in to make it easier to start on the beat.
7. Click Record and start playing.
8. Click Record again to stop recording (or press the spacebar).
Using a MIDI keyboardNOTE GarageBand does not trigger (Play) external synthesizer sounds, the keyboard can only be used to control the GarageBand sounds for recording (input) purposes.
To enter notes without MIDI keyboard:Use the onscreen keyboard and click the record buton or Click on Scissors icon or double-click track to see sequencer window.
3
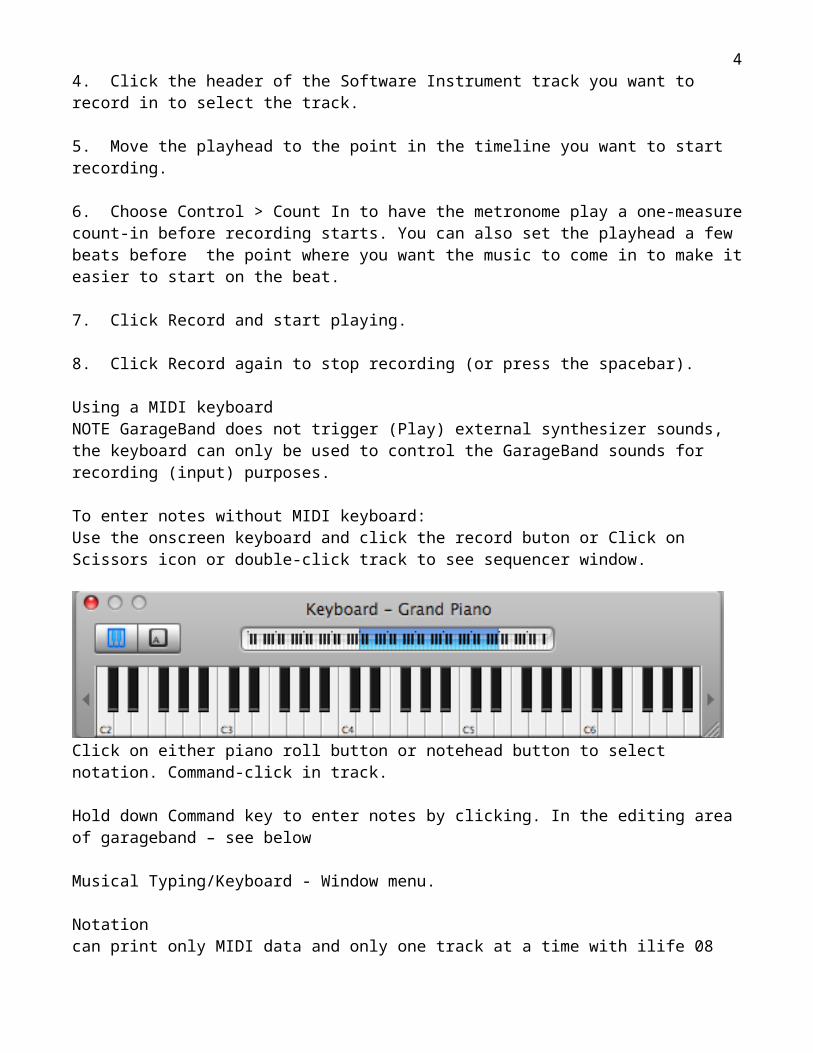
Click on either piano roll button or notehead button to select notation. Command-click in track.
Hold down Command key to enter notes by clicking. In the editing area of garageband – see below
Musical Typing/Keyboard - Window menu.
Notationcan print only MIDI data and only one track at a time with ilife 08
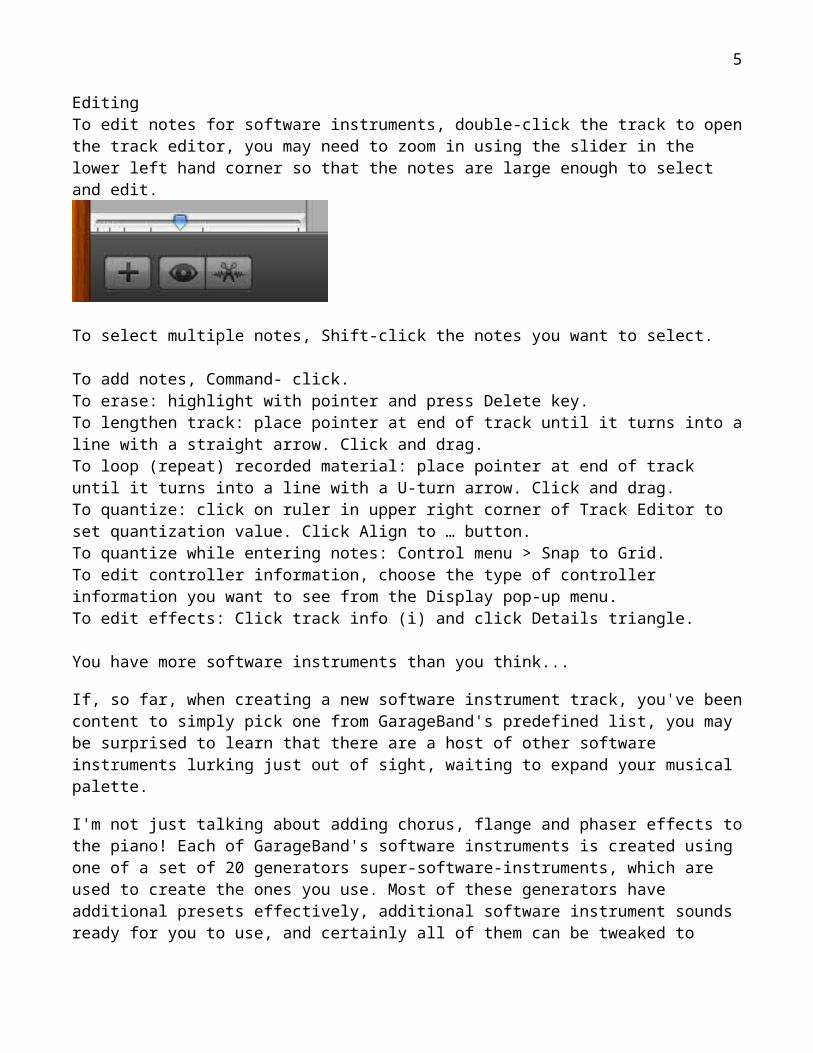
EditingTo edit notes for software instruments, double-click the track to open the track editor, you may need to zoom in using the slider in the lower left hand corner so that the notes are large enough to select and edit.
To select multiple notes, Shift-click the notes you want to select.
To add notes, Command- click. To erase: highlight with pointer and press Delete key.To lengthen track: place pointer at end of track until it turns into a line with a straight arrow. Click and drag.To loop (repeat) recorded material: place pointer at end of track until it turns into a line with a U-turn arrow. Click and drag.To quantize: click on ruler in upper right corner of Track Editor to set quantization value. Click Align to … button.To quantize while entering notes: Control menu > Snap to Grid.To edit controller information, choose the type of controller information you want to see from the Display pop-up menu.To edit effects: Click track info (i) and click Details triangle.
You have more software instruments than you think...
If, so far, when creating a new software instrument track, you've been content to simply pick one from GarageBand's predefined list, you may be surprised to learn that there are a host of other software instruments lurking just out of sight, waiting to expand your musical palette.
I'm not just talking about adding chorus, flange and phaser effects to the piano! Each of GarageBand's software instruments is created using one of a set of 20 generators super-software-instruments, which are used to create the ones you use. Most of these generators have additional presets effectively, additional software
4
instrument sounds ready for you to use, and certainly all of them can be tweaked to create slightly or wholly different sounds.
So how do you find them?
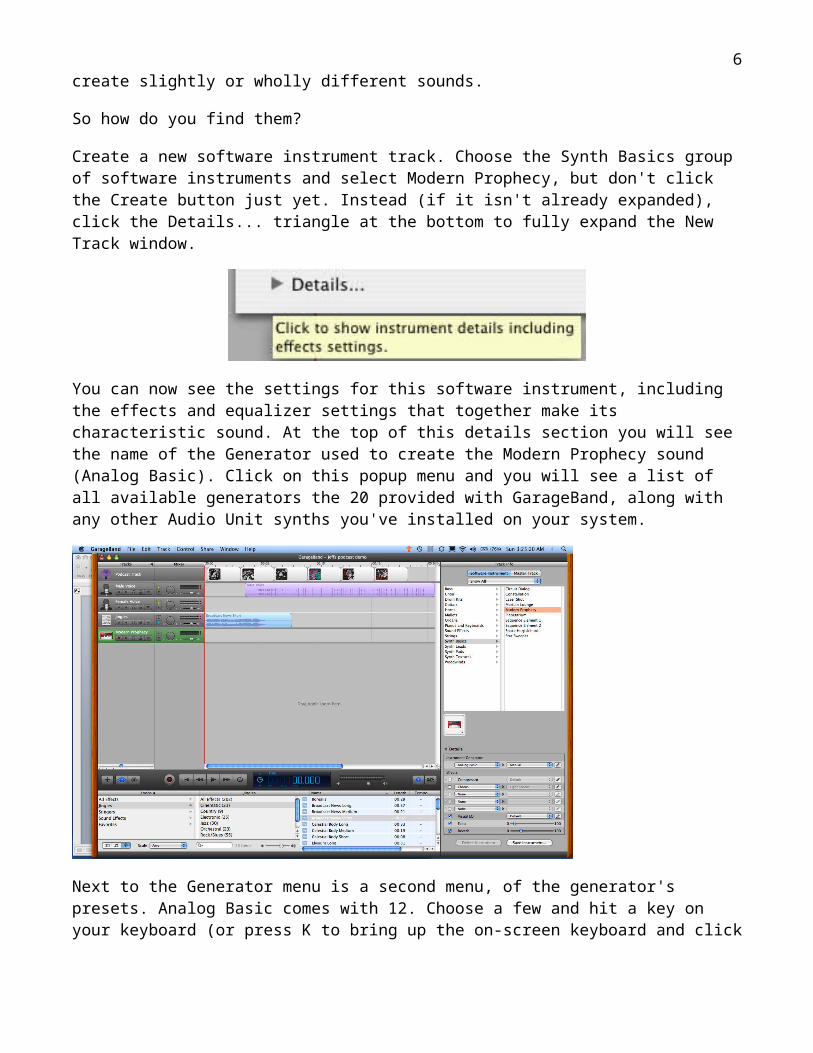
Create a new software instrument track. Choose the Synth Basics group of software instruments and select Modern Prophecy, but don't click the Create button just yet. Instead (if it isn't already expanded), click the Details... triangle at the bottom to fully expand the New Track window.
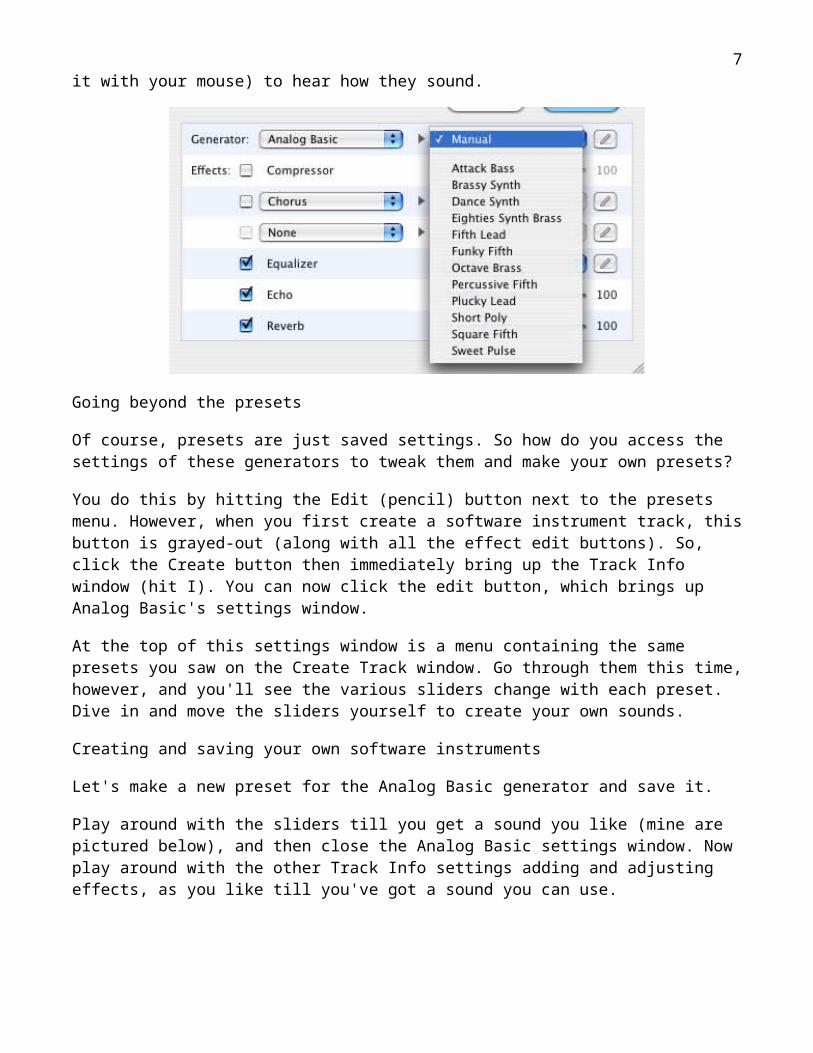
You can now see the settings for this software instrument, including the effects and equalizer settings that together make its characteristic sound. At the top of this details section you will see the name of the Generator used to create the Modern Prophecy sound (Analog Basic). Click on this popup menu and you will see a list of all available generators the 20 provided with GarageBand, along with any other Audio Unit synths you've installed on your system.
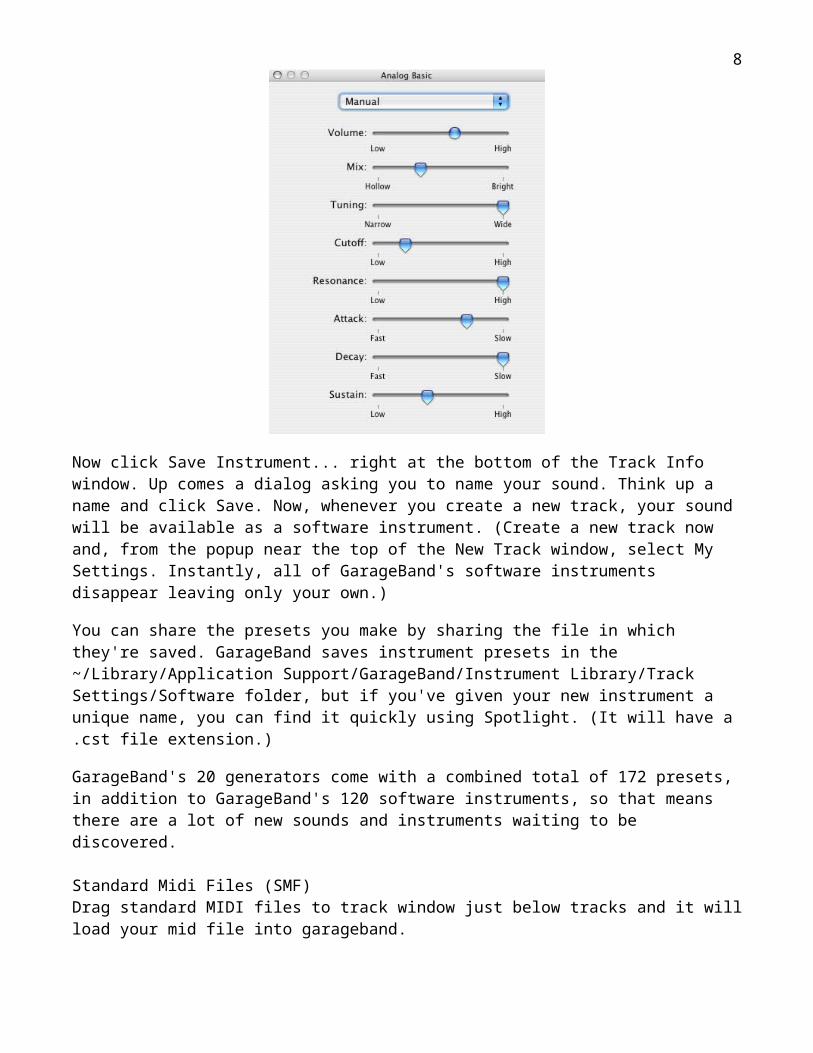
Next to the Generator menu is a second menu, of the generator's presets. Analog Basic comes with 12. Choose a few and hit a key on your keyboard (or press K to bring up the on-screen keyboard and click it with your mouse) to hear how they sound.
5
Going beyond the presets
Of course, presets are just saved settings. So how do you access the settings of these generators to tweak them and make your own presets?
You do this by hitting the Edit (pencil) button next to the presets menu. However, when you first create a software instrument track, this button is grayed-out (along with all the effect edit buttons). So, click the Create button then immediately bring up the Track Info window (hit I). You can now click the edit button, which brings up Analog Basic's settings window.
At the top of this settings window is a menu containing the same presets you saw on the Create Track window. Go through them this time, however, and you'll see the various sliders change with each preset. Dive in and move the sliders yourself to create your own sounds.
Creating and saving your own software instruments
Let's make a new preset for the Analog Basic generator and save it.
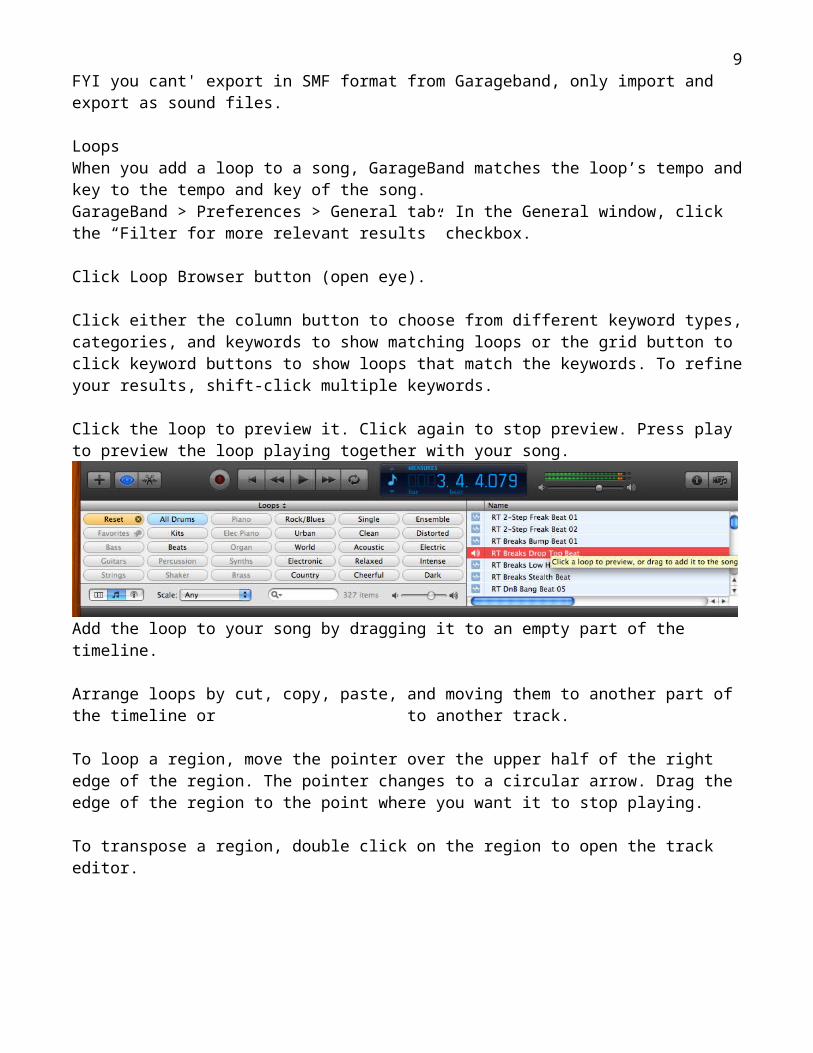
Play around with the sliders till you get a sound you like (mine are pictured below), and then close the Analog Basic settings window. Now play around with the other Track Info settings adding and adjusting effects, as you like till you've got a sound you can use.
6
Now click Save Instrument... right at the bottom of the Track Info window. Up comes a dialog asking you to name your sound. Think up a name and click Save. Now, whenever you create a new track, your sound will be available as a software instrument. (Create a new track now and, from the popup near the top of the New Track window, select My Settings. Instantly, all of GarageBand's software instruments disappear leaving only your own.)
You can share the presets you make by sharing the file in which they're saved. GarageBand saves instrument presets in the ~/Library/Application Support/GarageBand/Instrument Library/Track Settings/Software folder, but if you've given your new instrument a unique name, you can find it quickly using Spotlight. (It will have a .cst file extension.)
GarageBand's 20 generators come with a combined total of 172 presets, in addition to GarageBand's 120 software instruments, so that means there are a lot of new sounds and instruments waiting to be discovered.
Standard Midi Files (SMF)Drag standard MIDI files to track window just below tracks and it will load your mid file into garageband.FYI you cant' export in SMF format from Garageband, only import and export as sound files.
LoopsWhen you add a loop to a song, GarageBand matches the loop’s tempo and key to the tempo and key of the song.
7
GarageBand > Preferences > General tab. In the General window, click the “Filter for more relevant results” checkbox.
Click Loop Browser button (open eye).
Click either the column button to choose from different keyword types, categories, and keywords to show matching loops or the grid button to click keyword buttons to show loops that match the keywords. To refine your results, shift-click multiple keywords.
Click the loop to preview it. Click again to stop preview. Press play to preview the loop playing together with your song.
Add the loop to your song by dragging it to an empty part of the timeline.
Arrange loops by cut, copy, paste, and moving them to another part of the timeline or to another track.
To loop a region, move the pointer over the upper half of the right edge of the region. The pointer changes to a circular arrow. Drag the edge of the region to the point where you want it to stop playing.
To transpose a region, double click on the region to open the track editor.
To align the region’s beat and measures, choose Control > Snap to Grid. Click Timeline Grid button, then choose a note value from the menu, or choose Automatic.
8
Recording Real InstrumentsOpen Preferences from Garage Band menu > Audio/MIDI tab > select audio interface (US122 or iMic or built in sound or whatever interface you plan to record from) for output and input.Click the Add Track button (+), click the Real Instrument tab.Select an instrument category from the Category list, and then select an instrument from the Instrument list.
Choose the input channel and then select the input format by clicking either Mono or Stereo. Sing or play and watch the track’s level meters in the track mixer to make sure the track is receiving input, and isn’t clipping.
If you have other tracks and don’t want to hear them while recording, mute them.
Click Record. Click Record again (or spacebar) to stop.
To record over a specific part of a song, click the Cycle button in the timeline. Move the cycle region to the point in the timeline you want to start recording, then drag the end of cycle region to the point you want to end recording. Select the Real Instrument track you want to record in. Click Record.Use the Split regions command from the edit menu to cut and paste different tracks.
GarageBand's built-in tuner for tuning instruments
So you've got your instrument plugged into or playing into your Mac, it's making a noise and you've created a Real Instrument track for it, so you're ready to record?
Not quite. If you're using a guitar, bass, flute, saxophone or any other instrument that requires tuning (kazoos are mercifully exempt), the next step is to check it's in tune.
Get into the habit of doing this — with GarageBand's built-in tuner it doesn't take much effort — because there's nothing worse than perfecting a part only to find you've recorded it out of tune. After all, your guitar may be in tune with itself, but when you combine it with one of GarageBand's Software Instruments, or when you record another Real Instrument part later on, you may realize that it was not tuned to concert pitch. Tuning it with GarageBand's built-in tuner will make sure of this.
Turn on the tuner
To use the tuner you must have created a Real Instrument track. Select it and make sure your instrument is coming through at an audible level.
Now turn on the tuner by clicking the dimmed-out tuning fork icon in the timing display (ringed in red in this picture):
9
The timing display changes to the tuner display. (Clicking anywhere in this window returns it to the timing window.)
Now play a note. The tuner will do two things. It will display the letter-name of the note you're playing at the left of the tuner window (G in the picture below), and it will display a marker on the scale to show how far (if at all) the note you're playing differs from concert pitch. In this picture, the note is flat, so the scale-indicator is red:
If the note is flat, it will display left of the centre of the tuner scale, but if it is sharp, it will display to the right, also in red:
Note that if your instrument is tuned more than half a semitone out of the tune, the tuner will show a different note (Gb or G#, for instance, if you're tuning a G), so always check which note you're tuning to. The tuner scale, by the way, is in cents — hundredths of a semitone
If your instrument is out of tune, adjust it accordingly until you get a green indicator in the middle of the scale. This means the note is in tune:
I find that GarageBand's tuner tends to wander up or down the scale (for sharp or flat) once I've played a note. But, when the note is in tune, it tends to stay, perhaps with a little wavering once the note starts dying away (as the signal gets weaker). Real instruments that require tuning, such as guitars, are rarely perfect and will waver a little. Get the tuning as close as you can, then get on with the recording.
Note that, of course, the tuner can't tune multiple notes played simultaneously. And remember, when tuning a guitar, to always tune the strings from flat upwards — a sharp string loosened can catch at the nut and go out of tune while playing.
10
Why bother?
Why bother with all of this if GarageBand has got an Enhance Tuning slider? For a start, Enhance Tuning takes up processing power you could be using for effects, software instruments, etc., so it's best used only as a last resort. And, of course, it won't work if you're playing chords. As always with recording a real instrument, getting the basic signal right (both in tune and loud enough) is the most important point
To dismiss the tuner, click anywhere on the tuning window and you'll return to the timing display.
Troubleshooting tip: Check GarageBand preferences, Audio/MIDI setup.
Processor overload: curing the dreaded red play head syndrome
So you've just put the finishing touches to your latest magnum opus, adjusted the Phaser and Amp Simulation effects on each of your 32 Software Instrument tracks to perfection, added a shade of Vocal Transformer to each of your 64 Real Instrument tracks, and now it's time, finally, to hear your creation in all its magnificence. You sit back, click play, and get:
Congratulations! You've just overloaded your processor.
The signs were there
How can you tell your processor is about to be overloaded when you can't see the silicon sweat dripping from its overworked brow? Fortunately, GarageBand provides a temperature gage in the shape of the colour of the triangular playhead that moves along the top of your GarageBand song when it's played.
Keep an eye on it as you play through a song and you'll see it change:
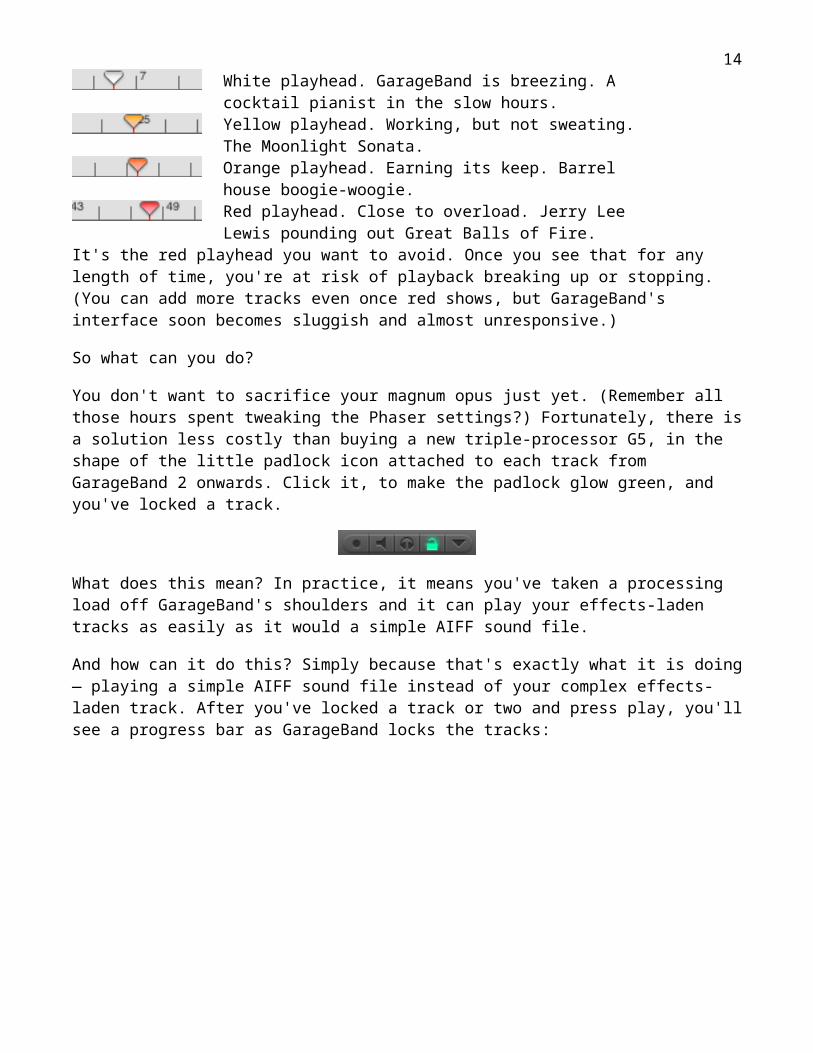
White playhead. GarageBand is breezing. A cocktail pianist in the slow hours.
11
Yellow playhead. Working, but not sweating. The Moonlight Sonata.Orange playhead. Earning its keep. Barrel house boogie-woogie.Red playhead. Close to overload. Jerry Lee Lewis pounding out Great Balls of Fire.
It's the red playhead you want to avoid. Once you see that for any length of time, you're at risk of playback breaking up or stopping. (You can add more tracks even once red shows, but GarageBand's interface soon becomes sluggish and almost unresponsive.)
So what can you do?
You don't want to sacrifice your magnum opus just yet. (Remember all those hours spent tweaking the Phaser settings?) Fortunately, there is a solution less costly than buying a new triple-processor G5, in the shape of the little padlock icon attached to each track from GarageBand 2 onwards. Click it, to make the padlock glow green, and you've locked a track.
What does this mean? In practice, it means you've taken a processing load off GarageBand's shoulders and it can play your effects-laden tracks as easily as it would a simple AIFF sound file.
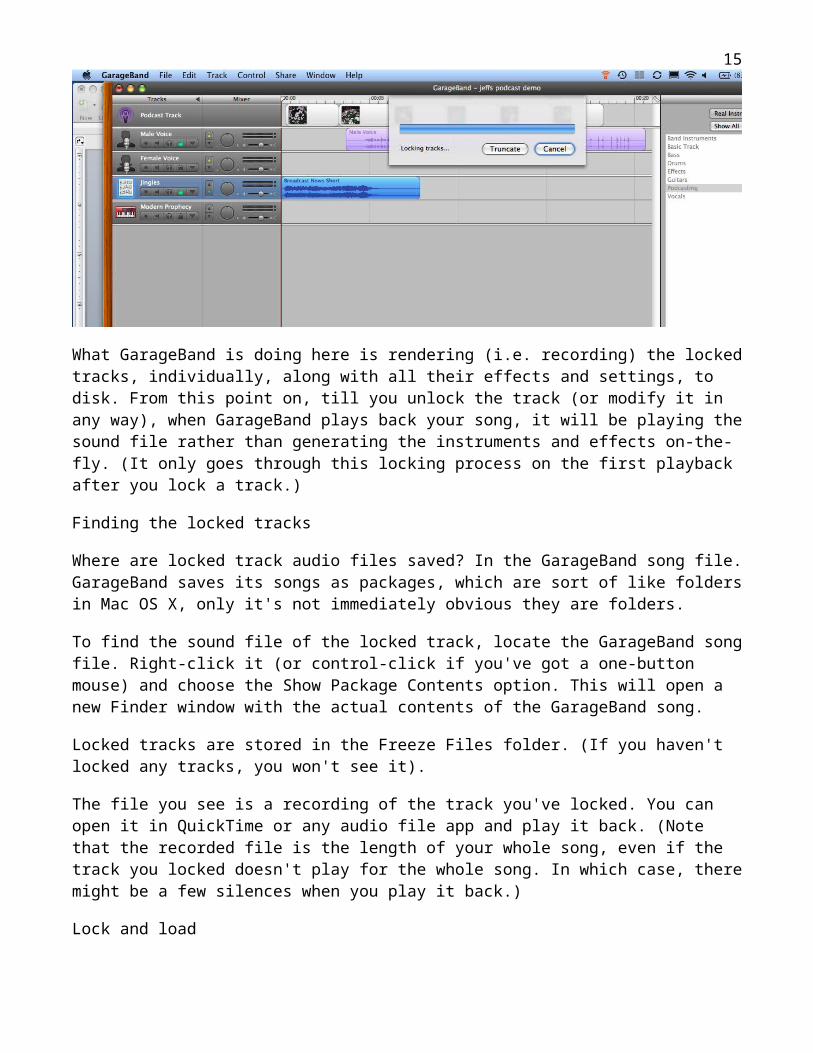
And how can it do this? Simply because that's exactly what it is doing — playing a simple AIFF sound file instead of your complex effects-laden track. After you've locked a track or two and press play, you'll see a progress bar as GarageBand locks the tracks:
What GarageBand is doing here is rendering (i.e. recording) the locked tracks, individually, along with all their effects and settings, to disk. From this point on, till you unlock the track (or modify it in any way), when GarageBand plays back your
12
song, it will be playing the sound file rather than generating the instruments and effects on-the-fly. (It only goes through this locking process on the first playback after you lock a track.)
Finding the locked tracks
Where are locked track audio files saved? In the GarageBand song file. GarageBand saves its songs as packages, which are sort of like folders in Mac OS X, only it's not immediately obvious they are folders.
To find the sound file of the locked track, locate the GarageBand song file. Right-click it (or control-click if you've got a one-button mouse) and choose the Show Package Contents option. This will open a new Finder window with the actual contents of the GarageBand song.
Locked tracks are stored in the Freeze Files folder. (If you haven't locked any tracks, you won't see it).
The file you see is a recording of the track you've locked. You can open it in QuickTime or any audio file app and play it back. (Note that the recorded file is the length of your whole song, even if the track you locked doesn't play for the whole song. In which case, there might be a few silences when you play it back.)
Lock and load
This might seem like only mildly interesting information, but there is more to it. Now you have your track, nicely rendered with all its effects and panning and so on, you can drag the file into a different GarageBand song (which copies it into that song's file) — for instance, if you're building up a very carefully-crafted or complex song out of several others.
Why is this useful to know? Well, the official line according to GarageBand Help is that, to do this, you should solo the track you want to copy, then export it to iTunes, then find the iTunes file and drag it into the song you want to duplicate it in, and then, unless you want a really messy iTunes library, remove it from iTunes.
As you can see, the "lock and drag" approach is a bit quicker, and saves you having to open iTunes.
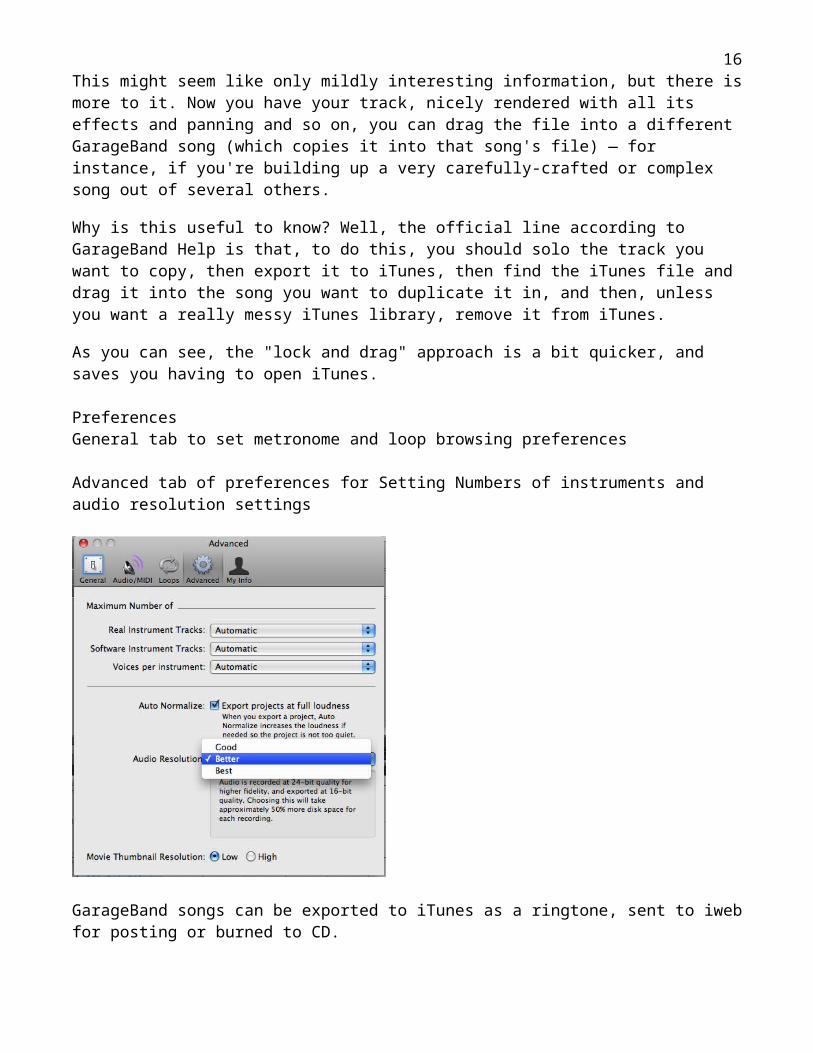
PreferencesGeneral tab to set metronome and loop browsing preferences
Advanced tab of preferences for Setting Numbers of instruments and audio resolution settings
13
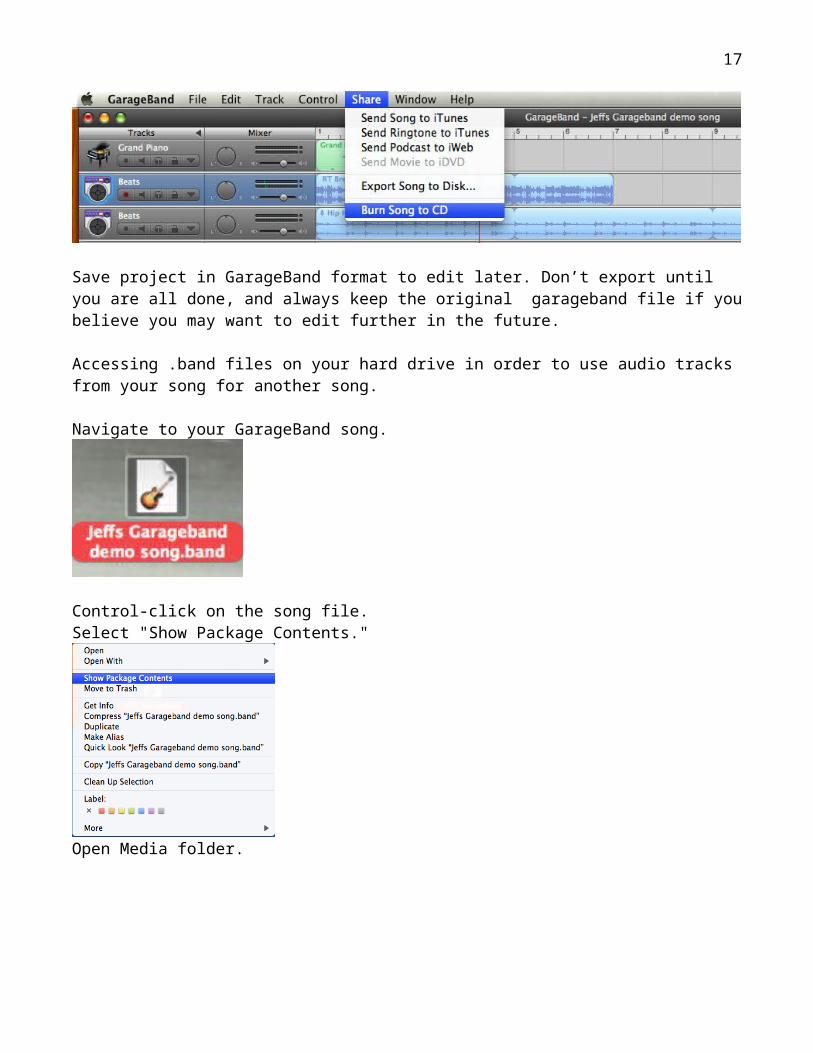
GarageBand songs can be exported to iTunes as a ringtone, sent to iweb for posting or burned to CD.
Save project in GarageBand format to edit later. Don’t export until you are all done, and always keep the original garageband file if you believe you may want to edit further in the future.
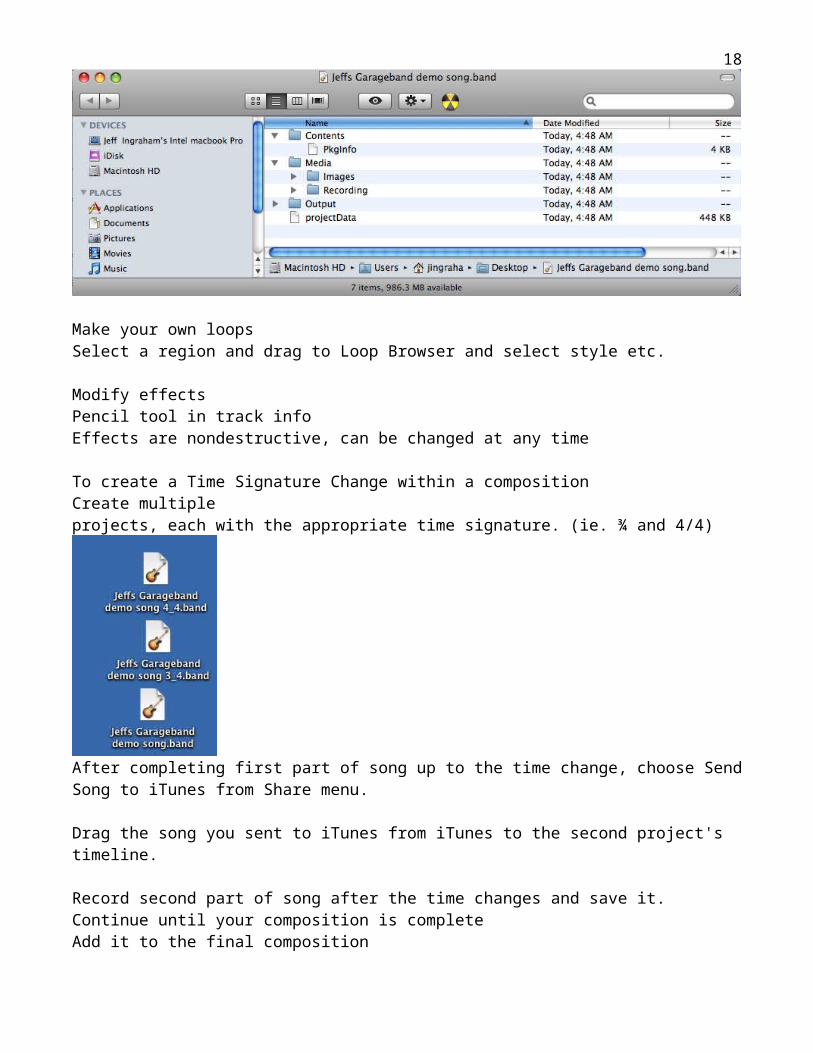
Accessing .band files on your hard drive in order to use audio tracks from your song for another song.
Navigate to your GarageBand song.
14
Control-click on the song file.Select "Show Package Contents."
Open Media folder.
Make your own loopsSelect a region and drag to Loop Browser and select style etc.
Modify effectsPencil tool in track infoEffects are nondestructive, can be changed at any time
To create a Time Signature Change within a compositionCreate multiple projects, each with the appropriate time signature. (ie. ¾ and 4/4)
15
After completing first part of song up to the time change, choose Send Song to iTunes from Share menu.
Drag the song you sent to iTunes from iTunes to the second project's timeline.
Record second part of song after the time changes and save it. Continue until your composition is completeAdd it to the final composition
TunerCreate Real Instrument TrackClick on tuning fork icon in the time display
Locking tracksTo conserve RAM resources; track will go from RAM to disk when you press Play.
Post recording editing!
IntroductionYou have laid down the tracks and chosen the loops, you are now ready to sit down and do what recording engineers spend weeks or months doing once the band has left the studio.
Start with the following four steps:
Editing is done in different ways in GarageBand, dependent on the track (Software instrument, real instrument, or loops). In the green tracks (MIDI data) you have almost unlimited control: you can move notes up and down, quantize to improve the rhythm, change the volume of each note by very small or large amounts, add vibrato, even change a flute into a cello. In the blue and purple tracks you need to work carefully because you are operating directly on the sound wave. It is much harder to find your place (so you need to zoom in and out a lot - control-left & right arrow)
16
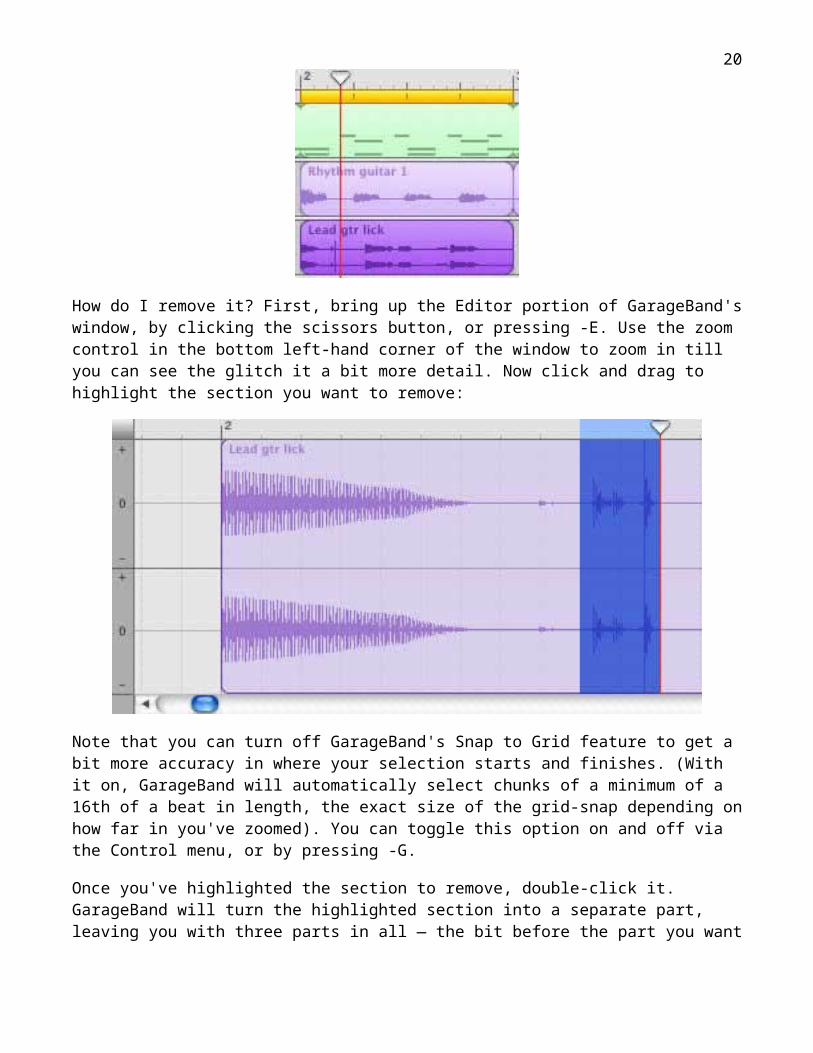
Using GarageBand you can replace an unwanted portion of a recording with silence. Here, for instance, is a part that needs editing. It's a lead guitar lick, and is just what I want apart from one annoying pop caused by a bad cable. The bit I want to remove is the spike-shape in the audio wave just before the red position marker:
How do I remove it? First, bring up the Editor portion of GarageBand's window, by clicking the scissors button, or pressing -E. Use the zoom control in the bottom left-hand corner of the window to zoom in till you can see the glitch it a bit more detail. Now click and drag to highlight the section you want to remove:
Note that you can turn off GarageBand's Snap to Grid feature to get a bit more
17
accuracy in where your selection starts and finishes. (With it on, GarageBand will automatically select chunks of a minimum of a 16th of a beat in length, the exact size of the grid-snap depending on how far in you've zoomed). You can toggle this option on and off via the Control menu, or by pressing -G.
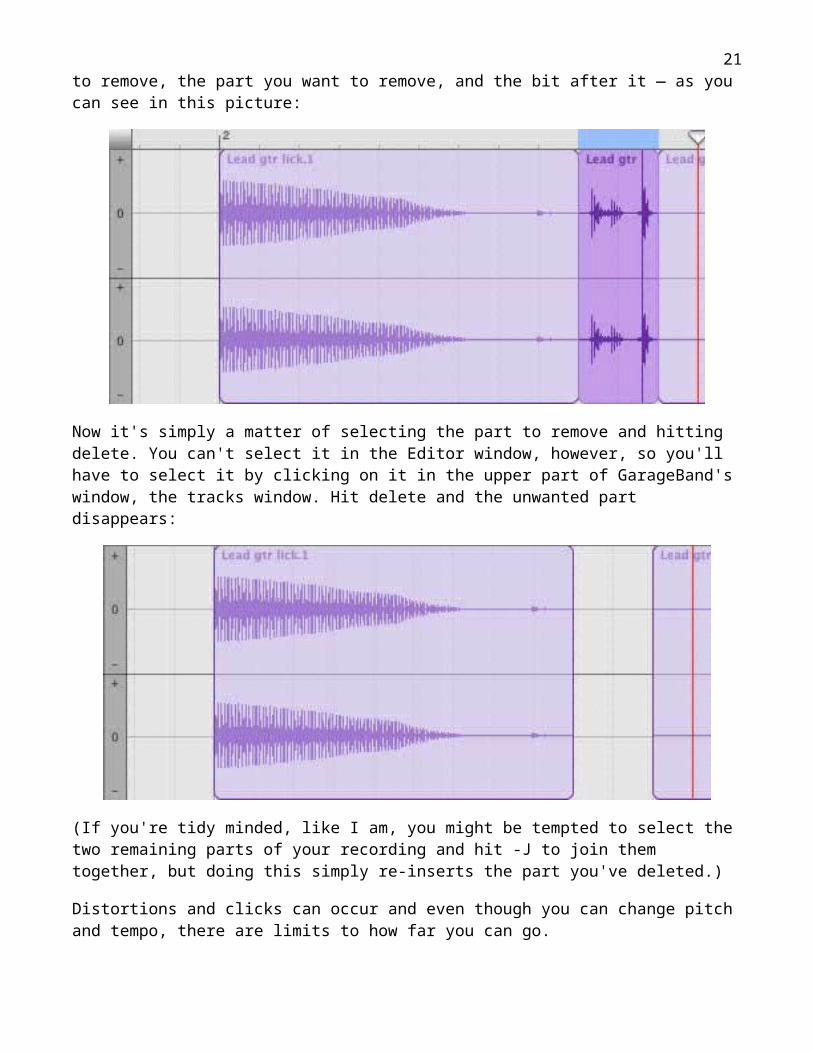
Once you've highlighted the section to remove, double-click it. GarageBand will turn the highlighted section into a separate part, leaving you with three parts in all — the bit before the part you want to remove, the part you want to remove, and the bit after it — as you can see in this picture:
Now it's simply a matter of selecting the part to remove and hitting delete. You can't select it in the Editor window, however, so you'll have to select it by clicking on it in the upper part of GarageBand's window, the tracks window. Hit delete and the unwanted part disappears:
(If you're tidy minded, like I am, you might be tempted to select the two remaining parts of your recording and hit -J to join them together, but doing this simply re-inserts the part you've deleted.)
18
Distortions and clicks can occur and even though you can change pitch and tempo, there are limits to how far you can go.
Using an external audio editor
There are some tasks that Garageband simply cannot do. Perhaps there is some effect in Audacity (http://audacity.sourceforge.net ) that you would like to apply to your song.
Whatyou ned to know is how you access the raw files behind GarageBand's recorded real instrument parts.
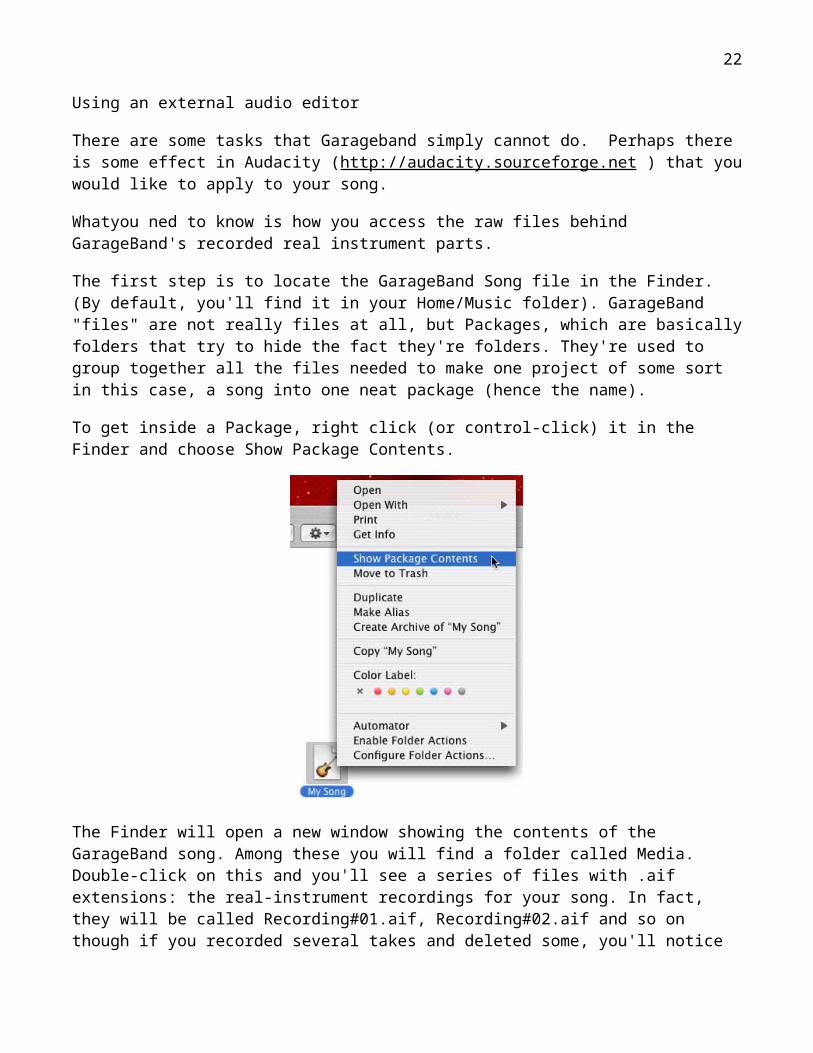
The first step is to locate the GarageBand Song file in the Finder. (By default, you'll find it in your Home/Music folder). GarageBand "files" are not really files at all, but Packages, which are basically folders that try to hide the fact they're folders. They're used to group together all the files needed to make one project of some sort in this case, a song into one neat package (hence the name).
To get inside a Package, right click (or control-click) it in the Finder and choose Show Package Contents.
The Finder will open a new window showing the contents of the GarageBand song. Among these you will find a folder called Media. Double-click on this and you'll see a series of files with .aif extensions: the real-instrument recordings for your song. In fact, they will be called Recording#01.aif, Recording#02.aif and so on though if you recorded several takes and deleted some, you'll notice gaps in the sequence.
This means, of course, that it won't be immediately obvious which file to edit, unless you know that you want to edit the latest recording, which will have the highest number. The easiest way to get a preview is to use the Finder's Get Info
19
window (select a file and press -I), or, better yet, the Info window (press alt--i), which updates according to what you have currently selected at the moment.
Locate the file you want to edit, and drag it onto the icon of the audio editor you want to use to edit it, or right-click and use the Open With menu to choose an application.
Once you have the file open in your audio editor, you can edit it as you would any other audio file, then save it right back into the package file. Next time you open the Garageband file it will have the changes you made to the file in the package.
Effects need to be added; you should always record everything with as few effects as possible to give you maximum control over the final mix, and more importantly to reduce processor load on your computer.
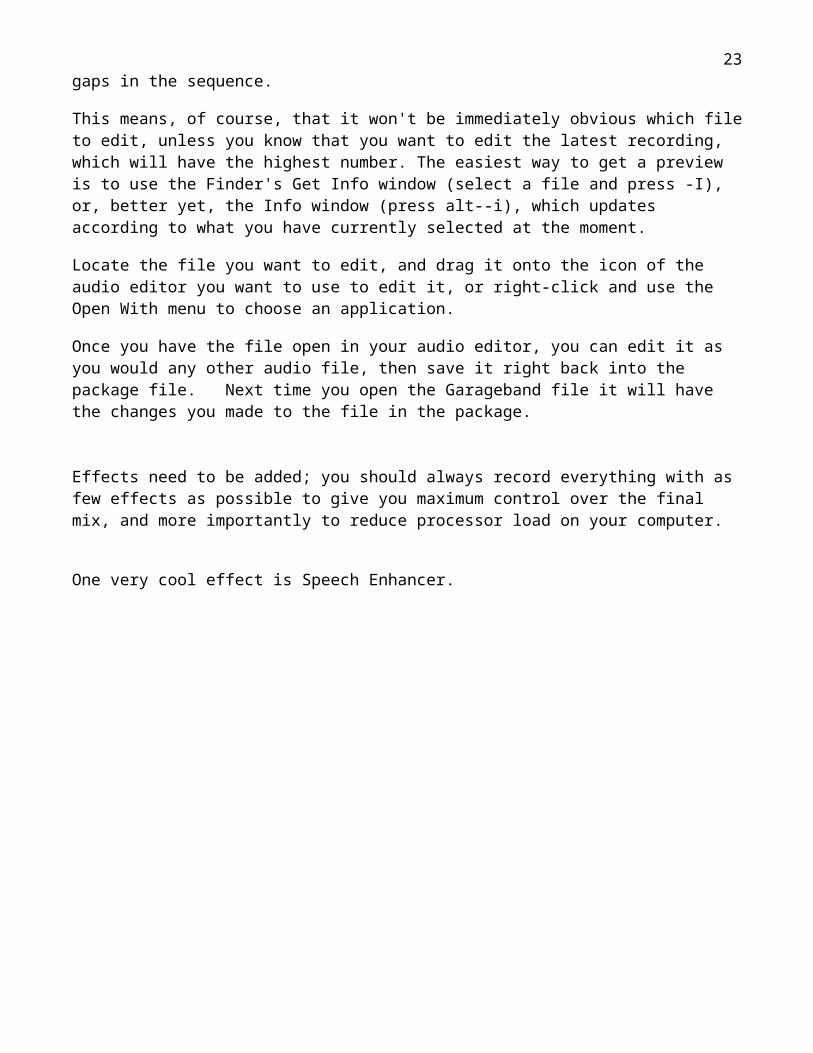
One very cool effect is Speech Enhancer.
It's for getting a better sound out of microphones for spoken-word tracks and includes noise-reduction and some presets for dealing with different microphone types (mostly built-in computer mics) and voice types.
Effects like compression and equalization are like the spices in a cooking: you can't cook without them, careful blending is a must, and too many will ruin the dish!
20
Mixing needs to be done with great care, using lots of back and forth comparisons. It is best to have a favorite, high quality recording near by to compare your song with. A solo, or vocal track, usually needs to stand out much more than beginners are comfortable with (this depends on the music style of course), and the choice of moving a track a little further to the foreground or background of the mix can have a hugh impact on the end result. Should you use reverb or volume to move a sound further back? Should you pan the piano across the stereo spectrum or locate the instrument on either side? Can you mask a bad note with a quick dip of the volume track?
Creating a professional-sounding fade-out
So you've all but completed your latest pop tune, and it only remains for you to give it some sort of ending. Why not a fade-out?
So how do you do it?
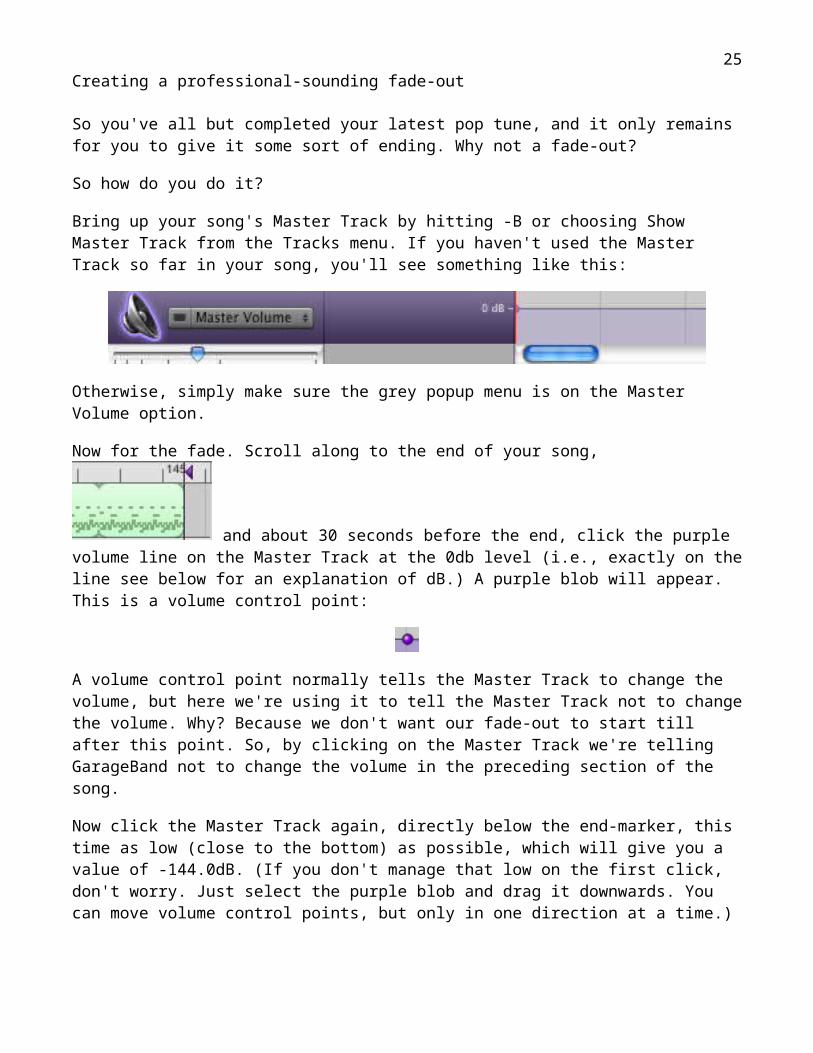
Bring up your song's Master Track by hitting -B or choosing Show Master Track from the Tracks menu. If you haven't used the Master Track so far in your song, you'll see something like this:
Otherwise, simply make sure the grey popup menu is on the Master Volume option.
Now for the fade. Scroll along to the end of your song, and about 30 seconds before the end, click the purple volume line on the Master Track at the 0db level (i.e., exactly on the line see below for an explanation of dB.) A purple blob will appear. This is a volume control point:
A volume control point normally tells the Master Track to change the volume, but here we're using it to tell the Master Track not to change the volume. Why? Because we don't want our fade-out to start till after this point. So, by clicking on the Master Track we're telling GarageBand not to change the volume in the preceding section of the song.
Now click the Master Track again, directly below the end-marker, this time as low
21
(close to the bottom) as possible, which will give you a value of -144.0dB. (If you don't manage that low on the first click, don't worry. Just select the purple blob and drag it downwards. You can move volume control points, but only in one direction at a time.)
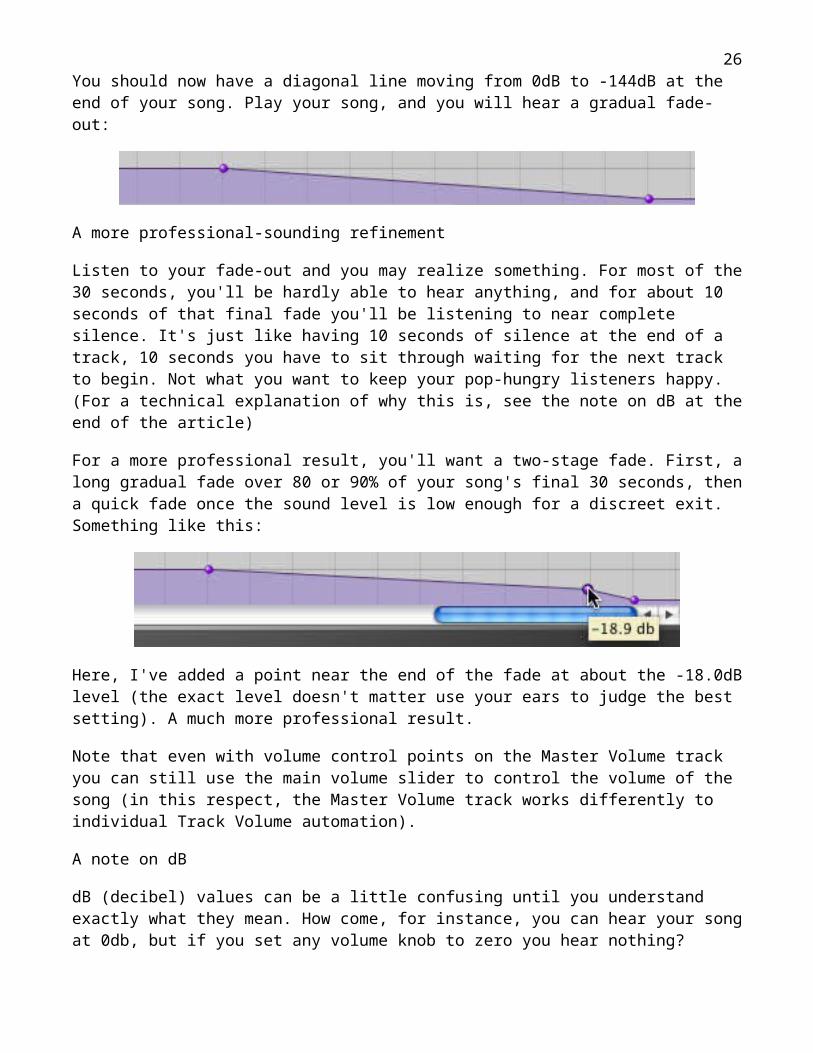
You should now have a diagonal line moving from 0dB to -144dB at the end of your song. Play your song, and you will hear a gradual fade-out:
A more professional-sounding refinement
Listen to your fade-out and you may realize something. For most of the 30 seconds, you'll be hardly able to hear anything, and for about 10 seconds of that final fade you'll be listening to near complete silence. It's just like having 10 seconds of silence at the end of a track, 10 seconds you have to sit through waiting for the next track to begin. Not what you want to keep your pop-hungry listeners happy. (For a technical explanation of why this is, see the note on dB at the end of the article)
For a more professional result, you'll want a two-stage fade. First, a long gradual fade over 80 or 90% of your song's final 30 seconds, then a quick fade once the sound level is low enough for a discreet exit. Something like this:
Here, I've added a point near the end of the fade at about the -18.0dB level (the exact level doesn't matter use your ears to judge the best setting). A much more professional result.
Note that even with volume control points on the Master Volume track you can still use the main volume slider to control the volume of the song (in this respect, the Master Volume track works differently to individual Track Volume automation).
A note on dB
dB (decibel) values can be a little confusing until you understand exactly what they mean. How come, for instance, you can hear your song at 0db, but if you set any volume knob to zero you hear nothing?
The answer is that dB is not a measurement of volume, but amplification. 0dB means that a signal is unaltered, i.e., left at its original level. In terms of the Master Volume track, 0dB means that the output is at the level set by the master volume
22
slider. Any negative value means that the volume is less than the master volume.
dB values have a second, rather mathematical, peculiarity, and this is that dB values are logarithmic. What this means in practice is that adding 1 to the current dB value does not (in the best Spinal Tap tradition) make the resulting sound "one louder", it actually multiplies its volume. Changing from 0dB to a negative dB value reduces the volume you hear in a similar way. This means that a straight line from 0dB to -144dB (as created on the Master Track to provide a fade-out) is actually moving very much more quickly towards silence than it appears to be. Hence the need for a two-stage fade.
Garageband ‘08? new features
Magic GarageBand: Play with a hand-picked band on a virtual stage with Magic Garageband where it generates a new project based on genre and performance styles.
Multi-take recording: Mark a region to repeat, record your part multiple times, and pick your best performance.
Automation of tempo effects and instruments: Set multiple edit points in a track to automate EQ and effect changes like a pro.
Arrangements: Define sections of your song – intro, verse, chorus – and copy, move, or delete at will.
Visual EQ: Graphically adjust frequencies for each track by clicking and dragging individual EQ bands.
Recording Improvements
Increased Audio Resolution
GarageBand 4 (the official version number of the new software) can now record at up to 24-bit resolution. This means that the software can differentiate between more levels of volume. That doesn’t mean that you can suddenly get louder without clipping, only that the loudness scale is more nuanced than before. Considering that the previous version of GarageBand could differentiate between 65,536 levels of volume (the same range a CD player can reproduce), the increase to 16,777,216 levels is significant for musicians recording their work.
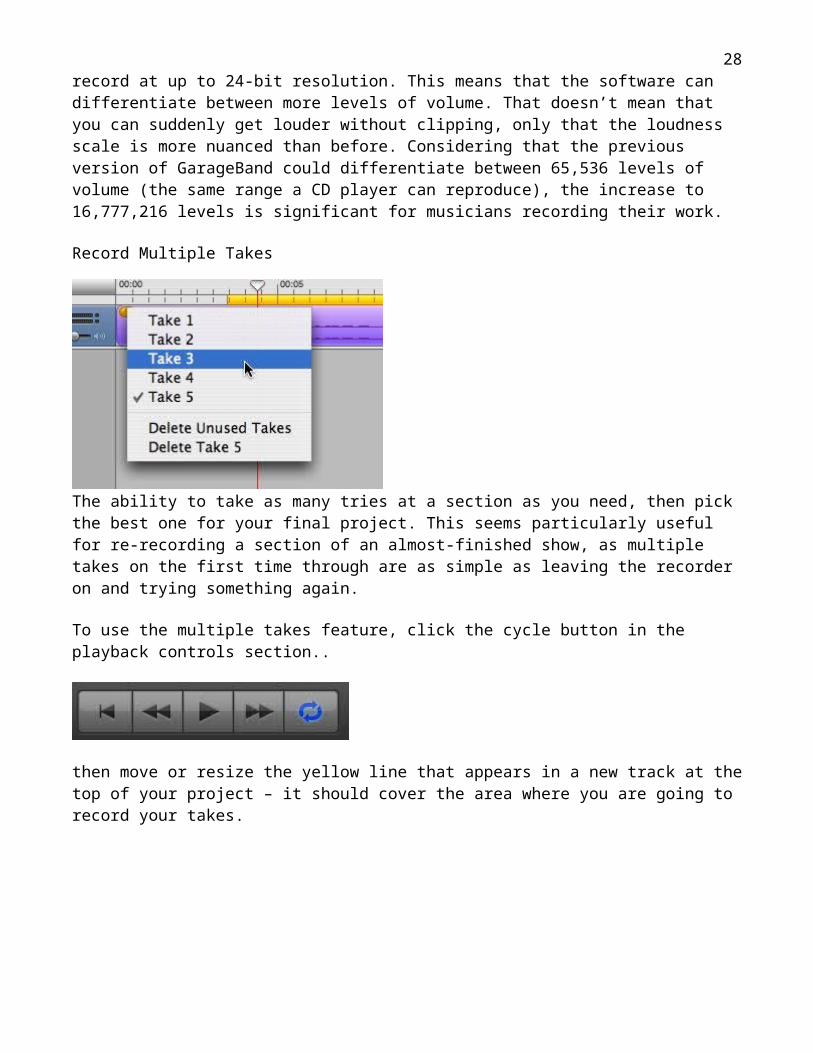
Record Multiple Takes
23
The ability to take as many tries at a section as you need, then pick the best one for your final project. This seems particularly useful for re-recording a section of an almost-finished show, as multiple takes on the first time through are as simple as leaving the recorder on and trying something again.
To use the multiple takes feature, click the cycle button in the playback controls section..
then move or resize the yellow line that appears in a new track at the top of your project – it should cover the area where you are going to record your takes.
While this is a cool feature when you need it, I would like to recommend it with a warning:
If I set the yellow selection region so that it overlapped other audio, that audio would disappear from my recording when I finished recording the takes. If you are going to use this, either cut out the section you are going to replace, or just delete it entirely before you start the multiple take process.
24
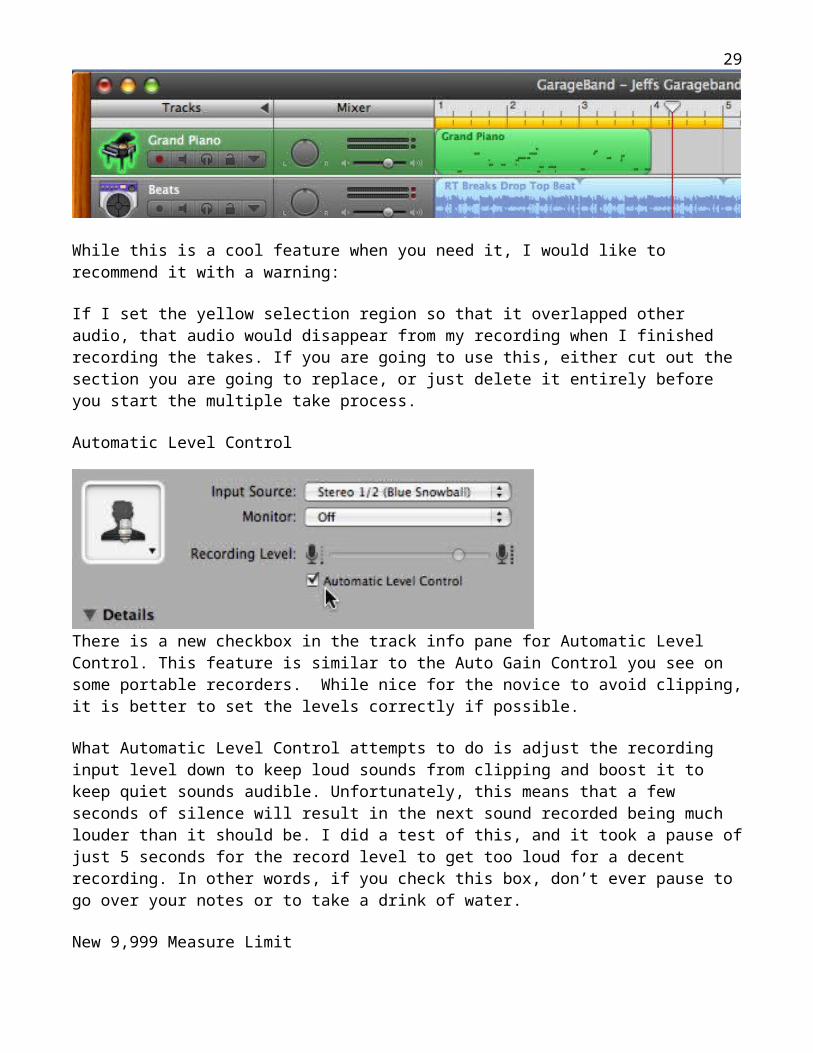
Automatic Level Control
There is a new checkbox in the track info pane for Automatic Level Control. This feature is similar to the Auto Gain Control you see on some portable recorders. While nice for the novice to avoid clipping, it is better to set the levels correctly if possible.
What Automatic Level Control attempts to do is adjust the recording input level down to keep loud sounds from clipping and boost it to keep quiet sounds audible. Unfortunately, this means that a few seconds of silence will result in the next sound recorded being much louder than it should be. I did a test of this, and it took a pause of just 5 seconds for the record level to get too loud for a decent recording. In other words, if you check this box, don’t ever pause to go over your notes or to take a drink of water.
New 9,999 Measure Limit
Earlier versions of GarageBand limited projects to 999 measures, ( in GB versions 1 & 2) or 1,999 (in GB 3) measures, which at the default tempo meant that the longest recording you could make were 33 or 66 minutes. Of course, changing the tempo to it’s slowest setting before you started recording could triple the recording time, but it was still a limitation that frustrated many users.
In GarageBand 4, the limit has been increased to 9,999 measures, giving you 5 hours, 33 minutes and 16 seconds of recording time at the default 120 bpm tempo, or up to 16 hours, 39 minutes and 48 seconds of time if you reduce the tempo to the minimum 40 bpm. If that doesn’t work for you, your podcast is too long!
Number of tracks recorded simultaneously
Apple limits GB to 8 simultaneous inputs max as a way to distinguish it, as a consumer app, from Logic etc., which do not have any limit.
If you have 7 mics on drums, you might want to send them into a stereo mixer board so they will only take up 2 tracks in GB sub mixing drums is not unusual. So
25
if you need more then 8 simultaneous inputs, sub mixing will allow you to stay with Garageband.
Beyond that, though, if you're going to want to regularly record more than 8 tracks at once, you might want to consider moving to logic, pro tools, or one of the other high end Apps.
Editing Improvements
Automation
Track pan and volume automation
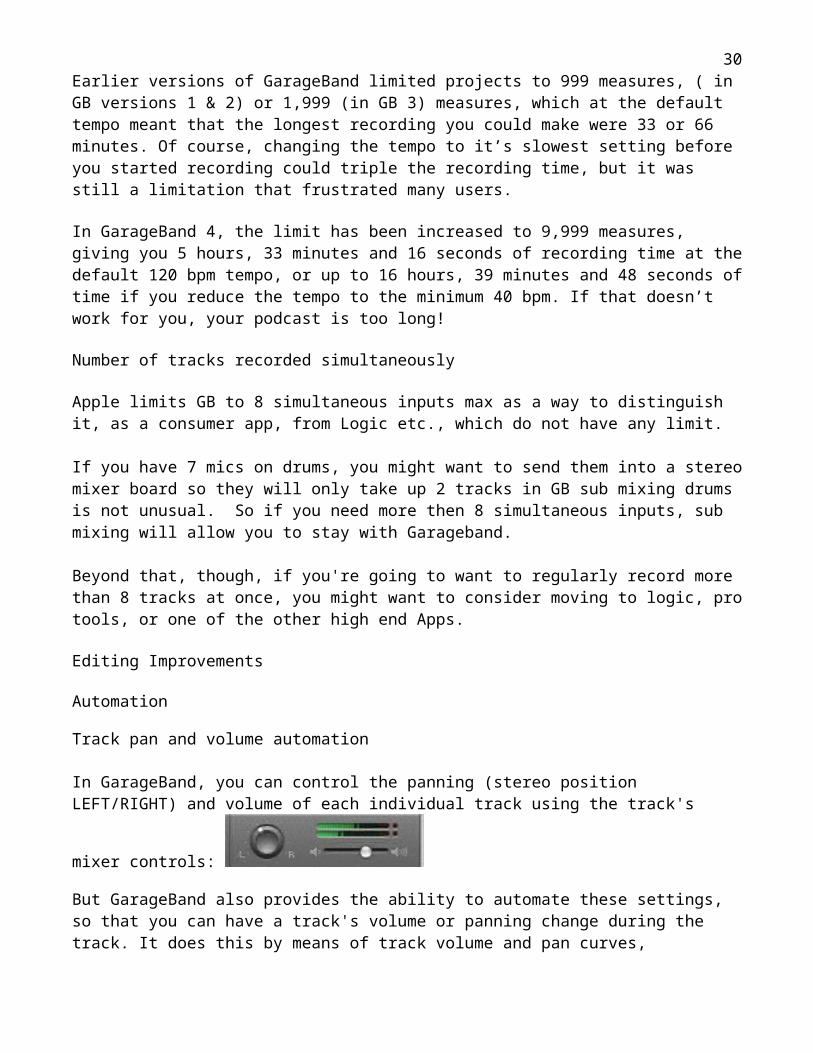
In GarageBand, you can control the panning (stereo position LEFT/RIGHT) and volume of each individual track using the track's mixer controls:
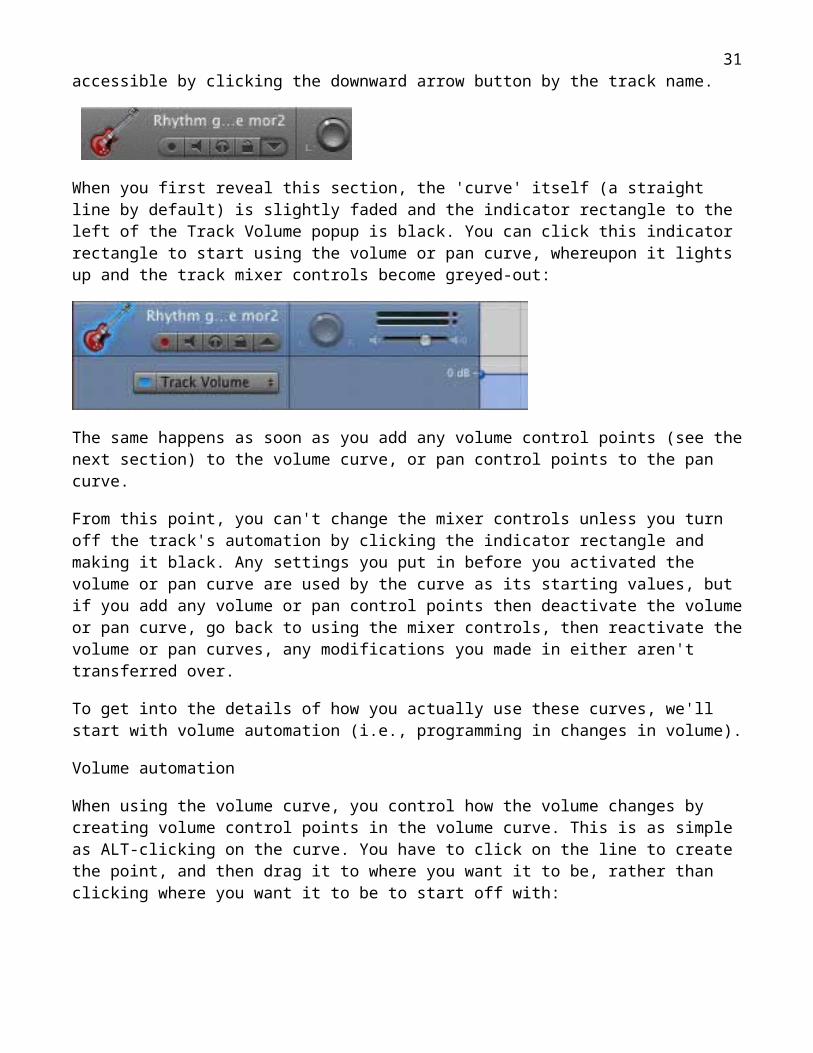
But GarageBand also provides the ability to automate these settings, so that you can have a track's volume or panning change during the track. It does this by means of track volume and pan curves, accessible by clicking the downward arrow button by the track name.
When you first reveal this section, the 'curve' itself (a straight line by default) is slightly faded and the indicator rectangle to the left of the Track Volume popup is black. You can click this indicator rectangle to start using the volume or pan curve, whereupon it lights up and the track mixer controls become greyed-out:
The same happens as soon as you add any volume control points (see the next section) to the volume curve, or pan control points to the pan curve.
From this point, you can't change the mixer controls unless you turn off the track's automation by clicking the indicator rectangle and making it black. Any settings you put in before you activated the volume or pan curve are used by the curve as its starting values, but if you add any volume or pan control points then deactivate the volume or pan curve, go back to using the mixer controls, then reactivate the
26
volume or pan curves, any modifications you made in either aren't transferred over.
To get into the details of how you actually use these curves, we'll start with volume automation (i.e., programming in changes in volume).
Volume automation
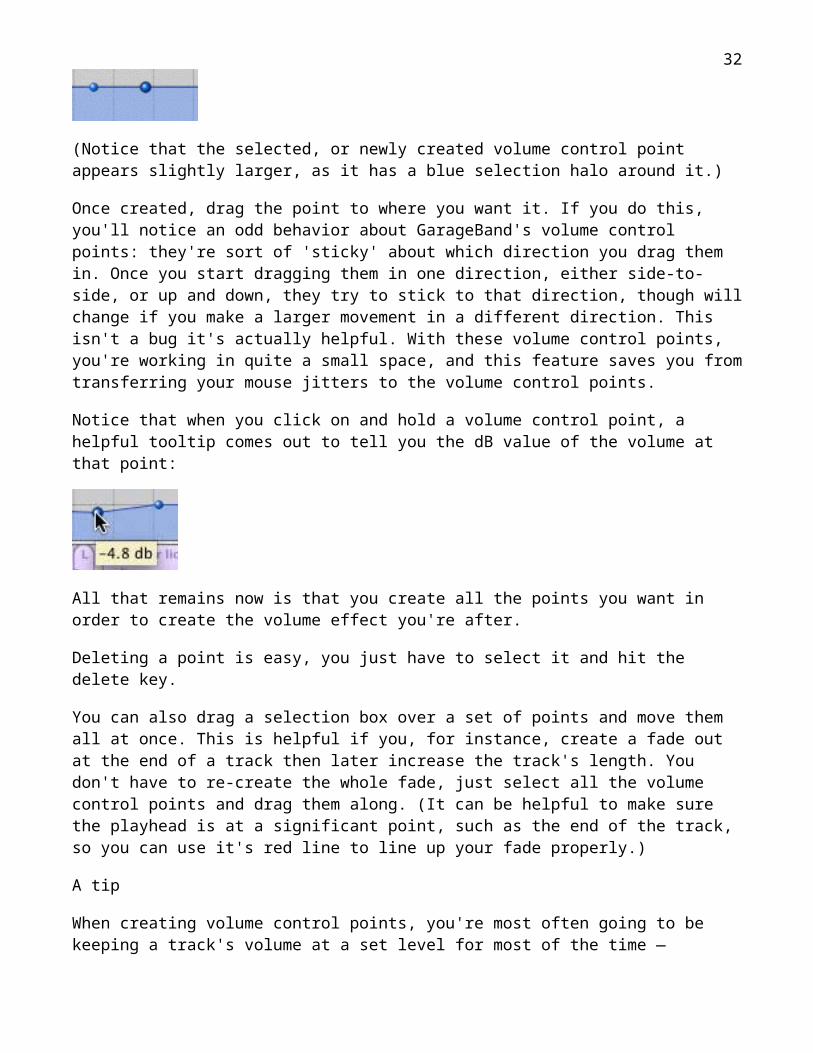
When using the volume curve, you control how the volume changes by creating volume control points in the volume curve. This is as simple as ALT-clicking on the curve. You have to click on the line to create the point, and then drag it to where you want it to be, rather than clicking where you want it to be to start off with:
(Notice that the selected, or newly created volume control point appears slightly larger, as it has a blue selection halo around it.)
Once created, drag the point to where you want it. If you do this, you'll notice an odd behavior about GarageBand's volume control points: they're sort of 'sticky' about which direction you drag them in. Once you start dragging them in one direction, either side-to-side, or up and down, they try to stick to that direction, though will change if you make a larger movement in a different direction. This isn't a bug it's actually helpful. With these volume control points, you're working in quite a small space, and this feature saves you from transferring your mouse jitters to the volume control points.
Notice that when you click on and hold a volume control point, a helpful tooltip comes out to tell you the dB value of the volume at that point:
All that remains now is that you create all the points you want in order to create the volume effect you're after.
Deleting a point is easy, you just have to select it and hit the delete key.
You can also drag a selection box over a set of points and move them all at once. This is helpful if you, for instance, create a fade out at the end of a track then later increase the track's length. You don't have to re-create the whole fade, just select all the volume control points and drag them along. (It can be helpful to make sure the playhead is at a significant point, such as the end of the track, so you can use it's red line to line up your fade properly.)
27
A tip
When creating volume control points, you're most often going to be keeping a track's volume at a set level for most of the time — probably a level you have already decided on with the standard mixer controls volume knob — so it's a good idea when creating volume control points to start by creating the points that return the volume to that set level first.
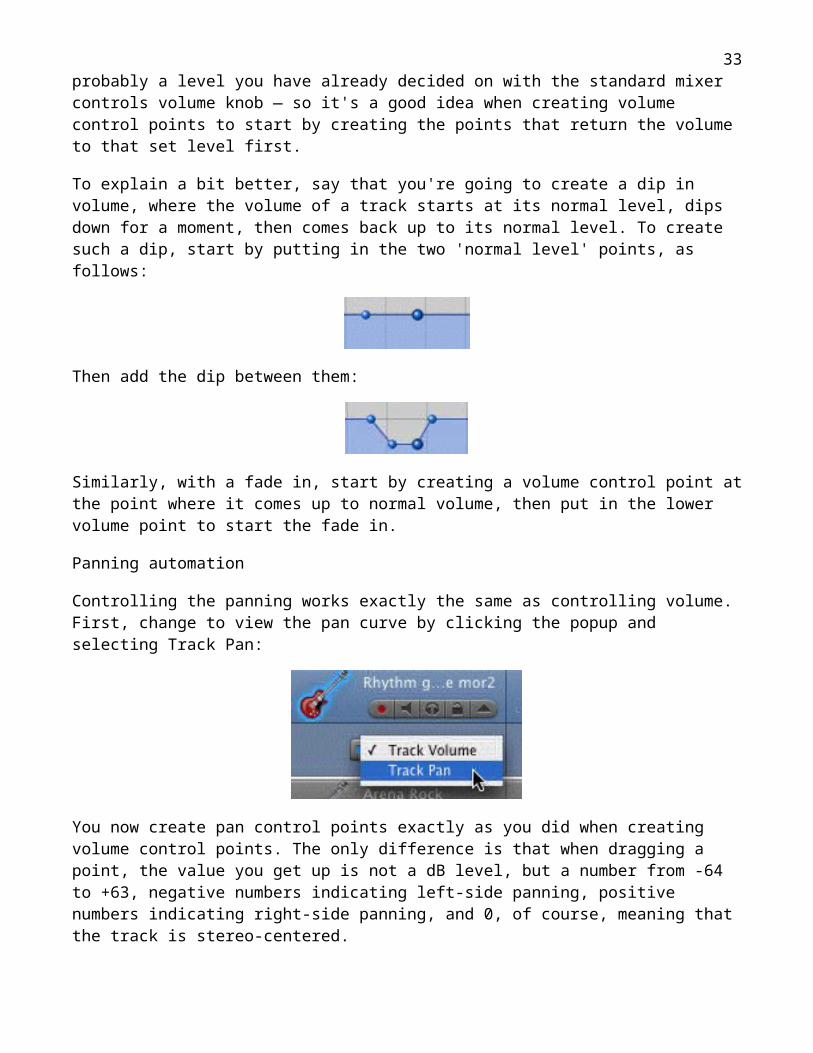
To explain a bit better, say that you're going to create a dip in volume, where the volume of a track starts at its normal level, dips down for a moment, then comes back up to its normal level. To create such a dip, start by putting in the two 'normal level' points, as follows:
Then add the dip between them:
Similarly, with a fade in, start by creating a volume control point at the point where it comes up to normal volume, then put in the lower volume point to start the fade in.
Panning automation
Controlling the panning works exactly the same as controlling volume. First, change to view the pan curve by clicking the popup and selecting Track Pan:
You now create pan control points exactly as you did when creating volume control points. The only difference is that when dragging a point, the value you get up is not a dB level, but a number from -64 to +63, negative numbers indicating left-side panning, positive numbers indicating right-side panning, and 0, of course, meaning that the track is stereo-centered.
Precisely how you use these effects is up to you — individual track fades can be used to, for instance, fade all tracks but the drums out at the end. You can also use volume automation to compensate for a real instrument track where the volume of
28
the recorded instrument changed for some reason.
Apple’s list mentions that – in addition to volume and panning automation available in earlier versions, – you can now control tempo, EQ, and effects with automation curves.
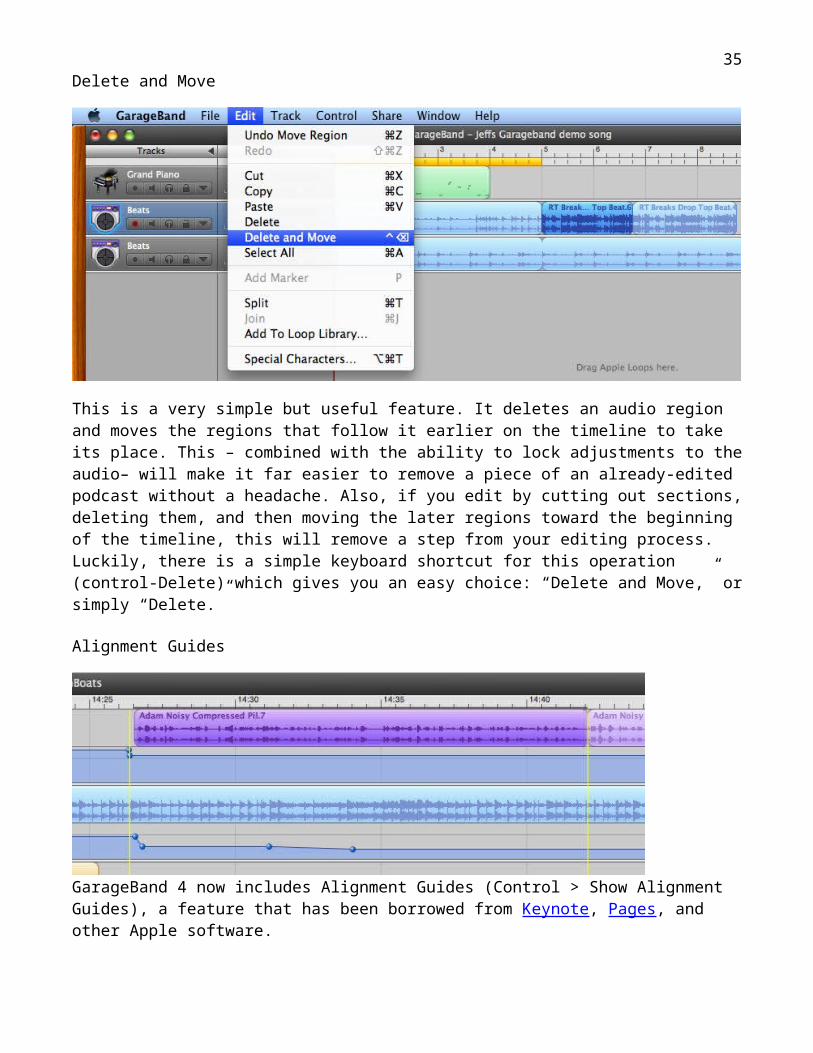
Delete and Move
29
This is a very simple but useful feature. It deletes an audio region and moves the regions that follow it earlier on the timeline to take its place. This – combined with the ability to lock adjustments to the audio– will make it far easier to remove a piece of an already-edited podcast without a headache. Also, if you edit by cutting out sections, deleting them, and then moving the later regions toward the beginning of the timeline, this will remove a step from your editing process. Luckily, there is a simple keyboard shortcut for this operation (control-Delete) which gives you an easy choice: “Delete and Move,” or simply “Delete.”
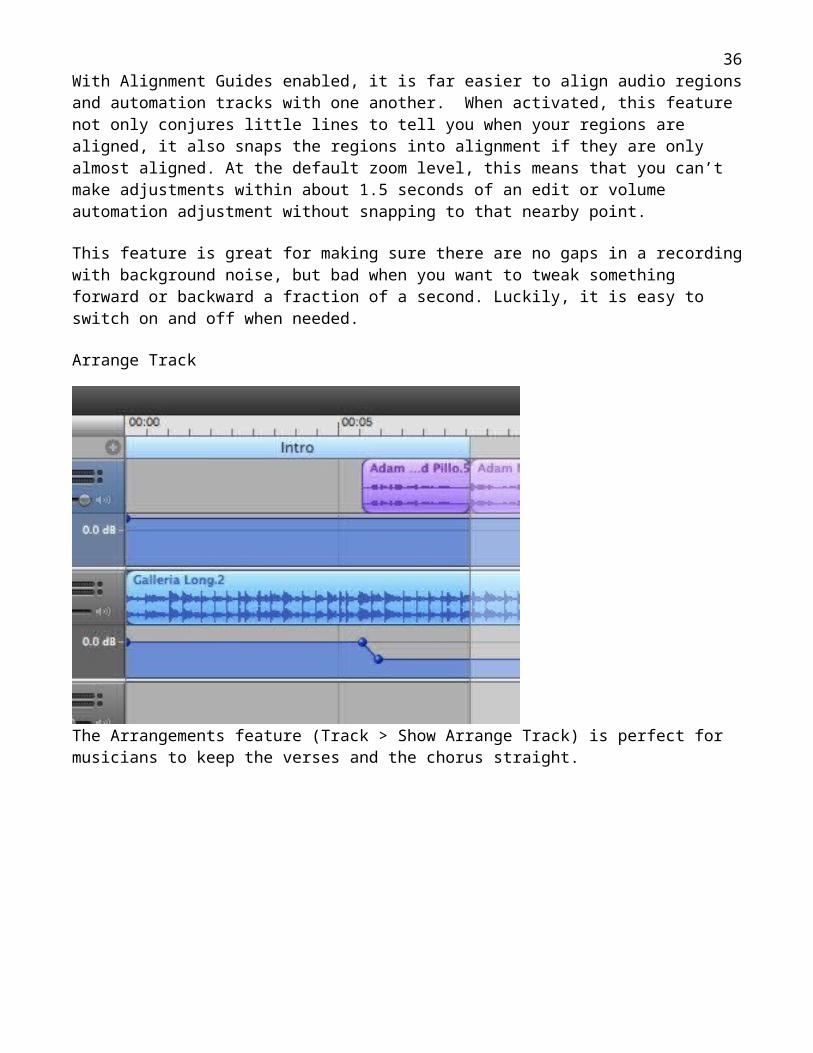
Alignment Guides
GarageBand 4 now includes Alignment Guides (Control > Show Alignment Guides), a feature that has been borrowed from Keynote, Pages, and other Apple software.
With Alignment Guides enabled, it is far easier to align audio regions and automation tracks with one another. When activated, this feature not only conjures little lines to tell you when your regions are aligned, it also snaps the regions into alignment if they are only almost aligned. At the default zoom level, this means that you can’t make adjustments within about 1.5 seconds of an edit or
30
volume automation adjustment without snapping to that nearby point.
This feature is great for making sure there are no gaps in a recording with background noise, but bad when you want to tweak something forward or backward a fraction of a second. Luckily, it is easy to switch on and off when needed.
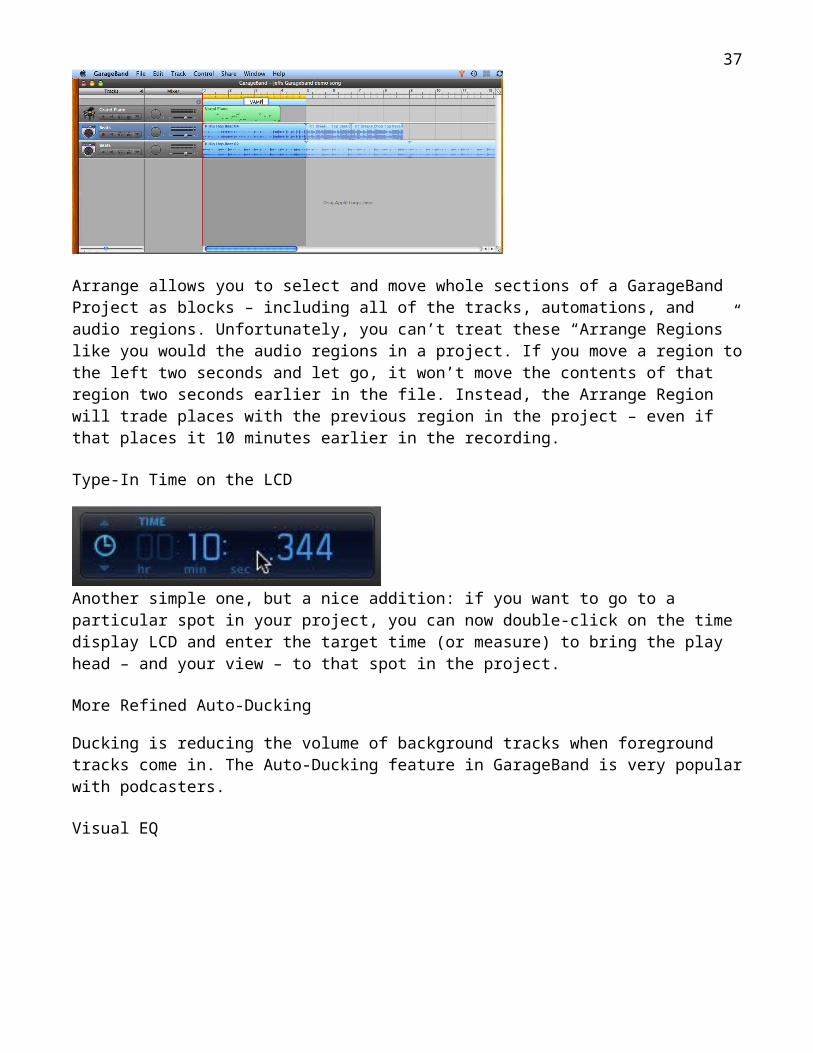
Arrange Track
The Arrangements feature (Track > Show Arrange Track) is perfect for musicians to keep the verses and the chorus straight.
Arrange allows you to select and move whole sections of a GarageBand Project as blocks – including all of the tracks, automations, and audio regions. Unfortunately, you can’t treat these “Arrange Regions” like you would the audio regions in a project. If you move a region to the left two seconds and let go, it won’t move the
31
contents of that region two seconds earlier in the file. Instead, the Arrange Region will trade places with the previous region in the project – even if that places it 10 minutes earlier in the recording.
Type-In Time on the LCD
Another simple one, but a nice addition: if you want to go to a particular spot in your project, you can now double-click on the time display LCD and enter the target time (or measure) to bring the play head – and your view – to that spot in the project.
More Refined Auto-Ducking
Ducking is reducing the volume of background tracks when foreground tracks come in. The Auto-Ducking feature in GarageBand is very popular with podcasters.
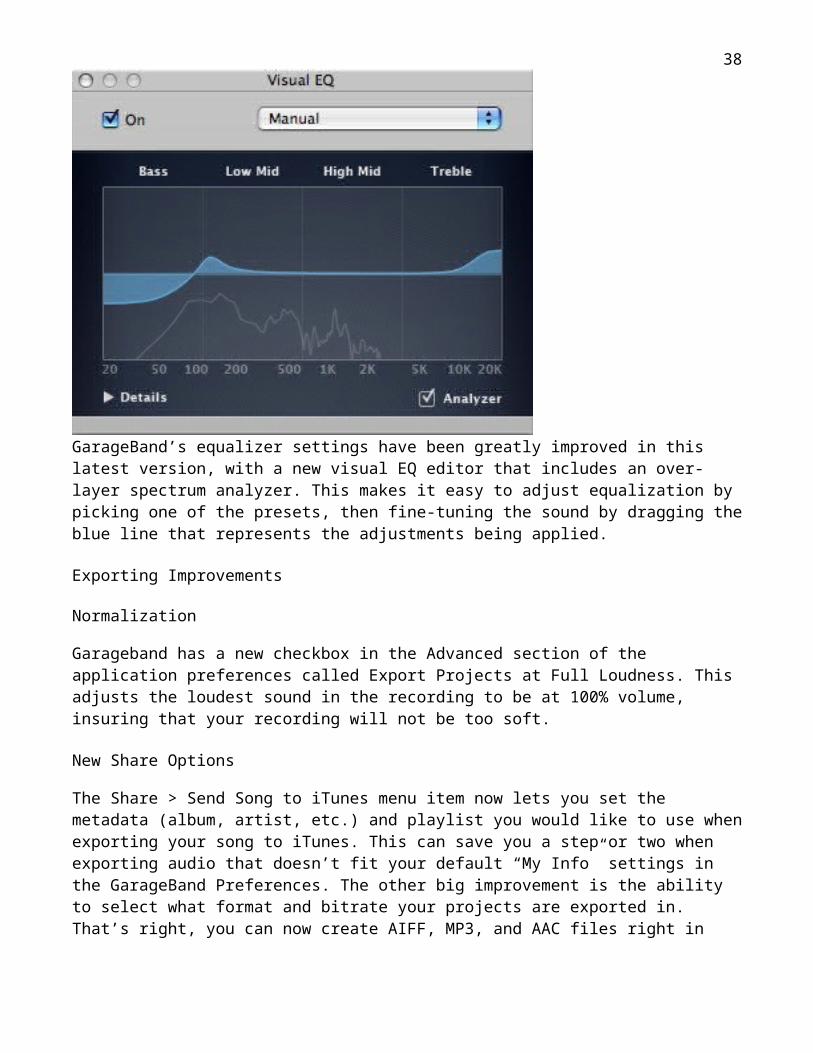
Visual EQ
GarageBand’s equalizer settings have been greatly improved in this latest version, with a new visual EQ editor that includes an over-layer spectrum analyzer. This makes it easy to adjust equalization by picking one of the presets, then fine-tuning the sound by dragging the blue line that represents the adjustments being applied.
32
Exporting Improvements
Normalization
Garageband has a new checkbox in the Advanced section of the application preferences called Export Projects at Full Loudness. This adjusts the loudest sound in the recording to be at 100% volume, insuring that your recording will not be too soft.
New Share Options
The Share > Send Song to iTunes menu item now lets you set the metadata (album, artist, etc.) and playlist you would like to use when exporting your song to iTunes. This can save you a step or two when exporting audio that doesn’t fit your default “My Info” settings in the GarageBand Preferences. The other big improvement is the ability to select what format and bitrate your projects are exported in. That’s right, you can now create AIFF, MP3, and AAC files right in GarageBand. In addition, all of these option are available whether you’ve selected “Create New Podcast Episode” or “Create New Music Project” when you first open your file – no more AAC-only podcasts!
In addition to the Send Song to iTunes option, there is a new Share > Export Song to Disk choice as well. This option gives you the same compression and bitrate settings as the iTunes export, then asks you what folder you’d like your finished file deposited in. This is a great feature that allows you to bypass iTunes entirely – as long as you don’t use it to add artwork or shownotes to the file.
Conclusion
GarageBand ‘08 includes many time-saving and headache-saving improvements over the previous version. It also includes some new features that – if used properly – will improve the overall sound and quality of your recordings and podcasts.
Podcasting with GarageBand
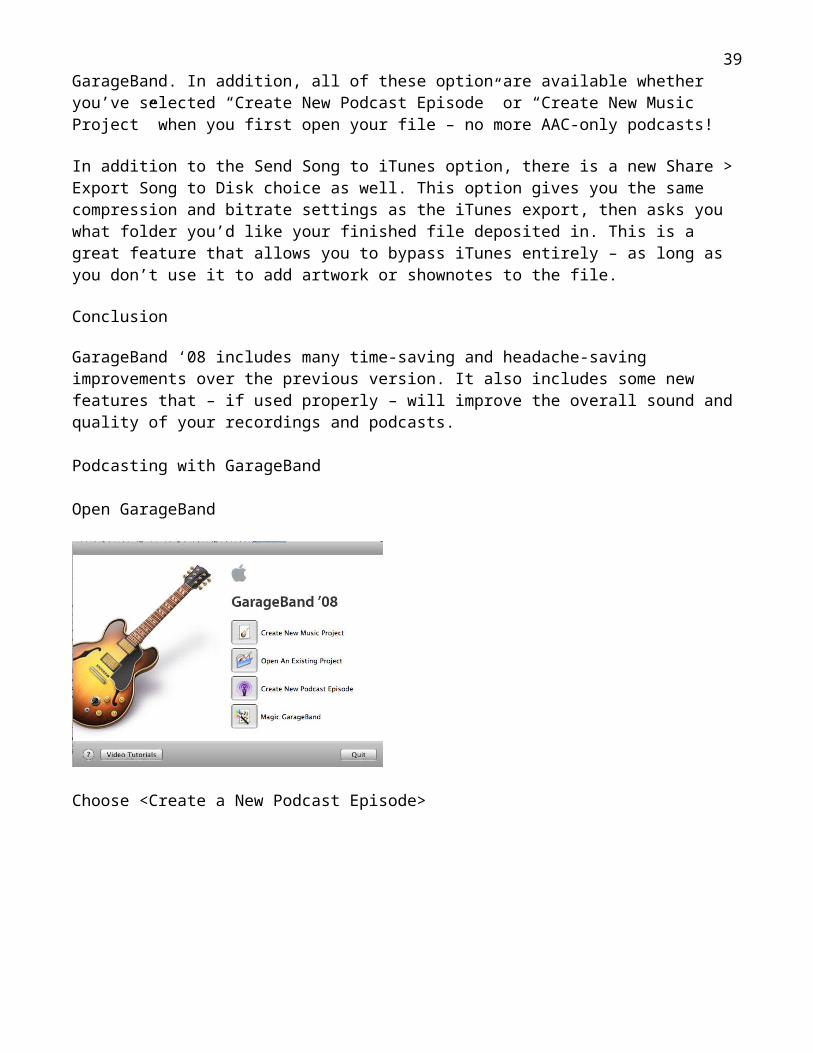
Open GarageBand
33

Choose <Create a New Podcast Episode>
Name your file and press <Create>.
Default for podcast docs is for 1 podcast track, 1 Male track, 1 female track and 1 Jingles track
34
Select the track to hold your vocals. (Male or female) Note the eq on the 2 tracks is very minimal and males or females can easily record on either track with very minimal difference in the sound.
Letting GarageBand recognize your interface or microphone by plugging it in to the USB port.
Or just use the build in Microphone on your laptop or limac.
Recording the dialogue for your podcast.
It is recommended that you allow a second or two at the beginning and ending of each recorded section. It is also recommended that each paragraph of your script be recorded separately from the others on the same track. This will allow you to re-record without having to repeat the whole show. You can move each recorded
35
section left or right along the track or bump them against one other—whatever sounds best.
You can review as you go by dragging the red line arrow to the left and pressing the play arrow to listen to your recording at any time through the creation of your recording.
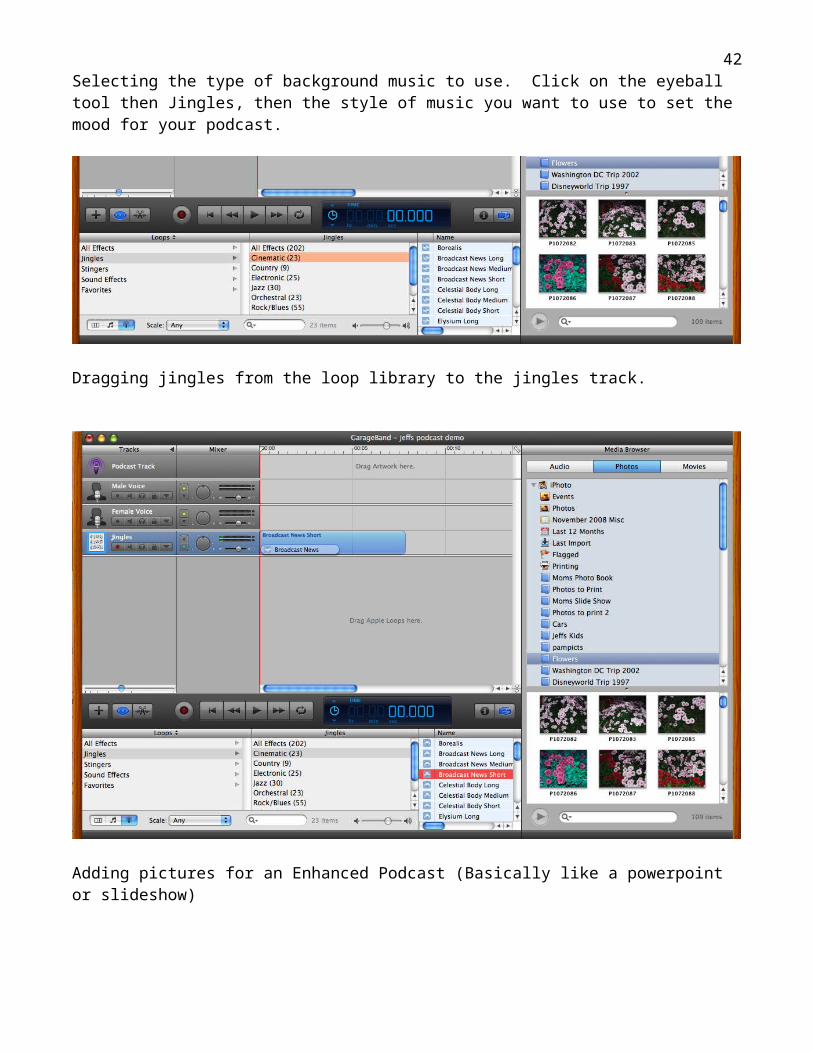
Adding background music to the jingles track
When you are ready to add background music, you can use GarageBand’s vast library of prerecorded loops. (You can expand the library of loops by purchasing more from Apple or other third party vendors).
Selecting the type of background music to use. Click on the eyeball tool then Jingles, then the style of music you want to use to set the mood for your podcast.
Dragging jingles from the loop library to the jingles track.
36
Adding pictures for an Enhanced Podcast (Basically like a powerpoint or slideshow)
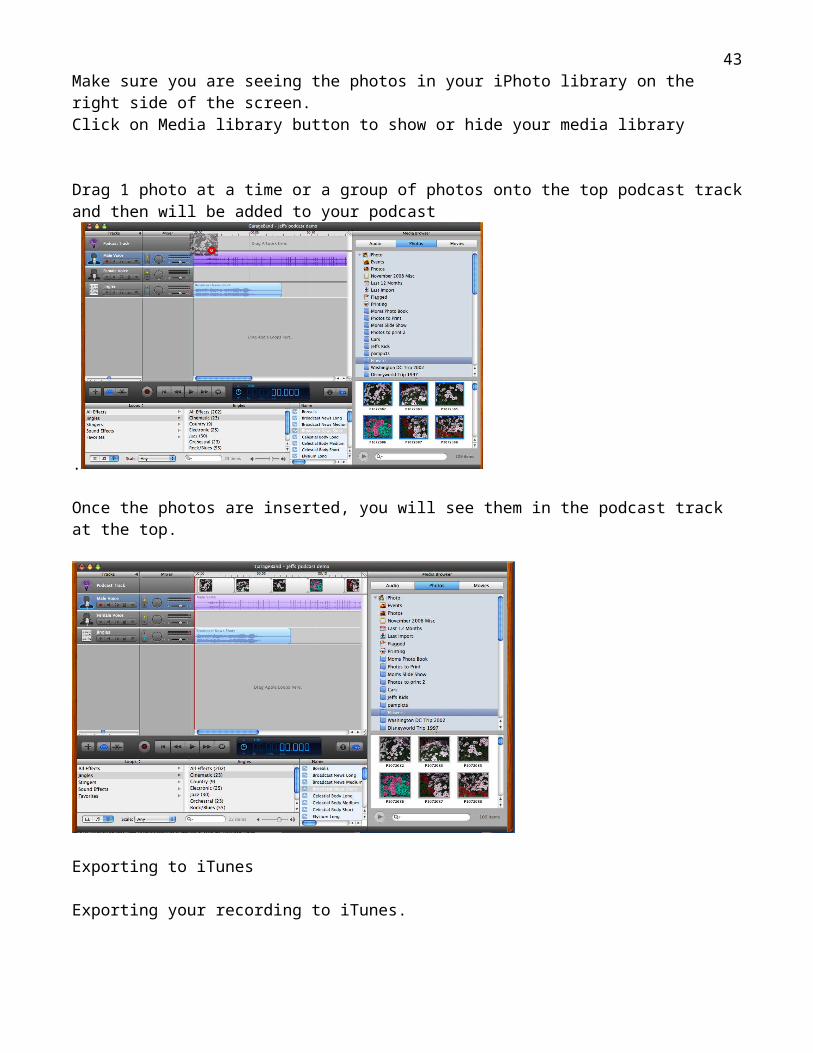
Make sure you are seeing the photos in your iPhoto library on the right side of the screen. Click on Media library button to show or hide your media library
Drag 1 photo at a time or a group of photos onto the top podcast track and then will be added to your podcast
.
Once the photos are inserted, you will see them in the podcast track at the top.
37
Exporting to iTunes
Exporting your recording to iTunes.
Within the GarageBand <File> dropdown menu is a choice <Send Podcast to iTunes>. It is just that simple. Your recording will appear in your iTunes library as an .aiff file. Now is the time to convert the .aiff file to MP3.
Converting your recording to an MP3 format in itunes.
Click on the filename once to highlight it. From the <Advanced> menu of iTunes, choose <Convert to MP3> (or Convert Selection to MP3). By default, the MP3s are saved in the Macintosh HD>Users>Current User indicated by the 'house' icon >Music> iTunes>iTunes Music folder.
Exporting as an enhanced podcast
Choose Export Podcast to Disk
38
Choose AAC (Allows file to include Images (ENHNCED Podcast)
Or MP3 for audio only
And choose Quality f Audio for your podcast
Choose where to save, and name your file
39

You will now have your file in the format of your choice.
M4a (Enhanced Audio PodcastOrMP3 (Audio Only)Or you COULD get And M4V (video podcast)
Adding it to your Web site, or PowerPoint
Once your podcast is converted to M4a or MP3 or m4v format, any browser or software application capable of hosting sound files will accept it. Use the directions of your HTML editor (Dreamweaver or GoLive, etc.) or the software (PowerPoint) where the sound file will be embedded.
How to create custom ringtones for your iPhone in GarageBand
Create a 40 second or less ringtone file in Garageband and then choose send ringtone to iTunes from the Share menu. If it is longer then 40 seconds, you will see the following screen telling you that it will be shortened.
40

In iTunes, use the Ringtones pane to select the ringtones you want to sync to iPhone.If Send Ringtone to iTunes is dimmed, be sure you are using iTunes 7.5 or later. Choose Software Update from the Apple menu. If you receive a message on your iPhone indicating your ringtone was not copied, be sure you are using iPhone software version 1.1.2 or later.
GarageBand Built-in Audio Unit Effects
Underlying GarageBand's simple interface is a host of complex features that offer some serious power for modifying your audio files. Many of these features are inherited from Final Cut Pro/Soundtrack, or from Apple's other professional audio products such as Logic.
The built-in Audio Unit effects
GarageBand comes out of the box with an extra twelve Audio Unit effects, which you will find in the pull-down menus of the Track Info: details menu.
AUBandpass cuts higher and lower frequencies and lets the middle ones through
AUDynamicsProcessor is a compressor/limiter that affects the dynamic range AUDelay is a delay effect, like Echo AUGraphicEQ is an equalizer that allows you to control the volume level of 31
frequency bands. Can be very handy to suppress a bad sound in a precise frequency range
AUHiPass allows only higher frequencies to pass AUHiShelFilter allows you to raise or lower the volume of high frequencies AUPeakLimiter is a compressor/limiter effect that allows you to set the
maximum volume. Useful for controlling clipping. AULowPass allows only lower frequencies to pass AULoShelFilter allows you to raise or lower the volume of low frequencies AUMultibandCompressor allows you to compress the dynamic range
41
according to frequency bands AUMatrixReverb is a sophisticated reverb control effect AUParametricEQ lets you control the frequency and the bandwidth to be
boosted or cut
Download lots more open source/free/or commercial Audio Unit effects plugins athttp://www.macmusic.org/software/cat.php/lang/en/id/7037/view/AU
Or just Google Audio Unit effects
Audio Unit Filter BasicsAudio Units are special audio program plug-ins that conform to a certain specification. The Audio Unit standard was created by Apple and is used in a number of their audo applications (including Logic, GarageBand, Soundtrack, etc.), however Audio Units are also supported in many non-Apple audio applications as well. Not all Audio Unit plugins will necessarily work with GarageBand, however the program ships with several default Audio Unit plugins to expand its functionality. We'll show you where these Audio Units show up in GarageBand and what each of them can do for you.
Finding the Audio Unit Filters in GarageBand
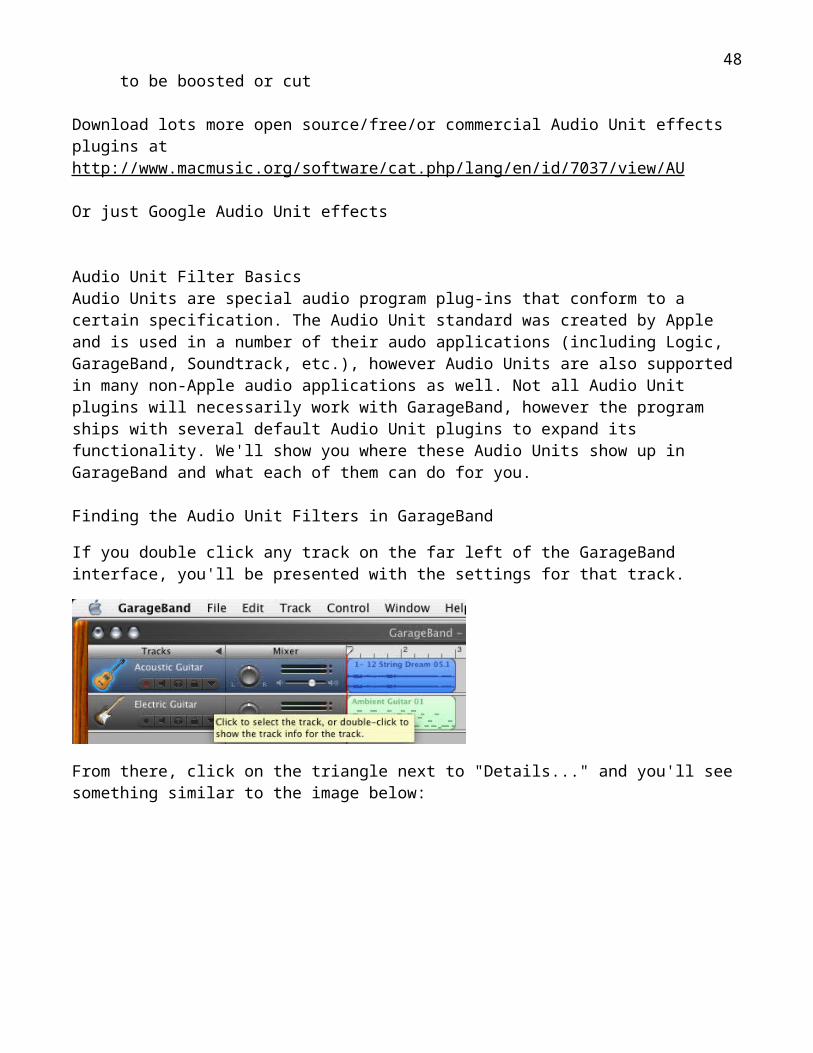
If you double click any track on the far left of the GarageBand interface, you'll be presented with the settings for that track.
From there, click on the triangle next to "Details..." and you'll see something similar to the image below:
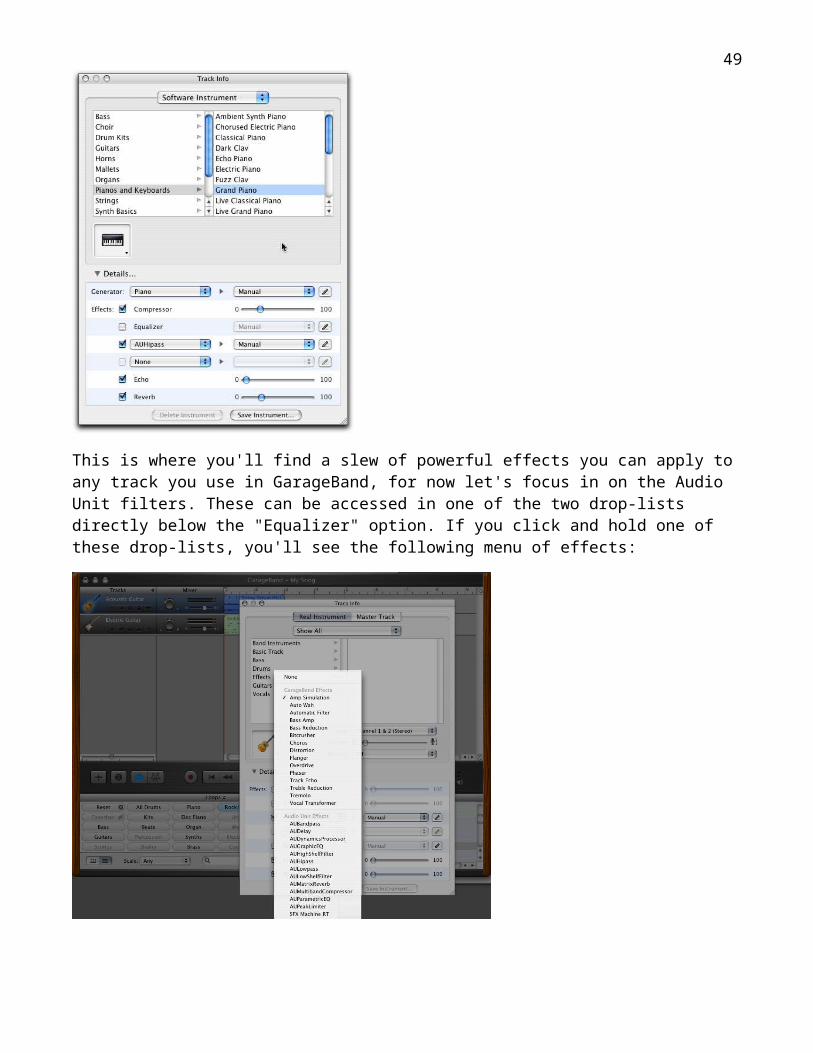
42
This is where you'll find a slew of powerful effects you can apply to any track you use in GarageBand, for now let's focus in on the Audio Unit filters. These can be accessed in one of the two drop-lists directly below the "Equalizer" option. If you click and hold one of these drop-lists, you'll see the following menu of effects:
43

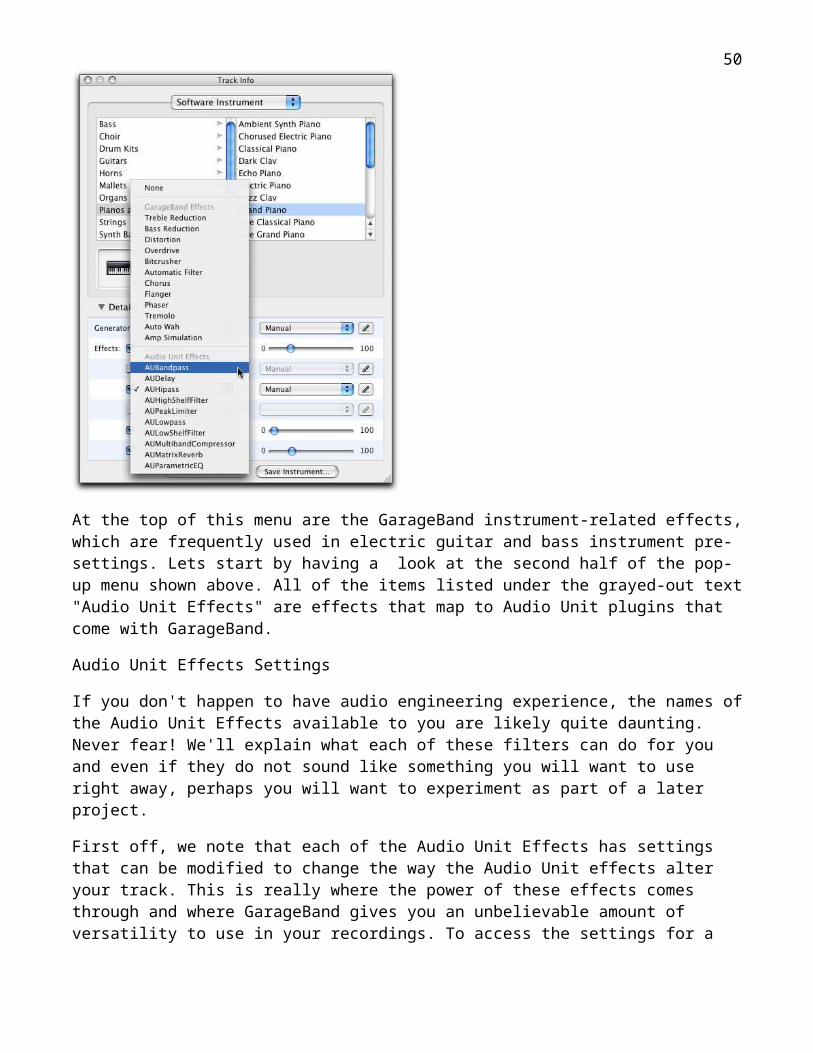
At the top of this menu are the GarageBand instrument-related effects, which are frequently used in electric guitar and bass instrument pre-settings. Lets start by having a look at the second half of the pop-up menu shown above. All of the items listed under the grayed-out text "Audio Unit Effects" are effects that map to Audio Unit plugins that come with GarageBand.
Audio Unit Effects Settings
If you don't happen to have audio engineering experience, the names of the Audio Unit Effects available to you are likely quite daunting. Never fear! We'll explain what each of these filters can do for you and even if they do not sound like something you will want to use right away, perhaps you will want to experiment as part of a later project.
First off, we note that each of the Audio Unit Effects has settings that can be modified to change the way the Audio Unit effects alter your track. This is really where the power of these effects comes through and where GarageBand gives you an unbelievable amount of versatility to use in your recordings. To access the settings for a particular Audio Unit Effect, just select the effect you want and then click the little square button with a diagonal pencil next to the effect.
44

A Little bit of Sound Basics
Since all of the Audio Unit effects that are included with GarageBand are really audio "filters" that do one thing or another to modify the sound waves produced by your track, it is worth it to make sure we're all on the same page with respect to certain sound concepts. If you're keen with basic physics or principles of sound, you can skip this part. If not, you may find this interesting.
Apple OS X dictionary defines Sound as:
Vibrations that travel through the air or another medium and can be heard when they reach a person's or animal's ear.
Sound is created when objects vibrate air and our ears (or microphones) detect these changes in the air. A bell that has been rung, or the pulsating speaker or your headphones, vibrates the air. The waves created in the air by these vibrating objects can have different frequencies -- the waves can fluctuate slowly and produce low pitched sounds, or they can fluctuate rapidly and produce high pitched sounds. Think of a rock dropped in a lake: near the place very close to where the rock was dropped, the waves created are very close together (they have high frequency), but further out, the waves are further apart (they have low frequency). Sound waves are very similar to the waves created in a lake.
Another feature of sound waves is that they have amplitude or strength. For sound waves, the level of air pressure produced by the vibrating object determines this. If you were looking at a two dimensional expression of a sound wave, the amplitude would be the height of the wave (and the frequency would be the length of the wave, i.e., wavelength).
These very basic principles should give you a glimpse at what the Audio Unit Effects in GarageBand do: they manipulate the sound waves of the track you've selected. One final point to consider: a "track" or any expression/recording of sound is really a collection of information that can re-produce (through your audio output devices like speakers and headphones) a pattern of sound waves. A recording of a piano or guitar will include information to produce a number of sound waves in varying frequencies and amplitudes, all at the same time.
Now, let's look at each of the Audio Unit Effects in garageband.
Here is the definition of Audio Unit effects from Apple;
http://developer.apple.com/audio/audiounits.htmlAn Audio Unit is a software component that manipulates audio data. It may generate, modify, amplify, or perform other processing on an audio data stream.
45

Structurally, an Audio Unit is a software component containing several well-defined entry points or functions, similar to a library. These entry points may be called by applications or by other components. Using Xcode, you build an Audio Unit as a bundle. That bundle gets loaded by the Component Manager and made available to all Audio Unit -aware applications.
An Audio Unit may be used singly or in combination with other Audio Units as part of an audio signal graph. The output of one Audio Unit may form the input to another Audio Unit. The data stream comprising the signal moves from one Audio Unit to the next, with each manipulating the stream by applying an internal algorithm.
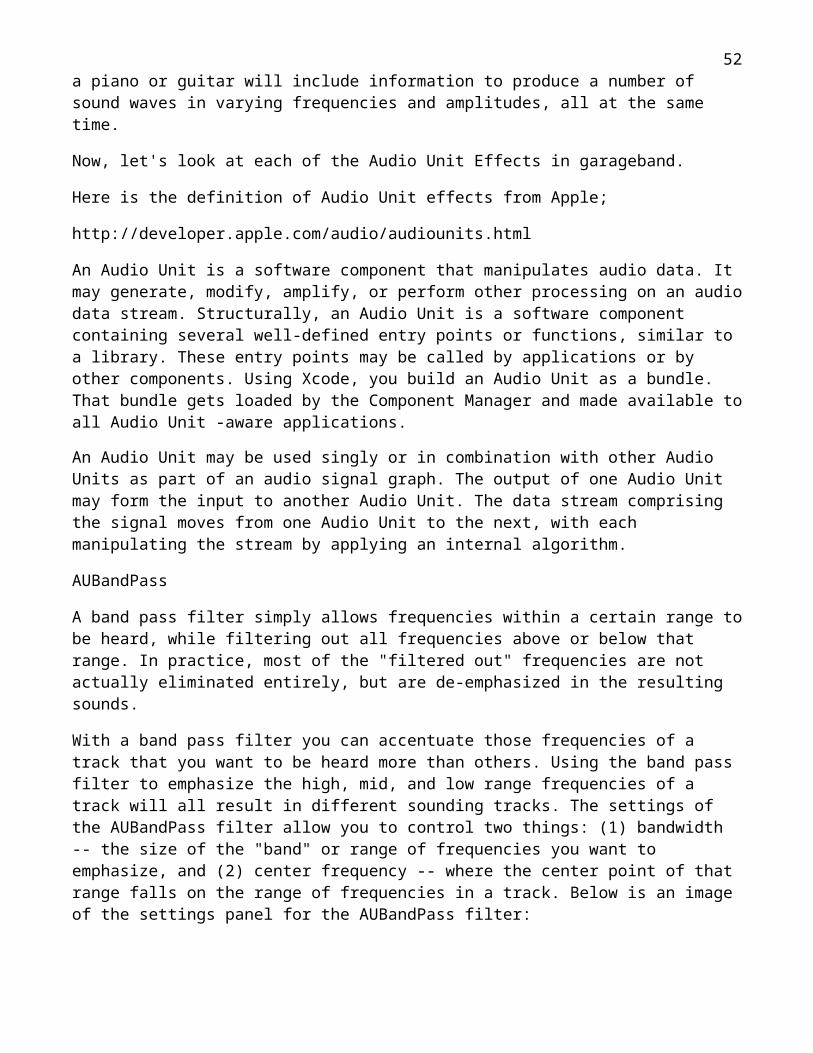
AUBandPass
A band pass filter simply allows frequencies within a certain range to be heard, while filtering out all frequencies above or below that range. In practice, most of the "filtered out" frequencies are not actually eliminated entirely, but are de-emphasized in the resulting sounds.
With a band pass filter you can accentuate those frequencies of a track that you want to be heard more than others. Using the band pass filter to emphasize the high, mid, and low range frequencies of a track will all result in different sounding tracks. The settings of the AUBandPass filter allow you to control two things: (1) bandwidth -- the size of the "band" or range of frequencies you want to emphasize, and (2) center frequency -- where the center point of that range falls on the range of frequencies in a track. Below is an image of the settings panel for the AUBandPass filter:
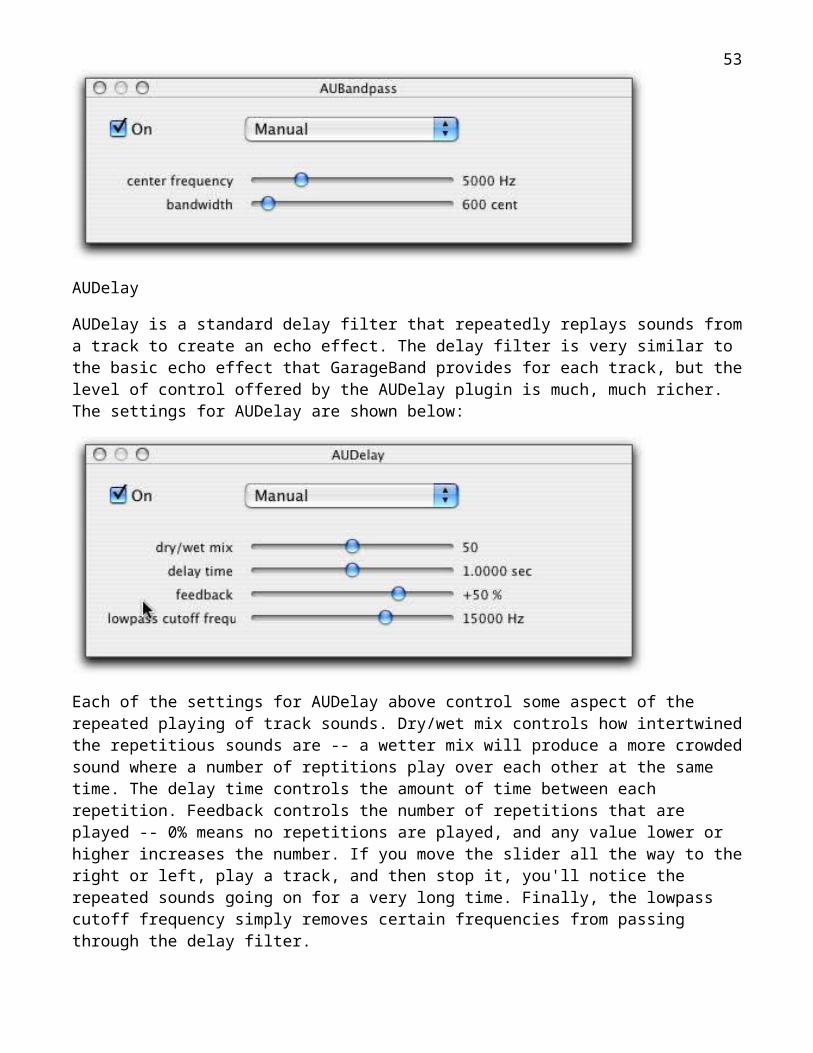
AUDelay
AUDelay is a standard delay filter that repeatedly replays sounds from a track to create an echo effect. The delay filter is very similar to the basic echo effect that GarageBand provides for each track, but the level of control offered by the AUDelay plugin is much, much richer. The settings for AUDelay are shown below:
46
Each of the settings for AUDelay above control some aspect of the repeated playing of track sounds. Dry/wet mix controls how intertwined the repetitious sounds are -- a wetter mix will produce a more crowded sound where a number of reptitions play over each other at the same time. The delay time controls the amount of time between each repetition. Feedback controls the number of repetitions that are played -- 0% means no repetitions are played, and any value lower or higher increases the number. If you move the slider all the way to the right or left, play a track, and then stop it, you'll notice the repeated sounds going on for a very long time. Finally, the lowpass cutoff frequency simply removes certain frequencies from passing through the delay filter.
AUHiPass
The Hi Pass filter, and several other filters we'll see, are really just filters that work very similarly to Band Pass, but are directed to a certain frequency band rather than allowing the users to select any part of the frequency spectrum for manipulation.
The Hi Pass filter reduces the emphasis of lower frequency sounds, allowing higher frequency sounds to pass through. You would use this filter if you wanted to get rid of low-frequency sounds in a track, for example if you were recording vocals in a room where there is a low rumble throughout the mix (e.g., if there is air conditioning or some other noisy interference occuring). The settings for Hi Pass allow you to determine where the cutoff occurs:
47
AUHighShelfFilter
The high shelf filter cuts off high end frequencies and allows lower frequencies to pass through. You can set the "gain" or sound boost that is given to the low frequency sounds that pass through the filter. The settings for this filter are shown below:
AUPeakLimiter
The peak limiter is a filter that modifies sounds where the amplitude is comparatively high -- when there are spikes in the loudness of the track. This is helpful if you are concerned about various instruments being so loud that they will cause interference in sound output devices like speakers, amplifiers, and the like. The settings for the peak limiter are shown below:
48
The attack and release time indicate how quickly the filter modifies a peak level and how quickly that modification comes to an end. When we say "modify," what we really mean is that the amplitude of the signal is lowered so the sound is quieter. Thus, a larger attack time means a longer period of time is used to lower the volume of the peaking signal, and a higher release time means that a longer time is taken for the track to resume its normal amplitude or volume level. The limiting amount refers to how much the amplitude is decreased when a peak happens.
One final note on the peak limiter is that this filter is not simply lowering your track volume when there is a period of high volume. Remember that a given track is actually producing sound in a wide range of frequencies. When ONE of those frequencies peaks, then that soundwave in particular is limited, and not the rest of the frequencies. What this results in is a sound that does not seem like an entire track has been lowered in volume. In this way, you can boost the overall volume level of a track without worrying about spikes in certain frequencies causing harmful distortion to your output devices. This is quite useful if you have something like a live microphone or instrument recording that has erratic volume levels and must be "cranked" in order to sound acceptable during most of the track, but at times is very, very loud.
AULowpass
The low pass filter is the exact opposit of the hi pass Hi Pass filter from above. The low pass filter reduces the emphasis of high end frequency while allowing low end frequencies to remain untouched. Just like the high pass filter, the low pass filter can be used to weed out unwanted sounds at the relevant end of the spectrum. While the hi pass filter was used to weed out low, rumbling sounds, the low pass filter would be used to weed out high pitched annoyances like hiss, whine, or machine noise. The controls for the low pass filter are the same as for the hi pass, and look like this:
49
AULowShelfFilter As above, the low shelf filter is the mirror image of the high shelf filter. It will cut off the low end of the frequency range and allow high-end frequencies to pass through. The gain setting allows you to control the level of boost added to the high range frequencies. Note that this filter is very similar in effect to the AUHiPass filter from above. The controls for the low shelf filter look like this:
AUMultibandCompressor
The multiband compressor is a very powerful and complex tool. Audio compressors serve the purpose of reducing the dynamic range of an audio signal so that both the low and high amplitude sound waves are "compressed" closser to a particular ideal level somewhere in between. The AUMultibandCompressor allows you to select the compression settings for multiple bands of frequencies, rather than just one. However, if you've taken a look at the settings panel for GarageBand's multiband compressor, you're likely to feel in over your head. In that case, you might want to stick to Apple's simplified compressor effects, which are available from the main settings window for any track within GarageBand. Another option would be to use one of the factory presets for the AUMultibandCompressor, which are shown in the AUMultibandCompressor settings below:
50
Of course, if you've used a hardware audio compressor or are otherwise inclined to play with the many options for GarageBand's Audio Unit compressor, then you should feel free to play with the options above. Some of the controls common to most audio compressors are: (1) Attack and Release: the quickness with which the compressor takes effect on sufficiently low or high amplitude signals, and correspondingly, the quickness with which the compressor's effects dissipate (2) Threshold: the range above or below which the compressor begins to kick in, and (3) Amount: the amount of compression or signal adjustment that is applied when the singal moves beyond the threshold.
AUMatrixReverb
51
Once again, this Audio Unit plugin is somewhat repetitive of functionality that GarageBand makes available elsewhere in a simpler format. Of course, if you were happy with what is easily made available in the way of filters and effects, you probably wouldn't be reading this. So, we'll show you how to take GarageBand's reverb effects outside the box.
The matrix reverb plugin provides a healthy amount of custom control over the reverb effects used on a track. Due to a lack of documentation, most of our knowledge of the matrix reverb plugin comes from experimentation. Without describing what each of the various settings can do for your reverb mix, suffice it to say that a healthy number of different reverb qualities can be obtained by adjusting the settings until you find your desired effect. Generally speaking, the higher each setting level is made, the longer or more pronounced your reverb effect will be. We were able to get some very large-hall sounding reverb by playing around a bit, and you can likely easily find what you're looking for as well. The control panel for matrix reverb looks like the following:
One tip for experimenting with this or any other Audio Unit plugin: GarageBand very conveniently allows you to preview the effect of your settings changes in real time. Thus, if you play your instrument right after (or even while) making a change, you'll be able to detect the effect of that change in your subsequent playing. This makes toying around with various settings quite productive when
52
searching for a particular sound without knowing quite what settings you should change.
AUParametricEQ
The final built-in Audio Unit Effect that comes with GarageBand is the parametric EQ. This fairly boring effect is actually not very interesting. Simply put, the parametric EQ allows you to boost or decrease the amplitude of a signal within a certain frequency range. This is not particularly exciting since GarageBand gives you a full spectrum EQ elsewhere in the program. The settings for the parametric EQ are shown below:
More help
http://gretnatraining.wikispaces.com/Garageband
53