garden koi pond with bio-filtration system · 2 introduction the following report details the...
TRANSCRIPT

Garden Koi Pond With Bio-filtration System

1
Garden Koi Pond With Bio-filtration System
By Brock Dolman and Kate Lundquist
Photographs by Brock Dolman and Jim Coleman
TABLE OF CONTENTS Introduction 1 Installation Process 2 Garden Koi Pond Cross Section 16 Plant & Vertebrate/Invertebrate List 17 Resources 18
ACKNOWLEDGEMENTS:
We would like to thank the Dean Witter Foundation and the Panta Rhea Foundation for their generous support of our work. OAEC’s WATER Institute was established to offer positive responses to the crisis of increasingly degraded water quality and diminishing water quantity. We promote a holistic and multidisciplinary understanding of healthy watersheds through our four interrelated program areas — Watershed Advocacy, Training, Education, and Research. For more information please visit www.oaecwater.org. The Occidental Arts and Ecology Center (OAEC) is a nonprofit education and organizing center and organic farm in Northern California’s Sonoma County. Since 1994 OAEC has explored, educated about and implemented innovative and practical approaches to the pressing environmental and economic challenges of our day. For more information please visit www.oaec.org. Copyright © 2007 Occidental Arts and Ecology Center WATER Institute

2
INTRODUCTION The following report details the design and construction of a garden scale koi pond that utilizes a bio-filter to maintain water clarity. It was built at The Occidental Arts and Ecology Center during our two-week Permaculture Design course in March of 2007. This project was conceived of with several goals in mind:
• To create a beautiful water feature • To enhance the soundscape with the sounds of water in motion • To create a habitat feature and attract a diverse array of species • To demonstrate a user-friendly design that utilizes solar photovoltaic panels to
power a bio-filtration system that greatly enhances water quality • To provide a hands-on learning opportunity for students of our Permaculture
Design course This bio-filter emulates the ecological process that occurs between bodies of water and their associated wetlands. Inspired by Gaia and the work of John and Nancy Todd, Michael Ogden and Michael Littlewood, this design utilizes biological processes to ensure the optimal water quality level to support life. The lava rock in this filter design plays an important role in maintaining the water quality of this system. It provides a large amount of surface area to volume upon which the nitrogen destroying organisms can grow. These organisms are denitrifying the fish wastes that would otherwise build up in toxic concentrations and make this pond uninhabitable to them. This system takes advantage of this by-product and turns “waste into food” for the nitrogen loving aquatic plants and other associated microorganisms. This eliminates the need to use a wide array of chemical inputs commonly associated with maintaining water quality in small garden ponds. This design is unique in that the bio-filter is placed at the same elevation and immediately adjacent to the pond itself. This unifies the system visually and mechanically. It requires fewer materials overall to build and greatly increases the biological performance and overall aesthetic beauty.

3
INSTALLATION PROCESS
Pond Site Before Installation This site was chosen for a variety of reasons: • Its relative location to the WATER Institute office - in Permaculture terms this
location falls within zone 1, meaning it is close enough to the office to easily interact with and enjoy on a daily basis.
• It adds to the ambience of the adjacent outdoor meeting area and indoor office spaces (the yurt walls allow the beautiful sounds of water moving to pass through easily).
• It is sited next to a frequently traveled footpath, which ensures that more people will get to enjoy and learn from this pond.
• It is a new building site that is in need of beautification.

4
Laying Out the Shape of the Pond Here we see the Permaculture students laying out the perimeter of the pond with a rope. This rope will act as a guide as they begin excavating the hole for the pond. The shape is determined by the designer’s aesthetics and the physical constraints of the space. In this case, the width has been determined by the amount of space available between the yurt on the left and the garden path to the right and leaves enough area for the plants to grow along the outside edges.

5
Digging The Pond Here the shape is starting to take form. The rope has been taken away and the irrigation flags help maintain a visual reminder of the shape we are trying to achieve. It is helpful to plan in advance what the excavated materials are going to be used for and therefore where they should be placed. In this case, we decided to use the soil to build an herb spiral on the other side of the yurt to the right of the entrance. This soil could also be used to build an outdoor earthen garden feature such as a cob bench, sculpture or oven.

6
Contouring The Pond The final shape is being formed. Note the depth of the center area of the pond where this gentleman is standing. This ensures that there will be enough volume to help keep the water temperature cool and provide refuge to the fish from predators such as raccoons and blue herons. The stepped sides will eventually support a wide array of potted water-loving plants. Note the rectangular shaped hole at the bottom of the photo. This is where the bio-filter will go.

7
Drilling Holes in the Bucket This is the bucket that will be used to house an important piece of the bio-filter - the submersible pump. The top of the bucket will get notched on one side to allow the electrical and water lines to pass through. There will be a removable lid left on top to allow for easy access. The holes being drilled are roughly a ½ inch in diameter – large enough to allow water to easily pass through and small enough to keep the lava rock out of this pump cavity. This pond is designed to use a solar photovoltaic powered DC pump. This means that it will only run when the sun is shining. It works equally well with an AC pump.

8
Installing the Pond Liner This pond liner is made of a thick, yet flexible material called EPDM. Penny is pushing it into place with her feet (shoes off to avoid puncturing). Before placing the liner, some left over floating floor underlayment was laid down on the soil to reduce the possibility of punctures to the liner. One can use old carpet or cardboard as well. Note the stacked cinder blocks in the lower right of the photo. These will be pulled out and placed on top of the liner and act as supports for the three flow forms that will sit on top of them. Having the liner under this feature will ensure that any spillover or leakage from the flow forms will drain back into the pond. The spaces between the cinder blocks will be back filled with lava rock and plants in potting tubes will be planted into this medium to take advantage of this extra source of moisture and provide additional bio-filtration.

9
Pushing the Liner Into the Crevices The liner is being carefully pressed into the contours of the pond and adjacent bio-filter cavities. Notice the drilled white bucket in the lower left being placed in its final location as part of the bio-filter. The conceptual drawing in the top of the photo illustrates the cross section of the pond.
10
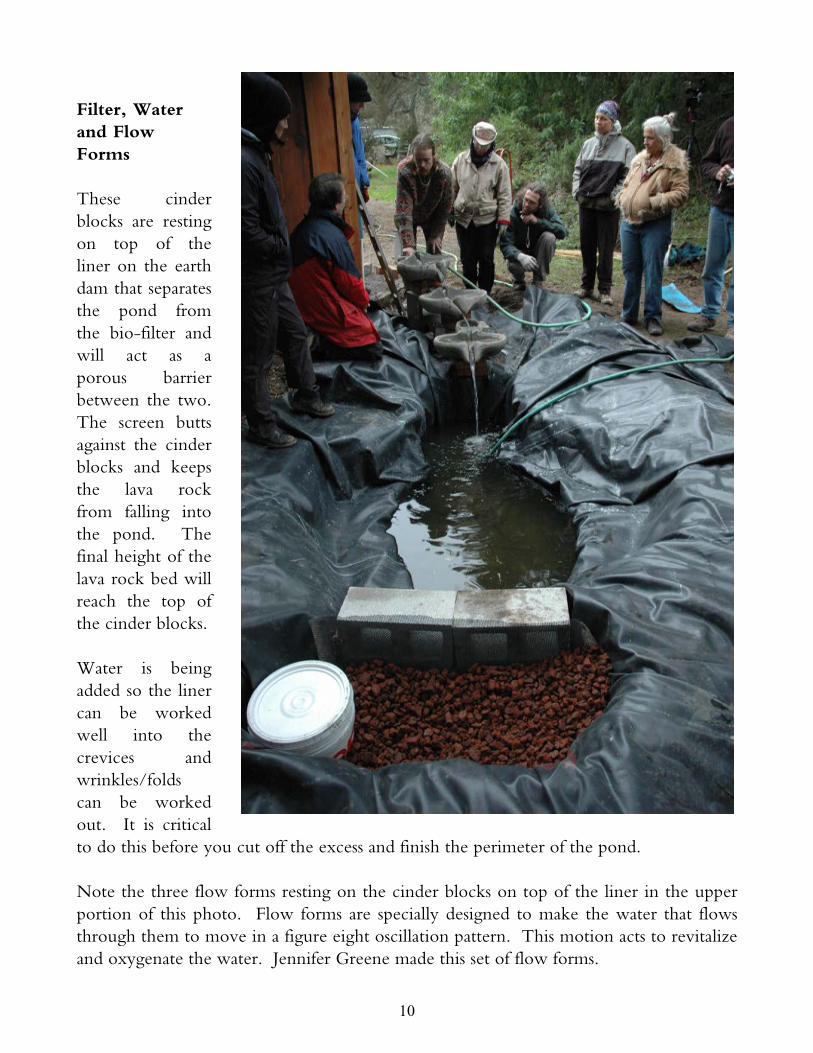
Filter, Water and Flow Forms These cinder blocks are resting on top of the liner on the earth dam that separates the pond from the bio-filter and will act as a porous barrier between the two. The screen butts against the cinder blocks and keeps the lava rock from falling into the pond. The final height of the lava rock bed will reach the top of the cinder blocks. Water is being added so the liner can be worked well into the crevices and wrinkles/folds can be worked out. It is critical to do this before you cut off the excess and finish the perimeter of the pond. Note the three flow forms resting on the cinder blocks on top of the liner in the upper portion of this photo. Flow forms are specially designed to make the water that flows through them to move in a figure eight oscillation pattern. This motion acts to revitalize and oxygenate the water. Jennifer Greene made this set of flow forms.

11
Pond Nears Completion The pond has been completely filled with water, excess liner trimmed and rocks put into place. The water has gotten quite cloudy from the sediment liberated in the construction process. We have decided to drain the pond and replenish it with fresh water. In the meantime the rocks are being given a final rinse to remove any remaining sediment. Note how form fitted the liner is now that it has been filled with water.

12
Placing The Plants The potted wetland plants (see plant list at end) are being placed into the bio-filter and will have lava rock back-filled around them up to the height of the tops of the pots. The pots contain a mixture of soil and lava rock. The bio-filter will then be inoculated with biologically active soil and mud samples taken from various local ponds and wetlands. This will encourage the growth of a diverse array of microorganisms that will do the critical and unseen work of this living filter.

13
Refilling The Pond With Fresh Water Notice the inlet to the bio-filter through the four holes in the cinder blocks. Water is being pulled through by the submerged pump in the bucket and re-circulated into the top of the flow forms in the foreground. The two cinder blocks in the center of the pond have been placed on their sides at different heights and will provide support for more potted plants and offer cover and protection to the fish.

14
A Finished Pond The pond is settling in nicely a couple of months after installation. The perimeter has been planted out and the edge of the liner can no longer be seen. The plants in the bio-filter are starting to fill in the space making it difficult to tell that there is a filter there at all.

15
The Flow Forms At Work The water is swishing through from side to side and bubbles are resulting from this action. Notice the clear water and the happy fish.

16
five
gal
lon
bu
ck
et
aqu
atic
wet
lan
d
plan
ts
elec
tric
w
ater
pu
mp
bio
filt
er
scr
een
ed c
ind
er
blo
ck
fil
ter
lava
ro
ck
bubb
ler
pon
d l
iner
flo
w f
or
m
Gar
den
Ko
i Po
nd
Wit
h B
io-f
iltr
atio
n
Syst
em C
ro
ss-S
ecti
on
ko
i po
nd
Illus
trat
ion
by Ji
m C
olem
an, O
AEC

17
Plant List Alisma plantago-aquatica Anemopsis californica Colocasia esculenta * Darmera peltata Iris pseudacorus * Juncus effusus Juncus xiphioides Lobelia cardinalis * B Mimulus cardinalis B Mimulus gutatus Nymphaea (sp.) * Sarracenia leucophylla B Sarracenia purpurea B * = Non-native species B = Plants used in the bio-filter
Vertebrates/Invertebrates Raccoon Humming Bird Stellar Jay California Towhee Goldfish Koi Mosquito Fish Bullfrog Tree Frog Rams Horn Snail Pond Snail Dragon Fly Damsel Fly Whirligig Beetle Water Strider Mud Dabber Wasp Yellow Jacket European Honey Bee

18
RESOURCES: Constructed Wetlands in the Sustainable Landscape by Craig S. Campbell and Michael Ogden. Published in 1999 by John Wiley & Sons Inc. From Eco-Cities to Living Machines: Principles of Ecological Design by Nancy Jack Todd & John Todd. Published in 1994 by North Atlantic Books. Natural Swimming Pools: Inspiration for Harmony with Nature by Michael Littlewood. Published in 2005 by Schiffer Publishing Ltd. www.restorativetechnologies.org - Find flow forms under “Products” www.flow-forms.com - Another great site for flow forms