gateway control software rs-rp2c - icom uk
TRANSCRIPT

GATEWAY CONTROL SOFTWARE
rs-rp2cSet Up Instructions

i
IMPORTANT
Icom, Icom Inc. and the logo are registered trademarksof Icom Incorporated (Japan) in the United States, the UnitedKingdom, Germany, France, Spain, Russia and/or othercountries.Linux is a registered trademark of Mr. Linus Torvalds in theUnited States and/or other countries.Other brands and model name are registered trademark(s)or trademark(s) of the respective holders.
TABLE OF CONTENTS
IMPORTANT ............................................................. iTABLE OF CONTENTS ............................................ i
1 PREPARATION .............................................. 1–2� System requirements ................................................ 1D PC ......................................................................... 1D Internet line ............................................................ 1D Fixed IP address ................................................... 1D Router .................................................................... 1
� Linux® down loading .................................................. 1D Down loading the OS ............................................ 1D Recording the CD .................................................. 1
� Linux® OS installation ................................................ 2� DNS name server installation ................................... 2
2 SYSTEM SETUP ........................................... 3–11� Gateway server connections .................................... 3D Connecting to the ID-RP1 system ......................... 3D Connecting to the ID-RP2 system ......................... 3
� Router settings .......................................................... 4D IP address setting .................................................. 4D Port forwarding setting .......................................... 4
� Server settings .......................................................... 4D LAN card settings .................................................. 4D Named setting ....................................................... 5D DNS function verification ....................................... 6
� Gateway control software ......................................... 6D Installation ............................................................. 6D Syslog setting ........................................................ 6D Starting up the control software ............................. 6D Data base directory ............................................... 7
� System setup ............................................................ 7D Setup example ...................................................... 7
� Control software settings .......................................... 8D dsgwd.conf screen description .............................. 8D dsipsvd.conf screen description ............................ 9
� IP server operation ...................................................10D Command operation ............................................ 10D Local IP address reservation ............................... 11D Station registration ............................................... 11D Station data synchronization ............................... 11D Data output .......................................................... 11D Deleting a station registration .............................. 12D Backup file ........................................................... 12D Data base maintenance ...................................... 12
3 SOFTWARE UNINSTALLATION ...................... 13� Uninstallation .......................................................... 13
READ THIS INSTRUCTION MANUALCAREFULLY before attempting to operate the re-peater.
SAVE THIS INSTRUCTION MANUAL. Thismanual contains important safety and operating in-structions for the RS-RP2C.

1
1
PREPARATION
� System requirements The following units and/or environments are requiredto build D-STAR gateway server.
DD PC•OS : Linux® (updated)
Compatible distribution:Fedora Core 2 or RedHat® Linux® 9
Compatible software versionLinux® Kernel 2.4.20 or laterglibc 2.3.2 or laterBIND 9.2.1 or later
•CPU : Pentium® grade 2.4 GHz or faster•Memory : At least 512 MB•LAN board : 2 (NIC from Intel® is recommended)•HDD : At least 10 GB of free space (incl. OS
installation)
DD Internet line•Line speed : 750 kbps or more (recommended effec-
tive speed*) for both uplink/downlink*Ask the ISP for effective speed.
DD Fixed IP address•Apply to the ISP to acquire a fixed global IP address.
DD RouterFollowing functions are required for the router.•Remote access function (the port forward, DMZ etc.)•Capability of setting a fixed IP address, such asPPPoE for WAN
•NAT/IP masquerade•Static IP masquerade/DMZ• IP filtering function•DNS answering function•Static DHCP server setting for LAN•Class A subnet mask (255.0.0.0) can be set for LAN(For your information: The router, WRV54G fromLINKSYS, covers all the requirements as above.)
*Ask the ISP for recommended router model.
DD Down loading the OSDown load the Linux® OS ISO images from the ap-propriate distributor’s site.See p. 2 for the address.
DD Recording the CDRecords the down loaded ISO image into the CD.The ISO image is the same format as the recorded ina CD. When this ISO image is recorded in CD as afile, OS cannot be installed with the CD.
NOTE: See the instruction manual of the CD writ-ing software about a detailed operation, the ISOimage recording procedures, etc.
� Linux® down loadingNOTE: If you have Linux OS CD (specified distribu-tion and software version), skip this instruction andrefer to “�Linux® OS installation” (p. 2).
The following hardware and software are required forLinux® OS down loading.
•Another PCThe PC must be connected to internet.
•CD-R drive•CD writing software
The software have capability to burninga CD with an ISO image.
2
1 PREPARATION
✔For your information (*The following addresses may delete or change without notice.)•Fedora Core 2
http://fedoraproject.org/http://fedora.redhat.com/
•RedHat® Linux® 9-OS down load sitehttp://ftp.redhat.com/pub/redhat/linux/9/en/iso/i386/
- ISO images necessaryshrike-i386-disc1.iso, shrike-i386-disc2.iso, shrike-i386-disc3.iso
- Installation descriptionhttp://www.redhat.com/docs/manuals/linux/RHL-9-Manual
•Fedora Legacy Projecthttp://www.fedoralegacy.org/
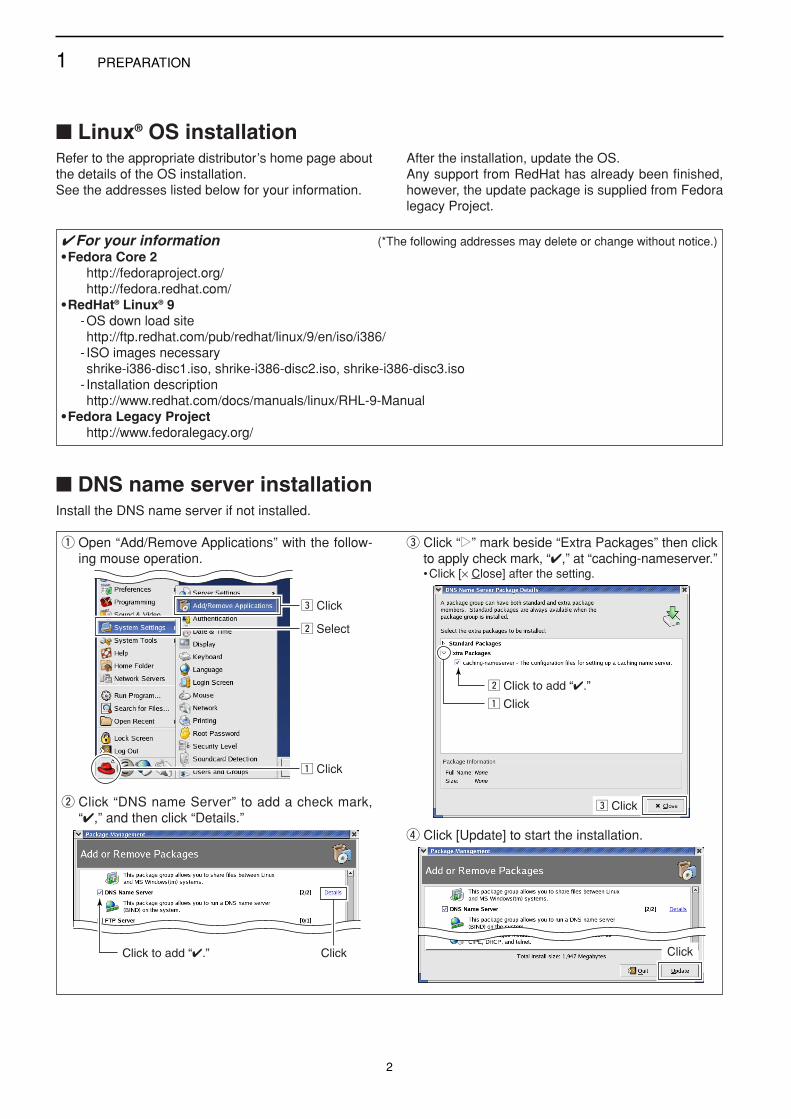
� Linux® OS installationRefer to the appropriate distributor’s home page aboutthe details of the OS installation. See the addresses listed below for your information.
After the installation, update the OS.Any support from RedHat has already been finished,however, the update package is supplied from Fedoralegacy Project.
� DNS name server installationInstall the DNS name server if not installed.
q Open “Add/Remove Applications” with the follow-ing mouse operation.
w Click “DNS name Server” to add a check mark,“✔,” and then click “Details.”
e Click “≈≈” mark beside “Extra Packages” then clickto apply check mark, “✔,” at “caching-nameserver.”•Click [× Close] after the setting.
r Click [Update] to start the installation.
Click
z Click
x Click to add “✔.”
c Click
Click to add “✔.” Click
z Click
x Select
c Click
2
3
SYSTEM SETUP
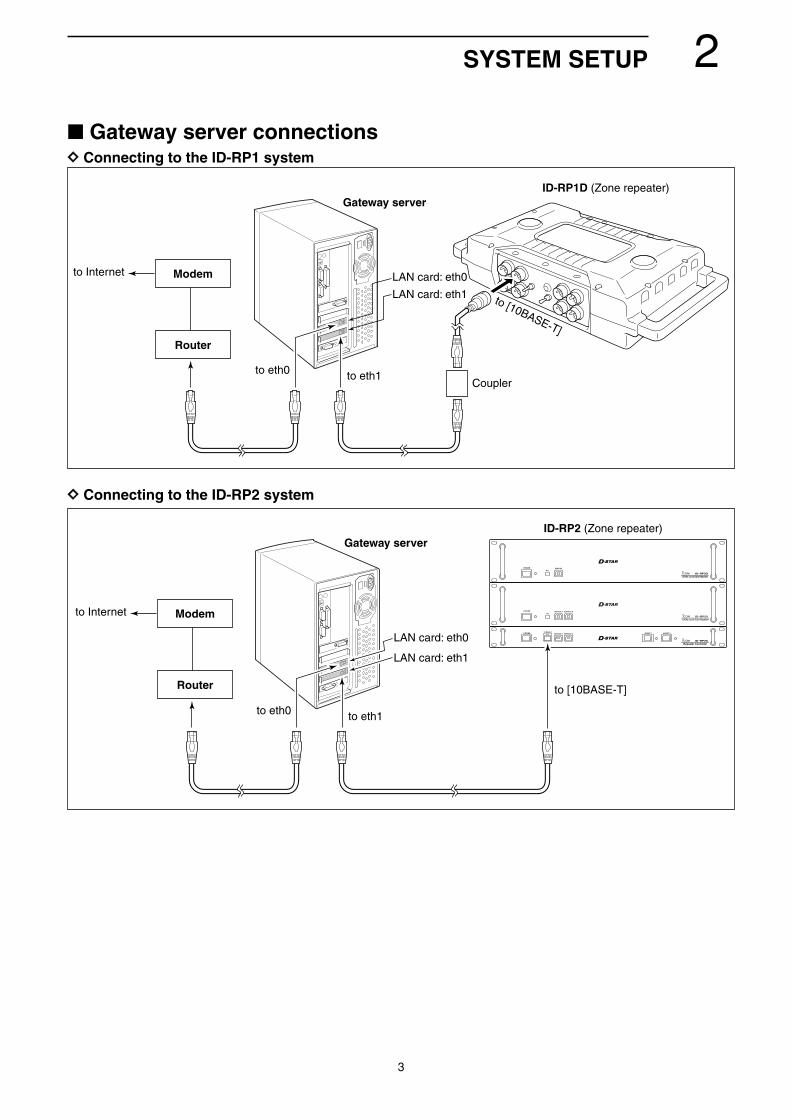
� Gateway server connectionsDD Connecting to the ID-RP1 system
DD Connecting to the ID-RP2 system
to [10BASE-T]
to eth1Coupler
to eth0
LAN card: eth1
LAN card: eth0
Gateway serverID-RP1D (Zone repeater)
to Internet
Router
Modem
to [10BASE-T]
to eth1to eth0
LAN card: eth1
LAN card: eth0
Gateway serverID-RP2 (Zone repeater)
to Internet
Router
Modem
4
2 SYSTEM SETUP
� Router settingsDD IP address settingSet the specified IP addresses for both WAN and LANas follows.
IP address (WAN) : Enter the fixed global IP addressthat is specified from the ISP.
IP address (LAN) : 10.0.0.1
NOTE: The same IP address (for LAN; 10.0.0.1) is usedfor all gateways. NEVER use other private IP address.
DD Port forwarding settingSet the following port number with protocol to transfer-ring to the IP address “10.0.0.2.”
NOTE: IP filter must be set to allowing Internet re-mote access to local IP address “10.0.0.2.”Otherwise the D-STAR gateway will not work due tothe firewall.
Port No. Usage File location/Protocol
20005/TCP IP server synchro- PORT_SYNCnization (/etc/dsipsvd.conf)
40000/UDP Voice transfer GW_VCPORT(/etc/dsgwd.conf)
40001/TCP Data transfer GW_DTPORT(/etc/dsgwd.conf)
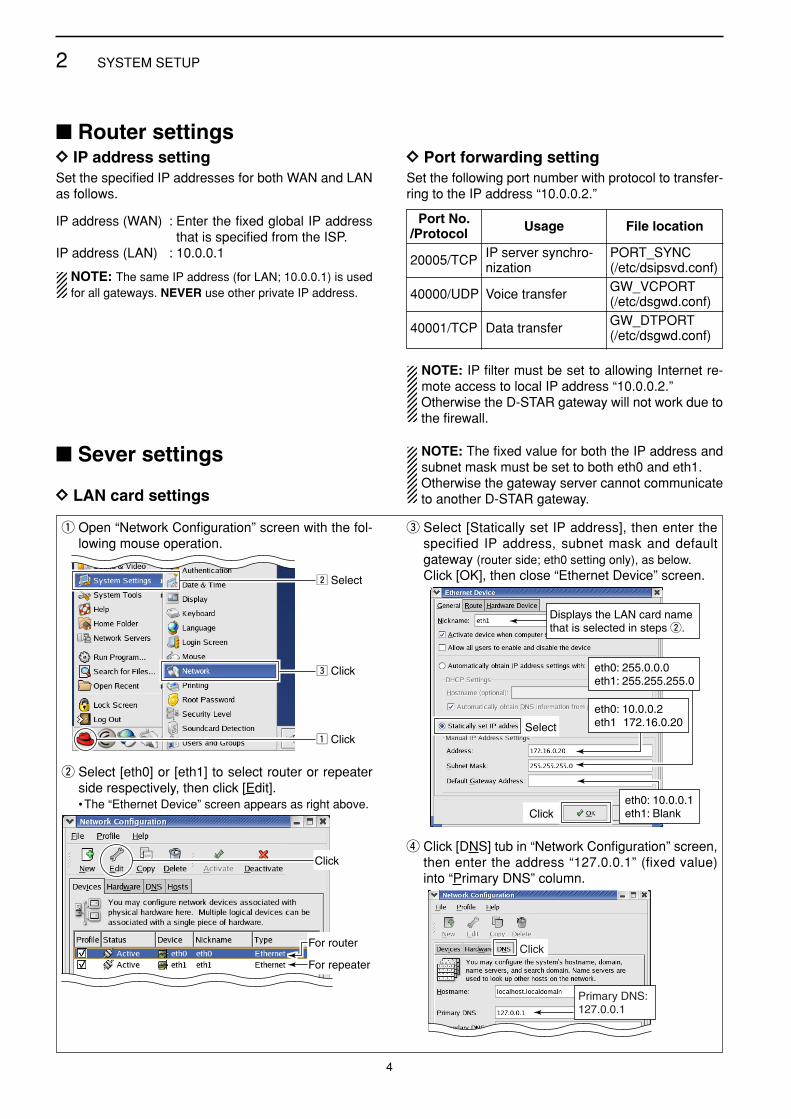
� Sever settings
DD LAN card settings
NOTE: The fixed value for both the IP address andsubnet mask must be set to both eth0 and eth1.Otherwise the gateway server cannot communicateto another D-STAR gateway.
q Open “Network Configuration” screen with the fol-lowing mouse operation.
w Select [eth0] or [eth1] to select router or repeaterside respectively, then click [Edit].•The “Ethernet Device” screen appears as right above.
e Select [Statically set IP address], then enter thespecified IP address, subnet mask and defaultgateway (router side; eth0 setting only), as below.Click [OK], then close “Ethernet Device” screen.
r Click [DNS] tub in “Network Configuration” screen,then enter the address “127.0.0.1” (fixed value)into “Primary DNS” column.
Click
Primary DNS: 127.0.0.1
Click
Select
eth0: 10.0.0.2eth1: 172.16.0.20
eth0: 255.0.0.0eth1: 255.255.255.0
eth0: 10.0.0.1eth1: Blank
Displays the LAN card namethat is selected in steps w.
For router
Click
For repeater
z Click
c Click
x Select

5
2SYSTEM SETUP
DD Named settingIMPORTANT!: Master the basis of BIND with a ref-erence book of Linux, before starting the namedsetting.
q Add local zone setting file (dstar.local.) to“/etc/named.conf.”
•e.g.; /etc/named.conf
w Create database, /var/named/dstar.local.db, forlocal D-STAR as the following example.
NOTE: A full-stop period must be applied into2nd, 3rd and 10th lines. And set the separatoras below at the end of the line.;##DSTAR A RECORD
•e.g.; /var/named/dstar.local.db
✔ For your informationWhen “Fedora Core 2” is used, the database locationis “/var/named/chroot/var/named/dstar.local.db.”
e Open “Service Configuration” screen with the fol-lowing mouse operation.
r Click the check box beside “named,” then save thechanged setting if no check mark, “✔,” is added.
t Select “named” item, then click [Restart] to restartthe named setting.
z Select
x Click
z Click to add check mark, “✔.”
x Click
c Click to save
z Click
v Click
c Select
x Select
Full stop period
Full stop period
Separator
Full stop period
Add

6
2 SYSTEM SETUP
DD DNS function verificationq Start up “Terminal” with the following mouse oper-
ation.
w The local DNS operation can be verified by enter-ing the following command.# dig router.dstar.local
e When the correct router IP address “10.0.0.1” isdisplayed in the answer section as below, the GWsetup is succeeded.
Router IP address
Enter the command
z Click
c Click
x Select
For your convenience:Set the syslog if desired. By setting the syslog, easy log management is pro-vided because of the independent log.
➥Add the following contents in “etc/syslog.conf.”# for D-STARlocal0.* /var/log/dsgwd.loglocal2.* /var/log/dsipsvd.log
DD Syslog setting
� Gateway control software DD Installation
q Insert the RS-RP2C CD into the drive.w Expands the file into the “/dstar” directory using
with the following command, or double-click the fileduring the CD content is displayed.Command: # tar zxvf dstar-xxxx.tar.gz
(XXXX=revision number)
e Copy the both “dsgwd.conf” and “dsipsvd.conf”files, expanded in the “/dstar/conf” directory, intothe “/etc” directory.
r Open the copied files, then edit the contents tosuits the network.•See page 8 and 9 for details.
DD Starting up the control softwareExecute “script /dstar/exec-mgsv” when starting upthe gateway control software.
When starting up the control software and the systemat the same time, add the command as above in the“/etc/rc.d/rc.local.”
And we recommend to set the server condition as de-scribed at right above to improve the gateway serverperformance.
•Deactivate all the services except belowanacron, apmd, atd, crond, keytable, named, network, ntpd, random, sshd, syslog, xinetd
•Do not start up the X-Window System whenstarting up the gateway server
Change the “Default runlevel” in “/etc/inittab” from5 to 3.*The X-Window System start up manually with the“startx” command.

7
2SYSTEM SETUP
Make the directory for data base backup in the “/var.”“/var/dsipsvd” is specified as the default setting.•Refer to y BACKUPDIR_PATH (p. 9)
DD Data base directory
� System setupDD Setup example
InternetInternet Modem Router
Gateway serverIP addressv eth0 (for router) : 10.0.0.2b eth1 (for repeater) : 172.16.0.20
Zone repeatern IP address: 172.16.0.1
Gateway server(TRUST SERVER)
Port No.400004000120005
Voice ReceiveData ReceiveData sync.
ProtocolUDPTCPTCP
RouterIP addressx LAN: 10.0.0.1c WAN:The fixed IP address
specified by the ISP
ID-RP2
ID-RP1
z

8
2 SYSTEM SETUP
� Control software settingsDD dsgwd.conf screen description
— Zone Repeater’s Information —q ZR_ADDR
Sets the zone repeater’s IP address (the IP addressn in DSetup Example).
The same IP address that is programmed in “IP” (forthe ID-RP1D maintenance) or “IP Address” (for the util-ity for ID-RP2C) cell in “Communication Settings”should be set.
w ZR_CALLSIGNSets the zone repeater’s call sign.
The same call sign that is programmed in “Callsign”cell in “General” of the ID-RP1D maintenance or theutility for ID-RP2C should be set.
e ZR_PORTSets the zone repeater’s transmit/receive port num-ber (the port number n in DSetup Example).
The same port number that is programmed in “Port”cell in “Communication Settings” of the ID-RP1Dmaintenance or the utility for ID-RP2C should be set.
— DNS Server’s Information —r DNS_ADDR
Sets the zone DNS server’s IP address (the IP ad-dress c in DSetup Example).
t DNS_MACSets the zone DNS server’s MAC address (the MACaddress c in DSetup Example).
Set the MAC address of the connected router withdividing by hyphen (-).
— GW’s Information —y GW_ETHIFNAME
Sets the interface name of the LAN card (the inter-face name v in DSetup Example).
The interface name can be confirmed with the “if-config” command.
u GW_VCPORTSets the port number for voice operation (UDP).Use the default setting.
i GW_DTPORTSets the port number for data operation (TCP).Use the default setting.
o GW_ZRPORTSets the port number of the gateway server self forthe communication with the zone repeater (UDP).Use the default setting.
— IP Server’s Information —!0 MGSV_QRPORT
Sets the port number of the IP address managingserver for call sign inquiry (UDP).Use the default setting.
!1 MGSV_UDPORTSets the port number of the IP address managingserver for updated location information request(UDP).Use the default setting.
— GW connection —!2 CON_WAIT_INTERVAL
Sets the application timer.
The application timer is the waiting timer (unit: sec-ond) until the connection is succeeded when mak-ing a new connection to another gateway in datamode operation.
Use the default setting.
!3 CON_REFRESH_INTERVALSets the decide timer (unit: second) to impossible toconnect to the gateway which is failed in connectiononce in data mode operation.Use the default setting.
!4 CON_MAX_GWSets the maximum number of simultaneous con-nections to another gateway in data mode opera-tion.Use the default setting.
qw
e
rt
yu
io
!0!1
!2!3
!4

9
2SYSTEM SETUP
DD dsipsvd.conf screen description
— Communication Port Number —q PORT_SEARCH
Sets the port number of the IP address managingserver for call sign inquiry (UDP).Use the default setting.
w PORT_RENEWALSets the port number of the IP address managingserver for updated location information request(UDP).Use the default setting.
— Command In/Out Mode —e CMDMODE_STD
Sets the command processing mode.Use the default setting.
— Backup Param. —r FILE_SWEEP_HOLD
Sets the backup file preservation period (unit: sec-ond). (default: 86400 sec.)
t FILE_SWEEP_CHECKSets the backup file check interval for the file delet-ing (unit: second). (default: 3600 sec.)
y BACKUPDIR_PATHSets the directory for saving the backup file.The directory “/var/dsipsvd” is the default.
— IP Server comm. Info.—u TRUST_SERVER
Sets the IP address of the “TRUST SERVER” to ac-quire the user information in MNG, GIP and RIPtable when starting up the repeater first time.
i PORT_SYNCSets the port number for the user information inMNG, GIP and RIP table synchronization. (TCP)Use the default setting.
o SEND_RECV_TIMEOUTSets the time-out period for the user information inMNG, GIP and RIP table synchronization.Use the default setting.
— My IP Server Info. —!0 ZR_CALLSIGN
Sets the call sign of the zone repeater.
The same call sign that is programmed in“ZR_CALLSIGN” in “dsgwd.conf” file should be set.
!1 IPSV_ADDRSets the fixed IP address (global address) of the IPserver (the IP address x in D Setup example).
!2 DNS_ZONE_FILE_PATHSpecifies the DNS zone file for D-STAR.
— Named Pid File Name —!3 NAMED_PID_FILE
Sets the PID (Process ID) of the named setting.
qw
e
rt
y
ui
o
!0!1
!2
!3

10
2 SYSTEM SETUP
� IP server operationDDCommand operationSets the command input and output using with the“FIFO” (/tmp/dsipsvd-cmdin, /tmp/dsipsvd-cmdout).
q Start up 2 Terminals, Terminal-1 and Terminal-2with the following mouse operation.
w Enter the following command in the Terminal-1 tomake an output terminal of the “FIFO.”#cat /tmp/dsipsvd-cmdout
Command
z Click
c Click
x Select
•FormatMark Description
YY Space (ASCII code: 0x20)
| Vertical line (ASCII code: 0x7c)
[CS(T/A/Z)] 8-character call sign (T: Target, A: Area repeater, Z: Zone repeater)When the entered call sign does not fulfil 8-character, fill using a space. (ASCII code: 0x20)
[DB] Enter one of “GIP,” “RIP” or “MNG.” (Capital letters only)
[GWIP] Enter the global IP address of the gateway divided by full stop (.).
[TIP] Enter the local IP address of the target server divided by full stop (.).
[HNAME] Enter the target HOST name that is used for DNS. Usable characters: A-Z, a-z, 0-9, _, /, [, ], +
[FNAME] Enter the file name that is specified by the absolute path.

11
2SYSTEM SETUP
DDLocal IP address reservation
q Enter the following command in the Terminal-2.#echo “reserve”>/tmp/dsipsvd-cmdin•The command processing result outputs to Terminal-1.
w The reserved IP addresses are displayed when the“reserve” command operation is succeeded.•32 of local IP addresses are reserved in consecutivenumbers.
Reserved IP addressesCommand
DDStation registration
➥ Enter the following command in the Terminal-2.#echo“add ID1000|RPT000|RPT000|XXX.XXX.XXX.XXX|10.22.179.96|id1000”> /tmp/dsipsvd-cmdin
*XXX.XXX.XXX.XXX=global IP addressFormat:addYY[CS(T)]|[CS(A)]|[CS(Z)]|[GWIP]|[TIP]|[HNAME]•Local IP addresses must be reserved using with “re-serve” command in advance.
•The command processing result outputs to Terminal-1.
<The station registration confirmation>➥ Enter the following command in the Terminal-2.
#dig id1000.dstar.local•The registration is succeeded when the registered localIP address is displayed in answer section.
Command
Confirmed staionIP address
Command (example only)
DDStation data synchronization
➥ Enter the following command in the Terminal-2.#echo “push_mng”> /tmp/dsipsvd-cmdin•The registered station information will be registered toanother gateway’s IP server when this command is per-formed.
DDData output
➥ Enter the following command in the Terminal-2.#echo “write MNG /tmp/mng.txt”>/tmp/dsipsvd-cmdinFormat: writeYY[DB]YY[FNAME]•The functioning data in the memory is output into thespecified file.
12
2 SYSTEM SETUP
DDData base maintenance
The maintained data will be restored when the gate-way server synchronized with another gateway evenif the data has been deleted because of the IP serversare synchronized each other.Follow the maintenance instructions as at right.
q Read out the “TRUST SERVER” data with the“write” command.•Used the same format for the file name as the “Backupfile” as described above.
w Deactivate the all programs that are connected tothe gateway server.
e Evacuate the all files in the backup directory in theconnected gateway server into the desired loca-tion.
r Move the file that is read out at step q into thebackup directory.
t Edit the file using a editor application.y Start up the “TRUST_SERVER.”u Start up another gateway servers one by one to
read the “TRUST_SERVER” data.
NOTE: When starting up the server with brand-new condition, start up the server with the con-dition that the backup directory is emptied.
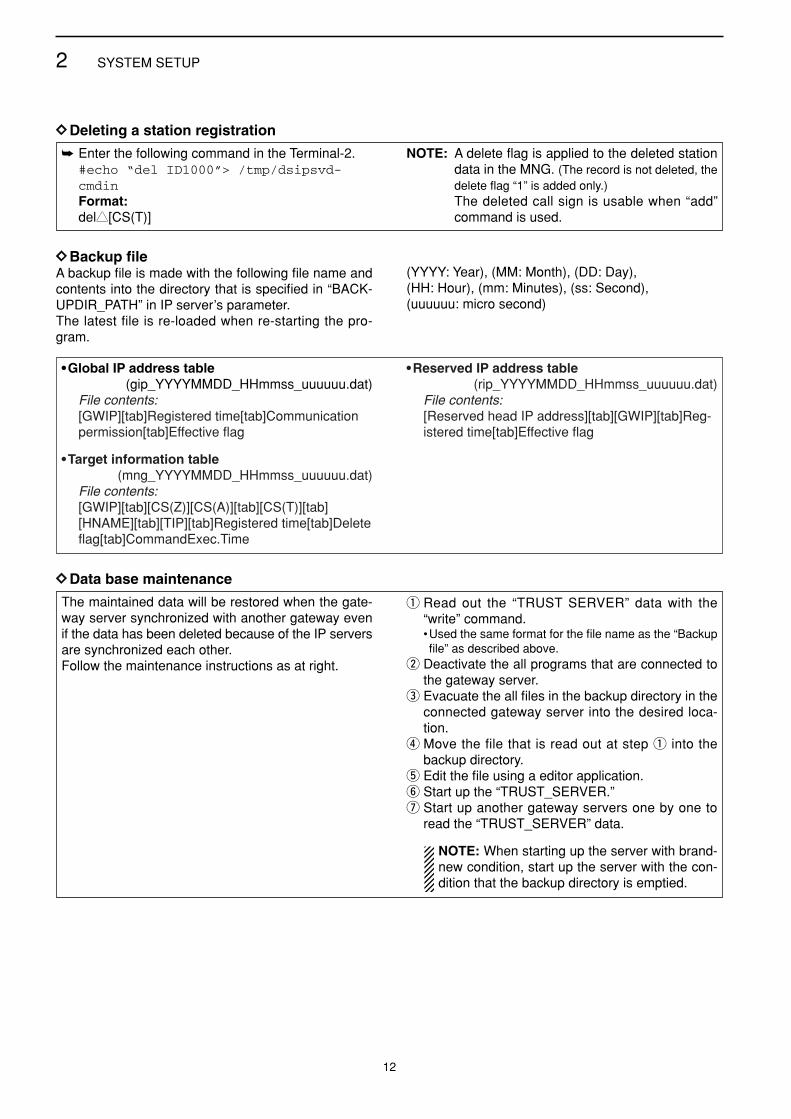
DDDeleting a station registration
➥ Enter the following command in the Terminal-2.#echo “del ID1000”> /tmp/dsipsvd-cmdinFormat: delYY[CS(T)]
NOTE: A delete flag is applied to the deleted stationdata in the MNG. (The record is not deleted, thedelete flag “1” is added only.)The deleted call sign is usable when “add”command is used.
DDBackup fileA backup file is made with the following file name andcontents into the directory that is specified in “BACK-UPDIR_PATH” in IP server’s parameter.The latest file is re-loaded when re-starting the pro-gram.
(YYYY: Year), (MM: Month), (DD: Day), (HH: Hour), (mm: Minutes), (ss: Second),(uuuuuu: micro second)
•Global IP address table(gip_YYYYMMDD_HHmmss_uuuuuu.dat)
File contents: [GWIP][tab]Registered time[tab]Communicationpermission[tab]Effective flag
•Target information table(mng_YYYYMMDD_HHmmss_uuuuuu.dat)
File contents:[GWIP][tab][CS(Z)][CS(A)][tab][CS(T)][tab][HNAME][tab][TIP][tab]Registered time[tab]Deleteflag[tab]CommandExec.Time
•Reserved IP address table(rip_YYYYMMDD_HHmmss_uuuuuu.dat)
File contents:[Reserved head IP address][tab][GWIP][tab]Reg-istered time[tab]Effective flag

3
13
SOFTWARE UNINSTALLATION
� UninstallationRefer to the following instructions when uninstalling thesoftware.
q Delete the following directories.•/dstar•/var/dsipsvd
w Delete the following files.•/etc/dsgwd.conf•/etc/dsipsvd.conf•/var/named/dstar.local.db•/var/log/dsgwd.log•/var/log/dsipsvd.log•/tmp/dsipsvd-cmdin•/tmp/dsipsvd-cmdout
e Restore the following files.•/etc/named.conf•/etc/syslog.conf•/etc/rc.d/rc.local

1-1-32 Kamiminami, Hirano-ku, Osaka 547-0003, Japan
A-6433I-1EXPrinted in Japan© 2005 Icom Inc.