general ledger job aid - cardinal project job aids...general ledger job aid sw gl332 uploading...
TRANSCRIPT
General Ledger Job Aid SW GL332 Uploading Spreadsheet Journals
1 of 10 Last updated 9/21/2015
General Ledger (GL) Spreadsheet Journals When entering journals with many lines, using the spreadsheet journal upload functionality in Cardinal can simplify the process for entering the data and saving time.
To create a Spreadsheet Journal, you first enter the journal information in an Excel macro. The user initiates the Excel macro to write the journal data to a .txt file that is then uploaded into Cardinal.
To Create a GL Spreadsheet Journal: 1 Download the two required files to your workstation from the Cardinal Project website (under
Statewide Toolbox > Forms > General Ledger): GL Journal Spreadsheet Upload Excel Template (JRNL1.xls) and GL Journal Spreadsheet Upload XLA Macro File (JRNLMCRO.xla). These two files must be saved to the same folder on your workstation. When downloading the JRNLMCRO file, make sure that it has an extension of .xla (this is different from the default extension of xls).
You can create multiple journal workbooks by saving a clean JRNL1.xls file as JRNL2.xls, etc. However, the macro sheet file name and extension, JRNLMCRO.xla, must not be changed or renamed.
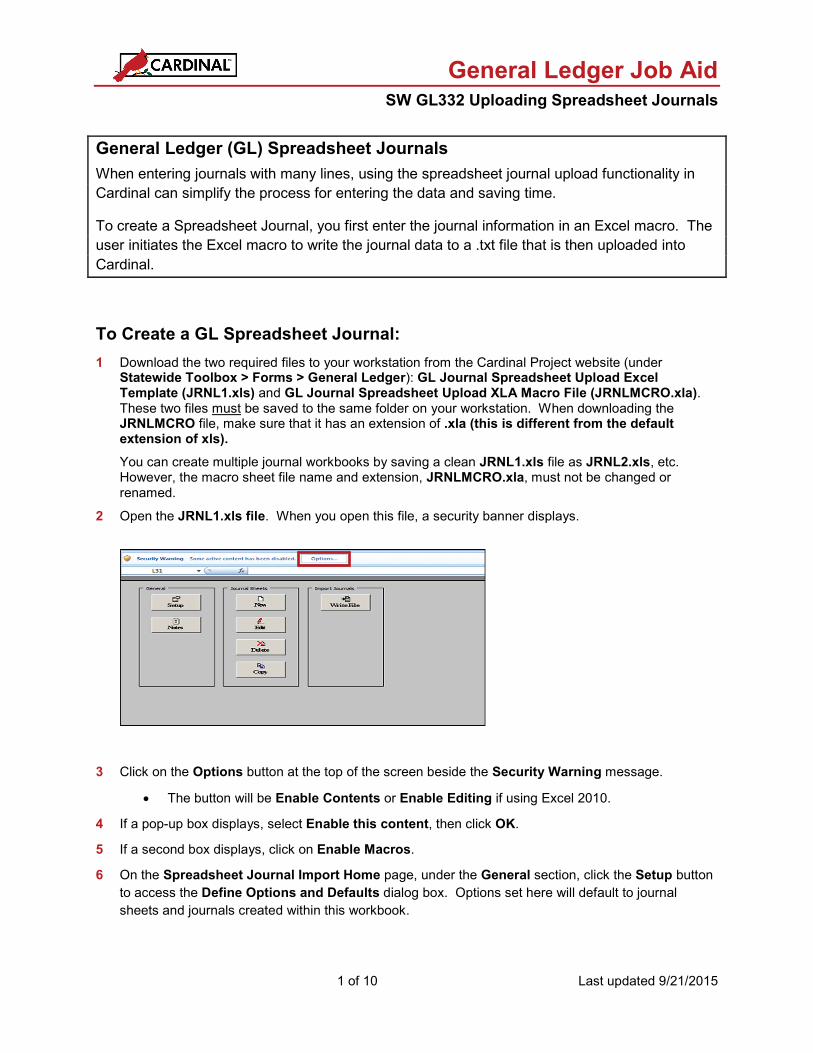
2 Open the JRNL1.xls file. When you open this file, a security banner displays.
3 Click on the Options button at the top of the screen beside the Security Warning message.
• The button will be Enable Contents or Enable Editing if using Excel 2010.
4 If a pop-up box displays, select Enable this content, then click OK.
5 If a second box displays, click on Enable Macros.
6 On the Spreadsheet Journal Import Home page, under the General section, click the Setup button to access the Define Options and Defaults dialog box. Options set here will default to journal sheets and journals created within this workbook.

General Ledger Job Aid SW GL332 Uploading Spreadsheet Journals
2 of 10 Last updated 9/21/2015
Complete the following fields:
• Business Unit
• Date - You can enter the journal date, or you can leave this blank and enter the appropriate date for each journal header individually.
• Ledger Group - Enter the value (e.g., ACTUALS) in CAPITAL letters.
• Source – This value defaults to SPJ since this is a spreadsheet journal.
• User ID – Leave blank because Cardinal will override this value with the ID of the user who actually uploads the spreadsheet journal into Cardinal.
Use the Message Options section to indicate whether you wish to see success and error messages or error messages only. You can also choose to view error messages online rather than using the text file on your workstation.
Always accept the defaults in the Online Import Control section. Do not change these values or options.
Once you’ve filled out the appropriate fields, click OK.
You then receive a message: “This is not a secured web address. Use it anyway?” Click the Yes button.
The second button under General on the Main Menu is the Notes button. Use this button to access another worksheet in the workbook that can be used as a scratch pad for instructions, calculations, and comments.
7 There are four buttons under Journal Sheets on the Main Menu:
• New - creates a new journal worksheet
• Edit – edits an existing journal worksheet
• Delete – deletes one or more journal worksheets
• Copy – copies one journal worksheet to a new journal worksheet

General Ledger Job Aid SW GL332 Uploading Spreadsheet Journals
3 of 10 Last updated 9/21/2015
8 Click the New button under Journal Sheets on the Main Menu to insert a new journal worksheet. A workbook can contain as many journal sheets as needed. Each sheet will be a separate journal.
9 In the dialog box that appears, enter a New Journal Sheet Name. Then click OK.
Note: The journal sheet name does not correspond to, nor will it transfer to, anything within Cardinal during the upload.
10 The Spreadsheet Journal Import spreadsheet is displayed.
Under Journal Header there are six buttons:
• A + (plus sign) - creates a new journal header
• A Select Journal button (white arrow) - opens an existing journal
• An Edit Journal Header button (red pencil) - makes changes to the journal header
• A Copy Journal button (two sheets of paper) - copies a journal header and lines
• A Delete Journal button (dash) - deletes a journal entry
• A Change Import Status button (colored lines) - marks a journal status as Import or Do Not Import
11 Under the Journal Header, click the + (plus sign). The values entered from the Setup page (Step 6) default onto the Journal Header.
General Ledger Job Aid SW GL332 Uploading Spreadsheet Journals
4 of 10 Last updated 9/21/2015
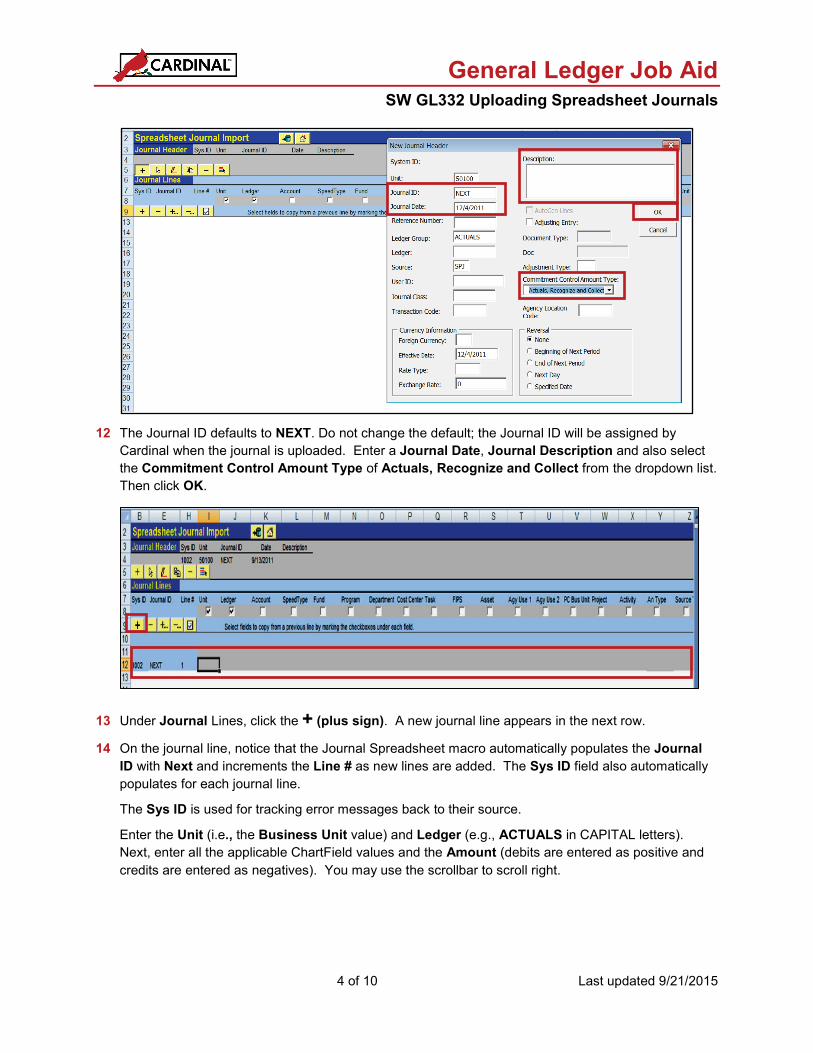
12 The Journal ID defaults to NEXT. Do not change the default; the Journal ID will be assigned by Cardinal when the journal is uploaded. Enter a Journal Date, Journal Description and also select the Commitment Control Amount Type of Actuals, Recognize and Collect from the dropdown list. Then click OK.
13 Under Journal Lines, click the + (plus sign). A new journal line appears in the next row.
14 On the journal line, notice that the Journal Spreadsheet macro automatically populates the Journal ID with Next and increments the Line # as new lines are added. The Sys ID field also automatically populates for each journal line.
The Sys ID is used for tracking error messages back to their source.
Enter the Unit (i.e., the Business Unit value) and Ledger (e.g., ACTUALS in CAPITAL letters). Next, enter all the applicable ChartField values and the Amount (debits are entered as positive and credits are entered as negatives). You may use the scrollbar to scroll right.

General Ledger Job Aid SW GL332 Uploading Spreadsheet Journals
5 of 10 Last updated 9/21/2015
15 Under Journal Lines there are five buttons:
• A + (plus sign) used to insert a single journal line
• A - (minus sign) used to remove a single journal line
• +… and -... buttons used to add/delete multiple journal lines. You will be prompted to enter the number of lines you wish to insert/delete in the dialog box.
• The next button, Check Amounts, is used to verify that you have entered amounts with the correct number of decimal points
When adding lines, you can check the box directly under the Unit, Ledger, and ChartField name(s) to copy the value on the preceding line to the subsequent line.
Data from another Excel spreadsheet can be copied and pasted into this Excel file.
• Ensure the order of the ChartFields copied is in the same order of the ChartFields displayed in this Excel file.
• Copy-paste the ChartFields into the spreadsheet journal file as “Paste Values” only, in order to preserve the spreadsheet journal file formatting.
• Before you copy, click +… to insert multiple lines.
16 After you have successfully entered all the lines for the journal, select File – Save from the Excel Menu, to save the file.

General Ledger Job Aid SW GL332 Uploading Spreadsheet Journals
6 of 10 Last updated 9/21/2015
17 Click the Home icon, to return to the Spreadsheet Journal Import Home page.
18 From the Spreadsheet Journal Import Home page, click the Write File button under Import Journals.
19 Select the sheet name created under Select Sheet; ensure the sheet is selected before proceeding (when the sheet is selected, it will be highlighted in blue.) Note the location to where the file is written in the File Name field at the bottom of the box. You can also rename the file from JRNL1 to a logical name to easily sort many files. Multiple sheets can be selected at the same time. Check the Write one file per Journal Sheet checkbox to create one file per journal sheet. Then click OK. (Do NOT use the button Import Now under Import Journals.)
20 Log into Cardinal and navigate to General Ledger > Journals > Import Journals > Spreadsheet Journals
21 Add or Find an Existing Run Control ID. The Spreadsheet Journal Import Request page displays.

General Ledger Job Aid SW GL332 Uploading Spreadsheet Journals
7 of 10 Last updated 9/21/2015
22 On the Spreadsheet Journal Import Request page, leave all the defaults as is. If you are using an existing Run Control ID, delete the file that was attached previously by clicking the Delete button. Then, click the Add button to attach your new file. The File Attachment dialog box is displayed. Click the Browse button. Locate the path displayed in Step 19 and select the .txt file you wish to upload. Click the Open button. Click the Upload button. The name of the file you selected for upload is now displayed in the Attached File field. The Delete button is used to remove the attachment and the View button is used to display the contents of the attachment.
23 Click Save, then click Run.

General Ledger Job Aid SW GL332 Uploading Spreadsheet Journals
8 of 10 Last updated 9/21/2015
24 On the Spreadsheet Journal Import Request page, verify the Spreadsheet Journal Import process is selected, and then click OK.
25 You will be returned to the Spreadsheet Journal Import Request page with a Process Instance number displayed under the Run button. Document this number.
26 Click on the Process Monitor link.
27 Click Refresh until the process runs to Success under Run Status and Posted under the Distribution Status. Then click the Details link on the process line.
28 Click the Message Log link.

General Ledger Job Aid SW GL332 Uploading Spreadsheet Journals
9 of 10 Last updated 9/21/2015
29 Verify the Process completed successfully with x journals imported. The Message Log can also be used to view if there was an error with the upload.
30 Click the Return button on the Message Log page and click the View Log/Trace link on the Process Detail page.

General Ledger Job Aid SW GL332 Uploading Spreadsheet Journals
10 of 10 Last updated 9/21/2015
31 Click on the GL_EXCL_JRNL_(process instance).LOG file. A new window will open displaying the log. Note the Journal ID number that was created.
32 Close the .LOG file.
33 Click the Return button.
34 Navigate to General Ledger > Journals > Journal Entry > Create/Update Journal Entries.
35 Click the Find an Existing Value tab and enter the Business Unit, and Journal ID number noted in Step 31. Click Search.
36 Reviewing and Correcting Errors
Spreadsheet journal validation is limited and it is not intended to be as broad as the validation provided with journal entry using the Journal Entry page online in Cardinal.
For batch import, error messages are provided in a separate log file and are not part of the message log. However, the message log provides reference to the log file and incorporates the Reference ID field value in all the messages logged.
After importing a journal from a spreadsheet, you must run the Journal Edit process on the journal before you can make corrections using the Create Journal Entries pages.
Journal entries loaded into Cardinal using the spreadsheet journal import process must be edited either online or in batch. This is important because imported journals do not yet have all journal lines and values populated by the various automatic features. If you open journals immediately after importing them, a warning message tells you that they must be edited first. It is only after the journal edit that imported journals display final entries for such things as separate debit or credit offset balancing entries.
Some common errors are listed below.
• Journal header validation errors. Example: the header does not contain a valid Business Unit, Ledger Group or Source.
• Journal line validation errors. Example: a journal line contains an invalid ChartField value.
• Skipped journal headers. Example: the Journal ID and date already exist (Skip Journal would need to be selected on the Spreadsheet Journal Import Report page).
• Skipped invalid journals.
• Specified SpeedType value does not exist.
After errors are corrected, you can then re-upload the file into Cardinal General Ledger.
Uploading a Spreadsheet Journal Simulation See the Uploading a Spreadsheet Journal simulation on the Cardinal website for an example of Uploading a Spreadsheet Journal. The scenario provides a step by step guide that leads you through the process.